|
| 1 | +--- |
| 2 | +title: Springboot 系列(十四)迅速启用 HTTPS 加密你的网站 |
| 3 | +toc_number: false |
| 4 | +date: 2019-08-07 00:10:22 |
| 5 | +url: springboot/springboot-14-https |
| 6 | +tags: |
| 7 | + - Springboot |
| 8 | + - Https |
| 9 | +categories: |
| 10 | + - Springboot |
| 11 | +--- |
| 12 | + |
| 13 | + |
| 14 | + |
| 15 | +## 1. 获取 HTTPS 证书 |
| 16 | + |
| 17 | +正常情况下 HTTPS 证书需要从证书授权中心获得,这样获得的证书才具有公信力,也会被各种浏览器客户端所认可。常见的证书品牌如 Symantec,GeoTrustm,TrustAsia,Symantec 等。不过在 Springboot 的 HTTPS 实验中就没有必要去申请了,我们可以使用 Java 自带的 **keytool** 生成 HTTPS 证书。 |
| 18 | + |
| 19 | +<!-- more --> |
| 20 | + |
| 21 | +查看 keytool 工具使用说明。 |
| 22 | + |
| 23 | +```shell |
| 24 | +D:\>keytool |
| 25 | +密钥和证书管理工具 |
| 26 | +命令: |
| 27 | + -certreq 生成证书请求 |
| 28 | + -changealias 更改条目的别名 |
| 29 | + -delete 删除条目 |
| 30 | + -exportcert 导出证书 |
| 31 | + -genkeypair 生成密钥对 |
| 32 | + -genseckey 生成密钥 |
| 33 | + -gencert 根据证书请求生成证书 |
| 34 | + -importcert 导入证书或证书链 |
| 35 | + -importpass 导入口令 |
| 36 | + -importkeystore 从其他密钥库导入一个或所有条目 |
| 37 | + -keypasswd 更改条目的密钥口令 |
| 38 | + -list 列出密钥库中的条目 |
| 39 | + -printcert 打印证书内容 |
| 40 | + -printcertreq 打印证书请求的内容 |
| 41 | + -printcrl 打印 CRL 文件的内容 |
| 42 | + -storepasswd 更改密钥库的存储口令 |
| 43 | + |
| 44 | +使用 "keytool -command_name -help" 获取 command_name 的用法 |
| 45 | + |
| 46 | +D:\>keytool -genkeypair --help |
| 47 | +keytool -genkeypair [OPTION]... |
| 48 | +生成密钥对 |
| 49 | +选项: |
| 50 | + -alias <alias> 要处理的条目的别名 |
| 51 | + -keyalg <keyalg> 密钥算法名称 |
| 52 | + -keysize <keysize> 密钥位大小 |
| 53 | + -sigalg <sigalg> 签名算法名称 |
| 54 | + -destalias <destalias> 目标别名 |
| 55 | + -dname <dname> 唯一判别名 |
| 56 | + -startdate <startdate> 证书有效期开始日期/时间 |
| 57 | + -ext <value> X.509 扩展 |
| 58 | + -validity <valDays> 有效天数 |
| 59 | + -keypass <arg> 密钥口令 |
| 60 | + -keystore <keystore> 密钥库名称 |
| 61 | + -storepass <arg> 密钥库口令 |
| 62 | + -storetype <storetype> 密钥库类型 |
| 63 | + -providername <providername> 提供方名称 |
| 64 | + -providerclass <providerclass> 提供方类名 |
| 65 | + -providerarg <arg> 提供方参数 |
| 66 | + -providerpath <pathlist> 提供方类路径 |
| 67 | + -v 详细输出 |
| 68 | + -protected 通过受保护的机制的口令 |
| 69 | +``` |
| 70 | + |
| 71 | +通过上面的 keytool ,我们生成自己的自签名证书。 |
| 72 | + |
| 73 | +```shell |
| 74 | +D:\>keytool -genkeypair -alias tomcat_https -keypass 123456 -keyalg RSA -keysize 1024 -validity 365 -keystore d:/tomcat_https.keystore -storepass 123456 |
| 75 | +您的名字与姓氏是什么? |
| 76 | + [Unknown]: darcy |
| 77 | +您的组织单位名称是什么? |
| 78 | + [Unknown]: codingme |
| 79 | +您的组织名称是什么? |
| 80 | + [Unknown]: codingme |
| 81 | +您所在的城市或区域名称是什么? |
| 82 | + [Unknown]: ShangHai |
| 83 | +您所在的省/市/自治区名称是什么? |
| 84 | + [Unknown]: ShangHai |
| 85 | +该单位的双字母国家/地区代码是什么? |
| 86 | + [Unknown]: ZN |
| 87 | +CN=darcy, OU=codingme, O=codingme, L=ShangHai, ST=ShangHai, C=ZN是否正确? |
| 88 | + [否]: y |
| 89 | +D:\> |
| 90 | +``` |
| 91 | + |
| 92 | +这时候已经在我们指定的位置下生成了证书文件,如果需要查看证书信息,可以使用 keytool 的 list 命令,可以看到密钥库类型是 JKS,在后面的配置里会用到。 |
| 93 | + |
| 94 | +```shell |
| 95 | +D:\>keytool -list -keystore tomcat_https.keystore |
| 96 | +输入密钥库口令: |
| 97 | + |
| 98 | +密钥库类型: JKS |
| 99 | +密钥库提供方: SUN |
| 100 | + |
| 101 | +您的密钥库包含 1 个条目 |
| 102 | + |
| 103 | +tomcat_https, 2019-4-21, PrivateKeyEntry, |
| 104 | +证书指纹 (SHA1): 1E:5F:15:9C:45:BD:D3:2A:7E:7F:1F:83:56:B8:74:E0:8B:CA:FD:F6 |
| 105 | + |
| 106 | +D:\> |
| 107 | +``` |
| 108 | + |
| 109 | +自己生成的 HTTPS 证书只能用来自己测试,真正用于网络上时,浏览器会显示证书无法信息。因此如果想要得到一个真实有效的证书,请看文章末尾。 |
| 110 | + |
| 111 | +## 2. 配置 HTTPS 证书 |
| 112 | + |
| 113 | +创建一个 Springboot 项目这里不提,拷贝上一步骤中生成的 tomcat_https.keystore 证书文件到**src/main/resource** 文件夹下,先看下总体的项目结构。 |
| 114 | + |
| 115 | +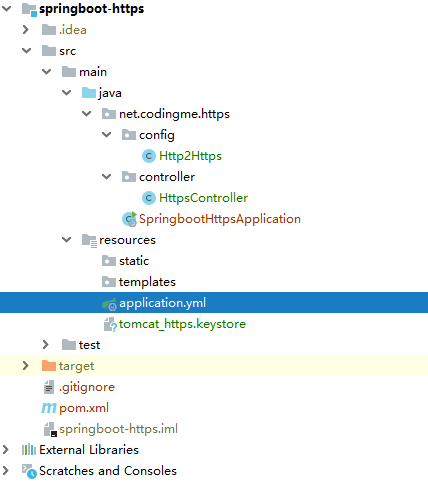 |
| 116 | + |
| 117 | + |
| 118 | +然后在 application.yml 文件中配置 HTTPS 相关信息。直接配置了端口号为 **443**,443是 HTTPS 的默认端口,这样在使用 HTTPS 就行访问的时候就不需要写额外的端口号了。 |
| 119 | + |
| 120 | +```yml |
| 121 | +# 配置 HTTPS 相关信息 |
| 122 | +server: |
| 123 | + port: 443 |
| 124 | + http-port: 80 # 为了后面的配置使用,暂时无用 |
| 125 | + ssl: |
| 126 | + enabled: true |
| 127 | + key-store: classpath:tomcat_https.keystore # 证书文件 |
| 128 | + key-password: 123456 # 密码 |
| 129 | + key-store-type: JKS # 密钥库类型 |
| 130 | + key-alias: tomcat_https |
| 131 | +``` |
| 132 | +
|
| 133 | +这时,已经可以通过 HTTPS 进行页面访问了。 |
| 134 | +
|
| 135 | +## 3. 测试 HTTPS 证书 |
| 136 | +
|
| 137 | +直接编写一个 接口用于测试。 |
| 138 | +
|
| 139 | +```java |
| 140 | +/** |
| 141 | + * <p> |
| 142 | + * Https 接口控制类 |
| 143 | + * |
| 144 | + * @Author niujinpeng |
| 145 | + * @Date 2019/4/20 22:59 |
| 146 | + */ |
| 147 | +@RestController |
| 148 | +public class HttpsController { |
| 149 | + |
| 150 | + @GetMapping(value = "/hello") |
| 151 | + public String hello() { |
| 152 | + return "Hello HTTPS"; |
| 153 | + } |
| 154 | + |
| 155 | +} |
| 156 | +``` |
| 157 | + |
| 158 | +启动之后可以通过 [https://localhost/hello](https://localhost/hello) 进行访问了。 |
| 159 | + |
| 160 | +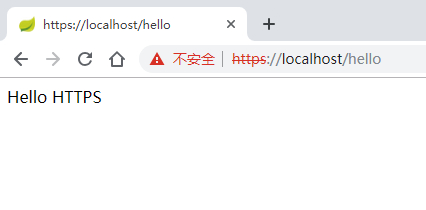 |
| 161 | + |
| 162 | + |
| 163 | +当然,由于是自己生成的证书,会提示不安全,继续访问即可,如果是正常申请或者购买的证书就不会有这个问题的。 |
| 164 | + |
| 165 | +## 4. HTTP 跳转 HTTPS |
| 166 | + |
| 167 | +在上面的测试里,HTTPS 已经可以访问了,但是 HTTP 却不能访问,大多数情况下在启用了 HTTPS 之后,都会希望 HTTP 的请求会自动跳转到 HTTPS,这个在 Springboot 里自然也是可以实现的。我们只需要写一个配置类把 HTTP 请求直接转发到 HTTPS 即可。 |
| 168 | + |
| 169 | +```java |
| 170 | +/** |
| 171 | + * <p> |
| 172 | + * HTTP 强制跳转 HTTPS |
| 173 | + * |
| 174 | + * @Author niujinpeng |
| 175 | + * @Date 2019/4/21 17:47 |
| 176 | + */ |
| 177 | +@Configuration |
| 178 | +public class Http2Https { |
| 179 | + |
| 180 | + @Value("${server.port}") |
| 181 | + private int sslPort; |
| 182 | + @Value("${server.http-port}") |
| 183 | + private int httpPort; |
| 184 | + |
| 185 | + @Bean |
| 186 | + public TomcatServletWebServerFactory servletContainerFactory() { |
| 187 | + TomcatServletWebServerFactory tomcat = new TomcatServletWebServerFactory() { |
| 188 | + @Override |
| 189 | + protected void postProcessContext(Context context) { |
| 190 | + SecurityConstraint securityConstraint = new SecurityConstraint(); |
| 191 | + securityConstraint.setUserConstraint("CONFIDENTIAL"); |
| 192 | + SecurityCollection collection = new SecurityCollection(); |
| 193 | + collection.addPattern("/*"); |
| 194 | + securityConstraint.addCollection(collection); |
| 195 | + context.addConstraint(securityConstraint); |
| 196 | + } |
| 197 | + }; |
| 198 | + Connector connector = new Connector("org.apache.coyote.http11.Http11NioProtocol"); |
| 199 | + connector.setScheme("http"); |
| 200 | + connector.setPort(httpPort); |
| 201 | + connector.setRedirectPort(sslPort); |
| 202 | + tomcat.addAdditionalTomcatConnectors(connector); |
| 203 | + return tomcat; |
| 204 | + } |
| 205 | +} |
| 206 | +``` |
| 207 | + |
| 208 | +再次启动之后,使用 [http://localhost/hello](http://localhost/hello) 访问会自动跳转到 [https://localhost/hello](https://localhost/hello). |
| 209 | + |
| 210 | + |
| 211 | + |
| 212 | +## 附录 |
| 213 | + |
| 214 | +如果需要申请免费证书,可以在腾讯云上免费申请,请参考: |
| 215 | + |
| 216 | +- [免费版 DV SSL 证书申请](https://cloud.tencent.com/document/product/400/6813#.E8.8E.B7.E5.8F.96.E8.AF.81.E4.B9.A6)。 |
| 217 | + |
| 218 | +如果想要自己安装证书,请参考: |
| 219 | + |
| 220 | +- [Apache 服务器证书安装](https://cloud.tencent.com/document/product/400/35243) |
| 221 | +- [Nginx 服务器证书安装](https://cloud.tencent.com/document/product/400/35244) |
| 222 | +- [Tomcat 服务器证书安装](https://cloud.tencent.com/document/product/400/35224) |
| 223 | +- [Windows IIS 服务器证书安装](https://cloud.tencent.com/document/product/400/35225) |
| 224 | + |
| 225 | +🐟 文章相关代码已经上传 Github [Spring Boot https](https://github.com/niumoo/springboot/tree/master/springboot-web-https), 欢迎⭐Star️,欢迎 Fork ! |
0 commit comments