|
| 1 | +--- |
| 2 | +title: Springboot 系列(十一)使用 Mybatis(自动生成插件) 访问数据库 |
| 3 | +toc_number: false |
| 4 | +date: 2019-03-07 01:40:01 |
| 5 | +url: springboot/springboot-11-data-mybatis |
| 6 | +tags: |
| 7 | + - Springboot |
| 8 | + - Mybatis |
| 9 | + - 插件 |
| 10 | +categories: |
| 11 | + - Springboot |
| 12 | +--- |
| 13 | + |
| 14 | + |
| 15 | + |
| 16 | +## 1. Springboot mybatis 介绍 |
| 17 | +MyBatis 是一款优秀的持久层框架,它支持定制化 SQL、存储过程以及高级映射。MyBatis 避免了几乎所有的 JDBC 代码和手动设置参数获取结果集的过程。MyBatis 可以使用简单的 ``XML`` 或``注解``来配置和映射原生信息,将接口和 Java 的 POJOs(Plain Old Java Objects,普通的 Java对象)映射成数据库中的记录。 |
| 18 | +<!-- more --> |
| 19 | +关于 Mybatis 的基础知识可以查询官方文档,十分的详细。[mybatis 官方文档](http://www.mybatis.org/mybatis-3/zh/getting-started.html). |
| 20 | +## 2. Springboot mybatis 依赖 |
| 21 | +本系列 Springboot 文章主要是 Springboot 的学习与分析,也因此只会试验 Mybatis 在 Springboot 中的一些用法,关于 Mybatis 的基础知识,还是需要自行学习的。 |
| 22 | +创建 Springboot 项目不提,引入 maven 依赖,主要是 mybastis 核心依赖以及一个 mybatis mapper 自动生成插件。依赖中的 druid 数据源部分,可以参考系列文章第九篇。 |
| 23 | +```xml |
| 24 | + <dependencies> |
| 25 | + <!-- Spring Boot web 开发整合 --> |
| 26 | + <dependency> |
| 27 | + <groupId>org.springframework.boot</groupId> |
| 28 | + <artifactId>spring-boot-starter-web</artifactId> |
| 29 | + <exclusions> |
| 30 | + <exclusion> |
| 31 | + <artifactId>spring-boot-starter-json</artifactId> |
| 32 | + <groupId>org.springframework.boot</groupId> |
| 33 | + </exclusion> |
| 34 | + </exclusions> |
| 35 | + </dependency> |
| 36 | + |
| 37 | + <dependency> |
| 38 | + <groupId>org.springframework.boot</groupId> |
| 39 | + <artifactId>spring-boot-starter-test</artifactId> |
| 40 | + <scope>test</scope> |
| 41 | + </dependency> |
| 42 | + |
| 43 | + <!-- 阿里 fastjson --> |
| 44 | + <dependency> |
| 45 | + <groupId>com.alibaba</groupId> |
| 46 | + <artifactId>fastjson</artifactId> |
| 47 | + <version>1.2.47</version> |
| 48 | + </dependency> |
| 49 | + |
| 50 | + <!-- Lombok 工具 --> |
| 51 | + <dependency> |
| 52 | + <groupId>org.projectlombok</groupId> |
| 53 | + <artifactId>lombok</artifactId> |
| 54 | + <optional>true</optional> |
| 55 | + </dependency> |
| 56 | + |
| 57 | + <!-- 导入配置文件处理器,在配置springboot相关文件时候会有提示 --> |
| 58 | + <dependency> |
| 59 | + <groupId>org.springframework.boot</groupId> |
| 60 | + <artifactId>spring-boot-configuration-processor</artifactId> |
| 61 | + <optional>true</optional> |
| 62 | + </dependency> |
| 63 | + |
| 64 | + <!-- 单元测试 --> |
| 65 | + <dependency> |
| 66 | + <groupId>org.junit.jupiter</groupId> |
| 67 | + <artifactId>junit-jupiter-api</artifactId> |
| 68 | + <version>RELEASE</version> |
| 69 | + <scope>compile</scope> |
| 70 | + </dependency> |
| 71 | + |
| 72 | + <!-- Druid 数据源 --> |
| 73 | + <dependency> |
| 74 | + <groupId>com.alibaba</groupId> |
| 75 | + <artifactId>druid-spring-boot-starter</artifactId> |
| 76 | + <version>1.1.10</version> |
| 77 | + </dependency> |
| 78 | + |
| 79 | + <!-- mybatis --> |
| 80 | + <dependency> |
| 81 | + <groupId>org.mybatis.spring.boot</groupId> |
| 82 | + <artifactId>mybatis-spring-boot-starter</artifactId> |
| 83 | + <version>1.3.2</version> |
| 84 | + </dependency> |
| 85 | + <!-- mybatis mapper自动生成插件 --> |
| 86 | + <dependency> |
| 87 | + <groupId>org.mybatis.generator</groupId> |
| 88 | + <artifactId>mybatis-generator-core</artifactId> |
| 89 | + <version>1.3.7</version> |
| 90 | + <scope>compile</scope> |
| 91 | + <optional>true</optional> |
| 92 | + </dependency> |
| 93 | + |
| 94 | + <!--添加数据库链接 --> |
| 95 | + <dependency> |
| 96 | + <groupId>mysql</groupId> |
| 97 | + <artifactId>mysql-connector-java</artifactId> |
| 98 | + </dependency> |
| 99 | + </dependencies> |
| 100 | +``` |
| 101 | + |
| 102 | +## 3. Springboot mybatis 配置 |
| 103 | +关于 Druid 数据源的配置不再说明,可以参考系列文章第九篇。配置中主要配置了项目编码、数据源信息、durid 数据源和 mybatis 的 mapper 位置以及 mybatis 映射别名的包路径。 |
| 104 | +```properties |
| 105 | +############################################################ |
| 106 | +# 服务启动端口号 |
| 107 | +server.port=8080 |
| 108 | +spring.profiles.active=dev |
| 109 | + |
| 110 | +# 编码 |
| 111 | +server.tomcat.uri-encoding=utf-8 |
| 112 | +spring.http.encoding.force=true |
| 113 | +spring.http.encoding.charset=UTF-8 |
| 114 | +spring.http.encoding.enabled=true |
| 115 | +############################################################ |
| 116 | +spring.datasource.url=jdbc:mysql://127.0.0.1:3306/springboot?characterEncoding=utf-8&serverTimezone=GMT%2B8 |
| 117 | +spring.datasource.driver-class-name= com.mysql.jdbc.Driver |
| 118 | +spring.datasource.username=root |
| 119 | +spring.datasource.password=123 |
| 120 | + |
| 121 | +# 使用 druid 数据源 |
| 122 | +spring.datasource.type: com.alibaba.druid.pool.DruidDataSource |
| 123 | +spring.datasource.initialSize: 5 |
| 124 | +spring.datasource.minIdle: 5 |
| 125 | +spring.datasource.maxActive: 20 |
| 126 | +spring.datasource.maxWait: 60000 |
| 127 | +spring.datasource.timeBetweenEvictionRunsMillis: 60000 |
| 128 | +spring.datasource.minEvictableIdleTimeMillis: 300000 |
| 129 | +spring.datasource.validationQuery: SELECT 1 FROM DUAL |
| 130 | +spring.datasource.testWhileIdle: true |
| 131 | +spring.datasource.testOnBorrow: false |
| 132 | +spring.datasource.testOnReturn: false |
| 133 | +spring.datasource.poolPreparedStatements: true |
| 134 | +spring.datasource.filters: stat |
| 135 | +spring.datasource.maxPoolPreparedStatementPerConnectionSize: 20 |
| 136 | +spring.datasource.useGlobalDataSourceStat: true |
| 137 | +spring.datasource.connectionProperties: druid.stat.mergeSql=true;druid.stat.slowSqlMillis=500 |
| 138 | + |
| 139 | +# mybatis |
| 140 | +mybatis.mapper-locations=classpath:mapper/*.xml |
| 141 | +mybatis.type-aliases-package=net.codingme.boot.domain |
| 142 | + |
| 143 | +``` |
| 144 | +## 4. Springboot mybatis 编码 |
| 145 | +mybatis 是半 ORM 框架,它通过 XML 描述符或者注解把 POJO 对象与 SQL 信息关联起来,也因为是和 SQL 关联起来,使用 mybatis 可以充分的利用数据的各种功能以及强大的 SQL 语句。也可以发发现使用 mybatis 至少应该建立 POJO 对象和 SQL 关联信息以及编写相关操作代码。 |
| 146 | +### 4.1. 数据库准备 |
| 147 | +既然是持久层框架,先准备一个用于实验操作的数据表。上一个步骤中有配置数据库信息为 springboot。 |
| 148 | +```properties |
| 149 | +spring.datasource.url=jdbc:mysql://127.0.0.1:3306/springboot |
| 150 | +``` |
| 151 | +因此在 mysql 数据库的 springboot 库中创建表 book 用于演示。 |
| 152 | +```sql |
| 153 | +CREATE TABLE `book` ( |
| 154 | + `id` int(11) NOT NULL AUTO_INCREMENT, |
| 155 | + `author` varchar(255) DEFAULT NULL COMMENT '书籍作者', |
| 156 | + `name` varchar(255) DEFAULT NULL COMMENT '书籍名称', |
| 157 | + `price` float NOT NULL COMMENT '书籍价格', |
| 158 | + `create_time` datetime NOT NULL COMMENT '创建时间', |
| 159 | + `description` varchar(255) DEFAULT NULL COMMENT '书籍描述', |
| 160 | + PRIMARY KEY (`id`) |
| 161 | +) ENGINE=InnoDB AUTO_INCREMENT=15 DEFAULT CHARSET=utf8; |
| 162 | +``` |
| 163 | +增加测试数据。 |
| 164 | +``` |
| 165 | +INSERT INTO `springboot`.`book`(`id`, `author`, `name`, `price`, `create_time`, `description`) VALUES (2, '金庸', '笑傲江湖', 12, '2018-09-01 10:10:12', '是作家金庸创作的一部长篇武侠小说'); |
| 166 | +INSERT INTO `springboot`.`book`(`id`, `author`, `name`, `price`, `create_time`, `description`) VALUES (3, '罗贯中', '三国演义', 22, '2018-09-01 10:10:16', '是作家罗贯中创作的一部长篇历史小说'); |
| 167 | +INSERT INTO `springboot`.`book`(`id`, `author`, `name`, `price`, `create_time`, `description`) VALUES (4, '吴承恩', '西游记', 17, '2018-09-01 10:10:19', '是作家吴承恩创作的一部长篇小说'); |
| 168 | +INSERT INTO `springboot`.`book`(`id`, `author`, `name`, `price`, `create_time`, `description`) VALUES (5, '金庸1535767819284', '笑傲江湖1535767819284', 43, '2018-09-01 10:10:19', '是作家金庸创作的一部长篇武侠小说1535767819284'); |
| 169 | +INSERT INTO `springboot`.`book`(`id`, `author`, `name`, `price`, `create_time`, `description`) VALUES (6, '金庸1535767819679', '笑傲江湖1535767819679', 24, '2018-09-01 10:10:20', '是作家金庸创作的一部长篇武侠小说1535767819679'); |
| 170 | +INSERT INTO `springboot`.`book`(`id`, `author`, `name`, `price`, `create_time`, `description`) VALUES (7, '罗贯中1535769035138', '三国演义1535769035138', 20, '2018-09-01 10:30:35', '是罗贯中创作的一部小说1535769035138'); |
| 171 | +INSERT INTO `springboot`.`book`(`id`, `author`, `name`, `price`, `create_time`, `description`) VALUES (8, '金庸1535783611785', '笑傲江湖1535783611785', 30, '2018-09-01 14:33:32', '是作家金庸创作的一部长篇武侠小说1535783611785'); |
| 172 | +``` |
| 173 | +### 4.2. 自动生成插件 |
| 174 | +传统的 mybatis 开发过程需要依照数据表新建大量的 POJO 类,然后在编写响应的增删改查接口,继而编写增删改查对应的 XML 文件。过程无趣且有重复劳动,因此产生了一个自动生成工具,可以通过 JDBC 连接到数据库,自动的创建 POJO、操作接口、XML 文件。 |
| 175 | + |
| 176 | +在引入依赖的时候已经引入了自动生成插件,也就是 `mybatis-generator-core`。 |
| 177 | + |
| 178 | +接着在项目根目录下创建自动生成配置文件,主要配置数据库信息和要生成的表已经生成的代码存放位置。 |
| 179 | +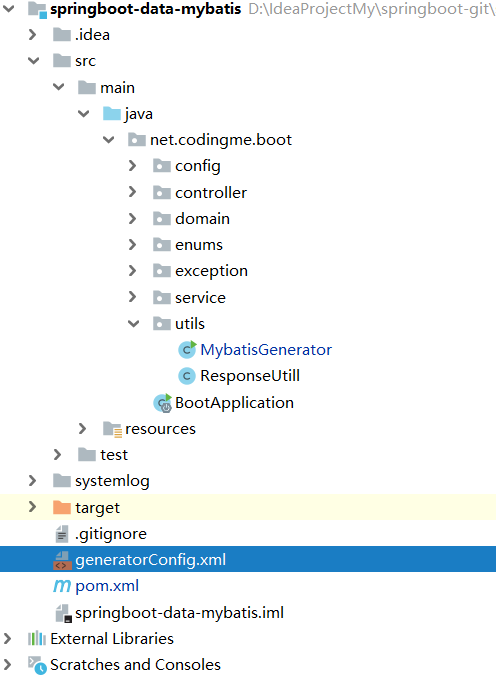 |
| 180 | + |
| 181 | +在之前作者也介绍过,可以参考博客文章[使用MyBatis Generator自动生成Model、Dao、Mapper相关代码](https://www.wdbyte.com/2017/11/develop/tool-mybatis-generator/)。 |
| 182 | + |
| 183 | +```xml |
| 184 | +<?xml version="1.0" encoding="UTF-8"?> |
| 185 | +<!DOCTYPE generatorConfiguration |
| 186 | + PUBLIC "-//mybatis.org//DTD MyBatis Generator Configuration 1.0//EN" |
| 187 | + "http://mybatis.org/dtd/mybatis-generator-config_1_0.dtd"> |
| 188 | + |
| 189 | +<generatorConfiguration> |
| 190 | + <context id="MysqlContext" targetRuntime="MyBatis3Simple" defaultModelType="flat"> |
| 191 | + <property name="beginningDelimiter" value="`"/> |
| 192 | + <property name="endingDelimiter" value="`"/> |
| 193 | + <jdbcConnection driverClass="com.mysql.cj.jdbc.Driver" |
| 194 | + connectionURL="jdbc:mysql://127.0.0.1:3306/springboot?characterEncoding=utf-8&serverTimezone=GMT%2B8&nullCatalogMeansCurrent=true" |
| 195 | + userId="root" |
| 196 | + password="123"> |
| 197 | + </jdbcConnection> |
| 198 | + |
| 199 | + <!-- 对于生成的pojo所在包 --> |
| 200 | + <javaModelGenerator targetPackage="net.codingme.boot.domain" targetProject="src/main/java"/> |
| 201 | + |
| 202 | + <!-- 对于生成的mapper所在目录 --> |
| 203 | + <sqlMapGenerator targetPackage="mapper" targetProject="src/main/resources"/> |
| 204 | + |
| 205 | + <!-- 配置mapper对应的java映射 --> |
| 206 | + <javaClientGenerator targetPackage="net.codingme.boot.domain.mapper" targetProject="src/main/java" |
| 207 | + type="XMLMAPPER"/> |
| 208 | + |
| 209 | + <!-- 要生成那些表(更改tableName和domainObjectName就可以) --> |
| 210 | + <table tableName="book" domainObjectName="Book" enableCountByExample="true" |
| 211 | + enableUpdateByExample="true" enableUpdateByPrimaryKey="true" |
| 212 | + selectByExampleQueryId="true" enableDeleteByPrimaryKey="true" |
| 213 | + enableSelectByPrimaryKey="true" enableSelectByExample="true" |
| 214 | + ></table> |
| 215 | + |
| 216 | + </context> |
| 217 | +</generatorConfiguration> |
| 218 | +``` |
| 219 | + |
| 220 | +写好配置文件之后,还需要写一个启动程序,用于加载配置文件,运行就可以生成相关配置。 |
| 221 | +```java |
| 222 | +import org.mybatis.generator.api.MyBatisGenerator; |
| 223 | +import org.mybatis.generator.config.Configuration; |
| 224 | +import org.mybatis.generator.config.xml.ConfigurationParser; |
| 225 | +import org.mybatis.generator.internal.DefaultShellCallback; |
| 226 | + |
| 227 | +import java.io.File; |
| 228 | +import java.util.ArrayList; |
| 229 | + |
| 230 | +/** |
| 231 | + * <p> |
| 232 | + * Mybatis generator的逆向生成工具类 |
| 233 | + * |
| 234 | + * @Author niujinpeng |
| 235 | + */ |
| 236 | +public class MybatisGenerator { |
| 237 | + |
| 238 | + public void generator() throws Exception { |
| 239 | + ArrayList<String> warnings = new ArrayList<>(); |
| 240 | + boolean overwrite = true; |
| 241 | + // 指定你想工程配置文件 |
| 242 | + File configFile = new File("generatorConfig.xml"); |
| 243 | + System.out.println(configFile.getAbsolutePath()); |
| 244 | + ConfigurationParser cp = new ConfigurationParser(warnings); |
| 245 | + Configuration config = cp.parseConfiguration(configFile); |
| 246 | + DefaultShellCallback callback = new DefaultShellCallback(overwrite); |
| 247 | + MyBatisGenerator myBatisGenerator = new MyBatisGenerator(config, callback, warnings); |
| 248 | + myBatisGenerator.generate(null); |
| 249 | + } |
| 250 | + |
| 251 | + public static void main(String[] args) throws Exception { |
| 252 | + MybatisGenerator mybatisGenerator = new MybatisGenerator(); |
| 253 | + mybatisGenerator.generator(); |
| 254 | + } |
| 255 | +} |
| 256 | +``` |
| 257 | +生成的文件如下图。 |
| 258 | + |
| 259 | +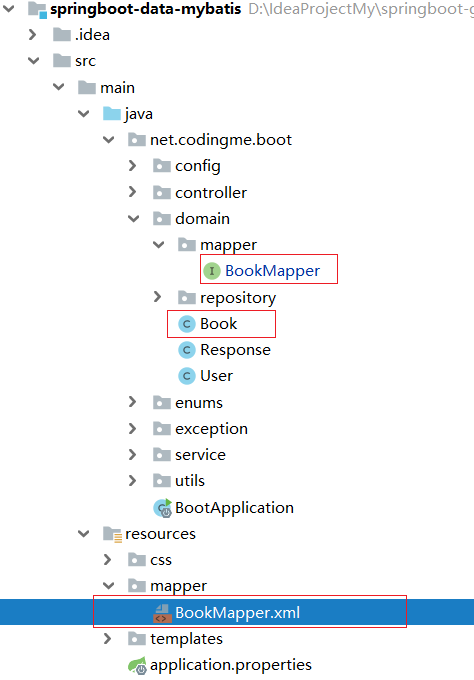 |
| 260 | + |
| 261 | +查看生成的接口以及 XML 映射文件可以发现已经自动生成了常用的几个方法。 |
| 262 | +1. deleteByPrimaryKey |
| 263 | +1. insert |
| 264 | +1. updateByPrimaryKey |
| 265 | +1. selectByPrimaryKey |
| 266 | +1. selectAll |
| 267 | + |
| 268 | +生成完成之后要在 Springboot 启动器上添加 MapperScan 注解指定要扫描的 mapper 位置。 |
| 269 | +```java |
| 270 | +@SpringBootApplication |
| 271 | +@MapperScan("net.codingme.boot.domain.mapper") |
| 272 | +public class BootApplication { |
| 273 | + |
| 274 | + public static void main(String[] args) { |
| 275 | + SpringApplication.run(BootApplication.class, args); |
| 276 | + } |
| 277 | +} |
| 278 | +``` |
| 279 | + |
| 280 | +### 4.3. 注解配置方式 |
| 281 | +Mybatis 同样支持注解的方式配置映射关系,使用注解可以替代 XML 的配置,写一个简单的注解例子。在刚才生成的 BookMapper.java 中增加一个根据作者名称查询的方法,并映射字段对应的属性。 |
| 282 | +```java |
| 283 | +// 添加 @Repository 注解,这样在使用 @Autowired 引入的时候不会报横线 |
| 284 | +@Repository |
| 285 | +public interface BookMapper { |
| 286 | + /** |
| 287 | + * 注解方式配置映射 |
| 288 | + * |
| 289 | + * @param author |
| 290 | + * @return |
| 291 | + * @Results 字段和属性映射关系 |
| 292 | + * @Select 查询语句 |
| 293 | + */ |
| 294 | + @Results({ |
| 295 | + @Result(property = "id", column = "ids"), |
| 296 | + @Result(property = "name", column = "name"), |
| 297 | + @Result(property = "author", column = "authors"), |
| 298 | + @Result(property = "createTime", column = "create_time") |
| 299 | + }) |
| 300 | + @Select("select id as ids, author as authors, name, price, create_time, description from book where author = #{author}") |
| 301 | + List<Book> selectByAuthor(@Param("author") String author); |
| 302 | + // 省略下面自动生成代码 |
| 303 | +``` |
| 304 | +## 5. Springboot mybatis 测试 |
| 305 | +正常情况下会在项目中的业务层 service 包下创建接口和类然后通过注解引入使用。 |
| 306 | +```java |
| 307 | +@Autowired |
| 308 | +private BookMapper bookMapper; |
| 309 | +``` |
| 310 | +我们只是实验,没有这样写一套的必要,只要能确保 BookMapper 可以正常注入使用就好了。因此创建测试类进行测试。 |
| 311 | +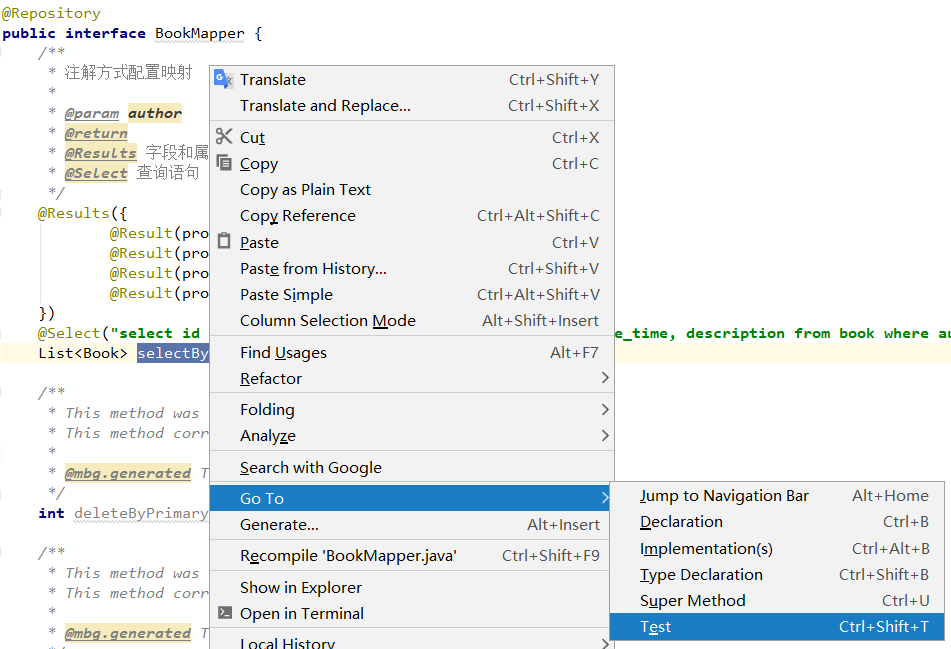 |
| 312 | + |
| 313 | +在生成的(也可以完全手写测试方法)测试类中添加测试方法进行测试。 |
| 314 | +```java |
| 315 | +@RunWith(SpringRunner.class) |
| 316 | +@SpringBootTest |
| 317 | +public class BookMapperTest { |
| 318 | + |
| 319 | + @Autowired |
| 320 | + private BookMapper bookMapper; |
| 321 | + |
| 322 | + @Test |
| 323 | + public void testSelectAll() { |
| 324 | + List<Book> bookList = bookMapper.selectAll(); |
| 325 | + Assert.assertNotNull(bookList); |
| 326 | + bookList.forEach((book) -> System.out.println(book)); |
| 327 | + } |
| 328 | + |
| 329 | + |
| 330 | + @Test |
| 331 | + public void testSelectByAuthro() { |
| 332 | + List<Book> bookList = bookMapper.selectByAuthor("金庸"); |
| 333 | + Assert.assertNotNull(bookList); |
| 334 | + bookList.forEach((book) -> System.out.println(book)); |
| 335 | + } |
| 336 | + |
| 337 | + @Test |
| 338 | + public void testSelectByPrimaryKey() { |
| 339 | + Book book = bookMapper.selectByPrimaryKey(2); |
| 340 | + Assert.assertNotNull(book); |
| 341 | + System.out.println(book); |
| 342 | + } |
| 343 | + |
| 344 | + public void testDeleteByPrimaryKey() { |
| 345 | + int primaryKey = bookMapper.deleteByPrimaryKey(8); |
| 346 | + Assert.assertNotEquals(0, primaryKey); |
| 347 | + System.out.println(primaryKey); |
| 348 | + } |
| 349 | + |
| 350 | +} |
| 351 | +``` |
| 352 | +为了观察查询接口 book 的信息输出,重写 Book 类的 toString 方法,然后运行单元测试。 |
| 353 | + |
| 354 | + |
| 355 | + |
| 356 | +可以发现测试全部通过。结果正常。 |
| 357 | +文章代码已经上传到 Github [Spring Boot 连接数据库 - Mybatis](https://github.com/niumoo/springboot/tree/master/springboot-data-mybatis)。 |
0 commit comments