|
| 1 | +--- |
| 2 | +title: 全文搜索ElasticSearch(三)Head插件的安装与使用 |
| 3 | +date: 2018-10-12 19:14:17 |
| 4 | +url: lucene/elasticsearch-head |
| 5 | +tags: |
| 6 | +- Elasticsearch |
| 7 | +- 插件 |
| 8 | +- Elasticsearch Head |
| 9 | +categories: |
| 10 | +- Elasticsearch |
| 11 | +--- |
| 12 | + |
| 13 | +### elasticsearch-head 介绍 |
| 14 | + |
| 15 | +`elasticsearch-head`是一个用于浏览器和与`elasticsearch`进行交互的Web前端程序。 `elasticsearch-head`是托管在github上的,可以自由的下载安装使用。 |
| 16 | + |
| 17 | +GitHub地址:https://github.com/mobz/elasticsearch-head |
| 18 | +<!-- more --> |
| 19 | +### elasticsearch-head 下载 |
| 20 | + |
| 21 | +head插件可以直接在github页面上点击`clone or download`进行下载然后解压,也可以使用git命令进行下载。 |
| 22 | + |
| 23 | +`git clone git://github.com/mobz/elasticsearch-head.git` |
| 24 | + |
| 25 | +### elasticsearch-head 启动 |
| 26 | + |
| 27 | +#### 方式1:使用nodejs启动 |
| 28 | + |
| 29 | +这种方式需要使用[nodejs](https://nodejs.org/en/download/)环境进行启动。 |
| 30 | + |
| 31 | +1. `git clone git://github.com/mobz/elasticsearch-head.git` |
| 32 | +1. `cd elasticsearch-head` |
| 33 | +1. `npm install` |
| 34 | +1. `npm run start` |
| 35 | +1. `open` <http://localhost:9100/> |
| 36 | + |
| 37 | +#### 方式2:使用Tomcat启动 |
| 38 | + |
| 39 | +观察解压的`elasticsearch-head` 目录和文件,我们发现head插件只是一个前端页面,因此我们可以运行于任何web服务器,如`Nginx`,`Tomcat`等。因为笔者开发环境是`JDK`,所以使用`Tomcat`进行测试。 |
| 40 | +1. 解压Tomcat,进入webapps目录。 |
| 41 | +2. 拷贝解压后的head插件内容到`webapps`文件夹。 |
| 42 | +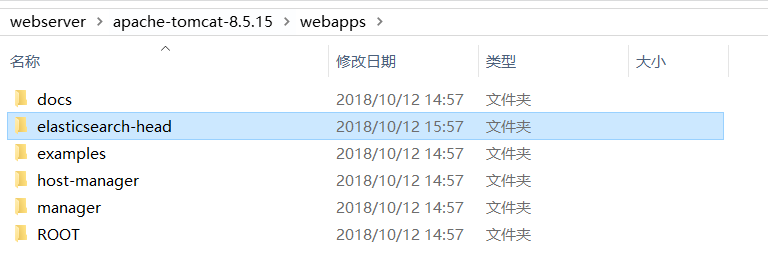 |
| 43 | +3. Tomcat启动。 |
| 44 | +4. `open` http://localhost:8080/elasticsearch-head/ |
| 45 | + |
| 46 | +这时候如果启动了`elasticsearch`,会发现head插件并不能连接到`elasticsearch`,打开浏览器控制台会发现由于跨域问题产生的错误日志。 |
| 47 | + |
| 48 | + |
| 49 | +这时候我们需要配置`elasticsearch`允许跨域访问,打开`elasticsearch`的配置文件config/elasticsearch.yml在里面添加允许跨域配置。 |
| 50 | +``` |
| 51 | +# 跨域问题 |
| 52 | +http.cors.enabled: true |
| 53 | +http.cors.allow-origin: "*" |
| 54 | +``` |
| 55 | +再次启动`elasticsearch`,会发现`head`可以正常连接到ES了。 |
| 56 | + |
| 57 | +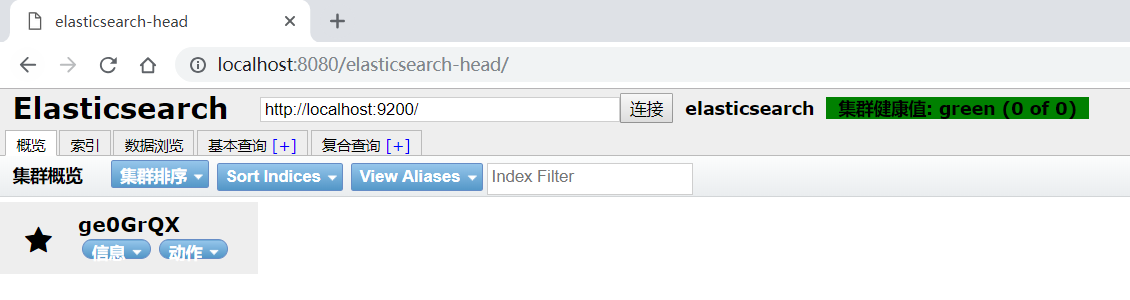 |
| 58 | + |
| 59 | +#### 方式3:使用chrome扩展插件 |
| 60 | +此种方式安装的`head`插件,安装简单,没有跨域问题,但是需要可以上`外网`。 |
| 61 | + |
| 62 | +1. 打开chrome插件地址 [Elasticsearch Head](https://chrome.google.com/webstore/detail/elasticsearch-head/ffmkiejjmecolpfloofpjologoblkegm/) |
| 63 | + |
| 64 | +2. 点击添加至Chrome |
| 65 | +  |
| 66 | +3. 等待安装完毕 |
| 67 | +4. 点击chrome扩展中的head图标运行 |
| 68 | +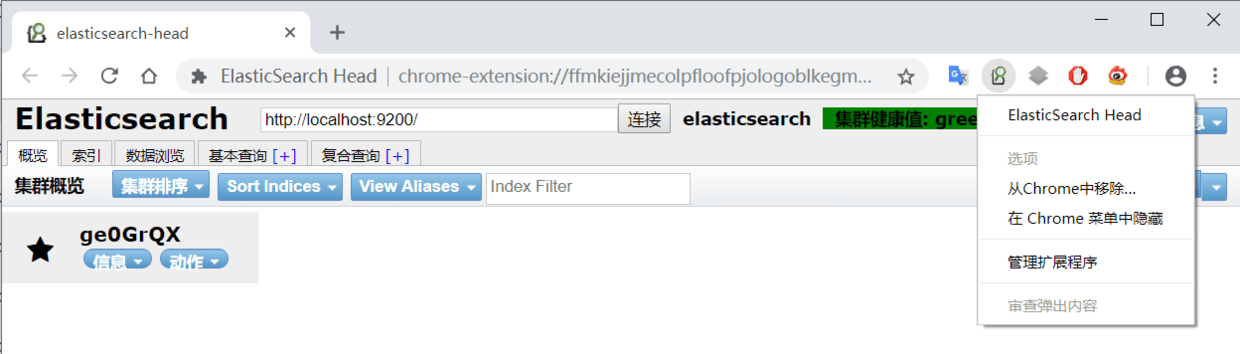 |
| 69 | + |
0 commit comments