Progressive Core Data Migrations
People really care about their possessions. Nowhere do you see this more than on public transport. It's not unusual to see bags occupying seats while people stand. As a Brit, we have developed a powerful form of communication to indicate that you want someone to move their bag - maybe a slight shuffle, fleeting eye contact with other standing commuters and low tutting. Even with these clear signs, some people have the audacity to ignore them and force you into doing the unthinkable - speaking to a stranger on public transport.
"Excuse me, could you please move your bag so that I can sit down?"
Surprisingly often, you are met with disdain as the other person consigns their bag to the indignity of the floor. As you settle into your seat, you begin thinking about how connected we are to our possessions.
People are not just deeply connected to physical items; we also feel the same way about our data. Especially if the data has been earned somehow - think about the sense of betrayal you feel when a game crashes and takes your newly unlocked thingamabob with it.
In our iOS apps, we often store these thingamabobs in Core Data. The structure of which is defined by a model/schema - a set of entities with attributes and relationships. A common situation in development is that, over time, our model changes. When that model changes, we need to move our users' data from the old structure to the new one.

This post will explore how to perform a progressive Core Data migration. We will manipulate the built-in Core Data migration mechanism to avoid having to perform each migration as a single step and instead perform each migration as a series of steps.
This post will gradually build up to a working example; however, if you're on a tight deadline and/or there is a murderous look creeping into your manager's eyes 😡, then head on over to the completed example to see how things end up.
The Migration Process
Core Data supports evolving the model over time by allowing us to create new versions of the model. Each version represents a snapshot of the schema at a point in time. A model version is only safely changeable between its creation and the moment it ships as part of an app update. Once released, a version is effectively "frozen" - any further changes to that version would result in an app crash upon launch. To change an already released model, you need to create a new version of that model and migrate users from the old version to the new version. Thankfully, Core Data has a built-in migration system.
Before you go any further and start writing migration code, you need to first answer this question:
"Do I need to bother with migration?"
Seriously, just because you use Core Data in your project does not mean that you need to care about migrating the data stored there. If you only use Core Data as a local cache and always override it with the content you get from an API response, you probably don't need to go through the effort of migrating from one version to another. Just delete the local
.sqlitefiles and recreate your Core Data stack, populating that new model with calls to the API.If that applies to you, you can stop reading now if you want or continue on with a certain smugness knowing that the difficulties being described below do not relate to you 😜.
Migrations can be handled using one of two techniques:
- Lightweight Migration - when Core Data can automatically infer how the migration should happen and create the mapping model on the fly.
- Standard Migration - when Core Data cannot infer how the migration should happen, we must write a custom migration by providing a mapping model (
xcmappingmodel) and/or a migration policy (NSEntityMigrationPolicy).
It's worth noting that both techniques produce a mapping model. The difference is where it comes from - Standard migrations use one that lives in the project as an
xcmappingmodelfile, while Lightweight migrations have Core Data generate one on the fly.
By default, Core Data will attempt to perform a migration automatically when it detects a mismatch between the model used in the persistent store and the bundle's current model. When this happens, Core Data will first attempt to perform a Standard migration by searching in the app's bundle for a mapping model that maps from the persistent store model to the current bundle model. If a custom mapping model isn't found, Core Data will then attempt to perform a Lightweight migration. If neither form of migration is possible, an exception is thrown.
If you are using
NSPersistentContainer, Lightweight migrations are enabled by default; however, if you are still directly setting up theNSPersistentStoreCoordinator, then you need to enable Lightweight migrations by passing in anoptionsdictionary with bothNSMigratePersistentStoresAutomaticallyOptionandNSInferMappingModelAutomaticallyOptionset totruewhen loading the persistent store.
These automatic migrations are performed as one-step migrations; directly from the source to the destination model. So if we support four model versions, mapping models would exist for 1 to 4, 2 to 4 and 3 to 4. While this is the most efficient migration approach from a device performance point-of-view, it can be quite wasteful from a development point-of-view. For example, if we added a new model version (5), we would need to create four new mapping models from 1 to 5, 2 to 5, 3 to 5 and 4 to 5. As you can see, none of the mapping models for migrating to version 4 can be reused. With a one-step migration approach, each newly added model version requires n-1 mapping models (where n is the number of supported model versions) to be created. All of that extra work may eventually convince us to prematurely drop support for migrating from certain versions 😞.
We can reduce this work by disabling automatic migrations and chaining multiple smaller migrations together. When adding a new model version, we only need to handle migrating from its direct predecessor - 4 to 5 - because we can reuse the existing 1 to 2, 2 to 3 and 3 to 4 mapping models.
Manual migrations also reduce the complexity of each migration. Version 4 is much nearer to the structure of version 5 than version 1 is, so the conceptual distance each mapping has to cover is smaller - which should make it easier to spot any issues with the migration.
Progressive Migrations
To support progressive migrations, we'll need to answer a few questions:
- Which model version comes after version X?
- What is a migration step?
- How can we combine the migration steps into a migration path?
- How do we trigger a migration?
The following types will answer these questions:
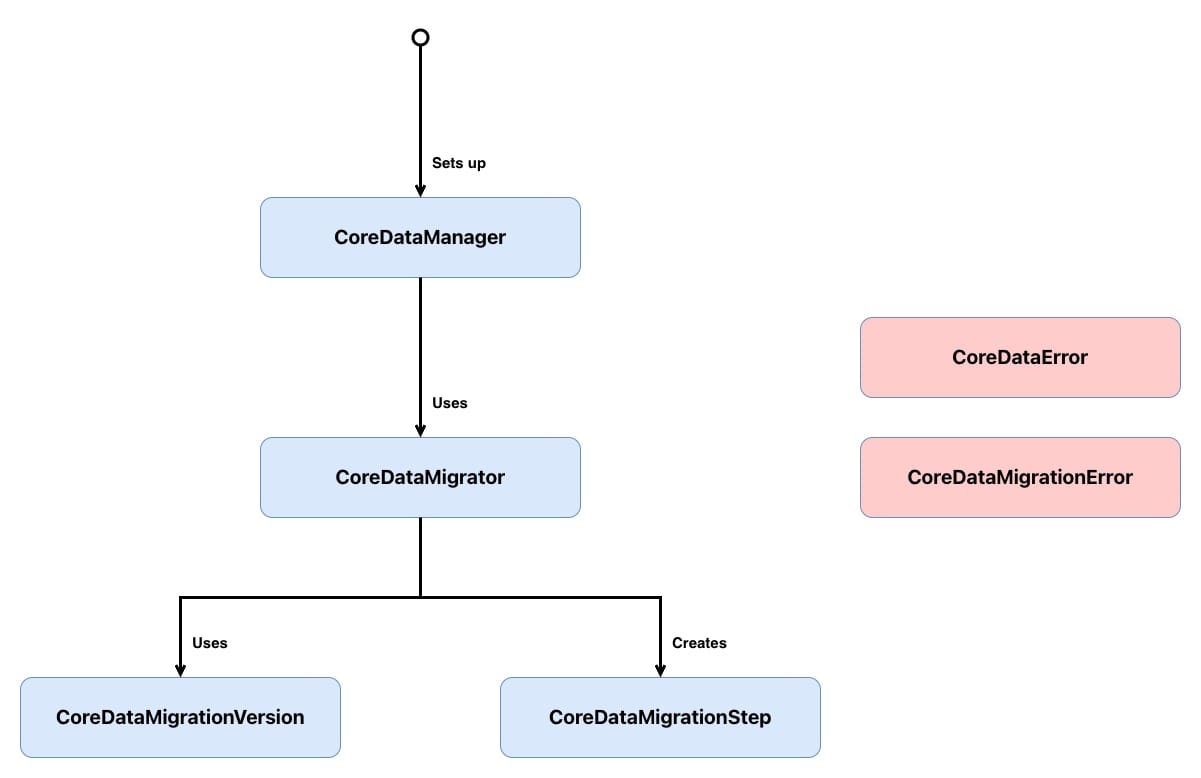
CoreDataManagersets up the Core Data stack and acts as the entry point for migrations. Before loading the persistent store, it checks whether a migration is needed and, if so, hands the work off toCoreDataMigrator.CoreDataMigratororchestrates the migration process. It determines whether a migration is required by comparing the persistent store's metadata against the current model, forces WAL checkpointing to ensure data integrity, builds the full migration path from source to destination, and then iterates through each step - writing intermediate results to temporary stores before replacing the original.CoreDataMigrationVersionrepresents a Core Data model version as an enum case. It defines the migration graph by mapping each version to its successor, making it possible to see the entire migration path at a glance.CoreDataMigrationStepis a simple value type that holds the three pieces needed to perform a single migration: the source model, the destination model and the mapping model that bridges them.CoreDataErrorcovers failures that can occur when setting up the Core Data stack.CoreDataMigrationErrorcovers failures that can occur during the migration process.
Don't worry if that doesn't all make sense yet; we will look into each type in greater depth below.
You'll notice cases from
CoreDataErrorandCoreDataMigrationErrorbeing thrown throughout the code below. To keep the focus on the migration logic, I won't show the full enum definitions in the post - if you want to see them, head over to the completed example.
Which Model Version Comes After Version X?
Each CoreDataMigrationVersion instance will represent a Core Data model version. As each Core Data model version is unique and known at compile time, they can be perfectly represented as enum cases:
// 1
enum CoreDataMigrationVersion: String, CaseIterable {
    case version1 = "CoreDataMigration_Example"

    // 2
    static func current() throws -> CoreDataMigrationVersion {
        guard let current = allCases.last else {
            throw CoreDataMigrationError.modelNotFound
        }

        return current
    }
}
Here's what we did:
CoreDataMigrationVersionis aStringbacked enum where each case maps to a model version in the*.xcdatamodeldpackage - providing a type-safe representation of those versions. It conforms toCaseIterableto allow its cases to be treated as an ordered array.current()returns the latest model version by grabbing the last element fromallCases. Because cases are returned in declaration order, adding a new version to the end of the enum is all that's needed to update this property.
The real value of CoreDataMigrationVersion comes in its ability to determine which model version should come after any given CoreDataMigrationVersion case:
enum CoreDataMigrationVersion: String, CaseIterable {
    // Omitted unchanged functionality

    // 1
    func nextVersion() -> CoreDataMigrationVersion? {
        switch self {
        case .version1:
            return nil
        }
    }
}nextVersion()determines which version comes afterselfin the migration graph. As we only have one version, it returnsnil. As new versions are added, each case will map to its successor, forming the step-by-step migration chain.
As we only have one model at the moment, the implementation of nextVersion() is simple, but eventually it could end up with something like:
enum CoreDataMigrationVersion: String, CaseIterable {
    // Omitted unchanged functionality

    func nextVersion() -> CoreDataMigrationVersion? {
        switch self {
        case .version1:
            return .version2
        case .version2:
            return .version3
        case .version3:
            return .version4
        case .version4:
            return nil
        }
    }
}
Writing a switch statement here may look like overkill - why not just always choose the next enum case? But that assumes the migration graph is always a straight line, and real projects rarely are. The switch earns its keep in two ways.
Existing Single-Step Migrations Can Be Folded In
A project that's already performed several single-step migrations will have mapping models and possibly migration policies in place. That work doesn't have to be thrown away - those existing paths can live inside nextVersion() as big jumps, with progressive migrations taking over from whatever version the project is on now.
If you're reading this post before performing your first migration, congratulations on your:
- Excellent taste in selecting blog posts.
- Organisational ability.
In a hypothetical project with six model versions, which used the one-step migration approach up to version 4 before switching over to the progressive migration approach, nextVersion() would look like:
func nextVersion() -> CoreDataMigrationVersion? {
    switch self {
    case .version1, .version2, .version3: // single-step migration
        return .version4
    case .version4: // progressive migration
        return .version5
    case .version5: // progressive migration
        return .version6
    case .version6:
        return nil
    }
}
In the above code snippet, version1, version2 and version3 migrate directly to version4, and then version4 and version5 migrate to their direct successor. The two migration approaches co-exist very happily with each other.
Broken Versions Can Be Routed Around
Shipping broken code happens. If a model version makes it into production and corrupts data on migration, nextVersion() can be configured to bypass that version entirely so that any currently unaffected users skip over it:
func nextVersion() -> CoreDataMigrationVersion? {
    switch self {
    case .version1:
        return .version2
    case .version2:
        return .version4 // skipping corrupted .version3
    case .version3:
        return .version4
    case .version4:
        return nil
    }
}
Both situations are handled inside nextVersion(), without leaking into the rest of the migration code.
Now that we know which version is next, we need to build the path between the two versions.
What Is a Migration Step?
A migration happens between two model versions by mapping the entities, attributes and relationships of the source model to their counterparts in the destination model. As such, CoreDataMigrationStep needs to contain three properties:
struct CoreDataMigrationStep {
    // 1
    let sourceModel: NSManagedObjectModel

    // 2
    let destinationModel: NSManagedObjectModel

    // 3
    let mappingModel: NSMappingModel
}- The source model represents the schema this step migrates from.
- The destination model represents the schema this step migrates to.
- The mapping model describes how to transform data between the two. This mapping will either be Lightweight or Standard - both of which use a
NSMappingModelinstance to hold the mapping path between the versions.
CoreDataMigrationStep won't be handed these values but will be responsible for setting its own properties:
struct CoreDataMigrationStep {
    // Omitted unchanged functionality

    // 1
    init(sourceVersion: CoreDataMigrationVersion,
         destinationVersion: CoreDataMigrationVersion) throws {
        let sourceModel = try NSManagedObjectModel.managedObjectModel(forResource: sourceVersion.rawValue)
        let destinationModel = try NSManagedObjectModel.managedObjectModel(forResource: destinationVersion.rawValue)

        guard let mappingModel = CoreDataMigrationStep.mappingModel(from: sourceModel,
                                                                    to: destinationModel) else {
            throw CoreDataMigrationError.mappingModelNotFound
        }

        self.sourceModel = sourceModel
        self.destinationModel = destinationModel
        self.mappingModel = mappingModel
    }

    // 2
    private static func mappingModel(from sourceModel: NSManagedObjectModel,
                                     to destinationModel: NSManagedObjectModel) -> NSMappingModel? {
        return customMappingModel(from: sourceModel, to: destinationModel) ?? inferredMappingModel(from: sourceModel, to: destinationModel)
    }

    // 3
    private static func customMappingModel(from sourceModel: NSManagedObjectModel,
                                           to destinationModel: NSManagedObjectModel) -> NSMappingModel? {
        return NSMappingModel(from: [Bundle.main],
                              forSourceModel: sourceModel,
                              destinationModel: destinationModel)
    }

    // 4
    private static func inferredMappingModel(from sourceModel: NSManagedObjectModel,
                                             to destinationModel: NSManagedObjectModel) -> NSMappingModel? {
        return try? NSMappingModel.inferredMappingModel(forSourceModel: sourceModel,
                                                        destinationModel: destinationModel)
    }
}- The initialiser takes a source and destination version, loads their corresponding
NSManagedObjectModelinstances from the bundle, then attempts to resolve a mapping model between them - throwing an error if no mapping exists. mappingModel(from:to:)is the resolution strategy. If a custom mapping model exists, then that is favoured over an inferred mapping model.customMappingModel(from:to:)searches the main bundle for a.xcmappingmodelthat matches the two models to perform a Standard migration.inferredMappingModel(from:to:)asks Core Data to automatically figure out the mapping based on model differences to perform a Lightweight migration. Thetry?swallows any error and returnsnilinstead - meaning if inference fails, we treat it as no mapping available.
It's possible to have multiple mapping models between versions (this can be especially useful when migrating large data sets). In this post, in an attempt to keep things simple, I assume only one mapping model.
How Can We Combine the Migration Steps into a Migration Path?
CoreDataMigrator is at the heart of our migration solution and has three tasks:
- Determining if there needs to be a migration.
- Ensuring the persistent store is ready to be migrated.
- Performing the migration.
Determining if There Needs to Be a Migration
class CoreDataMigrator {

    // 1
    func requiresMigration(at storeURL: URL,
                           toVersion version: CoreDataMigrationVersion) throws -> Bool {

        // 2
        guard let metadata = try? NSPersistentStoreCoordinator.metadata(at: storeURL) else {
            return false
        }

        // 3
        let compatibleVersion = try CoreDataMigrationVersion.compatibleVersionForStoreMetadata(metadata)

        // 4
        return compatibleVersion != version
    }
}requiresMigration(at:toVersion:)takes the URL of the persistent store and the model version we want to migrate to, and returns whether a migration is needed.- The persistent store's metadata is loaded from the store URL. If no metadata can be found - for example, because the store doesn't exist yet - then no migration is needed, so we return
false. - The metadata is used to determine which model version the persistent store is currently compatible with.
- If the store's version doesn't match the version we want to migrate to, a migration is needed.
To support this, we need to extend CoreDataMigrationVersion to include:
// 1
private extension CoreDataMigrationVersion {

    // 2
    static func compatibleVersionForStoreMetadata(_ metadata: [String : Any]) throws -> CoreDataMigrationVersion {

        // 3
        let compatibleVersion = CoreDataMigrationVersion.allCases.first {
            guard let model = try? NSManagedObjectModel.managedObjectModel(forResource: $0.rawValue) else {
                return false
            }

            // 4
            return model.isConfiguration(withName: nil,
                                         compatibleWithStoreMetadata: metadata)
        }

        // 5
        guard let compatibleVersion = compatibleVersion else {
            throw CoreDataMigrationError.versionUnknown
        }

        return compatibleVersion
    }
}compatibleVersionForStoreMetadata(_:)is added as aprivate extensionrather than being folded into the mainCoreDataMigrationVersiondeclaration. This is migrator-specific scaffolding - it reaches into the bundle to load models, which isn't a concern of the version enum itself. Keeping it in aprivateextension signals that it's an implementation detail of the migrator and prevents the rest of the app from accidentally depending on it.compatibleVersionForStoreMetadata(_:)takes the persistent store's metadata and returns theCoreDataMigrationVersioncase that matches it.- Each case in
CoreDataMigrationVersionis iterated through, and for each case, the associated managed object model is loaded from the bundle using the case's raw value. - The loaded model is checked against the store's metadata to see if they are compatible - that is, whether the store was created with (or last migrated to) that model version.
- If no compatible version is found, an error is thrown as the store is in an unknown state that we can't migrate from.
Ensuring the Persistent Store Is Ready to Be Migrated
Before attempting a migration, we need to undertake some housekeeping on our persistent store.
Since iOS 7, Core Data has used the Write-Ahead Logging (WAL) option on SQLite stores to provide the ability to recover from crashes by allowing changes to be rolled back until the database is stable. If you have ever had to perform a rollback before, the WAL approach may work a little differently from what you are expecting. Rather than directly writing changes to the sqlite file and having a pre-write copy of the changes to rollback to, in WAL mode, the changes are first written to the sqlite-wal file, and at some future date, those changes are transferred to the sqlite file. The sqlite-wal file is in effect an up-to-date copy of some of the data stored in the main sqlite file.
The sqlite-wal and sqlite files store their data using the same structure to allow data to be transferred easily between them. However, this shared structure causes issues during migration as Core Data only migrates the data stored in the sqlite file to the new structure, leaving the data in the sqlite-wal file in the old structure. The resulting mismatch in structure will lead to a crash when Core Data attempts to update/use data stored in the sqlite-wal file 😞. To avoid this crash, we need to force any data in the sqlite-wal file into the sqlite file before we perform a migration - a process known as checkpointing:
class CoreDataMigrator {
    // Omitted unchanged functionality

    // 1
    func forceWALCheckpointingForStore(at storeURL: URL) throws {

        // 2
        let metadata = try NSPersistentStoreCoordinator.metadata(at: storeURL)
        guard let currentModel = NSManagedObjectModel.compatibleModelForStoreMetadata(metadata) else {
            throw CoreDataMigrationError.walCheckpointingMissingCompatibleModel
        }

        // 3
        do {
            let persistentStoreCoordinator = NSPersistentStoreCoordinator(managedObjectModel: currentModel)

            let options = [NSSQLitePragmasOption: ["journal_mode": "DELETE"]]
            let store = try persistentStoreCoordinator.addPersistentStore(at: storeURL,
                                                                          options: options)
            try persistentStoreCoordinator.remove(store)
        } catch let error {
            throw CoreDataMigrationError.walCheckpointingFailed(error)
        }
    }
}forceWALCheckpointingForStore(at:)forces any data sitting in thesqlite-walfile into the mainsqlitefile before a migration is attempted.- The store's metadata is loaded and used to find the compatible managed object model. It's important that the store's model is used here rather than the bundle's current model - we need to checkpoint against the model the store was actually created with.
- A temporary persistent store coordinator is created, and the store is added with the
journal_modeset toDELETE. This forces SQLite to flush any pending WAL data into the mainsqlitefile and then delete the now-emptysqlite-walfile. Once checkpointing is complete, the store is removed from the coordinator.
An easy mistake when
checkpointingis to use the bundle's model rather than the store's model - remember we want to performcheckpointingon the live (store) model before attempting to migrate to the latest (bundle) model.
Performing the Migration
Before starting the migration process, we first need to chain the individual migration steps into a progressive migration path:
class CoreDataMigrator {
    // Omitted unchanged functionality

    // 1
    private func migrationStepsForStore(at storeURL: URL,
                                        toVersion destinationVersion: CoreDataMigrationVersion)  throws -> [CoreDataMigrationStep] {

        // 2
        let metadata = try NSPersistentStoreCoordinator.metadata(at: storeURL)
        let sourceVersion = try CoreDataMigrationVersion.compatibleVersionForStoreMetadata(metadata)

        return try migrationSteps(fromSourceVersion: sourceVersion,
                                  toDestinationVersion: destinationVersion)
    }

    // 3
    private func migrationSteps(fromSourceVersion sourceVersion: CoreDataMigrationVersion,
                                toDestinationVersion destinationVersion: CoreDataMigrationVersion) throws -> [CoreDataMigrationStep] {
        var sourceVersion = sourceVersion
        var migrationSteps = [CoreDataMigrationStep]()

        // 4
        while sourceVersion != destinationVersion, let nextVersion = sourceVersion.nextVersion() {
            let migrationStep = try CoreDataMigrationStep(sourceVersion: sourceVersion,
                                                          destinationVersion: nextVersion)
            migrationSteps.append(migrationStep)

            sourceVersion = nextVersion
        }

        return migrationSteps
    }
}migrationStepsForStore(at:toVersion:)builds the full list of migration steps needed to bring the persistent store from its current model version to the destination model version.- The store's metadata is loaded and used to determine which model version the store is currently on. That source version and the destination version are then passed into
migrationSteps(fromSourceVersion:toDestinationVersion:). migrationSteps(fromSourceVersion:toDestinationVersion:)constructs the ordered array ofCoreDataMigrationStepinstances that form the migration path.- Starting from the source version, each version is asked for its
nextVersion(). ACoreDataMigrationStepis created for each pair of consecutive versions and appended to the array. This continues until the destination version is reached, producing the complete chain of steps needed for the progressive migration.
With the path built, it's time to kick off the migration process:
class CoreDataMigrator {
    // Omitted unchanged functionality

    // 1
    func migrateStore(at storeURL: URL,
                      toVersion version: CoreDataMigrationVersion) throws {
        // 2
        try forceWALCheckpointingForStore(at: storeURL)

        // 3
        var currentURL = storeURL
        let migrationSteps = try self.migrationStepsForStore(at: storeURL,
                                                             toVersion: version)

        // 4
        for migrationStep in migrationSteps {
            // 5
            let manager = NSMigrationManager(sourceModel: migrationStep.sourceModel,
                                             destinationModel: migrationStep.destinationModel)
            let tmpDirectory = URL(fileURLWithPath: NSTemporaryDirectory(),
                                   isDirectory: true)
            let destinationURL = tmpDirectory.appendingPathComponent(UUID().uuidString)

            // 6
            do {
                try manager.migrateStore(from: currentURL,
                                         sourceType: NSSQLiteStoreType,
                                         options: nil,
                                         with: migrationStep.mappingModel,
                                         toDestinationURL: destinationURL,
                                         destinationType: NSSQLiteStoreType,
                                         destinationOptions: nil)
            } catch let error {
                throw CoreDataMigrationError.migrationFailed(error)
            }

            // 7
            if currentURL != storeURL {
                //Destroy intermediate step's store
                try NSPersistentStoreCoordinator.destroyStore(at: currentURL)
            }

            currentURL = destinationURL
        }

        // 8
        try NSPersistentStoreCoordinator.replaceStore(at: storeURL,
                                                      withStoreAt: currentURL)

        // 9
        if currentURL != storeURL {
            try NSPersistentStoreCoordinator.destroyStore(at: currentURL)
        }
    }
}migrateStore(at:toVersion:)performs the full progressive migration, taking the persistent store from its current model version to the destination version.- Before anything else, WAL checkpointing is forced so that all data is flushed from the
sqlite-walfile into the mainsqlitefile. - The migration path is built as an ordered array of
CoreDataMigrationStepinstances, andcurrentURLis set to track which store file should be used as the source for the next step. - Each migration step is iterated through in order.
- For each step, an
NSMigrationManageris created with the step's source and destination models, and a temporary file URL is generated to hold the output of this step. - The migration manager migrates the data from
currentURLto the temporary destination URL using the step's mapping model. If the migration fails, the error is wrapped and thrown. - If the source for this step was itself a temporary file from a previous step, it is destroyed - we no longer need it.
currentURLis then updated to point at the newly created temporary store, ready for the next iteration. - Once all steps have been completed, the original persistent store is replaced with the fully migrated temporary store.
- The final temporary store is cleaned up, leaving only the original store URL with the fully migrated data.
It's important to emphasise that we only overwrite the store once we know that all migration steps have been successfully completed. If any individual step fails, an error is thrown, and the original store is left untouched - we never end up in a corrupt state. Overwriting as the final step also speeds up the development of a custom migration path - as the source store is never mutated until the very end, we can iterate on a broken migration policy without having to reset our test data between attempts.
In the above code snippets, we've seen a number of methods used that are not part of the standard API, so I've included the extensions that contain these methods below. As with most extensions, the methods are used to reduce boilerplate code.
Let's start with those extensions on NSPersistentStoreCoordinator:
extension NSPersistentStoreCoordinator {

    // 1
    static func destroyStore(at storeURL: URL) throws {
        do {
            let persistentStoreCoordinator = NSPersistentStoreCoordinator(managedObjectModel: NSManagedObjectModel())
            try persistentStoreCoordinator.destroyPersistentStore(at: storeURL,
                                                                  ofType: NSSQLiteStoreType,
                                                                  options: nil)
        } catch let error {
            throw CoreDataMigrationError.storeDestructionFailed(error)
        }
    }

    // 2
    static func replaceStore(at targetURL: URL,
                             withStoreAt sourceURL: URL) throws {
        do {
            let persistentStoreCoordinator = NSPersistentStoreCoordinator(managedObjectModel: NSManagedObjectModel())
            try persistentStoreCoordinator.replacePersistentStore(at: targetURL,
                                                                  destinationOptions: nil,
                                                                  withPersistentStoreFrom: sourceURL,
                                                                  sourceOptions: nil,
                                                                  ofType: NSSQLiteStoreType)
        } catch let error {
            throw CoreDataMigrationError.storeReplacementFailed(error)
        }
    }

    // 3
    static func metadata(at storeURL: URL) throws -> [String: Any]  {
        do {
            return try NSPersistentStoreCoordinator.metadataForPersistentStore(ofType: NSSQLiteStoreType,
                                                                                at: storeURL,
                                                                                options: nil)
        } catch let error {
            throw CoreDataMigrationError.metadataUnknown(error)
        }
    }

    // 4
    func addPersistentStore(at storeURL: URL,
                            options: [AnyHashable: Any]) throws -> NSPersistentStore {
        do {
            return try addPersistentStore(ofType: NSSQLiteStoreType,
                                          configurationName: nil,
                                          at: storeURL,
                                          options: options)
        } catch let error {
            throw CoreDataMigrationError.storeAdditionFailed(error)
        }
    }
}destroyStore(at:)deletes the persistent store at the given URL. A temporary coordinator is created with an empty model purely to access thedestroyPersistentStore(at:ofType:options:)method.replaceStore(at:withStoreAt:)overwrites the persistent store at the target URL with the store at the source URL. As withdestroyStore(at:), a temporary coordinator is created to access the replacement API.metadata(at:)loads and returns the metadata dictionary for the persistent store at the given URL.addPersistentStore(at:options:)is an instance method that wraps the verboseaddPersistentStore(ofType:configurationName:at:options:)call with sensible defaults for an SQLite store.
Let's move on to the NSManagedObjectModel extension:
extension NSManagedObjectModel {

    // 1
    static func compatibleModelForStoreMetadata(_ metadata: [String : Any]) -> NSManagedObjectModel? {
        let mainBundle = Bundle.main
        return NSManagedObjectModel.mergedModel(from: [mainBundle],
                                                forStoreMetadata: metadata)
    }

    // 2
    static func managedObjectModel(forResource resource: String) throws -> NSManagedObjectModel {
        let mainBundle = Bundle.main
        let subdirectory = "CoreDataMigration_Example.momd"

        let omoURL = mainBundle.url(forResource: resource,
                                    withExtension: "omo",
                                    subdirectory: subdirectory) // optimised model file

        let momURL = mainBundle.url(forResource: resource,
                                    withExtension: "mom",
                                    subdirectory: subdirectory)

        guard let url = omoURL ?? momURL,
              let model = NSManagedObjectModel(contentsOf: url) else {
            throw CoreDataMigrationError.unableToLoadModel
        }

        return model
    }
}compatibleModelForStoreMetadata(_:)returns the managed object model from the main bundle that is compatible with the given store metadata, ornilif no match is found.managedObjectModel(forResource:)loads a specific model version from the bundle by name. It first looks for anomofile (the optimised model format), falling back to the standardmomfile if the optimised version isn't available.
Now that migrations are possible, we need to set up our Core Data stack.
How Do We Trigger a Migration?
CoreDataManager handles both setting up the Core Data stack and triggering a migration (if needed). Let's see our stack:
class CoreDataManager {

    // 1
    lazy var persistentContainer: NSPersistentContainer = {
        let persistentContainer = NSPersistentContainer(name: "CoreDataMigration_Example")
        let description = persistentContainer.persistentStoreDescriptions.first
        description?.shouldInferMappingModelAutomatically = false
        description?.shouldMigrateStoreAutomatically = false

        return persistentContainer
    }()

    // 2
    lazy var backgroundContext: NSManagedObjectContext = {
        let context = self.persistentContainer.newBackgroundContext()
        context.mergePolicy = NSMergeByPropertyObjectTrumpMergePolicy

        return context
    }()

    // 3
    lazy var mainContext: NSManagedObjectContext = {
        let context = self.persistentContainer.viewContext
        context.automaticallyMergesChangesFromParent = true

        return context
    }()

    // MARK: - Singleton

    // 4
    static let shared = CoreDataManager()

    // 5
    func setup(completion: @escaping (Result<Void, Error>) -> Void) {
        loadPersistentStore { result in
            completion(result)
        }
    }

    // 6
    private func loadPersistentStore(completion: @escaping (Result<Void, Error>) -> Void) {
        self.persistentContainer.loadPersistentStores { _, error in
            guard let error = error else {
                completion(.success(()))
                return
            }

            completion(.failure(CoreDataError.persistentStoreLoadFailed(error)))
        }
    }
}- The
NSPersistentContaineris created with bothshouldInferMappingModelAutomaticallyandshouldMigrateStoreAutomaticallyset tofalse. This disables Core Data's built-in automatic migrations so that our progressive migration approach can handle them instead. - A background context is created for performing Core Data operations off the main thread, with a merge policy that favours in-memory changes over store changes in the event of a conflict.
- The main context is the container's
viewContext, configured to automatically merge changes saved by other contexts - such as the background context above. CoreDataManageris a singleton, providing a single shared Core Data stack for the app.setup(completion:)is the entry point for initialising the Core Data stack, delegating toloadPersistentStore(completion:).loadPersistentStore(completion:)loads the persistent store and returns the result through a completion closure. If loading fails, the error is wrapped in aCoreDataErrorcase.
With our Core Data stack setup, let's add support for migrating:
class CoreDataManager {
    // Omitted unchanged functionality

    private func loadPersistentStore(completion: @escaping (Result<Void, Error>) -> Void) {
        // 1
        migrateStoreIfNeeded { result in
            guard case .success = result else {
                completion(result)
                return
            }

            self.persistentContainer.loadPersistentStores { _, error in
                guard let error = error else {
                    completion(.success(()))
                    return
                }

                completion(.failure(CoreDataError.persistentStoreLoadFailed(error)))
            }
        }
    }

    // 2
    private func migrateStoreIfNeeded(completion: @escaping (Result<Void, Error>) -> Void) {
        guard let storeURL = persistentContainer.persistentStoreDescriptions.first?.url else {
            completion(.failure(CoreDataError.persistentContainerNotSetup))
            return
        }

        // 3
        do {
            let currentVersion = try CoreDataMigrationVersion.current()
            let requiresMigration = try migrator.requiresMigration(at: storeURL,
                                                                   toVersion: currentVersion)

            guard requiresMigration else {
                completion(.success(()))
                return
            }

            migrateStore(storeURL: storeURL,
                         toVersion: currentVersion,
                         completion: completion)
        } catch {
            completion(.failure(error))
        }
    }

    // 4
    private func migrateStore(storeURL: URL,
                              toVersion version: CoreDataMigrationVersion,
                              completion: @escaping (Result<Void, Error>) -> Void) {

        // 5
        DispatchQueue.global(qos: .userInitiated).async {
            do {
                try self.migrator.migrateStore(at: storeURL,
                                               toVersion: version)
            } catch {
                DispatchQueue.main.async {
                    completion(.failure(error))
                }
                return
            }

            // 6
            DispatchQueue.main.async {
                completion(.success(()))
            }
        }
    }
}loadPersistentStore(completion:)now checks if a migration is needed before loading the persistent store. The store is only loaded once the migration has completed successfully.migrateStoreIfNeeded(completion:)retrieves the store URL from the persistent container and determines whether a migration is required.- The current model version is resolved and compared against the store's version. If no migration is needed, the method returns early with success. Otherwise, the migration is kicked off.
migrateStore(storeURL:toVersion:completion:)performs the actual migration using the migrator.- The migration is dispatched onto a background queue to avoid blocking the main thread - migrations can be slow, particularly for large data sets.
- Once the migration completes, the result is dispatched back to the main queue so that the caller can safely update the UI.
CoreDataManager is called in the SceneDelegate:
class SceneDelegate: UIResponder, UIWindowSceneDelegate {
    var window: UIWindow?

    func scene(_ scene: UIScene,
               willConnectTo session: UISceneSession,
               options connectionOptions: UIScene.ConnectionOptions) {
        // 1
        CoreDataManager.shared.setup { result in
            // 2
            guard case let .failure(error) = result else {
                DispatchQueue.main.asyncAfter(deadline: .now() + 1.0) { // just for example purposes
                    self.presentMainUI()
                }

                return
            }

            // 3
            fatalError("Unable to set up Core Data stack: \(error)")
        }
    }
}- The Core Data stack is set up when the scene connects, before the user is allowed into the app.
- If setup succeeds, the main UI is presented - replacing the loading screen with a navigation stack that can freely use Core Data.
- If setup fails, a fatal error is thrown. In a production app, you would want to handle this more gracefully.
The above code snippet is from the example project where the user is shown a loading screen while the Core Data stack is being set up. Only once the setup is complete is the user allowed into the app proper.
presentMainUI()switches out the window's root view controller for a navigation stack that can freely use Core Data. While this is strictly not necessary, by splitting the UI intopreandpostCore Data stack set-up, it is possible to avoid race conditions where the app is attempting to use Core Data before it has finished setting up.
💃🥂🎉🕺
Congratulations, that's all there is to the progressive migration approach.
The rest of this post is devoted to putting the above migration approach into practice by migrating an app through three Core Data model versions.
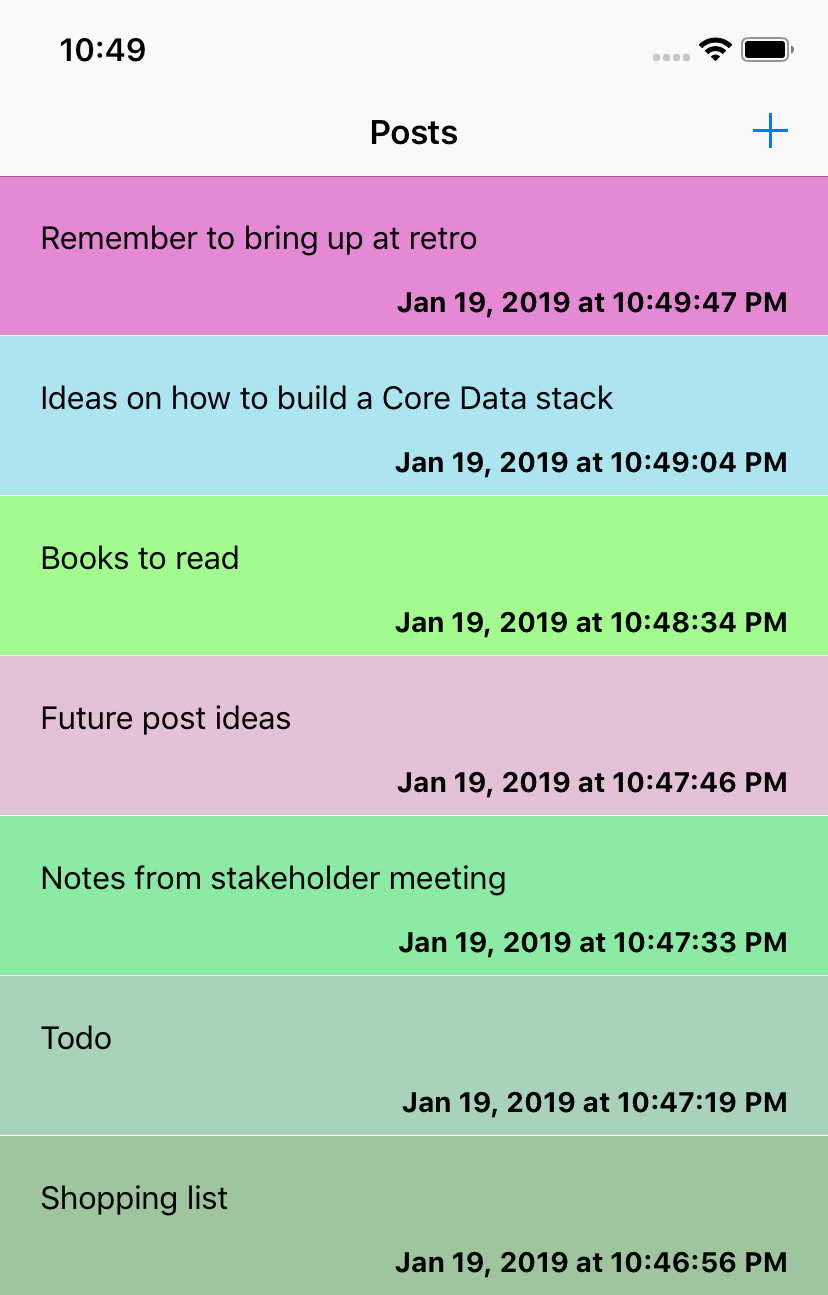
Colourful Posts
Colourful Posts is a simple app that allows the user to create posts that are persisted in Core Data. Each post consists of:
- A unique ID.
- A random associated colour represented as a hex string.
- The body/content of the post.
- The date the post was created.
So that the model looks like:

Each post that the user creates is then displayed in a tableview as a brightly coloured cell.
To keep this post to a reasonable length, I won't show any code from
Colourful Poststhat isn't connected to performing a migration.
It's a simple, fun app that we submit to Apple for approval 🤞.
Migrating to Version 2
Despite not being able to edit posts, Apple not only approves Colourful Posts, they love it so much so that they feature it on the Today tab. Colourful Posts is instantly propelled to the top of the charts. After hundreds of thousands of downloads, we decide to hire a new developer to help steer the success-train we find ourselves on 🚂. However, in their first week, the new developer mistakes the information stored in the color property on Post as using RGB rather than hex to store the colour as a string. Unfortunately, we don't catch this mismatch until it's in production and leads to the app crashing on launch 😞. To avoid this issue from happening when we hire more developers, we decide to rename color to hexColor. As this is a change to the model, we need to create a new model version and handle the migration between the old and new versions.
To create a new model version, select the
*.xcdatamodel(it may be called*.xcdatamodeld) file in theProject Navigator, open theEditormenu from the top bar and click on theAdd Model Version...option. In the wizard that opens, this new model will already be given a name, which typically follows[ModelName] [Number], e.g.CoreDataMigration_Example 2, but the name can be changed to whatever you want.
Lightweight migrations are typically a less intensive form of migration than Standard migrations (from both a developer and performance point-of-view). Because of this, I prefer to perform Lightweight migrations whenever possible. Lightweight migrations can handle the following transformations to the model:
- Adding an attribute.
- Removing an attribute.
- Changing a non-optional attribute to be optional.
- Changing an optional attribute to non-optional (by defining a default value).
- Renaming an entity, attribute or relationship (by providing a
Renaming ID). - Adding a relationship.
- Removing a relationship.
- Changing the entity hierarchy.
An impressive list of transformations that we get free (or almost free) with Lightweight migrations. The color to hexColor change is covered by the Renaming an entity, attribute or relationship, which has a small caveat: by providing a Renaming ID. The Renaming ID creates a link between the old attribute and the new attribute. All it requires is to add the old attribute name to the new attribute's metadata:
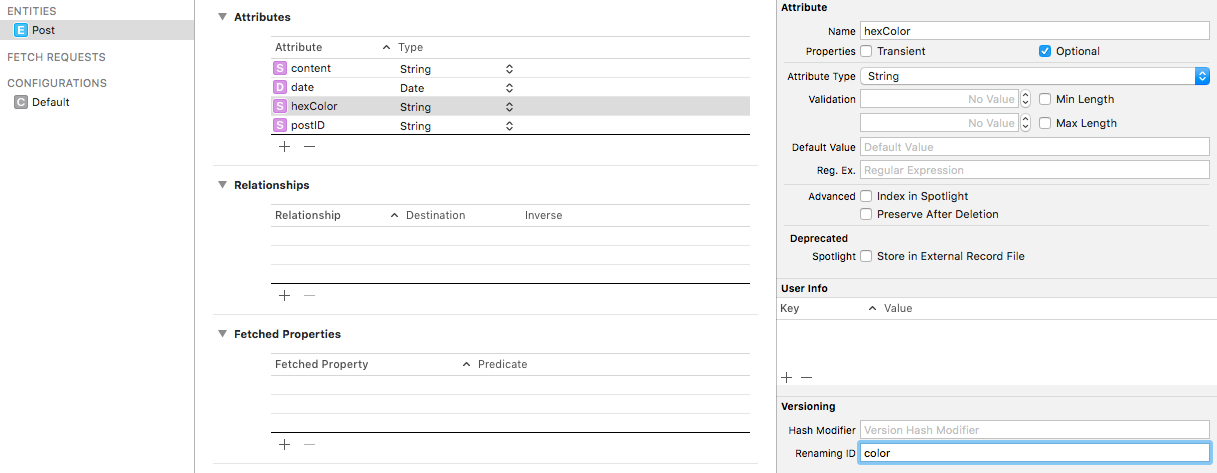
With this information, Core Data now knows that color and hexColor are the same attribute, just with different names. Rather than discarding color during a Lightweight migration, the value is transferred to hexColor.
With that change, the only thing that's left to do is update CoreDataMigrationVersion to allow migrations from CoreDataMigration_Example to CoreDataMigration_Example 2:
enum CoreDataMigrationVersion: String, CaseIterable {
    case version1 = "CoreDataMigration_Example"
    case version2 = "CoreDataMigration_Example 2"

    // Omitting unchanged functionality

    func nextVersion() -> CoreDataMigrationVersion? {
        switch self {
        case .version1:
            return .version2
        case .version2:
            return nil
        }
    }
}
A new case was added to CoreDataMigrationVersion - version2. As with version1, this new version has a raw value which maps to the name of its respective model version - CoreDataMigration_Example 2. nextVersion() has also been updated so that there is a migration path from version1 to version2.
Now that we have a migration path, let's look at unit testing it. Unit testing a migration path requires:
- Populating a SQLite database using the
CoreDataMigration_Examplemodel. - Copying that SQLite database into the test target.
- Asserting that the contents of that SQLite database migrated as expected.
Before copying your SQLite database, it's important to ensure it is, in fact, populated with test data. As we discussed above, Core Data uses
Write-Ahead Loggingto improve performance, so your data could be residing in thesqlite-walfile rather than thesqlitefile. The easiest way to force any uncommitted changes is to fake a migration - add a breakpoint just after theforceWALCheckpointingForStore(at:)method, open theApplication Supportfolder, copy thesqlitefile and then abort the migration.
class CoreDataMigratorTests: XCTestCase {
    // 1
    var sut: CoreDataMigrator!

    // 2
    override class func setUp() {
        super.setUp()

        FileManager.clearTempDirectoryContents()
    }

    // 3
    override func setUp() {
        super.setUp()

        sut = CoreDataMigrator()
    }

    // 4
    override func tearDown() {
        sut = nil

        super.tearDown()
    }

    // 5
    func tearDownCoreDataStack(context: NSManagedObjectContext) {
        context.destroyStore()
    }

    // 6
    func test_givenVersion1Store_whenMigratedToVersion2_thenStoreIsCompatibleWithVersion2() throws {
        let sourceURL = FileManager.moveFileFromBundleToTempDirectory(filename: "CoreDataMigration_Example_1.sqlite")
        let toVersion = CoreDataMigrationVersion.version2

        try sut.migrateStore(at: sourceURL,
                             toVersion: toVersion)

        XCTAssertTrue(FileManager.default.fileExists(atPath: sourceURL.path))

        let model = try NSManagedObjectModel.managedObjectModel(forResource: toVersion.rawValue)
        let context = NSManagedObjectContext(model: model, storeURL: sourceURL)
        let request = NSFetchRequest.init(entityName: "Post")
        let sort = NSSortDescriptor(key: "postID", ascending: false)
        request.sortDescriptors = [sort]

        let migratedPosts = try? context.fetch(request)

        XCTAssertEqual(migratedPosts?.count, 10)

        let firstMigratedPost = migratedPosts?.first

        let migratedDate = firstMigratedPost?.value(forKey: "date") as? Date
        let migratedHexColor = firstMigratedPost?.value(forKey: "hexColor") as? String
        let migratedPostID = firstMigratedPost?.value(forKey: "postID") as? String
        let migratedContent = firstMigratedPost?.value(forKey: "content") as? String

        XCTAssertEqual(migratedDate?.timeIntervalSince1970, 1547494150.058821)
        XCTAssertEqual(migratedHexColor, "1BB732")
        XCTAssertEqual(migratedPostID, "FFFECB21-6645-4FDD-B8B0-B960D0E61F5A")
        XCTAssertEqual(migratedContent, "Test body")

        tearDownCoreDataStack(context: context)
    }
}
There is no need to test every object stored in the persistent store; rather, we just have to assert that each entity has the correct number of objects, and then select one object per entity and assert the values on that object.
- The subject under test is a
CoreDataMigratorinstance. - The class-level
setUpclears the temp directory once before the entire test suite runs, removing any leftover files from previous test runs. - The instance-level
setUpcreates a freshCoreDataMigratorbefore each test. tearDownnils out the migrator after each test.tearDownCoreDataStack(context:)properly tears down the Core Data stack by destroying the store through the context. Simply deleting the SQLite files from disk without doing this would trigger adatabase integrity compromisederror, as the store would be removed from under an active Core Data stack.- The test migrates a pre-populated
version1SQLite database toversion2, then verifies the migration by loading the store using theversion2model and asserting that the data came through correctly. An interesting point to note is that rather than making use of thePostsubclass ofNSManagedObject, the above test uses a plainNSManagedObjectinstance andKVCto determine if the migration was a success. This is to handle the very likely scenario that thePoststructure defined in theversion2model will not be the finalPoststructure. If we usedPostinstances, then as thePostentity changed in later versions of the model, those changes would be mirrored inPostNSManagedObjectsubclass, which would result in this test potentially breaking. By using plainNSManagedObjectinstances andKVC, it is possible to ensure that this test is 100% accurate to the structure of thePostentity as defined in theversion2model.
In the above test class, a few extensions are being used to make things easier.
Let's start with the extensions of FileManager:
extension FileManager {

    // 1
    static func clearTempDirectoryContents() {
        let tmpDirectoryContents = try! FileManager.default.contentsOfDirectory(atPath: NSTemporaryDirectory())
        tmpDirectoryContents.forEach {
            let tmpDirectory = URL(fileURLWithPath: NSTemporaryDirectory(),
                                   isDirectory: true)
            let fileURL = tmpDirectory.appendingPathComponent($0)
            try? FileManager.default.removeItem(atPath: fileURL.path)
        }
    }

    // 2
    static func moveFileFromBundleToTempDirectory(filename: String) -> URL {
        let tmpDirectory = URL(fileURLWithPath: NSTemporaryDirectory(),
                               isDirectory: true)
        let destinationURL = tmpDirectory.appendingPathComponent(filename)
        try? FileManager.default.removeItem(at: destinationURL)
        let bundleURL = Bundle(for: CoreDataMigratorTests.self).resourceURL!.appendingPathComponent(filename)
        try? FileManager.default.copyItem(at: bundleURL,
                                          to: destinationURL)

        return destinationURL
    }
}clearTempDirectoryContents()removes all files from the temp directory, ensuring a clean slate before the test suite runs.moveFileFromBundleToTempDirectory(filename:)copies a pre-populated SQLite file from the test bundle into the temp directory so that it can be migrated during a test. Any existing file at the destination is removed first to avoid conflicts.
Now, let's see the extensions for NSManagedObjectContext:
extension NSManagedObjectContext {

    // 1
    convenience init(model: NSManagedObjectModel,
                     storeURL: URL) {
        let persistentStoreCoordinator = NSPersistentStoreCoordinator(managedObjectModel: model)
        try! persistentStoreCoordinator.addPersistentStore(ofType: NSSQLiteStoreType,
                                                           configurationName: nil,
                                                           at: storeURL,
                                                           options: nil)

        self.init(concurrencyType: .mainQueueConcurrencyType)

        self.persistentStoreCoordinator = persistentStoreCoordinator
    }

    // 2
    func destroyStore() {
        persistentStoreCoordinator?.persistentStores.forEach {
            try? persistentStoreCoordinator?.remove($0)
            try? persistentStoreCoordinator?.destroyPersistentStore(at: $0.url!,
                                                                    ofType: $0.type,
                                                                    options: nil)
        }
    }
}- A convenience initialiser that creates a managed object context wired up to a specific model and store URL. This allows the tests to load a migrated store using the destination model version without needing a full
NSPersistentContainersetup. destroyStore()tears down the Core Data stack by first removing each persistent store from the coordinator and then destroying the underlying SQLite files. This ensures a clean teardown without triggering thedatabase integrity compromisederror that would result from simply deleting the files from disk.
As this extension is in the test target, I'm happy to use
try!and allow this code to crash if an error is thrown.
Migrating to Version 3
After another successful release, we decide to expand our posting functionality by allowing the user to add multiple sections to a post. These sections will be stored alongside the post in Core Data. As with any model change, we need to create a new model version.
Each section consists of:
- A title.
- A body.
- An index.
Which in turn reduces a post to:
- A unique ID.
- A random associated colour represented as a hex string.
- The date the post was created.
- A collection of sections.
Such that:

Migrating from version2 to version3 is slightly trickier than the previous migration, as version3 splits an existing entity into two and creates a relationship between them. This will require implementing both a mapping model and a migration policy.
To create a mapping model, open the
Filemenu on the top bar, then click onNew File->New. In the window that opens, scroll down to theCore Datasection and double-tap onMapping Model. This will open a wizard where you can select your source and destination model versions, so in this case:CoreDataMigration_Example 2andCoreDataMigration_Example 3. After that, you need to give the mapping a name and save it. I tend to followMigration[sourceVersion]to[destinationVersion]ModelMappingas a naming convention, soMigration2to3ModelMapping.
A mapping model defines the transformations required to migrate from the source model to the destination model. In Xcode, a mapping model is an xcmappingmodel file that, when opened, has a GUI that's very similar to the Core Data Model GUI. A mapping model handles mapping between entities, attributes and relationships. The mapping model GUI even allows for simple transformations. If the model had a percentage attribute whose value used to range from 0 to 100 but now needs to range from 0 to 1, we could use the Expression field on that attribute to perform this transformation by setting the expression to: $source.percentage/100. Despite the range of transformations possible within the mapping model GUI, some changes are just too complex and require a more custom approach - this is handled by creating a migration policy. A migration policy is an NSEntityMigrationPolicy subclass that defines how to map between two entities from two different model versions using the full Core-Data/Swift toolkit.
Migrating from CoreDataMigration_Example 2 to CoreDataMigration_Example 3 will require a custom migration policy as we will need to move the current content attribute's value on Post to both the title and body attributes on a newly created Section instance.
As a rule of thumb: if a migration changes the shape of the data rather than just the names of its fields, you're probably in migration-policy territory. If you're splitting an entity, merging entities, or distributing one entity's data across several, you should be reaching for
NSEntityMigrationPolicy.
// 1
final class Post2ToPost3MigrationPolicy: NSEntityMigrationPolicy {

    // 2
    override func createDestinationInstances(forSource sourceInstance: NSManagedObject,
                                             in mapping: NSEntityMapping,
                                             manager: NSMigrationManager) throws {
        try super.createDestinationInstances(forSource: sourceInstance,
                                             in: mapping,
                                             manager: manager)

        // 3
        guard let destinationPost = manager.destinationInstances(forEntityMappingName: mapping.name,
                                                                 sourceInstances: [sourceInstance]).first else {
            fatalError("Expected a post")
        }

        // 4
        let sourceBody = sourceInstance.value(forKey: "content") as? String
        let sourceTitle = sourceBody?.prefix(4).appending("...")

        // 5
        let section = NSEntityDescription.insertNewObject(forEntityName: "Section",
                                                          into: destinationPost.managedObjectContext!)
        section.setValue(sourceTitle,
                         forKey: "title")
        section.setValue(sourceBody,
                         forKey: "body")
        section.setValue(destinationPost,
                         forKey: "post")
        section.setValue(0,
                         forKey: "index")

        // 6
        var sections = Set<NSManagedObject>()
        sections.insert(section)

        destinationPost.setValue(sections,
                                 forKey: "sections")
    }
}
Just like with mapping models, I have a naming convention for migration policies:
[Entity][Version]To[Entity][Version]MigrationPolicy. This way, I can know at a glance exactly what the migration policy is doing.
Post2ToPost3MigrationPolicyis anNSEntityMigrationPolicysubclass that handles the custom migration from theversion2Postentity to theversion3PostandSectionentities.createDestinationInstances(forSource:in:manager:)is overridden to allow us to customise howversion2Postinstances are transformed intoversion3instances. The call tosupercreates the destinationPostusing the mapping rules defined in the mapping model.- The newly created destination
Postis retrieved from the migration manager. - The
contentvalue is read from the sourcePostusingKVC, and atitleis derived by taking the first four characters and appending...- a rough approximation since the old model had no concept of a title. - A new
Sectioninstance is created in the destination context and populated with the title, body, a reference back to the destination post, and an index of0. - The
sectionsrelationship is set on the destination post, linking the two entities together.
For this migration policy to be used during the migration, we need to add it to the mapping model by setting the Custom Policy on the PostToPost entity mapping:

It's important to note that the migration policy class name is prefixed with the module name.
All that's left to do is to update CoreDataMigrationVersion by introducing a version3 case and updating nextVersion:
enum CoreDataMigrationVersion: String, CaseIterable {
    case version1 = "CoreDataMigration_Example"
    case version2 = "CoreDataMigration_Example 2"
    case version3 = "CoreDataMigration_Example 3"

    // Omitted unchanged functionality

    func nextVersion() -> CoreDataMigrationVersion? {
        switch self {
        case .version1:
            return .version2
        case .version2:
            return .version3
        case .version3:
            return nil
        }
    }
}
And that's it - we now have a migration path from not only CoreDataMigration_Example 2 to CoreDataMigration_Example 3 but also from CoreDataMigration_Example to CoreDataMigration_Example 3.
Check out CoreDataMigratorTests for the unit test that supports this migration.
Migrating to Version 4
The success of Colourful Posts knows no bounds, and we decide to release our next killer feature: deleting posts. This deletion functionality is actually a soft delete, which means that the post will still exist in Core Data but won't be shown to the user. We can achieve this by adding a new attribute to the Post entity - softDelete. Of course, this change will require a new model version and for us to handle the migration to that version. This migration can be handled as a Lightweight migration and, in fact, requires very little effort on our part. We only need to add a new case to CoreDataMigrationVersion and update nextVersion():
enum CoreDataMigrationVersion: String, CaseIterable {
    case version1 = "CoreDataMigration_Example"
    case version2 = "CoreDataMigration_Example 2"
    case version3 = "CoreDataMigration_Example 3"
    case version4 = "CoreDataMigration_Example 4"

    // Omitted unchanged functionality

    func nextVersion() -> CoreDataMigrationVersion? {
        switch self {
        case .version1:
            return .version2
        case .version2:
            return .version3
        case .version3:
            return .version4
        case .version4:
            return nil
        }
    }
}
Most migrations will probably look like this - a new enum case and a new switch arm. No custom migration code required.
We Got There 🏁
The default Core Data migration approach required n-1 new mappings for every new model version - a burden that grows with every release and tempts us into dropping support for older versions. With the above step-by-step approach, adding support for migrating to a new version only costs us a single step. Breaking the migration work down into a series of small steps takes a lot of the difficulty out of migrations.
And remember, if that's how someone on the bus reacts to having to move their bag, we should try and spare this person the trauma that losing their unlocked thingamabobs would surely cause 😉.
To see the complete working example, visit the repository and clone the project.
Note that the code in the repository is unit tested, so it isn't 100% the same as the code snippets shown in this post. The changes mainly involve a greater use of protocols to allow for test-doubles to be injected into the various types. While not hugely different, I didn't want to present the increased complexity necessary for unit testing to get in the way of the core message in this post.
I want to acknowledge that I leaned on the most excellent Core Data book by Florian Kugler and Daniel Eggert, which you can get here. I highly recommend that you give that book a read, as it's a treasure trove of Core Data knowledge.