- Basic UI
- Deployment Guide https://console.bluemix.net/docs/runtimes/nodejs/getting-started.html#getting-started-with-node-js-on-bluemix
- ? BotaaS ?
- Bluemix Account
- Node and npm (if running the application locally)
- CURL or Postman (so that we can test basic REST requests)
- Git
Our app can be set up using Watson free tier services. Components:
- Conversation Free
- ToneAnalyzer Lite
- Node App
- Login to Bluemix

- Open Services -> Watson


- Create Conversation Services


- Note down API Credentials

- Login to Conversation Administration Panel

- Create Workspace

-
Note down Workspace ID
-
Open Workspace
- Intents
- Entities
- Dialog
Intents expanded on from IBM's DevZone Hands on Developer Lab: https://ibm.ent.box.com/s/7ax67hlgvx5o7tn2wy6cqr8g0mnnbf5c/folder/20544200034
Let's start by creating some Intents. Click on the Intents tab and click "Create new". We'll make three intents, with 6+ examples each.
- I’m looking for support on Watson Text to Speech Service
- How can I get support on Watson Service
- I need some help with Docker Container Service
- I am looking for support on SSO
- I need support on Object Storage Service
- Support required on IBM Container Service
- bye
- bye and take care
- goodbye!
- bugger off
- goodbye for now
- see you
- talk to you soon
- so long and thanks for all the fish
Let's also create an Entity. This allows us to detect specific key words and phrases.
Instructor will note:
- Fuzzy Matching [Beta] - stemming etc.
- System Entities
For our Support bot, we want to detect different Bluemix services that a customer might be asking about.
Click create new and enter the following details.
- docker - Container, Container Image, Docker
- dev-ops - IBM Dev-Ops, DevOps, dev-ops
- sso - Single Sign On, SSO
- virtualmachine - Vitual Server, VM, Virtual machine
- watson - Watson, Watson Services
value - synonym, synonym, ...
Finally, let's start building our conversation flow. This provides the logic for how our customer will move through the conversation.
Instructor will note:
- Slots
- Evaluation logic of Dialog structure
The Welcome node is the node received before a user says anything. Let's change the node to:
- If bot recognises: welcome
- Then respond with: Welcome to Bluemix support, how can I help you?
The Anything Else node is our catch all. Let's leave this as is.
Important Note - Anything below an "anything_else" node can only be reached by a explicit goto statement. In evaluating conversation flow, Watson looks first at children of the current node. If it can't find an appropriate node, it then looks at the highest level nodes one by one. This is quite useful when you have a node you want to reuse several times. We'll come back to this.
Let's say our bot has the capability to activate support features for Bluemix. When our user speaks to the bot, we need to detect that they are speaking about #Support, and then respond by activate the appropriate support feature. Our support feature corresponds to the /@Bluemix entity we created.
-
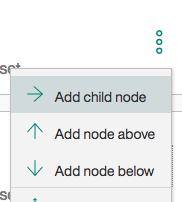
Click the 3 dots next to the Welcome node and select "Add node below" 
-
We need to fill the node in as follows -
- If bot recognises: #Support
- Then respond with: I am enabling support for /@bluemix
Let's also add a final farewell node.
- Click the 3 dots next to the Support node and select "Add node below" 
- If bot recognises: #Goodbye
- Then respond with: Have a nice day.
We can now test our bot. Click in the top right corner of the screen on the Chat Icon.
![]()

Since we've been adjusting the Conversation, Watson may still be training. Wait until the purple "Watson is training" box disappears.

Instructor to walk through analytics display and user conversation
curl -X POST --header 'Content-Type: application/json'  \
-u {username}:{password} \
--header 'Accept: application/json'  -d '{}' \
'https://watson-api-explorer.mybluemix.net/conversation/api/v1/workspaces/{workspace_id}/message?version=2017-07-17'
Tone Analyser is a machine learning model that detects a customer's sentiment based on the words that they are using. The service does not maintain a session - so the Tone measurement will correspond to only the text you have just sent to the service.
This means that, for short text snippets in a conversation, the results could be erratic. One sentence is positive, the next negative.
To get a better understanding of tone, you'll likely want to pass in conversation context as well. Rather than just passing in the last comment ("But the eggs were bad"), you might pass in the last three
("The conference was fantastic. The speakers were great. But the eggs were bad.")
Tone Analyser can also be used to parse more complex objects and sentence breakdowns. For this demo, we only want a simple analysis of the text we're passing to the API. For more details, you can check out: https://github.com/IBM-Bluemix-Docs/tone-analyzer/blob/master/getting-started.md
curl --user "{username}":"{password}" \
--header "Content-Type: application/json" \
--data  "{\"text\": \"Hi Team, I know the times are difficult! Our sales have been disappointing for the past three quarters for our data analytics product suite. We have a competitive data analytics product suite in the industry. But we need to do our job selling it! \"}" \
"https://gateway.watsonplatform.net/tone-analyzer/api/v3/tone?version=2017-07-17&sentences=false"
Basic Node App [API -> Tone Analyser -> Watson]
Within our App, we have an express web server (server.js), 1 main routing file (routes/index.js), 2 Watson API wrappers (internal_modules/ Conversation.js && ToneAnalyser.js) and an environment settings file (.env). package.json is our build file.
server.js                           - Web Server
.env                                - Environment Variables
package.json                        - Our node package requirements
routes/index.js                     - App Entry Point
routes/conversation.js              - Demo Route for just the Conversation API
routes/tone.js                      - Demo Route for just the Tone Analyser API
internal_modules/Conversation.js    - Wrapper for Watson Conversation API
internal_modules/ToneAnalyser.js    - Wrapper for Watson Tone Analyser
- Install package.json:
npm install - Setup Environment Variables:
vim .env[see section below for .env template] - Run Demo:
node server.js
.env
BOT_URL=https://gateway.watsonplatform.net/conversation/api
BOT_USER=
BOT_PASS=
BOT_WORKSPACE_ID=
BOT_API=v1
BOT_API_DATE=2017-07-17

TONE_URL=https://gateway.watsonplatform.net/tone-analyzer/api
TONE_USER=
TONE_PASS=
TONE_API=v1
TONE_API_DATE=2017-07-17

PORT=8080
curl -X POST -H "Content-Type: application/json" -H "Cache-Control: no-cache" -H "Postman-Token: 029946e5-e5b7-a387-10c3-5de996a35e44" -d '{
	"text":"I need help with Watson",
	"chatID":""
}' "http://localhost:8080/api/v1/chat"
Tone Entities and Custom Commands
- Customer says "I'm furious with you guys"
- Tone Analyser detects Anger
- Bot redirects customer to a staff member to have a personal conversation
So our app can now extract emotion from text input, but how does the Bot respond to it? There are a number of different ways we could pass in this data. The simplest is to pass in some additional context data:
context:{emotion:{anger:0.9}}
We can then pick this up and use it in our Conversation Dialog Flow as a variable.
$emotion.anger >= 0.8
- Create a new node under the "Welcome" node, call it "Transfer to Team" This will be our escape node.
- Add a new child node under the "Support" node.
- Add the condition $emotion.anger >= 0.5 [$variables are context variables]
- Down the bottom, against 'And then' select "Jump to..." -> "Transfer to Team"
Voila. We have a basic bot that can detect the emotion of the person calling and respond appropriately.
Finally, let's detect their response. Goto the intents tab and create two new Intents:
- Sure
- Thanks
- Right away please
- Yes please
- That would be fantastic
- Yep
- Okay
- No
- That's not what I want
- Stop
- No Thanks
- Hell no
- That's wrong
Now let's go back into the Dialog flow. Under "Transfer to Team" add two child nodes:
- If bot recognises: @Agree
- Then respond with: 'Putting you through right away!'
- If bot recognises: @Disagree
- Then respond with: 'No worries, is there anything else I can help with then?'
We can also now tailor our messages to how the customer is feeling. Open the existing Goodbye node.
Watson allows us to create responses that are sent based on a condition.
- Click "Add Another Response"

- Click "Add Response Condition"

-
We then Add the Response condition $emotion.joy >= 0.5 And our response is "Glad I could be of assistance! Have a fantastic day!"
-
Let's do the same for our Angry customer. The condition will be $emotion.anger >= 0.5 And our response is "Sorry I couldn't be of more assistance, hope you have a good day."
-
Important - We now need to move the generic response to the bottom of the list to ensure that the other conditions are checked first. Click the up arrows on the Happy and Angry responses until they both are above the generic response.
Local / Deploy App
Chatbot Responding to Tone