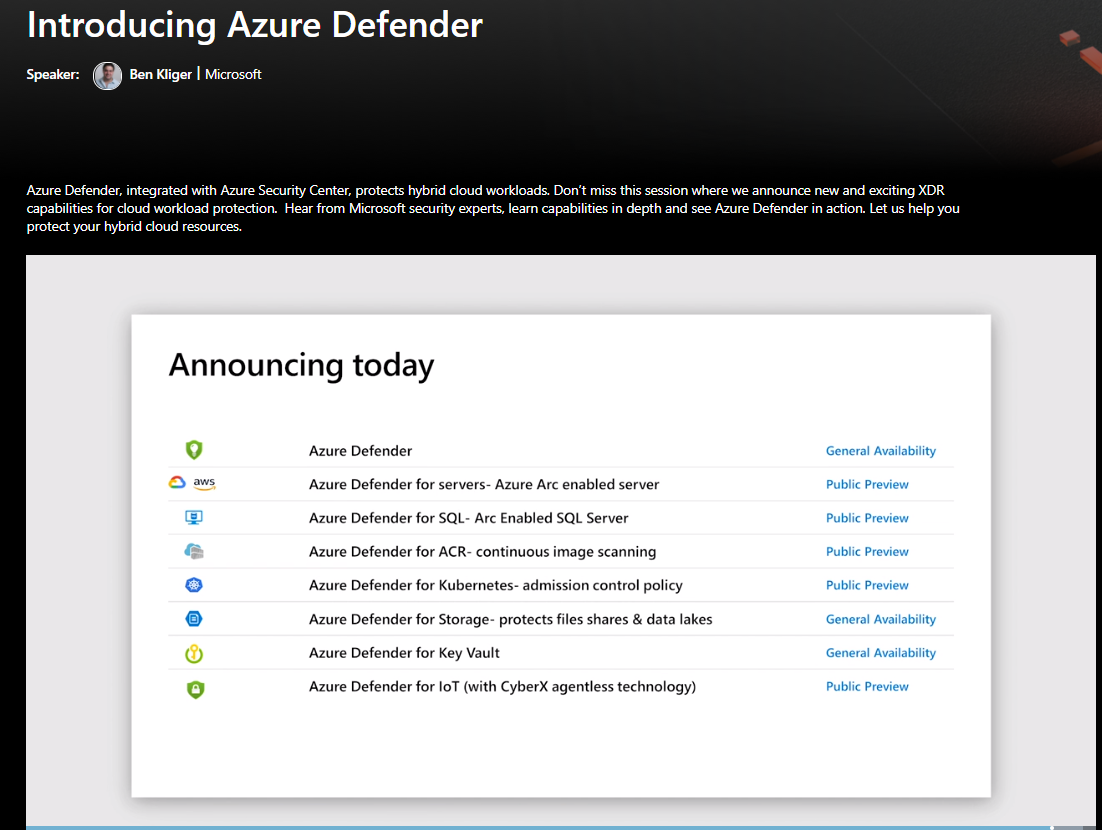
TangTalk - Tech Blogfuture architect's daily life2020-09-23T00:46:23.740Zhttps://xinyeah.github.io/XinyeHexoAzure Defender for Key Vault just released!https://xinyeah.github.io/Azure-Defender-for-Key-Vault-just-released/2020-09-22T17:30:26.000Z2020-09-23T00:46:23.740ZAs the service owner, I am super excited to share that Azure Defender for Key Vault is now generally available!
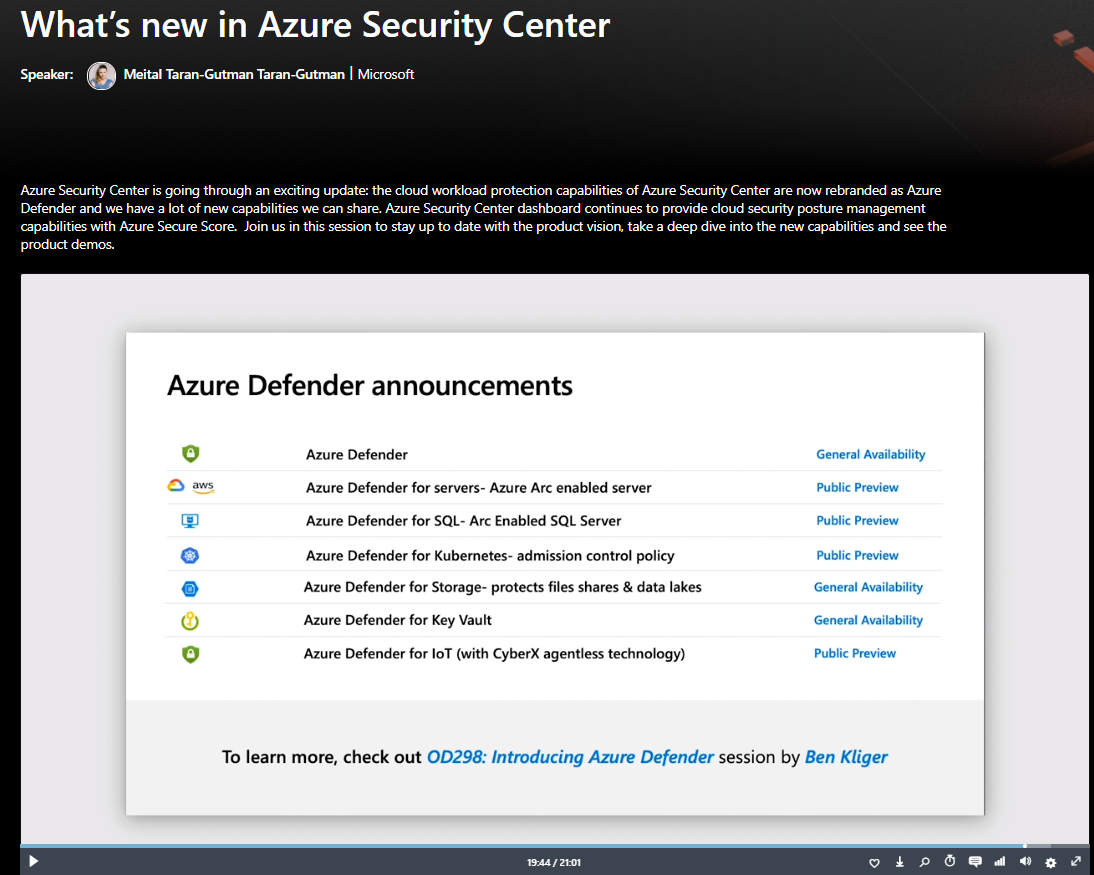
It is really One Microsoft experience to work closely with Azure Security Center and Azure Key Vault team to launch this service. Also personally, I grew up a lot after going through the Machine Learning algorithm improvement, infrastructure refactoring, BCDR and privacy policy compliance, cost reduce, monthly business review(MBR), customer feedback investigation.
It is indeed a challenging and inspiring work to wake me up every day.
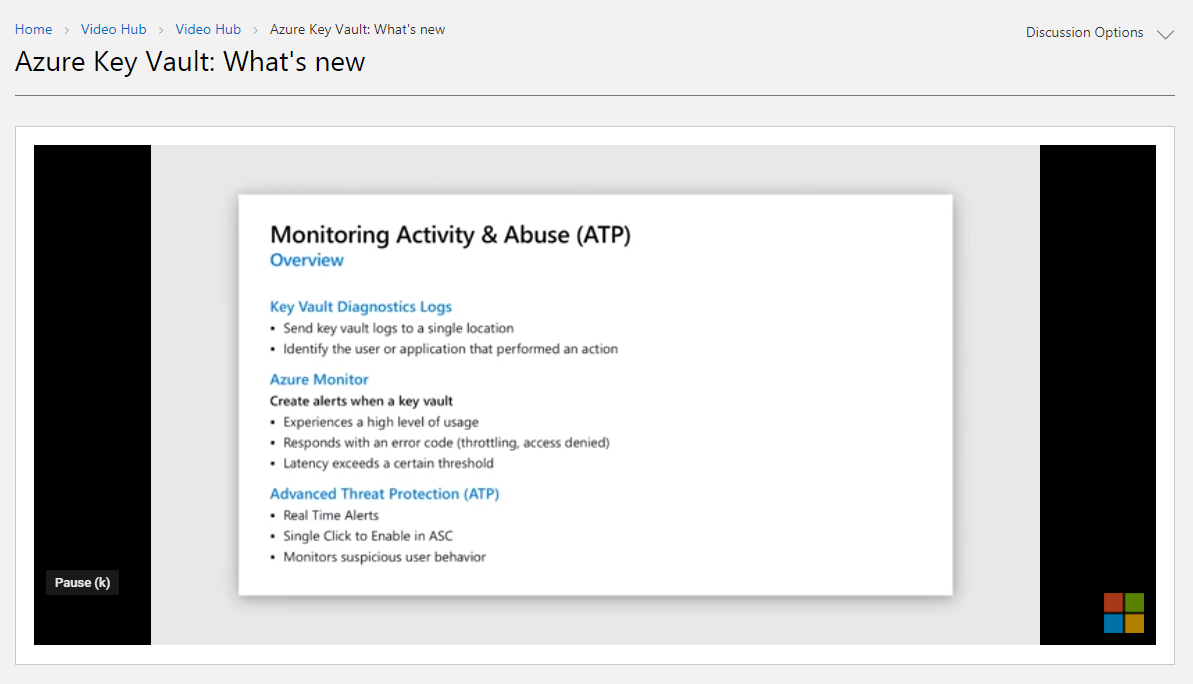
Customers are using Azure Key Vault to store the most sensitive information in their Azure environment: keys, passwords, secrets and certificates for all of their Azure resources. By achieving this data, attackers may be able to perform lateral movement and breach other resources in the customers Azure environment.
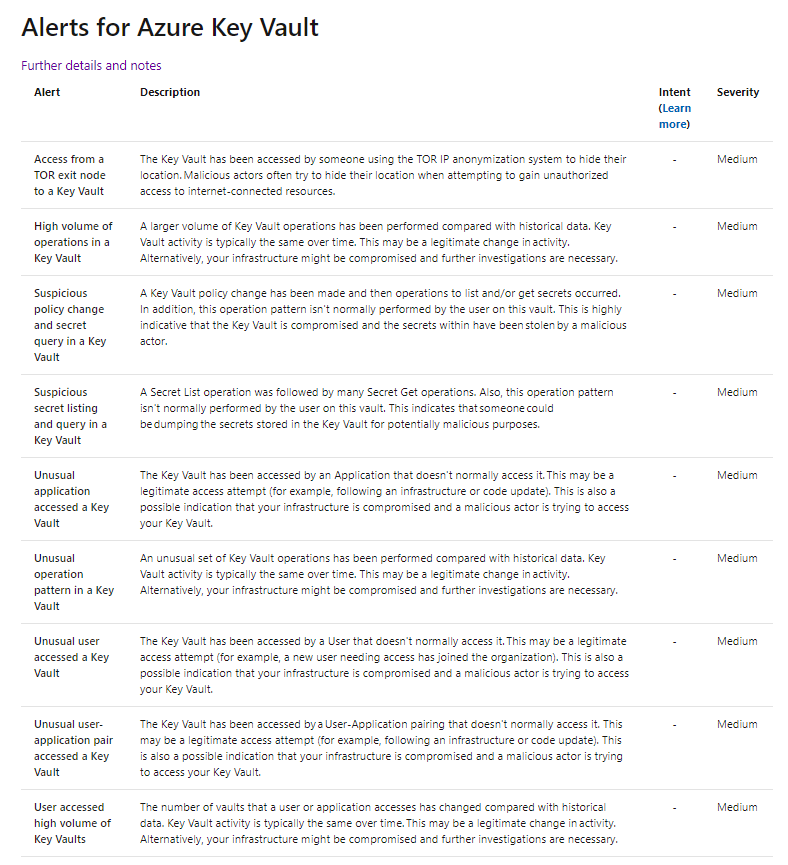
Azure Defender for Key Vault is a cloud-native, breadth threat protection suite – gives customers additional layer of protection for the precious secretes stored in the Key Vault by helping the SOC team to detect suspicious activities in their Key Vaults and protect the entire Azure environment.
How to Enable Azure Defender for Key Vault
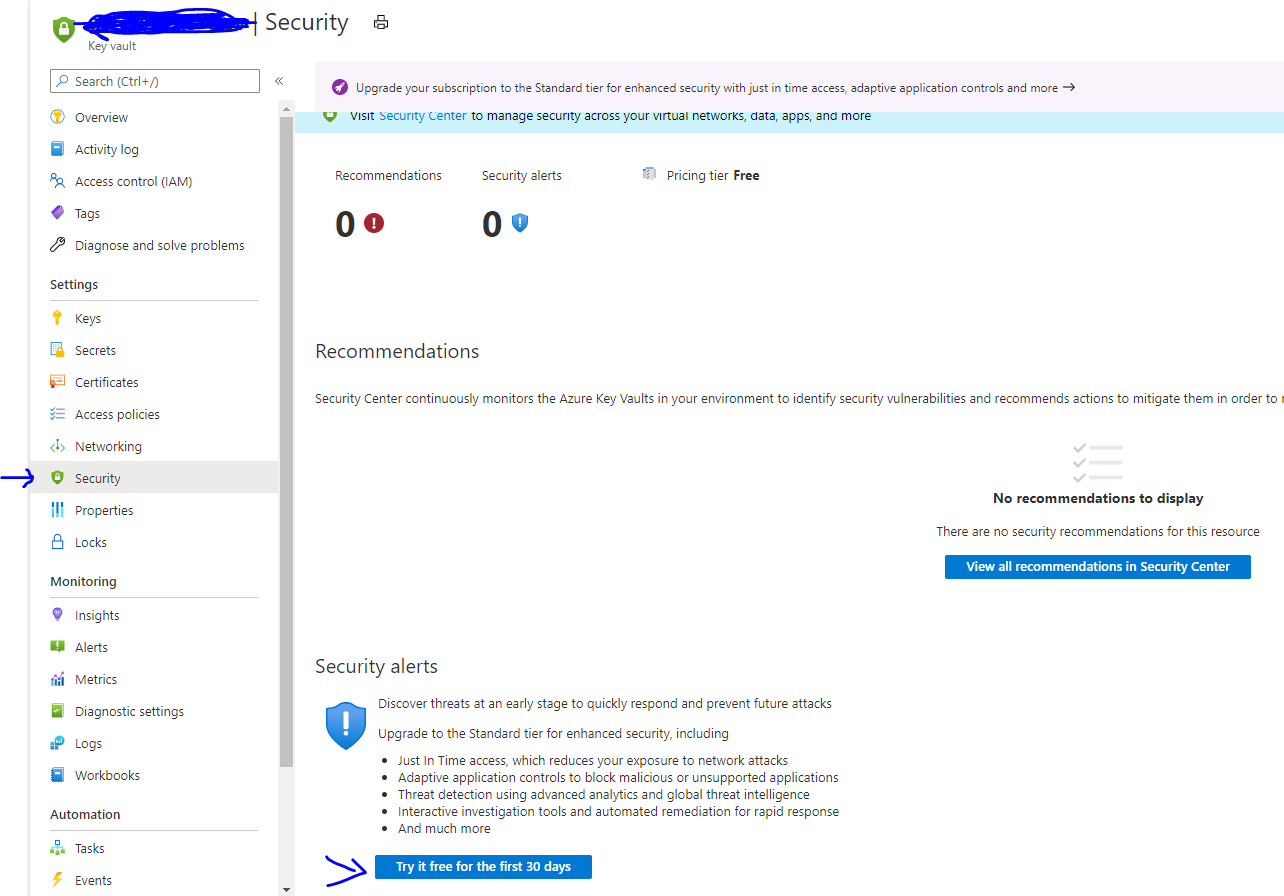
Enable it from Azure Key Vault
In Key Vault’s Security page, click “try it for the first 30 days”
From Security Center’s main menu, select Pricing & settings.
Select the subscription that you want to upgrade.
Select Azure Defender on to upgrade.
Select Save.
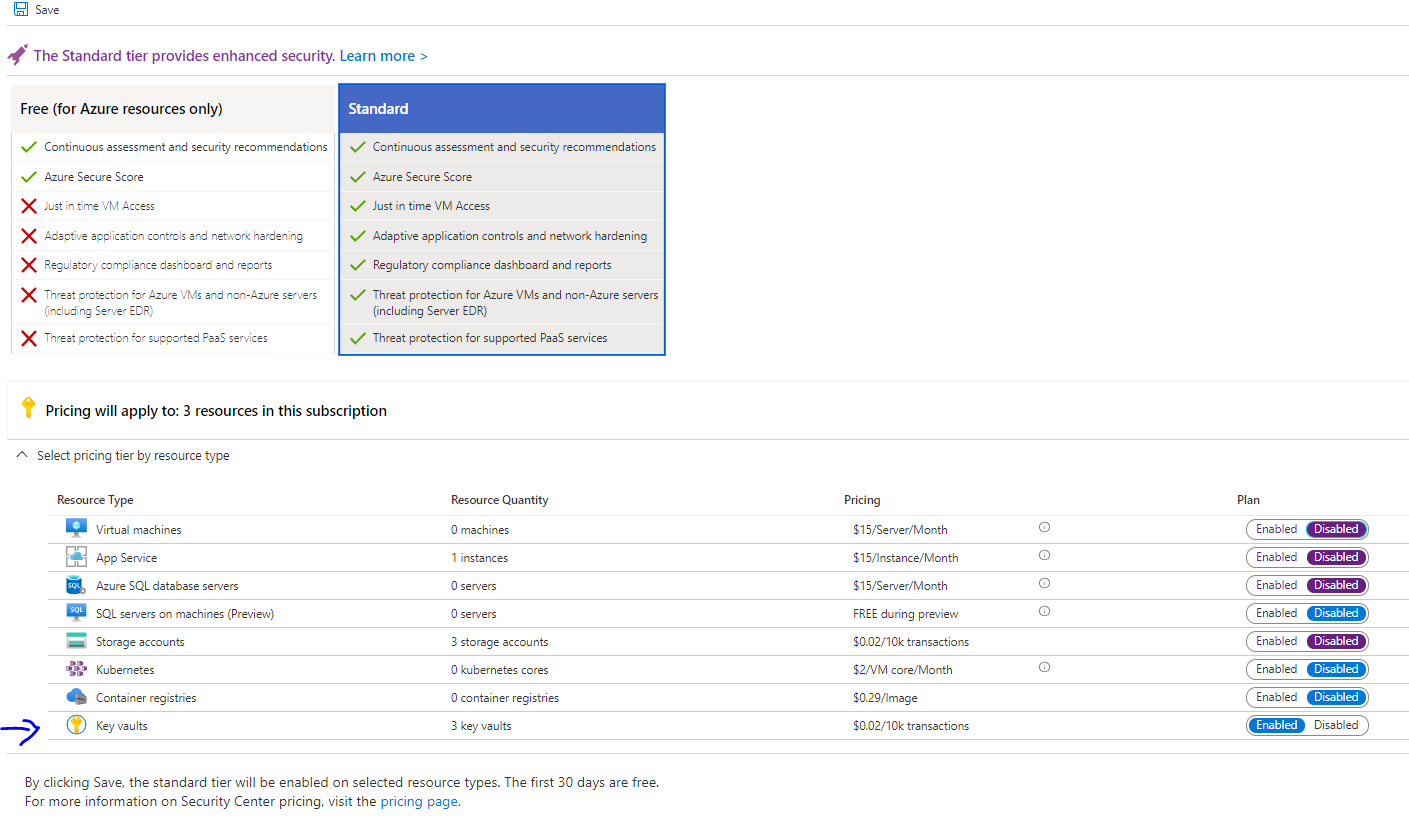
Below is the pricing page for an example subscription. You’ll notice that each plan in Azure Defender is priced separately and can be individually set to on or off. Make sure it is on for Azure Key Vault.
]]>
As the service owner, I am super excited to share that Azure Defender for Key Vault is now generally available! It is really One Microsoft experience to work closely with Azure Security Center and Azure Key Vault team to launch this service. Also personally, I grew up a lot after going through the Machine Learning algorithm improvement, infrastructure refactoring, BCDR and privacy policy compliance, cost reduce, monthly business review(MBR), customer feedback investigation. It is indeed a challenging and inspiring work to wake me up every day.
Azure Certifications and Examshttps://xinyeah.github.io/Azure-Certifications-and-Exams/2020-08-02T14:33:56.000Z2020-09-23T00:46:23.740ZAzure Certifications and Exams
Last month, I passed two Azure exams and earned the Azure Data Engineer Certification.
I take data engineer certificate as an example, to explain how to prepare and what the Azure certification exams look like.
Overview
Microsoft has made big changes to its Azure certifications at Ignite conference 2018. The new certifications are role-based, more practical and have a narrower focus for each certification.
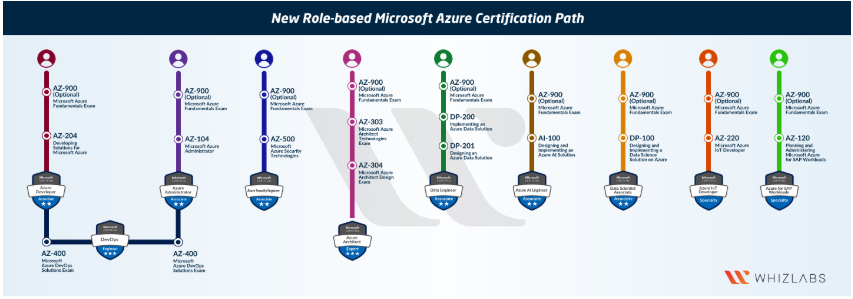
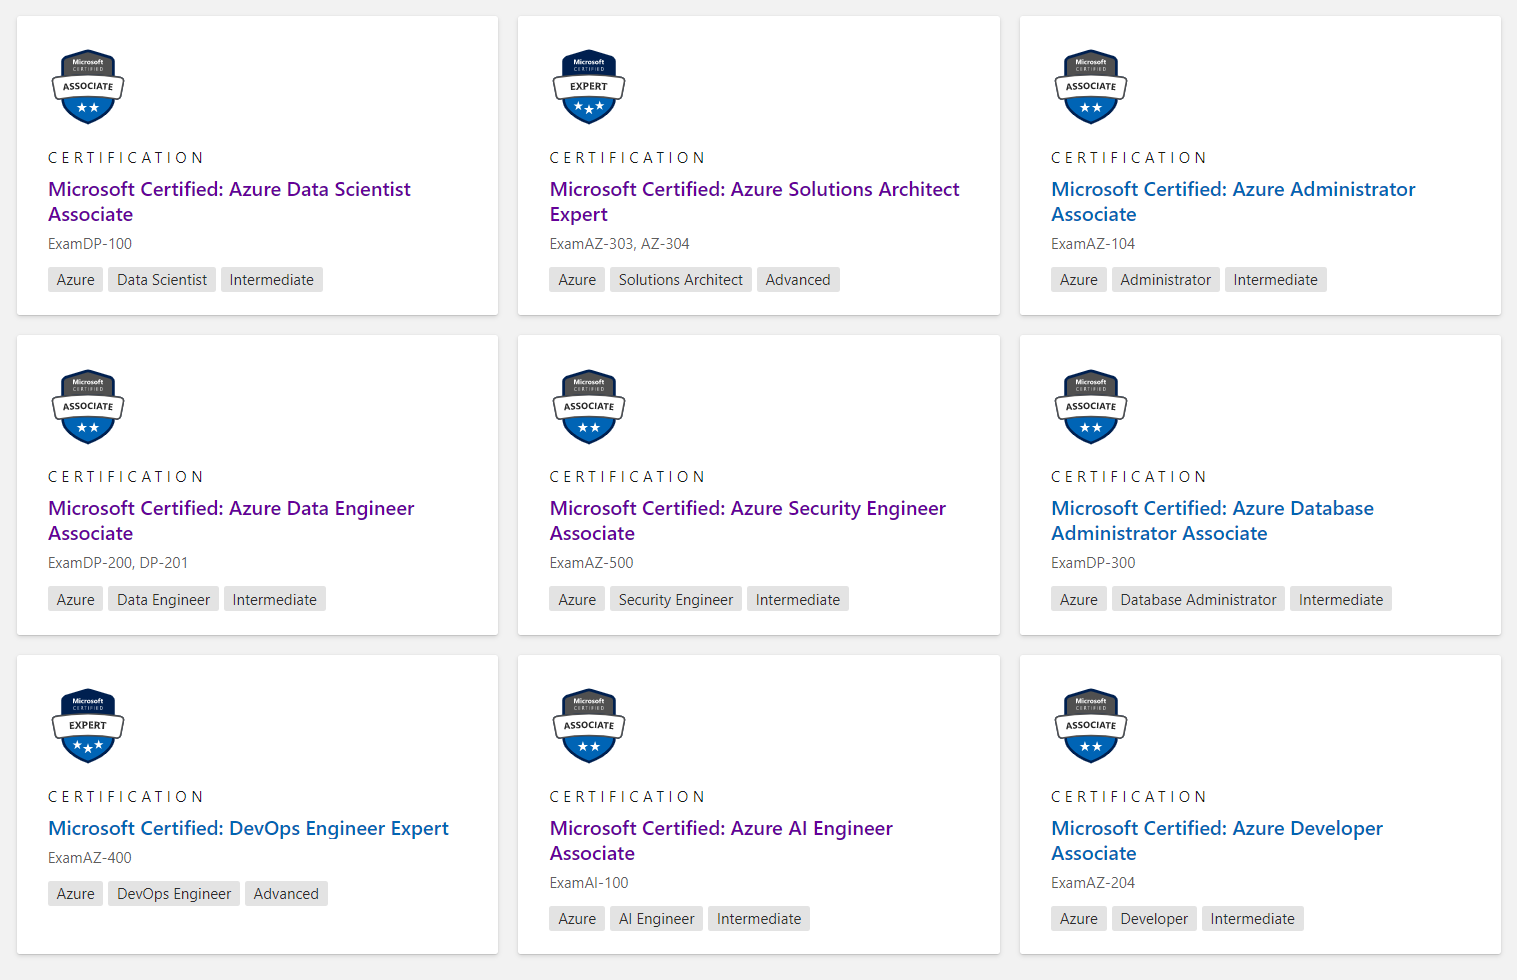
Currently, there are 9 role based azure certifications. To earn each certification, it is required to clear one or two certification exams. I list the current certifications and also the required exams in the following:
Associate
Data Engineer (DP-200, DP-201)
Data Scientist (DP-100)
Administrator (AZ-104)
Security Engineer (AZ-500)
Database Administrator (DP-300)
AI Engineer (AI-100)
Developer (AZ-204)
Expert
Solution Architect (AZ-303, AZ-304)
DevOps Engineer (AZ-400)
Which certification is right for me?
Should you go with AWS, Azure, or Google Cloud? Whether you are looking to move into a high paying cloud career or just looking to declare your existing cloud skills, Azure certifications are a great choice. Besides all the benefits that will bring to your career, all the Azure certs can be obtained remotely, which is awesome when working from home to fight against COVID-19.
Once you decided which cloud provider path is right for you, your next step is to figure out which certification path is right for you. From my experience, since Microsoft’s Azure certifications are role-based, it is better to select the job title and also go through the skills measured for each certification.
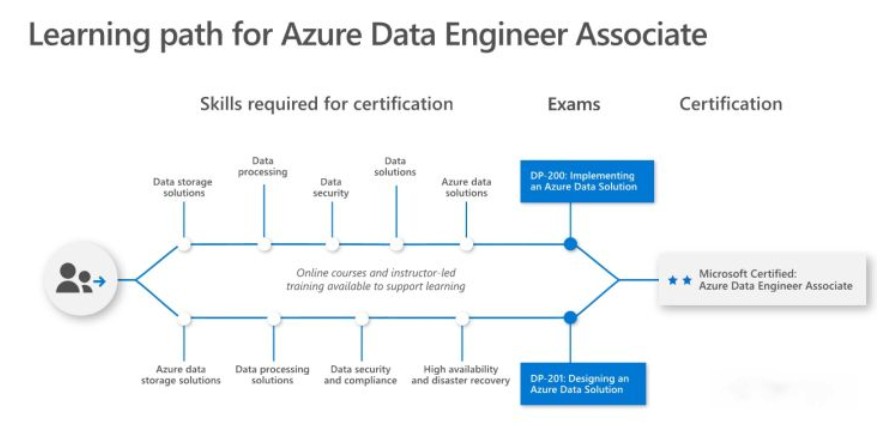
Certification Learning Path
Data Engineer Certification: validates the skills and knowledge to design and implement the management, monitoring, security, and privacy of data using the full stack of Azure data services to satisfy business needs.
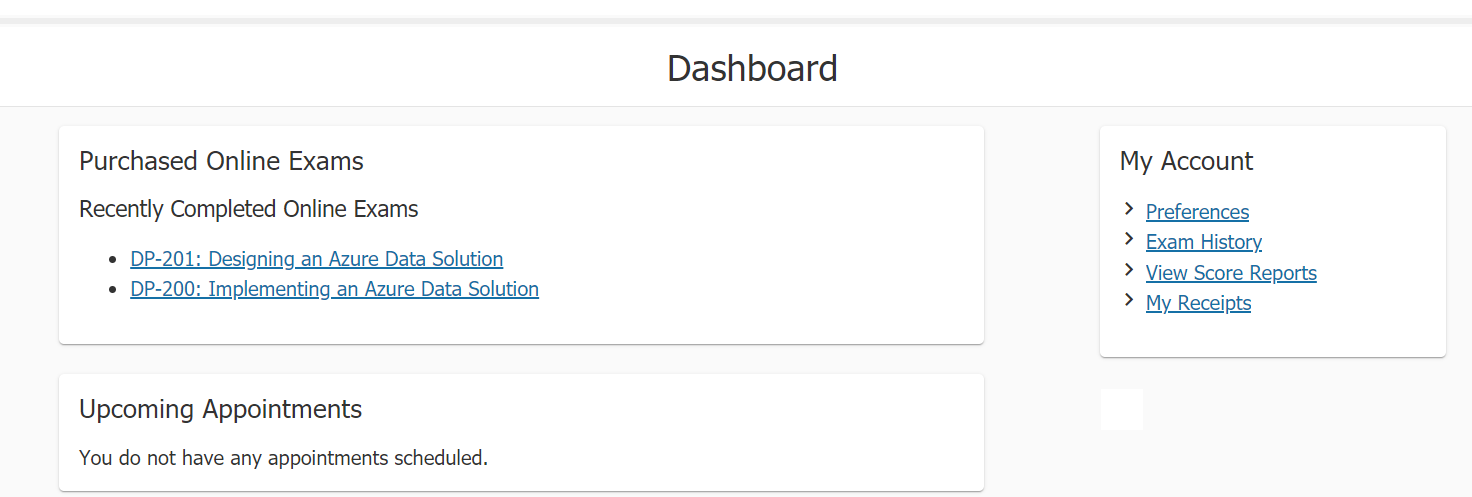
What the Azure certification online exams look like?
All the exams are held by Pearson VUE, the exam appointments appear on the dashboard after registration.
All Azure role based certifications can be taken online, but there are extra policies need to be follow.
Before the exam:
Perform a system test
prepare 2 Government issued personal ID
prepare your phone for identity verification and room scans. Also the exam proctor might contact you if there is an issue during the exam. Make sure your mobile phone is outside of the immediate testing space, but within extended arms reach with the screen visible.
prepare a work area:
Additional monitors (must be unplugged and turned away from you)
Additional computers (must be turned off and monitors must be dark)
clear of all materials, including the following items that are not allowed within arm’s reach: books, notepads, Post-it notes, typed notes/papers, or writing instruments such as pens, markers, whiteboards, or pencils.
Start the exam:
log in 15 minutes early to start the check-in process.
Choose Start a previously scheduled online proctored exam on dashboard.
Select the exam under Purchased Online Exams.
Select Begin exam and proceed through the self-check-in process and wait for a proctor to connect with you.
During the exam:
No breaks/eating/drinking
No personal belongings
No exam assistance
use facial comparison technology to verify identity during the testing process
the proctor will continuously monitor you by video and audio, and your face, voice, the physical room where you are seated, and the location during exam delivery will be recorded.
After exam:
when your exam ends, you should see your exam results(pass or fail) immediately before exiting the exam app.
Also your sore report will be available on dashboard after several hours.
You will receive an email about claiming your exams and certifications. Click the link to claim on cclaim, and then you can share your earned badge anywhere.
Reschedule policy: at least 6 business days prior to your appointment. 12.5% reschedule fee.
Cancelation policy: at least 24 hours prior to your appointment.
Exam question types
The exam may contain several question types: active screen, best answer, build list, case studies, drag and drop, hot area, multiple choice, repeated answer choices, short answer, labs, mark review, and review screen.
For security reason, exam formats or exact question types are not identified before the exam. You can view all question samples here to prepare the exam.
]]>
Congratulations to myself! I just hit my July goal and am now a certified Azure Data Engineer! Do you also want to snag some cloud certifications? Excellent! You've come to the right place!
Spark stateful streaming processing is stuck in StateStoreSave stage!https://xinyeah.github.io/Spark-stateful-streaming-processing-is-stuck-in-StateStoreSave-stage/2020-07-07T20:46:59.000Z2020-09-23T00:46:23.740ZSpark stateful streaming processing is stuck in StateStoreSave stage!
A stateful structured stream processing job is suddenly stuck at the 1st micro-batch job. Here are the notes about that issue, how to debug Spark stateful streaming job, and also how I fix it.
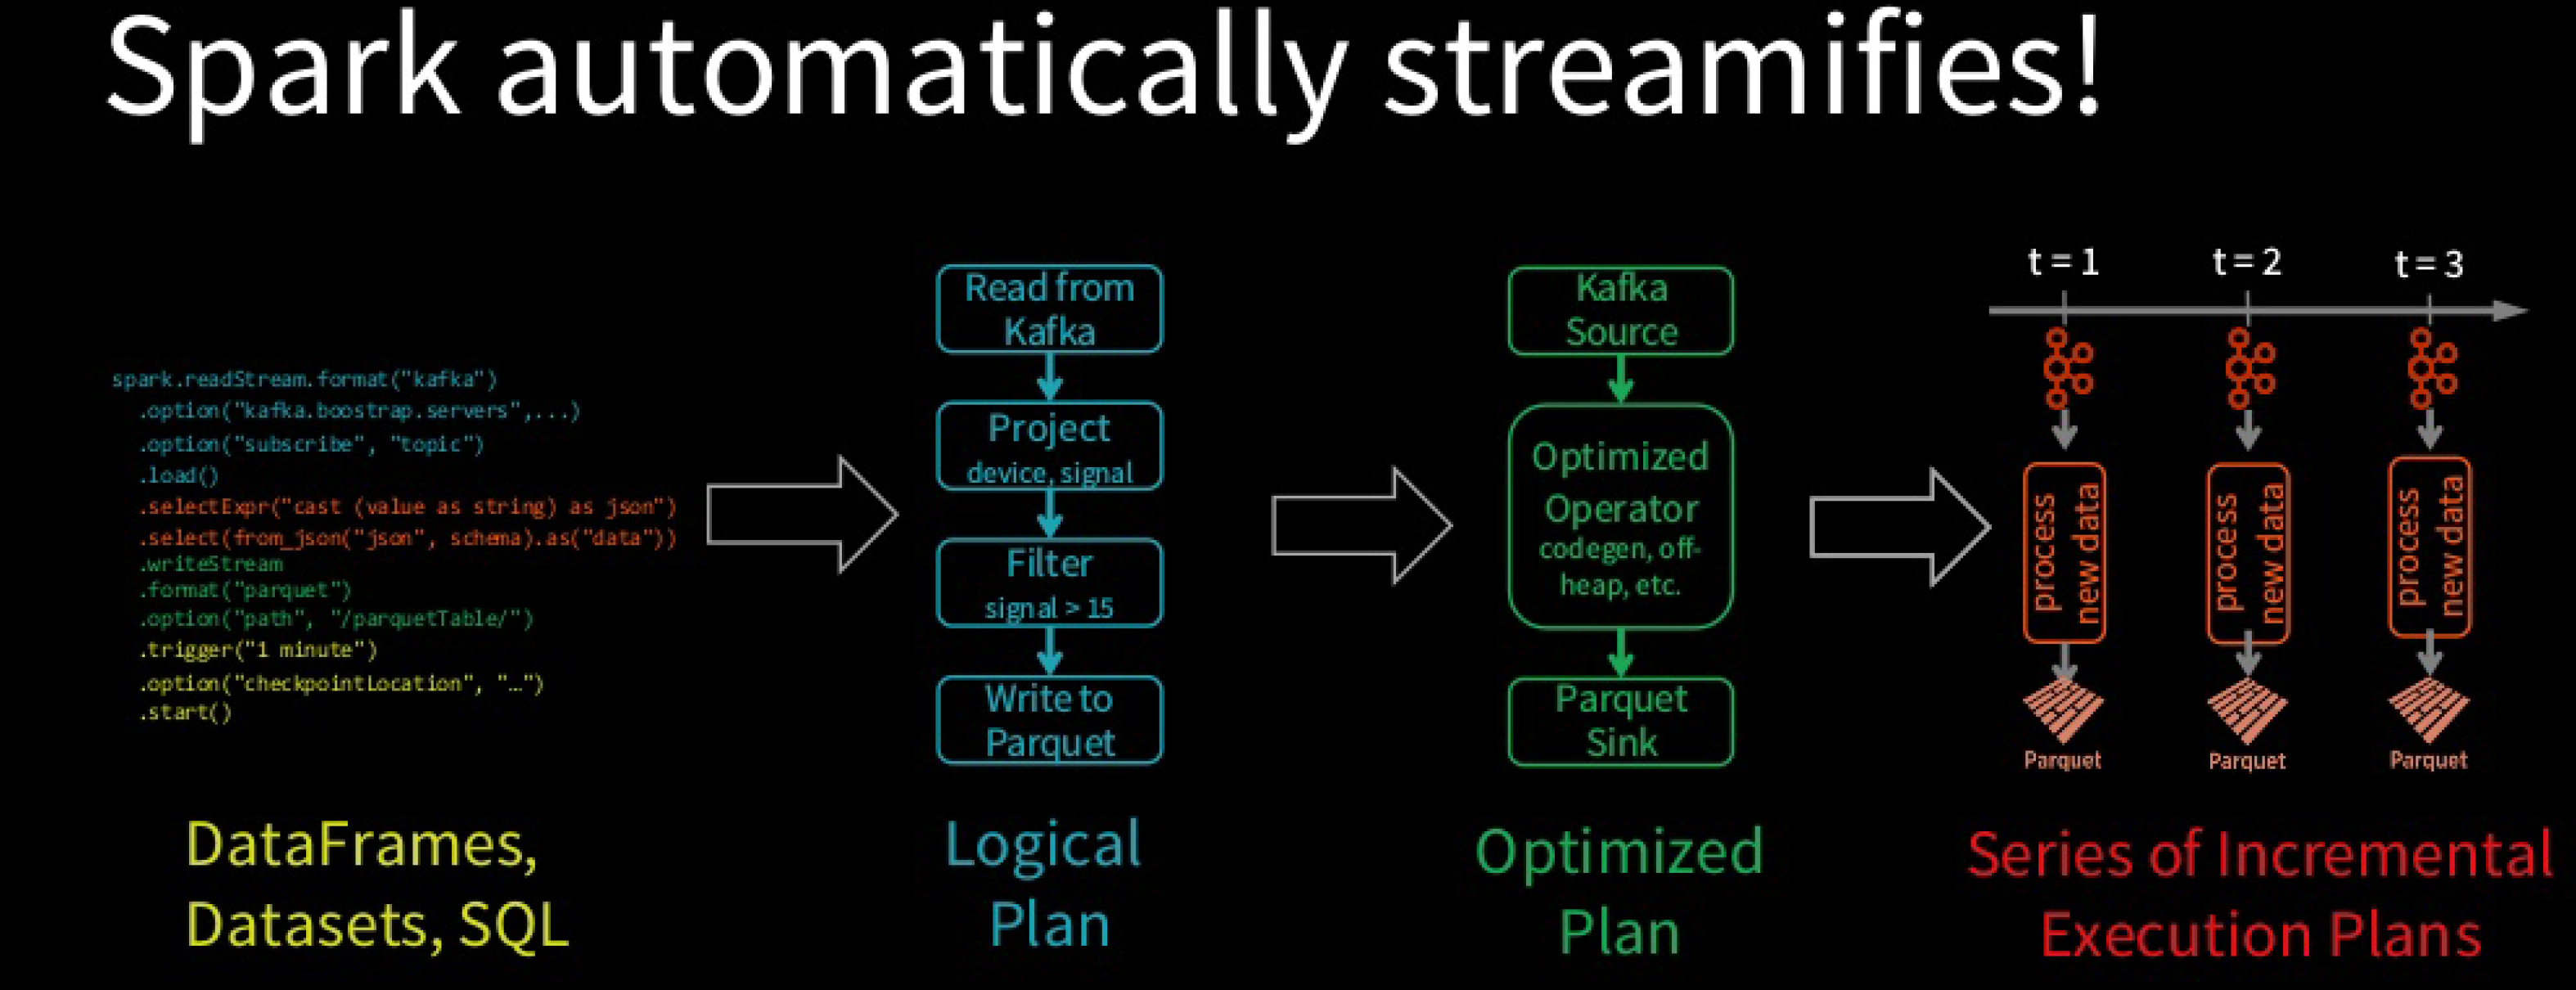
 ## specify data source, read data from Azure Event Hub
(spark.readStream.format("eventhubs")
 .options(**self.config.ehConfig)
 .load()
 ## use watermark to control state size
 .withWatermark(processTimeCol, waterMarkTime)
 ## transformations.
 .withColumn(eventTimeCol, col(eventTimeCol).cast('timestamp'))
 ## aggregation by event time windows
 .groupBy(col(key), window(eventTimeCol, "15 mins"))
 .agg()
 ...
 .select(*(cols+['windowStart', 'firstEventTime', 'lastEventTime', 'count']))
 ## specify data sink, write transformed output to Azure blob storage
 .writeStream
 .format("parquet")
 .option('path', outputPath)
 .outputMode("append")
 ## Processing details--Trigger: when to process data
 .trigger(processingTime="2 seconds")
 ## Processing details--Checkpoint: for tracking the progress of the query
 .option("checkpointLocation", checkpointPath)
 .start())
Spark SQL converts batch-like query to a series of incremental execution plans operating on new micro-batches of data.
Environment
This Streaming job is running on Databricks clusters triggered by Azure Data Factory pipeline.
Data source is from Azure Event Hub, and this job store the aggregated output to Azure Blob Storage mounted on Databricks.
Databricks instance has Vnet injections and have NSG associated with the Vnet.
Databricks cluster version is 5.5 LTS which use Scala 2.11, Spark 2.4.3 and Python 3.
We also use PySpark 2.4.4 for this streaming job.
Issue Symptom
This streaming job is scheduled to run for 4 hours every time. When the current job stops, the next one will start to run. It means the max number of concurrency job is 1.
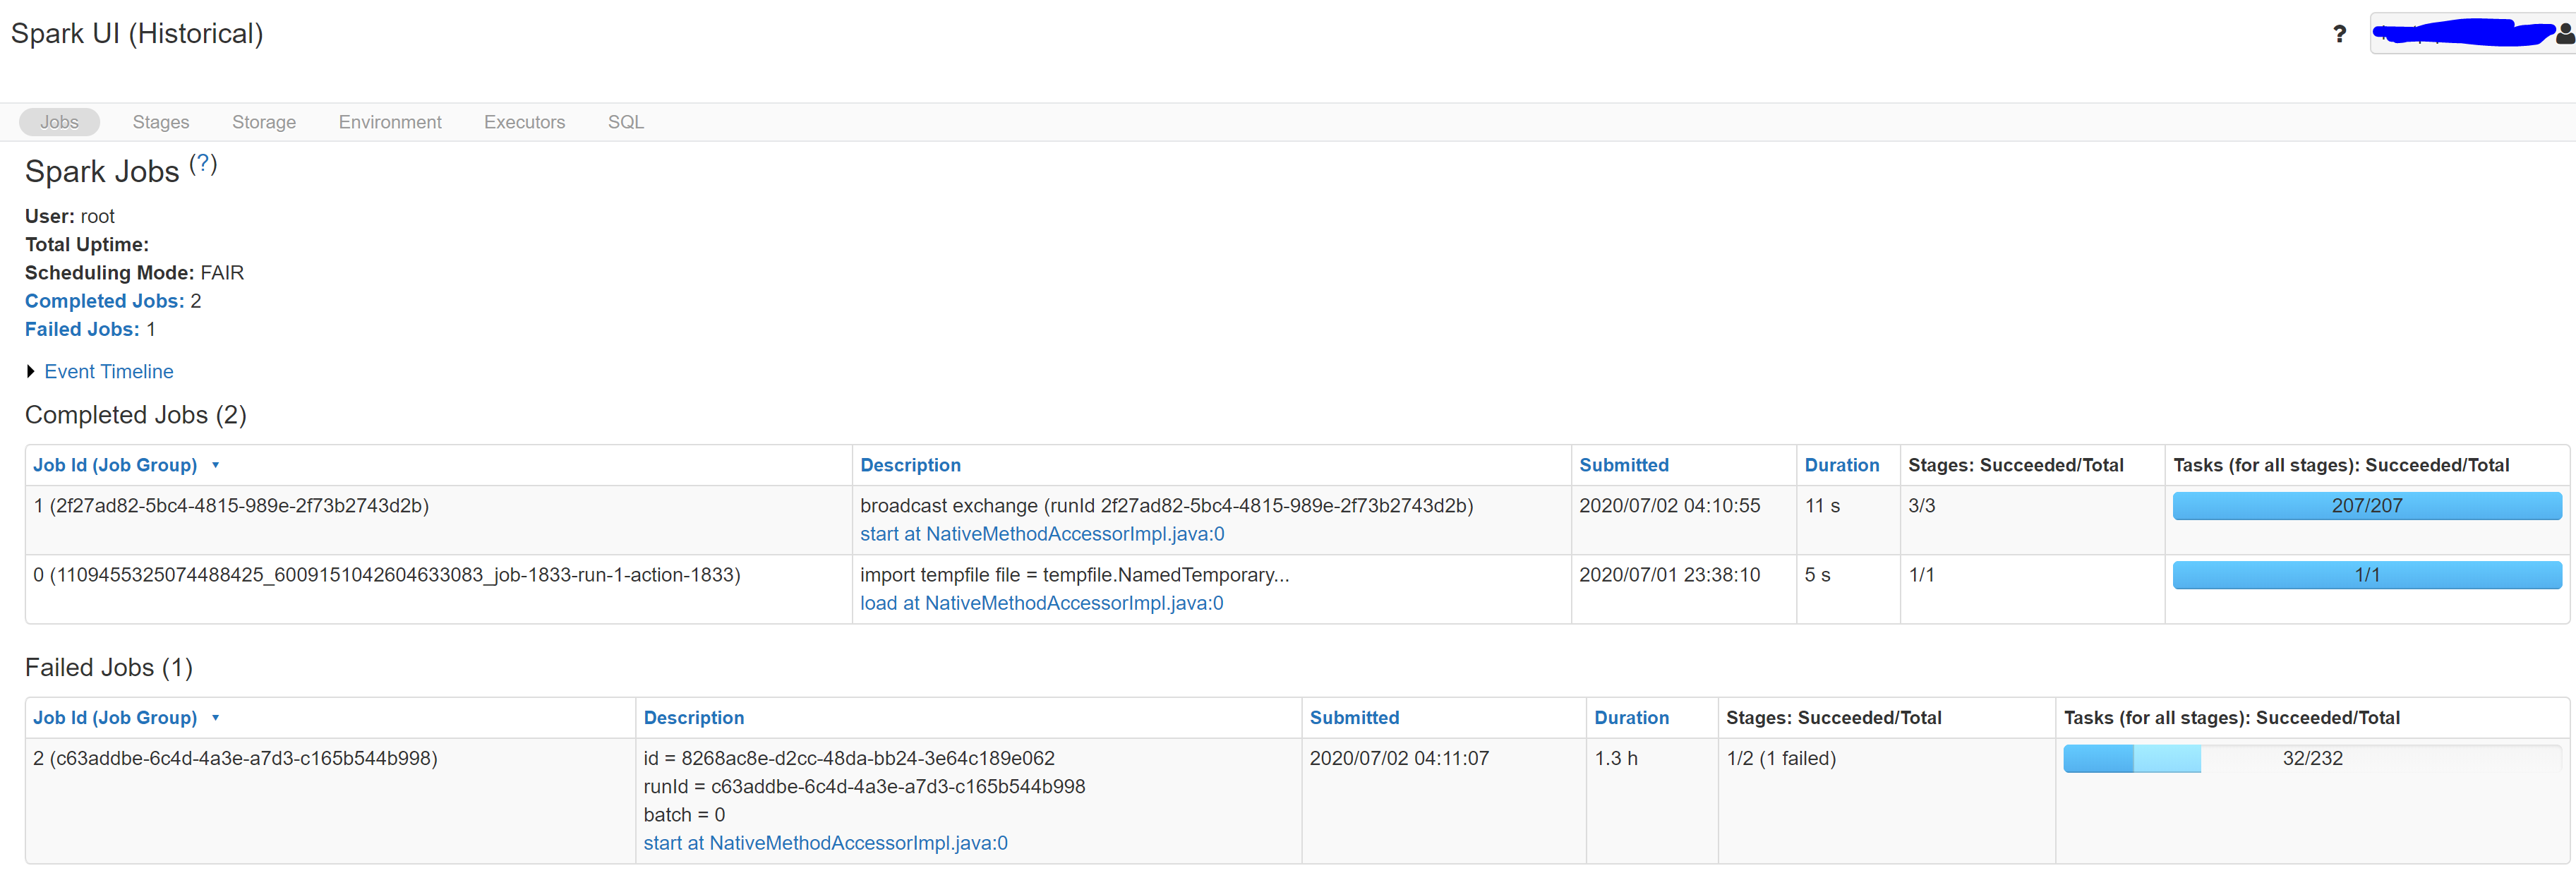
It was running well before. Suddenly, when a new streaming job starts, it seems to stuck at the 1st micro-batch like the following picture. You can see the job is stuck for batch=0 and it fails because of time out.
We have 3 regions and this issue happened to every region one by one in a week.
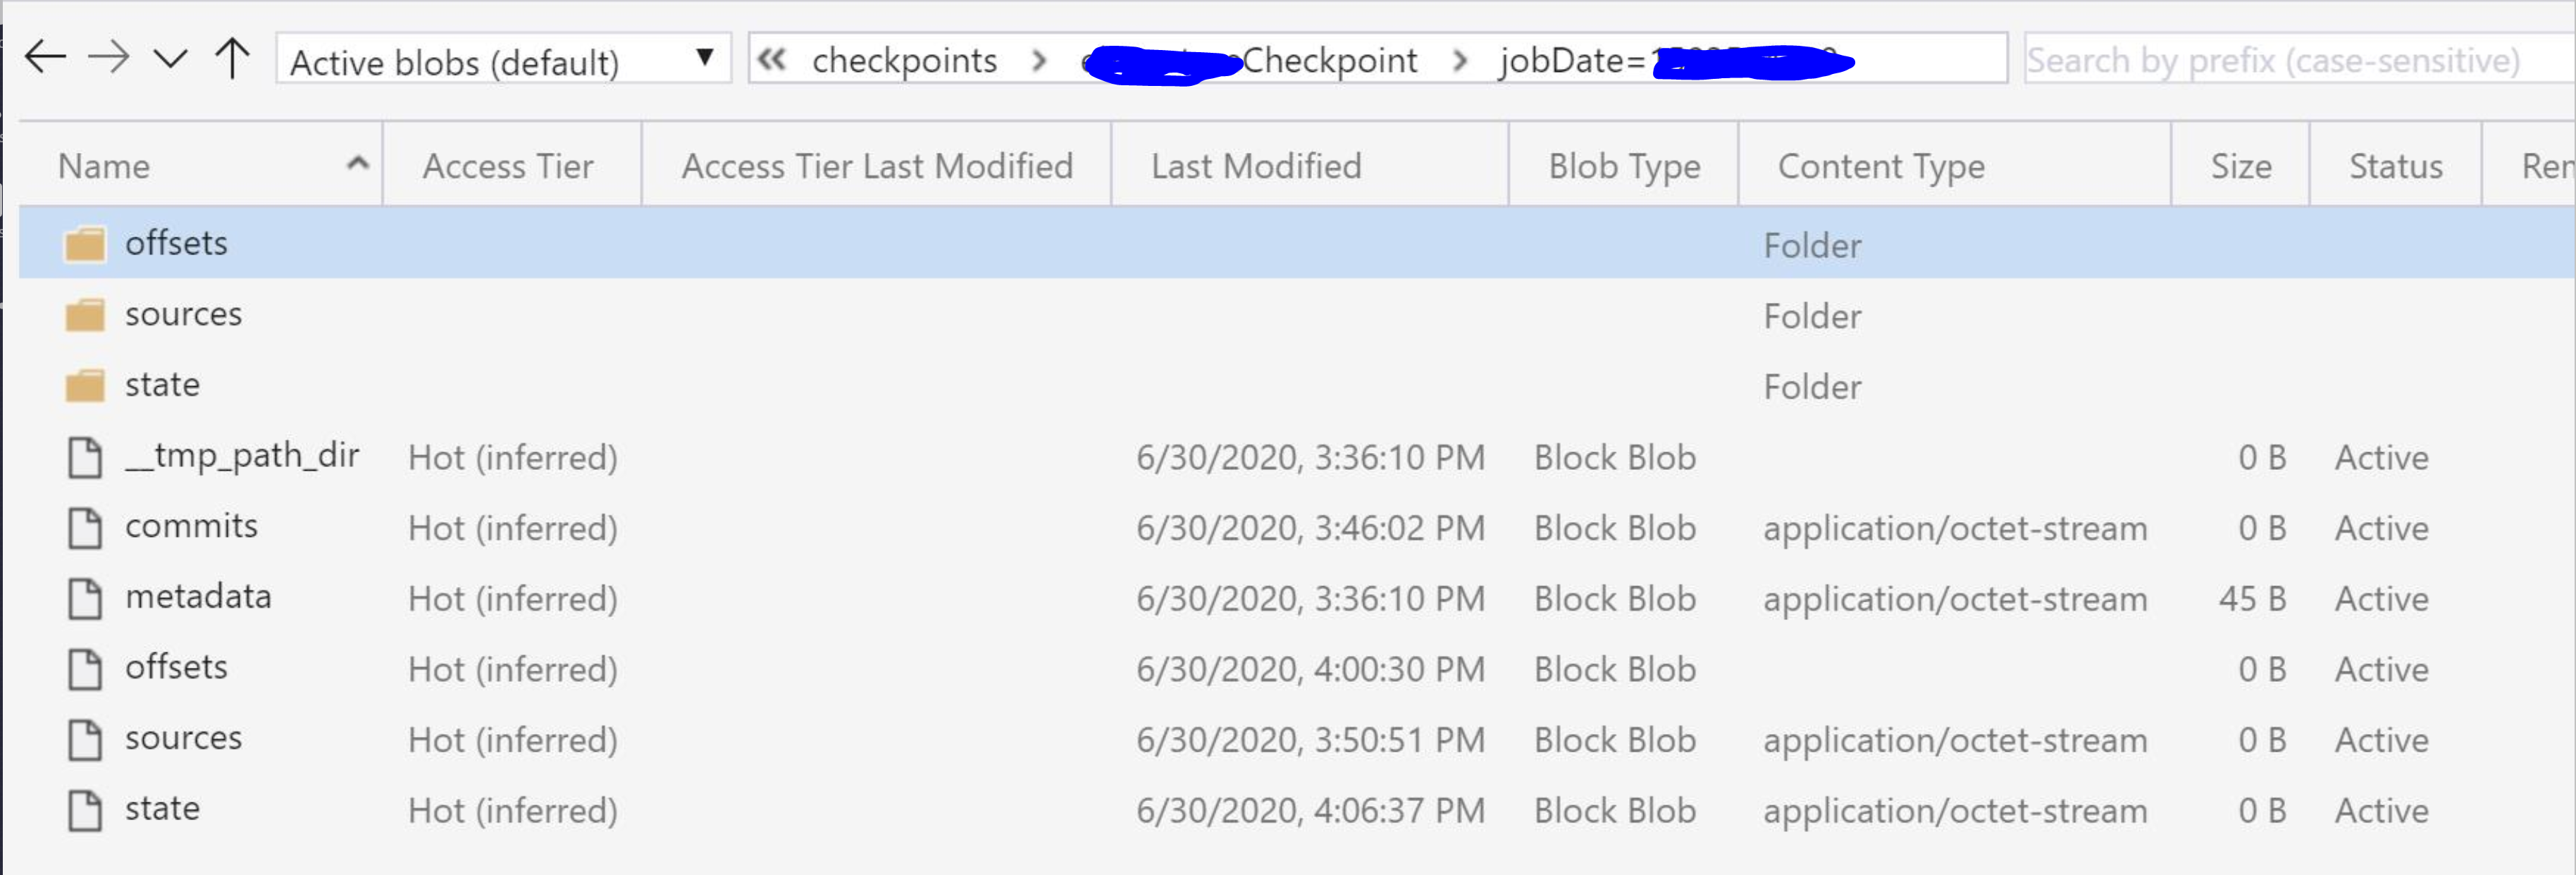
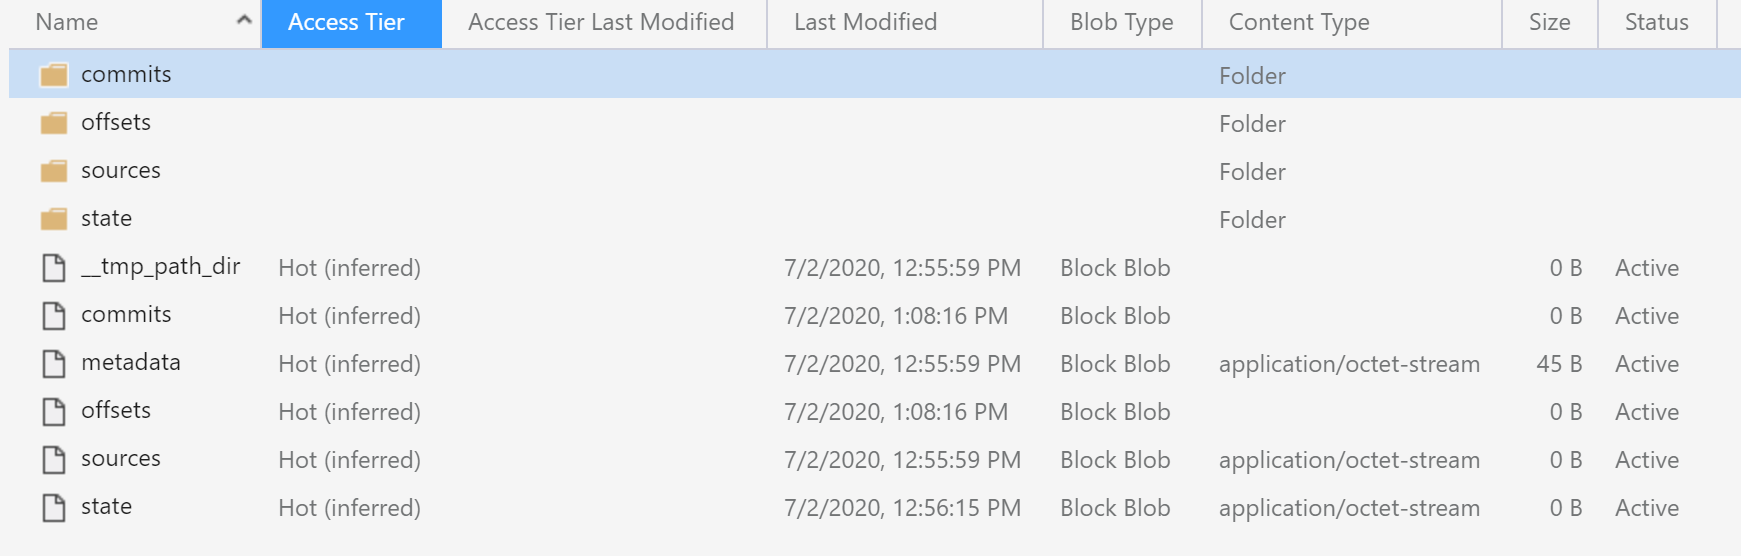
If you check the checkpoint folder:
compare with the normal checkpoint:
The difference is obvious: there is no commits in the checkpoint path. It means the streaming job didn’t succeed in processing even a single micro-batch.
Possible Causes
It is really tough to debug this issue because no error message shown up and just several misleading warning messages in the executor’s error logs.
Usually, there are several possible reasons to cause streaming processing job stuck, such as:
Total size of state per worker is too large which leads to higher overheads of snapshotting and JVM GC pauses.
Number of shuffle partitions is too high, so the cost of writing state to HDFS will increase which cause the higher latency.
NSG rules added to Databricks Vnet might block some ports and thus infect worker to worker communication.
Databricks mounted blobs are expired and need to rotate the storage connection string and databricks access token.
Databricks cluster version is deprecated and not supported any more.
Spark .metadata directory is messed up. We need to delete the metadata and let the pipeline recreate a new one. but for this one, it would complete micro-batch, and it just do nothing in the process.
But none of them work this time. We struggle to figure out the root cause is:
Azure blob storage has too many files in the checkpoint folder which slow down the read and write speed.
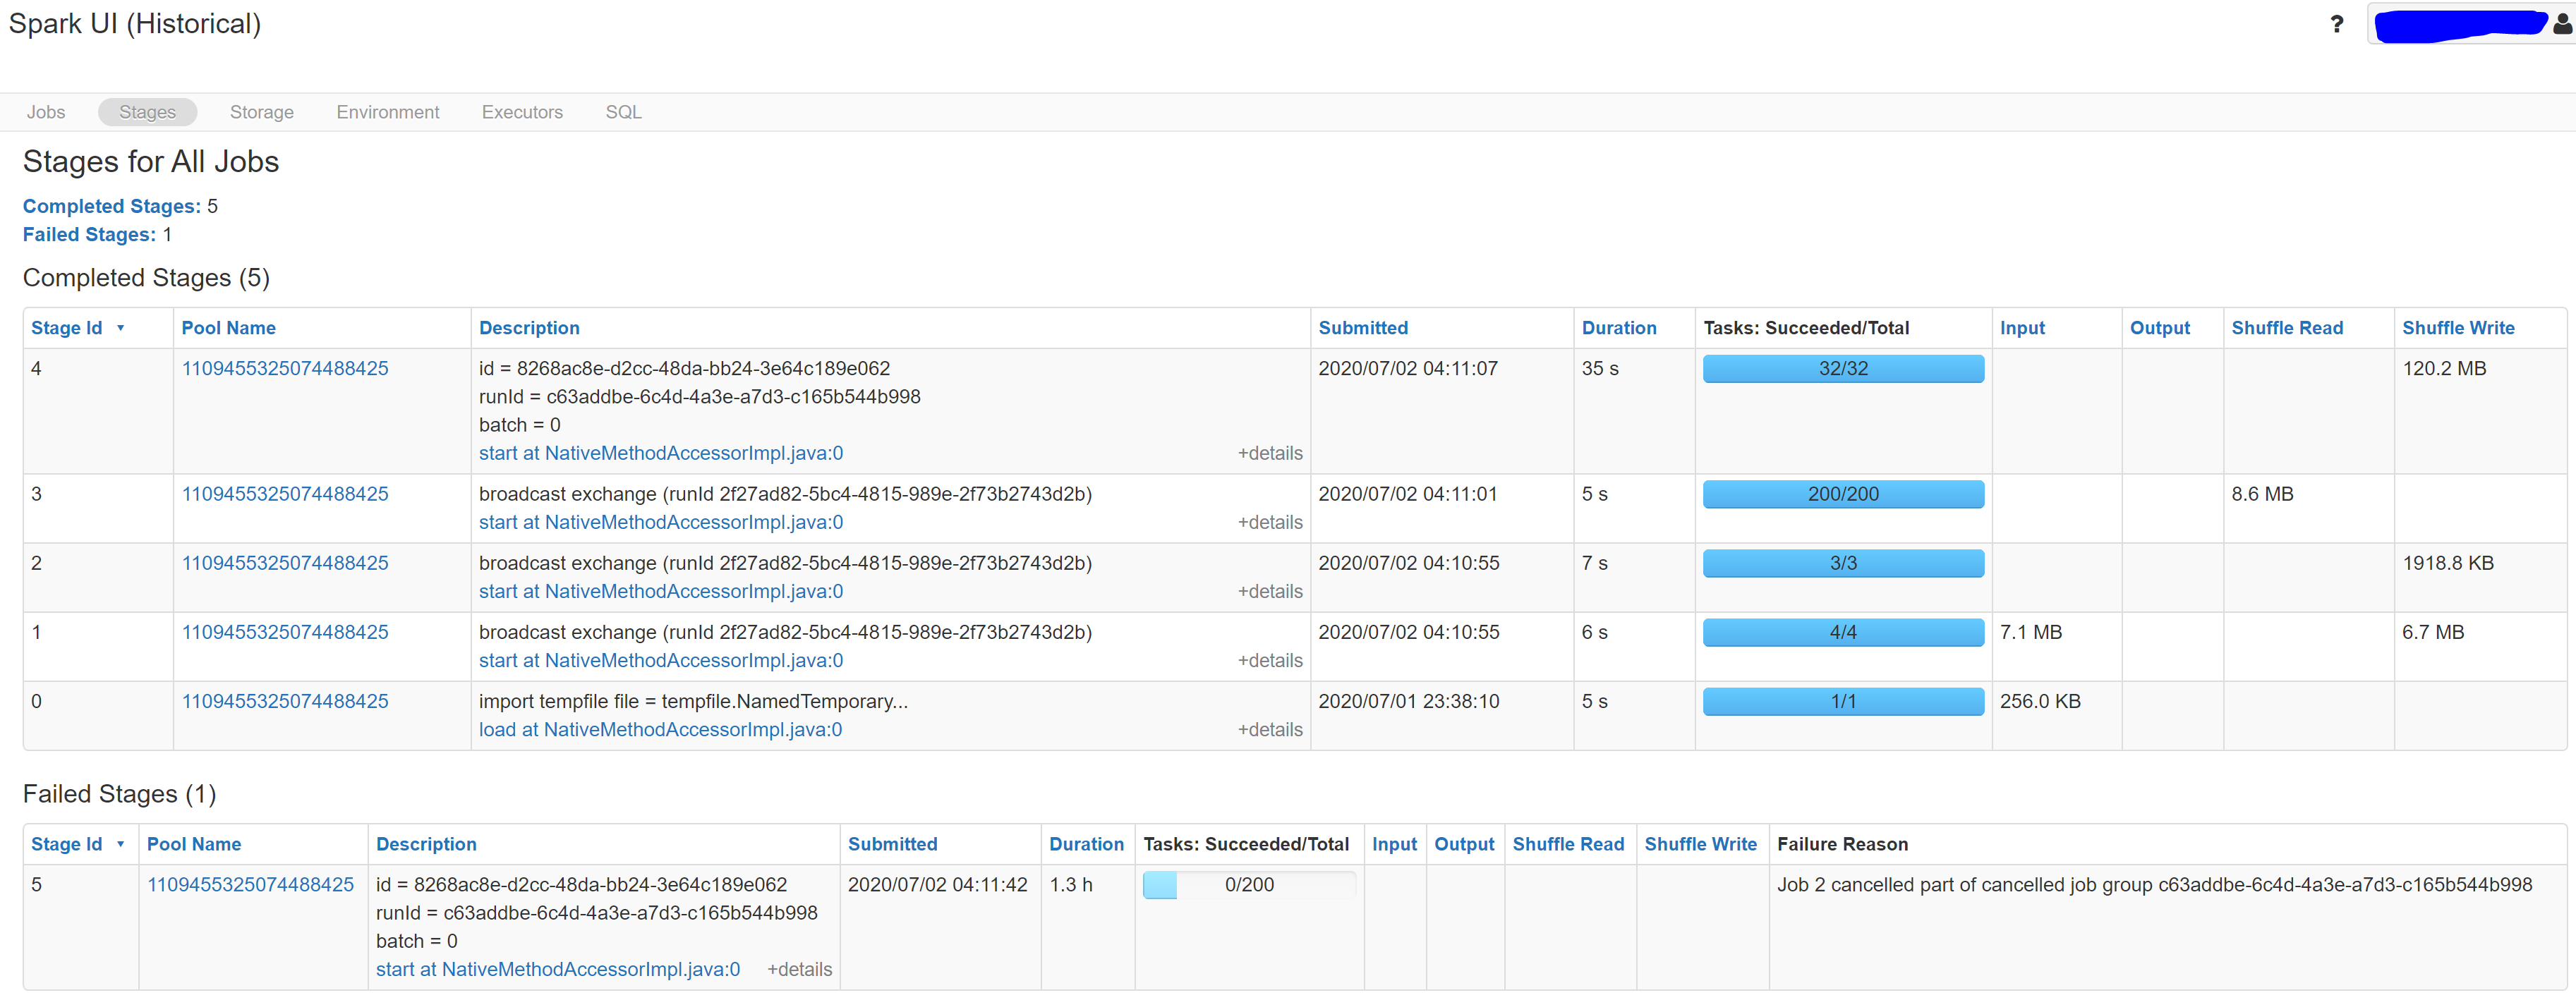
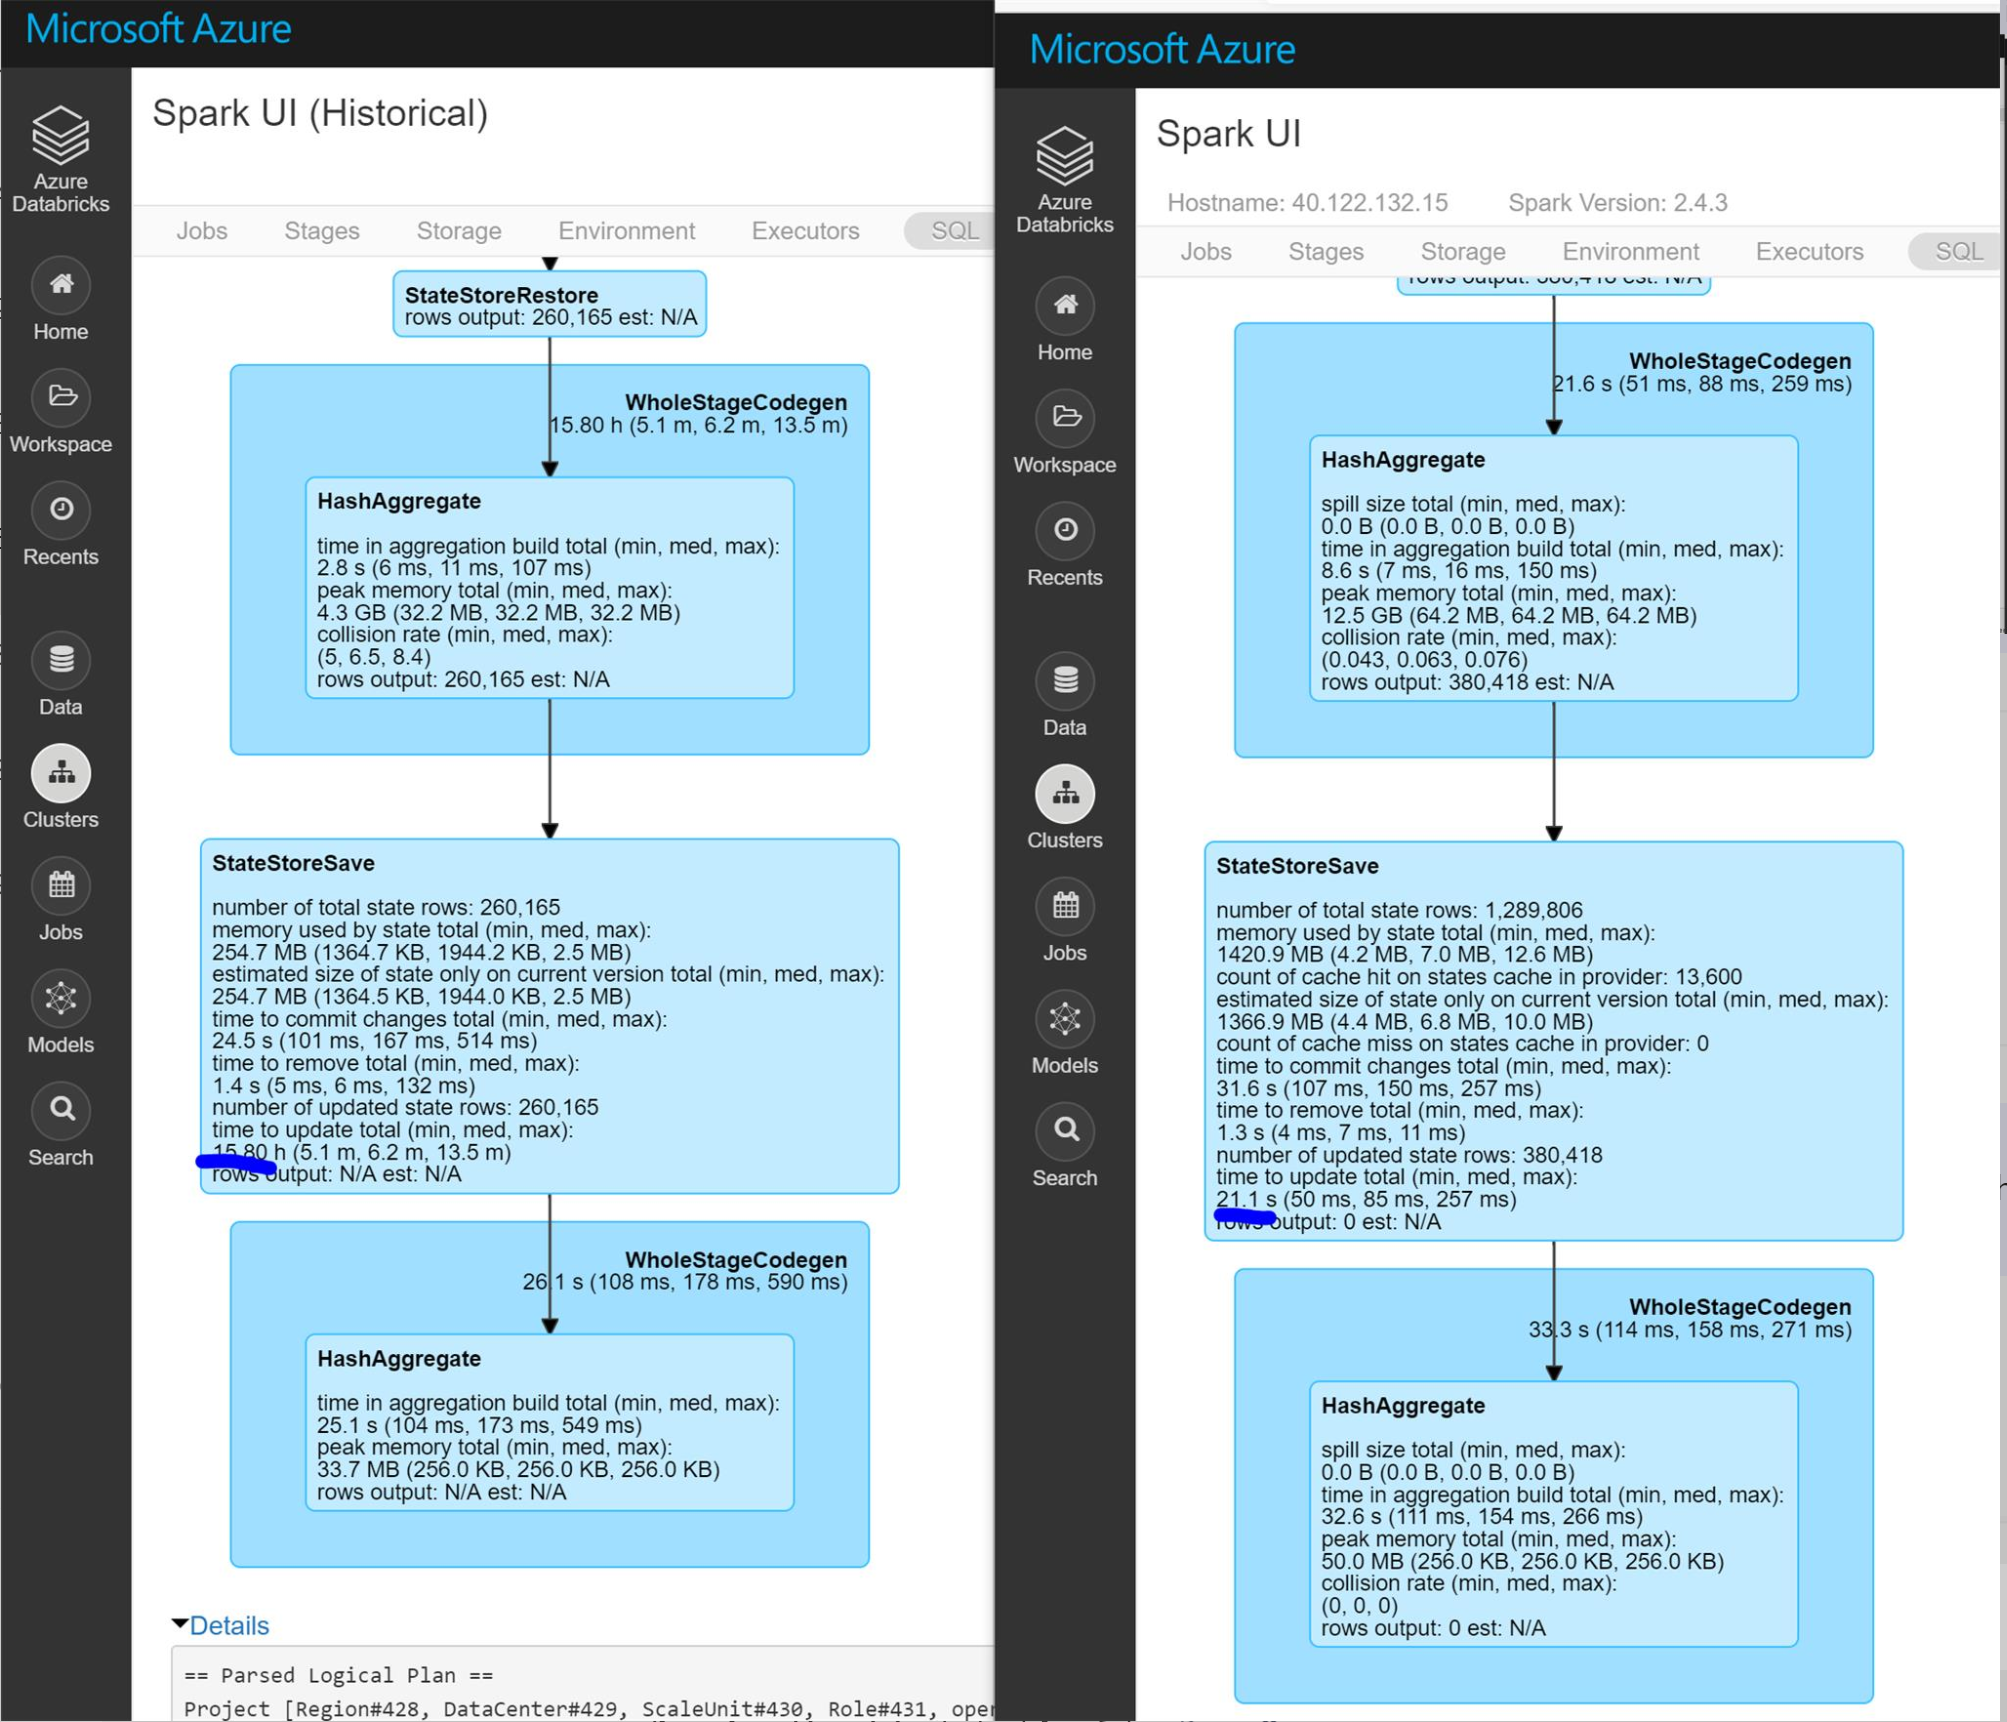
I compare the DAG visualization with normal job’s, it is shown that the StateStoreSave stage takes much longer (16 hours) than the normal one (21 seconds). StateStoreSave is the stage when spark store current streaming process status in checkpoint. Thus the issue exists in checkpoints. More info for StateStoreSave can be found here
From this detailed stage information, we can get:
number of total state rows is not the concern. we cannot solve the issue by reduce the watermark threshold or recreate checkpoint.
memory used by state total is lower than the normal state. so it is not a JVM GC pause issue.
time to update total is the pain point. It takes longer even the number of updated state rows is less, which point the issue to the write speed in blob storage.
In the checkpoint folder, we stored around 17 million checkpoints for each region. After I delete the whole checkpoint folder and restart the streaming job, the issue is fixed. I am not 100% sure about the reason for it. One possible reason for it is Azure blob storage doesn’t support hierarchical namespace, and it just mimic hierarchical directory structure by using slashes in the name.
Solutions
Solution 1 - migrate Azure blob storage to Azure Data Lake Gen2 which supports hierarchical namespace.
Solution 2 - delete checkpoint folder and decrease retention period.
Step1: Stop current streaming job
Step2: Delete .metadata directory and checkpoint folder
Step3: Add a failover mechanism so that the streaming job will resume from where the streaming job stopped in the last successful data persistence.
Here is my failover mechanism if no checkpoint found, so we can delete the checkpoint folder without losing state.
try:
       # if the checkpoint exists, continue to use it without refreshing
       config.dbutils.fs.ls(config.checkpointPath)
       print('Continue streaming job with checkpoint path, %s' %
             config.checkpointPath)
   except:
       # remove _spark_metadata folder when use a new checkpoint
       config.dbutils.fs.rm(config.outputPath + '_spark_metadata', True)
       print('removed _spark_metadata for last checkpoint')
       print('New streaming job checkpoint path is %s' %
             config.checkpointPath)
       # set the streaming start time to catch up from where the streaming job stoped in last data persistence
       timeKey = 'windowStart'
       try:
           ts = [int(p.path.split(timeKey + "=")[1][:-1])
                 for p in config.dbutils.fs.ls(config.outputPath) if timeKey in p.path]
           if ts:
               lookbackTs = int(dt.datetime.now().replace(minute=0, second=0, microsecond=0).timestamp()) - defualtLookbackTime
               # Set stream start time to the maximum of (15min aggregation output timestamp or one day back from current time)
               streamStartTime = np.max([np.max(ts), lookbackTs])
               # Add 15min to start time
               streamStartTime = dt.datetime.fromtimestamp(
                   streamStartTime) + dt.timedelta(minutes=15)
               streamStartTime = streamStartTime.strftime("%Y-%m-%dT%H:%M:%S.%fZ")
               # Create the positions
               startingEventPosition = {
                   "offset": None,
                   "seqNo": -1,
                   "enqueuedTime": streamStartTime,
                   "isInclusive": True
               }
               config.ehConfig["eventhubs.startingPosition"] = json.dumps(
                   startingEventPosition)
        except:
           pass
Step 4: restart the streaming job.
Step 5: Add retention policy to the checkpoint folder to decrease the checkpoints lifetime.
]]>
A stateful structured stream processing job is suddenly stuck at the 1st micro-batch job. Here are the notes about that issue, how to debug Spark stateful streaming job, and also how I fix it.
Databricks Migration Guidehttps://xinyeah.github.io/databricks-migration-guide/2020-06-24T22:18:09.000Z2020-09-23T00:46:23.740ZDatabricks migration steps
When you need to migrate an old Databricks to a new Databricks, all of the files, jobs, clusters, configurations and dependencies are supposed to move. It is time consuming and also easy to omit some parts. I document the detailed migration steps, and also write several scripts to automatically migrate folders, clusters and jobs. In this chapter, I will show you how to migrate Databricks.
Every time set up a profile, you need to provide the Databricks host url and the personal access token generated previously.
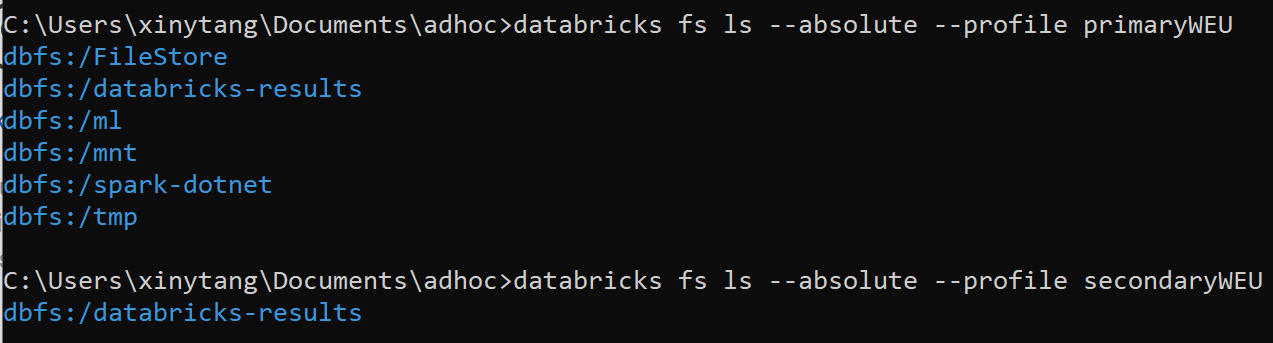
2.4 Validate the profile
1
2
databricks fs ls --absolute --profile primary databricks fs ls --absolute --profile secondary
Here is the DBFS root locations from [docs](https://docs.microsoft.com/en-us/azure/databricks/data/databricks-file-system)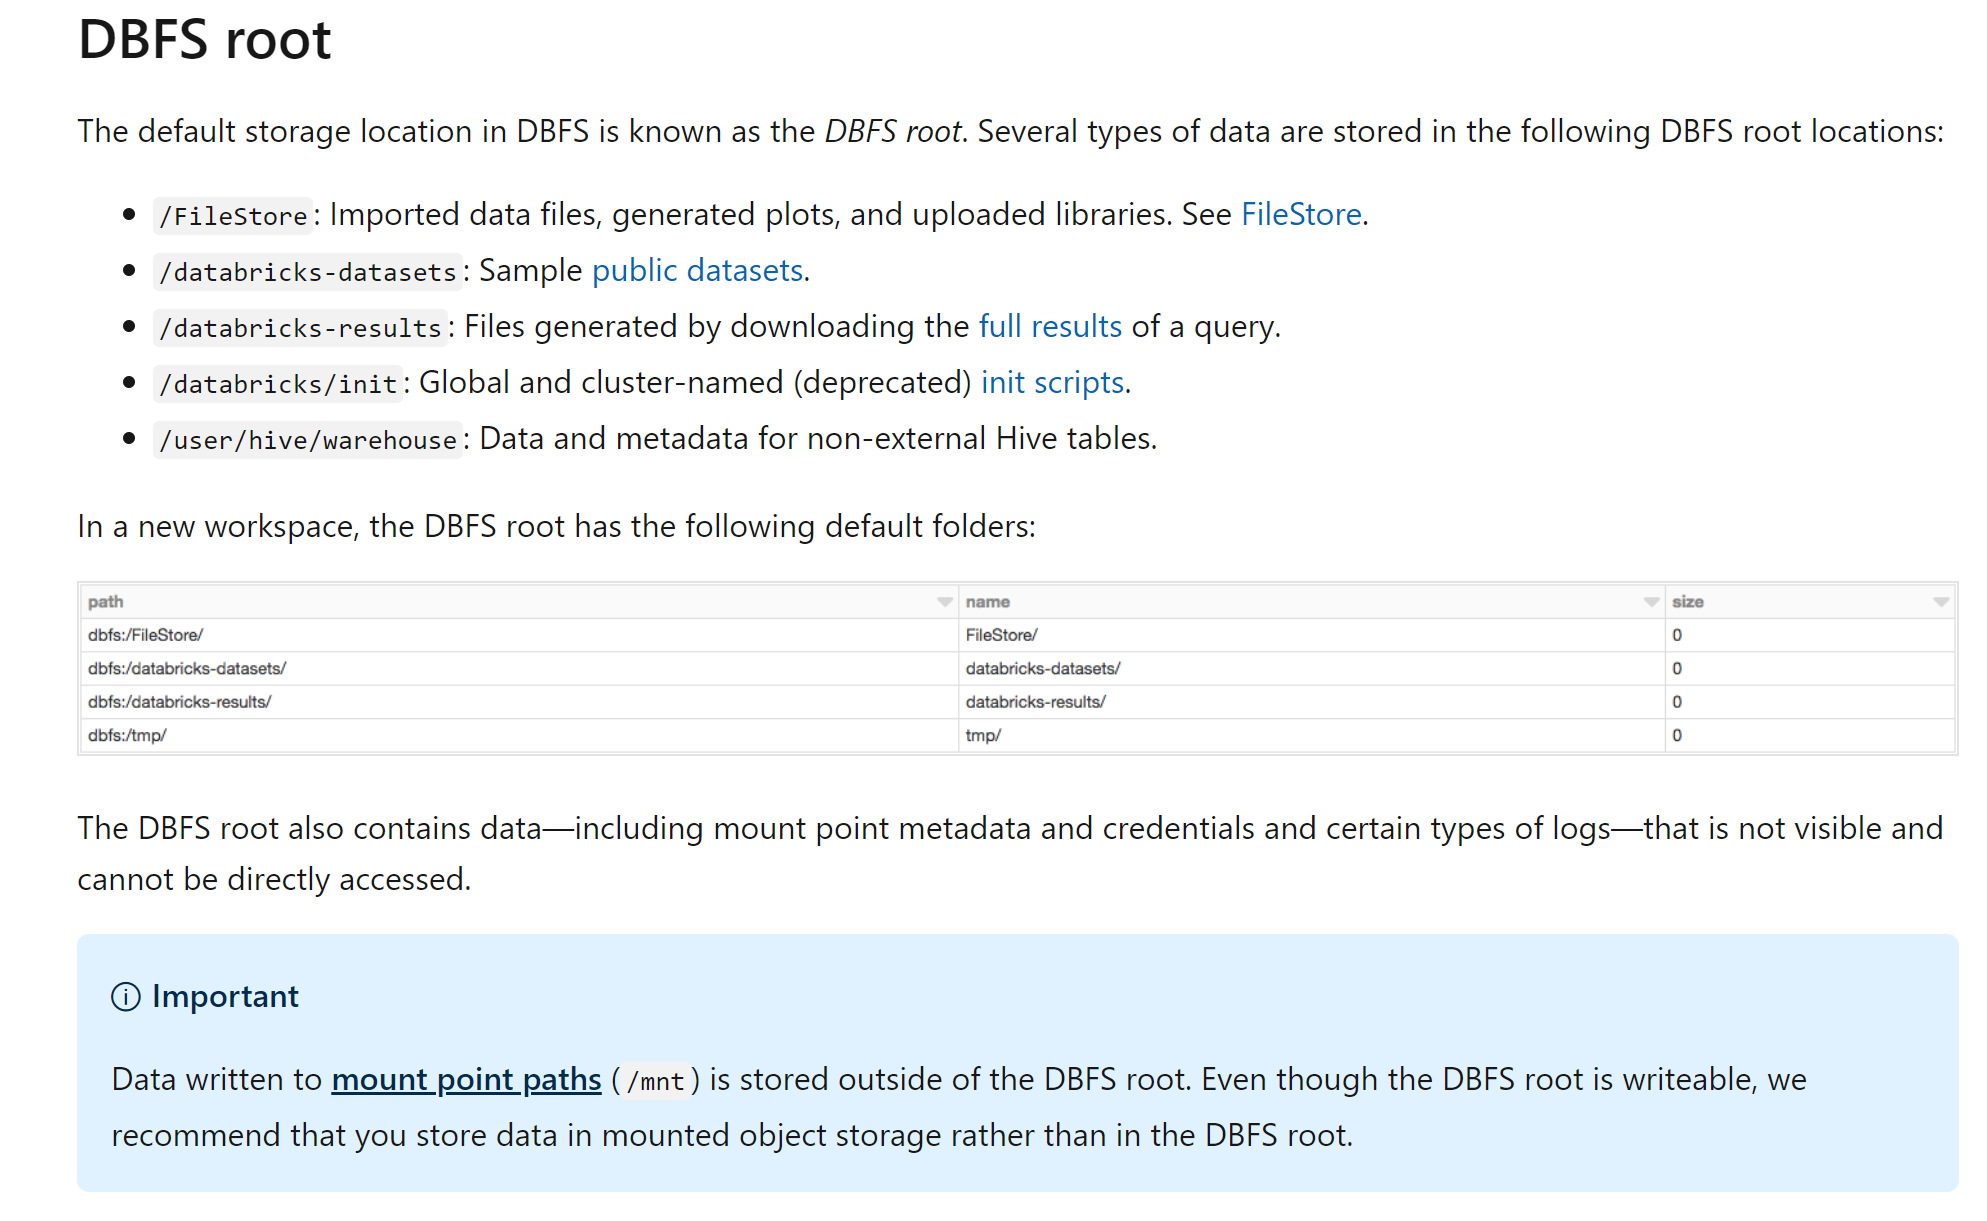
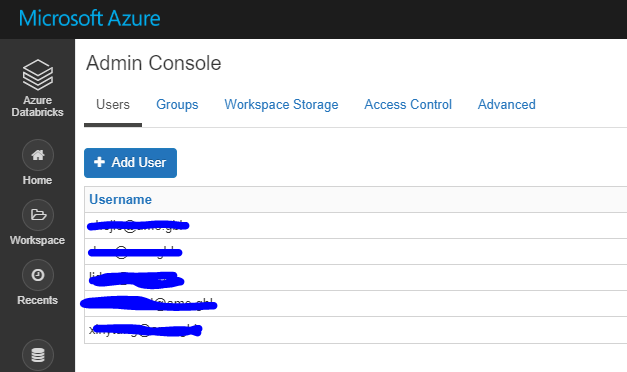
3. Migrate Azure Active Directory users
3.1 Navigate to the old Databricks UI, expand Account in the right corner, then click Admin Console. You can get a list of users as admin in this Databricks.
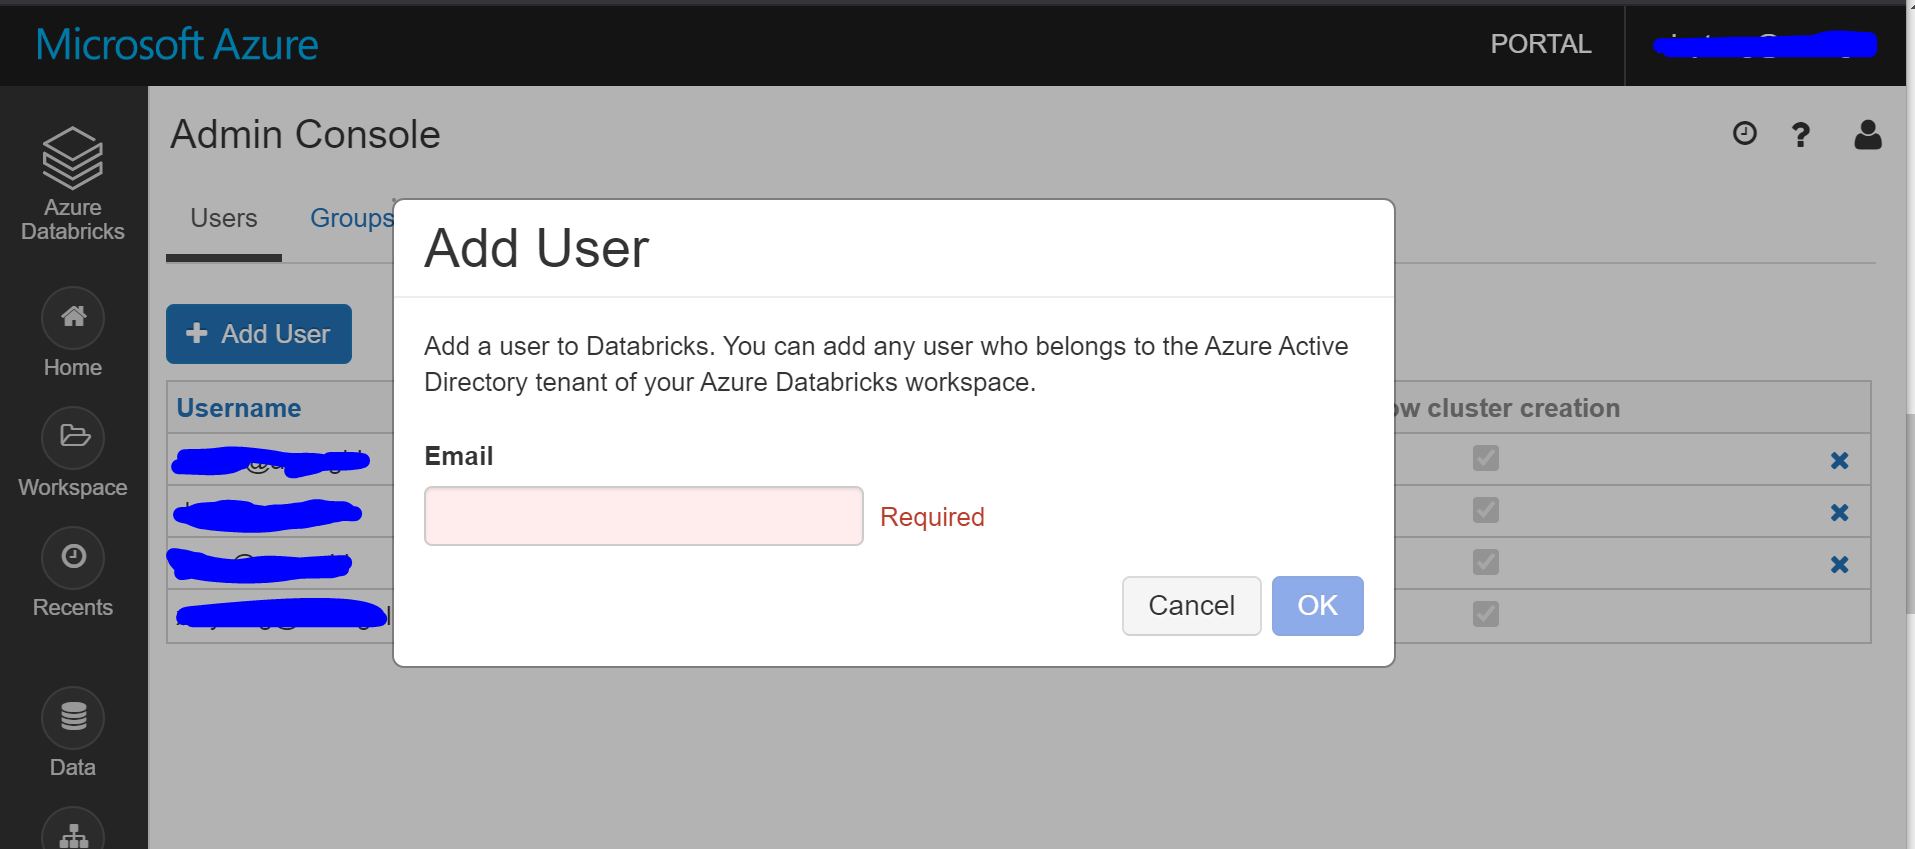
3.2 Navigate to the new Databricks portal, click Add User under Users tag of Admin Console to add admins.
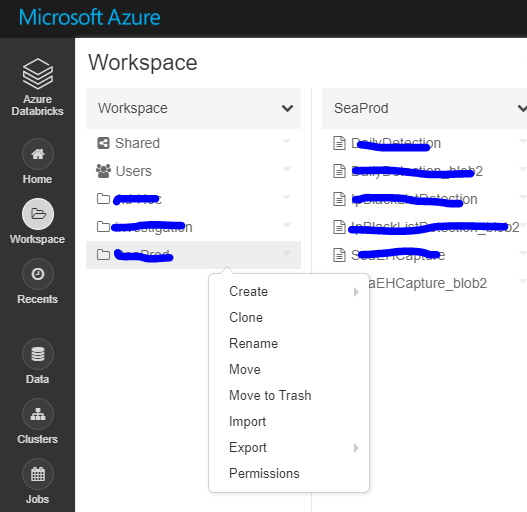
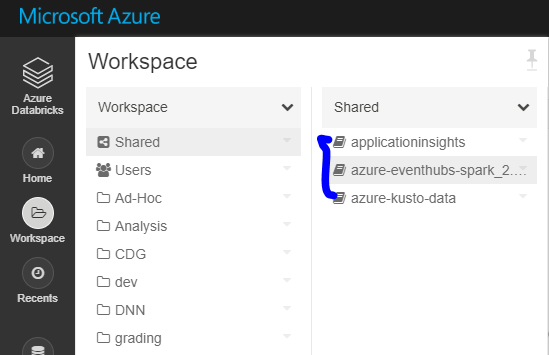
4. Migrate the workspace folders and notebooks
Solution 1 Put the migrate-folders.py in a separate folder (it will export files in this folder), and then run the migrate-folders.py script to migrate folders and notebooks. Libraries are not included using this scripts. It is shown in Step 5 to migrate libraries. Remember to replace the profile variables in this script to your customized profile names:
Solution 2 Also, you can do it manually: Export as DBC file and then import.
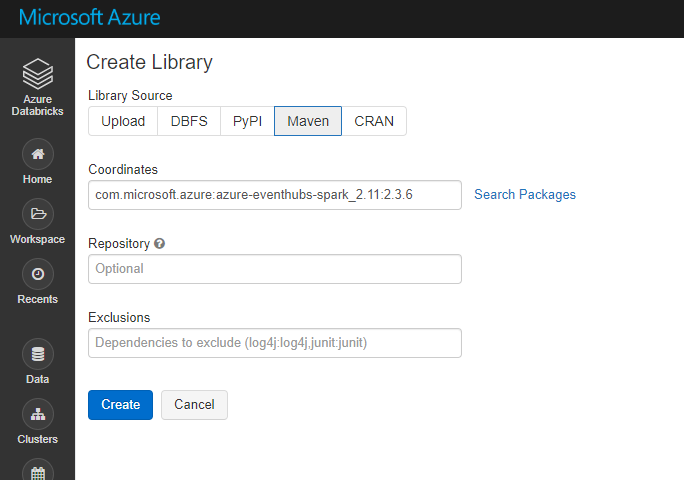
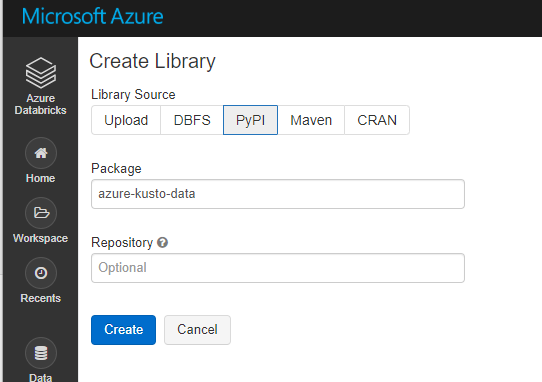
5. Migrate libraries
There is no external API for libraries, so need to reinstall all libraries into new Databricks manually.
5.1 List all libraries in the old Databricks.
5.2 Install all libraries.
Maven libraries: PyPI libraries:
6. Migrate the cluster configuration
Run migrate-cluster.py to migrate all interactive clusters. This script will skip all job source clusters. Remember to replace the profile variables in this script to your customized profile names:
Run migrate-job.py to migrate all jobs, schedule information will be removed so job doesn’t start before proper cutover. Remember to replace the profile variables in this script to your customized profile names:
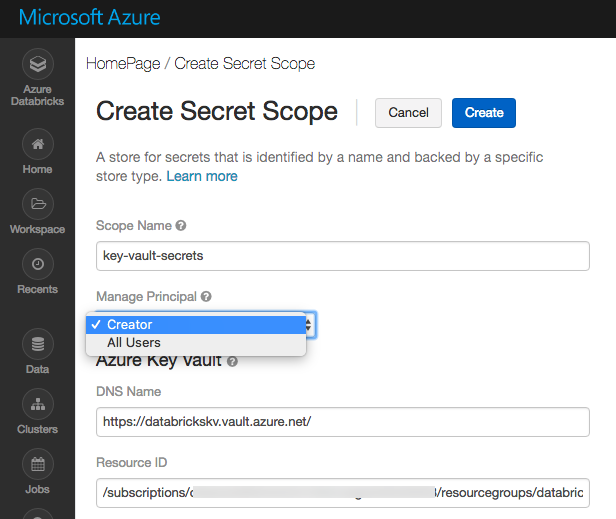
There are two types of secret scope: Azure Key Vault-backed and Databricks-backed. Creating an Azure Key Vault-backed secret scope is supported only in the Azure Databricks UI. You cannot create a scope using the Secrets CLI or API.
List all secret scopes:
1
databricks secrets list-scopes --profile primary
Generate key vault-backed secret scope:
Go to https://<databricks-instance>#secrets/createScope. This URL is case sensitive; scope in createScope must be uppercase.
Enter the name of the secret scope. Secret scope names are case insensitive.
These properties are available from the Properties tab of an Azure Key Vault in your Azure portal.
Click the Create button.
9. Migrate Azure blob storage and Azure Data Lake Storage mounts
There is no external API to use, have to manually remount all storage.
9.1 List all mount points in old Databricks using notebook.
1
dbutils.fs.mounts()
9.2 Remount all blob storage following the official docs using notebook.
<mount-name> is a DBFS path representing where the Blob storage container or a folder inside the container (specified in source) will be mounted in DBFS.
<conf-key> can be either fs.azure.account.key.<storage-account-name>.blob.core.windows.net or fs.azure.sas.<container-name>.<storage-account-name>.blob.core.windows.net
dbutils.secrets.get(scope = "<scope-name>", key = "<key-name>") gets the key that has been stored as a secret in a secret scope.
10. Migrate cluster init scripts
Copy all cluster initialization scripts to new Databricks using DBFS CLI.
1 2 3 4 5
// Primary to local dbfs cp -r dbfs:/databricks/init ./old-ws-init-scripts --profile primary
// Local to Secondary workspace dbfs cp -r old-ws-init-scripts dbfs:/databricks/init --profile secondary
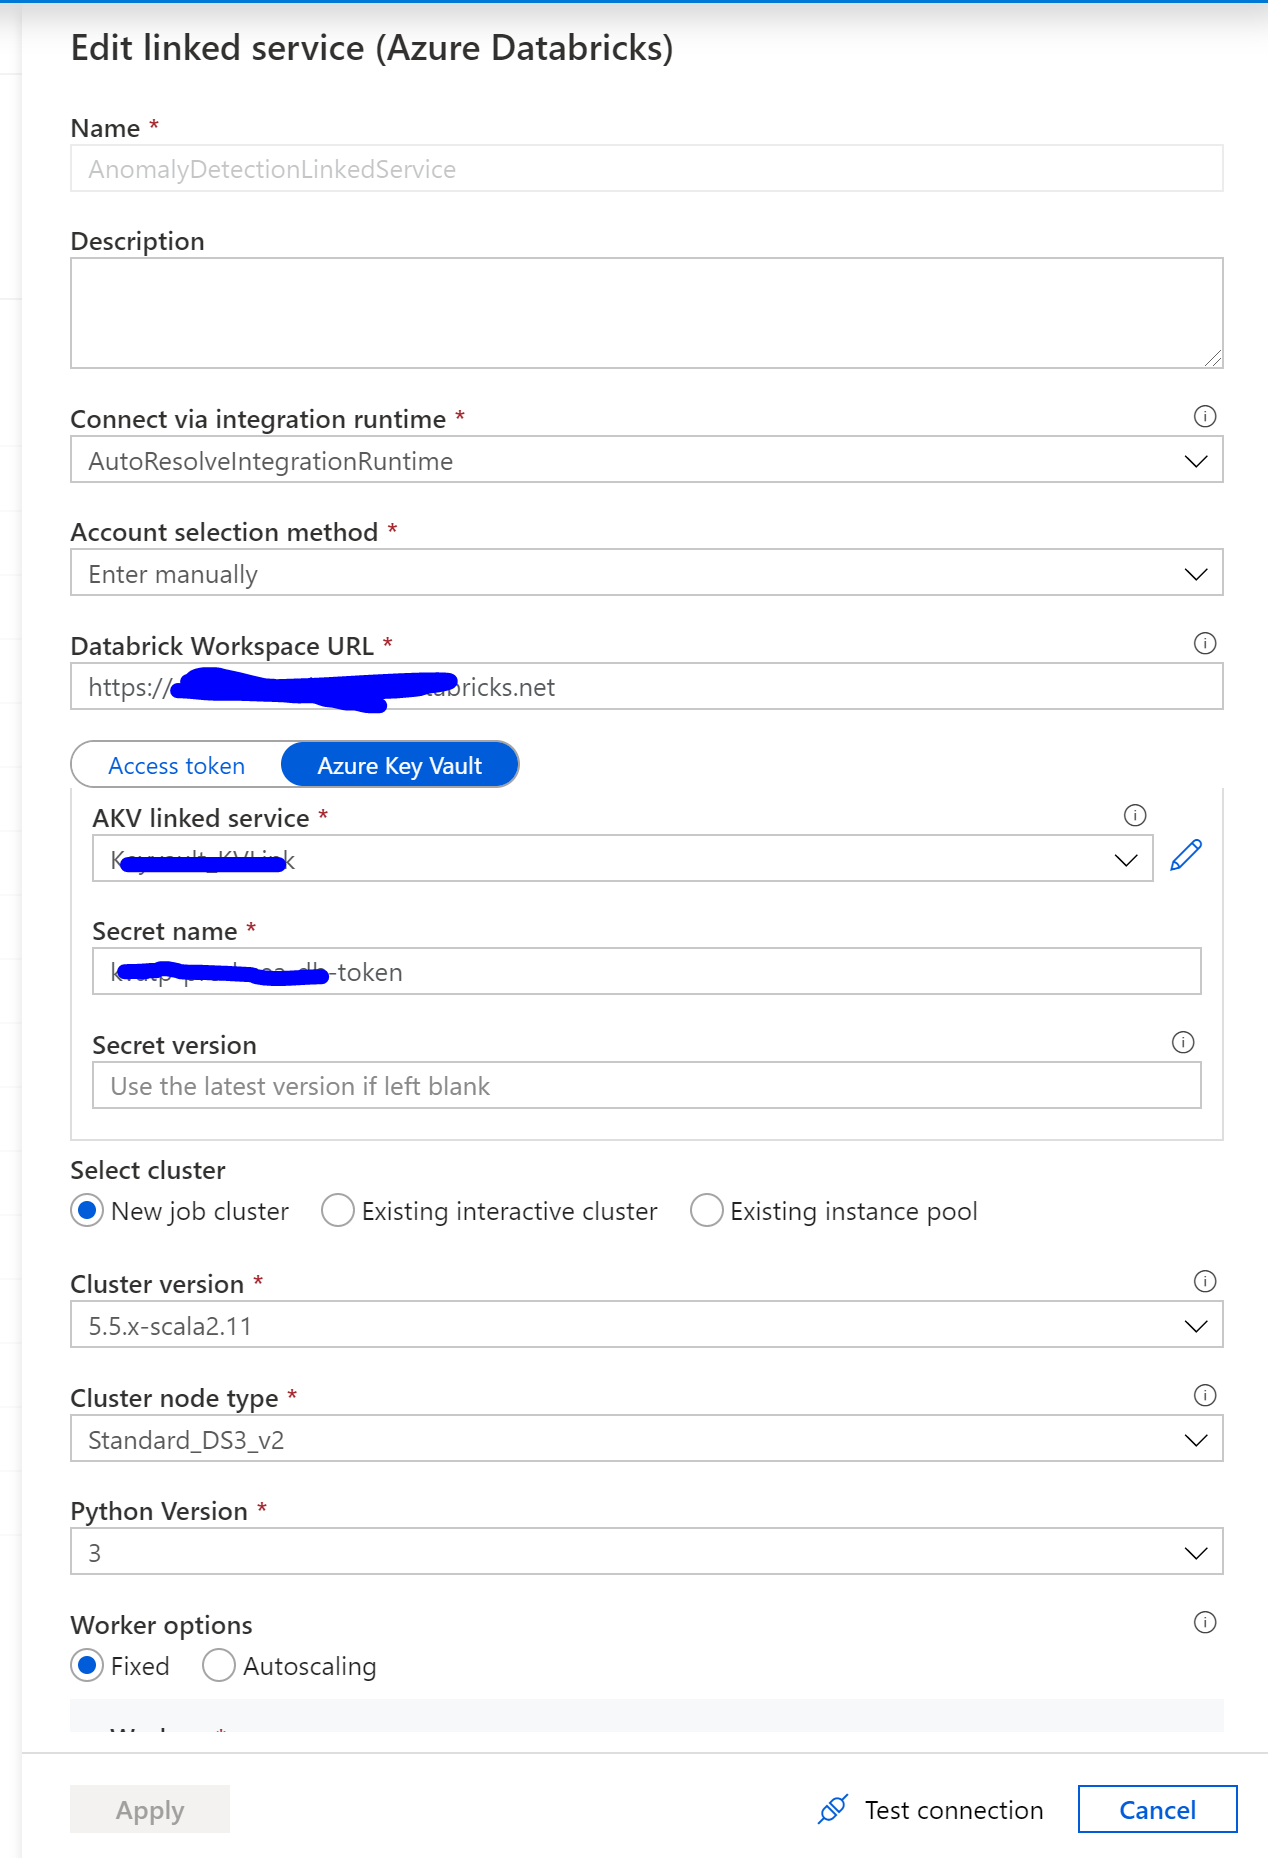
11. ADF config
For Databricks jobs scheduled by Azure Data Factory, navigate to Azure Data Factory UI. Create a new Databricks linked service linked to the new Databricks by the personal access key generated in step 2.
]]>
When you need to migrate an old Databricks to a new Databricks, all of the files, jobs, clusters, configurations and dependencies are supposed to move. It is time consuming and also easy to omit some parts. I document the detailed migration steps, and also write several scripts to automatically migrate folders, clusters and jobs. In this chapter, I will show you how to migrate Databricks.
Always flush Application Insightshttps://xinyeah.github.io/always-flush-application-insights/2020-06-22T21:50:20.000Z2020-09-23T00:46:23.740ZWhat is Application Insights?
Application Insights is one of Azure Monitoring solutions, it monitors the availability, performance, and usage of your web application.
How it works
Before you can use the Application Insights, you need to install an Application Insights SDK (instrumentation package) in your app. This instrumentation monitors your app and sends out the telemetry data to an Azure Application Insights resource identified by an instrumentation key (a unique GUID).
The official docs says, the SDK sends out data at fixed intervals (typically 30 secs) or whenever the buffer is full (typically 500 items).
However, from my personal experience, it won’t send the data if you don’t flush.
Here is a C# code example to flush the telemetry.
1 2 3 4 5 6 7 8 9 10 11 12
// Set up some properties and metrics:
var properties = new Dictionary <string, string>
    {{"game", currentGame.Name}, {"difficulty", currentGame.Difficulty}};
var metrics = new Dictionary <string, double>
    {{"Score", currentGame.Score}, {"Opponents", currentGame.OpponentCount}};

// Send the event:
telemetry.TrackEvent("WinGame", properties, metrics);
// Flush the buffer
telemetry.Flush();
// Allow some time for flushing before shutdown.
System.Threading.Thread.Sleep(5000);
]]>
Databricks docs says, the SDK sends out data at fixed intervals (typically 30 secs) or whenever the buffer is full (typically 500 items). However, from my personal experience, it won't send the data if you don't flush.
Java serialization is a bitch!https://xinyeah.github.io/Java-serialization-is-a-bitch/2020-06-21T21:54:05.000Z2020-09-23T00:46:23.740ZConcept
Object Serialization is the process of converting an object into a stream of bytes to store or transmit the object between machines.
The reverse process is called deserialization to use the byte stream to recreate the object.
Issue for Java Serialization
The main concern to use Java Serialization is security issue. There is a so called Java deserialization vulnerability affect all apps that receives serialized Java objects which can be used by attackers to gain complete remote control of an app service. Also, the attack surface is so big and even if you adhere to all best practice, your app is still be vulnerable.
What’s the vulnerability?
Many apps that accept serialized bytes stream do not validate or check untrusted input before deserialization. The attackers can insert a malicious code into the bytes stream and have it execute on the app. They can easily mount a denial-of-service attack by causing the deserialization takes forever, which is called deserialization bomb.
Solutions
The best way to avoid Java serialization vulnerability is never to use Java serialization!
There are other mechanisms to store and transmit between objects and bytes sequences which avoid Java serialization vulnerability, such as JSON and Protocol Buffers(Protobuf).
JSON vs Protocol Buffers
I summarize the differences between them:
JSON
Protocol Buffers
human-readable
not human-readable, but it provide pbtxt for readability.
text-based
binary
no schema needed
offer schemas to enforce appropriate usage
simple, faster, smaller in size
But they are both good serialization mechanisms:
They are simpler than Java serialization.
They don’t support auto serialization or deserialization
They only support a few primitive and array data types to avoid deserialization issue.
]]>
There is no reason to use Java Serialization anymore.
Deploy Spark .NET app on Databrickshttps://xinyeah.github.io/deploy-spark-dotnet-app-on-databricks/2020-06-19T10:35:53.000Z2020-09-23T00:46:23.740ZDeploy Spark .NET app on Databricks
I struggled to deploy a Spark .NET app on Databricks scheduled by Azure Data Factory pipeline. Here are the notes on the solutions how I finally figured out.
From this chapter, you can step-by-step create a Spark .NET app and deploy it either on Databricks directly or scheduled by an Azure Data Factory pipeline.
Prepare a Spark .NET application
This doc teaches you how to run a Spark .NET app using .NET Core. If you are familiar with .NET, we can simplify the process as:
Prepare environment.
1.1 Install the following dependencies: .NET, Java, compression software, Apache Spark, .NET for Apache Spark, WinUtils.
1.2 Set DOTNET_WORKER_DIR environment variable.
1.3 Verify you have all dependencies: you are good if you run dotnet, java,mvn,spark-shellfrom command line successfully.
Compress the published app files in the previous step. Navigate to mySparkApp/bin/Release/netcoreapp3.1/ubuntu.16.04-x64, compress Publish folder as a zip file.
Then all the dependencies are ready. We can deploy it on Databricks.
How to deploy
We can run .NET for Apache Spark apps on Databricks, but it is not what we usually do for Python or Scala jobs. For the Python or Scala jobs, we can just start a Notebook task for them. But for Spark .NET job, we need to use the “spark-submit” or “Jar” tasks.
Scheduled by Azure Data Factory pipeline
Deploy using Set Jar
Generate a Databricks access token for Azure Data Factory to access.
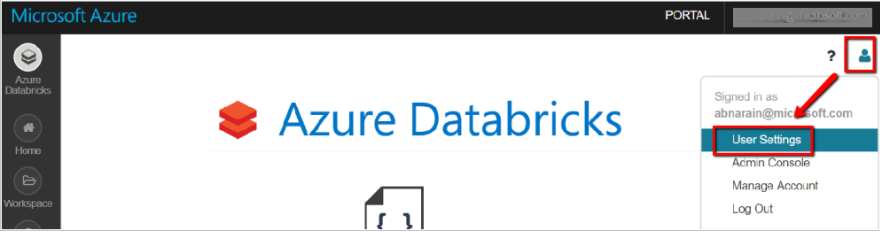
1.1 In Databricks workspace, select your user profile in the upper right, and select User Settings.
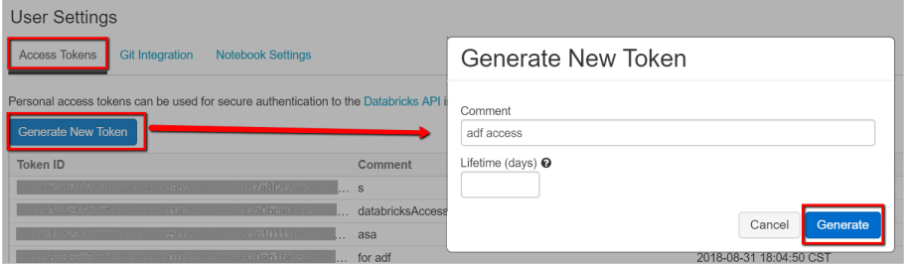
1.2 Select Generate New Token under the Access Tokens tab.
1.3 Save the access token for later use in creating a Databricks linked service. Usually save it in Azure Key Vault for security.
Navigated to the Pipelines page on Azure Data Factory, create a new pipeline, search for Databricks activities, drag the Jar task to panel.
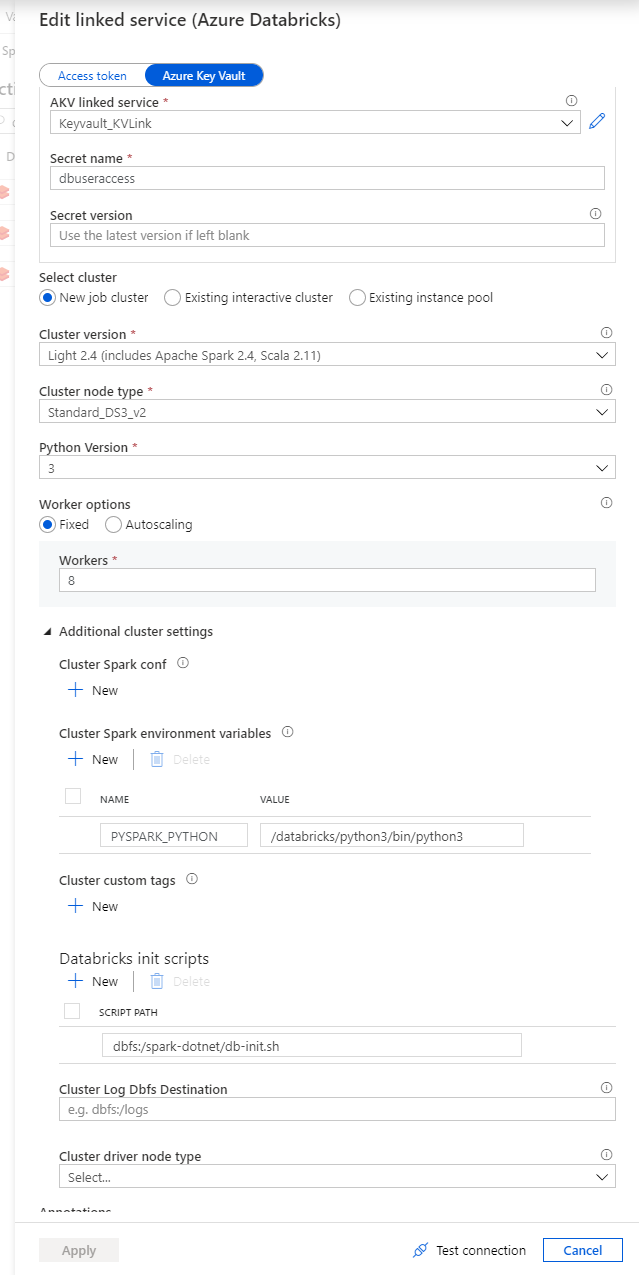
In the Jar activity Demo, updates the paths and settings as needed. Databricks linked service should be created using access token generated on Databricks previously. Remember to add init script for cluster settings.
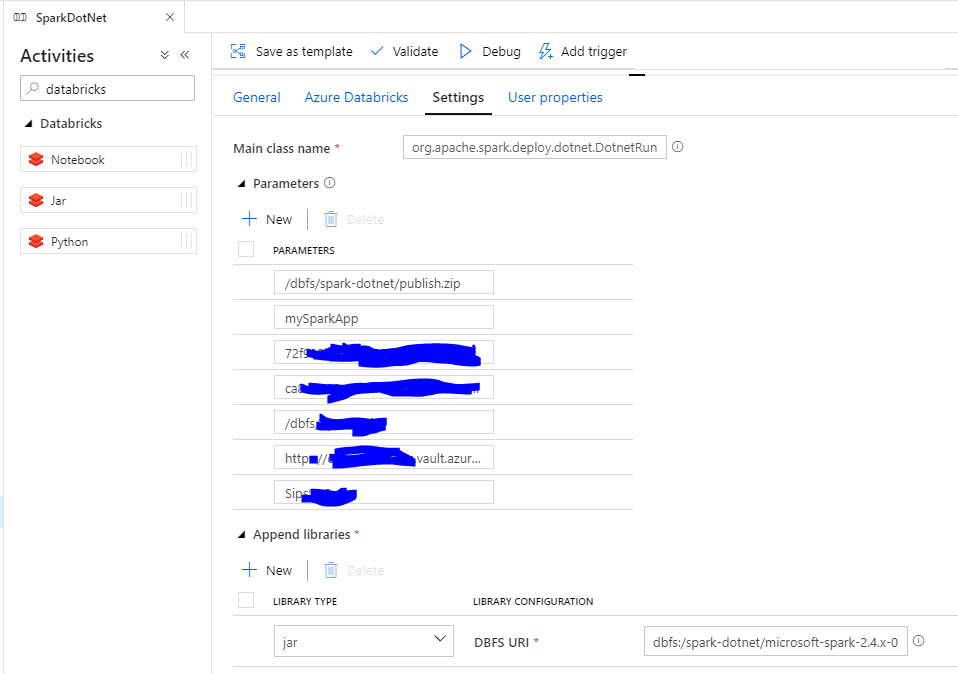
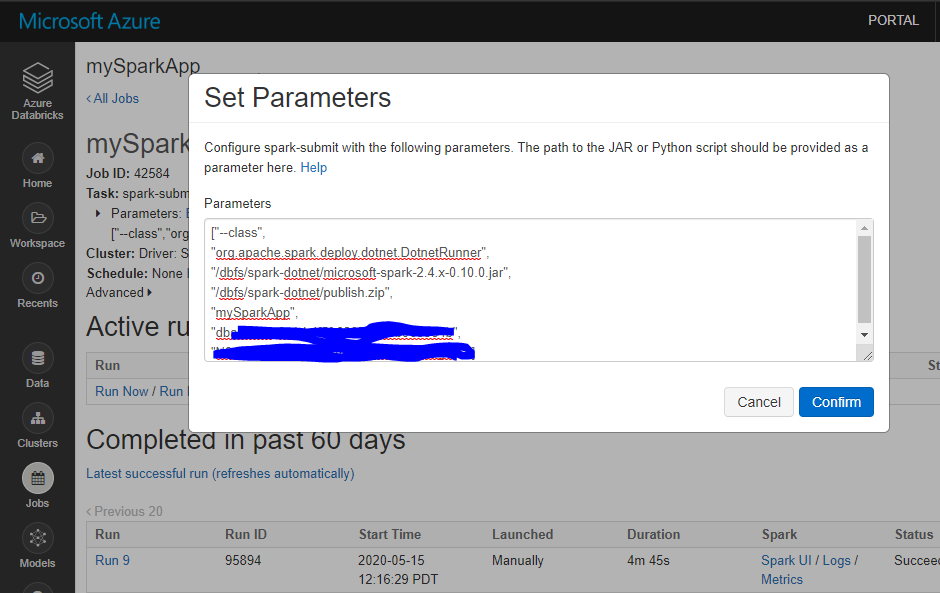
Check the Jar settings. Main class name is org.apache.spark.deploy.dotnet.DotnetRunner. Parameters will pass to the main class. it must have your app publish.zip and your app name as the first two parameters. The rest parameters are what your app need. Append libraries are microsoft-spark-2.4.x-0.10.0.jar on dbfs.
Click Debug to run a test for the current pipeline.
Save the newly added pipeline by click Publish all.
Directly on databricks
1. Deploy using Spark-submit
Navigate to Databricks Workspace and create a job. Select Task as spark-submit. Set job parameters。
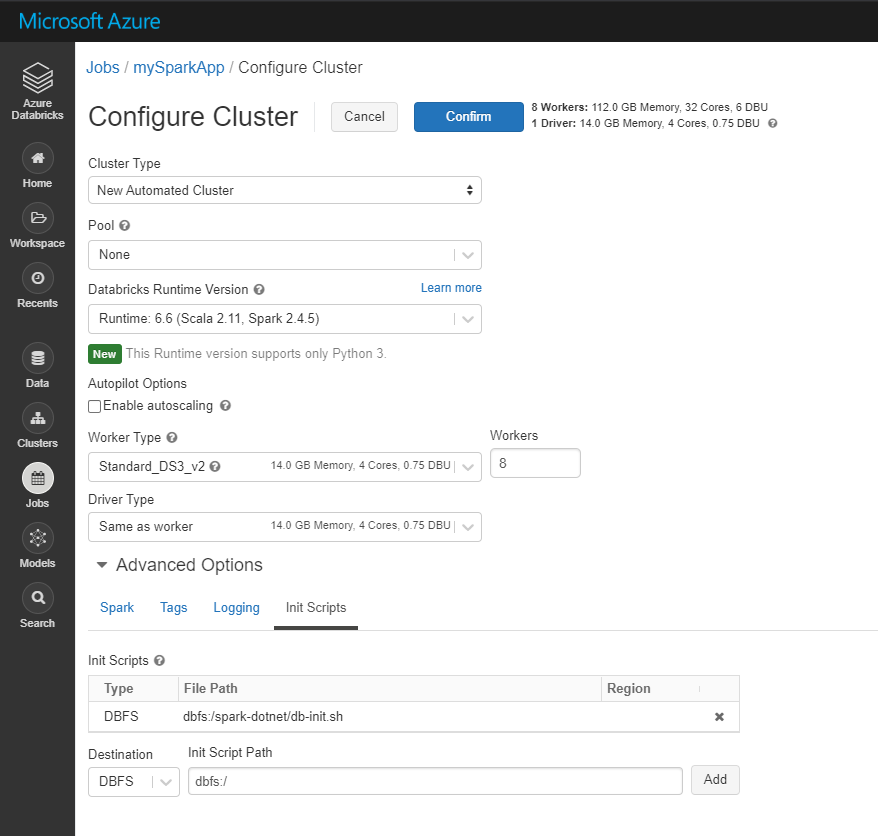
When configure Cluster, need to add init script located on DBFS (Databricks Filesystem).
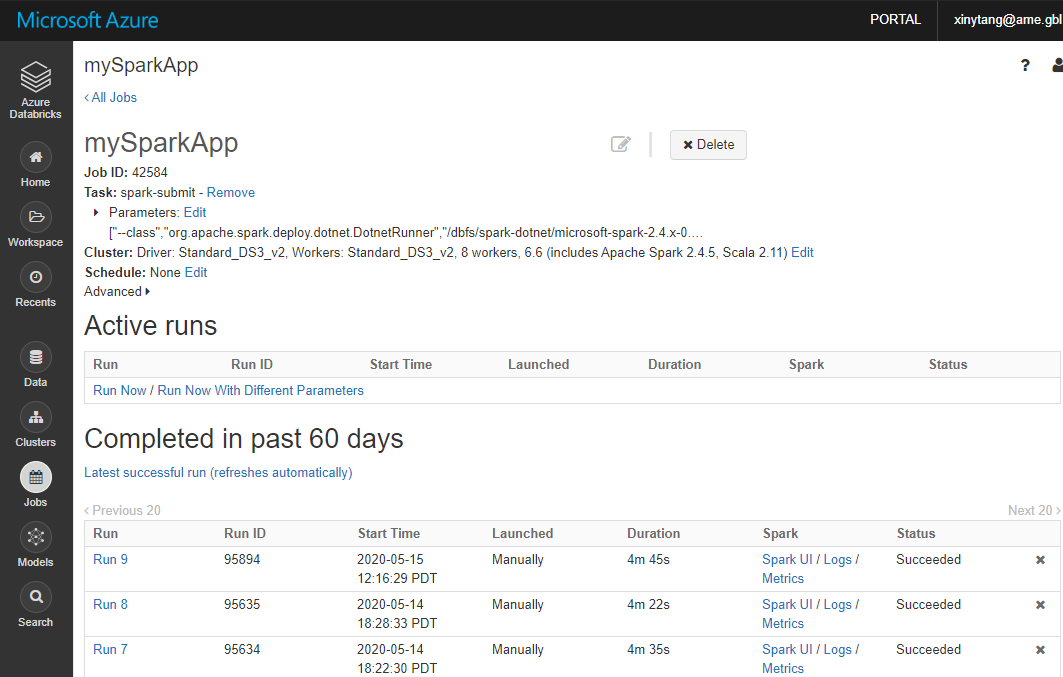
select Run Now to test the job. Once the job’s cluster is created, your Spark job will be submitted.
2. Deploy using Set Jar
We can also use the Jar task to deploy on Databricks. The settings should be the same with the one triggered by Azure Data Factory.
]]>
I struggled to deploy a Spark .NET app on Databricks scheduled by Azure Data Factory pipeline. Here are the notes on the solutions how I finally figured out. From this chapter, you can step-by-step create a Spark .NET app and deploy it either on Databricks directly or scheduled by an Azure Data Factory pipeline.
搭建Hexo + Github Pages + Travis CI个人站点的详细教程https://xinyeah.github.io/deploy-hexo-site/2020-06-07T21:27:46.000Z2020-09-23T00:46:23.740Z技术栈选择: Github Pages + Hexo + Travis CI
首要原因:没钱。这是一套免费的组合拳。
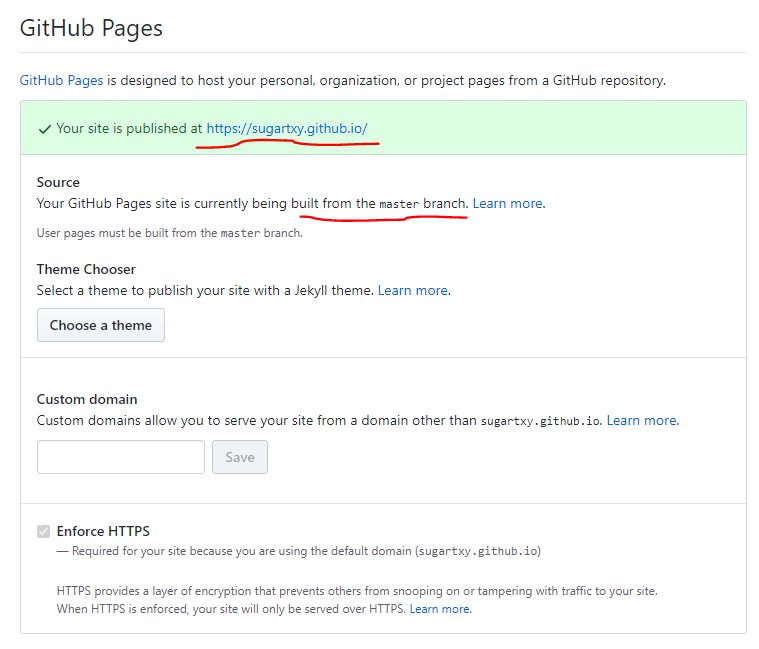
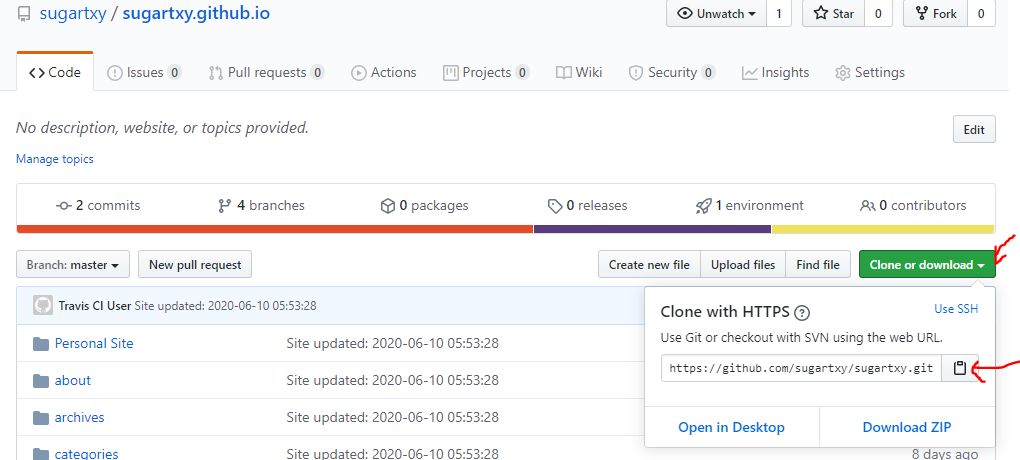
在众多站点选择中,最终选择了Github Pages。主要还是因为熟悉Github的版本控制,以及Github对其他平台很好的集成。官方推荐的静态站点生成器(static site generator)是Jekyll。还可以在项目仓库Settings页面中的Github Pages部分,选择Jekyll的theme。
Hexo也是一款静态站点生成框架(static site generator),基于Node.js 。通过Hexo可以使用Markdown来写文章,不用太关注排版和格式。而且Hexo比较成熟,有很多稳定的好看的主题。
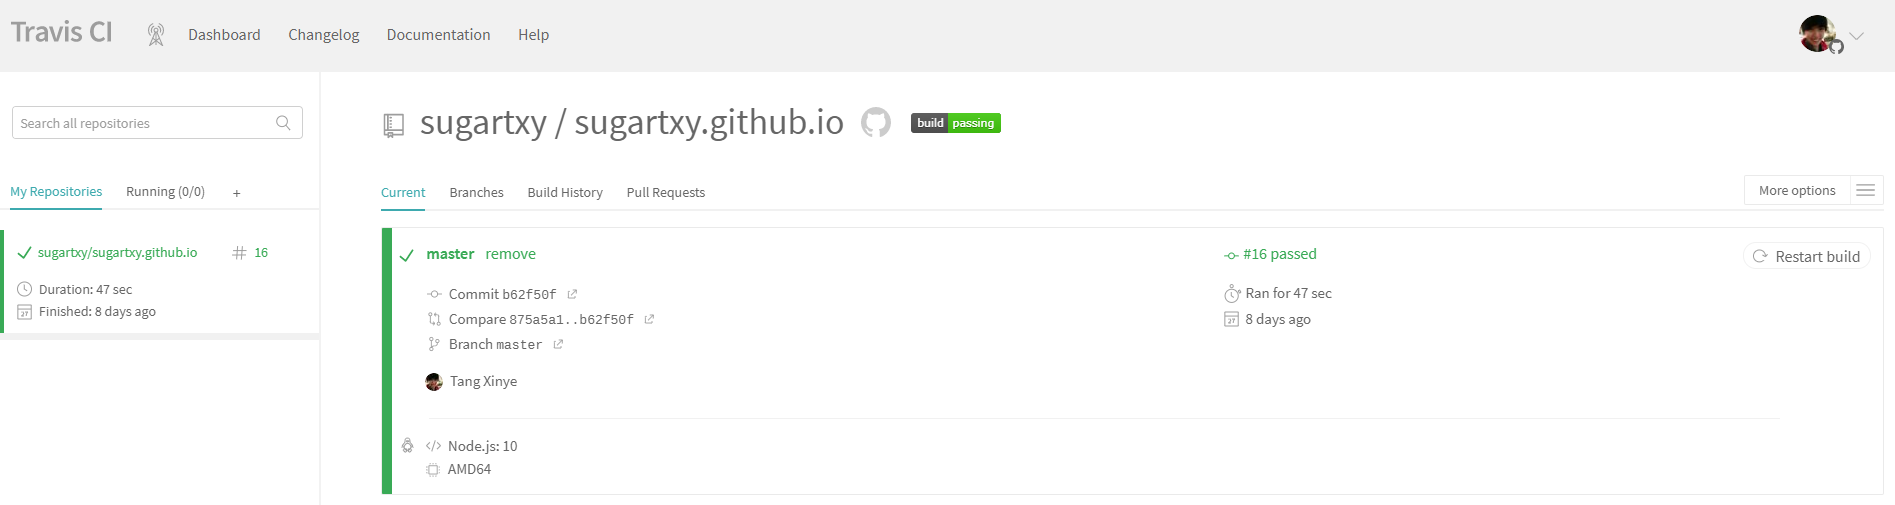
Travis CI 是持续集成(continuous integration)的平台,可以监控repo具体分支上的代码变动,自动触发build和test。帮助实现频繁的merge小段代码的Best practice。有了自动部署,就可以不受开发平台限制,不需要搭建环境也可以发布文章。
$ hexo init INFO Copying data to ~/***/<YourName>.github.io INFO You are almost done! Don't forget to run 'npm install' before you start blogging with Hexo!
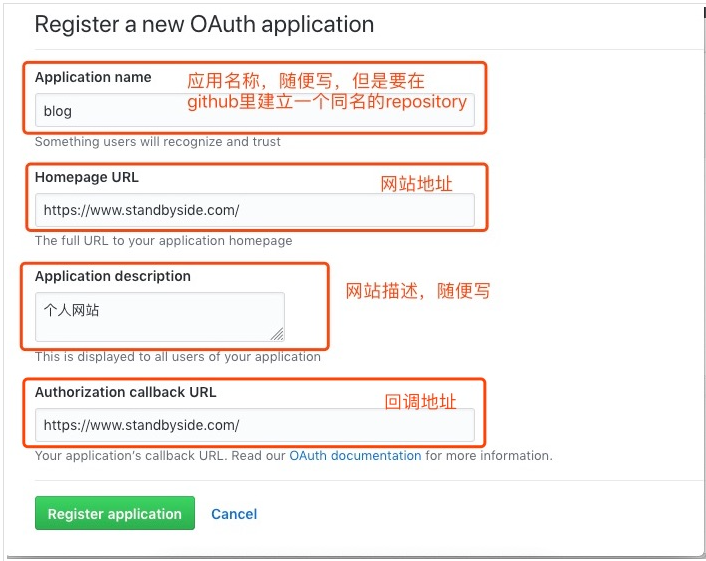
comments:
    # Available values: tabs | buttons
    style: tabs
    # Choose a comment system to be displayed by default.
    # Available values: changyan | disqus | disqusjs | gitalk | livere | valine
    active: gitalk
    # Setting `true` means remembering the comment system selected by the visitor.
    storage: true
    # Lazyload all comment systems.
    lazyload: false
    # Modify texts or order for any navs, here are some examples.
    nav:
        #disqus:
        #  text: Load Disqus
        #  order: -1
        #gitalk:
        #  order: -2

gitalk:
    enable: true # 启用gitalk
    github_id: # 你的github用户名
    repo: # 刚才你创建的repository的名字,只要名字,不要全链接
    client_id: # 你的 Client ID
    client_secret: # 你的 Client Secret
    admin_user: # 联系人, 页面显示联系**初始化评论
    distraction_free_mode: true  # Facebook-like distraction free mode
    # Gitalk's display language depends on user's browser or system environment
    # If you want everyone visiting your site to see a uniform language, you can set a force language value
    # Available values: en | es-ES | fr | ru | zh-CN | zh-TW
    language:
 ]]>
]]>

 Here is the DBFS root locations from [docs](https://docs.microsoft.com/en-us/azure/databricks/data/databricks-file-system)
Here is the DBFS root locations from [docs](https://docs.microsoft.com/en-us/azure/databricks/data/databricks-file-system)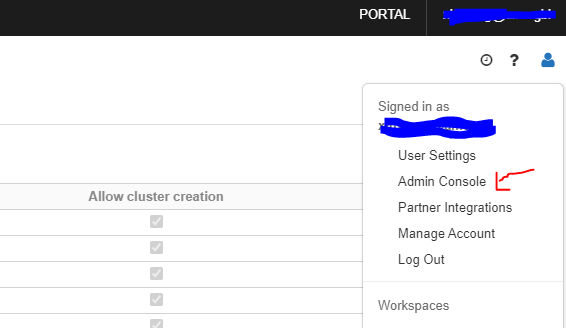


)