The post How to Connect and Deploy Private GitHub Repositories to cPanel Shared Hosting using GitHub Actions appeared first on Awan.
]]>So, you are working on a project and using GitHub for version control. And you want to automate the deployment, so that every time you make push to GitHub, it gets automatically deployed to your cPanel shared hosting.
Who would just manually upload files to the cPanel every time you make some changers, OR do you  ?
?
So, let’s get started.
GitHub to cPanel Deployment Flow
- You make changes to the project on local machine.
- You commit the changes and push the code to remote main branch.
- It automatically deploys your changes to the cPanel.
- Eat, Sleep, Repeat 1-3 until your project gets done.
There are multiple ways to deploy private GitHub repository to cPanel. In this blog, we are going to do it in a very simple way with FTP using GitHub Actions.
Steps to Deploy GitHub to cPanel
- Setup FTP account in your cPanel account.
- Setup Project in GitHub.
- GitHub action workflow configuration.
Create an FTP account on cPanel
In your cPanel go to FTP accounts.

Provide the details and create the FTP account.

Save your ftp account username and password. Will need those later.
You will also need your hosting’s IP address. Not sure how to get that?
You can use this.
Setup Private GitHub Repository to deploy to cPanel
Setup your private GitHub repository.
I assume you have already done that.
For minimal setup, just an index.html file with something on it should be enough.
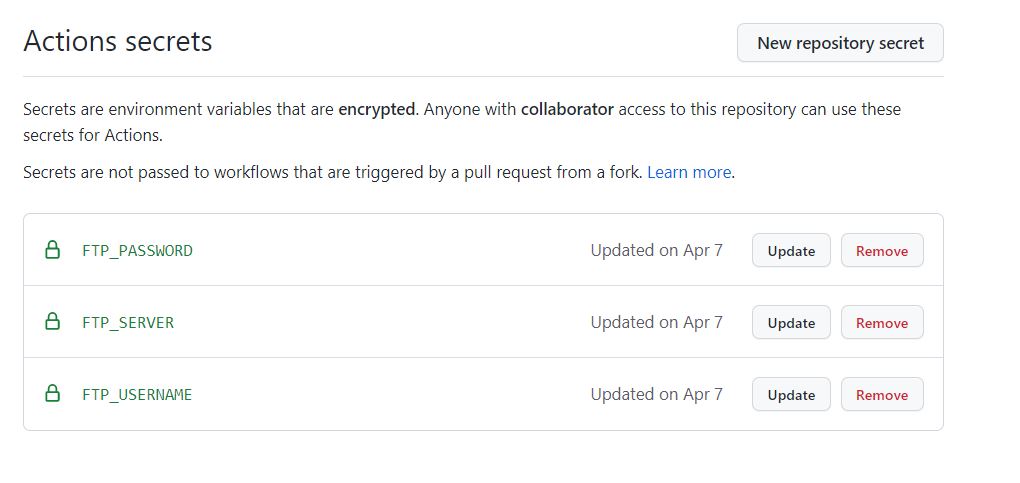
Add GitHub Secrets
Now, go to your private repository on GitHub.
Click on SETTINGS, then click on SECRETS -> ACTIONS to add your FTP account username, password and server IP.

Click on New Repository Secret . Then add the Name and Values for FTP server, username and password. For values, use your cPanel IP, username and password that you had created earlier.
For example, for FTP username would be: FTP_USERNAME as Name and [email protected] as Value.

The click on Add Secret. Final result should look something like:
GitHub Actions Workflow for cPanel Deployment
In your GitHub repository, click on ACTIONS.
Click on set up a workflow yourself.
Now, we need to edit the yaml file. You can also change its name. As you can see, its main.yml here.

Now write the configuration code below into the file.
name: Deploy Private GitHub repository to cPanel
on:
  push:
    branches:
      - main
jobs:
  FTP-Deploy-Action:
    name: FTP-Deploy-Action
    runs-on: ubuntu-latest
    steps:
    - uses: actions/[email protected]
      with:
        fetch-depth: 2
    - name: FTP-Deploy-Action
      uses: SamKirkland/[email protected]
      with:
        server: ${{ secrets.FTP_SERVER }}
        username: ${{ secrets.FTP_USERNAME }}
        password: ${{ secrets.FTP_PASSWORD }}
Change the branch if you want it to setup for other branches.
Finally, start on Start Commit. This will create a new workflow directory and place the configuration code in it.
Now anytime you push to the main branch, it automatically deploys to the cPanel via the FTP account.
Once you commit, go the Actions tab, there you can see the progress: whether its running, successfully deployed or failed.

And, that’s it.
Now, every time you make a push to the remote main branch, you should see the changes in your website, after a while.
You can also check for changes in your cPanel file explorer.
How The Web Works | Behind the scenes of a Website
In this way, you can deploy the private GitHub repository code to cPanel shared hosting using GitHub actions.
The post How to Connect and Deploy Private GitHub Repositories to cPanel Shared Hosting using GitHub Actions appeared first on Awan.
]]>The post Architecting a Real-Time, Serverless AI Chat Application with Amazon Bedrock appeared first on Awan.
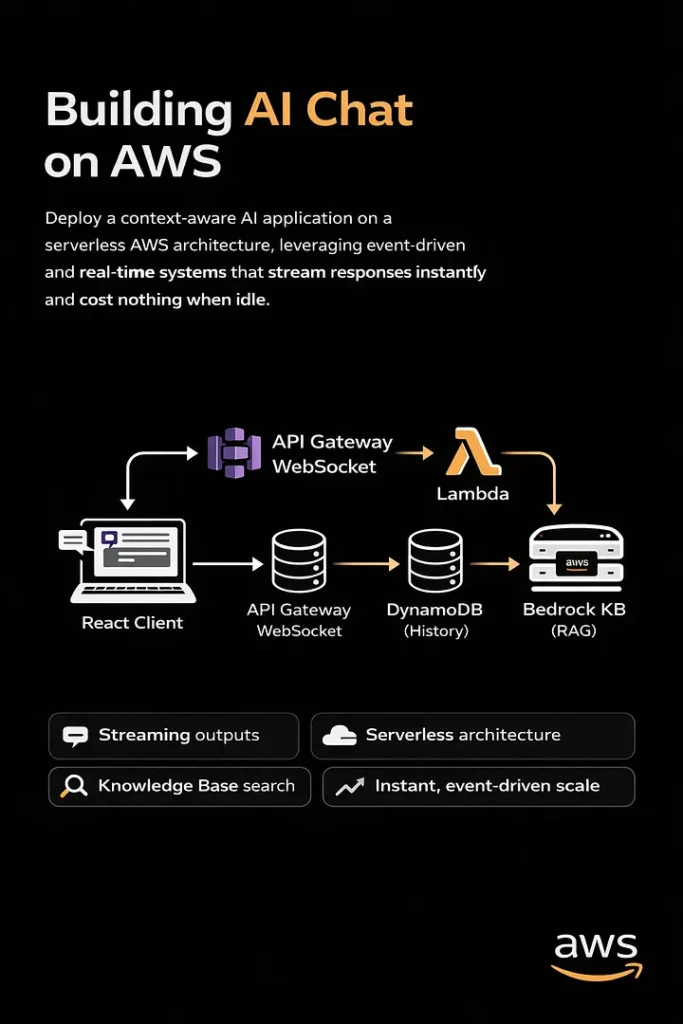
]]>Deploy a context-aware AI application on a serverless AWS architecture, which is quick enough to serve requests in less than 10 ms, leveraging serverless event-driven and real-time systems.
Most AI chat applications today feel like a bunch of API keys coordinating together with a naive UI that too made from LLM. You type some prompt, hit the send button, it thinks for 10 seconds, and then you receive a wall of text. Today I am going to fix it.
This article is a comprehensive guide to building real-time, context-aware, 100% serverless applications that stream tokens, can look up knowledge bases, and cost nothing when idle.
More than just a text box
When I state that most AI chatbots are merely AI wrappers with hardware components operating continuously, I am implying that they lack significant optimization.
A long loading spinner that spins for up to 30 seconds displays garbage text, which users do not engage with, causing them to disengage.
I set three rigid requirements before even initializing the project.
1. Streaming Server:
Open a WebSocket connection. The interface should feel alive, not frozen.
2. Tools:
Let it search through docs, fetch time, and look up resources so that it will be able to return real answers that matter.
3. Serverless:
If no one is using it, it will cost nothing.
These three principles are the basics of building a next-gen AI chat application that actually solves a problem.
Choosing the right tech:
Why Amazon Bedrock?
Obviously, I don’t want the headache of managing rate limits, GPU clusters, and built-in knowledge bases for RAG, and the only alternative to OpenAI’s API is Amazon Bedrock.
Another reason was that I have to stick within the AWS ecosystem for IAM integration, VPC security, and consolidated billing.
Why API gateway websocket?
I want the lambda to be completely ephemeral; it should fire an event, process a message, stream a token back, and shut down. Parallelly, the WebSocket API handles the request, which Lambda doesn’t have to. Why AWS CDK?
I am building a product in a highly competitive niche, already have a ton of issues to deal with, and can’t define the entire stack on my own. The best way to go is to use cdk deploy for initialization of entire ecosystem form dynamoDB tables, Lambda functions, API Gateway routes and to IAM roles.
Infrastructure as Code is non-negotiable for any production system.
Architecture deep dive (How it works?)
High-level view:
The system operates on an event-driven basis, managing chat sessions and delegating the complex tasks of state management and LLM orchestration to managed serverless AWS services.
A. The Connection Layer: API Gateway + WebSocket
A regular REST API won’t work here. LLMs are not fast. A sophisticated query can take 20 to 30 seconds from start to finish, yet a normal HTTP request would run out much before that.
API Gateway’s WebSocket API solves this cleanly: API gateway maintains a powerful persistent TCP connection to our lambda. It exposes three important routes on our behalf.

The ConnectionId is the most important piece of information. The ConnectionId is the permanent handle to the browser session, while Lambda is temporary. Lambda gets it from the event context and uses it to send tokens back through the API Gateway management endpoint for the whole stream.
By default, Lambda functions are ephemeral; it’s the connection ID that handles persistent connections to the browser session.
Lambda reads it from the event context and pushes back tokens through the API gateway management endpoint.
B. The Backend Brain: Lambda + Bedrock
The Entry Point
As said earlier, every inbound message reaches the Lambda handler. The first thing lambda does is extracting who sent it, and what they said.
export const handler = async (event: APIGatewayProxyWebsocketEventV2) => {
  const { connectionId, routeKey } = event.requestContext;

  if (routeKey === 'sendMessage') {
    const { message, sessionId } = JSON.parse(event.body ?? '{}');

    await processCopilotMessage({ connectionId, message, sessionId });
  }

  return { statusCode: 200 };
};
The Reasoning Loop
This is the very core of our application; instead of directly sending user’s message to Bedrock for final response, run it through a loop.
First, call the planner, which decides whether a tool is needed; if it says yes, execute it and feed the result into the event.
The second call is to the streamer to generate the final token-by-token response.

Planner call to tools
const plannerCall = async (messages: Message[]) => {
  const response = await bedrock.send(new ConverseCommand({
    modelId: 'anthropic.claude-3-5-sonnet-20241022-v2:0',
    system: [{ text: SYSTEM_PROMPT }],
    messages,
    toolConfig: {
      tools: [KB_LOOKUP_TOOL_SPEC],    // JSON schema for kb_lookup
      toolChoice: { auto: {} },
    },
  }));

  return response.output?.message;
};
Final Streaming to user
const finalStream = async (messages: Message[], connectionId: string) => {
  const stream = await bedrock.send(new ConverseStreamCommand({
    modelId: 'anthropic.claude-3-5-sonnet-20241022-v2:0',
    system: [{ text: SYSTEM_PROMPT }],
    messages,
  }));

  for await (const chunk of stream.stream) {
    if (chunk.contentBlockDelta?.delta?.text) {
      await pushToClient(connectionId, {
        type: 'token',
        value: chunk.contentBlockDelta.delta.text,
      });
    }
  }

  // Signal stream complete
  await pushToClient(connectionId, { type: 'done' });
};
The Tool: Knowledge Base Lookup
A half-baked copilot is one that can only talk. I used the kb_lookup tool with Bedrock after defining it in the JSON schema. The planner returns a tool_use block when it determines that it needs documentation context, and Lambda manages the actual retrieval:
const KB_LOOKUP_TOOL_SPEC = {
  toolSpec: {
    name: 'kb_lookup',
    description: 'Search internal documentation for relevant context.',
    inputSchema: {
      json: {
        type: 'object',
        properties: {
          query: { type: 'string', description: 'The search query.' },
        },
        required: ['query'],
      },
    },
  },
};

// When Bedrock returns tool_use with name 'kb_lookup':
const results = await bedrockAgent.send(new RetrieveCommand({
  knowledgeBaseId: process.env.KB_ID,
  retrievalQuery: { text: toolInput.query },
}));
C. State & Persistence: DynamoDB
By default LLMs are stateless; they don’t store anything. They should have a context what are we talking about, some sort of history, your name, your task and definately what is your goal.
DynamoDB is our go-to solution to this challenge; it’s fast, serverless, and integrated with the AWS ecosystem.
System Design
The lifecycle of our app is
Load → Append → Process → Save → Stream
It fetches the existing messages array, pushes the new user message, sends the full array to Bedrock, appends the assistant’s reply, and writes it all back.
PK prevents entity type key conflicts with SESSION#.
SK is always STATE one item per session, one read/write every turn.
Bedrock receives the whole chat array on every request, capped at 20 messages via a sliding window.
TTL automatically expires sessions after 24 hours, requiring no cleaning.
const loadAndSave = async (sessionId: string, newMsg: Message) => {
  // 1. Load
  const record = await dynamo.send(new GetItemCommand({
    TableName: TABLE_NAME,
    Key: { PK: { S: `SESSION#${sessionId}` }, SK: { S: 'STATE' } },
  }));

  const messages: Message[] = record.Item
    ? JSON.parse(record.Item.messages.S ?? '[]')
    : [];

  // 2. Append new user message
  messages.push(newMsg);

  // 3. (Call Bedrock — see previous section)

  // 4. Save updated history (enforce sliding window)
  const window = messages.slice(-20); // last 20 messages max
  await dynamo.send(new PutItemCommand({
    TableName: TABLE_NAME,
    Item: {
      PK: { S: `SESSION#${sessionId}` },
      SK: { S: 'STATE' },
      messages: { S: JSON.stringify(window) },
      ttl: { N: String(Math.floor(Date.now() / 1000) + 86400) },
    },
  }));
};
D. The React Frontend
WebSocket lifecycle management can get messy due to stale closures, reconnect logic, and cleanup on unmount. Therefore, I encapsulated all of it in a single custom hook:
export function useAIsocket(url: string) {
  const [messages, setMessages] = useState<ChatMessage[]>([]);
  const wsRef = useRef<WebSocket | null>(null);

  useEffect(() => {
    const connect = () => {
      const ws = new WebSocket(url);
      wsRef.current = ws;

      ws.onmessage = (event) => {
        const data = JSON.parse(event.data);

        if (data.type === 'token') {
          // Append token to last assistant message
          setMessages(prev => {
            const updated = [...prev];
            updated[updated.length - 1].content += data.value;
            return updated;
          });
        }

        if (data.type === 'done') {
          setMessages(prev =>
            prev.map((m, i) =>
              i === prev.length - 1 ? { ...m, streaming: false } : m
            )
          );
        }
      };

      // Auto-reconnect on drop
      ws.onclose = () => setTimeout(connect, 2000);
    };

    connect();
    return () => wsRef.current?.close();
  }, [url]);

  const sendMessage = (text: string) => {
    // Optimistic UI: show user message immediately
    setMessages(prev => [
      ...prev,
      { role: 'user', content: text },
      { role: 'assistant', content: '', streaming: true },
    ]);

    wsRef.current?.send(JSON.stringify({ message: text }));
  };

  return { messages, sendMessage };
}
Streaming Tokens in the UI
Websocket streaming is where backend and react comes in contact with each other, the backend sends a series of small JSON payloads. In react I concatenate them to the content string; react reconciler does the rest, re-rendering effectively and producing a typing animation without any third-party library.
An important UX tip is to hide the latency gap when a user sends a message and it reaches the Lambda; adding a typing indicator is a good change to do. This lets the user stick to the platform without being idle for a period of time.
E. Infrastructure as Code: AWS CDK
Opening the AWS console and setting up Lambda, Bedrock, API Gateway, DynamoDB, and IAM roles is a recipe for clustered workflow and pain.
CDK collapses everything into a single TypeScript file that is version controlled, reproducible, and deployable with a single command.
const table = new dynamodb.Table(this, 'Sessions', {
  partitionKey: { name: 'PK', type: dynamodb.AttributeType.STRING },
  sortKey:      { name: 'SK', type: dynamodb.AttributeType.STRING },
  timeToLiveAttribute: 'ttl',          // auto-expire sessions
  billingMode: dynamodb.BillingMode.PAY_PER_REQUEST,
});

const fn = new lambda.NodejsFunction(this, 'CopilotHandler', {
  entry: 'src/handler.ts',
  runtime: lambda.Runtime.NODEJS_20_X,
  timeout: cdk.Duration.seconds(28),   // just under GW 29s limit
  environment: {
    TABLE_NAME: table.tableName,
    KB_ID:      'your-knowledge-base-id',
  },
});

// Scoped permissions — principle of least privilege
table.grantReadWriteData(fn);
fn.addToRolePolicy(new iam.PolicyStatement({
  actions:   ['bedrock:InvokeModel', 'bedrock:InvokeModelWithResponseStream'],
  resources: [`arn:aws:bedrock:*::foundation-model/anthropic.claude-3-5-*`],
}));
Please take note of the IAM policy that is scoped. The Lambda can only use the Bedrock model family it requires, not all the resources in our account.
F. Checking Deployment on AWS Console
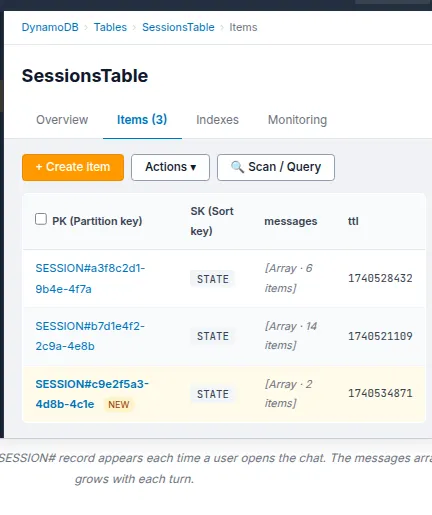
DynamoDB:
Navigate to DynamoDB → Tables and examine the SessionsTable. Press the Items button. Open our chat app and send a message now. When we refresh the table view, a new item will show up with the SESSION#<uuid> partition key.
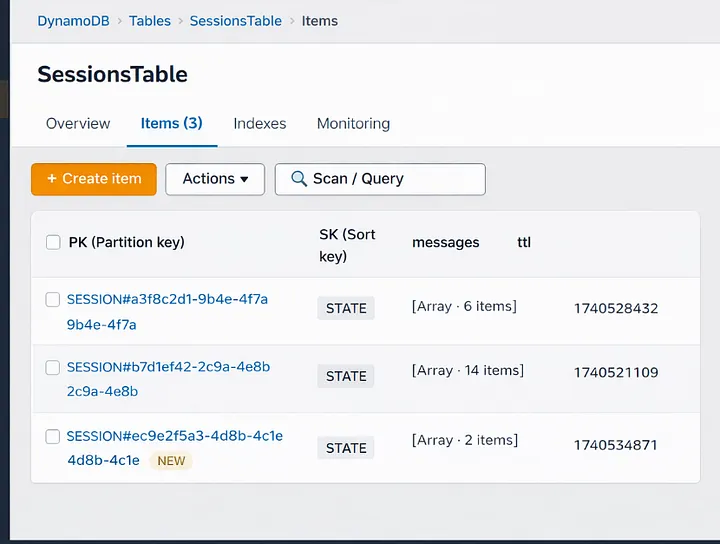
Send another message and then refresh
That item’s messages array gets bigger. This signifies that the history of the conversation is being saved correctly between turns.
If this isn’t there, it signifies that the Lambda isn’t sending anything to DynamoDB. Check out for IAM. The grantReadWriteData grant in CDK should have taken care of this, but if you did it yourself, make sure the policy is attached.
API Gateway:
OpenAPI Gateway →APIs, then pick CopilotWsApi. Click on Routes on the left side. You should see three routes: $connect, $disconnect, and sendMessage.
Every route should strictly point to your Lambda function as the integration target. If sendMessage is missing or points to the wrong Lambda, messages will not go through, and we won’t get any warning. The WebSocket connection will open, but when we type, nothing will happen.
Stages can also give you the WebSocket URL
This is what it looks like: wss://xxxxxxxxxx.execute-api.us-east-1.amazonaws.com/prod. You may check the connection layer without the front end, just copy and paste this into a WebSocket testing tool like wscat.
CloudWatch Logs:
This is the section of the stack that sticks out the most. Click on Log Groups in CloudWatch. Next, go to /aws/lambda/ChatFn. Check the most recent log stream for the planner output. We will notice a log entry like this if Bedrock decides to use the Knowledge Base feature:
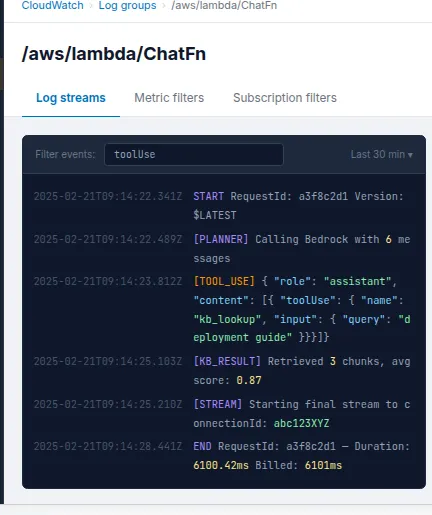
{
  "role": "assistant",
  "content": [
    {
      "toolUse": {
        "name": "kb_lookup",
        "input": { "query": "deployment guide" }
      }
    }
  ]
}
Bedrock thinks like this: the model isn’t just guessing; it’s choosing to search things up before it gives an answer. CloudWatch says that the planner loop is working well. If we only see plain text content blocks and never a toolUse block, either our tool spec isn’t set up right or the system prompt isn’t instructing the model to use tools.
We can use the string toolUse to build up a CloudWatch Metric Filter to check how often the model uses tools in all sessions. This is useful for learning how people use our knowledge base and making its content better over time.
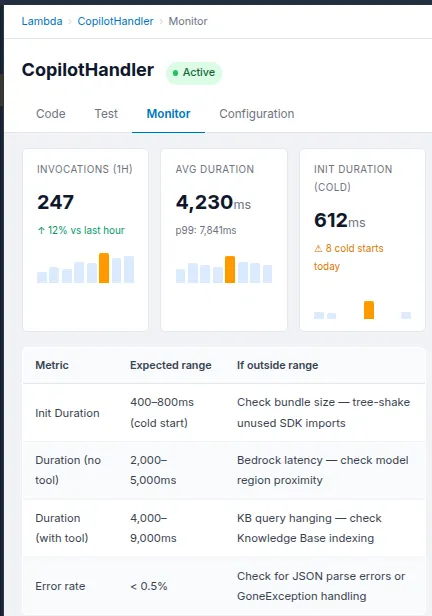
Lambda:
After that, navigate to Functions and then select ChatFn. Click on the tab that says “Monitor.” We should keep a watch on these two numbers:
The Init Duration is the time it takes to start from scratch, which is the one-time cost of putting up a new Lambda execution environment. It should take 400 to 800 milliseconds for a Node.js TypeScript function to start up with the Bedrock and DynamoDB SDKs. After that, the next calls in the same environment are warm and only need a few extra milliseconds before the first token streams.
Duration: This is the amount of time it takes for each invocation of Lambda to run. If we just want to converse, we should wait 2 to 5 seconds, most of which is Bedrock creating tokens. Add 1 to 3 seconds to the retrieval phase if a turn includes a Knowledge Base lookup. If we continually hitting the 28-second restriction, something is wrong. The planner is either repeating itself or the Knowledge Base query is stalled.
G. Challenges ahead
There are always problems when building a production system. These are the three that took me the most time:
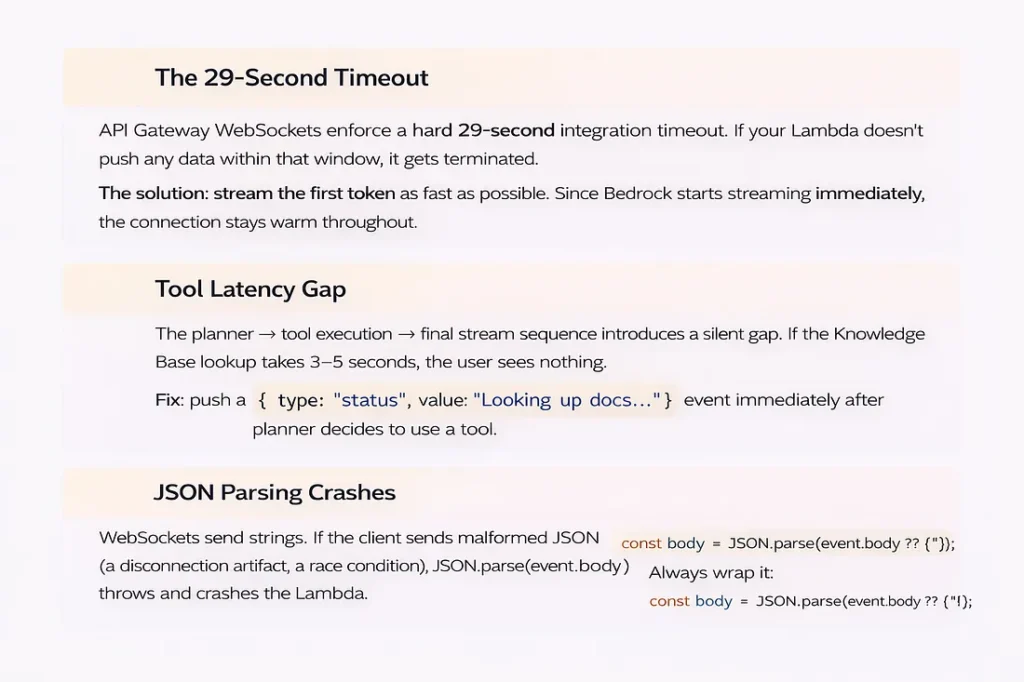
29-second break
API Gateway WebSockets have a strict 29-second integration timeout. Set the timeout for your Lambda to 28 seconds, and make sure that ConverseStreamCommand starts sending tokens right away, keeping the connection open during the response.
Gap in tool latency
When the planner decides to contact a tool, the client doesn’t get anything for 3 to 5 seconds while the Knowledge Base lookup executes. Send a status message right away:
{ type: “status”, value: “Searching knowledge base…” }
Without it, the UI looks like it’s frozen, and users think something is wrong.
JSON parsing crashes
WebSocket messages are just plain text. Always utilize defensive parsing with a backup plan: JSON.parse(event.body ?? ‘{}’). Before you trust any field, be sure the shape is correct. Your Lambda should never crash because of a single bad message.
Disconnects in middle of stream
When a user closes the tab in the middle of a stream, API Gateway sends a GoneException on the next PostToConnection operation. If you catch it in your push helper, break out of the streaming loop right away. If you don’t, Lambda will keep running and charging you for a dead connection
Cost of context window
If you submit the entire history on each round, the token cost increases linearly with the duration of the session. The loadAndSave method above has a 20-message sliding window that keeps this from getting too big. For really long sessions, the next step is to include a background summary process that combines old history into one system message.
Warning
Sending Bedrock the whole conversation history with every message means that the cost of tokens goes up as the session goes on. Use the sliding window method in production and optimize it for the cumulative chats.
H. Future Roadmap
If the foundation is built solidly, we can easily stack scalability on top of it.

Here’s where to take it next:
Cognito Auth
Put Cognito User Pools inside the WebSocket authorizer. Before Lambda is called, each connection is checked.
Advanced RAG
Instead of Bedrock Knowledge Bases, use a hybrid search strategy with dense vectors (OpenSearch kNN) and BM25 lexical search to get more results.
Human-in-the-Loop
Use Amazon Connect or a custom ticketing system to find low-confidence responses and send them to a queue for human agents
Multi-Region
Each region utilizes a combination of DynamoDB Global Tables and Lambda. The stateless Lambda design makes this straightforward; the session state lives in DynamoDB.
Agent Memory
Persist key user facts across sessions in DynamoDB not just the rolling conversation window. Personalization without fine-tuning.
Usage Analytics
Stream CloudWatch metrics into a dashboard: tool invocation rate, avg session length, cold start frequency, cost per session.
Conclusion
Serverless AI is production-ready: Bedrock’s controlled model access, API Gateway WebSockets for real-time push, Lambda for ephemeral compute, and DynamoDB for stateful memory create a production-grade system without a server.
I can state that the end result is not just a chatbot after constructing it. It’s a built-in, smart interface that feels like it’s been waiting for a long time.
The post Architecting a Real-Time, Serverless AI Chat Application with Amazon Bedrock appeared first on Awan.
]]>The post HTML to PDF JavaScript – Example with Code appeared first on Awan.
]]>For a project, I needed to convert some HTML to PDF using JavaScript.
It was a basic site. There would be a form inside a div, and all I needed to do was generate the pdf out of that div and show it in a new tab. All in the client side, no backed server.
The main tasks here were:
- To generate the HTML out of PDF.
- To show the generated pdf in a new tab.
HTML to PDF using JavaScript
So, the first part here. Pretty simple HTML to PDF.
A quick Google Search and I came upon this html2pdf library.
As stated in its documentation “html2pdf.js converts any webpage or element into a printable PDF entirely client-side using html2canvas and jsPDF.”
That was all I wanted. There were lots of other tutorials out there on it as well.
It all worked and it downloaded the pdf as well. But the pdf was blank.
html2pdf generate and return Blank or Empty PDF
That was a bit of weird. A few searches and turns out, there were some issues with the version.
Used the 0.9.3 version and issue solved.
CDN Link: https://cdnjs.cloudflare.com/ajax/libs/html2pdf.js/0.9.3/html2pdf.bundle.min.js
It printed the div with all the contents.
JavaScript Code:
let element = document.getElementById('div-to-print')

html2pdf().from(element).save();
So, it saved / downloaded the pdf file.
But I didn’t need it to be downloaded, I need it to show in a new browser tab.
Open PDF in new tab instead of Download – JavaScript – using Blob
We need to create a new blob from the pdf file and create new URL to show that file. Reading this issue, I got to know that using html2pdf promise API, we could get the file instead of downloading it. And then use it to create the blob.
How we would do it with a normal file.
const filed = document.querySelector('input[type=file]').files[0];
let file = new Blob([filed], { type: 'application/pdf' });
let fileURL = URL.createObjectURL(file);
window.open(fileURL);
Using it with the pdf generated from HTML by html2pdf:
async function printHTML() {

let worker = await html2pdf().from(element).toPdf().output('blob').then((data) => {
    console.log(data)
    let fileURL = URL.createObjectURL(data);
    window.open(fileURL);
    })
}
It worked. The PDF was now not downloading, but being opened in new tab. And now, I styled the div using CSS. But there was problem.
html2pdf CSS Not Working
The CSS I had written for the div was not loading up. The CSS was not working with html2pdf.
A few searches, and found out that external CSS was not being loaded up by html2css. So, only HTML was being printed. Not the CSS.
The workaround was to write CSS in HTML with style tag or to use inline CSS. Also, few workarounds in this issue.
Finally the PDF was being generated as I needed. Just one more caveat.
html2pdf PDF Text not Selectable
The texts in PDF were not being selectable. Now this might not be an requirement for most of the projects, but I needed it.
html2pdf generates pdf as canvas image. It had been using html2canvas all along. So, there were no texts. They were just canvas images out of HTML being converted to PDF.
I had to search for another library. Why not use the one I had been using all the way along under the hood.
jsPDf is used by html2pdf. So, I tried for jsPDF.
doc.fromHTML(document.getElementById("div-to-print"),
     22, // Margins
     17,
     {'width': 400},
     function (a) {
          // doc.save("HTML2PDF.pdf"); // To Save
          let blobPDF = new Blob([doc.output()], { type: 'application/pdf' });
          let blobUrl = URL.createObjectURL(blobPDF);
          window.open(blobUrl);
});
And all good here.
Open PDF in new tab instead of downloading from jsPDF
As for opening in new tab instead of downloading PDF from jsPDF, similar as in html2pdf case, in the callback function, we can pass doc.output() to create the blob.
And the PDF being generated was in text, not images.
So, all good and I added the CSS. But.
jsPDF CSS not Working
Turns out jsPDF does not work with CSS. And to make it work with CSS, it was to use html2canvas. And that’s what html2pdf had been doing all along.
We can easily pass margins in the jsPDf. And also it supported the html attributes as <font size=”3″ color=”red”>This is p one</font> as old times. But the reason I was needing CSS was because the div I was trying to print had two divs inside of it. And one of them needed to be centered aligned both vertically and horizontally.
The next thing I was searching was “How to center align div child with HTML only without using CSS”.
Turns out there was text API in the jsPDF that would take multiple parameters and make the job easy without CSS.
API.text = function(text, x, y, flags, angle, align);Multiple such texts and the job would be done.
But instead of writing multiple texts, if I could do it with multiple HTML elements with withHTML function, then that could be great. Turns out it works.
By adding another HTML element block in callback of function adding previous block, it could be done.
A few more calculations, and using the calculated values as margins, it could be perfectly center aligned.
This, this and this were helpful.
let pageHeight = doc.internal.pageSize.height || doc.internal.pageSize.getHeight()
let pageWidth = doc.internal.pageSize.width || doc.internal.pageSize.getWidth()
let recipientBlock = document.querySelector(".div2-block")
let rHeight = recipientBlock.clientHeight
let rWidth = recipientBlock.clientWidth

doc.fromHTML(document.querySelector(".div1-block"),
   22, 17, { 'width': 200, 'height': 200 },
   function (a) {
      doc.fromHTML(document.querySelector(".div2-block"),
          pageWidth / 2 - rWidth / 4,
          pageHeight / 2 - rHeight / 4,
          { 'width': 200, 'height': 200 },
          function (a) {
              let blobPDF = new Blob([doc.output()], { type: 'application/pdf' });
              let blobUrl = URL.createObjectURL(blobPDF);
              window.open(blobUrl);
                });
        });
Finally, around the end of the project.
Finally, one more thing was to do. That was to set the width and height of the final pdf.
It was given there in documentation and pretty easy.
Pass the Height and Width as an array and specify the unit. For some reasons, unit: “px” for pixels was having problems. So, used the “pt”. It worked.
let doc =new jsPDF({orientation: 'l', unit: 'pt', format: [widthForJsPDF, heightForJsPDF]})So, this is how a project is done, converting HTML to PDF using JavaScript.
And all I did was Google searches.
But how it all works? Want to know? Click here.
The post HTML to PDF JavaScript – Example with Code appeared first on Awan.
]]>The post How to Build a Secure and Advanced Auth System in AWS Amplify with OAuth & Federated Identities appeared first on Awan.
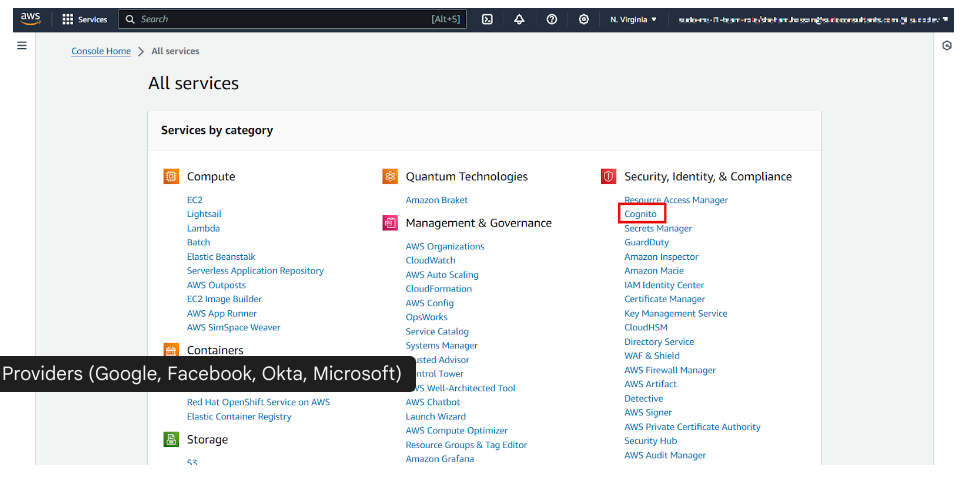
]]>Imagine signing into an app and instantly accessing personalized content—no repeated logins, no security headaches. Now, imagine doing this securely across multiple platforms while integrating Google, Facebook, or Okta as authentication providers.
That’s exactly what AWS Amplify + Cognito enables, but basic auth flows aren’t enough when dealing with enterprise-grade security, multi-tenant apps, and real-world scalability.
Whether you’re building a React web app, a React Native mobile app, or a hybrid solution, you need more than just “Sign in with Google”—you need:
- Custom OAuth providers (Google, Facebook, Okta, Microsoft)
- Federated identities for seamless cross-platform authentication
- Secure token management to prevent unauthorized access
In this guide, we’ll go beyond the basics, diving deep into Cognito’s advanced authentication capabilities, setting up OAuth & federated identities, and ensuring top-notch security for your authentication flows.
By the end of this tutorial, you’ll have a robust authentication system in AWS Amplify that not only improves user experience but also meets modern security standards. So, let’s get started!

Understanding Authentication & Authorization in AWS Amplify
Authentication vs. Authorization – What’s the Difference?
Before diving into AWS Amplify’s authentication system, it’s crucial to understand two often-confused terms:
- Authentication = Who you are (verifying user identity)
- Authorization = What you can access (determining permissions)
For example, when logging into Netflix, your email & password verify who you are (authentication), but whether you can watch 4K content or just HD depends on your subscription level (authorization).
A robust system needs to ensure users not only log in securely but also access only what they are permitted to.
How AWS Amplify Handles Authentication?
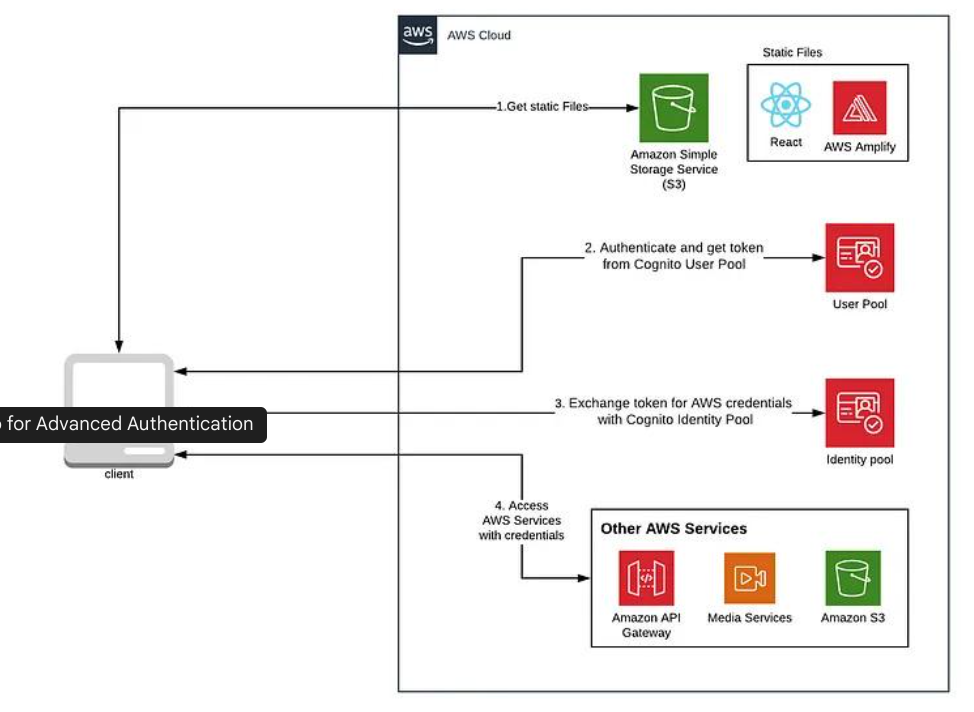
AWS Amplify simplifies authentication with Amazon Cognito, a managed identity service that eliminates manual backend work for developers. Here’s how it works:
Cognito User Pools → Handles user sign-ups, sign-ins, and multi-factor authentication (MFA).
Cognito Identity Pools → Grants users access to AWS resources (S3, DynamoDB, API Gateway, etc.).
AWS Amplify Auth → Provides an easy way to integrate authentication into React, React Native, and Expo apps.
User Pools vs. Identity Pools – When to Use What?
| Feature | Cognito User Pool | Cognito Identity Pool |
| Purpose | Authenticates users (sign-in, sign-up) | Grants access to AWS services |
| User Management | Yes (email, phone, social login) | No |
| Federation (Google, Facebook, etc.) | Yes | Yes |
| IAM Role Assignment | No | Yes (fine-grained access control) |
Real-World Use Case
- If you’re building an app and need to manage users who log in with email, Google, or Facebook, use User Pools.
- If you want authenticated users to access AWS services (S3, Lambda, etc.), use Identity Pools.
Why This Matters?
- Without User Pools, there’s no authentication—anyone could access your app.
- Without Identity Pools, users can log in but can’t interact with AWS resources securely.
- Combining both creates a secure and scalable authentication system.
Next Up: We’ll set up Cognito User Pools & Identity Pools step by step!
Setting Up Cognito for Advanced Authentication
Now that we understand how authentication works in AWS Amplify, let’s get hands-on and configure Cognito User Pools, Identity Pools, and secure token management for a production-ready authentication system.
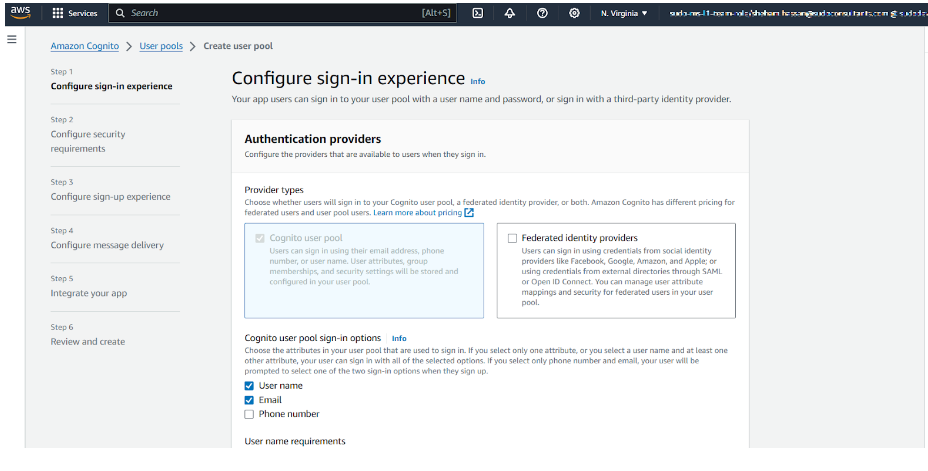
i) Creating a Cognito User Pool
A Cognito User Pool acts as a user directory where users can sign up, sign in, and manage their accounts. Let’s create one.
Step 1: Create a New User Pool
- Go to the AWS Cognito Console → Click “Create a user pool.”
- Enter a Pool name (e.g., MyAppUserPool).
- Choose “Email” as the primary sign-in method.
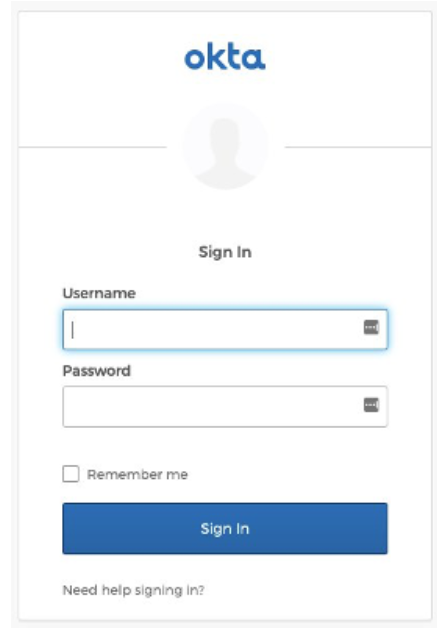
Step 2: Enable OAuth Providers (Google, Facebook, Okta, Microsoft)
To allow users to sign in with Google, Facebook, Okta, or Microsoft, follow these steps:
- In the “Federation” section, select “Identity providers”.
- Choose Google, Facebook, Okta, or Microsoft and enter the required client ID & secret.
- Then, configure callback URLs (e.g., https://myapp.com/callback).
Step 3: Enable Multi-Factor Authentication (MFA) & Strong Password Policies
To enhance security, enable MFA and set strong password policies:
- Enable MFA (via SMS or authenticator apps).
- Set password rules (minimum length, uppercase, special characters).
- Allow account recovery using email or phone number.
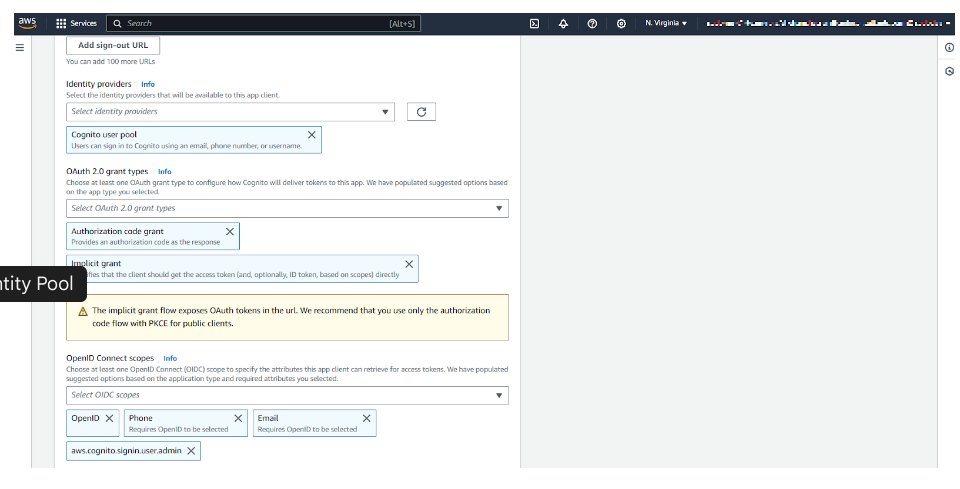
Step 4: Create a Cognito App Client
To allow applications to authenticate users, create an App Client:
- In App integration, click “Add an app client.”
- Enable OAuth 2.0 and select Authorization code grant.
- Choose allowed OAuth scopes:
- openid (User identity verification)
- email (Access to user email)
- profile (Access to user profile)
- Copy the App Client ID and Client Secret—we’ll need them in Amplify.
ii) Configuring Identity Pools for Federated Access
Cognito Identity Pools allow authenticated users to access AWS services (like S3, DynamoDB, Lambda). Let’s configure them.
Step 1: Create an Identity Pool
- Go to AWS Cognito → Click “Manage Identity Pools” → Create a new identity pool.
- Enable Authenticated & Unauthenticated identities.
- Link the User Pool ID (from the previous step).
Step 2: Assign IAM Roles for Different User Types
To control what users can do, assign IAM roles based on user type:
- Admin Users → Full access to AWS services
- Regular Users → Restricted access
- Guests → Limited public access
Example IAM Policy for authenticated users (S3 read & write access):
JSON Configuration File
| { “Version”: “2012-10-17”, “Statement”: [ { “Effect”: “Allow”, “Action”: [“s3:GetObject”, “s3:PutObject”], “Resource”: “arn:aws:s3:::my-secure-bucket/*” } ]} |
iii) Handling Token Management Securely
Step 1: Storing Tokens Securely in a React Native App
To store tokens securely in React Native/Expo, use expo-secure-store:
Install Secure Store by using this command:
| expo install expo-secure-store |
Secure the token securely by using the below config file:
| import * as SecureStore from ‘expo-secure-store’; async function saveToken(token) { await SecureStore.setItemAsync(‘userToken’, token);} async function getToken() { return await SecureStore.getItemAsync(‘userToken’);} |
Step 2: Handling Token Refresh & Expiration
When tokens expire, users need to refresh them without logging in again. Amplify handles this automatically, but you can manually refresh tokens using:
| import { Auth } from ‘aws-amplify’; async function refreshSession() { const session = await Auth.currentSession(); const newToken = session.getIdToken().getJwtToken(); return newToken;} |
Step 3: Best Practices for Secure Authentication Flows
You must:
- Never store tokens in AsyncStorage or localStorage (they are vulnerable to XSS attacks).
- Rotate OAuth secrets regularly to prevent misuse.
- Enable account lockout after multiple failed login attempts.
- Use HTTPS everywhere—never send tokens over HTTP.
Next Steps
Now that we have Cognito User Pools & Identity Pools set up, the next step is to integrate this authentication system into a React app using AWS Amplify!
Implementing Secure Authentication in a React App
Now that we’ve set up Cognito User Pools & Identity Pools, it’s time to integrate authentication into a React application using AWS Amplify. In this section, we’ll:
- Set up Amplify in a React project
- Integrate OAuth & federated authentication (Google, Facebook, Okta, Microsoft)
- Secure API requests using Cognito & IAM roles
i) Setting Up AWS Amplify in a React Project
First, let’s install and configure AWS Amplify in our React app.
Step 1: Install AWS Amplify
Run the following command in your React project directory:
| npm install aws-amplify @aws-amplify/ui-react |
Step 2: Configure Amplify with Cognito User Pools
Create an Amplify configuration file (aws-exports.js) with Cognito details.
| import Amplify from ‘aws-amplify’; Amplify.configure({ Auth: { region: “us-east-1”, // Replace with your AWS region userPoolId: “us-east-1_XXXXXXX”, userPoolWebClientId: “XXXXXXXXXXXXXXXXX”, identityPoolId: “us-east-1:XXXXXXXX-XXXX-XXXX-XXXX-XXXXXXXXX”, oauth: { domain: “your-auth-domain.auth.us-east-1.amazoncognito.com”, scope: [“email”, “profile”, “openid”], redirectSignIn: “http://localhost:3000/”, redirectSignOut: “http://localhost:3000/”, responseType: “code”, }, },}); |
“Note: Replace userPoolId, userPoolWebClientId, and identityPoolId with your actual Cognito details.”
Step 3: Initialize Amplify in Your React App
In index.js (or App.js), import and initialize Amplify:
| import React from “react”;import ReactDOM from “react-dom”;import Amplify from “aws-amplify”;import awsExports from “./aws-exports”;import App from “./App”; Amplify.configure(awsExports); ReactDOM.render(<App />, document.getElementById(“root”)); |
ii) Adding OAuth & Federated Authentication
Now, let’s implement a login UI that supports:
- Google, Facebook, Okta, and Microsoft OAuth
- Cognito sign-up and sign-in
Step 1: Create a Login Component
In Login.js, add the following:
| import React from “react”;import { AmplifySignOut, withAuthenticator } from “@aws-amplify/ui-react”; function Login() { return ( <div> <h2>Welcome to Secure App</h2> <AmplifySignOut /> </div> );} export default withAuthenticator(Login); |
This will:
- Automatically render the Cognito sign-in/sign-up form
- Enable federated sign-in for OAuth providers
Step 2: Customize the Sign-In UI
To allow Google, Facebook, or Okta login, modify aws-exports.js:
| oauth: { domain: “your-auth-domain.auth.us-east-1.amazoncognito.com”, scope: [“email”, “profile”, “openid”], redirectSignIn: “http://localhost:3000/”, redirectSignOut: “http://localhost:3000/”, responseType: “code”, options: { Google: true, Facebook: true, Okta: true, Microsoft: true, }}, |
iii) Securing API Requests with Cognito & IAM Roles
Once a user logs in, we need to secure API requests using Cognito tokens.
Step 1: Install GraphQL API & Amplify API Module
| npm install @aws-amplify/api |
Step 2: Configure API Authorization
Modify aws-exports.js:
| API: { endpoints: [ { name: “myAPI”, endpoint: “https://your-api-endpoint.amazonaws.com/”, region: “us-east-1”, authorizationType: “AMAZON_COGNITO_USER_POOLS”, }, ],}, |
Step 3: Make Secure API Requests
Use Cognito tokens to call a protected API endpoint.
| import API from “@aws-amplify/api”; async function fetchData() { const apiName = “myAPI”; const path = “/data”; const requestOptions = { headers: { Authorization: `Bearer ${(await Auth.currentSession()).getIdToken().getJwtToken()}` }, }; const response = await API.get(apiName, path, requestOptions); console.log(response);} |
End-Result:
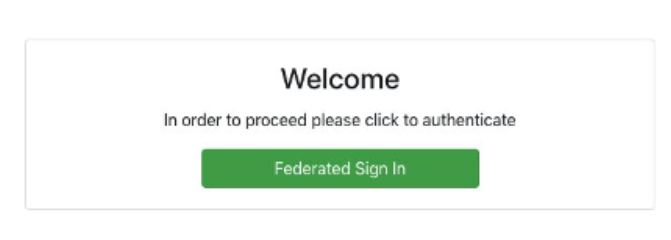
Then, the user will receive the following response:
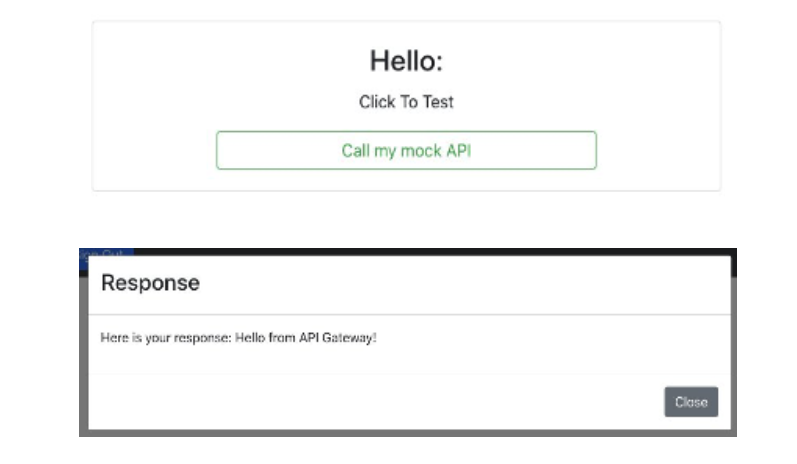
Why is this important? This ensures that only authenticated users with valid Cognito tokens can access sensitive API data.
Next Steps
Now that we have OAuth & Cognito authentication fully integrated into React, the final step is to apply security best practices to make our auth system even more secure!
Best Practices for Secure Authentication
Ensuring secure authentication is crucial to protecting against token theft, brute-force attacks, and unauthorized access. Below are key best practices for strengthening AWS Amplify authentication.
1) Secure Token Storage (React Native & Web)
Tokens grant access to APIs and user data—compromised tokens lead to security risks.
- Web Apps: Store tokens in HttpOnly cookies via a backend service. Avoid localStorage or sessionStorage (XSS risk).
- React Native: Use SecureStore (Expo) or encrypted AsyncStorage.
- Alternative: Store tokens in memory for non-persistent sessions.
2) Fine-Grained Access Control with IAM & Cognito
Ensure users only have necessary permissions using RBAC and Cognito Groups.
- Cognito Groups: Define roles like Admin, User, etc.
- IAM Policies: Attach policies restricting API access.
3) Prevent Brute Force & Account Takeover
- Enable MFA: Set as required in Cognito → MFA Settings (SMS, Email, or OTP).
- Account Lockout & Rate Limiting: Configure Cognito to limit failed login attempts & enforce strong password policies (8+ chars, special symbols, uppercase).
4) Rotate OAuth Secrets & Tokens
To prevent credential compromise:
- Use short-lived access tokens (1-hour expiration).
- Refresh tokens securely.
- Revoke compromised tokens immediately in Cognito.
5) Audit & Monitor Authentication Activity
- Enable AWS CloudTrail for sign-in tracking.
- Use Amazon GuardDuty for anomaly detection.
- Monitor failed login attempts in Cognito and set up SNS alerts for unusual activity.
Conclusion
Advanced authentication is crucial for securing cloud-based apps. By leveraging AWS Amplify, Cognito, and OAuth providers, you can build a scalable, secure authentication system while ensuring a smooth user experience.
Key Takeaways:
Here are some key takeaways:
- Use Secure Storage for tokens (HttpOnly cookies, SecureStore)
- Implement RBAC with Cognito Groups & IAM Policies
- Enforce MFA & Account Lockout to prevent brute-force attacks
- Rotate OAuth secrets & monitor authentication logs
With these best practices, your AWS Amplify authentication system will be secure, scalable, and future-proof.
The post How to Build a Secure and Advanced Auth System in AWS Amplify with OAuth & Federated Identities appeared first on Awan.
]]>The post Optimizing Costs and Enhancing Performance: Leveraging a Single Load Balancer for Multiple Websites appeared first on Awan.
]]>In today’s rapidly evolving digital landscape, website performance and cost efficiency are critical factors for businesses aiming to stay competitive. Load balancing is a fundamental technique used to distribute incoming network traffic across multiple servers, ensuring optimal resource utilization and preventing server overload. In this blog, we’ll explore how you can maximize cost savings by using a single load balancer to efficiently manage traffic for multiple websites.
The Importance of Load Balancing:
Load balancing plays a pivotal role in ensuring high availability and reliability for websites. By distributing incoming traffic across multiple servers, a load balancer not only enhances performance but also minimizes the risk of server failures. Traditionally, businesses would deploy separate load balancers for individual websites, incurring additional costs for hardware, software, and maintenance. However, a more cost-effective approach involves using a single load balancer to manage traffic for multiple websites.
Benefits of Using a Single Load Balancer:
- Cost Savings: Consolidating multiple websites onto a single load balancer eliminates the need for redundant infrastructure. This results in significant cost savings on hardware, software licenses, and maintenance.
- Simplified Management: Managing a single load balancer is inherently simpler than managing multiple instances. Centralized configuration and monitoring streamline administrative tasks, reducing the risk of errors.
- Improved Resource Utilization:By efficiently distributing traffic, a single load balancer ensures that each server operates at an optimal capacity. This not only improves performance but also maximizes the utilization of resources.
- Enhanced Security: Centralized security configurations at the load balancer level can be more effectively managed and monitored. This helps in implementing consistent security policies across all websites.
Step 1: Creating EC2 Instances
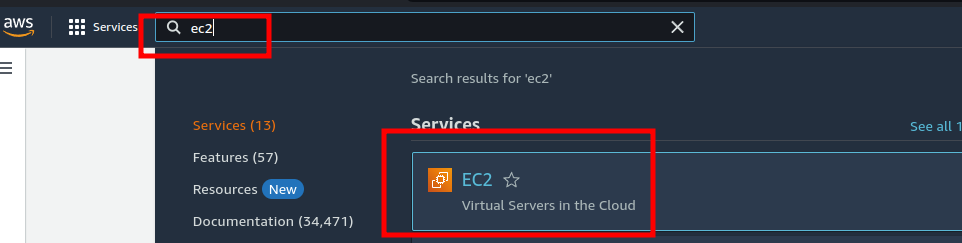
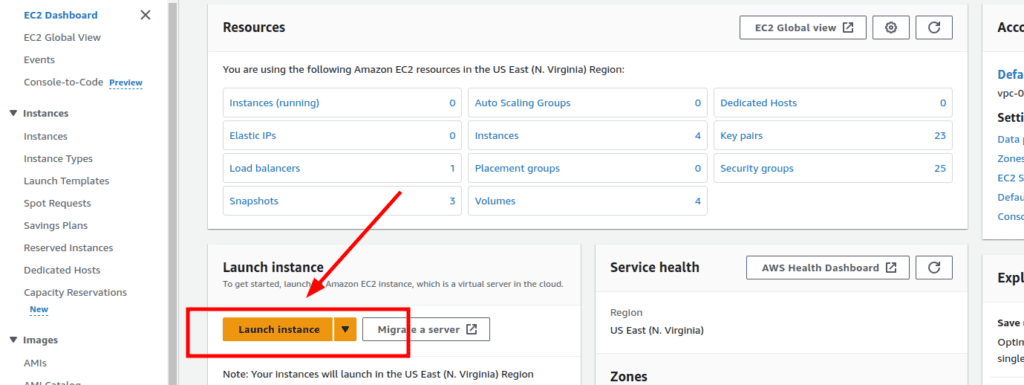
1.Accessing AWS Management Console:
- Go to the AWS Management Console and select EC2 from the services menu.
2.Launching the First Instance:
- Click on “Launch Instance” to begin the process.
- Provide a name for your server, for example, “Mywebsite-1.”

3.Choosing Amazon Machine Image (AMI):
- Select an Amazon Machine Image. For this example, we are using Amazon Linux.
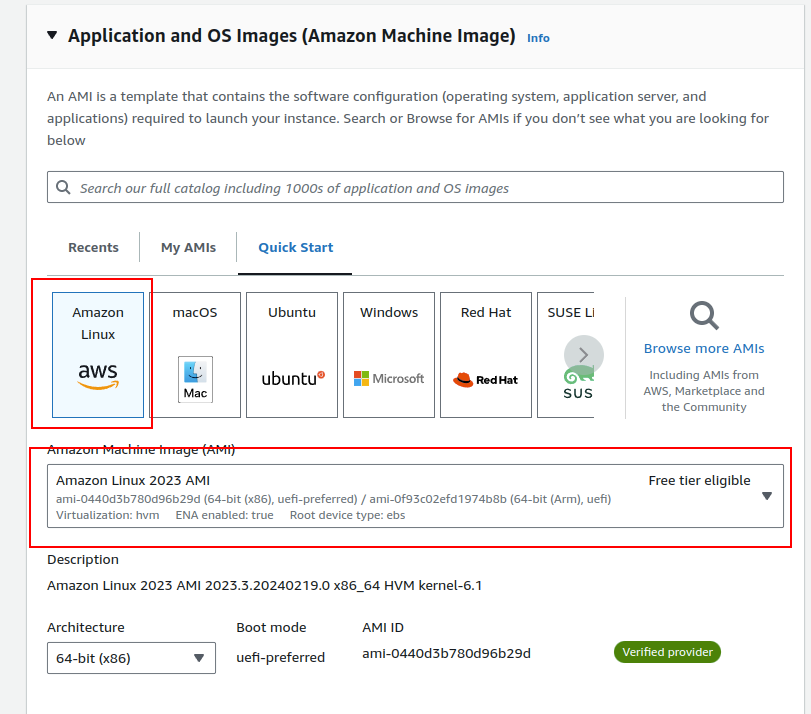
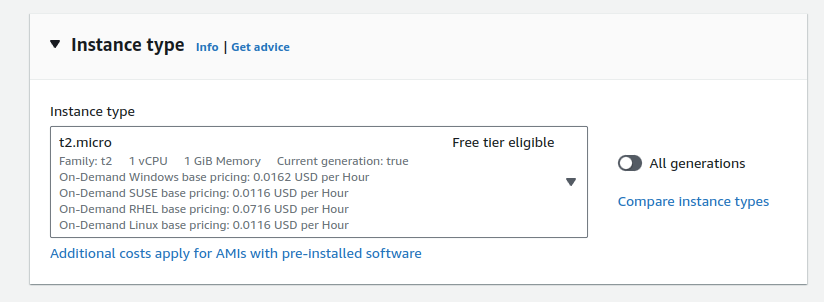
4.Selecting Instance Type:
- Choose an instance type. We recommend t2.micro for this tutorial as it falls within the AWS Free Tier.
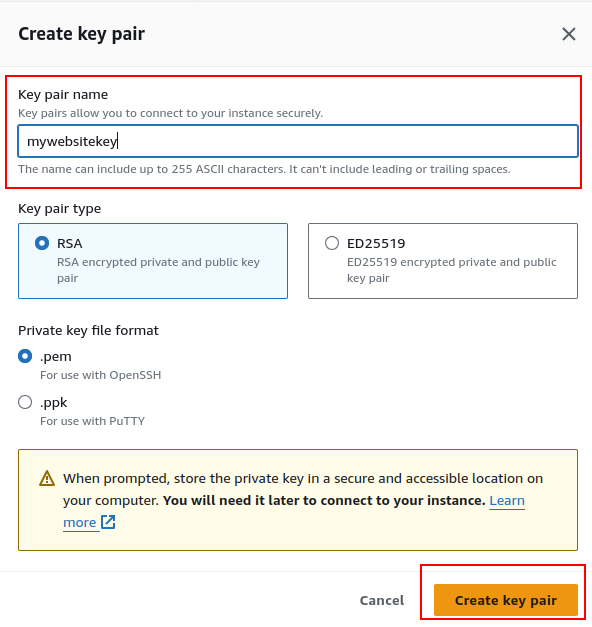
5.Setting Up Key Pair:
- Create a new key pair by clicking “Create a new pair” and giving it a name.
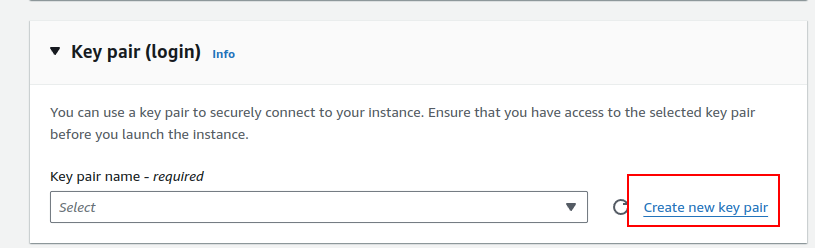
- For Windows, use PPK, and for Linux and Mac, use PEM. Click “Create key pair.”
6.Configuring Network and Security:
- Use the default VPC for network settings.
- In the security group, allow SSH, HTTP, and HTTPS traffic.

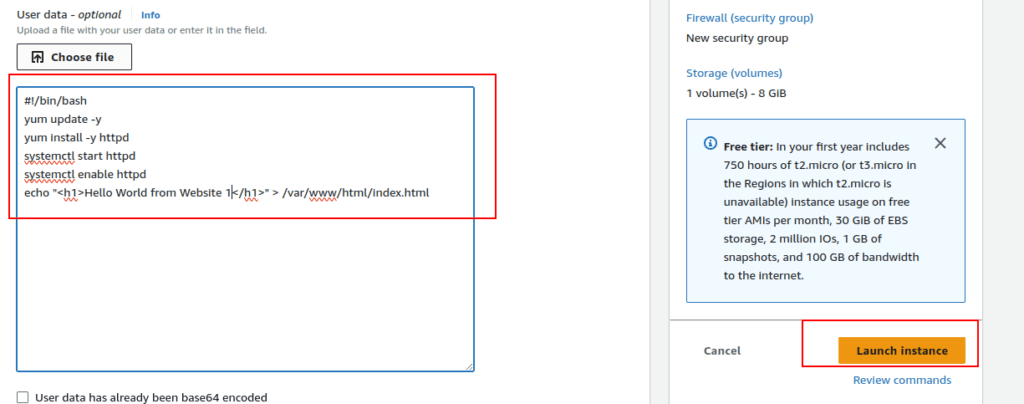
7.Advanced Options and User Data:
- Expand the advanced options and use the following user data:
| #!/bin/bashyum update -yyum install -y httpdsystemctl start httpdsystemctl enable httpdecho “<h1>Hello World from Website-1</h1>” > /var/www/html/index.html |
- Launch the instance.
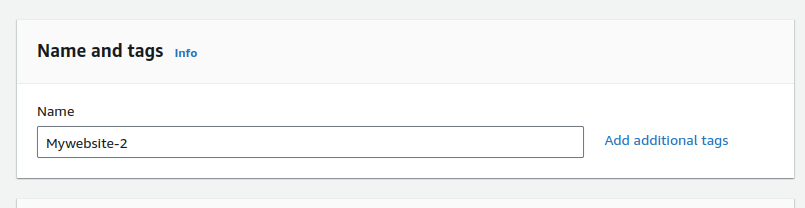
8. Launching the Second Instance:
- Repeat the process to launch the second instance, but give it a different name (e.g., “Mywebsite-2”).
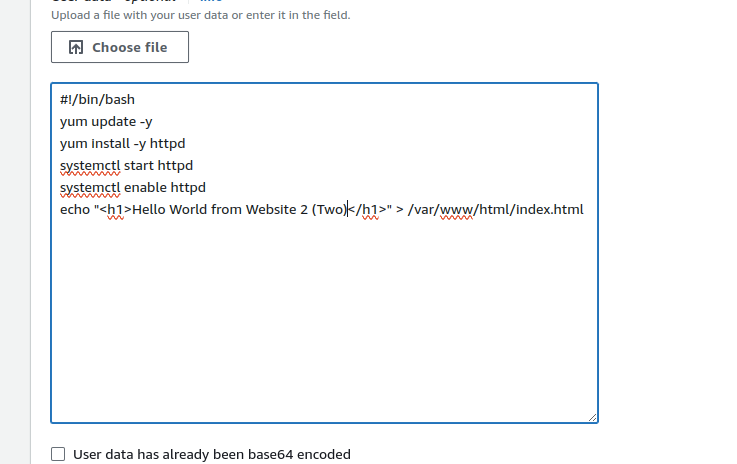
- Use the following user data for the second instance:
| #!/bin/bashyum update -yyum install -y httpdsystemctl start httpdsystemctl enable httpdecho “<h1>Hello World from Website 2 Two (Two) </h1>” > /var/www/html/index.html |
- Launch the instance.
Step 2: Creating Target Groups
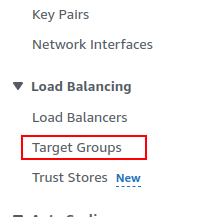
1.Accessing Target Groups:
- Navigate to the EC2 Dashboard and click on “Target Groups” in the left navbar.
2.Creating Target Group for Mywebsite-1:
- Click on “Create Target Group.”

- Choose the target type as “Instance” and assign a name, such as “Mywebsite-1.”
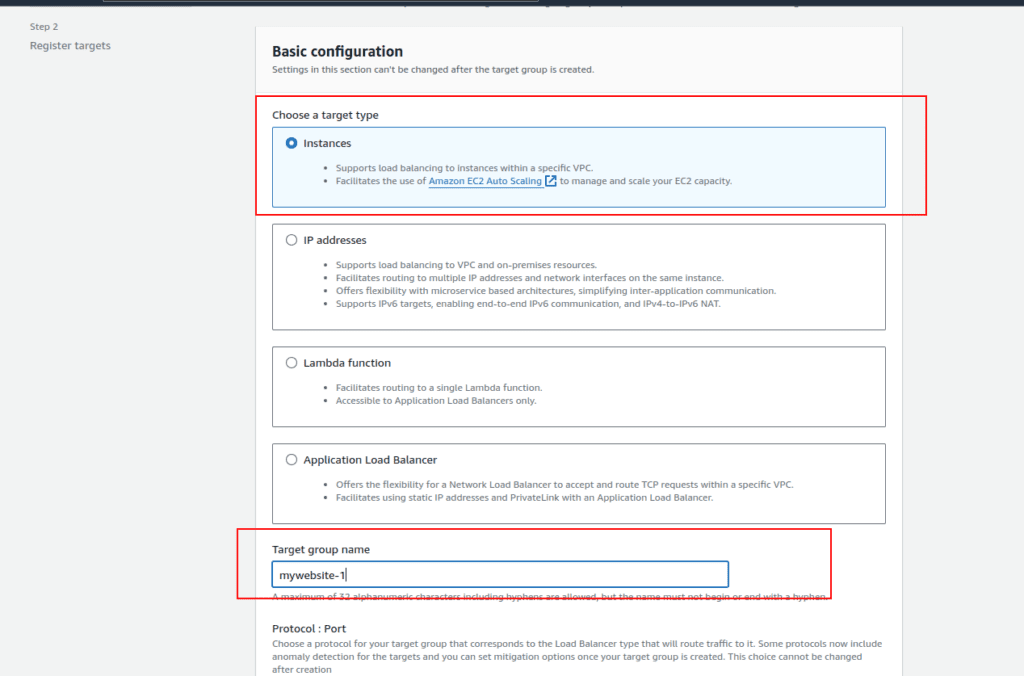
- Select the Mywebsite-1 instance and click “Include as Pending” below.
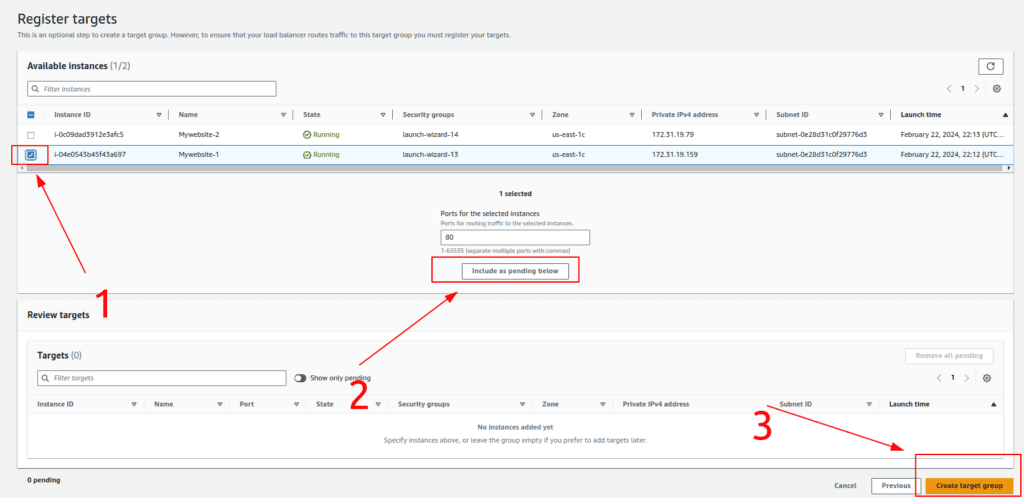
- Complete the creation of the target group.
3.Creating Target Group for Mywebsite-2:
- Repeat the process to create another target group for Mywebsite-2.
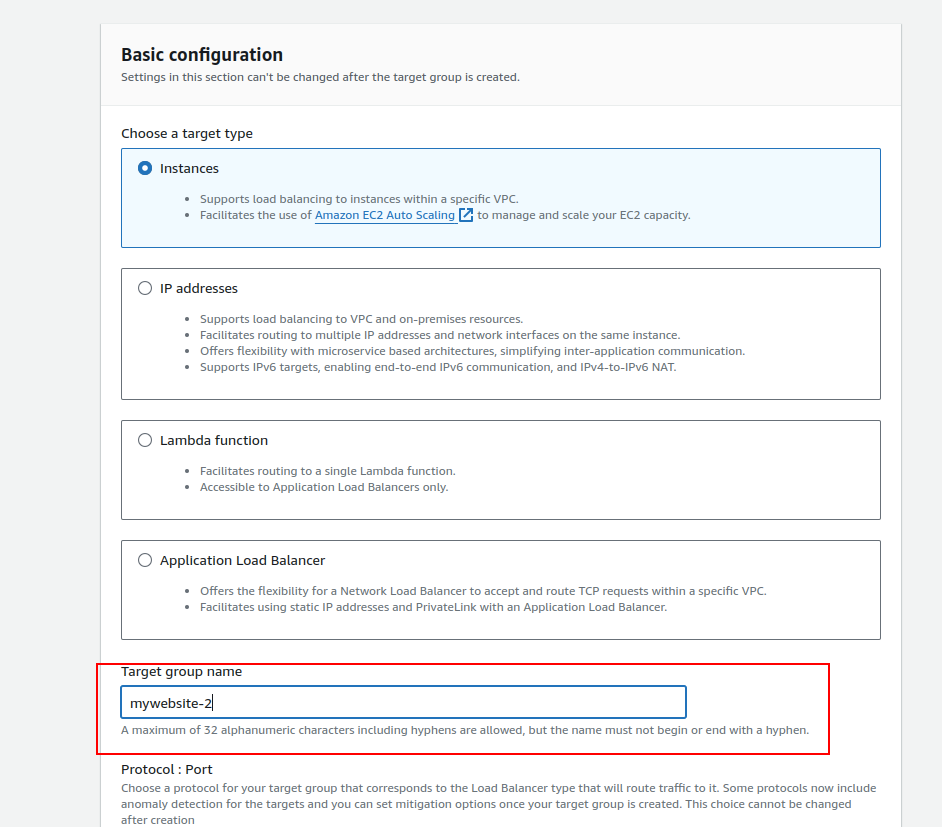
- Choose a different name (e.g., “Mywebsite-2”) and include the Mywebsite-2 instance.
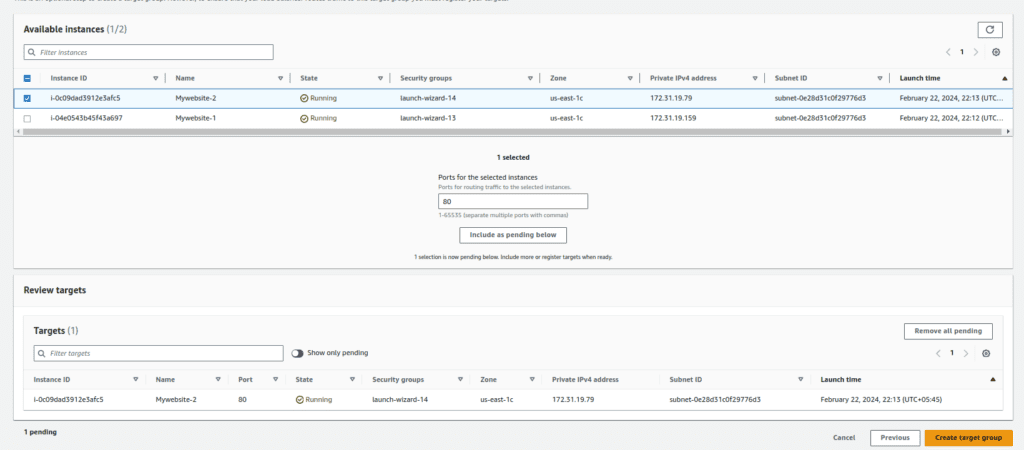
- Complete the creation of the second target group.
Step 3: Creating Load Balancer
1. Accessing Load Balancer:
- Click on “Load Balancers” in the left navbar.
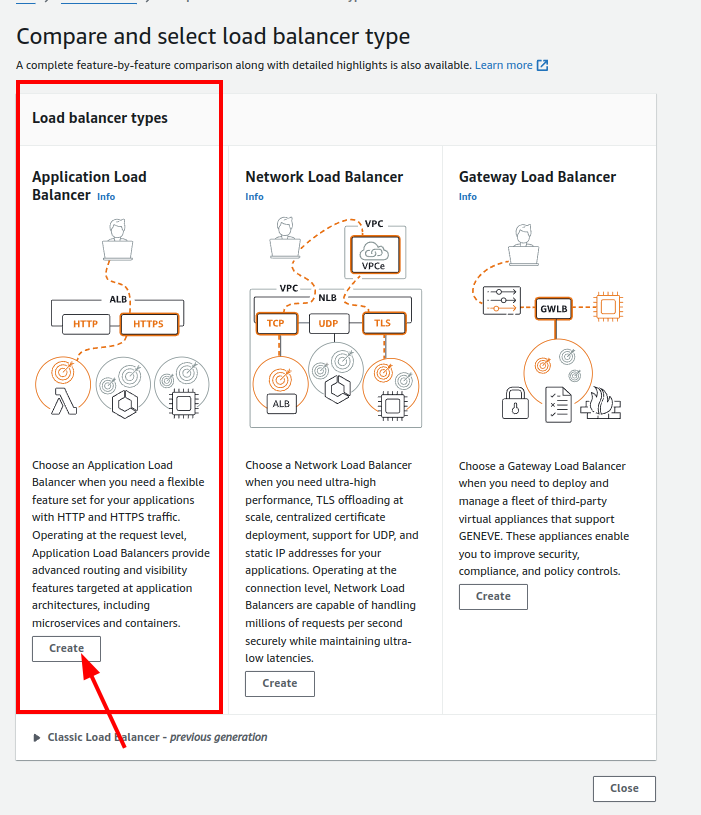
2.Creating Application Load Balancer:
- Click on “Create Load Balancer.”

- Choose “Application Load Balancer.”
3.Configuring Load Balancer Settings:
- Provide a name for your load balancer.
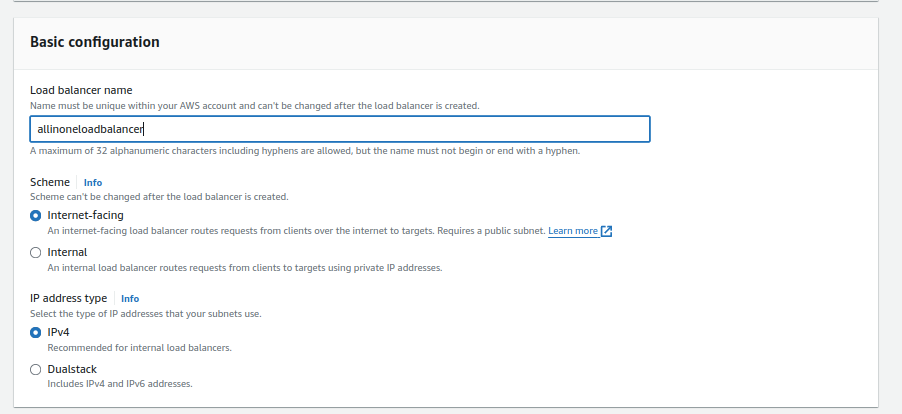
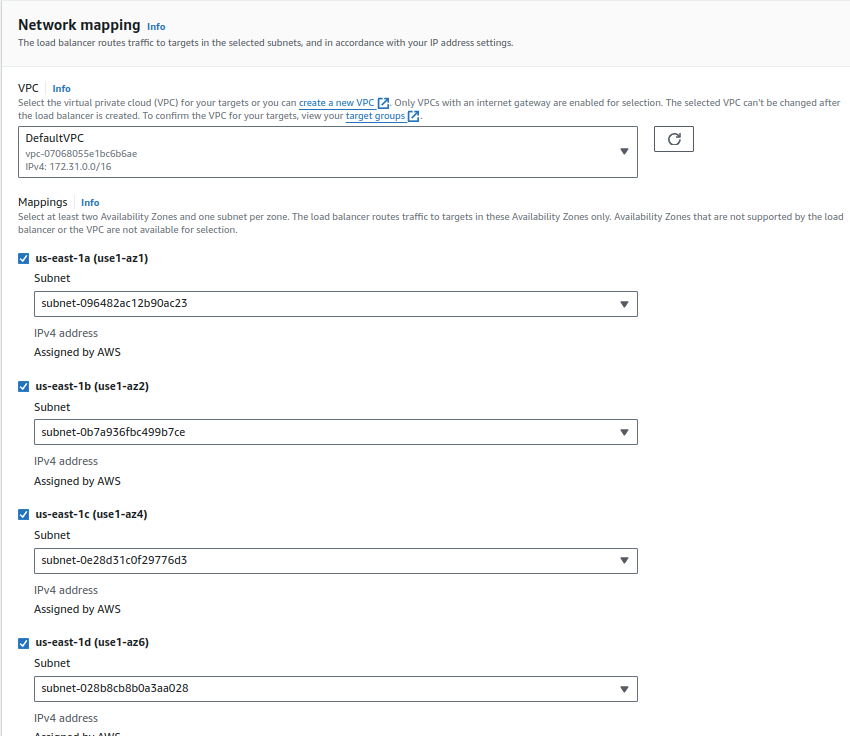
- Select the VPC and at least two subnets. You can use the default VPC or your custom VPC.
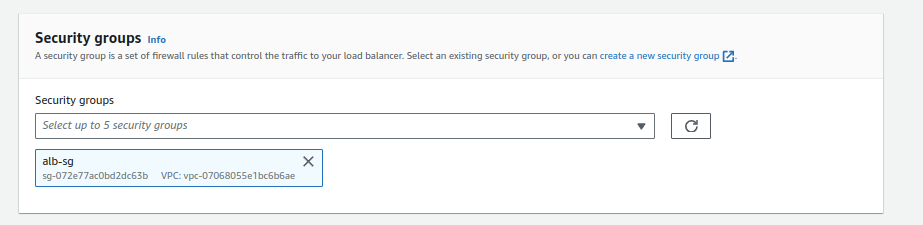
- Choose a security group with ports 80 and 443 open (e.g., “alb-sg”).
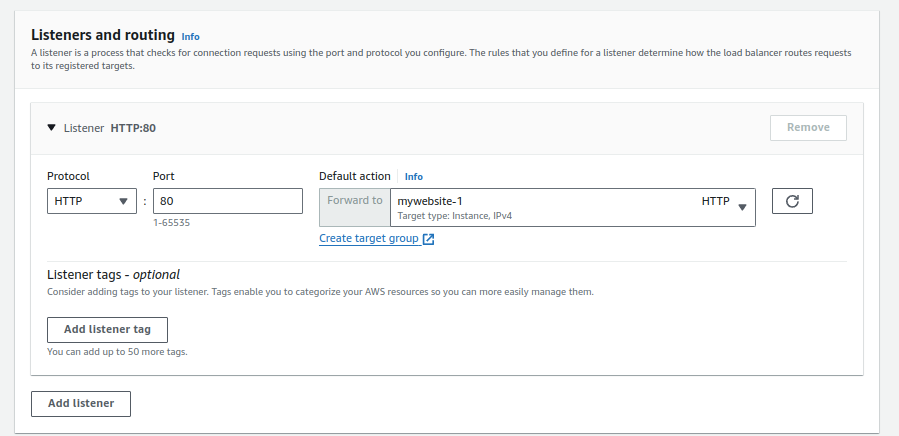
4.Configuring Listener and Forwarding Rules:
- Create an HTTP listener.
- Forward traffic to one of your target groups (e.g., Mywebsite-1).
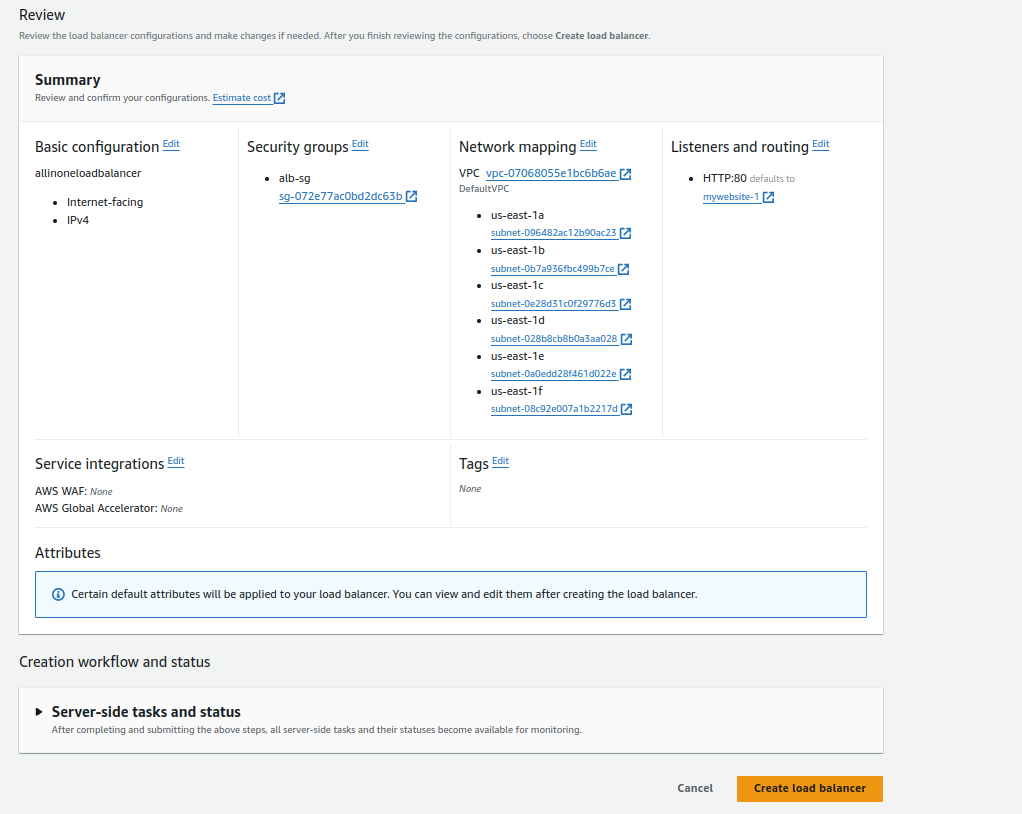
5.Review and Create:
- Review the summary of your configuration.
- Click “Create Load Balancer” to finalize the setup.
Step 4: Pointing Domains to Load Balancer
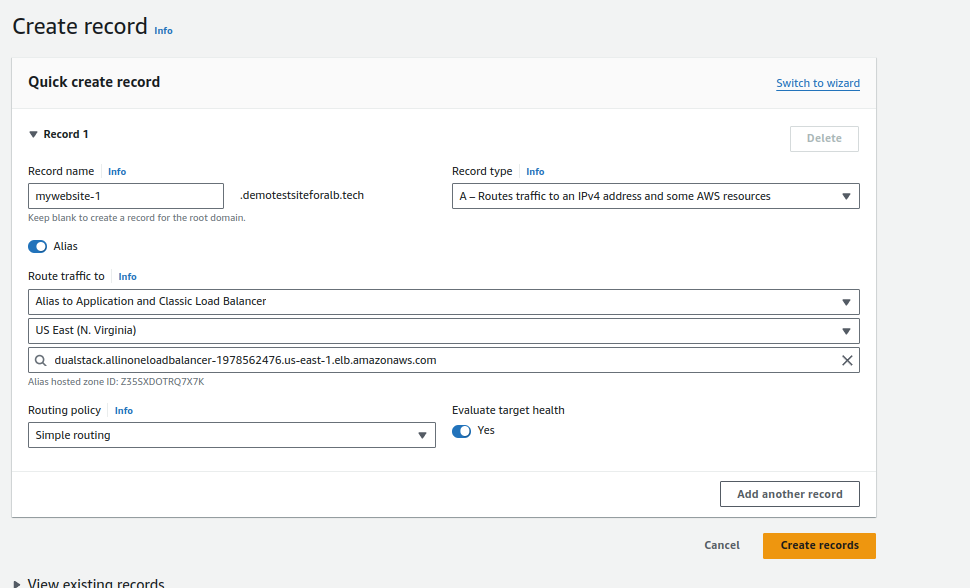
1.Accessing Domain Hosting Provider:
- Open your domain hosting provider, in this case, we are using AWS Route 53.
2.Pointing Domains:
- Point both of your domains, e.g., mywebsite-1.demotestsiteforalb.tech and mywebsite-2.demotestsiteforalb.tech, to the DNS of your Application Load Balancer (ALB).

Step 5: Creating SSL Certificates
1.Accessing Certificate Manager:
- Navigate to AWS Certificate Manager.
2.Requesting a Public Certificate:
- Click on “Request a public certificate.”

- Enter your domain names. Using a wildcard (*) is recommended for sub-domain structures.
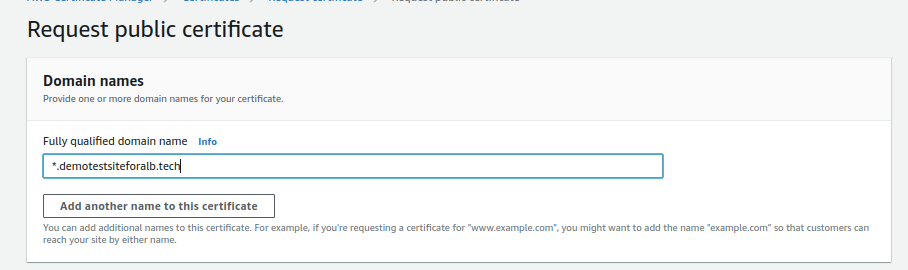
- Complete the certificate request.

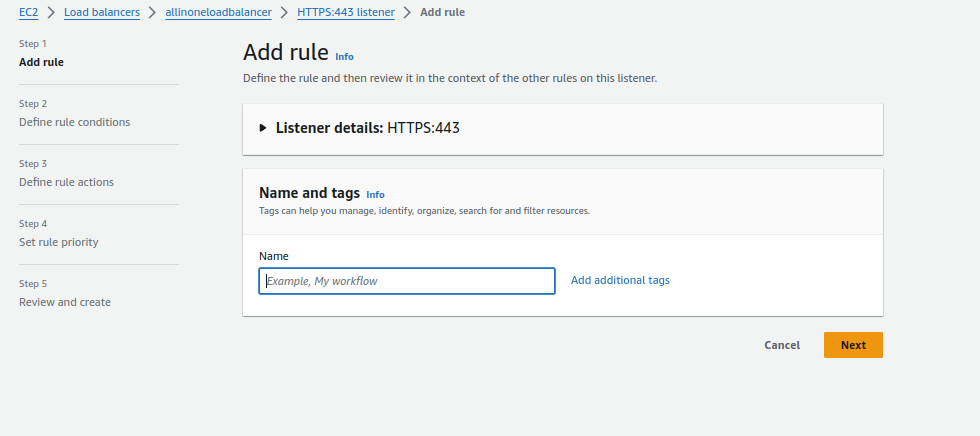
Step 6: Setting Up Host-Based Routing
1.Returning to Load Balancer Configuration:
- Go back to your Application Load Balancer configuration.
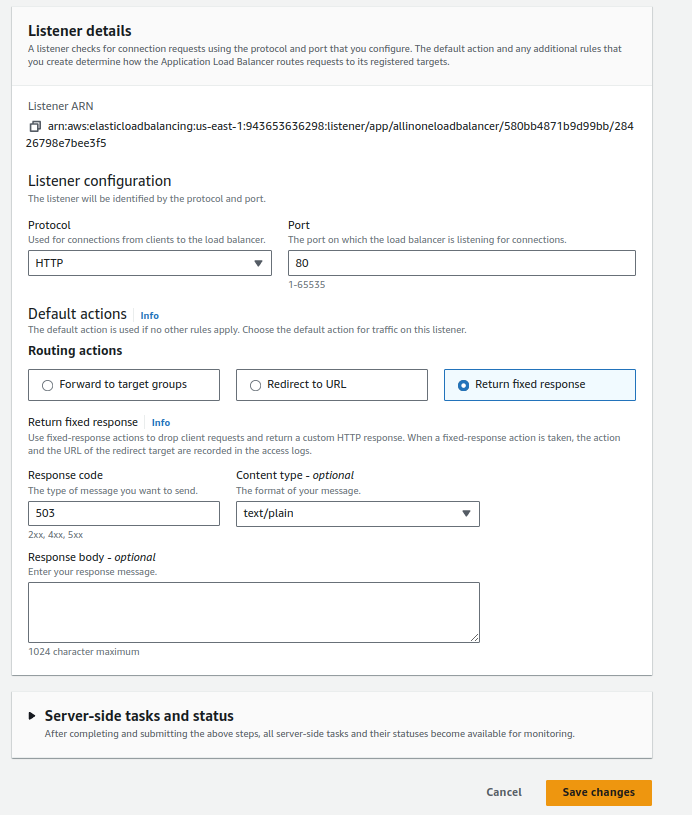
2.Adding HTTPS Listener:
- Click on “Add Listener” and choose HTTPS.
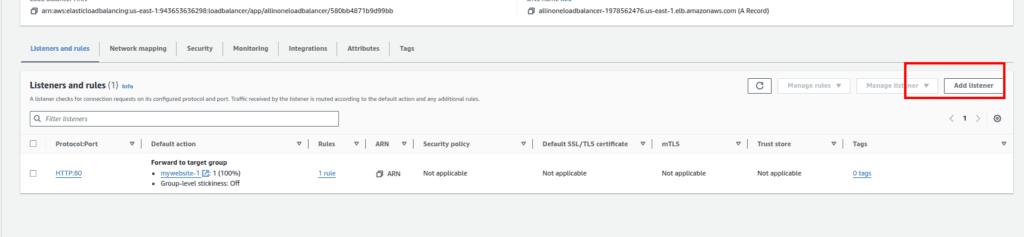
- Click “Return to fix response.”
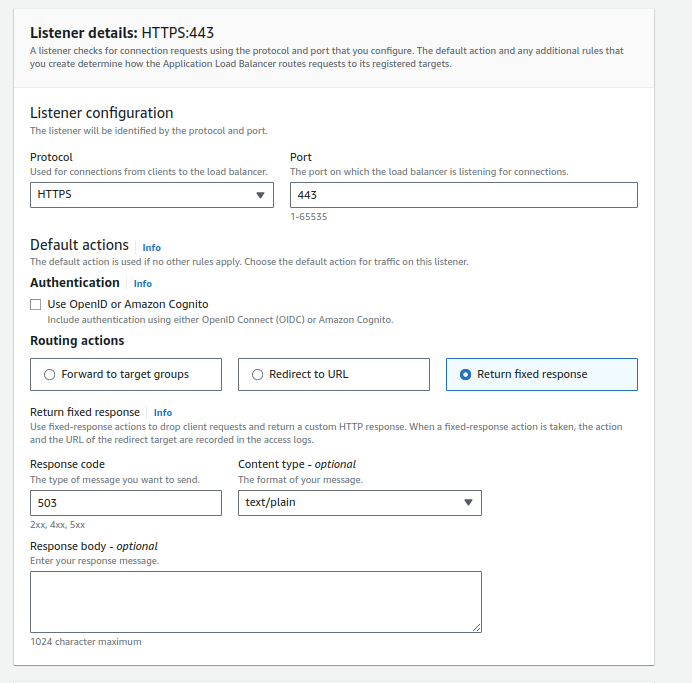
- Scroll down and choose certificate you requested
3.Configuring HTTPS Listener:
- Click on the created HTTPS listener.

- Click “Add Rule.”

4.Configuring Rule:
- Optionally, give the rule a name.
- Click “Add Condition.”
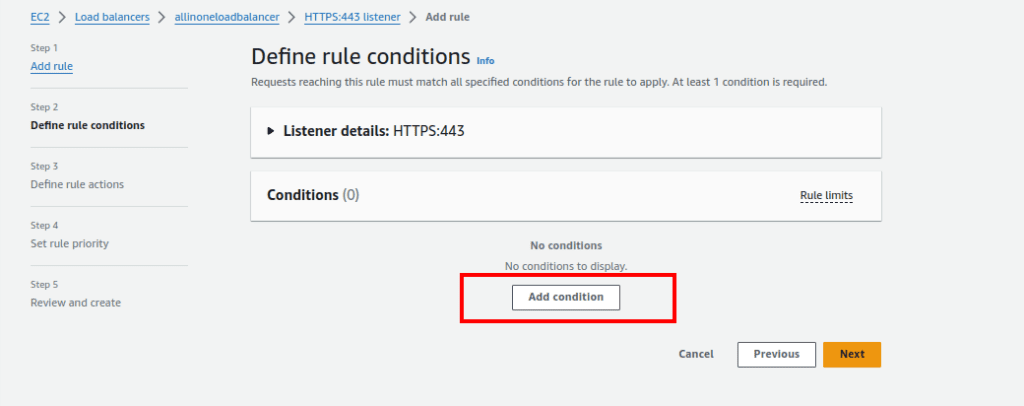
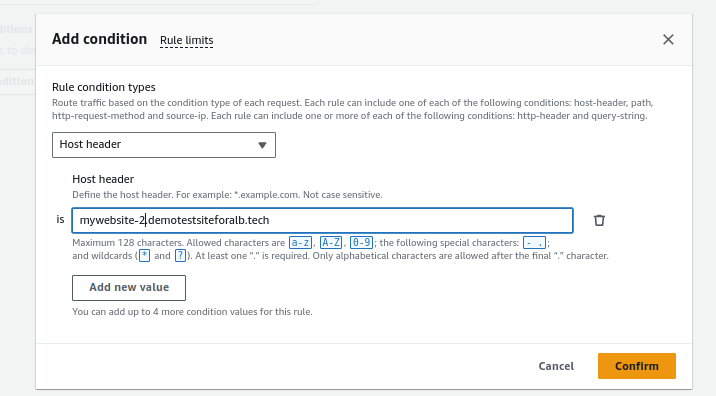
5.Setting Rule Condition:
- Choose “Host Header” as the rule condition.
- Enter the name for your first website in the Host Header value. Confirm.
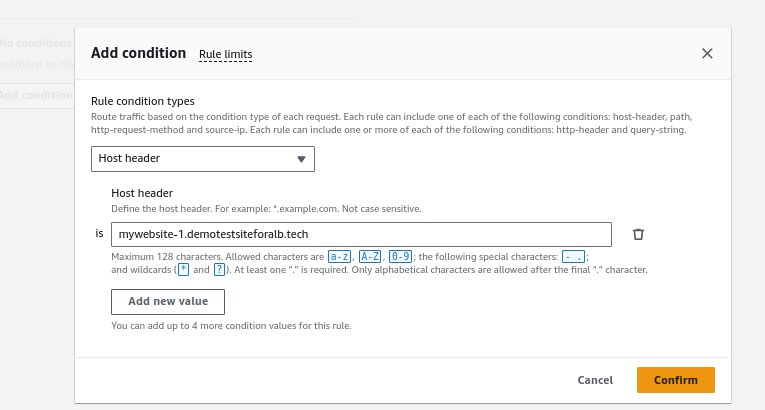
6.Forwarding to Target Group:
- Click “Forward to target group” and select the target group for the first website (e.g., Mywebsite-1).
- Click “Next.”
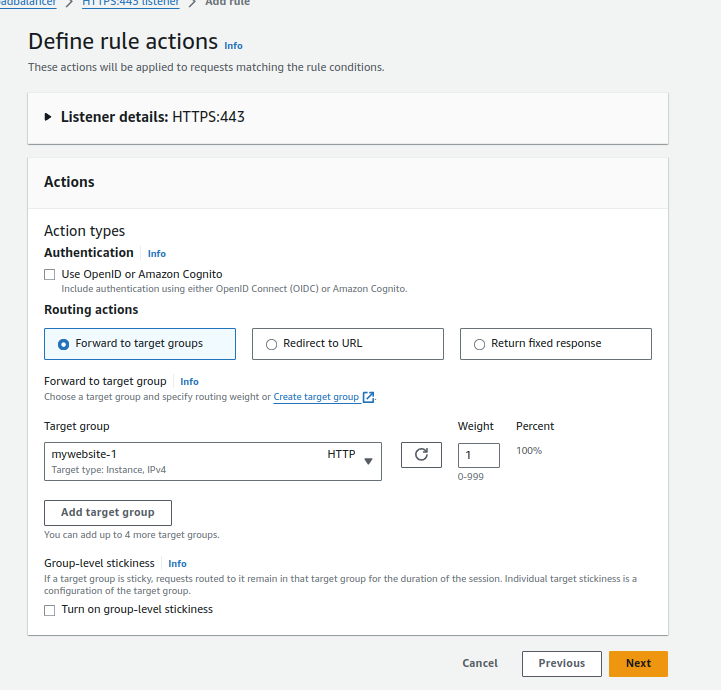
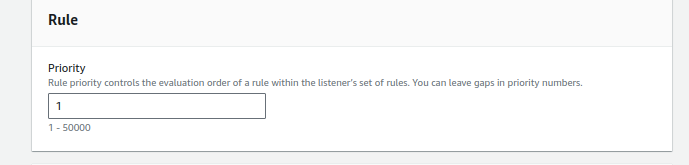
7.Setting Rule Priority:
- Give the rule a priority, such as 1.
- Click “Next.”
8.Review and Create:
- Review the configuration and click “Create.”
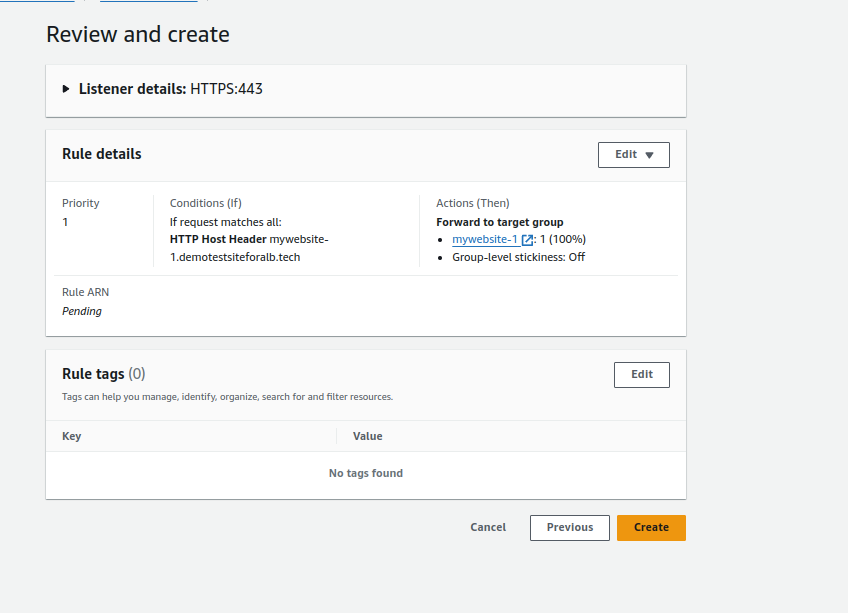
9.Repeating for Second Website:
- Repeat the process for the second website, changing the Host Header value and selecting the target group (e.g., Mywebsite-2).
- Give the rule a priority, such as 2.
- Review and create.
10. Block Port 80 and Configuring Fixed Response/Forward 80 to 443
Step 8: Testing Your Load Balancer Setup
1.Open Web Browser:
- Launch your preferred web browser.
2.Enter the Website URLs:
- Enter the URLs of your websites in the address bar. For example:
- https://mywebsite-1.demotestsiteforalb.tech

- https://mywebsite-2.demotestsiteforalb.tech
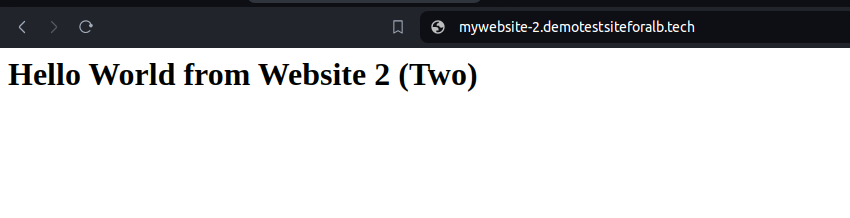
3.Check Load Balancer in Action:
- Observe that the websites load successfully.
- Verify that the URL remains secure with “https://” and that the SSL certificate is valid.
Conclusion:
In conclusion, leveraging a single load balancer for multiple websites is a strategic approach that combines cost savings with improved performance and simplified management. By carefully configuring virtual hosts, optimizing SSL handling, and implementing scalable and flexible architectures, businesses can achieve an optimal balance between cost efficiency and a robust online presence. As the digital landscape continues to evolve, adopting such best practices becomes essential for staying competitive and ensuring a seamless user experience.
The post Optimizing Costs and Enhancing Performance: Leveraging a Single Load Balancer for Multiple Websites appeared first on Awan.
]]>The post How The Web Works | Behind the scenes of a Website appeared first on Awan.
]]>In this blog we will discuss the behind the scenes of a website. What happens when we view a webpage on our computers or phones.
The Journey in a Nutshell
The moment we hit ENTER after typing the URL or click a link to the website, the request is sent to Domain Name Server, which is like the phone book for websites. The Domain Name Server converts the human-readable website URL to IP address for the server which hosts the website. An IP address is like an unique identifier assigned to every single device connected to the Internet.
The browser then makes a request to the server which hosts the website, with that IP address. The server handles the request and sends the response to the browser. Then it starts sending the website files in small chunks. The browser assembles the chunks and displays the full website to us in form of web page.
Now, lets dive deep.
Clients and Servers
The web is a client server system. Your computer is the client and the remote computers that store webpages, sites, or apps are the servers.

When you want to view a website, the client device (your computer) makes a request to the server (some computer on the internet where the website files are hosted) and downloads a copy of webpage from the server and displays it in the web browser.
In this client server model, the internet connection allows the devices to send and receive the data in the web. Then there is TCP/IP (Transmission Control Protocol and Internet Protocol) which is a networking protocol that allows two computers to communicate.
So, when we type the URL of the website; something like awan.com.np and hit ENTER, the request goes to one of the many special computers on the internet known as Domain Name Servers. But why?
DNS Explained – Web Working
Internet is massive and how the computers know where each other are?

So, if you visit techyexplorer.com, how does you browser knows where the techyexplorer.com server is in the internet?
This is where the Domain Name System (DNS) comes in. DNS is like the phonebook of the internet. The real web addresses, the IP addresses are just strings of numbers like 63.245.215.20.
It represents a unique location on the web but it is hard to remember. We are humans and we might be able to remember the names of hundred of websites but to remember something like IP addresses, its tough. Of course unless you are a robot.
So, the Domain Name Servers translate human-readable domain names that we type in the browsers into IP addresses.
Now, the browser sends an HTTP request message to the server, asking it to send a copy of the website to the client. Basically the web on its work.
HTTP – How computers talk
Hypertext Transfer Protocol (HTTP) is an application-layer protocol computers use to transmit data. HTTP(S) is the agreed-upon protocol that your browser uses to communicate with the server. It defines how the request and the response will look like, what data they will have and how will it be submitted.
Additionally there is HTTPS which is HTTP Secure. It is like HTTP but encrypted, ensuring that the transmitted data is only viewable by the intended receipt.
Once the server receives the request, it performs certain actions and responds with a status code to the client which is, server just basically saying “Yo! you can have a look at the website. Here it is.”
Then, the server starts sending the website files in the chunks of packets to the client device.
The browser assembles the small chunks into a complete web page and displays it to the user. But what are those website files?
Website Component Files
So, now we know that visiting a website is requesting for website files form a server computer on the internet and our browser creating a webpage for us from those files. Those website files are mainly of two types:
1. Code Files
The websites are primarily built using HTML, CSS and JavaScript. Lets have a look into them:
a. HTML – The Skeleton
HTML is the core markup language for creating web pages. It stands for “Hyper Text Markup Language” and it describes the structure of a webpage.
Technically, it’s not a programming language – we can’t write any logic with it.

b. CSS – The Styling
Cascading Style Sheets (CSS) is the language used to style the HTML documents. It is a style sheet language which describes how the HTML elements are to be displayed on the screen.
c. JavaScript- The Dynamic and Interactive
HTML and CSS are mainly for the look and are static. JavaScript gives the web page dynamic and interactive capabilities. It can be used to change the website whilst the user is viewing it.
2. Asset Files
The server would not only send the codes files but also other files like images, videos, audios, etc which we are collectively calling here as the asset files.
So, the browser assembles all these files and present a beautiful web page to you.
One more time – How The Web Works
So, lets do this one more time on how the web actually works.
The moment we hit ENTER after typing the URL or click a link to the website, the request is sent to Domain Name Server, which is like the phone book for websites. The Domain Name Server converts the human-readable website URL to IP address for the server which hosts the website.
The browser then makes a request to the server which hosts the website, with that IP address. The server handles the request and sends the response to the browser. Then it starts sending the website files in small chunks. The browser assembles the chunks and displays the full website to us in form of web page.
Hope this makes more sense now and you have got an idea about what goes behind the scenes and how the web works.
The post How The Web Works | Behind the scenes of a Website appeared first on Awan.
]]>The post Vis Js Network Save Position – Create Network Graph JavaScript appeared first on Awan.
]]>I needed to create a Network graph with lots of nodes and edges and it was becoming very hard, as due to lots of edges, it was becoming chaotic.
I was using vis.js, my favorite for network graphs. But it was not generating the graph I needed. I tried a lots of layouts, nodes, edges, and physics options. I spent a whole day tweaking settings, but due to large number of nodes, I was not getting a satisfactory graph.
Now, vis.js lets us drag and change the positions of nodes. But, I was unaware of the fact that once we have dragged all the nodes and get required positions, we could save that positions and load whenever needed.
I was looking over stackoverflow for maintaining big graphs using vis.js and I came across this stackoverflow answer by totymedli.
That helped me to save network position with vis js.
So, we can use storePositions() to load the X and Y coordinates to your dataset. We can save them, then just expand the nodes with the saved coordinates when we initialize the network later.
Suppose we have a vis.js graph.
Easiest way for JavaScript Network Graph Visualization – Vis.js
So, we can drag the nodes and make the layout of graph as we wanted it to be.
Then we can use storePositions.
network.storePositions()This is available at network.data.nodes.
const nodePositions = data.nodes.map(({ id, x, y }) => ({ id, x, y }))Its saved in nodePositions variable. So, next time we load the graph, we can update graph layout using this variable.
copy(nodePositions)This would copy the value in this variable, which is just the array of coordinates of positions. So, we can save it somewhere.
And, next we can load it and use it to update the graph.
nodePositions.forEach(nodePosition => data.nodes.update(nodePosition))Update: Vis Js Network Save Positions
So, later I also had to use dynamic filter in vis.js. And using DataView for dynamic filter, the storePositions was no longer working. storePositions was giving error.
Uncaught TypeError: Cannot read property ‘x’ of undefined
In a discussion, I found out storePositions would not work with dataview.
So, the alternative here is to use getPosition and later put them in the dataset.
However the data returned by it (getPosition) is incompatible for data.update(). So, changing a bit of structure.
let theNodePosition = []
let theEdgePosition = []

function savePosition() {
    let gpPositions = network.getPositions()
    let edgePositions = network.body.edges;

    // Either way
    for (const [key, value] of Object.entries(gpPositions)) {
        let tempObj = {
            id: parseInt(key),
            x: value.x,
            y: value.y
        }
        theNodePosition.push(tempObj)
    }
    for(let edgeId in edgePositions){
        theEdgePosition.push({ from:edgePositions[edgeId].from['id'], to: edgePositions[edgeId].to['id'] });
    }
}
Now for loading and updating the graph, same as above.
theNodePositions.forEach(nodePosition => nodes.update(nodePosition))

theEdgePositions.forEach(nodePosition => nodes.update(nodePosition))The post Vis Js Network Save Position – Create Network Graph JavaScript appeared first on Awan.
]]>The post Most Useful Websites for Students, Graphic Designers and Web Developers appeared first on Awan.
]]>Most of these websites are which I use regularly, and I am sharing this as I believe it will be helpful to someone else as well.
NOTE: This is an incomplete list, so I will be updating it frequently. Also, there is a lot of information on this page. So, please consider bookmarking it.
Most Useful Websites
This is going to be an alphabetical list.
For categorical list, please scroll below.
Archive.is
Take a snapshot of any web page, that will store it even if the original one is gone.
Autodraw.com
Create freehand doodles and they will magically transform into the beautiful drawings.
Bubbl.us
Create mind-maps, brainstorm ideas in the browser.
Calligraphr.com
Transform your handwriting into a real font.
copychar.cc
Copy special characters and emojis that aren’t on your keyboard.
Draw.io
Create diagrams, wireframe and flowcharts in the browser.
Downforeveryoneorjustme.com
Find if your favorite website is offline or not?
Everytimezone.com
A less confusing view of the world time zones.
Fast.com
Know your current internet connection speed.
Fontstruct.com
Draw and build your own fonts and use them in any application.
FutureMe.org
Write a letter to your future self.
Iconfinder.com, Icons8.com
Millions of icons for all kinds of projects.
Midomi.com
When you need to find the name of a song.
Myfonts.com/WhatTheFont
Upload an image of any text and quickly determine the font family.
Pdfescape.com
Quickly edit PDF in the browser without Acrobat.
Pixton.com
Create your own comic strips with your own characters and move them into any pose.
Remove.bg
Remove the background from any photograph without firing up Photoshop.
Screenshot.guru
Take high-resolution screenshots of web pages on mobile and desktops.
Similarsites.com
Discover new sites that are similar to what you like already.
Slides.com
Create pixel-perfect slide decks and broadcast your presentations to an audience of any size from anywhere.
Unscreen.com
Remove the background from GIFs and videos.
10minutemail.com
Create disposable email addresses for putting inside sign-up forms.
Most Useful Websites for Students
- archive.is
- slides.com
- screenshot.guru
- everytimezone.com
- unscreen.com
- calligraphr.com
- pdfescape.com
- draw.io
- bubbl.us
- 10minutemail.com
Most Useful Websites for Graphic Designers
- autodraw.com
- iconfinder.com
- icons8.com
- remove.bg
- unscreen.com
- fontstruct.com
Most Useful Websites for Web Developers
- screenshot.guru
- copychar.cc
- iconfinder.com
- icons8.com
- myfonts.com/WhatTheFont
- similarsites.com
- downforeveryoneorjustme.com
So, do you know about any useful site, that we missed here. Please comment below and share it.
Also, do checkout The Useless Web. It will be fun.
How The Web Works | Behind the scenes of a Website
The post Most Useful Websites for Students, Graphic Designers and Web Developers appeared first on Awan.
]]>The post Host React App with AWS Amplify and GitHub appeared first on Awan.
]]>AWS Amplify consists of a set of tools and services that helps developers to build and deploy web and mobile applications more easily and quickly.
AWS Amplify provides various pre-built tools and services to help developers create applications faster and with less effort.
These tools and services can help with things like authentication, storage, hosting, and notifications so that developers can focus on building their application’s unique features and functions. For this walkthrough, we are gonna focus on integrating Amplify with GitHub.
Amplify’s open-source framework consists of libraries, UI components, and a command line interface (CLI) to build an app backend and integrate it with your iOS, Android, Web, and React Native apps, etc.

Pre-Requisites
React application to GitHub:
Ensure that your React application is pushed to a GitHub repository. You can do this by initializing a new Git repository in your React application directory, committing your changes, and pushing them to GitHub.
AWS Account:
The AWS Free Tier provides customers the ability to explore and try out AWS services free of charge up to specified limits for each service.
Step 1: Navigate to AWS Amplify on AWS Console
Sign in to the AWS Management Console and navigate to the Amplify Console.

Step 2: Select Amplify Hosting
We have two options. Either use Amplify Studio or go with Amplify Hosting. As we have a React app so we are going to select the “Get Started” button under Amplify Hosting.

Step 3: Select GitHub as your source provider
We have several options to specify what is our code source. You can connect your source code from a Git repository or upload files to host a web application in minutes. Amplify Hosting allows you to build, deploy, and host your web application easily and efficiently.
You can use GitHub, Bitbucket, GitLab, AWS CodeCommit, or deploy without any git provider.

Step 4: Authorize Amplify to Access your GitHub repositories
You need to authorize Amplify to access your GitHub repositories. This allows Amplify to build and deploy your web application directly from your GitHub repository.

Step 5: Add Repository and Branch
Under “Recently updated repositories” you choose the repository that has your updated code. Once selected there will be a list of branches of that repository. Select the branch you want to deploy.

Step 6: Define the Application name in the Build Setting
Once in Build settings, you can specify the application name for AWS Amplify. Usually, Amplify detects default build settings but in case you have different configurations, you can customize it through the edit button.

Once completed review the settings and select deploy to deploy the application finally.

Step 7: Visit the Application Link by AWS Amplify
The process of provisioning, building, and deployment will take a few minutes. Amplify Hosting will automatically handle the deployment process for you. View your deployed application once the deployment is complete, you can view your deployed application by clicking the endpoint link.

Conclusion
In this tutorial, we showed you how to deploy a React application to the AWS Amplify Console using GitHub. With Amplify, you can easily deploy your React applications to the web with just a few clicks. With its simple and intuitive user interface, Amplify takes care of all the heavy lifting, allowing you to focus on developing your application. We hope this tutorial has been helpful, and wish you the best of luck with your application deployment!
The post Host React App with AWS Amplify and GitHub appeared first on Awan.
]]>The post Signs you have a weak password – Get Secure Password appeared first on Awan.
]]>When was the last time you changed your email’s password? When I asked this to my friends, most of them answered years ago. And even then, most of them had forgotten it and had to reset the password.
Yes, passwords are a pain and we obviously cannot survive without different forms of social media networks. Passwords are hard to remember, and different social networks have their own rules to form and change passwords. But is your password safe? Is your password strong?
Or is it a weak password?
What is a weak password?
First, what is a weak password?
A weak password is the password which is easy to guess both by the human and by computers. People often use simple passwords about someone or something they love, or they owe in order not to forget the passwords.
However, the simpler the password, the easier to detect. How many of you have used your name plus your birth year as your passwords? Or your phone number, or the name of your beloved ones, your favorite singer, player?
In 2019, the United Kingdom’s National Cyber Security Center analyzed public databases of breached accounts to see which words, phrases and strings people used. Top of the list was 123456, appearing in more than 23 million passwords. The second-most popular string, 123456789, was not much harder to crack, while others in the top five included “qwerty”, “password” and 1111111.
Many sites won’t even allow you to use a weak password, but there are still some that do. A study in 2017 found that the password “password$1” is deemed “Very Weak” by Dropbox, “Weak” by Apple, “Fair” by Google and “Very Strong” by Yahoo.
Find more about weak passwords here.
What kinds of information are you sharing on social networks like Facebook, Twitter, LinkedIn, Pinterest and YouTube? Maybe, Your name, location, email, travels, schools, and all. Trust me, you don’t want this information in the hands of someone who has bad intentions.
And the irony is that many people publicly share their date of birth on Facebook while having date of birth as the part of their Facebook password.
That is not a weak password. That is a public password.
Anatomy of a Password – How Secure is a Password
Why do you think when signing up for some sites, they have specific password requirements? A six-letter password using all upper-case letters, or all lower-case letters has 308 million possible letter combinations. This can be easily broken within a couple minutes by automated password cracking programs which are available in the Internet.
So, you think your password is secure?

With some combination of both upper and lower case letters, a six letter password has 19 billion possible combinations. If you increase the password to eight letters and use both upper and lower case letters, there are 53 trillion possible combinations.
Making a Weak Password Strong
Substitute a number for one of the letters, and there are 218 trillion possible combinations. Substitute one of the special characters for another one of the letters, and this has 6,095 trillion possible combinations — still crackable, but requiring a more sophisticated program, a far more powerful computer, and far more time.
There are tons of social media networks we use and for some we even create multiple accounts. And remembering the passwords for all these accounts might be a headache. The result? Some people write down their passwords and keeping them in a notebook.
Is it somewhere safe?
But what good is your strong password if it is open to see for anyone who has access to your that notebook. That notebook is just not a notebook anymore, it has the passwords which might be keys to your bank.
And some people just save it in some document files on their computer. Its hardly possible that you never let anyone other touch your computer, let alone cyber attacks.
Also never let anyone know your password. No matter how strong is your password, once someone else knows it, it’s no longer strong.

Yes, we have a ton of passwords and when browser asks for something like “Do you want Google Chrome to save your password for this site?”, most of the times we click yes.
You won’t disagree that Google knows everything about you. But now stakes are higher than ever before. We are trusting Google with the passwords that protect the rest of our life – our bank, our shopping, our travel, our private life.
It makes life a lot easier as if we log into our Google account using Chrome, we can see all our saved passwords. But here is the thing. If someone learns or guesses your Google account password, you are completely compromised.
And if by default “Sync everything” had been enabled, the intruder might not only see your other saved passwords but also your bookmarks, history and so on, basically your entire virtual life. So, its always a good idea to have two factor authentications for log in.
You might think, its not worth the time. But, trust me, it is. Always have your password secure.
Here are some proven ways to manage time.
And final notes, never go with admin, admin.

The post Signs you have a weak password – Get Secure Password appeared first on Awan.
]]>