The post Crypto mining on AWS and GCP after “The Merge” first appeared on AWS.NZ.
]]>Yes, you can still mine crypto in the public clouds even after Ethereum switch to Proof of Stake!

Ethereum mining and “The Merge”
For a long time Ethereum (ETH) used to be the favourite (= most profitable) crypto coin to mine on GPUs. People were building “mining rigs” — specialised computers equipped with lots and lots of NVidia or AMD Radeon GPUs — and operated them 24/7 in order to earn new ETH coins. The cost of setting up these rigs was massive, many thousands or even tens of thousands of dollars. And this upfront cost was obviously a big barrier for many wanna-be miners.
Welcome cloud-based mining. In the cloud — be it AWS or GCP — we can hire GPU capacity per hour without the need for a massive upfront investment. For many years I have been maintaining open source templates for AWS Ethereum Miner and more recently GCP Ethereum Miner for anyone to use.
However on September 15, 2022 the Ethereum blockchain is switching from Proof of Work (i.e. mining) to Proof of Stake (PoS), during an event called The Merge. A lot has been written about this change to PoS and I’m not going to repeat it here. The bottom line is that Ethereum (ETH) mining will no longer be possible after Sep 15.
Is this the end of crypto mining in the cloud? Of course not!
Ethereum Classic mining in AWS and GCP
While mining ETH will soon be over there are still other crypto coins to be mined. For now I have updated both the AWS and the GCP templates with Ethereum Classic support, one of the coins that can still be mined after The Merge. You are welcome 
Couple things to bear in mind before you start:
- You may or may not need a new Wallet address, it depends.
- MetaMask users can use the same address for both ETH and ETC, easy.
- Ledger users should create a new ETC address but there are ways to move the funds sent to your ETH Ledger address over to the ETC one, so no big deal if you make a mistake.
- Everyone else — check with your wallet or exchange or simply create a new address for ETC to be on the safe side.
- ETC profitability fluctuates more then ETH profitability and we expect even bigger swings when miners start re-configuring their rigs for ETC closer to The Merge.
Do your own research whether the mining will be profitable for you or not. Once things settle in a month or two I’m planning to do a new analysis similar to my older post The new AWS instance that makes ETH mining profitable. For now DYOCA – do your own cost analysis
AWS quick start
I won’t go into all the details on how to start mining on AWS. If you are new to AWS or crypto mining refer to my older articles, for example Mining Ethereum on AWS — the complete guide.
Here is the quick howto:
- Login to your AWS account. Do this before proceeding to the next step.
- Go to the AWS Ethereum Miner GitHub repository and scroll down to the Quick Start section.
- Choose the region where you want to start mining and click the “Launch to Default VPC” link. It will open a CloudFormation console where you can configure the mining stack — choose the coin (ETH or ETC), set your wallet address and the required hashrate.
- Click through the CloudFormation console wizard to launch the stack. Wait while it’s being created, it may take 5 to 10 mins.
- Open the CloudFormation “Outputs” tab and navigate to the “Dashboard URL”. After some 15 to 20 mins you should start seeing some mining progress. The hashrate will gradually ramp up, give it at least a couple of hours to stabilise.
- Watch your AWS spend closely in the Cost Explorer and remember that cloud mining can get very expensive very fast. Know what you are doing!
GCP quick start
Once again refer to my other post — Easy Ethereum mining on GCP — for a detailed step by step tutorial. If you already know your ways around GCP here is the quick rundown…
- Login to your GCP account and select the Project with high enough quotas for running GPU instances.
- Open the CloudShell and clone the GCP Ethereum Miner Github repository:
git clone https://github.com/mludvig/gcp-ethereum-miner.git - Edit the
terraform.tfvarsfile to suit your needs. - Start the miners with
terraform init && terraform apply -auto-approve - Go to the Ethermine ETC dashboard and enter your wallet address. It will take 15 to 20 mins before you will see some activity. Then it will gradually ramp up over the next few hours. Give it time.
Note that GCP is a bit touchy about crypto mining on their platform. Our terraform templates have been carefully crafted in such a way that they should not trigger their attention, but as always use it at your own risk!
Important: Don’t modify the templates unless you 100% know what you are doing. Even a little change like choosing a different mining software or a different mining pool may trip you up.
And as always watch your spend! GCP mining can get very expensive very fast so make sure that you know what you are doing.
What’s next?
The Ethereum move to PoS will inevitably create ripples through the crypto mining scene. Many GPU owners will start experimenting with other coins and the prices and profitability will fluctuate wildly for some time. This situation may take a couple of months to stabilise.
I’m planning to do a research into the profitability of different coins in the cloud environments once the dust from “The Merge” settles. Subscribe to my Cloud Miner mailing list to stay up to date.
Happy mining!
The post Crypto mining on AWS and GCP after “The Merge” first appeared on AWS.NZ.
]]>The post The new AWS instance that makes ETH mining profitable first appeared on AWS.NZ.
]]>Mining Ethereum on AWS until now wasn’t profitable. This new AWS instance is the game changer that no only breaks even but can finally make you money!

Ever since I wrote my first article about Ethereum and Bitcoin mining on AWS more than a year ago I was bombarded over and over again with the same sort of questions :
- Is it profitable now that the ETH price has increased?
- … that this new AWS instance type was released?
- … that this new coin is the hype of the day?
So far the answer was always a NO. The profitability has gradually improved from some $20 mined in ETH for every $100 spent on AWS services a year ago, to $60 or $65 in ETH for the same $100 AWS spent a month ago. You would still be losing money though.
Until now. Let me introduce you two new GPU-enabled EC2 instances, one of which finally changes the game. It took me some time to benchmark them because they are not the typical some-kind-of NVIDIA GPU in some-kind-of Intel CPU platform that we have seen so far in the form of p3.2xlarge, g4dn.xlarge, or as the newer g5.xlarge instances. Nope, these two that we are going to benchmark today are completely different and need a different setup. That’s why it took me a bit longer to get report on them.
TL;DR — for the impatient
Here is the most recent hashrate chart, updated with the g4ad.xlarge and g5g.xlarge instances discussed in this post.
Right now the most cost efficient EC2 instance for ETH mining is g4ad.xlarge at a spot price in one of the US regions. You can actually make money with it — the cost of running g4ad.xlarge can be slightly lower than the value of the mined ETH. That means profit!
Read below for details or start mining by launching the Ethminer CloudFormation template in us-east-1, us-east-2, or us-west-2. For any other region go to my AWS Ethereum Miner GitHub repo and download the CloudFormation templates from there.
To choose your AWS region consult this table:

g4ad.xlarge — yay, finally getting rich!!
Again, this is a completely different platform from the ones that we have discussed before. While the CPU is an unexciting AMD Epyc that have been seen in the T3a, M5a or M6a before, the GPU here is AMD Radeon Pro V520. Long story short it clocks around 48 MH/s at the spot price as low as $0.1136. That’s faster and cheaper than the above g5g.xlarge! In fact it’s so fast and cheap that it is profitable.
To make sure that I’m not dreaming I ran 5 of these instances for just over 2 days and mined into a new Ethereum wallet to have a clean picture of the results.
- AWS cost: $30.95
- ETH mined: 0.00820 worth $33.36 at that time
That means ca $108 in ETH for $100 spent on AWS costs!
That. Is. Brilliant! ETH mining on AWS finally makes some sense.
Bear in mind that the spot prices fluctuate, that you may not be able to get g4ad instances due to a high demand, and that the ETH price and the Ethereum network difficulty are volatile like everything in crypto. The profit margin is thin but right now it works.

On Dec 24 the instances ran for the whole day. Therefore we can calculate the effective spot price: $13.76 per day / 5 instances / 24 hours = $0.1147/hr per instance. Slightly above the rock bottom $0.1136 but still profitable.
How do I start mining?
I have covered that in details in my previous articles. I suggest you check them out…
To recap you will need:
- Ethereum web wallet — I recommend MetaMask as it allows you to easily change the payout settings at the Ethermine mining pool. If you don’t know what a mining pool is head over to my first article linked above, there I explain it.
- Your Ethereum wallet address — that’s where the mined ETH will be sent from the pool. Once they’re in your wallet they are truly yours. Copy the wallet address from your MetaMask plugin once it’s configured.
- AWS account with high enough service limits to start “G spot instances”, that is g4ad, g5g, g5 or g4dn and eventually also “P spot instances” for running p3 or p3dn instances.
Request the service limit increase through Service Quotas -> AWS Services -> Amazon Elastic Compute Cloud (Amazon EC2) in each region where you’re planning to run the miners.

If your account is new request a small increase first. For example to 4 or 8 vCPUs in one region then use it for a while and then request some more. You’re not likely to get an approval for a high increase without a history of using them!
Note that both g4ad.xlarge and g5g.xlarge have 4 vCPUs, therefore a limit of 8 vCPUs will let you start 2 mining instances.
Deploy the ETH miner CloudFormation stack
With these pre-requisites out of the way go ahead and start mining. Choose a region that offers the required instance types and deploy the ready to go CloudFormation template from my AWS Ethereum Miner GitHub project. The template is “intelligent” enough to figure out what instance types are available in each region, what are their spot prices and which one is the most cost effective to run.

Login to your AWS account and launch the miner in one of the regions where g4ad.xlarge is offered:
- us-east-1 (N. Virginia)
- us-east-2 (Ohio)
- us-west-2 (Oregon)
- eu-west-1 (Ireland)
- eu-west-2 (London)
- eu-central-1 (Frankfurt)
- ca-central-1 (Canada)
- ap-northeast-1 (Tokyo)
You can set the required hashrate, choose the desired instance types and of course set your Ethereum wallet address.
Once the stack is created navigate to its Outputs to find the link to your Ethermine dashboard. Be patient — the miner stats may take around 15 to 20 minutes to appear and another hour or more to ramp up. You should mine for at least 6 to 12 hours to receive some meaningful results.
Happy mining!
The post The new AWS instance that makes ETH mining profitable first appeared on AWS.NZ.
]]>The post CloudFormation Service Roles first appeared on AWS.NZ.
]]>Solution?
CloudFormation Service Role
CFN Service Role can achieve exactly that – users can have a separate set of credentials for work outside of CloudFormation and a completely different set of credentials for creating, updating and deleting CloudFormation stacks.
For example grant CloudFormation all the privileges it needs to create the stack but in the console limited the users to ReadOnly access.
Here is how…
1. Create CloudFormation Service Role
In this case we’ll give it Administrative privileges but in reality you should only give it as little privileges as it needs.
Of course we’ll use CloudFormation to create it
CfnServiceRole:
    Type: AWS::IAM::Role
    Properties:
      RoleName: svcCloudFormation
      Path: /service/
      AssumeRolePolicyDocument:
        Version: 2012-10-17
        Statement:
        - Action: sts:AssumeRole
          Effect: Allow
          Principal:
            Service: cloudformation.amazonaws.com
      ManagedPolicyArns:
        - arn:aws:iam::aws:policy/AdministratorAccess
This role can only be used by CloudFormation, you can’t assume it as a user e.g. with aws sts assume-role or use it as EC2 instance role.
2. Create an IAM Policy that can use the role
The most important permission it needs is iam:PassRole that gives it the ability to instruct CloudFormation to use the above IAM Role to create resources in CFN stacks.
The policy also needs some basic CloudFormation permissions to upload the template file to S3 and to actually create the stack. However it does not need permissions to create any of the resources in the stack. That will be done through the role.
CfnUserPolicy:
     Type: AWS::IAM::ManagedPolicy
     Properties:
       ManagedPolicyName: svcCloudFormation
       Path: /
       PolicyDocument:
         Version: 2012-10-17
         Statement:
         - Action:
           - iam:PassRole
           Effect: Allow
           Resource:
           - !GetAtt CfnServiceRole.Arn
         - Action:
           - cloudformation:CreateStack
           - cloudformation:CreateUploadBucket
           Effect: Allow
           Resource: "*"
         - Action:
           - s3:PutObject
           - s3:GetObject
           - s3:ListBucket
           Effect: Allow
           Resource:
           - arn:aws:s3:::cf-templates-*
           - arn:aws:s3:::cf-templates-*/*
The complete CloudFormation template to create the role and the policy is can be downloaded here: cfn-service-role-and-policy.yml
3. Create CFN User
We’ll create a new IAM User called e.g. cfn-user. We will restrict it to Read Only access but will also attach the above cfnCloudFormation managed policy to give it the ability to create CFN stacks.

4. Create a stack using the service role
Login in a new window as the just-created cfn-user account and try to create a new CloudFormation stack. Without the role the stack creation will fail because cfn-user doesn’t have a permission to create any resources:

However if you select the role in the drop-down list and proceed as usual your stack will get successfully created:

Updating and deleting stacks
Notice the warning above when you selected the role:
Warning
AWS CloudFormation will use this role for all stack operations. Otherusers that have permissions to operate on this stack will be able to
use this role, even if they don’t have permission to pass it.
What does that mean? Once the IAM Role is attached to the CFN stack it is used for all subsequent operations on the stack! That means the users who can manipulate the stack can update, delete and add new resources even if they don’t have the appropriate iam:PassRole permission. The IAM role is attached to the stack when created and stays attached – keep this in mind!
Use only with permission boundaries!
Giving otherwise-restricted users the ability to create any resources through CloudFormation means that they can create new IAM users and even use CloudFormation to extend their own permissions for example through custom resources! Where possible use IAM Permission Boundary to mitigate this.
Conclusion
The post CloudFormation Service Roles first appeared on AWS.NZ.
]]>The post ssm-tunnel first appeared on AWS.NZ.
]]>Sometimes, however, it’s inconvenient or difficult to achieve a direct connectivity ad-hoc – maybe you are in a location where your VPN is filtered, or from where the Bastion host Security Group won’t allow access but you still need access to the RDS for example.
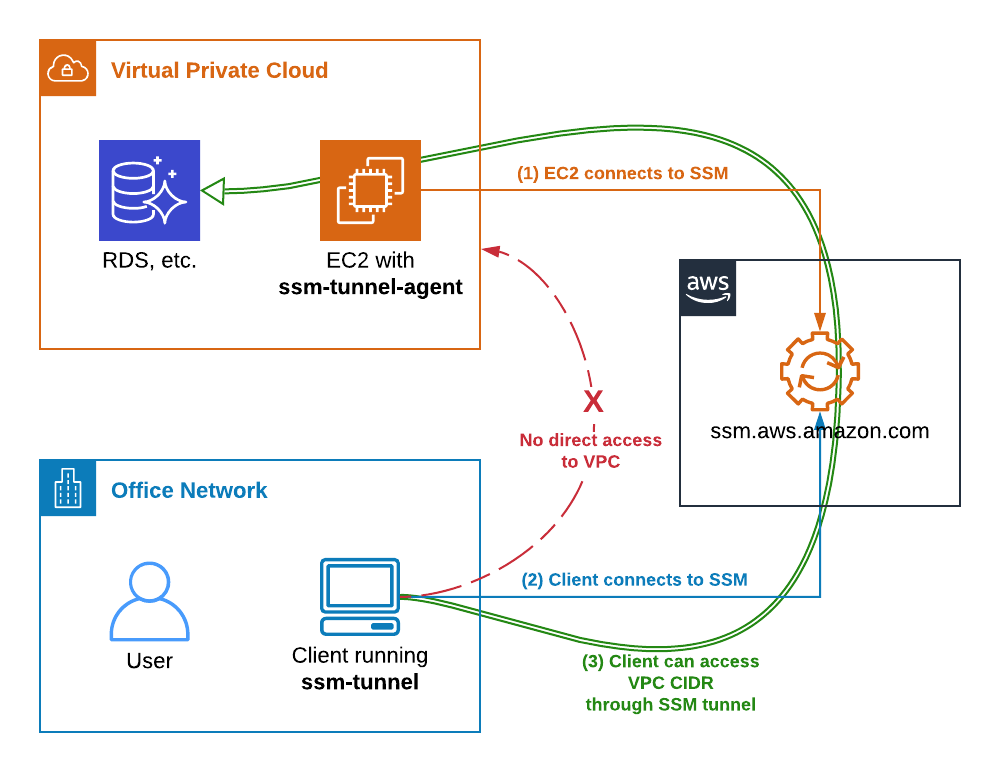
ssm-tunnel comes to the rescue
ssm-tunnel makes a creative use of the AWS Systems Manager (SSM) Session protocol to tunnel IP traffic between your laptop and your VPC. It is even encrypted so we can call it a SSM VPN
The only requirements are:
- Linux EC2 instance registered in AWS Systems Managers (SSM) in the target VPC
- Linux laptop (or Linux VM if you’ve got Windows or Mac OSX laptop) with aws-ssm-tools package that provides the script
ssm-tunnelfrom pip and SSM Session Manager plugin installed.
To get started refer to my other post about ssm-session script. From now on I assume that you’ve got all the connectivity, SSM permissions, plugins, etc sorted. Also create a new Amazon Linux 2 EC2 instance, t3.nano is good enough and make sure you can successfully login to it with ssm-session some-instance.
TL;DR
(laptop) ~ $ sudo pip3 install aws-ssm-tools
(laptop) ~ $ ssm-tunnel some-instance --route 172.31.0.0/16
ssm-tunnel explained
Here is how it works:
- EC2 instance connects to AWS SSM service and awaits instructions.
- On the laptop we start
ssm-tunnelthat also connects to AWS SSM service and requests a SSM Session to the instance. - ssm-tunnel starts
ssm-tunnel-agenton the EC2 instance. Both ends configure an IP tunnel, routing, packet forwarding, NAT and DNS to enable transparent access to the VPC address range. - Traffic starts passing through the tunnel and we can access any resource in the VPC, provided the Security Groups permit it of course.
Bring it up!
Here is how we start a SSM tunnel to a VPC through a brand new EC2 instance. At first it won’t work because the ssm-tunnel-agent isn’t installed.
(laptop) ~ $ ssm-session --list
i-0123456789   ip-172-31-21-30.compute.internal   some-instance   172.31.21.30

(laptop) ~ $ ssm-tunnel some-instance
[ssm-tunnel] ERROR: Unable to establish the tunnel!
[ssm-tunnel] ERROR: ssm-tunnel-agent: command not found on the target instance i-0123456789.
[ssm-tunnel] ERROR: Use 'ssm-session i-0123456789' and then run 'sudo pip install aws-ssm-tunnel-agent' to install it.
Let’s follow the instructions and install the agent. If python’s pip isn’t install it too. Use ssm-session to do the work.
(laptop) ~ $ ssm-session some-instance
Starting session with SessionId: botocore-session-1563416403

sh-4.2$ sudo pip install aws-ssm-tunnel-agent
sudo: pip: command not found

sh-4.2$ sudo yum install -y python-pip
...
Installed:
  python2-pip.noarch     0:9.0.3-1.amzn2.0.1

Complete!

sh-4.2$ sudo pip install aws-ssm-tunnel-agent
Collecting aws-ssm-tunnel-agent
  Downloading https://files.pythonhosted.org/packages/75/.../aws_ssm_tunnel_agent-0.9.6-py2.py3-none-any.whl
Installing collected packages: aws-ssm-tunnel-agent
Successfully installed aws-ssm-tunnel-agent-0.9.6

sh-4.2$ exit
Exiting session with sessionId: botocore-session-1563416403.
Ok, the agent is now installed and we should be able to start the tunnel. Assuming the VPC CIDR is 172.31.0.0/16 let’s run this command:
(laptop) ~ $ ssm-tunnel some-instance --route 172.31.0.0/16
[sudo] password for mludvig:
 00:02:04 | In:  312.0 B @    5.2 B/s | Out:    5.9kB @  121.3 B/s
Why does it ask for a sudo password you ask? Because it needs to configure a local tunnel network interface and routing – use --verbose to see the actual commands it runs.
If we look at the local interfaces on the laptop or VM we will see one named tunSSM.XXX.XXX with ip address from the range 100.64.0.0/16:
(laptop) ~ $ ip addr show
...
69: tunSSM.44.112: <POINTOPOINT,MULTICAST,NOARP,UP,LOWER_UP> mtu 1500 qdisc fq_codel state UP group default qlen 500
    link/none
    inet 100.64.44.112 peer 100.64.44.113/32 scope global tunSSM.44.112
       valid_lft forever preferred_lft forever
A similar interface has by now been created on the EC2 instance. Check it out with ssm-session if you like.
Now have a look at the local routing table:
(laptop) ~ $ ip route show | grep tunSSM
 172.31.0.0/8 via 100.64.44.113 dev tunSSM.44.112
 100.64.44.113 dev tunSSM.44.112 proto kernel scope link src 100.64.44.112
All the traffic for the VPC CIDR 172.31.0.0/16 will go out through the tunnel, that’s what we wanted.
The tunnel should now be set up.
Test it!
Traceroute to the VPC IGW is a good test…
(laptop) ~ $ sudo traceroute -I 172.31.0.1
 traceroute to 172.31.0.1 (172.31.0.1), 30 hops max, 60 byte packets
  1  100.64.44.113 (100.64.44.113)  85.552 ms  86.333 ms  85.460 ms
  2  * * *
  3  172.31.0.1 (172.31.0.1)  89.817 ms  88.356 ms  89.707 ms
Looks good!
Now you should be able to SSH to some other instance in the VPC or connect to an RDS if the security groups permit. More on this later.
EC2 instance and Security Groups
The remote agent automatically configures the instance as a tunnel endpoint.
- Creates tunSSM interface
- Enables packet forwarding
- Configures NAT of all the traffic from the tunnel to the VPC
The last point is important to understand – everything that comes out from the tunnel appears to come from the instance. That means that Security Groups and NACL rules apply! If for example your RDS only permits access from a certain EC2 instance you may not be able to connect to it through the tunnel! In other words – the SSM Tunnel instance must have access to the resources you want to connect to.
What about DNS?
What if we’ve got a VPC-private DNS zone that we need to resolve from the laptop, say vpc-only.example.com?
One option is to change the nameserver in /etc/resolv.conf to 172.31.0.2 (or whatever your VPC DNS is). That will however send all the DNS traffic over the tunnel, that’s not desirable.
A better option is to use the bundled ~/.local/bin/ssm-tunnel-updown.dns-example, copy it to ~/bin/ssm-tunnel-updown.dns-yourdomain and modify to your needs. Namely update the DNS_SERVERS and DNS_DOMAINS variables.
Also download and install the required update-systemd-resolved script from github. It makes use of systemd-resolved local resolver which is used by default in pretty much all modern Linux distributions and instructs it to resolve the domains specified in $DNS_DOMAINS using the nameservers from $DNS_SERVERS. Everything else will still be resolved through the default nameserver.
Now run ssm-tunnel with --up-down ~/bin/ssm-tunnel-updown.dns-yourdomain.
(laptop) ~ $ ssm-tunnel some-instance --route 172.31.0.0/16 \
                 --up-down ~/bin/ssm-tunnel-updown.dns-example
 <14>Jul 18 15:24:26 update-systemd-resolved: Link 'tunSSM.44.112' coming up
 <14>Jul 18 15:24:26 update-systemd-resolved: Adding IPv4 DNS Server 172.31.0.2
 <14>Jul 18 15:24:26 update-systemd-resolved: Adding DNS Routed Domain example.com
 <14>Jul 18 15:24:26 update-systemd-resolved: Adding DNS Routed Domain vpc-only.example.com
 00:52:28 | In:    3.1kB @    0.0 B/s | Out:   89.7kB @    0.0 B/s
Give it a try!
Now we’ve got a complete network access to the VPC, including DNS with very little setup needed. No VPNs, no bastion hosts, no public IPs.
It’s not particularly fast – my tests show around 40kB/s, but it’s certainly very convenient and easy to set up even for ad-hoc access.
Give it a try
The post ssm-tunnel first appeared on AWS.NZ.
]]>The post SSM Sessions the easy way first appeared on AWS.NZ.
]]>The native way for starting a SSM Session with aws ssm start-session requires the knowledge of the exact Instance ID, e.g. i-01234567890abcdef. That’s not very user friendly unfortunately. I know what my “pet” instances Host Names or Instance Names are. And I can often see the IP addresses of a misbehaving auto-scaling instances in the logs. However I don’t always know the corresponding Instance ID.
ssm-session for your convenience
That’s why I decided to develop ssm-session, an utility that can do {anything}-to-{instance-id} resolution and then call aws ssm start-session.
IMPORTANT:
ssm-sessiononly recognises the instances registered in AWS Systems Manager (SSM)!Instances that are not registered in SSM Inventory will not be resolved by
ssm-sessionnor will they show up in--listoutput.
The ssm-session currently understands these instance identifiers:
- Instance ID – For example i-01234567890abcdef. Just use it, nothing else to do here.
- Instance Name – Resolved from the EC2 Instance Name Tag, e.g. test1
- Host Name – That’s what the `hostname` command on the instance says and what’s reported by the SSM Agent to the SSM Inventory, e.g. test1.aws.nz. This is not the registered DNS name! That can be different and is not resolved here!
- Private or Public IP address – Taken from the EC2 details.
ssm-session examples
Here are a few simple usage examples.
1) List instances registered in SSM Inventory
[email protected] ~ $ ssm-session --list
i-01234567890abcdef   test1.aws.nz                                      test1   192.168.145.158
i-09876543210fedcba   ip-172-31-1-178.ap-southeast-2.compute.internal   test2   172.31.1.178  52.123.12.3
As mentioned above the hostname displayed in the second column is as reported by the SSM Agent. It may not correspond with the registered DNS name!
If you don’t see the instances you expect you
2) Open a session by Instance ID
(mylaptop) ~ $ ssm-session i-01234567890abcdef
Starting session with SessionId: michael.ludvig-047de6a9be69e73f9
sh-4.2$ hostname
test1.aws.nz
sh-4.2$ exit
Exiting session with sessionId: michael.ludvig-047de6a9be69e73f9.
3) Open a session by Instance Name using a specified credentials profile
Here the name test1 automatically resolves to the matching instance id i-01234…def. The credentials profile (and / or region) is used both for the name resolution as well as for starting the actual connection.
(mylaptop) ~ $ ssm-session --profile aws-nz --verbose test1
{ssm-session} INFO: Running command: aws --profile aws-nz ssm start-session --target i-01234567890abcdef
Starting session with SessionId: michael.ludvig-06193ef348f19afe7
sh-4.2$ hostname
test1.aws.nz
Download
ssm-session script is part of my aws-utils collection. Clone the whole repo from GitHub or download just the ssm-session script.
Troubleshooting
If some of your instances do not show up in the `–list` output or you’re unable to start a session make sure that:
- The instance IAM Role has AmazonEC2RoleforSSM managed IAM Policy attached.
- Up to date amazon-ssm-agent process is running on the instance.
- The instance can connect to ssm.{region}.amazonaws.com either directly with Public IP or through NAT or through a Proxy.
Common error messages
An error occurred (TargetNotConnected) when calling the StartSession operation: i-07c186e0429021bc5 is not connected.- Most likely your
amazon-ssm-agentis outdated. Update it and restart it.
- Most likely your
[ssm-session] ERROR: An error occurred (AccessDeniedException) when calling the GetInventory operation: User: arn:aws:iam::123456789012:user/someone is not authorized to perform: ssm:GetInventory on resource: arn:aws:ssm:ap-southeast-2:123456789012:*- Your credentials profile doesn’t have SSM permissions.
- Your credentials profile doesn’t have SSM permissions.
[ssm-session] WARNING: Could not resolve Instance ID for 'instance123'- The instance is not registered in SSM Inventory. Perhaps it doesn’t have the agent running, or has incorrect IAM Policy, insufficient network access, etc. See above.
Enjoy and report any problems
The post SSM Sessions the easy way first appeared on AWS.NZ.
]]>The post Using SSM Session Manager for interactive instance access first appeared on AWS.NZ.
]]>Traditionally our EC2 instances would have a SSH KeyPair assigned and a Security Group with SSH port open. If they were on private IPs only we would also need a jump host or VPN to access them. That works but it’s got its own problems – for example rotation of the SSH keys, keeping the Security Group up to date, etc.
SSM Session Manager
AWS Systems Manager offers a better solution – the SSM Session Manager.
Session Manager enables ad-hoc shell access for any authorised IAM User completely outside of your Network / VPC / Security Group infrastructure. In fact your instance doesn’t even need to have sshd running! All it needs is a running amazon-ssm-agent, which comes preinstalled in all recent AMIs, and a correct EC2 IAM Policy for connecting to the SSM service.
EC2 Instance prerequisities
Any recent Amazon Linux, Amazon Linux 2 as well as the official Ubuntu and RedHat AMIs come with SSM Agent ready to use. If it is not installed on your instance check out Installing and Configuring SSM Agent on Amazon EC2 Linux Instances.
The next requirement is AmazonEC2RoleforSSM managed policy attached to your instance role. In my CloudFormation templates I use this role definition:
InstanceRole:
     Type: AWS::IAM::Role
     Properties:
       AssumeRolePolicyDocument:
         Version: '2012-10-17'
         Statement:
         - Action: sts:AssumeRole
           Effect: Allow
           Principal:
             Service: ec2.amazonaws.com
       Path: /
       ManagedPolicyArns:
       - arn:aws:iam::aws:policy/service-role/AmazonEC2RoleforSSM
Provided the instance can connect from its subnet to ssm.{region}.amazonaws.com – either directly, through NAT or through a Proxy – you are now all set on the instance side.
Session from AWS Console
One way to open a new shell session is from the AWS Console. Simply go to AWS Systems Manager service dashboard, under Actions open the Session Manager, select your instance and click Start session. It can’t be any easier!


Unfortunately I’ve got two problems with this setup:
- You can’t work on instances in more than one AWS account at the same time. That’s the nature of AWS Console unfortunately.
- I keep closing the browser window!
Whenever I press Ctrl+W to delete the previous word in the shell or invimmy Chrome intercepts it and closes the open tab. Arrrgghhh!!
Shell Session through AWS-CLI
I find it much better to open the shell session through aws cli. There I can keep pressing Ctrl+W as much as I want
Make sure you’ve got the session-manager-plugin installed. Otherwise you will get a message prompting you to do so.
~ $ aws ssm start-session --target i-0123abcd1234abcd
SessionManagerPlugin is not found. Please refer to SessionManager
Documentation here:
http://docs.aws.amazon.com/console/systems-manager/session-manager-plugin-not-found
With the plugin installed the usage is really simple:
~ $ aws ssm start-session --target i-0123abcd1234abcd
Starting session with SessionId: michael.ludvig-006c1ff2b131a2531

sh-4.2$ bash
ssm-user@test1 /usr/bin $ id
uid=1001(ssm-user) gid=1001(ssm-user) groups=1001(ssm-user)

ssm-user@test1 /usr/bin $ sudo su -
Last login: Thu May 23 17:14:29 NZST 2019 on pts/0

root@test1 ~ # id
 uid=0(root) gid=0(root) groups=0(root)
UPDATE: I wrote a script to start SSM Sessions by instance name, IP, etc. Check it out here:
ssm-session– SSM Sessions the easy way
SSM Agent has automatically created this ssm-user for us and gave it sudo privileges. You can check what has been done in /var/log/amazon/ssm/amazon-ssm-agent.log:
2019-05-24 22:05:58 INFO [MessageGatewayService] Successfully created ssm-user
2019-05-24 22:05:58 INFO [MessageGatewayService] Successfully created file /etc/sudoers.d/ssm-agent-users
2019-05-24 22:05:58 INFO [MessageGatewayService] Successfully changed mode of /etc/sudoers.d/ssm-agent-users to 288
One little unsettling thing is that this session doesn’t appear in who, w or last outputs…
root@test1 ~ # w
  22:20:09 up  3:53,  0 users,  load average: 0.00, 0.01, 0.05
 USER     TTY      FROM             LOGIN@   IDLE   JCPU   PCPU WHAT

root@test1 ~ # who

root@test1 ~ # last
 reboot   system boot  3.10.0-957.1.3.e Thu May 23 13:26
 wtmp begins Thu May 23 13:26:23 2019

root@test1 ~ #
It would be nice to have a record of these logins in the standard places – if you know how to do that let me know in the comments.
Windows instances
Quite surprisingly SSM Sessions also works with Windows EC2 instances. However don’t expect a full graphical interface, you will only get a PowerShell command prompt…
~ $ aws start-session --target i-1234abcd1234abcd
 Starting session with SessionId: botocore-session-1558574990-abcd1234abcd1234

 Windows PowerShell
 Copyright (C) Microsoft Corporation. All rights reserved.

 PS C:\Windows\system32>
 PS C:\Windows\system32> exit

Exiting session with sessionId: botocore-session-1558574990-abcd1234abcd1234.
Behind the scenes
As I mentioned above the Session Manager doesn’t need inbound access to the instances. Instead all the traffic is relayed through the SSM service.
- When the instance boots up it connects to AWS SSM service endpoint and awaits the commands.
- When we run aws ssm start-session also connects to the AWS SSM service endpoint (very likely a different node though).
- AWS-CLI then executes the session-manager-plugin that we installed above which then negotiates a secure WebSocket channel with SSM. Something similar then happens on the instance where a ssm-session-worker process is in charge of its side of the WebSockets stream.
- All the keystrokes and all the screen outputs is passed from the instance through this channel between the instance and us. Note that at no time there is a direct connection between us and the instance. Everything is passed through the AWS SSM service.
I found the SSM Session Manager to be a very good option for the occasional ad-hoc access to our instances. No need to keep track of SSH keys, opening Security Group ports, etc. Give it a try!
The post Using SSM Session Manager for interactive instance access first appeared on AWS.NZ.
]]>The post CloudFormation package & deploy first appeared on AWS.NZ.
]]>Easily deploy complex CloudFormation templates with external resources such as Lambdas or Nested Stacks.
Many CloudFormation templates are completely standalone – one single YAML or JSON file and that’s it. Easy to deploy. However in some cases CFN templates refer to other files, or artifacts. For example Lambda source or ZIP file, nested CloudFormation Template file, or an API definition for API Gateway may be such “artifacts”. These files have to be available in S3 before we can deploy the main CloudFormation template.
Deploying such complex stacks is a multi-stage process, usually performed using a custom shell script or a custom Ansible playbook.
- ZIP up the Lambda source and required libraries
- Upload the ZIP file to S3
- Create CloudFormation stack with the correct path to the S3
Not a rocket science but still…
Fortunately AWS-CLI provides a very convenient method for deploying CloudFormation templates that refer to other files. Read on to learn how.
TL;DR
Use aws cloudformtion package and deploy…
~ $ aws cloudformation package \
         --template-file template.yml \
         --output-template-file template.packaged.yml \
         --s3-bucket {some-bucket}

 ~ $ aws cloudformation deploy \
         --template-file template.packaged.yml \
         --stack-name {some-name}
Sample project structure
Our little project has these four files:
~/cfn-package-deploy $ tree -F.
 ├── template.yml
 ├── lambda_one.py
 └── lambda_two/
     ├── index.py
     └── some_module.py
 1 directory, 4 files
One Cloud Formation template, one simple single-file Lambda function and one more complex Lambda that consists of multiple files.
Refer to local files in your CFN template
Traditionally we would have to zip up and upload all the lambda sources to S3 first and then in the template refer to these S3 locations. Perhaps through stack parameters.
However with aws cloudformation package we can refer to the local files directly. That’s much more convenient!
Have a look at this LambdaOne snippet for example – we refer to the lambda_one.py file locally, as it’s in the same directory as the template.
  LambdaOne:
     Type: AWS::Lambda::Function
     Properties:
       Handler: lambda_one.lambda_handler
       Code: lambda_one.py                  # <<< This is a local file
       Runtime: ...
Likewise with the more complex LambdaTwo that consists of two files in a subdirectory. Simply refer to the directory name lambda_two in the template.
  LambdaTwo:
     Type: AWS::Lambda::Function
     Properties:
       Handler: index.lambda_handler
       Code: lambda_two/                     # <<< This is a local directory
       Runtime: …
Package and upload the artifacts
The next step is calling <code>aws cloudformation package</code> that does three things:
- ZIPs up the local files, one ZIP file per “artifact”.
- Upload them to a designated S3 bucket.
- Generate a new template where the local paths are replaced with the S3 URIs.
Decide on a S3 bucket
First of all we need an S3 bucket where the files will be uploaded. I tend to (ab)use the cf-templates-… buckets that AWS creates when we deploy CFN through the console. But feel free to use any bucket you want.
~/cfn-package-deploy $ aws s3 ls | grep cf-templates
2018-11-07 22:55:23 cf-templates-abcdefghjklm-ap-southeast-2
2019-02-01 10:27:46 cf-templates-abcdefghjklm-ca-central-1
2018-11-02 07:06:25 cf-templates-abcdefghjklm-us-east-1
...
Let’s use the first one as I’m working in the Sydney region (ap-southeast-2)
Run the package command
~/cfn-package-deploy $ aws cloudformation package \
            --template-file template.yml \
            --s3-bucket cf-templates-abcdefghjklm-ap-southeast-2 \
            --output-template-file template.packaged.yml

Uploading to 35f69109a3a3f87e999f028f03403efa  193 / 193.0  (100.00%)
Uploading to cca5b023ed6603eabf9421471b65d68b  352 / 352.0  (100.00%)
Successfully packaged artifacts and wrote output template to file template.packaged.yml.
Examine the generated files
Let’s have a look at the output template file first.
We will notice that the Code attributes in LambdaOne and LambdaTwo were updated with the bucket and uploaded object name:
  LambdaOne:
     Properties:
       Code:
         S3Bucket: cf-templates-abcdefghjklm-ap-southeast-2
         S3Key: 35f69109a3a3f87e999f028f03403efa
       Handler: lambda_one.lambda_handler
       ...

   LambdaTwo:
     Properties:
       Code:
         S3Bucket: cf-templates-abcdefghjklm-ap-southeast-2
         S3Key: cca5b023ed6603eabf9421471b65d68b
       Handler: index.lambda_handler
       ...
For completeness let’s also look what’s in the uploaded files. From the listing above we know the bucket and object name to download.
~/cfn-package-deploy $ aws s3 cp \
      s3://cf-templates-abcdefghjklm-ap-southeast-2/cca5b023ed6603eabf9421471b65d68b .
And we know it’s a ZIP file. Even though there is no .zip extension we can still unzip it.
~/cfn-package-deploy $ unzip -l cca5b023ed6603eabf9421471b65d68b
 Archive:  cca5b023ed6603eabf9421471b65d68b
   Length      Date    Time    Name
 ---------  ---------- -----   ----
       114  2019-02-19 15:55   index.py
        35  2019-02-19 15:54   some_module.py
 ---------                     -------
       149                     2 files
As expect it’s the content of the lambda_two/ directory.
Deploy the “packaged” template
~/cfn-package-deploy $ aws cloudformation deploy \
        --template-file template.packaged.yml \
        --stack-name cfn-package-deploy

Waiting for changeset to be created..
Waiting for stack create/update to complete
Successfully created/updated stack - cfn-package-deploy
Note that we used the packaged template template.packaged.yml that refers to the artifacts in S3! Not the original one with local paths!!
We may also have to use --capabilities CAPABILITY_IAM if there are any IAM Roles in the template – and that’s quite likely. Otherwise deploy fails: An error occurred (InsufficientCapabilitiesException) when calling the CreateChangeSet operation: Requires capabilities : [CAPABILITY_IAM]
We can also set / override stack parameters with --parameter-overrides just like when using aws cloudformation create-stack.
See aws cloudformation deploy help for the available parameters.
What a convenience!
This is an easy way to create and update stacks with external resources. It works not only with Lambda sources but also with Nested Stacks, AWS::Include, and many other resources that need external files. Refer to <code>aws cludformation package help</code> for details and supported artifact types.
If you liked this article leave us a comment
The post CloudFormation package & deploy first appeared on AWS.NZ.
]]>The post IP-Ranges Updater first appeared on AWS.NZ.
]]>But running an aws-cli script from cron on some EC2 instance is so old school!
IP-Ranges-Updater Lambda
Much better way is to have this functionality in a Lambda function and let it update your Security Groups or Route Tables automatically.
Welcome IP-Ranges Updater project!
Use cases
Obviously I didn’t develop this Lambda just for the sake of it. Obviously I had a problem that needed solving. Actually two problems.
Permit access to EC2 / ELB only through CloudFront
I wanted to restrict access to a web server only through CloudFront. In my case to enforce WAF (Web Application Firewall), which at the time wasn’t available for ELB/ALB (now it is). One of the ways to achieve that is to add all the CloudFront CIDRs to the to the EC2 or ELB Security Group.
- Solution: Let IP-Ranges Updater populate the Security Group rules and keep it up to date when new CloudFront CIDRs are added.
Add routes for traffic to specific IP ranges
One of my customers has very strict policies regarding outbound access from VPCs. EC2 instance don’t have direct outside access and everything has to go through a Proxy with URL whitelist. Unfortunately there are services like Fargate or Cognito that don’t work without direct outside access. For these special cases we got a security exemption to create dedicated subnets in the VPC with NAT but that NAT could only be used to access the Amazon IPs in our region, nothing else!
- Solution: Use IP-Ranges Updater to add our local region’s IP Ranges to the new subnets’ Route Tables with target being the NAT gateway.
Installation and Usage
Head over to the IP-Ranges Updater on GitHub and check out the README file for detailed installation instructions.
Here I’ll add only a couple of notes…
- Just like with the command-line tool filter-ip-ranges you can filter prefixes by region or service. In this case the filter is in JSON format as described in the README.
- The Lambda Python file can be called from the shell to facilitate development of the JSON filter.
~/aws-ipranges-updater $ ./ipranges_updater/lambda.py \ --json '[{"region":"ap-southeast-2","services":["S3"]}]' SELECTED: 4 prefixes 52.92.52.0/22 ap-southeast-2 AMAZON S3 52.95.128.0/21 ap-southeast-2 AMAZON S3 54.231.248.0/22 ap-southeast-2 AMAZON S3 54.231.252.0/24 ap-southeast-2 AMAZON S3 - In the config.sh file comment out settings that you don’t need. For example if you are only going to update Ingress rules in Security Groups but not Route Tables or Security Group Egress rules comment out
ROUTE_TABLES,RT_TARGETandSG_EGRESS_PORTSlines.
SNS vs Scheduled runs
The Lambda is scheduled to run once a day, at some random point in the day. That’s fine because ip-ranges.json doesn’t change that often and even after AWS adds new CIDRs to the file it takes some time before they start using them.
It is however possible to run it as soon as and only when ip-ranges.json is updated. Every time Amazon updates the file they publish a SNS notification to a SNS Topic in us-east-1 – we can subscribe to it and trigger our run from there. Check out the use-sns branch in GitHub for an implementation.
Unfortunately on a few occasions I found that the ip-ranges.json file was not yet readable when the SNS Topic delivered the notification which essentially meant that I missed out on those updates. Running it periodically once a day seems to be more reliable.
- Either way you may want to run the newly created Lambda manually for the first time after deployment to populate your Security Groups or Route Tables without having to wait a day for the scheduled run or for the file update if you are using SNS.
That’s all
The post IP-Ranges Updater first appeared on AWS.NZ.
]]>The post New C5 / M5 / T3 instance disk names first appeared on AWS.NZ.
]]>/dev/sda1 or /dev/xvda that we were used to for years.
TL;DR
The new root disk name is
/dev/nvme0n1 with the partition device names being /dev/nvme0n1p1, /dev/nvme0n1p2, etc.
… just in case you’re lazy to read the whole post
Identifying the disks
Now that the disk names in the OS are no longer the names shown in the web console how do we know which disk is which? That’s even more pressing issue if you launch an M5D instance (e.g. m5d.large) with instance ephemeral disk.

Fortunately there’s an easy way to find out from the Linux command line. Let’s have a look into /dev/disk/by-id/ and see what we find there.
[ec2-user@ip-172-31-16-65 ~]$ ls -l /dev/disk/by-id/
total 0
lrwxrwxrwx 1 ... nvme-Amazon_EC2_NVMe_Instance_Storage_AWS6FA651C934ADD20C4 -> ../../nvme3n1
lrwxrwxrwx 1 ... nvme-Amazon_Elastic_Block_Store_vol08071310dbc3cfa1f -> ../../nvme0n1
lrwxrwxrwx 1 ... nvme-Amazon_Elastic_Block_Store_vol08071310dbc3cfa1f-part1 -> ../../nvme0n1p1
lrwxrwxrwx 1 ... nvme-Amazon_Elastic_Block_Store_vol08071310dbc3cfa1f-part128 -> ../../nvme0n1p128
lrwxrwxrwx 1 ... nvme-Amazon_Elastic_Block_Store_vol0b80ed4fd5b5e9cda -> ../../nvme1n1
lrwxrwxrwx 1 ... nvme-Amazon_Elastic_Block_Store_vol0bbf076a4e81f5789 -> ../../nvme2n1
As we can see the EBS Volume ID is actually displayed as part of the symbolic name – the volume vol-0bbf076a4e81f5789 as displayed in the console screenshot above is our nvme-Amazon_Elastic_Block_Store_vol0bbf076a4e81f5789 device which maps to /dev/nvme2n1.
The ephemeral instance store partition is apparently nvme-Amazon_EC2_NVMe_Instance_Storage_AWS6FA651C934ADD20C4 which maps to /dev/nvme3n1.
Partitioning the disks
Now that we know which disk is which we can create the partitions.
[ec2-user@ip-172-31-16-65 ~]$ sudo gdisk /dev/nvme2n1
GPT fdisk (gdisk) version 0.8.6

Creating new GPT entries.

Command (? for help): n
Partition number (1-128, default 1):
First sector (34-16777182, default = 2048) or {+-}size{KMGTP}:
Last sector (2048-16777182, default = 16777182) or {+-}size{KMGTP}:
Current type is 'Linux filesystem'
Hex code or GUID (L to show codes, Enter = 8300):
Changed type of partition to 'Linux filesystem'

Command (? for help): w

Final checks complete. About to write GPT data. THIS WILL OVERWRITE EXISTING
PARTITIONS!!

Do you want to proceed? (Y/N): y
OK; writing new GUID partition table (GPT) to /dev/nvme2n1.
The operation has completed successfully.
That looks good – let’s check if we can see the new partition /dev/nvme2n1p1:
[ec2-user@ip-172-31-16-65 ~]$ ls -l [...]
lrwxrwxrwx 1 root root 15 Oct 2 01:03 /dev/disk/by-id/nvme-Amazon_Elastic_Block_Store_vol0bbf076a4e81f5789-part1 -> ../../nvme2n1p1
brw-rw---- 1 root disk 259, 9 Oct 2 01:03 /dev/nvme2n1p1
Partition created, job done. From now on it’s Linux business as usual – mkfs, mount, use
The post New C5 / M5 / T3 instance disk names first appeared on AWS.NZ.
]]>The post CloudFormation Exports first appeared on AWS.NZ.
]]>The traditional approach is to pass Outputs from one template to Parameters in another template. However there are a few problems…
- The first problem with this method is that is that you somehow have to collect the Outputs from one stack and pass them to the Parameters in another. This can be done either manually or through some scripting like AWS-CLI or Ansible, but it’s an extra, mundane work.
- The second problem is that many stacks need the same set of parameters – VPC ID, Subnet IDs, perhaps some Security Group IDs, Route53 hosted zone name and ID, etc. The Parameters list can get very long and not very interesting.
There is a better option – CloudFormation Stack Exports
CloudFormation Stack Exports
The idea is that CFN Stacks that create resources Export their output values to a global namespace under some well known Name (global = account+region wide). Then the CFN Stacks that need those resources Import them from that global namespace using the known export Name.
For example in a VPC stack we can have an export like this:
Outputs:
  VpcId:
    Value: !Ref VPC
    Export:
      Name: MyVpcId
Then in the EC2 stack we can import it:
Resources:
  InstanceSecurityGroup:
    Type: AWS::EC2::SecurityGroup
    Properties:
      [...]
      VpcId:
        Fn::ImportValue: MyVpcId
No stack parameters needed, all we need is to know that the VPC ID was exported under a name MyVpcId.
Namespaces—{Project}:{EnvName}:{EnvIndex}:{ResourceName}
The obvious problem with the above is that you may want to deploy multiple versions of your stacks – for example dev-1, dev-2, test-1, test-2, prod-1, prod-2, etc. They can’t all export MyVpcId because – as mentioned – the Exports namespace is global in the account/region and once one of your stacks exports MyVpcId no other stack can export the same name.
Solution? Namespaces!
They are not required or prescribed by AWS and it’s up to the user to come up with something sensible. Over time I settled on a simple form: {Project}:{EnvName}:{EnvIndex}:{ResourceName}
For example the ECS Cluster name in dev-1 environment of MyApp deployment will be exported as: myapp:dev:1:ecs-cluster
Sometimes you may want to share some resources between environments, e.g. you may want to have a single VPC for all your Dev environments. In that case I use all for the EnvIndex field, for example: myapp:dev:all:vpc-id
With this “namespace system” in place we only need to pass EnvName and EnvIndex Parameters to each template and the template will figure out all the rest.
# vpc-template.yml
---
Parameters:
  EnvName:
    Type: String

Resources:
  VPC:
    Type: AWS::EC2::VPC
    Properties:
      [...]

Outputs:
  VpcId:
    Value: !Ref VPC
    Export:
      Name: !Sub "myapp:${EnvName}:all:vpc-id"
Then in the ECS stack’s Security Group we import it with Fn::ImportValue intrinsic function:
# ecs-template.yml
---
Parameters:
  EnvName:
    Type: String
  EnvIndex:
    Type: String

Resources:
  EcsSecurityGroup:
    Type: AWS::EC2::SecurityGroup
    Properties:
      [...]
      VpcId:
        Fn::ImportValue: !Sub "myapp:${EnvName}:all:vpc-id"
And in the same stack we export the ECS Cluster Name and ARN, this time for a specific EnvIndex:
# still in ecs-template.yml
Outputs:
  EcsCluster:
    Value: !Ref EcsCluster
    Export:
      Name: !Sub "myapp:${EnvName}:${EnvIndex}:ecs-cluster-name"

  EcsClusterArn:
    Value: !GetAtt EcsCluster.Arn
    Export:
      Name: !Sub "myapp:${EnvName}:${EnvIndex}:ecs-cluster-arn"
And finally in the actual ECS Service stack that gets deployed through CI/CD we import the cluster name:
# task-template.yml
---
[...]
Resources:
  TaskService:
    Type: AWS::ECS::Service
     Properties:
      Cluster:
        Fn::ImportValue: !Sub "myapp:${EnvName}:${EnvIndex}:ecs-cluster-name"
      TaskDefinition: !Ref TaskDefinition
      [...]
This way we can build dev / test / prod stacks in the same account by setting EnvName stack parameter and also multiple versions of each (blue / green or 1, 2, 3, ..) by setting the EnvIndex parameter. And we don’t have to pass heaps of repetitive Parameters to each template.
View the exports
You can view all the exports in CloudFormation ➔ Exports tab:

And of course you can use AWS-CLI to look up the exports in your scripts with aws cloudformation list-exports
That’s all for today
The post CloudFormation Exports first appeared on AWS.NZ.
]]>