Whether you’re running a business, a travel blog, or an event website, when you add a map block to WordPress, it can significantly enhance user experience.
A WordPress maps block helps visitors find your location physically, and even explore geographic data. Luckily… To add a maps block to WordPress posts and pages is especially easy when using the map block included with the FREE Blockons WordPress plugin.
Why Adding Maps to Your WordPress Website is a Great Idea
Maps aren’t just about showing a location; they improve engagement, provide valuable on-location information, and can definitely enhance the functionality of your WordPress website.
If you’re a business owner, an embedded map makes it easy for your customers to find your store or office location.
Travel bloggers can use maps to showcase destinations and routes, while real estate agents can highlight property locations.
Whatever your niche, to add a maps block to WordPress can increase your website credibility and user interaction.
Why We Choose Mapbox Over (or Instead of) Google Maps
When it comes to adding maps to a WordPress website, there are two options which are the most popular… Google Maps and Mapbox.
Google Maps has long been the default choice, but in recent years, Mapbox has emerged as a very strong competitor.
While both platforms offer a very robust mapping solution, Google Maps has become a bit more restrictive, requiring API keys and implementing usage-based pricing, which can get expensive for high-traffic sites.
Mapbox, on the other hand, provides a more flexible pricing model, offering almost double the traffic for free, and offers just as good customization options, and also allows developers to create visually stunning, interactive maps using a free api key.
For Google Maps & Mapbox, you need to enter billing details. You most likely won’t pay even as your website will need very high traffic to start paying, and even then, it is still cheap.
Why We Think Mapbox is the Better Choice
Much More Cost-effective
Unlike Google Maps, which can get expensive if you have high amounts of traffic, Mapbox offers a much more generous free tier and more predictable pricing.
Customization
With Mapbox, you can perfectly design maps to match your website’s branding, adding custom colors, markers, and interactive elements.
Performance
Mapbox maps tend to load slightly faster and provide a great user experience, especially on mobile devices.
Better for developers
If you want more control over how your map functions, Mapbox provides extensive customization options via its API, and this is why we’ve selected Mapbox for our Blockons Maps block.
Using Blockons to Add a Maps Block to WordPress
If you’re using the Gutenberg editor, the easiest way to embed a map is with a dedicated maps block. The Blockons plugin simplifies the process by offering a Mapbox-powered maps block, allowing you to add interactive maps to your WordPress posts and pages effortlessly.
With the Blockons Maps Block, you can: Easily embed maps without needing to add code. Customize map position and zoom, add and style custom markers to the map. Add place or event information to the Mapbox map. Enjoy seamless, easy Mapbox integration and display beautiful maps on your site.
To add a maps block with Blockons:
- Install and activate the Blockons plugin on your WordPress site.
- Open the Gutenberg editor and search to add a “Maps” block, or type “/map” to do a quick search.
- Customize your map, including location markers, zoom levels, and styles.
- Save and publish your post or page.
Conclusion
Adding maps to your WordPress website has never been easier, especially with Blockons blocks.
If you’re ready to take your website to the next level, consider using Mapbox with Blockons for an optimized mapping experience.
]]>However, like any online tool, it can sometimes present challenges or have issues that come with an open-sourced system that developers around the world are able to build themes, plugins and extensions for.
This guide will help you troubleshoot common Gutenberg editor issues you might encounter while using the WordPress core editor.
I hope this post helps you to find the issue!
A Common Solution on How to debug WordPress editor issues:
Before we jump into the different Gutenberg editor issues you may encounter when using the WP block editor, it’s important to note that most problems are often due to plugin or theme conflicts. Either a conflict with each other, or a conflict with WordPress.
And, since many users can build products for WordPress, these conflicts can be quite common.
The main debugging step I recommend is to disable all installed plugins and check if the issue is resolved.
Yes, it’s fixed:
Great! Now, activate the plugins one-by-one, and after each activation… Test to see if the issue comes back, this way you should be able to easily narrow it down to find the plugin that is causing the problem. Then, contact the plugin developers to sort it out.
No, the issue is still there:
Ok, so then it’s not a plugin issue… Next is to try activating another theme and then see if the issue is resolved. If it is, then you may need to try out another theme, or contact the theme developers and check if they can help fix it or give you a solution. If that didn’t fix it, then keep reading…
Let’s go through the more common Gutenberg editor issues that you will run into, if any.
1) JavaScript Errors [most common]

JavaScript errors are on of the more common issues you will experience when building a site… These errors can significantly impair the functionality of the Gutenberg editor, causing various features to break or not work as expected.
With WordPress being an open-sourced platform where many different developers can build on top of it, these errors often arise from conflicts between different scripts loaded by plugins or themes.
Monitoring the browser console for JavaScript errors and disabling conflicting plugins can help identify and fix these issues.
What Happens:
- Errors displayed in the browser console.
- Editor functionality is impaired or the editor stops working.
This issue is usually pretty easy to resolve as you can open the browser console to see where the error is coming from, or Scroll back to the plugin test for this.
Possible Solutions:
- Disable Conflict Plugins: JavaScript errors often stem from plugin conflicts. Follow the plugin test suggestion.
- Browser Console: Open your browser’s developer tools (“
Command+Option+J” on Mac OR “Ctrl+Shift+I” on Windows) and check the console for JavaScript errors. The errors often provide clues about which scripts are causing problems.
2) Editor Unresponsive / Slow, Lagging Editor [not too common]

An unresponsive or slow Gutenberg editor can be frustrating and really hinder your productivity.
This issue is usually caused by high memory usage, outdated versions, limited hardware resources, and background processes. Managing tabs, extensions, and keeping the browser updated can really help.
Server issues like high load and frequent autosaves could possibly slow down the editor. Overwhelmed servers, slow databases, and network latency contribute to the lag. Optimizing server settings and reducing autosave frequency can enhance editor performance.
What Happens:
- Editor is very slow or freezes.
- Delayed typing response or adding of blocks, etc
Possible Solutions:
- Browser Performance: Ensure your browser is up to date and not overloaded with extensions that could affect performance, maybe also don’t have a million tabs open at once.
- Keep Updated: Make sure your WP, your theme and all plugins are all up to date and fully compatible.
- Ensure you’re with a good host: Ensuring you’re with a good hosting provider is always recommended.
3) Content or Blocks Disappearing / Not Saving [does happen]

Content disappearing or not saving in the Gutenberg editor can be alarming and result in lost work.
This issue often occurs due to conflicts between the editor and other plugins or themes, leading to failed save attempts. In some instances, the autosave feature might not function correctly, causing content to be lost if the browser crashes or the session times out.
Another possible cause could be an issue with the plugin block… If you experience this, find out which plugin is providing the block that is breaking, and then contact the plugin developers for a fix.
What Happens:
- Changes are not saved.
- Content or blocks disappear after publishing.
Possible Solutions:
- Check Autosave: WordPress automatically saves drafts. Check the autosave feature by clicking on “View Autosave” if your content disappears.
- Contact Developers: Once you know which block or which plugin is causing this issue, contact the plugin developers to fix it for you or to help you troubleshoot the issue.
- Revisions: Use the revisions feature to restore previous versions of your content. This can help recover lost changes.
4) Editor Incompatibility Issues / Editor Crashes [does happen]

Block editor incompatibility occurs when certain blocks do not function correctly or display as intended. The whole editor will crash and not be usable at all.
This can be due to running outdated versions of WordPress, plugins, or themes that are not compatible with the latest Gutenberg updates.
Third-party block plugins may also introduce compatibility issues if they are not maintained or tested with the current WordPress version.
What Happens:
- Certain blocks do not work, or they display incorrectly.
- Missing block options.
Possible Solutions:
- Update WordPress and Plugins: Ensure you are running the latest version of WordPress and all plugins. Updates often include bug fixes and compatibility improvements.
- Disable Block Plugins: A third-party block plugin might be causing conflicts. Disable block plugins and see if the issue persists.
- Use Default Blocks or Find Another Plugin: If a specific custom block is causing issues, use default Gutenberg blocks as a workaround while investigating the problem.
5) Blocks Don’t Look Good / Not Aligning [not common]

If certain blocks in the Gutenberg editor do not align as expected, or do just not look good, it can disrupt the visual layout of your content.
These Gutenberg editor issues often arise from custom CSS added by themes or plugins that overrides the default styling of Gutenberg blocks.
Responsive design considerations are crucial… Blocks may align properly on desktop but not on mobile or tablet devices due to incorrect or missing responsive settings.
What Happens:
- Blocks are not displaying as expected.
- Alignment settings have no effect.
Possible Solutions:
- Check for Custom CSS: Custom CSS in your theme or plugins might be affecting block alignment. Inspect the page code using browser developer tools (if you know how) to identify any conflicting styles.
- Responsive Design Issues: Ensure that your blocks are configured for responsiveness. Check settings for mobile and tablet views to make sure blocks align correctly across devices.
- Contact the Developers or Find Another Plugin: This issue will be caused by a plugin you’ve added, either contact the developers for help to make it look better, or find another plugin that does what you’re needing.
Troubleshooting Editor Issues: Conclusion
The Gutenberg editor is a powerful tool for creating rich content in WordPress, but it can present challenges. By systematically troubleshooting these Gutenberg editor issues and identifying conflicts, you can often resolve problems quickly and efficiently.
Always keep your WordPress installation, themes, and plugins up to date to minimize compatibility issues.
If you encounter persistent problems, consider reaching out to the WordPress community or support forums for additional assistance… Or, reach out to us and I’d be happy to help.
]]>A slider (or carousel) typically consists of a series of images, content or products displayed in a slideshow format, with buttons or arrows that users can click to navigate between them. Sliders are commonly used on websites to showcase products, highlight features, or tell a story in a visually engaging way.
The Blockons WordPress plugin offers advanced Image Sliders and Image Carousels, Video Sliders and a WooCommerce Product Slider for the WordPress (Gutenberg) editor. All WordPress Sliders within the Blockons plugin can be further customized with various effects and design elements to make it suit your website style.
Easily adding sliders to your WordPress website
With the Blockons WP plugin, each type of slider is created as it’s own Gutenberg block, so adding sliders to your WordPress website is as simple as drag and drop, add your images, text and/or videos and you’re done.
You can add just the (Gutenberg) slider blocks as their own, create reusable blocks, or add them to your WP block patterns to be used elsewhere on your website.
The sliders are self loading and you can use as many image sliders, video sliders or advanced Sliders as you want when adding sliders to your WordPress website.
Adding Sliders to your WordPress website
Presuming you know how to use the WordPress editor… below we’ll explain how to use the different sliders offered by the Blockons WordPress plugin.
Simply click the “Add New” icon in the editor and search for the Blockons slider(s) that you want to add to the page.

To find the Blockons sliders (and other blocks) you can type “Blockons” or the type of slider you want such as “Video”, “Image”, etc. You can also open the left blocks sidebar and scroll down to the Blockons Blocks category and find them there.
WordPress Image Slider / Image Carousel
One of the most common sliders that users want on their websites are Image Sliders or Image Carousel sliders when adding images to their website
Blockons offers a great image slider which can also be turned into an image carousel.
WP Image Slider
The image slider offers 3 transition effects, 3 modes (default, rewind & infinite loop), Image Proportions and some caption settings to edit and design as you like.


WP Image Carousel
Turn the slider into a carousel by simply adjusting the Slides Per View settings.
The image carousel offers 3 transition effects, 3 modes (default, rewind & infinite loop), Image Proportions and some caption settings to edit as you like.
WordPress Video Slider
The WordPress Video Slider gives you the options of adding YouTube videos and Vimeo videos or you can also use your own self-hosted video in the slider by uploading a .mp4 video.
This slider is only showing YouTube & Vimeo examples.
WordPress Advanced / Product Slider
The more advanced slider in the Blockons plugin lets you customize a lot more.
In the example below we’ve made all different slides in one to show you a little on what the slider can offer.
You can also select the option to insert WooCommerce products as slides, and then still further edit the slides to be exactly as you want.

WordPress Testimonials Slider
Testimonials are a great way to gain trust in your work, and often it’s useful to show quite a few comments or good reviews in one place.
The Testimonials Slider comes with all the normal blockons slider settings, letting you display testimonials professionally on your website in a neat slider or carousel layout, you can also adjust colors, sizing and lots more.
Hopefully that covers it… Try out the Blockons plugin and see if it suits your needs.
If not, please let us know and we’ll see if we can improve it for you.
]]>Whether you’re using the free Advanced Editor Block by Blockons or simple core blocks, WP reusable blocks will work for all blocks in your WordPress editor.
We’ll explain what they are, how to use them and more in this guide for WordPress Reusable blocks.
What are WordPress Reusable blocks
WordPress Reusable blocks are a combination of blocks that have been saved as ‘snippet’, and can be used again anywhere on your site, and anywhere that you edit a saved Reusable block, it will update site-wide to all of the same reusable blocks.
Some examples where Reusable blocks are useful are Newsletter signups at the bottom of each blog page, call-to-action buttons, team listings or services listings… There are lots of other ways to use them but those are just a few.
Creating Reusable Blocks in the WordPress block Editor
In the WordPress Gutenberg editor, you can add/create the block or combination of blocks that you want to save as reusable blocks to be used again… For this example we’ve created 2 Columns with a slight background color with an image, heading and text inside each column.
Then to save these blocks as WordPress reusable blocks, simply select the parent block (in this case, the Columns) by either clicking on the 3 dots icon on the block tool bar and selecting “Select Parent Block”, or use the block list view to select the correct block and then click the 3 dots icon again and select “Add to Reusable blocks“.
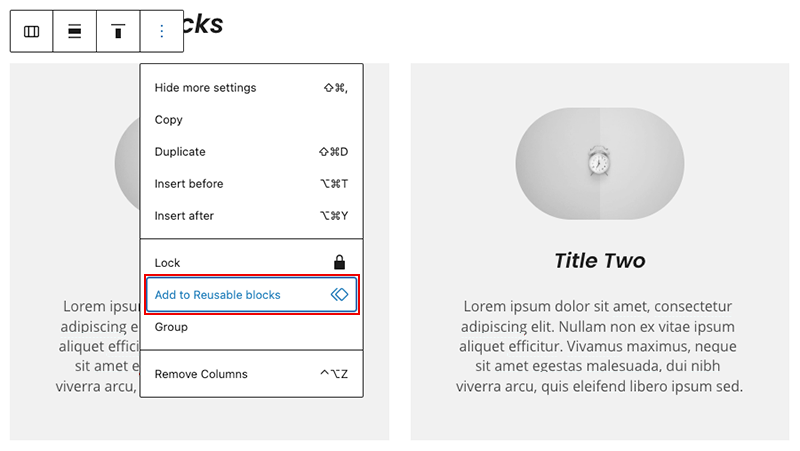
The editor will then ask you to name the block, and make sure to name it something you will remember when you want to add it to the same page or any other page at a later stage, and for when you have a whole list of saved reusable blocks.
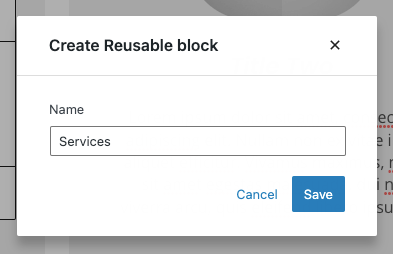
Once you click “Save”, it will now save the Reusable block(s) and any other reusable blocks you create to the sidebar for you to find later.
Using Reusable Blocks in other Posts and Pages
Creating and saving your own custom WordPress Reusable blocks was simple enough, right?
Now we’ll look at adding your reusable block to another page or post on your website.
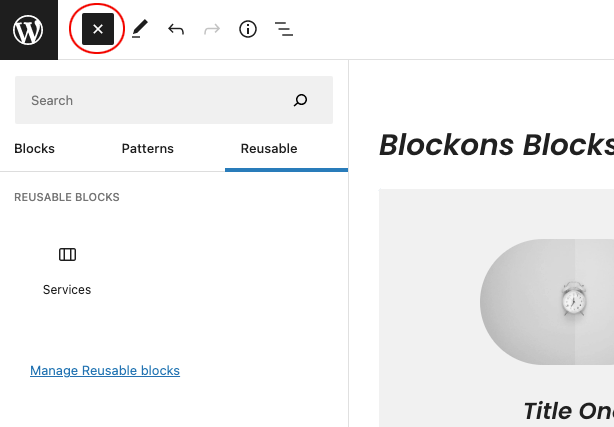
When editing the new page, click the blue plus + icon in the top left corner to open the blocks sidebar to view all blocks and you’ll see how to find your reusable blocks.
You’ll now see the Reusable tab available next to the Blocks and Patterns tabs.
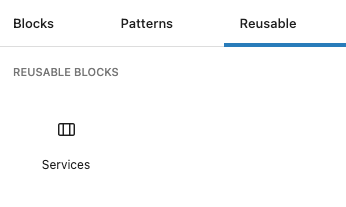
This will display a list of all the Reusable blocks you have created and you should be able to easily find the blocks you saved and named accordingly. In this case it was “Services”.
If you hover over the “Services” block, you will see a preview of what the blocks look like, to be 100% sure you are adding the correct block(s).
Once you add the reusable blocks to the page, if you edit them, these new changed will apply everywhere (all pages and posts) that this block has been added.
Managing all your Reusable Blocks in the WordPress Editor
After a while, you may find you have reusable blocks that you didn’t end up using or that you simply don’t want anymore because you’ve created new better reusable blocks… WordPress does also let you manage all your reusable blocks.
Open the blocks sidebar and select the Reusable Tab and then you should be able to see a “Manage Reusable blocks” link.
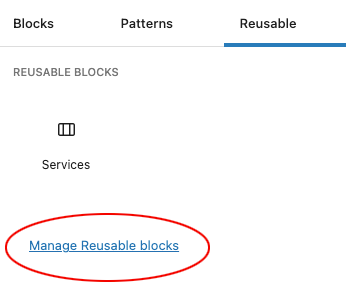
This will take you to a new page listing all your blocks so be sure to save you page first if there are changes you don’t want to lose.
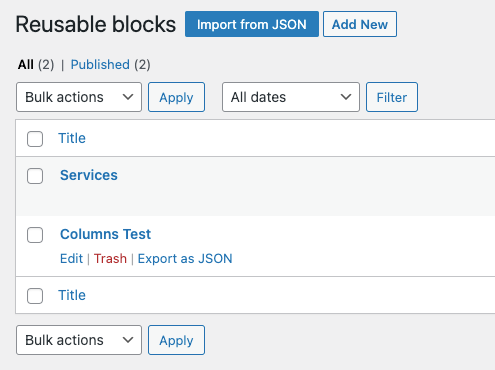
WordPress Reusable blocks are essentially saved as their own post type so the list screen shout look familiar to you, same as the post and pages lists, but will slightly different link options.
From here you can Edit, Delete or Export any of the blocks.
Exporting and/or importing Reusable Blocks
Do you have more than one website? Are you wanting those same reusable blocks on the other website?
You can very easily export the reusable blocks as a JSON file and import them into a new website to be used there too.
Going back to the Reusable blocks management screen, when you hover over the block you want to export, simply click the “Export as JSON” link.

This will download a json file to your computer.
Then on the new website, you can go to the Reusable blocks management screen too and then select Import from JSON.

Import and select the JSON file you downloaded earlier and then you should see the new block available once the import is complete.
Use the block as you would following the the explanations above for any page or post.
What’s the difference between Reuseable Blocks and Block Patterns?
WordPress reuseable blocks and WordPress block patterns are both a way for users to add commonly used blocks to their pages when building their website.
However, there is actually quite a difference in how they work.
When you create and save a re-useable block and then use it elsewhere on your site, when ever you edit the reuseable blocks, the changes will be applied to all the places where the selected re-useable block has been added.
Whereas, if you insert a Block Pattern into the page, when you edit the blocks, these changes will only apply to the pattern that you are currently editing.
]]>WordPress blocks, in the newer Full Site Editing features, are used to build headers, footers, page content and the sidebars for your website pages.
So, what exactly are WordPress block patterns?
We’ll explain what block patterns are, where to find and download block patterns and how to use them in your website.
What are WordPress block patterns
WordPress block patterns are a collection of predefined blocks added together to create layouts that you can use in your website, and once added, they can be changed or edited to the layout that you need.
Using block patterns are an easy and great way to start building you pages as it gives you a good idea of how the content will be displayed and give you a feel for what the page will look like… You can then simply change the block pattern dummy content to your own website information.
How to use WordPress block patterns
To use the WordPress block patterns, you will need to install WP version 5.5 or later.
The great thing about adding block patterns or using them as a starting point is that you can find what you’re needing very quickly and then simple edit the settings to make it exactly as you need, you can also then duplicate the collection of blocks to use it on the same page or any other page.
You can either:
1 – Use the default Block Patterns
2 – Find more Block Patterns to use on your website
3 – Create your own block patterns
Using the default WordPress Block Patterns
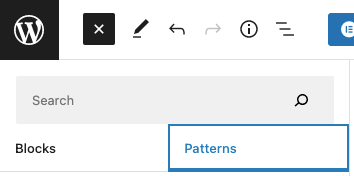
The WordPress editor offers basic default block patterns which are already on your site and ready to use. Simply click the blue plus + icon in the top left corner of the WordPress block editor.
You should then get the left-hand sidebar to open and it will be focused on the Blocks tab just below the Search bar. Click the Patterns tabs to view all the default WordPress block patterns that come with your editor by default.
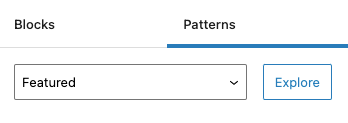
Once some of the block Patterns are showing, you can scroll further down and you will see more and more block patterns appear.
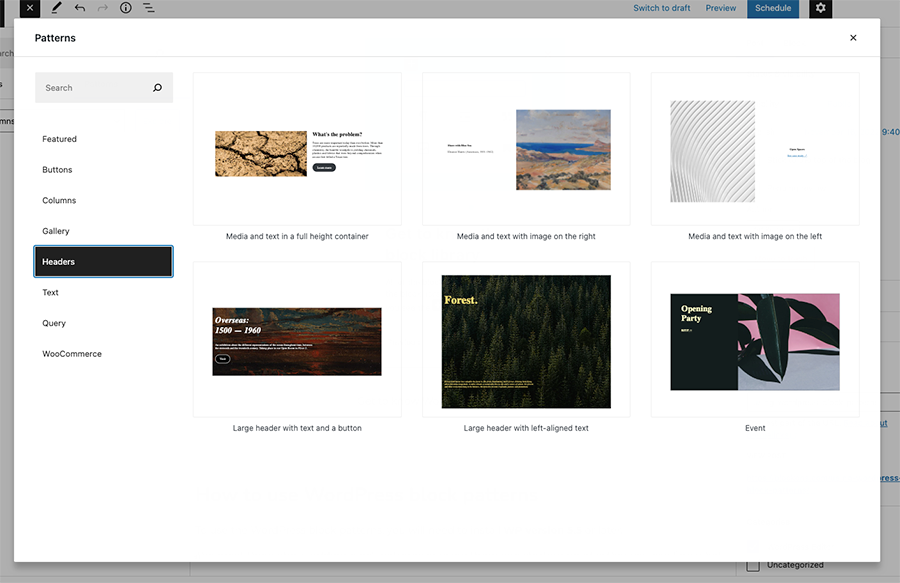
Just below, within the Patterns tab there is also a category drop down which you can select to find the blocks you want in the offered categories, once you’ve selected a category, then click “Explore”.
This will open the Block Patterns popup library where you might find it a little easier to browse through the categories and blocks that are offered within WordPress.
Happy searching!
Find more Block Patterns to use on your website
By default, WordPress will offer you the most commonly used block patterns, and WordPress themes or certain WordPress plugins may add their own block patterns too.
If you’re not able to find the block patterns you need, there are a lot more patterns listed on the WordPress Patterns Directory than the ones listed in the editor patterns inserter.
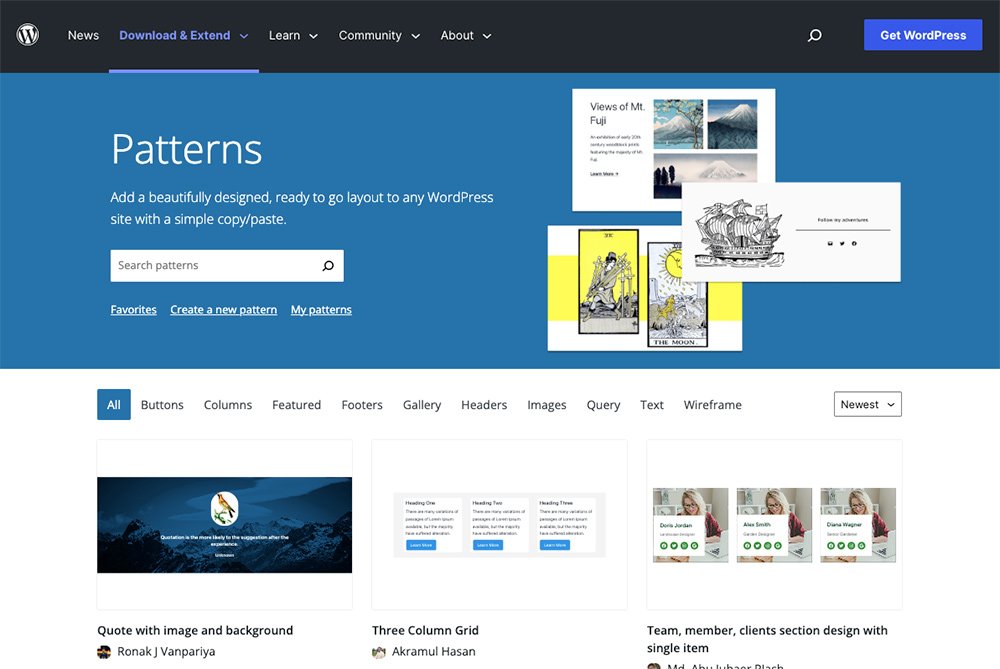
Here you can scroll down and you’ll find a list of many different patterns available to use, or you can use the search bar to look for something more specific. Select from the different pattern categories such as Buttons, Columns, Gallery, Query and more, and you can also sort them by Newest or most Popular.
Once you find a pattern that you want to use, you can simply hover over the pattern block and click Copy to copy the block and all its settings.
Then, all you need to do to add it to your website editor is click where you want the blocks to be added to the page and right click and select Paste, or press Command + V (Ctrl + V on PC) and you should see the selected pattern past into the WordPress editor for you.
There is also a section on the WP.org website for you to save your favorite patterns or Create or View your own patterns for the wp.org patterns directory.

To create, save and view your own block patterns, you will need to have an account on WordPress.org and be logged in.
Creating your own Block Patterns
Are you wanting to create your own patterns?
There was a solution using a plugin which will add extra sections for you to save your own custom block patterns, but that plugin has not been updated in a while so we are not going to recommend that way.
Instead we suggest creating an account or WordPress.org and then go to the My Patterns section on the WordPress website and click to Create your First Pattern.
This will open a Gutenberg editor online for you to build a block pattern to submit for review.
Once approved, your new pattern will be listed on wp.org for you to copy and use in any website you like, and it will be available for other users to view and use if they’d like to.
This is a nice way to contribute to the WordPress community if you are willing to give some back.
What’s the difference between Block Patterns and Reuseable Blocks?
WordPress block patterns and WordPress reuseable blocks both serve to provide users with a similar way to add commonly used blocks when building their website.
However, they are actually quite different in the way that they work.
If you create and save a reuseable block and you then use it elsewhere on your site, when ever you edit the re-useable block, the changes will be applied to all the places where the selected reuseable block has been added.
Whereas, if you insert a Block Pattern and the edit the blocks… these changes will only apply to the pattern that you are currently editing.
]]>Our 8 top tips to work more efficiently in the WordPress editor
Whether editing a site or building a new website, these are our main tips for building efficiently.
1) Quickly insert blocks using / (forward slash)
It can be a little tedious moving the cursor to the little ‘Add Block’ plus icon, or opening the block list and searching for the block each time you want to add a new block.
Instead… When you press “Enter” to start a new paragraph or block, simply type a forward slash (“/”) and you should then see a list of block suggestions appear, and you can type the name of the block you want to make the list of blocks narrow down to match your query.
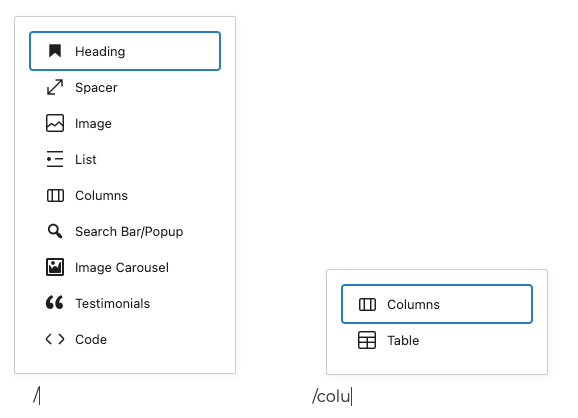
You can type the full name or use the arrow keys to select the block and then press “Enter” to add the block.
2) Select blocks quickly using the List View
Sometimes finding the block you want to edit is not as quick as you plan, especially if it’s the parent block of multiple nested blocks within the WordPress editor… Such as the right-hand side column block which is nested within a columns block.
The easiest and fastest way to select the block you want to edit is by opening the list view of the editor and selecting the block there.
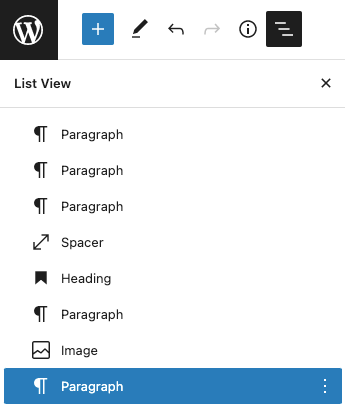
This will display a list of all blocks and the blocks nested within (parent) blocks.
3) Learn keyboard shortcuts
Learning the keyboard shortcuts are always a good thing, and definitely one of the best ways to speed up your use of the WordPress block editor, or actually for any software program. Even if it’s just a few main shortcuts that you learn.
Below are some of the most common, useful shortcuts:
On Mac:
- Navigate between blocks using the arrow keys – Up Arrow or Down Arrow
- Add a new block – Enter
- Change the block type after adding a new paragraph – /
- Save changes – Command + S
- Open the List View sidebar – Command + Option + O
- Undo your last changes – Command + Z
- Redo the last changes – Command + Shift + Z
- Duplicate the currently selected block(s) – Command + Shift + D
- Delete the currently selected block(s) – Control + Option + Z
- Insert a new block before the selected block(s) – Command + Option + T
- Insert a new block after the selected block(s) – Command + Option + Y
- Show or hide the main settings sidebar – Command + Shift + ,
- Show all keyboard shortcuts – Control + Option + h
On PC
- Navigate between blocks using the arrow keys – Up Arrow or Down Arrow
- Add a new block – Enter
- Change the block type after adding a new paragraph – /
- Save changes – Ctrl + S
- Open the List View sidebar – Ctrl + Shift + O
- Undo your last changes – Ctrl + Z
- Redo the last changes – Ctrl + Shift + Z
- Duplicate the currently selected block(s) – Ctrl + Shift + D
- Delete the currently selected block(s) – Shift + Alt + Z
- Insert a new block before the selected block(s) – Ctrl + Alt + T
- Insert a new block after the selected block(s) – Ctrl + Alt + Y
- Show or hide the main settings sidebar – Ctrl + Shift + ,
- Show all keyboard shortcuts – Alt + Shift + h
The WordPress editor also offers the default text formatting shortcuts that are the same for most programs such as making text bold, italic etc… If you’re not sure what these are then press Control + Option + h (Alt + Shift + h on PC) and view all the shortcuts available there.
4) Turn on ‘Show most used blocks’
You can also further customize how you interact with blocks in the WordPress block library and in the editing canvas.
You can turn on ‘Show most used blocks’ by clicking on the ellipsis (3 dots icon) in the very top right corner and select Preferences in the drop down menu.
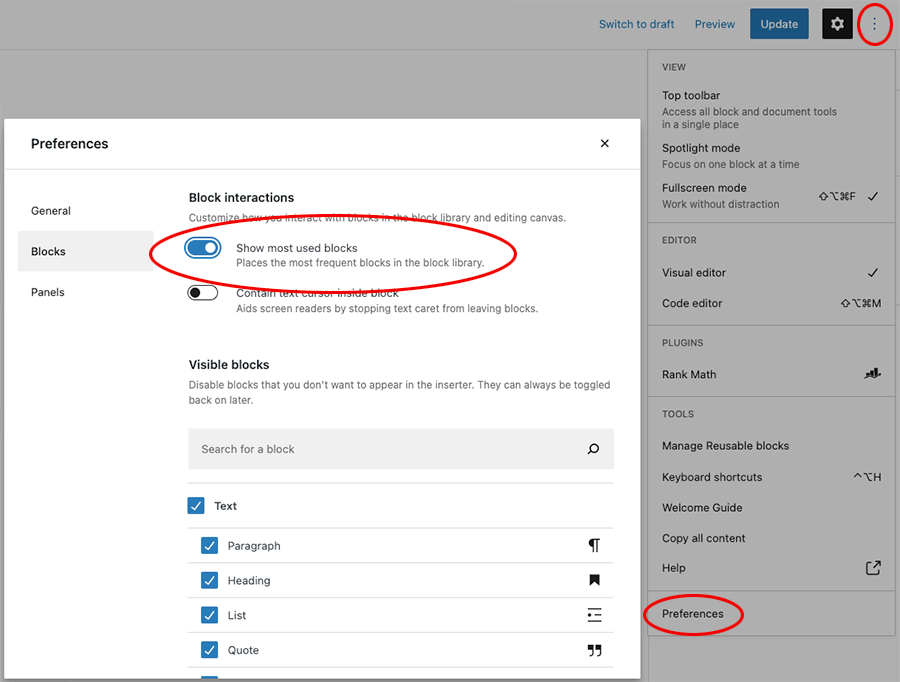
This will place the most frequently used blocks in the block library, as you use them.
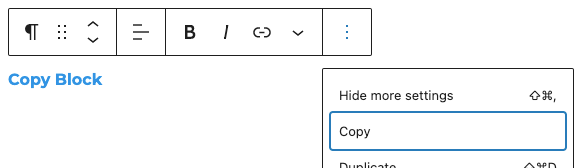
5) Copy a block and all its settings
Quite often you want to create a few of the same looking blocks on the page.
There are 3 ways to copy a block and all it’s settings.
1) Press Command + C (or Ctrl + C on PC) to copy the block.
2) Click on the ellipsis (3 dots icon) on the blocks toolbar and then select “Copy”
With the above 2 options of copying the block, you can then place your cursor anywhere on the page where you want the new block to get added and then simply type Command + V (or Ctrl + V on PC) to paste the block in position.
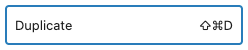
3) The third option is to click on the ellipsis (3 dots icon) on the blocks toolbar and then select “Duplicate”… This will create a direct copy of the selected block and place it right below as a new block.
6) Pin the Formatting Toolbar to the top of the editor screen
Instead of having the block Tool Bar display on top of each block when selected, you are also able to have it placed in a standard position for all blocks, this new position is pinned just below the main top tool bar.
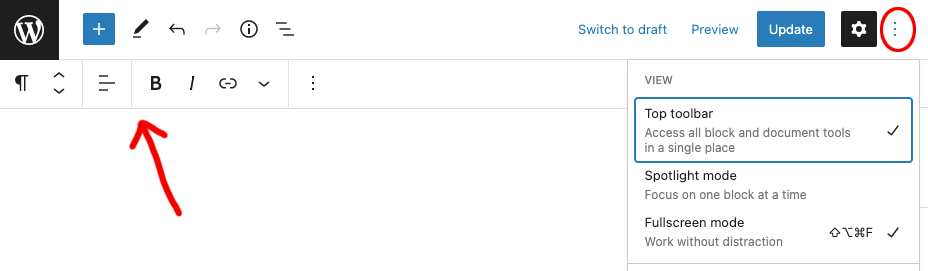
Simply select the ellipsis (3 dots icon) in the top right corner and select “Top Toolbar” to place it permanently at the top of the editing screen.
7) Hide the Blocks you’re not using
The WordPress block editor adds a lot of blocks by default, and certain plugins also add blocks that they think you might want to use.
If there are blocks you know you won’t be using or you simply don’t want them to show up when you’re using the editor, there is also an option to hide/remove them from the WordPress block editor.
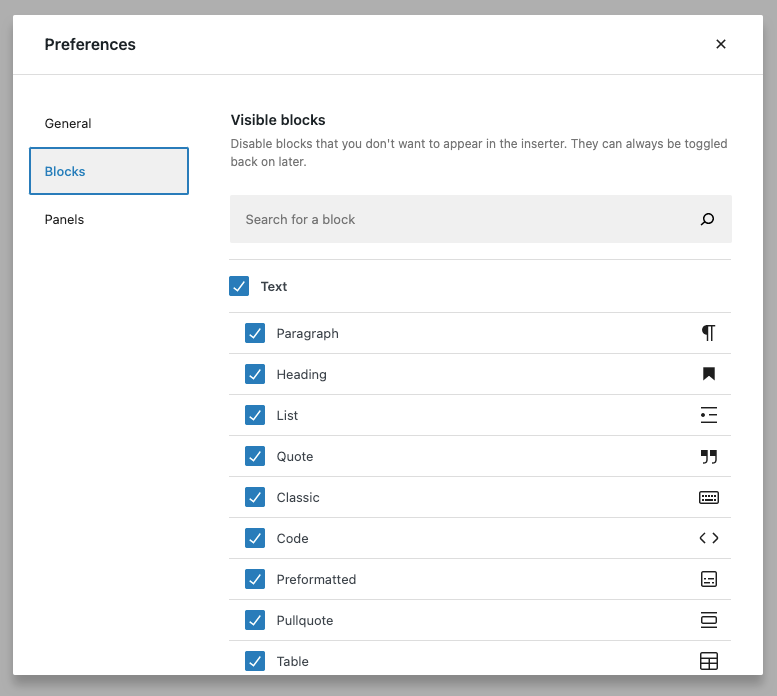
Select the ellipsis (3 dots icon) in the top right corner and select “Preferences“.
Then you can select “Blocks” on the left of the popup and there you can select which blocks to disable or leave visible to the editors block inserter.
8) Hide the Panels you’re not using
This is not as common, but you might want to remove some panels that have been added by a plugin or any other panels you find yourself not using.
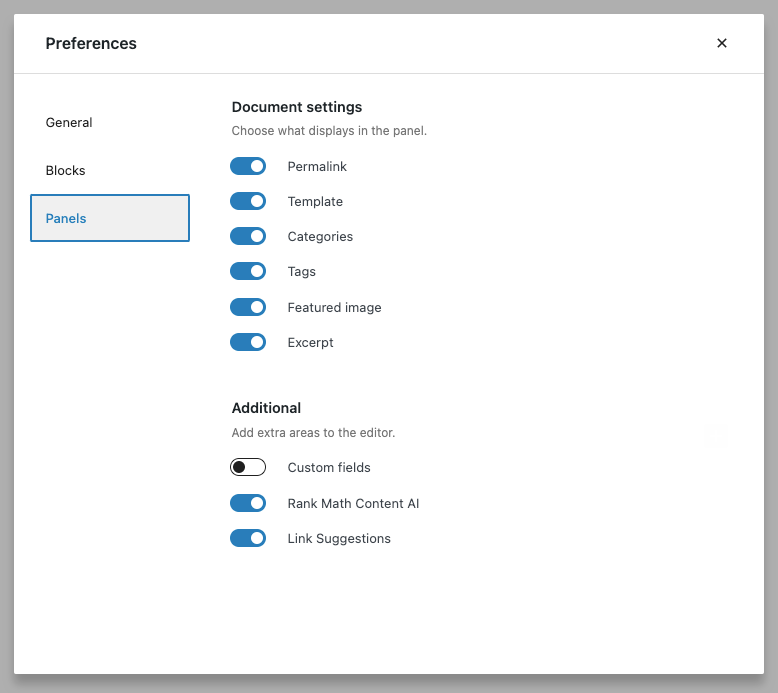
Select the ellipsis (3 dots icon) in the top right corner and select “Preferences“.
Then you can select “Panels” on the left of the popup and there you can select which panels to display or remove from the documents settings sidebar.
Hope you enjoyed our top tips to work more efficiently in the WordPress editor.
Happy editing !
]]>This is where the list view comes in as a very valuable feature of the WordPress block editor… Making it even easier for you to work with the blocks on your page.
This is a quick guide on how to use the WordPress block editor list view.
How to open and use the WordPress block editor list view
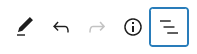
To open the List View feature in the WordPress block editor, simply click the 3 lines icon in the top left toolbar of the editing screen.
Once you click the list view icon you’ll see the left sidebar appear and it’ll display the list of all the blocks on the page with the block you currently have selected highlighted in blue.
The editor List View is useful for
There are several useful features when you use the WordPress block editor list view:
- View the exact order (and nesting) of all blocks on the page, as well as blocks that are nested within other blocks. The nested blocks will be below and slightly indented with its parent block.
- List View makes selecting nested blocks much easier, such as selecting blocks which are nesting within columns or other content layout blocks.
- Easily drag blocks to position them in a different part of the page.
- Select from block settings be clicking the ellipses (3 dots icon) such as duplicate, insert new blocks before or after, lock or group blocks and more. This displays all the settings available when right clicking on any block.
You can use the List View to make sure your blocks structure is clean and only contains the blocks you need.
For more advanced WordPress editor blocks, download the FREE Blockons Plugin for WordPress.
]]>Here we’ll explain a bit on how to undo changes in WordPress by viewing the revisions and autosaves and using the Undo button.
While revisions and autosaves are very useful, we also recommend making regular backups of your website.
WordPress Revisions and Autosaves
Only Administrator and Editor roles in WordPress are able to view ALL the post or page revisions. Authors can see post revisions for the posts that they have authored, and contributors can only see post revisions on their drafts that they have created.
There are 2 ways that WordPress “saves” the content as you edit or add new content:
Revisions – Every time you click Save Draft, Publish or Update in the top right corner of the editor, WordPress saves a snapshot of the page content.
Autosaves – By default, as you edit the page content or blocks, WordPress will automatically save a snapshot every 10 seconds in the new WordPress editor (every 60 seconds in the old classic editor). It saves only one autosave at a time, so it replaces the previous autosave at each interval.
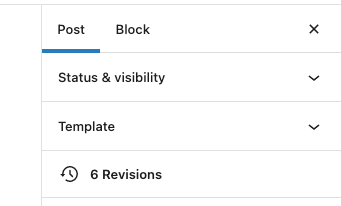
Revisions and Autosaves can be accessed at any time by clicking on the Revisions panel in the right sidebar
How to undo changes in WordPress by accessing revisions and autosaves
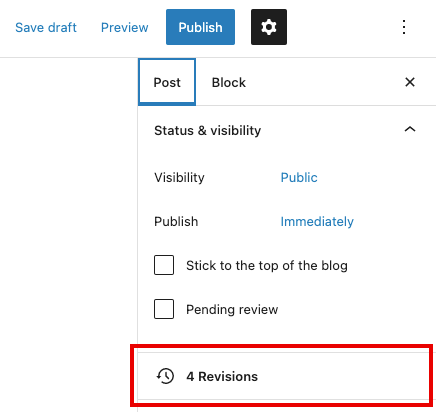
To access all revisions and autosaves that WordPress records as you edit your content, make sure you are on the “Post” panel in the right-hand sidebar of the editor, and click on the “Revisions” panel to see all changes that have been made.
Once you click the revisions button, the screen will change to the Compare Revisions screen which can look a bit more confusing, but have a look at the image below and we’ll explain a bit about what you see and how to undo changes in WordPress posts and pages content.
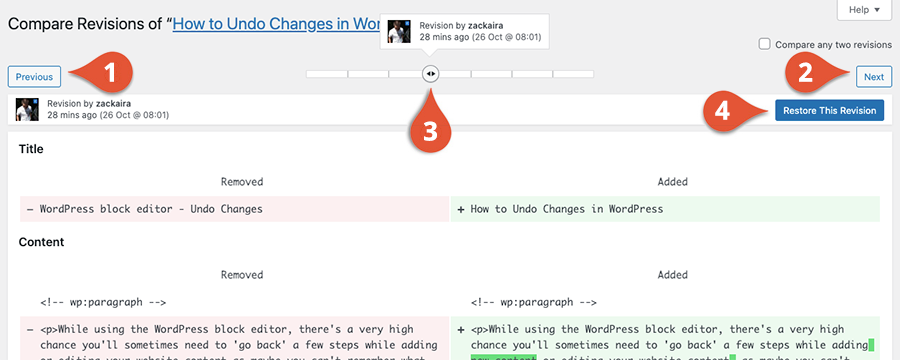
1 – View Previous Revision – Jump back to a previous revision by clicking the “Previous” button.
2 – View Next Revision – Go to the next available revision by clicking the “Next” button.
3 – Revision Slider – Quickly skip back and forth through the post revisions by dragging the slider left (previous) or right (next) through the revisions until you find the one you’re looking for.
4 – Restore Revision – Once you find the revision you want to revert back to, click “Restore This Revision” to switch back to the chosen step and then carry on editing your content from there. WordPress doesn’t delete the other revisions, it simply creates a new revision with the content you’ve chosen to restore.
The main content shown in the Compare Revisions will show you exactly what has been changed… If content has been removed or written over then it will be displayed with a light red background and if new content was added then it will be displayed with a light green background and you can easily choose which content you want to carry on working with by using the revision controls explained above.
How to undo changes in WordPress by using the undo button
WordPress also offers a very simple way of quickly switching between revisions by having Undo & Redo buttons in the top left toolbar of the WordPress editing screen.
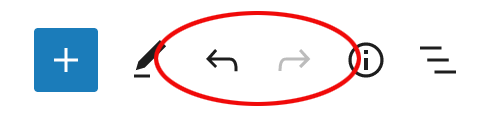
Simply click the Undo button to go back as many steps as you like, or Redo to go forward as many steps as you like.
]]>This post is written to try give you a good understanding of using the WordPress block editor (or WP content editor)… previously known as the Gutenberg Editor, the name give to the editor when it first started out as a plugin. The Gutenberg Editor plugin was later merged into WordPress core when WP version 5.0 was released on December 6, 2018.
The Editor & Plugins
Note that plugins and themes can add on any sidebars or extra panels with custom settings to enhance or extend the functionality of the WordPress block editor.
Here we’ll give you a basic explanation of all the options that come with the editor before adding on and extending it with any plugins.
Some WordPress plugins to improve and extend the functionality of the WordPress editor:
- Blockons – This will add a lot of extra blocks that are very useful for building your website pages.
- Rank Math – Helps to improve your writing to optimize the post or page for Google or other site engines to index the page and rank it better. Also offers a very powerful Premium version.
- We’ll add more suggestions soon…
Gutenberg Plugin editor
You can still install the Gutenberg plugin to keep up to date with the latest improvements and changes as they are made, before they are added into WordPress core… It’s advised that you do not install this on a live site.
The Gutenberg block editor is now used to allow the community to test the latest features and improvements before they are approved and added to the WordPress core.
Classic WordPress Editor
You can also install the old Classic editor if you prefer the old way of using only the WYSIWYG editor that WordPress used as the main content area before WP version 5.0… It is old now and will only be supported until 2022 so we suggest not using this as all newer plugins might not work with this classic editor.
We suggest you try using the WordPress block editor and get familiar with the new version, because it is here to stay, it’s only getting better and better and will become an amazing full site editing editor.
WordPress Block Editor
Lets take a look at using the WordPress Block Editor… The layout, where to find panels, blocks, and all the different settings that are available, and what they do:
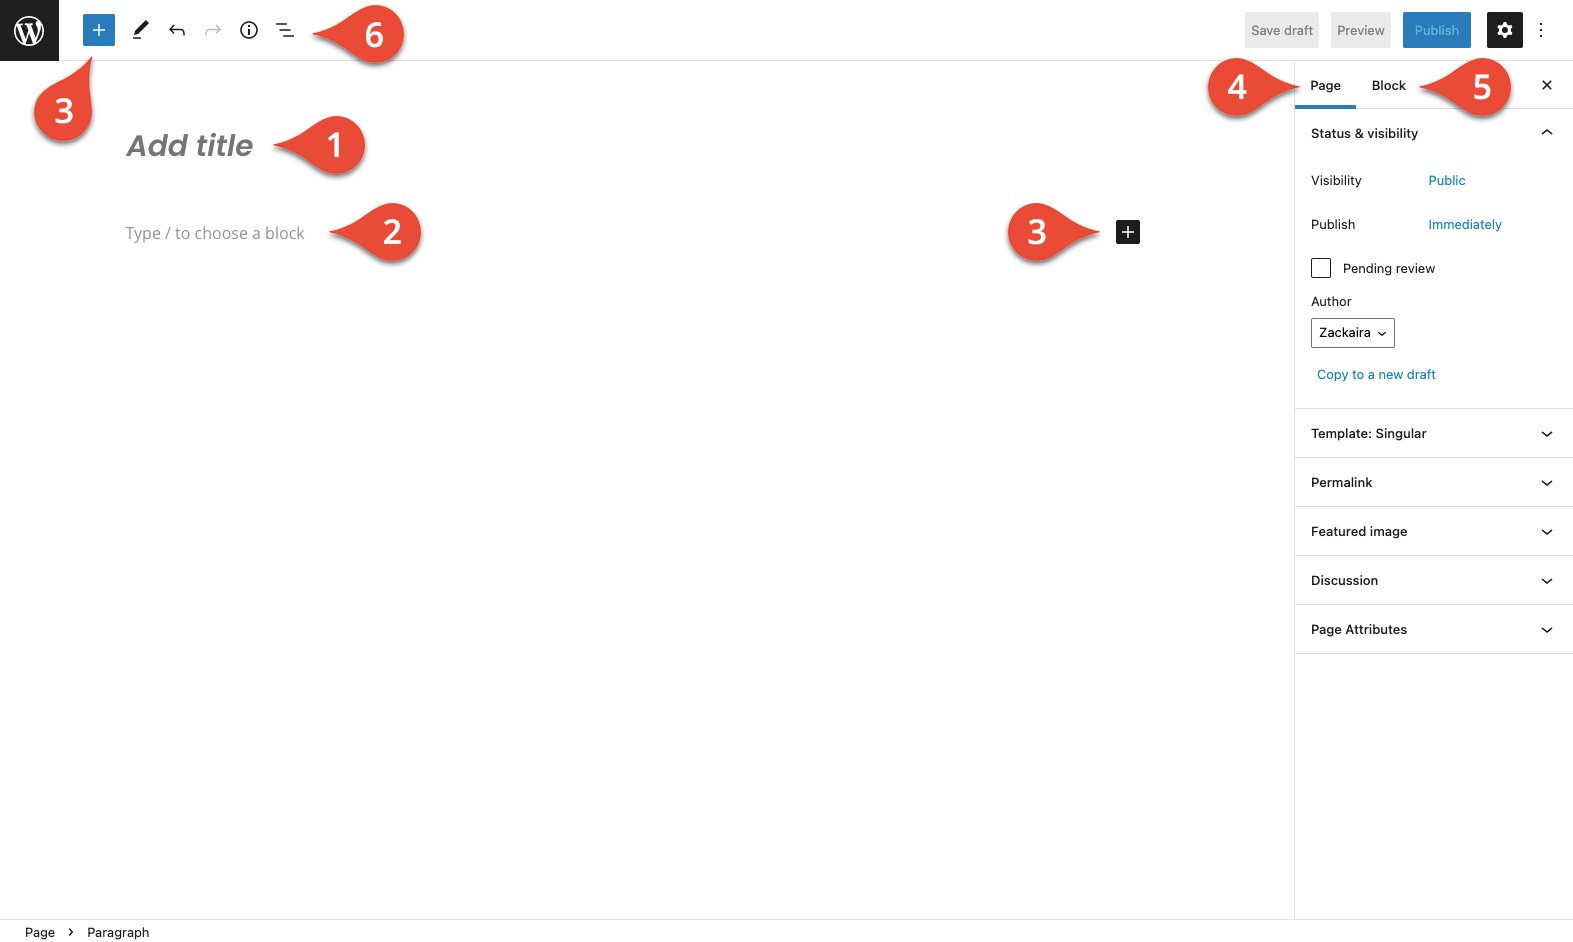
- The page or post title block – This is the primary heading or the page title for the post or page that you are editing.
- Block Area / Content Area – This is where you will build the content area for your page by adding all the blocks you require, this includes columns, spacers, lines and any other content type blocks you want.
- Add Block Button – Throughout building your page, you will see this little ‘plus sign’ block popup wherever you can add a block of your choice, when you click this button you will see that you can search for the block you want and click to add the block to the page area you have selected.
- Document / Page Settings Tab – This is where you will edit all elements for the page or post that you are on… This includes adding a featured image, excerpt, selecting categories and tags and choosing page templates and more.
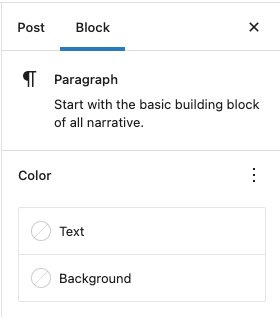
- Block Settings Tab – Once you have added a block of your choice, when you select the block, you will see all the block settings display in this tab. You need to select a block to view the settings.
- Blocks List View – This is a list view of all the blocks that have been added to the content area. This list view is very useful and makes it easy to select blocks that are sometimes hard to select by clicking within the editor.
What are blocks and how do they work?
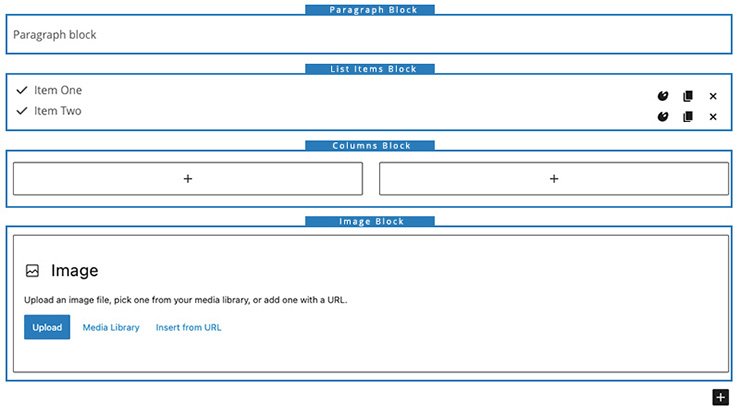
Think building blocks… Blocks are customizable elements that are used to build your page content, they can be a paragraph, an image gallery, a slider or carousel… A block can be anything really.
Blocks can be moved around, edited to look the way you need them to, customized individually or grouped, and there are already a lot of blocks out there for all the different layouts you need. You can search the WordPress directory for any type of block you want to add to your website.
Adding blocks to the page:
Within the content area of the post or page that you are editing, by default it will automatically add a paragraph block, and on the far right of the block you will see a small ‘plus icon’ like this ->

Click the plus icon and you will see a popup with the most recently used blocks. You can search for blocks or select from the recently used blocks shown there.
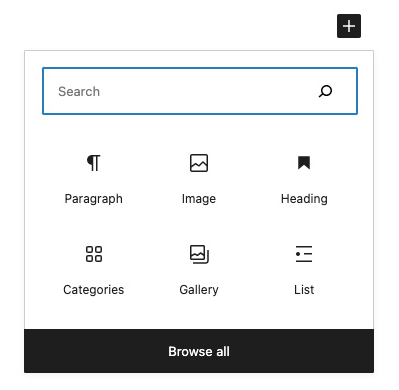
There is also an option to “Browse All”, which will open the left sidebar when clicked, and there you can browse through all the blocks available on your site… If you are needing other blocks then try searching the WP directory to find and install the blocks you need.
Editing blocks settings:
To edit a blocks settings when using the WordPress block editor, you simply need to select the block you want to edit, and you will then see all the block settings available to edit in the right sidebar on your page.
If you do not see the right sidebar on the page then click the cog icon in the top right corner.

Block Options:
All blocks also offer a list of options… When a block is selected, you will see a menu display right on top of the block… This menu gives you basic options to move the block up / down, or drag it to a new position, as well as styling options such as alignment, making text bold or adding links etc.

Some of the options:
- Drag the block to a different position on the page.
- Move the block up or down from its current position.
- Alignment & Styling options
- More Options
The more options button offers a further drop down when you click on the 3 dots to expand more options

Some of the other main options added here that you will use are:
- Copy – Copy the block as it is to paste it somewhere else.
- Duplicate – Create a copy of the selected block and all the settings that have been adjusted.
- Lock – Lock the block to that it cannot be moved or removed.
- Add to Reusable Blocks – This turns the block into a global block, so it can be used all around the website, and if the block is then edited, the changes will reflect across the entire website. This is useful for site buttons etc.
- Group – Blocks can be grouped together to function as a single block. You can hold down shift and then select multiple blocks, then click to group them together and they will become 1 block. You can just as easy un-group the blocks to change them back into individual blocks.
- Remove Block – Delete the block from the page.
Selecting the different Blocks:
When using the WordPress block editor, if you have blocks within blocks within columns etc… You might find it harder to select an exact block that you want to edit the settings of.
For this we suggest using the block List View sidebar.
To select and open the List View sidebar, you can click the list icon at the top left of the page:

Once you click the list icon, you will see the left sidebar open and it will display a collapsible list view of all the blocks that have been added to the page, and you can now easily find the block that you’re wanting to edit and then select it.

Then separate from editing blocks or the items in the content area, you can also edit the…
WordPress Editor Options
At the very top-right of the screen, in the same line as the Update/Publish post button, you will see 3 little dots… This will display a drop down of options that you can apply to using the WordPress block editor itself.
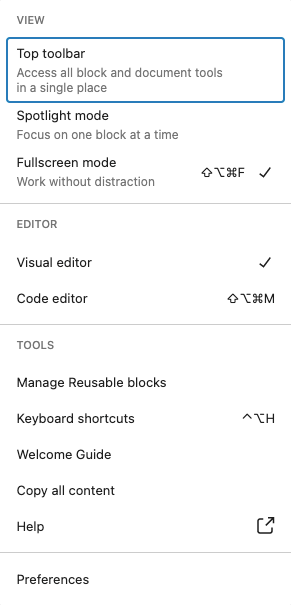
Most of these options are self explanatory or have little hints on what exactly they do… but here’s a list explaining what some of the main ones are:
- Top Toolbar – This will place the blocks toolbar at the top of the page so that it does not appear on each block as they are selected… We suggest keeping this turned off so the toolbar is attached to each block.
- Spotlight Mode – This is to place a more visible focus on the block you are currently editing, it will make all other blocks that are not selected seem less visible while editing.
- Fullscreen Mode – This is turned on by default, if you prefer the normal WordPress sidebar on the left of the page then turn this off. Fullscreen mode lets you focus more on the content you’re busy editing.
- Manage Reusable Blocks – Manage all the blocks that you have turned into reusable blocks and placed around the site.
- Keyboard Shortcuts – View this modal popup to learn all the shortcuts available, to speed up your workflow when using the WordPress block editor.
- Preferences – Here you can edit all General preferences and options related to publishing content, further customize how you interact with blocks in the block library and editing areas, and choose what displays in the editor panels and more.
Conclusion:
Since WordPress 5.0, the editor and other WP features have taken on some huge changes… Some adapted very well, but some were not enjoyed at all, at first… But with using the WordPress block editor more and more, it’s easy to see that the editor is only getting better after each update, and it will become a very powerful and easy-to-use editing experience for everyone.
The WordPress Gutenberg team are working hard to improve it feature by feature… to make using the WordPress block editor even better.
]]>