React is one of the most in-demand frontend libraries, and mastering its core concepts is essential for building scalable and high-performance web applications.
In React Part 2, based on the React Part 2 YouTube lecture by me,
]]>React Part 2—Complete Guide to Props, Conditional Rendering, Hooks & State Management
React is one of the most in-demand frontend libraries, and mastering its core concepts is essential for building scalable and high-performance web applications.
In React Part 2, based on the React Part 2 YouTube lecture by me, we dive deeper into real-world React concepts that every developer must know.
This guide covers Props, Conditional Rendering, Rendering Lists, Lifting State Up, useRef, and useEffect with clear explanations and practical examples.
Props (Properties)
Props are like arguments you pass to a function, but for components! They allow you to pass data from parent components to child components, making your components dynamic and reusable.
Real-world example: Think of a product card on Amazon—the same card component is reused for every product, but with different props (product name, price, image, etc.).
Basic Example:
// Child Component
function UserCard(props) {
  return (
    <div>
      <h2>{props.name}</h2>
      <p>Age: {props.age}</p>
      <p>Email: {props.email}</p>
    </div>
  );
}

// Parent Component
function App() {
  return (
    <div>
      <UserCard name="Kartik Mathur" age={28} email="[email protected]" />
      <UserCard name="Nitesh" age={24} email="[email protected]" />
    </div>
  );
}
Destructuring Props (Cleaner Way):
  return (
    <div>
      <h2>{name}</h2>
      <p>Age: {age}</p>
      <p>Email: {email}</p>
    </div>
  );
}```
Key Points:
- Props are read-only (immutable)—you cannot modify them inside the child component
- Props flow one way: from parent to child
- You can pass any data type: strings, numbers, arrays, objects, functions
- Use destructuring for cleaner code
Conditional Rendering
Conditional rendering allows you to display different content based on certain conditions. It's like using if-else statements for your UI!
Method 1: Using if-else
  if (isLoggedIn) {
    return <h1>Welcome back!</h1>;
  } else {
    return <h1>Please sign in.</h1>;
  }
}```
Method 2: Using Ternary Operator (Most Common)
  return (
    <div>
      {isLoggedIn ? (
        <h1>Welcome back!</h1>
      ) : (
        <h1>Please sign in.</h1>
      )}
    </div>
  );
}```
Method 3: Using && and || Operator (For single condition)
  return (
    <div>
      <h1>Your Dashboard</h1>
      {hasMessages && <p>You have {count} new messages!</p>}
    </div>
  );
}```
Real-world Example:
  return (
    <div>
      {user ? (
        <div>
          <h2>Hello, {user.name}!</h2>
          <button>Logout</button>
        </div>
      ) : (
        <div>
          <h2>Welcome, Guest!</h2>
          <button>Login</button>
        </div>
      )}
    </div>
  );
}```
Rendering Arrays
Rendering arrays lets you display lists of data dynamically. Use the `.map()` method to transform array data into JSX elements!
Basic Example:
  const todos = ['Buy groceries', 'Walk the dog', 'Learn React'];

  return (
    <ul>
      {todos.map((todo, index) => (
        <li key={index}>{todo}</li>
      ))}
    </ul>
  );
}```
Advanced Example with Objects:
  const products = [
    { id: 1, name: 'Laptop', price: 999 },
    { id: 2, name: 'Mouse', price: 29 },
    { id: 3, name: 'Keyboard', price: 79 }
  ];

  return (
    <div>
      {products.map((product) => (
        <div key={product.id}>
          <h3>{product.name}</h3>
          <p>Price: ${product.price}</p>
        </div>
      ))}
    </div>
  );
}```
Key Points:
- Always use a unique `key` prop when rendering lists
- Keys help React identify which items have changed, added, or removed
- Use unique IDs as keys (not array index if the list can change)
- The `key` prop is not accessible inside the component
Lifting State Up
When two or more components need to share the same state, you "lift" the state to their closest common parent component. The parent then passes the state down as props.
Problem: Two sibling components need to share data
Solution: Move the state to their parent!
  const [username, setUsername] = useState('');

  return (
    <div>
      <InputComponent username={username} setUsername={setUsername} />
      <DisplayComponent username={username} />
    </div>
  );
}

function InputComponent({ username, setUsername }) {
  return (
    <input
      value={username}
      onChange={(e) => setUsername(e.target.value)}
      placeholder="Enter username"
    />
  );
}

function DisplayComponent({ username }) {
  return (
    <div>
      <h2>Hello, {username || 'Guest'}!</h2>
    </div>
  );
}```
useRef Hook
useRef is like a box that holds a value that persists across renders but doesn't cause re-renders when changed. Perfect for accessing DOM elements directly!
Use Case 1: Accessing DOM Elements
function FocusInput() {
  const inputRef = useRef(null);

  const handleFocus = () => {
    inputRef.current.focus();
  };

  return (
    <div>
      <input ref={inputRef} type="text" />
      <button onClick={handleFocus}>Focus Input</button>
    </div>
  );
}```
Use Case 2: Storing Mutable Values
  const [count, setCount] = useState(0);
  const intervalRef = useRef(null);

  const startTimer = () => {
    intervalRef.current = setInterval(() => {
      setCount(c => c + 1);
    }, 1000);
  };

  const stopTimer = () => {
    clearInterval(intervalRef.current);
  };

  return (
    <div>
      <p>Count: {count}</p>
      <button onClick={startTimer}>Start</button>
      <button onClick={stopTimer}>Stop</button>
    </div>
  );
}```
useRef vs useState:
- useState: Causes re-render when value changes
- useRef: Does NOT cause re-render when value changes
- Access useRef value with `.current`
useEffect Hook
useEffect lets you perform side effects in your components. Side effects are operations that interact with the outside world: fetching data, updating the DOM, setting up subscriptions, timers, etc.
Basic Syntax:
useEffect(() => {
  // Side effect code here

  return () => {
    // Cleanup code (optional)
  };
}, [dependencies]);```
Example 1: Run on Every Render
  const [count, setCount] = useState(0);

  useEffect(() => {
    console.log('Component rendered!');
  }); // No dependency array

  return <button onClick={() => setCount(count + 1)}>Count: {count}</button>;
}```
Example 2: Run Once on Mount (Empty dependency array)
  const [user, setUser] = useState(null);

  useEffect(() => {
    // Fetch user data when component mounts
    fetch('https://api.example.com/user')
      .then(res => res.json())
      .then(data => setUser(data));
  }, []); // Empty array = run once

  return user ? <h1>{user.name}</h1> : <p>Loading...</p>;
}```
Example 3: Run When Specific Value Changes
  const [results, setResults] = useState([]);

  useEffect(() => {
    if (searchQuery) {
      fetch(`https://api.example.com/search?q=${searchQuery}`)
        .then(res => res.json())
        .then(data => setResults(data));
    }
  }, [searchQuery]); // Runs when searchQuery changes

  return (
    <div>
      {results.map(item => <p key={item.id}>{item.name}</p>)}
    </div>
  );
}```
Example 4: Cleanup Function
  const [seconds, setSeconds] = useState(0);

  useEffect(() => {
    const interval = setInterval(() => {
      setSeconds(s => s + 1);
    }, 1000);

    // Cleanup: runs when component unmounts
    return () => clearInterval(interval);
  }, []);

  return <p>Seconds: {seconds}</p>;
}```
Common Use Cases:
- Fetching data from APIs
- Setting up subscriptions or event listeners
- Updating document title
- Setting up timers
- Manually changing the DOM
Key Points:
- useEffect runs AFTER the component renders
- Empty dependency array `[]` = runs once on mount
- No dependency array = runs on every render
- With dependencies `[value]` = runs when value changes
- Return a cleanup function to prevent memory leaks
- Always include all dependencies that your effect uses
]]>Imagine you're writing a book with friends. Git is like a magical notebook that remembers every version of every page you've ever written—so if you mess something up, you can always go back. GitHub is like a shared library in the cloud where
]]>
Imagine you're writing a book with friends. Git is like a magical notebook that remembers every version of every page you've ever written—so if you mess something up, you can always go back. GitHub is like a shared library in the cloud where everyone can access the same notebook, add their chapters, and see what others have written.
Git helps you track changes on your computer, while GitHub lets you share and collaborate with others online. Together, they make teamwork smooth and keep your project safe from accidental deletions or overwrites.
Below are the essential commands you'll use to manage your projects, collaborate with others, and keep everything organized—think of them as the tools in your magical notebook's toolkit

Let’s Start with what is repository?
A Git repository (or "repo") is a storage space that contains all of your project's files, code, and each file's complete revision history. It functions as the central hub for the version control system, allowing developers to track changes, revert to previous versions, and collaborate efficiently.
Types of Repositories
Git employs a distributed version control system (DVCS), meaning every user has a complete copy of the entire codebase and its history. The main types are:
- Local Repository: Stored on your personal computer, allowing you to work, commit, and manage history without an internet connection.
- Remote Repository: Hosted on a server or cloud-based platform (e.g., GitHub, GitLab, Bitbucket), enabling team collaboration. Developers use
git pushto upload local changes to the remote andgit pullto fetch updates from others
How to Create a git repository
To create a Git repository locally on your computer, you will use the command line interface (CLI) to initialize a directory.
Prerequisites
Before you begin, ensure you have Git installed on your system. Check if Git Is Already Installed. If not you can follow the below steps.
Installation of Git
Go to the official Git download page and download the installer.
For macOS : brew install git, incase you don’t have brew google download homebrew and then proceed.
For Linux : apt-get install git
For Windows: https://git-scm.com/downloads
Run the installer and follow the setup wizard, clicking Next → Next → Install.
During setup, you’ll see options like:
Choose default editor (pick VS Code or Nano)
Adjust your PATH (recommended: Git from the command line)
Just leave the defaults if unsure.
After installation, open Git Bash (or Command Prompt) and run:
git --version

Steps to Create a Local Git Repository
Follow these steps using your terminal (macOS/Linux) or Git Bash/Command Prompt (Windows):
1. Navigate to your project directory
Use the cd (change directory) command to move to the folder where you want to create your repository. If the folder doesn't exist yet, you can create one first using mkdir.
*# Example: Create a new directory named 'my_project'*
mkdir my_project
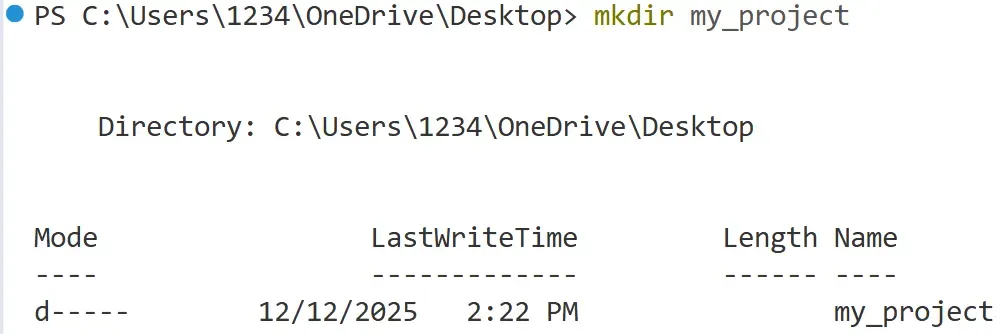
*# Change your current location into that directory*
cd my_project
Although macOS and Linux users use the same command, the resulting output may differ and may not match the example shown in the screenshot.

2. Initialize the Git repository
Once you are inside the correct directory, run the git init command. This command sets up the necessary Git internal files and data structures (specifically, it creates a hidden .git directory) that turn your simple folder into a fully functional Git repository.
git init

You will see output similar to this: Initialized empty Git repository in /path/to/my_project/.git/
Making changes in Git
Staging and committing in Git
Whenever you work on your project, and let’s suppose you made a feature F1. If you wish that you keep the snapshot of the code till the point of F1, then it’ll be stored in form of commits. That raises a few questions. What is a commit ? How do I make one of my own commit ? What if I made a mistake while making a commit ? To answer these questions, you need to understand how do we manage commits in git.
The workflow to make and store changes in git goes as follows:
- Modification: First you make changes in your project that you want to save upto.
- Staging : Staging is the area where you review files right before you finalize your changes.
- Commit : Commit is the final step you make that saves your progress in your code.
Key Concepts and Commands
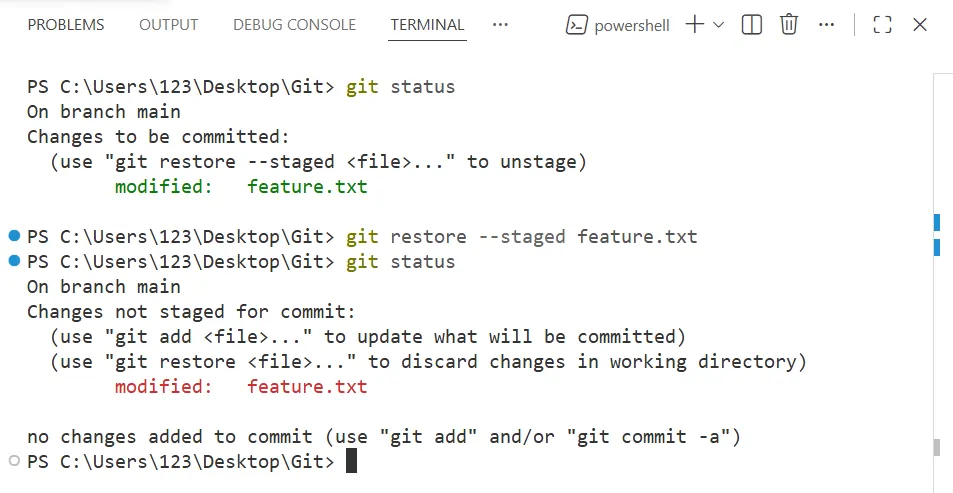
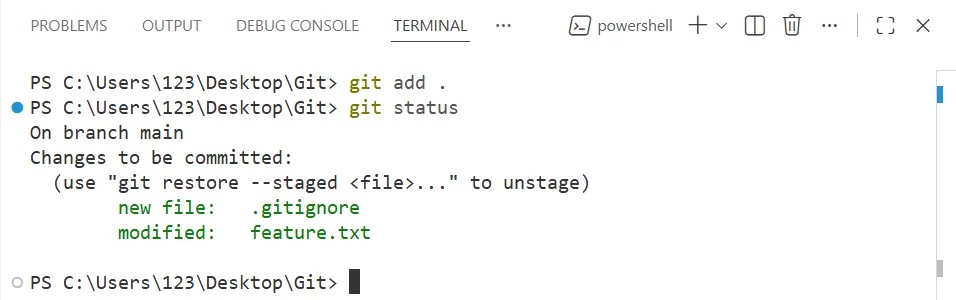
We first use git status command to check the current status of our repository.
git status

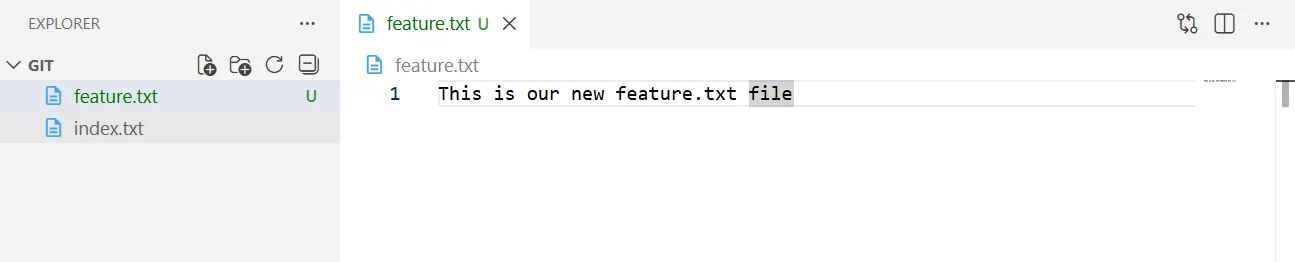
Modification
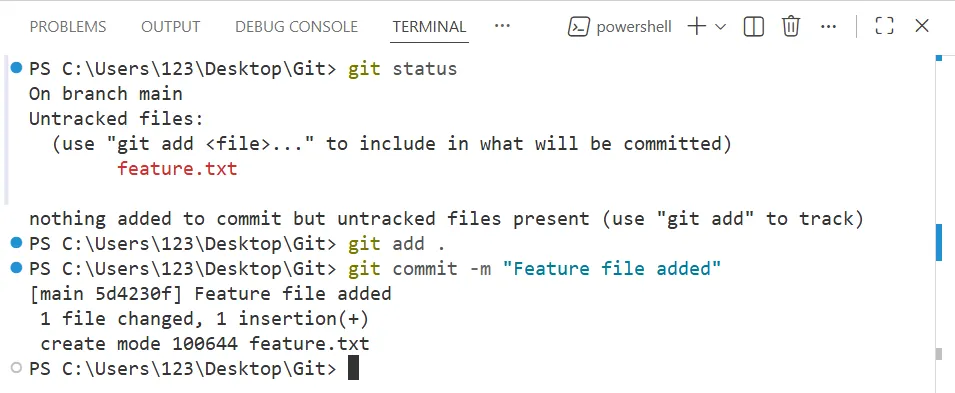
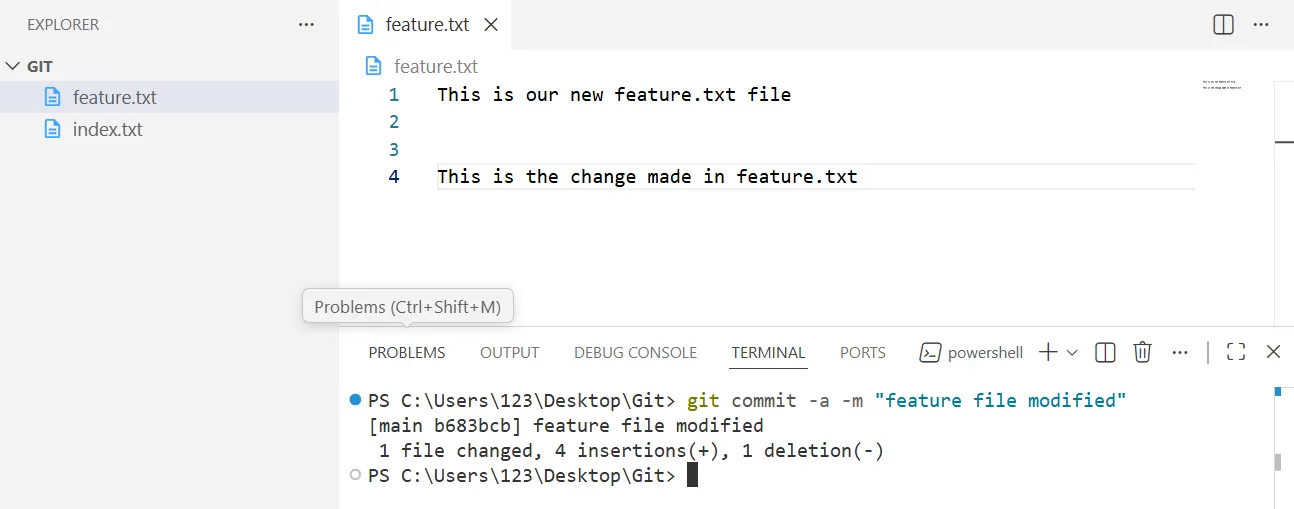
First, we make a new file by the name of feature.txt and make our changes in our new feature.txt file
Staging Changes (git add)
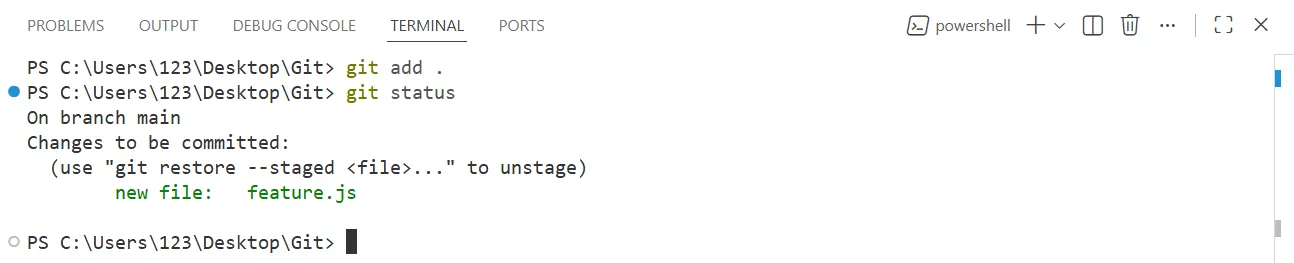
git status
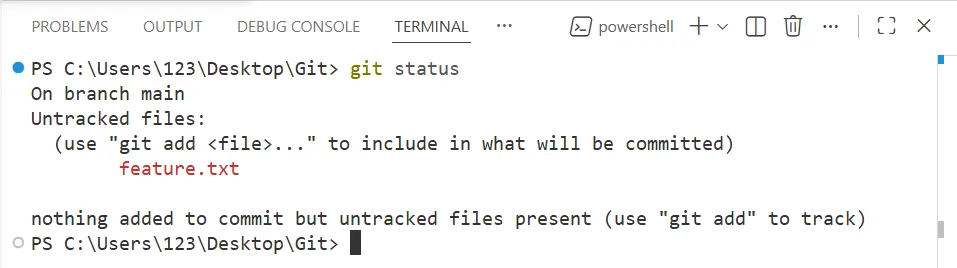
On using git status command we can see that our git environment can detect new changes. So, the next step that comes into line is to move these changes to staging area, to confirm which changes do we want to keep for record.
This can be done using the following command:
git add feature.txt
This command is used to move your changes to staging area where you’d review the files that you made changes in.
In order to add all the files at that point of time when you made changes, you can use “git add .”
git add .
Unstaging Changes
If you’ve moved some changes to staging area, and want to revert them back to unstaging, then you can do so with the command git restore —staged <filename>
git restore --staged <filename>
Commit changes (git commit)
After you’ve moved all your changes to staging area, the next step is to make a final snapshot of it, which you can revert back to if you wished to undo the changes. This point of storing the changes to the point in development process is called Commit.
To commit changes, you use the command git commit
The most common way to make a commit is by using git commit -m “Message”. This -m attribute requires a string in which you pass the name of message, by which you wish to recognize a particular commit, in the development process.
git commit -m "Your message goes here"
Also, you can simply use git commit directly, which will then lead you to your default code editor asking your message with a prompt.

There’s one more way by which you can directly stage your changes as well as commit it in one single command ie. git commit -a -m “Message”, only if your file has been present in at least one previous commit.
git commit -a -m "Your-message-goes-here"
Although, this method is not recommended as it does not allow the user to verify changes before commiting.
Reverting to git changes you made
Whenever a git commit is made, the git commit is given a unique hashed ids, which are generated by computing SHA1 hash of the commit object’s entire content and some metadata, meaning, it is always going to be unique. You can check these list of commits along with their ids, with the command git log.
git log
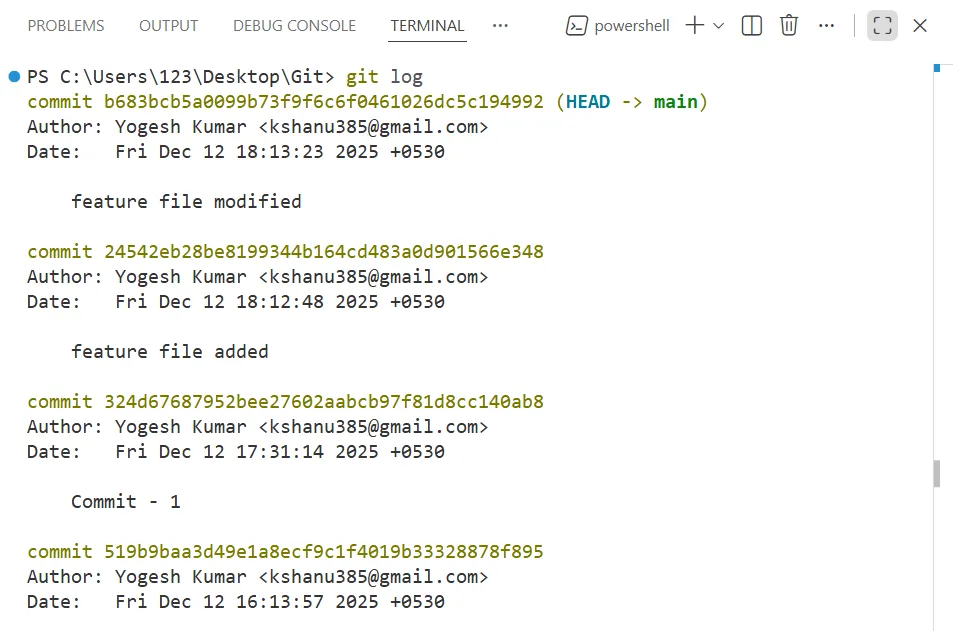
If you want your code to return to point in time of a given commit, you simple use git reset command along with their hashed ids.
git reset <'hashed commit ids'>

.gitignore
“git add .” **moves all the files to the staging area, except the file files or folder directories mentioned in .gitignore.
Now, What is .gitignore ?
.gitignore is a file that you make in your repository to contain the exceptions that doesn’t get stored in staging or commiting process.

In the above image, If I don’t want to add more-features directory and new-feature.txt, I can simply put them in .gitignore file

You can also review the changes, if they’re successfully moved to staging area or not by using git status command.
Explain master and main branch ??
master branch was traditionally used as the default branch in git.
In recent years, however, platforms like GitHub have shifted to using main as the default branch name, partly because the word master and slave is something that people want to avoid.
Creating new Branch
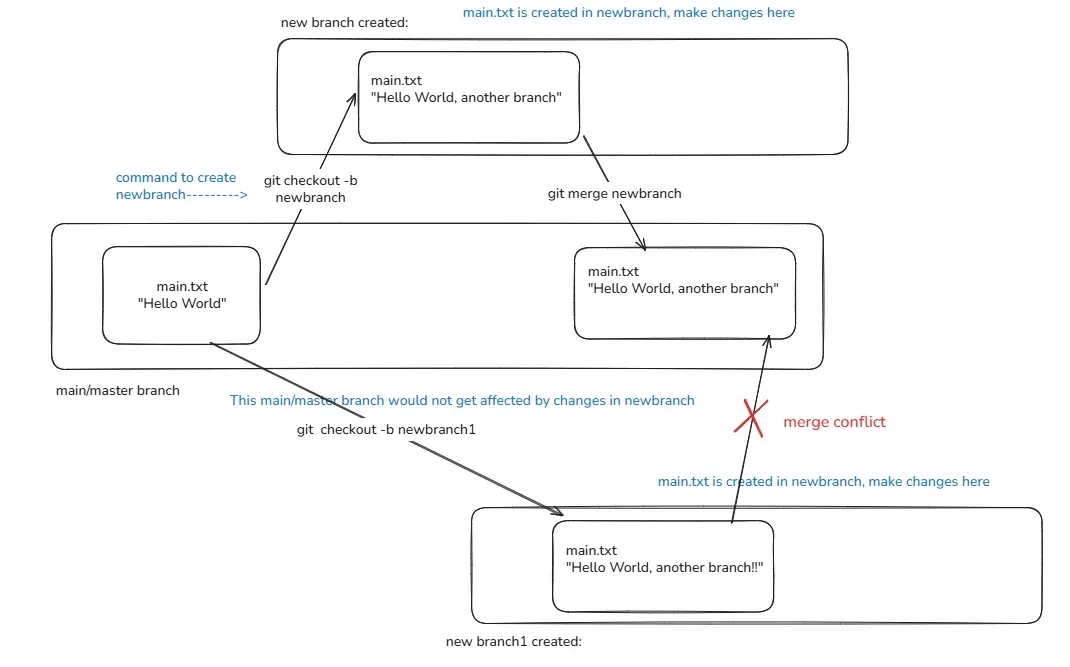
Creating a new branch in Git lets you work on changes separately from the main code, allowing you to develop features or fixes without affecting the existing project.
git branch new_branch_name
Shifting from one to another branch
Switch to an existing branch
git checkout new_branch_name
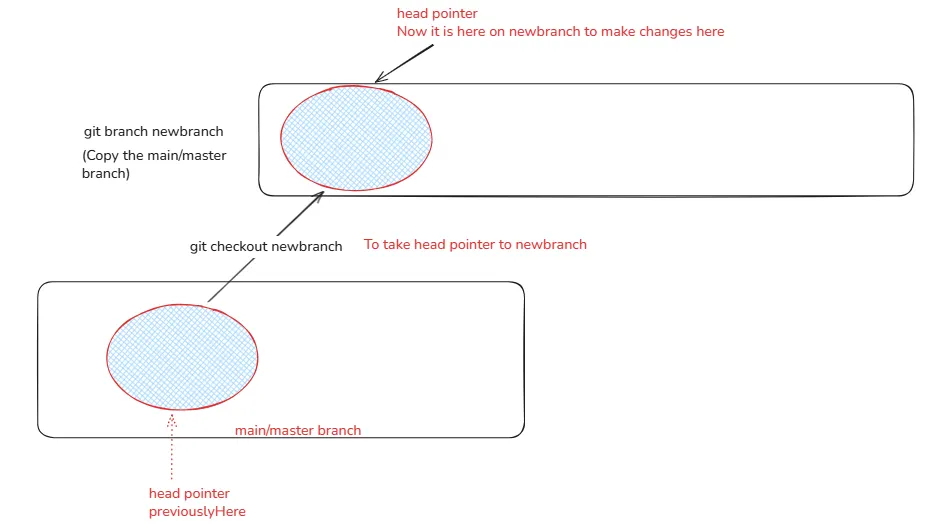
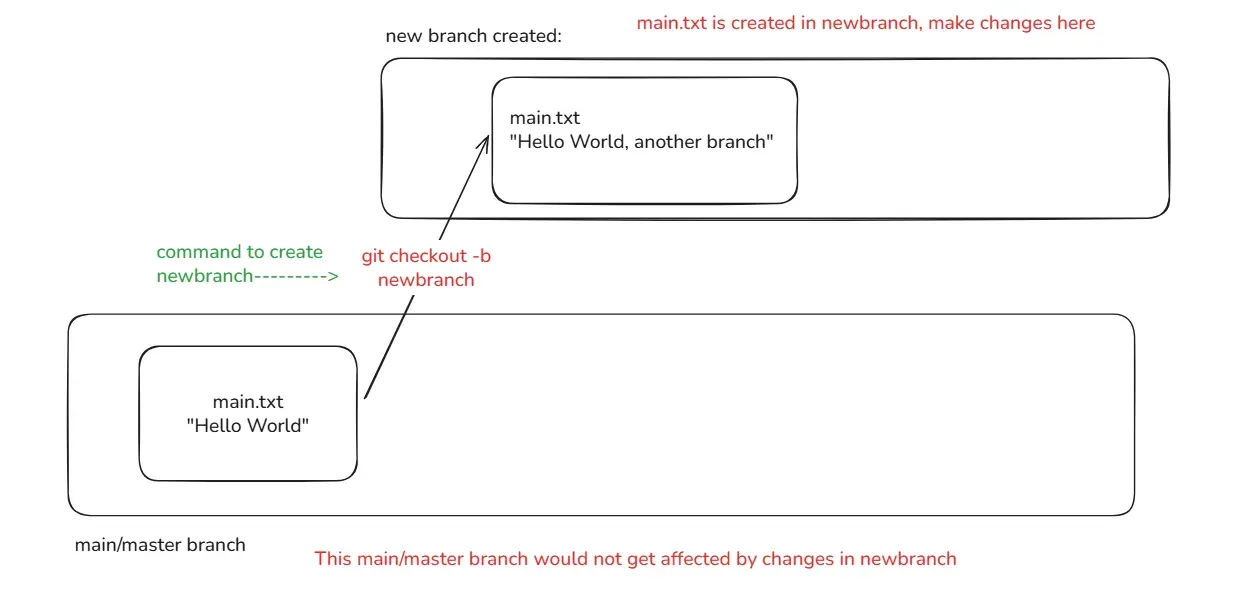
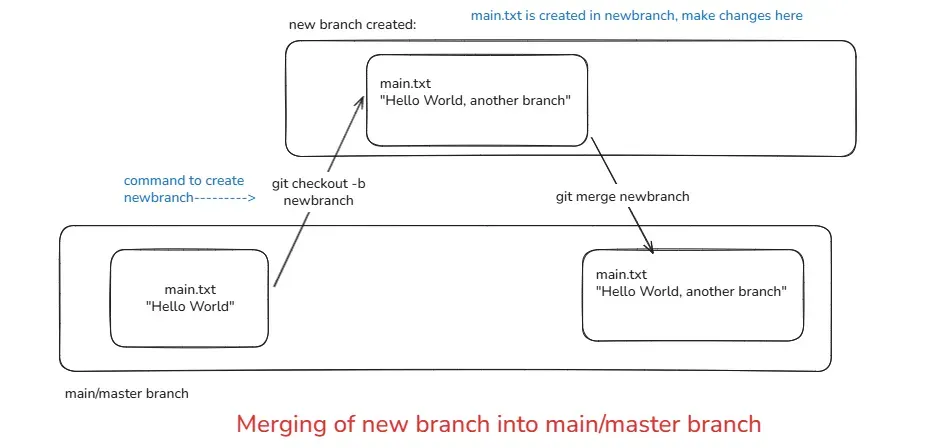
Create and switch to the new branch directly
git checkout -b new_branch_name
Merging code to main/master branch
Merging code into the main/master branch means bringing the changes you made in another branch back into the main branch.
This keeps your main branch clean, organized, and always stable.
git merge branch_name
Once your work is done you need to bring code to main branch
Step 1: Take your head pointer to main branch using git checkout main
Step 2: Merge the newbranch code into the main branch using git merge newbranch
Merge Conflict
When you merge multiple branches into the main/master branch, an error or issue may occur this is called a merge conflict
1. Github(website built on Git)
GitHub is a cloud-based platform where developers store, share, and collaborate on code projects using Git.
Storing your code in a "repository" on GitHub allows you to:
- Showcase or share your work.
- Track and manage changes to your code over time.
- Let others review your code, and make suggestions to improve it.
- Collaborate on a shared project, without worrying that your changes will impact the work of your collaborators before you're ready to integrate them.
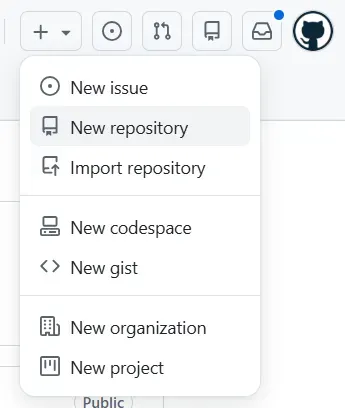
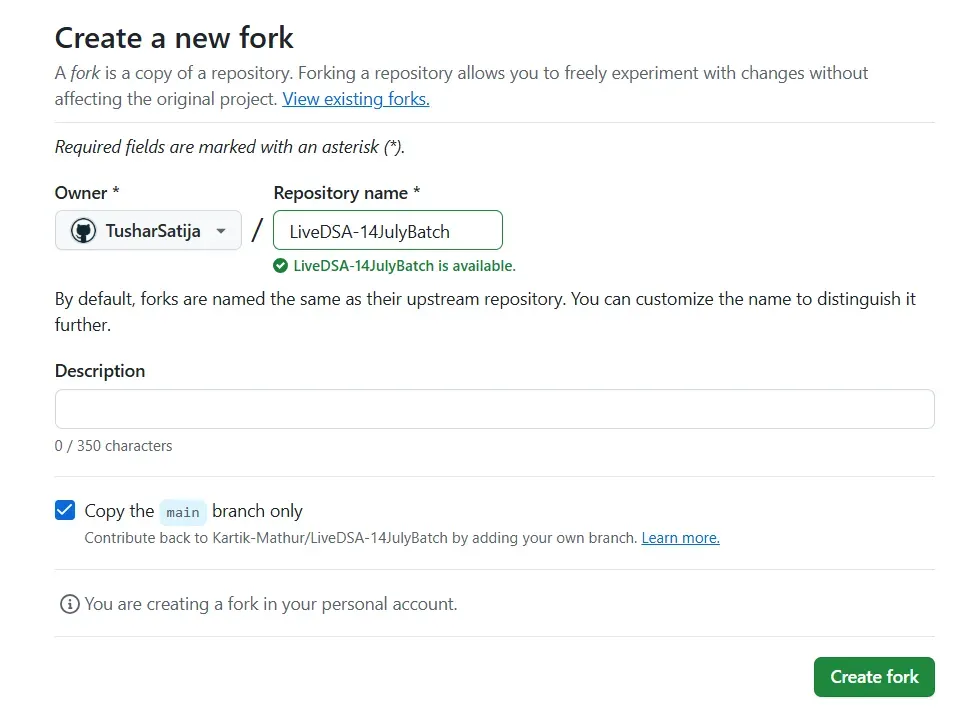
2. Step to create new repo
- Log in to GitHub.
- Click + (New) → New repository.
- Enter the repository name.
- Choose Public or Private.
- (Optional) Add README, .gitignore, License.
- Click Create repository.

- What is
git remote add origin?
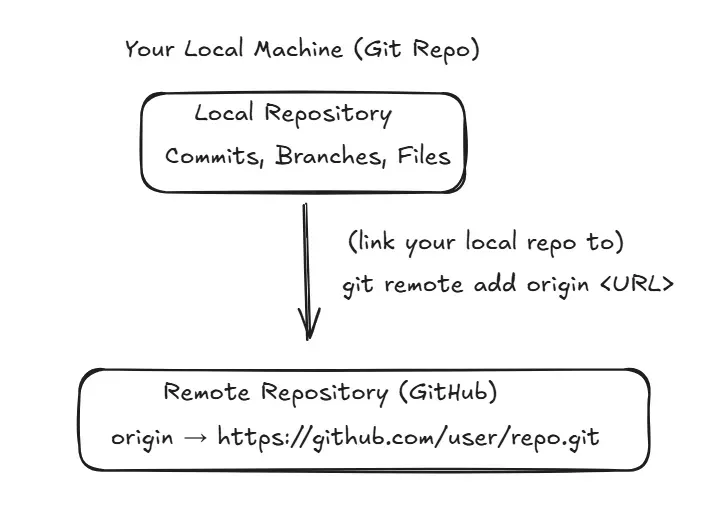
command:
git remote add origin <repository-url>
Meaning:
git remote→ manage connections to remote repositoriesadd→ create a new remote entryorigin→ name of the remote (default name)
Why name is ‘origin’?
- It is a nickname for the remote GitHub repo.
- Instead of writing long URLs again and again, git uses short names like:
origin
Example to understand ORIGIN
Suppose you have:
Repo URL = [email protected]:TusharSatija/Learning_Github.git
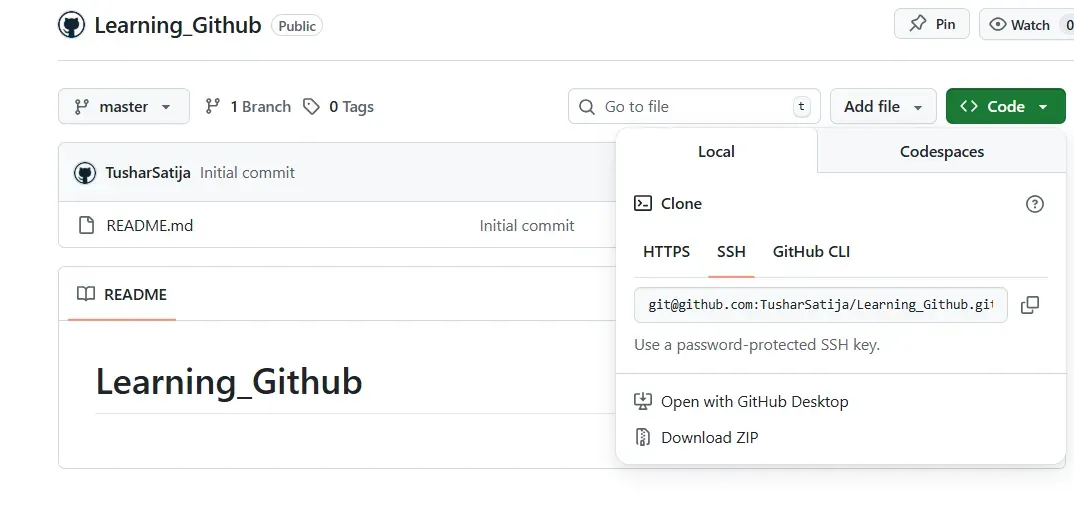
Instead of typing full URL every time, you run:
git remote add origin [email protected]:TusharSatija/Learning_Github.git
Now Git remembers this connection:
origin → [email protected]:TusharSatija/Learning_Github.git
So now when you write:
git push origin main
Git understands:
Push my code to the main branch of the repository stored in "origin".
- What is
git push?
To send your code from local repository to remote repository on githubWe use git push command.
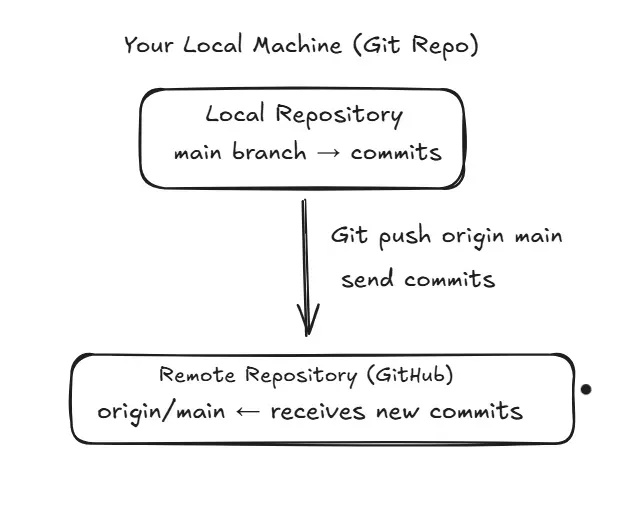
Meaning:
- Upload (push) your local commits → to remote repo.
origin→ remote repo name/urlmain→ branch name
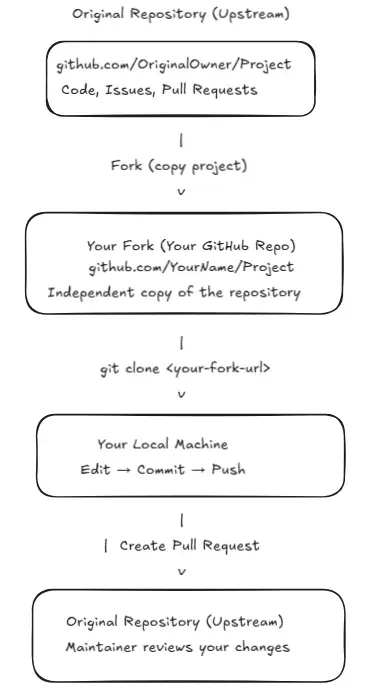
What is Fork in GitHub?

A fork is a copy of someone else’s GitHub repository into your own GitHub account.
Where Fork is used?
Fork is mostly used for open-source contributions
You can now:
1. Edit code
You can modify any file in your forked repository without needing permission from the original project.
2. Add files
You can add new files (features, docs, fixes) in your fork, just like your own project.
3. Commit
You can save your changes with a commit message, keeping track of what you updated.
4. Push
You can upload your commits from your local machine to your forked GitHub repository.
5. Create branches
You can create separate branches in your fork to work on new features or fixes safely.
Why this is safe?
All changes stay inside your fork, so the original repository remains unchanged until you open a Pull Request.
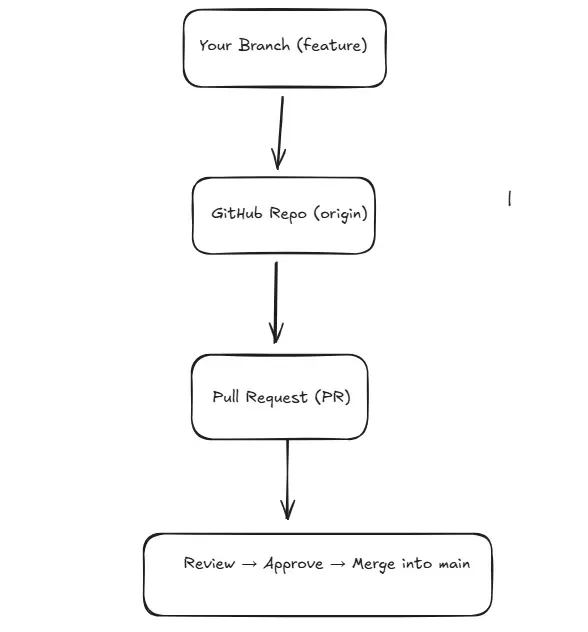
What is a Pull Request (PR)?
A Pull Request (PR) is a request you make to the owner of a repository asking them to pull your changes into their project
Why is it called a “Pull” Request?
Because you are asking the repository owner to:
Pull → your branch/changes
Where PR is used?
- Team projects
- Open-source contributions
- Code review
- Feature development
- Bug fixing
PR Allows:
- Code review
- Comment on code
- Discuss changes
- Suggest improvements
- Approve or reject changes
4. PR VIA FORK (Most common for open-source)
Use fork when you do not have permission on the repo.
Steps
- Go to the public GitHub repo.

2. Click FORK → creates copy in your GitHub.
git clone <your-fork-url>
- Create new branch:
git checkout -b fix-readme
- Make changes and push:
git push origin fix-readme
Go to your fork → GitHub shows:
**“Compare & Pull Request”**

Select base repository = original repo
Select compare branch = your branch
Submit PR.
Happy Open Source! 🚀
]]>Single Page Application (SPA)
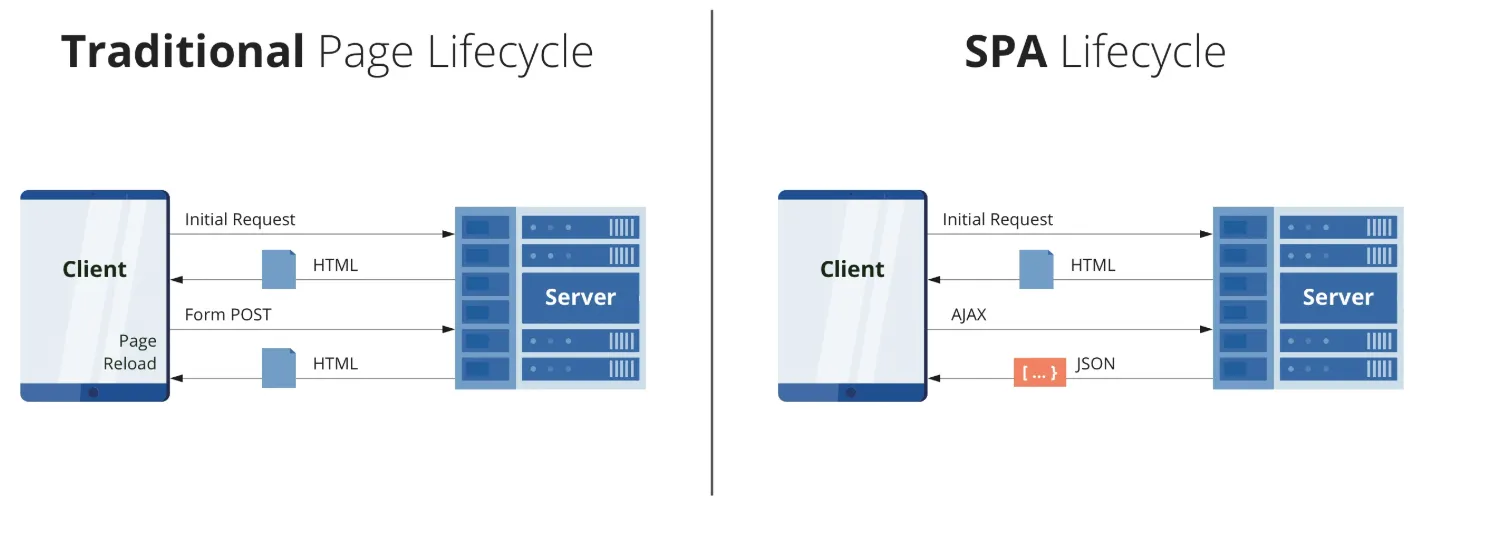
Imagine browsing a website that never refreshes, where content flows seamlessly as you navigate. That's the magic of SPAs! Unlike traditional websites that reload entire pages, SPAs update only the content that changes, creating lightning-fast, app-like experiences.
Real-world example: Think of Gmail
]]>Single Page Application (SPA)

Imagine browsing a website that never refreshes, where content flows seamlessly as you navigate. That's the magic of SPAs! Unlike traditional websites that reload entire pages, SPAs update only the content that changes, creating lightning-fast, app-like experiences.
Real-world example: Think of Gmail - you can read emails, compose messages, and navigate folders without ever seeing a page reload.
Component-Based Architecture
React components are small, independent, reusable pieces of code that define the structure and behavior of the user interface (UI). Its like breaking a long html code into small reusable peice called component !
Each component is a self-contained piece that you can reuse anywhere in your application.
Website
├── Header Component
├── Content Component
│ ├── Card Component
│ └── Button Component
└── Footer Component

Benefits:
- Reusable code - write once, use everywhere
- Easy to maintain and debug
- Better team collaboration
Virtual DOM Magic
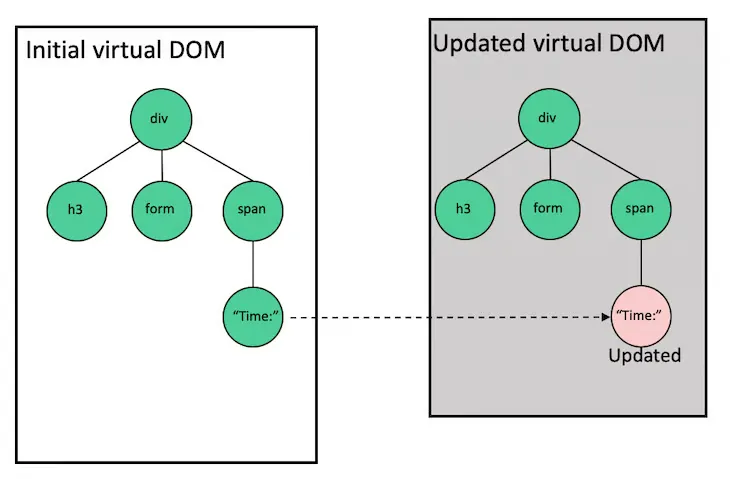
Why React is fast? All because of Virtual dom
React creates a virtual copy of your webpage in memory. When something changes, React compares the virtual copy with the real webpage and updates only what's different. It's like having a super-efficient editor that only changes the words that need updating!
User Action → Virtual DOM Updates → React Compares → Only Changed Parts Update → ⚡ Fast UI
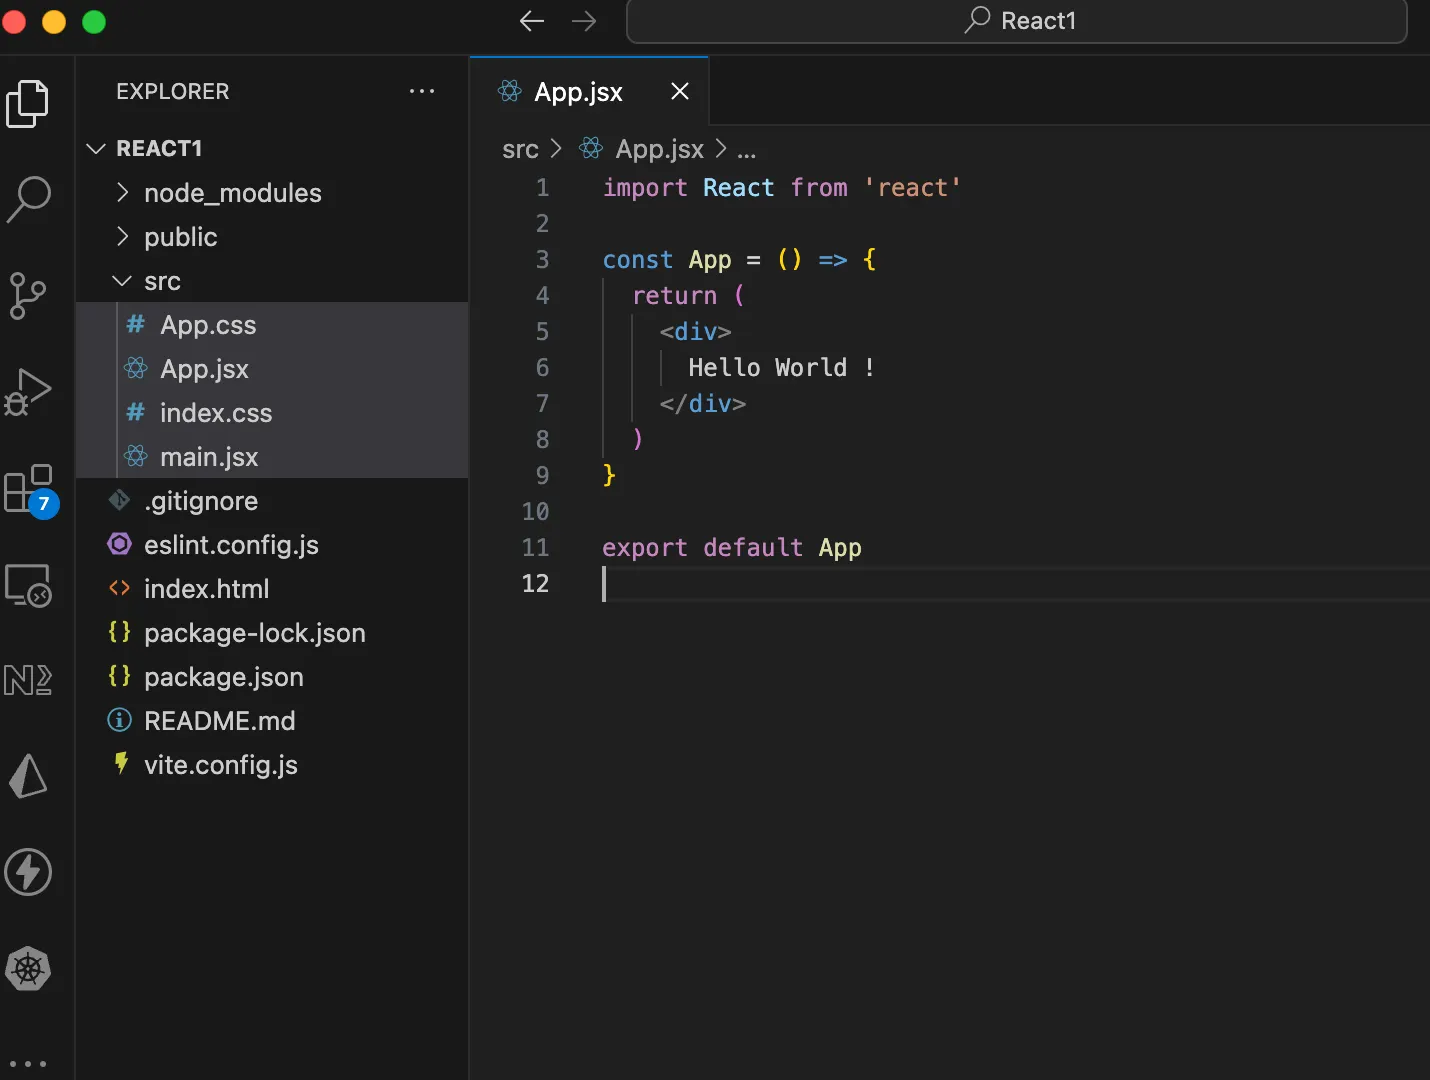
Setting Up React with Vite
Vite is a modern build tool that's super fast! Let's set up our first React project.
Step 1: Create Project
npm create vite@latest
// give project name React1 press enter
//package name package.json if asked
//choose react
//choose javascript
cd React1
npm install
npm run dev
Step 2: Project Structure
- Remove assests folder, and all the code inside App.jsx and App.css
- Install ES7 react/redux extension
- Type rafce in App.jsx
JSX and Babel
What is JSX?
JSX lets you write HTML-like code in JavaScript. It makes creating UI components intuitive and easy to read!
Regular JavaScript (Hard to read):
const element = React.createElement(
  'h1',
  { className: 'greeting' },
  'Hello, World!'
);
JSX (EAST TO READ):
const element = <h1 className="greeting">Hello, World!</h1>;What is Babel?
Babel is a translator that converts JSX into regular JavaScript that browsers can understand. Vite handles this automatically for us!
//jsx code
const greeting = <h1>Hello, World!</h1>;
//What Babel converts it to:
const greeting = React.createElement('h1', null, 'Hello, World!');Creating Your First Functional Component
- functional component are nothing but just a javascript function that return jsx
Let's create a simple greeting component in App.jsx
function Greeting() {
  return (
    <div>
      <h1>Welcome to React!</h1>
      <p>You just created your first component!</p>
    </div>
  );
}
Call this function in App component
function App() {
  return (
    <div>
      <Greeting />
    </div>
  );
}
function Greeting() {
  return (
    <div>
      <h1>Welcome to React!</h1>
      <p>You just created your first component!</p>
    </div>
  );
}

export default App;
Key Points:
- Component names must start with a capital letter
- Components are just JavaScript functions that return JSX
- Calling component is just like using html tag <ComponentName>
- In React each tag must have a closing tag
Embedding JavaScript in JSX
You can embed any JavaScript expression in JSX using curly braces {}
function UserCard() {
  const name = "Kartik Mathur";
  const age = 29;
  const hobbies = ["Reading", "Teaching", "Coding"];

  return (
    <div>
      <h2>User Profile</h2>
      <p>Name: {name}</p>
      <p>Age: {age}</p>
      <p>Birth Year: {2025 - age}</p>
      <p>Hobbies: {hobbies.join(", ")}</p>
      <p>Is Adult? {age >= 18 ? "Yes" : "No"}</p>
    </div>
  );
What you can put inside {}:
- Variables:
{name} - Expressions:
{2 + 2} - Function calls:
{getName()} - Ternary operators:
{isLoggedIn ? "Hi" : "Login"}
Regular Variable vs State Variable
Regular Variable - Doesn't Trigger Re-render
function BrokenCounter() {
  let count = 0;

  const increment = () => {
    count = count + 1;
    console.log(count); // This updates, but UI doesn't!
  };

  return (
    <div>
      <p>Count: {count}</p>
      <button onClick={increment}>Add 1</button>
    </div>
  );
}
// Clicking button won't update the display!
function App() {
return (
<div>
<Greeting />
<BrokenCounter />
</div>
);
}
function Greeting() {
return (
<div>
<h1>Welcome to React!</h1>
<p>You just created your first component!</p>
</div>
);
}
function BrokenCounter() {
let count = 0;
const increment = () => {
count = count + 1;
console.log(count); // This updates, but UI doesn't!
};
return (
<div>
<p>Count: {count}</p>
<button onClick={increment}>Add 1</button>
</div>
);
}
export default App;State Variable - Triggers Re-render
import { useState } from 'react';

function WorkingCounter() {
  const [count, setCount] = useState(0);

  const increment = () => {
    setCount(count + 1); // UI updates automatically!
  };

  return (
    <div>
      <p>Count: {count}</p>
      <button onClick={increment}>Add 1</button>
    </div>
  );
}
// Clicking button updates the display!
Dont worry about the syntax, we will deep dive into useState hook !!
Key Difference:
Regular Variable:
Update Variable → Nothing Happens to UI
State Variable:
Update State → React Re-renders Component → UI Updates
What are Hooks?
Hooks are special functions that let you "hook into" React features. They all start with "use".
Common Hooks:
useState- Manage component stateuseEffect- Handle side effectsuseContext- Share data across componentsuseRef- Reference DOM elements
Rules of Hooks:
- Only call hooks at the top level (not inside loops or conditions)
- Only call hooks in functional components
useState Hook - Deep Dive
Basic Syntax
const [stateVariable, setStateFunction] = useState(initialValue);
Breaking it down:
stateVariable- The current valuesetStateFunction- Function to update the valueinitialValue- Starting value
Project: Counter Application
Let's build a complete counter app with multiple features!
src/App.jsx
import { useState } from 'react';
import './App.css';

function Counter() {
  const [count, setCount] = useState(0);

  const increment = () => {
    setCount(count + 1);
  };

  const decrement = () => {
    setCount(count - 1);
  };

  const reset = () => {
    setCount(0);
  };

  return (
    <div className="counter-container">
      <h1>Counter App</h1>

      <div className="display">
        <h2>{count}</h2>
      </div>
      <div className="buttons">
        <button onClick={decrement} className="btn-decrement">
          Decrease
        </button>
        <button onClick={reset} className="btn-reset">
          Reset
        </button>
        <button onClick={increment} className="btn-increment">
          Increase
        </button>
      </div>
    </div>
  );
}
Key Take Away
- States are immutable in javascript
- Never change it directly, instead of doing count++, do count + 1
src/App.css
.counter-container {
  max-width: 400px;
  margin: 50px auto;
  padding: 30px;
  background: linear-gradient(135deg, #667eea 0%, #764ba2 100%);
  border-radius: 20px;
  box-shadow: 0 10px 30px rgba(0, 0, 0, 0.3);
  color: white;
  text-align: center;
}

.display {
  background: rgba(255, 255, 255, 0.2);
  padding: 20px;
  border-radius: 15px;
  margin: 20px 0;
}

.display h2 {
  font-size: 48px;
  margin: 0;
}

.buttons {
  display: flex;
  gap: 10px;
  justify-content: center;
  margin: 20px 0;
}

button {
  padding: 12px 24px;
  font-size: 16px;
  border: none;
  border-radius: 8px;
  cursor: pointer;
  transition: all 0.3s ease;
  font-weight: bold;
}

.btn-increment {
  background: #10b981;
  color: white;
}

.btn-decrement {
  background: #ef4444;
  color: white;
}

.btn-reset {
  background: #f59e0b;
  color: white;
}

button:hover {
  transform: translateY(-2px);
  box-shadow: 0 5px 15px rgba(0, 0, 0, 0.3);
}
Use it in App Component:
function App() {
  return (
    <div>
      <Counter />
    </div>
  );
}

export default App;
Happy Coding!
]]>Antigravity changes the way we build software. Instead of writing every line of code yourself, you tell smart AI agents what you want, and they handle the planning, coding, and problem-solving for you. It’s not just an autocomplete tool; it feels more like giving instructions from a Mission Control
]]>
Antigravity changes the way we build software. Instead of writing every line of code yourself, you tell smart AI agents what you want, and they handle the planning, coding, and problem-solving for you. It’s not just an autocomplete tool; it feels more like giving instructions from a Mission Control desk.
Your job also changes. You’re no longer stuck doing all the small tasks. You act more like a project lead who sets the direction, while the agents handle the detailed work. And if you ever want to jump in and edit the code yourself, you still can
In simple words, using Antigravity feels like moving from doing everything by hand to managing a smart team of digital workers. The diagram shows this clearly: the old way on the left and the new agent-driven way on the right.
Getting Started with Antigravity: A Guided Walkthrough
To help you make the most of this tutorial, we’ve organised the material into a simple, structured path:
1. Begin With Setup & Orientation
Start by installing Antigravity and applying the recommended configuration settings. This section also introduces the foundational concepts and essential navigation features you’ll rely on throughout your experience.
2. Explore Practical Use Cases
After completing the setup, browse through several example scenarios you can test right away—such as static and dynamic website creation, building interactive web applications, aggregating external news sources, and more.
By this point, you should have a clear sense of how Antigravity operates. It’s a perfect moment to try out your own prompts and tasks.
3. Customise Antigravity to Fit Your Workflow
Next, dive into personalising how Antigravity behaves. Here you’ll learn about Rules and Workflows, mechanisms that help you enforce coding standards, define reusable instructions, and trigger complex actions with a single command. Multiple examples are provided to guide you.
4. Configure Agent Security
Since Antigravity Agents may run a variety of shell or terminal commands, you may want to control what they can execute. This section walks you through setting Allowed and Restricted command lists, ensuring that sensitive actions require your approval while safe ones can run
Helpful Resources
Below is a quick reference to official Antigravity links
| Category | Link |
|---|---|
| Official Website | https://antigravity.google/ |
| Documentation | https://antigravity.google/docs |
| Use Cases | https://antigravity.google/use-cases |
| Download Page | https://antigravity.google/download |
| YouTube Channel (Google Antigravity) | https://youtu.be/5q1dbZg2f_4?si=6EluYrc74WmDjmGy |
Installing Antigravity
Let’s start by installing Antigravity. The product is currently in preview, and you can begin using it with your personal Gmail account.
Visit the downloads page, then select and download the version that matches your operating system.
Setting up Antigravity
Launch the application installer and install the same on your machine. Once you have completed the installation, launch the Antigravity application. You should see a screen similar to the following:
Click on the next button. This brings up the option for you to import from your existing VS Code or Cursor settings. We will go with a fresh start.
The next screen is to choose a theme type. We will go with the Dark theme, but it's entirely up to you, depending on your preference.
The next screen is important. It demonstrates the flexibility that is available in Antigravity in terms of how you want the Agent to behave.
Let’s take a closer look at what these settings mean. Keep in mind that none of the choices you make here are permanent—you can adjust them at any point, even while the Agent is actively working.
Before exploring the available modes, it’s important to understand the two key settings displayed on the right side of the screen:
Terminal Execution Policy
This controls how freely the Agent can run terminal commands or tools on your machine. You can choose from three levels:
- Off:
The Agent will never run terminal commands automatically, except those you explicitly place in an Allow List. - Auto:
The Agent evaluates each command and decides whether to run it automatically. When necessary, it will pause and ask for your approval. - Turbo:
The Agent automatically runs all terminal commands unless they are on a Deny List you configure.
Review Policy
While completing tasks, the Agent generates different items—such as task outlines, implementation plans, and more.
This policy controls who decides whether these items should be reviewed before the Agent continues.
You can choose from three behaviours:
- Always Proceed:
The Agent never requests a review. - Agent Decides:
The Agent determines when a review is needed and prompts you accordingly. - Request Review:
The Agent always pauses and asks for your review before proceeding.
Now that these properties are clear, the four setup choices simply combine different execution and review behaviours into convenient presets. They help you define how much independence the Agent should have when running commands or advancing through its workflow.
Understanding the Four Antigravity Agent Modes
Antigravity gives you flexibility in how much control you want the Agent to have over your development workflow. Think of these modes as different “collaboration styles” between you and the Agent. Each one changes how independently the Agent works, when it asks for permission, and how much manual involvement you prefer.
1. Agent-driven development
Think of this as: “You tell the Agent what you want, and it runs with it.”
In this mode, the Agent takes the lead:
- It plans the task
- Executes terminal commands automatically
- Proceeds with minimal interruptions
- Only checks in when necessary
This is ideal when you want hands-off automation, similar to hiring a highly trusted assistant who handles end-to-end execution.
Best for:
- Fast prototyping
- Repetitive tasks
- Experienced users are comfortable with high autonomy.
2. Agent-assisted development (Recommended)
Think of this as: “A balanced partnership, you give direction, and the Agent keeps you in the loop.”
In this mode, the Agent works actively but keeps a healthy feedback loop:
- It proposes plans
- Executes most commands automatically
- Asks for your approval when needed
- Shares important artifacts with you
You stay informed without micro-managing. This mode offers the best mix of speed and oversight, which is why it’s recommended for most users.
Best for:
- Everyday development
- Users who want speed but still some visibility and control
- Teams that value accountability
3. Review-driven development
Think of this as: “You approve every step, like code review for every action.”
Here, the Agent moves deliberately:
- It always asks for your review before executing important steps
- You approve terminal commands, plans, and artifacts
- Nothing happens without your confirmation
This mode ensures maximum control and transparency, useful when accuracy or safety is critical.
Best for:
- Production-critical systems
- Highly regulated environments
- Developers who prefer detailed oversight
4. Custom configuration (Full manual control)
Think of this as: “Build your own workflow—fine-tune exactly how the Agent behaves.”
You can adjust:
- Terminal command permissions
- Review policies
- Safety list
- How autonomous or cautious the Agent should be
This mode is perfect if you have very specific preferences, want to experiment, or need a workflow that fits a unique development environment.
Best for:
- Power users
- Specialized workflows
- Teams with custom process guidelines
The Agent-assisted development mode offers the best balance of autonomy and oversight. It allows the Agent to make intelligent decisions while still checking in with you when approval is needed, which is why it’s the recommended option.
Go ahead and choose the mode that suits your workflow, though for now, the recommended setting is a great place to start.
Next, you’ll move on to setting up your editor. Select the themes and preferences that match your style.
As mentioned earlier, Antigravity is available in preview mode and free if you have a personal Gmail account. So sign in now with your account. This will open up the browser, allowing you to sign in.
On successful authentication, you will see a message similar to the one below, and it will lead you back to the Antigravity application. Go with the flow.
The last step, as is typical, is the terms of use. You can make a decision if you’d like to opt in or not, and then click on Next.
This will lead you to the moment of truth, where Antigravity will be waiting to collaborate with you.
Let’s get started.
The Agent Manager
Antigravity is built on top of the open-source Visual Studio Code (VS Code) platform, but it transforms the experience by shifting the focus from traditional text editing to intelligent agent coordination. Instead of a single workspace, Antigravity introduces two main views: the Editor and the Agent Manager. This design reflects the difference between doing the work yourself and overseeing how the work gets done.
Agent Manager View: Your Mission Control
When you open Antigravity, you’re not presented with a file explorer like in most IDEs. Instead, the first thing you typically see is the Agent Manager, your central hub for monitoring and directing the Agent’s activities, as illustrated below:
This interface functions as a centralized Mission Control hub, built for overseeing complex workflows. It gives developers the ability to launch, track, and collaborate with several agents running in parallel, each handling different tasks or parts of the project independently.
In this environment, the developer operates more like a systems designer, setting broad goals rather than performing detailed edits. Examples of such high-level instructions include:
- Revamp the authentication system
- Refresh or reorganize the dependency graph
- Create a full test suite for the billing API
Each instruction initializes its own agent, as shown in the diagram. The dashboard then presents a clear view of all active agents, showing their progress, the artifacts they generate, such as plans, outputs, and code changes, and any actions awaiting your confirmation.
This model solves a major drawback of earlier IDEs built around chatbot interactions, where work happened in a single-threaded, back-and-forth manner. In those setups, developers had to wait for one AI response to complete before issuing another request. Antigravity removes that constraint: you can assign multiple agents to multiple problems at once, significantly boosting development velocity.
When you click Next, you’ll be able to open a Workspace and continue setting up your environment.
Think of Workspace as you know from VS Code and you will be done. So we can open up a local folder by clicking on the button and then selecting a folder to start with. In our case, I had a folder in my home folder named learninggravity, and I selected that. You can use a completely different folder.
Once you complete this step, you will be in the Agent Manager window, which is shown below:
Take a moment to review both the Planning and Model Selection dropdowns. The Model Selection menu lets you choose which available model your Agent should work with. The current list of models is shown below:
Similarly, we find that the Agent is going to be in a default Planning mode. But we can also go for the Fast mode.
Let’s look at what the documentation says on this:
Planning Mode
In this mode, the Agent takes time to think before acting. It’s ideal for tasks that require deeper reasoning, extensive research, or multi-step coordination. The Agent breaks the work into structured task groups, generates detailed artifacts, and performs thorough analysis to ensure higher-quality results. You can expect significantly more output and reasoning when using Planning mode.
Fast Mode
Fast mode instructs the Agent to act immediately without extended planning. It’s best suited for quick, straightforward tasks—like renaming variables, running simple shell commands, or making small, localized updates. This mode prioritizes speed and is appropriate when the task is simple enough that quality risks are minimal.
For now, we’ll stick with the default settings. Keep in mind that Gemini 3 Pro model usage is subject to limited free quotas at launch, so you may see notifications if your quota runs out.
Next: Understanding the Agent Manager
Let’s take a moment to explore the Agent Manager window. This will help you understand its core components, how navigation works in Antigravity, and how to interact effectively with the Agent system. The Agent Manager interface
- Inbox: Think of this as a way to track all your conversations in one place. As you send Agents off on their tasks, these will appear in the Inbox, and you can click on the Inbox to get a list of all the current conversations. Tapping on any of the conversations will lead you to all the messages that have been exchanged, the status of the tasks, what the Agent has produced or even if it is waiting for an approval from your side on the tasks. This is a great way to come back later to a previous task that you were working on. A very handy feature.
- Start Conversation: Click on this to begin a new conversation. This will directly lead you to the input where it says Ask anything.
- Workspaces: We mentioned Workspaces and that you can work across any workspace that you want. You can add more workspaces at any time and can select any workspace while starting the conversation.
- Playground: This is a great way by which you can simply start a conversation with the agent, and then, if you’d like to convert that into a workspace, where you have stricter control over the files, etc. Think of this as a scratch area.
- Editor View: So far, we are in the Agent Manager view. You can switch at any time to the Editor view, if you’d like. This will show you your workspace folder and any files generated. You can directly edit the files there, or even provide inline guidance, commands in the editor, so that the Agent can do something or change as per your modified recommendations/instructions. We will cover the Editor View in detail in a later section.
- Browser: Finally, we come to one of the clear differentiators that makes Antigravity very powerful, and that is its close integration with the Chrome browser. Let’s get going with setting up the Browser in the next section.
WANT TO GET A DETAILED TUTORIAL OF GOOGLE ANTIGRAVITY?
Watch this video!!!
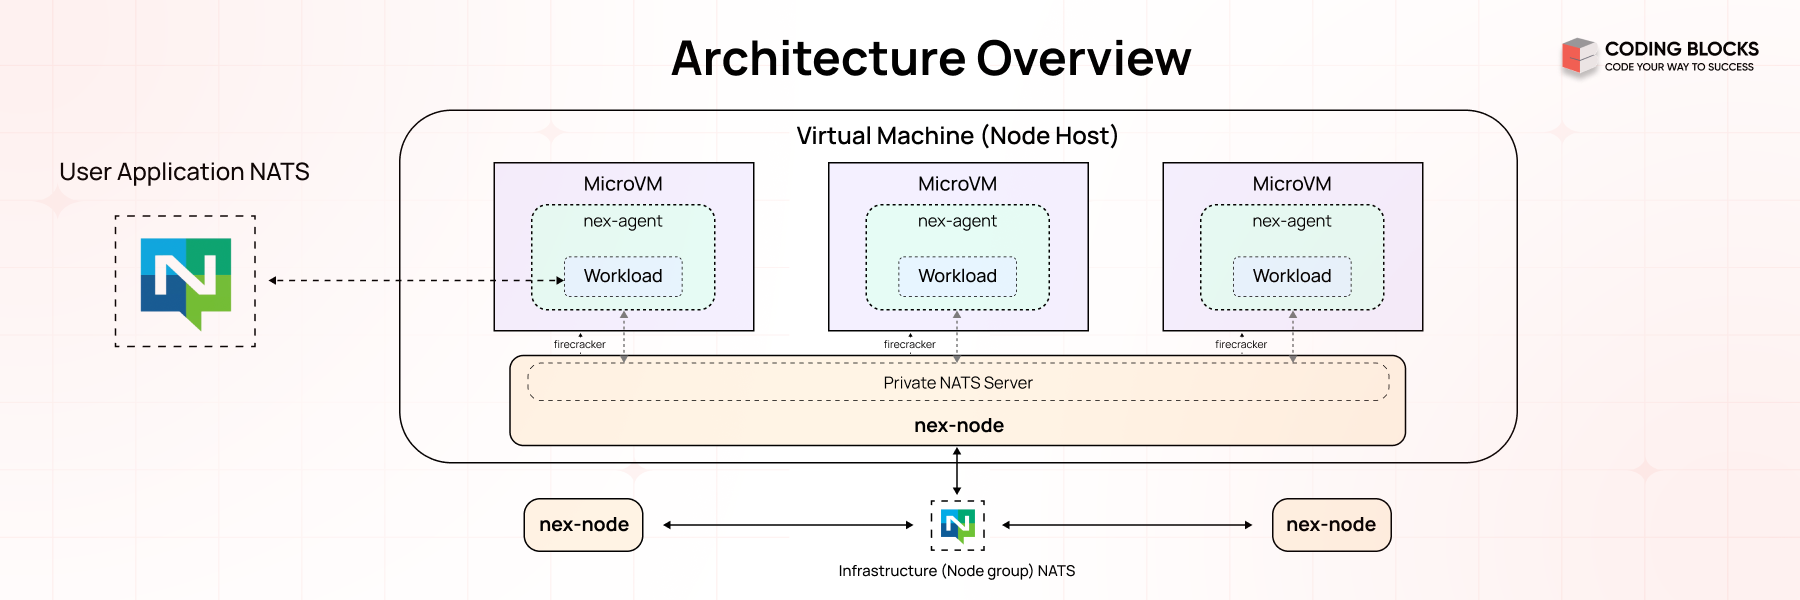
The NATS socket architecture is the foundation of its lightweight and high-performance messaging system. It manages how messages are sent and received between clients and the NATS server using sockets. The server can handle thousands of client connections simultaneously by sharing sockets through a process called multiplexing. To ensure efficiency, it uses event-driven methods to manage all active socket input/output (I/O) operations without causing delays or blocking other tasks.

What is NATS?
NATS is an advanced messaging technology crafted to address the intricate communication demands of modern applications. Its design ensures flexibility, security, and high performance, making it a powerful solution for diverse, interconnected ecosystems.
Key Capabilities:
Seamless Connectivity Across Platforms :
- Cloud Vendors : It facilitates communication across different cloud providers.
- On-Premises Infrastructure : I integrates systems within private networks.
- Edge Devices : It supports localized, resource-constrained environments.
- Mobile Apps and Web Applications : It ensures reliable communication for end-user interactions.
- IoT Devices : It manages the high concurrency required by connected devices.
Open-Source Modular Design :
- It consists of a family of tightly integrated tools.
- Tools can function independently or as a unified system.
What Are Sockets?
Sockets are endpoints for sending or receiving data between two systems over a network. In NATS, sockets are used for communication between:
- Clients (publishers or subscribers)
- The NATS server
NATS Communication Model
At a high level, NATS uses a publish/subscribe messaging model, and the socket architecture ensures efficient data transfer.
Components :
- Clients : Applications that publish or subscribe to messages.
- Server : The central NATS server managing connections and routing messages.
- Sockets : The underlying mechanism used to transmit data between the client and the server.
Key Roles of Sockets in NATS :
- Establish persistent TCP connections between clients and the server.
- Enable the server to multiplex many client connections.
- Efficiently handle message routing and delivery.
How Sockets Work in NATS ?
Connection Establishment => Connection establishment is the process of creating a persistent communication channel between a NATS client (publisher or subscriber) and the NATS server. This step is crucial to facilitate real-time data exchange between the client and the server.
- Client Initiates Connection : A client opens a socket and connects to the NATS server on its default TCP port 4222.
- Server Accepts Connection : The server accepts the client connection and establishes a persistent socket for communication.
Message Exchange => process by which message is sent and received between clients (publishers and subscribers) via the NATS server. NATS supports various communication patterns like publish/subscribe, request/reply, and queue groups, all of which rely on efficient routing and handling of messages.
- Publishing Messages :
- The publisher sends data over its socket to the server.
- The server routes the message to relevant subscribers using other sockets.
- Subscribing to Messages :
- A subscriber registers a subject with the server.
- When a message for the subject arrives, the server pushes it to the subscriber’s socket.
NATS Protocol
The NATS Protocol is a lightweight, text-based protocol designed to facilitate efficient communication between clients and the NATS server. It uses sockets as the underlying transport layer, ensuring high-speed, low-latency messaging suitable for distributed systems.
WebSocket Support in NATS
In addition to TCP sockets, NATS supports WebSocket connections, enabling browser-based clients to communicate with the NATS server.
- They enables real-time communication over HTTP-friendly protocols.
- They are useful for web-based applications like dashboards, chats, or notifications.
NATS Socket Workflow
- Connection :
- Connection establishes the foundation for message exchange by creating a direct communication channel.
- A client begins by creating a connection to the NATS server. This can be done using either:
- TCP: Traditional socket-based connection for high-speed, low-latency communication.
- WebSocket: Used for communication in browser-based or lightweight client applications.
- Handshake :
- Handshake ensures that only authorized clients connect and that the server understands the client’s communication capabilities.
- Once the connection is established:
- The server authenticates the client. This may involve checking credentials (e.g., username/password or tokens).
- The server and client negotiate connection details, such as protocol version, configuration options, and features (e.g., compression or encryption).
- Message Routing :
- Message Routing enables efficient delivery of messages to the right clients without unnecessary broadcasting.
- When a client publishes a message to a specific subject, the server determines which clients are subscribed to that subject.
- The server then routes the message to the relevant subscriber sockets.
- Internally Working :
- The server maintains a subject-to-subscriber map to track which clients are subscribed to which subjects.
- Using this map, the server routes messages only to the appropriate sockets.
- Keepalive Mechanism :
- Keepalive mechanism prevents idle connections from being dropped and ensures the client and server are still in sync.
- Periodic PING messages are sent by the client to check the server’s responsiveness.
- The server responds with a PONG message to confirm the connection is active.
- If Keepalive Fails:
- If the server does not respond to a PING within a specified timeout, the client considers the connection lost and attempts to reconnect.
- Disconnection :
- Disconnection frees up resources and ensures that disconnected clients do not continue to occupy server capacity.
- If a client decides to disconnect intentionally, it sends a DISCONNECT command to the server.
- The server closes the corresponding socket and cleans up resources.
- If a disconnection happens unexpectedly (e.g., due to network issues or a timeout), the server detects this and closes the socket.
Key Features of NATS Socket Architecture
Event-Driven I/O :
- NATS employs an event-driven model to manage socket operations. Instead of blocking threads while waiting for socket events (e.g., data arrival or connection closure), it uses an event loop to handle these events asynchronously.
How It Works ? :
- The event loop listens for socket activities like:
- Data ready for reading.
- Data available for writing.
- Connection establishment or termination.
- When an event occurs, a callback function processes the event without interrupting other ongoing tasks.
Advantages :
- It prevents CPU cycles from being wasted on idle waits.
- It handles thousands of connections concurrently with minimal resource usage.
Multiplexing :
- Multiplexing allows the NATS server to manage multiple client connections simultaneously over a single process or thread.
- How It Works ? :
- The server assigns each connected client a dedicated socket.
- Using multiplexing, it efficiently handles all active sockets without needing a separate thread for each connection.
- Data for different clients is processed independently within the same event loop.
- Advantages:
- It reduces the need for multiple threads, saving memory and CPU resources.
- It supports thousands or even millions of concurrent client connections.
Fault Tolerance :
- NATS provides mechanisms to recover from socket connection failures, ensuring uninterrupted messaging.
- How It Works ? :
- If a client’s connection to the server drops, the client library attempts to reconnect automatically.
- In a NATS cluster, clients can reconnect to another available server seamlessly.
- Persistent data streams (using JetStream) ensure no messages are lost during reconnections.
- Advantages :
- It ensures reliable communication even in case of network interruptions.
- It prevents downtime during failover scenarios.
Security :
- NATS uses industry-standard encryption protocols (TLS/SSL) to secure all socket communication.
How It Works ? :
- TLS/SSL Encryption : Protects data from being intercepted or tampered with during transmission.
- Authentication : Verifies the client’s identity using credentials (e.g., tokens, certificates).
- Access Control: Enforces permissions to ensure clients can only publish or subscribe to authorized subjects.
Advantages :
- It prevents eavesdropping on sensitive information.
- It ensures data is not altered during transmission.
- It meets security standards required by industries like finance and healthcare.
Using NATS for Microservices Communication
Microservices (Microservices Architecture) is a software design approach where an application is built as a collection of small, independent, and loosely coupled services. Each service in a microservices architecture focuses on a specific business capability and operates as an independent module that can be developed, deployed, and scaled separately.
Microservices communication with NATS involves using NATS as a messaging system to facilitate communication between different microservices in a distributed application architecture.
Why Use NATS for Microservices Communication?
- Low Latency : Latency refers to the time taken for a message to travel from the sender to the receiver and NATS provides low-latency communication, which is crucial for real-time applications.
- High Throughput : Throughput is the number of messages that can be processed or delivered within a specific time frame and NATS can handle high volumes of messages efficiently.
- Scalability : Scalability refers to the ability of a system to handle increasing loads by adding more resources and NATS can scale horizontally to accommodate increasing loads.
- Fault Tolerance : Fault tolerance is the ability of a system to continue operating correctly in the event of a failure of some of its components and NATS supports automatic reconnection and message redelivery in case of failures.
- Simplicity : Simplicity refers to the ease of setup, configuration, and maintenance of a system and NATS is easy to set up and use, reducing the complexity of inter-service communication.
Example - Order Processing System
- An order processing system with two microservices:
- Order Service (Publisher) and
- Inventory Service (Subscriber)
- Using Node.js we'll set up a Publisher Service to send messages about new orders and a Subscriber Service to receive and process these messages.
Step-by-Step Guide
Prerequisites
- Node.js installed on the system.
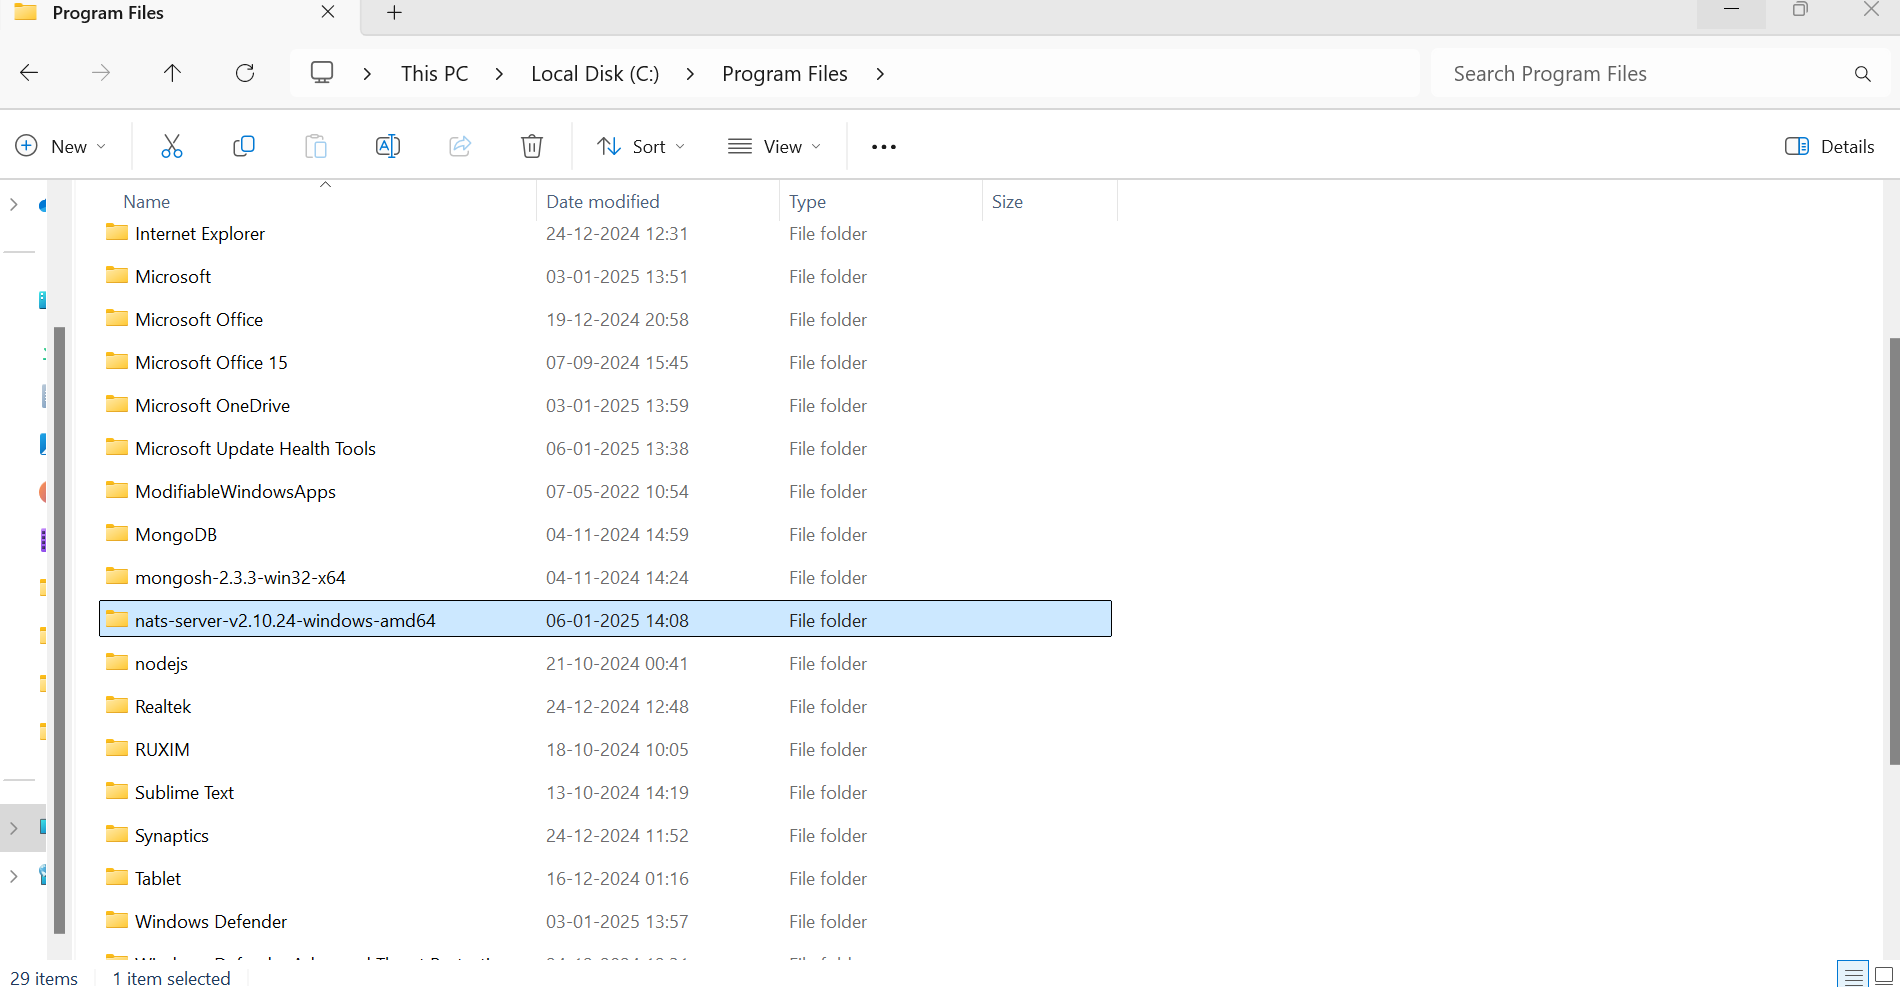
- Setup the NATS Server
- Download NATS-Server.

How to Choose the Right One?
- If you're downloading software for a PC or server, go for AMD/x86_64.
- If you're on a mobile device, Apple Silicon Mac, Raspberry Pi, or a device explicitly using ARM processors, choose the ARM version.
- Place the extracted folder in the Program Files directory on the C drive
Add NATS Server to System PATH
To make nats-server accessible globally, add its directory to the system's PATH variable:
- Open Environment variables
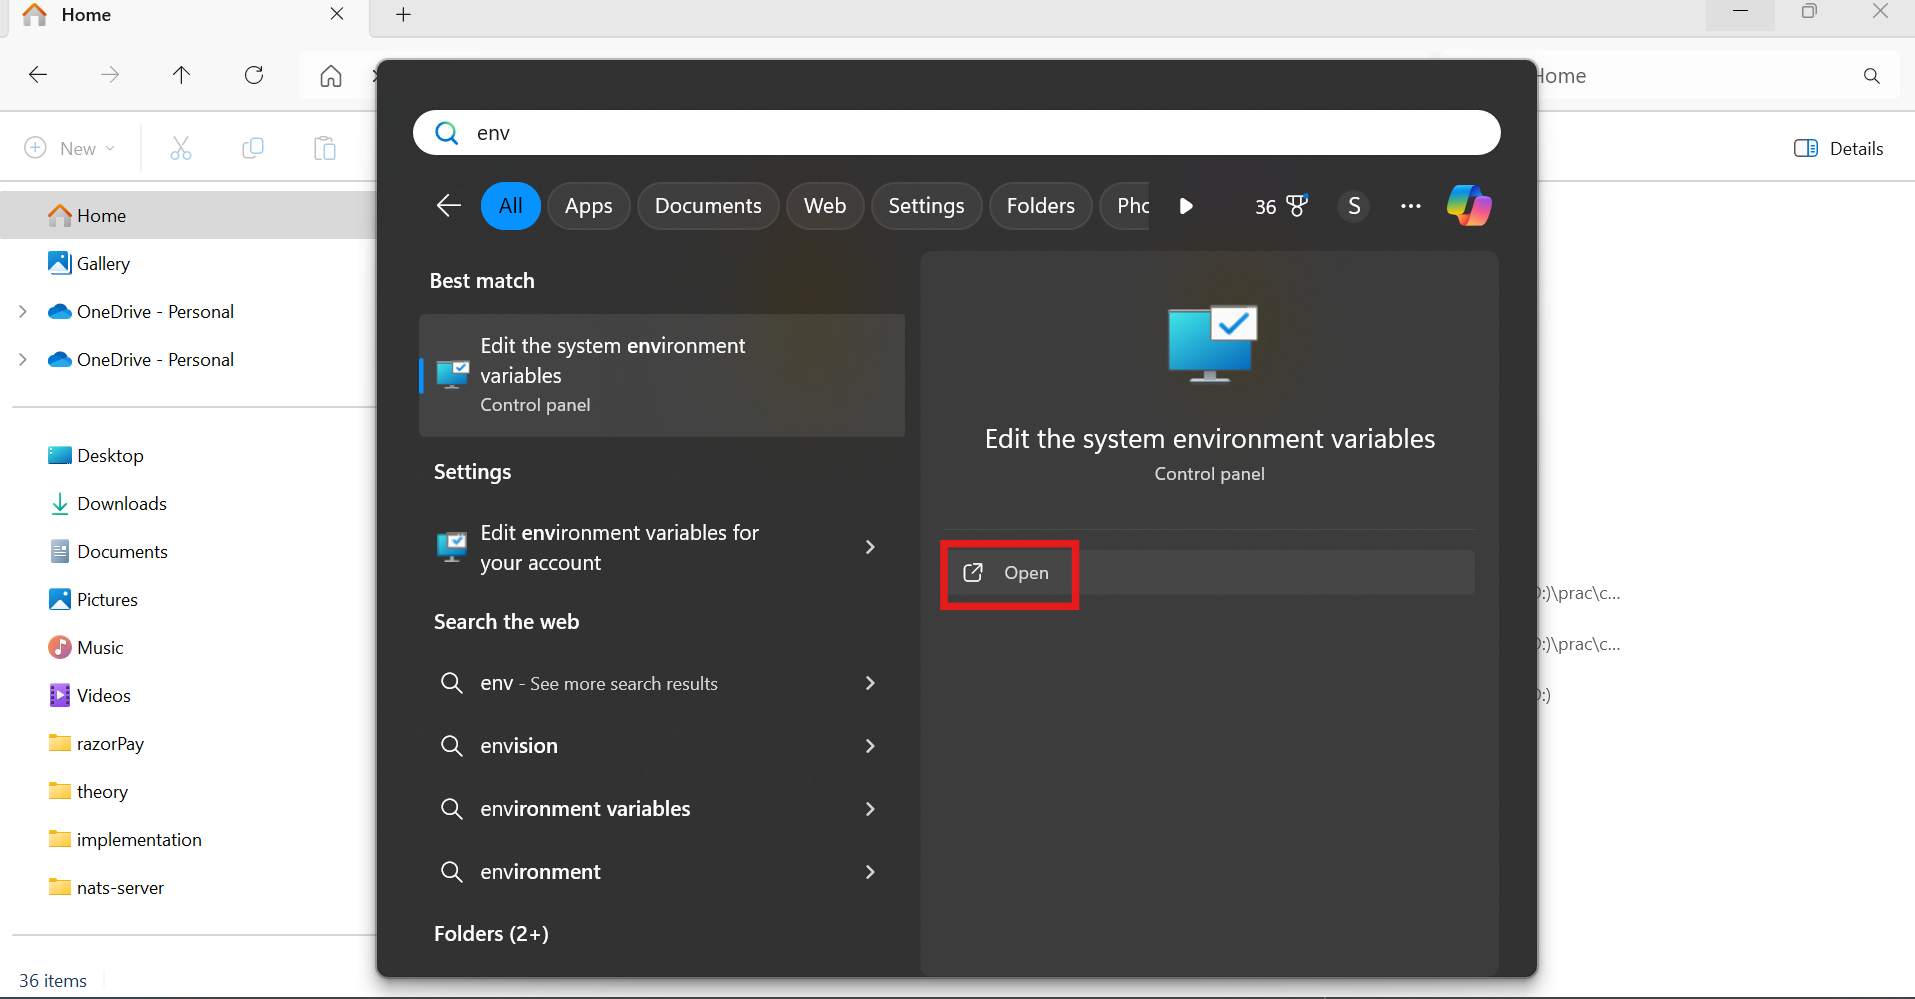

Add nats-server directory path here
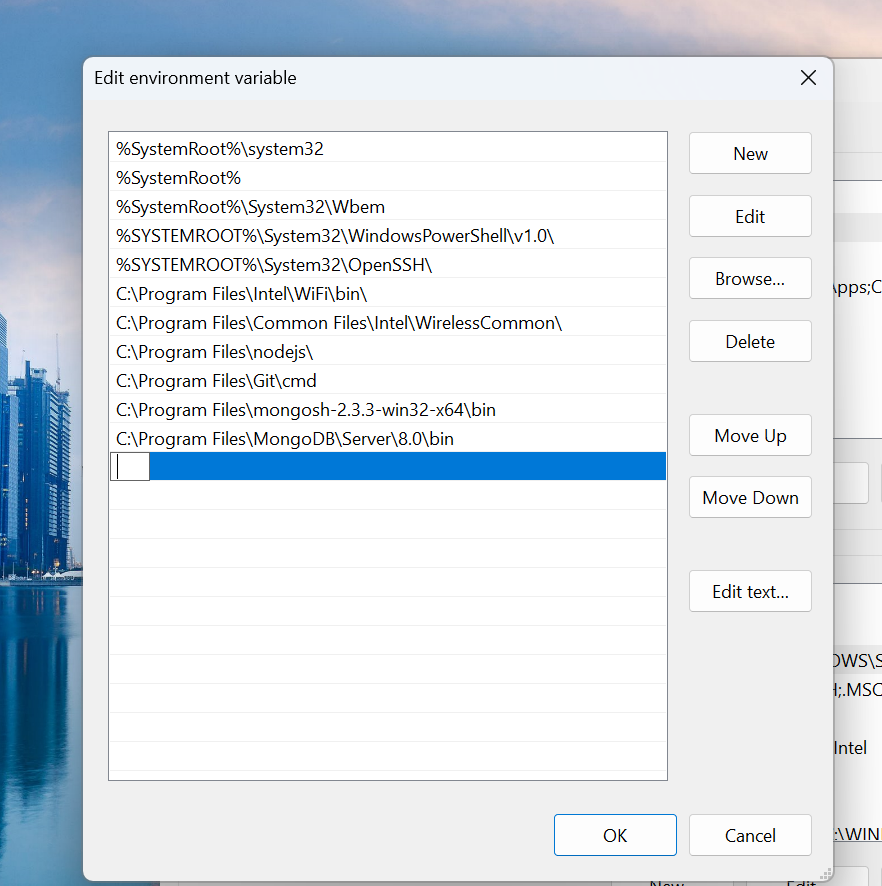
Click "OK"
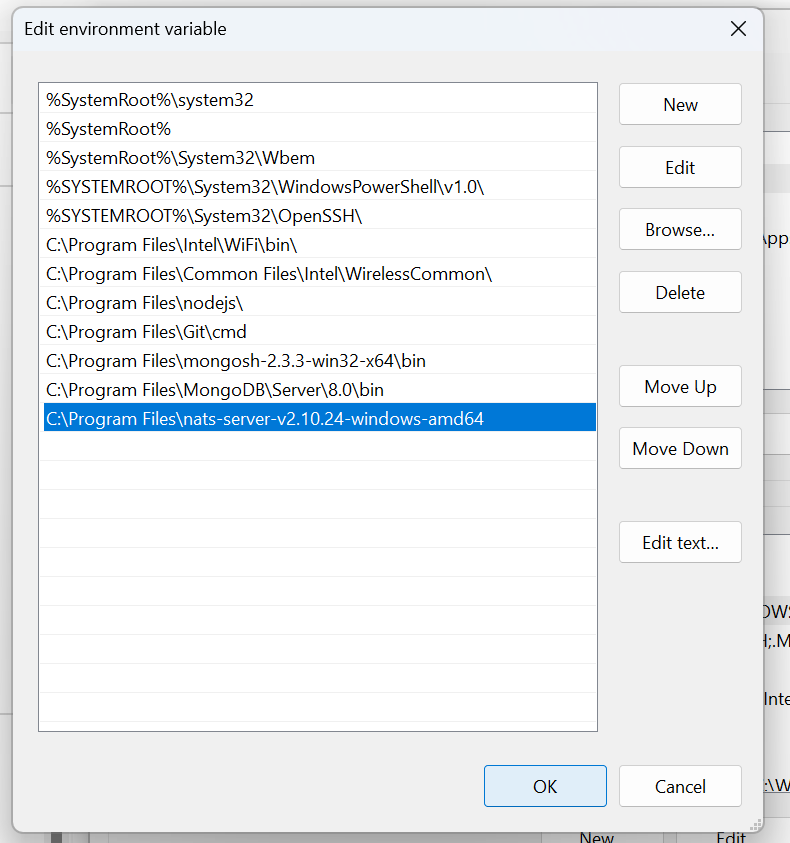
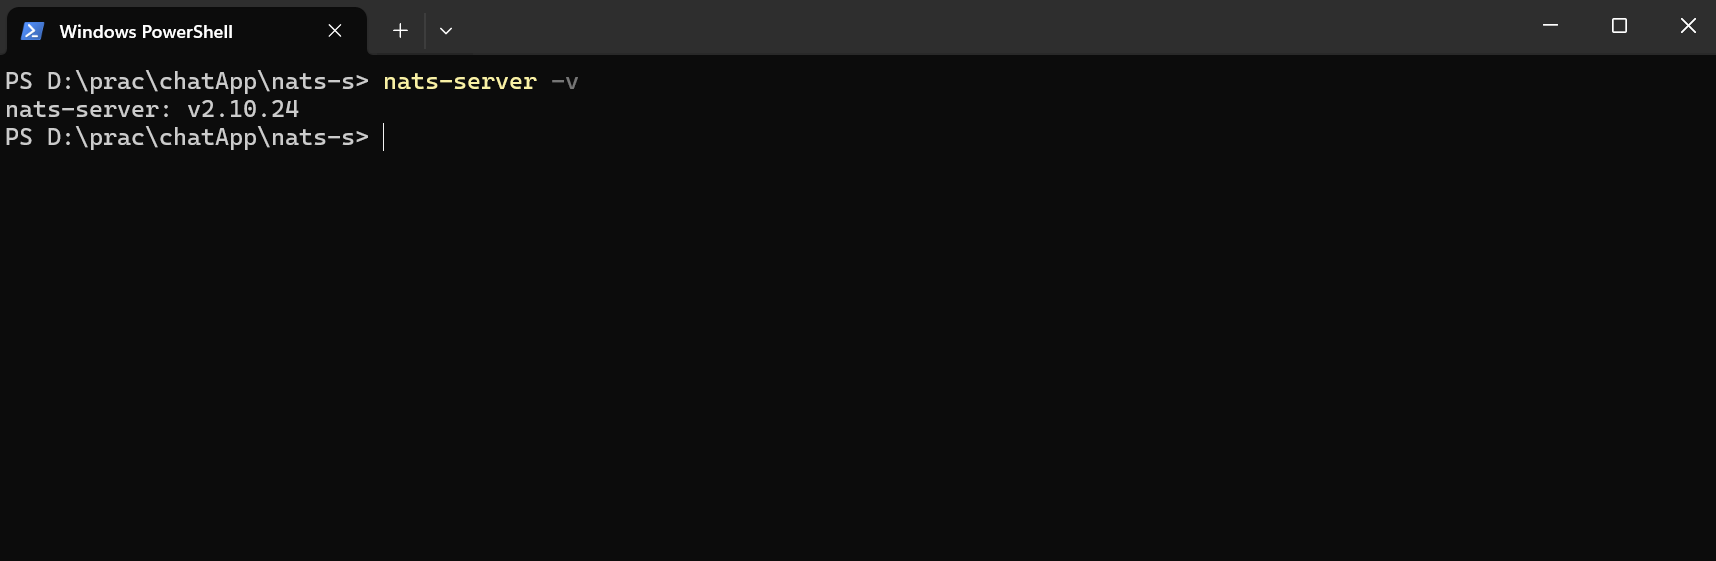
To verify, open Command Prompt (cmd) and type:
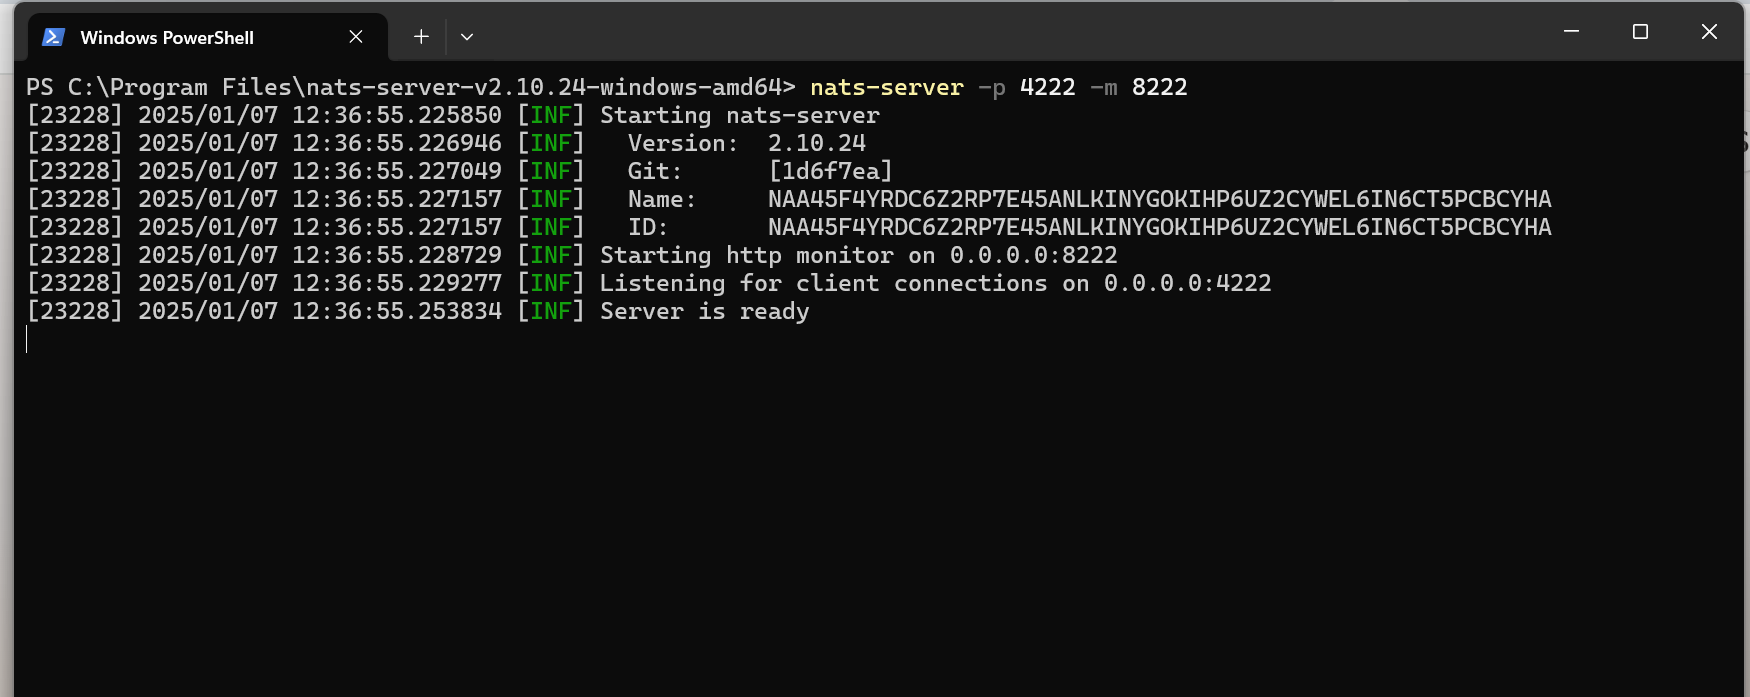
Run the NATS Server
- Navigate to the NATS Server Directory :
- Open a terminal (Command Prompt, PowerShell, or terminal application).
- Navigate to the directory where you extracted the NATS server.
- Start the NATS Server :
nats-server -p 4222 -m 8222
- -p 4222 : Sets the port for client connections.
- -m 8222 : Sets the port for the monitoring endpoint.
Order Service (Publisher)
About :
- Publishes messages about new orders to the NATS server.
- Subject: order_updates.
- We will create a simple NATS Publisher using Node.js that connects to the server, publishes a message to the specified subject, and ensures all messages are processed before closing the connection.
- Initialize the Node.js Project :
mkdir nats-publisher // make a directory(folder) named "nats-publisher"
cd nats-publisher // change the current working directory to "nats-publisher"
npm init -y // initial the project with default values
Install Dependencies :
npm install natsCreate a file publisher.js :
const { connect } = require('nats'); // import nats npm package
(async () => {
try {
// Connect to the NATS server
const nc = await connect({ servers: ['nats://localhost:4222'] });
console.log('Publisher connected to NATS');
// Function => publish a new order message
const publishOrder = (order) => {
    // nc.publish method to send a message to the specified subject
    nc.publish('order_updates', JSON.stringify(order));
    console.log('Order published:', order);
};

// Order need to be published
const newOrder = { id: 1, item: 'Laptop', quantity: 1 };
publishOrder(newOrder);

// Close the connection when done
await nc.flush();   // ensures that all published messages have been processed
await nc.close();   // closes the connection to the NATS server
}
catch (err) {
console.error('Error:', err);
}
})(); // it starts an asynchronous IIFE (Immediately Invoked Function Expression)
Inventory Service (Subscriber)
About :
- Subscribes to order_updates subject.
- Receives new order messages and processes them (e.g., updating inventory, notifying other services).
- We will create a simple NATS Subscriber using Node.js that connects to the server, subscribes to the specified subject, and processes incoming messages.
Initialize the Node.js Project :
mkdir nats-subscriber // make a directory(folder) named "nats-subscriber"
cd nats-subscriber // change the current working directory to "nats-subscriber"
npm init -y // initial the project with default values
Install Dependencies :
npm install natsCreate a file subscriber.js :
const { connect } = require('nats'); // import nats npm package
(async () => {
try {
// Connect to the NATS server
const nc = await connect({ servers: ['nats://localhost:4222'] });
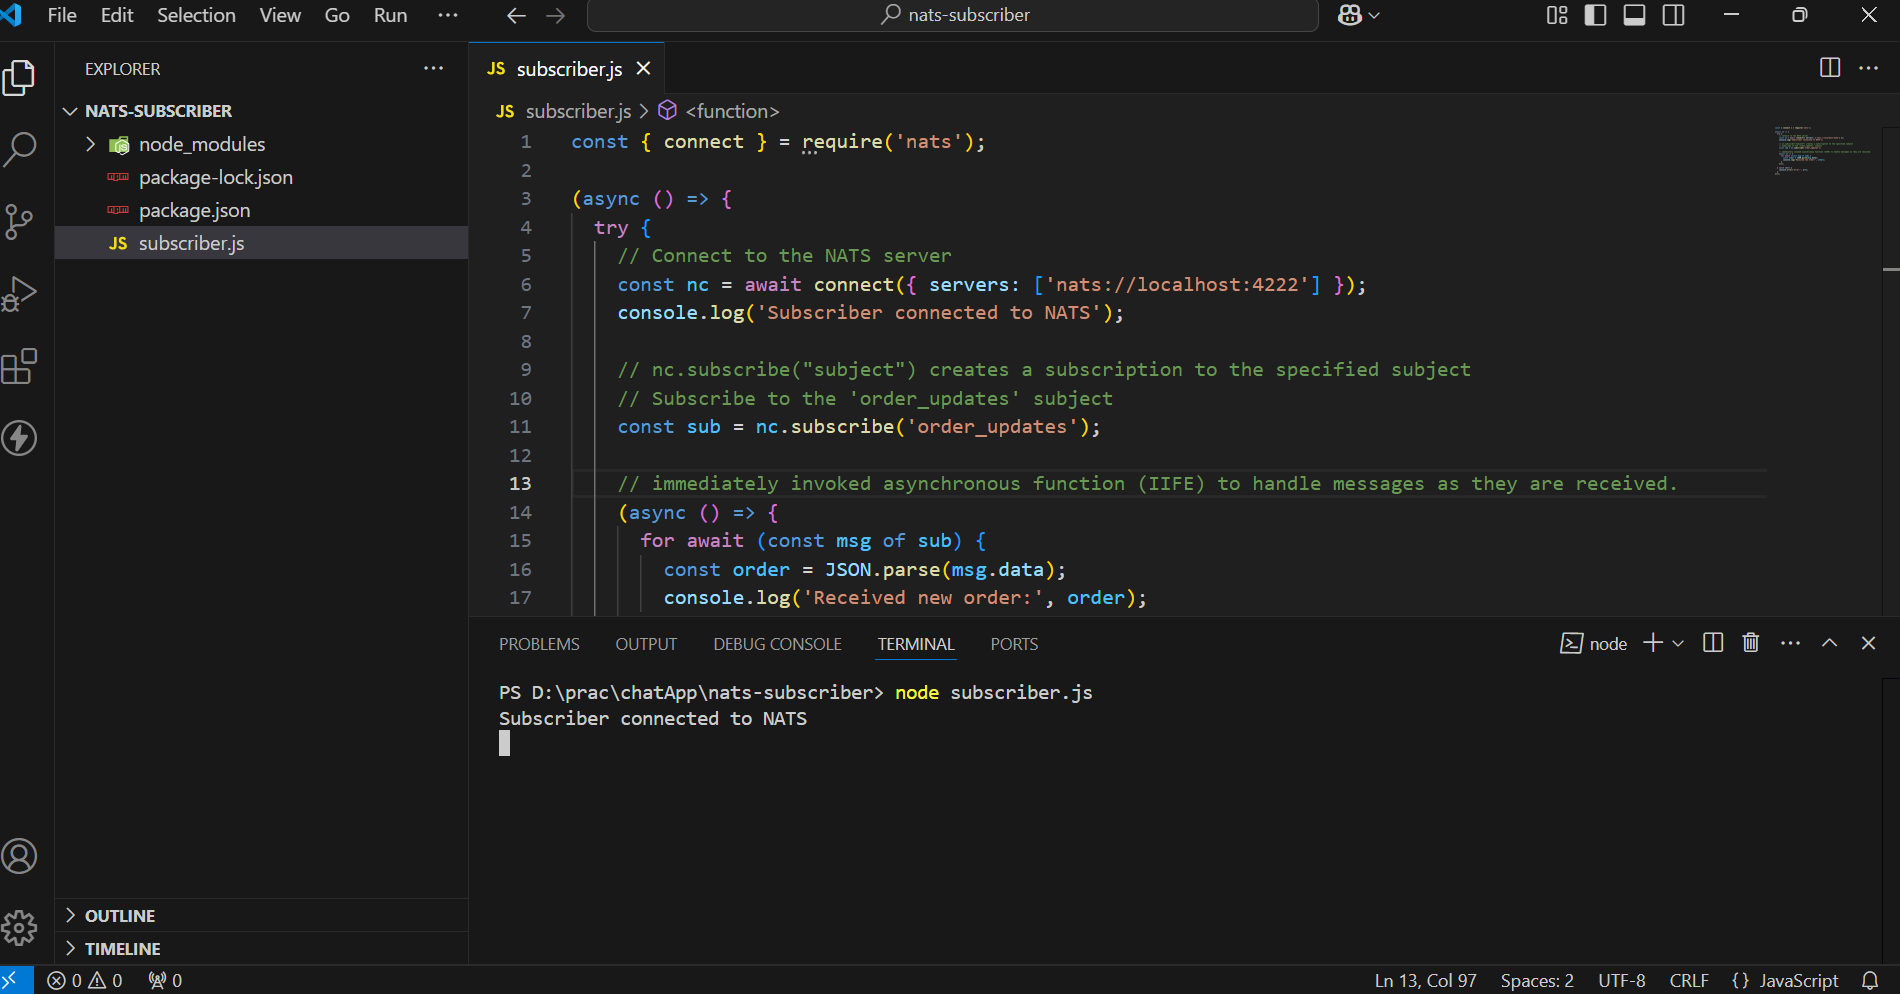
console.log('Subscriber connected to NATS');
// nc.subscribe("subject") creates a subscription to the specified subject
// Subscribe to the 'order_updates' subject
const sub = nc.subscribe('order_updates');

// IIFE to handle messages as they are received.
(async () => {
for await (const msg of sub) {
    const order = JSON.parse(msg.data);
    console.log('Received new order:', order);
}
})();
} catch (err) {
console.error('Error:', err);
}
})();
Run the Services
- Start the NATS Subscriber Service :
Start the NATS Publisher Service :
node publisher.js

Received Message of Order at Subscriber :

Testing and Debugging
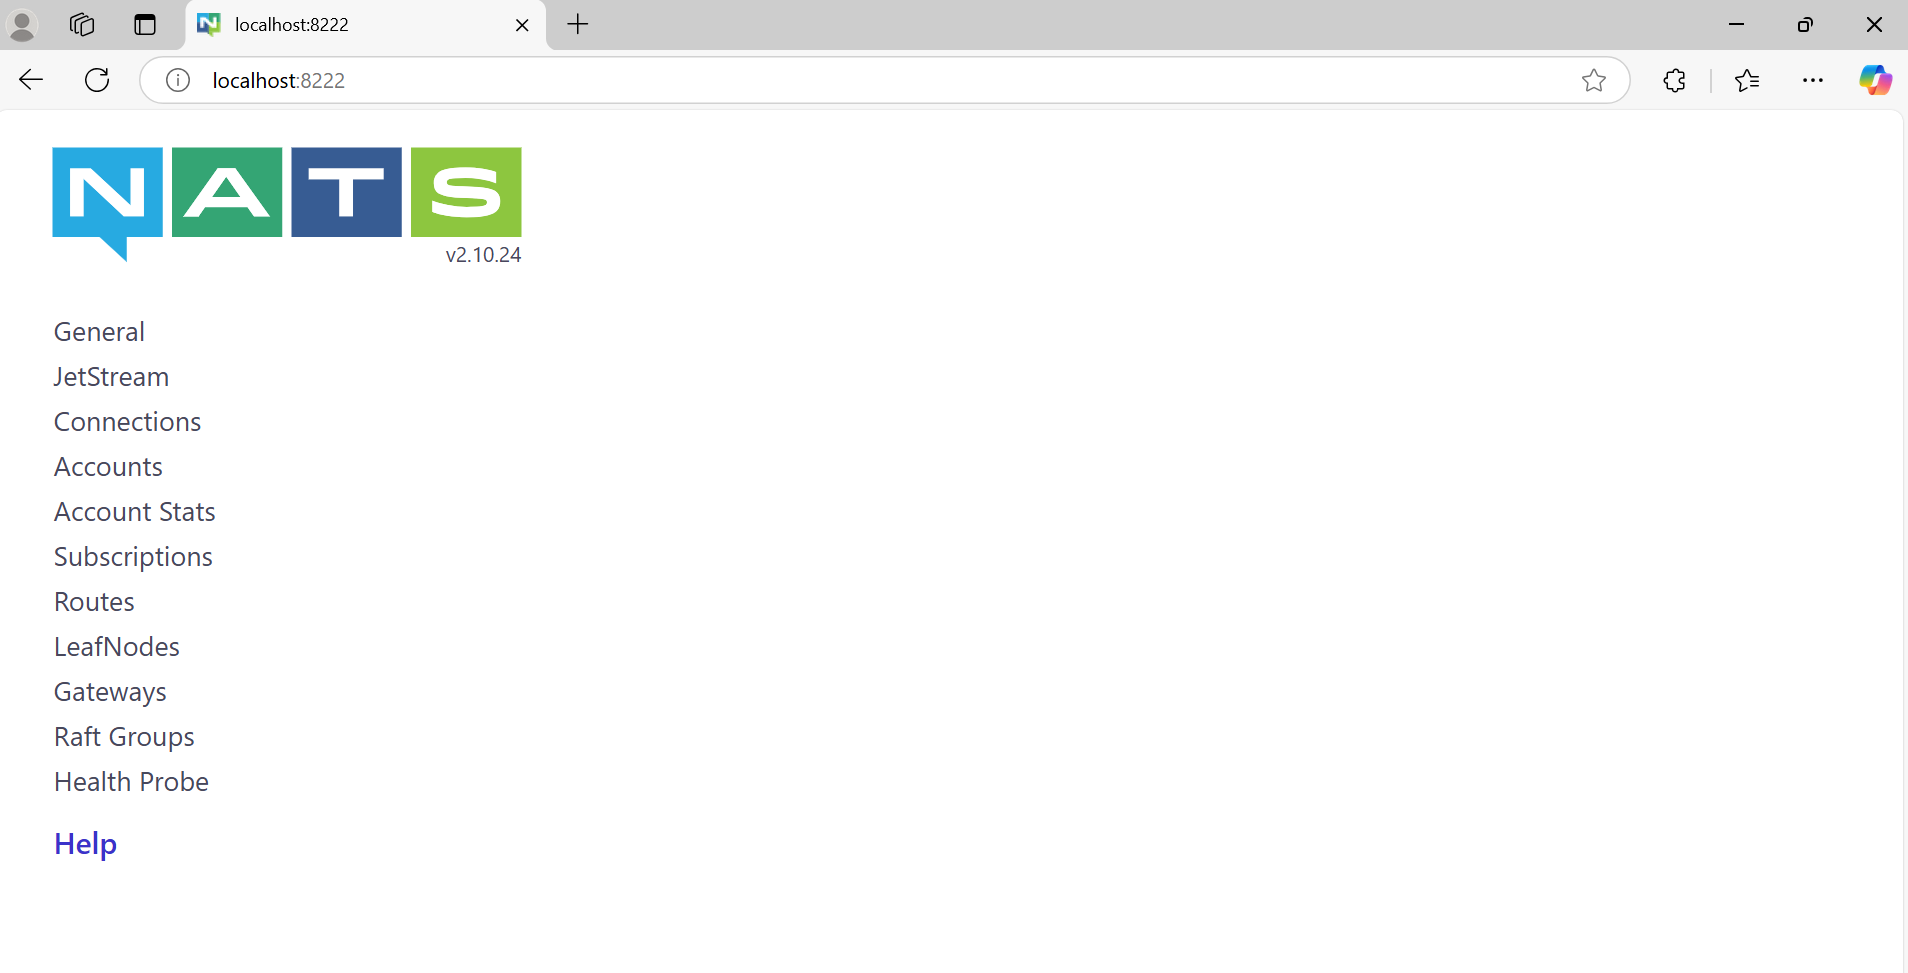
Verify the NATS Server :
- Once the server is running, the output in the terminal indicates that the server is up and running.
We can access the NATS server dashboard using our web browser at the following URL:
http://localhost:8222
- Simple Try-Catch for Async Functions : Wrap asynchronous code inside a try-catch block to handle any unexpected errors.
- Return Meaningful Error Messages : If there’s an error, provide a user-friendly message without exposing sensitive information.
Conclusion
The NATS socket architecture is designed for:
- Speed : Lightweight protocol and non-blocking I/O.
- Scalability : Efficient multiplexing of connections.
- Reliability : Fault-tolerant with reconnection support.
NATS provides several key advantages that make it an ideal choice for microservices communication. Its low latency and high throughput ensure fast and efficient message delivery. The system's scalability and fault tolerance make it robust and capable of handling growing demands and unexpected failures. Additionally, NATS's simplicity reduces the complexity of managing inter-service communication, making it a developer-friendly solution for modern distributed systems.
References and Resources
Links
FAQs (Frequently Asked Questions)
Can NATS support WebSocket-based communication?
Yes, NATS supports WebSocket connections for browser-based clients, enabling real-time communication over HTTP-friendly protocols.
How does NATS handle message routing for multiple subscribers?
The server maintains a subject-to-subscriber map, ensuring messages are routed only to relevant subscribers.
What happens if a client disconnects unexpectedly from the NATS server?
The server detects the disconnection, closes the socket, and cleans up resources. The client library automatically attempts to reconnect.
]]>
Google OAuth Integration is a powerful feature that enables users to authenticate their identity using their Google account. Secure Authentication Workflows ensure that user identities are verified through reliable and safe processes, minimizing the risk of unauthorized access. This process, commonly used in web applications, allows users to log in without needing to remember additional usernames or passwords. It relies on the OAuth 2.0 protocol, an industry-standard for secure authorization. As part of this, a Beginner's Guide to OAuth provides a simple introduction to how OAuth 2.0 enables secure, token-based authentication for third-party applications.
OAuth Implementation Best Practices ensure that OAuth is integrated securely, including practices such as using secure redirect URIs, validating tokens, and following least privilege access principles to protect user data.
Why Use Google OAuth?
- Users can log in with Google, avoiding the need for new credentials.
- OAuth uses secure tokens, avoiding password storage and reducing data breach risks.
- Users trust Google for a reliable login process.
- Google accounts simplify password resets, recovery, and verification.
- OAuth speeds up onboarding by skipping registration forms.
- Users can log in across devices without separate credentials.
How Google OAuth Works?
- User Interaction: The user clicks "Login Using Google Account" and authenticates on Google's page.
- Authorization: Google requests permission to share specific user data.
- Token Exchange: An authorization code or token is sent to the application.
- Data Fetching: The app uses the token to retrieve user data securely.
- Authentication Completion: The app verifies data, updates the database, and starts a user session.
Prerequisites
- Node.js Basics - Basic understanding of Node.js and its asynchronous programming model.
- Express.js Fundamentals - Familiarity with creating servers and managing routes using Express.js.
- Working with MongoDB - Knowledge of MongoDB and connecting to it with Mongoose.
- HTML and EJS - Ability to create and render HTML templates using EJS.
- Authentication Concepts - Understanding of user authentication and session management.
Role of Passport in Google OAuth Integration
Passport.js Integration simplifies the process of implementing OAuth in Node.js applications. By using Passport.js(a popular Node.js middleware), developers can integrate Google OAuth seamlessly, handling the authentication flow and managing user sessions with minimal effort. With Passport, you don’t need to handle the complex details of the OAuth protocol.
Google Strategy:
- Passport provides a passport-google-oauth20 strategy specifically for integrating Google OAuth 2.0.
- This strategy helps the application interact with Google's authentication API.
Session Handling:
- Passport handles user sessions automatically, making it easier to manage logged-in states.
Modular Design:
- Passport’s modular design allows developers to use only the strategies they need, such as Google, Facebook, or local authentication.
Integration:
- The passport.use() method registers the Google OAuth strategy.
- passport.serializeUser() and passport.deserializeUser() are used to manage user data in sessions effectively.
Steps for Google OAuth Integration
We will use Node.js and the Google API to enable secure user authentication and data access through Google OAuth.
Folder Structure :

Step 1: Set up a basic Node.js App
npm init -y
Now, create an app.js file for the Node.js backend server.
// File: /app.js
const express=require("express")
const app=express()
const PORT=3030
// Express.js Middleware
app.use(express.json())
app.listen(PORT,(err)=>{
if(err){
console.log(err)
}
else{
console.log(Listening on PORT: ${PORT})
}
})
Step 2: Install the required dependencies
- Passport → Middleware for handling authentication in Node.js and Express applications.
- Passport-google-oauth20 → A Passport strategy that enables authentication via Google, allowing users to log in using their Google account.
- Connect-Mongo→ enables MongoDB Session Storage by storing session data in a MongoDB database when used with express-session in a Node.js application. This ensures session persistence across server restarts, providing better scalability and durability than in-memory storage.
npm i express mongoose ejs bcrypt dotenv express-session passport passport-google-oauth20 connect-mongo
Step 3: Create a .env file and add the MongoDB URL and Secret Key to it.
- The .env file is used to store sensitive information.
- Now, we save the MongoDB URL of the MongoDB Atlas and the Secret Key for the session.
MONGO_URL=""
SECRET_KEY=""
Step 4: Set up a Google Developer Console Project
- Visit the Google Developer Console.
- Create a new project or select an existing one.

3. Enable the Google+ API or Google Identity Platform for your project.

4. Set up OAuth 2.0 credentials:


5. Go to the Credentials tab. Click on Create Credentials → OAuth 2.0 Client IDs.

6. Click on Application type and choose Web application.

7. Set the Authorized redirect URIs (OAuth Redirect URIs) (e.g., http://localhost:3030/login/google and http://localhost:3000/login/auth/google/callback for local development).

8. Note down the Client ID and Client Secret. These will be used in the OAuth flow.

9. To use these credentials, save them in a .env file.
GOOGLE_CLIENT_ID=""
GOOGLE_CLIENT_SECRET=""
Step 5: Connect the MongoDB database using mongoose in app.js
// File: /app.js
const express = require("express")
const mongoose = require('mongoose');
const app = express()
const dotEnv = require("dotenv") // import dotenv npm package
const PORT = 3030
dotEnv.config() // configuring dotenv
//Express.js Middleware
app.use(express.json())
//Express.js Middleware
app.use(express.urlencoded({ extended: true }))
mongoose.connect(process.env.MONGO_URL) // fetching MONGO_URL from .env file
.then(() => {
console.log('database Connected!')
app.listen(PORT, (err) => {
if (err) {
console.log(err)
}
else {
console.log(Listening on PORT ${PORT})
}
})
}).catch((err) => console.log(err));
Step 6: Set up the View engine as ejs to get HTML for the Login and Profile Page
// File: /app.js
app.set('view engine', 'ejs');
Step 7: Create login.ejs and profile.ejs files for the login and profile page, respectively.
- login.ejs
// File: views/login.ejs
<!DOCTYPE html>
<html lang="en">
<head>
<meta charset="UTF-8" />
<meta name="viewport" content="width=device-width, initial-scale=1.0" /><title>Document</title></head>
<body>
<h1>Login Page</h1>
<div>
<a href="proxy.php?url=/login/google">
<button>Login Using Google</button>
</a>
</div>
</body>
</html>
- profile.ejs
// File: views/profile.ejs
<!DOCTYPE html>
<html lang="en">
<head>
<meta charset="UTF-8">
<meta name="viewport" content="width=device-width, initial-scale=1.0">
<title>Document</title>
</head>
<body>
<h1>Welcome <%= username %> to the Profile Page</h1>
<a href="proxy.php?url=/logout">
<button >LOGOUT</button>
</a>
</body>
</html>
Step 8: Configure sessions using express-session and connect-mongo for User Session Management
// File: /app.js
const session = require("express-session") // importing express-session
const MongoStore=require("connect-mongo") // importing the connect-mongo
// configuring the session
app.use(session({
secret: process.env.SECRET_KEY, // Secret key for session encryption
resave: false, // Prevent session resaving if unmodified
saveUninitialized: true, // Save sessions even if uninitialized
store: MongoStore.create({ mongoUrl: process.env.MONGO_URL }) // Store sessions in MongoDB
}))
Step 9: Define Routes
Root Route:
Redirect the root path (/) to the login page.
// File: /app.js
app.get("/", (req, res) => {return res.redirect("/login");});
Login and Profile Routes:
Use separate route handlers for /login and /profile.
// File: /app.js
const profileHandler = require("./routes/profile");
const loginHandler = require("./routes/login");
app.use("/login", loginHandler);
app.use("/profile", profileHandler);
Step 10: Create a user model
The User model defines the structure of the user data in the database.
// File: /models/user.js
const mongoose=require("mongoose")
const userSchema=new mongoose.Schema({
googleId:{type:String},
googleAccessToken:{type:String},
username: {type:String}
})
module.exports=mongoose.model("user", userSchema)
- GoogleId: This field stores the unique Google ID of the user, which is used for identifying the user after they authenticate via Google OAuth.
- GoogleAccessToken: This field stores the access token received after a user logs in through Google. The access token is used to make authorized requests to Google services on behalf of the user.
- Username: This field stores the username of the user. It will be extracted from the user's Google profile after authentication.
Step 11: Steps to Configure Google OAuth with Passport.js
a. Import modules and configure environment variables.
- Create a file *passport.js* in *auth* folder
- Import required modules
- Configure the dotenv package to load environment variables
b. Define the Google OAuth 2.0 strategy, authenticate users, and handle user creation.
- Define the Google OAuth 2.0 Strategy by providing:
- clientID and clientSecret from environment variables.
- callbackURL: Redirect URI after successful login.
- scope: Permissions requested (e.g., access to profile and email).
- Implement the callback function to handle user authentication.
c. Serialize user information to store in the session.
- Define how user data is saved in the session:
- Save only the user ID to reduce session size.
d. Deserialize user information to retrieve from the session.
- Define how user data is retrieved from the session:
- Fetch the full user details from the database using the user ID.
e. Export the configured Passport for use in the application.
module.exports=passport
f. Integrate passport.js into an Express application, enabling it to handle user authentication and manage sessions effectively.
// File : /app.js
app.use(passport.initialize()); //middleware initializes passport.js in the app
app.use(passport.session()); //middleware enables session-based authentication in the app
// add the above lines below the session configured
CODE:
// File : /auth/passport.js
const passport = require("passport")
const User = require("../models/user")
const dotEnv = require("dotenv")
dotEnv.config()
var GoogleStrategy = require('passport-google-oauth20').Strategy;
passport.use(new GoogleStrategy({
clientID: process.env.GOOGLE_CLIENT_ID,
clientSecret: process.env.GOOGLE_CLIENT_SECRET,
callbackURL: "http://localhost:3030/login/auth/google/callback",
scope: ['profile', 'email']
},
async function (accessToken, refreshToken, profile, cb) {
try {
let user = await User.findOne({
googleId: profile.id
})
if (user) return cb(null, user)
user = await User.create({
googleAccessToken: accessToken,
googleId: profile.id,
username:profile.displayName,
})
cb(null, user)
} catch (err) {
cb(err, false)
}
}
));
// serializing
passport.serializeUser(function (user, done) {
done(null, user.id);
});
// deserializing
passport.deserializeUser(async function (id, done) {
try {
let user = await User.findById(id)
done(null, user)
} catch (err) {
done(err, null);
}
});
module.exports = passport
Step 12: Implementing Login Routes with Google OAuth
Import Required Modules
- *express*: Used to create the router.
- *passport*: Custom Passport instance for handling authentication.
- *loginHandler*: Controller to handle login-related logic.
Define the Root Login Route
- GET / :
- Uses *loginHandler.getLogin* to serve the login page.
Add Google OAuth Login Route
- GET /google :
- Initiates authentication with Google using the Google OAuth strategy.
- Requests access to the user's profile.
Handle Google OAuth Callback
- GET /auth/google/callback :
- Handles the callback from Google after user authentication.
- Redirects to /profile on success or /login on failure.
Export the Router
- Export the configured router so it can be used in the main app.
CODE:
- Controller
// File /controllers/login.js
const path=require("path")
const filepath=path.join(__dirname,"../views/login.ejs")
module.exports.getLogin=(req,res)=>{
if(req.user){
return res.redirect("/profile") // Redirect to profile if user is already logged in
}
res.render(filepath); // Render the login page if user is not logged in
}
3. Routes
// File : /routes/login.js
const express = require("express")
const router = express.Router()
const myPassport = require("../auth/passport");
const loginHandler=require("../controllers/login")
router.get("/",loginHandler.getLogin)
router.get('/google',
myPassport.authenticate('google', { scope: ['profile'] }));
router.get('/auth/google/callback',
myPassport.authenticate('google', { failureRedirect: '/login' }),
function(req, res) {
// Successful authentication, redirect home.
res.redirect('/profile');
});
module.exports = router
Step 13: Setting Up Profile Routes in Express.js for User Management
Import Required Modules
- *express*: The Express.js library is used to create a router instance.
- *profileHandler*: The controller that contains the logic for handling profile-related operations.
Define the Profile Route
- GET /:
- Maps the root profile route (/profile) to the getProfile method in the profileHandler controller.
- This method is responsible for retrieving and rendering the user's profile page.
Export the Router
- Export the configured router so it can be used in the main app.
CODE:
Controller
- getProfile controller function handles rendering the user's profile page.
- Authenticated User: If req.user exists, the profile.ejs page is rendered with the username displayed.
- Unauthenticated User: If req.user does not exist, the user is redirected to the login page (/login).
// File /controllers/profile.js
const path=require("path")
const filepath2=path.join(__dirname,"../views/profile.ejs")
module.exports.getProfile=(req,res)=>{
console.log(req.user)
if(!req.user){
return res.redirect("/login")
}
res.render(filepath2,{username:req.user.username});
}
Routes
// File : /routes/profile.js
const express=require("express")
const router=express.Router()
const profileHandler=require("../controllers/profile")
router.get("/", profileHandler.getProfile)
module.exports=router
Step 14: Define the logout Route
We define /logout route in app.js
- A user accesses the /logout route.
- The req.logout method terminates the user session.
- If no errors occur, the user is redirected to the /login page.
- If an error occurs during the logout process, it is passed to the next middleware for proper error handling.
// File: /app.js
app.get("/logout", (req, res, next) => {
req.logout(function(err) {
if (err) {
return next(err); // Pass the error to the error-handling middleware
}
res.redirect('/login');
});
});
Step 15: Testing and Debugging
- Check if Environment Variables are Loaded: First, ensure that dotenv is properly loading your environment variables. You can print the values of critical environment variables to confirm they are available.
// File : /app.js
if (!process.env.SECRET_KEY || !process.env.MONGO_URL) {
console.error("Error: Missing essential environment variables.");
process.exit(1); // Exit the application if environment variables are missing
}
else {
console.log("Environment variables are loaded correctly.");
}
2. Handling 404 Errors (Page Not Found): For routes that don’t exist, send a 404 response to indicate the resource isn’t found.
// File : /app.js
// Handling 404 Errors (Page Not Found)
app.use((req, res, next) => {
res.status(404).json({ error: 'Page not found' });
});
5. Basic Error-Handling Middleware: Set up a basic error-handling middleware that catches all errors and sends a response to the user.
// File : /app.js
// General error handling middleware
app.use((err, req, res, next) => {
console.error(err) // Optionally log the error for debugging
res.status(500).json({ error: 'Something went wrong!' })
})
6. Simple Try-Catch for Async Functions: Wrap asynchronous code inside a try-catch block to handle any unexpected errors.
7. Return Meaningful Error Messages: If there’s an error, provide a user-friendly message without exposing sensitive information.
Implementation (refer to GitHub Repo)
Additional Tips
- Use a Secure Callback URL: Always use HTTPS for your redirect URLs to ensure secure data transfer during the OAuth process.
- Limit Permissions : Request only the necessary permissions (scopes) you need from the user to avoid asking for more data than needed.
- Store Tokens Safely: Store OAuth tokens securely in the backend or use secure storage mechanisms to avoid exposing them to unauthorized access.
- Handle Errors Gracefully: Display user-friendly messages in case of errors, such as invalid tokens or permissions, so users understand what went wrong.
- Auto-Login with Refresh Tokens: Use refresh tokens to automatically log users back in without requiring them to authenticate again every time their access token expires.
- Test OAuth Flow: Regularly test the OAuth login flow to ensure it's working correctly and smoothly for users.
Conclusion
Google OAuth allows users to authenticate and log into applications using their Google account, leveraging the OAuth 2.0 protocol. The process involves obtaining credentials from the Google Developer Console, setting up OAuth consent screens, and configuring redirect URIs. It ensures secure access by granting tokens instead of direct user credentials. Implementing Google OAuth typically involves using Passport.js with the passport-google-oauth20 strategy, allowing seamless login and profile retrieval. This method improves security and user experience by managing authentication without storing sensitive credentials.
References and Resources
Links
- Introduction to OAuth 2.0
- Setting up OAuth 2.0
- passport.js official documentation
- Passport strategy for Google OAuth 2.0
- NodeJS Official Documentation
- Express Documentation
- EJS Documentation
- Mongoose Official Documentation
- Express-Session npm package documentation
- Connect-Mongo npm package documentation
FAQs (Frequently Asked Questions)
- What permissions (scopes) should I request from users?
Request only the necessary permissions that your app needs. For example, if you need access to the user's basic profile, request the profile and email scopes. - What is the difference between access tokens and refresh tokens?
Access tokens are short-lived tokens used to authenticate API requests, while refresh tokens are long-lived and can be used to get new access tokens when the old ones expire. - Can I use Google OAuth without a Google Developer Console account?
No, you must have a Google Developer Console account to register your application and obtain the required OAuth credentials. - How do I handle expired tokens?
You can refresh expired access tokens using the refresh token to continue the user's session without requiring them to log in again. - What security measures should I take when implementing OAuth?
Use HTTPS for all API calls and redirect URLs, store tokens securely, and limit the scopes to the minimum required by your app. - How can I debug issues with OAuth integration?
Check for correct redirect URIs, ensure proper scopes are set, review error messages from Google, and use browser developer tools to inspect network requests.
In today’s fast-changing tech world, being just a coder is no longer enough. Companies want more. They want developers who can build powerful, scalable web applications and understand how to work with the latest AI tools. If you’re a student preparing for placements, learning web development along with AI skills can give you a huge advantage.
At Coding Blocks, we designed our Web Development course to teach you the core frontend and backend skills, while also blending in AI technologies that are shaping the future of software. This combination helps you become more job-ready and opens up more doors in placement drives.
Let me explain why this blend matters, how our course prepares you, and how it has helped students land great jobs.
Why web development is still king but needs an AI twist
Web development has been the foundation of many software careers for years. Whether you want to work at a startup, product company, or service-based firm, the ability to build websites, web apps, and APIs is in high demand. Every business today needs a digital presence, which means more jobs for web developers.
But technology keeps evolving. AI is becoming part of almost every software product. From chatbots to recommendation engines, AI integration is becoming a must-have skill.
Imagine you know React, Node.js, and databases well, but you can also build a chatbot powered by AI or integrate an AI model to enhance user experience. That’s exactly the kind of developer companies want in 2025 and beyond.
Coding Blocks web development course is more than just Coding
Our Web Development course at Coding Blocks was created with this future in mind. It doesn’t just teach you the basics of HTML, CSS, JavaScript, or backend frameworks. It goes much further.
You’ll learn core full-stack skills, from responsive design and frontend frameworks like React to backend APIs and databases such as Node.js and MongoDB.
Every module includes hands-on projects, so you don’t just learn, you build. These projects become part of your portfolio, something recruiters love to see.
We also introduce you to popular AI tools and platforms like Hugging Face, Ollama, and vector databases like ChromaDB. You’ll learn how to combine AI with web apps to create smart features.
Plus, the course includes mock interviews, resume reviews, coding challenges, and system design basics, all tailored to what recruiters look for.
And of course, expert mentors guide you every step of the way, clearing your doubts and keeping your learning on track.
This combination ensures that by the time you finish, you’re not just a coder but a confident developer ready for modern tech roles.
Placement Drives at Coding Blocks connect you to your Dream Job
Skills alone don’t guarantee a job. Getting that first interview and cracking it is where many students struggle. That’s why Coding Blocks organizes regular placement drives, connecting you directly with companies looking to hire fresh talent.
Our placement drives benefit from a trusted recruiter network that includes startups and established companies that know the quality of Coding Blocks students.
We train you specifically for the interviews you will face coding rounds, technical discussions, and even behavioral interviews.
Real interview simulations help you practice under pressure and improve your performance.
Many students have landed jobs at Google, Tata 1mg, and other top companies through these drives.
By blending web development skills with AI knowledge, you become a strong candidate who can solve real problems, which is exactly what recruiters want.
How AI skills make your Web Development profile stand out
AI is not just hype. It is a powerful tool, and companies want developers who can integrate AI to build smarter products. Here’s how AI boosts your profile:
You can add chatbots, voice assistants, personalized recommendations, or image recognition to your web apps.
AI helps analyze user behavior and improve UI/UX dynamically.
It automates repetitive tasks on the backend or frontend, saving time and resources.
Most importantly, AI skills future-proof your career and prepare you for roles where AI and software development intersect.
Our course teaches you practical AI tools like Hugging Face for NLP models, Ollama to run models locally, and ChromaDB, a vector database used for semantic search and retrieval-augmented generation apps.
You’ll learn to build full-stack apps that use these AI technologies — a rare and valuable skill.
Real Student Stories Show the Way
Take Riya Garg, one of our students who started with no prior coding experience. Through our Web Development course and AI modules, she built impressive projects. She participated in placement drives, cleared tough interviews, and landed a software engineering internship at Google.
Gurditt Singh Khurana is another example. He used the mock interview prep and AI project knowledge to secure a role at Tata 1mg.
These stories prove that the right skills combined with the right placement support make all the difference.
Your Roadmap to Success
If you want to crack your placement and build a career in web development with AI skills, here’s a simple plan:
- Enroll in the Coding Blocks Web Development course and start learning from basics to advanced topics.
- Build projects as you go - these will help you practice and impress recruiters.
- Don’t skip the AI modules - they make your profile stand out from the crowd.
- Practice coding interviews using the challenges and mock interviews provided.
- Actively participate in placement drives and show your best skills.
- Keep learning. The tech world moves fast. Keep updating your skills even after the course.
Don’t Wait Start Your Future Today
Opportunities like this don’t come every day. The job market is competitive, and students who learn the right skills early get hired faster. Coding Blocks offers a clear path, mentorship, and placement support to help you succeed.
If you’re serious about your tech career, start your journey with the Web Development course today. Blend in AI skills and be ready to take on the world.
Because the future belongs to those who prepare for it now.
]]>In every hiring drive we’ve conducted at Coding Blocks over the past year, a quiet pattern has started to emerge.
It’s not just the students who solved the most problems.
It’s not just those with the
In every hiring drive we’ve conducted at Coding Blocks over the past year, a quiet pattern has started to emerge.
It’s not just the students who solved the most problems.
It’s not just those with the highest grades.
It’s the ones who built something with GenAI and could explain it clearly who were hired first.
They weren’t AI experts. Most didn’t have a background in machine learning.
But they learned how to work with the right tools.
They used GenAI to build smart, usable projects.
And when recruiters asked about them, their answers stood out.
So why is GenAI making such a big difference? And how can you start, even if you’re not from an AI background?
Let’s break it down.
Resume That Stood Out
In one of our placement drives earlier this year, a final-year student submitted a project called JobSage.
It wasn’t a complicated deep learning model. It was a simple web app.
You uploaded your resume. You pasted a job description.
The app gave you a score, highlighted mismatches, and suggested edits using a local LLM running on Ollama.
The recruiter paused.
“You built this yourself?”
“Yes,” the student said. “It uses semantic search with ChromaDB and a basic prompt pipeline. It helped me apply to fewer companies but get more callbacks.”
He got the offer.
That’s what GenAI does today. It doesn’t replace your learning. It helps you build things that solve real problems faster, better, and more visibly.
From Hype to Hiring
We all hear the buzzwords — ChatGPT, LLMs, vector databases.
But the real shift is happening in interviews and hiring discussions.
Recruiters are asking:
- Have you explored AI in your projects?
- Can you use GenAI tools to improve development speed?
- Do you know how to build systems that can reason, search, and respond?
In our Coding Blocks hiring drive, students who said “yes” to those questions often made it straight to the final round.
Not because they had years of AI experience. But because they showed the curiosity to learn and apply something new and Gen AI is very new.
It’s not a bonus skill anymore.
It’s becoming a core part of how modern engineers work.
What Tools Are Students Using?
Let’s keep this simple.
You don’t need to master AI from scratch. You just need to know how to use the tools that already work.
Here are some of the tools our students used during recent placement drives:
1. Ollama
Ollama lets you run models like Llama and Mistral locally on your machine.
Students used it to build AI chatbots, code reviewers, and personal productivity apps. No internet APIs. No privacy concerns. Just offline intelligence.
2. ChromaDB
Chroma is a vector database that lets you store and search embeddings. One student built a “smart notes search” tool that could find relevant content from handwritten PDFs. When she explained the architecture in her interview document embeddings + metadata tags, it made an immediate impression.
3. LangChain
LangChain helps you build logic around prompts.
It’s like writing code that thinks.
A student created a personal career guide using LangChain and a set of pre-fed documents, including company JD PDFs and role descriptions.
4. Whisper by OpenAI
Used for speech-to-text, Whisper helped a student build a voice-controlled coding assistant.
It was just a small tool, but it demonstrated their ability to think beyond the keyboard — something product companies love to see.
How GenAI Changes the Way You Learn
The students who succeed with GenAI don’t just add a feature.
They change how they approach building and learning.
Instead of following tutorials line by line, they:
- Ask clearer questions
- Explore faster iterations
- Use AI to prototype ideas before building. ding
- Focus more on why something works, not just how
One student built four different app versions in three weeks because he used AI tools to test design ideas and fix bugs.
Another rewrote their resume four times using a GenAI prompt pipeline — and ended up with a version that landed interviews.
In short, GenAI makes you faster, sharper, and more prepared for real-world work.
Why Companies Are Paying Attention
From startups to large firms, hiring managers are noticing a shift.
They’re no longer just looking for Java or Python expertise.
They’re looking for candidates who:
- Show systems thinking
- Use modern tools effectively.
- Can collaborate with AI, not just humans
When you show up with a portfolio that includes AI-driven projects and you can explain your thought process, you signal that you’re ready for the next generation of software development.
That’s what happened in our Coding Blocks placement rounds.
Several offers were extended simply because students showed working demos of GenAI tools solving real problems, even if those tools were basic.
One student built a campus helpdesk chatbot powered by Ollama and served it on a local network. Simple idea, but powerful execution.
And it worked.
How You Can Start - Even Today
You don’t need to wait for the perfect course or mentorship.
You can start learning GenAI right now, with what’s already available.
Here’s a simple roadmap to get you going:
Week 1: Understand the Basics
- What is an LLM?
- What is a vector database?
- How do prompts work?
Week 2: Pick One Tool and Build
- Try Ollama for local chatbot building.
- Use ChromaDB for semantic search.
- Use Whisper for voice transcription.
Week 3: Add a Real Problem
- Turn your resume into a smart analyzer.
- Build a coding assistant.
- Create a study planner chatbot.
Week 4: Document and Share
- Post your project on GitHub.
- Write about your process.
- Prepare to explain it interview
That’s all it takes to get started. You don’t need a PhD. You need curiosity, consistency, and the willingness to build.
What We’re Doing at Coding Blocks
To support this shift, we’ve made Gen AI a core part of our Fast Track programs and placement prep bootcamps.
During recent hiring drives, we guided students on how to:
- Present GenAI projects confidently
- Integrate AI with full-stack applications.
- Break down complex concepts for the recruiter's.
We’re not here to hype AI.
We’re here to help students use it practically, responsibly, and effectively, so that when they step into interviews, they’re not just ready, they’re ahead.
Final Thought
The future is not about competing with AI.
It’s about knowing how to build with it.
Students who learn GenAI today are doing more than getting jobs faster.
They’re building the foundations of a new kind of software career, one that’s shaped by intelligence, intention, and insight.
And companies are hiring them because of it.If you’re a student, the message is clear:
You don’t need to wait for the future.
It’s already here. And GenAI is how you enter i,t not just as a user, but as a builder.
In a world where most students prepare for years to get a tech job, some manage to do it in just three months.
This is not a shortcut. It’s not luck either. It’s the result of a shift in how
]]>
In a world where most students prepare for years to get a tech job, some manage to do it in just three months.
This is not a shortcut. It’s not luck either. It’s the result of a shift in how students are learning, building, and preparing for the future of work.
At Coding Blocks, we’ve seen this change up close. Over the past year, during our hiring drives and placement programs, students have landed jobs at companies like PayU, Just Charge, and Policy Bazaar. And many of them had one thing in common, they mastered system design and used AI tools the right way.
Here’s what we’ve learned from their journey and how you can follow the same path.
The Old Way Is Broken
For years, the formula was clear: learn data structures, solve hundreds of coding questions, build some projects, and hope for the best.
But companies today are no longer hiring based on just coding skills.
They’re looking for problem solvers. Engineers who understand how real systems work. People who can design scalable backends, think through edge cases, and communicate their thought process.
This is where most students struggle. They’re good at solving isolated problems but fall short when asked to build a real system or explain how a product like WhatsApp or Swiggy might work behind the scenes.
System Design Is No Longer Optional
Earlier, system design was something you learned after getting a job. Now, companies ask system design questions even during internship interviews.
Why?
Because today’s products are complex. Even small teams are building apps that serve thousands of users. Understanding system design has become essential, not just for seniors, but for anyone who wants to build or work on scalable applications.
During our placement drives at Coding Blocks, we noticed a pattern: the students who cracked top offers could confidently walk through their system architecture, even for small projects.
One of our students, who secured an internship at a fintech firm, explained his URL shortener design during a technical round, not just with diagrams, but with working code and optimization logic.
AI Is Not a Shortcut. It’s a Tool
Alongside system design, another change has quietly entered the picture, AI tools like ChatGPT, Copilot, Ollama, and LangChain.
These tools aren’t replacing learning. But they are changing how we learn.
Students are now using ChatGPT to brainstorm interview answers, test architectural ideas, and debug code. They are building AI-powered resume analyzers and full-stack apps with real-world functionality.
One student created a job description parser that matches resumes with ideal company roles, using just a weekend, a Node.js backend, and a basic AI integration. During the Coding Blocks placement drive, that project helped him stand out among hundreds of applicants.
This is the new developer mindset: learn the basics, build real projects, and use tools that help you move faster.
The 3-Month Roadmap That Worked
Most of the students who succeeded in a short time followed a focused, disciplined roadmap. Here’s a simplified version of what worked for them:
Month 1: Foundations and Thinking in Systems
- Learn HTTP, REST APIs, and basic backend development
- Design and build a small system (e.g., a URL shortener)
- Practice breaking down a product into parts, clients, APIs, and databases.
Goal: Understand how small systems are built and what makes them scalable
Month 2: Full-Stack Projects + AI Integration
- Build a complete app with frontend, backend, and database.
- Add an AI feature using a public API or a local model.
- Write technical documentation and learn to explain your design choices.
Goal: Build one solid project that reflects your thinking, not just your coding
Month 3: Mock Interviews + Placement Prep
- Practice system design questions from past interviews
- Do mock interviews with peers or mentors
- Prepare GitHub, resume, and LinkedIn with the project write-up
Goal: Sound confident and clear when explaining your work in real interviews
The Role of Placement Drives
At Coding Blocks, we run regular placement drives and hiring events that connect students directly with startups and mid-sized companies looking for fresh tech talent.
In our most recent drive, over 500 students registered, and dozens received interview calls based on the strength of their portfolios.
But what separated the selected candidates wasn’t just their CGPA or problem-solving scores, it was their ability to explain systems, show working code, and demonstrate AI fluency.
They weren’t just job seekers. They were builders.
One student even got an offer after walking the recruiter through the architecture of his own “Interview Insights Tracker”, a dashboard that logged company rounds, resume outcomes, and keyword matching. It used nothing fancy, just a spreadsheet, a simple backend, and a local AI model. But it showed initiative and system-level thinking.
What Companies Are Looking For
Here’s what we learned by talking to hiring partners in our drives:
- They don’t expect you to know everything.
- They want to see how you break down a problem.
- They value clarity in communication and structured thinking.
- And increasingly, they appreciate students who have explored AI projects in a meaningful way.
So if you’re applying for an SDE-1 role or internship, your ability to talk through an architecture diagram matters as much as your ability to reverse a linked list.
What You Can Start Today
If you’re serious about preparing for your next tech interview, or just want to be job-ready in 3 months, here are a few practical steps to begin:
- Pick a real-world project and build it from scratch
- Draw a system diagram of it and write a short explanation.
- Integrate an AI tool, even if it’s basic.c
- Write about your process on GitHub, LinkedInned.In
- Join a mock interview group or take part in a placement drive.
You don’t need to wait for perfect conditions. You just need to start.
A Final Word
There’s a growing gap between what colleges teach and what companies need.
But there’s also a growing opportunity for those who are willing to learn smartly, practice deeply, and show their work.
System design and AI tools are not buzzwords. They’re the building blocks of the modern software engineer. And when used together, they give students a real advantage, one that can fast-track their career, sometimes in just three months.
At Coding Blocks, we’ve seen this firsthand.
And we’ll continue to help students build, learn, and get placed, not through guesswork, but through a structured roadmap that reflects what the industry now values most.
Interested in becoming job-ready in 3 months?]]>
Explore the next Coding Blocks Hiring Drive, or apply for our Fast Track Placement Program that blends system design, real-world AI tools, and interview practice all in one place. Because your career doesn’t have to wait. And neither should your learning.
The technology industry has always evolved rapidly, but the pace at which it’s changing today is unprecedented. Just a few years ago, mastering the basics of HTML, CSS, JavaScript, and some backend language was enough to get your foot in the door of most
]]>
The technology industry has always evolved rapidly, but the pace at which it’s changing today is unprecedented. Just a few years ago, mastering the basics of HTML, CSS, JavaScript, and some backend language was enough to get your foot in the door of most tech companies.
Fast forward to 2025, and things have shifted dramatically. Companies now expect developers to be comfortable with new paradigms, especially Artificial Intelligence and, more specifically, Generative AI (GenAI).
GenAI refers to AI systems capable of creating content, from writing code and producing images to generating entire text passages. These capabilities are reshaping software development, product design, and user experience across all sectors.
What does this mean for students and freshers? It means you have to think beyond traditional coding. You need to learn how to work with AI tools and integrate them into your applications. This new skill set is becoming essential to stand out in the job market.
Why Gen AI Skills Are In-Demand Now
If you haven’t started exploring Gen AI yet, here’s the wake-up call: companies are aggressively seeking developers who can combine coding skills with AI knowledge. This isn’t just a nice-to-have, it’s quickly becoming a core hiring criterion.
Why is that?
- Automation & Efficiency: GenAI can automate repetitive programming tasks, code debugging, and documentation, making developers more productive.
- Innovative Products: AI-driven features like chatbots, personalized recommendations, and semantic search are standard expectations for modern apps.
- Data-Driven Insights: Gen AI tools can extract insights and generate reports, supporting smarter business decisions.
- Future-Proof Skills: As AI continues to integrate with software development, knowing Gen AI positions you well for growth in your career.
Here’s the thing, if you don’t learn these skills now, you risk falling behind.
The job market isn’t waiting, and neither are your peers. If you want your resume to pop and your interview to shine, understanding Gen AI is your shortcut to being the candidate companies can’t ignore.
How Coding Blocks Integrated Gen AI Into Its Curriculum
Recognizing this massive shift, Coding Blocks took a bold step: we didn’t just sprinkle AI lectures here and there. We rebuilt our curriculum to deeply integrate Gen AI concepts throughout the web development track.
Our Web Development with Gen AI course covers everything from foundational AI concepts to hands-on project building:
- Foundations: Understand how transformer models like GPT, diffusion models, and attention mechanisms work under the hood.
- Tools & Platforms: Learn to use powerful AI frameworks such as Hugging Face and Ollama.
- Databases for AI: Work with vector databases like ChromaDB to enable semantic search and intelligent retrieval.
- Project-Based Learning: Build real-world applications — AI chatbots, semantic search engines, content generators, and AI-powered developer tools.
- Full-Stack Integration: Combine your AI knowledge with frontend frameworks like React and backend technologies to build complete, deployable products.
- Ethics & Best Practices: Learn how to use AI responsibly and optimize models for better performance.
This approach isn’t just about knowledge, it’s about making you job-ready.
Because employers want to see real projects that solve real problems, not just theoretical understanding. And Coding Blocks students graduate with exactly that.
Let’s be honest:
Most courses out there still focus on basic web development or AI theory. But here? You’re getting the full picture, modern tools, real projects, and mentorship to ensure you don’t just learn, you build a portfolio recruiters love.
If you’re serious about your career, waiting any longer means missing out on the next wave of tech hiring.
Tools and Platforms
To truly master Generative AI, it’s not enough to just understand the theory, you need hands-on experience with the industry-standard tools and platforms that power real-world AI applications. At Coding Blocks, our curriculum is carefully designed to give students practical exposure to these tools so they graduate ready to build and innovate.
Here’s a closer look at the essential tools and platforms you will learn to use, along with their role in the AI ecosystem:
Language Models & APIs
- Open AI GPT (ChatGPT, GPT-4, GPT-3.5)
Industry-leading large language models for text generation, conversation, code writing. - Anthropic Claude
Safety-focused LLMs for ethical AI applications. - Cohere
Offers APIs for large language models with NLP focus. - Google PaLM API
Google’s powerful language model APIs for text and code. - Mistral AI
Open-source and commercial large language models.
Model Hosting & Management Platforms
- Hugging Face Hub
Repository for thousands of pre-trained models; supports deployment and collaboration. - Ollama
Local LLM runner for offline and privacy-conscious AI app development. - Weights & Biases
Toolset for tracking, visualizing, and managing ML experiments.
Vector Databases & Semantic Search
- ChromaDB
Open-source vector DB optimized for AI semantic search. - Pinecone
Fully managed vector database for similarity search and recommendations. - Weaviate
Modular, open-source vector search engine with ML integrations.
AI Frameworks & Libraries
- TensorFlow
Google’s open-source framework for building/training deep learning models. - PyTorch
Flexible DL framework favored for research and development. - JAX
Accelerated numerical computing framework popular for ML research. - Transformers (by Hugging Face)
Library for loading and fine-tuning transformer models.
Prompt Engineering & Workflow Tools
- LangChain
Framework for building complex LLM-based applications with chaining and memory. - PromptLayer
Version control and analytics platform for prompt engineering.
Multimodal AI & Vision Tools
- Stable Diffusion
Popular open-source text-to-image diffusion model. - DALL·E 2
OpenAI’s AI system for generating images from text prompts. - Midjourney
AI art generation platform focused on creative imagery.
Speech & Audio AI
- OpenAI Whisper
Speech-to-text automatic transcription models. - AssemblyAI
Speech recognition and audio intelligence APIs.
Deployment & Low-Code Platforms
- Streamlit
Rapid prototyping tool to create interactive AI web apps. - Gradio
Build simple web UIs for ML models with minimal code. - Replicate
Run and share machine learning models with a simple API. - AWS Bedrock
Fully managed service for building AI applications with foundation models.
Data Annotation & Dataset Tools
- Labelbox
Data labeling platform for supervised AI training. - SuperAnnotate
Annotation tool for images, videos, and LiDAR data.
Specialized AI Services
- DeepL Translator
AI-based language translation with high accuracy. - RunwayML
Creative suite for AI video editing and generation.
Why Mastering These Tools Is Key
Understanding and gaining hands-on experience with these tools enables you to:
- Build production-quality AI apps
- Handle data and AI workflows end-to-end
- Create multimodal applications combining text, image, and speech
- Scale AI applications in cloud or on-prem environments
- Stay ahead in the competitive AI job market
Projects That Impress
4. Real Projects That Help Students Shine
At Coding Blocks, projects are the heart of learning. Here are some standout examples from our GenAI course:
AI Chatbots for Customer Support: Students create bots that can understand and answer user queries instantly, integrating GPT APIs with React frontends.
Semantic Search Engines: Using vector embeddings, these projects enable search that understands the meaning behind words, not just keyword matches.
Content Generation Tools: Automate blog drafts, social media posts, or product descriptions — demonstrating practical marketing applications.
AI Code Assistants: Developer tools that suggest or generate code snippets, increasing productivity.
Personalized Recommendation Systems: Projects that analyze user behavior and suggest courses, products, or content dynamically.
These projects serve two purposes:
They deepen your understanding of GenAI and create a portfolio that screams ‘hire me’.
Stories of Success: Students Who Got Hired Fast
Nothing speaks louder than real results. Here’s how some of our students leveraged GenAI skills to get hired quickly:
- Ankit Sharma: Built a semantic search app during the course and landed an SDE internship at PayU within three months.
- Riya Garg: Developed an AI chatbot for a startup’s customer support, secured an internship, and converted it into a full-time job.
- Gurditt Singh Khurana: Showcased GPT-powered React projects and successfully cleared interviews at PolicyBazaar and Engaze.
What these stories have in common is more than just hard work — it’s strategic skill-building focused on the latest AI-powered tech trends.
Quick Reality Check:
In today’s hiring landscape, projects like these aren’t just nice to have — they’re often the deciding factor between you and other candidates with similar academic backgrounds.
What Makes GenAI Skills a Game Changer in Placements
Let’s break down why GenAI skills accelerate your placement success:
- Stronger Resumes: AI projects immediately catch recruiter attention.
- Higher Interview Scores: Demonstrating AI knowledge shows adaptability and forward-thinking.
- More Interview Calls: Recruiters often prioritize candidates with AI-relevant portfolios.
- Faster Offers: Interviews tend to be smoother and quicker when you bring cutting-edge skills to the table.
Simply put, GenAI skills turn your placement process from a long wait into a fast track.
How You Can Start Learning GenAI with Coding Blocks
Ready to get started? Here’s the step-by-step:
- Enroll in the Web Development with GenAI course — where you’ll get in-depth training and build projects that matter.
- Access expert mentorship to guide you through challenges and prepare you for interviews.
- Build your own AI-powered portfolio that stands out.
- Join Coding Blocks’ exclusive placement drives, where companies actively seek AI-capable developers.
Your Dream Career Awaits
The tech industry is moving fast, and Gen AI is at its forefront.
If you hesitate now, you risk missing the best opportunities.
Your future self will thank you for starting today.
👉 Explore the Web Development with GenAI course and unlock your potential.
Final Thought
Gen AI isn’t just a trend, it’s a fundamental shift in how software is developed and deployed. Coding Blocks equips you not only with the knowledge but with the hands-on experience and placement support needed to succeed in this new era.
Make the smart move. Get future-ready. Build with AI. And watch your career take off.
]]>
Master version control the easy way with GitHub Desktop | Coding Blocks
Imagine this: You’ve just written some killer code for your college project, or maybe you’re building your first full-stack app. But suddenly, something breaks. You try to undo
]]>Master version control the easy way with GitHub Desktop | Coding Blocks

Imagine this: You’ve just written some killer code for your college project, or maybe you’re building your first full-stack app. But suddenly, something breaks. You try to undo your changes… and now your entire project is gone. Sounds familiar?
That’s exactly why developers use Git, a version control system that tracks every change made to your code, lets you roll back to earlier versions, collaborate with others, and keep everything organized. And while Git is incredibly powerful, it can feel intimidating, especially if you’re not comfortable with the command line.
Enter GitHub Desktop, a beginner-friendly, graphical interface that removes the fear of version control. With a simple UI and seamless GitHub integration, it allows you to create repositories, push code, handle branches, and collaborate with others without writing a single terminal command.
At Coding Blocks, we believe every developer, beginner or expert, should be fluent in version control. Whether you’re aiming for top internships, freelance work, or industry placements, Git is a must-have skill in your toolkit.
This guide walks you through 5 essential steps to get started with Git and GitHub Desktop, with practical actions, real context, and future-ready workflows.
Step 1: Create Your Repository Locally and on GitHub
Every Git journey starts with a repository. A repository is like a digital folder where all your project files, changes, and version history are stored. You can create one locally on your system, and then publish it on GitHub so it’s backed up online and ready for collaboration.
Open GitHub Desktop and click on File > Add Local Repository. Choose the folder where your project lives, maybe it’s your first JavaScript project, a C++ DSA template, or a React app, and click Add Repository.
Next, it’s time to go live. Click the Publish repository button. You’ll be prompted to name your repository (choose something descriptive), add a brief description (like “My portfolio site” or “DSA template”), and set visibility to public or private depending on your need.
Start by creating a project folder on your machine. Open GitHub Desktop and follow these steps:
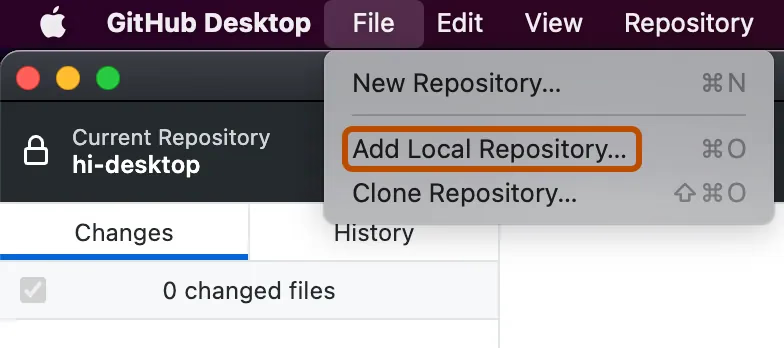
- Add Local Repository:
Go toFile > Add Local Repository, select your project folder, and click Add Repository. - Publish to GitHub:
Click the Publish repository button, set your repository name and description, choose whether it’s public or private, and hit Publish.

If you’re part of a GitHub organization (like a Coding Blocks classroom), you can choose where to host it. Otherwise, it’ll be under your personal account.
Once published, you have a two-way bridge between your local machine and GitHub’s cloud servers. You’ve officially versioned your project.
Step 2: Push Local Changes to GitHub
You’ve created your repository. Now comes the part you’ll repeat often, making changes, saving them, and pushing them to GitHub.
As you build your project, GitHub Desktop constantly monitors your changes, whether you’re adding new files, updating scripts, or tweaking HTML and CSS.
Whenever you're ready to save progress:
Stage Changes: GitHub Desktop automatically stages modified files. You can select/deselect them if neede

2. Commit Changes: Write a clear message like “Added login feature” or “Fixed navbar bug”, this makes tracking your progress easier. Then click Commit to main.
3. Push Changes: After committing, click Push origin to upload your changes to GitHub. This syncs your local repo with the online one.
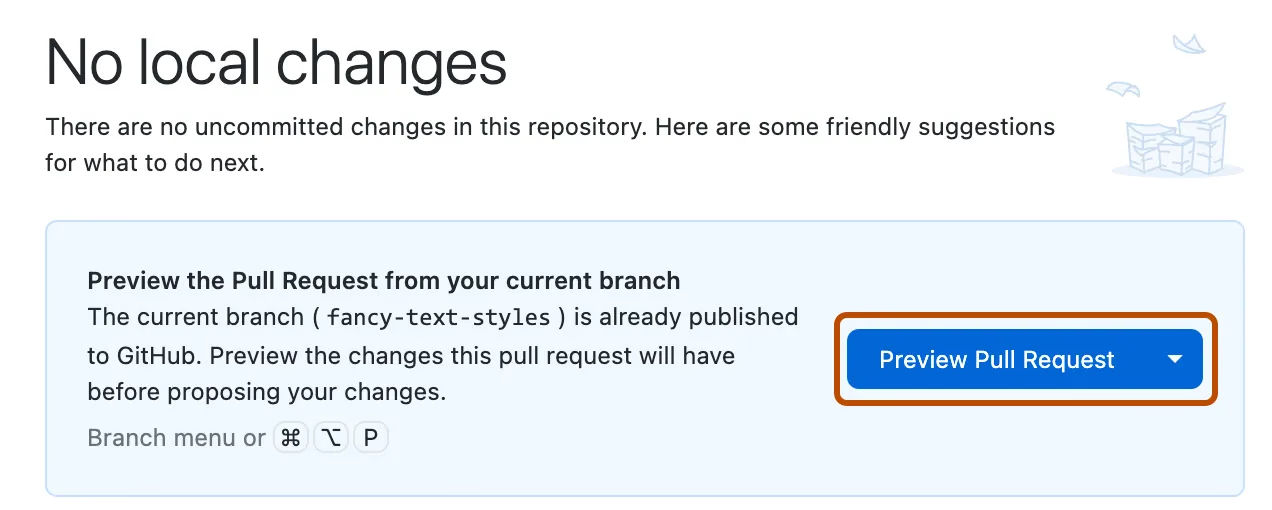
This system ensures every meaningful change is saved and traceable. If something breaks, you can always roll back.
And if your team members are working on the same project, they can see your commits in real time, pull the updates, and stay aligned.
Step 3: Clone and Pull Repositories
Sometimes you won’t start a project from scratch. Maybe you’re joining a team, contributing to open-source, or trying out a project someone shared. That’s where cloning comes in.
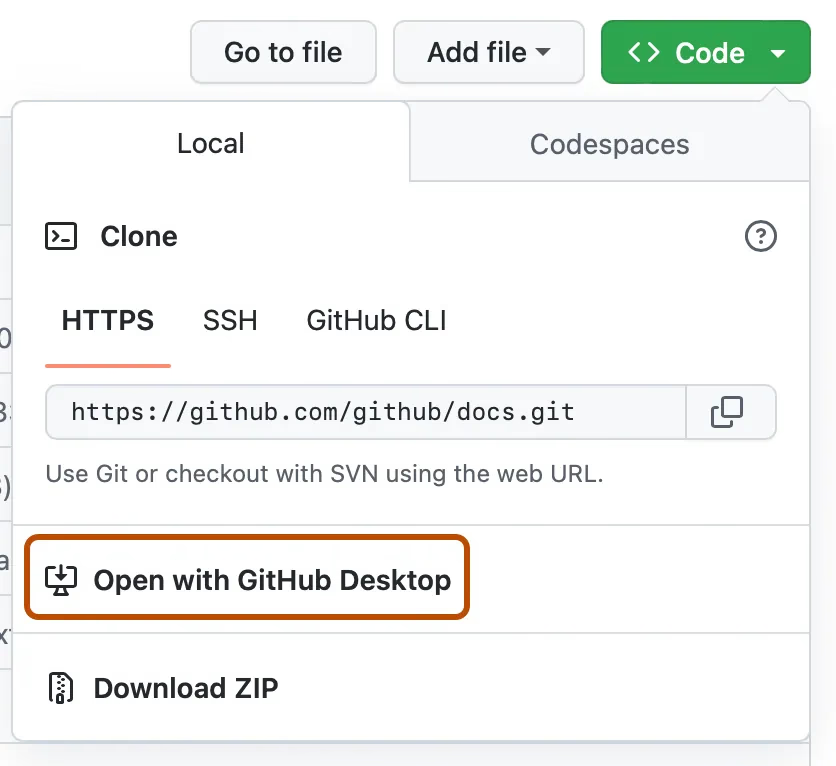
To clone a repo:
- Visit the GitHub repository page.
- Click Code > Open with GitHub Desktop.
- Select a local folder to save it, done.
You now have a full copy of that project, complete with its version history, on your computer.
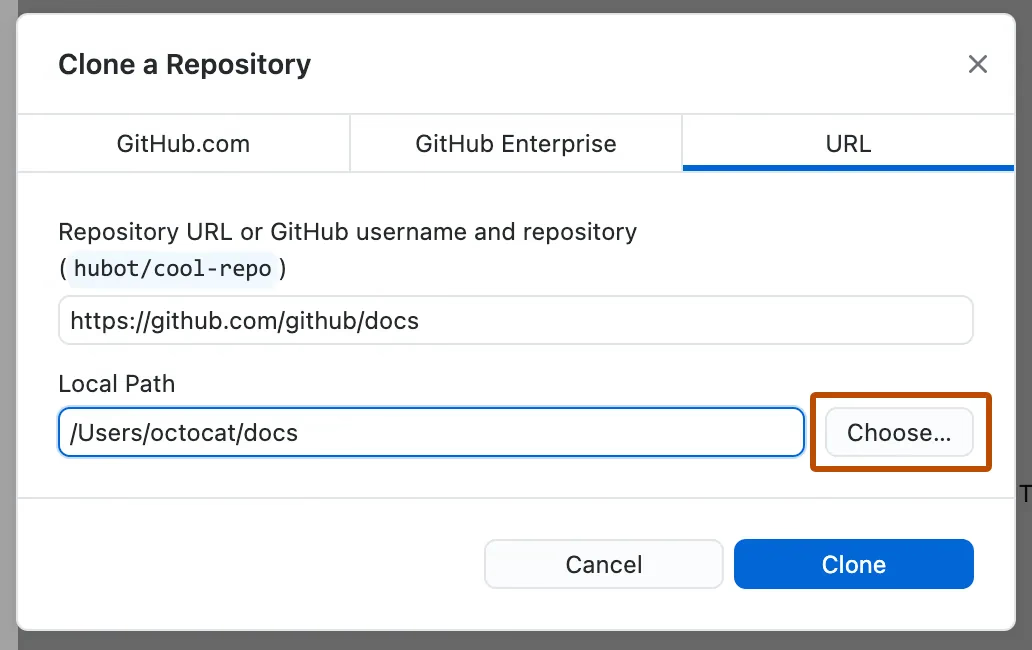
But cloning is just the beginning. Repos evolve, new features are added, bugs are fixed, and you’ll need to stay updated. That’s where pulling comes in.
Whenever someone else makes changes to the remote repo, you can click Fetch origin in GitHub Desktop. This brings in their latest changes without overwriting your own.
And if there are updates, clicking Pull origin merges those updates into your local version.
💡 Pro Tip: Always pull the latest code before starting your own changes. This prevents conflicts and ensures you’re working on the most recent version.
This pull/clone mechanism is crucial for teamwork and for syncing with public repositories like those in Coding Blocks' GitHub classroom exercises or open-source programs.
Step 4: Branching, Pull Requests & Merging
Collaboration is the heart of modern development, and Git branches make it possible.
A branch lets you create a separate workspace within your project, perfect for adding new features, fixing bugs, or experimenting safely. Your main branch remains untouched while you work.
In GitHub Desktop:
- Click Current Branch > New Branch and give it a name like
feature/contact-formorfix/navbar-bug. - Work freely in this branch, commit and push changes as usual.
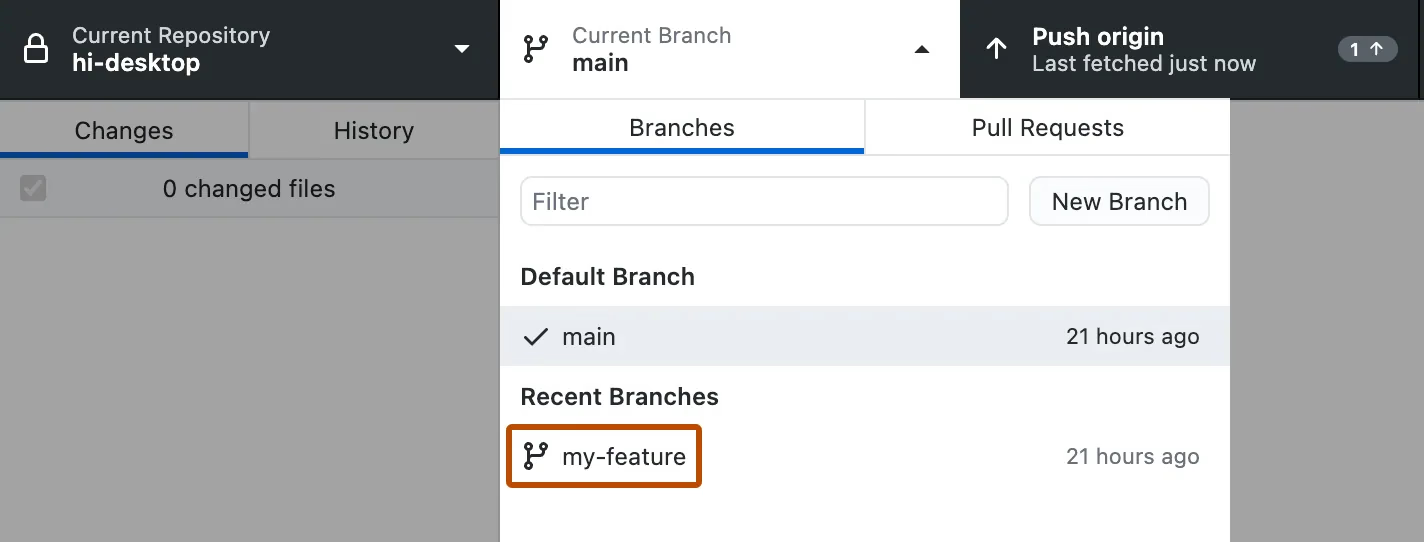
Once done, it’s time to bring your work back to the main project via a pull request (PR). This is Git’s official way to propose, review, and merge changes.
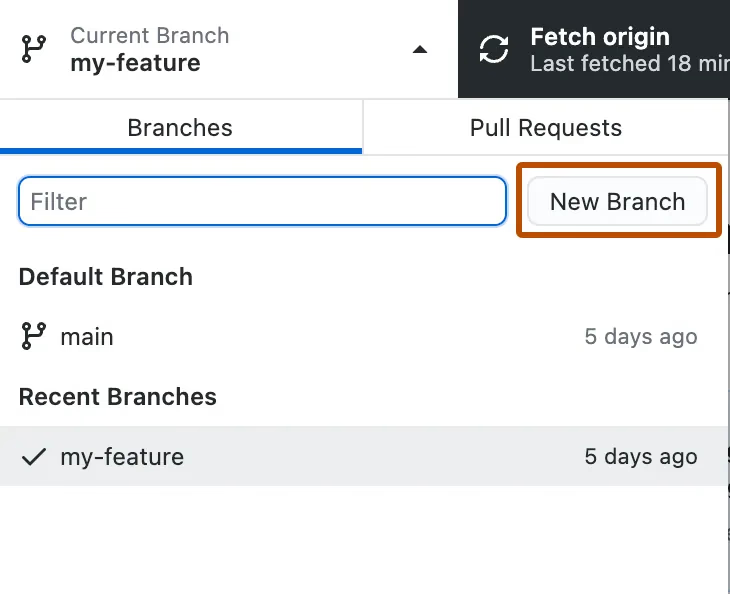
To create a PR:
- Click Create Pull Request in GitHub Desktop.
- On GitHub, add a description, reviewers, and any related issue tags.
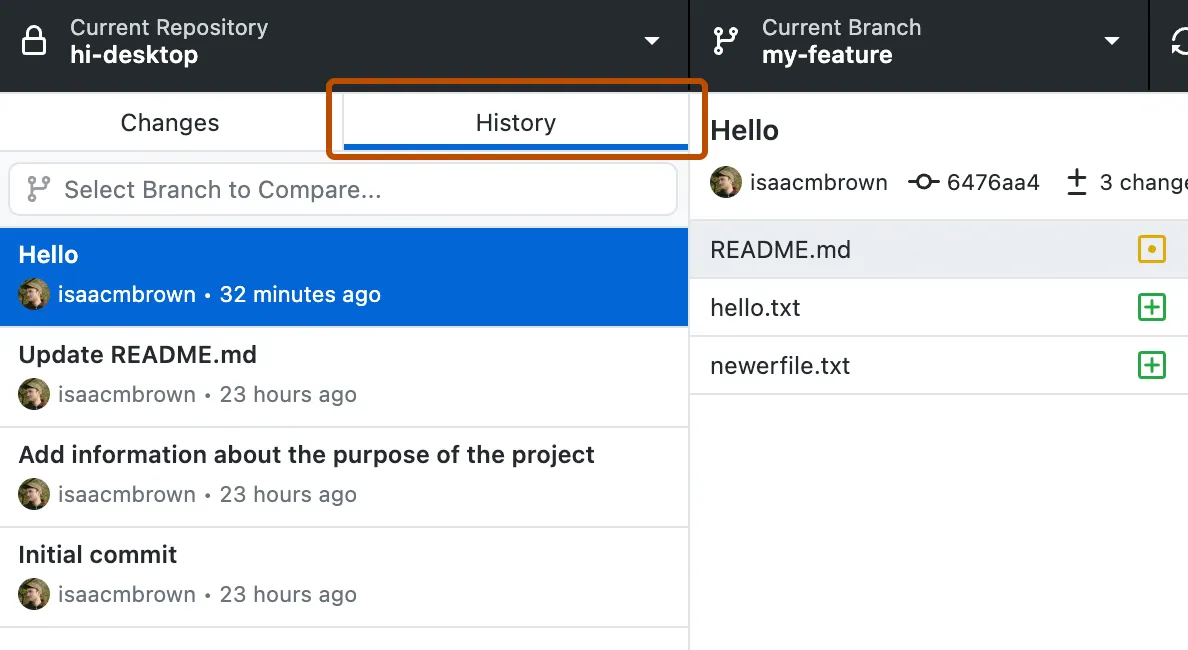
Once reviewed and approved, the PR can be merged into the main branch.
This flow ensures your code is reviewed, bugs are caught early, and collaboration becomes structured.
💡 Best Practice: Never work directly on the main branch. Always create branches for features or fixes.
At Coding Blocks, this PR-based workflow is taught as part of our full-stack and DSA programs, because it mirrors how real teams work at Google, Microsoft, and Amazon.
Step 5: Optional – Install Git Credential Helper
If you’re using GitHub often, typing your username and password each time you push code can get annoying, not to mention insecure.
Thankfully, GitHub Desktop supports Git Credential Manager, which securely saves your login credentials. Once installed, you won’t be asked to log in again for every push or pull.
To install on Windows:
Visit: https://github.com/GitCredentialManager/git-credential-manager
Download and install the latest version.
GitHub Desktop will now authenticate seamlessly in the background.
💡 Note: GitHub now uses personal access tokens instead of passwords, and the Credential Manager handles these securely.
If you're working in professional environments, this becomes essential for safe, smooth collaboration.
Why You Should Learn Git Now
Git isn’t just a tool, it’s a developer's second brain.
Whether you're a college student, a freelancer, or preparing for placements, knowing Git gives you an instant edge. It shows employers you can collaborate, manage your work, and contribute to real-world projects.
Here’s why learning Git now pays off:
🔁 Undo mistakes without panic
💻 Collaborate on group projects efficiently
🚀 Contribute to open source with confidence
🧠 Track your coding journey like a professional
Every job-ready developer knows Git. It’s used by teams at Google, Microsoft, startups, and even Coding Blocks’ engineering team. In fact, Git knowledge is often assumed in interviews — especially in system design, web dev, and full-stack roles.
With GitHub Desktop, there’s no excuse to delay. You can skip the terminal anxiety and start managing code like a pro, visually.
💡 Remember: you don’t need to learn everything today. Start small. Push a personal project. Create a branch. Merge a pull request.
The earlier you begin, the sooner Git becomes second nature.
Master Git with Coding Blocks
At Coding Blocks, we don't just teach you to code, we teach you how to manage, collaborate, and ship production-grade software.
Git and GitHub are baked into our curriculum:
✅ Build full-stack projects with Git-based versioning
✅ Collaborate on group assignments using pull requests
✅ Submit classroom tasks using GitHub Classroom
✅ Prepare for job-ready Git workflows used in top tech firms
Explore our flagship programs:
Learn version control the right way, in real projects, with real mentors.
👉 Browse all Coding Blocks Courses
Final Thoughts
Git is your foundation as a developer, and GitHub Desktop makes it easy. With simple steps like creating repos, pushing changes, and opening pull requests, you’re already on the path to pro-level workflows. Coding Blocks is here to make it practical, real, and job-ready.
Version control isn’t optional anymore it’s the language of modern development. GitHub Desktop lowers the entry barrier, helping you skip terminal confusion and focus on building great software. Whether you're coding solo, collaborating with classmates, or aiming for internships at tech giants, Git fluency will always set you apart. So don’t wait. Install GitHub Desktop, push your first commit, and experience the power of clean, trackable, collaborative code.
And when you’re ready to take your skills to the next level, Coding Blocks is right here with structured learning, real projects, and a path to your dream job.
]]>Whenever a tech-enthusiast thinks of exploring the field of programming, the first major question is about the language s/he should learn. There are various functioning programming languages in the world; some of the most famous being C++, Java, Python, Ruby, etc. Now the question is from where to begin?
C++ is considered to be a truly good starting point for beginners when it comes to learning a programming language. It helps students learn the foundation of computer language and coding.
What is C++?
Created by Bjarne Stroustrup in 1979, C++ is considered to be one of the oldest programming languages in the tech world. It is a general-purpose project-oriented programming language. C++ is the foundational language for various important technological advancements.
Where is C++ used?
C++ is centered around huge system execution and is thus used in a variety of small and big programs. This incorporates, however, isn't restricted to, web game development, animation, console games, medical software, MRI Scanners, etc. C++ is also used in internet browsers including Chrome and Firefox.
Why should you learn C++?
· Despite the emergence of various programming languages like Java, Python, etc., C++ continues to hold a significant place in the tech world.
· It is one language that familiarizes you with computers and programs like none other. It also helps you understand the computing structure, architecture, and theories.
· Almost all other programming languages including Java and Python are built around C++. Thus, learning C++ acts as a foundation for you to easily dive into learning other programming languages.
· Knowledge of C++ sets you apart in the tech world. Various big-wigs like Amazon, Adobe, Facebook, etc. need C++ developers to work on their programs.
· C++ programmers are paid well and their salaries are expected to rise in the coming future with increasing dependence on web browsers.
What are some important C++ terms to know?
· Keywords – Keywords are predetermined words that are used to identify objects and variables in codes.
· Variables – Variables are values with names or identifiers.
· Strings – Strings are objects with which one can perform functions in C++.
· Operators – Operators are symbols operating functions and manipulating data.
· Data Types – Data Types are different forms of data that can be used in a program.
· Objects – An object is a collection of data in C++. It has attributes and methods.
What are some platforms or communities for C++ Developers?
There are various platforms or communities for people with the same interests, hobbies, and/or professions. These platforms help them interact, learn from one another, and work on projects together. Following are some platforms or communities for C++ Developers:
· GitHub
· Stack Overflow
· Web Developers
· C++ Meetups
How to begin your C++ journey?
Having a steep learning curve, C++ is not the easiest language to learn, but it sure is a wonderful start. Learning a programming language like C++ requires the right path and effort. Coding Blocks brings to you the most finely designed course for C++ beginners. The C++ training course is designed to provide you with a platform from where you can start your journey in the amazing world of programming and software. It guides your learning right from the scratch and takes you to the expert level.
Some highlights of the course include:
• Extensive Data Structures & Algorithmic Coverage
• 500+ Video Lectures and Code Challenges
• Hint Videos for Complex Problems
• Lifetime Assignment Access
• Basics & Advanced Coding Topics for Interviews
• Expert Doubt Support

So, aren’t you excited? Well, we sure are! Explore the wonderful world of Programming today with Coding Blocks.
Website : https://online.codingblocks.com/
Contact Number : 9999579111 / 9999579222
E-mail Address :[email protected]
You can find us on our Social Channels :
Facebook | Instagram | Twitter | LinkedIn | YouTube | GitHub
In recent years, the demand for computer programming skills has skyrocketed, and with the ever-growing popularity of online courses, it's easier than ever to learn how to code from the comfort of your own home. Coding Blocks, a popular online coding education platform, has had decent success with a course called "Illuminati Programme" that offers a unique opportunity for students to learn full-stack web development and gain valuable work experience through on-the-job internships and training.
The Illuminati Programme is an 18-month-long online coding course that is specifically designed for students in their second or third year of college. The program covers all the essential topics in full-stack web development, including HTML, CSS, JavaScript, ReactJS, NodeJS, MongoDB, and more. The course is taught by experienced instructors who have years of industry experience and are passionate about helping students achieve their goals.
One of the most exciting aspects of the Illuminati Programme is the internship opportunities that are available to students. During the course, students will have the opportunity to intern with Coding Blocks in-house projects, top tech companies, and start-ups, with stipends ranging from 25,000 to 30,000 INR per month. This real-world work experience is invaluable for students who are looking to kickstart their careers in the tech industry.
100% Live classes of the programme allow you to solve your doubts instantly. Also, the course is designed to be flexible and accessible for students who are already juggling a full-time college workload. Even if you miss the live class, the recordings of all the classes get uploaded on the students Learning Management System. Students can access the course materials online and study at their own pace if they fail to attend live classes, with the support of a teaching assistant and mentor who will guide them throughout the programme.
The Illuminati Program has already garnered rave reviews from students who have completed the course. Many students have praised the high-quality course material and the excellent support provided by the teaching assistant and mentors. Internship opportunities are a major advantage of the course, as it provides them with the opportunity to gain practical work experience and build their portfolios according to industry standards.
.
In conclusion, the Illuminati Program by Coding Blocks is an excellent option for students who are looking to learn full-stack web development and gain valuable work experience through internships. With a flexible and accessible course structure, experienced instructors, and top-tier internship opportunities, this programme is a great investment for students who are looking to kick-start their careers in the tech industry.
]]>In the age of rapid technological advancements, Android is dominating the mobile market. Android is known to hold 80% of the mobile market shares. With such a huge demand for Android Applications, big tech companies like Amazon, Flipkart, Airtel, etc., are making huge investments in third-party android applications. Thus, it
]]>
In the age of rapid technological advancements, Android is dominating the mobile market. Android is known to hold 80% of the mobile market shares. With such a huge demand for Android Applications, big tech companies like Amazon, Flipkart, Airtel, etc., are making huge investments in third-party android applications. Thus, it would be quite right to claim that the future for android development is bright in the future.
As per a recruitment survey, it is believed that the demand for skilled android developers still far exceeds the supply. Android Applications keep pushing the boundaries of engagement, education, business, and almost everything; thus, making it a correct choice for a professional career.
Why do Android Developers have a bright scope in the near future?
- Open Source – Android is an Open Source Operating System that provides accessibility to various developers across the world. Developers can create, test, and run their apps on the Android Platform by simply registering once. The Open Source Platform also allows developers to launch their apps. The apps can be made available for use either in paid form or free of cost as per the desire of the developer.
- Huge Market – Android is a pioneer of the worldwide smartphone market share. It owns 80% of the smartphone market share today. It is the fastest growing IT market with android applications always in demand. The increasing demand for android applications also surges demand for skilled android developers.
- Higher Returns on Low Investments –Developers need to pay only the registration fee which enables them to build and run multiple apps. They can then sell these apps to the userbase at the desired rate, thus making incredible profits with a little amount of investment.
- Variety of Job Profiles – Android Development is an incredible field that provides you with multiple job opportunities like Mobile Developer, Mobile App Developer, Mobile Architect, Android Developer, Android Mobile Developer, Android Engineer, and many more.
- Flexible work – Android Developers need not necessarily work a 9 to 5. Many android developers work from the comfort of their homes for their organization. The field also allows you to do well in part-time or freelance jobs.
- Creative and Competitive – Two words that shall define your persona if you decide to explore the professional career of android development. The field of Android Development is ever-changing and ever-evolving. Thus, it requires you to stay at your toes and be your most creative self. It pushes you to give your best in the competition.
- Most Interesting Online Communities – All programmers are known to have online communities where they all come together to discuss and work on new and creative ideas. Android Developers too have an amazing set of communities for developers to work support groups to learn and grow with the help of one another.
- You can work in distinct industries – Android developers do not necessarily have to work with mobile companies. Various distinct industries like Business, Medical, Finance, Security, E-Commerce, Gaming industry, etc. have huge demands for professional android developers. Some giant companies that demand android developers include Amazon, YouTube, Google, Uber, Flipkart, American Express, Delloite, and the list goes on.
- Get paid well –An android developer is a profile that is in high demand in the tech industry today. A professional android developer can earn up to $80k. Salary trends also reveal that the average salary of android developers is increasing steadily with the surging demand.
- Learn it Easy – Android Development is a field relatively easier to learn. Good command of Java and some basic Development tools will have you set to undertake the journey of becoming an android developer.
In conclusion, there are billions of android apps on the Google Play store, with the number increasing drastically. Billions of apps are being downloaded and used by customers every day. With so much growth and development, the demand is obviously on a high tide. Thus, it is clear that the field of android development is expected to boom shortly, and android developers would be the kings of the tech market.
So, where do you start?
Now that you have an understanding of the importance of the field, it is time to dive in. Coding Blocks helps you by offering the most finely curated Android App Development Course. The course boosts your journey right from scratch of UI to building a full-fledged Android app on your own.
Some of the major highlights of the course include:
- Extensive coverage of end-to-end mobile development.
- Project-Based Learning Approach
- Lessons on Deploying your Application
- Basics & Advanced Topics for Interviews
- Expert Doubt Support
So, what are you waiting for? Let’s dive right into the most amazing learning and growing experience of your professional career! Explore the course today!
The selection process consisted of one Coding Round, two Technical Interviews, and finally the HR Round. All the rounds were conducted online due to the pandemic.
The Coding Round consisted of 3 questions that we had to
]]>Paytm visited my campus (NIT HAMIRPUR) in Aug 2021 for the placement drive.
The selection process consisted of one Coding Round, two Technical Interviews, and finally the HR Round. All the rounds were conducted online due to the pandemic.
The Coding Round consisted of 3 questions that we had to solve in 70 minutes.
Questions -
1. Delete duplicate nodes from unsorted single linked lists keeping the first occurrence of every duplicate node.
2. Find the number of elements in an array that are greater than all the elements to their right.
3. Find the sum of all numbers that are formed from root to leaf paths in a given tree.
I solved all three within the given time limit. After the first round, 98 students were selected out of 300.
On 13th Aug, the Technical Interview Rounds were held. The First Technical Round was of 45 minutes.
The interviewer first asked for my introduction and then moved on to DSA questions.
Questions -
1. He asked me to differentiate between graph and tree.
2. I was asked to write code for replacing an element at index 3 in the singly Linked list.
3. He asked me some puzzles like:
The 3-5 liter die hard-water-puzzle. Find the minimum cost to cross the river.
After I explained the approach to solve the puzzles, he asked me to show him one of my projects and run it. Once completed, he asked some more questions about the implementation of the project.
I was able to answer all the questions of this round. After 1 hour, I got a link for the second round.
The Second Technical Round was of 50 minutes.
The interviewer started with my introduction and asked some basic questions like -
Then he moved to the technical part and asked me to explain and write code for method overloading and method overriding. He also asked me some real-life scenarios in which these are used.
In addition to this, he asked me to explain deep copy, shallow copy, and static members with suitable examples.
He also asked some DBMS questions like ACID properties and indexing.
In indexing, he gave me a scenario where I need to tell the type of indexing to be used and why.
He later moved to projects. He asked me about GET and POST methods and asked me to explain my projects.
The HR ROUND did not take very long.
I got a call for the HR Round 30 minutes after completing the Technical Rounds. HR asked me about the interview experience so far. I explained it to him. I was then asked about my preference for location.
Final verdict:
I was selected with 37 others.
Some Tips -
Confidence is the key. Be confident!
Have good knowledge of famous OS & DBMS concepts.
Have at least two good projects and know them completely.
Be polite and interact with the interviewer as much as you can.
]]>