No scrum masters (nor bananas) were harmed during the writing of this article. 🍌
It's no secret that I love developing software. However, when it comes to being employed as a software developer, I tend to have more of a love-hate relationship. There's a few reasons as to why this is, but one of the more major ones is due to the amount of bureaucracy that tends to come with the job, especially when it comes to ceremonies.
One such ceremony is everyone's favorite 15-minute meeting: standup, which I find can be rather hit or miss.
On the one hand, standup itself can sometimes be rather valuable, especially when you have a really good team. Unfortunately, however, I think that's the exception rather than the rule. And even if you do happen to have a great team, I often feel like standup runs into the same repeating issues:
Personally, I find that all of these issues take away from the original purpose of standup, which is a bit of a shame because I think the underlying idea behind it is a good one.
In any case, whether or not standup is a good thing is kind of a moot point as it's not going anywhere anytime soon. And so, as developers, we're left with two options: either accept it as is or try to make it the best we can.
For myself, I decided to put my own spin on making standup the best I could. However, rather than trying to do this the responsible way of both improving the communication and underlying process, I instead decided to just break it in the only way that I know how—by building an overengineered solution that only I myself would use to automate the process of standup for me.
In order to build a solution to automate standup for myself, I began as if it was any normal project: defining both the goals and requirements in order to scope it as success. However, in order to do so effectively, I first needed to understand the core of the problem I was trying to solve—standup.
When it comes to standup, this typically involves communicating three main data points:
For me, all three of these can be a little hazy when it comes to an early morning meeting. And so, I wanted a way to automate the collection of these three data points.
However, rather than trying to attempt all three of these at once, I decided to take a little bit more of an iterative approach and chose just one data point to focus on at the beginning before adding in the other two.
Therefore, for my initial implementation, I decided to build a system to automatically remind me of what it was that I achieved the day before. This was not only going to be the easiest to implement (at least in my mind), but it would also solve one of my biggest personal pains when it comes to standup, making it a great MVP.
As for the actual implementation itself, I decided to achieve this by setting up a simple automation which would:
Pretty simple.
Normally when it comes to building projects like this, I would go about implementing it by hand using a language such as Go. However, recently I've been trying to broaden my horizons. And so for this project, I decided to build it using a piece of technology that's been hyped quite a lot online—one that I originally dismissed: n8n.
If you're unaware, n8n is an automation tool allowing you to connect multiple services together, similar to something like Zapier. However, unlike Zapier, n8n is both source available and self-hostable, which is something that I really appreciate.
In addition to this, it also provides a huge number of integrations out of the box and provides the ability to easily add your own. Because of this, n8n is extremely popular with just over 156,000 stars on GitHub at the time of recording.
Because of this, and because I like to learn new things, I decided that this project was going to be a good excuse to use n8n.
I began researching how to deploy a self-hosted instance of n8n. As it turns out, the n8n documentation provides a guide on how you can deploy it using Docker Compose, which will also install Traefik as a reverse proxy providing HTTPS.
I decided to make use of the new Docker Manager feature available on my VPS provider, Hostinger. This feature allows you to easily deploy a docker-compose.yaml straight to a VPS instance from the Hostinger dashboard, meaning you can do so without needing to SSH in—which makes deploying a self-hosted application incredibly fast.
Once I had my VPS instance in hand, it was time to set it up for both Docker Manager and n8n. Whilst Hostinger does provide an n8n ISO image that you can use, in my case I wanted to follow the documentation which gives you that Docker Compose file that also installs Traefik and provides you with HTTPS. So I decided to select the Docker app ISO image instead, which installs both Docker and Docker Compose, allowing you to use the Docker Manager feature.
Because I had both Docker and Docker Compose already installed, I could skip to step number three in the n8n docs, which was to set up DNS records for my new VPS instance. To do this, I added a new record to my CloudFlare dashboard pointing at the IP of my new VPS instance.
After this, I moved on to step number four, which was to create an environment file. Fortunately, when using Docker Manager, this is incredibly simple. I headed over to the Docker Manager page in the Hostinger dashboard and opened up the YAML editor view.
Here you have two different text entries: one for the docker-compose.yaml and the other for any environment variables. I copied the example file from the n8n documentation and made a couple of changes to suit my own environment, including:
After that was done, I copied in the Docker Compose file and pasted it into the Docker Manager YAML editor. All that remained was to name the project and it was ready to deploy.
After a couple of minutes, the Docker Compose stack was up and running, which I verified by heading over to my configured DNS record.
With n8n successfully deployed, the next thing to do was to set up a user account, and I was ready to begin implementing my standup automation.
First things first, I selected to start a new workflow from scratch before then deciding to give it a name—one that I felt would be rather accurate.
n8n defines a workflow as a collection of nodes which act as each of the individual steps to define your automation. The first of these nodes is the trigger, which is the condition or event that will kick off your workflow's execution.
n8n provides a number of different trigger types, such as:
For this automation, I wanted to use the schedule trigger, which would run the workflow at the same time each day. I set this to 8:00 a.m., which would be early enough to ensure that my trigger would complete before standup started.
One nice thing about triggers in n8n is you can execute these at any point during development, which means you're not having to wait around for a trigger to execute in order to test your flows.
With the trigger defined, the next thing to do was to obtain my first data source—the git commits from my previous day.
Nodes in n8n are the key building blocks of a workflow, allowing you to perform a range of different actions such as:
If you take a look at all the different node types available in n8n, you can see it provides a huge amount of integrations for various different services out of the box. This is one of the key features of n8n as you can take a pretty much no-code approach to interacting with many different APIs and services.
I wanted this first node to collect data from GitHub, specifically about the previous day's commits. So I searched for the GitHub node and selected one with the action of "get repo."
In order for this node to work, I needed to set up some authentication credentials, which I did by creating an access token inside of my GitHub account.
Note: When it comes to n8n, the majority of the nodes you'll use require credentials in order to integrate with their associated service. Fortunately, n8n provides comprehensive documentation that shows you how to obtain these credentials for whichever node you're configuring.
With my GitHub credentials added, I configured the rest of the node's properties, beginning by selecting which repository I wanted to pull the commit data from. Upon testing the node, I realized that the results from the "get repo" action didn't provide any commit data inside—it was only returning data about the actual repository itself.
In order to obtain the actual commit data, I needed to use a different operation. Unfortunately, the GitHub Node didn't have one that could do this.
At this point, I assumed I was cooked. However, I stumbled across the custom API call operation, which directed me to make use of an HTTP request node (though it mentioned it would take care of authentication for me).
I replaced the GitHub node with an HTTP one and configured it by setting the URL to the GitHub API endpoint for pulling down the commits of a repo:
https://api.github.com/repos/{owner}/{repo}/commits
For authentication, I selected a predefined credential type of GitHub API, followed by selecting my configured GitHub account.
Upon executing the node, I was now retrieving a list of my recent commits on the repo. Unfortunately, it was also pulling down commits made by other authors. Because I'm not a fan of plagiarism, I needed to constrain this to only returning commits that I myself had authored.
I achieved this using the author query parameter:
?author=myusername
I began to notice another issue where the results included commits made beyond the previous working day. To resolve this, I used another query parameter called since, which only returns commits with a timestamp greater than the value you pass in.
Unlike the author parameter, the value for since needed to be dynamically generated—basically set to 24 hours in the past.
Fortunately, n8n allows you to set dynamic values using an expression with JavaScript:
{{ new Date(Date.now() - 24 * 60 * 60 * 1000).toISOString() }}
I had yet another bug—one that only appeared when I ran this code on a Monday, which produced an empty list of commits. This was happening because I hadn't produced any commits the day before (Sunday).
I needed to modify my expression to return commits made during the previous working day, which on a typical Monday would be Friday. Thanks to my friend Claude, this wasn't too difficult to whip up an expression for.
With my commits filtering correctly, I realized they were currently only the git commit hashes—not the actual commit data itself. I needed to add another step to pull out the actual commit information.
To achieve this, I needed to loop over each of the commit hashes and perform an HTTP request to pull down the information for that specific commit.
I initially looked at the loop over items node. However, upon reading the documentation, it turns out you don't actually need to use this node in the majority of cases as n8n often handles the looping of input data for you.
All I needed to do was use another HTTP request node, this time using the same commits path but adding in the commit hash as a path parameter using an expression. For authentication, I reused the existing GitHub API credentials.
Now when I executed this step, n8n was looping through each individual commit hash and pulling down the commit information for each one—including most importantly the patch, which communicated the actual code changes that each commit made.
I was ready to move on to the next step: passing this information into an LLM for summarization.
I created another node—an OpenAI node called "message a model," which does exactly what it says on the tin. This is something I really like about n8n: they're very clear with what each node actually does.
For this node to work, I needed to set up credentials by creating a new API key inside the OpenAI platform. With credentials defined, I could configure the rest of the node.
First, I chose the model (initially GPT-5, later changed to 4.1 Mini). Then I defined a system message to configure the behavior of the LLM:
"Summarize the commits that I will be sending in the next message as a simple stand-up update that I could share with colleagues as to what I achieved in my previous day."
For the user message, I sent across the entire input data as stringified JSON.
I ran into an issue where the node was being invoked multiple times—one for each individual commit. This meant the generated AI message didn't have the full context of all changes taken together and was producing multiple outputs.
This was happening due to the default behavior of a node in n8n: it executes once for each input item in an array.
I needed to turn the multiple outputs from the previous node into a single input for the next. n8n provides the aggregate node for this purpose, which turns multiple items into a single one.
The aggregate node is one of several data transformation nodes that n8n provides, including:
I added an aggregate node between the HTTP and OpenAI nodes, configuring it to aggregate all item data into a single list with an output field called data. To save money on AI tokens, I specified only the two fields I needed.
Now the aggregate node was turning my 14 input items into a single output item, giving the LLM the entire context in a single message.
The initial output felt kind of wooden—I wanted it to be more natural sounding. So I went about refining the system prompt.
As always with prompt engineering, it often takes a few iterations to get it right (though it always feels a little bit arcane). In addition to modifying the system prompt, I found a big improvement from changing the model from GPT-5 to 4.1 Mini, which not only saved costs but gave a more natural result.
The standup report for my previous day's work was taking shape. Now I needed to send it to myself over a couple of communication channels: Slack and email.
Out of the two, Slack was going to be the easiest to configure. I selected the Slack node with the "send a message" action, which required setting up authentication credentials. I configured the authentication to use OAuth 2 so that messages would be sent from my own user account.
With credentials added, I configured where the message should be sent—either to a channel or to a user. Long-term, I wanted this sent to the engineering channel. However, for the MVP, I decided to just send it to myself.
I set it to a simple text message type and dragged in the output from the LLM. Upon executing the node, I received a Slack DM from myself with my summarized Git commits. Very cool.
I also wanted to send this as an email on the off chance that I didn't have access to Slack that day, or if I one day suddenly lost my mind and decided to migrate to Microsoft Teams.
I added an email node, which allows you to send an email over SMTP. I configured this to work with Resend, which is pretty much what I'm using for all my email sending these days (even though it is kind of expensive).
With email credentials configured, I finished setting up the rest of the node:
I tested this and received a nice plain text email with the summarization of my previous day's commits.
With my initial implementation completed, all that remained was to activate the workflow and wait for it to execute the following day.
The next morning, I woke up just after 6:00 a.m., went about my normal morning routine, then headed over to my desk and waited with nervous apprehension to see if my creation was going to work.
As 8:00 a.m. rolled around, I received both an email and Slack notification containing my standup update for the work I completed the day before.
Success! I had managed to complete my MVP.
It was now time to focus on making the rest of the standup process obsolete. I needed to obtain the other two data points:
This ended up being rather simple by adding an integration to Linear (my issue tracking tool). I could pull down any issues that were:
This would serve as the data for communicating what I was currently working on. I used a filter node to remove any items that didn't match these constraints.
I also attempted to use Linear to pull down any tasks that were closed in my previous working day. Unfortunately, this wasn't possible as the Linear node didn't return the timestamps for when a task status changed. Maybe it would have been better to use Jira instead.
For obtaining blocker data, I used another GitHub node to fetch data of any open PRs that were created by myself.
With both new data sources added, I linked them to their own aggregate nodes, each with their own unique field name. I also modified the output field for the existing commits aggregate node.
Then I used a merge node to turn each of the three inputs into a single object that could be passed to the LLM.
Once complete, I modified my system prompt to reference each of the input data fields for their respective standup communication topic.
With that, I was now generating a stand-up update that I would consider to be somewhat complete—one that could refresh my memory whenever the hacky sack of doom landed in my hands.
Given how far I'd come, I wanted to see how much of standup I could end up automating. I decided to first tackle asynchronous standup, where you typically publish your standup update inside of a Slack channel (in my case, #engineering).
Whilst sending a message to a channel would be simple enough, the real challenge was to modify my workflow so that it would only publish on days I didn't have a stand-up meeting scheduled.
I used the Google Calendar node to pull down any events from that scheduled day that matched the query of "standup." This meant it would only produce a result if I had a meeting that day.
However, for my workflow to succeed, I configured this node to always produce output data, which meant there would always be an output even if I didn't have a calendar event for that day.
I used an if node for branching based on a conditional expression—checking if the calendar input was empty. If it was, I would consider that day to be async.
Lastly, I modified the existing Slack node to explicitly reference the LLM input, then duplicated the node, linked this duplicate to the asynchronous branch, and modified it to write to the engineering Slack channel instead of sending the message to me.
Now when I tested this on a day I didn't have standup scheduled, I was receiving a message from myself direct to the engineering Slack channel.
I had managed to automate my async standup meetings.
This I'm still figuring out. However, my current idea is to make use of something such as 11 Labs in order to generate an audio clip that makes use of my voice.
Here's a sample of what that might sound like:
"Yesterday, I worked on the starter template, updating the dashboard UX with a personalized welcome message, added a clearer upgrade CTA, and some reusable UI elements. Today I'm working on getting integrations set up within the Zenstart dashboard, starting with one to create a new database instance when a new repo is generated from a starter kit. As for blockers, currently I have none."
In addition to generating this clip, I'm also going to have to figure out how to automatically play it whenever it's my time to give an update. However, that's going to be a problem for my future self.
And given the team that I currently have, I'm pretty sure that standups are going to be asynchronous for the foreseeable future.
What started as a simple frustration with forgetting what I did yesterday turned into a full-fledged automation project that handles:
n8n turned out to be a surprisingly powerful tool for this kind of automation work. The visual workflow builder, extensive integrations, and ability to self-host made it a great choice for this project.
If you want to try this yourself, I've made my workflow JSON available on GitHub.
Originally published on the Dreams of Code channel.
]]>One of the only real things in software development that keeps me up at night is downtime—sometimes quite literally, as anyone who's received a 2 a.m. PagerDuty alert knows all too well.
Fortunately, when it comes to my deployed applications, downtime isn't that common of an occurrence. However, because I've been increasing my use of tools such as Claude Code, where I'm effectively trading stability for speed, the likelihood of one of my applications suddenly going offline has substantially risen.
Because of this—and because I want to be able to sleep at night without constantly worrying about whether or not my applications are experiencing any downtime—I've been taking steps to ensure that I'm informed whenever this is the case.
One of the best ways to achieve this is to make use of an uptime monitoring tool, which notifies you whenever downtime is detected on a configured web application, allowing you to take action before it affects too many users.
Whilst there are a number of different products out there for uptime monitoring, there's one that I've been using quite a lot recently that I would consider to be almost perfect. It not only supports nearly everything that I need when it comes to uptime monitoring, but it also happens to be:
This service is Uptime Kuma, which I've been using to monitor all of my production web applications for the past few months.
However, that's not all I've been using it for. It provides a number of other features that make it incredibly useful for monitoring your infrastructure stack, including:
If that wasn't good enough, Uptime Kuma also provides a status page which is linked to all of your uptime monitors, allowing you to communicate any maintenance windows or downtime events with your users.
All of this makes Uptime Kuma almost the perfect uptime monitoring tool. And whilst there are a couple of features that I do find missing, overall it's an absolutely fantastic service, especially as you can host it yourself.
So let's go ahead and take a look at not only how easy it is to deploy an instance of Uptime Kuma, but I'll also show you how I like to configure it for my own application stack, including a couple of monitors I like to configure for my own infrastructure needs.
In order to deploy an instance of Uptime Kuma, there are a couple of different approaches we can take, laid out in the project's readme:
Personally, I'm a fan of using Docker, typically with a deployment platform such as Dockploy. However, because it's a good idea to deploy monitoring software onto different infrastructure than it's actually monitoring, I'm instead going to take a different approach and use a Docker-based feature provided by my VPS provider, Hostinger.
This feature is their new Docker Manager, which allows you to deploy and manage a Docker Compose deployment all from within the Hostinger UI. Docker Manager is available for any Hostinger VPS instance that has been set up using the Docker ISO image, which is available to select during the VPS's initialization. This means it's possible to deploy and manage your application stack using Docker Compose without ever needing to SSH in.
I'm going to deploy the following Docker Compose, which deploys a container for Uptime Kuma version 2.0 beta as well as an instance of Traefik to work as a reverse proxy.
If you want to deploy this yourself, you can find a link to the compose.yaml on GitHub, as well as some instructions on what you need to change in order to set it up for your own configuration.
When it comes to deploying a Docker Compose stack using Docker Manager, you can do this a couple of different ways:
Additionally, if you happen to have a Docker Compose file already available, you can either paste it into the YAML editor, or better yet, paste the URL of the Docker Compose file directly in, provided it's hosted on the internet. This is the approach I'm taking—pasting in the URL and pressing deploy.
Once the Uptime Kuma stack has been deployed, let's finish setting it up before configuring our first application monitor.
Head over to the hostname configured for your instance (defined inside the docker-compose.yaml). You'll be greeted with a page asking you to choose which database you want to use:
If this was a production setup, I'd probably choose an external MariaDB instance for failover or shared redundancy. However, for a single instance, I'm going with Embedded MariaDB as it provides a bit more of a performance boost compared to SQLite (although SQLite will work as well).
Upon selecting this database, you're brought to another page to set up an admin account.
Note: It's worthwhile to do this using HTTPS, which I have set up through the use of my reverse proxy in Traefik. You can change this to use one of your own domains by modifying the relevant lines inside of the Docker Compose and adding the relevant DNS record to point to your VPS's IP.
After creating your admin account with a username and password, you'll be logged into Uptime Kuma's admin panel where we can begin adding our first uptime monitor.
The first uptime monitor we're going to add is going to be the most simple. Don't worry—we're going to add in some more advanced ones later, as well as showing a couple of interesting ones that I like to use.
For this one, we just want to ensure that a website is up and accessible at its current domain name. The website I'm going to configure is Zenprompter, a simple web application that allows me to run scripts for a teleprompter, which I can use with my phone or on my desktop. This app is very niche, but it perfectly suits my needs. I want to make sure this service is always accessible, and in the event that it does go down, I'll at least be notified.
To create a new monitor:
This type is where Uptime Kuma sends an HTTP request to the configured domain to see if the request succeeds. If it fails, the monitor marks the website as down. This is the most simple and probably the most common monitor type.
With the monitor type selected, configure the following:
Zenprompter HTTPhttps://zenprompter.appHeartbeat Interval: The total time in seconds between requests sent to the configured URL. Default is 60 seconds, which is fine for most use cases. You can set it lower (like 15 seconds) for more responsiveness, but note:
Retries: The number of successive retry attempts before determining the website is down and sending notifications. Default is zero (first failure triggers down status).
I find zero to sometimes be susceptible to false positives, which can happen when a service is redeploying. To reduce false positives, I set this to 4, meaning four total attempts after the first one to confirm the website is down.
Heartbeat Retry Interval: By default, each retry happens after 60 seconds. This is a bit slow for me—it can mean up to five whole minutes before a service is marked down. I set this to 20 seconds, which means roughly 2 minutes total.
Request Timeout: The number of seconds without a response to mark a request as failed. Default is 48 seconds, which is fine.
Resend Notifications: Configure resending notifications after consecutive down events. I leave this at zero (disabled) because I don't want to get spammed with notifications for the same outage.
There are four important checkboxes in the advanced configuration:
Additional settings:
On the right side, you can configure the HTTP request:
For this simple monitor, I leave all of these as default.
Just above the HTTP options is where we can add a notification—the service that will notify us when the monitor detects the website is down.
Click Setup Notification to see a modal dialogue with many different notification types:
Despite dreading the 2 a.m. nightmare that is PagerDuty, this is actually one of my preferred notification configurations as it absolutely makes sure you're notified when something goes wrong.
For this article, I'll show how to set this up using Slack, but feel free to use whichever service you prefer.
To configure Slack notifications, you need a Slack webhook URL. Uptime Kuma provides a link to the Slack documentation with a step-by-step guide. The basic outline is:
With the required fields completed, there are additional properties to configure:
Press the Test button to produce a test message in your configured Slack channel. Once confirmed working, save the notification—it will automatically be enabled for your HTTP monitor.
Note: A monitor can have multiple notification services configured. Typically, I like to have both Slack and PagerDuty set up, allowing me to be notified whether I'm at my desk or away.
With the monitor created and notification configured, let's test everything:
In addition to having multiple notifications, another feature I commonly use in production is the built-in status page. This allows users to view the current status of my services and enables me to communicate any current incidents or maintenance windows.
You now have a status page viewable at the slug you provided, showing your configured monitors.
You can see an example of my status page for Zenprompter at uptime.zenvps.xyz/status/zenprompter.
One complaint I have with Uptime Kuma's status page is that it only shows a short amount of data—roughly 1 hour when you have a 60-second heartbeat configured. I'd love to be able to configure this so the range could be much larger (past month or even past year).
There is an open issue for this feature, and one of the maintainers mentioned they were waiting for V2 due to performance implications. So for now, we'll have to wait and see if it gets added.
Despite this limitation, I still link to this status page on my production services so users can see the up-to-date status at any time.
Use the Create Incident button to display a form where you can add:
Once created, this displays on the status page, communicating with your users when something is going on.
Uptime Kuma also provides the ability to schedule maintenance tasks through the Maintenance page.
When active, the maintenance task appears on the status page.
Maintenance tasks can be configured several ways:
I like to use this to communicate planned maintenance, such as upgrading a VPS instance size.
Tip: When performing tasks that might cause expected outages, you can pause a monitor to prevent it from performing checks during that time, avoiding disruptive notifications or affecting your total uptime score.
While this status page is a nice feature to have for free, compared to other status pages (like Better Stack or StatusPage.io), Uptime Kuma's is somewhat lacking. The main missing feature is the ability for users to subscribe to status update notifications.
Now let's look at some other monitors I like to configure for my infrastructure stack.
My favorite use is to monitor the SSH ports of my VPS instances to ensure they're inaccessible over the public internet.
If you've followed my content for a while, you'll know this is one of my preferred security approaches—only allowing SSH over my TailNet provided by Tailscale. This helps improve the security posture of all my VPS instances, but only if the firewall is up and running, which can sometimes be modified inadvertently (especially when using Docker).
By adding a monitor to check for this, I can rest confidently knowing that if my SSH port ever becomes accessible, I'd receive a PagerDuty alert.
Here's the key: this monitor would normally send a notification when the port isn't accessible. But I want the inverse—a notification when the port is accessible (meaning the firewall is down).
Enable Upside Down Mode to invert this behavior. The monitor will:
After saving, within about a minute you should see the first request displayed as green (the TCP request timed out, meaning SSH isn't accessible over the public internet—which is desired).
In addition to SSH port monitoring, here are other monitors I like to configure:
This helps gain coverage of key areas of my infrastructure. Because of the status page, it helps users know which specific service is down during an outage—whether it's the web page, the API, or upstream with the database.
By making use of the tags feature when configuring a monitor, you can apply more context on the status page. For example, communicating that a service being monitored is actually a third-party dependency.
Despite Uptime Kuma's capabilities, there are a couple of missing features I'd like to see added:
This has bitten me a couple of times in the past. This monitor would notify you a configured period before a domain is set to expire—usually 1 month beforehand, then more frequently as expiration approaches.
Most of the time this is handled by domain registrars. However, email notifications don't always make it through. Having an additional notification on Slack provides peace of mind, especially when the credit card used for domain renewals expires.
Fortunately, there's an open issue and a promising pull request that looks to add this functionality.
I'd love the ability to configure monitors through Docker labels, similar to how Traefik works—where you can configure Docker labels and CLI arguments to set up reverse proxy rules for different services.
It would be awesome to do the same with Uptime Kuma, meaning you could easily configure it in a configuration file rather than needing to use the GUI.
To be fair, Uptime Kuma does provide an API for configuring monitors, and there's an open issue for a Terraform provider which would allow declarative configuration. However, I'd still love the ability to do this through Docker Compose.
Despite these missing features, Uptime Kuma is still a fantastic way to add monitoring to your applications through a self-hosted solution—one that I would consider to be almost perfect.
For myself, I'm probably going to continue using it for the foreseeable future when it comes to helping me resolve any unexpected downtime as quickly as possible.
To get your own VPS instance to use with Docker Manager, visit hostinger.com/dreamsofcode and use coupon code DREAMSOFCODE for an additional 10% off.
]]>If you're like me, you probably enjoy working in the terminal. Whether it’s writing code, running commands, or even opening Vim only to forget how to close it, the terminal is an essential tool in our workflows. One of the greatest joys for any terminal enthusiast is discovering a new CLI command that can improve the way you work. However, many popular commands like fzf, zoxide, and tmux have been talked about extensively.
In this article, I’m excited to share 10 lesser-known but incredibly useful CLI applications that I regularly use. These range from practical productivity tools to a few fun utilities that add flair to your terminal experience. Let’s dive in!
While not the most practical, CBonsai is by far the most zenful CLI app on this list. It generates a random ASCII bonsai tree right inside your terminal.
By default, it shows a fully formed bonsai tree, but using the -l or --live flag, you can watch your bonsai grow in real-time from nothing to its final shape. The -a or --infinite flag loops this growth endlessly, turning it into a terminal-based screensaver (which you can also trigger with the -s flag).
You can customize:
-B flag)-L or --life flag)Other terminal-based screensavers worth checking out include cmatrix (the iconic Matrix effect), pipes (draws lines across your screen), and my personal favorite, ascii-aquarium, which animates fish swimming in your terminal.
Asciinema is one of my favorite tools for creating video content and demoing terminal sessions. Unlike typical screen recording software, Asciinema records the terminal output as text in a file, preserving exact timing and allowing playback inside the terminal or embedded in web pages.
asciinema rec
Ctrl+D or exit.asciinema play
You can also embed these recordings on websites with their JavaScript player, or convert them to GIFs for platforms that don’t support embedding (like GitHub READMEs).
Additional features:
Asciinema is a must-have for anyone who frequently shares terminal workflows.
Croc makes sharing files and directories between devices simple and secure, without the need for SSH setup, IP addresses, or firewall configurations.
croc send
croc
Key features include:
For me, Croc is perfect for quickly transferring files between devices or sharing with others — no email attachments or cloud storage needed.
TTYD lets you access a terminal session through your browser, which is super handy for remote workflows.
ttyd
For example, to start a Zsh shell:
ttyd zsh
By default, TTYD is read-only. Use the -w flag to enable write access:
ttyd -w zsh
I use TTYD paired with Tailscale on a VPS, allowing me to run an always-online agent accessible from anywhere, even from my phone while on the road. This setup has transformed how I work remotely with agentic AI tools.
Jrnl (pronounced "journal") is a lightweight, open-source journaling tool for the terminal inspired by bullet journaling.
jrnl "Your journal entry"
jrnl -n 10
Jrnl lets you keep track of your thoughts without leaving the terminal, making journaling fast and distraction-free.
Although not a standalone CLI app, wttr.in is a handy curl-based command to get weather updates.
curl wttr.in
It shows the forecast for your current location based on your IP. You can also specify any location:
curl wttr.in/Chicago
This is a great example of leveraging API endpoints to retrieve and display useful info directly in your terminal.
If you like consuming news without leaving the terminal, Newsboat is a text-based RSS reader with a friendly TUI.
newsboat
You can browse, download, and read articles right in the terminal. It also supports opening links with terminal browsers like links or w3m.
I subscribe to feeds like Dreams of Code RSS and Hostinger Tutorials RSS for quick updates.
Lolcat is a fun utility that adds a rainbow gradient to the output of any command, similar to cat.
cat file.txt | lolcat
You can customize the gradient colors, frequency, and even enable animation mode (-a) to render the output line by line.
I like pairing Lolcat with Figlet to create colorful ASCII welcome messages, especially for my TTYD sessions.
Faker is both a CLI tool and a Python package that generates realistic fake data like names, emails, addresses, passwords, URLs, and even binary data.
While I prefer the Python package for integration in scripts, the CLI tool is handy for quick data generation directly from the terminal.
Grex is a powerful CLI tool that generates regular expressions based on a list of example strings.
grex file1.txt file2.txt file3.txt
You can make the regex more generic with flags like:
-d to generalize digits-r for handling repeating charactersThis tool helps you quickly create regex patterns to match complex string sets and is a fantastic starting point for writing regex.
There you have it — 10 CLI applications that I bet many of you haven’t heard of before. Whether you’re looking for productivity boosts, fun terminal tweaks, or powerful utilities, I hope you found at least one new tool to try.
My personal favorite from this list is TTYD, especially for remote terminal access combined with agentic AI workflows. If you’re interested, I plan to do a deeper dive into that setup in the future.
This article is sponsored by Hostinger. If you want your own long-term VPS to run applications like TTYD and more, now is a great time.
Hostinger’s Black Friday sale offers excellent prices on high-resource VPS instances, like the KVM2 with 2 vCPUs, 8 GB RAM, and 8 TB monthly bandwidth — perfect for production workloads.
Using my coupon code DREAMSOFCODE will get you an additional 10% off! Check it out here: hostinger.com/dreamsofcode
Did you discover a new favorite CLI tool from this list? Let me know in the comments below!
Until next time, happy terminal exploring!
]]>When it comes to building SaaS products, one of the most important components is the ability to accept payments. While you could roll your own payment provider, this is in fact a terrible idea. Instead, it's much better to use a third-party service with some of the more popular ones being PayPal, Square, and of course, Stripe.
Stripe is perhaps the most popular payment provider out there, and for good reason. Not only does it have a fantastic developer experience, but I would argue it pretty much sets the trend on how a payment provider should work. Because Stripe has both high reliability and fantastic service, it's pretty much the de facto standard payment provider most developers will use.
This was certainly the case when it came to my own personal experience, having used Stripe now for almost 10 years. That is until I ran into a few challenges about a couple of months ago. These challenges ended up causing me to move over to a new payment provider—one that has not only managed to help me solve these issues, but I think I'm going to be using for the foreseeable future.
This provider is Polar.sh, which has been recently growing in popularity with more and more people migrating over. But this begs the question: why?
Well, ultimately, like most things in software development, it depends. For some people, like myself, there's a good reason to move over, but for others, migration might not actually be the best choice. Therefore, in order to answer the question of why people are migrating over, let's take a moment to talk about what Stripe provides, as well as perhaps more importantly, what it does not.
As I mentioned before, Stripe is likely the most popular payment provider out there. But what exactly does a payment provider do?
A payment provider is the service that sits between your business, your customer, and the financial institutions (aka a bank). They handle all of the heavy lifting of securely processing credit cards, debit cards, and digital wallets, making sure the money leaves your customer's account and lands in yours.
In practice, this means they deal with things like:
This way you don't have to build all of that infrastructure yourself, which would not only take a lot of time, but would be incredibly expensive.
In addition to this, Stripe also provides a wide range of features and functionality that go beyond raw payment processing, leaning towards more business logic. These include:
Not only this, but there's also some really amazing integrations when it comes to getting Stripe added to your project, with perhaps my favorite one being the plug-in for Better Auth, enabling you to easily add payments into your products through Stripe in a matter of minutes rather than hours.
All of this makes Stripe more than just a payment processor. Instead, you can consider it more as a financial infrastructure platform, enabling us developers to focus more on building and shipping our products without needing to worry about the complexities of handling payments.
So, given all this, why then did I decide to move away?
While Stripe does provide an awful lot of functionality, there are a couple of important things that it doesn't handle, which when done by oneself can take up quite a lot of time—with perhaps the biggest one, at least for myself, being related to sales tax.
Before I go on, this probably needs to be said: I'm not a tax professional and I'm not a legal expert. Instead, I'm just a software developer and YouTuber sharing my own experience. If you need legal advice or tax advice, then I recommend speaking to an actual tax expert.
To be fair, Stripe does provide you the ability for automatic tax collection when it comes to the relevant sales tax for your customers, which can be both enabled and configured, provided you've registered for sales tax in that jurisdiction and have provided Stripe the relevant tax ID.
Additionally, Stripe will also let you know when you need to register for sales tax for a specific jurisdiction—typically whenever you've exceeded a certain sales threshold for that location, which in some places is quite high, but in others, not so much.
Despite providing both of these useful features when it comes to sales tax, there's unfortunately one feature that Stripe doesn't provide: tax remittance. This is the process of reporting and paying these collected taxes to the relevant tax authority.
When it comes to selling online digital products, sales tax can be a little complicated. This is because the rules for sales tax typically apply based on where your customer is located rather than where your business is based. So, for example, if someone in Germany makes a purchase, then you need to comply with the German/EU VAT laws.
In many jurisdictions, you only need to register and remit once you pass that country's sales threshold, which can be in the hundreds of thousands. But in places like the EU and the UK, if you're located outside of them, this threshold is effectively zero, meaning that tax applies from your very first sale.
Once this threshold has been crossed for a jurisdiction (or immediately when it comes to the EU/UK), then you need to:
Missing these deadlines results in penalties, and in some jurisdictions, there are additional rules to abide by. For example, in the EU, you have to provide a VAT invoice for every sale that you make, which Stripe doesn't do for you (at least not for free).
If all of this sounds like a hassle, then you're correct. It absolutely is.
So much so that many solo developers like myself would rather not do this. Fortunately for those who don't, there is a solution through services like Lemon Squeezy, Paddle, or Polar.sh. All three of which are known as a merchant of record or MoR for short.
MoRs are services that work in a similar way to Stripe—basically allowing you to manage payments, customers, products, subscriptions, etc. However, unlike Stripe, they have one major difference: these services act as the official seller or merchant when it comes to any sales (i.e., the merchant of record, which is what gives them their name).
This basically means that your customers are legally buying from this service rather than buying from your own business, and the platform then pays you the sale amount minus a service fee. Basically, you can think of it like a proxy for any of the sales that you make.
While this might seem like a weird double hop, it actually provides some benefits when it comes to selling digital products. This is because the platform itself assumes the legal responsibility of the sale, which means they're responsible for handling:
This is what makes them so appealing for anybody who wants to outsource this tedious task.
For more detailed information about MoRs, check out What is an MoR.
Of course, these platforms don't do this out of the kindness of their heart, and they take a percentage of the sale as their operating fee. This percentage amount varies depending on each provider, but can range anywhere from 4% all the way up to 10%.
Now, this may seem like a lot, and yeah, to be fair, the 10% fee is kind of high, but when you consider that Stripe's fee is 2.9%, then if you're on the lower end of this spectrum (say 4%), this only ends up becoming about a 1.1% additional fee. For some people, this additional fee to not have to worry about tax compliance is going to be worth the cost.
However, there are some other drawbacks of using an MoR to be aware of beyond this additional fee, with the most major one being that there's a higher chance it'll cost your customers more.
This is because, as I mentioned before, you only need to collect sales tax in a jurisdiction once you've passed a certain sales threshold, which in some places can be quite high. This means until you exceed those thresholds, you don't have to charge tax to your customers in those locations, which means they'll technically end up paying less for your product and therefore it'll likely increase your sales.
However, by using an MoR, there's a greater likelihood that the sales threshold for a location has been exceeded due to the aggregate of sales that they make, which means your product is either going to have to cost more or you yourself are going to have to eat those additional costs.
This means depending on where you're selling, by using an MoR straight away, it may actually be a net negative, especially if you're willing to put in the effort to just handle sales tax in the few jurisdictions that you need to initially.
This was actually one of the main reasons I decided to forego using an MoR initially and instead decided to just use Stripe and handle tax remittance by myself. However, this ended up being quite a lot more work than I originally thought it would.
For starters, it often took weeks or sometimes months to register with a new jurisdiction. And once I was registered, deadlines to remit taxes came about pretty quickly, which given my time management issues, I would often end up missing and would be subsequently fined.
Perhaps the biggest thing I was concerned about, however, is I was starting to cross even more thresholds, which meant that the amount of work I would need to do to remain tax compliant was only going to increase.
Therefore, I decided that this sort of paperwork really isn't my cup of tea, and instead, I'd much rather spend my time both building and creating. So, I decided to outsource this and migrate over to another solution that would allow me to buy back some time.
One thing to note is that Stripe actually does provide a paid tax service called Stripe Tax Complete, which is fulfilled by their partner Taxually. This service does handle some tax registrations and filings for you, although it's not exactly what I would call comprehensive.
The pricing structure:
Remember, in the EU you have to file four times a year anyway. So unless I'm misunderstanding what this provides, the $90 plan wouldn't cover all of the EU and the UK—you would still have to do some of this yourself.
I determined that this option was a non-starter and instead I would have to use an MoR.
Therefore, I decided to do some preliminary research on the three services that I mentioned before: Lemon Squeezy, Paddle, and Polar.sh. Each of which come with their own percentage fee and onboarding requirements.
In the end, the one that I decided to go with was Polar.sh for a few different reasons:
Lowest Fee: Out of the three, Polar has the lowest fee at only 4%. In fact, they describe themselves as the cheapest MoR on the market.
Easy Onboarding: Polar, in my opinion, has the easiest onboarding process, allowing you to get up and running accepting payments before needing to be reviewed, which will come after your first few sales.
Quality of Life Features: It provides many quality of life features such as:
So, I decided to migrate over, which ended up being a lot easier than I originally thought it would.
In order to do so, I initially decided to do a proof of concept using Go, adding in Polar.sh alongside Stripe so that I could easily switch between the two when testing. To do so, I needed to make a few changes to my database schema.
In order to do so without accidentally breaking prod, I needed a way to be able to fork my production data into a new database branch so that I could test it properly. Fortunately, I was able to easily achieve this thanks to my Postgres provider, Neon.
The first change that I needed to make was to migrate all of my existing tables and columns to have a prefix of stripe_. This enabled me to segment the existing columns by platform, which meant I could add new ones in and they wouldn't be conflicting.
Because when it comes to Go, I like to use SQLC, this was easy enough for me to make the change throughout the code, as I had compile-time checking to make sure that I hadn't left any previous references to the non-prefixed columns.
Once I had confirmed that the changes were working, I then merged these in. Next, it was time to add in support for Polar.sh.
Fortunately, for the most part, Polar works very similar to Stripe. So, the majority of the changes were setting up a similar schema and business logic as what I had already defined. However, there are a few key differences between the two platforms to be aware of:
Both Stripe and Polar provide an entity type called a product which is used to represent what it is that the customer is purchasing. This product can be anything you want from a simple course all the way up to a different product tier such as a pro plan.
Each product then has an associated price, which on both platforms can either be:
The Key Difference:
Personally, I actually found that I preferred the way that Polar worked when it came to my database schema. This is because when using Stripe, I was having to store both a product ID and a price ID column for each of my products. Whereas with Polar, I could just reduce this down to a single product ID, which made my schema simpler.
That being said, one caveat with Polar's approach of having a one-to-one mapping of product and price does mean that if you like to use prices to represent multiple tiers of a product, then this doesn't directly translate over. Instead, you need to create multiple products in Polar—one to represent each pricing tier.
Both platforms provide an entity type called a customer, which is basically the financial representation of a user that you would find in your own platform.
Stripe Approach: To map your own user with the Stripe customer, you'll typically need to use either a lookup table or add a column to your user table, which means you can then reference the customer entity in Stripe for your user later on.
Polar Approach: There's no need to do this as Polar allows you to set a field on the customer called external_id, which you can use to reference the customer instead of the ID that's generated by Polar. By setting a customer's external ID to the ID of your own internal user, you don't need to store the Polar customer UUID inside of a lookup table, which can help simplify your database schema.
While this is a minor implementation detail, it could potentially have an impact when it comes to any foreign key references in your database. However, given the fact that you can store a UUID inside of a varchar, it's likely not going to be too much of an issue.
Other than these three differences, the rest of the migration was pretty straightforward and mostly involved:
To make the implementation easier, I made use of Go interfaces to define any custom business logic methods I was using with the Stripe SDK and therefore what I would need to reimplement in order to make it work with Polar. Basically, it acted like a blueprint for what I was needing to build.
To make testing easier, Polar comes with its own sandbox environment which you can find at sandbox.polar.sh and is able to be toggled between in the SDK. This allows you to test that everything is working before going live, which is rather important when it comes to integrating with a payment provider and dealing with both credit cards and real money.
Once I was confident that the migration was working in dev, I pushed up the changes to prod and saw my first successful Polar transaction come through, letting me know I had successfully migrated over.
All in all, migrating over my existing project wasn't too difficult. And as I mentioned before, I'm likely going to be using Polar on any future projects for the foreseeable future.
Fortunately, because I use Better Auth as my auth provider, it's incredibly simple to integrate with Polar thanks to its fantastic Better Auth plugin, which can get you up and running accepting payments in just a couple of minutes.
The plugin documentation on the Better Auth web page is pretty comprehensive on how to achieve this. But if you'd like to see a full video where I implement Polar into an existing Better Auth project, then let me know in the comments and I'll draft up a dedicated walkthrough showing how to do this.
All in all, for myself, migrating away from Stripe to Polar has been a great decision as it's prevented me from needing to spend time dealing with some of the more tedious tasks of shipping software. Instead, it's allowed me to focus more on creating and building, which really is what I want to be doing.
Personally, this is something that I want to be focusing more and more on in the future—opting to have a low-maintenance lifestyle where instead of spending time trying to do everything, I'm instead investing more in solutions that give me time back.
This includes using platforms like Polar and of course, database solutions like Neon, who have allowed me to not need to worry when it comes to setting up and deploying databases to use with all of my projects.
This article is based on my personal experience migrating from Stripe to Polar.sh. Your mileage may vary depending on your specific use case and requirements. Always consult with tax and legal professionals for advice specific to your situation.
]]>For the past few months, I've been deploying the majority of my production services to a VPS through the use of Dokploy. I originally did an entire video talking about how it had become my favorite way to deploy to a VPS in 2025, taking over from my original setup of using Docker Stack. In that article, I mentioned that I looked at a few different options when it came to finding a new platform for me to deploy on, with one of the main contenders being Coolify.
Ultimately, I decided to pass on Coolify and chose Dokploy for a few different reasons. I intentionally decided not to share those reasons in that original article as I wanted it to focus more on setting up Dokploy and deploying an application through it rather than comparing different options to one another.
However, as it turns out, a lot of you were really interested in why I didn't go with Coolify. In fact, it was perhaps the most common question that I got asked in that article's comments. Therefore, I decided to do an entire comparison talking about not only why I chose Dokploy over Coolify, but also doing a more in-depth comparison between the two, looking at what they have in common, as well as some of the key differences in order to help you decide which one might be right for you.
Before comparing both Dokploy and Coolify to one another, let's take a little bit of time to quickly give an overview of each of these projects and what they share in common.
Both Dokploy and Coolify are known as platforms as a service (PaaS) which are services that enable developers to deploy, manage and scale applications without having to worry about the underlying infrastructure complexities. Some of the more popular platforms as a service include Vercel, Netlify and Railway. However, these are proprietary platforms whereas both Coolify and Dokploy make use of open-source technologies and are self-hostable.
This provides a few key benefits such as:
Coolify was first created by Andras Bachai, who started the project back in 2022 and has been working on it full-time since middle of 2023. The application itself is built using PHP with Laravel. Under the hood, it makes use of Docker in order to both build and deploy applications.
GitHub Stats:
Dokploy is a much newer project, started just over a year ago in April 2024 by developer Mauricio Suárez. Despite being relatively new, Dokploy has managed to absolutely crush it when it comes to developer cadence.
GitHub Stats:
While the tech stack might feel like an implementation detail, for myself, it absolutely plays a role when choosing one platform over the other. By choosing one with a tech stack I have a better understanding of, it means I'm more likely to be able to contribute to the project if I ever need to.
For this comparison, I set up both platforms on separate VPS instances to ensure fair testing without resource contention. I used Hostinger KVM2 instances for consistency - each with 2 vCPUs, 100GB SSD storage, 8GB memory, and 8TB monthly bandwidth.
Note: This comparison is sponsored by Hostinger, who also sponsors both the Coolify and Dokploy projects. You can get your own VPS instance at hostinger.com/dreamsofcode and use coupon code DREAMSOFCODE for 10% off.
Let me break down my comparison across several key categories:
Both platforms provide a single command installation that takes a few minutes to complete.
Coolify Advantages:
Dokploy Advantages:
Issue I Encountered:
With Coolify, I ran into problems during setup because I had configured my firewall to deny public SSH access (a common security practice). Coolify couldn't set up the local server for deployments because it couldn't connect to itself via SSH. While I eventually resolved this by adjusting firewall rules, it required networking knowledge and left me with a slightly negative first impression.
Dokploy, on the other hand, worked straight out of the box with my security configuration.
Winner: Dokploy - Better overall experience despite Coolify's superior installation process.
I monitored resource usage at multiple points throughout the platform lifecycle.
Memory Usage:
Both platforms used roughly 1GB of memory each - quite high but understandable given their tech stacks.
CPU Usage:
After deploying services, Coolify's resource usage increased even further, especially when metrics were enabled. I tested this across multiple VPS instances to confirm the results.
Winner: Dokploy - Significantly more efficient resource utilization.
Hierarchy Comparison:
Key Difference:
Coolify includes environments (production, staging, etc.) as a native concept, while Dokploy goes directly from projects to services. This gives Coolify an additional dimension for organization and shared variables.
Update: Dokploy has since released environments in v25, bringing it to parity with Coolify.
Winner: Coolify - More intuitive organization with environments (though this has since been addressed in Dokploy).
This is highly subjective, but I found significant differences:
Dokploy Advantages:
Coolify Issues I Encountered:
Winner: Dokploy - By a considerable margin for my personal preferences.
Both platforms excel in this core functionality:
Similarities:
Dokploy Advantages:
Winner: Tie - Both meet most needs, with slight edge to Dokploy for broader provider support.
Both platforms offer production-ready database deployment:
Shared Features:
Differences:
Winner: Tie - Different strengths that balance out.
Both platforms support review apps/preview deployments for pull requests. However, both lack some advanced features I'd like to see:
Shared Support: Slack, Telegram, Discord, SMTP email
Differences:
Winner: Dokploy - Better production-ready monitoring.
Coolify provides built-in Cloudflare Tunnels support, which is excellent for homelab setups where you want to expose services without port forwarding.
Dokploy can work with Cloudflare Tunnels but requires manual setup.
For homelab users, this could be a deciding factor in favor of Coolify.
This is perhaps the most significant difference:
Coolify:
Dokploy:
This licensing restriction is a significant consideration for some users and organizations.
| Category | Winner | Reasoning |
|---|---|---|
| Ease of Installation | Dokploy | Better compatibility with security configs |
| Resource Usage | Dokploy | Much more efficient CPU usage |
| Structure | Coolify | Native environment support (now tied) |
| UI/UX | Dokploy | More consistent and intuitive interface |
| Application Deployment | Tie | Both excellent with different strengths |
| Database Services | Tie | Different advantages that balance out |
| Feature Set | Dokploy | Better production-ready features |
| Licensing | Coolify | Fully open-source vs source-available |
Final Score: Dokploy 6, Coolify 4
For my personal needs and preferences, Dokploy came out ahead. The deciding factors were:
However, the licensing concern with Dokploy is significant. I'd love to see these features come under something like AGPL v3, which would protect the author's IP while preventing ambiguity around self-hosting.
Choose Coolify if:
Choose Dokploy if:
Both platforms are actively developed and improving rapidly. This comparison represents a moment in time, and future updates may address current limitations. The Coolify team has been working on UI improvements in v4, and the Dokploy team continues to add features rapidly.
Ultimately, both are fantastic platforms that make self-hosting much more accessible. The choice often comes down to personal preferences, specific feature requirements, and licensing considerations.
Disclosure: This comparison includes sponsored content from Hostinger, who also sponsors both Coolify and Dokploy projects.
]]>Go 1.25 has finally dropped and with it we're seeing a number of new changes. Perhaps the most talked about of these are the various performance gains we're getting throughout the language including a new experimental garbage collector, faster slices, and improved JSON unmarshalling with the new experimental JSON/v2 package.
Whilst these performance improvements are pretty great, it's not what I would consider to be the most exciting part of this new JSON v2 package as it brings a number of other changes to both JSON marshalling and unmarshalling in Go. Changes that I believe are both overdue and that I and many other developers are going to be pretty happy with.
In this article, I'm going to show some of the more interesting changes coming to the new experimental JSON/v2 package found in Go 1.25, especially as there's a good chance that they'll become production in a future version of Go.
The first change that I want to talk about that's coming to the JSON/v2 package is the new formatting behavior when it comes to both nil slices and nil maps. Both of which are now rendered as either an empty array when it comes to the nil slice or an empty object when it comes to the nil map.
This differs to the existing behavior of the original encoding/json package. Here's how the original package handles nil values:
package main

import (
    "encoding/json"
    "fmt"
)

type Example struct {
    Slice []string `json:"slice"`
    Map   map[string]string `json:"map"`
}

func main() {
    data := Example{}
    result, _ := json.Marshal(data)
    fmt.Println(string(result))
    // Output: {"slice":null,"map":null}
}
However, if I change this to instead import the v2 package:
package main

import (
    "encoding/json/v2"
    "fmt"
)

type Example struct {
    Slice []string `json:"slice"`
    Map   map[string]string `json:"map"`
}

func main() {
    data := Example{}
    result, _ := json.Marshal(data)
    fmt.Println(string(result))
    // Output: {"slice":[],"map":{}}
}
This time you get back an empty array for the nil slice and an empty object for the nil map.
Whilst this change may seem like a smaller one, it's actually kind of a big deal as the null rendering was something that would often trip up developers when working in Go. This is because when it comes to Go, it's actually very common to encounter nil slices due to the fact that nil is the zero value of a slice, but also because working with nil slices is actually pretty safe.
For example:
var nilSlice []int
fmt.Println(len(nilSlice)) // Output: 0

nilSlice = append(nilSlice, 1)
fmt.Println(nilSlice) // Output: [1]
Because of this, the Go documentation recommends preferring nil slices over instantiating an empty one as it's more performant to do so because it avoids a potentially unnecessary heap allocation. That being said, the documentation also mentions an exception to this rule if there's the need of rendering an empty array when it comes to JSON marshalling.
Therefore, in order to prevent any nils from being rendered as null, one would need to make sure that any nil slices are instantiated before performing JSON marshalling. However, this was often easier said than done, especially as you may not be responsible for the creation of the slice that you need to marshal.
Fortunately, this has now been resolved in the experimental encoding/json/v2 package, which will make it much easier to write Go APIs that conform to an API specification or just meet the expectations of a typical frontend.
One thing to consider with this change is that there may be times where the old behavior of rendering nils as null is actually desired. Fortunately, the original proposal for this change did take this requirement into consideration and has proposed a solution through another change being brought with the JSON/v2 package.
The json.Marshal function now supports an additional variadic parameter which can be used to pass in various different options. The two that have been added in order to support this previous null formatting behavior are:
FormatNilSliceAsNullFormatNilMapsAsNulldata := Example{}
result, _ := json.Marshal(data, json.FormatNilSliceAsNull)
In addition to these two options, a number of other ones have also been added into the JSON v2 package in order to be able to fine-tune JSON marshalling outside of struct tags. Some of the more interesting options include:
For a full list of these options, you can refer to the encoding/json/v2 documentation.
Perhaps one of the more interesting options is the new WithMarshalers option, which is used with perhaps my favorite new feature coming to the JSON v2 package: the MarshalFunc function.
This function allows you to create a custom JSON marshaller inline without you needing to implement the json.Marshaler interface on a custom type.
boolMarshaler := json.MarshalFunc(func(enc *jsontext.Encoder, val bool, opts json.Options) error {
    if val {
        return enc.WriteToken(jsontext.String("✓"))
    }
    return enc.WriteToken(jsontext.String("✗"))
})

result, _ := json.Marshal(true, json.WithMarshalers(boolMarshaler))
fmt.Println(string(result)) // Output: "✓"
In addition to booleans, we can also create a custom marshaller for other types thanks to the fact that this function makes use of generics:
intMarshaler := json.MarshalFunc(func(enc *jsontext.Encoder, val int, opts json.Options) error {
    squared := val * val
    return enc.WriteToken(jsontext.String(fmt.Sprintf("%d", squared)))
})

result, _ := json.Marshal(4, json.WithMarshalers(intMarshaler))
fmt.Println(string(result)) // Output: "16"
What if you want to use multiple custom marshallers at once? This is easily achieved by combining them into a single marshal value using the JoinMarshalers function:
type CustomStruct struct {
    Flag   bool `json:"flag"`
    Number int  `json:"number"`
}

combinedMarshaler := json.JoinMarshalers(boolMarshaler, intMarshaler)
data := CustomStruct{Flag: true, Number: 4}
result, _ := json.Marshal(data, json.WithMarshalers(combinedMarshaler))
This makes it a lot easier to reuse groups of marshallers across your entire project.
In addition to the json.MarshalFunc, we also have the json.UnmarshalFunc, which basically works the same way, but is used to define any custom unmarshallers:
boolUnmarshaler := json.UnmarshalFunc(func(dec *jsontext.Decoder, val *bool, opts json.Options) error {
    token, err := dec.ReadToken()
    if err != nil {
        return err
    }

    str := token.String()
    if str == "yes" {
        *val = true
    } else if str == "no" {
        *val = false
    }
    return nil
})

var result bool
json.Unmarshal([]byte(`"yes"`), &result, json.WithUnmarshalers(boolUnmarshaler))
fmt.Println(result) // Output: true
The new JSON v2 package brings about some other changes and improvements for JSON marshalling of different Go types:
Byte arrays are now formatted as base64 by default rather than as an array of integers, which is what they were rendered previously in version one. This brings the behavior to the same as byte slices, making the whole thing more consistent.
format JSON Struct TagThe JSON v2 package also brings a new struct tag called format which can be used to modify the formatting of different types.
type Data struct {
    ByteSlice []byte `json:"data,format:array"`  // Renders as array of integers
    ByteArray [4]byte `json:"hash,format:hex"`   // Renders as hexadecimal string
    Encoded   []byte `json:"encoded,format:base64"` // Explicitly as base64
}
type Event struct {
    Duration time.Duration `json:"duration,format:sec"`  // Renders as seconds
    Timeout  time.Duration `json:"timeout,format:nano"`  // Renders as nanoseconds
    Interval time.Duration `json:"interval,format:iso8601"` // ISO8601 format
}
type Schedule struct {
    Date     time.Time `json:"date,format:dateonly"`     // Date portion only
    Time     time.Time `json:"time,format:timeonly"`     // Time portion only
    Created  time.Time `json:"created,format:'2006-01-02 15:04:05'"` // Custom format
}
The default formatting is RFC 3339, which you can also explicitly set if you want.
type Response struct {
    Items  []string          `json:"items,format:emitnull"`  // Renders nil as null
    Params map[string]string `json:"params,format:emitempty"` // Renders nil as {}
}
The last big change I want to mention is two new functions being added to the JSON package: MarshalWrite and UnmarshalRead. These are basically replacements for the encoder and decoder types found in the original JSON package, with some improvements.
// Writing to file with encoder
file, _ := os.Create("data.json")
defer file.Close()
encoder := json.NewEncoder(file)
encoder.Encode(data)

// Reading from file with decoder
file, _ := os.Open("data.json")
defer file.Close()
decoder := json.NewDecoder(file)
var result MyStruct
decoder.Decode(&result)
// Writing to file
file, _ := os.Create("data.json")
defer file.Close()
json.MarshalWrite(file, data)

// Reading from file
file, _ := os.Open("data.json")
defer file.Close()
var result MyStruct
json.UnmarshalRead(file, &result)
There are a couple of differences to be aware of:
MarshalWrite function doesn't add a newline once it's finished writing out the JSON data, which the encode method of the encoder did beforeUnmarshalRead function will now consume the entire IO reader and read until the end of file, differing from the decoder which would only read up to the next JSON valueIf you want the old behaviors, you can still use the old encode and decode methods of the encoder and decoder, respectively. These have been moved to a new package called jsontext for more low-level streaming capabilities.
All in all, I think that the JSON v2 package is shaping up to be rather exciting. As someone who likes to use Go for building backend services and APIs, I'm perhaps now more excited for Go 1.26 and the new JSON package than I have been for any other Go release since 1.22, which is when we finally got decent HTTP routing inside of the Go standard library.
Overall, I think that this is a testament to the way that the Go language continues to evolve in a way that's both steady, but also feels intentional with each design decision.
Note: Remember to set the GOEXPERIMENT=jsonv2 environment variable when using the experimental JSON/v2 package.
When it comes to writing code, I've been working in the terminal now for just over 10 years, and it's perhaps one of the best decisions I've ever made. Not only has it improved my own productivity when developing software, but given the recent rise of AI agents such as Claude Code and Gemini CLI—both of which operate inside the command line—having this terminal-based workflow is perhaps now more important than ever before.
By default, however, the terminal isn't exactly the most hospitable place, especially if you're coming from a more full-featured IDE or text editor such as JetBrains, VS Code, or even Cursor. Therefore, given that more and more people are likely going to be using the terminal in the near future, I thought it would be worthwhile sharing some of my favorite CLI tools that I've picked up over the past 10 years.
These tools have not only helped to improve the experience of working in the terminal, but have also helped to make me significantly more productive. Let's dive in.
To kick things off, let's start with one of my favorite CLI tools that I picked up in the past couple of years: Zoxide, which is a drop-in replacement for the cd command that makes navigating your file system from the terminal extremely efficient.
Let's first take a look at how I would normally change into a directory via the CLI using the cd command. Here I want to change into a project I'm currently working on found inside of:
~/projects/zenhq/studio/studio-app
As you can see, this is kind of a tedious path. By using the cd command, I have to type out the full path including any symbols, which is somewhat tedious and can be error-prone.
Now let's see how we can achieve the same thing using Zoxide (which I've set to the command z):
z projects zenhq studio app
This requires far less typing to achieve the same thing. However, we can actually optimize this even further:
z studio app
And it'll again take me to the exact same directory. Very cool.
The way that Zoxide works is by performing fuzzy matching on the arguments you pass in to the path of any directories you've already visited using Zoxide. This means you don't need to type out the exact path in order for it to match, which can help to save a lot of time when jumping between different projects and directories.
Examples:
z config instead of cd ~/.config/neovimz dreams of codeAdditionally, you can configure Zoxide to use the cd command instead of z, allowing you to use cd as you normally would, but with the added benefits provided by Zoxide.
Learn More: I've done a dedicated video on Zoxide that covers configuration details and caveats.
This next tool is incredibly useful when working in a codebase you might be unfamiliar with—which, given the rise of AI agents, is more and more likely to be the case. This command is rg, which is shorthand for ripgrep, an improved version of grep.
If you're not familiar with grep, it's basically a CLI command that allows you to search for occurrences of text patterns inside files in a directory. The grep command comes standard in modern Unix-based operating systems, but it's not exactly what I would call a modern command, especially given how slow it actually is.
Key Improvements of Ripgrep:
grep.gitignore# Search for "isAdmin" in current project
rg isAdmin
# Traditional grep equivalent (slower and includes node_modules)
grep -r isAdmin .
The speed improvement and intelligent filtering make ripgrep much more user-friendly and effective when working with larger projects.
Continuing the trend of improving legacy CLI commands, we have fd, which is to find as ripgrep is to grep, bringing similar improvements to file searching.
Let's say I want to list all files that have the word "auth" in their filename. With the traditional find command:
find . -type f -name "*auth*"
With fd, this becomes much cleaner:
fd auth
.gitignore by defaultAdvanced Example:
# Find files containing "test" but exclude those with "route"
fd test --exclude "*route*"
The equivalent find command would be much more complex and less intuitive.
This next command is the big one—perhaps having one of the biggest improvements to the way I work in the terminal of all time: tmux, which I've actually done a whole video on talking about how it's forever changed the way I write code.
tmux is a terminal multiplexer, meaning it allows you to spawn multiple pseudo terminals and arrange them either as panes, individual windows, or even in multiple sessions, each of which you can navigate between.
Key Benefits:
Perhaps the biggest benefit is session persistence, especially when working on remote machines over SSH. Here's how it works:
# SSH into server and start tmux
ssh user@server
tmux

# Start a long-running task
htop

# Detach from session (Ctrl+b, then d)
# Even if SSH connection drops, you can reconnect:

ssh user@server
tmux a  # Reattach to existing session
This is invaluable for long-running tasks and prevents work loss due to connection issues.
Because tmux has a CLI interface, you can automate various actions. In my case, I've integrated these automations into my own Vibe CLI application:
# Opens new tmux window with git worktree and Claude Code
vibe feature new-feature
The GitHub CLI is a rather recent addition to my toolkit, but despite only using it for a short time, it's already been a huge improvement to my workflow. I've been using it more than the actual GitHub website itself.
Main uses I find for the GitHub CLI:
# Create a new repository
gh repo create my-new-project --public

# View issues
gh issue list

# Create a pull request with AI-generated description
gh pr create --title "Add new feature" --body-file -
The ability to stay in the terminal and avoid browser distractions makes this tool incredibly valuable for a terminal-based workflow in 2025.
Another tool I've been using extensively is the Doppler CLI. Doppler is my favorite secrets management platform, and the CLI makes it incredibly powerful for local development.
Doppler allows you to easily manage secrets for different environments (dev, prod, personal) and inject them into your applications without storing them locally.
# Run local development with dev environment secrets
doppler run --project dreams-of-code --config dev -- bun run dev
This approach provides several benefits:
.env files on diskUsing the Doppler CLI adds an additional layer of security and is incredibly valuable when working as a team.
pass (also known as password store) describes itself as the standard Unix password manager. I like to describe it as the most perfect password manager for the terminal, making use of open source technologies such as GPG and Git.
# Set environment variable from pass
export OPENAI_API_TOKEN=$(pass show api-tokens/openai)

# Use with database connections
psql $(pass show databases/prod-url)

# Copy password to clipboard
pass -c github.com
Because pass uses Git under the hood, you can securely sync passwords across machines:
# Clone encrypted password store
git clone [email protected]:username/password-store.git ~/.password-store

# Access requires GPG key (I use a YubiKey for additional security)
pass show some-password  # Requires YubiKey + PIN
Learn More: I've done a dedicated video on pass covering setup and configuration.
jq is pretty much a staple for any backend/fullstack developer. It's a tool to make working with JSON data way more effective.
By default, jq will automatically format any JSON passed via standard input:
curl api.example.com/data | jq
The real power comes from jq filters, which allow you to extract and transform JSON data:
# Aggregate total sales value
curl api.example.com/sales | jq '[.[] | .value] | add'

# Extract specific fields
curl api.example.com/users | jq '.[] | {name: .name, email: .email}'
jq is invaluable for debugging APIs and automating JSON processing in shell scripts. While the syntax can be tricky to learn initially, it pays off in dividends.
stow is what I use for managing my dotfile configurations. It allows you to create symbolic links for files in a directory, making it perfect for storing dotfiles in a repository and deploying them across systems.
# Directory structure
~/dotfiles/
├── nvim/
│   └── .config/
│       └── nvim/
│           └── init.lua
└── zsh/
    ├── .zshrc
    └── .zsh_aliases

# Deploy configurations
cd ~/dotfiles
stow nvim  # Creates symlinks in ~/.config/nvim/
stow zsh   # Creates symlinks in ~/
Learn More: I have a detailed video on stow on my second channel.
Note: Recently I've been experimenting with Home Manager for NixOS/Nix Darwin, but I still use stow for certain configurations where symbolic links are superior.
Last but certainly not least is fzf (or "fuzzy find" if you speak the Queen's English). While powerful by itself, fzf truly shines when integrated with other commands.
# Interactive file selection
fzf
This opens a searchable list of files in the current directory with fuzzy matching.
The real power comes from integration with other tools:
With password store:
# Interactive password selection
pass show $(pass ls | fzf)

# Or with shell integration, just press TAB:
pass show   # Opens fzf interface
With shell history:
# Search command history (Ctrl+R with fzf integration)
history | fzf
fzf works excellently for building interactive CLI applications. In my Dreams of Code CLI, I use fzf to select lessons:
# Interactive lesson selection for course management
dreams-of-code edit $(dreams-of-code list-lessons | fzf)
Learn More: I cover building CLI applications with fzf in my CLI Applications in Go course.
These 10 CLI tools have fundamentally transformed how I work in the terminal over the past decade. Each one addresses specific pain points and inefficiencies in the default terminal experience:
Of course, these aren't the only tools I use in the CLI, but they are the ones that have had the biggest impact recently. The combination of these tools creates a powerful, efficient, and enjoyable terminal workflow that rivals any GUI-based development environment.
If you want to know about other tools I'm using, let me know in the comments and I'll consider doing a part two to this article!
Special thanks to Hostinger for sponsoring this content. If you need an affordable VPS for your projects, check them out and use coupon code DREAMSOFCODE for an additional 10% discount.
When it comes to building APIs and services, my go-to language of choice is well, Go. And for good reason. Personally, I find that Go strikes a decent balance when it comes to safety, performance, and ease of implementation. While it may not excel in all these areas compared to other languages, I find that when it comes to being pragmatic, Go is a language that really shines.
Despite this pragmatism, however, there is one area where I find Go to be less ideal compared to other web-focused languages: authentication.
If you take a look at other web-first languages such as Ruby with Ruby on Rails or PHP with Laravel, it's incredibly easy to set up a project that has authentication built in. However, when it comes to Go, the same can't really be said.
While the Go standard library does provide a couple of packages that can be used for authentication primitives—things such as password hashing and OAuth2—these are by no means a complete auth solution.
Now I know what you're thinking: comparing the standard library of Go to these more full-featured frameworks such as Rails and Laravel isn't exactly an apples-to-apples comparison. And you're right. However, even when you consider third-party packages available to Go, the situation is still kind of bleak.
The best package available for Go is probably Auth Boss, which to be fair is pretty feature-rich. However, it unfortunately requires you to set up a lot of the integration yourself with your own system, including things such as database storage and API endpoints.
This isn't exactly a bad thing. However, when you compare it to another open source package that I've been using recently—Better-Auth—the difference is night and day.
Better-Auth makes it incredibly easy to add authentication into your application that works with your API layer, your front end, and even your chosen database and its driver without you needing to write any of the implementation yourself.
In addition to basic authentication, Better-Auth makes it incredibly simple to add other auth features into your application through its fantastic plugin system:
All of these features are available if you happen to use a third-party auth provider with Go, such as Clerk or Auth0. However, unlike these platforms, which can sometimes cost an eye-watering amount (for example, two-factor authentication support on Clerk is $100 a month), Better-Auth allows you to have all of this for free.
The plugin system also provides other features that can often be tedious to implement when building a new SaaS product, including handling payments with plugins for Stripe and Polar.sh that handle all the complexity around products, checkouts, subscriptions, and even webhooks.
All this not only makes Better-Auth my favorite auth package, but it's perhaps my favorite library when it comes to building a SaaS product.
However, there is unfortunately one catch: Better-Auth isn't available for Go. Instead, it's only available for TypeScript.
For some people, this isn't too much of a problem, but for myself, it presents a bit of an issue. While I currently do use TypeScript on the front end with Next.js, I still like to use Go when it comes to back-end services such as APIs or other systems.
So, what is a mixed language full-stack developer to do? Well, one option is to just stop using Go and instead use TypeScript on the back end. While I have been tempted a couple of times to do this over the past few weeks, I fortunately haven't yet needed to do so.
This is because it's still possible to use Better-Auth when it comes to a Go backend API, thanks again to its fantastic plugin system.
This article is sponsored by boot.dev. Use code DREAMSOFCODE to get 25% off your first payment.
The first thing we're going to need is actually a TypeScript server with a database connection. Fortunately, this isn't as tricky as it might seem, especially if you're using a meta framework such as Next.js, Nuxt, or SolidStart.
In my case, I like to use Next.js with Drizzle, which has great support for Better-Auth and also allows me to export database migrations, which is really useful when working with SQL databases.
However, if you're using just a front-end framework by itself (something like React, Vue, or Solid), you're going to need basically a dedicated auth server powered by something like Hono or similar. Personally, I would only really recommend using this approach with a meta framework just because it's a lot easier.
With your TypeScript server selected, the next thing to do is to install Better-Auth. This step is basically following the installation documentation, which is pretty easy to navigate.
For a really quick setup, you can basically paste the URL of Better-Auth into Claude or similar AI tools and it will set it up for you. Although I do recommend doing this by hand the first time just to better understand it.
For this article, I've created a sample project that contains two applications:
You can find the complete code in the GitHub repository.
The easiest way to achieve Go integration is to make use of another one of Better-Auth's plugins: specifically the JWT plugin, which we can use to generate JSON Web Tokens for authentication with our Go API.
If you're unfamiliar with JWTs, they're basically a self-contained JSON-encoded token that includes both user data and verification through a cryptographic signature, which makes them perfect for authenticating across services.
In our case, we'll use this JWT to not only prove that the user has been authenticated, but to also pull out some of the user's information, including their ID, name, and email address.
To add the JWT plugin to Better-Auth is incredibly easy. All we have to do is import the function and add it to the plugins array in the Better-Auth configuration:
import { betterAuth } from "better-auth"
import { jwt } from "better-auth/plugins/jwt"

export const auth = betterAuth({
  // ... other config
  plugins: [
    jwt()
  ]
})
Then run the Better-Auth CLI generate or migrate command depending on your setup.
Rather than implementing JWT parsing by hand, I'm going to use what I think is perhaps the best package when it comes to working with JSON Web Tokens in Go: the JWX package by lestrrat-go.
go get github.com/lestrrat-go/jwx/v2
Here's how to parse the JWT token in Go:
package auth

import (
    "net/http"
    "github.com/lestrrat-go/jwx/v2/jwt"
    "github.com/lestrrat-go/jwx/v2/jwk"
)

type User struct {
    ID    string `json:"id"`
    Email string `json:"email"`
    Name  string `json:"name"`
}

func UserFromRequest(r *http.Request) (*User, error) {
    // Parse the JWT token from the request
    token, err := jwt.ParseRequest(r)
    if err != nil {
        return nil, err
    }

    // Get user ID from subject
    userID := token.Subject()

    // Extract email and name from claims
    var email, name string
    token.Get("email", &email)
    token.Get("name", &name)

    return &User{
        ID:    userID,
        Email: email,
        Name:  name,
    }, nil
}
By default when using Better-Auth, the user ID is stored inside the token's subject. Therefore we can pull it out by using the Subject() method of the parsed token.
An important step when using JWTs is verifying that the token was actually created by your authentication server. Better-Auth makes this key set available through an API endpoint when using the JWT plugin: /api/auth/jwks.
func UserFromRequest(r *http.Request) (*User, error) {
    // Fetch the key set from Better-Auth
    keySet, err := jwk.Fetch(context.Background(), "http://localhost:3000/api/auth/jwks")
    if err != nil {
        return nil, err
    }

    // Parse and verify the JWT token
    token, err := jwt.ParseRequest(r, jwt.WithKeySet(keySet))
    if err != nil {
        return nil, err
    }

    // Extract user information
    userID := token.Subject()
    var email, name string
    token.Get("email", &email)
    token.Get("name", &name)

    return &User{
        ID:    userID,
        Email: email,
        Name:  name,
    }, nil
}
In a production setting, you'd likely want to use the cache functionality of the JWK package to cache the key set rather than fetching it every time.
As mentioned, there's actually a caveat with sending tokens directly from the client. For each request to our Go API, we're actually making two requests: one to obtain the token from the auth server and the second being the actual request to the Go API.
While this works, it's not the most efficient approach. The solution is caching.
Here's a simple example of how to implement token caching:
class APIClient {
  private cachedToken: string | null = null;
  private tokenExpiry: number | null = null;

  async getToken(): Promise {
    // Check if cached token is still valid
    if (this.cachedToken && this.tokenExpiry && Date.now() User ID: {userData.user.id}
}
My favorite approach when it comes to sending authenticated requests is to perform request proxying. Rather than the client sending a request directly to the Go API, it instead sends it to the Next.js server, which then forwards it to the Go API in the backend.
Here's an example API route that proxies requests:
// pages/api/[...path].ts
import { auth } from "@/lib/auth"

export default async function handler(req: NextApiRequest, res: NextApiResponse) {
  // Get token from Better-Auth
  const token = await auth.api.getToken({
    headers: req.headers
  })

  // Proxy request to Go API
  const response = await fetch(`http://localhost:8080${req.url}`, {
    method: req.method,
    headers: {
      ...req.headers,
      "Authorization": `Bearer ${token}`
    },
    body: req.method !== 'GET' ? JSON.stringify(req.body) : undefined
  })

  const data = await response.json()
  res.json(data)
}
There is one major caveat with request proxying: you're essentially doing a double hop from your front-end to the Go API. However, this is only really an issue if:
Most of the time, if you keep your servers co-located and use a VPS, these caveats aren't too much of an issue.
With this setup, I've managed to continue using the language I most prefer for building back-end services (Go) while still being able to use what I think is the best authentication package out there (Better-Auth).
This approach has allowed me to build full-stack applications with a Go API and a TypeScript front-end framework like Next.js, getting the best of both worlds.
However, that being said, if TypeScript keeps getting packages that are as good as Better-Auth, then perhaps it's just a matter of time before I end up switching over completely!
If you're looking to learn how to build backend web services using either TypeScript or Go, I recommend checking out boot.dev. They even have a course on authentication that covers JWTs in more detail than I've covered in this article. Use the coupon code DREAMSOFCODE to get 25% off your first purchase.
]]>Title: Building an A.I. Blog Post Generator: How I Saved 120 Hours using an MCP with Neon
Slug: ai-blog-post-generator-using-an-mcp-with-neon
Published: 2025-06-03 08:00:00
Excerpt: When it comes to my content, I often create videos that can be somewhat deep technical guides. Whilst these videos can contain a lot of information within, it can sometimes be difficult to follow along with. So, I decided to go ahead and create a simple tool that makes use of A.I. in order to solve this issue for me.
Video URL: https://youtu.be/d05vNPmIIqc
Cover Image: https://assets.dreamsofcode.io/blog/2xoeTi0ngrvDofKhebwl9i0SOEq.png
So far, I've been kind of reluctant to use AI when it comes to writing code, which means that any bugs, security issues, or mistakes found in any of my projects was written by my own two hands. Outside of code generation, however, there are other places that I found AI to be incredibly useful for. These include things such as refining a product idea, thinking through technical design decisions, or just straight up using it as a better Google search.
Whilst I really like these more chat-based interactions, lately I've been using AI to automate a number of other tedious tasks that used to take up way too much of my time. These include things such as generating git commit messages when I've forgotten to commit for a while, or helping me to write documentation, which is something that's never really been my strong suit.
In addition to these, however, recently there's been one use case that stood above the rest, and has been my absolute favourite use of AI so far. Whilst this use case is a little bit more product-focused, it's managed to save me around 120 hours, at least by my calculations. Not only this, however, but it's also helped to solve one of the biggest problems I currently have with my content creation.
So what is this magical use of AI? Well, it's basically blog posts. I know, it sounds kind of dumb, but hear me out.
If you've followed my content for a while, then you know that I like to do deep technical guides on various different topics, such as setting up a Zenful Tmux configuration, advanced HTTP routing in Go, or spinning up a production-ready VPS from scratch. Because these videos contain a lot of information, they all suffer from the same problem. They lack a proper written guide to go along with them.
Now, to be fair, I have shared both code snippets and command lists on GitHub for each of these videos, and whilst it's better than nothing, it's not the same as a full, well-structured guide, in my opinion. Personally, I much prefer to follow along with written content when it comes to tackling technical tasks.
So given that I've almost completed my first full course, and I'm getting ready to jump back into creating content full-time, I decided it would be a good idea to go ahead and rectify this issue, not just for any new videos, but for old ones in my catalogue as well.
However, rather than spending time improving both my organisational and writing skills, which would no doubt make me a better content creator, and perhaps even a better man, I instead decided to lean into modernity, and went with outsourcing all of this personal development to AI.
I achieved this delegation of the human experience by building a new feature into my Dreams of Code website. That allows me to pick a video from my archive that I can then use to generate a fully formatted blog post from, with copyable code blocks, command snippets, URLs with further documentation, and even placeholders for screenshots I can add in later. Although that is something I'm planning on automating next.
But it doesn't just stop there, as I can also chat with an LLM in order to refine the blog post content, such as providing any missing context, fixing mistakes, or even adding in updated things I've learned since the original video was recorded. It basically gives me a rather complete draft based on my own content. Then all I need to do is just polish it ever so slightly.
So how did I go about building this? Well, that's actually been the most interesting part, as I initially started with a more traditional approach to developing this feature. But after running into a number of different issues, I ended up taking another route. One that was announced about six months ago in the AI space, and I've kind of overlooked. Consisting of three letters. M. C. P.
Before I explain what that is, and how it led to what I think is my best AI solution so far, let's take a look at the original approach that I tried, in order to gain some context onto some of the issues I ran into.
In order to be able to turn a video into a blog post, the first step I needed to complete was to convert the video into a transcription. To achieve this, I began by looking at the OpenAI transcription service. However, I ended up ruling it out because of two main reasons:
In addition to this file size restriction, the transcription service only supports audio durations up to 1500 seconds, which is 25 minutes in total. In my case, many of my videos are actually longer than this duration, which meant I would again need to process my audio files in order to be able to upload them, which again could impact the transcription quality.
Therefore, I decided to do some research and look for another approach, and ended up finding one that solved both of these issues. Whisper CPP, which is an open source project that allows you to run Whisper models locally with none of these restrictions.
# Clone and build Whisper CPP
git clone https://github.com/ggerganov/whisper.cpp.git
cd whisper.cpp
make

# Download a model (base model recommended for speed/quality balance)
./models/download-ggml-model.sh base

# Generate transcription from video
./main -m models/ggml-base.bin -f input_audio.wav -ot txt
So I cloned down the repo onto my system and followed the fantastic documentation in order to build it on my machine, which was the brand new AMD AI series of the Framework 13. Given the branding of the CPU, I kind of assumed it would work well with Whisper CPP, but that didn't end up being the case. Whilst it did work, it ended up being slower than I expected, especially when compared to running Whisper CPP on my older MacBook Pro.
Therefore, in order to save a bit of time whilst testing, instead of generating these transcriptions over and over again, I decided to instead store them in my Dreams of Code website Postgres database, which is powered by Neon.
This is important to note for a couple of reasons. The first of which is that Neon is the sponsor of this video, which I'm really excited about, as I've been using Neon as my Postgres provider for just over a year now, both on my Dreams of Code course website and other SaaS products as well.
In addition to me actually using the product, the second reason as to why Neon was important, however, is because they provide a couple of features that make it possible to use AI with my data securely, which I'll talk a little bit more about later on.
In any case, before I began writing the Whisper CPP transcriptions into my database, I went about forking my production data into a new branch, which is one of the features of Neon that I really like. This feature allows you to work with your production data without the risk of corrupting it. It basically allows you to test in production without actually testing in production. Yeah, it's pretty awesome.
-- Example transcription table structure
CREATE TABLE transcriptions (
    id SERIAL PRIMARY KEY,
    video_id VARCHAR(255) NOT NULL,
    title VARCHAR(500) NOT NULL,
    content TEXT NOT NULL,
    created_at TIMESTAMP DEFAULT CURRENT_TIMESTAMP,
    updated_at TIMESTAMP DEFAULT CURRENT_TIMESTAMP
);

-- Index for faster lookups
CREATE INDEX idx_transcriptions_video_id ON transcriptions(video_id);
With a new branch of my production data inside of Neon, and with Whisper CPP both installed and working on my system, I was now able to generate transcriptions for my videos and store them in my Postgres database. Therefore, step one was complete.
The next step was to turn this transcription into a well-formatted blog post. However, this is when things started to get a little more challenging.
Whilst Whisper is great for generating accurate transcriptions, when it comes to interpreting spoken CLI commands or code, then it kind of falls flat. This meant that, by itself, the transcription wasn't exactly usable to just publish as a blog post, unless I wanted to cause my readers to regret ever learning to read in the first place.
Therefore, in order to turn this transcription into a half-decent blog post, I needed to figure a way to both format and edit the content into something more readable. In order to achieve this, I had two options:
Given that editing this by hand would basically have been a full-time job, I decided to take the latter approach.
And so I started integrating the OpenAI SDK inside of my code, adding in an encouraging prompt asking the LLM to turn the generated transcript into a well-formatted blog post.
// Initial approach with OpenAI SDK
package main

import (
	"context"
	"fmt"
	"os"

	"github.com/sashabaranov/go-openai"
)

func generateBlogPost(transcription string) (string, error) {
	client := openai.NewClient(os.Getenv("OPENAI_API_KEY"))

	resp, err := client.CreateChatCompletion(
		context.Background(),
		openai.ChatCompletionRequest{
			Model: openai.GPT4,
			Messages: []openai.ChatCompletionMessage{
				{
					Role: openai.ChatMessageRoleSystem,
					Content: "You are a technical writing assistant. Convert video transcriptions into well-formatted blog posts with proper code blocks, headings, and structure.",
				},
				{
					Role: openai.ChatMessageRoleUser,
					Content: fmt.Sprintf("Please convert this transcription into a well-formatted blog post:\n\n%s", transcription),
				},
			},
			MaxTokens: 4000,
		},
	)

	if err != nil {
		return "", fmt.Errorf("ChatCompletion error: %v", err)
	}

	return resp.Choices[0].Message.Content, nil
}
Unfortunately, however, formatting the text from a transcription into a half-decent technical blog post isn't as easy as using a single encouraging prompt. This is because, well, as we know, LLMs hallucinate. And whilst a good percentage of those hallucinations are correct, there are times when they get things wrong.
In my case, the two biggest issues that I would encounter would be either when a command or block of code was interpreted incorrectly, or when the context of the video would sometimes be misunderstood. This would most likely happen when the transcription misunderstood what I like to think was my accent, but most likely was times when I was mumbling.
This compounding of LLM mistakes would then bubble up in the output of the written content. Sometimes this would only require me to change a single line or two in order to rectify the issue, but in most cases would require me to spend a bunch of time re-editing the entire thing.
Initially, I decided to implement and test this feature in order to help reformat all of the lesson transcriptions in my Building CLI Applications in Go course. And it was taking me around an hour per lesson in order to re-edit the transcription.
# Quick calculation of the time commitment
lessons = 120
time_per_lesson = 1  # hour
total_time = lessons * time_per_lesson
print(f"Total time needed: {total_time} hours")
# Output: Total time needed: 120 hours
Firing up the Python REPL in order to figure out how much time this would have taken me, I ended up working out that, given there were 120 lessons in the course, it would have taken me just around 120 hours. And that's not even considering the fact that there was other content that I wanted to bloggify.
And so after spending around 5 hours editing a grand total of 5 lessons, it became pretty clear that I needed to find another approach.
And so I spent some time thinking about what my ideal workflow would be. In the end, it was actually kind of simple. All I needed to do was to be able to provide more context to the LLM whenever it made a mistake. However, I couldn't do this statically, i.e. providing multiple prompts inside of my code. Instead, the context needed to be given in a much more dynamic way, such as in response to what the LLM was generating. Basically, I needed to be able to have a conversation with it.
In order to test that this conversing workflow was the right approach, I decided to just go ahead and copy and paste the transcription into Claude, followed by prompting for the changes that I wanted it to make. This is what I believe the AI bros refer to as prompt engineering.
As it turns out, prompt engineering worked really well, and allowed me to interactively work with the LLM to shape the transcription into a semi-decent blog post. Honestly, it kind of felt like I had my own personal copywriter, just one that didn't really complain about the amount of hours I was making it work, and didn't ask for any time off.
All jokes aside, it was something that was quite empowering. So, having proved that the workflow was effective, I decided to implement this chat-based interface into my solution.
However, rather than building my own AI chat app, like some once-blonde-haired mad lad, I instead decided to use a different technology. One that's come about quite recently in the AI landscape, one that Neon supports - MCP, which stands for Model Context Protocol.
If you're not too sure what that is, it basically defines a standard way for LLM chat interfaces to interact with external data sources, allowing you to connect a model directly to your applications, APIs, and databases such as Postgres.
As I mentioned, Neon, who I used for all of my Postgres needs, provides an MCP server that you can connect to, allowing you to work with your data through the use of an LLM.
Now, if that sentence gave you a somewhat visceral reaction, then don't worry, that's the exact same feeling I had when I first considered this approach as well. The idea of letting a hallucinating LLM loose in my production database is a rather uncomfortable feeling. Forget vibe coding, that to me feels a lot more like YOLO coding.
However, if you remember, I mentioned that Neon has a feature that mitigates the risk of a bad hallucination causing all of your data to be deleted. That feature is branching, which I actually talked about a little bit before.
Basically, it allows you to fork your entire database into a separate branch that you can then use without the risk of blowing up any of the parent data, which in my case was production. Typically, I use this branching feature when it comes to testing database migrations, or if I want to deploy a review version of my application without it potentially breaking prod.
In this case, it was also perfect for ensuring that the LLM wouldn't break anything when it accessed my transcription data. And so, I went and forked my production data yet again into another branch - one that I could use specifically with the MCP server.
// Claude Desktop MCP Configuration
// Add to ~/Library/Application Support/Claude/claude_desktop_config.json (macOS)
// or %APPDATA%/Claude/claude_desktop_config.json (Windows)
{
  "mcpServers": {
    "Neon": {
      "command": "npx",
      "args": ["-y", "mcp-remote", "https://mcp.neon.tech/sse"]
    }
  }
}
In order to be able to use it, I then needed to configure the Claude desktop application to connect to the server provided by Neon. This meant that I unfortunately had to use my MacBook Pro, as there wasn't a version of Claude desktop available for Linux, which was a bit of a shame.
In any case however, after downloading Claude onto my MacBook Pro, I went about setting up the MCP server, which was really easy to do so. All it took was for me to add in the configuration lines above into my Claude desktop configuration. Then, once I restarted Claude desktop, I was able to authenticate with Neon, and I could access all of my Neon projects from the LLM interface.
Which, yeah, does feel incredibly spooky the first time you try it.
In fact, for me it never stopped feeling spooky, which did end up leading me to implement another solution later on, which I'll talk about in a minute. Despite it feeling spooky however, it was ultimately still safe, given that I had set up a separate Neon branch for the LLM to interact with, and my main branch was also set to protect it.
Not only this however, but every time that Claude interacts with an MCP server, it prompts for confirmation on the command it's about to run. I guess prompt engineering works both ways.
Whilst this prompting for confirmation is great for ensuring that the queries and commands Claude was going to run weren't going to destroy my entire business and life, I did find that it ended up slowing down the overall experience for me, as I was having to spend time confirming each action before executing it.
When it came to generating content from my YouTube videos, this wasn't too much of an issue as I only had one database table to interact with. But when it came to generating them from my course lesson contents, because these span over a number of different tables, it meant I had multiple queries to confirm, which did end up taking a lot more time.
Despite this however, pulling out the transcriptions from the database ended up working really well, and once the transcription data was loaded into the model's context, I could then just use prompting in order to provide additional context about what I wanted the blog post to be.
Not only using this approach to fix any mistakes caused by the LLM, but even for things such as improving the original content, and really refining the blog post into something better than the sum of its parts. This included things like performing fact checking on the content itself, and being able to add in additional points that I may not have covered in the original video.
This to me was an incredibly powerful way of working with my existing data, and allowed me to create blog posts in minutes that would have normally taken me hours or even days.
In any case, once I was happy with the generated output, I then needed a way to insert it back into the database. If I was using something such as Hugo or Astro, then I could have just used this markdown file directly, and called it Job Done.
However, because I'm using a database already for my course content, then I instead decided to go ahead and use Static Site Generation or SSG, which means I needed to write this content back into the database somehow.
Initially, I considered doing this with the MCP server provided by Neon, but I had a massive internal conflict about allowing an LLM to make writes to my database. So instead, I decided to take a much more prudent approach, and just downloaded the markdown file onto my machine, and then created a custom CLI command to allow me to insert it into my database.
#!/bin/bash
# Custom CLI for inserting blog posts

# blog-import.sh
if [ "$#" -ne 2 ]; then
    echo "Usage: $0  "
    exit 1
fi

MARKDOWN_FILE=$1
VIDEO_ID=$2

# Read markdown content
CONTENT=$(cat "$MARKDOWN_FILE")

# Insert into database using psql
psql "$DATABASE_URL" << EOF
INSERT INTO blog_posts (video_id, title, content, status, created_at)
VALUES (
    '$VIDEO_ID',
    'Generated Blog Post',
    '$CONTENT',
    'draft',
    NOW()
);
EOF

echo "Blog post imported successfully for video: $VIDEO_ID"
This would not only create the blog post for me, but would also allow me to perform any final edits on the content itself.
Whilst this approach worked, it still wasn't as smooth as an experience as I would have liked it to have been. And coupling that with the heebie-jeebies that I still felt from allowing the LLM to perform SQL queries, I instead decided to take the best parts of this process and go one step further.
This next step was to just implement a custom MCP server myself, specifically for pulling out transcriptions and creating blog posts from the generated content, without the need for an LLM to directly access my Postgres database.
For this, I used the excellent mcp-go library from Mark3 Labs, which provides a clean Go implementation of the Model Context Protocol.
# Initialize a new Go module for the MCP server
go mod init transcription-mcp-server

# Add the required dependencies
go get github.com/mark3labs/mcp-go
go get github.com/lib/pq
// Custom MCP Server Implementation using mcp-go
package main

import (
	"context"
	"database/sql"
	"fmt"
	"log"
	"os"
	"time"

	"github.com/mark3labs/mcp-go/mcp"
	"github.com/mark3labs/mcp-go/server"
	_ "github.com/lib/pq"
)

type TranscriptionServer struct {
	db *sql.DB
}

func NewTranscriptionServer(dbURL string) (*TranscriptionServer, error) {
	db, err := sql.Open("postgres", dbURL)
	if err != nil {
		return nil, fmt.Errorf("failed to connect to database: %w", err)
	}

	if err := db.Ping(); err != nil {
		return nil, fmt.Errorf("failed to ping database: %w", err)
	}

	return &TranscriptionServer{db: db}, nil
}

func (ts *TranscriptionServer) GetTranscription(ctx context.Context, args map[string]interface{}) (*mcp.CallToolResult, error) {
	videoID, ok := args["videoId"].(string)
	if !ok {
		return nil, fmt.Errorf("videoId must be a string")
	}

	var content string
	err := ts.db.QueryRowContext(ctx,
		"SELECT content FROM transcriptions WHERE video_id = $1",
		videoID,
	).Scan(&content)

	if err != nil {
		if err == sql.ErrNoRows {
			content = "Transcription not found"
		} else {
			return nil, fmt.Errorf("database error: %w", err)
		}
	}

	return &mcp.CallToolResult{
		Content: []mcp.Content{
			{
				Type: "text",
				Text: content,
			},
		},
	}, nil
}

func (ts *TranscriptionServer) SaveBlogPost(ctx context.Context, args map[string]interface{}) (*mcp.CallToolResult, error) {
	videoID, _ := args["videoId"].(string)
	title, _ := args["title"].(string)
	content, _ := args["content"].(string)

	// Save blog post to file system instead of database
	filename := fmt.Sprintf("blog-%s-%d.md", videoID, time.Now().Unix())

	file, err := os.Create(filename)
	if err != nil {
		return nil, fmt.Errorf("failed to create file: %w", err)
	}
	defer file.Close()

	// Write frontmatter and content
	blogContent := fmt.Sprintf(`---
title: "%s"
videoId: "%s"
date: %s
draft: false
---

%s`, title, videoID, time.Now().Format("2006-01-02T15:04:05Z07:00"), content)

	_, err = file.WriteString(blogContent)
	if err != nil {
		return nil, fmt.Errorf("failed to write content: %w", err)
	}

	return &mcp.CallToolResult{
		Content: []mcp.Content{
			{
				Type: "text",
				Text: fmt.Sprintf("Blog post saved to %s", filename),
			},
		},
	}, nil
}

func main() {
	dbURL := os.Getenv("DATABASE_URL")
	if dbURL == "" {
		log.Fatal("DATABASE_URL environment variable is required")
	}

	ts, err := NewTranscriptionServer(dbURL)
	if err != nil {
		log.Fatalf("Failed to create transcription server: %v", err)
	}
	defer ts.db.Close()

	// Create MCP server
	s := server.NewMCPServer(
		"transcription-server",
		"1.0.0",
		server.WithLogging(),
	)

	// Register tools
	s.AddTool("get_transcription", "Get transcription by video ID", map[string]interface{}{
		"type": "object",
		"properties": map[string]interface{}{
			"videoId": map[string]interface{}{
				"type":        "string",
				"description": "The video ID to get transcription for",
			},
		},
		"required": []string{"videoId"},
	}, ts.GetTranscription)

	s.AddTool("save_blog_post", "Save generated blog post", map[string]interface{}{
		"type": "object",
		"properties": map[string]interface{}{
			"videoId": map[string]interface{}{
				"type":        "string",
				"description": "Video ID",
			},
			"title": map[string]interface{}{
				"type":        "string",
				"description": "Blog post title",
			},
			"content": map[string]interface{}{
				"type":        "string",
				"description": "Blog post content in markdown",
			},
		},
		"required": []string{"videoId", "title", "content"},
	}, ts.SaveBlogPost)

	// Start the server
	log.Println("Starting MCP server...")
	if err := s.Serve(); err != nil {
		log.Fatalf("Server error: %v", err)
	}
}
This not only helped to ensure that my data wouldn't be deleted, but it also sped up the entire process of content creation for me, as it allowed me to not need to confirm every command that the MCP server was trying to run.
Not only this, however, but it also served as a really good excuse to implement my first MCP server, which was both fun and enlightening.
Through this, the new implementation allowed me to generate formatted blog posts for the remaining 115 lessons that I needed to in my course, in less than three hours. Not only that, however, but I now have a fully working blog post on my Dreams of Code website, which has written content to go along with my videos.
In fact, I even have a blog post generated for this video as well, which you can find on Dreams of Code. And it even has steps on how you can set up Claude Desktop to work with Neon's MCP server, in case you're interested.
As I mentioned, this has been perhaps the most favourite thing that I've built with AI so far, and it's left a really good impression on some of the innovation in the AI space, especially as I'm one that's often sceptical about some of the advances being made, often chalking them down to hype.
Not only did this save me a huge amount of time, however, but I actually think the quality of the blog posts are somewhat half-decent, and being able to interact with the LLM in order to improve them really makes up for some of the drawbacks of using prompting in the first place.
In fact, I actually like this solution so much that I started building out a full product with it to go along with my Zenful Studio Suite, which are a set of tools that I'm creating to help with content creation. If you're interested, you can find a link to it in the description down below.
Of course, the Zenful Studio Suite is also being powered by Neon, like most of the applications that I've built over the last year.
The combination of these technologies saved me 120 hours of manual work while producing higher-quality content than I could have created manually in the same timeframe.
And I want to give a big thank you to Neon for sponsoring this video. If you happen to use Postgres, and you're looking for an affordable, modern service where you can easily deploy multiple database instances, each of which that can have multiple branches of your data, then I really recommend checking them out.
Even though they're sponsoring this video, I've been using Neon for just over a year now, and in my experience, they've been absolutely fantastic. I honestly couldn't have wished for anything more from a Postgres provider.
Also, fun fact, through this video, I actually found out that the founder of Neon, Heikki Linnakangas, is actually one of the major contributors to Postgres itself, which makes a lot of sense, and you can really see that reflected in the product.
So, if you want to try out Neon for yourself, there's a link here.
Otherwise, that's all from me. However, I'd love to hear from you. Have you tried working with any MCP servers yet? Or maybe you're interested in how you can actually build and deploy one yourself? Either way, let me know in the comments down below. Otherwise, I want to give a big thank you for watching, and I'll see you on the next one.
This article was sponsored by Neon. Check out my course on building CLI applications using Go.
Resources:
]]>Over the past couple of years, we've had a number of big features make their way into the Go programming language. Some of these include generics added back in version 1.18, improved backwards compatibility starting with 1.21, and of course the all-new advanced routing features added in 1.22.
For every big feature found in the release notes, there are a number of smaller ones added to the language as well—some of which tend to get overlooked. One of these overlooked features was actually added to the language back in February 2021 in version 1.16: the embed package.
The embed package allows you to embed files inside of your Go binary at compile time. Despite it being in the language for nearly 4 years, I hadn't actually used it in a production setting. However, I think that was a mistake. Recently, I've started to see its value, and it's actually a lot more useful than I initially thought.
The reason I hadn't used this package before was because initially I didn't really know what problems it could be used to solve. However, whilst recently working on a new production-ready middleware package that I intend to use with multiple projects, I actually ran into a problem that I ended up using this feature to solve. Through doing so, I've come to appreciate the package more than I ever thought I would—so much so that I now use it in a number of different ways.
Before we take a look at some of the ways I use this package, let's quickly take a moment to see how it actually works. The basic idea is that you use the embed package to bundle files inside of your application binary at compile time, allowing you to then access the contents as if they were hardcoded.
To see this in action, here's a project that contains a file called hello.txt that lives inside of the same directory as my main function. In this case, I want to load the contents of this file inside of my application and print it to the console.
Rather than taking the typical approach of loading the file in at runtime using something such as the os.ReadFile function, instead we can use the embed feature to load it in at compile time.
First, we need to import the embed package:
import (
    _ "embed"
    "fmt"
)
You'll notice that I'm importing it using the blank identifier as the explicit package name. This is used to prevent the compiler from throwing an error as there won't be any explicit references to this package in this code.
Next, in order to embed a file, we first need to define a variable to store the contents of it:
//go:embed hello.txt
var data string
Important notes:
fs type of the embed package (which we'll explore later).//go:embed hello.txt directive specifies the name of the file to load from the relative path where the code or package lives.Now all that remains is to print out this content:
func main() {
    fmt.Println(data)
}
When I build and execute this binary, it prints out "hello world"—the contents of my hello.txt file. Even if I delete the hello.txt file from the file system and run the code again, it still prints the same string because the file has been embedded in the binary at compile time.
Now that we know how the embed package works, let's take a look at some of the ways I actually use it in production.
The first way I came to rediscover the embed package was when building a production-ready middleware package. One of the middleware components is a rate limiter that uses a Redis client to store the number of requests a client makes. To implement this algorithm, I used a Lua script.
Redis and its forks allow you to use Lua scripts to perform application logic that interacts with multiple Redis commands atomically, preventing race conditions.
Initially, I was loading this script at runtime using the ReadFile function of the OS package. However, because I wanted to distribute this code as a third-party package, having a Lua script that needs to be loaded at runtime caused several issues:
Security concerns: The script could be modified before loading (either maliciously or accidentally).
Distribution complexity: The middleware package needed the script to be available on the file system of any deployed application.
By using the embed package, I could solve both problems:
//go:embed rate_limiter.lua
var rateLimiterScript string
This solution gave me the best of both worlds: effective distribution while keeping the script as a separate file with proper syntax highlighting and linting.
Perhaps my favorite use case is embedding database migrations. Typically, I perform database migrations during application startup using the fantastic golang-migrate package, which loads SQL files from the file system at runtime.
While this approach works, it comes with caveats—most notably increased complexity when deploying applications. You need to ensure migration files are available in the file system wherever your app is deployed, often requiring additional Docker configuration and environment variables.
This is where the third type supported by the embed directive comes in: the embed.FS type. This type allows you to embed multiple files, creating an embedded file system.
Here's how to embed database migrations:
//go:embed migrations/*.sql
var migrations embed.FS
The embed.FS type has several useful methods:
ReadDir: Obtains a list of entries in a named directoryReadFile: Returns the contents of a file as a byte arrayOpen: Returns a file type from the fs packageThe Open method is particularly powerful because it makes the embed.FS type conform to the fs.FS interface, which is accepted by many packages, including golang-migrate:
source, err := iofs.New(migrations, "migrations")
if err != nil {
    log.Fatal(err)
}

migrator, err := migrate.NewWithSourceInstance("iofs", source, databaseURL)
if err != nil {
    log.Fatal(err)
}

err = migrator.Up()
if err != nil && err != migrate.ErrNoChange {
    log.Fatal(err)
}
This allows me to solve deployment complexity issues completely. I've already implemented this change in my guestbook web app, and you can review the actual commit on GitHub.
Similar to database migrations, I typically load HTML templates during application startup from the file system. Using embedded files solves the same distribution and deployment issues.
First, load the templates using the embed directive:
//go:embed templates/*.html
var templates embed.FS
Then, instead of using the ParseGlob method of the template struct, use the ParseFS method:
tmpl, err := template.ParseFS(templates, "templates/*.html")
if err != nil {
    log.Fatal(err)
}
This makes it easy to distribute the binary anywhere with HTML templates included.
The fourth way I use the embed package is for serving static files. Instead of reading from the file system at runtime using the http.FileServer function coupled with http.Dir, I now use the embedded file system with the http.FileServerFS function:
//go:embed static/*
var staticFiles embed.FS

http.Handle("/static/", http.StripPrefix("/static/", http.FileServerFS(staticFiles, "static")))
Important considerations for static files:
http.FileServer function insteadI'm still considering other use cases, such as loading configuration files that I typically use when working with Viper. The embed package continues to prove its value in solving various pain points I've encountered in Go development.
I'm really glad to have rediscovered the embed package and how it can solve a number of pain points that I've typically encountered in Go. From Lua scripts and database migrations to HTML templates and static files, the embed package provides elegant solutions to common distribution and deployment challenges.
The embed package has been available since Go 1.16, but it's one of those features that truly shines when you encounter the right use case. If you haven't explored it yet, I highly recommend giving it a try in your next Go project.
This article was sponsored by boot.dev. Use code DREAMSOFCODE to get 25% off your first payment for boot.dev - that's 25% off your first month or your first year, depending on the subscription you choose.
]]>For the longest time, I chose not to use a tiling window manager. Not because I didn't like the idea of one—I actually rather did. Instead, it was due to the fact that using one often makes use of a certain keyboard key: the Super key, which is better known as the Windows key on Windows or the Command key on macOS.
This key is often located one or two keys away from the space bar on a traditional keyboard, which can make it a bit of a pain to reach. I don't mean that figuratively either—I mean it can actually cause physical pain. At least it did in my case, as I have a pretty bad habit where I will unnaturally bend my thumb in order to reach this key. After doing it for a couple of years, it had started to take its toll.
So when it came to tiling window managers, which often make heavy use of either the Super or even worse the Alt key, I ended up just avoiding them in an attempt to prevent my thumbs from suffering long-term health effects.
However, about 6 months ago, I discovered a new keyboard technique—one that not only enabled me to use a tiling window manager but also improved my entire developer experience. That technique is called Home Row Mods, which allows me to easily use the modifiers of Super, Alt, Shift, and Control without ever leaving the home row.
This not only makes it possible for me to use a tiling window manager comfortably but also makes me much more effective when working in the terminal, making it much easier to navigate tmux, Neovim, and even just the CLI.
The way that Home Row Mods work is, well, kind of described in the name. The basic idea is that you overload eight of the keys found on your keyboard's home row with additional behavior whenever those keys are held rather than when tapped.
To show what I mean, let's quickly take a look at the behavior of my D key:
D to be typed outThis means that I'm able to hold this key down with my left hand and type out other keys using my right, causing them to send their shifted codes.
But what about if I want to type an uppercase D? How can I do this when I also need to hold down the D key in order to activate Left Shift? Well, that's where the right-hand side of the Home Row Mods comes in. I've configured a key on the right-hand side of the keyboard that when held will act as the Right Shift modifier—the K key.
Therefore, by holding this key down with my right hand, I'm able to type uppercase letters using my left, including the aforementioned D key. By having both of these keys act as Shift, I'm able to easily use the Shift modifier with any other key without ever leaving the home row or stretching to reach where the Shift keys are typically located.
In addition to Shift, there are three other modifiers that are also used, which ends up as eight total keys that make up the Home Row Mods. These are the A, S, D, F keys on the left-hand side and the J, K, L, ; keys on the right.
The benefit of using these keys is that because of their location, it makes it much easier to activate these modifiers compared to their original positions, causing your hands to hardly ever leave the home row, making it extremely efficient when it comes to touch typing.
As for what the modifier keys actually are, in my configuration I have it as follows:
Left-hand side:
A key when held acts as Left SuperS key when held acts as Left AltD key when held acts as Left ShiftF key when held acts as Left ControlRight-hand side:
J key when held acts as Right ControlK key when held acts as Right ShiftL key when held acts as Right Alt; key when held acts as Right SuperI actually chose this layout for a good reason—to correlate each modifier and finger based on how often I use that modifier with the finger strength. For example:
By assigning the modifiers this way, it helps to reduce any finger fatigue when it comes to coding, which can be a pretty common occurrence when you make use of modifiers heavily. Just ask anyone who's ever suffered from Emacs pinky!
This layout works really well for my own terminal configuration. Take for example tmux, which is pretty much the application I live in when it comes to writing code. In my case, I have it configured so that I'm able to cycle through windows by holding Alt and Shift and using either the H or L keys to go left or right respectively.
This means that by using Home Row Mods, all I need to do is hold S and D with my left hand, and I'm free to cycle through the windows using my right hand, tapping the relevant key.
Not only this, but because I have the Control key assigned to my index finger, it also makes it incredibly easy for me to jump around my tmux splits—holding the F key down with my left hand and using the H, J, K, and L keys in order to navigate.
Additionally, I also make heavy use of the Control key when navigating Neovim, as well as using the Control and Alt keys for navigating CLI commands. And of course, using Home Row Mods has not only made it possible for me to use a tiling window manager but has also made me much more efficient when doing so, as the Super key is now much easier for me to reach.
Therefore, by setting up Home Row Mods on my keyboard, it means I'm able to navigate my development environment with much greater ease and speed whilst also causing me to make fewer mistakes when typing due to keeping my hands on the home row.
More importantly than speed and accuracy, however, is the fact that it's just better for my hand health. Considering that I plan on writing code until I physically can't anymore, keeping my hands in good health is something that I take seriously.
So yeah, whilst Home Row Mods aren't for everyone, for me they're here to stay, and I've had them set up on every keyboard that I've used since discovering them, including the built-in ones on my laptops.
If you're using a keyboard that runs customizable firmware such as QMK or ZMK, then you can set up Home Row Mods using the mod-tap behavior. I actually have a couple of examples for both firmware in a GitHub repo for this article.
If you don't happen to have a keyboard with firmware that you can configure (such as if you're using a laptop), then instead you can use a tool such as Kanata, which is actually what I used for my article on modifying the Caps Lock key.
Kanata is an open-source software keyboard remapper for Linux, macOS, and Windows, and is what I use to remap keys on my Linux laptops and on macOS.
To install Kanata is actually pretty simple. You can either install it via Cargo or through your operating system's package manager if it's available. If you're using macOS, then you'll also need to install the Karabiner Virtual HID package as well.
Once you have Kanata installed, you then need to define a Kanata configuration in order to add Home Row Mods. To do this, you'll first want to create a new configuration file. In my case, I'm creating one called kanata.kbd.
Let's begin by setting up just a single key to make it easier to explain the process. The key I'm going to start with is the A key, which we want to assign the modifier of Left Super.
First, we need to define the keys that we want Kanata to process using the defsrc function:
(defsrc
  a
)
Next, we want to define the overridden behavior that we want our A key to be mapped to. I like to define aliases to do this:
(defalias
  a-mod (tap-hold 200 200 a lmet)
)
The tap-hold function accepts four parameters:
a key codeNext, we need to overwrite our existing A key using the deflayer function:
(deflayer base
  @a-mod
)
Finally, we need to tell Kanata to process all keys:
(defcfg
  process-unmapped-keys yes
)
Here's a complete configuration with all Home Row Mods set up:
(defcfg
  process-unmapped-keys yes
)

(defvar
  tap-time 200
  hold-time 200
)

(defsrc
  a s d f   j k l ;
)

(defalias
  a-mod (tap-hold $tap-time $hold-time a lmet)
  s-mod (tap-hold $tap-time $hold-time s lalt)
  d-mod (tap-hold $tap-time $hold-time d lsft)
  f-mod (tap-hold $tap-time $hold-time f lctl)
  j-mod (tap-hold $tap-time $hold-time j rctl)
  k-mod (tap-hold $tap-time $hold-time k rsft)
  l-mod (tap-hold $tap-time $hold-time l ralt)
  ;-mod (tap-hold $tap-time $hold-time ; rmet)
)

(deflayer base
  @a-mod @s-mod @d-mod @f-mod   @j-mod @k-mod @l-mod @;-mod
)
To run this configuration, open a terminal and run:
sudo kanata -c kanata.kbd
One additional thing you may want to do when using Kanata is to make sure that it launches whenever you start up your computer. If you're using NixOS, this is pretty easy to do using the Kanata service in your configuration. However, if you're using a different Linux distro or macOS, you'll need to configure this for whichever launch service that you're using. In the repo, I've created examples for both systemd on Linux and for Launch Control on macOS.
Home Row Mods have really improved the way that I type when it comes to working on a keyboard, and as is often the case with information that I share, I don't think I'll go back to a time where I didn't use them.
Whether you're dealing with thumb pain, looking to improve your typing efficiency, or just want to make better use of your keyboard, Home Row Mods might be worth trying out. The initial learning curve can be a bit steep, but the long-term benefits for both productivity and hand health make it worthwhile.
This article was sponsored by Brilliant.org - where you learn by doing with thousands of interactive lessons in math, data analysis, programming, and AI.
]]>When it comes to working with databases, I believe there's two types of software developers: those that like to use ORMs and those who prefer to write SQL. As for myself, I'm definitely that kind of developer that likes to get his hands dirty writing raw queries - but I also make sure to be safe, which means I use protection.
That protection typically comes in the form of abstraction, wrapping the raw queries in a type-safe construct using the repository design pattern. By doing so, it provides a number of benefits:
All of this makes the repository design pattern my preferred approach for working with databases in my application code. But as with all design patterns, there is a trade-off.
In this case, that trade-off is time. You typically have to write this repository implementation by hand, which can be somewhat tedious as most of the code ends up just being boilerplate. For those developers who aren't AI-adverse, this may not be too much of an issue, but for myself, I'd much rather just write these SQL queries by hand and have the actual repository boilerplate be generated.
Fortunately, it seems I'm not the only one who thinks this way. Some rather clever individuals have created what I think is the perfect solution: SQLc, which was actually recommended to me by a couple of members of my Discord channel. After having used it for about a month now, it's dramatically reduced the amount of time it takes for me to write code that works with SQL queries - so much so that I don't think I'll ever go back.
The way SQLc works is actually rather intuitive:
.sql file using annotations to define the query name and typesqlc generate command to generate code in your chosen languageIf the term "generate code" gives you some pause, I get it. I've been known to have my own strong reaction whenever somebody mentions code gen to me, so when I first heard how SQLc worked, I was initially skeptical. However, after having used it a few times, I think the code generation has been implemented in one of the best ways I've ever seen.
Let's walk through a simple example. Here's how to set up SQLc for a Go project using PostgreSQL:
First, create a sqlc.yaml file:
version: "2"
sql:
  - engine: "postgresql"
    queries: "query.sql"
    schema: "migrations/"
    gen:
      go:
        package: "repository"
        out: "internal/repository"
You can define your schema using database migrations (recommended) or by writing it directly in SQL. If you're using a migration tool like golang-migrate, just point SQLc to your migrations directory.
Create a query.sql file with your SQL queries:
-- name: FindAllPlayers :many
SELECT * FROM player;

-- name: InsertItem :one
INSERT INTO item (id, name, value)
VALUES (uuid_generate_v4(), $1, $2)
RETURNING *;

-- name: FindItemByID :one
SELECT * FROM item WHERE id = $1;
SQLc is available through various package managers:
# macOS
brew install sqlc

# Arch Linux
pacman -S sqlc

# Or use Nix, Docker, etc.
Run the generation command:
sqlc generate
This creates three files:
db.go - Constructor for accessing database queriesmodels.go - Generated data types based on your schemaquery.sql.go - Implementation of your database queries// Create repository instance
repo := repository.New(db)
// Use generated methods
players, err := repo.FindAllPlayers(ctx)
if err != nil {
return err
}
// Insert with type-safe parameters
item, err := repo.InsertItem(ctx, repository.InsertItemParams{
Name: "Ruby",
Value: 300,
})
SQLc allows you to override default type mappings. For example, to use Google's UUID package instead of pgtype.UUID:
overrides:
  - db_type: "uuid"
    go_type:
      import: "github.com/google/uuid"
      type: "UUID"
  - db_type: "timestamptz"
    go_type:
      import: "time"
      type: "Time"
Enable JSON struct tags for easy serialization:
gen:
  go:
    emit_json_tags: true
Use the sqlc.embed() macro to reuse existing types in complex queries:
-- name: GetPlayerInventory :many
SELECT
    sqlc.embed(player),
    sqlc.embed(item)
FROM inventory
LEFT JOIN player ON player.id = inventory.player_id
LEFT JOIN item ON item.id = inventory.item_id;
When using Go with PGX v5, prepared statements are handled automatically. For other drivers, enable them in your config:
gen:
  go:
    emit_prepared_queries: true
SQLc makes transactions seamless through interface compatibility:
tx, err := db.Begin(ctx)
if err != nil {
    return err
}
defer tx.Rollback(ctx)

// Pass transaction to repository
repo := repository.New(tx)

// Perform operations
err = repo.DeleteInventoryItem(ctx, params)
if err != nil {
    return err
}

// Commit transaction
return tx.Commit(ctx)
For larger projects, organize queries into multiple files:
sql:
  - engine: "postgresql"
    queries: "queries/"  # Directory instead of single file
    schema: "migrations/"
Then structure your queries:
queries/player.sql - Player-related queriesqueries/item.sql - Item-related queriesqueries/inventory.sql - Inventory-related queriesSQLc has become a permanent fixture in my Go development stack. It saves tremendous time while still allowing me to write raw SQL queries. The generated code is clean, type-safe, and looks similar to what I would write by hand. If you prefer SQL over ORMs but want to eliminate boilerplate, SQLc is the perfect tool.
This article is based on a video by Dreams of Code. Check out their YouTube channel and Discord community for more great content.
]]>Homebrew is the most popular package manager on macOS, and for good reason. However, personally, I believe that Nix is more powerful and offers capabilities that go far beyond what traditional package managers provide.
Recently, I've been doing a lot of travel and rather than using my Linux laptops, I've been using my MacBook Pro. While the battery life and performance are really fantastic, there are a couple of quirks that I've had to get used to, especially when coming from Linux. One of these is the lack of a default package manager.
Fortunately, there are a few third-party options when it comes to macOS, with the most popular one being Homebrew. However, in my case, I actually prefer to use something else—one that I think is a lot more powerful.
Let me show you why with a practical demonstration.
Here I have a fresh copy of macOS on a brand new machine. By running only three commands:
Once this third and final command finishes, this fresh macOS system will now have all of my apps, packages, and system settings applied.
This includes:
In addition to installing packages and their configurations, the package manager has also configured my Mac system settings such as:
All of this is achieved by using the Nix package manager with Nix Darwin.
After having used it for a couple of months now, I can safely say it's forever changed the way I work on macOS for the better. Nix allows you to specify every application, package, system setting, and configuration on your machine in a declarative manner. This includes:
This is done using a functional language called Nix, which allows for a high level of expressibility in your Nix configuration. It's very similar to using Lua when it comes to configuring Neovim.
Reproducibility: Because of this declarative nature, it allows you to easily reproduce your configuration across multiple machines and even across multiple operating systems. In my case, I'm able to keep my MacBook Pro and Linux laptops in sync with their installed packages and configurations, making sure that my environment is consistent across each machine.
Version Control: Additionally, because my entire system configuration is stored in Git, I get all of the benefits that come with using version control. This means if I accidentally make a change to my configuration that causes something to go wrong, I can easily just roll it back.
System Rollbacks: Not only that, but we can also use the Nix package manager itself to roll back to a previous version of our system configuration, returning our system to a working state.
Nix provides a lot more functionality than just using Homebrew by itself, but there is a catch: Nix has somewhat of a steep learning curve, and the declarative nature of managing packages and configuration can be a challenging mindset to migrate to.
In this article, we're going to take a look at:
Note: For all the other features that Nix provides, such as managing dotfiles, I'll be saving those for another article.
To set up Nix and Nix Darwin is actually rather simple and only takes a couple of steps. For this demonstration, I'm using a fresh M1 Mac Mini running the latest version of macOS (Sonoma 14.6 at the time of recording, though I've confirmed everything works with macOS Sequoia as well).
We first need to install the Nix package manager using a single command from the downloads page of the NixOS website under macOS:
curl --proto '=https' --tlsv1.2 -sSf -L https://install.determinate.systems/nix | sh -s -- install
This command will prompt you to answer a couple of questions before installing Nix on your system.
Important note: The Nix installer is rather involved as it creates a separate Apple volume and a number of user accounts. This isn't really too much of an issue but definitely speaks to the complexity mentioned earlier.
Once the installer is finished, we can check that it's working by running:
nix shell nixpkgs#neofetch --command neofetch
Before we move on, I want to take a minute to appreciate how awesome the nix shell command is. As you just saw, we used it to download and run neofetch without actually installing neofetch onto our system. If you try to run neofetch again after exiting, you'll see that the command isn't found.
This is because the nix shell command downloads packages and loads them into a temporary environment rather than installing them system-wide. This makes it useful for running one-off commands without bloating your system.
Now that we have the Nix package manager installed, let's add the Nix Darwin module.
First, create a new directory to store your configuration:
mkdir ~/nix
cd ~/nix
Note: You can set this to wherever you want. The Nix Darwin documentation suggests using ~/.config/nix, but either location works fine.
When it comes to Nix Darwin, there are two approaches:
My personal preference is to use the flakes approach because it provides:
To use Nix Darwin with Nix flakes, run:
nix flake init -t nix-darwin --extra-experimental-features "nix-command flakes"
This creates a new file called flake.nix in your directory.
Let's examine the flake.nix file structure:
{
  description = "Zenful Darwin system flake";

  inputs = {
    nixpkgs.url = "github:NixOS/nixpkgs/nixpkgs-unstable";
    nix-darwin.url = "github:LnL7/nix-darwin";
    nix-darwin.inputs.nixpkgs.follows = "nixpkgs";
  };

  outputs = inputs@{ self, nix-darwin, nixpkgs }:
  let
    configuration = { pkgs, ... }: {
      # Your configuration goes here
    };
  in
  {
    darwinConfigurations."simple" = nix-darwin.lib.darwinSystem {
      modules = [ configuration ];
    };
  };
}
Description: A simple string describing your flake.
Inputs: Specifies the dependencies of the flake:
nixpkgs: The Nix packages repository (set to unstable branch for most recent versions)nix-darwin: The Nix Darwin repositoryfollows configuration keeps both repositories in syncOutputs: Contains your system configuration, including:
let expressionBefore installing, make a couple of changes to the flake:
Replace "simple" with something more descriptive. I prefer to use something memorable like "mini" for my Mac Mini:
darwinConfigurations."mini" = nix-darwin.lib.darwinSystem {
  modules = [ configuration ];
};
For Apple Silicon Macs, change the system architecture:
nixpkgs.hostPlatform = "aarch64-darwin";
Run the installation command:
nix run nix-darwin --extra-experimental-features "nix-command flakes" -- switch --flake ~/nix#mini
After completion, verify the installation:
which darwin-rebuild
Now we're ready to start managing packages! Here's where Nix differs significantly from other package managers.
Unlike Homebrew where you use brew install , Nix works declaratively. While Nix does provide a nix-env command similar to traditional package managers, I recommend against using it as it goes against Nix's main strength: its declarative nature.
To install packages, add them to the environment.systemPackages list in your flake.nix:
environment.systemPackages = [
  pkgs.neovim
  pkgs.tmux
  pkgs.zoxide
];
Then rebuild your configuration:
darwin-rebuild switch --flake ~/nix#mini
Due to Nix's declarative nature, anything specified in this configuration will be installed, and anything that isn't will be removed. This is great for reducing system bloat.
You can search for packages using:
nix search nixpkgs
Or use the web interface at search.nixos.org.
Nix can also install GUI applications, and there are several approaches:
This is the preferred approach as it works cross-platform:
environment.systemPackages = [
  pkgs.alacritty
  pkgs.firefox
];
By default, Nix uses symlinks which aren't indexed by Spotlight. To fix this, we need to generate macOS aliases instead.
First, add the required packages and configuration:
environment.systemPackages = [
  pkgs.makeWrapper
];

system.activationScripts.applications.text = let
  env = pkgs.buildEnv {
    name = "system-applications";
    paths = config.environment.systemPackages;
    pathsToLink = "/Applications";
  };
in
  pkgs.lib.mkForce ''
    # Set up applications.
    echo "setting up /Applications..." >&2
    rm -rf /Applications/Nix\ Apps
    mkdir -p /Applications/Nix\ Apps
    find ${env}/Applications -maxdepth 1 -type l -exec readlink '{}' \; | \
    while read src; do
      app_name=$(basename "$src")
      echo "copying $src" >&2
      ${pkgs.mkalias}/bin/mkalias "$src" "/Applications/Nix Apps/$app_name"
    done
  '';
You can find this activation script in the description.
Fonts can be installed declaratively as well:
fonts.fonts = [
  (pkgs.nerdfonts.override { fonts = [ "JetBrainsMono" ]; })
];
Non-open source applications require special configuration:
nixpkgs.config.allowUnfree = true;
Now you can install applications like Obsidian:
environment.systemPackages = [
  pkgs.obsidian
];
While I try to use the Nix repository as much as possible, not every Mac app is available there. For missing applications, we can integrate Nix with Homebrew using the Nix Homebrew module.
First, add it to your flake inputs:
inputs = {
  nixpkgs.url = "github:NixOS/nixpkgs/nixpkgs-unstable";
  nix-darwin.url = "github:LnL7/nix-darwin";
  nix-homebrew.url = "github:zhaofengli-wip/nix-homebrew";
};
Then add it to your Darwin configuration modules:
modules = [
  configuration
  nix-homebrew.darwinModules.nix-homebrew
  {
    nix-homebrew = {
      enable = true;
      enableRosetta = true; # For Apple Silicon
      user = "your-username";
    };
  }
];
Configure Homebrew declaratively:
homebrew = {
  enable = true;
  onActivation.cleanup = "zap"; # Removes packages not specified in config

  casks = [
    "hammerspoon"
    "firefox"
    "the-unarchiver"
  ];

  brews = [
    "mas" # Mac App Store CLI
  ];
};
For Mac App Store apps, use the masApps option:
homebrew.masApps = {
  "Yoink" = 457622435;
};
To find app IDs, you can:
mas CLI tool: mas search "app name"Note: You need to be logged into the App Store and have purchased the app already.
To update your packages:
Update the flake inputs:
nix flake update
Rebuild your configuration:
darwin-rebuild switch --flake ~/nix#mini
For Homebrew packages, you can enable automatic updates:
homebrew = {
  onActivation.autoUpdate = true;
  onActivation.upgrade = true;
};
One of Nix Darwin's most powerful features is the ability to configure macOS system settings declaratively.
system.defaults = {
  dock.autohide = true;
  dock.persistent-apps = [
    "${pkgs.alacritty}/Applications/Alacritty.app"
    "/Applications/Firefox.app"
    "/Applications/Obsidian.app"
    "/System/Applications/Mail.app"
    "/System/Applications/Calendar.app"
  ];

  finder.FXPreferredViewStyle = "clmv"; # Column view

  loginwindow.GuestEnabled = false;

  menuExtraClock.Show24Hour = true;

  NSGlobalDomain = {
    AppleInterfaceStyle = "Dark";
    KeyRepeat = 2;
  };
};
To discover available system settings:
darwin-option command for CLI documentation Don't forget to commit your configuration to Git:
git init
git add .
git commit -m "Initial Nix Darwin configuration"
Consider pushing to a remote repository like GitHub so you don't lose your configuration and can easily sync across machines.
This covers the basics of using Nix and Nix Darwin for package management and configuring macOS settings. In the next article, we'll explore how to add dotfiles into your Nix configuration and manage them declaratively using the fantastic Home Manager module.
If you can't wait that long, I recommend checking out Vim Joyer's YouTube channel, which has excellent content on setting up Nix and NixOS that easily translates to Nix Darwin.
The declarative approach to system management might feel different at first, but once you experience the power of reproducible, version-controlled system configurations, it's hard to go back to traditional package managers. Nix Darwin has fundamentally changed how I work on macOS, and I believe it can do the same for you.
]]>Recently, I've been working on a brand new micro SaaS and having a lot of fun doing so. One thing I've really appreciated is how easy it is to deploy applications to the cloud, with a huge number of platform-as-a-service options making deployment straightforward.
While these platforms can be pretty great, they're not always perfect. Due to their underlying business model, they're not well-suited for long-running tasks or transferring large amounts of data, which can sometimes result in unexpectedly high bills.
This contrasts with using a VPS (Virtual Private Server), which often provides much more consistent billing while mitigating some of the caveats that come from using serverless platforms. Despite these benefits, however, I've always been rather hesitant to use a raw VPS for deploying production services due to the perceived difficulty of setting up a production-ready environment.
But is that actually the case? To find out, I decided to give myself a challenge: see how difficult it would be to set up a production-ready VPS from scratch. As it turns out, it's actually a lot easier than I thought!
To go along with this challenge, I built a simple guestbook web app with the goal of deploying it on a VPS. Before deploying, however, I decided to write out a list of requirements to define what "production-ready" meant.
I set some constraints for this project:
This article is sponsored by Hostinger, who kindly provided a VPS instance for this project.
For this project, I used a Hostinger KVM 2 instance with:
To put this in perspective, if you tried to transfer 8TB of data on Vercel, it would cost over $1,000! The value proposition of a VPS becomes pretty clear when you look at these numbers.
Get your own VPS instance with Hostinger and use coupon code DREAMSOFCODE for an additional discount.
I chose Ubuntu 24.04 LTS for its stability and widespread support in the VPS community. While I would have loved to use Arch, Ubuntu's long-term support makes it ideal for production environments.
During setup, I:
The first thing I do on any new VPS is create a non-root user account, as working as root is generally not advised:
adduser elliot
usermod -aG sudo elliot
This creates a new user and adds them to the sudo group for elevated permissions when needed.
I purchased the zen.cloud domain from Hostinger for just $1.99 for the first year. After purchase, I configured the DNS records:
# Check your server's IP
ip addr
Before proceeding, I implemented several SSH security measures:
If you're following along, consider installing tmux to maintain sessions if your SSH connection drops:
sudo apt install tmux
First, I copied my SSH public key to the non-root user:
# From local machine
ssh-copy-id [email protected]
Then I modified the SSH configuration:
sudo vim /etc/ssh/sshd_config
Key changes made:
PasswordAuthentication noPermitRootLogin no UsePAM noAfter reloading SSH:
sudo systemctl reload ssh
I built a simple guestbook application in Go for this project. You can find the complete code on GitHub.
First, I tried the naive approach of building directly on the server:
# Install Go
sudo snap install go --classic

# Build the application
go build

# Set database URL and run
export DATABASE_URL="your_postgres_url"
./guestbook
While this worked, I'm not a fan of compiling applications on production servers.
Instead, I opted for containerization using Docker, which provides:
Following the official Docker installation guide:
# Add Docker's official GPG key
sudo apt-get update
sudo apt-get install ca-certificates curl
sudo install -m 0755 -d /etc/apt/keyrings
sudo curl -fsSL https://download.docker.com/linux/ubuntu/gpg -o /etc/apt/keyrings/docker.asc
sudo chmod a+r /etc/apt/keyrings/docker.asc

# Add the repository
echo \
  "deb [arch=$(dpkg --print-architecture) signed-by=/etc/apt/keyrings/docker.asc] https://download.docker.com/linux/ubuntu \
  $(. /etc/os-release && echo "$VERSION_CODENAME") stable" | \
  sudo tee /etc/apt/sources.list.d/docker.list > /dev/null

# Install Docker
sudo apt-get update
sudo apt-get install docker-ce docker-ce-cli containerd.io docker-buildx-plugin docker-compose-plugin

# Add user to docker group
sudo usermod -aG docker $USER
The project includes a docker-compose.yml file with both the application and PostgreSQL database. I set up a secure password using Docker secrets:
mkdir db
echo "your_secure_password" > db/password.txt
Then deployed the stack:
docker compose up -d
I used UFW (Uncomplicated Firewall) to secure the server:
# Default policies
sudo ufw default deny incoming
sudo ufw default allow outgoing

# Allow SSH (critical - don't skip this!)
sudo ufw allow ssh

# Allow HTTP and HTTPS
sudo ufw allow 80
sudo ufw allow 443

# Enable firewall
sudo ufw enable
Important caveat: Docker can bypass UFW rules by directly modifying iptables. This is a known issue, and the best solution is to use a reverse proxy instead of exposing application ports directly.
This is where things got really exciting. Instead of using nginx, I chose Traefik - and it was probably one of the two biggest reasons why setting up this production-ready VPS was much easier than expected.
I added Traefik as a service in my docker-compose.yml:
reverse-proxy:
  image: traefik:v3.1
  command:
    - "--api.insecure=true"
    - "--providers.docker=true"
  ports:
    - "80:80"
    - "8080:8080"  # Web UI
  volumes:
    - /var/run/docker.sock:/var/run/docker.sock
Then added a simple label to my guestbook service:
guestbook:
  # ... other config
  labels:
    - "traefik.http.routers.guestbook.rule=Host(`zen.cloud`)"
That's it! Traefik automatically detected the service and started routing traffic. No complex nginx configuration files needed.
Here's where Traefik really shines. To demonstrate load balancing, I scaled my application to three replicas:
docker compose up --scale guestbook=3 -d
Traefik automatically detected all three instances and began load balancing between them - no additional configuration required! This improves availability because if one instance fails, traffic continues flowing to the healthy instances.
To make this persistent, I added the replicas configuration:
guestbook:
  # ... other config
  deploy:
    replicas: 3
Traefik's second superpower is automatic TLS certificate generation using Let's Encrypt. I updated the Traefik configuration:
reverse-proxy:
  image: traefik:v3.1
  command:
    - "--providers.docker=true"
    - "--providers.docker.exposedbydefault=false"
    - "--entrypoints.websecure.address=:443"
    - "--certificatesresolvers.myresolver.acme.tlschallenge=true"
    - "--certificatesresolvers.myresolver.acme.email=your-email@example.com"
    - "--certificatesresolvers.myresolver.acme.storage=/letsencrypt/acme.json"
  ports:
    - "80:80"
    - "443:443"
  volumes:
    - /var/run/docker.sock:/var/run/docker.sock
    - letsencrypt:/letsencrypt
And updated the guestbook labels:
guestbook:
  # ... other config
  labels:
    - "traefik.enable=true"
    - "traefik.http.routers.guestbook.rule=Host(`zen.cloud`)"
    - "traefik.http.routers.guestbook.entrypoints=websecure"
    - "traefik.http.routers.guestbook.tls.certresolver=myresolver"
After redeploying, Traefik automatically obtained and configured TLS certificates!
To ensure all traffic uses HTTPS, I added redirect rules:
labels:
  # ... existing labels
  - "traefik.http.routers.guestbook-http.rule=Host(`zen.cloud`)"
  - "traefik.http.routers.guestbook-http.entrypoints=web"
  - "traefik.http.routers.guestbook-http.middlewares=redirect-to-https"
  - "traefik.http.middlewares.redirect-to-https.redirectscheme.scheme=https"
For automated deployments, I used Watchtower, which monitors Docker images and automatically updates containers when new versions are available.
watchtower:
  image: containrrr/watchtower
  command:
    - "--label-enable"
    - "--interval"
    - "30"
  volumes:
    - /var/run/docker.sock:/var/run/docker.sock
I labeled the guestbook service for monitoring:
guestbook:
  image: ghcr.io/dreamsofcode-io/guestbook:prod
  labels:
    # ... other labels
    - "com.centurylinklabs.watchtower.enable=true"
To avoid downtime during deployments, I enabled rolling restarts:
watchtower:
  # ... other config
  command:
    - "--label-enable"
    - "--interval"
    - "30"
    - "--rolling-restart"
Now when I push a new image with the prod tag, Watchtower detects it and performs a rolling update, restarting instances one by one to maintain availability.
For the final requirement, I set up monitoring using Uptime Robot, which has a decent free tier. It periodically checks if the website is available and sends email notifications if it detects downtime.
The setup is straightforward:
For a single-node VPS, this simple uptime monitoring is much more practical than setting up a full observability stack with Prometheus, Grafana, and the ELK stack.
With everything configured, I removed the Traefik web UI for security and deployed the final stack:
docker compose up -d
Setting up a production-ready VPS was much easier than I initially thought. By using tools like Traefik and Watchtower, I was able to quickly set up a robust environment with:
While a VPS solution may not be as simple as using a PaaS, it offers more control and potentially lower costs for certain types of applications, especially those with high data transfer needs or long-running processes.
The complete source code for the guestbook application and deployment configuration is available on Github
]]>Hosting my own services using a homelab has been an absolute dream. However, my first homelab setup had some mistakes, and so I decided to rebuild it from scratch. In this article, I'll share how I built what I consider to be the perfect homelab setup.
For the past 12 months, I've been running my own homelab using it to self-host a number of different software and services. My original setup was a highly available 4-node Kubernetes cluster powered by K3s, and whilst I've been really happy with this setup, I definitely made some mistakes at the beginning - ones that I would change if I was to rebuild my cluster from scratch.
So I decided to do just that, taking what I had learned and building what I think is the perfect homelab.
To begin, I decided to write down my thoughts about what I wanted my next setup to be:
With my hardware requirements defined, I went about searching for a viable option, which ended up being the Beelink EQ12 - a machine that either met or exceeded all my specifications.
The EQ12 comes with the Intel N100 CPU, which is incredibly low-powered:
Despite this efficiency, the N100 is still rather performant with an iGPU that supports most modern media codecs. When it comes to networking, the EQ12 comes with dual 2.5GB ethernet ports, which is more than I was looking for.
By default, the EQ12 only comes with 16GB of RAM and 500GB of storage. Fortunately, it's pretty simple to upgrade both components. Even though Intel's own website says that the N100 only supports 16GB of memory, I was able to install and use 32GB successfully.
Here's what I ordered for my three-node setup:
Total cost: approximately $1,400
Note for beginners: If you're just getting started with homelabs, I wouldn't recommend spending this sort of money. Instead, I recommend using an old laptop or any other hardware you may have lying around.
Installing the upgraded components on the EQ12 is straightforward:
Repeat this process for all three machines.
For my initial homelab, I had chosen Ubuntu Server, and whilst this worked, it was tedious to go through the setup process for each machine. This time I wanted a more declarative approach, which led me to two options:
I decided to go with NixOS because I wanted something familiar for this project, having used it successfully on both of my Framework laptops.
To make the installation process even easier, I used NixOS Anywhere, which enables remote NixOS installation using SSH.
dd commandpasswd command and obtain IP address with ip addrI adapted my configuration from one I wrote on stream a couple of months ago. The configuration is available on GitHub.
If you use this configuration, make sure to change:
configuration.nixmkpasswd command in NixOS installer)One challenge I encountered was securely setting the K3s token. This token is used for authentication when nodes join the cluster and needs to be kept secret.
My approach:
pwgen -s 16/var/lib/rancher/k3s/server/tokennixos-anywhere --flake .#h-0 root@
This command builds everything from scratch but caches artifacts for subsequent nodes, making the process much faster.
After successful installation:
scphomelab-0k get nodes (where k is an alias for kubectl)With the cluster running, I moved on to setting up necessary services. My main goal was to get PiHole running and accessible at pihole.home.
Longhorn provides distributed storage using node storage, offering fault tolerance and redundancy - one reason I chose 2TB SSDs for each node.
I use Helmfile for declarative Helm chart deployment, creating infrastructure as code.
repositories:
  - name: longhorn
    url: https://charts.longhorn.io

releases:
  - name: longhorn
    namespace: longhorn-system
    chart: longhorn/longhorn
    version: "1.5.3"
Initially, Longhorn failed because the iSCSI admin binary wasn't found. NixOS doesn't follow standard Linux file system hierarchy, but there was a simple fix available on the Longhorn GitHub repository.
MetalLB provides load balancer implementation for bare metal Kubernetes clusters, allowing services to be accessed via IP addresses.
After installation, I needed to configure an IP pool using Kustomize:
# metallb/pool.yaml
apiVersion: metallb.io/v1beta1
kind: IPAddressPool
metadata:
  name: default-pool
  namespace: metallb-system
spec:
  addresses:
  - 192.168.1.192/26
---
apiVersion: metallb.io/v1beta1
kind: L2Advertisement
metadata:
  name: default
  namespace: metallb-system
spec:
  ipAddressPools:
  - default-pool
PiHole serves as a DNS server for local network DNS records and network-wide ad blocking. I prefer using local DNS records over remembering IP addresses.
Key configuration in the values file:
192.168.1.250The Nginx Ingress Controller acts as a reverse proxy for cluster services, enabling access via domain names like pihole.home.
External DNS automatically writes DNS records to PiHole based on hostnames found in Ingress resources, eliminating manual DNS record management.
# external-dns values
txtOwnerId: "external-dns"
provider: pihole
sources:
  - ingress
ingressClassFilters:
  - nginx-internal
extraArgs:
  - --pihole-server=http://192.168.1.250
With all services configured and deployed using helmfile apply, I now have:
pihole.homeThis rebuild taught me valuable lessons:
I'm ready to start migrating the rest of my services to this new cluster. I'll plan on looking at some of those in further detail in another article, so let me know in the comments if that's something of interest!
Note: The hardware links above are Amazon Affiliate Links, which means I get a commission if you decide to make a purchase through them. This comes at no additional cost to you and helps support the channel.
]]>Since Go 1.22 was released, the net/http package has evolved into a comprehensive routing solution that eliminates the need for third-party dependencies. However, mastering advanced features like middleware, subrouting, path parameters, HTTP methods, and context passing can be challenging. In this article, we'll explore how to implement each of these features using only the Go standard library.
Adding path parameters to routes is similar to other frameworks like Gorilla Mux or Chi. You simply wrap the path component you want to parameterize in braces with the parameter name inside.
// Define a route with a path parameter
mux.HandleFunc("/item/{id}", func(w http.ResponseWriter, r *http.Request) {
    id := r.PathValue("id")
    fmt.Fprintf(w, "Item ID: %s", id)
})
With our parameter defined, we can extract it inside our handler using the PathValue method of the request type. When you send requests to this endpoint, it will return the captured path component.
Version Requirement: Path parameters require Go 1.22 and must be specified in your go.mod file. Earlier versions won't have access to this feature.
Conflicting Paths and Precedence: Be aware of conflicting paths. Go determines the correct path based on precedence ordering where "most specific wins."
// These routes work fine - Go knows /item/latest is more specific
mux.HandleFunc("/item/{id}", handleItem)
mux.HandleFunc("/item/latest", handleLatest)

// These routes will cause a panic - both are equally specific
mux.HandleFunc("/posts/{category}", handleCategory) // ❌ Conflicts
mux.HandleFunc("/posts/{id}", handlePost)           // ❌ Conflicts
Go will detect conflicts and panic when registering conflicting paths, which prevents requests from being routed to the wrong handler.
Before version 1.22, handling different HTTP methods required checking the request method inside the HTTP handler. Now it's much simpler - just define the method at the start of the matcher string.
// Handle POST requests only
mux.HandleFunc("POST /monster", createMonsterHandler)

// Handle other HTTP methods
mux.HandleFunc("PUT /monster/{id}", updateMonsterHandler)
mux.HandleFunc("GET /monster/{id}", getMonsterHandler)
mux.HandleFunc("DELETE /monster/{id}", deleteMonsterHandler)
// This handles PATCH requests specifically
mux.HandleFunc("PATCH /monster/{id}", patchMonsterHandler)

// This handles any method that isn't PATCH for the same path
mux.HandleFunc("/monster/{id}", genericMonsterHandler)
You can perform routing based on hostname rather than just path by specifying the host domain in your route definition.
// Handle requests for a specific host
mux.HandleFunc("dreamsofcode.foo/api/monsters", handleMonsters)
You can test this locally with curl by passing in the host header:
curl -H "Host: dreamsofcode.foo" http://localhost:8080/api/monsters
For production use, you'll want to set up proper DNS records and SSL certificates. The example uses a .foo domain from Porkbun with Let's Encrypt SSL certificates.
Middleware might seem lacking at first glance, but this is where the beauty of the net/http package really shines. Let's implement a simple logging middleware:
package middleware

import (
    "log"
    "net/http"
    "time"
)

func Logging(next http.Handler) http.Handler {
    return http.HandlerFunc(func(w http.ResponseWriter, r *http.Request) {
        start := time.Now()

        next.ServeHTTP(w, r)

        log.Printf("%s %s %v", r.Method, r.URL.Path, time.Since(start))
    })
}
The http.Handler type is an interface that describes any type with a ServeHTTP method. Our middleware function accepts an http.Handler and returns an http.Handler, allowing us to wrap the original handler with additional functionality.
To also log the HTTP status code, we need to create a wrapper for the response writer:
type WrappedWriter struct {
    http.ResponseWriter
    StatusCode int
}

func (w *WrappedWriter) WriteHeader(statusCode int) {
    w.StatusCode = statusCode
    w.ResponseWriter.WriteHeader(statusCode)
}

func Logging(next http.Handler) http.Handler {
    return http.HandlerFunc(func(w http.ResponseWriter, r *http.Request) {
        start := time.Now()

        wrapped := &WrappedWriter{
            ResponseWriter: w,
            StatusCode:     http.StatusOK,
        }

        next.ServeHTTP(wrapped, r)

        log.Printf("%s %s %d %v", r.Method, r.URL.Path, wrapped.StatusCode, time.Since(start))
    })
}
As your middleware stack grows, your code can become unwieldy. Middleware chaining helps organize multiple middleware functions:
type Middleware func(http.Handler) http.Handler

func CreateStack(middlewares ...Middleware) Middleware {
    return func(next http.Handler) http.Handler {
        for i := len(middlewares) - 1; i >= 0; i-- {
            next = middlewares[i](next)
        }
        return next
    }
}
Now you can use it like this:
// Instead of this nested mess:
// handler = middleware.Logging(middleware.Auth(middleware.CORS(router)))

// Use this clean syntax:
stack := middleware.CreateStack(
    middleware.Logging,
    middleware.Auth,
    middleware.CORS,
)

handler = stack(router)
Subrouting enables you to split routing logic across multiple routers. This is particularly useful for API versioning and organizing routes by functionality.
// Create a main router
mainRouter := http.NewServeMux()

// Create a V1 API router
v1Router := http.NewServeMux()
v1Router.HandleFunc("GET /monsters", getMonsters)
v1Router.HandleFunc("POST /monsters", createMonster)
v1Router.HandleFunc("GET /monsters/{id}", getMonster)

// Mount the V1 router under the /v1 prefix
mainRouter.Handle("/v1/", http.StripPrefix("/v1", v1Router))
Subrouters are also useful for applying different middleware to different route groups:
// Public routes (no authentication required)
publicRouter := http.NewServeMux()
publicRouter.HandleFunc("GET /monsters", getMonsters)

// Admin routes (authentication required)
adminRouter := http.NewServeMux()
adminRouter.HandleFunc("POST /monsters", createMonster)
adminRouter.HandleFunc("DELETE /monsters/{id}", deleteMonster)

// Apply middleware only to admin routes
mainRouter.Handle("/", publicRouter)
mainRouter.Handle("/admin/", middleware.EnsureAdmin(
    http.StripPrefix("/admin", adminRouter),
))
The context package allows you to pass data down through your routing stack. This is particularly useful for passing user information from authentication middleware to handlers.
package middleware

import (
    "context"
    "net/http"
)

type contextKey string

const UserIDKey contextKey = "userID"

func IsAuthenticated(next http.Handler) http.Handler {
    return http.HandlerFunc(func(w http.ResponseWriter, r *http.Request) {
        // Extract user ID from authorization header (simplified)
        authHeader := r.Header.Get("Authorization")
        userID := extractUserID(authHeader) // Your auth logic here

        // Add user ID to context
        ctx := context.WithValue(r.Context(), UserIDKey, userID)
        r = r.WithContext(ctx)

        next.ServeHTTP(w, r)
    })
}
func handleProtectedResource(w http.ResponseWriter, r *http.Request) {
    userID, ok := r.Context().Value(middleware.UserIDKey).(string)
    if !ok {
        http.Error(w, "Unauthorized", http.StatusUnauthorized)
        return
    }

    fmt.Fprintf(w, "Hello, user %s!", userID)
}
The Go 1.22 standard library now provides everything you need for advanced HTTP routing:
{param} syntax and r.PathValue()http.Handler interface for clean middleware chainshttp.StripPrefix() for mounting sub-routerscontext.WithValue()All of these features work together seamlessly and require only Go 1.22+ specified in your go.mod file. While third-party packages may still be useful for specific use cases, the standard library now covers the vast majority of routing needs for modern Go applications.
APPDEVFOO5 for $5 domainsThe evolution of Go's HTTP routing capabilities demonstrates the language's commitment to providing powerful tools in the standard library while maintaining simplicity and performance.
]]>For the longest time, I've used cd exclusively for navigating in the terminal. However, when it comes to nested directories, the only way to speed this up was to either use aliases or my shell history.
Since discovering zoxide, that's all changed...
cd (change directory) is undoubtedly one of my most used commands. Having used it for as long as I've been working in the terminal, I've never felt like anything was missing or anything more was needed. So when I came across zoxide, which describes itself as "the smarter cd command," I was intrigued. What more could I possibly need?
Well, as it turns out, quite a lot. After using it for about a week in my system, I can confidently say that it's improved the way I work in the terminal for the better. The command allows me to navigate around my projects and directories at a much greater speed and does so whilst saving me brain cycles in the process. All of this translates to saving me time, keeping me focused, and making me more productive.
Let me show you how it works.
The first thing you'll need to do is install zoxide onto your system. This takes a couple of steps:
sudo pacman -S zoxide
.zshrc:echo 'eval "$(zoxide init zsh)"' >> ~/.zshrc
Now if I open up a new terminal, I have the z command available to me.
So what can it do? Well, nothing special yet. In order to unlock zoxide's true potential, we need to first train it by navigating around our file system like we would do normally, but using the z command instead.
To do so is pretty much the same as using cd:
z command and pass in the directory's path (relative or absolute)z command by itselfz -) instead of a pathSo far, all of this is pretty much in parity with the way that cd works. As I said, none of this is special. However, after you've used zoxide for a little bit, that's when things start to become interesting.
Let's say I want to make some changes to my Neovim config. In order to do so, I need to navigate to the directory that contains my Neovim configuration files. This is all the way in my ~/.config/nvim/lua/custom directory, which is nested pretty deep.
In order to get there with cd, I have to use the full path every time, which can be rather tedious. The only way to speed this up is by using either my shell history or defining a custom alias for any directories that I use frequently.
With zoxide, however, if I want to get there quickly, all I have to do is type:
z nvim custom
And it takes me straight there. Yeah, that's pretty awesome!
As I've been navigating around, zoxide has been working in the background, adding weights to my most frequently visited paths. This means that if I want to jump into a directory that I've already visited with zoxide, I can do so using path fragments rather than specifying the entire thing. Zoxide will then use its internal matching algorithm to determine which path to use.
This algorithm has four main properties:
Case insensitive: The search term is case insensitive, meaning you can write your terms in lowercase and they'll still match to any mixed or uppercase path components.
Order matters: All of the terms that you provide must be contained within the path in the same order. For example, whilst "nvim lua" matches, "lua nvim" will not, because there is no path entry that contains those terms in that order.
Last component matching: The last component of the last keyword must match the last component of the path. For example, "dreams recorder" will match a path ending in "recorder", but "dreams tools" won't match if no path entries end with "tools".
Weight-based ordering: All matches are returned in descending order of their weights. This means that any conflicts are resolved with the path containing the highest weight being chosen.
This weight value is known as the "frecency" (an amalgamation of frequency and recency), and these two properties define the value of the weight or score:
Frequency: The number of times that the directory has been visited. Each time it is visited, its rank goes up by one point.
Recency: How long ago the directory was last visited. Each score has a modifier based on the amount of time since it was last accessed:
All of this makes zoxide incredibly dynamic, especially compared to alternatives such as creating aliases, which are typically static and require you to create and manage them manually.
In addition to the speed benefits, because zoxide removes the need for me to type uppercase characters and symbols, my fingers never travel far from the home row, which increases my typing speed for navigation. And because I no longer need to remember the full path, it's much easier on my brain to remember where I need to go.
Even with this, I can still sometimes forget. When that happens, I find that looking at a list helps to give my brain a friendly nudge. Fortunately, that's where another feature of zoxide comes in handy.
In order to enable this feature, we need to install another package on our system: fzf. fzf is a fuzzy finder tool for the terminal.
sudo pacman -S fzf
By itself, fzf lists all of the files in a directory and allows you to search for them in a fuzzy way. But when combined with zoxide, it becomes incredible.
The zi command: If I type zi (zoxide interactive), I'm shown an fzf window containing a list of all the directories I've visited using zoxide in descending order of their score. I can scroll through this list using Ctrl+P and Ctrl+N, or I can search for a directory with fuzzy finding by typing out the name.
Interactive prefix search: You can also bring up an interactive menu whilst you're typing out your terms. Start typing out the prefix of the directory you wish to change to, then press the space key followed by the Tab key. This brings up another fuzzy finder window that shows only a subset of entries that match the given prefix.
Both of these features are really useful for those times you need a visual clue to give you a nudge in the right direction.
As you can imagine, the list of entries in the zoxide database can start to grow rather large. Fortunately, zoxide does age these off once the total score gets above 10,000 by default. This triggers a rebalancing event, causing all of the scores in the database to be recalculated. Afterwards, any scores that fall below a certain threshold are removed from the database.
Zoxide also provides a number of commands to perform CRUD operations on the entries:
zoxide add: Add a directory or increment its rank without having to travel to itzoxide query: Search for a directory in the database-s flag to display scores-l to list all entrieszoxide remove: Delete directories from the database (handy if zoxide resolves to unwanted paths)zoxide edit: Brings up an interactive window to modify entries in the databaseThrough the edit menu, you can increment or decrement the rank of an entry or remove an entry entirely using the keys listed at the top of the menu.
At this point, I'm pretty convinced zoxide definitely improves my workflow. However, there's a catch. As I mentioned at the start, cd is one of my most used commands. Therefore, undoing that muscle memory is going to be very difficult. Not only that, but if I have to change to using the z command for navigation, anytime I move or SSH onto another machine that doesn't have zoxide installed, I'll need to adjust my muscle memory again. This results in the zoxide command becoming a crutch.
To prevent this from happening, I can rebind the cd command to use zoxide instead. The easiest way to do this is to use a shell alias, however I prefer to take a different approach.
The zoxide init command allows us to pass in an option called --cmd which changes the prefix of both the z and zi commands. We can add this to the init command inside of our shell RC file:
eval "$(zoxide init zsh --cmd cd)"
Once that's added, save and close the file and open up a new terminal to test it out.
Now I no longer have the z command available. However, if I run which on the cd command, you can see that it's aliased to the zoxide command instead. Now I can use cd as I would normally whilst also taking advantage of the features of zoxide. Additionally, by aliasing this way, we also now have access to interactive mode using cdi.
Note: This doesn't work for nushell or any POSIX-compliant shells. However, for zsh, bash, and fish, this works absolutely fine.
For me, I'm pretty happy with this setup. Because I live in the terminal so much, using zoxide for my cd command has improved my workflow considerably. So much so that I don't think I could ever go back to just the vanilla cd command.
The combination of intelligent path matching, frecency-based scoring, and seamless integration with existing workflows makes zoxide an indispensable tool for anyone who spends significant time navigating directories in the terminal. It's not just about speed—it's about reducing cognitive load and keeping you in the flow state while working.
Are you planning on giving zoxide a go, or perhaps you were using it already? The smart navigation and muscle memory preservation make it a game-changer for terminal productivity.
]]>Tmux is perhaps the one piece of software that's had the biggest impact on the way I write code. Out of the box, however, tmux can be difficult to look at—it requires a little bit of configuration to really get productive with. In this article, I'm going to explain why tmux is so powerful and show you how to update it from its default offering into a version that is modern, zenful, and a joy to work with.
I really meant it when I said that tmux has had one of the biggest impacts on the way I write code. Before discovering it, I worked more with IDEs and graphical editors and only entered the terminal when I needed to. Once I discovered tmux, however, that all changed. My default editor became Neovim, and I was able to have all of the goodness of a tiling window manager in the terminal.
Tmux also provides other features for working in a command line that I just can't live without. Using tmux, I can:
Tmux really has improved the way I work, and over the years I've built up a configuration that works really well for me, which I want to share with you today.
Before we can start writing our zenful configuration, we need to do a little setup work.
First, make sure you have tmux installed. As of the time of this writing, the latest version is 3.3a. Get that installed as per your operating system.
Next, you're going to need the Tmux Package Manager (TPM). This is installed using git, so make sure you have that as well. To install the tmux package manager, you can run the following command:
git clone https://github.com/tmux-plugins/tpm ~/.tmux/plugins/tpm
Now let's create our tmux config file. You can do this at either:
~/.tmux.conf, or $XDG_CONFIG_HOME/tmux/tmux.conf (which typically translates to ~/.config/tmux/tmux.conf)I'm going to go with the XDG config as it's the more modern way to manage dot files.
Next, open up your fresh config file in your favorite editor and add in the following lines to source the TPM package and run it:
# List of plugins
set -g @plugin 'tmux-plugins/tpm'
set -g @plugin 'tmux-plugins/tmux-sensible'

# Initialize TMUX plugin manager (keep this line at the very bottom of tmux.conf)
run '~/.tmux/plugins/tpm/tpm'
While we're here, we're also adding in the sensible package, which basically sets a number of options that fix some of the quirks with tmux's default configuration. If you want to know more about what options this package changes, I recommend heading over to the GitHub page and reading their documentation.
With our initial config set, we can go ahead and run tmux to load it. If you're already in tmux, you can reload the configuration by running:
tmux source ~/.config/tmux/tmux.conf
Before we jump into configuring tmux, it's worth going over some of the basic commands and key bindings for using it.
Tmux consists of three main objects:
Sessions are the topmost layer in tmux and are a collection of one or more windows managed as a single unit. You can have any number of sessions open at one time but typically only attached to one.
Windows are a container for one or more panes. You can think of windows as tabs in browsers or other software. Each window has a currently active pane and allows you to switch between any of the panes that it manages. The windows in the session are shown at the bottom of the screen, with the currently active window marked with an asterisk.
Panes are splits in the window and represent an individual terminal session. There will only be one active pane at a time that you'll interact with.
To enter commands to tmux, you need to use what's called the prefix key. This is a key combination that you use before the actual command itself. The default prefix is Ctrl + B.
prefix + cprefix + [window number]prefix + n (next) or prefix + p (previous)prefix + &prefix + %prefix + "prefix + [arrow keys]prefix + { or prefix + }prefix + qprefix + zprefix + !prefix + xtmux new -s [session-name]tmux ls (outside tmux) or prefix + s (inside tmux)tmux attach -t [session-name]prefix + wThis covers a lot of the basic commands for tmux, but there are plenty of others. I recommend checking out tmux cheatsheet.com for more commands.
After installing the package manager, the first thing I like to do is set up better key bindings for navigating around tmux. I use a package called vim-tmux-navigator, which provides two key features:
Ctrl + h/j/k/l keys (similar to Vim navigation)First, add it to your Neovim configuration. Since I'm using NvChad, I add the plugin to my custom plugins file:
{
  "christoomey/vim-tmux-navigator",
  lazy = false,
}
I also had to add custom mappings to override the ones that NvChad sets, which can interfere with vim-tmux navigation settings.
Now in our tmux config, add the vim-tmux-navigator to our tmux plugins:
set -g @plugin 'christoomey/vim-tmux-navigator'
Install it by using prefix + Shift + I, then source your tmux configuration. You'll now be able to navigate using Ctrl + h/j/k/l keys, and this works seamlessly between tmux and Neovim, making them work as if they were one application.
I also like to add custom mappings for navigating windows. Add these lines to allow cycling across windows using Shift + Alt + H/L:
bind -n M-H previous-window
bind -n M-L next-window
One thing we need to fix is our colors when inside a tmux session. You might notice that colors look different in tmux versus outside of it. Fix this by adding the following line to your tmux config:
set-option -sa terminal-overrides ",xterm*:Tc"
This sets tmux to use 24-bit color, provided that your terminal supports it.
So far we've kept the default prefix key binding of Ctrl + B. However, this binding tends to be used for other functionality in the terminal. I like to change the tmux prefix to Ctrl + Space instead:
unbind C-b
set -g prefix C-Space
bind C-Space send-prefix
Finally, it's time to get rid of that horrible green line! Catppuccin is my favorite color scheme, and it provides a plugin for tmux as well. Add it to your configuration:
set -g @plugin 'catppuccin/tmux'
Install it with prefix + Shift + I. As well as the default color scheme (called "mocha"), you can change this to any of the other variants by setting the Catppuccin flavor variable:
set -g @catppuccin_flavour 'latte' # or frappe, macchiato, mocha
I actually have my own fork of Catppuccin as I prefer to have a little more information on my window tabs. To use my version, change the plugin line to:
set -g @plugin 'dreamsofcode-io/catppuccin-tmux'
Enable mouse support to click between windows/panes and scroll through buffer history:
set -g mouse on
By default, tmux starts indexing windows at zero, but the zero key is all the way to the right on a keyboard. Start indexing at one instead:
set -g base-index 1
set -g pane-base-index 1
set-window-option -g pane-base-index 1
set-option -g renumber-windows on
The tmux-yank package provides better copying functionality:
set -g @plugin 'tmux-plugins/tmux-yank'
I also like to make copy mode more Vim-like:
set-window-option -g mode-keys vi
bind-key -T copy-mode-vi v send-keys -X begin-selection
bind-key -T copy-mode-vi C-v send-keys -X rectangle-toggle
bind-key -T copy-mode-vi y send-keys -X copy-selection-and-cancel
Now you can:
prefix + \[v to start selectiony to copyCtrl + vSet panes to open in the same directory as the pane you're splitting from:
bind '"' split-window -v -c "#{pane_current_path}"
bind % split-window -h -c "#{pane_current_path}"
With these configurations, you now have a tmux setup that is both productive and a joy to work with. The combination of better navigation, beautiful theming, and productivity features transforms tmux from a basic terminal multiplexer into a powerful development environment.
I hope this article inspired you to try tmux yourself or upgrade your existing configuration. The complete configuration can be found in my GitHub repository, and if you know of any other plugins that should be included, feel free to share them!
Want to connect? Join the Discord community or follow on Twitter.
]]>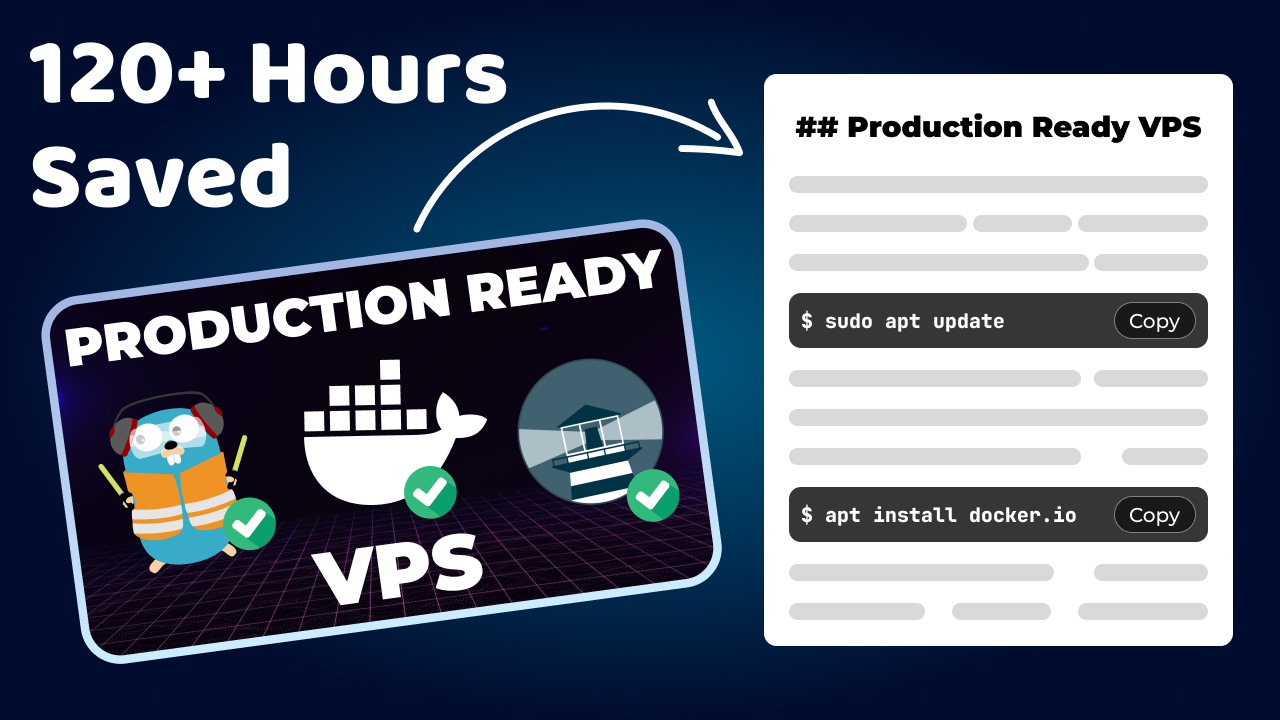