Debian 11 is out for quite a while now. The new version comes with a ton of updated packages and five years of support. Some of you might still be on Debian 10 though. So, today I'll show you how to upgrade to the latest and greatest
]]>Debian 11 is out for quite a while now. The new version comes with a ton of updated packages and five years of support. Some of you might still be on Debian 10 though. So, today I'll show you how to upgrade to the latest and greatest release of Debian. These instructions may also be used for upgrades from other Debian versions. You will then need to replace buster with the version you are currently using and bullseye with the newer version you want to upgrade to.
Upgrade procedure
Step 1: Update the system
Before upgrading to the next release of Debian, it is a good idea to upgrade the current packages to the latest version available.
$ sudo apt update
$ sudo apt upgrade
$ sudo apt full-upgrade
$ sudo apt --purge autoremove
and the upgrade process should start.
It is also worth installing these upgrades automatically and unattended. I've already written a guide on the subject.

After a successful upgrade, it is recommended that you reboot the system to load the new Linux kernel and get the services up and running with the updated binaries.
Step 2: Backup your system
Please make a backup of the system (at least of the data and the system configuration). Many cloud VM providers offer free snapshots of the system, that should be the least you do! Even though the upgrade normally goes smoothly, it is possible that something goes wrong and the system is unusable afterwards. Therefore, make a backup NOW!
Step 3: Update the sources.list file
Before we can update Debian to the latest version, we need to tell APT that we want to use the new package sources. Otherwise, the package manager will not know how to get the updated packages we need for Debian 11. You can view the default package sources of your current system by using the cat command to view the content of the file.
$ cat /etc/apt/sources.list
deb http://deb.debian.org/debian buster main
deb-src http://deb.debian.org/debian buster main

deb http://security.debian.org/debian-security buster/updates main
deb-src http://security.debian.org/debian-security buster/updates main

# buster-updates, previously known as 'volatile'
deb http://deb.debian.org/debian buster-updates main
deb-src http://deb.debian.org/debian buster-updates main
You may want to copy the current sources.list files to another location (for example, your home directory) as a backup.
$ cp -v /etc/apt/sources.list ~
$ cp -rv /etc/apt/sources.list.d/ ~
Now it is time to update the files accordingly. Open the /etc/apt/sources.list file with your favorite text editor and change all existing references from buster to bullseye. If you see keywords other than buster in this file (e.g. stretch (Debian 9), jessie (Debian 8), wheezy (Debian 7) or similar), please upgrade your system to the next version first until you are on Debian 10 (buster).
The Debian security repository has changed its "syntax", so we need to update it to allow APT to load the sources.
# Original
deb http://deb.debian.org/debian-security buster/updates main
# After our change
deb http://deb.debian.org/debian-security bullseye-security main
For reference, this is the sources.list file that I use on my systems and with which I've upgraded to Debian 11 successfully:
$ cat /etc/apt/sources.list
deb http://deb.debian.org/debian bullseye main
deb-src http://deb.debian.org/debian bullseye main

deb http://security.debian.org/debian-security bullseye-security main
deb-src http://security.debian.org/debian-security bullseye-security main

# bullseye-updates, previously known as 'volatile'
deb http://deb.debian.org/debian bullseye-updates main
deb-src http://deb.debian.org/debian bullseye-updates main
Now please update the contents of the files in the /etc/apt/sources.list.d/ directory as we did with the sources.list file. In case you don't know how to modify a repository in the directory for Debian 11, please refer to the documentation of the repository or look it up on the internet.
Step 4: System upgrade
After that, we need to update our package lists. Otherwise, our system will not know about the new Debian 11 packages we want to install.
$ sudo apt updateNow we want to upgrade our existing packages without installing any new packages (also called minimal system upgrade) before performing the full system upgrade. This helps avoid removing a large number of packages that we want to keep on our system.
$ sudo apt upgrade --without-new-pkgsDuring the update process, questions may pop up about whether you want to replace or keep a configuration file, restart a service that has received an update (or a library it works with e.g. libc, libpam, libssl) You might also encounter a list of changes included in some updates. Skim the changes and get an idea of whether you need to manually change some configurations after the updates (for example, if you are running a heavily customized service) and finish the process by pressing q.
Step 5: Full Upgrade to Debian 11
Now we need to perform the full system upgrade to Debian 11, including all new package versions, new or changed dependencies and configurations. This upgrade will take longer because all packages that have received an update in Debian 11 will be updated on the system.
$ sudo apt full upgradeYou may be advised of changed configurations or services that need to be checked. If you have changed some files yourself, it is a good idea to point out the differences between the current and the new configuration and decide which version to install/keep.
Step 6: Complete the upgrade
It's now time to reboot the system.
$ sudo rebootIt may take some time for the system to boot up again. It is strongly recommended to have a console open for manual intervention (e.g. a VNC console).
When the system is running again, log back in and check that the new kernel is running and that the system reports that it is running Debian 11.
$ uname -r
5.10.0-11-amd64
$ lsb_release -a
No LSB modules are available.
Distributor ID: Debian
Description:    Debian GNU/Linux 11 (bullseye)
Release:        11
Codename:       bullseye
If that looks good, check that all installed services are running and not reporting any problems or errors. If everything seems to be in order, we are done!
]]>Git is a powerful version control system that I have been using for quite some time for my own projects or the projects we do at the university. Recently, I stumbled across signed commits. You may be familiar with the green badges on GitHub when you commit to a repository directly from GitHub's web interface that says "Verified" next to your commit. I was curious how to archive these verified commits via the command line or an IDE like Visual Studio Code.
Git supports signed commits for quite some time (January 2012) and signed tags for even longer. This means that Git provides the ability to use the GNU Privacy Guard (GPG) to verify that commits actually come from a trusted source. GitHub marks signed commits with a green "verified" badge.
Set up GPG
First you need to install GPG on your system, either via a package manager (e.g. apt install gpg) or on Windows by installing Gpg4win.
You may want to verify that gpg has been installed successfully by calling the following command in the terminal or Windows PowerShell/CMD
$ gpg --version
gpg (GnuPG) 2.0.30 (Gpg4win 2.3.4)
libgcrypt 1.7.8
Next we need to import both our public and private keys. You may also have them exported in an .asc file. If you don't have any keys yet generated, then you first have to do so before we can continue and go straight to the Git setup part.
Set up Git
Now we need to tell Git about our GPG key, the signing key ID respectively. You can get this ID by using the following command and looking for the lines starting with sig
$ gpg --list-sigs

# Sometimes the above command doesn't work. In this case go with
$ gpg --list-signatures

$ git config --global user.signingkey YOURGPGSIGNATURE
$ git config --global commit.gpgsign true
Setup the Git server
We have to tell the Git server to recognize our public key. For that we need to export it.
$ gpg --armor --exportAfter that, open the file with your favorite text editor and copy the content to the clipboard. Now we need to navigate to the GPG settings on our Git server.
On GitHub, you need to navigate to Settings > SSH and GPG Keys > New GPG key.
Here we paste the key we just copied. After that, you should be able to see the GPG key in the web interface.
We should now be able to create signed commits!
]]>Docker alone makes the life of a system administrator quite easy. You install the docker engine on the system you want to deploy your application to, build your own container with the components you need and then run it in the development environment or deploy the container directly to the production system. What can sometimes be a little bit complicated is that you normally can't run multiple web applications at the same time on port 80 & 443, or that you have to create the Let's Encrypt certificates for each service separately. For all these problems there is an elegant solution thanks to Traefik. So today I will write about Traefik (version 2): A reverse proxy that takes some of the tedious work off your hands and which can be easily extended with new services!
Prerequisites
- A system you have access to, preferably a Linux-based system with a public IP address and a domain pointing to it
- Docker & docker-compose installed on the system (see my post about how to do this here)
- Elevated privileges (via sudo) or access to the root user
- Internet connection
Installation & Configuration
Step 1: Update the Linux system
Before setting up an application on your Linux server, it is a good idea to upgrade the system in advance to be up to date. To do this, we call
$ sudo apt update
$ sudo apt upgrade -y
and the upgrade process should start.
It is also worth installing these upgrades automatically and unattended. I've already written a guide on the subject.
After a successful upgrade, it is recommended that you reboot the system to load the new Linux kernel and get the services up and running with the updated binaries.
Step 2: Install apache2-utils
We need to install apache2-utils so we can use htpasswd to generate our password for the Traefik web interface. Note, only the Apache utils are installed and not the Apache2 web server itself!
# If you haven't done so already, update your package lists
$ sudo apt update

# Now install the package
$ sudo apt install apache2-utils
Step 3.1: Create the required files and directories
The data of the Traefik container and its configuration files must be stored somewhere. Therefore we need to create some directories and the initial files for Traefik to work with.
# First we create a directory that contains all subdirectories, data and configuration files.
$ sudo mkdir -p /opt/containers/traefik

# Now we create some files and directories that we will need later on
$ sudo mkdir -p /opt/containers/traefik/data
$ sudo touch /opt/containers/traefik/data/acme.json
$ sudo chmod 600 /opt/containers/traefik/data/acme.json
$ sudo touch /opt/containers/traefik/data/traefik.yml
Step 3.2: Modify the configuration file of Traefik
Now we need to do our initial configuration for Traefik. The provided configuration should work just fine by replacing [email protected] with your own email address. This is required for Let's Encrypt to work properly, as you will receive notifications if your certificates are about to expire.
# Open the config file with your favourite editor such as vim, nano or joe
$ sudo vim /opt/containers/traefik/data/traefik.yml
# Now paste the content down below into the file
api:
dashboard: true
entryPoints:
http:
address: ":80"
https:
address: ":443"
providers:
docker:
endpoint: "unix:///var/run/docker.sock"
exposedByDefault: false
file:
filename: "./dynamic_conf.yml"
certificatesResolvers:
http:
acme:
email: [email protected] # Change this to your valid email address
storage: acme.json
httpChallenge:
entryPoint: httpStep 3.3: Create the docker-compose.yml file
It's time for us to create a Docker compose file for the Traefik service, where we do some additional configuration and point to the files and directories we just created.
$ sudo vim /opt/containers/traefik/docker-compose.yml# Paste the content down below into the docker-compose.yml file
version: '3.8'
services:
traefik:
image: traefik:latest
container_name: traefik
restart: unless-stopped
security_opt:
- no-new-privileges:true
networks:
- proxy
ports:
- 80:80
- 443:443
volumes:
- /etc/localtime:/etc/localtime:ro
- /var/run/docker.sock:/var/run/docker.sock:ro
- ./data/traefik.yml:/traefik.yml:ro
- ./data/acme.json:/acme.json
- ./data/dynamic_conf.yml:/dynamic_conf.yml
labels:
- "traefik.enable=true"
- "traefik.http.routers.traefik.entrypoints=http"
- "traefik.http.routers.traefik.rule=Host(`traefik.example.org`)"
- "traefik.http.middlewares.traefik-auth.basicauth.users=USER:PASSWORD"
- "traefik.http.middlewares.traefik-https-redirect.redirectscheme.scheme=https"
- "traefik.http.routers.traefik.middlewares=traefik-https-redirect"
- "traefik.http.routers.traefik-secure.entrypoints=https"
- "traefik.http.routers.traefik-secure.rule=Host(`traefik.example.com`)"
- "traefik.http.routers.traefik-secure.tls=true"
- "traefik.http.routers.traefik-secure.tls.certresolver=http"
- "traefik.http.routers.traefik-secure.service=api@internal"
- "providers.file.filename=/dynamic_conf.yml"
- "traefik.http.routers.traefik-secure.middlewares=secHeaders@file,traefik-auth"
networks:
proxy:
external: trueWe still need to change some things
- Change the hostname from
traefik.example.orgto your own valid (sub-)domain - Set your own username and password for the traefik web interface
Changing the username and password
For this purpose, we installed apache2-utils earlier. Now it's htpasswd's time to shine.
# You have to replace "user" and "password" with the values you want to use later to authenticate against traefik
$ echo $(htpasswd -nb user password) | sed -e s/\\$/\\$\\$/g

Output should be something like this:
user:$$apr1$$7ciH.Uzt$$DUqDgmpLmFE2Fm7Z7VaMe/
Now we need to replace the placeholder values with the output we've just got.
Change "traefik.http.middlewares.traefik-auth.basicauth.users=USER:PASSWORD"
where USER:PASSWORD is the output you just received.
Step 3.4: Create the dynamic_conf.yml file
This file defines which ciphers we want to use and adds some optional security headers (in the form of a traefik middleware)
$ sudo vim /opt/containers/traefik/data/dynamic_conf.yml# Paste the content down below into the dynamic_conf.yml file
tls:
options:
default:
minVersion: VersionTLS12
cipherSuites:
- TLS_ECDHE_RSA_WITH_AES_128_GCM_SHA256
- TLS_ECDHE_RSA_WITH_AES_256_GCM_SHA384
- TLS_ECDHE_RSA_WITH_CHACHA20_POLY1305
- TLS_AES_128_GCM_SHA256
- TLS_AES_256_GCM_SHA384
- TLS_CHACHA20_POLY1305_SHA256
curvePreferences:
- CurveP521
- CurveP384
sniStrict: true
http:
middlewares:
secHeaders:
headers:
browserXssFilter: true
contentTypeNosniff: true
frameDeny: true
sslRedirect: true
# HSTS Configuration
stsIncludeSubdomains: true
stsPreload: true
stsSeconds: 31536000
customFrameOptionsValue: "SAMEORIGIN"Step 3.5: Create a docker network
We now need to create an internal network through which our containers will communicate with Traefik. In our case we will call it a proxy.
$ sudo docker network create proxyStep 4: Starting Traefik
We're now able to start Traefik.
sudo docker-compose -f /opt/containers/traefik/docker-compose.yml up -dYou should now be able to log in to your Traefik domain (here: https://traefik.example.org) with your previously configured credentials. After successful authentication, you will be welcomed by the Traefik dashboard.
]]>
Many of us are currently at home, having video conferencing, online school lessons, and using the Internet more than ever. Therefore, many people here in Germany have increased their internet capacity so that all household members can work at the same time without any problems. However, some of our fellow human beings are less fortunate and either cannot afford an internet connection or only a very slow internet connection. As a fan of open infrastructures and networks, I gave my neighbors free WiFi by using an older router that I bought some time ago that is no longer in use. Quite a few older routers / access points can be reprogrammed so that they can function as WLAN hotspots. You don't have to worry about being held responsible for the illegal activities of others through your hotspot. All data traffic is routed via an exit node of the Freifunk project and is not routed directly out of your home connection.
Since I live near Munich, I will be following the steps required to set up a Freifunk Munich router. The steps should not be so different from those of other Freifunk communities in Germany, Austria or Switzerland. So let's start and get the hotspot up and running.
Disclaimer
I am not responsible for any bricked devices or damage to the hardware you are working with! You are responsible for all changes you make to your device. Changing the firmware may void your warranty. Before flashing the new firmware, find a recovery guide to restore the device in case something goes wrong, e.g. a power failure during the upgrade.
Prerequisites
- A computer or laptop with a network-compatible operating system and a "LAN / RJ45 socket" so that we can connect to the router via an Ethernet cable.
- Internet connection
- Browser
- A supported router (see the press release here)
Installation and configuration
Step 1: Identifying your routers model number
You must first identify the model number of your router and the corresponding revision of the device. You can almost always find this information on the type plate of the device next to the power specifications and directly above the serial number. I will do this guide with my trustworthy TP-Link N750 (TL-WDR4300 V1.7), which I saved from being scrapped after a failed update.

Step 2: Download the appropriate firmware and connect to the router
You must first download the appropriate firmware for your device. Usually you have two options: the first is the factory version and the second is the sysupgrade version. If your device is running the original manufacturer image, you should use the factory image. If your system is running a variant of OpenWRT, choose the Sysupgrade version. Most of the people who follow this guide will likely need to use the factory image. Now go to https://firmware.ffmuc.net/ and enter your model number or device name. If you don't already see it, check the "Show older devices" box and search for your model again. If you still don't see it, click the "View Table" link and see if your device is supported. There is a good chance your device will be supported if it already has full OpenWRT support.
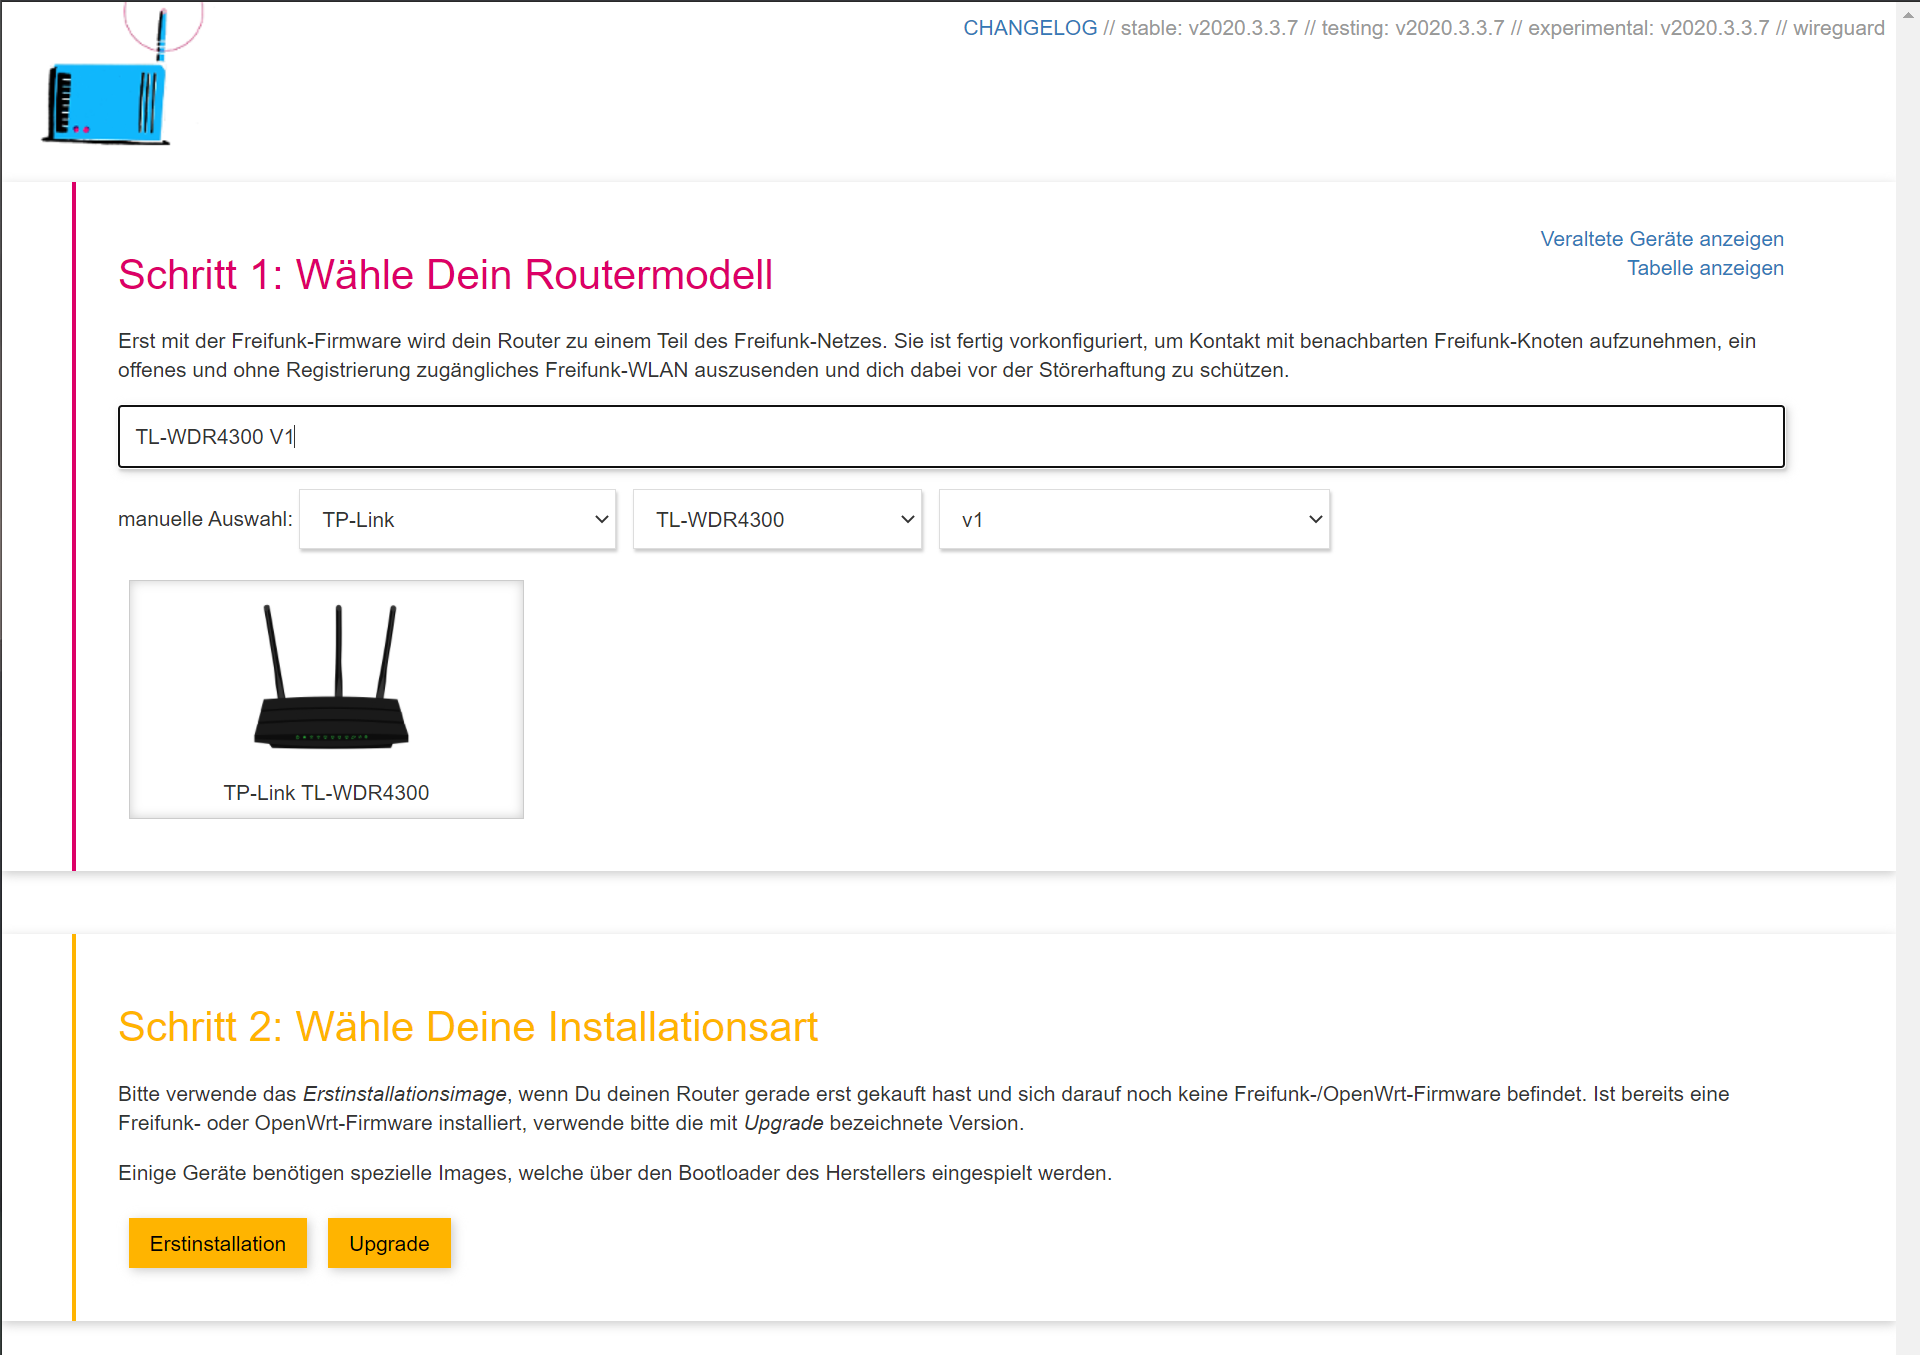
Now select "Erstinstallation" for Factory and "Upgrade" for Sysupgrade. I will continue with the factory install as I am still rocking the original manufacturer image. I recommend using the stable update channel as this guarantees reliable firmware and good results. Depending on the date you view this, the published version may have increased significantly. However, the installation process will not change that much. The file is only a few megabytes, so the download shouldn't take that long.

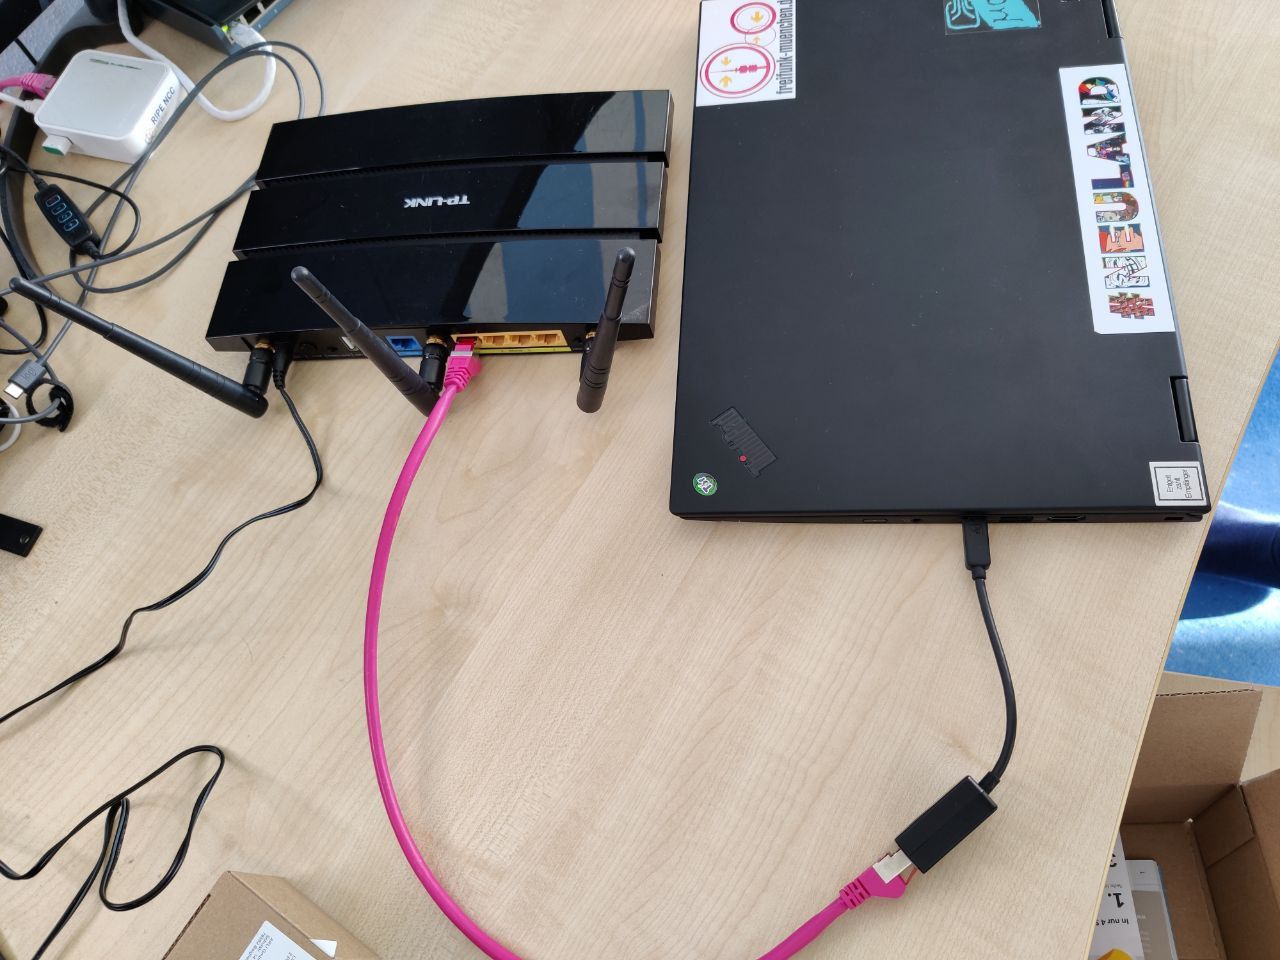
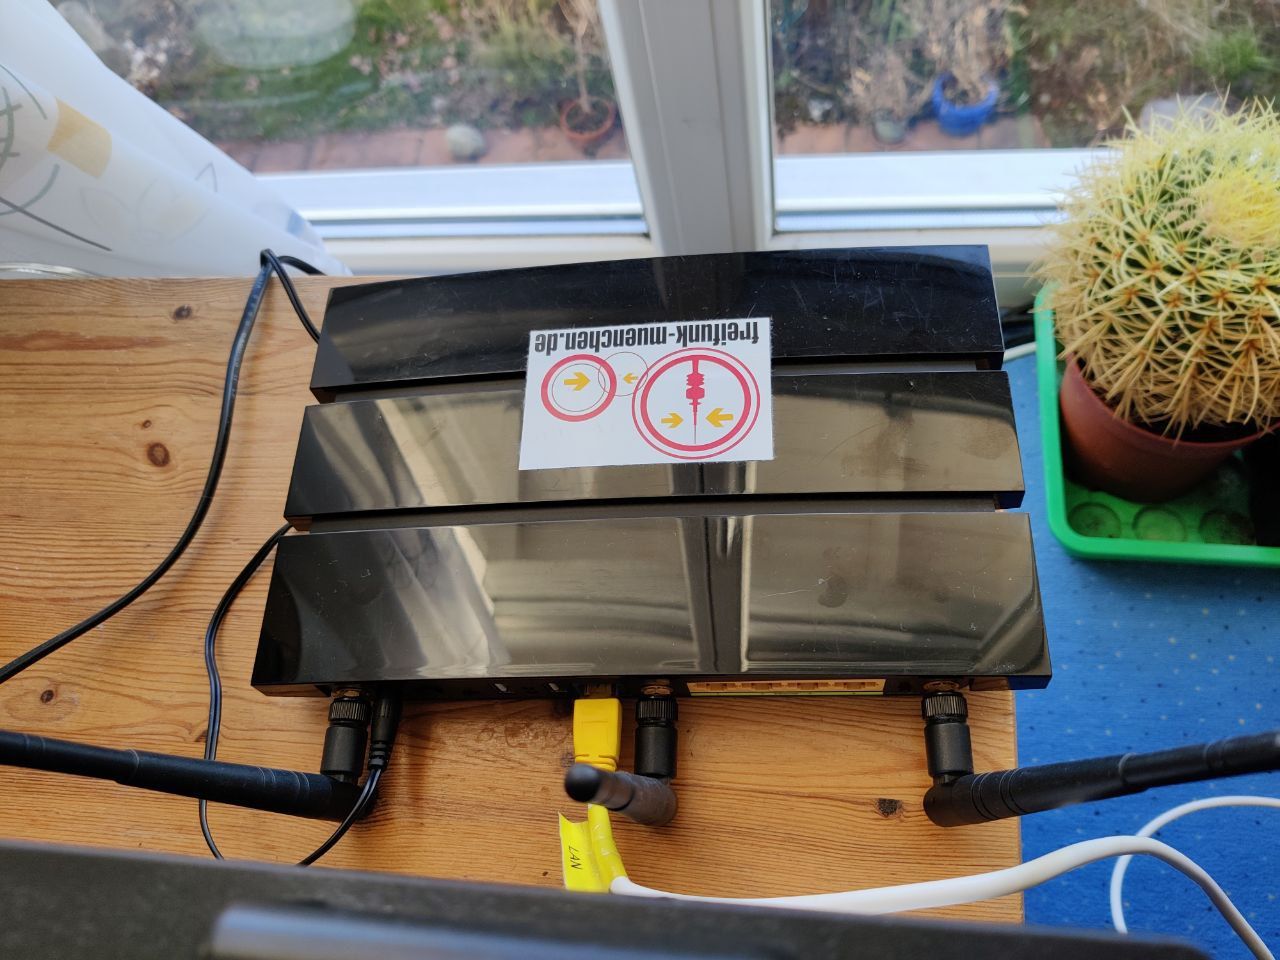
Now we have to connect our laptop or computer directly to the router using an Ethernet cable. Please do not use a switch that is intermittently connected to your home's intranet, as this can affect the DHCP server that is running on the router that we want to set up. Make sure you are not connected to your router's wide area network (WAN) connector as we cannot configure it from there. Use a LAN port (the yellow ones) and we're good to go. Take a look at Fig. 4 to see what I did.
Make sure the router is now plugged into the wall and wait for it to fully boot (start).
Step 3: Install the new firmware
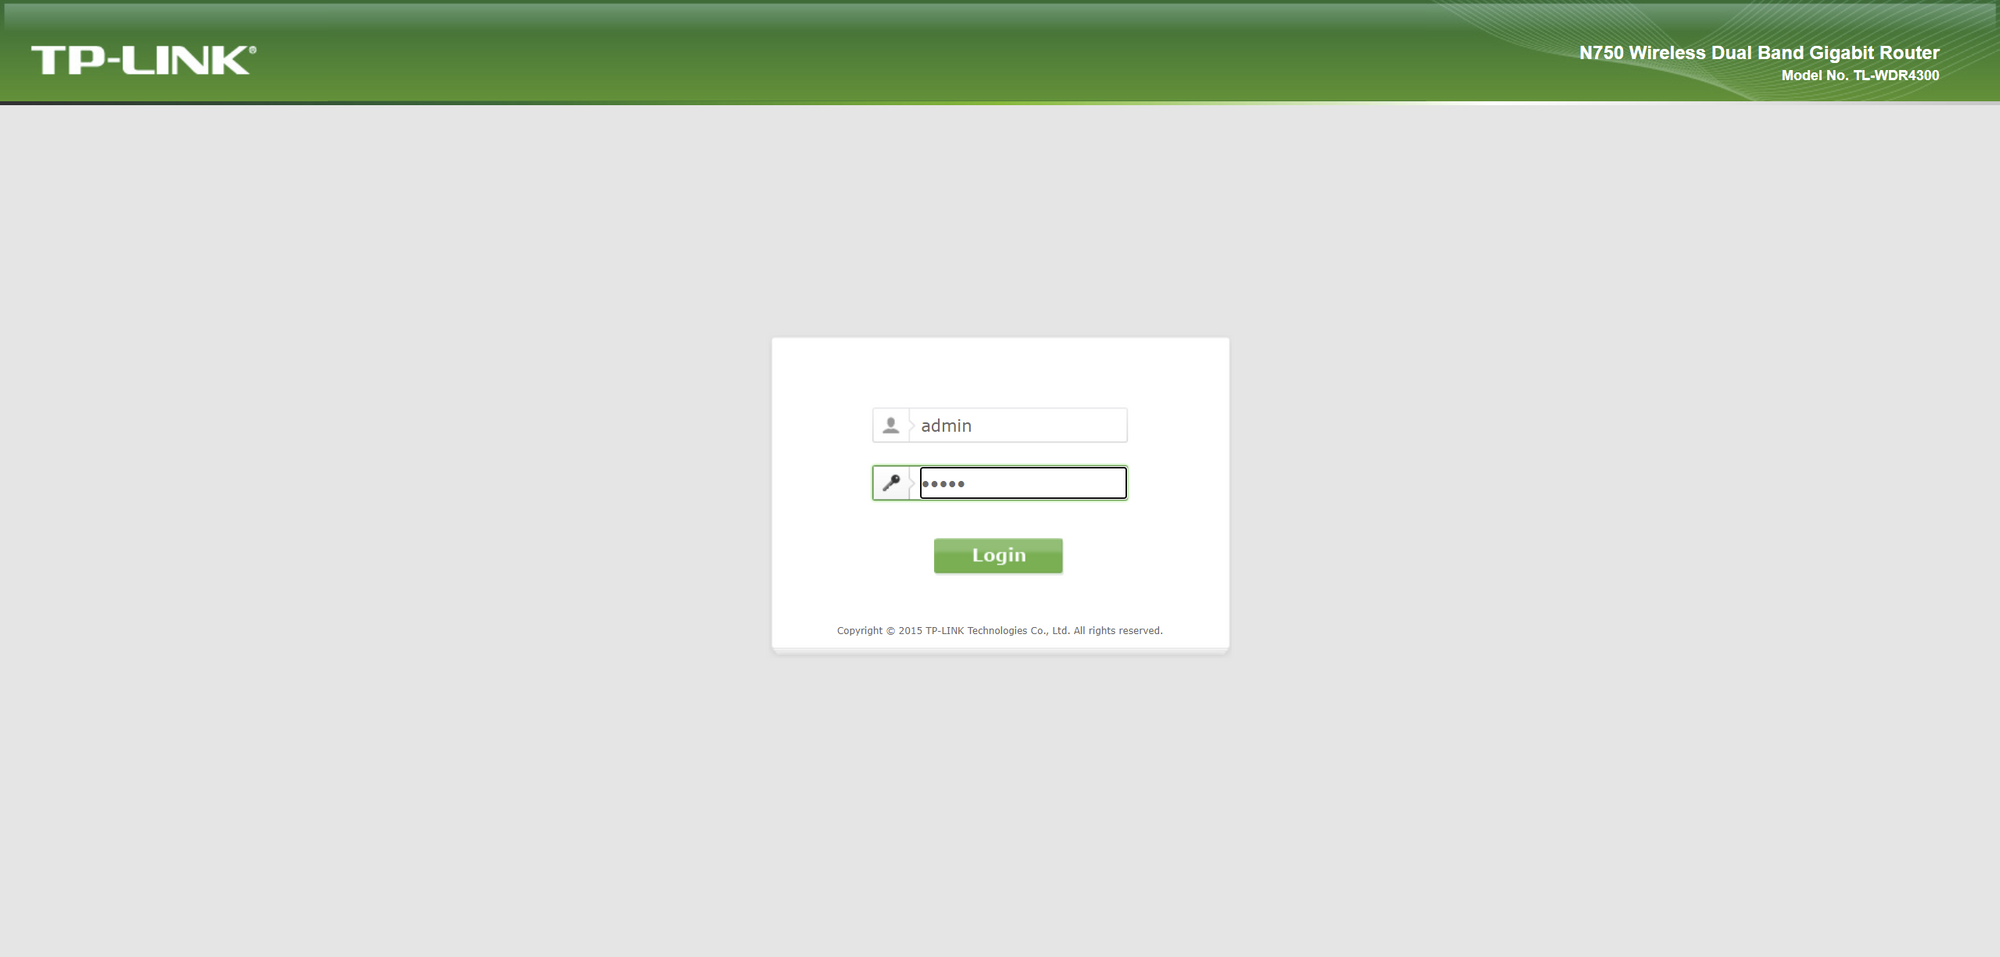
Our computer / laptop should now have automatically received a DHCP lease (IP address that your device receives from the router you are connected to). TP-Link devices normally operate on the 192.168.0.0/24 subnet, so we should be able to reach the device by going to the 192.168.0.1 address in our web browser of your choice. Now we should see the login mask. The default login information is often admin as the username and admin as the password.
After logging in, we should be greeted with the standard dashboard. In my case, it's the setup wizard, but we don't have to play around with it as we are replacing the currently running system. To do this, go to the System Tools section and select "Firmware Update". Now we are on the right page.

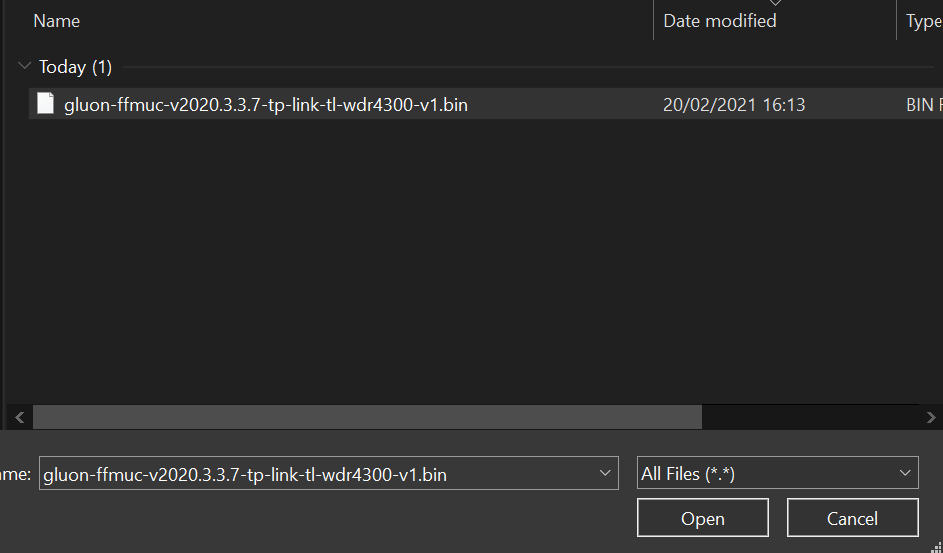
Select the Choose File button and select your downloaded firmware image.
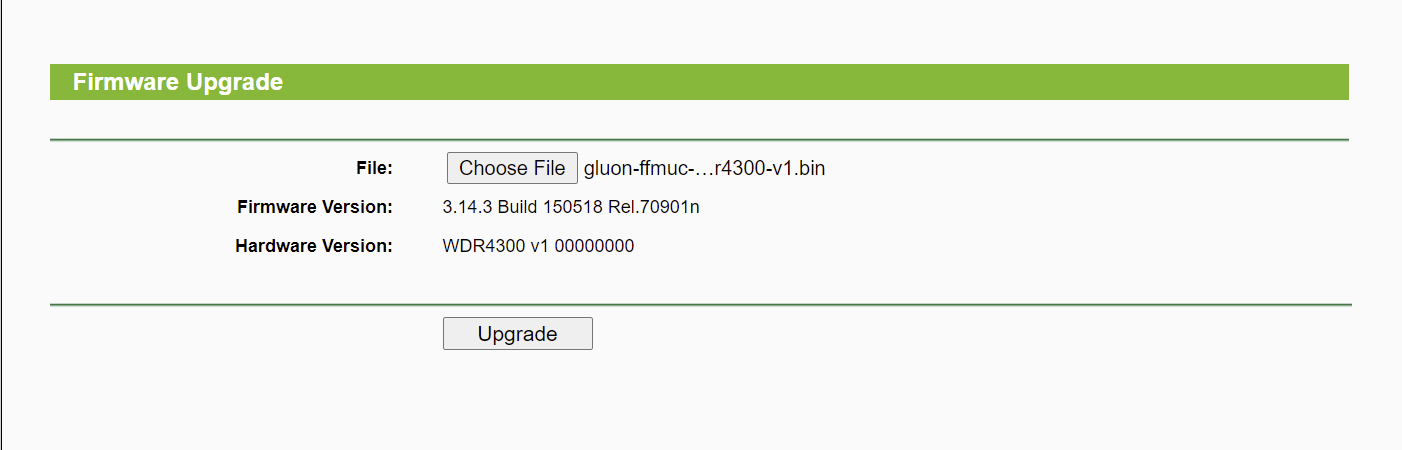
Now all you have to do is click the upgrade button on the old system and confirm the action by clicking the OK button in the message window.
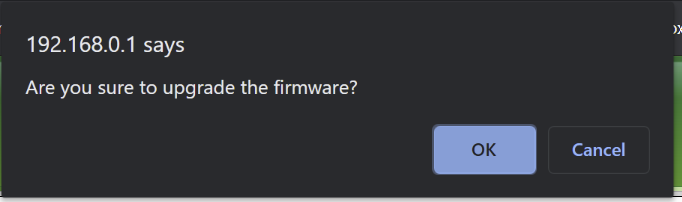
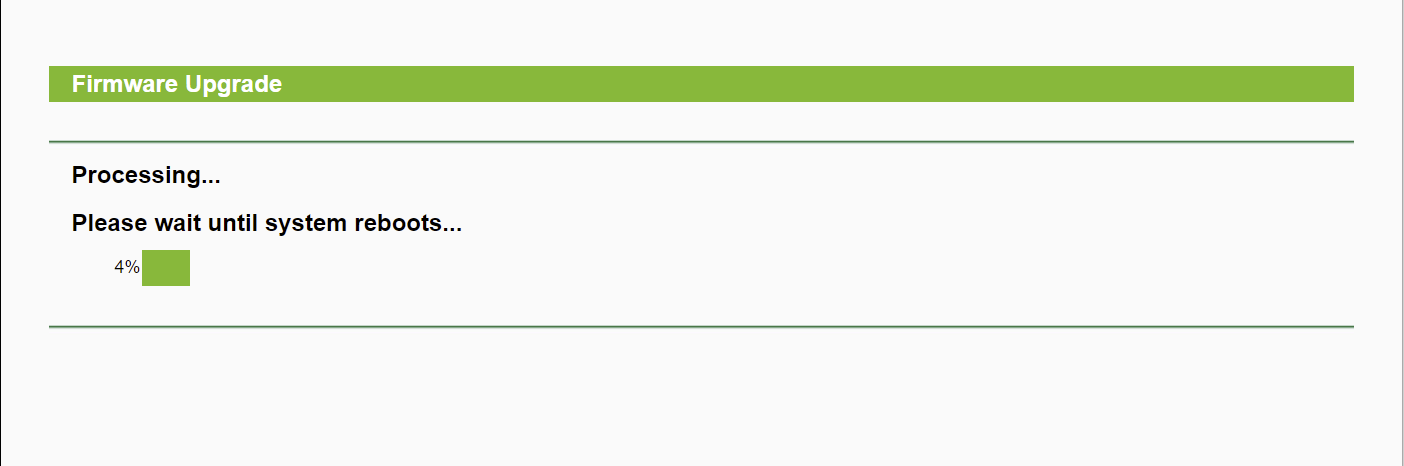
The system will now be updated to the Freifunk image you selected and will be restarted when the process is complete. Please do not pull the plug out of the socket under any circumstances while you are upgrading!
Step 4: Configure the router
We will only set up the access point in a rudimentary way. Further configurations are dealt with in the following blog posts and in the Freifunk (Munich) Wiki itself (although it is mainly written in German).
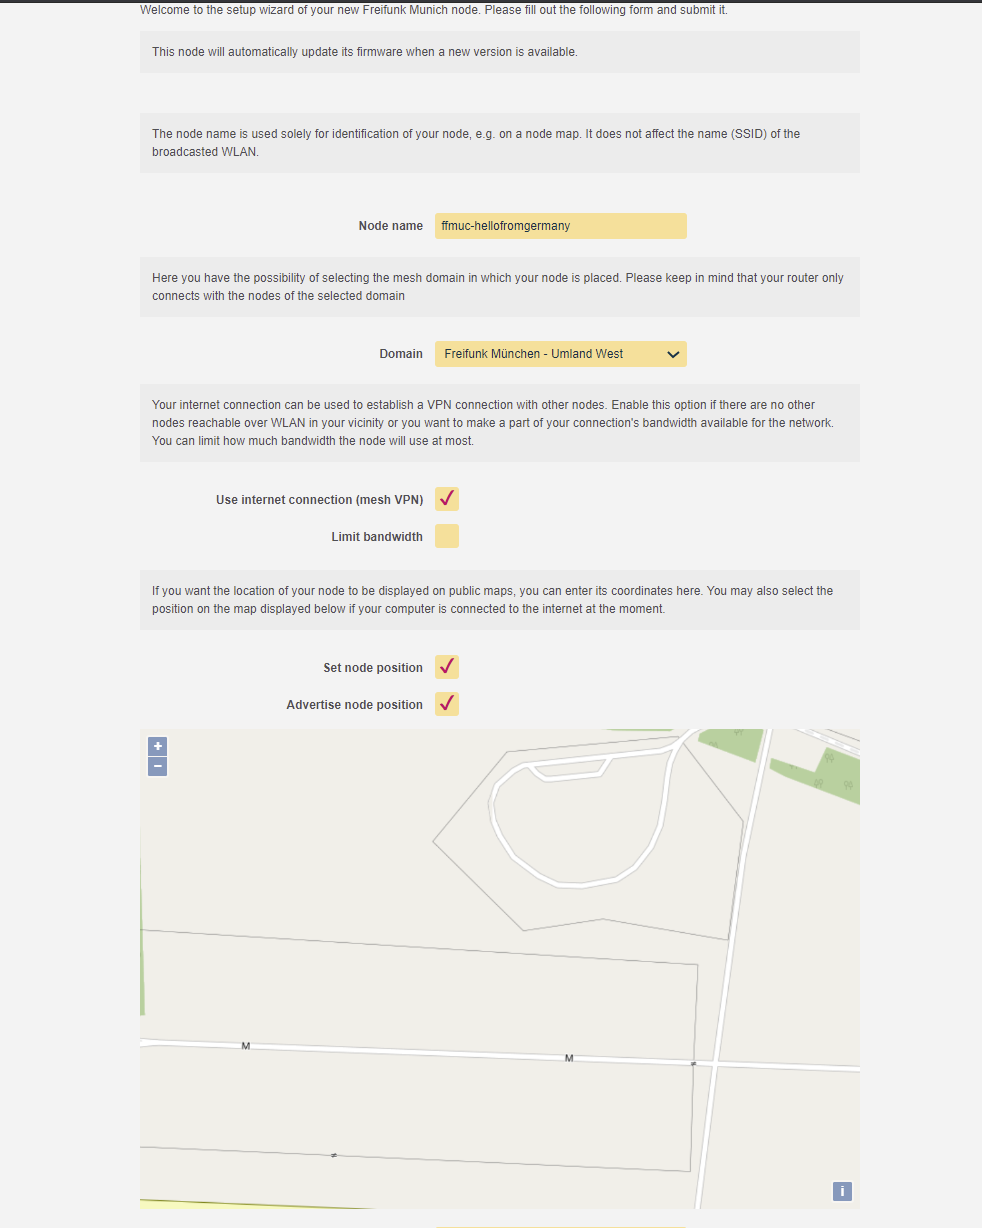
The Freifunk firmware (as it is based on OpenWrt) uses the subnet 192.168.1.0/24. The router can therefore be reached via the address 192.168.1.1. If you continue, the new shiny setup wizard for Freifunk will appear.
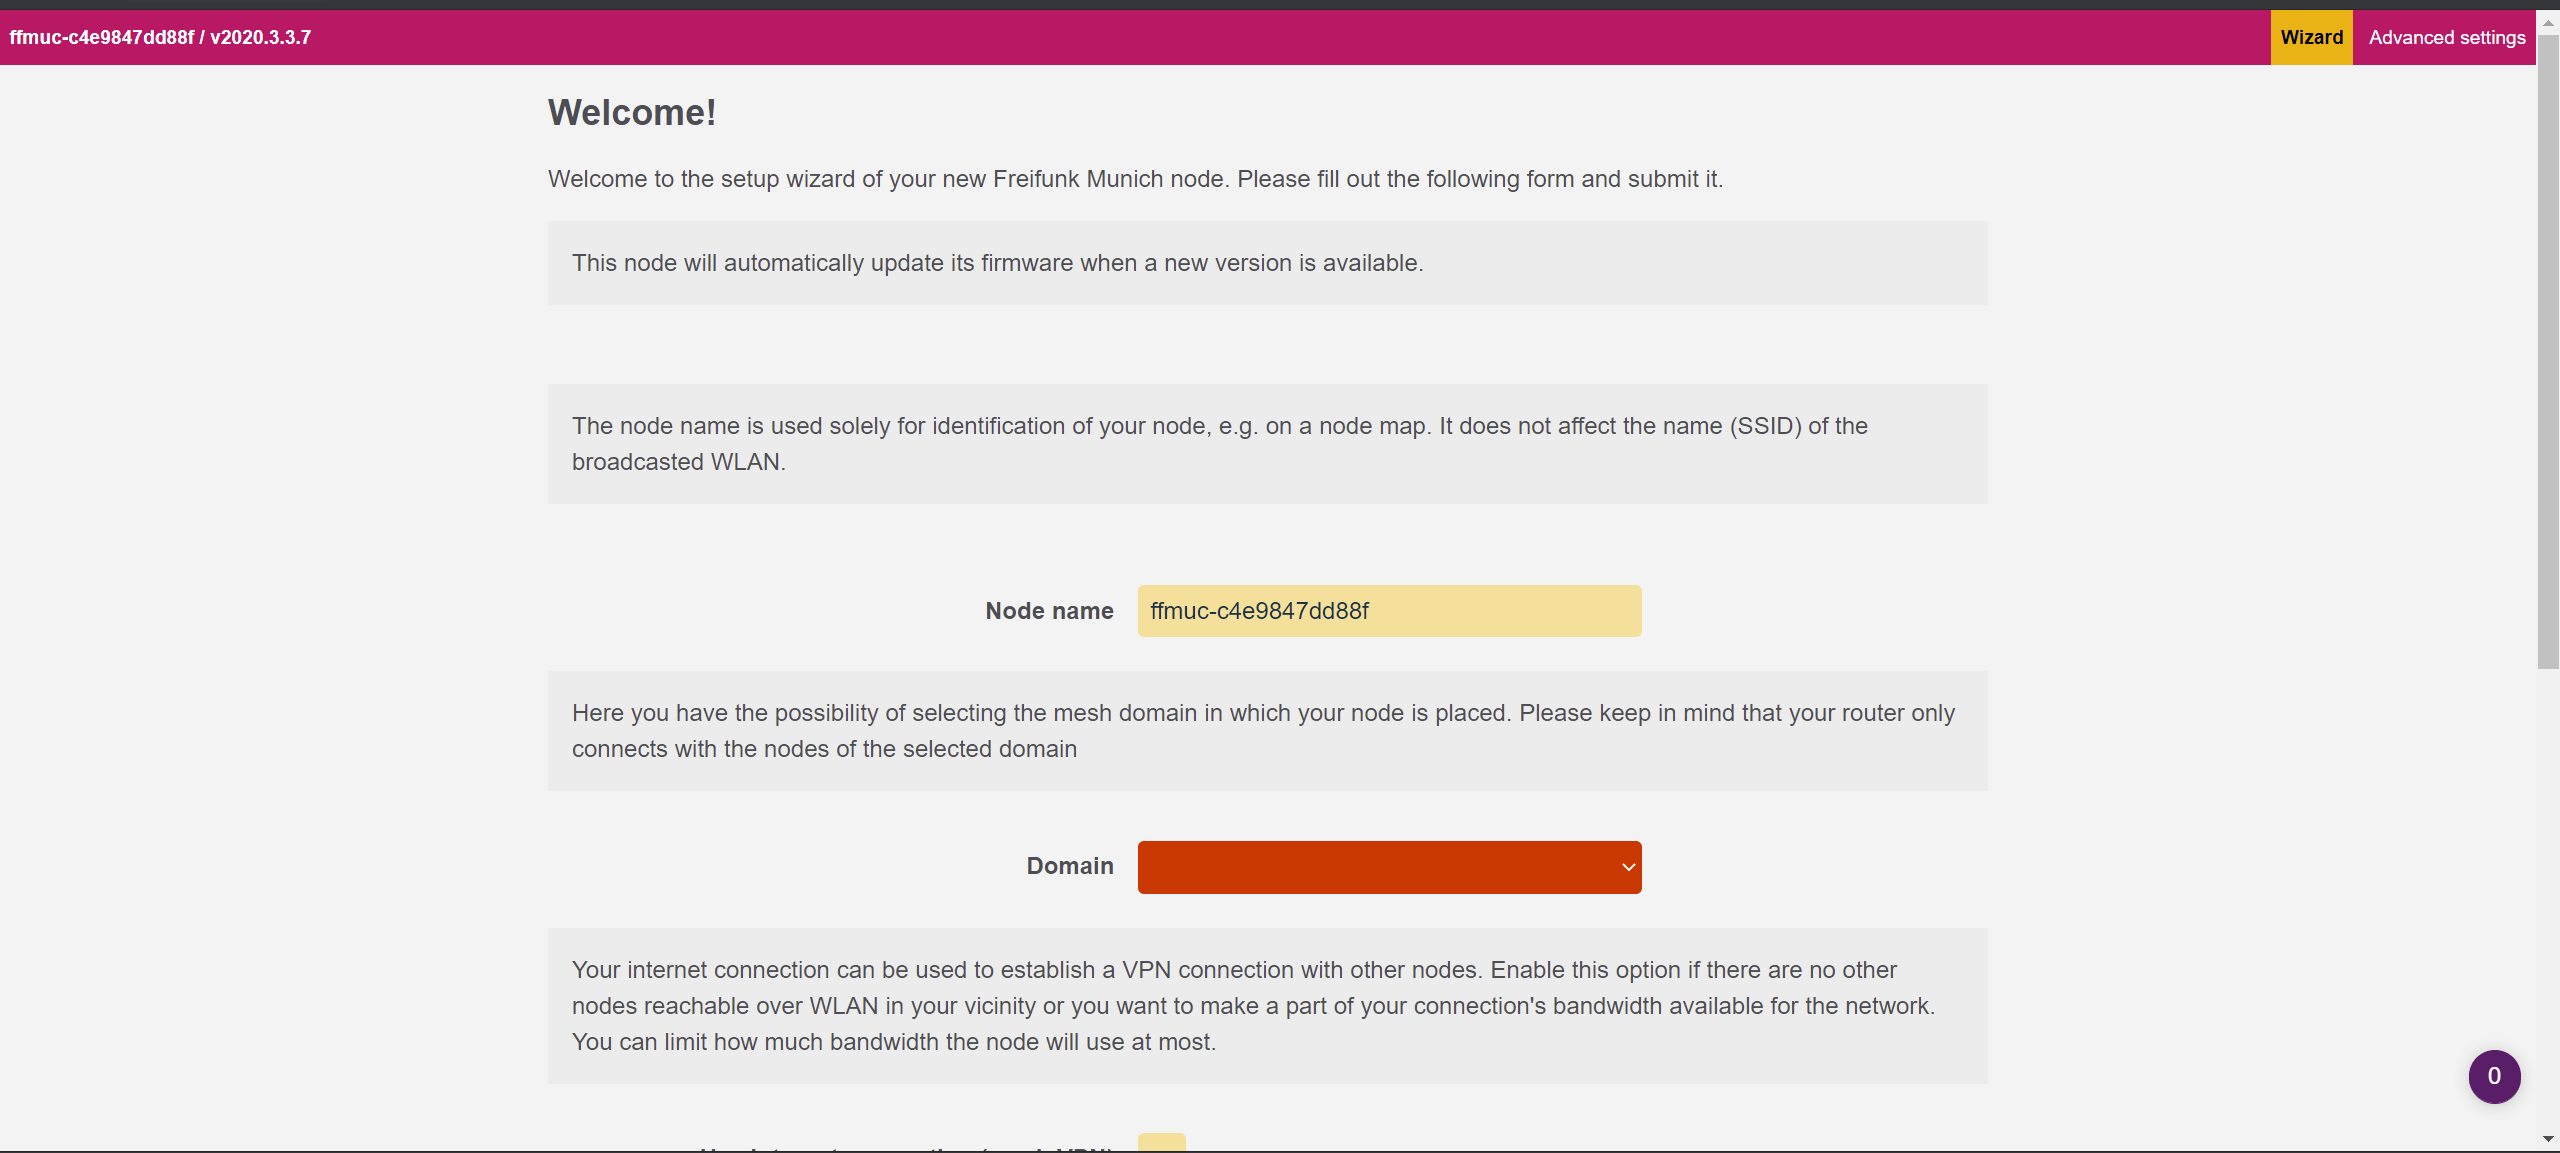
We can now define a name for the access point operated by us. I usually go with "ffmuc-yourstreetname-yourstreetnumber" but you can put anything there that suits your needs as long as it is within community guidelines. In short, use your brain and come up with a good and meaningful node name. Also select the domain you are in. If you are not near Munich, select the domain "Welt". However, the domain director used by Freifunk Munich can change this accordingly so that you are in the correct domain for your location. If you want to add additional access points, you can activate the option Use Internet connection (Mesh VPN) or limit the bandwidth so that you only give the neighborhood the bandwidth you want.
Now we need to set a node location (not mandatory, but almost all people do this so you can see if there is free wifi in the area). You can either enter the coordinates in the fields below the map or click your location on the map to set it accordingly. Finally, set up your contact information so that the project leaders or anyone who wants to contact you about the access point can. This could be your email address or a clue where to find you (IRC, Signal (Messenger), etc.). This is always a good idea as they can contact you if something is wrong with your setup!
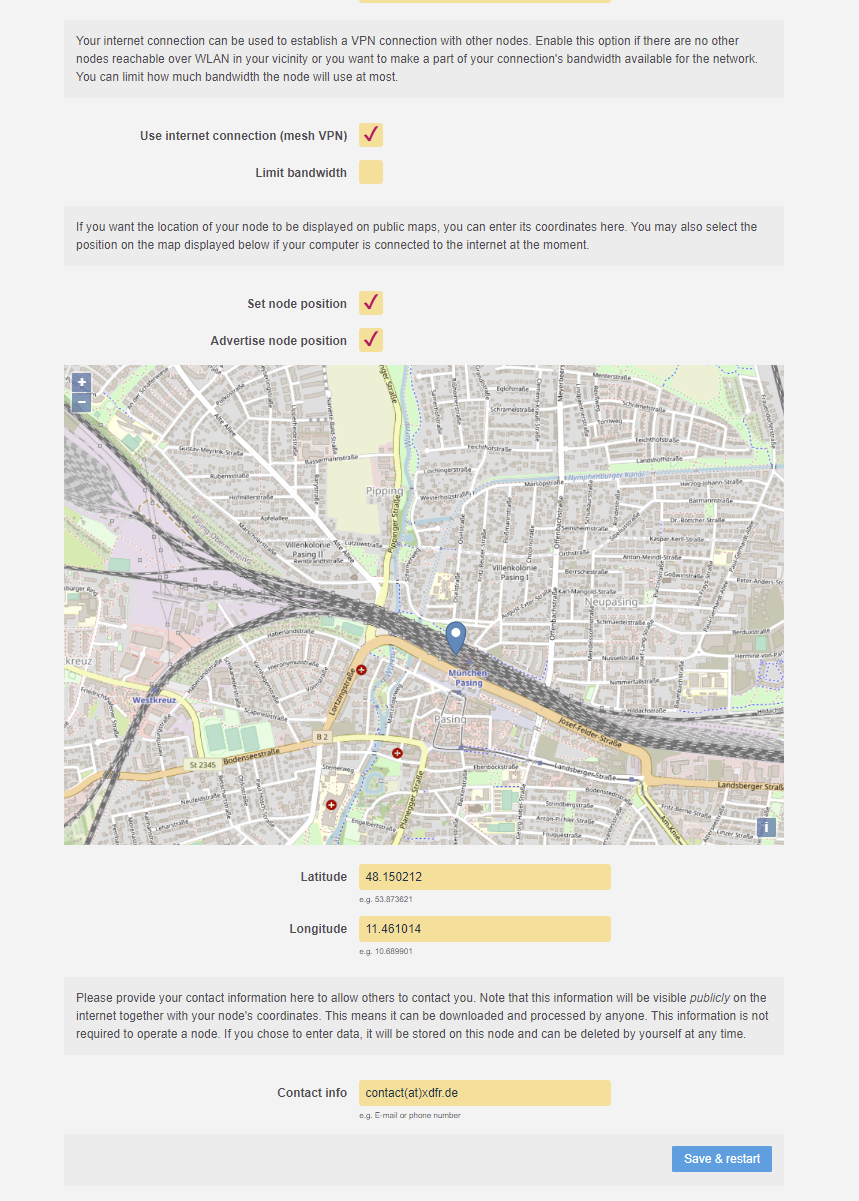
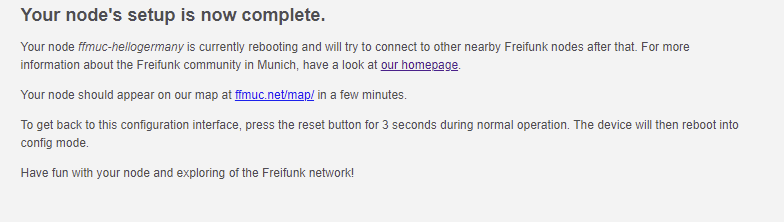
Click Save and Restart. The access point should restart and broadcast an SSID (WiFi signal) with the name of your community, e.g. muenchen.freifunk.net/uml_west. Make sure you connect the router to the internet via the WAN port and place it in a suitable location. I recommend placing it where most of your neighbors and guests can connect to it.
Conclusion
And that's it. A fully working and secure access point for neighbors, guests and family. You can now tell them that your router is operational and that they no longer need to enter a password. If they're also interested, feel free to link them to this blog post or just spread the word Freifunk. I am glad I was able to walk you through this process. If you have any questions, feel free to comment below. Further articles will be published in the near future. Until then, stay safe and healthy.
Cheers,
Felix
Containerization is an essential part of modern infrastructure. Containers are used everywhere from Netflix over Google to Slack and many more. Why don't we try them out for ourselves? You can get a service up and running in a matter of minutes to a few seconds. This blog also runs in one of my many docker containers. However, it can be scary to move away from traditional on-premise hosting as you have to migrate everything into containers. Nevertheless, I'll help you get started and prepare for the world of containerization by showing how easy it is to install the docker engine and docker-compose on a Debian-based system. Let us begin!
Prerequisites
- A Debian or Ubuntu based machine that can be accessed by you
- Internet connection
- Root access or elevated privileges (via sudo)
Installation & Configuration
Step 1: Update the Linux system
Before setting up an application on your Linux server, it is a good idea to upgrade the system in advance to be up to date and not to break anything after upgrading the server after setting up Docker. To make sure we are up to date, we call
$ sudo apt update && sudo apt upgrade -yand the upgrade process should start.
It is also worth installing these upgrades automatically and unattended. I've already written a guide on the subject.
After a successful upgrade, it is recommended that you reboot the system to load the new Linux kernel and get the services up and running with the updated binaries.
Step 2: Uninstall old versions of Docker-related packages
Docker-related packages may already be installed on your system. Since we are installing a completely new version directly from the Docker maintainer ourselves, we have to uninstall the components that have already been installed. We need to do this because we don't want any file conflicts or unwanted behavior from the Docker daemon. It is also good practice to start over on a new setup.
Don't worry, all images, containers, volumes and networks in /var/lib/docker/ container will be preserved.
All right, let's remove the older versions of docker and it's components.
$ sudo apt remove docker docker-engine docker.io containerd runcIt's okay if you get a message saying that none of these packages are installed.
Step 3: Set up the official Docker repository
Next we need to install the packages so that the apt package manager can use a repository over HTTPS.
$ sudo apt-get install \
    apt-transport-https \
    ca-certificates \
    curl \
    gnupg-agent \
    software-properties-common
In order for apt to be able to verify the signatures of the downloaded packages, we need to add Docker's official signature key.
On Debian:
$ curl -fsSL https://download.docker.com/linux/debian/gpg | sudo apt-key add -
On Ubuntu:
$ curl -fsSL https://download.docker.com/linux/ubuntu/gpg | sudo apt-key add -
Let's check that we have the correct key by looking for it on our system. This can be achieved by looking for the last eight characters of the fingerprint.
$ sudo apt-key fingerprint 0EBFCD88

pub   4096R/0EBFCD88 2017-02-22
      Key fingerprint = 9DC8 5822 9FC7 DD38 854A  E2D8 8D81 803C 0EBF CD88
uid                  Docker Release (CE deb) <[email protected]>
sub   4096R/F273FCD8 2017-02-22
Now let's add the repository for our respective system and architecture.
Debian (amd64):
$ sudo add-apt-repository \
   "deb [arch=amd64] https://download.docker.com/linux/debian \
   $(lsb_release -cs) \
   stable"
Ubuntu (amd64):
$ sudo add-apt-repository \
   "deb [arch=amd64] https://download.docker.com/linux/ubuntu \
   $(lsb_release -cs) \
   stable"
Last but not least, apt's package index needs to be updated in order to download and install the latest Docker packages. Again, we have to update our package lists in order to install the packages from the docker repository.
$ sudo apt updateStep 4: Install the Docker Engine and docker-compose
We are now ready to install the latest available Docker Engine on our system.
$ sudo apt install docker-ce docker-ce-cli containerd.ioCheck out the release page and make sure you're using the latest version in the script below.
And now we need to install the last bit, docker-compose and add the needed permissions to the binary.
$ sudo wget https://github.com/docker/compose/releases/download/v2.3.3/docker-compose-linux-x86_64 -O /usr/local/bin/docker-compose
$ sudo chmod +x /usr/local/bin/docker-compose
$ sudo ln -sf /usr/local/bin/docker-compose /usr/bin/docker-compose
If docker-compose --version throws an error message, you may need to create something called a symbolic link.
$ sudo ln -s /usr/local/bin/docker-compose /usr/bin/docker-composeA final call of docker-compose --version should return the docker-compose build version.
$ docker-compose --version
Docker Compose version v2.3.3
And we're done!
Conclusion
That's it, a fully functional and up-to-date Docker setup. You can now deploy containers with the Docker Compose tool and take advantage of the latest features of the Docker engine. You can be proud of yourself, so try some simple containers like Apache2 or Nginx as a web server. There's also a guide on how to setup Traefik with Docker as a reverse proxy which makes life way easier.
Stay safe and have a nice day!
]]>
In times when the internet is more important than ever, everyone should be able to create a small space for self-expression on the internet. With domains still costing from a few dollars to several thousand per year, free alternatives need to be found. The Dutch registrar Freenom is ideal here. They offer cost-price domains that cannot be found cheaper elsewhere. They are not after profit. However, some top-level domains (TLDs) are even free, including the .tk, .ml, .ga, .cf, and .gq TLDs. When you're ready, I can show you how to make a name for yourself and configure a domain the way you want.
Disclaimer
I have cancelled the domain used in this tutorial. Therefore, I no longer have control over the domain and anyone in the world could have registered it during this time. My content is only available at blog.morphnet.work. All other sites claiming to be this blog are not mine!
Prerequisites
- Internet connection
- a public IPv4 / v6 (best if it's static) (optional)
Select and register your domain
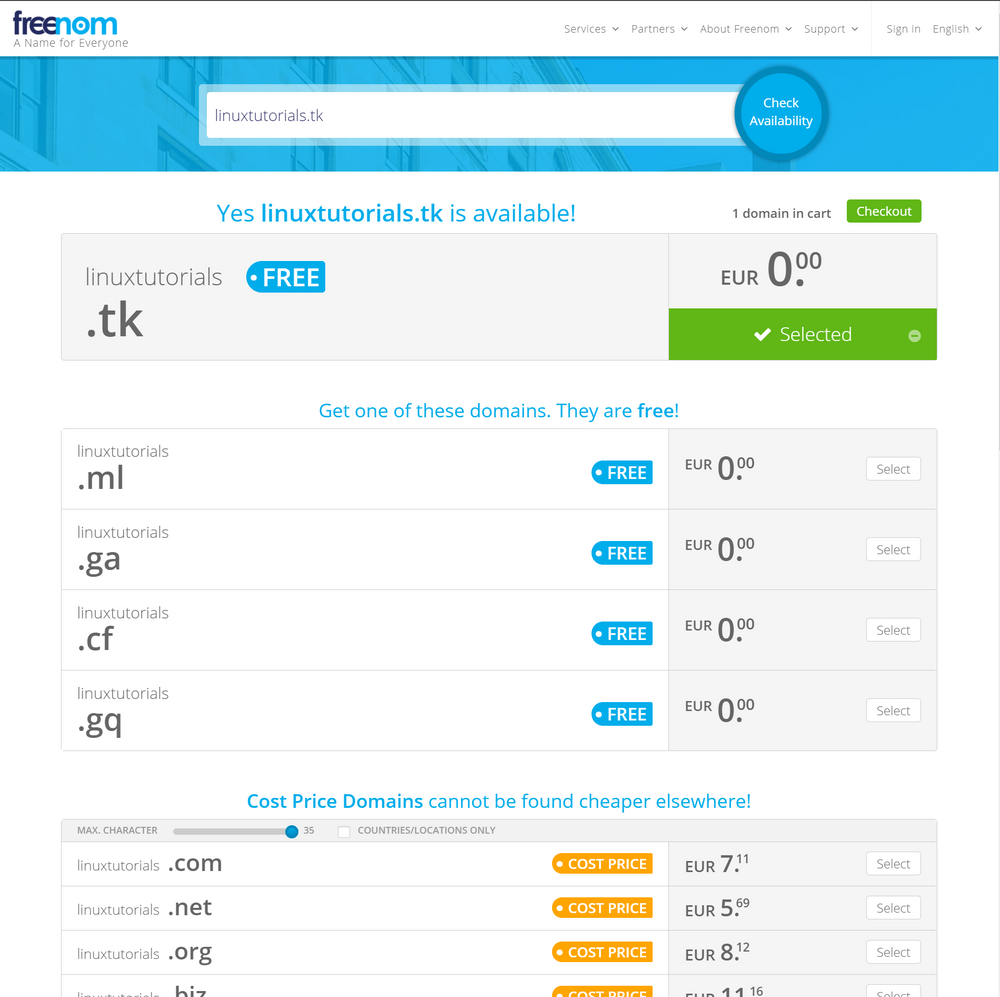
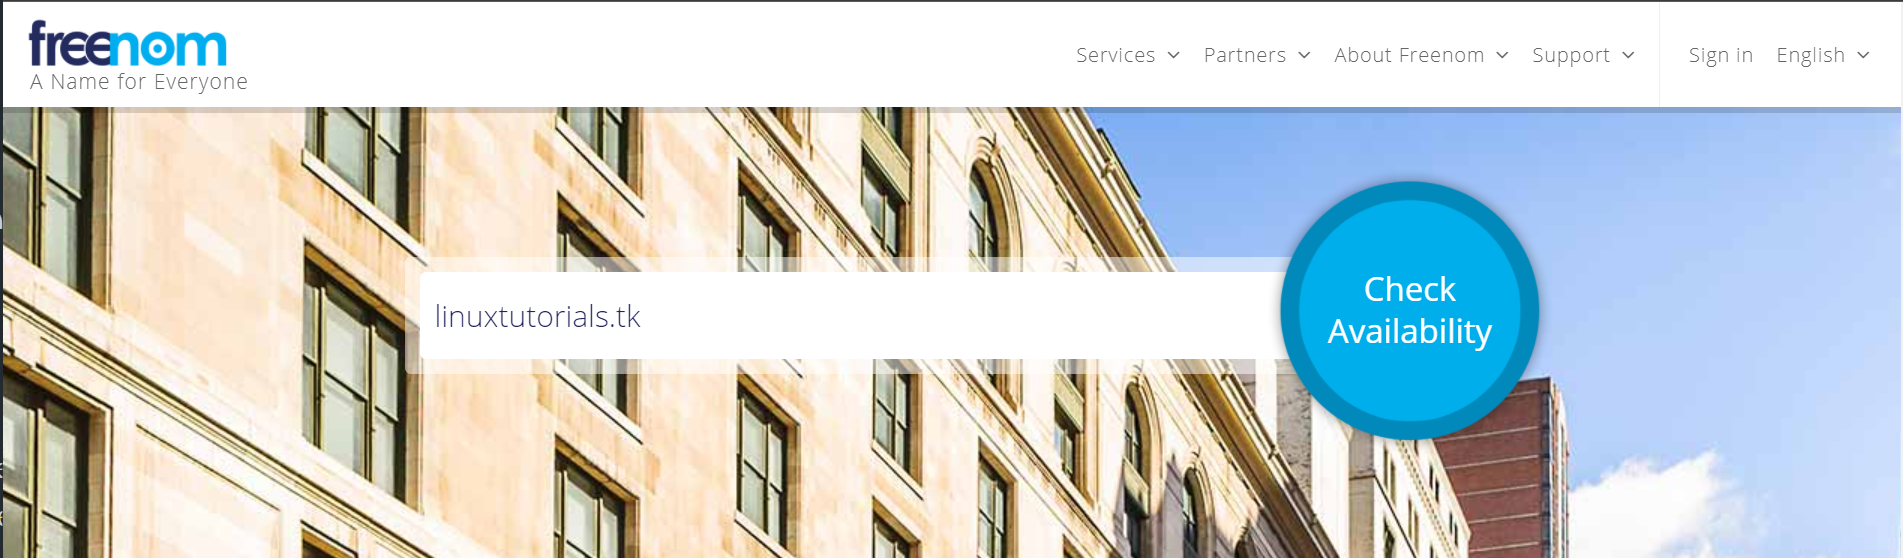
Check the availability of your desired domain and add it to your shopping cart
Of course, some domains are already taken. You are probably not the first to come across google.tk. To ensure that your desired domain is free and that you can take it over, visit the official Freenom website and enter the desired domain in the "Check availability" field.
After that, hit enter and you should see if your domain is free or not. You will also receive other TLDs that you might like better or that you need to switch to, e.g. because google.tk is already taken.

Please note that the paid domains are only checked for availability at the checkout. So don't be too excited if google.com still seems to be free.
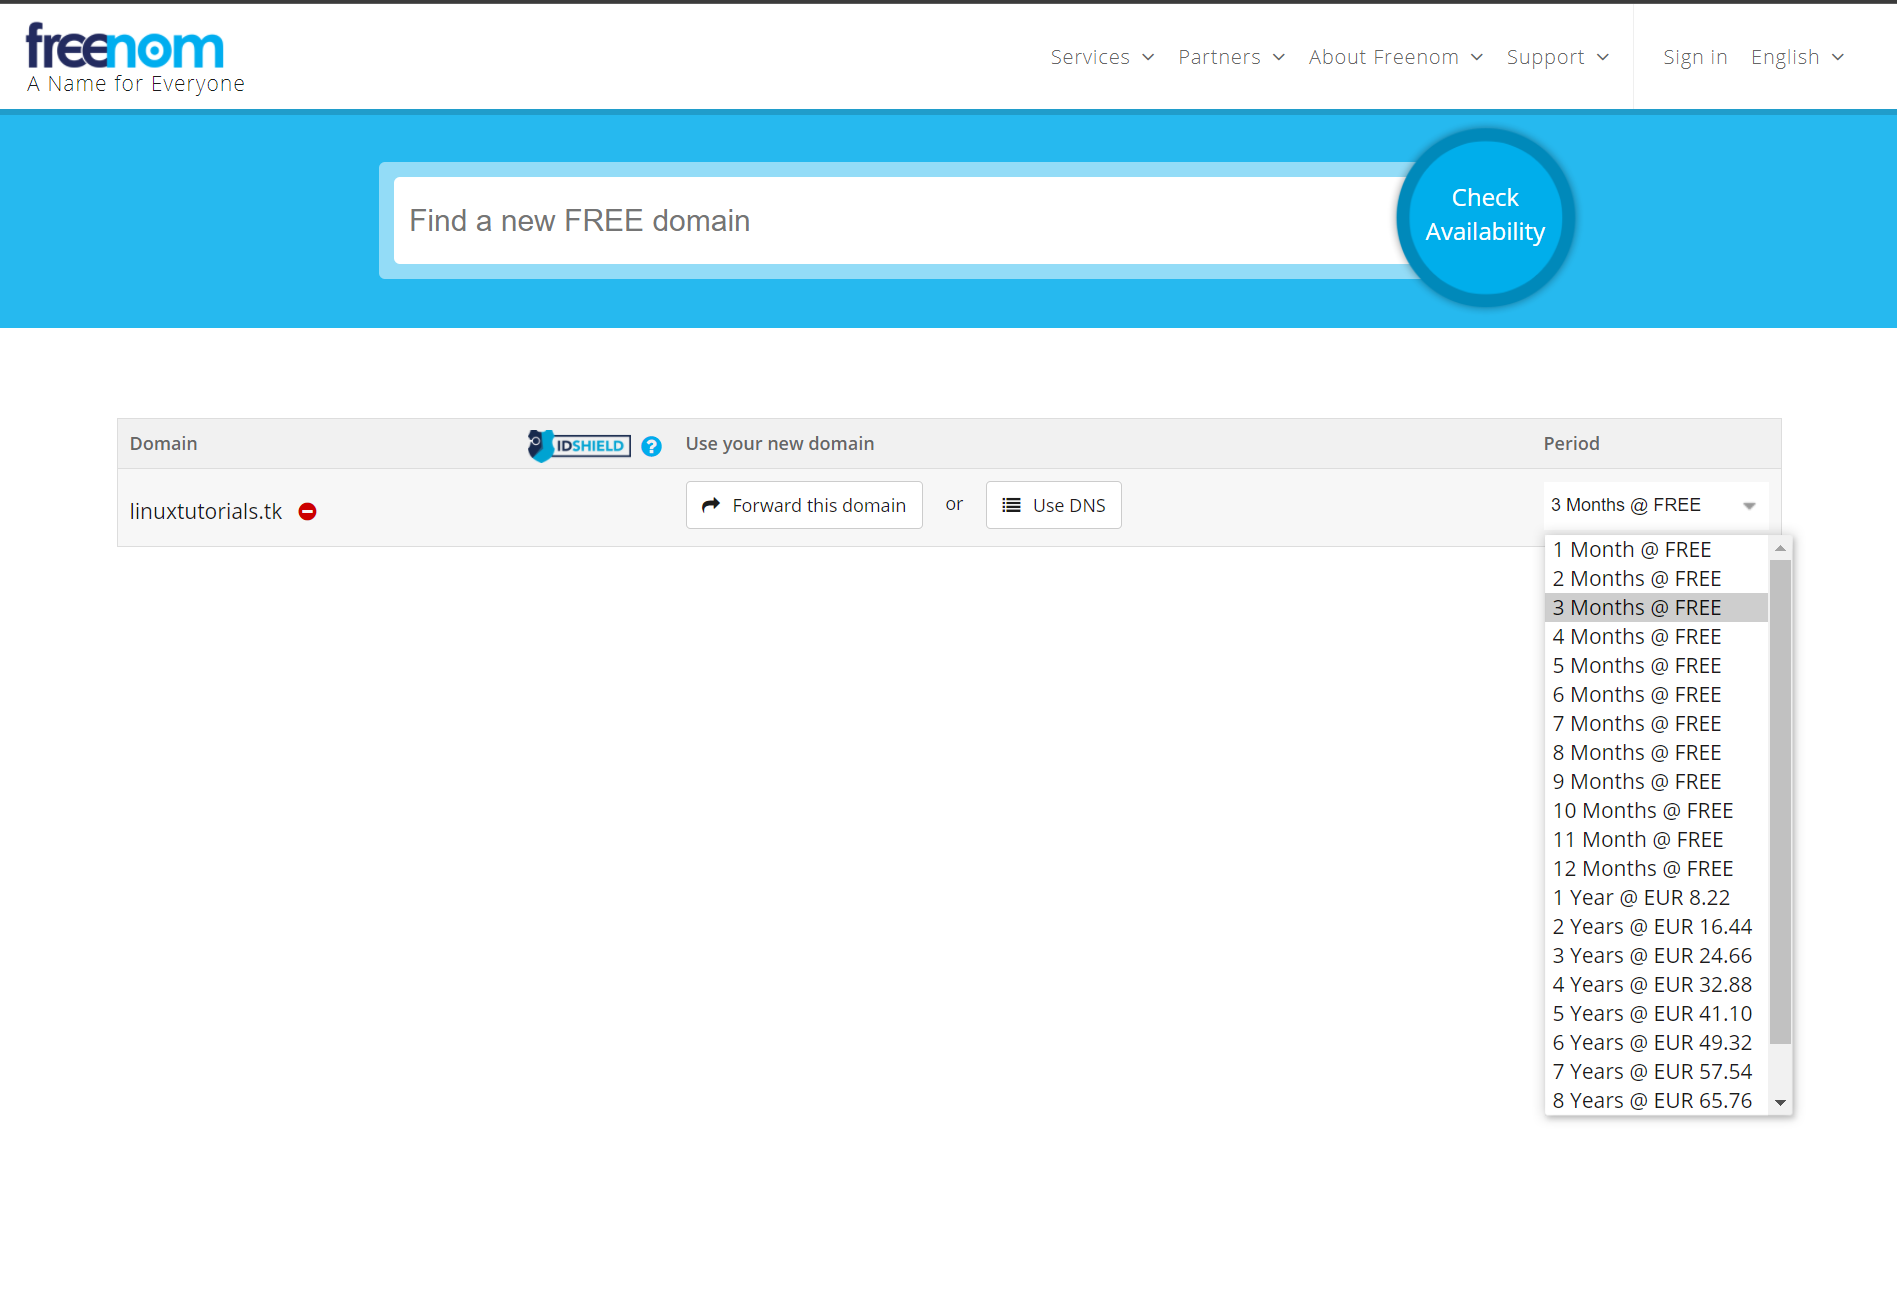
Now go to the checkout by clicking the "Checkout" button. You can now choose how long you want to use the domain. Don't worry, you can renew the domain a few months before the automatic cancellation. I recommend using 3 months first so that you don't accidentally occupy a domain that you have already forgotten. Otherwise, choose a time period that suits you best.
After pressing the Enter key, you still need to register or log in to Freenom in order to purchase the domain. You can either use social login through Google or Facebook, or you can register the old fashioned way.
After that is done go to the top right corner and click on "Hello YOUR NAME" and then on "View Cart". You should now be greeted with the Review & Checkout page. Select the checkbox "I have read and agree to the Terms & Conditions" and click the "Complete Order" button.
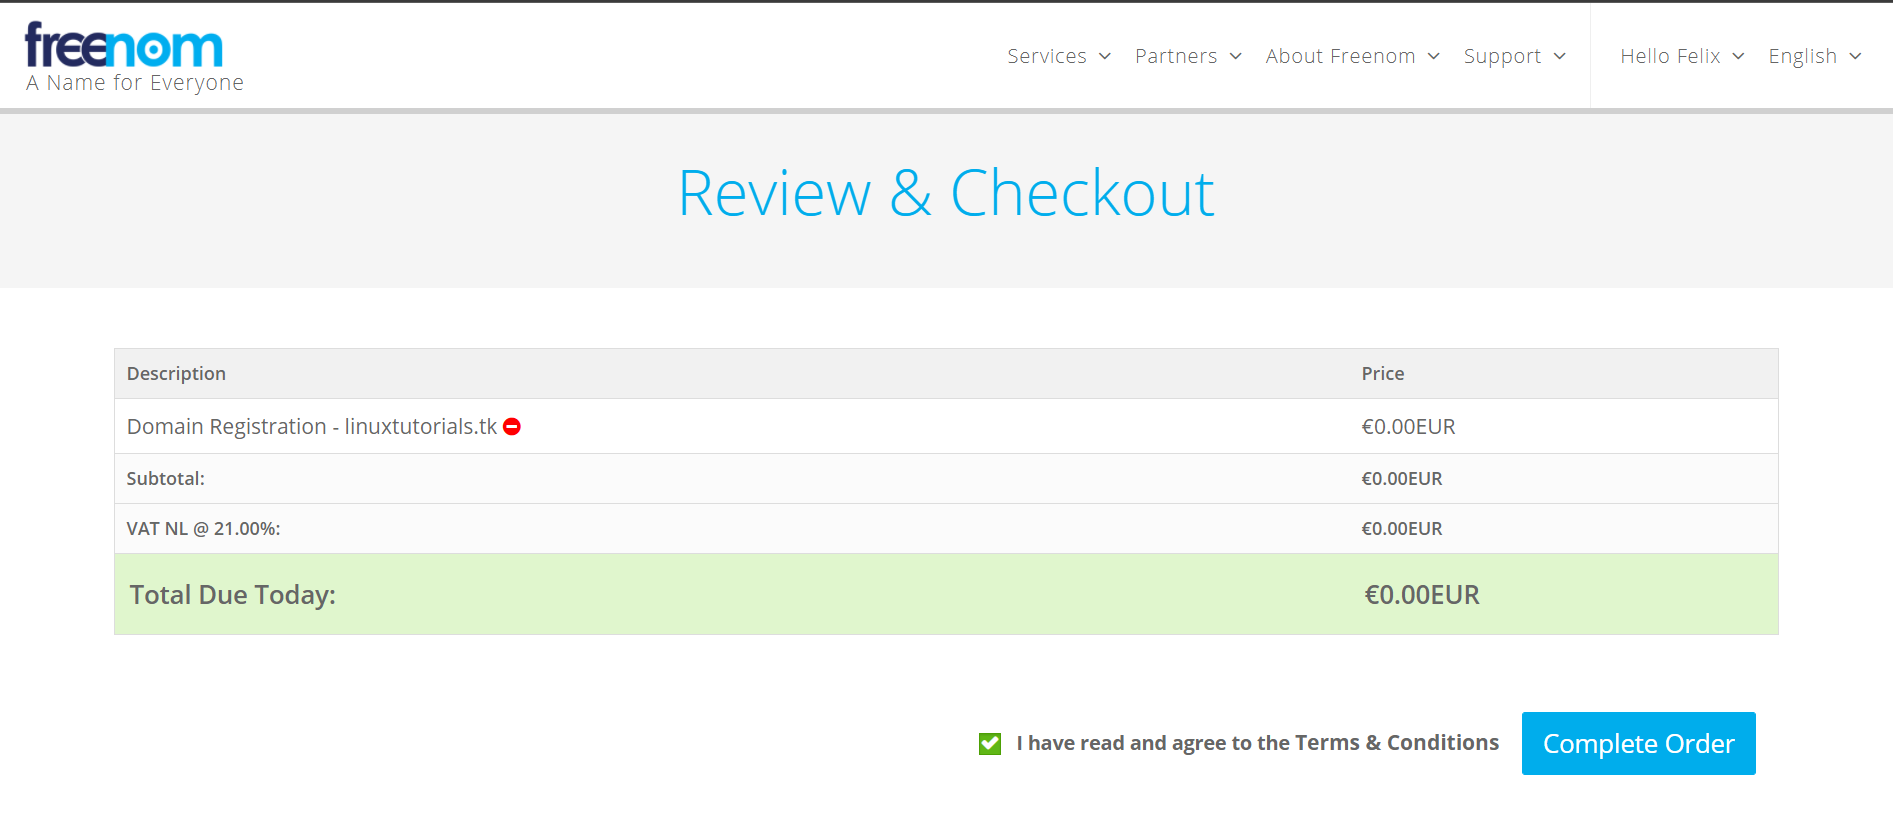
After a few seconds you should be presented with the order confirmation page and your order number. Now check your email for confirmation. It may take a few minutes for the email to arrive in your mailbox.

Now head over to "Services" and click the "My Domains" button. Your domain should now be displayed here. The status indicator shows whether it is successfully registered and ready for use.

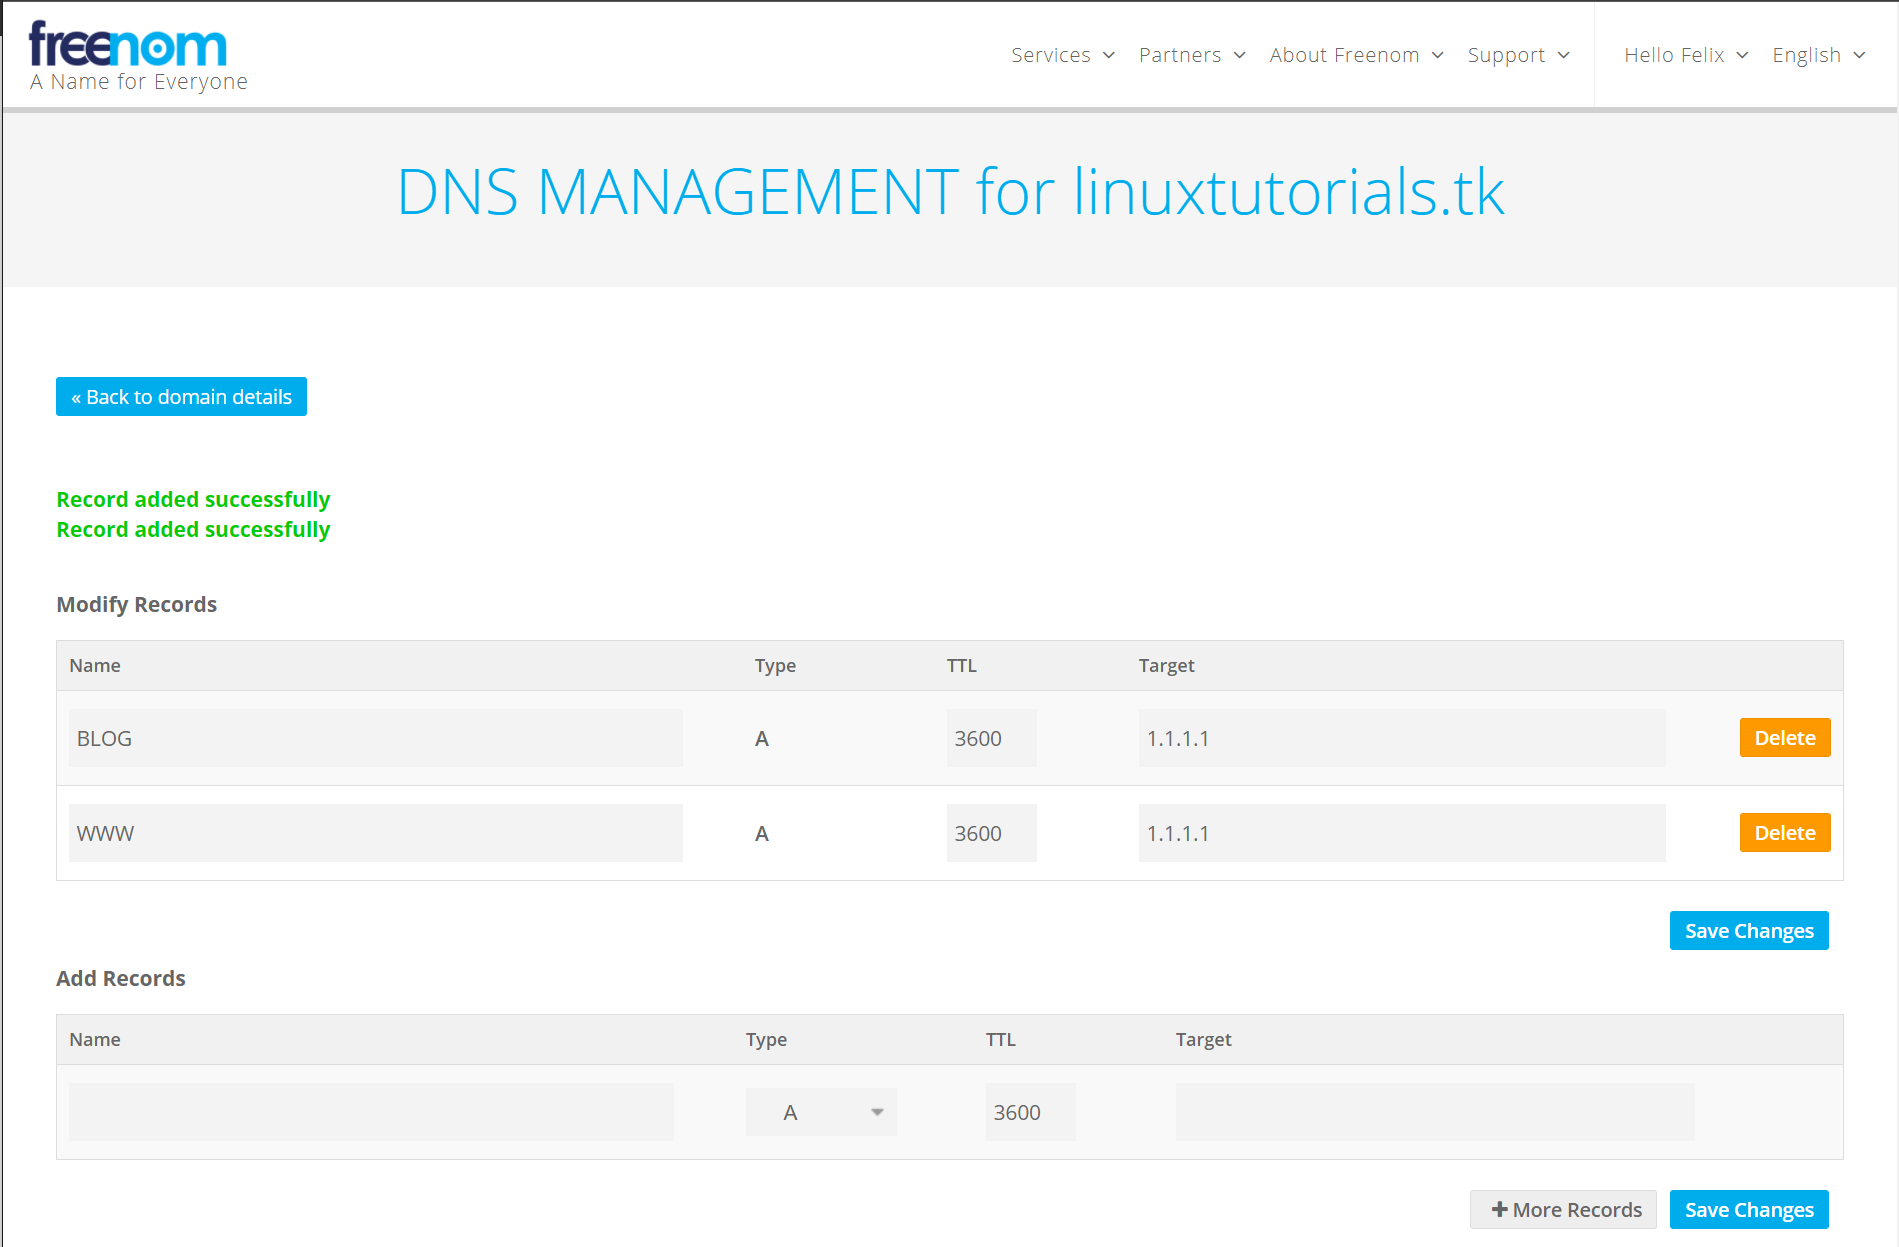
After clicking "Manage Domain" and then "Manage Freenom DNS", the DNS configuration site will be displayed. Here we can finally set your public IP address, subdomains and other DNS records.

You can now add DNS records as you wish. Please also consider adding IPv6 entries as more and more popular services now operate both IPv4 and IPv6 services under what is known as a dual stack. The DNS records "www.linuxtutorials.tk" in this example point to the IPv4 address 1.1.1.1 (address of Cloudflare's DNS server)

Last thing to do is hit "Save Changes" and we now have a fully operational domain.
Conclusion
And that's it, a fully functional and completely free domain for your own web presence, your game or your mail server or other interesting things. Using such free domains is an inexpensive alternative to buying expensive domains, while both are recognized and usable equally. Feel free to play around with your new domain and let me know in the comments if I could help you and what you would like to see next.
I will explain how to configure a professional web server in the near future. Until then, stay safe and have fun with your new domain.

Since we have already installed and configured our own TeamSpeak 3 server, it is time to bring quality music to these channels. So let's use the server we have already configured for TeamSpeak. I will walk you through installing and setting up a music bot called SinusBot, which integrates perfectly with the latest TeamSpeak 3 server. Without further ado, let's get started.
Prerequisites
- A Debian or Ubuntu based machine that can be accessed by the people you want to interact with
- Internet connection
- Root access or elevated privileges (via sudo)
- TeamSpeak 3 server
Installation & Configuration
Step 1: Update the Linux system
Before setting up an application on your Linux server, it is a good idea to upgrade the system in advance to be up to date and not to break anything after upgrading the server after setting up SinusBot. To make sure we are up to date, we call
$ sudo apt update && sudo apt upgrade -yand the upgrade process should start.
It is also worth installing these upgrades automatically and unattended. I've already written a guide on the subject.
After a successful upgrade, it is recommended that you reboot the system to load the new Linux kernel and get the services up and running with the updated binaries.
Step 2: Create a user for the SinusBot daemon
We need to create a separate, non-privileged user for our SinusBot so that no one can wreak havoc in the event that the SinusBot binary has a unknown vulnerability.
For this purpose we will create a new user named sinusbot with the directory /opt/sinusbot as the home directory, without the option to log in (for more security) and the display name "SinusBot". Simply call the command
$ sudo useradd -m -d /opt/sinusbot -s /usr/sbin/nologin -c "SinusBot" sinusbotand the new user will be created.

Step 3: Install dependencies and repositories
First of let's install the required dependencies and update the ca certificates on the system by calling:
$ sudo apt install -y x11vnc xvfb libxcursor1 ca-certificates curl bzip2 libnss3 libegl1-mesa x11-xkb-utils libasound2 libpci3 libxslt1.1 libxkbcommon0 libxss1 libxcomposite1 libglib2.0-0
$ sudo update-ca-certificates
Now we need to work with the newly created sinusbot user. To use it we have to run
$ sudo -u sinusbot /usr/bin/bash
$ cd ~

# Check your current location in the filesystem
$ pwd
We now should be in our designated home directory for the bot user (Use pwd to check that we are in the /opt/sinusbot directory).
I always recommend using the latest version available as the latest features and security patches will only be available in the newer versions.
Since the download link always refers to the latest version, it does not have to be changed. Now we will download SinusBot and extract it to the /opt/sinusbot directory.
$ wget https://www.sinusbot.com/dl/sinusbot.current.tar.bz2
$ tar xfj sinusbot.current.tar.bz2 -C /opt/sinusbot
Now we can delete the previously downloaded SinusBot archive.
rm -rf /opt/sinusbot/sinusbot.current.tar.bz2A current TeamSpeak client is required for the bot to work. So we have to download it from the official download page. Check for yourself whether a new version is available and edit the following lines according to the version change.
# Edit the current/supported TeamSpeak version down below
$ VERSION="3.5.6"
$ wget https://files.teamspeak-services.com/releases/client/$VERSION/TeamSpeak3-Client-linux_amd64-$VERSION.run
$ chmod 0755 TeamSpeak3-Client-linux_amd64-$VERSION.run
$ ./TeamSpeak3-Client-linux_amd64-$VERSION.run
You need to accept the terms of use by pressing Enter, then Q, then Y, and finally Enter. The execution file of the TeamSpeak client can then be safely deleted
$ rm TeamSpeak3-Client-linux_amd64-$VERSION.runStep 3: Configure the Bot
First we need to copy the original configuration file so that we don't overwrite it after an update. This can be achieved by calling cp config.ini.dist config.ini.
Now we have a configuration file that we can freely edit.
Verify that the path for the TeamSpeak 3 client is correct by typing
$ ls /opt/sinusbot/TeamSpeak3-Client-linux_amd64/ts3client_linux_amd64If files are displayed, the path is correct. Otherwise, take a look at your file/directory structure and change the path accordingly by editing the configuration file.
$ nano config.ini
In order for the bot to work properly, we need to remove a file by from the xcbglintegrations directory of the client by calling
$ rm TeamSpeak3-Client-linux_amd64/xcbglintegrations/libqxcb-glx-integration.so
Now we create a plugin directory and copy the plugin file so that the bot can be integrated into the TeamSpeak client. After that we have to mark the binary as executable so we can start the bot with ease.
$ mkdir TeamSpeak3-Client-linux_amd64/plugins
$ cp plugin/libsoundbot_plugin.so TeamSpeak3-Client-linux_amd64/plugins/

# Make the bot executable
$ chmod 755 sinusbot
Step 4: Add YouTube playback support
Since we don't want to add music the old-fashioned way, we should be able to play modern, non-copyrighted music with our friends. For this to work we need to download an additional binary called youtube-dl that will download YouTube videos and convert them to an audio-only format that you can listen to on your channels.
In order for it to work, we have to install Python, download the binary file ourselves and make it executable and accessible for the SinusBot.
$ sudo apt install python -y
$ cd /opt/sinusbot/
$ sudo curl -L -O https://yt-dl.org/downloads/latest/youtube-dl
$ sudo chmod a+rx youtube-dl
$ sudo chown sinusbot:sinusbot youtube-dl
Now we have to set YoutubeDLPath = "/opt/sinusbot/youtube-dl" in our config.ini file.

Step 4.1: Enable regular updates for youtube-dl
Since regular updates are good for converters like youtube-dl, these can even be installed fully automatically during operation. To do this, we need to add what is known as a cronjob (which runs a job over and over again at a given time).
To do this, simply call the following command as your regular user with elevated privileges:
$ sudo tee -a /etc/cron.d/ytdl > /dev/null << EOF
0 0 * * * sinusbot /opt/sinusbot/youtube-dl -U --restrict-filenames >/dev/null
EOF
Step 5: Create the systemd-unit file
Now we are going to install a systemd-unit file to start the SinusBot daemon on startup instead of playing around with the binary after every restart. Invoke
$ sudo nano /lib/systemd/system/sinusbot.service as your regular user and then paste the following into the empty file:
[Unit]
Description=Sinusbot, the TeamSpeak 3 and Discord music bot.
Wants=network-online.target
After=syslog.target network.target network-online.target

[Service]
User=sinusbot
ExecStartPre=/bin/rm -f /tmp/.sinusbot.lock
ExecStopPost=/bin/rm -f /tmp/.sinusbot.lock
ExecStart=/opt/sinusbot/sinusbot
WorkingDirectory=/opt/sinusbot
Type=simple
KillSignal=2
SendSIGKILL=yes
Environment=QT_XCB_GL_INTEGRATION=none
LimitNOFILE=512000
LimitNPROC=512000

[Install]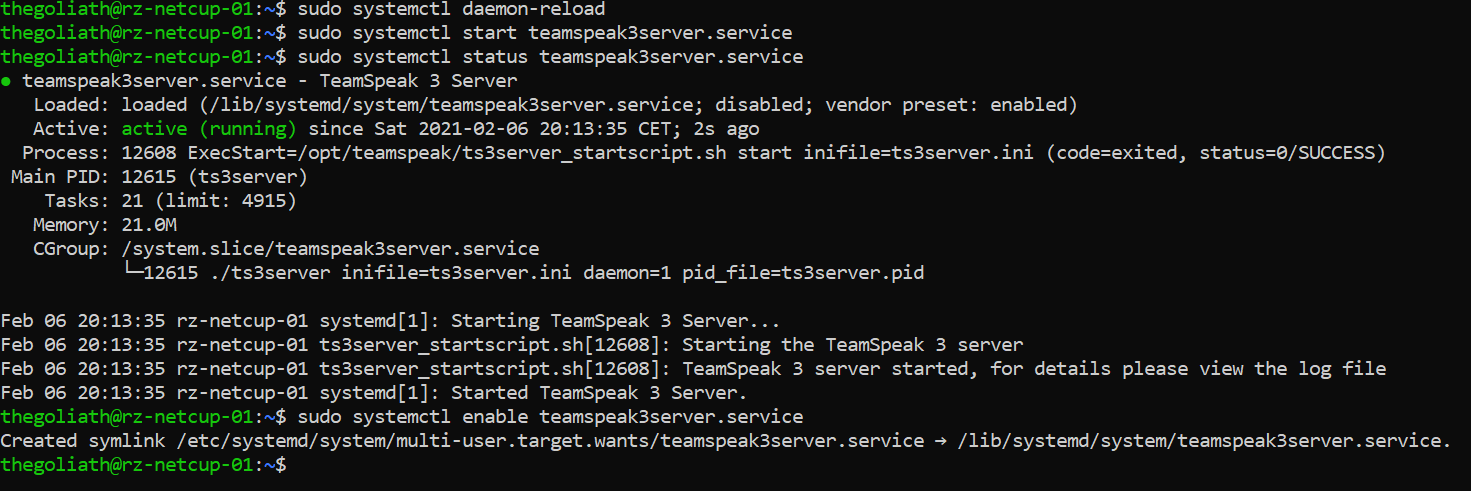
WantedBy=multi-user.targetNow let the systemd daemon recognize the newly created device file so we can finally start the server. Afterwards we should check whether the server is up and running (If you are in the expanded service status view, press q).
$ sudo systemctl daemon-reload
$ sudo systemctl start sinusbot.service
$ sudo systemctl status sinusbot.service
You can also enable the SinusBot service so it get's started automatically on the system's boot.
$ sudo systemctl enable sinusbot.service
We now have to temporarily set a password and start the server manually as the sinusbot user by using
$ ./sinusbot --override-password=mysecurepassword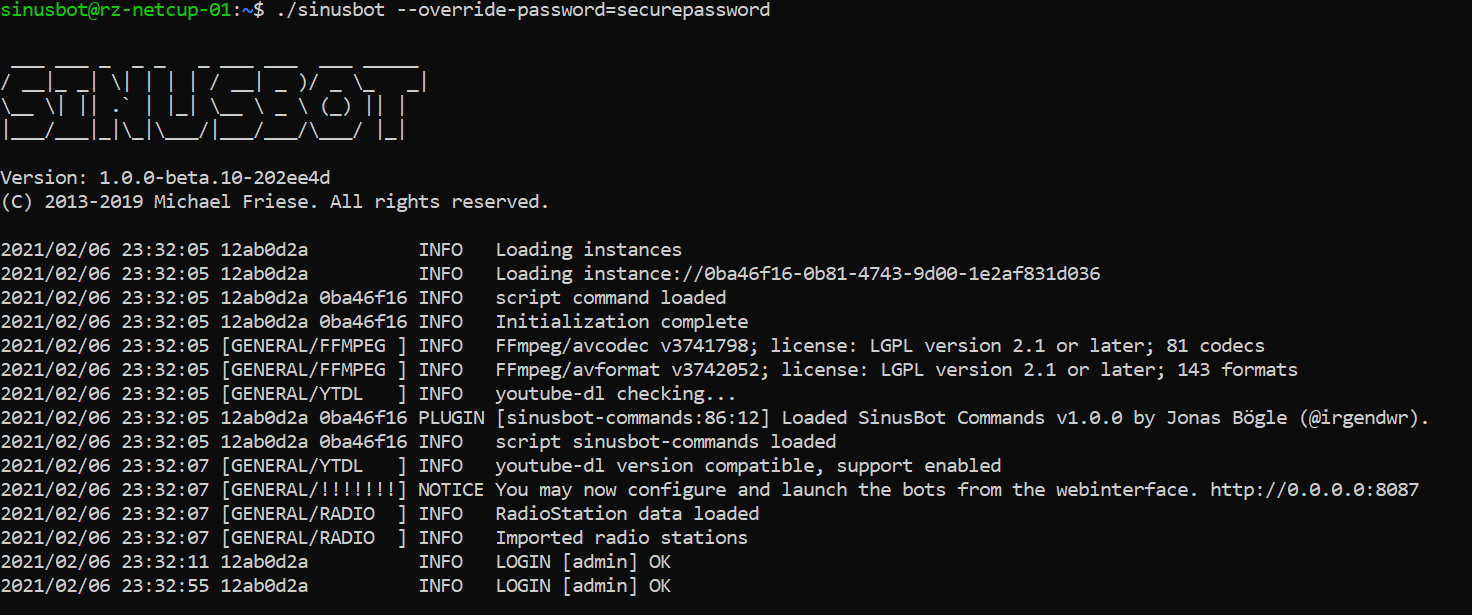
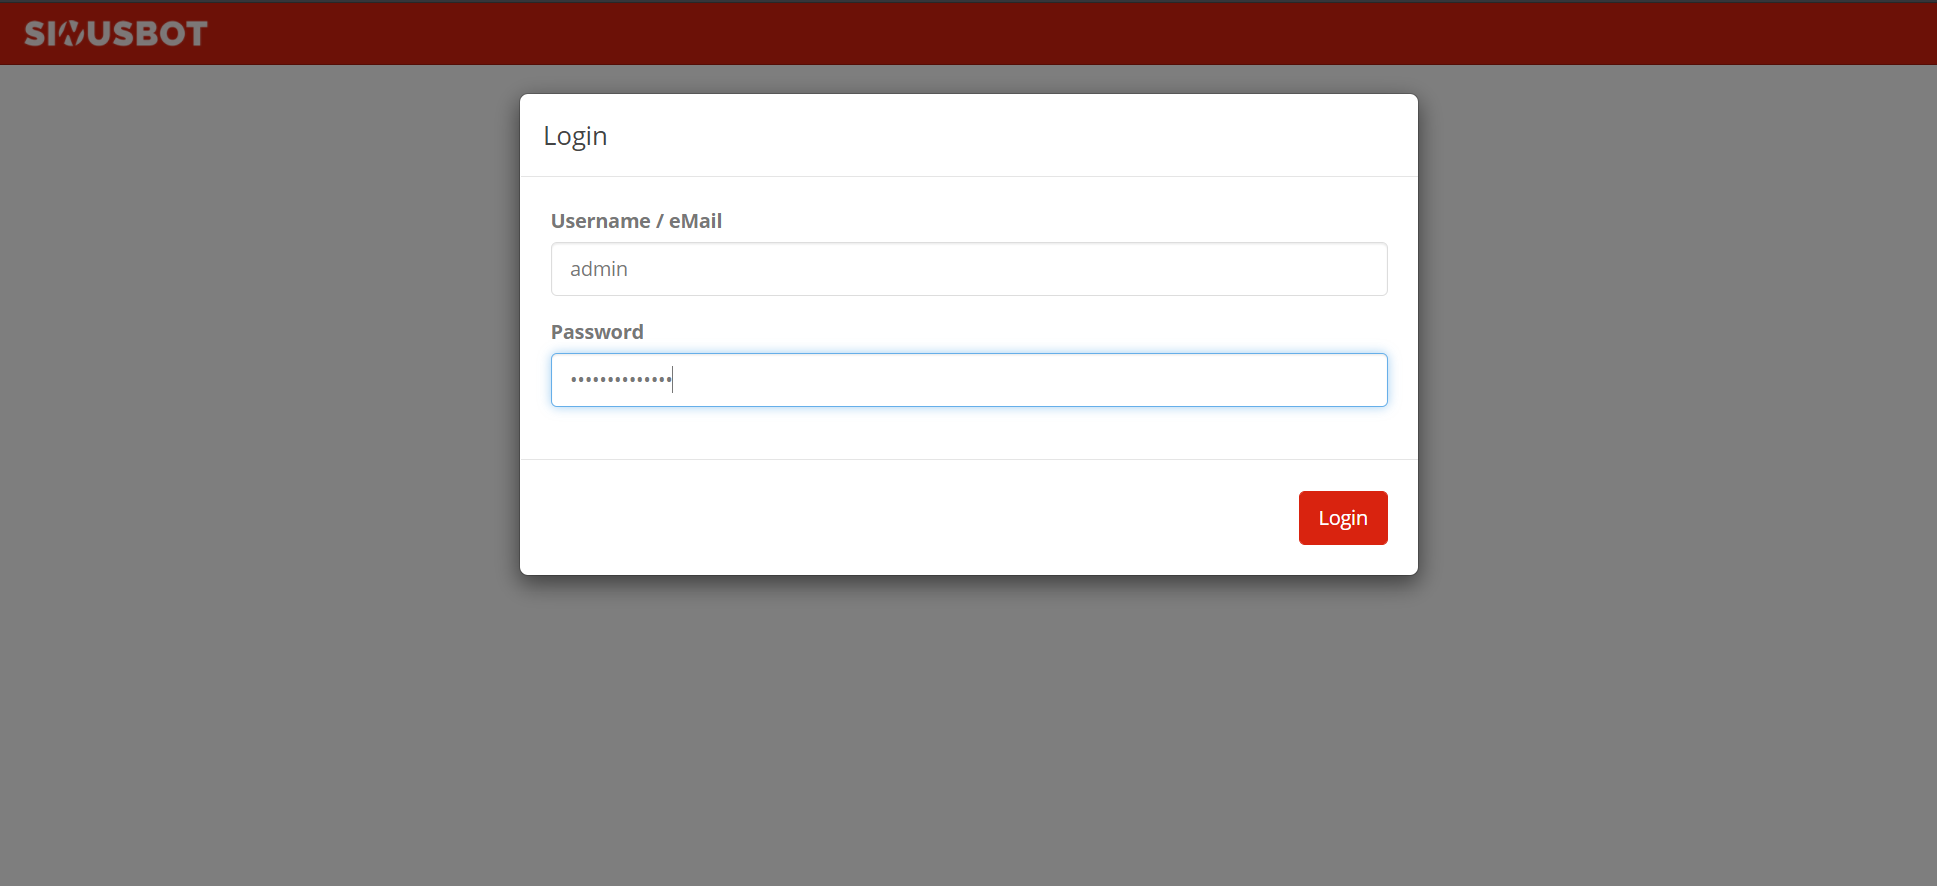
Now use your web browser to navigate to the bot's web interface using the following example: http://example.com:8087. You should now be greeted with the shiny web interface and login screen. Enter admin as the username and the passwords you've just set. You can always change the admin's password by doing the step above again.
Now go to the "User Accounts" section and select the "Edit" button for the administrator account (the little pencil).

Now enter your desired password and repeat it again. Finally, go and save the changes.

Now stop the manually started server by pressing CTRL + C and start it again via the systemd unit (sudo systemctl start sinusbot.service). Go to the web interface, log in with the new credentials and press the power button in the top right corner. The bot should now appear on the same server. If you want to change the server you want the bot to appear on, go to the instance settings and set the IP / domain name accordingly.

Conclusion
Congratulations, you did it! Your own SinusBot is now ready to use and you can tell your friends and family to jump on it and have a chat while listening to music to your liking. Remember to update the bot regularly and you should be on the safe side.
]]>
In times of the global pandemic, it is all the more important to keep in touch with other people. In this tutorial, I'm going to walk you through installing and setting up a TeamSpeak 3 server on your Linux server for friends and family.
Prerequisites
- A Debian or Ubuntu based machine that can be accessed by the people you want to interact with
- Internet connection
- Root access or elevated privileges (via sudo)
Installation & Configuration
Step 1: Update the Linux system
Before setting up an application on your Linux server, it is a good idea to upgrade the system in advance to be up to date and not to break anything after upgrading the server after setting up TeamSpeak. To make sure we are up to date, we call
$ sudo apt update && sudo apt upgrade -yand the upgrade process should start.
It is also worth installing these upgrades automatically and unattended. I've already written a guide on the subject.
After a successful upgrade, it is recommended that you reboot the system to load the new Linux kernel and get the services up and running with the updated binaries.
Step 2: Create a user for the TeamSpeak 3 daemon
We need to create a separate, non-privileged user for our TeamSpeak 3 server so that no one can wreak havoc in the event that the TeamSpeak 3 binary has a unknown vulnerability.
For this purpose we will create a new user named teamspeak with the directory /opt/teamspeak as the home directory, without the option to log in (for more security) and the display name "TeamSpeak 3". Simply call the command
$ sudo useradd -m -d /opt/teamspeak -s /usr/sbin/nologin -c "TeamSpeak 3" teamspeakand the new user will be created.

Step 3: Download and unpack the TeamSpeak 3 Server files
Now we need to work with the newly created teamspeak user. To use it we have to run:
$ sudo -u teamspeak /usr/bin/bashand then cd ~ to get to our designated home directory for the server (Use pwd to check that we are in the /opt/teamspeak directory).
Now we need to take a look at the official TeamSpeak 3 download page (for the server). Since my system is a 64-bit system, I'll be choosing the 64-bit package. If yours is somehow still 32-bit, then go for the 32-bit version. If you don't already know what architecture your Linux kernel uses, you can run uname -a to see if you are running a 32- or 64-bit kernel.

I always recommend using the latest version available as the latest features and security patches will only be available there.
For me the latest server version is 3.13.3. So I will download it via:
$ wget https://files.teamspeak-services.com/releases/server/3.13.6/teamspeak3-server_linux_amd64-3.13.6.tar.bz2into the current directory and then extract it via tar xfj teamspeak3-server_linux_amd64-3.13.6.tar.bz2 -C /opt/teamspeak to /opt/teamspeak.
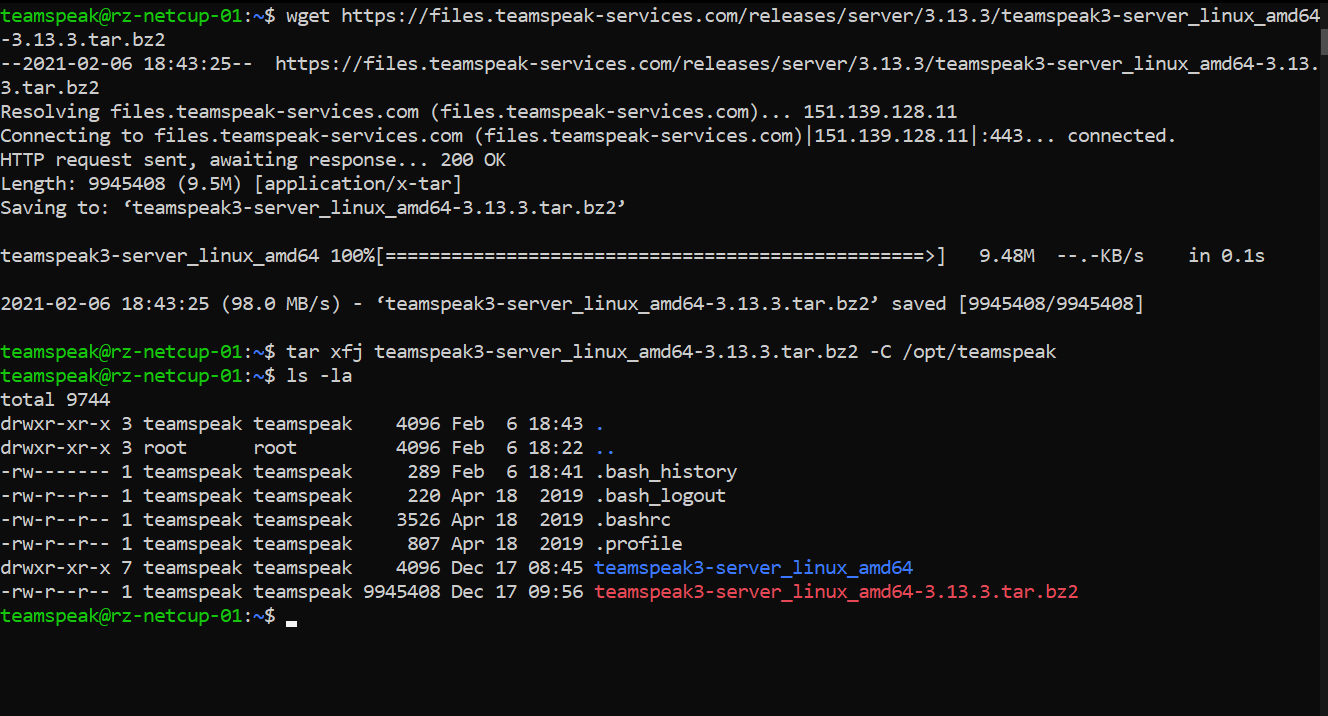
We'll now move the files to the /opt/teamspeak folder to clean up so we don't have an unnecessary subfolder and delete the downloaded archive that is no longer needed. To do this, we carry out an:
$ mv /opt/teamspeak/teamspeak3-server_linux_amd64/* /opt/teamspeak && rm -r /opt/teamspeak/teamspeak3-server_linux_amd64 teamspeak3-server_linux_amd64-3.13.6.tar.bz2Note that you have to change the last file name (teamspeak3-server_linux_amd64-3.13.6.tar.bz2) to your current TeamSpeak version / archive name.
Step 4: Accept the license in advance and start the server
TeamSpeak comes with a license that you must accept before you can freely run the server. Make sure you made yourself familiar with the terms of use before proceeding with the next step. We will add a file that tells the TeamSpeak 3 server that we have already read and accepted the license agreement. It's as easy as calling:
$ touch /opt/teamspeak/.ts3server_license_acceptedNow we can finally test out our server by starting it with the designated start script:
$ /opt/teamspeak/ts3server_startscript.sh start
Pressing Enter will take us back to our command line interface. Make sure you have written down these tokens and credentials and keep them safe. I will reset the server after this tutorial (just in case someone wonders why I would show the credentials).
Step 5: Create the systemd-unit file
Now we need to stop the server again as we are using a systemd-unit file to start the TeamSpeak 3 server daemon on startup instead of playing around with this script after every restart. Invoke
$ sudo nano /lib/systemd/system/teamspeak3server.serviceas your regular user and then paste the following into the empty file:
[Unit]
Description=TeamSpeak 3 Server
After=network.target

[Service]
WorkingDirectory=/opt/teamspeak/
User=teamspeak
Group=teamspeak
Type=forking
ExecStart=/opt/teamspeak/ts3server_startscript.sh start inifile=ts3server.ini
ExecStop=/opt/teamspeak/ts3server_startscript.sh stop
PIDFile=/opt/teamspeak/ts3server.pid
RestartSec=15
Restart=always

[Install]
WantedBy=multi-user.targetNow let the systemd daemon recognize the newly created service file by calling sudo systemctl daemon-reload. And it's time to finally start the server. Use sudo systemctl start teamspeak3server.service. Use the sudo systemctl status teamspeak3server.service to check whether the server is up and running (If you are in the expanded service status view, press q). If you want to enable the TeamSpeak 3 server to start when your Linux server starts up, go for a sudo systemctl enable teamspeak3server.service and your TeamSpeak server will be available as soon as your server is up.
Our server is now ready for use. We now have to initialize it with our TeamSpeak client.
Step 6: Initial Setup and connection to the server
Finally, we have to connect to the server once to provide the authorization key.
To do this, go to the TeamSpeak 3 client application and click on "Connections" and then on "Connect".
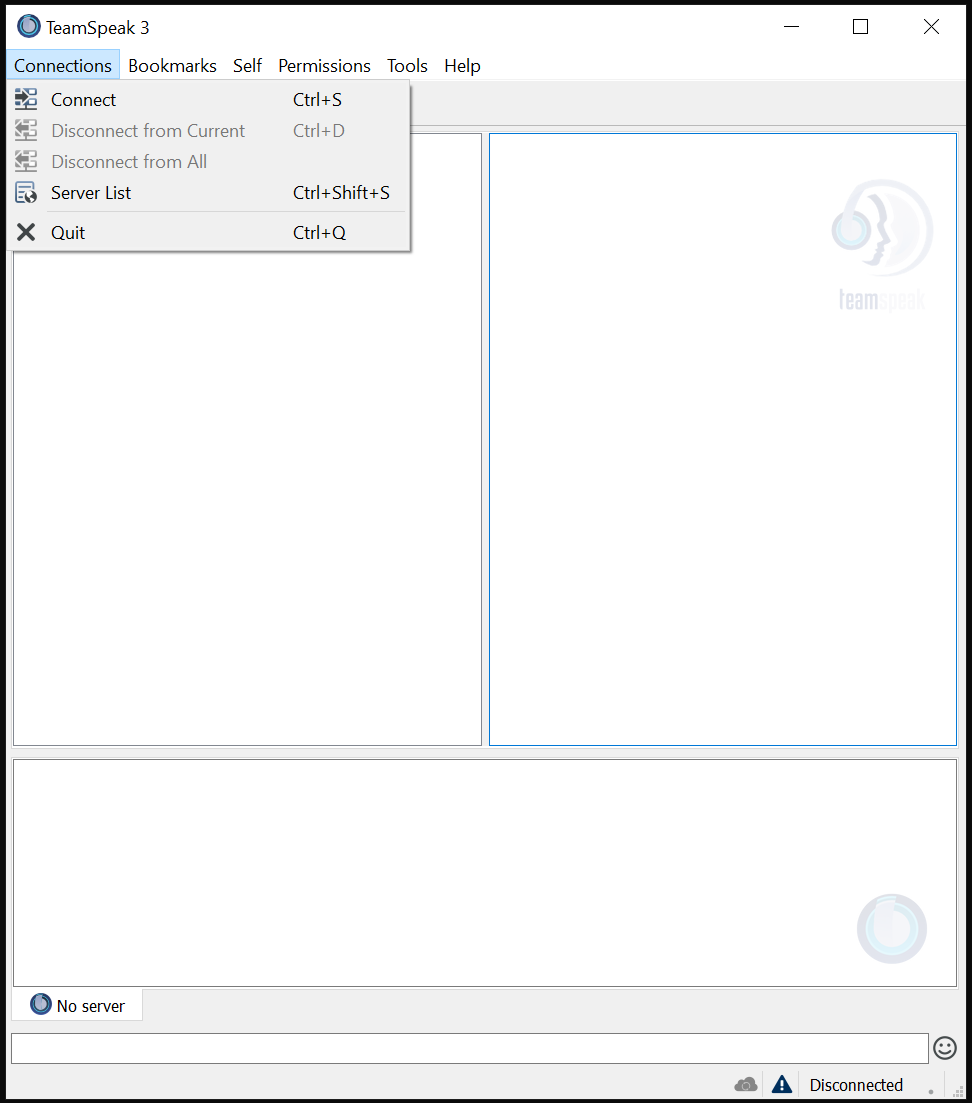
Now enter the IP address or the domain name of your newly set up server as well as the desired nickname and click on "Connect".

You should now be greeted with the "Use Privilege Key" window where we need to paste our ServerAdmin Privilege Key.

As soon as this is done, we will finally have our server up and running. Last but not least, hit the "OK" button and we're good to go.

Conclusion
Congratulations, you did it! Your own TeamSpeak 3 server is now operational and you can tell your friends and family to jump on it and have a chat. Remember to update the server regularly by extracting the contents of newer versions to the /opt/teamspeak directory while the server is stopped. Now call the well-known command
$ sudo systemctl start teamspeak3server.servicein order to restart the TeamSpeak 3 server.
]]>
The security of your servers should be of the utmost importance to any system administrator. Installing the latest security patches on your systems is an essential part of keeping your computers secure and preventing automated attacks with known vulnerabilities that put your systems at risk. However, updating the latest patches can be a real problem if you manage a lot of machines or if you just don't want to log in every two weeks to manually update your systems to the latest patch level. Almost all Debian-based systems (including Ubuntu) offer a package called unattended-upgrades which, if properly configured, can be used to upgrade the system for you. You can either just install security updates, perform a full system upgrade, or even install packages that are in the testing phase - all automatically.
But there is a catch. Critical infrastructures like your Internet backbone, VPN gateway, etc. should be updated manually or ONLY automatically install security patches, as downtime and messing around with broken configuration files can ruin your day. You should evaluate for yourself whether and to what extent your server should receive automatic updates. I recommend security updates for every system. If the system isn't that critical, I would consider installing pending updates automatically, which isn't that much of a hassle.
Prerequisites
- A Debian / Ubuntu system with the latest updates installed
- Internet connection
- Root access or elevated privileges (via sudo)
Installation & Configuration
Step 1: Install unattended-upgrades & optional packages
Some versions of Debian (9+) and Ubuntu versions come with the unattended upgrades and apt-listchanges packages preinstalled. To make sure both packages are really installed on our hard drive, we should double check. First, make sure the system is up to date by invoking
$ sudo apt update && sudo apt upgrade -y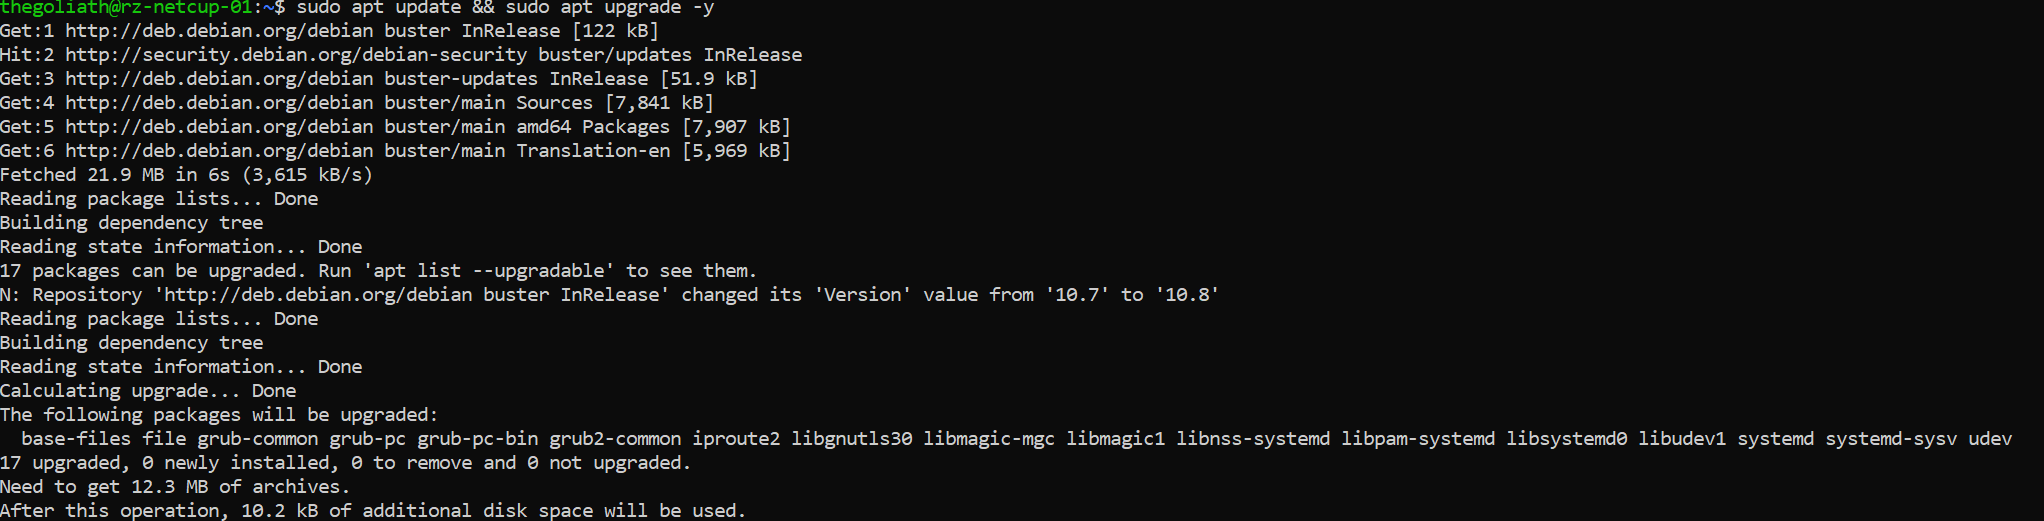
It is recommended that you monitor the latest changes of packages made available by the package maintainers of your distribution. Therefore, we should also install the apt-listchanges package that can be configured to notify us when changes that we should be aware of are made to the system. It does this by sending us these changes by e-mail or into the system-internal mailbox of the desired UNIX user.
Install them packages by invoking the following command:
$ sudo apt install unattended-upgrades apt-listchangesStep 2: Configure unattended-upgrades & apt-listchanges
Next we need to configure the configuration file of the unattended upgrade package, which location is /etc/apt/apt.conf.d/50unattended-upgrades.
We need to choose which updates we want to install. The lines that begin with a double slash (//) are not used by unattended-upgrades because they serve as comments for the configuration file. Therefore, to "activate" a line, we need to remove the double slash (//).
Step 2.1: Selecting the package groups we want to update
Use the editor of your choice to edit the configuration file. For beginners, I would recommend nano, which comes standard on most systems. Open the configuration by calling
$ sudo nano /etc/apt/apt.conf.d/50unattended-upgrades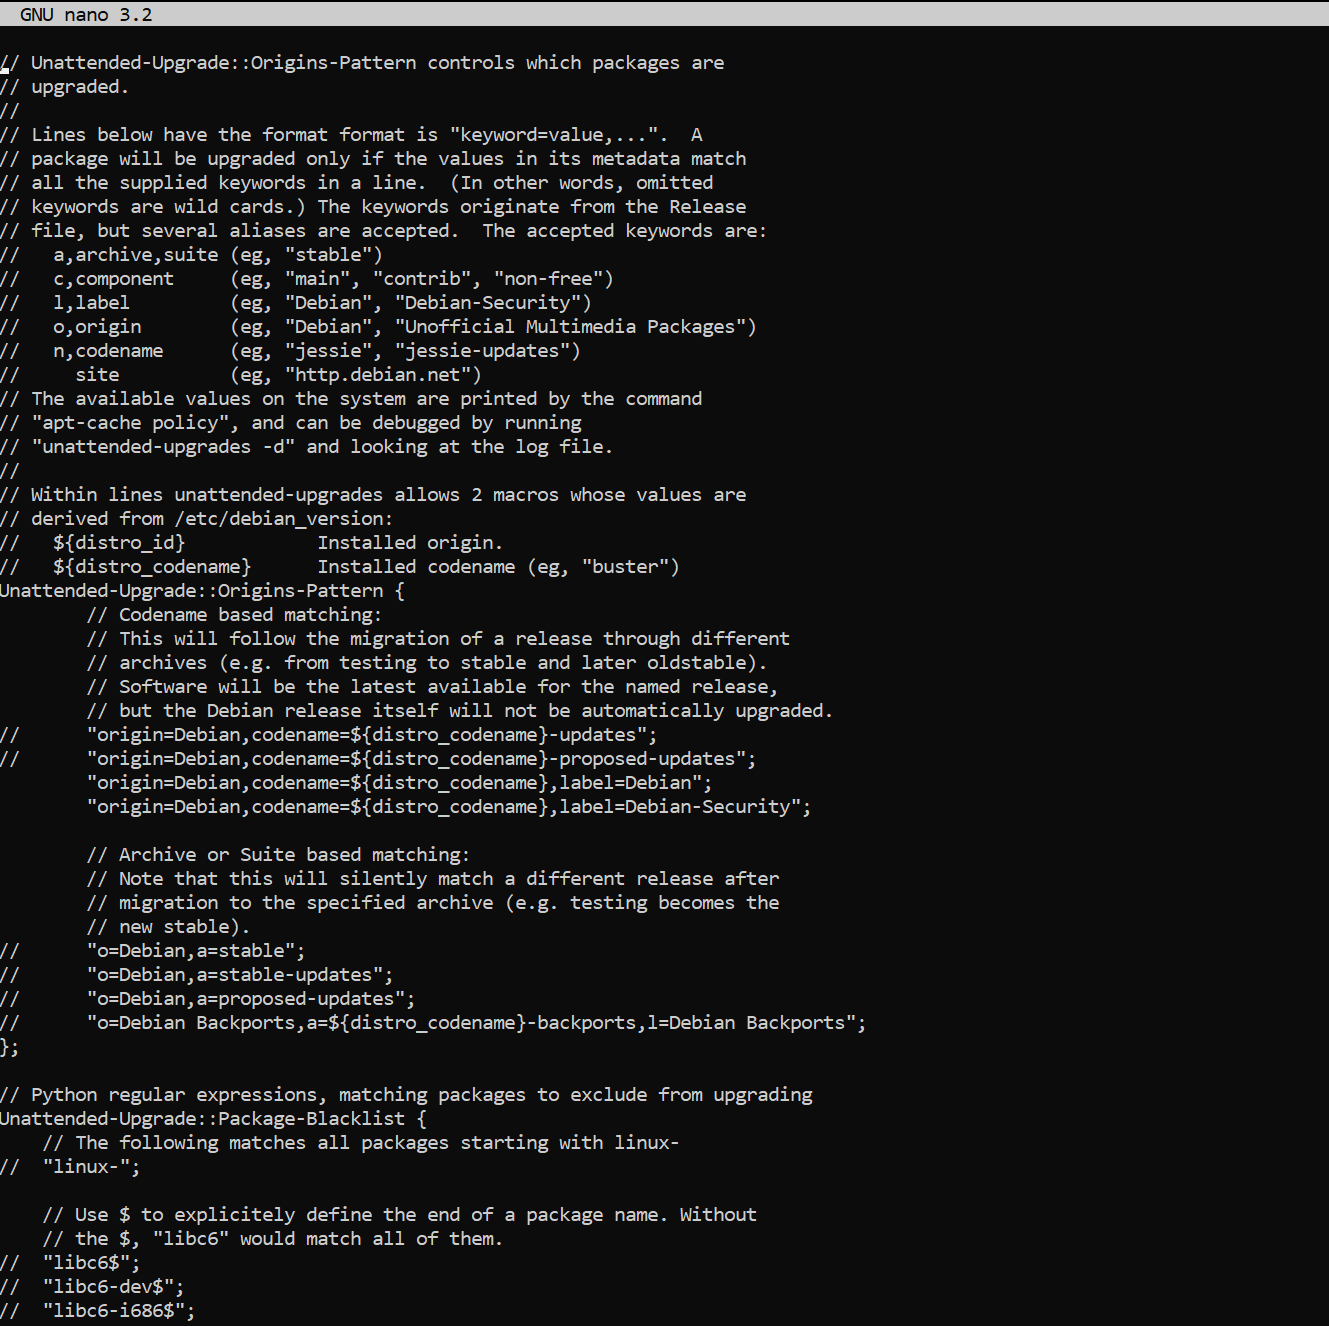
We can control what is automatically updated by uncommenting and uncommenting these lines in the configuration block, starting with Unattended-Upgrade::Origins-Pattern. By default, only security updates are occasionally installed for your system. To enable updates from other updates we have to uncomment them respectively.
But first we want to make sure everyone knows what is behind these different repositories. The Debian project itself provides a good explanation.
"origin=Debian,codename=${distro_codename},label=Debian-Security";- official Debian repository for frequent security updates"origin=Debian,codename=${distro_codename}-updates";- official Debian repository for changes that cannot wait for the next point release, packages are also added to StableProposedUpdates for inclusion in the next point release"origin=Debian,codename=${distro_codename}-proposed-updates";- official Debian repository for upcoming point releases (security and important bug fixes every ~2 months)"o=Debian Backports,a=${distro_codename}-backports,l=Debian Backports";- more recent versions of some packages, compatible with DebianStable.
Step 2.2: Configure the update schedule
By default we need to add the 20auto-upgrade file to our Debian installation as the file has not yet been created. To do this invoke:
$ sudo nano /etc/apt/apt.conf.d/20auto-upgradesand add the following parameters as desired.
By default it looks like this:
APT::Periodic::Update-Package-Lists "1";
APT::Periodic::Unattended-Upgrade "1";
APT::Periodic::Update-Package-Lists- This option allows you to specify the frequency (in days) with which the package lists are updated.APT::Periodic::Download-Upgradeable-Packages- When enabled, the script will perform an unattended upgrade on a daily basis.APT::Periodic::AutocleanInterval- This controls how often outdated packages are removed from the APT cache. This keeps the APT cache a reasonable size and means you don't have to worry about this task.APT::Periodic::Download-Upgradeable-Packages- Frequency (in days) for downloading the actual packages.
Our desired configuration updates package lists, downloads packages, and installs available upgrades on a daily basis. Meanwhile, the APT cache is cleaned every 7 days:

Step 2.3: Enable email reporting for package changes (optional)
We want to enable email reporting as some changes in the updated packages may break our configurations and therefore some services may fail. To reduce the length of downtime, it is a good idea to send yourself some information about the changes made to your system.
To do this, we have to look in our file /etc/apt/apt.conf.d/50unattended-upgrades again and find the line //Unattended-Upgrade::Mail "". Now uncomment the line and change the value to your own username or your e-mail address if you have already configured a suitable mail system.

Step 3: Verify that everything works!
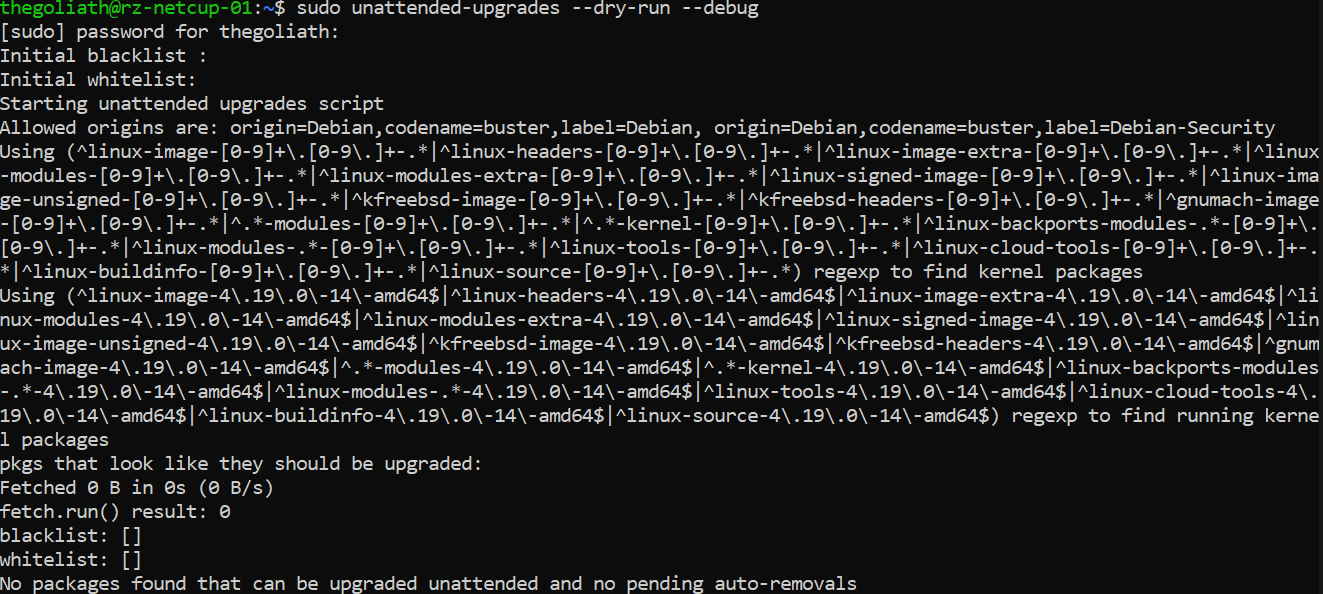
Finally, we need to verify that our unattended upgrade service is working. To do this, we can test our configuration by invoking it with a dry run of unattended upgrades:
$ sudo unattended-upgrades --dry-run --debug
And we're done!
Cheers,
Felix
# Here are some netcup coupon codes. It won't cost you a penny more to use them. I just get a small percentage credited by netcup for the particular product so I can fund this blog here :)
36nc17020388670 	Coupon 5 Euro (new customers, no domains)
2915nc17020389730 	RS 1000 G9.5 3M discount
2916nc17020389690 	RS 2000 G9.5 2M discount
2917nc17020389640 	RS 4000 G9.5 2M discount
2918nc17020389610 	RS 8000 G9.5 1M discount
3062nc17020389580 	VPS 1000 G10 1M discount
3063nc17020389490 	VPS 2000 G10 1M discount
3064nc17020389460 	VPS 3000 G10 1M discount
3065nc17020389430 	VPS 4000 G10 1M discount
3066nc17020389380 	VPS 6000 G10 1M discount
3067nc17020389300 	VPS 8000 G10 1M discount
Coupon codes
Introduction
Debian 10, also known as Buster, was released almost two years ago in 2019. However, it is the newest and most up-to-date version of the Linux distribution. As with any version of Debian, Buster had some high performance tests to be as stable and secure as possible. At the time of writing, the latest version of Debian 10 is 10.7 (released December 2020).
Our goal is to install Debian 10 Buster on our own Virtual Private Server (VPS). I will walk you through installing Buster on a Netcup VPS, but the process shouldn't be very different from other hosting providers.
Prerequisites (minimal)
- RAM: 256MB or more (Recommended: at least 512MB)
- Hard Drive space: 2GB or more (I recommend at least 10GB)
- CPU: 1GHz Intel Pentium should do the job but don't expect it to be blazing fast then ;)
Installation procedure
Step 1: Downloading the installation ISO file
Netcup already has up-to-date installation images for common distributions such as CentOS, Debian, Ubuntu etc. We will use them for our installation. If you want to use your own installation image, visit the official Debian website to grab a copy of the image and upload it to your hoster's FTP server.
Step 2: Booting the ISO
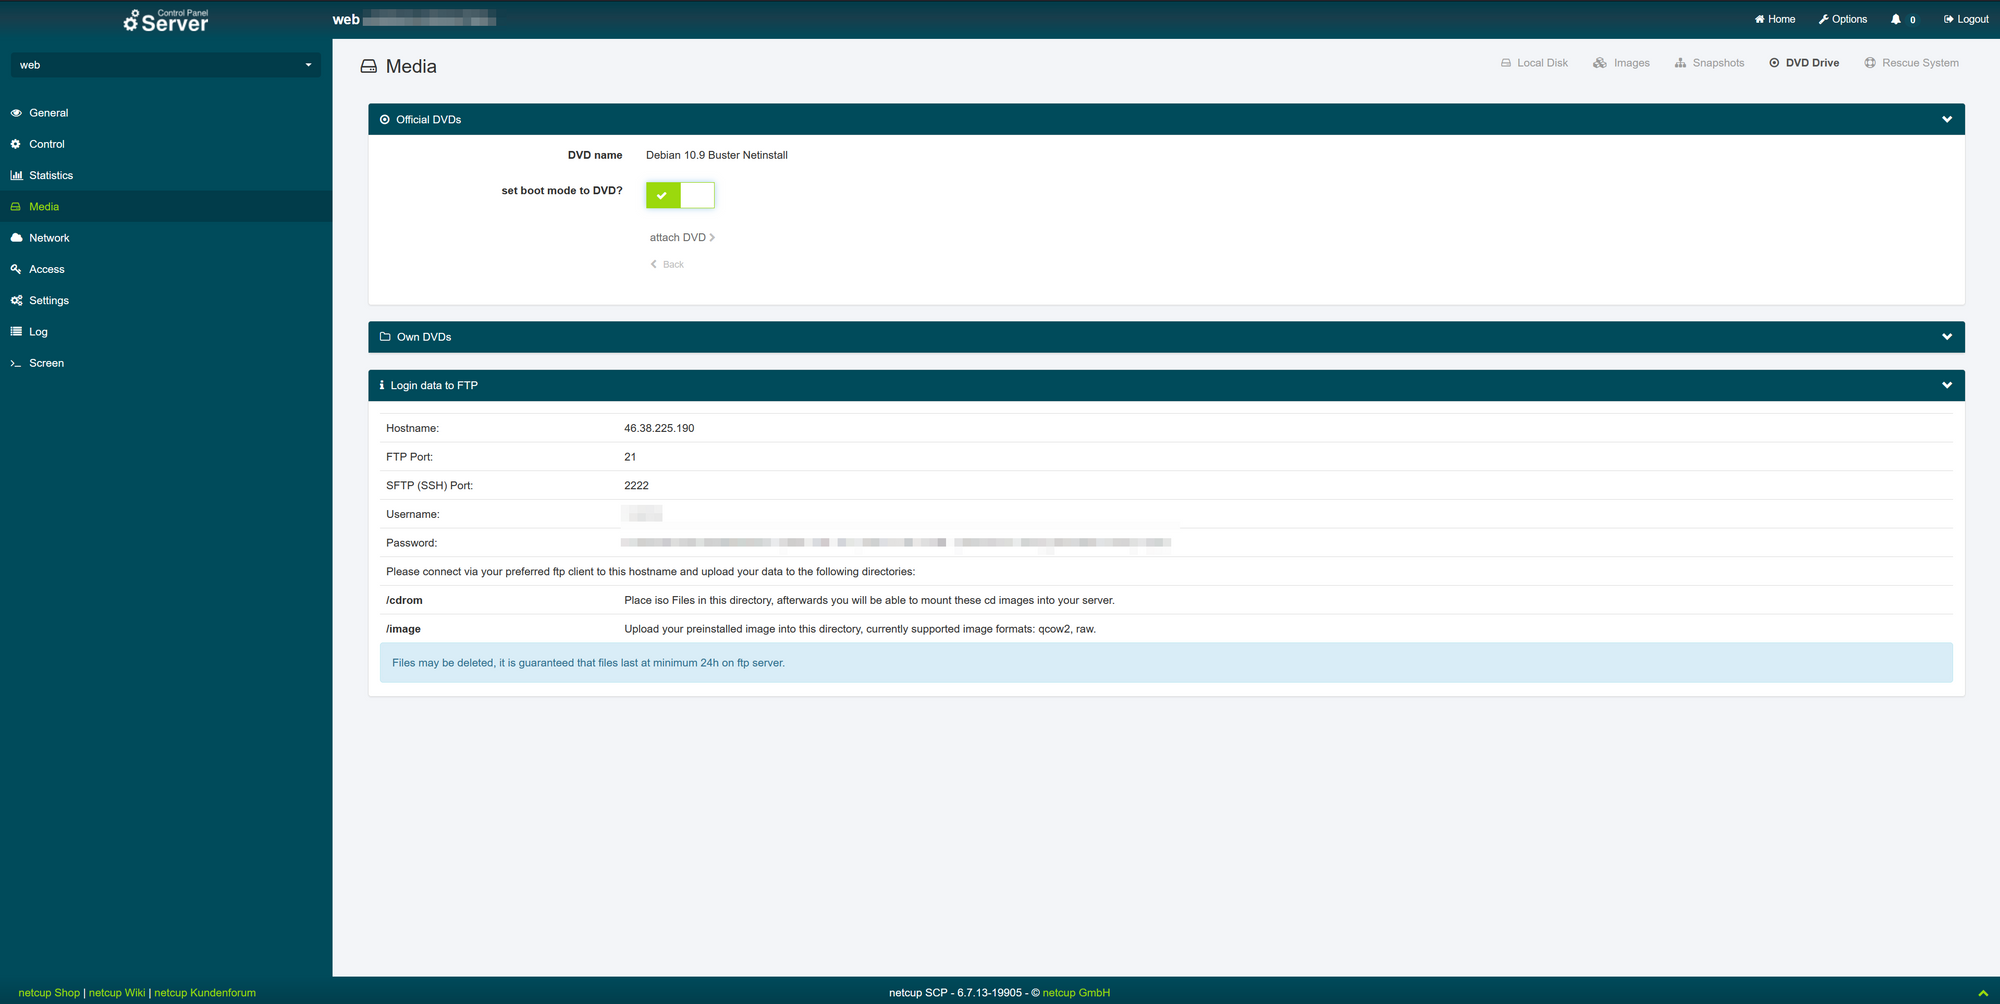
If you log in to the server control panel (SCP) of netcup (servercontrolpanel.de) with your login information, you will be greeted with the "General" overview of your rented server (Fig. 1).

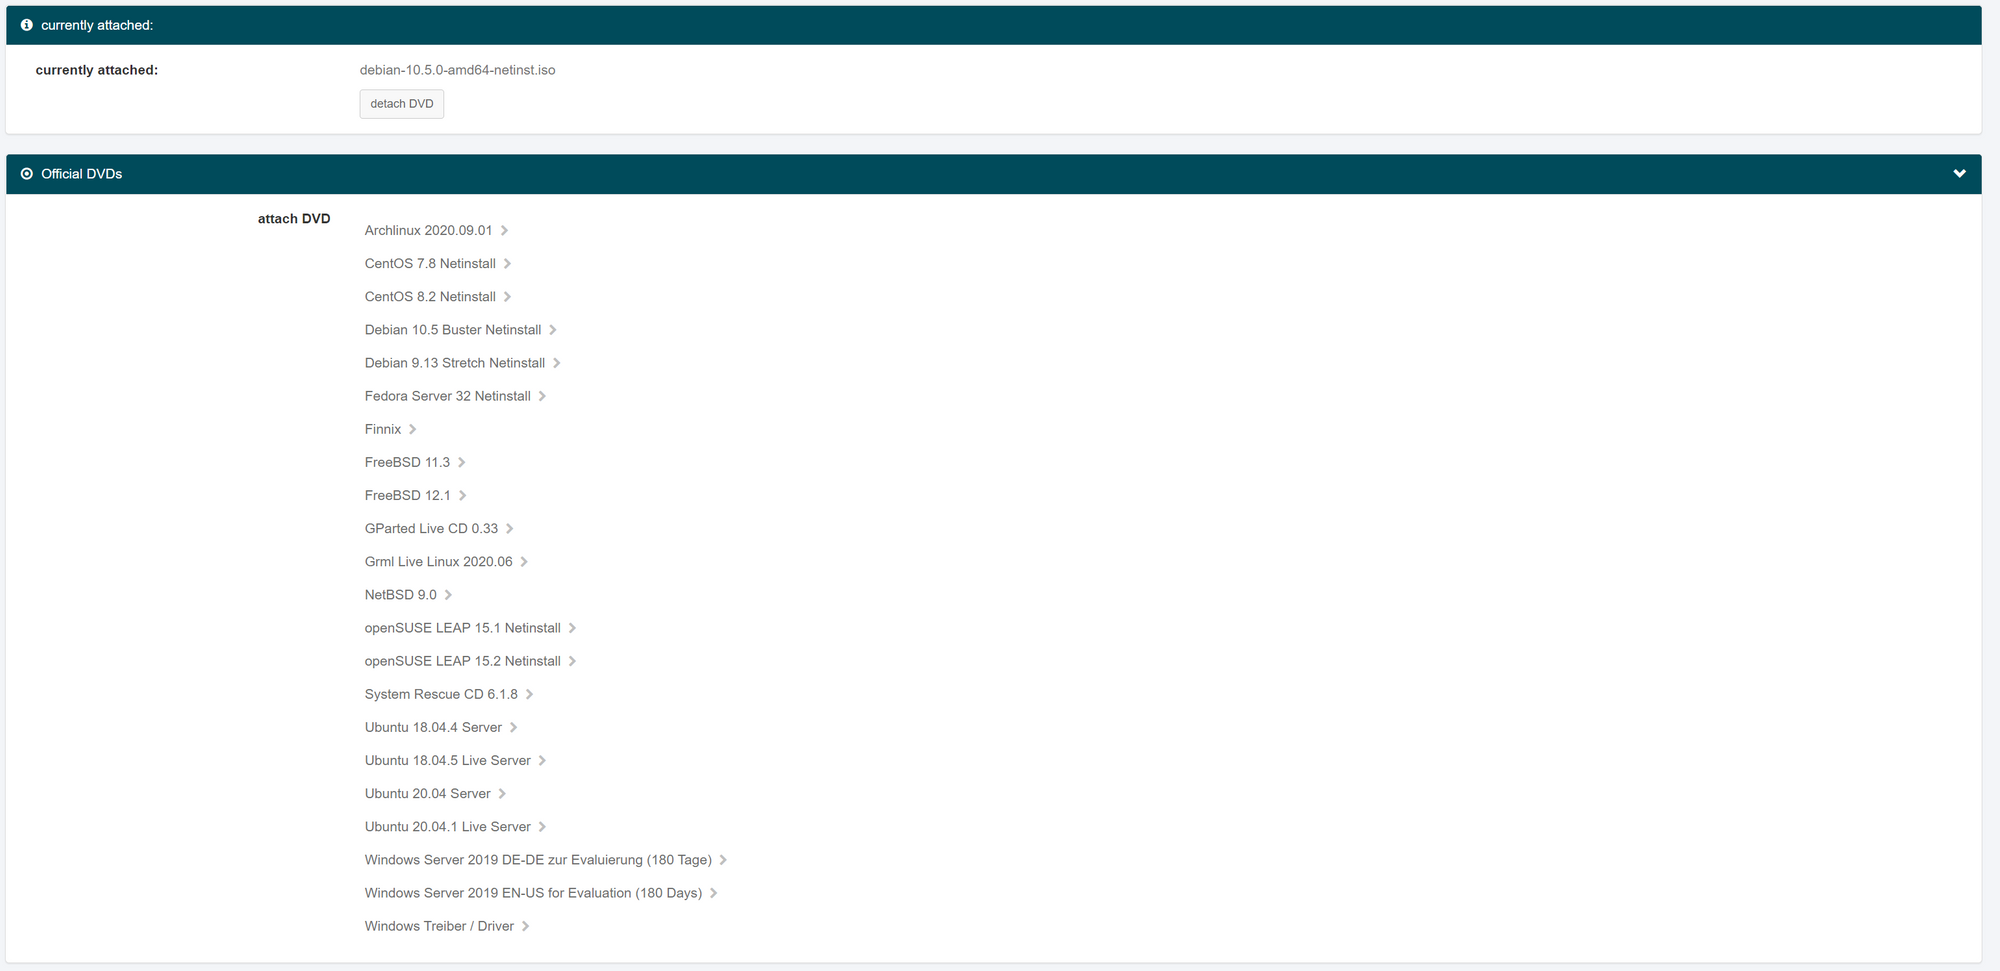
From there we need to go to the "Media" section (Fig. 2) where we will go to the "DVD Drive" menu and select the Debian 10.x Netinstall medium.

You can also choose your own installation media after uploading it to the FTP server. Next we have to set the boot mode to DVD (Fig. 3) and attach the DVD.
After that, go to the "Control" section on the left and select "Start" (Fig. 4) (if the server has already started with the default Netcup image, select "Force Stop" and then click the "Start" button) .

To get things rolling right, we finally need to go back to the General taband click on the newly displayed VNC window (Fig. 5).

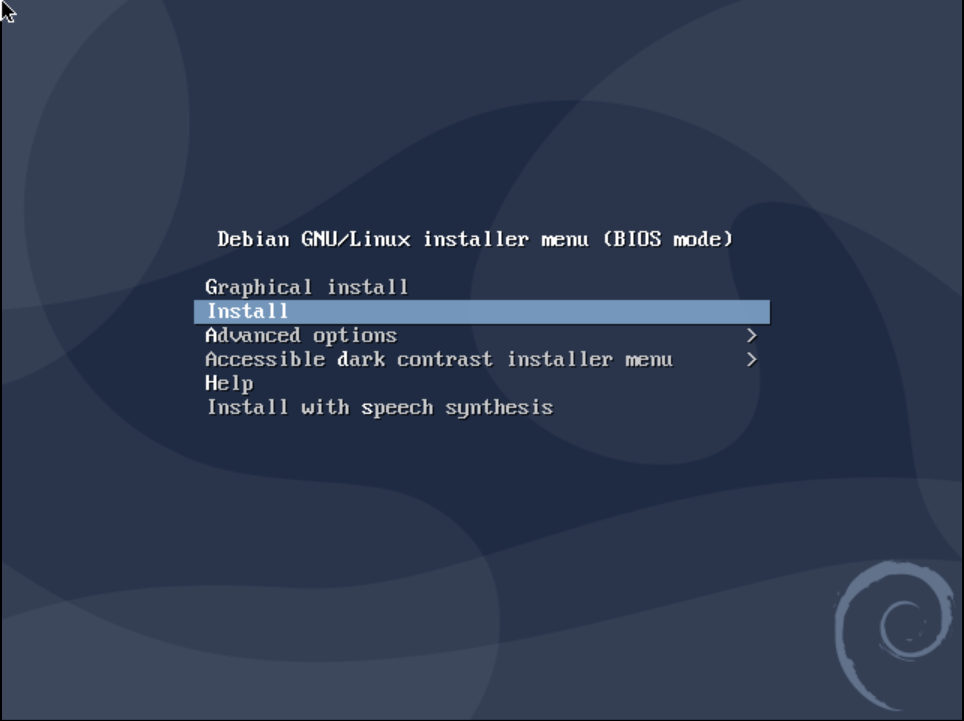
Step 3: Setting up language, location and keymap
Now that we are in the VNC window of our own VPS, we can interact with the machine using both our mouse and our keyboard. You can now choose either the graphical installation- or the "classic" installation process. Both behave very similarly and only differ in their visual appearance. This guide will follow with the classic installation. However, you can proceed with the graphical installation process if you wish.
Now that the installer has loaded, we need to set our language for the installation process. This language does not affect the later installed system and is only used for the installation environment.

After that we need to choose our country or area where the server is hosted. This will help us choose our language and will set our time zone to match the range selected. Since netcup provides servers mainly in Germany (like this server), I will select Germany as the area.

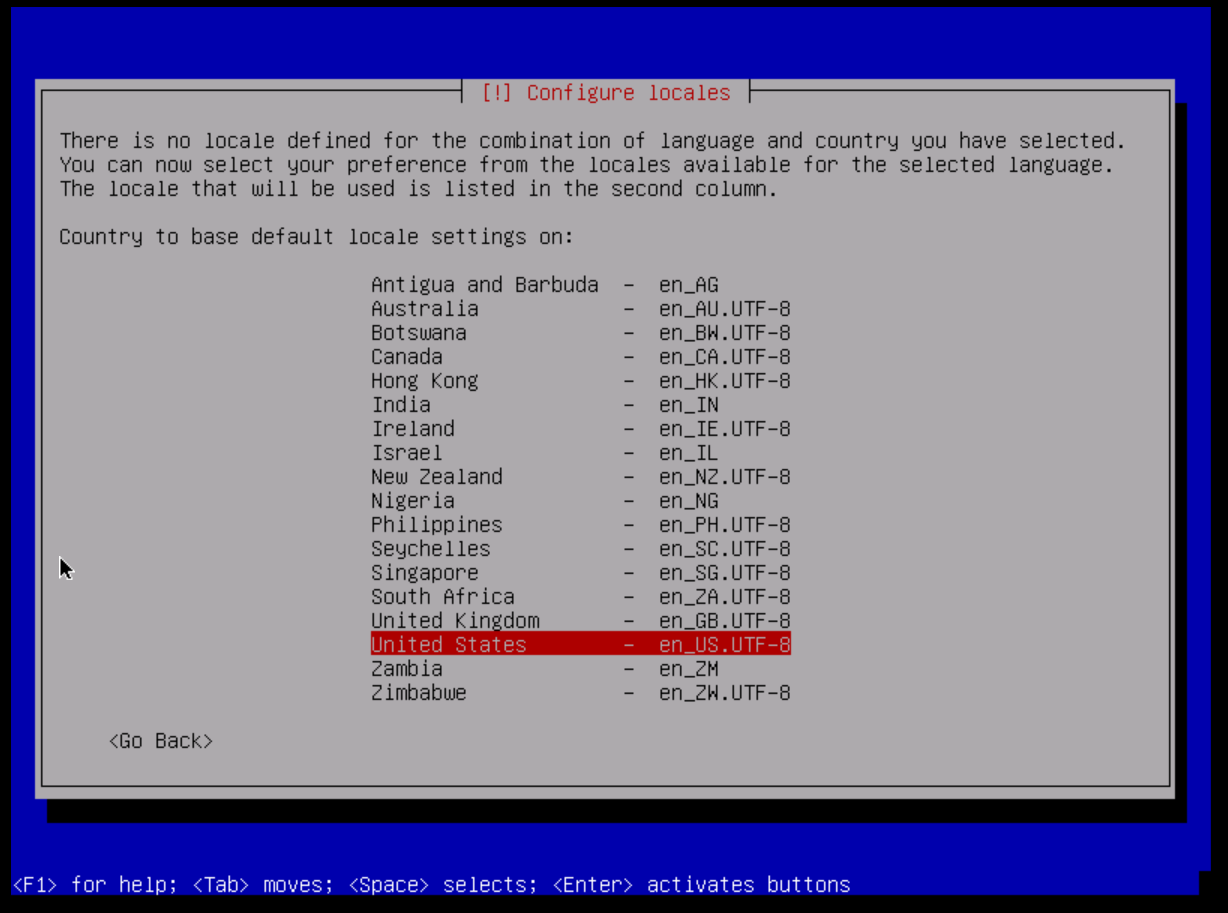
Next we choose the locale that will be used later on the server. Since I prefer English systems (for internationalization and for easier debugging), I recommend choosing either en_US.UTF-8 or en_GB.UTF-8. Note that not all programs you may encounter do support a language other than English, but it's up to you.
Since we want to get our key layout correct, we need to select the appropriate keyboard layout. For me it's the German standard, but yours might be different.
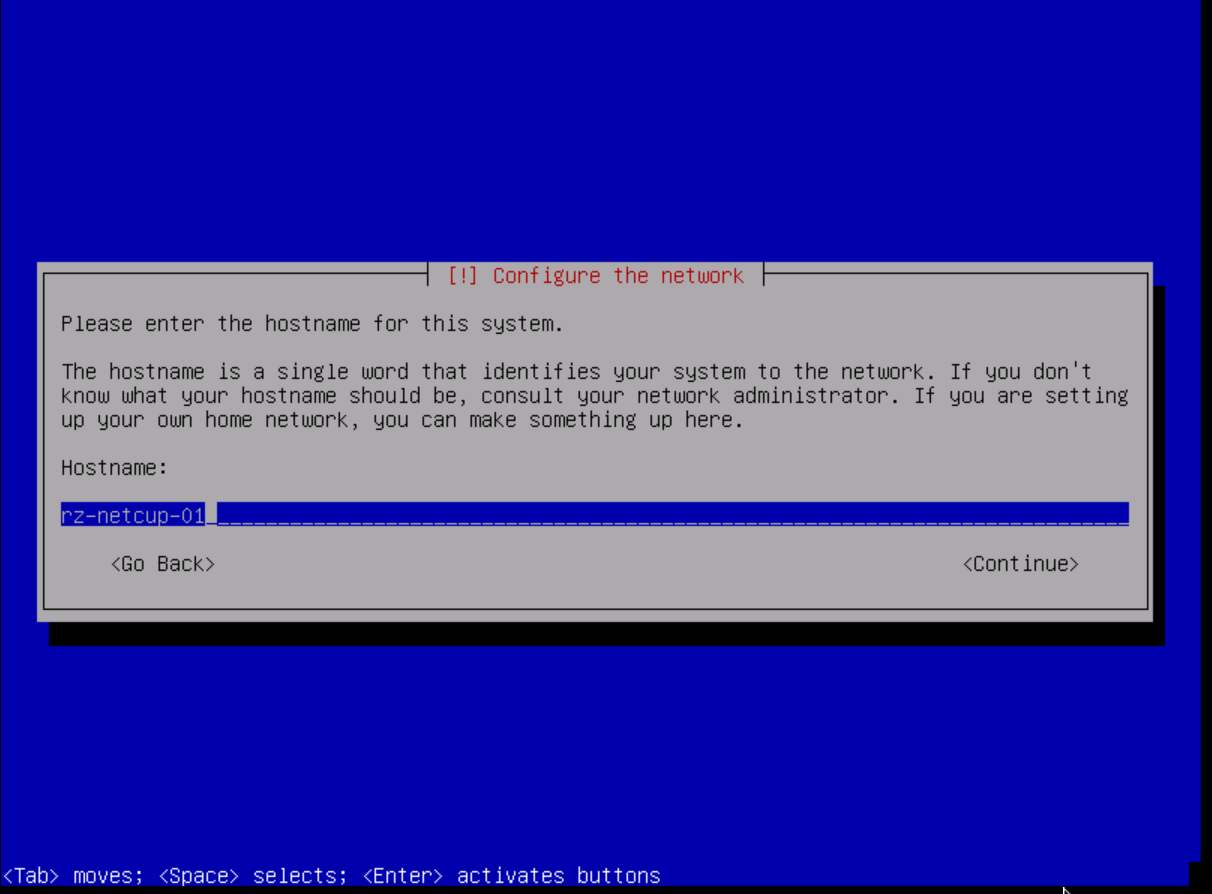
Step 4: Configure the Network
We need a configuration to connect to the internet and identify ourselves with the other machines. The first thing we need to set is our hostname. The host name is a simple name or word (just a single word) used to identify us on the network. You should think about it a little as it should be recognizable and easy to remember. For our guide here I chose rz-netcup-01 (rz stands for "Rechenzentrum", which means "datacenter" in English; "netcup" was selected because this server is hosted by netcup; "01" is only there for numbering reasons as this is the first server we will set up here, but I recommend incrementing this number if you are setting up multiple server instances.)
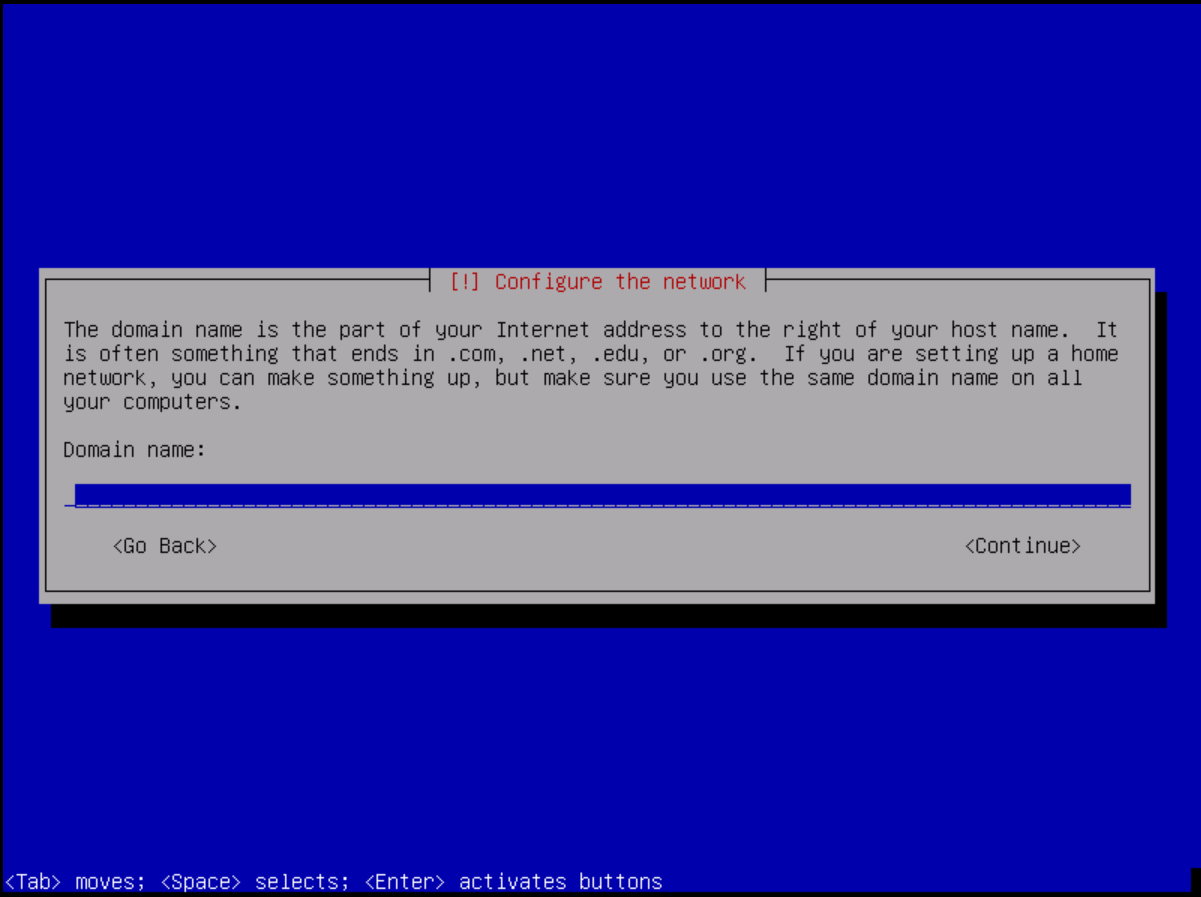
Next comes the domain name. If you plan to use a domain with the server, I recommend adding that here as well. But it's not bad to leave it blank. You can also change it later on.
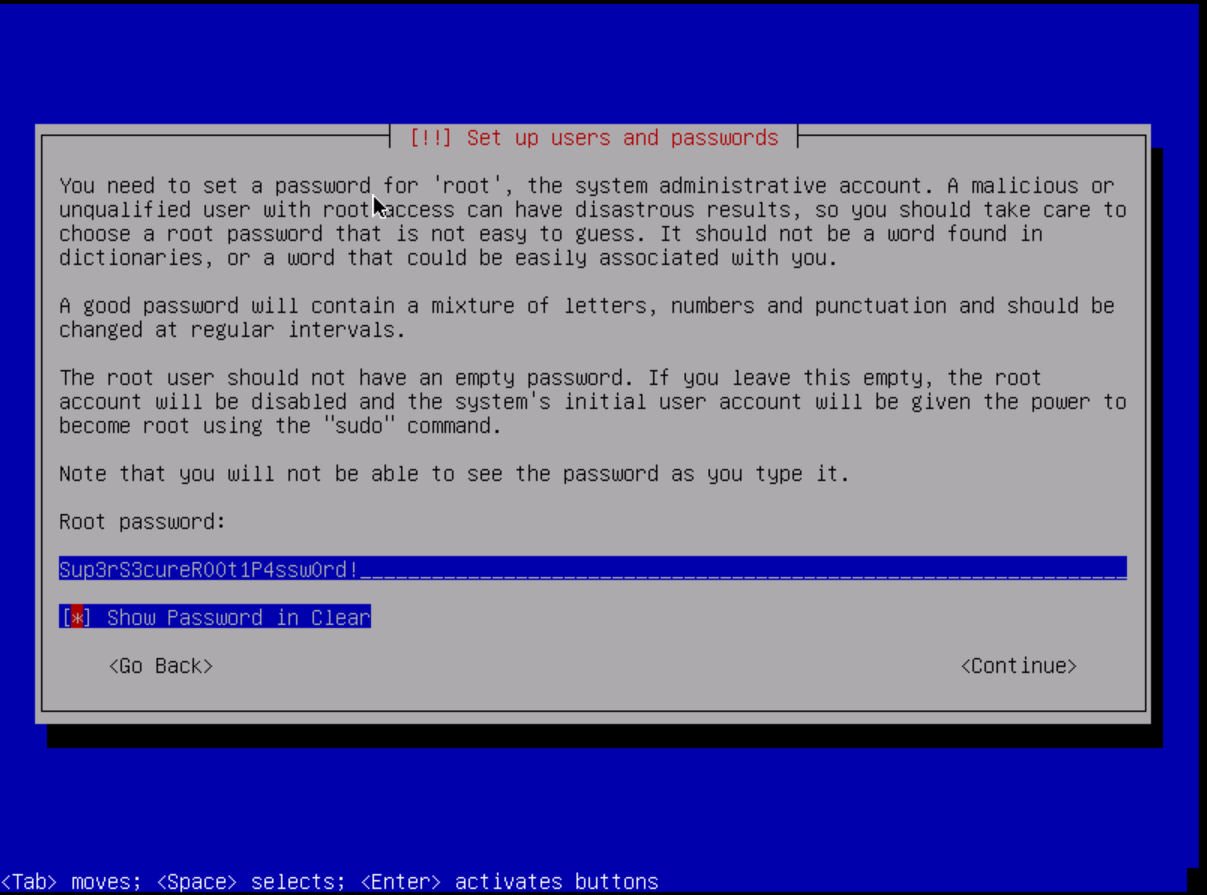
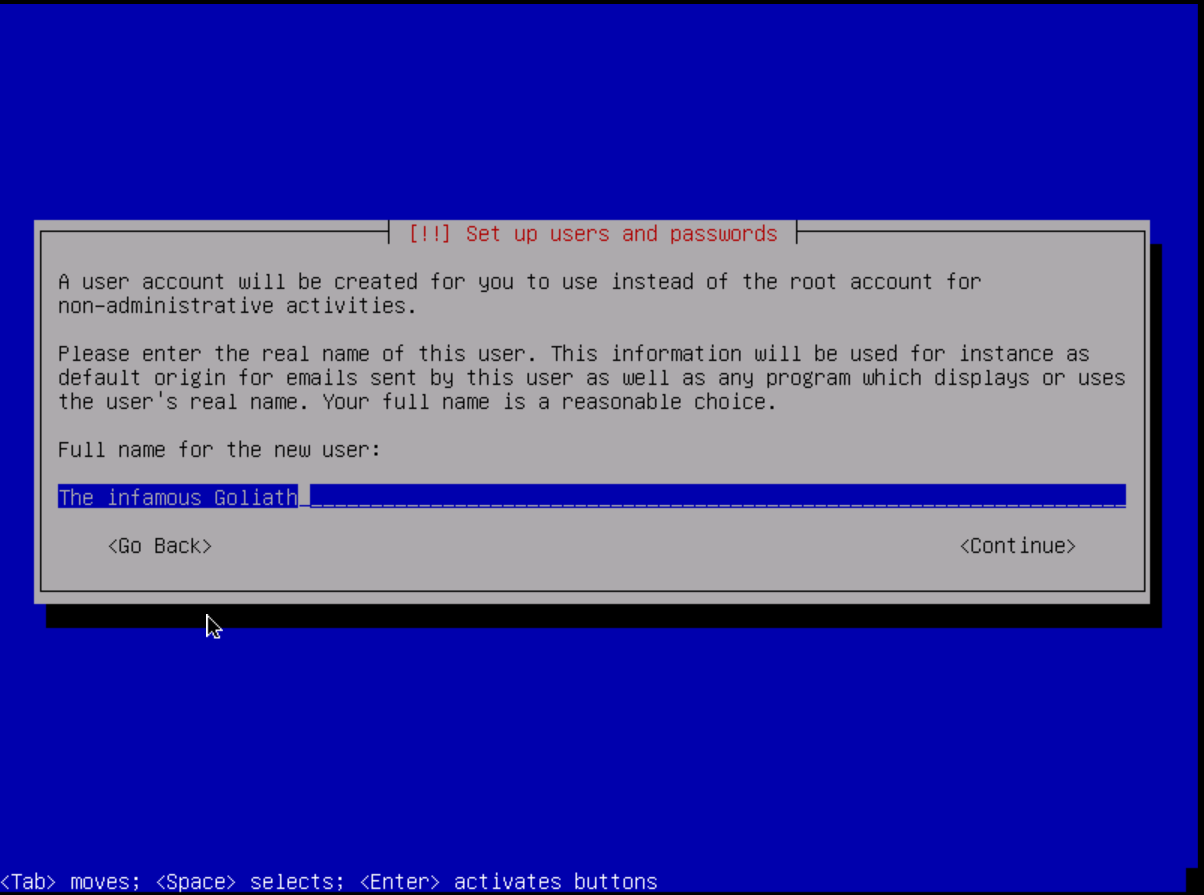
Step 5: Set up users and passwords
First, let's set a super secure password for our root user. It is the most powerful user of our system and should only be used during the initial setup. Otherwise, I recommend invoking privileged commands with the sudo command. I recommend generating a random password for the root user. DuckDuckGo offers a great mechanism for that: Password Generator.
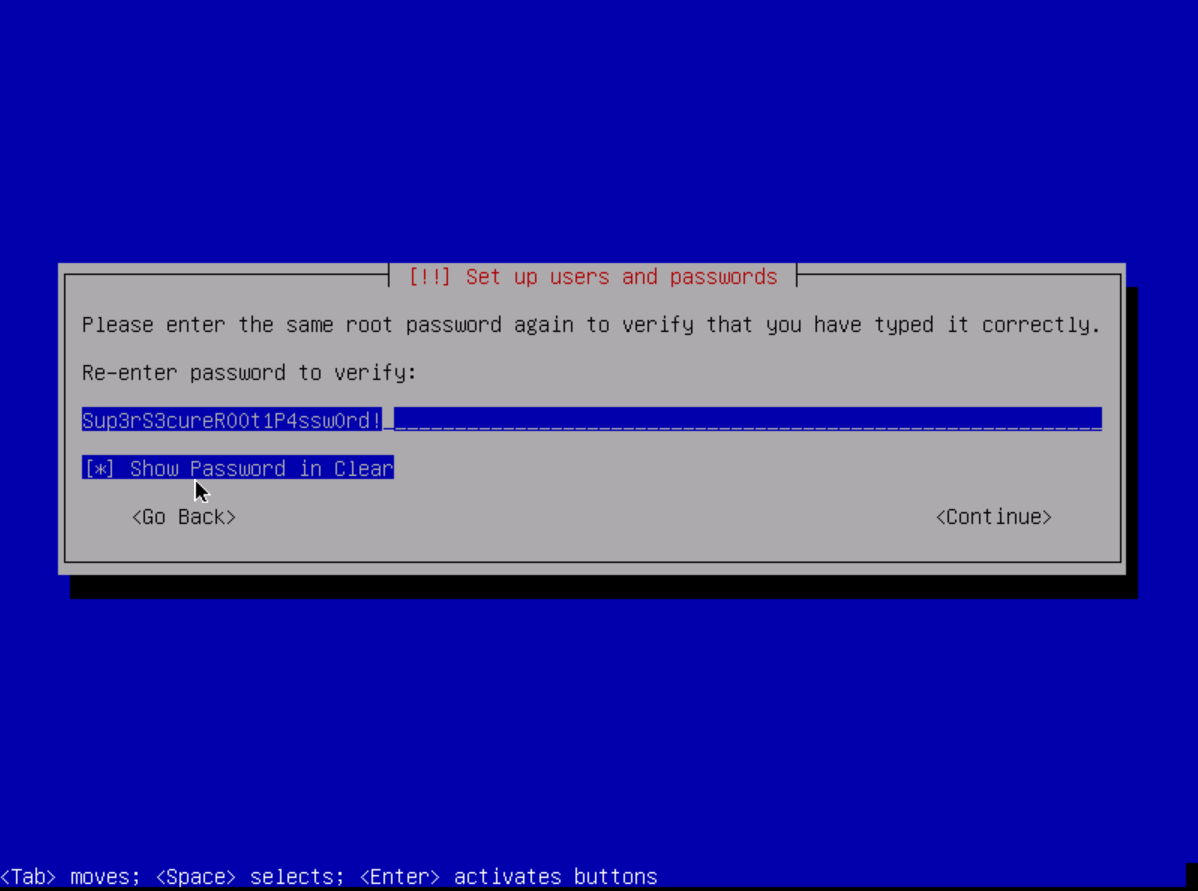
Now let's verify the password by typing it in again.
Running things as root is not good practice. You therefore need a UNIX account that we can work with. This can be your pseudonym or your real name. For systems with more than two users, I recommend using your real names to get the relationships between usernames and the people behind them right.
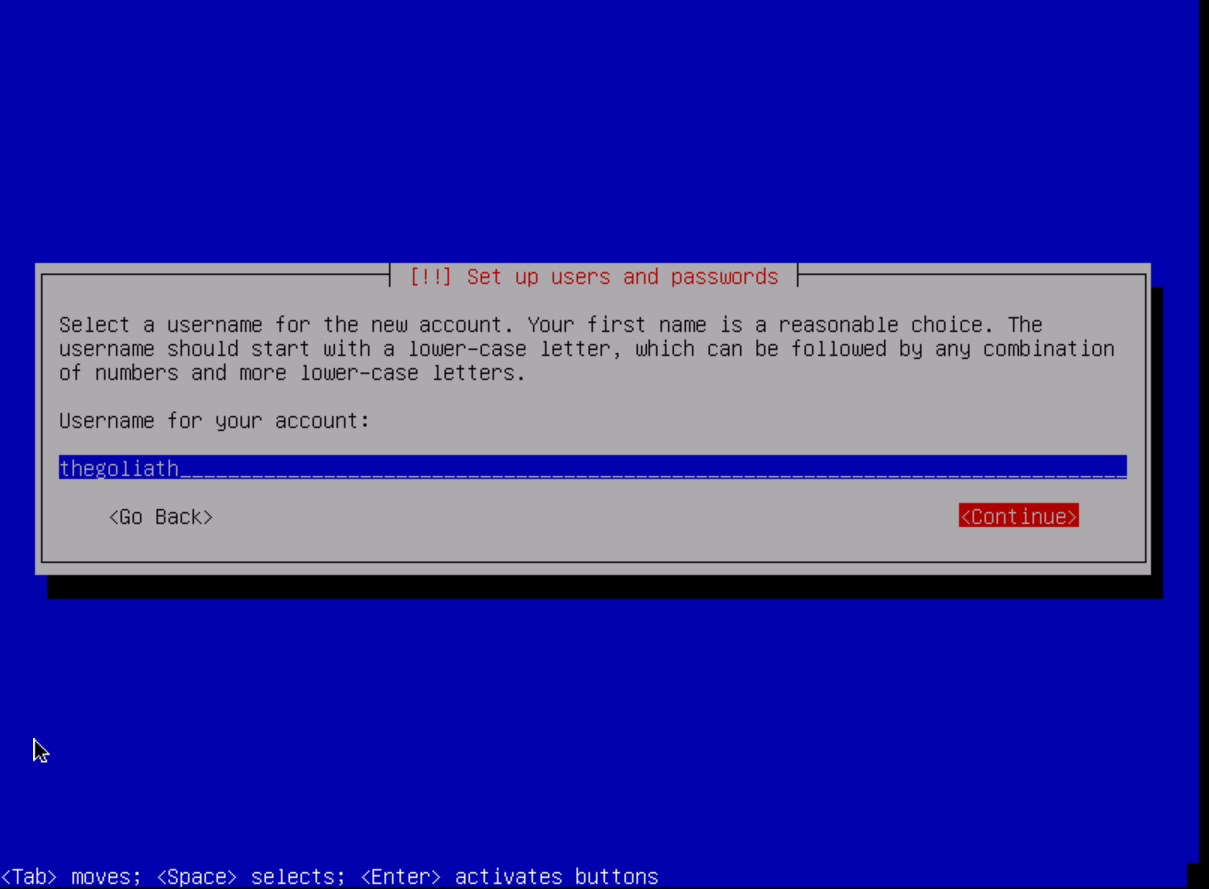
Now choose a username for the account. Either go for your pseudonym or I recommend using the 5 letters of your last name and 3 of your first name. (e.g. Jeff Hawkins becomes "hawkijeff").
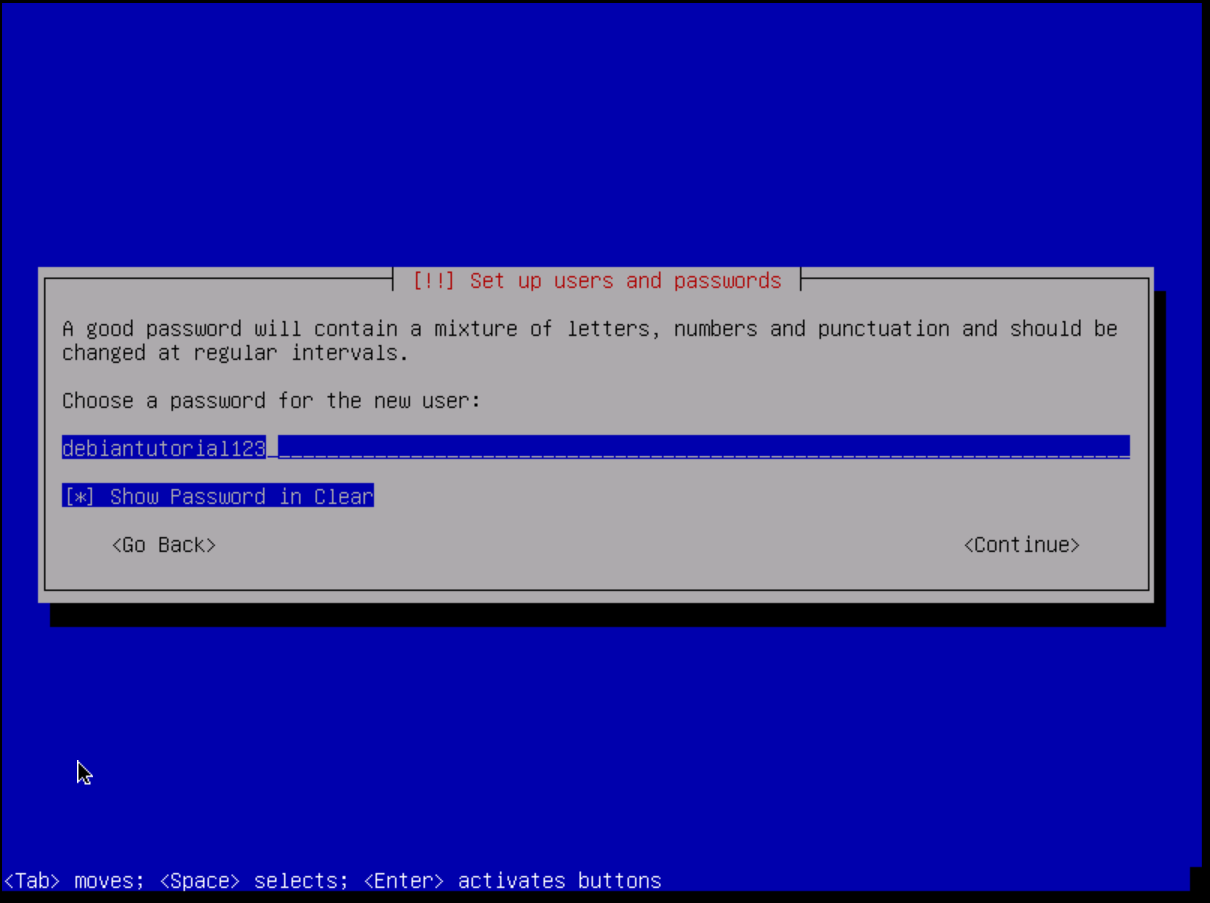
As with the root user, we must also provide a secure password for the user. Mine in this tutorial is not secure at all. Please use a different one!
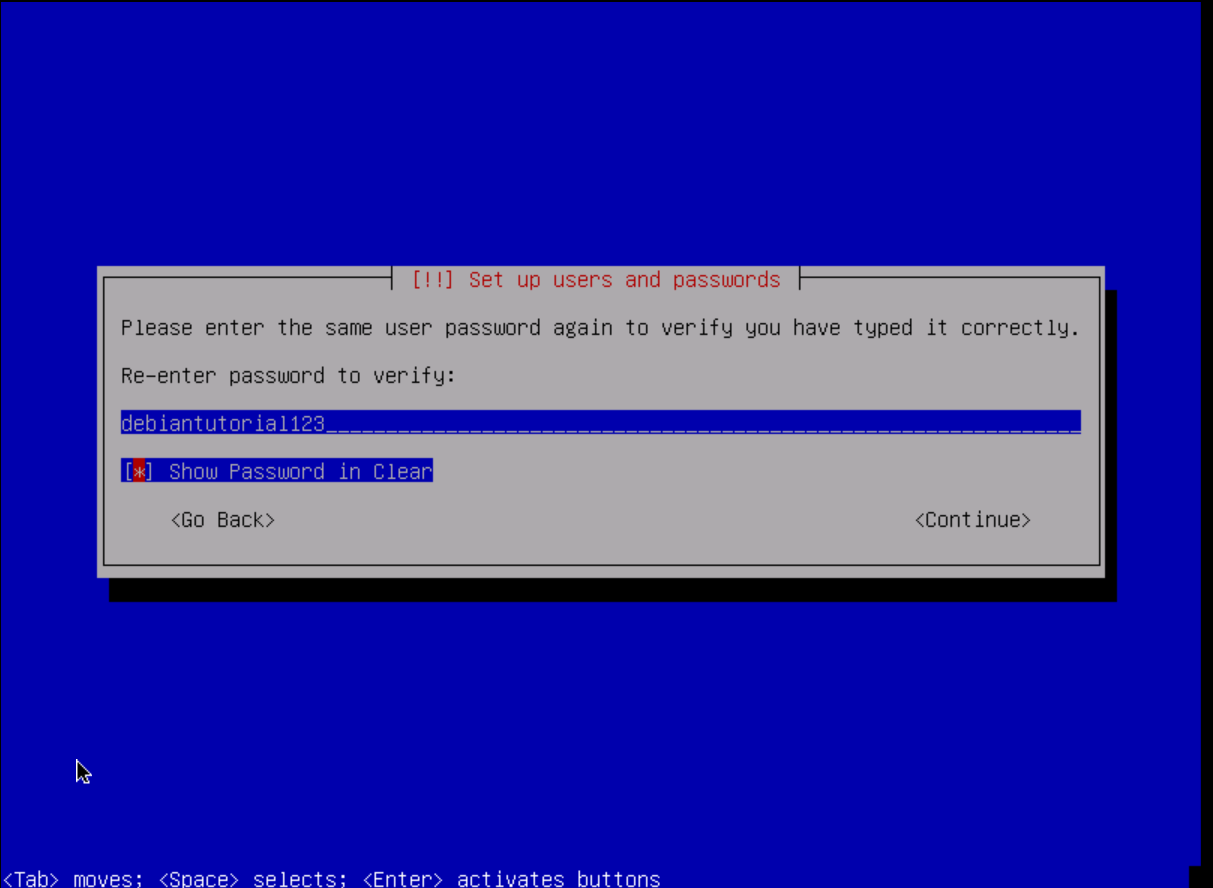
Please check your password now so that we don't get locked out from the system after the restart. Write it down or copy it to your password manager!
Step 6: Partition the disks for the system
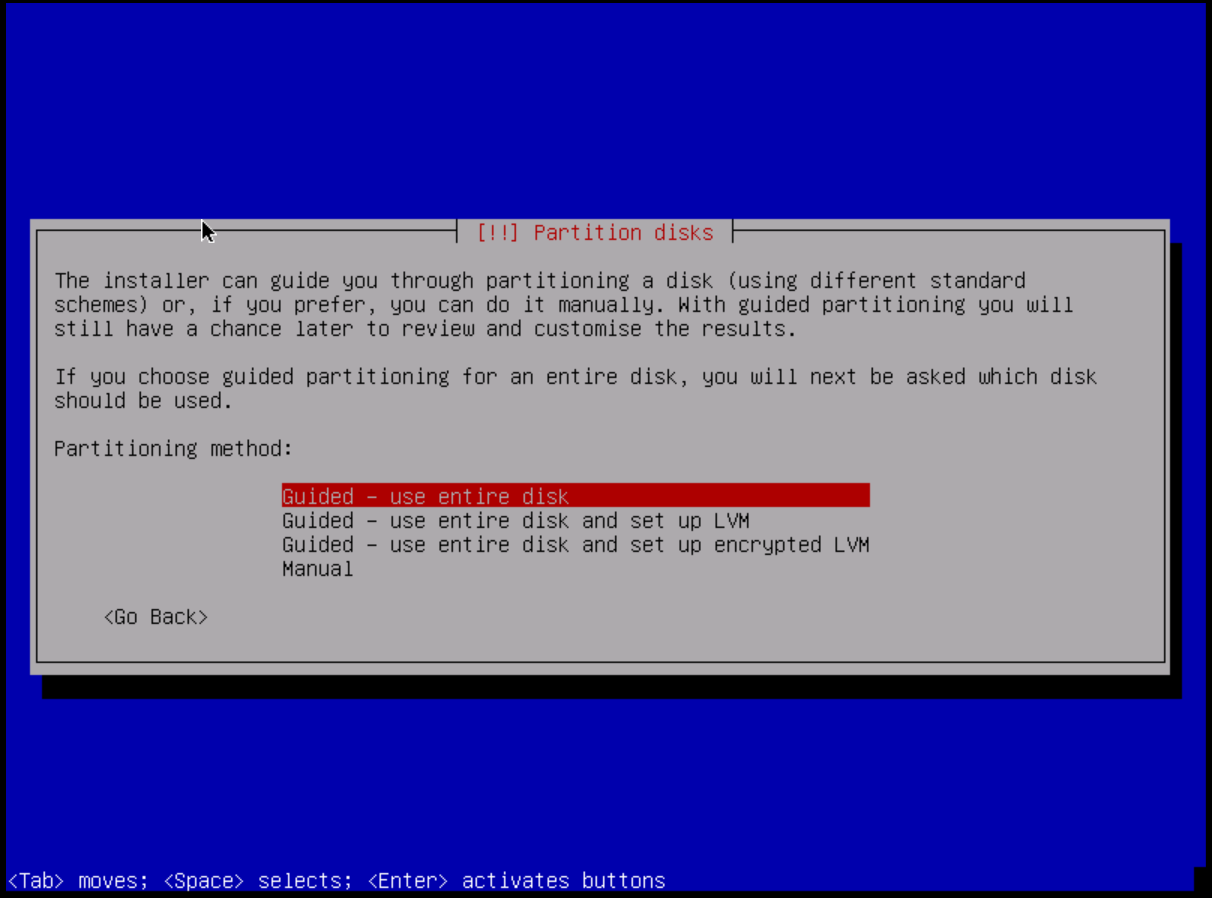
To get started, we need to give our system some space to install its components. I recommend the "Guided - use entire disk" option. If you are more experienced and want to set up LVM or full disk encryption or use different filesystems, you can choose the latter options below.
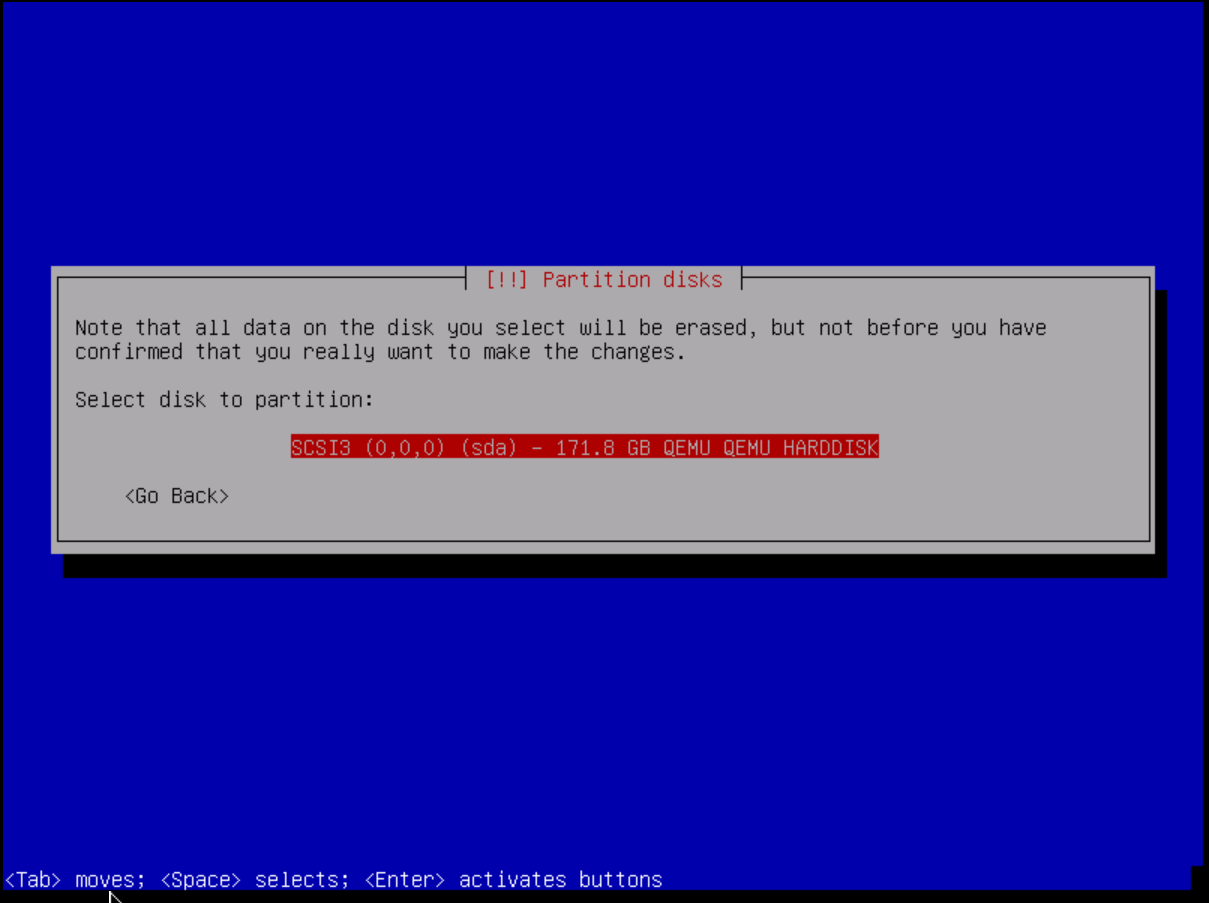
Now let's specify the hard drive that we want to partition. Please make sure you choose the correct one. Otherwise data may be lost. There is usually no more than one storage device on netcup servers.
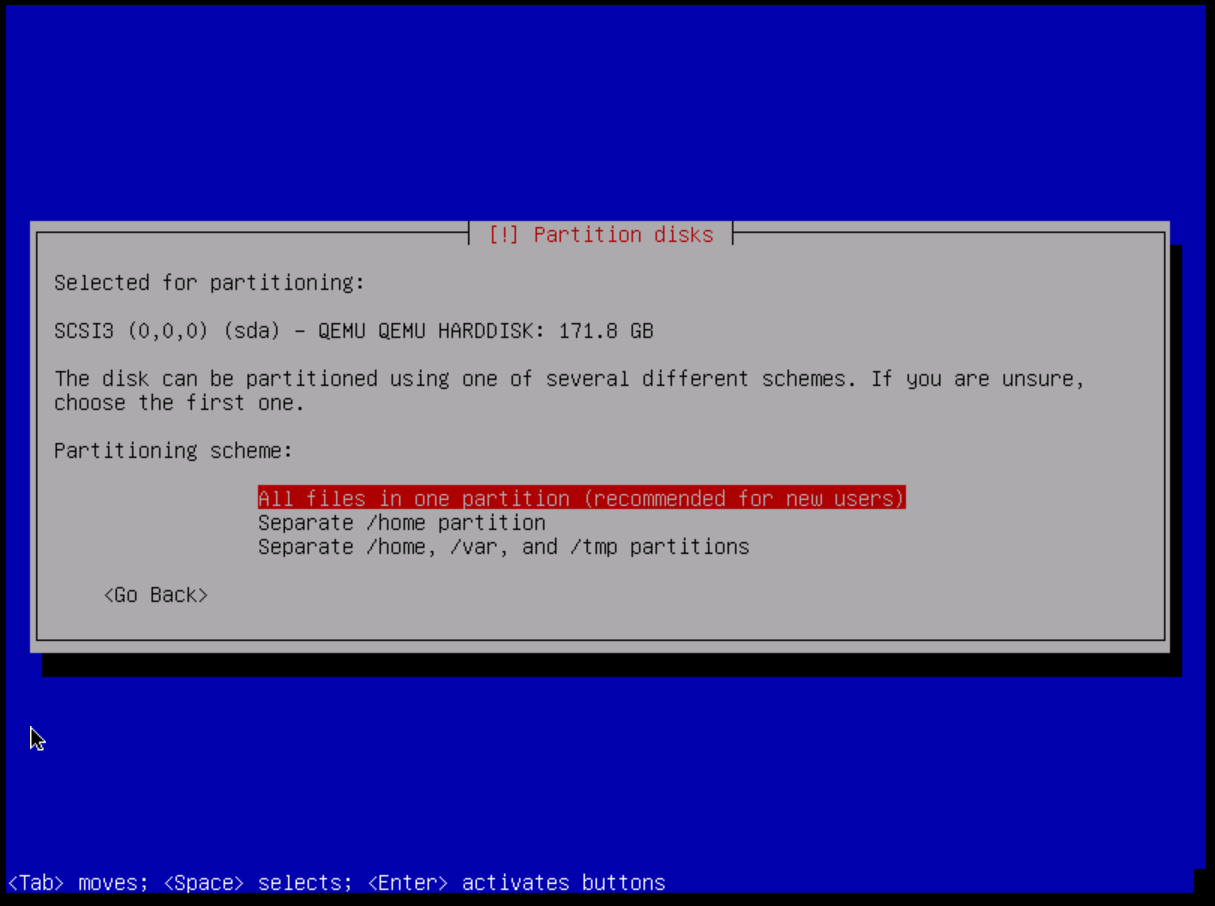
I recommend using one partition for all files. However, there is not much difference between using separate partitions for the home or temporary directory. It's up to you.
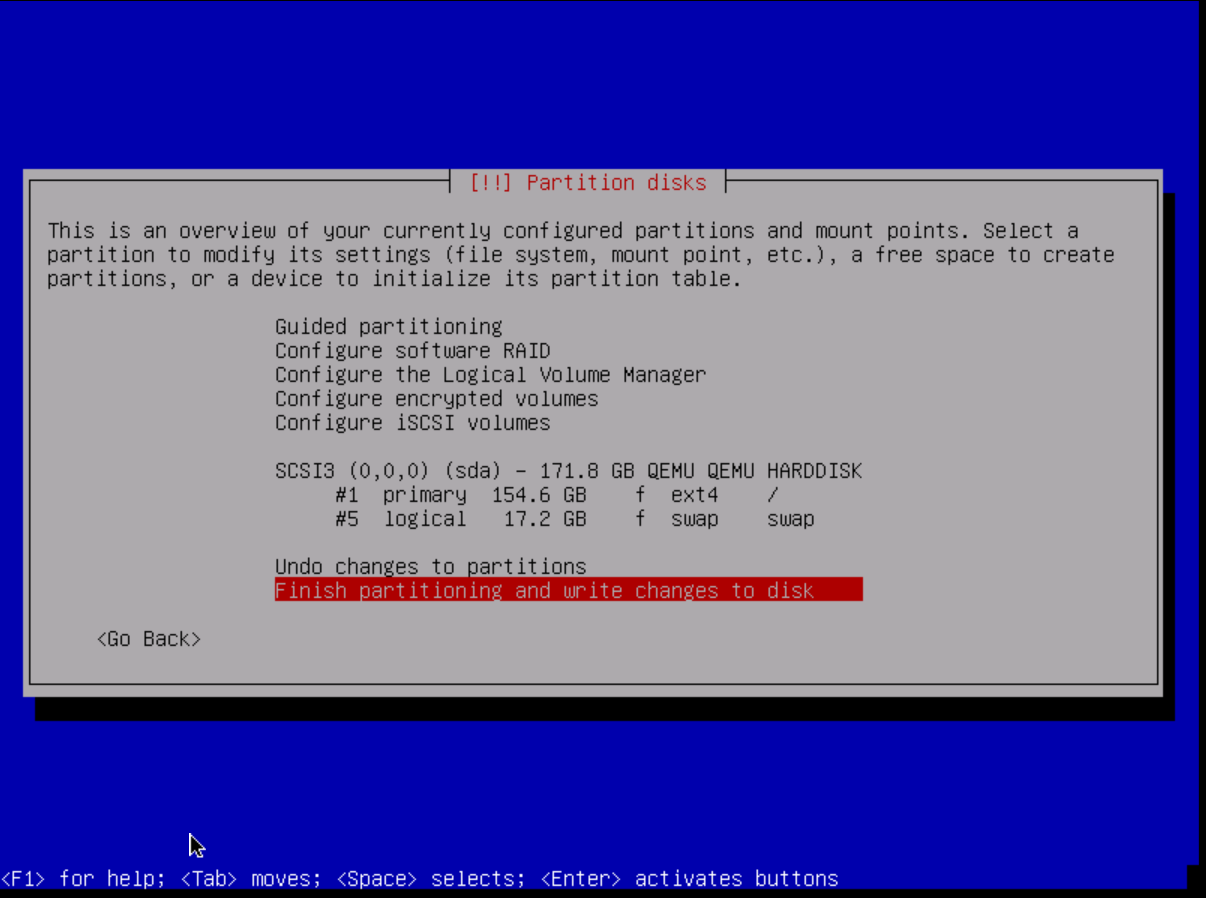
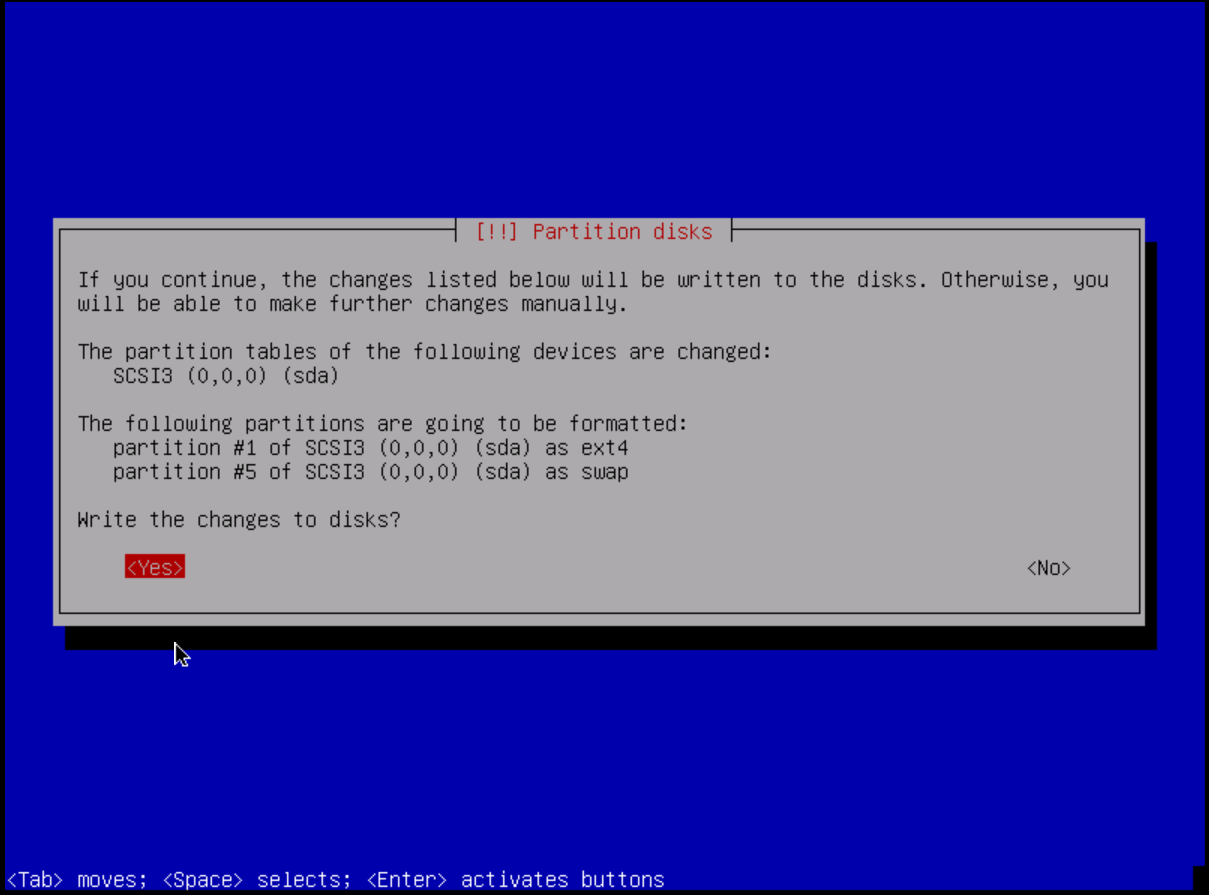
To complete the partitioning, we confirm the changes by pressing "Finish partitioning and write changes to disk" and then confirm our selection by pressing "<yes>".
Step 7: Configure the package manager
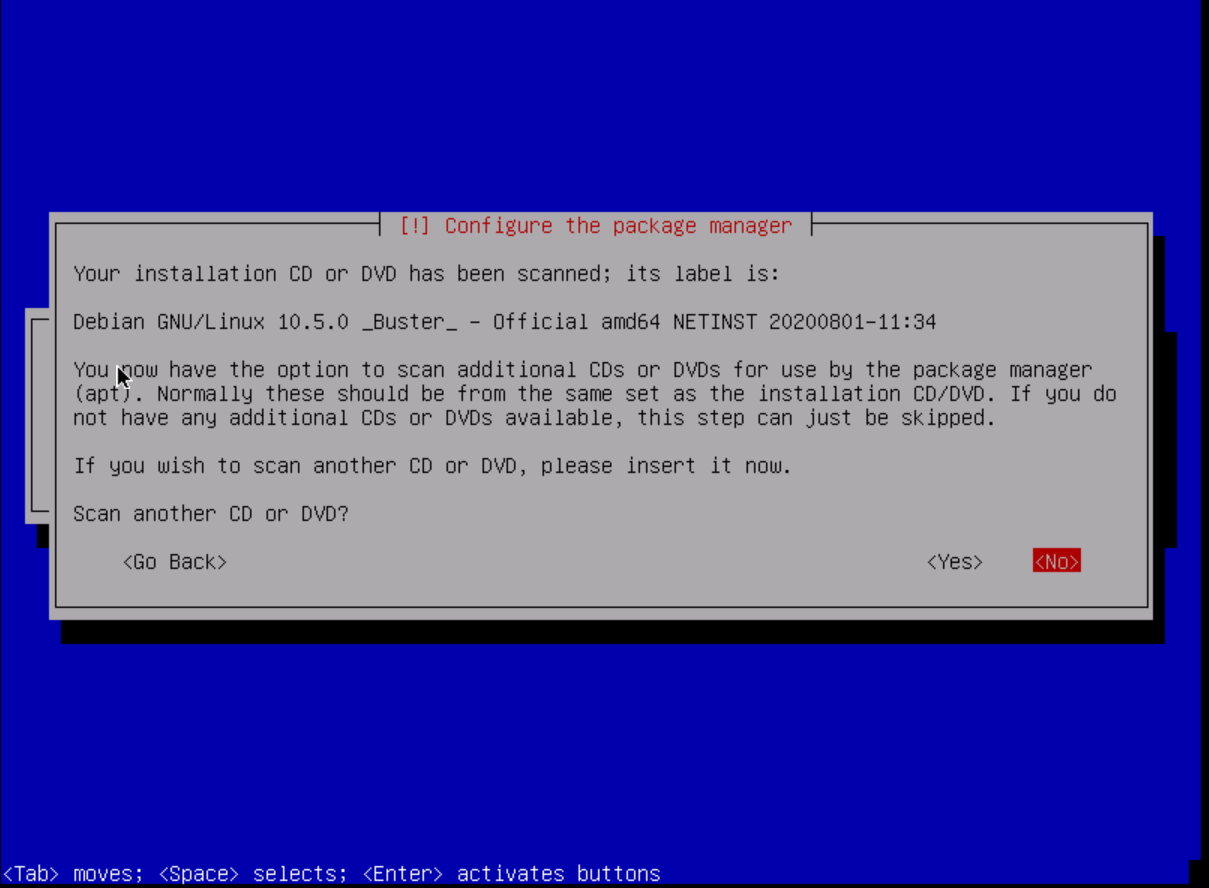
We are now asked if we would like to scan another DVD / CD so that our package manager can use it. Since we don't need any proprietary drivers for our server to operate properly or other packages that are not available through the apt package manager, we choose the option <no>.
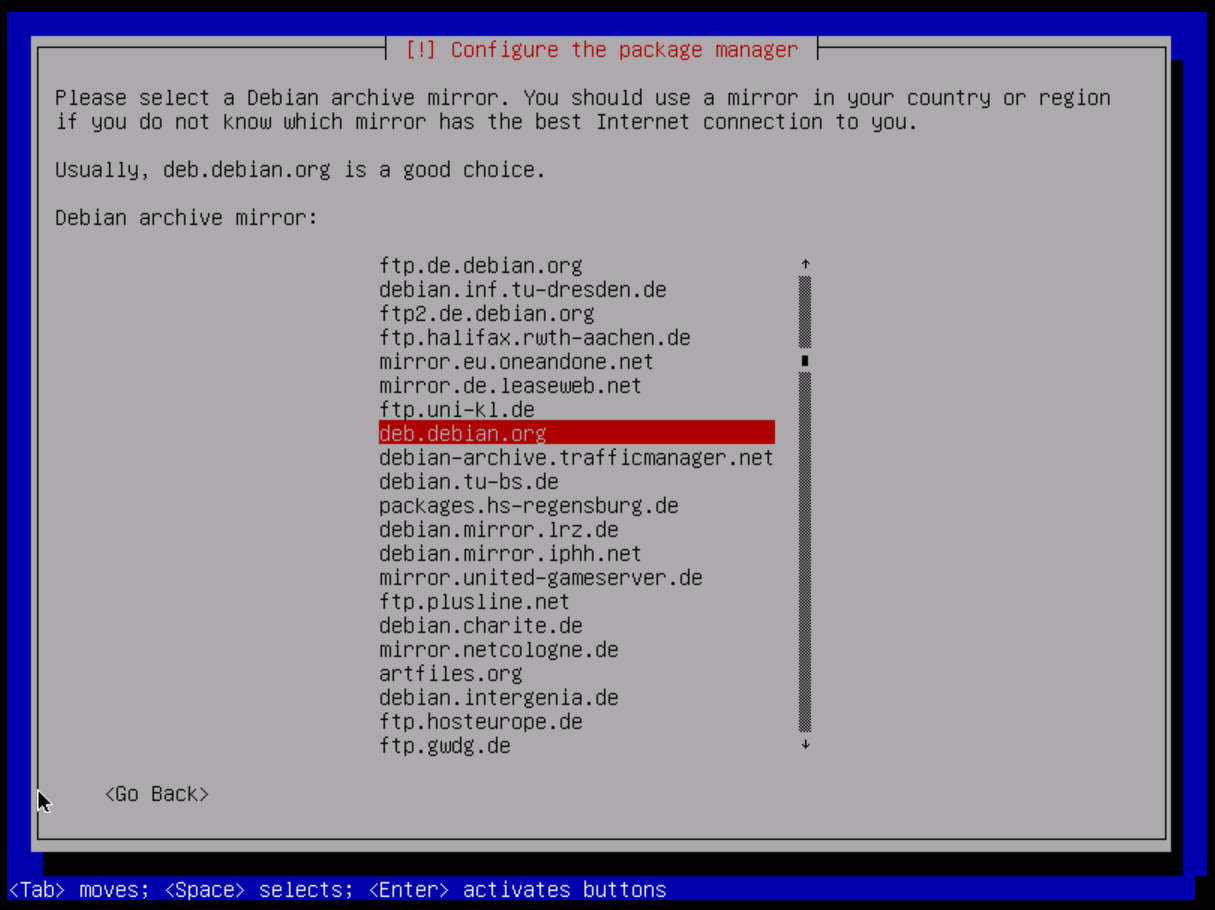
As with the location and language, we should now specify the area that is closest to our server (so that our package downloads are not slow). I'm going to select Germany here and then choose "deb.debian.org" which will automatically select the best mirrors for me.

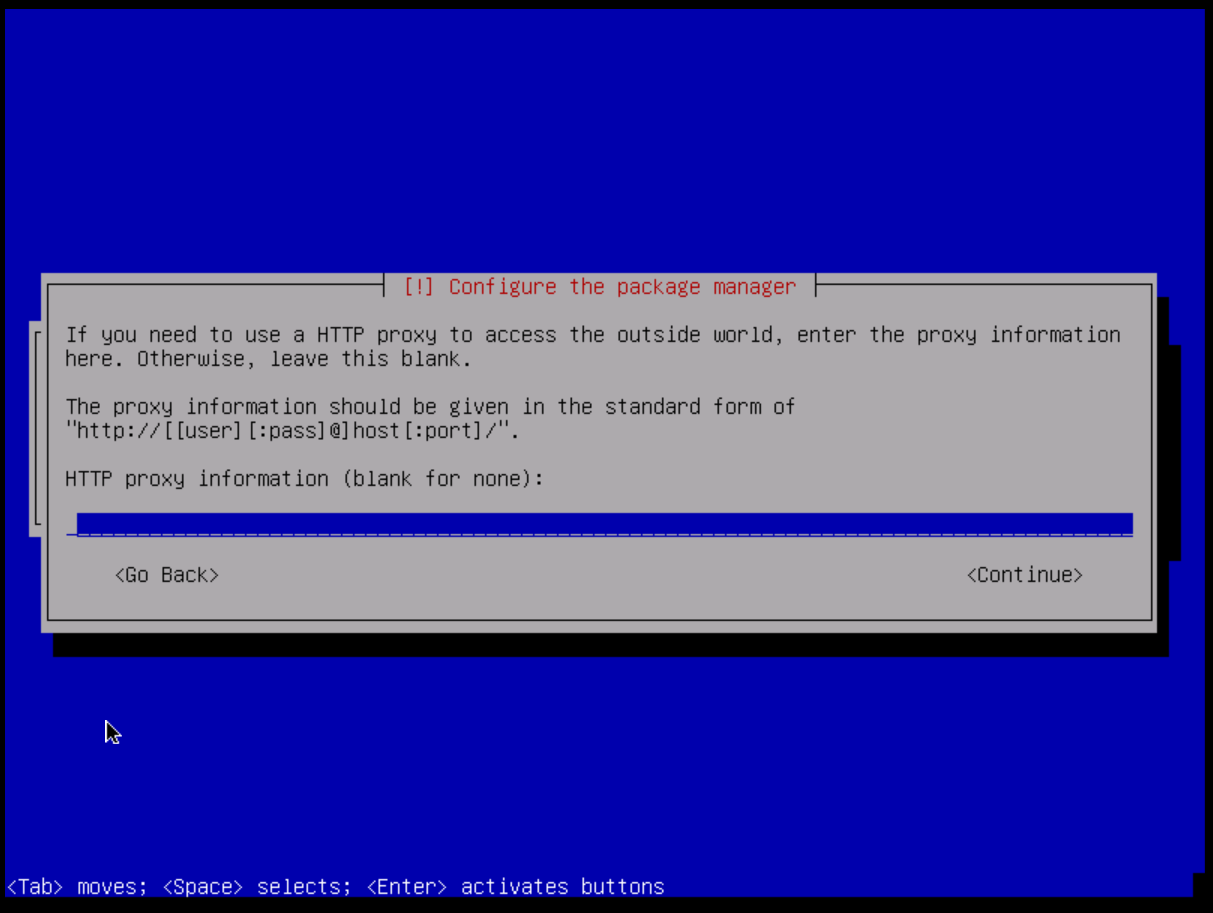
I don't recommend using an HTTP proxy for the apt package manager. If for any reason you would like to use it, you can enter the appropriate information in the field as described by the installer. Otherwise, you can leave the field blank and press Enter.
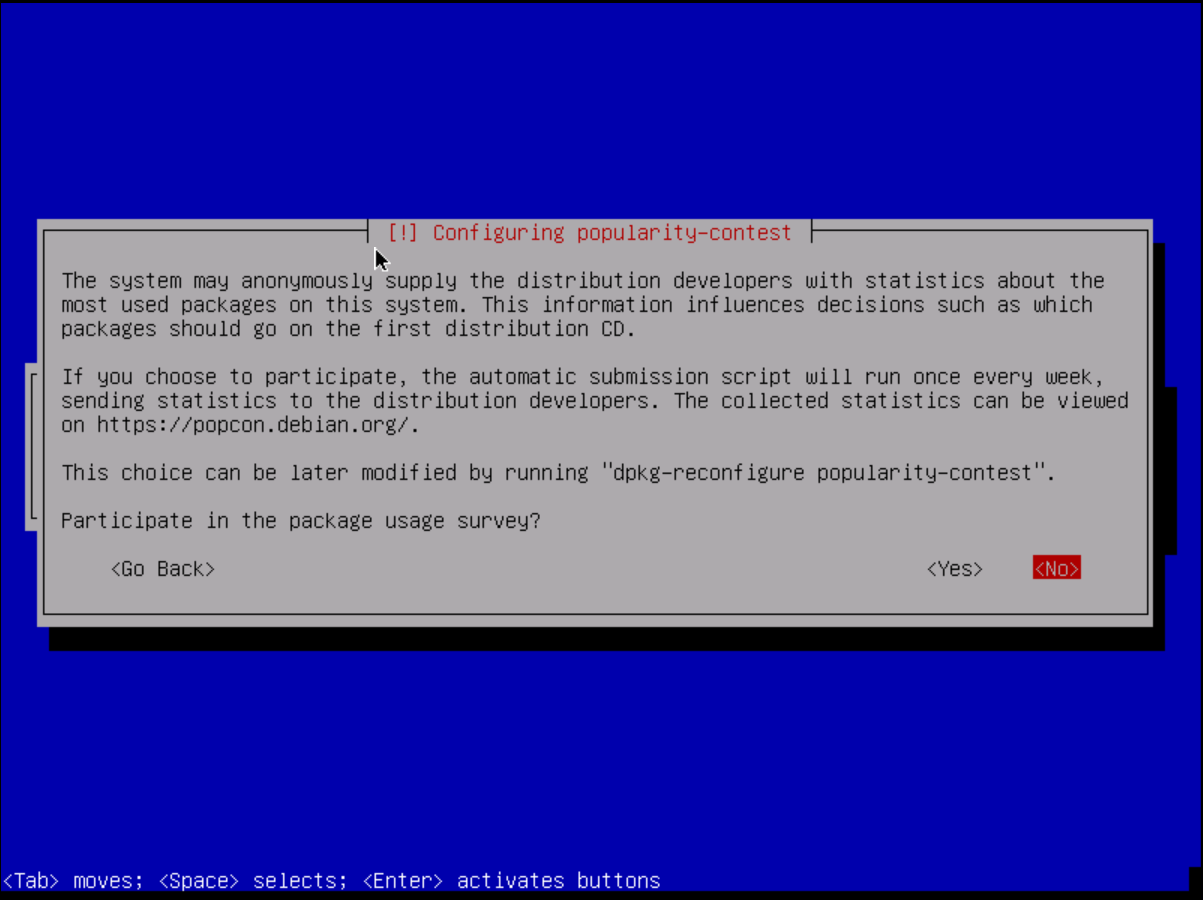
You can participate in Debian's popularity contest. It is anonymous and provides statistics to distribution developers on which packages are used and downloaded most often. It is up to you whether you want to help them or not.
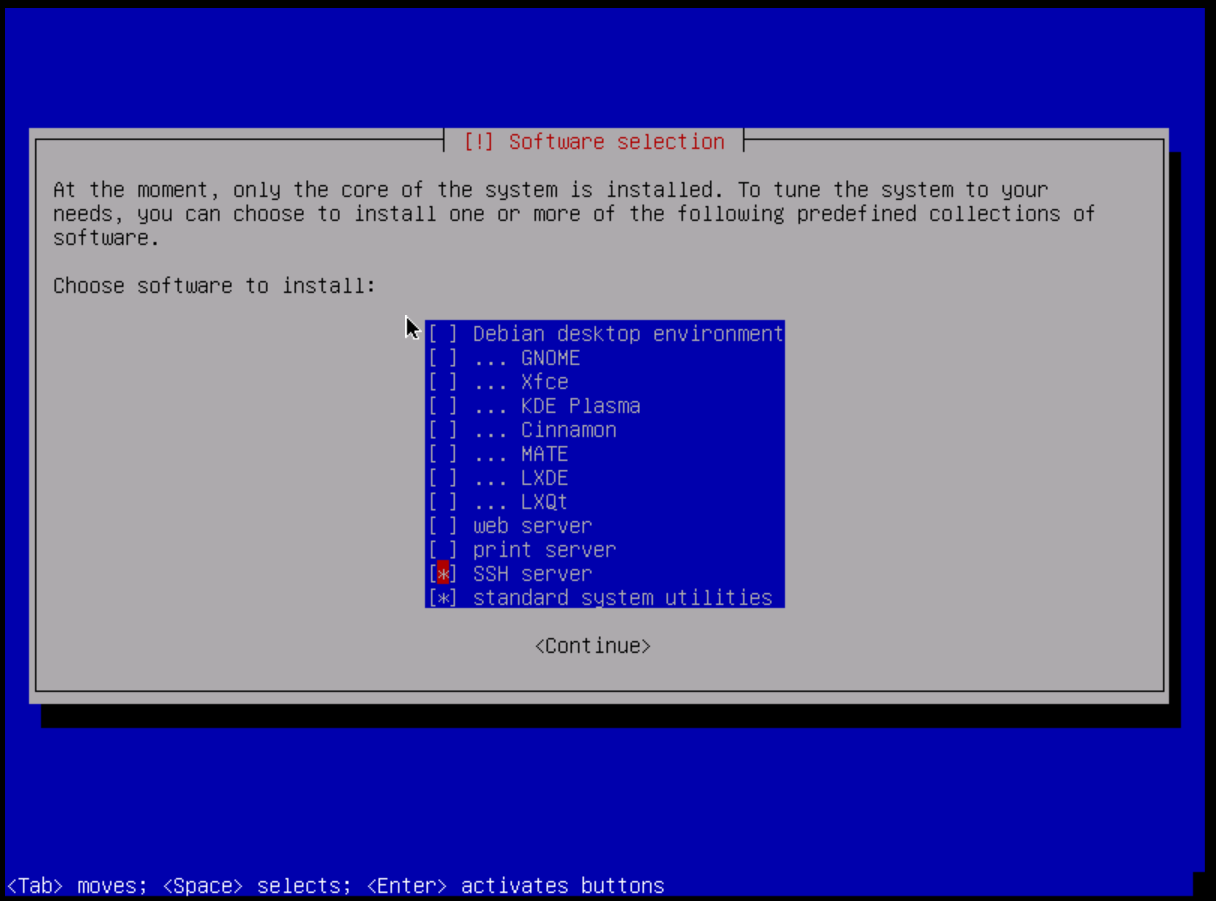
Now we select the "basic" software packages / suites that we would like to have on our system. For servers, it is advisable not to install a desktop environment. It is recommended to run an SSH server. I personally deselected the web server (as I don't really like Apache) and the print server because it doesn't make that much sense to run a print server on a computer outside of your home or corporate network.
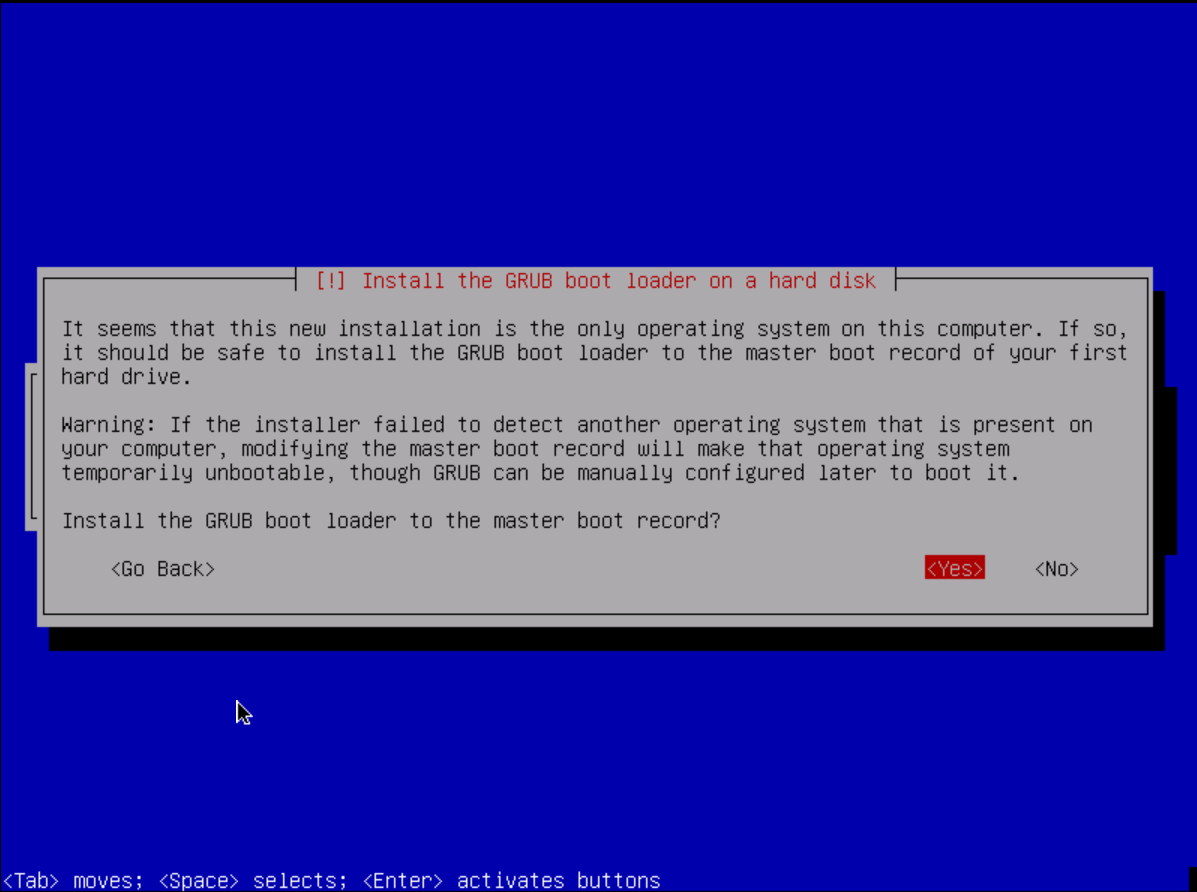
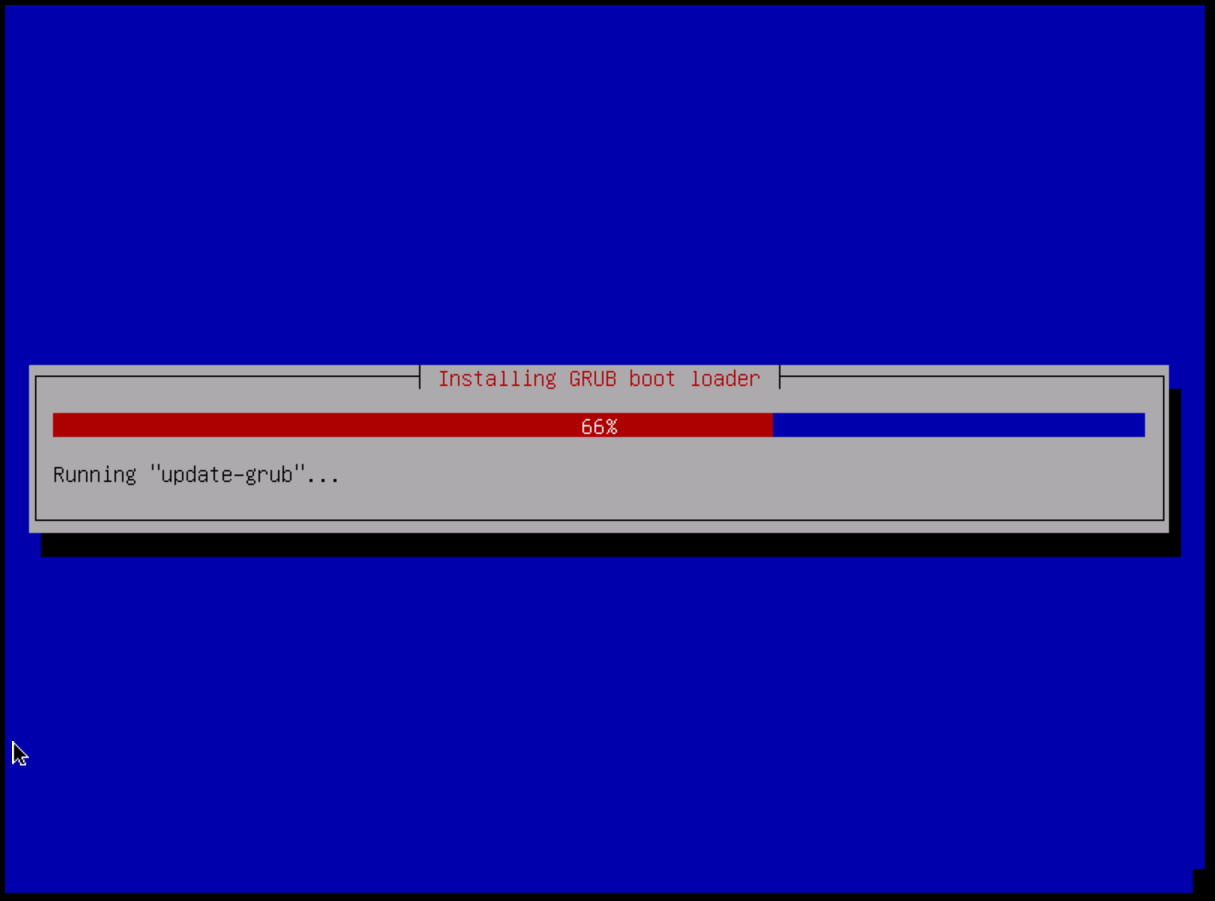
After a little while the packages have been installed and configured properly. We now have to install our bootloader to the disk. Debian uses GRUB 2 by default. We want to install it to our master boot record (MBR). So press yes.
After that we finally installed our own VPS. We must now select "Reboot" and then remove the installation media from within the server control panel (SCP).
After that, go to the General tab and look at the VNC console to see if we rebooted into the installation media or the Debian system itself. If it is still in the selection menu of the installation program, you can select the "Force reset" option in the Control tab. After doing this, your VPS should finally restart into the correct Debian system and you should be able to access it via
ssh YourUsername@YourIPorDomain(Please replace the username and IP with your respective parameters).
Cheers,
TheGoliath