Loveable is powerful.
You describe an app.
It generates an app.
You deploy something working in minutes.
That phase is valuable.
But eventually, something shifts.
You’re no longer exploring an idea.
You’re building a system.
And systems need specification.
]]>
Loveable is powerful.
You describe an app.
It generates an app.
You deploy something working in minutes.
That phase is valuable.
But eventually, something shifts.
You’re no longer exploring an idea.
You’re building a system.
And systems need specification.
The Hidden Cost of Prompt-Generated Apps
Loveable gives you output.
What it doesn’t give you is:
- A durable architecture document
- An explicit data model strategy
- A long-term migration plan
- Operational ownership
The app exists.
But the spec rarely does.
And without a spec, you don’t control evolution.
The Kill Shot: You Have to Rebuild It
There’s no shortcut here.
If you want:
- Real control
- Real schema design
- Real background processing
- Real auth flexibility
- Real hosting ownership
You must rebuild it.
Not blindly.
Not angrily.
Intentionally.
You extract the intent.
You formalize the spec.
Then you re-implement it on a real stack.
That’s the transition from phase one to phase two.
Step One: Turn the Generated App Into a Specification
Before you touch Django, you write the spec.
Not a 100-page enterprise document.
A clear architectural contract.
Here’s what that includes:
1. Domain Model
- What are the core entities?
- What are the relationships?
- What are the invariants?
- What must always be true?
If Loveable generated tables, you reverse-engineer them.
You decide what is accidental and what is essential.
2. Authentication Model
- Who are the users?
- What roles exist?
- What permissions exist?
- How does session state work?
If auth was abstracted away, now you define it.
Explicitly.
3. Workflows
- What background jobs exist?
- What triggers what?
- What needs idempotency?
- What can fail safely?
Generated platforms hide this.
Infrastructure ownership requires it.
4. Deployment Model
- What environment variables exist?
- What secrets exist?
- What external services exist?
- What scaling assumptions exist?
If you can’t describe your deployment in text, you don’t own it.
The Discipline: Spec Before Stack
Most developers try to:
Loveable → Django immediately.
That’s wrong.
The real path is:
Loveable → Spec → Django.
Because once you have a clean spec, the rebuild becomes surgical.
Step Two: Rebuild in Django (Intentionally)
Now you open VS Code.
Now you’re in control.
You create:
- A real Django project
- Real apps
- Explicit models
- Real migrations
- Structured settings modules
- Proper environment variable handling
You wire it to:
- PostgreSQL
- Nginx
- uWSGI
- Cron or Celery
You deploy it on Opalstack.
Now your app runs persistently.
Not as a generated artifact.
As infrastructure.
The Role of AI (Used Correctly)
Here’s where modern tooling changes the game.
Rebuilding doesn’t mean “manually type everything.”
It means:
Use AI as an assistant
inside a system you own.
With VS Code + GitHub Copilot (or your model of choice), you can:
- Generate Django models from your written spec
- Refactor logic cleanly
- Generate migrations
- Write management commands
- Build test suites
- Draft permission logic
- Convert implicit flows into explicit code
The difference is:
You’re generating into a framework that has structure.
Django gives guardrails.
AI accelerates the writing.
That combination is powerful.
Why This Is Better Than Staying
When you stay fully inside a prompt-platform:
- Architecture decisions are implicit
- Database choices are fixed
- Deployment assumptions are hidden
- Scaling constraints are external
- Cost structure is abstract
When you rebuild intentionally:
- Models are explicit
- Migrations are visible
- Auth is configurable
- Background jobs are controlled
- Costs are predictable
You trade convenience for sovereignty.
At scale, sovereignty wins.
Hosting It on Opalstack
On Opalstack, your Django application:
- Runs as a real process
- Has a dedicated Unix user
- Has a real virtual environment
- Connects directly to PostgreSQL
- Serves static assets via Nginx
- Uses automatic SSL
- Deploys via Git or SSH
No abstraction layer.
No black box.
Just infrastructure.
The Psychological Transition
Loveable feels like:
“The app builds itself.”
Django on Opalstack feels like:
“I build the machine.”
With AI tooling, you don’t lose speed.
You gain clarity.
You move from:
Prompt-driven experimentation
to
Specification-driven engineering.
That’s the upgrade.
When to Make the Move
You’re ready to exit Loveable when:
- You’re maintaining real customers
- You’re adding complex business logic
- You’re writing non-trivial workflows
- You care about database structure
- You need predictable hosting cost
- You want long-term control
You’re not ready if:
- You’re still validating the idea
- You don’t want operational responsibility
- You prefer abstraction to control
There’s no moral judgment.
Just lifecycle phases.
The Bigger Pattern
Start fast.
Then own your stack.
If phase one is speed,
phase two is structure.
And structure is what lasts.
— Opalstack
]]>Firebase is great at one thing:
Getting you live fast.
But eventually, a lot of teams hit the same wall:
- Pricing starts feeling unpredictable.
- Auth becomes a black box.
- Firestore stops fitting

Firebase is great at one thing:
Getting you live fast.
But eventually, a lot of teams hit the same wall:
- Pricing starts feeling unpredictable.
- Auth becomes a black box.
- Firestore stops fitting your data model.
- Cloud Functions feel like duct tape around a backend that wants to exist.
If you’ve built a real Django app — or you want one — it’s time to step off the platform treadmill.
Here’s how to exit Firebase cleanly and land on traditional hosting (like Opalstack) without chaos.
And then: how to vibe code the whole migration + ongoing dev workflow using Django on Opalstack with an MCP server + Vibe Shell tooling + VS Code and bring-your-own model (Copilot, local models, whatever).
What Firebase Actually Is (And Isn’t)
Firebase is primarily:
- CDN-backed static hosting
- A managed auth system
- A document database (Firestore)
- Cloud Functions glued to events
- Google Cloud Storage under the hood
It is not:
- A traditional long-running backend server
- A relational database
- A place where you control runtime shape
When your app grows up, you usually want:
- Django running persistently
- PostgreSQL or MariaDB
- Direct control over schema
- Predictable monthly hosting
- Auth that isn’t welded to a proprietary hash format
That’s where traditional hosting comes in.
The Target Architecture
Here’s what you’re moving toward:
Traditional Stack (Opalstack-style):
- Nginx handles SSL + static
- Django runs via uWSGI
- PostgreSQL (or MariaDB) stores relational data
- Cron or Celery handles background work
- You control environment variables
- You control schema
- You control auth
No rewrites into Cloud Functions.
No per-request billing surprises.
No document-store contortions.
Just software running like software.
The Three Hard Parts of Leaving Firebase
Everything else is straightforward.
These are the real friction points:
- Auth
- Firestore → SQL
- Storage Rules
Let’s break them down.
1. Leaving Firebase Auth (Without Losing Users)
This is where most teams panic.
Here’s the truth:
You can export users.
You cannot export passwords in plaintext.
Firebase stores passwords using a modified scrypt hash.
You get:
- uid
- hash
- salt
- provider info
You have three options.
Option A — Force Password Reset (Cleanest)
Import users into Django.
Set unusable passwords.
Require reset on first login.
This is operationally clean.
No crypto reimplementation.
No security guessing.
For most teams, this is the correct move.
Option B — Support Firebase Hash as Legacy Hasher
Django supports multiple hashers.
You can:
- Implement a Firebase scrypt verifier
- Accept old passwords once
- Rehash into Django’s native PBKDF2/Argon2
This preserves seamless login.
But:
You are now implementing security-critical code.
Do not wing this.
Option C — Move to an Independent Identity Provider
You can migrate to a neutral auth provider that supports Firebase imports.
That lets you:
- Leave Firebase
- Keep user credentials
- Avoid building crypto yourself
This is useful if you don’t want to own auth long-term.
Why Leaving Firebase Auth Matters
Firebase Auth ties:
- Storage rules
- Firestore rules
- Cloud Functions triggers
… to its token ecosystem.
Once you move to Django sessions or your own JWT system, you decouple everything.
That’s freedom.
2. Firestore → PostgreSQL
This is the structural shift.
Firestore is hierarchical:
users/{userId}/posts/{postId}
PostgreSQL is relational:
users
posts (foreign key user_id)
You cannot “export JSON and import into SQL.”
You must:
- Design real tables
- Define foreign keys
- Define indexes based on actual queries
- Write an ETL script
This is where your app becomes stable.
Document stores are easy early.
Relational models are powerful long-term.
If you built serious Django models anyway, this part is just normalization work.
3. Cloud Storage Rules → Real Authorization
Firebase Storage is Google Cloud Storage under the hood.
Rules look like:
allow read: if request.auth.uid == userId
In Django, that becomes:
if request.user.id == object.owner_id:
    allow()
Authorization moves into your application layer.
That’s not worse.
It’s clearer.
You now control permissions through Django’s auth and model relationships instead of policy DSLs.
Replacing Cloud Functions
Cloud Functions feel magical because they auto-scale.
But they’re just:
- HTTP handlers
- Event triggers
- Cron jobs
In Django:
- HTTP functions → views
- Scheduled jobs → cron + management commands
- Background processing → Celery (if needed)
You regain:
- Logging clarity
- Debuggability
- Full stack trace visibility
- Local reproducibility
You lose:
- “Infinite scaling” marketing copy
In exchange, you gain:
Predictability.
Hosting on Opalstack (Django Setup Reality)
On Opalstack, Django runs as a proper application:
- Isolated Unix user
- Virtual environment
- uWSGI process
- Nginx front-end
- Separate static app for
/static
Environment variables go into uwsgi.ini.
Database is provisioned from the dashboard.
You run:
python manage.py migrate
python manage.py collectstatic
Restart.
Done.
No deploy targets.
No hosting channels.
No CLI deploy tokens.
It’s software running on a server.
Cost: The Quiet Motivation
Firebase Hosting bills:
- Stored assets
- Data transfer
- Reads
- Writes
- Function invocations
It scales elastically.
Which also means:
Costs scale elastically.
Traditional hosting flips the model:
Flat monthly pricing.
You manage load responsibly.
No per-request metering.
If your app is stable and predictable, that’s often a win.
Migration Timeline (Realistic)
| Phase | Time |
|---|---|
| Inventory + design | 1–3 days |
| Set up Django hosting | 1 day |
| Auth strategy implementation | 2–7 days |
| Data mapping + ETL | 2–10 days |
| Staging validation | 2–5 days |
| DNS cutover | Hours |
The only variable that explodes timelines:
Firestore data complexity.
Everything else is controlled.
When Should You Leave Firebase?
You’re ready when:
- You’re building real Django models anyway
- Firestore queries feel unnatural
- Cloud Functions feel like glue code
- You want predictable hosting cost
- You want to own auth
You’re not ready if:
- You need instant infinite autoscale
- You don’t want to manage schema
- You don’t want to think about runtime
There’s no moral argument here.
It’s architecture maturity.
The Bigger Pattern
Firebase is optimized for:
Fast starts.
Django on traditional hosting is optimized for:
Long-term clarity.
If you’re building something real — SaaS, internal tools, AI-powered services, data-heavy apps — the second model wins over time.
You get:
- Real database guarantees
- Real background processing
- Real control over identity
- Real debugging
- Real ownership
That’s the trade.
Bonus: Vibe Coding Django on Opalstack (Without Lock-In)
Now for the part Firebase doesn’t give you:
A workflow where you can vibe code the app without living inside one vendor’s world.
Here’s the Opalstack angle:
You host the Django runtime.
You bring the AI.
We don’t sell “our LLM.”
We sell a stack that plays nice with whatever model you want.
Copilot.
Claude.
OpenAI.
Local models.
Anything that can drive your editor + tools.
And we make the hosting side MCP-native, so your “AI dev loop” can actually do work instead of hallucinating instructions.
Django + MCP: what it means in practice
MCP (Model Context Protocol) is basically:
a standard way to expose tools to your AI dev environment.
So instead of “copy/paste commands,” your assistant can:
- read project files
- write code
- run migrations
- inspect logs
- check environment variables
- hit your APIs
- update configs
- verify deploy steps
…in a controlled way.
That’s the difference between:
“AI that talks”
and
“AI that ships.”
The MCPVibe Shell Plugin (the idea)
Think of MCPVibe Shell as the bridge between:
- Your editor (VS Code)
- Your model (Copilot / BYO)
- Your real server environment (Opalstack)
So the workflow becomes:
- Vibe code Django changes in VS Code
- Plugin exposes “safe tools” via MCP
- Model can run real actions (lint/test/migrate/deploy)
- You ship without turning every deploy into a manual ritual
The selling point is simple:
“Traditional hosting, but with modern AI tooling.”
Not a platform prison.
A real server stack, enhanced.
Why this matters specifically for Firebase exits
When you leave Firebase, you’re doing things Firebase “hid” from you:
- schema design
- auth flows
- background jobs
- deploy/rollback
- observability
That’s where AI tooling actually helps — if it can touch real systems.
So instead of “read docs for 4 hours,” you get:
- “generate migration mapping plan, then implement it”
- “build ETL script, run dry-run, report diffs”
- “set up password reset pipeline”
- “wire up Django permissions replacing storage rules”
- “create cron jobs and log rotation”
- “verify staging vs production settings”
This is vibe coding aimed at moving responsibility back to you — without turning that responsibility into pain.
“Bring Your Own Model” (why it’s the right framing)
A lot of platforms want to bundle you into:
- their runtime
- their auth
- their database
- their AI model
- their pricing
That’s maximum coupling.
We’re pushing the opposite:
- Django you control
- SQL you control
- auth you control
- AI you choose
If Copilot is your move, cool.
If you want local models for cost control, cool.
If you want to mix models by task (cheap model for refactors, strong model for architecture), cool.
You’re not stuck.
The punchline
Firebase is “fast to start.”
Opalstack-style Django hosting is “built to last.”
And with MCP + Vibe Shell + VS Code + BYO AI, you can keep the modern vibe-coding speed without living inside someone else’s walled garden.
That’s the play.
Same mission:
Move from platform dependency
to infrastructure ownership.
— Opalstack
]]>Synapse is the “reference” homeserver implementation — and it’s absolutely runnable on managed hosting as long as you treat it like an app (not a snowflake
]]>Matrix is what you run when you want your own chat without giving a platform permanent custody of your community.
Synapse is the “reference” homeserver implementation — and it’s absolutely runnable on managed hosting as long as you treat it like an app (not a snowflake pet server).
On Opalstack, Synapse runs the way we think apps should run:
- userspace
- isolated per app
- restartable
- loggable
- upgradeable
- and readable (it’s a script, not a black box)
TL;DR
- Create a Matrix Synapse app as an Open App Stack (Proxied Port).
- Map it to a domain/site (so HTTPS works normally).
- Set
server_name+public_baseurlonce (then never change them). - Create your first admin user.
- Add
.well-knownso federation works cleanly behind port 443. - Keep it alive with a cron watchdog (every ~10 minutes).
The pitch
Most “how to host Matrix” guides assume one of these:
- root access
- Docker spaghetti
- “just systemctl it bro”
- a reverse proxy config you’re supposed to guess
That’s not how Opalstack works.
Here, Synapse runs as a userspace service under your account — same model as every other Open App Stack.
What you get from the Synapse Open App Stack
A production-ish baseline that looks like this:
- Synapse installed into a per-app Python venv
- Postgres-backed config (recommended once you’re past toy usage)
- Start/stop scripts:
~/apps/<appname>/startand~/apps/<appname>/stop - Logs where you’d expect them
- Cron watchdog for boring reliability
Where it lives on disk (so you can debug like an adult)
Your app folder looks like:
- App root:
~/apps/<appname>/ - Project dir:
~/apps/<appname>/matrix/ - Virtualenv:
~/apps/<appname>/matrix/venv/ - Config:
~/apps/<appname>/matrix/config/homeserver.yaml - Data:
~/apps/<appname>/matrix/data/ - Log:
~/apps/<appname>/matrix/synapse.log
First run checklist (do this once)
1) Set your domain (this matters)
Open:
~/apps/<appname>/matrix/config/homeserver.yaml
Set these to your real domain:
server_name: "chat.example.com"
public_baseurl: "https://chat.example.com/"
Do not change server_name later unless you intend to wipe and rebuild. (Synapse treats it as identity, not cosmetics.)
2) Start it
~/apps/<appname>/start
tail -f ~/apps/<appname>/matrix/synapse.log
Quick local sanity check:
curl -sS http://127.0.0.1:<YOUR_APP_PORT>/_matrix/client/versions
3) Create your first admin user
Synapse ships a helper for this. The pattern looks like:
~/apps/<appname>/matrix/venv/bin/register_new_matrix_user \
  -c ~/apps/<appname>/matrix/config/homeserver.yaml \
  -u admin -p "use-a-real-password" -a \
  http://127.0.0.1:<YOUR_APP_PORT>
That gets you an initial admin without opening public registration.
Federation on managed hosting (the part everyone trips on)
By default, other Matrix servers expect to reach yours at https://<server_name>:8448/.
On shared hosting, you generally don’t expose 8448 — you run behind standard HTTPS (443). So you must tell the federation network where to find you.
That’s what .well-known is for.
Minimum: /.well-known/matrix/server
Serve this JSON from:
https://<server_name>/.well-known/matrix/server
{ "m.server": "chat.example.com:443" }
Also recommended: /.well-known/matrix/client
Serve this JSON from:
https://<server_name>/.well-known/matrix/client
{
  "m.homeserver": { "base_url": "https://chat.example.com" }
}
CORS note: Clients expect CORS headers on the .well-known responses. If you’re serving these as static files, add Access-Control-Allow-Origin: *.
Voice/video (straight talk)
If you want reliable voice/video calling, you’ll need a TURN server.
On shared hosting, opening the giant UDP port ranges TURN wants is typically a non-starter. If you need TURN, use a VPS (or use an external TURN provider).
Security notes (straight talk)
- Turn off open registration unless you want spam accounts forever.
- Treat your config + signing keys as secrets.
- If you expose admin surfaces publicly, you’re responsible for access control.
- Backups aren’t optional once people care about the server.
Next up
If you want to go further after the base install:
- add SSO / OIDC
- add moderation tooling
- add retention policies
- tune Postgres pooling
- set up real monitoring/alerting
That’s what “managed hosting” should feel like: boring, inspectable, fixable.
]]>Most “run an AI assistant on a server” guides still assume one of these:
- root access
- Docker
OpenClaw is an open-source “personal AI assistant” built around a Gateway. The Gateway is the whole point: it’s the always-on brain/entrypoint, and everything else is optional.
Most “run an AI assistant on a server” guides still assume one of these:
- root access
- Docker spaghetti
- “just systemctl it bro”
- a pile of mysterious config you’re supposed to guess
That’s not how Opalstack works.
On Opalstack, OpenClaw runs as a userspace app inside your account. No root. No systemd. No drama.
TL;DR
- Create an OpenClaw app on Opalstack (Open App Stack).
- The installer drops a self-contained gateway under your home dir.
- Start it with
~/apps/<appname>/start. - Open the dashboard with a token (kept in
state/.env). - Keep it running with a cron watchdog (every ~10 minutes).
The pitch
You don’t want “a demo”. You want something you can actually run:
- isolated per app
- restartable
- loggable
- upgradeable
- and readable (it’s a script, not a black box)
That’s exactly what an Open App Stack is: an installer you can read and modify.
What you get from the OpenClaw Open App Stack
When you install OpenClaw on Opalstack, you’re not just getting npm install -g openclaw.
You get a working, production-ish baseline that looks like this:
- Userspace install (no global Node installs needed)
- Per-app state + config isolation
- Token auth on the Control UI (no “oops it’s public”)
- Start/stop/status scripts
- Cron watchdog to keep it alive (and come back after reboots)
- Logs where you’d expect them
In other words: “run a gateway” instead of “become a part-time platform engineer.”
Where it lives on disk (so you can debug like an adult)
Your OpenClaw app folder will look like:
- App root:
~/apps/<appname>/ - OpenClaw project dir:
~/apps/<appname>/oc/ - Wrapper CLI:
~/apps/<appname>/oc/bin/openclaw - Config:
~/apps/<appname>/oc/openclaw.json - State:
~/apps/<appname>/oc/state/ - Token env:
~/apps/<appname>/oc/state/.env - Logs:
- Console:
~/apps/<appname>/oc/logs/openclaw.console.log - JSONL:
~/apps/<appname>/oc/logs/openclaw.jsonl
- Console:
Control it (start / stop / status / upgrade)
From SSH:
# start the gateway
~/apps/<appname>/start

# stop it
~/apps/<appname>/stop

# status (+ a quick OpenClaw status check)
~/apps/<appname>/status

# upgrade OpenClaw in-place (keeps state/config)
~/apps/<appname>/upgrade

# tail the live console log
tail -f ~/apps/<appname>/oc/logs/openclaw.console.log
Open the dashboard (without “token_missing”)
This gateway uses token auth. The token is stored here:
cat ~/apps/<appname>/oc/state/.env
Option A: SSH tunnel (simple + safest)
# on your laptop
ssh -L 19001:127.0.0.1:19001 youruser@your-opalstack-server
Then open:
http://127.0.0.1:19001/?token=PASTE_TOKEN_HERE
Option B: put it behind an Opalstack site proxy
If you map the gateway port to a site/domain, you’ll still need the token on first load:
https://yourdomain.tld/?token=PASTE_TOKEN_HERE
Why this runs clean on Opalstack
A couple implementation details worth knowing:
- The installer binds the gateway to loopback and trusts
127.0.0.1as a proxy hop. - OpenClaw is installed into a per-app npm prefix, not system-wide.
- A cron watchdog runs the
startscript every ~10 minutes, so if the gateway dies, it comes back.
That’s the “no systemctl” trick: it’s boring, and it works.
Provider keys / onboarding (the part people forget)
OpenClaw can run with no provider keys configured, but agents won’t answer until you set them up.
Once the gateway is running, you’ll typically do one of these:
# interactive onboarding
~/apps/<appname>/oc/bin/openclaw onboard

# or add an agent explicitly
~/apps/<appname>/oc/bin/openclaw agents add main
If you want the installer script (it’s open)
Here’s the exact Open App Stack installer we run on AlmaLinux 9:
https://raw.githubusercontent.com/opalstack/installers/refs/heads/master/el9/openclaw/install.py
Fork it. Tweak it. Ship your own flavor. That’s the point.
Security notes (straight talk)
- The Control UI is an admin surface. Don’t expose it publicly without auth.
- Treat
state/.envlike a secret. Don’t commit it. Don’t paste it into screenshots. - If you publish the dashboard on a public domain, you are responsible for access control.
Next up
If you want to go further:
- run multiple OpenClaw gateways (one per app) with isolated state
- wire OpenClaw into real workflows (channels, skills, automations)
- treat it like a service: logs, restarts, upgrades, and sane defaults
- chain together apps like n8n via webhook
That’s what “managed hosting” should feel like.
]]>And now you can run it on Opalstack the way we think apps should run:
as an
]]>Wagtail is what you reach for when you want a real CMS without the “plugin casino” vibe. It’s Django-native, editor-friendly, and built to scale like an actual web app.
And now you can run it on Opalstack the way we think apps should run:
as an Open App Stack installer. Click. Deploy. Edit the stack script if you want. No mystery meat.
The pitch
Most “Wagtail hosting guides” start with:
- install a pile of packages
- guess your server config
- pray you didn’t miss one of the 12 steps
- then “just put it behind nginx bro”
That’s fine… if your hobby is rebuilding the same deployment for the 40th time.
On Opalstack, you use the Open App Stack and get a working Wagtail app that’s already wired for production patterns.
What you get from the Wagtail Open App Stack
When you install the Wagtail stack, you’re not just getting pip install wagtail.
You’re getting an opinionated, deployable baseline:
- Python virtualenv created for the app
- App server configured (WSGI, not devserver)
- Project scaffold generated (Wagtail/Django structure)
In other words: “ship a CMS” instead of “become a part-time SRE.”
Install it (the way it should be)
- Go to your Opalstack dashboard
- Create a new app → pick Wagtail (Open App Stack)
You get a live app you can log into, configure, theme, and extend.
How Open App Stacks work (the part we care about)
Here’s the whole point of our “Open App Stacks” direction:
The installer is a script. You can read it. You can fork it. You can run it yourself.
Not a black box. Not a proprietary wizard. Not “call support to change one setting.”
If you want to:
- swap uWSGI ↔ gunicorn
- change Python version
- add Redis/Celery later
- tweak file layout
- add a build step
…you edit the stack like a normal person edits a script. That’s the deal.
What to do right after install
1) Create your admin user
You’ll have a management command available inside the app environment. Use it to create the first admin user and get into /admin/.
2) Theme it like a real site
Wagtail is meant to be customized. Don’t treat it like WordPress. Treat it like Django: templates, settings, apps.
Why Wagtail (and who it’s for)
Wagtail makes sense if you want:
- a CMS editors actually like using
- structured content (not “one giant blob field”)
- a sane upgrade path
- real software architecture (Django apps, migrations, repeatable deploys)
It’s especially good for:
- marketing sites that need “pages + collections + editorial workflow”
- docs + content-heavy sites
- teams that want the CMS to be part of the codebase, not a separate universe
The Opalstack angle
We’re hosting people who want control without spending their life on ops.
So the goal is:
- fast deploy
- boring production defaults
- full transparency
- no container mandate
- easy upgrades
- human support when it matters
Wagtail fits that perfectly.
]]>You don’t have clean inputs.
You have “a thread I saw,” “a DM I meant to follow up on,” “a bug report buried in a forum,” “a spicy quote someone posted,” and
]]>Most automation stacks fail for one simple reason:
You don’t have clean inputs.
You have “a thread I saw,” “a DM I meant to follow up on,” “a bug report buried in a forum,” “a spicy quote someone posted,” and zero pipeline to turn that into something usable.
n8nCapture fixes that by making your browser a data intake tool.
It’s a lightweight WebExtension that sends selected text + page metadata to an n8n webhook via HTTP POST. GitHub
What it does
Select text → right-click → choose a target → it POSTs JSON to your n8n workflow. GitHub
Key features from the repo:
- Right-click → Send to n8n
- Multiple targets/endpoints (each target becomes its own context-menu entry + webhook URL)
- Includes page context (URL, title, domain, timestamp, user agent, target key)
- n8n-friendly JSON payload
- Optional shared-secret header for simple auth GitHub
This is exactly the kind of “boring glue” that makes automations real.
Example payload
The extension ships with a clear payload model like:
{
  "text": "This platform is great but I wish it had a simpler automation setup.",
  "url": "https://example.com/some-thread",
  "title": "Random discussion about tooling",
  "domain": "example.com",
  "target": "leads",
  "createdAt": "2025-12-09T07:00:00.000Z",
  "userAgent": "Mozilla/5.0 ...",
  "extra": {}
}
And optionally a header like:
x-n8n-webclip-token: YOUR_SHARED_SECRET GitHub
Install (dev-mode, fast)
Repo’s approach is straightforward:
- Clone repo
- Load unpacked in Chrome/Chromium (
chrome://extensions/→ Developer mode → Load unpacked) - Firefox temporary load via
about:debuggingGitHub
No build step. No bundler. Just files.
Configure targets (the part that makes it useful)
Targets are the real trick: each “target” is basically a named route into your automation brain.
A target typically has:
- Label (what you see in the menu)
- Slug/key (what’s sent as
target) - Webhook URL
- Optional token + optional header name GitHub
This lets you clip the same kind of content into different buckets:
leads_redditsupport_snippetscompetitor_notesfeature_requestsmeme_fuel
Build the matching n8n workflow (minimal + scalable)
The README’s recommended pattern is the correct one:
- Webhook (POST) trigger
- Optional IF/Switch on
target - DataTable/DB insert (store the raw clip)
- Downstream processing (AI summary/categorization, enrichment, notifications, outreach) GitHub
Here’s a practical “don’t overthink it” flow that scales:
Node 1 — Webhook
- Method: POST
- Respond immediately (200) so the extension feels instant
Node 2 — Auth check (optional but recommended)
- If header token mismatch → return 401/403
Node 3 — Normalize
- Trim text
- Drop clips below a minimum length
- Add campaign/source tags based on
targetanddomain
Node 4 — Store raw
- Save the full JSON
- Store the page URL + a hash so you can de-dupe
Node 5+ — Enrich / classify / act
- Summarize into a “one-liner”
- Classify pain/intent
- Route to CRM/email/Discord/whatever
This is how you build a dataset without pretending you’ll “remember it later.”
Security notes (don’t expose your webhook like it’s 2012)
Repo guidance is sensible:
- Only sends data to the webhook URLs you configure
- Config is stored locally in extension storage
- Use HTTPS
- Use token+header if webhook is public GitHub
If you’re hosting n8n on Opalstack, you can keep it sane by putting it behind HTTPS and adding a simple token check.
Why this matters
n8n is incredible at actions, but it’s still fed by inputs.
n8nCapture turns your day-to-day browsing into structured, queryable, automatable data—with almost no friction.
Right-click. Clip. Automate.
]]>VibeShell goes the opposite direction.
It’s a
]]>If you’ve been watching the agentic tooling wave, you already know the annoying part: most “AI integrations” assume you’re running Docker, have root, or want to rebuild your stack around somebody else’s platform.
VibeShell goes the opposite direction.
It’s a single-file PHP MCP server you can drop onto basically any LAMP/LEMP host, then let an MCP-capable assistant securely read/write/list/search/tail files and logs—without adding dependencies. GitHub
What VibeShell is (and why it exists)
VibeShell is a lightweight, PHP 7.4+ implementation of the Model Context Protocol (MCP) over JSON-RPC 2.0 via HTTP, designed to give an AI assistant a safe toolbox for file operations. GitHub+1
If you read our MCP write-up, you know our stance: you shouldn’t need containers to ship a small project, and you shouldn’t have to “trust magic” to automate your hosting. Opalstack
VibeShell fits that philosophy: show me the wires.
What it can do
VibeShell exposes a small set of practical tools—enough to be useful, not enough to be scary:
fs_info(paths: home/base/apps/logs)fs_list(list dirs, optional recursion)fs_read(read file contents with offset/limit)fs_write(write/append + auto-mkdir)fs_tail(tail logs)fs_search(recursive grep)fs_move(move/rename)fs_delete(delete, optional recursive) GitHub
And it comes with guardrails: home-directory jail, realpath() resolution to prevent symlink escapes, traversal blocking, protected files, rate limiting, and bearer-token auth. GitHub
Quick start: deploy VibeShell on Opalstack (or anywhere)
1) Upload the file
You literally upload index.php to a directory your web server can hit. The README shows the idea: GitHub
# Example: deploy to your app directory
scp index.php user@yourserver:~/apps/mcp/
2) Create the config
VibeShell reads a simple INI in your home directory:
cat > ~/.mcp_vibeshell.ini << 'EOF'
[vibeshell]token = "your-secure-token-here"
base_dir = "~"
EOFchmod 600 ~/.mcp_vibeshell.ini
Token + base_dir are the big knobs. If you want to be extra sane, set base_dir="~/apps" so the agent can’t wander. GitHub
Generate a token the boring way:
openssl rand -hex 20
3) Point your MCP client at it
Example MCP client config (VS Code / agent / whatever you’re using):
{
  "mcpServers": {
    "vibeshell": {
      "type": "http",
      "url": "https://your-domain.com/mcp/",
      "headers": {
        "Authorization": "Bearer your-secure-token-here"
      }
    }
  }
}
That matches the repo’s recommended setup. GitHub
Test it with curl (because you should)
Initialize:
curl -X POST https://your-domain.com/mcp/ \ -H "Authorization: Bearer your-token" \ -H "Content-Type: application/json" \ -d '{"jsonrpc":"2.0","id":1,"method":"initialize","params":{"protocolVersion":"2024-11-05"}}'
List tools:
curl -X POST https://your-domain.com/mcp/ \ -H "Authorization: Bearer your-token" \ -H "Content-Type: application/json" \ -d '{"jsonrpc":"2.0","id":2,"method":"tools/list","params":{}}'
Call a tool (fs_list):
curl -X POST https://your-domain.com/mcp/ \ -H "Authorization: Bearer your-token" \ -H "Content-Type: application/json" \ -d '{"jsonrpc":"2.0","id":3,"method":"tools/call","params":{"name":"fs_list","arguments":{"path":"~"}}}'
All straight from the README. GitHub
The “don’t be dumb” security checklist
Agentic tooling is powerful because it can do real work. That’s also the risk.
- Use HTTPS (VibeShell recommends it for production). GitHub
- Use a real token (bearer auth is built-in). GitHub
- Restrict
base_dirif you can. GitHub - Treat your MCP token like prod credentials (because it is).
If you’ve used our Opalstack MCP endpoint, the mental model is the same: tokens are granular, and an agent can absolutely do destructive things if you let it. Opalstack
Why we like this
VibeShell is the kind of integration we’re into:
- No platform lock-in
- No container tax
- No mystery meat
- Works on boring hosting (shared accounts, legacy apps, the stuff people actually run) GitHub+1
If you want “AI that can actually help maintain real servers,” start here.
]]>TL;DR
- Mount your Opalstack home directory in VS Code using the SSH FS extension.
- Open your app’s
index.html(or template) directly from the server.
TL;DR
- Mount your Opalstack home directory in VS Code using the SSH FS extension.
- Open your app’s
index.html(or template) directly from the server. - Let GitHub Copilot (or ChatGPT) generate code into those live files.
- Save → refresh site → iterate.
- When ready, commit and lock it in.
This post mirrors the steps from the video—use it as your quick checklist.
Why this workflow
- Real environment, zero drift. You’re editing the same files your app serves.
- No build pipeline drama when you just need changes now.
- Copilot does the boilerplate while you point it at real files and paths.
- Works with Opalstack’s stack (WordPress, Django, Rails, Node, static sites, CUS/port-proxied apps, etc.).
Yes, keys are best practice. For quick “vibe” sessions, username/password also works. Use what fits your moment; switch to keys when you settle in.
Prereqs
- An Opalstack account and one of:
- A static site (e.g.
apps/yourapp/index.html) - or any app that exposes web files under your home dir.
- A static site (e.g.
- VS Code
- GitHub Copilot (or your AI of choice)
- SSH FS extension for VS Code (publisher: Kelaberetiv).
Alternative: the “SFTP” extension by liximomo also works; below I show SSH FS.
If you’re on macOS and want a full OS mount, install macFUSE—but you don’t need it for the VS Code SSH FS plugin. The plugin mounts inside VS Code’s explorer.
Step 1 — Install the VS Code extensions
- In VS Code: Extensions → search
SSH FS→ Install. - Install GitHub Copilot (if you haven’t).
Step 2 — Create the SSH FS connection
Open Command Palette → “SSH FS: Create a new configuration”.
Or drop this into Settings (JSON). Replace with your details:
// settings.json (User or Workspace)
"sshfs.configs": [
  {
    "name": "opal1",                      // shows in the SSH FS panel
    "host": "opal1.opalstack.com",        // or just "opal1" if you mapped it
    "port": 22,
    "username": "your_opal_username",
    "password": "your_password",          // for quick start; prefer keys later
    "root": "/home/your_opal_username/",  // your home dir
    "privateKeyPath": "",                 // leave empty when using password
    "interactiveAuth": false,
    "agent": false,
    "followSymlinks": true,
    "uploadOnSave": false,                // not needed—edits are live
    "readOnly": false,
    "reconnect": true,
    "debug": false
  }
]
Prefer keys? Set"privateKeyPath": "~/.ssh/id_ed25519"and remove"password".
Connect: Open the SSH FS side panel → click opal1 → Mount.
You’ll see a new tree in the Explorer with your live server files.
Step 3 — Navigate to your app files
Common locations on Opalstack:
- Static / PHP site:
apps/<appname>/ - WordPress:
apps/<wpapp>/ - Django/Rails/Node (CUS/port apps):
- Code:
apps/<appname>/ - Static assets (if any): often
public/orstatic/ - Proc/launch:
~/apps/<appname>/runscripts or yourstart/finish_installpatterns
- Code:
Open your page entry point. For the demo:/home/your_user/apps/index.html
Step 4 — Start vibe coding with Copilot
- Open
index.html(or a template). - Prompt Copilot inline (type a comment or start a tag; Copilot completes).
- Accept suggestions → Save.
- Refresh your site URL → see it live.
Example Copilot prompts
- “Add a responsive nav bar with a sticky header and a ‘Get Started’ button. Tailwind classes only.”
- “Insert a hero section with gradient background, H1, subcopy, and two CTAs side-by-side on desktop, stacked on mobile.”
- “Create a minimally invasive
<script>that toggles dark mode and remembers user choice inlocalStorage.”
Quick HTML snippet to bootstrap a hero
Paste, then refine with Copilot:
<section class="min-h-[70vh] grid place-items-center bg-slate-950 text-white px-6">
  <div class="max-w-3xl text-center space-y-5">
    <h1 class="text-4xl sm:text-6xl font-extrabold tracking-tight">
      Build faster on Opalstack
    </h1>
    <p class="text-slate-300 text-lg sm:text-xl">
      Real Linux hosting, flat pricing, AI-assisted workflows. No surprise bills.
    </p>
    <div class="flex flex-col sm:flex-row gap-3 justify-center">
      <a class="btn btn-primary" href="/signup/">Start Free</a>
      <a class="btn btn-outline" href="/docs/">Read Docs</a>
    </div>
  </div>
</section>
Ask Copilot to “animate the buttons on hover with subtle scale and glow” or “add an ambient radial gradient glow behind the hero”.
Step 5 — App-specific commands (when not static)
If your app is not plain static HTML, you may need a restart or build step:
- Django (gunicorn/uvicorn): restart your process or touch the WSGI/ASGI target.
- Node: restart your PM2/forever/
systemd --userservice. - Rails (Puma/Passenger): restart service or
touch tmp/restart.txt. - Static: just save. No restart.
Tip: wrap restarts in a tiny script so you can call it from the VS Code terminal:
# ~/bin/restart_my_app.sh
#!/usr/bin/env bash
set -euo pipefail
systemctl --user restart myapp.service
echo "Restarted myapp.service ✅"
Make executable: chmod +x ~/bin/restart_my_app.sh
Security notes (straight talk)
- Passwords are fine for quick sessions; use SSH keys for ongoing work.
- Don’t store production secrets in random files in
apps. - Keep permissions sane: your user should own your app files; avoid
chmod 777like the plague. - If you’re editing production, be prepared to revert fast (see Git below).
Git it under control
Even if you vibe directly on the server, commit early and often, Use Gitea to set up a Git repo on Opalstack.
Troubleshooting
I can’t save files / read-only?
Check your SSH FS config "readOnly": false. Ensure file ownership: ls -l and chown -R your_user:your_user.
Latency / slow saves?
Stick to editing within your app’s folder, not your entire home. Disable heavy VS Code extensions on remote mounts.
Permissions weird after deploy script?
Reset ownership: chown -R your_user:your_user ~/apps/yourapp. Avoid sudo in web paths.
Edits not showing in browser?
- Static: hard refresh (Cmd+Shift+R).
- App: restart the process or clear your app cache.
- CDN in front? Purge cache.
Copilot keeps hallucinating paths
Point it: “Use the existing /apps/styles.css path.” Then tab-complete the relative import.
Optional: Use Opalstack’s MCP server (AI-assisted ops)
If you’ve wired our MCP endpoint into your AI toolchain, you can:
- create apps/databases from chat,
- deploy a template,
- restart a user service,
- tail logs.
That pairs well with SSH FS: AI handles ops, you live-edit the code.
Example: From “blank page” to shipped hero (2 minutes)
- Mount via SSH FS → open
public_html/index.html. - Paste the hero skeleton from above.
- Prompt Copilot: “Make the hero responsive; add animated gradient glow, keep it tasteful.”
- Save → refresh → tweak copy → save again.
Done.
When not to vibe directly on prod
- Complex build steps (Next.js, Rails asset pipeline) where a local dev server is faster
- Risky migrations or mass refactors—use a staging app (Opalstack makes it cheap)
- Large teams without branch discipline
In those cases, SSH FS still works—just point it at staging.
Wrap-up
That’s the whole loop: mount → open → prompt → save → refresh.
With Opalstack + SSH FS + Copilot, you get instant feedback in the real environment, minus the yak-shaving. Keep it tight, keep it versioned, and ship.
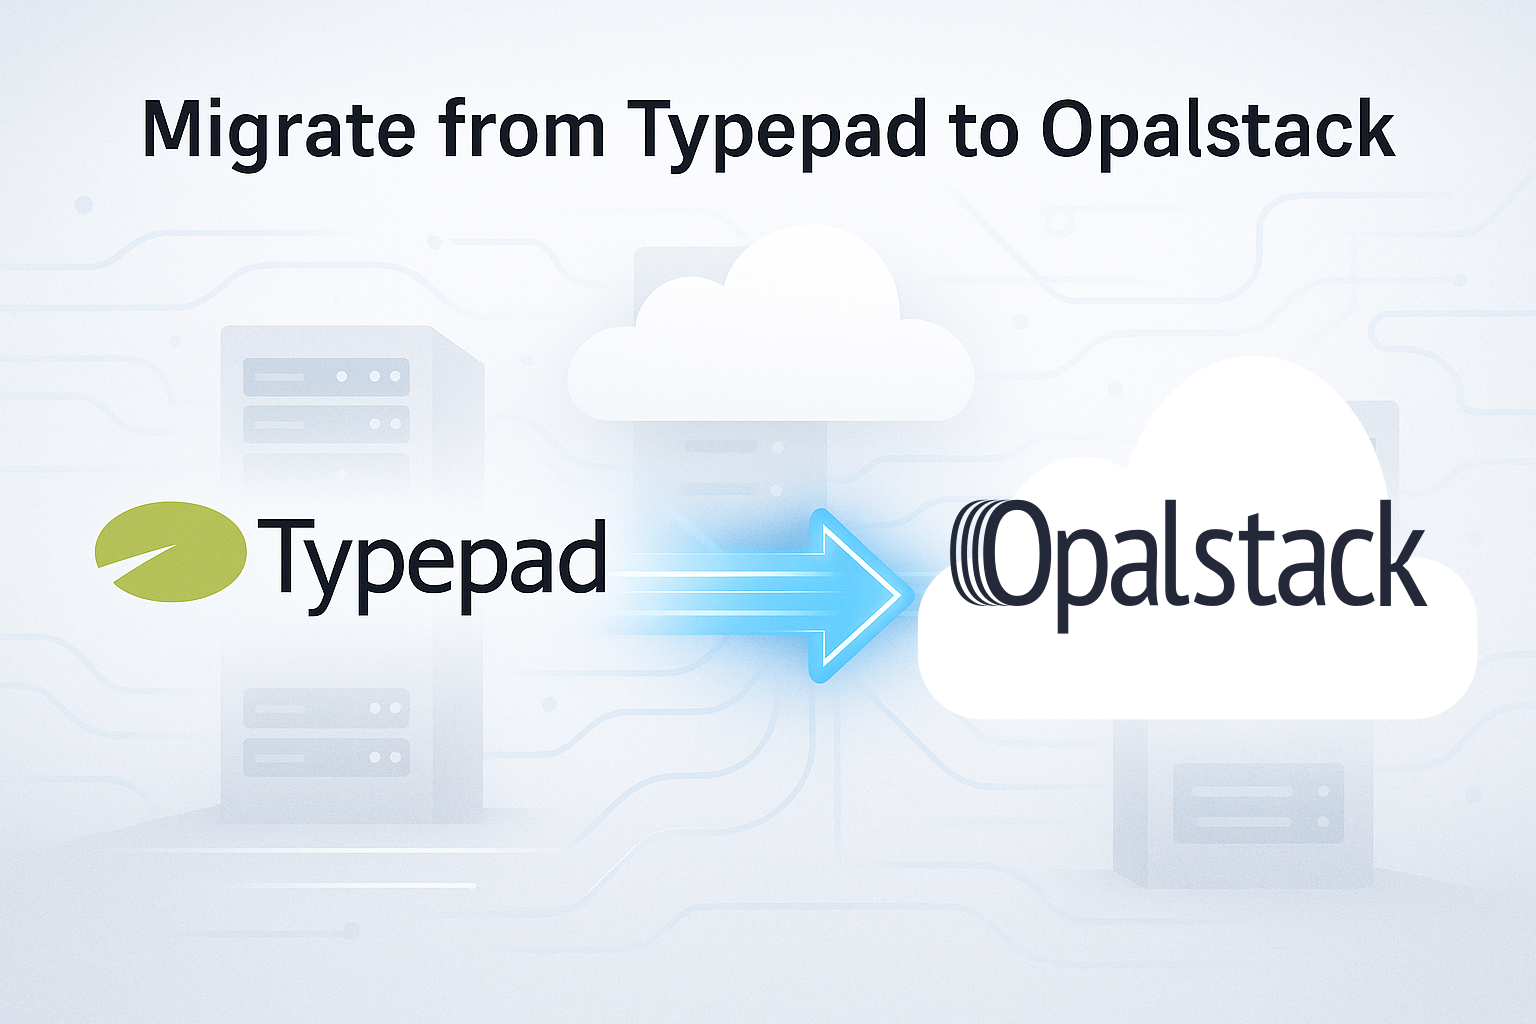
Why migrate from Typepad to Opalstack?
When you migrate from Typepad to Opalstack, you get:
Complete ownership of your content — Your blog posts, comments, and media files will be preserved on your own hosting account giving you full control of your content.
Modern hosting infrastructure — Built on the
]]>Why migrate from Typepad to Opalstack?
When you migrate from Typepad to Opalstack, you get:
Complete ownership of your content — Your blog posts, comments, and media files will be preserved on your own hosting account giving you full control of your content.
Modern hosting infrastructure — Built on the latest technologies with regular server updates ensuring your server stays secure.
Flexible platform options — Whether you want to stick with a familiar blogging experience or explore more powerful content management systems we've got you covered.
Developer-friendly environment — SSH access, Git integration, custom applications, and all the tools you need to customize your site exactly how you want it.
Better performance — With servers located globally and optimized for speed your readers will notice the improvement.
With Typepad's announced shutdown on September 30th, 2025 you'll need a new home for your content. Rather than scrambling at the last minute now's a great time to move to a platform that gives you more control and better performance.
What are your migration options?
We've made it straightforward to migrate from Typepad with step-by-step guides for the two most popular destinations:
Option 1: Migrate from Typepad to Movable Type
If you love the familiar blogging interface and want minimal disruption to your workflow Movable Type is the natural choice. Since Typepad is built on Movable Type technology your content will feel right at home.
Benefits:
- Nearly identical interface to what you're used to
- Seamless import process for your Typepad content
- All the customization options Typepad didn't offer
- Full control over themes, plugins, and functionality
Read our complete guide: Migrating from Typepad to Movable Type on Opalstack →
Option 2: Migrate from Typepad to WordPress
Want to join the world's most popular content management system? WordPress powers over 40% of all websites and offers an enormous ecosystem of themes, plugins, and customization options.
Benefits:
- Massive community and plugin ecosystem
- Thousands of free and premium themes
- SEO-friendly out of the box
- Easy content management for non-technical users
- Mobile-responsive admin interface
Read our complete guide: Migrating from Typepad to WordPress on Opalstack →
What About Your Data?
Both migration paths preserve your valuable content:
- Blog posts — All your articles, drafts, and formatting
- Comments — Reader conversations and engagement
- Media files — Images, documents, and other attachments
- Categories and tags — Your content organization system
- User accounts — Author information and permissions
Typepad's export tools work seamlessly with both Movable Type and WordPress import processes so you won't lose anything in the transition.
Getting Started: How to to migrate your content
Ready to make the move? Here's what you'll need:
- An Opalstack account — If you don't have one yet, sign up here to get started
- Your Typepad export file — We'll walk you through creating this in our detailed guides
- About 30 minutes — That's typically all it takes to get your new site up and running
Both migration processes use our one-click installers so you can focus on your content instead of server configuration. Since Typepad shuts down on September 30th it's worth getting your migration done with plenty of time to spare.
Why Choose Opalstack?
We built Opalstack specifically for developers, entrepreneurs, and businesses who want reliable hosting without the corporate overhead. When you migrate from Typepad to Opalstack you get:
- Expert support — Our team has experience with both Movable Type and WordPress migrations
- Modern infrastructure — SSD storage, current software versions, and regular security updates
- Global server locations — Choose the location closest to your audience for best performance
- Flexible scaling — Start small and scale up as your site grows
- Developer tools — SSH access, Git integration, staging environments, and more
Ready to get started? Don't let your years of content disappear on September 30th. Choose your migration path and let's move your content to its safe new home on Opalstack today!
]]>Did you know you can route your browser traffic with a secure tunnel to any web hosting company which supports SOCKS over SSH? That might be useful! Want per-app, encrypted routing through your Opalstack server without installing a VPN? Do this:
0) Create your Shell (OS) user on Opalstack
- In the dashboard go to Applications → Create Shell User.
- Pick the server, choose a username, click Create.
- Your new user’s initial password appears in the Notice Log. (You can change it later.)
Shell users are used for SSH/SFTP access and to run your apps. (docs.opalstack.com)
1) Add your SSH key (recommended)
- macOS / Linux (and Windows if you have
ssh-copy-id):ssh-keygen -t rsa -b 4096 -f ~/.ssh/id_rsa ssh-copy-id [email protected]Now you can log in without a password. - Windows (PuTTY): generate a key with PuTTYgen, then paste the public key into
~/.ssh/authorized_keys, and configure PuTTY to use the private key for that host.
2) Start a local SOCKS5 proxy (“SOCKS over SSH”)
macOS (built-in OpenSSH)
ssh -N -D 127.0.0.1:1080 [email protected]
-D 127.0.0.1:1080creates a local SOCKS5 proxy on port 1080.-Ntells SSH not to run a remote command—just forward.
macOS includes thesshclient out of the box; Opalstack shows the login patternssh [email protected].
Windows Option A: PowerShell (OpenSSH client)
ssh -N -D 127.0.0.1:1080 [email protected]
Microsoft Windows 10/11 include (or can add) the OpenSSH Client: Settings → Apps → Optional Features → OpenSSH Client.
Windows — Option B: PuTTY (GUI)
- Open PuTTY → Session → Host Name:
opal1.opalstack.com. - Go to Connection → SSH → Tunnels.
- Source port:
1080→ choose Dynamic → Add. - Back to Session, Save, then Open and log in. (Leave the window open to keep the tunnel running.)
3) Point your browser/app at the proxy (and avoid DNS leaks)
Firefox (Windows & macOS)
- Settings → Network → Manual proxy
SOCKS Host:127.0.0.1Port:1080Version: SOCKS v5 - Turn on “Proxy DNS when using SOCKS v5” (or set
about:config→network.proxy.socks_remote_dns=true).
Chrome / Edge (Windows & macOS)
Launch with flags that force proxy use and remote DNS:
# macOS example
"/Applications/Google Chrome.app/Contents/MacOS/Google Chrome" \
  --proxy-server="socks5://127.0.0.1:1080" \
  --host-resolver-rules="MAP * ~NOTFOUND , EXCLUDE localhost"
On Windows, edit the shortcut and append the same flags to the Target. These flags stop Chrome from doing local DNS lookups while using a SOCKS proxy.
CLI sanity check (either OS)
curl --socks5-hostname 127.0.0.1:1080 https://ifconfig.me
You should see your Opalstack server’s IP, proving traffic is routing through the tunnel (the --socks5-hostname bit forces remote DNS).
4) What you just built (and what it isn’t)
- Yes: Routes web traffic for apps you configure (HTTP/HTTPS ride over TCP via SOCKS5 → SSH → your server).
- No: Not a full VPN (no device-wide tunnel, no UDP/WebRTC/QUIC). Use a real VPN if you need OS-wide routing.
- Security: The hop from you → Opalstack is encrypted by SSH. From the server → websites is normal internet—keep using HTTPS end-to-end.
5) Keep it alive (optional)
- macOS:
brew install autossh autossh -M 0 -N -D 127.0.0.1:1080 [email protected](If you want login-start, we can drop a smalllaunchdplist.) - Windows:
Create a shortcut that runs thessh -N -D ...command at login, or use Task Scheduler to start it on sign-in.
6) Troubleshooting on Opalstack
- Which host do I SSH to? Use the server hostname shown in your dashboard (examples use
opal1.opalstack.com). - Password isn’t working? Check the Notice Log for the initial shell-user password (or reset it).
- Lots of failed logins? Your source IP can be auto-banned for ~1 hour; try again later or contact support.
7) Quick copy/paste checklist
# In Opalstack dashboard:
#   Applications → Create Shell User → pick server & username
#   Check Notice Log for the initial password

# On your computer (macOS/Windows with OpenSSH):
ssh-keygen -t rsa -b 4096 -f ~/.ssh/id_rsa           # if needed
ssh-copy-id [email protected]               # macOS/Linux (or add key via PuTTY/Server Access docs)

# Start the SOCKS proxy:
ssh -N -D 127.0.0.1:1080 [email protected]

# Browser:
#   Firefox: set SOCKS5 127.0.0.1:1080 + "Proxy DNS when using SOCKS v5"
#   Chrome/Edge: launch with --proxy-server + --host-resolver-rules flags

# Verify:
curl --socks5-hostname 127.0.0.1:1080 https://ifconfig.me

Shared servers and VPS running AlmaLinux 9 are available now! 🚀
Let's cut right to it: Shared servers running AlmaLinux 9 are now available in Frankfurt, Washington DC, Dallas, San Francisco, and Singapore. VPS running the new operating system are available everywhere we support VPS.
What's
]]>Shared servers and VPS running AlmaLinux 9 are available now! 🚀
Let's cut right to it: Shared servers running AlmaLinux 9 are now available in Frankfurt, Washington DC, Dallas, San Francisco, and Singapore. VPS running the new operating system are available everywhere we support VPS.
What's new? 🌟
Here’s a list of some of the software versions that are available on the new system, with the current versions included for comparison:
- PostgreSQL 14 → PostgreSQL 17
- MariaDB 10.6 → Percona MySQL 8.4
- Ruby 3.2 → Ruby 3.3
- System Python 2.7 → Python 3.9
- ImageMagick 6 → ImageMagick 7
- Default PHP 7.3 → PHP 8.3
- Apache 2.4.6 → Apache 2.4.57
- Rust 1.72 → Rust 1.75
- Git 1.83 → Git 2.43
- Linux kernel 3.10.0 → kernel 5.14.0
- Hundreds of system library updates
How can you get started with the new OS? 🏁
The new operating system will only be available on newly-provisioned hardware; our existing servers will not be upgraded. If you’re an existing customer and want to take advantage of the new OS then you must either migrate your account to one of the new servers or purchase an additional hosting plan located on one of the new servers.
Note that the following software is not supported on the new operating system:
- PHP versions earlier than 8.3
- Python versions earlier than 3.9
- Ruby versions under 3.3
- Applications that only support MySQL < 8.0
If you have applications using these software versions then you will need to upgrade them to a supported version before you can migrate them to the new operating system. You can find everything else you need to know in our migration docs.
There’s more to come! ✨
We're looking forward to the new installers and software you'll be able to run on the new operating system. Watch for them through the coming months!
]]>Continuing our series on MCP, In this video John explains what MCP is and a birds eye view of how to deploy an MCP server with django-mcp-server
MCP Won’t Let Me Be
…or why your LLM needs a wrapper if you want it to ship real code,
]]>
Continuing our series on MCP, In this video John explains what MCP is and a birds eye view of how to deploy an MCP server with django-mcp-server
MCP Won’t Let Me Be
…or why your LLM needs a wrapper if you want it to ship real code, not just cute prose
Context: The video at the top of this post is John’s lightning-tour of Model-Context Protocol (MCP) and the quickest path to spinning up an MCP-enabled Django project withdjango-mcp-server.
Below is the long-form write-up—perfect for pausing, skimming, and copy-pasting at your own pace.
TL;DR for the terminally busy
- A raw LLM is not an agent; it lacks persistent memory and safe API access.
- MCP adds typed tool manifests, separate auth, and structured logging—turning the LLM into an orchestrator instead of a kamikaze script-kiddie.
- One MCP server → every client that speaks MCP (ChatGPT, Copilot, local LLaMA) can call your stuff.
- Scroll to the bottom for the business payoff and next steps.
1. Raw LLM ≠ Agent
LLMs are brilliant storytellers but amnesiac engineers.
Ask ChatGPT to “create a user” and then immediately “make a DB for that user.” It forgets the ID you just gave it—because every turn starts from zero. Agents need an external memory + tooling system. MCP provides both.
2. Context-Window Reality Check
“128 k tokens” sounds huge—until you remember that’s ~300 KB of text. Your smallest SaaS codebase is 10–100× bigger. The model will never “know” your whole system; it only needs to know how to call it. That’s the job of tool manifests.
3. Tools, Calls & Manifests
Free-hand JSON is the Wild West: fields drift, types change, hallucinations happen. An MCP manifest is a strict contract—names, params, enums, return types. Agents stop guessing and start doing.
4. Security & Compliance Layer
Giving an untrusted LLM direct API keys is like handing the intern root. MCP splits:
- Auth server – verifies the bearer token / OAuth flow / whatever.
- Tool server(s) – do the work, gated by scopes & rate-limits.
That clean split lets you pass a SOC 2 audit without losing sleep.
5. Connector Explosion → One Bus
Without a standard you get M × N wrappers (every model × every API).
With MCP you write one server; every agent that speaks MCP plugs in. Think HTTP for agents.
6. Observability & Audit Trails
Every tool call is a structured log entry—great for debugging and governance: replay, rollbacks, blame, glory.
7. Live Code Drop: The Forwarding Pattern
Here’s an abridged version of the OSUser tool demoed in the video. Key idea: zero business logic in the tool—just forward to the classic API.
# osuser_example.py
from typing import Literal, Any, Dict
from modules.mcp.utils import MCPTransport
from mcp_server import MCPToolset

class OSUserAPI:
    def __init__(self, token: str) -> None:
        self.http = MCPTransport(bearer_token=token)

    def list(self) -> list[dict]:
        # This is where you would place logging for auditing,
        # on each CRUD or whatever tooling you decide.
        # You would have full context to "self.request" which is the same as django "request"
        return self.http.get("/osuser/list/")

    def read(self, data: Dict[str, Any]) -> dict:
        return self.http.get(f"/osuser/read/{data['id']}")

    def create(self, data: Dict[str, Any]) -> dict:
        return self.http.post("/osuser/create/", [data])

    def update(self, data: Dict[str, Any]) -> dict:
        return self.http.post(f"/osuser/update/", [data])

    def delete(self, data: Dict[str, Any]) -> str:
        return self.http.post(f"/osuser/delete/", [data])

class OSUserTools(MCPToolset):
    def osuser(self,
               action: Literal["list","read","create","update","delete"],
               payload: Any | None = None):
        """ in python this would be a docstring and it is where the manifest in django-mcp-server lives. This is where you describe to the LLM how to use your API.
        """
        return {
            "list":   lambda _: self._api().list(),
            "read":           self._api().read,
            "create":         self._api().create,
            "update":         self._api().update,
            "delete":         self._api().delete,
        }[action](payload or {})
    def _api(self):
        return OSUserAPI(token=self.request.auth)
Flow in one breath: Copilot prompt → OSUserTools.osuser() → Django MCP server → classic REST → Celery worker/Ansible/whatever.
8. Real-World Magic: “Vibe Deploy WordPress”
When a user types:
chat: vibe deploy wordpress on opalstack
the agent:
- Creates an OS user & MySQL DB via two MCP tools
- Spins a containerless runtime
- Runs the WordPress installer
- Issues a Let’s Encrypt cert
- Returns a secure preview URL
The model never “learned DevOps.” It just chained typed tools together.
9. Business Payoff
- Speed – one protocol, less glue.
- Reliability – typed manifests curb hallucinations.
- Governance – audit trails make SecOps & Legal smile.
- Ecosystem – every new MCP-speaking service increases the pie.
10. Next Steps
| Link | Pip |
|---|---|
| django-mcp-server on pypi | pip install django-mcp-server |
Questions? send us an email, [email protected] Ready to ship? Grab a PAT, push to Git, and let MCP handle the midnight shift.
Say it. Ship it. Keep the vibes moving. 🚀
]]>From REST to Vibe Deploy
Opalstack’s core platform is built from the ground up not an off‑the‑shelf cPanel clone. We’re wholly owned and operated by experienced software developers many of whom have worked together for almost
]]>From REST to Vibe Deploy
Opalstack’s core platform is built from the ground up not an off‑the‑shelf cPanel clone. We’re wholly owned and operated by experienced software developers many of whom have worked together for almost two decades. We built the platform to solve our own problems: rapid deployment, easy management, and rock‑solid support.
From day one the goal was a modern interface—so we shipped a fully REST‑compliant JSON API. Authentication uses a bearer token in the Authorization header and every endpoint comes with copy‑paste curl examples for GET and POST. Power users can streamline workflows with embedded objects—e.g. /osuser/list/?embed=server returns both the user and its server in a single call—keeping automation lean and self‑contained.
Our API now exposes a /mcp endpoint. At first glance these paths look unremarkable – they accept GET, POST and DELETE – but they mark the beginning of something extraordinary.
Why the Model Context Protocol (MCP) matters
The Model Context Protocol (MCP) is an emerging open standard that lets AI models call external tools in a safe, structured way. According to the official specification MCP consists of several layers: a base protocol built on JSON‑RPC message types, lifecycle management for connection setup, an authorization framework for HTTP transports, and optional server and client features. Servers expose resources, prompts and tools while clients can provide sampling and directory listings. All messages follow the JSON‑RPC 2.0 specification ensuring that requests responses and notifications are predictable. The protocol’s modular design allows implementations to support exactly the features they need.
This makes MCP a perfect match for a hosting platform. It provides a secure, stateless channel where an AI agent can ask a server to perform an action (like creating a database or deploying an app) and receive structured results. Because MCP is transport‑agnostic it can work over HTTP, WebSockets, or even standard I/O. And because it is built on JSON‑RPC it integrates easily with our existing API.
Opalstack × MCP: natural‑language deployment (i.e. vibe deploy your app)
We have always loved new tech and we’ve been following large‑language‑model research in our spare time. When the Model Context Protocol was released earlier this year we immediately recognized its potential. Within weeks we exposed an /mcp endpoint on the Opalstack API. This endpoint serves as a wrapper around our existing API operations but it also publishes a catalogue of tools defined by manifests to any MCP‑compatible AI agent. You can now vibe deploy your next app using natural language.
Here’s why this matters for you:
- Natural‑language deployment: Because MCP uses JSON‑RPC and our API uses JSON a conversational agent can now ask the Opalstack MCP endpoint to “create a new WordPress site named blog on my domain” or “add a Django app and set up a PostgreSQL database” and receive the structured calls needed to make it happen. No cURL commands, no copy‑pasting tokens. You simply describe your intent.
- Seamless IDE integration: The endpoint is designed to work with agentic workflows in editors like VS Code. As you code you can chat with the agent, ask it to deploy, tweak configurations, or provision resources. The manifest system ensures that the agent prompts use the right parameters and returns human‑friendly explanations.
- Managed security: MCP’s authorization layer defines how the agent authenticates and what permissions it has. Because our API already requires token‑based auth we can map those tokens directly, ensuring that the agent can’t exceed your account’s privileges.
- Future‑proof architecture: MCP’s modular design allows us to add new capabilities over time. As the protocol evolves, we can publish additional tools without breaking existing integrations. Our shift to AlmaLinux 9 in 2025 is another example of how we embrace change; we evaluated multiple distributions and chose AlmaLinux because of its widespread adoption and ease of migration.
Vibe‑code, vibe deploy without containers
Developers come to Opalstack because they want to ship quickly. We provide one‑click installers for WordPress, Django, Ruby on Rails, and more but we also let you build and deploy custom apps without hiding the underlying system. Our philosophy is that you shouldn’t need Docker or Kubernetes to run a small project. You get full SSH and SFTP access in a managed OS environment. There’s no root access required so you can focus on your code while we handle the hosting.
That philosophy extends to our support: our staff are developers who debug server configuration and application code because they enjoy it. We’re a close‑knit team bound by a shared passion for open‑source software. When you’re experimenting with a new framework or pushing an LLM‑powered agent to production, we’re right there with you.
Built for the long haul
We’ve been on this journey since the early days of Python web frameworks. Along the way we’ve seen hosts come and go. Opalstack isn’t a venture‑funded experiment; it’s a company owned and operated by developers. We keep our team small and cross‑trained so that we can respond quickly and stay accountable. We have no hidden fees – email, SSL and DNS are included in every plan. When customers asked for dark mode or for the ability to route traffic to a single domain we added those features. When the hosting world began experimenting with MCP we were ready.
Our commitment to innovation doesn’t mean we throw caution to the wind. We roll out new OS builds slowly and deliberately because real‑world applications are more complex than any lab test. We listen to feedback and prioritise stability over hype. As we integrate MCP into more of our tooling we’ll continue to refine the manifests and prompts so that your LLM agents behave predictably and securely.
Join the next chapter
We invite you to explore the Opalstack MCP endpoint and start building your own agent‑driven workflows. As always, our support team is eager to help. Whether you’re spinning up a WordPress blog, orchestrating a Django microservice, or experimenting with AI agents Opalstack is here to make your vision sparkle.
Many MCP clients are now available, the one we have done the most testing with is VS Code and Copilot. The configuration needed to connect to the MCP server, where ABB123 is your bearer token that is issued within the dashboard.
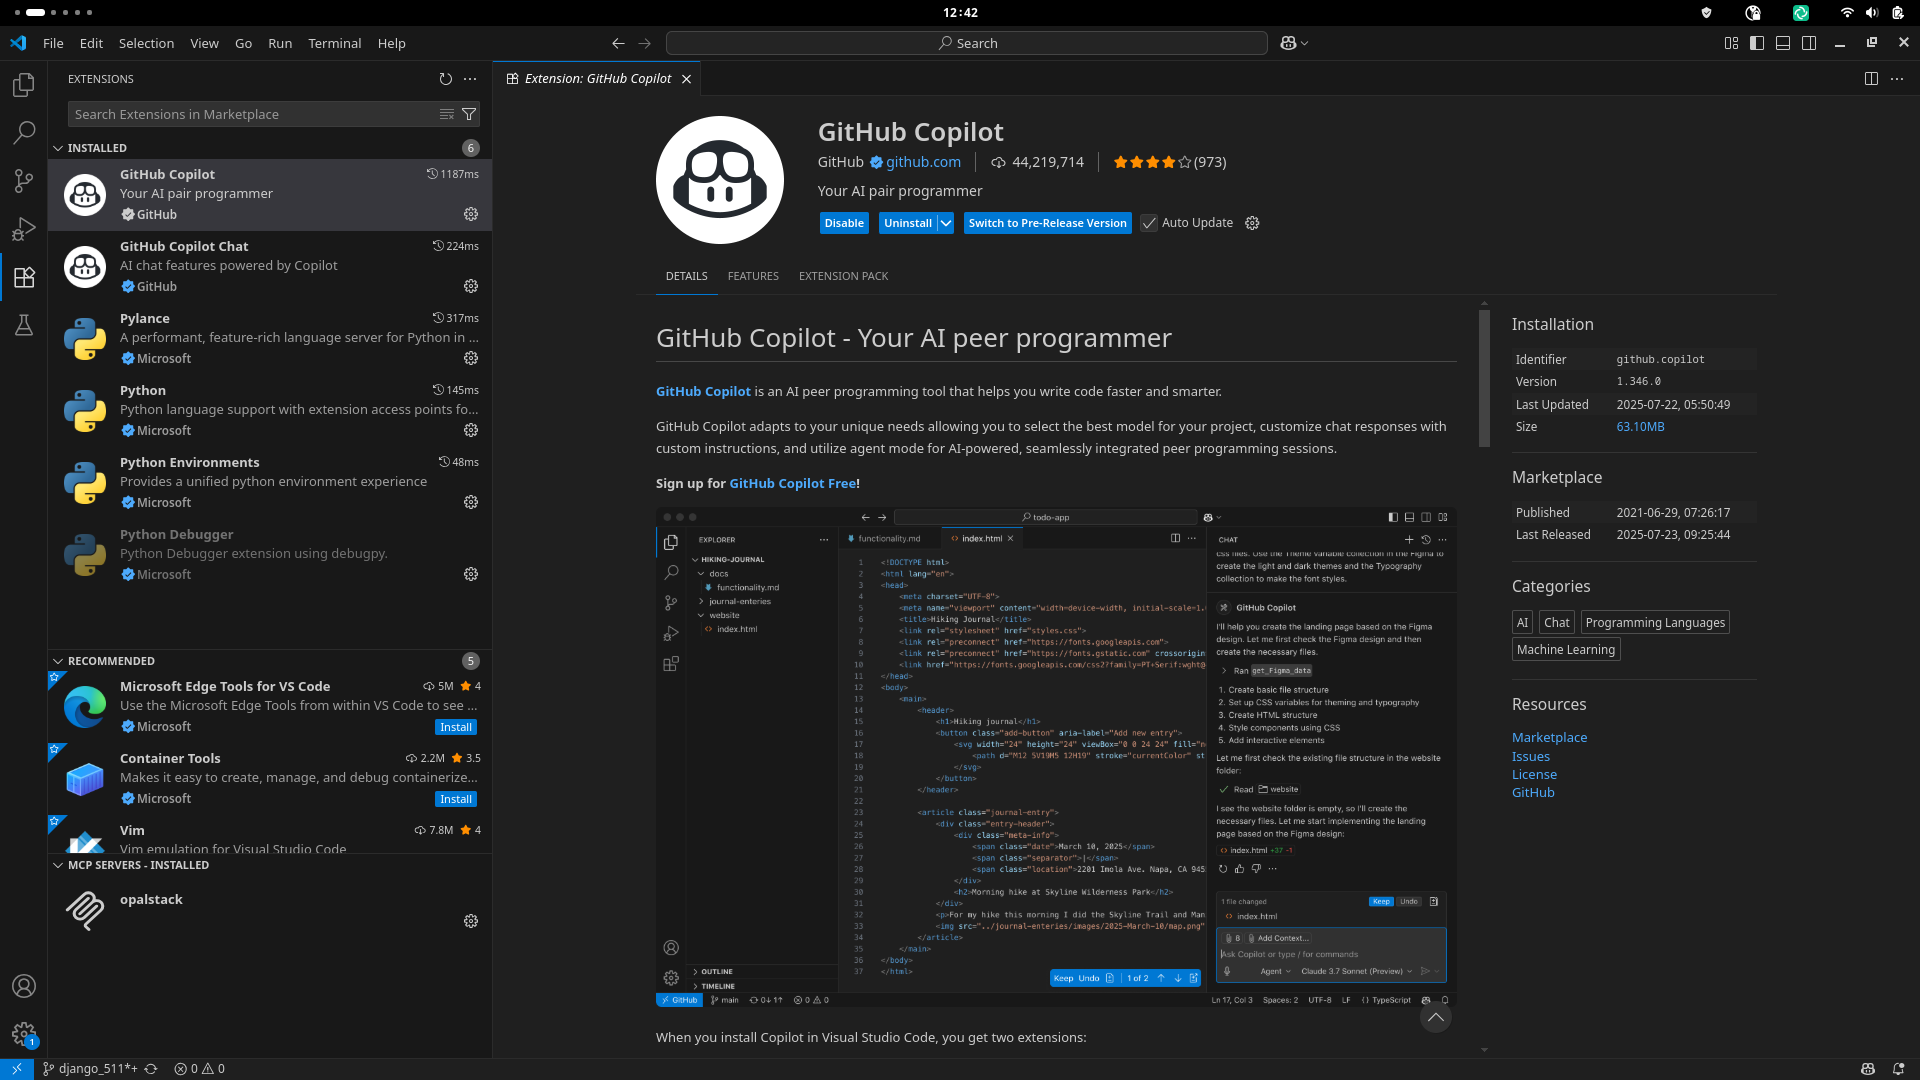
Github Copilot via the Extensions tab.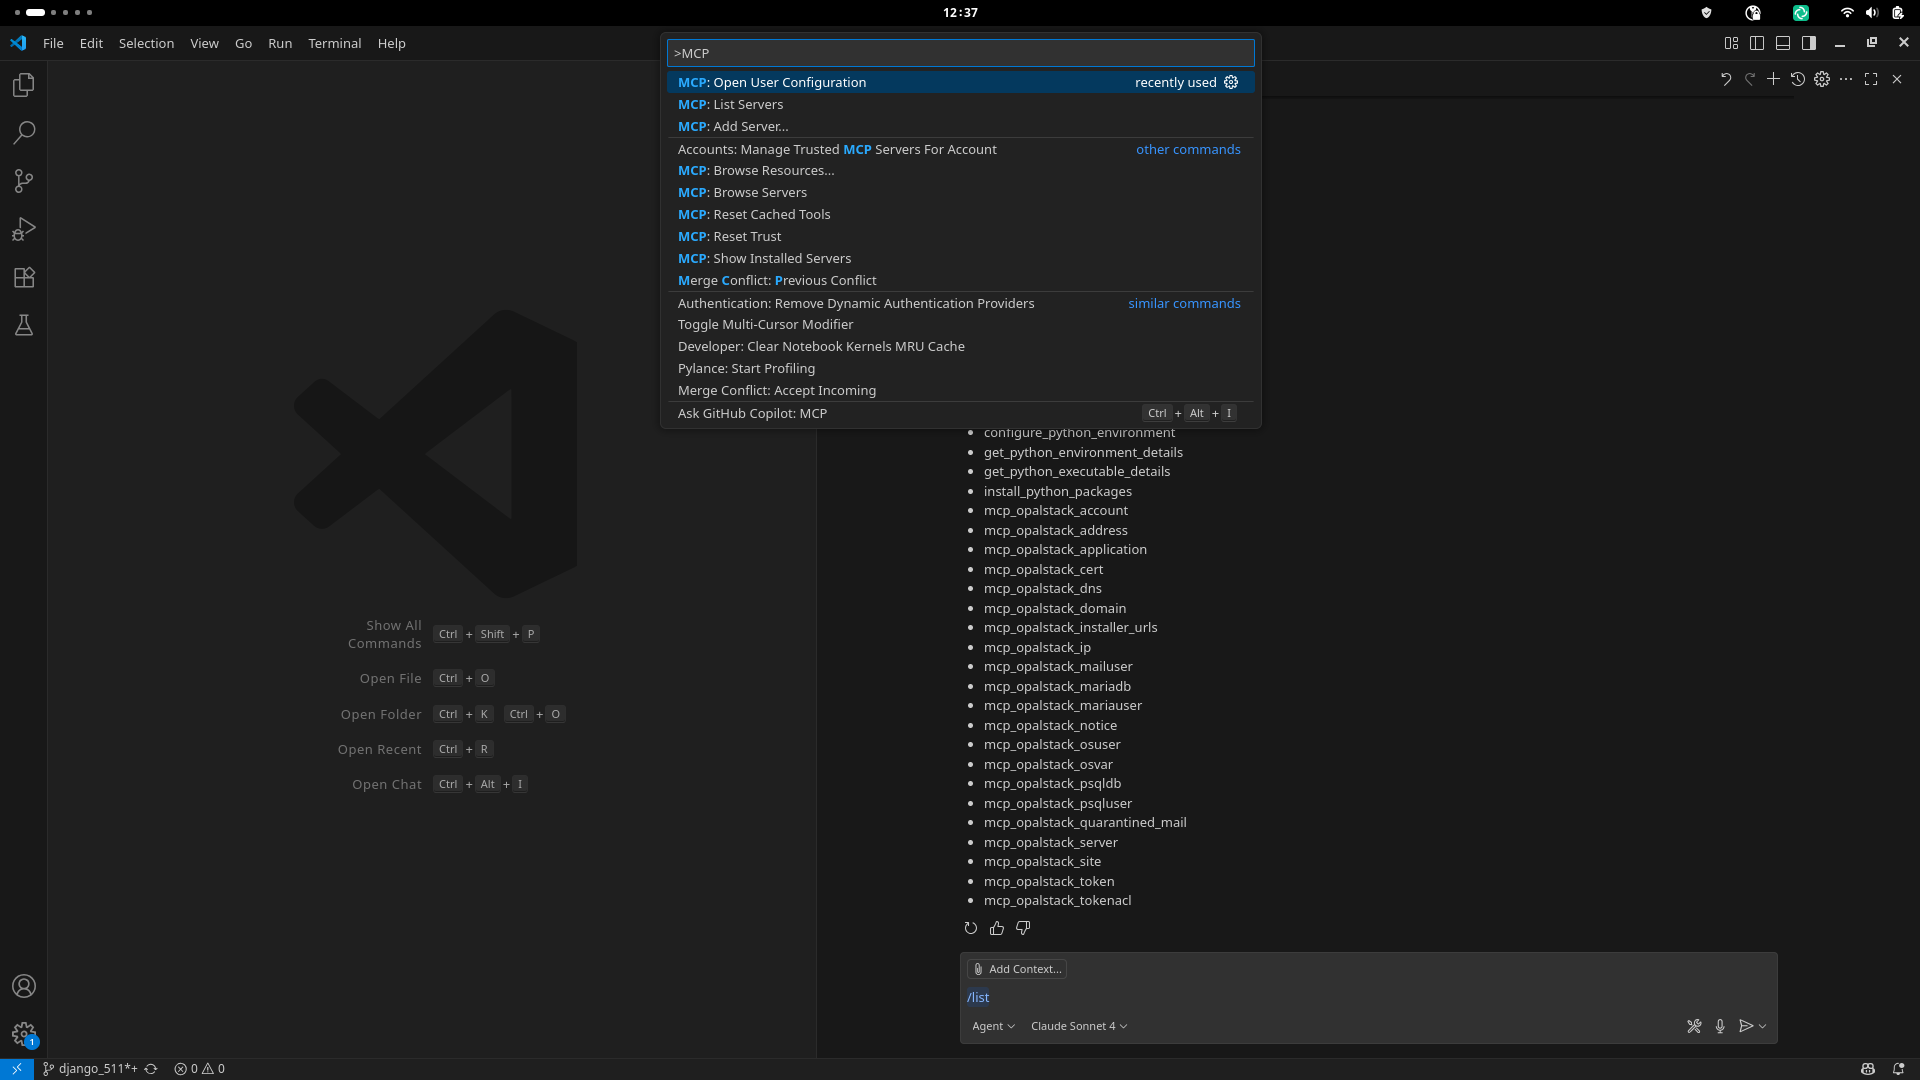
>MCP: Open User Configuration in in the VS Code search to open the config file.{
"servers": {
"opalstack": {
"url": "https://my.opalstack.com/mcp",
"type": "https",
"headers": {
"Authorization": "Bearer ABC123"
}
}
},
}
https://my.opalstack.com/tokens/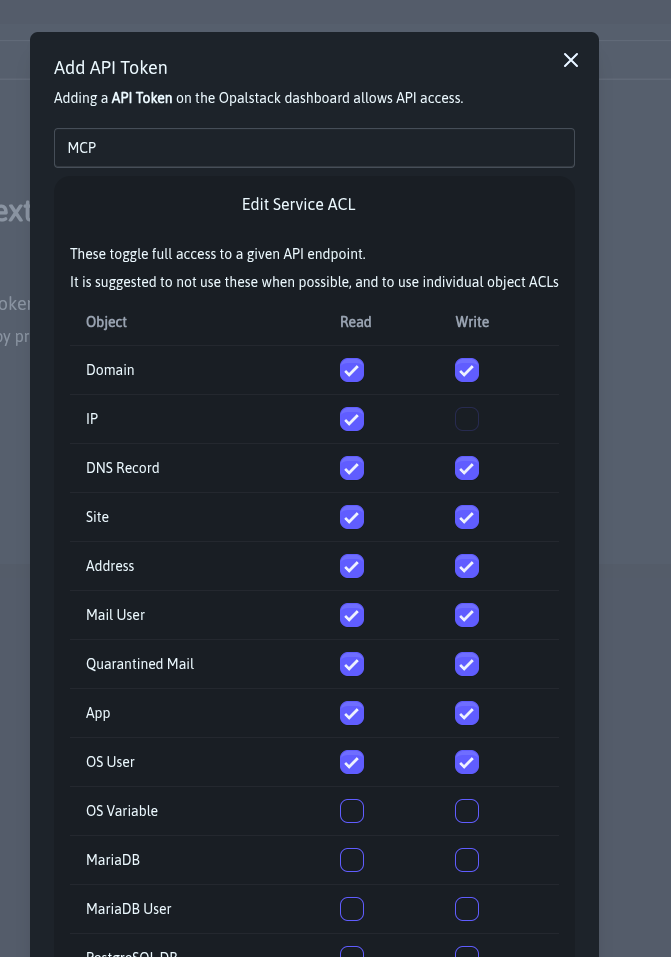
Make sure you change the mode from 'Ask' to 'Agent' This is known as an 'Agenic AI', the ability to perform long chains of tasks. Once this is done you can run the /list command and it will return the mcp_opalstack_* toolkit as well as the other tools your IDE has available.
Meet the toolbox (aka “the buttons your AI can push”)
Behind the scenes, every chat‑command you fire at Opalstack is translated into one of 21 purpose‑built MCP tools—each a wrapper around our JSON REST API (full schema lives at /api/v1/doc/). Think of them as Lego bricks your agent stacks together to get real work done:
mcp_opalstack_account        # create/read your account profile
mcp_opalstack_address        # forward‑only or full mail addresses
mcp_opalstack_application    # deploy Django, Laravel, Node, static, you name it
mcp_opalstack_cert           # issue/renew Let’s Encrypt certs
mcp_opalstack_dns            # manage records without leaving your editor
mcp_opalstack_domain         # add or park domains in one shot
mcp_opalstack_installer_urls # fetch our 1‑click installer library
mcp_opalstack_ip             # list dedicated or shared IPs
mcp_opalstack_mailuser       # mailbox CRUD (quota, passwords, etc)
mcp_opalstack_mariadb        # spin up MariaDB databases
mcp_opalstack_mariauser      # grant DB creds
mcp_opalstack_notice         # surface panel notifications to your bot
mcp_opalstack_osuser         # sandboxed Linux users for each app
mcp_opalstack_psqldb         # PostgreSQL 17 in two keystrokes
mcp_opalstack_psqluser       # role‑based PSQL access
mcp_opalstack_server         # get server health & resource data
mcp_opalstack_site           # map domains → apps → SSL in one call
mcp_opalstack_token          # issue or revoke API tokens
mcp_opalstack_tokenacl       # fine‑grain ACLs for shared accounts
Why it matters:
- No hidden magic—each tool is a first‑class, versioned endpoint bound to real JSON you can curl if you’re the “show me the wires” type.
- Agents chain them together transparently, so “launch a staging Django with Postgres + Redis” is a single English sentence, not a 12‑step shell script.
- You still get raw API access when you need to color outside the lines—MCP just saves you from boilerplate 95 % of the time.
Bottom line: Opalstack MCP turns our rock‑solid API into an instant‑action command palette for both humans and AI. Less YAML, more “go live” button‑mashing. Go vibe‑code and vibe deploy something wild and let us know what you ship!
If you need any assistance with MCP please email us at [email protected] we are happy to answer any questions.
]]>After months of work our new operating system is almost here and over the next few weeks we will begin opening up VPS and shared servers running on AlmaLinux 9 instead of CentOS 7. Since your applications are far more complicated than
]]>After months of work our new operating system is almost here and over the next few weeks we will begin opening up VPS and shared servers running on AlmaLinux 9 instead of CentOS 7. Since your applications are far more complicated than our tests could reasonably be we will be slowly rolling out upgraded servers as we get more confident. All of our internal tests have passed but we’ve done this long enough to know that only the real world is a sufficient test plan.
We evaluated a few different Linux distributions including Rocky Linux, AlmaLinux, and Oracle Enterprise Linux. We chose AlmaLinux because it has gained widespread adoption across the hosting industry making migrations to Opalstack faster and easier.
New shared servers running AlmaLinux 9 should be available in all of our shared service regions before the end of the year. VPS running AlmaLinux 9 will be available slightly earlier than the shared servers and will be available in all of the locations we support VPS now.
What’s new? 🌟
Here’s a list of some of the software versions that are available on the new system, with the current versions included for comparison:
- PostgreSQL 11/14 → PostgreSQL 17
- MariaDB 10.6 → Percona MySQL 8.4
- Ruby 3.2 → Ruby 3.3
- System Python 2.7 → Python 3.9
- ImageMagick 6 → ImageMagick 7
- Default PHP 7.3 → PHP 8.3
- Apache 2.4.6 → Apache 2.4.57
- Rust 1.72 → Rust 1.75
- Git 1.83 → Git 2.43
- Kernel 3.10.0 → Kernel 5.14.0
- Hundreds of system library updates
(an earlier version of this post had MySQL 8.0 and PostgreSQL 16 as the new database versions, but since then MySQL 8.4 had a point release and PostgreSQL 17 was released)
How can you get started with the new OS?
The new operating system will only be available on newly-provisioned hardware; our existing servers will not be upgraded. If you’re an existing customer and want to take advantage of the new operating system then you must either migrate your account to one of the new servers or purchase an additional hosting plan located on one of the new servers.
Note that the following software is not supported on the new operating system:
- PHP versions earlier than 8.0
- Python versions earlier than 3.9
- Ruby versions under 3.3
If you have applications using these software versions then you will need to upgrade them to a supported version before you can migrate them to the new operating system.
We’ll send out an update when the new servers are ready for you to migrate!
There’s more to come! ✨
This is just the first step toward the next generation of the Opalstack platform. Just as we’ve grown and evolved the platform over the last five and a half years, we’ll continue to do so by introducing new features made possible by the new operating system.
]]>Effective December 1st 2023 we’ll be increasing the price for all Opalstack hosting plans. The increase will be 25% or less depending on the plan, with most plans having a 20% increase.
Price increases are never anyone’s favorite discussion topic. It's
]]>Effective December 1st 2023 we’ll be increasing the price for all Opalstack hosting plans. The increase will be 25% or less depending on the plan, with most plans having a 20% increase.
Price increases are never anyone’s favorite discussion topic. It's not ours either, but our own costs have increased steadily since we launched Opalstack in 2019 — and dramatically so over the past 2 years leading us to an increase in operational costs of over 25% since launch.
We've done our best to avoid a price increase for our customers for as long as possible. We've debated moving our infrastructure to cheaper providers to avoid the higher costs, but we are committed to providing the best hosting experience possible and do not believe that we could do so by relying on cheap hardware and services. We're also a small and fiercely independent company and do not have venture capital or investor fundraising to fall back on. Faced with these facts, our only option is to increase our prices for the first time in the 4+ years that we've been operating.
We at Opalstack appreciate your business and continued support. If you have any questions or concerns about the upcoming price increase then please email our support team and someone from our team will get back to you.
Thank you for your time and, as always, thank you for using Opalstack.
Sincerely,
The (((Opalstack Team
]]>