Redgate Flyway is available in three (3) editions, Community (free), Teams and Enterprise. When I first started using it, I thought it would be similar to Redgate SQL Change Automation. I had already developed YAML templates for that in the past. What I immediately noticed was that only one extension was available in the marketplace for Flyway, unfortunately it did not appear to be a very active project. I decided to checkout the resources available from Redgate for the product. They had a lot of great YAML pipeline examples for Azure Pipelines using Docker, Self-hosted Agents in GitHub which was fantastic.
One of the first tasks I completed was creating an installer YAML template for the Flyway CLI. We were using Microsoft-hosted Agents, which did not have any Flyway or SQL Fluff components. Unlike a Self-hosted Agent, these cannot not be installed manually. One thing you’ll notice right away is a variable groups is required to make this template work properly. I use a variable group named redgate-global-vars to put a few values I like to be able to change outside of my database project, those are:
- FLYWAY_LICENSE_KEY – This contains your license key, but if not we’ll just use the community edition. Comment out the environment variable used in the ‘Check Flyway Client’ step
- FLYWAY_VERSION – What version of Flyway you want to use with your database project (sometimes an issue with the latest release occurs due to breaking changes which may require you to update your scripts/templates)
- SQL_FLUFF_VERSION – What version of SQL Fluff do you want to deploy alongside Flyway
As part of the pipeline YAML template a check is performed to ensure the Flyway CLI loads properly and during that step the Flyway will let you know whether a more recent version is available

The YAML template has been tested using the following Microsoft-hosted images without any issues
- windows-latest
- ubuntu-latest
- macos-latest

Here is the complete YAML template InstallFlyway.yml in case you decide to use it in your environment
parameters:
- name: flywayversion
  type: string
  default: '9.21.1'
- name: edition
  type: string
  default: community
  values:
    - community
    - teams
- name: sqlfluffversion
  type: string
  default: '3.0.7'

steps:
- task: PowerShell@2
  displayName: 'Download and unzip Flyway command line'
  env:
    FLYWAY_LICENSE_KEY: $(FLYWAY_LICENSE_KEY)
    FLYWAY_VERSION: ${{ parameters.flywayversion }}
    FLYWAY_EDITION: ${{ parameters.edition }}
  inputs:
    targetType: 'inline'
    script: |
      # Write your PowerShell commands here.
      $version = $env:FLYWAY_VERSION
      $edition = $env:FLYWAY_EDITION
      $extension = $IsWindows ? 'zip' : 'tar.gz'
      if ($IsWindows) {$platform = 'windows'}`
      elseif ($IsMacOS) {$platform = 'macosx'}`
      elseif ($IsLinux) {$platform = 'linux'}
      Write-Host "Hello Flyway $edition, getting Version $version for $platform"
      $flywayZip = "https://download.red-gate.com/maven/release/org/flywaydb/enterprise/flyway-commandline/$version/flyway-commandline-$version-$platform-x64.$extension"
      $targetZip = "flyway-commandline-$version-$platform-x64.$extension"
      $flyway = "flyway-$version"
      $flywayPath = Join-Path (Get-Location).ToString() -ChildPath "\Tools\$flyway"
      mkdir ./Tools
      # Remove-Item .\Tools -Force -Recurse -ErrorAction Ignore
      Invoke-WebRequest $flywayZip -OutFile $targetZip
      if ($IsWindows)
      {
        Expand-Archive -LiteralPath $targetZip -DestinationPath ./Tools
      }
      else
      {
        tar -xvf $targetZip -C ./Tools
        chmod +x $flywayPath/flyway
      }
      write-host "##vso[task.prependpath]$flywayPath"
    pwsh: true
    workingDirectory: '$(Pipeline.Workspace)'

- script: |
    python -m pip install --upgrade pip
    pip install sqlfluff==${{ parameters.sqlfluffversion }}
  displayName: 'Install SQL Fluff'
  failOnStderr: true

- task: PowerShell@2
  displayName: 'Check Flyway Client'
  continueOnError: true
  env:
    FLYWAY_LICENSE_KEY: $(FLYWAY_LICENSE_KEY) # FLYWAY will throw an error if blank
    FLYWAY_EDITION: ${{ parameters.edition }}
  inputs:
   targetType: 'inline'
   script: |
     write-host "$($env:PATH)"
     flyway -v
   pwsh: true
   failOnStderr: false
Here is an example of the template above being used for a simple pipeline with a stage for each of the vmImage types: windows-latest, ubuntu-latest and macos-latest

If you have any comments or suggestions please feel free to leave them below. According to AI my sentences are too long 
- Server OS requirements
- Group Selected Clauses
- Deployment Groups
- Update Max Attachment Size [Updated 03-OCT-2022]
Server OS Requirements
This is a big one, Windows Server 2019 and Windows Server 2022 are the only supported OSs. If most of your user base is on Windows 10/11 it is not such a big deal. However if you have users/devs running an older version of a client or server operating systems you may run into some TLS issues with some applications.
We had some devs on Windows Server 2012 R2 running PowerBuilder 2019 R3 using the MSSCI Provider (32-bit) which did not work after the upgrade. We added the following registry subkey values to resolve the issue:
[HKEY_LOCAL_MACHINE\SOFTWARE\Microsoft\Windows\CurrentVersion\Internet Settings\WinHttp\]
DefaultSecureProtocols = (DWORD): 0xAA0
[HKEY_LOCAL_MACHINE\SOFTWARE\Wow6432Node\Microsoft\Windows\CurrentVersion\Internet Settings\WinHttp\]
DefaultSecureProtocols = (DWORD): 0xAA0
[HKEY_LOCAL_MACHINE\SOFTWARE\Microsoft.NETFramework\v2.0.50727]
"SystemDefaultTlsVersions" = (DWORD):00000001
"SchUseStrongCrypto" = (DWORD):00000001
[HKEY_LOCAL_MACHINE\SOFTWARE\Microsoft.NETFramework\v4.0.30319]
"SystemDefaultTlsVersions" = (DWORD):00000001
"SchUseStrongCrypto" = (DWORD):00000001
[HKEY_LOCAL_MACHINE\SOFTWARE\Wow6432Node\Microsoft.NETFramework\v2.0.50727]
"SystemDefaultTlsVersions" = (DWORD):00000001
"SchUseStrongCrypto" = (DWORD):00000001
[HKEY_LOCAL_MACHINE\SOFTWARE\WOW6432Node\Microsoft.NETFramework\v4.0.30319]
"SystemDefaultTlsVersions" = (DWORD):00000001
"SchUseStrongCrypto" = (DWORD):00000001
Group Selected Clauses
If you’re trying to use the Group Select Clauses button, you might find it does nothing after selecting checkboxes of your clauses, hopefully this will be addressed in the next Release Candidate (RC)

Deployment Groups
If you click the “Show more” link you will get the error shown below
The requested version “7.0” of the resource is under preview. The preview flag must be supplied in the api-version for such requests. For example: “7.0-preview”

I am eagerly awaiting the next Release Candidate (RC) which should address those last two issues.
Update Max Attachment Size
In case you did not know, the max attachment size was increased in Azure DevOps Server to 60MB, which is huge compared to the 4MB default in TFS. If you’d like to change this setting, a few lines of PowerShell can make that happen.
[Net.ServicePointManager]::SecurityProtocol = [Net.SecurityProtocolType]::Tls12
$client = New-WebServiceProxy -Uri https://<serverUrl>/DefaultCollection/WorkItemTracking/v1.0/ConfigurationSettingsService.asmx -UseDefaultCredential
$client.SetMaxAttachmentSize(62914560)
Hopefully that helps someone out.
So many features have been added in this 2022 RC, if you haven’t migrated to Azure DevOps Services yet and are still running an on-premises version I urge you to check out the following:
- Delivery Plans
- New controls for environment variables in pipelines
- Generate unrestricted token for fork builds
- Templates support in YAML editor
- Group By Tags available in chart widgets
You can see the entire list of new features in the release notes.
]]>The PowerShell Script (with variables)
$pso = New-PsSessionOption -SkipCACheck -SkipCNCheck
$username = "$(AdminUser)"
$password = ConvertTo-SecureString $(AdminPassword) -AsPlainText -Force
$cred = New-Object System.Management.Automation.PSCredential -ArgumentList ($username, $password)

$session = New-PSSession -ComputerName $(CognosServer) -Credential $cred -UseSSL -SessionOption $pso

Copy-Item $(DestinationFolder)\deploy-vis.ps1 -Destination $(System.DefaultWorkingDirectory)\deploy-vis-new.ps1 -FromSession $session
NOTE: The variables I used above are defined in my pipeline
This post of course assumes you have WinRM configured on the remote computer. If you do not have WinRM configured, do not fear Microsoft has a script to perform the configuration for you.
Configure WinRM on the Target machine(s)
Download from GitHub this PowerShell script for Windows 10 and Windows Server 2016 or higher, or this PowerShell script for previous versions of Windows. Copy it to your target machine, and decide whether you plan to use HTTP or HTTPS to communicate to the target machine from the Agent.
If you choose HTTP, you must use a fully qualified domain name (FQDN). To use a FQDN to access the target machine(s), execute the following in a Windows PowerShell command prompt As Administrator:
.\ConfigureWinRM.ps1 {FQDN} http
If you choose HTTPS, you can use either a fully qualified domain name (FQDN) or an IP address to access the target machine(s). To use a FQDN to access the target machine(s), execute the following in a Windows PowerShell command prompt As Administrator:
.\ConfigureWinRM.ps1 {FQDN} https
To use an IP address to access the target machine(s), execute the following in a Windows PowerShell command prompt As Administrator:
.\ConfigureWinRM.ps1 {ipaddress} https
Azure DevOps – Azure Pipelines
The PowerShell Task should look something like this in a Classic Build or Release pipeline

Don’t forget YAML
Here is the equivalent task using YAML – watch out for your indenting 
steps:
- powershell: |
   # This example copies a file from the remote PC
   # The file happens to be one I copied to the server, renamed it on the way back to the agent

   $pso = New-PsSessionOption -SkipCACheck -SkipCNCheck
   $username = "$(AdminUser)"
   $password = ConvertTo-SecureString $(AdminPassword) -AsPlainText -Force
   $cred = New-Object System.Management.Automation.PSCredential -ArgumentList ($username, $password)
   $session = New-PSSession -ComputerName $(WindowsServer) -Credential $cred -UseSSL -SessionOption $pso
   Copy-Item $(DestinationFolder)\deploy-vis.ps1 -Destination $(System_DefaultWorkingDirectory)\deploy-vis-new.ps1 -FromSession $session

  displayName: 'PowerShell Script - Copy file from the $(WindowsServer)'
If you wanted to use environment variables in your PowerShell step that are not defined prior to the step you can add the following env: to your PowerShell YAML task so they are present in the PowerShell environment when the task runs.
steps:
- powershell: |
   $pso = New-PsSessionOption -SkipCACheck -SkipCNCheck
   $username = "$env:User"
   $password = ConvertTo-SecureString $Env:Password -AsPlainText -Force
   $cred = New-Object System.Management.Automation.PSCredential -ArgumentList ($username, $password)
   $session = New-PSSession -ComputerName $Env:WindowsServer -Credential $cred -UseSSL -SessionOption $pso
   Copy-Item $env:DestDir\deploy-vis.ps1 -Destination $env:WorkDir\deploy-vis-new.ps1 -FromSession $session

  displayName: 'PowerShell Script - Copy file from the $(WindowsServer)'
  env:
    User: $(AdminUser)
    Password: $(AdminPassword)
    WorkDir: $(System.DefaultWorkingDirectory)
    DestDir: $(DestinationFolder)
    WindowsServer: $(WindowsServer)
Happy Azure Pipelining!!
]]>- Release
- Preview

These settings are located in the More button/dropdown by clicking Update settings

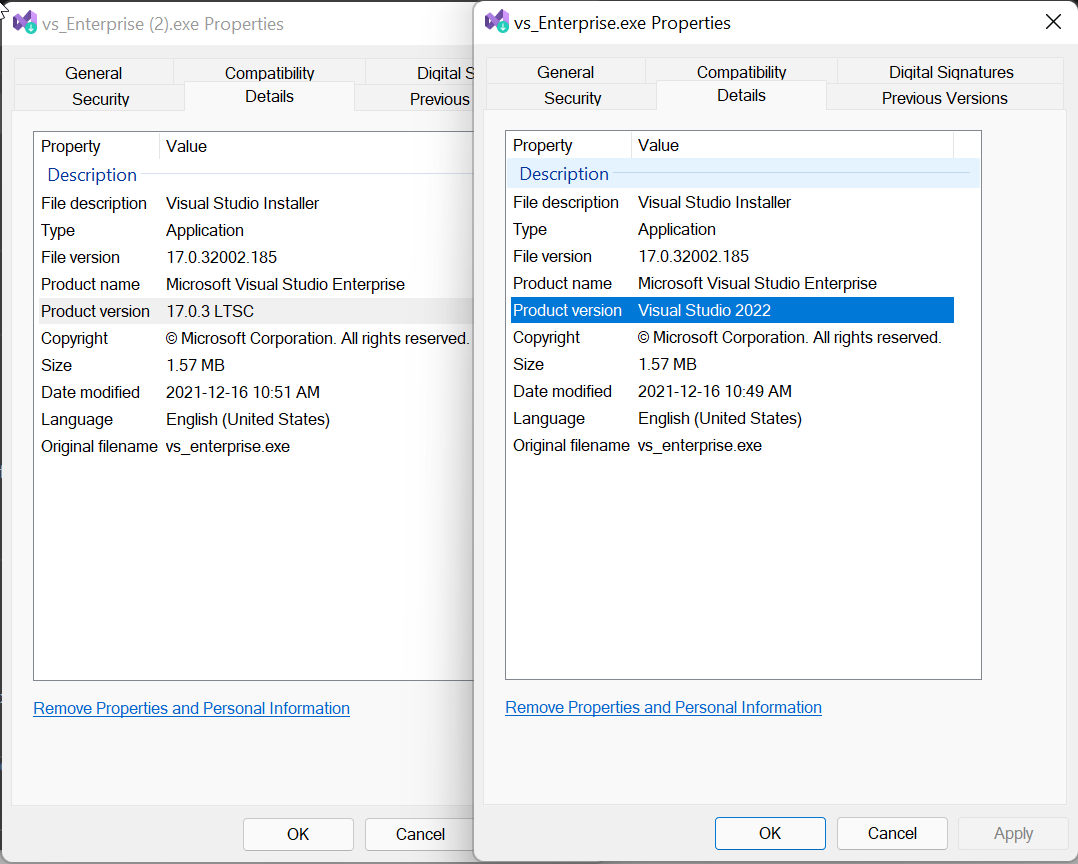
If you’ve been able to install Visual Studio 2022 the update channels are different, you can pick from the following:
- Current
- Preview
- LTSC Version 17.0
Note: The Long-Term Servicing Channel (LTSC) includes security and high priority servicing bug fixes while remaining at the 17.0 feature level. The Current channel includes the latest features and fixes that are ready for production use. The Preview channel provides an early look into what’s coming in the next feature release on the Current channel.

I typically have two (2) channels of a version of Visual Studio on my machine, Current and Preview just in case the version of Preview has an issue with my machine I can fallback to using the Current version.
If you’re looking for a specific bootstrapper for Visual Studio which installs the latest release (evergreen bootstrappers) or a fixed version (fixed version bootstrappers) from a channel you can use the links provided. If you’re not sure which bootstrapper you have downloaded you can check the Details tab of the installer and check the Product version value (click on the images to see the enlarged versions).

Hope that helps. Happy Holidays
]]>
The Azure DevOps connector is currently in preview and is one (1) of ten (10) Graph Connectors developed by Microsoft. Here is the current list in case you want to check out the others.
- Azure Data Lake Storage Gen2
- Azure DevOps
- Azure SQL
- Enterprise websites
- MediaWiki
- Microsoft SQL Server
- File share
- Oracle (preview)
- Salesforce (preview)
- ServiceNow
You can add this connector for your Microsoft 365 tenant if you’re a Microsoft 365 Administrator. The connector requires you register an app in Azure DevOps so that Microsoft Search can access the organization or projects you specify. The assumption here is the Microsoft 365 Administrator is already a member of the Project Collection Administrators group, not to be confused with the Azure DevOps Administrator Azure AD role which grants no Azure DevOps specific permissions.
You can view your apps here under Applications and services. For example here is how my app registration appears ready for my connector configuration.

The values you require for the connector configuration are App ID & Client Secret.
You can access the Search & Intelligence Connectors from within the Microsoft 365 admin center. The Search & Intelligence menu may not be visible in the navigation by default, you can click Show more to display the Settings menu if it is not visible.

On the Connectors tab click Add and choose the Azure DevOps data source

Give the Azure DevOps Connector a name and connection ID and then click Next, on the Connection settings page enter the name of your Azure DevOps organization (https://dev.azure.com/<organization-name>/)
Paste in your App ID & Client secret and click Sign In, if everything is configured correctly you will receive a Connection successful message below the Client secret.


The next step you are able to choose whether you want to index specific team projects or the entire organization (all team projects).

The properties ID, Title, WorkItemType, TeamProject, ChangedDate, URL are required fields. The other preselected fields shown below are suggested. If you click Edit properties you can select from other fields present in your Work Item Types, by default fourteen (14) fields are selected.
Once you are done selecting the fields you’d like for indexing, you can click Preview to see the data that will be indexed by the connector.

The next step in the process is to assign property labels, the ones that match to a source property are already populated for you.

The next step is Manage schema, each source property must have at least one of the following checkboxes selected: Query, Search, Retrieve. The Content Property defaults to Description which makes sense, however you can change this if desired. It is used to generate result snippets and descriptions in the search results that are returned.

You can also choose to make a source property a refiner, in the example above the two (2) that are available are ChangedDate and Tags, the caveat with Tags is that the property cannot be both Searchable and Refinable. The schema cannot be edited after the fact so if you wish to edit this after you shall have to drop the connector and recreate it.
The next step is Manage search permissions, not much here to configure as you *must* select Everyone.

This does make sense from an information perspective but if you need to exclude Team Project(s) make sure you customize the search data accordingly.
The next step is Refresh settings, the defaults should suffice for most however you can customize both the incremental and full refresh intervals if necessary.

Finally we’re able to review the connection settings we’ve chosen

If you’re okay to proceed you can now click Finish updating to publish your connection, this will take a few minutes.
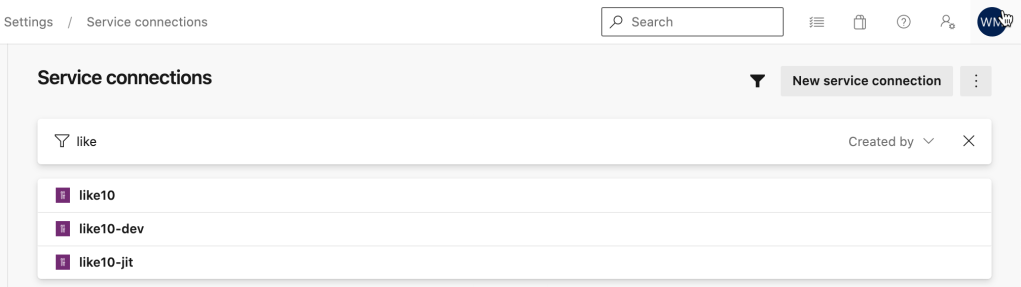
You should see the connector appear shortly like in my screenshot below, the screenshots above are for the like10-demo entry you see below. You will also note that a required action Create Vertical link is present in the last column, you will need to click this to create a named vertical in Bing for your Azure DevOps search results.

The Create Vertical wizard is pretty brief and half of the pages are optional, these pages are:
-Vertical name
-Select a content source: You can choose to select multiple connector sources. A connector can only be used in a single vertical.
-Add a query (optional): If you want to limit the scope for this vertical you can write a query using KQL
-Filters (optional): If you selected any Refiners when defining your schema you can add a filter here.
-Review
Once this is complete, you can head over to Bing and login with your work/school account and you will see the Vertical you added along with results. You are able to Enable or Disable your Verticals from the Customizations tab within Search & Intelligence.

I could search for “As a customer” in Bing within my Azure DevOps vertical only to review the results.

Definitely easy to implement, so what are you waiting for

My last post demonstrated using the Power Platform Build Tools in an Azure Pipeline which downloaded a solution, extracted the files and committed them to a Git repository. While this is a great demonstration of what is possible, wouldn’t it be nice if the Azure Pipeline did what a developer might typically do?
Instead of committing directly to main, a developer might perform the following:
- Create a feature branch from develop
- Commit code changes to that branch
- Push branch with all changes to remote
- Create a pull request to review pending changes with their peers (we might have to deploy the solution to validate the PR)
- Commit more code changes and push (based on feedback)
The YAML is very similar to what I had posted previously, I mean creating branches with Git on the command line is straight forward – GitHub Actions for Microsoft Power Platform (Preview) actually supports it out of the box with a Branch Solution action. However, it would be really cool if we could create a pull request in Azure DevOps for our new branch instead of having the click the button in the Web UI. Automation Everywhere!
Enter the Azure CLI, with the azure-devops extension.
Azure DevOps CLI
I am using the windows-latest image with this Azure Pipeline, this image already has the Azure Command Line Interface (CLI) and azure-devops extension installed so we do not have to run the following command as part of our pipeline. If you already have the Azure CLI installed, you can add the extension using the following command line.
az extension add -n azure-devopsDevOps Login
We do however have to login to Azure DevOps with the CLI, this is easy since with the YAML build the SYSTEM_ACCESSTOKEN is always exposed as a secret variable, we don’t need to set “Allow scripts to access OAuth Token” like we used to in the classic release definitions.
We need to add the following step in our pipeline to login to Azure DevOps using the Azure CLI. It also serves another important purpose of creating the environment variable AZURE_DEVOPS_EXT_PAT. Note, the CLI works with both Azure DevOps Server 2020 and Azure DevOps Services
- pwsh: $env:AZURE_DEVOPS_EXT_PAT | az devops login
  displayName: 'Login Azure DevOps Extension'
  env:
    AZURE_DEVOPS_EXT_PAT: $(System.AccessToken)
Without that environment variable you may encounter the following error when trying to run any of the azure-devops extensions in subsequent tasks.
TF400813: The user ” is not authorized to access this resource.
Default Configuration
We also need to configure our default configuration for our organization and project, I have put the following command in its own step for this example but you could combine it in a single task.
The values we require for this are already available in variables, so we can just reference them as part of our command line.
- pwsh: az devops configure --defaults organization=$env:System_TeamFoundationCollectionUri project=$env:System_TeamProject --use-git-aliases true
  displayName: 'Set default Azure DevOps organization and project'
Create Pull Request using the CLI
Now on to the fun part, creating our pull request based on our newly created Git Branch. The default output format of these commands is JSON, if you are using this on the command line you may want to specify table as it is more readable but in this particular case JSON is fine.
The first thing I want to do is verify I don’t already have a pull request for this branch. We might just be updating the code in the branch for an already existing Pull Request. I split the command over multiple lines for readability but it should be just a single line.
$pullRequest = az repos pr list
--repository $env:Build_Repository_Name
--source-branch
users/$env:Build_RequestedForEmail/$env:Feature_Branch_Name |
ConvertFrom-Json
I’m using the ConvertFrom-JSON utility to convert the JSON response from the list command to a PowerShell object which we can check whether it is $null or not.
if ($pullRequest -eq $null)
{
az repos pr create --source-branch refs/heads/users/$env:Build_RequestedForEmail/$env:Feature_Branch_Name
--target-branch refs/heads/develop
--repository $env:Build_Repository_Name
--title $env:Feature_Branch_Name
--draft true
--reviewers $env:Pull_Request_Reviewers
}
This way if a pull request already exists in Azure DevOps for this branch, we just push the new code changes to our remote and finish, if we need a pull request we create one. I’ve added a variable for reviewer(s) so a notification is generated by Azure DevOps when the pull request is created and optional reviewer assigned.
Permissions Required
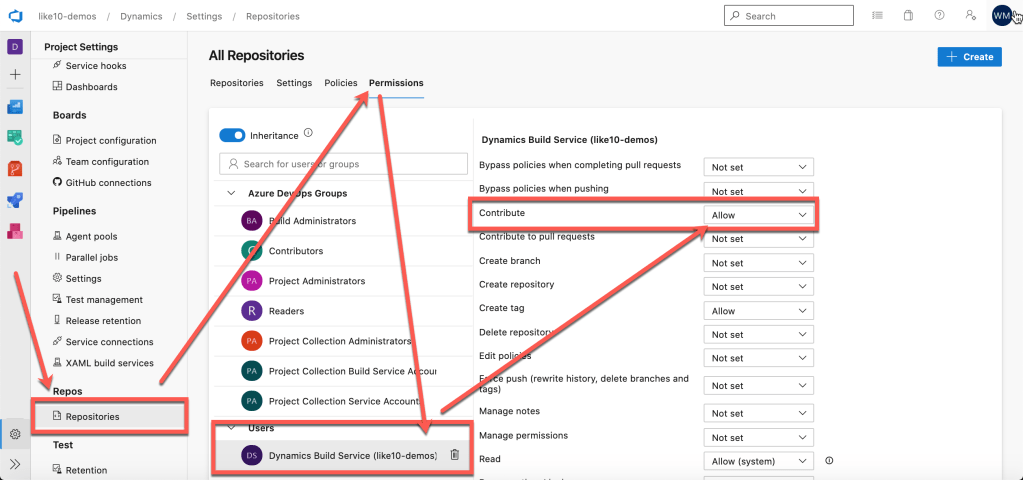
We must grant the Build Service more than read permissions (which it already has). The required permissions are:
- Contribute
- Contribute to pull requests
- Create branch
You can grant that permission across the board to all of your repositories or for a particular repository. In the example below I have granted it to all of my Git repositories but that may not work for you.
You can find the Manage repositories link in the Git repository dropdown.


If you want to see the YAML for the Azure Pipeline you can head over to this public project hosted in Azure DevOps. I have some other YAML pipeline samples in that public repository also.
Thanks for reading and if you’ve any questions please leave a comment below.
]]>
This is not really the best method for managing your custom solutions. Luckily the Power Platform team has created a ton of guidance which you can review here.
This blog post aims to share how you can go from shipping your solutions manually to using Azure DevOps, store your solutions in Git and leverage Azure Pipelines to manage your solution and deploy them to a testing environment. Once approved, the solution can be deployed to production for your users.
If your Microsoft 365 user account/tenant requires two factor authentication (2FA) then you will have to perform a few extra steps as you will not be able to use a username/password combination when connecting to Dynamics from the Azure Pipeline. In this case we will use an App Registration.
You will need the following to continue:
- Azure DevOps
- Azure Application Registration
- Common Data Service environments (Power Apps)
- Developer Environment
- Just-In-Time (JIT) Build Environment
- Production Environment
- Power Platform Build Tools
Azure DevOps
If you do not have an Azure DevOps account you can sign up for free here. If you already have an account then click on the Sign in to Azure DevOps available on that same page.
In Azure DevOps we’ll assume you have a Team Project with a Git repository. If this is not the case you can follow the steps here to add a Git repository.
The reason we’re asking for a Git repository is because one of the Azure Pipelines we’ll create will extract the solution and put the source into Git.
If you want to commit the extracted source of a solution package from within an Azure Pipeline you will have to enable contribute permissions to the project build service user by changing the setting from Not set to Allow. More information is available here.
Azure Application Registration
Please follow the steps in this article to create your application registration in Azure AD.

Once you have your application registration, you must also add it as an Application User by following the steps in this article. Make sure you assign the System Administrator role to this account.
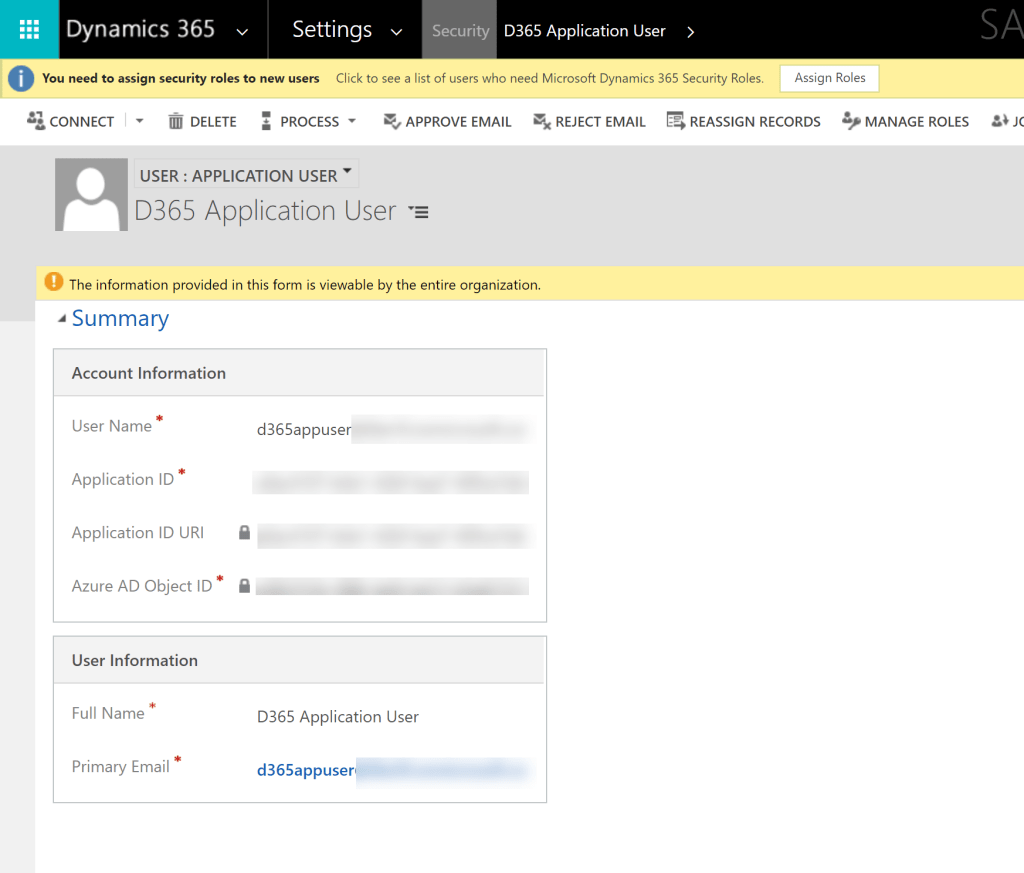
In the example above I am adding the user to my Developer environment (sandbox) but you need to do this to every environment that Azure DevOps will have a service connection and its matching Application User.
Power Platform Service Connections
Here are the three (3) service connections I’ve configured in my demo environment which will be used in the various pipeline flows.
The service connection requires the following bits of information
- Server Url
- Tenant ID
- Application ID
- Client Secret
- Service Connection Name
Azure Pipeline (YAML)
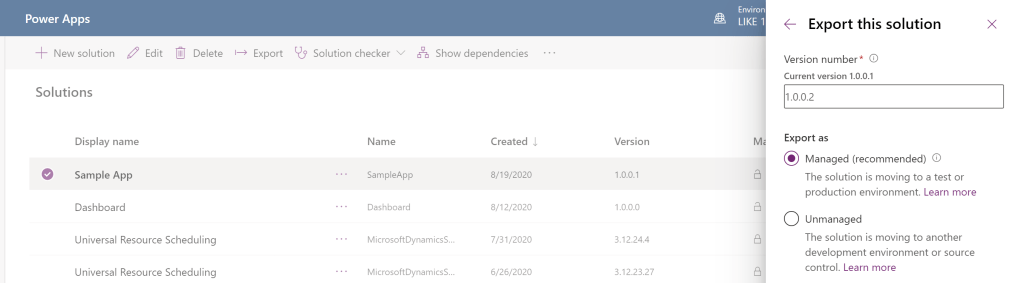
I think we’re ready to build our first Azure Pipeline using YAML to Create an export from Dev and Commit to our repository. In the example below my app is named SampleApp.

# Starter pipeline
# Create Export from Dev

trigger:
- main

pool:
  vmImage: 'windows-latest'

variables:
  GIT_REDIRECT_STDERR: 2>&1
  Version.Revision: $[counter(format('{0:yyyyMMdd}', pipeline.startTime), 0)]
  BuildPlatform: 'Any CPU'
  BuildConfiguration: 'Release'
  MajorVersion: 1
  MinorVersion: 0
  PatchVersion: 0

name: '$(Build.DefinitionName) $(MajorVersion).$(MinorVersion).$(PatchVersion).$(Date:yy)$(DayOfYear)$(Version.Revision)'

steps:
- checkout: self
  clean: true
  persistCredentials: true


- task: PowerPlatformToolInstaller@0
  inputs:
    DefaultVersion: true

- task: PowerPlatformPublishCustomizations@0
  inputs:
    authenticationType: 'PowerPlatformSPN'
    PowerPlatformSPN: 'like10-dev'
- task: PowerPlatformExportSolution@0
  inputs:
    authenticationType: 'PowerPlatformSPN'
    PowerPlatformSPN: 'like10-dev'
    SolutionName: 'SampleApp'
    SolutionOutputFile: '$(Pipeline.Workspace)\Zips\SampleApp.zip'

- task: PowerPlatformUnpackSolution@0
  inputs:
    SolutionInputFile: '$(Pipeline.Workspace)/Zips/SampleApp.zip'
    SolutionTargetFolder: '$(Build.SourcesDirectory)/Solution'

- pwsh: |
   write-host "commit all changes"
   git config user.email "[email protected]"
   git config user.name "Azure Pipeline"
   git checkout $env:Build_SourceBranchName --
   git add --all
   git commit -m "solution source updated by $env:BUILD_BUILDNUMBER [skip ci]"
   write-host "push code to repo"
   git push origin $env:Build_SourceBranchName
  displayName: "Commit changes to Git repo"
If you want to see the pipeline you can head over to this public project hosted in Azure DevOps. I have some other pipeline samples in that project also.
The next pipeline which is important is to build a managed solution from the source that is stored in the repository, this one is packaged as an unmanaged solution first and imported into a Just-In-Time build environment, it is then extracted as a managed solution ready for deployment to your UAT, Pre-Prod and Production environments.
# Build managed solution from git repository
# requires a Just-In-Time (JIT) environment in Power Apps
# umanaged solution is imported and a managed solution
# is exported
# The managed solution is saved as a pipeline artifact
#

trigger:
  - main
  - develop

pool:
  vmImage: 'windows-latest'

variables:
  # Solution Details
  Solution.Name: 'SampleApp'
  Solution.Path: '$(Pipeline.Workspace)/s/Solution'

steps:

- task: PowerPlatformToolInstaller@0
  displayName: 'Power Platform Tool Installer'
  inputs:
    DefaultVersion: true

- task: PowerPlatformPackSolution@0
  displayName: 'Pack Solution from Repository'
  inputs:
    SolutionSourceFolder: '$(Solution.Path)'
    SolutionOutputFile: '$(Build.ArtifactStagingDirectory)\$(Solution.Name).zip'

- task: PowerPlatformImportSolution@0
  displayName: 'Import Solution to JIT Build Environment'
  inputs:
    authenticationType: 'PowerPlatformSPN'
    PowerPlatformSPN: 'like10-jit'
    SolutionInputFile: '$(Build.ArtifactStagingDirectory)\$(Solution.Name).zip'
    AsyncOperation: true
    MaxAsyncWaitTime: '240'

- task: PowerPlatformExportSolution@0
  displayName: 'Export Managed Solution'
  inputs:
    authenticationType: 'PowerPlatformSPN'
    PowerPlatformSPN: 'like10-jit'
    SolutionName: '$(Solution.Name)'
    SolutionOutputFile: '$(Build.ArtifactStagingDirectory)\$(Solution.Name)_managed.zip'
    Managed: true

- task: PublishPipelineArtifact@1
  displayName: 'Publish Artifacts managed and unmanaged solutions'
  inputs:
    targetPath: '$(Build.ArtifactStagingDirectory)\'
    artifact: 'PowerAppSolutions'
    publishLocation: 'pipeline'
Some steps you may want to include during this pipeline execution is to *version* the managed solution, Power Platform Build tools has a task which can put your version string on the app prior to the export.
Hopefully you find this helpful, if you have any questions or I’ve missed something please feel free to leave a comment below.
]]>Updated 08/05/2019 – update date/time in WSL2 due to Windows 10 sleep/hibernate
Windows 10 Pro Insider Preview
Get the latest Windows Insider Build, you find out more here on the Quick Start page
Enable WSL (WSL 1.0)
If you do *not* have WSL already configured in Windows 10, you can execute the following command in PowerShell (as Administrator)
Enable-WindowsOptionalFeature -Online -FeatureName Microsoft-Windows-Subsystem-Linux
Open the Microsoft Store and select Ubuntu 18.04 LTS
Enable WSL 2
Execute the following command in PowerShell (as Administrator)
Enable-WindowsOptionalFeature -Online -FeatureName VirtualMachinePlatform
You will have to restart your PC to complete the previous step.
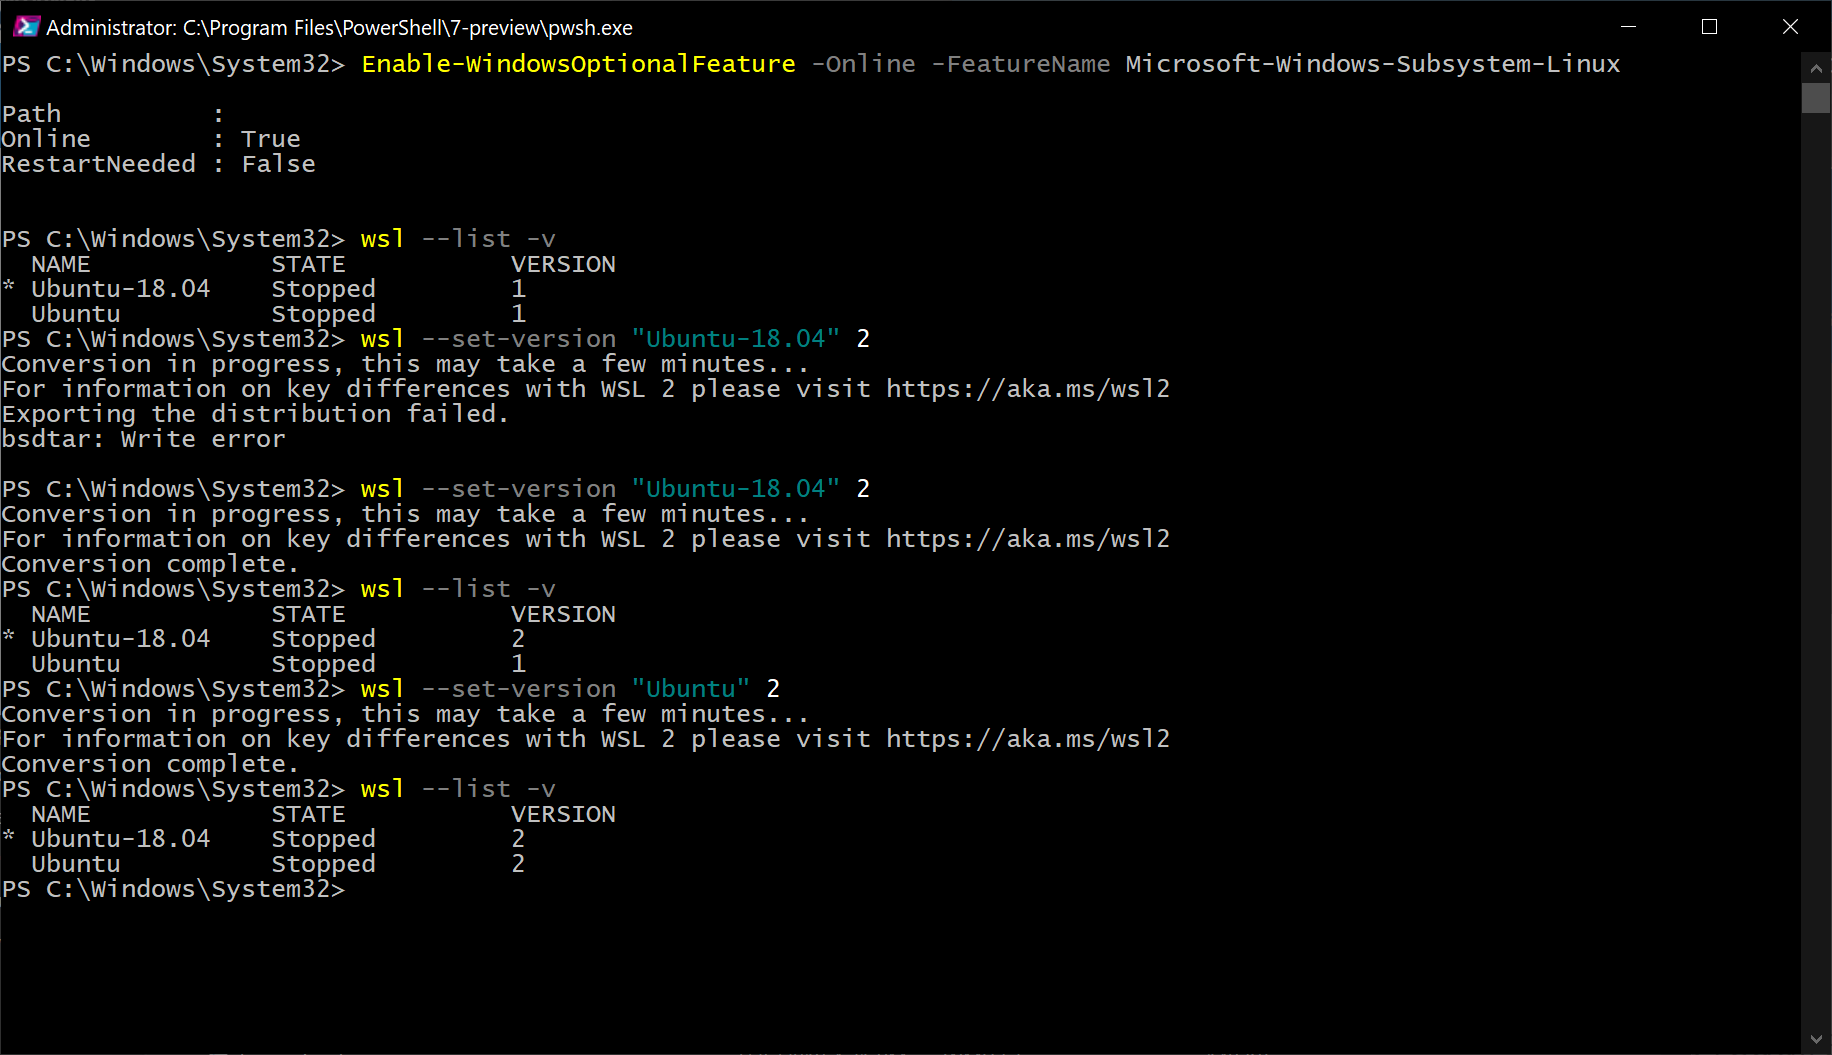
Open a PowerShell command prompt (as Administrator). This first command will list the distributions you have installed with WSL
wsl -- list -v
You should see Ubuntu-18.04 listed and with a Version 1. You can now switch Ubuntu-18.04 to Version 2 by executing the following command:
wsl --set-version "Ubuntu-18.04" 2
You can see from the image below it took me two (2) tries to get that to happen successfully.
You should now be able to install the Docker Desktop WSL 2 Tech Preview, if you already have a version of Docker installed it will be upgraded to this version.
Once installed you should see the familiar icon in your task bar, Click on the Docker Desktop Icon to display the menu. Select the WSL 2 Tech Preview menu item
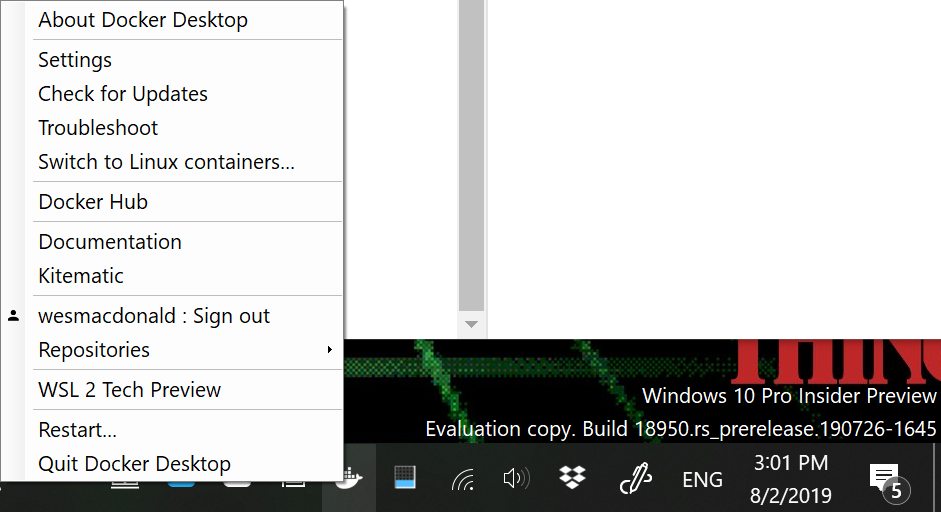
Once you click that menu item you will be presented with a dialog to start the daemon running in WSL 2.

Create Docker file
I wanted an excuse to use Visual Studio Code with the new Remote WSL extension and open a folder in WSL. I launched VS Code with the extension installed and chose to open a folder in Ubuntu 18.04


Once you do that you can use VS Code to open your home folder to create a directory and the necessary docker files we need to configure the agent.
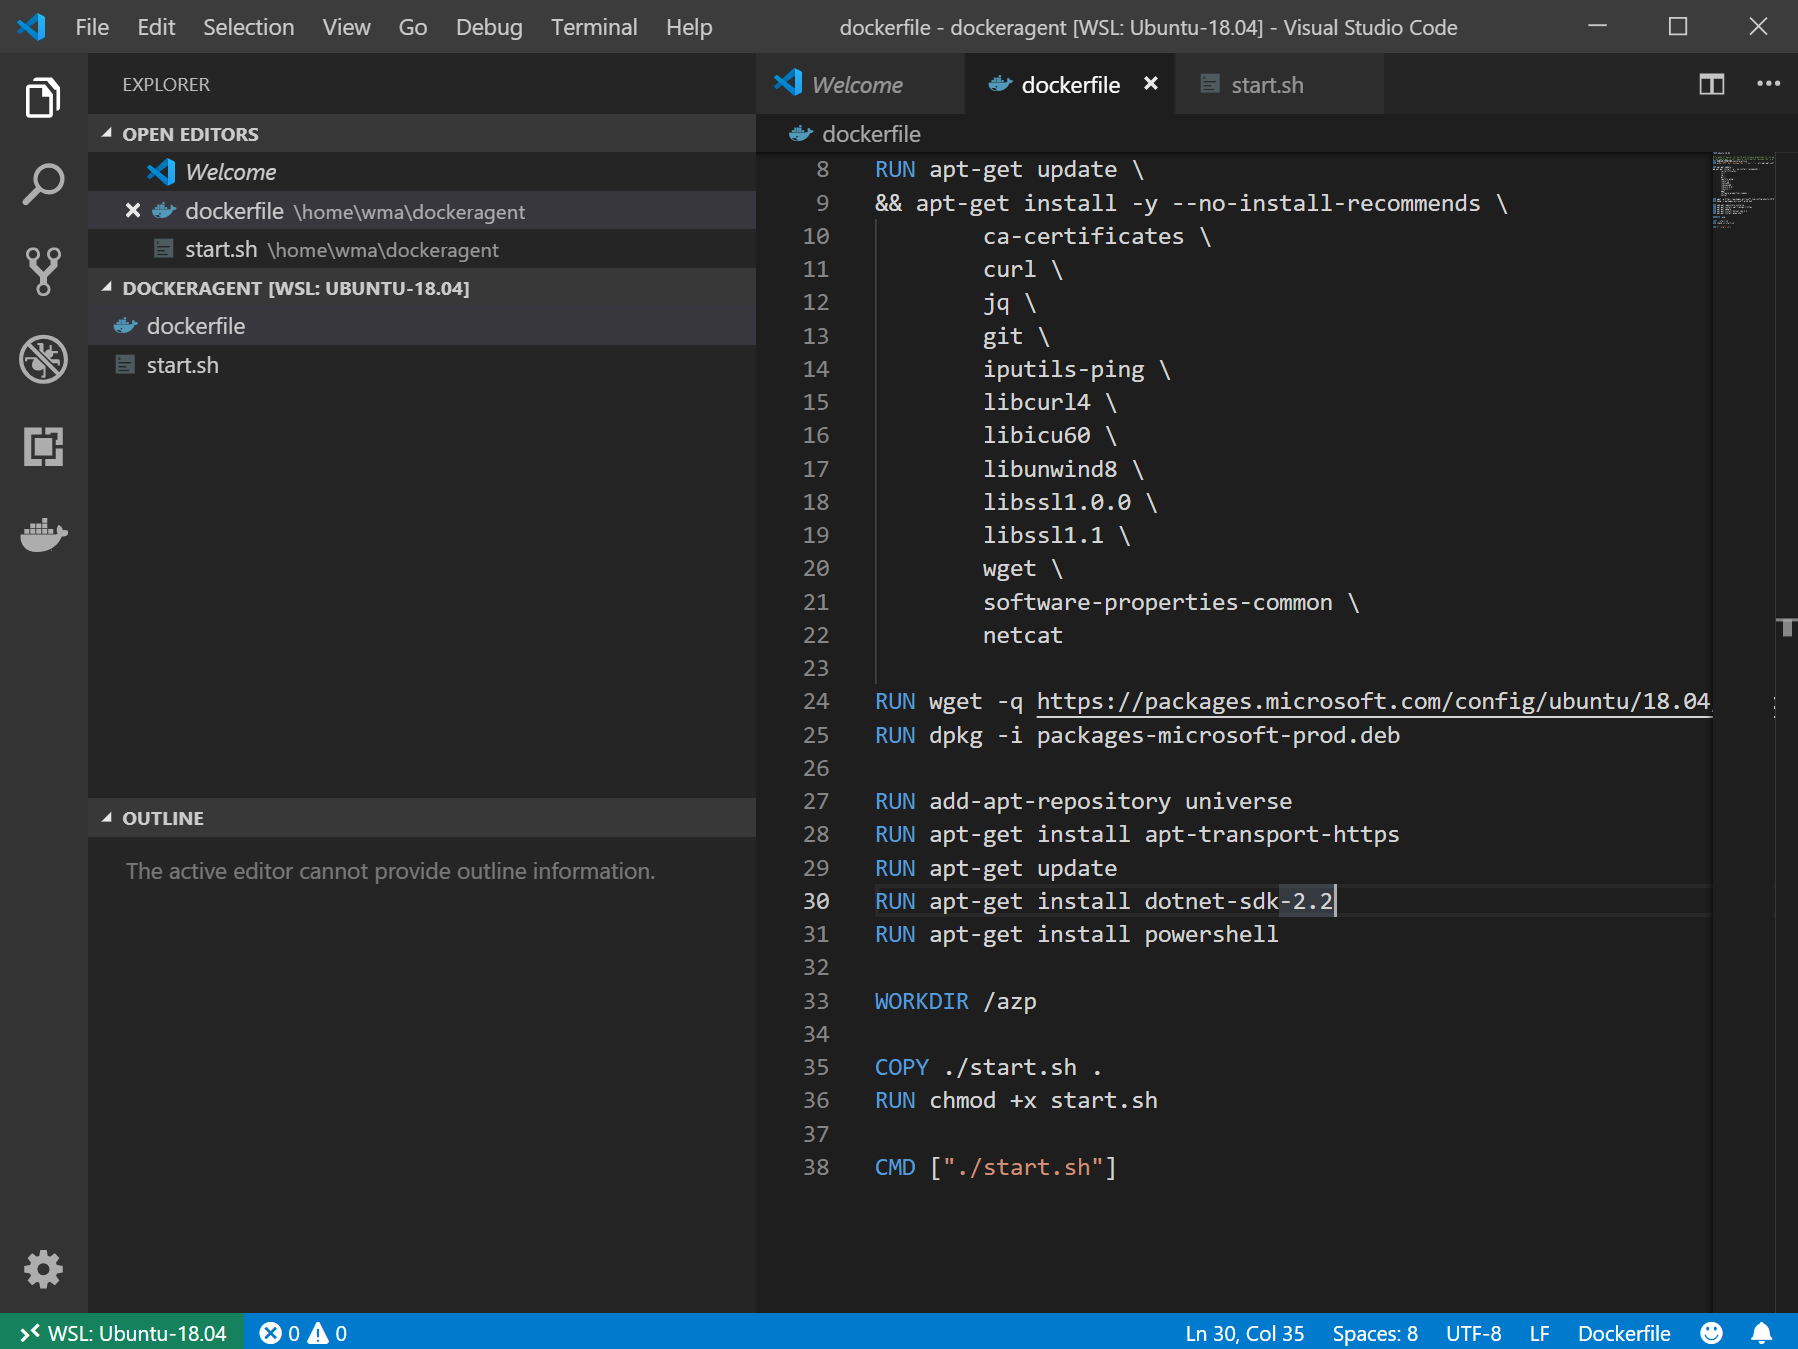
Here is the Dockerfile (below) I created, portion of it was obtained from here. The issues I had with that particular configuration is I wanted to use Ubuntu 18.04, compile a .NET core application (which required the sdk) and execute a PowerShell script (which required PowerShell core) as part of the build definition of my .NET Core Web Application.
The Dockerfile was modified to use Ubuntu 18.04, install the dot net core sdk 2.2 and install PowerShell core.
FROM ubuntu:18.04

# To make it easier for build and release pipelines to run apt-get,
# configure apt to not require confirmation (assume the -y argument by default)
ENV DEBIAN_FRONTEND=noninteractive
RUN echo "APT::Get::Assume-Yes \"true\";" > /etc/apt/apt.conf.d/90assumeyes

RUN apt-get update \
&& apt-get install -y --no-install-recommends \
        ca-certificates \
        curl \
        jq \
        git \
        iputils-ping \
        libcurl4 \
        libicu60 \
        libunwind8 \
        libssl1.0.0 \
        libssl1.1 \
        wget \
        software-properties-common \
        netcat

RUN wget -q https://packages.microsoft.com/config/ubuntu/18.04/packages-microsoft-prod.deb -O packages-microsoft-prod.deb
RUN dpkg -i packages-microsoft-prod.deb

RUN add-apt-repository universe
RUN apt-get install apt-transport-https
RUN apt-get update
RUN apt-get install dotnet-sdk-2.2
RUN apt-get install powershell

WORKDIR /azp

COPY ./start.sh .
RUN chmod +x start.sh

CMD ["./start.sh"]
Here is the start.sh file which is exactly what was in the article. I did not have to change this script whatsoever.
#!/bin/bash
set -e

if [ -z "$AZP_URL" ]; then
  echo 1>&2 "error: missing AZP_URL environment variable"
  exit 1
fi

if [ -z "$AZP_TOKEN_FILE" ]; then
  if [ -z "$AZP_TOKEN" ]; then
    echo 1>&2 "error: missing AZP_TOKEN environment variable"
    exit 1
  fi

  AZP_TOKEN_FILE=/azp/.token
  echo -n $AZP_TOKEN > "$AZP_TOKEN_FILE"
fi

unset AZP_TOKEN

if [ -n "$AZP_WORK" ]; then
  mkdir -p "$AZP_WORK"
fi

rm -rf /azp/agent
mkdir /azp/agent
cd /azp/agent

export AGENT_ALLOW_RUNASROOT="1"

cleanup() {
  if [ -e config.sh ]; then
    print_header "Cleanup. Removing Azure Pipelines agent..."

    ./config.sh remove --unattended \
      --auth PAT \
      --token $(cat "$AZP_TOKEN_FILE")
  fi
}

print_header() {
  lightcyan='\033[1;36m'
  nocolor='\033[0m'
  echo -e "${lightcyan}$1${nocolor}"
}

# Let the agent ignore the token env variables
export VSO_AGENT_IGNORE=AZP_TOKEN,AZP_TOKEN_FILE

print_header "1. Determining matching Azure Pipelines agent..."

AZP_AGENT_RESPONSE=$(curl -LsS \
  -u user:$(cat "$AZP_TOKEN_FILE") \
  -H 'Accept:application/json;api-version=3.0-preview' \
  "$AZP_URL/_apis/distributedtask/packages/agent?platform=linux-x64")

if echo "$AZP_AGENT_RESPONSE" | jq . >/dev/null 2>&1; then
  AZP_AGENTPACKAGE_URL=$(echo "$AZP_AGENT_RESPONSE" \
    | jq -r '.value | map([.version.major,.version.minor,.version.patch,.downloadUrl]) | sort | .[length-1] | .[3]')
fi

if [ -z "$AZP_AGENTPACKAGE_URL" -o "$AZP_AGENTPACKAGE_URL" == "null" ]; then
  echo 1>&2 "error: could not determine a matching Azure Pipelines agent - check that account '$AZP_URL' is correct and the token is valid for that account"
  exit 1
fi

print_header "2. Downloading and installing Azure Pipelines agent..."

curl -LsS $AZP_AGENTPACKAGE_URL | tar -xz & wait $!

source ./env.sh

trap 'cleanup; exit 130' INT
trap 'cleanup; exit 143' TERM

print_header "3. Configuring Azure Pipelines agent..."

./config.sh --unattended \
  --agent "${AZP_AGENT_NAME:-$(hostname)}" \
  --url "$AZP_URL" \
  --auth PAT \
  --token $(cat "$AZP_TOKEN_FILE") \
  --pool "${AZP_POOL:-Default}" \
  --work "${AZP_WORK:-_work}" \
  --replace \
  --acceptTeeEula & wait $!

print_header "4. Running Azure Pipelines agent..."

# `exec` the node runtime so it's aware of TERM and INT signals
# AgentService.js understands how to handle agent self-update and restart
exec ./externals/node/bin/node ./bin/AgentService.js interactive
Build the container
Once these file are saved in your WSL 2 environment, open a wsl prompt and change directories into ~/dockeragent and execute the command below to build your Dockerfile
docker build -t dockeragent:latest .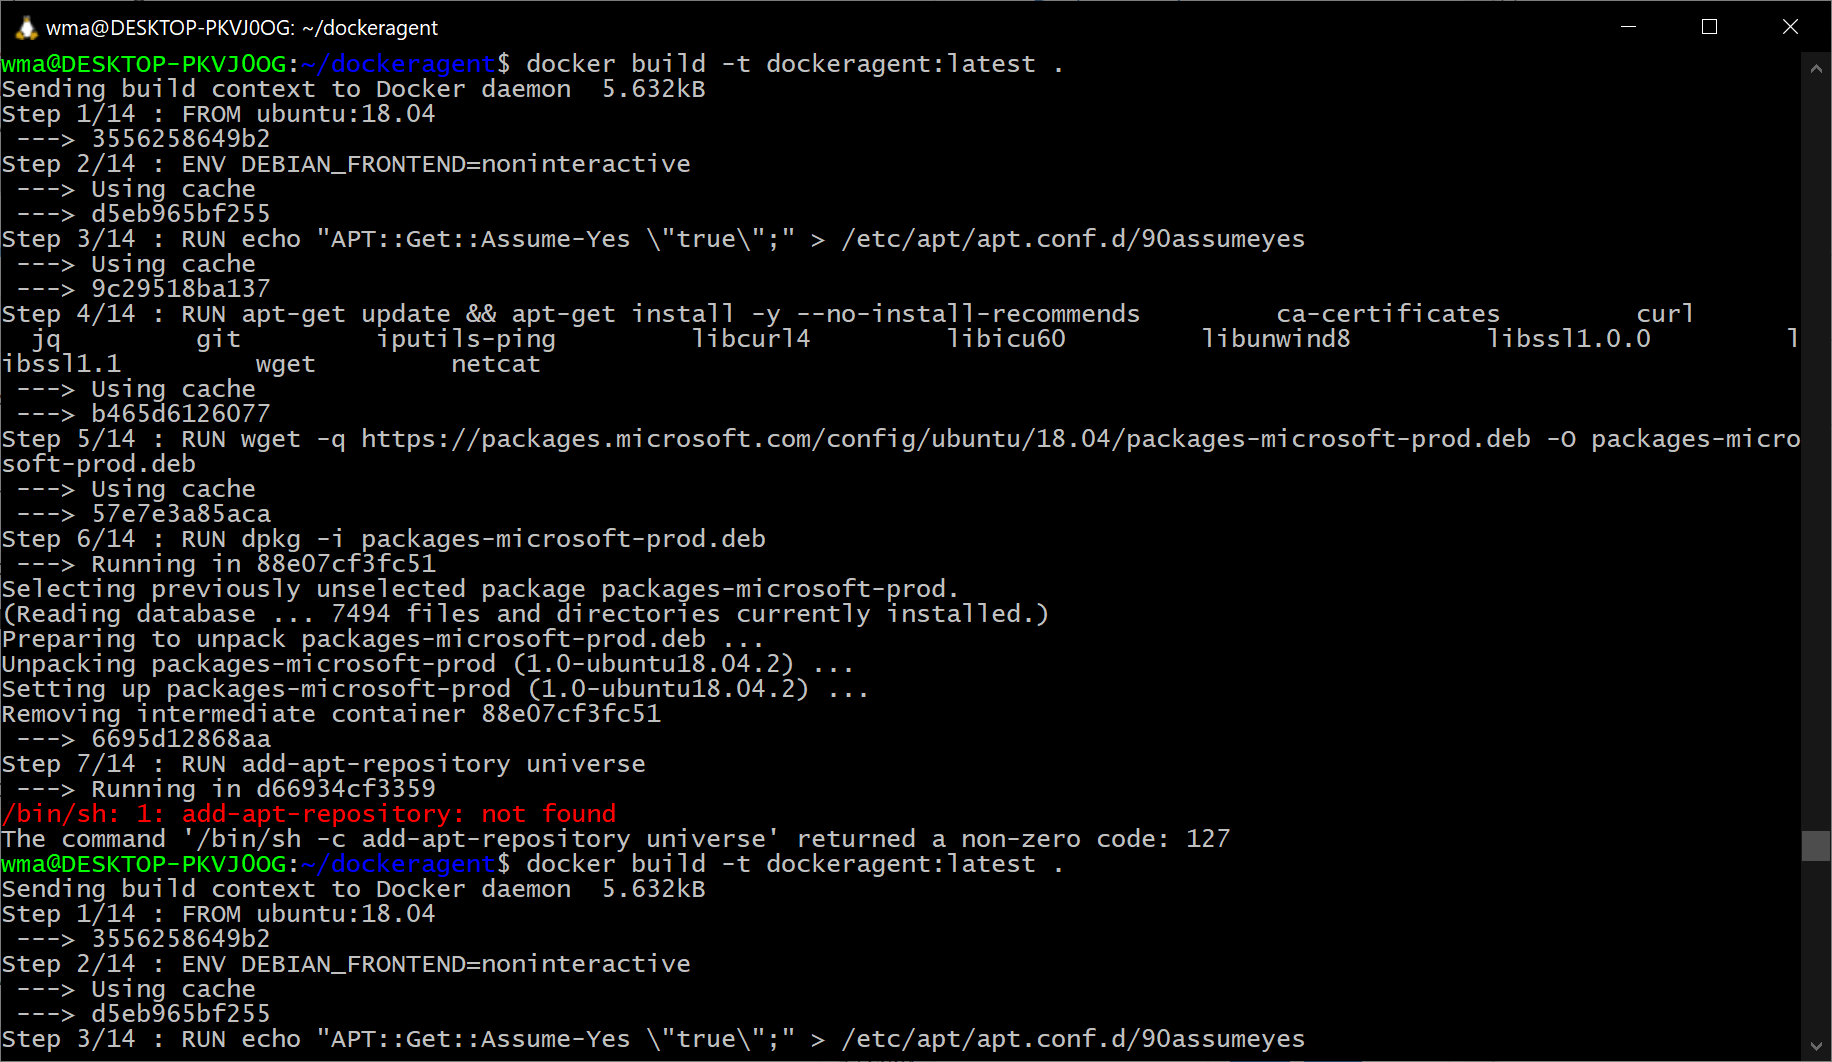
Start the container
Once that command completes we can run our docker container. This will install the latest version of the agent, configure it, and run the agent targeting the default pool of the Azure DevOps service specified on the command line.
docker run -e AZP_URL=<Azure DevOps instance> -e AZP_TOKEN=<PAT token> -e AZP_AGENT_NAME=mydockeragent dockeragent:latest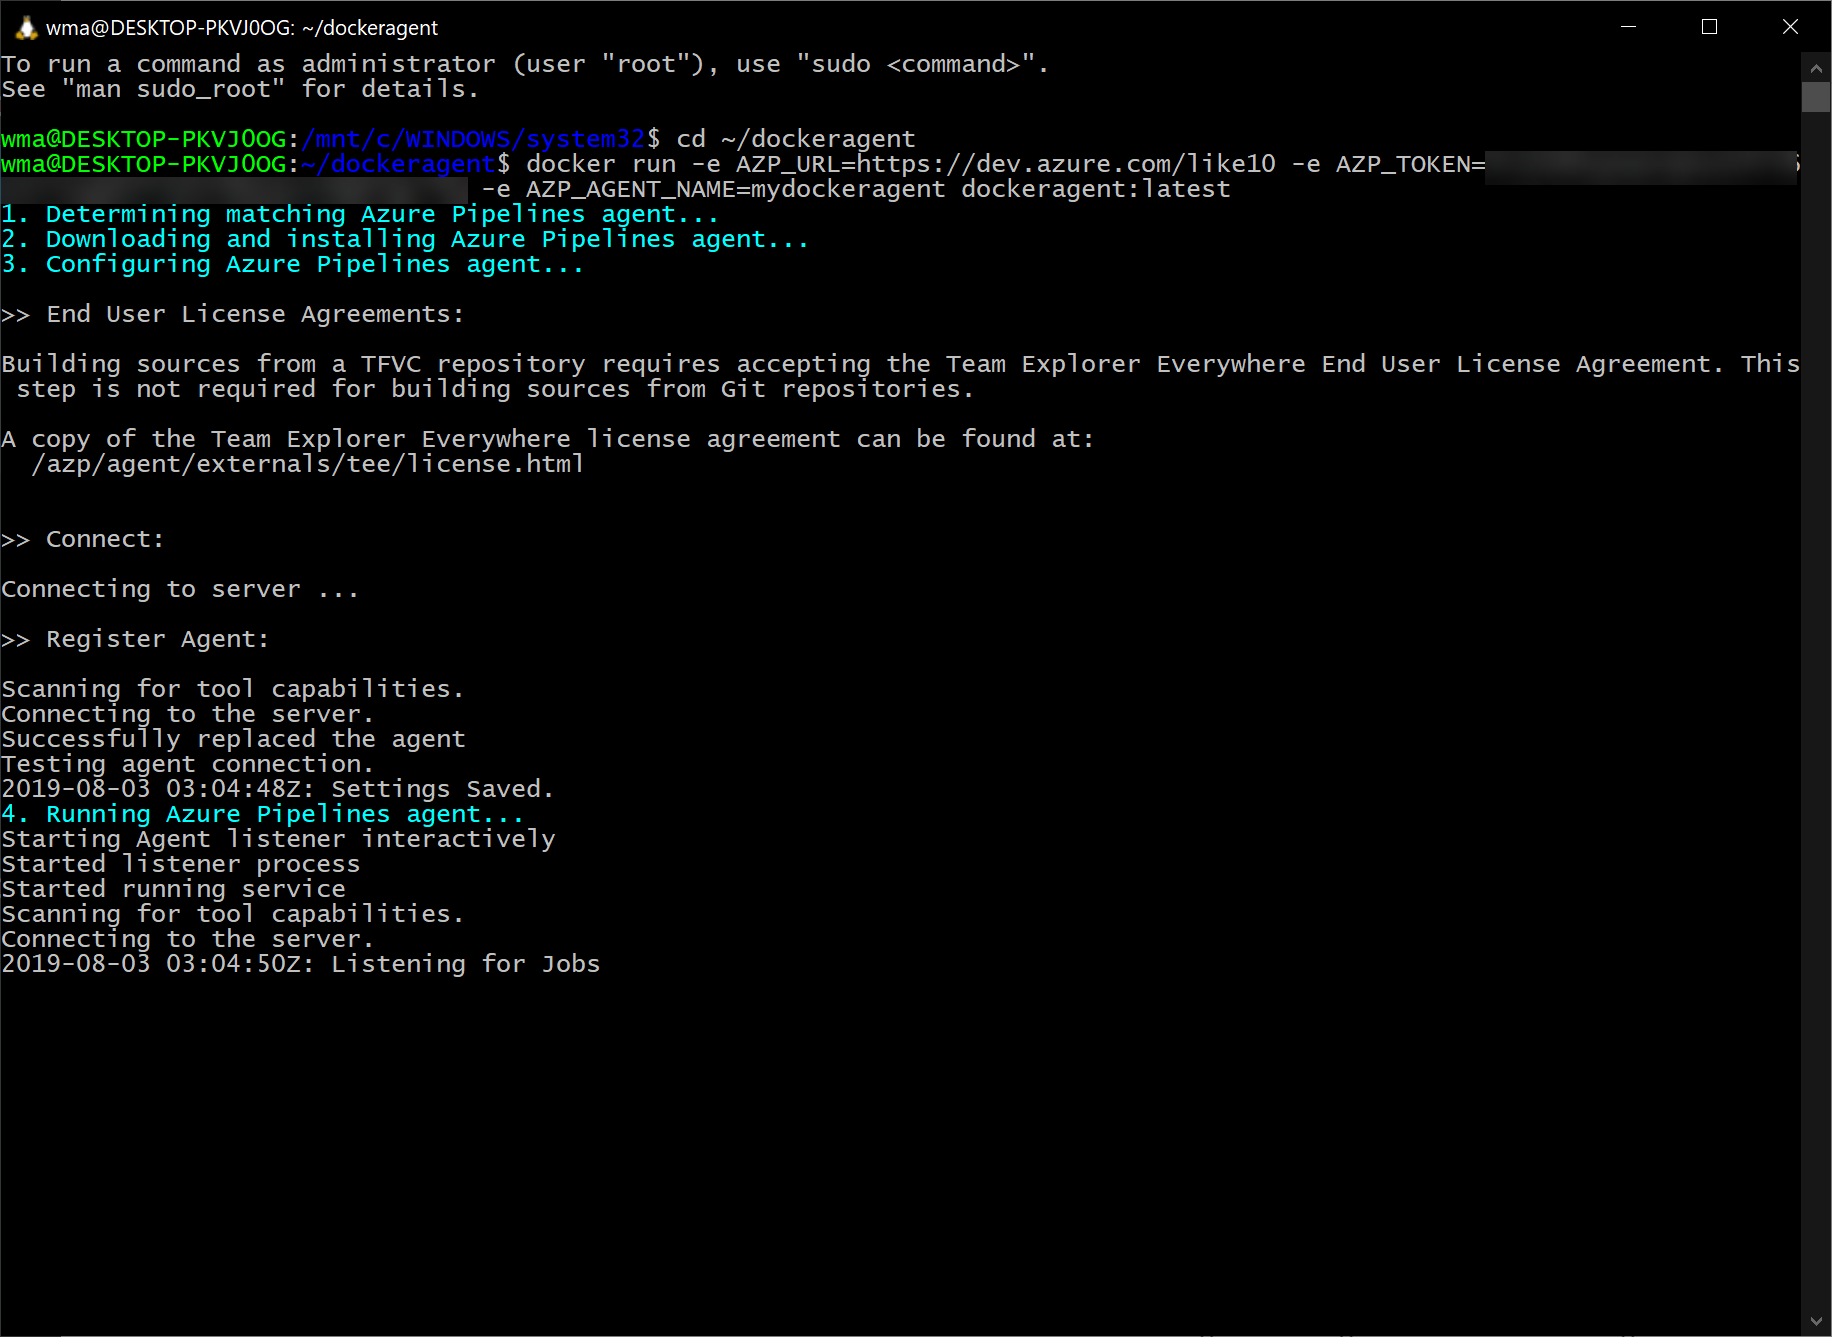
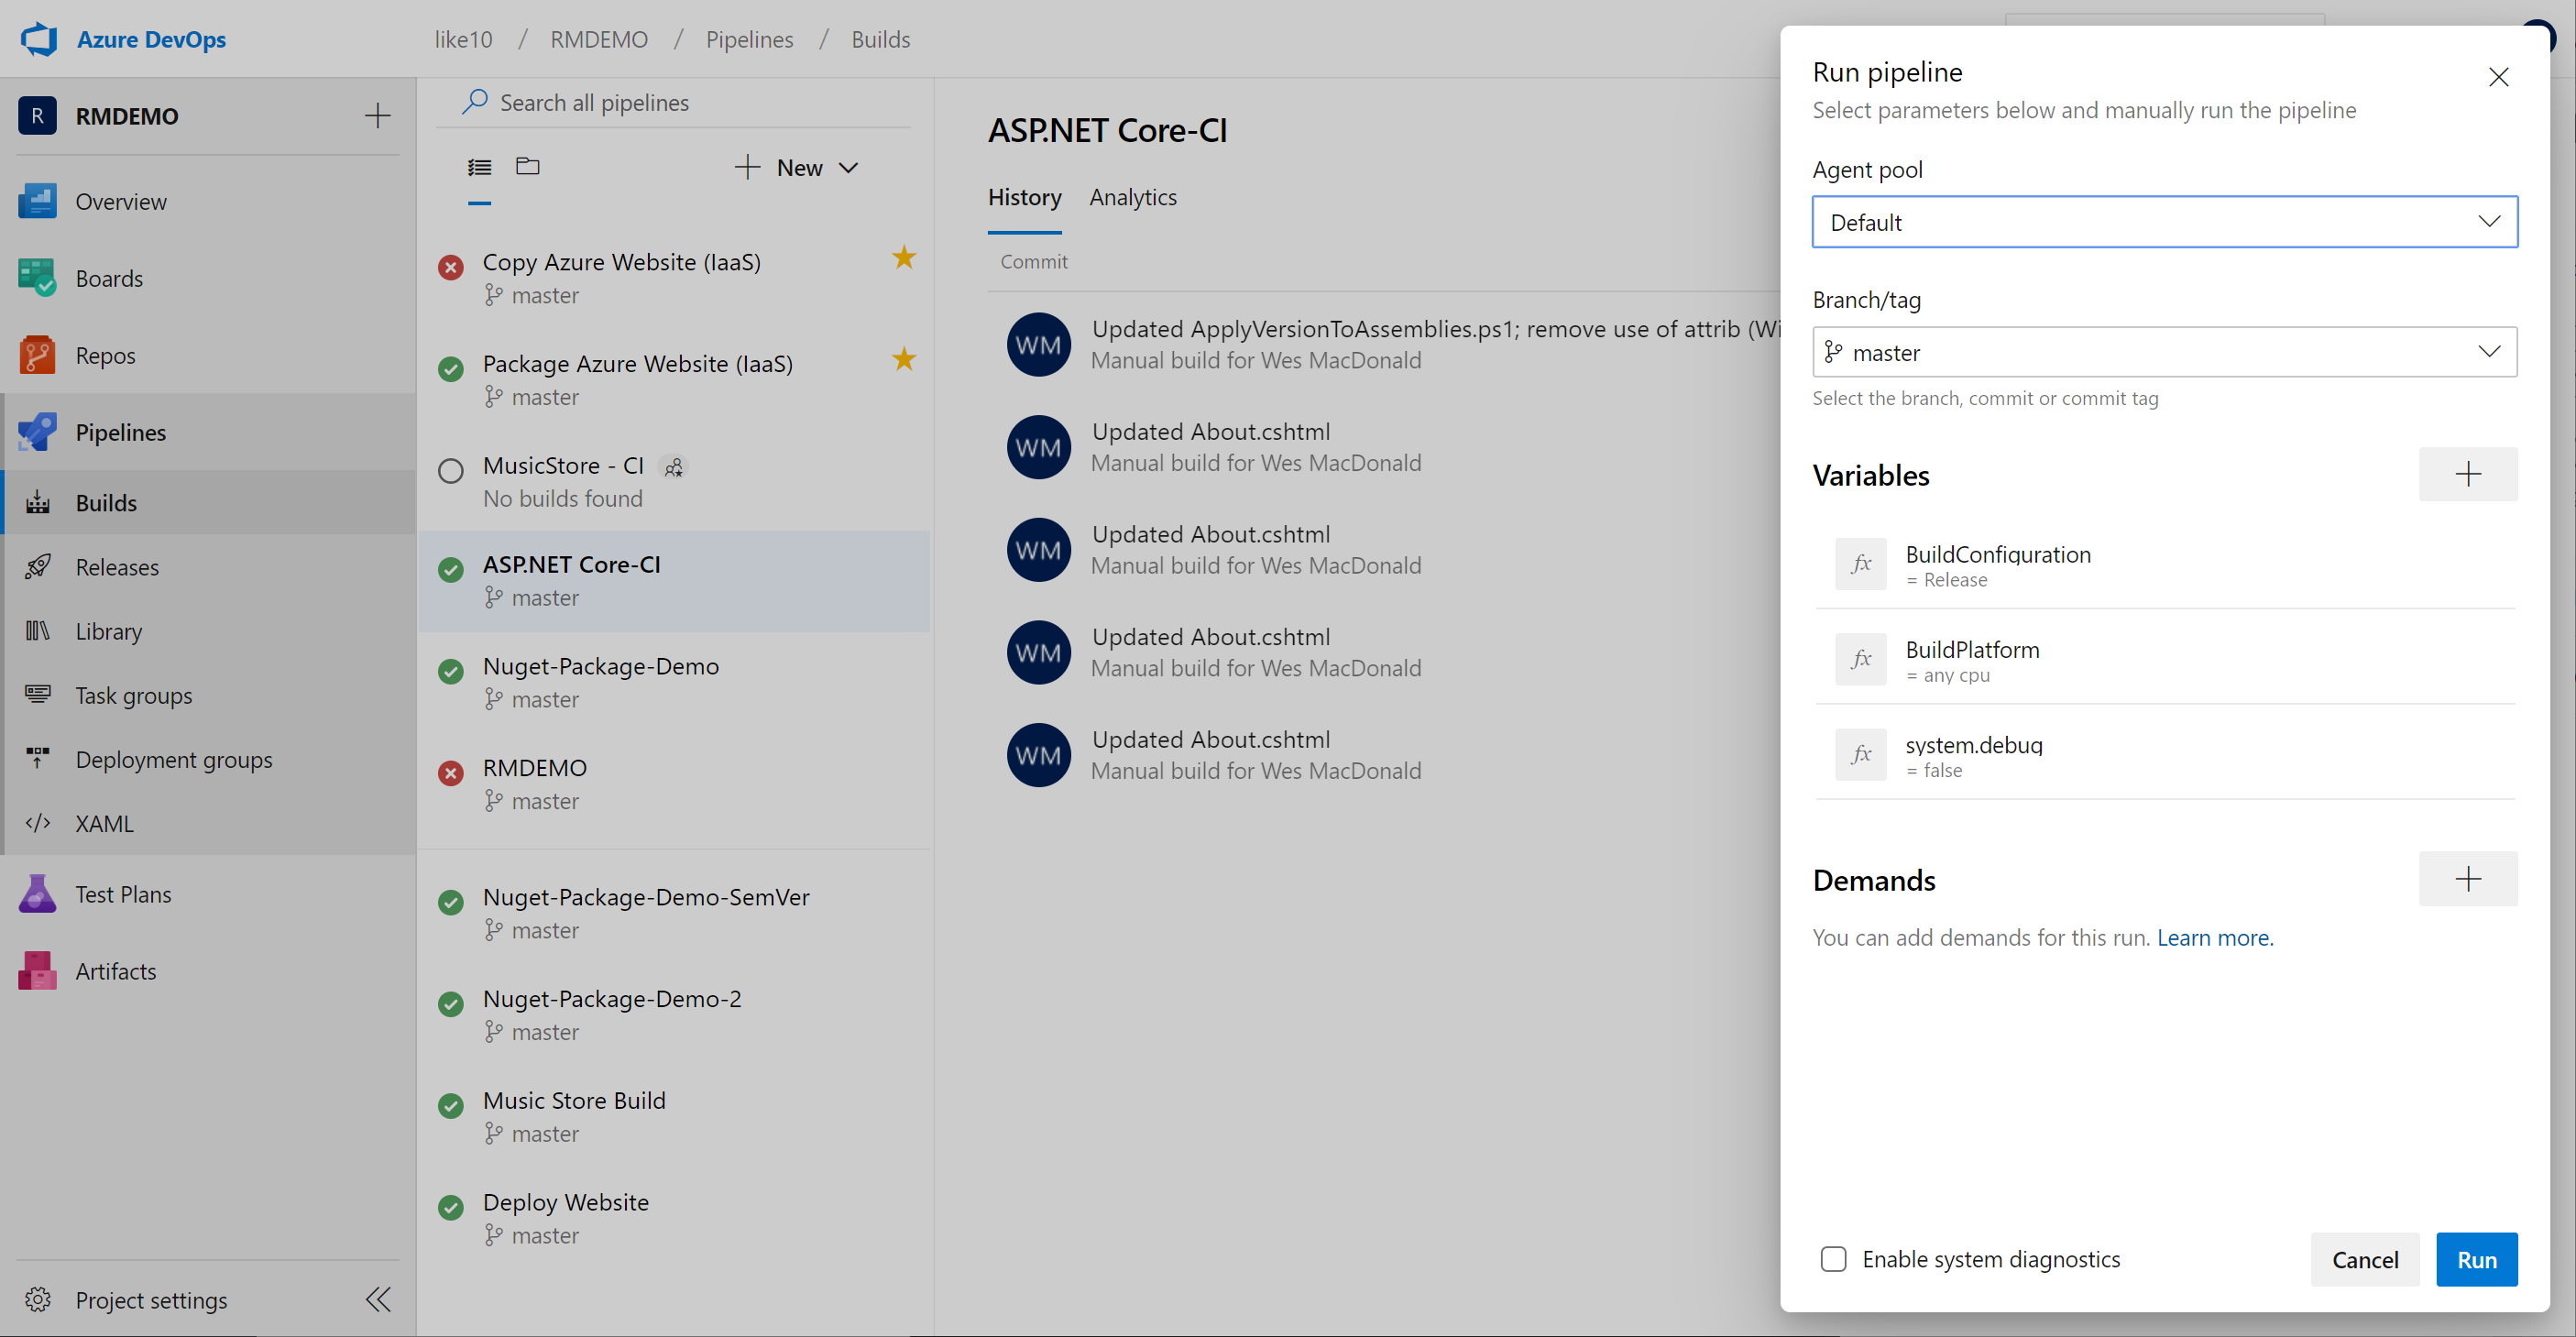
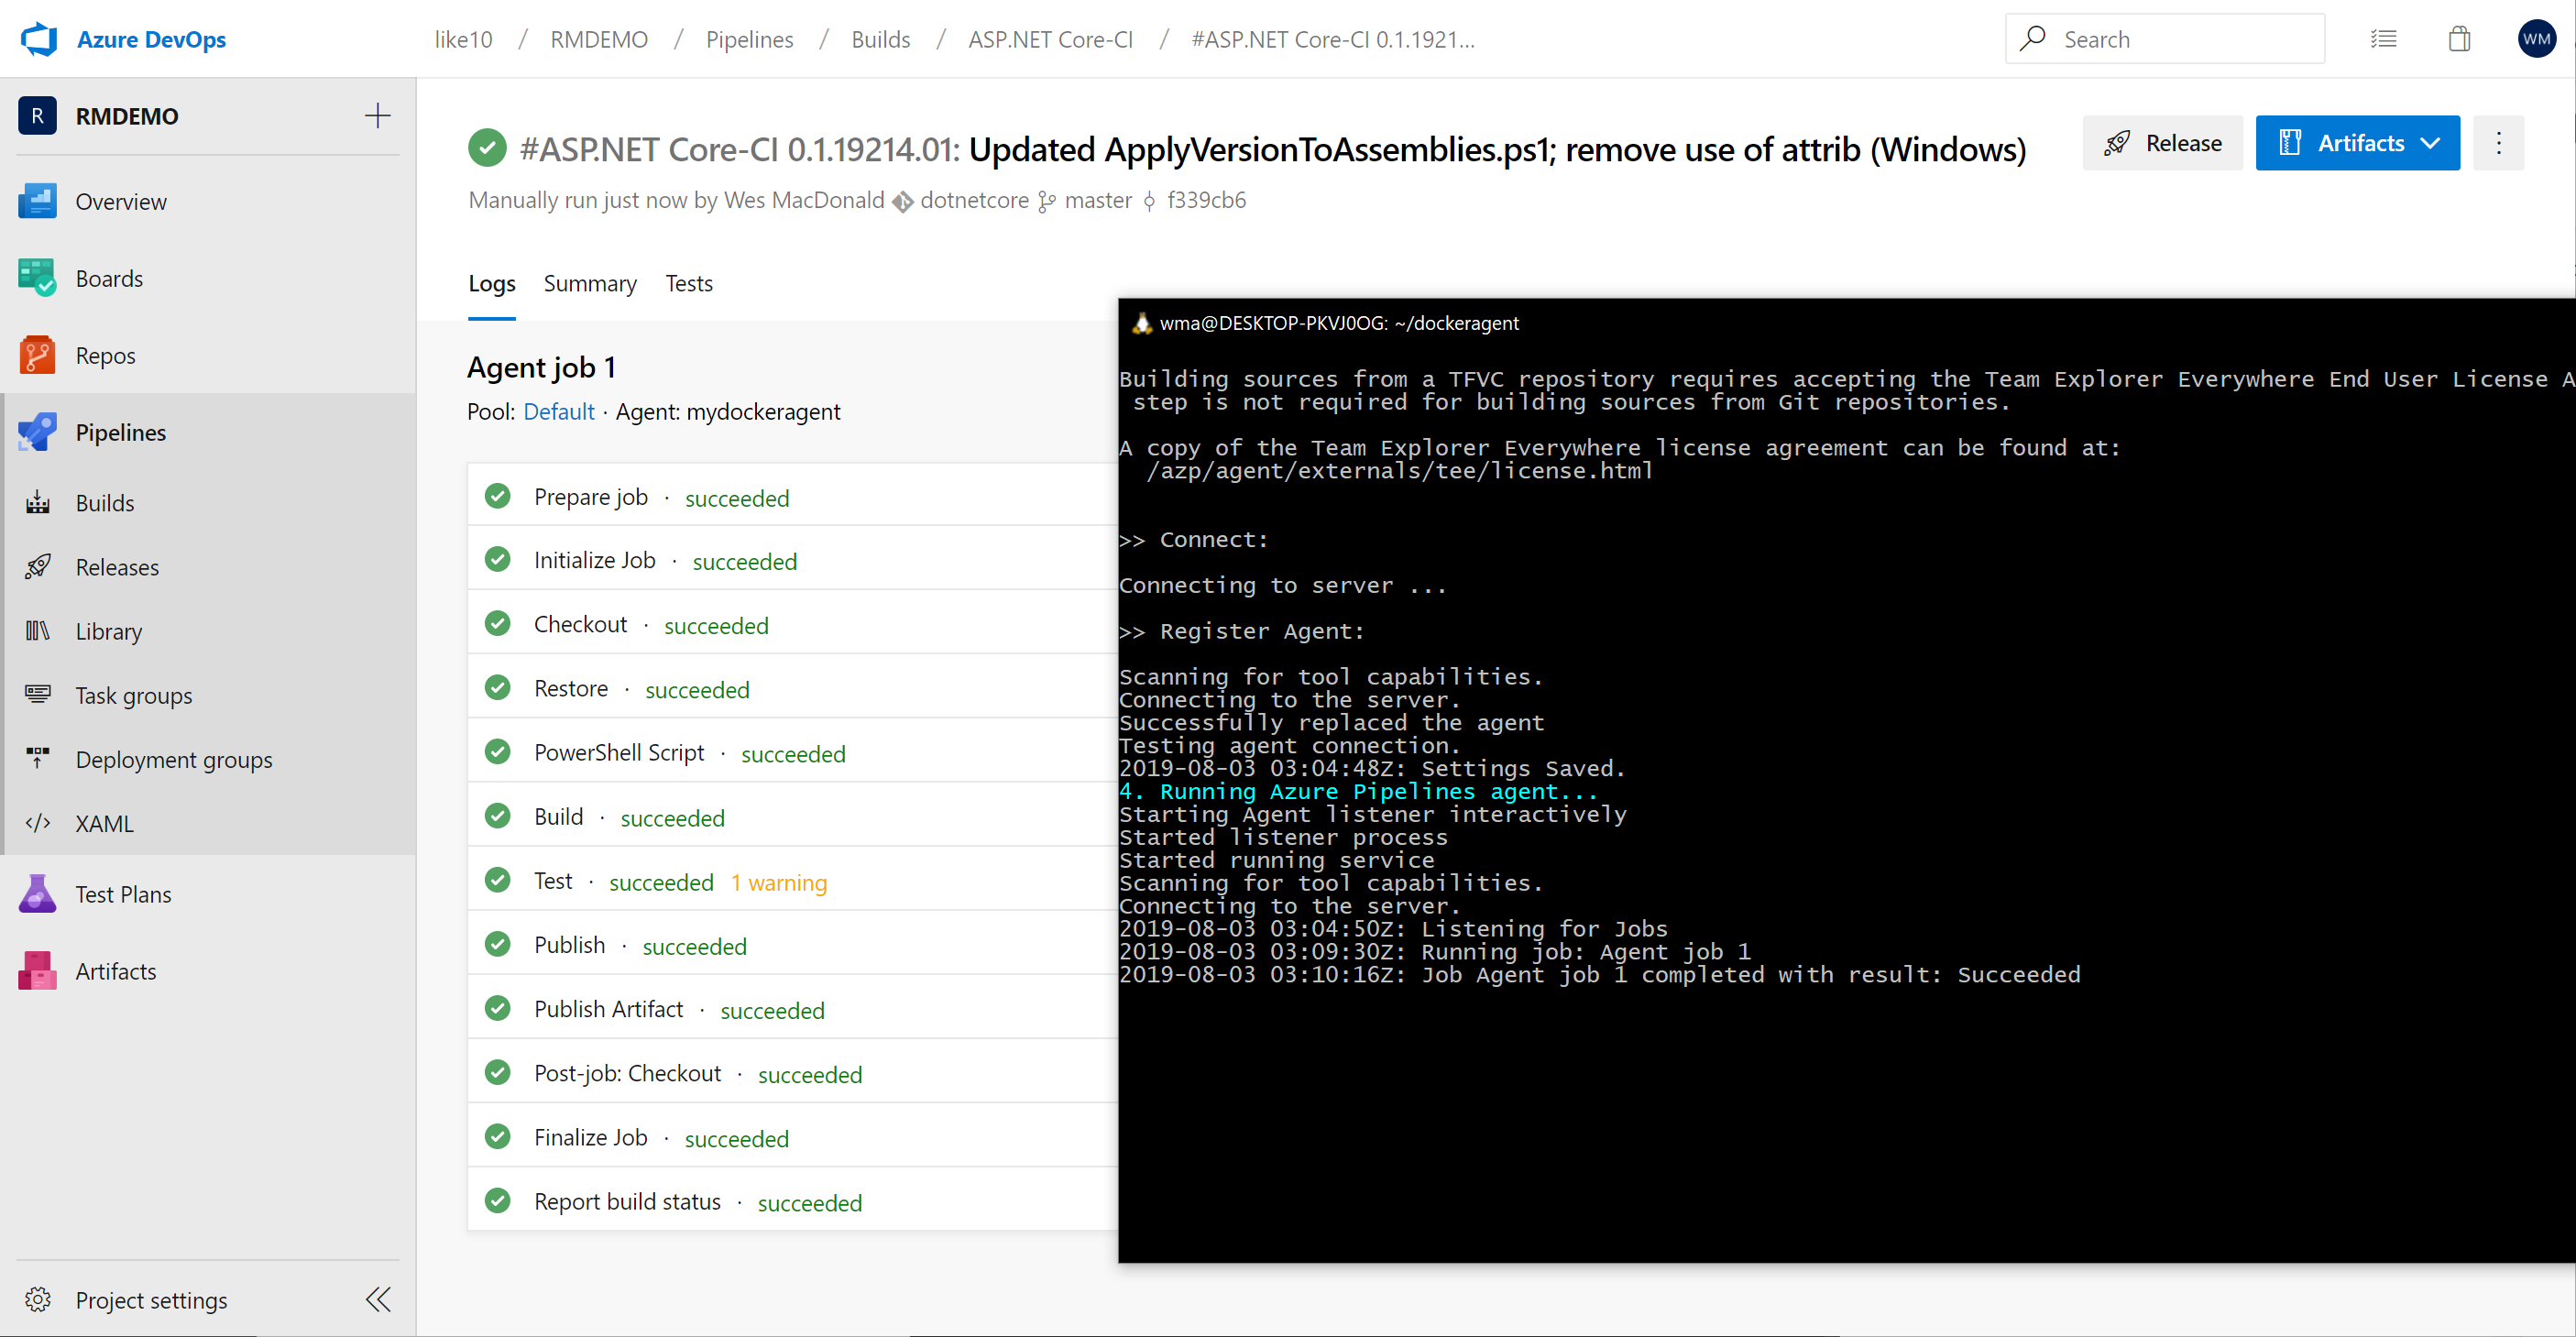
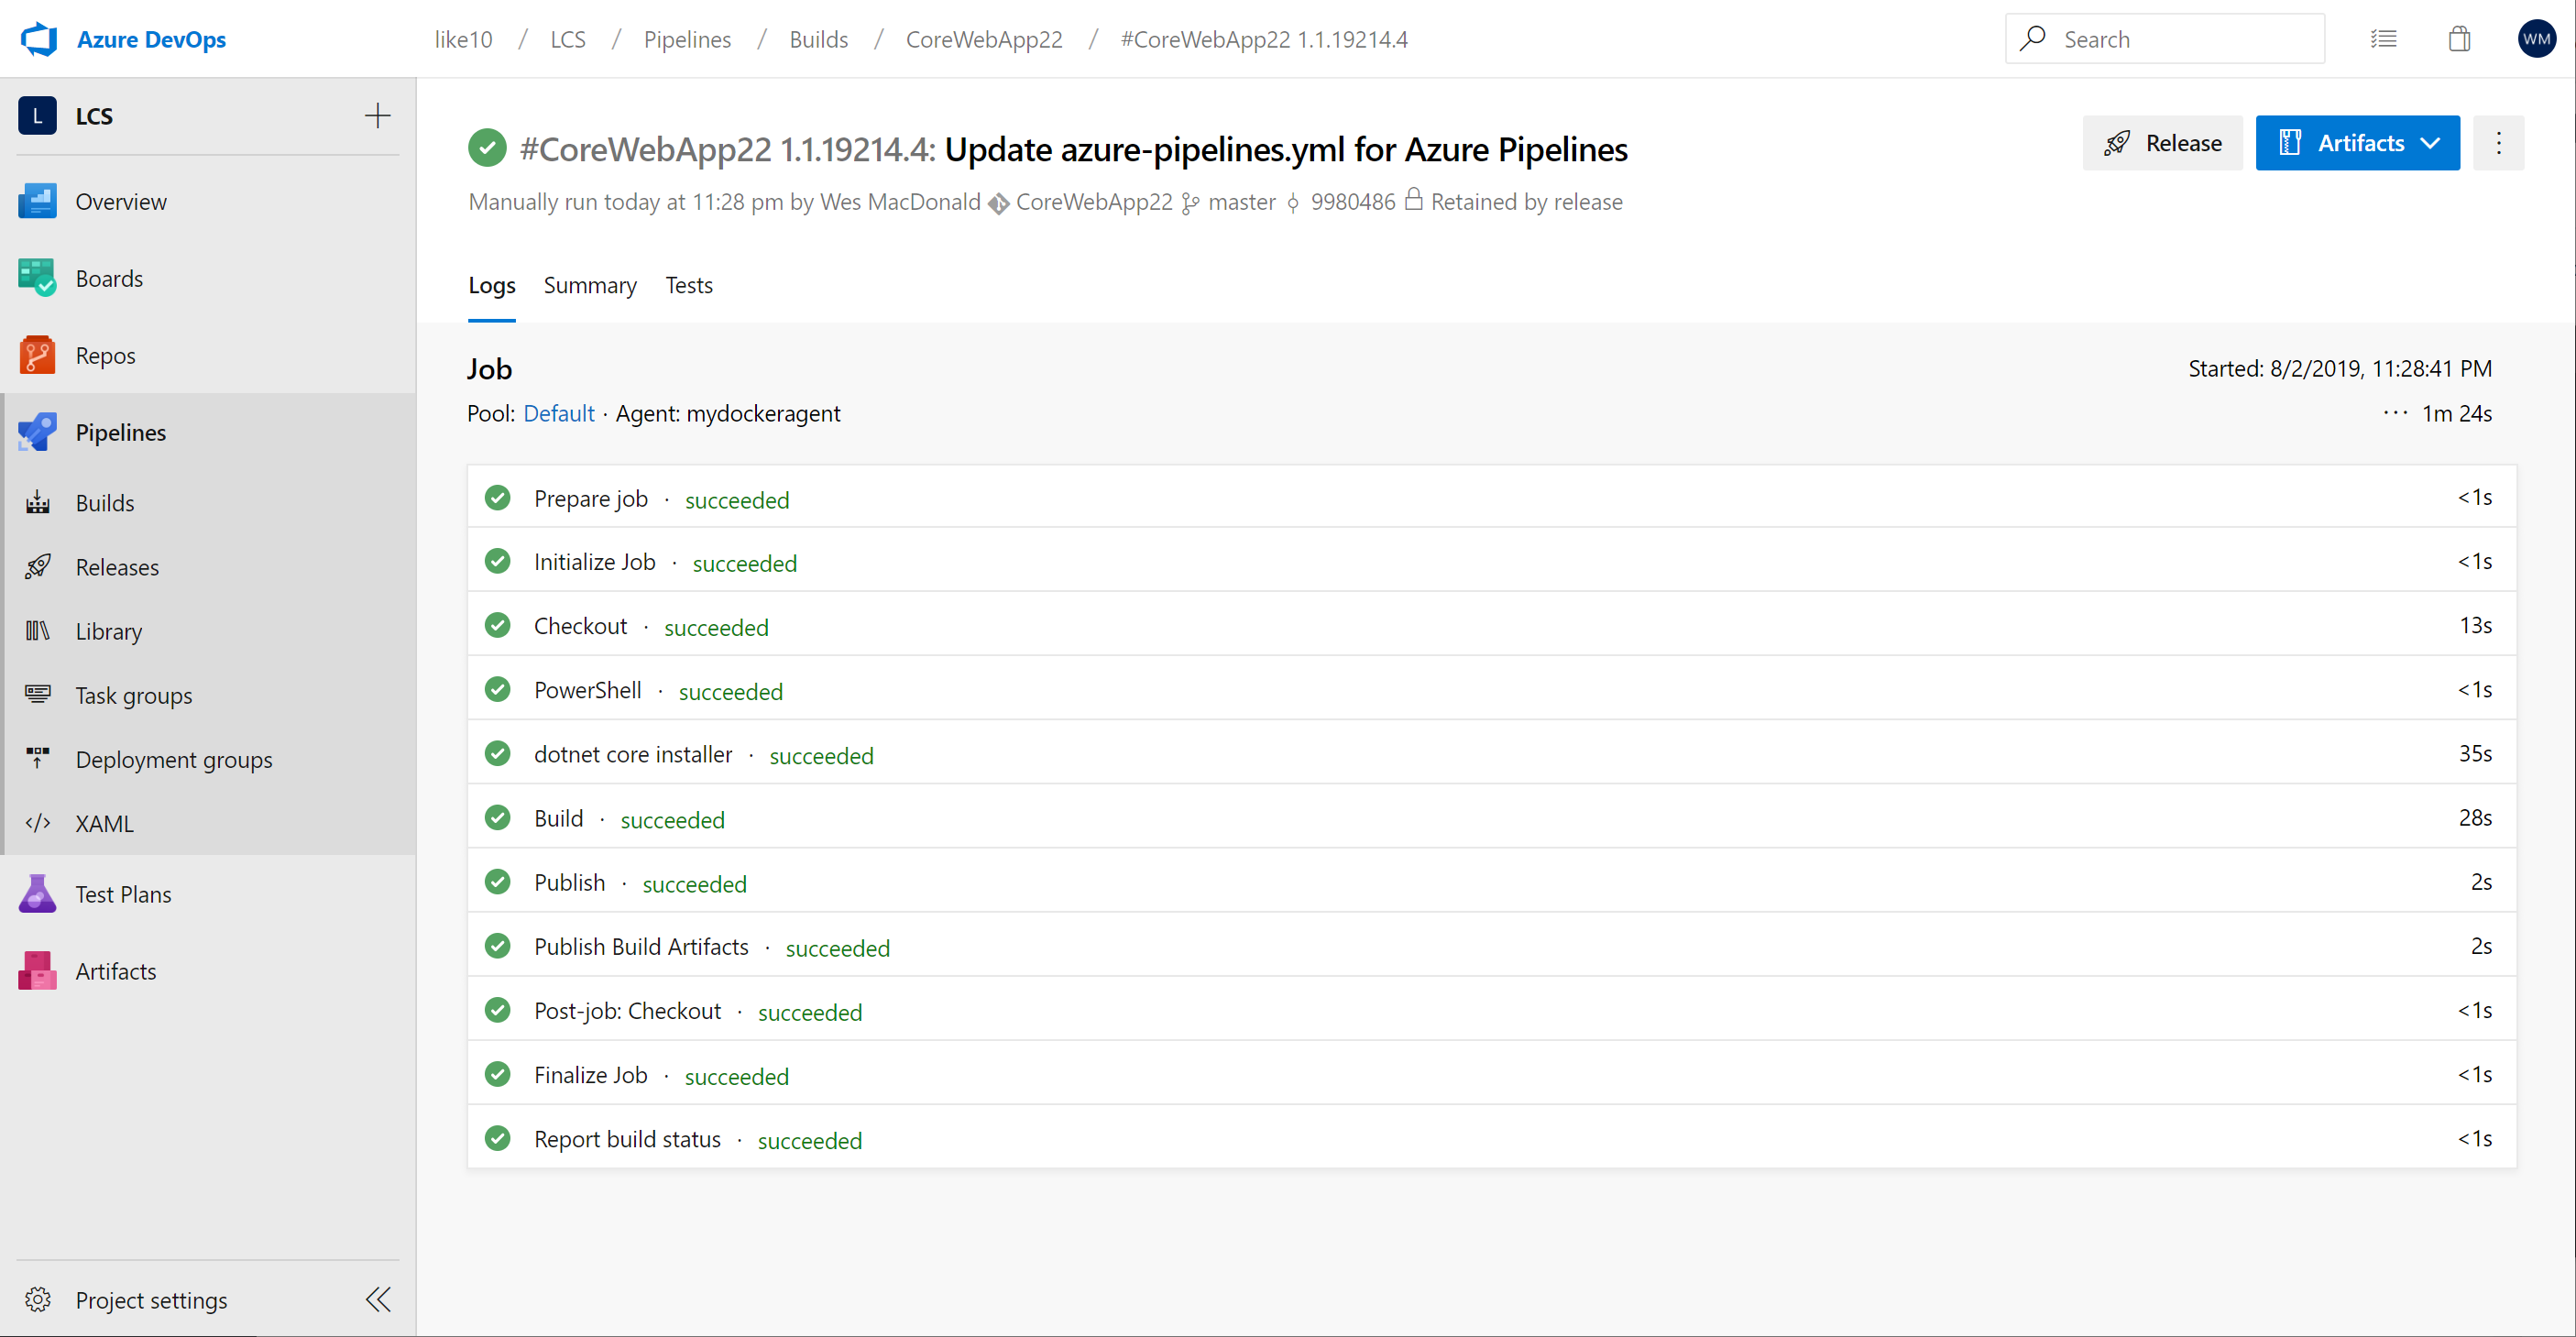
Let’s take the containerized agent for a spin from Azure DevOps, to do this I will trigger a build of my demo ASP.NET Core Web App.
Here is the log of the agent running our build
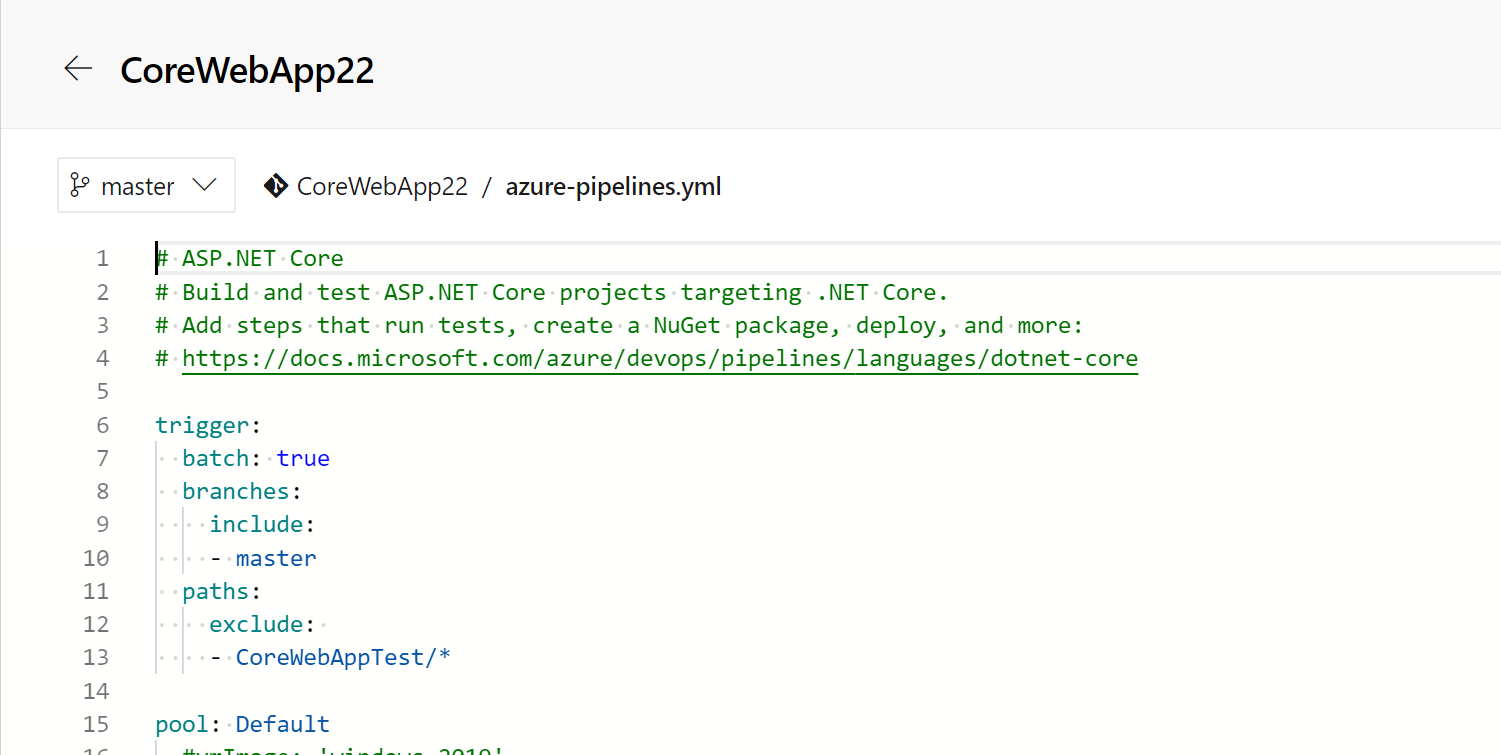
You can also use this agent in your YAML build definition by specifying Default as the pool value
Once you have saved your edits you can trigger another build to verify it is okay. Note you will have to authorize the pool the first time.
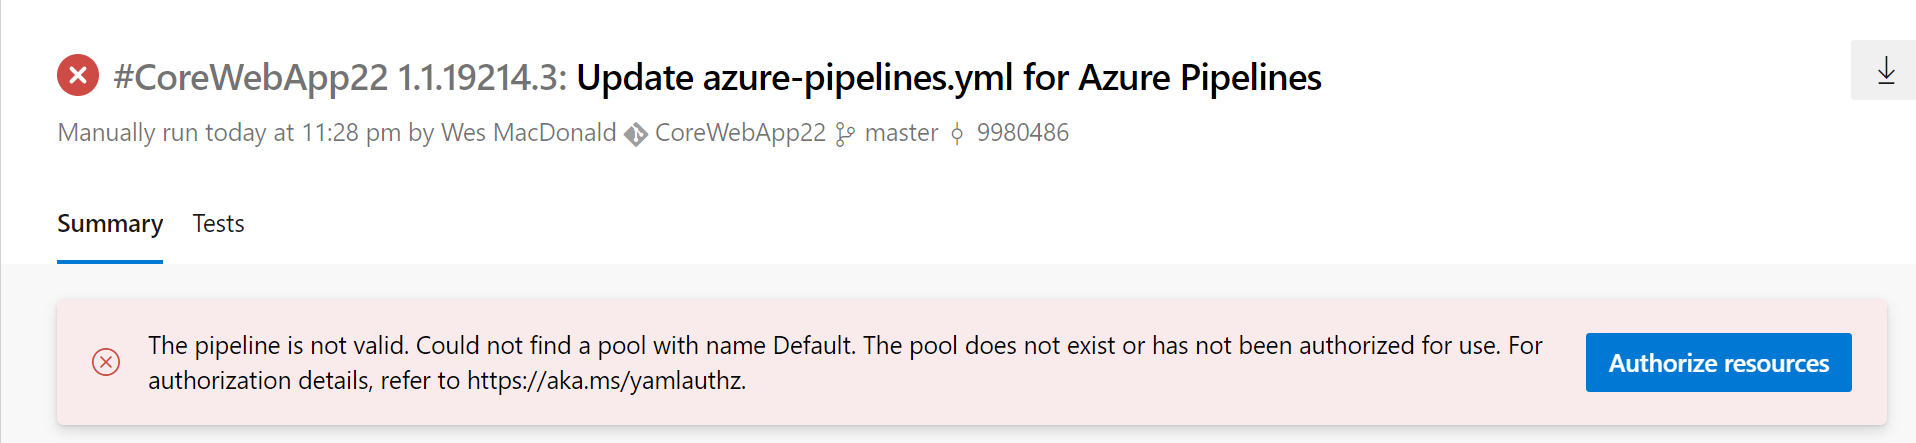
I clicked the Authorize resources button and then triggered another build
Hope this is helpful if you are interested in trying out Docker with WSL 2.
UPDATE
If you sleep or hibernate Windows 10 while WSL2 is running your clock will completely be out of sync and the Azure DevOps Agent will fail to start due to the date/time issue.
You can easily update the date/time by issuing the following command
sudo hwclock -s
I discovered this after waking my laptop up to continue working on my container and this blog post.
]]>Microsoft-hosted agents are pre-configured for UI testing and UI tests for both web apps and desktop apps. The agents are also pre-configured with popular browsers and matching web-driver versions that can be used for running Selenium tests. The browsers and corresponding web-drivers are updated on a periodic basis. (ref.)
It’s great to have a complete CI-CD pipeline but if you have no way of knowing whether it actually works or not after it gets deployed you’ll soon be getting emails when it breaks. We can of course do better by including some tests which run after we deploy to the slot and then again after we swap slots with production.
I also grabbed a screenshot of the web page while it was executing the test and saved it as an attachment with the test.
Configuration
First we need a selenium test to execute against our web application that we deployed, this is quite easy to do. If you want an end-end example you can refer to the following example.
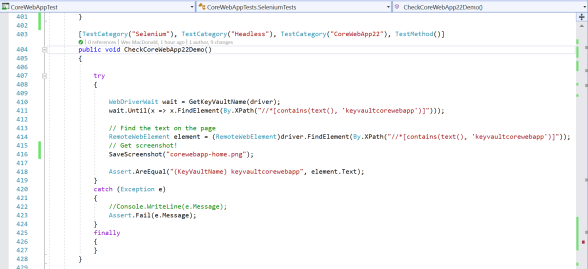
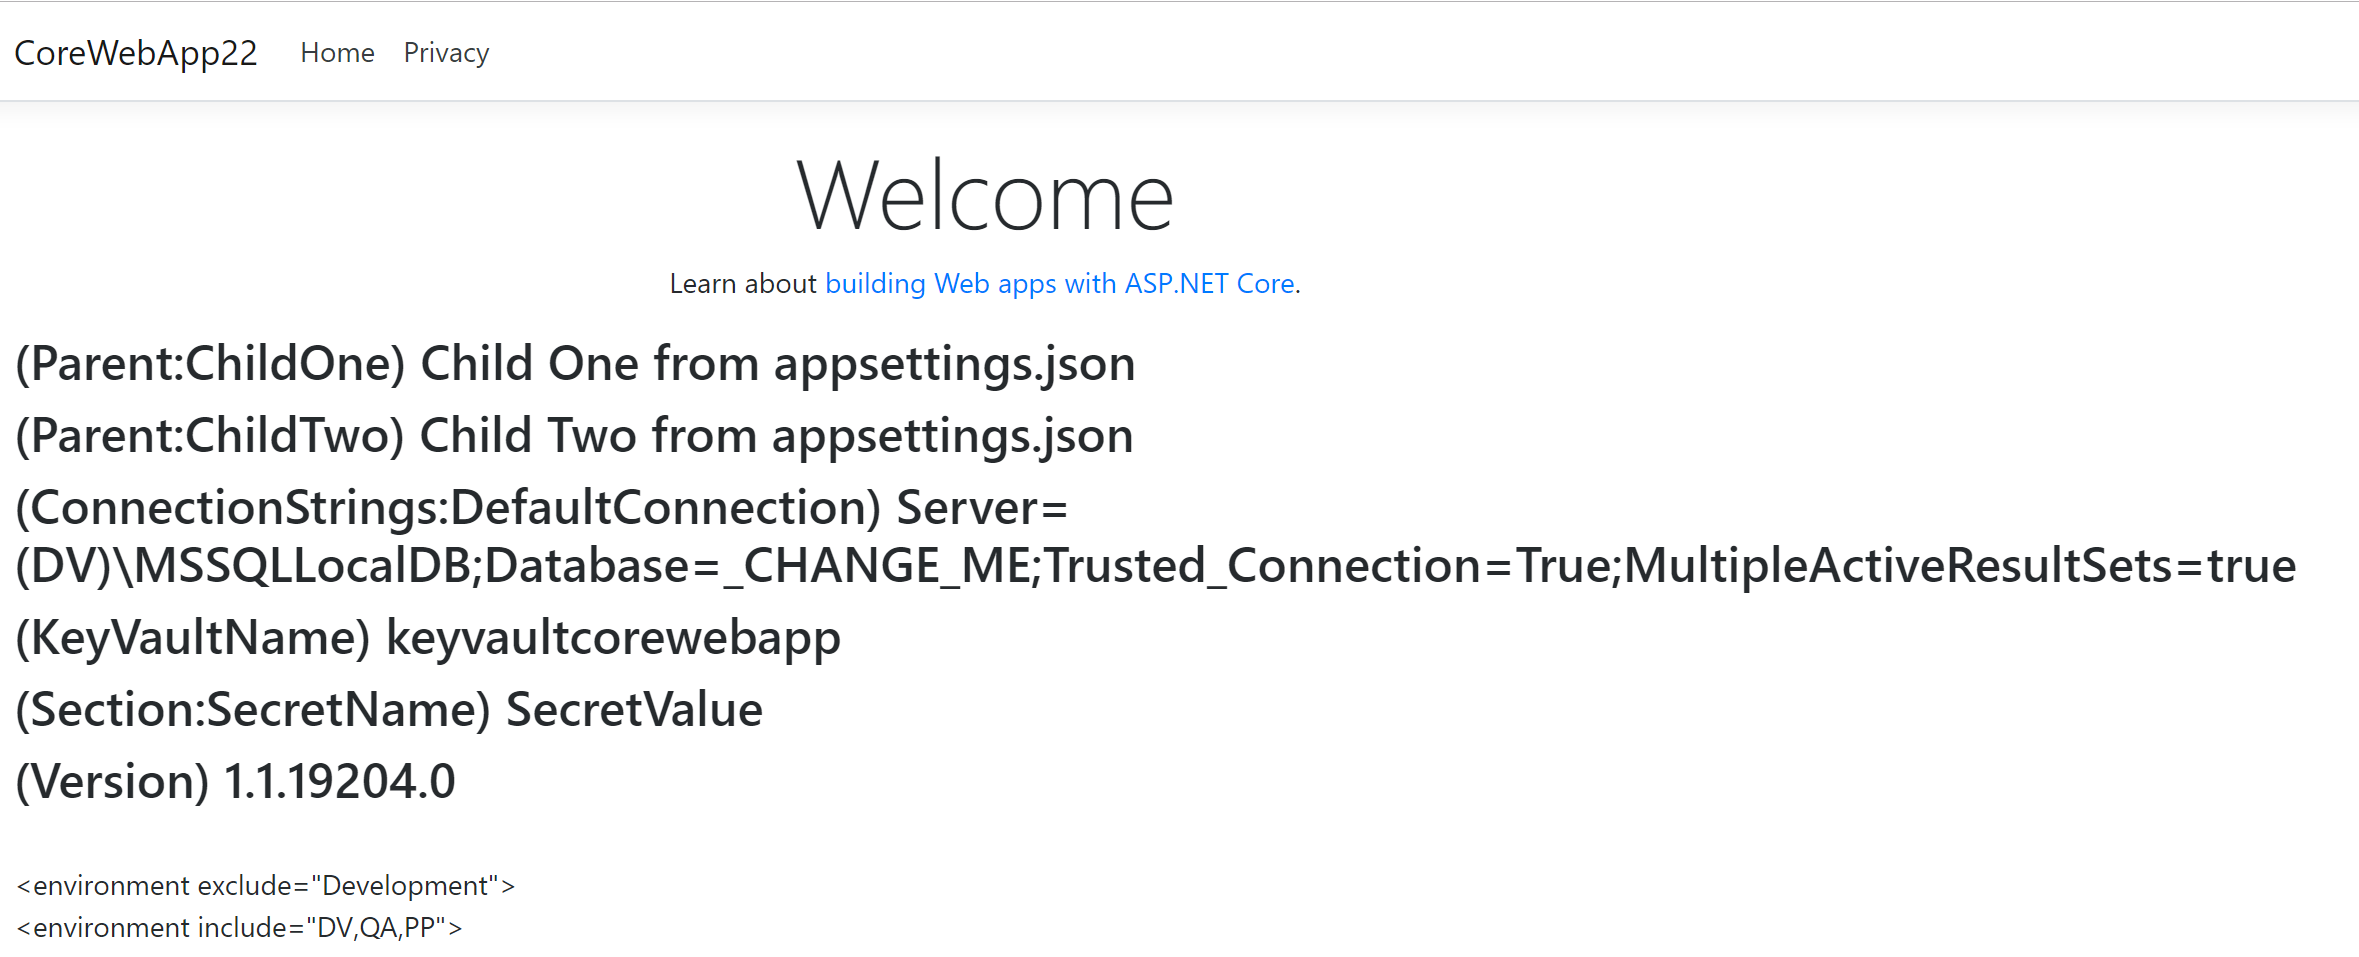
Here is a Test Method which at the moment uses Google Chrome in headless mode to navigate to my web apps home page and look for the name of my Azure Key Vault that I have displayed on the home page.
My Test Project exists in its own solution (independent of the .NET Core Web App) and has its own Build Pipeline which creates an artifact (see below) that is linked to the CoreWebApp Release Pipeline.
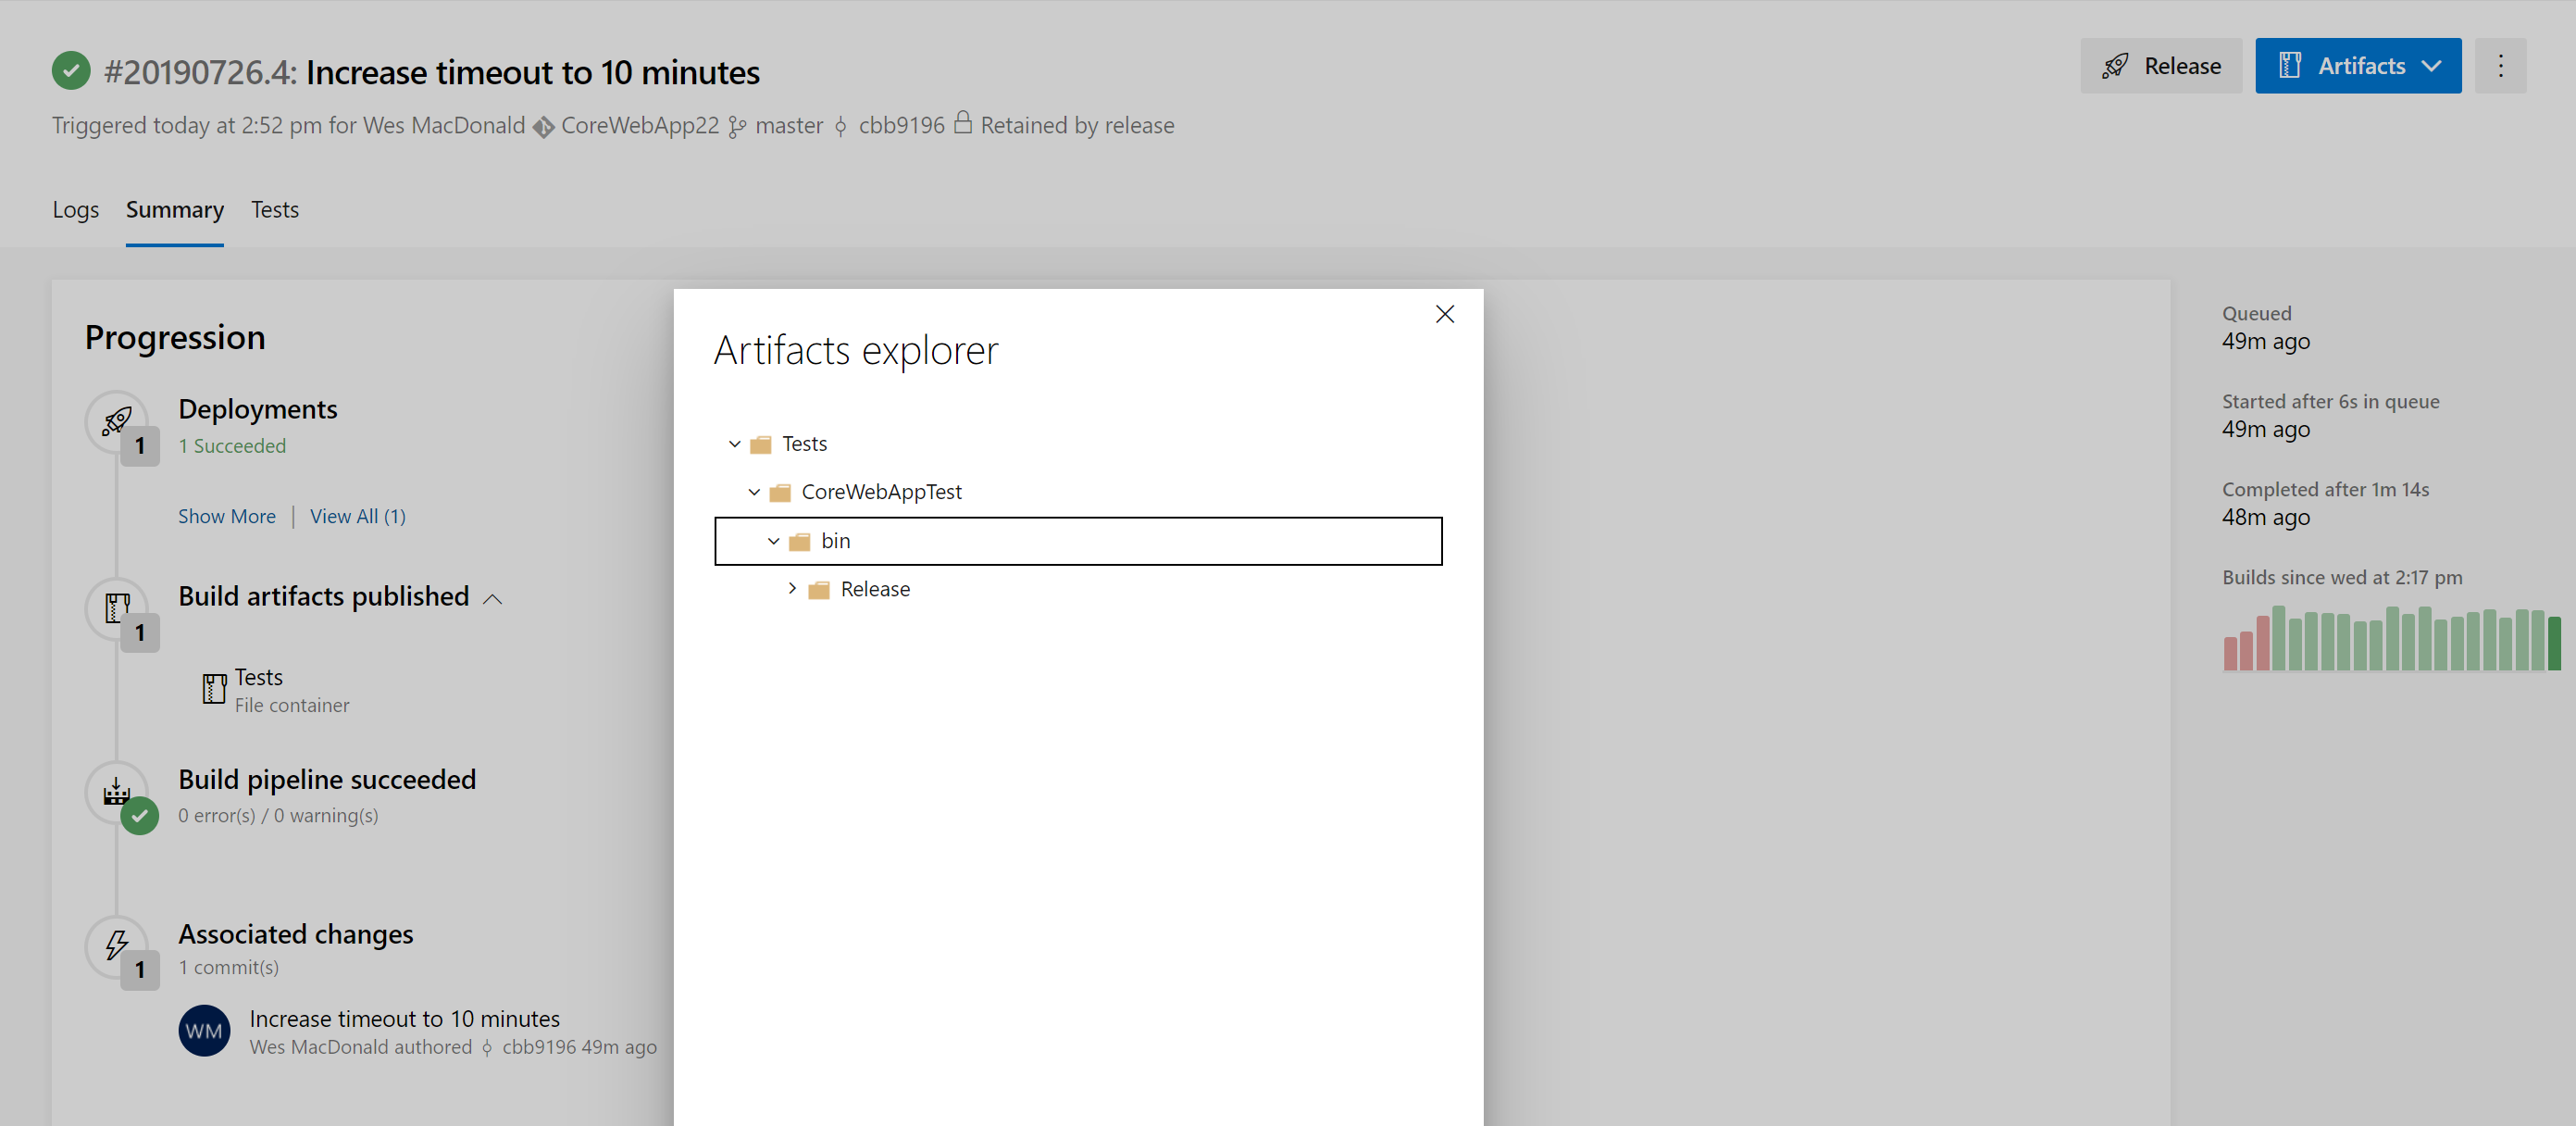
The artifact produced from that build pipeline has my test assembly which is executed by the VS Test tasks in the Core Web App release pipeline before and after the slot swap task. I have two (2) different .runsettings files that are used with the different VS Test tasks.
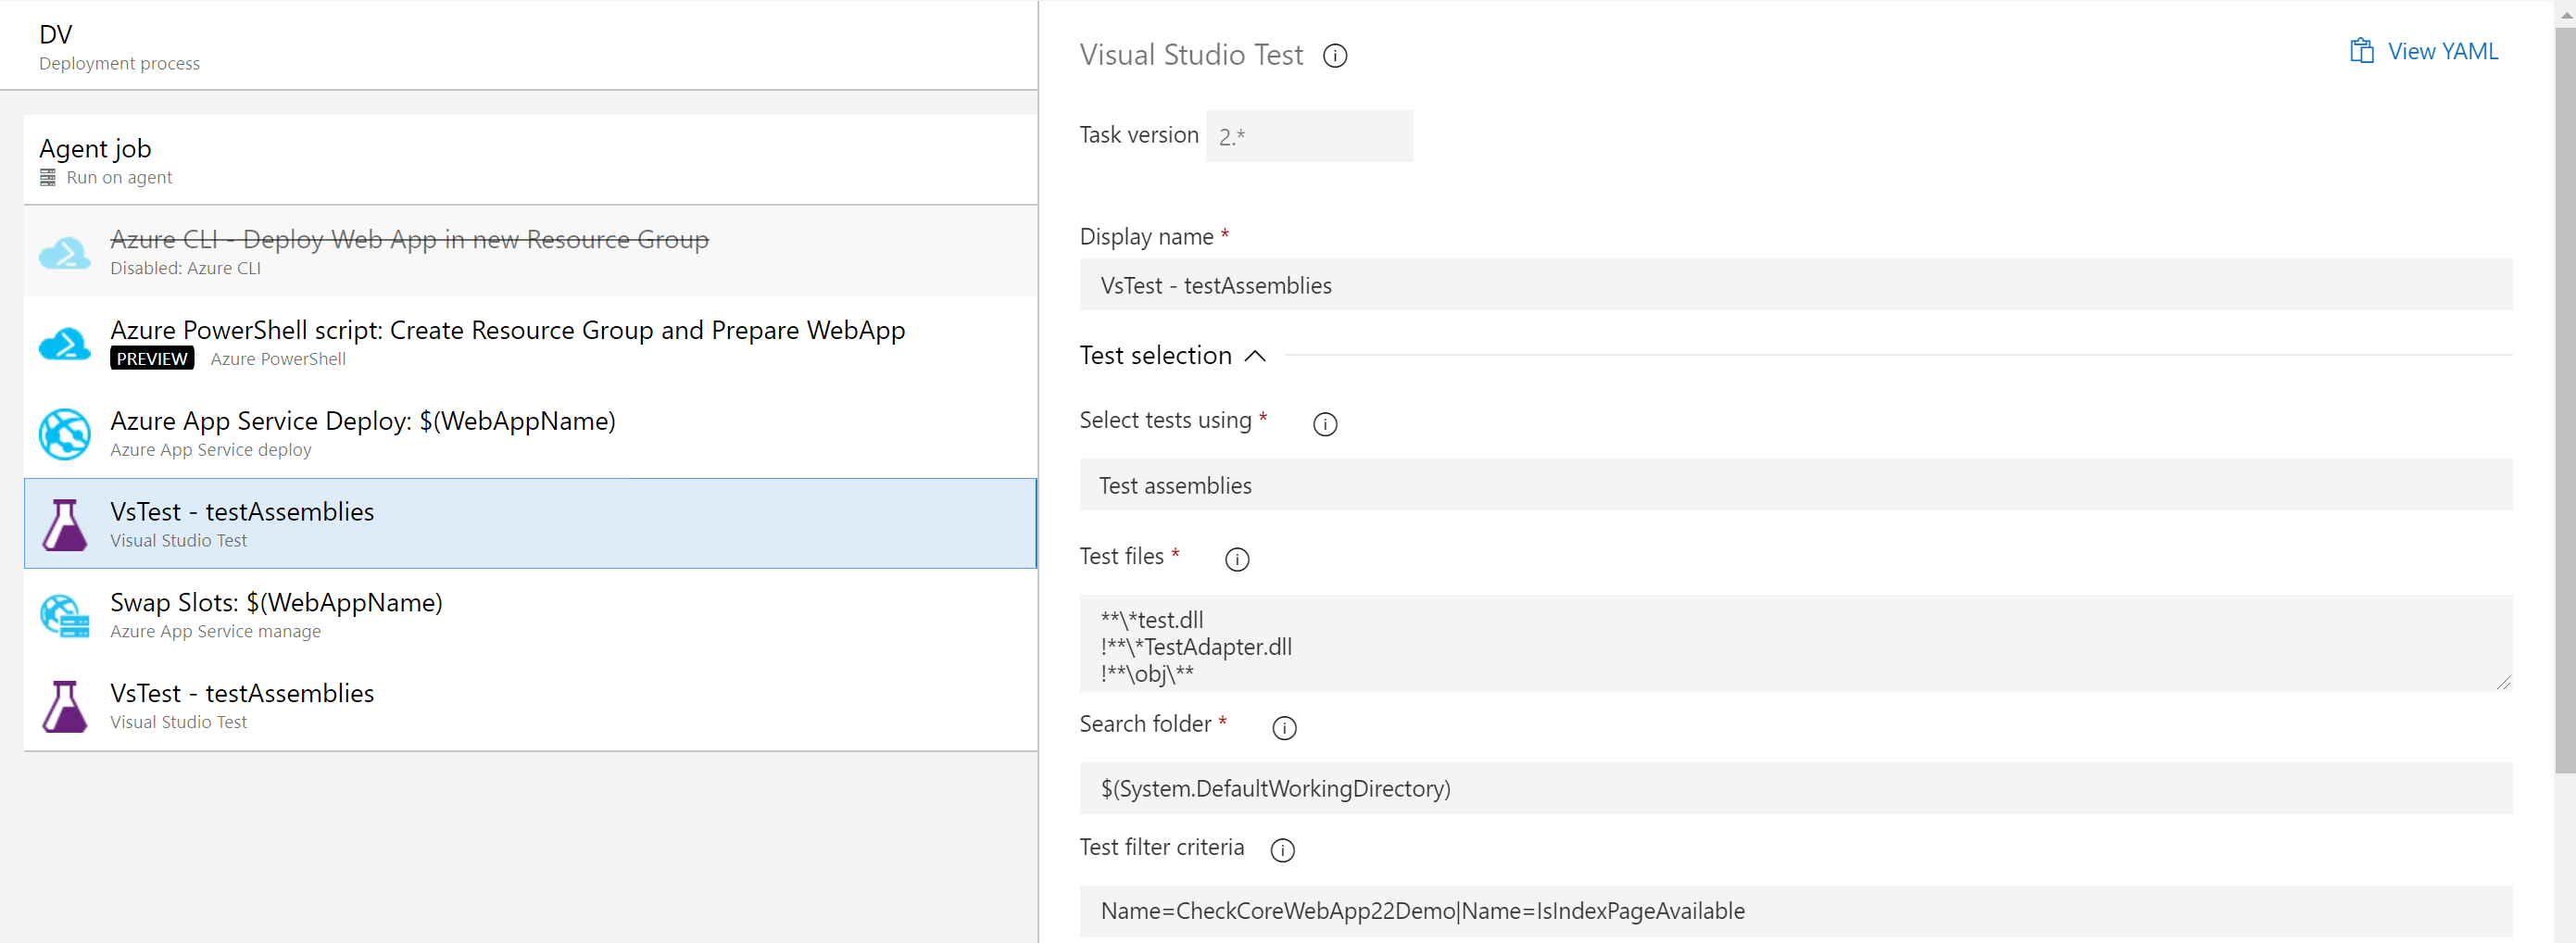
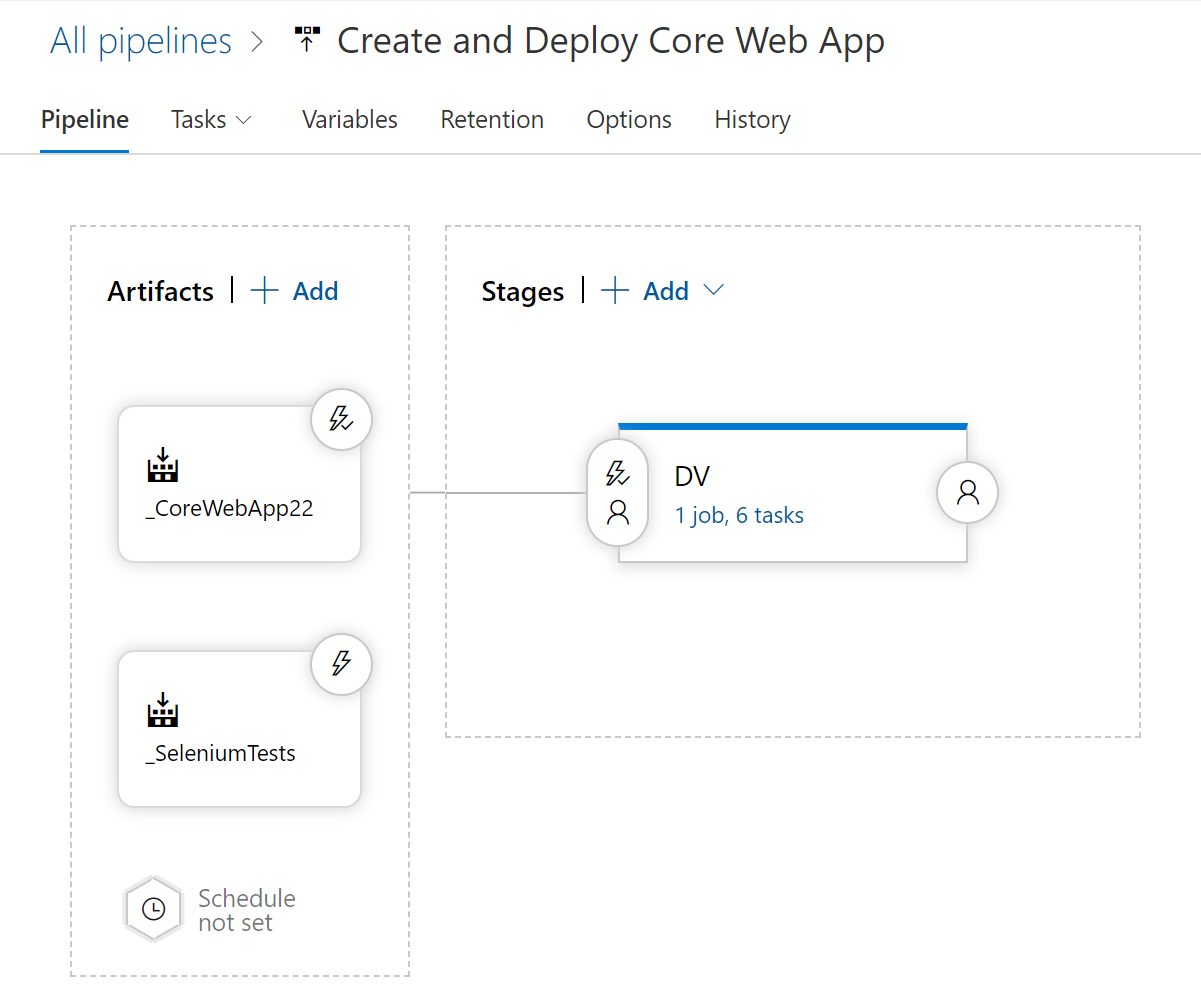
Release Pipeline
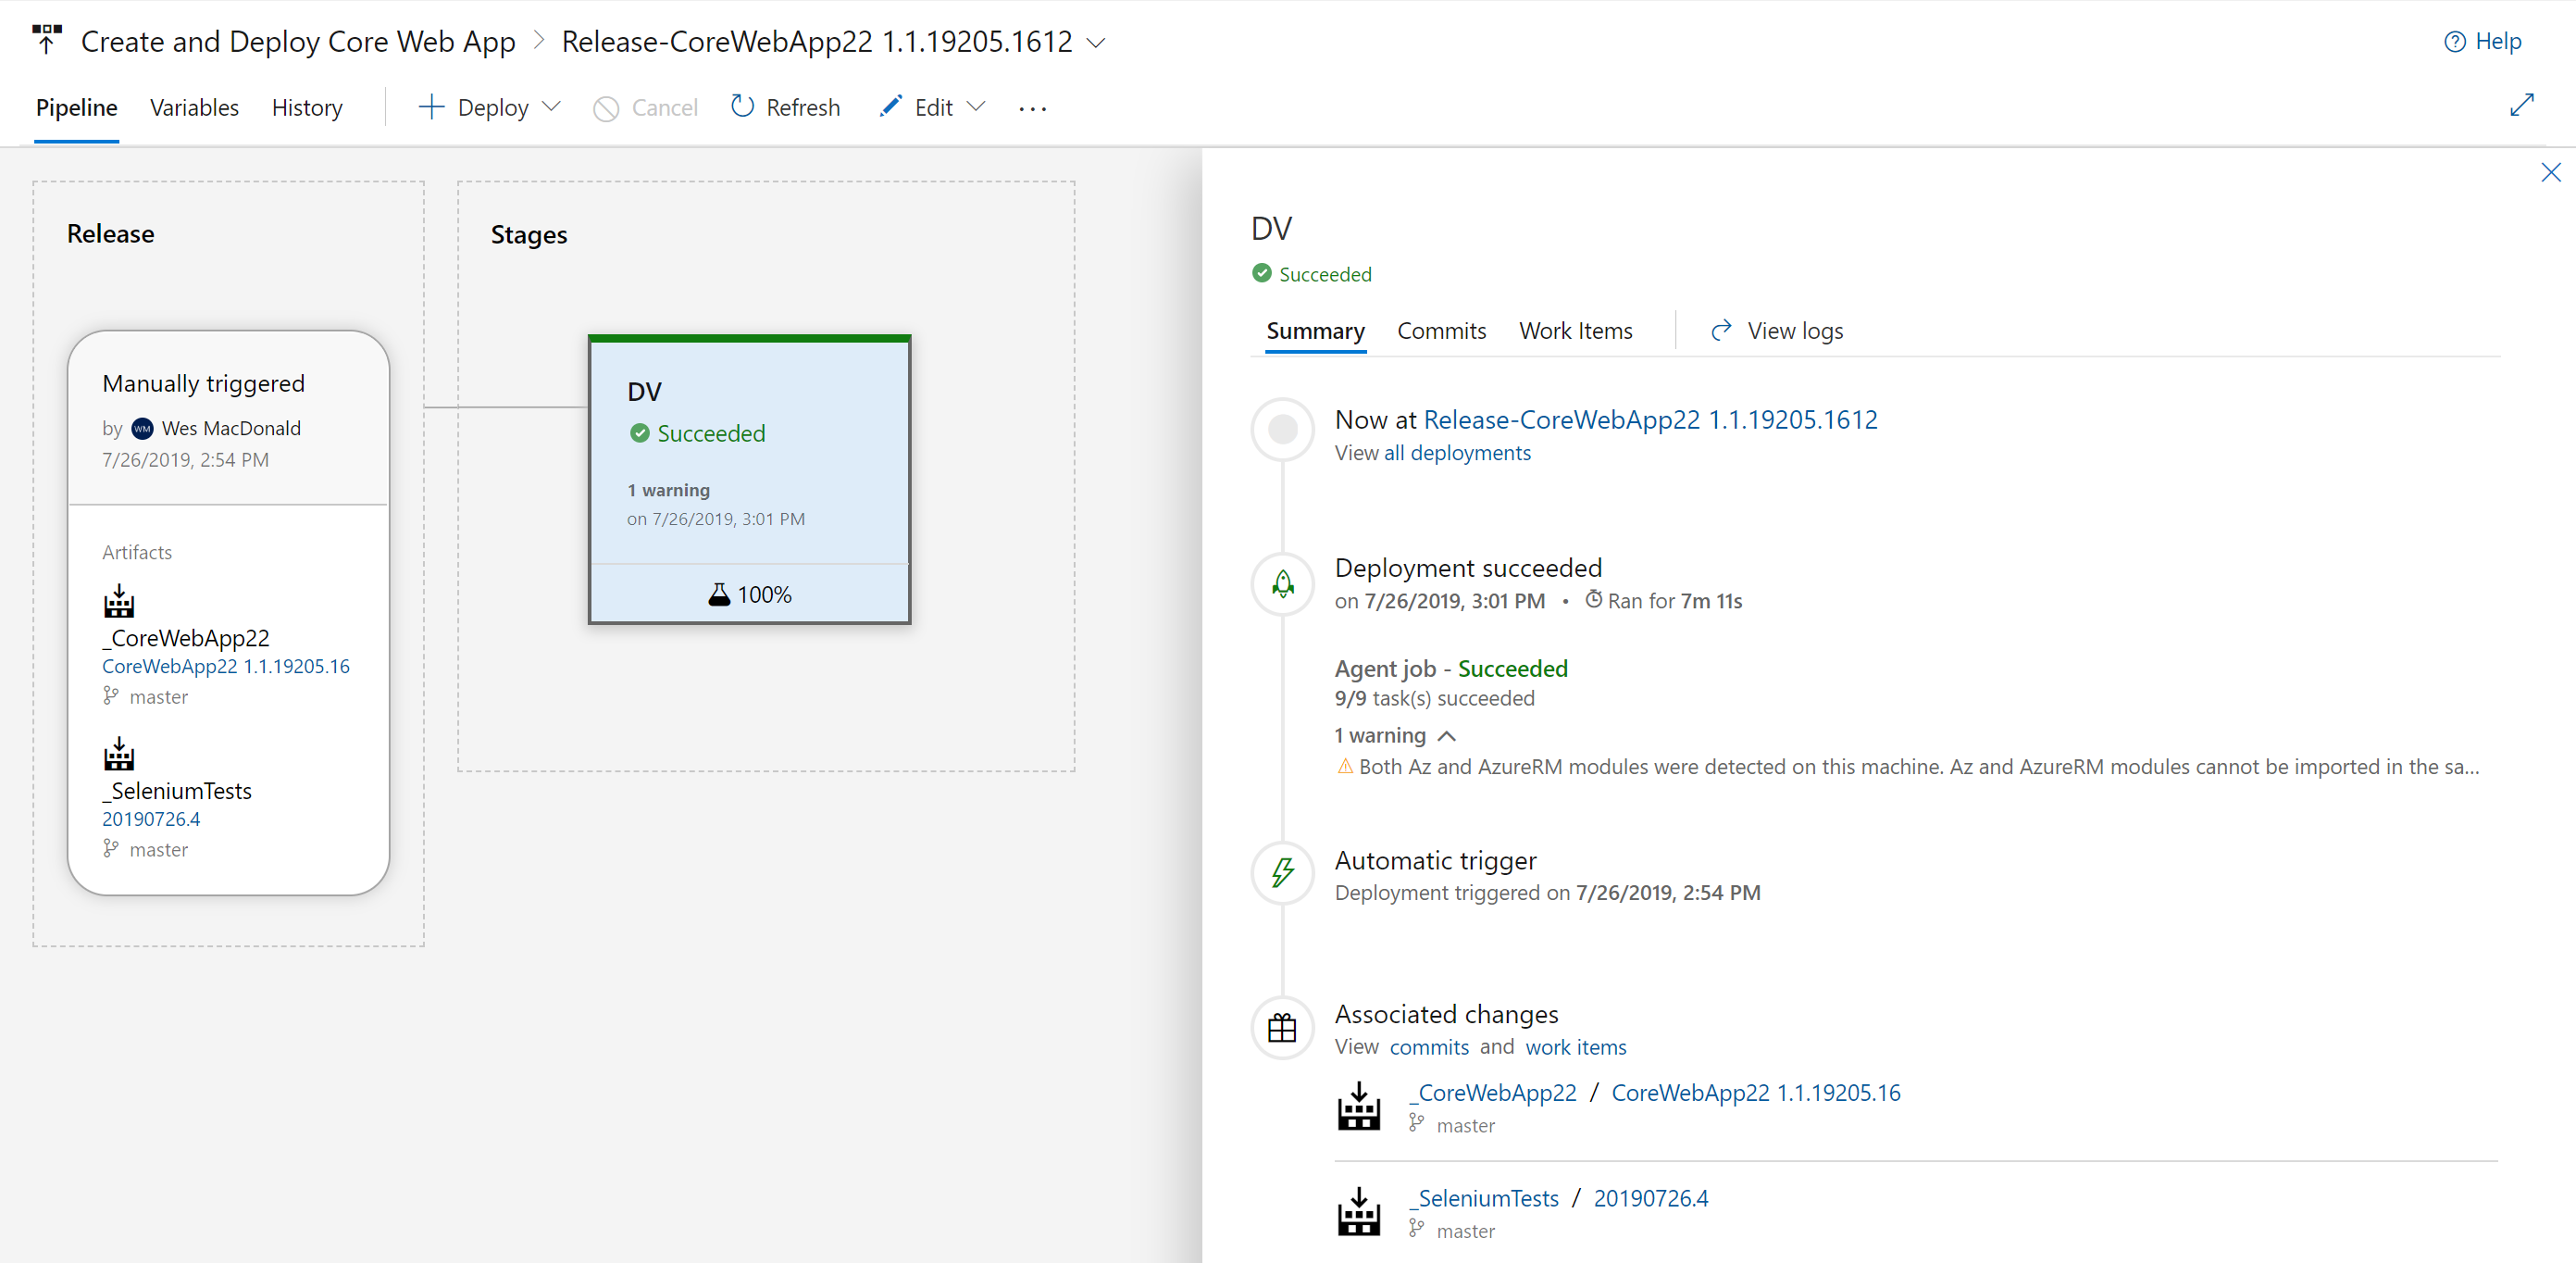
Here is my release pipeline configured with both of the build artifacts (Core Web App and Selenium Tests), the CD trigger is only configured on the Web App artifact in the picture below.
So now when my release is triggered, it not only builds the environment in Azure it also validates that the website is functional before it performs the slot swap.
I can even view a screen capture that was taken during the execution of the test method on either of the slots in my App Service (from the Attachments) if I desire.
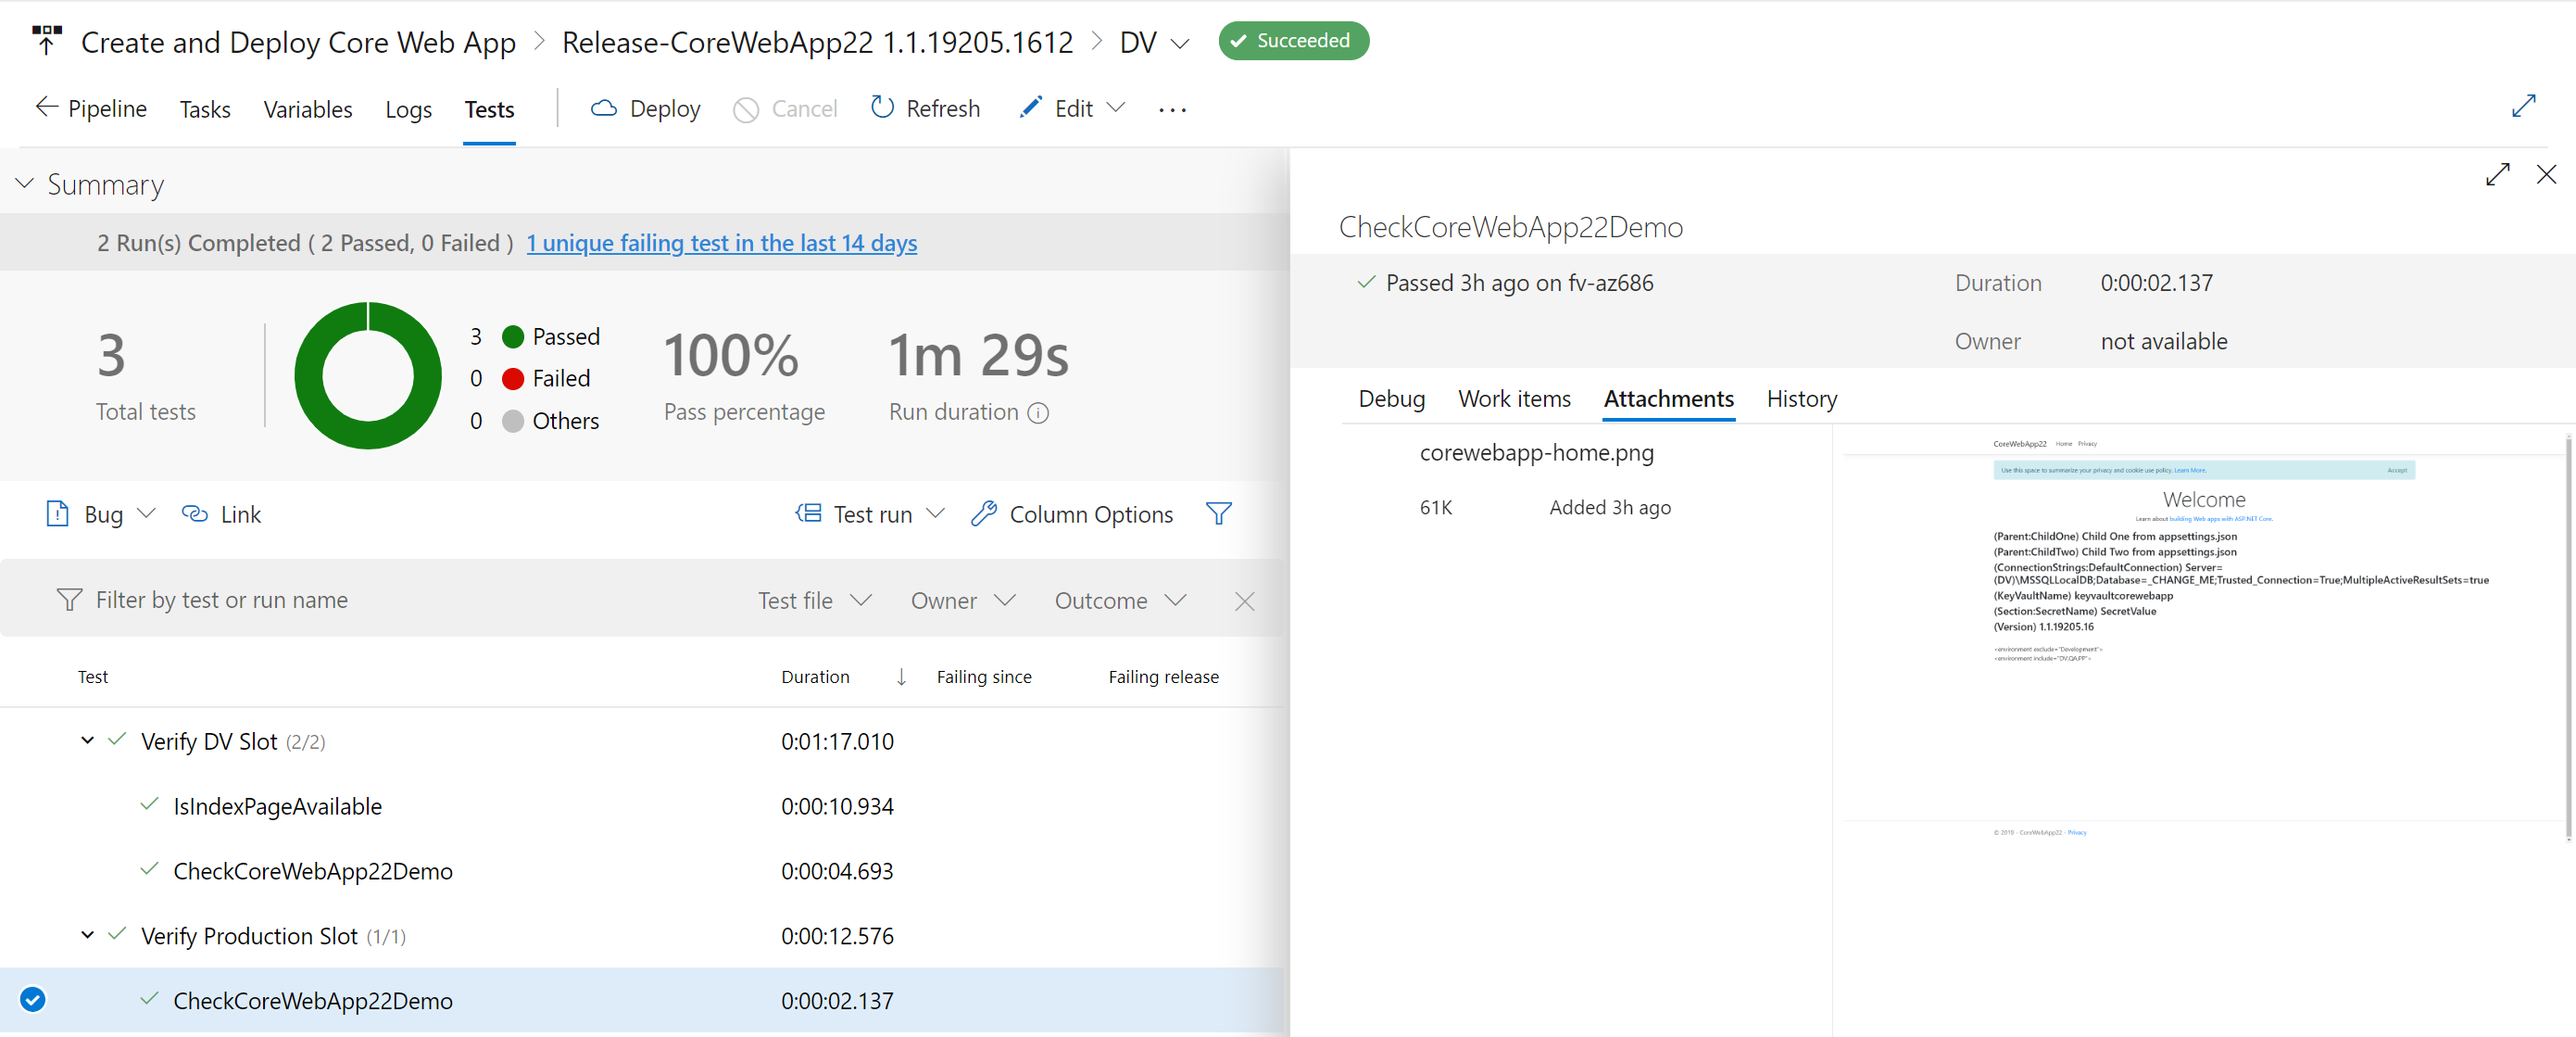
Hope you find this post helpful, next I think I’m going to expand my tests to execute Edge, Chrome and Firefox selenium tests on the hosted agent. I also want to integrate Application Insights into the pipeline… so many ideas!
If you want some recipes to help you get started with Azure DevOps (Server or Services) then I definitely recommend my good friends Tarun and Utkarsh‘s cookbook for sale on Amazon!
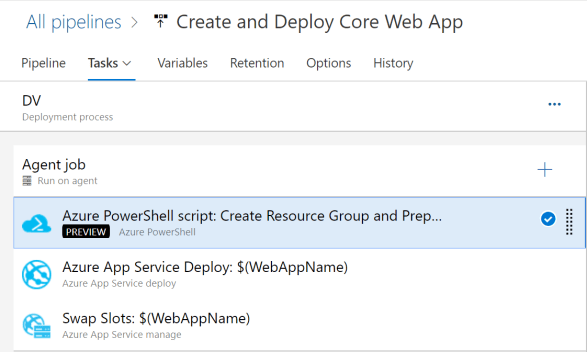
]]>- Delete Resource Group if it already exists
- Create Resource Group
- Create an App Service Plan
- Create an App Service (Web App)
- Enable the System Assigned Managed Identity and grant it access to read Secrets from an Azure Key Vault (already deployed)
- Create an additional Slot named after the release variable $(Release.EnvironmentName) to deploy the web app into.
- Creating Application Settings used by the .NET Core Web App in the Slot (This can also be done in the Azure App Service Deploy task but I wanted to try it anyways)
- Restart the App Service (Web App)
If you’ve tried to create resources in Azure using an ARM template, you might appreciate this approach,
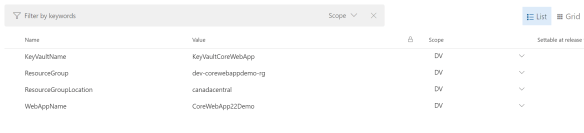
Let’s start with the first four items from the above list, the commands I use are all from the Az module which you can find here. I have defined the following variables in my release environment scoped to my environment titled DV:
- $(ResourceGroup)
- $(ResourceGroupLocation)
- $(WebAppName)
- $(KeyVaultName)
# Delete resource group if it already exists
Get-AzResourceGroup -Name $(ResourceGroup) | Remove-AzResourceGroup -Verbose -Force

# Create a new resource group
New-AzResourceGroup -Name $(ResourceGroup) -Location $(ResourceGroupLocation)

# Create an App Service plan in STANDARD tier (minimum required by deployment slots)
New-AzAppServicePlan -ResourceGroupName $(ResourceGroup) -Name $(WebAppName) -Location $(ResourceGroupLocation) -Tier "S1"

# Create a Web App
New-AzWebApp -ResourceGroupName $(ResourceGroup) -Name $(WebAppName) -Location $(ResourceGroupLocation) -AppServicePlan $(WebAppName)
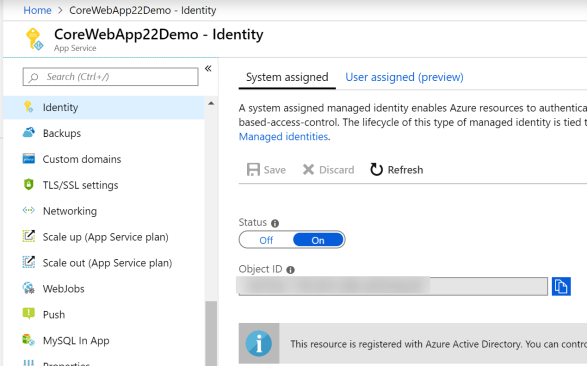
The next thing I wanted to do was enable the System Assigned Identity on the App Service because my demo .NET Core Web App grabs a secret out of a Key Vault I have deployed in another resource group in the *same* subscription and I do not want to have to maintain the access credentials from within the applications appSettings{environment}.json files.
# Enable managed identity
Set-AzWebApp -AssignIdentity $true -Name $(WebAppName) -ResourceGroupName $(ResourceGroup)

# Grant Permissions to the Key Vault - $KeyValutName
# Get PrincipalId of the Identity
$WebApp = Get-AzWebApp -ResourceGroupName $(ResourceGroup) -Name $(WebAppName)
Set-AzKeyVaultAccessPolicy -BypassObjectIdValidation -VaultName $(KeyVaultName) -ObjectId $WebApp.Identity.PrincipalId -PermissionsToSecrets Get,List
First we enable the Identity in the App Service. This is the Identity blade in the App Service (pictured below). After we do that we get (Get-AzWebApp) the web app so we can retrieve the PrincipalId from the Identity property.
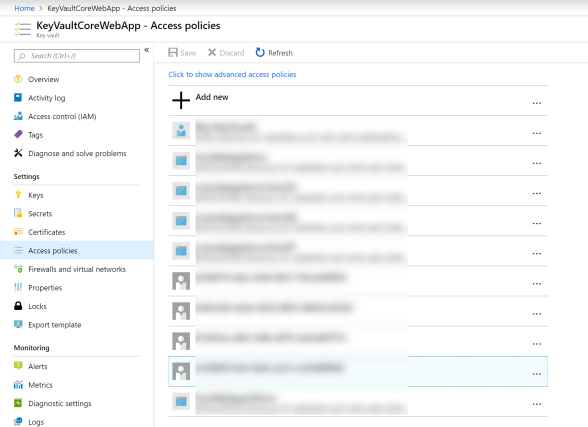
Now we call Set-AzKeyVaultAccessPolicy to grant access to our App Service System Assigned Identity. *NOTE* you will notice I am using –ByPassObjectIdValidation parameter because otherwise the command will fail with the following error during execution of the command:
##[error]Cannot find the Active Directory object ‘***’ in tenant ‘***’. Please make sure that the user or application service principal you are authorizing is registered in the current subscription’s Azure Active directory. The TenantID displayed by the cmdlet ‘Get-AzContext’ is the current subscription’s Azure Active directory.
I am granting access to the secrets with the following parameter PermissionsToSecrets Get, List which is the same as if you were to go to the Access Policies blade in your Azure Key Vault and manually grant them to the Object ID from above.
The remainder of the script creates a slot, add some application settings and then restart the App Service. The name we are giving the slot is from a release variable available during execution of the release.
# Create a deployment slot with the name of the stage
New-AzWebAppSlot -ResourceGroupName $(ResourceGroup) -Name $(WebAppName) -AppServicePlan $(WebAppName) -Slot $(Release.EnvironmentName)

# Configure Settings required by our App
$AppSettings = @{"ASPNETCORE_ENVIRONMENT" = "$(Release.EnvironmentName)";"APPINSIGHTS_INSTRUMENTATIONKEY" = ""}
Set-AzWebAppSlot -Name $(WebAppName) -ResourceGroupName $(ResourceGroup)  -AppSettings $AppSettings -Slot $(Release.EnvironmentName)

# Restart the web app
Restart-AzWebApp -ResourceGroupName $(ResourceGroup) -Name $(WebAppName)
The $AppSettings value which is passed as a parameter to Set-AzWebAppSlot must be a Hashtable which is why is is formatted the way it is above. My Application Insights instrumentation key is blank on purpose for the moment because I have not scripted that portion of the deployment yet (working on it).
The Azure PowerShell script task does the bulk of the work which I no longer have to perform manually. I then have the last two tasks which deploy the Web App to the DV slot and then swap the DV slot with Production (see image below).
Both of the tasks below use the same variables from the release, the reason being is that none of the drop downs will populate with any of your resources (Resource Group, App Service Name and Slot) because they don’t exist yet
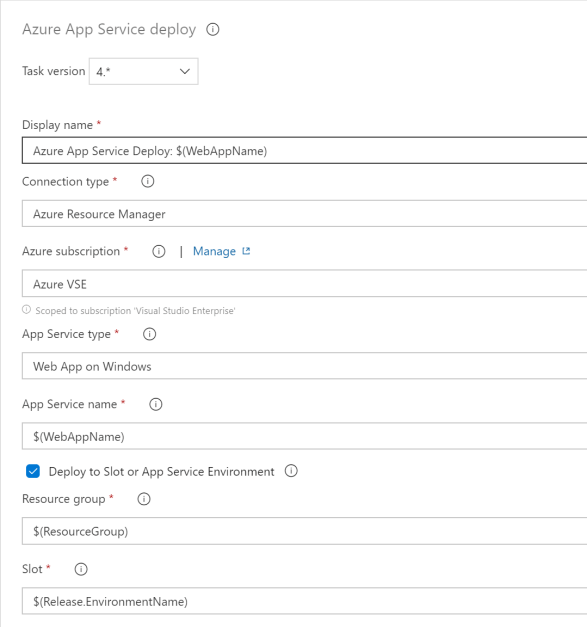
You can see above the Azure App Service Deploy task I use variables for the resources we build in the script task.
If I go online to check my web app, I can see that it has a connection to my Azure Key Vault.
Happy Azure PowerShelling!
]]>