The post Best 20 .Net Core Libraries Every Developer should know appeared first on Coding Infinite.
]]>With Every new Update, new features are added that help developers deploy high-performance & highly scalable applications using less Code.
In this article, I’m listing down some of the most useful but not very commonly used .Net Core Libraries that every developer needs to know.
LiteDB
LiteDB is a lightweight, small & fast NoSQL embedded database. It’s Open source & freely available for everyone, also for commercial usage. LiteDB is fast & also support LINQ queries. It stores data in documents & support Datafile encryption using DES (AES).
Like SQLite, LiteDB also stores data in a single file. It can also index document fields for fast search.
CacheManager
CacheManager is an open source caching abstraction layer for .NET written in C#. It supports various cache providers and implements many advanced features.
CacheManager makes developer’s life simpler by handling very complex cache scenarios. It also provides the implementation of multiple layers of caching in just a few lines of code, e.g. in-process caching in front of a distributed cache.
Smidge
A lightweight runtime CSS/JavaScript file minification, combination, compression & management library for ASP.Net Core. It supports compression, Minification & combination for CSS/JS Files. It properly configures client-side caching & persistent server-side caching.
Smidge is easily extensible. You can completely customize the pre-processor pipeline and create your own processors for any file type.
BCrypt.Net-Core
A .net Core version of BCrypt.net, with enhanced features and security. Compatible with .net framework as well as .net core. It should be a drop-in replacement for BCrypt.net as the namespaces are unchanged.
AspNetCore.Diagnostics.HealthChecks
This project is a BeatPulse liveness and UI port to new Microsoft Health Checks feature included on ASP.NET Core 2.2. It supports almost every commonly used database including MySql, Sql Server, Sqlite, MongoDB, Amazon S3, Postgres, Elasticsearch, DynamoDb & many other.
FluentEmail
Send email from .NET or .NET Core. Many useful extension packages make this very simple and powerful. It also offers Email body as a template. We can also use a template from disk. Here’s the basic usage example, look how simple it is.
var email = Email
    	.From("[email protected]")
    	.To("[email protected]", "bob")
    	.Subject("hows it going bob")
    	.Body("yo dawg, sup?")
    .Send();
UnitConversion
UnitConversion is designed to be expansible through factories or through concrete converter implementations. It supports Mass Conversion, Time Conversion, Area Conversion, Distance Conversion & Volume Conversion.
FastReport
FastReport provides open source report generator for .NET Core 2.x/.Net Framework 4.x. You can use the FastReport in MVC, Web API applications.
You can get data from XML, JSON, CSV, MySql, MSSQL, Oracle, Postgres, SQLite, MongoDB, Couchbase, RavenDB.
autocomplete
A very simple, Persistent, powerful and portable autocomplete library. Ready for desktop, web & cloud. It Supports all stream types, including on classical disc storage for cheapest hosting. Considered as one of the fastest autocomplete algorithms with O(n) complexity for searching.
AppMetrics
App Metrics is an open-source and cross-platform library used to record metrics within an application. it provides several metric types to measure things such as the count of login users over time, the rate of requests, measure time to run a DB query, measure the amount of free memory and so on. It supports Counters, Meters, Gauges, Histograms and Timers etc.
sharpcompress
SharpCompress is a compression library that can unzip, unrar, un7zip, untar unbzip2 and ungzip with forward-only reading and file random access APIs. Write support for zip/tar/bzip2/gzip are implemented.
The major feature is support for non-seekable streams so large files can be done on the fly.
HashLib
Here you can find implementations of many hashing algorithms e.g. all sha3 round 2 and 3 candidates. You can hash files, streams, common types of data.
nopCommerce
nopCommerce is the best open-source e-commerce shopping cart. nopCommerce is available for free. It is a fully customizable shopping cart. It’s stable and highly usable. nopCommerce is an open source ecommerce solution.
nopCommerce can be up-and-running in just a few clicks. just download and follow the simple instructions. It’s also optimised for search engines & has friendly URLs.
MailKit
The main goal of this project is to provide the .NET world with robust, fully featured and RFC-compliant SMTP, POP3, and IMAP client implementations.
cscore
A free .NET audio library which is completely written in C#. it offers many features like playing or capturing audio, en- or decoding many different codecs, effects and much more!
NetOffice
NetOffice supports extending and automating Microsoft Office applications: Excel, Word, Outlook, PowerPoint, Access, Project and Visio. It doesn’t have any version limitation. It supports Office versions from 2000 to the latest version.
SSH.NET
This project was inspired by Sharp.SSH library which was adopted from java and it seems like was not supported for quite some time. This library is a complete rewrite, without any third party dependencies, using parallelism to achieve the best performance possible.
It provides SSH commands using Sync & Async methods. SFTP functionality also supports Sync & Async operations. Supports two-factor or higher authentication as well.
SignalR
ASP.NET SignalR is a library for ASP.NET developers that makes it incredibly simple to add real-time web functionality to your applications.
“real-time web” functionality is the ability to have your server-side code push content to the connected clients as it happens, in real-time.
C-Sharp-Algorithms
A C# plug-and-play class-library project of Algorithms & standard Data Structures. It includes 30+ Algorithms & 35+ Data Structures designed as Object-Oriented separate components. Actually, this project was started for educational purposes, the implemented Algorithms & Data Structures are efficient, standard, tested & stable.
Nancy
Nancy is a lightweight framework for building HTTP based services on .NET Framework/Core and Mono.
Nancy is designed to handle GET, POST, PUT, DELETE, HEAD, OPTIONS, & PATCH requests and provides a simple, elegant way for returning a response with just a couple of keystrokes, leaving you with more time to focus on the important logic of your application.
Here are some more Articles, you might be Interested:
– A Complete Guide to Secure Your Asp.Net Core Web Application & Apis
– Top Open Source Asp.Net Core Content Management System (Cms)
– Best Cross-platform .Net Core Ide for Windows | Macos | Linux
The post Best 20 .Net Core Libraries Every Developer should know appeared first on Coding Infinite.
]]>The post CRUD Operations Web App using PHP & MySQL | Part 2 appeared first on Coding Infinite.
]]>If you missed previous parts, then you can find here => Getting Started with Web Application using PHP & MySQL | Tutorials
I’m assuming that you have followed the previous part of this Tutorial & created API for CRUD Operations using PHP & MySQL.
In this part, we’ll use AdminLTE Template to create UI for our CRUD API we have created in the previous part of this article.
We have also set up our Template & created the database in the First part of this Tutorial.
After following the previous article, your project structure will look like this.
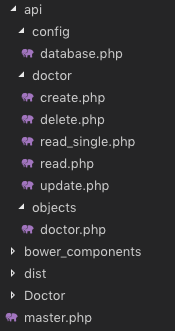
We know that we have created the master.php in the First part, which is our Layout page.
We also have “Doctor” Folder at the root directory of our Project. We’ll create all pages related to Doctor in this Folder.
Let’s start by creating a page to display all doctors data into a Table.
We have created “index.php” file inside “Doctor” Folder. Update this file with the Code below.
<?php
  $content = '<div class="row">
                <div class="col-xs-12">
                <div class="box">
                  <div class="box-header">
                    <h3 class="box-title">Dostors List</h3>
                  </div>
                  <!-- /.box-header -->
                  <div class="box-body">
                    <table id="doctors" class="table table-bordered table-hover">
                      <thead>
                      <tr>
                        <th>Name</th>
                        <th>Email</th>
                        <th>Phone</th>
                        <th>Gender</th>
                        <th>Specialist</th>
                        <th>Action</th>
                      </tr>
                      </thead>
                      <tbody>
                      </tbody>
                      <tfoot>
                      <tr>
                        <th>Name</th>
                        <th>Email</th>
                        <th>Phone</th>
                        <th>Gender</th>
                        <th>Specialist</th>
                        <th>Action</th>
                      </tr>
                      </tfoot>
                    </table>
                  </div>
                  <!-- /.box-body -->
                </div>
                <!-- /.box -->
              </div>
            </div>';
  include('../master.php');
?>
<!-- page script -->
<script>
  $(document).ready(function(){
    $.ajax({
        type: "GET",
        url: "../api/doctor/read.php",
        dataType: 'json',
        success: function(data) {
            var response="";
            for(var user in data){
                response += "<tr>"+
                "<td>"+data[user].name+"</td>"+
                "<td>"+data[user].email+"</td>"+
                "<td>"+data[user].phone+"</td>"+
                "<td>"+((data[user].gender == 0)? "Male": "Female")+"</td>"+
                "<td>"+data[user].specialist+"</td>"+
                "<td><a href='update.php?id="+data[user].id+"'>Edit</a> | <a href='#' onClick=Remove('"+data[user].id+"')>Remove</a></td>"+
                "</tr>";
            }
            $(response).appendTo($("#doctors"));
        }
    });
  });
  function Remove(id){
    var result = confirm("Are you sure you want to Delete the Doctor Record?");
    if (result == true) {
        $.ajax(
        {
            type: "POST",
            url: '../api/doctor/delete.php',
            dataType: 'json',
            data: {
                id: id
            },
            error: function (result) {
                alert(result.responseText);
            },
            success: function (result) {
                if (result['status'] == true) {
                    alert("Successfully Removed Doctor!");
                    window.location.href = '/medibed/doctor';
                }
                else {
                    alert(result['message']);
                }
            }
        });
    }
  }
</script>
Code Explanation
First of all, we have the content of this page in a PHP variable & then we simply included our master.php because it has the code for Layout page.
On document load, we’re using ajax to consume our read API to get all doctors.
We also have a function to remove a Doctor.
Now go to this Url => http://localhost/medibed/doctor/
you’ll see this page

Doctor remove will also work fine because of remove function ready in our code.
Now we need to create pages to Create & Update a Doctor.
Create a new file inside “Doctor” Folder with the name “create.php” & add this Code.
<?php
  $content = '<div class="row">
                <!-- left column -->
                <div class="col-md-12">
                  <!-- general form elements -->
                  <div class="box box-primary">
                    <div class="box-header with-border">
                      <h3 class="box-title">Add Doctor</h3>
                    </div>
                    <!-- /.box-header -->
                    <!-- form start -->
                    <form role="form">
                      <div class="box-body">
                        <div class="form-group">
                          <label for="exampleInputName1">Name</label>
                          <input type="text" class="form-control" id="name" placeholder="Enter Name">
                        </div>
                        <div class="form-group">
                          <label for="exampleInputEmail1">Email address</label>
                          <input type="email" class="form-control" id="email" placeholder="Enter email">
                        </div>
                        <div class="form-group">
                          <label for="exampleInputPassword1">Password</label>
                          <input type="password" class="form-control" id="password" placeholder="Password">
                        </div>
                        <div class="form-group">
                          <label for="exampleInputName1">Phone</label>
                          <input type="text" class="form-control" id="phone" placeholder="Enter Phone">
                        </div>
                        <div class="form-group">
                            <label for="exampleInputName1">Gender</label>
                            <div class="radio">
                                <label>
                                <input type="radio" name="gender" id="optionsRadios1" value="0" checked="">
                                Male
                                </label>
                            </div>
                            <div class="radio">
                                <label>
                                <input type="radio" name="gender" id="optionsRadios2" value="1">
                                Female
                                </label>
                            </div>
                        </div>
                        <div class="form-group">
                          <label for="exampleInputName1">Specialist</label>
                          <input type="text" class="form-control" id="specialist" placeholder="Enter Specialization">
                        </div>
                      </div>
                      <!-- /.box-body -->
                      <div class="box-footer">
                        <input type="button" class="btn btn-primary" onClick="AddDoctor()" value="Submit"></input>
                      </div>
                    </form>
                  </div>
                  <!-- /.box -->
                </div>
              </div>';
  include('../master.php');
?>
<script>
  function AddDoctor(){

        $.ajax(
        {
            type: "POST",
            url: '../api/doctor/create.php',
            dataType: 'json',
            data: {
                name: $("#name").val(),
                email: $("#email").val(),
                password: $("#password").val(),
                phone: $("#phone").val(),
                gender: $("input[name='gender']:checked").val(),
                specialist: $("#specialist").val()
            },
            error: function (result) {
                alert(result.responseText);
            },
            success: function (result) {
                if (result['status'] == true) {
                    alert("Successfully Added New Doctor!");
                    window.location.href = '/medibed/doctor';
                }
                else {
                    alert(result['message']);
                }
            }
        });
    }
</script>
Now click on Create Doctor inside Doctors SideBar Menu or go to this Url => http://localhost/medibed/doctor/create.php
You’ll see this page

Try to Create a new Doctor.
I hope everything is working as expected.
Let’s complete our Update Doctor functionality by creating a new file inside “Doctor” Folder as “update.php”
Add the below code inside this newly created file.
<?php
  $content = '<div class="row">
                <!-- left column -->
                <div class="col-md-12">
                  <!-- general form elements -->
                  <div class="box box-primary">
                    <div class="box-header with-border">
                      <h3 class="box-title">Update Doctor</h3>
                    </div>
                    <!-- /.box-header -->
                    <!-- form start -->
                    <form role="form">
                      <div class="box-body">
                        <div class="form-group">
                          <label for="exampleInputName1">Name</label>
                          <input type="text" class="form-control" id="name" placeholder="Enter Name">
                        </div>
                        <div class="form-group">
                          <label for="exampleInputEmail1">Email address</label>
                          <input type="email" class="form-control" id="email" placeholder="Enter email">
                        </div>
                        <div class="form-group">
                          <label for="exampleInputPassword1">Password</label>
                          <input type="password" class="form-control" id="password" placeholder="Password">
                        </div>
                        <div class="form-group">
                          <label for="exampleInputName1">Phone</label>
                          <input type="text" class="form-control" id="phone" placeholder="Enter Phone">
                        </div>
                        <div class="form-group">
                            <label for="exampleInputName1">Gender</label>
                            <div class="radio">
                                <label>
                                <input type="radio" name="gender" id="gender0" value="0" checked="">
                                Male
                                </label>
                            </div>
                            <div class="radio">
                                <label>
                                <input type="radio" name="gender" id="gender1" value="1">
                                Female
                                </label>
                            </div>
                        </div>
                        <div class="form-group">
                          <label for="exampleInputName1">Specialist</label>
                          <input type="text" class="form-control" id="specialist" placeholder="Enter Specialization">
                        </div>
                      </div>
                      <!-- /.box-body -->
                      <div class="box-footer">
                        <input type="button" class="btn btn-primary" onClick="UpdateDoctor()" value="Update"></input>
                      </div>
                    </form>
                  </div>
                  <!-- /.box -->
                </div>
              </div>';

  include('../master.php');
?>
<script>
    $(document).ready(function(){
        $.ajax({
            type: "GET",
            url: "../api/doctor/read_single.php?id=<?php echo $_GET['id']; ?>",
            dataType: 'json',
            success: function(data) {
                $('#name').val(data['name']);
                $('#email').val(data['email']);
                $('#password').val(data['password']);
                $('#phone').val(data['phone']);
                $('#gender'+data['gender']).prop("checked", true);
                $('#specialist').val(data['specialist']);
            },
            error: function (result) {
                console.log(result);
            },
        });
    });
    function UpdateDoctor(){
        $.ajax(
        {
            type: "POST",
            url: '../api/doctor/update.php',
            dataType: 'json',
            data: {
                id: <?php echo $_GET['id']; ?>,
                name: $("#name").val(),
                email: $("#email").val(),
                password: $("#password").val(),
                phone: $("#phone").val(),
                gender: $("input[name='gender']:checked").val(),
                specialist: $("#specialist").val()
            },
            error: function (result) {
                alert(result.responseText);
            },
            success: function (result) {
                if (result['status'] == true) {
                    alert("Successfully Updated Doctor!");
                    window.location.href = '/medibed/doctor';
                }
                else {
                    alert(result['message']);
                }
            }
        });
    }
</script>
Now you can also update any doctor record.
We have successfully created our CRUD(Create, Read, Update, Delete) Operations using Beautiful & Free UI Template.
You can also download the complete source code from GitHub.
Please Comment If you found any problem.
You might be interested in:
- Signup Login page in PHP with Database MySQL Source Code
- Restful Web Services in PHP Example – PHP + MySQL with Source Code
The post CRUD Operations Web App using PHP & MySQL | Part 2 appeared first on Coding Infinite.
]]>The post My Story When Working With Google Distance Matrix API appeared first on Coding Infinite.
]]>Problem
The Uber and Careem have their driver app at which passenger request for the ride. After accepting the passenger request driver needs to reach passenger location and then the driver starts the ride. When the ride starts the driver application start tracking the distance from origin to the passenger destination. At first, I think that’s easy store the location when a driver starts the ride and execute the distance matrix request with the destination location. That’s it!

Distance Tracking Problem
One day, when I’m testing the app I start the ride from my house go to the market came back then complete the ride. But when I see the total traveling distance is just two meters I shocked. I said, to myself, the market is two kilometers away from my home and that’s the one-way distance. So the total distance needs to be 4 kilometers. After an hour of thinking I came up with the problem that my start ride co-ordinates and end ride co-ordinates are the same.

Distance Tracking Solution
Another solution which I come up with after searching on StackOverflow and talking with other developers on Reddit is to execute the Distance Matrix API request whenever the driver current location changed. This approach is better than the previous one and most of all calculate the correct tracking distance. I need to do two extra things with this approach.
- I need to request the Google Distance Matrix API every time when the driver current location changed.
- Need to store the result of Distance Matrix API, store the destination location and again when the current location change executes the request with the previously stored location and so on…
Distance Matrix Billing Problem
Everything seems to be working fine unless I see the graph of Distance Matrix API graph in google console. After every three seconds, one request is executed for distance calculation.

Distance Matrix Billing Solution
Another day at work and need to find out another solution for distance tracking. At the end of the day I finally able to find a solution which generates less billing and better in performance from the previous one. Now instead of executing distance request whenever the driver current location changed, I started a background service and also increase the interval for Distance Matrix network request. The new interval is ten seconds, so it means the API billing is three times less.
I know there are many other solutions which may be better than my final explanation. Any suggestion, comments, and corrections are always welcome.
In the last, I just want to say that if you’re an Android Developer then do check out the next article. In the next article, I’m gonna to make a location distance tracking application.
Thank you for being here and keep reading…
Location Distance Tracking App
The post My Story When Working With Google Distance Matrix API appeared first on Coding Infinite.
]]>The post Android Image Upload Example using PHP with Source Code appeared first on Coding Infinite.
]]>There are several ways to upload Image or any other file from Android to Server using PHP Webservice. I’m going to upload the image in base64 encoded form. I’ll share the source code for both Android and PHP.
Web Service will also save the image on the server after receiving it.
How Does It Work?
- Select the Image from Phone Gallary
- Encode the Image to Base64
- Send the Image as POST Parameter using PHP Webservice
- Webservice will receive encoded image
- Decode Image and save it on the Server
Source Code
Android:
Now it’s time to do some Android coding for uploading the image. In this app, for uploading the image we’re using Retrofit. For to add the Retrofit in Android app add the dependencies in your app. Below are the dependencies.
implementation 'com.squareup.retrofit2:retrofit:2.3.0'
implementation 'com.squareup.retrofit2:converter-gson:2.3.0'
implementation 'com.squareup.okhttp3:logging-interceptor:3.9.0'
Before starting the Android app coding I wanna show you the demo of the app.
Now you see the demo right, let’s start making the app by designing its UI. Below is the activity_main.xml file.
<?xml version="1.0" encoding="utf-8"?>
<RelativeLayout xmlns:android="http://schemas.android.com/apk/res/android"
    xmlns:tools="http://schemas.android.com/tools"
    android:layout_width="match_parent"
    android:layout_height="match_parent"
    tools:context=".MainActivity">

    <ImageView
        android:id="@+id/imageView"
        android:layout_width="match_parent"
        android:layout_height="200dp"
        android:contentDescription="@null"
        android:scaleType="centerCrop" />

    <LinearLayout
        style="?android:attr/buttonBarStyle"
        android:layout_width="match_parent"
        android:layout_height="wrap_content"
        android:layout_alignParentBottom="true"
        android:orientation="horizontal"
        android:weightSum="2">

        <Button
            android:id="@+id/selectImageButton"
            android:layout_width="0dp"
            android:layout_height="wrap_content"
            android:layout_marginEnd="10dp"
            android:layout_weight="1"
            android:text="@string/select_image"
            tools:ignore="ButtonStyle" />

        <Button
            android:id="@+id/uploadImageButton"
            android:layout_width="0dp"
            android:layout_height="wrap_content"
            android:layout_weight="1"
            android:text="@string/select_image"
            tools:ignore="ButtonStyle" />

    </LinearLayout>

</RelativeLayout>
In our MainActivity when the user clicks on the selectImage button it will open the Gallery app and let you select the image. Below is the code for when a user presses the select image button.
findViewById<Button>(R.id.selectImageButton).setOnClickListener {
            val intent = Intent(
                    Intent.ACTION_PICK, android.provider.MediaStore.Images.Media.EXTERNAL_CONTENT_URI)
            startActivityForResult(Intent.createChooser(intent, "Select Picture"), PICK_IMAGE_REQUEST_CODE)
}
Now when the user selects the image from the Gallery app the result will come in the onActivityResult method. Below is the MainActivity onActivityResult method.
override fun onActivityResult(requestCode: Int, resultCode: Int, data: Intent?) {
     super.onActivityResult(requestCode, resultCode, data)
     if (requestCode == PICK_IMAGE_REQUEST_CODE && RESULT_OK == resultCode) {
         data?.let {
             try {
                 bitmap = uiHelper.decodeUri(this, it.data)
                 imageView.setImageBitmap(bitmap)
             } catch (e: Exception) {
                 if (bitmap != null) imageView.setImageBitmap(bitmap)
             }
         }
     }
 }
After the user selects an image the onActivityResult method will be called. So, we store the image as Bitmap in our global bitmap object. Before proceeding next you guys see that we’re decoding the image with a decodeUri method to get the resulted bitmap. Below is the decodeUri method.
@Throws(FileNotFoundException::class)
fun decodeUri(context: Context, selectedImage: Uri): Bitmap {
    val o = BitmapFactory.Options()
    o.inJustDecodeBounds = true
    BitmapFactory.decodeStream(context.contentResolver.openInputStream(selectedImage), null, o)
    val REQUIRED_SIZE = 140
    var width_tmp = o.outWidth
    var height_tmp = o.outHeight
    var scale = 1
    while (true) {
        if (width_tmp / 2 < REQUIRED_SIZE || height_tmp / 2 < REQUIRED_SIZE) {
            break
        }
        width_tmp /= 2
        height_tmp /= 2
        scale *= 2
    }
    val o2 = BitmapFactory.Options()
    o2.inSampleSize = scale
    return BitmapFactory.decodeStream(context.contentResolver.openInputStream(selectedImage), null, o2)
}
So, we select the image and store the resulted image in the bitmap object. Now we only need to upload the image the user press the Upload Image button.
findViewById<Button>(R.id.uploadImageButton).setOnClickListener {
            if (bitmap != null) {
                val imageBytes = uiHelper.getImageBytes(bitmap!!)
                uploadImage(imageBytes)
            } else
                Toast.makeText(this, "No image selected", Toast.LENGTH_SHORT).show()
        }
To upload the image first we check if a user selects the image before or not. Second, we need to convert the bitmap into Base64 ByteArray and third upload the image bytes to the server. Below is the getImageBytes method.
fun getImageUrl(bitmap: Bitmap): String {
    val byteArrayOutputStream = ByteArrayOutputStream()
    bitmap.compress(Bitmap.CompressFormat.JPEG, 100, byteArrayOutputStream)
    val bytes = byteArrayOutputStream.toByteArray()
    return Base64.encodeToString(bytes, Base64.DEFAULT)
}
The prep work is done. Now it’s time to upload the image bytes to the server. Below is the uploadImage method code.
private fun uploadImage(imageBytes: String) {
    ServiceApi.Factory.getInstance(this).uploadImage(imageBytes)
            .enqueue(object : Callback<StatusMessageResponse> {
                override fun onFailure(call: Call<StatusMessageResponse>?, t: Throwable?) {
                    Toast.makeText(MainActivity.this,"Image uploaded",Toast.LENGTH_SHORT).show()
                    // Image uploaded successfully
                }

                override fun onResponse(call: Call<StatusMessageResponse>?, response: Response<StatusMessageResponse>?) {
                    // Error Occurred during uploading
                }
            })

}
The ServerApi is the instance of a Retrofit interface. Below is the ServerApi class.
interface ServiceApi {

    companion object {
        private const val BASE_URL = ""  // Base url of your hosting
    }

    @FormUrlEncoded
    @POST("")   // end_point url
    fun uploadImage(@Field("image_bytes") imageBytes: String): Call<StatusMessageResponse>

    class Factory {

        companion object {
            private var service: ServiceApi? = null
            fun getInstance(context: Context): ServiceApi? {
                if (service == null) {
                    val builder = OkHttpClient().newBuilder()
                    builder.readTimeout(15, TimeUnit.SECONDS)
                    builder.connectTimeout(15, TimeUnit.SECONDS)
                    builder.writeTimeout(15, TimeUnit.SECONDS)
                    if (BuildConfig.DEBUG) {
                        val interceptor = HttpLoggingInterceptor()
                        interceptor.level = HttpLoggingInterceptor.Level.BODY
                        builder.addInterceptor(interceptor)
                    }
                    val file = File(context.cacheDir, "cache_dir")
                    if (!file.exists())
                        file.mkdirs()
                    val cacheSize: Long = 10 * 1024 * 1024 // 10 MiB
                    val cache = okhttp3.Cache(file, cacheSize)
                    builder.cache(cache)
                    val retrofit: Retrofit
                    retrofit = Retrofit.Builder()
                            .client(builder.build())
                            .addConverterFactory(GsonConverterFactory.create())
                            .baseUrl(BASE_URL)
                            .build()
                    service = retrofit.create(ServiceApi::class.java)
                    return service
                } else {
                    return service
                }
            }
        }
    }
}
In this article, I’m not gonna show you how the Retrofit works and how to create its instance. You can learn about Retrofit from this article. Each call created from ServerApi can be synchronous or asynchronous HTTP request to the remote web server.
Note: There are two things that you need to do. First, you need to add your web server BASE_URL. Second, add the end-point URL to POST annotation. And in the end, don’t forget to add the Internet permission in the Manifest file.
Alright, our code for Android App is complete. You can get the complete source code of the above app from GitHub.
PHP:
// receive image as POST Parameter
$image = str_replace('data:image/png;base64,', '', $_POST['image']);
$image = str_replace(' ', '+', $image);
// Decode the Base64 encoded Image
$data = base64_decode($image);
// Create Image path with Image name and Extension
$file = '../images/' . "MyImage" . '.jpg';
// Save Image in the Image Directory
$success = file_put_contents($file, $data);
The post Android Image Upload Example using PHP with Source Code appeared first on Coding Infinite.
]]>The post Signup Login page in PHP with Database MySQL Source Code appeared first on Coding Infinite.
]]>What we’ll cover in Signup Login page in PHP with Database
- File Structure
- Creating HTML page
- Connecting HTML page with Webservices
File Structure
We’ll use this folders & files structure inside our “app” folder for our Login & Signup page.
index.html
|
assets
├─── css
├────── style.css
api
├─── config/
├────── database.php – file used for connecting to the database.
├─── objects/
├────── user.php – contains properties and methods for “user” database queries.
├─── User/
├────── signup.php – file that will accept user data to be saved to the DB.
├────── login.php – file that will accept username & password and validate
as you can see that we have added pages and assets folders, pages folder will contain all HTML pages and assets folder is for CSS, JS, images etc.
Creating HTML page
as I stated that you can create your own design or you can use any other design, for this tutorial I’m using This template and I just modified it according to my Webservices.
inside your “app” folder, create a new file as “index.html” and paste this code there
<!DOCTYPE html>
<html lang="en" >

<head>
  <meta charset="UTF-8">
  <title>PHP Learning</title>


  <link rel='stylesheet prefetch' href='https://fonts.googleapis.com/css?family=Open+Sans:600'>

      <link rel="stylesheet" href="proxy.php?url=./assets/css/style.css">


</head>

<body>

  <div class="login-wrap">
  <div class="login-html">
    <input id="tab-1" type="radio" name="tab" class="sign-in" checked><label for="tab-1" class="tab">Sign In</label>
    <input id="tab-2" type="radio" name="tab" class="sign-up"><label for="tab-2" class="tab">Sign Up</label>
    <div class="login-form">
      <form class="sign-in-htm" action="proxy.php?url=./api/user/login.php" method="GET">
        <div class="group">
          <label for="user" class="label">Username</label>
          <input id="username" name="username" type="text" class="input">
        </div>
        <div class="group">
          <label for="pass" class="label">Password</label>
          <input id="password" name="password" type="password" class="input" data-type="password">
        </div>
        <div class="group">
          <input id="check" type="checkbox" class="check" checked>
          <label for="check"><span class="icon"></span> Keep me Signed in</label>
        </div>
        <div class="group">
          <input type="submit" class="button" value="Sign In">
        </div>
        <div class="hr"></div>
        <div class="foot-lnk">
          <a href="proxy.php?url=#forgot">Forgot Password?</a>
        </div>
      </form>
      <form class="sign-up-htm" action="proxy.php?url=./api/user/signup.php" method="POST">
        <div class="group">
          <label for="user" class="label">Username</label>
          <input id="username" name="username" type="text" class="input">
        </div>
        <div class="group">
          <label for="pass" class="label">Password</label>
          <input id="password" name="password" type="password" class="input" data-type="password">
        </div>
        <div class="group">
          <label for="pass" class="label">Confirm Password</label>
          <input id="pass" type="password" class="input" data-type="password">
        </div>
        <div class="group">
          <input type="submit" class="button" value="Sign Up">
        </div>
        <div class="hr"></div>
        <div class="foot-lnk">
          <label for="tab-1">Already Member?</a>
        </div>
      </form>
    </div>
  </div>
</div>


</body>

</html>
Now go to the “assets” folder and create a new folder as “css” and create a new file there as “style.css” and paste this code there
body{
  margin:0;
  color:#6a6f8c;
  background:#c8c8c8;
  font:600 16px/18px 'Open Sans',sans-serif;
}
*,:after,:before{box-sizing:border-box}
.clearfix:after,.clearfix:before{content:'';display:table}
.clearfix:after{clear:both;display:block}
a{color:inherit;text-decoration:none}

.login-wrap{
  width:100%;
  margin:auto;
  margin-top: 30px;
  max-width:525px;
  min-height:570px;
  position:relative;
  background:url(http://codinginfinite.com/demo/images/bg.jpg) no-repeat center;
  box-shadow:0 12px 15px 0 rgba(0,0,0,.24),0 17px 50px 0 rgba(0,0,0,.19);
}
.login-html{
  width:100%;
  height:100%;
  position:absolute;
  padding:90px 70px 50px 70px;
  background:rgba(40,57,101,.9);
}
.login-html .sign-in-htm,
.login-html .sign-up-htm{
  top:0;
  left:0;
  right:0;
  bottom:0;
  position:absolute;
  -webkit-transform:rotateY(180deg);
          transform:rotateY(180deg);
  -webkit-backface-visibility:hidden;
          backface-visibility:hidden;
  transition:all .4s linear;
}
.login-html .sign-in,
.login-html .sign-up,
.login-form .group .check{
  display:none;
}
.login-html .tab,
.login-form .group .label,
.login-form .group .button{
  text-transform:uppercase;
}
.login-html .tab{
  font-size:22px;
  margin-right:15px;
  padding-bottom:5px;
  margin:0 15px 10px 0;
  display:inline-block;
  border-bottom:2px solid transparent;
}
.login-html .sign-in:checked + .tab,
.login-html .sign-up:checked + .tab{
  color:#fff;
  border-color:#1161ee;
}
.login-form{
  min-height:345px;
  position:relative;
  -webkit-perspective:1000px;
          perspective:1000px;
  -webkit-transform-style:preserve-3d;
          transform-style:preserve-3d;
}
.login-form .group{
  margin-bottom:15px;
}
.login-form .group .label,
.login-form .group .input,
.login-form .group .button{
  width:100%;
  color:#fff;
  display:block;
}
.login-form .group .input,
.login-form .group .button{
  border:none;
  padding:15px 20px;
  border-radius:25px;
  background:rgba(255,255,255,.1);
}
.login-form .group input[data-type="password"]{
  text-security:circle;
  -webkit-text-security:circle;
}
.login-form .group .label{
  color:#aaa;
  font-size:12px;
}
.login-form .group .button{
  background:#1161ee;
}
.login-form .group label .icon{
  width:15px;
  height:15px;
  border-radius:2px;
  position:relative;
  display:inline-block;
  background:rgba(255,255,255,.1);
}
.login-form .group label .icon:before,
.login-form .group label .icon:after{
  content:'';
  width:10px;
  height:2px;
  background:#fff;
  position:absolute;
  transition:all .2s ease-in-out 0s;
}
.login-form .group label .icon:before{
  left:3px;
  width:5px;
  bottom:6px;
  -webkit-transform:scale(0) rotate(0);
          transform:scale(0) rotate(0);
}
.login-form .group label .icon:after{
  top:6px;
  right:0;
  -webkit-transform:scale(0) rotate(0);
          transform:scale(0) rotate(0);
}
.login-form .group .check:checked + label{
  color:#fff;
}
.login-form .group .check:checked + label .icon{
  background:#1161ee;
}
.login-form .group .check:checked + label .icon:before{
  -webkit-transform:scale(1) rotate(45deg);
          transform:scale(1) rotate(45deg);
}
.login-form .group .check:checked + label .icon:after{
  -webkit-transform:scale(1) rotate(-45deg);
          transform:scale(1) rotate(-45deg);
}
.login-html .sign-in:checked + .tab + .sign-up + .tab + .login-form .sign-in-htm{
  -webkit-transform:rotate(0);
          transform:rotate(0);
}
.login-html .sign-up:checked + .tab + .login-form .sign-up-htm{
  -webkit-transform:rotate(0);
          transform:rotate(0);
}

.hr{
  height:2px;
  margin:60px 0 50px 0;
  background:rgba(255,255,255,.2);
}
.foot-lnk{
  text-align:center;
}
Now you’ll see the page same as this

Connecting HTML page with Webservices
Download Login & Signup API from Github you can also create these API following my previous post, Restful Web Services in PHP Example – PHP + MySQL Best Practice
setup Database and paste “api” folder inside “app” folder.
all done, Now you can run your index.html through localhost.
You might be Interested in:
Here are some more Tutorial for creating Web Application & CRUD Operations using PHP & MySQL.
- Getting Started with Web Application using PHP & MySQL | Tutorials
- CRUD Operations using PHP & MySQL | Tutorials with Source Code
- Learn Object Oriented Programming In PHP
The post Signup Login page in PHP with Database MySQL Source Code appeared first on Coding Infinite.
]]>The post Restful Web Services in PHP Example – PHP + MySQL with Source Code appeared first on Coding Infinite.
]]>Using PHP Core, there are many straightforward ways to directly write Webservices in a single File or each Webservice in a single File but keep in mind that code organization is one of the most important programming practice. That is the reason that developers prefer using Frameworks because frameworks provide a pre-organized project structure, but for small Applications or writing Restful Webservices, I always prefer Core PHP.
What we’ll cover in Restful Web Services in PHP Example
- File Structure
- Creating Database & users Table
- Database Connectivity
- Creating User Class with Signup & Login methods
- Creating SignUp & Login Restful Webservices
File Structure
We’ll use this folders & files structure for writing our Webservices.
api
├─── config/
├────── database.php – file used for connecting to the database.
├─── objects/
├────── user.php – contains properties and methods for “user” database queries.
├─── User/
├────── signup.php – file that will accept user data to be saved to the DB.
├────── login.php – file that will accept username & password and validate
Creating Database & Users Table
Using PHPMyAdmin First create a database I’m using PHPLearning as the database name. For keeping things simple we’ll create very simple users Table with very few columns.
Run this SQL Query to create a users table
CREATE TABLE `users` (
  `id` int(11) NOT NULL PRIMARY KEY AUTO_INCREMENT,
  `username` varchar(255) NOT NULL,
  `password` varchar(255) NOT NULL,
  `created` timestamp NOT NULL DEFAULT CURRENT_TIMESTAMP ON UPDATE CURRENT_TIMESTAMP
)
Database Connectivity
In your “api” folder, create a new folder “config” and create a new file there as “database.php” and paste this code there
<?php
class Database{

    // specify your own database credentials
    private $host = "localhost";
    private $db_name = "PHPLearning";
    private $username = "root";
    private $password = "";
    public $conn;

    // get the database connection
    public function getConnection(){

        $this->conn = null;

        try{
            $this->conn = new PDO("mysql:host=" . $this->host . ";dbname=" . $this->db_name, $this->username, $this->password);
            $this->conn->exec("set names utf8");
        }catch(PDOException $exception){
            echo "Connection error: " . $exception->getMessage();
        }

        return $this->conn;
    }
}
?>
Creating User Class with Signup & Login methods
In your “api” folder, create a new folder “objects” and create a new file there as “user.php” and paste this code there
<?php
class User{

    // database connection and table name
    private $conn;
    private $table_name = "users";

    // object properties
    public $id;
    public $username;
    public $password;
    public $created;

    // constructor with $db as database connection
    public function __construct($db){
        $this->conn = $db;
    }

    // signup user
    function signup(){

    }

    // login user
    function login(){

    }

    // a function to check if username already exists
    function isAlreadyExist(){

    }
}
as you can see we have empty functions for Signup & Login.
Here is the signup Function Code
// signup user
function signup(){

    if($this->isAlreadyExist()){
        return false;
    }

    // query to insert record
    $query = "INSERT INTO
                " . $this->table_name . "
            SET
                username=:username, password=:password, created=:created";

    // prepare query
    $stmt = $this->conn->prepare($query);

    // sanitize
    $this->username=htmlspecialchars(strip_tags($this->username));
    $this->password=htmlspecialchars(strip_tags($this->password));
    $this->created=htmlspecialchars(strip_tags($this->created));

    // bind values
    $stmt->bindParam(":username", $this->username);
    $stmt->bindParam(":password", $this->password);
    $stmt->bindParam(":created", $this->created);

    // execute query
    if($stmt->execute()){
        $this->id = $this->conn->lastInsertId();
        return true;
    }

    return false;

}
you can see that signup function is calling isAlreadyExist function for validating if the username already exists. and here’s the code for it
function isAlreadyExist(){

    $query = "SELECT *
        FROM
            " . $this->table_name . "
        WHERE
            username='".$this->username."'";

    // prepare query statement
    $stmt = $this->conn->prepare($query);

    // execute query
    $stmt->execute();

    if($stmt->rowCount() > 0){
        return true;
    }
    else{
        return false;
    }
}
and this is the login Function Code
function login(){
    // select all query
    $query = "SELECT
                `id`, `username`, `password`, `created`
            FROM
                " . $this->table_name . "
            WHERE
                username='".$this->username."' AND password='".$this->password."'";

    // prepare query statement
    $stmt = $this->conn->prepare($query);

    // execute query
    $stmt->execute();
    return $stmt;
}
after adding functions code into “user.php” file, here is the complete code for “user.php” file
<?php
class User{

    // database connection and table name
    private $conn;
    private $table_name = "users";

    // object properties
    public $id;
    public $username;
    public $password;
    public $created;

    // constructor with $db as database connection
    public function __construct($db){
        $this->conn = $db;
    }

    // signup user
    function signup(){

        if($this->isAlreadyExist()){
            return false;
        }

        // query to insert record
        $query = "INSERT INTO
                    " . $this->table_name . "
                SET
                    username=:username, password=:password, created=:created";

        // prepare query
        $stmt = $this->conn->prepare($query);

        // sanitize
        $this->username=htmlspecialchars(strip_tags($this->username));
        $this->password=htmlspecialchars(strip_tags($this->password));
        $this->created=htmlspecialchars(strip_tags($this->created));

        // bind values
        $stmt->bindParam(":username", $this->username);
        $stmt->bindParam(":password", $this->password);
        $stmt->bindParam(":created", $this->created);

        // execute query
        if($stmt->execute()){
            $this->id = $this->conn->lastInsertId();
            return true;
        }

        return false;

    }

    // login user
    function login(){
        // select all query
        $query = "SELECT
                    `id`, `username`, `password`, `created`
                FROM
                    " . $this->table_name . "
                WHERE
                    username='".$this->username."' AND password='".$this->password."'";

        // prepare query statement
        $stmt = $this->conn->prepare($query);

        // execute query
        $stmt->execute();
        return $stmt;
    }

    function isAlreadyExist(){

        $query = "SELECT *
            FROM
                " . $this->table_name . "
            WHERE
                username='".$this->username."'";

        // prepare query statement
        $stmt = $this->conn->prepare($query);

        // execute query
        $stmt->execute();

        if($stmt->rowCount() > 0){
            return true;
        }
        else{
            return false;
        }
    }
}
Creating SignUp & Login Webservices
In your “api” folder, create a new folder “User” and create a new file there as “signup.php” and paste this code there
<?php

// get database connection
include_once '../config/database.php';

// instantiate user object
include_once '../objects/user.php';

$database = new Database();
$db = $database->getConnection();

$user = new User($db);

// set user property values
$user->username = $_POST['username'];
$user->password = $_POST['password'];
$user->created = date('Y-m-d H:i:s');

// create the user
if($user->signup()){
    $user_arr=array(
        "status" => true,
        "message" => "Successfully Signup!",
        "id" => $user->id,
        "username" => $user->username
    );
}
else{
    $user_arr=array(
        "status" => false,
        "message" => "Username already exists!"
    );
}
print_r(json_encode($user_arr));
?>
as you can see in the code above we are just calling the signup function from the “users.php” in the objects folder.
Following the same, create another file in the User folder, name the file as “login.php” and add the code below in the file
<?php

// include database and object files
include_once '../config/database.php';
include_once '../objects/user.php';

// get database connection
$database = new Database();
$db = $database->getConnection();

// prepare user object
$user = new User($db);

// set ID property of user to be edited
$user->username = isset($_GET['username']) ? $_GET['username'] : die();
$user->password = isset($_GET['password']) ? $_GET['password'] : die();

// read the details of user to be edited
$stmt = $user->login();

if($stmt->rowCount() > 0){

    // get retrieved row
    $row = $stmt->fetch(PDO::FETCH_ASSOC);

    // create array
    $user_arr=array(
        "status" => true,
        "message" => "Successfully Login!",
        "id" => $row['id'],
        "username" => $row['username']
    );
}
else{
    $user_arr=array(
        "status" => false,
        "message" => "Invalid Username or Password!",
    );
}

// make it json format
print_r(json_encode($user_arr));
?>
almost done, now you keep this “api” folder in localhost server. I’m using XAMPP so I’m going to paste the “api” folder in the htdocs folder of XAMPP.
Remember that Signup API accepting POST parameters and Login API accepting GET.
Now you can test your Signup API using this URL => http://localhost/api/users/signup.php with Post parameters of username, & password
and for login
You can also download complete code from Github.
Note: For keeping things simple for Beginners I’m storing the plain password in Database which is not a good practice. Password must be hashed using PHP hashing methods.
Also, See This => Signup Login page in PHP with Database MySQL Source Code
You might be Interested in:
Here are some more Tutorials for creating Web Application & CRUD Operations using PHP & MySQL.
- Getting Started with Web Application using PHP & MySQL | Tutorials
- CRUD Operations using PHP & MySQL | Tutorials with Source Code
- Learn Object Oriented Programming In Php
- OPP In PHP – Inheritance | Encapsulation | Abstraction | Polymorphism
The post Restful Web Services in PHP Example – PHP + MySQL with Source Code appeared first on Coding Infinite.
]]>