The post Display Data in DataGrid | .NET WPF Grid Layout Tutorial appeared first on Coding Infinite.
]]>What is DataGrid?
DataGrid is a WPF control which is used to display data in a customizable grid. The “customizable grid” means that we have so many options to display the data depends on our need. Let’s see how we can work with this control.
The article divides into several parts. In this part, we will see how to work with DataGrid and display the data on it.
Open Visual Studio from your PC or Mac and create a new WPF project, name the project to whatever you want. Now we need to make a DataGrid, there are two ways to do that, either we can drag and drop the DataGrid control from the toolbox, or we can write the code for it, let’s go for the second option, but first let’s define our grid layout to have one column and two rows. We will use the first row to put the DataGrid and the second row to place some buttons to perform the actions on the DataGrid. The following lines will create a Grid layout.
<Grid>
    <Grid.ColumnDefinitions>
        <ColumnDefinition SharedSizeGroup="A" Width="*"/>
    </Grid.ColumnDefinitions>
    <Grid.RowDefinitions>
        <RowDefinition Height="*"/>
        <RowDefinition Height="50"/>
    </Grid.RowDefinitions>
</Grid>
Now its time to place our DataGrid layout inside the Grid layout. The following line will create a DataGrid in the first row spanning the entire width of the window. Place the code just before </Grid>.
<DataGrid Name="myGrid" Grid.Column="0" Grid.Row="0" AutoGenerateColumns="False">
</DataGrid>
The AutoGenerateColumns is used to prevent the repetition of the columns. Run the program,
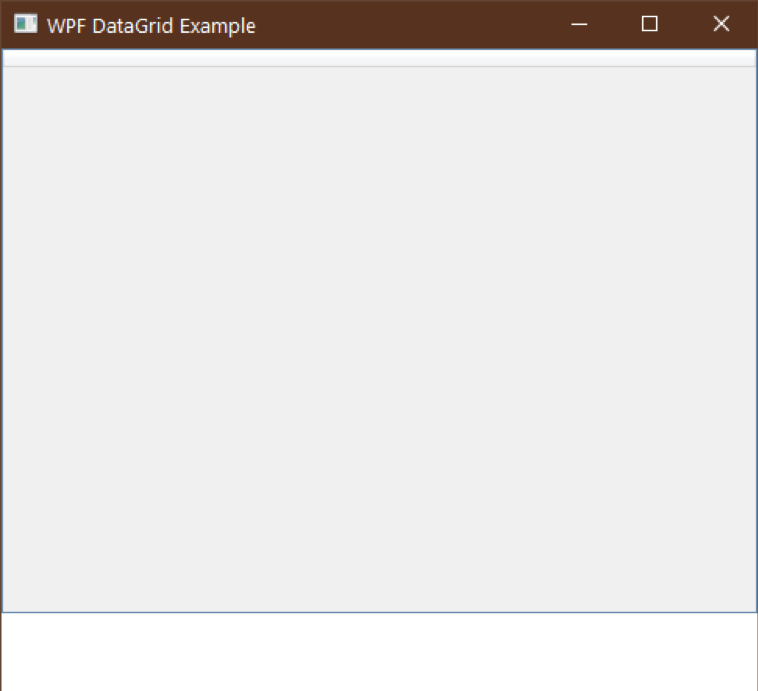
The DataGrid is empty because we haven’t added something to it yet. Now it’s time to add some data to our DataGrid.
We will use the dummy data of Employees to fill our DataGrid. Employees will have an Id, Name, Date of joining, Gender and monthly salary. To save this type of record, we need to have a class.
To create a class, right-click on the project title under solution explorer, go to Add and then select “New Item…”, choose the “class” from available items, name it “Employee” and click ok button.
Copy the following code in the Employee class you just created.
class Employee
{
        public Employee(int id, string name, string dateOfjoining, string gender, double monthlySalary)
        {
                set(id, name, dateOfjoining, gender, monthlySalary);
        }

        public int Id {set; get;}
        public string Name {set; get;}
        public string DateOfJoining {set; get;}
        public string Gender {set; get;}
        public double MonthlySalary {set; get; }

        public void set(int id, string name, string dateOfjoining, string gender, double monthlySalary)
        {
                Id = id;
                Name = name;
                DateOfJoining = dateOfjoining;
                Gender = gender;
                MonthlySalary = monthlySalary;
        }
}
The code above is self-explanatory, but if you are facing trouble to understand it, let me explain it for you. The class have five data members which we will use to store the data. It also has an overloaded constructor and a public method to set or update the values of an object. The set and get keywords after every attribute are used to “assign or get the value” of the data member. The “set” is private, it means we cannot directly assign the data members a value outside the class, and we have to use a method to do so.
Since we’ll have more than one record of Employee, so we need to have a list which will store all the objects of employees. We will be using the list which we are going to create in more than one windows, so we will have to make it available in the entire project.
Before creating the list, let’s first create a new class as we did before and name it “Utility”, make sure that you make it a static class. If you don’t know about “static classes”, the public data members and methods of a static class can be accessed without creating an object of that class first. Since we will use this class without creating an object, so we need to make it a static class.
After creating the “Utility class”, create a data member “ListEmployee” of type “Employee”. We also need to make “ListEmployee” static because C# does not allow us to declare instance data members in a static class. The entire class you just created should be something as follows:
static class Utility
{
     public static List<Employee> ListEmployee;
}
The next step is to initialise the “ListEmployee” before we can use it. To do this, write the following line of code in the No-Argument constructor, under InitializeComponent(); line in the “cs” file of “MainWindow”. The “No-Argument constructor” should look like the following.
public MainWindow()
{
     InitializeComponent();
     Utility.ListEmployee = new List<Employee>();
}
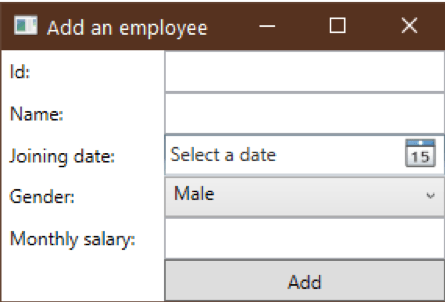
Now, we are moving into an exciting part. We now have to create a new window to take the data of an employee from the user, add it to the list and then display it in the DataGrid. To do this, create a new Window, make four “TextBox” and one DatePicker, don’t forget to create a button which will take the values from these control and add them to the list. You can use the following “XAML” code for your convenience.
<Window x:Class="WPFDataGrid.AddEmployee"
        xmlns="http://schemas.microsoft.com/winfx/2006/xaml/presentation"
        xmlns:x="http://schemas.microsoft.com/winfx/2006/xaml"
        xmlns:d="http://schemas.microsoft.com/expression/blend/2008"
        xmlns:mc="http://schemas.openxmlformats.org/markup-compatibility/2006"
        xmlns:local="clr-namespace:WPFDataGrid"
        mc:Ignorable="d"
        Title="Add an employee" Height="200" Width="300">
    <Grid>
        <Grid.ColumnDefinitions>
            <ColumnDefinition SharedSizeGroup="A" Width="*"/>
            <ColumnDefinition SharedSizeGroup="A" Width="180"/>
        </Grid.ColumnDefinitions>
        <Grid.RowDefinitions>
            <RowDefinition Height="*"/>
            <RowDefinition Height="*"/>
            <RowDefinition Height="*"/>
            <RowDefinition Height="*"/>
            <RowDefinition Height="*"/>
            <RowDefinition Height="*"/>
        </Grid.RowDefinitions>
        <Label Grid.Row="0" Grid.Column="0" Content="Id:"/>
        <TextBox VerticalContentAlignment="Center" Grid.Row="0" Grid.Column="1" Name="txtId"/>
        <Label Grid.Row="1" Grid.Column="0" Content="Name:"/>
        <TextBox VerticalContentAlignment="Center" Grid.Row="1" Grid.Column="1" Name="txtName"/>
        <Label Grid.Row="2" Grid.Column="0" Content="Joining date:"/>
        <DatePicker Grid.Row="2" Grid.Column="1" Name="dtpJoiningDate"/>
        <Label Grid.Row="3" Grid.Column="0" Content="Gender:"/>
        <ComboBox Grid.Row="3" Grid.Column="1" Name="cbxGender">
            <ComboBoxItem IsSelected="True">Male</ComboBoxItem>
            <ComboBoxItem>Female</ComboBoxItem>
        </ComboBox>
        <Label Grid.Row="4" Grid.Column="0" Content="Monthly salary:"/>
        <TextBox Grid.Row="4" Grid.Column="1" Name="txtSalary"/>
        <Button Grid.Row="5" Grid.Column="1" Content="Add" Name="btnAdd" Click="BtnAdd_Click"/>
    </Grid>
</Window>
The XAML above will create a small window just like the following:
The following code is used to get the information from the controls and then add it to our “ListEmployee” object as one item. We have to write this in the click even of Add button.
private void BtnAdd_Click(object sender, RoutedEventArgs e)
{
        //getting the values from controls
        int id = Convert.ToInt32(txtId.Text);
        string name = txtName.Text;
        string date = dtpJoiningDate.SelectedDate.Value.Date.ToShortDateString();
        string gender = ((ComboBoxItem) cbxGender.SelectedItem).Content.ToString();
        double salary = Convert.ToDouble(txtSalary.Text);

        //Creating a new object of Employee
        Employee employee = new Employee(id, name, date, gender, salary);
        //Adding the newly created object to the list
        Utility.ListEmployee.Add(employee);
        //Displaying the message
        MessageBox.Show(this, "The employee has been added.");
        //Calling CLearControls() method to clear the fields
        ClearControls();
}
After adding an employee, we should clear the fields so the user can add multiple employees without closing and opening the window again. Add the following lines of code under the click event of Add button:
private void ClearControls()
{
      txtId.Text = string.Empty;
      txtName.Text = string.Empty;
      dtpJoiningDate.SelectedDate = null;
      cbxGender.SelectedIndex = 0;
      txtSalary.Text = string.Empty;
}
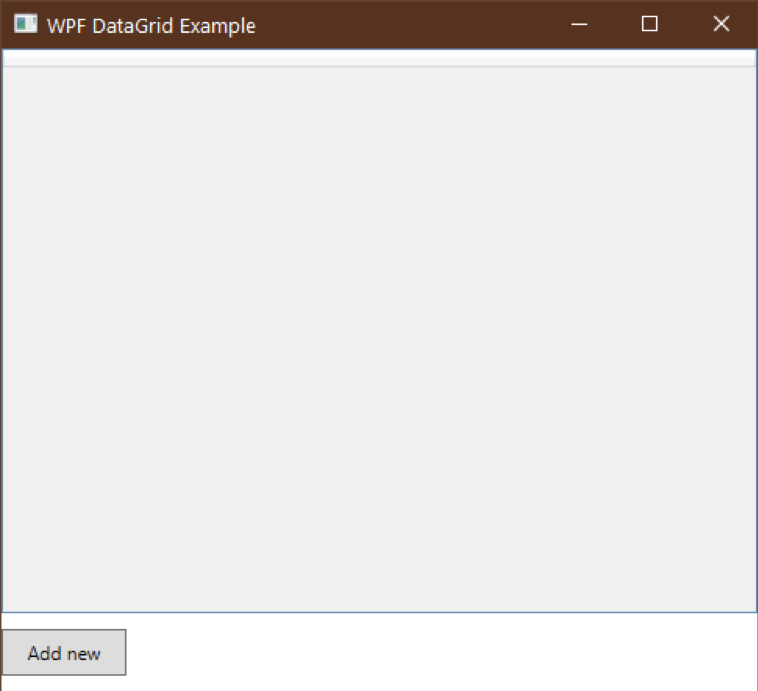
Now, we have to open this window from the MainWindow. For this, first, create a button and then open “Add New Employee” from the click event of the button. The following line of code will add a button in MainWindow under the DataGrid.
Button Grid.Row="1" Grid.Column="0" Content="Add new" Name="AddNew"
         Width="80" Height="30" HorizontalAlignment="Left" Click="AddNew_Click"/>
Now add the following code as the click even of Add new button in the “cs” file of the “MainWindow”.
private void AddNew_Click(object sender, RoutedEventArgs e)
{
        AddEmployee addEmployee = new AddEmployee();
        addEmployee.ShowDialog();
}
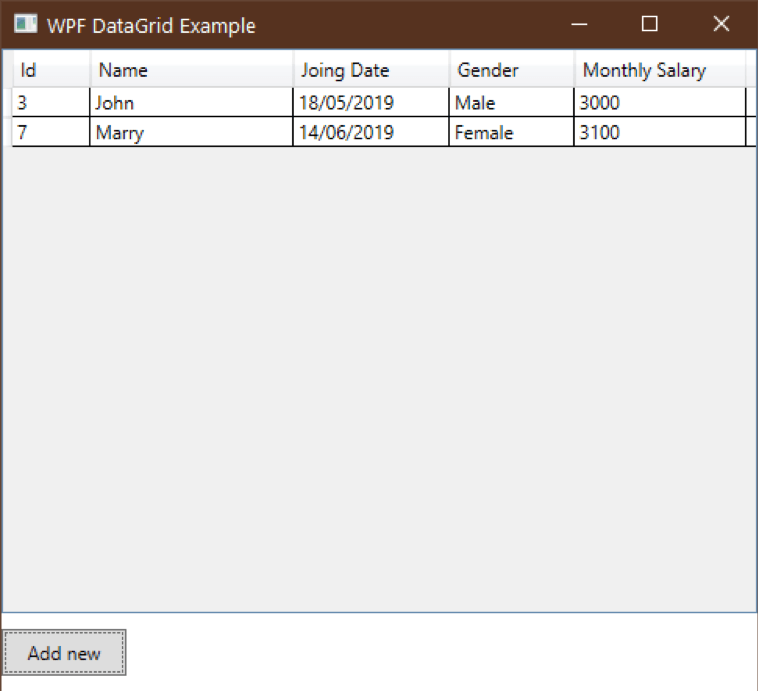
After adding the button, our MainWindow will look like the following:
Now try to run the project, click on Add new button of MainWindow to open “add new employee”, fill out the fields and click on the Add button. Close the add new employee window; you will see that the DataGrid will not show any data because we haven’t written any code to display the data to the DataGrid.
<DataGrid.Columns>
               <DataGridTextColumn Width="50" Header="Id" Binding="{Binding Id}"></DataGridTextColumn>
                <DataGridTextColumn Width="130" Header="Name" Binding="{Binding Name}"></DataGridTextColumn>
                <DataGridTextColumn Width="100" Header="Joing Date" Binding="{Binding DateOfJoining}"></DataGridTextColumn>
                <DataGridTextColumn Width="80" Header="Gender" Binding="{Binding Gender}"></DataGridTextColumn>
                <DataGridTextColumn Width="110" Header="Monthly Salary" Binding="{Binding MonthlySalary}"></DataGridTextColumn>
            </DataGrid.Columns>
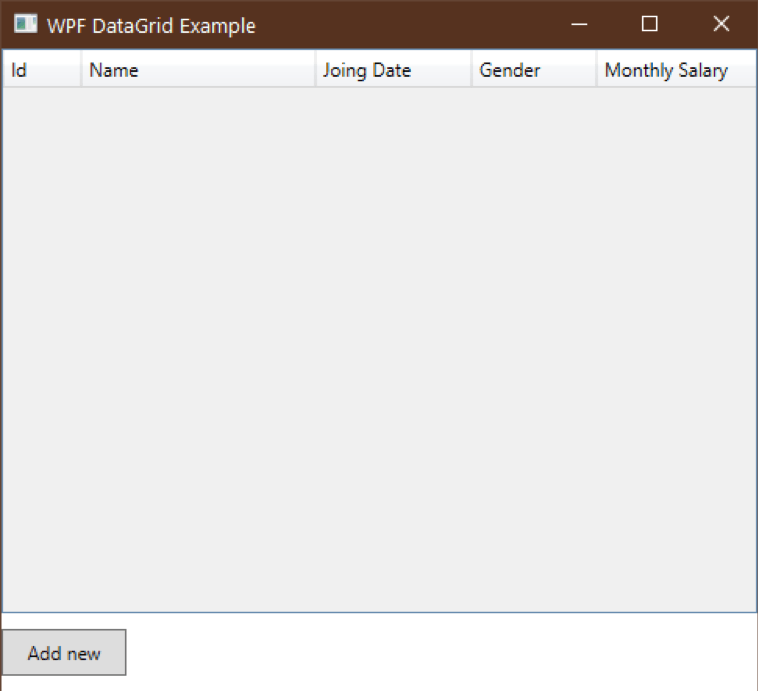
In case you haven’t understood the code above, we have to define in <DataGrid.Columns>, and every column is defined in <DataGridTextColumn>. Note that every column has three attributes.
Width: Defines the width of the column.
Header: Defines the name of the column.
Binding: Defines which data member of a list is to use for the value. Now the MainWindow should look like the following:
Now, we have to do one last thing. Add the following method in the “MainWindow.xaml.cs” and call it after addEmployee.ShowDialog(); from click event of Add new button.
private void ShowData()
{
        myGrid.ItemsSource = null;
        myGrid.ItemsSource = Utility.ListEmployee;
}
The ItemsSource property is used to assign a source to the DataGrid. In the first line, we assign it null, because the ItemsSource will only take value when it’s null, so we have to make it null every time we assign it a list.
Now run the project, add some employees, and when you close the add new employee window, you will see the data on the DataGrid.
Enough for this post, in the next part of this article, we will see how to change the alignment of headers, add formatting, add alternate row colours, and add right-click context menu to the DataGrid Items.
The post Display Data in DataGrid | .NET WPF Grid Layout Tutorial appeared first on Coding Infinite.
]]>The post Multi-threaded TCP Server using Dotnet Core Example | C# appeared first on Coding Infinite.
]]>Every time TCP Server developed using .Net Core was on top in performance as compared to other platforms. So no one should have doubt on .Net Core Performance.
I would also like to share a comment on one of your post which was related to handling thousands of requests using Java

The above comment describes the Dotnet Core Performance over rxjava.
Creating TCP Server
Let’s start by creating a new .Net Core Console Application Project.
I’m going to use VS Code, you may use the editor or IDE of your choice.
So create a new project using this command.
dotnet new console
Create a new file at the root of your project as Server.cs & add the below Code
using System;
using System.Net;
using System.Net.Sockets;
using System.Text;
using System.Threading;

class Server
{
    TcpListener server = null;
    public Server(string ip, int port)
    {
        IPAddress localAddr = IPAddress.Parse(ip);
        server = new TcpListener(localAddr, port);
        server.Start();
        StartListener();
    }

    public void StartListener()
    {
        try
        {
            while (true)
            {
                Console.WriteLine("Waiting for a connection...");
                TcpClient client = server.AcceptTcpClient();
                Console.WriteLine("Connected!");

                Thread t = new Thread(new ParameterizedThreadStart(HandleDeivce));
                t.Start(client);
            }
        }
        catch (SocketException e)
        {
            Console.WriteLine("SocketException: {0}", e);
            server.Stop();
        }
    }

    public void HandleDeivce(Object obj)
    {
        TcpClient client = (TcpClient)obj;
        var stream = client.GetStream();
        string imei = String.Empty;

        string data = null;
        Byte[] bytes = new Byte[256];
        int i;
        try
        {
            while ((i = stream.Read(bytes, 0, bytes.Length)) != 0)
            {
                string hex = BitConverter.ToString(bytes);
                data = Encoding.ASCII.GetString(bytes, 0, i);
                Console.WriteLine("{1}: Received: {0}", data, Thread.CurrentThread.ManagedThreadId);

                string str = "Hey Device!";
                Byte[] reply = System.Text.Encoding.ASCII.GetBytes(str);
                stream.Write(reply, 0, reply.Length);
                Console.WriteLine("{1}: Sent: {0}", str, Thread.CurrentThread.ManagedThreadId);
            }
        }
        catch(Exception e)
        {
            Console.WriteLine("Exception: {0}", e.ToString());
            client.Close();
        }
    }
}
Above Code Explaination:
We have a parameterized constructor taking IP & Port as parameters to instantiate a TcpListener object & start listening on the given IP & Port.
StartListener method keeps listening for incoming connections & every time when a new client gets connected, It creates a new Thread of HandleDeivce & start waiting for a new client.
HandleDeivce method receive bytes stream from the Client & reply with a message & again start listening from the client.
Calling Server.cs
Here’s my Program.cs which calls our Server.cs
using System;
using System.Threading;

class Program
{
    static void Main(string[] args)
    {
        Thread t = new Thread(delegate ()
        {
            // replace the IP with your system IP Address...
            Server myserver = new Server("192.168.***.***", 13000);
        });
        t.Start();

        Console.WriteLine("Server Started...!");
    }
}
Now, run you server.
you’ll see that server is listening for the clients.

If you want to Test you server, you need a client.
So, here’s the Code for Multithreaded TCP Client.
Multi-threaded TCP Client
Create a new Console Project for TCP Client & paste the below code in your Program.cs File.
using System;
using System.Net.Sockets;
using System.Threading;

class Program
{

    static void Main(string[] args)
    {
        new Thread(() =>
        {
            Thread.CurrentThread.IsBackground = true;
            Connect("192.168.***.***", "Hello I'm Device 1...");
        }).Start();

        new Thread(() =>
        {
            Thread.CurrentThread.IsBackground = true;
            Connect("192.168.***.***", "Hello I'm Device 2...");
        }).Start();


        Console.ReadLine();
    }

    static void Connect(String server, String message)
    {
        try
        {
            Int32 port = 13000;
            TcpClient client = new TcpClient(server, port);

            NetworkStream stream = client.GetStream();

            int count = 0;
            while (count++ < 3)
            {
                // Translate the Message into ASCII.
                Byte[] data = System.Text.Encoding.ASCII.GetBytes(message);

                // Send the message to the connected TcpServer.
                stream.Write(data, 0, data.Length);
                Console.WriteLine("Sent: {0}", message);

                // Bytes Array to receive Server Response.
                data = new Byte[256];
                String response = String.Empty;

                // Read the Tcp Server Response Bytes.
                Int32 bytes = stream.Read(data, 0, data.Length);
                response = System.Text.Encoding.ASCII.GetString(data, 0, bytes);
                Console.WriteLine("Received: {0}", response);

                Thread.Sleep(2000);
            }

            stream.Close();
            client.Close();
        }
        catch (Exception e)
        {
            Console.WriteLine("Exception: {0}", e);
        }

        Console.Read();
    }
}
change the Server IP address & Port in this code according to your Server IP & Port.
Above Code will create 2 clients in separate threads & both clients will send 3 messages with the Sleep of 2 seconds after each message.
First run the Server Project then run you Client.
Let me know in comment section below If you find any problem.
Here are more Articles you might be Interested:
— Top Open Source Asp.Net Core Content Management System (CMS)
— Best 20 .Net Core Libraries Every Developer should know
— Creating Admin Panel in Asp.net Core MVC – Step by Step Tutorial
The post Multi-threaded TCP Server using Dotnet Core Example | C# appeared first on Coding Infinite.
]]>The post The Ultimate Guide to the Best .NET Core E-commerce Open Source Platforms appeared first on Coding Infinite.
]]>Not all like to install a WordPress theme & start selling. Some are quite conscious of choosing technologies because there are many factors you need to consider – high-performance, scalability, security, extensibility, pricing, programming language, etc.
Related: Why I’m in Love with .Net Core – Future of .Net Core
A key feature of any E-Commerce is its modular architecture which allows additional features to be added that’s one of the reasons that WordPress & Zero Up Ecommerce became so popular while choosing Platform for an online store. But the Good News is that .Net Core also has some shopping Platforms with pluggable/modular architecture.
Mobile responsiveness is another must-have feature for any online business because 82% of smartphone users buy while surfing the Internet on their smartphone.
Since you’re here, so you’ve decided to develop your e-commerce store using Asp.net Core.
But choosing the best option is not an easy task. If you start developing your E-commerce platform from scratch it could take months, depending upon your development team. So starting from an open source project is one of the best choices.
In this article, I’ll list down some of the best E-commerce platforms developed in Asp.net Core & available at Github. So let’s get started with the Top 3 Open Source E-commerce platform in ASP.NET Core.
1. NopCommerce
NopCommerce is a free and open-source e-commerce platform.
It’s a fully customizable shopping platform developed in Asp.Net Core.
Its architecture is modular & clean which allows developers to easily customize the front-end design and the back-end functionality.
New themes and add-ons can also be developed on top of nopCommerce.

Features
Responsive: nopCommerce has fully Responsive & Mobile ready design.
Multi-store: you can host many frontend stores on different domains and manage all operations from your single backend panel.
Multi-vendor: multiple vendors can add their products & sell.
Product comparison: user can select & compare products features.
Search Engine Optimization: customized URLs, friendly SEO names for products, sitemap, microdata, URL Canonicalization & Google analytics integration.
Reward Points System: points earning system on the money spent at store.
Discounts and coupons: It can either be a fixed value or a percent off, e.g. $20 off or 20% off. we can also define between what dates discount offer is valid.
Payment methods: more than 50 supported payment methods.
Affiliate program: supports affiliate marketing feature.
Tax Feature: Tax calculation system is so configurable.
Platform
.Net Core SDK Version: .Net Core 2.2
Database: SQL Server 2008
2. SimplCommerce
SimplCommerce is Another simple, cross-platform, customized E-commerce system developed on .NET Core.
SimplCommerce is divided into many self-contained modules.

Features
Responsive: fully responsive UI on all size devices.
Product Comparison: user can compare different products.
Coupons & Discounts: you can generate discount coupons for direct & percentage of discounts.
Payment Methods: Stripe, Paypal Express, COD
Tax System: Tax System is available for tax per country, state or zip code.
Platform
.Net Core SDK Version: .Net Core 2.2
Database: Microsoft SQL Server, PostgreSQL, MySQL, SQLite
3. GrandNode
GrandNode – Powered By nopCommerce is another functional cross-platform e-commerce solution developed for the most demanding users. You can run it on any operating system – Linux, Windows.
It’s based on ASP.NET Core 2.2 and MongoDB – non-relational database system.


Features
Responsive: Support devices of all sizes.
Multi-store: can host many web store using a single back-end
Multi-vender: also support Multi-vender functionality like NopCommerce.
Product Comparison: user can compare different products.
Search engine optimization: Sitemap, Friendly URLs, Google Analytics integration & Localizable URLs.
Reward Points System: Reward Points System, Gift Cards, Discounts
Coupons & Discount: can generate coupons for discounts.
Payment Methods: more than 50 payment methods and gateways.
Tax System: flexible tax system.
Platform
.Net Core SDK Version: .Net Core 2.2
Database: MongoDB
Comparison
| Feature | nopCommerce | SimplCommerce | GrandNode |
| Docker | Yes | Yes | Yes |
| Multi-store | Yes | Yes | Yes |
| Multi-vender | Yes | Yes | Yes |
| Product Comparison | Yes | Yes | Yes |
| Payment methods | 50+ | Stripe, Paypal Express, COD | 50+ |
| Reward System | Yes | Yes | Yes |
| Coupons Discount | Yes | Yes | Yes |
| .Net Core Version | 2.2 | 2.2 | 2.2 |
| Database | SQL Server 2008 | SQL Server, PostgreSQL, MySQL, SQLite | MongoDB |
Here are more Articles you might be Interested:
– A Complete Guide to Secure Your Asp.Net Core Web Application & Apis
– Creating Admin Panel in Asp.net Core MVC – Step by Step Tutorial
— Best 20 .Net Core Libraries Every Developer should know
– Best Cross-platform .Net Core Ide for Windows | Macos | Linux
The post The Ultimate Guide to the Best .NET Core E-commerce Open Source Platforms appeared first on Coding Infinite.
]]>The post Creating Email Sending Application using Asp.net Core | Open Source appeared first on Coding Infinite.
]]>
Setting Up Project
Let’s start by creating a new Asp.net Core Project. I’m going to create an Empty Project using Dotnet CLI.
Run this Command to create a new Empty Project.
dotnet new Web
Update your “Startup.cs” to ready your Project.
public class Startup
{
    public void ConfigureServices(IServiceCollection services)
    {
        services.AddMvc();
    }

    public void Configure(IApplicationBuilder app, IHostingEnvironment env)
    {
        if (env.IsDevelopment())
        {
            app.UseDeveloperExceptionPage();
        }
        app.UseStaticFiles();
        app.UseMvc(routes =>
        {
            routes.MapRoute(
                name: "default",
                template: "{controller=MailSender}/{action=Index}/{id?}");
        });
    }
}
Create 3 Folders as “Controllers”, “Views” & “wwwroot” at the root directory of your project.
Creating Controller
Inside your “Controllers” Folder Create a new File as “MailSenderController.cs” & Add this Code.
using System.Net;
using System.Net.Mail;
using FluentEmail.Core;
using Microsoft.AspNetCore.Mvc;

public class MailSenderController : Controller
{
    public ActionResult Index()
    {
        return View();
    }

    public string SendEmail(string Name, string Email, string Message){

        try
        {
            // Credentials
            var credentials = new NetworkCredential("[email protected]", "your-password");

            // Mail message
            var mail = new MailMessage()
            {
                From = new MailAddress("[email protected]"),
                Subject = "Email Sender App",
                Body = Message
            };

            mail.IsBodyHtml = true;
            mail.To.Add(new MailAddress(Email));

            // Smtp client
            var client = new SmtpClient()
            {
                Port = 587,
                DeliveryMethod = SmtpDeliveryMethod.Network,
                UseDefaultCredentials = false,
                Host = "smtp.gmail.com",
                EnableSsl = true,
                Credentials = credentials
            };

            client.Send(mail);

            return "Email Sent Successfully!";
        }
        catch (System.Exception e)
        {
            return e.Message;
        }

    }
}
Don’t Forget to Update your Email & Password Credentials in this Line of Code in the above Code.
var credentials = new NetworkCredential("[email protected]", "your-password");
Setting Up Contact Form Template
Now, we need to Create a Contact Form for Sending Emails.
I’m going to use this beautiful Email Sending Template by colorlib.
So, go to this Link & download the Source Code of Contact Page.
Extract the downloaded file & you’ll get this

Now, copy all the folders from the above image & paste inside the “wwwroot” directory in your project which we have created earlier.
Creating View
Create a new Folder inside the “Views” Folder as “MailSender” at the root directory of your Project.
Now, create a new file inside “MailSender” Folder as “Index.cshtml” & Add this Code.
<!DOCTYPE html>
<html lang="en">
<head>
  <title>Contact V2</title>
  <meta charset="UTF-8">
  <meta name="viewport" content="width=device-width, initial-scale=1">
<!--===============================================================================================-->
  <link rel="icon" type="image/png" href="proxy.php?url=images/icons/favicon.ico"/>
<!--===============================================================================================-->
  <link rel="stylesheet" type="text/css" href="proxy.php?url=vendor/bootstrap/css/bootstrap.min.css">
<!--===============================================================================================-->
  <link rel="stylesheet" type="text/css" href="proxy.php?url=fonts/font-awesome-4.7.0/css/font-awesome.min.css">
<!--===============================================================================================-->
  <link rel="stylesheet" type="text/css" href="proxy.php?url=vendor/animate/animate.css">
<!--===============================================================================================-->
  <link rel="stylesheet" type="text/css" href="proxy.php?url=vendor/css-hamburgers/hamburgers.min.css">
<!--===============================================================================================-->
  <link rel="stylesheet" type="text/css" href="proxy.php?url=vendor/select2/select2.min.css">
<!--===============================================================================================-->
  <link rel="stylesheet" type="text/css" href="proxy.php?url=css/util.css">
  <link rel="stylesheet" type="text/css" href="proxy.php?url=css/main.css">
<!--===============================================================================================-->
</head>
<body>

  <div class="bg-contact2" style="background-image: url('images/bg-01.jpg');">
    <div class="container-contact2">
      <div class="wrap-contact2">
        <span class="contact2-form-title">
          Contact Us
        </span>

        <div class="wrap-input2 validate-input" data-validate="Name is required">
          <input class="input2" type="text" id="name">
          <span class="focus-input2" data-placeholder="NAME"></span>
        </div>

        <div class="wrap-input2 validate-input" data-validate = "Valid email is required: [email protected]">
          <input class="input2" type="text" id="email">
          <span class="focus-input2" data-placeholder="EMAIL"></span>
        </div>

        <div class="wrap-input2 validate-input" data-validate = "Message is required">
          <textarea class="input2" id="message"></textarea>
          <span class="focus-input2" data-placeholder="MESSAGE"></span>
        </div>

        <div class="container-contact2-form-btn">
          <div class="wrap-contact2-form-btn">
            <div class="contact2-form-bgbtn"></div>
            <button class="contact2-form-btn" onclick="SendEmail()">
              Send Your Message
            </button>
          </div>
        </div>
      </div>
    </div>
  </div>

<!--===============================================================================================-->
  <script src="proxy.php?url=vendor/jquery/jquery-3.2.1.min.js"></script>
<!--===============================================================================================-->
  <script src="proxy.php?url=vendor/bootstrap/js/popper.js"></script>
  <script src="proxy.php?url=vendor/bootstrap/js/bootstrap.min.js"></script>
<!--===============================================================================================-->
  <script src="proxy.php?url=vendor/select2/select2.min.js"></script>
<!--===============================================================================================-->
  <script src="proxy.php?url=js/main.js"></script>

  <script>

    function SendEmail(){

      $.ajax(
      {
        type: "POST",
        url: '@Url.Action("SendEmail", "MailSender")',
        data: {
          Name: $("#name").val(),
          Email: $("#email").val(),
          Message: $("#message").val()
        },
        error: function (result) {
          console.log(result);
        },
        success: function (result) {
          alert(result);
          $("#name").val("");
          $("#email").val("");
          $("#message").val("");
        }
      });
    }
  </script>

</body>
</html>
Testing Application
Run your Application, You’ll get this
Fill the Form & click on “Send Your Message” Button.
You’ll Get an Email at the Given Email Address.
Complete Source Code of the Example is also available at Github.
Secure Client Problem
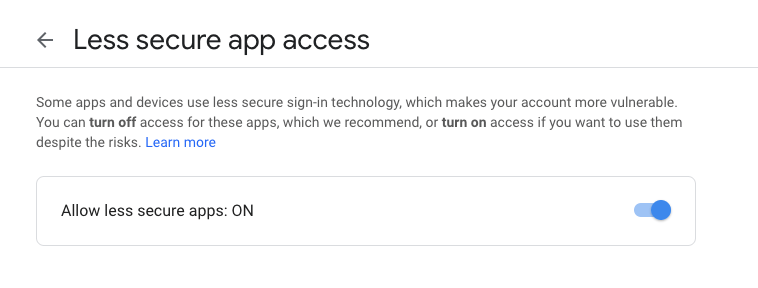
You might get this Exception while trying to send an Email from your Local Host.

In this Case, you need to Allow Access for Less Secure Apps.
Using the same Google Account you have used in your Controller to Send Email, Go to this Link https://www.google.com/settings/security/lesssecureapps
& Allow Access for Less Secure App.
Now, Test your Application again, you’ll be able to receive Email from your Application.
Thank you for reading, Feel free to Comment below if you find any problem.
Here are more Articles you might be Interested
– Creating Admin Panel in Asp.net Core MVC – Step by Step Tutorial
– Top 10 .Net Core Features You need to know
– Dynamic Role-Based Authorization Asp.net Core
The post Creating Email Sending Application using Asp.net Core | Open Source appeared first on Coding Infinite.
]]>The post Best 20 .Net Core Libraries Every Developer should know appeared first on Coding Infinite.
]]>With Every new Update, new features are added that help developers deploy high-performance & highly scalable applications using less Code.
In this article, I’m listing down some of the most useful but not very commonly used .Net Core Libraries that every developer needs to know.
LiteDB
LiteDB is a lightweight, small & fast NoSQL embedded database. It’s Open source & freely available for everyone, also for commercial usage. LiteDB is fast & also support LINQ queries. It stores data in documents & support Datafile encryption using DES (AES).
Like SQLite, LiteDB also stores data in a single file. It can also index document fields for fast search.
CacheManager
CacheManager is an open source caching abstraction layer for .NET written in C#. It supports various cache providers and implements many advanced features.
CacheManager makes developer’s life simpler by handling very complex cache scenarios. It also provides the implementation of multiple layers of caching in just a few lines of code, e.g. in-process caching in front of a distributed cache.
Smidge
A lightweight runtime CSS/JavaScript file minification, combination, compression & management library for ASP.Net Core. It supports compression, Minification & combination for CSS/JS Files. It properly configures client-side caching & persistent server-side caching.
Smidge is easily extensible. You can completely customize the pre-processor pipeline and create your own processors for any file type.
BCrypt.Net-Core
A .net Core version of BCrypt.net, with enhanced features and security. Compatible with .net framework as well as .net core. It should be a drop-in replacement for BCrypt.net as the namespaces are unchanged.
AspNetCore.Diagnostics.HealthChecks
This project is a BeatPulse liveness and UI port to new Microsoft Health Checks feature included on ASP.NET Core 2.2. It supports almost every commonly used database including MySql, Sql Server, Sqlite, MongoDB, Amazon S3, Postgres, Elasticsearch, DynamoDb & many other.
FluentEmail
Send email from .NET or .NET Core. Many useful extension packages make this very simple and powerful. It also offers Email body as a template. We can also use a template from disk. Here’s the basic usage example, look how simple it is.
var email = Email
    	.From("[email protected]")
    	.To("[email protected]", "bob")
    	.Subject("hows it going bob")
    	.Body("yo dawg, sup?")
    .Send();
UnitConversion
UnitConversion is designed to be expansible through factories or through concrete converter implementations. It supports Mass Conversion, Time Conversion, Area Conversion, Distance Conversion & Volume Conversion.
FastReport
FastReport provides open source report generator for .NET Core 2.x/.Net Framework 4.x. You can use the FastReport in MVC, Web API applications.
You can get data from XML, JSON, CSV, MySql, MSSQL, Oracle, Postgres, SQLite, MongoDB, Couchbase, RavenDB.
autocomplete
A very simple, Persistent, powerful and portable autocomplete library. Ready for desktop, web & cloud. It Supports all stream types, including on classical disc storage for cheapest hosting. Considered as one of the fastest autocomplete algorithms with O(n) complexity for searching.
AppMetrics
App Metrics is an open-source and cross-platform library used to record metrics within an application. it provides several metric types to measure things such as the count of login users over time, the rate of requests, measure time to run a DB query, measure the amount of free memory and so on. It supports Counters, Meters, Gauges, Histograms and Timers etc.
sharpcompress
SharpCompress is a compression library that can unzip, unrar, un7zip, untar unbzip2 and ungzip with forward-only reading and file random access APIs. Write support for zip/tar/bzip2/gzip are implemented.
The major feature is support for non-seekable streams so large files can be done on the fly.
HashLib
Here you can find implementations of many hashing algorithms e.g. all sha3 round 2 and 3 candidates. You can hash files, streams, common types of data.
nopCommerce
nopCommerce is the best open-source e-commerce shopping cart. nopCommerce is available for free. It is a fully customizable shopping cart. It’s stable and highly usable. nopCommerce is an open source ecommerce solution.
nopCommerce can be up-and-running in just a few clicks. just download and follow the simple instructions. It’s also optimised for search engines & has friendly URLs.
MailKit
The main goal of this project is to provide the .NET world with robust, fully featured and RFC-compliant SMTP, POP3, and IMAP client implementations.
cscore
A free .NET audio library which is completely written in C#. it offers many features like playing or capturing audio, en- or decoding many different codecs, effects and much more!
NetOffice
NetOffice supports extending and automating Microsoft Office applications: Excel, Word, Outlook, PowerPoint, Access, Project and Visio. It doesn’t have any version limitation. It supports Office versions from 2000 to the latest version.
SSH.NET
This project was inspired by Sharp.SSH library which was adopted from java and it seems like was not supported for quite some time. This library is a complete rewrite, without any third party dependencies, using parallelism to achieve the best performance possible.
It provides SSH commands using Sync & Async methods. SFTP functionality also supports Sync & Async operations. Supports two-factor or higher authentication as well.
SignalR
ASP.NET SignalR is a library for ASP.NET developers that makes it incredibly simple to add real-time web functionality to your applications.
“real-time web” functionality is the ability to have your server-side code push content to the connected clients as it happens, in real-time.
C-Sharp-Algorithms
A C# plug-and-play class-library project of Algorithms & standard Data Structures. It includes 30+ Algorithms & 35+ Data Structures designed as Object-Oriented separate components. Actually, this project was started for educational purposes, the implemented Algorithms & Data Structures are efficient, standard, tested & stable.
Nancy
Nancy is a lightweight framework for building HTTP based services on .NET Framework/Core and Mono.
Nancy is designed to handle GET, POST, PUT, DELETE, HEAD, OPTIONS, & PATCH requests and provides a simple, elegant way for returning a response with just a couple of keystrokes, leaving you with more time to focus on the important logic of your application.
Here are some more Articles, you might be Interested:
– A Complete Guide to Secure Your Asp.Net Core Web Application & Apis
– Top Open Source Asp.Net Core Content Management System (Cms)
– Best Cross-platform .Net Core Ide for Windows | Macos | Linux
The post Best 20 .Net Core Libraries Every Developer should know appeared first on Coding Infinite.
]]>The post Error Logging in Asp.Net Core Application | NLog | Log4Net | Tutorials appeared first on Coding Infinite.
]]>There are many open-source libraries available for Error Logging. For .Net, most trusted & commonly used frameworks are NLog & Log4Net. Both frameworks make it simpler to send our application logs in different places like databases, files, log management systems & many other places. We can also Email our Critical logs. The awesome thing is that we can send the logs to a different place just by changing the config file.
By using Error Logging in an Application, we can categorize our logs at different levels. Here’s the list.
Levels
- Info – Info Message, enabled in production mode
- Warning – Warning Messages, temporary & recoverable problems.
- Error – Error Messages, programming exceptions.
- Trace – Very detailed Logs, usually enabled during the development phase.
- Debug – Debugging information, less information than Traces.
- Fatal – Serious Errors, failures that need immediate attention.
As I have discussed above, Error Logging Frameworks also facilitates us to send our application’s log to different destinations, we called them targets.
Targets
- Files- We can log our messages into a file.
- Databases – Important Logs can also be stored in a database. Usually, we store only those logs to a database which we need to display in our application.
- Console – In Console Applications, best available target to display logs is console itself.
- Email – In case of fatal errors which need attention we need to aware the team with the failure. so it’s always a good idea to email those logs.
Let’s have a quick look at available Logging frameworks for .Net Core. After deciding the better one, we’ll implement the winner logging framework in our Application. So in case, you missed the Admin Panel tutorials,
here you can follow => Creating Admin Panel in Asp.net Core MVC – Step by Step Tutorial
Choosing a Framework
Here’s the result of a speed comparison of 5 most popular error logging framework for .Net & .Net Core
Logging Frameworks Comparison Result by Loggly and SolarWinds
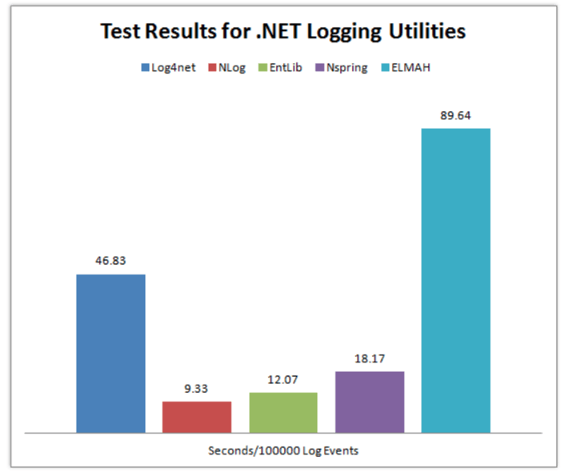
So clearly, NLog is the winner here because it’s taking the minimum time to Log.
Without wasting our time let’s see how we can install, configure and use NLog in our Application.
Creating a Project
I’m going to use VS Code to create an empty web project.
Create an empty Web Application using this command
dotnet new web
after this add the Code below to your “Startup.cs” File to ready your Application.
using Microsoft.AspNetCore.Builder;
using Microsoft.AspNetCore.Hosting;
using Microsoft.Extensions.DependencyInjection;

public class Startup
{
    public void ConfigureServices(IServiceCollection services)
    {
        services.AddMvc();
    }

    public void Configure(IApplicationBuilder app, IHostingEnvironment env)
    {
        if (env.IsDevelopment())
        {
            app.UseDeveloperExceptionPage();
        }

        app.UseMvc(routes =>
        {
            routes.MapRoute(
                name: "default",
                template: "{controller=Home}/{action=Index}/{id?}");
        });
    }
}
Now create a new Folder as “Controllers” at the root level of your Project & inside this folder create a controller class as “HomeController.cs”
Installing NLog
After creating the project, we need to add NLog Library.
NLog is available at Nuget. You can install it in the way you like it. I’m going to use the .Net CLI. So, here’s the command to install NLog
dotnet add package NLog
Configuration
Now Add a configuration file at the root of your project with the name as “NLog.config” & paste this Code
<?xml version="1.0" encoding="utf-8" ?>
<nlog xmlns="http://www.nlog-project.org/schemas/NLog.xsd"
      xmlns:xsi="http://www.w3.org/2001/XMLSchema-instance">

    <targets>
        <target name="logfile" xsi:type="File" fileName="Logs.txt" />
        <target name="logconsole" xsi:type="Console" />
    </targets>

    <rules>
        <logger name="*" minlevel="Info" writeTo="logconsole" />
        <logger name="*" minlevel="Debug" writeTo="logfile" />
    </rules>
</nlog>
There’s another way to configure NLog but I’ll recommend using XML configuration. In this case, you’ll be able to edit you Logging configuration even after publishing your application.
If you still don’t like configuring NLog using above way then you can do the same by programmatically.
Here’s the alternate way.
var config = new NLog.Config.LoggingConfiguration();

var logfile = new NLog.Targets.FileTarget("logfile") { FileName = "Logs.txt" };
var logconsole = new NLog.Targets.ConsoleTarget("logconsole");

config.AddRule(LogLevel.Info, LogLevel.Fatal, logconsole);
config.AddRule(LogLevel.Debug, LogLevel.Fatal, logfile);

NLog.LogManager.Configuration = config;
you can add this code to your “Program.cs” or “Startup.cs”.
Writing Logs
Now Add the code below in your “HomeController.cs” inside your Controllers Folder.
Microsoft.AspNetCore.Mvc;
using NLog;

public class HomeController : Controller
{
    private static Logger logger = LogManager.GetCurrentClassLogger();

    public void Index()
    {
        logger.Debug("Hello from Home Controller...");
    }
}
Run your application & go to the Home Controller URL. e.g. http://localhost:*/Home
Now you’ll find your “Logs.txt” here => bin -> Debug -> netcoreapp
Here’s what I got in my “Logs.txt” File
2019-02-21 13:17:49.4574|DEBUG|NLogTutorials.HomeController|Hello from Home Controller...
Comment If you find any problem or have any Question.
Here are more Articles you might be Interested
– Creating Admin Panel in Asp.net Core MVC – Step by Step Tutorial
– Top 10 .Net Core Features You need to know
– Dynamic Role-Based Authorization Asp.net Core
The post Error Logging in Asp.Net Core Application | NLog | Log4Net | Tutorials appeared first on Coding Infinite.
]]>The post Why I’m in Love with .Net Core – Future of .Net Core 2019 appeared first on Coding Infinite.
]]>
Although you have listened to this famous Quote “Love is blind” & no one believes to defend his love with arguments & solid pieces of evidence, but In this Article, I’m going to share some real grounds that why I’m in Love with .Net Core & why I think that .Net Core is the best available Framework even in 2019.
Without biasness, I can say that every language has it’s own area of strength, for example:
Python: Machine Learning, Data Science, and oh yes! Web development.
JavaScript: Web Development (Front End as well as Backend), and Game Development.
Java: Mobile Application Development, Enterprise Applications, and even Web development.
C++ & C: Operating Systems, Performance critical solutions, embedded systems, and anything needed low-level ability.
These languages also have some other roles, but I just mentioned strength areas of these languages.
If you’re interested in the Top programming languages to learn in 2019, here is the complete guide for you => The Ten Best Programming Languages to learn in 2019
Before talking about why I considered .Net Core the Top Framework, I want to clear one thing. Otherwise, we might get some comments something like “python is better than .Net Core”.
Language vs Framework
A programming language is a set of rules that need to be followed to write a program to accomplish a task whereas a framework is a collection of useful tools written for a particular programming language.
For example, C# is a programming language. Microsoft built the .NET & .NET Core Frameworks in C# so that developers can build C# applications much more quickly than if they had to create everything from scratch.
Before Talking about my Love (.Net Core), my Introduction is important.
Who I am?
I’m Shehryar Khan, working as a Full Stack .Net Core MVC developer from last 2 years. Before that, I worked as a .Net Developer 3 years. So I’m playing with .Net & C# from last 5 years, before that, I had some experience as a PHP developer.
What is my Job? (Important to know)
Actually, I’m working in a Smart Metering company from last 3 years & have worked on many projects of different types.
- A project I completed, was a huge Web Based Application named as “Energy Axis” for Managing smart meters Data & for automatic Billing.
- A task assigned to me was to Implement a protocol(DLMS) for reading some metering devices data.
- A task assigned to me was to write some web services for sharing some Data to be used by another application.
- A task assigned to me was to create a Task Scheduler for generating some files & send over SFTP using Code.
- How can I forget that I have successfully completed a Ride Booking application project like Uber with Ahsen Saeed
– My C# knowledge has also helped me to develop a 3D game using Unity3D.
I have also worked on many other projects but these are enough to define the versatility of .Net Core Framework
.Net Core has countless features but In this Article, I’m going to discuss only a single feature which is Versatility.
If you’re interested in Top .Net Core features, you can read this Article => Top 10 .Net Core Features You need to know
Versatility: Web, Mobile, Server, Desktop
The main reason why I chose .Net Core as my Life Partner is the Versatility. Are you a Web Developer or want to Develop an app for Desktop or Mobile, If you are a Game Developer or want to work on Machine Learning, DotNet Core is here for you.
Thanks to Xamarin to use our Microsoft knowledge to Develop Cross-Platform Mobile Apps. Unity is there for Developing games. You can build desktop applications with UWP. Asp.net Core is also a main player in the Game for Developing powerful Web-based applications providing amazing SPA Angular Templates. Real-time applications with SignalR and a lot more.
Let’s not forget the high-performance service-oriented architecture. Docker containers is also supported which makes it easy to deploy your app to AWS or other providers. Using Microsoft Azure you can develop & deploy on the cloud in a few clicks.
ML.NET is a machine learning framework for .NET developers, when we talk about Cognitive Services in Azure, we’re really talking about commoditized AI(Artificial Intelligence). Blazor is going to take over some of the JavaScript functionalities.
Every time when I start to talk about .Net Features, It becomes difficult for me to stop writing. There are many more reasons why I’m in Love with .Net Core. Like Performance, Open-source, Awesome Developers Tools & many more.
I would like to share a review from Raygun’s CEO & Co-Founder here about .Net Core

Updates & News
Now, Let’s have a quick look at the Future Updates & News from Microsoft.
.NET Core 3.0
The open-source .NET Core 3.0 adds support for WinForms and the Windows Presentation Framework (also now open source) and enabled more flexible deployment with self-contained EXE files and improved performance.
C# 8.0
Microsoft recently launched a new version of C# with some really useful features. I’ll write about the use of these features some other day. Some of the features I really want to use in my new developments are Non-Nullable & Nullable Reference Types, New Lightweight Classes, Solving Object Equality with Records, Default Interface Implementations & Improved Extension Support.
Visual Studio 2019 for Windows and Mac
Visual Studio is one of the most powerful IDE available. Visual Studio 2019 Preview is available for Windows & Mac with new features to help the developers make the development faster
Conclusion
I have no doubt that .Net Core is the Future. The reason why most of the top firms love to use .Net for the developments of their huge applications is because of Microsoft Support. Microsoft is adding new features to help developers in every new update. I have also worked with Top PHP MVC Frameworks, Python & Java but I can say that .Net Core has no limits.
Here are more Articles you might be Interested
— Best 20 .Net Core Libraries Every Developer should know
– Creating Admin Panel in Asp.net Core MVC – Step by Step Tutorial
– Top 10 .Net Core Features You need to know
— The Ultimate Guide to the Best .NET Core E-commerce Open Source Platforms
The post Why I’m in Love with .Net Core – Future of .Net Core 2019 appeared first on Coding Infinite.
]]>The post Upload File to SFTP Server using C# | DotNet Core | SSH.NET appeared first on Coding Infinite.
]]>A few days ago a job assigned to me was to develop a Task Scheduler for generating XML files daily on a specific time of the day & send these files on a Remote Server using File Transfer Protocol in a secure way.
Here’s my article on creating task scheduler => Creating Scheduler in c# – Schedule Task by Seconds, Minutes, Hours, Daily
In .Net Framework there are many Libraries available for uploading files to another machine using File Transfer Protocol but most of the libraries don’t work with .Net Core. In this Tutorial, we will develop a very simple SFTP client using C# for .Net Core.
Before start let’s have a quick look at SFTP.
What is SFTP?
SFTP stands for SSH File Transfer Protocol or Secure File Transfer Protocol. It is a protocol used to transfer files between remote machines over a secure shell.
In almost all cases, SFTP is preferable over FTP because of security features. FTP is not a secure protocol & it should only be used on a trusted network.
Choosing Library for C#
A lot of search & after testing many libraries I finally met with SSH.NET which was working perfectly with .Net Core 2.2 project & the good thing was that It does its job in a very few lines of Code.
So we’ll use SSH.NET
What is SSH.NET?
SSH.NET is an open-source library available at Nuget for .NET to work over SFTP. It is also optimized for parallelism to achieve the best possible performance. It was inspired by Sharp.SSH library which was ported from Java. This library is a complete rewrite using .Net, without any third party dependencies.
Here are the features of SSH.NET:
Features

Creating Project
I’m in love with VS Code right after its first release so I’m going to use VS Code for creating project to upload/transfer a file to a remote server using SFTP.
Create a console application using this command
dotnet new console
Installing SSH.NET
I won’t recommend you to install the latest version of SSH.NET. It has a bug, it can be stuck on transferring the file to the remote location.
version 2016.0.0 is perfect.
run this command to install the library from NuGet
using package manager
Install-Package SSH.NET -Version 2016.0.0
or using .Net CLI
dotnet add package SSH.NET --version 2016.0.0
Code
Finally, It’s time to create a class for SFTP Client Code.
Create a file with the name as “SendFileToServer” & add the below code
using Renci.SshNet;

public static class SendFileToServer
{
    // Enter your host name or IP here
    private static string host = "127.0.0.1";

    // Enter your sftp username here
    private static string username = "sftp";

    // Enter your sftp password here
    private static string password = "12345";
    public static int Send(string fileName)
    {
        var connectionInfo = new ConnectionInfo(host, "sftp", new PasswordAuthenticationMethod(username, password));

        // Upload File
        using (var sftp = new SftpClient(connectionInfo)){

            sftp.Connect();
            //sftp.ChangeDirectory("/MyFolder");
            using (var uplfileStream = System.IO.File.OpenRead(fileName)){
                sftp.UploadFile(uplfileStream, fileName, true);
            }
            sftp.Disconnect();
        }
        return 0;
    }
}
Now you can call this Method to transfer a file to SFTP Server like this
SendFileToServer.Send("myFile.txt");
“myFile.txt” is the name of the file which should be located in your project root directory.
Let me know if you find any problem or comment If you find this Article helpful.
Here are more Articles you might be Interested:
– A Complete Guide to Secure Your Asp.Net Core Web Application & Apis
– Creating Admin Panel in Asp.net Core MVC – Step by Step Tutorial
— How to Create SOAP Web Services in Dotnet Core
– Dynamic Role-Based Authorization Asp.net Core
— Generate QR Code Using ASP.NET CORE
The post Upload File to SFTP Server using C# | DotNet Core | SSH.NET appeared first on Coding Infinite.
]]>The post Creating Interactive Dashboards in Asp.net Core MVC appeared first on Coding Infinite.
]]>
Here’s my Tutorial, If you’re interested in Dynamic User-defined Dashboards using Asp.Net Core
This is the 7th Part of Admin Panel Tutorial Series.
- Choosing Template for Admin Panel
- Creating a Database
- Setup AdminLTE Template in Asp.net Core MVC project
- Creating Models
- Login Page for Admin Panel
- CRUD(Create, Read, Update, Delete) Operations
- Creating Interactive Dashboards
- Audit Trail / Activity Logging
- Role-Based Authorization
- Error Logging
Creating Dashboards breaks down into two portions:
- Dashboard Design
- Populating it with required data.
For the first portion, you’ll have to do CSS and HTML work. And for it, you can search for already created HTML templates.
Chats, Graphs, Tables & Tiles make the Dashboards more Interactive & help to better understand your business. So, Let’s start from here.
I’ll recommend you to always use a Template to create Dashboards because in a Template you’ll get everything already included for you. You’ll just need to download, Setup & start development.
I’ll use AdminLTE for Designing our Dashboards. If you don’t know how to setup AdminLTE Template with Asp.net Core MVC Project,
here’s the simple setup Tutorial for you => Setting up Admin Template in Asp.net Core MVC
I hope that following above article you have setup Template with your Asp.net Core project.
Add this Line at the start of your “_Layout.cshtml” page right after BootStrap css
<!-- Morris chart -->
<link rel="stylesheet" href="proxy.php?url=bower_components/morris.js/morris.css">
Like this

Now Open your “Index.cshtml” inside your Views -> Home Folder & paste this code:
@model AdminPanelTutorial.Models.DashboardViewModel

<section class="content-header">
    <h1>
    Dashboard
    <small>Control panel</small>
    </h1>
    <ol class="breadcrumb">
    <li><a href="proxy.php?url=#"><i class="fa fa-dashboard"></i> Home</a></li>
    <li class="active">Dashboard</li>
    </ol>
</section>
<!-- Main content -->
<section class="content">
    <!-- Small boxes (Stat box) -->
    <div class="row">
    <div class="col-lg-3 col-xs-6">
        <!-- small box -->
        <div class="small-box bg-aqua">
        <div class="inner">
            <h3>@Model.doctors_count</h3>
            <p>Doctors</p>
        </div>
        <div class="icon">
            <i class="fa fa-users"></i>
        </div>
        <a href="proxy.php?url=#" class="small-box-footer">More info <i class="fa fa-arrow-circle-right"></i></a>
        </div>
    </div>
    <!-- ./col -->
    <div class="col-lg-3 col-xs-6">
        <!-- small box -->
        <div class="small-box bg-green">
        <div class="inner">
            <h3>@Model.nurses_count<sup style="font-size: 20px"></sup></h3>
            <p>Nurses</p>
        </div>
        <div class="icon">
            <i class="fa fa-users"></i>
        </div>
        <a href="proxy.php?url=#" class="small-box-footer">More info <i class="fa fa-arrow-circle-right"></i></a>
        </div>
    </div>
    <!-- ./col -->
    <div class="col-lg-3 col-xs-6">
        <!-- small box -->
        <div class="small-box bg-yellow">
        <div class="inner">
            <h3>@Model.patients_count</h3>
            <p>Patients</p>
        </div>
        <div class="icon">
            <i class="ion ion-person"></i>
        </div>
        <a href="proxy.php?url=#" class="small-box-footer">More info <i class="fa fa-arrow-circle-right"></i></a>
        </div>
    </div>
    <!-- ./col -->
    <div class="col-lg-3 col-xs-6">
        <!-- small box -->
        <div class="small-box bg-red">
        <div class="inner">
            <h3>65</h3>
            <p>This Month</p>
        </div>
        <div class="icon">
            <i class="ion ion-pie-graph"></i>
        </div>
        <a href="proxy.php?url=#" class="small-box-footer">More info <i class="fa fa-arrow-circle-right"></i></a>
        </div>
    </div>
    <!-- ./col -->
    </div>
    <!-- /.row -->
    <!-- Main row -->
    <div class="row">
    <!-- Left col -->
    <section class="col-lg-7 connectedSortable">
        <!-- Custom tabs (Charts with tabs)-->
        <!-- DONUT CHART -->
        <div class="box box-danger">
            <div class="box-header with-border">
            <h3 class="box-title">Donut Chart</h3>
            <div class="box-tools pull-right">
                <button type="button" class="btn btn-box-tool" data-widget="collapse"><i class="fa fa-minus"></i>
                </button>
                <button type="button" class="btn btn-box-tool" data-widget="remove"><i class="fa fa-times"></i></button>
            </div>
            </div>
            <div class="box-body chart-responsive">
            <div class="chart" id="sales-chart" style="height: 300px; position: relative;"></div>
            </div>
            <!-- /.box-body -->
        </div>
        <!-- /.nav-tabs-custom -->
    </section>
    <!-- /.Left col -->
    <!-- right col (We are only adding the ID to make the widgets sortable)-->
    <section class="col-lg-5 connectedSortable">
        <!-- TO DO List -->
        <div class="box box-primary">
        <div class="box-header">
            <i class="ion ion-clipboard"></i>
            <h3 class="box-title">To Do List</h3>
            <div class="box-tools pull-right">
            <ul class="pagination pagination-sm inline">
                <li><a href="proxy.php?url=#">«</a></li>
                <li><a href="proxy.php?url=#">1</a></li>
                <li><a href="proxy.php?url=#">2</a></li>
                <li><a href="proxy.php?url=#">3</a></li>
                <li><a href="proxy.php?url=#">»</a></li>
            </ul>
            </div>
        </div>
        <!-- /.box-header -->
        <div class="box-body">
            <!-- See dist/js/pages/dashboard.js to activate the todoList plugin -->
            <ul class="todo-list">
            <li>
                <!-- drag handle -->
                <span class="handle">
                    <i class="fa fa-ellipsis-v"></i>
                    <i class="fa fa-ellipsis-v"></i>
                    </span>
                <!-- checkbox -->
                <input type="checkbox" value="">
                <!-- todo text -->
                <span class="text">Patient 1 Check up Time</span>
                <!-- Emphasis label -->
                <small class="label label-danger"><i class="fa fa-clock-o"></i> 2 mins</small>
                <!-- General tools such as edit or delete-->
                <div class="tools">
                <i class="fa fa-edit"></i>
                <i class="fa fa-trash-o"></i>
                </div>
            </li>
            <li>
                    <span class="handle">
                    <i class="fa fa-ellipsis-v"></i>
                    <i class="fa fa-ellipsis-v"></i>
                    </span>
                <input type="checkbox" value="">
                <span class="text">Medicine for X Patient</span>
                <small class="label label-info"><i class="fa fa-clock-o"></i> 4 hours</small>
                <div class="tools">
                <i class="fa fa-edit"></i>
                <i class="fa fa-trash-o"></i>
                </div>
            </li>
            <li>
                    <span class="handle">
                    <i class="fa fa-ellipsis-v"></i>
                    <i class="fa fa-ellipsis-v"></i>
                    </span>
                <input type="checkbox" value="">
                <span class="text">New Patient Operation</span>
                <small class="label label-warning"><i class="fa fa-clock-o"></i> 1 day</small>
                <div class="tools">
                <i class="fa fa-edit"></i>
                <i class="fa fa-trash-o"></i>
                </div>
            </li>
            <li>
                    <span class="handle">
                    <i class="fa fa-ellipsis-v"></i>
                    <i class="fa fa-ellipsis-v"></i>
                    </span>
                <input type="checkbox" value="">
                <span class="text">Ward Visit</span>
                <small class="label label-success"><i class="fa fa-clock-o"></i> 3 days</small>
                <div class="tools">
                <i class="fa fa-edit"></i>
                <i class="fa fa-trash-o"></i>
                </div>
            </li>
            <li>
                    <span class="handle">
                    <i class="fa fa-ellipsis-v"></i>
                    <i class="fa fa-ellipsis-v"></i>
                    </span>
                <input type="checkbox" value="">
                <span class="text">Any other Activity</span>
                <small class="label label-primary"><i class="fa fa-clock-o"></i> 1 week</small>
                <div class="tools">
                <i class="fa fa-edit"></i>
                <i class="fa fa-trash-o"></i>
                </div>
            </li>
            <li>
                    <span class="handle">
                    <i class="fa fa-ellipsis-v"></i>
                    <i class="fa fa-ellipsis-v"></i>
                    </span>
                <input type="checkbox" value="">
                <span class="text">Any other Activity</span>
                <small class="label label-default"><i class="fa fa-clock-o"></i> 1 month</small>
                <div class="tools">
                <i class="fa fa-edit"></i>
                <i class="fa fa-trash-o"></i>
                </div>
            </li>
            </ul>
        </div>
        <!-- /.box-body -->
        <div class="box-footer clearfix no-border">
            <button type="button" class="btn btn-default pull-right"><i class="fa fa-plus"></i> Add item</button>
        </div>
        </div>
        <!-- /.box -->
    </section>
    <!-- right col -->
    </div>
    <!-- /.row (main row) -->
</section>

<!-- Morris.js charts -->
<script src="proxy.php?url=bower_components/raphael/raphael.min.js"></script>
<script src="proxy.php?url=bower_components/morris.js/morris.min.js"></script>
<script>
  $(function () {
    "use strict";
    //DONUT CHART
    var donut = new Morris.Donut({
      element: 'sales-chart',
      resize: true,
      colors: ["#3c8dbc", "#f56954", "#00a65a"],
      data: [
        {label: "Registered Doctors", value: @Model.doctors_count},
        {label: "Registered Nurses", value: @Model.nurses_count},
        {label: "Registered Patients", value: @Model.patients_count}
      ],
      hideHover: 'auto'
    });
  });
</script>
</body>
</html>
For populating above Page with real Data from DB you need to pass Data from Controller to View.
As a Best Practise, we’ll use ViewModel.
Create a new Folder as “ViewModels” & inside this Folder create a new file with the name “DashboardViewModel.cs”
& Add this Code:
namespace AdminPanelTutorial.Models
{
    public class DashboardViewModel
    {
        public int doctors_count { get; set; }
        public int nurses_count { get; set; }
        public int patients_count { get; set; }

    }
}
* Don’t forget to Update namespace here & in “Index.cshtml” File’s First Line According to your project’s namespace.
Now finally add this code to your “HomeController.cs”:
using System.Linq;
using AdminPanelTutorial.Models;
using Microsoft.AspNetCore;
using Microsoft.AspNetCore.Hosting;
using Microsoft.AspNetCore.Mvc;

namespace AdminPanelTutorial
{
    public class HomeController : Controller
    {
        private MyDbContext db = new MyDbContext();
        public IActionResult Index()
        {
            DashboardViewModel dashboard = new DashboardViewModel();

            dashboard.doctors_count = db.Doctors.Count();
            dashboard.nurses_count = db.Nurses.Count();
            dashboard.patients_count = db.Patients.Count();

            return View(dashboard);
        }
    }
}
Run your Application & you’ll see this page.
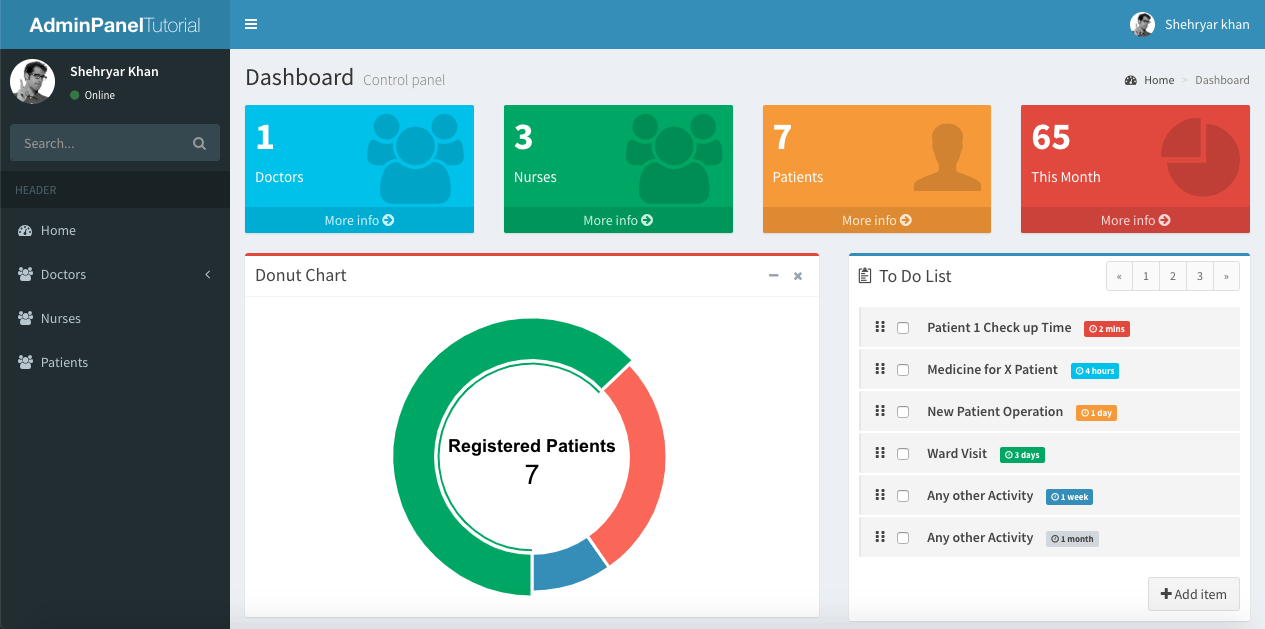
I’m just getting Doctors, Nurses & Patients count & displaying in my Dashboard as an example, you can Create ViewModel according to your Dashboard Design.
Running your project, you’ll see your Dashboard with real Doctors, Nurses & Patients count.
* Explore the AdminLTE Template to design your more Interactive Dashboards. Your Application can have more than one Dashboard.
Comment below If you find any difficulty or If you find this tutorial helpful.
The post Creating Interactive Dashboards in Asp.net Core MVC appeared first on Coding Infinite.
]]>The post Dynamic Role Based Authorization Asp.net Core | Assign Role from DB appeared first on Coding Infinite.
]]>In Applications like Admin Panel where your Application is being managed by multiple users, you must manage your users according to their roles.
Typically in an ASP.NET MVC project, this can be achieved by using an authorize attribute, Something like this:
[Authorize(Roles = "Manager, SecondUser")]
public ActionResult HelloWorld()
Now Only “Manager” & “SecondUser” can access the HelloWorld Action.
But what’s the problem here?
Actually, the above code ties the “Manager” & “SecondUser” with your Controller & Action. So If you want to change User Role in Future, you have to update your code and publish a new version of your Application.
So In this Tutorial, we’ll see the better way to implement Role based Authorization & dynamically Create & Assign Roles to Users.
If you missed Admin Panel Tutorial, Find here => Creating Admin Panel in Asp.net Core MVC – Step by Step Tutorial
Difference Between Authentication & Authorization
Before Start Implementing Dynamic Role-based Authorization we must know the difference between Authorization & Authentication.
Authentication is actually the process of validating Users Identity by verifying Credentials e.g. Username & Password. Whereas Authorization is the process to validate If a user has rights to access a specific action.
Authorization always comes after the Authentication process.
Now Let’s see how you can Implement Dynamic Role-based Authorization using Asp.net.
Dynamic Role-based Authorization
Database Structure is Important
The database structure is really Important for this. First of all, we should have an Admins Table where we’ll add your users & a Roles Table for adding Roles for Users.
Menus Table is for defining all actions or menus & link_roles_menus is for assigning access to roles.
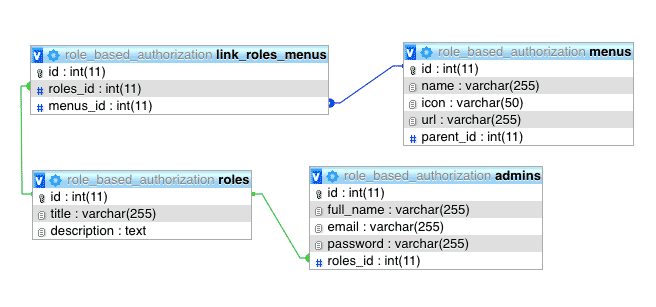
Here’s the Code Database Script. I have also shared the database script inside the GitHub repository.
-- phpMyAdmin SQL Dump
-- version 4.7.7
-- https://www.phpmyadmin.net/
--
-- Host: localhost
-- Generation Time: Nov 28, 2018 at 09:46 PM
-- Server version: 10.1.30-MariaDB
-- PHP Version: 7.2.1

SET SQL_MODE = "NO_AUTO_VALUE_ON_ZERO";
SET AUTOCOMMIT = 0;
START TRANSACTION;
SET time_zone = "+00:00";


/*!40101 SET @OLD_CHARACTER_SET_CLIENT=@@CHARACTER_SET_CLIENT */;
/*!40101 SET @OLD_CHARACTER_SET_RESULTS=@@CHARACTER_SET_RESULTS */;
/*!40101 SET @OLD_COLLATION_CONNECTION=@@COLLATION_CONNECTION */;
/*!40101 SET NAMES utf8mb4 */;

--
-- Database: `role_based_authorization`
--

-- --------------------------------------------------------

--
-- Table structure for table `admins`
--

CREATE TABLE `admins` (
  `id` int(11) NOT NULL,
  `full_name` varchar(255) DEFAULT NULL,
  `email` varchar(255) DEFAULT NULL,
  `password` varchar(255) DEFAULT NULL,
  `roles_id` int(11) DEFAULT NULL
) ENGINE=InnoDB DEFAULT CHARSET=latin1;

--
-- Dumping data for table `admins`
--

INSERT INTO `admins` (`id`, `full_name`, `email`, `password`, `roles_id`) VALUES
(1, 'Shehryar Khan', '[email protected]', '12345', 1),
(2, 'Ahsan Saeed', '[email protected]', '12345', 2),
(3, 'Shayan tahir', '[email protected]', '12345', 6);

-- --------------------------------------------------------

--
-- Table structure for table `link_roles_menus`
--

CREATE TABLE `link_roles_menus` (
  `id` int(11) NOT NULL,
  `roles_id` int(11) NOT NULL,
  `menus_id` int(11) NOT NULL
) ENGINE=InnoDB DEFAULT CHARSET=latin1;

--
-- Dumping data for table `link_roles_menus`
--

INSERT INTO `link_roles_menus` (`id`, `roles_id`, `menus_id`) VALUES
(47, 2, 1),
(48, 2, 2),
(49, 2, 4),
(50, 2, 5),
(51, 2, 6),
(52, 2, 7),
(65, 1, 1),
(66, 1, 2),
(67, 1, 3),
(68, 1, 4),
(69, 1, 5),
(70, 1, 6),
(71, 1, 7),
(76, 6, 1),
(77, 6, 2),
(78, 6, 4);

-- --------------------------------------------------------

--
-- Table structure for table `menus`
--

CREATE TABLE `menus` (
  `id` int(11) NOT NULL,
  `name` varchar(255) NOT NULL,
  `icon` varchar(50) NOT NULL,
  `url` varchar(255) DEFAULT NULL,
  `parent_id` int(11) NOT NULL
) ENGINE=InnoDB DEFAULT CHARSET=latin1;

--
-- Dumping data for table `menus`
--

INSERT INTO `menus` (`id`, `name`, `icon`, `url`, `parent_id`) VALUES
(1, 'Dashboard', 'fa fa-dashboard', '/', 0),
(2, 'Admins', 'fa fa-users', '#', 0),
(3, 'Create Admin', 'fa fa-plus', '/Admins/Create', 2),
(4, 'Manage Admins', 'fa fa-users', '/Admins/Index', 2),
(5, 'Roles', 'fa fa-lock', '#', 0),
(6, 'Create Role', 'fa fa-lock', '/Roles/Create', 5),
(7, 'Manage Roles', 'fa fa-lock', '/Roles/Index', 5);

-- --------------------------------------------------------

--
-- Table structure for table `roles`
--

CREATE TABLE `roles` (
  `id` int(11) NOT NULL,
  `title` varchar(255) NOT NULL,
  `description` text NOT NULL
) ENGINE=InnoDB DEFAULT CHARSET=latin1;

--
-- Dumping data for table `roles`
--

INSERT INTO `roles` (`id`, `title`, `description`) VALUES
(1, 'Manager', 'Super Admin with all rights...'),
(2, 'Supervisor', 'Can View Dashboard, Admins & Roles'),
(6, 'Developer', 'Can View Dashboard &  Admins List');

--
-- Indexes for dumped tables
--

--
-- Indexes for table `admins`
--
ALTER TABLE `admins`
  ADD PRIMARY KEY (`id`),
  ADD KEY `admins_ibfk_1` (`roles_id`);

--
-- Indexes for table `link_roles_menus`
--
ALTER TABLE `link_roles_menus`
  ADD PRIMARY KEY (`id`),
  ADD KEY `menus_id` (`menus_id`),
  ADD KEY `roles_id` (`roles_id`);

--
-- Indexes for table `menus`
--
ALTER TABLE `menus`
  ADD PRIMARY KEY (`id`);

--
-- Indexes for table `roles`
--
ALTER TABLE `roles`
  ADD PRIMARY KEY (`id`);

--
-- AUTO_INCREMENT for dumped tables
--

--
-- AUTO_INCREMENT for table `admins`
--
ALTER TABLE `admins`
  MODIFY `id` int(11) NOT NULL AUTO_INCREMENT, AUTO_INCREMENT=6;

--
-- AUTO_INCREMENT for table `link_roles_menus`
--
ALTER TABLE `link_roles_menus`
  MODIFY `id` int(11) NOT NULL AUTO_INCREMENT, AUTO_INCREMENT=79;

--
-- AUTO_INCREMENT for table `menus`
--
ALTER TABLE `menus`
  MODIFY `id` int(11) NOT NULL AUTO_INCREMENT, AUTO_INCREMENT=8;

--
-- AUTO_INCREMENT for table `roles`
--
ALTER TABLE `roles`
  MODIFY `id` int(11) NOT NULL AUTO_INCREMENT, AUTO_INCREMENT=7;

--
-- Constraints for dumped tables
--

--
-- Constraints for table `admins`
--
ALTER TABLE `admins`
  ADD CONSTRAINT `admins_ibfk_1` FOREIGN KEY (`roles_id`) REFERENCES `roles` (`id`);

--
-- Constraints for table `link_roles_menus`
--
ALTER TABLE `link_roles_menus`
  ADD CONSTRAINT `link_roles_menus_ibfk_1` FOREIGN KEY (`menus_id`) REFERENCES `menus` (`id`),
  ADD CONSTRAINT `link_roles_menus_ibfk_2` FOREIGN KEY (`roles_id`) REFERENCES `roles` (`id`);
COMMIT;

/*!40101 SET CHARACTER_SET_CLIENT=@OLD_CHARACTER_SET_CLIENT */;
/*!40101 SET CHARACTER_SET_RESULTS=@OLD_CHARACTER_SET_RESULTS */;
/*!40101 SET COLLATION_CONNECTION=@OLD_COLLATION_CONNECTION */;
How to Implement
As I have already said, the most important thing here is your Database Tables Linking. Above database is perfect for the easy to implement role-based authorization system.
After Creating a database, simply Add pages for “admins”, “roles”, “menus” Tables with CRUD Operations.
Here’s the Simple CRUD Operations Tutorial with Admin Template => CRUD Operations in Asp.net Core MVC
How to Create Menu from Database
As you can see in “menus” Table that It has a column with the name “parent_id” so It means that menus will be in a Tree format with the Parent-Child relations in the same Table. So I’ll recommend you to Follow This Tutorial to load Data from Database to TreeView for Assigning Menus Access to a Role.
Here’s the Code for Creating Menu from Database.
public class AccountController : Controller
{
    MyDbContext db = new MyDbContext();

    public IActionResult Login()
    {
        return View();
    }

    public ActionResult Validate(Admins admin)
    {
        var _admin = db.Admins.Where(s => s.Email == admin.Email).FirstOrDefault();
        if (_admin != null)
        {
            if (_admin.Password == admin.Password)
            {
                HttpContext.Session.SetString("email", _admin.Email);
                HttpContext.Session.SetInt32("id", _admin.Id);
                HttpContext.Session.SetInt32("role_id", (int)_admin.RolesId);
                HttpContext.Session.SetString("name", _admin.FullName);

                int roleId = (int)HttpContext.Session.GetInt32("role_id");
                List<Menus> menus = db.LinkRolesMenus.Where(s => s.RolesId == roleId).Select(s => s.Menus).ToList();

                DataSet ds = new DataSet();
                ds = ToDataSet(menus);
                DataTable table = ds.Tables[0];
                DataRow[] parentMenus = table.Select("ParentId = 0");

                var sb = new StringBuilder();
                string menuString = GenerateUL(parentMenus, table, sb);
                HttpContext.Session.SetString("menuString", menuString);
                HttpContext.Session.SetString("menus", JsonConvert.SerializeObject(menus));

                return Json(new { status = true, message = "Login Successfull!" });
            }
            else
            {
                return Json(new { status = true, message = "Invalid Password!" });
            }
        }
        else
        {
            return Json(new { status = false, message = "Invalid Email!" });
        }
    }

    private string GenerateUL(DataRow[] menu, DataTable table, StringBuilder sb)
    {
        if (menu.Length > 0)
        {
            foreach (DataRow dr in menu)
            {
                string url = dr["Url"].ToString();
                string menuText = dr["Name"].ToString();
                string icon = dr["Icon"].ToString();

                if (url != "#")
                {
                    string line = String.Format(@"<li><a href="proxy.php?url="{0}""><i class=""{2}""></i> <span>{1}</span></a></li>", url, menuText, icon);
                    sb.Append(line);
                }

                string pid = dr["Id"].ToString();
                string parentId = dr["ParentId"].ToString();

                DataRow[] subMenu = table.Select(String.Format("ParentId = '{0}'", pid));
                if (subMenu.Length > 0 && !pid.Equals(parentId))
                {
                    string line = String.Format(@"<li class=""treeview""><a href="proxy.php?url="#""><i class=""{0}""></i> <span>{1}</span><span class=""pull-right-container""><i class=""fa fa-angle-left pull-right""></i></span></a><ul class=""treeview-menu"">", icon, menuText);
                    var subMenuBuilder = new StringBuilder();
                    sb.AppendLine(line);
                    sb.Append(GenerateUL(subMenu, table, subMenuBuilder));
                    sb.Append("</ul></li>");
                }
            }
        }
        return sb.ToString();
    }

    public DataSet ToDataSet<T>(List<T> items)
    {
        DataTable dataTable = new DataTable(typeof(T).Name);
        //Get all the properties
        PropertyInfo[] Props = typeof(T).GetProperties(BindingFlags.Public | BindingFlags.Instance);
        foreach (PropertyInfo prop in Props)
        {
            //Setting column names as Property names
            dataTable.Columns.Add(prop.Name);
        }
        foreach (T item in items)
        {
            var values = new object[Props.Length];
            for (int i = 0; i < Props.Length; i++)
            {
                values[i] = Props[i].GetValue(item, null);
            }
            dataTable.Rows.Add(values);
        }
        DataSet ds = new DataSet();
        ds.Tables.Add(dataTable);
        return ds;
    }

    public ActionResult Logout()
    {
        HttpContext.Session.Clear();
        return RedirectToAction("Login", "Account");
    }
}
Validate Method is called when we click on the Login button on the Login Page. It Generates the Menu HTML based string keep in the Session.
How It will work
On Successful Login, First of all, get the Role ID of the Admin, from Role ID get all menus list from Database which is allowed to the User & display in your Application Menu. Also, store in your Sessions memory.
Use ActionFilterAttribute to check before every Action that either this Action is Valid for the Logged in User or Not.
Here’s the Code for ActionFilterAttribute
public class AuthorizedAction: ActionFilterAttribute
{
    public override void OnResultExecuting(ResultExecutingContext filterContext)
    {

    }

    public override void OnActionExecuting(ActionExecutingContext filterContext)
    {
        base.OnActionExecuting(filterContext);

        if (filterContext.HttpContext.Session.GetString("email") == null)
        {
            filterContext.Result = new RedirectToRouteResult(
                new RouteValueDictionary { { "controller", "Account" }, { "action", "Login" } });
            return;
        }

        var menus = JsonConvert.DeserializeObject<List<Menus>>(filterContext.HttpContext.Session.GetString("menus"));
        var controllerName = filterContext.RouteData.Values["controller"];
        var actionName = filterContext.RouteData.Values["action"];
        string url = "/" + controllerName + "/" + actionName;

        if (!menus.Where(s => s.Url == url).Any())

        {
            filterContext.Result = new RedirectToRouteResult(
                new RouteValueDictionary { { "controller", "Account" }, { "action", "Login" } });
            return;
        }
    }
}
I would recommend using routing to not reload your whole page on every option-click.
Here’s the Angular UI-Router Tutorial with Asp.net Core.
I’ll recommend to Download Complete Code from GitHub & run it. In my opinion, If you are able to understand the Database, you can easily Implement the solution in your own way.
If you want any support from me please comment below. I’m always available to help you.
FAQ.
Q: How to Authorize Links other than Menu?
Ans: Add another column in the “Menus” Table as “is_menu” & when getting menus list on Successful login, filter the records only have “is_menu” = 1. Rest of the work will be as explained above.
Now you can Add all links(other than menu items), you want to authorize in “Menus” Table.
You might be interested in:
The post Dynamic Role Based Authorization Asp.net Core | Assign Role from DB appeared first on Coding Infinite.
]]>