The post Using TypeScript with Styled Components appeared first on Coding Infinite.
]]>One of the most noticeable TypeScript pros is enabling IDEs to provide a richer environment that could see common errors in code typing. It streamlines Java code, which makes reading and debugging so much easier.
Use TypeScript with Styled Components
It’s great to use styled-components with React, as well as React native. However, it truly shines when using it with VS Code, getting suggestions about the code and errors when writing an error. The components help keep problems regarding the separation of styling and architecture, which makes for a more readable code.
In addition, should there be components relying on JavaScript, the components provide control over the states, and then back to CSS, and not using many conditional class names instead. When transitioning most projects to include TypeScript, some things would feel perfect. Consider checking them out.
1. Types Installation
Styled components do not ship with types. Rather, you need to install it from the repository called the Definitely Typed.
npm i --save-dev @types/styled-components
2. Customized props
Using a CSS in a JavaScript solution has one particular major advantage, and this the ability of passing customized props on the runtime, as well as accordingly adapting CSS.
const HeaderTitle = styled.h1<{ isActive: boolean }>`

color: ${props=>(props.isActive ? 'green' : 'red' )}

`;
Similar to JSX elements, the generic type could be passed after the component with <>. Now, what you have is a typed styled-component, and thus will become a static element error if unable to pass the active prop.
To extend the component, you can use it like this:
import Title from './Title'

const HeaderTitle = styled(Title)<{ isActive: boolean }>`

color: ${props=>(props.isActive ? 'green' : 'red' )}

`;
Keep in mind however that active as a prop is passed to the Title component even if not explicitly stated so. Later, if someone adds an optional prop to the component, this could be a concern. You can nonetheless refactor to avoid this, such as:
const HeaderTitle = styled(({ isActive, ...rest }) => <Title {...rest} />)<{

isActive: boolean;

}>`

color: ${props => (props.isActive ? 'green' : 'red')};

`;
This syntax however obviously is more intricate, and builds additional component. If the mess is worth uncovering an accidental prop, it would be your decision.
3. Typing a Theme
With the help of the ThemeProvider, Styled Components could specify a theme. The autocomplete form itself form the theme object is worth doing even if you steer away from everything else.
The first thing to do is to build a declarations file. For instance, we shall call it styled.d.ts.
// import original module declarations

import 'styled-components';

// and extend them!

declare module 'styled-components' {

export interface DefaultTheme {

fontSize:{

body: string;

h1: string;

h2: string;

h3: string;

h4: string;

h5: string;

h6: string;

},

colors: {

main: string;

secondary: string;

};

}

}
Typing the theme manually like this is hard however, mainly due to the fact that every time you add or remove something form the theme object, you have to edit a couple of files. Rather, consider doing this:
import {} from 'styled-components';

import myTheme from '../custom-theme';

declare module 'styled-components' {

type Theme = typeof myTheme;

export interface DefaultTheme extends Theme {}

}
We make use of the type inference of TypeScript here for the theme object to do it.
4. Using the CSS Prop
In the Styled Components documentation, there are a couple of CSS functions. Here specifically is the attribute of CSS that could be utilized on an element when a Babel plugin is enabled.
<div

css={`

display: block;

`}

>

...

</div>
Unfortunately, TypeScript does not know about this CSS property, and makes an error.
To resolve this, consider the following styled.d.ts:
import {} from 'styled-components';

import { CSSProp } from 'styled-components';

declare module 'react' {

interface Attributes {

css?: CSSProp | CSSObject;

}

}
5. The Media Templates
Specifying media queries from documentation has an easy way. However, while the syntax is user-friendly, the implementation is difficult to reason for TypeScript, and for new users too as it happens. Consider the following seamless option:
const customMediaQuery = (maxWidth: number) => `@media (max-width: ${maxWidth}px)`;

const media = {

custom: customMediaQuery,

desktop: customMediaQuery(992),

tablet: customMediaQuery(768),

phone: customMediaQuery(576),

};

const ContentBlock = styled.div`

width: 4em;

height: 4em;

background: white;


/* Now we have our methods of raw queries */


${media.desktop} {

background: green;

}

${media.tablet} {

background: yellow;

}

${media.phone} {

background: blue;

}

`;

render(<ContentBlock />);
The Pros of TypeScript
- Helps deal with growing teams
- Code scalability
- Compliance to ES-next
- Awesome tooling and community effort
- Types boost agility when refactoring. It’s also better for a compiler to catch errors than having things fail during runtime
- Have a proven ability of enhancing the quality and understandability of code.
- With typing, it provides a taste of the future of JavaScript
- One of the best forms of documentation.
- With auto-injection libraries combined, the code-base is truly predictable and maintainable.
- The dependency injection opens up a lot of opportunities for cool testing, and make sure that the APIs are controller-based.
- The Dependency Injections makes for easy testing.
- Supports change and innovation, with safety measures that ensure it won’t entirely go the wrong way.
- Helps in the implementation of sturdy design patterns into a language that does not really support it.
- Make more readable code, helping developers remember what every code piece is supposed to do fast.
- Could compile down to a JavaScript version, which runs on all browsers.
- The code completion IntelliSense provides active hints that a code is being added.
- Very easily write pure TypeScript object-oriented code with less knowledge.
- The static typing feature detects a bug or bugs as a developer is writing the scripts. This enables a developer to write more sturdy code, maintain it, which result in cleaner, better code.
- TypeScript tools make refactoring faster and easier.
Why Styled Components?
1. Makes less bulky components. There would be plenty of heavy lifting done via the CSS for injecting styling towards a component that’s user-centered. Majority of the methods id render components end up with style objects, which clutter and splits the CSS into two, making the code parsing process difficult. Styled components however keep the element architecture and styling separated, and make more readable components.
2. CSS Function. Props could be used to render CSS conditionally, meaning that there’s no need to render conditional classes names that are props-based. This minimizes components clutter, and maintaining a separation of issues between JavaScript and CSS.
3. ThemeProvider. Severing as the wrapper, it injects props into all the child components. It’s significantly useful when creating a ‘configuration’ page, which is a duplicate page essentially, letting users perform customizations to specific stylistic elements, such as color in particular.
4. Test. Testing of the styled components is painless through building class names that are consistent. Moreover, it also enables asserting certain CSS rules, which could be relevant to the app’s integrity.
Conclusion
Styled-components overall, have made creating apps with TypeScript more enjoyable. The styles are a neat approach to scoping styles. TypeScript could be leveraged to have a strong-typing in props passed to the styled components.
The styled components have over 5.7 million downloads per month from npm, more than 27.8 GitHub stars, as well as hundreds of open source contributors, thus it’s here to stay.
Author Profile:
V K Chaudhary working as a project manager in a software development company Tatvasoft.com. He is a technical geek and also managing some online campaigns for his company.
The post Using TypeScript with Styled Components appeared first on Coding Infinite.
]]>The post 11 Best HTML Website Templates For Your Next Project appeared first on Coding Infinite.
]]>- hire a specialist;
- choose a CMS;
- use one of the programming languages.
Each option has pros and cons. In this article, I will focus on the HTML CSS website templates. HTML was at the source of the website building. Even now, CMS websites go through several stages before taking the usual form:
- The server executes a PHP website’s version to put together an HTML version of the website.
- It reaches the database to insert content into an HTML website.
It doesn’t matter if you use WordPress or HTML. It all comes to HTML on the frontend.
So, despite a wide choice of ways to create a website, HTML doesn’t lean back. It still has benefits for web developers. To save time, you can use a ready-made template. A template from the reliable source already has a clean code. It means that you:
- have no or few problems with a code;
- can change the code and the look of a website fast.
Below, you can check out 11 top web templates. They are good for creating an online store, portfolio, personal or business website. There are multipurpose options. Before, I offer you to look at the pros of the HTML website.
So, let’s start.
Advantages of Website Template HTML and CSS
There are pros of both using programming languages and CMS to build a website. First, it’s a matter of tastes and skills. Not everyone can code. In this case, the drag-and-drop nature of CMS comes in handy. Still, if you know HTML, you can face the following pros.
HTML websites are SEO-friendly
Every browser can interpret HTML code. Unlike the Flash websites, for instance, that need a Flash Player. If the user’s browser doesn’t have it, the website won’t work. It doesn’t mean that Flash websites are evil. It all comes to the question of your needs. Flash websites can handle a big number of pictures and videos. In this case, the HTML website might not work so good.
Furthermore, an HTML website is lightweight. It means that it will load faster. It’s good for SEO optimization. Yes, it’s possible to optimize a CMS website for speed too. Still, you will use extra plugins. Why do it if you can avoid those extra steps?
HTML websites are easy to edit
Yes, there are no admin panels with dozens of options. For some people, it might be a disadvantage. For me, it’s easier and faster to use Notepad to edit pages this way. All you need to do to make changes is to use tags.
If you know how to code, it shouldn’t be a big deal.
No need to worry about updates
It’s important to keep a track of the CMS theme updates. I don’t mention the perks the updated versions contain. The question of security is more important. A big number of hacking attacks happens because of old themes and plugins.
With HTML, you don’t have to worry. You don’t have updates itself.
Besides, HTML has all tags for adding and organizing content. You can add graphics, multimedia, tables, hyperlinks, etc. Such elements help improve UX.
That was a tiny part of the HTML website pros. If you still want to build one, think about using one of the HTML5 web templates.
Lintense – All-in-one Landing Page Template

Lintense contains 9 ready-made landing page themes. There are skins for several niches:
- corporate agency;
- SEO company;
- digital agency;
- medicine.
You can create one product, mobile app, eBook, or course presentation. Lintense has instruments for promotion. It focuses on SEO. Thus, your presentation will be visible to the audience.
Plus, it’s responsive. It means that it will look the same on all devices. It also helps the website be on the top of the search results.
You will use the Novi Builder to create a page. This HTML page builder is one of the easiest to use. You can both access the source code or use ready-made blocks.
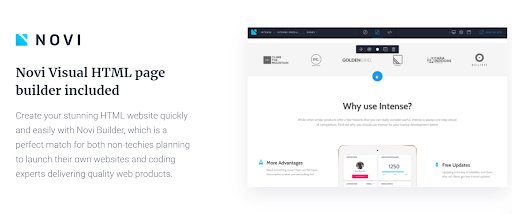
It has useful plugins and visual elements. Novi Builder offers free themes and plugins.

So, creating pages is fast and easy.
Besides, Lintense has:
- Visual Editor;
- 4 Gallery scripts;
- 2 Web Forms;
- HTML plus JS animation;
- Parallax;
- Back to Top button;
- 24/7 support.
The vendor releases updates that have new skins and features. The clinic skin is coming soon.
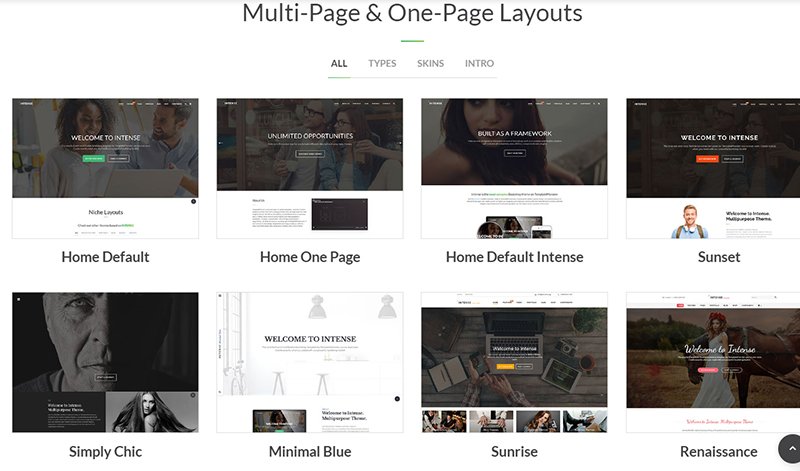
Multipurpose Website Template Intense

This bestseller suits any kind of website. It has 500+ HTML ready to use pages:
- 50+ one-page and multipurpose templates;
- 30+ blog templates;
- 20+ portfolio templates;
- 10+ eCommerce shop templates.
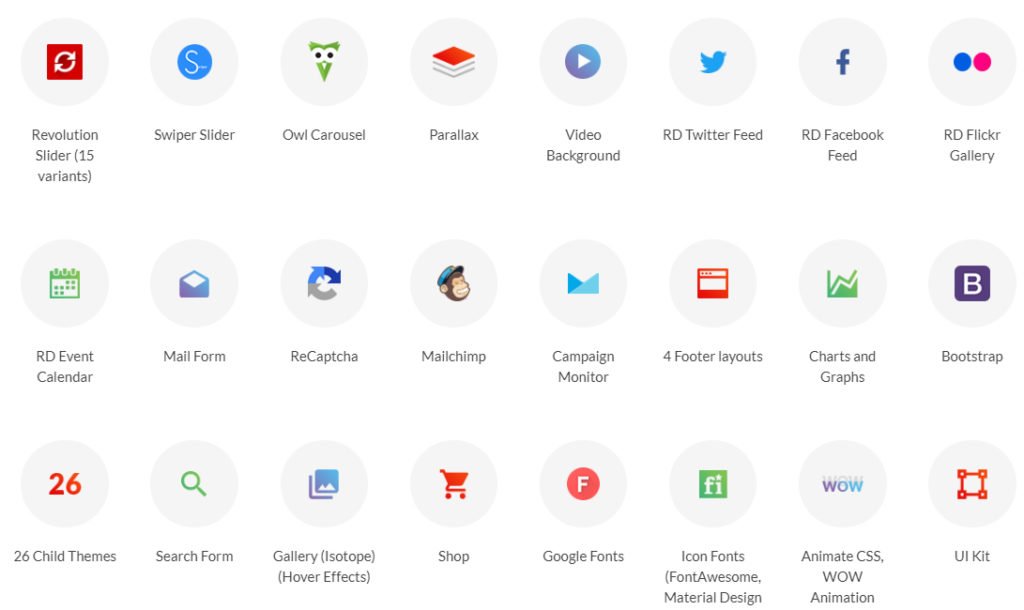
Besides, it has a toolkit for web design. Among the major features are:
- 200+ reusable elements;
- 15+ sliders with 20 templates;
- 15+ header & footer styles;
- 2000+ font icons;
- 300+ PSD files;
- Ajax forms;
- sidebar widgets;
- Responsive slider;
- Touch Swipe photo gallery;
- unlimited color options;
- sticky menus;
- Revolution slider with 15+ effects;
- hover effects.
There are even more features:
In total, Intense has 29 niche demos. This multipurpose template will suit:
- any kind of business;
- medicine;
- any type of a shop;
- presentation of any product;
- any kind of landing page;
- blog.
Intense is compatible with Novi Builder. It makes the theme’s functionality even larger.
After a buy, you get lifetime updates.
Spinecare – Medical Website Template

Spinecare suits the website for the healthcare industry. It’s perfect if you want to present the massage services. It has 25+ HTML ready-made pages. With Novi Builder, you will create pages fast. You can either dive into code or use pre-built elements.
Besides, the template has:
- Visual Content Editor;
- CSS3 animations and transitions;
- 3 Blog layouts;
- Contact, Newsletter, and Subscription forms;
- Gallery layouts;
- header and footer styles;
- many UI elements and ready-made blocks.

The template goes with free pictures on medical topics.

Brave Responsive Multipurpose Website Template
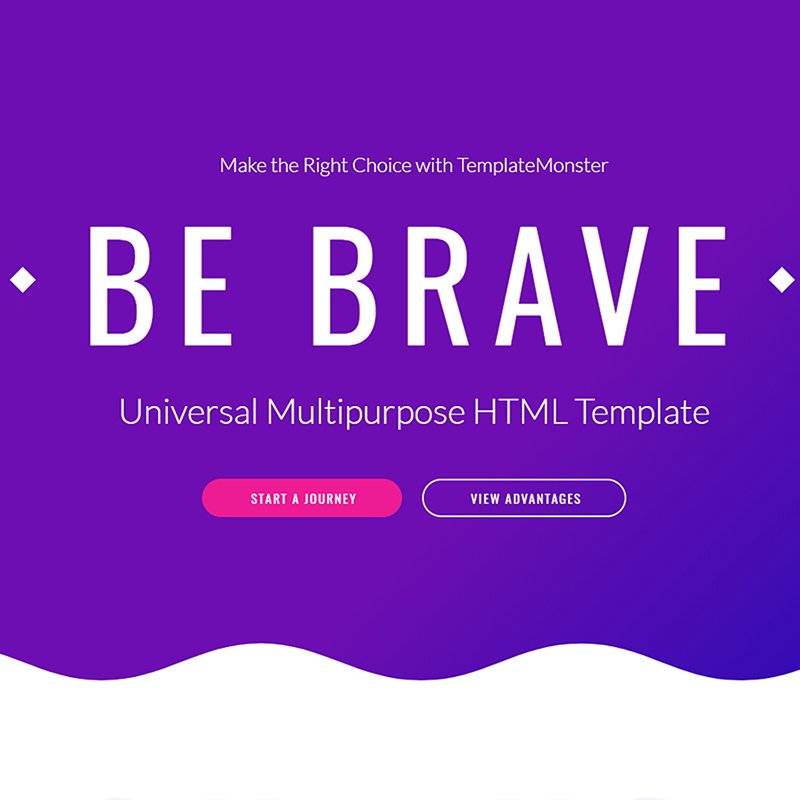
Brave comes with 11 niche themes that are suitable for:
- IT company;
- environmental project;
- trucking company;
- SEO company;
- private airlines;
- taxi service;
- maritime company;
- museum;
- auction;
- theater;
- movies.
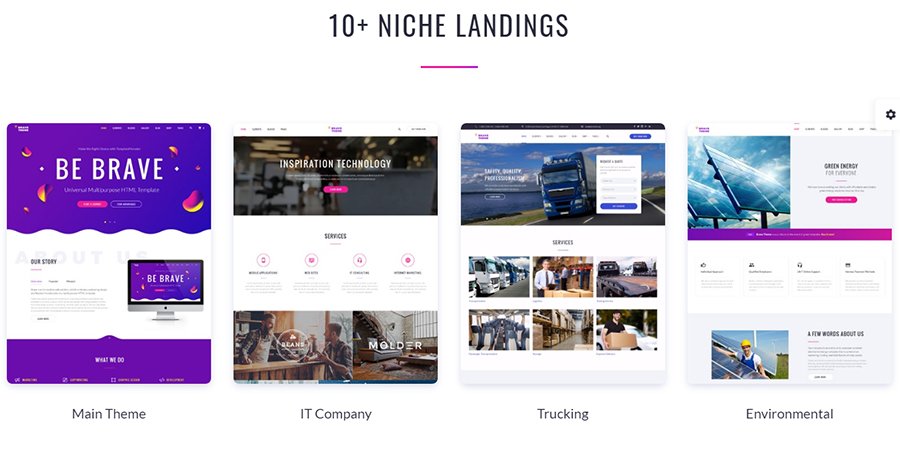
Besides, the theme is editable. For this purpose, you have:
- Novie Builder;
- Visual Page Builder;
- 10+ navigation and footer styles;
- 150+ of pre-made elements and blocks;
- Parallax effect;
- Blog and Gallery layouts;
- eCommerce templates;
- social and visual widgets;
- working Ajax forms via PHP;
- Background Video.

In total, Brave comes with 100+ HTML ready to use pages. You can change the source code. Also, you can just fill the theme with content. Web developers will feel comfortable working with Brave. It has a flexible grid system, universal scripts. It has sources on PUG and SCSS processors.
The theme comes with 24/7 support. It has all images and PSD files from the demo.
Massive – StartUp Company Website Template
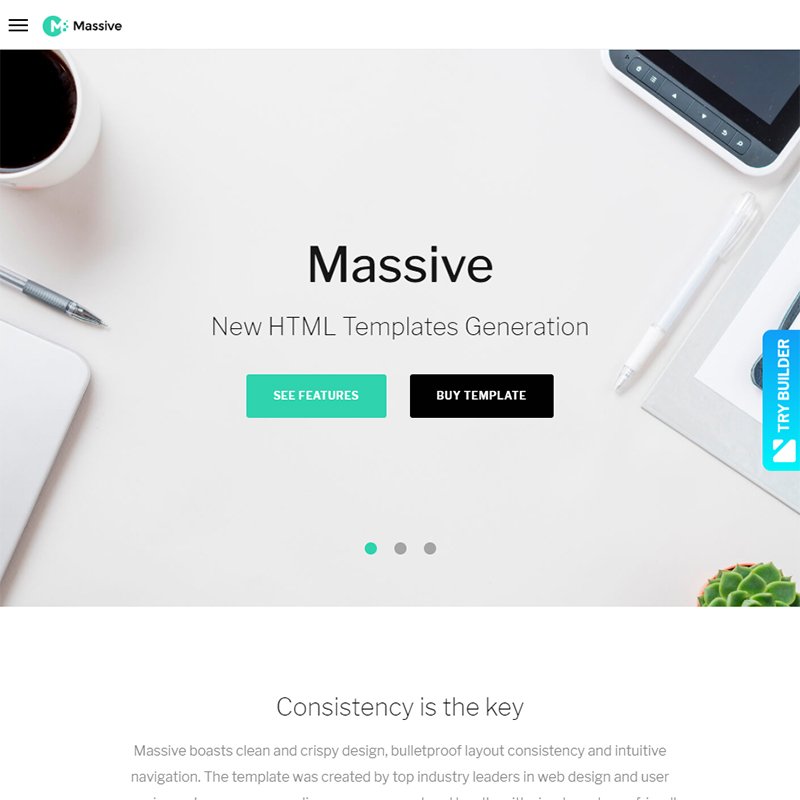
Massive is another multipurpose solution. You can edit it according to your project. For editing, it has:
- several page designs;
- 4 blog layouts;
- Novi Builder;
- headers, footers, content boxes;
- Gallery layouts;
- working forms;
- set of sliders;
- Parallax sections;
- Retina homepage.
Besides, it has pixel-perfect typography. If you focus on presenting content, then this feature comes in handy.
Massive has a Bootstrap framework. Lots of things are easier with frameworks. For instance, you shouldn’t care much about the pixel width. The framework takes care of the sidebar standards. So, the sidebars will adjust to the widgets or images.
Of course, the framework allows you not diving into code. No need to write from scratch. Moreover, it will remember all the changes you did on each page. No need to say that it works well with all of the browsers.
Its main pro lies in saving the time.
Real Estate Multipurpose HTML Template
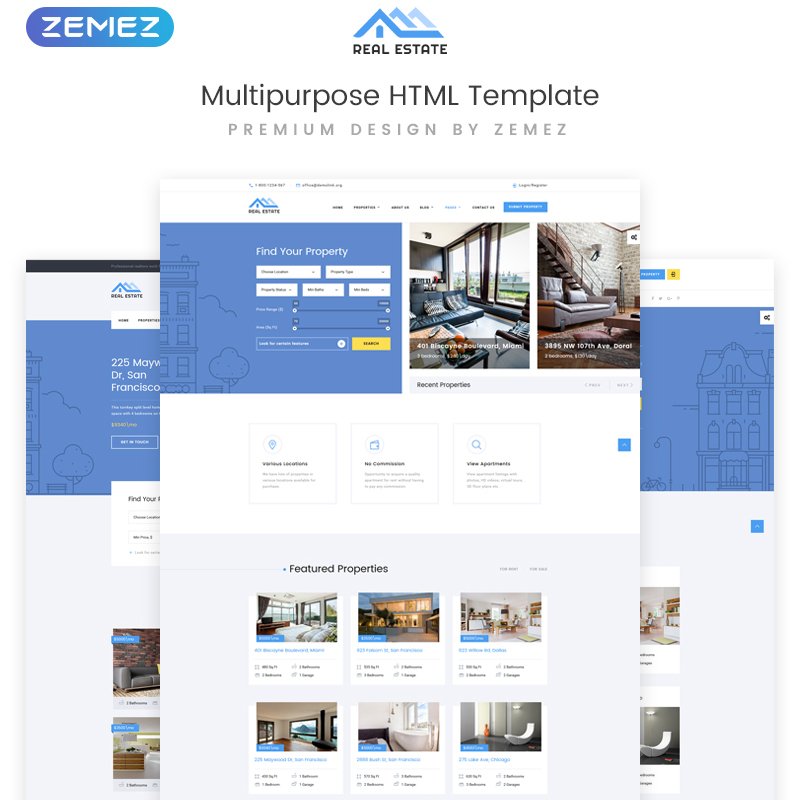
Planning to build a real estate website? Then, this multipurpose HTML template can be the right choice. It has plenty of tools for a user-friendly layout and high performance. You can create tables to present the real estate. You can add forms to get feedback from the clients. It’s possible to add sliders with trademarks.
Besides, the template has:
- 30+ HTML pages;
- header and footer layouts;
- Megafooter;
- Blog and Gallery layouts;
- a set of UI elements and blocks;
- 3 Home Page layouts;
- fonts and colors.
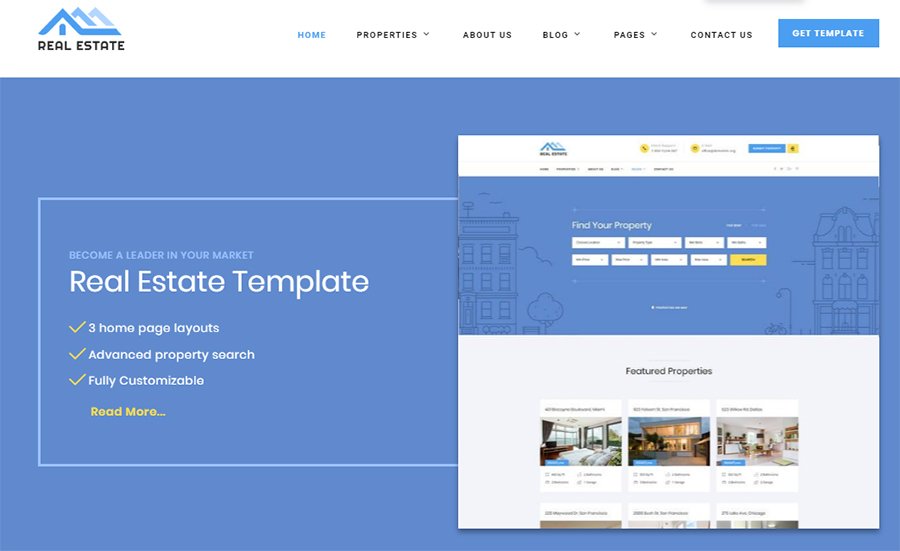
It also has PSD files.
Infradust – Engineering Website Templates

Websites for industrial companies can look good. InfraDust proves this idea. It has plenty of editable pages. You can create such pages as:
- Home;
- About Us;
- Careers;
- Mission;
- Social Policy;
- Contact Us.

You can use the Visual Content Editor. It’s possible to change the code. The template has clean HTML, SCSS, Pug, JS source files. It also has:
- 7 Blog layouts + Blog Timeline;
- Contact Form;
- header and footer styles;
- Grid, masonry, cobbles Gallery layouts;
- a set of UI elements and blocks;
- Google fonts;
- CSS3 animation effects and transitions.

The layout is responsive and optimized toward search engines. The template has images from the demo.
Unit HTML5 Template

This web design HTML template suits such niches as:
- car and bike repair company;
- farm;
- church;
- marketing agency;
- perfume shop;
- diving;
- event planner.

New micro-niche themes are coming soon. The template comes with plenty of pros:
- tons of blocks and elements;
- responsive design;
- clean code;
- regular updates.
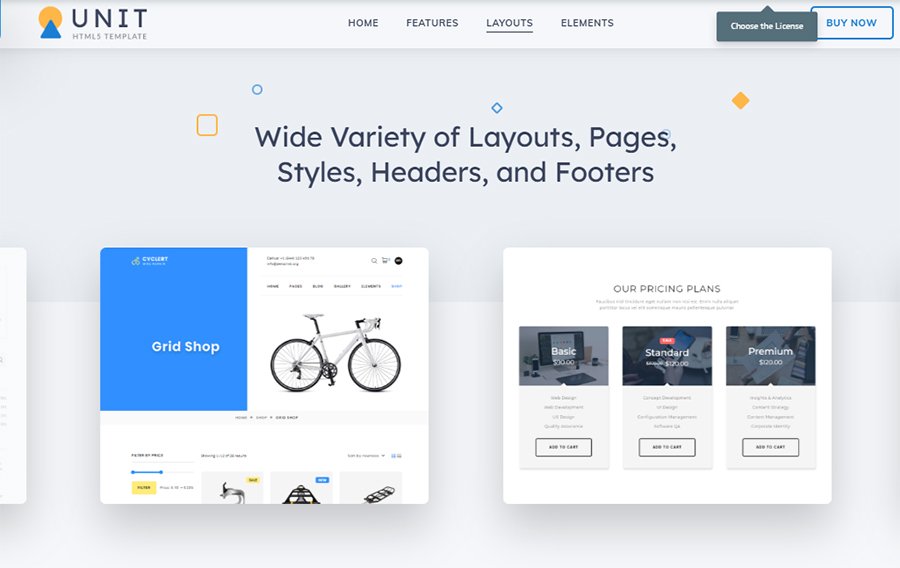
It has a variety of ready-made pages, header and footer styles. You can add plugins and elements to the pages. The template has:
- Swiper Slider;
- Call to Action button;
- Blog and Portfolio layouts;
- Shop pages;
- pricing tables;
- subscription forms;
- contacts.
It goes with 24/7 support.
Fasteria – Fast Food Website Templates
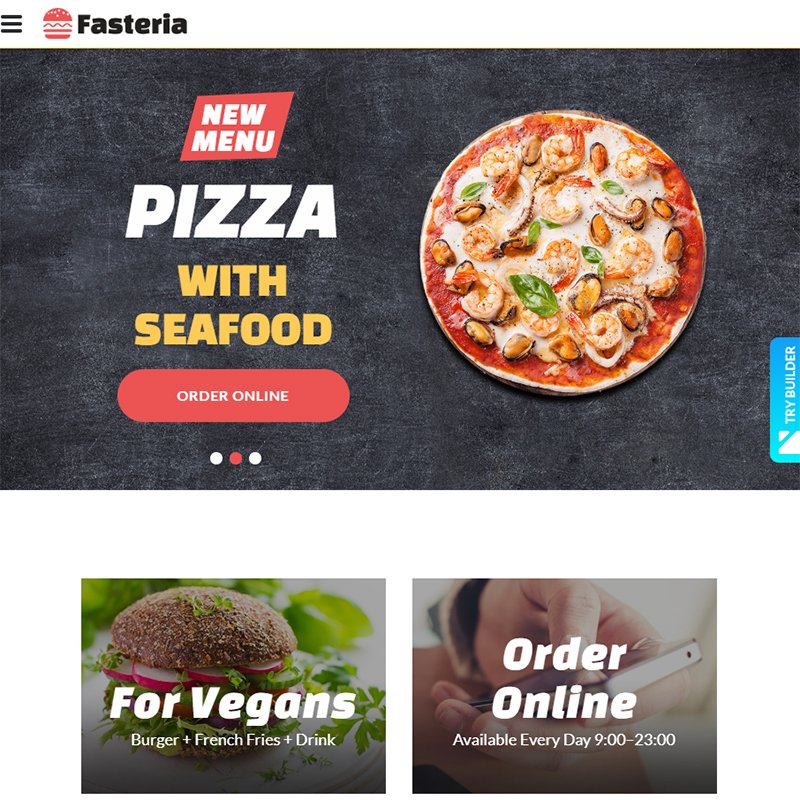
This responsive template suits the fast-food restaurant website. Fasteria has:
- a huge set of UI elements and blocks;
- 3 Blog layouts;
- contact form;
- Parallax effect;
- Google Map;
- Gallery layouts;
- Newsletter and Subscription forms;
- CSS3 animation effects and transitions.
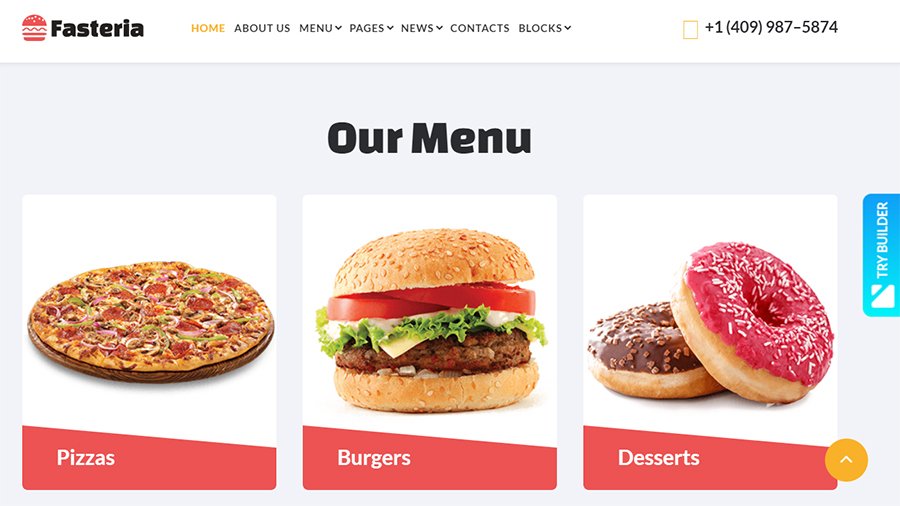
It uses a Bootstrap framework. Thus, it is 100% responsive. The developers optimized it toward search engines.
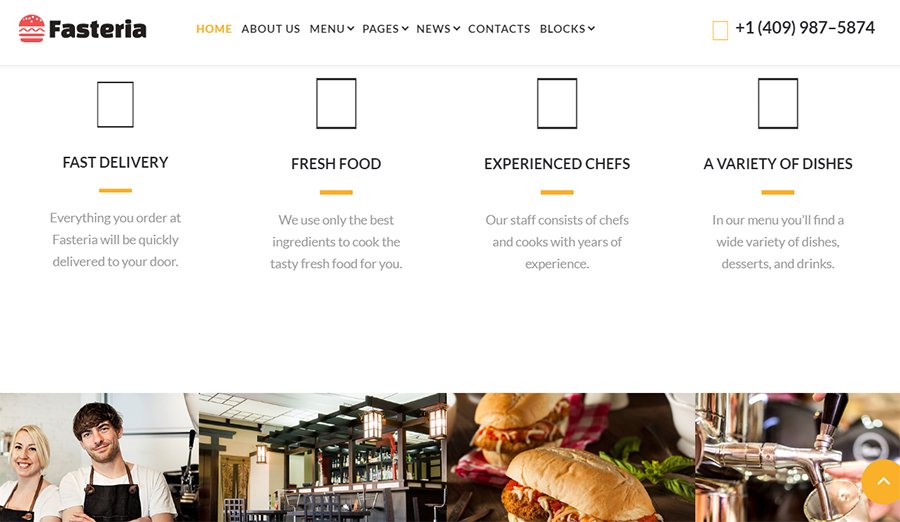
It’s easy to organize content in blocks, add sliders, menus, sidebars.
The Future Multipurpose HTML5 Template

The Future is a universal solution for many business niches. It’s editable and has a powerful toolkit:
- Stick-to-top menu;
- header and footer layouts;
- Megafooter;
- contact form;
- 400+ UI elements and blocks.
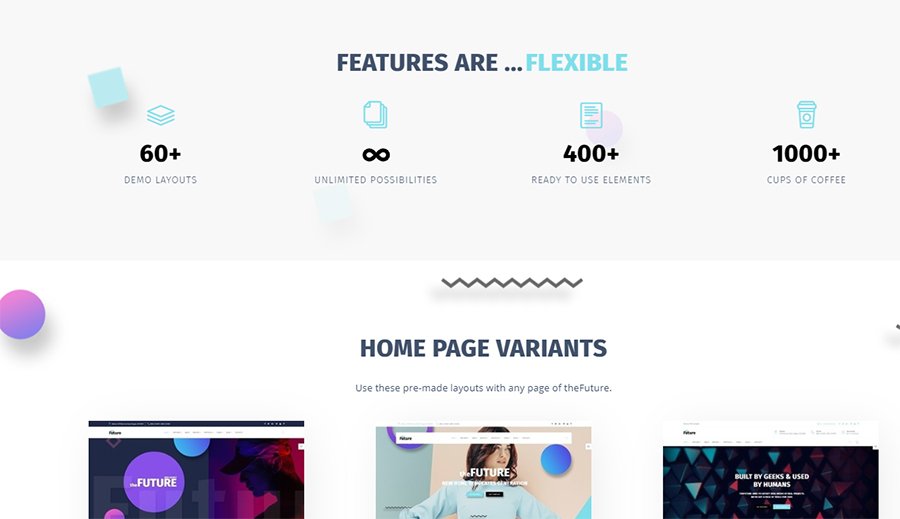
You can create a unique design of the website using:
- Swiper Slider;
- Owl Carousel;
- Parallax;
- Video background;
- Mail form;
- Search form;
- Gallery layouts with Hover effect;
- Google and Icon fonts.
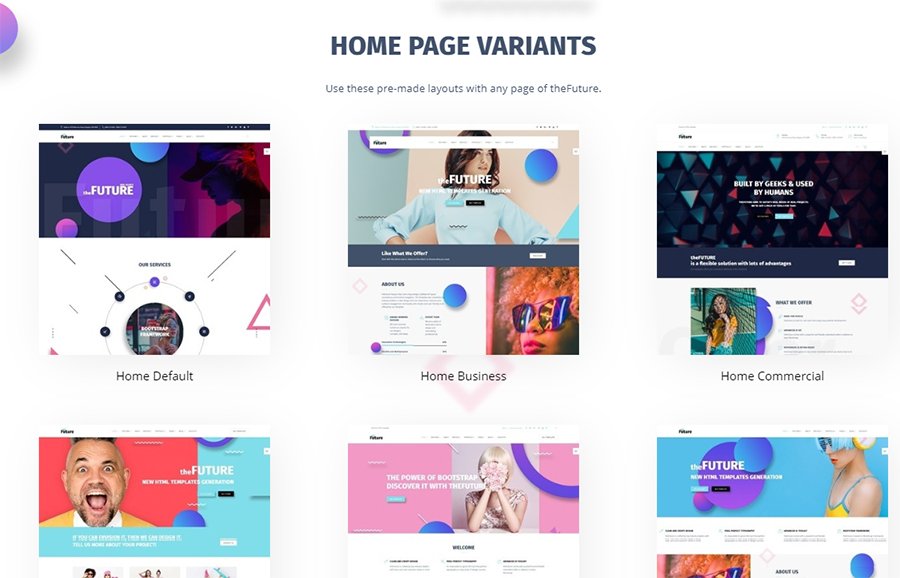
It has 60+ ready-made responsive free HTML pages.
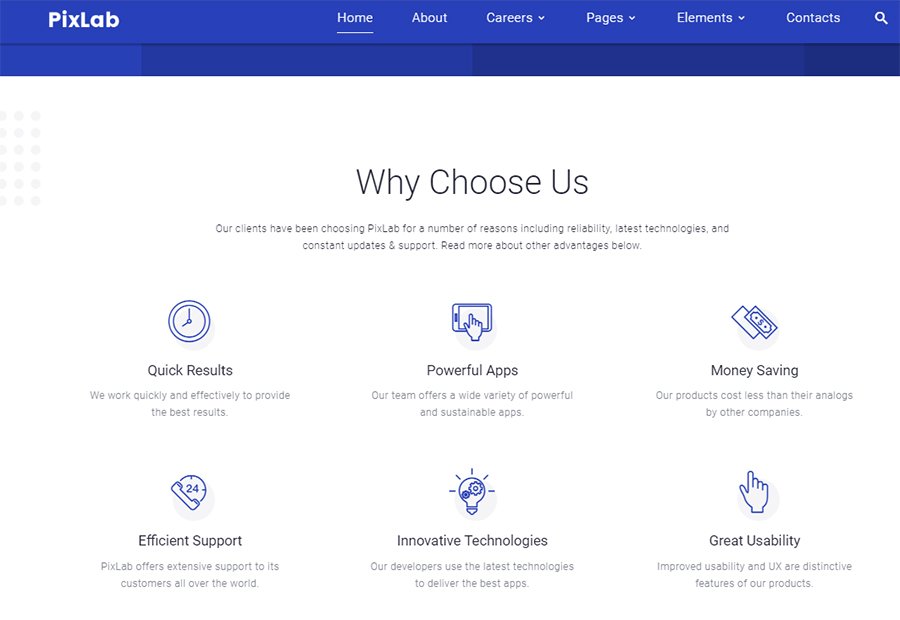
PixLab – Software Company Website Templates

This multipurpose template suits the website of a software company. It has plenty of pages that you can change with the tools:
- a rich UI kit;
- layouts for Blog and Gallery (Grid, masonry, cobbles);
- Google Map;
- fonts;
- Parallax;
- Contact, Newsletter, Subscription forms;
- header and footer styles.

CSS3 animations and transitions.
Sum Up
This was a collection of easy HTML website templates. Using one, you will create a good-looking website that will work smoothly. The templates have modern page builders inside. They offer kits with plenty of tools for web design. Besides, you can change the code. The developers used a clean code that you can modify without problems.
Though it’s all about tastes and skills, HTML templates have pros. They are light, familiar to all browsers and search engines. They don’t need updates. Working with them while creating a website is easy.
For this collection, I picked up the worthy options. You can use most of them for different purposes. I hope that you found a good fit for your project. Stay tuned for more templates overviews.
Here’s Another Article You Might be Interested:
The post 11 Best HTML Website Templates For Your Next Project appeared first on Coding Infinite.
]]>The post 10 The Most Impressive Admin Templates appeared first on Coding Infinite.
]]>There are always two ways of choosing the HTML dashboard template:
- free templates
- premium templates
Everyone knows that more power, reliability, and productiveness is real to find in Premium templates. For this reason, I propose you to look at the 10 most attractive and forcefull HTML5 Bootstrap admin templates. Then learn some exceptional features about these beauties, try demos and choose the best one. I’m sure you can find something really blue-chip and become the owner of a top-notch admin dashboard.
It’s enough to play for time! Let’s get started!
MonsterAdmin Dashboard
This is extremely important to have attractive and colorful dashboard designs. It has been proved that pleasant colors make you feel better. Especially, if you are working in front of HTML admin for long hours. These vibrant colors will truly make your life more vivid and break the monotony.
Of course, the layout is significant but what about the inner world of the MonsterAdmin dashboard? This template has recently got a powerful update and is ready to show itself to the world.
There are some must-read and brand-new features about this beauty:
- It’s easy to work with thanks to updated JS core. Now you have an ability to see absolutely understandable and structured code. Front-end developers will be excited!
- No way without Bootstrap 4, and it’s here for you. Use it thoroughly.
- Are there people who haven’t got any gadgets? The answer is clear so that the template is fully responsible and mobile-friendly.
- Migration to PUG and Sass.
- Also, it includes a dropdown menu, Google maps, favicon, extra pages layouts.
- HTML5 dashboard template contains a parallax effect, which will do your scroll more visual and appealing.
It includes all the possibilities to keep an eye on the web traffic, control the number of clients and be sure in your dashboard.
Choosing the MonsterAdmin dashboard you will save plenty of time, have fun and become a happy owner of the Premium admin dashboard HTML template.
Ready Pro Bootstrap Dashboard Admin Template
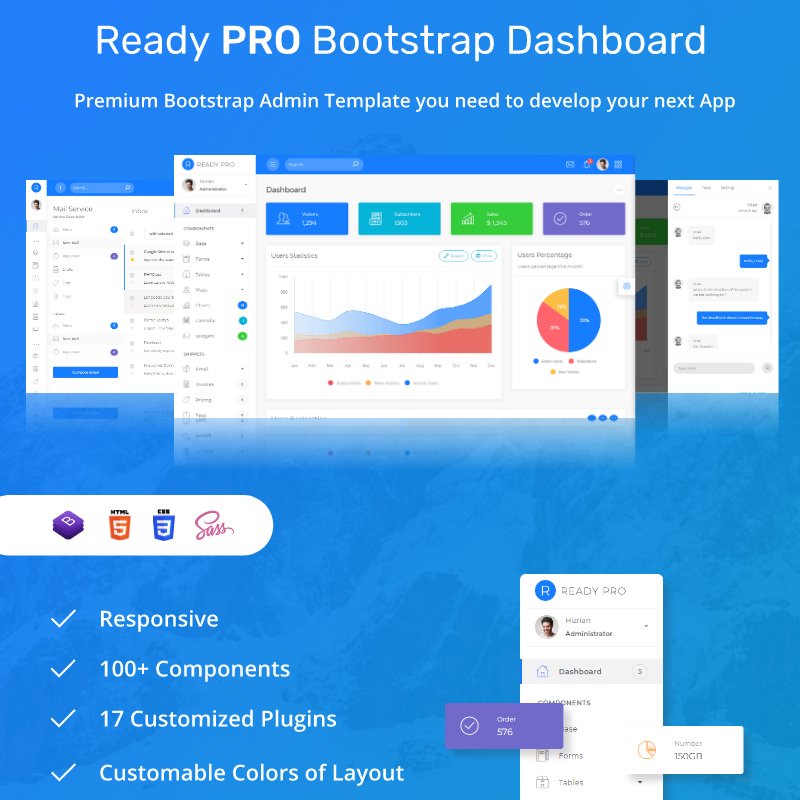
Now take a look and the next HTML dashboard template, which is waiting for you to help with all your projects. Ready Pro Bootstrap Dashboard is one of those Bootstrap admin templates that will gain your heart from the very beginning.
Right here is an example of good-looking and the fastest dashboards. Its clean design attracts anybody. The main thing you must check out of this template is highlighting in hover. Here’s highlighting, there’s highlighting, everywhere’s highlighting. It makes any admin alive.
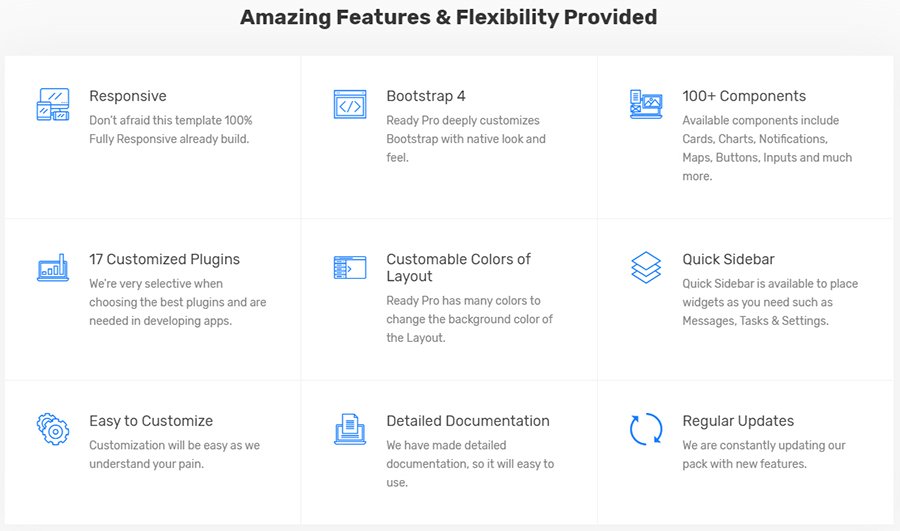
Not by highlighting alone! This pretty and forcefull admin dashboard template is feature-rich. So, what does this richness consist in?
- The abundance of different UI components. For example, more than 100, and each of them is your endless usage.
- Responsiveness is must-have today, so apply it everywhere you want. This template will look perfect on any gadget.
- Customizable colors of the layout. You don’t need to do a big number of actions to change color. Also, it’s possible to edit topbar, sidebar and logo header appearance to your taste.
- It goes without saying that the Bootstrap4 framework runs the world. And this dashboard, too.
- nearly forgot to mention that it contains 17 customizable plugins. Be sure that all the plugins are necessary and won’t stop the speed of dashboard working.
This Ready Pro Admin template says all by itself. Look at the preview to be convinced by yourself.
ECab – Taxi Admin Bootstrap 4 Material Admin Template

Sometimes it’s hard enough to get a desirable dashboard. Especially, if we are speaking about the admin which you can apply both in your own projects and for your clients. Everybody wants to find something personal and original. Something that will be really appealing but simple at the same time.
There’s a solution which is called ECab – Taxi Admin Template. This one looks absolutely structured. It contains plenty of roundish elements that are a delight to the eye. Pleasant and calm colors will make a relaxing atmosphere. It’s significantly for your eyes!
Let’s get to know this simple dashboard HTML template better and study some of the secrets in this stunning template.
The latest Bootstrap 4 is already in this admin.
- You will get 2 absolutely different dashboards in one template. What can be more beneficial?
- This pretty ECab comes with the pack of Material Design Lite Components. This is a good opportunity to implement Material Design on the website. All your web projects will be marvelous and attractive.
- How many pages are you expecting to see over the template? Get ready because there are 200+ HTML5 pages for any of your needs.
- The developers don’t forget about the jQuery Plugins and include the most powerful and popular plugins.
- Choose any you want! 5 Different Layouts Desktop and each of them is extraordinary and remarkable.
So, don’t be shy and test the demo to see for yourself.
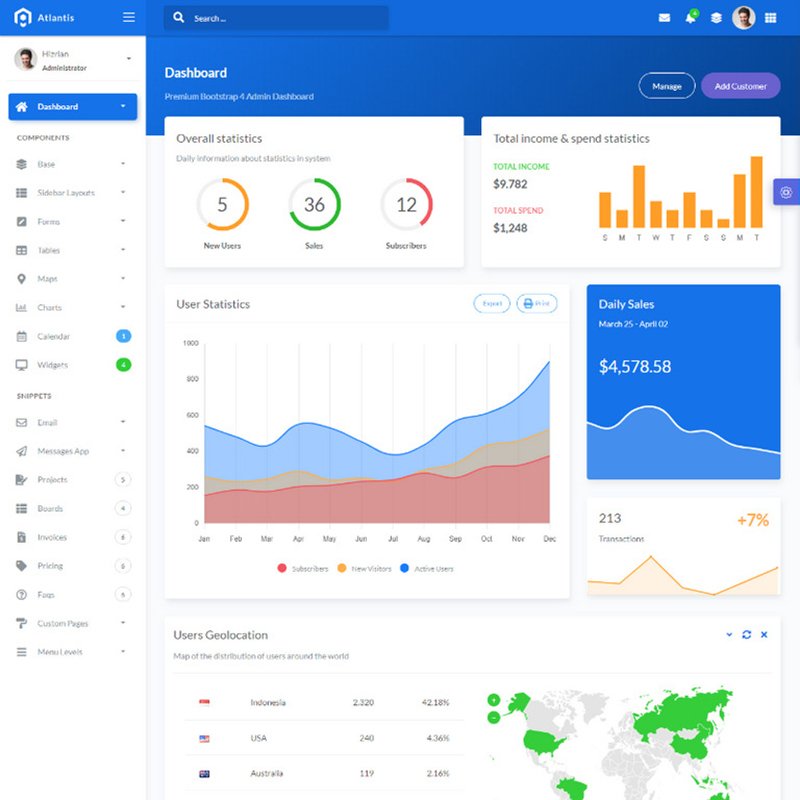
Atlantis – Bootstrap 4 Dashboard Admin Template
What a great variety of HTML5 Bootstrap admin templates! Dollars to doughnuts that you have no idea which one to choose so there is cheering news. Give a tumble on the next no less beautiful than the other admin themes.
Atlantis tells its own tale. It’s full of various UI elements, it’s ready to save your time on designing the dashboards and just enjoy your work to the max.
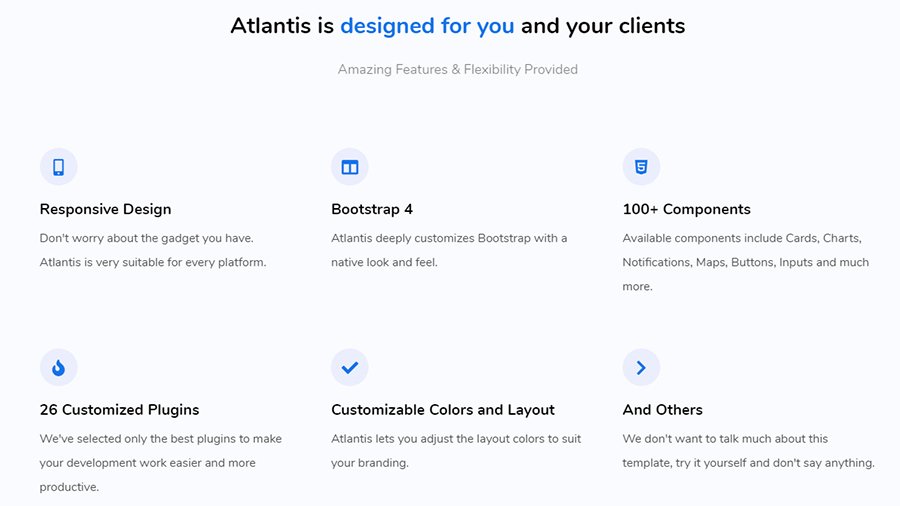
Do you want to go to bed early and with the high-qualified made-up admin? So, don’t go by the next features and think of it.
- The first hot feature is having 26 absolutely customized plugins. You will get only the most productive and Successful plugins which guarantee you a stable and smooth work process.
- Responsive design is a thing that should be in all of the contemporary templates. Mainly, if it’s a dashboard and you want to have the ability to use it via any gadget.
- If your project has an individual branding and I’m sure it’s a right, this feature is yours. All the layouts and colors are customizable. Use something that you really want.
- Wow! UI kit. The number of different components is 100+ components and they include such staff as charts, notifications, maps, buttons, inputs, etc. All you need in one dashboard.

That beauty is really worth your attention. Frankly, there are a lot of surprises inside. Just don’t wait for a moment and try it by yourself.
iboard Admin Template

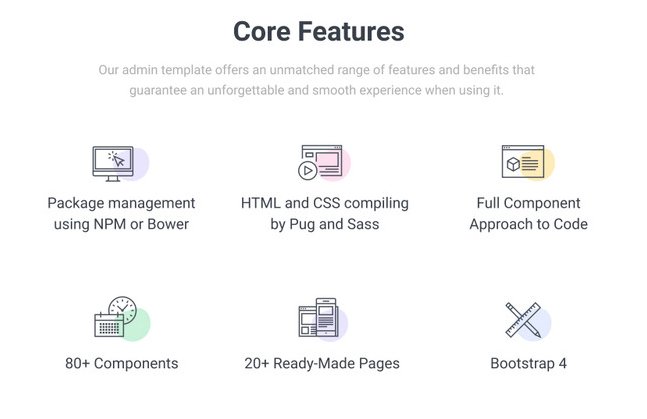
Now you will be extremely satisfied with the next Bootstrap 4 admin template. Iboard Multipurpose Dashboard Template is here to present the unbelievable and forceful user experience. This sample is clear and creative. This is a great example of the admin tool that you were looking for all this time.
It allows you to track the necessary statistics such as sales, browser shares, subscribers and so on. Also, you can keep under control the web traffic. The chat and notification system are at your service and placed in a convenient and elegant header.
Propose to be closer to this perfect HTML admin template and learn some of the highly useful features.

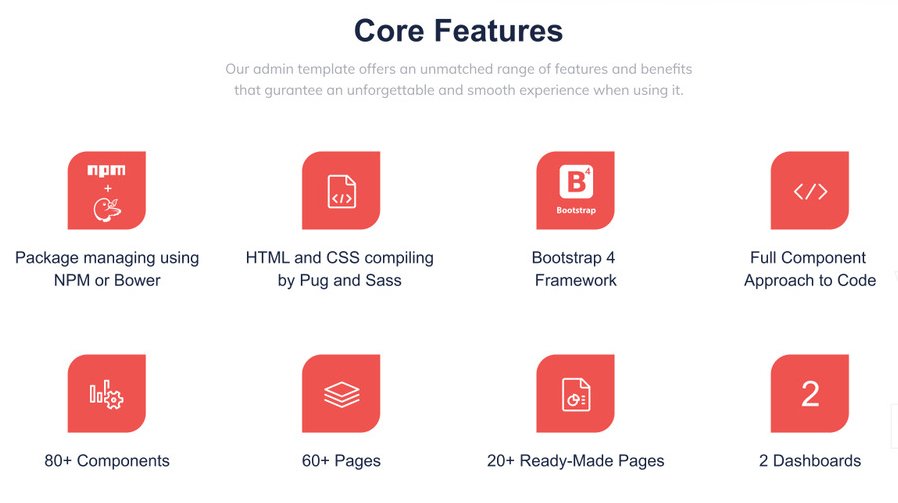
- Of course, the Bootstrap 4 framework will fix up with fast and confident work.
- HTML and CSS compiling by Pug and Saas.
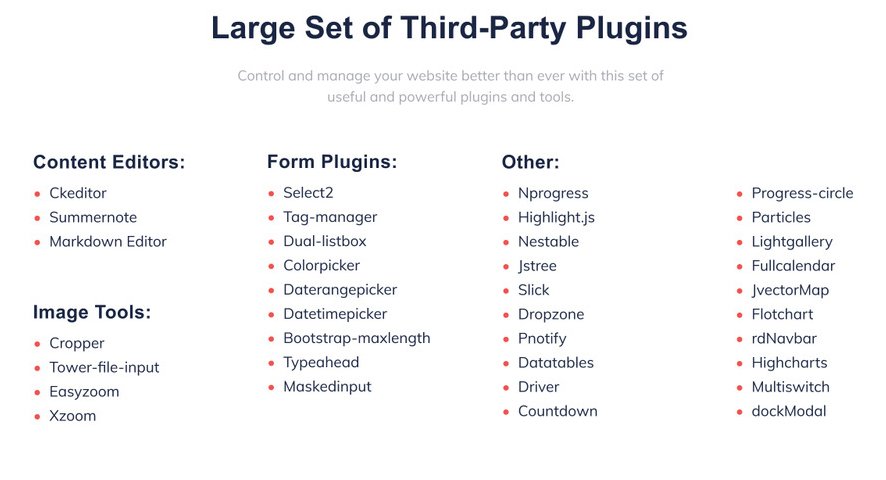
- The large set of third-party plugins. There are such additions as Summernote, Tag-manager, Color picker, Easy zoom and great amount of others. You can see the whole list below and then try it by yourself on the demo.
- Browser compatibility isn’t the last thing today. Chrome, Safari, Edge, Firefox – use each of them without any doubts because the Iboard can work well there.
- Full component approach code.
- 80+ exceptional UI components are there and ready to make the dashboard more active.
- More than 60 pages to all tastes and needs. Just adjust what you want.
And remember that modern editor open the brand-new possibilities to a webmaster. So, don’t be shy to use it all out.
IoDashboard Dashboard Admin Template
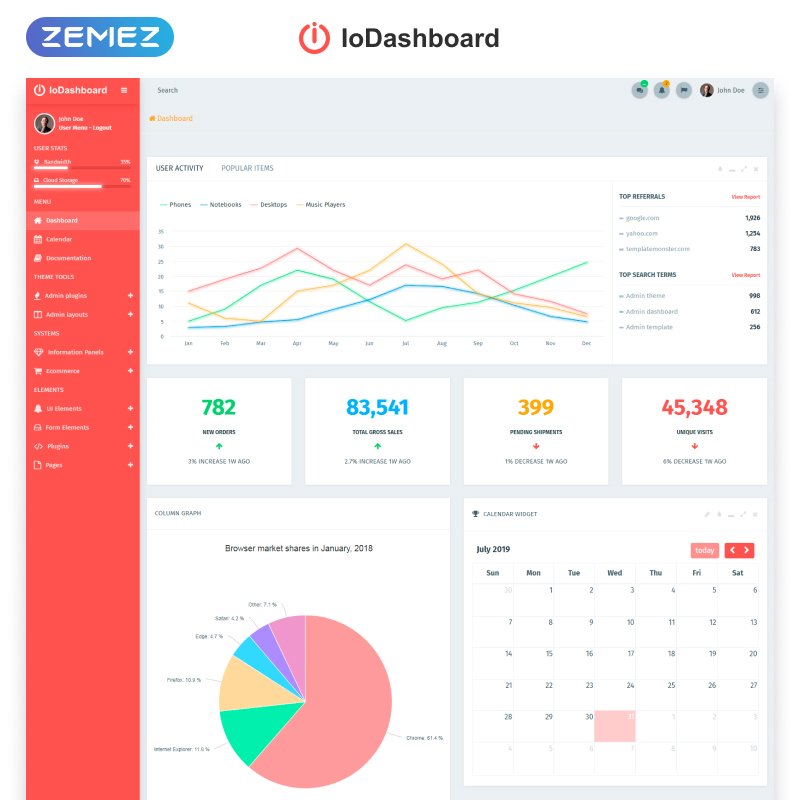
Are you still looking for a helpmate in your business? There is something more than just a helpmate. This is a real controller and developer of any of your business and project. IoDashboard – Intuitive Dashboard Admin Template is such a thing I was talking about.
- Do you need an easy but functional dashboard?
- Have you been dreaming of stable communication with the clients and enjoying their growing?
- Or have you been wondering which browser is the most popular and convenient among your clients?
All of these questions are about IoDashboard, let’s dive in. And who knows, maybe this is an HTML5 dashboard template of your dreams. Here are core features that will help you to beef up knowledge about the template before your personal trying.
- Choose your favorite dashboard style. This user-friendly template comes with 2 shining dashboards.
- Don’t you love various pages? More pages, more variants for choosing. The IoDashboard contains 60+ pages, and 20 of them are ready-made. Just look, test and enjoy!
- Full component approach to code. Now the reliance of your work is much higher.
- Bootstrap 4 framework.
- Full set of third-party plugins (Content Editors, Image Tools, Form Plugins, other powerful and useful add-ons).
- Don’t be afraid to use E-Commerce with this admin template. Be sure you will know about all the incomes and even more.
The IoDashboard will not leave you without any good impressions. Zemez team worked hard to create such a professional and reliable product.
Datta Able Angular 7 Admin Template
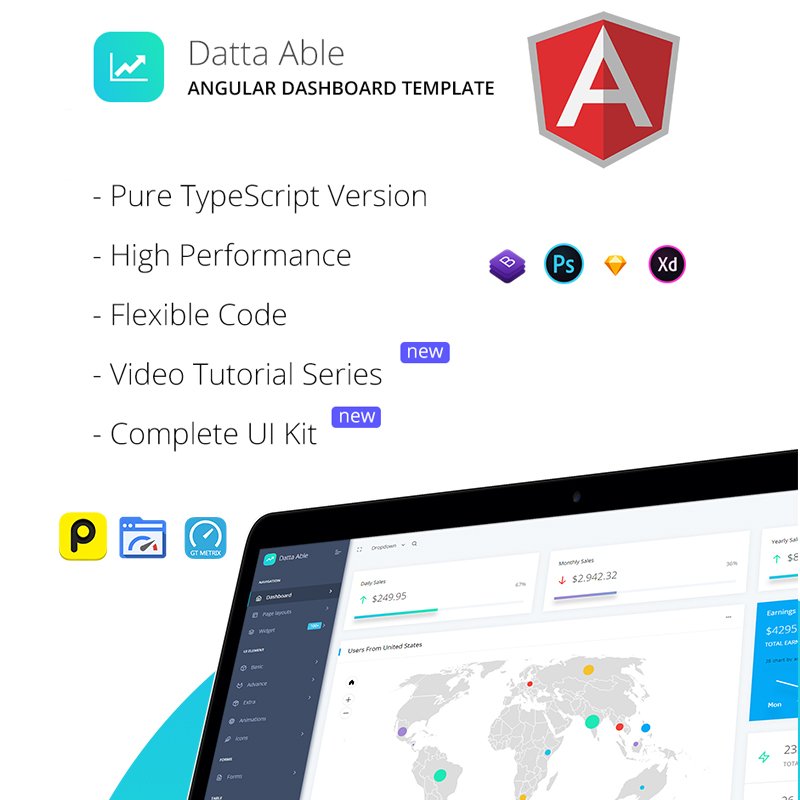
The latest technologies are extremely important in modern life. Web development is progressing every day and it is highly important to be on the top. Each developer team tries to create something new and embed the latest update inside of the product.
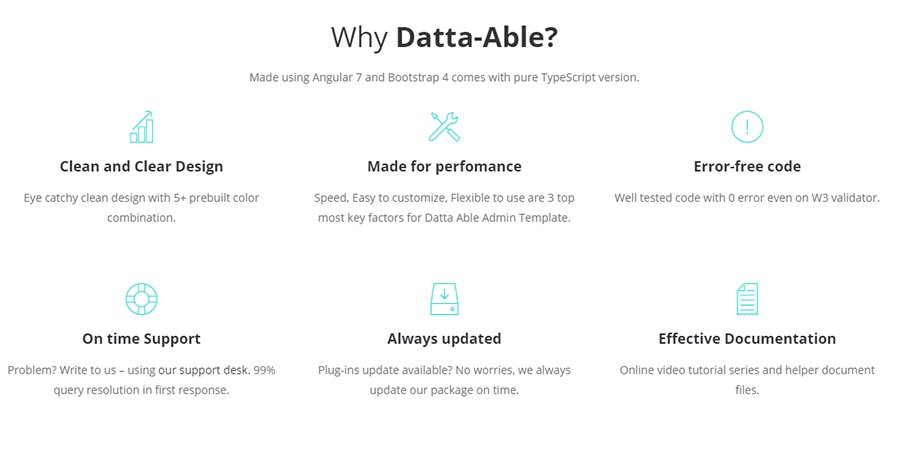
Datta Able Angular 7 Admin Template is extremely modern as there are such forcefull technologies as Bootstrap 4 and Angular 7+. These top most used frameworks nowadays and both of them have inserted inside this pretty admin template.
Also, there are Angular 7 materials to read and be aware of.
So, it is time to see the main advantages of this template.
- 1000+ UI elements. Yes, more than one thousand and this is a truth. Datta Able contains all the elements and even more
- 70+ third-party plugins are as well integrated. These are different tools of Content Editors, Image Tools, Form Plugins, other powerful and useful add-ons
- 5+ web applications such as a gallery, task, to-do, calendar and other
- 150 widgets that are already designed and ready to be involved in your projects
- Charts are highly important to use. They show complicated ideas in a simple way, so use it in full. Because there are more than 40 Charts.
- Different demos. It comes with some types of demo version and each of them will be in the purchase package.
As you understand Datta Able includes a variety of surprises. You need just to try it yourself.
Neon – Responsive Bootstrap & Laravel Admin Template
What is the key point in the admin dashboard HTML template for you? It should be fast, eye-catching, simple in using and full of top-notch features. You must admit that these criteria are the first thing you are thinking about while choosing the admin template.
Neon is one more brilliant example of an HTML dashboard template and now it will try to prove it by showing its strong points.
The developers of Neon built it with the latest technologies for your comfortable and marvellous work. With the help of Bootstrap 4, Laravel, PHP, HTML5, CSS3 and JQuery this template is absolutely ready to be in service. Be sure that choosing Neon you can surely rely on its stable work.
As for the other pack of strengthens, let’s look at the most significant and impressive.
- Plugins are never too much (almost never), and Neon creators knew that. For this reason, there you can find a lot of useful and powerful plugins which make a good effect on the dashboard performance.
- Are you fond of Icons? If yes, you will be satisfied with the fact that there are more than 7 sets of modern Icons. To any taste and design, try it!
- 80+ inner pages for any situation.
- Horizontal vs Vertical. Your dashboard, your rules. Choose the most appropriate layout and enjoy it.
- Sass supported.
- Easy customization to save your time and make you relax. Now you have a few minutes to make a cup of coffee instead of nervous in front of the screen.
Neon has a lot to say and show, and it is waiting for you living a demo.
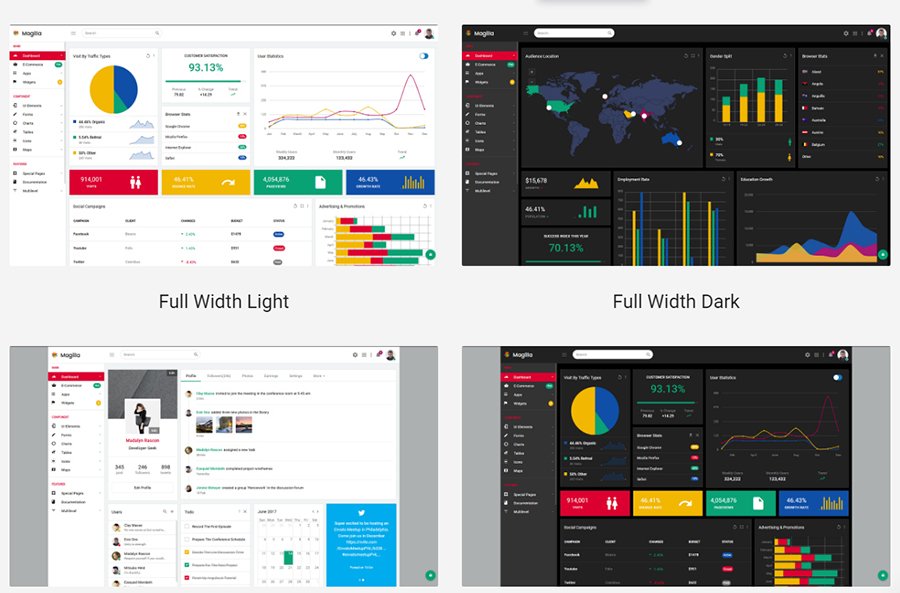
Magilla – The Ultimate MultipurposeDashboard / Admin Template
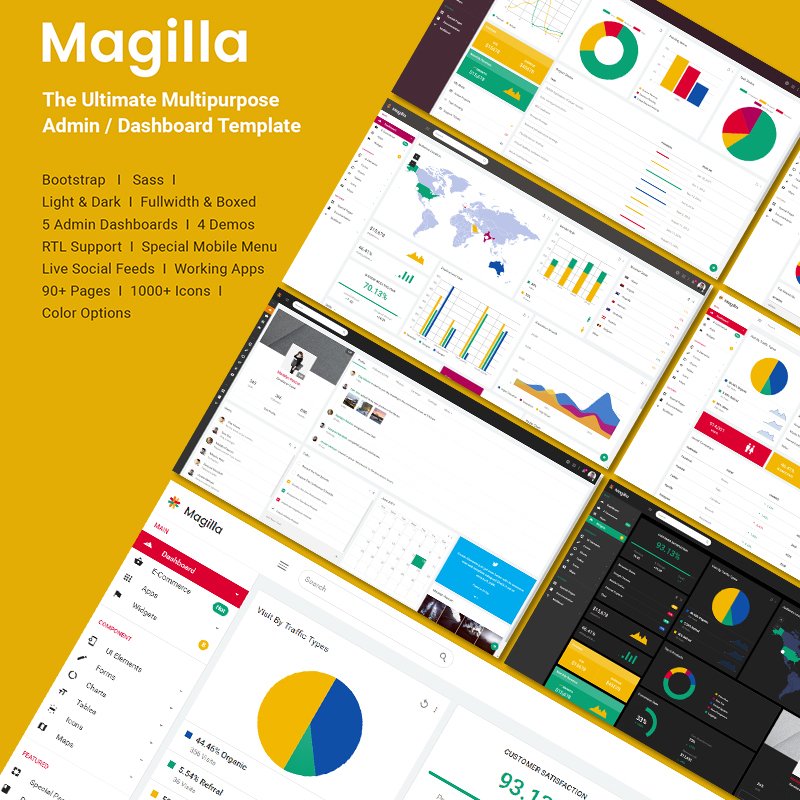
The ideal HTML5 Bootstrap admin templates consist of a great variety of statistics, infographics which make your life easier. Also, this must be a full complex of unbelievable features and impeccable performance.
Magilla is exactly this type of admin dashboard. It will easily control customer satisfaction, visitors’ traffic, any types of add. Yeah, this beauty can do a lot.
So, let’s check it out and look inside of the Magilla. There are tones of exceptional features which you should know about.
- Several types of demos. Light or dark? Full Width or boxed? Which one is most suitable for you?
- E-Commerce is now a leader on the web, so in the Magilla dashboard template, you will find loads of pages for E-commerce.
- It includes Mega Menu, which you can customize as you want, and special Mobile Menu for your favorite gadget.
- Bootstrap4, Sass, HTML5, CSS3, and JQuery – all of these guarantee a perfect process of working to you and your clients.
- 500+ UI elements such as charts, multiple buttons, inputs and so on.
- Enjoy 90+ pages with 2000+ Icons. What a marvelous combination!
- Apps are various inside: Mail App with Inbox Layout, Detail Email, Contacts App with Cards & List Option, Chat App and many others.
Try this responsive and reliable dashboard template and safety with your website templates and other projects.
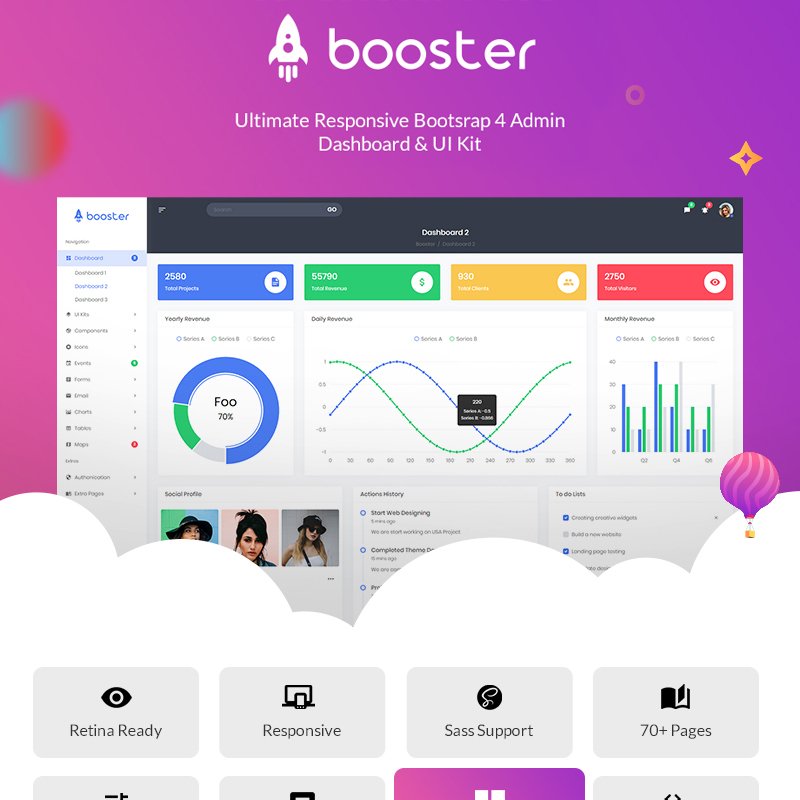
Booster – Responsive Bootstrap & Laravel Admin Template
Multipurpose templates were in Vogue. Today is no exception. It makes life easier and more pleasant when you can purchase some products and apply them to different spheres. So, the last attractive and simple dashboard HTML template will impress you, too.
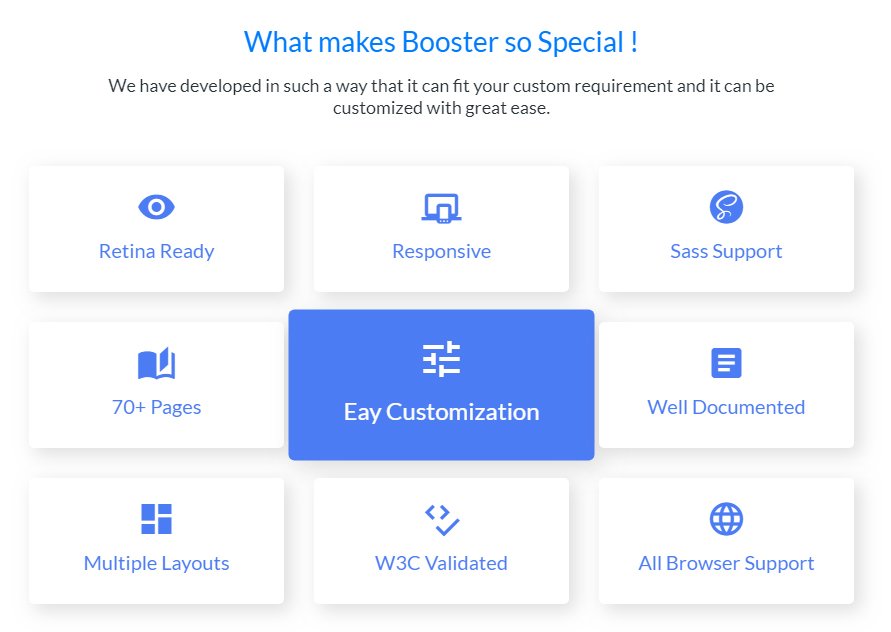
Called it Booster and it differs with it developing in such a way that it can fit your custom requirement and it can be customized with excellent ease. Be ready to come closer and make some notes of this great HTML dashboard template.
- To take care of your eyes is simple with Booster. It is Retina ready, looks crystal clear will be unique and will provide the most enjoyable user experience.
- Sass support will be always with you. This is CSS preprocessor, which helps to decrease repetition with CSS and saves your time a lot.
- Pages to any taste. 70+ is a pages’ quantity and can delete or choose only the pages you really need.
- Browsers compatibility is extremely needful. All of us are unique and use various browsers. So, your clients don’t have to worry about it. Booster supports all browsers.
- It is powered by Bootstrap4, the latest Laravel. This point must make you more confident in the future of this template.
To your attention, there are lots of demos, which include all the features we were discussing. That is why pick yours and enjoy it.
Final words
10 HTML5 Bootstrap admin templates pass away and now you are full of strong knowledge and set teeth for the best dashboard. This article was focused on the outstanding features and cool design of the templates to make you understand them fully.
I hope you had fun and found something yours. Make your projects brilliant with admin dashboard templates.
The post 10 The Most Impressive Admin Templates appeared first on Coding Infinite.
]]>The post Creating Email Sending Application using Asp.net Core | Open Source appeared first on Coding Infinite.
]]>
Setting Up Project
Let’s start by creating a new Asp.net Core Project. I’m going to create an Empty Project using Dotnet CLI.
Run this Command to create a new Empty Project.
dotnet new Web
Update your “Startup.cs” to ready your Project.
public class Startup
{
    public void ConfigureServices(IServiceCollection services)
    {
        services.AddMvc();
    }

    public void Configure(IApplicationBuilder app, IHostingEnvironment env)
    {
        if (env.IsDevelopment())
        {
            app.UseDeveloperExceptionPage();
        }
        app.UseStaticFiles();
        app.UseMvc(routes =>
        {
            routes.MapRoute(
                name: "default",
                template: "{controller=MailSender}/{action=Index}/{id?}");
        });
    }
}
Create 3 Folders as “Controllers”, “Views” & “wwwroot” at the root directory of your project.
Creating Controller
Inside your “Controllers” Folder Create a new File as “MailSenderController.cs” & Add this Code.
using System.Net;
using System.Net.Mail;
using FluentEmail.Core;
using Microsoft.AspNetCore.Mvc;

public class MailSenderController : Controller
{
    public ActionResult Index()
    {
        return View();
    }

    public string SendEmail(string Name, string Email, string Message){

        try
        {
            // Credentials
            var credentials = new NetworkCredential("[email protected]", "your-password");

            // Mail message
            var mail = new MailMessage()
            {
                From = new MailAddress("[email protected]"),
                Subject = "Email Sender App",
                Body = Message
            };

            mail.IsBodyHtml = true;
            mail.To.Add(new MailAddress(Email));

            // Smtp client
            var client = new SmtpClient()
            {
                Port = 587,
                DeliveryMethod = SmtpDeliveryMethod.Network,
                UseDefaultCredentials = false,
                Host = "smtp.gmail.com",
                EnableSsl = true,
                Credentials = credentials
            };

            client.Send(mail);

            return "Email Sent Successfully!";
        }
        catch (System.Exception e)
        {
            return e.Message;
        }

    }
}
Don’t Forget to Update your Email & Password Credentials in this Line of Code in the above Code.
var credentials = new NetworkCredential("[email protected]", "your-password");
Setting Up Contact Form Template
Now, we need to Create a Contact Form for Sending Emails.
I’m going to use this beautiful Email Sending Template by colorlib.
So, go to this Link & download the Source Code of Contact Page.
Extract the downloaded file & you’ll get this

Now, copy all the folders from the above image & paste inside the “wwwroot” directory in your project which we have created earlier.
Creating View
Create a new Folder inside the “Views” Folder as “MailSender” at the root directory of your Project.
Now, create a new file inside “MailSender” Folder as “Index.cshtml” & Add this Code.
<!DOCTYPE html>
<html lang="en">
<head>
  <title>Contact V2</title>
  <meta charset="UTF-8">
  <meta name="viewport" content="width=device-width, initial-scale=1">
<!--===============================================================================================-->
  <link rel="icon" type="image/png" href="proxy.php?url=images/icons/favicon.ico"/>
<!--===============================================================================================-->
  <link rel="stylesheet" type="text/css" href="proxy.php?url=vendor/bootstrap/css/bootstrap.min.css">
<!--===============================================================================================-->
  <link rel="stylesheet" type="text/css" href="proxy.php?url=fonts/font-awesome-4.7.0/css/font-awesome.min.css">
<!--===============================================================================================-->
  <link rel="stylesheet" type="text/css" href="proxy.php?url=vendor/animate/animate.css">
<!--===============================================================================================-->
  <link rel="stylesheet" type="text/css" href="proxy.php?url=vendor/css-hamburgers/hamburgers.min.css">
<!--===============================================================================================-->
  <link rel="stylesheet" type="text/css" href="proxy.php?url=vendor/select2/select2.min.css">
<!--===============================================================================================-->
  <link rel="stylesheet" type="text/css" href="proxy.php?url=css/util.css">
  <link rel="stylesheet" type="text/css" href="proxy.php?url=css/main.css">
<!--===============================================================================================-->
</head>
<body>

  <div class="bg-contact2" style="background-image: url('images/bg-01.jpg');">
    <div class="container-contact2">
      <div class="wrap-contact2">
        <span class="contact2-form-title">
          Contact Us
        </span>

        <div class="wrap-input2 validate-input" data-validate="Name is required">
          <input class="input2" type="text" id="name">
          <span class="focus-input2" data-placeholder="NAME"></span>
        </div>

        <div class="wrap-input2 validate-input" data-validate = "Valid email is required: [email protected]">
          <input class="input2" type="text" id="email">
          <span class="focus-input2" data-placeholder="EMAIL"></span>
        </div>

        <div class="wrap-input2 validate-input" data-validate = "Message is required">
          <textarea class="input2" id="message"></textarea>
          <span class="focus-input2" data-placeholder="MESSAGE"></span>
        </div>

        <div class="container-contact2-form-btn">
          <div class="wrap-contact2-form-btn">
            <div class="contact2-form-bgbtn"></div>
            <button class="contact2-form-btn" onclick="SendEmail()">
              Send Your Message
            </button>
          </div>
        </div>
      </div>
    </div>
  </div>

<!--===============================================================================================-->
  <script src="proxy.php?url=vendor/jquery/jquery-3.2.1.min.js"></script>
<!--===============================================================================================-->
  <script src="proxy.php?url=vendor/bootstrap/js/popper.js"></script>
  <script src="proxy.php?url=vendor/bootstrap/js/bootstrap.min.js"></script>
<!--===============================================================================================-->
  <script src="proxy.php?url=vendor/select2/select2.min.js"></script>
<!--===============================================================================================-->
  <script src="proxy.php?url=js/main.js"></script>

  <script>

    function SendEmail(){

      $.ajax(
      {
        type: "POST",
        url: '@Url.Action("SendEmail", "MailSender")',
        data: {
          Name: $("#name").val(),
          Email: $("#email").val(),
          Message: $("#message").val()
        },
        error: function (result) {
          console.log(result);
        },
        success: function (result) {
          alert(result);
          $("#name").val("");
          $("#email").val("");
          $("#message").val("");
        }
      });
    }
  </script>

</body>
</html>
Testing Application
Run your Application, You’ll get this
Fill the Form & click on “Send Your Message” Button.
You’ll Get an Email at the Given Email Address.
Complete Source Code of the Example is also available at Github.
Secure Client Problem
You might get this Exception while trying to send an Email from your Local Host.

In this Case, you need to Allow Access for Less Secure Apps.
Using the same Google Account you have used in your Controller to Send Email, Go to this Link https://www.google.com/settings/security/lesssecureapps
& Allow Access for Less Secure App.
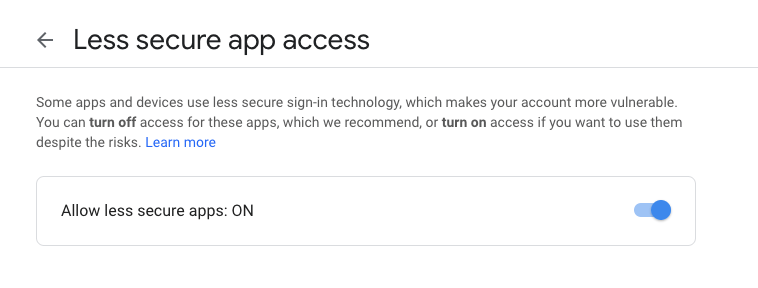
Now, Test your Application again, you’ll be able to receive Email from your Application.
Thank you for reading, Feel free to Comment below if you find any problem.
Here are more Articles you might be Interested
– Creating Admin Panel in Asp.net Core MVC – Step by Step Tutorial
– Top 10 .Net Core Features You need to know
– Dynamic Role-Based Authorization Asp.net Core
The post Creating Email Sending Application using Asp.net Core | Open Source appeared first on Coding Infinite.
]]>The post CRUD Operations Web App using PHP & MySQL | Part 2 appeared first on Coding Infinite.
]]>If you missed previous parts, then you can find here => Getting Started with Web Application using PHP & MySQL | Tutorials
I’m assuming that you have followed the previous part of this Tutorial & created API for CRUD Operations using PHP & MySQL.
In this part, we’ll use AdminLTE Template to create UI for our CRUD API we have created in the previous part of this article.
We have also set up our Template & created the database in the First part of this Tutorial.
After following the previous article, your project structure will look like this.
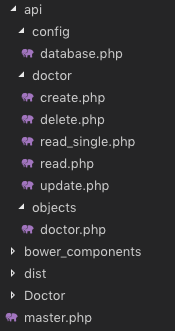
We know that we have created the master.php in the First part, which is our Layout page.
We also have “Doctor” Folder at the root directory of our Project. We’ll create all pages related to Doctor in this Folder.
Let’s start by creating a page to display all doctors data into a Table.
We have created “index.php” file inside “Doctor” Folder. Update this file with the Code below.
<?php
  $content = '<div class="row">
                <div class="col-xs-12">
                <div class="box">
                  <div class="box-header">
                    <h3 class="box-title">Dostors List</h3>
                  </div>
                  <!-- /.box-header -->
                  <div class="box-body">
                    <table id="doctors" class="table table-bordered table-hover">
                      <thead>
                      <tr>
                        <th>Name</th>
                        <th>Email</th>
                        <th>Phone</th>
                        <th>Gender</th>
                        <th>Specialist</th>
                        <th>Action</th>
                      </tr>
                      </thead>
                      <tbody>
                      </tbody>
                      <tfoot>
                      <tr>
                        <th>Name</th>
                        <th>Email</th>
                        <th>Phone</th>
                        <th>Gender</th>
                        <th>Specialist</th>
                        <th>Action</th>
                      </tr>
                      </tfoot>
                    </table>
                  </div>
                  <!-- /.box-body -->
                </div>
                <!-- /.box -->
              </div>
            </div>';
  include('../master.php');
?>
<!-- page script -->
<script>
  $(document).ready(function(){
    $.ajax({
        type: "GET",
        url: "../api/doctor/read.php",
        dataType: 'json',
        success: function(data) {
            var response="";
            for(var user in data){
                response += "<tr>"+
                "<td>"+data[user].name+"</td>"+
                "<td>"+data[user].email+"</td>"+
                "<td>"+data[user].phone+"</td>"+
                "<td>"+((data[user].gender == 0)? "Male": "Female")+"</td>"+
                "<td>"+data[user].specialist+"</td>"+
                "<td><a href='update.php?id="+data[user].id+"'>Edit</a> | <a href='#' onClick=Remove('"+data[user].id+"')>Remove</a></td>"+
                "</tr>";
            }
            $(response).appendTo($("#doctors"));
        }
    });
  });
  function Remove(id){
    var result = confirm("Are you sure you want to Delete the Doctor Record?");
    if (result == true) {
        $.ajax(
        {
            type: "POST",
            url: '../api/doctor/delete.php',
            dataType: 'json',
            data: {
                id: id
            },
            error: function (result) {
                alert(result.responseText);
            },
            success: function (result) {
                if (result['status'] == true) {
                    alert("Successfully Removed Doctor!");
                    window.location.href = '/medibed/doctor';
                }
                else {
                    alert(result['message']);
                }
            }
        });
    }
  }
</script>
Code Explanation
First of all, we have the content of this page in a PHP variable & then we simply included our master.php because it has the code for Layout page.
On document load, we’re using ajax to consume our read API to get all doctors.
We also have a function to remove a Doctor.
Now go to this Url => http://localhost/medibed/doctor/
you’ll see this page

Doctor remove will also work fine because of remove function ready in our code.
Now we need to create pages to Create & Update a Doctor.
Create a new file inside “Doctor” Folder with the name “create.php” & add this Code.
<?php
  $content = '<div class="row">
                <!-- left column -->
                <div class="col-md-12">
                  <!-- general form elements -->
                  <div class="box box-primary">
                    <div class="box-header with-border">
                      <h3 class="box-title">Add Doctor</h3>
                    </div>
                    <!-- /.box-header -->
                    <!-- form start -->
                    <form role="form">
                      <div class="box-body">
                        <div class="form-group">
                          <label for="exampleInputName1">Name</label>
                          <input type="text" class="form-control" id="name" placeholder="Enter Name">
                        </div>
                        <div class="form-group">
                          <label for="exampleInputEmail1">Email address</label>
                          <input type="email" class="form-control" id="email" placeholder="Enter email">
                        </div>
                        <div class="form-group">
                          <label for="exampleInputPassword1">Password</label>
                          <input type="password" class="form-control" id="password" placeholder="Password">
                        </div>
                        <div class="form-group">
                          <label for="exampleInputName1">Phone</label>
                          <input type="text" class="form-control" id="phone" placeholder="Enter Phone">
                        </div>
                        <div class="form-group">
                            <label for="exampleInputName1">Gender</label>
                            <div class="radio">
                                <label>
                                <input type="radio" name="gender" id="optionsRadios1" value="0" checked="">
                                Male
                                </label>
                            </div>
                            <div class="radio">
                                <label>
                                <input type="radio" name="gender" id="optionsRadios2" value="1">
                                Female
                                </label>
                            </div>
                        </div>
                        <div class="form-group">
                          <label for="exampleInputName1">Specialist</label>
                          <input type="text" class="form-control" id="specialist" placeholder="Enter Specialization">
                        </div>
                      </div>
                      <!-- /.box-body -->
                      <div class="box-footer">
                        <input type="button" class="btn btn-primary" onClick="AddDoctor()" value="Submit"></input>
                      </div>
                    </form>
                  </div>
                  <!-- /.box -->
                </div>
              </div>';
  include('../master.php');
?>
<script>
  function AddDoctor(){

        $.ajax(
        {
            type: "POST",
            url: '../api/doctor/create.php',
            dataType: 'json',
            data: {
                name: $("#name").val(),
                email: $("#email").val(),
                password: $("#password").val(),
                phone: $("#phone").val(),
                gender: $("input[name='gender']:checked").val(),
                specialist: $("#specialist").val()
            },
            error: function (result) {
                alert(result.responseText);
            },
            success: function (result) {
                if (result['status'] == true) {
                    alert("Successfully Added New Doctor!");
                    window.location.href = '/medibed/doctor';
                }
                else {
                    alert(result['message']);
                }
            }
        });
    }
</script>
Now click on Create Doctor inside Doctors SideBar Menu or go to this Url => http://localhost/medibed/doctor/create.php
You’ll see this page

Try to Create a new Doctor.
I hope everything is working as expected.
Let’s complete our Update Doctor functionality by creating a new file inside “Doctor” Folder as “update.php”
Add the below code inside this newly created file.
<?php
  $content = '<div class="row">
                <!-- left column -->
                <div class="col-md-12">
                  <!-- general form elements -->
                  <div class="box box-primary">
                    <div class="box-header with-border">
                      <h3 class="box-title">Update Doctor</h3>
                    </div>
                    <!-- /.box-header -->
                    <!-- form start -->
                    <form role="form">
                      <div class="box-body">
                        <div class="form-group">
                          <label for="exampleInputName1">Name</label>
                          <input type="text" class="form-control" id="name" placeholder="Enter Name">
                        </div>
                        <div class="form-group">
                          <label for="exampleInputEmail1">Email address</label>
                          <input type="email" class="form-control" id="email" placeholder="Enter email">
                        </div>
                        <div class="form-group">
                          <label for="exampleInputPassword1">Password</label>
                          <input type="password" class="form-control" id="password" placeholder="Password">
                        </div>
                        <div class="form-group">
                          <label for="exampleInputName1">Phone</label>
                          <input type="text" class="form-control" id="phone" placeholder="Enter Phone">
                        </div>
                        <div class="form-group">
                            <label for="exampleInputName1">Gender</label>
                            <div class="radio">
                                <label>
                                <input type="radio" name="gender" id="gender0" value="0" checked="">
                                Male
                                </label>
                            </div>
                            <div class="radio">
                                <label>
                                <input type="radio" name="gender" id="gender1" value="1">
                                Female
                                </label>
                            </div>
                        </div>
                        <div class="form-group">
                          <label for="exampleInputName1">Specialist</label>
                          <input type="text" class="form-control" id="specialist" placeholder="Enter Specialization">
                        </div>
                      </div>
                      <!-- /.box-body -->
                      <div class="box-footer">
                        <input type="button" class="btn btn-primary" onClick="UpdateDoctor()" value="Update"></input>
                      </div>
                    </form>
                  </div>
                  <!-- /.box -->
                </div>
              </div>';

  include('../master.php');
?>
<script>
    $(document).ready(function(){
        $.ajax({
            type: "GET",
            url: "../api/doctor/read_single.php?id=<?php echo $_GET['id']; ?>",
            dataType: 'json',
            success: function(data) {
                $('#name').val(data['name']);
                $('#email').val(data['email']);
                $('#password').val(data['password']);
                $('#phone').val(data['phone']);
                $('#gender'+data['gender']).prop("checked", true);
                $('#specialist').val(data['specialist']);
            },
            error: function (result) {
                console.log(result);
            },
        });
    });
    function UpdateDoctor(){
        $.ajax(
        {
            type: "POST",
            url: '../api/doctor/update.php',
            dataType: 'json',
            data: {
                id: <?php echo $_GET['id']; ?>,
                name: $("#name").val(),
                email: $("#email").val(),
                password: $("#password").val(),
                phone: $("#phone").val(),
                gender: $("input[name='gender']:checked").val(),
                specialist: $("#specialist").val()
            },
            error: function (result) {
                alert(result.responseText);
            },
            success: function (result) {
                if (result['status'] == true) {
                    alert("Successfully Updated Doctor!");
                    window.location.href = '/medibed/doctor';
                }
                else {
                    alert(result['message']);
                }
            }
        });
    }
</script>
Now you can also update any doctor record.
We have successfully created our CRUD(Create, Read, Update, Delete) Operations using Beautiful & Free UI Template.
You can also download the complete source code from GitHub.
Please Comment If you found any problem.
You might be interested in:
- Signup Login page in PHP with Database MySQL Source Code
- Restful Web Services in PHP Example – PHP + MySQL with Source Code
The post CRUD Operations Web App using PHP & MySQL | Part 2 appeared first on Coding Infinite.
]]>The post CRUD Operations using PHP & MySQL | Tutorials with Source Code appeared first on Coding Infinite.
]]>For creating beautiful & responsive UI, I’m using AdminLTE Template. So, In case if you missed the first part of this Tutorial, then you can find here => Getting Started with Web Application using PHP & MySQL | Tutorials
Assuming that you have followed the above tutorial & setup your project, let’s start our CRUD Operations Tutorial using PHP & MySQL.
I’m performing my CRUD Operation on this Database Table. You can use your own Table.

Creating Folders
- First of all, create a new folder at the root of your project directory as “api”.
- Inside “api” folder create three folders as “config”, “objects” & “doctors”.
we’ll keep all Doctor API inside “doctors” folder.
This directory structure will help us to keep our project easy to manage.
Database Connectivity
In your “config” folder inside “api” folder, create a new file there as “database.php” and paste this code there
<?php
class Database{

    // specify your own database credentials
    private $host = "localhost";
    private $db_name = "hospital_db";
    private $username = "root";
    private $password = "";
    public $conn;

    // get the database connection
    public function getConnection(){

        $this->conn = null;

        try{
            $this->conn = new PDO("mysql:host=" . $this->host . ";dbname=" . $this->db_name, $this->username, $this->password);
            $this->conn->exec("set names utf8");
        }catch(PDOException $exception){
            echo "Connection error: " . $exception->getMessage();
        }

        return $this->conn;
    }
}
?>
Now, your project structure should look like this.

Let’s start from creating API for CRUD operations.
I’m going to use Object Oriented Approach in this tutorial.
First of all, create a Model of your Doctor.
So, create a new file as “doctor.php” inside “objects” folder & add this Code:
<?php
class Doctor{

    // database connection and table name
    private $conn;
    private $table_name = "doctors";

    // object properties
    public $id;
    public $name;
    public $email;
    public $password;
    public $phone;
    public $gender;
    public $specialist;
    public $created;

    // constructor with $db as database connection
    public function __construct($db){
        $this->conn = $db;
    }

    // read all doctors
    function read(){

        // select all query
        $query = "SELECT
                    `id`, `name`, `email`, `password`, `phone`, `gender`, `specialist`, `created`
                FROM
                    " . $this->table_name . "
                ORDER BY
                    id DESC";

        // prepare query statement
        $stmt = $this->conn->prepare($query);

        // execute query
        $stmt->execute();

        return $stmt;
    }

    // get single doctor data
    function read_single(){

        // select all query
        $query = "SELECT
                    `id`, `name`, `email`, `password`, `phone`, `gender`, `specialist`, `created`
                FROM
                    " . $this->table_name . "
                WHERE
                    id= '".$this->id."'";

        // prepare query statement
        $stmt = $this->conn->prepare($query);

        // execute query
        $stmt->execute();
        return $stmt;
    }

    // create doctor
    function create(){

        if($this->isAlreadyExist()){
            return false;
        }

        // query to insert record
        $query = "INSERT INTO  ". $this->table_name ."
                        (`name`, `email`, `password`, `phone`, `gender`, `specialist`, `created`)
                  VALUES
                        ('".$this->name."', '".$this->email."', '".$this->password."', '".$this->phone."', '".$this->gender."', '".$this->specialist."', '".$this->created."')";

        // prepare query
        $stmt = $this->conn->prepare($query);

        // execute query
        if($stmt->execute()){
            $this->id = $this->conn->lastInsertId();
            return true;
        }

        return false;
    }

    // update doctor
    function update(){

        // query to insert record
        $query = "UPDATE
                    " . $this->table_name . "
                SET
                    name='".$this->name."', email='".$this->email."', password='".$this->password."', phone='".$this->phone."', gender='".$this->gender."', specialist='".$this->specialist."'
                WHERE
                    id='".$this->id."'";

        // prepare query
        $stmt = $this->conn->prepare($query);
        // execute query
        if($stmt->execute()){
            return true;
        }
        return false;
    }

    // delete doctor
    function delete(){

        // query to insert record
        $query = "DELETE FROM
                    " . $this->table_name . "
                WHERE
                    id= '".$this->id."'";

        // prepare query
        $stmt = $this->conn->prepare($query);

        // execute query
        if($stmt->execute()){
            return true;
        }
        return false;
    }

    function isAlreadyExist(){
        $query = "SELECT *
            FROM
                " . $this->table_name . "
            WHERE
                email='".$this->email."'";

        // prepare query statement
        $stmt = $this->conn->prepare($query);

        // execute query
        $stmt->execute();

        if($stmt->rowCount() > 0){
            return true;
        }
        else{
            return false;
        }
    }
}
you can see that we have all CRUD Operations including read_single function for reading a single Doctor record from MySQL database table.
Now, we’ll create a separate file for each operation inside “doctor” folder & we’ll call functions from “doctor.php” inside “objects” folder.
Let’s create a file inside “doctor” folder as “create.php” for creating a new doctor & add the below code inside this file.
<?php

// include database and object files
include_once '../config/database.php';
include_once '../objects/doctor.php';

// get database connection
$database = new Database();
$db = $database->getConnection();

// prepare doctor object
$doctor = new Doctor($db);

// set doctor property values
$doctor->name = $_POST['name'];
$doctor->email = $_POST['email'];
$doctor->password = base64_encode($_POST['password']);
$doctor->phone = $_POST['phone'];
$doctor->gender = $_POST['gender'];
$doctor->specialist = $_POST['specialist'];
$doctor->created = date('Y-m-d H:i:s');

// create the doctor
if($doctor->create()){
    $doctor_arr=array(
        "status" => true,
        "message" => "Successfully Signup!",
        "id" => $doctor->id,
        "name" => $doctor->name,
        "email" => $doctor->email,
        "phone" => $doctor->phone,
        "gender" => $doctor->gender,
        "specialist" => $doctor->specialist
    );
}
else{
    $doctor_arr=array(
        "status" => false,
        "message" => "Email already exists!"
    );
}
print_r(json_encode($doctor_arr));
?>
For reading all records from Doctors table create a file as “read.php” & add this code
<?php
// include database and object files
include_once '../config/database.php';
include_once '../objects/doctor.php';

// get database connection
$database = new Database();
$db = $database->getConnection();

// prepare doctor object
$doctor = new Doctor($db);

// query doctor
$stmt = $doctor->read();
$num = $stmt->rowCount();
// check if more than 0 record found
if($num>0){

    // doctors array
    $doctors_arr=array();
    $doctors_arr["doctors"]=array();

    while ($row = $stmt->fetch(PDO::FETCH_ASSOC)){
        extract($row);
        $doctor_item=array(
            "id" => $id,
            "name" => $name,
            "email" => $email,
            "password" => $password,
            "phone" => $phone,
            "gender" => $gender,
            "specialist" => $specialist,
            "created" => $created
        );
        array_push($doctors_arr["doctors"], $doctor_item);
    }

    echo json_encode($doctors_arr["doctors"]);
}
else{
    echo json_encode(array());
}
?>
to Update a record, create a file as “update.php” & add the code below
<?php

// include database and object files
include_once '../config/database.php';
include_once '../objects/doctor.php';

// get database connection
$database = new Database();
$db = $database->getConnection();

// prepare doctor object
$doctor = new Doctor($db);

// set doctor property values
$doctor->id = $_POST['id'];
$doctor->name = $_POST['name'];
$doctor->email = $_POST['email'];
$doctor->password = base64_encode($_POST['password']);
$doctor->phone = $_POST['phone'];
$doctor->gender = $_POST['gender'];
$doctor->specialist = $_POST['specialist'];

// create the doctor
if($doctor->update()){
    $doctor_arr=array(
        "status" => true,
        "message" => "Successfully Updated!"
    );
}
else{
    $doctor_arr=array(
        "status" => false,
        "message" => "Email already exists!"
    );
}
print_r(json_encode($doctor_arr));
?>
& for the last letter of CRUD, which is D.
create another file as “delete.php” & add this code
<?php

// include database and object files
include_once '../config/database.php';
include_once '../objects/doctor.php';

// get database connection
$database = new Database();
$db = $database->getConnection();

// prepare doctor object
$doctor = new Doctor($db);

// set doctor property values
$doctor->id = $_POST['id'];

// remove the doctor
if($doctor->delete()){
    $doctor_arr=array(
        "status" => true,
        "message" => "Successfully Removed!"
    );
}
else{
    $doctor_arr=array(
        "status" => false,
        "message" => "Doctor Cannot be deleted. may be he's assigned to a patient!"
    );
}
print_r(json_encode($doctor_arr));
?>
in the end, we need another method which is to get a single doctor record.
So, create a new file as “read_single.php” & add the below code
<?php
// include database and object files
include_once '../config/database.php';
include_once '../objects/doctor.php';

// get database connection
$database = new Database();
$db = $database->getConnection();

// prepare doctor object
$doctor = new Doctor($db);

// set ID property of doctor to be edited
$doctor->id = isset($_GET['id']) ? $_GET['id'] : die();

// read the details of doctor to be edited
$stmt = $doctor->read_single();

if($stmt->rowCount() > 0){
    // get retrieved row
    $row = $stmt->fetch(PDO::FETCH_ASSOC);
    // create array
    $doctor_arr=array(
        "id" => $row['id'],
        "name" => $row['name'],
        "email" => $row['email'],
        "password" => $row['password'],
        "phone" => $row['phone'],
        "gender" => $row['gender'],
        "specialist" => $row['specialist'],
        "created" => $row['created']
    );
}
// make it json format
print_r(json_encode($doctor_arr));
?>
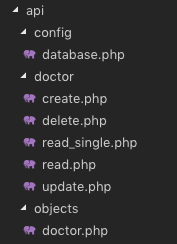
After this our “api” directory will look like this
Our API for CRUD Operation is ready using PHP & MySQL. Now, we need to create UI using the template we set up in the previous article & then connect our UI with the API we created in this article.
We’ll create UI for our CRUD Operations in the next part of this Article.
Comment If you find any difficulty, I’m available to solve your problems.
The post CRUD Operations using PHP & MySQL | Tutorials with Source Code appeared first on Coding Infinite.
]]>The post Creating Interactive Dashboards in Asp.net Core MVC appeared first on Coding Infinite.
]]>
Here’s my Tutorial, If you’re interested in Dynamic User-defined Dashboards using Asp.Net Core
This is the 7th Part of Admin Panel Tutorial Series.
- Choosing Template for Admin Panel
- Creating a Database
- Setup AdminLTE Template in Asp.net Core MVC project
- Creating Models
- Login Page for Admin Panel
- CRUD(Create, Read, Update, Delete) Operations
- Creating Interactive Dashboards
- Audit Trail / Activity Logging
- Role-Based Authorization
- Error Logging
Creating Dashboards breaks down into two portions:
- Dashboard Design
- Populating it with required data.
For the first portion, you’ll have to do CSS and HTML work. And for it, you can search for already created HTML templates.
Chats, Graphs, Tables & Tiles make the Dashboards more Interactive & help to better understand your business. So, Let’s start from here.
I’ll recommend you to always use a Template to create Dashboards because in a Template you’ll get everything already included for you. You’ll just need to download, Setup & start development.
I’ll use AdminLTE for Designing our Dashboards. If you don’t know how to setup AdminLTE Template with Asp.net Core MVC Project,
here’s the simple setup Tutorial for you => Setting up Admin Template in Asp.net Core MVC
I hope that following above article you have setup Template with your Asp.net Core project.
Add this Line at the start of your “_Layout.cshtml” page right after BootStrap css
<!-- Morris chart -->
<link rel="stylesheet" href="proxy.php?url=bower_components/morris.js/morris.css">
Like this

Now Open your “Index.cshtml” inside your Views -> Home Folder & paste this code:
@model AdminPanelTutorial.Models.DashboardViewModel

<section class="content-header">
    <h1>
    Dashboard
    <small>Control panel</small>
    </h1>
    <ol class="breadcrumb">
    <li><a href="proxy.php?url=#"><i class="fa fa-dashboard"></i> Home</a></li>
    <li class="active">Dashboard</li>
    </ol>
</section>
<!-- Main content -->
<section class="content">
    <!-- Small boxes (Stat box) -->
    <div class="row">
    <div class="col-lg-3 col-xs-6">
        <!-- small box -->
        <div class="small-box bg-aqua">
        <div class="inner">
            <h3>@Model.doctors_count</h3>
            <p>Doctors</p>
        </div>
        <div class="icon">
            <i class="fa fa-users"></i>
        </div>
        <a href="proxy.php?url=#" class="small-box-footer">More info <i class="fa fa-arrow-circle-right"></i></a>
        </div>
    </div>
    <!-- ./col -->
    <div class="col-lg-3 col-xs-6">
        <!-- small box -->
        <div class="small-box bg-green">
        <div class="inner">
            <h3>@Model.nurses_count<sup style="font-size: 20px"></sup></h3>
            <p>Nurses</p>
        </div>
        <div class="icon">
            <i class="fa fa-users"></i>
        </div>
        <a href="proxy.php?url=#" class="small-box-footer">More info <i class="fa fa-arrow-circle-right"></i></a>
        </div>
    </div>
    <!-- ./col -->
    <div class="col-lg-3 col-xs-6">
        <!-- small box -->
        <div class="small-box bg-yellow">
        <div class="inner">
            <h3>@Model.patients_count</h3>
            <p>Patients</p>
        </div>
        <div class="icon">
            <i class="ion ion-person"></i>
        </div>
        <a href="proxy.php?url=#" class="small-box-footer">More info <i class="fa fa-arrow-circle-right"></i></a>
        </div>
    </div>
    <!-- ./col -->
    <div class="col-lg-3 col-xs-6">
        <!-- small box -->
        <div class="small-box bg-red">
        <div class="inner">
            <h3>65</h3>
            <p>This Month</p>
        </div>
        <div class="icon">
            <i class="ion ion-pie-graph"></i>
        </div>
        <a href="proxy.php?url=#" class="small-box-footer">More info <i class="fa fa-arrow-circle-right"></i></a>
        </div>
    </div>
    <!-- ./col -->
    </div>
    <!-- /.row -->
    <!-- Main row -->
    <div class="row">
    <!-- Left col -->
    <section class="col-lg-7 connectedSortable">
        <!-- Custom tabs (Charts with tabs)-->
        <!-- DONUT CHART -->
        <div class="box box-danger">
            <div class="box-header with-border">
            <h3 class="box-title">Donut Chart</h3>
            <div class="box-tools pull-right">
                <button type="button" class="btn btn-box-tool" data-widget="collapse"><i class="fa fa-minus"></i>
                </button>
                <button type="button" class="btn btn-box-tool" data-widget="remove"><i class="fa fa-times"></i></button>
            </div>
            </div>
            <div class="box-body chart-responsive">
            <div class="chart" id="sales-chart" style="height: 300px; position: relative;"></div>
            </div>
            <!-- /.box-body -->
        </div>
        <!-- /.nav-tabs-custom -->
    </section>
    <!-- /.Left col -->
    <!-- right col (We are only adding the ID to make the widgets sortable)-->
    <section class="col-lg-5 connectedSortable">
        <!-- TO DO List -->
        <div class="box box-primary">
        <div class="box-header">
            <i class="ion ion-clipboard"></i>
            <h3 class="box-title">To Do List</h3>
            <div class="box-tools pull-right">
            <ul class="pagination pagination-sm inline">
                <li><a href="proxy.php?url=#">«</a></li>
                <li><a href="proxy.php?url=#">1</a></li>
                <li><a href="proxy.php?url=#">2</a></li>
                <li><a href="proxy.php?url=#">3</a></li>
                <li><a href="proxy.php?url=#">»</a></li>
            </ul>
            </div>
        </div>
        <!-- /.box-header -->
        <div class="box-body">
            <!-- See dist/js/pages/dashboard.js to activate the todoList plugin -->
            <ul class="todo-list">
            <li>
                <!-- drag handle -->
                <span class="handle">
                    <i class="fa fa-ellipsis-v"></i>
                    <i class="fa fa-ellipsis-v"></i>
                    </span>
                <!-- checkbox -->
                <input type="checkbox" value="">
                <!-- todo text -->
                <span class="text">Patient 1 Check up Time</span>
                <!-- Emphasis label -->
                <small class="label label-danger"><i class="fa fa-clock-o"></i> 2 mins</small>
                <!-- General tools such as edit or delete-->
                <div class="tools">
                <i class="fa fa-edit"></i>
                <i class="fa fa-trash-o"></i>
                </div>
            </li>
            <li>
                    <span class="handle">
                    <i class="fa fa-ellipsis-v"></i>
                    <i class="fa fa-ellipsis-v"></i>
                    </span>
                <input type="checkbox" value="">
                <span class="text">Medicine for X Patient</span>
                <small class="label label-info"><i class="fa fa-clock-o"></i> 4 hours</small>
                <div class="tools">
                <i class="fa fa-edit"></i>
                <i class="fa fa-trash-o"></i>
                </div>
            </li>
            <li>
                    <span class="handle">
                    <i class="fa fa-ellipsis-v"></i>
                    <i class="fa fa-ellipsis-v"></i>
                    </span>
                <input type="checkbox" value="">
                <span class="text">New Patient Operation</span>
                <small class="label label-warning"><i class="fa fa-clock-o"></i> 1 day</small>
                <div class="tools">
                <i class="fa fa-edit"></i>
                <i class="fa fa-trash-o"></i>
                </div>
            </li>
            <li>
                    <span class="handle">
                    <i class="fa fa-ellipsis-v"></i>
                    <i class="fa fa-ellipsis-v"></i>
                    </span>
                <input type="checkbox" value="">
                <span class="text">Ward Visit</span>
                <small class="label label-success"><i class="fa fa-clock-o"></i> 3 days</small>
                <div class="tools">
                <i class="fa fa-edit"></i>
                <i class="fa fa-trash-o"></i>
                </div>
            </li>
            <li>
                    <span class="handle">
                    <i class="fa fa-ellipsis-v"></i>
                    <i class="fa fa-ellipsis-v"></i>
                    </span>
                <input type="checkbox" value="">
                <span class="text">Any other Activity</span>
                <small class="label label-primary"><i class="fa fa-clock-o"></i> 1 week</small>
                <div class="tools">
                <i class="fa fa-edit"></i>
                <i class="fa fa-trash-o"></i>
                </div>
            </li>
            <li>
                    <span class="handle">
                    <i class="fa fa-ellipsis-v"></i>
                    <i class="fa fa-ellipsis-v"></i>
                    </span>
                <input type="checkbox" value="">
                <span class="text">Any other Activity</span>
                <small class="label label-default"><i class="fa fa-clock-o"></i> 1 month</small>
                <div class="tools">
                <i class="fa fa-edit"></i>
                <i class="fa fa-trash-o"></i>
                </div>
            </li>
            </ul>
        </div>
        <!-- /.box-body -->
        <div class="box-footer clearfix no-border">
            <button type="button" class="btn btn-default pull-right"><i class="fa fa-plus"></i> Add item</button>
        </div>
        </div>
        <!-- /.box -->
    </section>
    <!-- right col -->
    </div>
    <!-- /.row (main row) -->
</section>

<!-- Morris.js charts -->
<script src="proxy.php?url=bower_components/raphael/raphael.min.js"></script>
<script src="proxy.php?url=bower_components/morris.js/morris.min.js"></script>
<script>
  $(function () {
    "use strict";
    //DONUT CHART
    var donut = new Morris.Donut({
      element: 'sales-chart',
      resize: true,
      colors: ["#3c8dbc", "#f56954", "#00a65a"],
      data: [
        {label: "Registered Doctors", value: @Model.doctors_count},
        {label: "Registered Nurses", value: @Model.nurses_count},
        {label: "Registered Patients", value: @Model.patients_count}
      ],
      hideHover: 'auto'
    });
  });
</script>
</body>
</html>
For populating above Page with real Data from DB you need to pass Data from Controller to View.
As a Best Practise, we’ll use ViewModel.
Create a new Folder as “ViewModels” & inside this Folder create a new file with the name “DashboardViewModel.cs”
& Add this Code:
namespace AdminPanelTutorial.Models
{
    public class DashboardViewModel
    {
        public int doctors_count { get; set; }
        public int nurses_count { get; set; }
        public int patients_count { get; set; }

    }
}
* Don’t forget to Update namespace here & in “Index.cshtml” File’s First Line According to your project’s namespace.
Now finally add this code to your “HomeController.cs”:
using System.Linq;
using AdminPanelTutorial.Models;
using Microsoft.AspNetCore;
using Microsoft.AspNetCore.Hosting;
using Microsoft.AspNetCore.Mvc;

namespace AdminPanelTutorial
{
    public class HomeController : Controller
    {
        private MyDbContext db = new MyDbContext();
        public IActionResult Index()
        {
            DashboardViewModel dashboard = new DashboardViewModel();

            dashboard.doctors_count = db.Doctors.Count();
            dashboard.nurses_count = db.Nurses.Count();
            dashboard.patients_count = db.Patients.Count();

            return View(dashboard);
        }
    }
}
Run your Application & you’ll see this page.
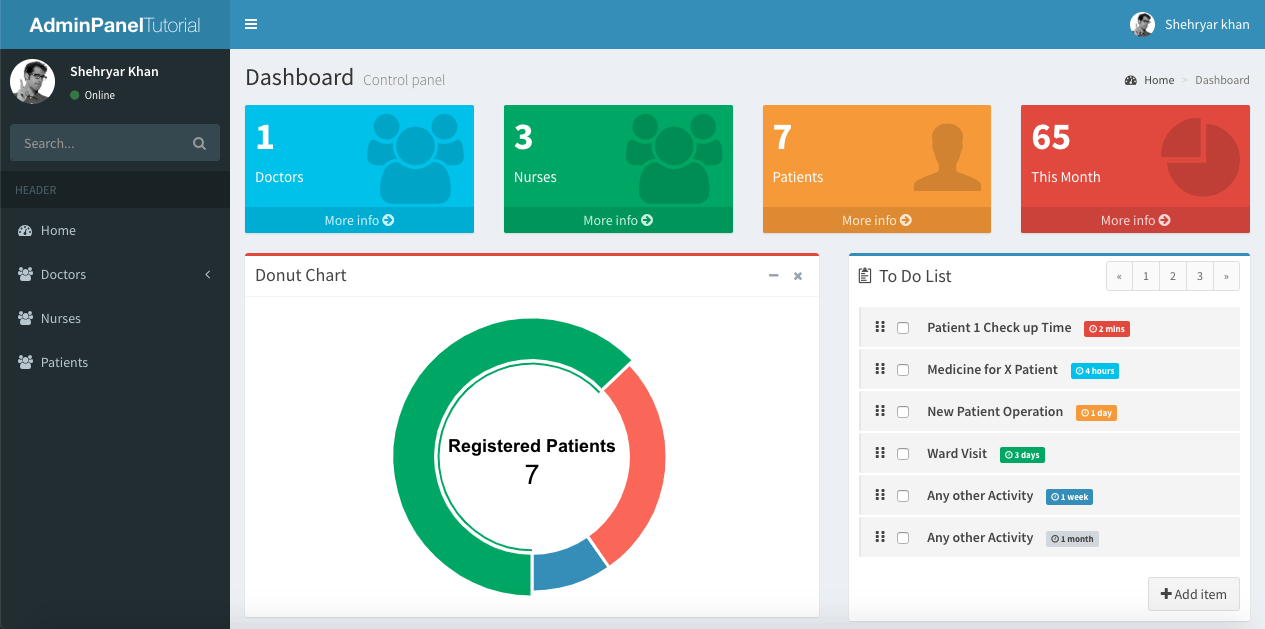
I’m just getting Doctors, Nurses & Patients count & displaying in my Dashboard as an example, you can Create ViewModel according to your Dashboard Design.
Running your project, you’ll see your Dashboard with real Doctors, Nurses & Patients count.
* Explore the AdminLTE Template to design your more Interactive Dashboards. Your Application can have more than one Dashboard.
Comment below If you find any difficulty or If you find this tutorial helpful.
The post Creating Interactive Dashboards in Asp.net Core MVC appeared first on Coding Infinite.
]]>The post CRUD Operations in Asp.net Core MVC appeared first on Coding Infinite.
]]>For creating beautiful & responsive UI, I’m using AdminLTE Template. So, In case if you missed Setting up AdminLTE in Asp.net Core, then you can find here => Setting up Admin Template in Asp.net Core MVC
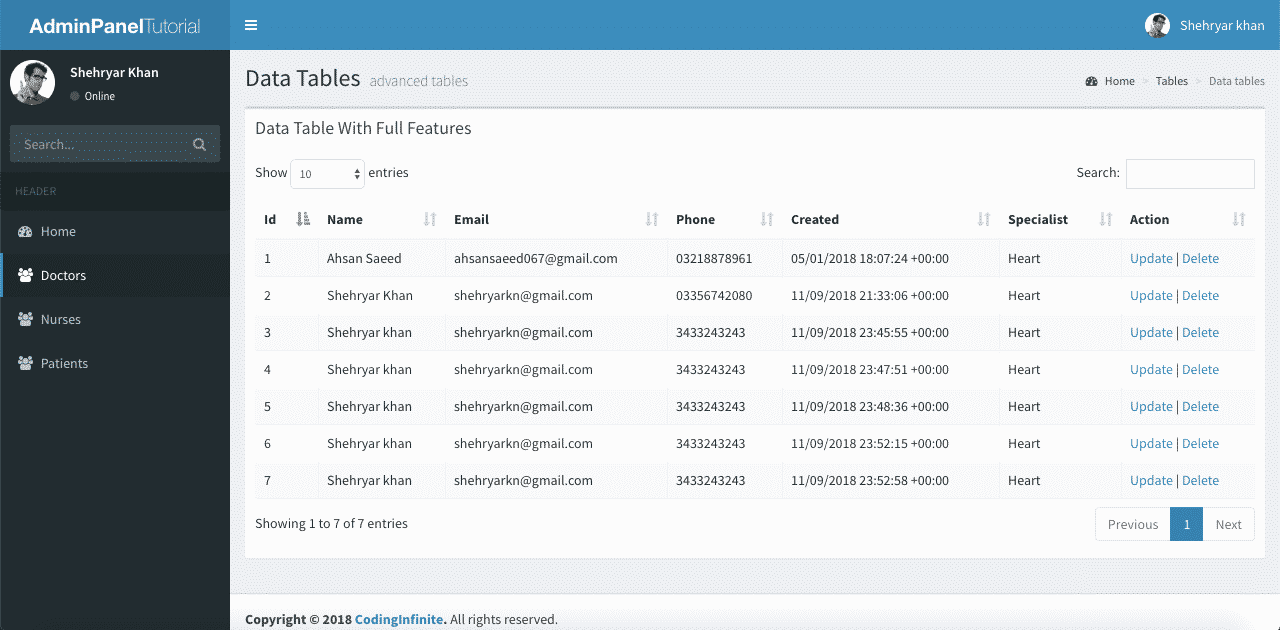
Assuming that you have followed the above tutorial & setup your project, let’s start our Asp.net Core CRUD Operations Tutorial.
This is the 6th Part of Admin Panel Tutorial Series.
- Choosing Template for Admin Panel
- Creating a Database
- Setup AdminLTE Template in Asp.net Core MVC project
- Creating Models
- Login Page for Admin Panel
- CRUD(Create, Read, Update, Delete) Operations
- Creating Interactive Dashboards
- Audit Trail / Activity Logging
- Role-Based Authorization
- Error Logging
If you want to create Models from MySQL Database then you can follow this Article => Entity Framework Core Database First – Asp.Net Core Scaffold MySql DB
I’m performing my CRUD Operation on this Database Table. You can use your own Table.
First of all, create a Controller as “DoctorsController.cs” & Add this Code.
using System.Linq;
using AdminPanelTutorial.Models;
using Microsoft.AspNetCore;
using Microsoft.AspNetCore.Hosting;
using Microsoft.AspNetCore.Mvc;

namespace AdminPanelTutorial
{
    public class DoctorsController : Controller
    {
        MyDbContext db = new MyDbContext();
        public ActionResult Index()
        {
            return View(db.Doctors.ToList());
        }

        public ActionResult Create()
        {
            return View();
        }

        [HttpPost]
        public ActionResult CreateDoctor(Doctors doctor){
            db.Doctors.Add(doctor);
            db.SaveChanges();
            return RedirectToAction("Index", "Doctors");
        }

        [HttpPost]
        public bool Delete(int id){
            try
            {
                Doctors doctor = db.Doctors.Where(s => s.Id == id).First();
                db.Doctors.Remove(doctor);
                db.SaveChanges();
                return true;
            }
            catch (System.Exception)
            {
                return false;
            }

        }

        public ActionResult Update(int id){
            return View(db.Doctors.Where(s => s.Id == id).First());
        }

        [HttpPost]
        public ActionResult UpdateDoctor(Doctors doctor){
            Doctors d = db.Doctors.Where(s => s.Id == doctor.Id).First();
            d.Name = doctor.Name;
            d.Phone = doctor.Phone;
            d.Specialist = doctor.Specialist;
            db.SaveChanges();
            return RedirectToAction("Index", "Doctors");
        }
    }
}
* Update your Solution name
Code Explanation:
We have an Index Method to list all records from Doctors Table to our DataTable.
We have Create Method to open Create Doctor Form & when we Submit this Form our CreateDoctor will be used to Add Doctor into the Database.
You must Encrypt your Password before storing it into Database. You may follow this Tutorial for Password Hashing Code => C# Hashing algorithm class
We have only one Method to Delete Doctor because we’ll use Ajax to delete our Doctor.
Now Create a new Folder as “Doctors” inside your “Views” Folder & Create these 3 Files inside “Doctors” Folders => “Index.cshtml”, “Create.cshtml”, “Update.cshtml”
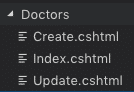
Add this Code into your “Index.cshtml”
@model IEnumerable<AdminPanelTutorial.Models.Doctors>

<section class="content-header">
    <h1>
    Doctors
    </h1>
    <ol class="breadcrumb">
    <li><a href="proxy.php?url=#"><i class="fa fa-dashboard"></i> Home</a></li>
    <li class="active">Doctors</li>
    </ol>
</section>
<!-- Main content -->
<section class="content">
    <div class="row">
    <div class="col-xs-12">
        <div class="box">
        <div class="box-header">
            <h3 class="box-title">Manage Doctors</h3>
        </div>
        <!-- /.box-header -->
        <div class="box-body">
            <table id="example1" class="table table-bordered table-striped">
            <thead>
            <tr>
                <th>Id</th>
                <th>Name</th>
                <th>Email</th>
                <th>Phone</th>
                <th>Created</th>
                <th>Specialist</th>
                <th>Action</th>
            </tr>
            </thead>
            <tbody>
                @foreach (var item in Model)
                {
                    <tr>
                    <td>@Html.DisplayFor(modelItem => item.Id)</td>
                    <td>@Html.DisplayFor(modelItem => item.Name)</td>
                    <td>@Html.DisplayFor(modelItem => item.Email)</td>
                    <td>@Html.DisplayFor(modelItem => item.Phone)</td>
                    <td>@Html.DisplayFor(modelItem => item.Created)</td>
                    <td>@Html.DisplayFor(modelItem => item.Specialist)</td>
                    <td><a href="proxy.php?url=Doctors/Update/@item.Id">Update</a> | <a href="proxy.php?url=" onclick="Delete('@item.Id')">Delete</a></td>
                    </tr>
                }
            </table>
        </div>
        <!-- /.box-body -->
        </div>
        <!-- /.box -->
    </div>
    <!-- /.col -->
    </div>
    <!-- /.row -->
</section>

<!-- DataTables -->
<script src="proxy.php?url=~/bower_components/datatables.net/js/jquery.dataTables.min.js"></script>
<script src="proxy.php?url=~/bower_components/datatables.net-bs/js/dataTables.bootstrap.min.js"></script>

<!-- page script -->
<script>
    $(function () {
        $('#example1').DataTable();
    });
    function Delete(id){
        var txt;
        var r = confirm("Are you sure you want to Delete?");
        if (r == true) {

            $.ajax(
            {
                type: "POST",
                url: '@Url.Action("Delete", "Doctors")',
                data: {
                    id: id
                },
                error: function (result) {
                    alert("error");
                },
                success: function (result) {
                    if (result == true) {
                        var baseUrl="/Doctors";
                        window.location.reload();
                    }
                    else {
                        alert("There is a problem, Try Later!");
                    }
                }
            });
        }
    }
</script>
* Don’t forget to replace your Solution name with “AdminPanelTutorial” at the very First line of this Code
Add “DataTables” css file into your “_Layout.cshtml” (Created in the First Part of this Tutorial) after BootStrap css added at the start of the File
<!-- DataTables -->
<link rel="stylesheet" href="proxy.php?url=~/bower_components/datatables.net-bs/css/dataTables.bootstrap.min.css">
your “_Layout.cshtml” will look like this

You can see that I have already Added Ajax at the End of the Code above to Delete the Doctor Record from the Database.
Now run your Project & go to http://localhost:port/Doctors (replace your port)
you’ll see All Doctors from your Database Table.
You can Also Test Your Delete Operation, It should work fine.
Let’s move Further & Add Code below into your “Create.cshtml”
<!-- Content Header (Page header) -->
<section class="content-header">
    <h1>
    Doctors
    </h1>
</section>
<!-- Main content -->
<section class="content container-fluid">
    <!-- Horizontal Form -->
    <div class="box box-info">
    <div class="box-header with-border">
        <h3 class="box-title">Add Doctor</h3>
    </div>
    <!-- /.box-header -->
    <!-- form start -->
    <form class="form-horizontal" method="post" action="proxy.php?url=CreateDoctor">
        <div class="box-body">
        <div class="form-group">
            <label for="inputEmail3" class="col-sm-2 control-label">Name</label>
            <div class="col-sm-10">
            <input type="text" class="form-control" name="Name" placeholder="Name">
            </div>
        </div>
        <div class="form-group">
            <label for="inputEmail3" class="col-sm-2 control-label">Email</label>
            <div class="col-sm-10">
            <input type="email" class="form-control" name="Email" placeholder="Email">
            </div>
        </div>
        <div class="form-group">
            <label for="inputPassword3" class="col-sm-2 control-label">Password</label>
            <div class="col-sm-10">
            <input type="password" class="form-control" name="Password" placeholder="Password">
            </div>
        </div>
        <div class="form-group">
            <label for="inputEmail3" class="col-sm-2 control-label">Phone</label>
            <div class="col-sm-10">
            <input type="text" class="form-control" name="Phone" placeholder="Phone">
            </div>
        </div>
        <div class="form-group">
            <label for="inputEmail3" class="col-sm-2 control-label">Specialist</label>
            <div class="col-sm-10">
            <input type="text" class="form-control" name="Specialist" placeholder="Specialist">
            </div>
        </div>
        </div>
        <!-- /.box-body -->
        <div class="box-footer">
        <button type="submit" class="btn btn-default">Cancel</button>
        <button type="submit" class="btn btn-info pull-right">Create</button>
        </div>
        <!-- /.box-footer -->
    </form>
    </div>
    <!-- /.box -->
</section>
Run your project & go to https://localhost:port/Doctors/Create
You’ll see this Page
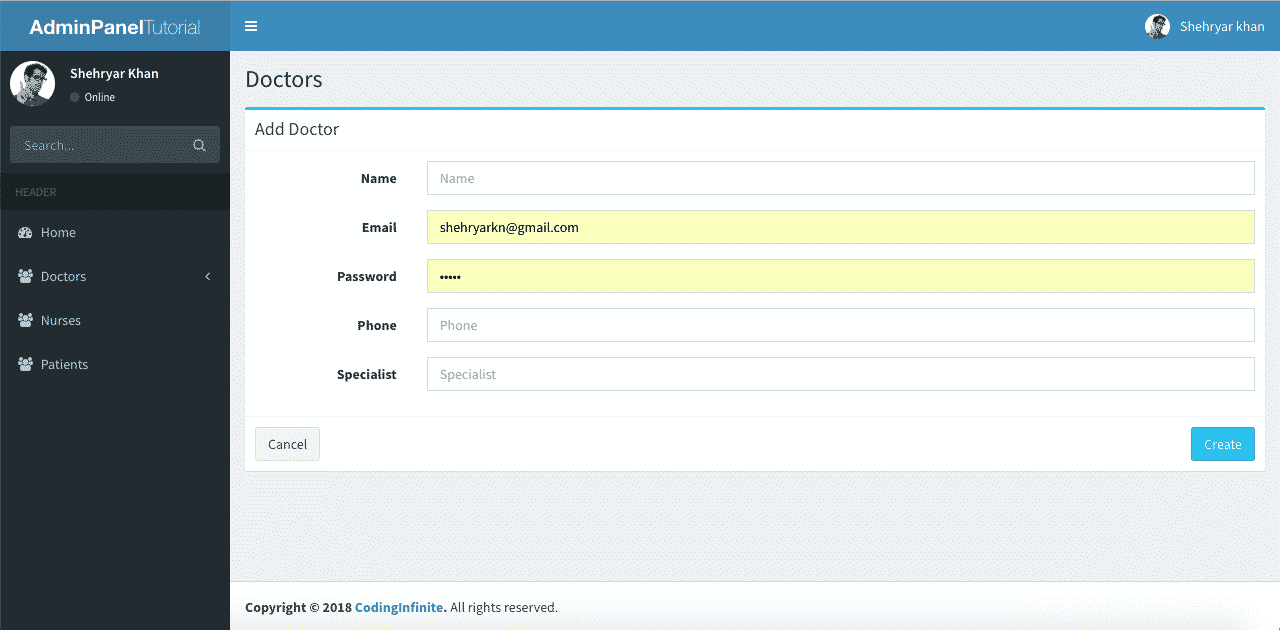
Try to create a new Doctor, It will Add new Doctor & redirect you to Index Page.
Now the last thing is our Update Operation.
Open your “Update.cshtml” file Add this Code
@model AdminPanelTutorial.Models.Doctors

<section class="content-header">
    <h1>
    Doctors
    </h1>
</section>
<!-- Main content -->
<section class="content container-fluid">
    <!-- Horizontal Form -->
    <div class="box box-info">
    <div class="box-header with-border">
        <h3 class="box-title">Update Doctor</h3>
    </div>
    <!-- /.box-header -->
    <!-- form start -->
    <form class="form-horizontal" method="post" action="proxy.php?url=/Doctors/UpdateDoctor">
        <div class="box-body">
        <div class="form-group">
            <label for="inputEmail3" class="col-sm-2 control-label">Email</label>
            <div class="col-sm-10">
            <input type="Email" class="form-control" name="Email" value="@Model.Email">
            </div>
        </div>
        <div class="form-group">
            <label for="inputEmail3" class="col-sm-2 control-label">Name</label>
            <div class="col-sm-10">
            <input type="text" class="form-control" name="Name" placeholder="Name" value="@Model.Name">
            </div>
        </div>
        <div class="form-group">
            <label for="inputEmail3" class="col-sm-2 control-label">Phone</label>
            <div class="col-sm-10">
            <input type="text" class="form-control" name="Phone" placeholder="Phone" value="@Model.Phone">
            </div>
        </div>
        <div class="form-group">
            <label for="inputEmail3" class="col-sm-2 control-label">Specialist</label>
            <div class="col-sm-10">
            <input type="text" class="form-control" name="Specialist" placeholder="Specialist" value="@Model.Specialist">
            </div>
        </div>
        <input type="hidden" name="Id" value="@Model.Id"/>
        </div>
        <!-- /.box-body -->
        <div class="box-footer">
        <button type="submit" class="btn btn-default">Cancel</button>
        <button type="submit" class="btn btn-info pull-right">Update</button>
        </div>
        <!-- /.box-footer -->
    </form>
    </div>
    <!-- /.box -->
</section>
* Don’t forget to replace your Solution name with “AdminPanelTutorial” at the very First line of this Code
Now run your Project & Update a Doctor Record.
I hope that everything is working fine & your CRUD operations are working perfectly. You can use your UI Template & Database Table for Performing your CRUD Operations. I used This AdminLTE Template just to Beautify our UI you can use your own.
You can also download the complete project from GitHub.
Comment If you find any Difficulty, I’m here to help you. I’ll reply you with Solution as soon as possible.
Creating Login Page Asp.net Core
Creating Interactive Dashboards
The post CRUD Operations in Asp.net Core MVC appeared first on Coding Infinite.
]]>The post Signup Login page in PHP with Database MySQL Source Code appeared first on Coding Infinite.
]]>What we’ll cover in Signup Login page in PHP with Database
- File Structure
- Creating HTML page
- Connecting HTML page with Webservices
File Structure
We’ll use this folders & files structure inside our “app” folder for our Login & Signup page.
index.html
|
assets
├─── css
├────── style.css
api
├─── config/
├────── database.php – file used for connecting to the database.
├─── objects/
├────── user.php – contains properties and methods for “user” database queries.
├─── User/
├────── signup.php – file that will accept user data to be saved to the DB.
├────── login.php – file that will accept username & password and validate
as you can see that we have added pages and assets folders, pages folder will contain all HTML pages and assets folder is for CSS, JS, images etc.
Creating HTML page
as I stated that you can create your own design or you can use any other design, for this tutorial I’m using This template and I just modified it according to my Webservices.
inside your “app” folder, create a new file as “index.html” and paste this code there
<!DOCTYPE html>
<html lang="en" >

<head>
  <meta charset="UTF-8">
  <title>PHP Learning</title>


  <link rel='stylesheet prefetch' href='https://fonts.googleapis.com/css?family=Open+Sans:600'>

      <link rel="stylesheet" href="proxy.php?url=./assets/css/style.css">


</head>

<body>

  <div class="login-wrap">
  <div class="login-html">
    <input id="tab-1" type="radio" name="tab" class="sign-in" checked><label for="tab-1" class="tab">Sign In</label>
    <input id="tab-2" type="radio" name="tab" class="sign-up"><label for="tab-2" class="tab">Sign Up</label>
    <div class="login-form">
      <form class="sign-in-htm" action="proxy.php?url=./api/user/login.php" method="GET">
        <div class="group">
          <label for="user" class="label">Username</label>
          <input id="username" name="username" type="text" class="input">
        </div>
        <div class="group">
          <label for="pass" class="label">Password</label>
          <input id="password" name="password" type="password" class="input" data-type="password">
        </div>
        <div class="group">
          <input id="check" type="checkbox" class="check" checked>
          <label for="check"><span class="icon"></span> Keep me Signed in</label>
        </div>
        <div class="group">
          <input type="submit" class="button" value="Sign In">
        </div>
        <div class="hr"></div>
        <div class="foot-lnk">
          <a href="proxy.php?url=#forgot">Forgot Password?</a>
        </div>
      </form>
      <form class="sign-up-htm" action="proxy.php?url=./api/user/signup.php" method="POST">
        <div class="group">
          <label for="user" class="label">Username</label>
          <input id="username" name="username" type="text" class="input">
        </div>
        <div class="group">
          <label for="pass" class="label">Password</label>
          <input id="password" name="password" type="password" class="input" data-type="password">
        </div>
        <div class="group">
          <label for="pass" class="label">Confirm Password</label>
          <input id="pass" type="password" class="input" data-type="password">
        </div>
        <div class="group">
          <input type="submit" class="button" value="Sign Up">
        </div>
        <div class="hr"></div>
        <div class="foot-lnk">
          <label for="tab-1">Already Member?</a>
        </div>
      </form>
    </div>
  </div>
</div>


</body>

</html>
Now go to the “assets” folder and create a new folder as “css” and create a new file there as “style.css” and paste this code there
body{
  margin:0;
  color:#6a6f8c;
  background:#c8c8c8;
  font:600 16px/18px 'Open Sans',sans-serif;
}
*,:after,:before{box-sizing:border-box}
.clearfix:after,.clearfix:before{content:'';display:table}
.clearfix:after{clear:both;display:block}
a{color:inherit;text-decoration:none}

.login-wrap{
  width:100%;
  margin:auto;
  margin-top: 30px;
  max-width:525px;
  min-height:570px;
  position:relative;
  background:url(http://codinginfinite.com/demo/images/bg.jpg) no-repeat center;
  box-shadow:0 12px 15px 0 rgba(0,0,0,.24),0 17px 50px 0 rgba(0,0,0,.19);
}
.login-html{
  width:100%;
  height:100%;
  position:absolute;
  padding:90px 70px 50px 70px;
  background:rgba(40,57,101,.9);
}
.login-html .sign-in-htm,
.login-html .sign-up-htm{
  top:0;
  left:0;
  right:0;
  bottom:0;
  position:absolute;
  -webkit-transform:rotateY(180deg);
          transform:rotateY(180deg);
  -webkit-backface-visibility:hidden;
          backface-visibility:hidden;
  transition:all .4s linear;
}
.login-html .sign-in,
.login-html .sign-up,
.login-form .group .check{
  display:none;
}
.login-html .tab,
.login-form .group .label,
.login-form .group .button{
  text-transform:uppercase;
}
.login-html .tab{
  font-size:22px;
  margin-right:15px;
  padding-bottom:5px;
  margin:0 15px 10px 0;
  display:inline-block;
  border-bottom:2px solid transparent;
}
.login-html .sign-in:checked + .tab,
.login-html .sign-up:checked + .tab{
  color:#fff;
  border-color:#1161ee;
}
.login-form{
  min-height:345px;
  position:relative;
  -webkit-perspective:1000px;
          perspective:1000px;
  -webkit-transform-style:preserve-3d;
          transform-style:preserve-3d;
}
.login-form .group{
  margin-bottom:15px;
}
.login-form .group .label,
.login-form .group .input,
.login-form .group .button{
  width:100%;
  color:#fff;
  display:block;
}
.login-form .group .input,
.login-form .group .button{
  border:none;
  padding:15px 20px;
  border-radius:25px;
  background:rgba(255,255,255,.1);
}
.login-form .group input[data-type="password"]{
  text-security:circle;
  -webkit-text-security:circle;
}
.login-form .group .label{
  color:#aaa;
  font-size:12px;
}
.login-form .group .button{
  background:#1161ee;
}
.login-form .group label .icon{
  width:15px;
  height:15px;
  border-radius:2px;
  position:relative;
  display:inline-block;
  background:rgba(255,255,255,.1);
}
.login-form .group label .icon:before,
.login-form .group label .icon:after{
  content:'';
  width:10px;
  height:2px;
  background:#fff;
  position:absolute;
  transition:all .2s ease-in-out 0s;
}
.login-form .group label .icon:before{
  left:3px;
  width:5px;
  bottom:6px;
  -webkit-transform:scale(0) rotate(0);
          transform:scale(0) rotate(0);
}
.login-form .group label .icon:after{
  top:6px;
  right:0;
  -webkit-transform:scale(0) rotate(0);
          transform:scale(0) rotate(0);
}
.login-form .group .check:checked + label{
  color:#fff;
}
.login-form .group .check:checked + label .icon{
  background:#1161ee;
}
.login-form .group .check:checked + label .icon:before{
  -webkit-transform:scale(1) rotate(45deg);
          transform:scale(1) rotate(45deg);
}
.login-form .group .check:checked + label .icon:after{
  -webkit-transform:scale(1) rotate(-45deg);
          transform:scale(1) rotate(-45deg);
}
.login-html .sign-in:checked + .tab + .sign-up + .tab + .login-form .sign-in-htm{
  -webkit-transform:rotate(0);
          transform:rotate(0);
}
.login-html .sign-up:checked + .tab + .login-form .sign-up-htm{
  -webkit-transform:rotate(0);
          transform:rotate(0);
}

.hr{
  height:2px;
  margin:60px 0 50px 0;
  background:rgba(255,255,255,.2);
}
.foot-lnk{
  text-align:center;
}
Now you’ll see the page same as this

Connecting HTML page with Webservices
Download Login & Signup API from Github you can also create these API following my previous post, Restful Web Services in PHP Example – PHP + MySQL Best Practice
setup Database and paste “api” folder inside “app” folder.
all done, Now you can run your index.html through localhost.
You might be Interested in:
Here are some more Tutorial for creating Web Application & CRUD Operations using PHP & MySQL.
- Getting Started with Web Application using PHP & MySQL | Tutorials
- CRUD Operations using PHP & MySQL | Tutorials with Source Code
- Learn Object Oriented Programming In PHP
The post Signup Login page in PHP with Database MySQL Source Code appeared first on Coding Infinite.
]]>