The post Reasons For The Popularity Of PHP Scripting Language appeared first on Coding Infinite.
]]>Many web developers now make use of PHP to develop websites and the trend has become the order of the day. So, you may want to know why PHP has become so popular. Different sets of web developers were asked why they have chosen the language. These web developers gave different reasons and the reasons have been compiled and outlined below.
PHP can handle a lot of tasks
The language is useful for the execution of different types of web development tasks. One of them is that it helps web developers add dynamic content to websites. It is needless to remind you that dynamic content makes for better user experience.
A website with dynamic content is the one whose content depends on your input. You could say it is an interactive website. Membership sites that require your username and password are good examples. Examination sites are examples too. The most common examples are retail websites. As you add items to cart, it calculates your bill and this includes the shipping fee.
PHP can be used to modify files on the server
You can use the language to create, edit, or modify any of the files on the server and on the database. It can perform commands like create, open, read, and write. It can also be used to send and receive cookies. If you want to restrict access to certain parts of your website to only members, it is best and easiest done with the scripting language called PHP.
You may want to convert important data on your file to Excel or PDF files for easier analysis. PHP can pull the data and present it in both forms automatically so you won’t need to do any manual conversion. You can continue reading to see more important reasons why every developer should try PHP. There is reason many popular content management systems like Drupal, Joomla, and WordPress use PHP.
PHP is easy to learn
Although it can be used for complex codes, the language is quite easy to learn. The best part is that its syntax is similar to that of C and C++. This implies that programmers that are vast in both languages will be able to learn the language more easily.
Due to its popularity, you can get numerous free and paid resources on the language online. For example, it is said to be the fourth most tagged topic on StackOverflow. It currently has close to 2 million topics on it and more topics are still being added every week.
The language is fast
PHP codes can be executed relatively faster than other scripting languages. This is the reason why it is great for dynamic sites. Being embedded in HTML makes it also faster to develop. With PHP, you can easily edit or modify a website without rewriting everything from scratch.
It prevents compatibility issues
The language works on many platforms and it supports major browsers like Microsoft Edge, Google Chrome, Mozilla Firefox, Opera, Safari, Internet Explorer, and others. In addition, it also supports a lot of databases. When your website is developed with PHP, it’ll be mobile optimized because the language supports iOS, Android, and other mobile device platforms.
Apart from the benefits of PHP outlined above, there are other benefits too. If you’re a website developer and you’ve not tried PHP, you’re missing out big time. Try the language once and you’ll likely stick with it. To underscore the importance of the language, here are some interesting statistics about it.
Interesting statistics about PHP
After carrying out a survey that involved thousands of developers, the following figures were revealed and they buttress the importance and usefulness of PHP.
- It is currently the fifth most popular technology worldwide and the fact that 25.9% of the respondents of the survey use it confirms this.
- Front-end developers confirmed it to be the third most popular language.
- With back-end developers, PHP is the fourth most popular programming language.
- It is also the fourth most popular language with full-stack developers.
- About 8,000 PHP jobs are advertised worldwide every month.
- And these jobs come with an average salary of $66,000.
- In the United States alone, about 2,500 PHP jobs are advertised every month and these jobs have an average salary of $89,000.
It is a great all-purpose tool for web development language that every web developer should learn. This also means that you should make this a requirement when hiring web developers. Hire only the ones that have vast knowledge in PHP. Fortunately, many Indian website developers are proficient with this language.
As a conclusive summary, PHP is one of the best and most popular scripting languages because of the following facts:
- It is lucrative.
- PHP programmers are highly sought after and highly paid.
- The language is very easy to learn.
- It is fast to execute.
- It supports most platforms, databases, and browsers.
- It is quite easy to learn especially with the knowledge of either C or C++.
- It can be used to handle numerous tasks.
- It is can be sued to modify files on the server.
When next you want to hire website developers, opt for the ones with PHP knowledge.
The post Reasons For The Popularity Of PHP Scripting Language appeared first on Coding Infinite.
]]>The post CRUD Operations in Laravel 6 Tutorial with Example appeared first on Coding Infinite.
]]>You can check the demo before starting this Tutorial.
Laravel is one of the most popular PHP frameworks. It is growing so fast. It comes up with a variety of functionalities that you can leverage.
Laravel Overview
- MVC Architecture
- Blade Templating Engine
- Eloquent ORM
- Routing
- Facades
- Middleware
- Built-in Testing
- Great Documentation
- Large community
and the list goes on.
Prerequisites
- Node and NPM (Latest Versions)
- Latest PHP installed (>=7.3)
- Composer Dependency Manager. Download it from here.
Creating Laravel Project
In order to create a fresh installation of Laravel, open command prompt and type the following command:
composer create-project --prefer-dist laravel/laravel crudapp
The above given command will create a fresh installation of the Laravel project in your current directory in command prompt.
After the installation of the Laravel project, change your directory to your Laravel project by using the following command:
cd crudapp
Open the code editor of your choice and find the file called .env. In this file, you will store the private environment variables for your app.
For this article, I will use sqlite as database.
Database Setup
- Open the .env file.
- Set DB_CONNECTION to sqlite on line # 9 of .env file.
- Remove the lines DB_HOST, DB_PORT, DB_DATABASE, DB_USERNAME, and DB_PASSWORD.
- Open the file database.php located at
config>database.php - Change default database connection to sqlite from mysql.
Change this line:'default' => env('DB_CONNECTION', 'mysql'),
to'default' => env('DB_CONNECTION', 'sqlite'), - In the database folder, create a file named
database.sqlite
The database is successfully setup now.
Creating Routes
Creating routes is the right way to start developing your app. It will make clear that what models, views and controllers you will need.
Requirements of the app
For this app, a user should be able to:
- View a list of employees
- Create an Employee
- Edit Employee
- Update Employee
- Remove Employee
To achieve this, we need to create the following routes:
Get Requests
An HTTP GET request is made when a user wants to view a specific resource or resources. Following are the GET request routes:
/– route shows homepage-
/employees– shows list of all employees /employee/{id}– views a specific employee’s record/create– shows a form to create employee/edit/employee/{id}– shows a form to edit specific employee/employee/{id}/– delete deletes and redirects to the home page
POST Requests
Normally, when there is some change to be made on the server, we use HTTP POST Request. Following are the POST request routes:
/create– Creates a new employee/update– Updates the employee
Open routes/web.php file and replace the file with the following piece of code:
<?php

/*
|--------------------------------------------------------------------------
| Web Routes
|--------------------------------------------------------------------------
|
| Here is where you can register web routes for your application. These
| routes are loaded by the RouteServiceProvider within a group which
| contains the "web" middleware group. Now create something great!
|
*/

Route::get('/', function () {
    return view('welcome');
})->name('home');

Route::get('/employees', 'EmployeeController@index')->name('employees.index');
Route::get('/employees/{id}/edit','EmployeeController@edit')->name('employees.edit');
Route::get('/employees/{id}/delete','EmployeeController@destroy')->name('employees.destroy');
Route::get('/create','EmployeeController@create')->name('employees.create');
Route::post('/create','EmployeeController@store')->name('employees.store');
Route::post('/employee/update','EmployeeController@update')->name('employees.update');
Understanding Route
Let’s analyze a route’s structure:
Route::get('/employees', 'EmployeeController@index')->name('employees.index');
This will create a route at 127.0.0.1/employees. If this route is triggered, then the index function of EmployeeController will be called.
Notice the {id} route parameter. This situation occurs when you want to select a specific resource, in our case, a specific employee with id 2. It helps in editing, deleting the resource.
Creating Views
In the MVC Architecture, View is something what the user sees. In simple words, it is the User Interface (UI). Laravel ships with a default view named welcome.blade.php. All the view files in Laravel have an extension .blade.php since Laravel uses the Blade Template Engine. Blade view files use the .blade.php file extension and are typically stored in the resources/views directory.
A Templating Engine is an elegant way of outputting your dynamic data in your View/html code. Blade is the simple, yet powerful templating engine provided with Laravel. Unlike other popular PHP templating engines, Blade does not restrict you from using plain PHP code in your views. In fact, all Blade views are compiled into plain PHP code and cached until they are modified, meaning Blade adds essentially zero overhead to your application.
Required Views
- show list of all employees
- add a new employee
- edit an existing employee
Let’s add the above given views. Add a folder named layouts inside views folder. Add a folder inside views folder named employee. Create the following files and add the code:
master.blade.php
<!DOCTYPE html>
<html lang="en">
<head>
  <title>@yield('title')</title>
  <meta charset="utf-8">
  <meta name="viewport" content="width=device-width, initial-scale=1">
  <link rel="stylesheet" href="proxy.php?url=https://maxcdn.bootstrapcdn.com/bootstrap/4.3.1/css/bootstrap.min.css">
  <script src="proxy.php?url=https://ajax.googleapis.com/ajax/libs/jquery/3.4.1/jquery.min.js"></script>
  <script src="proxy.php?url=https://cdnjs.cloudflare.com/ajax/libs/popper.js/1.14.7/umd/popper.min.js"></script>
  <script src="proxy.php?url=https://maxcdn.bootstrapcdn.com/bootstrap/4.3.1/js/bootstrap.min.js"></script>
</head>
<body>

<div class="container">
  @yield('content')
</div>

</body>
</html>
index.blade.php
@extends('layouts.master')
@section('title','Employees Index')
@section('content')
	<div class="row">
		<div class="col-sm-12">
			<table class="table">
				<tr>
					<th>ID</th>
					<th>First Name</th>
					<th>Last Name</th>
					<th>Department</th>
					<th>Phone No.</th>
				</tr>
				@foreach($employees as $employee)
					<tr class = "text-center">
						<td>{{ $employee->id }}</td>
						<td>{{ $employee->firstname }}</td>
						<td>{{ $employee->lastname }}</td>
						<td>{{ $employee->department }}</td>
						<td>{{ $employee->phone }}</td>
						<td><a href="proxy.php?url={{route('employees.edit',['id'=>$employee->id])}}" class = "btn btn-info">Edit</a></td>
						<td><a href="proxy.php?url={{route('employees.destroy',['id'=>$employee->id])}}" class = "btn btn-danger">Delete</a></td>
					</tr>
				@endforeach
			</table>
		</div>
	</div>
@endsection
create.blade.php
@extends('layouts.master')
@section('title','Create Employee')
@section('content')
	<div class="row mt-5">
		<div class="col-sm-8 offset-sm-2">
			<form action="proxy.php?url={{route('employees.store')}}" method = "post">
				@csrf
				<div class="form-group">
					<label for="firstname">Firstname:</label>
					<input type="text" name = "firstname" id = "firstname" class="form-control" required>
				</div>
				<div class="form-group">
					<label for="lastname">Lastname:</label>
					<input type="text" name = "lastname" id = "lastname" class="form-control" required>
				</div>
				<div class="form-group">
					<label for="department">Department:</label>
					<input type="text" name = "department" id = "department" class="form-control" required>
				</div>
				<div class="form-group">
					<label for="phone">Phone Number:</label>
					<input type="text" name = "phone" id = "phone" class="form-control" required>
				</div>
				<button type = "submit" class = "btn btn-success">Submit</button>
			</form>
		</div>
	</div>
@endsection
edit.blade.php
@extends('layouts.master')
@section('title','Edit Employee')
@section('content')
	<div class="row">
		<div class="col-sm-8 offset-sm-2">
			<form action="proxy.php?url={{route('employees.update')}}" method = "post">
				@csrf
				<div class="form-group">
					<label for="firstname">Firstname:</label>
					<input type="text" name = "firstname" id = "firstname" class="form-control" required value = "{{$employee->firstname}}">
				</div>
				<div class="form-group">
					<label for="lastname">Lastname:</label>
					<input type="text" name = "lastname" id = "lastname" class="form-control" required value = "{{$employee->lastname}}">
				</div>
				<div class="form-group">
					<label for="department">Department:</label>
					<input type="text" name = "department" id = "department" class="form-control" required value = "{{$employee->department}}">
				</div>
				<div class="form-group">
					<label for="phone">Phone Number:</label>
					<input type="text" name = "phone" id = "phone" class="form-control" required value = "{{$employee->phone}}">
				</div>
				<input type="hidden" name="id" value = "{{$employee->id}}">
				<button type = "submit" class = "btn btn-success">Submit</button>
			</form>
		</div>
	</div>
@endsection
Creating Model and Database Migration File
In Laravel, a Model basically represents a table in the database. A database migration file is used to tell the schema of the table. We can simply create a model with its relevant migration file with the following command:
php artisan make:model Employee -m
The above command will create a model Employee and its migration file.
First, open the migration for employees table file. It is located in database/migrations folder and replaces with the following code:
<?php

use Illuminate\Database\Migrations\Migration;
use Illuminate\Database\Schema\Blueprint;
use Illuminate\Support\Facades\Schema;

class CreateEmployeesTable extends Migration
{
    /**
     * Run the migrations.
     *
     * @return void
     */
    public function up()
    {
        Schema::create('employees', function (Blueprint $table) {
            $table->bigIncrements('id');
            $table->string('firstname');
            $table->string('lastname');
            $table->string('department');
            $table->string('phone');
            $table->timestamps();
        });
    }

    /**
     * Reverse the migrations.
     *
     * @return void
     */
    public function down()
    {
        Schema::dropIfExists('employees');
    }
}
Now, open the Employee.php model. It is available in app folder and add the following line. The following line tells the laravel that these fields of the model are fillable and mass assignment can be done on these.
Model.php
protected $fillable = ['firstname','lastname', 'description', 'phone'];
Now, run the following command to run the migrations:
php artisan migrate
Setting Up the Controller
Create a controller named EmployeeController by typing the following command in the terminal or cmd:
php artisan make:controller EmployeeController
Controller in MVC architecture is responsible for taking input from the user and interacting with model to get the required data for the view. It can also be used to validate the input.
Open the EmployeeController file which can be found at app/http/controllers and paste the following code:
<?php

namespace App\Http\Controllers;

use Illuminate\Http\Request;
use App\Employee;

class EmployeeController extends Controller
{
    /**
     * Display a listing of the resource.
     *
     * @return \Illuminate\Http\Response
     */
    public function index()
    {
        //Show all employees from the database and return to view
        $employees = Employee::all();
        return view('employee.index',['employees'=>$employees]);
    }

    /**
     * Show the form for creating a new resource.
     *
     * @return \Illuminate\Http\Response
     */
    public function create()
    {
        //Return view to create employee
        return view('employees.create');
    }

    /**
     * Store a newly created resource in storage.
     *
     * @param  \Illuminate\Http\Request  $request
     * @return \Illuminate\Http\Response
     */
    public function store(Request $request)
    {
        //Persist the employee in the database
        //form data is available in the request object
        $employee = new Employee();
        //input method is used to get the value of input with its
        //name specified
        $employee->firstname = $request->input('firstname');
        $employee->lastname = $request->input('lastname');
        $employee->department = $request->input('department');
        $employee->phone = $request->input('phone');
        $employee->save(); //persist the data
        return redirect()->route('employees.index')->with('info','Employee Added Successfully');
    }


    /**
     * Show the form for editing the specified resource.
     *
     * @param  int  $id
     * @return \Illuminate\Http\Response
     */
    public function edit($id)
    {
        //Find the employee
        $employee = Employee::find($id);
        return view('employee.edit',['employee'=> $employee]);
    }

    /**
     * Update the specified resource in storage.
     *
     * @param  \Illuminate\Http\Request  $request
     * @param  int  $id
     * @return \Illuminate\Http\Response
     */
    public function update(Request $request)
    {
        //Retrieve the employee and update
        $employee = Employee::find($request->input('id'));
        $employee->firstname = $request->input('firstname');
        $employee->lastname = $request->input('lastname');
        $employee->department = $request->input('department');
        $employee->phone = $request->input('phone');
        $employee->save(); //persist the data
        return redirect()->route('employees.index')->with('info','Employee Updated Successfully');
    }

    /**
     * Remove the specified resource from storage.
     *
     * @param  int  $id
     * @return \Illuminate\Http\Response
     */
    public function destroy($id)
    {
        //Retrieve the employee
        $employee = Employee::find($id);
        //delete
        $employee->delete();
        return redirect()->route('employees.index');
    }
}
The code is explained with comments.
With this effort, you have created a single table simple CRUD app in Laravel.
Let’s take a look at demo. Start up the server by typing the following command in the project directory:
php artisan serve
All done. Please comment if you find any difficulty. We’ll love to help you.
Here’s another related article you might be interested:
LARAVEL 6 STRIPE PAYMENT INTEGRATION TUTORIAL
The post CRUD Operations in Laravel 6 Tutorial with Example appeared first on Coding Infinite.
]]>The post Laravel 6 Stripe Payment Integration Tutorial appeared first on Coding Infinite.
]]>This article demonstrates that how can you integrate stripe in your Laravel 6 App. Stripe payment is easy to integrate and use. Stripe is a very simple and most powerful and flexible tool.
Prerequisites
- Node and NPM (Latest Versions)
- Latest PHP installed (>=7.3)
- Composer Dependency Manager. Download it from here.
Creating Laravel Project
In order to create a fresh installation of Laravel, open command prompt and type the following command:
composer create-project --prefer-dist laravel/laravel crudapp
The above given command will create a fresh installation of the Laravel project in your current directory in command prompt.
Install Stripe Package
For installing the stripe package in your current Laravel app, open the terminal your app’s directory and type the following command:
composer require cartalyst/stripe-laravel
After running the above command, you will need to register the provider and aliases. Goto app/config/app.php file and add the following:
In the providers array adds the following line:
Cartalyst\Stripe\Laravel\StripeServiceProvider::class
In the aliases array, add the following line:
'Stripe' => Cartalyst\Stripe\Laravel\Facades\Stripe::class
Setting secret credentials
Now open .evn file and set the secret credential provided by a stripe payment gateway. I have created a temporary account with a temporary email. For the sake of the tutorial, you can use the following:
STRIPE_KEY=pk_test_umkeHetjdz1MkkMgi79vxRNF001b1aHu6o
STRIPE_SECRET=sk_test_WFMlyRLCZFAIxh5KVe3UW2lo00jmAQSjX2
Let’s now setup the Stripe API key. It is done in the file config/services.php. Add/update the ‘stripe’ array:
Replace the STRIPE SECRET with your own.
Creating Routes
Open the web.php file which can be located at routes/web.php. Add the following routes:
 Route::get('/stripe', 'MyStripeController@index');
 Route::post('/store', 'MyStripeController@store');
Creating View
Add the following view file payment.blade.php in app/resources/views.
<!DOCTYPE html>
<html lang="en">
<head>
  <title>Stripe Demo</title>
  <meta charset="utf-8">
  <meta name="viewport" content="width=device-width, initial-scale=1">
  <meta name="csrf-token" content="{{ csrf_token() }}">
  <link rel="stylesheet" href="proxy.php?url=https://maxcdn.bootstrapcdn.com/bootstrap/4.3.1/css/bootstrap.min.css">
  <script src="proxy.php?url=https://ajax.googleapis.com/ajax/libs/jquery/3.4.1/jquery.min.js"></script>
  <script src="proxy.php?url=https://cdnjs.cloudflare.com/ajax/libs/popper.js/1.14.7/umd/popper.min.js"></script>
  <script src="proxy.php?url=https://maxcdn.bootstrapcdn.com/bootstrap/4.3.1/js/bootstrap.min.js"></script>
</head>
<body>
<div class="container">
      <div class="row">
      <div class="col-sm-12">
        <div class="jumbotron text-center">
          <h1>Stripe Payment Demo</h1>
      </div>
      </div>
    </div>
   <div class="row">
      <div class="col-md-12"><pre id="token_response"></pre></div>
    </div>

    <div class="row">
      <div class="col-md-4">
        <button class="btn btn-primary btn-block" onclick="pay(10)">Pay $10</button>
      </div>
      <div class="col-md-4">
        <button class="btn btn-success btn-block" onclick="pay(50)">Pay $50</button>
      </div>
      <div class="col-md-4">
        <button class="btn btn-info btn-block" onclick="pay(100)">Pay $100</button>
      </div>
    </div>
</div>
  <script src="proxy.php?url=https://checkout.stripe.com/checkout.js"></script>
  <script type="text/javascript">
  $(document).ready(function () {
    $.ajaxSetup({
        headers: {
            'X-CSRF-TOKEN': $('meta[name="csrf-token"]').attr('content')
        }
    });
  });

  function pay(amount) {
    var handler = StripeCheckout.configure({
      key: 'pk_test_umkeHetjdz1MkkMgi79vxRNF001b1aHu6o', // your publisher key id
      locale: 'auto',
      token: function (token) {
        // You can access the token ID with `token.id`.
        // Get the token ID to your server-side code for use.
        console.log('Token Created!!');
        console.log(token)
        $('#token_response').html(JSON.stringify(token));

        $.ajax({
          url: '{{ route('stripe.store') }}',
          method: 'post',
          data: { tokenId: token.id, amount: amount },
          success: (response) => {

            console.log(response)

          },
          error: (error) => {
            console.log(error);
            alert('There is an error in processing.')
          }
        })
      }
    });

    handler.open({
      name: 'Some Site',
      description: '10 widgets',
      amount: amount * 1500
    });
  }
</script>
</body>
</html>
Creating Controller
Create a controller with the following command:
php artisan make:controller MyStripeController
Replace with the following code:
<?php

namespace App\Http\Controllers;

use Illuminate\Http\Request;
use Redirect,Response;
use Stripe\Stripe;

class MyStripeController extends Controller
{

    /**
     * Display a listing of the resource.
     *
     * @return \Illuminate\Http\Response
     */
    public function index()
    {
        return view('payment');
    }


    /**
     * Store a newly created resource in storage.
     *
     * @param  \Illuminate\Http\Request  $request
     * @return \Illuminate\Http\Response
     */
    public function store(Request $request)
    {

        $stripe = Stripe::charges()->create([
            'source' => $request->get('tokenId'),
            'currency' => 'USD',
            'amount' => $request->get('amount') * 1500
        ]);

        return $stripe;
    }
}
Start the Server
Start the server by typing the following command:
php artisan serve
Go to 127.0.0.1/stripe and perform a transaction. See the following demo. Ignore the error, the request was successful.
In this way, you can integrate Stripe payment in your website.
Thank you for reading. If you find any difficulty, you can let me know in the comment section below.
The post Laravel 6 Stripe Payment Integration Tutorial appeared first on Coding Infinite.
]]>The post OOP in PHP – Inheritance | Encapsulation | Abstraction | Polymorphism appeared first on Coding Infinite.
]]>Let’s move further. Here’s another important OOP concept.
Inheritance
Inheritance is one of the most important aspects of OOP. It allows a class to inherit members from another class. One of the main advantages of object-oriented programming is the ability to reduce code duplication with inheritance. Code duplications occur when a programmer writes the same code more than once, a problem that inheritance strives to solve.
In inheritance, we have a parent class with its methods and properties, and a child class (or classes) that can use the code from the parent. By using inheritance, we can create a reusable piece of code that we write only once in the parent class, and use again as much as we need in the child classes. So, the main idea of the inheritance is, we can access the properties of other class rather than write the same code again. To quickly understand the concept of inheritance, think it as just like a newborn baby who has the properties of her parent.
INHERITANCE
To implement inheritance, we made one class and define some methods in it, then
we create another class and inherits it from the first class. By inheriting the
new class from the first class, we can use the methods written already in the
first class into the new class. The class from which the other class(es)
inherits is called the parent class, and the inherited classes are called child
classes.
Let’s see the code implementation of inheritance in
PHP.
The parent class:
class ParentClass
{
    //define variable
    private $data1;
    //Function/behavior
    function parentFun()
    {
       echo “I am the function of parent class”;
    }
}
The child class:
To create a class as a child, we use the keyword “extends” after the class name, followed by the name of the parent class. See the code below.
The child class:
class ChildClass extends ParentClass
{
    function childFun()
    {
        echo "I am the function of child class.";
    }
}
Let’s create an object of the child class and call its method “childFun”.
$child1 = new ChildClass();
$child1->childFun();
The above code will display the output “I am the function of child class”.
To call the method of its parent class, we just call it just like we call its method.
$child1->parentsFun();
The above code will display the output “I am the function of parent class”.
A real-life example of inheritance is Vehicle-Car example, where the Vehicle is a parent class, and the Car is a child class. Some other real-life examples could be, Shape-Circle, Pet-Cat and/or Employee-Manager.
The relationship between a parent and a child class is called “is-A’ relationship. For example, Car is a Vehicle, and Circle is a shape etc.
Overloading and Overriding methods:
Overriding in PHP is same as other programming languages, but overloading is quite different.
Method Overriding:
We already know that when we inherit a child class from a parent class, the child class has access to the methods of its parent class. Let’s say we have an Animal class with a method move(). The following code is the implementation of this class.
class Animal{
  public function move(){
    echo "The animal is moving.";
  }
}
Now, we want to make the Cat class a child of Animal class. The cat class will inherit the move method as well. Now the problem is, the move method of cat is so generic that it is saying “The animal is moving”, we want to make a specialised version of move method for the Cat class only, which will tell that “The cat is moving” instead of “The animal is moving”. So, to make the specialised version out of a generalised version, we override the move method in the child class.
The overridden method will have the same header as its parent method, but it has its own implementation. The following code is the implementation of the Cat class along with the overridden move method.
class Cat extends Animal{
  public function move(){
    echo "The cat is moving.";
  }
}
To make use of the overridden move method, let’s create an object of the Cat class and call its move method.
$cat = new Cat();
$cat->move();
The above lines of code will produce the output “The cat is moving”.
Method Overloading:
Method overloading is all about having two or more methods with the same name but with a different number of parameters. Let’s understand this concept with an example.
Suppose we have a class Calculator with a method named add, which accepts two parameters and return the sum of them. See the following code:
class Calculator{
  public function add($a, $b){
    return $a + $b;
  }
}
The method written above will only add two parameters. What if we want to add three numbers together? Obviously, we can create another method and call it “addThree”, but this will confuse the user as the user have to call different methods with different names but the purpose of these methods is the same. To avoid this, PHP, like many other languages, allows us to write the methods with the same name with the distinction in the number of parameters to make them unique.
The following lines of code will have two methods with the same name but with the different number of parameters:
class Calculator{
  public function add($a, $b){
    return $a + $b;
  }
  public function add($a, $b, $c){
    return $a + $b + $c;
  }
}
To call the methods:
$obj = new Calculator();
echo $obj->add(2, 3);
echo $obj->add(2, 3, 4);
The second and third line of the above code will display 5 and 9, respectively.
Please note that the method overloading is only available in the class methods and not in non-class functions.
The simple difference between method overriding and method overloading:
Method Overriding: Same name, the same number of parameters, different body.
Method Overloading: Same name, different number of parameters, and a different body.
Abstract classes and Abstract methods:
- The abstract classes are those classes which have at least one abstract method, and the abstract methods are those methods which only have the header but not the implementation. Here are some essential points to remember about abstract classes and methods.
- Abstract classes are used when we want to force the programmer to must provide the implementation of the method declared as abstract in the parent class.
- An abstract class is a class that has at least one abstract method
Abstract methods can only have names and arguments and no implementation. Thus, we cannot create objects out of abstract classes; instead, we need to create child classes that add the code into the bodies of the methods. - An abstract class can have abstract and non-abstract methods.
- The abstract classes and methods are created with the keyword “abstract”.
Let’s see the code example:
abstract class MyParentClass
{
  abstract public function anAbstractMethod();

  public function aNoneAbstractMethod()
  {
    echo "I have my own implementation.":
  }
}
Now let’s create a child class:
class MyChildClass extends MyParentClass
{
  public function anAbstractMethod()
  {
    echo "I have to provide the implementation of the abstract method I inherited from the parent class.";
  }
}
Let’s call these methods by creating an object of the child class.
$obj = new MyChildClass();
$obj->anAbstractMethod();
$obj->aNoneAbstractMethod();
The output of the lines above is:
“I have to provide the implementation of the abstract method I inherited from the parent class. I have my own implementation.”
Why we need abstract method and classes:
Let’s consider this with an example. Suppose we are creating a school management system, where we need to store the information about Teacher and Student. We want to create a method in both of these classes which will return the information about Teacher and Student, but the problem is that both classes have different information to return, for example, the teacher has the qualification and experience whereas the student might not have such pieces of information. So, we will first create an abstract parent class which will have an abstract method, let’s call it “getDetail”. Both the Teacher and Student now have to inherit from the parent class and need to override the “getDetail” method and provide their own implementation.
Interfaces
PHP Interfaces allows a user to specify some methods which a class must implement. resemble the Abstract classes and methods, but the difference is that a class can not extend the interfaces; instead, it must be implemented by a class. A class can implement an interface by using “implements” keyword after the class name followed by the interface name. An interface can be defined just like a class, but we will write “interface” instead of “class”. The following lines of code will create an interface:
interface MyInterfaceForAirConditioner{
  public function turnOnAC(){
  }
  public function turnOffAC(){
  }
}
A class can implement an interface as follows:
class AirConditioner implements MyInterfaceForAirConditioner{
  public function turnOnAC(){
    echo "AC turned on.";
  }
  public function turnOffAC(){
    echo "AC turned off.";
  }
}
Here are some essential points about the interface.
- Interfaces can only have abstract methods, which means they will not have any implementation.
- An interface can also extend from another interface using the “extends” keyword.
The abstract methods in an interface must be public. - A class that implements the interface must provide the implementation of all the methods written in the interface.
Polymorphism
Polymorphism means the ability to have many forms. Let’s consider this with an example. Suppose a person is a teacher, and he is also studying, so he is a student as well. It means that a person has more than one roles, means, more than one form. Some times he is acting as a teacher, whereas he is acting as a student at some points.
The inheritance is one way to implement polymorphism in PHP. We can create a Person class which will have some common attributes like name, age and CNIC of the person. Then we will create a Teacher class and a Student class which will have their unique attributes. The following piece of code will create these three classes:
<?php
class Person{
   $name;
   $age;
   $cnic;
}
class Teacher extends Person{
   $qualification;
   $roomNumber;
}
class Student extends Person{
   $programName;
   $totalProgramFee;
}
?>
To make two roles or two forms of a person, we can simply create the objects of the respective roles. See the code below for understanding:
$personAsaTeacher = new Teacher();
$personAsaStudent = new Student();
The “personAsaTeacher” will have the details of the person along with the details of its specific role, which is a teacher. Same like the teacher, the “personAsaStudent” will have the details of the same person but with the different information of the student.
Here are some more Tutorial for creating Web Application & CRUD Operations using PHP & MySQL.
- Getting Started with Web Application using PHP & MySQL | Tutorials
- CRUD Operations using PHP & MySQL | Tutorials with Source Code
- Signup Login page in PHP with Database MySQL Source Code
The post OOP in PHP – Inheritance | Encapsulation | Abstraction | Polymorphism appeared first on Coding Infinite.
]]>The post Learn Object Oriented Programming in PHP – OOP Tutorial appeared first on Coding Infinite.
]]>Pre-requisites
- In order to follow this article, you must have some basic knowledge of PHP.
- Your favorite text editor installed.
- You must have one of the web server solution stack installed like XAMPP, WAMP, MAMP or any other.
Most of the modern PHP frameworks use Object Oriented approaches for Application Developments.
What is object-oriented programming?
OOP is a technique to make the program most effective, easy to maintain & similar to our real life. When we use real-life things as objects in programing this technique is called Object-Oriented Programming.
Object
In this concept, basically we use object word for everything. Every real-world entity can be treated as an object. An object has three things:
- Identity
- Data
- Functionality
Object-Oriented Programming: is a technique to solve the problem by breaking the problem into objects. It’s easy to maintain when we consider everything around us as an object in programming. Actually, we break a huge problem into small problems and then solve it easily.
Class
A PHP Class is a group of values with a set of operations to manipulate these values. Classes facilitate modularity and information hiding. Classes are used to define a new data type. Objects are created from a Class. Class is just like a blueprint or description of object. Object is an instance of the Class.
Rules for Class name:
- The class name can be any valid label.
- It can’t be a PHP reserved word.
- Any valid class name starts with a latter or underscores, followed by any number of latter, numbers or underscores.
class Classname
{
       Var-type $variable_name;
       Var-type $variable_name;
       function Method_name( )
       {
       Body of method;
       }
       function Method_name( parameter_list)
       {
       Body of method;
       }
}
In the given above Code, the word class is the keyword when we make a class and Also write a name ( except reserved words ) of this class after written the class keyword. Being a good programmer try to put the first character of the class name is capital anyway It’s not necessary. After this, you put open and close braces. Now you write the whole code in these braces.
Then put var keyword for variable declaration and after this, you write any name for the variable. As you know the end of every statement put a semicolon. Like
var $variable_name; //global variable
When we declare a variable in a class, It’s also called Data member, property or attribute.
Functions
It performs a specific task. Function or method helps to break a big problem into small problems. It has two types of returning and non-returning functions. Its also called method or member function.
Value-Returning Functions: return integer, string or Boolean values after the operation, the parametric values which accept the function.
Non-Returning functions: do not return any value. It accepts parameters and displays or performs operations on it.
The Function may have parameters or not. Parameters are optional. It depends on the type of problem you are working with.
Syntax of Function that takes no parameter
function Method_name()
{
    //Body of method;
}
Syntax of Function that takes a parameter
function Method_name(parameter_list)
{
     // Body of method;
}
Note: There is no semicolon after the parenthesis. It causes a compilation error.
function Method_name() ;    //error
{
    //Body of method;
}
Let us take an example in order to understand the class.
As mentioned above, we model the real-world problems in the object-oriented sense.
Let’s assume that as a programmer I have a project for an application that shows the model number of mobile. Different companies come to me for this same problem.
I have one old technique I make function as the name of that company. But as a developer writing the same code again and again for every company is time-consuming.
You first make a class and put the Class name as you like
In this example, we use the class name Mobile
class  mobile
{
}
We need to think about what is properties and functions a mobile ca have.
Example of some properties
- RAM
- Hard
- SD Slot
- Storage
- Screen size
- Camera
All these things are properties or attributes.
These things will make a variable in this class.
Now, we need a model number against every company
Class Mobile
{
      Var- type  $model;    //global variable
}
We make a variable for the mobile model because it’s a property of mobile. Now, we will examine the functionalities.
We know the things which define the operation. When write function is class we use the word “method”.
- Volume up and down.
- Click the camera to capture the picture.
- Flash
- Music
According to example requirement model function will be shown so
We write function which shows the model.
Class Mobile
{
    $model;    //global variable
    function showModel( $number)
    {
        global  $model;
        $model = $number;
        Echo   “Model Number: ” .$model;
    }
}
As mention in the above Code, the global keyword is used when we write the global variable in the function. After this, you can access this keyword. The value which accepts as a parameter is assigned in $model variable. The last step of this function is to show the value of the model number.
Three types of properties to declare variables in Class
- Public
- protected
- private
those types change the behavior of the properties so as a quick rundown, the Public allows you to access the property outside the class as well as change its definition to change its value.
Protected allows the property to be accessed within the class as well as within an extending class.
Private means that it’s only accessible internally to that class. It can’t be accessed by extending class nor from outside of the class.
Class Mobile
{
      Public $name;
      public $model;
      public $price;
}
Constructors:
Now we need to instantiate the class and there’s a magic method that automatically runs during instantiation that is the constructor method and like the properties we need to define the type of method and all method within the class can have these types so again its pipe private-public and protected they have the similar meaning as the properties in the sense that private can only be accessed internally to that class protected can be overwritten and accessed in other classes and public can be accessed from outside of the class.
Now, we write the public function the constructor is the magic method as I mentioned magic function starts with an underscore. For function also need to write keyword ‘function’.
We actually supply some properties into $name ,$model and the last is $price.
After this, now we need to do is set the values of these properties for that we use the keyword ‘this’ and then ‘-’ then we put the greater than symbol ‘>’ & put the variables individually.
Class Mobile
{
    Public $name;
    public $model;
    public $price;

    public function __constructor($name,$model,$price)
    {
        $this->name = $name;
        $this->model = $model;
        $this->price = $price;
    }
}
Now the thing that we need to do in order to create this car class is we need to instantiate it we need to create an object a member instance that will have some states some explicit values set against this car. The following code is described that above discussion. Note that code written in the outside the curly bracket of the class.
PHP
Class Mobile
{
    Public $name;
    public $model;
    public $price;

    public function __constructor($name,$model,$price)
    {
        $this->name = $name;
        $this->model = $model;
        $this->price = $price;
    }

    Public function whichMobile()
    {
        return “Mobile name is” . $this->name .
        ”Mobile model is ”. $this->model.
        “Mobile price is ”. $this->price;
    }
}

$Iphone = new mobile(‘iphone’,’10’,’$700’);
$sumsung = new mobile(‘sumsung’,’note7’,’$700’);
echo  $Iphone->whichMobile;
echo  $sumsung->whichMobile;
The function ‘which mobile’ use the above code is to return the all values of the mobile with a description when this method is called.
The last two lines of the above code is to call that function with multiple objects of mobile.
Here $Sumsung and $Iphone are objects.
If we want to get the individual values of name or some other variable then we make individual functions for every variable.
Public function getPrice()
{
       Return $this->price;
}
This function give me the value of price you can also make the model and name function according to that function. more details
Here’re some more related Articles:
- Getting Started with Web Application using PHP & MySQL | Tutorials
- CRUD Operations using PHP & MySQL | Tutorials with Source Code
- Signup Login page in PHP with Database MySQL Source Code
The post Learn Object Oriented Programming in PHP – OOP Tutorial appeared first on Coding Infinite.
]]>The post CRUD Operations Web App using PHP & MySQL | Part 2 appeared first on Coding Infinite.
]]>If you missed previous parts, then you can find here => Getting Started with Web Application using PHP & MySQL | Tutorials
I’m assuming that you have followed the previous part of this Tutorial & created API for CRUD Operations using PHP & MySQL.
In this part, we’ll use AdminLTE Template to create UI for our CRUD API we have created in the previous part of this article.
We have also set up our Template & created the database in the First part of this Tutorial.
After following the previous article, your project structure will look like this.
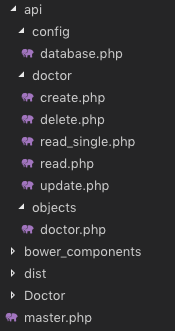
We know that we have created the master.php in the First part, which is our Layout page.
We also have “Doctor” Folder at the root directory of our Project. We’ll create all pages related to Doctor in this Folder.
Let’s start by creating a page to display all doctors data into a Table.
We have created “index.php” file inside “Doctor” Folder. Update this file with the Code below.
<?php
  $content = '<div class="row">
                <div class="col-xs-12">
                <div class="box">
                  <div class="box-header">
                    <h3 class="box-title">Dostors List</h3>
                  </div>
                  <!-- /.box-header -->
                  <div class="box-body">
                    <table id="doctors" class="table table-bordered table-hover">
                      <thead>
                      <tr>
                        <th>Name</th>
                        <th>Email</th>
                        <th>Phone</th>
                        <th>Gender</th>
                        <th>Specialist</th>
                        <th>Action</th>
                      </tr>
                      </thead>
                      <tbody>
                      </tbody>
                      <tfoot>
                      <tr>
                        <th>Name</th>
                        <th>Email</th>
                        <th>Phone</th>
                        <th>Gender</th>
                        <th>Specialist</th>
                        <th>Action</th>
                      </tr>
                      </tfoot>
                    </table>
                  </div>
                  <!-- /.box-body -->
                </div>
                <!-- /.box -->
              </div>
            </div>';
  include('../master.php');
?>
<!-- page script -->
<script>
  $(document).ready(function(){
    $.ajax({
        type: "GET",
        url: "../api/doctor/read.php",
        dataType: 'json',
        success: function(data) {
            var response="";
            for(var user in data){
                response += "<tr>"+
                "<td>"+data[user].name+"</td>"+
                "<td>"+data[user].email+"</td>"+
                "<td>"+data[user].phone+"</td>"+
                "<td>"+((data[user].gender == 0)? "Male": "Female")+"</td>"+
                "<td>"+data[user].specialist+"</td>"+
                "<td><a href='update.php?id="+data[user].id+"'>Edit</a> | <a href='#' onClick=Remove('"+data[user].id+"')>Remove</a></td>"+
                "</tr>";
            }
            $(response).appendTo($("#doctors"));
        }
    });
  });
  function Remove(id){
    var result = confirm("Are you sure you want to Delete the Doctor Record?");
    if (result == true) {
        $.ajax(
        {
            type: "POST",
            url: '../api/doctor/delete.php',
            dataType: 'json',
            data: {
                id: id
            },
            error: function (result) {
                alert(result.responseText);
            },
            success: function (result) {
                if (result['status'] == true) {
                    alert("Successfully Removed Doctor!");
                    window.location.href = '/medibed/doctor';
                }
                else {
                    alert(result['message']);
                }
            }
        });
    }
  }
</script>
Code Explanation
First of all, we have the content of this page in a PHP variable & then we simply included our master.php because it has the code for Layout page.
On document load, we’re using ajax to consume our read API to get all doctors.
We also have a function to remove a Doctor.
Now go to this Url => http://localhost/medibed/doctor/
you’ll see this page

Doctor remove will also work fine because of remove function ready in our code.
Now we need to create pages to Create & Update a Doctor.
Create a new file inside “Doctor” Folder with the name “create.php” & add this Code.
<?php
  $content = '<div class="row">
                <!-- left column -->
                <div class="col-md-12">
                  <!-- general form elements -->
                  <div class="box box-primary">
                    <div class="box-header with-border">
                      <h3 class="box-title">Add Doctor</h3>
                    </div>
                    <!-- /.box-header -->
                    <!-- form start -->
                    <form role="form">
                      <div class="box-body">
                        <div class="form-group">
                          <label for="exampleInputName1">Name</label>
                          <input type="text" class="form-control" id="name" placeholder="Enter Name">
                        </div>
                        <div class="form-group">
                          <label for="exampleInputEmail1">Email address</label>
                          <input type="email" class="form-control" id="email" placeholder="Enter email">
                        </div>
                        <div class="form-group">
                          <label for="exampleInputPassword1">Password</label>
                          <input type="password" class="form-control" id="password" placeholder="Password">
                        </div>
                        <div class="form-group">
                          <label for="exampleInputName1">Phone</label>
                          <input type="text" class="form-control" id="phone" placeholder="Enter Phone">
                        </div>
                        <div class="form-group">
                            <label for="exampleInputName1">Gender</label>
                            <div class="radio">
                                <label>
                                <input type="radio" name="gender" id="optionsRadios1" value="0" checked="">
                                Male
                                </label>
                            </div>
                            <div class="radio">
                                <label>
                                <input type="radio" name="gender" id="optionsRadios2" value="1">
                                Female
                                </label>
                            </div>
                        </div>
                        <div class="form-group">
                          <label for="exampleInputName1">Specialist</label>
                          <input type="text" class="form-control" id="specialist" placeholder="Enter Specialization">
                        </div>
                      </div>
                      <!-- /.box-body -->
                      <div class="box-footer">
                        <input type="button" class="btn btn-primary" onClick="AddDoctor()" value="Submit"></input>
                      </div>
                    </form>
                  </div>
                  <!-- /.box -->
                </div>
              </div>';
  include('../master.php');
?>
<script>
  function AddDoctor(){

        $.ajax(
        {
            type: "POST",
            url: '../api/doctor/create.php',
            dataType: 'json',
            data: {
                name: $("#name").val(),
                email: $("#email").val(),
                password: $("#password").val(),
                phone: $("#phone").val(),
                gender: $("input[name='gender']:checked").val(),
                specialist: $("#specialist").val()
            },
            error: function (result) {
                alert(result.responseText);
            },
            success: function (result) {
                if (result['status'] == true) {
                    alert("Successfully Added New Doctor!");
                    window.location.href = '/medibed/doctor';
                }
                else {
                    alert(result['message']);
                }
            }
        });
    }
</script>
Now click on Create Doctor inside Doctors SideBar Menu or go to this Url => http://localhost/medibed/doctor/create.php
You’ll see this page

Try to Create a new Doctor.
I hope everything is working as expected.
Let’s complete our Update Doctor functionality by creating a new file inside “Doctor” Folder as “update.php”
Add the below code inside this newly created file.
<?php
  $content = '<div class="row">
                <!-- left column -->
                <div class="col-md-12">
                  <!-- general form elements -->
                  <div class="box box-primary">
                    <div class="box-header with-border">
                      <h3 class="box-title">Update Doctor</h3>
                    </div>
                    <!-- /.box-header -->
                    <!-- form start -->
                    <form role="form">
                      <div class="box-body">
                        <div class="form-group">
                          <label for="exampleInputName1">Name</label>
                          <input type="text" class="form-control" id="name" placeholder="Enter Name">
                        </div>
                        <div class="form-group">
                          <label for="exampleInputEmail1">Email address</label>
                          <input type="email" class="form-control" id="email" placeholder="Enter email">
                        </div>
                        <div class="form-group">
                          <label for="exampleInputPassword1">Password</label>
                          <input type="password" class="form-control" id="password" placeholder="Password">
                        </div>
                        <div class="form-group">
                          <label for="exampleInputName1">Phone</label>
                          <input type="text" class="form-control" id="phone" placeholder="Enter Phone">
                        </div>
                        <div class="form-group">
                            <label for="exampleInputName1">Gender</label>
                            <div class="radio">
                                <label>
                                <input type="radio" name="gender" id="gender0" value="0" checked="">
                                Male
                                </label>
                            </div>
                            <div class="radio">
                                <label>
                                <input type="radio" name="gender" id="gender1" value="1">
                                Female
                                </label>
                            </div>
                        </div>
                        <div class="form-group">
                          <label for="exampleInputName1">Specialist</label>
                          <input type="text" class="form-control" id="specialist" placeholder="Enter Specialization">
                        </div>
                      </div>
                      <!-- /.box-body -->
                      <div class="box-footer">
                        <input type="button" class="btn btn-primary" onClick="UpdateDoctor()" value="Update"></input>
                      </div>
                    </form>
                  </div>
                  <!-- /.box -->
                </div>
              </div>';

  include('../master.php');
?>
<script>
    $(document).ready(function(){
        $.ajax({
            type: "GET",
            url: "../api/doctor/read_single.php?id=<?php echo $_GET['id']; ?>",
            dataType: 'json',
            success: function(data) {
                $('#name').val(data['name']);
                $('#email').val(data['email']);
                $('#password').val(data['password']);
                $('#phone').val(data['phone']);
                $('#gender'+data['gender']).prop("checked", true);
                $('#specialist').val(data['specialist']);
            },
            error: function (result) {
                console.log(result);
            },
        });
    });
    function UpdateDoctor(){
        $.ajax(
        {
            type: "POST",
            url: '../api/doctor/update.php',
            dataType: 'json',
            data: {
                id: <?php echo $_GET['id']; ?>,
                name: $("#name").val(),
                email: $("#email").val(),
                password: $("#password").val(),
                phone: $("#phone").val(),
                gender: $("input[name='gender']:checked").val(),
                specialist: $("#specialist").val()
            },
            error: function (result) {
                alert(result.responseText);
            },
            success: function (result) {
                if (result['status'] == true) {
                    alert("Successfully Updated Doctor!");
                    window.location.href = '/medibed/doctor';
                }
                else {
                    alert(result['message']);
                }
            }
        });
    }
</script>
Now you can also update any doctor record.
We have successfully created our CRUD(Create, Read, Update, Delete) Operations using Beautiful & Free UI Template.
You can also download the complete source code from GitHub.
Please Comment If you found any problem.
You might be interested in:
- Signup Login page in PHP with Database MySQL Source Code
- Restful Web Services in PHP Example – PHP + MySQL with Source Code
The post CRUD Operations Web App using PHP & MySQL | Part 2 appeared first on Coding Infinite.
]]>The post CRUD Operations using PHP & MySQL | Tutorials with Source Code appeared first on Coding Infinite.
]]>For creating beautiful & responsive UI, I’m using AdminLTE Template. So, In case if you missed the first part of this Tutorial, then you can find here => Getting Started with Web Application using PHP & MySQL | Tutorials
Assuming that you have followed the above tutorial & setup your project, let’s start our CRUD Operations Tutorial using PHP & MySQL.
I’m performing my CRUD Operation on this Database Table. You can use your own Table.

Creating Folders
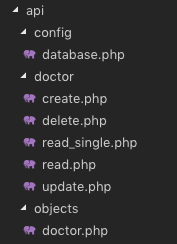
- First of all, create a new folder at the root of your project directory as “api”.
- Inside “api” folder create three folders as “config”, “objects” & “doctors”.
we’ll keep all Doctor API inside “doctors” folder.
This directory structure will help us to keep our project easy to manage.
Database Connectivity
In your “config” folder inside “api” folder, create a new file there as “database.php” and paste this code there
<?php
class Database{

    // specify your own database credentials
    private $host = "localhost";
    private $db_name = "hospital_db";
    private $username = "root";
    private $password = "";
    public $conn;

    // get the database connection
    public function getConnection(){

        $this->conn = null;

        try{
            $this->conn = new PDO("mysql:host=" . $this->host . ";dbname=" . $this->db_name, $this->username, $this->password);
            $this->conn->exec("set names utf8");
        }catch(PDOException $exception){
            echo "Connection error: " . $exception->getMessage();
        }

        return $this->conn;
    }
}
?>
Now, your project structure should look like this.

Let’s start from creating API for CRUD operations.
I’m going to use Object Oriented Approach in this tutorial.
First of all, create a Model of your Doctor.
So, create a new file as “doctor.php” inside “objects” folder & add this Code:
<?php
class Doctor{

    // database connection and table name
    private $conn;
    private $table_name = "doctors";

    // object properties
    public $id;
    public $name;
    public $email;
    public $password;
    public $phone;
    public $gender;
    public $specialist;
    public $created;

    // constructor with $db as database connection
    public function __construct($db){
        $this->conn = $db;
    }

    // read all doctors
    function read(){

        // select all query
        $query = "SELECT
                    `id`, `name`, `email`, `password`, `phone`, `gender`, `specialist`, `created`
                FROM
                    " . $this->table_name . "
                ORDER BY
                    id DESC";

        // prepare query statement
        $stmt = $this->conn->prepare($query);

        // execute query
        $stmt->execute();

        return $stmt;
    }

    // get single doctor data
    function read_single(){

        // select all query
        $query = "SELECT
                    `id`, `name`, `email`, `password`, `phone`, `gender`, `specialist`, `created`
                FROM
                    " . $this->table_name . "
                WHERE
                    id= '".$this->id."'";

        // prepare query statement
        $stmt = $this->conn->prepare($query);

        // execute query
        $stmt->execute();
        return $stmt;
    }

    // create doctor
    function create(){

        if($this->isAlreadyExist()){
            return false;
        }

        // query to insert record
        $query = "INSERT INTO  ". $this->table_name ."
                        (`name`, `email`, `password`, `phone`, `gender`, `specialist`, `created`)
                  VALUES
                        ('".$this->name."', '".$this->email."', '".$this->password."', '".$this->phone."', '".$this->gender."', '".$this->specialist."', '".$this->created."')";

        // prepare query
        $stmt = $this->conn->prepare($query);

        // execute query
        if($stmt->execute()){
            $this->id = $this->conn->lastInsertId();
            return true;
        }

        return false;
    }

    // update doctor
    function update(){

        // query to insert record
        $query = "UPDATE
                    " . $this->table_name . "
                SET
                    name='".$this->name."', email='".$this->email."', password='".$this->password."', phone='".$this->phone."', gender='".$this->gender."', specialist='".$this->specialist."'
                WHERE
                    id='".$this->id."'";

        // prepare query
        $stmt = $this->conn->prepare($query);
        // execute query
        if($stmt->execute()){
            return true;
        }
        return false;
    }

    // delete doctor
    function delete(){

        // query to insert record
        $query = "DELETE FROM
                    " . $this->table_name . "
                WHERE
                    id= '".$this->id."'";

        // prepare query
        $stmt = $this->conn->prepare($query);

        // execute query
        if($stmt->execute()){
            return true;
        }
        return false;
    }

    function isAlreadyExist(){
        $query = "SELECT *
            FROM
                " . $this->table_name . "
            WHERE
                email='".$this->email."'";

        // prepare query statement
        $stmt = $this->conn->prepare($query);

        // execute query
        $stmt->execute();

        if($stmt->rowCount() > 0){
            return true;
        }
        else{
            return false;
        }
    }
}
you can see that we have all CRUD Operations including read_single function for reading a single Doctor record from MySQL database table.
Now, we’ll create a separate file for each operation inside “doctor” folder & we’ll call functions from “doctor.php” inside “objects” folder.
Let’s create a file inside “doctor” folder as “create.php” for creating a new doctor & add the below code inside this file.
<?php

// include database and object files
include_once '../config/database.php';
include_once '../objects/doctor.php';

// get database connection
$database = new Database();
$db = $database->getConnection();

// prepare doctor object
$doctor = new Doctor($db);

// set doctor property values
$doctor->name = $_POST['name'];
$doctor->email = $_POST['email'];
$doctor->password = base64_encode($_POST['password']);
$doctor->phone = $_POST['phone'];
$doctor->gender = $_POST['gender'];
$doctor->specialist = $_POST['specialist'];
$doctor->created = date('Y-m-d H:i:s');

// create the doctor
if($doctor->create()){
    $doctor_arr=array(
        "status" => true,
        "message" => "Successfully Signup!",
        "id" => $doctor->id,
        "name" => $doctor->name,
        "email" => $doctor->email,
        "phone" => $doctor->phone,
        "gender" => $doctor->gender,
        "specialist" => $doctor->specialist
    );
}
else{
    $doctor_arr=array(
        "status" => false,
        "message" => "Email already exists!"
    );
}
print_r(json_encode($doctor_arr));
?>
For reading all records from Doctors table create a file as “read.php” & add this code
<?php
// include database and object files
include_once '../config/database.php';
include_once '../objects/doctor.php';

// get database connection
$database = new Database();
$db = $database->getConnection();

// prepare doctor object
$doctor = new Doctor($db);

// query doctor
$stmt = $doctor->read();
$num = $stmt->rowCount();
// check if more than 0 record found
if($num>0){

    // doctors array
    $doctors_arr=array();
    $doctors_arr["doctors"]=array();

    while ($row = $stmt->fetch(PDO::FETCH_ASSOC)){
        extract($row);
        $doctor_item=array(
            "id" => $id,
            "name" => $name,
            "email" => $email,
            "password" => $password,
            "phone" => $phone,
            "gender" => $gender,
            "specialist" => $specialist,
            "created" => $created
        );
        array_push($doctors_arr["doctors"], $doctor_item);
    }

    echo json_encode($doctors_arr["doctors"]);
}
else{
    echo json_encode(array());
}
?>
to Update a record, create a file as “update.php” & add the code below
<?php

// include database and object files
include_once '../config/database.php';
include_once '../objects/doctor.php';

// get database connection
$database = new Database();
$db = $database->getConnection();

// prepare doctor object
$doctor = new Doctor($db);

// set doctor property values
$doctor->id = $_POST['id'];
$doctor->name = $_POST['name'];
$doctor->email = $_POST['email'];
$doctor->password = base64_encode($_POST['password']);
$doctor->phone = $_POST['phone'];
$doctor->gender = $_POST['gender'];
$doctor->specialist = $_POST['specialist'];

// create the doctor
if($doctor->update()){
    $doctor_arr=array(
        "status" => true,
        "message" => "Successfully Updated!"
    );
}
else{
    $doctor_arr=array(
        "status" => false,
        "message" => "Email already exists!"
    );
}
print_r(json_encode($doctor_arr));
?>
& for the last letter of CRUD, which is D.
create another file as “delete.php” & add this code
<?php

// include database and object files
include_once '../config/database.php';
include_once '../objects/doctor.php';

// get database connection
$database = new Database();
$db = $database->getConnection();

// prepare doctor object
$doctor = new Doctor($db);

// set doctor property values
$doctor->id = $_POST['id'];

// remove the doctor
if($doctor->delete()){
    $doctor_arr=array(
        "status" => true,
        "message" => "Successfully Removed!"
    );
}
else{
    $doctor_arr=array(
        "status" => false,
        "message" => "Doctor Cannot be deleted. may be he's assigned to a patient!"
    );
}
print_r(json_encode($doctor_arr));
?>
in the end, we need another method which is to get a single doctor record.
So, create a new file as “read_single.php” & add the below code
<?php
// include database and object files
include_once '../config/database.php';
include_once '../objects/doctor.php';

// get database connection
$database = new Database();
$db = $database->getConnection();

// prepare doctor object
$doctor = new Doctor($db);

// set ID property of doctor to be edited
$doctor->id = isset($_GET['id']) ? $_GET['id'] : die();

// read the details of doctor to be edited
$stmt = $doctor->read_single();

if($stmt->rowCount() > 0){
    // get retrieved row
    $row = $stmt->fetch(PDO::FETCH_ASSOC);
    // create array
    $doctor_arr=array(
        "id" => $row['id'],
        "name" => $row['name'],
        "email" => $row['email'],
        "password" => $row['password'],
        "phone" => $row['phone'],
        "gender" => $row['gender'],
        "specialist" => $row['specialist'],
        "created" => $row['created']
    );
}
// make it json format
print_r(json_encode($doctor_arr));
?>
After this our “api” directory will look like this
Our API for CRUD Operation is ready using PHP & MySQL. Now, we need to create UI using the template we set up in the previous article & then connect our UI with the API we created in this article.
We’ll create UI for our CRUD Operations in the next part of this Article.
Comment If you find any difficulty, I’m available to solve your problems.
The post CRUD Operations using PHP & MySQL | Tutorials with Source Code appeared first on Coding Infinite.
]]>The post Getting Started with Web Application using PHP & MySQL | Tutorials appeared first on Coding Infinite.
]]>This Tutorial is for beginners. So, for keeping the things simple we’ll not use any PHP Framework. We’ll use Object-Oriented PHP for creating our Web Application.
We’re going to create an Application to manage Doctors, Nurses etc & I’m going to give our application a name “Medibed”.

If you’re interested in creating Web Services using PHP. Here’s my article on Web Services in PHP
Restful Web Services in PHP Example – PHP + MySQL with Source Code
This Tutorial is designed using Object Oriented PHP. So, you must have a basic knowledge of Object Oriented Concepts in PHP before following this series. Here’s a quick overview of all those OOP Concepts.
Now, Let’s start our Tutorial.
Pre-requisites
Before starting this Tutorial, you must have a basic knowledge of PHP, MySQL, HTML, CSS, & JQuery to customize your application. We’ll use MySQL for creating Database for our Application & an Admin Template for creating interactive User Interfaces.
There are many Free Templates Available, for this Tutorial, I’m going to use This Beautiful Admin Template by almasaeed.
Setting up Server
To work on your local system you need to have PHP & MySQL installed on your system. So, the first step is to have a server to run our application. I’m going to install XAMPP because It installs both PHP & MySQL for us.

Run your server, go to your “htdocs” Folder inside “XAMPP” Forder & create a new folder there as “medibed”
Creating Database
It’s time to create a database for our Web Application.
I’m going to use very simple Hospital Database with 4 Tables, “doctors”, “nurses”, “patients” & “admins”.
You can use the database of your Web or Mobile App for which you are developing your Application.
Here’s the Database I’m going to use with the name “hospital_db”

& here’s the SQL script for this database
Database Script
SET SQL_MODE = "NO_AUTO_VALUE_ON_ZERO";
SET AUTOCOMMIT = 0;
START TRANSACTION;
SET time_zone = "+00:00";

-- Database: `hospital_db`
--
-- --------------------------------------------------------
--
-- Table structure for table `admins`
--
CREATE TABLE `admins` (
  `id` int(11) NOT NULL,
  `name` varchar(255) NOT NULL,
  `email` varchar(255) NOT NULL,
  `password` varchar(255) NOT NULL,
  `phone` varchar(15) NOT NULL,
  `created` timestamp NOT NULL DEFAULT CURRENT_TIMESTAMP
) ENGINE=InnoDB DEFAULT CHARSET=latin1;
-- --------------------------------------------------------
--
-- Table structure for table `doctors`
--
CREATE TABLE `doctors` (
  `id` int(11) NOT NULL,
  `name` varchar(255) NOT NULL,
  `email` varchar(255) NOT NULL,
  `password` varchar(255) NOT NULL,
  `phone` varchar(15) NOT NULL,
  `gender` int(11) NOT NULL,
  `specialist` varchar(255) NOT NULL,
  `created` timestamp NOT NULL DEFAULT CURRENT_TIMESTAMP
) ENGINE=InnoDB DEFAULT CHARSET=latin1;
--
-- Dumping data for table `doctors`
--
INSERT INTO `doctors` (`id`, `name`, `email`, `password`, `phone`, `gender`, `specialist`, `created`) VALUES
(1, 'Ahsan Saeed', '[email protected]', 'Vm0xMFlWbFdWWGhVYmxKWFltdHdVRlpzV21GWFJscHlWV3RLVUZWVU1Eaz0=', '03218878961', 0, 'Heart', '2018-05-01 13:07:24');
-- --------------------------------------------------------
--
-- Table structure for table `nurses`
--
CREATE TABLE `nurses` (
  `id` int(11) NOT NULL,
  `name` varchar(255) NOT NULL,
  `email` varchar(255) NOT NULL,
  `password` varchar(255) NOT NULL,
  `phone` varchar(15) NOT NULL,
  `created` timestamp NOT NULL DEFAULT CURRENT_TIMESTAMP
) ENGINE=InnoDB DEFAULT CHARSET=latin1;
--
-- Dumping data for table `nurses`
--
INSERT INTO `nurses` (`id`, `name`, `email`, `password`, `phone`, `created`) VALUES
(1, 'Ahsan', '[email protected]', 'MTIzNDU=', '03218878961', '2018-06-27 13:39:31'),
(2, '2', 'ABC', 'WFla', '123456789', '2018-07-06 13:50:24'),
(3, 'Shehryar khan', '[email protected]', 'YXBwcnl4', '3433243243', '2018-07-06 18:12:35');
-- --------------------------------------------------------
--
-- Table structure for table `patients`
--
CREATE TABLE `patients` (
  `id` int(11) NOT NULL,
  `name` varchar(255) NOT NULL,
  `phone` varchar(15) NOT NULL,
  `gender` int(11) NOT NULL,
  `health_condition` varchar(255) NOT NULL,
  `doctor_id` int(11) NOT NULL,
  `nurse_id` int(11) NOT NULL,
  `created` timestamp NOT NULL DEFAULT CURRENT_TIMESTAMP
) ENGINE=InnoDB DEFAULT CHARSET=latin1;
--
-- Dumping data for table `patients`
--
INSERT INTO `patients` (`id`, `name`, `phone`, `gender`, `health_condition`, `doctor_id`, `nurse_id`, `created`) VALUES
(6, 'hjj', '9988596666', 1, 'vbjbb', 1, 1, '2018-06-26 13:12:18'),
(9, '2', '123456789', 1, 'OK', 1, 1, '2018-07-06 13:59:25'),
(10, '2', '123456789', 1, 'OK', 1, 1, '2018-07-06 14:13:13'),
(11, 'shehryar', '123456789', 1, 'OK', 1, 1, '2018-07-06 17:36:08'),
(14, 'Coding Infinite', '3433243243', 0, 'asd', 1, 1, '2018-07-06 18:39:42'),
(15, 'Coding Infinite', '3433243243', 0, 'asd', 1, 1, '2018-07-06 18:40:07'),
(16, 'Coding Infinite', '3433243243', 0, 'asd', 1, 1, '2018-07-06 18:40:59');
--
-- Indexes for dumped tables
--
--
-- Indexes for table `admins`
--
ALTER TABLE `admins`
  ADD PRIMARY KEY (`id`);
--
-- Indexes for table `doctors`
--
ALTER TABLE `doctors`
  ADD PRIMARY KEY (`id`);
--
-- Indexes for table `nurses`
--
ALTER TABLE `nurses`
  ADD PRIMARY KEY (`id`);
--
-- Indexes for table `patients`
--
ALTER TABLE `patients`
  ADD PRIMARY KEY (`id`),
  ADD KEY `doctor_id` (`doctor_id`),
  ADD KEY `nurse_id` (`nurse_id`);
--
-- AUTO_INCREMENT for dumped tables
--
--
-- AUTO_INCREMENT for table `admins`
--
ALTER TABLE `admins`
  MODIFY `id` int(11) NOT NULL AUTO_INCREMENT;
--
-- AUTO_INCREMENT for table `doctors`
--
ALTER TABLE `doctors`
  MODIFY `id` int(11) NOT NULL AUTO_INCREMENT, AUTO_INCREMENT=2;
--
-- AUTO_INCREMENT for table `nurses`
--
ALTER TABLE `nurses`
  MODIFY `id` int(11) NOT NULL AUTO_INCREMENT, AUTO_INCREMENT=4;
--
-- AUTO_INCREMENT for table `patients`
--
ALTER TABLE `patients`
  MODIFY `id` int(11) NOT NULL AUTO_INCREMENT, AUTO_INCREMENT=17;
--
-- Constraints for dumped tables
--
--
-- Constraints for table `patients`
--
ALTER TABLE `patients`
  ADD CONSTRAINT `patients_ibfk_1` FOREIGN KEY (`doctor_id`) REFERENCES `doctors` (`id`),
  ADD CONSTRAINT `patients_ibfk_2` FOREIGN KEY (`nurse_id`) REFERENCES `nurses` (`id`);
COMMIT;
Save the Above SQL Script in a file as “hospital_db.sql”.
Go to http://localhost/phpmyadmin, create a database as “hospital_db” & import the SQL File in your Database.
Now our database is ready & the next step is to set up our Server & AdminLTE Template for our Application.
Setting Up Template
First, you need to download AdminLTE Template. So download or clone AdminLTE & Unzip AdminLTE folder.
You’ll see these files & folders.

For keeping our project clean you need to copy & paste only Two Folders “bower_components” & “dist” from here to the folder we have created earlier with the name “medibed”.
Let start by creating a Layout Page for our Application.
Now create a new file as “master.php” at the root folder of your Folder & paste this code.
<!DOCTYPE html>
<html>
<head>
  <meta charset="utf-8">
  <meta http-equiv="X-UA-Compatible" content="IE=edge">
  <title>MediBed</title>
  <!-- Tell the browser to be responsive to screen width -->
  <meta content="width=device-width, initial-scale=1, maximum-scale=1, user-scalable=no" name="viewport">
  <link rel="stylesheet" href="proxy.php?url=../bower_components/bootstrap/dist/css/bootstrap.min.css">
  <!-- Font Awesome -->
  <link rel="stylesheet" href="proxy.php?url=../bower_components/font-awesome/css/font-awesome.min.css">
  <!-- Ionicons -->
  <link rel="stylesheet" href="proxy.php?url=../bower_components/Ionicons/css/ionicons.min.css">
  <!-- Theme style -->
  <link rel="stylesheet" href="proxy.php?url=../dist/css/AdminLTE.min.css">
  <link rel="stylesheet" href="proxy.php?url=../dist/css/skins/skin-blue.min.css">

  <!-- Google Font -->
  <link rel="stylesheet"
        href="proxy.php?url=https://fonts.googleapis.com/css?family=Source+Sans+Pro:300,400,600,700,300italic,400italic,600italic">
</head>
<body class="hold-transition skin-blue sidebar-mini">
<div class="wrapper">

  <!-- Main Header -->
  <header class="main-header">

    <!-- Logo -->
    <a href="proxy.php?url=index.php" class="logo">
      <!-- mini logo for sidebar mini 50x50 pixels -->
      <span class="logo-mini"><b>M</b>BD</span>
      <!-- logo for regular state and mobile devices -->
      <span class="logo-lg"><b>Medi</b>BED</span>
    </a>

    <!-- Header Navbar -->
    <nav class="navbar navbar-static-top" role="navigation">
      <!-- Sidebar toggle button-->
      <a href="proxy.php?url=#" class="sidebar-toggle" data-toggle="push-menu" role="button">
        <span class="sr-only">Toggle navigation</span>
      </a>
      <!-- Navbar Right Menu -->
      <div class="navbar-custom-menu">
        <ul class="nav navbar-nav">


          <!-- User Account Menu -->
          <li class="dropdown user user-menu">
            <!-- Menu Toggle Button -->
            <a href="proxy.php?url=" class="dropdown-toggle" data-toggle="dropdown">
              <!-- The user image in the navbar-->
              <img src="proxy.php?url=../dist/img/avatar5.png" class="user-image" alt="User Image">
              <!-- hidden-xs hides the username on small devices so only the image appears. -->
              <span class="hidden-xs">Ahmed Khalid</span>
            </a>
            <ul class="dropdown-menu">
              <!-- The user image in the menu -->
              <li class="user-header">
                <img src="proxy.php?url=../dist/img/avatar5.png" class="img-circle" alt="User Image">

                <p>
                  Ahmed Khalid - Developer
                  <small>Member since May. 2018</small>
                </p>
              </li>

              <!-- Menu Footer-->
              <li class="user-footer">
                <div class="pull-left">
                  <a href="proxy.php?url=#" class="btn btn-default btn-flat">Profile</a>
                </div>
                <div class="pull-right">
                  <a href="proxy.php?url=#" class="btn btn-default btn-flat">Sign out</a>
                </div>
              </li>
            </ul>
          </li>
          <!-- Control Sidebar Toggle Button -->

        </ul>
      </div>
    </nav>
  </header>
  <!-- Left side column. contains the logo and sidebar -->
  <aside class="main-sidebar">

    <!-- sidebar: style can be found in sidebar.less -->
    <section class="sidebar">

      <!-- Sidebar user panel (optional) -->
      <div class="user-panel">
        <div class="pull-left image">
          <img src="proxy.php?url=../dist/img/avatar5.png" class="img-circle" alt="User Image">
        </div>
        <div class="pull-left info">
          <p>Ahmed Khalid</p>
          <!-- Status -->
          <a href="proxy.php?url="><i class="fa fa-circle text-success"></i> Online</a>
        </div>
      </div>

      <!-- search form (Optional) -->
      <form action="proxy.php?url=#" method="get" class="sidebar-form">
        <div class="input-group">
          <input type="text" name="q" class="form-control" placeholder="Search...">
          <span class="input-group-btn">
              <button type="submit" name="search" id="search-btn" class="btn btn-flat"><i class="fa fa-search"></i>
              </button>
            </span>
        </div>
      </form>
      <!-- /.search form -->

      <!-- Sidebar Menu -->
      <ul class="sidebar-menu" data-widget="tree">
        <li class="header">Menu</li>
        <!-- Optionally, you can add icons to the links -->
        <li class="treeview">
          <a href="proxy.php?url=#"><i class="fa fa-medkit"></i> <span>Doctors</span>
            <span class="pull-right-container">
                <i class="fa fa-angle-left pull-right"></i>
              </span>
          </a>
          <ul class="treeview-menu">
            <li><a href="proxy.php?url=/medibed/doctor/create.php">Create Doctor</a></li>
            <li><a href="proxy.php?url=/medibed/doctor">All Doctors</a></li>
          </ul>
        </li>
      </ul>

      <!-- /.sidebar-menu -->
    </section>
    <!-- /.sidebar -->
  </aside>

  <!-- Content Wrapper. Contains page content -->
  <div class="content-wrapper">
    <!-- Content Header (Page header) -->
    <section class="content-header">
      <h1>
        Dashboard
        <small>Welcome to Admin Dashboard</small>
      </h1>
      <ol class="breadcrumb">
        <li><a href="proxy.php?url=#"><i class="fa fa-dashboard"></i> MediBed</a></li>
        <li class="active">Dashboard</li>
      </ol>
    </section>

    <!-- Main content -->
    <section class="content container-fluid">

      <?php echo $content; ?>

    </section>
    <!-- /.content -->
  </div>
  <!-- /.content-wrapper -->

  <!-- Main Footer -->
  <footer class="main-footer">
    <!-- Default to the left -->
    <strong>Copyright © 2018 <a href="proxy.php?url=https://codinginfinite.com">Coding Infinite</a>.</strong> All rights reserved.
  </footer>

  <!-- Add the sidebar's background. This div must be placed
  immediately after the control sidebar -->
  <div class="control-sidebar-bg"></div>
</div>
<!-- ./wrapper -->

<!-- REQUIRED JS SCRIPTS -->

<!-- jQuery 3 -->
<script src="proxy.php?url=../bower_components/jquery/dist/jquery.min.js"></script>
<!-- Bootstrap 3.3.7 -->
<script src="proxy.php?url=../bower_components/bootstrap/dist/js/bootstrap.min.js"></script>
<!-- DataTables -->
<script src="proxy.php?url=../bower_components/datatables.net/js/jquery.dataTables.min.js"></script>
<script src="proxy.php?url=../bower_components/datatables.net-bs/js/dataTables.bootstrap.min.js"></script>
<!-- AdminLTE App -->
<script src="proxy.php?url=../dist/js/adminlte.min.js"></script>

</body>
</html>
This is our master/layout page. We’ll load the content of all other pages inside this master page.
Let’s test our master page.
Create a new Folder as “Doctor” at the root of our project & inside this folder create a new file with the name “index.php”
Now, your “medibed” folder should look like this.

Add the Code below Inside your “index.php”
<?php
  $content = '<h2>Your Main Content Here</h2>';
  include('../master.php');
?>
Now, open your browser & go to this URL => http://localhost/medibed/doctor
you’ll see this

Congrats, you have successfully completed the first step toward creating your Web Application.
In the Next part of this Tutorial, we’ll perform CRUD operations using this beautiful Template.
Comment If you have any question or find any difficulty. I’m here to solve your problem.
You might be interested in:
- Signup Login page in PHP with Database MySQL Source Code
- Restful Web Services in PHP Example – PHP + MySQL with Source Code
The post Getting Started with Web Application using PHP & MySQL | Tutorials appeared first on Coding Infinite.
]]>The post Android Image Upload Example using PHP with Source Code appeared first on Coding Infinite.
]]>There are several ways to upload Image or any other file from Android to Server using PHP Webservice. I’m going to upload the image in base64 encoded form. I’ll share the source code for both Android and PHP.
Web Service will also save the image on the server after receiving it.
How Does It Work?
- Select the Image from Phone Gallary
- Encode the Image to Base64
- Send the Image as POST Parameter using PHP Webservice
- Webservice will receive encoded image
- Decode Image and save it on the Server
Source Code
Android:
Now it’s time to do some Android coding for uploading the image. In this app, for uploading the image we’re using Retrofit. For to add the Retrofit in Android app add the dependencies in your app. Below are the dependencies.
implementation 'com.squareup.retrofit2:retrofit:2.3.0'
implementation 'com.squareup.retrofit2:converter-gson:2.3.0'
implementation 'com.squareup.okhttp3:logging-interceptor:3.9.0'
Before starting the Android app coding I wanna show you the demo of the app.
Now you see the demo right, let’s start making the app by designing its UI. Below is the activity_main.xml file.
<?xml version="1.0" encoding="utf-8"?>
<RelativeLayout xmlns:android="http://schemas.android.com/apk/res/android"
    xmlns:tools="http://schemas.android.com/tools"
    android:layout_width="match_parent"
    android:layout_height="match_parent"
    tools:context=".MainActivity">

    <ImageView
        android:id="@+id/imageView"
        android:layout_width="match_parent"
        android:layout_height="200dp"
        android:contentDescription="@null"
        android:scaleType="centerCrop" />

    <LinearLayout
        style="?android:attr/buttonBarStyle"
        android:layout_width="match_parent"
        android:layout_height="wrap_content"
        android:layout_alignParentBottom="true"
        android:orientation="horizontal"
        android:weightSum="2">

        <Button
            android:id="@+id/selectImageButton"
            android:layout_width="0dp"
            android:layout_height="wrap_content"
            android:layout_marginEnd="10dp"
            android:layout_weight="1"
            android:text="@string/select_image"
            tools:ignore="ButtonStyle" />

        <Button
            android:id="@+id/uploadImageButton"
            android:layout_width="0dp"
            android:layout_height="wrap_content"
            android:layout_weight="1"
            android:text="@string/select_image"
            tools:ignore="ButtonStyle" />

    </LinearLayout>

</RelativeLayout>
In our MainActivity when the user clicks on the selectImage button it will open the Gallery app and let you select the image. Below is the code for when a user presses the select image button.
findViewById<Button>(R.id.selectImageButton).setOnClickListener {
            val intent = Intent(
                    Intent.ACTION_PICK, android.provider.MediaStore.Images.Media.EXTERNAL_CONTENT_URI)
            startActivityForResult(Intent.createChooser(intent, "Select Picture"), PICK_IMAGE_REQUEST_CODE)
}
Now when the user selects the image from the Gallery app the result will come in the onActivityResult method. Below is the MainActivity onActivityResult method.
override fun onActivityResult(requestCode: Int, resultCode: Int, data: Intent?) {
     super.onActivityResult(requestCode, resultCode, data)
     if (requestCode == PICK_IMAGE_REQUEST_CODE && RESULT_OK == resultCode) {
         data?.let {
             try {
                 bitmap = uiHelper.decodeUri(this, it.data)
                 imageView.setImageBitmap(bitmap)
             } catch (e: Exception) {
                 if (bitmap != null) imageView.setImageBitmap(bitmap)
             }
         }
     }
 }
After the user selects an image the onActivityResult method will be called. So, we store the image as Bitmap in our global bitmap object. Before proceeding next you guys see that we’re decoding the image with a decodeUri method to get the resulted bitmap. Below is the decodeUri method.
@Throws(FileNotFoundException::class)
fun decodeUri(context: Context, selectedImage: Uri): Bitmap {
    val o = BitmapFactory.Options()
    o.inJustDecodeBounds = true
    BitmapFactory.decodeStream(context.contentResolver.openInputStream(selectedImage), null, o)
    val REQUIRED_SIZE = 140
    var width_tmp = o.outWidth
    var height_tmp = o.outHeight
    var scale = 1
    while (true) {
        if (width_tmp / 2 < REQUIRED_SIZE || height_tmp / 2 < REQUIRED_SIZE) {
            break
        }
        width_tmp /= 2
        height_tmp /= 2
        scale *= 2
    }
    val o2 = BitmapFactory.Options()
    o2.inSampleSize = scale
    return BitmapFactory.decodeStream(context.contentResolver.openInputStream(selectedImage), null, o2)
}
So, we select the image and store the resulted image in the bitmap object. Now we only need to upload the image the user press the Upload Image button.
findViewById<Button>(R.id.uploadImageButton).setOnClickListener {
            if (bitmap != null) {
                val imageBytes = uiHelper.getImageBytes(bitmap!!)
                uploadImage(imageBytes)
            } else
                Toast.makeText(this, "No image selected", Toast.LENGTH_SHORT).show()
        }
To upload the image first we check if a user selects the image before or not. Second, we need to convert the bitmap into Base64 ByteArray and third upload the image bytes to the server. Below is the getImageBytes method.
fun getImageUrl(bitmap: Bitmap): String {
    val byteArrayOutputStream = ByteArrayOutputStream()
    bitmap.compress(Bitmap.CompressFormat.JPEG, 100, byteArrayOutputStream)
    val bytes = byteArrayOutputStream.toByteArray()
    return Base64.encodeToString(bytes, Base64.DEFAULT)
}
The prep work is done. Now it’s time to upload the image bytes to the server. Below is the uploadImage method code.
private fun uploadImage(imageBytes: String) {
    ServiceApi.Factory.getInstance(this).uploadImage(imageBytes)
            .enqueue(object : Callback<StatusMessageResponse> {
                override fun onFailure(call: Call<StatusMessageResponse>?, t: Throwable?) {
                    Toast.makeText(MainActivity.this,"Image uploaded",Toast.LENGTH_SHORT).show()
                    // Image uploaded successfully
                }

                override fun onResponse(call: Call<StatusMessageResponse>?, response: Response<StatusMessageResponse>?) {
                    // Error Occurred during uploading
                }
            })

}
The ServerApi is the instance of a Retrofit interface. Below is the ServerApi class.
interface ServiceApi {

    companion object {
        private const val BASE_URL = ""  // Base url of your hosting
    }

    @FormUrlEncoded
    @POST("")   // end_point url
    fun uploadImage(@Field("image_bytes") imageBytes: String): Call<StatusMessageResponse>

    class Factory {

        companion object {
            private var service: ServiceApi? = null
            fun getInstance(context: Context): ServiceApi? {
                if (service == null) {
                    val builder = OkHttpClient().newBuilder()
                    builder.readTimeout(15, TimeUnit.SECONDS)
                    builder.connectTimeout(15, TimeUnit.SECONDS)
                    builder.writeTimeout(15, TimeUnit.SECONDS)
                    if (BuildConfig.DEBUG) {
                        val interceptor = HttpLoggingInterceptor()
                        interceptor.level = HttpLoggingInterceptor.Level.BODY
                        builder.addInterceptor(interceptor)
                    }
                    val file = File(context.cacheDir, "cache_dir")
                    if (!file.exists())
                        file.mkdirs()
                    val cacheSize: Long = 10 * 1024 * 1024 // 10 MiB
                    val cache = okhttp3.Cache(file, cacheSize)
                    builder.cache(cache)
                    val retrofit: Retrofit
                    retrofit = Retrofit.Builder()
                            .client(builder.build())
                            .addConverterFactory(GsonConverterFactory.create())
                            .baseUrl(BASE_URL)
                            .build()
                    service = retrofit.create(ServiceApi::class.java)
                    return service
                } else {
                    return service
                }
            }
        }
    }
}
In this article, I’m not gonna show you how the Retrofit works and how to create its instance. You can learn about Retrofit from this article. Each call created from ServerApi can be synchronous or asynchronous HTTP request to the remote web server.
Note: There are two things that you need to do. First, you need to add your web server BASE_URL. Second, add the end-point URL to POST annotation. And in the end, don’t forget to add the Internet permission in the Manifest file.
Alright, our code for Android App is complete. You can get the complete source code of the above app from GitHub.
PHP:
// receive image as POST Parameter
$image = str_replace('data:image/png;base64,', '', $_POST['image']);
$image = str_replace(' ', '+', $image);
// Decode the Base64 encoded Image
$data = base64_decode($image);
// Create Image path with Image name and Extension
$file = '../images/' . "MyImage" . '.jpg';
// Save Image in the Image Directory
$success = file_put_contents($file, $data);
The post Android Image Upload Example using PHP with Source Code appeared first on Coding Infinite.
]]>The post Signup Login page in PHP with Database MySQL Source Code appeared first on Coding Infinite.
]]>What we’ll cover in Signup Login page in PHP with Database
- File Structure
- Creating HTML page
- Connecting HTML page with Webservices
File Structure
We’ll use this folders & files structure inside our “app” folder for our Login & Signup page.
index.html
|
assets
├─── css
├────── style.css
api
├─── config/
├────── database.php – file used for connecting to the database.
├─── objects/
├────── user.php – contains properties and methods for “user” database queries.
├─── User/
├────── signup.php – file that will accept user data to be saved to the DB.
├────── login.php – file that will accept username & password and validate
as you can see that we have added pages and assets folders, pages folder will contain all HTML pages and assets folder is for CSS, JS, images etc.
Creating HTML page
as I stated that you can create your own design or you can use any other design, for this tutorial I’m using This template and I just modified it according to my Webservices.
inside your “app” folder, create a new file as “index.html” and paste this code there
<!DOCTYPE html>
<html lang="en" >

<head>
  <meta charset="UTF-8">
  <title>PHP Learning</title>


  <link rel='stylesheet prefetch' href='https://fonts.googleapis.com/css?family=Open+Sans:600'>

      <link rel="stylesheet" href="proxy.php?url=./assets/css/style.css">


</head>

<body>

  <div class="login-wrap">
  <div class="login-html">
    <input id="tab-1" type="radio" name="tab" class="sign-in" checked><label for="tab-1" class="tab">Sign In</label>
    <input id="tab-2" type="radio" name="tab" class="sign-up"><label for="tab-2" class="tab">Sign Up</label>
    <div class="login-form">
      <form class="sign-in-htm" action="proxy.php?url=./api/user/login.php" method="GET">
        <div class="group">
          <label for="user" class="label">Username</label>
          <input id="username" name="username" type="text" class="input">
        </div>
        <div class="group">
          <label for="pass" class="label">Password</label>
          <input id="password" name="password" type="password" class="input" data-type="password">
        </div>
        <div class="group">
          <input id="check" type="checkbox" class="check" checked>
          <label for="check"><span class="icon"></span> Keep me Signed in</label>
        </div>
        <div class="group">
          <input type="submit" class="button" value="Sign In">
        </div>
        <div class="hr"></div>
        <div class="foot-lnk">
          <a href="proxy.php?url=#forgot">Forgot Password?</a>
        </div>
      </form>
      <form class="sign-up-htm" action="proxy.php?url=./api/user/signup.php" method="POST">
        <div class="group">
          <label for="user" class="label">Username</label>
          <input id="username" name="username" type="text" class="input">
        </div>
        <div class="group">
          <label for="pass" class="label">Password</label>
          <input id="password" name="password" type="password" class="input" data-type="password">
        </div>
        <div class="group">
          <label for="pass" class="label">Confirm Password</label>
          <input id="pass" type="password" class="input" data-type="password">
        </div>
        <div class="group">
          <input type="submit" class="button" value="Sign Up">
        </div>
        <div class="hr"></div>
        <div class="foot-lnk">
          <label for="tab-1">Already Member?</a>
        </div>
      </form>
    </div>
  </div>
</div>


</body>

</html>
Now go to the “assets” folder and create a new folder as “css” and create a new file there as “style.css” and paste this code there
body{
  margin:0;
  color:#6a6f8c;
  background:#c8c8c8;
  font:600 16px/18px 'Open Sans',sans-serif;
}
*,:after,:before{box-sizing:border-box}
.clearfix:after,.clearfix:before{content:'';display:table}
.clearfix:after{clear:both;display:block}
a{color:inherit;text-decoration:none}

.login-wrap{
  width:100%;
  margin:auto;
  margin-top: 30px;
  max-width:525px;
  min-height:570px;
  position:relative;
  background:url(http://codinginfinite.com/demo/images/bg.jpg) no-repeat center;
  box-shadow:0 12px 15px 0 rgba(0,0,0,.24),0 17px 50px 0 rgba(0,0,0,.19);
}
.login-html{
  width:100%;
  height:100%;
  position:absolute;
  padding:90px 70px 50px 70px;
  background:rgba(40,57,101,.9);
}
.login-html .sign-in-htm,
.login-html .sign-up-htm{
  top:0;
  left:0;
  right:0;
  bottom:0;
  position:absolute;
  -webkit-transform:rotateY(180deg);
          transform:rotateY(180deg);
  -webkit-backface-visibility:hidden;
          backface-visibility:hidden;
  transition:all .4s linear;
}
.login-html .sign-in,
.login-html .sign-up,
.login-form .group .check{
  display:none;
}
.login-html .tab,
.login-form .group .label,
.login-form .group .button{
  text-transform:uppercase;
}
.login-html .tab{
  font-size:22px;
  margin-right:15px;
  padding-bottom:5px;
  margin:0 15px 10px 0;
  display:inline-block;
  border-bottom:2px solid transparent;
}
.login-html .sign-in:checked + .tab,
.login-html .sign-up:checked + .tab{
  color:#fff;
  border-color:#1161ee;
}
.login-form{
  min-height:345px;
  position:relative;
  -webkit-perspective:1000px;
          perspective:1000px;
  -webkit-transform-style:preserve-3d;
          transform-style:preserve-3d;
}
.login-form .group{
  margin-bottom:15px;
}
.login-form .group .label,
.login-form .group .input,
.login-form .group .button{
  width:100%;
  color:#fff;
  display:block;
}
.login-form .group .input,
.login-form .group .button{
  border:none;
  padding:15px 20px;
  border-radius:25px;
  background:rgba(255,255,255,.1);
}
.login-form .group input[data-type="password"]{
  text-security:circle;
  -webkit-text-security:circle;
}
.login-form .group .label{
  color:#aaa;
  font-size:12px;
}
.login-form .group .button{
  background:#1161ee;
}
.login-form .group label .icon{
  width:15px;
  height:15px;
  border-radius:2px;
  position:relative;
  display:inline-block;
  background:rgba(255,255,255,.1);
}
.login-form .group label .icon:before,
.login-form .group label .icon:after{
  content:'';
  width:10px;
  height:2px;
  background:#fff;
  position:absolute;
  transition:all .2s ease-in-out 0s;
}
.login-form .group label .icon:before{
  left:3px;
  width:5px;
  bottom:6px;
  -webkit-transform:scale(0) rotate(0);
          transform:scale(0) rotate(0);
}
.login-form .group label .icon:after{
  top:6px;
  right:0;
  -webkit-transform:scale(0) rotate(0);
          transform:scale(0) rotate(0);
}
.login-form .group .check:checked + label{
  color:#fff;
}
.login-form .group .check:checked + label .icon{
  background:#1161ee;
}
.login-form .group .check:checked + label .icon:before{
  -webkit-transform:scale(1) rotate(45deg);
          transform:scale(1) rotate(45deg);
}
.login-form .group .check:checked + label .icon:after{
  -webkit-transform:scale(1) rotate(-45deg);
          transform:scale(1) rotate(-45deg);
}
.login-html .sign-in:checked + .tab + .sign-up + .tab + .login-form .sign-in-htm{
  -webkit-transform:rotate(0);
          transform:rotate(0);
}
.login-html .sign-up:checked + .tab + .login-form .sign-up-htm{
  -webkit-transform:rotate(0);
          transform:rotate(0);
}

.hr{
  height:2px;
  margin:60px 0 50px 0;
  background:rgba(255,255,255,.2);
}
.foot-lnk{
  text-align:center;
}
Now you’ll see the page same as this

Connecting HTML page with Webservices
Download Login & Signup API from Github you can also create these API following my previous post, Restful Web Services in PHP Example – PHP + MySQL Best Practice
setup Database and paste “api” folder inside “app” folder.
all done, Now you can run your index.html through localhost.
You might be Interested in:
Here are some more Tutorial for creating Web Application & CRUD Operations using PHP & MySQL.
- Getting Started with Web Application using PHP & MySQL | Tutorials
- CRUD Operations using PHP & MySQL | Tutorials with Source Code
- Learn Object Oriented Programming In PHP
The post Signup Login page in PHP with Database MySQL Source Code appeared first on Coding Infinite.
]]>