Global Privacy Control (GPC) is a browser signal that allows users to automatically tell websites they do not want their personal data sold or shared.
CookieAdmin enables your website to honor the GPC signal and automatically accept necessary and functional cookies, without the need for user to accept anything making the user experience better.
To enable GPC on your site follow the steps below :-

This is all you need to do to enable GPC.
GPC Notification
When a user with GPC enabled in their browser or extension comes to your website, CookieAdmin will show the user a Message Toast to inform the user their GPC signal was honored as shown in the screenshot below.

Override GPC
User still has the option to override the GPC signal if the user wants to. They can simply click on the reconsent Icon, and make the preference changes, and then enable Override GPC option as well, that will override the GPC signal.
Once the override is done, the overridden preference will be honored until the expiry of the consent cookie

If you face any issue regarding this feature you can reach out to us at [email protected]
Overview
CookieAdmin allows you to display a dynamic, automatically updated cookie table anywhere using a simple Shortcode.
This table pulls cookie data from your CookieAdmin database and groups it by category — making your site more transparent and GDPR-ready.
Shortcode is:
[cookieadmin_render]Usage
By default this will show all the cookie categories.
Insert this Shortcode inside any page, blog to view a structured table showing all cookies scanned by CookieAdmin.
Many businesses use this table for Legal audits, Client transparency, Enterprise compliance documentation and Internal compliance records.
Since the data is generated dynamically, it always reflects the latest scanned cookies.
If
you an agency who manage websites for clients, add this Shortcode to
every client’s cookie policy page to save maintenance time and reduces compliance risk.
The cookie table is typically used on :
1 .Cookie Policy Page (Most Common Use) - for GDPR compliance, ePrivacy Directive requirements, Legal transparency
2. Privacy Policy Page - to help visitors understand what cookies are used, why they are used and how long they last.
Cookie categories
CookieAdmin organizes cookies into five standard compliance categories.
Those categories are :
1. Necessary : Essential cookies required for the website to function properly. To enable core functionality (security, login, forms), maintain session state, store consent preferences and cannot be disabled.
2. Functional : Cookies that remember user settings and enhance experience.
These cookies are used to Store language preferences, Save theme
settings (dark/light mode), Remember region selection, Personalize
content. They improve user experience but are not strictly necessary.
3. Analytical : Cookies used to collect anonymous statistical data
about website usage. These cookies help to Measure visitor traffic,
Analyze user behavior, Improve website performance and Understand
popular content.
4. Marketing : Cookies used for advertising and tracking
across websites. These cookies are used to Track users across different
websites, Build user profiles, Display personalized ads and to Measure
advertising effectiveness.
5. Unknown : Cookies that have been detected but not yet categorized.
This can happen when a new plugin sets cookies, a third-party script
adds cookies or a scan detects unknown storage. You should review and
assign these cookies to the correct category for compliance clarity.
Display specific cookie categories
You can show only specific categories if needed. The below usage of
ShortCode will show Necessary, Analytical and Marketing cookies and skip
the Functional cookies.
Eg : [cookieadmin_render categories="necessary,analytics,marketing"]
Remember to :
1. Use comma-separated category names.
2. Category names matching is case-insensitive.
3. Only cookies from those categories will be displayed.
What Information Is Displayed
The generated table shows grouped by Category :
1. Cookie Name : The technical cookie identifier.
2. Description : Purpose of the cookie (if defined).
3. Expiry : Number of remaining days Or “Session” if it expires on browser close

Best Practice Recommendation
For full compliance:
1. Create a dedicated Cookie Policy page.
2. Add the Shortcode.
3. Link it in your website footer.
4. Reference it inside your Privacy Policy.
Overview
User can use CookieAdmin on any WordPress website by purchasing license and installing it.
If your hosting provider offers Softaculous Premium with your hosting plan, you might be eligible to receive a SoftWP license, which activates CookieAdmin Pro for free.
Install & Activate CookieAdmin without an additional purchase, making it a seamless way to get started with full cookie compliance on your WordPress site.
Purchasing a License
A Softaculous account and following simple steps listed below can get you a CookieAdmin license.
1. Login or create an account with Softaculous
2. Click on the CookieAdmin icon, click on Purchase CookieAdmin
3. Select Plan
4. Click on Purchase CookieAdmin button and it will take you to the payment page to show you all the details and you can then pay for the license.

Once you make the payment you will get the license key which you can use to activate your CookieAdmin installation. Refer this guide on how to update CookieAdmin License.
If you need any help, you can create a Support Ticket or contact us at [email protected] and our support team will get back to you ASAP.
Overview
CookieAdmin Pro is a comprehensive WordPress cookie compliance and management plugin designed to help website owners comply with privacy regulations like GDPR, CCPA, and ePrivacy Directive. It provides an intuitive interface for managing cookies, tracking user consent, and controlling the loading of cookies based on user preferences.
Purchasing CookieAdmin Pro ensures full access to premium features, including advanced cookie blocking and real-time consent tracking.
Download
CookieAdmin is available for download from the Client area after you have purchased your license.
Follow these steps to download:
1. Login and navigate to Softaculous client area
2. Click on CookieAdmin plugin Icon then on My licenses
3. Click on Download CookieAdmin Pro button
Note : You can download the plugin as long as your license is active. Once your license expires you will need to renew your license to download the latest package.

Upload & Install
After downloading the plugin, log into your WordPress Admin Panel and follow below steps :
1. Navigate to Plugins → Add New → Upload Plugin.
2. Click Choose File, select the downloaded zip file, then click Install Now.
3. Once installed, click Activate Plugin.
4. Activate CookieAdmin Pro using the purchased license.
CookieAdmin Pro will automatically upgrade if your license is active and automatic updates are enabled.

That's it your CookieAdmin Pro is installed and Activated successfully.
If you need any help, you can create a Support Ticket or contact us at [email protected] and our support team will get back to you ASAP.
Overview
CookieAdmin Seamlessly integrates with Google services (Analytics, Ads, Tag Manager).
Google Consent Mode v2 enables websites to adjust how Google tags behave based on user consent. It ensures compliance with GDPR and other privacy regulations by integrating consent signals into Google services like Google Analytics, Ads, and Tag Manager — without compromising tracking accuracy.
Enable Google Consent Mode v2
Follow these simple steps to activate Consent Mode v2 in the CookieAdmin plugin:
1. Navigate to Plugin Settings:
From your WordPress dashboard, go to CookieAdmin → Settings
2. Locate the Google Consent Mode v2 Toggle:
Scroll down to find the label, “Google Consent Mode v2” and switch the toggle to the ON position.
3. Save Settings:
Click the “Save Settings” button to apply your changes.
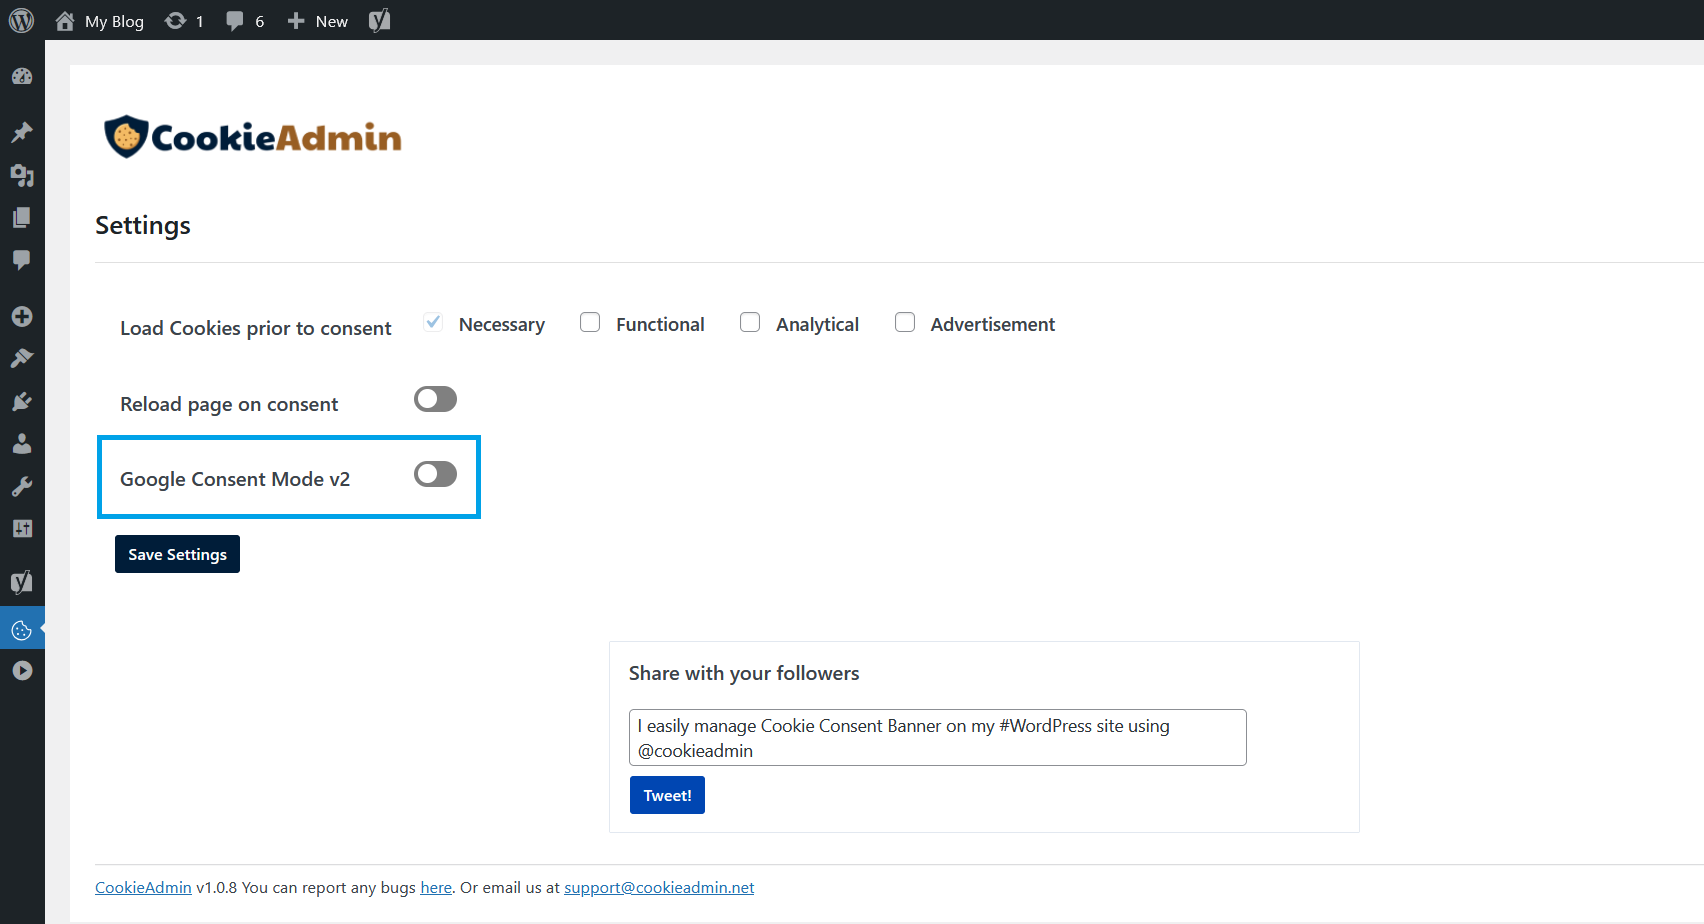
That's it your website now adjusts data collection based on user consent signals and enables measurement continuity while respecting privacy.
Overview
Note: All consent data is fully stored in your WordPress database and no data is stored on our servers. CookieAdmin is fully self-hosted.
Consent Logs
The Consent Logs provide a clear and concise record of user consent activity on your website. This feature helps you:
– Track user consent actions for transparency.
– Demonstrate compliance with privacy regulations (like GDPR, CCPA).
– Maintain an audit trail showing when and how consent was given or denied.
Each entry captures vital details such as the Consent ID, status, country, anonymized IP address, and the exact time of the action.
Additionally, you can easily export this data as a CSV file using the Export CSV button —ideal for compliance documentation, auditing processes, or internal record-keeping.

Overview
The Cookie Scan and Categorization tools help you manage website cookies efficiently. The scan feature detects all cookies currently active on your site, while categorization allows you to group them based on their purpose, ensuring better transparency and compliance.
Scan Cookies
Find out what cookies your site is using—it’s quick and easy.
The Scan Cookies feature helps you identify all the cookies your WordPress site is using. Just click the button, and CookieAdmin will scan your site to detect every active cookie.
Once the scan is complete, a table will display all detected cookies along with important details like their name, expiry, path, domain, and whether they are secure. This gives you a clear overview of how cookies are being used on your site before you move on to organizing them for user consent.

Categorize Cookies
The Categorize Cookies feature helps organize cookies detected during the scan by assigning them to specific categories such as Necessary, Functional, Analytical, and Unknown. This step ensures cookies are clearly grouped based on their purpose, allowing for easier consent management and improved compliance with privacy regulations.
Once categorized, the cookies can be presented to users in a structured manner, making it easier for them to understand and manage their preferences.
Edit Cookies
The Edit Cookies option allows you to modify the details of any cookie detected on your site. This gives you full control over how each cookie is labeled and categorized before presenting them to users.
Simply click the Edit icon next to any cookie in the list to update its name, category, description, or duration.
You can also use the Delete icon to remove any unnecessary or unwanted cookies from the list.

Overview
CookieAdmin allows you to set up a customizable cookie consent banner on your website. You can choose the consent type, adjust the layout and position, personalize the message, and style the buttons to fit your site’s design—all while ensuring compliance with privacy regulations.
Consent Form
Consent type allows users to choose the applicable consent standard for displaying the cookie banner. Options include GDPR and US State Laws.
Consent Expiry sets the duration (in days) for which the user's cookie preferences will be remembered.
Notice Type defines the format in which the cookie consent notice will be displayed on the website. This allows you to control how the banner appears to users based on your site design.
Notice Position specifies the location where the consent notice will appear on the user’s screen. This helps in aligning the banner with the overall layout of your website.
Preference Position sets the display position of the detailed cookie preferences section within the notice. Adjusting this ensures a user-friendly experience when managing cookie settings.
Notice Section allows you to customize the main content displayed within the cookie banner.
Title lets you define the heading that appears at the top of the notice.
The Notice is where you can write the main text of the banner, usually explaining how cookies are used on your website.

Button Setttings allows you to customize the labels and appearance of the buttons displayed on the cookie banner.
Each button—such as Accept All, Reject All, Customize, and Save Preferences—can be personalized to match your website’s style.
You can change the button text as well as adjust the text colour, background colour and border colour for a consistent user experience.
Preference Section allows you to configure how users view and manage their cookie preferences.
You can set a Title, add a Privacy Notice with details about cookie usage, and customize the colors for the title, content, background, and border to match your website’s design.
Once the setup is complete, click Save Settings to apply the changes, and select Show Preview to view a preview of the banner based on your configuration.
Preview Banner

This is how the cookie consent banner will appear on the WordPress front-end. It will be displayed at the top or bottom of the page (as per your configuration), allowing users to customize, reject, or accept cookies based on the settings you've configured in CookieAdmin.

Overview
Cookieadmin License for your website is auto generated if you install CookieAdmin using Softaculous via Featured Plugins or while installing WordPress.
However you might need to update CookieAdmin license if you have manually installed CookieAdmin plugin or have migrated your website.
Update License
CookieAdmin licenses are linked to the domain/URL of your WordPress installation.
You have an option to activate it manually if you have a new license for your website.
The process is simply copying your license from your Softaculous client area and adding it to the plugin's license page.
1. Login or create an account with Softaculous
2. Click on the CookieAdmin icon, click on My Licenses. The license page shows all the license you own
3. Copy the license key you would like to use

4. Login to your WordPress Admin Dashboard.
5. Click on CookieAdmin from the left main menu, then click on License.

6. Paste the license key in the license field.
7. Click on Update license button.
Overview
Updating CookieAdmin is similar to upgrading any plugin in WordPress.
Keeping it updated is recommended to benefit from the latest features and to stay safe through security fixes.
Upgrading
It is essential to keep your WordPress Plugins up-to-date.
To quickly upgrade your CookieAdmin plugin from WordPress admin panel follow below steps.
1. Login to WordPress Dashboard and navigate to updates page by clicking on Dashboard from left main menu and click on Updates
2. Select CookieAdmin plugin from the list and click on Update Plugins.
This should upgrade CookieAdmin plugin and show success message similar to : CookieAdmin updated successfully.
