
Unity 2019 added an API for DX12's RTX stuff. Nice, finally!


It's later! Unity 2020.1 now has skinned mesh renderer support! Time to play around a bit.
What's New?
There's a few new juicy additions to Unity's scripting API.
- RayTracingShader - a new special type of shader which is used to generate rays, for querying geometry intersections.
- RayTracingAccelerationStructure - a GPU memory representation of the geometry to ray trace against.
Getting Started
If you are starting from scratch, the very first thing you need to do is to generate a RayTracingAccelerationStructure. Here's a simple example to get started.
var settings = new RayTracingAccelerationStructure.RASSettings();
settings.layerMask = UpdateLayers;
settings.managementMode = RayTracingAccelerationStructure.ManagementMode.Automatic;
settings.rayTracingModeMask = RayTracingAccelerationStructure.RayTracingModeMask.Everything;

_AccelerationStructure = new RayTracingAccelerationStructure(settings);_AccelerationStructure.Update();
_AccelerationStructure.Build(); Once this has been setup, you're ready to generate rays!
Generating Rays
RTX rays are generated from a ray generation shader. If you've used Compute Shaders in Unity, things will look pretty familiar to you.
#include "HLSLSupport.cginc"
#include "UnityRaytracingMeshUtils.cginc"
#include "UnityShaderVariables.cginc"

RaytracingAccelerationStructure _RaytracingAccelerationStructure : register(t0);

float4x4 _CameraToWorld;
float4x4 _InverseProjection;

[shader("raygeneration")]
void MyRayGenerationShader()
{
    uint3 dispatchId = DispatchRaysIndex();
    uint3 dispatchDim = DispatchRaysDimensions();

    // somehow get the world space position of the pixel we care about
    // somehow generate a ray from that pixel in a meaningful Direction
    // color the pixel we care about, with the information that ray gathered
}
For the sake of example, we should create something meaningful. Let's dispatch rays from every pixel on the screen, which we will eventually get intersecting with geometry in the acceleration structure that we defined earlier.
Also, note that the RaytracingAccelerationStructure needs to be defined somewhere, too. t0 is the register that Unity uses for this structure.
float2 texcoord = (dispatchId.xy + float2(0.5, 0.5)) / float2(dispatchDim.x, dispatchDim.y);
float3 viewPosition = float3(texcoord * 2.0 - float2(1.0, 1.0), 0.0);float4 clip = float4(viewPosition.xyz, 1.0);
float4 viewPos = mul(_InverseProjection, clip);viewPos.xyz /= viewPos.w;float3 worldPos = mul(_CameraToWorld, viewPos);
float3 worldDirection = worldPos - _WorldSpaceCameraPos;Now that we know from where and to where we want to cast rays, let's start building a ray and it's payload. In the raytracing API provided to us, we need to build both a RayDesc and a custom payload struct, which are passed into a TraceRay() call.
RayDesc ray;
ray.Origin = _WorldSpaceCameraPos;
ray.Direction = worldDirection;
ray.TMin = 0;
ray.TMax = 10000;You can use any payload that you wish. Keep in mind that you may run into issues with high memory footprint payloads, so try to keep them as small as possible. In this example, we'll just use color.
struct MyPayload
{
	float4 color;
};MyPayload payload;
payload.color = float4(0, 0, 0, 0);TraceRay(_RaytracingAccelerationStructure, 0, 0xFFFFFFF, 0, 1, 0, ray, payload);TraceRay() is another magic call we can do with the raytracing API. I highly recommend clicking on the previous link, to read up on some of the finer details. At the least, you'll need an acceleration structure to pass in, some flags for intersection rules, a 32 bit LayerMask flag, the RayDesc, and the custom payload.
After you've traced a ray, you need to do something with the payload result.
RWTexture2D<float4> RenderTarget;RenderTarget[dispatchId.xy] = payload.color;This traced ray may or may not intersect with geometry. If it does not, you'll probably want to provide a "miss" kernel.
[shader("miss")]
void MyMissShader(inout MyPayload payload : SV_RayPayload)
{
    payload.color = 0;
}This miss kernel would be called if the ray does not hit anything, as the name implies.
Keep note of that inout keyword. For our purposes, you can assume it works similarly to the ref keyword in c# (although its a bit different. inout actually does a copy in and a copy out, its not a reference being passed around).
On the c# side, you'll need some component which can reference the ray generation shader, and then execute it.
 // define a RT, to see whats going on
 // note, if its public,
 //   you can double click it in the inspector to preview it,
 //   when the game view is focused
 public RenderTexture _RenderTexture;
public RayTracingShader MyRayGenerationShader;I recommend using a CommandBuffer to dispatch the ray generation shader, but you can also just do it from the shader itself.
command.SetRayTracingTextureParam(MyRayGenerationShader, "RenderTarget", _RenderTexture); command.SetRayTracingShaderPass(MyRayGenerationShader, "MyRaytracingPass");
command.SetRayTracingAccelerationStructure(MyRayGenerationShader, "_RaytracingAccelerationStructure", _AccelerationStructure);var projection = GL.GetGPUProjectionMatrix(camera.projectionMatrix, false);
var inverseProjection = projection.inverse;
command.SetRayTracingMatrixParam(MyRayGenerationShader, "_InverseProjection", inverseProjection);
command.SetRayTracingMatrixParam(MyRayGenerationShader, "_CameraToWorld", camera.cameraToWorldMatrix);
command.SetRayTracingVectorParam(MyRayGenerationShader, "_WorldSpaceCameraPos", camera.transform.position);command.DispatchRays(MyRayGenerationShader, "MyRayGenerationShader", (uint)_texture.width, (uint)_texture.height, 1u, camera);Once this dispatch is called, you'll be generating rays! However, they won't do anything when they hit anything, yet.
Hit!
To do anything interesting, you'll need to provide a hit kernel. In Unity, you can do this in the .shader file of any shader by adding a Pass{} block. When you dispatch rays, you can use SetRayTracingShaderPass to specify a name, and when a ray intersects an object, Unity will check for any Passes that match that name.
As an example, let's create a new shader.

Open it up, and add in something like this, after the SubShader block.
SubShader
{
    Pass
    {
        Name "MyRaytraceShaderPass"

        HLSLPROGRAM

        #pragma raytracing MyHitShader

        struct MyPayload
        {
            float4 color;
        };

        struct AttributeData
        {
            float2 barycentrics;
        };

        [shader("closesthit")]
        void MyHitShader(inout MyPayload payload : SV_RayPayload,
          AttributeData attributes : SV_IntersectionAttributes)
        {
            payload.color = 1;
        }

        ENDHLSL
    }
}HLSL has some a new attribute: [shader("")]. You can define what type of raytracing shader this function is meant for. The most useful for us is "closesthit" - which is ran when the ray intersection nearest to the ray's origin is found.
Here is a list of available DXR shader types, with their appropriate method signatures.
[shader("raygeneration)]
void RayGeneration() {}

[shader("intersection")]
void Intersection() {}

[shader("miss")]
void Miss(inout MyPayload payload : SV_RayPayload) {}

[shader("closesthit")]
void ClosestHit(inout MyPayload payload : SV_RayPayload, MyAttributes attributes : SV_IntersectionAttributes) {}

[shader("anyhit")]
void AnyHit(inout MyPayload payload : SV_RayPayload, MyAttributes attributes : SV_IntersectionAttributes) {}
What will happen now, is our ray generation shader will generate black for any pixels that are not overlapping geometry, and white for any pixels that are generating geometry. We're raytracing!
What can we do with this?
The raytracing API that DX12 is providing us unlocks some great stuff.
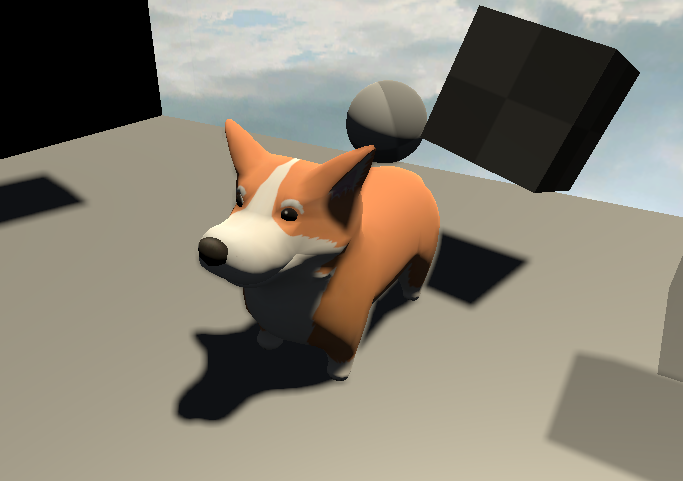
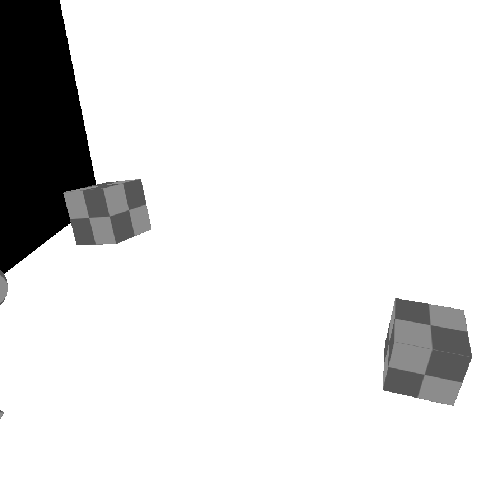
Here's a screenshot of some raytraced reflections I've thrown together.
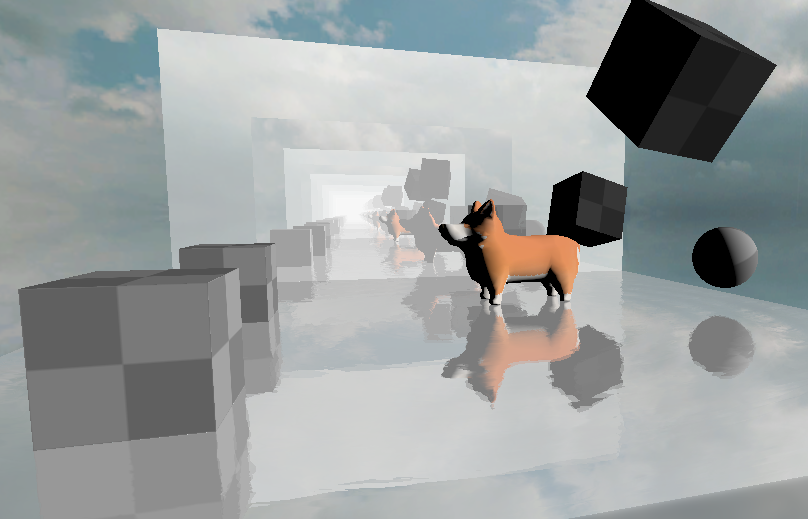
This can be taken a step further, too. Why not have shadows in our reflections?
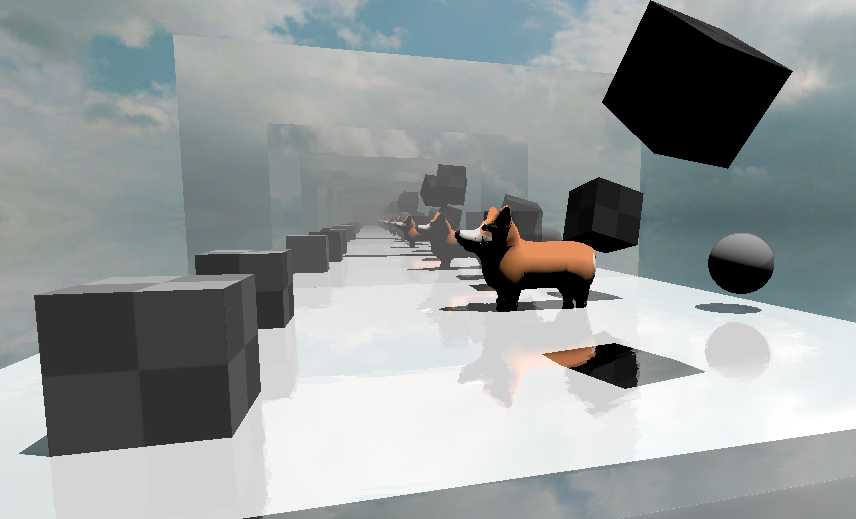
And if our reflections can have raytraced shadows.. why not replace unity's shadows completely with raytraced shadows?
its about time voxelgame got some #rtx support#gamedev #madewithunity pic.twitter.com/w2KuLFFcf0
— Coty Getzelman (@cotycrg) November 28, 2020
Getting Useful Data From Intersections
struct AttributeData
{
    float2 barycentrics;
};
Using a user defined struct, you can request some data from intersections. It's possible to use these barycentric coordinates provided to get useful interpolated data from the vertices. For example, you could use this to get the albedo of the triangle with proper uv mapping, or you could even shade the triangle like normal.
#include "UnityRaytracingMeshUtils"struct Vertex
{
float2 texcoord;
};uint primitiveIndex = PrimitiveIndex();uint3 triangleIndicies = UnityRayTracingFetchTriangleIndices(primitiveIndex);Vertex v0, v1, v2;v0.texcoord = UnityRayTracingFetchVertexAttribute2(triangleIndicies.x, kVertexAttributeTexCoord0);
v1.texcoord = UnityRayTracingFetchVertexAttribute2(triangleIndicies.y, kVertexAttributeTexCoord0);
v2.texcoord = UnityRayTracingFetchVertexAttribute2(triangleIndicies.z, kVertexAttributeTexCoord0);float3 barycentrics = float3(1.0 - attributeData.barycentrics.x - attributeData.barycentrics.y, attributeData.barycentrics.x, attributeData.barycentrics.y);Vertex vInterpolated;
vInterpolated.texcoord = v0.texcoord * barycentrics.x + v1.texcoord * barycentrics.y + v2.texcoord * barycentrics.z;From here, you can sample from textures in the normal way.
Texture2D<float4> _MainTex;
SamplerState sampler_MainTex;

[shader("closesthit")]
void MyHitShader(inout ExamplePayload payload : SV_RayPayload, AttributeData attributes : SV_IntersectionAttributes)
{
    // get texcoord somehow
    // then use below

    payload.color = _MainTex.SampleLevel(sampler_MainTex, texcoord, 0);
}
Some useful data! You can expand this further by using TraceRay() inside of the closesthit shader passes. Keep in mind that you need to increase #pragma max_recursion_depth 1, when using TraceRay() inside of a hit function. You'll also need to manage your recursion manually. Keep this in mind, or you may crash!
Self Promo
If you just want to download some source code, I'm providing it all in the form of a Unity Asset Store package. The raytraced reflections and raytraced shadows are both packaged with it, of course. I've also included a lot of helpful macros, for quickly making your own raytracing shaders.

Further Reading
I highly recommend the following for further reading.
]]>Technical Breakdown
Hey, I’m Coty Getzelman, the lead engineer on Wave Break, the world’s first skateboating game, made in Unity! Wave Break is inspired by classic arcade skateboarding games, with a splash of boating, explosions, and cold-blooded murder.

Inspired by the water physics from Wave Race 64, I
]]>Technical BreakdownHey, I’m Coty Getzelman, the lead engineer on Wave Break, the world’s first skateboating game, made in Unity! Wave Break is inspired by classic arcade skateboarding games, with a splash of boating, explosions, and cold-blooded murder.
Inspired by the water physics from Wave Race 64, I started reading a bunch of fluid sim physics papers and tried out many methods. However, the simplicity of Wave Race’s design still holds up to this day. Let’s talk about how we could scale this idea up for modern hardware.
I wanted the resolution of the wave sim to be such that a single “wave” could be smaller than a player, so that the wakes created by their driving would be in high detail. Getting this level of detail would require a lot of memory, and even now in 2020 this is way too much data to process on a CPU. Instead, We can take advantage of the massively parallel nature of a modern GPU. Unity has Compute Shaders, which will allow us to read and write to arbitrary buffers for this effect.

The core idea is to treat a water plane as a set of interconnected springs. For Wave Break, I set up a 2D RenderTexture, in which each pixel represents a spring state. With some simple math, you can get some spring-like behavior by passing the texture through a Compute Shader. In this example gif, the Compute Shader has each pixel sample it’s neighbor pixels and spring accordingly; this alone is enough to generate these nice ripple patterns.

Take that texture and blur it to get nice, smooth ripples. Spring + Blur starts looking like some convincing shallow waves!

The very first pass of this looked like this! All that’s done here is combining that RenderTexture with a simple custom transparent shader, which samples the texture for offsetting vertices and using the length (current - previous) spring states of the pixel for detecting “foam”.
Obvious issue: the water is too still for ocean/lakes. We need to do a wind pass. We’ll need the world position of the vertex we want to apply wind to. For this world position, we can do the following. Take the current pixel’s (x,y) position, divided by the width and height of the wave texture to normalize into a 0-1 range, then shift over to (-1, 1) range to pretend it’s in the water plane’s transform’s local space, then use localToWorld matrix of the transform to convert it to world space. This allows shifting, rotating, and scaling while still getting the correct world position of a pixel in the RenderTexture. We can then pass the world position into a noise function. However, calling that noise function on every fragment would be pretty slow. Instead, it’s a better idea to create a noise texture!
Ripples are great for making wakes, but to make a really convincing ocean, you need wind, both by the shoreline and out to sea. So I made this simple unity editor tool for generating noise textures.


Combining the noise texture into the ripple texture results in this texture. Starting to look good!
With blurred ripples with wind, it looks like waves. Once we start rendering it, it is obvious that the foam is missing. I tried doing it dynamically in a fragment shader, but I wanted the foam to stick around, and it is kind of wasteful doing it for a lot of fragments at a higher resolution (4k?). Instead: allocate a dedicated foam RenderTexture. Also, we’ll need to create two Compute Shader kernels: one for generating foam from wave delta, one for fading foam over time.


On top of those two Compute Shaders passively generating foam based on the waves, we should also stamp to the foam texture when we write to the wave texture. For each wave sim step, I’m diffusing the foam while the ripple is happening. Afterwards, I combine these two textures, using the R channel for the waves and G channel for the foam.
Water planes are placed in a grid, using blurred data for rendering. Unfortunately, this has very visible seams. Our blur is sampling neighbor pixels, but edge pixels were sampling themselves, because there is no info on their neighbor textures!

The next challenge is to get these textures in-game without seams. The blur effect is tricky, because if you only sample just one texture, you will generate seams around the edges which looks ugly in-game. Each fetch could check if it needs to use the neighbor textures, but that’s just way too slow. One solution is just splitting 1 blur kernel into 5, one for inside block and 4 for the outside edges. Fixed!
A similar problem occurs when rendering as well, as the fragment shader is billinearly interpolating the blur texture, because there is no info on neighboring textures. So, the shader will need to use a manual bilinear filter, but.. that’s also slow! To avoid shading in this way for most of the screen, I split up the water plane mesh into two meshes: an inside chunk and an outside strip of triangles. The two meshes have the same shader and material, but the outside edge has a material setting to toggle the shader keyword so it uses a shader variant to use a manual bilinear filter which combines neighboring textures. Whew!

Now that we have fixes, we can start rendering. I’m just doing a normal vert/frag shader, where the vertex pass moves verts based on blurred wave texture. But.. verts moved means the normals will be broken! To deal with this, I’m sampling the neighboring wave heights to calculate the new vertex normal, which gets passed to the fragment shader.
Lighting is typical N dot L diffuse, with some normals scaling and specular adjustments for that stylised feel. The fragment’s normals are shifted a bit by a “micro normals” texture, for added detail. Artists can adjust these micro normals to create the sparkles you see in the gif. The foam RenderTexture is sampled to use as a mask for an artist, who made a repeating foam texture.


Here are some stylised examples of what is possible with this shader.
Wireframe is a typical wireframe shader, fragments know their distance from the edge of the triangle. The wire is lit up based on foam mask RT. Light is used to light entire triangles at once.

For gameplay, this water is only really useful if there’s two way coupling. This means, I want unity’s Rigidbodies to affect the water, and I want the water to affect the Rigidbodies!
To ramp off waves, I need to be able to get the wave height from the wave texture. The problem is, it’s not just some array to sample, it’s memory on the GPU. Latency from GPU -> CPU is no joke, so we need to be clever.
The water plane objects have a trigger to collect a list of touched “floatable” objects that need to query wave height. A List will be used to build a buffer of texture coordinates (made from taking world position -> local position -> uv position) to pass to a Compute Shader, which iterates over the texture and fills an output buffer with wave heights and calculated wave normals.
Using this method of passing a buffer of positions to a Compute Shader which does the handful of texture samples on the GPU, which are then returned to the CPU, allowing us to get the data we need to calculate buoyancy for hundreds of objects, if necessary, without a significant performance impact of waiting on a whole texture to come back to the CPU.
However, processing buoyancy math for hundreds of objects would still be slow; C# is bad at math. This is a good use of Unity’s Job System with the Burst Compiler. Buoyancy for multiple objects can be calculated in parallel, since they do not directly affect one another. The slowest part now is iterating over the results of the job, and calling the Rigidbody.AddForce functions.


The Burst job is managed by another script which checks the water plane’s distance from the nearest cameras to LOD, to use for both physics and rendering.
Notice those high detail strips of triangles between the LODs? Remember when I mentioned we would need a strip of triangles for the manual bilinear filter which samples nearby textures along the edges? That’s what that is!
The core of the wave system is complete, the rest is polish!


Here’s a question. At what time step do we want to run the physics sim? Every frame would make water move super fast, but a fixed timestep makes it look like a slideshow.
Solution: time travel?!
I keep the previous wave texture around, and linearly interpolate between the last physics tick’s texture and current, based on how much time has passed since the last physics step. Because our method is so resolution dependent, we can adjust our timescale based on quality settings in-game. Half the resolution wave sim in quality settings? Then we can also halve the time-step! Huge performance savings for lower quality settings!
Bonus: This lets us have slow motion waves by just changing the timescale variable in unity!


Post process, for most games, is just comparing screen position converted to world position to the water plane’s position/normal. More complex water in most games only calculates the world position of water by using the same wave function the vertex pass of the water is using. Ours isn’t so simple; we need to go from screen space to world space to local space to texture space, get value, back to world space for comparison. We just generate one matrix by multiplying all these matrices together on the CPU, and pass to the post process shader so it’s only one multiple away from the correct position.

That’s it! Any questions? You can hit me up.
- Email: [email protected]
- Twitter: @cotycrg
And be sure to check out our game!
- Website: wavebreakgame.com
- Twitter: @WaveBreakGame
- Discord: discord.gg/funktroniclabs

Thanks for reading!
]]>