Code https://github.com/damienbod/bff-aspnetcore-angular-downstream-cert-api
Setup
The application was built using the following github repository:
https://github.com/damienbod/bff-aspnetcore-angular
The web application is secured with an OpenID Connect confidential client using PKCE. The UI is built with Angular , while the backend is implemented using ASP.NET Core. The API is protected with certificate authentication. This application is deployed to an Azure App Service and requires the correct certificate for access. The server ensures that the correct certificate is used to access the API.

The YARP reverse proxy is setup in the start up of the ASP.NET Core application and the appsettings.json file. The client certificate required for the downstream API, is loaded into the project using the X509Certificate2 class. This could be loaded from the operating system, or Azure key vault or some other secure way. The demo loads this directly in an unsecure way.
The AddReverseProxy method adds the YARP definitions and the ConfigureHttpClient method is used to add the SslOptions containing the client certificate which is used for the Azure API calls. The MapReverseProxy is used to add the endpoints and reads the configuration from the app settings. The proxy is also used in development to load the Angular project. Depending on the UI packages, different setups are required.
var builder = WebApplication.CreateBuilder(args);

builder.WebHost.ConfigureKestrel(serverOptions =>
{
    serverOptions.AddServerHeader = false;
});

var services = builder.Services;
var configuration = builder.Configuration;

var stsServer = configuration["OpenIDConnectSettings:Authority"];

services.AddSecurityHeaderPolicies()
  .SetPolicySelector((PolicySelectorContext ctx) =>
  {
      return SecurityHeadersDefinitions.GetHeaderPolicyCollection(
          builder.Environment.IsDevelopment(), stsServer);
  });

services.AddAntiforgery(options =>
{
    options.HeaderName = "X-XSRF-TOKEN";
    options.Cookie.Name = "__Host-X-XSRF-TOKEN";
    options.Cookie.SameSite = SameSiteMode.Strict;
    options.Cookie.SecurePolicy = CookieSecurePolicy.Always;
});

services.AddHttpClient();
services.AddOptions();

services.AddAuthentication(options =>
{
    options.DefaultScheme = CookieAuthenticationDefaults.AuthenticationScheme;
    options.DefaultChallengeScheme = OpenIdConnectDefaults.AuthenticationScheme;
})
.AddCookie()
.AddOpenIdConnect(options =>
{
    configuration.GetSection("OpenIDConnectSettings").Bind(options);
    //options.Authority = configuration["OpenIDConnectSettings:Authority"];
    //options.ClientId = configuration["OpenIDConnectSettings:ClientId"];
    //options.ClientSecret = configuration["OpenIDConnectSettings:ClientSecret"];

    options.SignInScheme = CookieAuthenticationDefaults.AuthenticationScheme;
    options.ResponseType = OpenIdConnectResponseType.Code;

    options.SaveTokens = true;
    options.GetClaimsFromUserInfoEndpoint = true;
    options.TokenValidationParameters = new TokenValidationParameters
    {
        NameClaimType = "name"
    };
});

services.AddControllersWithViews(options =>
    options.Filters.Add(new AutoValidateAntiforgeryTokenAttribute()));

services.AddRazorPages().AddMvcOptions(options =>
{
    //var policy = new AuthorizationPolicyBuilder()
    //    .RequireAuthenticatedUser()
    //    .Build();
    //options.Filters.Add(new AuthorizeFilter(policy));
});

builder.Services.AddSingleton<ApiTokenCacheClient>();

// Create an authorization policy used by YARP when forwarding requests
builder.Services.AddAuthorization(options => options.AddPolicy("CookieAuthenticationPolicy", builder =>
{
    builder.AddAuthenticationSchemes(CookieAuthenticationDefaults.AuthenticationScheme);
    builder.RequireAuthenticatedUser();
}));

var cert = new X509Certificate2("client.pfx", "pfx-certificate-secret");

services.AddReverseProxy()
    .ConfigureHttpClient((context, handler) =>
    {
        handler.SslOptions = new SslClientAuthenticationOptions
        {
            ClientCertificates = [cert]
        };
    })
    .LoadFromConfig(builder.Configuration.GetSection("ReverseProxy"));
The ReverseProxy settings adds the configuration which is almost standard like the documentation. The CookieAuthenticationPolicy is used to accept only authenticated requests. The YARP is setup differently for development and production.
"ReverseProxy": {
	"Routes": {
	  "route1": {
		"ClusterId": "cluster1",
		"AuthorizationPolicy": "CookieAuthenticationPolicy",
		"Match": {
		  "Path": "{**catch-all}"
		}
	  }
	},
	"Clusters": {
	  "cluster1": {
		"HttpClient": {
		  "SslProtocols": [
			"Tls12"
		  ]
		},
		"Destinations": {
		  "cluster1/destination1": {
			"Address": "https://azurecertauth20201108214641.azurewebsites.net/"
		  }
		}
	  }
	}
}
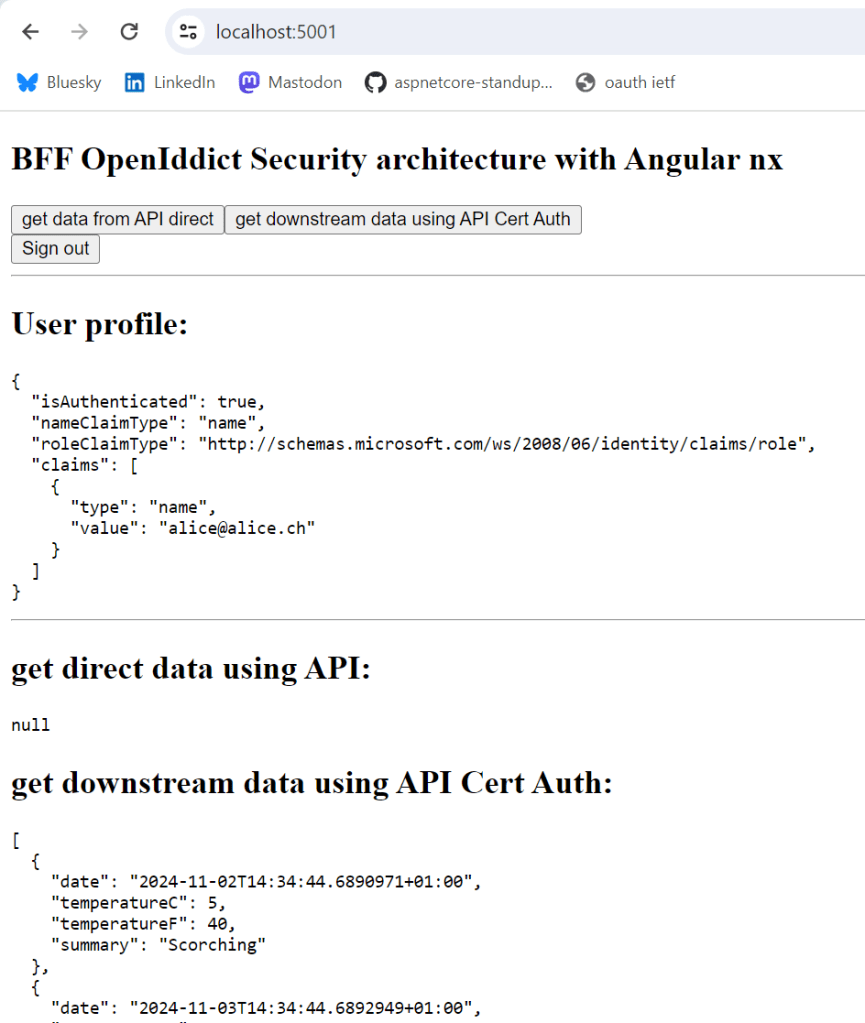
Downstream API protected using certificate authentication
The downstream API uses certification authentication to protect the API. The API requires a certificate forwarding middleware in local development as well as allowing any certificate type including self signed certificates. When the application is deployed to an Azure App Service, the certificate forwarding middleware is not required. The API validates the thumbprint of the certificate and returns a 403 if the certificate authentication in ASP.NET Core fails. This is because the certificate is already validated before it reaches the application. It is really authorization.
using Microsoft.AspNetCore.Authentication.Certificate;
using Microsoft.AspNetCore.Server.Kestrel.Https;
using Microsoft.IdentityModel.JsonWebTokens;
using Microsoft.IdentityModel.Logging;
using Serilog;
using System.Security.Claims;
using System.Security.Cryptography.X509Certificates;

namespace DownstreamApiCertAuth;

internal static class StartupExtensions
{
    public static WebApplication ConfigureServices(this WebApplicationBuilder builder)
    {
        var services = builder.Services;
        var configuration = builder.Configuration;

        if(builder.Environment.IsDevelopment())
        {
            builder.WebHost.ConfigureKestrel((context, serverOptions) =>
            {
                serverOptions.ConfigureHttpsDefaults(listenOptions =>
                {
                    listenOptions.ClientCertificateMode = ClientCertificateMode.RequireCertificate;
                    listenOptions.AllowAnyClientCertificate();
                });
            });
        }

        services.AddSingleton<MyCertificateValidationService>();

        services.AddCertificateForwarding(options =>
        {
            options.CertificateHeader = "X-ARR-ClientCert";
            options.HeaderConverter = (headerValue) =>
            {
                Console.WriteLine("headerValue: " + headerValue);

                X509Certificate2? clientCertificate = null;
                if (!string.IsNullOrWhiteSpace(headerValue))
                {
                    byte[] bytes = Convert.FromBase64String(headerValue);
                    clientCertificate = new X509Certificate2(bytes);
                }

                return clientCertificate!;
            };
        });

        services.AddAuthentication(CertificateAuthenticationDefaults.AuthenticationScheme)
            .AddCertificate(options => // code from ASP.NET Core sample
            {
                // https://docs.microsoft.com/en-us/aspnet/core/security/authentication/certauth
                options.AllowedCertificateTypes = CertificateTypes.All;

                // Default values
                //options.AllowedCertificateTypes = CertificateTypes.Chained;
                //options.RevocationFlag = X509RevocationFlag.ExcludeRoot;
                options.RevocationMode = X509RevocationMode.NoCheck;
                options.ValidateCertificateUse = false;
                options.ValidateValidityPeriod = false;

                options.Events = new CertificateAuthenticationEvents
                {
                    OnCertificateValidated = context =>
                    {
                        var validationService =
                            context.HttpContext.RequestServices.GetService<MyCertificateValidationService>();

                        if (validationService!.ValidateCertificate(context.ClientCertificate))
                        {
                            var claims = new[]
                            {
                                new Claim(ClaimTypes.NameIdentifier, context.ClientCertificate.Subject, ClaimValueTypes.String, context.Options.ClaimsIssuer),
                                new Claim(ClaimTypes.Name, context.ClientCertificate.Subject, ClaimValueTypes.String, context.Options.ClaimsIssuer)
                            };

                            context.Principal = new ClaimsPrincipal(new ClaimsIdentity(claims, context.Scheme.Name));
                            context.Success();
                        }
                        else
                        {
                            context.Fail("invalid cert");
                        }

                        return Task.CompletedTask;
                    },
                    OnAuthenticationFailed = new Func<CertificateAuthenticationFailedContext, Task>(context =>
                    {
                        Console.WriteLine("OnAuthenticationFailed: " + context.Exception.Message);
                        return Task.CompletedTask;
                    })
                };
            });

        services.AddAuthorization();
        services.AddControllers();

        return builder.Build();
    }

    public static WebApplication ConfigurePipeline(this WebApplication app)
    {
        IdentityModelEventSource.ShowPII = true;
        JsonWebTokenHandler.DefaultInboundClaimTypeMap.Clear();
        app.UseSerilogRequestLogging();
        if (app.Environment.IsDevelopment())
        {
            app.UseDeveloperExceptionPage();
        }

        app.UseHttpsRedirection();
        app.UseRouting();

        if (app.Environment.IsDevelopment())
        {
            app.UseCertificateForwarding();
        }

        app.UseAuthentication();
        app.UseAuthorization();
        app.MapControllers();

        return app;
    }
}
When the application is started, the web application can use the downstream API protected using certificates.
Notes
This works good and the downstream APIs can be protected in a secure way using certificates. Using this approach, it is very easy to increase security or implement the app-to-app security in a good way. Of course security is only as good as the weakest link. The Angular UI view calling to the API protected with cookies is now the weakest link, depending of course on how you secure the downstream APIs, but this should not be a problem to do correctly.
Links
https://github.com/microsoft/reverse-proxy
https://github.com/damienbod/Blazor.BFF.OpenIDConnect.Template
https://docs.microsoft.com/en-us/aspnet/core/security/authentication/certauth
]]>Here’s the recording:
Link to the Sonar Q&A:
https://community.sonarsource.com/t/webinar-end-to-end-security-in-a-web-application/115405
Link to the repository:
]]>Code: https://github.com/damienbod/EndToEndSecurity

Solution Setup
The application uses an Angular UI implemented with NX tools and services. During deployment builds, the UI is integrated into the ASP.NET Core backend, while in development, it operates as a standalone component. Microsoft YARP facilitates the connection between Angular development and local ASP.NET Core APIs. The Angular application is an integral part of the backend system when deployed. Both technical stacks require code analysis and Static Application Security Testing (SAST). Additionally, the solution is secured as a single OpenID Connect confidential client, utilizing the code flow with Proof Key for Code Exchange (PKCE).

SonarCloud setup
I set up SonarCloud testing and integrated it with GitHub Actions using the repository from Marc Rufer.
https://github.com/rufer7/github-sonarcloud-integration
This references the docs from SonarCloud and all the steps required for setting up a build and analysis of the different technical stacks are documented.
ASP.NET Core project setup
To enable SonarCloud to analyze both the ASP.NET Core project and the Angular projects, you’ll need to make adjustments in the .NET Core csproj file settings. Specifically, the Angular components should be added as hidden elements so that SonarCloud can properly detect and analyze them.
<ItemGroup>
<!-- This is required to include ts and js files in SonarCloud analysis -->
<!-- Add to the sonar cloud build: EndToEndSecurity == github repo -->
<!-- /d:sonar.projectBaseDir="D:\a\EndToEndSecurity\EndToEndSecurity" /d:sonar.exclusions=**/node_modules/** -->
<!-- See https://docs.sonarsource.com/sonarqube/9.8/analyzing-source-code/scanners/sonarscanner-for-dotnet/#advanced-topics -->
   <Content Include="..\ui\**\*.ts" Visible="false">
      <CopyToOutputDirectory>Never</CopyToOutputDirectory>
   </Content>
   <Content Include="..\ui\**\*.js" Visible="false">
      <CopyToOutputDirectory>Never</CopyToOutputDirectory>
   </Content>
</ItemGroup>
Quality build
The SonarCloud github action YAML file implements the quality build. Normally this would be integrated with the default build, PRs and feature branches would run this. The dotnet testing tools are added but not active. The build uses a windows-latest image and java. When testing the code of the two technical stacks, you should ignore folders like node_modules and so on. This can be excluded in the YAML file. For this to work, the SonarCloud project must match the YAML file definitions. This is well documented in the Sonar documentation.
name: SonarCloud
on:
  push:
    branches:
      - develop
      - main
  pull_request:
    types: [opened, synchronize, reopened]
jobs:
  build:
    name: Analyze dotnet and Augular projects
    runs-on: windows-latest
    steps:
      - name: Set up JDK 17
        uses: actions/setup-java@v4
        with:
          java-version: 17
          distribution: 'zulu' # Alternative distribution options are available.
      - uses: actions/checkout@v4
        with:
          fetch-depth: 0  # Shallow clones should be disabled for a better relevancy of analysis
      - name: Cache SonarCloud packages
        uses: actions/cache@v4
        with:
          path: ~\sonar\cache
          key: ${{ runner.os }}-sonar
          restore-keys: ${{ runner.os }}-sonar
      - name: Cache SonarCloud scanner
        id: cache-sonar-scanner
        uses: actions/cache@v4
        with:
          path: .\.sonar\scanner
          key: ${{ runner.os }}-sonar-scanner
          restore-keys: ${{ runner.os }}-sonar-scanner
      - name: Install SonarCloud scanner
        if: steps.cache-sonar-scanner.outputs.cache-hit != 'true'
        shell: powershell
        run: |
          New-Item -Path .\.sonar\scanner -ItemType Directory
          dotnet tool update dotnet-sonarscanner --tool-path .\.sonar\scanner
      - name: Install dotnet-coverage # not used as not tests exist in backend
        shell: powershell
        run: |
          dotnet tool install --global dotnet-coverage
      - name: Build and analyze
        env:
          GITHUB_TOKEN: ${{ secrets.GITHUB_TOKEN }}  # Needed to get PR information, if any
          SONAR_TOKEN: ${{ secrets.SONAR_TOKEN }}
        shell: powershell
        run: |
          .\.sonar\scanner\dotnet-sonarscanner begin /k:"damienbod_EndToEndSecurity" /o:"damienbod" /d:sonar.token="${{ secrets.SONAR_TOKEN }}" /d:sonar.host.url="https://sonarcloud.io" /d:sonar.projectBaseDir="D:\a\EndToEndSecurity\EndToEndSecurity" /d:sonar.exclusions=**/node_modules/**
          dotnet build .\Bff.sln --configuration Release
          # dotnet-coverage collect 'dotnet test .\src\--testproj--.Tests\--testproj--.Tests.csproj' -f xml  -o 'coverage.xml'
          .\.sonar\scanner\dotnet-sonarscanner end /d:sonar.token="${{ secrets.SONAR_TOKEN }}"
Badges
Badges from SonarCloud can be added directly in the readme file of the github repository. The badges are created in SonarCloud and I switched them to the overall results and not just the last delta. By clicking the badges in the readme, you are redirected to the SonarCloud test results.

SonarCloud is a great service for code quality analysis and has a good SAST implementation with very good access into the github UI and tools. Security alerts can be directly viewed in github.
Links
https://docs.sonarsource.com/sonarcloud/getting-started/github
https://github.com/rufer7/github-sonarcloud-integration
https://community.sonarsource.com/t/code-coverage-report-for-net-not-working-on-linux-agent/62087
https://andreiepure.ro/2023/08/20/analyze-web-files-with-s4net.html
]]>This article shows how to use a CSP nonce in a Blazor Web application using the InteractiveServer server render mode. Using a CSP nonce is a great way to protect web applications against XSS attacks and other such Javascript vulnerabilities.
Code: https://github.com/damienbod/BlazorServerOidc

Notes
The code in this example was built using the example provided by Javier Calvarro Nelson.
https://github.com/javiercn/BlazorWebNonceService
Services and middleware
The Blazor Web application is implemented using the AddInteractiveServerComponents for the InteractiveServer server render mode. The nonce can be used by implementing a nonce service using the CircuitHandler. The nonce service is a scoped service.
builder.Services.AddRazorComponents()
	.AddInteractiveServerComponents();

builder.Services.TryAddEnumerable(ServiceDescriptor
	.Scoped<CircuitHandler, BlazorNonceService>(sp =>
		sp.GetRequiredService<BlazorNonceService>()));

builder.Services.AddScoped<BlazorNonceService>();
The headers are implemented using the NetEscapades.AspNetCore.SecurityHeaders package. The headers are added to the Blazor nonce service using the NonceMiddleware middleware.
app.UseSecurityHeaders(SecurityHeadersDefinitions.GetHeaderPolicyCollection(
	app.Environment.IsDevelopment(),
	app.Configuration["OpenIDConnectSettings:Authority"]));

app.UseMiddleware<NonceMiddleware>();
Setup Security headers
The security headers CSP script tag is setup as best possible for a Blazor Web application. A CSP nonce is used as well as the fallback definitions for older browsers.
.AddContentSecurityPolicy(builder =>
{
    builder.AddObjectSrc().None();
    builder.AddBlockAllMixedContent();
    builder.AddImgSrc().Self().From("data:");
    builder.AddFormAction().Self().From(idpHost);
    builder.AddFontSrc().Self();
    builder.AddBaseUri().Self();
    builder.AddFrameAncestors().None();

    builder.AddStyleSrc()
		.UnsafeInline()
		.Self();

    // due to Blazor
    builder.AddScriptSrc()
		.WithNonce()
		.UnsafeEval() // due to Blazor WASM
		.StrictDynamic()
		.OverHttps()
		.UnsafeInline(); // fallback for older browsers when the nonce is used
})
Setup Middleware to add the nonce to the state
The NonceMiddleware uses the nonce header created by the security headers package and sets the Blazor nonce service with the value. This is updated on every request.
namespace BlazorWebFromBlazorServerOidc;

public class NonceMiddleware
{
    private readonly RequestDelegate _next;

    public NonceMiddleware(RequestDelegate next)
    {
        _next = next;
    }

    public async Task Invoke(HttpContext context,
          BlazorNonceService blazorNonceService)
    {
        var success = context.Items.TryGetValue(
          "NETESCAPADES_NONCE", out var nonce);

        if (success && nonce != null)
        {
            blazorNonceService.SetNonce(nonce.ToString()!);
        }
        await _next.Invoke(context);
    }
}
Using the nonce in the UI
The BlazorNonceService can be used from the Blazor components in the InteractiveServer render mode. The nonce is applied to all script tags. If the script does not have the correct nonce, it will not be loaded. The GetNonce method reads the nonce value from the BlazorNonceService service.
@inject IHostEnvironment Env
@inject BlazorNonceService BlazorNonceService
@using System.Security.Cryptography;

<!DOCTYPE html>
<html lang="en">
<head>
    <meta charset="utf-8" />
    <meta name="viewport" content="width=device-width, initial-scale=1.0" />
    <base href="/" />
    <link rel="stylesheet" href="css/bootstrap/bootstrap.min.css" />
    <link href="css/site.css" rel="stylesheet" />
    <link href="BlazorWebFromBlazorServerOidc.styles.css" rel="stylesheet" />
    <HeadOutlet @rendermode="InteractiveServer" />
</head>
<body>
    <Routes @rendermode="InteractiveServer" />

    http://_framework/blazor.web.js
</body>
</html>

@code
{
    /// <summary>
    /// Original src: https://github.com/javiercn/BlazorWebNonceService
    /// </summary>
    [CascadingParameter] HttpContext Context { get; set; } = default!;

    protected override void OnInitialized()
    {
        var nonce = GetNonce();
        if (nonce != null)
        {
            BlazorNonceService.SetNonce(nonce);
        }
    }

    public string? GetNonce()
    {
        if (Context.Items.TryGetValue("nonce", out var item)
           && item is string nonce and not null)
        {
            return nonce;
        }

        return null;
    }
}
Notes
Nonces can be applied to Blazor Web using the server rendered mode and the BlazorNonceService which implements the CircuitHandler. Thanks the Javier Calvarro Nelson for providing a solution to this. Next would be to find a solution for the AddInteractiveWebAssemblyComponents setup. You should always use a CSP nonce on a server rendered application and only load scripts with the CSP nonce applied to it.
Links
https://github.com/javiercn/BlazorWebNonceService
https://github.com/andrewlock/NetEscapades.AspNetCore.SecurityHeaders
]]>Code: https://github.com/damienbod/bff-aspnetcore-angular
When using Angular, the root of the UI usually starts from a HTML file. A meta tag with the CSP_NONCE placeholder was added as well as the ngCspNonce from Angular. The meta tag is used to add the nonce to the Angular provider or development npm packages. The ngCspNonce is used for Angular, although this does not work without adding the nonce to the Angular provider.
<!DOCTYPE html>
<html lang="en">
  <head>
    <meta charset="utf-8" />
    <meta name="CSP_NONCE" content="**PLACEHOLDER_NONCE_SERVER**" />
    <title>ui</title>
    <base href="/" />
    <meta name="viewport" content="width=device-width, initial-scale=1" />
    <link rel="icon" type="image/x-icon" href="favicon.ico" />
  </head>
  <body>
    <app-root ngCspNonce="**PLACEHOLDER_NONCE_SERVER**"></app-root>
  </body>
</html>
The CSP_NONCE is added to the Angular providers. This is required, otherwise the nonce is not added to the Angular generated scripts. The nonce value is read from the meta tag header.
import { provideHttpClient, withInterceptors } from '@angular/common/http';
import { ApplicationConfig, CSP_NONCE } from '@angular/core';
import { secureApiInterceptor } from './secure-api.interceptor';

import {
  provideRouter,
  withEnabledBlockingInitialNavigation,
} from '@angular/router';
import { appRoutes } from './app.routes';

const nonce = (
  document.querySelector('meta[name="CSP_NONCE"]') as HTMLMetaElement
)?.content;

export const appConfig: ApplicationConfig = {
  providers: [
    provideRouter(appRoutes, withEnabledBlockingInitialNavigation()),
    provideHttpClient(withInterceptors([secureApiInterceptor])),
    {
      provide: CSP_NONCE,
      useValue: nonce,
    },
  ],
};
CSP in HTTP responses production
The UI now uses the nonce based CSP. The server can return all responses forcing this and increasing the security of the web application. It is important to use a nonce and not the self attribute as this overrides the nonce. You do not want to use self as this allows jsonp scripts. The unsafe-inline is used for backward compatibility. This is a good setup for production.
style-src 'unsafe-inline' 'nonce-your-random-nonce-string'; script-src 'unsafe-inline' 'nonce-your-random-nonce-string';
CSP style in development
Unfortunately, it is not possible to apply the style nonce in development due to the Angular setup. I used self in development for styles. This works, but has problems as you only discover style errors after a deployment, not during feature development. The later you discover errors, the more expensive it is to fix it.
Replace the values in the index.html
Now that the Angular application can use the nonce correctly, it needs to be updated with every page refresh or GET. The nonce is generated in the server part of the web application and is added to the index html file on each response. It is applied to all scripts and styles.
Links
https://nx.dev/getting-started/intro
https://developer.mozilla.org/en-US/docs/Web/HTTP/CSP
https://github.com/damienbod/bff-auth0-aspnetcore-angular
https://github.com/damienbod/bff-openiddict-aspnetcore-angular
https://github.com/damienbod/bff-azureadb2c-aspnetcore-angular
]]>Code: https://github.com/damienbod/bff-auth0-aspnetcore-angular
Auth0 Setup
An Auth0 account is required and a Regular Web Application was setup for this. This is not an SPA application and must always be deployed with a backend which can keep a secret. The Angular client can only use the APIs on the same domain and uses cookies. All application authentication is implemented in the trusted backend and the secure data is encrypted in the cookie.
Architecture Setup
The application is setup to authenticate as one and remove the sensitive data from the client browser. The single security context has UI logic implemented in Angular and server logic, including the security flows, implemented in ASP.NET Core. The server part of the application handles all request from the client application and the client application should only use the APIs from the same ASP.NET Core implemented host. Cookies are used to send the secure API requests. The UI implementation is greatly simplified and the backend application can add additional security features as it is a confidential client, or trusted client.

ASP.NET Core Setup
The ASP.NET Core application is setup to authenticate using OpenID Connect and to store this session in a secure cookie. All OpenID Connect providers require small specific flavors of OpenID Connect. The different OpenID Connect clients can all be implemented using the standard ASP.NET Core AddOpenIdConnect method. If you want, most identity providers provide product specific clients which just wrap this client and change the names of the methods, and pre-configure the provider server specifics. When using the client specific clients, you need to re-learn the APIs for the different OpenID Connect servers. The following code implements the OpenID Connect client for Auth0 and also acquires a delegated access token for the required scope. This is not required, just added as documentation.
services.AddAuthentication(options =>
{
    options.DefaultScheme = CookieAuthenticationDefaults.AuthenticationScheme;
    options.DefaultChallengeScheme = OpenIdConnectDefaults.AuthenticationScheme;
})
.AddCookie(options =>
{
    options.Cookie.Name = "__Host-auth0";
    options.Cookie.SameSite = SameSiteMode.Lax;
})
.AddOpenIdConnect(OpenIdConnectDefaults.AuthenticationScheme, options =>
{
    options.Authority = $"https://{configuration["Auth0:Domain"]}";
    options.ClientId = configuration["Auth0:ClientId"];
    options.ClientSecret = configuration["Auth0:ClientSecret"];
    options.ResponseType = OpenIdConnectResponseType.Code;
    options.Scope.Clear();
    options.Scope.Add("openid");
    options.Scope.Add("profile");
    options.Scope.Add("email");
    options.Scope.Add("auth0-user-api-one");
    // options.CallbackPath = new PathString("/signin-oidc");
    options.ClaimsIssuer = "Auth0";
    options.SaveTokens = true;
    options.UsePkce = true;
    options.GetClaimsFromUserInfoEndpoint = true;
    options.TokenValidationParameters.NameClaimType = "name";

    options.Events = new OpenIdConnectEvents
    {
        // handle the logout redirection
        OnRedirectToIdentityProviderForSignOut = (context) =>
        {
            var logoutUri = $"https://{configuration["Auth0:Domain"]}/v2/logout?client_id={configuration["Auth0:ClientId"]}";

            var postLogoutUri = context.Properties.RedirectUri;
            if (!string.IsNullOrEmpty(postLogoutUri))
            {
                if (postLogoutUri.StartsWith("/"))
                {
                    // transform to absolute
                    var request = context.Request;
                    postLogoutUri = request.Scheme + "://" + request.Host + request.PathBase + postLogoutUri;
                }
                logoutUri += $"&returnTo={Uri.EscapeDataString(postLogoutUri)}";
            }

            context.Response.Redirect(logoutUri);
            context.HandleResponse();

            return Task.CompletedTask;
        },
        OnRedirectToIdentityProvider = context =>
        {
            // The context's ProtocolMessage can be used to pass along additional query parameters
            // to Auth0's /authorize endpoint.
            //
            // Set the audience query parameter to the API identifier to ensure the returned Access Tokens can be used
            // to call protected endpoints on the corresponding API.
            context.ProtocolMessage.SetParameter("audience", "https://auth0-api1");

            return Task.FromResult(0);
        }
    };
});
The OpenID Connect client for Auth0 using the configuration from the appsettings or
  "Auth0": {
    "Domain": "your-domain-in-auth0",
    "ClientId": "--in-secrets--",
    "ClientSecret": "--in-secrets--"
  }
The API controller uses the secure cookie and the CSRF protection.
[ValidateAntiForgeryToken]
[Authorize(AuthenticationSchemes = CookieAuthenticationDefaults.AuthenticationScheme)]
[ApiController]
[Route("api/[controller]")]
public class DirectApiController : ControllerBase
{
    [HttpGet]
    public async Task<IEnumerable<string>> GetAsync()
    {
        // if you need a delegated access token for downstream APIs
        var accessToken = await HttpContext.GetTokenAsync("access_token");

        return new List<string> { "some data", "more data", "loads of data" };
    }
}
Angular Setup
The Angular solution for development and production is setup like described in this blog:
The UI part of the application implements no OpenID connect flows and is always part of the server application. The UI can only access APIs from the single hosting application.
Links
https://github.com/damienbod/bff-aspnetcore-angular
https://learn.microsoft.com/en-us/aspnet/core/introduction-to-aspnet-core
https://nx.dev/getting-started/intro
https://github.com/isolutionsag/aspnet-react-bff-proxy-example
Code: https://github.com/damienbod/bff-aspnetcore-angular
Overview
The solution is deployed as a single OpenID Connect confidential client using the Microsoft Entra ID identity provider. The OpenID Connect client authenticates using the code flow with PKCE and a secret or a certificate. I use secrets in development and certificates in production deployments. The UI part of the solution is deployed as part of the server application. Secure HTTP only cookies are used to persist the session after a successful authentication. No security flows are implemented in the client part of the application. No sensitive data like tokens are exposed in the client browser. By removing the security from the client, the security is improved and the complexity is reduced.

Setup Angular application
The Angular application is setup using nx and a standalone Angular project. The UI needs one setup for production and one setup for development. As the application uses cookies, anti-forgery protection is added. The CSP uses nonces and this needs to be applied to all scripts including the dynamic scripts ones created by Angular. This also applies for styles.
HTTPS setup
The Angular application runs in HTTPS in development and production. The nx project needs to be setup for this. I created a development certificate and added this to the Angular project in a certs folder. The certificates are read in from the folder and used in the project.json file of the nx project. The serve configuration is used to define this. I also switched the port number.
"serve": {
  "executor": "@angular-devkit/build-angular:dev-server",
  "options": {
  "browserTarget": "ui:build",
  "sslKey": "certs/dev_localhost.key",
  "sslCert": "certs/dev_localhost.pem",
  "port": 4201
},
Production build
The Angular project is deployed as part of the server project. In ASP.NET Core, you would use the wwwroot folder and allow static files. The Angular nx project.json file defines the build where the outputPath parameter is updated to match the production deployment.
  "executor": "@angular-devkit/build-angular:browser",
  "outputs": ["{options.outputPath}"],
  "options": {
	"outputPath": "../server/wwwroot",
	"index": "./src/index.html",
CSP setup
The CSP is setup to use nonces both in development and production. This will save time fixing CSP issues before you go live. Angular creates scripts on a build or a nx serve. The scripts require the nonce. To add the server created nonce, the index.html file uses a meta tag in the header. The ngCspNonce is added to the app-root Angular tag. The nonce gets added and updated with a new value on every HTTP request.
<!DOCTYPE html>
<html lang="en">
  <head>
    <meta charset="utf-8" />
	<meta name="CSP_NONCE" content="**PLACEHOLDER_NONCE_SERVER**" />
    <title>ui</title>
    <base href="/" />
    <meta name="viewport" content="width=device-width, initial-scale=1" />
    <link rel="icon" type="image/x-icon" href="favicon.ico" />
  </head>
  <body>
    <app-root ngCspNonce="**PLACEHOLDER_NONCE_SERVER**"></app-root>
  </body>
</html>
You need to add the CSP_NONCE provider to the providers in the Angular project. This must also use the server created nonce.
const nonce = (
  document.querySelector('meta[name="CSP_NONCE"]') as HTMLMetaElement
)?.content;

export const appConfig: ApplicationConfig = {
  providers: [
    provideRouter(appRoutes, withEnabledBlockingInitialNavigation()),
    provideHttpClient(withInterceptors([secureApiInterceptor])),
    {
      provide: CSP_NONCE,
      useValue: nonce,
    },
  ],
};
Anti-forgery protection
Cookies are uses in the authentication session. The authentication cookie is a HTTP only secure cookie only for its domain. Browser Same Site protection helps secure the session. Old browsers do not support Same Site and Anti-forgery protection is still required. You can add this protection in two ways. I use a CSRF anti-forgery cookie.
import { HttpHandlerFn, HttpRequest } from '@angular/common/http';
import { getCookie } from './getCookie';

export function secureApiInterceptor(
  request: HttpRequest<unknown>,
  next: HttpHandlerFn
) {
  const secureRoutes = [getApiUrl()];

  if (!secureRoutes.find((x) => request.url.startsWith(x))) {
    return next(request);
  }

  request = request.clone({
    headers: request.headers.set(
      'X-XSRF-TOKEN',
      getCookie('XSRF-RequestToken')
    ),
  });

  return next(request);
}

function getApiUrl() {
  const backendHost = getCurrentHost();
  return `${backendHost}/api/`;
}

function getCurrentHost() {
  const host = window.location.host;
  const url = `${window.location.protocol}//${host}`;
  return url;
}
The Anti-forgery header is added to every API call to the same domain using an Angular interceptor. The interceptor is a function and added using the HTTP client provider:
provideHttpClient(withInterceptors([secureApiInterceptor])),
Setup ASP.NET Core application
The ASP.NET Core project is setup to host the static html file from Angular and respond to all HTTP requests as defined using the APIs. The nonce is added to the index.html file. Microsoft.Identity.Web is used to authenticate the user and the application. The session is stored in a cookie. The NetEscapades.AspNetCore.SecurityHeaders nuget package is used to add the security headers and the CSP.
using BffMicrosoftEntraID.Server;
using BffMicrosoftEntraID.Server.Services;
using Microsoft.AspNetCore.Mvc;
using Microsoft.Identity.Web;
using Microsoft.Identity.Web.UI;
using Microsoft.IdentityModel.Logging;

var builder = WebApplication.CreateBuilder(args);

builder.WebHost.ConfigureKestrel(serverOptions =>
{
    serverOptions.AddServerHeader = false;
});

var services = builder.Services;
var configuration = builder.Configuration;
var env = builder.Environment;

services.AddScoped<MsGraphService>();
services.AddScoped<CaeClaimsChallengeService>();

services.AddAntiforgery(options =>
{
    options.HeaderName = "X-XSRF-TOKEN";
    options.Cookie.Name = "__Host-X-XSRF-TOKEN";
    options.Cookie.SameSite = SameSiteMode.Strict;
    options.Cookie.SecurePolicy = CookieSecurePolicy.Always;
});

services.AddHttpClient();
services.AddOptions();

var scopes = configuration.GetValue<string>("DownstreamApi:Scopes");
string[] initialScopes = scopes!.Split(' ');

services.AddMicrosoftIdentityWebAppAuthentication(configuration, "MicrosoftEntraID")
    .EnableTokenAcquisitionToCallDownstreamApi(initialScopes)
    .AddMicrosoftGraph("https://graph.microsoft.com/v1.0", initialScopes)
    .AddInMemoryTokenCaches();

services.AddControllersWithViews(options =>
    options.Filters.Add(new AutoValidateAntiforgeryTokenAttribute()));

services.AddRazorPages().AddMvcOptions(options =>
{
    //var policy = new AuthorizationPolicyBuilder()
    //    .RequireAuthenticatedUser()
    //    .Build();
    //options.Filters.Add(new AuthorizeFilter(policy));
}).AddMicrosoftIdentityUI();

builder.Services.AddReverseProxy()
   .LoadFromConfig(builder.Configuration.GetSection("ReverseProxy"));

var app = builder.Build();

IdentityModelEventSource.ShowPII = true;

if (env.IsDevelopment())
{
    app.UseDeveloperExceptionPage();
    app.UseWebAssemblyDebugging();
}
else
{
    app.UseExceptionHandler("/Error");
}

app.UseSecurityHeaders(
    SecurityHeadersDefinitions.GetHeaderPolicyCollection(env.IsDevelopment(),
        configuration["MicrosoftEntraID:Instance"]));

app.UseHttpsRedirection();

app.UseStaticFiles();

app.UseRouting();

app.UseNoUnauthorizedRedirect("/api");

app.UseAuthentication();
app.UseAuthorization();

app.MapRazorPages();
app.MapControllers();
app.MapNotFound("/api/{**segment}");

if (app.Environment.IsDevelopment())
{
    var uiDevServer = app.Configuration.GetValue<string>("UiDevServerUrl");
    if (!string.IsNullOrEmpty(uiDevServer))
    {
        app.MapReverseProxy();
    }
}

app.MapFallbackToPage("/_Host");

app.Run();
Setup Azure App registration
The application is deployed as one. The application consists of two parts, the Angular part and the ASP.NET Core part. These are tightly coupled (business) even if the technical stacks are not. This is an OpenID Connect confidential client with a user secret or a certification for client assertion.
Use the Web client type on setup.

Development environment
Developers require a professional development setup and should use the technical stacks like the creators of the tech stacks recommend. Default development environments is the aim. The Angular nx project uses a default nx environment or best practices as the Angular community recommends. The server part of the application must proxy all UI requests to the Angular nx development environment. I use Microsoft YARP reverse proxy to implement this. This is only required for development in this setup.

Testing and running
The appsettings.json MUST be updated with your Azure tenant Azure App registration values. If using a client secret, store this in the user secrets for development, or in a key vault when deployed to Azure.
  "MicrosoftEntraID": {
    "Instance": "https://login.microsoftonline.com/",
    "Domain": "[Enter the domain of your tenant, e.g. contoso.onmicrosoft.com]",
    "TenantId": "[Enter 'common', or 'organizations' or the Tenant Id (Obtained from the Azure portal. Select 'Endpoints' from the 'App registrations' blade and use the GUID in any of the URLs), e.g. da41245a5-11b3-996c-00a8-4d99re19f292]",
    "ClientId": "[Enter the Client Id (Application ID obtained from the Azure portal), e.g. ba74781c2-53c2-442a-97c2-3d60re42f403]",
    "ClientSecret": "[Copy the client secret added to the app from the Azure portal]",
    "ClientCertificates": [
    ],
    // the following is required to handle Continuous Access Evaluation challenges
    "ClientCapabilities": [ "cp1" ],
    "CallbackPath": "/signin-oidc"
  },
Debugging
Start the Angular project from the ui folder
nx serve --ssl
Start the ASP.NET Core project from the server folder
dotnet run
When the localhost of the server app is opened, you can authenticate and use.
Links
https://learn.microsoft.com/en-us/aspnet/core/introduction-to-aspnet-core
https://nx.dev/getting-started/intro
https://nx.dev/getting-started/tutorials/angular-standalone-tutorial
https://github.com/AzureAD/microsoft-identity-web
https://github.com/isolutionsag/aspnet-react-bff-proxy-example
]]>Code: https://github.com/damienbod/AspNetCoreQuartz
History
- 2024-01-07 Updated to .NET 8
- 2023-01-01 Updated to .NET 7
A simple ASP.NET Core Razor Page web application is used to implement the scheduler and the SignalR messaging. The Quartz Nuget package and the Quartz.Extensions.Hosting Nuget package are used to implement the scheduling service. The Microsoft.AspNetCore.SignalR.Client package is used to send messages to all listening web socket clients.
<Project Sdk="Microsoft.NET.Sdk.Web">

  <PropertyGroup>
    <TargetFramework>net8.0</TargetFramework>
    <Nullable>enable</Nullable>
    <ImplicitUsings>enable</ImplicitUsings>
  </PropertyGroup>

  <ItemGroup>
    <PackageReference Include="Microsoft.AspNetCore.SignalR.Client" Version="7.0.1" />
    <PackageReference Include="Microsoft.Extensions.Hosting" Version="7.0.0" />
    <PackageReference Include="Quartz" Version="3.5.0" />
    <PackageReference Include="Quartz.Extensions.Hosting" Version="3.5.0" />
  </ItemGroup>

</Project>
The .NET 7 templates no longer use a Startup class, all this logic can now be implemented directly in the Program.cs file with no static main. The ConfigureServices logic can be implemented using a WebApplicationBuilder instance. The AddQuartz method is used to add the scheduling services. Two jobs are added, a concurrent job and a non concurrent job. Both jobs are triggered with a simple trigger every five seconds which runs forever. The AddQuartzHostedService method adds the service as a hosted service. The AddSignalR adds the SignalR services.
using AspNetCoreQuartz;
using AspNetCoreQuartz.QuartzServices;
using Quartz;

var builder = WebApplication.CreateBuilder(args);

builder.Services.AddRazorPages();

builder.Services.AddSignalR();

builder.Services.AddQuartz(q =>
{
    var conconcurrentJobKey = new JobKey("ConconcurrentJob");
    q.AddJob<ConconcurrentJob>(opts => opts.WithIdentity(conconcurrentJobKey));
    q.AddTrigger(opts => opts
        .ForJob(conconcurrentJobKey)
        .WithIdentity("ConconcurrentJob-trigger")
        .WithSimpleSchedule(x => x
            .WithIntervalInSeconds(5)
            .RepeatForever()));

    var nonConconcurrentJobKey = new JobKey("NonConconcurrentJob");
    q.AddJob<NonConconcurrentJob>(opts => opts.WithIdentity(nonConconcurrentJobKey));
    q.AddTrigger(opts => opts
        .ForJob(nonConconcurrentJobKey)
        .WithIdentity("NonConconcurrentJob-trigger")
        .WithSimpleSchedule(x => x
            .WithIntervalInSeconds(5)
            .RepeatForever()));

});

builder.Services.AddQuartzHostedService(
    q => q.WaitForJobsToComplete = true);
The WebApplication instance is used to add the middleware like the Startup Configure method. The SignalR JobsHub endpoint is added to send the live messages of the running jobs to the UI in the client browser..
var app = builder.Build();

if (!app.Environment.IsDevelopment())
{
    app.UseExceptionHandler("/Error");
    app.UseHsts();
}

app.UseHttpsRedirection();
app.UseStaticFiles();

app.UseRouting();

app.UseAuthorization();

app.UseEndpoints(endpoints =>
{
    endpoints.MapHub<JobsHub>("/jobshub");
});

app.MapRazorPages();

app.Run();
The ConconcurrentJob implements the IJob interface and logs messages before and after a time delay. A SignalR client is used to send all the job information to any listening clients. A seven second sleep was added to simulate a slow running job. The jobs are triggered every 5 seconds, so this should result in no change in behavior as the jobs can run in parallel.
using Microsoft.AspNetCore.SignalR;
using Quartz;

namespace AspNetCoreQuartz.QuartzServices
{
    public class ConconcurrentJob : IJob
    {
        private readonly ILogger<ConconcurrentJob> _logger;
        private static int _counter = 0;
        private readonly IHubContext<JobsHub> _hubContext;

        public ConconcurrentJob(ILogger<ConconcurrentJob> logger,
            IHubContext<JobsHub> hubContext)
        {
            _logger = logger;
            _hubContext = hubContext;
        }

        public async Task Execute(IJobExecutionContext context)
        {
            var count = _counter++;

            var beginMessage = $"Conconcurrent Job BEGIN {count} {DateTime.UtcNow}";
            await _hubContext.Clients.All.SendAsync("ConcurrentJobs", beginMessage);
            _logger.LogInformation(beginMessage);

            Thread.Sleep(7000);

            var endMessage = $"Conconcurrent Job END {count} {DateTime.UtcNow}";
            await _hubContext.Clients.All.SendAsync("ConcurrentJobs", endMessage);
            _logger.LogInformation(endMessage);
        }
    }
}
The NonConconcurrentJob class is almost like the previous job, except the DisallowConcurrentExecution attribute is used to prevent concurrent running of the job. This means that even though the trigger is set to five seconds, each job must wait until the previous job finishes.
[DisallowConcurrentExecution]
public class NonConconcurrentJob : IJob
{
	private readonly ILogger<NonConconcurrentJob> _logger;
	private static int _counter = 0;
	private readonly IHubContext<JobsHub> _hubContext;

	public NonConconcurrentJob(ILogger<NonConconcurrentJob> logger,
		   IHubContext<JobsHub> hubContext)
	{
		_logger = logger;
		_hubContext = hubContext;
	}

	public async Task Execute(IJobExecutionContext context)
	{
		var count = _counter++;

		var beginMessage = $"NonConconcurrentJob Job BEGIN {count} {DateTime.UtcNow}";
		await _hubContext.Clients.All.SendAsync("NonConcurrentJobs", beginMessage);
		_logger.LogInformation(beginMessage);

		Thread.Sleep(7000);

		var endMessage = $"NonConconcurrentJob Job END {count} {DateTime.UtcNow}";
		await _hubContext.Clients.All.SendAsync("NonConcurrentJobs", endMessage);
		_logger.LogInformation(endMessage);
	}
}
The JobsHub class implements the SignalR Hub and define methods for sending SignalR messages. Two messages are used, one for the concurrent job messages and one for the non concurrent job messages.
public class JobsHub : Hub
{
	public Task SendConcurrentJobsMessage(string message)
	{
		return Clients.All.SendAsync("ConcurrentJobs",  message);
	}

	public Task SendNonConcurrentJobsMessage(string message)
	{
		return Clients.All.SendAsync("NonConcurrentJobs", message);
	}

}
The microsoft signalr Javascript package is used to implement the client which listens for messages.
{
  "version": "1.0",
  "defaultProvider": "cdnjs",
  "libraries": [
    {
      "library": "[email protected]",
      "destination": "wwwroot/lib/microsoft-signalr/"
    }
  ]
}
The Index Razor Page view uses the SignalR Javascript file and displays messages by adding html elements.
@page
@model IndexModel
@{
    ViewData["Title"] = "Home page";
}

<div class="container">
    <div class="row">
        <div class="col-6">
            <ul id="concurrentJobs"></ul>
        </div>
         <div class="col-6">
            <ul id="nonConcurrentJobs"></ul>
        </div>
    </div>
</div>

<script src="~/lib/microsoft-signalr/signalr.js"></script>
The SignalR client adds the two methods to listen to messages sent from the Quartz jobs.
const connection = new signalR.HubConnectionBuilder()
    .withUrl("/jobshub")
    .configureLogging(signalR.LogLevel.Information)
    .build();

async function start() {
    try {
        await connection.start();
        console.log("SignalR Connected.");
    } catch (err) {
        console.log(err);
        setTimeout(start, 5000);
    }
};

connection.onclose(async () => {
    await start();
});

start();

connection.on("ConcurrentJobs", function (message) {
    var li = document.createElement("li");
    document.getElementById("concurrentJobs").appendChild(li);
    li.textContent = `${message}`;
});

connection.on("NonConcurrentJobs", function (message) {
    var li = document.createElement("li");
    document.getElementById("nonConcurrentJobs").appendChild(li);
    li.textContent = `${message}`;
});
When the application is run and the hosted Quartz service runs the scheduled jobs, the concurrent jobs starts every five seconds as required and the non concurrent job runs every seven seconds due to the thread sleep. Running concurrent or non concurrent jobs by using a single attribute definition is a really powerful feature of Quartz.NET.

Quartz.NET provides great documentation and has a really simple API. By using SignalR, it would be really easy to implement a good monitoring UI.
Links:
https://www.quartz-scheduler.net/
https://andrewlock.net/using-quartz-net-with-asp-net-core-and-worker-services/
https://docs.microsoft.com/en-us/aspnet/core/signalr/introduction
]]>The node-oidc-provider clients need a configuration for the public client which uses refresh tokens. The grant_types ‘refresh_token’, ‘authorization_code’ are added as well as the offline_access scope.
clients: [
	{
		client_id: 'angularCodeRefreshTokens',
		token_endpoint_auth_method: 'none',
		application_type: 'web',
		grant_types: [
			'refresh_token',
			'authorization_code'
		],
		response_types: ['code'],
		redirect_uris: ['https://localhost:4207'],
		scope: 'openid offline_access profile email',
		post_logout_redirect_uris: [ 'https://localhost:4207' ]
	}
,]
The Angular client is implemented using angular-auth-oidc-client. The offline_access scope is requested as well as the prompt=consent. The nonce validation after a refresh is ignored.
import { NgModule } from '@angular/core';
import { AuthModule, LogLevel } from 'angular-auth-oidc-client';

@NgModule({
  imports: [
    AuthModule.forRoot({
      config: {
        authority: 'http://localhost:3000',
		redirectUrl: window.location.origin,
		postLogoutRedirectUri: window.location.origin,
		clientId: 'angularCodeRefreshTokens',
		scope: 'openid profile offline_access',
		responseType: 'code',
		silentRenew: true,
		useRefreshToken: true,
		logLevel: LogLevel.Debug,
		ignoreNonceAfterRefresh: true,
		customParams: {
			prompt: 'consent', // login, consent
		},
      },
    }),
  ],
  exports: [AuthModule],
})
export class AuthConfigModule {}
That’s all the configuration required.
Links:
]]>The angular-auth-oidc-client npm package can be added to the application in the App.Module class. We used an AuthConfigModule module to configure the settings and can keep the AppModule small.
import { NgModule } from '@angular/core';
import { BrowserModule } from '@angular/platform-browser';
import { RouterModule } from '@angular/router';
import { AppComponent } from './app.component';
import { AuthConfigModule } from './auth-config.module';
import { HomeComponent } from './home/home.component';
import { UnauthorizedComponent } from './unauthorized/unauthorized.component';

@NgModule({
  declarations: [AppComponent, HomeComponent, UnauthorizedComponent],
  imports: [
    BrowserModule,
    RouterModule.forRoot([
      { path: '', redirectTo: 'home', pathMatch: 'full' },
      { path: 'home', component: HomeComponent },
      { path: 'forbidden', component: UnauthorizedComponent },
      { path: 'unauthorized', component: UnauthorizedComponent },
    ]),
    AuthConfigModule,
  ],
  providers: [],
  bootstrap: [AppComponent],
})
export class AppModule {}
The AuthConfigModule configures the two identity providers. Both clients are setup to use the Open ID Connect code flow with PKCE (proof key for code exchange). Each secure token server (STS) has it’s specifics configurations which are required to use this flow. These configurations must match the corresponding client configuration on the token service of the identity provider. All identity providers have their own flavour of the Open ID Connect specification and also support different features. Some of these are worse, some are better. When implementing SPA applications, you should validate the required features supported by the identity provider.
import { NgModule } from '@angular/core';
import { AuthModule, LogLevel } from 'angular-auth-oidc-client';

@NgModule({
  imports: [
    AuthModule.forRoot({
      config: [
        {
          authority: 'https://offeringsolutions-sts.azurewebsites.net',
          redirectUrl: window.location.origin,
          postLogoutRedirectUri: window.location.origin,
          clientId: 'angularCodeRefreshTokens',
          scope: 'openid profile email taler_api offline_access',
          responseType: 'code',
          silentRenew: true,
          useRefreshToken: true,
          logLevel: LogLevel.Debug,
        },
        {
          authority: 'https://dev-damienbod.eu.auth0.com',
          redirectUrl: window.location.origin,
          postLogoutRedirectUri: window.location.origin,
          clientId: 'Ujh5oSBAFr1BuilgkZPcMWEgnuREgrwU',
          scope: 'openid profile offline_access auth0-user-api-spa',
          responseType: 'code',
          silentRenew: true,
          useRefreshToken: true,
          logLevel: LogLevel.Debug,
          customParamsAuthRequest: {
            audience: 'https://auth0-api-spa',
          },
          customParamsRefreshTokenRequest: {
            scope: 'openid profile offline_access auth0-user-api-spa',
          },
        },
      ],
    }),
  ],
  exports: [AuthModule],
})
export class AuthConfigModule {}
The checkAuthMultiple function is used to initialize the authentication state and begin the flows or whatever. An SPA application requires some route when this logic can run before the guards execute. This is not a server rendered application where the security runs in the trusted backend. The initializing logic setups the state and handles callbacks form the different authentication flows. Great care should be taken when using guards. If a guard is applied to the default route, you need to ensure that the initialization logic runs first. The checkAuthMultiple function should only be called once in the application.
import { Component, OnInit } from '@angular/core';
import { OidcSecurityService } from 'angular-auth-oidc-client';

@Component({
  selector: 'app-root',
  templateUrl: 'app.component.html',
})
export class AppComponent implements OnInit {
  constructor(public oidcSecurityService: OidcSecurityService) {}

  ngOnInit() {
    this.oidcSecurityService.checkAuthMultiple().subscribe(([{ isAuthenticated, userData, accessToken }]) => {
      console.log('Authenticated', isAuthenticated);
    });
  }
}
The sign-in logout, revoke tokens can then be implemented anywhere for the different identity providers. Each client configuration has its own configuration ID which can be used to run or start the required authentication flow, logout or whatever.
import { Component, OnInit } from '@angular/core';
import {
  AuthenticatedResult,
  OidcClientNotification,
  OidcSecurityService,
  OpenIdConfiguration,
  UserDataResult,
} from 'angular-auth-oidc-client';
import { Observable } from 'rxjs';

@Component({
  selector: 'app-home',
  templateUrl: 'home.component.html',
})
export class HomeComponent implements OnInit {
  configurations: OpenIdConfiguration[];
  userDataChanged$: Observable<OidcClientNotification<any>>;
  userData$: Observable<UserDataResult>;
  isAuthenticated$: Observable<AuthenticatedResult>;

  constructor(public oidcSecurityService: OidcSecurityService) {}

  ngOnInit() {
    this.configurations = this.oidcSecurityService.getConfigurations();
    this.userData$ = this.oidcSecurityService.userData$;
    this.isAuthenticated$ = this.oidcSecurityService.isAuthenticated$;
  }

  login(configId: string) {
    this.oidcSecurityService.authorize(configId);
  }

  forceRefreshSession() {
    this.oidcSecurityService.forceRefreshSession().subscribe((result) => console.warn(result));
  }

  logout(configId: string) {
    this.oidcSecurityService.logoff(configId);
  }

  refreshSessionId4(configId: string) {
    this.oidcSecurityService.forceRefreshSession(null, configId).subscribe((result) => console.log(result));
  }

  refreshSessionAuth0(configId: string) {
    this.oidcSecurityService
      .forceRefreshSession({ scope: 'openid profile offline_access auth0-user-api-spa' }, configId)
      .subscribe((result) => console.log(result));
  }

  logoffAndRevokeTokens(configId: string) {
    this.oidcSecurityService.logoffAndRevokeTokens(configId).subscribe((result) => console.log(result));
  }

  revokeRefreshToken(configId: string) {
    this.oidcSecurityService.revokeRefreshToken(null, configId).subscribe((result) => console.log(result));
  }
}
The application can be run and you can logout or use the required configuration. Underneath the identity has not signed in with IdentityServer and the Auth0 client has be authenticated. Each identity provider is independent from the other.

The multiple identity provider support is implemented using redirects. You could also implement all of this using popups depending on you use cases.
Links:
https://github.com/damienbod/angular-auth-oidc-client
]]>