The post Testing email functionality using DebugMail with Rust appeared first on DebugMail.
]]>
A little bit of information on SMTP
Role of fake SMTP server DebugMail: when and how can it help?
— Improve email testing: simplify and optimize with DebugMail
What’s this manual about?
Before starting the testing of the email functionality of the application
Installing Rust on your computer
— Downloading Rust and Cargo
— Checking installed versions of Rust and Cargo
Creating a project in DebugMail
Writing application code to connect to the fake SMTP server DebagMail
— Creating an application project
— Adding project dependencies
— Writing code to test the outgoing mail functionality of a Rust application
— Building an Rust application
— Running the application and testing email functionality
Afterword
Summary
Additional Resources
A little bit of information on SMTP
When sending emails from your application to customer’s email addresses, you have the option to utilize various outgoing mail servers such as Google, Mailjet, Unisender, or other similar services. Additionally, you can also configure and use your own SMTP server, for example, by employing Postfix.
Regardless of the above options, the underlying protocol you will be using to send emails remains SMTP. This means that it doesn’t matter which programming language you choose to develop your application in; you will still be able to send emails to your customers by simply leveraging the SMTP protocol. You have two approaches to achieve this:
- Either by incorporating an SMTP library within your application to handle email sending,
- Or by directly working with the SMTP protocol at a more granular level.
Role of fake SMTP server DebugMail: when and how can it help?
Even after configuring an outgoing mail server and preparing to send emails, it is crucial to thoroughly test the email sending logic, especially if it involves specific criteria. It is important to ensure that your clients receive accurate emails containing correct data. Making mistakes in this aspect can lead to dissatisfaction among clients, as they understandably expect accurate and error-free communication from us.
Improve email testing: simplify and optimize with DebugMail
In this scenario, you have two options to test your outgoing emails:
- Manually creating multiple real email accounts can be time-consuming and cumbersome.
- An alternative option is to use a Fake SMTP server like DebugMail, which simplifies the process and eliminates the need for creating numerous real email accounts.
DebugMail specifically functions as a Fake SMTP server, meaning it doesn’t deliver emails to actual recipients. Instead, it captures and stores these emails within your DebugMail project, allowing you to analyze and identify any errors or inaccuracies. This eliminates the hassle of creating multiple real email accounts to simulate real customers and makes your work much easier.
Similar to a genuine outgoing mail server, DebugMail works with the SMTP protocol. This enables you to incorporate it into your projects regardless of the programming language used. Connecting to DebugMail or a real mail service follows the same method.
We recommend using DebugMail in the staging of your application development, so that you can easily and quickly test outgoing emails if there have been any changes in its logic. Just imagine how convenient it would be — you make changes to the logic of sending emails, the logic of composing email content, or the logic of selecting recipients. You need to make sure that everything is working correctly. By deploying updates to the staging environment where DebugMail is connected, you can quickly test all the scenarios related to outgoing emails — no need to register new mailboxes or add/change user addresses in your application. You can simply test your outgoing emails without any hassle.
What’s this manual about?
As it was said above — it doesn’t matter what language you use to write your application. If you need to work with outgoing mail, you will use the SMTP protocol, which can be handled from any language. This can be implemented using a library, or it can be direct communication via SMTP with your server.
Specifically this manual will show a simple example of how you can use DebugMail in your Rust projects. We will create an account in DebugMail service and write a simple code in Rust that will allow us to send emails from the application. And all these sent emails will be stored in your DebugMail space. From where you can easily and simply analyze these emails and find errors or inaccuracies.
In this tutorial we will be using the Rust language and its package manager Cargo.
Before starting the testing of the email functionality of the application
Since in this manual we will be working with Rust and its package manager Cargo, first you need to install everything we need, as well as create an account and a project in the DebugMail service.
We will be demonstrating an example using Ubuntu OS. The OS doesn’t matter much though. You can do all the same things but with some caveats on any other OS.
Installing Rust on your computer
1 – Downloading Rust and Cargo
Open the terminal and go to the convenient folder where you will work and write our code.
Let’s upload Rust and Cargo on command:
curl --proto '=https' --tlsv1.2 https://sh.rustup.rs -sSf | shThe file will be downloaded and the Rust installation will start. During the process, you will be asked which installation option you want → choose option 1 (default installation).
After the installation is complete, you should see the message in the console:
Rust is installed now. Great!2 – Checking installed versions of Rust and Cargo
Let’s check the Rust version:
rustc --versionIf Rust has been installed correctly, then you should see something like this:
rustc 1.72.1 (d5c2e9c34 2023-09-13)- If that is the case, everything is fine and you can proceed.
- If not, find an error in the Rust installation process and fix it.
Let’s check the Cargo version:
cargo --versionWith Cargo installed correctly, you should see something like:
cargo 1.72.1 (103a7ff2e 2023-08-15)- If that is the case, everything is fine and you can proceed.
- If not, find an error in the Rust installation process and fix it.
Our main goal is to install the Rust compiler and Cargo package manager on your system.
If Rust or Cargo did not install correctly — find an error made during the Rust and Cargo installation process, or search Google for instructions on how to install Rust and Cargo on your system. It shouldn’t be difficult.
Creating a project in DebugMail
After installing Rust, you need to create an account on DebugMail. When you create an account, a team and a project, you will get access credentials that you will use to send emails through the DebugMail mail server.
- Go to https://app.debugmail.io and register and confirm your mail.
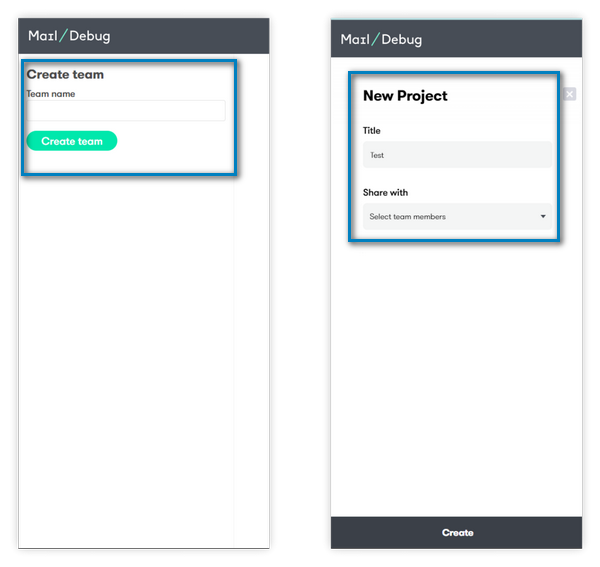
- Upon first login to your profile, you will see a form to create your team.
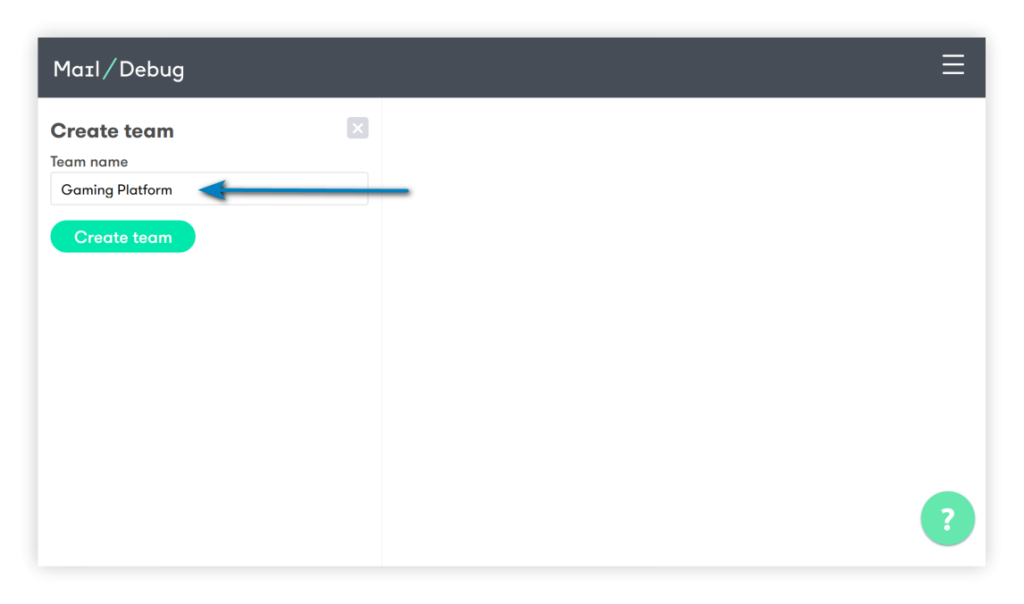
- Now that you have a team, you can create projects inside this command. Normally, the logic is that if you have several applications, a project in DebugMail is created for each application.
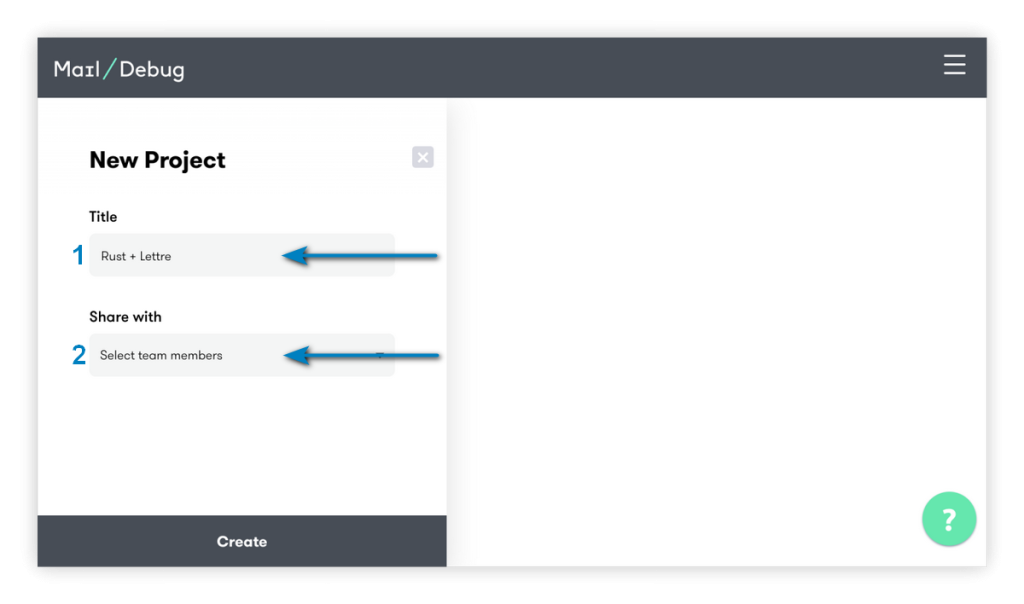
Let’s create the project. Find the «New projects» button in the lower left corner of the screen and click on it. You will see the form of creation of the project. Enter the project name, save it.
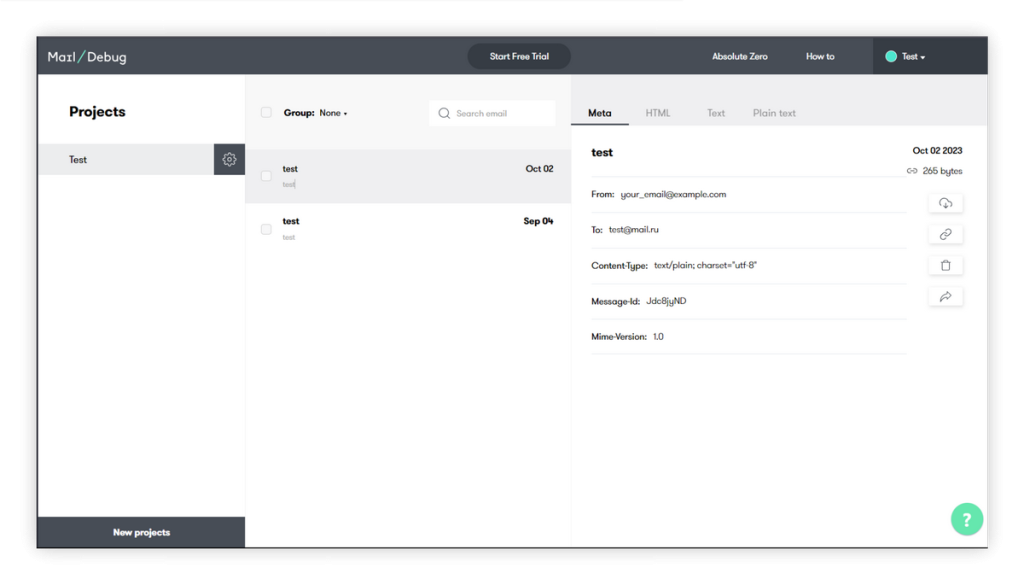
Now you should see your created project:

As you can see, your project doesn’t have any emails yet. It’s time to fix it!
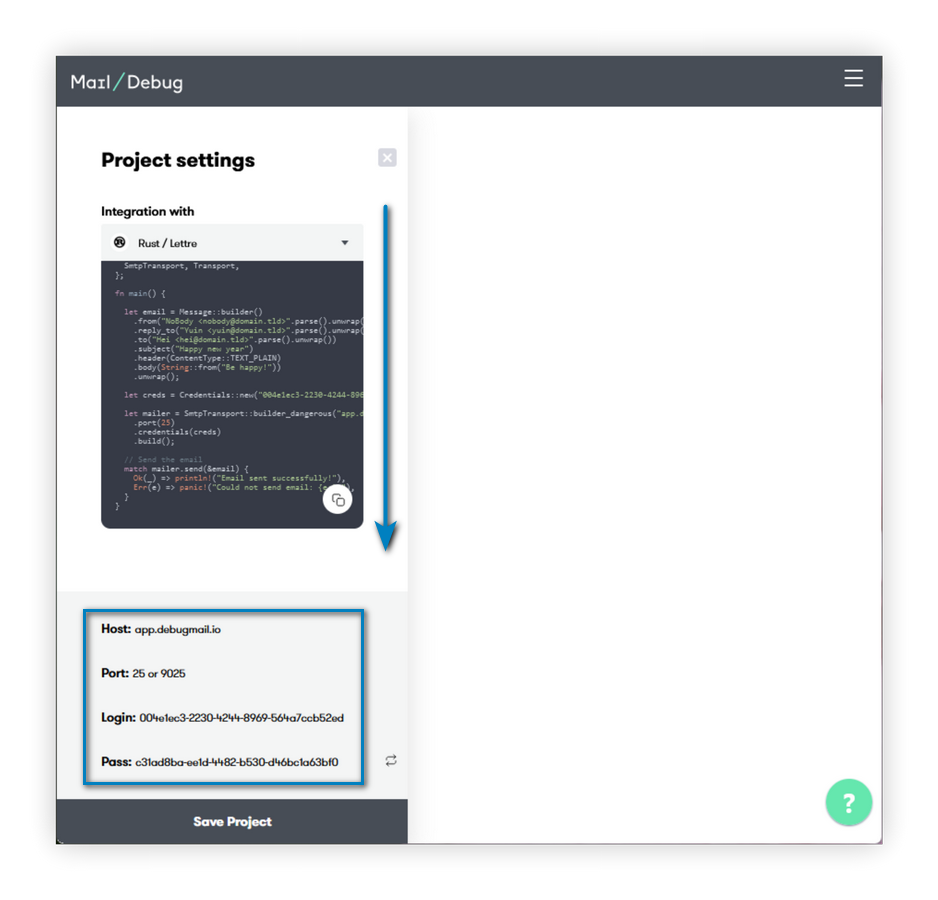
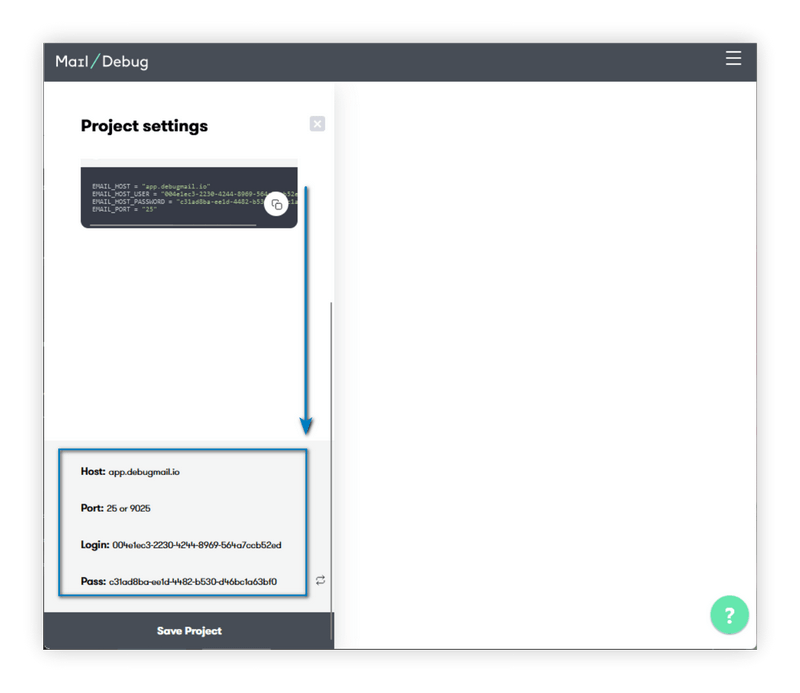
You need to obtain the necessary data that will be required in your Rust code to use DebugMail as your outgoing mail server.
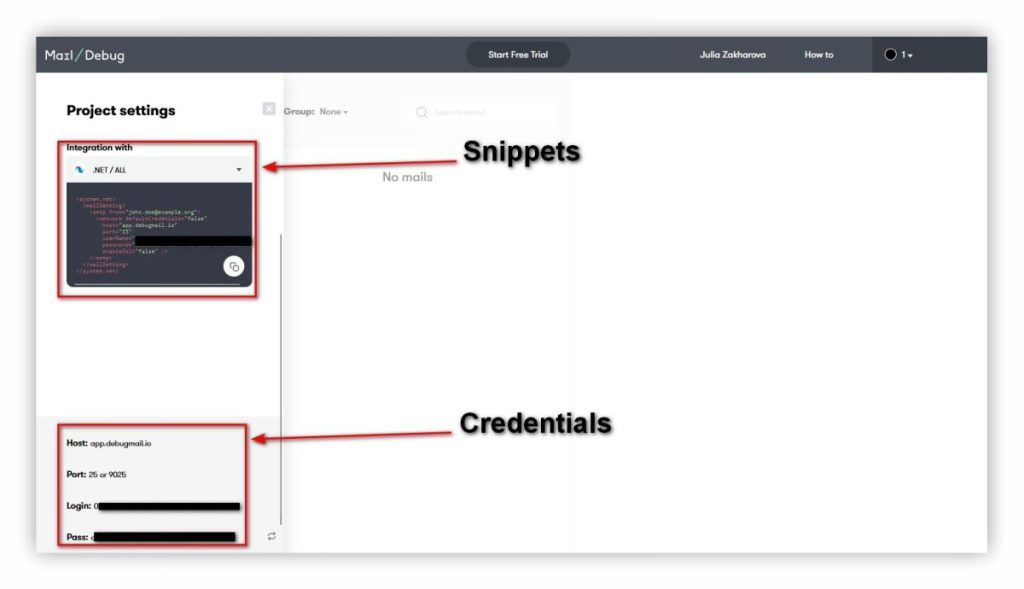
- Tap on the gear icon
 next to the project name.
 - Open the «Settings» section.
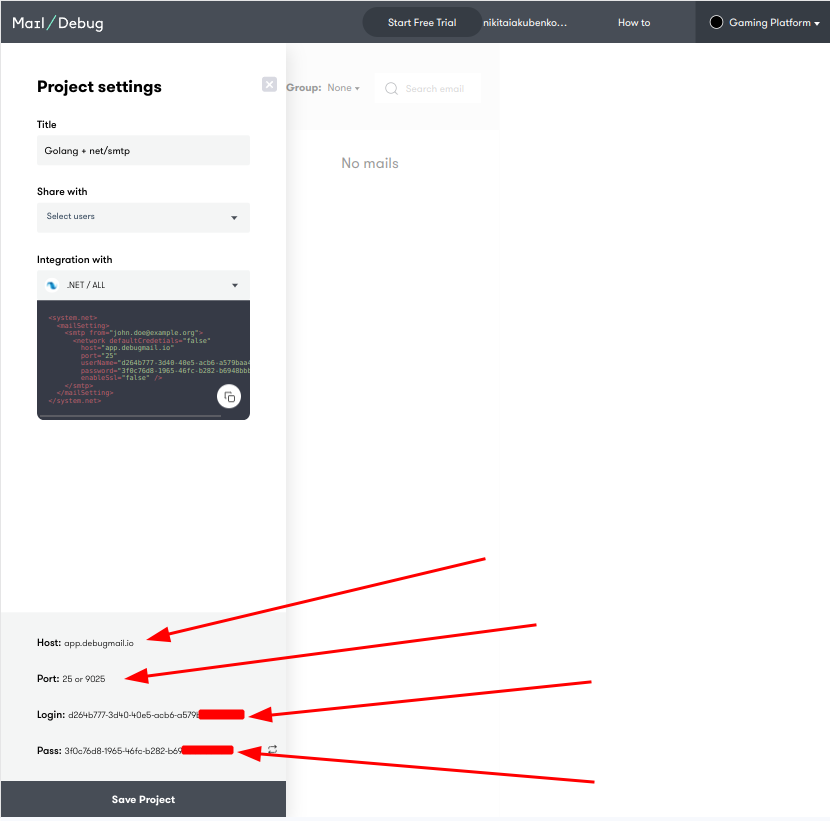
In the «Project settings» menu at the bottom you will see host, port, login, and pass. You use this data in your Rust application.
Writing application code to connect to the fake SMTP server DebagMail
1 – Creating an application project
Open the terminal in the folder where you will be developing your Rust application and run the command:
cargo new dm2_test_mailThis command will create a «skeleton» for your future Rust application. In our example, we decided to name the application dm2_test_mail. Although you can name it as you like.
Now open the created folder with the project in your favorite IDE.
In the folder with your project (our — dm2_test_mail) you will see a folder called «src» — it will contain your source files Rust.
Now this folder has main.rs. In this file we will write our code.
2- Adding project dependencies
Since your Rust application will use the Lettre library to work with SMTP, you need to specify this library in the project dependencies.
Open the Cargo.toml file and change the dependencies section to:
[dependencies]
lettre = "0.10"
lettre_email = "0.9"
Save the changes.
3 – Writing code to test the outgoing mail functionality of a Rust application
Open the main.rs file in the src folder and paste the following code into it:
use lettre::{
    message::header::ContentType, transport::smtp::authentication::Credentials, Message,
    SmtpTransport, Transport,
};

fn main() {

    let email = Message::builder()
        .from("[email protected]".parse().unwrap())
        .reply_to("[email protected]".parse().unwrap())
        .to("[email protected]".parse().unwrap())
        .subject("Send email for Rust app")
        .header(ContentType::TEXT_PLAIN)
        .body(String::from("It really works?"))
        .unwrap();

    let creds = Credentials::new("8f3f072e-dfb4-482c-85c5-b7e90883ad3d".to_owned(), "5b8834bf-780f-4a7a-b172-f787c3782440".to_owned());

    let mailer = SmtpTransport::builder_dangerous("app.debugmail.io")
        .port(25)
        .credentials(creds)
        .build();

    // Send the email
    match mailer.send(&email) {
        Ok(_) => println!("Email sent successfully!"),
        Err(e) => panic!("Could not send email: {e:?}"),
    }
}
Let’s explore what’s happening in our code.
use lettre::{
    message::header::ContentType, transport::smtp::authentication::Credentials, Message,
    SmtpTransport, Transport,
};
We specify which objects we will be using from the Lettre library.
fn main() {Here we declare the main function, where the message sending will occur.
    let email = Message::builder()
        .from("[email protected]".parse().unwrap())
        .reply_to("[email protected]".parse().unwrap())
        .to("[email protected]".parse().unwrap())
        .subject("Send email for Rust app")
        .header(ContentType::TEXT_PLAIN)
        .body(String::from("It really works?"))
        .unwrap();
We create a Message object and specify the following parameters:
from— the sender of our email.reply_to— the email address where the recipient should send a reply if they want to respond to this email.to— the recipient’s email address.subject— the subject of the email.header— we add a ContentType header specifying the type as text/plain.body— the body of the email.
let creds = Credentials::new("8f3f072e-dfb4-482c-85c5-b7e90883ad3d".to_owned(), "5b8834bf-780f-4a7a-b172-f787c3782440".to_owned());In here we create a Credentials object and provide our credentials for the DebugMail project. We need to specify the login and password for the outgoing mail server that we want to use.
Where are the creds in the DebugMail project?
Go to your DebugMail project, open the project settings, at the lowest bottom you will see the necessary data. You need to replace the login and password used in the code above with the login and password from your DebugMail project.
If you were using a different outgoing mail server, you would need to provide your login and password from that server.
    let mailer = SmtpTransport::builder_dangerous("app.debugmail.io")
        .port(25)
        .credentials(creds)
        .build();
In this section of code, we create a SmtpTransport object by passing it the host and port parameters of our mail server.
- If you are using DebugMail, you need to specify host = “app.debugmail.io”, port = 25 or 9025.
- If you were using a different outgoing mail server, you would need to specify a different host and port to match that server.
Also passed here is the creds object created earlier, which contains the login and password data for authenticating the user to DebugMail.
    // Send the email
    match mailer.send(&email) {
        Ok(_) => println!("Email sent successfully!"),
        Err(e) => panic!("Could not send email: {e:?}"),
    }
This section of the code will attempt to send an email with the data generated earlier.
- If the email is sent, the “Email sent successfully!” message will be displayed in the console.
- If an error occurs while sending the email, the message “Failed to send the email” with the error description will be displayed.
This is where the work of our program ends. All we have left to do is create our Rust app and run it.
4 – Building an Rust application
Open the terminal and navigate to the folder with your Rust application. In our case, we call it as dm2_test_mail.
Execute command:
cargo buildWe will acquire the necessary dependencies and proceed to compile your Rust application.
In the project folder (for us it is dm2_test_mail), you will see a new directory called «target». Your compiled application will be located in this folder. Specifically, in our case, the compiled application will reside in the directory — dm2_test_mail/target/debug/dm2_test_mail.
5 – Running the application and testing email functionality
Open the terminal and navigate to the Rust project folder.
Execute command:
cargo runThis command will execute our program.
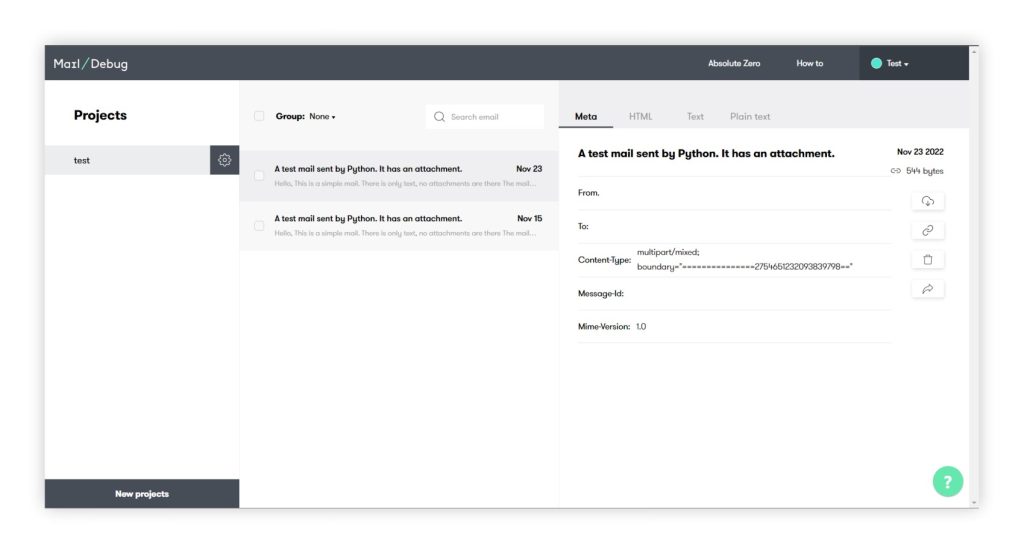
If you did everything correctly earlier, you will get the output “Email sent successfully!”. And our DebugMail project will receive the email sent by the program.
Let’s open our project in DebugMail and confirm that the email has been received as expected.

We’ve successfully achieved our goal! The email has arrived in our DebugMail project, thanks to the implementation of a simple Rust code that facilitates outgoing email sending. And we used DebugMail as our outgoing mail server.
It works!
Afterword
In this manual, we have provided a basic example of how you can use DebugMail in your Rust applications using the Lettre library. We were able to write a simple Rust code and send an email to a user. However, we used the DebugMail service as our outgoing mail server, which helps us easily and quickly test outgoing email from our application, written in any language.
If you have understood the concept of this guide, you will be able to integrate any SMTP outgoing mail server into your application, including DebugMail.
Summary
Let’s summarize.
- All SMTP outgoing mail servers work on the same principle — using the SMTP protocol.
- If you want to test outgoing email from your application or debug outgoing emails, you will need a service like DebugMail — a fake SMTP server.
- DebugMail server assists in debugging your mail during the staging of your project.
- DebugMail server is not intended for the actual delivery of emails to your customers. Its primary purpose is for debugging and testing during the development stage of your project.
We recommend following this principle:
- For the staging phase of your application, connect DebugMail so that you can quickly and easily test outgoing emails and any changes related to outgoing email functionality.
- For the production stage of your application, connect a real SMTP server that will deliver real emails to your customers.
By following this principle, you can easily modify the logic of your outgoing email, test these changes using DebugMail, and only deliver your changes to production when you are confident that the outgoing email in your application is working correctly.
If you have any questions or need help with integration, just email us. We are always ready to help!
Additional Resource
- DebugMail API Documentation: https://app.debugmail.io/api-public/docs/
The post Testing email functionality using DebugMail with Rust appeared first on DebugMail.
]]>The post Testing email functionality using DebugMail on Golang appeared first on DebugMail.
]]>
A little bit about SMTP
Role of fake SMTP server DebugMail: how and when it’s useful
— Enhancing email testing: simplify and streamline with DebugMail
What is this guide about?
Before getting started
Installing Golang
— Downloading Golang
— Write PATH for Go
— Performing a check
DebugMail account
Writing application code
— What the DebugMail snippet code contains
In Summary
Conclusion
A little bit about SMTP
When you send emails from your application to customer’s email addresses, you need to use an outgoing mail server. The outgoing mail server can be Google, Mailjet, Unisender, or other services. Alternatively, you can configure your own SMTP server, such as using Postfix.
Regardless of the option you choose from the above, you will still use the SMTP protocol to send emails. This means that it doesn’t matter which programming language you use to write your application. You will still be able to send emails to your customers by simply using the SMTP protocol.
Either you use a SMTP-library to send emails, or you can work directly at the SMTP level itself.
Role of fake SMTP server DebugMail: how and when it’s useful
Even after setting up an outgoing mail server and being ready to send emails, you would most likely want to test the logic of sending your emails to clients, especially if the logic is specific. After all, you wouldn’t want your clients to receive incorrect emails or incorrect data in those emails. Clients don’t appreciate it when we make mistakes.
Enhancing email testing: simplify and streamline with DebugMail
Here, you have at least two options — manually create multiple real email accounts to test your outgoing emails or use a Fake SMTP server to simplify the process and avoid the hassle of creating numerous real email accounts.
DebugMail is precisely such a Fake SMTP server. This means that DebugMail does not deliver emails to real recipients; it only captures and saves them in your DebugMail project, where you can analyze your emails and identify errors or inaccuracies. This eliminates the need to create thousands of real email accounts to simulate your customers and greatly simplifies your work.
Just like any other real outgoing mail server, DebugMail works with the SMTP protocol. This means that you can use DebugMail in your projects regardless of the programming language your application is written in, and the method of connecting to DebugMail or a real mail service will be the same.
We recommend using DebugMail in the staging environment of your application so that you can easily and quickly test outgoing emails if there have been any changes in the logic of their operation.
Imagine how convenient it is — you make changes to the logic of outgoing emails, the logic of generating email content, or the logic of selecting recipients.
- You need to make sure everything is working correctly.
- You deploy updates to the staging environment where DebugMail is connected and quickly test all the cases related to outgoing emails — you don’t need to register new email accounts or add/change user addresses in your application.
- You simply test your outgoing emails without any hassle.
What is this guide about?
As mentioned above, it doesn’t matter which programming language you use for your application. If you need to work with outbound email, you will use the SMTP protocol, which can be used from any programming language. This can be implemented using a library, or it can be direct interaction with your server via SMTP protocol.
Specifically in this guide will show a simple example of how to use DebugMail in your Golang projects. You will create an account in the DebugMail service and write basic Golang code that allows you to send emails from your application, with all these sent emails being stored in our DebugMail space. From there, you can easily analyze these emails and identify any errors or inaccuracies.
In this guide, we assume that your application may not be related to the WEB or HTTP, but still needs to send outbound email. Therefore, we will only write a simple function that sends an email. Essentially, you need to modify and reuse this function in your own application.
This guide is more like a demonstration of how to use DebugMail in your Golang projects using the net/smtp library.
It will provide a simple example, but based on this example, you will understand the working principle and be able to apply it to your Golang application, regardless of its size, complexity, or purpose.
Of course, this example requires some improvements, and it’s better not to use it as is. However, for a simple demonstration, this example is suitable. It will give you an idea of how to use an SMTP server in your code. If you understand the concept and have an understanding of how to construct programs correctly, you can easily adapt this example for your application.
Before getting started
Since we will be working with Golang in this guide, we need to install all the necessary dependencies, create an account and project in the DebugMail service.
We will demonstrate the example using the Ubuntu operating system, although the specific OS doesn’t matter. You can do the same with some caveats on other operating system.
Installing Golang
1 – Downloading Golang
Visit the Golang website and download the latest version of the package — https://go.dev/doc/install.
Depending on your operating system, choose the package that suits your needs.
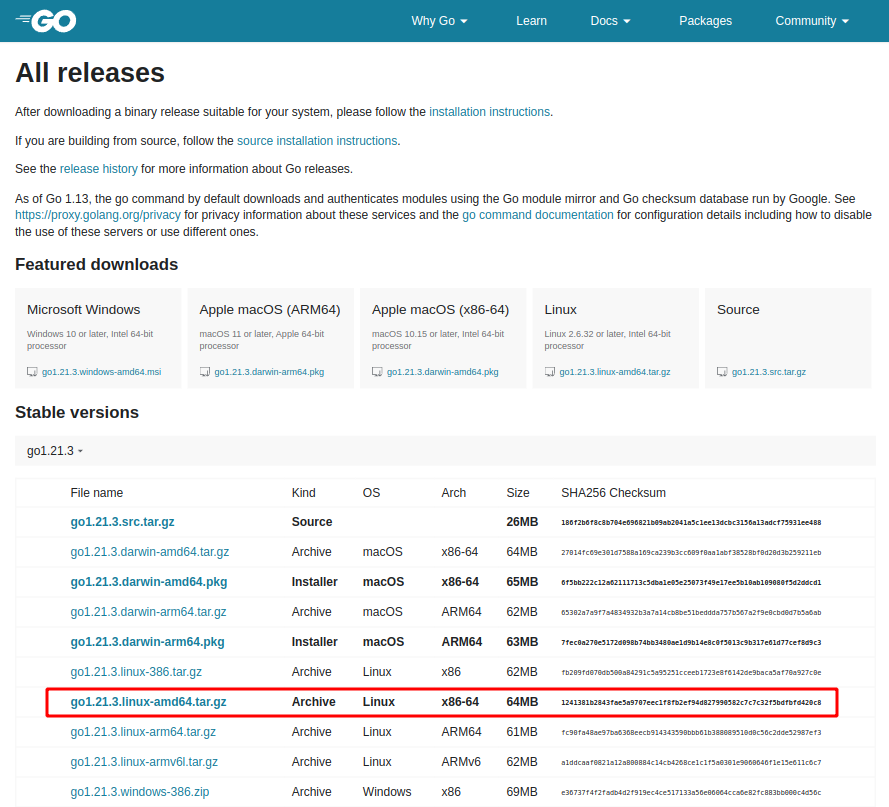
In our case we need this particular package:
Unpack the archive with the command:
sudo tar -C /usr/local -xvf go1.21.1.linux-amd64.tar.gz2 – Write PATH for Go
Open the next file:
sudo nano ~/.profileAt the end of the file, add the lines:
export PATH=$PATH:/usr/local/go/binTo save, press Ctrl+O then Enter.
3 – Performing a check
In the terminal, type:
source ~/.profileNext, in the terminal, type:
go versionIf you get the output go version go1.21.1 linux/amd64, it means everything is fine and you can continue with your task.
If not, identify any errors made during the Go installation process or use Google to find installation instructions for Golang on your system. This shouldn’t be difficult.
Our main task is to install the Go compiler on your system.
DebugMail account
After installing Go, you must first create an account on DebugMail and then create a project to use the DebugMail mail server. By creating an account and project on DebugMail, you will obtain access credentials that you will use to send emails through the DebugMail mail server.
- Go to https://app.debugmail.io and complete the registration and email verification process.
- After you log in to your profile for the first time, you will see a form that will allow you to create your team.

- Having created a team, you can now create projects within that team. The usual practice is to create a separate project in DebugMail for each application if you have multiple applications.
To create a new project, click on the «New projects» button in the lower-left corner of the screen. A project creation form will appear. Enter the name of your project and save it.

Now you should be able to see the project we have created:

As you can observe, our project currently does not have any emails. It is high time to change that!
You need to collect all the data required for your Golang code to use DebugMail as an outgoing mail server.
- Tap on the gear icon next to the project name.
- Open the Settings section.
You will find the host name, port number, username, and password. These are the data that you will be using in your Golang application.
Writing application code
Open your favorite IDE and create the necessary folder where your Golang application files will be stored.
In that folder, create a file called net_smtp.go and add the following code into it:
package main

import (
	"fmt"
	"net/smtp"
)

func main() {
	host :=
	port :=
	login :=
	pass :=

	auth := smtp.PlainAuth("", login, pass, host)
	to := []string{"[email protected]"}
	from := "[email protected]"
	msg := []byte("From: [email protected]\r\nTo: [email protected]\r\nSubject: Hello\r\n\r\nThis is the body of the email.\r\n")

	err := smtp.SendMail(fmt.Sprintf("%s:%d", host, port), auth, from, to, msg)

	if err != nil {
		fmt.Println("Error:", err)
		return
	}

	fmt.Println("Email sent successfully!")
}
Please note that the variables host, port, login, and pass are empty. You must provide the data you obtained after creating the project in DebugMail for these variables.
Let us complete this information.
Return to the DebugMail project, open the project settings, and copy the necessary data into the corresponding variables in the Golang code.
In our example, the code will look like this:
package main

import (
	"fmt"
	"net/smtp"
)

func main() {
	host := "app.debugmail.io" //insert project host
	port := 25 //insert project port
	login := "dacd64c6-91b9-48fa-850d-fc588a840472" //insert project login
	pass := "bce892d4-add3-47af-a9b4-abe050ddd6db" //insert project password

	auth := smtp.PlainAuth("", login, pass, host)
	to := []string{"[email protected]"}
	from := "[email protected]"
	msg := []byte("From: [email protected]\r\nTo: [email protected]\r\nSubject: Hello\r\n\r\nThis is the body of the email.\r\n")

	err := smtp.SendMail(fmt.Sprintf("%s:%d", host, port), auth, from, to, msg)

	if err != nil {
		fmt.Println("Error:", err)
		return
	}

	fmt.Println("Email sent successfully!")
}
In general, we are ready to run our application, which will send an email to our DebugMail project.
But before that, let’s take a more in-depth look at what is happening in our code.
What the DebugMail snippet code contains
package mainSpecify the name of our Golang package.
import (
	"fmt"
	"net/smtp"
)
Import the necessary libraries:
- fmt — allows messages to be output to the console.
- net/smtp — library for sending emails, which works at SMTP level.
func main()Declare the name of the function that will send messages to your DebugMail project. The rest of the code will be executed within this function.
host := "app.debugmail.io" //insert project host
	port := 25 //insert project port
	login := "dacd64c6-91b9-48fa-850d-fc588a840472" //insert project login
	pass := "bce892d4-add3-47af-a9b4-abe050ddd6db" //insert project password
In this section of the code, we define variables that contain the data needed by the net/smtp library to connect to the DebugMail mail server.
auth := smtp.PlainAuth("", login, pass, host)
	to := []string{"[email protected]"}
	from := "[email protected]"
	msg := []byte("From: [email protected]\r\nTo: [email protected]\r\nSubject: Hello\r\n\r\nThis is the body of the email.\r\n")
Here, we create an auth object that will be used for authentication during the connection to the DebugMail server. We also specify the email addresses to which we want to send the email. Additionally, we specify the body of the email itself and the From and To headers.
err := smtp.SendMail(fmt.Sprintf("%s:%d", host, port), auth, from, to, msg)On this line, we attempt to send the email.
if err != nil {
		fmt.Println("Error:", err)
		return
	}
This code checks for any errors that may have occurred when sending the email. If an error is found, the error message will be printed to the console and the function will be terminated.
fmt.Println("Email sent successfully!")If no errors were found, we will display a message to the console indicating that the email was successfully sent.
Now that you understand what the code does, you need to make sure that you have entered the host, port, login, and password data correctly in the code and run it. A test email should appear in the DebugMail project.
Let’s return to the terminal, open the folder with your file net_smtp.go, and run the command:
go run net_smtp.goIf you have done everything correctly, you will get the following output:
Email sent successfully!Now move on to your DebugMail project. You will see a list of emails there.

Opening the email, you see that it is the email that you sent from the Golang application.
It works!
In Summary
This guide provides a basic example of how to use DebugMail in your Golang applications using the net/smtp library.
You should understand that headers, body, and other email parameters were not discussed in this guide, as that is a separate topic. This guide aims to demonstrate the basic principle of outgoing mail in your applications.
If you understand the idea of this guide, you will be able to implement any SMTP server for outbound mail in your application, including DebugMail.
DebugMail server is used for debugging your mail at the staging environment of your project.
Furthermore, the DebugMail server is not used for actually sending mail to your clients.
Conclusion
To summarize, if you want to send email messages from your application, you will need an outgoing mail SMTP server. All outgoing mail SMTP servers work on the same principle, through the SMTP protocol.
If you want to test or debug outgoing emails from your application, you will need a service called DebugMail, a fake SMTP server.
We recommend following this principles:
- Connect DebugMail to the staging environment of your application so that you can quickly and easily test outgoing mail and any changes related to outgoing mail.
- Connect a real SMTP server to the production environment of your application that will deliver real emails to your clients.
By following this principle, you can easily modify the logic of your outgoing mail, test these changes using DebugMail, and only deliver your changes to production when you are confident that the outgoing mail in your application is working correctly.
The post Testing email functionality using DebugMail on Golang appeared first on DebugMail.
]]>The post Testing email functionality using DebugMail on Django appeared first on DebugMail.
]]>
Preparing the project for integration with DebugMail
— Setup and data for capturing mail with DebugMail
In conclusion
One of the tasks in the software testing process is testing and debugging email functionality. Having a good and reliable tool for this purpose is essential, and that’s where DebugMail comes to the rescue.
DebugMail is a virtual mail server that allows you to test applications and websites without the need to install an SMTP server. To start using it, all you need to do is change the host, port, username and password settings in your mail configuration to match the values provided by the DebugMail service.
More details of the integration steps are described below.
Preparing the project for integration with DebugMail
Step 1. Install the virtual environment of the project:
python -m venv venvStep 2. Activate the virtual environment:
command for Windows
venv\Scripts\activateStep 3. After setting up the virtual environment, let’s proceed with installing Django:
pip install DjangoStep 4. Let’s create a project:
django-admin startproject mysiteStep 5. Create the templates directory in the root of mysite.
Step 6. Create the main.html file (for now, without any inheritance, just for displaying mail submission).

Step 7. Write the main template for mail submission:
<!DOCTYPE html>
<html>
<head>
<title>Testing email with DebugMail via Django</title>
<link href="proxy.php?url=https://cdn.jsdelivr.net/npm/[email protected]/dist/css/bootstrap.min.css" rel="stylesheet" integrity="sha384-4bw+/aepP/YC94hEpVNVgiZdgIC5+VKNBQNGCHeKRQN+PtmoHDEXuppvnDJzQIu9" crossorigin="anonymous">
</head>
<body>
<div class="container py-5">
<h1>Testing email with DebugMail via Django</h1>
<br>
<form action="proxy.php?url={% url 'main_send_email_view' %}" method="post">
{% csrf_token %}
<div class="mb-3">
<label for="email" class="form-label">Email:</label>
<input type="email" class="form-control" aria-describedby="emailHelp" id="email" name="email" required>
</div>
<br>
<div class="mb-3">
<label class="form-label" for="subject">Subject:</label>
<input class="form-control" type="text" id="subject" name="subject" required>
</div>
<br>
<div class="mb-3">
<label for="exampleFormControlTextarea1" class="form-label">Message:</label>
<textarea class="form-control" id="exampleFormControlTextarea1" name="message" rows="4" cols="50" rows="3" required></textarea>
</div>
<br>
<button type="submit" class="btn btn-primary mb-3">Send</button>
</form>
</div>
<script src="proxy.php?url=https://cdn.jsdelivr.net/npm/[email protected]/dist/js/bootstrap.bundle.min.js" integrity="sha384-HwwvtgBNo3bZJJLYd8oVXjrBZt8cqVSpeBNS5n7C8IVInixGAoxmnlMuBnhbgrkm" crossorigin="anonymous"></script>
</body>
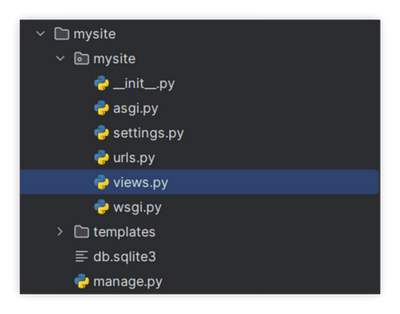
</html>Step 8. Create the views.py file in the main directory of mysite, where our urls.py is located.
Step 9. Write the necessary code in the views.py file to display the page:
from django.shortcuts import render
from django.core.mail import send_mail
from django.http import HttpResponse

def main_send_email_view(request):
    if request.method == 'POST':
        email = request.POST.get('email')
        subject = request.POST.get('subject')
        message = request.POST.get('message')

        # Here you can add additional logic for data processing

        try:
            send_mail(subject, message, '[email protected]', [email])
            return HttpResponse('Email successfully sent!')
        except Exception as e:
            return HttpResponse(f'Oops! Something went wrong: {str(e)}')

    return render(request, 'main.html')
Step 10. Add the required path in urls.py file.
from django.contrib import admin
from django.urls import path
from . import views

urlpatterns = [
    path('admin/', admin.site.urls),
    path('', views.main_send_email_view, name="main_send_email_view"),
]
Step 11. Customize the settings.py file to output templates.
import os
TEMPLATES = [
{
'BACKEND': 'django.template.backends.django.DjangoTemplates',
'DIRS': [os.path.join(BASE_DIR, 'templates')],
'APP_DIRS': True,
'OPTIONS': {
'context_processors': [
'django.template.context_processors.debug',
'django.template.context_processors.request',
'django.contrib.auth.context_processors.auth',
'django.contrib.messages.context_processors.messages',
],
},
},
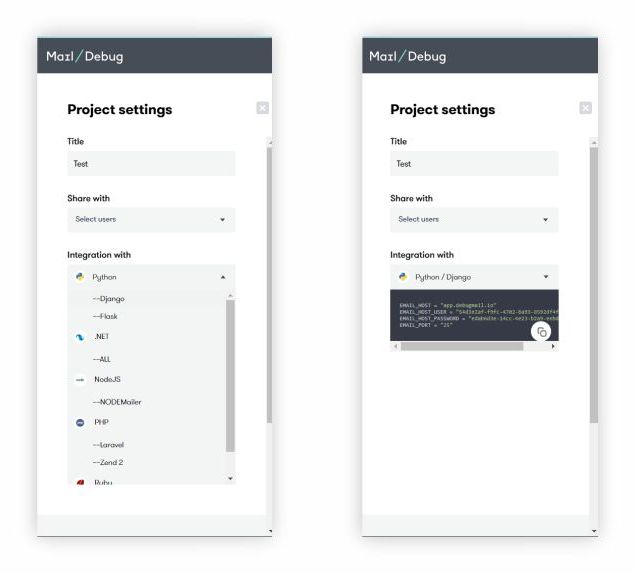
]Step 12. Copy the snippet from DebugMail with the necessary details and paste it at the end of settings.py.
Setup and data for capturing mail with DebugMail
Firstly, let’s go to DebugMail first and create an account.

Secondly, create a team and create a project for that team. The project will display test emails from your Python project.
Thirdly, in the created project, open the settings and copy the SMTP data for connecting to the staging project.

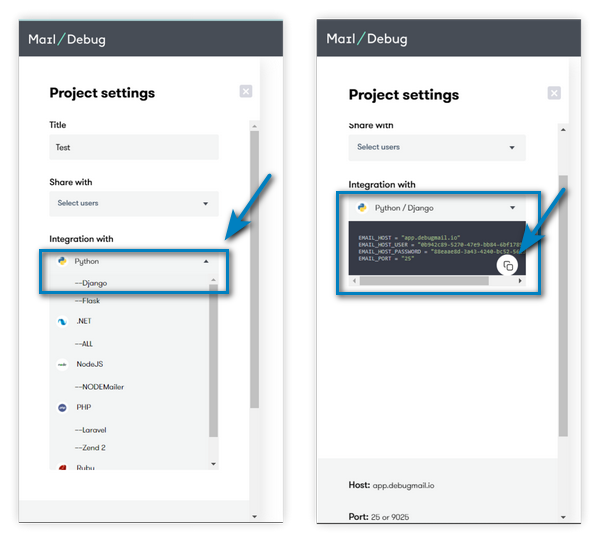
Copy a similar snippet (with individually generated username and password) to a convenient location of your choice:
EMAIL_HOST = "app.debugmail.io"
EMAIL_HOST_USER = "0b942c89-5270-47e9-bb84-6bf178951feb"
EMAIL_HOST_PASSWORD = "88eaae8d-3a43-4240-bc52-56e321739f0b"
EMAIL_PORT = "25"
Scrolling down below the project settings page, you can find the SMTP credentials.
Take these credentials and paste them into the appropriate fields in the code:
# EMAIL
EMAIL_HOST = "app.debugmail.io"
EMAIL_HOST_USER = ""
EMAIL_HOST_PASSWORD = ""
EMAIL_PORT = ""
Step 13. Navigate to mysite in the console:
cd mysiteStep 14. Run the project:
python manage.py runserverStep 15. After that, go to http://127.0.0.1:8000/. And test it out!

Step 16. Check the results.
Finally, we have done all the steps. And now is the time to check the results. If you check your DebugMail project, you have received the email successfully as below.

In conclusion
I hope this guide has helped you successfully integrate DebugMail into your project, making it easier to test functionality related to sending email. If you have any questions or need help with integration, just email us. We are always ready to help!
PS. If you need more information to compare DebugMail with other popular email services, we recommend checking out our blog articles on DebugMail vs. Google SMTP and DebugMail vs. Yahoo Mail SMTP.
The post Testing email functionality using DebugMail on Django appeared first on DebugMail.
]]>The post Operation of DebugMail API appeared first on DebugMail.
]]>
Where to locate the API documentation on the site
Supported HTTP requests in DebugMail API
What are the features of the DebugMail API
— Possible scenarios for using the DebugMail API
Getting started with DebugMail API
Where to locate the API documentation on the site
To access detailed documentation on API DebugMail, use this link.

where you can explore and interact with the API.
You can also find it in the bottom section of the page in the Info block, in the API Docs line.

Alternatively, the documentation link is available in the account Control panel in the API Rules section.

Supported HTTP requests in DebugMail API
DebugMail supports the following HTTP requests:
- POST to create a new resource.
- PATCH to partially update a resource.
- PUT to update a resource.
- GET to retrieve a resource or a list of resources.
- DELETE to delete a resource.

What are the features of the DebugMail API
Through the API, you can execute the following commands:
- Projects: create a new project, update or delete a project, reset password, and set project priority.
- Team members: get a list of all team members, change a team member’s role or remove them from the team.
- Teams: create, update, get, or delete a team.
- Users: get and update user data, login or logout, update password.
- Project members: add, remove, or get users in a project.
- Mails: get all project emails, view an email, get a short link to an email, forward an email, delete an email or all project emails.
- Invitations: get information, create an invitation, accept an invitation.
- Forwarding rules: create, update, delete, get project information, delete all project rules, list all project rules.
- Billing: get payment source information, get payment information, get customer information, view all team payments.
Possible scenarios for using the DebugMail API
- Confirm that emails are received by the project
- Ensure that the email forwarding rules to recipients are accurate
- Verify that the status of projects is up-to-date
- Manage the team and its members, etc.
Getting started with DebugMail API
Right on the documentation page https://app.debugmail.io/api-public/docs/, you can fire off requests without any hassle.
- First, you need to get the token using
/users/loginand account details (password and login).
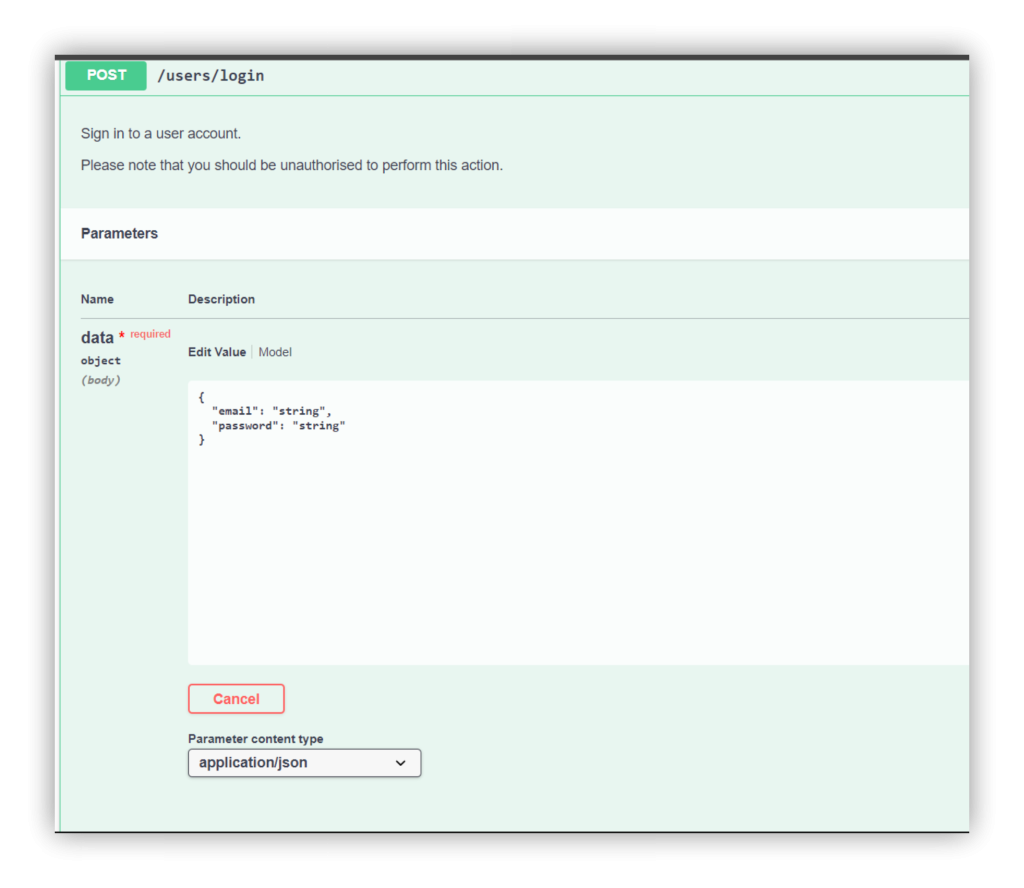
- You get a token when you send a login request.

- To run the request, you need to add the Authorization in Header and add
your tokento its value (don’t forget to manually add the prefix).
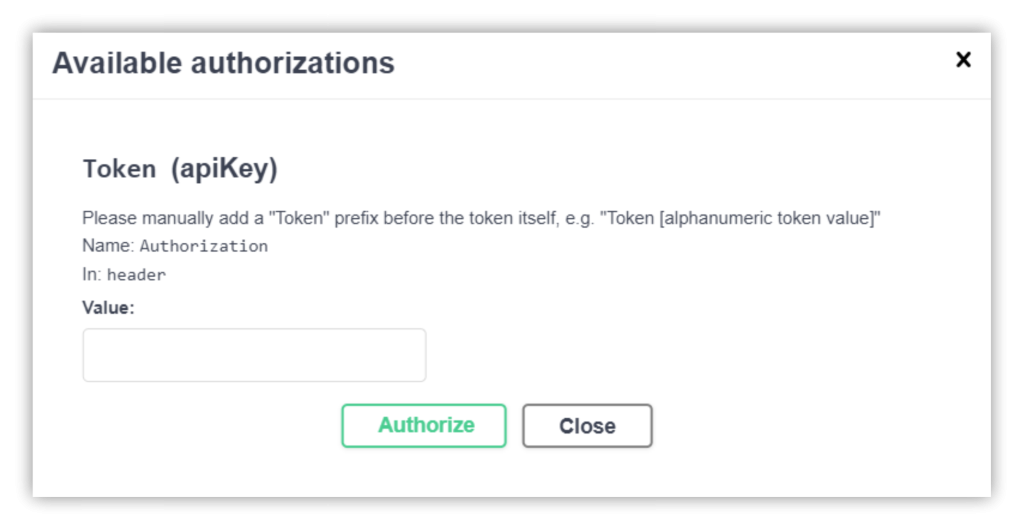
- After that, send a request to any endpoint.
If you have any questions or need help, please email us.
To ensure reliable testing of email functionality in your project, make sure to explore DebugMail integration through SMTP. For more information on this integration, click on the following link: https://debugmail.io/how-to/how-to-integrate-debugmail-for-testing-email-as-smtp/.
The post Operation of DebugMail API appeared first on DebugMail.
]]>The post DebugMail included in the list of top testing tools for 2023 according to Find Dev Tools appeared first on DebugMail.
]]>
DebugMail: Named as one of the best email testing tools in 2023
The finddev.tools website editor has included DebugMail in their list of best tools for developers in 2023 in the category of Best Email testing developer tools. This recognition speaks to the high reliability and effectiveness of DebugMail in the field of email testing and debugging.

FindDevTools represents a platform often described as «ProductHunt, but for developers». It enables developers to share helpful links with other developers, which editors manually review to prevent spam and ensure high-quality content. This approach makes DebugMail a preferred choice among other tools and earns trust from the professional developer community.
In total, four categories of the Best tools in 2023 received recognition:
It fills us with pride to see DebugMail acknowledged as one of the top email testing tools on this list. Alongside other popular tools such as Helo, Mailtrap, MailHog, Pacomail, ImitateEmail, and other, we continue to grow and improve. Some of these tools have already been compared to DebugMail. You can find more information about it here.
The DebugMail team expresses joy and pride for the recognition and inclusion of our tool in the list of top testing tools. We kindly ask users not to hesitate in supporting DebugMail by mentioning it on social media platforms like Twitter or LinkedIn. The opportunity to receive feedback from enthusiasts and professionals enables us to continue improving our tool. Additionally, it allows us to provide high-quality email testing solutions 
The post DebugMail included in the list of top testing tools for 2023 according to Find Dev Tools appeared first on DebugMail.
]]>The post Comparison of DebugMail and Yahoo Mail SMTP appeared first on DebugMail.
]]>
DebugMail setup for mailcatching and debugging outgoing email traffic
Yahoo Mail SMTP setup for email testing
Pros and cons of services
Features and functionality of services
Conclusion
— Additional Resources
First, let’s look at how both services are integrated into the project.
Setting up DebugMail for mailcatching and debugging outgoing email traffic
DebugMail provides two integration methods, via snippets or credentials. Just a few simple steps and you can begin the testing process:
- Visit debugmail.io and create an account using your preferred credentials (email, Google or GitHub).
- Create a team and project for the specific app or online store where you want to test email.

- Choose between integrating DebugMail with a code snippet or using SMTP credentials:
- Projects →→ Settings
- Projects →
- If you want to integrate through a code snippet, select the desired technology, copy the generated code, and paste it into your project.
An example snippet for Python technology looks like this:
EMAIL_HOST = "app.debugmail.io"
EMAIL_HOST_USER = "unique-project-login-in-debugmail"
EMAIL_HOST_PASSWORD = "unique-project-password-in-debugmail"
EMAIL_PORT = "25"- If you want to integrate via SMTP credentials, type the host, port, unique login and password in your project code:
Host: app.debugmail.io
Port: 25 or 9025
Login: login-generated-by-debugmail
Pass: pass-generated-by-debugmail
- Done. Now test your email functionality by sending emails and monitoring their reception and content within the DebugMail workspace.
Setting up DebugMail as a SMTP server takes less than 2 minutes.
Setting up Yahoo Mail SMTP for email testing
Yahoo Mail provides its customers with SMTP server settings for outbound mail and similar settings for inbound mail using POP or IMAP. Here, we provide the details that you need to enter into your program’s code to integrate Yahoo Mail as an SMTP server.
To get outgoing email traffic from a web project to your Yahoo mailbox, follow these steps:
- Register an account with Yahoo Mail.
- Navigate to the account settings section and access the «Account Security» options.

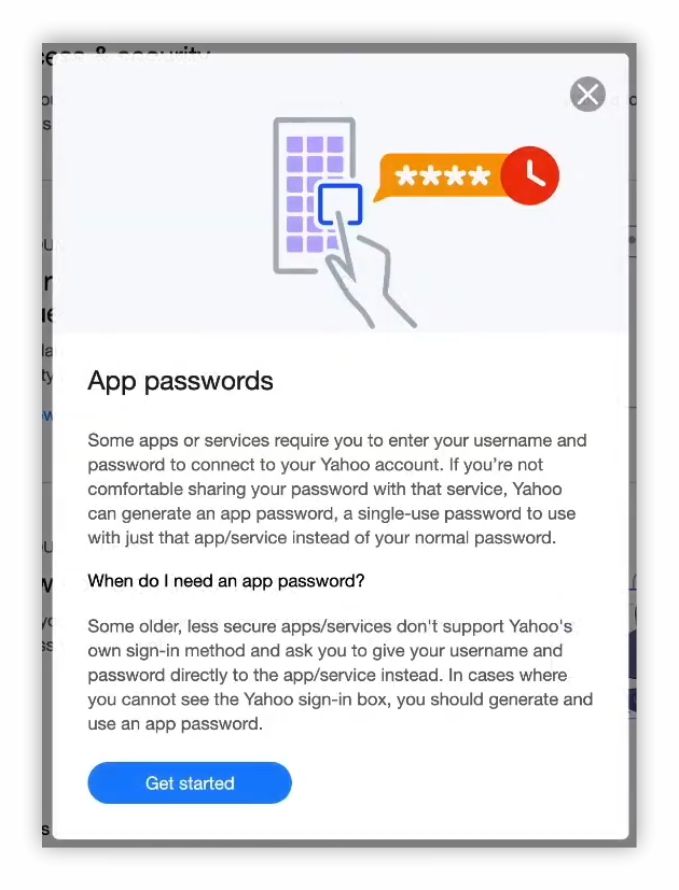
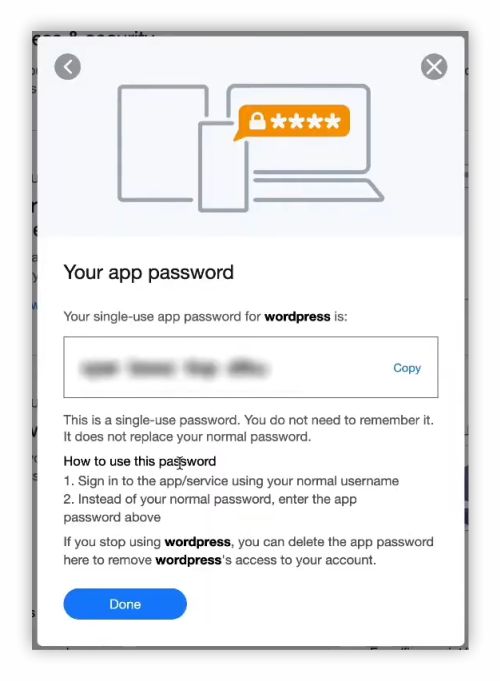
- Proceed to «App Passwords» and generate a unique key for SMTP access.
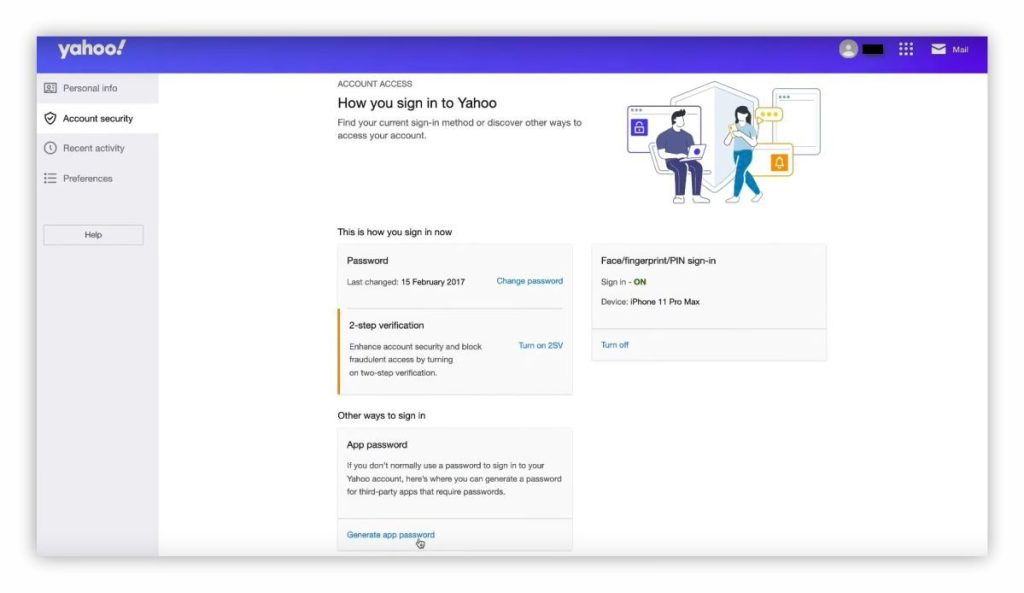

- Configure your web project with the provided SMTP credentials.
Host: mail.yahoo.com (default)
Username: your full Yahoo Mail email address (e.g. [email protected])
Password: special Yahoo Mail app password (key) (it’s not the password you use to log in to Yahoo Mail)
Port: 465 or 587 (default)
Requires SSL/TLS: Yes (if available)
Authentication: Yes (choose login if multiple options available)- Send a test email and verify its successful delivery.
Pros and cons of services
| DebugMail | Yahoo Mail SMTP | |
|---|---|---|
| Pros | Integration in less than 2 minutes | Widely used and trusted email service provider |
| Teamwork on projects | Simple integration | |
| Free plan + affordable pricing plans | Free service | |
| Unlimited number of test emails per day | ||
| No need to manually sort test emails | ||
| Cons | No spam rating | Cluttering of the actual Yahoo Mailbox |
| Requires setting up email sorting rules or manually moving them | ||
| Limits the number of test emails per day |
Features and functionality of services
Yahoo Mail SMTP offers a reliable way to test and store emails in a real mailbox. To get started, you’ll need to register and link a valid phone number. This method can be difficult if you don’t have an extra test number. Additionally, with a daily limit of up to 500 test emails, it may not meet all your requirements.
Also, I’m not particularly fond of the design and placement of tools on Yahoo Mail. To implement email sending test functionality, you need to navigate through various pages.
Semen Senkevich
Backend Developer at WBT—Global
DebugMail greets users with an intuitively designed interface and a convenient workspace for managing projects. The service provides a convenient solution for organizing project-related emails in dedicated folders, keeping your actual email accounts clutter-free. It also offers an HTML mode for viewing emails. One notable feature is the ability to set up forwarding rules, which allows you to send test emails to clients for approval. In addition, you can generate short links to share with colleagues and post them in your task tracker. And most importantly, the service allows you to test an unlimited number of emails per day. This feature is really important for stress testing.
By utilizing DebugMail’s functionalities, you can optimize your test email process while avoiding the limitations of Yahoo Mail SMTP.
Conclusion
In general, Yahoo Mail SMTP provides a simple setup process but is inconvenient in terms of email viewing, sorting, and the number of testable emails. It’s more suitable for small manual unit tests.
DebugMail offers testers a quickly configurable tool for debugging email correctness, integrating into projects using snippets, credentials, or API. The tool is functional and useful for unit tests, automated and stress tests. If you have any questions about setting up DebugMail, please contact us.
Additional Resources
- DebugMail API Documentation: https://app.debugmail.io/api-public/docs/
- Top 10 Fake SMTP servers for testing emails on staging: https://medium.com/@rnbpart/fake-smtp-servers-for-development
The post Comparison of DebugMail and Yahoo Mail SMTP appeared first on DebugMail.
]]>The post How to Integrate DebugMail Service for Testing Email as an SMTP Server appeared first on DebugMail.
]]>
— How to integrate DebugMail with a code snippet
— How to integrate DebugMail with SMTP credentials
You can integrate DebugMail with your web project or app using two methods: code snippet or credentials.
How to integrate DebugMail with a code snippet
Follow these steps:
- Go to the Debug Mail website https://debugmail.io/ and login to your account using your Google, Github, or email credentials. After logging in, you must create a team and a project for the app or online store you wish to test.

- Choose the technology from the list of presets. Copy the generated code and then paste it to your project.

- Run your email sending code and check how it was sent to DebugMail.
How to integrate DebugMail with SMTP credentials
One can also utilize SMTP credentials, and we presume that you have already logged in.
- To find unique credentials for your project, scroll down past technology and snippets to the bottom of the page. You will see the following information:
Host: app.debugmail.io
Port: 25 or 9025
Username: unique-to-your-project
Password: unique-to-your-project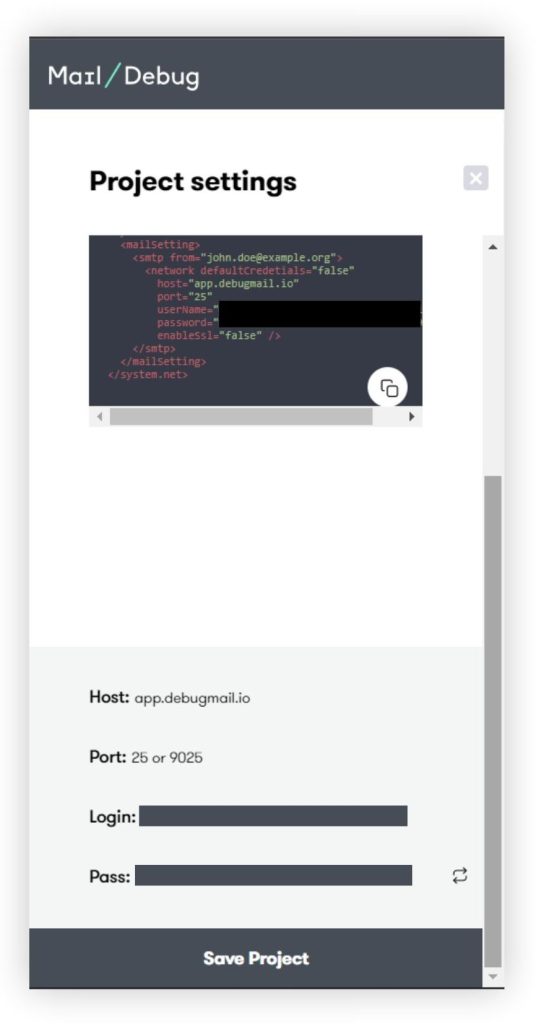
- Paste them to your project and run the email sending code. And then check the email in DebugMail.
We also have an API for managing DebugMail, which we’ll cover in another article.
Our goal was to provide a straightforward and simple guide to getting started with DebugMail, and we hope you found it useful. Also check out our comparison of DebugMail vs. Google SMTP to see how easy it is to integrate DebugMail into your project.
The post How to Integrate DebugMail Service for Testing Email as an SMTP Server appeared first on DebugMail.
]]>The post DebugMail vs. Google SMTP appeared first on DebugMail.
]]>
Setting up a Google account for email testing
Setting up DebugMail for mailcatching and debugging
Comparing Google SMTP and DebugMail
— Pros and cons
— Features and functionality
Conclusion
— Additional resources
Let’s start by comparing which tool is faster and easier to integrate into a web project.
Setting up a Google Account for email testing
To test email delivery, you can use Google SMTP, which is one of the most popular options for email testing. Follow these step-by-step instructions to set up a Google account for receiving emails:
- Click on the gear icon in your Gmail account and select See all settings.

- Navigate to the Forwarding and POP/IMAP tab and enable IMAP access.

- Click on your account icon and select Manage your Google Account.

- Go to the Security section and scroll down to the Signing in to Google block.

- If the App passwords tab is not visible, enable two-step verification.
- Access the App passwords tab, enter your account password, and specify the data for which you want to generate a password for the application.

- Click Generate, and copy the generated password to paste it into the code.

- To complete the process, specify your Gmail account data, including login, password, port, and host (which are set as default values to smtp.gmail.com and 587, respectively). Then, run the script. Once the script has executed, go to the test recipient’s page to read the message that was sent.

Setting up DebugMail for mailcatching and debugging outgoing email traffic
- Go to the DebugMail website https://debugmail.io/ and log in to your account.


- Create a team and a project within that team.


- Click on the gear icon and go to Settings.

- Select the desired code generation method.

- Copy the generated code.

- Paste the code into your project and run it.
- Go to DebugMail to check how the email was sent.

Setting up everything will only take 2 minutes of your time.
Comparing Google SMTP and DebugMail
Pros and Cons
| Google SMTP | DebugMail | |
|---|---|---|
| Pros | Widely used and trusted email service provider. | Trusted email testing service with clear legal documentation. |
| High level of customization and control. | Integration in 2 minutes. | |
| Provides Gmail API. | Quick project and team creation. | |
| Reliable email delivery. | Comfy and cheap plans. | |
| Unlimited acceptance of emails per day. | ||
| Cons | Time-consuming setup and configuration process. | No spam rating. |
| Daily sending limits may affect email testing. |
When choosing between Google SMTP and DebugMail, it’s important to consider factors such as the size and complexity of the project, budget, and level of customization required. Ultimately, the decision will depend on the specific needs and preferences of the developer or development team.
Features and Functionality
Google SMTP provides email logs that can be accessed through the Google Admin console or via third-party email tracking tools. These logs include information such as the sender and recipient of the email, the date and time it was sent, and the status of the message (e.g. delivered, bounced, etc.). This can be helpful for tracking email delivery and troubleshooting any issues that may arise. Additionally, Google SMTP allows users to customize their email signature, which can help to give a more professional look to their test emails.
DebugMail offers a convenient email management solution with the ability to create teams and projects for each site or application. Projects can store, sort, group and delete all captured emails, which is useful for team collaboration. DebugMail also offers an API for integrating email testing into existing workflows, making email testing more efficient for developers. Role customization is also available, allowing users to pay a monthly subscription if there are multiple team admins.
While Google SMTP may be a simpler option for individual developers, the additional features and functionality of DebugMail make it a powerful tool for teams and projects. DebugMail also eliminates the risk of accidentally sending a test email to a real subscriber before the tester has verified that the outgoing emails of the project being developed are correct.
Conclusion
Google SMTP and DebugMail offer great solutions for email testing in development. We hope this article has helped you determine which option is right for your individual needs. If you’re interested in learning more, check out the additional resources below.
Additional Resources
- DebugMail API Documentation: https://app.debugmail.io/api-public/docs/
- Google SMTP Documentation: https://developers.google.com/gmail/api/quickstart/python
- 10 Fake SMTP servers for development: https://medium.com/@rnbpart/fake-smtp-servers-for-development
The post DebugMail vs. Google SMTP appeared first on DebugMail.
]]>