T-SQL Tuesday #49 – Wait for it…

T-SQL Tuesday is a recurring blog party, that is started by Adam Machanic (Blog | @AdamMachanic). Each month a blog will host the party, and everyone that want’s to can write a blog about a specific subject.

This month the subject is “Wait for it…”. If you want to read the opening post, please click the image below to go to the party-starter: Robert Davis (Blog | @SQLSoldier).


Explaining developers how SQL Server works is something we all do. Maybe not on a daily basis, but you’re asked questions like “why is my index not working”, or “what’s the best way to add multiple columns to a table”. And most of the time, these questions lead to whole other bunch of questions you need to answer. And the one question we all are asked more than once: “why is my query running slow?”. So where do you start explaining?

 
Wait Types
There are lots and lots of wait types that can be found in SQL Server. In SQL Server 2005 there are 230 different wait types, 475 in SQL Server 2008 and 491 in SQL Server 2008 R2. In SQL Server 2012 they added another 197 new ones to the list. The wait types can be found by running this query:

SELECT wait_type
FROM sys.dm_os_wait_stats
ORDER BY wait_type ASC

 
These wait types can tell you what SQL Server is doing to execute your statement, and what the possible delays are. I’m not going to sum up all the wait types, but here’s a short list of common wait types you’ll see on your SQL server:

 
SOS_SCHEDULER_YIELD
Yielding processor time

LCK_M_*
Waiting for a lock

OLEDB
Wait on the OLEDB provider (Linked servers, Full-Text Search)

WRITELOG
Writing transaction log to disk

RESOURCE_SEMAPHORE
Waiting for a query memory grant

CXPACKET
Query parallelism

PAGEIOLATCH_*
Latch on a memory address while data is retrieved from disk

LAZYWRITER_SLEEP
System process waiting to start

 
All these different wait types could indicate a problem with your statement or the server. Some are more informative, while others show you a real issue. But what I really would like to show you, is how you can find these wait types.

 
DIY or just ask for help…
One of the ways to find the wait types on your SQL server, is to dive into the seemingly endless list of DMV’s. You could use the “sys.dm_exec_requests” and “sys.dm_os_waiting_tasks” DMV’s to find what you want, or you could take the easy way out: sp_WhoIsActive by Adam Machanic (Blog | @AdamMachanic ).

Adam (also the party starter of T-SQL Tuesday) wrote a no less than brilliant script to find problems on your server. But how does it work?

 
Installing sp_WhoIsActive
The “installation” of sp_WhoIsActive couldn’t be easier. You just need to download the script, and run it. This creates a stored procedure in the database of your choice. Usually I just create it in the master database. But if you have a DBA database with useful scripts, it’s okay to create it there.

 
Running it for the first time
The stored procedure can be executed without any parameters. That way, you use the default options. Just run the statement shown below:

EXEC master.dbo.sp_WhoIsActive

 
If you need it, or just like to see more information, you can also configure the procedure with a lot of parameters. If you want to see all the options you can configure, just set the documentation parameter to 1 (true):

EXEC master.dbo.sp_WhoIsActive
  @help = 1

 
The options
If you start using sp_WhoIsActive more and more, you’ll get your own set of favorite options. It all depends on the purpose you’re using the procedure for. Most of the time, I use it to determine why queries run slow, or why the performance of the SQL server is so low.

The information sp_WhoIsActive retrieves gives you a good indication of what SQL Server is doing, or what queries are bugging each other. I’ll list my favourite options below:

First, I set @show_own_spid on, so I can see my own query in the resultset.

The second option I love is @get_plans. This shows you the execution plans of the running queries:

 
Another great parameter to set is @get_outer_command. That way, you won’t just see the query running at the moment, but also the outer-command of the query (in the example below, the INSERT INTO the temp table is executed from within the stored procedure you see in the right column):

 
To see which transaction logs are used when running your query, set @get_transaction_info to 1:

 
Information regarding locks can be found, by setting @get_locks to 1:

 
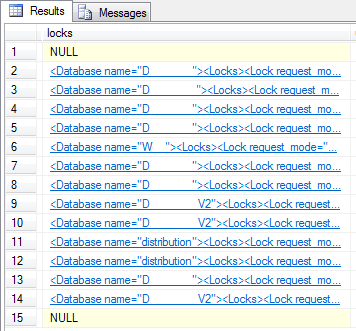
If you click the XML, you’ll see which locks are granted, pending or denied:

 
The last option I’d like to set, is @get_additional_info. This will show you more information regarding the connection settings, session variables, etc:

 
Clicking the XML shows you the properties I mentioned above:

 
So this is what the query looks like, the way I personally like to use it:

EXEC master.dbo.sp_WhoIsActive
  @show_own_spid = 1,
  @get_plans = 1,
  @get_outer_command = 1,
  @get_transaction_info = 1,
  @get_locks = 1,
  @get_additional_info = 1

 
Conclusion
Wait types are your keys to open the door of the next level of SQL Server. Not all wait types are that easy to read and understand, but there are plenty of resources to be found online. For example, just take a look at the rest of the posts today. Most of the posts for T-SQL Tuesday can be found on Twitter, when you search for #TSQL2sDay.


I want to say thanks to the employees at Coeo for the easy explanation of some of the wait types!

Incremental updates with Change Data Capture

When designing a database or ETL process, for example loading your production data into a reporting environment, you always start your design with performance in mind. In the beginning of the project, your scripts and ETL run blazing fast. But after a few months in production, the entire project grinds to a halt. But how do you fix that problem, without a complete redesign of your applications and database? One of the many solutions is an easy one: incrementally load your data into the destination tables.

 
Change Data Capture
Incremental data loading could be a hard nut to crack. It’s not always an option, but it might be a good point to start from. One of the ways to start loading your data incrementally, is by using the keys in your database as a reference. If your table has a column called “Modified Date”, and that is updated every time the record is updated, you could use that. Every night, when the process runs, you just add the records that were modified after the last successful process run. But what if you don’t have that possibility? Change Data Capture (CDC) is an easy way out.

 
CDC is a way to record inserts, updates and deletes on a specific table, without the need of writing the triggers yourself. CDC reads the transaction log, and captures all changes made to the specific table. These changes are stored in the associated change table, that is created by CDC.

Below I’m going to show you how to setup your first table with CDC.If you would like to know more about CDC, this TechNet article is a place to start.

 
Create an example
To show you the basics of CDC, let start with creating a table called TestCDC in the database called Sandbox:

USE Sandbox
GO

CREATE TABLE dbo.TestCDC
  (ID int IDENTITY(1,1) NOT NULL PRIMARY KEY,
	 Descr varchar(50) NULL)
GO

 
Once you’ve created the table, turn on CDC at the database level, by execution the system stored procedure created to do that:

EXEC sys.sp_cdc_enable_db

 
There is also a system stored procedure to enable CDC on the table level. You need to enable CDC on tables manually, and separately for every table you need:

EXEC sys.sp_cdc_enable_table
  @source_schema = 'dbo',
  @source_name = 'TestCDC',
  @role_name = NULL

 
If the SQL Server Agent is running on your machine or server, you’ll see this confirmation (I’ll explain later why SQL Server Agent is needed):

 
If the Agent isn’t running, you’ll see this warning:

 
If you ran the enable table statement, you will see that SQL Server created the system objects needed to track changes in the table:

 
Because CDC uses 2 SQL Server Agent jobs to capture and cleanup the change tables, you need to run the Agent to start the data capture. If the jobs aren’t running, SQL Server won’t capture any changes made:

 
Start data changes
In order to see what happens when you change data, let’s insert some records:

INSERT INTO dbo.TestCDC
  (Descr)
VALUES
  ('This is a description')

INSERT INTO dbo.TestCDC
  (Descr)
VALUES
  ('This is a description too...')

 
And let’s update one of those 2 inserted records:

UPDATE dbo.TestCDC
SET Descr = 'UPD - ' + Descr
WHERE ID = 2

 
Now, let’s check the content of both the original table, and the change table:

/* Original table */
SELECT * FROM dbo.TestCDC

/* Change table */
SELECT * FROM cdc.dbo_TestCDC_CT

 
If you run both queries, you’ll see the resultset below:

 
The records in the CDC change table allow you to update the data in your reporting environment. You could query them yourself, by retrieving all the changes since your last update. You can also use the procedures that return those changes for you, for example the cdc.fn_cdc_get_net_changes_. You can read more about the system function here.

 
Cleaning up after an update
Now that you’ve updated your reporting environment, it’s a wise thing to cleanup your CDC data. You could also drop the records yourself with a DELETE statement. Another option is using the system procedure for that: “sys.sp_cdc_cleanup_change_table”. You can clean your data using the following SQL statement:

DECLARE @Last_LSN VARBINARY(10) =
  (SELECT MAX(cdc.dbo_TestCDC_CT.[__$start_lsn]) FROM cdc.dbo_TestCDC_CT)

EXEC sys.sp_cdc_cleanup_change_table
  @capture_instance = 'dbo_TestCDC',
  @low_water_mark = @Last_LSN,
  @threshold = 5000

 
The query will retrieve the last LSN (Log Sequence Number), and remove everything that happened before that.

 
Cleanup of CDC
If you want to completely remove CDC (because we’re done testing), you can disable it on the table level by running the query below:

EXEC sys.sp_cdc_disable_table
  @source_schema = 'dbo',
  @source_name = 'TestCDC',
  @capture_instance = 'dbo_TestCDC'

 
The statement will cleanup all the objects that were created to enable CDC on that specific table. But the statement will only stop the CDC on the specific table. The fastest way to disable CDC on all tables in the database, is disabling CDC on the database level, by running the query below:

EXEC sys.sp_cdc_disable_db

 
Conclusion
Loading data always takes time, and there are many factors that are important: your database size, your frequency of changes, your ETL process, etc. The time it costs you to move data can be changed by rewriting your process to incremental loads. CDC is one of the many ways to achieve this. It works out of the box, and doesn’t require you to build any process yourself. But maybe your environment needs a custom process to operate the way you want it to. Not every feature in SQL Server is a so called silver bullet, but sometimes it comes darn close to one…

T-SQL Tuesday #48 – Cloud Atlas

T-SQL Tuesday is a recurring blog party, that is started by Adam Machanic (Blog | @AdamMachanic). Each month a blog will host the party, and everyone that want’s to can write a blog about a specific subject.

This month the subject is “Cloud Atlas”. If you want to read the opening post, please click the image below to go to the party-starter: Jorge Segarra (Blog | @SQLChicken).


In the last few years, “the cloud” has become more and more important in our lives. Not only in IT, or as a database- or data-professionals, but also in our personal lives. Take a look around you. How many people do you still see, carrying around a USB drive to store their data? Now do the same, and count the people that use a cloud solution for their data, like Dropbox, SkyDrive (if we are still allowed to call it that…), or Copy.com?

So everyone is storing their data in the cloud now. From personal information like a copy of a passport, to text files with peoples password lists. So without jumping to conclusions just yet, I guess we trust the companies that hold our data right…?

 
Trust
But now comes the hard (and controversial) part: we trust them with our personal data, but not our corporate data. It’s okay to store your passwords and private documents in the cloud, but it’s unthinkable that you store business data in the cloud!

So where is that distrust coming from? It probably has something to do with the whole NSA-thing. There, I said it! Without completely going off-topic, I would like to explain something about this statement.

My personal opinion is that people in the Netherlands are different from the rest of the world, when it comes to their privacy. They don’t care if the ISP is monitoring web traffic. They know it’s being monitored, but they accept that as a fact. When it comes to downloading games, music or movies, they think their entitled to that. But when it comes to government agencies monitoring the corporate data they put in the cloud, they draw the line.

 
Are you… the one…?
In the past few years, the discussion about on premise and off premise data intensified. People try to convince each other with arguments, and think the other is completely wrong.

A while ago, I encountered my first “cloud-company”. I’ve done some consulting for them, and they’ve set themselves the goal to move to the cloud within the next few years. The biggest advantages they see are costs, scalability and administration. And I fully agree with them.

 
Why use a cloud solution
Choosing a WASD (Windows Azure SQL Database) solution makes it easier to maintain your environment. You don’t have to monitor the hardware, and move to another server if your hardware fails or dies. This is all being taken care of by Microsoft.

Looking at the cost of a cloud solution is easy: it saves you money. When you run on premise servers, where you need a data center, electricity, maintenance team, etc. When you use a cloud solution, you only pay for the hardware you need. And if you’re done with it, you can just shut down the machine you were working on.

The same goes for scalability. For example, if you need to run a billing process, you could “spawn” twice as many cloud machines. This makes scalability a piece of cake. And again, when your done, just get rid of the machines you don’t use anymore. This makes it easier for companies to run big processes in a smaller amount of time.

 
Trying it out
The only time I’ve used WASD is on the machine that Jamie Thomson (Blog | @jamiet) made available to the SQL Family (read about it here). This was later taken over by Red-Gate, but I’m not sure this is still available.

But if you want to try it out, just create your own AdventureWorks on Azure. You can download the scripts here, and start your Azure trial here.

Removing duplicates in a dataset

As most of you know, “data is only as good as its weakest record”. Or was it “The possession of facts is knowledge, the use of data is wisdom”? Anyway, data quality is one of the most important aspects of a dataset. But in practice, this is one of the first things that fails.

Data quality isn’t something you can create overnight, but it’s something that is achieved over a longer period of time. Because data is volatile, the quality of that data is becoming volatile itself. Who in your development- or administration-team is responsible for data quality? If you can’t think of anyone, you don’t have to be ashamed. In many companies data quality is underestimated.

 
Duplicates
One of the biggest mistakes that I saw at most companies I worked for, was data duplication. Developers created the database, forgot to put primary- and foreign keys on the tables, and they didn’t think of unique constraints. What do you get? Well, one of the least problems you’ll see is data duplication. Similar records being inserted twice or even more, without any constraint to prevent this.

I’m not going to tell you how to prevent duplicates, because that’s a whole other story. Start looking at primary keys, unique constraints, and (in most cases) the overall design of your database.

 
Removing duplicates
The main questions is: how do I get rid of duplicates, without trashing too much data. First of all, let’s create a small table:

CREATE TABLE #T1
  (Descr VARCHAR(10))

 
Now let’s insert some data, including some duplicates:

INSERT INTO #T1
  (Descr)
VALUES
  ('Value 1'),
  ('Value 2'),
  ('Value 2'),
  ('Value 3'),
  ('Value 4'),
  ('Value 5'),
  ('Value 6'),
  ('Value 6'),
  ('Value 6'),
  ('Value 7'),
  ('Value 8')

 
If you’d try to remove the duplicates with a normal DELETE statement, you can only delete both versions of the duplicate record. So how can we remove only one of the duplicates?

 
ROW_NUMBER to the rescue!
In order to delete one of the duplicates, we need to mark the “extra version” of the record. But how can we do this? The records are identical, right? In this case, we can use the function ROW_NUMBER to add a unique ID to the records.

ROW_NUMBER returns a sequential number for every record in the database, based on the grouping (Partition) and order you choose.

In the table we just created, you see that there are two duplicates for “Value 2”, and that the “Value 6” record is even inserted three times. We want to completely remove these duplicates, and want to save only 1 record for each value.

Now we just add the ROW_NUMBER to our query:

SELECT
  Descr,
  ROW_NUMBER() OVER(PARTITION BY Descr
                    ORDER BY Descr)       AS RowNumber
FROM #T1

 
The result looks like this:

 
As you can see, every record has a unique number, based on the partition (which is basically a group by clause) of the “Descr” column. The order by is mandatory, but doesn’t affect the result in this example.

 
Removing the duplicates
Because ROW_NUMBER can only be used in the SELECT or ORDER BY statement, we can’t directly use it in a DELETE statement. But we can use a CTE to delete the duplicates:

WITH DeleteCTE AS
  (SELECT
      Descr,
      ROW_NUMBER() OVER(PARTITION BY Descr ORDER BY Descr) AS RowNumber
   FROM #T1)


DELETE D
FROM #T1 T
INNER JOIN DeleteCTE D
  ON D.Descr = T.Descr
WHERE D.RowNumber <> 1

 
ROW_NUMBER creates unique records for us, which we are able to delete in the following DELETE statement. We only want to keep one version, so we delete everything that has a “RowNumber” that isn’t 1.

The result of this looks like this:

 
Conclusion
Removing duplicates is something we can do very easily, and is only one single step in achieving data quality. There are many more steps to follow, before you have a trustworthy dataset, that is reliable any time of the day.

After removing the duplicates from your dataset, don’t forget to add primary- and foreign keys and unique constraint to prevent this situation in the future. Because running a script like this every week, isn’t going to solve your problems…

Data paging using offset

With every new release of SQL Server, we get to use new features that make our lives as developers and administrators so much easier. A few days ago, I came across an old piece of code (SQL 2005 if I remember correctly), that I used to page data for a CMS I build when I was still a web developer.

The company I worked for needed a new website, and wanted an HTML-editor to edit content on the website. This content was stored in SQL Server, and was retrieved by the website. With a few business rules we decided which content was visible, and which content was hidden from the website.

One of the features of the website was a news feed. But because there were so much news articles, we needed to show the top 10 articles on the first page and let the user click through to the next page of articles. But because we had so much news in the database, we needed to page this data. Every page should show 10 new articles, and we needed to switch pages for the rest of the news articles.

 
Creating the sample data
In order to show you the problem and solution, we need to create a sample table:

CREATE TABLE dbo.Paging
  (ID INT IDENTITY(1,1),
   Title VARCHAR(50),
   Content VARCHAR(50))

 
The test data we need to insert looks the same for every record:

INSERT INTO dbo.Paging
  (Title, Content)
VALUES
  ('This is an article', 'This is the content')
GO 50

 
This script will insert 50 record in the Paging table.

 
The old way
In older versions of SQL Server you needed to build your own solution to solve this problem. Let’s assume you clicked the news feed button on the website, and we want to switch to page 2 of the results. The solution I build back then looked something like this:

DECLARE @RowsToShow INT = 10,
        @RowsToSkip INT = 10


SELECT TOP(@RowsToShow)
  ID ,
  Title ,
  Content
FROM dbo.Paging
WHERE ID NOT IN
  (SELECT TOP(@RowsToSkip) ID FROM dbo.Paging)
ORDER BY ID ASC

 
In the query above, you can see we skip the first 10 rows, and retrieve the next 10 rows after that. That means that you need to remember on the website which records were retrieved already, and which records you want to see. The easiest way to do this, is by selecting the ID’s you’ve already shown, and retrieve the next set of rows.

This means you get execution plans like this:

 
The new way
From SQL Server 2012 onwards, we can use a new feature that is called OFFSET. That feature allows us to “window” our dataset, and retrieve a small subset of data without using a TOP and subquery, like in the example above. The new query would look like this:

SELECT
  ID ,
  Title ,
  Content
FROM dbo.Paging
ORDER BY ID ASC
OFFSET 10 ROWS
FETCH NEXT 10 ROWS ONLY

 
In the query above, you can see an offset of 10 rows, and a fetch of 10 rows. This means that it skips the first 10 records, and retrieves the next 10 records after that. But how can you get this to work with dynamic resultsets and pages? This is one way to do it:

DECLARE @RowsPerPage INT = 10,
        @PageNumber INT = 2

SELECT
  ID ,
  Title ,
  Content
FROM dbo.Paging
ORDER BY ID ASC
OFFSET ((@PageNumber - 1) * @RowsPerPage) ROWS
FETCH NEXT @RowsPerPage ROWS ONLY

 
The offset is calculated by taking the @PageNumber parameter minus one to retrieve the page we want to see. If we wouldn’t do that, the offset would always skip the first 10 records. Then we multiply that number by the @RowsPerPage parameter, to calculate how many results we want to retrieve.

After that, we use the @RowsPerPage in the FETCH NEXT clause to retrieve the number of rows we want (in this case the next 10). This results in a completely different execution plan:

 
As you can see, this has a lot less impact on SQL Server. This becomes really visible if you compare both in SSMS:

 
I/O Costs
Comparing query costs is nice when you quickly compare 2 different approaches for the same solution, but in the end it all comes down to I/O costs. So which query is the fastest solution, and how are we going to test that?

First of all, we need to measure the I/O calls. We do that by using a DBCC command called DROPCLEANBUFFERS. This allows us “to test queries with a cold buffer cache without shutting down and restarting the server”. SO DON’T USE THIS IN PRODUCTION!!!

So the complete testscript looks like this:

SET NOCOUNT ON
SET STATISTICS IO ON


DBCC DROPCLEANBUFFERS

--==================================================
DECLARE @RowsToShow INT = 10,
        @RowsToSkip INT = 10


SELECT TOP(@RowsToShow)
  ID ,
  Title ,
  Content
FROM dbo.Paging
WHERE ID NOT IN
  (SELECT TOP(@RowsToSkip) ID FROM dbo.Paging)
ORDER BY ID ASC
--==================================================

DBCC DROPCLEANBUFFERS

--==================================================
DECLARE @RowsPerPage INT = 10,
        @PageNumber INT = 2

SELECT
  ID ,
  Title ,
  Content
FROM dbo.Paging
ORDER BY ID ASC
OFFSET ((@PageNumber - 1) * @RowsPerPage) ROWS
FETCH NEXT @RowsPerPage ROWS ONLY
--==================================================

So we clean the SQL Server buffers, run the first query, clean the buffers again, and run the second query. Now the effect of the new statement is really obvious, if you look at I/O costs:

 
So the old version of the query (with the sub-select) scans the table twice, and reads 51 pages from the cache. The new approach (with the OFFSET) scans the table only once, and reads only 1 page from the cache.

 
Conclusion
The less I/O calls SQL Server needs to retrieve the result from disk or cache, the faster your query will run. In this case, we’ve tuned the query from 51 pages read to 1 page read. And we’ve only tested this on a table with 50 records, but the network traffic is decreased significantly. So here’s a lot of performance improvement from only one new piece of functionality. And there is a lot more out there.

T-SQL Tuesday #46 – Rube Goldberg Machine

T-SQL Tuesday is a recurring blog party, that is started by Adam Machanic (Blog | @AdamMachanic). Each month a blog will host the party, and everyone that want’s to can write a blog about a specific subject.

This month the subject is “Rube Goldberg Machine”. If you want to read the opening post, please click the image below to go to the party-starter: Rick Krueger (Blog | @DataOgre).


This months topic is about being creative with SQL Server, and how you sometimes bend the rules a little bit, to fix a problem. This might not be the best solution, but it’s the only solution or quickest solution at the time. Everyone has a story like that, and so do I…

 
Just like a normal project: no budget
A few years back, I worked for a company as a web developer and team-DBA. One of our projects was to build a new warning system, so administrators and developers knew if something went wrong in the production environment. But the checks (like heartbeats, disk space checks, etc.) needed to be stored in SQL Server. But instead of creating budget for a new SQL Server, they told us to solve it with SQL Express.

The version we used was SQL Server 2005 Express, and all went well in the development phase. But the moment we tested the new system in the test environment, the data grew exponentially within a few hours. And after a few days, we stopped the test, because we couldn’t use a single database anymore. The checks generated close to 4 GB of data each month, and that’s the limit for SQL Server 2005 Express edition.

 
Solving it, MacGyver-style
So we needed to come up with a solution within a few days. And there was no possibility to change to a full SQL Server license. So we needed to find a solution, that worked with SQL Express. We finally solved it with a 3rd party tool, that was able to run SQL Server Agent jobs on the machine, which contained a single step, that started a stored procedure. This stored procedure contained a lot of dynamic SQL (yes, I’m sorry, but we had no other option at the time), that moved data into an archive database.

The job ran every night at a few minutes past midnight. The stored procedure first checked if there was data in the database, that was older than today. If so, it than checked if there was an archive database for that month. If there wasn’t a database, it created a database with a dynamic name: “Archive” + “_” + %ApplicationName% + “_” + %Month% + “-” + %Year%.

So now that we made sure there was an archive database, we moved the data from the day(s) before today to the archive database. The flow would look something like this:

 
Don’t try this at home kids!
So you can image that, looking back at this solution, I’m not proud of the path we were forced to choose. The technical solution however, is something that I look back on with pride. Back then I just started working with SQL Server, and didn’t have a lot of experience with building these types of solutions. But the solution we build was pretty stable. The only downside was, that if the job didn’t run at night for some reason, we needed to move the data by hand during the day. And because the database ran in “production” (there was a possibility of running transactions) we needed to move the data bit by bit, without locking the SQL server. This meant that if the job didn’t ran, I would spend most of the day moving data, waiting for that operation to finish, moving the next chunk of data, and so on.

So in the end, the man hours we put into it probably didn’t weigh up to a SQL Server license, but that would have made a cleaner solution. But in the end, the manager was right (unfortunately). We never found the time after that to perfect the checks, and the system administrators went with another 3rd party application, because it was easier to maintain. So a full SQL Server license would have been wasted money after all, if we couldn’t use that for another project. But looking back, it was a great experience to build it, and to design such a solution.

T-SQL Tuesday #45 – Follow the Yellow Brick Road

T-SQL Tuesday is a recurring blog party, that is started by Adam Machanic (Blog | @AdamMachanic). Each month a blog will host the party, and everyone that want’s to can write a blog about a specific subject.

This month the subject is “Follow the Yellow Brick Road”. If you want to read the opening post, please click the image below to go to the party-starter: Mickey Stuewe (Blog | @SQLMickey).


When I read this months subject, I didn’t know what to write about, until I read one of the other blogs. So I’m sorry Mickey, but I’m using the subject this month as a guideline, and extend it a little bit. I’m glad I know Mickey, and I’m guessing she doesn’t mind me getting a little creative.

The writer of the post I read, talked about index fragmentation and data growth, and then I remembered a situation I encountered a while back.

When you come in to a company, you’d really like to see (and maybe even expect) to walk into a well organized team. A team that has procedures that work for them, and team members that agreed to solve problems in a specific way. But sometimes, it’s not…

 
Here you go!
On my first day as DBA at the company, I walked in and after a few conversations booted up my computer. Once it was booted, they gave me the name of a server, and wished me good luck. No documentation, no explanation of the databases, and no mention of who worked on the server. The only thing they said when they “handed over the key”, is “Here you go! From now on it’s your responsibility to keep the environment running and healthy!”.

So, there I was… No documentation, no health check, no one to tell me what the status of the server was…

 
Taking that first step is always the hardest
So the first thing I did was check out which databases were on the server. There were a lot: 70 in total. Then I checked the user permissions: most users were a member of the db_owner role. Great! Asking which users really needed all that permissions was useless. Everyone needed full access to everything.

So then I took the step to tell them that I was in charge of the server from that moment on, and that if they did something without my permission, I’d remove their access to the environment. Looking back, that was easier said than done.

But the first step that was really hard to accomplish, was reporting of the server health. No one thought that we needed that, and if there was something went wrong we would notice in an instant. And because I knew we really needed that, I just cleared my schedule, and created a few reports.

 
Being right is always a fun thing
A few weeks later, they finally saw I was right. One of the databases filled up a disk, and now we had issues. The only way we could see what went wrong, was looking at the data growth over the previous weeks in my reports. So now I could show them how wrong they were. It’s nice to be right once in a while!

 
Audit
This is were this months topic comes into play. A clear indication that you lack an audit trail, is when there’s an issue with one of your processes, databases, or even as small as a specific dataset, and you don’t know where the issue came from. Following your data flows from beginning to end is always a good idea. And if you work at a larger company, you’re (at least in the Netherlands) required to document your data flows for a financial audit every year.

But not only your datasets need audit trails. Your databases are in dying need of an audit trail as well. Because what happens if your database increases 50% in size over the course of a week, and you don’t track those kind of numbers? Your disk is filling up, your database stops working (if you haven’t got the space to extend your datafiles), and eventually your world is becoming a dark and evil place if you can’t fix it.

 
Conclusion
Even if you don’t have a full front-to-back audit trail of your data and processes, at least try to monitor and audit the key point in your data flow. That helps you debug excessive data growth, and helps you when (for example) a user creates a new database without asking your permissions. Even small audits help you out when you’re in a world of pain and trouble.

Recursive CTEs: Opening the door to a new dimension

A few weeks ago, someone asked me what a Common Table Expression (CTE) was, and how it works. But writing about a CTE would result in a short blog post. So why not make it a little more interesting, and also write about recursive CTE’s, right?

Since SQL Server 2005 we have the opportunity to use something called a Common Table Expression, or CTE for short. This T-SQL feature allows us to use the resultset of a query, as a source for another statement, just like a physical table. This sounds weird, but let me show you.

 
Creating the resources needed
To explain the possibilities of a CTE, let’s create a simple example with employee data. We’re going to create a table that contains the employee’s ID, name, job title and the employee ID of the manager:

CREATE TABLE dbo.Employees
    (EmployeeID INT,
	 EmployeeName VARCHAR(25),
     JobTitle VARCHAR(50),
     ManagerID INT)
 
 
INSERT INTO dbo.Employees
    (EmployeeID, JobTitle, EmployeeName, ManagerID)
VALUES
    (1, 'CEO', 'Smith', NULL),
    (2, 'Department Manager', 'Winters', 1),
    (3, 'Team Manager', 'Thompson', 2),
    (4, 'Employee', 'Jones', 3);

 
If you select all records from this table, it will look like this:

 
So as you can see, every employee has a manager, except the CEO. He’s at the top of the food chain and no one has a higher position than him. And looking at the “ordinary” employee, you’ll see that he has a manager above him, but no employees beneath him. He’s at the bottom of the food chain so to speak.

But what about the CTE? Let’s write an easy example to show you how to add the employees last names and job titles together, without doing that in your final select statement:

WITH EmployeeList AS
(
    SELECT
		EmployeeID,
        EmployeeName
        + ' - ' +
        JobTitle AS EmployeeNameAndJobTitle
    FROM dbo.Employees
)


SELECT
	EmployeeID,
	EmployeeNameAndJobTitle
FROM EmployeeList;

 
If we analyse the example above, the select query that adds the employees last name and job title together becomes a new resultset that is called “EmployeeList”, and can be used just like a normal table in the query below the CTE. The result looks like this”

 
But remember: the CTE just exists in the scope of your query. This means that you can only run one select statement on the CTE. If you try to run a second select statement, you’ll see that the CTE will no longer exist.

Another thing you can do with a CTE, is directly add the column names to the CTE like this:

WITH EmployeeList (EmployeeID, EmployeeNameAndJobTitle) AS
(
    SELECT
		EmployeeID,
        EmployeeName
        + ' - ' +
        JobTitle
    FROM dbo.Employees
)


SELECT
	EmployeeID,
	EmployeeNameAndJobTitle
FROM EmployeeList;

 
This might be easier to read for you and your colleagues, instead of naming your column in the select with an “AS EmployeeID”. The result is exactly the same as in the example above.

This is just an easy example, but imagine that you can use this to join your aggregated temporary dataset from your CTE, onto another table that you need to build a final resultset.

 
Recursive
But now comes the best part: recursive CTE’s. To stick with this example, what if you want to combine the job title of the employee with the manager above him? This sort of resultsets can be created with a recursive CTE. In the example below, the job title of the manager is added to the employees job title:

WITH HierarchyCTE (EmployeeID, ManagerID, JobTitle, Hierarchy)
AS
	(SELECT
		EmployeeID,
		ManagerID,
		JobTitle,
		CONVERT(VARCHAR(35), '')
	 FROM dbo.Employees
	 WHERE ManagerID IS NULL

	 UNION ALL

	 SELECT
		E.EmployeeID,
		E.ManagerID,
		E.JobTitle,
		CONVERT(VARCHAR(35), H.JobTitle + ' \ ' + E.JobTitle)
	 FROM dbo.Employees E
	 INNER JOIN HierarchyCTE H
		ON H.EmployeeID = e.ManagerID
)


SELECT
	EmployeeID,
	ManagerID,
	JobTitle,
	Hierarchy
FROM HierarchyCTE;

 
This is what the result looks like:

 
What happens in the recursive CTE, is that the first query is used as an anchor, and a loop is executed to add every child-record to the anchor (parent)-record. If there are no child-records left for the parent, the next parent is fetched, and so on.

 
So what can you do with this?
The examples above were just easy examples, but you can imagine the opportunities with this functionality. For example, if you work for an electronics store, you could build a long string of all packages with sub-deliveries (when every phone is send with a screen protector and case for example). Or create a complete overview of contents for recipes (for example, which ingredients are put into a pie). The possibilities are endless…

T-SQL Tuesday #44 – The second chance

T-SQL Tuesday is a recurring blog party, that is started by Adam Machanic (Blog | @AdamMachanic). Each month a blog will host the party, and everyone that want’s to can write a blog about a specific subject.

This month the subject is “The second chance”. If you want to read the opening post, please click the image below to go to the party-starter: Bradley Ball (Blog | @SQLBalls).


This months topic isn’t easy for me. Even while I’m writing this, I’m still thinking about what that means to me personally. Second chances sound to good to be true. Doing something for a second time, and trying a different approach then the first time, in order to succeed…

Normally I try not to be a person that looks back at previous mistakes, but sometimes that’s easier said than done. But I must say, there are not a lot of things I regret in my life. Only one that’s really close to my heart, and nobody probably knows about. But I won’t bother you with that story…

 
Deserving a second chance
People always say: everybody deserves a second chance. But I don’t completely agree with that. Everyone makes mistakes, and that’s not something to be ashamed of. But if you make the same mistake twice, you need to start wondering if there’s something you could have done to prevent it. But even then, you deserve a second chance.

The people that actually know me, know I’m a nice guy, I’m honest (sometimes even a little bit too honest), and normally you can’t get me angry. But if you screw the same things up over and over again, I’m not that friendly anymore. Let me explain that with an example.

 
No, that wasn’t me!
A while ago I worked with someone who thought he was really good at his job. Personally, I had some issues with that opinion, but I gave him the benefit of the doubt. On a number of occasions he screwed things up, and I thought he should have known that what he was doing was never ever going to work. But still, I was willing to give him that second chance. But then he got me angry. And you won’t like me when I’m angry.

There were a number of SQL Server Agent Jobs running, and they locked up some of our tables and databases. When I asked him to look at that, he said he didn’t run those jobs, and focused on his screen again. So I asked him again, nicely, to look at it. He replied with the same answer.

A little bit angry, I told him the jobs were started on the server, and that he was the only one that was logged on to the server. Then he “suddenly” remembered he started the jobs, and said the locking wasn’t that bad. As a DBA, I took a deep breath, and counted to 10, and waited for him to fix the issue. But if you’re that stubborn, you’re clearly lying to me, and don’t even have the courage to tell me you screwed up, you don’t deserve a second chance in my opinion. At least be honest with yourself and to your colleagues!

 
Honesty get’s you a second chance
At this and previous companies I worked for, I always tried to teach the student and interns they need to be honest and listen to people with experience. Even if things go wrong, and you’re the one to blame, at least tell the truth. For me, that’s the difference between fixing the issue together and moving on, or letting him take the fall all on his own. But this is also an experience I got handed down to me by my colleagues a few years back. This is what happened to me, as I remember it:

When I started my first job in IT, I was offered a job as SQL Server Consultant. That meant that I was responsible for data conversions from different systems to our core system. When I took the job, I had never written a query before. But by listening to colleagues and my mentor (a good friend of mine who worked for the same company), I made it into a development team about 1.5 years after I started my first job.

That meant I was able to access the production system (yes, that’s where the problems began!). These permission were given to me, so I could solve data related issues in production. Until the day they asked me to update 5 rows in production. I checked and double checked the T-SQL statement I wrote, asked a colleague to take a look at it, and then took a break away from my computer so I could totally focus on this task when I got back.

I sat down again, looked at the query one last time, and pressed F5… One minute passed… Two minutes passed… And then the query finished… 50.000 rows affected… I slightly panicked, and noticed I only selected the update, a half “WHERE” clause, and no “BEGIN TRAN”… My heart started racing, and I picked up the phone and asked the system administrator (a good friend of mine, who worked at a different location) if he could restore the last backup for me, because I screwed up. After some questions, and some explanations about my mistake, the last thing he said, before he hung up the phone in anger, was “Which backup? The one that didn’t ran for the last few weeks?”.

I didn’t know what to do. How could I ever fix this? Almost every record in the table was updated, and there was no way of knowing what he old values of the updated records were. So it took all my courage to pick up the phone, and ring the system administrator again. All I heard on the other side of the phone was his evil laughter. Before I could ask him what was going on, he told me: “I’m glad you were honest to me. But don’t worry, I’m restoring the backup that was taken an hour ago. There’s no data lost”.

At that moment, I didn’t know what to think or feel. At first I wanted to slap him silly, but a few minutes later I wanted to thank him for his wonderful help. He probably saved my ass, and he never told anyone except my mentor (who also was my direct manager back then, and also a good friend of us both). A few days later, the three of us talked about it face to face, and eventually all laughed about the situation.

 
A wise lesson
But if I learned anything from that situation, besides never running an update without transaction or “WHERE” clause, is to be honest. Even though you might think the company will fire you for the mistake you made, it’s always better to tell them then letting them find out themselves. And that’s what I try to tell the students, interns, and junior colleagues I work with. Be honest, and then you earn a second chance…

SQL Server Agent Jobs Schedules – A hidden evil…

One of the many beautiful features of SQL Server, is the possibility to schedule a query or job within a few minutes by using SQL Server Agent Jobs. Especially for people who want to run a query at a quiet moment of the day, but don’t want to stay up, or wake up at 4:00 AM in the morning.

 
Types of schedules
If you dig into the SQL Server Agent Jobs, you can create a job-specific schedule, or create a shared schedule. Both are essentially the same type of schedule, except the fact that the shared schedule can be a part of a lot of jobs.

 
What type do you need?
If you create a new SQL Server Agent Job, you need to figure out which type of schedule you want to use. If you want to start a number of jobs all at the same time, you want to go for a shared schedule. But if you easily want to move jobs in time (change the start date or start time), then a single (job specific) schedule is what you want.

 
How it works
Once you’ve created a job, you can click on “Schedules”, and then either choose “New” (single schedule), or “Pick” (shared schedule):

 
New schedule
If you decide to create a new schedule, you’ll get a window like this:

In this window you can set the runtime of the schedule, start- and end date, frequency, etc.

 
Pick a schedule
If you go for the “Pick” option, you’ll see a window like this:

In this window, you can select a previously made schedule, so you could run it in specifically created time windows for example.

 
Edit schedule
But what’s the catch? If you change a schedule, this might effect other jobs in the same schedule! This is where my issue comes in. A few weeks back a schedule was changed (we wanted to run the job 2 hours earlier every day), and suddenly several other jobs changed schedule. Without checking, the schedule was changed, and that resulted in a really strange situation with parallel running jobs that almost locked out all other processes.

So if you want to change the schedule of a job, click the “Jobs in schedule” button. Double check if your schedule isn’t turned into a shared schedule by you, or one of your colleagues or customers:

 
Manage schedules on server
But that’s not all. Last week I’ve read an article about shared job schedules, that was tweeted by Pieter Vanhove (Blog | @Pieter_Vanhove). In that article I discovered that you can also right-click on “Jobs”, and click on “Manage Schedules”:

This results in this window, where you can see the shared schedule overview, the amount of jobs per schedule, etc:

 
Conclusion
As I’ve said in previous posts: Always check, double check, and triple check before you make any changes before you run into more issues than you solve with your change!

Design a site like this with WordPress.com
Get started