The post CSS List Property With Example appeared first on Devnote.
]]>Example
<html>
       <head>
             <style type="text/css">
                   ul {
                         list-style-image:url("https://devnote.in/wp-content/uploads/2020/04/cropped-devnote-32x32.png");
                         list-style-type:circle;
                        /* square, upper-roman, upper-alpha, lower-roman,
                           lower-alpha, decimal, disc, none */
                    }
             </style>
       </head>

        <body>
               <ul>
                     <li>Laravel</li>
                     <li>Wordpress</li>
                     <li>PHP</li>
                     <li>CI</li>
                     <li>JS</li>
               </ul>
        </body>
</html>
The post CSS List Property With Example appeared first on Devnote.
]]>The post How to Create a Cookie Consent Popup in JavaScript appeared first on Devnote.
]]>We will build this popup from scratch without any external libraries. When a user clicks the accept button, their choice will be saved in the browser using cookies or local storage. This prevents the popup from showing every time the page reloads. By the end of this guide, you will understand how to design the popup interface, handle user actions with JavaScript, and provide a smooth user experience on your website.
Also read: How to add GDPR Cookie Consent in Laravel
When users come to your website, they will get a cookie consent popup and accept the cookies policy. Cookie Consent is what users must know about the cookie privacy & policy of your website.
Create a Cookie Consent Popup in JavaScript
<!DOCTYPE html>

<html>

<head>

    <meta charset='utf-8'>

    <meta http-equiv='X-UA-Compatible' content='IE=edge'>

    <title>How to Create a Cookie Consent Popup in JavaScript</title>

    <meta name='viewport' content='width=device-width, initial-scale=1'>

    <style>

        #cookieConcentPopup {

            background: white;

            width: 25%;

            position: fixed;

            left: 10px;

            bottom: 20px;

            box-shadow: 0px 0px 15px #cccccc;

            padding: 10px;

            border-radius: 10px;

        }


        #cookieConcentPopup h3 {

            margin: 0;

        }


        #cookieConcentPopup p {

            text-align: left;

            font-size: 17px;

            color: #4e4e4e;

        }


        #cookieConcentPopup button {

            width: 100%;

            border: 1px solid #097fb7;

            background: #097fb7;

            padding: 5px;

            border-radius: 8px;

            color: white;

        }


        #acceptCookieConcent {

            cursor: pointer;

        }

    </style>

</head>

<body>

    <div id="cookieConcentPopup">

        <h3>Cookie Consent</h3>

        <p>Lorem ipsum dolor sit amet consectetur adipisicing elit. Velit ducimus, doloremque eligendi animi minus reiciendis perferendis exercitationem soluta ut dolorum nemo corrupti, praesentium asperiores cumque qui earum. Voluptas, ipsam sint? <a href="proxy.php?url=#">Cookie Policy & Privacy</a></p>

        <button id="acceptCookieConcent">Accept</button>

    </div>


    <script type="text/javascript">


        var c_name= "Devnote";

        var c_value="Devnote Tutorials";

        var c_expire_days= 15;


        let acceptCookieConcent = document.getElementById("acceptCookieConcent");

        acceptCookieConcent.onclick= function() {

            createCookie(c_name, c_value, c_expire_days);

        }


        // function to set cookie in web browser

        let createCookie= function(c_name, c_value, c_expire_days) {


            let todayDate = new Date();

            todayDate.setTime(todayDate.getTime() +

            (c_expire_days*24*60*60*1000));

            let expires = "expires=" + todayDate.toGMTString();

            document.cookie = c_name + "=" + c_value + ";" + expires + ";path=/";


            if(document.cookie) {

                document.getElementById("cookieConcentPopup").style.display = "none";

            } else {

                alert("Unable to set cookie. Please check your cookies setting");

            }

        }


        // get cookie from the web browser

        let getCookie= function(c_name) {

            let name = c_name + "=";

            let decodedCookie = decodeURIComponent(document.cookie);

            let ca = decodedCookie.split(';');

            for(let i = 0; i < ca.length; i++) {

                let c = ca[i];

                while (c.charAt(0) == ' ') {

                    c = c.substring(1);

                }

                if (c.indexOf(name) == 0) {

                    return c.substring(name.length, c.length);

                }

            }

            return "";

        }


        // check cookie is set or not

        let checkCookie= function() {

            let check=getCookie(c_name);

            if(check=="") {

                document.getElementById("cookieConcentPopup").style.display = "block";

            } else {

                document.getElementById("cookieConcentPopup").style.display = "none";

            }

        }

        checkCookie();

    </script>

</body>

</html>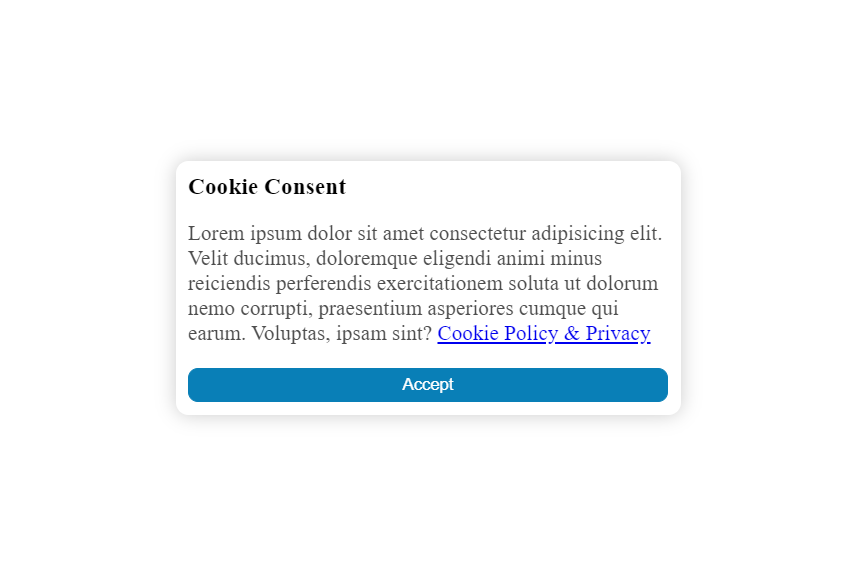
The post How to Create a Cookie Consent Popup in JavaScript appeared first on Devnote.
]]>The post Magic Navigation Menu using HTML CSS and Javascript appeared first on Devnote.
]]>Magic Navigation Menu using HTML CSS and Javascript
index.html
<!DOCTYPE html>
<html lang="en">

<head>
    <meta charset="UTF-8">
    <meta http-equiv="X-UA-Compatible" content="IE=edge">
    <meta name="viewport" content="width=device-width, initial-scale=1.0">
    <title>Magic Navigation Menu using HTML CSS and Javascript</title>
    <link rel="stylesheet" href="proxy.php?url=styles.css">
    <link rel="stylesheet" href="proxy.php?url=https://cdnjs.cloudflare.com/ajax/libs/font-awesome/4.7.0/css/font-awesome.min.css">
</head>

<body>
    <div class="navigation">
        <ul>
            <li class="list active">
                <a href="proxy.php?url=#">
                    <span class="icon">
                        <i class="fa fa-home"></i>
                    </span>
                    <span class="text">Home</span>
                    <span class="circle"></span>
                </a>
            </li>
            <li class="list">
                <a href="proxy.php?url=#">
                    <span class="icon">
                        <i class="fa fa-user-o"></i>
                    </span>
                    <span class="text">Contact</span>
                    <span class="circle"></span>
                </a>
            </li>
            <li class="list">
                <a href="proxy.php?url=#">
                    <span class="icon">
                        <i class="fa fa-comment-o"></i>
                    </span>
                    <span class="text">Chat</span>
                    <span class="circle"></span>
                </a>
            </li>
            <li class="list">
                <a href="proxy.php?url=#">
                    <span class="icon">
                        <i class="fa fa-camera"></i>
                    </span>
                    <span class="text">Gallery</span>
                    <span class="circle"></span>
                </a>
            </li>
            <li class="list">
                <a href="proxy.php?url=#">
                    <span class="icon">
                        <i class="fa fa-cog"></i>
                    </span>
                    <span class="text">Customize</span>
                    <span class="circle"></span>
                </a>
            </li>
            <div class="selected"></div>
        </ul>
    </div>

    <script src="proxy.php?url=scripts.js"></script>
</body>

</html>
styles.css
@import url('https://fonts.googleapis.com/css2?family=Roboto:ital,wght@0,100;0,300;0,400;0,500;0,900;1,700&display=swap');
* {
    margin: 0;
    padding: 0;
    box-sizing: border-box;
    font-family: 'Roboto', sans-serif;
}

body {
    display: flex;
    justify-content: center;
    align-items: center;
    min-height: 100vh;
    background: #06021b;
}

.navigation {
    position: relative;
    width: 440px;
    height: 70px;
    background: linear-gradient(45deg, #f9ce34, #ee2a7b, #6228d7);
    display: flex;
    justify-content: center;
    align-items: center;
    border-radius: 8px;
}

.navigation ul {
    display: flex;
    width: 350px;
}

.navigation ul li {
    position: relative;
    width: 70px;
    height: 70px;
    list-style: none;
    z-index: 1;
}

.navigation ul li a {
    position: relative;
    display: flex;
    justify-content: center;
    align-items: center;
    flex-direction: column;
    width: 100%;
    text-align: center;
}

.navigation ul li a .icon {
    position: relative;
    display: block;
    line-height: 75px;
    font-size: 24px;
    text-align: center;
    color: #fff;
    transition: 0.4s;
}

.navigation ul li.active a .icon {
    transform: translateY(-36px);
}

.navigation ul li a .text {
    position: absolute;
    color: #fff;
    font-size: 16px;
    opacity: 0;
    transform: translateY(20px);
    transition: 0.4s;
}

.navigation ul li.active a .text {
    opacity: 1;
    transform: translateY(10px);
}

.navigation ul li a .circle {
    position: absolute;
    display: block;
    width: 50px;
    height: 50px;
    background: transparent;
    border-radius: 50%;
    border: 1.8px solid #fff;
    transform: translateY(-37px) scale(0);
}

.navigation ul li.active a .circle {
    transition: 0.4s;
    transition-delay: 0.4s;
    transform: translateY(-37px) scale(1);
}

.selected {
    position: absolute;
    top: -50%;
    width: 70px;
    height: 70px;
    background: linear-gradient(45deg, #f9ce34, #ee2a7b, #6228d7);
    border: 6px solid #06021b;
    border-radius: 50%;
    display: flex;
    justify-content: center;
    align-items: center;
    transition: .5s;
}

.selected::before {
    content: '';
    position: absolute;
    top: 50%;
    left: -22px;
    width: 20px;
    height: 20px;
    background: transparent;
    border-top-right-radius: 20px;
    box-shadow: 1px -10px 0 #06021b;
}

.selected::after {
    content: '';
    position: absolute;
    top: 50%;
    right: -22px;
    width: 20px;
    height: 20px;
    background: transparent;
    border-top-left-radius: 20px;
    box-shadow: -1px -10px 0 #06021b;
}

.navigation ul li:nth-child(1).active~.selected {
    transform: translateX(calc(70px * 0));
}

.navigation ul li:nth-child(2).active~.selected {
    transform: translateX(calc(70px * 1));
}

.navigation ul li:nth-child(3).active~.selected {
    transform: translateX(calc(70px * 2));
}

.navigation ul li:nth-child(4).active~.selected {
    transform: translateX(calc(70px * 3));
}

.navigation ul li:nth-child(5).active~.selected {
    transform: translateX(calc(70px * 4));
}

.color-white {
    color: #FFF;
}
scripts.js
const listClass = document.querySelectorAll('.list');

function activeLink() {
    listClass.forEach((value) =>
    value.classList.remove('active'));
    this.classList.add('active');
}

listClass.forEach(
    (value) => value.addEventListener('click', activeLink)
);
Output:

The post Magic Navigation Menu using HTML CSS and Javascript appeared first on Devnote.
]]>The post Export HTML Table to PDF using jQuery appeared first on Devnote.
]]>We will use two popular libraries:
- html2canvas – to capture the HTML table as a canvas/image
- pdfMake – to generate a PDF document from that image
No server-side PDF library is required.
What We Are Going to Build
- A simple HTML table
- A button labeled “Export to PDF”
- When the button is clicked, the table will be captured and downloaded as a PDF file
Example
<html>
<head>
    <title>Export HTML Table to PDF using jQuery</title>
     <style type="text/css">
        table
        {
            border: 1px solid #ccc;
            border-collapse: collapse;
        }

        table th
        {
            background-color: #F7F7F7;
            color: #333;
            font-weight: 600;
        }

        table th, table td
        {
            padding: 5px;
            border: 1px solid #ccc;
        }

    </style>
</head>
<body>
    <h1>Export HTML Table to PDF using jQuery</h1>
     <table id="employee" cellspacing="0" cellpadding="0">
        <tr>
            <th>Id</th>
            <th>Name</th>
            <th>Email</th>
            <th>Age</th>
        </tr>
        <tr>
            <td>1</td>
            <td>Raj</td>
            <td>[email protected]</td>
            <td>20</td>
        </tr>
        <tr>
            <td>2</td>
            <td>John</td>
            <td>[email protected]</td>
            <td>21</td>
        </tr>
        <tr>
            <td>3</td>
            <td>Lark</td>
            <td>[email protected]</td>
            <td>24</td>
        </tr>
        <tr>
            <td>4</td>
            <td>Emely</td>
            <td>[email protected]</td>
            <td>24</td>
        </tr>
        <tr>
            <td>5</td>
            <td>kel</td>
            <td>[email protected]</td>
            <td>27</td>
        </tr>
    </table>
    <br />
    <input type="button" id="export" value="Export"/>

    <script type="text/javascript" src="proxy.php?url=https://ajax.googleapis.com/ajax/libs/jquery/1.8.3/jquery.min.js"></script>
    <script type="text/javascript" src="proxy.php?url=https://cdnjs.cloudflare.com/ajax/libs/pdfmake/0.1.22/pdfmake.min.js"></script>
    <script type="text/javascript" src="proxy.php?url=https://cdnjs.cloudflare.com/ajax/libs/html2canvas/0.4.1/html2canvas.min.js"></script>

    <script type="text/javascript">
        $("body").on("click", "#export", function () {
            html2canvas($('#employee')[0], {
                onrendered: function (canvas) {
                    var dataUrl = canvas.toDataURL();
                    var data = {
                        content: [{
                            image: dataUrl,
                            width: 450
                        }]
                    };
                    pdfMake.createPdf(data).download("employee.pdf");
                }
            });
        });
    </script>
</body>
</html>
Output
Export HTML Table to PDF using jQuery
| Id | Name | Age | |
|---|---|---|---|
| 1 | Raj | [email protected] | 20 |
| 2 | John | [email protected] | 21 |
| 3 | Lark | [email protected] | 24 |
| 4 | Emely | [email protected] | 24 |
| 5 | kel | [email protected] | 27 |
The post Export HTML Table to PDF using jQuery appeared first on Devnote.
]]>The post How to make a Calculator using HTML CSS JavaScript appeared first on Devnote.
]]>Make a Calculator using HTML CSS and JavaScript

index.html
<!DOCTYPE html>
<html lang="en">
<head>
    <meta charset="UTF-8" />
    <meta name="viewport" content="width=device-width, initial-scale=1.0" />
    <link rel="stylesheet" href="proxy.php?url=style.css" />
    <title>How to make a Calculator using HTML CSS JavaScript - Devnote.in</title>
</head>

<body>
    <div class="container">
        <div class="calculator">
            <input type="text" id="textinput" placeholder="0" />
            <div>
                <button class="button operators">AC</button>
                <button class="button operators">DEL</button>
                <button class="button operators">%</button>
                <button class="button operators">/</button>
            </div>
            <div>
                <button class="button">7</button>
                <button class="button">8</button>
                <button class="button">9</button>
                <button class="button operators">*</button>
            </div>
            <div>
                <button class="button">4</button>
                <button class="button">5</button>
                <button class="button">6</button>
                <button class="button operators">-</button>
            </div>
            <div>
                <button class="button">1</button>
                <button class="button">2</button>
                <button class="button">3</button>
                <button class="button operators">+</button>
            </div>

            <div>
                <button class="button">00</button>
                <button class="button">0</button>
                <button class="button">.</button>
                <button class="button equalBtn">=</button>
            </div>
        </div>
    </div>

    <script src="proxy.php?url=script.js"></script>
</body>
</html>
style.css
@import url('https://fonts.googleapis.com/css2?family=Roboto:ital,wght@0,100;0,300;0,400;0,500;1,700&display=swap');

*{
    margin: 0;
    padding: 0;
    box-sizing: border-box;
    font-family: 'Roboto', sans-serif;
}

body{
    width: 100%;
    height: 100vh;
    display: flex;
    justify-content: center;
    align-items: center;
    background: linear-gradient(45deg, #0a0a0a, #3a4452);
}

.calculator {
    border: 1px solid #717377;
    padding: 20px;
    border-radius: 16px;
    background: transparent;
    box-shadow: 0px 3px 15px rgba(113, 115, 119, 0.5);
}

#textinput {
    width: 320px;
    border: none;
    padding: 24px;
    margin: 10px;
    background: transparent;
    box-shadow: 0px 3px 15px rgbs(84, 84, 84, 0.1);
    font-size: 40px;
    text-align: right;
    cursor: pointer;
    color: #ffffff;
}

#textinput::placeholder{
    color: #ffffff;
}

button {
    border: none;
    width: 60px;
    height: 60px;
    margin: 10px;
    border-radius: 50%;
    background: transparent;
    color: #ffffff;
    font-size: 20px;
    box-shadow: -8px -8px 15px rgba(255, 255, 255, 0.1);
    cursor: pointer;
}

.equalBtn {
    background-color: #fa0000;
}

.operators {
    color: #00ff1d;
}
script.js
let input = document.getElementById('textinput');
let buttons = document.querySelectorAll('button');

let string = "";
let arr = Array.from(buttons);
arr.forEach(button => {
    button.addEventListener('click', (e) =>{
        if(e.target.innerHTML == '='){
            string = eval(string);
            input.value = string;
        }

        else if(e.target.innerHTML == 'AC'){
            string = "";
            input.value = string;
        }
        else if(e.target.innerHTML == 'DEL'){
            string = string.substring(0, string.length-1);
            input.value = string;
        }
        else{
            string += e.target.innerHTML;
            input.value = string;
        }
    })
})
The post How to make a Calculator using HTML CSS JavaScript appeared first on Devnote.
]]>The post How to Create a Draggable Card Slider Using HTML, CSS, and JavaScript appeared first on Devnote.
]]>In this tutorial, we will create a draggable card slider that works, we don’t use any external JavaScript libraries such as Owl Carousel or SwiperJs. Instead, we will create the slider from scratch using JavaScript, HTML, and CSS. A Draggable card slider, the user can slide cards by dragging using the left or right arrow. It also includes infinite scrolling and autoplay functionality.
Learn how to build a custom draggable card slider using pure HTML, CSS, and JavaScript. No external libraries required. We’ll create a smooth sliding interface that supports drag, infinite scrolling, and autoplay.
How to Create A Draggable Card Slider in HTML CSS & JavaScript
Example
index.html
<!DOCTYPE html>
<html lang="en">
<head>
    <meta charset="utf-8">
    <title>How to Create A Draggable Card Slider in HTML CSS & JavaScript</title>
    <meta name="viewport" content="width=device-width, initial-scale=1.0">
    <link rel="stylesheet" href="proxy.php?url=https://cdnjs.cloudflare.com/ajax/libs/font-awesome/5.14.0/css/all.min.css">
    <link rel="stylesheet" href="proxy.php?url=styles.css">
    <script src="proxy.php?url=scripts.js" defer></script>
</head>

<body>
    <div class="main-wrapper">
        <h1 class="text-center">How to Create A Draggable Card Slider in HTML CSS & JavaScript</h1>
        <i id="left" class="fa fa-solid fa-angle-left"></i>
        <ul class="carousel">
            <li class="card">
                <div class="img"><img src="proxy.php?url=images/john-india.jpg" alt="img" draggable="false"></div>
                <h2>John India</h2>
                <span>Sales Manager</span>
            </li>
            <li class="card">
                <div class="img"><img src="proxy.php?url=images/mike-us.jpg" alt="img" draggable="false"></div>
                <h2>Mike US</h2>
                <span>Web Developer</span>
            </li>
            <li class="card">
                <div class="img"><img src="proxy.php?url=images/lary-us.jpg" alt="img" draggable="false"></div>
                <h2>Lary US</h2>
                <span>Online Teacher</span>
            </li>
            <li class="card">
                <div class="img"><img src="proxy.php?url=images/james-canada.jpg" alt="img" draggable="false"></div>
                <h2>James Canada</h2>
                <span>Freelancer</span>
            </li>
            <li class="card">
                <div class="img"><img src="proxy.php?url=images/kishan-india.jpg" alt="img" draggable="false"></div>
                <h2>Kishan India</h2>
                <span>Bank Manager</span>
            </li>
            <li class="card">
                <div class="img"><img src="proxy.php?url=images/lomas-india.jpg" alt="img" draggable="false"></div>
                <h2>Lomas India</h2>
                <span>App Designer</span>
            </li>
        </ul>
        <i id="right" class="fa fa-solid fa-angle-right"></i>
    </div>
</body>

</html>
styles.css
@import url('https://fonts.googleapis.com/css2?family=Roboto:wght@100;300;400;500;700;900&display=swap');
* {
    margin: 0;
    padding: 0;
    box-sizing: border-box;
    font-family: 'Roboto', sans-serif;
}

body {
    display: flex;
    padding: 0 35px;
    align-items: center;
    justify-content: center;
    min-height: 100vh;
}

.text-center {
    text-align: center;
}

.main-wrapper {
    max-width: 1100px;
    width: 100%;
    position: relative;
}

.main-wrapper i {
    top: 50%;
    height: 50px;
    width: 50px;
    cursor: pointer;
    font-size: 1.25rem;
    position: absolute;
    text-align: center;
    line-height: 50px;
    border-radius: 50%;
    box-shadow: 0 3px 6px rgba(0, 0, 0, 0.23);
    transform: translateY(-50%);
    transition: transform 0.1s linear;
}

.main-wrapper i:active {
    transform: translateY(-50%) scale(0.85);
}

.main-wrapper i:first-child {
    left: -22px;
}

.main-wrapper i:last-child {
    right: -22px;
}

.main-wrapper .carousel {
    display: grid;
    grid-auto-flow: column;
    grid-auto-columns: calc((100% / 3) - 12px);
    overflow-x: auto;
    scroll-snap-type: x mandatory;
    gap: 16px;
    border-radius: 8px;
    scroll-behavior: smooth;
    scrollbar-width: none;
}

.carousel::-webkit-scrollbar {
    display: none;
}

.carousel.no-transition {
    scroll-behavior: auto;
}

.carousel.dragging {
    scroll-snap-type: none;
    scroll-behavior: auto;
}

.carousel.dragging .card {
    cursor: grab;
    user-select: none;
}

.carousel :where(.card, .img) {
    display: flex;
    justify-content: center;
    align-items: center;
}

.carousel .card {
    scroll-snap-align: start;
    height: 342px;
    list-style: none;
    background: #fff;
    cursor: pointer;
    padding-bottom: 15px;
    flex-direction: column;
    border-radius: 8px;
}

.carousel .card .img {
    background: #8B53FF;
    height: 148px;
    width: 148px;
    border-radius: 50%;
}

.card .img img {
    width: 140px;
    height: 140px;
    border-radius: 50%;
    object-fit: cover;
    border: 4px solid #fff;
}

.carousel .card h2 {
    font-weight: 500;
    font-size: 1.56rem;
    margin: 30px 0 5px;
}

.carousel .card span {
    color: #6A6D78;
    font-size: 1.31rem;
}

@media screen and (max-width: 900px) {
    .main-wrapper .carousel {
        grid-auto-columns: calc((100% / 2) - 9px);
    }
}

@media screen and (max-width: 600px) {
    .main-wrapper .carousel {
        grid-auto-columns: 100%;
    }
}
scripts.js
const wrapper = document.querySelector(".main-wrapper");
const carousel = document.querySelector(".carousel");
const firstCardWidth = carousel.querySelector(".card").offsetWidth;
const arrowBtns = document.querySelectorAll(".main-wrapper i");
const carouselChildrens = [...carousel.children];

let isDragging = false,
isAutoPlay = true,
startX, startScrollLeft, timeoutId;

let cardPerView = Math.round(carousel.offsetWidth / firstCardWidth);

carouselChildrens.slice(-cardPerView).reverse().forEach(card => {
    carousel.insertAdjacentHTML("afterbegin", card.outerHTML);
});


carouselChildrens.slice(0, cardPerView).forEach(card => {
    carousel.insertAdjacentHTML("beforeend", card.outerHTML);
});

carousel.classList.add("no-transition");
carousel.scrollLeft = carousel.offsetWidth;
carousel.classList.remove("no-transition");
arrowBtns.forEach(btn => {
    btn.addEventListener("click", () => {
        carousel.scrollLeft += btn.id == "left" ? -firstCardWidth : firstCardWidth;
    });
});

const dragStart = (e) => {
    isDragging = true;
    carousel.classList.add("dragging");
    startX = e.pageX;
    startScrollLeft = carousel.scrollLeft;
}

const dragging = (e) => {
    if (!isDragging) return;
    carousel.scrollLeft = startScrollLeft - (e.pageX - startX);
}

const dragStop = () => {
    isDragging = false;
    carousel.classList.remove("dragging");
}

const infiniteScroll = () => {
    if (carousel.scrollLeft === 0) {
        carousel.classList.add("no-transition");
        carousel.scrollLeft = carousel.scrollWidth - (2 *
            carousel.offsetWidth);
        carousel.classList.remove("no-transition");
    }

    else if (Math.ceil(carousel.scrollLeft) === carousel.scrollWidth -
        carousel.offsetWidth) {
        carousel.classList.add("no-transition");
        carousel.scrollLeft = carousel.offsetWidth;
        carousel.classList.remove("no-transition");
    }

    clearTimeout(timeoutId);
    if (!wrapper.matches(":hover")) autoPlay();
}

const autoPlay = () => {
    if (window.innerWidth < 800 || !isAutoPlay) return;
    timeoutId = setTimeout(() => carousel.scrollLeft += firstCardWidth,
        2500);
}

autoPlay();
carousel.addEventListener("mousedown", dragStart);
carousel.addEventListener("mousemove", dragging);
document.addEventListener("mouseup", dragStop);
carousel.addEventListener("scroll", infiniteScroll);
wrapper.addEventListener("mouseenter", () => clearTimeout(timeoutId));
wrapper.addEventListener("mouseleave", autoPlay);
Download
The post How to Create a Draggable Card Slider Using HTML, CSS, and JavaScript appeared first on Devnote.
]]>The post How to create Analog Clock in HTML CSS & JavaScript appeared first on Devnote.
]]>How to create Analog Clock in HTML CSS & JavaScript
Example
<!DOCTYPE html>
<html lang="en">
<head>
    <meta charset="UTF-8" />
    <meta http-equiv="X-UA-Compatible" content="IE=edge" />
    <meta name="viewport" content="width=device-width, initial-scale=1.0" />
    <title>How to create Analog Clock in HTML CSS & JavaScript</title>
    <style>
        @import url('https://fonts.googleapis.com/css2?family=Montserrat&family=Roboto:wght@100;300;400;500;700;900&display=swap');
        * {
            margin: 0;
            padding: 0;
            box-sizing: border-box;
            font-family: 'Montserrat', sans-serif;
            font-family: 'Roboto', sans-serif;
        }

        :root {
            --primary-color: #f6f7fb;
            --white-color: #fff;
            --black-color: #18191a;
            --red-color: #ff1900;
        }

        body {
            display: flex;
            min-height: 100vh;
            align-items: center;
            justify-content: center;
            background: var(--primary-color);
        }

        body.dark {
            --primary-color: #242526;
            --white-color: #18191a;
            --black-color: #fff;
            --red-color: #ff1900;
        }

        .container {
            display: flex;
            flex-direction: column;
            align-items: center;
            gap: 60px;
        }

        .container .clocks {
            display: flex;
            height: 400px;
            width: 400px;
            border-radius: 50%;
            align-items: center;
            justify-content: center;
            background: var(--white-color);
            box-shadow: 0 15px 25px rgba(0, 0, 0, 0.1), 0 25px 45px rgba(0, 0, 0,
                0.1);
            position: relative;
        }

        .clocks label {
            position: absolute;
            inset: 20px;
            text-align: center;
            transform: rotate(calc(var(--i) * (360deg / 12)));
        }

        .clocks label span {
            display: inline-block;
            font-size: 30px;
            font-weight: 600;
            color: var(--black-color);
            transform: rotate(calc(var(--i) * (-360deg / 12)));
        }

        .container .indicators {
            position: absolute;
            height: 10px;
            width: 10px;
            display: flex;
            justify-content: center;
        }

        .indicators::before {
            content: "";
            position: absolute;
            height: 100%;
            width: 100%;
            border-radius: 50%;
            z-index: 100;
            background: var(--black-color);
            border: 4px solid var(--red-color);
        }

        .indicators .hand {
            position: absolute;
            height: 130px;
            width: 4px;
            bottom: 0;
            border-radius: 25px;
            transform-origin: bottom;
            background: var(--red-color);
        }

        .hand.minutes {
            height: 120px;
            width: 5px;
            background: var(--black-color);
        }

        .hand.hours {
            height: 100px;
            width: 8px;
            background: var(--black-color);
        }

        .switch-mode {
            padding: 10px 20px;
            border-radius: 8px;
            font-size: 22px;
            font-weight: 400;
            display: inline-block;
            color: var(--white-color);
            background: var(--black-color);
            box-shadow: 0 5px 10px rgba(0, 0, 0, 0.1);
            cursor: pointer;
        }
    </style>
</head>

<body>
    <div class="container">
        <div class="clocks">
            <label style="--i: 1"><span>1</span></label>
            <label style="--i: 2"><span>2</span></label>
            <label style="--i: 3"><span>3</span></label>
            <label style="--i: 4"><span>4</span></label>
            <label style="--i: 5"><span>5</span></label>
            <label style="--i: 6"><span>6</span></label>
            <label style="--i: 7"><span>7</span></label>
            <label style="--i: 8"><span>8</span></label>
            <label style="--i: 9"><span>9</span></label>
            <label style="--i: 10"><span>10</span></label>
            <label style="--i: 11"><span>11</span></label>
            <label style="--i: 12"><span>12</span></label>
            <div class="indicators">
                <span class="hand hours"></span>
                <span class="hand minutes"></span>
                <span class="hand seconds"></span>
            </div>
        </div>
        <div class="switch-mode">Dark Mode</div>
    </div>
    <script>
        const body = document.querySelector("body"),
            hours = document.querySelector(".hours"),
            minutes = document.querySelector(".minutes"),
            seconds = document.querySelector(".seconds"),
            modeSwitch = document.querySelector(".switch-mode");
        if (localStorage.getItem("mode") === "Dark Mode") {
            body.classList.add("dark");
            modeSwitch.textContent = "Light Mode";
        }

        modeSwitch.addEventListener("click", () => {
            body.classList.toggle("dark");
            const isDarkMode = body.classList.contains("dark");
            modeSwitch.textContent = isDarkMode ? "Light Mode" : "Dark Mode";
            localStorage.setItem("mode", isDarkMode ? "Dark Mode" : "Light Mode");
        });
        const everySecondTimeUpdate = () => {
            let date = new Date(),
                secDeg = (date.getSeconds() / 60) * 360,
                minDeg = (date.getMinutes() / 60) * 360,
                hrDeg = (date.getHours() / 12) * 360;

            seconds.style.transform = `rotate(${secDeg}deg)`;
            minutes.style.transform = `rotate(${minDeg}deg)`;
            hours.style.transform = `rotate(${hrDeg}deg)`;
        };

        setInterval(everySecondTimeUpdate, 1000);
        everySecondTimeUpdate();
    </script>
</body>

</html>
Output
Download
The post How to create Analog Clock in HTML CSS & JavaScript appeared first on Devnote.
]]>The post How to Detect AdBlock using HTML CSS & JavaScript appeared first on Devnote.
]]>AdBlocker is a content filtering, that blocks check online ads from interrupting your browsing experience. This code helps the user prevent unintended flashing banners, pop-ups, and online advertisements from being displayed.
Detect AdBlock using JavaScript can see in the preview image, there is a popup box with text and a button to dismiss the popup. If the user has enabled AdBlocker, then this popup will be open; if not, then this popup will close.
Detect AdBlock using JavaScript
To create this program [Detect AdBlock using JavaScript]. First, we need to create two files: one index.html and another style.css file. After creating these files, just paste the below codes into your file.
Example
HTML File
Create an HTML file with the name index.html and paste the below codes into your HTML file.
#index.html

<!DOCTYPE html>
<html lang="en">
<head>
    <meta charset="UTF-8">
    <meta name="viewport" content="width=device-width, initial-scale=1.0">
    <title>Detect AdBlock using JavaScript</title>
    <link rel="stylesheet" href="proxy.php?url=style.css">
    <link rel="stylesheet" href="proxy.php?url=https://cdnjs.cloudflare.com/ajax/libs/font-awesome/5.15.3/css/all.min.css" />
</head>

<body>
    <div id="adsDetect"></div>
    <div class="ads-wrapper">
        <div class="ads-content">
            <div class="exclamation-icon">
                <span class="icon"><i class="fas fa-exclamation"></i></span>
            </div>
            <h2>AdBlock Detected!</h2>

            <p>Welcome to <b>Devnote</b></p>
            <p>It looks like you're using an ad-blocker!</p>
            <p><b>Devnote</b> is an advertising supported site and we noticed you have ad-blocking enabled.</p>
            <p><b>Please turn off your Ad-Blocker</b></p>

            <div class="ads-btn">
                <div class="background-layer"></div>
                <button class="okay">Okay, I'll Whitelist</button>
            </div>
        </div>
    </div>

    <script>
        const adsDetect = document.querySelector("#adsDetect");
        const adswrapper = document.querySelector(".ads-wrapper");
        const button = adswrapper.querySelector(".okay");

        let adClasses = ["ad", "ads", "adsbox", "doubleclick", "ad-placement", "ad-placeholder", "adbadge", "BannerAd"];
        for (let item of adClasses) {
            adsDetect.classList.add(item);
        }

        let getProperty = window.getComputedStyle(adsDetect).getPropertyValue("display");

        if (!adswrapper.classList.contains("show")) {
            console.log(getProperty);
            getProperty == "none" ? adswrapper.classList.add("show") : adswrapper.classList.remove("show");
        }

        button.addEventListener("click", () => {
            adswrapper.classList.remove("show");
        });
    </script>

</body>
</html>
CSS File
Create a CSS file with the name style.css and paste the below codes into your CSS file.
#style.css

@import url('https://fonts.googleapis.com/css2?family=Noto+Sans:wght@700&family=Poppins:wght@400;500;600;700&display=swap');

* {
    margin: 0;
    padding: 0;
    font-family: "Poppins", sans-serif;
    box-sizing: border-box;
}

body {
    width: 100%;
    height: 100vh;
    background: linear-gradient(#159957, #155799 100%);
}

.ads-wrapper {
    position: absolute;
    max-width: 480px;
    top: 50%;
    left: 50%;
    width: 100%;
    background: #fff;
    padding: 40px 30px;
    opacity: 0;
    pointer-events: none;
    border-radius: 16px;
    box-shadow: 1px 1px 5px rgba(0, 0, 0, 0.06);
    transform: translate(-50%, -50%) scale(1.2);
    transition: opacity 0.2s 0s ease-in-out, transform 0.2s 0s ease-in-out;
}

.ads-wrapper.show {
    opacity: 1;
    pointer-events: auto;
    transform: translate(-50%, -50%) scale(1);
}

.ads-wrapper .ads-content,
.ads-content .exclamation-icon,
.exclamation-icon .icon {
    display: flex;
    align-items: center;
    justify-content: center;
}

.ads-wrapper .ads-content {
    flex-direction: column;
}

.ads-content .exclamation-icon {
    height: 115px;
    width: 115px;
    border-radius: 50%;
    background: linear-gradient(#159957, #155799 100%);
}

.exclamation-icon .icon {
    height: 100px;
    width: 100px;
    background: #fff;
    border-radius: inherit;
}

.exclamation-icon .icon i {
    background: linear-gradient(#159957, #155799 100%);
    background-clip: text;
    -webkit-background-clip: text;
    -webkit-text-fill-color: transparent;
    font-size: 50px;
}

.ads-content h2 {
    font-size: 32px;
    margin-top: 35px;
}

.ads-content p {
    font-size: 17px;
    margin-top: 20px;
    text-align: center;
}

.ads-btn {
    height: 57px;
    width: 223px;
    margin-top: 30px;
    border-radius: 50px;
    position: relative;
    overflow: hidden;
}

.ads-btn .background-layer {
    height: 100%;
    width: 300%;
    position: absolute;
    left: -100%;
    background: linear-gradient(#159957, #155799 100%);
    transition: all 0.4s ease;
}

.ads-btn:hover .background-layer {
    left: 0;
}

.ads-content .okay {
    position: relative;
    z-index: 1;
    height: 100%;
    width: 100%;
    background: none;
    font-size: 18px;
    border: none;
    outline: none;
    color: #fff;
    cursor: pointer;
}

::selection {
    color: #fff;
    background: #159957;
}
Now you’ve successfully created How to Detect AdBlock using HTML CSS & JavaScript. If you’ve faced any errors then please
download the source code files from the given download button.
The post How to Detect AdBlock using HTML CSS & JavaScript appeared first on Devnote.
]]>The post How to Add Custom Dropdown in DataTable appeared first on Devnote.
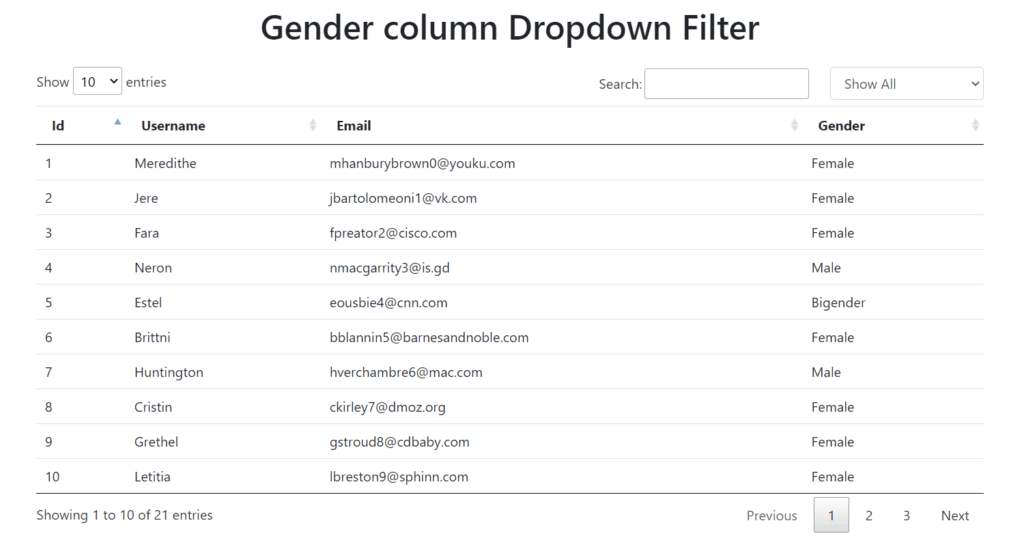
]]>How to Add Custom Dropdown in DataTable
Table of concept
- Gender column Dropdown Filter
- Individual column searching
Gender column Dropdown Filter
Example
<!doctype html>

<html lang="en">

<head>
    <meta charset="utf-8">

    <title>How to Add Custom Dropdown in DataTable</title>
    <meta name="description" content="">
    <link rel="stylesheet" href="proxy.php?url=https://cdn.datatables.net/1.10.23/css/jquery.dataTables.min.css" />
    <link rel="stylesheet" href="proxy.php?url=https://stackpath.bootstrapcdn.com/bootstrap/4.5.2/css/bootstrap.min.css" />
    <style>
        .custom-cls {
            display: inline;
            width: 180px;
            margin-left: 25px;
        }
    </style>
</head>

<body>
    <h1 class="text-center m-3">Gender column Dropdown Filter</h1>
    <div class="container mt-4">
        <select id="customFilter" class="form-control custom-cls">
            <option value="">Show All</option>
            <option value="Male">Male</option>
            <option value="Female">Female</option>
            <option value="Bigender">Bigender</option>
            <option value="Genderfluid">Genderfluid</option>
        </select>

        <!-- Set up the datatable -->
        <table class="table" id="userTable">
            <thead>
                <tr>
                    <th>Id</th>
                    <th>Username</th>
                    <th>Email</th>
                    <th>Gender</th>
                </tr>
            </thead>
            <tbody>
                <tr>
                    <td>1</td>
                    <td>Meredithe</td>
                    <td>[email protected]</td>
                    <td>Female</td>
                </tr>
                <tr>
                    <td>2</td>
                    <td>Jere</td>
                    <td>[email protected]</td>
                    <td>Female</td>
                </tr>
                <tr>
                    <td>3</td>
                    <td>Fara</td>
                    <td>[email protected]</td>
                    <td>Female</td>
                </tr>
                <tr>
                    <td>4</td>
                    <td>Neron</td>
                    <td>[email protected]</td>
                    <td>Male</td>
                </tr>
                <tr>
                    <td>5</td>
                    <td>Estel</td>
                    <td>[email protected]</td>
                    <td>Bigender</td>
                </tr>
                <tr>
                    <td>6</td>
                    <td>Brittni</td>
                    <td>[email protected]</td>
                    <td>Female</td>
                </tr>
                <tr>
                    <td>7</td>
                    <td>Huntington</td>
                    <td>[email protected]</td>
                    <td>Male</td>
                </tr>
                <tr>
                    <td>8</td>
                    <td>Cristin</td>
                    <td>[email protected]</td>
                    <td>Female</td>
                </tr>
                <tr>
                    <td>9</td>
                    <td>Grethel</td>
                    <td>[email protected]</td>
                    <td>Female</td>
                </tr>
                <tr>
                    <td>10</td>
                    <td>Letitia</td>
                    <td>[email protected]</td>
                    <td>Female</td>
                </tr>
                <tr>
                    <td>11</td>
                    <td>Alonso</td>
                    <td>[email protected]</td>
                    <td>Male</td>
                </tr>
                <tr>
                    <td>12</td>
                    <td>Vick</td>
                    <td>[email protected]</td>
                    <td>Male</td>
                </tr>
                <tr>
                    <td>13</td>
                    <td>Sharity</td>
                    <td>[email protected]</td>
                    <td>Female</td>
                </tr>
                <tr>
                    <td>14</td>
                    <td>Korie</td>
                    <td>[email protected]</td>
                    <td>Female</td>
                </tr>
                <tr>
                    <td>15</td>
                    <td>Terry</td>
                    <td>[email protected]</td>
                    <td>Genderfluid</td>
                </tr>
                <tr>
                    <td>16</td>
                    <td>Estel</td>
                    <td>[email protected]</td>
                    <td>Bigender</td>
                </tr>
                <tr>
                    <td>17</td>
                    <td>Brittni</td>
                    <td>[email protected]</td>
                    <td>Female</td>
                </tr>
                <tr>
                    <td>18</td>
                    <td>Huntington</td>
                    <td>[email protected]</td>
                    <td>Male</td>
                </tr>
                <tr>
                    <td>19</td>
                    <td>Cristin</td>
                    <td>[email protected]</td>
                    <td>Female</td>
                </tr>
                <tr>
                    <td>20</td>
                    <td>Grethel</td>
                    <td>[email protected]</td>
                    <td>Female</td>
                </tr>
                <tr>
                    <td>21</td>
                    <td>Letitia</td>
                    <td>[email protected]</td>
                    <td>Female</td>
                </tr>
            </tbody>
        </table>

    </div>

    <script src="proxy.php?url=https://code.jquery.com/jquery-3.5.1.min.js"></script>
    <script src="proxy.php?url=https://cdn.datatables.net/1.10.23/js/jquery.dataTables.min.js"></script>

    <script>
        $("document").ready(function () {

            $("#userTable").dataTable({
                "searching": true
            });

            var table = $('#userTable').DataTable();

            $("#userTable_filter.dataTables_filter").append($("#customFilter"));

            var index = 0;
            $("#userTable th").each(function (i) {
                if ($($(this)).html() == "Gender") {
                    index = i;
                    return false;
                }
            });

            $.fn.dataTable.ext.search.push(
                function (settings, data, dataIndex) {
                    var selectedItem = $('#customFilter').val()
                    var gender = data[index];
                    if (selectedItem === "" || gender.includes(selectedItem)) {
                        return true;
                    }
                    return false;
                }
            );

            //When you change event for the Gender Filter dropdown to redraw the datatable
            $("#customFilter").change(function (e) {
                table.draw();
            });

            table.draw();
        });
    </script>
</body>

</html>Individual column searching
In this example, you can add an event handler when the select element is changed and when you can change the content of the next selection using the selector-modifier.

Example
<!doctype html>

<html lang="en">

<head>
    <meta charset="utf-8">

    <title>How to Add Custom Dropdown in DataTable</title>
    <meta name="description" content="">
    <link rel="stylesheet" href="proxy.php?url=https://cdn.datatables.net/1.13.1/css/jquery.dataTables.min.css" />
    <link rel="stylesheet" href="proxy.php?url=https://stackpath.bootstrapcdn.com/bootstrap/4.5.2/css/bootstrap.min.css" />
</head>

<body>
    <h1 class="text-center m-3">Individual column searching</h1>
    <div class="container mt-4">

        <!-- Set up the datatable -->
        <table class="table" id="userTable" style="width:100%">
            <thead>
                <tr>
                    <th>Id</th>
                    <th>Username</th>
                    <th>Email</th>
                    <th>Gender</th>
                </tr>
            </thead>
            <tbody>
                <tr>
                    <td>1</td>
                    <td>Meredithe</td>
                    <td>[email protected]</td>
                    <td>Female</td>
                </tr>
                <tr>
                    <td>2</td>
                    <td>Jere</td>
                    <td>[email protected]</td>
                    <td>Female</td>
                </tr>
                <tr>
                    <td>3</td>
                    <td>Fara</td>
                    <td>[email protected]</td>
                    <td>Female</td>
                </tr>
                <tr>
                    <td>4</td>
                    <td>Neron</td>
                    <td>[email protected]</td>
                    <td>Male</td>
                </tr>
                <tr>
                    <td>5</td>
                    <td>Estel</td>
                    <td>[email protected]</td>
                    <td>Bigender</td>
                </tr>
                <tr>
                    <td>6</td>
                    <td>Brittni</td>
                    <td>[email protected]</td>
                    <td>Female</td>
                </tr>
                <tr>
                    <td>7</td>
                    <td>Huntington</td>
                    <td>[email protected]</td>
                    <td>Male</td>
                </tr>
                <tr>
                    <td>8</td>
                    <td>Cristin</td>
                    <td>[email protected]</td>
                    <td>Female</td>
                </tr>
                <tr>
                    <td>9</td>
                    <td>Grethel</td>
                    <td>[email protected]</td>
                    <td>Female</td>
                </tr>
                <tr>
                    <td>10</td>
                    <td>Letitia</td>
                    <td>[email protected]</td>
                    <td>Female</td>
                </tr>
                <tr>
                    <td>11</td>
                    <td>Alonso</td>
                    <td>[email protected]</td>
                    <td>Male</td>
                </tr>
                <tr>
                    <td>12</td>
                    <td>Vick</td>
                    <td>[email protected]</td>
                    <td>Male</td>
                </tr>
                <tr>
                    <td>13</td>
                    <td>Sharity</td>
                    <td>[email protected]</td>
                    <td>Female</td>
                </tr>
                <tr>
                    <td>14</td>
                    <td>Korie</td>
                    <td>[email protected]</td>
                    <td>Female</td>
                </tr>
                <tr>
                    <td>15</td>
                    <td>Terry</td>
                    <td>[email protected]</td>
                    <td>Genderfluid</td>
                </tr>
                <tr>
                    <td>16</td>
                    <td>Estel</td>
                    <td>[email protected]</td>
                    <td>Bigender</td>
                </tr>
                <tr>
                    <td>17</td>
                    <td>Brittni</td>
                    <td>[email protected]</td>
                    <td>Female</td>
                </tr>
                <tr>
                    <td>18</td>
                    <td>Huntington</td>
                    <td>[email protected]</td>
                    <td>Male</td>
                </tr>
                <tr>
                    <td>19</td>
                    <td>Cristin</td>
                    <td>[email protected]</td>
                    <td>Female</td>
                </tr>
                <tr>
                    <td>20</td>
                    <td>Grethel</td>
                    <td>[email protected]</td>
                    <td>Female</td>
                </tr>
                <tr>
                    <td>21</td>
                    <td>Letitia</td>
                    <td>[email protected]</td>
                    <td>Female</td>
                </tr>
            </tbody>
            <tfoot>
                <tr>
                    <th>Id</th>
                    <th>Username</th>
                    <th>Email</th>
                    <th>Gender</th>
                </tr>
            </tfoot>
        </table>

    </div>

    <script src="proxy.php?url=https://code.jquery.com/jquery-3.5.1.js"></script>
    <script src="proxy.php?url=https://cdn.datatables.net/1.13.1/js/jquery.dataTables.min.js"></script>

    <script>
        $(document).ready(function () {
            $('#userTable').DataTable({
                initComplete: function () {
                    this.api().columns().every(function (ind) {
                        var column = this;
                        if(ind != 0) {
                            var select = $('<select class="form-control custom-cls"><option value="">All</option></select>').appendTo($(column.footer()).empty()).on('change', function () {
                                var val = $.fn.dataTable.util.escapeRegex($(this).val());
                                column.search(val ? '^' + val + '$' : '', true, false).draw();
                            });

                            column.data().unique().sort().each(function (d, j) {
                                select.append('<option value="' + d + '">' + d + '</option>');
                            });
                        }
                    });
                },
            });
        });
    </script>
</body>

</html>The post How to Add Custom Dropdown in DataTable appeared first on Devnote.
]]>The post How To Create a Simple Animation Movie Using HTML appeared first on Devnote.
]]>Also read: Top 10 HTML Awesome tags
How To Create a Simple Animation Movie Using HTML
Also read: Animated Indian flag using CSS
Now, Open the notepad++ and write the below code:
<!DOCTYPE html>
<html>
<head>
<meta charset='utf-8'>
<meta http-equiv='X-UA-Compatible' content='IE=edge'>
<title>How To Create a Simple Animation Movie Using HTML</title>
<meta name='viewport' content='width=device-width, initial-scale=1'>
<style>
body {
background: url('forest-bg.jpg');
background-repeat: no-repeat;
background-size: 100% 100%;
background-attachment: fixed;
}
.lion {
width: 18%;
}
.deer {
width: 14%;
}
marquee {
margin-top: 27%;
}
</style>
</head>
<body>
<marquee behavior="scroll" direction="right">
<img src="proxy.php?url=lion.gif" alt="Lion Gif" class="lion">
<img src="proxy.php?url=deer.gif" alt="Deer Gif" class="deer">
</marquee>
</body>
</html>Also read: How to use HTML Marquee tag
Here, is the perfect speed for this Animation. what do you think about it?
<marquee direction="right" scrolldelay="400"> it is used to slow the delay.<marquee direction="right" scrollamount="40"> it is used for fast.
The post How To Create a Simple Animation Movie Using HTML appeared first on Devnote.
]]>