The post The Rise of ES2025: What’s New in JavaScript? appeared first on Devnote.
]]>The Rise of ES2025: What’s New in JavaScript?
- Simplifying Deep Property Access with Optional Chaining (?.) in JavaScript
- Nullish Coalescing Operator (??) in JavaScript
- BigInt: Handling Large Integers in JavaScript
- globalThis: A Universal Global Object in JavaScript
- String.prototype.matchAll(): Powerful Regex Matching in JavaScript
- Promise.allSettled(): Handling Multiple Promises in JavaScript
- String.prototype.at(): Indexing Made Easier in JavaScript
- Error.prototype.cause: Better Error Context in JavaScript
1. Simplifying Deep Property Access with Optional Chaining (?.) in JavaScript
The ?. operator short-circuits and returns undefined if the part of the object you’re trying to access doesn’t exist. This prevents runtime errors and keeps your code clean and concise. It can be used for:
Example: Practical Usage
const user = {
  name: "John Doe",
  profile: {
    contact: {
      email: "[email protected]",
    },
  },
};

// Accessing email safely using optional chaining
console.log(user?.profile?.contact?.email); // Output: "[email protected]"

// Attempting to access a missing property
console.log(user?.profile?.contact?.phone); // Output: undefined

// Providing a fallback value using the nullish coalescing operator
console.log(user?.profile?.contact?.phone ?? "Phone number not available");
// Output: "Phone number not available"
2. Nullish Coalescing Operator (??) in JavaScript
The nullish coalescing operator (??), introduced in ECMAScript 2020, provides a default value when the first operand is null or undefined. Unlike the logical OR (||) operator, it doesn’t treat falsy values like 0, false, or “” as nullish, making it ideal for handling truly “missing” values.
Example: Practical Usage
const userInput = null;
const defaultValue = "Default Text";

const result = userInput ?? defaultValue;
console.log(result); // Output: "Default Text"

const validInput = "";
console.log(validInput ?? defaultValue); // Output: ""
In this example:
- null and undefined trigger the fallback value (defaultValue).
- Falsy values like “” or 0 don’t trigger the fallback, maintaining their intended meaning.
3. BigInt: Handling Large Integers in JavaScript
Introduced in ES2020, BigInt is a numeric primitive that enables JavaScript to represent and manipulate integers beyond the Number type’s safe limit (2^53 – 1). With BigInt, you can perform precise calculations on extremely large numbers without losing accuracy.
Example: Practical Usage
// Creating BigInt values
const largeNumber = 9007199254740991n; // Adding 'n' makes it a BigInt
const anotherLargeNumber = BigInt("123456789012345678901234567890");

// Performing operations
console.log(largeNumber + 1n); // Output: 9007199254740992n
console.log(anotherLargeNumber * 2n); // Output: 246913578024691357802469135780n

// Mixing BigInt with Number throws an error
// console.log(largeNumber + 1); // TypeError: Cannot mix BigInt and Number
In this example:
- Use the suffix n or BigInt() to create BigInt values.
- BigInt is not directly interchangeable with Number; explicit conversion is required.
4. globalThis: A Universal Global Object in JavaScript
Introduced in ES2020, globalThis is a standardized way to access the global object across all JavaScript environments, including browsers (window), Node.js (global), and Web Workers. It ensures consistent code without needing environment-specific checks.
Example: Practical Usage
// Accessing global properties
console.log(globalThis.setTimeout); // Works in all environments
console.log(globalThis.Math.PI);   // Output: 3.141592653589793

// Defining a global variable
globalThis.myGlobalValue = "Hello, world!";
console.log(globalThis.myGlobalValue); // Output: "Hello, world!"
5. String.prototype.matchAll(): Powerful Regex Matching in JavaScript
Introduced in ES2020, the matchAll() method returns an iterator containing all matches of a regular expression in a string, including capturing groups. Unlike match(), it allows iteration over matches and supports detailed data extraction for complex patterns.
Example: Practical Usage
const text = "Order ID: 123, Order ID: 456, Order ID: 789";
const regex = /Order ID: (\d+)/g;

const matches = text.matchAll(regex);

for (const match of matches) {
  console.log(`Found: ${match[0]}, ID: ${match[1]}`);
}
// Output:
// Found: Order ID: 123, ID: 123
// Found: Order ID: 456, ID: 456
// Found: Order ID: 789, ID: 789
In this example:
- matchAll() returns an iterator, not an array so that you can loop over matches with for…of.
- It’s particularly useful for accessing capturing groups in regex patterns.
6. Promise.allSettled(): Handling Multiple Promises in JavaScript
Introduced in ES2020, Promise.allSettled() returns a promise that resolves after all promises in an array have settled (either resolved or rejected). It provides detailed results for each promise, making it ideal for scenarios where you need the outcome of all promises, regardless of their success or failure.
Example: Practical Usage
const promises = [
  Promise.resolve("Success 1"),
  Promise.reject("Error 1"),
  Promise.resolve("Success 2"),
];

Promise.allSettled(promises).then((results) => {
  results.forEach((result, index) => {
    if (result.status === "fulfilled") {
      console.log(`Promise ${index + 1} resolved with:`, result.value);
    } else {
      console.log(`Promise ${index + 1} rejected with:`, result.reason);
    }
  });
});

// Output:
// Promise 1 resolved with: Success 1
// Promise 2 rejected with: Error 1
// Promise 3 resolved with: Success 2
In this example:
- Unlike Promise.all(), it doesn’t fail fast on rejections.
- Ensures you get the status and result of every promise, making it useful for error-tolerant workflows.
7. String.prototype.at(): Indexing Made Easier in JavaScript
Introduced in ES2022, the at() method allows you to retrieve the character at a specific index in a string. It supports negative indices, making it convenient to access characters from the end without calculating the length.
Example: Practical Usage
const str = "JavaScript";

// Access characters using positive indices
console.log(str.at(0));  // Output: "J"

// Access characters using negative indices
console.log(str.at(-1)); // Output: "t"
console.log(str.at(-3)); // Output: "i"

// Handling out-of-range indices
console.log(str.at(20)); // Output: undefined
console.log(str.at(-20)); // Output: undefined
In this example:
- Simplifies working with strings, especially when accessing characters from the end.
- Provides a modern, readable alternative to charAt() and manual length calculations.
8. Error.prototype.cause: Better Error Context in JavaScript
Introduced in ES2022, the cause property on Error objects allows you to specify the underlying cause of an error, making it easier to trace and understand complex error chains.
Example: Practical Usage
try {
  const causeError = new Error("Database connection failed");
  const mainError = new Error("Unable to fetch data");
  mainError.cause = causeError;
  throw mainError;
} catch (err) {
  console.log(err.message); // Output: "Unable to fetch data"
  console.log(err.cause.message); // Output: "Database connection failed"
}
In this example:
- Provides more informative error handling by linking errors to their causes.
- Helps with debugging by maintaining a clear context of the error chain.
The post The Rise of ES2025: What’s New in JavaScript? appeared first on Devnote.
]]>The post Mastering JavaScript Array Methods: A Comprehensive Guide to Boost Your Coding Efficiency appeared first on Devnote.
]]>In this tutorial, I will give you Mastering JavaScript Array Methods: A Comprehensive Guide to Boost Your Coding Efficiency. Explore the power of JavaScript array methods with this in-depth guide. Learn to wield map, filter, reduce, and more, unlocking efficiency and elegance in your coding journey.
JavaScript Array Methods
1. push()
The push() function adds one or more elements to the end of an array and returns the new length of the array.
const numbers = [1, 2, 3];
numbers.push(4, 5);
console.log(numbers);

// [1, 2, 3, 4, 5]
2. pop()
The pop() Removes the last elements from the array and returns that element.
const numbers = [1, 2, 3, 4, 5];
const last_number = numbers.pop();
console.log(last_number);

// 5
3. shift()
The shift() removes the first element from an array and returns that element.
const numbers = [1, 2, 3, 4, 5];
const first_number = numbers.shift();
console.log(first_number);
// 1
4. unshift()
The unshift() Adds one or more elements to the beginning of an array and returns the new length of the array.
const numbers = [1, 2, 3, 4, 5];
numbers.unshift(0, -1);
console.log(numbers);

// [0, -1, 1, 2, 3, 4, 5]
5. find()
The find() returns the value of the first element in the array that satisfies the provided testing function. Otherwise, undefined is returned.
const numbers = [1, 2, 3, 4, 5];
const found_number = numbers.find((num) => num > 3);
console.log(found_number);
// 4
6. some()
The some() is tests whether at least one element in the array passes the test implemented by the provided function. it returns true if any element passes the test, Otherwise, it returns false.
const numbers = [1, 2, 3, 4, 5];
const has_event_number = numbers.some((num) => num % 2 == 0);
console.log(has_event_number);

// true
7. every()
the every() tests whether all elements in the array pass the test implemented by the provided function. it returns true if any element passes the test, Otherwise, it returns false.
const numbers = [1, 2, 3, 4, 5];
const all_event_number = numbers.some((num) => num % 2 == 0);
console.log(all_event_number);

// false
8. sort()
the sort sorts the elements of an array in place and returns the sorted array. the default sort order is built upon converting the elements into strings, and then comparing their sequences of UTF-16 code unit values.
const cars = ['swift', 'baleno', 'BMW', 'Audi'];
cars.sort();
console.log(cars);

// ['Audi', 'baleno', 'BMW', 'swift']

const numbers = [200, 45, 100, 6, 8];
numbers.sort((a, b) => a - b);
console.log(numbers);

//  [6, 8, 45, 100, 200]
9. includes()
The includes () determines whether an array includes a certain element, returning true or false as appropriate.
const numbers = [1, 2, 3, 4, 5];
const includes_there = numbers.includes(3);
console.log(includes_there);

// true
10. slice()
the slice() returns a shallow copy of a portion of an array into a new array object selected from start to end (end not included). the original array will not be modified.
const numbers = [1, 2, 3, 4, 5];
const slice_number = numbers.slice(0, 2);
console.log(slice_number);

// [1, 2]
11. map()
the map() creates a new array with the results of calling a provided function on every element in the calling array.
const numbers = [1, 2, 3, 4, 5];
const doubled_number = numbers.map((num) => num * 2);
console.log(doubled_number);

// [2, 4, 6, 8, 10]
12. filter()
the filter() creates a new array with all elements that pass the test implemented by the provided function.
const numbers = [1, 2, 3, 4, 5, 6];
const even_number = numbers.filter((num) => num % 2 == 0);
console.log(even_number);

// [2, 4, 6]
13. reduce()
The reduce() executes a reducer function on each element of the array, resulting in a single output value.
const numbers = [1, 2, 3, 4, 5];
const sum = numbers.reduce((total, num) => total + num, 0);
console.log(sum);

// 15
14. forEach()
the forEach() executes a provided function once for each array element.
const numbers = [1, 2, 3, 4, 5];
numbers.forEach((num) =>
    console.log(num * 2)
);

// 2, 4, 6, 8, 10
15. indexOf()
the indexOf() returns the first index at which a given element can be found in the array, or -1 if it is not present.
const cars = ['swift', 'baleno', 'BMW', 'Audi'];
const bmw_index = cars.indexOf('baleno');
console.log(bmw_index);

//1
16. lastIndexOf()
the lastIndexOf() returns the last index at which a given element can be found in the array, or -1 if it is not present.
const cars = ['swift', 'baleno', 'BMW', 'Audi'];
const bmw_index = cars.lastIndexOf('Audi');
console.log(bmw_index);

//3
17. reverse()
the reverse() reverses the order of the elements of an array in place. The first element becomes the last, and the last element becomes the first.
const numbers = [1, 2, 3, 4, 5];
numbers.reverse();
console.log(numbers);

//[5, 4, 3, 2, 1]
18. concat()
the concat() Returns a new array that includes elements from the original array and additional elements.
const numbers = [1, 2, 3];
const more_numbers = [4, 5];
const all_number = numbers.concat(more_numbers);
console.log(all_number);

//[1, 2, 3, 4, 5]
19. join()
the join() joins all elements of an array into a string. the elements are separated by a specified separator string.
const cars = ['swift', 'baleno', 'BMW', 'Audi'];
const join_car = cars.join(" - ");
console.log(all_number);

//'swift - baleno - BMW - Audi'
20. toString()
the toString() returns a string representing the specified number or array and its elements.
const numbers = [1, 2, 3, 4, 5];
const num_string = numbers.toString();
console.log(num_string);

// '1, 2, 3, 4, 5'
The post Mastering JavaScript Array Methods: A Comprehensive Guide to Boost Your Coding Efficiency appeared first on Devnote.
]]>The post How to Create a Cookie Consent Popup in JavaScript appeared first on Devnote.
]]>We will build this popup from scratch without any external libraries. When a user clicks the accept button, their choice will be saved in the browser using cookies or local storage. This prevents the popup from showing every time the page reloads. By the end of this guide, you will understand how to design the popup interface, handle user actions with JavaScript, and provide a smooth user experience on your website.
Also read: How to add GDPR Cookie Consent in Laravel
When users come to your website, they will get a cookie consent popup and accept the cookies policy. Cookie Consent is what users must know about the cookie privacy & policy of your website.
Create a Cookie Consent Popup in JavaScript
<!DOCTYPE html>

<html>

<head>

    <meta charset='utf-8'>

    <meta http-equiv='X-UA-Compatible' content='IE=edge'>

    <title>How to Create a Cookie Consent Popup in JavaScript</title>

    <meta name='viewport' content='width=device-width, initial-scale=1'>

    <style>

        #cookieConcentPopup {

            background: white;

            width: 25%;

            position: fixed;

            left: 10px;

            bottom: 20px;

            box-shadow: 0px 0px 15px #cccccc;

            padding: 10px;

            border-radius: 10px;

        }


        #cookieConcentPopup h3 {

            margin: 0;

        }


        #cookieConcentPopup p {

            text-align: left;

            font-size: 17px;

            color: #4e4e4e;

        }


        #cookieConcentPopup button {

            width: 100%;

            border: 1px solid #097fb7;

            background: #097fb7;

            padding: 5px;

            border-radius: 8px;

            color: white;

        }


        #acceptCookieConcent {

            cursor: pointer;

        }

    </style>

</head>

<body>

    <div id="cookieConcentPopup">

        <h3>Cookie Consent</h3>

        <p>Lorem ipsum dolor sit amet consectetur adipisicing elit. Velit ducimus, doloremque eligendi animi minus reiciendis perferendis exercitationem soluta ut dolorum nemo corrupti, praesentium asperiores cumque qui earum. Voluptas, ipsam sint? <a href="proxy.php?url=#">Cookie Policy & Privacy</a></p>

        <button id="acceptCookieConcent">Accept</button>

    </div>


    <script type="text/javascript">


        var c_name= "Devnote";

        var c_value="Devnote Tutorials";

        var c_expire_days= 15;


        let acceptCookieConcent = document.getElementById("acceptCookieConcent");

        acceptCookieConcent.onclick= function() {

            createCookie(c_name, c_value, c_expire_days);

        }


        // function to set cookie in web browser

        let createCookie= function(c_name, c_value, c_expire_days) {


            let todayDate = new Date();

            todayDate.setTime(todayDate.getTime() +

            (c_expire_days*24*60*60*1000));

            let expires = "expires=" + todayDate.toGMTString();

            document.cookie = c_name + "=" + c_value + ";" + expires + ";path=/";


            if(document.cookie) {

                document.getElementById("cookieConcentPopup").style.display = "none";

            } else {

                alert("Unable to set cookie. Please check your cookies setting");

            }

        }


        // get cookie from the web browser

        let getCookie= function(c_name) {

            let name = c_name + "=";

            let decodedCookie = decodeURIComponent(document.cookie);

            let ca = decodedCookie.split(';');

            for(let i = 0; i < ca.length; i++) {

                let c = ca[i];

                while (c.charAt(0) == ' ') {

                    c = c.substring(1);

                }

                if (c.indexOf(name) == 0) {

                    return c.substring(name.length, c.length);

                }

            }

            return "";

        }


        // check cookie is set or not

        let checkCookie= function() {

            let check=getCookie(c_name);

            if(check=="") {

                document.getElementById("cookieConcentPopup").style.display = "block";

            } else {

                document.getElementById("cookieConcentPopup").style.display = "none";

            }

        }

        checkCookie();

    </script>

</body>

</html>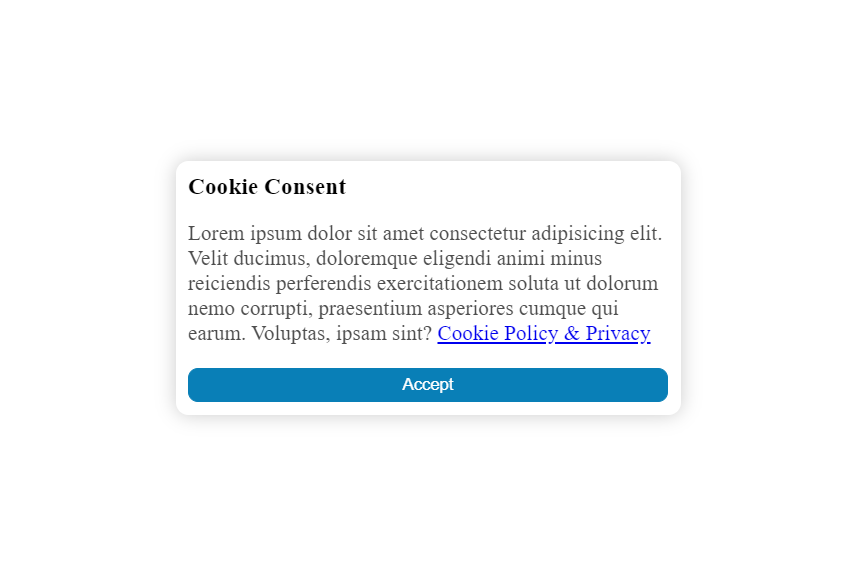
The post How to Create a Cookie Consent Popup in JavaScript appeared first on Devnote.
]]>The post Top 7 Javascript Console Methods appeared first on Devnote.
]]>Table of concept
Top 7 Javascript Console Methods
1. Log
Outputs a message to the console.
Example:
console.log("Top 7 Javascript Console Methods");Output:
Top 7 Javascript Console Methods2. Error
Outputs an error message to the console.
Example:
console.error("This is a error message");Output:

3. Warn
Outputs a warning message to the console.
Example:
console.warn("This is a warning message");Output:

4. Assert
Writes an error message to the console if an assertion is false.
Example:
console.assert(2 + 3 == 6, "Expression return false");Output:

5. Table
Displays tabular data as a table.
Example:
console.table(["PHP", "Laravel", "WordPress"]);Output:

6. Count
Logs the number of times that is particular call to count[] has been called.
Example:
for(let i = 1; i<=5; i++) {
    console.count()
}
Output:

7. Clear
Clear the console.
Example:
console.clear();Output:

The post Top 7 Javascript Console Methods appeared first on Devnote.
]]>The post Magic Navigation Menu using HTML CSS and Javascript appeared first on Devnote.
]]>Magic Navigation Menu using HTML CSS and Javascript
index.html
<!DOCTYPE html>
<html lang="en">

<head>
    <meta charset="UTF-8">
    <meta http-equiv="X-UA-Compatible" content="IE=edge">
    <meta name="viewport" content="width=device-width, initial-scale=1.0">
    <title>Magic Navigation Menu using HTML CSS and Javascript</title>
    <link rel="stylesheet" href="proxy.php?url=styles.css">
    <link rel="stylesheet" href="proxy.php?url=https://cdnjs.cloudflare.com/ajax/libs/font-awesome/4.7.0/css/font-awesome.min.css">
</head>

<body>
    <div class="navigation">
        <ul>
            <li class="list active">
                <a href="proxy.php?url=#">
                    <span class="icon">
                        <i class="fa fa-home"></i>
                    </span>
                    <span class="text">Home</span>
                    <span class="circle"></span>
                </a>
            </li>
            <li class="list">
                <a href="proxy.php?url=#">
                    <span class="icon">
                        <i class="fa fa-user-o"></i>
                    </span>
                    <span class="text">Contact</span>
                    <span class="circle"></span>
                </a>
            </li>
            <li class="list">
                <a href="proxy.php?url=#">
                    <span class="icon">
                        <i class="fa fa-comment-o"></i>
                    </span>
                    <span class="text">Chat</span>
                    <span class="circle"></span>
                </a>
            </li>
            <li class="list">
                <a href="proxy.php?url=#">
                    <span class="icon">
                        <i class="fa fa-camera"></i>
                    </span>
                    <span class="text">Gallery</span>
                    <span class="circle"></span>
                </a>
            </li>
            <li class="list">
                <a href="proxy.php?url=#">
                    <span class="icon">
                        <i class="fa fa-cog"></i>
                    </span>
                    <span class="text">Customize</span>
                    <span class="circle"></span>
                </a>
            </li>
            <div class="selected"></div>
        </ul>
    </div>

    <script src="proxy.php?url=scripts.js"></script>
</body>

</html>
styles.css
@import url('https://fonts.googleapis.com/css2?family=Roboto:ital,wght@0,100;0,300;0,400;0,500;0,900;1,700&display=swap');
* {
    margin: 0;
    padding: 0;
    box-sizing: border-box;
    font-family: 'Roboto', sans-serif;
}

body {
    display: flex;
    justify-content: center;
    align-items: center;
    min-height: 100vh;
    background: #06021b;
}

.navigation {
    position: relative;
    width: 440px;
    height: 70px;
    background: linear-gradient(45deg, #f9ce34, #ee2a7b, #6228d7);
    display: flex;
    justify-content: center;
    align-items: center;
    border-radius: 8px;
}

.navigation ul {
    display: flex;
    width: 350px;
}

.navigation ul li {
    position: relative;
    width: 70px;
    height: 70px;
    list-style: none;
    z-index: 1;
}

.navigation ul li a {
    position: relative;
    display: flex;
    justify-content: center;
    align-items: center;
    flex-direction: column;
    width: 100%;
    text-align: center;
}

.navigation ul li a .icon {
    position: relative;
    display: block;
    line-height: 75px;
    font-size: 24px;
    text-align: center;
    color: #fff;
    transition: 0.4s;
}

.navigation ul li.active a .icon {
    transform: translateY(-36px);
}

.navigation ul li a .text {
    position: absolute;
    color: #fff;
    font-size: 16px;
    opacity: 0;
    transform: translateY(20px);
    transition: 0.4s;
}

.navigation ul li.active a .text {
    opacity: 1;
    transform: translateY(10px);
}

.navigation ul li a .circle {
    position: absolute;
    display: block;
    width: 50px;
    height: 50px;
    background: transparent;
    border-radius: 50%;
    border: 1.8px solid #fff;
    transform: translateY(-37px) scale(0);
}

.navigation ul li.active a .circle {
    transition: 0.4s;
    transition-delay: 0.4s;
    transform: translateY(-37px) scale(1);
}

.selected {
    position: absolute;
    top: -50%;
    width: 70px;
    height: 70px;
    background: linear-gradient(45deg, #f9ce34, #ee2a7b, #6228d7);
    border: 6px solid #06021b;
    border-radius: 50%;
    display: flex;
    justify-content: center;
    align-items: center;
    transition: .5s;
}

.selected::before {
    content: '';
    position: absolute;
    top: 50%;
    left: -22px;
    width: 20px;
    height: 20px;
    background: transparent;
    border-top-right-radius: 20px;
    box-shadow: 1px -10px 0 #06021b;
}

.selected::after {
    content: '';
    position: absolute;
    top: 50%;
    right: -22px;
    width: 20px;
    height: 20px;
    background: transparent;
    border-top-left-radius: 20px;
    box-shadow: -1px -10px 0 #06021b;
}

.navigation ul li:nth-child(1).active~.selected {
    transform: translateX(calc(70px * 0));
}

.navigation ul li:nth-child(2).active~.selected {
    transform: translateX(calc(70px * 1));
}

.navigation ul li:nth-child(3).active~.selected {
    transform: translateX(calc(70px * 2));
}

.navigation ul li:nth-child(4).active~.selected {
    transform: translateX(calc(70px * 3));
}

.navigation ul li:nth-child(5).active~.selected {
    transform: translateX(calc(70px * 4));
}

.color-white {
    color: #FFF;
}
scripts.js
const listClass = document.querySelectorAll('.list');

function activeLink() {
    listClass.forEach((value) =>
    value.classList.remove('active'));
    this.classList.add('active');
}

listClass.forEach(
    (value) => value.addEventListener('click', activeLink)
);
Output:

The post Magic Navigation Menu using HTML CSS and Javascript appeared first on Devnote.
]]>The post Top 7 Javascript Animation Libraries appeared first on Devnote.
]]>Top 7 Javascript Animation Libraries
Table of concept
1. ANIME.JS
Anime.js library allows making animation with simple yet powerful API. It works with CSS properties, DOM Attributes, SVG, and Javascript Objects.

2. MO.JS
Mo.js is a JavaScript motion animation library. it has several amazing features and it is entirely customizable.

3. THREE.JS
Three.js is a powerful 3D animation library that makes it very easy to create 3D WebGL experiences on the web. It has a vast and extensive API with a lot of features.

4. SCROLLREVEAL.JS
ScrollReveal.js is a JavaScript library to animates elements as they scroll into view. it is a simple-to-use library and has a number of different animation effects.

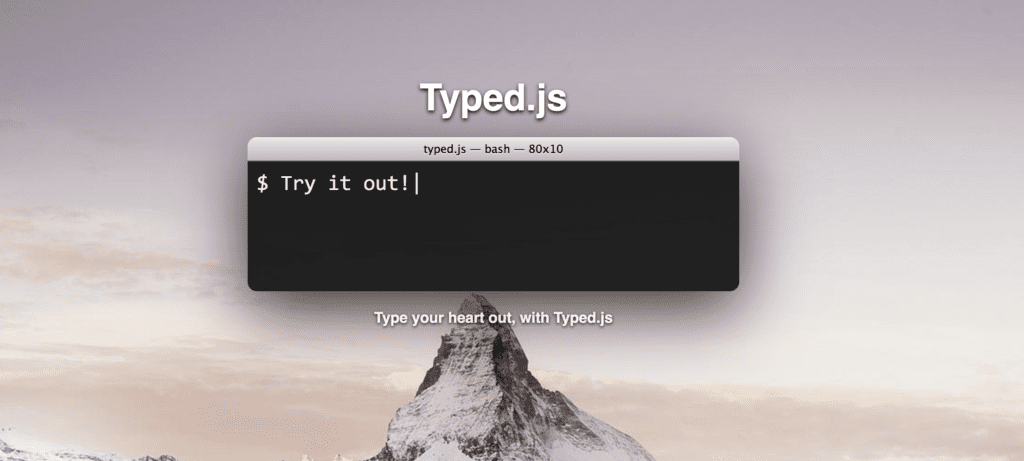
5. TYPED.JS
Typed.js is a library that types. enter in any string, and watch it type at the speed you’ve set, backspace what it’s typed, and create a new sentence for however many strings you’ve set.
6. PAPER.JS
Paper.js is an animation library that strictly focuses on animating vector graphics. Paper.js is useful for projects where users can provide custom inputs, drag objects, and rearrange them.

7. GSAP
Green Sock animation platform (GSAP) is the most powerful animation library with tons of features and has excellent support across all the major web browsers.

The post Top 7 Javascript Animation Libraries appeared first on Devnote.
]]>The post How to make a Calculator using HTML CSS JavaScript appeared first on Devnote.
]]>Make a Calculator using HTML CSS and JavaScript

index.html
<!DOCTYPE html>
<html lang="en">
<head>
    <meta charset="UTF-8" />
    <meta name="viewport" content="width=device-width, initial-scale=1.0" />
    <link rel="stylesheet" href="proxy.php?url=style.css" />
    <title>How to make a Calculator using HTML CSS JavaScript - Devnote.in</title>
</head>

<body>
    <div class="container">
        <div class="calculator">
            <input type="text" id="textinput" placeholder="0" />
            <div>
                <button class="button operators">AC</button>
                <button class="button operators">DEL</button>
                <button class="button operators">%</button>
                <button class="button operators">/</button>
            </div>
            <div>
                <button class="button">7</button>
                <button class="button">8</button>
                <button class="button">9</button>
                <button class="button operators">*</button>
            </div>
            <div>
                <button class="button">4</button>
                <button class="button">5</button>
                <button class="button">6</button>
                <button class="button operators">-</button>
            </div>
            <div>
                <button class="button">1</button>
                <button class="button">2</button>
                <button class="button">3</button>
                <button class="button operators">+</button>
            </div>

            <div>
                <button class="button">00</button>
                <button class="button">0</button>
                <button class="button">.</button>
                <button class="button equalBtn">=</button>
            </div>
        </div>
    </div>

    <script src="proxy.php?url=script.js"></script>
</body>
</html>
style.css
@import url('https://fonts.googleapis.com/css2?family=Roboto:ital,wght@0,100;0,300;0,400;0,500;1,700&display=swap');

*{
    margin: 0;
    padding: 0;
    box-sizing: border-box;
    font-family: 'Roboto', sans-serif;
}

body{
    width: 100%;
    height: 100vh;
    display: flex;
    justify-content: center;
    align-items: center;
    background: linear-gradient(45deg, #0a0a0a, #3a4452);
}

.calculator {
    border: 1px solid #717377;
    padding: 20px;
    border-radius: 16px;
    background: transparent;
    box-shadow: 0px 3px 15px rgba(113, 115, 119, 0.5);
}

#textinput {
    width: 320px;
    border: none;
    padding: 24px;
    margin: 10px;
    background: transparent;
    box-shadow: 0px 3px 15px rgbs(84, 84, 84, 0.1);
    font-size: 40px;
    text-align: right;
    cursor: pointer;
    color: #ffffff;
}

#textinput::placeholder{
    color: #ffffff;
}

button {
    border: none;
    width: 60px;
    height: 60px;
    margin: 10px;
    border-radius: 50%;
    background: transparent;
    color: #ffffff;
    font-size: 20px;
    box-shadow: -8px -8px 15px rgba(255, 255, 255, 0.1);
    cursor: pointer;
}

.equalBtn {
    background-color: #fa0000;
}

.operators {
    color: #00ff1d;
}
script.js
let input = document.getElementById('textinput');
let buttons = document.querySelectorAll('button');

let string = "";
let arr = Array.from(buttons);
arr.forEach(button => {
    button.addEventListener('click', (e) =>{
        if(e.target.innerHTML == '='){
            string = eval(string);
            input.value = string;
        }

        else if(e.target.innerHTML == 'AC'){
            string = "";
            input.value = string;
        }
        else if(e.target.innerHTML == 'DEL'){
            string = string.substring(0, string.length-1);
            input.value = string;
        }
        else{
            string += e.target.innerHTML;
            input.value = string;
        }
    })
})
The post How to make a Calculator using HTML CSS JavaScript appeared first on Devnote.
]]>The post How to Create a Draggable Card Slider Using HTML, CSS, and JavaScript appeared first on Devnote.
]]>In this tutorial, we will create a draggable card slider that works, we don’t use any external JavaScript libraries such as Owl Carousel or SwiperJs. Instead, we will create the slider from scratch using JavaScript, HTML, and CSS. A Draggable card slider, the user can slide cards by dragging using the left or right arrow. It also includes infinite scrolling and autoplay functionality.
Learn how to build a custom draggable card slider using pure HTML, CSS, and JavaScript. No external libraries required. We’ll create a smooth sliding interface that supports drag, infinite scrolling, and autoplay.
How to Create A Draggable Card Slider in HTML CSS & JavaScript
Example
index.html
<!DOCTYPE html>
<html lang="en">
<head>
    <meta charset="utf-8">
    <title>How to Create A Draggable Card Slider in HTML CSS & JavaScript</title>
    <meta name="viewport" content="width=device-width, initial-scale=1.0">
    <link rel="stylesheet" href="proxy.php?url=https://cdnjs.cloudflare.com/ajax/libs/font-awesome/5.14.0/css/all.min.css">
    <link rel="stylesheet" href="proxy.php?url=styles.css">
    <script src="proxy.php?url=scripts.js" defer></script>
</head>

<body>
    <div class="main-wrapper">
        <h1 class="text-center">How to Create A Draggable Card Slider in HTML CSS & JavaScript</h1>
        <i id="left" class="fa fa-solid fa-angle-left"></i>
        <ul class="carousel">
            <li class="card">
                <div class="img"><img src="proxy.php?url=images/john-india.jpg" alt="img" draggable="false"></div>
                <h2>John India</h2>
                <span>Sales Manager</span>
            </li>
            <li class="card">
                <div class="img"><img src="proxy.php?url=images/mike-us.jpg" alt="img" draggable="false"></div>
                <h2>Mike US</h2>
                <span>Web Developer</span>
            </li>
            <li class="card">
                <div class="img"><img src="proxy.php?url=images/lary-us.jpg" alt="img" draggable="false"></div>
                <h2>Lary US</h2>
                <span>Online Teacher</span>
            </li>
            <li class="card">
                <div class="img"><img src="proxy.php?url=images/james-canada.jpg" alt="img" draggable="false"></div>
                <h2>James Canada</h2>
                <span>Freelancer</span>
            </li>
            <li class="card">
                <div class="img"><img src="proxy.php?url=images/kishan-india.jpg" alt="img" draggable="false"></div>
                <h2>Kishan India</h2>
                <span>Bank Manager</span>
            </li>
            <li class="card">
                <div class="img"><img src="proxy.php?url=images/lomas-india.jpg" alt="img" draggable="false"></div>
                <h2>Lomas India</h2>
                <span>App Designer</span>
            </li>
        </ul>
        <i id="right" class="fa fa-solid fa-angle-right"></i>
    </div>
</body>

</html>
styles.css
@import url('https://fonts.googleapis.com/css2?family=Roboto:wght@100;300;400;500;700;900&display=swap');
* {
    margin: 0;
    padding: 0;
    box-sizing: border-box;
    font-family: 'Roboto', sans-serif;
}

body {
    display: flex;
    padding: 0 35px;
    align-items: center;
    justify-content: center;
    min-height: 100vh;
}

.text-center {
    text-align: center;
}

.main-wrapper {
    max-width: 1100px;
    width: 100%;
    position: relative;
}

.main-wrapper i {
    top: 50%;
    height: 50px;
    width: 50px;
    cursor: pointer;
    font-size: 1.25rem;
    position: absolute;
    text-align: center;
    line-height: 50px;
    border-radius: 50%;
    box-shadow: 0 3px 6px rgba(0, 0, 0, 0.23);
    transform: translateY(-50%);
    transition: transform 0.1s linear;
}

.main-wrapper i:active {
    transform: translateY(-50%) scale(0.85);
}

.main-wrapper i:first-child {
    left: -22px;
}

.main-wrapper i:last-child {
    right: -22px;
}

.main-wrapper .carousel {
    display: grid;
    grid-auto-flow: column;
    grid-auto-columns: calc((100% / 3) - 12px);
    overflow-x: auto;
    scroll-snap-type: x mandatory;
    gap: 16px;
    border-radius: 8px;
    scroll-behavior: smooth;
    scrollbar-width: none;
}

.carousel::-webkit-scrollbar {
    display: none;
}

.carousel.no-transition {
    scroll-behavior: auto;
}

.carousel.dragging {
    scroll-snap-type: none;
    scroll-behavior: auto;
}

.carousel.dragging .card {
    cursor: grab;
    user-select: none;
}

.carousel :where(.card, .img) {
    display: flex;
    justify-content: center;
    align-items: center;
}

.carousel .card {
    scroll-snap-align: start;
    height: 342px;
    list-style: none;
    background: #fff;
    cursor: pointer;
    padding-bottom: 15px;
    flex-direction: column;
    border-radius: 8px;
}

.carousel .card .img {
    background: #8B53FF;
    height: 148px;
    width: 148px;
    border-radius: 50%;
}

.card .img img {
    width: 140px;
    height: 140px;
    border-radius: 50%;
    object-fit: cover;
    border: 4px solid #fff;
}

.carousel .card h2 {
    font-weight: 500;
    font-size: 1.56rem;
    margin: 30px 0 5px;
}

.carousel .card span {
    color: #6A6D78;
    font-size: 1.31rem;
}

@media screen and (max-width: 900px) {
    .main-wrapper .carousel {
        grid-auto-columns: calc((100% / 2) - 9px);
    }
}

@media screen and (max-width: 600px) {
    .main-wrapper .carousel {
        grid-auto-columns: 100%;
    }
}
scripts.js
const wrapper = document.querySelector(".main-wrapper");
const carousel = document.querySelector(".carousel");
const firstCardWidth = carousel.querySelector(".card").offsetWidth;
const arrowBtns = document.querySelectorAll(".main-wrapper i");
const carouselChildrens = [...carousel.children];

let isDragging = false,
isAutoPlay = true,
startX, startScrollLeft, timeoutId;

let cardPerView = Math.round(carousel.offsetWidth / firstCardWidth);

carouselChildrens.slice(-cardPerView).reverse().forEach(card => {
    carousel.insertAdjacentHTML("afterbegin", card.outerHTML);
});


carouselChildrens.slice(0, cardPerView).forEach(card => {
    carousel.insertAdjacentHTML("beforeend", card.outerHTML);
});

carousel.classList.add("no-transition");
carousel.scrollLeft = carousel.offsetWidth;
carousel.classList.remove("no-transition");
arrowBtns.forEach(btn => {
    btn.addEventListener("click", () => {
        carousel.scrollLeft += btn.id == "left" ? -firstCardWidth : firstCardWidth;
    });
});

const dragStart = (e) => {
    isDragging = true;
    carousel.classList.add("dragging");
    startX = e.pageX;
    startScrollLeft = carousel.scrollLeft;
}

const dragging = (e) => {
    if (!isDragging) return;
    carousel.scrollLeft = startScrollLeft - (e.pageX - startX);
}

const dragStop = () => {
    isDragging = false;
    carousel.classList.remove("dragging");
}

const infiniteScroll = () => {
    if (carousel.scrollLeft === 0) {
        carousel.classList.add("no-transition");
        carousel.scrollLeft = carousel.scrollWidth - (2 *
            carousel.offsetWidth);
        carousel.classList.remove("no-transition");
    }

    else if (Math.ceil(carousel.scrollLeft) === carousel.scrollWidth -
        carousel.offsetWidth) {
        carousel.classList.add("no-transition");
        carousel.scrollLeft = carousel.offsetWidth;
        carousel.classList.remove("no-transition");
    }

    clearTimeout(timeoutId);
    if (!wrapper.matches(":hover")) autoPlay();
}

const autoPlay = () => {
    if (window.innerWidth < 800 || !isAutoPlay) return;
    timeoutId = setTimeout(() => carousel.scrollLeft += firstCardWidth,
        2500);
}

autoPlay();
carousel.addEventListener("mousedown", dragStart);
carousel.addEventListener("mousemove", dragging);
document.addEventListener("mouseup", dragStop);
carousel.addEventListener("scroll", infiniteScroll);
wrapper.addEventListener("mouseenter", () => clearTimeout(timeoutId));
wrapper.addEventListener("mouseleave", autoPlay);
Download
The post How to Create a Draggable Card Slider Using HTML, CSS, and JavaScript appeared first on Devnote.
]]>The post How to create Analog Clock in HTML CSS & JavaScript appeared first on Devnote.
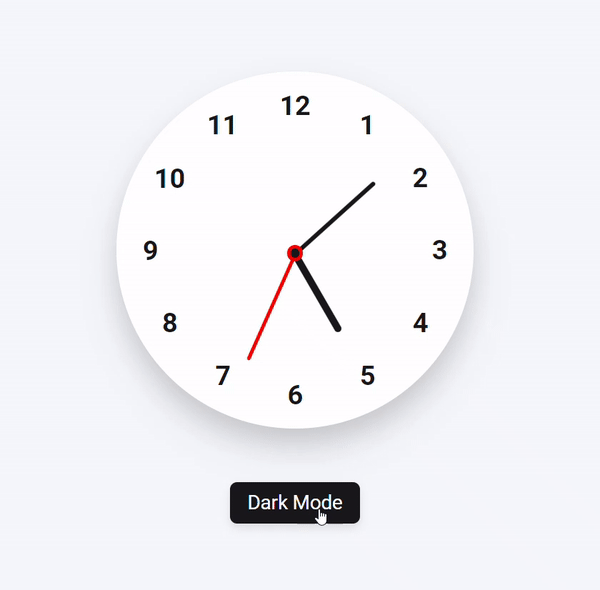
]]>How to create Analog Clock in HTML CSS & JavaScript
Example
<!DOCTYPE html>
<html lang="en">
<head>
    <meta charset="UTF-8" />
    <meta http-equiv="X-UA-Compatible" content="IE=edge" />
    <meta name="viewport" content="width=device-width, initial-scale=1.0" />
    <title>How to create Analog Clock in HTML CSS & JavaScript</title>
    <style>
        @import url('https://fonts.googleapis.com/css2?family=Montserrat&family=Roboto:wght@100;300;400;500;700;900&display=swap');
        * {
            margin: 0;
            padding: 0;
            box-sizing: border-box;
            font-family: 'Montserrat', sans-serif;
            font-family: 'Roboto', sans-serif;
        }

        :root {
            --primary-color: #f6f7fb;
            --white-color: #fff;
            --black-color: #18191a;
            --red-color: #ff1900;
        }

        body {
            display: flex;
            min-height: 100vh;
            align-items: center;
            justify-content: center;
            background: var(--primary-color);
        }

        body.dark {
            --primary-color: #242526;
            --white-color: #18191a;
            --black-color: #fff;
            --red-color: #ff1900;
        }

        .container {
            display: flex;
            flex-direction: column;
            align-items: center;
            gap: 60px;
        }

        .container .clocks {
            display: flex;
            height: 400px;
            width: 400px;
            border-radius: 50%;
            align-items: center;
            justify-content: center;
            background: var(--white-color);
            box-shadow: 0 15px 25px rgba(0, 0, 0, 0.1), 0 25px 45px rgba(0, 0, 0,
                0.1);
            position: relative;
        }

        .clocks label {
            position: absolute;
            inset: 20px;
            text-align: center;
            transform: rotate(calc(var(--i) * (360deg / 12)));
        }

        .clocks label span {
            display: inline-block;
            font-size: 30px;
            font-weight: 600;
            color: var(--black-color);
            transform: rotate(calc(var(--i) * (-360deg / 12)));
        }

        .container .indicators {
            position: absolute;
            height: 10px;
            width: 10px;
            display: flex;
            justify-content: center;
        }

        .indicators::before {
            content: "";
            position: absolute;
            height: 100%;
            width: 100%;
            border-radius: 50%;
            z-index: 100;
            background: var(--black-color);
            border: 4px solid var(--red-color);
        }

        .indicators .hand {
            position: absolute;
            height: 130px;
            width: 4px;
            bottom: 0;
            border-radius: 25px;
            transform-origin: bottom;
            background: var(--red-color);
        }

        .hand.minutes {
            height: 120px;
            width: 5px;
            background: var(--black-color);
        }

        .hand.hours {
            height: 100px;
            width: 8px;
            background: var(--black-color);
        }

        .switch-mode {
            padding: 10px 20px;
            border-radius: 8px;
            font-size: 22px;
            font-weight: 400;
            display: inline-block;
            color: var(--white-color);
            background: var(--black-color);
            box-shadow: 0 5px 10px rgba(0, 0, 0, 0.1);
            cursor: pointer;
        }
    </style>
</head>

<body>
    <div class="container">
        <div class="clocks">
            <label style="--i: 1"><span>1</span></label>
            <label style="--i: 2"><span>2</span></label>
            <label style="--i: 3"><span>3</span></label>
            <label style="--i: 4"><span>4</span></label>
            <label style="--i: 5"><span>5</span></label>
            <label style="--i: 6"><span>6</span></label>
            <label style="--i: 7"><span>7</span></label>
            <label style="--i: 8"><span>8</span></label>
            <label style="--i: 9"><span>9</span></label>
            <label style="--i: 10"><span>10</span></label>
            <label style="--i: 11"><span>11</span></label>
            <label style="--i: 12"><span>12</span></label>
            <div class="indicators">
                <span class="hand hours"></span>
                <span class="hand minutes"></span>
                <span class="hand seconds"></span>
            </div>
        </div>
        <div class="switch-mode">Dark Mode</div>
    </div>
    <script>
        const body = document.querySelector("body"),
            hours = document.querySelector(".hours"),
            minutes = document.querySelector(".minutes"),
            seconds = document.querySelector(".seconds"),
            modeSwitch = document.querySelector(".switch-mode");
        if (localStorage.getItem("mode") === "Dark Mode") {
            body.classList.add("dark");
            modeSwitch.textContent = "Light Mode";
        }

        modeSwitch.addEventListener("click", () => {
            body.classList.toggle("dark");
            const isDarkMode = body.classList.contains("dark");
            modeSwitch.textContent = isDarkMode ? "Light Mode" : "Dark Mode";
            localStorage.setItem("mode", isDarkMode ? "Dark Mode" : "Light Mode");
        });
        const everySecondTimeUpdate = () => {
            let date = new Date(),
                secDeg = (date.getSeconds() / 60) * 360,
                minDeg = (date.getMinutes() / 60) * 360,
                hrDeg = (date.getHours() / 12) * 360;

            seconds.style.transform = `rotate(${secDeg}deg)`;
            minutes.style.transform = `rotate(${minDeg}deg)`;
            hours.style.transform = `rotate(${hrDeg}deg)`;
        };

        setInterval(everySecondTimeUpdate, 1000);
        everySecondTimeUpdate();
    </script>
</body>

</html>
Output
Download
The post How to create Analog Clock in HTML CSS & JavaScript appeared first on Devnote.
]]>The post How to create a dynamic year in dropdown using javascript appeared first on Devnote.
]]>First, we use the window.onload event handler and the dropdown list i.e. HTML SELECT element will be referenced and using a For Loop, and get one by one Year values will be appended to the DropDownList.
How to a create dynamic year in dropdown using javascript
Example
<!DOCTYPE html>
<html>
<head>
    <meta charset='utf-8'>
    <meta http-equiv='X-UA-Compatible' content='IE=edge'>
    <title>How to a create dynamic year in dropdown using javascript</title>
    <meta name='viewport' content='width=device-width, initial-scale=1'>
</head>
<body style="text-align: center;">
    <h1>How to a create dynamic year in dropdown using javascript</h1>
    <select id="years"></select>

    <script type="text/javascript">
        window.onload = function () {
            //The DropDownList.
            var years = document.getElementById("years");

            //Get the Current Year.
            var currentYear = (new Date()).getFullYear();

            //Loop and add the Year to DropDownList.
            for (var i = 1970; i <= currentYear; i++) {
                var option = document.createElement("OPTION");
                option.innerHTML = i;
                option.value = i;
                years.appendChild(option);
            }
        };
    </script>
</body>
</html>
Output

Download
The post How to create a dynamic year in dropdown using javascript appeared first on Devnote.
]]>