Inspiration
The inspiration of developing the solution came from things that I experienced in my day to day life post-pandemic. The outbreak of COVID has changed the ways how we live our day to day life. People are hesitant to be in crowded places like they did pre-pandemic, and we are living by following the new norm. Going with our life by the new norm can be challenging some times, and that's where technology can play a major role to eliminate at least some of these challenges.
As most of the countries are now in the phase of eliminating the lockdown restrictions, to prevent citizens from getting exposed to virus, governments of most of the countries has put forward numerous guidelines to be followed. One of them is restriction of the number of people who can be present in a store at once. (restriction on occupancy in indoor places)

On top of the customer occupancy restrictions, governments have directed the shop owners to keep a record of the visitors to help the health authority know who might have been potentially exposed to the corona virus. Usually the shop provisions a dedicated employee just for writing the visitor's name, address and time of visit which is a tedious task.

QwithMax was developed to address these issues by helping the users stay in the queue virtually and safely from wherever they want and to help shops keep track of the visitors by automating the tedious task.

The solution is built with scope even beyond the pandemic. The same solution can be used to make more out of the the waiting time in long queues, by being virtually in the queue using QwithMax.
Contents (How the document is structured)
1) List of technologies used
2) Anypoint platform components used
3) Setup the application at your side / Source code repo
4) Implementation
4.1) High level design - explains the structure of the solution
4.2) Components configurations - explains the various mulesoft component configurations used in the project (Eg: Database, SQS, SMTP etc...)
4.3) Functionalities - explains the actual working of the code (Of every flow)
- 5) How to use - Demo of how to use the app using animated GIFs
1) List of Technologies used
- Mulesoft - Works as the brain of QwithMax
- React-Native -React Native is an open-source UI software framework created by Facebook, Inc. It is used to develop applications for Android, Android TV, iOS, macOS, tvOS, Web, Windows and UWP by enabling developers to use the React framework along with native platform capabilities.
- MySQL database from AWS RDS.
- Simple Queuing Service from AWS.
- Public third-party APIs
- Outlook - To achieve SMTP capability.
2) Anypoint platform components/connectors used
- RAML based request validation
- Anypoint API manager out of the box policies
- API-first approach, API-led connectivity
- HTTP Listener/Requester
- Database connector
- Amazon SQS connector
- Database connection pooling configuration
- Crypto Module - Java cryptography extension password based encryption
- Caching
- Object Store (Used for caching)
- SMTP connector
- Munit
Mulesoft is known for it's ability integrate systems seamlessly , but by leveraging mulesoft's ever expanding connectors and anypoint platform capabilities, QwithMax integrates/connects people, help them go with their day to day shopping activities in these challenging times.
3) Source Code Repo
- To use the application download Android application APK file and install on your device.
- QwithMax Experience API : https://github.com/ashlaycyriac/QwithMax-eapi
- QwithMax Process API : https://github.com/ashlaycyriac/QwithMax-papi
- React-Native android application code repo : https://github.com/ashlaycyriac/QwithMax
4) Implementation
4.1) High Level Design
The brain of the solution QwithMax is entirely built using mulesoft by following the API-first approach. The beauty of mulesoft is that all the backend systems that are being used in this project (SQS,SMTP, etc...) already has mule connectors readily available. Which helped me to focus on the actual use case rather than backend-system connectivity.
The process of queuing up in real world is the same logic adapted to implement FIFO messaging queues. And its not a surprise that in the heart of QwithMax, an AWS SQS FIFO queue is provisioned to mimic the real world queuing process. For every shops a separate FIFO queue is provisioned in amazon SQS and when a user wants to book a reservation in any shop, a message is published into the FIFO queue and when the shop is looking to accept the next user, it consumes the message from the FIFO queue.
Along with this three other tables named user, shop and activity are kept in the MYSQL database to persist user, shop and visitor information.

The users of QwtihMax interacts with the application using an android application which is build with react-native, a JavaScript library to build mobile applications.
The JavaScript code consumes the experience API endpoints which is enforced with policies as well as RAML based request validation. The experience API then in turn make calls to corresponding process API endpoints.
The business logic is implemented in the process layer. The process layer interacts with the external systems and orchestrates mule messgaes.
Since the connectors are readily available, I decided to build all the logical flows in the process layer, and to omit the system layer.
The experience API and process API are deployed in cloudhub shared load balancer on 1 worker with 0.1 vcore of memory.


The application can have consumer from all around world, since it is a mobile app based solution. Hence the need for experience layer is clear. The mandatory policies are imposed in the experience layer using the out of the box policies that are available from API manager.
The experience API is enforced with RAML based request validation. The frontend doesn't do the input data check, rather the RAML based API does the datatype check , content checks, and accepts a request if all the rules are met, if not a 400 HTTP bad request error is sent back to the user with the specific error message which will be displayed in the frontend.
The valid requests are routed to corresponding process layer endpoints from the experience layer.
- /User : POST - This endpoint is used to create a new user in the system, used for user signup process
- /Shop : POST - To enroll a new shop in the system, used for shop signup process
- /Shop : GET - Used to get all shops in a specific pincode/zipcode (passed as query param). The response is cached in the API implementation
- /User/{number} : GET - Used in user login process to verify credentials
- /Shop/{number} : GET - Used in shop login process to verify credentials
- /queue : POST - This endpoint is used when the user books a spot in queue
- /queue : GET - Used by the shop to get the next user in the queue
- /queue : DELETE - To cancel user's reservation in a queue by user or shop.
- /acceptUser : PUT - To allow access to a user who is waiting in spot 1 in the queue, and this is done by the shop.
- /endSession : PUT - Used when the user completes their shopping session.
- /getPosition : GET - Used to poll the spot of a user in queue in real time.
- /getActiveSpots : GET - Used to retrieve all the active reservations a user has.
- /getReport : GET - Invoked when the shop wants to generate report for a certain period of time
Find the RAML file here
4.2) Component configurations used
The various connectors used in the project was the key factor of pulling out such an end to end project within the span of a month. The same are described below
Amazon simple queuing service (AWS)
In the heart of QwithMax are FIFO queues hosted with amazon SQS Each shop will be having separate FIFO queue provisioned for them. When a user wants to book a spot in a specific shop, a message which contains the user information will be published into the queue. The shop will be subscribed to the queue and whenever they want to accept the next user, they will consume the first-arrived message in the FIFO queue.
Amazon Simple Queue Service is a distributed message queuing service. It supports programmatic sending of messages via web service applications as a way to communicate over the Internet. Even though everyone might not have heard about SQS, it is closely related to mulesoft. The VM queue component in mulesoft makes use of SQS under the hood when its deployed to the mulesoft controlled runtime plane, cloudhub.
I tried to use VM queue for the project to implement queuing but the VM queues at this moment doesn't support ordered delivery of messages or in other words the VM queues are not strictly FIFO.
With some additional configurations I made use of the Amazon SQS FIFO queues to implement the queuing logic.
The SQS provided two modes of access, Basic and Role based access,
I have generated access key and secret key for the access to SQS with basic mode, and the credentials are stored in common.properties.

Secured Property Configuration
For keeping the credentials secure , secured property configuration is used. properties are encrypted using AES encryption algorithm and CBC mode. A 16 character long key is required for the encryption and it is passed as a parameter in the secured property configuration.

Have a look at the encrypted sqs.accesskey and sqs.secretkey property values enclosed in ![] along with another bunch of encrypted properties which are used throughout the application

AWS Relational Database Service - MYSQL DB
QwithMax makes use of 3 different MYSQL tables user, shop and activity to store mission critical information.
Amazon Relational Database Service is a distributed relational database service by Amazon Web Services. It is a web service running "in the cloud" designed to simplify the setup, operation, and scaling of a relational database for use in applications. AWS RDS MYSQL database is used to host the tables which are necessary for the solution.
Database connector is used to talk with MYSQL database hosted in AWS cloud. As depicted in the image below,with mysql driver, host, port, username, password and database details the connector is configured.
One important configuration to note here is that, the database connection pooling is set-up for the database configuration.
Database connection pooling is a method used to keep database connections open so they can be reused by others.
Typically, opening a database connection is an expensive operation, especially if the database is remote. You have to open up network sessions, authenticate, have authorization checked, and so on. Pooling keeps the connections active so that, when a connection is later requested, one of the active ones is used in preference to having to create another one.
5 active connections are kept alive in the pool by default which can go up-to 10 as per the current settings.


- The user table is used to store user information. Whenever a new user signs up into the system, the information is stored in this table. Sensitive data like contact number and password are encrypted and stored.
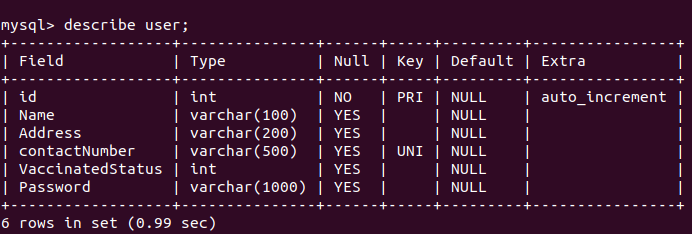
user table: snapshot

- The shop table is analogous to user tables, but for shops. Whenever a new shop registers the shop details and the queue URL of the new queue provisioned for that shop etc... are stored in this table.

shop table: snapshot

- The activity table is a table which stores all the historical data about visits. This table comes in handy when the shop wants to generate visitors report of the historical customer visits. Details such as when the customer came into the shop, when they left, the state of each reservation at that moment, the position of each user in queue etc... are stored in this table.
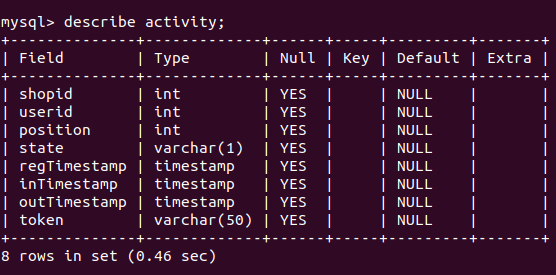
activity table: snapshot

Microsoft Outlook SMTP connection
One of the main use case which attract shops to use the solution QwithMax is the ability to keep track of visitors and the ability to generat excel reports from it
The Simple Mail Transfer Protocol is an internet standard communication protocol for electronic mail transmission. Mail servers and other message transfer agents use SMTP to send and receive mail messages.
To export the report generated, the solution makes use of a SMTP connection Microsoft outlook account, which allows the application to send the mail containing the report as an attachment to any email inbox.


Caching Strategy
When a user signs in , and search for the shops nearby, by providing their pincode/zipcode they will be getting response with all the details of shop in their locality. This information will be the same for all the users who wants a hold of this data, hence a perfect scenario where we can implement cache scope
The Cache scope is for storing and reusing frequently called data. You can use a Cache scope to reduce the processing load on the Mule instance and to increase the speed of message processing within a flow.

API Manager Policies
The api manager policies are used to enforce NFRs to the project in simple clicks. Following are the policies enforced at the experience layer

HTTPS Listener and HTTP Requester
HTTPS listener is used to listen for requests from the consumers
The listener makes of a self signed certificate generated using keytool
Since the application uses shared load balancer of cloudhub, the worker is listening on the port 8082


The typical use of the HTTP request operation is to consume an external HTTP service using the default GET method. In the proposed solution, the requester is used to consume public API to retrieve data such as location data for a particular pincode

4.3) Functionalities
For all the functionalities, the java script code of the mobile application consumes the respective endpoints in the experience layer. The API is consumed using the axios library in react.

The main functionalities work as depicted in the diagram below

4.3.1) User Sign up/Registration
The user signup process makes use of the endpoint /User :POST and the post method takes in details from the user (Name, address, mobile number and password).

We all know the importance of data privacy in this digital era. To comply with norms and to secure user data, the implementation makes use of java cryptography extension password based encryption to encrypt the phone number and password of every user.
The encrypted data is then converted into base64 format and stored to the AWS MYSQL database with the help of database insert operation. Making sure data is encrypted at rest.
Have a look at the way in which the user data is stored securely


4.3.2) Shop Sign up/Registration
/Shop : POST endpoint is used for signing up/registering new shops.

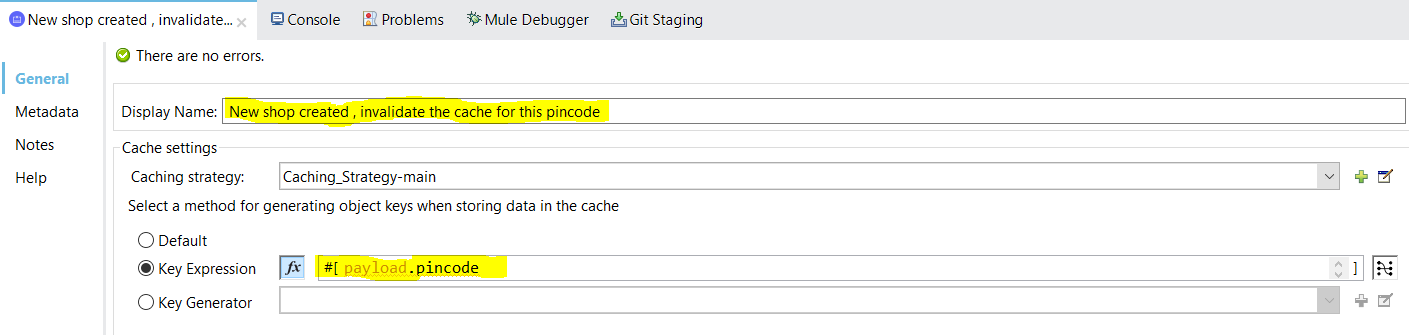
The data of shops belonging a specific pincode/zipcode are cached using the caching strategy for faster performance. But whenever a new shop registers with a particular pincode/zipcode, the cached data becomes invalid. To tackle this scenario we will have to invalidate the cache data for that particular pincode/zipcode whenever a new shop registers with it.
Whenever a new shop registers, it is required to create a new FIFO queue in SQS, so that for each shop there will be a dedicated FIFO queue.
Each queue should be having a unique name in SQS, hence the queue name is a combination of the shop name and shop contact number. By default the queues created in SQS are not FIFO and to make a queue FIFO, the name should be appended with ".fifo" Few other parameters are also passed while creating a queue
ContentBasedDeduplciation : enforces uniqueness among messages in the queue so that no two messages will be having same data, so one user will not able to flood the queue with multiple requests.
fifoqueue : for creating a fifo queue
Visibility timeout : Duration for which the message will be preserved in the queue
ReceiveMessageWaitTimeSeconds : the amount of time after the message can be consumed, once its published
A new FIFO queue will be created at SQS
Each queue will be having a unique URL associated with it, called queueURL and this is mandatory for reading and deleting messages from a queue. Hence it is stored in the "shop" table , after a new shop is created, along with other information.


3. All the input fields are validated using RAML and not with the frond-end JavaScript code, and the expectation is for every shop's contact number to be unique. All these scenarios are checked and if it is not met, the error handling takes care of it and respond with a bad request 400 error.
4.3.3) User Login / Shop Login
The process of logging the user and shop in to the system uses the same flow "get-details-flow".
The user makes use of User/{number} : GET method to login and shop uses Shop/{number} : GET method.
If the credentials are correct the flow responds back with respective user/shop details, if the credentials are wrong it sends back an error response.
- When a user request to to login, the credentials given by the user are encrypted using the same algorithm and key, and converted to base64.
- The encrypted data from the database for that particular user is retrieved
- If both values match, the login credentials are correct and the user details are sent back to the frond-end application

Route 1: Responds back with details of the user for user login
Route 2: Responds back with details of the shop for shop login

4.3.4) get shops - used when the user search for shops with a specific pincode/zipcode
When the user log in successfully, a screen will be shown where they can search for shops nearby by providing the pincode/zipcode, Shop : GET endpoint is used for achieving this functionality.
One important thing to notice here is that, the list of shops which belongs to a pincode will stay the same unless a new shop is created with that same pincode. This scenario is a perfect candidate for implementing the mulesoft caching strategy. Whenever a new shop is registered with a pincode, the cache is invalidated for that single key (pincode), rather than invalidating the whole cache.
Caching helps speed up the process and make less calls to the database.

The black outlined portion shows the components in caching scope. The flow checks whether for the incoming pincode, the data is cached or not. In the case of cache hit the components inside cache scope are not excecated. If it is a cache miss the components are excecated to get the data from the backend system and it is cached for future invocations.
The http requester is making a request to and external public API which provided the actual location information for a numerical pincode/zipcode value. Rather than just showing the number in the UI, displaying the actual locality information is better user experience , and the public API https://https://api.postalpincode.in/pincode/{pincode} provides the same. This result is also cached.
Shops belonging under a pincode are fetched from the "shop" table if cache miss was occured.
The shop data and the details about how many are in queue for each shop are merged together and sent back.
4.3.5) User booking spot in queue
When the user try to book their spot in the queue for a specific shop the "queue : POST" endpoint is used
The post method takes in a JSON request of the type
{
  "shopId": 1,
  "personId":1
}

The component makes a cross check with the "user" table in the database to see whether the personid is valid
Check the "activity" table to see whether the user is already in a queue for that shop. If the user is already in the queue and requesting again, the flow responds back saying that "you are already in queue and X is your position" . If the user is not in queue , then the choice routes the message into first route.
The first step of booking a spot in the queue is to insert a new record into the "activity" table, with the user and shop Ids, registration time and a unique token for the spot booking. The correlation id generated by mule runtime is reused for this. The first 8 digits of the token is used as the OTP the user have to provide to shop, once his turn comes up in the queue.
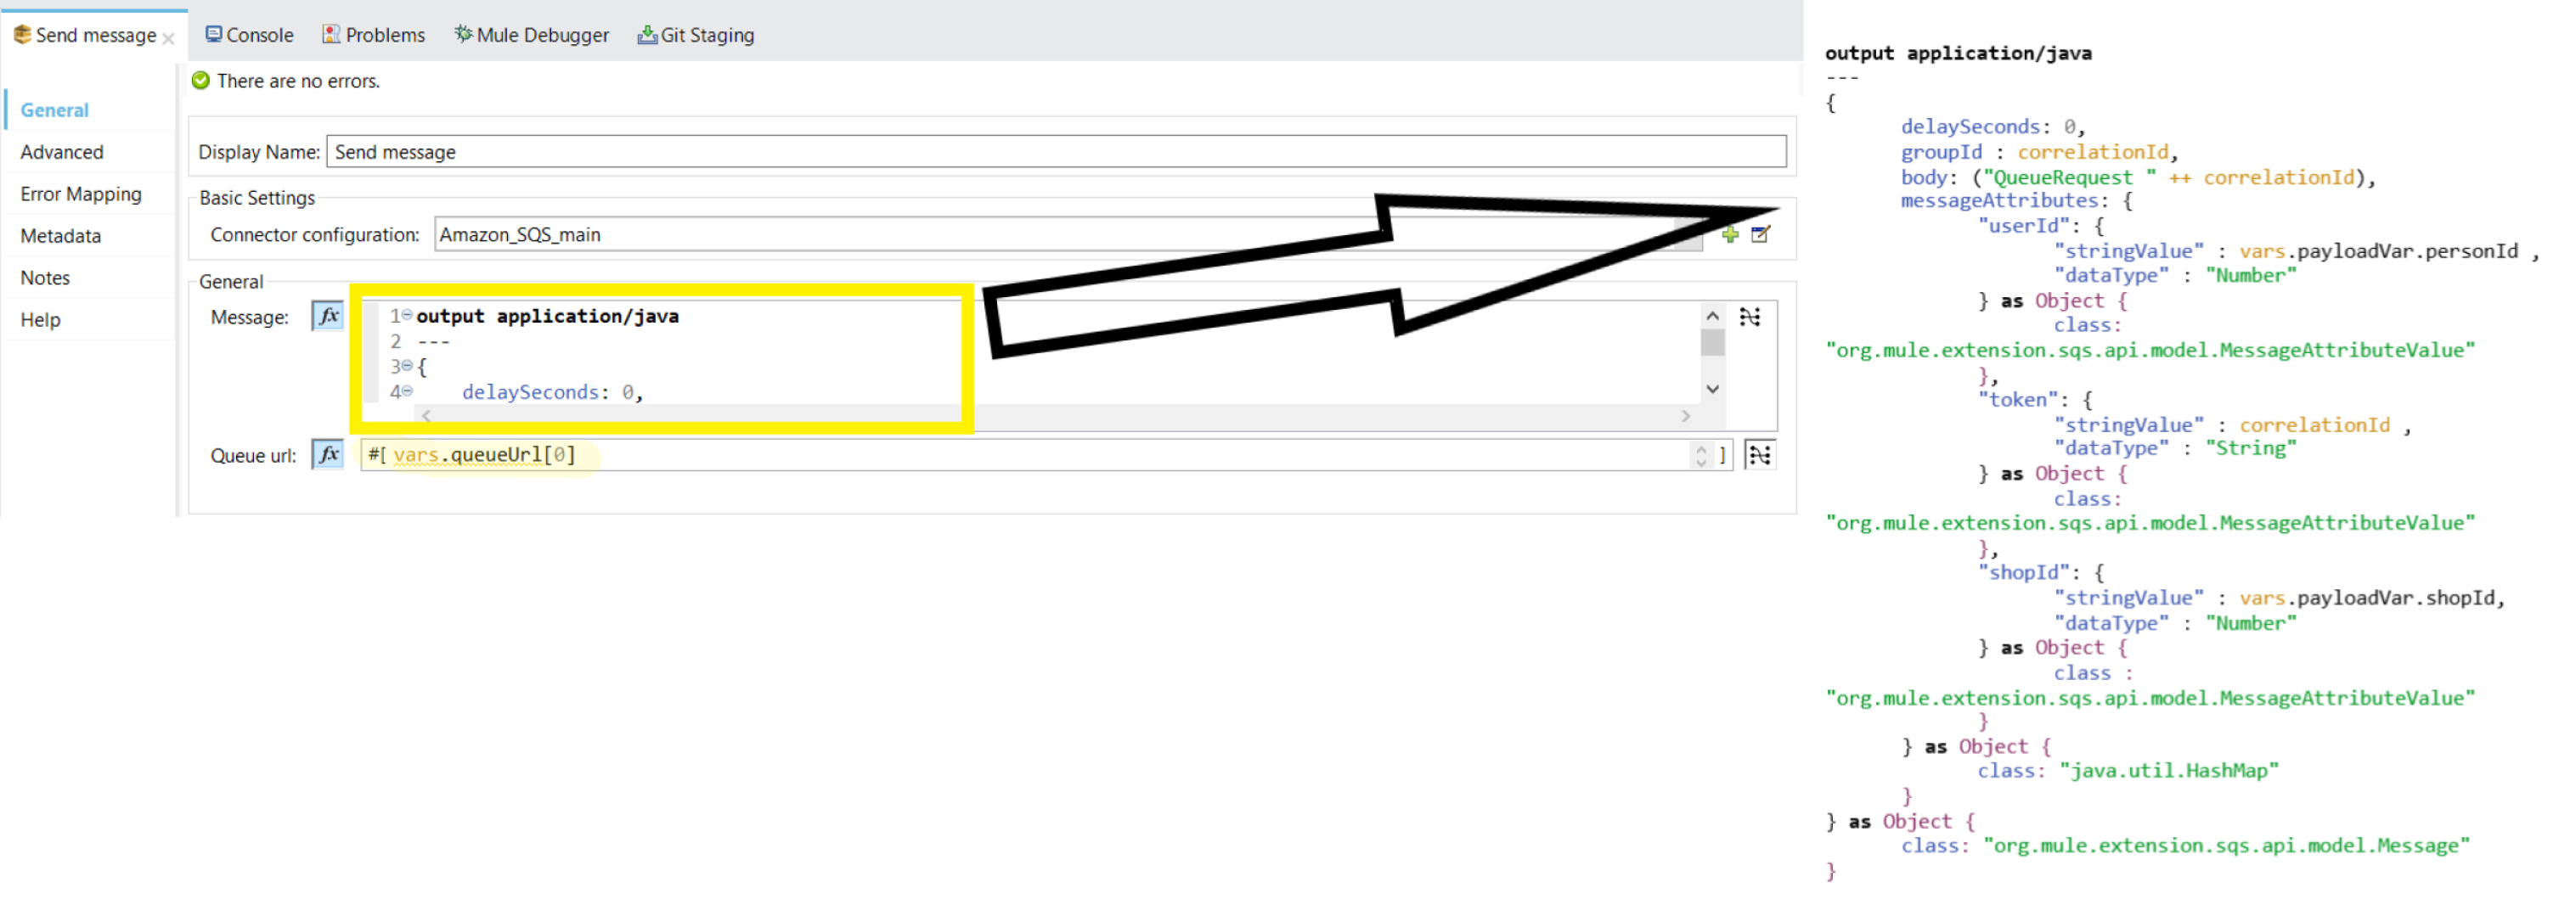
The process of getting a user into queue is by pushing a new message into the respective FIFO queue. The message will be attached with message attributes userId who requested the spot, token of the spot reservation, shopId of the shop to which the request is made.
To send a message into SQS queue a specific message template should be built.
output application/java
---
{
    delaySeconds: 0,
    groupId : correlationId,
    body: ("QueueRequest " ++ correlationId),
    messageAttributes: {
        "userId": {
            "stringValue" : vars.payloadVar.personId ,
            "dataType" : "Number"
        } as Object {
            class: "org.mule.extension.sqs.api.model.MessageAttributeValue"
        },
        "token": {
            "stringValue" : correlationId ,
            "dataType" : "String"
        } as Object {
            class: "org.mule.extension.sqs.api.model.MessageAttributeValue"
        },
        "shopId": {
            "stringValue" : vars.payloadVar.shopId,
            "dataType" : "Number"
        } as Object {
            class : "org.mule.extension.sqs.api.model.MessageAttributeValue"
        }
    } as Object {
        class: "java.util.HashMap"
    }
} as Object {
    class: "org.mule.extension.sqs.api.model.Message"
}
Once the message is published the number of available messages will increase in the SQS console.

The reservation details are added to the "activity" table as well, to be used later for report generation purposes.
Notice that the state is "Q" which indicated the reservation is active, also the correlationId generated by the mule runtime is used as the token
The OTP that the user has to provide to the shop once they try to enter the shop is the first 8 digits of the token/correlation Id generated for the transaction

After the message is added to the queue , a success response is sent back to the UI
{
    "message":"added to queue",
    "position": 1,
    "token":"df46b430-21db-11ec-8ba0-06f3f912b3b4"
}
4.3.6) check for the current position of the user in the queue
The getPosition : GET endpoint is used to poll for the current spot of the user in the queue, in fixed frequency to re-render the UI without the user manually refreshing it.

All the reservation data is available as part of the "activity" table, and that is from where the spot information is retrieved.
4.3.7) get active reservations
When the user logs in, the home screen will be having button Get Active Reservations.
The get active reservation functionality is used to retrieve the details of all the active reservations that the user has. getActiveSpots : GET endpoint is used to retrieve the data.

The information is fetched from the activity table.
4.3.8) Cancel Reservation - When the user wants to the cancel the reservation
Cancel reservation functionality is used when
- a user changed their mind and wants to cancel their reservation
- by the shop when the user is not physically present at the shop when the user's turn comes up, so that the shop can let the next person in.
- any other valid reasons.
The queue : DELETE endpoint is used to achieve this functionality.

The state of the entry corresponding to the user's reservation in the activity table is changed into "C" indicating that the reservation is cancelled.
A message from SQS FIFO queue cannot be deleted without consuming it, which means it cannot be deleted while its midway in the queue. Hence marking the state of reservation in activity table as "C" helps to skip the cancelled user's message and get the next valid reservation message, once its consumed by the shop
Have a look how the record in activity table changes once the reservation is cancelled

after cancellation

- The spot of all the participants in the queue, is reduced by 1.
4.3.9) Get the next user in queue - when the sop wants to get the next user waiting in the queue
When the shop wants to let in the next user from the queue, the queue : GET endpoint is called. This endpoint is equipped to get the next valid message from the corresponding FIFO queue.

- To read the message from a queue, the queue URL which is unique should provided. The URL is available as part of the "shop" table from my MYSQL database, and the same is retrieved for the corresponding shop.

Once the URL is fetched consume the latest message from the queue. Once the message is read, the payload will contain a message and an attribute called recipientHandle which is mandatory to delete the message from the queue.
check whether the entry that read from the queue is still waiting in the queue or not by checking if the state is "C" in "activity" table ,if the user has cancelled their reservation.
If the user has cancelled their reservation, delete the message from the queue using the recipientHandle attribute received when the message was read.
Recursively call the same flow to get the next latest user's message from the queue
If the user who published the message has not cancelled his reservation and is still in the queue, delete the message from the queue, get the details of the user from "user" table and send back the details to the shop.


The available messages are zero since, there was only one message and the message got consumed. If there was people still waiting in the queue, those messages would've been still present in the queue.
4.3.10) accept user - when shop wants to accept a user in queue
A shop can either accept or reject a user once his turn is up.
When the shop wants to accept a user who is at at the first position in the queue acceptUser : PUT endpoints is invoked.

When the user registers a spot in the queue a record with state "Q" is entered into the activity table, that particular record is updated when the user enters the shop (when the shops accepts the user). The state is updated to "I" which means "In" and inTime is updated to the time at which the user entered. These are used for generating the visitors report in future. when the user is still in the queue, before accepting, "activity" table looks like
after the user is accepted, notice that the state and inTime columns got updated these fields are vital in generating the visitors report.

Once the user is removed from the queue, the spot of all the other users in the queue needs to be decreased by 1, which is done by the update SQL componenent.
4.3.11) end session - When user completes shopping
When the shop accepts a user, the user will start their shopping session and the user will enter the shop. After the user enters the shop and the shopping itinerary is completed, the user will click on the button "Shopping Completed" which in turn calls the endSession : PUT endpoint.

The record corresponding to the spot booking is updated with state = "O" from "I" which means that the shopping was successfully completed. Also the outTime is also updated. The inTIme, outTime combination is used to generate the report of the visitors in future.
Have a look at the record

4.3.12) Generate visitors report and send email using SMTP
This functionality of generating historical data of the user visits as a report and sending the report over email using SMTP helps shops to comply with local government guidelines, and the endpoint generateReport : GET is used for this.

1. The table "activity" table will be containing all the historical data of the users who has visited the shop, who has cancelled the reservation etc.. Hence this table can be used to extract the visitors report for the shops. The user when requesting the report will pass the fromDate and toDate as query parameters which is used to generate the report for a specific time range. Using these values the data is retrieved from the table using a database select operation.
select * from activity where state="O" and regTimestamp>=:from and regTimestamp<=:to and shopid=:shopid2. The "activity" table will only be having the userId as the user information, to get more details about the user like address, vaccination status etc... "user" table is queried with the userId attribute to get the user data.
3. Now the user data and activity data needs to be joined together, the Arrays module is imported in dataweave and the two arrays are joined in a flash using the join function.
 %dw 2.0
 import * from dw::core::Arrays
 var data=(( join(vars.userVar, vars.activityVar, (user) -> user.id, (activity) -> activity.userid)) map()->
 $.l ++ $.r)
 output application/json
 ---
 data map(data,index)
-> {
        "Address": data.Address,
        "Name": data.Name,
        "VaccinatedStatus":data.VaccinatedStatus,
        "inTimestamp": data.inTimestamp,
        "outTimestamp":data.outTimestamp,
        "regTimestamp": data.regTimestamp,
        "token":data.token
    }
4. The flow will send an email containing the report as an attachment if the user has entered an email id, where the report is to be sent.
1. The attachment file name is generated using mule expression language and the file extension ".xlsx" is manually appended to the file name
2. The actual excel file data is generated and store in the variable called emailData. which is consumed in the send email component.
 %dw 2.0
 import * from dw::core::Arrays
 var data=(( join(vars.userVar, vars.activityVar, (user) -> user.id, (activity) -> activity.userid)) map()->
 $.l ++ $.r)
 output application/xlsx
 ---
 {
    "Visitors Report": (data map(data,index)
-> {
        "Address": data.Address,
        "Name": data.Name,
        "VaccinatedStatus":data.VaccinatedStatus,
        "inTimestamp": data.inTimestamp,
        "outTimestamp":data.outTimestamp,
        "regTimestamp": data.regTimestamp,
        "token":data.token
    })}
3. A dedicated mail box is created for the project under the Id [email protected] which is used to establish SMTP connection. The same is provided in the component as well.

5) How to use
The solution revolves around two roles ,
- The user who books their spot in the queue virtually
- The shop who accepts user one by one from the queue. Also they are interested in generating the visitors report to comply with local government COVID norms.

NOTE : All the operations are explained using GIF loops of screen captured video. The GIFs will be in loop
ROLE : USER
QwithMax lets the customer book a spot in the queue and wait virtually without risking the exposure to virus by physically being at the queue.
Actions performed by a user in the application are
- Booking a reservation in any shop
- Cancelling a reservation
BOOKING A SPOT IN QUEUE
The process of booking a spot in the queue is as follows
- The user will have to sign up to the system and then login using their credentials.

- After the login , user is navigated to the search page where they will search for shops with the local pincode/zipcode and book a slot in the shop of interest

Once the user finds the shop, click on the shop .
The details will contain information like shop name, address , contact number , number of doses of vaccination required etc... As the vaccinations are going on, there is a chance that in future shops might impose rules like, only people who are vaccinated with 1 dose or 2 doses can enter the shop.This requirement is shown in the details tab so that the users can select the shop which allows their entry according to their vaccination status.
Review Details and click on the button "Let Max Wait In Queue For You" to book spot in the queue. If the user choose to book the position, the user will be navigated to page where real time spot of the user in the queue will be shown.
The spot will be automatically updated in the UI in realtime. Once the turn is up for the user and the shops accepts the entry, the shopping session will be initiated. The real time data is fetched by polling the REST endpoint in fixed intervals to avoid manual reload by the user
The queue screen also contains an OTP(One Time Password) which is required at the entry time to confirm the identity of the user.
User can cancel their reservation at any time from the queue page using the "Cancel Reservation" button.
- Once the shop accepts entry, shopping session is started and the UI will render shopping page automatically

whenever the user is done with shopping and leaving the shop they can click on "Shopping Completed" to end the shopping session.
Manage Active Reservations
This functionality is used to manage existing reservations.
Once the user is logged in, click on the "Get Active Reservations" button to see all active reservations.
Click on any entry to get current status of the reservation, or to cancel the reservation.

To cancel a reservation, click on the appropriate entry, and click on the "Cancel Reservation" button
ROLE : SHOP
The shop will have to sign up to the system as the initial step and then login using the credentials.
The home page for shops contains two buttons to serve the two main functionalities , one to let the users waiting in the queue in one by one. two to generate the report of the visitors.

Accept User
Click on the "Get Next User In Queue" to retrieve the details of the next user who's turn is up. The shop will have to accept or reject the user

To accept the next user in queue, ask the user for their OTP. This OTP is enforced to confirm the identity of the user in the queue.
If the OTPs match when the shop clicks on "Let In" the user will enter the shop and shopping session for the user is started.
There can be cases when the user is not physically present when their turn comes up, in this scenario another button is provided "cancel 's reservation" to kick out the user from the queue.
The next user will be given the chance to enter queue after kicking the previous user.
Also in the scenario where the OTP of the user doesn't match , which implies the person in the queue who claims to be the user is not the actual user, their spot also can be cancelled with the same functionality.
Cancel user reservation
A shop can cancel a user's reservation once their turn comes up, due to reasons like
- The user was not present at the shop once their turn came up
- The user was not compliant with the vaccination requirement
- any other reason
In these scenarios the shop is allowed to cancel the reservation, so that they can take in the next valid/eligible user

Click on "Get Next User In Queue"
Click on "Cancel 's Reservation
Generate Visitors Report
Whenever the shop wants to generate their visitors report for a certain time range , click on the "Generate Report" button.

There are input fields for from date, to date and email Id
The time range for which the report is wanted is specified using the from date and to date fields
If the email id columns is left blank a report is shown in the UI and if the user wants an excel file containing the report fill in the email Id to get report in any email inbox.
When the report is generated the shop can click on each entry to get more details about the entry
Mail that was sent to the inbox
Attachment sent with the mail


Challenges we ran into
The main challenge that I faced while the development of QwithMax was to test the application with multiple devices. Since each of the user is supposed to interact from a separate mobile device, the testing was tricky . But with the help of android mobile emulators in PC, I simulated android devices in computer.
Accomplishments that we're proud of
To be able to pull of such a end-to-end product in a time of less than 1 month.
What we learned
Mulesoft is the best integration platform , period.
What's next for QwithMax, A virtual queuing app powered by mulesoft
If government provide the APIs to check someone's vaccination status, this can be integrated with the application to check vaccination status of individuals.
Built With
- amazon-web-services
- api
- api-manager
- caching
- cloudhub
- crypto-module
- mulesoft
- mysql
- object-store
- react-native
- smtp
- sqs

Log in or sign up for Devpost to join the conversation.