The post How to connect from your local environment to a private Postgres server through a kubernetes service? appeared first on Dim Solution.
]]>During my working day, I was confronting to a simple developer question:
 How to connect my local API server to a remote RDS Postgres instance present into an AWS VPC, accessible only throug the Kubernetes (k8s) cluster?
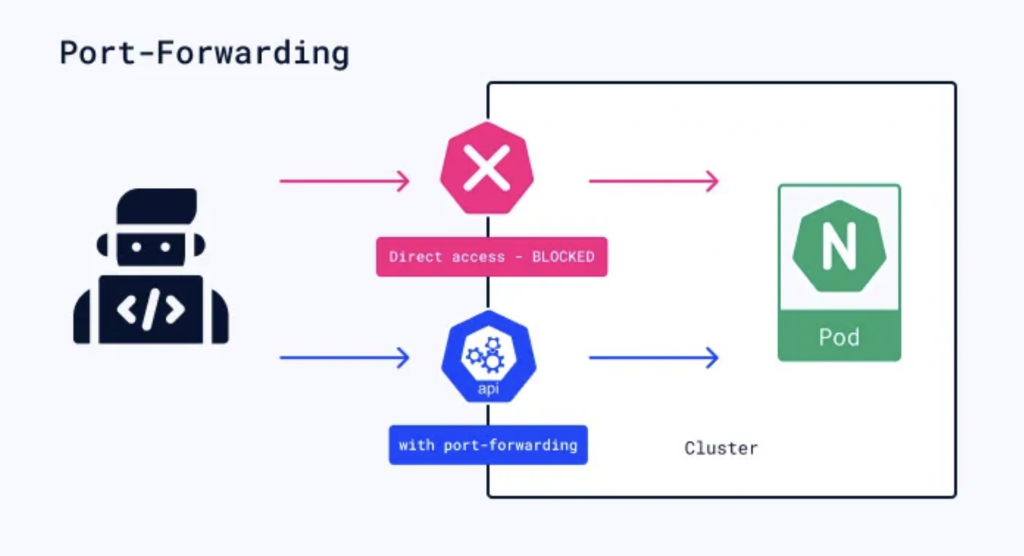
port-forwarding-k8s
Kubernetes is an open-source platform for automating deployment, scaling, and management of containerized applications. It provides a container-centric infrastructure, orchestrating the deployment and management of application containers across clusters of hosts. Kubernetes abstracts away much of the complexity involved in managing containerized applications, allowing for efficient resource utilization and seamless scaling.
Two steps to follow to create you database tunnel
To connect you from your local environment to your remote database through a Kubernetes service, you just need to:
1. Create a passthrough service:
This proxy service will be essential to reach you database.
Its target is to forward all incoming trafic from the port 5432 to the port 5432 of the PostgresSQL server (a simple tunnel, like an SSH tunnel).In this example, we’ll connect to a RDS PostgresSQL server, but this approach also works with all types of services : Redis, Mysql, MariaDB etc..
$ export DATABASE_PORT=5432
$ export DATABASE_HOSTNAME=example.eu-west-1.rds.amazonaws.com
Then,
$ kubectl run postgres-tunnel --image=alpine/socat -it --tty --rm --expose=true --port={DATABASE_PORT} tcp-listen:{DATABASE_PORT},fork,reuseaddr tcp-connect:{DATABASE_HOSTNAME}:{DATABASE_PORT}This command creates a k8S service named postgres-tunnel based on the alpine/socat:lastest image (you can use your own) and forward all incoming trafic to the RDS database. It’s our pass-through.
2. Connect you on the database:
You now have a pass-through, you can simply connect you to your database. 
$ psql postgres://USERNAME:PASSWORD@localhost:5432/schema_name
Sources
- Kubernetes: Official documentation
The post How to connect from your local environment to a private Postgres server through a kubernetes service? appeared first on Dim Solution.
]]>The post Detect AdBlock and display an unclosable modal appeared first on Dim Solution.
]]>If you have a websites that is financed by advertising, you might be sometimes thinking about « how can I force my visitors to turn off their ad blockers? ».

Since few years ago, lots of ad blockers (open sourced or not) have been created in order to hide all ads presents on the website that you are visiting. Because theses ad blockers, can have some dramatic side effects for the webmasters. That’s why this package has been created.
The purpose of ABM (AdBlockModal) is to display an unclosable modal until the visitor hasn’t disable his ad blocker.
How to add @rimiti/abm on my website?
Easy, there two steps to follow.
- The first one is to add these tags into the head block of your page:
<script type="text/javascript" src="proxy.php?url=https://cdn.jsdelivr.net/npm/@rimiti/abm@latest/dist/index.js"></script>
<link rel="stylesheet" media="all" href="proxy.php?url=https://cdn.jsdelivr.net/npm/@rimiti/abm@latest/dist/style.css" />
2. Then, you just have to add the below block into the body block:
<div id="abm">
  <div class="abm-position">
    <div class="abm-container">
      <h3 class="abm-title">Adblock detected</h3>
      <p class="abm-text">Please, <strong>turn off</strong> your ad blocker in order to continue browsing.</p>
      <a class="abm-reload" onclick="window.location.reload()" href="proxy.php?url=#">Refresh the page</a>
    </div>
  </div>
</div>
Now, if you enable Adblock on your browser you’ll see a beautiful modal appear :

Simple, quick and powerful.. ?
A live demo is available if you want to test it before including it on your website: https://rimiti.github.io/abm/demo/
Sources
- Github page: @rimiti/abm
The post Detect AdBlock and display an unclosable modal appeared first on Dim Solution.
]]>The post How to use async/await functions with Express ? appeared first on Dim Solution.
]]>In June 2017, has been released the 8th version of ECMAScript (ES8), as usual, a lot of interesting new features has been published.

As a reminder, ECMAScript is a standardization of script-like languages like Javascript. Throughout the different versions, ECMAScript brings standardization of functions, new functionalities and deprecates certain other functions.
One of the most important features of ES8 is the arrival of the async / await keywords.
The target of this article isn’t to show you how to use async / await, but how to use them with the Express framework.
Why?
If you are an async/await functions addict, it’s most certainly because you like writting clean code ? ?
So, I deduce you dislike to be forced by a framework to write crappy code like:
makeTheWorldBetter()
 .then(() => {
   // ...
 })
 .then(() => {
   // ...
 })
 .then(() => {
   // ...
 })
 .then(() => {
   // ...
 })
 .then(() => {
   // ...
 })
 .then(() => {
   // ...
 })
 .catch((e) => {
   // ...
 })
What’s the Express problem with async/await?
To be precise, it’s not really « an express problem », this is the normal express operating mode.
With Express, when you want to create a controller or a middleware function which uses a promise you must use .then sentences like:
import express from 'express';

const app = express();
app.get('/example', function (req, res, next) {
  myPromise
    .then((result) => {
      res.status(200).send({success: true});
    })
    .catch((error) => {
      res.status(500).send({success: false});
    });
});
The problem is simple, Express does not allow to pass a Promise as second argument, it must be function or Router instance.
Example of not working code. 
import express from 'express';

const app = express();
app.get('/example', async function (req, res, next) {
  await myPromise
    .catch((error) => {
      res.status(500).send({success: false});
    });
  res.status(200).send({success: true});
});
Okay, but what’s the correct way?
The trick is very simple but very useful, for using async/await function into your express middlewares, you just need to wrap your functions with a Promise:
const wrapAsync = (fn) => {
  return (req, res, next) => {
    const fnReturn = fn(req, res, next);

    return Promise.resolve(fnReturn).catch(next);
  }
};
For helping the community, I’ve created an open source package to simplify the wrapper usage: @rimiti/express-async.
The package has been developed with TypeScript and the code is 100% covered by tests.
Example with @rimiti/express-async package.
import express from 'express';
import {wrapAsync} from '@rimiti/express-async';

const app = express();
app.get('/example', wrapAsync(async function example(req, res, next) {
  res.status(200).send({success: true});
}));
Simple, clean and powerful.. ?
Sources
- Github page: @rimiti/express-async
The post How to use async/await functions with Express ? appeared first on Dim Solution.
]]>The post How to appear always connected on Slack? appeared first on Dim Solution.
]]>If you are like me, afraid to hear « He isn’t connected to Slack, he must not work… », this quick tutorial will interest you. ?
Let’s go!
Before everything, you need to have NodeJS installed on your machine because this tool has been developed in Javascript.
NodeJS installed, we just have to install the @rimiti/slack-ghost package globally from NPM:
$ npm i -g @rimiti/slack-ghost
After that, you need to get your Slack Legacy Token:
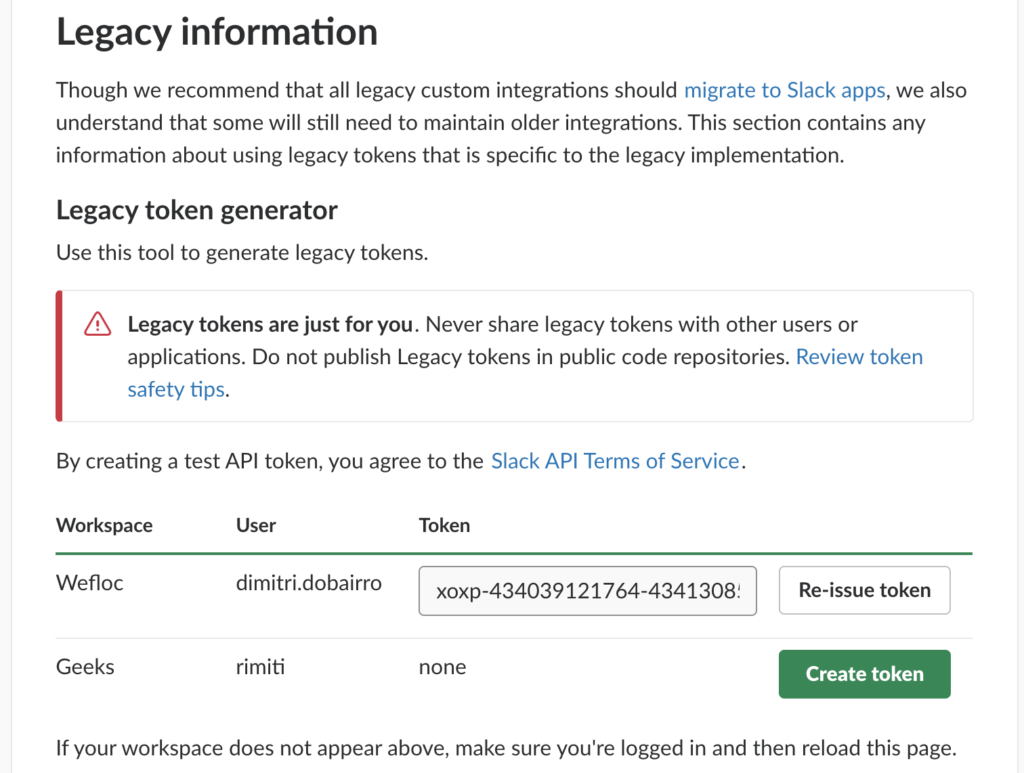
Copy the generated token and create the environment variable like:
$ export SLACK_GHOST_TOKEN=xoxp-434039121764-514358755265-514963434781-8a42548cfba0p8d028bd3fe1ac6ff65d
Run the tool:
$ slackghost
$ [2019-01-04T18:03:28+01:00] - You are connected as "dobairro.dimitri" (UF4AJN77T).
You appear now present on your Slack Workspace ??

Sources
- Github page: @rimiti/slack-ghost
The post How to appear always connected on Slack? appeared first on Dim Solution.
]]>The post What’s the best CSS unit ? appeared first on Dim Solution.
]]>As full stack developer you sometime have to code front-end features and what’s better than reading best practice articles before coding? Nothing! After reading this article, you’ll know why you should use rem unit instead of %, em (or worse) px.
Before using a css spec, you always have to check it’s browser compatibilities. For making that, the awesome CanIUse website is the great tool.
« rem » browser compatibility

Why you shouldn’t use Pixel unit ?
In my opinion, part of the debt of the CSS and design in its generality comes from the non-intelligent use of the pixel. Whether designer or developer, many use and continue to use this unit as the main unit without even knowing the limits.
Not wishing to deepen the operation of the pixel as well as its constraints related to dpi and « false pixels », we will simply say that once a font size (for example) set at 14 pixels, it will always remain at 14 pixels, whatever the resolution of the screen, the size of the window or its zoom.
If, like me, you want to be able to resize or zoom in or out on some sites, you’ve probably already seen that not all sites respond in the same way. Sometimes even, the site becomes totally unusable. It may be that the site you are browsing uses px. We therefore note that the main constraint of the Pixel is that it is not an accessible unit.
Ok, but what’s the difference between Rem?
The rem, most recent and created to be totally « Responsive Web Design » comes to the rescue of all the problems faced by the Pixel in a simple but intelligent way.
The rem is a percentage of the screen calculated by the browser according to many parameters such as the screen zoom and its resolution. Its size inherits from the font-size (for example) sets defined by default in the body.
In other words, say if you set a 100% font-size in the body, then your rem size of 1 will be 100%. This can be handy when you want to resize all your elements up or down.
Unlike the pixel, if you put your font at 1 rem and you resize or zoom the screen, you will realize that the size of this font changes automatically. And that’s all the power of rem! Created to make the web more accessible, many CSS libraries or frameworks such as Twitter Bootstrap (version 4) now use this unit as a base unit. This makes the developments a lot simpler and more efficient. Especially at a time when front-end developers are fighting with thousands of screen resolutions.
Well, said like that you probably think that you have to stop using the pixel or rem? Well no, the pixel is not dead and still useful when you want to set the size of an element that should not vary, such as for margins.
Rem said goodbye to Em!
The em is almost the same thing as the rem with the difference that the size of the em is proportional to the size defined in the parent unlike the rem which is proportional to the size of the text defined in the body.
Conclusion
To conclude, I propose you to show this amazing Gif which it simulate a window resizing.
« Pixel » versus « Rem »
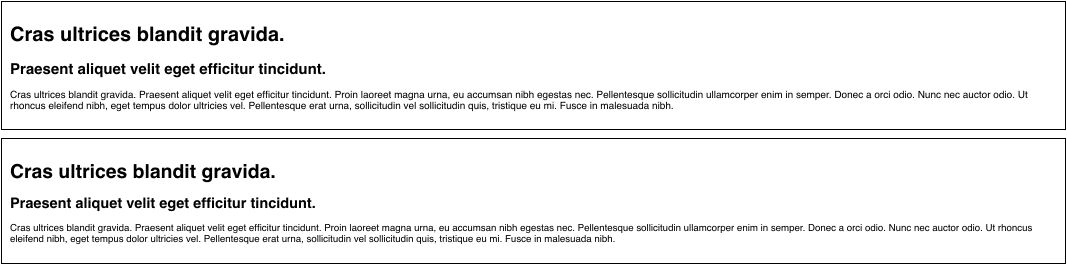
First block font-size is set in Pixel, the second in rem.
For more informations
The post What’s the best CSS unit ? appeared first on Dim Solution.
]]>The post Kubernetes – Installing Kong (API Gateway) appeared first on Dim Solution.
]]>Today, it’s a sun day and I’m pretty happy to write this tutorial to show you how it’s easy to install an API gateway in a Kubernetes cluster.
What’s an API gateway?
An API gateway is a programming service in front of an application programming interface (API) which filters the traffic. This front-end service is useful when you have a Microservice architecture pattern.
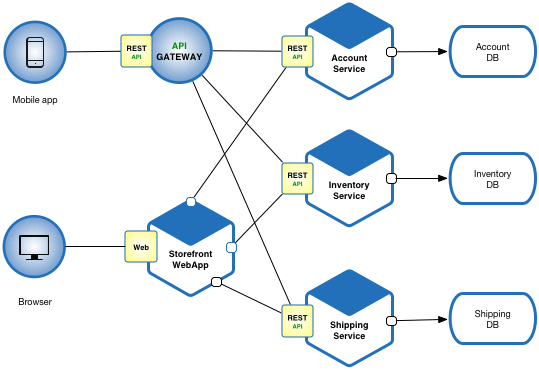
Microservice architecture
API gateways can be used to limit traffic and enforce security policies. In addition to combining a number of APIs with potentially different interfaces in a unified presentation interface, separating the interface and the API has a number of advantages. When an API contains all the necessary functions, ease of use can be improved by updating the gateway interface. Because the API Gateway is separate, it can be updated while avoiding changes to an API that could result in an unexpected operation. The frontal nature of an API gateway allows the gateway to provide new languages while the hidden APIs remain intact, rather than updating multiple APIs separately.
Why using Kong?

It’s not just because I’m loving monkeys… In comparaison of other API gateways, Kong offer many advantages:
- Radically Extensible
- Multi store (Postgresql or Cassandra)
- Blazingly Fast
- Open Source (+17k stars, 110 contributions)
- Platform Agnostic
- Cloud Native
- RESTful APIs
- Many plugins
Kong infrastructure example
In this article, we’ll use the open source Community Edition.
It’s time!
To be installed, Kong just need a datastore initialized. In this article, I’ll use PostgreSQL because this service will be shared with micro services (later).
In first, check your cluster status.
$ kubectl cluster-info
Kubernetes master is running at https://163.172.XXX.XXX:6443
KubeDNS is running at https://163.172.XXX.XXX:6443/api/v1/namespaces/kube-system/services/kube-dns:dns/proxy
Clone this official kong-dist-kubernetes repository.
$ git clone [email protected]:Kong/kong-dist-kubernetes.git
$ cd kong-dist-kubernetes
Create the PostgreSQL service.
$ kubectl create -f postgres.yaml
If you don’t my PostgreSQL constraint, prefer Cassandra datastore because it’s better solution for scalability.
Now, create the ephemeral migration job.
$ kubectl create -f kong_migration_postgres.yaml
When the migration is done, you can remove it.
kubectl delete -f kong_migration_postgres.yaml
If all pods are running, you can now install Kong.
$ kubectl create -f kong_postgres.yaml
You should have a similar output if you check your pods status:
$ kubectl get all --all-namespaces
NAMESPACE     NAME                                  READY     STATUS    RESTARTS   AGE
default       pod/kong-rc-86f48cd777-cm468          1/1       Running   0          1h
default       pod/kong-rc-86f48cd777-z2zfr          1/1       Running   0          1h
default       pod/kong-rc-86f48cd777-zzh2n          1/1       Running   0          1h
default       pod/postgres-grj5k                    1/1       Running   0          1h
...

default       service/kong-admin       LoadBalancer   10.106.236.226   <pending>     8001:32713/TCP   1h
default       service/kong-admin-ssl   LoadBalancer   10.99.61.45      <pending>     8444:30539/TCP   1h
default       service/kong-proxy       LoadBalancer   10.96.235.85     <pending>     8000:32459/TCP   1h
default       service/kong-proxy-ssl   LoadBalancer   10.101.176.45    <pending>     8443:31012/TCP   1h
default       service/postgres         ClusterIP      10.103.191.155   <none>        5432/TCP         1h
...

NAMESPACE     NAME                            DESIRED   CURRENT   UP-TO-DATE   AVAILABLE   AGE
default       deployment.apps/kong-rc         3         3         3            3           1h
...

NAMESPACE     NAME                                      DESIRED   CURRENT   READY     AGE
default       replicaset.apps/kong-rc-86f48cd777        3         3         3         1h
...
Ok, but how to check if the service really runs?
If like me your have a remote remote cluster proxify your connection.
$ kubectl --kubeconfig ~/.kube/config proxy
Starting to serve on 127.0.0.1:8001
Open your browser add copy and paste this url.
http://127.0.0.1:8001/api/v1/namespaces/default/services/https:kong-admin-ssl:8444/proxy/
Kong should respond you with a beautiful JSON output:
{
  "plugins": {
    "enabled_in_cluster": [],
    "available_on_server": {
      "response-transformer": true,
      "oauth2": true,
      "acl": true,
      "correlation-id": true,
      "pre-function": true,
      "jwt": true,
      "cors": true,
      "ip-restriction": true,
      "basic-auth": true,
      "key-auth": true,
      "rate-limiting": true,
      "request-transformer": true,
      "http-log": true,
      "file-log": true,
      "hmac-auth": true,
      "ldap-auth": true,
      "datadog": true,
      "tcp-log": true,
      "zipkin": true,
      "post-function": true,
      "request-size-limiting": true,
      "bot-detection": true,
      "syslog": true,
      "loggly": true,
      "azure-functions": true,
      "udp-log": true,
      "response-ratelimiting": true,
      "aws-lambda": true,
      "statsd": true,
      "prometheus": true,
      "request-termination": true
    }
  },
  "tagline": "Welcome to kong",
  "configuration": {
    "plugins": [
      "bundled"
    ],
    "admin_ssl_enabled": true,
    "lua_ssl_verify_depth": 1,
    "trusted_ips": {},
    "prefix": "/usr/local/kong",
    "loaded_plugins": {
      "response-transformer": true,
      "request-termination": true,
      "prometheus": true,
      "ip-restriction": true,
      "pre-function": true,
      "jwt": true,
      "cors": true,
      "statsd": true,
      "basic-auth": true,
      "key-auth": true,
      "ldap-auth": true,
      "aws-lambda": true,
      "http-log": true,
      "response-ratelimiting": true,
      "hmac-auth": true,
      "request-size-limiting": true,
      "datadog": true,
      "tcp-log": true,
      "zipkin": true,
      "post-function": true,
      "bot-detection": true,
      "acl": true,
      "loggly": true,
      "syslog": true,
      "azure-functions": true,
      "udp-log": true,
      "file-log": true,
      "request-transformer": true,
      "correlation-id": true,
      "rate-limiting": true,
      "oauth2": true
    },
    "cassandra_username": "kong",
    "admin_ssl_cert_csr_default": "/usr/local/kong/ssl/admin-kong-default.csr",
    "ssl_cert_key": "/usr/local/kong/ssl/kong-default.key",
    "admin_ssl_cert_key": "/usr/local/kong/ssl/admin-kong-default.key",
    "dns_resolver": {},
    "pg_user": "kong",
    "mem_cache_size": "128m",
    "cassandra_data_centers": [
      "dc1:2",
      "dc2:3"
    ],
    "nginx_admin_directives": {},
    "custom_plugins": {},
    "pg_host": "postgres",
    "nginx_acc_logs": "/usr/local/kong/logs/access.log",
    "proxy_listen": [
      "0.0.0.0:8000",
      "0.0.0.0:8443 ssl"
    ],
    "client_ssl_cert_default": "/usr/local/kong/ssl/kong-default.crt",
    "ssl_cert_key_default": "/usr/local/kong/ssl/kong-default.key",
    "dns_no_sync": false,
    "db_update_propagation": 0,
    "nginx_err_logs": "/usr/local/kong/logs/error.log",
    "cassandra_port": 9042,
    "dns_order": [
      "LAST",
      "SRV",
      "A",
      "CNAME"
    ],
    "dns_error_ttl": 1,
    "headers": [
      "server_tokens",
      "latency_tokens"
    ],
    "dns_stale_ttl": 4,
    "nginx_optimizations": true,
    "database": "postgres",
    "pg_database": "kong",
    "nginx_worker_processes": "auto",
    "lua_package_cpath": "",
    "admin_acc_logs": "/usr/local/kong/logs/admin_access.log",
    "lua_package_path": "./?.lua;./?/init.lua;",
    "nginx_pid": "/usr/local/kong/pids/nginx.pid",
    "upstream_keepalive": 60,
    "cassandra_contact_points": [
      "127.0.0.1"
    ],
    "admin_access_log": "/dev/stdout",
    "client_ssl_cert_csr_default": "/usr/local/kong/ssl/kong-default.csr",
    "proxy_listeners": [
      {
        "ssl": false,
        "ip": "0.0.0.0",
        "proxy_protocol": false,
        "port": 8000,
        "http2": false,
        "listener": "0.0.0.0:8000"
      },
      {
        "ssl": true,
        "ip": "0.0.0.0",
        "proxy_protocol": false,
        "port": 8443,
        "http2": false,
        "listener": "0.0.0.0:8443 ssl"
      }
    ],
    "proxy_ssl_enabled": true,
    "pg_password": "******",
    "cassandra_ssl": false,
    "enabled_headers": {
      "latency_tokens": true,
      "X-Kong-Proxy-Latency": true,
      "Via": true,
      "server_tokens": true,
      "Server": true,
      "X-Kong-Upstream-Latency": true,
      "X-Kong-Upstream-Status": false
    },
    "ssl_cert_csr_default": "/usr/local/kong/ssl/kong-default.csr",
    "client_ssl": false,
    "db_resurrect_ttl": 30,
    "error_default_type": "text/plain",
    "cassandra_consistency": "ONE",
    "client_max_body_size": "0",
    "admin_error_log": "/dev/stderr",
    "pg_ssl_verify": false,
    "dns_not_found_ttl": 30,
    "pg_ssl": false,
    "db_update_frequency": 5,
    "ssl_ciphers": "ECDHE-ECDSA-AES256-GCM-SHA384:ECDHE-RSA-AES256-GCM-SHA384:ECDHE-ECDSA-CHACHA20-POLY1305:ECDHE-RSA-CHACHA20-POLY1305:ECDHE-ECDSA-AES128-GCM-SHA256:ECDHE-RSA-AES128-GCM-SHA256:ECDHE-ECDSA-AES256-SHA384:ECDHE-RSA-AES256-SHA384:ECDHE-ECDSA-AES128-SHA256:ECDHE-RSA-AES128-SHA256",
    "cassandra_repl_strategy": "SimpleStrategy",
    "cassandra_repl_factor": 1,
    "log_level": "notice",
    "admin_ssl_cert": "/usr/local/kong/ssl/admin-kong-default.crt",
    "real_ip_header": "X-Real-IP",
    "kong_env": "/usr/local/kong/.kong_env",
    "cassandra_schema_consensus_timeout": 10000,
    "dns_hostsfile": "/etc/hosts",
    "admin_listeners": [
      {
        "ssl": false,
        "ip": "0.0.0.0",
        "proxy_protocol": false,
        "port": 8001,
        "http2": false,
        "listener": "0.0.0.0:8001"
      },
      {
        "ssl": true,
        "ip": "0.0.0.0",
        "proxy_protocol": false,
        "port": 8444,
        "http2": false,
        "listener": "0.0.0.0:8444 ssl"
      }
    ],
    "cassandra_timeout": 5000,
    "ssl_cert": "/usr/local/kong/ssl/kong-default.crt",
    "proxy_access_log": "/dev/stdout",
    "admin_ssl_cert_key_default": "/usr/local/kong/ssl/admin-kong-default.key",
    "cassandra_ssl_verify": false,
    "ssl_cipher_suite": "modern",
    "cassandra_lb_policy": "RoundRobin",
    "real_ip_recursive": "off",
    "proxy_error_log": "/dev/stderr",
    "client_ssl_cert_key_default": "/usr/local/kong/ssl/kong-default.key",
    "nginx_daemon": "off",
    "anonymous_reports": true,
    "db_cache_ttl": 0,
    "nginx_proxy_directives": {},
    "pg_port": 5432,
    "nginx_kong_conf": "/usr/local/kong/nginx-kong.conf",
    "client_body_buffer_size": "8k",
    "lua_socket_pool_size": 30,
    "admin_ssl_cert_default": "/usr/local/kong/ssl/admin-kong-default.crt",
    "nginx_http_directives": [
      {
        "value": "prometheus_metrics 5m",
        "name": "lua_shared_dict"
      }
    ],
    "cassandra_keyspace": "kong",
    "ssl_cert_default": "/usr/local/kong/ssl/kong-default.crt",
    "nginx_conf": "/usr/local/kong/nginx.conf",
    "admin_listen": [
      "0.0.0.0:8001",
      "0.0.0.0:8444 ssl"
    ]
  },
  "version": "0.14.0",
  "node_id": "a5913589-7aa8-4fe3-816e-d5c5f5b52c78",
  "lua_version": "LuaJIT 2.1.0-beta3",
  "prng_seeds": {
    "pid: 55": 181732512326,
    "pid: 54": 142607197313
  },
  "timers": {
    "pending": 5,
    "running": 0
  },
  "hostname": "kong-rc-86f48cd777-z2zfr"
}
Sources
The post Kubernetes – Installing Kong (API Gateway) appeared first on Dim Solution.
]]>The post Kubernetes – Using a private registry, like Gitlab appeared first on Dim Solution.
]]>This article shows how to use secrets to pull an image from a private Docker registry.
Description
Incredibly powerful, Kubernetes offer a simple way to manage your secrets and customize the default registry (Docker Hub).
In this example, we’ll use the Gilab Container Registry service.
Let’s go!
Create a file ~/.dockerconfig with your registry credentials on your local machine.
$ export DOCKER_REGISTRY_SERVER=https://registry.gitlab.com
$ export DOCKER_USER=user
$ export [email protected]
$ export DOCKER_PASSWORD=password
Export variables from~/.dockerconfig.
$ source ~/.dockerconfig
To verify the configuration.
$ printenv | grep DOCKER
You should have the same output:
DOCKER_REGISTRY_SERVER=https://registry.gitlab.com
DOCKER_USER=user
[email protected]
DOCKER_PASSWORD=password
Everything is ok, let’s create Kubernetes gitlab-registry secret.
kubectl create secret gitlab-registry gitlab-registry \
--docker-server=$DOCKER_REGISTRY_SERVER \
--docker-username=$DOCKER_USER \
--docker-password=$DOCKER_PASSWORD \
--docker-email=$DOCKER_EMAIL
It’s time to test it!
cat <<EOF | kubectl apply -f -
apiVersion: v1
kind: Pod
metadata:
  name: foo
spec:
  containers:
    - name: foo
      image: foo/your-gitlab-private-image:latest
      imagePullPolicy: Always
  imagePullSecrets:
    - name: gitlab-registry
EOF
To check if your private image has been pulled, your can:
$ kubectl describe po/foo | grep -i pull
Extra
To remove the created pod.
$ kubectl delete po/foo
To remove local Docker configuration.
# Remove environment variables file
$ rm ~/.dockerconfig

# Remove environment variables
$ unset DOCKER_REGISTRY_SERVER
$ unset DOCKER_USER
$ unset DOCKER_EMAIL
$ unset DOCKER_PASSWORD
To sharing the secret across multiple Kubernetes namespaces.
export NAMESPACE=your-namespace
kubectl get secret gitlab-registry -o yaml \
  | sed "s/default/$NAMESPACE/g" \
  | kubectl -n $NAMESPACE create -f -
The post Kubernetes – Using a private registry, like Gitlab appeared first on Dim Solution.
]]>The post Kubernetes – Creating a single master cluster on a remote Debian 9 appeared first on Dim Solution.
]]>This article has for goal to demonstrate you how to create a Kubenetes (bare metal) single master cluster with the kubeadm tool on a remote Debian 9 server.
Requirements
- 2 GBs minimum per machine.
- 2 CPUs minimum.
- Full network connectivity between all machines in the cluster.
- Unique hostname, MAC address, and product_uuid for every node.
- Swap disabled.
- Certain ports have to be open on your machines:Port details for Master node
Protocol Direction Port Range Purpose TCP Inbound 6443* Kubernetes API server TCP Inbound 2379-2380 etcd server client API TCP Inbound 10250 Kubelet API TCP Inbound 10251 kube-scheduler TCP Inbound 10252 kube-controller-manager TCP Inbound 10255 Read-only Kubelet API
Port details for Worker nodeProtocol Direction Port Range Purpose TCP Inbound 10250 Kubelet API TCP Inbound 10255 Read-only Kubelet API TCP Inbound 30000-32767 NodePort Services**
Provisionning
You have to know you can get away with a single host for testing but it’s highly recommended to have at least a single master and two worker nodes in your cluster.
Now, run the followings commands on each nodes as root (Gist). The following script install everything you need for running Kubernetes on your machine(s):
Linux utils
- apt-transport-https
- ca-certificates
- curl
- software-properties-common
Docker + Kubernetes
- docker-ce (docker community edition)
- kubelet (the component that runs on all of the machines in your cluster and does things like starting pods and containers.)
- kubeadm (to bootstrap the cluster, could be only installed in your master)
- kubectl (to control the cluster)
$ curl -sL https://gist.githubusercontent.com/rimiti/7827217049de4e9cb9b398e7a5f2cc12/raw/c69df2657cc0de78e8783065644be7ce62d9f753/installations.sh | sh
Disable swap
Since Kubernetes 1.8, you need to disable swap on each servers.
$ sudo swapoff -a
Support for swap is non-trivial. Guaranteed pods should never require swap. Burstable pods should have their requests met without requiring swap. BestEffort pods have no guarantee. The kubelet right now lacks the smarts to provide the right amount of predictable behavior here across pods. (@derekwaynecarr)
Create the cluster
At this step, connect you from ssh to your remote master server.
$ ssh -i ~/.ssh/my_secret_key [email protected]
As root, initialize your cluster with kubeadm.
$ sudo kubeadm init
You should have a similar output like that:
[init] Using Kubernetes version: vX.Y.Z
[preflight] Running pre-flight checks
[kubeadm] WARNING: starting in 1.8, tokens expire after 24 hours by default (if you require a non-expiring token use --token-ttl 0)
[certificates] Generated ca certificate and key.
[certificates] Generated apiserver certificate and key.
[certificates] apiserver serving cert is signed for DNS names [kubeadm-master kubernetes kubernetes.default kubernetes.default.svc kubernetes.default.svc.cluster.local] and IPs [10.96.0.1 10.138.0.4]
[certificates] Generated apiserver-kubelet-client certificate and key.
[certificates] Generated sa key and public key.
[certificates] Generated front-proxy-ca certificate and key.
[certificates] Generated front-proxy-client certificate and key.
[certificates] Valid certificates and keys now exist in "/etc/kubernetes/pki"
[kubeconfig] Wrote KubeConfig file to disk: "admin.conf"
[kubeconfig] Wrote KubeConfig file to disk: "kubelet.conf"
[kubeconfig] Wrote KubeConfig file to disk: "controller-manager.conf"
[kubeconfig] Wrote KubeConfig file to disk: "scheduler.conf"
[controlplane] Wrote Static Pod manifest for component kube-apiserver to "/etc/kubernetes/manifests/kube-apiserver.yaml"
[controlplane] Wrote Static Pod manifest for component kube-controller-manager to "/etc/kubernetes/manifests/kube-controller-manager.yaml"
[controlplane] Wrote Static Pod manifest for component kube-scheduler to "/etc/kubernetes/manifests/kube-scheduler.yaml"
[etcd] Wrote Static Pod manifest for a local etcd instance to "/etc/kubernetes/manifests/etcd.yaml"
[init] Waiting for the kubelet to boot up the control plane as Static Pods from directory "/etc/kubernetes/manifests"
[init] This often takes around a minute; or longer if the control plane images have to be pulled.
[apiclient] All control plane components are healthy after 39.511972 seconds
[uploadconfig] Storing the configuration used in ConfigMap "kubeadm-config" in the "kube-system" Namespace
[markmaster] Will mark node master as master by adding a label and a taint
[markmaster] Master master tainted and labelled with key/value: node-role.kubernetes.io/master=""
[bootstraptoken] Using token: <token>
[bootstraptoken] Configured RBAC rules to allow Node Bootstrap tokens to post CSRs in order for nodes to get long term certificate credentials
[bootstraptoken] Configured RBAC rules to allow the csrapprover controller automatically approve CSRs from a Node Bootstrap Token
[bootstraptoken] Creating the "cluster-info" ConfigMap in the "kube-public" namespace
[addons] Applied essential addon: CoreDNS
[addons] Applied essential addon: kube-proxy

Your Kubernetes master has initialized successfully!

To start using your cluster, you need to run (as a regular user):

  mkdir -p $HOME/.kube
  sudo cp -i /etc/kubernetes/admin.conf $HOME/.kube/config
  sudo chown $(id -u):$(id -g) $HOME/.kube/config

You should now deploy a pod network to the cluster.
Run "kubectl apply -f [podnetwork].yaml" with one of the addon options listed at:
  http://kubernetes.io/docs/admin/addons/

You can now join any number of machines by running the following on each node
as root:

  kubeadm join --token <token> <master-ip>:<master-port> --discovery-token-ca-cert-hash sha256:<hash>
At this moment, your kubernetes cluster is created, but to start using it, you need to run the following steps (as a regular user / not root):
$ sudo su - kube
$ mkdir -p $HOME/.kube
$ sudo cp -i /etc/kubernetes/admin.conf $HOME/.kube/config
$ sudo chown $(id -u):$(id -g) $HOME/.kube/config
Trick
To not every time adding –kube-config argument to your kubectl command, example
$ kubectl --kube-config $HOME/.kube/config get all
You can create an environment variable to say to Kubernetes to use this config file as default.
$ echo "export KUBECONFIG=$HOME/.kube/config" | tee -a ~/.bashrc
$ source ~/.bashrc
Now, you can use kubectl without –kube-config argument.
Join the cluster (optional for this tutorial)
If you have workers, you can easily join the cluster with the command generated by the previous kubeadm command.
$ sudo kubeadm join --token c30633.d178035db2b4bb9a 10.0.0.5:6443 --discovery-token-ca-cert-hash sha256:<hash>
Create a network (optional for this tutorial)
There are many network providers available for Kubernetes, but none are included by default. Weave Net (created by Weaveworks) is one of the most popular providers in the Kubernetes community. One of its many benefits is that it works directly without any configuration.
$ kubectl apply -f "https://cloud.weave.works/k8s/net?k8s-version=$(kubectl version | base64 | tr -d '\n')"
Apply your first chart
Before applying the kubernetes-dashboard chart, we check the cluster and nodes status.
$ kubectl cluster-info
Kubernetes master is running at https://163.173.23.173:6443
KubeDNS is running at https://163.173.23.173:6443/api/v1/namespaces/kube-system/services/kube-dns:dns/proxy

$ kubectl get nodes
NAME      STATUS    ROLES     AGE       VERSION
kube-01   Ready     master    2h        v1.11.0
Everything is ok, we can apply the recommended kubernetes-dashboard chart (Github).
$ kubectl apply -f https://raw.githubusercontent.com/kubernetes/dashboard/master/src/deploy/recommended/kubernetes-dashboard.yaml
The post Kubernetes – Creating a single master cluster on a remote Debian 9 appeared first on Dim Solution.
]]>The post How to replace your string variables by your values? appeared first on Dim Solution.
]]>Despite the fact that javascript is an excellent programming language, it sometimes suffers from a lack of functionalities. Unlike others programming language, it doesn’t have a native string replacer and that’s why I’ve written the @rimiti/stimmy (Github) package and this article.
Why @rimiti/stimmy?
Used in many production packages, it have been written to be safe and fully customizable.
Benefits:
- Very light (8kb)
- Can replace string variables from an object.
- Can replace string variables from an array.
- Pattern customizable.
- Doesn’t have dependencies.
- 100% of code coverage
- …
How to use it?
Stimmy is CommonJS and ES6 compliant, in this case you can import or require it without .default.
Like all NodeJS packages, you need to import it before using it.
// CommonJS
const stimmy = require('@rimiti/stimmy');

// ES6
import stimmy from '@rimiti/stimmy';
After that, you just have to instantiate it:
// As default, it use the {myVariable} pattern
const replacer = stimmy();
Stimmy provides two ways for replacing your variables.
From an array:
replacer('This {0} is {1}!', ['module', 'awesome']);
// This module is awesome!

replacer('{0}% of code coverage, it\'s {1}...', [100, 'so amazing']);
// 100% of code coverage, it's so amazing...
From object:
replacer('{timmy} My hobby is {hobby}...', {timmy: 'Timmmmmmmyy !!', hobby: 'running'});
// Timmmmmmmyy !! My hobby is running...

replacer('My name is {name}, I\'m {age}.', {name: 'stimmy', age: 25});
// My name is stimmy, I'm 25.
Ok, but how to customize the replacement pattern?
In case you want to change the default pattern, you just have to pass it as parameter when you assign the replacer, example:
// If you want to customized default pattern (ex: {{myVariable}}
const replacer = stimmy('{{', '}}')
From an array:
replacer('This {{0}} is {{1}}!', ['module', 'awesome']);
// This module is awesome!

replacer('{0}% of code coverage, it\'s {{1}}...', [100, 'so amazing']);
// 100% of code coverage, it's so amazing...
From object:
replacer('{{timmy}} My hobby is {{hobby}}...', {timmy: 'Timmmmmmmyy !!', hobby: 'running'});
// Timmmmmmmyy !! My hobby is running...

replacer('My name is {{name}}, I\'m {{age}}.', {name: 'stimmy', age: 25});
// My name is stimmy, I'm 25.
If you want more examples or snippets, you can check the official repository.
The post How to replace your string variables by your values? appeared first on Dim Solution.
]]>The post How to easily generate order / invoice PDF file? appeared first on Dim Solution.
]]>This tutorial aims to show you how use @rimiti/invoice-it (Github, NPM) NodeJS package to easily generate invoice or order PDF files.
Invoice-it is production ready since July 1st, 2017. It use PhatomJS (Scriptable Headless Browser) from html-pdf package, which is embedded by invoice-it to convert html templates to PDF.
Why invoice it?
Invoice-it has been created to be fully customizable and supporting multi page. You can easily override default configuration to:
- Use your own order and invoice templates.
- Add your logo.
- Change date format.
- Change default locale.
- Add / use your own locales file (to override wording).
- Add order and invoice notes.
- Customize you company informations (company name, address, phone, website, footer…).
- Change document identification format (example: IN-1805-00001).
- …
Let’s go!
As an example, let’s generate a first order containing the items below:
- Macbook Pro 13″ – (x3)
- Github licence – (x1)
- Apple care 1 year – (x3)
To be in real condition, I’ll fully customize the document with following informations:
Emitter:
Dim Solution
73 rue Victor Hugo
77340 Pontault-Combault
Phone: +33 0 00 00 00 00
Email: [email protected]
Recipient:
Will Jameson
20 rue de Paris
75001 Paris
Phone: 00 00 00 00 00
Email: [email protected]
Our footer company informations:
Dim Solution inc – Registration: 87564738493127
NAF-APE: 6202A – Num. VAT: EN28987856541
To don’t pass every time emitter and logo informations, you can configure it and exporting it.
import invoiceIt from '@rimiti/invoice-it';

// Configuration
invoiceIt.configure({
    emitter: {
        name: 'Dim Solution',
        street_number: '15',
        street_name: 'Rue Jean Jaures',
        zip_code: '75012',
        city: 'Paris',
        country: 'France',
        phone: '01 00 00 00 00',
        mail: '[email protected]',
        website: 'www.dimsolution.com',
    },
    global: {
        logo: 'http://placehold.it/230x70&text=Dim+Solution',
        lang: 'en',
        footer: {
            fr: 'Société par Actions Simplifiée Unipersonnelle (SASU) - Capital de 1 000 000 € - SIRET: 87564738493127 <br> NAF-APE: 6202A - Num. TVA: FR28987856541',
            en: 'Dim Solution inc - Registration: 87564738493127 <br> NAF-APE: 6202A - Num. VAT: EN28987856541'
        },
    },
});

export default invoiceIt;
Adding recipient informations:
// Import customized instance
import invoiceIt from 'lib/invoiceIt';

const recipient = {
    first_name: 'Will',
    last_name: 'Jameson',
    street_number: '20',
    street_name: 'Rue Victor Hugo',
    zip_code: '77340',
    city: 'Pontault-Combault',
    country: 'France',
    phone: '06 00 00 00 00',
    mail: '[email protected]'
};

// Prepare document
const document = invoiceIt.create(recipient);
There are two ways for adding articles in a document.
From an array:
document.article = [{
    description: 'Macbook Pro 13"',
    tax: 19.60,
    price: 952.09,
    qt: 2,
}, {
    description: 'Github licence',
    tax: 10,
    price: 79,
    qt: 5,
}];
From object:
document.article = {
    description: 'Apple care 1 year',
    tax: 20,
    price: 100,
    qt: 3,
};
It’s time to export our document ?
Invoice-it provides several formats to export document.
HTML
// Export order to HTML file.
document.getOrder()
        .toHTML()
        .toFile('./exports/order.html')
        .then(() => console.log('Order HTML file created.'));

// Export invoice to HTML file.
document.getInvoice()
        .toHTML()
        .toFile('./exports/invoice.html')
.then(() => console.log('Invoice HTML file created.'));// Export order to PDF file.
document.getOrder()
.toPDF()
.toFile('./exports/order.pdf')
.then(() => console.log('Order PDF file created.'));
// Export invoice in PDF
document.getInvoice()
.toPDF()
.toFile('./exports/invoice.pdf')
.then(() => console.log('Invoice PDF file created.'));
Isn’t it awesome ? 

Invoice PDF

Order PDF
Extras
Some others examples to demonstrate you how to customize some fields:
// If you want to add note to your order
document.order_note = 'Your order note...';

// If you want to add note to your invoice
document.invoice_note = 'Your invoice note...';

// To delete all articles
document.deleteArticles();
The code present in this tutorial is accessible into this repository.
If you want more examples or snippets, you can check the official repository.
The post How to easily generate order / invoice PDF file? appeared first on Dim Solution.
]]>