Over the holidays I implemented a system for reflective materials in Block Game. Here I’ll go over roughly how it works. I originally intended for this post to be a deep dive, but then I realized that the nitty gritty on this one just isn’t that interesting. Or at least, I’m just not that interested in doing a deep dive on it so this one will stay fairly high level.
Anyway, it all started when I got introduced to matcaps over on Mastodon. Matcaps are a neat way to add texture to a model without texturing it. You obtain, via photograph, 3D render, or even freehand painting, a spherical map of a material. Then, you apply it to an object by sampling the sphere based on where the normal is pointing using the view space x and y coordinates. And that, I thought, was pretty rad.

This works because when you look at an object in view space, none of the normals will be pointing away. They’ll either be pointing sideways or nominally at the camera. So half a sphere is all you need.
And I thought to myself: hey, I’ve used the spherize filter in Photoshop to make spheres out of squares. And I also thought to myself: hey, if I flip the camera around and render the scene with a high field of view into a square texture, then I could spherize that and use it as a matcap for reflective materials!
Is this the right way to do reflective materials? Absolutely not. Does it work? Yes, sometimes very well and occasionally not so good.
]]>
Over the holidays I implemented a system for reflective materials in Block Game. Here I’ll go over roughly how it works. I originally intended for this post to be a deep dive, but then I realized that the nitty gritty on this one just isn’t that interesting. Or at least, I’m just not that interested in doing a deep dive on it so this one will stay fairly high level.
Anyway, it all started when I got introduced to matcaps over on Mastodon. Matcaps are a neat way to add texture to a model without texturing it. You obtain, via photograph, 3D render, or even freehand painting, a spherical map of a material. Then, you apply it to an object by sampling the sphere based on where the normal is pointing using the view space x and y coordinates. And that, I thought, was pretty rad.
This works because when you look at an object in view space, none of the normals will be pointing away. They’ll either be pointing sideways or nominally at the camera. So half a sphere is all you need.
And I thought to myself: hey, I’ve used the spherize filter in Photoshop to make spheres out of squares. And I also thought to myself: hey, if I flip the camera around and render the scene with a high field of view into a square texture, then I could spherize that and use it as a matcap for reflective materials!
Is this the right way to do reflective materials? Absolutely not. Does it work? Yes, sometimes very well and occasionally not so good.
The first thing I had to do was figure out how to mimic the spherize filter in a shader. I found this shadertoy which worked great and then set out to optimize it a little bit. In the process I came up with a formula that matches the asin function extremely well and a bunch of maths people on Mastodon had a lovely chat about it which I didn’t understand. You can find the whole HLSL shader include file on Github.

Then I had to render the back view. I just render it to a chunk render distance of 1. You don’t need much!
That gives me reflections, but I need a few other things to make the material shine (pardon the pun):
- The color of the material (for metallics, though I added dielectrics later)
- A roughness value which is used to blur the reflections
- A matcap image to overlay on top of the reflections
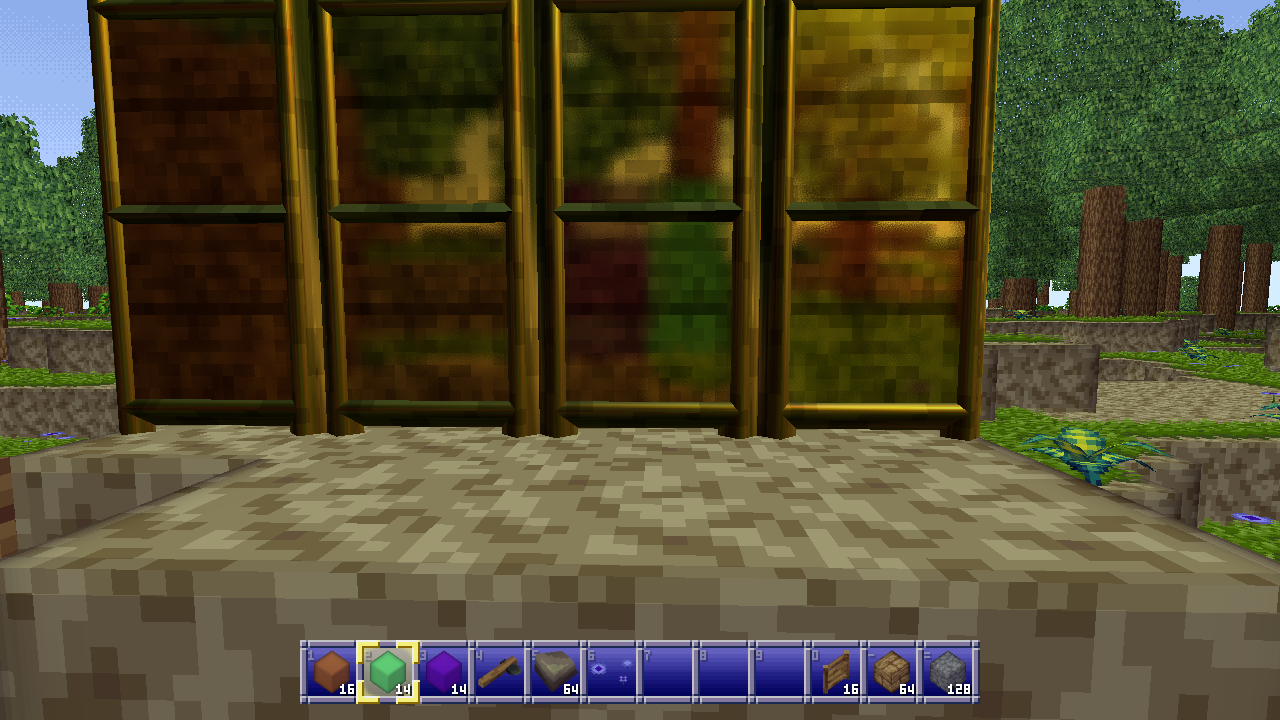
For example, the gold material I started testing with has a linear color of (1.059, 0.773, 0.307) which I got from the PBR values database, a roughness of 0.125, and the following matcap:

Before I touch any of that though, I have to make a modification to how matcaps work to make all this work. Instead of using the surface normal I actually have to use the reflected ray in view space. If I didn’t do that a flat surface would all reflect the same pixel from the environment map which isn’t desirable.
Unfortunately this did cause some issues with some geometry where the axes of reflection would flip around straight to the other side, which I never figured out but believe to be issues with normal smoothing on my very low-poly geometry.

I found out that I could eliminate these issues by averaging the reflected ray with the normal. This does mean the rays aren’t accurate anymore, but they’re still convincing enough and it fixed my issue. ¯\_(ツ)_/¯
Once I have the reflected ray, I do the following:
- De-spherize the target location for my environment map (a strength of -1) because I want to go from the spherical coordinates I have to the flat environment map I have.
- Get a blurred sample of the environment map and color that, with blurring and coloring based on roughness and material color.
- Mix the matcap over the reflections using a formula similar to Photoshop’s hard light blend mode, which screens the bright portions and multiplies the dark portions.
Blurring is done via a stochastic blue noise blur which I stole (with permission) from Alan Wolfe aka demofox (Mastodon, Bluesky) who is the master of all things blue and noisy. It works great and can be done with as little as a single sample, although averaging 2, 3 or 4 samples does look nicer. This means I don’t need to pre-blur the environment map for materials with different roughness which is great.
(Yes I know about tex2Dlod and tex2Dbias and no, it did not look nearly as good.)
I mix the matcap using a HardLightScaleBright function which allows me to scale how strong the screen effect is, because it’s weird to get a super bright specular in a mostly dark environment. To get scene luminance I just sample the highest mipmap level of my environment map to get the averaged color, then get the maximum of the RGB channels, and multiply by 2 before using it with said function which looks like this:
float3 HardLightScaleBright(float3 cBase, float3 cBlend, float brightScale) {
    float3 multColor = 2.0 * cBase * cBlend;
    float3 screenColor = 1.0 - 2.0 * (1.0 - cBase) * (1.0 - cBlend);
    screenColor = lerp(cBase, screenColor, brightScale);

    return lerp(multColor, screenColor, step(0.5, cBlend));
}
Then I blend the reflected environment/material color with the diffuse texture map, even though metallic things shouldn’t have a diffuse color, just so the diffuse texture can add some, well, texture:
HardLight(1 - pow(1 - ColorToLuminanceLinear(diffuse.rgb), 5), envColor)
In order to not make the material too dark I power up the reverse of the diffuse luminance to brighten everything up, then reverse it again, then blend the material color using regular hard light blending.
Finally I do a single sample blue noise jitter to blur sampling around the edges of the matcap image specifically, because otherwise the edges can create some artifacts as well. I also scale the sample location inwards towards the center ever so slightly for similar reasons on the environment map.

And here’s what that looks like on a piece of flint. It looks just like a Christmas ornament! :D

It also creates some pretty neat head-on reflections of what’s behind you. Like here, where I placed a couple transparent purple and green blocks behind me which you can see in the center of the screen in the reflection on these golden doors.
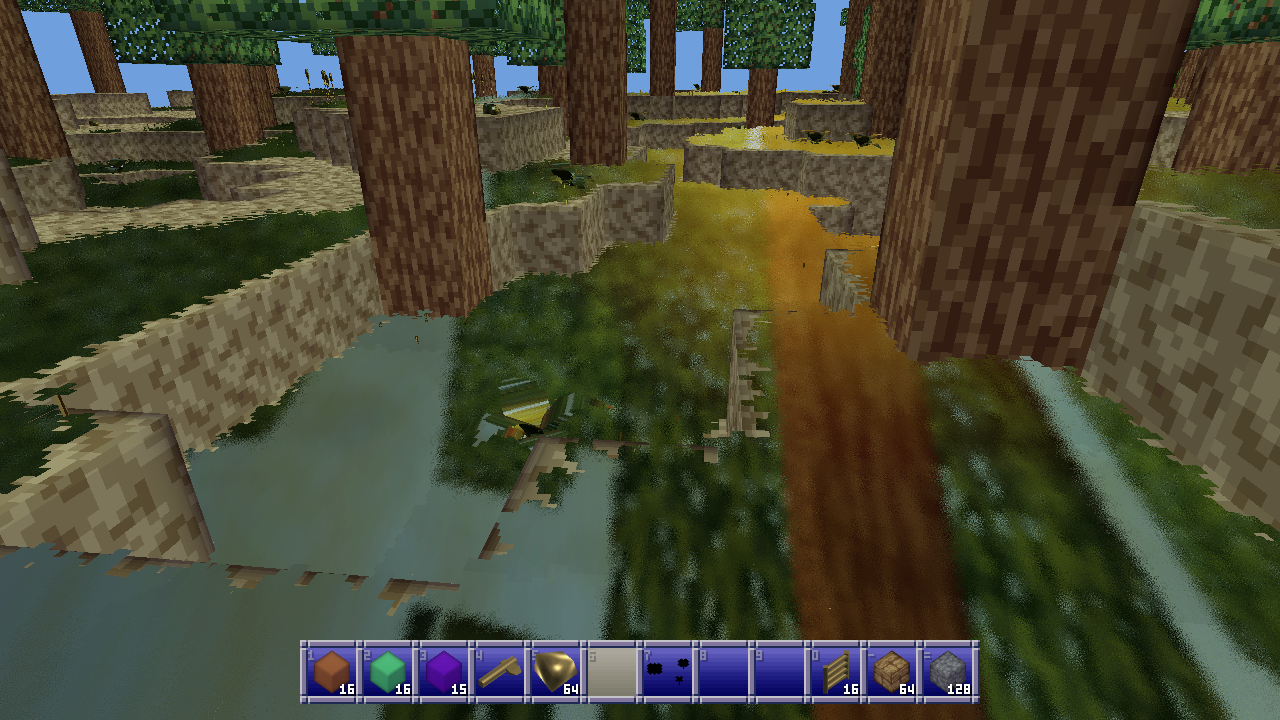
Unfortunately it doesn’t work great for especially ground plane type stuff. In this example I’ve turned the grass gold, and because most rays are reflecting off into the distance rather than back at the camera the reflections are all wrong for most typical viewing angles. Unless you look directly at your feet, but I suspect most players won’t spend most of their time doing that.

Still for objects that aren’t mostly large flat planes I think this technique works great and I’m very happy with the result.
I did eventually add dielectrics (nonmetallic materials) and I’ll go over how I tweak my method for those, but I’m not 100% happy with the results yet so take these with a grain of salt.
For dielectrics instead of multiplying the reflections by the material color (there should be none since dielectrics have their own diffuse color) I desaturate the reflections from the environment map by averaging the maximum of the RGB values and the actual color, which also makes them a bit brighter which is nice.
When blending the reflections for dielectrics I just screen blend them over the diffuse color based on some power of the inverse roughness. That is to say, the higher the roughness, the lower the value I multiply the reflection color by, which decreases how much the screen blending blends it into the diffuse color.
This gives it a nice plasticky look that I think works pretty well.
Anyway here’s an assortment of objects with metallic and dielectric materials applied.

As a happy added bonus of this approach, on weaker systems the reflections can be disabled which skips most steps for extra performance and just uses the matcap image verbatim. That way reflective materials will still look correct. This also happens when I pre-render item icons:
I did also try to generate a front environment map, even compositing the previous frame into it, but the incongruity where the two half-spheres don’t quite meet made everything feel much worse plus it didn’t really help anyway. At some point I’ll probably wind up mixing these with screen-space reflections or something since SSR doesn’t really handle camera facing reflections.
Anyway, I don’t know if this is a good way to handle things but it’s an idea that popped into my head and I quite like the results. I also have some neat ideas for creating flat material textures and then moving a sphere across them using the spherize shader to create dynamic matcaps for special effects, but I haven’t played around with that yet. If you wind up playing with this before I do, show me how it looks!
If you’ve enjoyed this post, give the Block Game site a look. It has some screenshots, an FAQ, and a development feed. Also consider following me on Mastodon @[email protected], or on Bluesky at @enikofox.com.
]]>My GPU is the integrated Radeon Vega 8 that comes with my AMD Ryzen 7 5700G CPU. I tell you this so you know that my workstation is not a graphical computing powerhouse. It is, in fact, quite weak. To its credit my integrated GPU shows up as 48% faster on UserBenchmark than the GPU in my low end hardware target; a laptop I bought in 2012.
(Side note: I’m aware of accusations of inaccuracy surrounding UserBenchmarks, but it’s not that serious. I just think it’s funny that an iGPU I picked up recently doesn’t compare more favorably to a 14 year old laptop GPU that wasn’t considered that great even at the time.)
That, and the fact I want my game to run well even on a potato, is why I recently decided to try my hand at writing a software rendered occlusion culling solution for the Block Game (working title) I’m developing as I’ve always been interested in the idea. Blocks and chunks are axis aligned cubes, which makes things easier, and block games tend to have a ton of hidden geometry in the form of underground caves. There are other ways to cull these, but the algorithms tend to be fairly complex and this seemed like a good way to avoid that complexity and stick with something very conceptually simple.
In this post I’ll be explaining the development process and the solution that I eventually landed on. If you like you can also read the development thread I posted on Mastodon and Bluesky.
Before I start though I’d like to say that this came out quite well, better than I expected. It runs in half a frame at 60 FPS or less (threaded, of course) and generally culls at least 50% of the chunks that survive frustum culling. Above ground, looking straight ahead at the horizon it’ll cull around between 50 and 60% of chunks, but indoors and below ground in caves it can cull upwards of 95% of chunks, resulting in framerates of 400+ even on my weak system. All around a resounding success, though it has some cases where it breaks down which I’ll touch on at the very end of this post.


My GPU is the integrated Radeon Vega 8 that comes with my AMD Ryzen 7 5700G CPU. I tell you this so you know that my workstation is not a graphical computing powerhouse. It is, in fact, quite weak. To its credit my integrated GPU shows up as 48% faster on UserBenchmark than the GPU in my low end hardware target; a laptop I bought in 2012.
(Side note: I’m aware of accusations of inaccuracy surrounding UserBenchmarks, but it’s not that serious. I just think it’s funny that an iGPU I picked up recently doesn’t compare more favorably to a 14 year old laptop GPU that wasn’t considered that great even at the time.)
That, and the fact I want my game to run well even on a potato, is why I recently decided to try my hand at writing a software rendered occlusion culling solution for the Block Game (working title) I’m developing as I’ve always been interested in the idea. Blocks and chunks are axis aligned cubes, which makes things easier, and block games tend to have a ton of hidden geometry in the form of underground caves. There are other ways to cull these, but the algorithms tend to be fairly complex and this seemed like a good way to avoid that complexity and stick with something very conceptually simple.
In this post I’ll be explaining the development process and the solution that I eventually landed on. If you like you can also read the development thread I posted on Mastodon and Bluesky.
Before I start though I’d like to say that this came out quite well, better than I expected. It runs in half a frame at 60 FPS or less (threaded, of course) and generally culls at least 50% of the chunks that survive frustum culling. Above ground, looking straight ahead at the horizon it’ll cull around between 50 and 60% of chunks, but indoors and below ground in caves it can cull upwards of 95% of chunks, resulting in framerates of 400+ even on my weak system. All around a resounding success, though it has some cases where it breaks down which I’ll touch on at the very end of this post.
Depth based occlusion culling
Other people have explained the concept of depth based occlusion culling better than I can, but I’ll go over it real quick. You take the scene’s depth buffer, then for every cullable thing you check that depth buffer to see if any of its pixels would be visible. If so, it’s visible. If not, it’s culled.
There’s lots of stuff you can do with this. You can render at relatively high res and conservatively downsample your buffer (always using the farthest distance) which is called hierarchical Z buffers. You can, with modern technology, enlist the help of your GPU to do this. You can use motion vectors to just reuse the previous frame’s buffer. You could use async readback to get back an actual depth buffer rendered on the GPU for analysis on the CPU without stalling your GPU.
I’ll explain my final system first and then walk you through the process of how I actually arrived at that system.
Block Game’s occlusion culling
What I did is much simpler and doesn’t have any of the fancy stuff I mentioned above. I’m using FNA to create Block Game, so I’m stuck with older technology and can’t leverage the GPU’s capabilities. I could do a readback from the GPU to get the actual depth buffer, but not asynchronously, so that would necessarily involve some kind GPU stall which isn’t great. That’s why I’m just rendering on the CPU.
I render at a resolution of 256x128 pixels, and because in a block game everything is cubes, I render cubes into my depth buffer (which is a simple array of floats) and then check more cubes against the buffer.
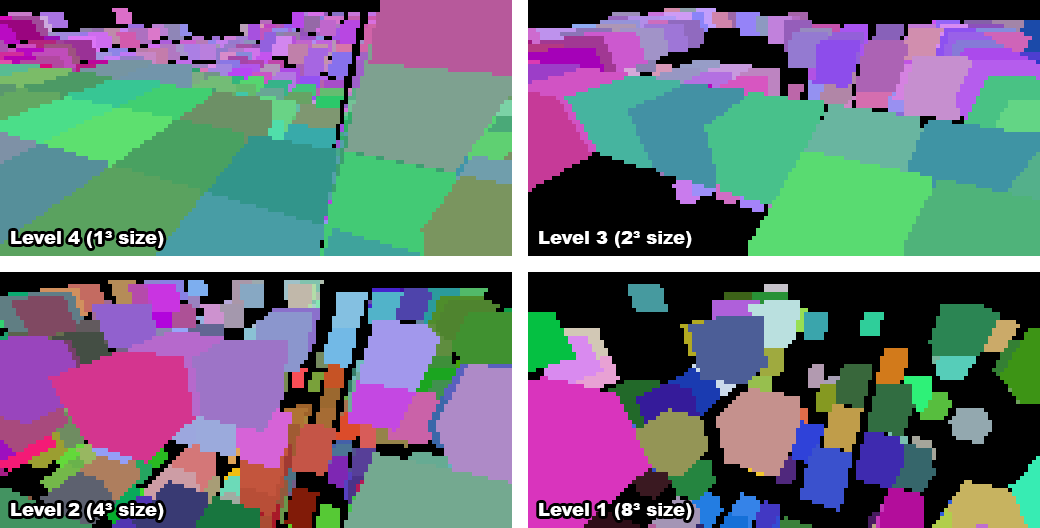
When a chunk gets rebuilt due to changes I build up a sort of “mipmap” chain of occluding subchunks. My chunks are 16x16x16 in size, so there’s 5 levels:
- this is just the entire chunk
- 2x2x2 cubes, each 8x8x8 blocks in size
- 4x4x4 cubes, each 4x4x4 blocks in size
- 8x8x8 cubes, each 2x2x2 blocks in size
- 16x16x16 cubes, each one conforming to a single block
I process level 4 first, marking as an occluder any full opaque block with a visible face. Then I go down the levels, marking as occluding subchunks any cube of blocks that has a visible face and is made up entirely of full opaque blocks.
Once the camera’s position for the frame is updated the game tells the renderer to begin occlusion culling. This gathers the chunks around the player, throws out any that don’t contain visible faces or entities, and frustum culls the rest in world space. It then sends the remaining chunks to the occlusion culler which gathers all the occluders. The highest level, occluders which are individual blocks, consists of occluders within a radius of 20 blocks of the camera. Then the next levels, 1 through 3, are gathered based on the distance of the chunks they’re in from the chunk the camera is in.
While there are plenty of level 1 occluders of 8x8x8 blocks in size, there never seem to be any 16x16x16 occluders, but I could theoretically add those too. In order to avoid false positive occlusions I shrink every occluder’s cube by 1 pixel horizontally and vertically which causes them to vanish at a far enough distance, and there’s no point rendering cubes further out than where they’re reasonably visible. Skipping occluders like this vastly reduces the workload for the occlusion culler.
The occlusion culler also stores every candidate chunk’s position, size, and chunk index in a list of chunks. Once all of this data is gathered the occlusion culler won’t need to touch the actual chunks’ data anymore, which means we’ve achieved thread safety, and signals the background thread to wake up and do the actual work.
In the background thread every occluder is first frustum culled because the earlier frustum culling only applied to entire chunks, not subchunks, and up to 8 vertex transforms are much more expensive than the dot products required for frustum culling.
The corners of the remaining occluders are then transformed into the depth buffer’s x/y coordinates and depth. To avoid the overhead of a full 4x4 projection matrix multiplication what I do is rotate using the view matrix, translate through addition, and use the linear view depth since my buffer is just made up of regular 32-bit floats. This takes fewer operations and so is significantly faster when dealing with many thousands of vertices. The occluder’s depth value is then the maximum of all linear depth values calculated.
If any of the transformed corners are invalid because they lie behind the camera’s near plane, the occluder is skipped entirely, but if not, its “shape” is traced. Instead of rendering triangles or faces, I use a 1D array that holds the minimum and maximum x coordinates for every row in the depth buffer. Tracing the shape then means finding the minimum and maximum y coordinates of any of the 8 cube corners, and then stepping through all 12 cube edges, recording the minimum and maximum x values for each row.
Drawing the occluder then becomes as easy as stepping through each row from the minimum y (plus one) to the maximum (minus one), looking up the minimum and maximum x from the 1D array (also plus and minus 1), and horizontally filling the depth buffer with the furthest possible depth value for the occluder.
The plus and minus one is because I’m rendering the depth at such a low resolution. By shrinking the cube by a pixel I can avoid edge cases where at this lower resolution a chunk wouldn’t be visible at all, while it would be at the full resolution.

The occlusion culler then does a similar thing for all the candidates for occlusion, except it now records the nearest distance instead of the furthest, and there’s no longer a 1 pixel inset. If the depth is less than or equal to any of the values in the buffer, the chunk is visible and no more pixels need to be checked. If the depth doesn’t pass anywhere, the chunk can be culled. One notable change here is that if any of the corner vertices of a candidate chunk aren’t valid (due to being positioned behind the camera’s near plane) then it’s simply considered visible because we can’t perform the check.
This approach works well in a variety of situations, and performs well even on slower CPUs. It really helps older systems or those with weaker graphics like my own to achieve good framerates in most normal play scenarios, without the complexity or overhead of cave visibility algorithms.
The process
Of course I didn’t come to this approach fully formed and optimized, I had to start from somewhere. My first approach was to divide each chunk into a fixed number of subchunks. I tried 2 and 4 on each edge (for 8 and 16 subchunks per chunk respectively, and recorded simply whether a subchunk was full of opaque blocks regardless of whether it had any visible faces.
I would then send all subchunks of chunks that contain non-air/void blocks and or visible entities to the occlusion culler and transform their vertices using a full 4x4 projection matrix, multiplying by 1/w and recording the x/y/z coordinates. I would save the transformed coordinates in a list, rendering the occluders in one pass then reading occlusion candidates in another. If any chunk subchunk for a candidate was visible, the whole chunk was marked visible.
I was also not properly frustum culling before this stage, only eliminating chunks I knew were fully behind the camera, so the occlusion culler at this stage was also doing frustum culling.
This did work, for some definitions of the word “work”, in that it culled occluded chunks. Unfortunately it was also very slow, taking 150-200 milliseconds to process at a render distance of 12 chunks. I’ll admit that this made me a little bit nervous: that seemed like a big gap to bridge with optimizations. But I figured I’d give it a go.
Optimization 1: cheaper transforms
First I came up with the idea to do the 3x3 view rotation plus additive translation and using linear depth. Doing it the normal way involves a 4x4 projection matrix multiplication, for 16 multiplies, and then a division by 1/w for the x, y, and z coordinates, followed by a multiplication by the buffer size for x and y for a total of 21 multiplications and 1 division.
Instead I decided to do this:
private static Vector3F Transform(Vector3F position, Matrix4 view, Vector2F focalLenPixels, out bool valid) {
    // world to view
    Vector3F viewPos;
    viewPos.X = view.M11 * position.X + view.M21 * position.Y + view.M31 * position.Z + view.M41;
    viewPos.Y = view.M12 * position.X + view.M22 * position.Y + view.M32 * position.Z + view.M42;
    viewPos.Z = -view.M13 * position.X + view.M23 * position.Y + view.M33 * position.Z + view.M43);

    // perspective divide
    var invZ = 1.0f / viewPos.Z;
    var xScreen = viewPos.X * invZ * focalLenPixels.X + (bufferWidth / 2);
    var yScreen = viewPos.Y * invZ * focalLenPixels.Y + (bufferHeight / 2);

    // distance in view space substitute for actual depth
    var dist = viewPos.Z;

    valid = dist > FNARenderer.ZNearPerspective;
    return new Vector3F(xScreen, yScreen, dist);
}
I do a 3x3 matrix multiplication and use addition for the translation. Then I do the perspective divide and multiply by the focal length in pixels. I don’t care about scaling the depth along the z axis and instead just use the depth in linear view space because that’ll still work fine for my purposes. I’m not trying to render textures or anything, so this works fine for my purposes.
The result is 13 multiplications and 1 division versus 21 multiplications and 1 division. Performing only 62% as many multiplications all on its own lowered the required time to process everything to a factor of 0.67 from 150ms to 99. Not bad!
Optimization 2: world-space frustum culling
Because I was already transforming everything into screen space I was also trying to frustum cull in that space. I quickly found out that’s a terrible idea. While you can easily calculate the bounding sphere of a cube (it’s sqrt(3) * size * 0.5) cube corners can actually stick out much further because things are non-linear after projection to screen space. That meant I had to be much more conservative with my culling, which slowed everything down.
Fortunately it was pointed out to me that a simple dot product between the frustum planes and the bounding spheres of the cubes in world space would be much cheaper and more accurate. I found a way to extract the frustum planes from my projection matrix and tried it out and found the original unoptimized run time had now been lowered to a factor of 0.43, to 61ms.
For reference, here’s my function for extracting the planes, using FNA’s Plane struct:
public static void GetFrustumPlanes(Plane[] planes, Matrix4 viewProjection) {
    Debug.Assert(planes.Length >= 6);

    // left
    planes[0] = new Plane(
        viewProjection.M14 + viewProjection.M11,
        viewProjection.M24 + viewProjection.M21,
        viewProjection.M34 + viewProjection.M31,
        viewProjection.M44 + viewProjection.M41
    );

    // right
    planes[1] = new Plane(
        viewProjection.M14 - viewProjection.M11,
        viewProjection.M24 - viewProjection.M21,
        viewProjection.M34 - viewProjection.M31,
        viewProjection.M44 - viewProjection.M41
    );

    // bottom
    planes[2] = new Plane(
        viewProjection.M14 + viewProjection.M12,
        viewProjection.M24 + viewProjection.M22,
        viewProjection.M34 + viewProjection.M32,
        viewProjection.M44 + viewProjection.M42
    );

    // top
    planes[3] = new Plane(
        viewProjection.M14 - viewProjection.M12,
        viewProjection.M24 - viewProjection.M22,
        viewProjection.M34 - viewProjection.M32,
        viewProjection.M44 - viewProjection.M42
    );

    // near
    planes[4] = new Plane(
        viewProjection.M13,
        viewProjection.M23,
        viewProjection.M33,
        viewProjection.M43
    );

    // far
    planes[5] = new Plane(
        viewProjection.M14 - viewProjection.M13,
        viewProjection.M24 - viewProjection.M23,
        viewProjection.M34 - viewProjection.M33,
        viewProjection.M44 - viewProjection.M43
    );

    // normalize planes
    for (int i = 0; i < 6; i++) {
        Plane.Normalize(ref planes[i], out planes[i]);
    }
}
This was fast enough that I eventually moved it out of the background thread and the occlusion culler entirely, into the renderer’s normal chunk gathering pass.
Optimization 3: visible faces
I then realized that my criteria for what constitutes visible geometry was wrong. I considered any chunk (or subchunk at this time) to be potentially visible if it had blocks that weren’t by definition invisible, like air. Of course, that’s naive. A chunk only has visible geometry if it has visible faces. So I cut out subchunks without visible faces as occlusion candidates.
This helped significantly, bringing the run time down to a factor of 0.21 times the original, to 34ms. I was feeling a lot more optimistic at this stage, because that’s within a couple of frames and I hadn’t even been forced to break out the SIMD!
Optimization 4: near occluders, far culling
At this stage I had a key realization that would make everything fall into place with the optimization after this one: because of perspective nearby subchunks are large, and far away subchunks are tiny.
This meant that I wanted to mostly draw nearby occluders, because a nearby occluder that covers a large amount of the buffer is far more likely to occlude things than a far away occluder that only covers a few pixels.
It also meant that I wanted to mostly test far away subchunks for occlusion, because a far away subchunk is going to be tiny, so is far more likely to be occluded and will have far fewer pixels to test.
I tested this assumption and the run time went down from a factor of 0.21 to 0.14, from 37ms to 29ms. While this wasn’t the magic bullet I wanted, it would help lead me to it.
Optimization 5: subchunk levels
Realizing that nearby things are big and far away things are small (a truly revolutionary insight, I know, please applaud) I realized that I should be doing something like mipmapping: instead of having one size of subchunks, I should use smaller subchunks up close and larger ones further away.
This would help enormously with load. As render distance goes up the number of (sub)chunks rises geometrically, but using larger subchunks further away would lower the number of subchunks geometrically, so these two forces would counteract each other.
I also realized that while I wanted occluders to be subchunks, there wasn’t much call for occlusion candidates to be split up like that. After all, if I only cared if the entire chunk was occluded, why would I want to split that test up into 8 or 16 separate tests, each with their own 8 vertex transformations? So I split up occluders and candidates, with occlusion candidates remaining entire chunks, and occluders using the multiple levels of subchunks I explained at the start of the post.
For the highest level (where every subchunk is a block) I record two bits of information about each subchunk or block: whether it’s opaque or not, and if it is opaque whether or not it’s an occluder (i.e. it has a visible face). Tracking whether a subchunk is opaque, regardless of whether or not it’s an occluder, helps when generating the lower subchunk levels.
To optimize RAM usage I actually store this information in two 16 bit integers per z-slice: one for the opacity, one for the occlusion.
When generating higher levels (i.e. bigger subchunks) I do something very similar, looking at the previous level and recording the subchunk as an occluder only if all previous subchunks in the 2x2x2 area are fully opaque, and if at least one of them is an occluder. In other words, a subchunk is an occluder if all 8 of the subchunks it represents in the next level up are opaque and at least one of them has a visible face.
When I finally tested this optimization I was blown away. At a render distance of 12 chunks it was now taking on average 0.04 times the original run time. The previous optimization had it down to 29ms, this one had it down to only 4. That’s a speed up of over seven times.
To be fair to the other optimizations I did, they had made things five times faster as well, so it’s not like they weren’t contributing.
At this point I considered my work done, and moved on to clean up.
Limitations
While this software rendered depth occlusion culling approach works really well in many cases, there are some instances where it breaks down. The most notable one is that the best occluders are the subchunks that correspond to a single block. However, I can only process a limited number of occluders without slowing things down too much, so I can only render this highest level of subchunks so far out.
Even without that, because of the 1 pixel inset these 1³ sized occluders tend to shrink into single pixels and then nothingness relatively quickly, so even if I could process more of them there’s not really any point more than 20 or so blocks away.
So if the player is somewhere where there’s no opaque blocks within a 20 block radius, such as flying in the air or standing on a ledge high off the ground, then the most useful occluders aren’t rendered at all and while occlusion culling still helps, it rapidly drops below 50% to more like 25% or worse.

As more and more subchunk levels are phased out the higher up the player goes due to shrinking into nothingness themselves, the culling performs worse and worse. Also, because many player made structures will be 1, maybe 2 blocks thick, many large and distant player made structures will not be considered occluders at all.
These cases aren’t that common in survival mode style gameplay however, and in the worst case the performance will drop to the same performance to be had without any culling at all, so it doesn’t hurt anything either. Meanwhile in many situations FPS can be, 50%, 100%, or even many times better, especially when the player is indoors or in caves. So this method is still more than worthwhile despite this limitation.
Another issue is that the 1 pixel inset on occluders can cause gaps between subchunks but especially between chunks, as occluders are limited to a single chunk and so can never span across multiple chunks. This does mean that chunks along that gap won’t be culled, but in practice this doesn’t really hurt the occlusion culler’s performance very much at all.

Future work
Partway through implementing the multiple subchunk levels I realized that it might be better if subchunks were 1 thick slices along each axis. So for example at level 2 where subchunks are 4 blocks in size you’d have 4x4x1, 4x1x4, and 1x4x4 subchunks instead. These would be much more common than their chunkier counterparts (pardon the pun) and so would be much more effective as occluders.
They’d also conform better to the geometry of player made structures. And unlike 16x16x16 subchunks which basically never occur, I think 16x16 slices one block thick would actually be found. These bigger, more common slices might provide better ground cover when the player is high up, improving the culling of underground caves in what is currently this method’s worst case scenario.
Something that might be worth doing for very high render distances on rigs with an actually powerful GPU could be to group multiple chunks into superchunks in order to reduce the volume of checks as render distance increases.
I suppose I could also try to optimize things further by using SIMD but honestly that sounds like a pain and I’m not sure I’ll bother.
If you’ve enjoyed this post, give the Block Game site a look. It has some screenshots, an FAQ, and a development feed. Also consider following me on Mastodon @[email protected], or on Bluesky at @enikofox.com.
]]>So uh, it’s been a rough 5 and a half years. If you’re here you’ve probably followed me on social media for a while but if you haven’t lemme do a quick recap:
- 2020: There was this big fucking pandemic (still going today btw) and that was rough, also my partner and I made the decision to leave the US where we’d built a life because we saw the direction the country was heading in and didn’t see a future there after Biden’s term.
- 2021: Brief sparkle of hope when vaccines came out, squashed when delta happened in summer, another brief glimmer when boosters seemed effective against delta in fall, and just crushing despair when omicron hit.
- 2022: Trying to navigate leaving behind our life in the US and moving to a country we’d never been before while not catching the plague somehow even though countries were rapidly dismantling all health measures all of which resulted in a literal nervous breakdown on my part.
- 2023: Cost of living spiraling out of control because of the war Russia started with Ukraine, especially where we lived (which we specifically moved to because it was cheap) because Cyprus has strong ties to Ukraine and Russia and the rental market was flooded with people fleeing both countries. Our landlords (screw all landlords btw) tried to hike our rent by a third. Then horrible heatwaves lasted for 2 straight months in a house that didn’t have functioning AC.
- 2024: Being told by our incompetent agents that actually my partner was likely to be deported in violation of my rights as an EU citizen. Also that I needed to reup my passport because they’d dragged their feet on my residency long enough that it was too close to expiring to apply now. Worrying I’d be made stateless because the Dutch government said you have to have proof of legal residency to reup your passport in a foreign country. Followed by 6 months of 100 hour week crunch to get Kitsune Tails done. Having to beg online for financial support to not bounce rent checks while trying to get Kitsune Tails launched. Also, more months long horrible heatwaves! Then a move to a house that wasn’t driving me insane right after all that.
It’s been super great. Really good time, A+ 10/10 would recommend absolutely losing your whole ass mind, all your money, all your stability, and burning out really really badly.
Things are slowly improving but 2025 hasn’t been the amazing year I’d hoped it would be either so if you’ve ever wondered what happened to Kitsune Tails coming out on consoles just picture me lying face down on the floor making wailing sounds. But I’m not here to complain, despite having just spent quite a few words doing exactly that. I’m here to write down an idea I had less because I want to convince anyone else this is a good idea and more because I want to convince myself it’s a good idea.
You see, if you take away the living under the rising specter of fascism during late stage capitalism stuff, my life is actually pretty cool. I make videogames for a living, for god’s sake. And I get to make videogames with a bunch of people who are really cool and who I really like (shout outs to Lizstar, Rally and Owlbear.) And I’m clearly capable, even with migraines and burnout, to really dig into a project that excites me as evidenced by the work I did over my July break on Bismuth, and put in the work required to show my creations. I’m also supported by a cool community of people who think my work is interesting and want to see it and share it and talk about it.
So why is it so hard to sit down and do work?
You know how people can get an aversion to a food, even one they really like, if eating it makes them really sick? Maybe it’s like that. Maybe I’ve started to associate work, or at least the feeling of having to work with the real misery hoursyears. And if my problem is that, then maybe I can reframe things to get myself out of the hole and not just back to being productive again, but enjoying my pretty cool life again.
That’s the theory anyhow.
Like, the idea of sitting down to work on the undisclosed special effect I came up with for the redacted thing that we are doing after Kitsune Tails excites me. The thought of making YouTube videos explaining stuff excites me. We have, for the time being, enough money coming in that we’re probably not going to be bouncing rent checks in the very near future. Why the fuck am I not waking up every morning with a spring in my step, excited to work on these things that I love and am excited by?
Just because it’s work? And I have to do it? That’s bullshit, me! Why would you come up with something so stupid. Like, I look at other people, and how they’re putting out cool things and through their creations interacting with a supportive community and I sit there daydreaming about how cool it would be to have that when I literally have that all I have to do is do the work.
Part of my mission this year has been to knock out major stressors in my life. And while a few more got added to the list this year I’ve dealt with a lot of the worst ones, so maybe it’s time. Maybe it’s time that I tell myself to stop worrying about work, stop worrying about expectations, and just sit down every day to work on stuff I think is cool and worthwhile, and to share that with my community.
I dunno. Maybe it’s stupid trying to psyche myself up to reframe away my burnout, but something’s gotta give because I’m sick and tired of having no joy in life, so I might as well try.
]]>This is the third in a series of posts about a virtual machine I’m developing as a hobby project called Bismuth. I’ve talked a lot about Bismuth, mostly on social media, but I don’t think I’ve done a good job at communicating how you go from some code to a program in this VM. In this post I aim to rectify that by walking you through the entire life cycle of a hello world Bismuth program, from the highest level to the lowest.
let hello = data_utf8("Hello world!\n");

func main() i32 {
    // system call 0x10 is the PrintStr system call
    sys(0x10, hello, 0, sizeof(hello));
    return 0;
}
This code will be converted to the VM’s intermediate representation, which can then be transpiled to C, or compiled to a binary version of the IR, which the VM ingests and turns into bytecode and runs.
]]>
This is the third in a series of posts about a virtual machine I’m developing as a hobby project called Bismuth. I’ve talked a lot about Bismuth, mostly on social media, but I don’t think I’ve done a good job at communicating how you go from some code to a program in this VM. In this post I aim to rectify that by walking you through the entire life cycle of a hello world Bismuth program, from the highest level to the lowest.
let hello = data_utf8("Hello world!\n");

func main() i32 {
    // system call 0x10 is the PrintStr system call
    sys(0x10, hello, 0, sizeof(hello));
    return 0;
}
This code will be converted to the VM’s intermediate representation, which can then be transpiled to C, or compiled to a binary version of the IR, which the VM ingests and turns into bytecode and runs.
Bronze
The language this code is written in is Bronze, which converts mostly 1:1 into the VM’s IR. It’s just got niceties like a C-like syntax and infix operators. It makes for a good test-bed of the IR and I find a bit more comfortable to write than s-expressions. Let’s go through it line by line.
let hello = data_utf8("Hello world!\n");
This first line sets up a global variable hello which has data which the VM should initialize when the program starts. The data should be initialized from the specified UTF8 encoded string. This means that when the program starts the global hello will contain a handle to some memory that contains the string in question.
func main() i32 {
This is the main function, automatically called when the program starts. It returns an i32, a 32-bit integer. This is one of the two types the VM currently supports, the other being pointer. More on that one in a future post. All functions in Bismuth are expected to return an integer. If you don’t want a function to return an integer, just return zero.
sys(0x10, hello, 0, sizeof(hello));
Because Bismuth is completely isolated from the outside world to do anything interesting you have to go through system calls. These are hardcoded functions the VM can perform, like copying or clearing memory, printing strings or characters, converting between integers and strings, and more. Syscalls are like the standard library of the VM.
This particular syscall, 0x10, is PrintStr. The first argument is a handle to string memory, the second is the byte offset within memory at which to start printing characters, and the third is the number of bytes to print. Because all memory access goes through handles with the VM bounds checking the access, the system knows the size of allocated memory and sizeof(hello) can return the number of bytes stored in our string.
Finally, after printing our string, we return:
return 0;
Text IR
Bronze, like all languages that would target the Bismuth VM, converts its code into plain-text IR. Running the compiler on the above code will produce the following IR:
(global hello)
(data hello utf8 "Hello world!\n")

(func main () {
    (sys 0x10 hello 0 (len hello))
    (ret 0)
})
Given that Bronze maps basically 1:1 to the IR this doesn’t contain any surprises. We declare our global, initialize it with a data statement, and then define the main function which prints it and returns.
This IR is read by the plain-text IR parser, which creates an abstract syntax tree. At this point there’s two things that can be done by visiting each node in this AST: the C transpiler can convert the IR to C, or the binary IR compiler can convert the text version of the IR to binary.
We’ll start with the C transpiler. Being able to transpile to C offers numerous advantages. C code is able to be compiled ahead-of-time, is maximally portable, and by transpiling to C programs could run on older hardware, embedded hardware, or even webassembly.
The C code can also be compiled by an optimizing compiler like GCC or Clang, so if you need more performance on modern systems than the VM offers you can transpile your code and run it stand-alone. The VM itself is written in C, so the relevant system calls and other code can be compiled with your program. In fact I’m already writing syscalls used by the VM in Bronze, which works because it’s transpiled to C.
Bismuth C
So what does this C code look like? Well, I tried my best to keep it readable but it’s C, so it’s not strictly the prettiest code you’ll have ever seen:
static uint32_t xhello;

uint32_t MyMain(EXCEPTION* eret, CONTEXT context);
uint32_t MyMain(EXCEPTION* eret, CONTEXT context) {
#define EXCEPTION_HANDLER default_exception_handler
    EXCEPTION e = {0};
    {
        uint32_t t0, t1;

        // (sys 16 hello 0 (len hello))
        HLEN(t1, GLOBAL(xhello));
        SYS(t0, PrintStr, GLOBAL(xhello), 0, t1);
        // (ret 0)
        return 0;
    }
#undef EXCEPTION_HANDLER
    // default return value and default exception handler
default_exception_handler:;
    *eret = e;
    return 0;
}

static const char rodata_xhello[13] = {
    0x48, 0x65, 0x6c, 0x6c, 0x6f, 0x20, 0x77, 0x6f, 0x72, 0x6c, 0x64, 0x21, 0x0a,
};

uint32_t BismuthC_ModuleInit(EXCEPTION* eret, CONTEXT context, bool isGlobalContext) {
#define EXCEPTION_HANDLER default_exception_handler
    EXCEPTION e = {0};
    {
        Alloc mi_alloc;
        if (!InitCGlobal(&e, context, &xhello, isGlobalContext, true)) { THROW(e); }
        if (!isGlobalContext) {
            ALLOC(GLOBAL(xhello), 13, 1);
            mi_alloc = Handles_Get(&context->Handles, GLOBAL(xhello));
            if (mi_alloc.Ptr == NULL) THROW(INVALID_HANDLE);
            memcpy(mi_alloc.Ptr, rodata_xhello, 13);
        }
        return 1;
    }
#undef EXCEPTION_HANDLER
    // default return value and default exception handler
default_exception_handler:;
    *eret = e;
    return 0;
}
(Note that I’ve skipped some uninteresting header/footer bits here to reduce the noise)
There’s a lot to unpack here so let’s look at the big picture first.
static uint32_t xhello;

uint32_t MyMain(EXCEPTION* eret, CONTEXT context);
uint32_t MyMain(EXCEPTION* eret, CONTEXT context) {
    ...
}

static const char rodata_xhello[13] = {
    ...
};

uint32_t BismuthC_ModuleInit(EXCEPTION* eret, CONTEXT context, bool isGlobalContext) {
   ...
}
First we see there’s a static (private) 32-bit unsigned integer called xhello. The transpiler defaults to prefixing all identifiers with an ‘x’ to avoid name collisions. Then the transpiler declares the signature of all the functions, of which there is one, and then it outputs the actual function bodies. There’s a weirdly named rodata_xhello global that contains an array of hex data. Then there’s something that looks kind of like a normal function called BismuthC_ModuleInit.
You’ll notice that my main function isn’t called xmain here and isn’t static. That’s because the transpiler can be given symbol names to export as different names via the command line. Here I’ve specified -export main MyMain. A similar thing can be done to rename the module init function using -initname, though I didn’t do it here.
Main C function
Let’s look at our main function next.
uint32_t MyMain(EXCEPTION* eret, CONTEXT context) {
#define EXCEPTION_HANDLER default_exception_handler
    EXCEPTION e = {0};
    {
        uint32_t t0, t1;

        // (sys 16 hello 0 (len hello))
        HLEN(t1, GLOBAL(xhello));
        SYS(t0, PrintStr, GLOBAL(xhello), 0, t1);
        // (ret 0)
        return 0;
    }
#undef EXCEPTION_HANDLER
    // default return value and default exception handler
default_exception_handler:;
    *eret = e;
    return 0;
}
The function returns a 32-bit integer, just like all functions in Bismuth. It also takes an EXCEPTION pointer eret and a CONTEXT. Bismuth supports try/catch/finally style syntax, and eret is used when there’s an uncaught exception, which is handled by the default_exception_handler, which simply sets eret to e and returns a default value. The program context is used by many of the macros that make Bismuth C tick, more on that later.
Next we abuse macros to tell the C compiler where the current exception handler lives. At the start of a function that’s always default_exception_handler, but a try/catch block would redefine this for the length of that block. We also initialize our local error object e, which is actually just a handle or 32-bit integer, to zero. A lot of macros like EXCEPTION seen in Bismuth C are there for some degree of future proofing; the transpiler doesn’t need to know the exact type of EXCEPTION or CONTEXT, it just needs to know that they’re whatever that means.
Now we get to the actual user code.
        uint32_t t0, t1;

        // (sys 16 hello 0 (len hello))
        HLEN(t1, GLOBAL(xhello));
        SYS(t0, PrintStr, GLOBAL(xhello), 0, t1);
        // (ret 0)
        return 0;
At the top is where the transpiler would declare local variables if we had any. They, like other identifiers, would be prefixed by an ‘x’, so foo would turn into xfoo. It also declares what I call “temporaries.” These are numbered variables prefixed with a ‘t’ and they’re here because while I sometimes really enjoy C as a language, it also really really sucks. Let me explain.
First, C doesn’t strictly guarantee the order of operations for certain things, including function arguments. Meanwhile, Bismuth does guarantee things are done in a certain order. This means that whenever the transpiler finds code that could have side-effects and so must be done in order even though C gives no such guarantees, that code must be broken out into separate statements, done in-order in advance, and the results passed in-order to whatever we’re doing like making a function call.
Temporaries are created when the C transpiler has to break out this code. The sub-expression is lifted out of where it is, to before the current statement, evaluated, stored in a tN variable, and then used.
Second, anything which requires a statement expression, that is a block of code with multiple statements needed to arrive at the result, is also broken out the same way. Why? Because statement expressions are an extension and so aren’t universally available, so even though it would improve code readability using them would harm portability and so becomes unacceptable. A simple example would be the syscall macro:
#define SYS(dest, call, ...) { \
    dest = BISMUTHC_CONCAT(Sys_, call)(&e, context, __VA_ARGS__); \
    if (IS_EXCEPTION(e)) { THROW(e); } \
}
This macro actually calls a named C function for the system call with the address of our local exception, the program context, and then whatever other arguments there are. But it (like many macros) then transparently checks whether an exception was passed down the call stack, and then throws it if so. So even though in our IR sys is an expression, we need a block of statements in C to handle all of its functionality.
Looking at the actual code our program wants to run illustrates this quite nicely:
        // (sys 16 hello 0 (len hello))
        HLEN(t1, GLOBAL(xhello));
        SYS(t0, PrintStr, GLOBAL(xhello), 0, t1);
First, the transpiler creates a comment that shows the reader what IR created the C code directly below it. Because getting the length of a memory handle is something that could throw an exception (the handle could be invalid, for example) that expression is broken out and done first, assigning the result to t1. Then the SYS macro assigns the result to t0, says it wants to call Sys_PrintStr, and then provides the arguments.
Bismuth C module initializer
We’ll figure out what this whole GLOBAL macro business is when we check out the module initializer: BismuthC_ModuleInit. I’ll be cutting out the pre- and post-amble to get right to the meat and potatoes of the function:
        Alloc mi_alloc;
        if (!InitCGlobal(&e, context, &xhello, isGlobalContext, true)) { THROW(e); }
        if (!isGlobalContext) {
            ALLOC(GLOBAL(xhello), 13, 1);
            mi_alloc = Handles_Get(&context->Handles, GLOBAL(xhello));
            if (mi_alloc.Ptr == NULL) THROW(INVALID_HANDLE);
            memcpy(mi_alloc.Ptr, rodata_xhello, 13);
        }
The module initializer for a program initializes the global state of an instance of a Bismuth program that’s been transpiled to C. Each instance of a program context has its own memory space and its own table which maps handles to memory, so we can’t simply set our global xhello to the value of the handle. Rather, xhello needs to uniquely identify where in our program context the value of its corresponding global can be found.
To do this, the module initializer actually has to be run at least twice. Before any program can run a global program context must run the module initializer, which will initialize all globals to this unique value. It’s easier to understand by looking at the InitCGlobal function:
uint32_t InitCGlobal(EXCEPTION* eret, ProgramContext* context, uint32_t* global, bool isGlobalContext, bool canThrow) {
    assert(global != NULL);

    if (isGlobalContext) {
        assert(*global == 0);

        if (context->CGlobalsCount == UINT32_MAX) {
            if (canThrow) {
                THROW_RET(TOO_MANY_CGLOBALS);
            }
            else {
                return 0;
            }
        }

        *global = context->CGlobalsCount++;
    }
    else {
        assert(context->CGlobals != NULL);

        if (*global >= context->CGlobalsCount) {
            if (canThrow) {
                THROW_RET(CGLOBAL_OUT_OF_BOUNDS);
            }
            else {
                return 0;
            }
        }
    }
    return 1;
}
The first time this function is called, with the global context, the number of C globals are counted and each global is assigned its index in an array of C globals held by the context. Subsequent calls of this function for different program contexts ensure that the global’s value is valid.
So what does GLOBAL(xhello) do? It just transforms into context->CGlobals[xhello], looking up the value of the global in our array of C globals unique to this program context.
Next is this bit of code:
        if (!isGlobalContext) {
            ALLOC(GLOBAL(xhello), 13, 1);
            mi_alloc = Handles_Get(&context->Handles, GLOBAL(xhello));
            if (mi_alloc.Ptr == NULL) THROW(OUT_OF_MEMORY);
            memcpy(mi_alloc.Ptr, rodata_xhello, 13);
        }
This actually initializes the data for our global variable. This data initialization isn’t run for the global context because the global context never actually runs any code, so it’d just be a waste of effort and memory.
This code allocates 13 bytes of memory for our global and passes in a non-zero value to indicate this memory handle is privileged. That is, only privileged code can access the memory associated with this handle. Right now all C code is considered privileged, mostly because I’m only using the C transpiler to write syscalls for the VM right now. Multiple privilege levels in C transpiled code is on my todo list.
After allocating the memory, we fetch the actual allocation containing the pointer, size, and flags from the handles table as mi_alloc. If the allocation failed our global will be set to a zero handle and so attempting to fetch it will give us an empty Alloc struct with a null pointer. So if we detect that, we throw an out of memory exception.
And this illustrates a neat thing about Bismuth C: even when we’re directly writing the C code ourselves we can still use non-C constructs like exceptions so long as our functions conform to the parameters of a Bismuth C function. In the future it could be possible to transpile a Bismuth program to C and use it as a C library, wouldn’t that be neat?
Our final act is to use memcpy to copy the data from rodata_xhello to the memory pointed at by our global’s handle. Having set everything up appropriately, we exit the module initializer and our program is ready to run. At this point calling this function is as easy as:
Handle e = HNULL;
MyMain(&e, context);
if (e) printf("Error executing Bismuth C code.\n");
Binary IR
Now let’s look at the other branch, where we turn the text-based IR into binary. I’m honestly not sure if long term this step will remain or not, but for now I find it convenient to have the binary IR that represents the program’s abstract syntax tree because I can do things like read the IR and emit bytecode in a single interleaved pass. This makes dealing with reading the IR easier on the side of the VM because I just don’t find C great at text parsing. The other compilers meanwhile, are written in C# which is a lot better for that kinda thing. It also allows me to do things like inserting code at the beginning of the program which invokes the start system call and then calls main.
Data section
Let’s open the binary in a hex editor and have a little look.
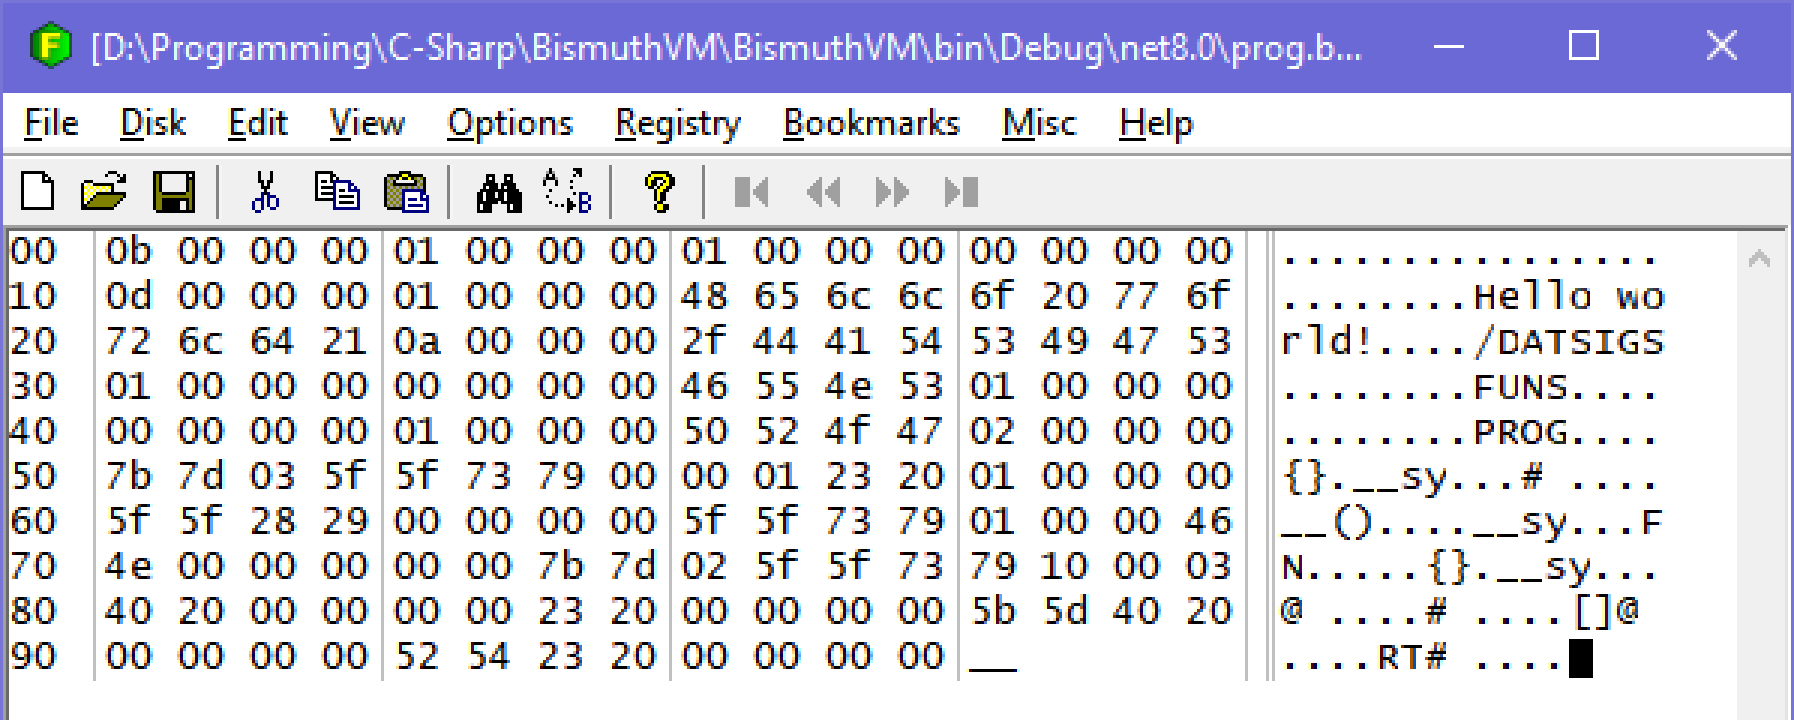
We can see our “Hello world!” string. This is in the data section at the start of the file. The first three 32-bit values are 11, 1, and 1. The first, 11, is the data section size in 32-bit words. That means the data section size in bytes is 44, which takes us right past /DAT to the leading ‘S’ in SIGS, the next section. The next number is the number of globals in this program, followed by the number of globals that have to be initialized with data. After all, some globals can simply be initialized to zero.
After that header, there will be a number of entries equal to the initialization count, detailing what globals to initialize and how. Each entry starts with the global’s index, in this case we only have one and the first global index is zero. After this is the 32-bit size in bytes of the global, and then a 32-bit integer containing flags.
The size of our global is 13 bytes, the number of bytes in our UTF8 formatted string. The flags value is 1 which indicates this global has data to initialize. This “has-data” flag will only ever not be set for globals which have a simple integer value rather than allocated memory. The next two bits indicate whether or not the memory is privileged (it isn’t) and whether or not the memory is read-only (it isn’t.)
Then comes the data for our string, and 3 padding null bytes. Because I’m an inelegant hack I decided that I wanted to store the data section the interpreter uses to initialize globals when the start syscall happens right inside the same bytecode it uses to run programs. The interpreter’s bytecode is all 32-bit words, so that’s why the padding bytes are there; they align the data to 32-bit words. This is also why the data section size is stored as words rather than bytes.
After that we see four /DAT bytes, which signify the end of the data section. I use those in the interpreter to verify that nothing went wrong with the data section during compilation from binary IR to bytecode.
Program sections
After the data section come three program sections, SIGS, FUNS, and PROG. The SIGS section contains an array of function signatures, starting with a 32-bit entries count, followed by the entries which for each signature encode the number of arguments as well as their type information. We only have one function and it takes zero arguments.

Then there’s FUNS which is the functions section. This again starts with a count of entries, followed by the entries. For each entry it writes the index of the function signature for that function (0 in this case), followed by the function’s label (label 1.)
The reason signatures are stored separately from functions is so that when I’m implementing function pointers in the future dynamic function invocations can be type-checked by simply checking the index of the calling signature with the index of the receiving function’s signature.
Finally we have the PROG section, which contains the actual program data: the binary IR. This leads with a count of “functions.” The word functions is in scare-quotes here because what this actually means is the number of top-level statements to process. These are almost all actual functions, but the starting code the binary IR compiler injects isn’t an actual function but a simple block of statements.
I’m a big believer in making binary formats as human-readable as possible so every node in our AST has a 2 or 3 character ID which identifies the type of AST node it is. Statements are always all caps, and you can see a few of them in this example: {} for a block containing multiple statements, __ for an expression statement (or discard,) FN for function, and RT for return. Expressions are always lower case.
The way the binary reader distinguishes between 2 and 3 character codes is by checking if the first character of the 2 character code is a space. If it is, then the code is contained in the next 3 bytes, otherwise there’s just the two characters.
We can see that our program starts with a block {}. The block is followed by a 7-bit encoded integer with the number of statements in that block. It’s first statement is an expression which invokes system call sy 0 (16-bit) which is the start system call, with 1 argument (8-bit), and is followed by the argument. The argument is an immediate number # with a value of 1, indicating the start system call should allocate space for a single global.

Next is another expression statement, with a call () node, calling the 0th function, which is our main function, providing a whopping zero arguments. Then after returning there’s another expression statement which invokes system call 1, which exits the program.
The body of our main function FN follows with it’s function index (0) and locals count and information (also 0.) This is followed by a block {} containing a statement which calls system call 16 or 0x10, which we know is PrintStr. The first argument is a global @ with an index of zero, our string global. The second is an integer, zero, for the offset, followed by [] which grabs the length of our global. This is all followed by the return RT statement which returns an immediate value of zero.
The binary IR isn’t super easy to read, but when I need to debug it I can read it okay with a little bit of effort, which is a lot better than most binary formats out there.
Finally, we load this binary IR into our interpreter, which flattens out the AST into a series of bytecode instructions.
Interpreter bytecode
I’m not going to do a thorough play-by-play for this one as an exhaustive description of each bytecode operation would take forever, but I will show the debug output for the bytecode and go through it more generally.
The VM mainly uses three general purpose registers: main, alt, and extra. Generally speaking opcodes are in the form of operation destination [arguments]. Any opcode that’s followed by a 32-bit word containing additional data is indicated with a little arrow -> and a contextual value.
The big picture is that the VM first transplants the data section into the bytecode:
00000000    11 data size
00000001    1 globals
00000002    1 global initializers
  -> 00000009
0000000a    /DAT (magic bytes should be "/DAT")
This section is used by the start syscall to initialize globals. Next is the bytecode for the start section inserted by the binary IR compiler:
0000000b      Movi Alt 1
0000000c      Push Alt
0000000d       Sys 0 (Start)
0000000e      Call
    -> +4 (0x12)
00000010      Txnz
00000011       Sys 1 (Exit)
It invokes the start system call with the value 1 indicating the number of globals. It then calls a function, jumping to 0x12 to do so, throws if the exception register is non-zero, then invokes the exit system call. Our main function is at 0x12:
00000012      Func 0
00000013      Puxh
    -> +13 (0x20)
(...)
00000020      Poxh
00000021      Movi Main 0
00000022       Ret
This allocates space for zero locals in the current stack frame, then pushes an exception handler (puxh) which, if an exception occurs, jumps to 0x20. Looking ahead to 0x20 you can see the exception handler is popped (poxh) and it returns zero. Because the exception register isn’t cleared, the start code’s txnz operation will propagate the exception. Since there’s no exception handler here the interpreter will panic with the error message if an exception is propagated. This is the standard sort of pre- and post-amble for a function.
Next is our actual code:
00000015      Gloi Alt 0
00000016      Push Alt
00000017      Movi Alt 0
00000018      Push Alt
00000019      Gloi Main 0
0000001a       Len Main Main
0000001b      Push Main
0000001c       Sys 16 (PrintStr)
0000001d      Movi Main 0
0000001e      Poxh
0000001f       Ret
The gloi (global load immediate) opcode loads global zero, our string, into a register and pushes it to the stack. Next we push a zero to the stack. Then we load our global into a register again, but this time we use the len operation which fetches the size in bytes of the memory pointed at by the handle. Finally we push that to the stack as well, and invoke the PrintStr syscall which prints our string. Then we pop the exception handler and return 0.
Mind you that system calls work differently from normal functions. A normal function call would store its arguments on the stack in reverse order (i.e. the first argument would be at the top of the stack) and creates and tears down stack frames. To invoke a system call you push the arguments in order, and they’re more lightweight because they don’t require stack frame creation/teardown.
With our bytecode ready we can initialize our global context (to figure out the index of any C globals,) then our program context, and finally run the interpreter. We get the following output:
Creating global context
Creating program context
Running script
Hello world!
Done!
And that’s the life cycle of a hello world program in Bismuth. This was a long one so kudos on making it all the way to the end! If you’ve enjoyed this one, maybe check out the other posts about Bismuth and I hope you’ll join me again for the next one.
]]>This is the second in a series of posts about a virtual machine I’m developing as a hobby project called Bismuth. In this edition we’re going to look at the VM’s design for memory management and safety. To start with I’ll remind you of the design goals for this VM as detailed in my last post, with those that apply here in bold:
- Must be fast
- The IR must be compatible with standard C
- Can run in a browser
- The VM must be easy to implement
Not to give away the twist, but when you combine points 2 and 4 with a VM that cares about memory safety (i.e. programs should not be able to do things like read outside of the bounds of an allocated region of memory) things can get a little bit complicated. So let’s walk through the stages of grief that I experienced and the solutions I came to during the bargaining stage when designing the memory management and safety features of the Bismuth VM.
]]>
This is the second in a series of posts about a virtual machine I’m developing as a hobby project called Bismuth. In this edition we’re going to look at the VM’s design for memory management and safety. To start with I’ll remind you of the design goals for this VM as detailed in my last post, with those that apply here in bold:
- Must be fast
- The IR must be compatible with standard C
- Can run in a browser
- The VM must be easy to implement
Not to give away the twist, but when you combine points 2 and 4 with a VM that cares about memory safety (i.e. programs should not be able to do things like read outside of the bounds of an allocated region of memory) things can get a little bit complicated. So let’s walk through the stages of grief that I experienced and the solutions I came to during the bargaining stage when designing the memory management and safety features of the Bismuth VM.
Simple is complicated
Point 4 says the VM must be easy to implement. In my experience this means the VM must be relatively simple, and as I’m sure we can all agree* the simplest language is C. Why? Because C is basically fancy machine code. Everything’s a number. Can’t get simpler than that. Sometimes the number points to a region of memory where other numbers live. It’s numbers all the way down, and I like that about C. So if we want a VM that’s simple, well, it should be like C, right? Especially since one of the design goals is to have an IR that’s compatible with standard C.
* I’m sure plenty of people will disagree with this, actually.
So that’s easy! When the IR wants to allocate memory, we just put in a call to malloc (or calloc if you’re feeling fancy) and shove the pointer onto the stack. There’s a few problems with this approach, including that on 64-bit systems the pointer would be 64-bit and the VM is a 32-bit machine, but we’ll start with the more obvious one.
You see, C has a problem. If everything is a number, and an array is just some arbitrary region in memory full of other numbers with a number pointing to it, then there’s no reason you can’t just read arbitrarily from anywhere in memory. If you want to look at a number that’s before the start of or after the end of an array, you can totally do that. Nobody’s going to stop you! Well, until your program segfaults anyhow.
These are also called buffer over or underruns, and the Rustaceans tell me those are like, bad? Something about CVEs? I don’t know, I’m just a game developer, we don’t care** about that sort of thing.
** This is a joke, please put down the pitchfork. Although I suppose there was the time Untitled Goose Game had arbitrary code execution in its save system.
So we probably want some kind of sandboxing behavior. After all, accessing arbitrary memory addresses is bad because it can cause the VM to segfault (and a VM should probably never do that) but it’s also bad because we don’t want user programs to be able to poke around in the memory used by the VM itself, because that’s a security risk.
We need some other strategy for separating what memory belongs to a program (and which memory belongs to which program if we can run multiple simultaneously) and what memory belongs to the VM. That means we can’t use malloc and its ilk. Right?
Nobody wants to write a heap allocator
Let me be clear: I’ve written malloc-style heap allocators, composable memory allocators, and a variety of other memory allocators. I’ve written a post on Cohost explaining memory allocators (which I should repost here soon.) I know how memory allocators work and even I can’t stomach the thought of writing another heap allocator.
This is a bit of a problem. Because we can’t use malloc, and we need to have separate memory for the VM and user programs, which means we need separate heaps, which means we need to write a heap allocator.
And I know what you’re thinking: just use one of the C memory allocators with permissive licenses that are freely available on Github! And I too had that thought. But going through all of them I noticed that many don’t have the features I need. For example, a lot of them just function as a drop-in replacement for malloc. That’s great if that’s what you need, but if you need multiple heaps that’s not going to help a lot!
The good ones are also complicated and design goal number 1 was “must be fast” so we need a good one. The good ones with different heap instances are even more complicated. Looking at integrating some of these gave me such an overwhelming feeling of ennui that I thought to myself “I would rather write my own heap allocator.” But I quickly came to my senses and realized that nobody wants to write a heap allocator, not even me, and even if I did there’s no guarantee it’d be fast anyway. I realized that mandating writing a heap allocator or integrating an off-the-shelf allocator was at odds with the design goal of the VM being easy to implement.
Plus while many of those allocators are great, what if you’re writing an implementation of the VM in C#? Or JavaScript? Or Python? Or Lua? Then you can’t use the off-the-shelf ones and still have to write your own. Don’t say it couldn’t happen, I have personally done much stranger things and I’m friends with many sickos who would also do things like this.
So we have to use malloc because it’s fast and eases implementation of the VM. Plus on higher level languages, instantiating an array (or table, yes Lua you can put your hand down now) is conceptually very similar to a call to malloc so things remain very consistent.
But we can’t use malloc… or can we?
I’ll handle it my way
Okay, so, theoretically we could implement this VM in something like C#, right? And a “pointer” would just be a reference to an array with some kind of offset. Could we apply that model to malloced memory? Well, of course we can! I mean, that’s basically what high level languages do, right? Allocate some memory and call it an array and provide a reference. So that’s what we have to do, too.
I decided to call these references “handles” because to my mind a handle is an opaque indirect reference to something that you can only really interact with through system or API calls. So a pointer becomes a handle which points to some allocated memory somewhere, plus an offset. Great! What system calls do we need for this system? As it turns out, it’s pretty simple. These are the memory management operations available to Bismuth’s IR:
- alloc size : allocate memory of size bytes and return a handle.
- free handle : free memory associated with handle.
- load handle offset : return the 32-bit value contained in the memory pointed at by handle starting at byte offset.
- stor handle offset value : store the 32-bit value into the memory pointed at by handle starting at byte offset.
I’m omitting load/store operations for different bit depths for brevity here.
So the plan is this:
- When a program wants to allocate memory, use
callocto allocate and zero out some memory, generate a unique value that represents the handle to that memory, and store this information in a hash table with the handle as the key and the pointer plus size as the value. The handle table is unique to each user program, so programs can’t snoop on each other’s memory. - If a program is done with memory, it can free it via the handle. This removes the key-value-pair from the handle table.
- When a program wants to load from or store to memory, do this via the handle by providing an offset. The VM looks up the pointer and size information, bounds checks the offset, and if it’s in bounds performs the load or store. We can also prevent dereferencing stale pointers because any freed pointers won’t be in the handle table.
This approach will work, though there are a couple downsides that make this more of a compromise than an ideal solution.
First, indirecting every memory access through a table is going to slow things down. I don’t know how much yet, but given there are languages where literally every member access is a hash table lookup, I think it’s going to be fine. There’s probably ways of caching things to improve matters.
Second, C-style pointers become more complicated. Instead of a single integer, it becomes a handle and offset struct. This is fine because I happen to know that the C standard says that pointers need not be integers, only that they can be converted to integers, and even that operation may be undefined depending on the implementation. The fact that pointers are usually simple integers is just a happy coincidence, not mandated by the standard. So you could still implement standard-compliant C on top of this implementation, unless I’m overlooking something. Plus, on a modern 64-bit system the pointer could have the handle value in the top 32 bits and the offset in the bottom 32 bits.
Generating handles
At this point I started happily implementing my VM’s memory management systems, when everything came to a screeching halt. How do I actually generate the unique handle values for the pointers?
My first idea was to just use the pointer itself as the value. That’s certainly the easiest, and guaranteed to be unique. Just one small problem: my OS is 64-bit and my VM is 32-bit. I can’t cram a 64-bit integer into a 32-bit integer, or take a 32-bit chunk of it and guarantee it’s unique. I could make every heap for every program a contiguous chunk of memory (webassembly does this) so that every pointer is always a 32-bit offset from the start of that memory, but then I couldn’t use malloc!
In the before-times there were architectures that had more memory than their system’s word size. For example, 16-bit machines with 24 bits of memory, or 8-bit machines with 16 bits of memory. I could keep my VM using 32-bit integers and just consider handles a 64-bit integer.
This would unfortunately be very messy. Making this change would create a separate class of incompatible values, with “normal” IR operations that expect 32-bit values unable to operate on handles. I’d have to create different versions of relevant operations that work exclusively with handles, and that would greatly increase the VM’s complexity. Suffice to say this would be incompatible with the “must be easy to implement” design goal. So that wasn’t a great fit either.
The simplest idea I had was to just use an incrementing 32-bit integer. Unfortunately that’s only guaranteed to be unique so long as the value doesn’t overflow, which it eventually would. This would still work though if whatever method doles out handle values checks the handle table to see if it contains that value, and if so continues to loop until it finds a handle that isn’t taken.
I didn’t like that for two reasons though:
- It’s quite possible for a lot of memory to be allocated at the start of a program that’s never deallocated. This means generating the handle value could stall on allocations for some amount of time if the handle value overflowed.
- Though I can’t quite put my finger on it, it just felt like having valid handles all be on the low end of a 32-bit integer was dangerously insecure.
So, like I always do, I decided to complicate things.
Linear feedback shift registers
I’m not going to explain everything about linear feedback shift registers here. Partly because I don’t have that kind of time, and partly because I don’t really understand how or why they work, just that they do and that they’re awesome. If you want a thorough explanation you can watch DavidXNewton’s video about them. The short version is that a linear feedback shift register is a simple bit-shifting algorithm that, when using the correct maximum length term, yields an ideal non-repeating series of pseudo-random numbers.
This means that a 4-bit LFSR with the right term will generate 15 numbers, from 1 through 15, in a random order, without repeating any value, until all values have been exhausted. The series of numbers will then loop and repeat. Transport Tycoon uses this for tile updates (see aforementioned DavidXNewton video) and Wolf3D and others use this technique to do fizzle fades.
They’re basically a shuffled list of integers up to N bits in a can, where “can” means “algorithm.” LFSRs are pretty nifty and I’m going to use them for generating handles. The code for them is also short enough that I can show you the entirety of my lfsr.h file right here:
#pragma once
#include <assert.h>

typedef struct lfsr16_t {
    uint16_t value;
    uint16_t term;
} lfsr16_t;

typedef struct lfsr32_t {
    uint32_t value;
    uint32_t term;
} lfsr32_t;

static inline uint16_t shift16(lfsr16_t* inst) {
    assert(inst != NULL);
    if (inst->value & 1) {
        inst->value = (inst->value >> 1) ^ inst->term;
    }
    else {
        inst->value = inst->value >> 1;
    }
    return inst->value;
}

static inline uint32_t shift32(lfsr32_t* inst) {
    assert(inst != NULL);
    if (inst->value & 1) {
        inst->value = (inst->value >> 1) ^ inst->term;
    }
    else {
        inst->value = inst->value >> 1;
    }
    return inst->value;
}
Feel free to use the above code snippet in your own projects if you like.
The fact that LFSRs never produce the number zero is also quite handy because it means we can just designate a handle of 0 as effectively the same as NULL. Neat!
Here’s how the VM generates new handles:
- Have a list of N maximum length LFSR terms.
- When a program starts, create an LFSR using a random term from this list and an initial value of 1. Store the term’s index in the list as the initial term as well.
- Whenever a handle value must be generated shift the LFSR to produce a number. If that number is 1 we know the LFSR has looped and should initialize a new LFSR with the next term from the terms list, wrapping back to index 0 if necessary. The initial term the program started with is always skipped in order to avoid stalls from long-lived early-program allocations. This means the initial sequence of handle values is only ever used once for the runtime of the program.
- We now have a pseudo-random handle value. Check if it already exists as a key in the handle table. If not, great! Return that handle. Otherwise, go back to step 3.
This may sound more complicated than it really is, so I’ll go through the relevant bits of code to show it’s not so bad. This is the function for initializing the handle manager for a user program:
static inline char* Handles_Init(HandleManager* handles) {
    handles->InitialTerm = rand() & RANDOM_TERM_MASK;
    handles->NextTerm = handles->InitialTerm;
    Handles_NextLFSR(handles);
    HandleMap_init(&handles->Table);
    return NULL;
}
Select a random initial term index, set the next term index to the initial index, (the Handles_NextLFSR function will use, then advance it) initialize the LFSR, then the hash table. Next is the function which initializes the LFSR:
static inline void Handles_NextLFSR(HandleManager* handles) {
    lfsr32_t lfsr = { 1, lfsrterms32[handles->NextTerm++] };
    handles->LFSR = lfsr;
    if (handles->NextTerm >= HANDLE_TERMS_COUNT) {
        handles->NextTerm = 0;
    }
    if (handles->NextTerm == handles->InitialTerm) {
        handles->NextTerm++;
        if (handles->NextTerm >= HANDLE_TERMS_COUNT) {
            handles->NextTerm = 0;
        }
    }
}
Pretty simple. Set the value to 1, and the term to whatever is in our terms list at the NextTerm index, then increment the next term index. If that index overflows, set it to 0. If the next term index is the initial term’s index, increment to skip it and check for overflow again. Finally here’s the snippet that generates the handle:
size_t count = HandleMap_size(table);
while (true) {
    uint32_t halloc = shift32(lfsr);
    assert(halloc != 0);

    // if handle is 1 then the LFSR has cycled through the entire series of numbers
    // and we should swap the LFSR to the next term in the list
    if (halloc == 1) {
        Handles_NextLFSR(handles);
    }

    // add alloc to handle table if it does not exist
    HandleMap_itr itr = HandleMap_get_or_insert(table, halloc, mem);
    if (HandleMap_is_end(itr)) {
        return 0; // out of memory
    }

    if (count != HandleMap_size(table)) {
        // count will be different if the key value pair was successfully inserted
        return halloc;
    }
}
Get the LFSR to spit out a new value, and if that value is 1 set up the next LFSR. 1 is still a valid handle value though, so we can still use it. Try to insert the handle into the handle table, returning the NULL handle to indicate failure if out of memory. If the handle was successfully inserted, return the handle value, otherwise try again.
I think this is a pretty robust process for generating unique and pseudo-random 32-bit handles to 64-bit pointers, and it avoids some obvious security pitfalls. There might be some I’m overlooking, but I can’t think of them. If you can think of anything I’ve missed, let me know in the comments.
Though this is the recommended way of doing it I probably won’t mandate in the VM’s specification that handle generation is implemented this way, in service of the “must be easy to implement” design goal. I’ll probably just leave it implementation defined. There’s loads of scenarios where a simple incrementing integer would probably be just fine.
So now we can allocate memory, access it via handles, and free it, and nobody ever needs to write their own stinkin’ memory allocator, fabulous! But astute readers may have noticed there’s a missing operation for handles.
Realloc
Later, when I was working on a language to sit on top of the IR and thinking about things like borrowing references, I realized an interesting property of this fancy handle indirection system. Using realloc in C has the annoying property that the pointer to your memory might wind up somewhere else because the previously allocated memory can’t be grown to the new size. In that case C allocates new memory of the appropriate size and copies the relevant sections of the old memory, and returns the new pointer.
But our VM uses handles, not pointers. The underlying pointer and size can change without having to change the value of the handle. This is great news for the final part of the memory management API:
- realloc handle size : resize the memory associated with handle to be size bytes and return either the previous value of handle, or a
NULLhandle on failure.
So reallocating memory in our VM will never mutate the handle. It either succeeds and the handle stays the same, or it fails and doesn’t affect the memory pointed at by the handle at all. I’m not sure how helpful this is truly going to be, but I think it’s a pretty neat side effect of the system. It’s like getting object references for free!
Conclusion
That concludes the memory management and safety design of the Bismuth VM. It’s not perfect, some compromises had to be made, but all in all I’m quite pleased. It hits all 3 of the relevant design goals and while it’s not as fast as one might like I think it’s fast enough. It’s compatible with the C standard. And importantly it keeps the VM much easier to implement, by not forcing anyone to deal with custom heap allocators.
I hope you’ve found this interesting, and that you’ll join me for the next post.
]]>This is the first post in what will hopefully become a series of posts about a virtual machine I’m developing as a hobby project called Bismuth. This post will touch on some of the design fundamentals and goals, with future posts going into more detail on each.
But to explain how I got here I first have to tell you about Bismuth, the kernel.

This is the first post in what will hopefully become a series of posts about a virtual machine I’m developing as a hobby project called Bismuth. This post will touch on some of the design fundamentals and goals, with future posts going into more detail on each.
But to explain how I got here I first have to tell you about Bismuth, the kernel.
Bismuth OS
Over my winter holiday break at the end of 2023 I was doing some recreational OS development. I was working on a kernel called Bismuth (Bismuth OS) running on 32-bit or 64-bit RISC-V and got as far as having a 4k kernel page allocator. At that point it was time to deal with virtual memory mapping and the MMU. I wasn’t feeling up to that sort of commitment and my break ended and life and work resumed.
At various points throughout 2024 I had the urge to pick the project back up, but dealing with memory mapping prevented me from doing so. I investigated running position independent executables, but the details of compiling executables to be position independent felt even more tiresome. It felt like there was no good, fun way to pick the project back up.
Eventually though, a thought hit me: what if the kernel just runs a virtual machine? That VM could run programs, those programs could be position independent, and the VM could ensure that no program steps on memory owned by another program. That’s how Bismuth (Bismuth VM) was born.
DDCG
The idea for this VM didn’t come out of nowhere though. A friend of mine who’d been working on a Gameboy Z80 compiler for his own language had introduced me to Destination-Driven Code Generation. DDCG is a technique for generating machine code from an abstract syntax tree, or AST, that is conceptually a lot simpler than other approaches which require things like SSA (static single assignment), phi nodes, and register allocation. He’d learned about DDCG from this blog post written by Max Bernstein. I assume Max learned about it from the paper by R. Kent Dybvig from Indiana University written in the extremely recent year of *checks notes* 1990.
So, yeah, maybe DDCG isn’t the latest and greatest, but given that three people have been diving into it in the past year or so, maybe we can say it’s having a bit of a revival? Plus it can’t be utterly hopeless, as evidenced by this slide deck for a talk by Kevin Millikin about how Google’s V8 scripting engine used to use it. I can’t source the date on that one, and it may be 15 years old for all I know, but if it was ever good enough for Google it’s good enough for me!
In essence the trick behind DDCG is that in an abstract syntax tree a parent node will have contextual information that will help remove redundant operations if the child is informed. As a trivial example, in the expression x + 1 the immediate value 1 would be a node of its own. It would know that an constant value of 1 is supposed to go somewhere, but it doesn’t have the context required to know where. A simple way to deal with this is to generate code that pushes 1 onto the stack in the child node, and then pop that into a register after. The code might look something like this:
; put the value 1 in a register, then push to stack
MOV X 1
PUSH X
; pop the result of child expression into register X
POP X
This is kind of like implementing a stack machine on top of a register machine, and it’s a bit silly isn’t it? The parent already knows to put 1 into register X. If we could just tell the child that the destination register should be X, we could get away with just one MOV X 1 operation. Fortunately, we can! In DDCG you pass the destination register down to child nodes, and then they “plug” the result of the operation into the correct register. In fact, the destination can be a register, the stack, or it could even be discarded.
If you want to learn more about it, I highly recommend you read Max’s article about DDCG.
The big benefit of DDCG is that you don’t have to worry about lowering your code to basic blocks using static single assignment. You can operate directly on the AST you get from your parser which cuts out a lot of the complexity. The other benefit is that it’s fast which means that you can use it for JIT compilation as well. In fact from what I understand DDCG normally would be used for JIT compilation, where speed is a lot more important than optimal efficiency.
Intermediate representation
Making programming languages is hard and the more you can separate concerns, the better off you’ll be. To that end I made a decision a few years ago that I would separate my programming language development projects into two separate parts:
- A simple intermediate representation in AST form which can be compiled to bytecode, machine code, or even transpiled to C.
- The actual language with all of the expected syntax features which sits on top of and compiles to this IR.
Storing programs in the form of an AST happens to be exactly what DDCG needs in order to emit byte or machine code. This is not unlike the model used by webassembly, which also stores its IR as an AST in a binary file, with other languages compiling to that IR. In fact, I stole the idea of using s-expressions for my IR from webassembly’s WAT plain-text format, although I’m a little bit more strict on the parentheses than they seem to be.
The benefit of this approach means that if the IR isn’t working out I can dump the project long before I need to waste any time on complex lexing, parsing, and error recovery mechanisms. Plus if the IR is sound but the language that sits on top of it isn’t I can scrap the high-level language and create a new one that targets the IR without having to start completely from scratch. The tools that take the IR and transform it to something else are fully independent and will continue working fine, after all.
Currently, Bismuth’s IR (in plain-text form) looks something like this:
(func fib (n) {
    (if (lte n 1) {
        (ret n)
    } {
        (ret (add (call fib (sub n 1)) (call fib (sub n 2))))
    })
})
Every value in the VM is currently a 32-bit integer, and all operations work only on those. This is to keep the IR as absolutely simple as possible. It’s also, again, a lot like webassembly, although that distinguishes between 32-bit and 64-bit integer operations and also has support for floating point.
The IR is extremely easy to parse because it’s Lisp-like. Also, the IR isn’t supposed to be written in plain-text by hand so I don’t have to waste a lot of time on proper syntax error detection. So with this IR and DDCG the VM can start by interpreting bytecode, and can then use a JIT compilater to emit and run machine code for hot paths.
Design goals
So what are my design goals for Bismuth VM? I’m a game developer by trade and that’s going to influence the types of things I’d want to make with my own languages, and the design of those languages. I’ll detail my design goals for this VM in the sections below.
Must be fast (have JIT or AOT compilation)
Really this “fast” is more of a “fast-ish” as I’m not looking for the ultimate in performance. I’m just looking for something faster than your average interpreted language because making games using fully interpreted languages is painful in the performance department. I massively respect the Lua team for making such a fast register-machine interpreter, but it’s still not enough for me.
The VM has to be able to optimize code somehow, whether it be through JIT compilation, AOT compilation, or even transpiling to another language with an optimizing compiler. Fortunately DDCG can do both JIT and AOT compilation, if you’re not too fussed about the quality of the machine code. The AST can also be transpiled to C because…
The IR must be compatible with standard C (without compiler-specific extensions)
If the IR is sufficiently like C then transpiling from the abstract syntax tree to C becomes almost (but not entirely, as we’ll see in a future post) trivial. C is the most portable language in the world, and I’m pretty comfortable with it. This means programs written for the VM could also be transpiled to C and then compiled to a stand-alone executable with an optimizing compiler like GCC to get as much performance as possible. This is a great ace up your sleeve to have for games!
Since the VM is written in C, this means that if I play my cards right large parts of the VM can be written using the VM’s IR and transpiled to C and integrated into the VM. I plan for Bismuth to have system calls which do game-development type things that you would expect from a batteries included environment like QBASIC or fantasy consoles like Pico-8 or TIC-80. By writing these routines in the IR (or a language that targets it) this standard library of system calls would be very portable. Also, they could be more easily integrated with standalone executables.
Another benefit of transpiling to C means that web support becomes possible because C can compile to webassembly, and that…
Can run in a browser
Running a VM (Bismuth) inside another VM (the browser’s webassembly sandbox) just doesn’t perform well, especially since it greatly complicates having a functioning JIT compiler. Programs written for Bismuth should be able to be ahead-of-time compiled to webassembly so they can run standalone in a browser, without the overhead of the actual VM. This requires the IR be largely compatible with webassembly, or at the very least for the IR to be transpilable to C.
And last but not least…
The VM must be easy to implement
Making a VM too hard to implement hinders portability. Webassembly got this right initially, with a relatively sleek and minimal design. Then they started to heap a bunch of hard-to-implement extensions on top of that which, if you ask me, was the wrong call. VMs aren’t conceptually very complex: churning through some bytecode and interpreting each individual operation is pretty easy, and I don’t want to overcomplicate things. This means I want to keep Bismuth (the specification) easy to replicate. If someone wants or needs to roll their own implementation of the VM, it shouldn’t take months or even years to do.
This impacts a lot of the design of the VM, but especially memory management as we’ll see in a future post.
Writing large parts of the VM in its own IR also means those parts of the VM can be compiled to bytecode instead of C in order to bootstrap a new implementation of the VM. The whole standard library doesn’t have to be reimplemented, it can simply be interpreted.
Sounds cool, but how much of this have you got working?
Great question, reader! At the time of writing I’ve got the following working:
- Plain-text IR and compiler supporting functions with arguments, locals and return values, if/else, while loops, function calls, all the usual operators, memory management, load/store, and even logical and/or
- Human-readable binary version of the IR
- A VM written in C that ingests the binary IR and processes it using DDCG into bytecode which it runs
- A transpiler which takes the plain-text IR and converts it to equivalent C code
I’ve also got a first draft of an error handling model planned out, and am working on a language that compiles to the VM’s IR.
Will all of this ever amount to something usable? Who knows! I’m not even sure I’m still developing this VM for my RISC-V kernel at this point. I’ve also never gotten anywhere with my hobby language development projects before, but it’s not impossible this is the one.
Either way, I intend to write more posts covering work I’ve already done. These will include such topics as compilation using DDCG in more depth and some new tricks I’ve learned while using it, the error handling model I’ve settled on, the specifics of transpiling from C-like IR to C (it’s more complex than you might think!) and the memory management and safety aspects of the VM.
Those categories are in arbitrary order. I’m not making any promises as to when or in what order I’ll cover these topics. Still, if you’ve read this all the way to the end, then I hope you’ll join me again next time on this programming language development journey.
]]>Elon Musk just forced through the new blocking changes on Twitter (also known as X, but I refuse to call it that) where blocking someone means they can still see your posts. That and the news that in November all data will be used to train his shitty AI, Grok, without an opt-out, has caused another exodus from Twitter.
As a result my Bluesky account has gone from 2.5k followers to 3k. On the fediverse my Mastodon account just hit 9,900 followers, and I’m hoping I’ll get to that coveted 10k before the end of the year. I’m not writing this to humble brag about my internet clout though, there is a point: there is life after Twitter.
]]>
Elon Musk just forced through the new blocking changes on Twitter (also known as X, but I refuse to call it that) where blocking someone means they can still see your posts. That and the news that in November all data will be used to train his shitty AI, Grok, without an opt-out, has caused another exodus from Twitter.
As a result my Bluesky account has gone from 2.5k followers to 3k. On the fediverse my Mastodon account just hit 9,900 followers, and I’m hoping I’ll get to that coveted 10k before the end of the year. I’m not writing this to humble brag about my internet clout though, there is a point: there is life after Twitter.
Scraping my way to 10,000 followers on Twitter took forever. I don’t really know exactly how long, but I think it took me basically a decade. Not long after my Twitter account sat at 13k and was growing steadily, until Elon Musk took over.
My partner and I had just moved out of our home we built together in Missouri because we felt things were getting too dangerous. Not long after moving, the school district my partner had once trained to be a teacher at started banning books. It was the right move, but it was a very hard time. Between leaving the home I’d built for myself in the US (I’m Dutch) and moving to a new country that I’d never been to before (Cyprus,) and the fact that measures for covid were being scaled down even though the pandemic was and is clearly ongoing, I was going through a little bit of a nervous breakdown when Elon Musk walked his sink into Twitter HQ.
I knew then what I know now: Twitter, long term, is not going to make it. As someone who’s reliant on income from creative pursuits which had never gotten much attention from press (the one time a project did it was a free game) I did not take it well. Everything I had was rolled up in Twitter and if that was taken away I’d surely be doomed, I felt. Two years later, I’m not sure I was entirely wrong in that assessment.
What followed was a mad scramble to be first on every platform I could be first on. I made an account on Cohost (RIP) and pushed it heavily. I grudgingly made an account on Mastodon because things had been made easy for me with an invitation to peoplemaking.games. I even tried Hive Social, although I was absolutely rooting for it to collapse like it did.
It turned out that even though I’d previously felt like the vibes on fedi were pretty rancid, I actually felt quite at home there, with lots of queer and extremely nerdy people who often had an answer to even my most niche tech questions. Cohost I used mostly for long-form content. Not long after I managed to get to around 3,000 followers by riding the wave of new (and short-lived) arrivals from Twitter to fedi and felt at least a little safer.
Though I was sad to see many of my fellow game developers and other contacts no longer posting on Mastodon after 1-3 months, the new fledgling community I found there was welcoming and supportive. Then the real work started, in early 2023. Riding the wave was over, and most of my professional network had simply resumed posting on Twitter like nothing was wrong. It took ages to scramble my way to 1,000 followers on Bluesky, and most of the accounts that followed me were primarily idle backups for people who were still mainly using Twitter.
Slowly, over the two years after November 2022, my reach grew. I eventually got to 5k on fedi and could allow myself to dream of, once again, reaching 10k like I had on Twitter, something I’d worked so hard for. I was helped out tremendously with support from both fedi and Cohost earlier this year, during one of the toughest times in my life. They helped me with donations, so that my studio could reach the release of Kitsune Tails without bouncing rent checks, for which I’m eternally grateful.
I don’t have numbers for Cohost (since it never showed any) but on fedi the support for our game at launch was overwhelming. 1,600 boosts and enough people buying and reviewing our game in the 1st week that it got over 500 reviews and hit overwhelmingly (99%) positive on Steam. The game is a success now, and just recently won silver at the Queer Games Festival in Melbourne.
Now I enjoy great support on fedi (every fedi follower is worth at least a couple Twitter followers in terms of engagement) but I also have my backup Bluesky account. That means I won’t have all my eggs in one basket anymore, ensuring no rich billionaire can take said basket and use it as a bedpan like Musk did.
My mental health is also much improved. Turns out that spending large amounts of time on a place called “the hell site” even before Musk took over wasn’t great for me. Meanwhile, fedi doesn’t have nearly the same effect on my mental health because moderation there tends to be so much better.
All that to say: I’m safe now. And yes, it took a couple years of work. Living your values is hard. Point is: you can do it too. You don’t need to take Elon Musk’s shit. I believe in you.
There is life after Twitter.
]]>For Mastodon comments I’m using this widget by Daniel Pecos Martínez. You’ll want to add mastodon-comments.js to your site via the file manager (Tools & Plugins) and then add the links to purify.js and Font Awesome in the custom HTML section for the head of your site (also in Tools & Plugins) as well as link mastodon-comments.js. If that file lives in the root of your website, you can link it like so:
<script type="module" src="/mastodon-comments.js"></script>
The easiest way then to add comments is to just plonk the <mastodon-comments/> widget at the bottom of your posts. If that’s alright with you, then things are easy and you don’t have to continue reading. Just do that.
I thought that was a little bit untidy though, so the first I did was add the <mastodon-comments/> widget to the “after every post” section for custom HTML. Obviously, this means I can’t embed the tootId property in the widget though, so I had to solve that. My first thought was to put <script>mastodonCommentsId="109574160582937075"</script> in my post, and then grab that global in the mastodon-comments.js JavaScript code. That worked fine, but it’s still untidy because the script tag still shows up in the RSS feed.
My second attempt involved creating a commentsid.json file in the file manager, which looks a little like this:
{
    "testing-fediverse-comments": "113114374538482908"
    , "what-the-ultima-series-means-to-me": "113125860938508763"
}
Just a simple json file mapping post slugs to the correct Mastodon post ID. The plan was that the code would fetch this json, parse it, and then grab the correct ID using the current post’s slug.
To do that I want to make sure the json is always loaded before the widget tries to load the comments though. Inside connectedCallback the code calls this.respondToVisibility which creates an IntersectionObserver that’s used to lazy load the comments. So long as that observer doesn’t exist, the comments won’t load, so I replaced that with my own function loadCommentsId.
Inside that function I fetch /commentsids.json and parse it. Then I use document.querySelector("link[rel='canonical']").href to get the post’s canonical URL and parse out the slug using group 1 of the regular expression /\/posts\/([^\/]+)/.
Note that this works on my site because under “Site settings > URLs” I set “Posts prefix” to “posts”, so every post on my site ends in /posts/<slug>/ with maybe a file at the end. If your site is already up and running and you don’t wanna change that setting, you’ll have to use a different method to capture the post slug.
Finally with my json and post slug in hand I look up the ID, set tootId and call the respondToVisibility function in order to start lazy loading the comments.
I did add a little bit more customization, where the comments section starts out with the text “Comments are not available for this post” and once I verify I have an actual post ID I switch it to the proper comments text, otherwise I set commentsLoaded to true and remove the element with the ID mastodon-stats from the document.
Anyway, hope that helps. If you want to see the full code, it’s right over here. Please note that I made other minor modifications to the HTML and code as well (adding a wrapper div, changing where the date element is on posts, and adding <wbr> in front of any @ beyond the first in usernames.)
One of my earliest childhood memories, and one of the few positive memories I have of my dad (a malignant narcissist and an alcoholic who drank himself to death) was my father playing Ultima 4. Well, not so much “playing” as mapping out the world. The living room floor would be covered in graph paper that he meticulously filled in with all the tiles in the game.
I remember playing Ultima 4, 5, 6, and 7 as a kid. I wasn’t good at playing them, mind you. I spent most of my time in Ultima 6 telling Iolo “spam spam spam humbug,” the iddqd equivalent for RPG nerds. I’d then pick a spot in the world and spend inordinate amounts of time painstakingly moving furniture from halfway across the map into a house to make it mine. I don’t think I ever completed a single Ultima game, really, but it was great anyway.
The Ultima games were my first taste of virtual worlds, and I loved them so much they were the biggest influence that started me down the path of game development. There were other influences of course, but I think it’s fair to say it all started with Ultima.
]]>
One of my earliest childhood memories, and one of the few positive memories I have of my dad (a malignant narcissist and an alcoholic who drank himself to death) was my father playing Ultima 4. Well, not so much “playing” as mapping out the world. The living room floor would be covered in graph paper that he meticulously filled in with all the tiles in the game.
I remember playing Ultima 4, 5, 6, and 7 as a kid. I wasn’t good at playing them, mind you. I spent most of my time in Ultima 6 telling Iolo “spam spam spam humbug,” the iddqd equivalent for RPG nerds. I’d then pick a spot in the world and spend inordinate amounts of time painstakingly moving furniture from halfway across the map into a house to make it mine. I don’t think I ever completed a single Ultima game, really, but it was great anyway.
The Ultima games were my first taste of virtual worlds, and I loved them so much they were the biggest influence that started me down the path of game development. There were other influences of course, but I think it’s fair to say it all started with Ultima.
Later came Ultima Online. It’s hard to explain UO to people who’ve never experienced that trimmed branch of the MMO evolutionary tree. It’s hard to explain to people who are used to theme parks with level grinds and endgame raiding what Ultima Online was like, because Ultima Online (like the other games in the Ultima series) was more of a virtual world. You got 700 points to distribute across a laundry list of skills, in whatever ad hoc way you pleased, and once you got your points distributed the way you wanted you were done. You could lower a skill to raise others at that point, but those 700 points were all you got.
Stats worked the same way although there was a different point maximum you could have that I can’t remember now. They were also trivially simple to raise just by using skills, which also improved as you used them successfully. All of this meant that for builds with skills that were simple to raise, which was most skills in the game, you could “finish” your build in anywhere from a single day to a week.
“So then what did you do?” I hear you ask. Well, it certainly wasn’t grind for loot. Equipment like swords, armor, and so on came in three qualities in Ultima Online: poor, regular, and masterwork. Any masterwork longsword was completely fungible with any other longsword. This worked great because on death all your gear stayed with your corpse, and you’d have to run to a healer as a ghost to get resurrected, then run back with absolutely nothing on you and grab your gear. Often, like in Minecraft, your corpse would just despawn, taking all the gear with you.
But that wasn’t an issue! Most people just used masterwork gear which was ubiquitous and available from player vendors across the game (more on those later) so often the easiest way to deal with death was just to go home and gear up with another set of identical equipment you’d prepped for just such a scenario. There were magical items, but they weren’t often more powerful than masterwork items, and those that were were exceedingly rare and expensive, and still not that much more powerful, so mostly nobody really used them.
Okay, so what else did you do? Dungeons? Well, there’s nothing to get in dungeons besides gold and maybe the occasional magical item which you’d probably sell to a rich player. There’s no experience points, no levels, so sure, you could go to a dungeon and kill monsters for gold, but that’s all you were going to get out of that.

No, once you finished your build people would just… live in the world. In Ultima Online there was player housing, but it wasn’t instanced, houses just dotted the landscape of the world every player shared. While this was very immersive (except for the suburban sprawl that blighted all of the world map in the game) it obviously also immediately caused housing shortages which meant that players needed lots of gold to even buy a little shack.
But given that the main activity in Ultima Online was the accumulation of wealth, eventually most serious players would be able to afford a house of some kind or another. Then they’d engage in trade with other players, decorate their house, hang out and chill with their local communities, or craft. Given there was a constant churn of items, crafting was very popular, and you could even set up your house like a mall full of NPC vendors to sell your stuff to other players.
So the “gameplay” of Ultima Online was mostly just life in a virtual world. Hard to imagine if all you’ve ever known is the perpetual content treadmill of post World of Warcraft MMORPGs.
Eventually they did ruin UO by shoehorning a loot grind into it, which never worked particularly well as you might imagine. World of Warcraft was here and everyone wanted to eat its lunch, including Origin Systems Inc. They did not, of course, eat WoW’s lunch, but instead lost most of their most engaged players and the game became a shadow of its former self.
The Ultima games and Ultima Online particularly were the closest I ever got to living in a virtual world. It’s something that grabbed my imagination as a child and has persisted for 30 years. That’s why I’m always talking about making an Ultima-like game, or an Ultima Online style MMORPG, because that’s why I got into game development: to make virtual worlds.
I haven’t really managed to do that yet in my career as a game developer. But I hope to, some day.
]]>Comments? (Y)es / (N)o / (C)ancel
]]>