Search the Community
Showing results for tags 'script'.
-


Version 1.0.0
2 downloads
Latest version and support here : https://github.com/gravelfreeman/launchbox-xml-cleaner --- This script cleans a LaunchBox platform XML so it only keeps entries for games that actually exist in a local roms folder. It is especially useful when a MAME platform XML was created from `MAME Arcade Full Set...` import but your local ROM folder only contains part of that set, and you want the XML reduced to the games you actually have while still preserving additional applications (clones) from merged romsets. LaunchBox's Scan For Removed MAME Roms... feature removes clone entries from merged sets because those clone files are stored inside the parent rom.zip. Although it was designed around this MAME workflow, it can also be used with other LaunchBox platform XML files. What It Does The cleaner scans the current ROM folder and compares it against the provided LaunchBox XML. It keeps a game when a local ROM exists for that game, including: - the main Game and ApplicationPath - any linked AdditionalApplication entries for the same GameID After the main game pass, it removes orphaned metadata entries that no longer belong to a kept game: AdditionalApplication GameControllerSupport AlternateName How to Use Paste a <Platform>.xml file in it's corresponding roms folder Paste _LB_XML_Cleaner.ps1 and _LB_XML_Drop.cmd files in the roms folder Drag and drop the Platform.xml file onto the _LB_XML_Drop.cmd launcher Command line If you prefer using command line, run the PowerShell script directly and point it to the XML file and ROM folder you want to validate. powershell.exe -NoProfile -ExecutionPolicy Bypass -File ".\_LB_XML_Cleaner.ps1" "C:\Path\Platform.xml" -RomsPath "C:\Path\Roms" powershell.exe -NoProfile -ExecutionPolicy Bypass -File ".\_LB_XML_Cleaner.ps1" -XmlPath "C:\Path\Platform.xml" -RomsPath "C:\Path\Roms" powershell.exe -NoProfile -ExecutionPolicy Bypass -File ".\_LB_XML_Cleaner.ps1" -PreviewOnly -XmlPath "C:\Path\Platform.xml" -RomsPath "C:\Path\Roms" powershell.exe -NoProfile -ExecutionPolicy Bypass -File ".\_LB_XML_Cleaner.ps1" -OutputPath "C:\Path\Cleaned.xml" -XmlPath "C:\Path\Platform.xml" -RomsPath "C:\Path\Roms" powershell.exe -NoProfile -ExecutionPolicy Bypass -File ".\_LB_XML_Cleaner.ps1" -InPlace -XmlPath "C:\Path\Platform.xml" -RomsPath "C:\Path\Roms" Flags -XmlPath : LaunchBox XML file to clean. Can also be passed as the first positional argument. -RomsPath : Folder containing the ROMs or CHDs to scan. -PreviewOnly : Run the cleanup without writing any file. -OutputPath : Write to a specific output path instead of replacing the source XML. -InPlace : Replace the source XML directly. If -OutputPath is not provided, the default behavior already performs a safe backup-and-replace workflow. -RomExtensions : File extensions treated as ROMs. Default: .zip, .7z, .chd. The script never modifies or deletes files or folders. It only reads the folder content and writes a new XML based on local roms. -
LaunchBox XML Cleaner (great for MAME merged roms) (keep entries for games that you have) View File Latest version and support here : https://github.com/gravelfreeman/launchbox-xml-cleaner --- This script cleans a LaunchBox platform XML so it only keeps entries for games that actually exist in a local roms folder. It is especially useful when a MAME platform XML was created from `MAME Arcade Full Set...` import but your local ROM folder only contains part of that set, and you want the XML reduced to the games you actually have while still preserving additional applications (clones) from merged romsets. LaunchBox's Scan For Removed MAME Roms... feature removes clone entries from merged sets because those clone files are stored inside the parent rom.zip. Although it was designed around this MAME workflow, it can also be used with other LaunchBox platform XML files. What It Does The cleaner scans the current ROM folder and compares it against the provided LaunchBox XML. It keeps a game when a local ROM exists for that game, including: - the main Game and ApplicationPath - any linked AdditionalApplication entries for the same GameID After the main game pass, it removes orphaned metadata entries that no longer belong to a kept game: AdditionalApplication GameControllerSupport AlternateName How to Use Paste a <Platform>.xml file in it's corresponding roms folder Paste _LB_XML_Cleaner.ps1 and _LB_XML_Drop.cmd files in the roms folder Drag and drop the Platform.xml file onto the _LB_XML_Drop.cmd launcher Command line If you prefer using command line, run the PowerShell script directly and point it to the XML file and ROM folder you want to validate. powershell.exe -NoProfile -ExecutionPolicy Bypass -File ".\_LB_XML_Cleaner.ps1" "C:\Path\Platform.xml" -RomsPath "C:\Path\Roms" powershell.exe -NoProfile -ExecutionPolicy Bypass -File ".\_LB_XML_Cleaner.ps1" -XmlPath "C:\Path\Platform.xml" -RomsPath "C:\Path\Roms" powershell.exe -NoProfile -ExecutionPolicy Bypass -File ".\_LB_XML_Cleaner.ps1" -PreviewOnly -XmlPath "C:\Path\Platform.xml" -RomsPath "C:\Path\Roms" powershell.exe -NoProfile -ExecutionPolicy Bypass -File ".\_LB_XML_Cleaner.ps1" -OutputPath "C:\Path\Cleaned.xml" -XmlPath "C:\Path\Platform.xml" -RomsPath "C:\Path\Roms" powershell.exe -NoProfile -ExecutionPolicy Bypass -File ".\_LB_XML_Cleaner.ps1" -InPlace -XmlPath "C:\Path\Platform.xml" -RomsPath "C:\Path\Roms" Flags - `-XmlPath`: LaunchBox XML file to clean. Can also be passed as the first positional argument. - `-RomsPath`: Folder containing the ROMs or CHDs to scan. - `-PreviewOnly`: Run the cleanup without writing any file. - `-OutputPath`: Write to a specific output path instead of replacing the source XML. - `-InPlace`: Replace the source XML directly. If `-OutputPath` is not provided, the default behavior already performs a safe backup-and-replace workflow. - `-RomExtensions`: File extensions treated as ROMs. Default: `.zip`, `.7z`, `.chd`. The script never modifies or deletes files or folders. It only reads the folder content and writes a new XML based on local roms. Submitter Light Sock Submitted 03/09/2026 Category Platform Media
-
 Launchbox Precache Manager - Speed up your build View File LaunchBox Precache Manager (LPM) Mass image optimizer + precache system for LaunchBox libraries (PowerShell 5.1, ASCII-only). TL;DR LPM scans your LaunchBox Images folder, builds a compressed WebP/JPEG precache into: LaunchBox\Images\_Precache …then (optionally) swaps your original image folders for the precache using NTFS junctions. Original art is protected in: Images\_Originals LaunchBox/Big Box browsing gets faster and lighter You can restore originals at any time Designed for very large libraries (hundreds of thousands to millions of images). What’s included This package contains two main scripts: LB-Precache-Manager.ps1 – interactive front-end menu (the “manager”) Build-LaunchBox-Thumbnails-Parallel.ps1 – the “engine” that does the heavy lifting Optional (recommended): cwebp.exe – Google WebP encoder (best compression / speed) Launcher: Launch-LPM.cmd (optional convenience) You can also run the manager directly with PowerShell. High-level workflow Audit your Images folder (counts, types, savings estimates). Build thumbnails (create/update files in Images\_Precache). Backfill later (fill gaps only after partial runs or new content). Activate Precache (parks originals into _Originals, junction-swaps to _Precache). Restore Originals (undo junction swap, put everything back). Rebuild existing precache later with a new profile if you want tighter compression. Important notes up front Close LaunchBox and Big Box before running (especially Activate/Restore). Locked folders will be skipped. Back up first. Make a backup/snapshot of your LaunchBox folder if you’re cautious (recommended for first-time users). LPM does not change your game metadata except when you explicitly use: Clean XML references (only removes references to images already moved to _BadImages). Remote / network / external path warning (important) LPM is built for local, fixed disks. If your LaunchBox path is a mapped drive / UNC path / remote share, some operations will refuse to run and you will see: Remote paths not supported; run on the Launchbox PC. This prevents multi-day failures, broken junctions, and extreme slowdowns. SAFE vs FULL run mode At startup you’ll choose a run mode: SAFE: low impact (older/USB systems) FULL: uses hardware recommendations for faster multi-threaded work (best on SSD/NVMe) FULL mode will also show detected hardware and recommended defaults (workers/batch sizing). Why counts don’t always match It’s normal to see differences between: a simple file count script, and what the engine prints during scanning/building Reasons: The engine may walk additional internal paths (depending on mode and what already exists in your Images tree). “Visited directories” and “files matched” are progress counters, not a strict “real folder count.” Bottom line: don’t panic if counts don’t line up perfectly, especially after multiple runs or after Activate/Restore operations. Handling locked folders / “file in use” During Activate/Restore (and sometimes builds), you may see locked items skipped. What it means: LaunchBox/Big Box/Explorer/AV has something open. What LPM does: prints a warning continues with the rest (doesn’t abort the entire run) Fix: close LB/BB re-run the option (safe to re-run) Installation Extract the zip anywhere (Desktop/tools folder). Run one of: Launch-LPM.cmd (recommended convenience) or open PowerShell and run: .\LB-Precache-Manager.ps1 Recommended: Run PowerShell as Administrator for: junction swap operations optional Defender exclusion standby-cache clearing (RAM file cache) Logging LPM-Answers-Last.json This stores the last answered prompts so you can re-run the same build easily (Repeat mode uses this). This is NOT a log and remains on by default. Session logs can be viewed or deleted from the install folder. Batch mode also maintains small state/summary files so it can resume safely. Main Menu (Manager) You’ll see: Main Menu [0] Audit images (recommended first step) [1] Build Thumbnails [2] Activate Precache (junction swap) [3] WebP -> PNG hardlink aliases (LaunchBox compatibility) [4] Restore Originals [5] Clean XML references [6] Backfill missing precache from Images [7] Rebuild existing precache at new profile [8] Exit [B] Batch run-all (50,000 cap per session) [R] Repeat last build (use saved answers) [T] Clean LPM temp files (optional) WebP note (important): - LaunchBox / Big Box do not load images with a .webp extension. - LPM can still build WebP precache for disk savings, but you must create .png/.jpg filename aliases for LaunchBox. - Use menu option [3] to create .png hardlink aliases next to each .webp (no extra disk usage). - On startup, LPM checks whether Windows can decode WebP and (if missing) opens the Microsoft Store "WebP Image Extensions" page. [0] Audit images Walks the Images tree and produces: counts convertible totals rough space saving estimates planning hints per profile Outputs: lb_audit.json lb_audit.csv [1] Build Thumbnails Creates/updates the precache under: LaunchBox\Images\_Precache\... Profiles: Fast Balanced Extreme Custom Notes: If cwebp.exe is present, WebP is used (best compression). You can force JPEG-only (optional). [2] Activate Precache (junction swap) “Turns it on.” Moves originals to Images\_Originals\... Creates junctions under Images\... pointing to _Precache [3] WebP -> PNG hardlink aliases (LaunchBox compatibility) Run this after [1] or [2] to create replacement .png hardlinks for all the new .webp files for LB / BB compatibility. This will scan and create all the files in the _Precache folder. [4] Restore Originals Undoes Activate: removes junctions moves originals back from _Originals [5] Clean XML references Advanced/optional cleanup for broken image refs linked to _BadImages. [6] Backfill missing precache from Images Fills only what’s missing: finds originals without corresponding precache output generates precache copies only for those [7] Rebuild existing precache at new profile Re-encodes existing precache using a different profile (only replaces when beneficial, depending on settings). [B] Batch run-all (50,000 cap per session) This is for huge libraries with hundreds+ platforms/folders. What it does: Iterates through platform folders under Images Processes them in segments capped at 50,000 per batch session Writes output into: Images\_Precache\<Platform>\... Can resume where it left off in later runs using a state file Behavior: Prompts per platform with an auto-default (so you can run unattended) Designed so you can run overnight without bogging down the machine for days in one “run all” Batch state: LaunchBoxRoot\LPM-Batch-State.json (resume point / continuation) Batch summary: Writes short progress summaries to the LaunchBox root (easy to find) Also: Batch runs can clear standby cache automatically (admin required) before segments to reduce cache thrash. [R] Repeat last build (use saved answers) Re-runs your last answered configuration using: LPM-Answers-Last.json This is the “do exactly what I did last time” option. [T] Clean LPM temp files (optional) Cleans LPM temporary working files (typically under Windows %TEMP% related to LPM processing). This is safe housekeeping and does not change your LaunchBox Images content. Notes about WebP + LaunchBox LaunchBox can display WebP files when they’re in place in the Images tree, but: Drag/drop and scraping workflows typically expect PNG/JPG sources. LPM’s approach keeps originals safe, while precache improves performance. Clear Logos: PNG sources are strongly recommended (transparency matters). Recommendation for first-time users Run Audit Run Build Thumbnails with Balanced Test LaunchBox/Big Box performance Then consider Activate Precache Support / community If you like this and want to help me out, buy me a coffee https://buymeacoffee.com/mcflylpm Submitter -McFly- Submitted 11/22/2025 Category Third-party Apps and Plugins
 -
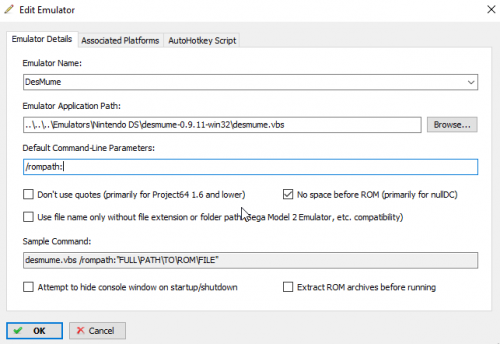
 Hi, I made this script to start DeSmuMe (Stand-alone. Not RetroArch) in fullscreen automatically. These are the steps for using the script: 1) Extract the attached file "desmume.zip" in the folder where you have the executable of the emulator. 2) Open "desmume.vbs" with a text editor and replace "DeSmuME_0.9.11_x86.exe" with your executable file name. Save the file "desmume.vbs" 3) On launchbox go to Tools / Manage Emulators, select your DeSmuMe emulator and click Edit. 4) In "Emulator Application Path" select "desmume.vbs" file (Filter All Files in Browse) instead of the emulator executable. In "Default command-line parameters" enter "/rompath:" Check the option "No space before ROM" Click ok 4) Play Little Red Riding Hood's Zombie BBQ (If you bought it ) I'm a noob in vbscript, if you know an easier way to solve this problem, tips are welcome. (Sorry for bad Great Britainnnish) desmume.zip
-
 Till it is added as a feature to set Default Clear logos to Autogenerated or repeating playlists, I use this PowerShell script to update them. You can use it to make your own auto update ones when you add a new playlist in the future and avoid the redundant copy paste This script find all folders in images/playlists containing a word like Canada and overwrite in the subfolder the source image: just open powershell ISE in windows and paste your adapted code since running .ps1 files is disabled by default: (you can use notepad++ to replace all source folder paths) ex: $sourceFile = "C:\LaunchBox\Images\Playlists\Canada.png" # Specify the path to your source file Get-ChildItem -Recurse -Directory -Filter "*Canada" | ForEach-Object { $clearLogoPath = Join-Path -Path $_.FullName -ChildPath "Clear Logo" if (Test-Path -Path $clearLogoPath) { Copy-Item -Path $sourceFile -Destination $clearLogoPath -Force } } Write-Output "Done." For all the regions clear logo in platform categories ex: $sourceFile = "C:\LaunchBox\Images\Platform Categories\Regions.png" # Specify the path to your source file Get-ChildItem -Recurse -Directory -Filter "*Regions" | ForEach-Object { $clearLogoPath = Join-Path -Path $_.FullName -ChildPath "Clear Logo" if (Test-Path -Path $clearLogoPath) { Copy-Item -Path $sourceFile -Destination $clearLogoPath -Force } } Write-Output "Done." Files attached as txt for copy paste and .ps1 for those who enabled running scripts Countries.ps1Countries.txtregions.ps1regions.txt Cheers NB: Autogenerated playlists don't create corresponding images folders till you select each generated country in Launchbox I use the great regions logos from RetroHumanoid and Yorrick36
-
Hey guys, just started importing my Steam library to Launchbox and tested my only installed game which is FFXIII. So using the pause menu,first of all the game is not paused, I can still hear the music playing. But most importantly, the quit game option does nothing, the game is sent to the task bar but isn't closed. Is there a way to make it work? The last thing is when starting up games, is there a way to keep the steam opening process fully hidden by the startup screen?
-
Version 1.0.0
45 downloads
I had a lot of duplicate MS-DOS games, and when I tried to use the "Consolidate roms for MS-DOS" tool, it would just say "The selected platform is not an emulated ROM-based platform." But I had so many duplicates that not consolidating them was not an option. So I wrote a script that imitates what the tool did for my PlayStation library. It seemed to work for me; now I only see one entry per game and I have the option of "additional apps" for the others. Usage instructions: - Download Python: https://www.python.org/downloads/ - Double click on the script or run it via command line `python path/to/file` - Enter a full path to the platform you wish to consolidate - Note: the platform should not have been consolidated already (i.e., it should have no additional apps for any game) - Platform XML files are located at LaunchBox\Data\Platforms - Script will generate a file called {file name}-consolidated; backup your previous XML file and then rename the new file to take its place - Make sure to remove all other XML files for the newly consolidated platform from the Data\Platforms folder or Launchbox may use one of those old/undesired files Here is the original question I asked on the forums about solving this: -
Script To launch DesMume in fullscreen automatically with LaunchBox. View File Hi, I made this script to start DeSmuMe (Stand-alone. Not RetroArch) in fullscreen automatically. These are the steps for using the script: 1) Extract the attached file "desmume.zip" in the folder where you have the executable of the emulator. 2) Open "desmume.vbs" with a text editor and replace "DeSmuME_0.9.11_x86.exe" with your executable file name. Save the file "desmume.vbs" 3) On launchbox go to Tools / Manage Emulators, select your DeSmuMe emulator and click Edit. 4) In "Emulator Application Path" select "desmume.vbs" file (Filter All Files in Browse) instead of the emulator executable. In "Default command-line parameters" enter "/rompath:" Check the option "No space before ROM" Click ok 4) Play Little Red Riding Hood's Zombie BBQ (If you bought it ) I'm a noob in vbscript, if you know an easier way to solve this problem, tips are welcome. (Sorry for bad Great Britainnnish) Submitter Sdentau92 Submitted 08/17/16 Category Third-party Apps and Plugins
-
Does anybody know how I can find out the full path of ROM file for Running or Exit Scripts? My intention is to run "vmrun.exe" - where I can pass the full path of the rom file - in my case this is a VMX file: I am reading about the variable "%1%" in many threads here, but this seems only work, when I use a separate AHK script. But I don't want mess my LaunchBox with additional AHK scripts. If possible - I would like make use of the onboard possibilities of LauchBoxs "Running Script" and "Exit Script" freature ...
-

Version 1.0.0
53 downloads
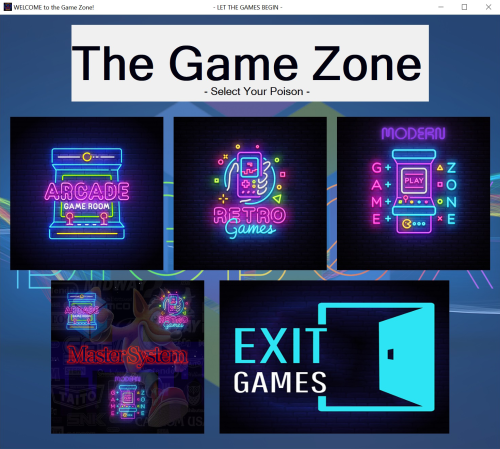
Allows you to Easily use multiple instances of Bigbox on each PC to improve speeds in navigation by splitting up platforms and running them from a single app. Also allows you to customize each instance to use different themes, platform videos, etc.. Includes a ReadMe in the folder I wrote this AHK script to make it easy to run multiple instances of Bigbox on the same PC. The reason I did this was I noticed my main LB/BB rig was getting so big that navigation was starting to slow down, especially in arcade using the newer themes. It was even worse on the older PC's thoughout he house. I got the idea that maybe if I split the platforms up into different copies of LB/BB I might get a smoother experience, especially on older PC's and it worked. The script can be easily changed and customized to your needs. It's simple to change the images, background, layout, number of instances, etc. with much more than Notepad++. It takes a little work to set things up, but works pretty well after your done. Just extract it and put the "The Game Zone" folder where you want. Here is what you need do to Prepare: - this is most of the work 1. Make a copy of your Launchbox folder before doing anything just as a backup in case you have a boo-boo and something gets messed up. That makes it easy to go back. I'd leave it alone until finished. 2. If your game media, including roms, (images, videos, music, manuals) is within your Launchbox folder, you will need to move or make a copy of it all to a centralized location Outside the default Launchbox folder. This excludes your Platform Categories, Platforms, Playlists folders and startup videos. Mine is actually on a shared NAS folder. This keeps you from creating and having multiple copies of your roms and game media in a later step. 3. Next, you need to edit the paths to each of them in the "Folders" section of Launchbox by right clicking on a platform, then Edit > Folders (tab) and navigate each of them to where you put the media OR edit the Platform xml (../Launchbox/Data/Platforms) files with Notepad++ so Launchbox uses the new centralized media locations. Notepad++ is faster and easier, but more chance of errors. 4. After your media is in a centralized location, you can delete it all from your default Launchbox folders. 5. Next, make multiple copies of your edited Launchbox folder and rename them the following (only if you wish to use the script "As Is"): LB-Arcade LB-Retro LB-Modern by default the script uses your normal Launchbox instance for the Master system. 6. Lastly, you will need to edit the AHK script to match the different path instances that you have chosen. Mine are as follows and what the script is using by default: D:\Gaming\Apps\LB-Arcade D:\Gaming\Apps\LB-Retro D:\Gaming\Apps\LB-Modern D:\Gaming\Apps\LaunchBox (master system with all platforms) After everything is all set up and working, you can play with modding to your taste and needs. TIPS: I do all my maintenance work in my master instance and use Syncthings to copy the appropriate platform xml files to the appropriate LB instances, that way I do the work once and the other instances are updated automatically. Yep, I'm lazy! There is a shortcut in the folder to drop on the desktop. You might have to fix the icon for it (copy of it in the "The Game Zone" folder), since my paths may be different than yours. I think that's it. This is my first AHK script and was fun learning about AHK. You can do much more with it than I imagined. Feel free to post questions, comments, suggestions and share what you come up with. -Enjoy -
The Game Zone (Multiple BB Instances via AHK script) View File Allows you to Easily use multiple instances of Bigbox on each PC to improve speeds in navigation by splitting up platforms and running them from a single app. Also allows you to customize each instance to use different themes, platform videos, etc.. Includes a ReadMe in the folder I wrote this AHK script to make it easy to run multiple instances of Bigbox on the same PC. The reason I did this was I noticed my main LB/BB rig was getting so big that navigation was starting to slow down, especially in arcade using the newer themes. It was even worse on the older PC's thoughout he house. I got the idea that maybe if I split the platforms up into different copies of LB/BB I might get a smoother experience, especially on older PC's and it worked. The script can be easily changed and customized to your needs. It's simple to change the images, background, layout, number of instances, etc. with much more than Notepad++. It takes a little work to set things up, but works pretty well after your done. Just extract it and put the "The Game Zone" folder where you want. Here is what you need do to Prepare: - this is most of the work 1. Make a copy of your Launchbox folder before doing anything just as a backup in case you have a boo-boo and something gets messed up. That makes it easy to go back. I'd leave it alone until finished. 2. If your game media, including roms, (images, videos, music, manuals) is within your Launchbox folder, you will need to move or make a copy of it all to a centralized location Outside the default Launchbox folder. This excludes your Platform Categories, Platforms, Playlists folders and startup videos. Mine is actually on a shared NAS folder. This keeps you from creating and having multiple copies of your roms and game media in a later step. 3. Next, you need to edit the paths to each of them in the "Folders" section of Launchbox by right clicking on a platform, then Edit > Folders (tab) and navigate each of them to where you put the media OR edit the Platform xml (../Launchbox/Data/Platforms) files with Notepad++ so Launchbox uses the new centralized media locations. Notepad++ is faster and easier, but more chance of errors. 4. After your media is in a centralized location, you can delete it all from your default Launchbox folders. 5. Next, make multiple copies of your edited Launchbox folder and rename them the following (only if you wish to use the script "As Is"): LB-Arcade LB-Retro LB-Modern by default the script uses your normal Launchbox instance for the Master system. 6. Lastly, you will need to edit the AHK script to match the different path instances that you have chosen. Mine are as follows and what the script is using by default: D:\Gaming\Apps\LB-Arcade D:\Gaming\Apps\LB-Retro D:\Gaming\Apps\LB-Modern D:\Gaming\Apps\LaunchBox (master system with all platforms) After everything is all set up and working, you can play with modding to your taste and needs. TIPS: I do all my maintenance work in my master instance and use Syncthings to copy the appropriate platform xml files to the appropriate LB instances, that way I do the work once and the other instances are updated automatically. Yep, I'm lazy! There is a shortcut in the folder to drop on the desktop. You might have to fix the icon for it (copy of it in the "The Game Zone" folder), since my paths may be different than yours. I think that's it. This is my first AHK script and was fun learning about AHK. You can do much more with it than I imagined. Feel free to post questions, comments, suggestions and share what you come up with. -Enjoy Submitter The Papaw Submitted 05/25/2022 Category Third-party Apps and Plugins
-
Hello, First post here. I've been trying to find a way to get antimicro to run then launch a game. Then, when the game exits, so does antimicro. This is my first time scripting and it looks like I've got it right. It works in Launchbox, but in Big Box the shell [cmd window] stays active on the screen instead of the game. At this point I would need keyboard or mouse interaction to continue, which I do not want. Any suggestions? Here's my script so far: cd C:\Program Files (x86)\AntiMicro start antimicro.exe cd C:\LaunchBox\Games\Windows\Mortal Kombat 4 start /b /wait mk4.exe cd C:\Program Files (x86)\AntiMicro taskkill /F /IM antimicro.exe
-
I'm asking for help with the AHK hotkey script. I got help here regarding AHK scripts for PCSX2. And I googled further, but there are some things that I haven't been able to solve. I want to make the desired hotkey action when the select button is pressed and the arrow key of the xbox360 (x-input) pad is pressed. For example, if you press the DPAD right button while holding down the select button, the save slot will change to the next slot, and if you press the DPAD left button while holding down the select button, the save slot will change to the previous slot. I also want to create a combination of a select button and an analog joystick. The purpose is to configure the hotkeys as above. I desperately want help. Thank you for your interest. Here is the script I made. Joy5:: Joy6:: Joy7:: Joy8:: Press= SetTimer, WatchAxis, 5 return WatchAxis: { GetKeyState, SelectButton, Joy7 GetKeyState, StartButton, Joy8 GetKeyState, L1Button, Joy5 GetKeyState, R1Button, Joy6 GetKeyState JoyZButtons, JoyZ JoyZButtons := Round(JoyZButtons) PressPrev= %Press% PressNext= %Press% if (SelectButton = "D") { if (L1Button = "D") { ; Load state SendInput {F3} Sleep 750 } else if (R1Button = "D") { ; Save state SendInput {F1} Sleep 750 } else if (JoyZButtons > 60) { ; Prev slot Press=LZ if Press= %PressPrev% return SendInput, {Shift down}{F2 down} Sleep 750 SendInput, {F2 up}{Shift up} Press= } else if (JoyZButtons < 40) { ; Next slot Press=RZ if Press= %PressNext% return SendInput {F2} Sleep 750 Press= } else if (StartButton = "D") { ; This section closes PCSX2 when pressing Escape WinClose, ahk_exe {{{StartupEXE}}} } } }
-
 This is probably a long shot. Not sure if this would even be possible but I thought i'd throw it out there, see if someone with scripting knowledge could help me out. I have well over 1000 rom hacks across different systems, and i've made separate platforms for each system with rom hacks. Each platform has an XML file in LaunchBox\Data\Platforms and I'd like to figure out if there is a way to create a new text file named from part of the <ApplicationPath> tag, then copy the <Notes> tag to the associated file. Example: Create Legend of Zelda [ROMHACK] (Triforce Power) (v3.6).txt from <ApplicationPath>Games\Nintendo Entertainment System (Hacks)\Legend of Zelda [ROMHACK] (Triforce Power) (v3.6).zip</ApplicationPath> , then take everything between the <Notes></Notes> tags and copy that into the associated text file Hopefully that makes sense. Obviously, if it would need to take everything between the tags, rather than just a section, I could deal with that (if the system can deal with the backslashes or create a directory structure matching the full path between the tag) Also interested in doing the reverse, finding the rom name based on the text file name, then just copying the contents of the text file into the <Notes> tag for the associated game in the XML file
 -
Hi All, I am looking for ahk script that will allow me to hold "button 10" on my arcade stick for 5 seconds to exit out of an emulator. The code below that was submitted in the noob script section will exit on key press only. $joy10:: ; my start button { Process, Close, {{{StartupEXE}}} ;closes emulator } thanks in advance bman
-
 Platform Consolidation Script View File I had a lot of duplicate MS-DOS games, and when I tried to use the "Consolidate roms for MS-DOS" tool, it would just say "The selected platform is not an emulated ROM-based platform." But I had so many duplicates that not consolidating them was not an option. So I wrote a script that imitates what the tool did for my PlayStation library. It seemed to work for me; now I only see one entry per game and I have the option of "additional apps" for the others. Usage instructions: - Download Python: https://www.python.org/downloads/ - Double click on the script or run it via command line `python path/to/file` - Enter a full path to the platform you wish to consolidate - Note: the platform should not have been consolidated already (i.e., it should have no additional apps for any game) - Platform XML files are located at LaunchBox\Data\Platforms - Script will generate a file called {file name}-consolidated; backup your previous XML file and then rename the new file to take its place - Make sure to remove all other XML files for the newly consolidated platform from the Data\Platforms folder or Launchbox may use one of those old/undesired files Here is the original question I asked on the forums about solving this: Submitter ikinsey Submitted 04/24/2020 Category Third-party Apps and Plugins
 -
Hello, currently I have created a small script with AutoHotKey in "Tools -> Manage Emulators -> Running AutoHotkey Script", which allows me to associate the 2 buttons of the joystick 2, as second player for Dragon's Lair. The code is as follows: ; Start 2 2Joy7:: Send, 2 return ; Coin 2 2Joy9:: Send, 6 return I have already configured the keys in the DaphneLoader.exe configuration: Dragon's Lair -> Configure -> Input: Start 2 = Primary Key -> 2 Coin 2 = Primary Key -> 6 When I start it from LaunchBox or BigBox the keys on the keyboard work. Instead on the joystick of the second player, only the button associated with the "key 6" (2Joy9) of the keyboard (the one that gives the token) works for me. The other button (start 2 - 2Joy7) does not want it to work. And the button number is right, because if I start the AutoHotkey script on Windows and press one of the two joystick buttons with the notepad active, the correct keyboard input is sent. What's wrong? Thx!
-
Hi everyone. Been a while since I've been able to get on here. I have found bits of information on this topic that for a complete newb the basics are missing. Basically what I am trying to do is get joytokey to start and end any time I open a visual pinball game through LB. So far what I know is a batch file needs to be made in order to get joy to key to exit when exiting the game because a script will only start joytokey and not exit upon leaving the game. I don't know if it makes a difference but I did have to turn off each tables association with an emulator to get it to launch properly so none of them have an "emulator" per say through launchbox because it won't auto launch the game and instead brings up the emulator as if I am loading the table and still need to hit play to start the table. My assumption then is I may have to do that for each game that is unless I can script it to go through the emulator and automatically hit play after the table loads like it does without the emulator association. Cool with it either way, just don't know the nitty gritty. Lets assume I know what has to be done terminology wise but that I don't know how to do any of it (writing scripts, creating the batch file proper, ect.) I can say that I had to make quite a few batch files for my dreamcast library and the CDI I believe (its been a while) so I know the basics of running the batch program by putting what you want made into a batch file into the proper folder with the batch program but lets assume here that - I don't know how to write scripts (very little programer knowledge) - I don't know how to specifically make a batch file for anything but the mentioned up above - Am not sure how to direct everything properly afterwords to make sure launchbox is reading everything right (ex. do I just redirect to the batch file instead of the "tablename".exe file?) Sorry to make this so wordy or if these are some stupid questions. The closest I get to doing anything script wise or anything related here is working on this launchbox project. I am just a humble retail manager ?. Thanks so much!!!!
-
.thumb.png.daba333a61f5a96e85d850eeae9c53f3.png) MAME to Demul Rom Copier (MAME .184 & demul07a_180816) View File So Derek (@DOS76), originally posted these scripts, and I saw that they were not copying over all of the files for these systems, and that there were now some errors thrown in. So I updated all of the scripts to include name changes, newly added games, and now the Naomi GD and Naomi GD2 scripts also copy over CHD files. Required Files: 1. These scripts obviously. 2. MAME .184b and demul07a_180816 2. A MAME .184 split or non-merged rom set. Searching mame dome of pleasure helps. (Non-merged is suggested for the best compatibility, even though it's much larger). 3. A MAME .184 CHD pack. This is optional, but the Naomi GD and Naomi GD2 games will either not run correctly or at all. The CHD pack only comes as "merged". How to Use: 1.Download the zip 2. Extract the contents of the zip to a folder (like your Demul folder). 3. Move the scripts (.bat) files to your MAME .184 roms folder. 4. Run each of the scripts 1 by 1, and when the script is done it will ask you to press a button to close the Windows Command Prompt. 5. It will create new folders, sorted to the top of your current view; These folders begin with _ so they move to the top. 6. Move those folders to a location of your choosing so that you can import them in to LaunchBox. 6.5 Make sure to set the "Scrape As" option for these platforms all to Arcade (Will automatically pop up during import when you type in a non-default System name) and check the box "Force using MAME Metadata" (That box is on the final screen with the rest of those check boxes). Remember, these are all Arcade MAME Games, so all of their metadata will be in there. 7. Make sure to also tell Demul where your MAME roms are located for parent and dependency reasons. You can add this in the Plugins and Bioses options menu in Deuml, pictured below. The Systems this script will copy games for: Naomi NaomiGD Naomi 2 Naomi 2 GD Sammy Atomiswave Hikaru Gaelco This script uses 2 commands, copy and xcopy, and I can only promise that it will work on Operating Systems that LaunchBox supports (Windows 7, Windows 8 / 8.1 and Windows 10 currently). If you have any questions, leave a comment on the download page or the thread. I will also post Derek's original script for the version of MAME he edited them for. To clarify, his scripts work on a older version of MAME and Demul. Submitter SentaiBrad Submitted 04/18/2017 Category Third-party Apps and Plugins
MAME to Demul Rom Copier (MAME .184 & demul07a_180816) View File So Derek (@DOS76), originally posted these scripts, and I saw that they were not copying over all of the files for these systems, and that there were now some errors thrown in. So I updated all of the scripts to include name changes, newly added games, and now the Naomi GD and Naomi GD2 scripts also copy over CHD files. Required Files: 1. These scripts obviously. 2. MAME .184b and demul07a_180816 2. A MAME .184 split or non-merged rom set. Searching mame dome of pleasure helps. (Non-merged is suggested for the best compatibility, even though it's much larger). 3. A MAME .184 CHD pack. This is optional, but the Naomi GD and Naomi GD2 games will either not run correctly or at all. The CHD pack only comes as "merged". How to Use: 1.Download the zip 2. Extract the contents of the zip to a folder (like your Demul folder). 3. Move the scripts (.bat) files to your MAME .184 roms folder. 4. Run each of the scripts 1 by 1, and when the script is done it will ask you to press a button to close the Windows Command Prompt. 5. It will create new folders, sorted to the top of your current view; These folders begin with _ so they move to the top. 6. Move those folders to a location of your choosing so that you can import them in to LaunchBox. 6.5 Make sure to set the "Scrape As" option for these platforms all to Arcade (Will automatically pop up during import when you type in a non-default System name) and check the box "Force using MAME Metadata" (That box is on the final screen with the rest of those check boxes). Remember, these are all Arcade MAME Games, so all of their metadata will be in there. 7. Make sure to also tell Demul where your MAME roms are located for parent and dependency reasons. You can add this in the Plugins and Bioses options menu in Deuml, pictured below. The Systems this script will copy games for: Naomi NaomiGD Naomi 2 Naomi 2 GD Sammy Atomiswave Hikaru Gaelco This script uses 2 commands, copy and xcopy, and I can only promise that it will work on Operating Systems that LaunchBox supports (Windows 7, Windows 8 / 8.1 and Windows 10 currently). If you have any questions, leave a comment on the download page or the thread. I will also post Derek's original script for the version of MAME he edited them for. To clarify, his scripts work on a older version of MAME and Demul. Submitter SentaiBrad Submitted 04/18/2017 Category Third-party Apps and Plugins -
Version 1.0.0
579 downloads
So Derek (@DOS76), originally posted these scripts, and I saw that they were not copying over all of the files for these systems, and that there were now some errors thrown in. So I updated all of the scripts to include name changes, newly added games, and now the Naomi GD and Naomi GD2 scripts also copy over CHD files. Required Files: 1. These scripts obviously. 2. MAME .184b and demul07a_180816 2. A MAME .184 split or non-merged rom set. Searching mame dome of pleasure helps. (Non-merged is suggested for the best compatibility, even though it's much larger). 3. A MAME .184 CHD pack. This is optional, but the Naomi GD and Naomi GD2 games will either not run correctly or at all. The CHD pack only comes as "merged". How to Use: 1.Download the zip 2. Extract the contents of the zip to a folder (like your Demul folder). 3. Move the scripts (.bat) files to your MAME .184 roms folder. 4. Run each of the scripts 1 by 1, and when the script is done it will ask you to press a button to close the Windows Command Prompt. 5. It will create new folders, sorted to the top of your current view; These folders begin with _ so they move to the top. 6. Move those folders to a location of your choosing so that you can import them in to LaunchBox. 6.5 Make sure to set the "Scrape As" option for these platforms all to Arcade (Will automatically pop up during import when you type in a non-default System name) and check the box "Force using MAME Metadata" (That box is on the final screen with the rest of those check boxes). Remember, these are all Arcade MAME Games, so all of their metadata will be in there. 7. Make sure to also tell Demul where your MAME roms are located for parent and dependency reasons. You can add this in the Plugins and Bioses options menu in Deuml, pictured below. The Systems this script will copy games for: Naomi NaomiGD Naomi 2 Naomi 2 GD Sammy Atomiswave Hikaru Gaelco This script uses 2 commands, copy and xcopy, and I can only promise that it will work on Operating Systems that LaunchBox supports (Windows 7, Windows 8 / 8.1 and Windows 10 currently). If you have any questions, leave a comment on the download page or the thread. I will also post Derek's original script for the version of MAME he edited them for. To clarify, his scripts work on a older version of MAME and Demul. -
Hi Everyone! I found it really hard to search for games when looking at a console and none are expanded. I wrote a little script that writes the name of each game on top of it's cover so I'll be able to find games easier and even use the browser's search functionality on a console. Here's the script and how to use it: 1. Create a new bookmark in your favorite browser 2. Enter the following name: "Launchbox - inject names" 3. As the URL, enter the following code: javascript:(function() { $('.box-item').each(function(){ let qElm = $(this); let boxWidth = this.clientWidth; let imgWidth = qElm.find('img')[0].clientWidth; let boxHeight = this.clientHeight; let imgHeight = qElm.find('img')[0].clientHeight; let hSpace = (boxHeight - imgHeight) / 2; let wSpace = (boxWidth - imgWidth) / 2; let name = $.trim(qElm.next().find('h3').text()); qElm.append(`<div style="position: absolute;bottom: ${hSpace + 5}px;left: ${wSpace}px;right: ${wSpace}px;color: white;display: flex;align-items: center;text-align: center;justify-content: center;background: rgba(0, 0, 0, 0.5)">${name}</div>`); });})() I usually put this in my bookmark bar for easy access. Look at the gif for a quick demo. I hope someone else will find this useful ? Notice that it might take a while if your rom collection for a specific console is huge ?
-
When i close project 64 in bigbox with the hotkeys joy+joy button, it closes the game, but it stays frozen inside bigbox afterwards. What is the script for exiting project 64, isnt it alt+4 to completely close. Please help someone
-
Hi everyone, I have 2 problems and I need your help. 1- In the applications of the games I add Xpadder to start before the game, and a bat to close it when it closes. With the new versions of LB now it opens to me and I close without being able to use it. 2- How can I do to load an xpadder profile directly with a script in applications? When I use nomousy I have the same problem mentioned in number 1. It opens nomousy and closes instantly without being able to function. I hope you can help me. From already a thousand thanks
-
I have a nesicaxlive game which uses two files one to decrypt the game and the other to launch the game so I want to know if there is a way to launch the two files 1 then 2 Thanks
-
Version 0.8.5
262 downloads
Hi, I made this script to start DeSmuMe (Stand-alone. Not RetroArch) in fullscreen automatically. These are the steps for using the script: 1) Extract the attached file "desmume.zip" in the folder where you have the executable of the emulator. 2) Open "desmume.vbs" with a text editor and replace "DeSmuME_0.9.11_x86.exe" with your executable file name. Save the file "desmume.vbs" 3) On launchbox go to Tools / Manage Emulators, select your DeSmuMe emulator and click Edit. 4) In "Emulator Application Path" select "desmume.vbs" file (Filter All Files in Browse) instead of the emulator executable. In "Default command-line parameters" enter "/rompath:" Check the option "No space before ROM" Click ok 4) Play Little Red Riding Hood's Zombie BBQ (If you bought it ) I'm a noob in vbscript, if you know an easier way to solve this problem, tips are welcome. (Sorry for bad Great Britainnnish)


.thumb.png.daba333a61f5a96e85d850eeae9c53f3.png)


