The first time I said those words I was on a Microsoft stage, wearing a Microsoft logoed shirt, speaking to a Microsoft audience. I remember seeing the event sponsor – a Product Manager at Microsoft Canada – turn shades of red. How dare I stand on a Microsoft stage speaking to a Microsoft audience and imply that in some cases there were better options than those offered by Microsoft?
I was relieved when he and I spoke later and I was able to explain to him why I said it… and I convinced him that I was right. We continued to work together on many different events after that. It could have gone another way.
I have used Microsoft Windows as my main desktop operating system for the last three decades. I have been implementing Windows Server for nearly as long, and I have been consulting on both of them since before the millennium started. I cannot imagine what would have to happen for me to decide one day that Windows would no longer be my primary operating system. I am not saying it couldn’t happen… but it is unlikely to happen any time soon.
Here’s the thing… while I still see Windows as the best tool for the job for desktop productivity, when it comes to cybersecurity it is a Linux world. Sure, you can download some of the tools we use for cyber in Windows, but there is no contest – to be a cybersecurity professional you need to know and use Linux.
A couple of years ago I wrote a series of three articles on installing Kali Linux on Windows Subsystem for Linux (WSL). Kali Linux is a penetration testing and security-focused distribution that is based on the Debian kernel. While some may prefer Parrot Linux for the purpose, and believe me I understand, Kali remains an industry standard. Additionally, Kali is available in WSL where Parrot is not.
I have been telling my students for years that if you are going to work in cybersecurity, you need to learn Linux… and I have championed the use of Kali to them for just as long. I even wrote a couple of articles to guide my students in installing virtual machines running Kali on their desktop computers (See Windows 11/10 Hyper-V and Oracle VirtualBox articles). I also wrote later that year a series of three articles on installing Kali in WSL… including the full experience and Remote Desktop.
After teaching a class on Linux recently, I decided it was time to revisit WSL.
I have been a Windows Hyper-V advocate since before it was called Hyper-V. However, the ability to completely and seamlessly integrate the Linux environment into our Windows desktop certainly has its advantages. It requires fewer resources (and no resource dedication), it starts up much quicker, and it seamlessly integrates to the desktop (including mounting the local file system as /mnt/c). Additionally, by using WSL it is easier to mount several different builds of Linux in the desktop.
Step 1: Enable Windows Subsystem for Linux
Installing WSL is a pretty simple process. Because it is a part of the Windows it really just has to be turned on. Open a PowerShell window (as Administrator) and run the following cmdlet:
Enable-WindowsOptionalFeature –Online –FeatureName Microsoft-Windows-Subsystem-Linux
Your system may require a reboot after this.
When you log back in, open PowerShell (again as Administrator) and run this command to apply any updates that are available.
wsl –update
While it is possible Windows will prompt you to reboot again, at this stage it is unlikely. However, if it does… just log back in, and then reopen Windows PowerShell as Administrator.

Step 2: Choose and Install Your Build
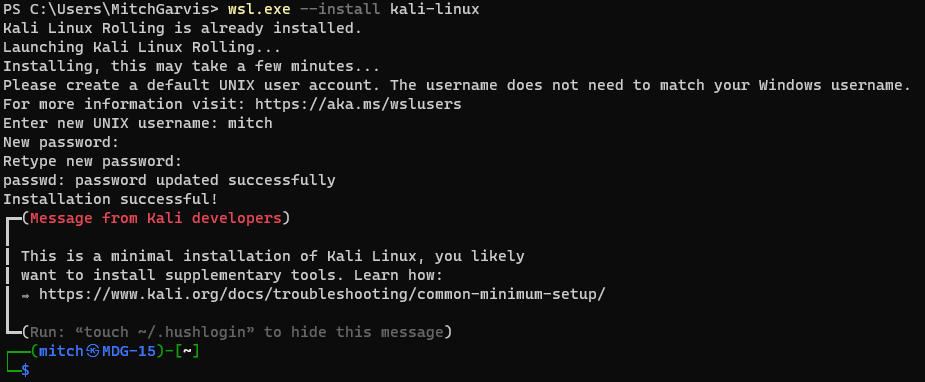
If you want to continue the PowerShell route, there is a simple way to extract a list of Linux builds available. Just type wsl –list –online. That will give you a list of builds (at the time of writing it was 22 distros) that can be installed by using the command wsl –install <distro name> -online. This list conveniently includes Kali Linux Rolling, which is the distro that I use most often. However, there are a number of other distros that are available through other means. While I will not spend any time discussing them, there are several additional builds that are available for download from the Microsoft Store, and a few others (including CentOS and RHEL) that are available to download as tarballs (.tar images) which can then be installed manually. In all there are more than thirty distros available, and while most of them are Debian based, there are a few available that are based on the Red Hat kernel.
When you enter the command wsl –list –online you should receive a list that will include kali-linux. This is the one we are focusing on here, although I encourage you to install more than one!
wsl –install kali-linux
This will install a minimal Kali in your WSL. It might or might not require a reboot (I have seen both… for reasons I never quite understood). If it does, then reboot, and then reopen PowerShell. run the command wsl. You will be prompted to create a local user account. Remember that unlike Windows, Linux accounts are case-sensitive.
Step 3: Connecting to your WSL instance
Now that you have your Kali Linux instance installed, you have a number of easy ways to access it:
- From a command line you can type wsl.exe;
- In your Windows Terminal you should have an option to open a new tab directly into your WSL instance (note that if you just installed your WSL, this option will not be available until you close and then reopen Terminal); or
- In your Start Menu there will be an entry for kali-linux.

Note that to this point, you are exclusively accessing Linux from the bash. To get a GUI experience, read on to the next section (Installing Win-KeX).
Step 4: Install Win-KeX
Okay, we are not quite ready to interact with your Windows desktop. That requires another step. We are going to install Win-KeX in the Kali instance. Win-KeX is the tool that provides a full graphic desktop environment inside WSL, and it stands for Windows + Kali Desktop Experience.
In your WSL instance, run the following commands:
sudo apt update
sudo apt install -y kali-win-kex
We are now ready to go.
KeX supports three modes:
Windows Mode gives us a dedicated Kali desktop in a dedicated window. To start from inside your Kali WSL, type kex –win -s. To start it from PowerShell (or a Command Prompt) type wsl -d kali-linux kex –win -s
Seamless Mode allows us to share the Windows desktop between Windows and Kali applications and menus. To start from inside your Kali WSL, type kex –sl -s. To start it from PowerShell (or a Command Prompt) type wsl -d kali-linux kex –sl -s
Enhanced Session Mode is similar to Hyper-V, and uses Remote Desktop Protocol (RDP) for a more feature-rich experience. To start from inside your Kali WSL, type kex –esm –ip -s. To start it from PowerShell (or a Command Prompt) type wsl -d kali-linux kex –esm –ip -s
Step 5: Supersize Me!
I mentioned earlier that when you install Kali in WSL it installs a minimal installation. The minimal installation is good to get started, but you will not have all of the tools that make Kali the go-to for cybersecurity and penetration testing.
You can pick and choose which apps to install… but at that point you could just as easily be using Ubuntu. There is an option to install “Kali with everything” with a single command. From within your Kali WSL instance, type:
sudo apt update
sudo apt -y upgrade
sudo apt install -y kali-linux-large
You are now installing many different packages with a single command, and some of those packages require user interaction… even if it is just to click OK. Make sure you read what you are agreeing to… some of them might involve exposing or hiding your MAC address, and other fun stuff!
This will install all of the tools that you are used to having from a traditional Kali install… the full Monty, as it were. It will definitely take a few minutes, so be patient.
I should mention that this option is going to take a hit on your free drive space. Whereas the base install might be a couple of gigabytes in a virtual hard drive file, by installing Kali Linux Large that quickly turns into a file that is 30gb… before you do any work in it.
Step 6: Configuration
In addition to the WSL instance that you created, there is another new Start Menu item that might helpful. Windows Subsystem for Linux Settings allows you to manage the resources you are allowing the WSL instances to use, networking modes, optional features, and more. Take a look in them to see what you might want to tweak for your usage.
Conclusion
I have discovered a lot of bugs and instability in the current release of Windows Subsystem for Linux (version 2.6.2.0,kernel version 6.6.87.2-1, WSLg version 1.0.71, MSRDC version 1.2.6363). Don’t get me wrong; it works… more or less most of the time. It is definitely a useful tool, but these instabilities can test your patience. It is definitely not something I would recommend to hand to end users… but then again, most end users do not require Windows and Linux on the same interface. As an IT Pro / Techie, you will put up with having to reboot, or to terminate unresponsive processes, or other fun gotchas that you are likely to encounter.
Once you have gotten past all of the frustrations, you are likely to find that Kali on WSL is a great way to compromise using the familiar Windows 11 desktop while still having the powerful pen testing tools of Kali… without needing a second computer.
Good luck, and let me know how it goes for you!
]]>From time to time one of those training providers will call on me to teach a course that is outside of my comfort zone. When that has happened, it has almost always been on the Microsoft stack. ‘Mitch is a Microsoft guy, so we can ask him to teach Azure Open AI, or DevOps!’ At first, I used to jump at every class I was offered, simply because as a contract trainer I only earn when I work… and teaching a course that I am not comfortable teaching is still more comfortable than not being able to pay my bills. On these classes I usually spend a lot of time studying and preparing… it would be unfair to the students if I went into any class unprepared.
A couple of months ago I got such a call from a training provider with whom I have an excellent relationship. Really, they have helped to advance my career so much that it would be hard for me to imagine not accepting any reasonable request from them. Of course, they know that my expertise lies in cybersecurity and the Microsoft infrastructure stack, so most of their requests – even the ones that are outside of my comfort zone – are usually tied to one or the other of those.
“Mitch, can you teach a CompTIA Linux+ class for us at the beginning of December?”
After checking my calendar to confirm that it was not April 1st, I gave it some thought. I have been using Linux for a couple of decades… for very specific use cases. In 2010 I even bought a laptop that was intended strictly for me to use and really learn Linux on… although that never really worked because I was distracted by a number of other, more pressing tasks… including being a new father. I have been using both Kali and Parrot Linux for my cybersecurity work (and demos) for several years. I can certainly navigate the command line interface of BaSH and could even do some very rudimentary Python scripting. It’s not like I would be diving into a new invention (which I have done for Microsoft on at least three occasions)… Linux is an operating system, and I know operating systems. Sure, there would be a few concepts that I would really need to brush up on, but would teaching Linux be so difficult?
I checked my calendar again. No joke this time, while there was a month between the request and the course delivery, I do have obligations (including other classes to teach) that I needed to consider when estimating if I would have sufficient time to prepare for the course… and of course to book and pass the exam. I decided that it would be a little tight, but it would certainly be doable. I would be cutting it close… but yes, I could do it.
I joked with the training broker that they were really scraping the bottom of the barrel, but I agreed to take on this class. They assigned me the courseware, and I got to work.
I downloaded the courseware at the end of October when the weather was still reasonable, and I spent a few evenings on the balcony studying with a cigar. I was interrupted by a high level infosec class I needed to deliver, and some other work I needed to do, but I made sure that I was able to go through all of the labs provided… and replicated many of the steps in my own lab so that I could have the technology as persistent, and not in an online lab that is wiped out at the end of each session.
When the training provider asked me a week before the class if I was ready… I lied and said that I was. Deep down I knew that I was not… and I was certain that I was going to fail the exam. I booked the exam anyways… for Thursday afternoon. I figured that if I failed it Thursday, then I would have enough time to rebook it and take the exam again over the weekend.
Thursday afternoon came, and I decided to reschedule the exam for Saturday. I was not feeling confident, but I was at the point where I felt that a couple of more days of studying would make a real difference. I spent two more days studying and then sat down to the exam.
I was very confident on some questions, extremely unsure about others. In short, I was not confident when I pressed the ‘End Exam’ button. When it told me that I passed I was relieved… and I started to laugh. I have passed fifty-eight Microsoft exams… and now one Linux exam! (It should be noted that several of my cybersecurity and networking exams required a decent knowledge of Linux, including live simulations… but none of them were Linux exams.)
Okay, I am certified. Great. Was I ready to teach the class? That was another issue. I went over my score report and spent several hours on Sunday reviewing the topics I was uncomfortable with. By the time I was ready for bed I was confident that I was ready for the class. Woohoo!
I had more fun teaching the Linux+ class than I ever thought I would have. I went through the material but broke into demos as often as I could so that I could show the students what the concept I was teaching looked like in practice. I always prefer to teach with demos because there is only so much you can learn from slides. I also realized as I taught that despite my heavy focus on Microsoft, I have implemented or at least used so many of the features and concepts included in the class in my professional life.
Because all of my students were very new to Linux, and were mostly Windows guys, they asked me to show the comparison to Windows on a lot of concepts. I realized that for someone who grew up in Windows, they would be familiar with the concepts I was teaching if I could draw the comparison. That was probably one of the most beneficial reasons to have a Microsoft consultant teach Linux. I asked the students and they all agreed that it was a huge value add for them and helped them to better understand the material covered.
We spent the week together, and at the end they all filled out the course evaluations that were entirely positive. I was relieved by that because trainers live and die by those scores, so when I am teaching well outside of my comfort zone, I have to pay even closer attention. It was a win.
I never expected to love teaching that course, but I have told the training provider that I did, and that I will happily teach it again. Don’t get me wrong… I am not reformatting my primary computers to Linux… but I will definitely maintain the lab environment that I built, and I will continue to work in it so that I can maintain and hone my Linux skills. I am also thinking that when I get a laptop that I loaned out back next month, I will repurpose my other spare laptop to run Linux. Which distro? I don’t know… but expect this Microsoft guy to continue to coexist in Linux!
]]>
This is the third in my series of articles on installing Kali Linux on the Windows Subsystem for Linux. Before performing these steps, make sure you have performed all of the necessary steps from the previous two articles, found here:
Kali on Windows: Adding the Desktop
Of course, in the first article I mentioned that we got to the end of the installation process only to be told that we now have a minimal installation of Kali Linux. We did not even have a GUI until the second article. Now we will complete the process and install the complete set of tools that we expect from Kali Linux. Follow these steps from within your Linux environment and you will have everything you need.
sudo apt update && sudo apt full-upgrade –y
sudo apt install –y kali-tools-web
These commands will install the Kali Metapackages. I am not going to list them here but trust me, there are a lot of them.
But wait, there’s more!!…
I feel like I should be throwing in a set of steak knives when I write that, but it’s true… yes, you have your Kali Linux desktop that you can connect to (either through RDP or the wsl.exe commands that I enumerated in the first article)… but you can also just run the tools directly on your Windows desktop. Yes, your Kali Linux tools are now listed in your Windows Start Menu… right there under K for kali-linux

Have fun with that folks!
]]>
In my last article (Kali on Windows) I showed you how to install the Windows Subsystem for Linux (WSL) on your Windows client, and then install an instance of Kali Linux in it so that you could have the functionality of Kali without the separation of a hypervisor… or worse, needing a second computer.
The problem with that installation was that at the end of the installation process it informs us that we have now installed ‘…a minimal installation of Kali Linux.’ Okay, so you enticed us with the allure of Kali, but when we arrived at our destination we are not quite receiving what we were expecting, right? I mean… there isn’t even a desktop!
In this article I am going to show you how to install that desktop… and the entire suite of tools on top of it. Let’s go!
*** NOTE *** You might find that your Linux instance has a strange IP addressing scheme from your environment. Before you proceed with any of this, make sure you can ping the Internet. try ping www.garvis.ca. If it does not work then you need to run the following commands before you proceed:
sudo rm /etc/resolv.conf
sudo nano /etc/resolv.conf
(This will create a new configuration file. enter the following text, then save the file)
[network]
generateResolvConf = false
nameserver 8.8.8.8
Try to ping the Internet again, and it should work.
Step 1: Install xRDP
There are two steps required to be able to use the Windows RDP (Remote Desktop Protocol) to access our Kali WSL environment. First we need to install an RDP program! To do so, perform the following steps from within your Kali Linux console:
sudo apt update && sudo apt –y upgrade
sudo apt install kali-desktop-xfce
sudo apt-get install xrdp
sudo cp /etc/xrdp/xrdp.ini /etc/xrdp/xrdp.ini.bak
sudo sed -i ‘s/3389/3390/g’ /etc/xrdp/xrdp.ini
sudo sed -i ‘s/max_bpp=32/#max_bpp=32\nmax_bpp=128/g’ /etc/xrdp/xrdp.ini
sudo sed -i ‘s/xserverbpp=24/#xserverbpp=24\nxserverbpp=128/g’ /etc/xrdp/xrdp.ini
sudo /etc/init.d/xrdp restart
*** NOTE *** We are changing the default RDP from tcp/3389 to tcp/3390 on the chance that your local computer is already an RDP system. You can change the 3390 to whatever non-standard port you like… as long as you remember it.
You will notice that some of these will take some time… and you might need to press Y to continue ![]()
(For those of you unfamiliar with the command, sed changes text within a file. If you prefer, you could simply edit the file using nano or vi.)
Step 2: Install the Kali GUI (Win-KeX)
Yes, it is nice to have the command line tools, but I know a lot of Windows enthusiasts will feel more comfortable in the GUI… even a Linux GUI. Win-KeX will give us that ability. We might be accused of putting the cart before the horse! We installed and configured xRDP for the remote desktop environment, but it will not work until we install the actual desktop. This one is pretty simple:
- sudo apt update
- sudo apt install –y kali-win-kex
Step 4: Connecting to xRDP
- From within your Windows client launch the Remote Desktop Connection (mstsc.exe).
- In the Computer box type localhost:3390 and click Connect.
- A warning will pop up that says The identity of the remote computer cannot be verified. Do you want to connect anyway? Click the checkbox (Don’t ask me again for connections to this computer) and click Yes.

Log in with the username and password that you provided and voila! you should now see this screen in a Remote Desktop window:

Bonus: Three more ways to connect!
There are three ways that you can connect to your Kali instance without the RDP console. They are:
Windows Mode
This will give you sound support:
- From within the Kali WSL console:
kex –win 0s - From the Windows command prompt:
wsl -d kali-linux kex --win –s
Enhanced Session Mode
This will give sound support and ARM workaround:
- From within the Kali WSL console:
kex --esm --ip -s - From the Windows command prompt:
wsl -d kali-linux kex --esm --ip –s
Seamless Mode
This will launch a Kali Linux panel on your Windows desktop, so your Kali applications will share the desktop with your Windows apps.
- From within the Kali WSL console:
kex --sl -s - From the Windows command prompt:
wsl -d kali-linux kex --sl –s
Conclusion
We are actually not done yet… but this article is. In my next article I will show you how to install the full suite of Kali Linux tools to your Kali WSL environment. See you tomorrow!
This will be the first in a series of three (3) articles that I am writing to take my readers step-by-step through the installation of Windows Subsystem for Linux, installing Kali Linux on that, and then converting that minimal installation into a complete Kali toolset, including the desktop, and the ability to connect to it using RDP. These articles will go live between Thursday, October 19 and Tuesday, October 24, 2023. If you find them helpful, then please let me know in the comments! -MDG
In the first half of 2020 Microsoft released the Windows Subsystem for Linux (WSL) on Windows 10 which allows us to run different distros of Linux from within our Windows client. This can be extremely useful for those of us who need to use both operating environments without needing the power to run a full virtual machine environment (or who need direct access to hardware, such as wireless network interfaces).
While I have been a Windows user since the 1980s and have no plans on switching my primary operating system, I also believe that IT should never be about religion, but rather it should be about what is the best tool for the job. For network management and especially for cybersecurity the best tools are absolutely on Linux. Both Kali and Parrot are Linux distros that include so many of those tools that can make our jobs easier.
In this article I will show how to install a Kali Linux distro into the Windows Subsystem for Linux on Windows 11. The steps should be identical to installing on Windows 10.
Step 1: Install the latest Windows Subsystem for Linux
- Open PowerShell as an Administrator.
- Run the following cmdlet: Enable-WindowsOptionalFeature –Online –FeatureName Microsoft-Windows-Subsystem-Linux
If Windows asks you to restart then do so.
Step 2: Install Kali Linux Rolling
- Once again, open PowerShell as an Administrator.
- In case you have had the Windows Subsystem For Linux for a bit, run the following command to apply any recent updates: wsl –update
- Run the following command to see the distros available: wsl.exe –list –online
- Run the following commend to install: wsl –install kali-linux
It should not take very long to install, and when it is finished you will immediately be asked to create a local (Unix) account. Choose your name (remember that Linux and Unix usernames are case sensitive) and then your password.

You will notice that the message clearly states that “This is a minimal installation of Kali Linux, you likely want to install supplementary tools.” I will discuss that in my next article, which will show you how to install a GUI environment onto your WSL Kali.
Step 3: Log on!
Now that you have installed it and created an account for yourself, all that is left to do is to run it and log in. The icon will now be in your Start Menu (shown):

In my next article I will be showing you how to take this one step further by adding the full Kali Graphical User Environment (GUI)… as well as the entire suite of tools that many of us find so useful in Kali.
Thanks for reading!
When I wrote the article I was not thinking that so many end users are using Windows 10/11 Home Edition, which does not include the Hyper-V feature. That does not mean they will be left out, it simply means that we need to do it another way. In this article I will outline the steps to building the same virtual machine on the Oracle VirtualBox platform, which is a free hypervisor that anyone can use. I want to note here that VirtualBox is also available for Mac OS, and I suspect the steps to create the VM will be the same. Obviously there will be differences in installing the hypervisor.
Prerequisites
Before you get started, there are three downloads that you will need.
Oracle VirtualBox: We can download the executable for Oracle VirtualBox from this link: Downloads – Oracle VM VirtualBox
Microsoft C++ 2019 Redistributable: If you have not already had to do so for another application, you will need to download these bits (which are also free) from Microsoft. The installation of this will require you to reboot your computer. You can download the installer from this link: Latest supported Visual C++ Redistributable downloads | Microsoft Learn
Kali Linux: You obviously need the bits to install Kali Linux, which you can download from here: Get Kali | Kali Linux
**NOTE: Because we are working on a 64-bit operating system, and we want to install the 64-bit Kali, when there is a choice between the X86 or X64, we are going to select the X64.
**NOTE: From the Kali download page you actually have the option of downloading the installed bits, or a pre-built virtual machine. As there is no Hyper-V option in the image downloads I did not mention this in my previous article, but there is one for both VMware and for VirtualBox. If you are going to use this option make sure you click on the download button, and not the torrent button, which then requires a torrent tool. For the sake of this article, we are going to use the installer image for Kali Linux 2023.1.
Installing the Hypervisor
Before we even install VirtualBox, let’s take a minute to install the Virtual C++ Redistributable. the filename as of this writing is VC_redist.x64.exe, and you should find that in the Downloads directory. Double-click the icon to run it. When the window pops up, check the box to agree to the license terms and then click Install. You will receive a User Account Control (UAC) prompt asking if you are sure you want to go ahead with the installation. If your account does not have elevated privileges then you will have to get permission from one that does by entering those credentials.
It is likely that you will have to reboot your computer for the installation to complete. Go ahead and do that now. Don’t worry, we’ll be waiting right here when you come back! Just to be safe, you should bookmark this page in case we get lost.
Ah, there you are! Good. Now let’s go ahead and install the actual hypervisor, Oracle VirtualBox. The filename for the version I downloaded is VirtualBox-7.0.8-156879-Win.exe, but do not fret if the numbers for your version are for a later build. Double-click that icon in the Downloads folder. Again, you will have to accept a UAC prompt that you need to accept in order to proceed.

When you see this window, click Next >

On this screen you can select to install all of the components, or pick and choose the ones that you want. A lot of people will install all of the components, but for our purposes we are going to choose to not install the VirtualBox Python Support so click on the box next to that and select Entire feature will be unavailable. You can also change the installation location if you want to. When you are ready, click Next >

When we install our hypervisor it is going to take over your network interface card (to allow your virtual machines to connect to the network), and when it does, it resets the NIC for a moment. I have installed VirtualBox while attending online video meetings, and I hardly noticed a blip. If you are worried, make sure you are not doing anything that relies on persistent network connectivity while you install. Click Yes.

If you are ready, you should click Install on this screen. The installation will not take long at all, and when you see the next screen, you can click Finish. Unless you uncheck the box, Oracle VirtualBox will run automatically.

Creating the Virtual Machine
You should now see the Oracle VirtualBox application on your screen.

There are several customizations required for the Kali VM, and failing to do any of them might cause problems. Be careful to follow these steps until you are comfortable enough to know what all of the options are.
1) Click the big blue star that says New. The guided Create Virtual Machine appears. For our Kali machine we need to click on the button that says Expert Mode.

In the expert mode you will see four blades, with the first one (Name and Operating System) expanded. We are going to work in three of the four blades in order from top to bottom. Notice that I have filled in the following information:
Name and Operating System
- Name: Kali Linux 2023.1 (you can name your VM however you like).
- Folder: C:\Users\MitchGarvis\VirtualBox VMs (feel free to change the location as you like, but this will be the default folder within your profile).
- ISO Image: C:\ISOs\kali-linux-2023.1-installer-amd64.iso (note that I have already moved the ISO to another location. By default, you will find yours under your Downloads folder).
- Type: Linux
- Version: Debian (64-bit) (This is important!)
Hardware

- Base Memory: 4096 MB (The default is 2048 MB but I like to give it a little more).
- Processor: 1 CPU (Kali does not need multiple processors).
Hard Disk

While you are free to change the file location, the only change I make on this screen is to allocate a full 80 GB to the drive (the default is 20 GB).
When you have made all of your changes, click Finish to close the Create Virtual Machine window.
Customizations
Before we start, there are a few changes we need to make to the virtual machine itself. From the Oracle VM VirtualBox Manager, make sure the newly created VM is selected on the left, and in the main window click General.

In the Advanced tab of the General window, change both Shared Clipboard and Drag/n/Drop to Bidirectional.

In the left navigation bar, click the System blade. change the boot order of the drives to correspond to what is shown in the above screen capture (Hard Disk first, Optical second, all other options deselected).

In the Processor tab of the System blade, select the checkbox next to Enable PAE/NIX

In the left navigation bar, select the Display blade. Adjust the Video Memory to 128 MB. As there is no need for it in Kali, make sure the checkbox next to Enable 3D Acceleration is deselected.
Click OK.

Your settings should now look identical to what you see in the screen capture above. If it does, then you can click the green Start arrow at the top.
When the VM appears, select the View menu, then click Scaled Mode. This will allow you to resize the window and the VM will adjust with your changes.
Installing Kali Linux
**NOTE: With the exception of a couple of screen shots which I have updated, a as a number of differences such as the virtual hard drive type, the rest of the instructions are copied straight from my article on installing Kali in Hyper-V.
You should now have a window on your screen that looks like this:

Press Enter to proceed with the Graphical install. You will be asked a series of questions (language, location, keyboard… a lot of things that will remind you of the Windows OOBE). Press Continue on each screen, unless you feel the need to make changes. At the end of the first series of questions, Linux will do some hardware and network detection. If you do not have a DHCP Server available, you might need to set your IP Address manually.
If you are at a level where you are creating a Kali-Linux VM on a virtual machine, you should know how to find an IP Address and configure the subnet mask and gateway. Unless you have a domain you are working with in your lab, leave that blank. Pick a username for yourself, and set your password. When prompted, select your time zone.
The first really foreign concept you should encounter is that of the disk partitioning. Linux does not use drive letters like Windows. An advanced user might set up different virtual hard disks for all of the requirements, but I do not want to confuse anyone just yet. When prompted on the Partition Disks page, select Guided – use entire disk, and click Continue. On the next screen it will confirm the disk (in most cases it should read SCSI1 (0,0,0) (sda) – 85.9 GB ATA VBOX HARDDISK if you followed my instructions). Click Continue.
The next screen gives us options to use different partitions for different mounts. I recommend you select All files in one partition (recommended for new users) and click Continue.
The next screen will ask you to select Finish partitioning and write changes to disk. Click Continue.
You will then be asked to confirm what we just set up, and to write the changes to the disk. select Yes and then click Continue.
Your Kali Linux is now installing, and it will take a few minutes to complete. After a few minutes, you will be asked for your Software Selection. For most, the defaults should suffice. Click Continue. This will take several more minutes.
When the software installation is finished, you will see a screen about installing the GRUB boot loader. Ensure that Yes is selected and then click Continue. On the next screen (still installing the GRUB), change the option from Enter Device Manually to the drive (something like /dev/sda (ata-VBOX_HARDDISK_VBae40cdf2-a0a8c9d0) and click Continue.
Once it is done, you should receive a message that Installation is complete. Press Continue to reboot.
It should not take too long for you to receive a screen that looks like this in your VM:

You are ready to go! Okay, you are not… there are a bunch of gotchas in Kali Linux that are possible (or probable) stumbling blocks. I was joking a few days ago that it seems that several changes made to the most recent versions of Kali seem to have been made to frustrate Windows people who know a little bit of Linux. I have figured out most of them and so will you. It will take time, and you will be smarter for it.
Conclusion
I have said for years that IT should not be about religion, but about the best tool for the job. Integrating a Linux VM into your Windows environment is a good way to get the best of both worlds without having to spend more money. Most of my readers are likely long-time Windows users, as I am. It is not a crime to love the Windows environment and ecosystem, while recognizing that some tools are either better or at least more readily available in non-Windows environments.
I cannot imagine that I am ever going to live in the Linux space. I find too many of my Microsoft tools comfortable, and in the business (and personal) productivity space, Microsoft 365 wins hands down. For some things like cybersecurity, Kali Linux provides the right environment, with most of the tools pre-installed and ready to use. Why would I try to shoehorn those tools into a system where they do not belong and are not comfortable, when Kali in a virtual machine gives me the best of all worlds? More importantly, why would you?
]]>Once upon a time, our end users used what we told them to use. If we bought a particular desktop or laptop model with a particular operating system then that is what the employees had to use. In 2015 I wrote an article which was only published a year later called BYOD: A Fairy Tale. It shows how our office environments went from the dictated IT systems of the past to where we are today, or at least where we were in 2015. Since the onset of the COVID-19 pandemic we have gone much further down that rabbit hole to the point where today users can pick not only the make and model of their PC, but even the operating system that it runs. It will not be uncommon to do a walkthrough of an organization’s IT systems and find Windows PCs alongside Apple Mac and even Linux operating systems.
In order to support Linux in the workplace, the first step is to have them join the Active Directory infrastructure so that the users can log in using their same account that they would use to check their email and cloud services. This article will show you how to join a desktop running Ubuntu Linux version 22.10 to the Active Directory. The tools that I use for this article are the sssd, or System Security Services Daemon.
While the commands I share are generic, the screen captures are showing how I joined a computer to my demo tenant, Behike.ca.
The first thing we are going to have to remember as we go through this process is that unlike Windows, everything we do in Linux is going to be case-sensitive. That means that if you created your domain as beHike.ca then that is how you have to enter it in Linux.
Let’s start.
Before we do anything, we need to make sure that the proper firewall ports are open between your client and the domain controller. The ports that we need are:
| Service | Port # | Protocol |
| DNS | 53 | TCP/UDP |
| LDAP | 389, 636 | TCP/UDP |
| Kerberos | 88, 464 | TCP/UDP |
| SMB | 445 | TCP/UDP |
| NTP | 123 | UDP |
In order to check this in Linux, we will use the following two commands:
Nc -z -v <Domain Controller IP Address> 53 389 636 88 464 445
Nc -z -v -u <Domain Controller IP Address> 53 389 636 88 464 445 123

You want to make sure that these all succeeded, and if not, you will have to take extra steps to open the ports.
Next we are going to check our hostname. Remember, we need this to be an exact match, which includes case sensitivity.
hostname –f
We are also going to check that our time sync is in order by doing this:
timedatectl status
Before we download the necessary components from the web, we are going to update the repository indices. Remember, in Linux, any command that requires administrative (root or su) permissions will be run with the preface sudo.
sudo apt update
(you will be required to enter your password)
Now we will download all of the required packages for the sssd:
sudo apt install sssd-ad sssd-tools realmd adcli
(When you are prompted, click Y to continue)
Once that is done, we can now discover the realm (which is the Linux word for domain):
realm discover <domain name>

It is important that the last line says that configured: no for you to continue.
Now we can join the realm! Run the following command, remembering that it needs to be case sensitive. In the screen capture we see the Domain-name is Behike.ca, so that is what I need to use.
sudo realm join <domain name>
You are going to be prompted for the password of the default domain Administrator account (in my case, [email protected]). If you want to change that user, add the –U switch, followed by the username.
The realmd will have created a configuration file. Verify that it is there, and that you recognize the information. Use the following command:
sudo cat /etc/sssd/sssd.conf

Now we will set up the process to create a Home Directory for users:
pam-auth-update –enable mkhomedir
Great! Now let’s reboot our Linux machine.
While we are waiting for that, you can check your Active Directory to confirm that the Computer account for the system has been created. On either your domain controller (if you think that domain controllers should have GUIs), or on a jump box on which your AD tools are installed, navigate to your domain > Computers. You should see the new system there.

Let’s go back to our Linux machine so that we can verify that our domain users can be resolved:
getent passwd [email protected]

You will notice as well that I am still not logged on to the computer with my domain account. This might still take a few minutes. While we wait, let’s go one step further and install the SAMBA tools that we need:
sudo apt install samba-common-tools
Once that is done, you should be able to log off, and log in with your domain account from the main screen (which shows your username) click Not Listed? and you will be prompted to enter a username. Make sure to use the full domain name. Notice that we no longer have to worry about the case sensitive domain name.

Note that I am now logged on with my domain account, which I see when I open a Terminal window.

I also see that it has created a home directory for me, including my very own desktop, documents, downloads, music, pictures, public, snap, templates, and videos sub-directories.
I can now either use the included Libre Writer to create my documents, or (more likely) open Firefox and use my online Microsoft 365 apps… just like I would on a PC that did not have the local apps installed.

Conclusion
I am not advocating that people abandon Microsoft Windows. I have been a loyal user of that platform for more than thirty years, and I believe that for most productivity workers it is the best tool for the job.
As I started to write this article I tried to enumerate some of the reasons why users (or companies) might opt to pick Linux for their desktops in place of Microsoft Windows, and the only reason I could come up with that makes any sense is money. There is no question that if Linux is free and Windows costs money then there might be a real cost savings to be had. In truth, most of my friends who do use Linux as their primary desktops do so for religious reasons – they dislike Microsoft on spec. There are other reasons, of course… but that is the main one for most of them.
When I was with Microsoft Canada as a contractor, my job title was Virtual Technology Evangelist. I always laughed at that title because of the religious connotations. Now when people tell me that they prefer this or that over Windows, my usual answer is that I do not care. It is no longer my job to proselytize for Microsoft, and if you prefer something else then use it. I prefer Windows for most things, but I also recognize that for some of the training that I deliver (around security and networking) I have to use Linux for some of the tools I need… and different distros of it as well.
When I was still with Microsoft the internal joke was that we had to know a little bit of other environments because we needed to know the enemy. I no longer drink the Kool-Aid, and I no longer see other platforms as the enemy. I also know that there whatever a user might prefer on the desktop, there is no debating the dominance of Active Directory in the enterprise. Allowing our users to use the same account on whatever platform they prefer is a simple step to take to make their jobs a little bit easier.
]]>It is funny where life can take you. I have been a specialist (and in some things maybe even expert) in so many different technologies over the course of my career, so when I sat down a few weeks ago to create a Kali Linux virtual machine on my Windows 11 laptop, I was surprised that I encountered a number of stumbling blocks. I got through them, but I was surprised that I even had the hiccoughs.
If you are not familiar with Kali Linux, do not be discouraged. It is a distro that is used primarily by cybersecurity specialists and hackers. A friend and colleague from my Microsoft MVP days and I decided a few weeks ago to study for a cybersecurity certification together, and I told her that aside from doing all of the CompTIA labs (which are great, believe me), she should also install Kali on a virtual machine to play with. As she has not spent as much time in the Hyper-V world as I have, and because I have not written about it in a while (and have likely never written about creating a Linux VM), I thought I would take the opportunity… to help her, and to help you!
The first thing you need to do is ensure your Windows 11 (or Windows 10) hardware supports Hyper-V, and that the necessary bits are enabled in the UEFI. For Intel CPUs ensure that Intel VT is enabled; for AMD it is called AMD-V. As enabling this will be different for every brand, I suggest you refer to the manufacturer’s instructions. You also need to make sure you have enough memory. I recommend a minimum of 4GB of RAM for the base operating system, plus a minimum of 2GB of RAM for each virtual machine you will have running simultaneously. This of course should be increased if you have VMs with higher memory requirements. As my laptop (a Microsoft Surface Laptop 4, Core i7 CPU, and 16GB RAM) meets and exceeds the minimum requirements, I should be fine, right?
Not so fast… If you are going to be running a single VM then that is fine; if you plan to run several VMs simultaneously, I suggest you invest external storage. Even with fast Solid-State Drives, you are going to find things slow down mighty fast once the second or third or fourth VM is running. If you only need a single VM running (you can have as many of them installed but shut down as you want) then your single SSD will be sufficient.
**NOTE: I will not be covering changing any defaults or different file locations for your Hyper-V VMs. Unless you change these or specify otherwise, your VMs will be stored in the default locations, which are:
- (For virtual hard drives) C:\ProgramData\Microsoft\Windows\Virtual Hard Disks
- (For virtual machine configuration files) C:\ProgramData\Microsoft\Windows\Hyper-V
For my laptop environment, I have changed both these defaults to C:\Hyper-V.
Installing Hyper-V
Hyper-V is what is called in Windows 10 (and later) a Windows Optional Feature. While there are a few ways to install it (GUI and DISM come to mind), I usually opt for the PowerShell cmdlet. Once you run this, your machine will need to reboot a couple of times.
Before we bulldoze ahead, let’s make sure that it is not already installed. Open your PowerShell window as an Administrator (in Windows 11, right-click the Start Menu and click Terminal (Admin). Type the following to see if it is there or not:
Get-WindowsOptionalFeature -Online -FeatureName Microsoft-Hyper-V-All
You should get a response that looks like this:

Now we can move forward and get to work. Use the following cmdlet to install Hyper-V, and then let the process reboot your system (twice). Make sure you have saved all of your work in any open windows ![]()
Enable-WindowsOptionalFeature -Online -FeatureName Microsoft-Hyper-V –All
Depending on the speed of your machine it should not take too long. After less than a minute, I was prompted to reboot. Click Y and let it happen.
Once you have rebooted, you should open your PowerShell window again to check that it worked. You should see this:

Okay then! Let’s keep going. Before you do anything else, you should download the Kali Linux installation image from https://www.kali.org. There are a lot of different download options; while you can actually download a VM of it directly, I suggest downloading the installed image from here. Make sure you download the 64-bit image.
Creating the Virtual Machine
Before we create our VM, we need to have some information. If you have not changed anything, the name of your virtual switch (which we will be connecting the VM to for networking) will be called Default Switch. Because I do not like having spaces in my switch names, I have created a new virtual switch called MDG-External and connected my Wi-Fi adapter to it. You might want to do that, or you might not. Remember, if you have spaces in the name, you need to put “quotation marks” around them when using the PowerShell interface.
In your PowerShell window (with Admin), type Get-VMSwitch. You will see something like this:

Now that we know the name of our switch, we can create our virtual machine. For the Kali environment that I want, I will be creating a Generation 2 VM and giving it 4GB of RAM, a 40GB virtual disk, and connecting it to the network switch that I created. I will be calling the VM Kali-1, and calling the virtual disk Kali-1.vhdx. I will be storing all of the files in that directory that I created, C:\Hyper-V. Let’s do that with the following cmdlet:
New-VM –Name “Kali-1” –Path “C:\Hyper-V” –MemoryStartupBytes 4GB –NewVHDPath “C:\Hyper-V\Kali-1.vhdx” –NewVHDSizeBytes 40GB –Generation 2 –Switch “MDG-External”
That will create the virtual machine, but we are not done yet. We have to connect the Kali installation source that we downloaded. To simplify typing, you might want to move it from your Downloads directory to a simpler one like c:\ISOs, like I did.
Add-VMDvdDrive –VMName “Kali-1” –Path “c:\ISOs\kali-linux-2022.4-installer-amd64.iso”
If you did not do anything else during this process, your PowerShell window should look like this:

**NOTE: I made a slight mistake, calling my virtual disk Kali1.vhdx and not Kali-1.vhdx. I decided the mistake was not significant enough in my lab environment to matter, but I have since corrected the cmdlet in the text so that you will not get caught by it.
We now have to set the boot order so that it boots from the DVD and not from the network adapter or the virtual hard drive. To do that, we are going to run the following cmdlet:
Set-VMFirmware -VMName Kali-1 -BootOrder (Get-VMDvdDrive -VMName Kali-1), $(Get-VMHardDiskDrive -VMName Kali-1)
There should be no response except for the PowerShell prompt.
Additionally, we need to disable Secure Boot. That is another simple cmdlet:
Set-VMFirmware -VMName Kali-1 -EnableSecureBoot Off
Again, there will be no response other than the prompt.
Start Your Engines Virtual Machines!
You are now ready to start the VM and connect to it, at which point you have to switch from the warm, familiar comfort of PowerShell and Windows and descend into the madness of Kali Linux. Okay, there is no madness… it is actually a lot of fun. To do so, run these two cmdlets:
Start-VM –Name Kali-1
VMConnect $env:Kali-1
Yes, you can drop into the Hyper-V Manager MMC console, but this will work just fine. You should now have a window on your screen that looks like this:

Press Enter to proceed with the Graphical install. You will be asked a series of questions (language, location, keyboard… a lot of things that will remind you of the Windows OOBE). Press Continue on each screen, unless you feel the need to make changes. At the end of the first series of questions, Linux will do some hardware and network detection. If you do not have a DHCP Server available, you might need to set your IP Address manually.
If you are at a level where you are creating a Kali-Linux VM on Hyper-V, you should know how to find an IP Address and configure the subnet mask and gateway. Unless you have a domain you are working with in your lab, leave that blank. Pick a username for yourself, and set your password. When prompted, select your time zone.
The first really foreign concept you should encounter is that of the disk partitioning. Linux does not use drive letters like Windows. An advanced user might set up different virtual hard disks for all of the requirements, but I do not want to confuse anyone just yet. When prompted on the Partition Disks page, select Guided – use entire disk, and click Continue. On the next screen it will confirm the disk (in most cases it should read SCSI1 (0,0,0) (sda) – 42.9 GB Msft Virtual Disk if you followed my instructions). Click Continue.
The next screen gives us options to use different partitions for different mounts. I recommend you select All files in one partition (recommended for new users) and click Continue.
The next screen will ask you to select Finish partitioning and write changes to disk. Click Continue.
You will then be asked to confirm what we just set up, and to write the changes to the disk. select Yes and then click Continue.
Your Kali Linux is now installing, and it will take a few minutes to complete. After a few minutes, you will be asked for your Software Selection. For most, the defaults should suffice. Click Continue. This will take several more minutes.
Once it is done, you should receive a message that Installation is complete. Press Continue to reboot.
It should not take too long for you to receive a screen that looks like this in your VM:

You are ready to go! Okay, you are not… there are a bunch of gotchas in Kali Linux that are possible (or probable) stumbling blocks. I was joking a few days ago that it seems that several changes made to the most recent versions of Kali seem to have been made to frustrate Windows people who know a little bit of Linux. I have figured out most of them and so will you. It will take time, and you will be smarter for it.
Conclusion
I have said for years that IT should not be about religion, but about the best tool for the job. Integrating a Linux VM into your Windows environment is a good way to get the best of both worlds without having to spend more money. Most of my readers are likely long-time Windows users, as I am. It is not a crime to love the Windows environment and ecosystem, while recognizing that some tools are either better or at least more readily available in non-Windows environments.
I cannot imagine that I am ever going to live in the Linux space. I find too many of my Microsoft tools comfortable, and in the business (and personal) productivity space, Microsoft 365 wins hands down. For some things like cybersecurity, Kali Linux provides the right environment, with most of the tools pre-installed and ready to use. Why would I try to shoehorn those tools into a system where they do not belong and are not comfortable, when Kali on Hyper-V gives me the best of all worlds? More importantly, why would you?
Notes on SecurityOnion
While similar in many respects, SecurityOnion (another distro of Linux geared toward cybersecurity professionals) has some distinct differences in Hyper-V that you should be aware of when you build your VM. The main ones are the resources required.
- The installation will not proceed with less than 99gb of hard drive space. To be safe, I gave it 120gb.
- If you do not give it at least 12gb of RAM and 4 vCPUs, you will be warned about it during the installation. I have not tried it on minimal resources so I do not know if they will work or not, but you will be warned!
- The installation will require you to answer a few more questions, and in a couple of places you have to type something in (usually to agree with licenses and confirm that you did not just press Next – Next).
Good luck… It’s a lot of work, but a lot of fun too!
]]> The truth is that Microsoft wants your business. I will not deny that, Microsoft feels that if your virtualization hosts are running Hyper-V and you are managing it using System Center 2012, then it should be as easy a management experience as they can provide. They also understand that some of you are running other operating systems in some of your machines. Rather than making you use separate tools, they have made it easier for you to manage that heterogeneous mixed-mode environment using the same tools as you would use to manage your Microsoft environment – the ‘Single Pane of Glass’ that I have been speaking about for the past few years.
Last year I wrote an article about Linux Integration Services (LIS) 3.4 (http://blogs.technet.com/b/canitpro/archive/2012/09/11/linux-integration-services-for-hyper-v-3-4.aspx). Recently Gilson Banin, a PFE with Microsoft in Brazil, wrote a great step-by-step article on installing Oracle Linux with the LIS 3.4 under a Hyper-V environment. Of course Oracle Linux is not officially supported in Hyper-V (Oracle is very clear that the only virtualization environment they support is their own), but that does not mean that you cannot do it, and that it will not work. Try it out and let us know what you think!
You can follow Gilson’s blog on TechNet.com at http://blogs.technet.com/b/gbanin/.
—
Hello Virtualization Nation. Probably you are thinking, how an Premier Field Engineer that loves Windows Server may help a Linux Community? Well, before starting at Microsoft’s World I was a Linux enthusiast, I started my career managing SCO Unix, yes I was born in 1978 but leaving these years on the past, today I love to help customer to get better experience, it does not matter if virtual machines are Windows or Linux. Recently I had the opportunity to help a important customer here in Brazil to win this challenge. Frequently some Oracle DBA told me that Linux didn’t work very well on Hyper-V, they were working more than a month trying to install Linux and nothing, nothing, nothing. I love to hear these customers that are not satisfied with our product because I always have a chance to change the game and improve their satisfaction.
So I decided to do step by step all procedures to install Oracle Linux on Hyper-V, of course first step was to make a download of ISO of Oracle Linux from Oracle Web Site (www.oracle.com), I’ve used the version Release 6 Update 3 64 bits. I didn’t to try to use oldest versions but feel free to validate it.

Download of LIS 3.4 HERE http://www.microsoft.com/en-us/download/details.aspx?id=34603

The next step is to create a Virtual Machine without Network Interfaces (Yes! No NICs synthetic OR legacy). So create a VM into Hyper-V normally after remove Network Adapter, attach ISO and start it. Take a look VM settings below :

After that install the operating system using default values. During the installation you will observe that Network Settings will be not available to set IP address; don’t worry and continue and finish installation. Select “Install or upgrade an existing system”

Everybody knows that Oracle Linux is a copy of Red Hat Linux. In the past the companies had contractual agreements broken because all customers that decided to use Oracle on Linux, Red Hat always was recommended. Both companies won and had revenues.
Leaving disagree between these companies, let’s go back to this article, Configure Network button will not be available, don’t worry and go, click Next.

Wait for the process to complete, then log on as root and configure your password. If you use VI editor it is easier and simple. If you do not know how to do this visit http://www.linux.org/article/view/using-the-vi-editor
Edit /etc/grup.conf
# vi /etc/grub.conf set default = 1

# vi /etc/sysconfig/kernel,
(delete –uek from last of DEFUALT KERNEL..line)

Reboot (it is mandatory).
Insert ISO LIS 3.4 into virtual DVD.
login as root.
# mount /dev/cdrom /media
# cd /media/RHEL63

To Install Hyper-V Integration Services, execute ./install.sh
# ./install.sh

Shutdown virtual machine (#halt)
Add a Network Adapter (not legacy)

Start the VM. The Integration Services should be fine. Before editing configure network settings below:
# cd /etc/sysconfig/network-scripts
# cp ifcfg-lo ifcfg-eth0

Edit ifcfg-eth0 and define your configurations (ip, mask, device name…)
#vi /etc/sysconfig/network-scripts/ifcfg-eth0

DEVICE=eth0
BOOTPROTO=static
IPADDR=YOUR IP
NETMASK=YOUR MASK
ONBOOT=yes
NAME=eth0
Now create or edit /etc/sysconfig/network and include below information, gateway is yours
# vi /etc/sysconfig/network (if it does not exist create it )

NETWORKING=yes
HOSTNAME=<your hostname>
GATEWAY= <your IP Gateway>
Edit /etc/resolv.conf and put at least one DNS IP server
# vi /etc/resolv.conf
nameserver 8.8.8.8
(or use the system-config-network utility)


Select Device Configuration


Finally, execute # ifup eth0 to start network interface 0 and after # ifconfig, observe that network interface eth0 is now shown:

Linux Integration Services provides support for the modinfo command. To get module information for each installed kernel module, run the following command :
#/sbin/modinfo hv_vmbus

This command can be repeated for all kernel modules (hv_vmbus, hv_netvsc, hv_storvsc, hv_blkvsc, and hv_utils).
To verify that all subcomponents are running as the root user, issue the following command at a shell prompt :

Don’t forget that if your VM is highly available and you want to do Live Migration, MAC Address needs to be Static rather than Dynamic.

Change it on Advanced Features on Network Adapter Properties VM.

Well done! Welcome to Linux on Hyper-V!! Interoperability is here!
Note: Officially Oracle Linux is not supported by Microsoft, but it works perfectly. To learn more about which operating systems are officially supported, please visit : http://technet.microsoft.com/en-us/library/cc794868(v=ws.10).aspx
Windows Server 2012: The Definitive Cloud OS
]]> This post was originally written for the Canadian IT Pro Connection blog, and can be seen there at http://blogs.technet.com/b/canitpro/archive/2012/09/11/linux-integration-services-for-hyper-v-3-4.aspx.
Microsoft has been taking tremendous steps to prove that Hyper-V is not simply the best hypervisor for Windows users and administrators, it is also a viable option if you have Linux servers as well. Last week Microsoft released the Linux Integration Services v3.4 for Hyper-V. Integration Services are the tools that you need to get the full functionality of your hardware within a guest OS, including the drivers that enable synthetic device support in (supported) Linux virtual machines under Hyper-V.
Here is the overview of what is included:
When installed in a supported Linux virtual machine running on Hyper-V, the Linux Integration Components provide. Driver support: Linux Integration Services supports the network controller and the IDE and SCSI storage controllers that were developed specifically for Hyper-V. Fastpath Boot Support for Hyper-V: Boot devices now take advantage of the block Virtualization Service Client (VSC) to provide enhanced performance. Time Sync: The clock inside the virtual machine will remain synchronized with the clock on the virtualization server with the help of the pluggable time source device. Integrated Shutdown: Virtual machines running Linux can be shut down from either Hyper-V Manager or System Center Virtual Machine Manager by using the “Shut down” command. Symmetric Multi-Processing (SMP) Support: Supported Linux distributions can use multiple virtual processors per virtual machine. The actual number of virtual processors that can be allocated to a virtual machine is only limited by the underlying hypervisor. Heartbeat: This feature allows the virtualization server to detect whether the virtual machine is running and responsive. KVP (Key Value Pair) Exchange: Information about the running Linux virtual machine can be obtained by using the Key Value Pair exchange functionality on the Windows Server 2008 virtualization server. Integrated Mouse Support: Linux Integration Services provides full mouse support for Linux guest virtual machines.
The requirements are simple: If you have Hyper-V (including Windows Server 2008 RTM and Windows 8) on the host, and a supported build of Linux in the guest OS, the LIS will work.
Supported builds:
I am not an expert in Linux, but I do know that previous LIS sets supported several builds, including:
- Red Hat Enterprise Linux
- SuUSE Linux Enterprise Server
- FreeBSD
- Ubuntu
- CentOS
This most recent build only includes support for several builds of Red Hat Enterprise Linux (5.7, 5.8, 6.0, 6.3). This is not because Microsoft does not care about Linux, nor because it feels that other builds are less important. Simply stated, all versions of Linux based on Linux Kernel 2.6.32 and later include the drivers for Linux in Hyper-V out of the box. There are articles on-line which explain how to enable these modules (see article from Port 25).
Microsoft wants you to use Windows Server; they are also realistic to know that not everyone does, and there are a huge number of heterogeneous environments out there. Just because you use Linux in addition to Windows Server does not mean that you should discount Hyper-V (and all of its great benefits) as your hypervisor of choice.
By the way, the best resource that I have found for Open Source support with Microsoft technologies is the Port 25 Blog right here on TechNet… Check them out here.
]]>