The KCRE (Kingdoms and Castles Reskin Engine) is an engine that simplifies and standardizes the process of changing visual elements of Kingdoms and Castles through mods. One of the main features of the KCRE is its Unity Tool/Plugin that allows artists to create mods with absolutely no coding necessary.
Modding in Kingdoms and Castles currently - as of Summer 2021 - requires a significant amount of experience in coding (C#) and knowledge of the Unity Engine, which is the game engine the game uses. This significantly increases barriers to entry into the modding community and steepens the learning curve even with some prior experience.
The broad goal of this engine is to make it easier where possible for people of varying degrees of skill at programming to add art into the game; currently a programmer with no knowledge of art can do a fair bit of modding but an artist with no knowledge of programming can do almost nothing.

UI - User Interface; Visual controls like buttons, panels, displays etc.
Unity - Game Engine that the game uses; it has an editor called the Unity Editor that is free and allows users to create games or other types of media (we use it here to create mods using the Unity Tool)
Normally, a modder would have to write code to create a mod, and upload the files containing the code and its associated assets (models, images, etc. ) to the Steam Workshop.
This Engine has a special tool you can download called the KCRE Unity Tool. The Unity Tool lets you create your mod through the Unity Editor, using UI instead of code (buttons, text fields, settings, essentially visual things instead of lines of code), and automatically generates the files you can upload to the Steam Workshop. Therefore in the absolute minimalist sense, you don't ever need to even open a code editor, much less write code.
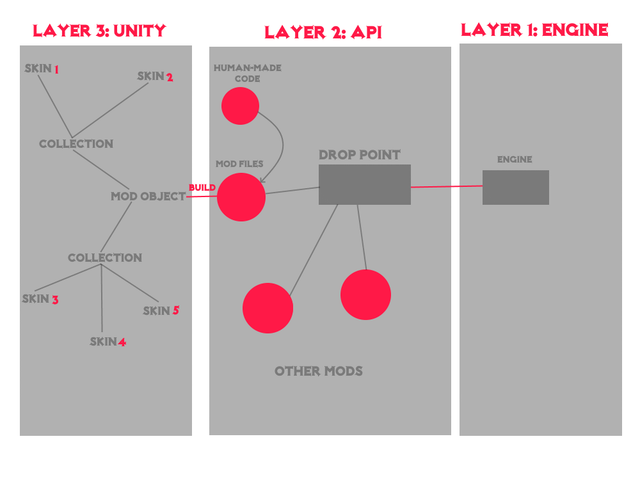
In the diagram above, all the red bubbles are code and everything in the Unity layer is done entirely through UI. Since everything in the Unity Layer eventually feeds into a single red bubble called Mod Files and that bubble is automatically generated, the rest of the diagram doesn't even need to be considered by someone using the Unity Tool.
The Human-Made Code bubble is, of course, optional but if you do want to write code either in addition to the Unity Tool's generated code or just entirely to make the mod by yourself, I suggest you look through the API Reference and the KC Mod Tutorial.
If you're thinking, why in the world would I want to write code when the tool's already doing it for me? The reason is because it gives far more control and allows you to make specific behaviours that the Engine's standardized processes are too generic for. A perfect example of this that has been published on the workshop is Skusch's Day-Night Cycle Mod. It was a very early alpha tester of this Engine and used the API code along with a special script the creator wrote themself to make the windows and street torches of certain buildings glow at night and shut off during the day.
Before starting on art for a skin, you must first look up the specifications for that skin in the Skin-Index so that you know how to make the art. In the past, this has been the main, solid option to understanding how to make the art for a skin without full-on code diving research, but now there's an actively changing spreadsheet you can use to track the official progress on the level and type of support for each of the different types of skins. Note using the spreadsheet is more unstable and subject to change, but gives you an insight into the most recent changes to the Engine's structure.
If you want a more comprehensive, in-depth look at game assets, there's a collection of prefabs, materials, textures, and more from the game in the folder [Tool Root Folder]/Reskin Engine/Resources/Reskin Engine/KCAssets. All assets, with the exception of a few I updated personally, come directly from the KC Toolkit, a public GitHub repository of a good selection of the assets the game uses internally.
I have annotated the buildings, at least the ones I've worked on so far, with comments and notes showing where the game scripts would be in their tree structure because the KC Toolkit does not contain user-made scripts, only core Unity ones and a couple important shaders.
Before modelling I highly recommend you look into the Common Graphical Patterns Document for any patterns that may affect how you make your art, especially for building skins.
If you want additional information on how things are injected into the game and the patterns of visual elements and art look into the advanced section of the Common Patterns file; it contains details on the way buildings of different model formats get their models injected. [Not written yet :p]
A prerequisite of this tool is the Unity Editor; it's a free, widely used Game Engine that Kingdoms and Castles uses. The game prefers the 2018.1 - 2018.3 versions, anything outside that range might mess with how the game reads your mod as the mod code will be using a newer version of Unity than the game itself does.
Have no idea what Unity is or want to read more? Click here.
Also, if you are looking for any kind of tutorials on anything about the Unity Editor I recommend you read through the Official Unity Documentation for that subject; it's fairly comprehensive in most areas, especially regarding the interface of the editor.
Installing the KCRE Unity Tool is extremely simple, you literally just download the folder here and drag it into any Unity Project you want. If you're unsure of how to start a project in the Unity Editor, reading through this tutorial might help.
All of the images shown henceforth will be showing the Unity Editor + KCRE Unity Tool so make sure you're familiar with the interface of Unity (see the Unity Editor -> Editor Interfaces tutorials in the link appendix for further reading).
As mentioned in the layers diagram, inside of the Unity Tool there's three main components: Skins, Collections, and Mods.
All three exist in the Unity Editor in the form of a ScriptableObject, better known as an Asset. If you have no idea what these are, I reccommend you read through the Unity Tutorials on the Asset Workflow.
Collections and Mods can be created through the project context menu (Right Click in the Project window --> Create --> Reskin Engine --> Collection or Mod).
A Collection is a list of skins that are grouped together. Personally, I like to group collections by category or theme, like 'Town Buildings' or 'Halloween-themed`.
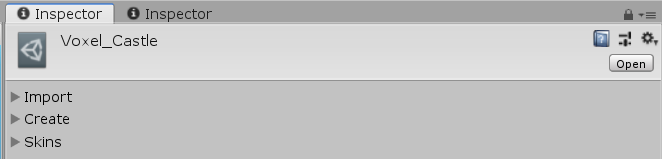
A Collection's interface looks like this by default:
And like this with all of its menus expanded:
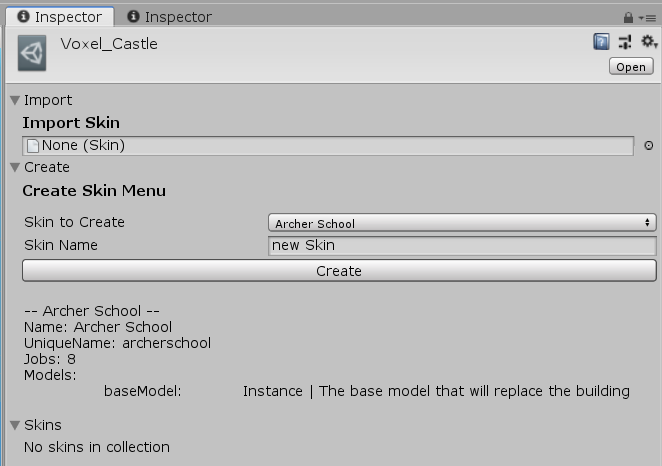
The Import menu allows you to import skins you have already designed for other collections or that have just been floating around in the project.
The Create menu allows you to create skins for different types of buildings/environmental factors. When selecting a type of skin to create, it shows a relevant snipped from the Skin-Index to give you an idea of what its specifications are. Skin names must start with a lowercase letter.
The Create Menu interface pulls its
Skin-Indexfile from[Tool Parent Folder]/Reskin Engine/Resources/Reskin Engine/Info.txtso if you change that or add new entries it'll show in the create menu
Do note, the skin-name field is pretty laggy as of right now, this is going to be fixed in the future.
The Skins section is a list of all the skins currently added to the Collection. The list has a special feature that allows you to preview what the skin you have selected might look like in the game (though there are rare discrepencies between the preview and the real game). This feature only works if you have the Reskin Editor scene open that can be found in [Tool Parent Folder]/Reskin Engine/Editor/Reskin Editor.unity
A Mod is a list of collections with some extra data (name, author, output path, etc. ) that has a build button that will turn the Collections and Skins listed in the Mod's menu into actual code and write it to the specified output path.
Its interface looks like this:
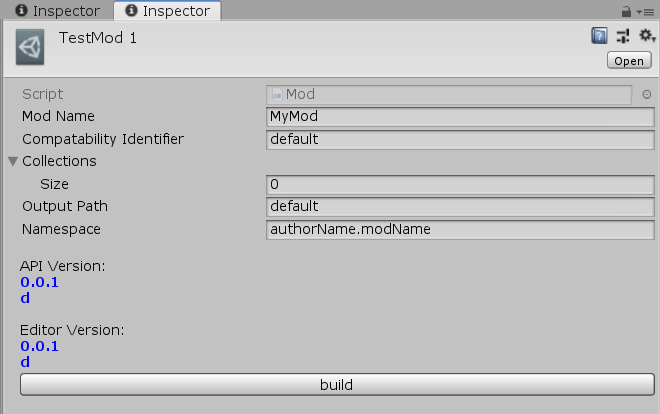
To add collections to a mod, open the dropdown labelled 'Collections' and set the size to something more than 0. This will open a field for you to drag and drop a collection from somewhere else. You can also click the circle with a dot on the right-hand side of the field to search for a collection by name from all the collections currently in the project.
The interface will show you the comparison of the Tool's version (as 'Editor Version') and the API's version (as 'API Version'). These should match and if they do not or seem to be behind the official version, you can download the latest verseion of the Tool - which should come with the latest version of the API as well baked into it - here.
In order to generate your mod you click the Build button and it will be written to the output path specified.
This mod will run if posted to the Steam Workshop and subscribed to or added to the local mod directory, but only if you also have the Reskin Engine Mod subscribed.
At this point some of the more code-oriented modders might be wondering: So how do the interfaces correspond to the code that is outputted?
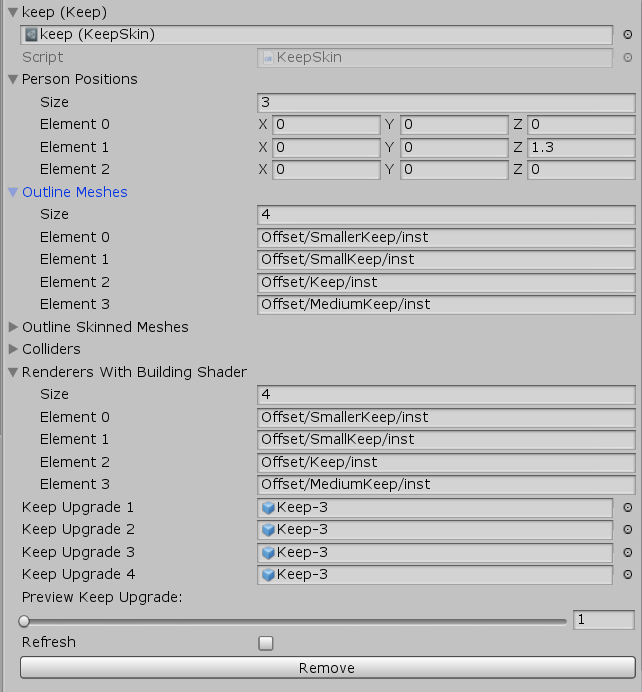
The frame of the mod is built like a traditional mod would be and the skins are pretty much 1:1 transferred from the interface to code as you would expect them to be. Below is an example showing a keep skin's build process from a skin in a collection (in the editor) to a piece of code.

Any fields of a type that is a subclass of UnityEngine.Object will be packed into an AssetBundle as AssetBundles can contain anything that is a UnityEngine.Object. Other types of fields will only be built into the mod if they are a recognized primitive/special type (including string, int, bool, Vector3, Color, and more) or an array of a recognized type. The list of recognized types will likely expand over time.

AssetBundles are automatically built into the multi-platform format the game expects and the scene paths of their assets are written - hardcoded - into the mod code so that it can extract them at runtime.
The Engine itself is technically a 'mod' in the strict sense of 'a modification to a game' but not in the traditional sense. It has a listing in the Steam Workshop as a standalone mod that can be subscribed to, however this listing does absolutely nothing by itself. All it does is allow other mods to register to it and change visual elements of the game, with a greatly reduced amount of code, research, and thus general headache. Other mods exist like this such as Zat's ModMenu and Slooth's Custom Spells API and Custom Research API, but they all follow a different pattern to traditional mods and so I'm using the term 'engine' to describe this rather than 'mod', just for the sake of making a distinction.
Essentially the Engine has 3 layers, but only 2 are necessary: it has the base layer, the Engine itself, - meaning the mod with the steam listing here - and the API, which is a little piece of code that you put in your own, separate mod that allows it to communicate with the Engine. All mods that run through the engine have some code in them and the API. The Unity Tool, as talked about above, is an optional third layer that automatically writes code for you (download here), so you don't have to. Instead of code, it allows you to build your mod through the interfaces, settings, and UI of the Unity Editor.
Of course this tool is optional and modders experienced in C# can just write the code themselves directly in the Human-Made Code + Mod Files section of the diagram above utilizing the API (more on this later).
This does mean potential users of the Unity Tool have to be familiar with the Unity Editor so those looking to get started should look into some tutorials if they are unfamiliar. Note that you only need to learn the interface and none of the scripting aspects of the Editor for this tool (unless you want to of course).
When your mod is complete it will run through either Steam Workshop or locally, but you absolutely must also be subscribed to the Reskin Engine Mod on the Workshop simultaneously. For this reason I recommend setting the KCRE Workshop Mod to be a prerequisite in Steam if you choose to upload your mod to the Workshop. Many mods do this with Zat's ModMenu I mentioned earlier such as mpu's New Lands and Zat's Minimap
The final result of your mod should be a folder with two folders and one file inside:
- assetbundle
    - contents of AssetBundle
- API
    - contents of API code (latest version always available at https://github.com/DaDevFox/KCReskinEngine/tree/master/API)
- Mod.cs
the Unity Editor is a free, widely used Game Engine that Kingdoms and Castles uses.
The game uses veresion 2018.2.
Some helpful tutorials from the Unity Docs:
- Installation and first use of the Unity Editor
- Structure of the Unity Editor's Asset system
- UI of the Unity Editor
If this is your first time hearing of the Unity Editor or don't understand it, I very strongly recommend reading through all three of the above tutorials.
If you wish to use the Unity Tool to make mods without the use of code you will do so through the Unity Editor - hence the name Unity Tool - so you should be familiar with the editor or familiarize yourself with the above tutorials.
- Kingdoms and Castles
- Unity Editor
- KCRE
- Mentioned Mods
- ModMenu by Zat/BigMo
- Custom Research API by Slooth
- Custom Spells API by Slooth
- Day Night Cycle by Skusch
- New Lands by mpu/Cedric
- Minimap by Zat/BigMo