
VMware {code} Power Sessions Online April/May…
We’re excited to announce the launch of our VMware {code} Power Sessions Online program! Each week, we’ll be live streaming a new technical talks on our YouTube channel If you are interested in giving a talk of your own, please see details here for further instructions. April 2020 Simplify Kubernetes development with Octant The post VMware {code} Power Sessions Online April/May Schedule appeared first on VMware {code}.
]]>
“Who uses SQL authentication these days” I hear you ask. Well unfortunately there are some legacy applications out there that only work with a SQL account, not an Active Directory one. Not ideal but that’s life if you want to use that vendor’s application but what if your corporate security policy insists that passwords are changed regularly, which, let’s face it, isn’t exactly unreasonable in this day of heightened security awareness? Oh, and perhaps we also should change passwords when people who know them leave an organisation – now there’s a radical idea!
A Scripted Solution
I’m no SQL expert but it didn’t take me long to figure out a TSQL query to return SQL account details, assuming you run it with an account that has sufficient SQL privileges to query accounts although I found that a non-privileged SQL account can query itself which is ideal for my first use case as we have no privileged access to the SQL instance.
Putting this into PowerShell is relatively easy although I tend to use the SQL cmdlets available with .NET rather than relying on the SQLPS module having been installed. A little more code is required to use them but with the advantage that the script should run wherever the .NET Framework is installed.
Passing Credentials
When I write any script that takes credentials, I’m acutely aware that if someone is sniffing process command lines, either live with task manager, Process Explorer, etc. or trawling through historic data, depending on what process auditing options are set, then passing a clear text password on the command line isn’t a great idea.
Therefore there are a number of ways to make it more difficult, but not impossible, for the password to be obtained by a third-party.
- The -password option can be omitted if the %SQLval1% environment variable has been set to contain the clear text password as the script will use that instead. However, this still requires the plain text password to be stored somewhere although file system permissions can be used to restrict access. If mail server credentials need to be specified then the environment variable %_MVal12% can be used to store that.
- PowerShell includes the cmdlet ConvertTo-SecureString which can take a plain text string and encrypt it so the script has the ability to encrypt a plain text password such that it can later be passed via the -hashedPassword option to the script (or -mailHashedPassword if this is the password for the account required to connect to the mail server). This encrypted password can only be used, which includes decryption, on the same machine as it was encrypted on and by the same user. For example, to encrypt the password we can run this which places it into the clipboard:
& '.\Check SQL account expiry.ps1' -encryptPassword -password thepassword|Set-Clipboard
and then we can paste that into the argument for the -hashedPassword option when we call the script, such as via a scheduled task. This still isn’t 100% secure because an administrator could reset the password on the account used to encrypt the password so they could then logon and decrypt it but it’s a whole lot better than passing a clear text password on a command line!
There is also a -mailOnFail argument so that if the connection to the SQL server fails then an email can be sent by the script in case the potential outage or account problem hasn’t been detected already.
Additionally, there is -includeDisabled, which will include all accounts, unless -accountName is specified (as a regular expression) to limit what accounts are reported, that cannot currently login since password expiry for an account is a little moot if that account is already disabled, or set to require a password change after first use.
Example Usage
The script includes full PowerShell compatible help including examples but I’ll include one here so you get the gist of it:
& '.\Check SQL account expiry.ps1' -sqlServer SQL01\instance01 -recipients [email protected] -mailServer smtp.hell.com -mailOnFail -expireWithinDays 10
This will connect to the specified SQL server instance as the user running the script and email a list of all SQL accounts which expire within the next 10 days to the given recipient. If the script fails to connect to the SQL server then an email will also be sent containing details of the error.
The Output
If no mail parameters, such as the mail server and recipients, are specified then the output will go to an onscreen grid view, unless -nogridview is specified whereupon the account objects will be output directly so they can be piped into another script or manipulated manually.
With mail parameters set, an email should be sent which looks similar to the following, where I’ve overridden the default of 7 days for the expiry check to 39 days to ensure that it captures some data for demonstration purposes:

If the script fails to connect to SQL and the -mailOnFail argument is specified then an email similar to the following will be sent:

If you just want the script to check that connections to SQL can be made, specify the -accountName argument with the name of an account that doesn’t exist, such as “non-existent” so that it won’t email any expiring accounts, just connection failures. Even without privileged credentials being used to connect to SQL, either by running the script under a Windows account that has the securityadmin server/instance privilege or with a privileged SQL account via -username, a SQL account can query itself so that can be used.
The Script
The digitally signed script is available on GitHub here and you use it at your own risk although it is purely passive so cannot inflict any damage.
]]>Whilst designing a XenApp 7.x infrastructure for a customer, a requirement surfaced that they wanted to be able to update their in-house developed applications, of which there were three separate ones, written by three separate teams, on a weekly basis. Given that they did not have App-V packaging skills, so weekly repackaging would have been cost prohibitive, we looked at using Citrix AppDisks so that we could hand Server 2012R2 virtual machines over to the customer with AppDisks in write mode, let them install and test their apps and then hand them back to us for sealing and promotion to UAT and thence Production. Unfortunately, we hit a number of issues with the AppDisk technology which meant that we had to seek an alternative way of delivering these applications.
The Solution
Using a computer startup PowerShell script assigned via Group Policy to the OU where the servers earmarked for the customer’s applications resided, I came up with a robust mechanism which would install the applications during boot. The Server 2012R2 VMs with the Citrix VDA installed, which were providing published applications and desktops to the end users, were booting from Provisioning Services with Cache in device RAM and overflow to local disk so we therefore needed to ensure that the installation of the software didn’t use the RAM cache as this could have had a negative effect on performance. It was deemed too high risk to have the software explicitly installed to a drive other than the system drive, namely C:, even if the installers allowed it, particularly as some of the required prerequisite packages were quite old and out of support. We therefore added another virtual hard disk to the VMs which the installation script would find, format and then create symbolic links to folders on the additional drive from the installation folders on the C: drive so that their software could be installed without using C: drive space.
As the customer’s previous XenApp 6.x implementation had sprawled to over twenty different PVS vDisks, including the ones the developers used which had been continuously in private, writeable, mode for many years so were very different from the rigidly change controlled production images, the solution needed to keep the number of vDisks to an absolute minimum so the install on boot apps would install on the single base image that was also used for COTS (Commercial Off The Shelf) apps.
Solution Detail
Support for Multiple Applications
Since there were three distinct applications which required different installers to be run, with possibly more applications to come, I tried to keep the complexity low, particularly in terms of scripts since trying to maintain multiple scripts was something that could prove problematic for BAU operations. I therefore used AD groups to designate which XenApp servers got which applications where the application name was part of the group name so it was simple, via good old regular expressions, to figure out which application a server should be getting by enumerating its AD group memberships via ADSI (so that the Active Directory PowerShell module isn’t required).
$filter = "(&(objectCategory=computer)(objectClass=computer)(cn=$env:COMPUTERNAME))"
$properties = ([adsisearcher]$filter).FindOne().Properties
## We will get computer group memberships to decide what to install if( $properties )
{
   [string[]]$groups = @( $properties.memberof )
   if( ! $groups -or ! $groups.Count )
   {
     ## Already determined via computer name that we are a custom app server so having no groups means we do not know what to install
     $fatalError = "Failed to get any AD groups via $filter therefore unable to install any custom applications"
     throw $fatalError
   }
   else
   {
     Write-Verbose "Found $($groups.Count) groups via $filter"
     ForEach( $group in $groups )
This was preferred to using different OUs for the different apps so then only one copy of the startup script was required and the chances of a server being in the wrong OU were reduced, especially in Production where a single OU was used for servers providing these custom apps and those not providing them. The script differentiated between the two types of server via NetBIOS name as a different naming convention was used for those providing custom apps so the startup script could exit almost immediately if the NetBIOS name was not that of a custom apps server and thus not delay the boot noticeably.
In order to keep it simple from a Citrix Studio perspective, we used Citrix tags to designate each application so that we could use a single Delivery Group for all of the custom applications and use tag restrictions on Application Groups to direct them to the correct XenApp server. This was in preference to using multiple Delivery Groups. There did not unfortunately appear to be an easy and reliable method of getting tag information on the XenApp server during boot otherwise we would have considered just using tags as opposed to tags and AD groups.
Disk Preparation
The startup script enumerates local disks by way of the Get-Disk cmdlet, filtering on a friendly name of “VMware*”, since that is the hypervisor in use, and where the disk size is 4GB or less so that it does not try to use the non-persistent system drive or the persistent drive used for the PVS overflow disk. These filters are passed to the script as parameters with defaults to make the script more easily repurposed.
$disks = Get-Disk -FriendlyName $diskDriveName | Where-Object { $_.Size -le $agileDriveSize }
if( ! $disks -or $disks.GetType().IsArray )
{
       $fatalError = "Unable to find single drive of type $diskDriveName of size $($agileDriveSize / 1GB)GB or less"
       throw $fatalError
}
If the disk’s partition style is “raw” then it is initialised otherwise all of its partitions are deleted in order to remove all vestiges of any previous application installation.
if( $disks.PartitionStyle -eq 'raw' )
{
   $disks = $disks | Initialize-Disk -PartitionStyle MBR -PassThru
}
else ## partitions exist so delete them
{
   $disks|Get-Partition|Remove-Partition -Confirm:$false
}
The drive is then formatted and a drive letter assigned although the drive letter is not hard-coded which removes the chances of clashing with others disks and optical drives.
$formatted = $disks | New-Partition -AssignDriveLetter -UseMaximumSize | Format-Volume -FileSystem NTFS -NewFileSystemLabel $label -Confirm:$false

if( ! $? -or ! $formatted -or [string]::IsNullOrEmpty( $formatted.DriveLetter ) )
{
   $fatalError = "Failed to format drive with label "$label""
   throw $fatalError
}
Finally, permissions are changed on the root of the new drive since non-admin users get write access by default which is not desired (or secure!).
As the underlying storage tier had built-in deduplication, we hoped/believed that the overhead of say ten instances of this additional disk for one application was nowhere near ten times the size of the data written to one disk.
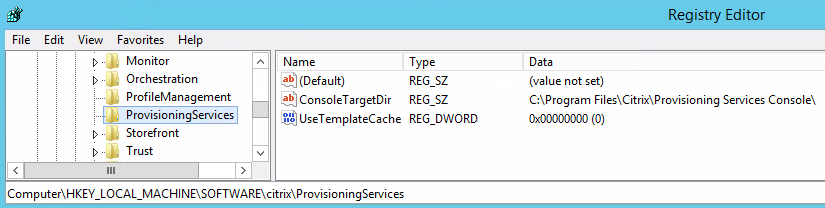
If using the XenDesktop Setup Wizard within the PVS console to create one or more VMs with additional disks, ensure that the “UseTemplateCache” registry value is set to 0 where the PVS MMC snap-in is run from and that it is set before the mmc process is started otherwise additional disks in your template VM will not appear in the newly created VMs. See this aticle for more information.
Symbolic Links
Before the installation script for the custom applications can be run, symbolic links have to be created from the system (C:) drive to the newly created drive in order to preserve the PVS RAM cache. This was achieved by having a simple text file for each application which had one folder per line where the folder was the name of a location on C: where that app would install software components. For instance, a line in the text file might be “\ProgramData\Chocolatey” which would result in the following PowerShell code being executed where $dest =
“D:\ProgramData\Chocolatey” and $source =
“C:\ProgramData\Chocolatey” :
if( ! ( Test-Path -Path $dest -PathType Container -EA SilentlyContinue  ) )
{
     $newDir = New-Item -Path $dest -ItemType Container -Force
     if( ! $newDir )
     {
         $fatalError = "Failed to create folder $dest`n$_"
         throw $fatalError
     }
}
## This requires PowerShell 5.0+
$link = New-Item -ItemType SymbolicLink -Path $source -Value $dest
if( ! $link )
{
   $fatalError = "Failed to create link $source to $dest`n$_"
   throw $fatalError
}
Where D: is the drive letter that was assigned to the 4GB additional drive.
One slight hiccup we encountered was that although the startup script was running with administrative privilege, it still didn’t have sufficient privilege to create the symbolic link, which also requires PowerShell version 5.x. I therefore added functionality to the script to take a local copy of the running script and elevate it to run under the system account using the SysInternals psexec utility.
Local Administrator Access
In order for this solution to not be onerous on BAU support and potentially introduce delays for the customer’s developers, specific AD groups were added to the local administrators group during boot if the server was a development one, as opposed to UAT or Production. The fact that a server was a development one, which the customer had full control over in terms of rebooting, since it was booting from a read-only PVS vDisk, was simply gleaned from the fact that the string “_DEV_” appeared at an expected position in the AD group name that was also used to determine which application was to be installed on it. On UAT and Production servers, changes to the local administrators group membership were not done.
There is a script here which uses the same code to change local group membership.
Application Installation
From our perspective, the installation of the customer’s applications was straightforward as they were responsible for the application installation scripts so the startup script simply had to call the customer’s script, checking for any exceptions so these could be percolated up into our error handling mechanism, once the additional drive was ready. Having determined which of the three applications were to be installed on a particular XenApp server by way of its AD group membership as previously described, the startup script would simply invoke the “XenApp.Boot.Time.Installer.ps1” script in the folder for that application or throw a fatal error if the script did not exist, could not be accessed or raised an exception itself.
In the development environment, where the customer had full control over the share containing their install script and Chocolatey packages and also had local admin access to the XenApp servers hosting their applications, the customer could test their own script whenever they wanted by simply rebooting their development servers.
In the UAT and Production environments, the customer had no local administrator access to the servers or write access to the share containing their install script and packages – a change request was required in order for us to copy, albeit via another PowerShell script with simple prompts to reduce the risk of BAU operations making incorrect changes, the files from the development shares into the production ones. The Delivery Groups containing these servers had a weekly reboot set to commence at 0200 on a Sunday.
One of the few limitations of this approach is that any software being installed that requires a server reboot cannot be supported since the reboot would cause the changes to be lost, because they are PVS booted in shared mode, and a cycle of infinite reboots would ensue. However, the nature of the applications, particularly as they would not be in use during installation as the server would be starting up, meant this was unlikely to happen. It would be more likely that a change to a required component, such as the .NET Framework, would require a reboot which is covered later.
Multiple Datacentre Considerations
The whole solution was provided out of two datacentres for resiliency so the solution for these bespoke apps also had to fit within this. To that end, two shares were provided for the UAT and Production environments such that the startup script would examine the IPv4 address of the booting XenApp server and select the installation share local to that datacentre although with a mechanism to fallback to the share in the other datacentre if the local one was not available. Data was replicated between the two shares by way of the script that BAU operations would use when promoting the customers scripts and packages from Development after a change request had been approved. This script had its own sanity checking in such as ensuring that there were actually changes, additions or removals to the files that were being promoted, as it kept a copy of the previous installation files, this being achieved via checksumming files rather than just relying on comparison of file sizes and datestamps.
At the Citrix level, there were two machine catalogues containing the bespoke app servers – one for each datacentre although this did not affect the startup script at all other than as mentioned in the previous paragraph.
Testing PVS vDisk Changes
Since the bespoke app servers are booting off the same vDisk as normal XenApp servers, in order to reduce complexity, regular updating and patching of the base disk is occurring which needs to also be incorporated into the bespoke apps to ensure they continue functioning as expected. In the development environment, the bespoke app servers are not subject to an automated reboot schedule, unlike the normal servers, since the developers are in control of their servers. It was agreed with the customer that there would be a ten working day grace period from when a new vDisk version was put into production before the development bespoke app servers would be forcibly rebooted by BAU operations if any had not been rebooted already. In order to automate this, a “message of the day” (MOTD) mechanism was implemented which launches notepad with a text file when an administrator logs on where the text file contains the date by which the reboot needs to be performed and the reasons why. The creation of this startup item and the contents of the text file are part of the script used to promote vDisks so is all automated and when a server is rebooted the startup item is removed via the startup script so that erroneous reboot notifications are not shown at admin logon. A scheduled task could have been created to perform the forced reboot after ten days, and removed at boot by the startup script, but the customer did not want this functionality automating.
As mentioned earlier, there are also potentially customer instigated PVS base disk changes where the developers need to test a change to one of their components which requires a reboot, such as the .NET Framework or database drivers. This is catered for in development by making the development servers boot off a copy of the main vDisk which most of the time is identical but can have a new version created if required. Once the new version with the potential changes has been created and promoted to a production version, just for the development servers, the customer can then test their applications and subsequently either raise a change request for the change to be incorporated into the main vDisk, which will eventually be promoted to UAT and Production, or will ask for the changes to be reverted, as in they don’t need them, so the development servers are then rebooted off the previous PVS production version and the newer disk version discarded.
Error Handling and SCOM Integration
Everything is error/double checked with exception handlers writing to a log file which is the first point of call for troubleshooting. If a fatal error, as in exception, is detected, the Citrix Broker Agent service is stopped and disabled by the script so that the affected server could not be accessed by end users, since it cannot register with a Delivery Controller, in case the application wasn’t available at all or in an inconsistent state.
A pair of events was implemented such that a successful boot and installation would log the one, information event, and a fatal error would give rise to an error event, with descriptive error test, with a different event id, being raised locally on the server. As SCOM was being used, a custom monitor and thence alert was implemented so that the BAU support team had pro-active notifications if any installation failures occurred as these would need investigating and rectifying (which would generally mean another reboot was required once the issue had been identified and resolved).
]]>So What is a Zombie Process?
There seem to be a few different views out there as to what constitutes a zombie process on Windows operating systems.
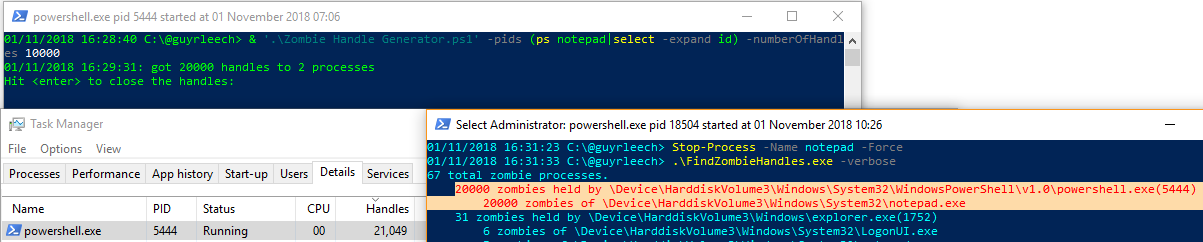
There’s the school of thought here that they are processes which have open handles to non-existent items such as processes which have exited. The article links to a handy tool on GitHub which can identify these processes. This led me to write a PowerShell script which opens handles via the OpenProcess() API to a given process and then waits for user input or a specified amount of time before closing them. Whilst it is waiting, if the process(s) to which it has the handles open are terminated then the PowerShell process running my script is deemed by the tool as being a Zombie.
It’s definitely a useful tool but my interpretation of a Zombie process is one that should be dead and thus gone completely but isn’t so this doesn’t fit the case here in my opinion since my PowerShell process is alive and well, and living in West Yorkshire, but it has handles to what are dead processes, so almost Zombies.
Helge Klein wrote a great post on finding the causes for lack of session re-use on RDS/Citrix servers, so where session ids returned by the quser.exe command are relatively high numbers unless it has just been rebooted, which is a subject close to my heart as I see this frequently in my consultancy work and this is what initially led to my Zombie hunt. I’ve had some success with this to find Zombie sessions, mainly where processes show in task manager with a status of “Suspended”. I haven’t had any joy though in using SysInternals handle.exe utility to close all open handles and thus free up the session (which is also potentially dangerous). The “suspended” processes are closer to zombies though, in my view of the world, as they should be dead but aren’t as they are generally present in sessions which have been logged off so all processes in that session should have been terminated.
I’ve yet to find a way in PowerShell to find processes that task manager shows as suspended as that doesn’t seem to be in any property returned by Get-Process or from a WMI/CIM query on the win32_process class. The latter has an “ExecutionState” property which ought to be what I need but it is always empty so appears to not be implemented. However, I have had some success in looking for processes whose session id is for a session that no longer exists or which have no threads or open handles as that seems to be a sympton of some of these “Suspended” processes. I thought it would be a case of finding that all threads for a given process were suspended but how does that then relate to processes flagged as suspended in task manager but which have no threads at all unless task manager assumes that any process with no threads must be suspended since it has nothing that could be scheduled to run on a CPU?
Microsoft have a debugger extension command “!zombies” but I’ve never got that to show any Zombie processes as yet.
My own definition of a Zombie process is where they are not visible in any user mode tools like task manager or Process Explorer but still have an EPROCESS block in the kernel address space although these are tricky to find as you have to look for symptoms of their existence, such as Zombie sessions causing a lack of session reuse, given their inherent lack of visibility.
Finding Zombie Processes
So how do we see these EPROCESS blocks which reside in the kernel address space? Why, with a debugger of course. However, we would normally look at this in kernel dumps which we usually get after a BSoD (although there are some neat ways of converting hypervisor snapshot memory files and saved state files into dump files for VMware and Hyper-V that I’ve used).
We can point a debugger at a running machine but only if it has been started in debug mode which isn’t generally how they should be booted in BAU situations.
Fortunately, SysInternals comes to the rescue, again, in that they have a tool called livekd that in conjunction with Windows debuggers like windbg (a debugger with a GUI) or kd (a command line debugger), can debug a live system. It’s easy to use; we just need to tell it where windbg or kd are (they are in the same folder as each other when installed) and also decide what we are going to do about symbols which are what are required to convert raw memory addresses into meaningful function names. If you don’t do anything about symbols then livekd will prompt with some defaults but I prefer to first set the _NT_SYMBOL_PATH environment variable to “srv*c:\Symbols*http://msdl.microsoft.com/download/symbols” which uses Microsoft’s online symbol server and stores the downloaded symbols in the c:\Symbols folder.
So to start windbg to debug the local system, we run the following, elevated, obviously changing folders depending on where livekd.exe and windbg.exe live; where I’m using a PowerShell session, not a (legacy) cmd:
& 'C:\Program Files\sysinternals\livekd.exe' -k 'C:\Program Files (x86)\Windows Kits\10\Debuggers\x64\windbg.exe' -w -b
This will then start windbg which should look something like this:

Don’t worry about the error for symbols for livekd.sys as we can safely ignore this.
We’re now ready to view the process entries contained in EPROCESS blocks which we achieve via running the “!process 0 0″ debugger extension command where the first zero instructs it to dump all processes rather than the current process or a specific pid (which we would specify in hex, not decimal) and the second is a flags value which tells it here to just dump basic information. We type this in at the bottom where it shows the “0: kd>” prompt.
This should then give something similar to the following although it may take some time to complete if there are a lot of processes (if you’re on a remote session then minimising the windbg window can make it complete faster since it has to do less screen updating).

To quit the debugger, enter “q”.
So there we have it, all of the processes as far as the kernel sees it. But hang on, that’s not exactly easy to digest is it now and what does all the data mean? The Cid is actually the process id, albeit in hex, and thus the ParentCid is the parent process id for the process.
Rather than manually wading through this data, I wrote a quick PowerShell script that uses regular expressions to parse this data, which can be copied and pasted into a text file or saved directly to file via the “Write Window Text to File” option from the windbg Edit menu, correlates these processes against currently running processes via the Get-Process cmdlet and then outputs the data as below where I’ve filtered the grid view where “Running” is false:
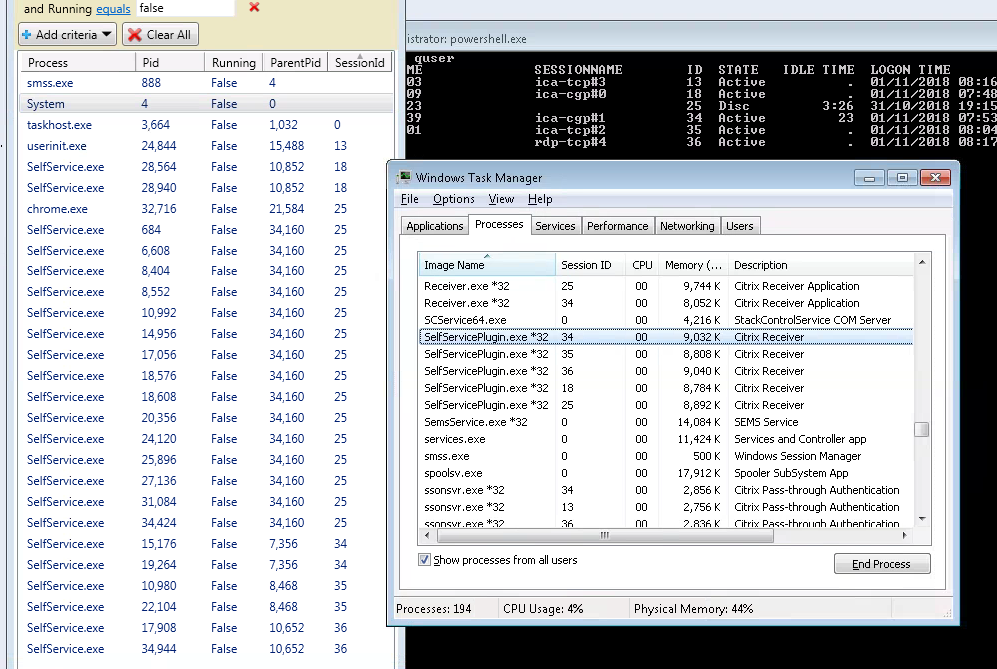
Ignore the fact that it flags the System process as being a Zombie as it isn’t – I’ll filter that out presently.
So here we can see lots of Citrix SelfService.exe Zombie processes since there are none shown in task manager and yet the processed !process output has over 25 instances in the EPROCESS table. We don’t have any Zombie sessions here though, since the Zombie processes all exist in active or disconnected sessions. I have discovered Zombie sessions too using this technique where there are processes shown, and typically the same executables, for sessions that no longer exist and aren’t shown in task manager, etc.
You will potentially get a few false positives for processes that have exited between when the !process was executed and then when the script was run to process its output. However, I’m working on a script to automate the whole process, (weak) pun intended, by using the command line debugger kd.exe, rather than windbg, to run the !process command and then pipe its output straight into a PowerShell script to process it immediately.
The script will be made available in the publicly accessible ControlUp Script Based Actions (SBA) library although all of the available SBAs there can be used standalone without ControlUp software.
]]>
Citrix
- DailyChecks.ps1 – allows you to get a summary of your Citrix XenApp/XenDesktop 7.x deployment emailed to you via a scheduled task to help spot issues. Blog Post
- End Disconnected sessions.ps1 – finds sessions disconnected over a given duration and logs them off, optionally terminating specified processes in case they are preventing logoff.
- Get PVS boot time stats.ps1 – pull PVS target device boot times from PVS server event logs to show fastest, slowest, mean, median and mode values with the option to send an email if thresholds are breached. Blog Post
- Get PVS device info.ps1 – retrieve PVS target device information from PVS servers and display their configuration along with corresponding data from Citrix Studio, Active Directory, VMware and the devices themselves such as last boot time & IP address. Selected devices can then have operations performed on them such as deleting from PVS/AD/Studio or rebooting. Blog Post
- Ghost Hunter.ps1 – find disconnected Citrix XenApp sessions which Studio/Director say still exist but do not and mark them such that they cannot prevent affected users from launching further published applications. Blog Post
- Show PVS audit trail.ps1 – collect PVS auditing events in a given date/time range and show on-screen or export to a csv file. Can also enable auditing if it is not already enabled.
- Show Studio Access.ps1 – show all users granted access to Citrix Studio and their access levels and optionally export to a csv file. It will recursively enumerate AD groups to show each individual user with Studio access.
- StoreFront Log Levels.ps1 – display and/or change the logging levels on Citrix StoreFront servers. It can operate on multiple servers from a single script invocation. Blog Post
- Parse storefront log files.ps1 – show Citrix StoreFront log files in a sortable and filterable consolidated view, optionally filtering on entry type and date ranges. Selected lines will be placed in the clipboard to enable further research. Blog Post
- Get Citrix admin logs.ps1 – retrieve the logs viewable in Studio in a given time window and write to a csv file or display in an on screen sortable/filterable grid view. The logs can be filtered on the user who performed the action, where the action was performed from, either Studio or Director, whether it was an admin or config change action and the type of action such as logoff or shadow.
- Get Citrix OData.ps1 – query the OData interface exposed by Citrix Delivery Controllers to retrieve information on sessions, errors, machines, etc. This is where Citrix Director gets its information from and also means that you don’t have to query SQL (which is unsupported). See here for information on what is available.
- Modify and launch file.ps1 – make modifications to a text file such as an ICA file, e.g. to change window sizes, and launch the newly created file. Can also install itself as an explorer SendTo context menu shortcut.
- Recreate PVS XML manifest.ps1 – create the XML manifest that PVS needs in order to import disks which have multiple versions. Can import from orphaned SQL data or examination of specified *.(a)vhd(x) files. Use when a disk has disappeared from the PVS console.
- Direct2Events.ps1 – Uses OData (like Citrix Director) to retrieve Citrix Virtual Apps and Desktops Session information from a Delivery Controller and displays in a WPF GUI allowing troubleshooting and remediation without needing to go to different tools such as PVS Console, VMware vSphere and Active Directory or connecting to the end-points
Microsoft
- Change CPU priorities.ps1 – dynamically change the base priorities of processes which over consume CPU so other processes get preferential access to the CPU. If a process stops over consuming then its original base priority will be restored. Can include/exclude specific users, processes and sessions.
- Trimmer.ps1 – trim the working sets of processes to make more memory available for other processes/users on a system. Can trim on demand or when processes are unlikely to need the memory such as when a session is idle, disconnected or locked. Can also set hard working set limits to cap leaky processes. Blog Post Blog Post Blog Post
- Get installed software.ps1 – show the installed software on one or more computers where the computers are specified on the command line or via a csv file. Queries the registry rather than the win32_product WMI/CIM class which is faster and gives more complete results. Output can be to a csv file, an on screen grid view or standard output for piping into something else. If -uninstall is specified, items selected when OK is clicked in the grid view will be uninstalled. Similarly, a -remove option takes a comma separated list of package names or regular expressions and will run the uninstaller for them, silently if -silent is specified and the uninstall program is msiexec.exe.
- Group Membership Modifier.ps1 – add or remove a specified list of user accounts from local groups, such as Administrators or Remote Desktop Users, on one or more machines.
- Clone VHD.ps1 – create a new Hyper-V virtual machine from a .vhd/.vhdx file containing an existing VM, selecting the VM configuration in a GUI. Will integrate itself into Windows Explorer so you right-click on a virtual disk file and run it, elevating itself if required. Can make linked clones which can reduce disk space. Blog Post
- Fix Sysprep Appx errors.ps1 – parses sysprep logs looking for failures due to AppX packages causing sysprep to fail, removes them and runs sysprep again until successful.
- Show NTFS zone info.ps1 – Google Chrome and Internet Explorer store the URL of where downloaded files have come from in an NTFS Alternate Data Stream (ADS). This script shows these and optionally removes this information. Blog Post
- Profile Cleaner.ps1 – retrieve local profile information from one or more machines, queried from Active Directory OU, group or name, present them in an on-screen filterable/sortable grid view and delete any selected after prompting for confirmation. Options to include or exclude specific users and write the results to a csv file. Blog Post
- Show users.ps1 – Show current and historic logins including profile information, in a given time range or since boot, across a number of machines queried from Active Directory OU, group or name, write to csv file or display in an on-screen sortable/filterable grid view and logoff any selected sessions after confirmation. Works on RDS and infrastructure servers as well as XenApp. Blog Post
- Profile.ps1 – a PowerShell profile intended to be used on Server Core machines, with PowerShell set as the shell, which reports key configuration and status information during logon.
- Add firewall rules for dynamic SQL ports.ps1 – find all SQL instances and create firewall rules for them to work with dynamic ports
- Find Outlook drafts.ps1 – find emails in your Outlook drafts folder of a given age, prompt with the information with the option to open the draft. Designed to help you stop forgetting to complete and send emails. Has options to install & uninstall itself to launch at logon. Blog Post
- Outlook Leecher.ps1 – find SMTP email addresses in all your Outlook folders including calendars and write them to a csv file including context such as the subject and date of the email.
- Check Outlook recipient domains – an Outlook macro/function which will check the recipient addresses when sending an email and will warn if the email is going to more than a single external domain. Designed to help prevent accidental information leakage where someone may pick the wrong person when composing.
- Fix reminders – an Outlook macro/function which will find any non-all day Outlook meetings which have no reminder set, display the details in a popup and add a reminder for a number of minutes before the event as selected by the user. Blog Post.
- Check Skype Signed in.ps1 – uses the Lync 2013 SDK to check Skype for Business is signed in and will alert if it is not via a popup and playing an optional audio file. Can also pop up an alert if the client has been in “Do Not Disturb” in excess of a given period of time.
- Redirect Folders.ps1 – show existing folder redirections for the user running the script or set one or more folder redirections with a comma separated list of items of the form specialfolder=path. For example Music=H:\Music
- Check and start processes.ps1 – check periodically if each of a given list of processes is running and if not optionally start it, after an optional prompt is displayed. Any necessary parameters for each process can be specified after an optional semicolon character in the process name argument. Can install or uninstall itself to the per user or per machine registry run key so it runs at logon. Use it to launch and monitor key processes such as Outlook or Skype for Business (lync.exe).
- Autorun.ps1 – list, remove or add logon autoruns entries in the file system or registry for the user running the script or all users if the user has permissions. Can also operate on the RunOnce key and wow6432node on x64 systems. Uses regular expressions for matching the shortcut/registry value name and/or the command so knowing the exact names or commands is not required. Uses PowerShell’s built in confirmation mechanism before overwriting/deleting anything.
- Find and check IIS server certs.ps1– find IIS servers via OUs or AD groups or specify via regular expression, specific servers or from the contents of a text file. Check the expiry date of any certificates in use and present a list of those expiring within a specified number of days in a grid view, write to csv file or send via email.
- wcrasher.cs.ps1 – compiles embedded C# code to produce an exe file (32 or 64 bit or even Itanium) which will crash when the “OK” button of the displayed dialogue box is clicked. Use it to check that the OS is configured the desired way for handling application crashes or to produce dumps for practicing analysis.
- WTSApi.ps1 – provides the function Get-WTSSessionInformation which is a wrapper for the WTSQuerySessionInformationW function from wtsapi32.dll with the WTSSessionInfoEx class parameter. This returns an array of session information items for the one or more computers passed to it which can be used in place of running quser.exe (“query user”) and having to parse its somewhat inconsistent output.
- Trim run history.ps1 – Remove items from the history of Explorer’s Start->Run menu, and task Manager’s File->Run new task, either by specifying what to keep or what to remove via regular expression (which can be as simple as something like ‘mstsc’). Uses PowerShell’s builtin confirmation mechansim so by default will prompt before each deletion.
- Get Process Durations.ps1 – Retrieve process creation and termination events from the security event log, if auditing of these is enabled, and show the start and end times of the processes and command lines if that auditing is enabled too. Can optionally show how long after logon and/or boot processes started and can filter on specific processes and/or users. Output to csv format file, sortable/filterable grid view or the PowerShell pipeline.
- Analyse IIS log files.ps1 – Analyse IIS log files to show requests/min/sec, and min, max, average and median response times per time interval, usually seconds to aid in finding busy/overloaded periods for capacity planning, troubleshooting, etc.
- Check AD account expiry.ps1 – Find AD accounts with passwords or accounts expiring within the specified number of days or are locked out or disabled and optionally send an email containing the information. To help spot problems where account expiry could cause issues such as when used as service accounts.
- Check SQL account expiry.ps1 – Find SQL accounts with passwords expiring within the specified number of days and optionally send an email containing the information. Useful where these accounts are used as service accounts. Can also be used to send an email alert if the specified SQL server cannot be connected to.
- Download and Install Office 365 via ODT.ps1 – Download the latest version of the Office Deployment Kit and use that, once the executable has been extracted and its certificate checked, to download and install Office 365.
- Find loaded modules.ps1 – Examine loaded modules all or specific processes by name or pid and show those where the module name/path or company name match a specified string/regex. Designed to help spot processes hooked by 3rd party software like Citrix, Ivanti, Lakeside, etc. Shows module versions so can also be used to play spot the difference between processes.
- Get Remote User Logon Times.ps1 – Use WMI to query computers to find out, since boot, when any remote desktop connections logged on. Gives finer granularity than “query user” (quser) and works on multiple computers in a single invocation.
- Kill elevated processes.ps1 – Check already running processes and then watch for process created events and if the process is in a specified list and have been launched elevated then terminate them and audit to the event log.
- Monitor process start stop.ps1 – Uses WMI/CIM to register for notifications when processes are started or stopped so effectively a process watcher.
- Network Profile Actioner.ps1 – Check network connection profiles and if any are connected on a public network, or nothing is connected so the computer is offline, set a registry value differently compared with private/domain network. Defaults to setting the registry such that the username is not displayed on the lock screen if the computer is on a public network or offline to aid with privacy protection.
- Power Watcher.ps1 – Designed to help set the most suitable power scheme when using an external power bank for a laptop as the laptop sees it as still being powered by an external power source so does not implement any power saving (on a Dell laptop).
- Show FSlogix volumes.ps1 – Show FSLogix currently mounted volume details & cross reference to FSLogix session information in the registry.
- Check and fix domain membership.ps1 – Check domain membership of the machine the script is running on and try to repair using Test-ComputerSecureChannel. Can be placed in a computer startup script with encrypted password.
- Convert graphics files.ps1 – bulk convert graphics files from one format to another
- Get file bitness.ps1 – show the file bitness of specified files or files in a folder including the .NET CPU specifications
- event aggregator.ps1 – retrieve all events from the 300+ event logs on one or more computers and show in sortable/filterable gridview and/or write to csv. Various filter in/out option available.
- Set Foreground Window.ps1 – find the main window for given one or more processes, by id or name, and optional argument matching, and set as the foreground window or perform another operation on them such as minimising or maximising. Written to solve a problem when a running process refused to show its window or even a taskbar icon for it.
- Get MSI Properties.ps1 – get any MSI property, such as ProductVersion, from one or more MSI files by reading the contents of the MSI file. Useful for finding out the version of an MSI file. ALso gets summary information such as bitness https://twitter.com/guyrleech/status/1207013011417948160
- Get files modified since boot.ps1 – Find files modified or created since the last boot time without following symbolic links and junction points. Useful to find out what has consumed the Citrix Provisioning Services write cache but can also take arbitrary start and end times to find files modified/created in a given time window for troubleshooting.
- Pause Resume Processes.ps1 – Pause or resume processes using debugger API functions. Useful to stop applications being used outside of approved hours, stop resource guzzling applications impacting other processes so it can be examined later. Note that the process resuming a process must be the same one that paused it otherwise it will fail. Also if the pausing process exits, the paused processes will exit. The script caters for this. https://twitter.com/guyrleech/status/1254432210872078337
- Bincoder GUI.ps1 – base 64 encode and decode data to and from any file to allow the data to be copied over the Windows clipboard, e.g. to or from a remote session where file sharing sites, email, etc are not available.
- Get Extended File Properties.ps1 – Retrieve specified or all extended properties from a file, not just those in the version resource of the file
- Add computers to perfmon xml.ps1 – Take an XML template exported from perfmon with a single machine and duplicate all counters for a specified set of machines. This creates a new XML file which can be imported back in to perfmon to capture performance data across all the machines.
- Delete profile for group member.ps1 – Delete local user profiles for members of an Active Directory group which are not currently in use
- Fix shortcuts.ps1 – Find shortcuts with target or icon path or arguments matching a given regular expression and change to a new string.
- Get Account Lockout details.ps1 – Find all domain controllers and show account lockouts in a given time range and/or for a specific user including the machine where the lockout occurred.
- Get info via CIM.ps1 – Gather info from one or more computers via CIM and write to CSV files to aid health checking. A list of nearly 50 CIM classes is built in to assist relevant information gathering.
- Send to Clipboard.ps1 – Put contents of text or graphics files onto the clipboard – designed for use as a shortcut in explorer’s right click send to menu
General Scripts
- Regrecent.ps1 – find registry keys modified in a given time/date window and write the results to a csv file or in an on-screen sortable/filterable grid view. Can include and/or exclude keys by name/regular expression. Blog Post
- Leaky.ps1 – simulate a leaky process by causing the PowerShell host process for the script to consume working set memory at a rate and quantity specified on the command line.
- Twitter Statistics.ps1 – fetch Twitter statistics, such as the number of followers and tweets, for one or more Twitter handles without using the Twitter API
- Sendto Checksummer.ps1 – when a shortcut to this script, by setting the shortcut target to ‘powershell.exe -file “path_to_the_script.ps1”, is added to the user’s Explorer SendTo folder, a right-click option for calculating file checksums/hashes is available. The user will be prompted for which hashing algorithm to use and then the checksums of all selected files will be calculated and shown in a grid view where selected items will be copied to the clipboard when “OK” is clicked.
- Zombie Handle Generator.ps1 – opens handles to a given list of processes and then closes them after a given time period or after keyboard input. Used to simulate handle leaks to test other software. Can open process or thread handles.
- Sendto folder size.ps1 – shows the sizes of each folder/file selected in explorer, or passed directly on the command line. For each item then selected in the grid view, it will show the largest 50 files. If any files are selected when OK is pressed in that grid view, a prompt to delete will be shown and if Yes is clicked, the files will be deleted via the recycle bin. To install for explorer right-click use and add a shortcut to this script via Powershell.exe -file in the shell:sendto folder.
- Compare files in folders.ps1 – compare file attributes and checksums between files in two specified folders, and sub folders. Files selected in the grid view when OK is clicked will then have their differences shown in separate grid views.
- Query SQLite database.ps1 – query data from a SQLite database file or show all of the table names. Queries can be qualified with a “where” clause, the columns to return specified, or it defaults to all, and the results output to a csv file or are displayed in an on-screen filterable/sortable grid view.
- Find file type.ps1 – Looks at the content of files specified to determine what the type of a file actually is. File types identifiable include various zip formats, image and video formats and executables. It will also seek out files stored in Alternate Data Streams on NTFS volumes.
- Set photo dates.ps1 – Get the date/time created from image file metadata and set as the file’s creation date/time which can make it easier to see/sort picture files by the creation date of the image itself, not when the file was copied to the current folder it resides in.
- Shortcuts to csv.ps1 – Produce csv reports of the shortcuts in a given folder and sub-folders and optionally email the resulting csv file. Can check shortcuts locally (default) or on a remote server, e.g. for checking centralised Citrix XenApp/XenDesktop shortcuts. By default it will check that the target and working directory exist for a shortcut so the resulting csv file can be filtered on these columns to easily find bad shortcuts.
- Update dynamic dns.ps1 – Update dynamic DNS provider if the external IP address has changed (stored in the registry) to update the address or email the details to a given list of recipients.
- Find JSON attribute by name.ps1 – Find JSON attributes via name or regex and return the value(s). Saves having to navigate a potentially unknown object structure.
- Get chunk at offset.ps1 – display the text from a given file at a given offset within the file. Used with SysInternals Process Monitor (procmon) to see what is being written to a log file for any given procmon trace line.
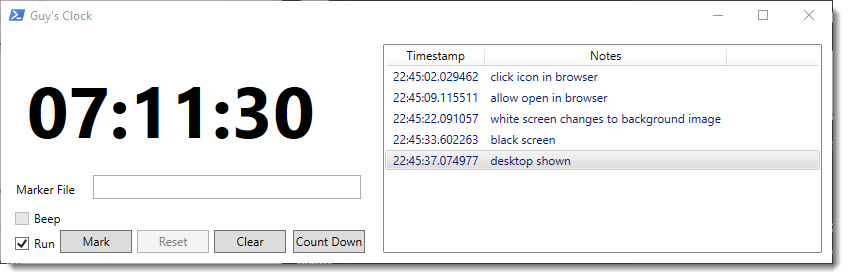
- Digital Clock.ps1 – display a digital clock, stop watch (with 0.1 second granularity) or countdown timer with the ability to “mark” specific points, e.g. when timing a logon
Ivanti
- AMC configuration exporter.ps1 – Export the configuration of one or more AppSense/Ivanti DesktopNow Management Servers to csv or xml file.
- Get process module info.ps1 – Interrogate running processes to extract file and certificate information for their loaded modules which can be useful in composing Ivanti Application Control configurations.
- Ivanti UWM EM event processor.ps1 – Get Ivanti UWM EM event log entries and split into sortable table for durations to aid logon analysis. Display on screen in a sortable/filterable grid view or export to a CSV file.
VMware
- ESXi cloner.ps1 – Create one or more new VMware ESXi virtual machines from existing VMs nominated as templates. For use when not using vCenter which has a built in templating mechansim. Can created linked clones to save on disk space and drastically speed up new VM creation. Can be used with or without a GUI.
- Get VMware or Hyper-V powered on vm details.ps1 – Retrieves details of all powered on virtual machines, or just those matching a name pattern, from either VMware vSphere/ESXi or Hyper-V and either displays them in an on screen sortable & filterable grid view, standard output for further processing or writes to a text file that can be used in a custom field in SysInternals BGinfo tool to show IP addresses of these VMs on your desktop wallpaper which is useful when they are on an isolated network or not registered in DNS.
- Power state change running VMs.ps1 – Pause or shutdown running VMs and the ESXi host – designed to be run by UPS shutdown software. Requires the VMware PowerCLI module.
- VMware GUI.ps1 – Allow users to view VMs and their details that they have access to in a WPF grid view and perform the following actions if they have permissions in VMware as well as being able to launch mstsc and VMware consoles:
-
-
-
- Snapshots – take, delete, revert, consolidate
- Power – on, off, suspend, shutdown/restart guest
- Reconfigure – number of CPUs, amount of memory and change notes
- Delete
- Screenshot
- Run scripts/cmdlets/exes
- Mount/Unmount CDs
- Connect/Disconnect NICs
- Show events
- Backup
-
-
- Set VMware guest info.ps1– Set VM guest information, by connecting to vCenter or ESXi directly, so it can be retrieved in VMs. For example, set the VMware host running the VM in the guest so it knows who its parent is.
I recently had the need to automate the use of SysInternals’ Process Monitor such that no manual intervention is required to initiate the capture, with a filter, and then to process the results, in PowerShell of course. Searching around, I found that the format of a procmon configuration (.pmc) file didn’t appear to be documented anywhere and, being a binary format, could prove tricky, and time-consuming, to fully reverse engineer. Indeed, web searches showed others looking for ways to dynamically create these configuration files, which contain the filters as well as included columns, but apparently without success.
Of course, one could run it without a filter but that will make for potentially much larger trace files, which could impact free disk space and performance and would take longer to process in PowerShell. I therefore set about trying to figure out how I could add a process id (PID) filter for a specific process via a script and I present the research and relevant script parts here for the benefit of others.
Isolating the Relevant Section of the Configuration File
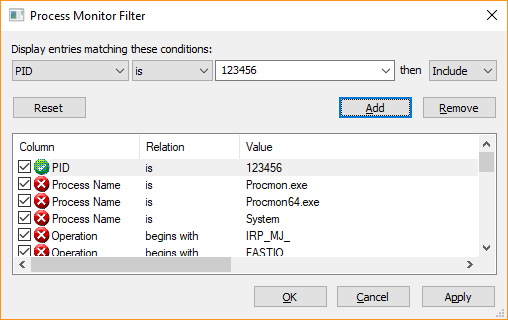
In order to see if it was feasible to take an existing procmon configuration file containing a PID filter and change it, I performed a binary comparison between two configuration files I had manually saved from the procmon user interface. In terms of the filter parameters they contained, they were identical except one was for a PID of 123456 and the other for a PID 567890, e.g:
To perform a binary comparison, I used the built-in Windows File Compare utility fc.exe. Note that when calling this from PowerShell, you must append the .exe to the end of the command since “fc” is a built-in alias for the Format-Custom cmdlet which is not what we want to call. The results looked like this:
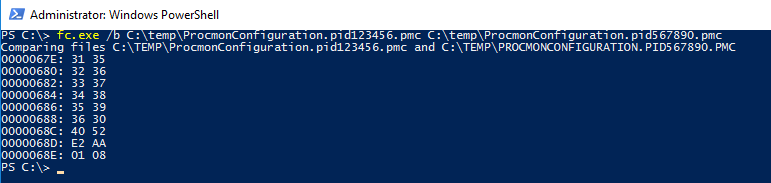
Which instantly gave me hope that what I was trying to accomplish was achievable since there were only nine differences and being the sad geek that I am from my 6502 hand assembly days on Commodore computers, I already knew that hex 31 is the ASCII code for the number 1, hex 32 is 2 and so on so that the first six rows of the first column were representing the PID 123456 and the second column 567890. But what about the last 3 bytes which are different? Well, 123456 in hex is 01E240 and 567890 is 08AA52 which we can see stored in those last 3 different bytes, albeit in little endian format.
If we look at the area around these differences in a hex editor (I use XVI32 which has served me well for many years), then we get some context and more information:

Where the selected character is the start of the “123456” PID string. However, notice that after each ASCII character there is a null (00) – this means that the characters are technically Unicode (16 bit) rather than ASCII (8 bit). This is for information only, it doesn’t cause an issue as we’ll see presently. Also, the (crudely) highlighted portion shows that there is a Unicode null terminator character (00 00) after the “6” of “123456” followed by the PID in little endian format.
So my thinking was that I could produce a template configuration file with a placeholder PID of 123456 and then replace that with the actual PID I wanted procmon to trace. One potential issue was that PIDs can be between 1 and 6 digits long and I didn’t want to risk changing the size/layout of the file since that may have broken procmon. Fortunately I found that procmon was quite happy accepting a PID with leading zeroes such as “000123” so that meant as long as I padded my PID to six digits, procmon would still work.
Dynamically Creating a Configuration File
Whilst it is easy with the procmon GUI to set the filters how you want them and also include or exclude display columns and then save this as a .pmc file, I had the added complication that this script, because it is run as a Script Based Action (SBA) by ControlUp’s Real-Time console, needed to be self-contained so had to have the .pmc configuration file embedded within the script itself.
This fortunately is easy to achieve since we can base64 encode the binary file, which converts it to text that we then just assign to a variable within the script. To base64 encode a file and place it in the clipboard so that it can be pasted into a script, run the following:
[System.Convert]::ToBase64String( [byte[]][System.IO.File]::ReadAllBytes( 'c:\temp\demo.pmc' ) | Clip.exe
and we then paste it into the value of a variable assignment in our script, remembering to place the terminating quote character at the end of what will be a very long line:
![]()
At run time, we can convert this base64 encoded text back to binary data simply by running the following:
[byte[]]$filter = [System.Convert]::FromBase64String( $procmonFilter )
I initially just used XVI32 to determine at what point the “123456” string appeared in the file data and placed that offset into a variable but I found as I tweaked the filter that I had to keep using XVI32 to see what the offset was which became laborious. I therefore wrote a function which returns the offset of a Unicode string within a PowerShell byte array, or -1 if it is not found. I then ended up with the following code snippet which, using the aforementioned function, finds the offset of the “FilterRules” block in the config file (see hex view above), finds “123456” after that offset and replaces the PID with ours from the $processId variable:

The in memory configuration file, contained in the $filter variable, can then be written to a .pmc file and the full path to the file specified as an argument to procmon.exe via the “/LoadConfig” option. The arguments highlighted below are the ones I used to capture a trace where I used “/RunTime” which runs the capture for a given number of seconds and then terminates procmon, and thus the trace, cleanly. You could also run it without “/RunTime” and call procmon.exe again with a “/Terminate” argument when you have finished the capture. If you just kill the procmon.exe or procmon64.exe processes then the trace file will not be closed cleanly and will not be usable.

Once this has finished capturing and exited, it will leave a binary trace in the file argument given to the “/BackingFile” option so to convert this to a CSV file that PowerShell can read in using the Import-Csv cmdlet, we run procmon again thus:
procmon.exe /Quiet /AcceptEula /OpenLog `"$backingFile`" /Minimized /SaveAs `"$csvTrace`" /SaveApplyFilter /LoadConfig `"$pmcFile`"
where $backingFile is the .pml trace, $csvTrace is the csv file that we want it to produce and $pmcFile is the configuration file we constructed and wrote to disk. Notice the quoting of the variables in case they contain spaces.
Downloading Procmon
But what if procmon isn’t already on the system where the script needs to run? Technically I could’ve used the same base64 encoding technique to embed it within the script but this would tie it to a specific version of procmon and may also fall foul of the licence agreement as it could be construed as distributing procmon. Thankfully, for many years, the SysInternals tools have been individually available via live.sysinternals.com so the following will download procmon to the file specified in the $procmon variable (proxy willing):
(New-Object System.Net.WebClient).DownloadFile( 'https://live.sysinternals.com/procmon.exe' , $procmon )
However, depending on security settings, sometimes running of the downloaded executable will produce a dialogue box warning that the file may be untrusted. We can prevent that by running the following:
Unblock-File -Path $procmon
The Finished Script
Will be made available shortly in the ControlUp Script Library. In fact, it’s likely there will be a number of Script Based Actions authored that utilise this dynamic filtering method.
Whilst this technique has shown how a custom PID filter can be dynamically constructed and used, the same techniques could be used to set other filters. The only caveat is that the patterns, such as “123456”, would need to be unique as the simple mechanism presented here cannot determine the column or relation for the filter rule.
]]>Let me illustrate this with an example where I have downloaded a theme from Microsoft using Chrome version 68 on Windows 10 and saved it into C:\Temp. One can then easily examine the ADS on this downloaded file using PowerShell version 3.0 or higher:

The ZoneId is 3, which is the “Internet” zone as can be checked by looking at the “DisplayName” value in “HKLM\SOFTWARE\Microsoft\Windows\CurrentVersion\Internet Settings\Zones\3”, and notice that it gives the actual path to where the file came from, which is actually different to the URL that I clicked. I reckon that could be handy if you forget where a particular file came from but also potentially embarrassing/incriminating depending on what you download where clearing your browser history and cache will only delete some of the evidence.
I’ve been aware of the Zone.Identifier ADS for a long time but I only ever remember seeing the zone number in there, not URLs, so I went back to a 2008R2 system, downloaded the same file with IE11 and sure enough there was only the ZoneId line. I then tried IE11 on Windows 10 and it too only had the ZoneId in the ADS file which gave rise to this table for my Windows 10 laptop since the behaviour is browser specific:
| Browser | Version | Captures URL in ADS |
| Internet Explorer | 11 | No |
| Edge | 42.17134 | Yes |
| Chrome | 68 | Yes |
| Firefox | 61 | No |
| Tor | 7.5.6 | No |
Although both Chrome and Edge don’t put the URL in the Zone.Identifier ADS when browsing in Incognito and InPrivate modes respectively.
This got me sufficiently interested to write a PowerShell script which finds files with a Zone.Identifier ADS in a given folder, and sub-folders if the -recurse option is specified. The script just outputs the data found so you can pipe it through cmdlets like Export-CSV or Out-GridView – below is an example of piping it through Out-GridView:

The script also has -remove and -scrub options which will either completely remove the Zone.Identifier ADS file or just remove the URLs from it, so keeping the zone information, respectively.
The script is available here and you use it entirely at your own risk.
]]>There are already some great scripts out there that will give you very detailed machine by machine health but I wanted something that would give an overview of the environment(s) given that many I work in have many hundreds of machines so one or two being unavailable at any one time isn’t necessarily a disaster but wading through an email with a list of 200+ machines trying to get a feel for overall health can be error prone.
The email that the script sends starts with a summary:

and then below that there are a series of tables to give specific details on each of these items as well as a per-delivery group summary, including scheduled reboot information, but separately for XenApp and XenDesktop since you probably want to see different information for these.

In addition it will also show the following in separate tables together with delivery group and catalogue information for each machine:
- PVS devices with the highest number of retries, which might suggest problems with storage, networking or both if the numbers are high.
- File share usage and percentage free space for a list of UNCs passed to the script.
- Availability metrics for application groups and desktops which are tag restricted since the high level per-delivery group statistics can’t give this information.
- Machines not powered on (a -excludedMachines option is available if you want/need to exclude machine names which are expected to be powered off such as PVS maintenance mode masters).
- Unregistered powered on machines which are not in maintenance mode.
- Machines with the highest number of sessions.
- Machines with the highest load balancing indexes.
The “powered on machines failed to return boot time” table may indicate where machines are in a bad state of health such as having fallen off the domain, stuck at boot, hung, etc.
The “users disconnected more than xxx minutes” table is designed to show users whose sessions have failed to be terminated by settings in Citrix policy, which I have seen at some customers, and I have a separate script to help rectify this, available on GitHub. It will also show, by cross referencing the user’s session to the User Profile Service event log on the server where Citrix thinks they have their disconnected session to see if they do still have that session as I have seen issues where this session has already been logged off. I call these “ghost” sessions and this can cause a problem if an affected user tries to launch another application that would session share on that server as they will get an error since there is no session to share. I came across a workaround for this, by setting the “hidden” flag for that session which means that it won’t try and session share in that specific session and, yes, there is a script for that on GitHub too.
If your machines are not power managed by Citrix, so the Power State shows as “unmanaged” in Studio, the -vCentres option can be used, along with a comma separated list of vCentres, which allows the script to get the power state from VMware instead. VMware PowerCLI must be installed in order for this to work.
Options wise, the script accepts the following although not all are mandatory and many take defaults (there are a few others but I’ve omitted these as they’re not especially interesting) plus you can tab complete them if running interactively and only need to specify enough of the option for it to not be ambiguous:
| Option | Purpose |
| -ddcs | Comma separated list of Delivery Controllers (only specify one per SQL connection) |
| -pvss | Comma separated list of PVS servers (only specify one per SQL connection) |
| -vCentres | Comma separated list of VMware vCentres |
| -UNCs | Comma separated list of file shares to report on capacity & free space |
| -mailserver | Address of SMTP server to use to send the email |
| -proxyMailServer | If the SMTP server does not allow relaying via the machine where you run the script, use this option to proxy it via an allowed machine |
| -from | The sender of the email. The default is the machine running the script but this may fail as it isn’t a valid email address |
| -subject | The subject of the email. The default includes the date/time |
| -qualifier | Prepended to the subject. E.g. “Production” or “Test” |
| -recipients | Comma separated list of email recipients |
| -excludedMachines | A regular expression where matching machines are excluded |
| -disconnectedMinutes | Report sessions disconnected over this time which should be greater than any setting in Citrix policy. Default is 480 (8 hours) |
| -lastRebootedDaysAgo | Report on machines which have not been rebooted in more than this number of days. The default is 7 days |
| -topCount | Report this number of machines per category. Default is 5 |
| -excludedTags | Comma separated list of Citrix tags to exclude if machines are tagged |
It must be run where the Citrix Delivery Controller and PVS PowerShell cmdlets are available locally which can be anywhere where the Studio and PVS consoles are installed. I tend to have these installed on dedicated management servers so as not to risk compromising the performance of production servers like Delivery Controllers.
If you don’t have scheduled reboots set and don’t want to report on workers not rebooted in a given timeframe then pass zero to the -lastRebootedDaysAgo option.
I tend to schedule it to run it at least a couple of times a day for customers – once early in the morning so issues spotted can be rectified before the busier periods and again at just before midday when I think usage will be at its maximum so overloaded servers, etc can more easily be spotted and capacity increased if necessary. A typical command line to run it as a scheduled task is:
-ddcs ctxddc001 -pvss ctxpvs001 -UNCs \\clus01\AppV,\\clus01\commonfiles,\\clus01\usersettings -mailserver smtp.org.uk -recipients [email protected] -excludedMachines "\\(win10|win7)"
The script is available on GitHub here , requires version 3.0 of PowerShell as a minimum and is purely passive, other than sending an email, so risks associated with it are very low although you do use it entirely at your own risk. Note that it also requires the “Guys.Common.Functions.psm1” module which should be placed in the same folder as the script itself and is available ion the same GitHub repository.
]]>So how does one reduce the impact of these “ghost” sessions? In researching this, I came across this article from @jgspiers detailing the “hidden” flag which can be set for a session, albeit not via Studio or Director, such that session sharing is disabled for that one session.
I therefore set about writing a script that would query Citrix for disconnected sessions, via Get-BrokerSession, cross reference each of these to the XenApp server they were flagged as running on via running quser.exe and report those which didn’t actually have a session on that server. In addition, the script also tries to get the actual logoff time from the User Profile Service event log on that server and also checks to see if they have any other XenApp sessions, since that is a partial indication that they are not being hampered by the ghost session.
If the -hide flag is passed to the script then the “hidden” flag will be set for ghost sessions found.
The script can email a list of the ghost sessions if desired, by specifying the -recipients and -mailserver options (and -proxymailserver if the SMTP mail server does not allow relaying from where you run the script) and if a history file is specified, via the -historyFile option, then it will only email when there is a new ghost session discovered.
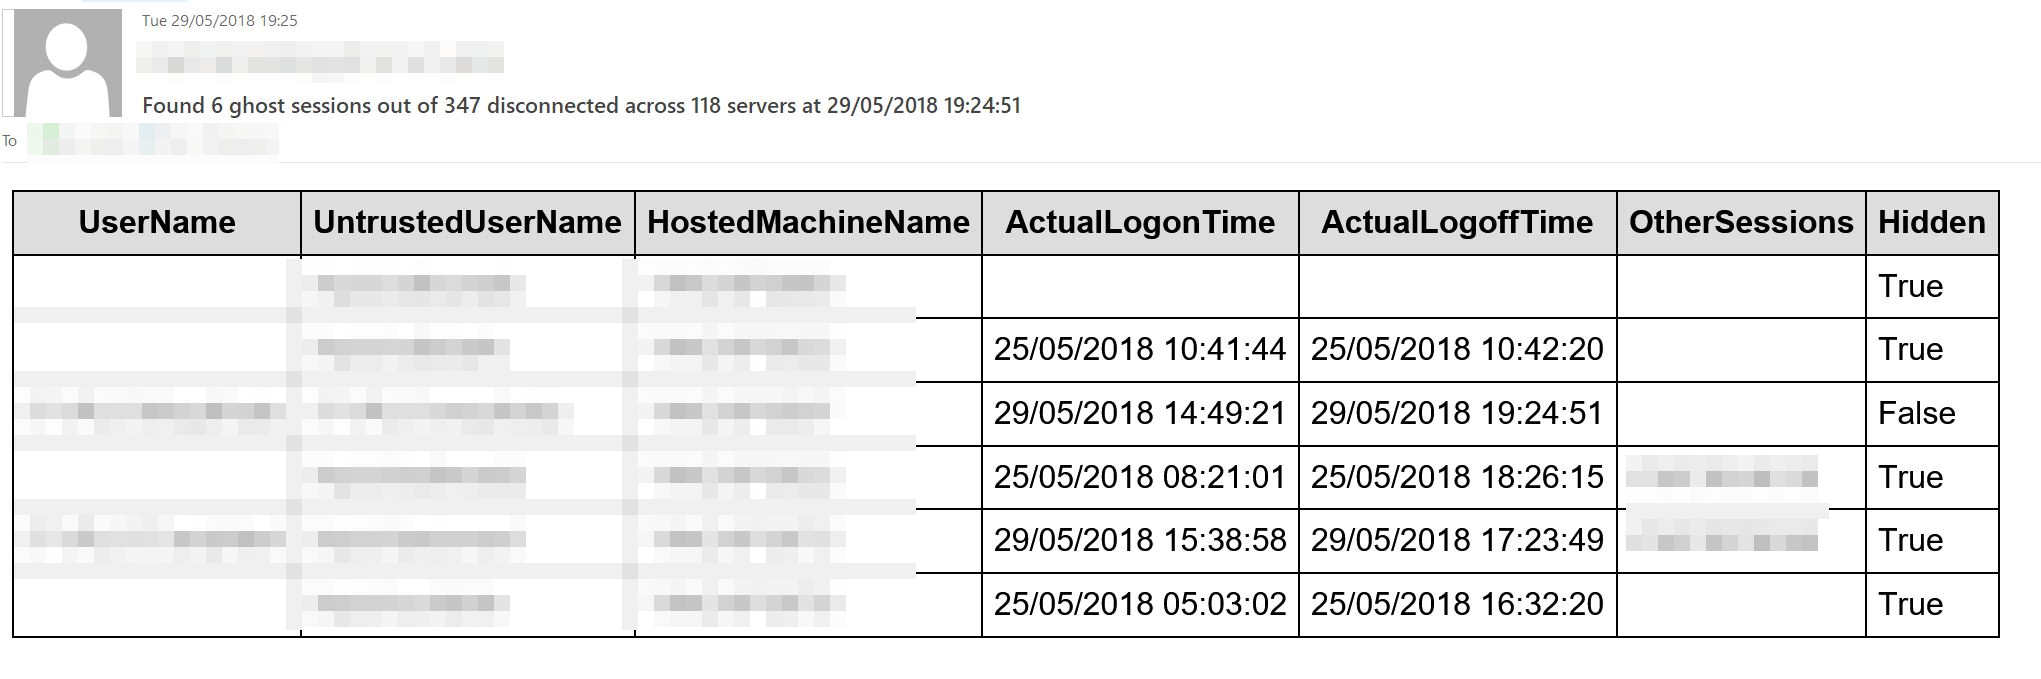
I have noticed that the “UserName” field return by Get-BrokerSession is quite often blank for these ghost sessions and the user name is actually in the “UntrustedUserName” field about which the documentation states “This may be useful where the user is logged in to a non-domain account, however the name cannot be verified and must therefore be considered untrusted” but it doesn’t explain why the UserName field is blank since all logons are domain ones via StoreFront non-anonymous applications.
If running the script via a scheduled task, which I do at a frequency of every thirty minutes, with -hide, also specify the -forceIt flag otherwise the script will hang as it will prompt to confirm that you want to set any new ghost sessions to hidden.
The script is available on GitHub here and you use it at your own risk although I’ve been running it for one of my larger customers for months without issue; in fact we no longer have reports of users failing to launch applications which we previously had tracked down to the farm being haunted with these ghosts although it rarely affects more than 1% of disconnected sessions. This is on XenApp 7.13.
]]>Yes, it has happened to me on more than one occasion so I therefore decided to script a solution to it, or at least something that would politely remind you that you had draft emails that perhaps you might want to finish. I started off writing in VBA but I couldn’t get it to trigger at startup or asynchronously so I switched to PowerShell, which I much prefer anyway.
The script has a number of options but I would suggest that the easiest way to use it is to have it run at logon and give it parameters -waitForOutlook and -wait which mean that it will wait for an Outlook process to start before it starts checking, although it doesn’t have to since it uses COM to instantiate an Outlook instance of its own anyway, and the -wait means that it will loop around rather than performing one check and exiting.
If it finds draft emails created in the last seven days, although this can be changed via the -withinDays option, a popup will be displayed, which will be on top of all other windows, asking if you want to open them:

Clicking “Yes” will result in the emails being opened, giving you the opportunity to finally finish and send them. Selecting “No” will either cause the script to exit if the -nowait option isn’t specified or put it to sleep until either a new Outlook instance appears, for instance because you close the current one and at some point start another one, or until the nag timer expires. The nag option, triggered by using the -nag parameter with a value in minutes, will cause the script to remind you, via the popup, that there are drafts that could probably do with your attention.
As I believe the best way to run this is to have it run at logon and then continue to check for draft emails, I added options to install and uninstall it into the registry so that it will be run at logon to save you the hassle of doing this yourself. If you run the following command line, it will create a registry value “Outlook draft nagger” in HKCU\Software\Microsoft\Windows\CurrentVersion\Run, or HKLM if you want it to run for all users and the -allusers option is specified:
& '.\Find Outlook drafts.ps1' -waitForOutlook -withinDays 7 -wait -install "Outlook Drafts Checker" -nag 120
This will nag the user if there are drafts created in the last seven days as soon as Outlook is launched and then nag again either if Outlook is relaunched in that session or every two hours. Alternatively, it could be setup as a scheduled task if preferred but you lose some of its responsiveness such as being able to nag immediately if a new Outlook process for that user is detected.
If you need to remove this autorun, simply run with -uninstall “Outlook draft nagger”.
The script is available on GitHub here and you use it entirely at your own risk although there’s not exactly a great deal of damage that it can wreak. None in fact, other than perhaps you finally finishing and sending an email that perhaps you shouldn’t but don’t blame the script for that, after all you can always delete draft emails rather than send them!
]]>