The past year I’ve been playing pretty active on federated social networks. This led me to try and write a federated social network group system. Although this group system is far from being complete since Fedigroup is currently in pre-alpha level. I think it is worth sharing what I have learned, and also explain a bit why, if you met me during the past three years. I’ve been going about federated social networks.
You are also welcome to join a server I maintain here, Hayu.sh is the second largest Hebrew-speaking instance.
What is a federated social network?
A federation in servers means everyone can run their own server which is autonomous. And it can communicate with other servers too. Creating a large network. The first protocol on the internet is actually federated too – email.
There is no one central email server, or single email software. In social networks this means that you join a server, and follow and interact with everyone else. Even though your server could be, like in my case, hosted in your own home, with you owning all the data. You can also join a any other server, and switch between them.
For Hebrew speakers, I gave a small TED lecture about it, which is hosted on a federated video server. You can watch it here (Hebrew).
The Fediverse is the servers using the a W3C Standard that does just that
What made the Fediverse possible is the standard that was passed to describe it. The protocol is called ActivityPub 2.0. And it lets social networks share status messages (notes), shares (boosts) and favorites across different servers. It was created by a group of people who cared, not large companies. Despite some of them being members of the W3C. Its also worth mentioning that one of the major adopters of the ActivityPub 2.0 protocol was Mastodon, a type of social network server, which resembles twitter. And that really help gain critical mass.
Why didn’t I hear about this?
I was asked this by other developers and power users. It makes people dismiss the Fediverse as a passing or niche thing.
Unlike Facebook, Twitter even if you’re been avoiding social networks, their marketing will reach you, your news channel, municipality and country are likely using them. Their existence depends on it that you use and browse on their site. However, in the Fediverse does not have a business model that demands it. Or a marketing team. Its just people. You are welcome to join, but no ones income depends on it.
The Fediverse is growing though, by word-of-mouth, or text-in-blog. Recently even celebrities and others. The latest are the BBC, PNAS, George Takei, Neil Gaiman, Stephen Fry and the European Commission.
Not to be confused with crypto – Which lacks moderation
I think one of the strength of the Fediverse is that it’s actually not going with the blockchain trend now, which is where a lot of effort is going to distribute things.
The Fediverse does not run using the now trendy crypto stuff. The advantage of it is that it costs far less to run. A small server for a few tens of people + a domain and you are good to go.
Another thing is that having an admin means you have a moderator, which is becoming critical for social networks. Large companies today are unable to moderate the volumes of messages on their social networks, resulting in many bad decisions, people getting blocked by algorithms and others who should roam freely. Many social networks today still don’t have moderation-by-design in mind. Even less in a trust-less network that uses crypto.
What is Fedigroup
Fedigroup is a server type that allows users to create a group and share it across the Fediverse. When a user creates a group, they can specify the topics they want to discuss, and the group, when mentioned, will automatically boost their posts related to those topics. This helps increase visibility for posts within the group and attract more members. Additionally, Fedigroup stores the contents of the group for future reference, making it easier for members to find and access previous discussions. Currently, there is also a web interface available that allows users to search through the contents of groups they belong to (the search button though is not implemented yet). Overall, Fedigroup provides a convenient way for users to create and participate in specialized communities within the Fediverse with group memory.
Features
- Federated – you can mention a group and it will boost the message if you are following it
- Has a responsive UI written in NiceGUI
- You can log in using your Mastodon/Pleroma or any MastodonAPI compatible account
- You can use your federated account to create group and then you have access to moderate it
- Posts in the group are archived in a database that can be searched (search not implemented)
- See all the posts in the groups you follow
Unimplemented (roadmap in theory)
- Use your MastodonAPI-compatible account to comment and preform tasks on the WebUI
- Search history of the group

I stopped developing it because it was far too much work only for me. It might pick up if someone joins me, but alone I will not manage to make it as good as others out there. It has potential as being a place to search for history on the Fediverse which is a little challenging today.
Also I think the recent migration of Reddit users show that the Fediverse is handling groups pretty well.
Still, Fedigroup was a good learning experience on how the technology works, and I think its worth sharing if you want to build a Federated instance that uses python, FastAPI and PostgreSQL.
If anyone wants to pick up where I left they are welcome. The source code is available on GitHub.
There is a running instance at: https://fedigroup.party
You welcome to try it out and as always – code contributions are welcome
Atribution: Icon by: Freepik
Hey all,
I am releasing today something I’ve been working on the past year. It stared with a friend that had a requirement to do off-site backups of his work for his insurance, but BackupFriend has became a full blown backup solution.
The idea is you get a RaspberryPi and plug a harddrive to it, put it at your friends, family or just in your house and backup up to it using a desktop client that should have the feel like Dropbox/Google Drive/etc. You also get history! The RaspberryPi can also be changed to a remote server (instructions here). This guide focuses on self-hosted instructions, because I think its strange all backup solutions out there require you to pay rent for your own data.
Using a 4TB drive for under $100 and a Pi, you can get much more storage which is not ephemeral.
The desktop client has been tested on both Linux, MacOS and Windows.
Also, many thanks to Pull Request Community that featured BackupFriend as a project to work on, that helped get a few PRs on-board.
What you will need
- A Raspberry Pi, preferably 4B because of the USB3
- Note: Raspsberrypi can be replaced with a server (instructions here).
- A home network with a computer running Linux, MacOS or Windows, which you will be backing up from
- An external hard drive that can connect to the Pi (I use a 4TB WD My Passport drive, you can also just use a thumb drive for testing).
How to install on a Pi
- Download and the BackupFriend image (source code so you can see what’s under the hood)
- Unzip the image and install it to an SD card like any other Raspberry Pi image
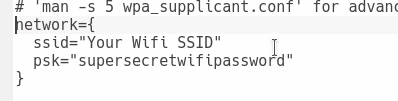
- Configure your WiFi by editing
backupfriendpi-wpa-supplicant.txtat the root of the flashed card when using it like a flash drive (You can also just plug the device to an Ethernet port on your router). - Attach the external drive and power up.
- Hostname is
backupfriend(notraspberrypias usual), username:piand inital password is:raspberry - After a few minutes you should be able to access http://backupfriend/ or http://backupfriend.local.
- Default password for the Web UI is
adminpasswordadmin123.
You should see a login screen like this:

At this point you have the backup server running. Excellent!
The backup server is now sitting on your local network. If you want to have it backing up on a remote location, you will need to open the router port to it, and set the domain name on the nginx-proxy container there. More info on that here.
How to set up the Desktop Client
Now that we have a server on the Pi, let’s backup to it form the local host.
Linux
sudo python3 -m pip install backupfriendWindows
- Download .zip for windows run the executable backupfriend-client.exe.
- If you want to make it start on boot follow this guide.
Mac
- Download the .zip for mac and open it to extract the .app
- Copy it to our applications folder.
- If you want to make it start on boot follow this guide (guide would not work if the .app is not in the applications folder).
First Time Run
On the first run you will be asked to follow a wizard and create your connection keys. Those let you backup sequentially to the server. Just follow the guide and copy the public key:


Server setup
Now that we have a key, let’missing apostrophes place it in the server.
Log in to your backup server using the default
user: admin
password: admin123
You should get this view as shown below
Go to admin on the top right and select “Profile”
We need to set up the sync folder and SSH key.

In the SSH key page press “add new SSH key” and paste the public SSH key you got from the BackupFriend Client:

Now there is one more step to do before we can start backing up – setting the root folder for the user.
Click on “Admin area” and then on the “Users: 1” button as shown below:

Select the only admin user in the list and click on the “edit” button. You should see the following edit page.
Here you need to add the “Root directory” to be “/backup”. This means that anything in the “/backup” folder on the Pi would be visible in the web interface.

Once the changes are saved you will see the amount of free space on the main window:

Now we can finally sync. The first install comes with an example sync. It just syncs your temp folder. Click the “edit” and then you can confirm that it all works using the “test” button. You should get “connection succeeded”.
Note: Sometimes you might see first “warning: server added to authorized servers”. Just press “Test” again, its the SSH system setting that server as an authorized one.
When the job is running it will turn blue, when it’s finished it will turn green:

Once it’s done, or in the middle, you can access the backup on the web interface.
To do so you might need on the first time to refresh the repositories to it will be shown. To do that go to the “profile” and press “refresh repositories”:

Finally, you can see now the repositories and the files with their versions:

That’s it, you should have now a backup server on a Pi that you can also move elsewhere.
Development – Source Code Repos
There are quite a few parts for the project, here are the repos for them:
- BackupFriend Client – wxpython mostly)
- BackupFriend-docker – server-side Docker builder)
- BackupfriendPi – The RaspsberryPi image builder
- Rdiffweb fork – The web interface fork that runs on BackupFriend
This is just version 0.1.0 and there is a lot to improve. Since I am only one person I would greatly appreciate PRs and help getting this to be a full blown solution.
]]>Hey all,
The latest Raspeberry Pi I am releasing is a distro that lets you flash and run social network called Pleroma. Its part of a group federated social networks known as the Fediverse. There are about 4 million users to date, although this does not compare to the giants today, its enough that the software is fairly mature and it looks and feel like networks you know, and there are enough people to follow and get a decent feed to read. It also mean you can use it for different uses not covered by mainsteam social networks.
Requirements
- A domain name that redirects to your Raspsberry Pi – you need a domain name because communication from server-to-server happens on HTTPs, which needs a domain for the signature to work. And laso because usernames are in format @[email protected] .
- Raspberry Pi prefrebly 3B+ , 4B and above.
- Pi should be connected to internet.
Setup
- Flash the PleromaPi image from official mirror (source code). Get the nightly build or latest stable release (at the moment the initlal release).
- Configure your WiFi by editing
pleromapi-wpa-supplicant.txtat the root of the flashed card when using it like a flash drive - Configure the Pleroma settings at
/boot/docker-compose/pleroma/environments/pleroma/pleroma.env
and set: # Make sure to use your specific domain and email, otherwise you won't get an HTTPs cerfificate [email protected] [email protected] DOMAIN=pleroma.gnethomelinux.com VIRTUAL_HOST=pleroma.gnethomelinux.com LETSENCRYPT_HOST=pleroma.gnethomelinux.com [email protected]- Boot your Pi and make sure its connected to the internet. wait for it to pull the latest Pleroma docker container, it should take a while. You can SSH to it and make sure its all working in order. You can ssh to the hostname pleromapi.local, username and password like in rpios (pi/raspberry)
- Create an admin account by running:
/home/pi/scripts/make_admin_user - Wait a while, you can test if you have no domain name set if Plermoa is accessible by running:
curl -k http://pleromapi.local -H "Host: ops.pleroma.social" - You can change pleroma settings at
/var/lib/pleroma/config.exs
The data is saved there and its recommended you back it up once you are actually using the instance.
In later versions I should be able to make the Pi auto-mount an external harddrive, and then you could store all the information there.
Source code is avilable here:
https://github.com/guysoft/PleromaPi
The docker-compose settings are forked on Pleroma’s gitlab:
https://git.pleroma.social/guysoft/pleroma-docker-compose/
Thats it! You should have a running Pleroma instance which is connected to the federated social network known as the Fediverse.
I would really value comments on how to improve this so it would be easy and hassle free to set up a social network instance.
Having your own node in the network mean you have full control on what is allowed to be posted, and what servers your Pi will allow to view. You can federate or defederate any content and you are not restricted to the current networks. So no more censorship, or moderate content you and people on your server don’t wish to see.
]]>
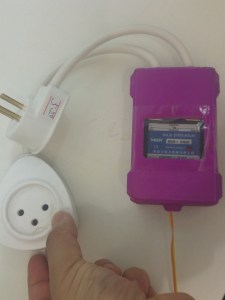
Sous vide pot with temperature sensor
Hey all,
So I’ve been cooking sous vide a few months now, with a sous vide I built myself. Its connected to a RaspberryPi and can be controlled via the web or telegram.
No soldering required!
Flash a ready made image to the Pi!
Bill of materials
- Slow cooker (crockpot) with a ‘high’ option. You can get them second hand, they are pretty cheap. Make sure it has no digital control.
- Raspberry Pi, even version 1 should work – also an SD card and power supply for the Pi.
- Pi Plate prototype board. Make sure you get one that matches your Raspberry Pi footprint if you are re-using an old Pi.
- Solid state relay that can handle mains
- Power cables
- Data cable to connect the relay to the Pi
- Power socket and power connector for your country – get locally so it fits your country standard.
- Water resistant temperature sensor DS1820 x2 – Get a spare one so you can measure the temperature difference and make sure your sous vide is uniformly heated.
- Important – 3D printed enclosure for raspberrypi (Raspberry Pi 1) and enclosure for the relay – you are mixing water and electricity in a kitchen, don’t be an idiot.
Assembly
- Build the following construction from the relay. You need phase to go via the relay, and in to the sous vide. Please look at this chart to understand what cable is equivalent in your country.

Relay assembly – brown writes is phase
- Close up the relay in its box, and attach the power plugs
Relay in its case and power sockets in place, transparent sticky tape protects case
- Wire the temperature sensor DS1820 to GPIO pin 4 (you can use one on the screw terminal and another on the jumper slot, the second one is only to make sure you have a working sous vide.
- Connect SSR – terminal to ground, and + terminal to GPIO 17 (you can pick other GPIOs if you want).

Raspberypi wiring . Two temp sensors on GPIO 4, one Solid state relay (SSR) on GPIO 17
- plug the relay in the your power supply and plug your slow cocker to it. DANGER: Make sure your connections are right with a multimeter before. If you are unsure don’t do this. Mains power can kill!
- That’s it!


Rasepberrypi and relay in cases
Sous vide pot with temperature sensor
Software
I have built a distro called CraftBeerPiOS based on CraftBeerPi 2.2. Why 2.2 and not 3? Because there is an issue with the license. I would have picked something else, but Manuel the developer clearly writes in the README that CraftBeerPi is open source. Its dodge I know, I would welcome someone rewriting something like this. I would help build a distribution.
Why telegram? (which is optional)
I found that telegram was much faster and handy while I am in the kitchen, or if I want to turn the sous vide on before I come home. So I warmly recommend it over CraftBeerPi’s interface. I will mark all its step as optimal in case you don’t want it.
Anyway,
- All you got to do is just flash the img to the Pi. Which can be downloaded here. It has both CraftBeerPi and a telegram bot pre-install. The bot is written by me and is open source.
- [optional telegram] Create a telegram bot using the botfather here is an explanation how to do this. Its really easy – basically you text a bot the command /newbot, you are asked a few questions and get an API token, you place this token in the file /boot/config.ini where its asked for.

Setting a new bot
- Open the sdcard /boot partition, you can do this on windows. And edit the file /boot/craftbeerpios-wpa-supplicant.txt
Set wifi setting you need to change
- [optional telegram] Add your telegram token

config.ini, Telegram token goes here
- Pop the SD card in the Pi and boot it
- You might want to attach a screen on first boot and make sure everything went well. If it did, you should have on your network a service on http://craftbeerpi.local:5000 .If you can’t find the hostname try the Raspberrypi’s IP address. Depending on your network router it might not work.
- Follow on that link the wizard to set up your temperature, relay, and kettle.

CraftBeerPi all set up with a thermometer and relay

Hardware setting in craftbeerpi

How the kettle configuration looks
- [optional telegram] Text your new telegram bot the command /start this should make your telegram user appear in the telegram control panel located at http://craftbeerpi.local:5001.
- Login default user is admin, password 1234
- [optional telegram] Set yourself as an admin, otherwise you can’t control your sous vide. This is for security reasons.

CraftbeerPiBot access control
- [optional telegram] Send /help to the bot to see the available commands. You can set the sous vide temperature, turn it on and off.

Sous vide bot list of commands

Thats it, enjoy! Share recipes!

Sous vide pork belly cooked in maple and liquid smoke and rosemary for 18 hours at 72C

RaspberryPi alarm clock
Hey all,
So do you have a RaspberryPi not doing anything at home? Got that 2GB class 4 SD card that you just don’t know what to do with it? Well this guide is for you! It will let you turn your Pi in to an IOT alarm clock, no code, no complicated commands, just flash, edit two text files and you are good to go. The alarm clock is controlled from Telegram, so you can set it and turn it off from your smartphone. I find that usually using my phone wakes me up. So it’s useful for me. You can also edit the alarm and use any mp3 file you want.
The code is all available in github. AlarmBot is the Telegram Bot. An AlarmPi is the distro (built with CustomPiOS yet again).
Steps to install
- Download the image here
- Unzip and flash it to an SD card (small enough to fit a 2GB card)
- While it downloads and flashes, let’s create a telegram bot and get a token for it!
- Send a message to bot father
- Send /newbot
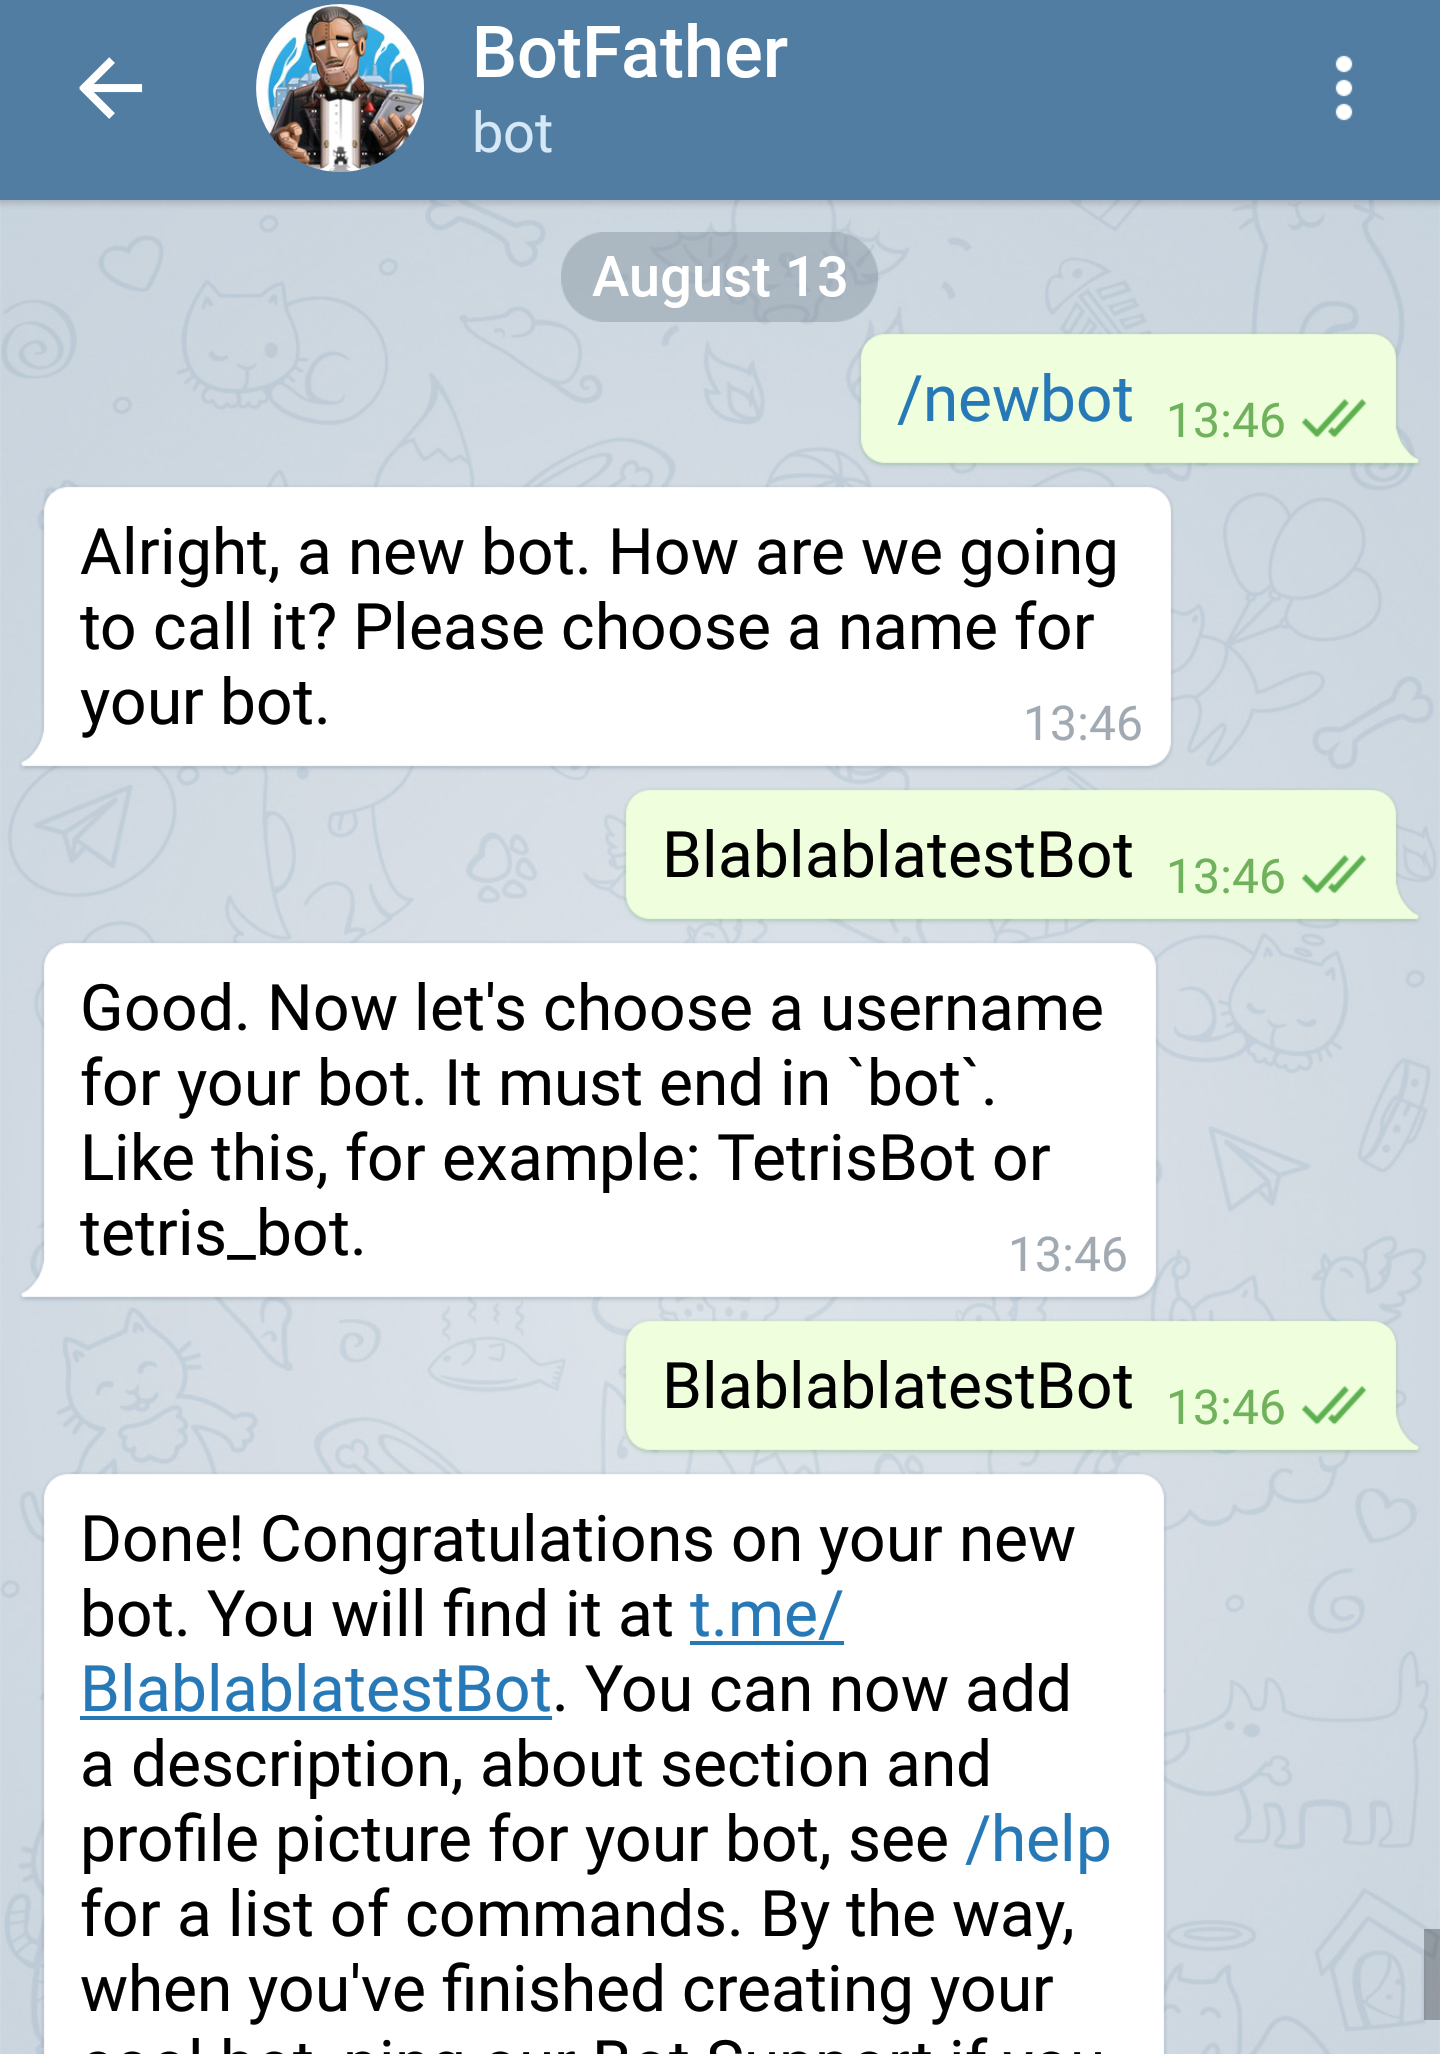
Setting a new bot
- Copy the telegram token that is in the last message
- Open newly flashed image and edit two files, one for the wifi, and one for the bot token:
- Put in alarmpi-wpa-supplicant.txt your wifi address (skip if using Ethernet cable). Here is how it should look:
- In config.ini, paste the newly created bot token from step 3. This is where the token goes:
- optionally, you can change the alarm.mp3 file to the sound of your choice.
- Put in alarmpi-wpa-supplicant.txt your wifi address (skip if using Ethernet cable). Here is how it should look:
- Boot your pi and connect it to speakers, wait a bit, because it will reboot internally twice. And send /start to your bot.
- You’re done! Let’s see how we can set alarm with telegram!
How to use the telegram bot
Once you got a reply to /start and you know the bot is working you can use “/help” to list all the available commands.
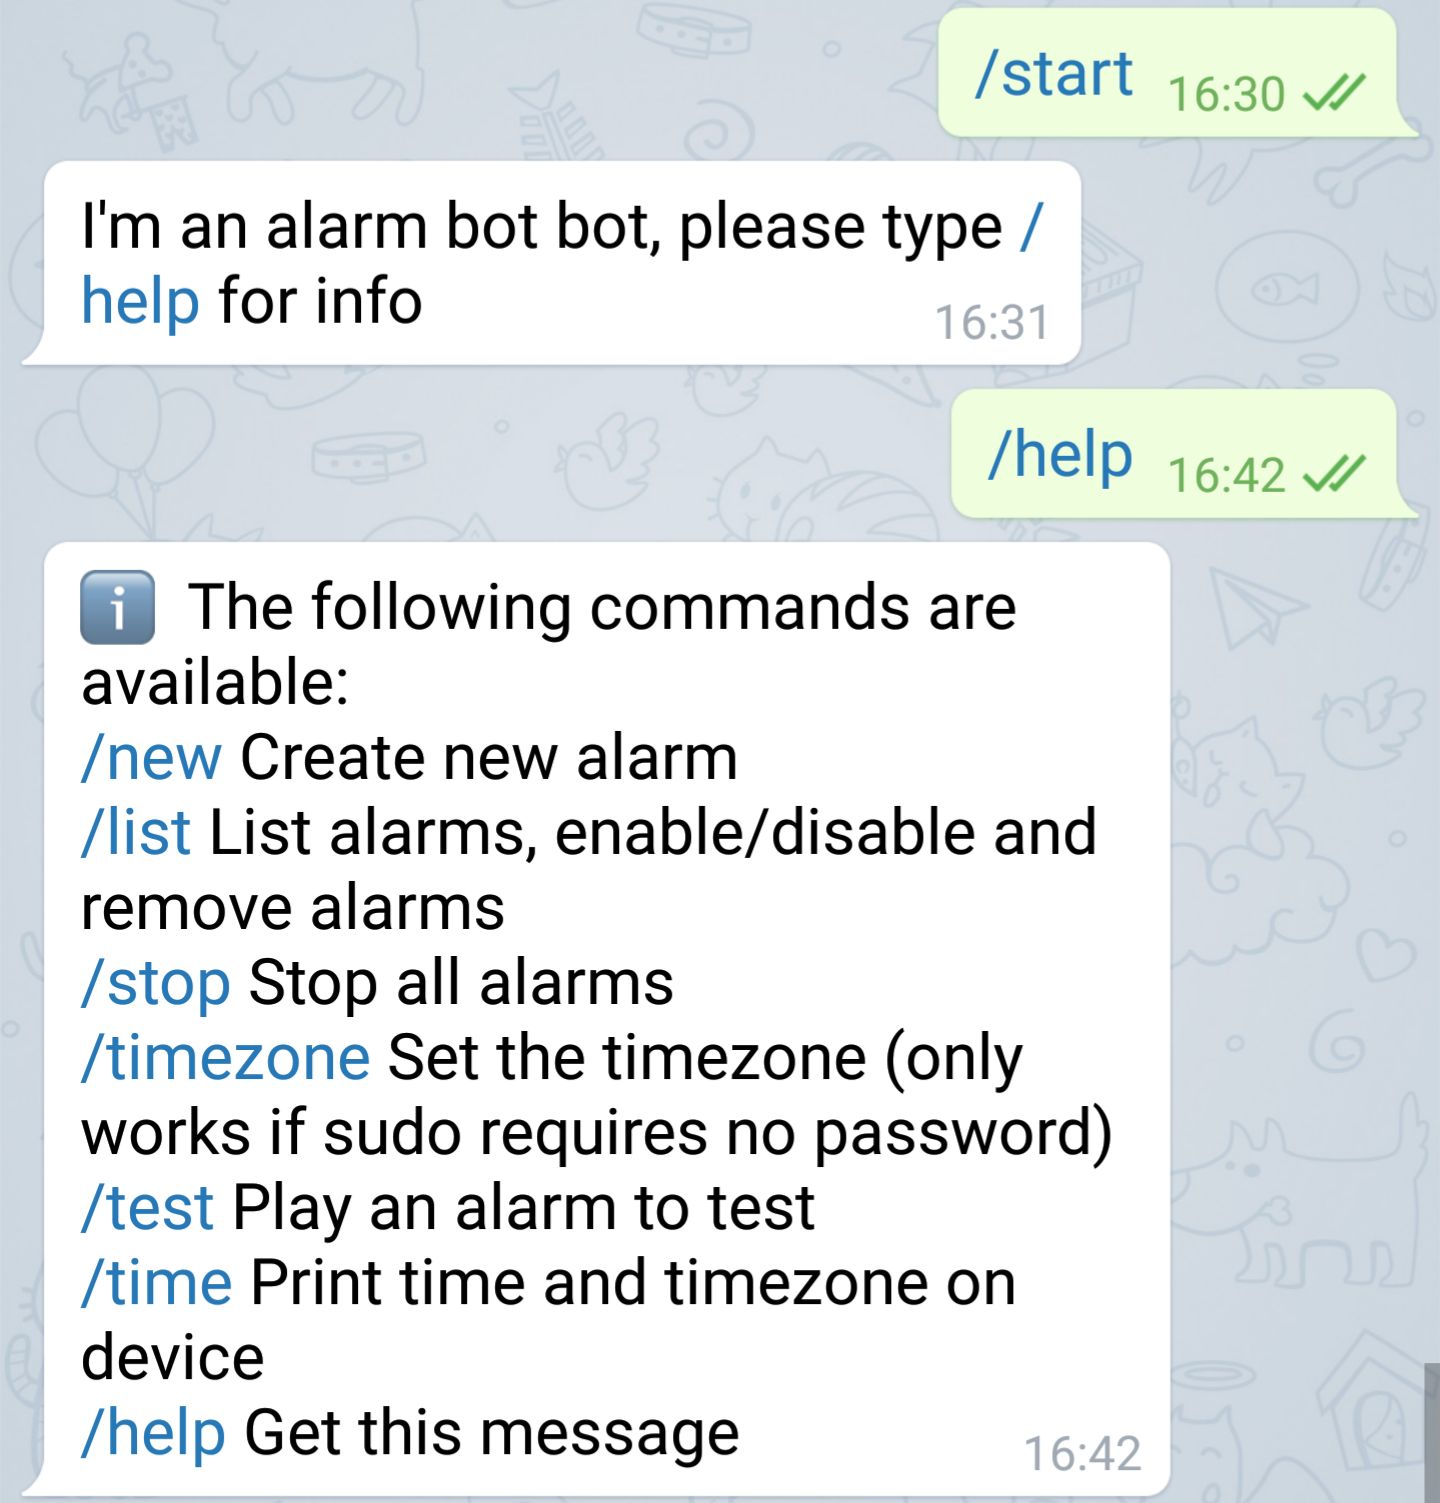
First, set the /timezone to your location, and make sure you can see the correct time with the /time command.
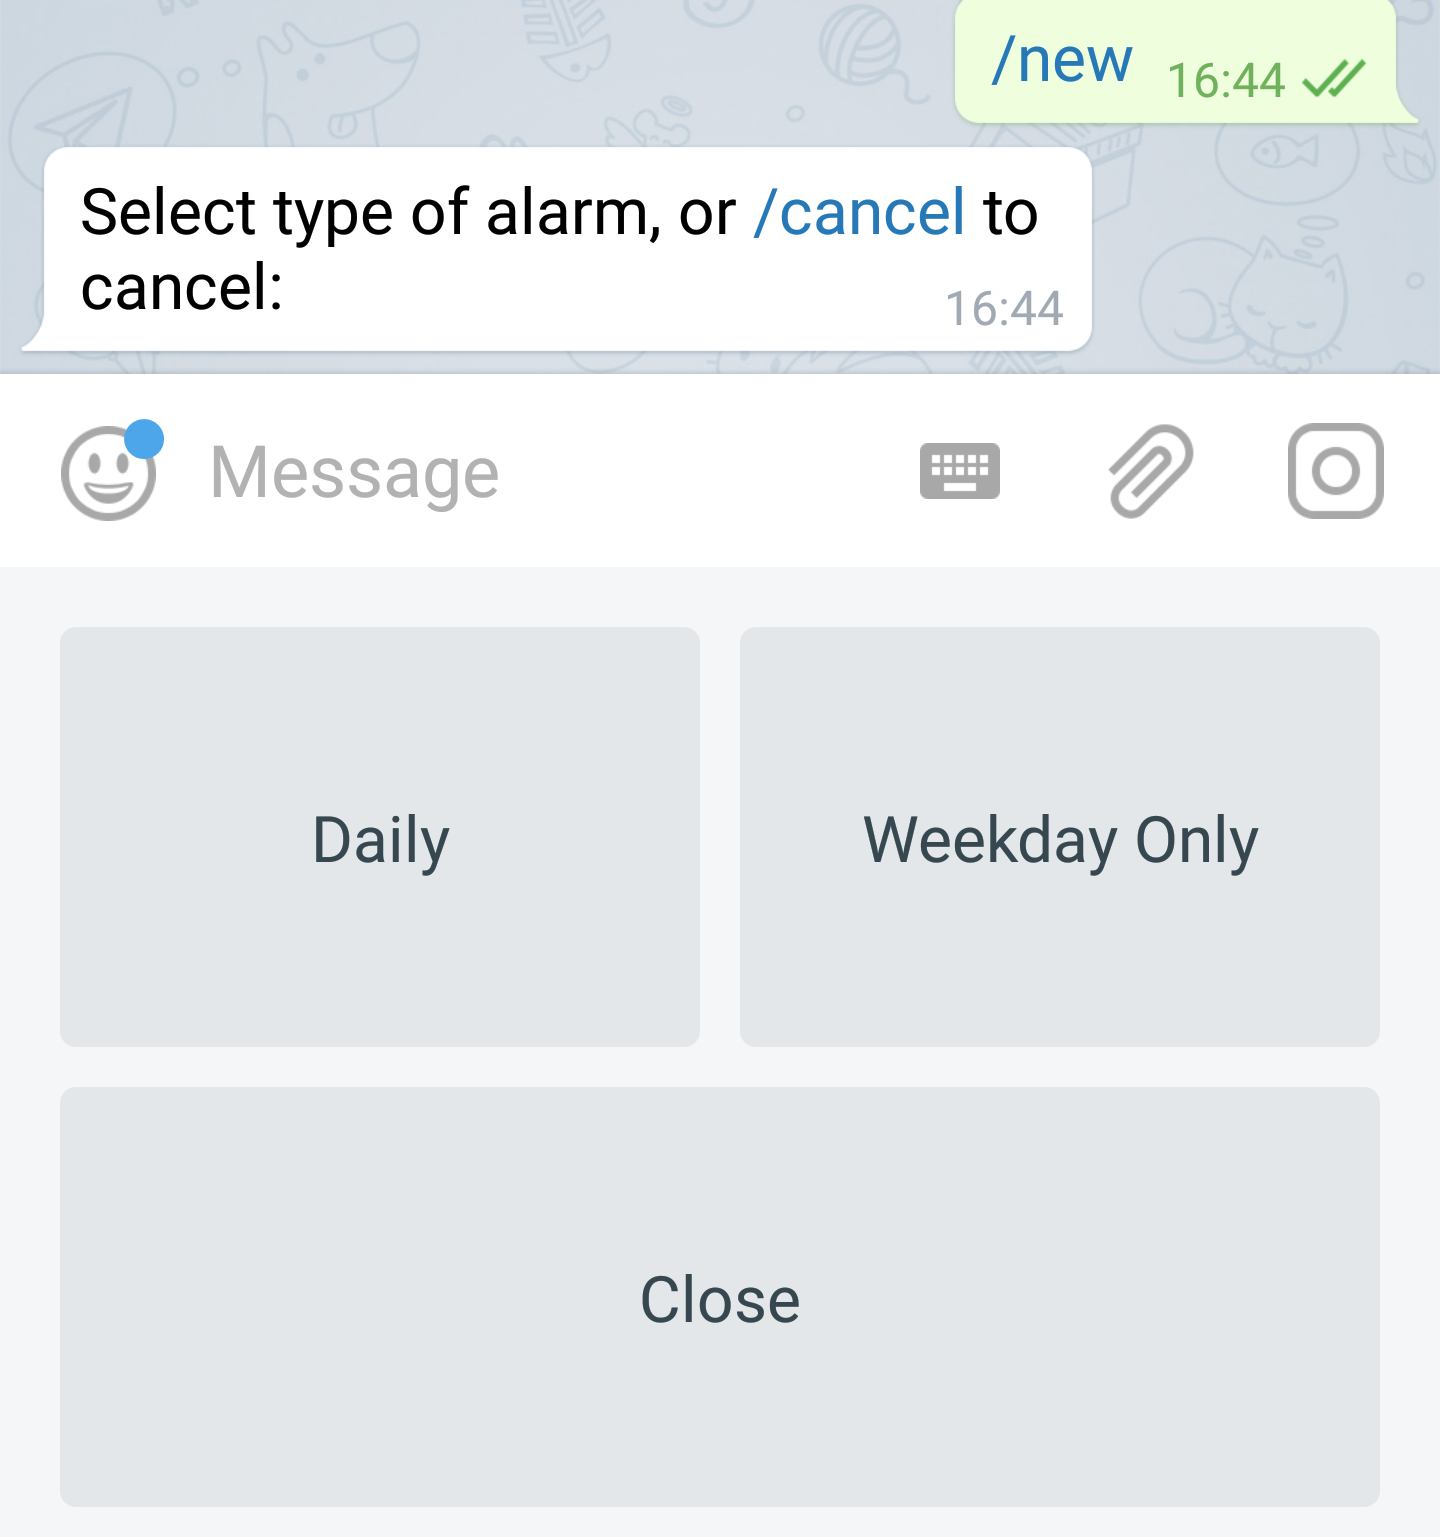
Now let’s set an alarm, type /new and you will get the option to pick an alarm that works daily or weekly (code contributions would be great to add more types of alarms).
Once you have alarms, you can manage them in the /list command.
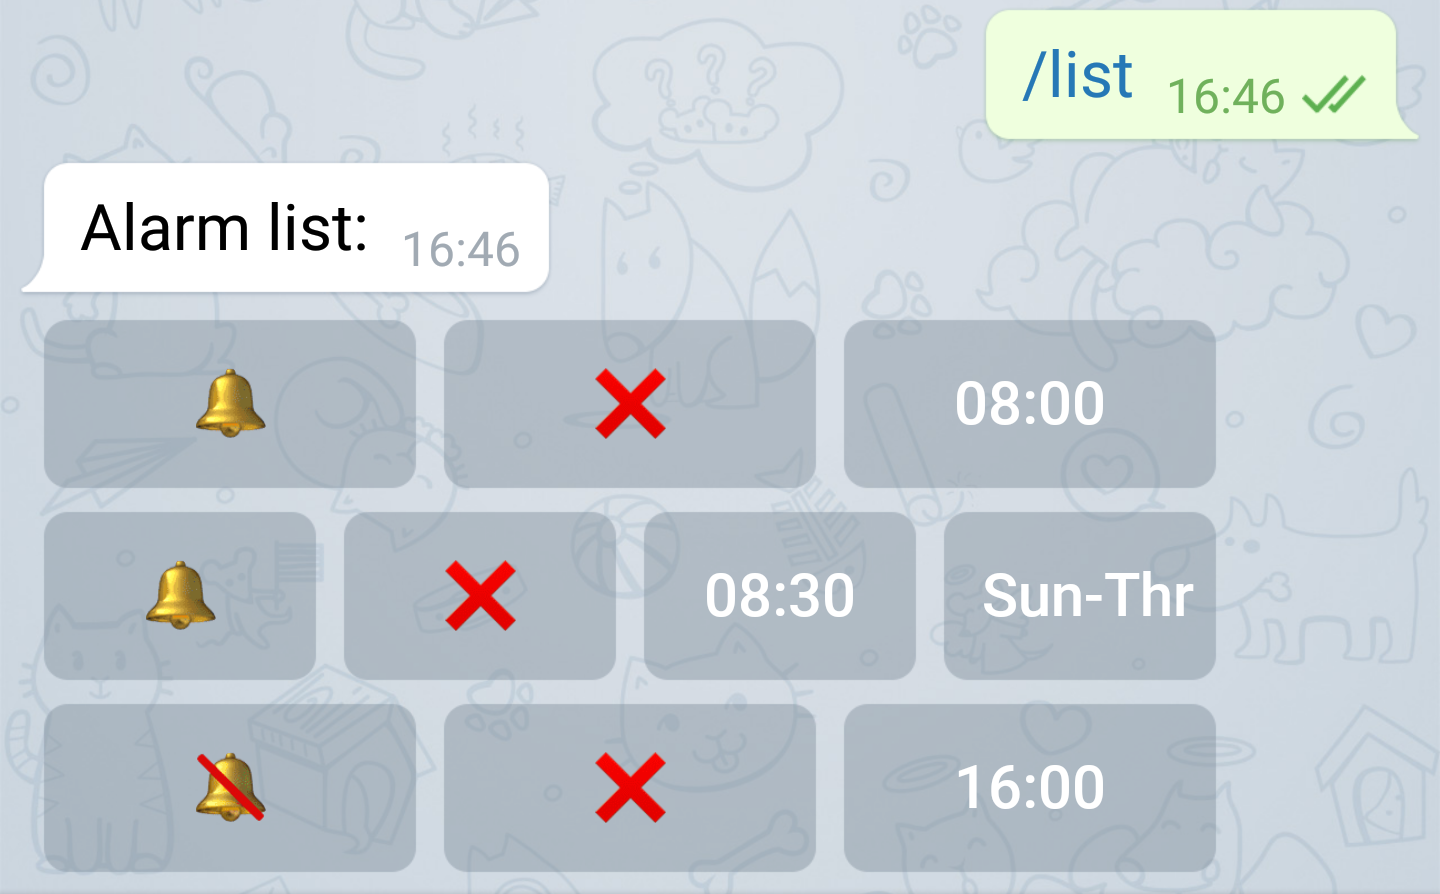
You can disable, or delete commands using this menu. Selecting the bell will disable it, the X will delete an alarm, pressing on the alarm names would close the table.
To stop an alarm that is going, send /stop to the bot.
You can test the alarm using the /test command.
There is no reason why any Pi on earth should not be doing something
So this AlarmPi distro is usable, it lets you burn and flash a device within minutes and make it useful instead of lying and collecting dust in your house. The reason people are not using Pis is because making them do something requires “a guide”, aka list of instructions you are probably going to get wrong to do something simple. Building something as robust as this would take hours, and would be hell to maintain and receive code contributions. But AlarmPi is easy to read and modify. There is a repo for the bot, and a repo for the distro. If a new rapsberrypi comes out and there is a new Raspbian, all you got to do is rebuild and release. No manual editing. And takes less time to build and supports over 40 devices already which run Armbian.
The code base of AlarmBot lets you control crontabs, it could be used for controlling
As always, code contribute are appreciated!
]]>
Hey all,
A short post to announce a small piece of software I released today on github for the ham radio people.
I give you SvxlinkWrapper, this wrapper sits on top of Svxlink‘s stdout and stdin and processes it with python. Making it easy to add more advance features to Svxlinik. Since Svxlink is written in C++ and takes a while to compile, this wrapper really speeds up development. Furthermore, it uses straight.plugin making its simple to write more modules by extending SvxlinkwrapperModule and placing it in the modules folder.
Currently the to modules that SvxlinkWrapper has are for auto-connect to Echolink nodes on startup and another for a QSO logger for Echolink connections. There is also a module that should let you send commands over the Echolink chat, if you extend it. This lets me open and close repeater connections directly from the Echolink chat box.
Thats it for today, now that I have more free time, I hope to publish more things, 73
]]>
TEDing from the car
Hey all,
After a few weeks of bouncing emails with Thomas Perl I am happy to announce that we have a working plugin for his wonderful podcast application called gPodder. With this plugin installed, any mp4 video podcast that is downloaded with gPodder is automatically converted to a format playable by rockbox MPEG player plugin. Effectively meaning seamless sync of video podcasts to any rockbox enabled device. I am specifically using the Sansa fuze player, but just changing the screen resolution at the top of the plugin should make it work with any other rockbox device, and with the right screen size. The final product for me of all this technical stuff is that I can listen to TED lectures in the car. Or using the verb was coined by my friend Uzair “TEDding” from my car.
How to Install
- First you should have gPodder installed (available also as “apt-get install gpodder” or any other distribution install equivalent).
- Second you will need these packages installed too:
apt-get install python-kaa-metadata ffmpeg python-dbus
- Now all that is left is to copy this script to
mkdir -p ~/.config/gpodder/hooks/
cp rockbox_mp4_convert.py ~/.config/gpodder/hooks/
- If your are using a different player from the Sansa Fuse, modify the first lines to your screen resolution:
DEFAULT_DEVICE_WIDTH = 224.0
DEFAULT_DEVICE_HEIGHT = 176.0
make sure to include the .0 at the end.
- Thats it! Now each time video is download, for example from the TEDTalks Video Podcast it would be converted on arrival, and relinked as the file to be synced.
As usual, I would love to hear feedback from users and suggestions.

TEDing from the car, thanks to a gPodder hook and Rockbox

gPoder downloading and converting

SMS Twitter Gateway logo
Hey all,
I am releasing here set of instructions and source that will enable anyone to set up a phone number, that if you SMS it, will post your massage on to your own twitter account. This service is called “Twiter SMS Gate”. The service handles multiple users, and should be easily modified to support other services like statusnet (and with a bit more code maybe even other social networks). The SMS hardware required is any cheap cellphone that can work with gammu-smsd (mine is a fake Nokia from India). Twiter SMS Gate also lets users easily register to it with their own cellphone.
I hope that people that like this idea would start hosting more SMS gates, as we create a wide network of those around the world. SMS Twitter Gate-IL , The Israeli Gate, has been running for a few weeks now and even got covered in the local media here.
The source is written in Python, which includes the phone hardware hooks, webserver, twitter client and database access.
Here is the cellphone used to run my server, just to show you how simple it is to do this, no super-expensive hardware required! (server is also my personal Linux-running PC:

Fake Nokia Cellphone acting as a dedicated SMS server
- Source is available here on GitHub, along with basic instructions on how to set it up.
- Working example of an SMS Twitter Gate in Israel
- List of working gates (one at the time of writing this)
If you have any kind of difficulty setting this up, please give me feedback, so we can make it as easy as possible.
]]>
3arabi Logo
Hi all,
As some might have noticed, Arabic speakers on the net use a form of writing called ‘Arabic chat‘ or 3arabi, which involves using Latin characters and Hindu-Arabic numerals to write words in Arabic. I wrote a small service called 3arabi that lets you translate this Arabic chat directly to English.
Apparently there are tools to do transliteration (converting Latin letters back to Arabic), and also translation. But nothing that does them both. That is why I wrote a small script that uses Google’s transliteration service and ‘Google Translate’. This does the job, but is not perfect, however, it does actually help me understand some messages.
The source is also available in GitHub (its in python). If anyone contributes better code I’ll merge it back to the service.
Thanks to Ira Abramov for hosting the service!
Thanks to Rajesh who wrote the transliteration API though after using it I moved to the javascript google tool with his help.
Thanks Muhammad Khatib who wrote Google Translate python API and for releasing it.
Enjoy,
Guy
Update: Google seem to be blocking the translation service, thinking its spam, if anyone knows how to contact them and asking them to lift that ban would be appreciated.
]]>
CHDK used in university for capturing blackboards
Hi all,
During last semester I developed a set of scripts that lets me photograph pictures of the blackboards during my university courses, categorize them while I am taking them and automatically generate PDF document for each course week. Because physics equations are not the simplest things to input in to a laptop in realtime, I have developed the following method. I am writing the post because I have a feeling this tool could help people in many ways, since it did change how I study in lectures.
You can see my blackboard photographs here (and here is a simple pdf example, if you get lost in the Hebrew).
How it works in a nutshell

The work flow - photograph, store, generate pdfs
During the lesson I take the photographs of the blackboard with a script I wrote for CHDK. In the script you set the course and week of the semester and this is stored per-picture on the SD card.
When I get home, I can quickly clear the card using the build.py script, moving the pictures to my computer, I might be taking dozens of photos a day, so its useful to do this a few times a week. The images are automatically stored in corresponding folders (e.g. /camera/coursename/pics/week1/ ).
Once the images are in the directory structure, all that is left is to generate PDFs from each ‘week folder’. There are quite a few things taken in to account here, due to the fact that the images are resized for fast PDF rendering, to setting the temporary folder of Imagemagick (it needs a few gigs to generate the PDFs!). The final outcome is a PDF file per-course per-week. From here I will go in to the technical configuration.
What you will need
- Canon powershot camera running the CHDK software (Cannon Hack Development Kit). I use a Cannon powershot A590
- Python + bash (+ Linux)
- Imagemagick installed (the convert command)
- Free space is important (both for PDF generation and storage of your photos)
Setting up CHDK script
I will not go in to the details of installing the CHDK, I wrote about this already, and its a post I recommend you read!
Once you have CHDK running on your camera you will need to use this script for shooting pictures (copy it to /CHDK/scripts and load it).
The script lets you pick the course and week, you can edit the script to have a little abbreviations for courses. For example (line 3 in blackboard.lua):
@param c Course (0=inf,1=QM,2=ds,3=fn,4=op)
It will give you a message each time you photograph with it.
The script saves files with the images filenames to the LOGS folder on the card, containing the course ID and week number.

Screenshot of the CHDK script menu
Importing you photos from the camera automatically
Using the build.py will move all the photographs from the camera to the disk, you will need to set a few things in its header, here is how the build.py file looks:
### configuration ###</p> <p>#path to which the camera is mounted<br /> cameraMount="/media/CANON/"</p> <p>#path were the photos should be moved to<br /> DESTDIR = "/media/Elements1/University/camera/"</p> <p>#path where the photos are in the camera (you might need to change this if you took more than 1000 photos)<br /> PICDIR = cameraMount + "DCIM/100CANON/"</p> <p>#the number, and hte course folder to move it to<br /> course= []<br /> course.insert(0, "infi")<br /> course.insert(1,"quantum1")<br /> course.insert(2,"dast")<br /> course.insert(3, "lab2")<br /> course.insert(4, "oop")
Its pretty straight forward. The last list sets which ID number corresponds to which course.
Generating PDFs
The script to generate the PDF is called genpdf.sh, It basically scans the folder and generates the pdf files using imagemagick, it also creates a small file with the picture list, so it only generates when there is a change. Generally useful script! I recommend you set the temp folder that it uses for the generation to be somewhere on your disk (and not just /tmp), because it can take as much as 10GB sometimes to generate!
Here is the settings header:
#this temp dir is where the PDF are generated, it can reach gigabytes! so its recommended to set it to a place with space<br />
export TMPDIR=/tmp</p>
<p>#path where the images are saved<br />
PICS_DIR= /media/Elements1/University/camera
Camera setting tips – How not to blind your lecturer
If you are using this tool, here are just a few minor tips for getting a good result:
- First use the manual setting in the camera (the M option). If the course is in a closed lecture hall you can tweak the exposure time to get better resultes. As you can see I also set the picture to grayscale.
- Make sure to set the flash off! Also you can set the AF-Assist beam off (its the red light on the camera). The manual setting remembers these options, so this is useful too.
- I personally try not to photograph lecturers, I suggest you do the same.
What courses are good for this method? – Tips for Lecturers
I found that some courses are better than others to photograph, usually if you have a tidy lecturer who doesn’t erase in the middle of calculations, then you tend to get a good result. Also there are some lectures that think that the whole lecture can be done with equations only, no text. Those lectures tend to be much harder to follow, I would really suggest that they add notes, it tends to help everyone. Even a tiny title over a calculation can really change things, students don’t always follow.
That’s it! This technique really changed how I study in university, I am sure there are ways to improve the process and the code or use this for another things. I would love to hear feedback and would be glad to assist anyone attempting this.
]]>