The CSAT Survey AI Action allows you to automatically collect customer satisfaction ratings at the end of conversations. With it, you can trigger a 5-star rating prompt and request text-based feedback to measure how well your AI chatbot is performing in real-time conversations.
Why Use the CSAT
]]>The CSAT Survey AI Action allows you to automatically collect customer satisfaction ratings at the end of conversations. With it, you can trigger a 5-star rating prompt and request text-based feedback to measure how well your AI chatbot is performing in real-time conversations.
Why Use the CSAT Survey AI Action?
Capturing customer feedback helps you:
- Understand how helpful your chatbot actually is
- Identify patterns in negative feedback
- Improve bot responses and flows based on real user insights
- Monitor support performance over time
How It Works
Once configured, this action prompts users to leave a star rating (1–5) along with an optional comment after their conversation ends — either automatically or based on AI-triggered conditions.
🛠️ Setup Steps
1. Go to “Create AI Action”
Navigate to your AI Actions panel and click Create AI Action → Select CSAT Survey from the list of Ready-to-Use actions.
Location: LiveChatAI Dashboard → AI Actions → Create → CSAT Survey

2. Choose Collection Type
You'll be asked to pick when the CSAT survey should appear:
🧷 Static (Event-Based)
- After Chat Resolution: Triggered when the customer clicks “That helped” or gives a positive response.
- After Period of Inactivity: Triggered after 5 minutes of no user activity.
- 🤖 AI-Driven (Dynamic)
Let AI decide when to display the CSAT survey based on your defined condition.
Example: “Show this survey when the conversation is ending or when the user indicates they are satisfied.”
3. Configure Survey Trigger Conditions
For static setups:
- Choose one or both options (chat resolution, inactivity)
For AI-driven setups:
- Write a natural-language condition like:
“Show this survey when the user says thank you or when the conversation ends with no questions left.”
4. Select Fields to Request
You can request a free-text comment from users in addition to the star rating:
- 📝 Comment Field (Required or Optional)
This helps gather qualitative feedback alongside the score.
5. Complete & Activate
Click Complete to save and activate your CSAT Survey Action.
Once active, LiveChatAI will automatically handle the logic and display the survey at the right time.
Best Practices
- Keep your chatbot responses helpful and concise to boost positive CSAT ratings.
- Review feedback weekly to uncover conversation gaps.
- Use tags or exports to analyze CSAT data over time.
This section is designed for teams that want to understand trends, optimize performance, and make data-backed decisions at scale. You’ll find topic and sentiment breakdowns, filterable
]]>This section is designed for teams that want to understand trends, optimize performance, and make data-backed decisions at scale. You’ll find topic and sentiment breakdowns, filterable views by date, and export options for custom analysis.
Let’s walk through what you’ll find here.
🧠 Topic Analytics

The Topic Analytics panel helps you identify the most frequently discussed topics across all your customer conversations.
- View recurring subjects your customers bring up—like shipping, pricing, bugs, or account issues.
- Available in two formats:
→ Line View (shows how topics trend over time)
→ Pie View (shows current topic share at a glance)
💡 Use this data to uncover FAQs, refine chatbot responses, or detect rising issues before they become support tickets.
🧊 Freeze Topic
The “Freeze Topic” option in advanced analytics > topic analytics allows you to prevent the AI from creating new topics. When enabled, conversations are assigned only to the topics you’ve defined or marked as Other. This way, you can set your own topics and freeze them to get analytics tailored exactly to your preferences.
😊 Sentiment Analytics
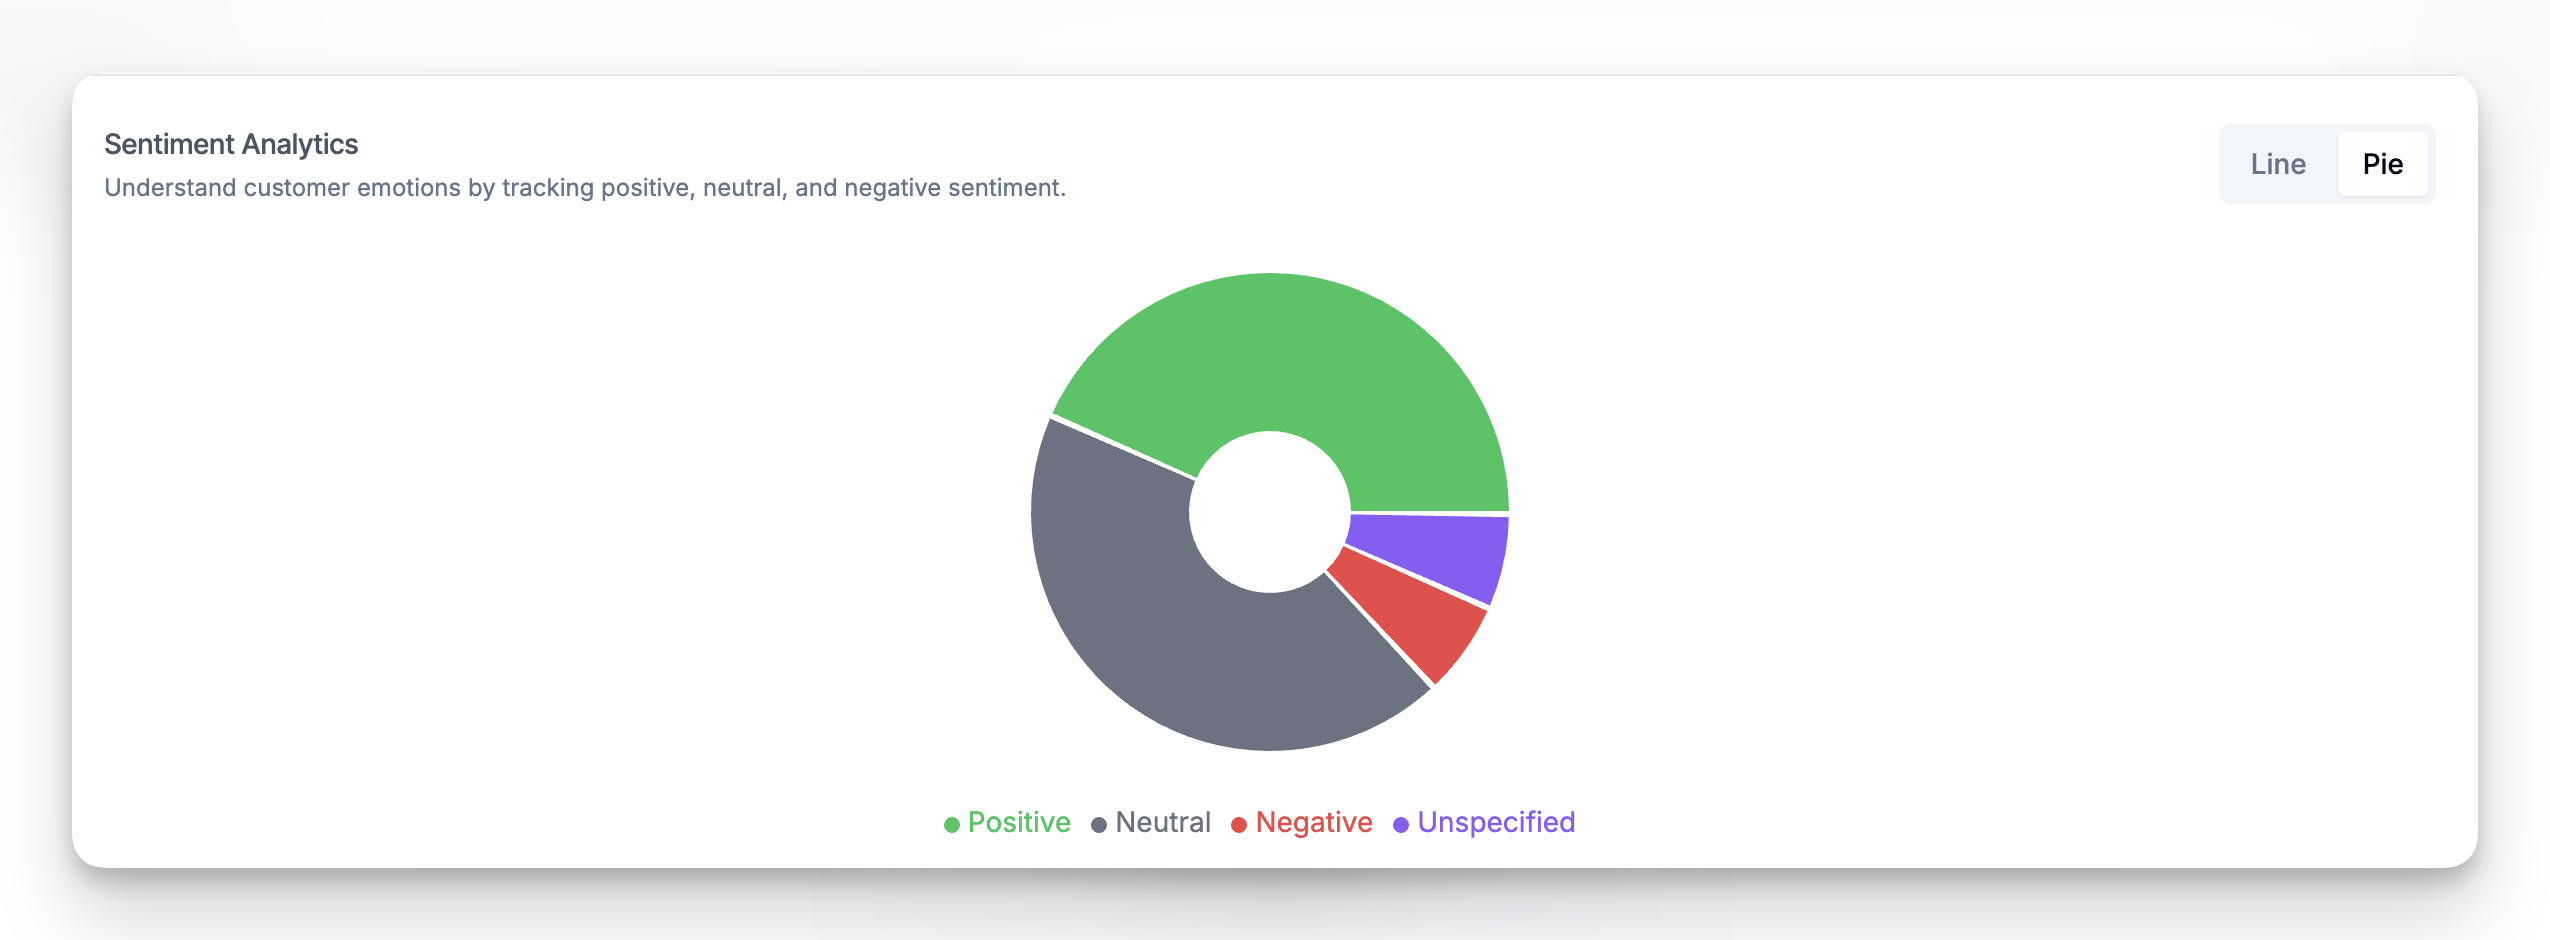
Sentiment analytics helps you understand how your customers feel during conversations with your AI agent.
- Analyze overall sentiment distribution: Positive, Neutral, Negative
- Spot shifts in customer mood across different time periods
- Align this with key events like feature releases or support incidents
This is especially useful for product teams, CX managers, or marketers who want to track satisfaction trends and friction points.
📉 When Data Appears
If you're seeing a "No analytics data available" message: Check that you’ve selected an active time period with conversations
Advanced Analytics works best when you’ve had enough chat volume .
🚀 Available in Expert Plan Only
The Advanced Analytics section is part of the Expert plan. If you don’t see this section in your dashboard, upgrade your plan or contact support to unlock it.
What You Can Do with Custom MCP
With Custom MCP, your AI bot can:
- Retrieve data from external systems
- Trigger multi-step workflows
- Push updates to external services
- Run internal tools or scripts
- Chain together multiple tools via your custom backend
This setup works great for businesses with:
- Custom internal systems
- Middleware platforms
- Developer-maintained services that expose MCP-compatible actions
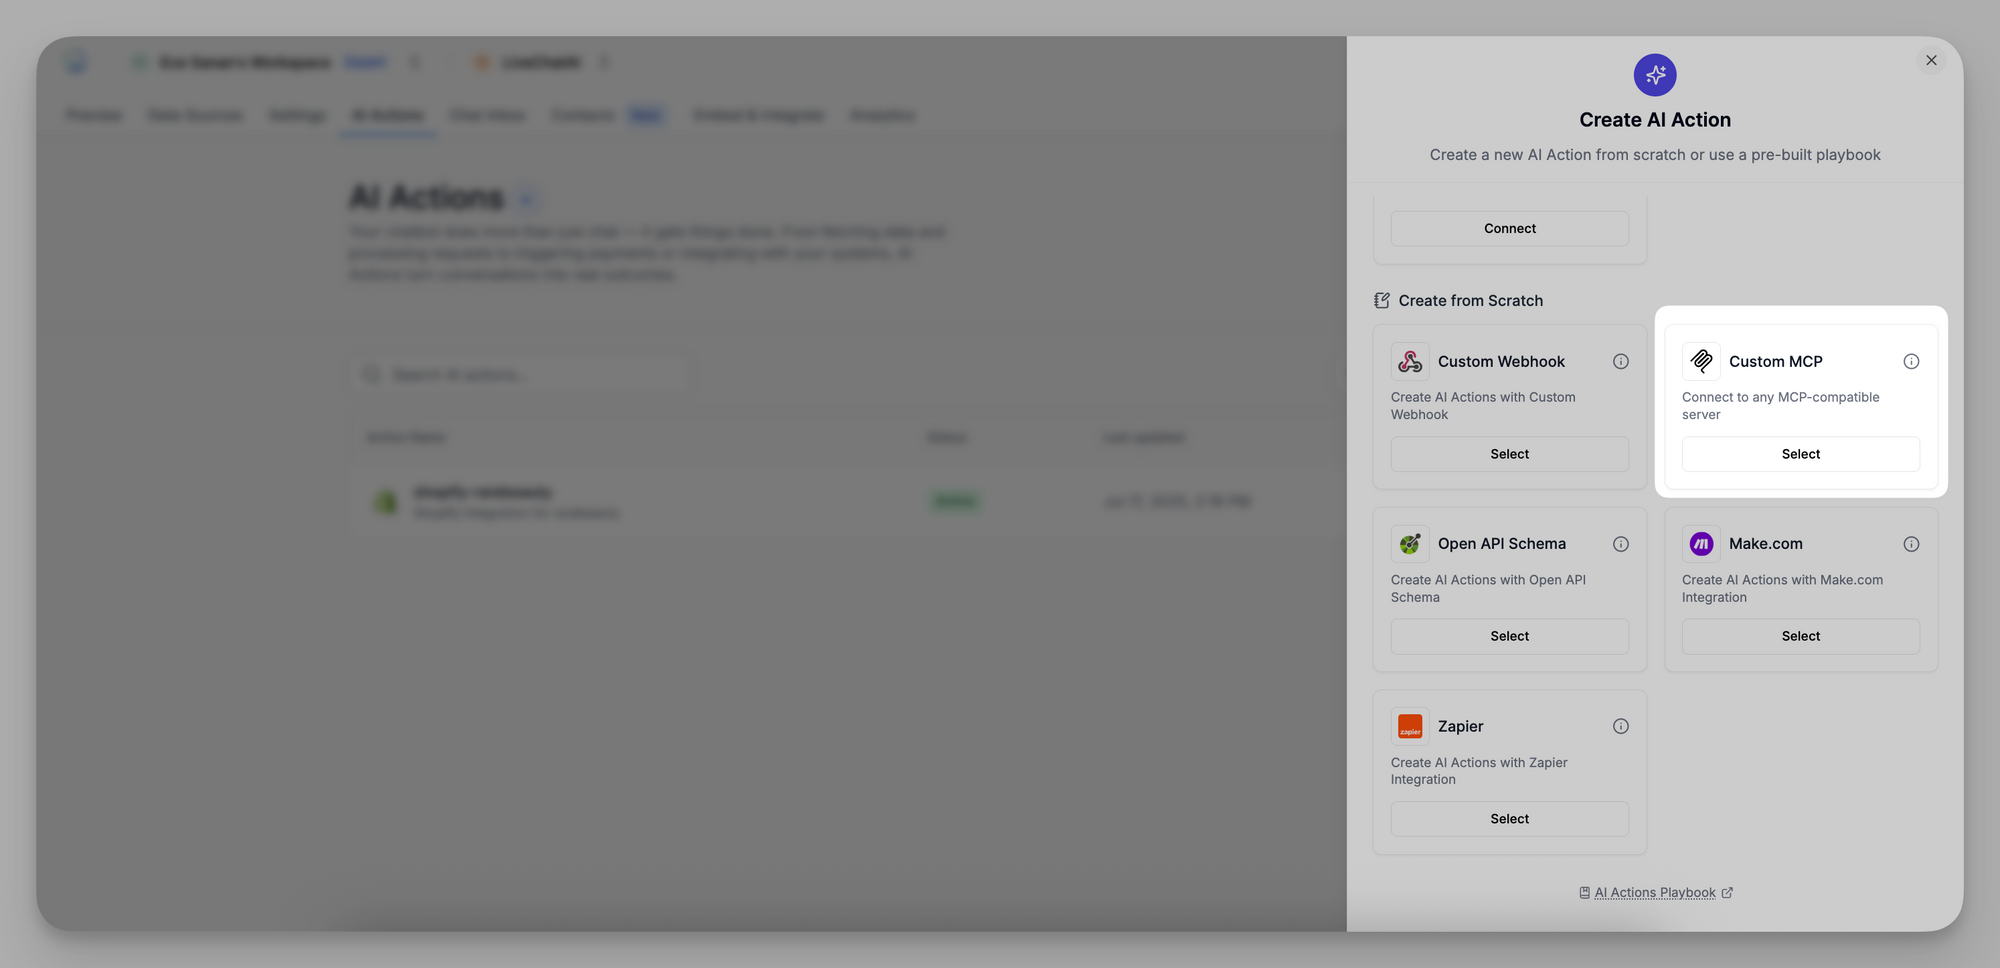
⚙️ How to Set It Up
1. Go to AI Actions
Navigate to your AI Actions tab and select Custom MCP under “Create from Scratch.”
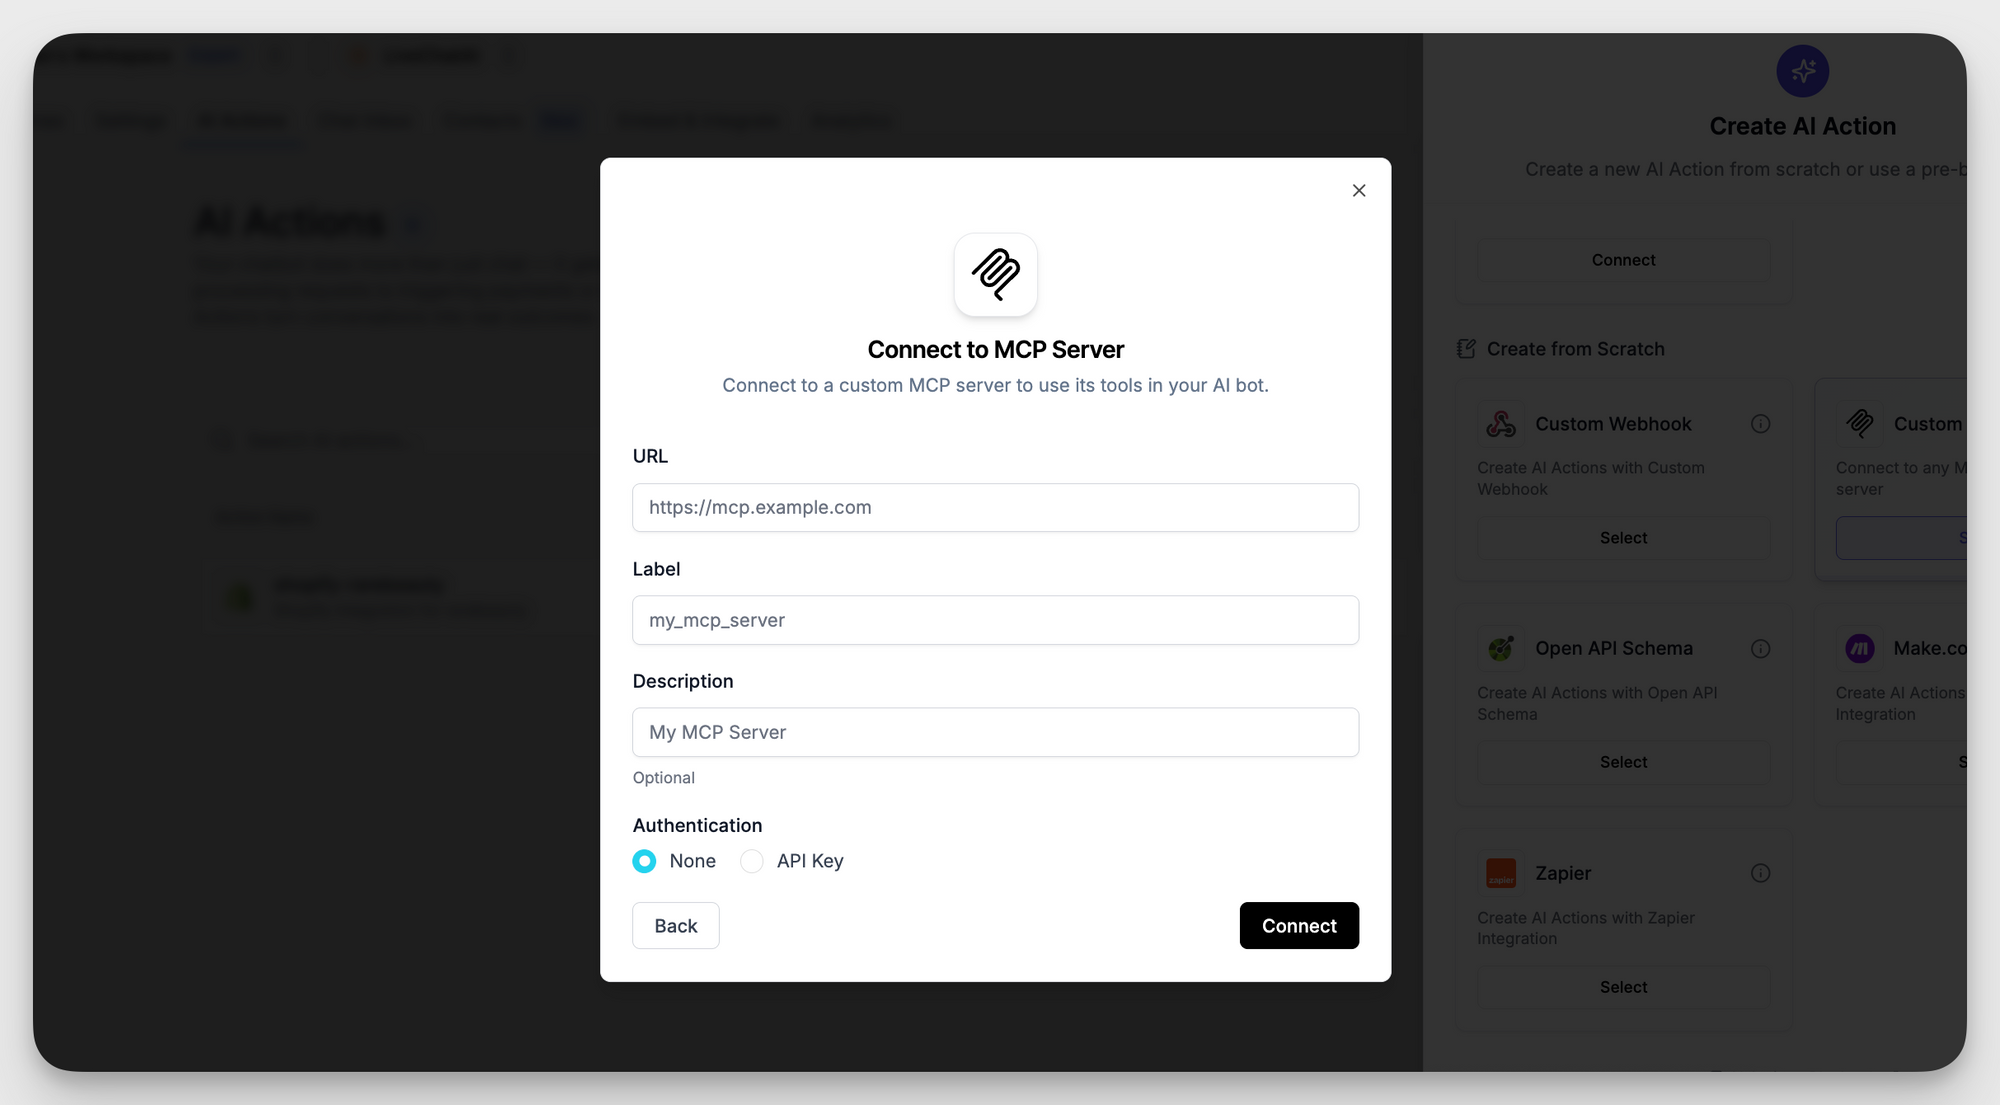
2. Enter Connection Details
Fill out:
- URL of your MCP server (must support Server-Sent Events)
- Label (for internal naming)
- Optional Description
- Authentication Method (API Key or none)
- If API Key: provide your key and select Basic, Bearer, or Custom
3. Add Tools
Once authenticated, LiveChatAI will fetch the list of available actions (tools) from your MCP server. Select the ones you want your AI to use, then click Add Tools.
How It Works in Conversations
Once connected, your selected tools appear in your bot’s capabilities. Each MCP tool can be triggered when certain conditions in the conversation are met — just like other AI Actions.
The chatbot will:
- Collect user inputs (e.g., form fields, messages)
- Send those to your MCP server
- Display the response from your server to the user — instantly
🧪 Example Use Cases
Here are a few ways teams use Custom MCP AI Actions:
🔐 Notes
- Custom MCP requires the MCP server to support SSE (Server-Sent Events) protocol.
- Data exchange is secure and customizable with your authentication method.
- This is ideal for technical teams looking to unlock deeper automation via their backend.
This enables the AI bot to search for products, retrieve cart contents, update cart items, and even return policies, all through a seamless conversational interface.
What You Can Do
With Shopify MCP, your AI chatbot can:
- Search products by keywords or filters.
- Retrieve cart contents and show what’s inside.
- Update the cart by adding or removing products.
- Access policy and FAQ content stored in your Shopify store.
- Get product details like title, price, availability, etc.
How to Connect Your Shopify Store
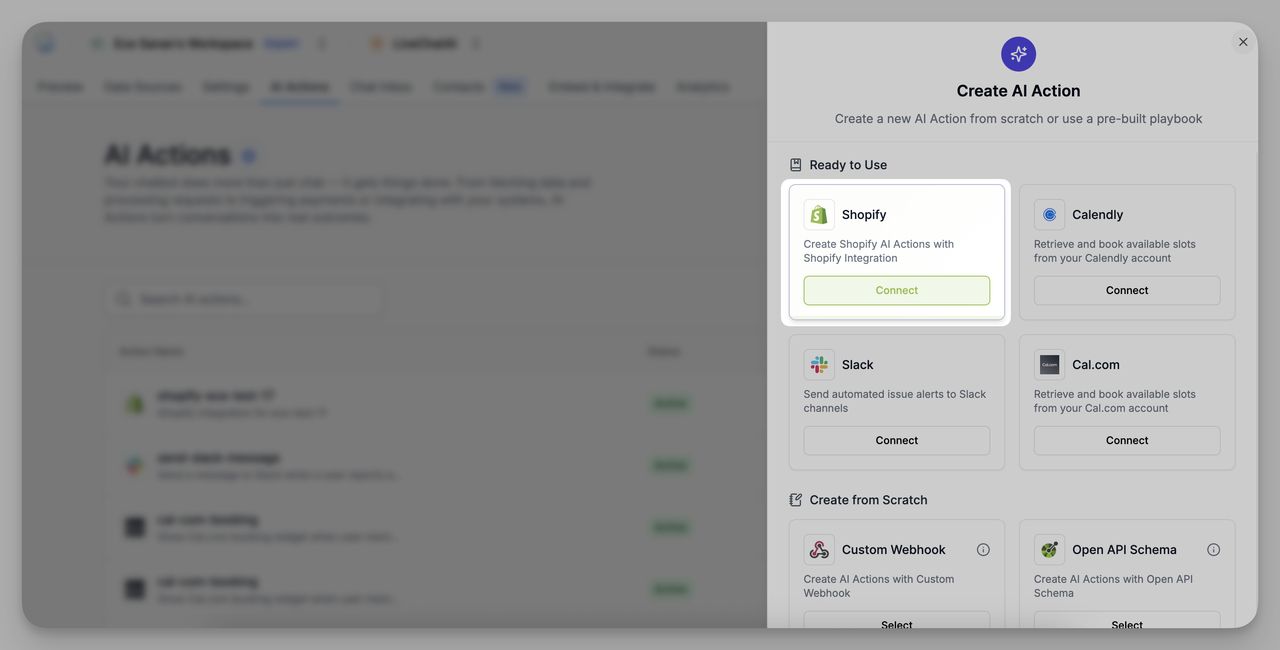
- Go to the AI Actions section in your dashboard.
- Under Ready to Use, click Connect under the Shopify integration.
3. Enter your Shopify store URL (e.g., https://yourstore.myshopify.com).
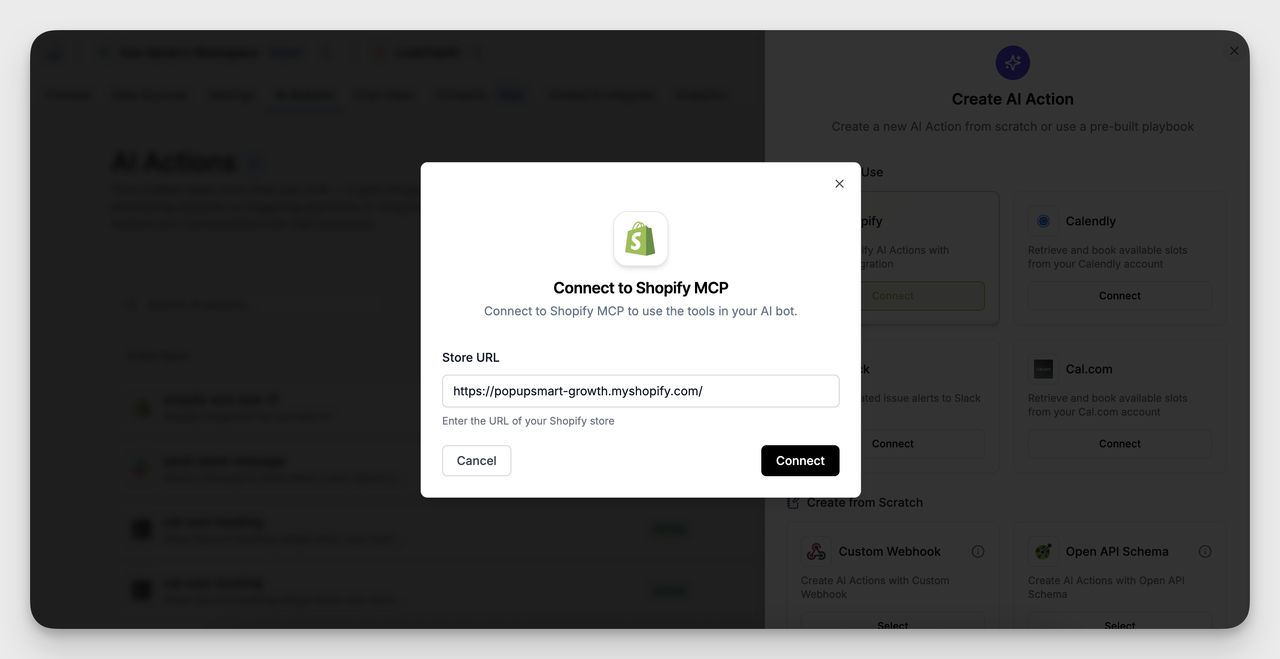
4. Click Connect.
Select Tools to Enable
After connecting, you’ll be prompted to enable specific tools for your AI bot to use:
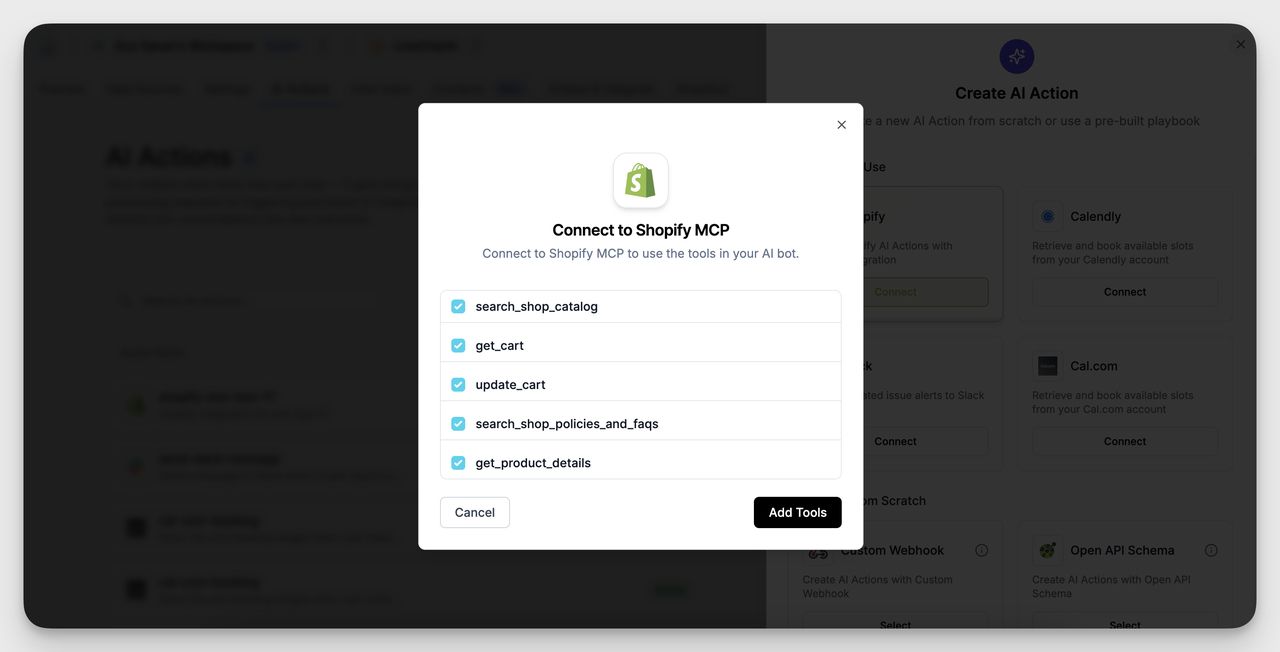
- search_shop_catalog
- get_cart
- update_cart
- search_shop_policies_and_faqs
- get_product_details
Select the ones you want, then click Add Tools.
These tools will be available for your chatbot to automatically respond to customer questions and requests related to products, cart, or policy info.
Example Use Cases
🛍️ Product Search
User says:
“Show me black hoodies under $50.”
Bot Action:
→ Triggerssearch_shop_catalogto filter products by color and price.
Bot Responds:
“Here are some black hoodies under $50 I found in our store.”
👟 Find Specific Sizes or Variants
User says:
“Do you have white sneakers in size 9?”
Bot Action:
→ Usessearch_shop_catalogwith keyword and size filter.
Bot Responds:
“Yes! These white sneakers are available in size 9.”
🛒 Cart Overview
User says:
“What’s in my cart right now?”
Bot Action:
→ Runsget_cartto retrieve current cart contents.
Bot Responds:
“You currently have 2 items in your cart: 1x Classic Tee ($20), 1x Joggers ($45).”
➕ Add Products to Cart
User says:
“Add those black hoodies to my cart.”]]>
Bot Action:
→ Executesupdate_cartto add selected items.
Bot Responds:
“Got it! The black hoodie has been added to your cart.”
This is useful for urgent issues, handoffs, or internal alerts.
What You Can Do
- Automatically send messages to a Slack channel when a user reports a specific issue
- Collect information like user messages, emails, or issue descriptions
- Route alerts to the appropriate team instantly
How to Set Up the Slack AI Action
1. Connect Slack
- Go to the AI Actions tab in your LiveChatAI workspace.
- Click Create AI Action and select Slack under the “Ready to Use” section.
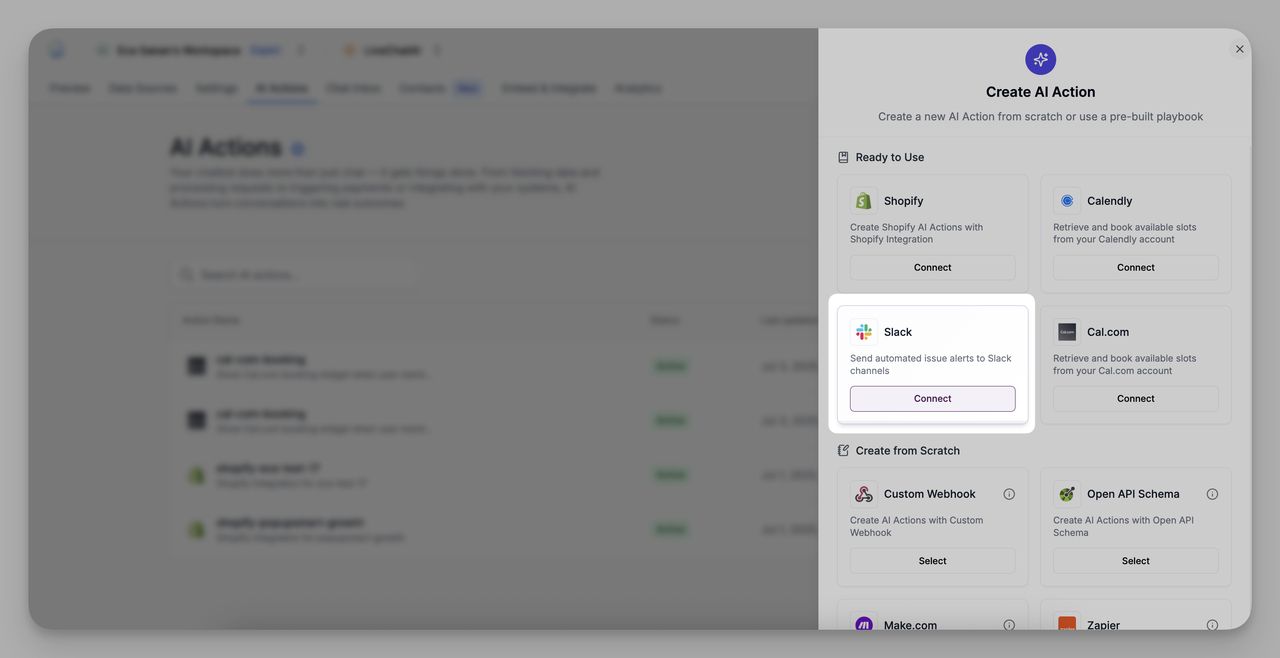
- Click Connect to begin integrating your Slack account.
- Select an existing Slack workspace or click + Add New Slack Workspace to connect a new one.
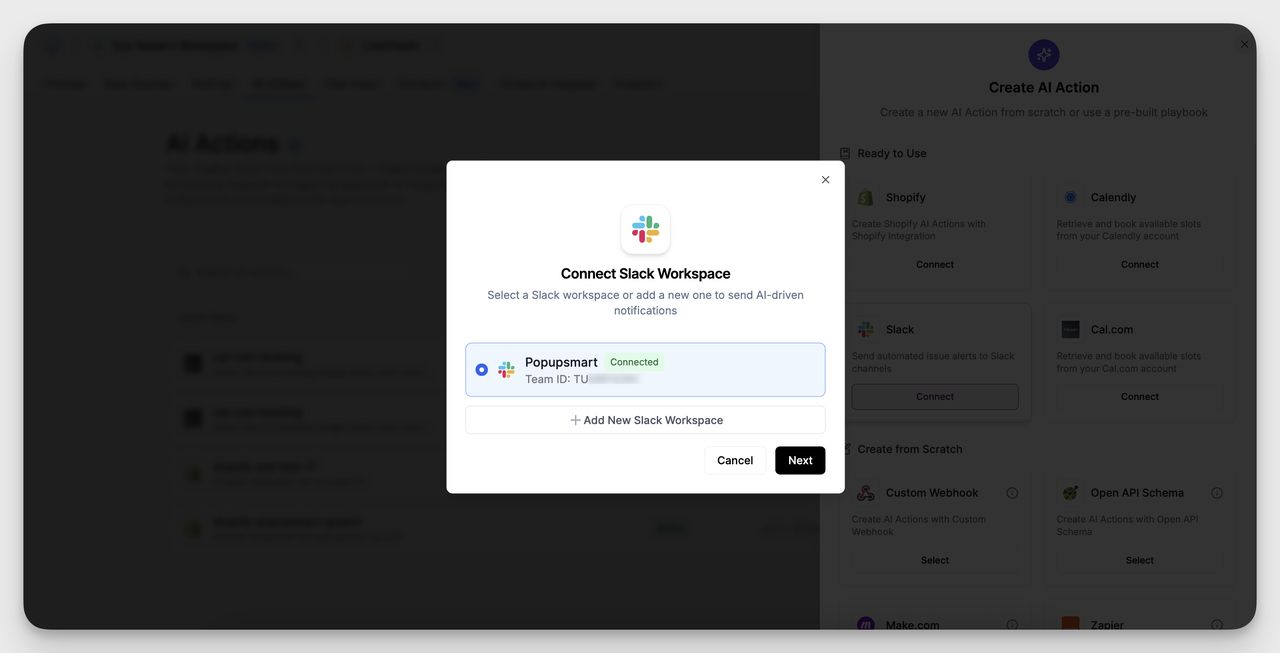
- Click Next to proceed.
- Choose the specific Slack channel where you want notifications to be sent.
Use the dropdown to pick from the available channels in the connected workspace.

- Click Create AI Action to finalize the setup.
2. Configure Your AI Action
Once Slack is connected, define your AI Action:

- AI Action Name: Choose a clear name (e.g. send-slack-message)
- Condition: Write the condition for when this action should trigger. Example:
Send a message to Slack when a user reports an urgent issue
This tells the chatbot when to fire this action based on conversation input.
3. Collect Data (Optional)
You can define inputs to be collected during the chat. These are passed along in the Slack message:
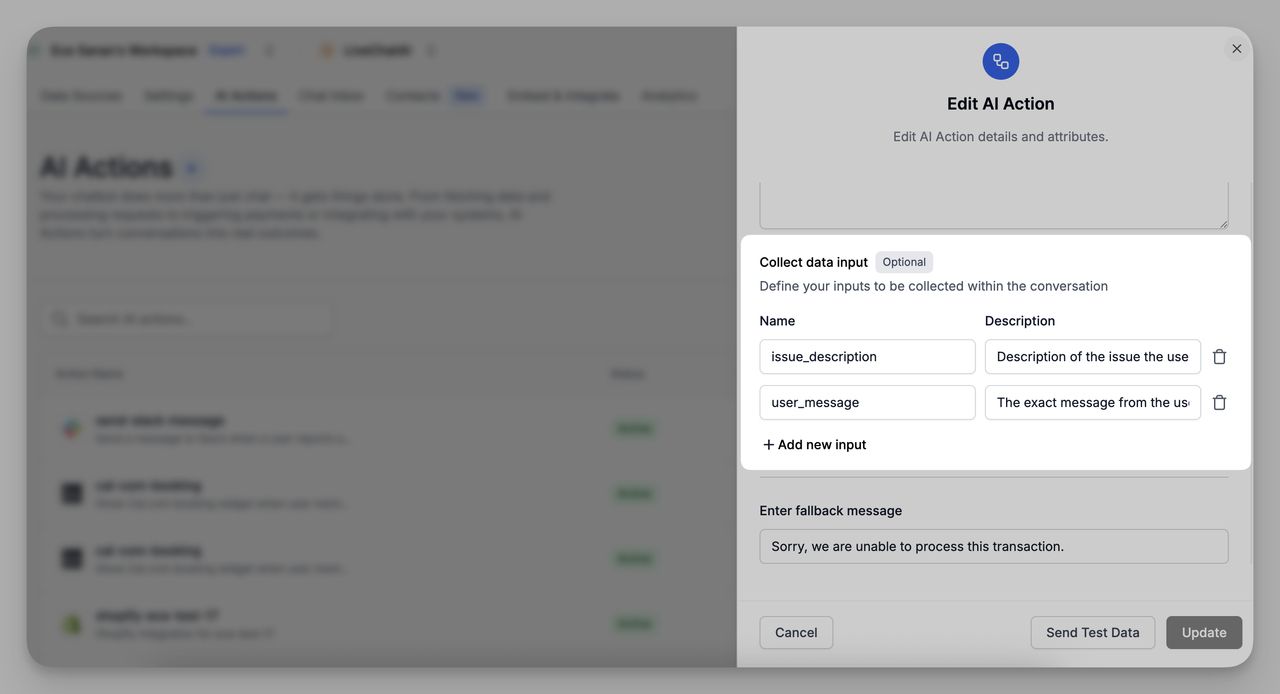
These fields are collected in real-time and included in the Slack notification.
4. Fallback Message (Optional)
Define a fallback message in case the action fails.
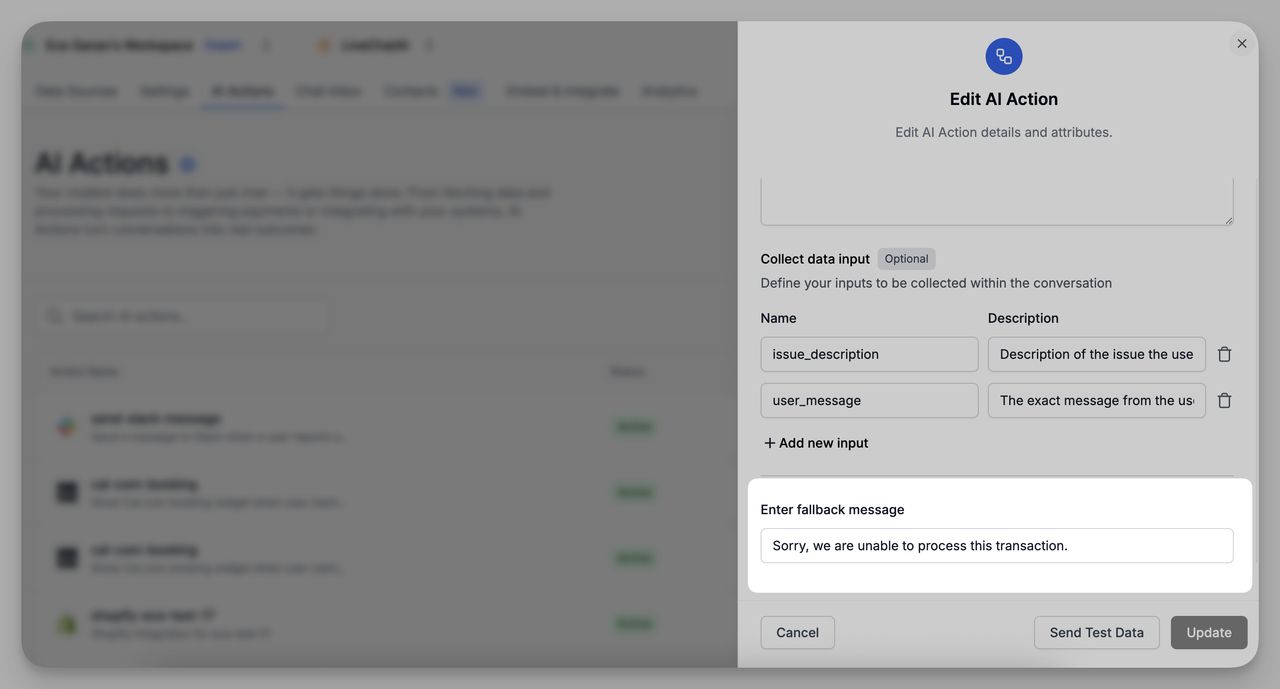
Example: "Sorry, we are unable to process this transaction."
5. Save and Test
- Click Send Test Data to preview how the message appears in Slack.
- Once ready, click Update to activate your AI Action.
Use Case Example
AI Action Name:
send-refund-requestCondition: User message contains keywords like “refund”, “return”, or “money back”
What Slack Receives:
____________________________________
💰 Refund Request Alert
From: Sarah Lee ([email protected])
Message: "I’d like to request a refund for my last order."
Issue Type: Refund Request
Triggered by chatbot using AI Action: send-refund-request
____________________________________
AI Action Name:
high-intent-lead-alertCondition:User mentions “pricing”, “demo”, or “talk to sales”
What Slack Receives:
____________________________________
📈 High-Intent Lead Alert
From: Aisha Kumar ([email protected])
Message: "I’m interested in your pricing for enterprise plans."
Location: Singapore
Triggered by chatbot using AI Action: high-intent-lead-alert triggered
____________________________________
This gives your team real-time alerts and improves response speed.
With Slack AI Actions, LiveChatAI lets your support team stay in the loop, automatically, contextually, and instantly.
What It Does
Once connected, your chatbot can respond to scheduling-related queries by surfacing your Cal.com booking page. This allows users to book time directly through the conversation interface.
How to Set Up Cal.com AI Action
1. Go to AI Actions
Navigate to the AI Actions tab in your workspace and click on + Create AI Action.
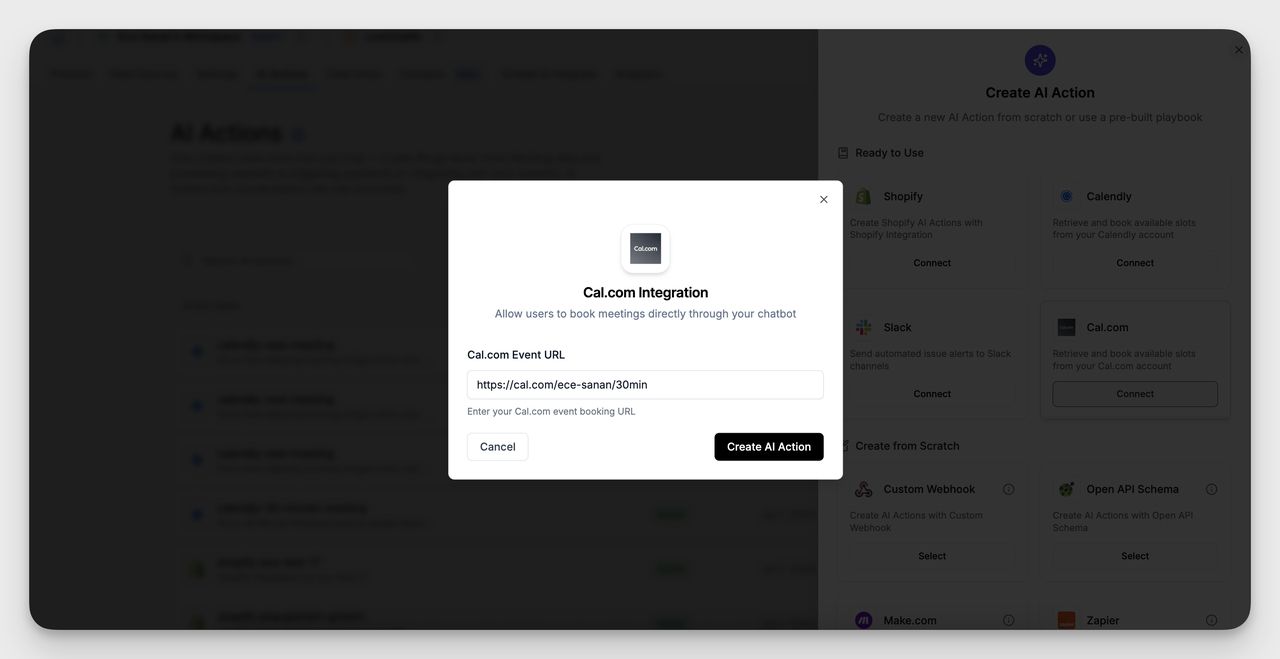
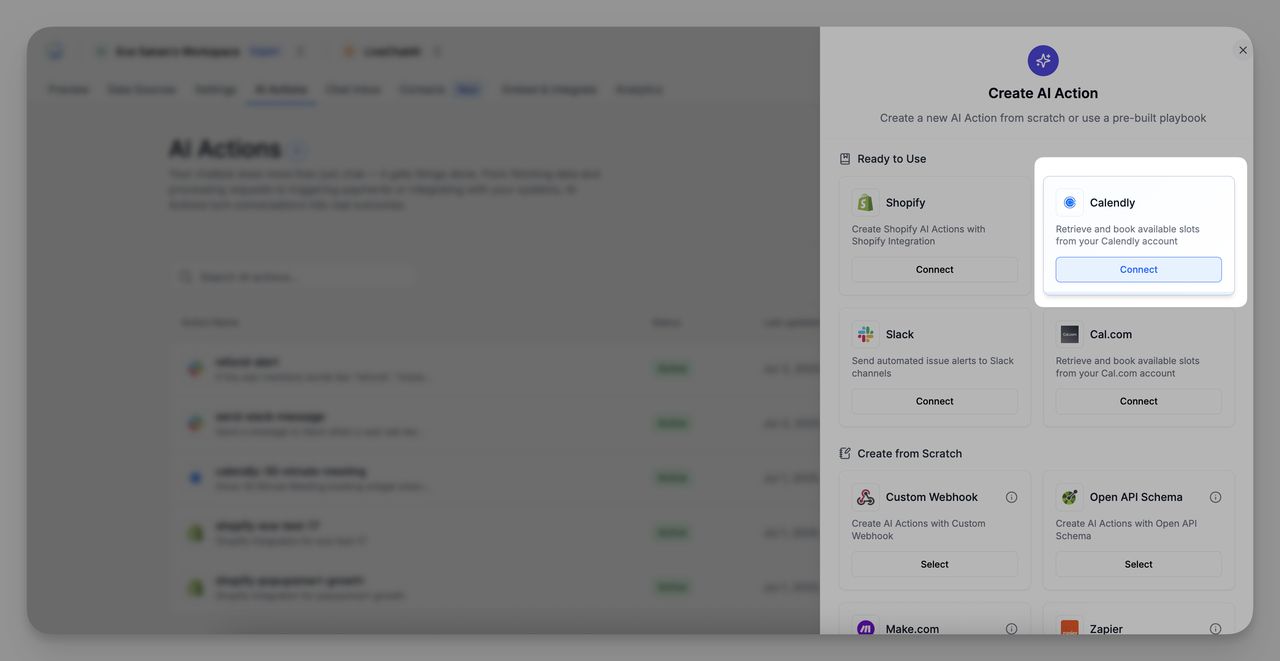
2. Choose Cal.com
Under the Ready to Use section, click Connect on the Cal.com tile.

3. Enter Your Cal.com Event URL
Paste your Cal.com event booking link (e.g., https://cal.com/your-name/30min) in the field.
Click Create AI Action to continue.
4. Define Action Details
In the “Edit AI Action” modal:
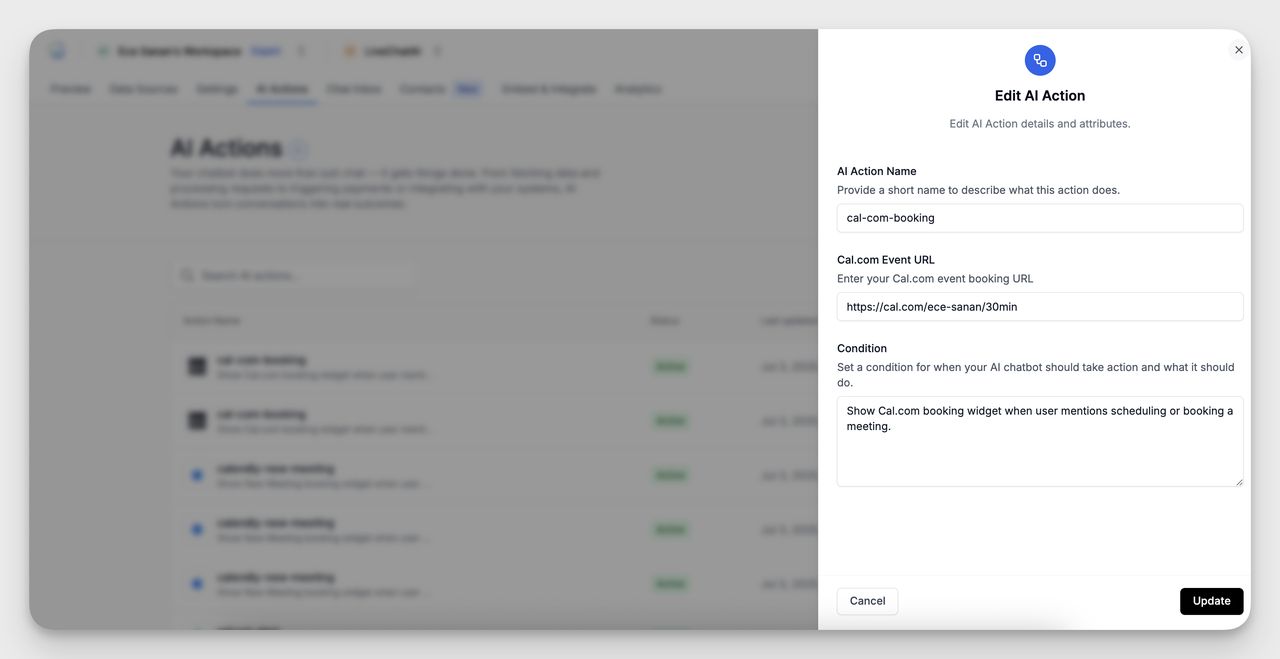
- AI Action Name: Name the action for internal use (e.g., cal-com-booking)
- Event URL: Confirm or edit your Cal.com booking link
- Condition: Define the trigger for the action (e.g., “Show Cal.com booking widget when user mentions scheduling or booking a meeting.”)
Click Update to save the action.
Example Use Case
Chatbot Response: "Your meeting is successfully scheduled! Please check your email for the confirmation and further details. Looking forward to our conversation!"
- The chatbot detects the scheduling intent and displays your Cal.com booking interface, letting the user reserve a slot immediately.
If you need help connecting your Cal.com account or setting trigger conditions, feel free to reach out to our support team.
It’s ideal for product demos, consultations, or any customer-facing appointment.
What It Does
Once connected, the Calendly AI Action enables your chatbot to:
- Retrieve available time slots from your Calendly account
- Display a booking interface inside the chat
- Trigger this action automatically when certain keywords are mentioned (like “book a meeting” or “schedule demo”)
How to Create a Calendly AI Action
Follow these steps to connect your Calendly account and build the action:
1. Go to AI Actions
Navigate to the AI Actions tab from your main dashboard and click + Create AI Action.
2. Select Calendly
Under the “Ready to Use” section, choose Calendly and click Connect.
3. Choose or Add a Calendly Account
You’ll see any existing Calendly accounts connected to your workspace. If needed, click + Add New Calendly Account and follow the prompt to authorize access.
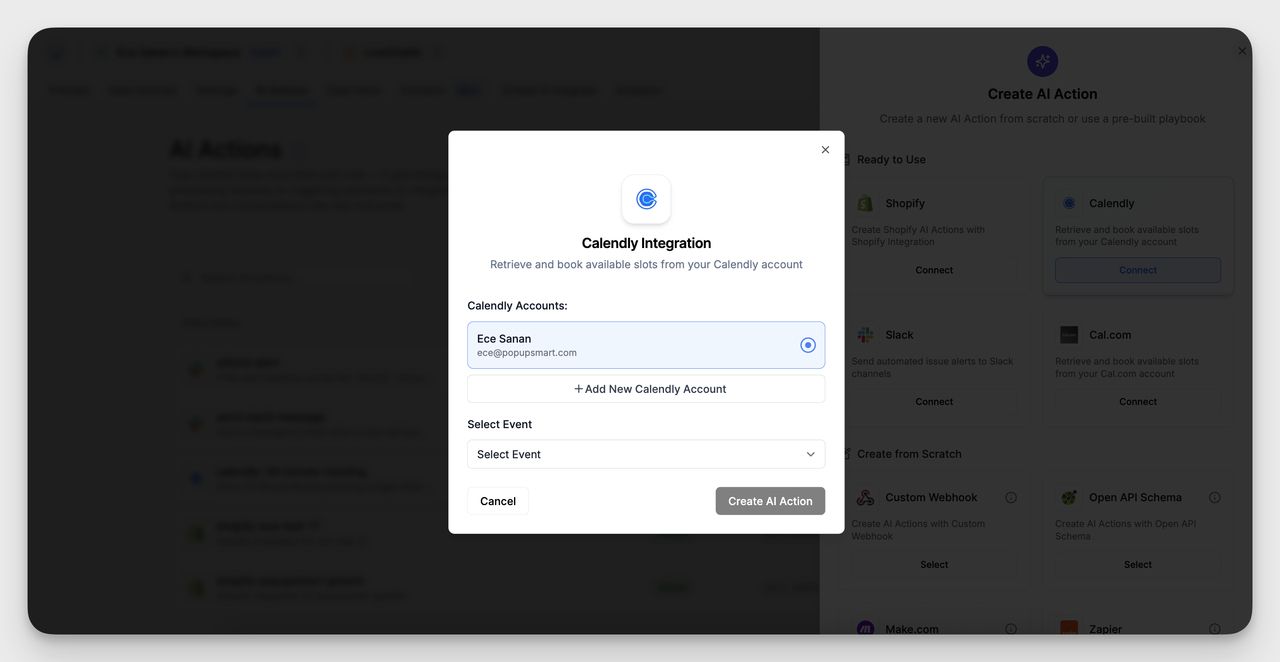
4. Select the Event to Use
After selecting your account, pick the specific event type (e.g. “LiveChatAI Product Demo”) that the chatbot should offer for booking.

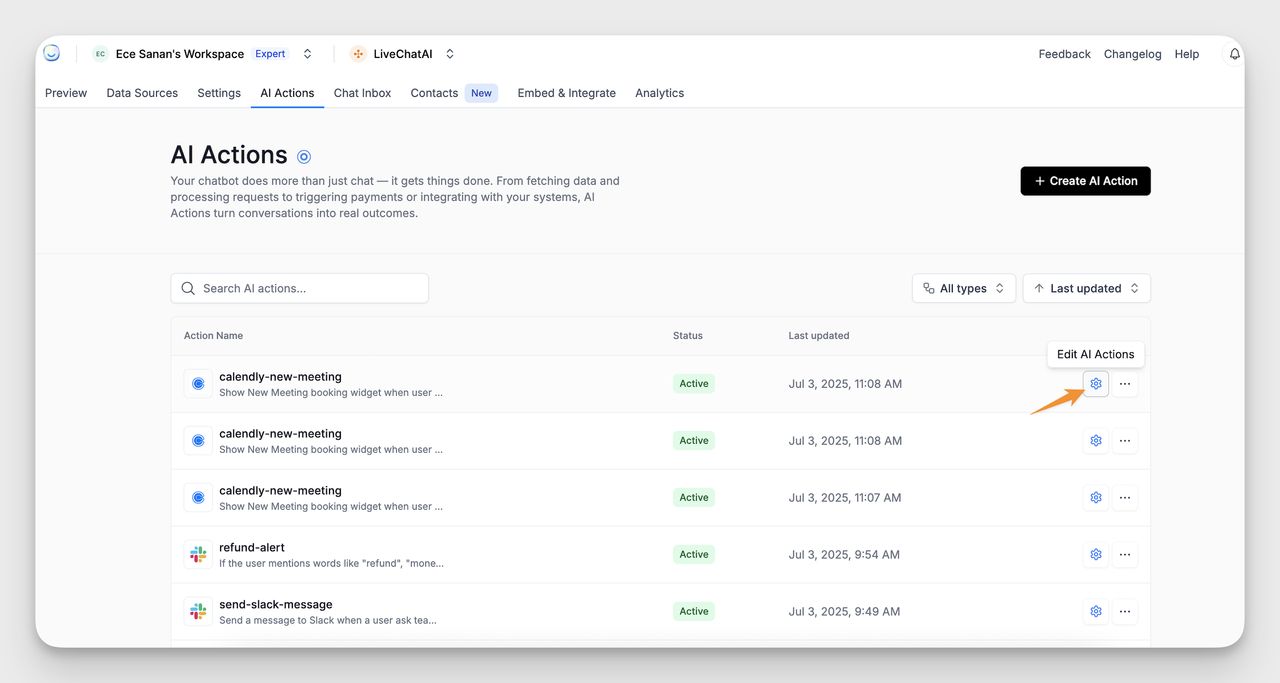
5. Edit AI Actions
Click the "Edit AI Actions"
6. Name the AI Action & Set the Condition

- Give your AI Action a clear and specific name, like:
calendly-livechatai-product-demo
- Define the trigger, the condition when this action should activate in a conversation. For example:
Show LiveChatAI Product Demo booking widget when user mentions scheduling.
This condition lets the chatbot recognize user intent and automatically respond with the booking interface.
7. Save Your AI Action
Click "Update" to activate the logic.
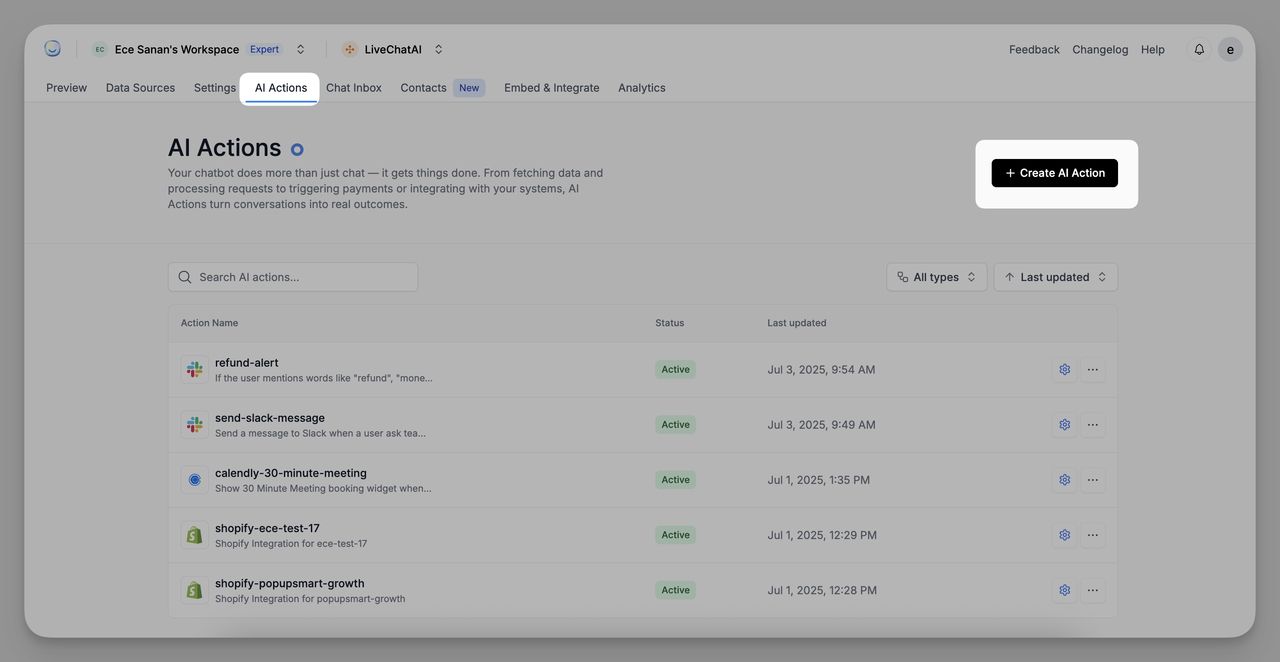
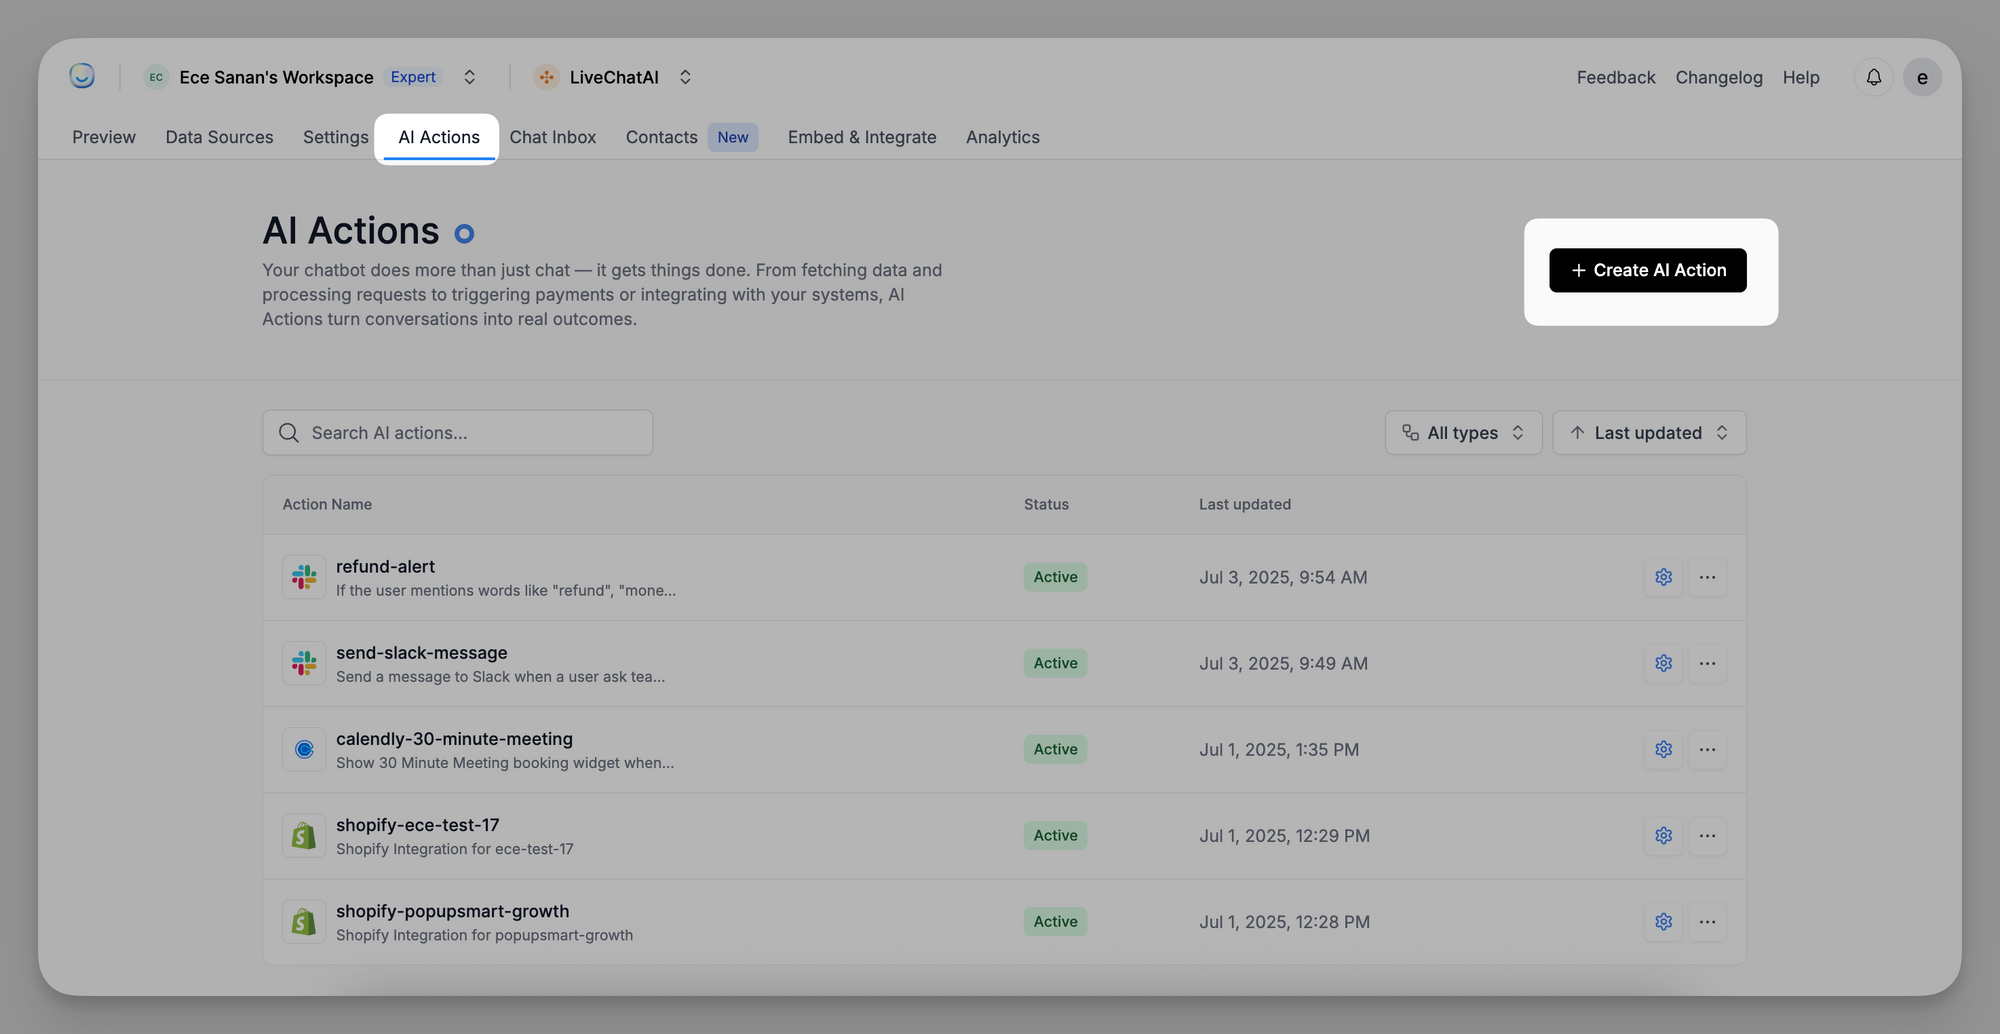
Where to Manage Your AI Actions
All created AI Actions appear in the AI Actions tab. You can:
- Search by name
- Check the status (active/inactive)
- Edit or remove existing actions
Best Practices
- Name your AI Actions clearly so they’re easy to manage later
- Make sure your Calendly event is active and configured correctly
If you need help with AI Actions or Calendly integration, feel free to contact our support team. We're here to help!
]]>You decide what defines each group (a contact attribute such as plan type, total spend, industry, etc.), then tell the bot which knowledge it should use for that group. From then on, matching users see the right answers without any extra work from you.
To activate it, contact [email protected].
What Are Segments?
Segments are predefined user groups built using Contact Attributes - fields such as:
| Attribute examples | Typical values |
|---|---|
plan_type |
free, pro, enterprise |
total_spent |
numeric (e.g., ≥ 1000) |
industry |
ecommerce, SaaS, education |
country |
US, DE, IN |
trial_days_left |
numeric (e.g., < 5) |
After you build the filter, you attach one or more Data Sources (FAQs, PDFs, web pages, etc.). Users who match the filter see answers only from those sources.
How to Use Segments in LiveChatAI
Segments let you show different chatbot responses to different users—here’s how to set them up step by step.
Step 1: Create Contact Attributes
By default, the Segment builder only shows these attributes:
contact.emailcontact.namecontact.phonecontact.distinctId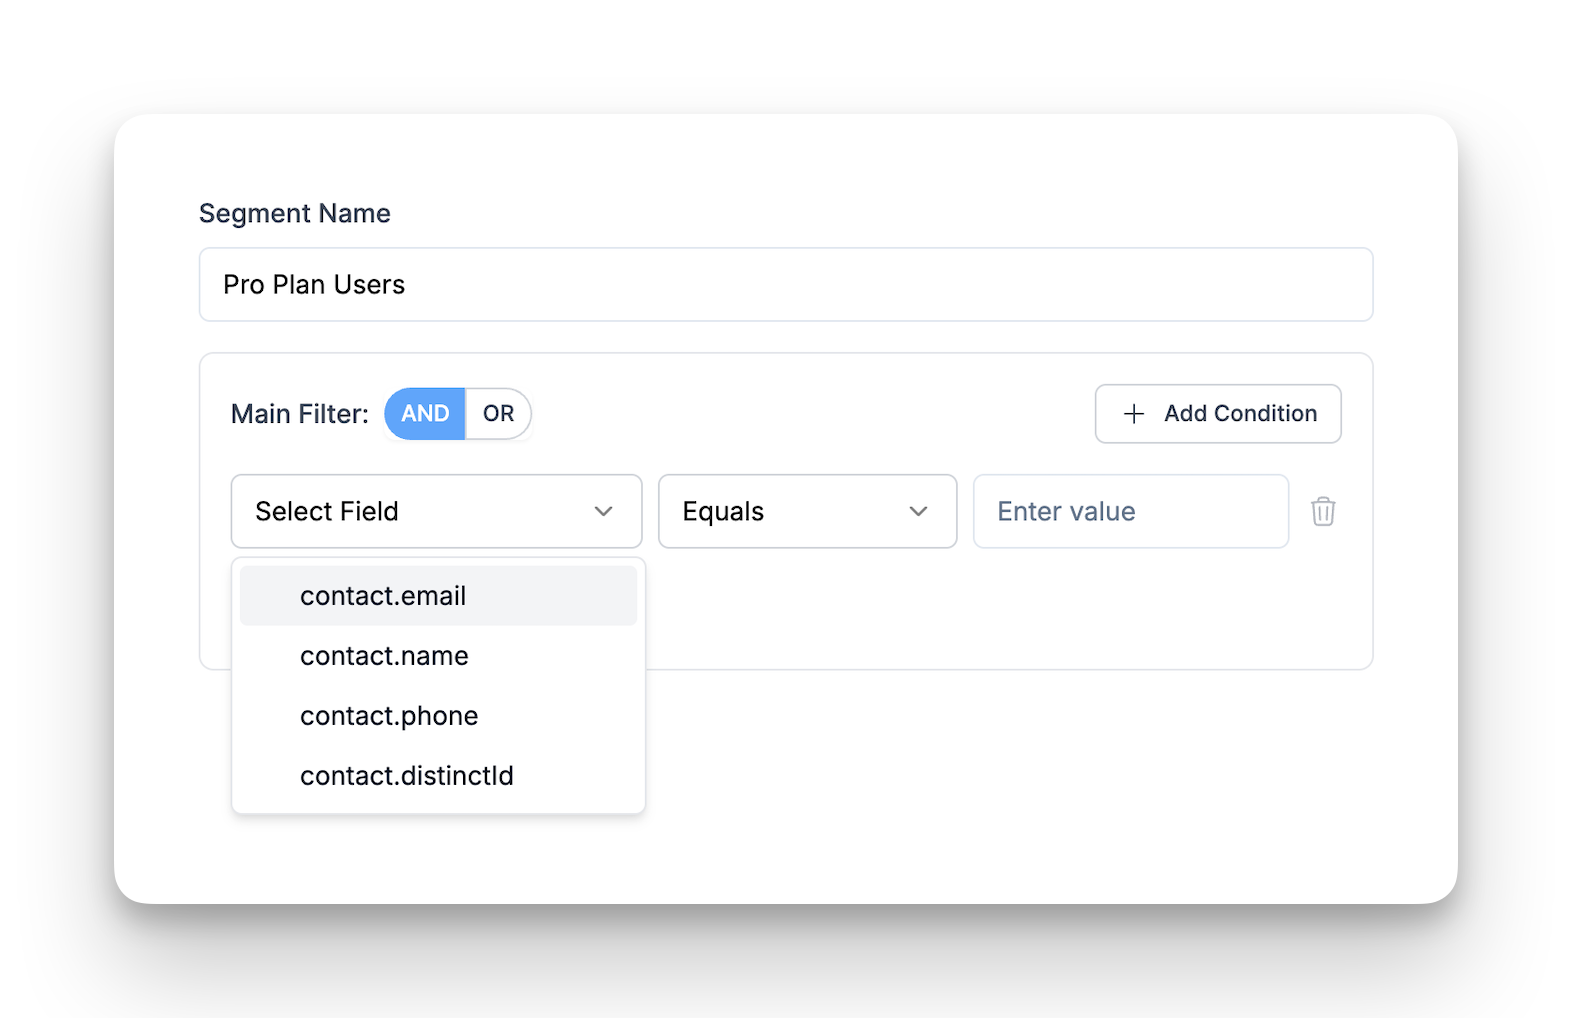
To build more useful filters (like by plan or purchase amount), you'll need to add custom attributes first:
- Go to Contacts → Contact Attributes.
- Click + New Attribute.
- Enter a name (e.g.,
plan_type,total_spent) and pick a data type (String, Number, Boolean, Timestamp).
- Click Create Attribute.
🚀 Your custom attributes will now appear in the Segment builder's field dropdown.
Step 2: Create a Segment (User Group)
Once your attributes are ready:
1. Navigate to Contacts → Segments and click + Create Segment.
2. Name the segment (e.g., Loyal Ecommerce Customers, Pro Plan Users).
3. Build your filter rules:
➤ Select Field → Pick an attribute (including the one you just added as a custom attribute).
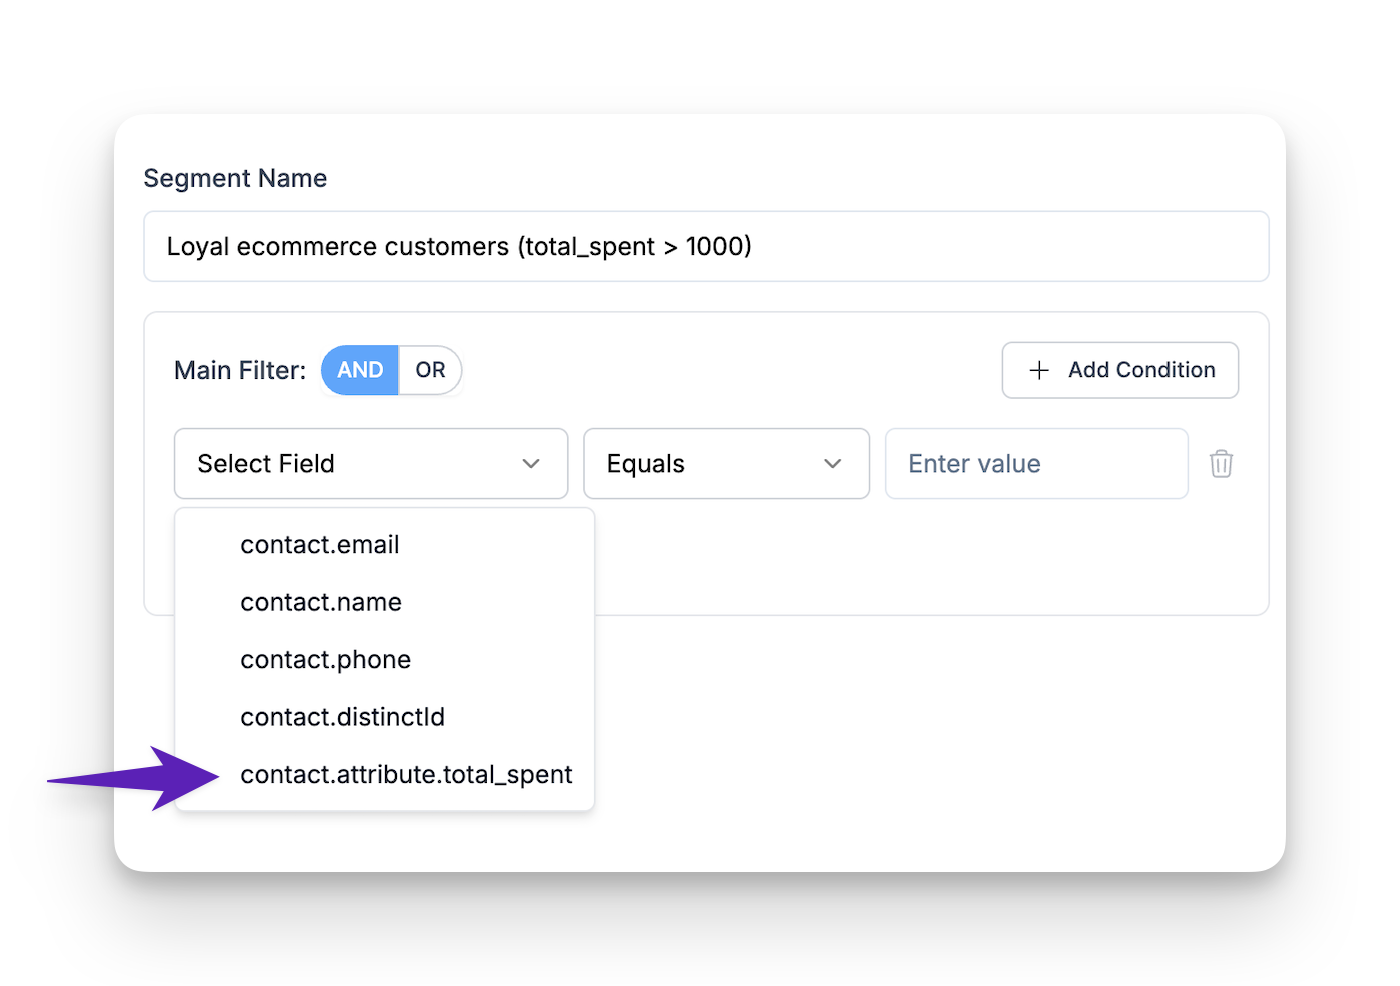
➤ Choose an operator (Equals, Contains, Is Greater Than, etc.).
➤ Type the value.
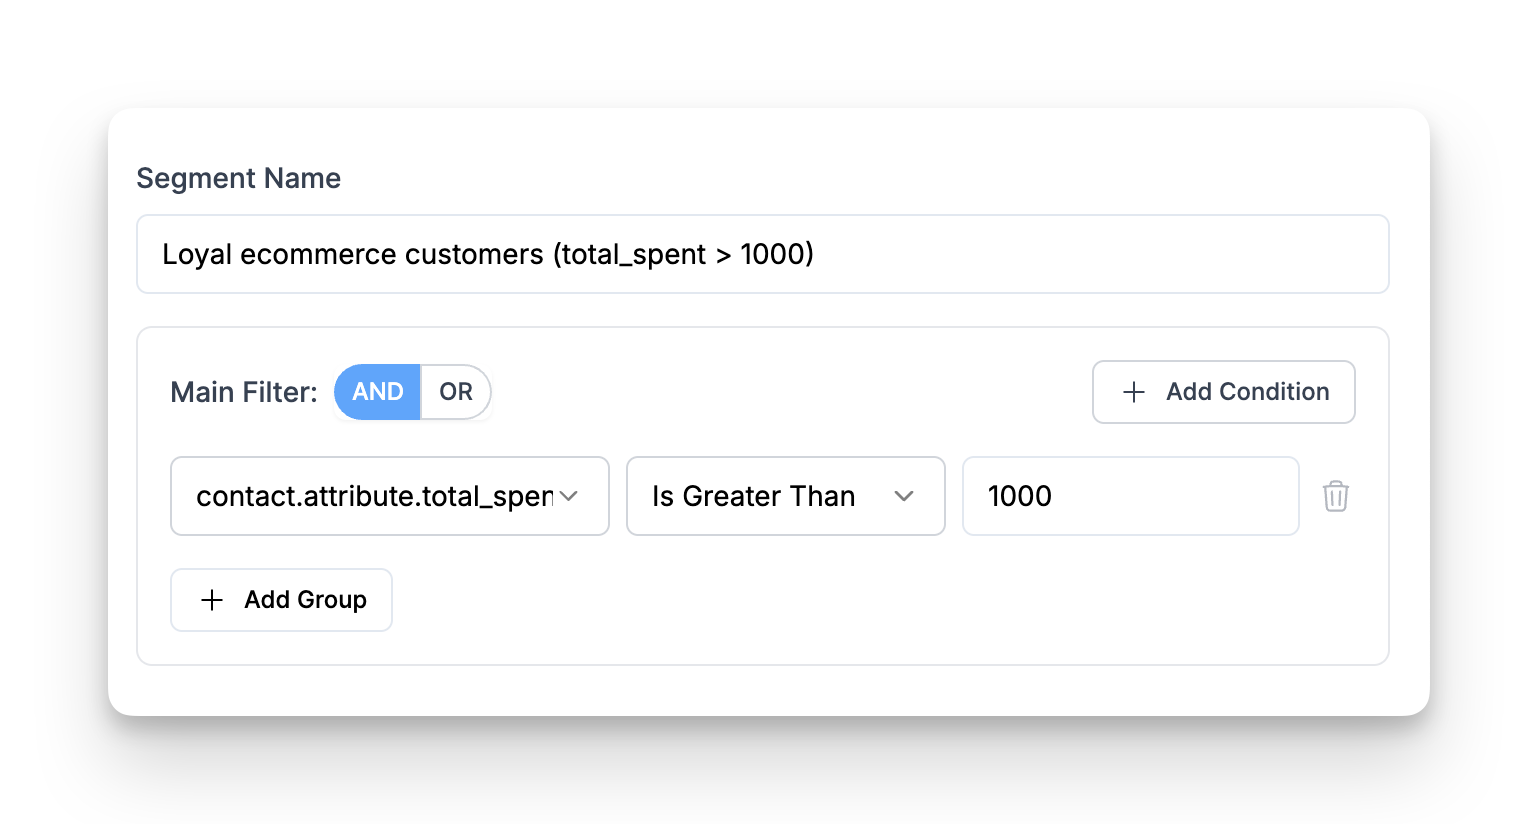
➤ Click + Add Condition to add more rules
➤ Use AND / OR logic at the top to combine rules
➤ Use + Add Group if you need nested logic
4. Click Create Segment. You’ll see it listed under Segments.

Step 3: Assign a Segment to a Data Source (from the Data Source view)
1. Go to Data Sources
2. Click the three-dot menu next to the data source
3. Select “Segments”

4. In the modal, choose one or more segments
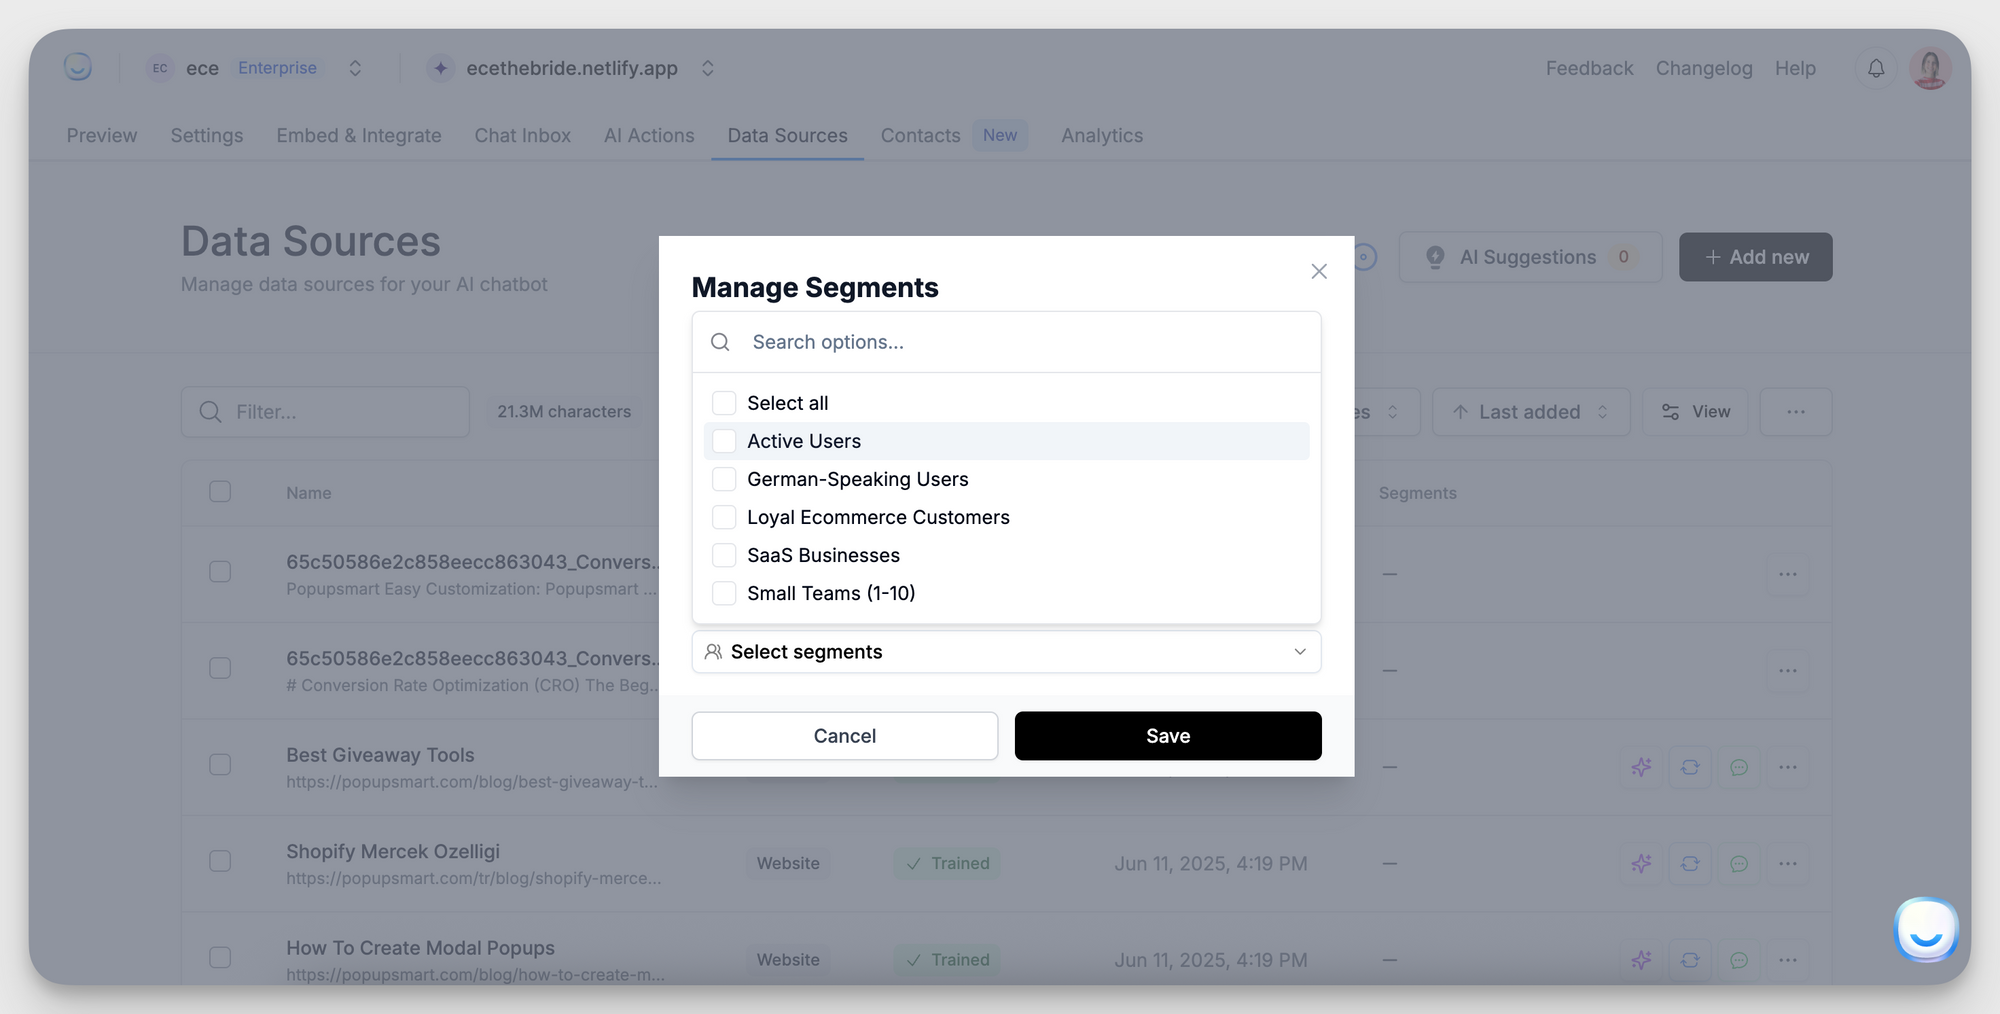
5. Click Save.
Step 4: Link Data Sources to a Segment (from the Segments view)
1. Go to Contacts → Segments
2. Click the database icon next to your segment
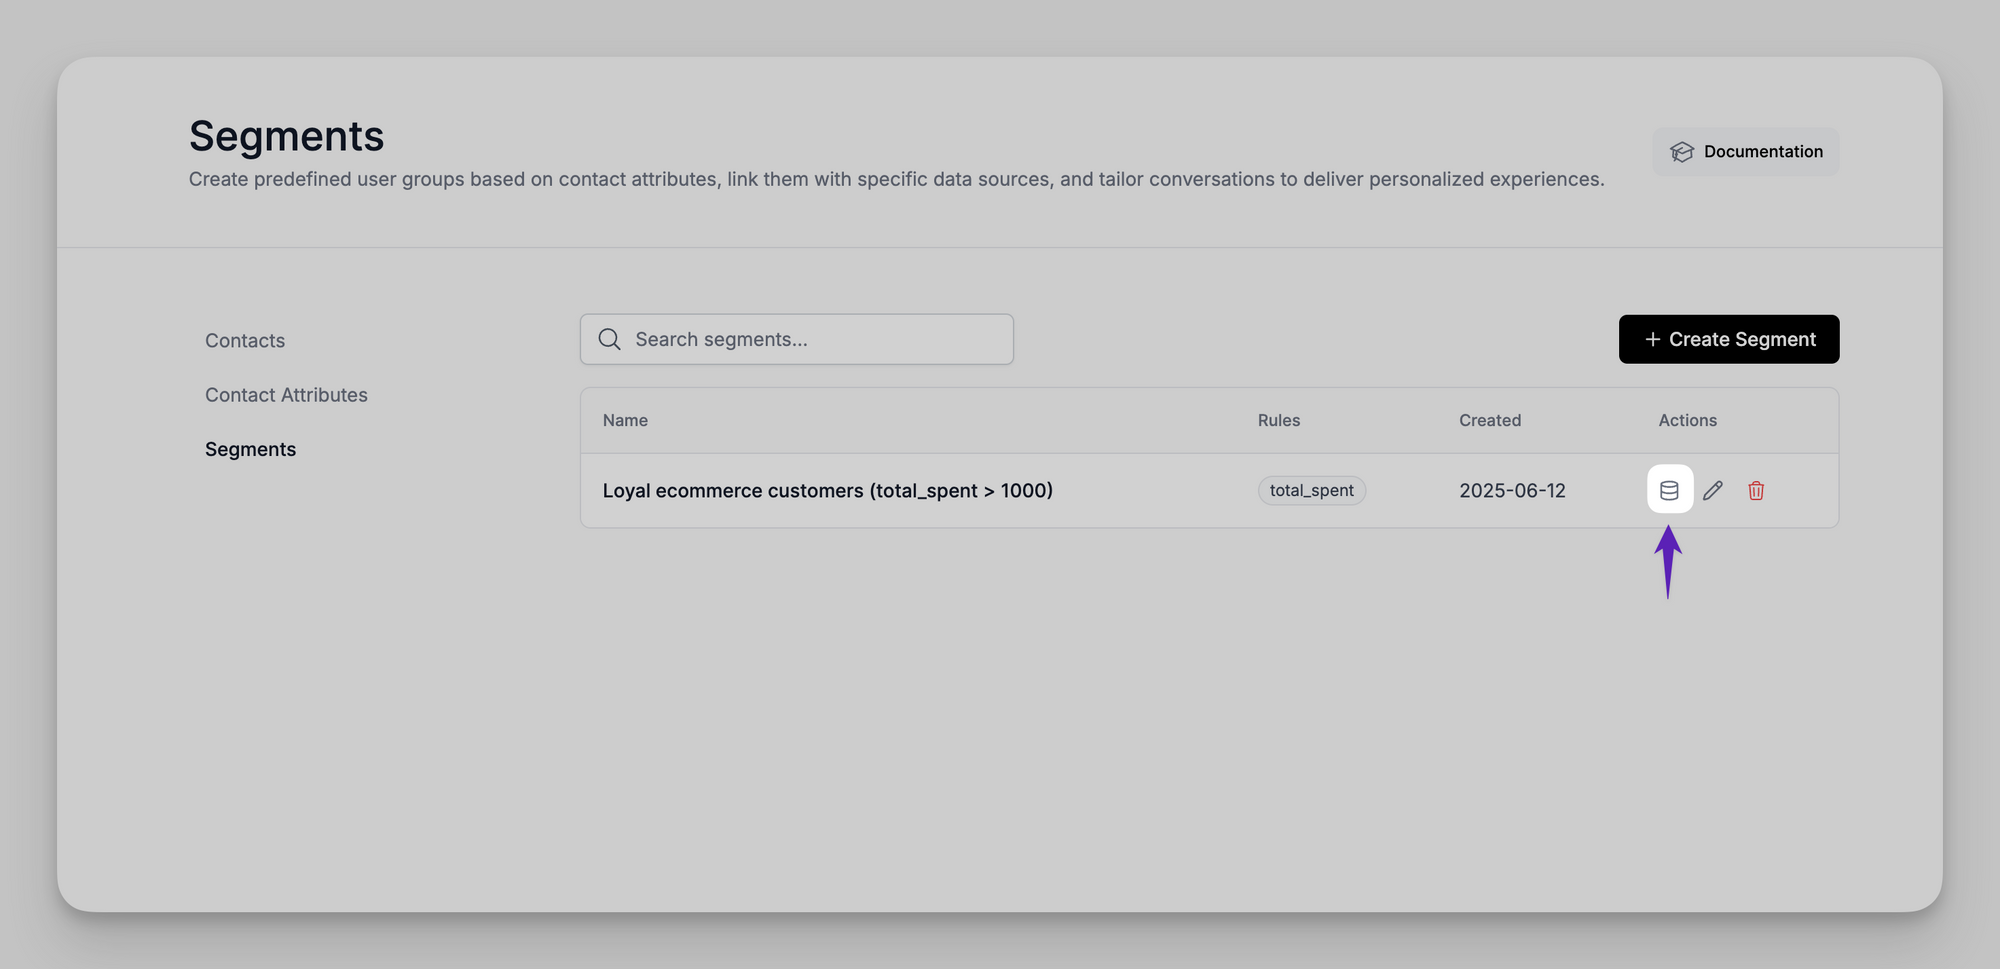
- In the popup, search for and select the sources this segment should use
- Once linked, users who match this segment will get answers only from these connected sources.
Example Segment Use Cases
| Scenario | Rule | Example Chatbot Response |
|---|---|---|
| VIP Ecommerce Customers | total_spent > 1000 |
Thanks for being a loyal customer—your shipping is free. |
| SaaS Pro Users | plan_type = pro |
You’re on the Pro Plan, which includes 250,000 pageviews/month. |
| Trial Ending Soon | plan_type = trial and days_left < 5 |
You have 4 days left in your trial. Upgrade to unlock advanced features like API access. |
These attributes help you identify, segment, and personalize AI interactions for known users.
What Are Contact Attributes?
Contact Attributes are custom fields you define and use to enrich your Contacts in LiveChatAI. These attributes can be passed automatically via API, or manually created in the dashboard. They're useful for:
- Personalizing AI responses based on user metadata
- Segmenting users for targeted support
- Enhancing context in the Chat Inbox
- Powering AI Actions
How to Create a Contact Attribute
Contact Attributes let you store extra details about your users, like their company, role, or plan type.
Here’s how to create one:
1. Go to the Contacts tab
Open your LiveChatAI dashboard and click Contacts from the menu.
2. Click on “Contact Attributes”
This is where all your custom fields are listed.

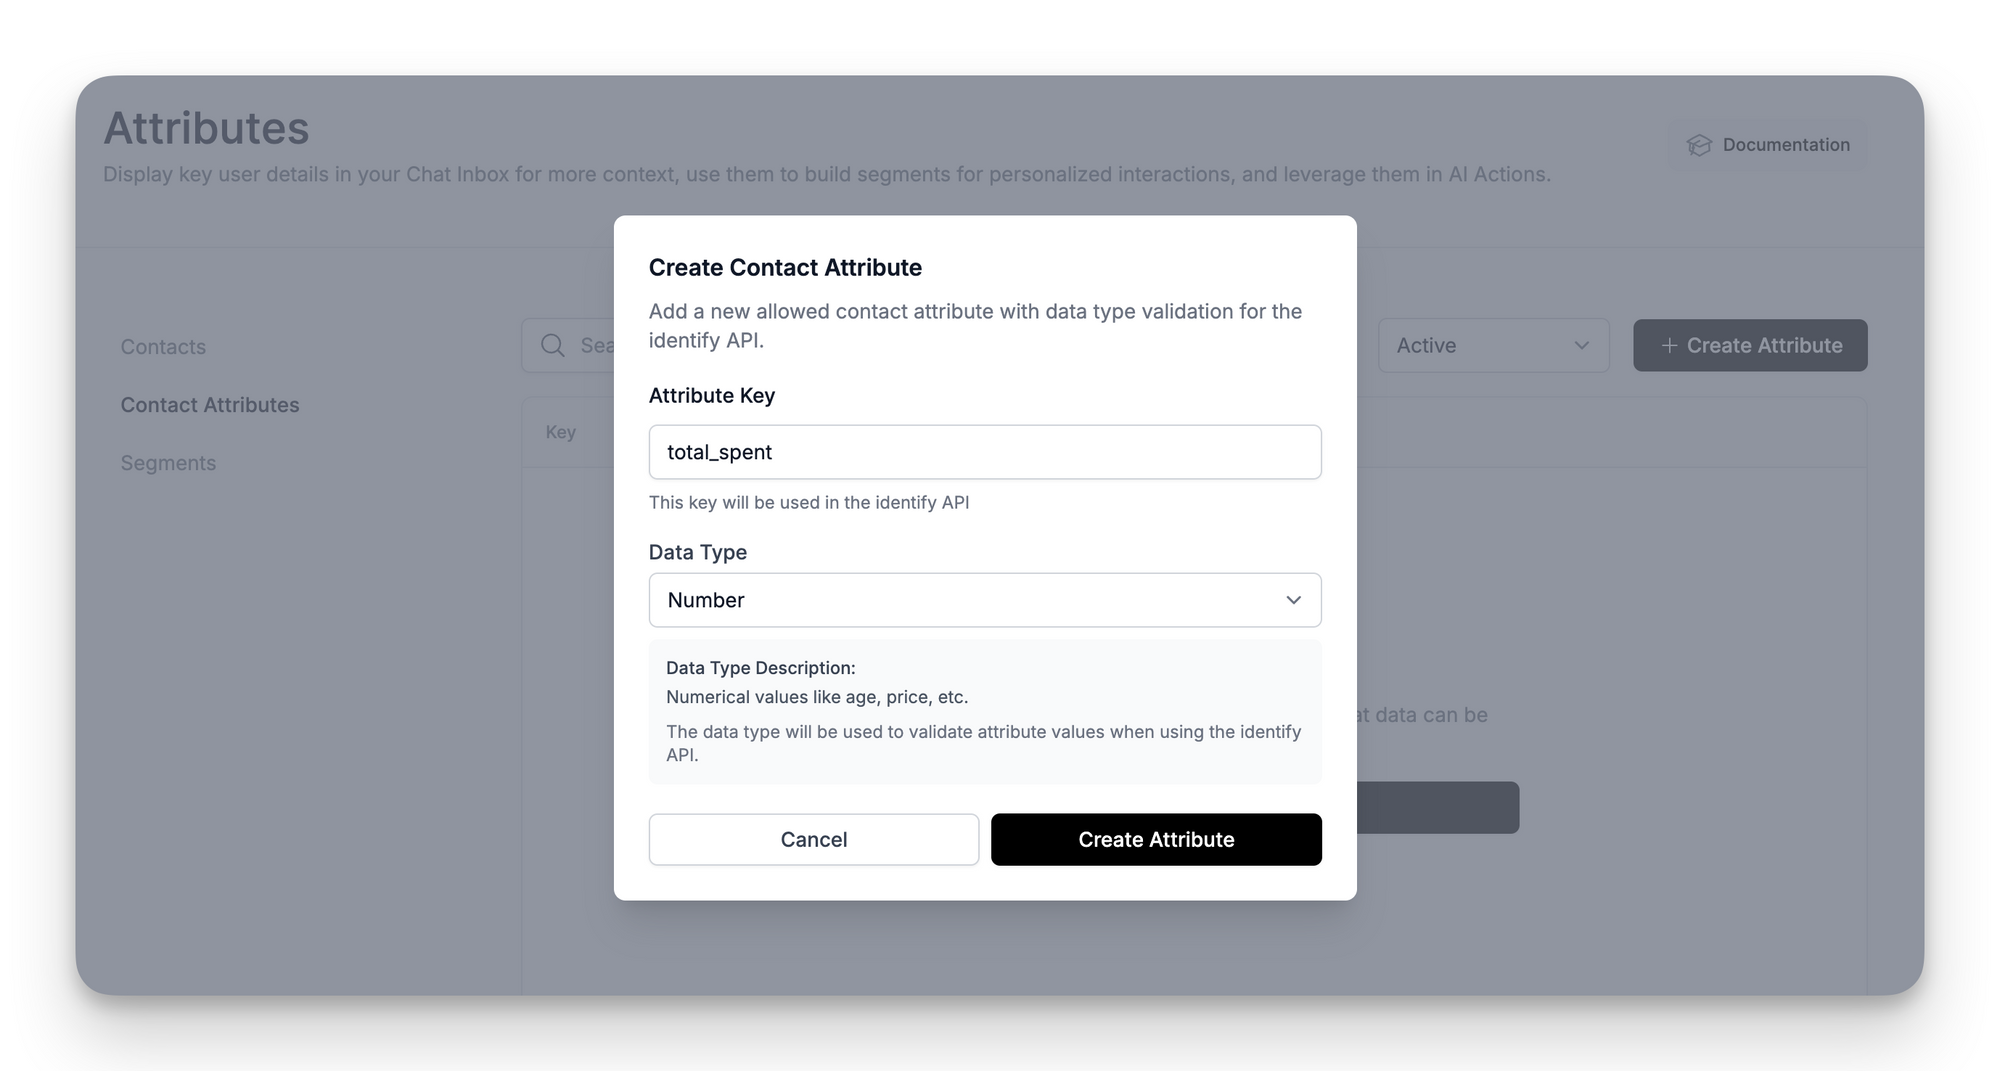
3. Click the “Create Attribute” button
You’ll see this at the top right of the Contact Attributes page.
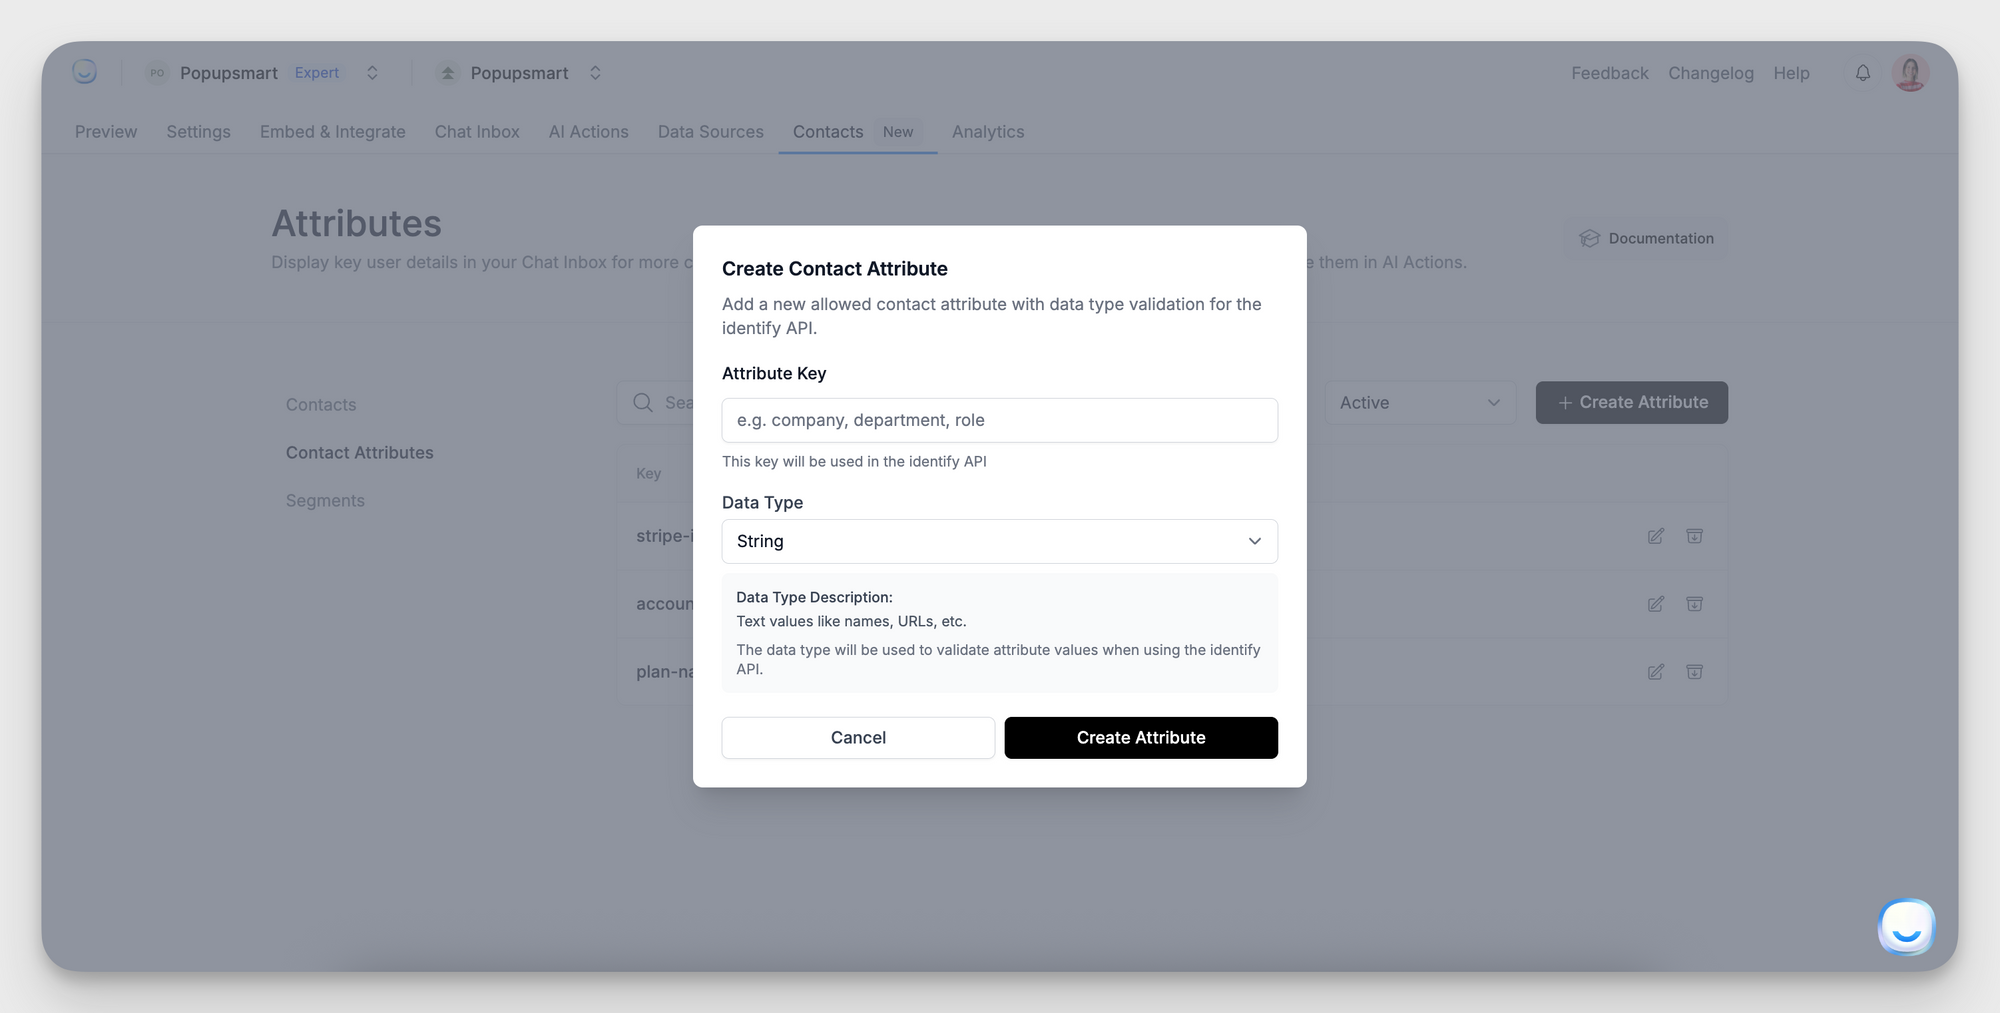
4. Fill out the form:
→ Attribute Key: This is the name of the field (example: company, plan_type, or team_size)
→ Data Type – Choose the type of data this field will store:
- String – for text (e.g., names, tiers)
- Number – for numeric values (e.g., user ID, amount spent)
- Boolean – for yes/no flags (e.g.,
is_active) - Timestamp – for date-time values (e.g., signup date)
5. Click “Create”
That’s it! You’ve added a new custom attribute.
Supported Data Types
When creating a Contact Attribute, choose one of the following data types:
Managing Attributes
- You can archive an attribute to deactivate it.
- You can edit the data type of an existing attribute.
- You cannot edit or delete the attribute key after it’s created.
Archived attributes are excluded from filtering, segmenting, and display. You can restore them anytime.
Next Steps
Once you’ve created your Contact Attributes:
- Use the Identify API to pass attribute values during user sessions.
- Apply filters to create Segments (available on Enterprise Plan).
For advanced setup or troubleshooting, feel free to reach out to [email protected].
- Initial Interaction
- Contact Capture
- Smart Response Options
- User Input & Feedback
- Live
- Initial Interaction
- Contact Capture
- Smart Response Options
- User Input & Feedback
- Live Chat Settings
Be sure to click Save Changes at the bottom of each panel after making updates.
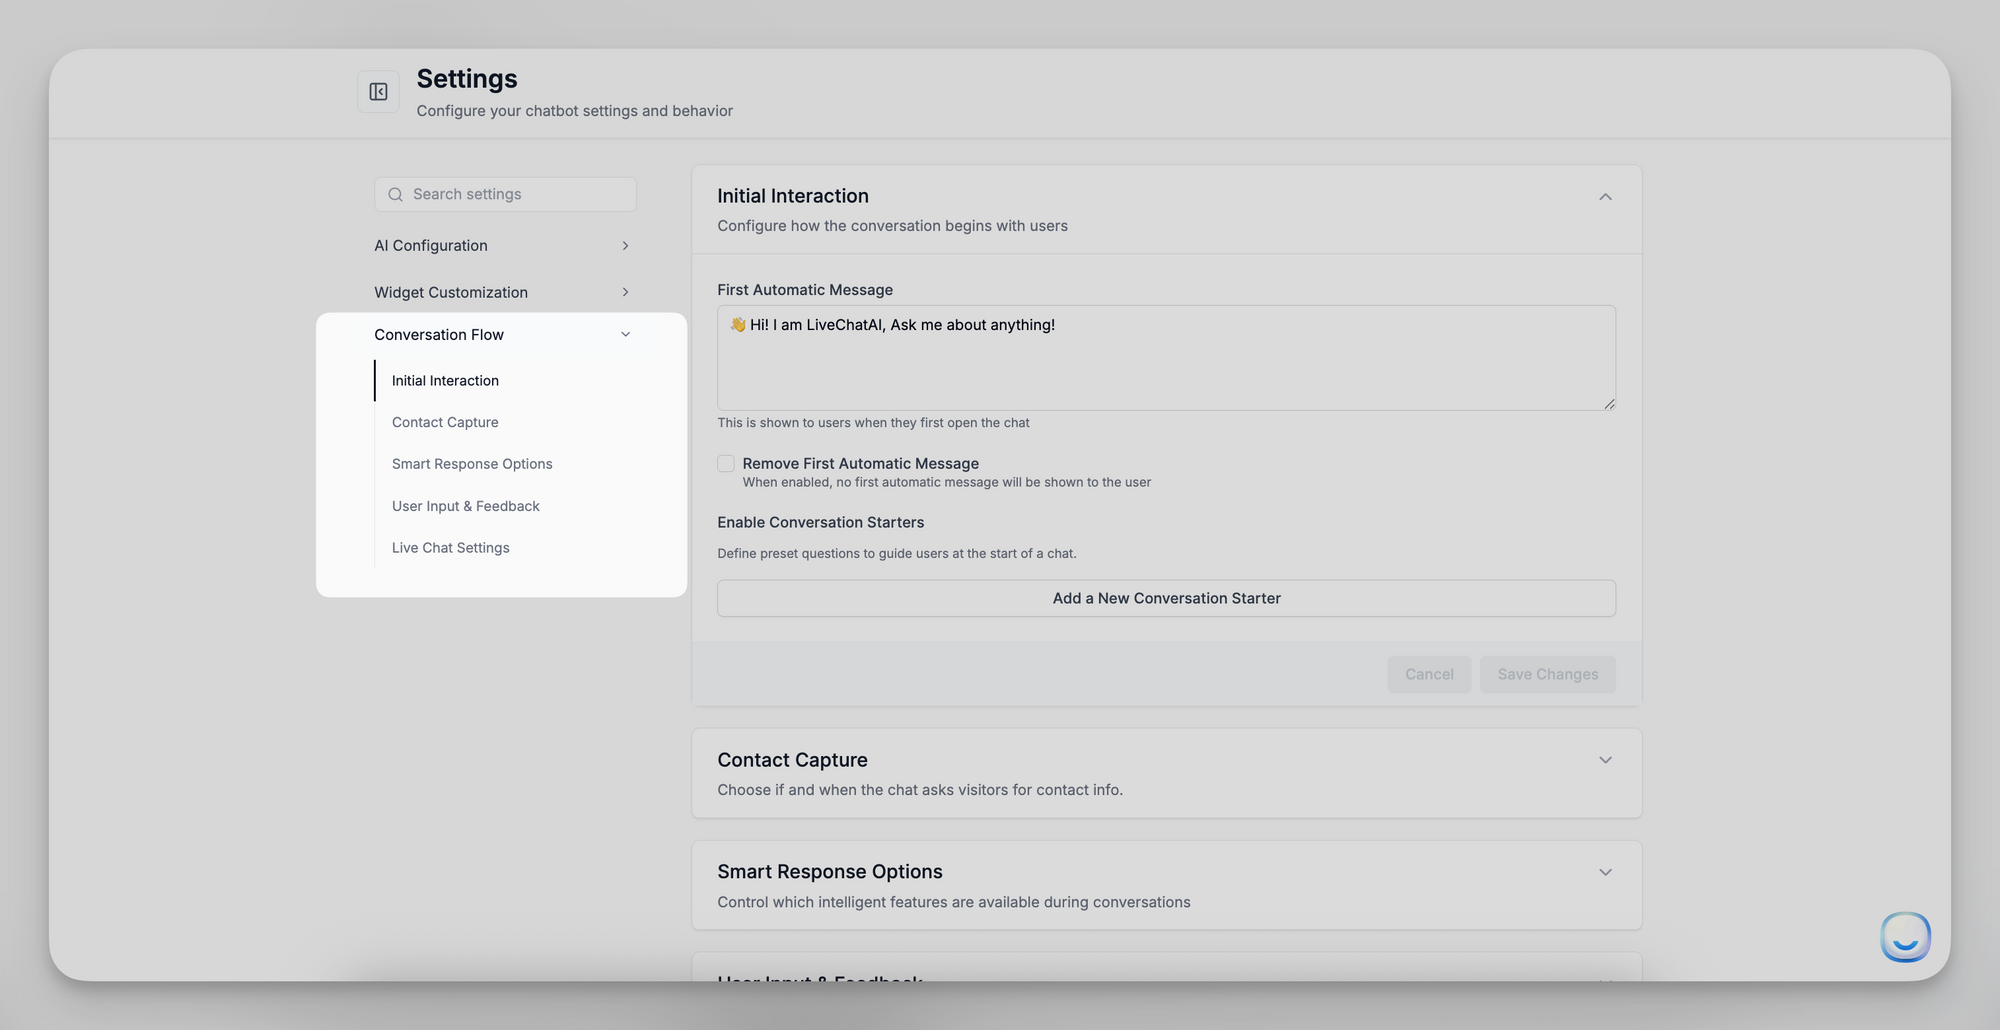
Initial Interaction
Customize the first messages and conversation starters that greet visitors as soon as they open the chat.
First Automatic Message
- Field: A rich-text box where you can add plain text first messages.
- Purpose: Displayed automatically when a user first opens the chat window. Use it to welcome visitors, introduce your brand, or highlight top support options (e.g., “Hey there! 👋 How can we improve your experience today?”).
- Remove First Automatic Message:
- Checkbox: When checked, no automatic greeting will be shown. The chatbot waits for the user’s first message.
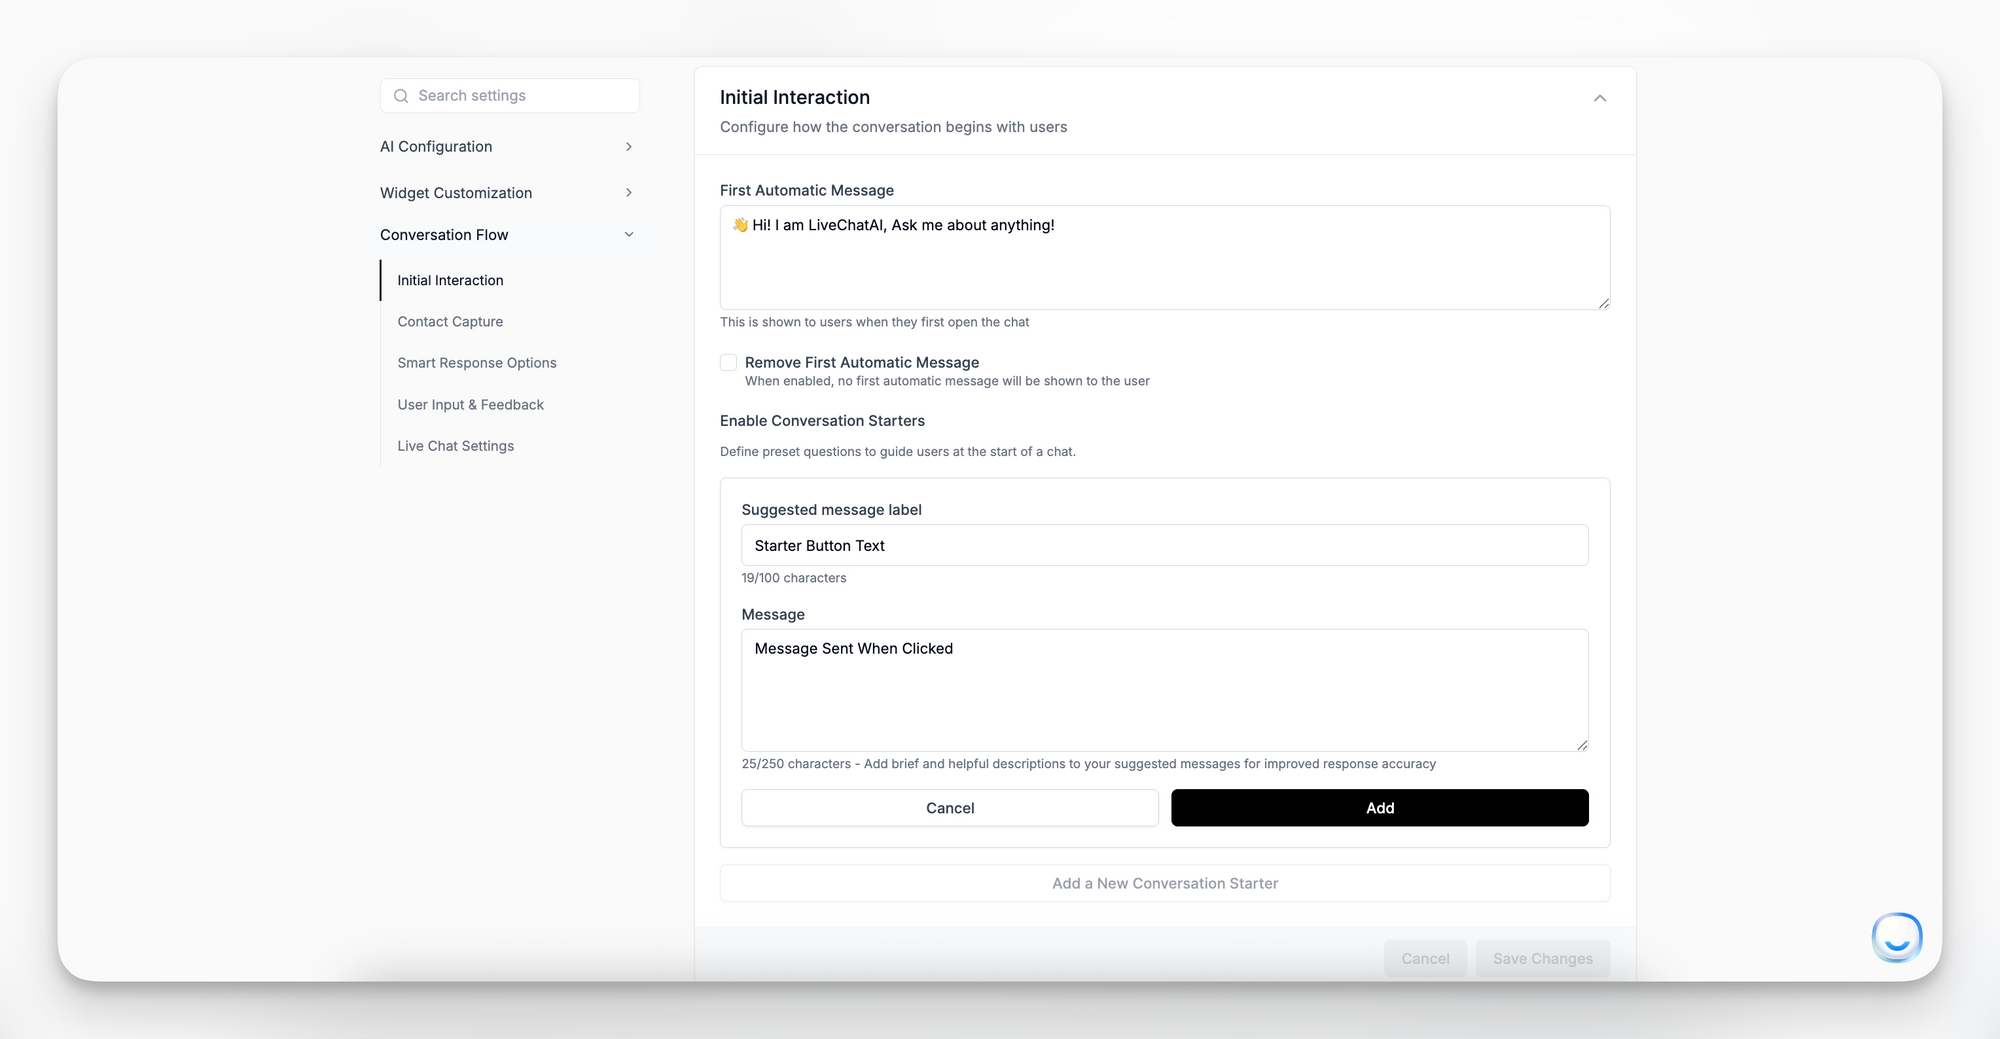
Enable Conversation Starters
- Toggle: Controls whether preset “quick-start” buttons appear beneath the greeting.
- How to Add a Starter:
- Click Add a New Conversation Starter.
- Enter the Button Text (e.g., “Book a Demo?”) and the User Reply that the bot sends when clicked (e.g., “I’d like to book a demo”).
- Click Save.
- Edit or Delete: Click Edit to modify the text or 🗑️ Delete to remove it.
Best Practice: Keep each starter concise (5–6 words) and action-oriented.
Contact Capture
Choose if and when to ask visitors for their contact details during a chat session.
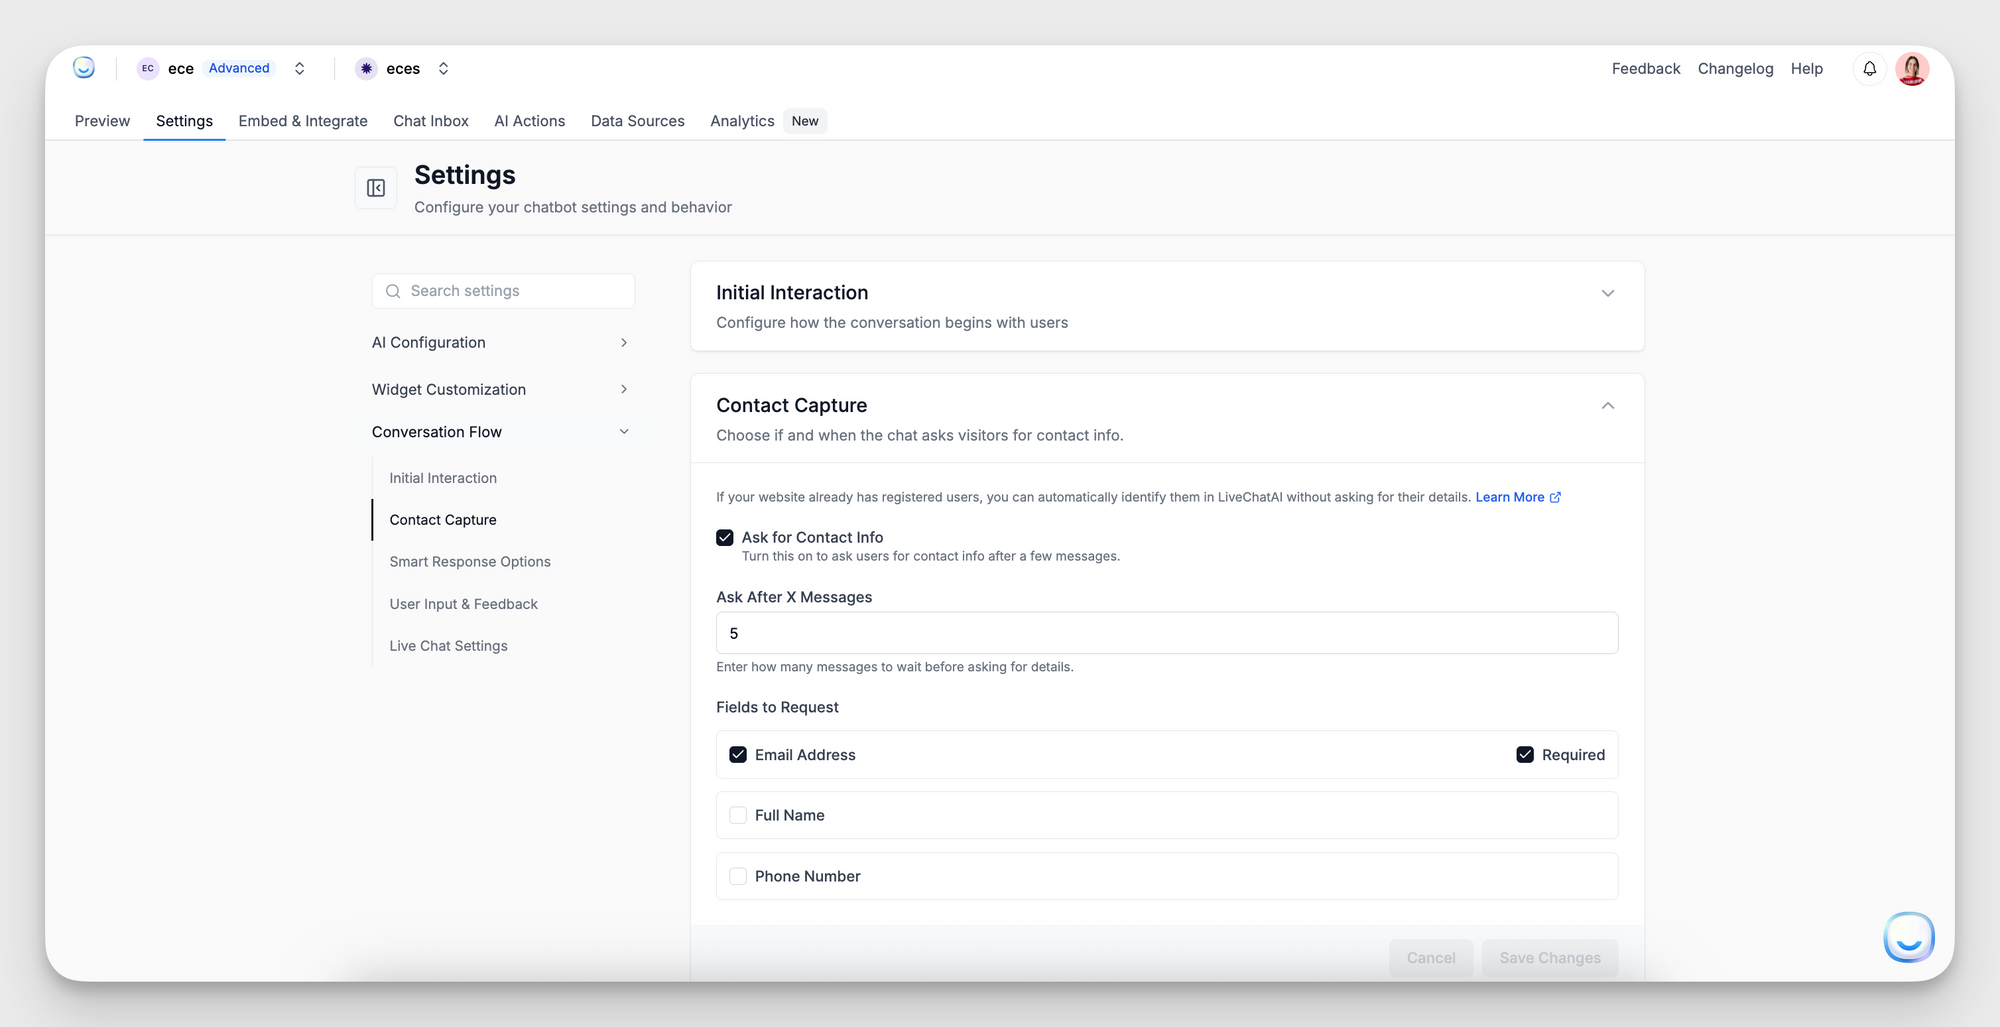
- Ask for Contact Info
- Checkbox: When enabled, the chatbot automatically prompts the user for contact information after a set number of messages.
- Ask After X Messages
- Field: Enter an integer (e.g., 2). After that many AI-generated or user-sent messages, the bot pauses and asks for contact info.
- Recommendation: Set to 1–3 so you capture an email before a deep support issue.
- Fields to Request: Check the boxes beside each field you want to collect:
Full Name
Phone Number
Required: When toggled on, the user cannot skip this field.
Tip: Only request contact info when absolutely needed (e.g., “We’ll send you a follow-up via email”). Too many required fields can frustrate users.
Smart Response Options
Enable or disable intelligent chat features that appear after each AI answer.
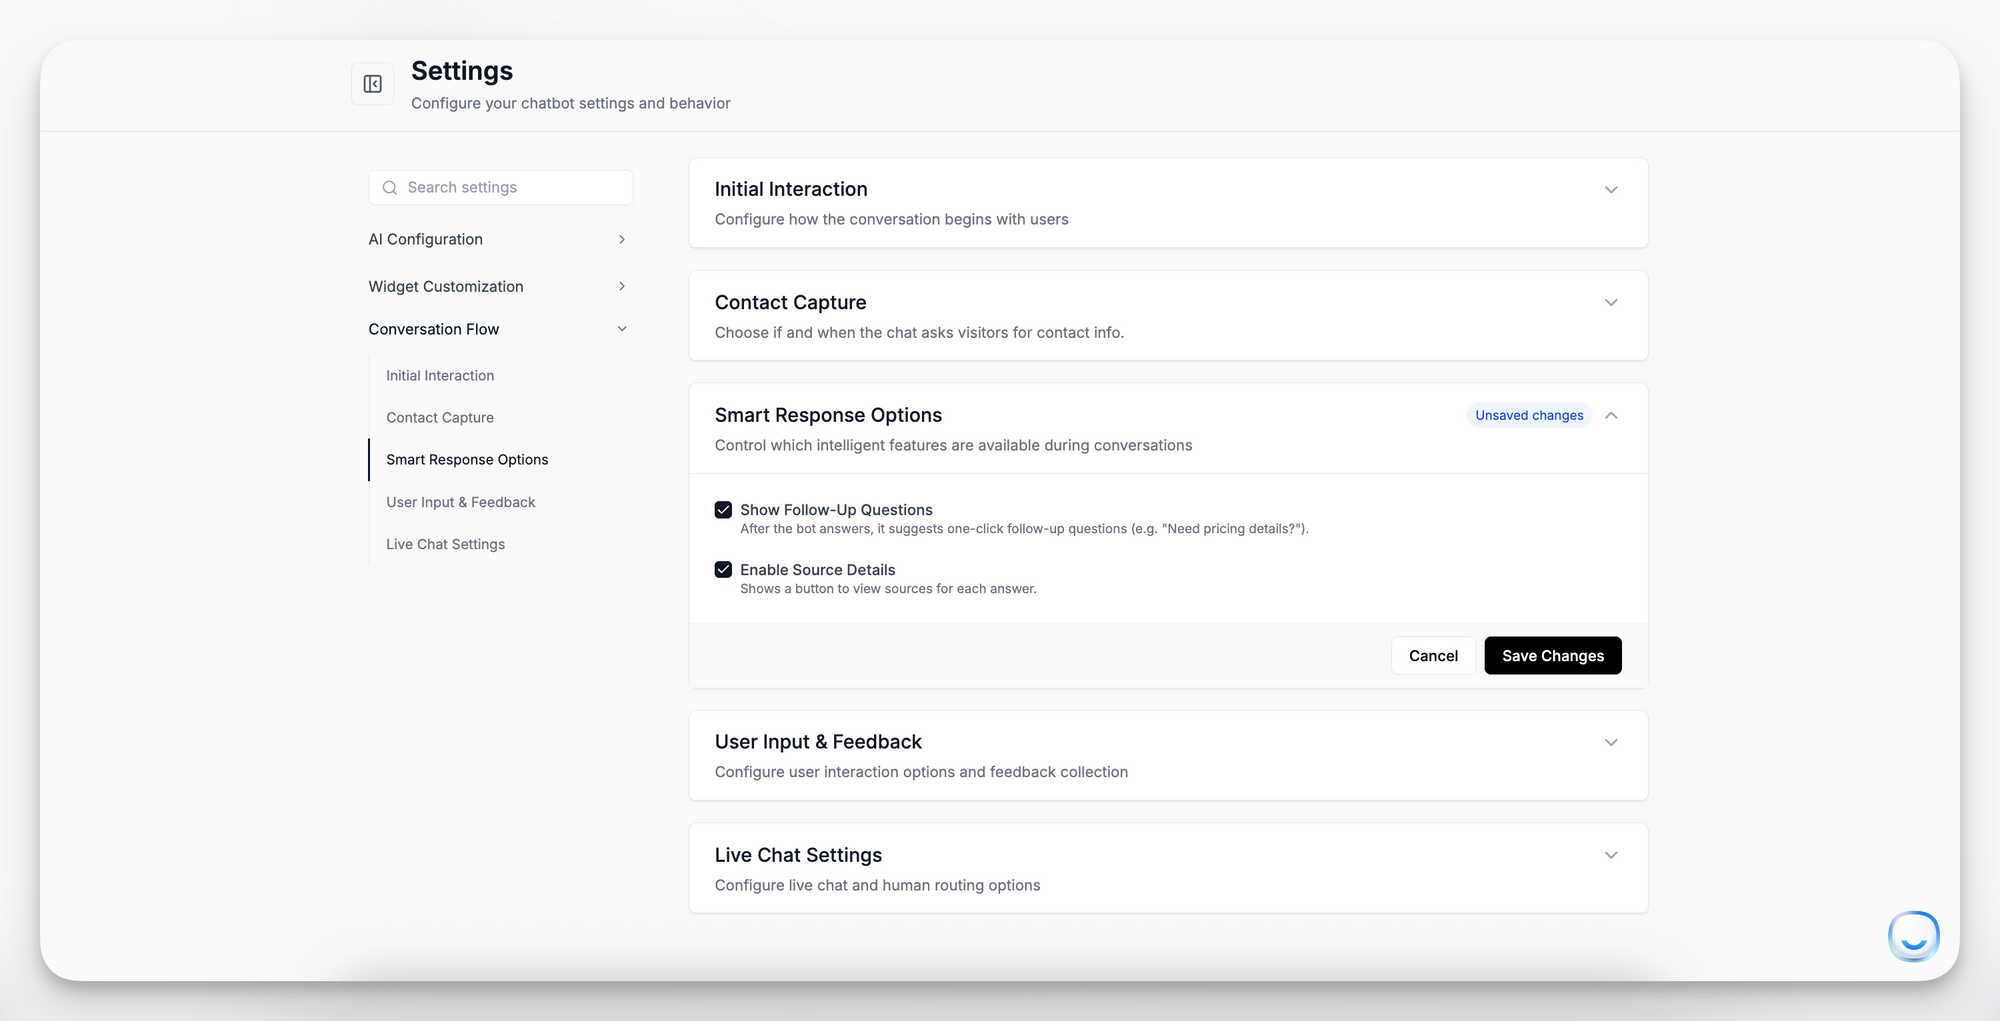
- Show Follow-Up Questions
- Checkbox: When checked, the chatbot displays 1–3 “quick” follow-up suggestions (e.g., “Need pricing details?” or “Want to schedule a demo?”).
- Benefit: Encourages users to dive deeper without typing, guiding them to relevant topics.
- Enable Source Details
- Checkbox: When enabled, a “View Source” button appears under each AI response.
- Function: Clicking “View Source” shows which document, webpage, or Q&A snippet the answer was derived from.
- Use Case: Improves transparency and trust—users can verify where the information came from.
User Input & Feedback
Control how users can interact, including image uploads and feedback collection.
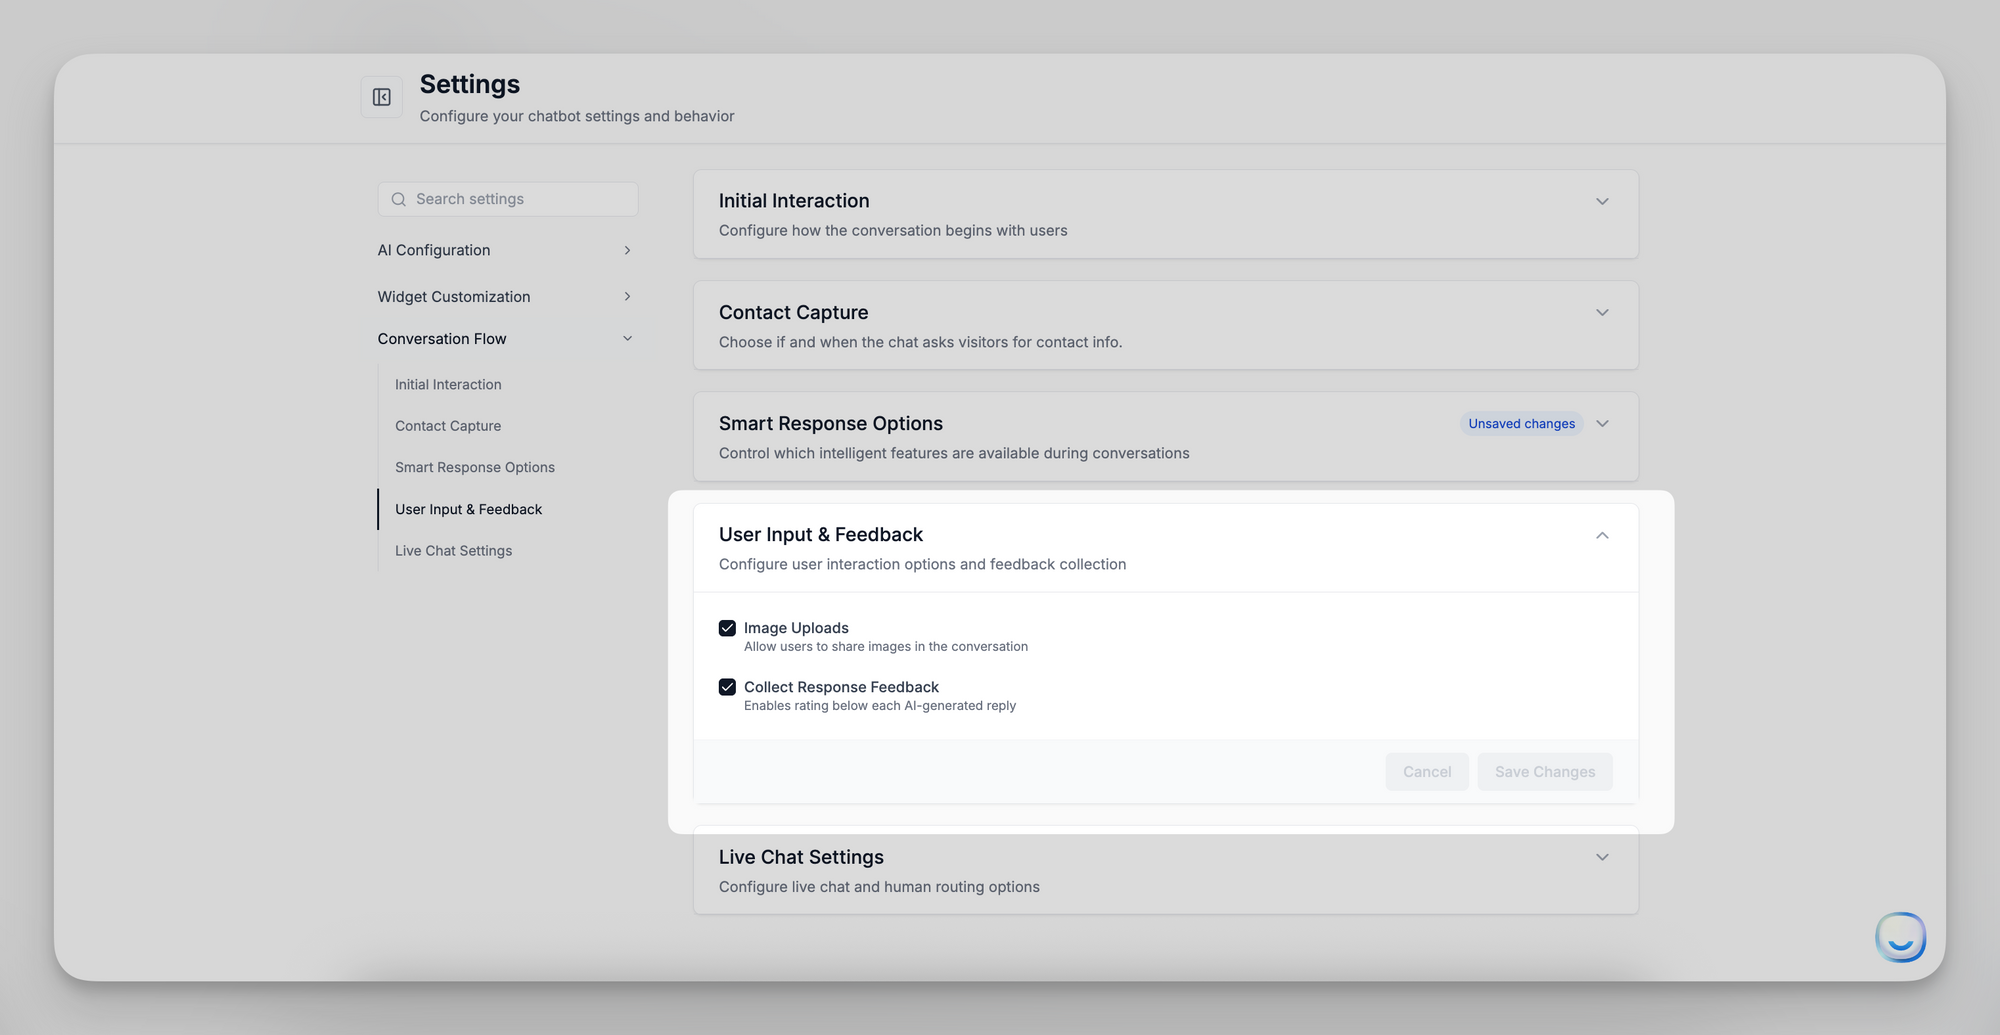
- Image Uploads
- Checkbox: Allow users to attach image files (PNG, JPEG) during a chat.
- Use Case: Helpful for product support when users need to show a screenshot or photo of an issue.
- Collect Response Feedback
- Checkbox: When enabled, each AI-generated response includes a thumbs-up/thumbs-down or star rating UI.
- Benefit: Gathers real-time sentiment—track which answers are helpful and continuously improve training data.,
Live Chat Settings
Configure how and when you route a user from the AI chatbot to a human agent.
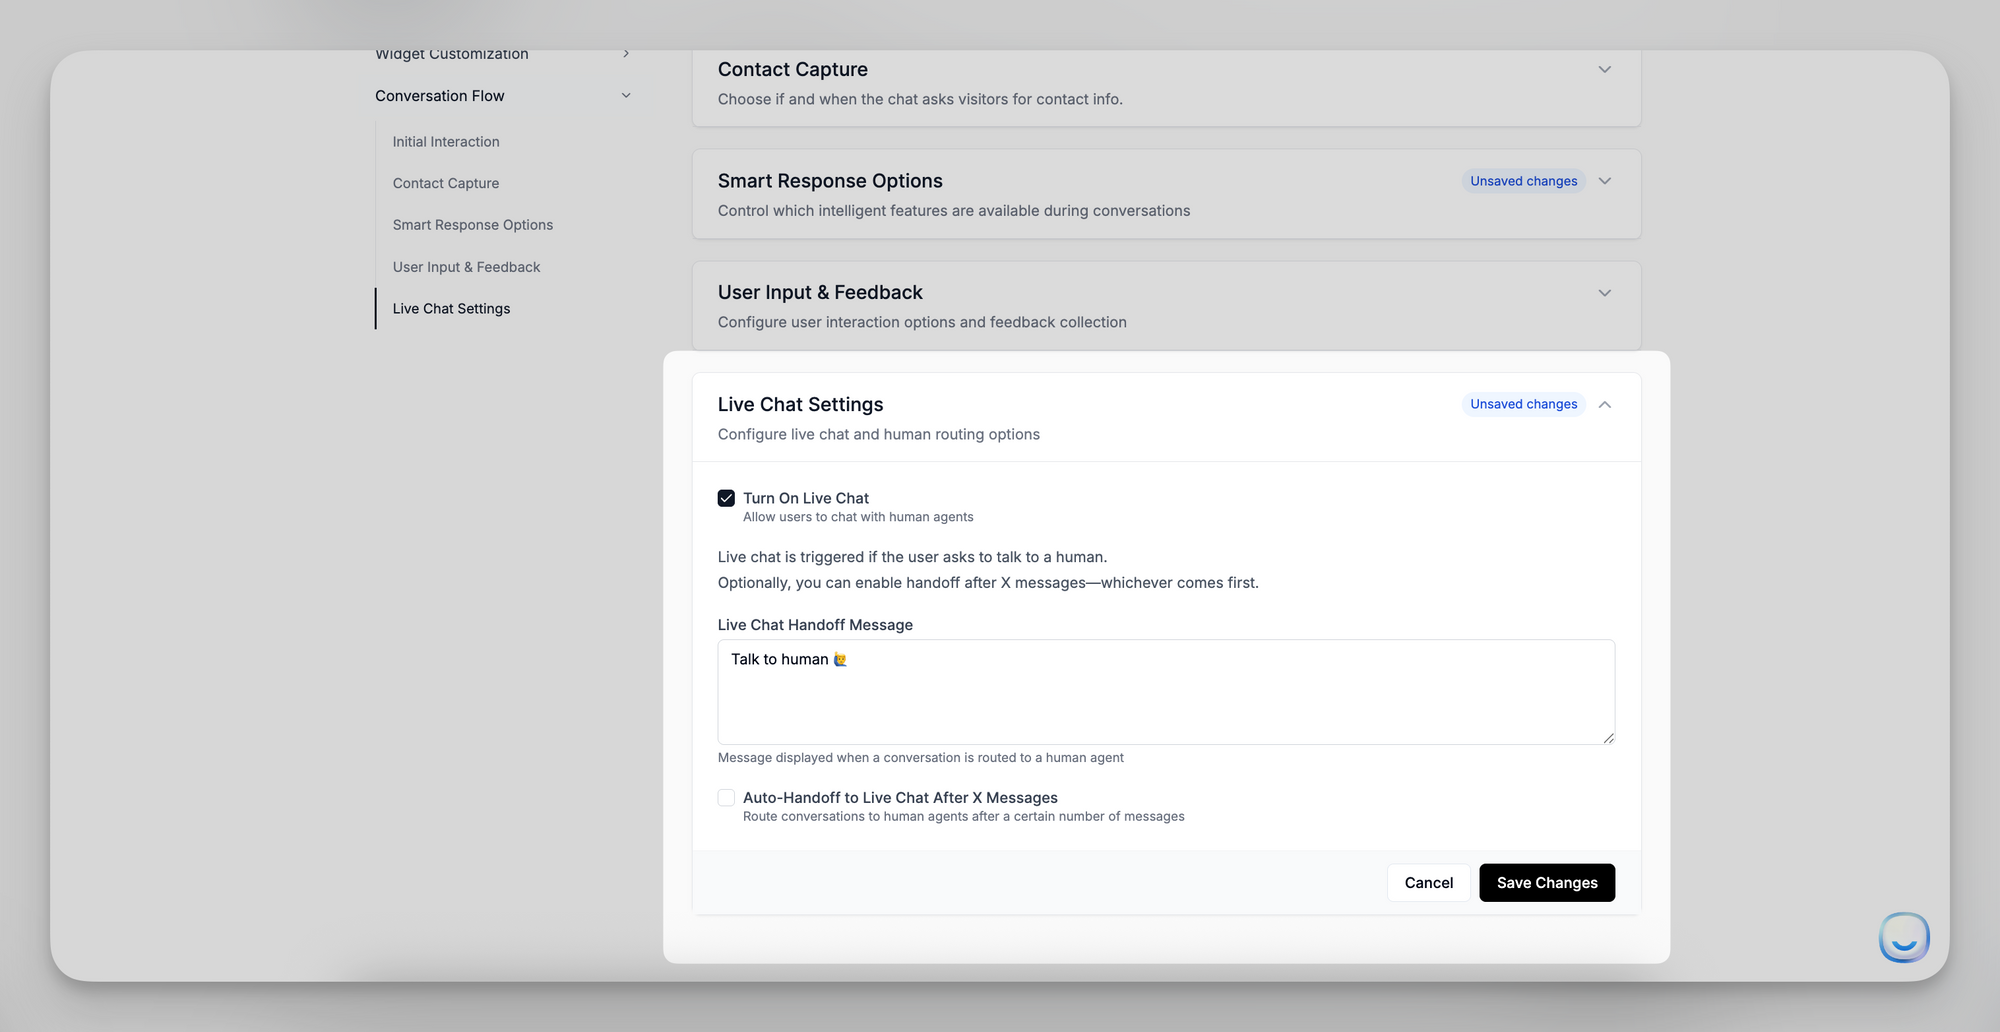
Turn On Live Chat
- Checkbox: When checked, allows visitors to request a human. Live chat is triggered if:
- The user explicitly asks to speak with a human (e.g., “I want to talk to someone”).
- Auto-Handoff to Live Chat After X Messages is enabled.
Live Chat Handoff Message
- Field: Enter the text the bot displays when handing off (e.g., “Connecting you to a live agent now…”).
- Appearance: Immediately after the user indicates “Talk to a human,” this message shows while the handoff occurs.
Auto-Handoff to Live Chat After X Messages
- Checkbox: When enabled, automatically routes a conversation to a human agent after a set number of back-and-forth messages.
- Handoff After X Messages
- Field: Enter the maximum number of AI/user exchanges (e.g., 2 or 3). Once reached, the bot stops and triggers the live chat.
Note: Ensure your support queue or agent notifications are monitored so handoffs happen promptly.
Saving & Testing Your Conversation Flow
- After adjusting any sub-section, click Save Changes within that panel.
- Open your website chat widget (or Preview the full-page chat) to verify that:
- The automatic greeting (or lack thereof) appears as expected.
- Contact info is requested after the correct number of messages.
- Conversation starters display and send the right replies.
- Smart response suggestions and “View Source” buttons behave correctly.
- Users can upload images and rate responses.
- Live chat handoff triggers when configured conditions are met.
For additional help or troubleshooting with Conversation Flow settings, email [email protected].
]]>
- Style & Appearance
- Preview Message
- Full Page
- Widget Interface Language
- Widget Availability Schedule
- Custom Styling
After making changes, click Save Changes in each panel to apply
]]>- Style & Appearance
- Preview Message
- Full Page
- Widget Interface Language
- Widget Availability Schedule
- Custom Styling
After making changes, click Save Changes in each panel to apply them immediately.
Style & Appearance
Control the visual look of your embedded chat widget (when used as a Messenger or inline chat).
- Header Color: Pick the hex or use the color picker to set the top banner color (e.g., #1C86FA). This color appears behind your header logo and title.
- Text Color: Choose the color for chat messages and text labels inside the widget.
- Background Color: Set the chat window’s background area color. This is visible behind messages and in the page’s blank regions.
- Widget Icon Alignment: Select Left Aligned or Right Aligned to position the floating launch icon on the user’s screen.
- Header Logo: Upload a PNG or JPEG (transparent background recommended) to replace the default “LiveChatAI” logo in the widget header.
- File guidelines: up to 2 MB, dimensions around 200×50 px for best fit.
- AI Avatar
Upload a 1:1 avatar image (e.g., 100×100 px) for the bot’s contact icon next to its messages. If left blank, the default logo is used. - Remove Branding (checkbox)
Enable this to hide the “Powered by LiveChatAI” badge at the bottom of the widget. (Note: Only available on paid plans.) - Brand Logo (checkbox + upload)
If checked, you can upload your brand’s logo. This merges your logo with the LiveChatAI logo in the header for co-branding.
Save Changes after updating any field.
Preview Message
Show a friendly teaser before users open the chat and define how the bot refers to itself.
- AI Agent Name
Enter how the bot identifies itself in chat (e.g., “SupportBot” or “LiveChatAI”). This name appears above any automated message previews. - Welcoming Text
Text displayed in the initial bubble before the chat is expanded (e.g., “How may I help you?”). Keep it concise. - Hide Teaser Message (checkbox)
When checked, the teaser bubble is hidden—users see only the widget icon until they click it. - Teaser Message
This message shows inside the bubble before the user expands the chat (e.g., “👋 Hi! How can I help today?”). It should encourage interaction.
Full Page
Configure your standalone, full-page chatbot experience (when using the “Full Page Chat” embed).
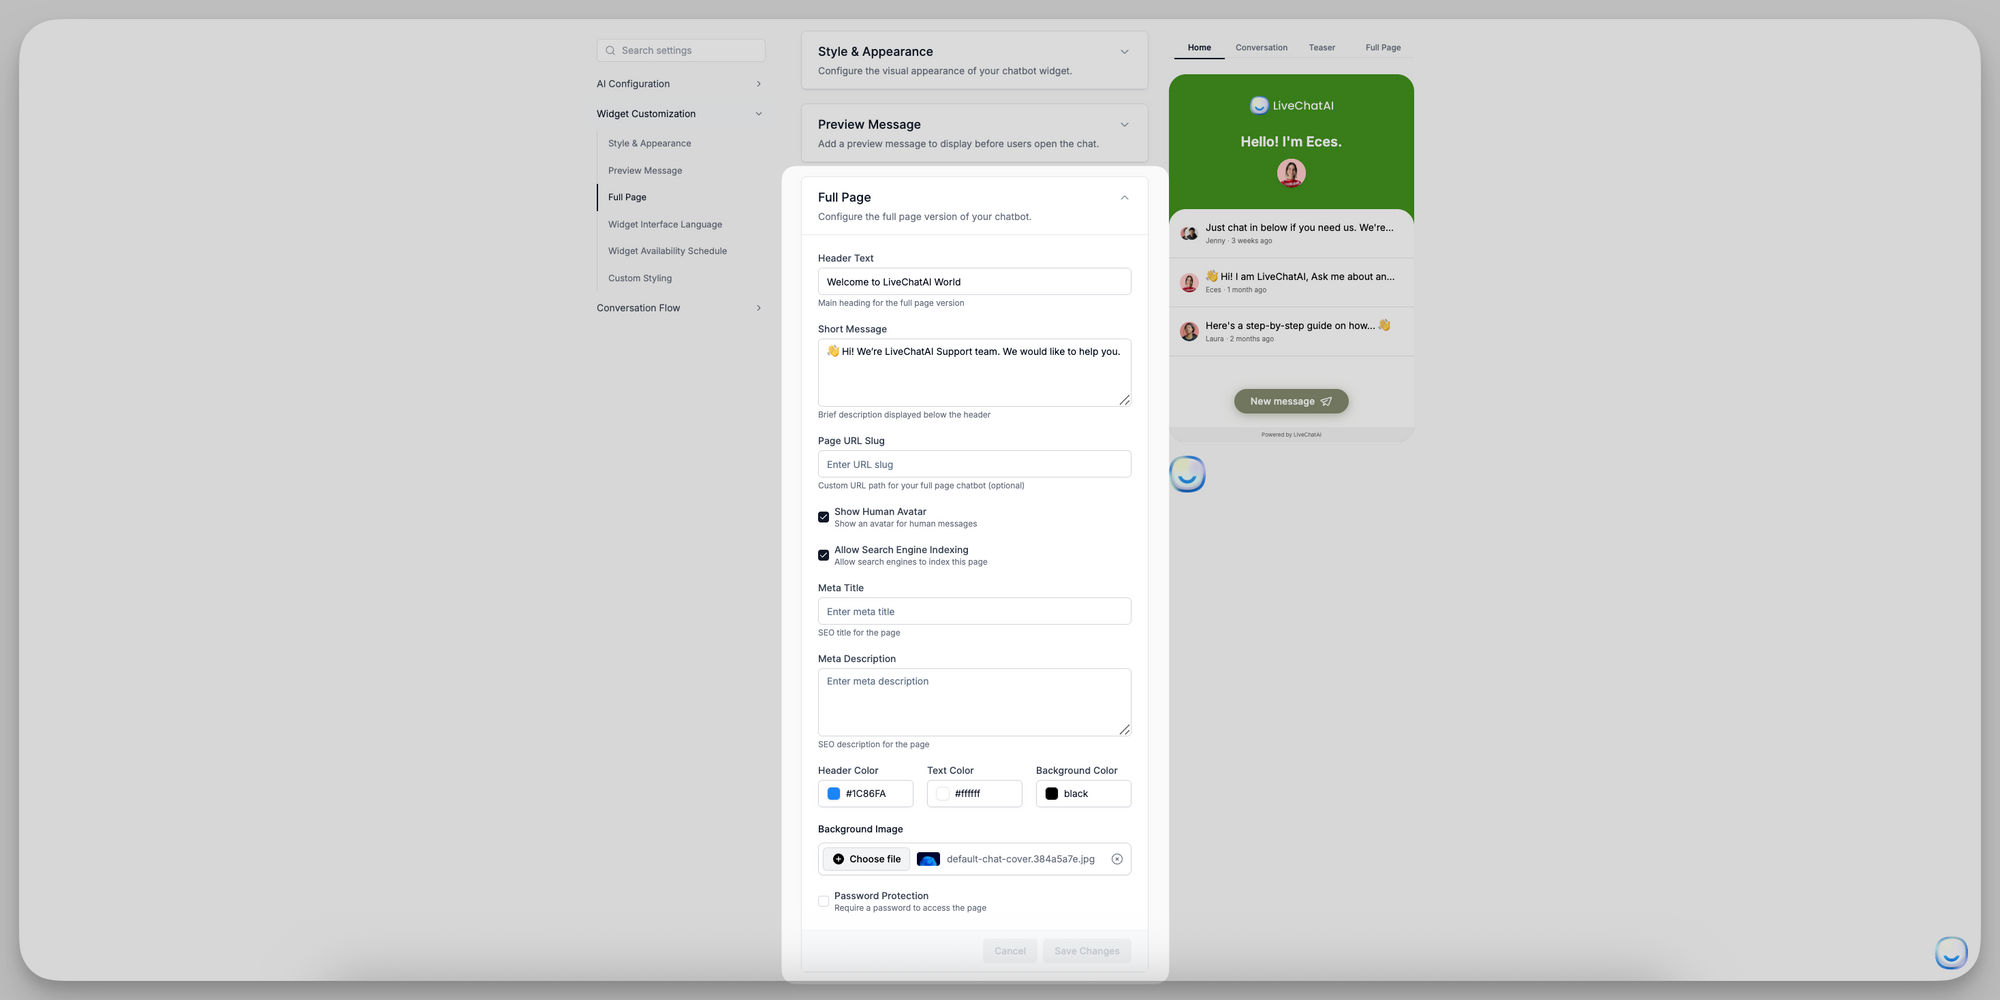
- Header Text: The main headline at the top of the full-page layout (e.g., “Welcome to LiveChatAI World”).
- Short Message: A brief subheading or description below the header (e.g., “👋 Hi! We’re LiveChatAI Support team. We’d love to help you.”).
- Page URL Slug: Define a custom path for your full-page chat (e.g., livechatai → accessible at https://app.livechatai.com/livechatai). If left blank, a random slug is assigned.
- Show Human Avatar (checkbox)
When enabled, displays a human avatar next to any replies passed to a human support agent. - Allow Search Engine Indexing (checkbox)
Enable this if you want Google and other search engines to index your full-page chat as a webpage. - Meta Title & Meta Description: Meta Title: SEO title for this chat page. Meta Description: SEO description for search results.
- Header Color / Text Color / Background Color: Same color pickers as Style & Appearance, but applied to the header bar, text, and overall page background of the full-page view.
- Background Image: Upload a banner image (e.g., 1200×400 px) that appears behind the header text on the full-page chat. (Supported formats: JPEG, PNG (≤ 2 MB).)
- Password Protection (checkbox): If checked, visitors must enter a password to access the standalone chat page. After enabling, enter the desired password in the field that appears.
Widget Interface Language
Set the language for all widget UI elements (buttons, labels, menus). The chatbot’s responses can still be in any supported language.
- Default Language: Choose the primary interface language (e.g., ENGLISH, SPANISH, FRENCH, etc.). This controls the text on buttons like “Send,” “Close,” and menu actions.
- Enable Auto Translation (checkbox): When enabled, the widget will auto-detect a visitor’s browser language and switch UI elements accordingly.
- Supported Languages: Click Add Language to include additional languages the widget can auto-detect. Each added language ensures UI translations even if the visitor’s browser is set to that locale.
Widget Availability Schedule
Control when the chat widget appears active on your site. (This does not affect human or AI uptime—only the widget’s visibility.)
- Enable Schedule (checkbox)
Turn this on to define specific operating hours. - Timezone
Select the timezone that your operating hours reference (e.g., “America/New_York”). - Operating Hours
- Every: Choose a daily or weekly pattern (e.g., Every day, Mon–Fri, Sat–Sun).
- From / To: Set the time range (e.g., 08:30 → 17:30).
- Click Add Schedule to set multiple blocks (e.g., Mon–Fri 08:30–17:30 and Sat 09:00–12:00).
If no schedule is defined, the widget remains visible 24/7.
Custom Styling
Add your own CSS to fine-tune the widget’s appearance beyond standard settings.
- Custom CSS
Paste any valid CSS selectors and rules here. This CSS is injected into the widget’s iframe, allowing you to override styles such as font sizes, margins, or colors not covered by the built-in controls.
Warning: Incorrect CSS may break widget styling—test thoroughly on a staging site first. Click Save Changes to apply your custom styles.
Summary
- Style & Appearance: Visual theme, logos, and branding.
- Preview Message: Teaser bubble text and AI name.
- Full Page: Standalone chat page header, slug, colors, and SEO.
- Widget Interface Language: UI language and auto-translation.
- Widget Availability Schedule: Hours when the widget is visible.
- Custom Styling: Advanced CSS overrides.
Review each section carefully and click Save Changes to ensure your customizations appear live. For any questions, email [email protected].
- Identity
- Behavior & Instructions
- LLM Models
- Knowledge & Safety
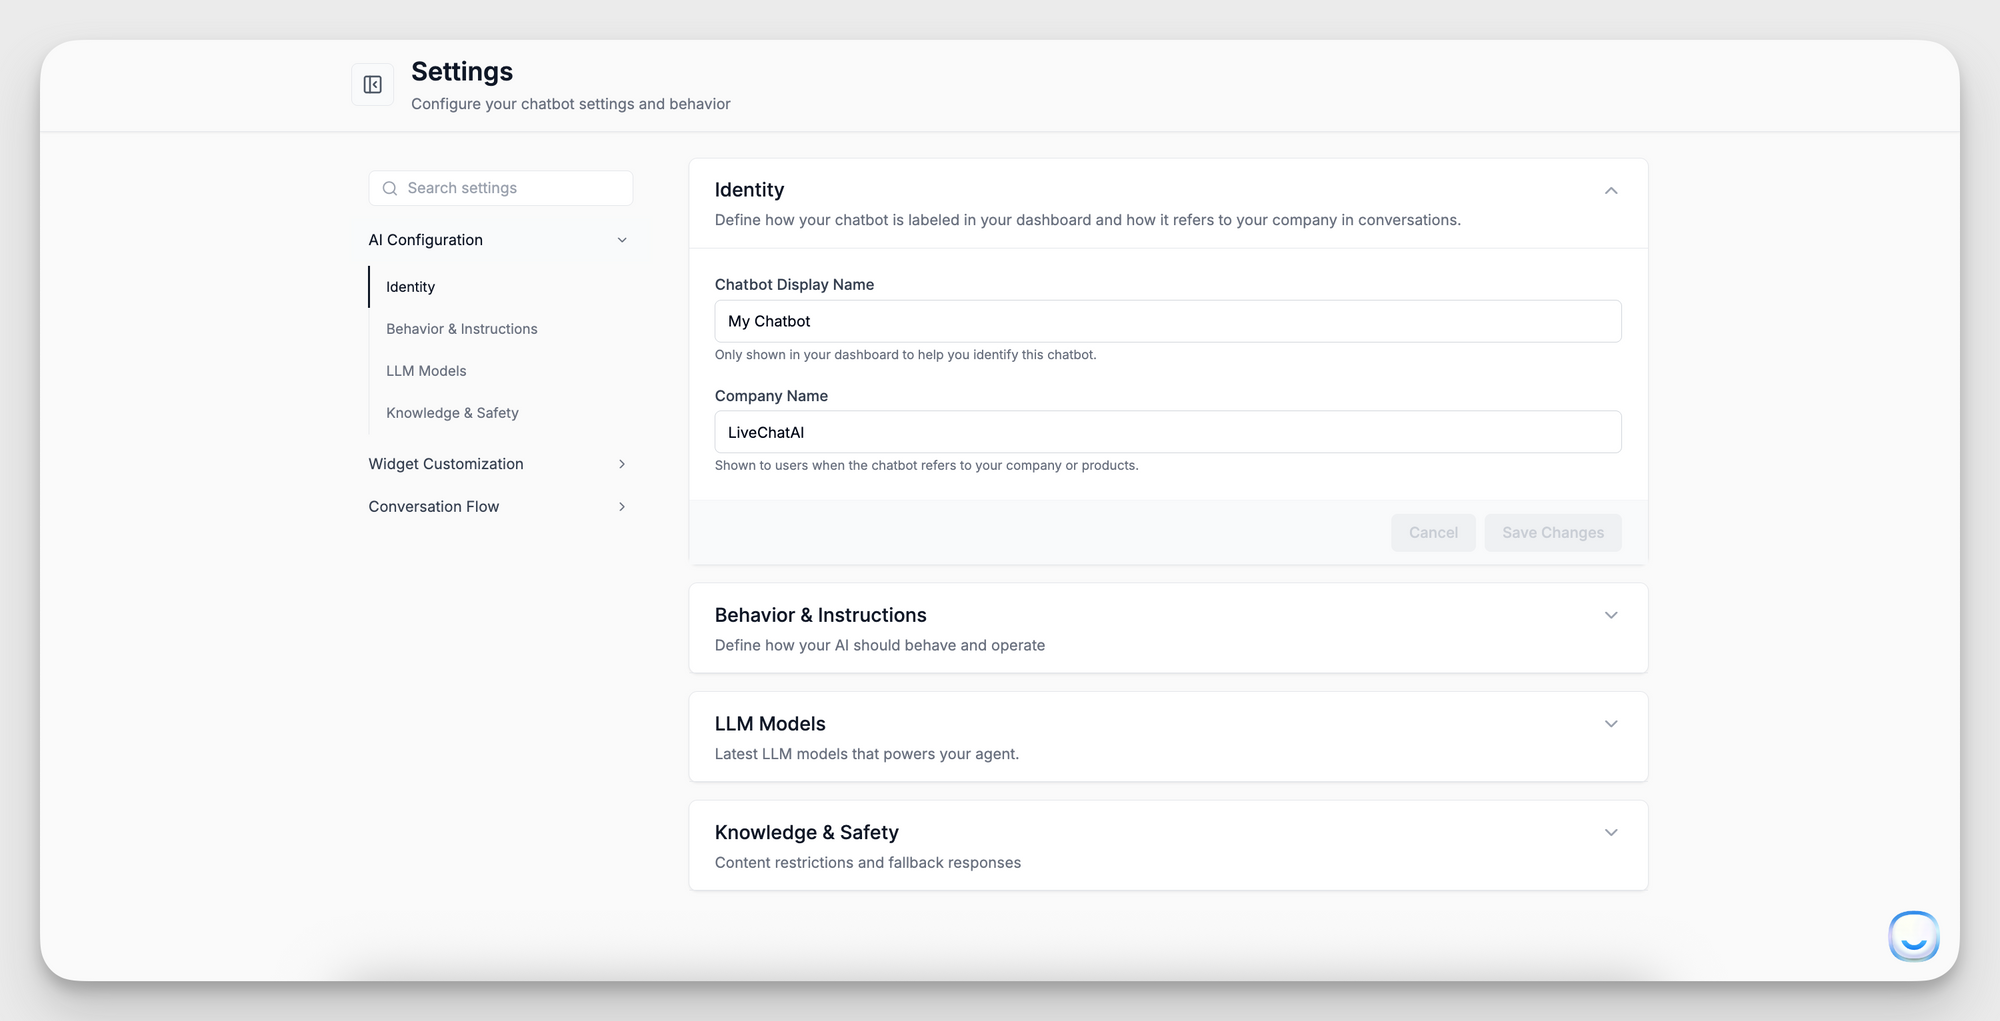
Identity
Define how your chatbot appears in the dashboard and in conversations.
- Chatbot Display Name
Enter
- Identity
- Behavior & Instructions
- LLM Models
- Knowledge & Safety
Identity
Define how your chatbot appears in the dashboard and in conversations.
- Chatbot Display Name
Enter an internal name (e.g., “SupportBot”) to help you identify this bot in the workspace. - Company Name
Enter the name (e.g., “Acme Corp”) the chatbot uses when referring to your organization or products. This is shown to end users when the bot says “Our company…” or introduces itself.
Tip: Choose a friendly, on-brand company name so responses feel cohesive and professional.
Behavior & Instructions
This section allows you to define how your AI chatbot should think, sound, and act.
Setting this correctly helps the chatbot stay aligned with your brand tone and customer service policies, without needing to repeat the same guidelines in every data source.
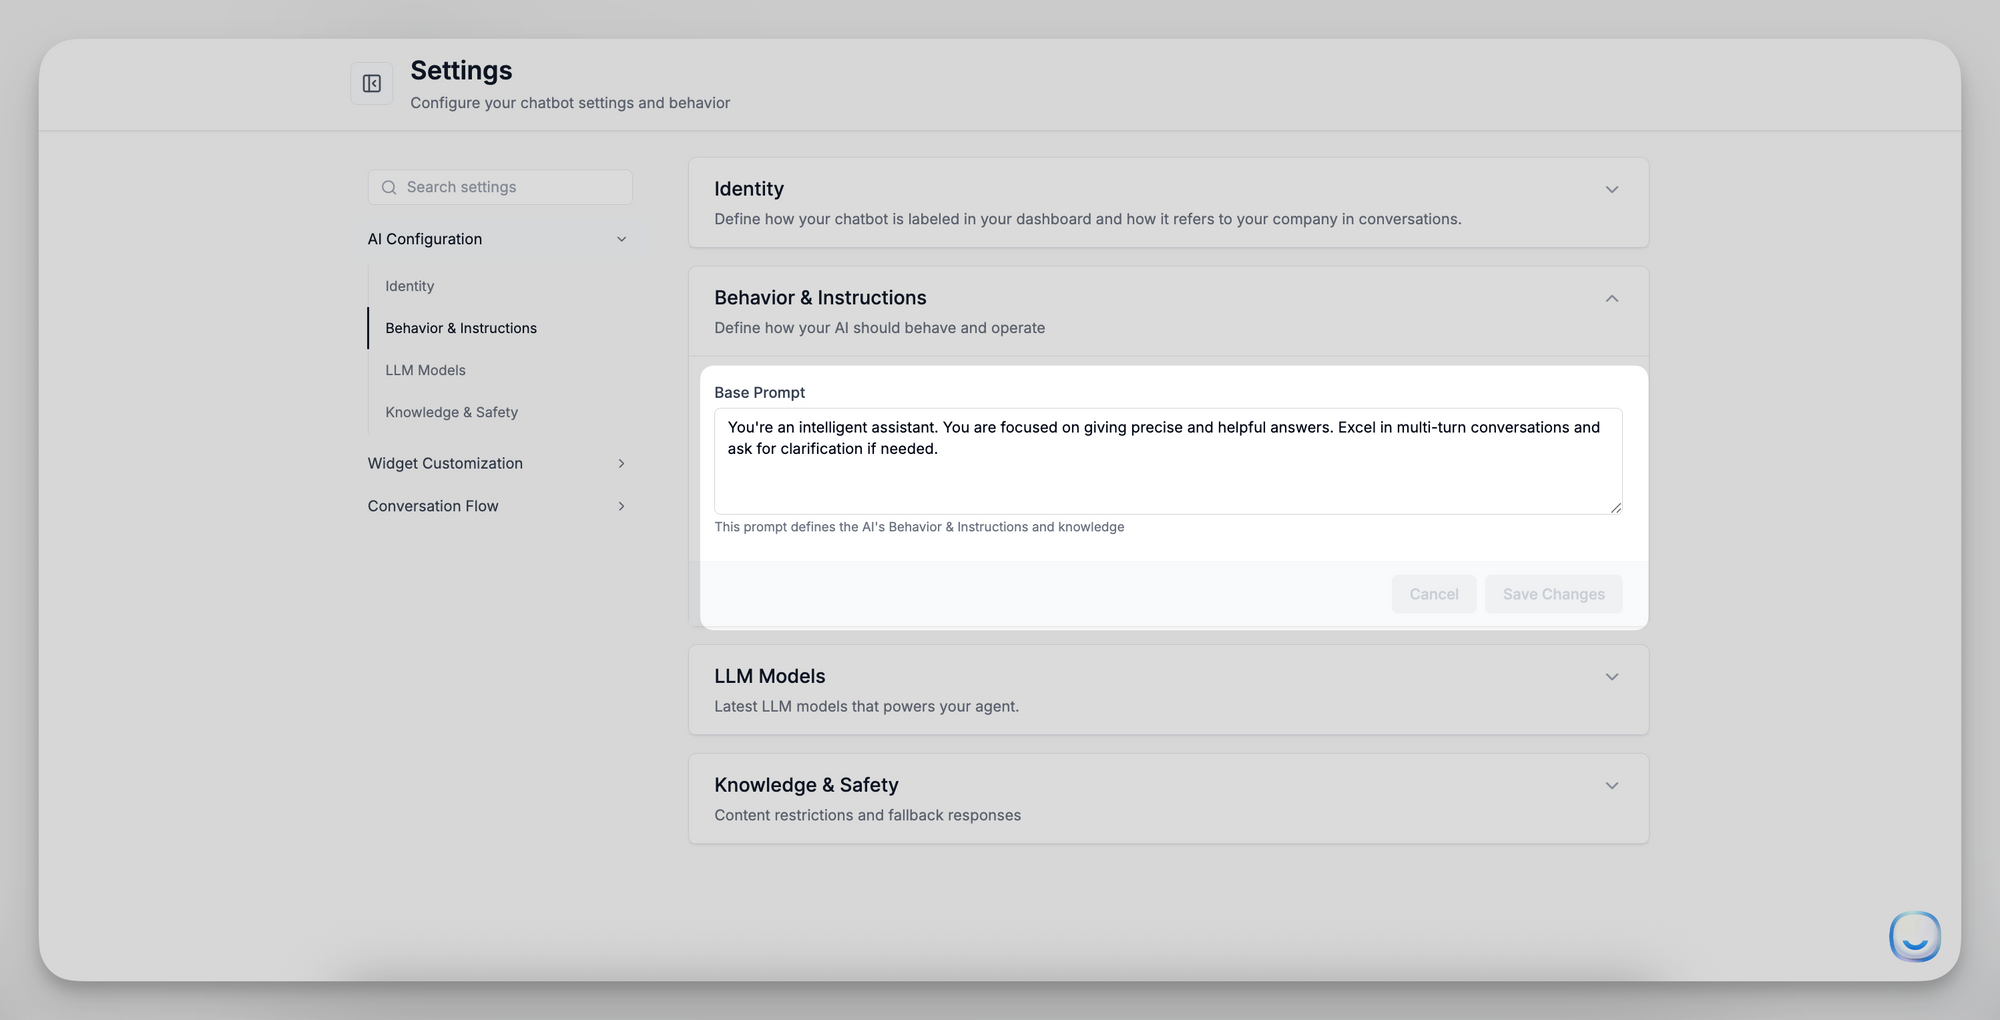
- Base Prompt: This prompt runs at the start of every conversation. Keep it concise (2–3 sentences) and focused on overarching guidelines.
“You are a helpful and friendly support assistant for [Your Company]. Keep answers clear, concise, and professional.”
“Speak with a casual, warm tone and assist users with product-related questions. Don’t guess—only respond when confident.”
- Custom Instructions (optional): Add or update any additional rules, policies, or tone notes here (e.g., “Always greet users with a friendly welcome” or “If you’re unsure, refer to our returns policy.”).
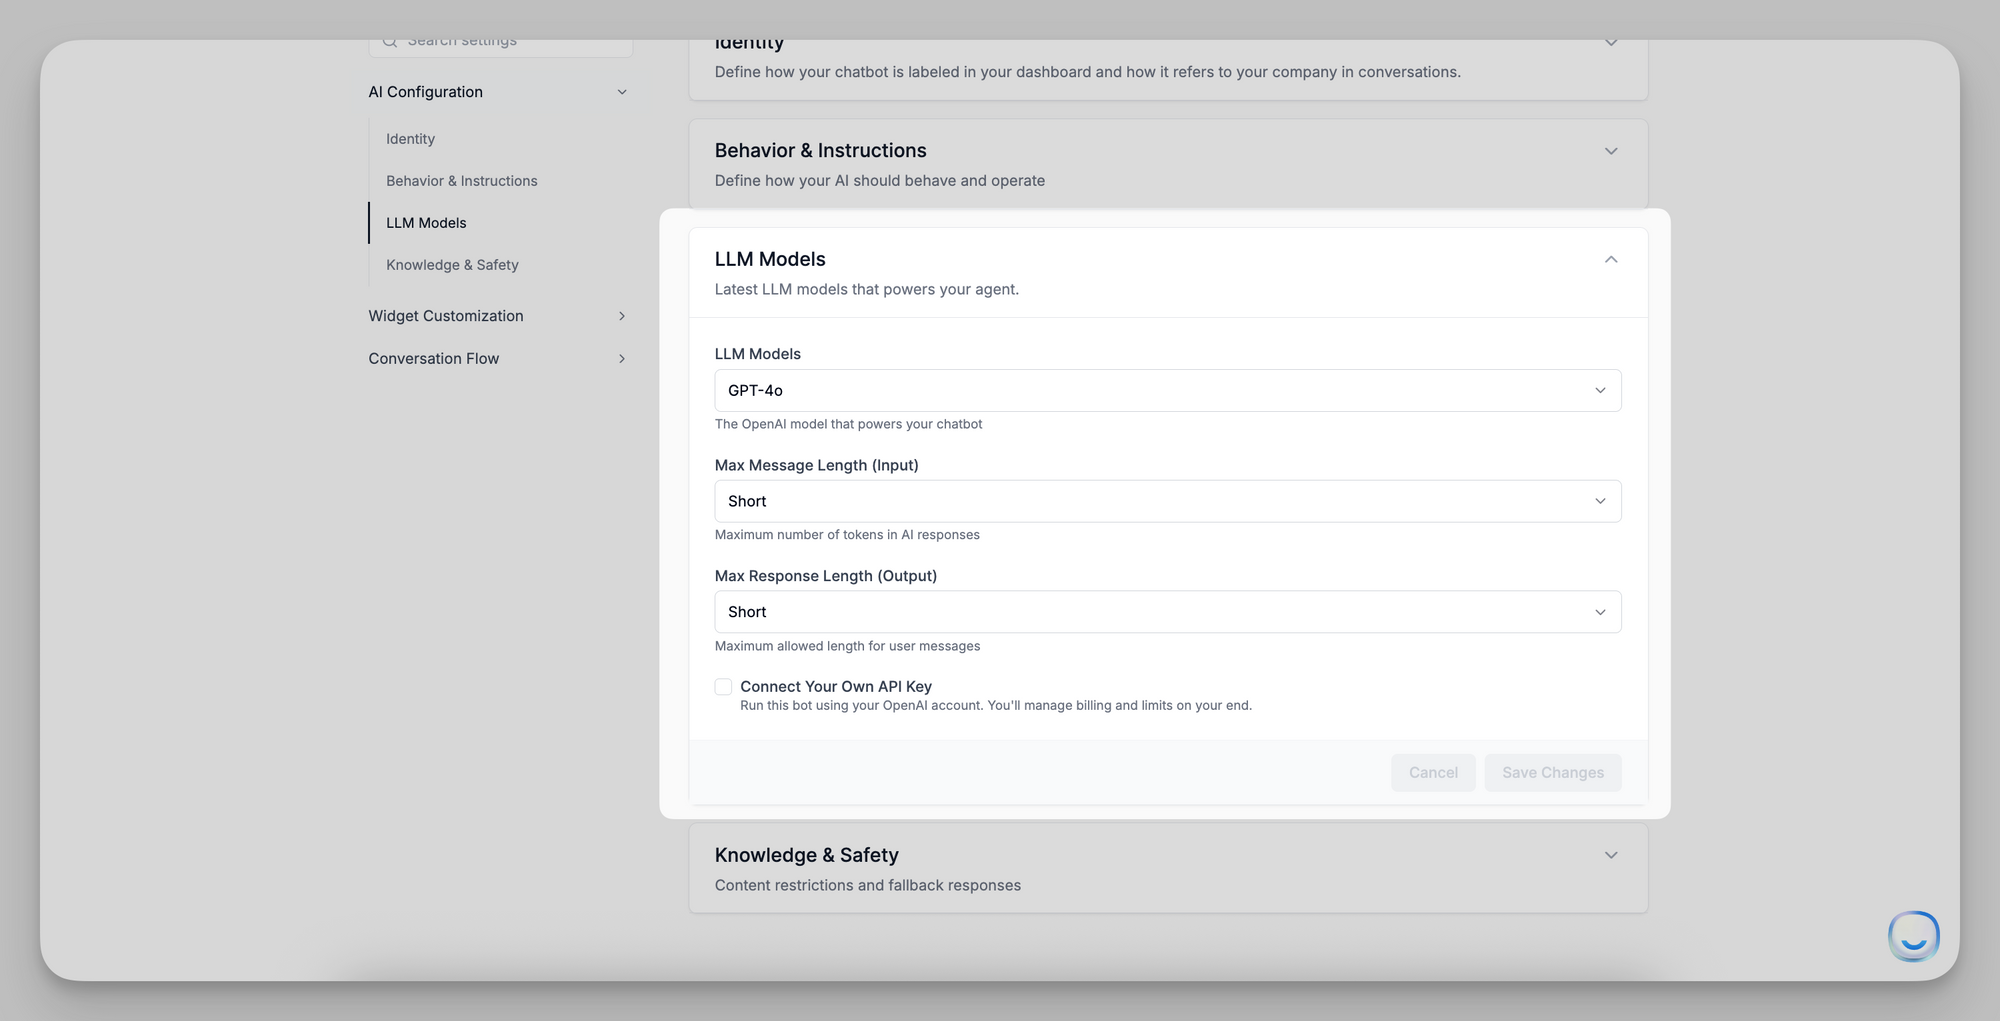
LLM Models
Choose which large-language model powers your chatbot. Below is a list of available models and their ideal use cases:
Note on “Message Credit Cost”:
- This column indicates the number of credits consumed per full user‐AI exchange (one user query + one AI response).
- Always verify your plan’s credit allowances when switching models, especially for high-cost engines like O1 (20 credits/request).
Once you’ve chosen your model, click Save Changes to apply it immediately.
Input/Output Length Settings
- Max Message Length (Input)
Choose Short, Medium, or Long to cap the tokens users can send in a single message. - Max Response Length (Output)
Select Short, Medium, or Long to limit how verbose the AI’s replies can be.
Tip: If users tend to send long paragraphs, set Max Message Length to “Long.” To avoid overly wordy answers, keep Max Response Length at “Medium” or “Short.”
After selecting your model and length settings, click Save Changes to apply immediately.
Knowledge & Safety
Control how the chatbot uses your data sources and what it says when it cannot find an answer.
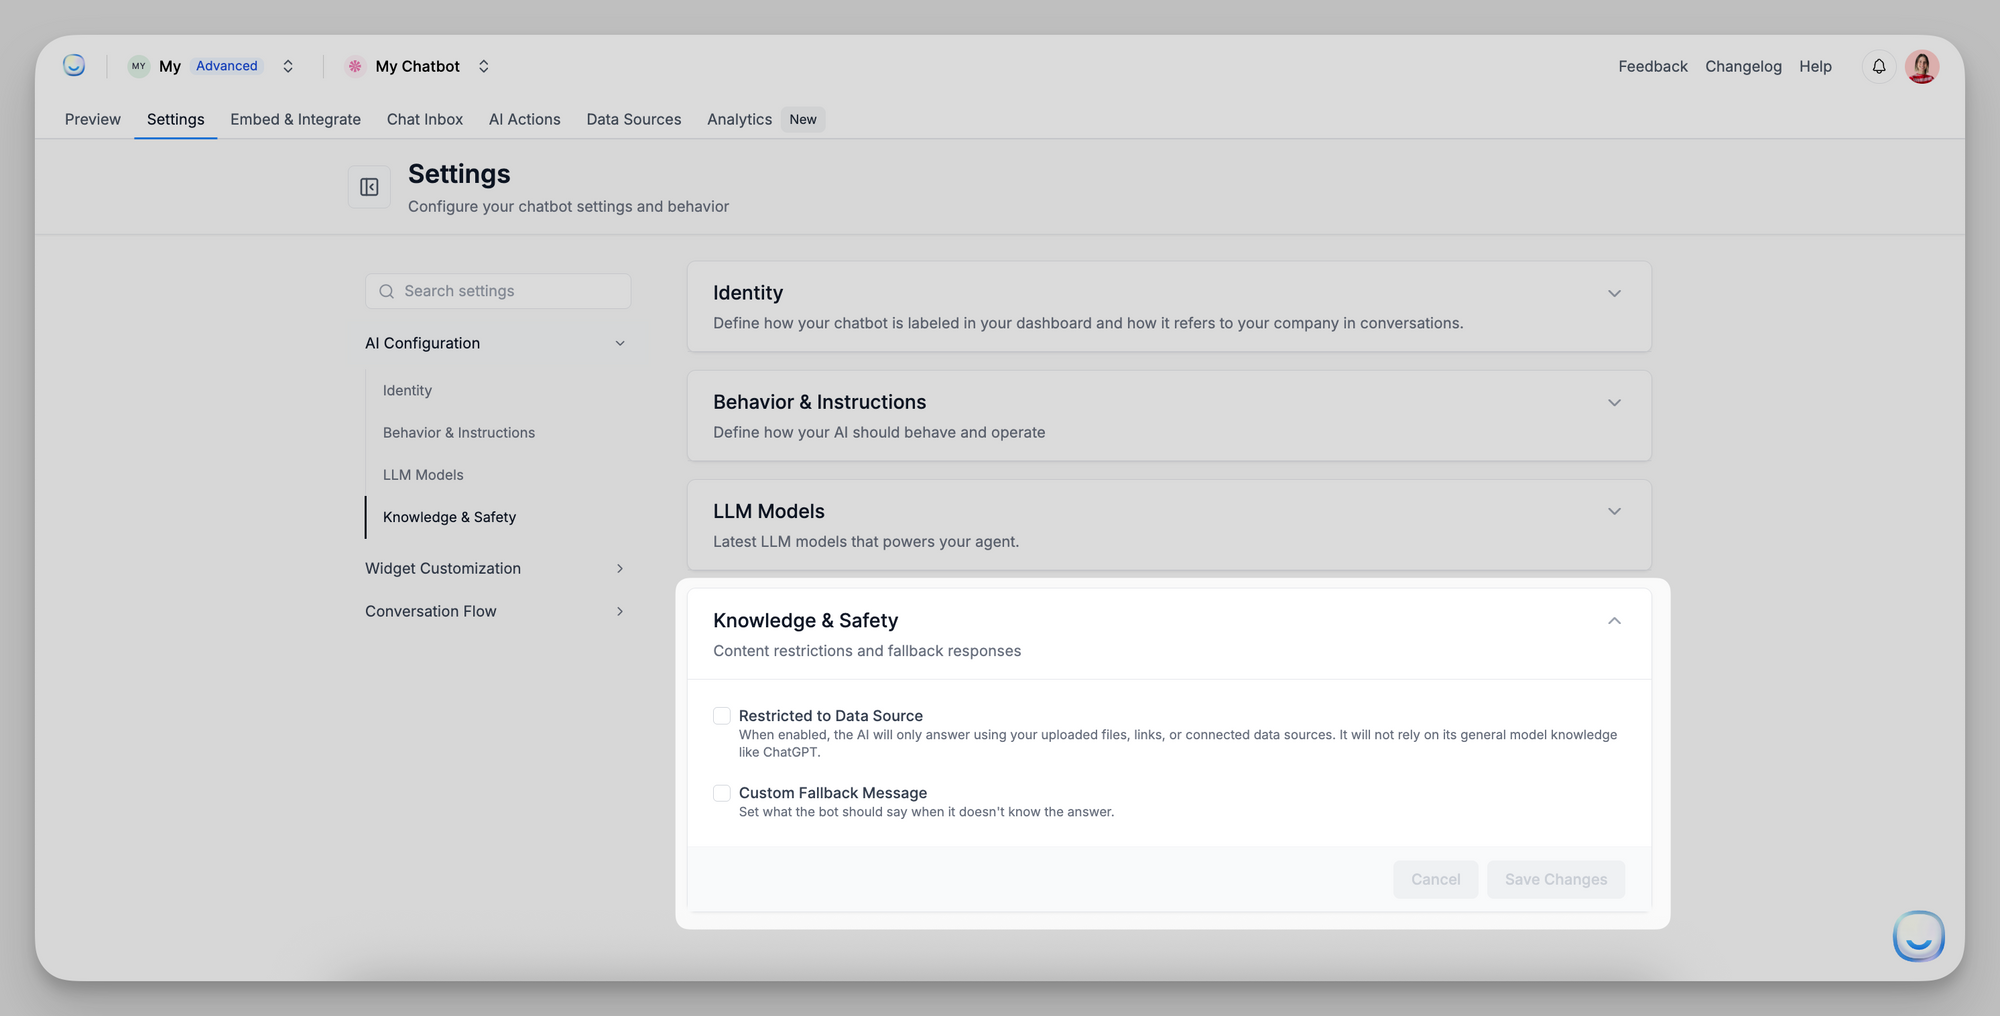
- Restricted to Data Source
When enabled, the bot will only answer using your uploaded files, website crawls, Q&As, or other connected sources. It will not rely on its general LLM knowledge.
Turn this on if you require 100% brand-specific answers without any external assumptions.
- Custom Fallback Message
Enter the exact text the bot sends when it can’t find an answer in your sources (e.g., “I’m sorry, I don’t have that information. Please contact support at [email protected].”)
This prevents generic, off-brand “I don’t know” replies.
Warning: If “Restricted to Data Source” is checked, Custom Fallback Message is required. Otherwise, the chatbot will have no fallback response.
Saving & Applying Changes
- After updating any section—Identity, Behavior & Instructions, LLM Models, or Knowledge & Safety—click Save Changes at the bottom of that panel.
- Changes take effect immediately for all new conversations.
For further assistance with any AI Configuration setting, email [email protected].
]]>Plans: Advanced & Expert (website sources only)
Auto Q&A Generation scans a crawled web page, identifies likely questions, and creates ready-to-answer Q&A pairs in your chatbot’s knowledge base.
Plans: Advanced & Expert (website sources only)
Auto Q&A Generation scans a crawled web page, identifies likely questions, and creates ready-to-answer Q&A pairs in your chatbot’s knowledge base.
How It Works
- You crawl a website source.
- Click on the "Generate Q&A" button next to each website page.
- It proposes concise questions and answers.
- You review and accept - entries are saved to your Q&A data source.
FAQ
How many Q&As will it propose?
Roughly 2–5 pairs per webpage, depending on length and structure.
Does it count against my character limit?
Yes. Accepted Q&As are stored like any manual entry, so they contribute to the workspace quota.
Will it overwrite my existing Q&As?
Never. Suggestions become new entries only after you accept them.
Next Step
Use Generate Q&A for your freshly crawled site, accept the high-impact drafts, and give your users clearer answers—no typing required.
]]>What Does AI Boost Do?
Instead of treating each page as one big block of text, AI Boost breaks it into smart,
]]>What Does AI Boost Do?
Instead of treating each page as one big block of text, AI Boost breaks it into smart, focused sections that understand context better. This makes your chatbot’s answers more accurate, up to 40% better compared to a basic crawl.
Comparison: With vs. Without AI Boost
Who Can Use It?
Everyone!
AI Boost is automatically applied to all website content you add to LiveChatAI—no extra setup needed.
Tips for Best Results
- Start with essential pages first – Add your help center, FAQ, or onboarding guides before general marketing pages.
- Manage your quota – If you’re close to your character limit, remove low-value pages or consider upgrading your plan.
Why It Matters
AI Boost helps your chatbot deliver sharper, more relevant answers—and you don’t have to write anything new.
FAQ
Does AI Boost cost more tokens when users chat?
No. It only affects how your content is stored and prepared, not how it's used during chats.
Can I turn AI Boost off or undo it?
No, but don't worry—your chatbot can still use both regular and boosted content together for the best results.
It runs every Monday, retraining the chatbot with updated content from existing URLs and crawling new URLs to expand its knowledge.
Once complete, you’ll receive an email summary with details of the updates.
How to Enable Weekly Site Sync
- Go to Data Sources in your LiveChatAI dashboard.
- Toggle “Weekly Site Sync” ON.
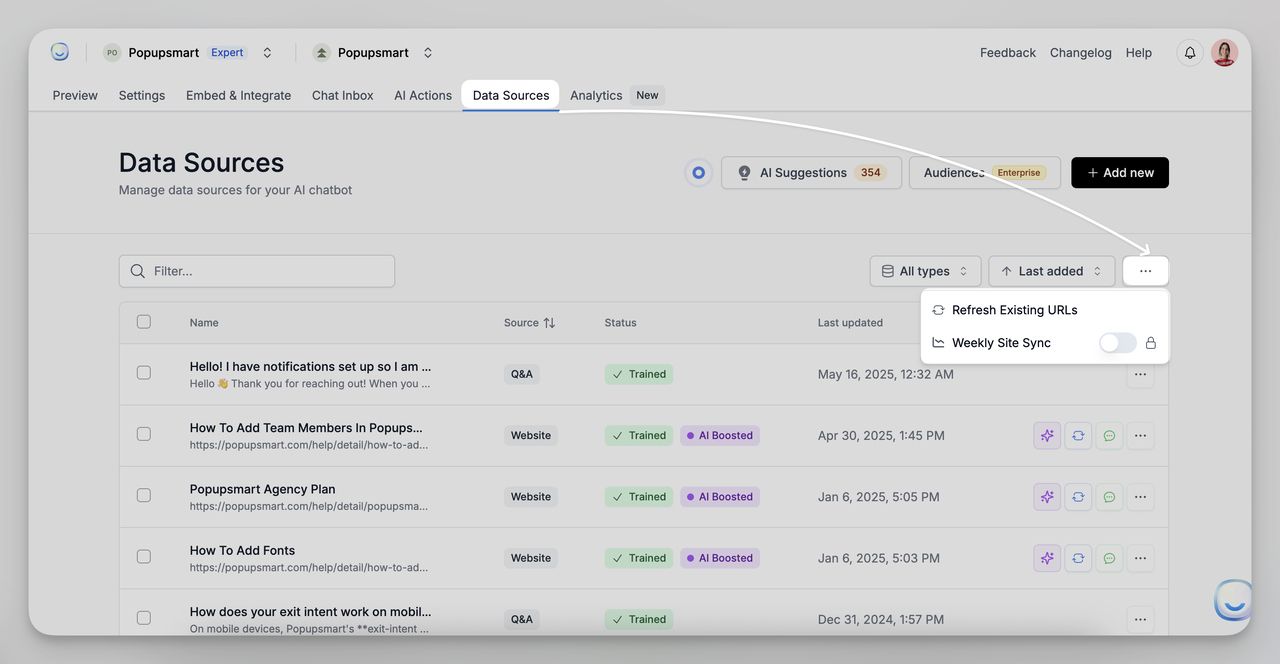
- The system will now update your chatbot every Monday.
- You can disable it anytime from the same section.
How It Works
Site Sync runs weekly, identifying chatbots with the feature enabled. It then:
- Resyncs existing content, updating or removing outdated information.
- Crawls new URLs, expanding the chatbot’s knowledge base.
- Tracks progress in the background to ensure updates are applied efficiently.
Once the process is complete, you’ll receive an email summary with a list of new, updated, and removed content, along with the completion timestamp.