The other day, I was talking about my QoS journey and my work on implementing a Virtual Router Redundancy Protocol (VRRP)-like solution using Node.js and Bun. More info here:
https://iiaku.com/2024/12/08/how-to-ensure-a-more-reliable-isp-fiber-connection-with-failover/
I wanted to add a way to monitor my
]]>The other day, I was talking about my QoS journey and my work on implementing a Virtual Router Redundancy Protocol (VRRP)-like solution using Node.js and Bun. More info here:
https://iiaku.com/2024/12/08/how-to-ensure-a-more-reliable-isp-fiber-connection-with-failover/
I wanted to add a way to monitor my app, which natively logs to stdout using Pino. Initially, I considered a myriad of tools to achieve this. The thing is, most logging tools are primarily tracing-oriented. You can think of standard OpenTelemetry, as well as other open-source or proprietary solutions like Sentry, New Relic, and Better Stack.
However, (at least for now) I didn’t need all those extra features like tracing or debugging—I just needed logging and monitoring. Another key requirement was the ability to set up alerts. I tried New Relic, but in the end, I wasn’t entirely comfortable sending my data to their servers. Another issue was that their alerting integration didn’t work as expected (at least on the free plan I was using).
Sentry was a good option, but it included extra features that didn’t align with my needs. Better Stack does offer a logging-only solution, but since it comes with a paid plan, I wanted a way to retain a good history of my logs without limitations. Ultimately, a self-hosted solution seemed like the best fit.


My Self-Hosting Journey with Loki, Grafana, and Fluent Bit
Naturally, I reached a point where using the open-source Loki + Grafana became a very good option.
Loki is a log aggregation system designed to store and query logs from all your applications and infrastructure
Grafana is an open-source platform for querying, visualizing, alerting on, and understanding your data, no matter where it’s stored. It allows you to create, explore, and share insights through beautiful and flexible dashboards

Fluent Bit is a super fast, lightweight, and highly scalable logging, metrics, and traces processor and forwarder. It is the preferred choice for cloud and containerized environments.
rom that, I had my base stack.
Pros of this setup:
- Open-source
- Can be self-hosted on a machine of your choice for free
- No log ingestion limits (only your hard drive space is the limit)
- Relatively easy to set up
- Part of the Grafana ecosystem
- Extensible and highly configurable
- Built-in alerting features
Cons:
- Requires manual setup
- You need to manage, upgrade, and maintain the stack yourself
- System monitoring may be necessary
For example, I initially set up the Grafana stack using Docker Compose, but one day, the stack went down for some reason. Since then, I’ve had to set up an alerting check on the container using Uptime Kuma to stay informed whenever something goes wrong with the stack.
The Setup
For the Grafana + Loki part, I simply followed the guide and chose the Docker Compose option.

This is running locally on my NUC. For monitoring the stack, I also added a container-based Uptime Kuma setup.

This is how my three containers for monitoring look. Uptime Kuma supports a variety of monitoring options, and you can receive real-time alerts through different destinations like Slack, Telegram, email, etc.
As for Fluent Bit, it’s essentially the tool that sends your logs to your chosen destination. The great thing about it, compared to other options I mentioned earlier, is that Fluent Bit allows you to export logs to one or multiple destinations without needing to add extra code to your application. This is nice because, in my opinion, it’s a non-intrusive way of exporting logs. It doesn’t affect your codebase or impact the performance of your application. Your app is already in production, and it natively produces logs through stdout, so you can send them wherever you want. 😄
Fluent Bit uses a configuration file system where you can define the logging flow (at least, this is how I understand the tool).
On a linux/ubuntu based system how to setup ubuntu

When you have located your Fluent Bit binary, created your service, and it is up and running:

Then, you'll need to set up a configuration file, e.g. fluent-bit.conf
[SERVICE]
  Flush         1
  Log_Level     info

[INPUT]
  Name          tail
  Tag           pm2
  DB            /home/iiaku/.pm2/logs/*.log.db
  Path          /home/iiaku/.pm2/logs/*.log

[OUTPUT]
  name          loki
  match         *
  host          0.0.0.0
  port          3100
  drop_single_key raw
Here’s how my config looks. It's pretty simple, and there may be other options I could be interested in, but this is doing the job.
In the input section, you can see that I’m streaming my PM2 logs to the output, which is Loki.
As a reminder, PM2 is the process manager I use to run my Node.js app on my server.

Then, you set your config like this:
# path_of_fluent-bit_binary -c path_of_your_conf

/opt/fluent-bit/bin/fluent-bit -c fluent-bit.conf
If needed, you can start or restart Fluent Bit, and you should start receiving your logs in Grafana.
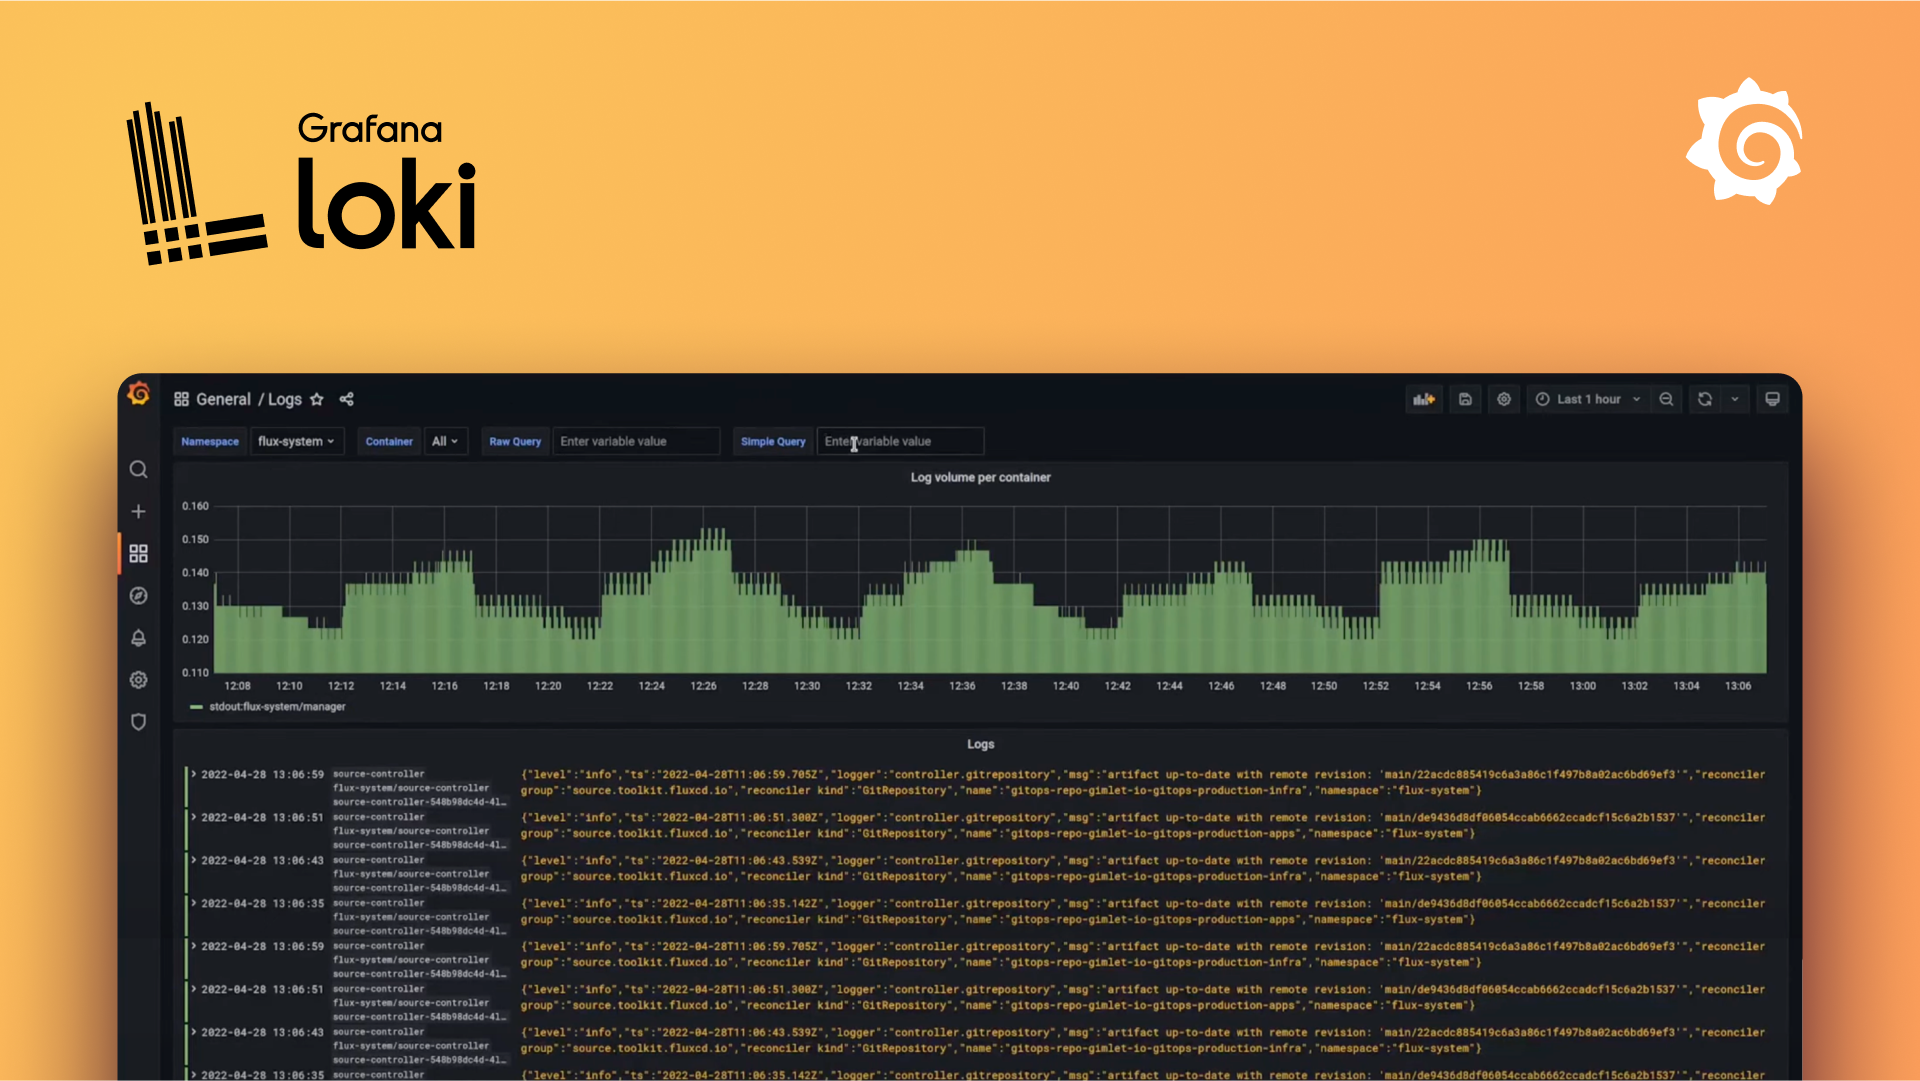
This is how it looks in my Grafana. In the following screenshot, I'm filtering the data as JSON, which allows me to filter by field (e.g., log level = warn).


As you can see on the left panel, there is the Alerting section where you can set a variety of rules and policies to trigger alerts based on your logs. I’ve tested it, and it works well. The only area that could be enhanced is the UX for message delivery (I’ve used the Telegram integration). However, I haven’t dug deep enough to see how I could tweak the message, so that might be the raw content of it. 😄
All in all, I’m pretty happy and satisfied with my setup. It works well, it’s open-source, and it’s free. It also meets my expectations.
I hope you enjoyed the article, and happy self-hosting! 🚀 😄
]]>Recently, I bought a brand new computer with the PRO-X870-P-WIFI motherboard. It has a Realtek® 8126VB 5G LAN port.
I have been running Linux for a while, especially Solus. I was surprised when I realized that my 5GbE port was not natively supported.
I started looking for
]]>Recently, I bought a brand new computer with the PRO-X870-P-WIFI motherboard. It has a Realtek® 8126VB 5G LAN port.
I have been running Linux for a while, especially Solus. I was surprised when I realized that my 5GbE port was not natively supported.
I started looking for drivers on Realtek or MSI, but with no luck—I couldn't find anything for Linux.
edit available here: https://www.realtek.com/Download/List?cate_id=584

sources: link from Banana on Gentoo Forums
Then I came across this repository (thanks to openwrt):
Realtek 8126 Linux driver
It is basically the driver I need for my 5Gbe LAN port.
How to Install Realtek RTL8126 Drivers for the 5GbE LAN Port on Linux
Disclaimer: My Solus installation is brand new, so I needed to install a couple of prerequisites first:
linux-current-headers- version 6.11.10binutils- version 2.43.1
Steps to Install the Driver
- Clone the repository
git clone https://github.com/openwrt/rtl8126.git- Navigate to the folder containing the source:
cd rtl8126- Run the following commands
sudo make
sudo make install
sudo modprobe rtl8126
Then voilà! Your Ethernet interface will be recognized, and you'll have access to the internet through the port.
Note: My port was recognized as a 2.5GbE port on my Solus setup. I believe this is mainly because my Ethernet connection delivers 2.5GbE, and I don’t have higher bandwidth throughput to test beyond that.
I hope this helps!
]]>Recently, I have been into the homelab stuff. I wanted to host a little bit more at home. Also, because I am running a Tezos node, I wanted my connection to be as reliable as possible. The need for that became a little more important when my ISP
]]>Recently, I have been into the homelab stuff. I wanted to host a little bit more at home. Also, because I am running a Tezos node, I wanted my connection to be as reliable as possible. The need for that became a little more important when my ISP experienced an outage for a couple of days.
My QoS journey
QoS stands for Quality of service, and this is what Wikipedia is saying about:
Quality of service (QoS) is the description or measurement of the overall performance of a service, such as a telephony or computer network, or a cloud computing service, particularly the performance seen by the users of the network
sources: https://en.wikipedia.org/wiki/Quality_of_service
As I was saying, I had some ISP (fiber) outages, and I wanted to make my home internet more reliable. It started by changing my ISP. Then, I looked into the idea of "replacing your ISP box with a router." There are plenty of solutions out there, but in the end, it is quite expensive, and you never know exactly in advance if it will work.
The vast majority of what you'll find involves mimicking what the ISP router does so that your router is "authenticated" as legitimate on the network and can decode the fiber signal. I wanted to do that, but I also wanted to reduce the complexity of my setup.
So, here's what I decided in the end: let's just stick with the ISP router and try to build a resilient connection system around it.
The bad idea
Initially, I thought subscribing to two ISP fiber connections was the solution. That way, I could easily have failover from one to another in case of an outage. However, this is not doable (at least in France and where I live). Most of the time, you'll have only one connection port allocated to your home, and you won't be able to have two fiber lines coming in.
The first alternative
This is where I started digging into the 4G/5G router option. There are a couple of 4G/5G routers where you simply insert a SIM card, and it streams the connection to your devices. The good thing about this setup is that you can even connect your ISP router to it. Depending on the 4G/5G router, you can have failover to 4G/5G as a backup in case your primary connection (fiber) fails.
This is the path I decided to go with.
What you'll need:
- An ISP connection and router
- A 4G or 5G router
- A mobile 4G or 5G SIM card and plan

I choose the TP Link Deco 5G

It has one WAN/LAN 2.5 Gbps port where you can plug your ISP router. The two other ports are gigabit ports if you want to connect devices.
This was working pretty well, and I started testing the failover option. However, it was not what I was expecting. I wanted an efficient and fast failover—I don't want to wait 30 seconds for my 4G/5G router to realize I've lost the signal from my ISP.
I started looking into different solutions. There are routers that can perform load balancing and may be a little more efficient, but they would add additional layers of complexity to my infrastructure and increase the cost. This is when I started thinking about VRRP.
The Virtual Router Redundancy Protocol (VRRP) is a computer networking protocol that provides for automatic assignment of available Internet Protocol (IP) routers to participating hosts. This increases the availability and reliability of routing paths via automatic default gateway selections on an IP subnetwork.
source: https://en.wikipedia.org/wiki/Virtual_Router_Redundancy_Protocol
The second alternative
It looks like the first option, but instead of relying on the 4G/5G router to use the ISP router as the primary connection, you decouple your connectivity differently.
I have a server, which is a NUC, and that NUC has two Ethernet connections. You don’t necessarily need a NUC; you can use a laptop or computer with a dongle or external/internal network card to achieve the same. Once your host device has two entry points for Ethernet, your operating system will have two interfaces with connectivity.

Now, the network wiring looks a little more like this:
- Primary Connection: The ISP router is connected to one Ethernet interface on the host device.
- Backup Connection: The 4G/5G router is connected to the second Ethernet interface on the host device.
- The host device (NUC, laptop, or PC with dual Ethernet) manages the failover and routing between the two connections.

Basically, the host will have two connection entry points, e.g., eth1 and eth2. One will have priority over the other, and you can define these priorities using the network manager or by configuring route metrics.

From that point, I needed a way to prioritize my primary connection, determine when to fall back to my backup connection (5G), and decide how to switch back once the primary connection is restored.
To do that there are a couple of options:
- Internet Connection Bonding: This is a technique where you can aggregate multiple connections. It means the computer will stick to a single connection entry point (the bonded one), but behind the scenes, it binds to both connections. In the end, this acts as a kind of failover because, whether the primary or backup is up, you'll have connectivity.
I don't remember exactly why I ditched that option, but it wasn’t working as expected.

- MPTCP (Multipath TCP): This is essentially a protocol layer that allows you to route your internet traffic through multiple sources. It can help achieve a failover option, but I found it a bit heavy and complex to implement. It would have been my last resort if I hadn’t found another solution to achieve what I wanted to do.

- Keepalived: Keepalived is routing software written in C. The main goal of this project is to provide simple and robust facilities for load balancing and high availability to Linux systems and Linux-based infrastructures. The load balancing framework relies on the well-known and widely used Linux Virtual Server (IPVS) kernel module, which provides Layer 4 load balancing.
This was definitely the option I looked into. You basically install it, configure your interfaces, and it will monitor the connection, falling back to your backup depending on the results of the monitoring tests. To test connectivity, you'll have to provide scripts, and it will run these scripts for you, using the results to make decisions.
This is where I was a little skeptical, as it didn’t have built-in capabilities for the checks—it only had the logic to balance traffic from one connection to another. From there, since I had to provide the scripts, I wondered why not code the entire orchestration myself.

From the second alternative to a homemade solution
Network and wiring-wise, the second alternative was the right choice. I now only needed the software part that would:
- Check the connectivity regularly
- Switch to the backup connectivity quickly
- Recover to the primary connection when it's back up
I started my R&D on my desktop computer, which is running the Solus distribution, and it has a network manager (nmcli).
My R&D environment was as follows:
- ISP fiber on eth
- Phone hotspot through USB
So, I had two connections plugged into my computer, and I started hacking away.
The whole point of the application is as follows: we set the following environment variables:
PRIMARY_CONNECTION=eth0
PRIMARY_CHECK_INTERVAL_IN_SECONDS=5
BACKUP_CONNECTION=eth1
BACKUP_CHECK_INTERVAL_IN_SECONDS=30
The environment variables set are for the connection names (primary and backup) and the delay between checks for each connection.
The program will do the following:
- Pick a well-known website randomly from a list.
- Ping that website using
curl, specifying the interface being used. - Based on the result (whether the primary is down, secondary is down, or both are down), take action.
Actions:
- If the primary is up and the backup is up, stick to the primary.
- If the primary is down and the backup is up, switch to the backup.
- If the primary is back up and the backup is active, switch back to the primary.
- If both primary and backup are down, do nothing.
For this, I started writing a little script, which is a Nest.js application written in TypeScript and run using bun.

You’ll find the implementation details and all the requirements for the program in the GitHub README.md, as the repository is open source. More information can be found here:

This is what it looks like when it's running:
[16:50:00.438] WARN (1470255): Primary connection seems to be down, checking again
[16:50:00.438] INFO (1470255): Checking connectivity against
[16:50:00.438] INFO (1470255): Checking connectivity against
[16:50:01.453] INFO (1470255): Current check interval is 5 seconds
[16:50:01.453] INFO (1470255): Primary connection is down ❌
[16:50:01.453] INFO (1470255): Backup connection is up ✅
[16:50:01.453] INFO (1470255): Connection state is PRIMARY
[16:50:02.515] INFO (1470255): Setting route priority for connection eth0
[16:50:03.427] INFO (1470255): Setting route priority for connection eth1
[16:50:03.738] INFO (1470255): Connection (eth0) took 1223ms to restart.
[16:50:03.738] INFO (1470255): Connection (eth0) ipv4.route-metric=300 ✅
[16:50:03.738] INFO (1470255): Connection (eth0) ipv6.route-metric=300 ✅
[16:50:03.738] INFO (1470255): Connection (eth0) connection.autoconnect-priority=200 ✅
[16:50:03.751] INFO (1470255): Connection (eth1) took 323ms to restart.
[16:50:03.751] INFO (1470255): Connection (eth1) ipv4.route-metric=100 ✅
[16:50:03.751] INFO (1470255): Connection (eth1) ipv6.route-metric=100 ✅
[16:50:03.751] INFO (1470255): Connection (eth1) connection.autoconnect-priority=400 ✅
[16:50:03.751] INFO (1470255): Changing from PRIMARY to BACKUP connection is active.
[16:50:03.751] INFO (1470255): Primary connection is down ❌ - Activating backup 🔄
[16:50:04.423] INFO (1470255): Checking connectivity against
[16:50:04.424] INFO (1470255): Checking connectivity against
[16:50:05.440] INFO (1470255): Current check interval is 30 seconds
[16:50:05.440] INFO (1470255): Primary connection is up ✅
[16:50:05.440] INFO (1470255): Backup connection is down ❌
[16:50:05.440] INFO (1470255): Connection state is BACKUP
[16:50:06.448] INFO (1470255): Setting route priority for connection eth0
[16:50:07.334] INFO (1470255): Setting route priority for connection eth1
[16:50:07.622] INFO (1470255): Connection (eth1) took 288ms to restart.
[16:50:07.622] INFO (1470255): Connection (eth1) ipv4.route-metric=300 ✅
[16:50:07.622] INFO (1470255): Connection (eth1) ipv6.route-metric=300 ✅
[16:50:07.622] INFO (1470255): Connection (eth1) connection.autoconnect-priority=200 ✅
[16:50:07.637] INFO (1470255): Connection (eth0) took 1188ms to restart.
[16:50:07.637] INFO (1470255): Connection (eth0) ipv4.route-metric=200 ✅
[16:50:07.637] INFO (1470255): Connection (eth0) ipv6.route-metric=200 ✅
[16:50:07.637] INFO (1470255): Connection (eth0) connection.autoconnect-priority=300 ✅
[16:50:07.637] INFO (1470255): Changing from BACKUP to PRIMARY connection is active.
[16:50:07.637] INFO (1470255): Primary connection is back up ✅ - Switching back to primary.
That way, I had achieved a proper failover software system that switches between two connections on Linux. 😄
I hope you enjoyed this blog post.
]]>For a couple of months, I have been self-running a Tezos node at home using the amazing Tezbake solution available here https://bakebuddy.xyz/. It is an open-sourced Tezos instrumentation tool to bootstrap and set up your Tezos Baking Node 👨🍳 yourself using a connected computer]]>
For a couple of months, I have been self-running a Tezos node at home using the amazing Tezbake solution available here https://bakebuddy.xyz/. It is an open-sourced Tezos instrumentation tool to bootstrap and set up your Tezos Baking Node 👨🍳 yourself using a connected computer and a ledger signing wallet.

This is nice but I wanted to keep an eye to my node. I wanted to know when it goes down and be alerted. To do that I opted for the option to leverage the Tezos explorer API.
Tezos Explorer API
They have a variety of plans based on your need but the free tier is quite enough to achieve what we want.
Setup
Requirements:
- An already running Tezos Baker node running and it address

- A checkly account

Steps:
Get into your Checkly account at the top left corner click on the blue plus button to create a new monitor.

You'll have to select API check and fill out the form:
- Give your monitor a name (required)
- Set Tags (optional)
- Method: GET (required)
- Url: https://api.tzkt.io/v1/accounts/YOUR_TEZOS_BAKER_ADDRESS (required)
You'll have to replace YOUR_TEZOS_BAKER_ADDRESS to your Tezos Baker address. Your final address should look like that for instance:
https://api.tzkt.io/v1/accounts/tz1YFkDj3fqq2Ee5Uwx1EpxVtifvv9vm49SE

From that point what we have done so far? We are just in process of creating an alert that will monitor the TzKT api on a given endpoint, however, this is not exactly what we want. What we want is to specifically monitor our baker. As the endpoint is customized with your Tezos baker address, the endpoint returns a bunch of information (JSON format) about a specific account. If you are curious to know how it works and what we get from that route, more info from the documentation and section account here: https://api.tzkt.io/#tag/Accounts
Then what we will be doing? The idea is that Checkly will periodically hit our customized endpoint and against the returned JSON payload we will run a script that will make assertions. These assertions will be based on the lastActivity field from the response payload. Given that info, if let's say our baker was not active for a given amount of time we can consider it inactive or down and alert us based on that.
5. As stated to do so we will set a script which is called a teardown script, this is a script ran just after the endpoint is being hit by Checkly. So a little bit down to the previous script there is the following section and get into:
- Run setup/teardown scripts before or after your check
- > SHOW EDITOR
- Teardown script
- Inline script
What you need to know, is that theses script Checkly is exposing npm packages that you can use out of the box. This is convenient if you need some npm package within your script. More about this, there:


import moment from 'moment'

const diffToNowInMinutes = (time) => {
    const currentTime = moment()
    const timeToCompare = moment(time)
    const diff = currentTime.diff(timeToCompare, 'minutes')
    return diff
}

// 1. We parse the response from tzkt.io that was hit by checkly
const parsedResponse = JSON.parse(response.body)

//2. We get the lastActivityTime field from the response
const { lastActivityTime } = parsedResponse

//3. We make an assertion, if the diffToNowInMinutes > 5 minutes we throw an error
if (diffToNowInMinutes(lastActivityTime) > 5) {
    throw new Error('No activity in the last 5 minutes')
}
Teardown Javascript Script
If the teardown throws, the alerting will be triggered, checkly will interpret this as a failing monitoring otherwise nothing happen and it is considered as up (green). In this script, you are free to adjust the number of times where you want to consider your baker should be considered as inactive. I had a couple of false positives using 5-minute-based alerting. For instance, this alert triggered sometimes when all endorsements were properly acknowledged, so adjust to your baker and needs.
- Then once you have done that I'll recommend setting a periodicity check for your alert, and ideally syncing it with the value you set in the script

Avoid setting a too low value otherwise, you might hit the free quota limit available for your checkly account.
- At the end of all of that you can select a bunch of alerts you'll have access to the channel available to your account. If I'm not mistaken you'll have by email address which might be the default one. If you'd like to use another one I suggest you set other one from your alert settings:


That's pretty much all, reference your setup alerting channel at your convenience and you are good to go. You'll receive alerting if something is going wrong. For instance, to me I've set up an email and a Telegram (bot) channel and it looks like that.


I hope you liked how you can set up monitoring for your Tezos baker, happy baking and monitoring. See ya.
The other day (2 years ago) I was doing talking about my transition from Google Auhenticator to Authy here with the variety of all advantages Authy brought. Easy of use, convenience of getting your 2FA code right from your desktop, multi-device etc.
This was great but all good
]]>The other day (2 years ago) I was doing talking about my transition from Google Auhenticator to Authy here with the variety of all advantages Authy brought. Easy of use, convenience of getting your 2FA code right from your desktop, multi-device etc.
This was great but all good stuff comes to an end and that was basically what the email of Twilio send to their user recently.

It's was the start of looking for an alternative, there are some but they were not fitting all my needs. I mainly work on macOS or Linux, sometime getting on Windows just for gaming. My main goal was pretty much to get the exact same experience accross all of my devices, which means all software I'm using must be cross platform, at least macOS + Linux. I did some investigation and I have found the following:


Theses were a bunch of option but none were ticking all of my criterias. I was not a big fan of ente auth, since if I'm right they were asking to create an account (I know I had to link my authy to my phone number), but did not like the onboarding so did not go further. The other one 2FAS or Aegis did not have a desktop app or an app that fit my needs. Bitwarden was the best candidate as I am already using it as password manager but has it has OTP support but first of all if I'm not mistaken you have to get the first plan for OTP support and also I'm not a fan to combine both my password manager with my OTP, so this was a no go. There were also the vaultwarden solution if I don't want to get a plan, but it does not solve the fact that both my password manager and 2FA OTP live in the same app.
Then I dug a little bit about how that OTP thing was working, I stumbled on the following npm packages:


I choose otpauth, that was the one that fits my needs. However it blew my mind 🤯 and I wonder why there was not that much OTP token manager out there. Then I said why not recreating Authy myself using Tauri which is an electron alternative where you can embed web app to create cross-platform app. It's rust based and seems to works well. Tauri gives you also API for system access, it works arround permissions etc, the same way as it work in mobile development. I had heard about Tauri but never really had an idea or the opportunity to work with it so that was the opportunity.
Did my own research and a couple of days after had this little side project to build.
My stack:
- Tauri my cross platform app creator (linux/macos/windows)
- Nuxt.js: my framework to craft a multipage app without the hasle of routing and a great DX
- Zustand as my state manager
- Zod for fields and schema validation
- Tailwind CSS + Tailwind UI for UI
- optauth as OTP lib


Then Yhtua 🔓 was born
Yhtua is an open source and free desktop application and Authy alternative designed to provide secure and convenient two-factor authentication (2FA) management.
 iiAku
iiAkuYhtua comes with the following built-in feature:
- Can add OTP Token from their secret (6/7/8 digits support)
- You can import your previously exported tokens (from another computer)
- You can export your tokens
What next for the futur ?
I did not wanted to have a too complex add a new 2FA token form for a MVP, but I'd like to let the (advanced) user to change the algorithm of its token and also perhaps support HOTP (HMAC-based one-time password). I know I can do it with the lib and that just a matter of parameters. The token schema can handle it.
Also I'm open to contribution, haven't got the time to write a contribution guideline markdown, but definitely open to that 😄.
I hope you enjoy my article about Yhtua and I hope you'll use it.
Enjoy
It has been a long time since I haven't written anything here. I'm pretty sure I have plenty of subjects I could write about, I just need to figure out the one I should pick and write down a couple of words about it.
]]>It has been a long time since I haven't written anything here. I'm pretty sure I have plenty of subjects I could write about, I just need to figure out the one I should pick and write down a couple of words about it.
But...
Wait a second? I was just wondering, what actually drives me in Tech? What is fueling me on a daily basis and why am I happy to get to work whatever the purpose, for the 9-5 job or for the fun when I have a little bit of time to work on the many side projects all developers are starting but where they never get in production.
Honestly, that's a good question, and I believe I have a glimpse of an answer to that. Tech is gigantic, I don't believe it has a limit as it has a variety of fields, but I believe what drives me the most is the following.
I'm a Cartesian, I have an engineering degree and I once loved mathematics, and I believe I always loved solving things the smart way. Always been interested in tackling something with an elegant and smart solution, and I believe programming and tech are all about that.
However, I could have asked myself where that inner power is coming from when you realize after almost a decade it's still there. I believe to me it's all about the passion, but this is a vague term; it does not speak about something which is concrete. I also think the other part of the magic is about being an infinite learner. As an engineer, a developer, a programmer, a scientist, you always have unknowns, but you also have a skillset of basics; the alchemy happens through the solving journey. You'll have business needs solved by techniques, technology, and a myriad of tools to help achieve that. All of that will take into consideration your basics, and obviously because you don't know everything, you'll learn in the meantime. I do believe I also love that aspect of working on something that is always new to me, where I'll bring value to an end-user. There is another aspect of that, maximizing the time you spend. I believe I'm lucky working in such an industry.
I'm not saying your work should be your passion. There are a lot of people that are in IT and are not especially passionate about it, and that's totally fine. You definitely don't have to be. Nevertheless, when it comes to talking about myself, this is how it feels to me.
]]>The other day, I was looking for an old replacement solution to dump my database across the internet securely. I needed it to run on a daily basis, safely, isolated and transfer and store data securely in the cloud.
I came across that:
The other day, I was looking for an old replacement solution to dump my database across the internet securely. I needed it to run on a daily basis, safely, isolated and transfer and store data securely in the cloud.
I came across that:
 jameshy
It inspired me , however the way it was implemented was not fitting exactly what I was looking for so I rewrote it based on my need and came up with something like that.

The workflow is the following:
- Kicking off a function in AWS Lambda on a daily basis cron(0 3 * * ? *) this is the cron expression I used in serverless framework
- Create the dump archive and generate a key and iv as I was targeting AES-256-GCM encryption
- Sent out archive at Scaleway S3 api compatible Object Storage solution and the iv file with the key alongside the way you want (through the filename, or metadata etc..) to R2 the s3 object storage alternative by Cloudflare.
- Use a simple utility to decrypt your ciphered file.
#!/usr/bin/env node

import * as fs from "fs"

import { Command } from "commander"
import { basename } from "node:path"
import { createDecipheriv } from "node:crypto"

const program = new Command()

program
  .version("0.0.1")
  .description("Decrypt an AES-256-GCM encrypted file")
  .arguments("<encryptedFile> <ivFile>")
  .action(async (encryptedFile: string, ivFile: string) => {
    const iv = fs.readFileSync(ivFile, "utf8")
    //change key retrieving accordingly to the way you are passing it
    const key = ivFile.split("_").pop().split(".").shift()

    const decipher = createDecipheriv(
      "AES-256-GCM",
      Buffer.from(key, "hex"),
      Buffer.from(iv, "hex")
    )

    const fileBasename = basename(encryptedFile)
    const input = fs.createReadStream(encryptedFile)
    const outputPath = encryptedFile.replace(
      fileBasename,
      `unencrypted_${fileBasename}`
    )
    const output = fs.createWriteStream(outputPath)

    input.pipe(decipher).pipe(output)
    console.log(`Decrypted file written to ${outputPath}`)
  })
  .parse(process.argv)
Can be run that way for instance:
npx ts-node decrypt.utility.ts '/home/foo/2023-05-17.backup.gz' '/hom /home/foo/backup_2023-05-17_your_key.backup.iv'Pros:
- You can build something customized
- Your data is encrypted and never go through the internet unencrypted
- AWS Lambda offer you isolation and consistency for recurring and scheduled triggers
- You can scale your function endpoint with multiple triggers and different events. Basically 1 event = 1 database to dump
Cons:
- You have to maintain your backup mechanism
- Need to monitor failed or interrupted backup system
- Lambda has some limitation (15 minutes max execution time) it might not work if dumping your db takes too much time to dump
- Meanwhile you increase the complexity to get all info in order to decrypt your data, you are exposing to more service which is in a way a bigger exposure to threats
Since a couple of months. I'm working on a CRM-like SaaS product. I've done like 80% of the projects and when you are doing the remaining bytes, there are always concerns or questions hard to answer. In that post I'll illustrate which]]>
Since a couple of months. I'm working on a CRM-like SaaS product. I've done like 80% of the projects and when you are doing the remaining bytes, there are always concerns or questions hard to answer. In that post I'll illustrate which problem I've faced, what was my thinking journey and how I solved it.
Intro
What my CRM-like SaaS is actually doing ?
It's actually pretty simple: The idea is that if you have a phisical store you might ended up doing the excel sheeting thingy to take orders in your shop or by phone. Do your stuff and then your clients are comming picking up your stuff. What I wanted to to is to enhance that experience for both the merchant but also for your customers. You come up with a well crafted and intuitive solution to take your client's orders and they are getting a text message on order confirmation and/or a reminder to pickup their order.
What was the technical issue?
So there are 2 type of notification:
- Confirmation notification which is being sent right after the order is registered by the merchant
- Reminder notification which is being sent X days before pickup
Then this is on the reminder notification where things are getting a little bit tricky as for the confirmation you just have to send it immediately while creating the order on the first place. How would you do if you want to execute a specific handler at a given time.
To me it rings some design bells: delayed queuing or cron.
Don't know why but I took the queuing option initially versus the cron one. Actually cron in my mind make a little bit more sense to something that will be triggered on a regurlarly basis, even if it would work perfectly it you wanted to trigger something only once.
Once I took queuing there was the thing about is it critical to make sure no items is being lost or that's fine we can resume them in some way.
So if it's critical, I presume any queuing system out there would work suck as SQS, Kafka and RabbitMQ. However for the level of usage I'm having I found theses solution a little bit overkill. In the end I came up with a bullmq solution which is basically a queuing system with all mechanics you might need from a queuing system and this is redis based. It means locally and for your DX you simply set up a docker container with redis and you are ready to go with your queuing system.


I did all of my stuff and that integration looked good. Then I started to look about how I would do that in production. It brought me to look at how I would expose a redis docker container through the internet securely with Traefik. I managed to do something that work for that, but it was not as straighforward as I thought. Here you might ask why I would do that in the first place where there are plenty of solution out there to have a managed redis instance without the pain of self hosting it. You are definitely right, but I find this terribly expensive for what it is, but for sure it's peace of mind and you don't have to take care about the maintenance of that piece (monitoring, upgrades, security and so on).
bullmq solution pro and cons:
pros
- Good developper experience locally through redis + docker
- bull/bullmq is battle tested and a standar in node.js queuing
cons
- self-hosted hosting is not that easy
- managed solutions are not very cheap
I started wondering could I get rid of that redis piece that way you won't have to either pay for it or self host it. This is what brought me to upstash, which is an amazing product I've heard recently and seems to do the work. Decent free tier, has redis, kafka and proprietary solution called qstash (an http based queuing system).
For a while the redis option from these was an option, but looks like it's not yet fully support with bullmq and another reason it seems using that with bullmq is not super relevant, as bullmq seems to do a lot of operations managing queuings and you might crush your free tier sooner that expected.
upstashI did not wanted to go through the Kafka thingy for the same reason exposed earlier. Then the qstash thing was an option, the only thing I was reluctant is that I did not wanted to lock me into a solution that was not really interchangeable. Indeed, with a bullmq option if you are self-hosted I can go redis managed in a blink of an eye just by changing my redis endpoint. That would not be the case with a qstash option, but nevermind I'm currious let's give a try.
Qstash works well. It actually and api endpoint which will forward to your desired endpoint that's is.

It works that way
curl -XPOST \
    -H 'Authorization: Bearer XXX' \
    -H "Content-type: application/json" \
    -d '{ "hello": "world" }' \
    'https://qstash.upstash.io/v1/publish/https://example.com'
You set up your route which will represents your consumer and it will receive your message payload.
There is an sdk for doing this, if you don't to send request yourself:
https://www.npmjs.com/package/@upstash/qstash
There is also ways to make to validate who is sending that data with signature validation on your route.
From that you have a "managed" or "serverless" queuing system out of the box up to 500 messages per day for free, then 1$ per 100k message, amazing. Another good thing about there solution is that you have log, with payload and status out of the box. This would let you avoid having to make the extra step of managing, storing visualizing your items.
it looks good, but the exact same concerns I had with my self-hosted solution is exactly the same with Upstash. Obviously for sure in a serverless way I'll get a decent queuing system BUT that an extra piece into my system that I'll be relying on. What if upstash is going down ? What if they is congestion in there system ? etc.. IMHO the less you are dependant on external and critical for your business thing the better it is.
upstash qstahs solution pro and cons:
pros
- Good developper experience locally, you can set up local tunneling with ngrok or anything for the local routing forward to consume your messages
- Decent free tier
- Simple to use sdk
- Reliability
- Serverless aspect (no infra to monitor, manage etc)
cons
- Proprietary solution
- External third party
Finally I came up with another solution I had from the begining, the cron solution. My backend is that way
- Nest.js for the API
- PostgreSQL db with prisma
- Nuxt.js for the frontend
- TailwindCSS for the style
- Supabase for authentication
Nest has a built-in cron system.
The idea is the following:
- Confirmations notification will be triggered with a single executed cron immediately
- Reminders notification will be triggeed with a single executed cron on a given time
I keep track about all of this in tables here my schema from a customer_command perspective

A command has 1 or n notification with a given type reminder/confirmation, then each notification has their own log with their status queued, sent, received.
The only tricky point is that the cron system in Nest.js does not have track of the cron in a persisted way, which means if your server is going down or restart you'll lose track of your scheduled crons. The idea was from that point being able to resume theses cron from pg.
That system is pretty simple, actually on module initialization by default no schedule will be set so just fetch all customers notification which are queued but not sent yet. Once you have done that go through the existing scheduled cron and re-schedule them if there are not there (all of them in case of init). The other part would be to cron run that on a let's say hourly basis. Then from that point you'll have a fully resumable "scheduling" system for notifications.

In house nest.js cron-based solution
pros
- Good DX
- Integrated to your existing backend
- No third party or extra infrastructure required
- Cheap solution
cons
- More boilerplate to implement and track your system
I hope you liked the way I presented things and I always find that interesting to test multiple thing to find the right fit based on your need. It also helps to discover new product such as upstash for exemple and it show you how it could be interesting to use for other project.
]]>The Hubic's way
To do so, hubic is saying to use Cyberduck and everything is stated their:

Basically you get cyberduck and it handle the oauth thingy for you, you get authenticated and you are able to get your data back.The bad thing is that Cyberduck is available only on Windows and Mac and who knows.. I'm running Linux.
So started to look at Cyberduck's GUI alternative in Linux and haven't find something, however it make me think about rclone and it perfectly fits my needs.
The rclone's way
- You get rclone
- Follow the step from their while adding a provider:https://rclone.org/hubic/
- rclone at the end of configuration will open up a tab, you'll have to sign up (feel free to use the forgot password if you no longer have your credentials). At the end of the process you'll get that

4. rclone is setup and ready
rclone ls remote:rclone copy remote: /your/destination/path -PVery convenient and helpful, could be exactly the same with the bunch of service rclone is supporting.
]]>What is Dogamí actually ?
Dogami is a unique play-and-earn game based on tezos blockchain where]]>
What is Dogamí actually ?
Dogami is a unique play-and-earn game based on tezos blockchain where you adopt and raise virtual dogs NFTs. Each dog has its very own attributes, evolving in different stages and able to compete in real-time competitions and events. The better you raise them, the more you earn. From a puppy into your best friend, all your actions will make you earn $DOGA. Moreover, dogamis can also be bred together to produce new and unique offspring, which can be kept or sold on marketplaces.
Quotation by Bilal EL ALAMY - CTO @Dogami
Once I first heard about Dogamí I felt like it was one of the most promising project in the gaming industry and more importantly for the Tezos community.
So it all started that way. A friend of mine and me as part of a week-end were spending together I introduced it about Dogamí and since It was all of our spare time interest and we started diving into it getting more and more interest into Dogamí.
The first mint
So the thing is going on the discord community of Dogamí. Basically what you need to do is taking part of the hype, follow events, be active on their community and if you have some luck you get a Dogalist which is a spot that let you mint (privately or publicly).
The first mint of Dogamí was on the 22.02.22. They were initialy 8000 NFTs to mint. This was a success accross the community and if you had not the chance to be listed to mint your chance to get a Dogamí was through the marketplaces either on Dogami or objkt.com.
https://marketplace.dogami.com/marketplace

The next chance of getting a spot or take part to the journey is 31th of May 2022 where the second private mint will happen check out their discord here:

- Twitter: https://twitter.com/dogami
- Instagram: https://www.instagram.com/dogami
- Telegram: https://t.me/DogamiAnnouncement
- Medium: https://dogami.medium.com
So back in the day my friend and I had the chance to secure a spot and we mint. However the hype was still there and we were scrutinizing every marketplaces to look at NFT's attribute, rarity and so on. However the missing part was mainly that we had data only on listed Dogami which means only for sale dogami where available but we did not have way to explore or filter data based on already revealed data out of hardcoding and visiting url based endpoints. This is where the dogamistats website came up to our mind. Due to the web3 nature, the fact that every interaction with the blockchain is persisted you can effectively parse the blockchain and extract valuable data.
Note on the reveal aspect of Dogamí's NFT: Basically when you mint a Dogamí it has a set attribute which has as status: Box. You won't get a Dogamí directly but a box where you will be free to open when you want (when the reveal is being "unlocked"). For instance as stated the mint occured on 22 th of February 2022 and first revealed box were on 4th of March 2022.

Dogamistats a prototype
So I started hacking. My first goal was to understand how I can access the blockchain effectively. To do so I've been using:

Better Call Dev is a smart contract explorer for the Tezos blockchain.
Non-exhaustive definition but basically as an individual or programmer you can easily explore contract, look at their entrypoint or parameters (required/optional) and so on and you can even query it through different way directly from the UI.
So BCD was here to help and go through the Dogamí NFT reveal's data and the good thing is that you can do so through API as a programmer. Then the next thing was to get the attribute bidding from the data to a human-readable one. Then the job is only to traverse the reveal entrypoint, normalize data and use it.
So after a few hours I was able to traverse BCD's api, store some normalized data.
What was needed further down the road:
- An API to expose that data
- A frontend to consume that data
Dogamistats the prototype that get into production
So I've started crafting the API locally to do so I've been using the following
- Server Framework Fastify https://www.fastify.io
- Used Prisma for db querying https://www.prisma.io/
- Used knex.js for fancy custom and advanced db querying https://knexjs.org
To orchestrate and test this locally leveraged a postgreSQL server through a docker-container see docker-compose file down below.keyv
version: "3.9"

services:
  database:
    container_name: "backend"
    image: postgres
    ports:
      - "5432:5432"
    environment:
      POSTGRES_USER: ***
      POSTGRES_PASSWORD: ***
      POSTGRES_DB: ***
    volumes:
      - ./docker_postgres_init.sql:/docker-entrypoint-initdb.d/docker_postgres_init.sql
So wrote a couple of routes and it was working as expected.
Then had to get started on the Frontend I've used the following:
- Nuxtjs https://nuxtjs.org
- Buefy which is a Bulma UI framework component library for Vue.js https://buefy.org
My app was a single page app, wrote a couple of components tested it out and finally released it.
The last missing piece was actually my scheduled task that fetch new revealed boxes on a daily basis.
To do so I find it quite useful to write a lambda function that was going to do this for me.
The idea is simple:
- On a regularly basis, fetch all elements available on blockchain dogami's reveal data.
- Do a diff between what we already have into db and what's new
- Insert new data
Then my frontend is fully reactive because backend is exposing fresh new and updated data and component are being populated automatically based on attributes and internal avaible data.

How the whole was hosted
- Domain name Got the domain name dogamistats.com from https://www.gandi.net
- Set up database myself on an instance at https://www.scaleway.com. I did not needed to pay extra money for managed database and also it does not really need to be backup, because all the data is available on blockchain. So even if data get lost and I can recover it quite easily and quickly through the automated script. Set up this through docker.
- Set up the frontend on Vercel, pretty easy. Binded the domain name on production + hook when pushing on main branch updating instantly into production.
- Initialy set up my backend on Vercel as well for sake of simplicity and it worked and went through defining a node engine and so on. However note that I was not using a single function and basically if I'm not mistaken vercel is not designed for that. So that was my initialy go to solution, but just recently replaced it with fly.io. This service is exactly what I was looking for being able to spawn and host my service right from a git push action, also bind it to a domain through some DNS mechanism and it works like a charm. I had other alternative heroku for example, but I'm finding it too expensive (out of the hobby free plan) and it has also digitalocean which was my initial bet, but failed on the DNS part. So I gave fly.io a go.
- Wrote and deployed my scheduled function to AWS with Serverless Framework. Again I could I've deployed to Scaleway Function or any other cloud function based service, but I'm used to work with AWS + Serverless and it was straighforward to do so. Eager to give scaleway a new shot again with serverless to double check how the plugin integration is smoother or not, it was such a pain the other time I tried.
Thanks for reading. I hope you enjoyed that deep dive. Feel free to support me and dogamistats.com while sending some Tezos to the address on the footer. That will help me to support my work and mainly cover the cost of hosting.
]]>Over the past few years, 2FA became a standard. Ultimately I've been authenticating myself with Google Authenticator by default and I haven't had any issue with it. I remember I've been playing with Authy in the past but did not stick with]]>
Over the past few years, 2FA became a standard. Ultimately I've been authenticating myself with Google Authenticator by default and I haven't had any issue with it. I remember I've been playing with Authy in the past but did not stick with it. More recently I was facing 2 main issues with Google Authenticator. The first one was the fact I was constantly needed to have my phone with me the second was the fact that I realized that losing my phone could have been resulting in some trouble. A mechanism exists to recover your account if your phone gets lost or stolen it's lost backup codes however I noticed I did not do that and I would have been a hard time getting access to my account without it. This is why I decided to make the switch from Google Authenticator to Authy.
Authy the good alternative
You may wonder why Authy instead of Google Authenticator. In my daily usage, the main advantages were the following.
Multi-device support:
- Smartphone
- PC
Basically, if you set 2FA on one of your devices codes will sync across all of your devices.
If you lose or get one device stolen you can still have access from another device which is huge to me.
Another big point to me is the multi-operating system support. I have an Android device for my smartphone, at work I work on Mac OS, and on my personal computers for personal use PC and laptop, I run Linux Solus distribution. Now I'm always trying to have the software I can use in every environment I work with that way I'm used to working with them.
Authy runs everywhere
You can get Authy there

If you choose Linux you'll be redirected to snapcraft, so Authy is available through snap here:
 Twilio Authy
Also, note there was a browser extension on Authy that could fall into the all operating system section but browser extensions are now deprecated and not recommended to be used. So I recommend using a version from the Authy Download section directly
The only issue I faced while doing my migration was the fact I was forced to basically disabled 2FA and re-enable it on every single service I was using 2FA. This is a pain and I'll love to be able to migrate this is on click in the future. Out of this is now a pleasure to get access to my code directly from my computer with Authy working out of the box in Linux.
Hope you'll make the switch if you found out Authy could fit a little bit more your needs.
That sits for today, stay secure!
Hope you'r good, since a couple of year both of my laptop or desktop computer I'm running Solus OS. Recently I built a desktop computer for working purpose and I haven't received my NVMe drive yet meanwhile I had my OS already
]]>Hope you'r good, since a couple of year both of my laptop or desktop computer I'm running Solus OS. Recently I built a desktop computer for working purpose and I haven't received my NVMe drive yet meanwhile I had my OS already installed in a spare drive. I had all of my data on it and all my system parameters already setup. I didn't want to transfer it all by hand so I look at how to transfer my data drive the easy way and found out Clonezilla was the easiest and best solution to achieve this.
Backup and setup
Note: Before doing anything I recommend to copy at least sensitive data to a safe place, either to an external hard drive or to the cloud. It has many solution for achieving this.
For local or to a known server over ssh copying I'm suggesting using rsync which is available on pretty any OS. Another alternative for remote/S3-storage based oriented backup is rclone.
Assuming sensitive stuff are already backed up, setup a live USB drive of Clonezilla.
For any USB live CB I'm using Etcher which is available everywhere. You can grab it from solus software center directly.

- Install Etcher
- Download USB CloneZilla iso file: https://clonezilla.org/downloads.php
- Create your usb with Etcher, interface is pretty intuitive

4. Restart your computer and make sure to boot to CloneZilla
In my case I was copying a disk of exact same size 1TB to 1TB disk, if I'm not mistaken you may have extra stuff to do if disk are not same size. Especially if let's say the targeting drive is bigger, you'll probably to copy partition to partition and then extend the one where you data are stored.
For my case I haven't touch any partitioning tools, it was a full disk to disk cloning.
Clone your OS
I've follow pretty much the following steps from here:
https://clonezilla.org/show-live-doc-content.php?topic=clonezilla-live/doc/03_Disk_to_disk_clone
What I actually did:
- Boot up Clonezilla live USB
- I've choose the option with ToRam option
- Selected my language and keyboard stuff
- Select Beginer with no advanced options and everything
- I had my source 1TB internal hard drive in my computer + my NVME drive enclosed an attached through USB
- Selected source for 1TB internal hard drive, selected target source for 1TB external through USB
- Confirmed question that targeted source will be fully erased, also asked what to do after clone is done. I've selected to shutdown computer. I can't confirm this, but I've read somewhere that you should not have 2 cloned drives wired to the same computer. Actually boot manager such as GRUB relies on volume UUID and clone copy thoses uuid, this is why I select to shutdown after clone.
- Cloning is now happening
After a while (10-15mn) clone was done and my computer was shutdown. I've changed drives so took out the internal hard drive and replaced it with the new cloned NVME one, boot up and everything was cloned and working as expected.
Do not hesitate to look arround and look for specific cases from Clonezilla website they have a variety of use case and documentation about different cases for cloning your hard drives. I just wanted to share this with you people, because I find Clonezilla cloning quite efficient and straighforward avoiding me to reinstall my OS from scratch and needed to parametrized all of my stuff again.
Enjoy and happy clonning 💾
]]>Recently, I had some domains from an old to a new provider. Unfortunately I had attached emails to those domains and I wanted to keep track of my email history such as email sent, email received and so on.
Basically, what's going on when you change
]]>Recently, I had some domains from an old to a new provider. Unfortunately I had attached emails to those domains and I wanted to keep track of my email history such as email sent, email received and so on.
Basically, what's going on when you change your domain provider and it has email related ? You'll end up with two exact email adress, let say:
[email protected] imap.server1.co
[email protected] imap.server2.co
If your DNS are already updated all new email will come to the new email adress inbox and the contrary if it's not the case. Anyway you'll have first to update your DNS when your domain is transfered and you'll start receiving and sending mail from the new one. However all of your history will not be forwarded. I've look at multiple solution to forward/copy/export-import your old data to the new server. Some were client-side based (thunderbird) with some extensions or third party services such as:
- Thunderbird add-ons ImportExportTools NG available from here
- OVH has also on option of doing this here the problem is that I'm not that much confident of giving my credentials through a third party program
None of the solution above were fiting my needs. Nevertheless I stumble onto IMAPSYNC a very well written tool for achieving this.
Official website:
Github:
 imapsync
It also have a online solution available from: https://imapsync.lamiral.info/X/, however same as OVH's solution can't deal with that where futhermore it has also some limitation.
So you can buy imapsync with support right from the website here: https://imapsync.lamiral.info/#buy_all
But you can also run it yourself locally with docker, actually there is a docker image maintained here: https://hub.docker.com/r/gilleslamiral/imapsync/
Usage is pretty straighforward it works out of the box the same way as if you had the imapsync cli installed on your comp.
Let say you want to migrate an adress you can do so that way:
docker run gilleslamiral/imapsync imapsync \
   --host1 old_server --user1 email_address --password1 password_value \
   --host2 new_server --user2 email_address --password2 password_value
This will litterraly sync your 2 email from `old_server` to `new_server`.
I managed to sync a bunch of email adress without any issue the tools works pretty well. Big thanks to the author @gilleslamiral for his devotion and work for that tool. Ouf of the simplicity of his tool, to be honest I had no idea it was such a pain in 2020 to achieve this kind of thing of just migrating mail data between 2 different server. Now with IMAPSYNC you know how to make it, the right way.
]]>Recently, I've been playing with internal micro services. I've was used to work with micro which was doing the work pretty well for little thing.
micro
Recently, I've been playing with internal micro services. I've was used to work with micro which was doing the work pretty well for little thing.
micro

Also recently I've come to work with fastify which is quite interesting as well. I love the internal hooks system but also the vast variety of data validation and feature it does offer out of the box.
fastifyAlso I have been used to work with in-memory caching while using Keyv.
lukechilds
Keyv is simple and also can be used with a huge variety of adapters/in-memory or not database such as redis, mongo, sqlite and so on.. I have been using Keyv as a main tool for managing small caching unit in my codebase, when I can easily identify and cache computed data that can be invalidate later on, it does save a little bit of compute, bandwidth and make your stuff work quicker when same internal data are requested multiple times.
npm install --save @keyv/redis
npm install --save @keyv/mongo
npm install --save @keyv/sqlite
npm install --save @keyv/postgres
npm install --save @keyv/mysqlMost of my internal micro services are single threaded, but for some of them I make them run with each core or my machine. This is why I started using Cluster to spawn multiple threads of an internal service when needed.
Single threaded way
const fastify = require("fastify")({ logger: true })

const PORT = process.env.PORT || 1337

const start = async () => {
  try {
    await fastify.listen(PORT)
    fastify.log.info(`server listening on ${fastify.server.address().port}`)
  } catch (err) {
    fastify.log.error(err)
    process.exit(1)
  }
}

fastify.post("/", async (req, res) => {
  //My workflow comes here
})

start()Multi-threaded way
const cluster = require("cluster")
const os = require("os")
const numCPUs = os.cpus().length
const fastify = require("fastify")({ logger: true })

const PORT = process.env.PORT || 1337

const start = async () => {
  try {
    await fastify.listen(PORT)
    fastify.log.info(`server listening on ${fastify.server.address().port}`)
  } catch (err) {
    fastify.log.error(err)
    process.exit(1)
  }
}

fastify.post("/", async (req, res) => {
  //My workflow comes here
})

if (cluster.isMaster) {
  for (let i = 0; i < numCPUs; i++) {
    cluster.fork()
  }
  cluster.on("exit", (worker) => log(`worker ${worker.process.pid} died`))
} else {
  start()
}What was the issue
The first question is how I was used to do caching ? Since I was not doing that much caching, I needed it quite quickly and did not have that huge amount of data to store (all of my data expire after few seconds or minutes TTL based). It's was a good thing to use the basic Keyv in-memory thing. This can be achieve that way:
const Keyv = require("keyv")
const ONE_SEC = 1000
const keyv = new Keyv({
  serialize: JSON.stringify,
  deserialize: JSON.parse,
})
/* Extra use of JSON serialize/deserialize, which is not a mandatory */

const workFlow = async () => {
  const key = "71f1fedd-1556-4a7d-9621-7e66a5088095"
  let myComputedValue = await keyv.get(key)
  if (!myComputedValue) {
    //do my work... and cache it
    //let myComputedValue = ...
    await keyv.set(key, myComputedValue, 60 * ONE_SEC)
  }
  //use myComputedValue value
}So that way you'll have a classic workflow function which does naively trying to get from cache a computed value. If that value already has been cached before take it, otherwise if it never has been cached, get it the usual way and cache it afterward. However what happen if your load is spread through forks and each fork has it own context. You won't be able to share in-memory data easily without having specific mechanism to share data in-between. An easy going solution to this is an independent redis instance gathering your cache independently of your running processes.
So easiest way to setup a redis on a server was actually doing it through docker
Everything is explained into the hub but shortly
- Make sure docker is installed on your machine
- run redis docker that way
docker run --name redis -p host:external_port:6379 -d redis
Pay attention if you are exposing your redis instance publicly make sure it has the protected mode on and user/pass authentication. Check Security notes from docker's hub.
That way you'll be able to use Keyv and point it that way to your redis instance.
So remember:
npm install --save @keyv/redisThen just reference your redis instance into Keyv
const Keyv = require("keyv")
const keyv = new Keyv("redis://localhost:7001", {
  serialize: JSON.stringify,
  deserialize: JSON.parse,
})The advantage of working with Keyv is that you won't need to change your logic or workflow whatever the adapter your are using and this is very helpful. I was glad to enhance my caching logic, make it less thread independent and make it point to my redis instance in a blink of an eye 👀.
That's sit for today, hope you enjoyed it.
Today as usual, I was playing around with S3. Sometimes you are downloading stuff, often you are uploading stuff as well. I was putting a bunch of objects into buckets, and I've got an unusual source stream. I needed to turn that stream into a readable stream]]>
Today as usual, I was playing around with S3. Sometimes you are downloading stuff, often you are uploading stuff as well. I was putting a bunch of objects into buckets, and I've got an unusual source stream. I needed to turn that stream into a readable stream and to be honest I did not have the straightforward solution on top of my head, so I dig a little bit and found out a quite interesting solution.
Node.js File System and Stream apis
Node.js has native file system and stream apis that let you do a huge variety of stuff with streams. You can play with stream, you can transform them through a pipe smart stuff with streams.
Classic stuff we are use to do with stream is the following, you have a readStream which define our source, and a writeStream which defines our destination.
See the following from File System native module from Node.js https://nodejs.org/api/fs.html
fs.createReadStream(path[, options])
https://nodejs.org/api/fs.html#fs_fs_createreadstream_path_optionsfs.createReadStream(path[, options])
https://nodejs.org/api/fs.html#fs_fs_createwritestream_path_options
const fs = require("fs")
const p = require("phin")

const main = async () => {
  const output = "/path/to/file/output.txt"
  const readStream = await p({
    url: "https://example.com/18e977f5-2663-4f97-aa69-2cdcf1f18a30",
    followRedirects: true,
    stream: true,
  })
  const writeStream = fs.createWriteStream(output)
  readStream.pipe(writeStream)
  console.log(`File saved to ${output}`)
}This are classic stuff we are used to do, also working with S3, like downloading stuff and uploading it back directly to s3 could be done this way
const p = require("phin")

const main = async () => {
  const readStream = await p({
    url: "https://example.com/18e977f5-2663-4f97-aa69-2cdcf1f18a30",
    followRedirects: true,
    stream: true,
  })
  const s3 = new AWS.S3()
  const file = { Bucket: BUCKET_NAME, Key: FILENAME, Body: readStream }
  s3.upload(file, (err, data) => {
    if (err) {
      return console.log("Error while uploading your file")
    }
    console.log(`File saved to ${output}`)
  })
}The vast majority of the time, your stream will be a readStream if you do control the way you are getting it. However as I said, sometime you could use a third party libs which does not return a readable stream and you won't be able to transfer your file to S3. This is what I faced recently and you'll the following error.
.../node_modules/aws-sdk/lib/s3/managed_upload.js:422
    var buf = self.body.read(self.partSize - self.partBufferLength) ||
                        ^

TypeError: self.body.read is not a function
    at ManagedUpload.fillStream (.../node_modules/aws-sdk/lib/s3/managed_upload.js:422:25)
    at Stream.<anonymous> (.../node_modules/aws-sdk/lib/s3/managed_upload.js:192:28)
    at Stream.emit (events.js:223:5)
    at Stream.EventEmitter.emit (domain.js:475:20)
    at Stream.handleEnd (.../node_modules/duplexer/index.js:81:21)
    at Stream.emit (events.js:228:7)
    at Stream.EventEmitter.emit (domain.js:475:20)
    at Stream.end (...)
    at _end (.../node_modules/through/index.js:65:9)
at Stream.stream.end (.../node_modules/through/index.js:74:5)In order to solve this you have to turn your output stream into a readable stream. I got leads and solutions from @chrisradek from here:
aws
The solution is simple as stream just provide PassThrough stream apis, more info here:
- Stream api
https://nodejs.org/api/stream.html - PassThrough
https://nodejs.org/api/stream.html#stream_class_stream_passthrough
Usage:
const { PassThrough } = require("stream");

const asReadable = (unreadableStream) => {
    const pass = new PassThrough();
    return unreadableStream.pipe(pass);
}
That's sit for today enjoy.
]]>