With mini Godzillas in our stomach craving for some Lunch.. we wanted to eat at some decent place ASAP. Then like the Oasis in sight of a thirsty traveller we stumbled upon a small joint with pictures of everything except Dosa and Sambhar on its hoarding.. There were puris , bhatures etc.. We were all delighted to feast on some chole puris. We asked the driver [Srinivas] to drop us there and he parked at a nearby parking lot. We entered the restaurant and saw the Menu.. Aha! Chole Puri and a variety of North Indian Dishes. Some were so horribly spelt that they almost sounded like abuses which compelled [Jassi] to click a picture..
We asked the waiter to serve us 4 chole puri. He nodded and said ‘Sorry!’ . That sorry was really a ‘HeartBreak’ for all four of us. I mean why do you write when you can`t serve. He said ‘Sir! This is breakfast..Served till 12.. Now its 12:45.We don’t serve breakfast so late’. We again reconciled our forces and thought of ordering the ‘Dal Makhani and Paneer’ and some naans. He went inside and talked with the chef and returned and said ,’Not Available!’. I asked ,’What do u have then?’.
He replied modestly , ‘South-Indian-Dosa, Idli, Vada’. We were Trolled!
We ordered some Idli and Vada`s and some juice as he didn’t stock cold drinks as he owned a side fruit juice shop. The sambar and vada/idli came. The sambhar was utterly diluted, but tasted fine. The juice was pretty good. We took some water bottles, paid the bill and moved ‘somewhat’ disappointed to our car.
As we moved to our destination ‘ Chamundi Temple’ several other tourist spots passed on the way like the St.Philomonia Church, The Mysore Zoo etc.. Soon we suddenly started gaining altitude.. Hills! Hills! And those curves on the roads that swayed each one of us into an Oscillatory mode.. I must confess it was deliberate sometimes.. Haha.. Fun!

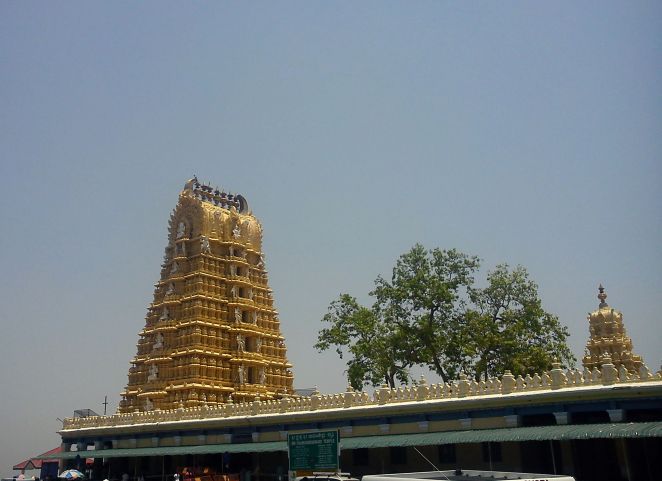
Chamundeshwari temple
The entire Mysore city can be seen from a point . It was so good. But the weather was sultry hot. Soon ,we reached the parking lot and the driver told us that you need to climb ‘some’ stairs to reach the temple. We agreed and that ‘some’ was well a bit more than 500! As we reached near the temple we could see the houses of local people . They were pretty old and some even had an asbestos slanting roof probably for the rain. Panting, we crashed into a local shop and bought some water bottles and moved on.. On the next left turn, we entered the temple premises. The temple was just huge. All painted yellow complementing the sun. It was made by the Maharajas of Mysore as goddess Durga was the Royal Goddess!
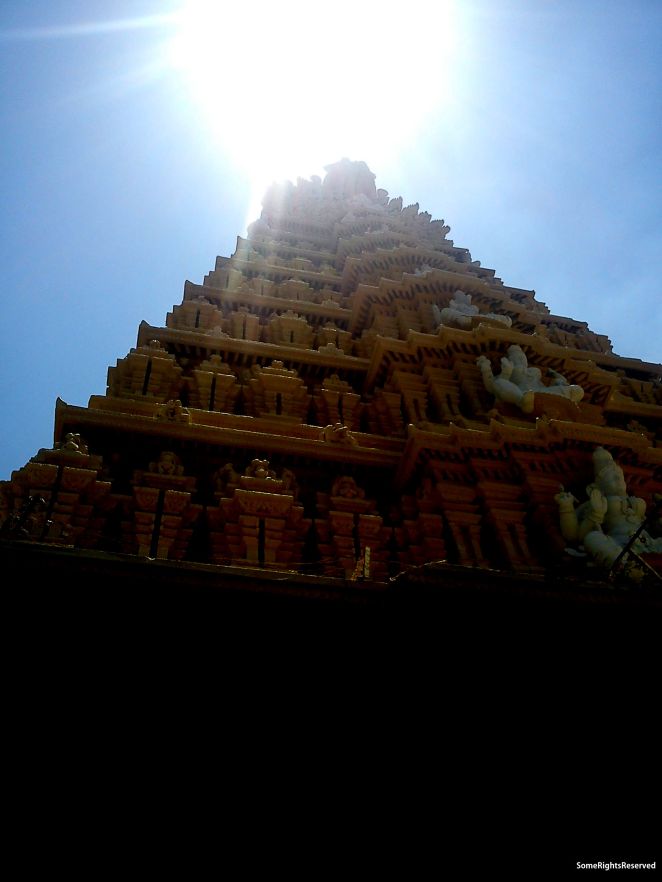
Chamundeshwari temple- Through the Sun
We feared the huge queue at the temple entrance. If we enter the temple we won`t have enough time to visit other spots. We went to the main temple area where all the shops were located. Since we had a ‘sumptuous’ breakfast. We were hungry. [Jassi] and [Shank] noticed a stall serving ice-ed cream. They went on to buy them but i refused to buy as i didn`t like the colour of the ice cream. It seemed artificially prepared with colours like ‘Alien-Green’. But my judgement was correct. They threw them away later.
We all moved to a corner where we could enjoy the magnificence of the temple. The premises were pretty neat and well maintained. Glancing over the entire scene, i stopped on a joint that looked like a typical Mother Dairy stall ( in North). I couldn’t stop my legs to proceed and enquire if they stocked my favourite ‘ Butter Milk’. And Yes ! Yes! They did. The joint was called ‘Nandi’ South –Indian Mother Dairy! Butter Milk was awesome! Others bought the Ice-Cream too!
The Scene from the Nandi Store
We then decided to exit and started our way down. Since, parking is not permanent meaning; we won’t get the car where we parked it. We called [Srinivas] and he brought the car near the stairs. The parking was built around a dried up a kund or a pond! Probably people would bath first and then go upstairs!
Our next destination was the temple of the god who`s joint served us ‘Butter Milk’- ‘Nandi Temple’. Although there was a stair path from Chamundi Temple to the temple too. This is the best thing about [Srinivas] he kept the element of surprise. We all used to keep guessing ‘What`s Next?’.
The Nandi Temple has a magnanimous Idol of Nandi. Probably the biggest I had seen. It was even bigger than a real bull. The temple was open, there was no garbagriha. Just an Idol of Lord Shiva`s vehicle Nandi in open , with people taking customary parikrimas and some carrying out pujas. We went on to seek his blessings unaware of the fact that some fire walking was awaiting us!
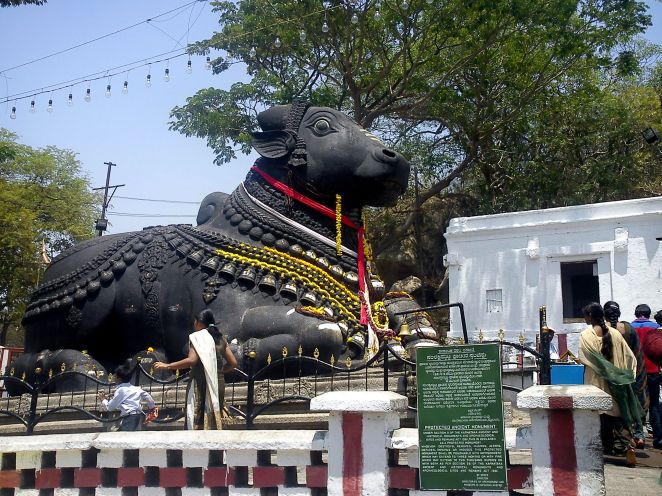
The Nandi Temple
As soon as we removed our shoes and socks and stepped on the floor.. It was like standing on a burning coal pit. We gathered our forces and ran through the parikrima and came back looked at our feet and then without a thought wore back the socks and shoes. #Spiritual
Next on cards, was visiting the place Mysore was for- ‘The Epic Mysore Palace’. We parked our car in the parking. Moved on to the Ticket Booth and paid 40 bucks entry fee. One thing I noticed was that the entire periphery was studded with ‘Bulbs’ to light the palace on nights. It must look pretty nice when hundreds of bulbs would glow at night just on the door itself. But it pissed me off as an Electrical Engineer! #PowerWastage
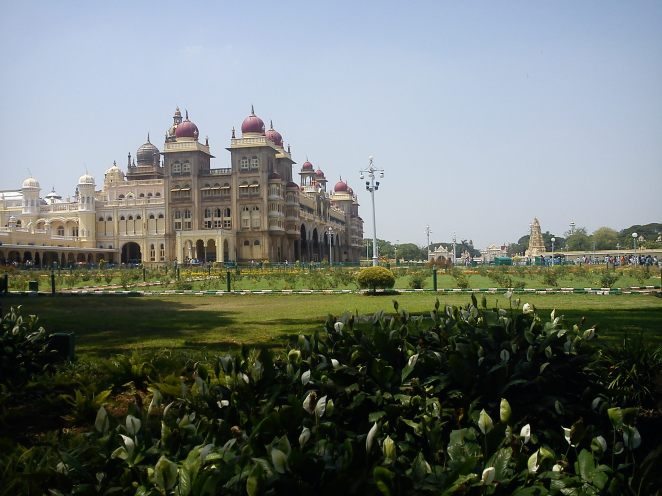
Through the Leaves
Soon, after the queue moved, we entered the palace. It was stunning.. maroon coloured domes studded the palace. Probably, some renovation was being carried out as half palace was painted.
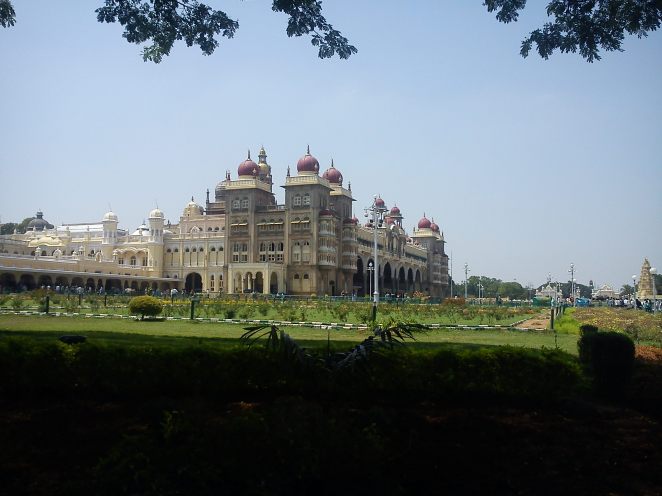
The Palace!
Unfortunately, camera`s and shoes were not allowed and we had to be ready for another ‘fire-walk’. There was also arrangement for speech guided tours in multiple launguages.We deposited our stuff and moved on to witness the legacy of the Wodeyars. It was Grand! As we enter the palace we saw the gifts the King used to get from around the world. Later on we see, the plates they ate in, the chairs they sat on, the beds they slept on, the paintings they got made of themselves. Then we entered the ‘Darbar’; where the king used to interact with the people. It seemed like a large parliament. There was also some nets towards the site from where the king used to see his people from the balcony. They were probably for suicide prevention.
After the visit, we exited the palace, to notice that apparently there was an older palace too which was made majorly in wood. [RKS] and [Jassi] didn’t want to go the second palace, so I and [Shank] proceeded to the next palace, where we had to pay an extra 35 bucks for that.
It was a small and ancient palace(as compared to the main one),but the essence of the place was still intact. As you enter the palace, you will be escorted to a square shaped veranda, whose inner periphery is guarded and displays things like palkis, horse saddle, dresses , utensils etc which were preserved from that era. It seemed that this particular old palace didn’t have many visitors as it was particularly not well maintained. There was a small balcony made in wood, that was about 6-7ft from the ground and 3ft high that kept me thinking what would that be used for as its impossible to stand in it, Probably the veranda was a centre for some cultural activities and people used to sit cross legged in that veranda?
As you enter the next floor, you will witness the armours and shields the warriors of Mysore used to use in wars. There were also some pistols from that time. The first floor was small and got finished very soon but surely left us amazed. With our shoes locked near the main entrance and no way to go around , we had to make some distance in the “Fire-Walk”, believe me, it was unbearable.
After walking a few steps jumping, we would give up and sit near the park fencing wait for the pain to damp out and then try again. We were thankful to [Jassi] and [RKS] who bought us shoes back on time. 🙂
Mysore is famous for its sandal. So, why not get some sandal products? We shopped for some ‘authentic’ Mysore incense sticks and went back to our car. On the way to the parking lot, feeling thirsty, hungry and bored of drinking water, we sighted another Nandi Outlet. Ahh! The yummy milk shake..
Next on cards was some lunch, we asked [Srinivas] to take us to a good restaurant. As asked , he took to a Hotel Siddhath , which is probably the best in Mysore. We had a sumptuous lunch, same old Dosa but it was different and it was good enough to call me back when i come to mysore again. The lunch was concluded with lemon soda and a few wickets of Mumbai Indians.
It was 4:30 already, and [Srinivas ] wanted us to visit another place, we were drained out, near our DOD, but out of the spirit of travelling,we gladly agreed. At about 5:30 we reached, the beautiful Brindavan Gardens, which are located in/near the Krishnarajasagara Dam. It was beautiful from the outside and water seemed to be flowing from everywhere… But sadly, due to huge queue , and late show timings of the musical fountain, we had to vote out our plan to visit these Gardens. Later, as we were heading on the way back , Google Image Search regarding the gardens was carried out and we perhaps missed the most beautiful gardens we could ever visually relish..So do plan to see them!
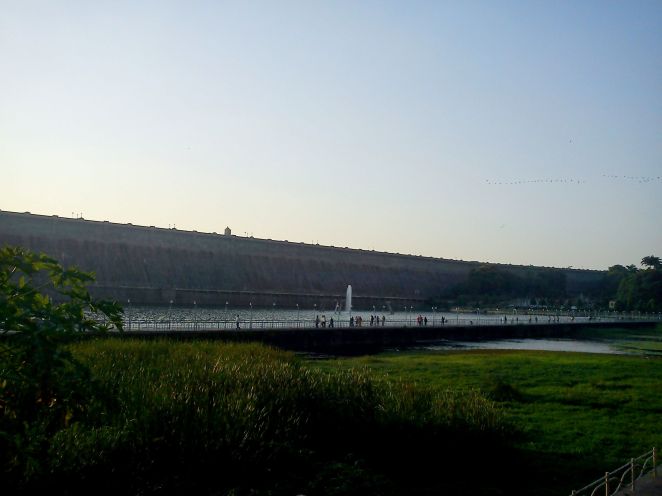
Brindavan Gardens- Krishnarajasagara Dam
As we were heading back, thinking about the palace, the luxury of the kings ,the sangham and the beauty of Karnataka..i dozed off in these thoughts..
Hope you enjoyed Reading this post.. But if u miss the technical stuff which i haven’t been writing about lately, I will write about the several interesting projects i have been doing lately which includes Power Supplies, wearable gadgets, MSP430, Arduino, a Few tutorials and of course PCB `s!
Cheers
IndianTinker


")


