
7 Segmented Displays are pretty low tech and have been around for quite a while.They have a lot of wiring clutter with them..But still they are by far the most easiest(and cheapest) way to give out a (alpha)numerical output..I had interfaced 7segs with MSP430 a while back directly but owing to the low current capabilities of MSP430 the display wasn`t very good and clear . We were recently ‘taught’ about the BCD-7 segmented display in our semester..So i thought about interfacing the 7 segmented with the CD4511..This will save some precious pins and plus drive the 7 seg directly. The CD4511 IC can run from 3V Supply..So no power supply issues and the logic high(input) is about 2V which is also apt as on MSP430 we have this about 3.3V.
The datasheet is available here
The only thing that was bad was the wiring clutter has increased and there were (as always) a few loose connections.After a few minutes,I was up and running with the display.
The Fritzing Schematic is given below:
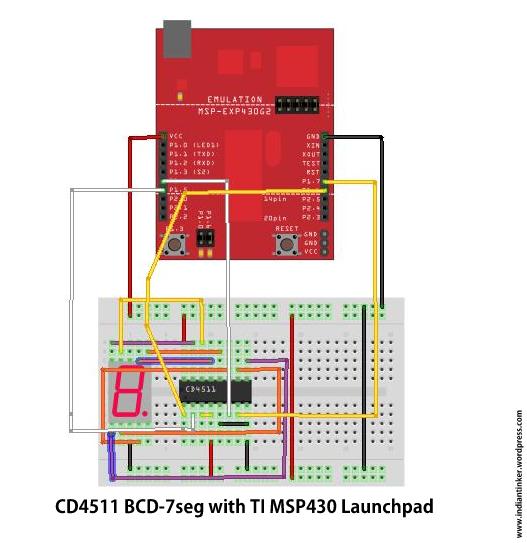
Do everything according to the picture above for the code to run. If the Schematic is not clear..then refer to datasheet linked above.Everything has been done according to it..The LT(bar) and BI(bar) have been connected to +VCC and LE to ground.The display is powered from the ‘board’.
The connections (from the MSP430 end to CD4511) are:
P1.4 -D
P1.5-C
P1.6-B
P1.7-A
#define D BIT4
#define S BIT5
#define B BIT6
#define A BIT7
The code to drive the CD4511 “According” to the above config is:
void CD4511(int numb)
{
switch(numb){
				case 0:P1OUT&=~(B+A+S+D);
				break;
				case 1:P1OUT|=(A);
				       P1OUT&=~(B+S+D);
                break;
				case 2:P1OUT|=(B);
				       P1OUT&=~(A+S+D);
                break;
				case 3:P1OUT|=(A+B);
				       P1OUT&=~(S+D);
                break;
				case 4:P1OUT|=(S);
				       P1OUT&=~(A+D+B);
                break;
				case 5:P1OUT|=(A+S);
				       P1OUT&=~(B+D);
                break;
				case 6:P1OUT|=(S+B);
				       P1OUT&=~(A+D);
                break;
				case 7:P1OUT|=(S+B+A);
				       P1OUT&=~(D);
                break;
				case 8:P1OUT|=(D);
				       P1OUT&=~(B+S+A);
                break;
				case 9:P1OUT|=(A+D);
				       P1OUT&=~(B+S);
                break;
				default:P1OUT&=~(B+A+S+D);
				break;
}
}
Just to clarify :The code uses ‘S’ instead of ‘C’ because C was being used as an internal macro in the header file!
The video is down here..It first shows the simple counter..then the push to change count and then the Dice.
To get the complete source code..you can comment below..The comments are moderated so you email will not be leaked.
Thanks for passing by!
🙂
#Sorry for the bad cam! 😛


