If you're working in a big company, you're probably struggling to work on a single application with multiple teams. You have the large codebase, bunch of components, pages, everything is connected and you're always overlapping your work with some other team. Yeah, I know, that sucks, I've been there and tried a bunch of things to fix that issue.
When you work on a single app with multiple teams, on different functionalities, you need to have:
- A big shared codebase that everybody maintains and has routing, session and authentication functionalities
- Multiple modules separated into repositories that each team maintains
- The bundling and deployment system that bundles everything into one big monolith app and puts that on a server
I have been in companies that have implemented this strategy and this is fine, or I can say it's perfect, but not for all use cases. When it becomes bigger and you want to scale, you're stuck.
The solution to this problem is very simple. Welcome to the era of the Micro Frontends.
What are Micro Frontends? It is a new approach to building frontend applications. We're deprecating the good old monolith methodology and starting to write the apps in multiple frameworks (and even vanilla JS), loading them together using the same router, same domain and without refreshing the page. This gives us the ability to work separately and make separated single page applications that can work independently, isolated and tested. We can load and deploy them and use them together under one building system.
I am the big fan of the single-spa module. Using single-spa we can make the main parent app that has routing and authentication (user sessions etc.) implemented and a bunch of child apps that work like the independent apps. They're loaded using lazy loading without page refresh and can be loaded on the same or different pages.
Main features:
- Use multiple frameworks on the same page without refreshing the page (React, AngularJS, Angular, Ember, or whatever you're using)
- Write code using a new framework, without rewriting your existing app
- Lazy load code for improved initial load time
- Hot reload entire chunks of your application (instead of individual files).
TL;DR
I appreciate everyone's time, if you want to see the code without any explanation, here you go, everything is in the repo: https://github.com/IvanJov/react-angular-single-spa
How to do it?
So far you've read what is single-spa and why is it so awesome. It's time to build a real app and show how can we integrate two main frameworks, React and Angular to work together. We'll finally unite Angular and React fans. Isn't that awesome? 😅
We're going to make a simple index.html file, inject React and Angular and exchange messages between them. Should be really awesome! Let's start.
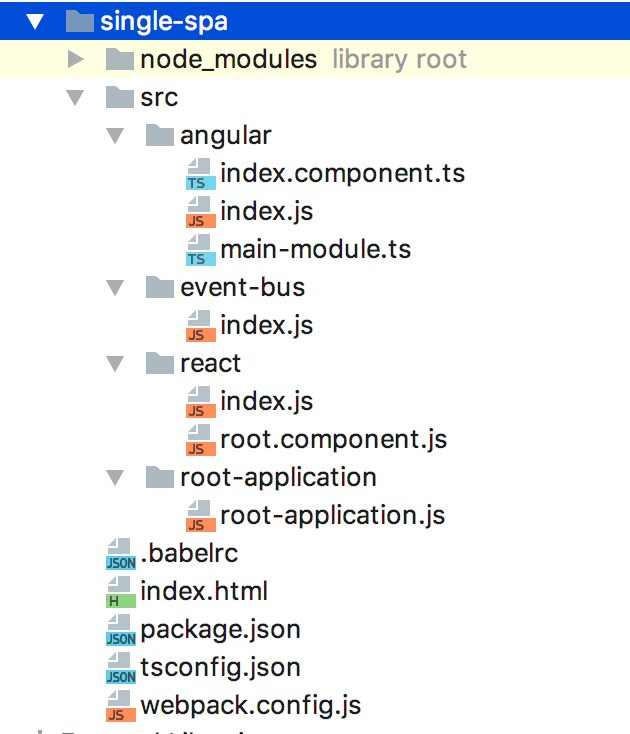
App structure
Let's see how are we going to structure our files. This is how it should look like at the end:
First thing we need to do is to initialize NPM project:
npm init
You can take .babelrc, package.json, tsconfig.json, webpack.config.js and other boilerplate from the Github repo. You'll also need to install a lot of dependencies to make this work, with:
npm install
We'll now go to the Angular and React part, and their communication and initialization on the page.
Root application
First, let's make root-application.js file. It should have everything for rendering our child apps. It should be created in root-application directory:
import { start, registerApplication } from 'single-spa'

const hashPrefix = prefix => location => location.hash.startsWith(`#${prefix}`)

registerApplication('react', () => import('../react/index.js'), hashPrefix('/'))
registerApplication('angular', () => import('../angular/index.js'), hashPrefix('/'))

start()
In this file, we're importing index files from react and angular directories and we initialize them on the page when the router hash starts with the /. In this example we want them to be on the same page, to show how they can communicate together. hashPrefix is a good method and you can use it to mount child app on any other page.
Communication
The communication between React and Angular apps can be tricky. I recommend Eev event bus. It's small, fast and zero-dependency event emitter that will help us to exchange information between React and Angular app. Let's see how that should look:
import Eev from 'eev'

export const e = new Eev()

export default e
This is the index.js file in the event-bus directory. It just initializes Eev and exports it. We'll import it in both child apps and use it to exchange data.
React
The first thing we'll work on is the React app. We'll start with the root-component.js. It's a React component that's rendering some text, emitting and listening for the data and renders it.
import React from 'react'
import e from '../event-bus'

export default class Root extends React.Component {
  constructor(props) {
    super(props)

    this.state = {
      message: 'When Angular receives message, we should see a confirmation here 😎'
    }

    this.messageHandler = this.messageHandler.bind(this)
  }

  componentDidMount() {
    e.on('received', this.messageHandler)
  }

  componentDidUnmount() {
    e.off('received', this.messageHandler)
  }

  messageHandler(message) {
    this.setState({
      message: message.text
    })
  }

  sendMessage() {
    e.emit('message', { text: 'Hello from React 👋' })
  }

  render() {
    return (
      <div style={{marginTop: '10px'}}>
        <h1>This was written in React</h1>

        <p>
          <button onClick={this.sendMessage}>
            Send a message to Angular
          </button>
        </p>

        <p>
          {this.state.message}
        </p>
      </div>
    )
  }
}
When it comes to the React app, we just have 2 files, index.js, and root-component.js file. In the root component, at the top, we just import React and Eev instance. Next, we make a constructor and a component state object. The state has a message key and a placeholder value that will be replaced when we get a confirmation message from the Angular app. Next, we use componentDidMount lifecycle to listen for the event received that's going to be emitted from the Angular app when it receives a message from the React. And finally, inside the render method, we render an H1 element, a paragraph with a button and a paragraph with a message variable from the state. Button has the onClick event, it will emit the message to the Angular component. There's also a nice usage of the componentDidUnmount that removes the event handler when the React app is unmounted and saves some memory.
We'll need a index.js file, the export of the React child app:
import React from 'react'
import ReactDOM from 'react-dom'
import singleSpaReact from 'single-spa-react'
import Root from './root.component.js'

const domElementGetter = () => {
  let el = document.getElementById('react')
  if (!el) {
    el = document.createElement('div')
    el.id = 'react'
    document.body.appendChild(el)
  }

  return el
}

const reactLifecycles = singleSpaReact({
  React,
  ReactDOM,
  rootComponent: Root,
  domElementGetter,
})

export const bootstrap = props => reactLifecycles.bootstrap(props)

export const mount = props => reactLifecycles.mount(props)

export const unmount = props => reactLifecycles.unmount(props)
This is the code that will tell single-spa how to bootstrap, mount and unmount the React app. We're using the single-spa-react module to help us export those three methods.
Angular
Now it's time for the next part, Angular app. Angular is a bit more complicated than React, so we need couple more files for this. The first one we'll create is index.component.ts, the file for the code of the component:
import { Component, ChangeDetectorRef, Inject } from '@angular/core'
import e from '../event-bus'

@Component({
  selector: 'AngularApp',
  template: `
	<div style="margin-top: 100px;">
      <h1>This was written in Angular</h1>
      <p>{{message}}</p>
	</div>
  `,
})
export default class AngularApp {
  message: string = "Message from React should appear here 😱"

  constructor(@Inject(ChangeDetectorRef) private changeDetector: ChangeDetectorRef) {}

  ngAfterContentInit() {
    e.on('message', message => {
      this.message = message.text
      this.changeDetector.detectChanges()
      this.returnMessageToReactWhenReceived()
    })
  }

  returnMessageToReactWhenReceived() {
    e.emit('received', { text: 'Woohoo! Hello from Angular! 🎉' })
  }
}
In this file, we're creating an Angular component that just renders a div with the message that will come from the React app. When the message is received, Angular is sending a response to the React app, that will be rendered on the React's side.
Inside the constructor, we inject the ChangeDectorRef. Since the change of the message will come from the Eev event, Angular won't re-render automatically and we'll need to tell it when to render. Then, we're using a method from the Angular Component Lifecycle, ngAfterContentInit. It is called when all content has been rendered for the first time. That's the place where we want to listen for the Eev event. Inside it, we call an Eev instance on method and listen for a message event that will come from our React app. There we change the message, tell Angular to re-render using this.changeDetector.detechChanges() function and call custom returnMessageToReactWhenReceived function that will send a message back to the React and say that Angular has successfully got the message.
The next file we need is main-module.ts, the main Angular module file.
import { NgModule } from '@angular/core'
import { BrowserModule } from '@angular/platform-browser'
import AngularApp from './index.component.ts'
import { enableProdMode } from '@angular/core'
import { APP_BASE_HREF } from "@angular/common"

enableProdMode()

@NgModule({
  imports: [
    BrowserModule,
  ],
  providers: [{ provide: APP_BASE_HREF, useValue: '/angular/' }],
  declarations: [
    AngularApp
  ],
  bootstrap: [AngularApp]
})
export default class MainModule {
}
And the last file we need is index.js to export the child component to the single-spa root component:
import 'zone.js'
import 'reflect-metadata'
import singleSpaAngular from 'single-spa-angular2'
import { platformBrowserDynamic } from '@angular/platform-browser-dynamic'
import mainModule from './main-module.ts'
import { Router } from '@angular/router'

const domElementGetter = () => {
  let el = document.getElementById('angular')
  if (!el) {
    el = document.createElement('div')
    el.id = 'angular'
    document.body.appendChild(el)
  }

  return el
}

const ngLifecycles = singleSpaAngular({
  domElementGetter,
  mainModule,
  angularPlatform: platformBrowserDynamic(),
  template: `<AngularApp />`,
  Router,
})

export const bootstrap = props => ngLifecycles.bootstrap(props)

export const mount = props => ngLifecycles.mount(props)

export const unmount = props => ngLifecycles.unmount(props)
Same as React, this code will tell single-spa how to bootstrap, mount and unmount the Angular app. We're using the single-spa-angular2 module to help us export those three methods.
Now we have exported the Angular app and completed our first Micro Frontend application. The demo can begin!
Demo!
As you probably saw in the package.json, for running the app we just need to execute:
npm start
Then just open this link in the browser
http://localhost:9090/#/Notice the hash, we are loading React and Angular app on the / of the hash.
After opening the page you should see something like this:
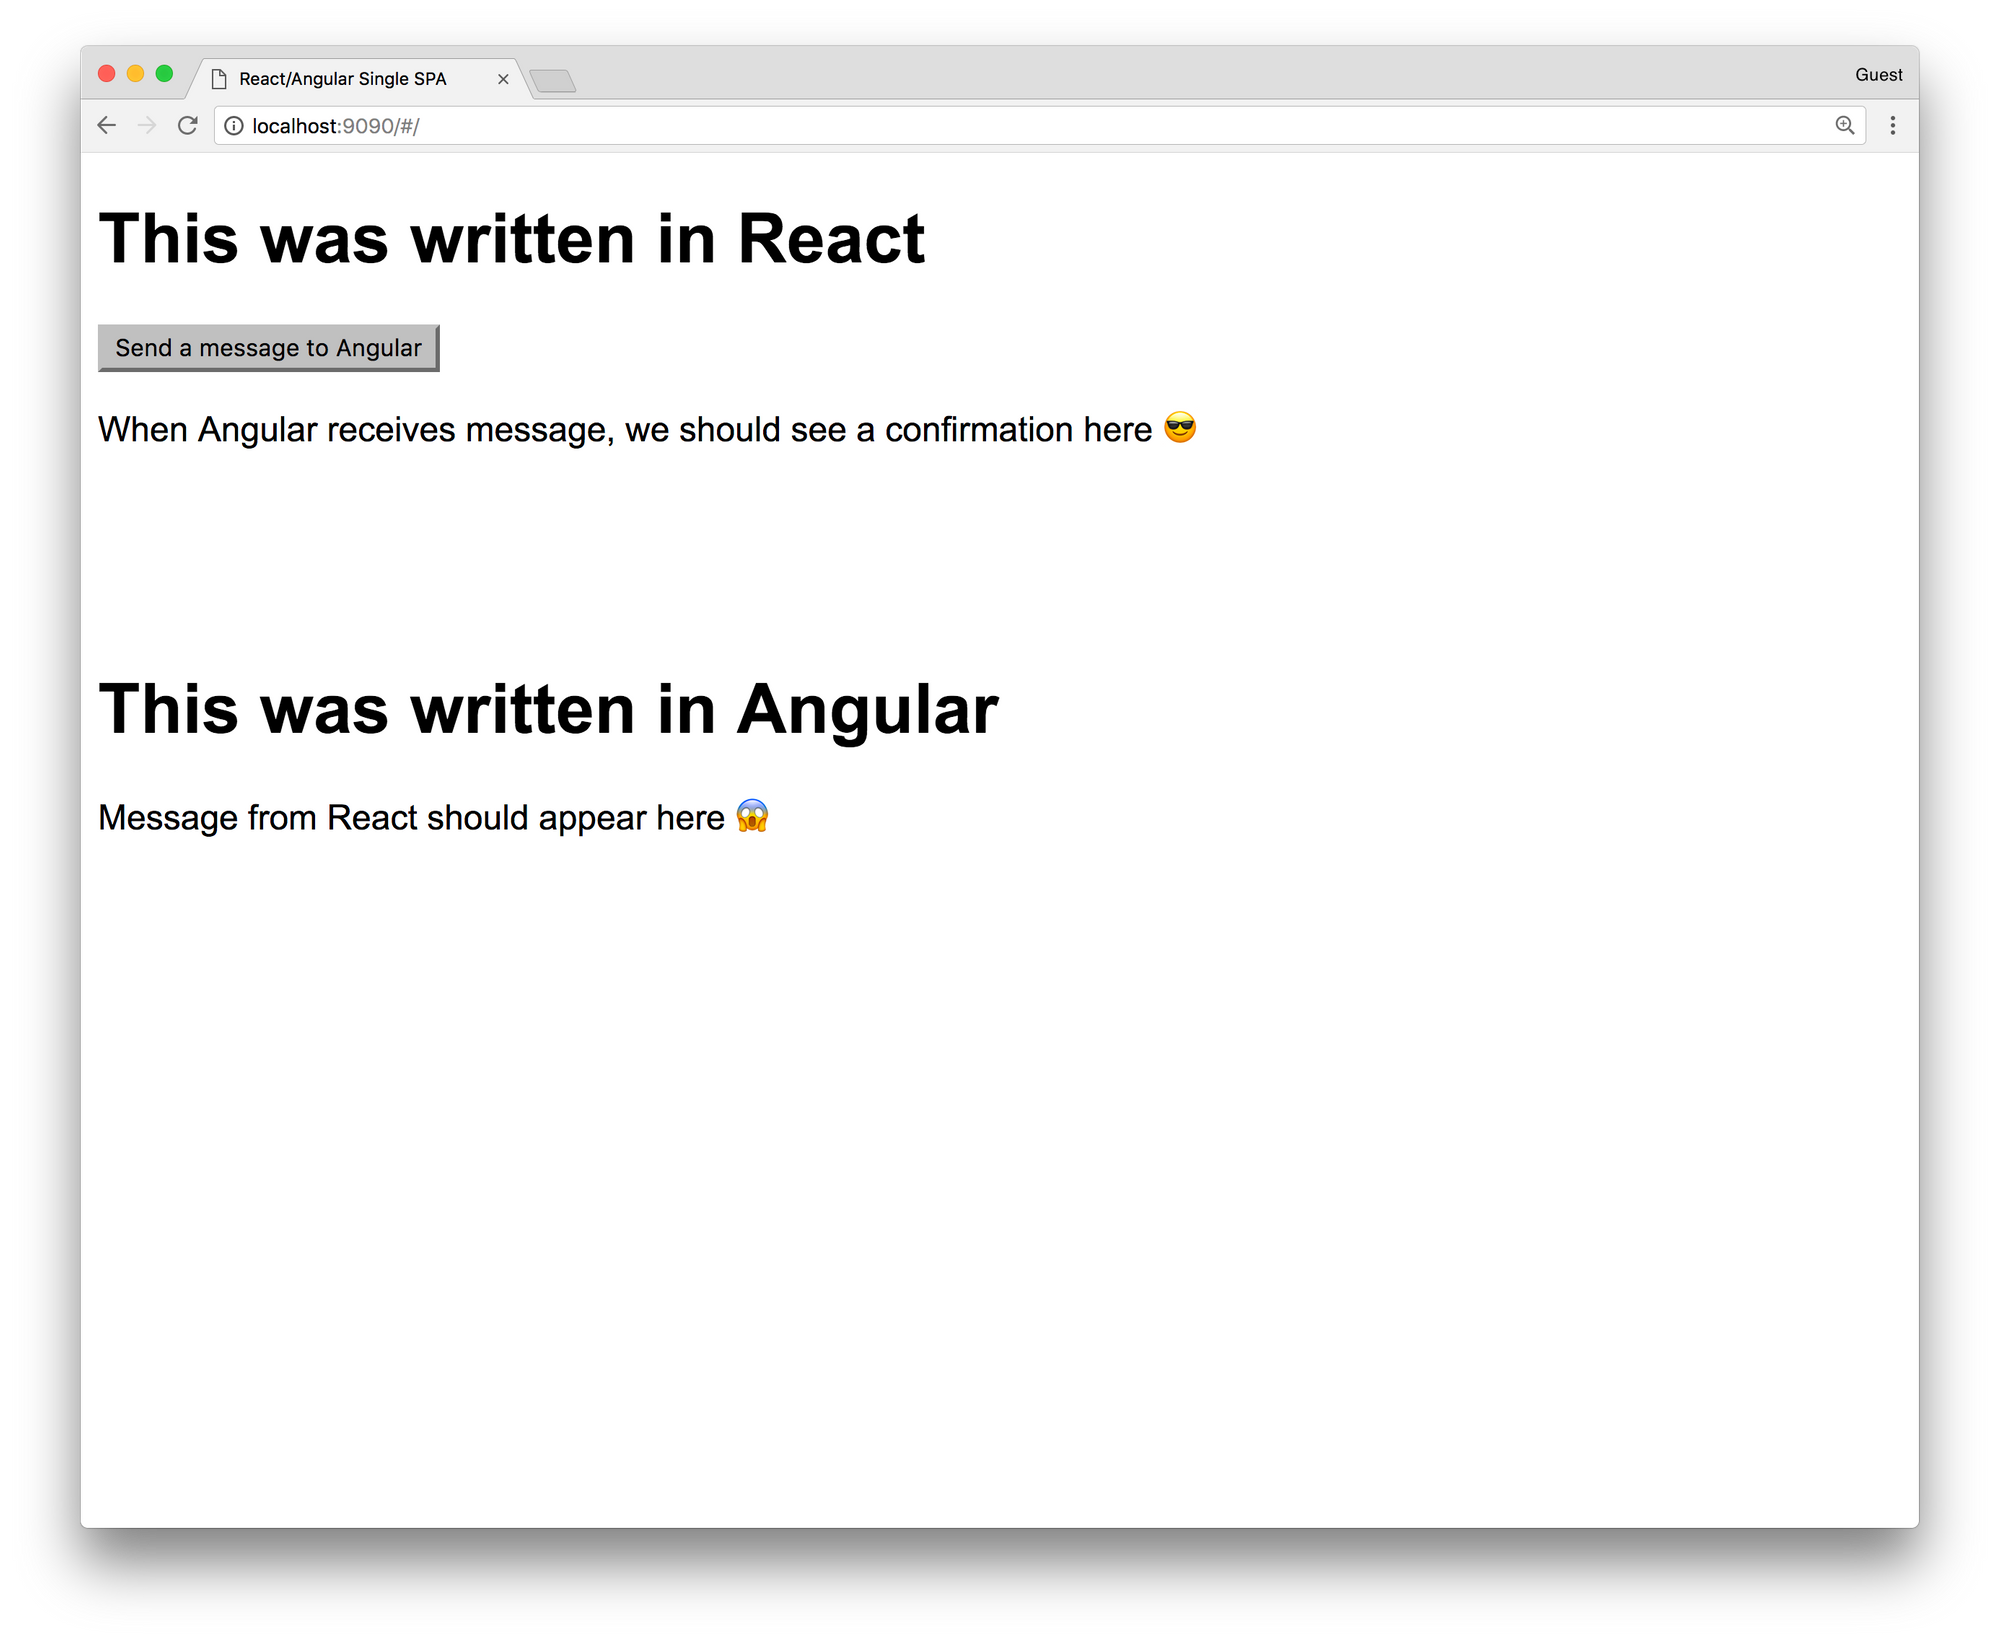
Looks cool, right? You have just rendered your first app that has been made from React and Angular! To see them working together, click on the Send a message to Angular button. You should see this:
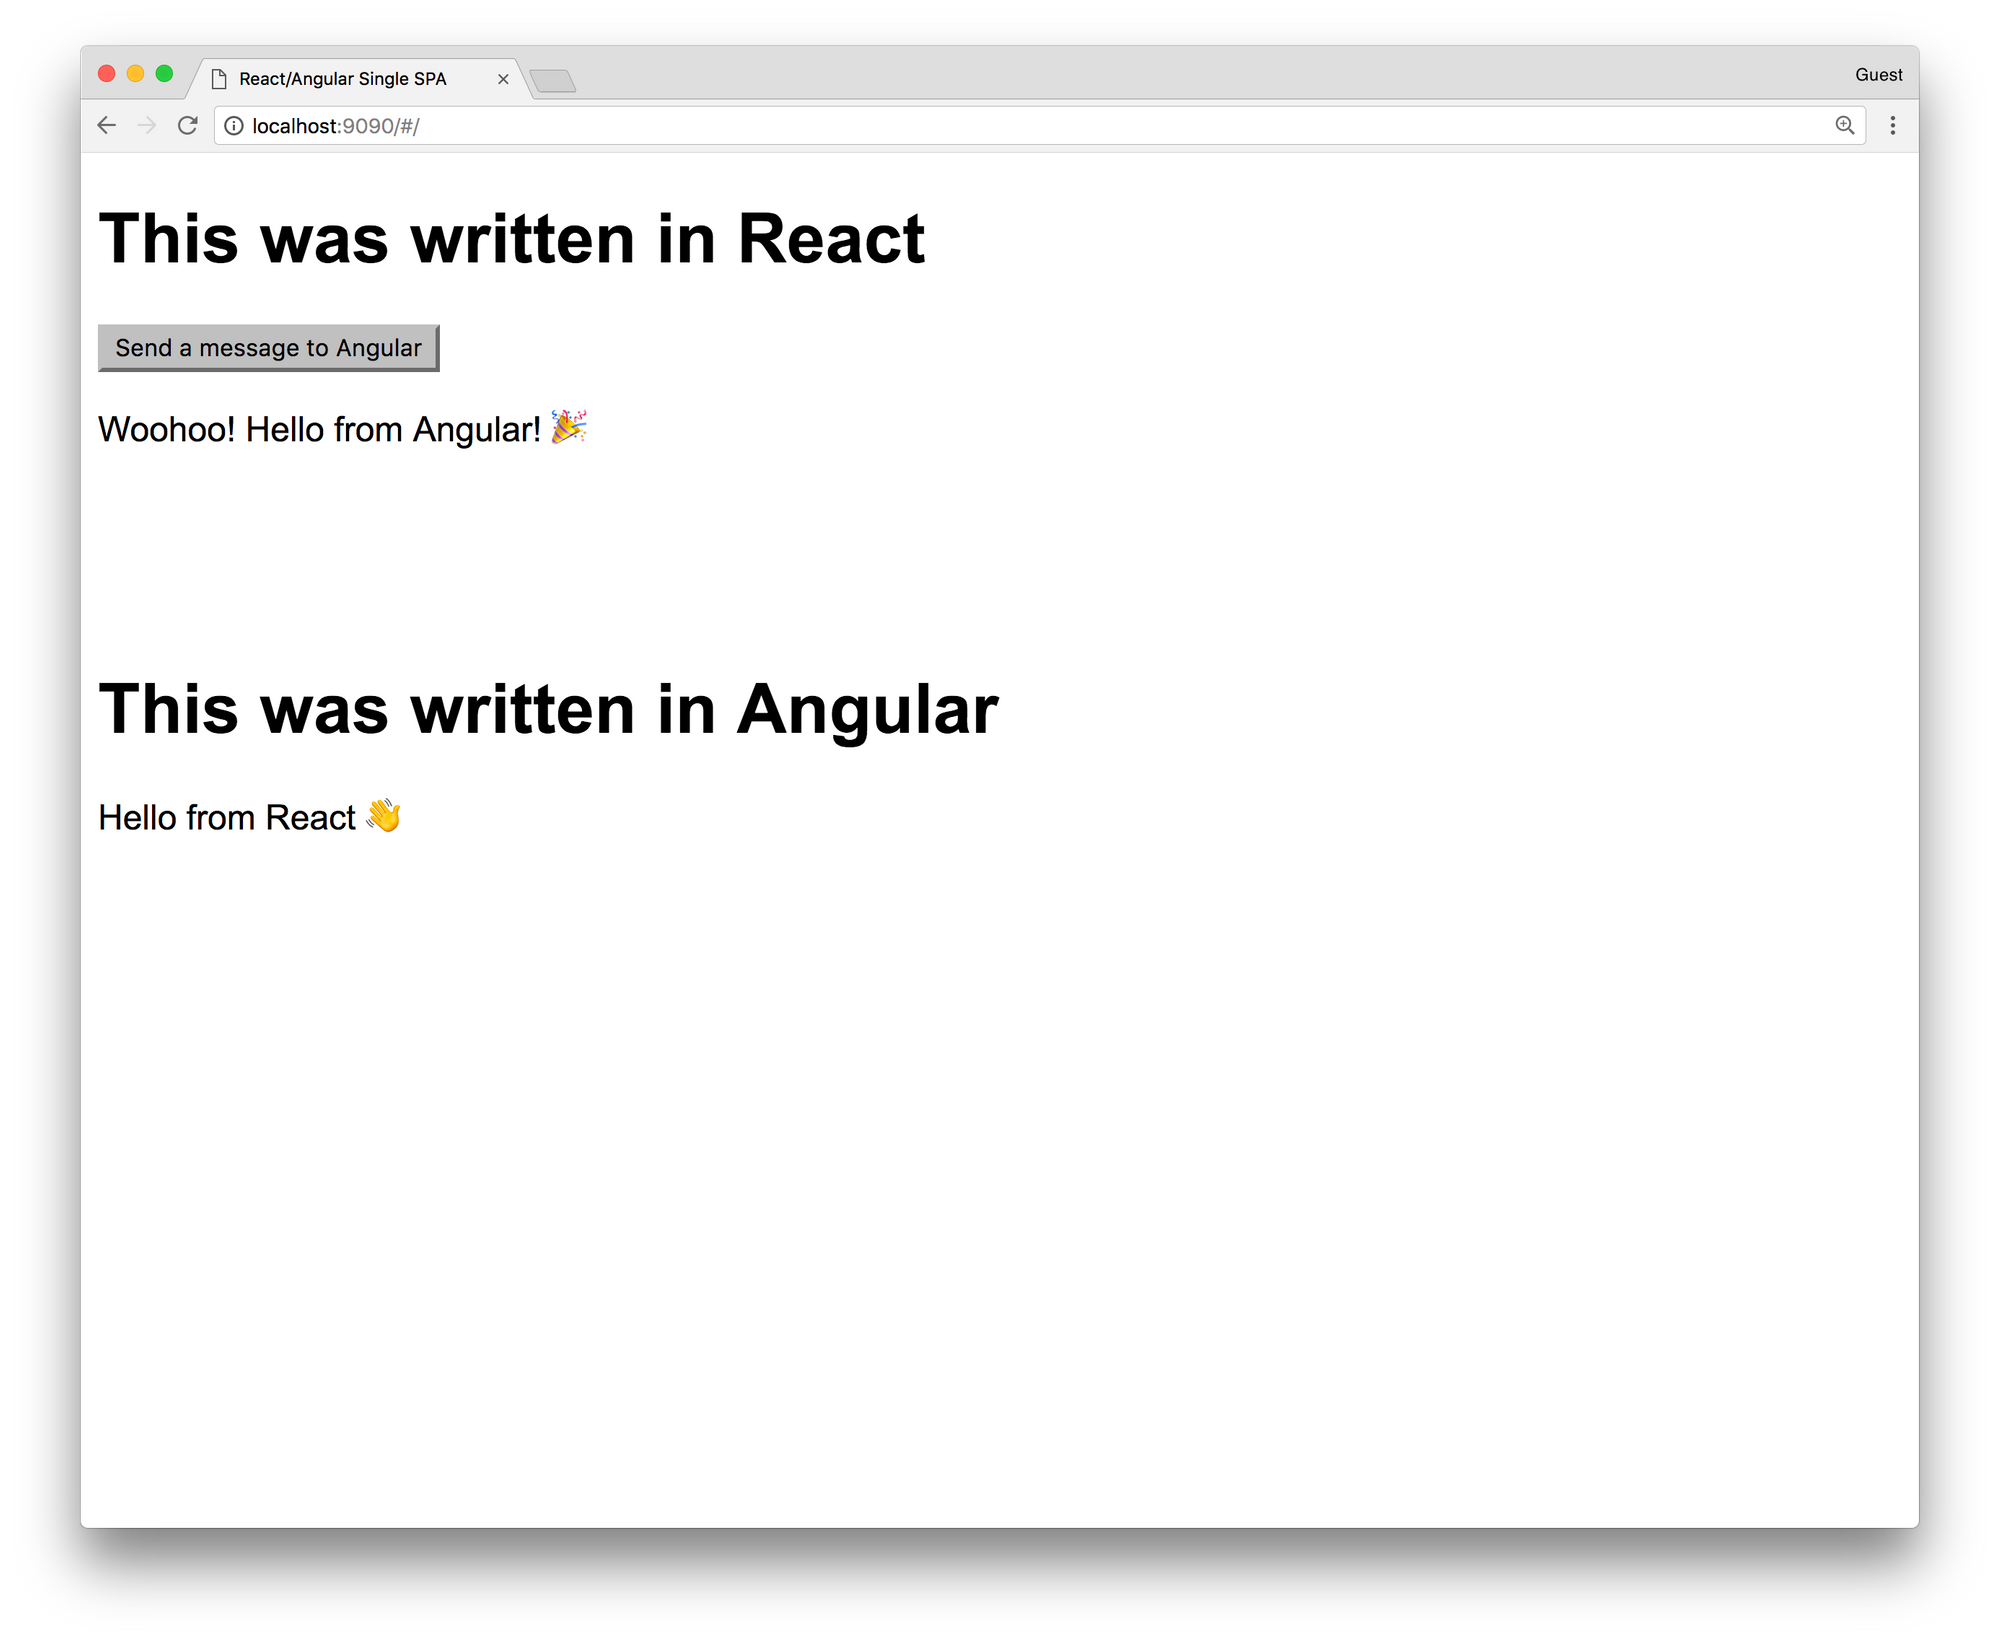
As you see, the Angular app has rendered Hello from React 👋 text and sent a message to a React app. React app has rendered the Woohoo! Hello from Angular 🎉 message. We have successfully exchanged async messages between two apps on the same page and they have re-rendered and showed us the result. Isn't that awesome? This small example tells us that we can really have multiple apps on the same page, made using different frameworks, from different teams, that work together.
Conclusion
This is the simplest example of the Micro Frontends. It's a new topic that's still developing and we can take part in it. When you first look at it, it's fun, but it's also really powerful and useful in big organizations. You can combine smaller apps and create big frontend applications. We can finally scale on the frontend. I hope that you learned something new, or just had some fun while you were reading this 😄
]]>If you're still having big offices in your company, making your employees to come at 9 AM every morning to the office and stay till 5 PM, you're doing it wrong. Modern technologies have given us the freedom to work from any part of the world and be more productive and happy. It also helps you to hire quality people, no matter where they live. Usually, no one wants to move from their country, especially if they live there for decades. Remote companies can find those people, hire them and build better products. Are you one of them?
Why should we go remote?
There are a lot of arguments about why companies should go remote. As people that work in the tech industries, we use a lot of online tools for communication, writing code, reviewing and planning. And at the same time, traditional companies force you to commute to the job, go through the traffic, spend 8 hours in the office and be online and communicate online. You'll probably say face to face conversation and planning meetings in the conference room is something that you don't want to change and that it makes you more productive, but that can also happen online, face to face. In the conference room you'll probably use the same online tools that you'll use when you work remotely, so physically being there doesn't make that big difference.
I recommend an article on Toggl's blog about Pros and Cons of working remotely: https://toggl.com/out-of-office-why-go-remote/
How to start?
So, you want to move your company to the cloud? Congratulations, you're one of the thousands that want to have a healthier and better company! 🎉
First steps are always hard. Always start small. Set a rule that everyone has to work from their home once or twice a week. It will be enough for the start, people will see how that suits them and you'll be able to track their productivity and see if working from home makes any changes. Then try to hire someone from other countries, remotely, and see how that works. If things are going great, you're starting to move your company to the remote world and you can just continue. After a couple of months, no one will be coming to your office and they'll be happier than ever. The same thing happened to Automattic, check it out here: https://www.businessinsider.com/automattic-closes-san-francisco-office-to-let-everyone-work-remotely-2017-6
If you see that your coworkers are happier to work from the office, you can keep it, but still allow them to work from their home, a lot of them will appreciate that. You'll also get used to that and hiring remote people will help you to get to qualified persons outside of your city or country.
Where to find developers?
Hiring is always problematic, but when you are starting with the remote company, you can work with anyone in the world. Your developer can live in Europe, a designer in the USA, DevOps engineer in Asia and you can work together. Many companies are struggling to find people that fit their team in their city and they are paying a lot of money to relocate people from different countries to their city. Hiring remotely allows you to hire a person from the whole world without forcing them to relocate.
There are couple popular websites that you can use to find people:
- We Work Remotely
- RemoteOk
- Working Nomads
- Jobspresso
- AngelList
- JS Remotely (I built this one 😎)
How to organize work?
This is the biggest problem that remote companies have. How to organize work across different time zones, with people that you never met? This is the place where tools can help you. There are some awesome tools that you can use for solving your problems.
Timezones
Keeping track of peoples timezones is the biggest problem that you need to solve. I recommend one tool that will keep track of everyone's timezone can help you to easier organize meetings and everyone else can see where are their teammates living. That is https://timezone.io/. It's free and setup process is really easy.
Projects
There are not big differences between the project's organization when it comes to traditional and remote companies. You can use Trello, Jira, Pivotal or anything else. Although, it is important to plan together with your team and have at least one planning meeting a week or in two weeks.
Agile
The most important thing is to be agile and flexible. Split your work in one or two-week sprints and have daily standup. Pick a time that works best for most of the teammates, depending on their timezones. The most important thing when it comes to remote work is trust. You need to trust each other since you're not physically in the same room and you can't see who's really working and who's not. So just be agile, give people freedom but also make sure that everyone is really committed to their work and be there to help them if they have some issues.
Communication
Slack is the best tool for communication. It's fast, user-friendly and everyone will love it! You're probably already using it in your company so it won't be a big problem to continue with it, in a different way, from your home.
Meetings
I recommend using Zoom for your meetings. It's a really great app! I was in a meeting with 200+ persons and it worked without any problems. For smaller meetings, Slack video calls should also work. They have good screen sharing functionality, it will definitely help your teammates to do screen sharing and help each other.
Conclusion
Working remotely is great! It's even better when you have the opportunity to allow people to work from their home, be with their families and achieve success. It will be hard, it will be tricky, it will require a lot of work from everyone to achieve trust and to create a good working environment, but when you succeed, you'll create a better workplace for everyone. I did it couple times and never regretted. If you stuck, I am here to help, just contact me 😄
]]>In the era of modern technology, traditional working environments are losing their battle with new approaches to work and team organizations. That's visible in almost every industry, especially in software development. Companies are going remote now, people can work from their home and be more productive. People tend to be more happy, to travel more and spend more time with their families.
This sounds interesting, right? You want to have to work for best global companies without leaving your home and learning more than in the tradition on-site positions? Let's see how can you find your first remote job and start to live a better life!
Who am I to talk about this?
I've been working remotely for more than 8 years for various software development companies, from 6 continents and together we completed more than 50 high scale projects. I met some awesome people, work for best companies without leaving my home office.
How to start?
So, you want to find your first remote job? Perfect, you've already completed the first step, congratulations! Now it's time for some hard work. You'll need to learn how to promote yourself and how to show that you have the expertise for the job that you applied for.
Write a blog
This is the best way to show your knowledge. By writing a blog, you're giving your knowledge to others and new employer will be able to see how you think, how you explain stuff and what are your interests. That doesn't need to be something hard, or something that's currently popular. Just write anything that interests you. If that's React, write about React stuff, start from some basic tutorials and go to advanced stuff. It can be something that you discussed with a friend.
I'm getting a lot of offers just because I am running this blog with couple blog posts. My blog posts were featured in weekly newsletters such as JavaScript and Node Weekly. I am getting 500+ unique visits every week, 300+ are coming from the organic search. You can also do it, it's so simple. Start with the simple Ghost blog with some free theme and you'll be in that 1% of the developers that are running their blogs. Keep that in mind!
Make a side project
Making a side project is a great way to show what you know. I am running JS Remotely, a website that fetches remote jobs from 10+ website APIs and filters only JS ones (filtering is not that perfect, I am still working on that). The app is simple, it's running React on the frontend and microservice architecture on the backend. Everything is hosted on Digital Ocean, Kubernetes is responsible for running microservice containers and that's it. It's awesome opportunity to build something useful, to learn something new, play with stuff and also share that with people. I am getting more than a thousand unique visits per week, most of them are coming from organic search.
If you build a side project, maybe share a code on Github, you'll have one big app to show to the employers. It shows that you can really build something useful, it shows your experience and knowledge. That can give you the opportunity to be above other candidates and to get the job!
Keep Linkedin, Github, Behance, Dribbble and other social media profiles updated
Since you want to work remotely and your office and life are basically online, your social network profiles are presenting you. If the employer is in the other country, or continent, the only things that he sees are your social media profiles. Keep your Linkedin updated!
If you're a developer, put your code on Github. Try to build something and share that with the world. Same thing if you're designed, put designs from your projects on Behance on Dribbble. It's your online portfolio, it represents you. The employer will usually try to find you online and to see who you are. If you don't have any of those, it will be much harder to convince him that you're the right person. You won't even get the opportunity for that.
Sign up on platforms
You've probably heard of platforms such as TopTal, Gigster... Those are freelance platforms, they hire remote developers and designers and match them with the employers. You then become part of the company, work for an hourly rate and that's usually a couple months gig but it can become full-time contract work. I'd suggest applying for those platforms. You'll get a company that's selling your knowledge and looking for a company for you. Doesn't that sound awesome?
There are also platforms that only work with big companies and find the full-time contract for you. Some of those are Upstack and Pilot.
You'll probably need to past various interviews and tech assignments, but it's worth. You'll do it only once and when you pass it, jobs will just come to your profile and you'll be able to select one that interests you the most.
Below you can find a list of those platforms:
If you have experience with some other cool platform, post it in the comments and I'll be happy to update the article!
Regularly check remote development job ads
Working on the platform is good, but there's something even better, being a really independent full-time contractor and working for a company as a real employee with all benefits:
- Paid time off
- Company retreats
- Budget for your setup
- Medical insurance
- Anything else that companies can offer
Trust me, this is the harder, but the much better way. Being independent, having a direct contract with the remote company and having all those benefits is a real heaven! The bad thing is that there aren't so many companies in the world that work like that. They're usually receiving thousands of applications for just one role. You'll need to stand out.
There are many websites that show remote jobs. Make sure to follow them:
- We Work Remotely
- RemoteOk
- Working Nomads
- Jobspresso
- AngelList
- Boon Board
- JS Remotely (I built this one 😎)
Contact companies with remote DNA
One more approach is to directly contact companies and offer them your services. It might sound silly, but I found a job by contacting one company, I liked what they do, they liked me and we worked together for couple months.
Here's a list of companies that hire remote: https://github.com/remoteintech/remote-jobs
If you find a list of more companies, please post a comment, I'll be happy to update the article!
You can go through the list and check companies that build something that you like. Do a short research, check what people work there, try to find an email of the company or CEO, CTO or some HR on Linkedin (or direct email), prepare a nice introduction email and just hit send! It might take some time until they respond you, in my experience, 80% of the companies responded with some answer. Some of them will definitely like you and will be happy to do a video call to meet you!
Some of the most popular remote companies:
Work on freelance sites
If you're a beginner, student or someone that's learning how to develop apps or design them, you can try with freelance sites. It might sound silly to you now, but believe me, this method works. You can find small and even big companies that search for freelancers to work on some project for a month or so, if the freelancer is good they offer him a full-time contract. Let me tell you a story about my personal experience.
I got my first real job on a freelance site. I already had a good profile on Elance, more than 20 successful projects and one day I applied for an interesting job with a higher salary than I usually worked for. And I got it, the client was happy with my experience. I spend two months to develop a web app and client liked it. He liked the way I work and he offered me a full-time job! I was shocked! That was the first time that someone offered a full-time job to me and I immediately accepted it. When I started to work on that two-month project, I didn't know that client has a team of 5 developers and that they're working together remotely from different countries, they're applying agile principles and they're developing couple successful apps. They're having daily standups, one-week iterations, hundreds of clients that are paying monthly. It looked like a jackpot for me! And it was, I was working more than a year and a half in that team, learned a lot and met some awesome people! And just by applying for a freelance job on Elance 😜
Conclusion
This is my first non-technical article. I have a lot of experience with remote work, time management, hiring remote devs and remote company management. If you want to read more about that topic, please let me know!
I am always happy to help with the remote job search! If you have some questions, please post a comment or send me an email. Thanks!
]]>If you're like me, you're using Redux every day, to manage your state, probably with React, or any other view library or framework. You definitely know how hard is when it comes to handling async code and side effects. I know that very well, been there, tried all kinds of stuff and I think that I finally found the best way (in my opinion) to do it. Today I'd like to show you that it doesn't have to be that hard, you can still have fun while you write your actions and reducers and communicate from API or WebSockets.
What is the problem with Redux and its actions and reducers? Actions are pure functions that tell Redux what it has to do. Then it transfers that action to reducer and we get some data in the store. But it doesn't tell it how to do it. Reducers are handling the state changes but they're doing that synchronously. The problem happens when we need to wait for some async event to happen, like fetching data from the API or listening to some message from WebSocket. We need some async middleware to help us do all those async work and synchronously send data to the reducer. This is the place where RxJS and Reactive programming methodology help us!
What is Reactive programming?
Reactive programming (RP) is programming with asynchronous data streams. The idea behind RP is to create a data stream from anything, clicks, ajax calls, WebSockets etc. and to use the same API to work with them. Sounds cool? If you want to learn more about reactive programming, check gist from André Staltz https://gist.github.com/staltz/868e7e9bc2a7b8c1f754
Most popular RP library is RxJS. It has a lot of operators and it's really powerful! RxJS official documentation can help you to learn it and I also recommend learn-rxjs website. Also check RxMarbles, the interactive diagrams of Rx observables.
How can Reactive programming help me?
Good question. Reactive programming can make your state reactive and all data flow can be pure. All your actions will be buffers in streams, and you can easily manipulate with them, transform them, do async stuff like HTTP requests and send the results to the reducers.
Main advantages:
- Abstract all your async processes and use just one API for them
- Cancel requests
- Have an easy way to rescue from errors
- Better performance
How to integrate RxJS into Redux?
As you probably know, main Redux parts are actions and reducers. It also has middlewares, functions that are between actions and reducers and they're usually used for async stuff. If you probably used redux-saga you know what I am talking about.
The middleware that we're going to use is redux-observable. It's a small library and it helps us to abstract actions into streams and we can easily transform them using RxJS. It's made for RxJS v5, but any other library like Most.js or XStream can be used too. Just check the documentation.
Middlewares in redux-observable are called Epics (like Sagas in redux-saga). Epics functions that are getting the stream of actions as an argument and must return the stream of actions.
Example
Now when we know what is Reactive programming and how can it make our life easier, let's see some code and some real examples. Since React is my favorite framework, I am going to use it as a view library.
TL;DR All code is on GitHub: https://github.com/IvanJov/react-rxjs-github-search
Let's make a simple GitHub search by username. It should look like this:
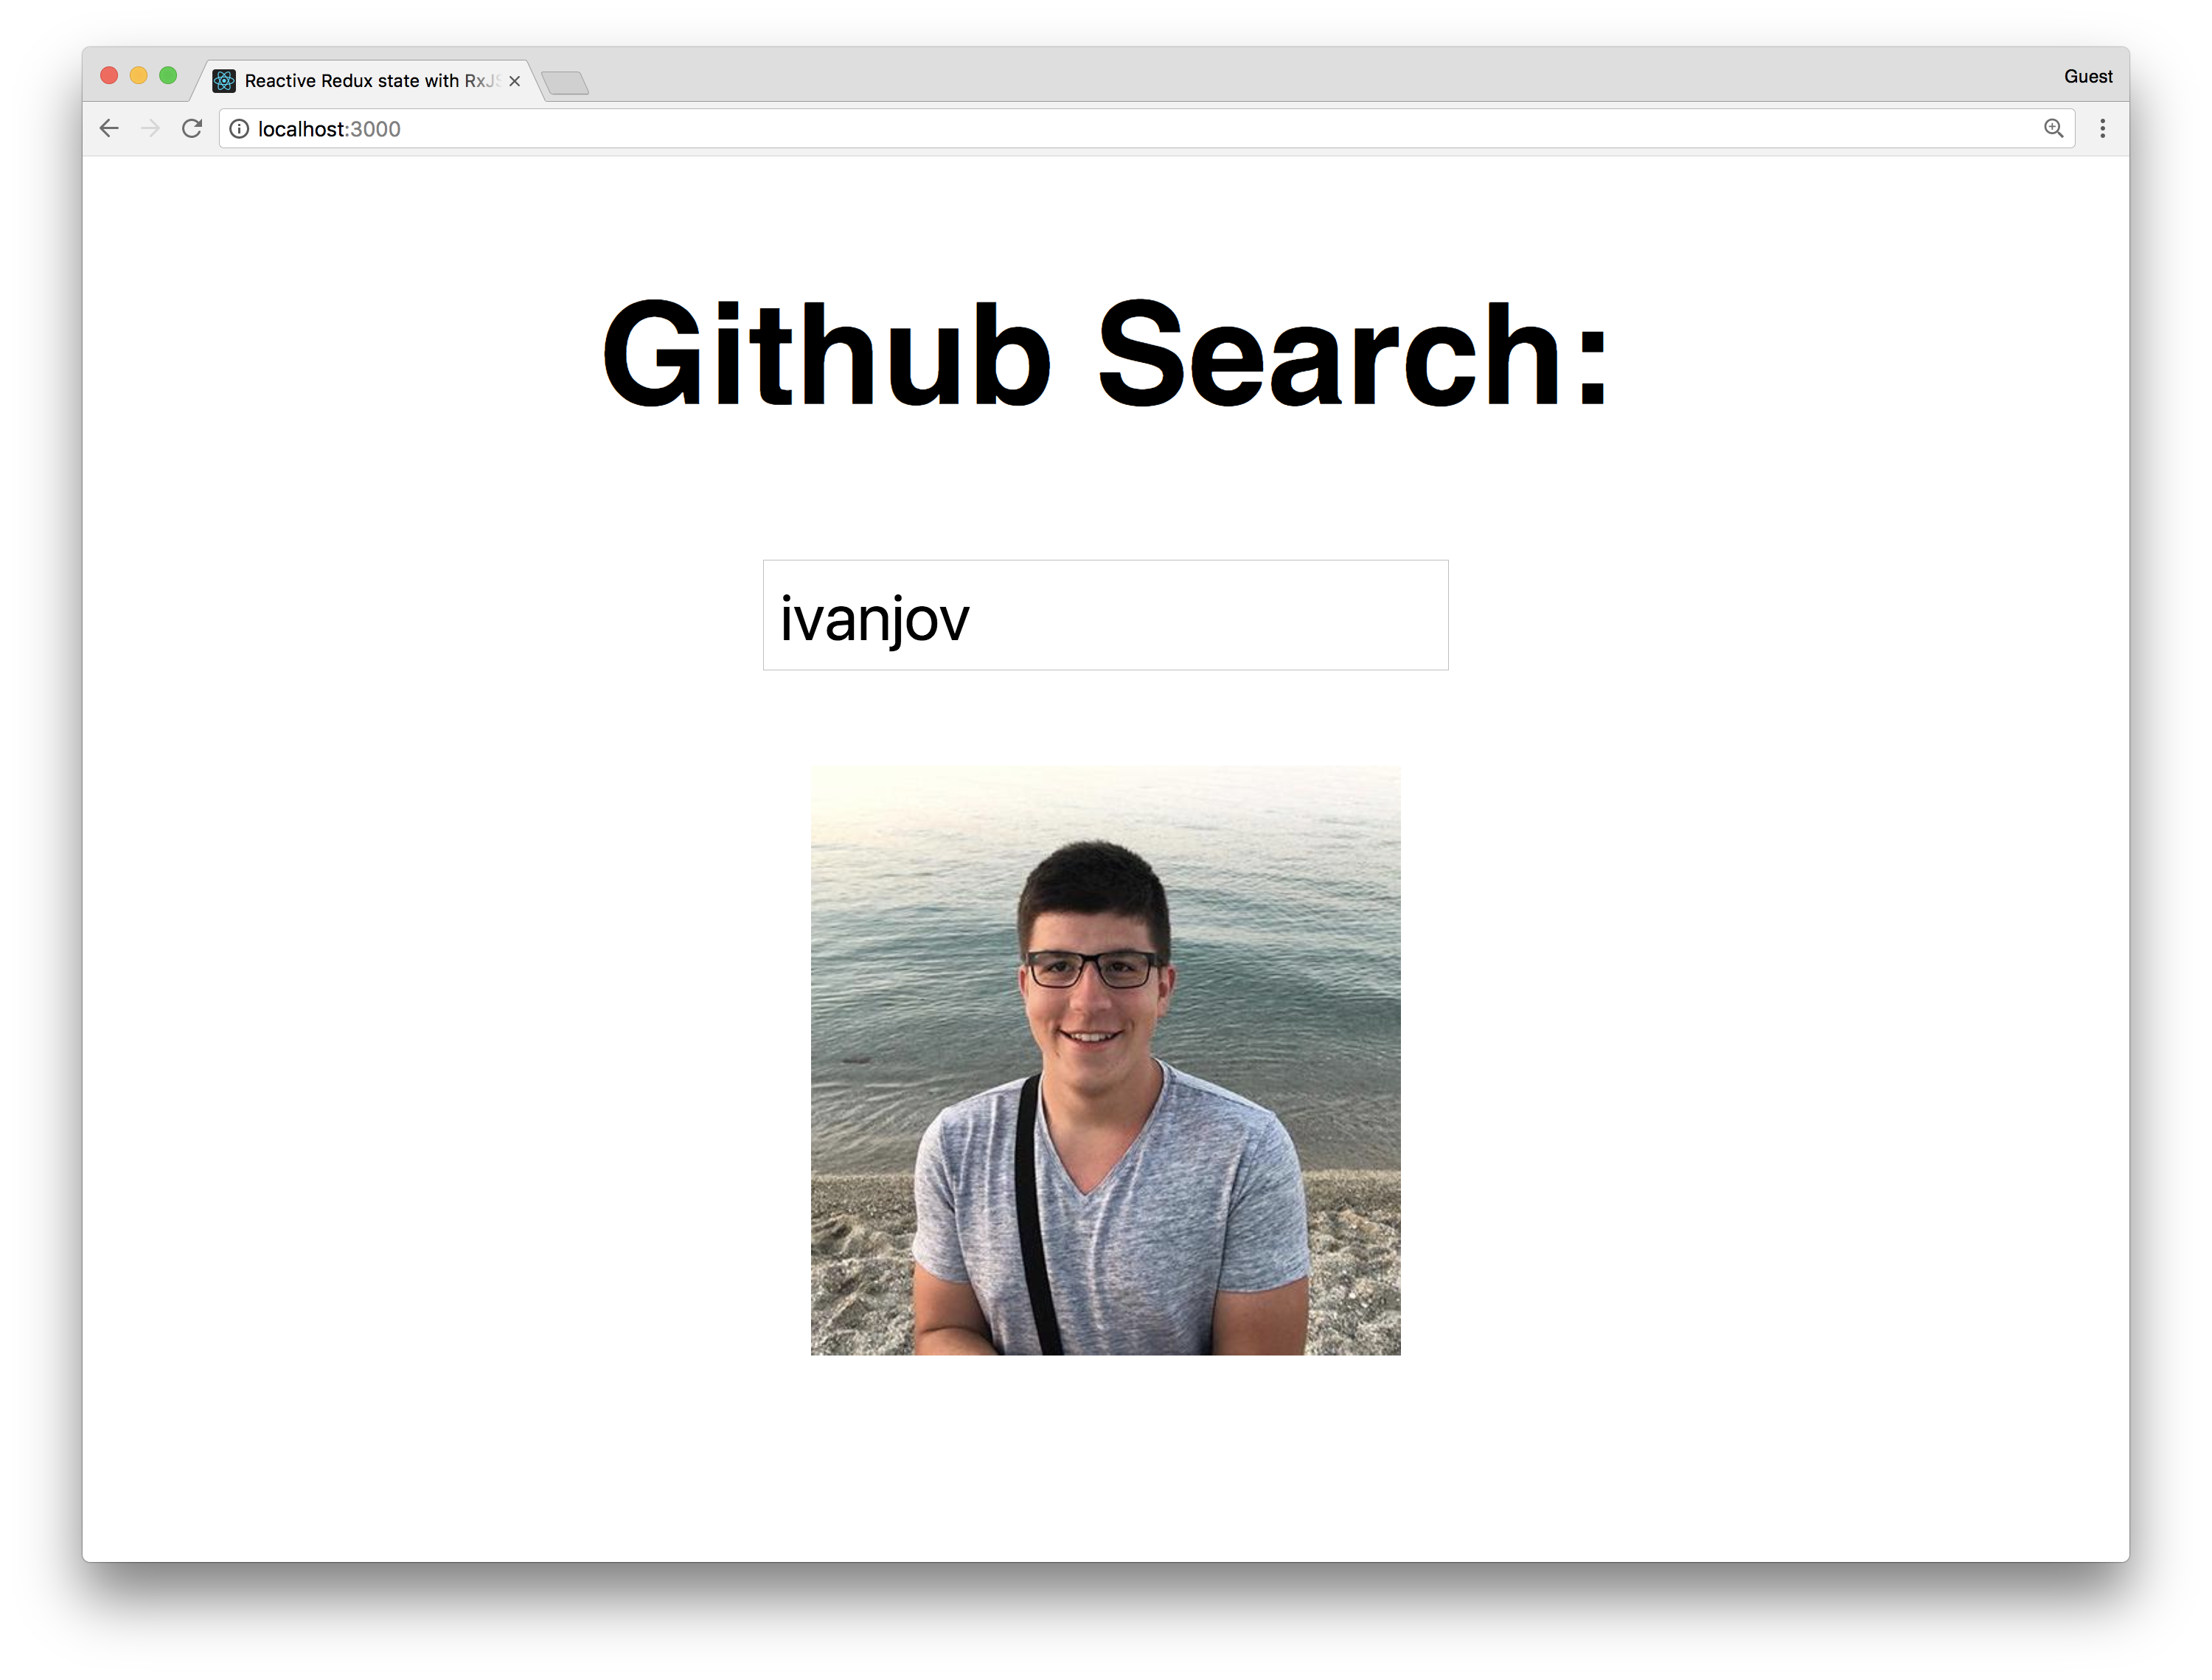
The main features are:
- Add type to search functionality
- Show just the avatar of the user
- Search GitHub API using RxJS ajax functionality
- Retry to send the request if it fails less than 3 times
- Cancel the previous action if the new one is dispatched
Let's start with the setup of a react app using create-react-app by running:
npm i -g create-react-app #if you don't have it installed
create-react-app react-rxjs-github-search
cd react-rxjs-github-search
Okay, let's now install all packages we need:
yarn add redux react-redux rxjs redux-observable
Open the index.js file and update it to look like this:
import React from 'react';
import ReactDOM from 'react-dom';
import './index.css';
import App from './App';
import { Provider } from 'react-redux';
import { createStore, compose, applyMiddleware } from 'redux';
import reducer from './reducer';
import { createEpicMiddleware } from 'redux-observable';
import epics from './epics';

const epicMiddleware = createEpicMiddleware(epics);

const composeEnhancers = window.__REDUX_DEVTOOLS_EXTENSION_COMPOSE__ || compose;

const store = createStore(
  reducer,
  composeEnhancers(
    applyMiddleware(epicMiddleware)
  )
);

ReactDOM.render(
  <Provider store={store}>
    <App />
  </Provider>
, document.getElementById('root'));
Here we did the usual boilerplate stuff, initialized redux, injected reducers and then injected that into the Provider HOC. The new thing here is createEpicMiddleware. That function comes from redux-observable and it takes the combined epics and makes the epic middleware that's later injected into the redux store as a middleware. All epics will get the actions as streams thanks to this.
Let's now make the constants.js file with the constants that we're going to use in redux actions:
export const FETCH_USER = 'FETCH_USER';
export const FETCH_USER_SUCCESS = 'FETCH_USER_SUCCESS';
export const FETCH_USER_FAILED = 'FETCH_USER_FAILED';
Cool, let's make actions.js file:
import { FETCH_USER, FETCH_USER_SUCCESS, FETCH_USER_FAILED } from './constants';

export const fetchUser = username => ({
  type: FETCH_USER,
  payload: { username }
});

export const fetchUserSuccess = user => ({
  type: FETCH_USER_SUCCESS,
  payload: { user }
});

export const fetchUserFailed = () => ({
  type: FETCH_USER_FAILED
});
As you see, we have 3 actions:
- fetchUser - we'll dispatch this action on username field change
- fetchUserSuccess - Epic middleware will dispatch this action with the user data from GitHub if HTTP request is successful
- fetchUserFailed - Epic middleware will dispatch this action if HTTP request has failed
We also need reducer.js:
import { FETCH_USER_SUCCESS, FETCH_USER_FAILED } from './constants';
import { combineReducers } from 'redux';

const initialState = {};

export const user = (state = initialState, action) => {
  switch (action.type) {
    case FETCH_USER_SUCCESS:
      return action.payload.user
    case FETCH_USER_FAILED:
      return {};
    default:
      return state;
  }
};

export default combineReducers({
  user
});
This reducer is simple, it just puts all data from the payload into the store if the success action is dispatched. If the fail action is dispatched, it saves the empty object in the store.
Let's now update our App.js component to match the design we want:
import React, { Component } from 'react';
import { connect } from 'react-redux';
import { fetchUser } from './actions';

class App extends Component {
  constructor(props) {
    super(props);

    this.searchUser = this.searchUser.bind(this);
  }

  searchUser(event) {
    this.props.fetchUser(event.target.value);
  }

  render() {
    return (
      <div>
        <h2>Github Search:</h2>
        <input placeholder='Username' onChange={this.searchUser} />
        <p>
          <img src={this.props.image} alt='Not Found' width={100} />
        </p>
      </div>
    );
  }
}

const mapStateToProps = state => ({
  image: state.user.avatar_url
});

const mapDispatchToProps = {
  fetchUser
};

export default connect(
  mapStateToProps,
  mapDispatchToProps
)(App);
Now we have everything from React and Redux to make our app work. We have connected our App component to Redux and we're going to take the image of the GitHub user from state and render that. The app will call the fetchUser action on every change of the username field. Let's now add the Epic middleware and fetch the data from the GitHub every time the fetchUser action is dispatched.
We need to create epics.js file:
import 'rxjs';
import { combineEpics } from 'redux-observable';
import { FETCH_USER } from './constants';
import { fetchUserSuccess, fetchUserFailed } from './actions';
import { ajax } from 'rxjs/observable/dom/ajax';
import { Observable } from 'rxjs';

export const fetchUser = actions$ =>
  actions$
    .ofType(FETCH_USER)
    .mergeMap(action =>
      ajax.getJSON(`https://api.github.com/users/${action.payload.username}`)
        .map(user => fetchUserSuccess(user))
        .takeUntil(actions$.ofType(FETCH_USER))
        .retry(2)
        .catch(error => Observable.of(fetchUserFailed()))
    );


export default combineEpics(
  fetchUser
);
This is the main part of this example. Without the Epic none of this will work. Let's see how it works. At the top, we import full rxjs. Don't do this on a production app, it will import everything from rxjs. Instead just import the stuff you're going to use. We also import actions and constants, ajax observable for handling HTTP requests and the Observable for making the observable from anything (function, promise, generator etc.). We also need combineEpics to combine all our epics that we want to export. It's something like combine combineReducers in redux.
The fetchUser epic does all the functionality. It's a function where the first argument is the actions$ stream (variables that are streams have $ sign at the end) and it can take store argument if you want to get data from the store. actions$ stream will get have all actions dispatched, so with ofType(FETCH_USER) operator we want to filter only ones with the type FETCH_USER.
Then we call a mergeMap operator. It maps the buffer to Observable and emits the resulted value. It takes a callback function with one argument, the current buffer in the stream. In our case, that's the current action that's dispatched. Now we want to make the ajax stream and send a request to GitHub. We use ajax for that and getJSON helper. If it successful, it will map to a fetchUserSuccess action. If it fails, it will go to a catch and map to a new Observable we make from fetchUserFailed action.
takeUntil and retry operators are the "magic" from the RxJS and that's why we want to have the reactive state. With takeUntil we cancel the current ajax request if the new action is dispatched. Since the request will be sent on every field change, we want to get only the last one and cancel all other requests. If the user types my username ivanjov, the app will send a request for i, iv, iva ... ivanjov but we want to get a response just for the last one, ivanjov. takeUntil makes that really easy and it really cancels the request. Promises can't cancel requests, they can just ignore the response from the previous one, but the browser will still wait for other requests to complete and that will kill our app.
retry is used for the user-friendly error handling. It takes one argument, the number of errors. If you give 2, like we did in this example, it will retry to send the request after 2 errors. If the 3rd error occurs, it will go to catch. This is great because sometimes the user needs to fill some big form and when he clicks Save button, API can be down for 2-3 secs, for example, he'll get an error, and we don't want that. It's much nicer to try again the couple more times, API can come up again and the data will be saved.
At the end, to make everything centered, update the index.css file:
body {
  margin: 0;
  padding: 0;
  font-family: sans-serif;
  text-align: center;
}
Testing
Let's see how can we write the unit tests for the Epics. It's probably not a perfect way, but it's probably the easiest one to make sure that Epic is really doing what it's supposed to do.
First, we'll need to install the packages for testing:
yarn add redux-mock-store nock xhr2
We need redux-mock-store to mock the redux store for the test, nock to mock the GitHub URL and xhr2 to make RxJS ajax work in Node, because it's made for using XHR from the browser.
Let's now make epics.test.js file and add our 2 tests:
import nock from 'nock';
import configureMockStore from 'redux-mock-store';
import { createEpicMiddleware } from 'redux-observable';
import { FETCH_USER, FETCH_USER_FAILED, FETCH_USER_SUCCESS } from './constants';
import epics from './epics';
import { fetchUser } from "./actions";
import XMLHttpRequest from 'xhr2';
global.XMLHttpRequest = XMLHttpRequest;

const epicMiddleware  = createEpicMiddleware(epics);
const mockStore = configureMockStore([epicMiddleware]);

describe('fetchUser', () => {
  let store;

  beforeEach(() => {
    store = mockStore();
  })

  afterEach(() => {
    nock.cleanAll();
    epicMiddleware.replaceEpic(epics);
  })

  it('returns user from github', done => {
    const payload = { username: 'user' };
    nock('https://api.github.com')
      .get('/users/user')
      .reply(200, payload);

    const expectedActions = [
      { type: FETCH_USER, payload },
      { type: FETCH_USER_SUCCESS, "payload": {"user": {"username": "user"} } }
    ];

    store.subscribe(() => {
      const actions = store.getActions();
      if (actions.length === expectedActions.length) {
        expect(actions).toEqual(expectedActions);
        done();
      }
    });

    store.dispatch(fetchUser('user'));
  });

  it('handles error', done => {
    const payload = { username: 'user' };
    nock('https://api.github.com')
      .get('/users/user')
      .reply(404);

    const expectedActions = [
      { type: FETCH_USER, payload },
      { type: FETCH_USER_FAILED }
    ];

    store.subscribe(() => {
      const actions = store.getActions();
      if (actions.length === expectedActions.length){
        expect(actions).toEqual(expectedActions);
        done();
      }
    });

    store.dispatch(fetchUser('user'));
  });
});
At the top, we import all stuff that we need and make global XMLHttpRequest variable for ajax to work. Then we make the epic middleware and mock store. configureMockStore accepts an array of the middlewares as the argument.
We have 2 tests, one for user successful GitHub request and one for the failed one. In both of them, we dispatch the fetchUser action and expect some action to be dispatched by the Epic.
Before every test, we mock the store and make the store variable. And after every the test, we clean the URLs that nock mocked and make the new Epic middleware.
The first test mocks https://api.github.com/users/user URL and returns some object with the user data. Then we define what actions we want to be successfully dispatched at the bottom of the test we dispatch the fetchUser action. In the middle, we subscribe to the store and we listen to all changes. When the number of actions dispatched is the same as the ones we're waiting for, they will be compared. If they match, the test will pass, if not, it will fail.
The same thing we do for the second test. We mock the https://api.github.com/users/user to return 404 Not Found error and check if the correct actions are dispatched.
Now run:
yarn test
and see how cool it is when all test pass 😎
This two tests will confirm that our Epics are working properly. We can also test many other scenarios, like testing if the requests are properly canceled, but that's left for you to play with 😉
Conclusion
Just give it a try. I hope that this example was good enough for you to at least try RxJS with Redux and feel the magic. It becomes so good if you have some big search forms, like the one on Booking.com website or a lot of user interactivity. You'll just use Observables for that and it will be much easier to develop complex apps.
]]>Hi. I've recently written an article about Claudia API Builder and AWS Lambda and it got a lot of views. You can check it here: http://ivanjov.com/building-serverless-api-with-claudia-api-builder/. If you haven't read it, now's the time, you will need to understand what is Claudia API Builder and AWS Lambda before going through this article.
Today I want to talk about how can we use a database in Claudia API Builder and make an awesome serverless stack. Since we are using AWS Lambda service, in this article we are going to stick to AWS and use DynamoDB.
What is DynamoDB?
AWS DynamoDB is a fully managed NoSQL database service that provides fast and predictable performance with seamless scalability. DynamoDB scales automatically and you don't have to worry about hardware provisioning, setup, and configuration, software updates or anything like that.
With DynamoDB, you can create database tables that can store and retrieve any amount of data, and serve any level of request traffic. This is great because AWS Lambda gives us that feature too, we can have unlimited traffic and it will always work and respond to events.
You can scale up or scale down your tables' throughput capacity without downtime or performance degradation, and use the AWS Management Console to monitor resource and performance metrics. It's pretty awesome!
Setting up the project
Let's start. For setting up, you will need to have AWS account and ability to create Lambda function and DynamoDB table. We are going to build a Book database, with three operations:
- Add new book
- Get book by ID
- Delete book from database
Pulling code from Github
I have already written code and you can pull it from Github repo:
git clone https://github.com/IvanJov/claudia-api-builder-dynamo-db-example.git && cd claudia-api-builder-dynamo-db-example
This command will pull the code from repo and it will open the folder with code.
You will also need to install all dependencies:
npm install
Creating DynamoDB table
Let's create a DynamoDB table. Open your AWS Console using this link: https://console.aws.amazon.com/dynamodb/home
Find Create table section at the top of the page:

Click on Create table. You should see this:
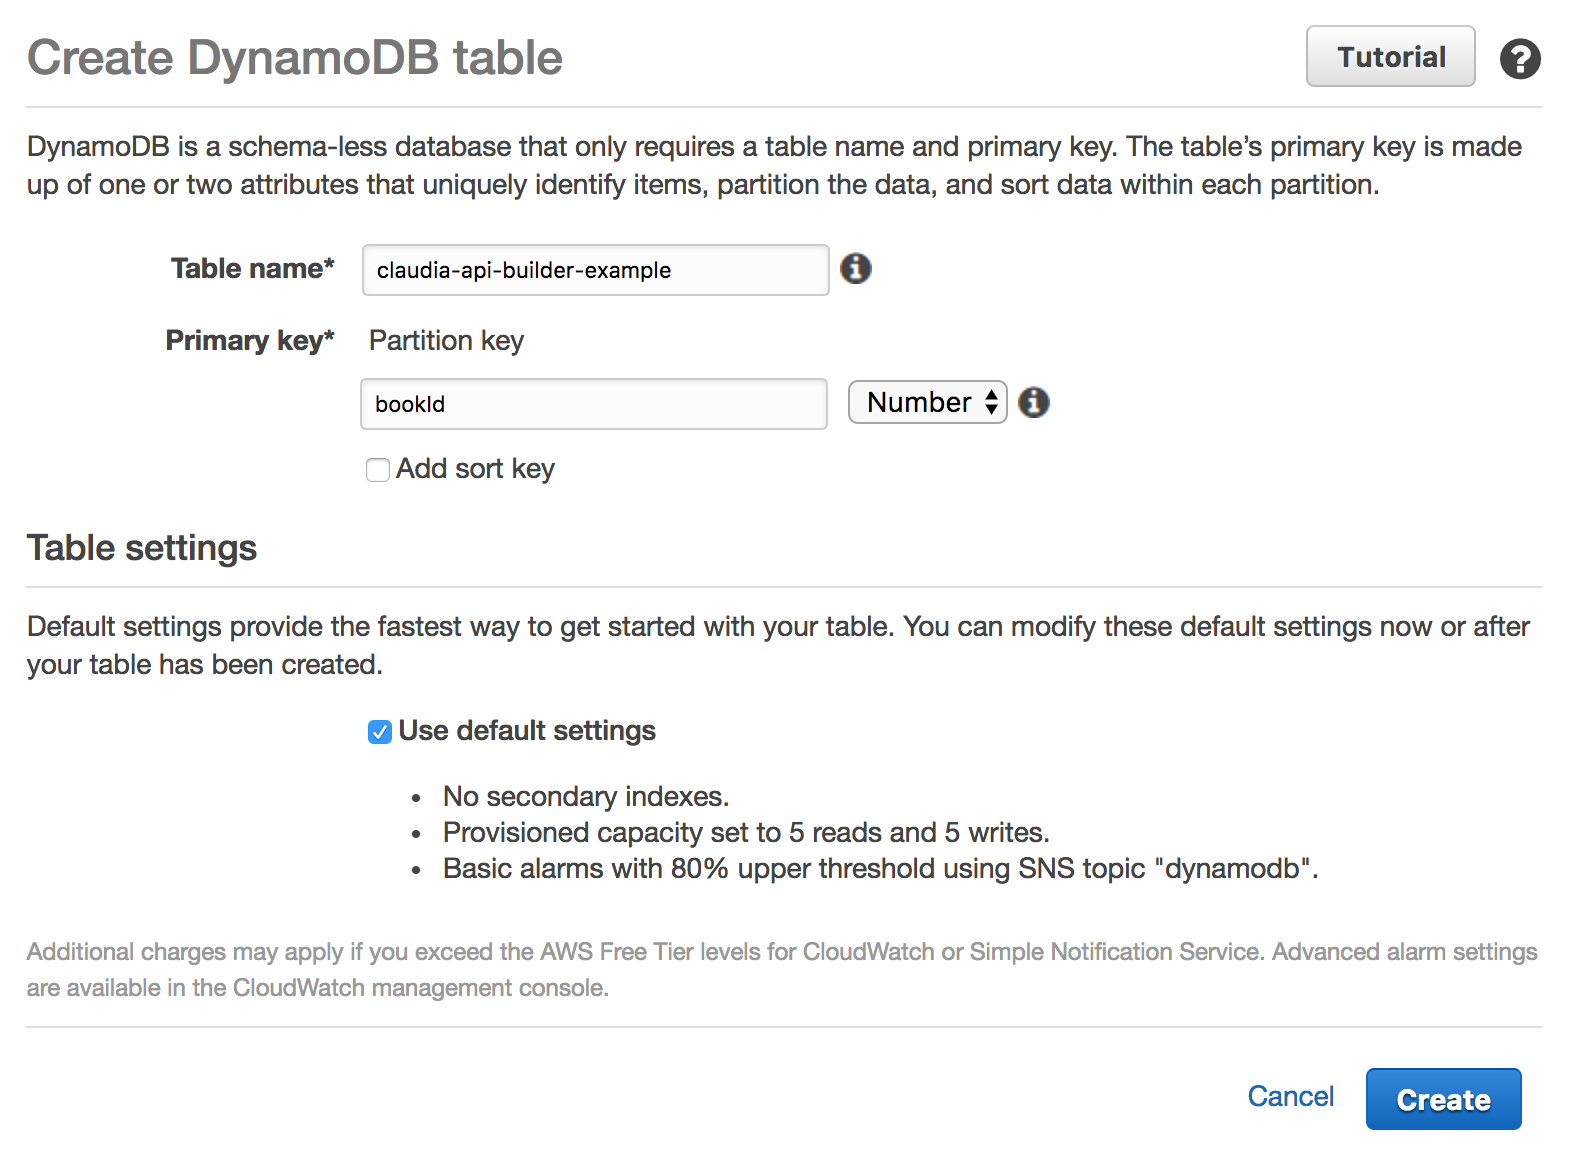
Fill the Table name field. That's the name of the table that we will use. I named it claudia-api-builder-example but you can use some other (and remember it, we will need to connect our Lambda code with it later). And fill Primary key. For this example, it should be bookId, an ID for our book. Also select Number from the dropdown, because we are going to use the number as an ID.
Click on Create. That's all from our side. Please wait until your table is created. After it's created, continue with the article.
Main logic
Main logic is in index.js file. At the top, we are including all dependencies. We also need to initialize api object and export it:
var ApiBuilder = require('claudia-api-builder'),
  AWS = require('aws-sdk'),
  api = new ApiBuilder(),
  dynamoDb = new AWS.DynamoDB.DocumentClient();

module.exports = api;
As you can see, we aren't entering any credentials, all those stuff are handled by Claudia.js.
We also need to have one line of code at the bottom:
api.addPostDeployConfig('tableName', 'DynamoDB Table Name:', 'configure-db');
This code sends us a prompt DynamoDB Table Name: after the deployment process. That's important because Claudia.JS saves table name and we can access it in every request. We can access it in every request, in request object: request.env.tableName.
Book creation
Next block of code handles book creation and it looks like this:
api.post('/book', function (request) {
  'use strict';
  var id = request.body.bookId;
  var params = {
    TableName: request.env.tableName,
    Item: {
      bookId: id,
      name: request.body.name,
      author: request.body.author,
      genre: request.body.genre
    }
  };

  return dynamoDb.put(params).promise()
    .then(function () {
      return 'Created book with id ' + id;
    });
}, { success: 201 });
It handles POST requests that are sent to /book endpoint. We are taking table name from request.env.tableName and book information from the body of the request. As you can see, we are sending name, author and genre. DynamoDB saves that, API returns 201 success code and a success message.
Example:
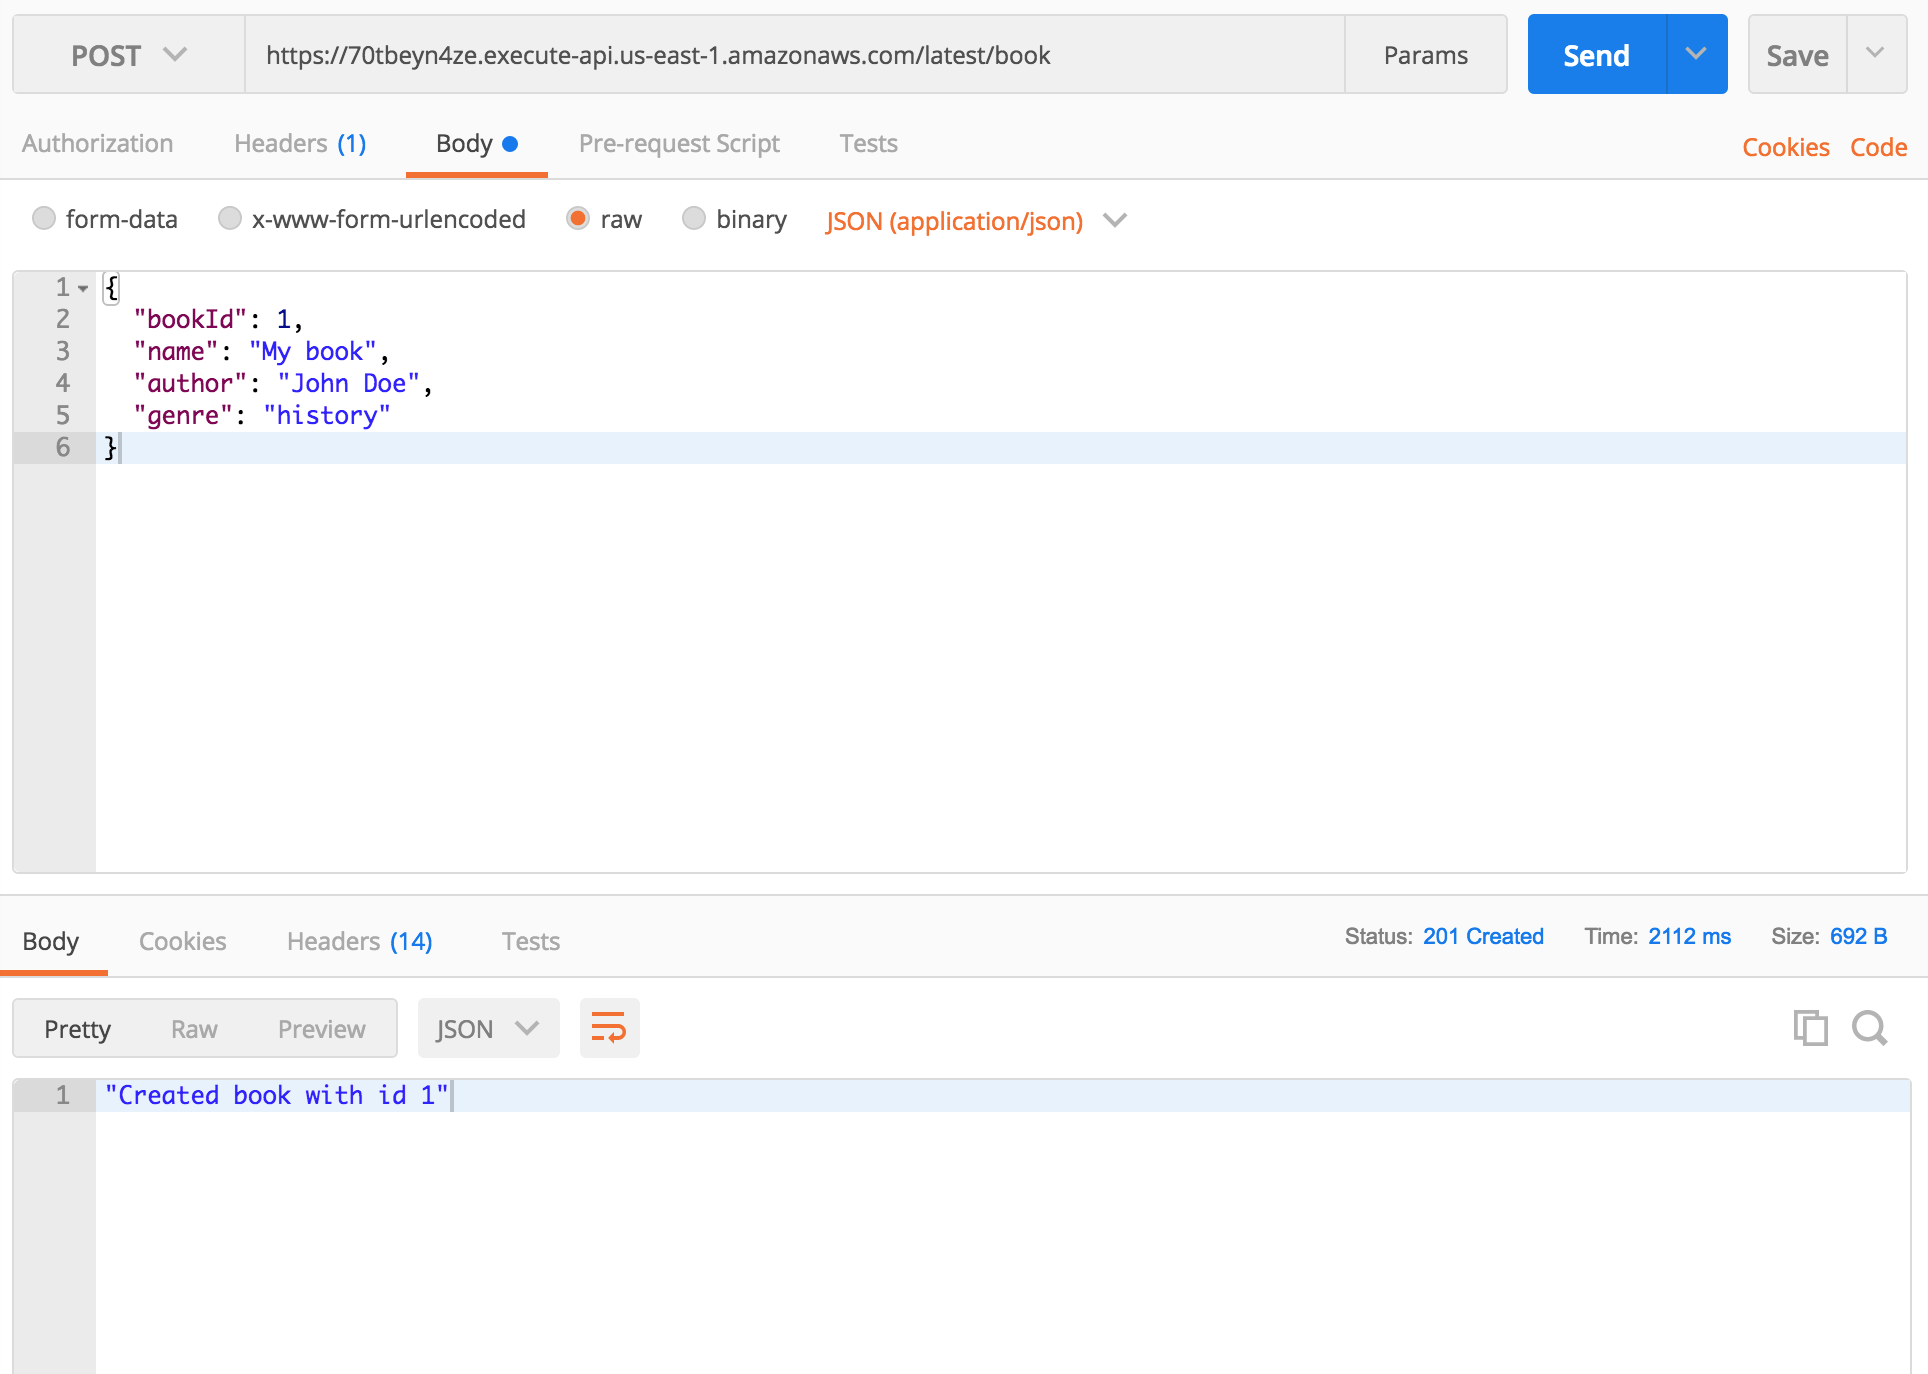
If you send new POST request with same bookId, DynamoDB will update book with that ID with new data.
Getting book by ID
Code bellow handles reading from DB by ID.
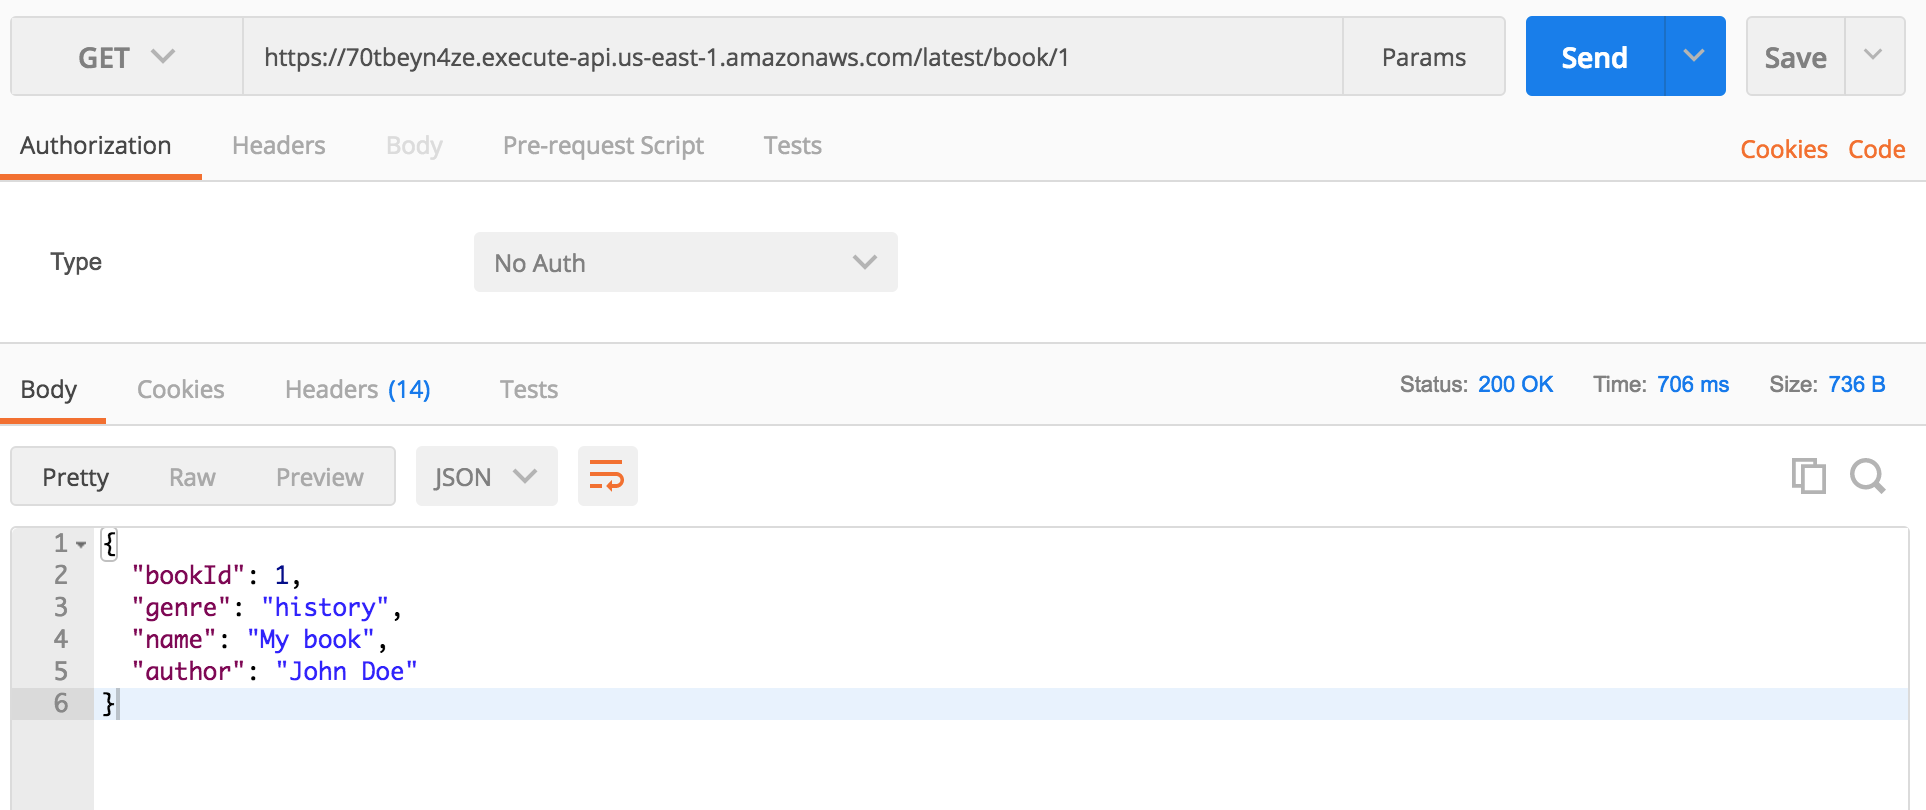
api.get('/book/{id}', function (request) {
  'use strict';

  var params = {
    TableName: request.env.tableName,
    Key: {
      bookId: parseInt(request.pathParams.id)
    }
  };

  return dynamoDb.get(params).promise()
    .then(function (response) {
      return response.Item;
    });
});
It handles GET requests that are sent to /book/{id} endpoint.
We are creating params object with our book id and table name. dynamoDb.get(params).promise() returns a Promise with a response. Everything else is handled by the Claudia (converting the response to JSON, returning data...)
Example:
Deleting book
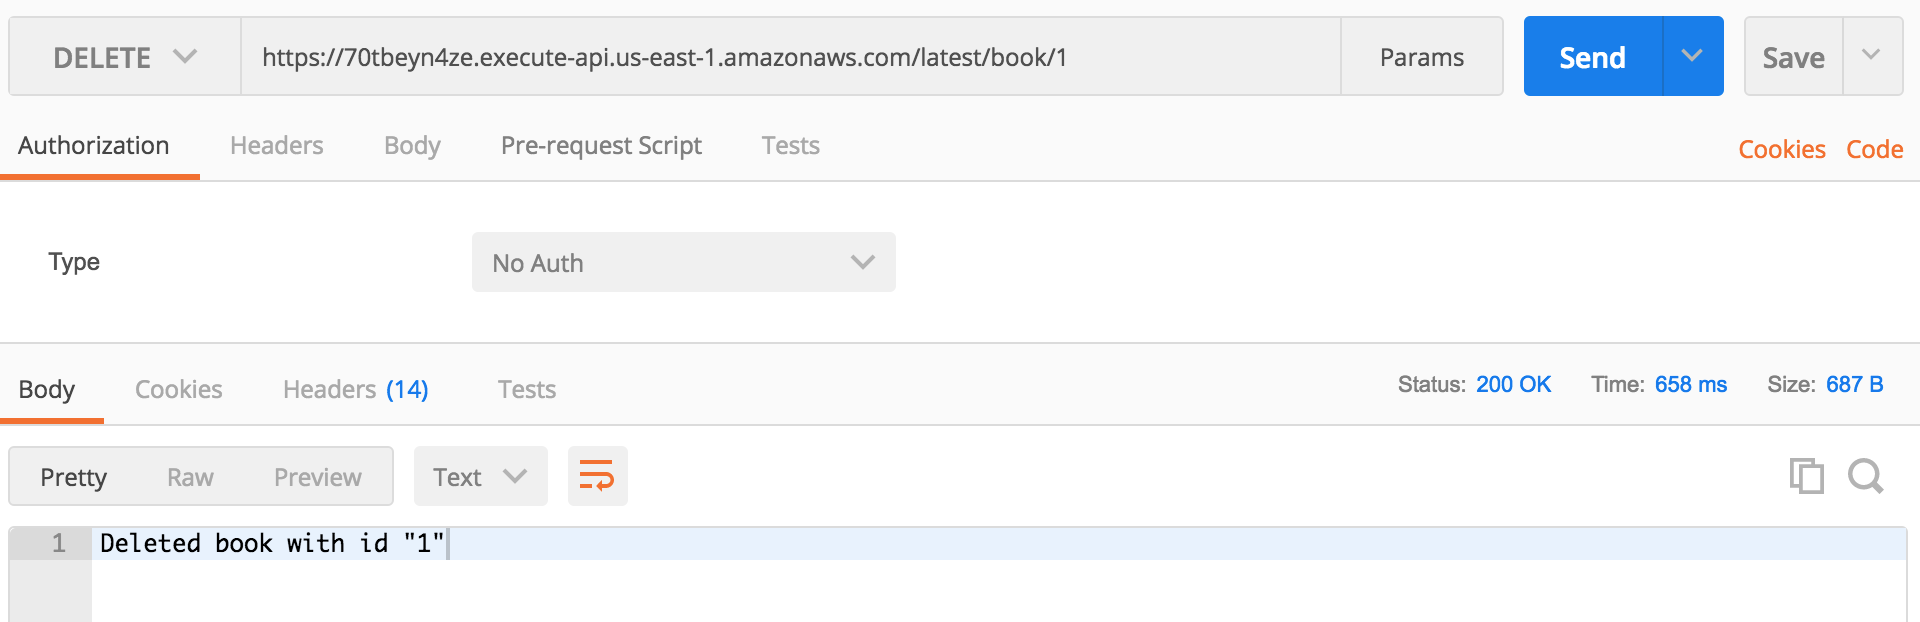
api.delete('/book/{id}', function (request) {
  'use strict';
  var id = parseInt(request.pathParams.id);
  var params = {
    TableName: request.env.tableName,
    Key: {
      bookId: id
    }
  };

  return dynamoDb.delete(params).promise()
    .then(function () {
      return 'Deleted book with id ' + id;
    });
}, {success: { contentType: 'text/plain'}});
It handles DELETE requests that are sent to /book/{id} endpoint. It's almost same as our GET request above. We also have Promise returned with a simple string message.
Example:
Deploying
As you know, deployment with Claudia.js is simple. package.json already contains scripts that we can use for deployment:
create- use it only once, when you deploy your code for the first timedeploy- use it every time when you want to deploy new codereconfigure- use it when you want to change the configuration of your table (change table for example).
For deploying our code, use this command:
npm run create
At the end of the deployment process, you will be asked to provide table name:
DynamoDB Table Name:
Just insert the table name you put in Table name field when you created your DynamoDB table and press Enter.
Next time when you want to update your code, use:
npm run deploy
Conclusion
API Gateway, Lambda, and DynamoDB are awesome services. When they are combined, they can be an awesome stack that's easy to use, cheap and easy to get started with. In combination with Claudia, you can create services that will be available at any time and process the unlimited number of requests. Pretty awesome!
]]>What is a Promise?
As the word says, Promise is something that can be available now, or in future, or never. When someone promises you something, that can be fulfilled
]]>Are you still writing your async JavaScript code using callbacks or async library? It's the time to start to Promises!
What is a Promise?
As the word says, Promise is something that can be available now, or in future, or never. When someone promises you something, that can be fulfilled of rejected.
In JavaScript, Promise represents the eventual result of an asynchronous function.
It has 3 different states:
pending- The initial state of a promise.fulfilled- Operation is successful.rejected- Operation failed.
Why is Promise better than classic callbacks?
Promises are the new way of handling asynchronous functions. There are couple reasons why are Promises better than callbacks:
- With the extra callback parameter, we can be confused with what's input and what's the return value
- Callbacks don't handle errors thrown by functions that are used inside them (JSON.parse for example)
- Callback hell (executing functions in sequences)
- When we use callback function, they can depend on function that calls her
Promises give us the ability to write independent functions, that are understandable and that can handle all errors with ease.
Support
The newer version of browsers and NodeJS natively support Promises. If you want to make sure that Promises will work on older browsers or NodeJS versions, you can use Babel or some modules that imitate Promises:
and much more. But since NodeJS and browsers got native support for Promises, you can use them without these modules.
Below, you can see browser support of promises:
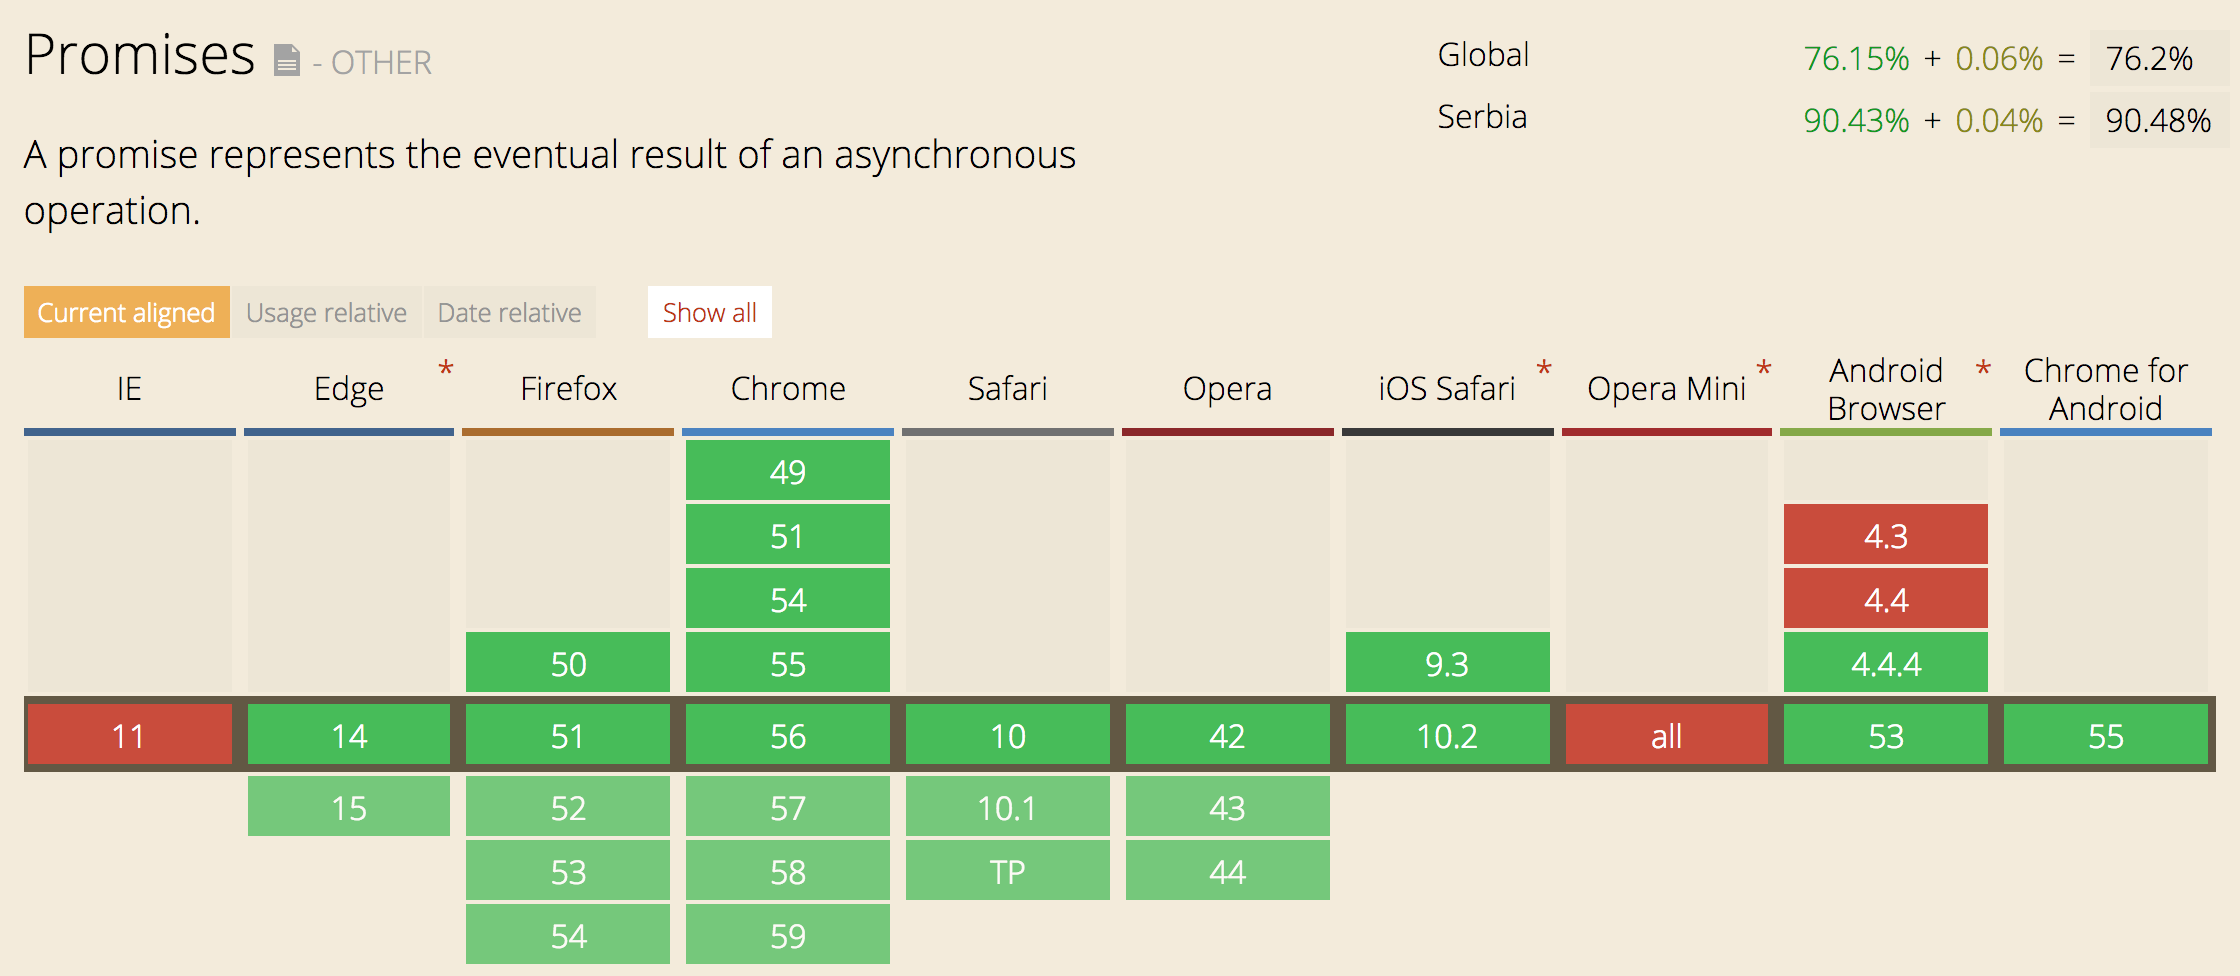
As you can see, support is very good. The only problem is Internet Explorer, but that can be handled by using Babel or some other transpiler for ES6 to ES5 code.
Regarding the NodeJS support, Promises don't work only on 0.10.* versions. But starting from 0.12.18 you can use native NodeJS Promises. If you want to find more about Promises support, you can check http://node.green/#Promise
Usage
Using Promises is very simple! The Promise comes in one class that handles everything. Check the example below:
new Promise( function(resolve, reject) { ... } );
That's all! Just one class that accepts function with two parameters, resolve and reject. Both of them are the functions that are called when a function finishes its execution. They accept one parameter. resolve should accept the value and reject should accept the reason why function didn't execute correctly. Check out the example below:
function readFile(filename) {
  return new Promise(function (resolve, reject) {
    asyncReadFile(filename, function (error, result) {
        if (error) {
          reject(error);
        } else {
          resolve(result);
        }
    });
  });
}
In the above example, we have readFile function that should read data from a file, specified in the argument filename. This function returns a Promise. Then inside the Promise, we call the async function called asyncReadFile. As you know, reading from files is an async process and we need to call some async function for it. After asyncReadFile is executed, it calls a callback that resolves (on success) or rejects (on error), depending on the result of the function.
Below, you can see the code that uses our readFile function:
readFile('some_file.txt')
  .then(function(result) {
    console.log(result);
  })
  .catch(function(error) {
    console.error(error)
  });
After calling readFile, it returns a Promise that has then method. then accepts one function and passes data inside it, as one argument. That argument is the data that's passed to resolve method. In the example above, the result should be the text that's read from the file.
Promise also has catch method that is called after reject and it also accepts one function. Data that's passed inside the function is passed from reject function and that's usually the reason for the error.
catch will also handle all errors that are thrown in the function, like try...catch does.
then method should always return promises. That gives us an ability to chain our functions and run code sequentially. See the example:
readFile('some_file.txt')
  .then(function(result) {
    return getFirstParagraph(result);
  })
  .then(function(result) {
    return getFirstSentence(result);
  })
  .then(function(result) {
    console.log(result);
  })
  .catch(function(error) {
    console.error(error)
  });
As you can see, any data that's returned inside the function in then will be transformed to Promise and we will be able to chain it. In the above example, we are first reading some text from the file, then getting the first paragraph, then getting the first sentence and at the end, we are logging the result in the console. Most important is that all errors that occur in the execution of those functions, will be handled with catch.
Shorter way to use promises
There is a shorter way to return promise. Promise has also resolve and reject methods inside, so you can just call those functions, like this:
Promise.resolve(3)
  .then(function(result) {
    console.log(result); // 3
  });
Or
Promise.reject(new Error('error'))
  .catch(function(result) {
    console.log(result); // error
  });
As you can see, this might be the shorter way to use Promise, especially when you just want to reject or resolve an async function.
Promise.all and Promise.race
Let's talk about two methods that come with promises, all and race. These two methods give us an ability to send the list of Promises and then receive results.
The all method accepts an array of functions that return Promises and gives us an array of the results in then method. It's resolved when all Promises are resolved. Check the code below:
var p1 = Promise.resolve('text');
var p2 = 1234;
var p3 = new Promise((resolve, reject) => {
  setTimeout(resolve, 100, 'foo');
});

Promise.all([p1, p2, p3])
  .then(values => {
    console.log(values); // ["text", 1234, 100]
  });
Promises also give us an ability to execute functions and then resolve after the first one finishes. For that purpose, we are going to use race method from Promise class. It accepts an array of Promises. Check below how it works:
var p1 = new Promise(function(resolve, reject) {
  setTimeout(resolve, 2000, 'one');
});
var p2 = new Promise(function(resolve, reject) {
  setTimeout(resolve, 1000, 'two');
});

Promise.race([p1, p2])
  .then(function(value) {
    console.log(value); // "two"
  });
Promises in the ES6 way!
After ES6 came, we got arrow functions. Arrow functions are awesome for making code shorter and readable. I am going to show you how to use arrow functions to make our first example much shorter.
This is how it looks like now:
function readFile(filename) {
  return new Promise(function (resolve, reject) {
    asyncReadFile(filename, function (error, result) {
        if (error) {
          reject(error);
        } else {
          resolve(result);
        }
    });
  });
}

readFile('some_file.txt')
  .then(function(result) {
    console.log(result);
  })
  .catch(function(error) {
    console.error(error)
  });
This is how it looks when we add arrow functions:
var readFile = filename => new Promise((resolve, reject) => {
  asyncReadFile(filename, (error, result) => {
    if (error) {
      reject(error);
    } else {
      resolve(result);
    }
  });
});

readFile('some_file.txt')
  .then(result => console.log(result))
  .catch(error => console.error(error));
We have saved couple lines and, in my opinion, made code nicer. It's your choice whether you are going to use arrow functions or not 🙂
Promisify
Many Promise libraries have methods that transform callback-based functions to function that return Promises. Those methods are usually called promisify. An example for bluebird can be found here: http://bluebirdjs.com/docs/api/promise.promisify.html
If you're not a big fan of Promise libraries, there is one awesome library that can convert your callback-based function to function that returns native Promises. It's called es6-promisify. Here is an example:
const promisify = require("es6-promisify");
const fs = require("fs");

// Convert the stat function
const stat = promisify(fs.stat);

// Now usable as a promise!
stat("example.txt").then(function (stats) {
  console.log("Got stats", stats);
}).catch(function (err) {
  console.error("Yikes!", err);
});
So cool! You can convert any function from NodeJS API to promise-based function!
Conclusion
Promises are awesome and if you aren't, you should start using them right now!
If you have an opinion about Promises, please leave a comment, I would love to hear what you think!
]]>Now you
]]>Writing a scalable API is something that we're struggling with every day. We want an API can scale and be always online. If you're like me, you don't want to think about server infrastructure, downtimes and you want to have an easy way to deploy changes and updates.
Now you probably ask "Is there some great service that can help us achieve what we want?". Yes, there is, welcome to serverless architecture, welcome to the era of AWS Lambda!
About AWS Lambda
AWS Lambda is a service that lets you run code without provisioning or managing servers. It runs your code when you need it and it scales automatically (yeah, no more headaches and downtimes). Lambda is designed to process as much request as you have. The most important thing is that you pay when your code runs and there is no charge when your code is not running. Amazon also gives you 1.000.000 requests for free each month, which is enough for testing and practicing (and even starting with some smaller apps).
How it works?
Writing code for AWS Lambda is very simple. It provides support for Node.js, Java, C# and Python.
Lambda uses handlers and you can read more about them here: http://docs.aws.amazon.com/lambda/latest/dg/nodejs-prog-model-handler.html
NodeJS code for Lambda would look like this:
exports.myHandler = function(event, context, callback) {
   ...
}
After writing code, you need to go to AWS Lambda console, then manually create Lambda function from AWS console, set up everything, then package code and deploy. Each time you make some change, you will need to package code and deploy it manually (yeah, login to AWS console and upload file...). There is one great video tutorial that shows you everything: https://www.youtube.com/watch?v=PEatXsXIkLc
I think that you agree that this is a very boring process and takes some time. You will also need to do some configuration and package code every time you want to deploy code: http://docs.aws.amazon.com/lambda/latest/dg/nodejs-create-deployment-pkg.html
Claudia.js
Today I want to present you Claudia.js, great NPM module that gives us the ability to easily deploy code to AWS Lambda and API Gateway and does all setup for us.
Claudia.js comes with CLI and couple commands. For this tutorial, we will need to install it. You can setup Claudia.js on your local machine in two steps:
- Install AWS-CLI and enter your credentials: http://docs.aws.amazon.com/cli/latest/userguide/installing.html
- Install Claudia.js with NPM command:
npm install claudia -g
That's all. Claudia will automatically find your credentials from AWS-CLI and be ready for new deployment.
If you need more info about installation and configuration, check official documentation: https://claudiajs.com/tutorials/installing.html.
Claudia API Builder
Here we are. Now that we have installed Claudia.js, we are ready to start with Claudia API Builder. Claudia API Builder is an extension library for Claudia.js that helps you get started with AWS API Gateway and AWS Lambda easily.
If you have worked with Express or some other NodeJS web framework, you will know how to use Claudia API Builder.
I have already prepared code and we will now go through the process of writing code and deployment on AWS Lambda. You can find code on Github: https://github.com/IvanJov/claudia-api-builder-example
Setting up project
As always, we will need to initialise our NodeJS project:
npm init
When you have created the project, we will need to install dependencies:
npm install claudia-api-builder --save
That's all! We are now ready to write some code.
Main logic
Let's create index.js and init our api:
var ApiBuilder = require('claudia-api-builder'),
  api = new ApiBuilder();

module.exports = api;
We have initialized our api variable and we are also exporting it.
Claudia API Builder comes with 5 main handlers:
getpostputdeleteany(handler for any of 4 above)
They accept callback function and pass request object with many useful properties from a request. You can check here what properties are sent: https://github.com/claudiajs/claudia-api-builder/blob/master/docs/api.md#the-request-object
Let's create our first GET request handler:
api.get('/', function () {
  'use strict';
  return 'Hello World';
});
Great! Now we have our API that simply returns Hello World when we send GET request to the main endpoint.
Setting up AWS Lambda and API Gateway
It's time to put our API on AWS Lambda and test how it works. Claudia.js gives us an ability to do that with just one command:
claudia create
It accepts a lot of options, but now we are going to use just a couple of them:
--region: AWS region where to create the lambda--api-module: optional The main module to use when creating Web APIs--name: lambda function name
For more options, please check official documentation: https://github.com/claudiajs/claudia/blob/master/docs/create.md
For this example, we are going to use this command:
claudia create --name claudia-api-builder-example --region us-east-1 --api-module index
After running it, you should see this response:
{
  "lambda": {
    "role": "claudia-api-builder-example-executor",
    "name": "claudia-api-builder-example",
    "region": "us-east-1"
  },
  "api": {
    "id": "yw5awjdbul",
    "module": "index",
    "url": "https://yw5awjdbul.execute-api.us-east-1.amazonaws.com/latest"
  }
}
Claudia.js will also deploy our code and prepare everything for running.
From the example above, you can see that main API URL is https://yw5awjdbul.execute-api.us-east-1.amazonaws.com/latest. Let's send GET request to that URL. Simply open it in the browser and you should see Hello World.
Re-deploying API
Let's image that you changed something it the code (as we are going to do later) and you want to re-deploy code. That's very simple and Claudia.js has a solution for that. When you have created your project using claudia create, it made claudia.json file with some information inside. That file tells Claudia where is your project set, what's its ID and module.
For re-deploying API, we will use:
claudia update
That's all. When the command finishes its execution, your API is re-deployed.
In my projects I like to set commands in package.json and I advise you to do that too:
"scripts": {
  "start": "claudia create --name claudia-api-builder-example --region us-east-1 --api-module index",
  "deploy": "claudia update"
}
Calling scripts will look like:
- Starting:
npm run start - Deploying:
npm run deploy
Handling parameters
In next example, we are going to see how to handle parameters in Claudia API Builder. It's very simple, check the code bellow:
api.get('/people/{name}', function (request) {
  'use strict';
  return request.pathParams.name + ' is cool!';
});
You can define params in URL by putting it in curly brackets like we did above: {name}. All parameters will be available in request.pathParams object.
Let's test this. Deploy app and open page: https://yw5awjdbul.execute-api.us-east-1.amazonaws.com/latest/people/John
You should see John is cool!
Returning JSON
Returning JSON is very simple! Just return the object/array and it will be automatically converted and served as JSON:
api.get('/json', function (request) {
  'use strict';
  return {
    name: 'John',
    surname: 'Doe',
    email: '[email protected]'
  };
});
Handling POST requests
For handling POST requests, Claudia API Builder has post method.
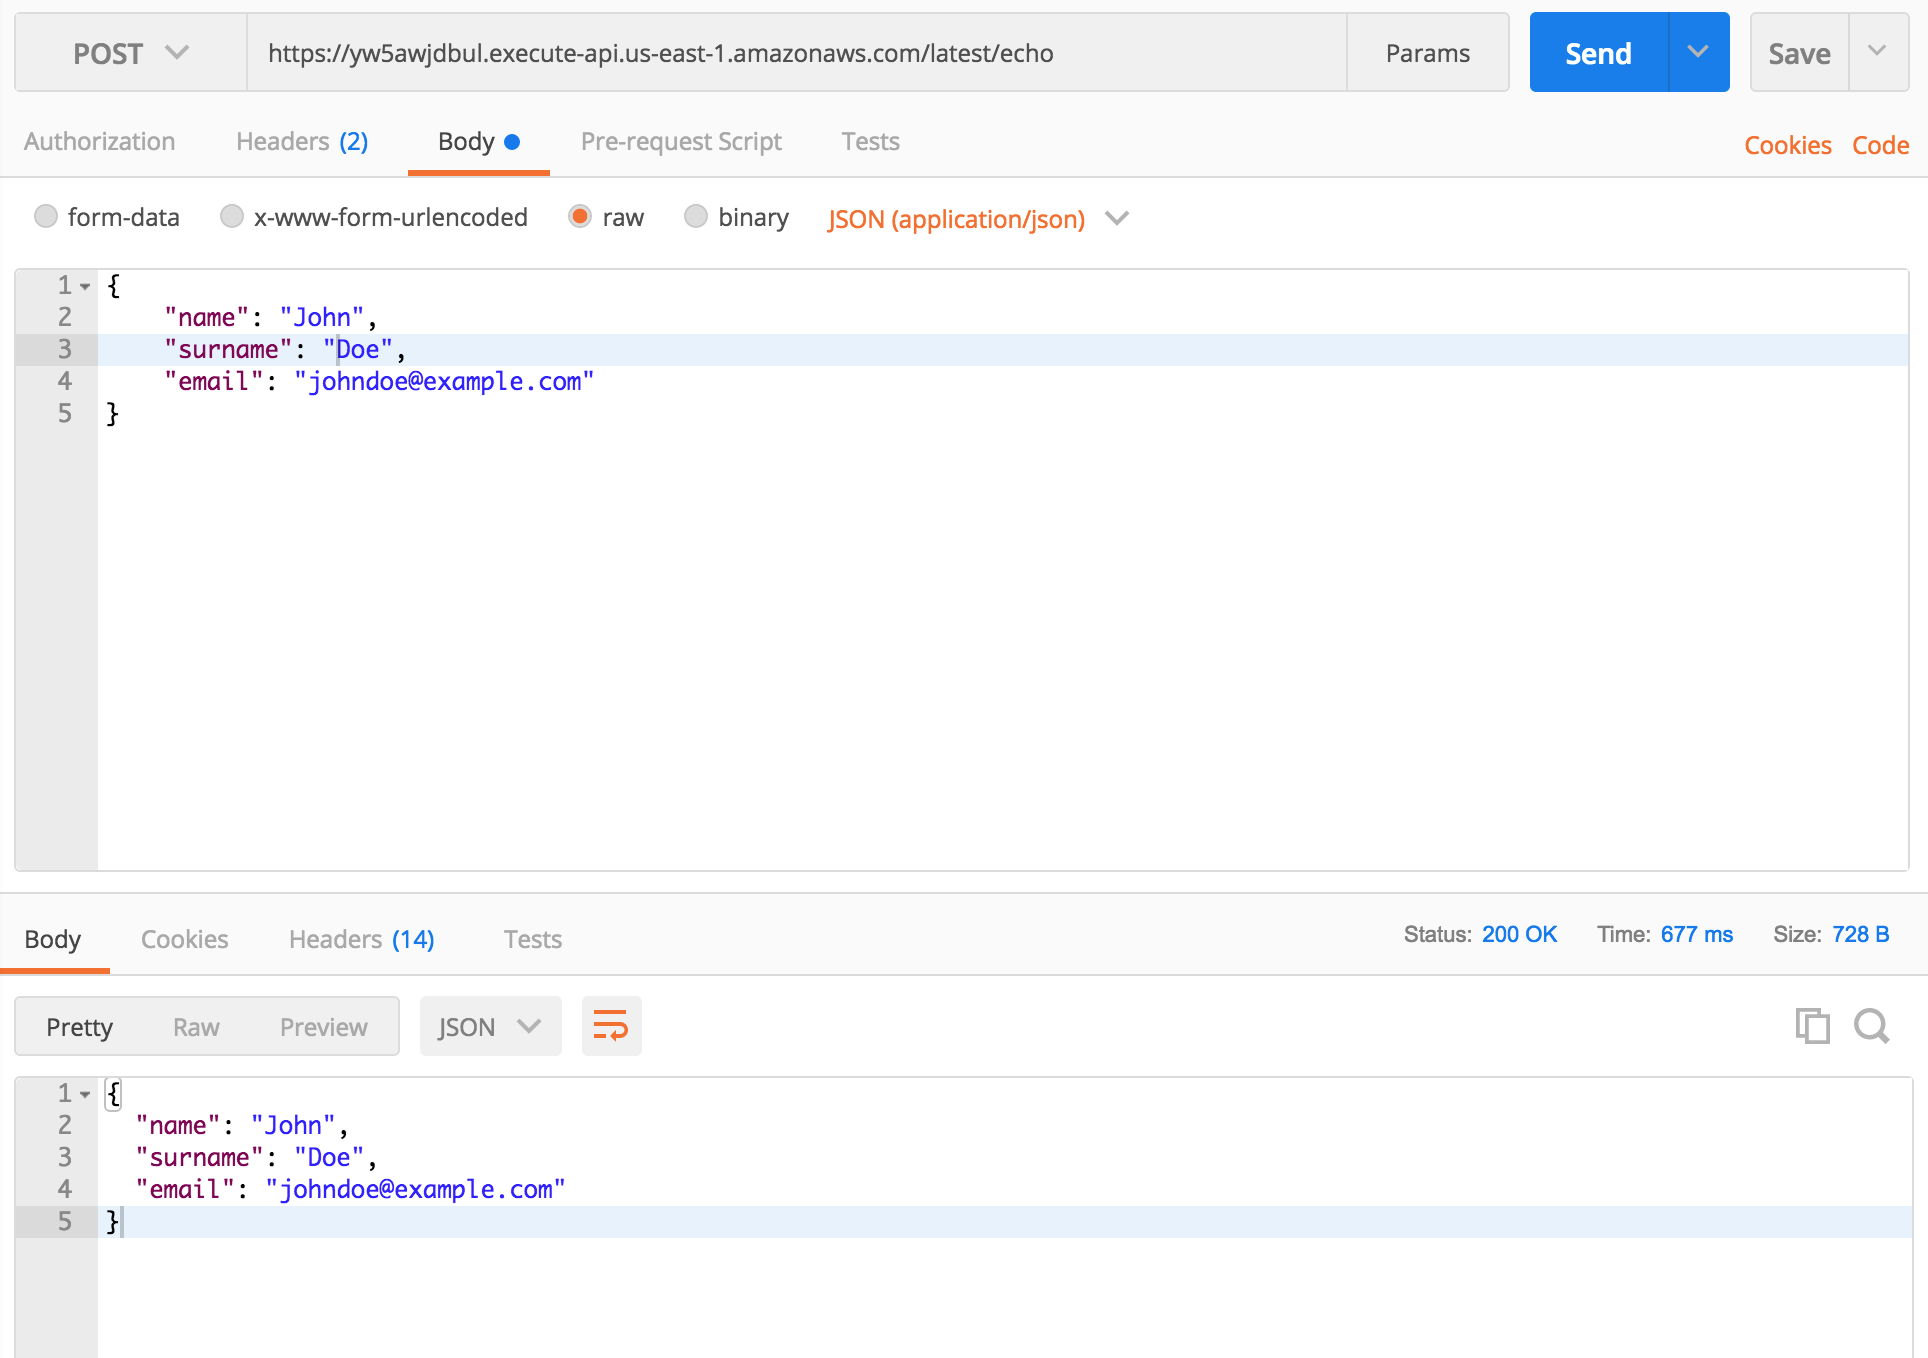
api.post('/echo', function (request) {
  'use strict';
  return request.body;
});
The example above will return the body of the POST request. If you send the request with Content-Type: application/json, request.body will be parsed and an object will be returned (and you will still be able to get raw body string using body.rawBody).
You can test above example by sending a POST request to https://yw5awjdbul.execute-api.us-east-1.amazonaws.com/latest/echo. You should get request body as a response.
All code for index.js
Bellow is full code in index.js file:
var ApiBuilder = require('claudia-api-builder'),
  api = new ApiBuilder();

module.exports = api;

api.get('/', function () {
  'use strict';
  return 'Hello World';
});

api.get('/people/{name}', function (request) {
  'use strict';
  return request.pathParams.name + ' is cool!';
});

api.get('/json', function (request) {
  'use strict';
  return {
    name: 'John',
    surname: 'Doe',
    email: '[email protected]'
  };
});

api.post('/echo', function (request) {
  'use strict';
  return request.body;
});
Conclusion
Claudia.js and Claudia API Builder are awesome modules for building scalable and serverless API on AWS Lambda and API Gateway. It's so easy to setup, has a developer-friendly code, and can also be connected with other AWS services, such as S3 or DynamoDB. You can deploy your API and stop worrying about downtimes and overload.
]]>Git changelog comes with Grunt plugin and CLI. I am using CLI for generating changelogs, but Grunt plugin is also an awesome idea. It uses Angular JS commit standard (which is probably the best commit standard
]]>I've recently found one awesome changelog generator, based on your commit messages. That's git-changelog.
Git changelog comes with Grunt plugin and CLI. I am using CLI for generating changelogs, but Grunt plugin is also an awesome idea. It uses Angular JS commit standard (which is probably the best commit standard in my opinion), but you also have the ability to change that.
For installing git-changelog CLI, execute this command:
npm install -g git-changelog
How generated changelog looks like?
Here is an example of generated changelog: https://github.com/rafinskipg/git-changelog/blob/master/EXTENDEDCHANGELOG.md
How to configure git-changelog?
Here is an example of .changelogrc file that's used as configuration file:
{
    "app_name": "Git Changelog",
    "logo": "https://github.com/rafinskipg/git-changelog/raw/master/images/git-changelog-logo.png",
    "intro": "Git changelog is a utility tool for generating changelogs. It is free and opensource. :)",
    "branch" : "",
    "repo_url": "",
    "version_name" : "v1.0.0",
    "file": "CHANGELOG.md",
    "template": "myCustomTemplate.md",
    "sections": [
        {
            "title": "Bug Fixes",
            "grep": "^fix"
        },
        {
            "title": "Features",
            "grep": "^feat"
        },
        {
            "title": "Documentation",
            "grep": "^docs"
        },
        {
            "title": "Breaking changes",
            "grep": "BREAKING"
        },
        {
            "title": "Refactor",
            "grep": "^refactor"
        },
        {
            "title": "Style",
            "grep": "^style"
        },
        {
            "title": "Test",
            "grep": "^test"
        },
        {
            "title": "Chore",
            "grep": "^chore"
        },
        {
            "title": "Branchs merged",
            "grep": "^Merge branch"
        },
        {
            "title" : "Pull requests merged",
            "grep": "^Merge pull request"
        }
    ]
}
This is just a JSON file with a lot of properties. It's not required, if you don't insert it, it will use default settings (which is also ok for a nice changelog). You can find all properties on this link: https://github.com/rafinskipg/git-changelog#options--defaults
How commit message looks like?
So here we are. After you install git-changelog CLI and you setup .changelogrc file, you're ready to start committing in a proper way and generating your changelogs.
This plugin comes with a set of types:
feat: A new featurefix: A bug fixdocs: Documentation only changesstyle: Changes that do not affect the meaning of the code (white-space, formatting, missing semi-colons, etc)refactor: A code change that neither fixes a bug or adds a featuretest: Adding missing testschore: Changes to the build process or auxiliary tools and libraries such as documentation generation
An example of a message of a commit that updates readme file:
git commit -m "docs(readme): Add documentation for explaining the commit message"
You see, just add any of type at the start of a commit message, then specify the exact feature that you worked on in brackets and give more information after two dots. Simple! This will increase commits readability.
Generating changelog
Now you have configuration and commits with specific message style. It's time to generate your changelog. That's really simple, just execute git-changelog command in your console:
git-changelog
That's all, your changelog will be saved in CHANGELOG.md file.
You can also use Grunt task for generating changelog, more information here: https://github.com/rafinskipg/git-changelog#grunt-task
Conclusion
git-changelog is an awesome library for teams and individuals. When you're working on projects, you want to know what stuff you changed, added or fixed. Writing proper commit messages increases readability and gives you the ability to create changelogs and track all changes in your code. Please try it, you will never regret!
Please leave a comment if you like this article! I would also like to know what plugins you use for generating changelogs and what commit message styles you prefer! 😊
]]>Since I've started to work on web apps, I am searching for ways to improve page speeds and create better user experience. We are minifying our code, bundling files and optimizing images. One thing that we don't think about is server protocol. Is there a way to increase speed by changing protocol? Yes, there is! Welcome to HTTP/2 era!
HTTP/2 is latest version of HTTP protocol, made by the HTTP Working Group. It's developed from SPDY, experimental protocol made by Google. Last HTTP version is 1.1, released 1997, almost 20 years ago. Now's the time for a change!
HTTP/2 has many advantages. It uses single TCP protocol to server multiple files. It also compresses HTTP headers and sends them in binary format, which is better than HTTP/1 plain text format. There is also one amazing feature, HTTP/2 Server Push. It gives server ability to serve files before the client has requested them, which gives amazing speed improvements.

What about the support? Check it here: http://caniuse.com/#feat=http2. As you can see, the newer versions of browsers are supporting HTTP/2 protocol. In my opinion, I think that you can use HTTP/2 on your servers. I have tested HTTP/2 on various machines and only Internet Explorer had problems with it. People are moving to Edge so that also shouldn't be a problem in future.
Using HTTP/2 in Node
Now that we know what is HTTP/2 and are its advantages, we can start upgrading our Node apps. As you have probably seen, there is NPM module for almost anything. Developers have created two awesome modules for working with HTTP/2 protocol, http2 and spdy. They are using same API design as Node HTTPS API so it will be really simple to get started.
Generating SSL certificate
Let's write some code baby! We will implement HTTP/2 protocol on Express, Koa, and Hapi frameworks. But before we start, we need SSL certificate. HTTP/2 protocol only works on SSL and we need to generate certificate and key. I've already done it and you can use this certificate: https://github.com/IvanJov/node-on-http2/tree/master/certificate. If you still want to create your own, here is a simple tutorial (execute these commands in separate folder):
$ openssl genrsa -des3 -passout pass:x -out server.pass.key 2048
...
$ openssl rsa -passin pass:x -in server.pass.key -out server.key
writing RSA key
...
$ rm server.pass.key
$ openssl req -new -key server.key -out server.csr
...
Country Name (2 letter code) [AU]:US
State or Province Name (full name) [Some-State]:California
...
A challenge password []:
...
$ openssl x509 -req -sha256 -days 365 -in server.csr -signkey server.key -out server.crt
After you generate certificate, you should see something like this: https://github.com/IvanJov/node-on-http2/tree/master/certificate
HTTP/2 in Express
We are starting with the most famous framework, Express. Let's assume that you already know how to setup express, init your project and create package.json. Next thing that we need to do is to install spdy package. I usually prefer to work with http2, but Express has some problems with it. They will hopefully be solved in next versions.
Let's install spdy:
npm install spdy --save
Now let's create index.js file and include packages in it, initialize our Express app and createa one route for testing:
const express = require('express');
const spdy = require('spdy');
const fs = require('fs');

const app = express();

app.get('/', function (req, res) {
  res.send('Serving using HTTP2!');
});
Next thing we need to do is to include our SSL certificate:
const options = {
  key: fs.readFileSync('path/to/server.key'),
  cert:  fs.readFileSync('path/to/server.crt')
};
And here comes the main part. Now we need to create spdy server, inject our app variable and listen on some port. Sounds easy? Look at this code:
spdy
  .createServer(options, app)
  .listen(3000, (err) => {
    if (err) {
      throw new Error(err);
    }

    console.log('Listening on port: ' + 3000 + '.');
  });
Now we have all parts of our app. If you inserted all parts of code, your index.js should look like this:
const express = require('express');
const spdy = require('spdy');
const fs = require('fs');

const app = express();

app.get('/', function (req, res) {
  res.send('Serving using HTTP2!');
});

const options = {
  key: fs.readFileSync('path/to/server.key'),
  cert:  fs.readFileSync('path/to/server.crt')
};

spdy
  .createServer(options, app)
  .listen(3000, (err) => {
    if (err) {
      throw new Error(err);
    }

    console.log('Listening on port: ' + 3000 + '.');
  });
Run your app
node index
and open https://localhost:3000
(if you see Your connection is not private page, just proceed localhost)
You should see this output:

Look at the protocol in the console. Yeah, it's HTTP/2, you've successfully implemented HTTP/2 protocol in your Express application!
HTTP/2 in Koa
Now that we know how to use HTTP/2 in Express, we can implement that in Koa too! Koa can use http2 so we will use it. Process will be almost same as setting up HTTP/2 in Express app.
Important Notice: This code works only with Koa v1!
After installing and setting up your Koa app, install http2 module:
npm install http2 --save
Then initialize Koa app with a test route:
const http2 = require('http2');
const koa = require('koa');
const _ = require('koa-route');
const fs = require('fs');

const app = koa();

app.use(_.get('/', function *(next) {
  this.body = 'Serving using HTTP2!';
  yield next;
}));
Now we can include our certificate, create http2server and inject our app variable:
const options = {
  key: fs.readFileSync('path/to/server.key'),
  cert:  fs.readFileSync('path/to/server.crt')
};

http2
  .createServer(options, app.callback())
  .listen(3000, (err) => {
    if (err) {
      throw new Error(err);
    }

    console.log('Listening on port: ' + 3000 + '.');
  });
We have created our http2 server and started to listen on port 3000. Let's run the app and see the output:
node index
Open https://localhost:3000/ and you should see this:

Yeah, it works!
HTTP/2 in Hapi
Last but not least, Hapi framework (my favorite). Setting up HTTP/2 in Hapi will also require http2 package.
After you install Hapi and setup package.json, let's install http2 package again (yeah, every time...):
npm install http2 --save
Now we need to setup our app in index.js. Hapi works a little bit different than Express and Koa, so now we won't need to setup http2 server and inject app, we will do the opposite, inject http2 server as listener in Hapi. We will also setup one simple route for testing. Check the code bellow:
const hapi = require('hapi');
const http2 = require('http2');
const fs = require('fs');

const options = {
  key: fs.readFileSync('path/to/server.key'),
  cert:  fs.readFileSync('path/to/server.crt')
};

const server = new hapi.Server();
server.connection({
  listener: http2.createServer(options),
  host: 'localhost',
  port: 3000,
  tls: true
});

server.route({
  method: 'GET',
  path:'/',
  handler: (req, res) => {

    return res('Serving using HTTP2!');
  }
});

server.start((err) => {
  if (err) {
    throw err;
  }
  console.log('Server running at:', server.info.uri);
});
Now we can run our app:
node index
and open https://localhost:3000/
The output is:

Woohoo, it works!
Summary
You've done it! Now you know how to use HTTP/w protocol in your Node applications. Everything you serve through your Express, Koa or Hapi application will be transferred much faster. If you use a web app to serve static files, it will be transferred in parallel and save so much time!

I have created a Github repo with all examples and instructions how to run the code: https://github.com/IvanJov/node-on-http2
I would like to hear your comments. Please let me know if everything is clear and if you maybe need some help. Thanks!
]]>I've recently started to use Cycle.js framework for reactive programming. This
]]>Hi! These days everyone is talking about functional programming in JS, reactive programming, and streams. Some awesome libraries came out to help us to work with streams and my favorite is Cycle.js. It's created by André Staltz.
I've recently started to use Cycle.js framework for reactive programming. This framework gives you the ability to think about what should your app do when some data comes in the stream (Sources) and what it should do when you send some response back (Sinks). It creates an awesome circle between Sources and Sinks and that's why it's called Cycle!
Let's quote text from cycle.js.org website. It perfectly explains what's the main function of Cycle.js framework:
Cycle’s core abstraction is your application as a pure function main() where inputs are read effects (sources) from the external world and outputs (sinks) are write effects to affect the external world. These side effects in the external world are managed by drivers: plugins that handle DOM effects, HTTP effects, etc.
It basically tells everything, Cycle.js creates a cycle between your inputs and outputs and gives you ability to write code that's in the middle.
Building app
TL;DR I've already created app, it's on github: https://github.com/ivanjov/cycle-js-http-tutorial. There is also simple explanation how to test it on local environment.
Setting up
First of all, we will need to install Cycle.js and XStream, with their components:
npm install @cycle/dom @cycle/http @cycle/xstream-run xstream --save
This is enough for now. We will install and create Express server later (we will use it for getting random JSON data) and test our Cycle.js app.
Main.js file
In our main.js file, we are going to import Cycle.js and other important components:
import Cycle from '@cycle/xstream-run';
import xs from 'xstream';
import {div, h2, makeDOMDriver} from '@cycle/dom';
import {makeHTTPDriver} from '@cycle/http';
We will also call Cycle.run function and inject out main function:
function main(sources) {}

Cycle.run(main, {
  DOM: makeDOMDriver('#main'),
  HTTP: makeHTTPDriver()
});
Cycle.run function takes main function as the first argument (that function will make magic) and passes sources as the second argument:
- DOM: That's our DOM driver that connects to div with id
main. Cycle.js is awesome because we can select just one div and implement whole logic inside it, as we do with React for example. - HTTP: This is our HTTP driver that take our URL stream, make request to those URLs and pass responses to
mainfunction
Main logic
Here we are! We have our main function and now's the time to create some magic!
We will first create our request stream:
const request$ = xs.periodic(1000)
    .mapTo({
      url: 'http://localhost:3000',
      category: 'api',
    });
I think that this is very clear. We are creating streams of URLs and that will later be wired to HTTP driver. HTTP driver then makes GET requests to http://localhost:3000 every 1000 milliseconds. We are then mapping it to category api. It's important to set a category for every request we create from Cycle.js because we can listen for specific request later.
Now we have our request stream and we need stream listener that will do something on every response from HTTP driver. We are changing our DOM on every request. Here is the code for that:
const vtree$ = sources.HTTP.select('api')
    .flatten()
    .map(res => res.body)
    .startWith({
      number: 0
    })
    .map(result =>
      div([
        h2('.label', `Random number from server: ${result.number}`)
      ])
    );
It's taking HTTP responses from stream, selects our api stream (as we talked about later, we can select a specific category to listen to). It's then mapping response, selecting just body of the response and pushing result to the DOM.
Cycle.js also gives us ability to set a default value, so we set it to 0:
{
  number: 0
}
This is also the response format that we want to get.
We also need to flatten our stream: https://github.com/staltz/xstream#flatten (check out the diagram, it explains everything). Our source stream will return multiple streams and we can only use one at the time.
Also, Cycle.js DOM is based on Virtual DOM library called snabbdom and it's awesome library for rendering DOM elements. You will get used to it in couple minutes. Cycle.js can also use JSX (scroll down to find documentation how to use JSX with Cycle.js).
Final main.js file should look like this:
import Cycle from '@cycle/xstream-run';
import xs from 'xstream';
import {div, h2, makeDOMDriver} from '@cycle/dom';
import {makeHTTPDriver} from '@cycle/http';

function main(sources) {
  const request$ = xs.periodic(1000)
    .mapTo({
      url: 'http://localhost:3000',
      category: 'api',
    });

  const vtree$ = sources.HTTP.select('api')
    .flatten()
    .map(res => res.body)
    .startWith({
      number: 0
    })
    .map(result =>
      div([
        h2('.label', `Random number from server: ${result.number}`)
      ])
    );

  return {
    DOM: vtree$,
    HTTP: request$
  };
}

Cycle.run(main, {
  DOM: makeDOMDriver('#main'),
  HTTP: makeHTTPDriver()
});
HTML file
We need to include Cycle.js code and our main.js in HTML file that will server everything. File should look like this:
<!DOCTYPE html>
<html lang="en">
<head>
    <meta charset="UTF-8">
    <title>Cycle.js HTTP request example</title>
</head>
<body>
    <div id="main"></div>
    <script src="./dist/main.js"></script>
</body>
</html>
main.js will be in dist folder after we connect modules using browserify and transpile code using babel.
Creating server
As you saw, we are taking responses from server listening on http://localhost:3000. That is simple Express server that returns random number in JSON format.
We need to install express and cors library (for allowing access from different domains):
npm install express cors --save
Our server.js should look like this:
import express from 'express';
import cors from 'cors';

let app = express();
app.use(cors());
app.options('*', cors());

app.get('/', (req, res, next) => {
  return res.json({number: getRandomInt(1, 1000)});
});

app.listen(3000, () => console.log('Server listening on port 3000'));

const getRandomInt = function(min, max) {
  min = Math.ceil(min);
  max = Math.floor(max);
  return Math.floor(Math.random() * (max - min)) + min;
};
Running the app
The app we created now is on (github)[https://github.com/IvanJov/cycle-js-http-tutorial]. I highly recommend to clone it and run in your local environment. I've setup all scripts in package.json and you should just call
npm run start
and to open index.html file in your browser.
You can also play with the code from this page, but you will need to setup browserify and babel.
When you open index.html, you should see something like this:

Conclusion
Cycle.js is an awesome library for reactive programming. It gives you enough space to experiment with your ideas but also gives you enough support and makes sure that everything will go well. It's perfect for real-time apps, with a lot of client-server conversation. You can create awesome apps with it, just give it a chance!
]]>composer.json and composer.lock. Composer.json file is similar to package.json in Node.js but what's composer.lock? Here comes]]>I've recently talked to people who are mostly PHP developers and want to try Node.js. For installing and managing dependencies, they use Composer. Composer creates 2 files, composer.json and composer.lock. Composer.json file is similar to package.json in Node.js but what's composer.lock? Here comes npm shrinkwrap.
NPM shrinkwrap lets you lock down the versions of installed packages and their descendant packages. It helps you use same package versions on all environments (development, staging, production) and also improve download and installation speed. Having same versions of packages on all environments can help you test systems and deploy with confidence. If all tests pass on one machine, you can be sure that it will pass on all other because you know that you use same code!
How to use it?
NPM shrinkwrap is very simple to use. After installing packages using npm install or npm install <package-name> and updating your node_modules folder, you should run
npm shrinkwrap
That's all!
It should create new npm-shrinkwrap.json file with information about all packages you use. Don't forget to commit it!
Next time, when someone calls npm install, it will install packages from npm-shrinkwrap.json and you will have the same environment on all machines.
How to add/update/delete package?
Installing and updating packages is very simple. Just use npm install <package-name> to install package, or npm update <package-name> to update it or npm uninstall <package-name>. Just don't forget to run npm shrinkwrap command after you finish. It will update npm-shrinkwrap.json file with new packages.
NPM shrinkwrap is not including my dev packages, how to fix that?
So, if you want to have your development packages in the package list, just run the command with --dev. Command will look like this:
npm shrinkwrap --dev
Why is this better than locking down versions in package.json file?
Hmm, that's a good question. I think that you already know that when you run npm install, it will install latest specified version of the package. If you specify exact version, it will install that version. Example:
"express": "4.14.0"
In this example, npm will install express package, version "4.14.0". But the thing that you won't think about is "what if express published new version with the same version number?" or "what if express didn't lock their package versions?". These are the questions you can't know an answer for, but you can simply use npm shrinkwrap and be sure that you will always have the version you specified. Shrinkwrap will save package version and all its descendant packages.
Summary
I hope that you like this article and that you learned something new. Please let me know if comments if you have some question about npm shrinkwrap and why it's great to use it on production apps. Try it, you won't regret!
Welcome to my redesigned blog! I've gained big experience in software and web development in the past couple years and I am starting to share my thoughts and ideas with the world. I hope that you will find something interested here.
I will give my best to write at
]]>Hi!
Welcome to my redesigned blog! I've gained big experience in software and web development in the past couple years and I am starting to share my thoughts and ideas with the world. I hope that you will find something interested here.
I will give my best to write at least one article per week. It will usually be something about JavaScript and it's ecosystem, but I also like to write about pretty code, my ideas, and best practice recommendations.
If you like my articles, please share them and if you have the question or want to tell me what do you think about the article, please write a comment, you will get a response!
]]>