ILogger here, an ILogger there; a package here, a config there; and voilà, you're done. And although Microsoft.Extensions.Logging and packages]]>When you listen to senior developers, speakers, and other subject matter experts (SMEs) talk about logging in .NET applications, it all sounds so easy. An ILogger here, an ILogger there; a package here, a config there; and voilà, you're done. And although Microsoft.Extensions.Logging and packages like Serilog do in fact make implementing advanced logging quite straightforward nowadays, there's a whole lot more to it than that.
See, writing logs is all good and fine, but as soon as you start working with a team and the application starts being used substantially by lots of users, many new factors come into play. The speed at which logs are written and the volume of those logs start to increase. It's not uncommon for applications to go through multiple stages of deployment, with the developers having little to no access to production. Production environments often have operational complexities such as clustering, scaling, and data residency requirements. The number of things that can go wrong also increases, which leads to adding more logging "just in case". And things quickly snowball into an avalanche of text that require plenty of searching.
And this is without even talking about Observability, which includes Tracing and Metrics that further increase that volume. Combined with the complexity of those production environments, it doesn't take long for teams to start looking for alternatives to simple logging such as those offered by Application Insights. Often though, it's not enough, and companies end up looking for even more specialized solutions like those offered by Datadog.
However, you'll often hear those same SMEs who advocate the use of specialized observability solutions, also complain about how large the wheelbarrow of money they need to give Datadog every month is. In a large-scale high-usage distributed cloud application, it's not uncommon for the application to produce several hundred megabytes, if not gigabytes, of logging, tracing, and metric data. All of which has historically been packaged up and delivered through custom vendor implementations that have often left companies locked in to those vendors.
Thankfully, that landscape is changing thanks to the arrival of OpenTelemetry. Developed as an open standard, it is unifying the concepts of Structured Logs, Tracing, and Metrics under a universal vendor agnostic solution that is slowly making its way into all the different software development ecosystems, including .NET. Microsoft is heavily involved in the development process as they're part of both the Governance and Technical Committees while also being maintainers.
That's great, but what about Aspire?
How does Aspire fit into all of this?
I have been writing software for a very long time now. I started with .NET back when .NET Framework was released as a public beta in 2001. Over the years, it's been my experience that there's often this disconnect between the reality that Microsoft lives in, and the reality that exists within existing development teams. Perhaps it's the scale at which Microsoft operates (it is, after all, the largest software company in the world), or perhaps it's their privileged position as the inventors and thus maintainers of the .NET technologies we all use. I don't really know. I just know there is a gap between those two realities.
I recently joined the .NET development team at Orbis Communications, a division of Symplicity. And though my colleagues are just awesome (hey everyone! 👋), our application is having some growing pains that we're working through. Born in the days of .NET Core 1.1, it has accumulated a lot of technical debt that has made that gap even more evident.
Logging, for example, has been a pain point for our team for a few years now. Although Serilog was shoehorned in at some point, it was integrated in such a way that getting to logs essentially turns into a hunting adventure of searching through the many text files that are actively dumped to Azure Storage.
When I first read about Aspire, I was both excited and frustrated at the same time. As most things brought to us by the various .NET teams, I could see a lot of the value in what was being done and the benefits this would bring in the future. Thanks to such initiatives, I can now imagine a future where I can write software while running a full cloud stack on my laptop while I'm on my 6 hours flight to Colombia. And though that's an exciting future to look forward to, I have a reality to get back to on Monday that's not so futuristic.
My frustration mostly stems from the fact that although these are great things that will accelerate the development of new applications in the future, it doesn't do much for existing applications. I once had the privilege of exchanging thoughts with David Fowler on Discord regarding the integrated nature of Aspire as all-in-one solution, but I don't think I succeeded in communicating my thoughts as well as I would have liked to.
Aspire is an incredible developer experience if you're writing a new application. It's also possible to work an existing application into an Aspire solution, if it's not too long in the tooth. But what do you do with an application such as ours that's been around as long as it has? Our application has 7 years of custom implementations built into it to accommodate for the realities of how tumultuous the landscape for ASP.NET was in the pre-.NET 5.0 days. Some things also take time to get around to. For example, although we've managed to successfully upgrade to .NET 8.0, we're still using WebHost.CreateDefaultBuilder inside a Startup.cs file with server-side compiled Razor pages and custom-written APIs all packaged up as a single executable that only recently lost its strong dependency on Windows.
As much as I'd like to get on board the .NET Aspire developer train, I can't, in good conscience, do so carelessly. We have more than 14 million users across Canada and the United States who depend on our applications. A full rewrite is a monumental task and I can't stop the development of the product just to add, what essentially amounts to, some extra developer tools to make our lives easier.
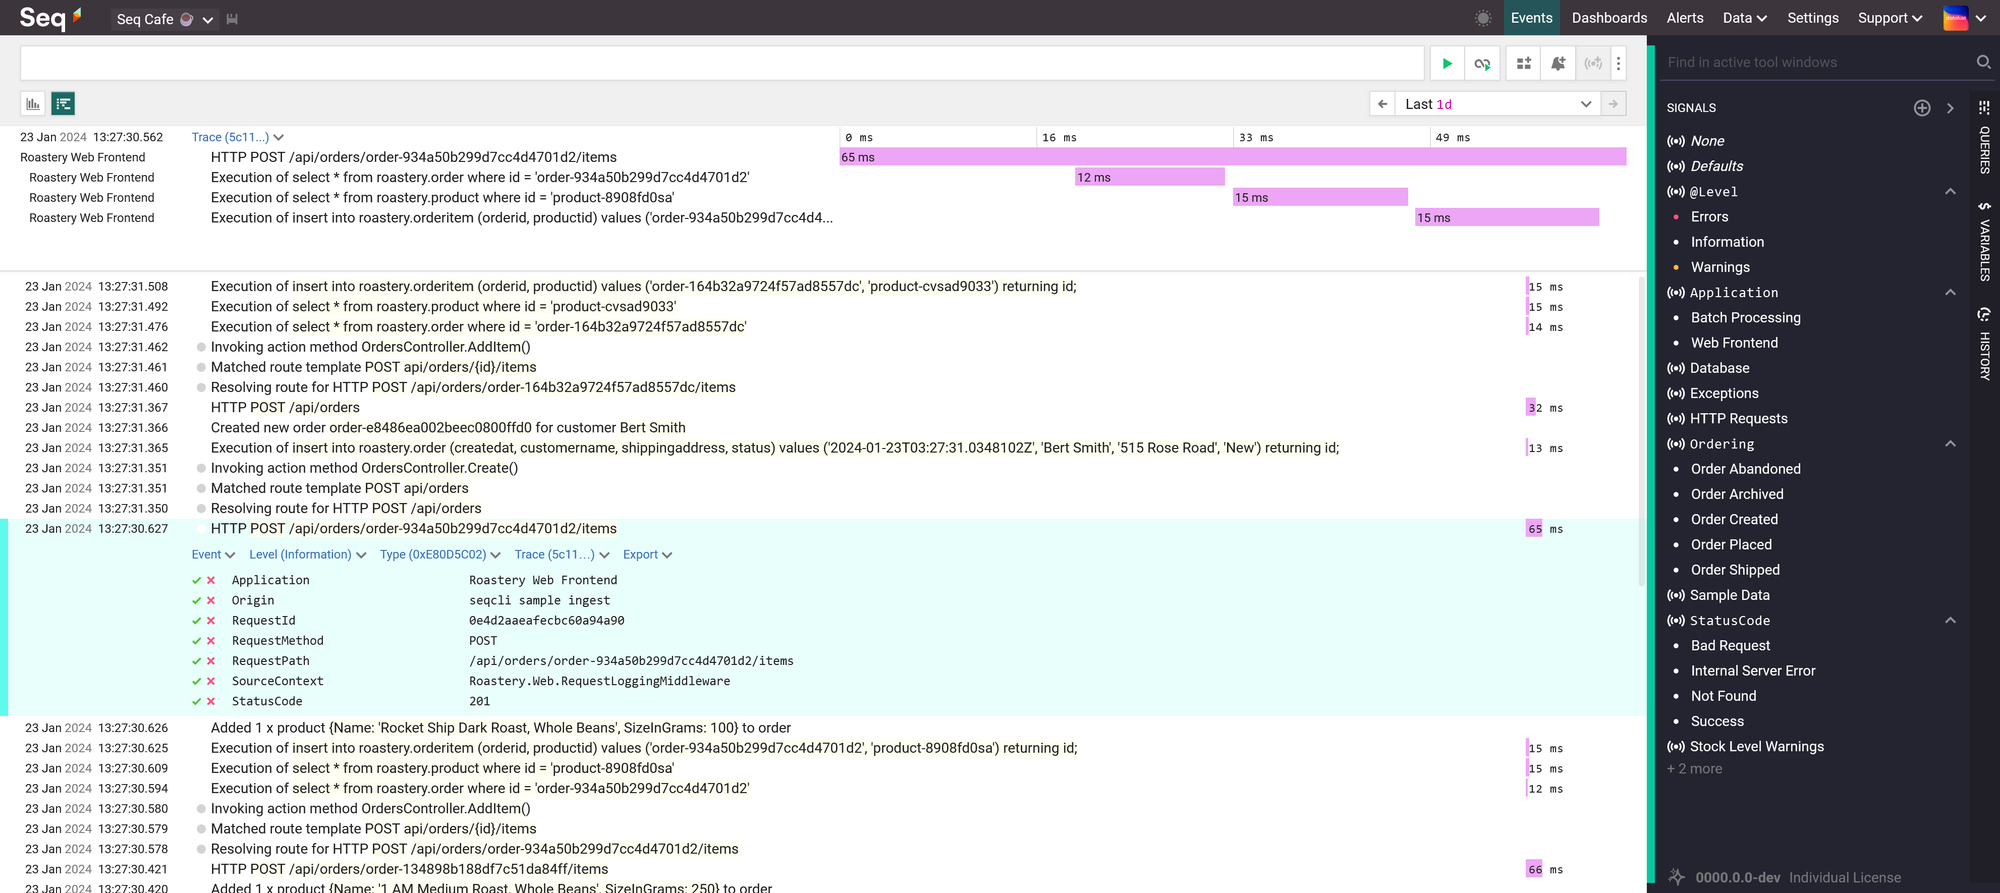
Week after week, I began to feel the burden that had become the routine choreography that is our dance when we jump through the required hoops of searching text files to get log information when things fail in one of our environments. Application Insights wasn't of much help. So I started looking at solutions such as Seq, but it was hard to justify the price to management for something that, at this point, was nothing more than exploratory experiments in an attempt to look for a solution to our logging woes. Disappointed that I couldn't find an easy fix to our situation, I went back to our priorities and was about to relegate myself to the confines of our reality.
That is, until I discovered that the Aspire Dashboard was now available as a standalone container image. That changed everything.
Currently, our deployment pipeline is based on the older approach of building artifacts from a branch for each environment, packaging them up as ZIP files, and unzipping them on the destination server. It's been modernized slightly over the years and currently runs off some automation that was built in Azure DevOps.
I was thankfully fortunate that our repositories are hosted in GitHub and even more fortunate that I was given the flexibility of rewriting some of our deployment pipelines as GitHub Actions. Over the last few weeks, I've been using that freedom to explore how we could package and deploy our application as a Docker container, with all of the benefits that come with a modern CI/CD workflow, since I have the rare opportunity of being able to build a parallel workflow that doesn't affect the one that currently deploys to production.
Knowing that the Aspire Dashboard is essentially just a basic user interface over an OpenTelemetry collector, further confirmed by reading about the configuration of the standalone Aspire Dashboard, I started wondering if I could use this to solve some of our issues with logging. I had already looked into adding support for OpenTelemetry using the NuGet packages provided by their SDK and didn't see much of a challenge in doing so within our current application. The problem is I didn't have anywhere to send the data.

There are some really great platforms, like Honeycomb, available. But due to the need for security and auditing that must tie into our Microsoft Entra ID, combined with our use of three development and two production environments, we often find ourselves needing to access Enterprise level pricing for even the most basic usage by our application. That's a hard sell for, again, what is essentially nothing more than developer tools to make our lives easier. Those are costs that can often be justified for production environments, but they're harder to negotiate in the pre-production ones.
While investigating options for the deployment of our application as a container in Azure, I also recently ran across documentation that showed how to use the Aspire Dashboard container with Azure Container Apps. Now this is cool, I thought. That looks exactly like the kind of solution I need.
Azure Container Apps are awesome, don't get me wrong. But considering our application cannot be scaled to multiple instances as it's not designed to support such a scenario, it seemed to be a bit too much complexity and cost for what would only ever be a single container with an accompanying dashboard. Although going through deployment with Azure Container Apps is much simpler than a full Azure Kubernetes Service deployment, it's still a fully managed version of Kubernetes.
I needed something simpler and less expensive that I could use for the deployment of our various environments. Something that would also allow us to move away from our current setup based on various Azure Web Apps with deployment slots. There was the obvious choice of using Azure Web App for Containers, but I imagined the mess I could quickly get myself into if I tried to coordinate an extra floating container used to host the Aspire Dashboard. I really didn't want to start having to manage a VNet with all of the associated routing responsibilities.
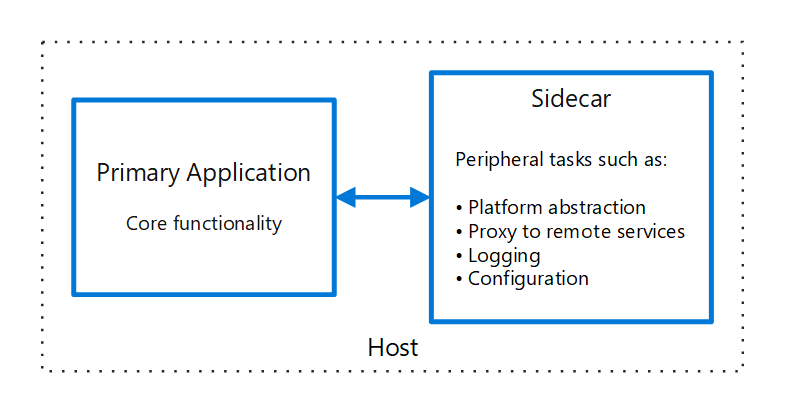
And that's when I saw that the Gods of Perfect Timing seemed to have gotten together to align all of the stars for me. Turns out that a team at Azure had been working on a new feature for Azure Web App, sidecars for the Azure App Service.
If you don't know what the sidecar pattern is, it describes the concept of deploying a container that accompanies another container. Like the sidecar of a motorcycle. Sounds a lot like an accompanying Aspire Dashboard that sidecars an application, doesn't it?
As the feature is still in preview, there's a lack of documentation, and some of the tooling is sort of incomplete. It took me a lot of trial and error, but I finally figured out how to bundle up a solution that works really well. There are some things you have to be aware of to avoid some frustration and make for a reliable deployment, but once you understand what those are, they're straightforward and easy to take into consideration.
Stay tuned for the follow-up to this post where I'll help you cross the gap to get your application deployed with an Aspire Dashboard sidecar, just as I helped our team cross the gap with ours. And together, we'll go on the shared adventure of discovering the world of observability through the eyes of OpenTelemetry.
Leave me a comment below or find me online. I'd love to hear your thoughts!
]]>Value Objects is one of the most powerful concepts that should be at the core of
]]>Yes, I'm serious. Well written Value Objects are one of the most valuable skills you can learn as a software developer. There's a reason why Primitive Obsession is so popular.
Value Objects is one of the most powerful concepts that should be at the core of every developer's skill set. Unfortunately, most don't understand just how important they really are.
Most developers are flooded with short-form content on LinkedIn, Instagram, Twitter, and YouTube that try to click-bait attention for popularity points. Very few content creators take the time and effort to walk other developers through the deep dive needed to really learn and understand these concepts.
So take the time with me to explore why Value Objects are so important, how to build better Value Objects in .NET, and why this will make you a better software developer that will earn you clout and respect.
But first, some history!
Value Objects and the shadow they live under
Although it may have been popularized in 1999 by Martin Fowler with the publishing of his book Refactoring: Improving the Design of Existing Code, the concept of Value Objects is far from a new one.
As most things in history, the world forgets, someone brings something old out of the shadow, and the original authors are forgotten about until the pattern repeats itself again.
Value Objects are one of those things.
You see, there's been a resurgence of popularity around Value Objects lately. There are plenty of YouTube videos, wiki articles, blog posts, and talks. Even Entity Framework Core recently improved support for Value Objects with the release of Complex Types.
Throughout that content, sometimes Martin Fowler's 2002 book Patterns of Enterprise Application Architecture will be referenced, but most often, Value Objects tend to live in the shadow of the very well known book Domain-Driven Design written in 2003 by Eric Evans.
There's a reason why I say in the shadow of DDD.
The concept of Value Objects is much older than the early 2000s. We're just at the peak of another cycle of history.
The core concept and origins of Value Objects
So you've heard of SOLID right? Remember the L? Liskov's substitution principle?
The Liskov is for Barbara Liskov. She wrote a paper at MIT in 1974 that was titled Programming with Abstract Data Types in which she laided out the foundational concepts that would eventually evolve into the modern Value Object.
What makes Value Objects so important
Everyone who's written any decent amount of software knows that a lot of what is software development revolves around data. Inputing data, outputing data, manipulating data, calculating data, aggregating data, comparing data, reporting data, and the list goes on.
Most of our time as developers is spent around data in our systems.
- Validating input before it enters our system.
- Organizing data into objects to work with it logically.
- Storing and indexing it efficiently in databases.
- Running routines on that data to generate reports.
We also spend a considerable amount of effort to ensure the integrity of that data. If users can't trust the data then they won't trust the system, and if you're a developer on that system, that means that its users won't trust you either.
Value Objects are so crucial to software because they're built around trust.
Most .NET developers won't use float because they don't trust it. They'd rather use decimal because of the inherit nature of real numbers that causes floating point errors.
At it's core, a Value Object is "a small simple object, like money or a date range, whose equality isn't based on identity". But as Martin Fowler points out when using Money as an example:
A large proportion of the computers in this world manipulate money, so it's always puzzled me that money isn't actually a first class data type in any mainstream programming language. The lack of a type causes problems, the most obvious surrounding currencies. If all your calculations are done in a single currency, this isn't a huge problem, but once you involve multiple currencies you want to avoid adding your dollars to your yen without taking the currency differences into account. The more subtle problem is with rounding. Monetary calculations are often rounded to the smallest currency unit. When you do this it's easy to lose pennies (or your local equivalent) because of rounding errors.
Which again comes back to trust.
Value Objects serve as a mechanism to build trust in the data of your system.
How to create Value Objects that build trust
There are two rules I use when I design Value Objects to ensure that trust is inherently built into them.
Never allow a Value Object to exist with an invalid value
Knowing that a Value Object cannot exist if its value is invalid allows you to implicitly trust its usage everywhere else in your code base. It doesn't matter if the value comes from a user's input or from the database, its very nature means you can rely on the fact that any instance of the Value Object you encounter will always contain valid data for its type.
Never allow a Value Object to be mutated
Not allowing a Value Object to mutate also means that you can be confident that it's value did not change when passed around to other methods. No matter where the value originated, any particular instance of a Value Object will always contain the same valid value throughout its lifetime.
Building the Value Object
And keeping it efficient at the same time
I won't go into the the details of what the heap and stack are, but you should familiarize yourself with the difference between value types and reference types. Most built-in types are value types with the exception of string and object. We'll be using C# 12.0 for all of the code example, so if you're wondering where the braces went, that's why.
How to build an Email Address Value Object
I'm going to use an email address as an example of how to build a solid Value Object that builds the trust we are looking for in its value, while also being efficient and performant.
To struct or not to struct
The very first choice we need to make is whether to build a struct or a class based Value Object. What should influence your decision primarily is the underlying type of the value that Value Object will contain. If the underlying value of your Value Object is a value type, then use a struct. If it's a reference type, use a class. This will allow you to use it in the same way with a similar performance envelope as the underlying type would offer.
An email address is a string, which is a reference type.
public class EmailAddress;Seal it!
A Value Object should never inherit from another Value Object. Value Objects, like the values they contain, should only ever exist as a unit. This will also ensure that any behavior that is later associated with that Value Object is not influenced by any base or derived types.
public sealed class EmailAddress;Don't let anyone look under the hood
We need to store the underlying value inside the Value Object, but you should never expose it directly. Doing so would allow other developers to simply bypass all of the protections built into it by accessing the value directly.
public sealed class EmailAddress
{
    private readonly string _emailAddress;
}
Creating new instances the right way
Refering back to the first rule "Never allow a Value Object to exist with an invalid value" means we need to validate any strings used to create new instances of the email address Value Object. Don't validate in the constructor, constructors aren't designed for this. As stated in the C# documentation, constructors are for setting default values and limit instantiation. Instead, use a Factory method.
public sealed class EmailAddress
{
    private static Regex _emailValidation = new(@".+\@.+\..+");
    private readonly string _emailAddress;

    private EmailAddress(string emailAddress)
    {
        _emailAddress = emailAddress;
    }

    public static EmailAddress Create(string value)
    {
        if (_emailValidation.IsMatch(value))
            throw new ArgumentException("Value is not a valid email address.");

        return new EmailAddress(value);
    }
}struct for EmailAddress would haved allowed validation to be bypassed very easily. Since structs are value types, any default instance of EmailAddress would cause the underlying string to be initialized to null.Adding better validation
What is a valid email address is a highly subjective and relative topic. A lot of which depends on your use case. If your system is meant to act as an SMTP server, then you'll want to accept what is valid according to the RFC including odd-ball addresses like postmaster@[123.123.123.123]. Instead, what you'll most likely want to accept is what's mostly regarded as a standard email address with a domain and tld such as [email protected] .
A simple Regex such as the one above of .+@.+..+ isn't really going to cut it. There are some monstreous Regex examples out there such as this RFC 5322 compliant one. But a much better approach is to use a variety of methods to fail fast whenever the value is invalid.
- The simplest and fastest indication that an email address is invalid is the absense of the @ symbol.
- An empty string or a string that exceeds 320 characters is also an invalid email address. Specifically, RFC 2822 mentions that the local part of an email address must not exceed 64 characters and the domain part must not exceed 255 characters. So adding 64 to 255, plus 1 to account for the @ symbol, is how we arrive at the total of 320.
- We can also validate the local part and the domain part individually.
- An empty string or a string that exceeds 64 characters for the local part would make it invalid.
- We can then validate the local part with some basic Regex to match our expected patterns.
- An empty string or a string that exceeds 320 characters for the domain part would make it invalid as well.
- The domain can then be validated in two steps. First using Regex to determine that it's a fully qualified domain name (FQDN), then using the official IANA list of all valid top level domains (TLDs).
public sealed partial class EmailAddress
{
    private static readonly FrozenSet<string> IanaTlds = GetIanaTlds();
    private readonly string _emailAddress;

    private EmailAddress(string emailAddress)
    {
        _emailAddress = emailAddress;
    }

    public static EmailAddress Create(string value)
    {
        if (value.Length is 0 or > 320)
            throw new ArgumentException("Value is not a valid email address.");

        var span = value.AsSpan();

        var indexOf = value.IndexOf('@');
        if (indexOf == -1)
            throw new ArgumentException("Value is not a valid email address.");

        var localPart = span[..indexOf];
        if (localPart.Length is 0 or > 64)
            throw new ArgumentException("Value is not a valid email address.");

        if (!LocalPartRegex().IsMatch(localPart))
            throw new ArgumentException("Value is not a valid email address.");

        var domainPart = span[(indexOf + 1)..];
        if (domainPart.Length is 0 or > 255)
            throw new ArgumentException("Value is not a valid email address.");

        if (!DomainFqdnRegex().IsMatch(domainPart))
            throw new ArgumentException("Value is not a valid email address.");

        var tld = DomainTldRegex().Match(value).Groups[1].Value;
        if (!IanaTlds.Contains(tld))
            throw new ArgumentException("Value is not a valid email address.");

        return new EmailAddress(value);
    }

    [GeneratedRegex(@"^[a-z0-9]+([._+-][a-z0-9]+)*$")]
    private static partial Regex LocalPartRegex();

    [GeneratedRegex(@"^(?!-)(?:[a-z0-9-]{1,63}|xn--[a-z0-9]{1,59})(?<!-)(?:\.(?!-)(?:[a-z0-9-]{1,63}|xn--[a-z0-9]{1,59})(?<!-))*\.[a-z]{2,}$")]
    private static partial Regex DomainFqdnRegex();

    [GeneratedRegex(@"\.((?:xn--)?[a-z]{2,})$")]
    private static partial Regex DomainTldRegex();

    private static FrozenSet<string> GetIanaTlds()
    {
        var hashSet = new HashSet<string>
        {
            "com",
            "net",
            "org",
        };
        return hashSet.ToFrozenSet();
    }
}Span, GeneratedRegex, and FrozenSet as ways to increase the performance and efficiency of the validation.Eliminating Exceptions
I absolutely hate Exceptions. I've written about it in the past. They're messy, they're slow, they're difficult to debug, and offer very little contextual information that can easily be communicated to other parts of the system. Using LightResults, we can replace all of the ArgumentExceptions with a failed Result<T> that adds more context to the error and return it through a TryCreate method.
    public static Result<EmailAddress> TryCreate(string value)
    {
        switch (value.Length)
        {
            case 0:
                return Result.Fail<EmailAddress>("Value must not be empty.");
            case > 320:
                return Result.Fail<EmailAddress>("Value must not exceed 320 characters.");
        }

        var span = value.AsSpan();

        var indexOf = value.IndexOf('@');
        if (indexOf == -1)
            return Result.Fail<EmailAddress>("Value is not a valid email address.");

        var localPart = span[..indexOf];
        switch (localPart.Length)
        {
            case 0:
                return Result.Fail<EmailAddress>("The local part of the email address must not be empty.");
            case > 64:
                return Result.Fail<EmailAddress>("The local part of the email address must not exceed 64 characters.");
        }

        if (!LocalPartRegex().IsMatch(localPart))
            return Result.Fail<EmailAddress>("Value is not a valid email address.");

        var domainPart = span[(indexOf + 1)..];
        switch (domainPart.Length)
        {
            case 0:
                return Result.Fail<EmailAddress>("The domain part of the email address must not be empty.");
            case > 255:
                return Result.Fail<EmailAddress>("The domain part of the email address must not exceed 255 characters.");
        }

        if (!DomainFqdnRegex().IsMatch(domainPart))
            return Result.Fail<EmailAddress>("The domain part of the email address is not a valid fully qualified domain name.");

        var tld = DomainTldRegex().Match(value).Groups[1].Value;
        if (!IanaTlds.Contains(tld))
            return Result.Fail<EmailAddress>("The domain part of the email address does not end with a valid top level domain.");

        return new EmailAddress(value);
    }
Don't make people hate you
Strict validation is both important and necessary to ensure the integrity of data and is the whole premise behind Value Objects. Nonetheless, if you do not provide a frictionless way of creating a Value Object that's flexible to input variations, both your users and your fellow developers will hate you. Don't be lazy, add a Parse method that does everything it reasonably can to try to understand the input and return a valid Value Object.
You'll notice that the TryCreate method is completely inflexible. It doesn't accept mixed case or upper case email addresses and it won't even accept whitespace before or after. This is intentional. Because creation is supposed to be a very high frequency operation, it has to be as efficient as possible. We do not want to skip validation because we want to protect ourselves from bad values no matter where they come from, even if it's from the database. Nothing prevents an administrator from manually updating a value in the database. Never assume that the data used to create a Value Object can be trusted. Parse methods are where flexibility is meant to be introduced and can afford to be less efficient.
    private static readonly ParserOptions ParserOptions = new() { AllowAddressesWithoutDomain = false };

    public static Result<EmailAddress> TryParse(string str)
    {
        var value = str.Trim().ToLowerInvariant();
        if (!MailboxAddress.TryParse(ParserOptions, value, out var mailboxAddress))
        {
            return Result.Fail<EmailAddress>("Value is not a valid email address.");
        }

        return TryCreate(mailboxAddress.Address);
    }
Accessing the value without exposing it
If the Value Object contains only a single underlying value, then it should never be directly accessed nor exposed as this will lead other developers to use the underlying value directly. Instead, expose methods that will allow the use of the underlying value in ways that are appropriate for it such a ToType method.
In the case of our email address Value Object, that means a ToString method.
    public override string ToString()
    {
        return _emailAddress;
    }
Comparing references types is not comparing its values
Be careful with reference types, when two instances are compared, their references are compared, not their values. Which means if you create two Value Objects that are classes and you check that they are the same using ==, even if they have the same underlying values, the comparison will come back as false.
To solve this issue, add the IEquatable<T> interface and its related operators to your Value Object.
public sealed partial class EmailAddress : IEquatable<EmailAddress>
{
    public bool Equals(EmailAddress? other)
    {
        if (ReferenceEquals(null, other))
            return false;
        if (ReferenceEquals(this, other))
            return true;
        return _emailAddress == other._emailAddress;
    }

    public override bool Equals(object? obj)
    {
        return ReferenceEquals(this, obj) || obj is EmailAddress other && Equals(other);
    }

    public override int GetHashCode()
    {
        return _emailAddress.GetHashCode();
    }

    public static bool operator ==(EmailAddress? left, EmailAddress? right)
    {
        return Equals(left, right);
    }

    public static bool operator !=(EmailAddress? left, EmailAddress? right)
    {
        return !Equals(left, right);
    }
}
Order matters
Don't be lazy. If your underlying value should be sortable, add the IComparable<T> and IComparable interfaces along with its related operators.
public sealed partial class EmailAddress : IComparable<EmailAddress>, IComparable
{
    public int CompareTo(EmailAddress? other)
    {
        if (ReferenceEquals(this, other))
            return 0;
        if (ReferenceEquals(null, other))
            return 1;
        return string.Compare(_emailAddress, other._emailAddress, StringComparison.Ordinal);
    }

    public int CompareTo(object? obj)
    {
        if (ReferenceEquals(null, obj))
            return 1;
        if (ReferenceEquals(this, obj))
            return 0;
        return obj is EmailAddress other ? CompareTo(other) : throw new ArgumentException($"Object must be of type {nameof(EmailAddress)}");
    }

    public static bool operator <(EmailAddress? left, EmailAddress? right)
    {
        return Comparer<EmailAddress>.Default.Compare(left, right) < 0;
    }

    public static bool operator >(EmailAddress? left, EmailAddress? right)
    {
        return Comparer<EmailAddress>.Default.Compare(left, right) > 0;
    }

    public static bool operator <=(EmailAddress? left, EmailAddress? right)
    {
        return Comparer<EmailAddress>.Default.Compare(left, right) <= 0;
    }

    public static bool operator >=(EmailAddress? left, EmailAddress? right)
    {
        return Comparer<EmailAddress>.Default.Compare(left, right) >= 0;
    }
}
A well rounded implementation
That's it! Now we have a complete implementation of an Email Address Value Object that ensures it can never exist without a value email address, it does so in an efficient way, allows for flexibility in input, and mimics the behavior you'd expect from its underlying type.
public sealed partial class EmailAddress : IEquatable<EmailAddress>, IComparable<EmailAddress>, IComparable
{
    private static readonly FrozenSet<string> IanaTlds = GetIanaTlds();
    private static readonly ParserOptions ParserOptions = new() { AllowAddressesWithoutDomain = false };
    private readonly string _emailAddress;

    private EmailAddress(string emailAddress)
    {
        _emailAddress = emailAddress;
    }

    public static EmailAddress Create(string value)
    {
        if (TryCreate(value).IsFailed(out var error, out var emailAddress))
            throw new ArgumentException(error.Message, nameof(value));

        return emailAddress;
    }

    public static Result<EmailAddress> TryCreate(string value)
    {
        switch (value.Length)
        {
            case 0:
                return Result.Fail<EmailAddress>("Value must not be empty.");
            case > 320:
                return Result.Fail<EmailAddress>("Value must not exceed 320 characters.");
        }

        var span = value.AsSpan();

        var indexOf = value.IndexOf('@');
        if (indexOf == -1)
            return Result.Fail<EmailAddress>("Value is not a valid email address.");

        var localPart = span[..indexOf];
        switch (localPart.Length)
        {
            case 0:
                return Result.Fail<EmailAddress>("The local part of the email address must not be empty.");
            case > 64:
                return Result.Fail<EmailAddress>("The local part of the email address must not exceed 64 characters.");
        }

        if (!LocalPartRegex().IsMatch(localPart))
            return Result.Fail<EmailAddress>("Value is not a valid email address.");

        var domainPart = span[(indexOf + 1)..];
        switch (domainPart.Length)
        {
            case 0:
                return Result.Fail<EmailAddress>("The domain part of the email address must not be empty.");
            case > 255:
                return Result.Fail<EmailAddress>("The domain part of the email address must not exceed 255 characters.");
        }

        if (!DomainFqdnRegex().IsMatch(domainPart))
            return Result.Fail<EmailAddress>("The domain part of the email address is not a valid fully qualified domain name.");

        var tld = DomainTldRegex().Match(value).Groups[1].Value;
        if (!IanaTlds.Contains(tld))
            return Result.Fail<EmailAddress>("The domain part of the email address does not end with a valid top level domain.");

        return new EmailAddress(value);
    }

    public static EmailAddress Parse(string str)
    {
        if (TryParse(str).IsFailed(out var error, out var emailAddress))
            throw new ArgumentException(error.Message, nameof(str));

        return emailAddress;
    }

    public static Result<EmailAddress> TryParse(string str)
    {
        var value = str.Trim().ToLowerInvariant();
        if (!MailboxAddress.TryParse(ParserOptions, value, out var mailboxAddress))
        {
            return Result.Fail<EmailAddress>("Value is not a valid email address.");
        }

        return TryCreate(mailboxAddress.Address);
    }

    public override string ToString()
    {
        return _emailAddress;
    }

    public bool Equals(EmailAddress? other)
    {
        if (ReferenceEquals(null, other))
            return false;
        if (ReferenceEquals(this, other))
            return true;
        return _emailAddress == other._emailAddress;
    }

    public override bool Equals(object? obj)
    {
        return ReferenceEquals(this, obj) || obj is EmailAddress other && Equals(other);
    }

    public override int GetHashCode()
    {
        return _emailAddress.GetHashCode();
    }

    public static bool operator ==(EmailAddress? left, EmailAddress? right)
    {
        return Equals(left, right);
    }

    public static bool operator !=(EmailAddress? left, EmailAddress? right)
    {
        return !Equals(left, right);
    }

    public int CompareTo(EmailAddress? other)
    {
        if (ReferenceEquals(this, other))
            return 0;
        if (ReferenceEquals(null, other))
            return 1;
        return string.Compare(_emailAddress, other._emailAddress, StringComparison.Ordinal);
    }

    public int CompareTo(object? obj)
    {
        if (ReferenceEquals(null, obj))
            return 1;
        if (ReferenceEquals(this, obj))
            return 0;
        return obj is EmailAddress other ? CompareTo(other) : throw new ArgumentException($"Object must be of type {nameof(EmailAddress)}");
    }

    public static bool operator <(EmailAddress? left, EmailAddress? right)
    {
        return Comparer<EmailAddress>.Default.Compare(left, right) < 0;
    }

    public static bool operator >(EmailAddress? left, EmailAddress? right)
    {
        return Comparer<EmailAddress>.Default.Compare(left, right) > 0;
    }

    public static bool operator <=(EmailAddress? left, EmailAddress? right)
    {
        return Comparer<EmailAddress>.Default.Compare(left, right) <= 0;
    }

    public static bool operator >=(EmailAddress? left, EmailAddress? right)
    {
        return Comparer<EmailAddress>.Default.Compare(left, right) >= 0;
    }

    [GeneratedRegex(@"^[a-z0-9]+([._+-][a-z0-9]+)*$")]
    private static partial Regex LocalPartRegex();

    [GeneratedRegex(@"^(?!-)(?:[a-z0-9-]{1,63}|xn--[a-z0-9]{1,59})(?<!-)(?:\.(?!-)(?:[a-z0-9-]{1,63}|xn--[a-z0-9]{1,59})(?<!-))*\.[a-z]{2,}$")]
    private static partial Regex DomainFqdnRegex();

    [GeneratedRegex(@"\.((?:xn--)?[a-z]{2,})$")]
    private static partial Regex DomainTldRegex();

    private static FrozenSet<string> GetIanaTlds()
    {
        var hashSet = new HashSet<string>
        {
            "com",
            "net",
            "org",
        };
        return hashSet.ToFrozenSet();
    }
}Using it with Entity Framework
We can easily integrate our email address Value Object with Entity Framework just as we would with any other primitive type.
All we need is a ValueConverter that converts between our EmailAddress and a string.
public class EmailAddressConverter : ValueConverter<EmailAddress, string>
{
    public EmailAddressConverter()
        : base(emailAddress => emailAddress.ToString(), value => EmailAddress.Create(value))
    {
    }
}
Which we can then configure against all of our entities using a convention.
public class MyDbContext : DbContext
{
    protected override void ConfigureConventions(ModelConfigurationBuilder configurationBuilder)
    {
        configurationBuilder.Properties<EmailAddress>()
            .HaveConversion<EmailAddressConverter>()
            .HaveColumnType("varchar")
            .HaveMaxLength(320);
    }
}
Now that you have a better understanding on how to build better Value Objects, let me know what you think by finding me online or leaving me a comment below!
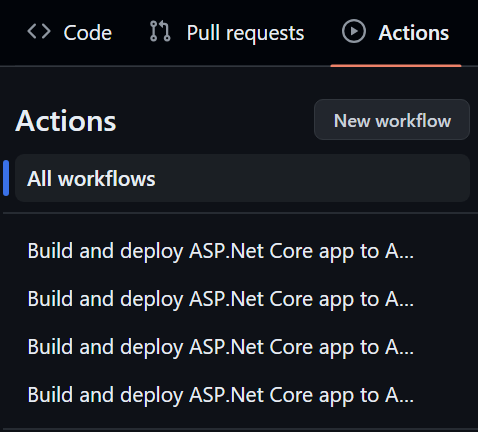
]]>If you've ever deployed your .NET project to Azure using Azure's ClickOps portal (you can ask Glenn about that), chances are it created a GitHub Action in your repository that looks like this:
# Docs for the Azure Web Apps Deploy action: https://github.com/Azure/webapps-deploy
# More GitHub Actions for Azure: https://github.com/Azure/actions

name: Build and deploy ASP.Net Core app to Azure Web App - nahasapeemapetilonmarket

on:
  push:
    branches:
      - main
  workflow_dispatch:

jobs:
  build:
    runs-on: ubuntu-latest

    steps:
      - uses: actions/checkout@v4

      - name: Set up .NET Core
        uses: actions/setup-dotnet@v1
        with:
          dotnet-version: '8.x'
          include-prerelease: true

      - name: Build with dotnet
        run: dotnet build --configuration Release

      - name: dotnet publish
        run: dotnet publish -c Release -o ${{env.DOTNET_ROOT}}/myapp

      - name: Upload artifact for deployment job
        uses: actions/upload-artifact@v3
        with:
          name: .net-app
          path: ${{env.DOTNET_ROOT}}/myapp

  deploy:
    runs-on: ubuntu-latest
    needs: build
    environment:
      name: 'Production'
      url: ${{ steps.deploy-to-webapp.outputs.webapp-url }}

    steps:
      - name: Download artifact from build job
        uses: actions/download-artifact@v3
        with:
          name: .net-app

      - name: Deploy to Azure Web App
        id: deploy-to-webapp
        uses: azure/webapps-deploy@v2
        with:
          app-name: 'nahasapeemapetilonmarket'
          slot-name: 'Production'
          publish-profile: ${{ secrets.AZUREAPPSERVICE_PUBLISHPROFILE_D84E3D95B0D857727CE771C9840A48DE }}
          package: .
Or this newer variation that now comes with three secrets to maintain:
# Docs for the Azure Web Apps Deploy action: https://github.com/Azure/webapps-deploy
# More GitHub Actions for Azure: https://github.com/Azure/actions

name: Build and deploy ASP.Net Core app to Azure Web App - nahasapeemapetilonmarket

on:
  push:
    branches:
      - main
  workflow_dispatch:

jobs:
  build:
    runs-on: ubuntu-latest

    steps:
      - uses: actions/checkout@v4

      - name: Set up .NET Core
        uses: actions/setup-dotnet@v1
        with:
          dotnet-version: '8.x'
          include-prerelease: true

      - name: Build with dotnet
        run: dotnet build --configuration Release

      - name: dotnet publish
        run: dotnet publish -c Release -o ${{env.DOTNET_ROOT}}/myapp

      - name: Upload artifact for deployment job
        uses: actions/upload-artifact@v3
        with:
          name: .net-app
          path: ${{env.DOTNET_ROOT}}/myapp

  deploy:
    runs-on: ubuntu-latest
    needs: build
    environment:
      name: 'Production'
      url: ${{ steps.deploy-to-webapp.outputs.webapp-url }}
    permissions:
      id-token: write #This is required for requesting the JWT

    steps:
      - name: Download artifact from build job
        uses: actions/download-artifact@v3
        with:
          name: .net-app

      - name: Login to Azure
        uses: azure/login@v1
        with:
          client-id: ${{ secrets.AZUREAPPSERVICE_CLIENTID_1D074363B9E84262BB598576A5992CDE }}
          tenant-id: ${{ secrets.AZUREAPPSERVICE_TENANTID_ECAA5EC61F7C4BA2B326DB8392D9A74E }}
          subscription-id: ${{ secrets.AZUREAPPSERVICE_SUBSCRIPTIONID_BC4F68CBF28D4B439875006DF1D41104 }}

      - name: Deploy to Azure Web App
        id: deploy-to-webapp
        uses: azure/webapps-deploy@v2
        with:
          app-name: 'nahasapeemapetilonmarket'
          slot-name: 'Production'
          package: .
Either one of which has several issues.
Unnecessarily long names
The default name given to the action may seem clear and descriptive until you actually start seeing it put to use. Say you have various actions created this way for different environments, how can you tell which is which at a glance?
Woefully out of date
Until the workflow breaks, no one seems to really update it. Which, if you think about it, makes sense. The team working over at Azure are primarily focused on making sure the infrastructure functions as it should, so they're not often in GitHub validating how the workflow looks.

Not up to date with .NET
Back in .NET 7.0, it was announced that the -o (--output) would no longer be supported with the publish command. In any .NET project with some amount of complexity, this often produces a The process cannot access the file 'X' because it is being used by another process. message which brings people to use the horrible --maxcpucount:1 switch.
Considering that MSBuild is designed to build multiple projects in parallel by default, if the
--maxcpucount:1 switch solves an issue in your workflow, it's usually proof that you should not be using build or publish on the solution in combination with the --output switch.Fix the root cause instead of fixing the effect.
Inconsistent results
Due to the reasons above, this also leads to inconsistent results as the use of the --output flags introduces a race condition.

Impossible to distinguish steps
When adding status check restrictions to a Ruleset, the restrictions are against the job names, not against the GitHub Action's workflow name.
This means if you have several actions that have the same job name, you won't be able to tell them apart.
Writing a better GitHub Action
That's also easier to maintain and debug
A good CI/CD workflow is one that is easy to follow, easy to monitor, easy to understand, and easy to debug when things don't go as planed. Don't wait for Murphy's law to come knocking at your door before you decide to rewrite your GitHub Action.
Use short names with comments
Long names are problematic in various places in the GitHub UI. Using short names that are relevant make it easy to distinguish between actions and comments can be used to add more context and information to those short names.
# Deploy to the Production environment
name: Deploy (Production)
Use unique names for each job
Using unique names across all of the workflows allows you distinguish between them when adding status checks to rulesets.
  build:
    name: Build for Production
deploy:
name: Deploy to ProductionUse the current version for each action
You can figure out the current version of each of the actions by looking at the branches or the releases of their respective repositories in GitHub.
At the time of this writing, the template created by Azure used the following actions:
- actions/checkout@v4
Up to date! 👍 - actions/setup-dotnet@v1
Behind, currently at version 4. 👎 - actions/upload-artifact@v3
Behind, currently at version 4. 👎 - actions/download-artifact@v3
Behind, currently at version 4. 👎 - azure/login@v1
Behind, currently at version 2. 👎 - azure/webapps-deploy@v2
Behind, currently at version 3. 👎
Use descriptive names for each step
Make your workflow easier to read and follow by giving each step a descriptive name. Use comments to give longer descriptions where necessary.
- name: Checkout source
uses: actions/checkout@v4 - name: Setup .NET 8.0
uses: actions/setup-dotnet@v4 - name: Upload Api artifact
uses: actions/upload-artifact@v4 - name: Download Api artifact
uses: actions/download-artifact@v4 - name: Deploy Api
uses: azure/webapps-deploy@v3Break the build step into individual commands
Not only do you eliminate any potential concurrency issue with building multiple projects at the same time, you also make sure that you only build what you need. If new projects are added, such as local development tools, they're not built unless you specifically opt-in to doing so. It also makes it easier to debug which project is failing when a build fails.
- name: Restore packages
run: dotnet restore
- name: Build solution
run: |
dotnet build tools/SourceGenerators.csproj --configuration Release --no-restore --no-dependencies
dotnet build src/Api.csproj --configuration Release --no-restore --no-dependencies
- name: Publish Api
run: dotnet publish src/Api.csproj --configuration Release --no-restore --no-build --output ${{ env.GITHUB_WORKSPACE }}/publishdotnet build on your solution locally and observe the order in which projects are built to figure out which order is best.--no-restore switch is used to save time since the restore was done in the previous step, while the --no-dependencies switch ignores project-to-project references and only builds the specified project.--output switch. The --no-restore and --no-build switches are also used to prevent repeating work done in the previous steps.Improve your CI/CD workflow
There are also some additional quality of life improvements that you can make to your GitHub Action that will improve your CI/CD workflow.
Add your tests
Build your test projects individually and run them individually.
- name: Build solution
run: |
dotnet build tests/SourceGenerators.Fixtures.csproj --configuration Release --no-restore --no-dependencies
dotnet build tests/SourceGenerators.Tests.csproj --configuration Release --no-restore --no-dependencies
dotnet build tests/Api.UnitTests.csproj --configuration Release --no-restore --no-dependencies
dotnet build tests/Api.IntegrationTests.csproj --configuration Release --no-restore --no-dependencies
- name: Run Source Generator tests
run: dotnet test tests/SourceGenerators.Tests.csproj --configuration Release --no-restore --no-build
- name: Run Api tests
run: dotnet test tests/Api.UnitTests.csproj --configuration Release --no-restore --no-build
- name: Run Integration tests
run: dotnet test tests/Api.IntegrationTests.csproj --configuration Release --no-restore --no-buildUse a consistent path and artifact
Publish and upload from a consistent path by using a GitHub environment variable such as GITHUB_WORKSPACE or RUNNER_TEMP with a relevant directory name such as publish resulting in --output ${{ env.GITHUB_WORKSPACE }}/publish.
Give the artifact a relevant name as well.
- name: Upload Api artifact
uses: actions/upload-artifact@v4
with:
name: api
path: ${{ env.GITHUB_WORKSPACE }}/publish - name: Download Api artifact
uses: actions/download-artifact@v4
with:
name: apiSet the build version
There are a lot of different ways to set the build version, but once you have it set as an environment variable (such as BUILD_VERSION), you can then pass it to the dotnet build command using the --property:Version= switch.
Reduce output noise
Most people aren't aware, but the dotnet tool also includes a --nologo switch which mutes the output of the startup banner or the copyright message on most commands. It's especially useful when running multiple dotnet commands in sequence such as the way this improved workflow does.
Putting it all together
A proper GitHub Action for .NET
It might seem verbose, but the end result is a clear, consistent and reliable workflow that is easy to understand, maintain, and diagnose while also being consistent and reliable.
# Deploy to the Production environment
name: Deploy (Production)
on:
push:
branches:
- main
workflow_dispatch:
jobs:
build:
name: Build for Production
runs-on: ubuntu-latest
steps:
- name: Checkout source
uses: actions/checkout@v4
- name: Setup .NET 8.0
uses: actions/setup-dotnet@v4
with:
dotnet-version: 8.x
- name: Set build version
run: echo "BUILD_VERSION=$(date +'%Y.%m.%d.%H%M')" >> $GITHUB_ENV
- name: Restore packages
run: dotnet restore --nologo
- name: Build solution
run: |
dotnet build tools/SourceGenerators.csproj --configuration Release --nologo --no-restore --no-dependencies --property:Version=$BUILD_VERSION
dotnet build tests/SourceGenerators.Fixtures.csproj --configuration Release --nologo --no-restore --no-dependencies --property:Version=$BUILD_VERSION
dotnet build tests/SourceGenerators.Tests.csproj --configuration Release --nologo --no-restore --no-dependencies --property:Version=$BUILD_VERSION
dotnet build src/Api.csproj --configuration Release --nologo --no-restore --no-dependencies --property:Version=$BUILD_VERSION
dotnet build tests/Api.UnitTests.csproj --configuration Release --nologo --no-restore --no-dependencies --property:Version=$BUILD_VERSION
dotnet build tests/Api.IntegrationTests.csproj --configuration Release --nologo --no-restore --no-dependencies --property:Version=$BUILD_VERSION
- name: Run Source Generator tests
run: dotnet test tests/SourceGenerators.Tests.csproj --configuration Release --nologo --no-restore --no-build
- name: Run Api tests
run: dotnet test tests/Api.UnitTests.csproj --configuration Release --nologo --no-restore --no-build
- name: Run Integration tests
run: dotnet test tests/Api.IntegrationTests.csproj --configuration Release --nologo --no-restore --no-build
- name: Publish Api
run: dotnet publish src/Api.csproj --configuration Release --nologo --no-restore --no-build --output ${{ env.GITHUB_WORKSPACE }}/publish
- name: Upload Api artifact
uses: actions/upload-artifact@v4
with:
name: api
path: ${{ env.GITHUB_WORKSPACE }}/publish
  deploy:
    name: Deploy to Production
runs-on: ubuntu-latest
needs: build
environment:
name: 'Production'
url: ${{ steps.deploy-to-webapp.outputs.webapp-url }}
steps:
      - name: Download Api artifact
        uses: actions/download-artifact@v4
with:
name: api
- name: Login to Azure
uses: azure/login@v2
with:
client-id: ${{ secrets.AZUREAPPSERVICE_CLIENTID_1D074363B9E84262BB598576A5992CDE }}
tenant-id: ${{ secrets.AZUREAPPSERVICE_TENANTID_ECAA5EC61F7C4BA2B326DB8392D9A74E }}
subscription-id: ${{ secrets.AZUREAPPSERVICE_SUBSCRIPTIONID_BC4F68CBF28D4B439875006DF1D41104 }}
- name: Deploy to Azure Web App
id: deploy-to-webapp
uses: azure/webapps-deploy@v3
with:
app-name: 'nahasapeemapetilonmarket'
slot-name: 'Production'
package: .The original Azure templated GitHub Action:
And the improved GitHub Action:
Have ideas on how this could be improved further? Find me online or leave me a comment and let me know!
]]>Sometimes those systems end up having a very long lifespan. Sometimes those lifespans are long enough that those systems come back to me. And sometimes a lot of
]]>Over the course of my career, I've often written large software systems which are eventually taken over by other developers.
Sometimes those systems end up having a very long lifespan. Sometimes those lifespans are long enough that those systems come back to me. And sometimes a lot of developers have gone through the system while it was out of my hands.
In the rare case where a system has returned to my realm of responsibility, the system in question is often large enough that doing an inventory of all the changes since it left my care would often prove to be prohibitive, let alone practical.
So I get to rediscover my own systems through the eyes of its past care takers, one odd decision at a time. Sort of like those Choose Your Own Adventure books we'd read as a kid, except that I don't get to choose, I just get to read the bizarre choices of past developers.
In one particular system, I had a user complain that whenever he'd archive an item in the web management portal, the item would disappear from the portal, but would still be visible on the public web site.
Being mostly a backend developer, my first instinct was to check the database. Looking at the table, I quickly found my original field of StatusID from years past, and found that it's value was a 1 for Active.
"Well, of course it's going to show. You have to set it to Inactive.", I said.
After watching the field update to a 2 for Inactive.
"Oh right. One sec ... ok, that worked! Thanks.", he replied.
Great, nothing to fix, I thought. And went about my day.
A few weeks later, the user came back with the same issue. This, I thought, is odd. So I decided to take a deeper look this time around. I asked the user to share his screen with me and have him show me how he would go about archiving an item. And there it was. I couldn't believe it.
In the UI, right below the Status dropdown, there was a new checkbox with a simple label of Archived. My soul wept in silence as it questioned the decision of this phantom developer of the past. "Why would you add a checkbox when status is an integer and was meant to be expandable?", I cried to myself.
Looking closer at the database table, I found the Archived field, arrogantly tacked onto the end of the long list of fields it already contained. A quick look around also confirmed that there was now a lot of code that had been written on top of this now thorny addition. A refactor would have been more work and effort than I would have cared for at the time.
So I did the only sensible thing I could do. I tossed dogmatism out the window and took the most pragmatic solution I could find.
First, I added a ficticious 3 for Archived to the Status dropdown. Then I nuked the checkbox and its label. And then I simply added a bit of logic so that if Archived was selected in the Status dropdown, it would save a StatusID of 2 and set Archived to true in the database. And on load, if Archived is true, it ignores the StatusID and sets the Status dropdown to 3 for Archived. A quick manual update of the table to set all Archived rows to a StatusID of 2 for inactive, and I was done.
No refactor, just a quick fix, yet months went by and I never heard of the issue again. You can often get a lot done with some good pragmatism when you stop worrying about design patterns and just look for real solutions to real problems.
Leave me a comment below or find me online and let me know what you think!
]]>Around that same time, the original author of Newtonsoft.Json, James Newton-King, joined Microsoft and became one of the principal developers of what later became System.Text.Json. It did not take long for
]]>Back in 2018, a discussion started asking for .NET runtime provided JSON serializing and deserializing support.
Around that same time, the original author of Newtonsoft.Json, James Newton-King, joined Microsoft and became one of the principal developers of what later became System.Text.Json. It did not take long for people to start asking for additional features such as adding support for System.Runtime.Serialization attributes within System.Text.Json.
Which, concidently, also happened to be around the same time that the original implementation of JsonStringEnumConverter was first written.
As predicted by James, requests soon started appearing asking for support to customize the enum member names.
After a few years of people coming up with workarounds and hoping that the .NET team would eventually fix the issue, the discussion was closed and led me to reopen the issue again in 2022, once again hoping that the work started with JsonStringEnumConverter would continue and the workarounds could finally be put to rest.
According to the few comments left by Eirik Tsarpalis, who appears to have taken over this portion of the runtime, it would seem that the JsonStringEnumConverter has become a sunken ship that will be relegated the archives of its namespace and forgotten about as the .NET team prioritizes other work.
So where does that leave us?
I have two alternatives to offer you. Extension methods or a better JsonConverter. Pick whichever works best for your use case.
Extension methods
A quick and dirty workaround is to use extension methods like these:
using System.Text.Json.Serialization;

public static class EnumExtensions
{
    public static string ToEnumString<TField>(this TField field)
        where TField : Enum
    {
        var fieldInfo = typeof(TField).GetField(field.ToString());
        if (fieldInfo is null)
            throw new InvalidOperationException($"Field {nameof(field)} was not found.");

        var attributes = (JsonPropertyNameAttribute[])fieldInfo.GetCustomAttributes(typeof(JsonPropertyNameAttribute), false);
        if (attributes.Length == 0)
            throw new NotImplementedException($"The field has not been annotated with a {nameof(JsonPropertyNameAttribute)}.");

        var name = attributes[0]
            .Name;
        if (name is null)
            throw new NotImplementedException($"{nameof(JsonPropertyNameAttribute)}.{nameof(JsonPropertyNameAttribute.Name)} has not been set for this field.");

        return name;
    }

    public static TField FromEnumString<TField>(this string str)
        where TField : Enum
    {
        var fields = typeof(TField).GetFields();
        foreach (var field in fields)
        {
            var attributes = (JsonPropertyNameAttribute[])field.GetCustomAttributes(typeof(JsonPropertyNameAttribute), false);
            if (attributes.Length == 0)
                continue;

            var name = attributes[0]
                .Name;
            if (name is null)
                throw new NotImplementedException($"{nameof(JsonPropertyNameAttribute)}.{nameof(JsonPropertyNameAttribute.Name)} has not been set for the field {field.Name}.");

            if (string.Equals(name, str, StringComparison.OrdinalIgnoreCase))
                return (TField)Enum.Parse(typeof(TField), field.Name) ?? throw new ArgumentNullException(field.Name);
        }

        throw new InvalidOperationException($"'{str}' was not found in enum {typeof(TField).Name}.");
    }
}
After decorating an enum with JsonPropertyNameAttribute like this:
public enum ContactType
{
    [JsonPropertyNameAttribute(Name = "per")]
    Person,

    [JsonPropertyNameAttribute(Name = "bus")]
    Business
}
You can then use it the extension methods like this:
// Converts "bus" to ContactType.Business.
var asEnum = "bus".FromEnumString<ContactType>();

// Converts ContactType.Person to "per".
var asString = ContactType.Person.ToEnumString();
Though this works in simple scenarios, it can quickly become complicated for larged models and more complex use cases. Which is why I prefer using my improved JsonConverter as shown below.
A better JsonConverter
As detailed in my GitHub repository comparing different JsonConverters, my variation brings a lot of improvements not found in the runtime provided JsonStringEnumConverter.
- Case-Insensitive Deserialization: Supports deserialization of enums regardless of the case of the JSON string.
- Custom String Values: Supports
JsonPropertyNameAttributefor custom enum string values. - Dual Value Handling: Can deserialize both string and integer values.
- Naming Policy Integration: Integrates with
PropertyNamingPolicy, making it adaptable to different naming conventions. - Detailed Error Messages: Provides comprehensive error information for easier debugging.
using System.Text;
using System.Text.Json;
using System.Text.Json.Serialization;

public class BetterEnumConverter<TEnum> : JsonConverter<TEnum>
    where TEnum : struct, Enum
{
    private readonly Dictionary<TEnum, string> _enumToString = new();
    private readonly Dictionary<int, TEnum> _numberToEnum = new();
    private readonly Dictionary<string, TEnum> _stringToEnum = new(StringComparer.InvariantCultureIgnoreCase);

    public BetterEnumConverter(JsonSerializerOptions options)
    {
        var type = typeof(TEnum);
        var names = Enum.GetNames<TEnum>();
        var values = Enum.GetValues<TEnum>();
        var underlying = Enum.GetValuesAsUnderlyingType<TEnum>().Cast<int>().ToArray();
        for (var index = 0; index < names.Length; index++)
        {
            var name = names[index];
            var value = values[index];
            var underlyingValue = underlying[index];

            var attribute = type.GetMember(name)[0]
                .GetCustomAttributes(typeof(JsonPropertyNameAttribute), false)
                .Cast<JsonPropertyNameAttribute>()
                .FirstOrDefault();

            var defaultStringValue = FormatName(name, options);
            var customStringValue = attribute?.Name;

            _enumToString.TryAdd(value, customStringValue ?? defaultStringValue);
            _stringToEnum.TryAdd(defaultStringValue, value);
            if (customStringValue is not null)
                _stringToEnum.TryAdd(customStringValue, value);
            _numberToEnum.TryAdd(underlyingValue, value);
        }
    }

    private static string FormatName(string name, JsonSerializerOptions options)
    {
        return options.PropertyNamingPolicy?.ConvertName(name) ?? name;
    }

    public override TEnum Read(ref Utf8JsonReader reader, Type typeToConvert, JsonSerializerOptions options)
    {
        switch (reader.TokenType)
        {
            case JsonTokenType.String:
            {
                var stringValue = reader.GetString();

                if (stringValue is not null && _stringToEnum.TryGetValue(stringValue, out var enumValue))
                    return enumValue;
                break;
            }
            case JsonTokenType.Number:
            {
                if (reader.TryGetInt32(out var numValue) && _numberToEnum.TryGetValue(numValue, out var enumValue))
                    return enumValue;
                break;
            }
        }

        throw new JsonException(
            $"The JSON value '{
                Encoding.UTF8.GetString(reader.ValueSpan)
            }' could not be converted to {typeof(TEnum).FullName}. BytePosition: {reader.BytesConsumed}."
        );
    }

    public override void Write(Utf8JsonWriter writer, TEnum value, JsonSerializerOptions options)
    {
        writer.WriteStringValue(_enumToString[value]);
    }
}
To use it, you'd simply add it to the JsonSerializerOptions of the Serialize and Deserialize methods.
var options = new JsonSerializerOptions
{
    Converters = { new BetterEnumConverter() },
    PropertyNamingPolicy = JsonNamingPolicy.CamelCase
};

string json = JsonSerializer.Serialize(obj, options);
Leave me a comment below or find me online and let me know what you think!
]]>Often exceptions can be avoided entirely by
]]>The hidden cost of throwing exceptions has been heavily debated for years. Although the effect on an application’s performance will vary greatly based on where and how often exceptions are thrown, the evidence is undeniable that there is a significant impact.
Often exceptions can be avoided entirely by choosing an alternative method to test for failure before proceeding.
int.Parse() will generate an exception if the input string is invalid. This can be avoided by instead using int.TryParse().
Unfortunately, the .NET SDK is sprinkled with methods that generate exceptions without such alternatives.
For example, JsonSerializer.Deserialize() offers no JsonSerializer.TryDeserialize().
As such, many developers have become accustomed to letting exceptions bubble up, wrapping and rethrowing exceptions, or even just throwing their exceptions.
Instead of throwing exceptions, a better approach is to use the Operation Result Pattern. Ensuring that methods which can fail return a result eliminates the need the throw exceptions to communicate failure. This also eliminates the clutter of repetitive try-catch blocks that proliferate an application’s code.
Exceptions should be exceptional. Returning a result makes a clear distinction between failure within the application’s usual logic flow and a genuine exception that was unexpected.
A library such as LightResults can simplify the implementation of the result pattern by providing the necessary building blocks to replace exceptions with application errors.
Let’s take another look at JsonSerializer.Deserialize().
A typical implementation to avoid exceptions will simply try-catch for a JsonException.
using System.Text.Json;

public static class JsonHelper
{
    public static bool TryDeserialize<T>(string json, out T? result)
    {
        try
        {
            var obj = JsonSerializer.Deserialize<T>(json);
            if (obj is null)
            {
                result = default;
                return false;
            }

            result = obj;
            return true;
        }
        catch (JsonException)
        {
            result = default;
            return false;
        }
    }
}
Although this will stop the exception from bubbling up through the application, we now no longer have access to failures. We could argue that the JsonException can also be passed out, but this quickly gets convoluted.
using System.Text.Json;

public static class JsonHelper
{
    public static bool TryDeserialize<T>(string json, out T? result, out JsonException? jsonException)
    {
        try
        {
            var obj = JsonSerializer.Deserialize<T>(json);
            if (obj is null)
            {
                result = default;
                jsonException = null;
                return false;
            }

            result = obj;
            jsonException = null;
            return true;
        }
        catch (JsonException)
        {
            result = default;
            jsonException = null;
            return false;
        }
    }
}
Instead, let’s refactor the first TryDeserialize using LightResults.
using System.Text.Json;
using LightResults;

public static class JsonHelper
{
    public static Result<T> TryDeserialize<T>(string json)
    {
        try
        {
            var obj = JsonSerializer.Deserialize<T>(json);
            if (obj is null)
                return Result.Fail<T>("Could not deserialize the json string.");

            return Result.Ok<T>(obj);
        }
        catch (JsonException)
        {
            return Result.Fail<T>("An exception occured while attempting to deserialize the json string.");
        }
    }
}
Now the method’s logic flow is a lot more concise, and the different reasons why the method failed become easy to identify.
What about the exception? Well, LightResults allows any custom metadata to be attached to a result. So, we’ll simply attach the exception to the failure.
using System.Text.Json;
using LightResults;

public static class JsonHelper
{
    public static Result<T> TryDeserialize<T>(string json)
    {
        try
        {
            var obj = JsonSerializer.Deserialize<T>(json);
            if (obj is null)
                return Result.Fail<T>("Could not deserialize the json string.");

            return Result.Ok<T>(obj);
        }
        catch (JsonException ex)
        {
            return Result.Fail<T>("An exception occured while attempting to deserialize the json string.", ("Exception", ex));
        }
    }
}
There is the issue that now we’ve lost our ability to filter exceptions by type. Identifying errors by error message is not a recommended approach as that can quickly lead to mistakes if the error messages change. Instead, we can create our own derived errors based on the Error type.
using System.Text.Json;
using LightResults;

public sealed class JsonDeserializationError : Error
{
    public JsonDeserializationError()
        : base("Could not deserialize the json string.")
    {
    }

    public JsonDeserializationError(JsonException ex)
        : base("An exception occured while attempting to deserialize the json string.", ("Exception", ex))
    {
    }
}
Then we can fail with that JsonDeserializationError instead or just a generic error.
using System.Text.Json;
using LightResults;

public static class JsonHelper
{
    public static Result<T> TryDeserialize<T>(string json)
    {
        try
        {
            var obj = JsonSerializer.Deserialize<T>(json);
            if (obj is null)
                return Result.Fail<T>(new JsonDeserializationError());

            return Result.Ok<T>(obj);
        }
        catch (JsonException ex)
        {
            return Result.Fail<T>(new JsonDeserializationError(ex));
        }
    }
}
Checking a result for a specific error type is also straightforward since results have a HasError method to do just that.
var result = JsonHelper.TryDeserialize<Person>(json);
if (result.IsFailed && result.HasError<JsonDeserializationError>())
{
    // We know the result failed and why!
}
There’s one last optimization we can do. Instead of creating all our errors, we can centralize them inside of an error factory for our application.
using System.Text.Json;
using LightResults;

public static class ApplicationError
{
    public static Result JsonDeserialization()
    {
        return Result.Fail(new JsonDeserializationError());
    }

    public static Result JsonDeserialization(JsonException ex)
    {
        return Result.Fail(new JsonDeserializationError(ex));
    }

    public static Result<T> JsonDeserialization<T>()
    {
        return Result.Fail<T>(new JsonDeserializationError());
    }

    public static Result<T> JsonDeserialization<T>(JsonException ex)
    {
        return Result.Fail<T>(new JsonDeserializationError(ex));
    }
}
Then call the error factory from our TryDeserialize method instead of using Result.Fail.
using System.Text.Json;
using LightResults;

public static class JsonHelper
{
    public static Result<T> TryDeserialize<T>(string json)
    {
        try
        {
            var obj = JsonSerializer.Deserialize<T>(json);
            if (obj is null)
                return ApplicationError.JsonDeserialization<T>();

            return Result.Ok<T>(obj);
        }
        catch (JsonException ex)
        {
            return ApplicationError.JsonDeserialization<T>(ex);
        }
    }
}
If you’re still try-catching everywhere, give LightResults a try. Once you start implementing the Operation Result Pattern in .NET, you’ll wonder how you ever did without it.
As a final note, I wrote the following benchmark in order to compare the performance impact between catching an exception, wrapping an exception with a result, and avoiding an exception entirely by using a failed result.
public class ResultBenchmarks
{
	[Params(1, 10, 100)]
    public int Iterations { get; set; }

	[Benchmark(Baseline = true)]
	public void ThrowingExceptions()
	{
		for (var iteration = 0; iteration < Iterations; iteration++)
			try
			{
				throw new FileNotFoundException();
			}
			catch (Exception)
			{
				// Ignore exception.
			}
	}

	[Benchmark]
	public void WrappingExceptionsWithResults()
	{
		for (var iteration = 0; iteration < Iterations; iteration++)
			try
			{
				throw new FileNotFoundException();
			}
			catch (Exception ex)
			{
				_ = Result.Fail("The file does not exist.", ("Exception", ex));
			}
	}

	[Benchmark]
	public void ReturningResults()
	{
		for (var iteration = 0; iteration < Iterations; iteration++)
			_ = Result.Fail("The file does not exist.");
	}
}
BenchmarkDotNet v0.13.12, Windows 11 (10.0.22631.3155/23H2/2023Update/SunValley3)
13th Gen Intel Core i7-13700KF, 1 CPU, 24 logical and 16 physical cores
.NET SDK 8.0.200
[Host] : .NET 8.0.2 (8.0.224.6711), X64 RyuJIT AVX2
.NET 8.0 : .NET 8.0.2 (8.0.224.6711), X64 RyuJIT AVX2| Method | Iterations | Mean | Ratio | Allocated | Alloc Ratio |
|---|---|---|---|---|---|
| ThrowingExceptions | 1 | 2,427.17 ns | 1.000 | 240 B | 1.00 |
| WrappingExceptionsWithResults | 1 | 2,631.09 ns | 1.085 | 800 B | 3.33 |
| ReturningResults | 1 | 12.61 ns | 0.005 | 128 B | 0.53 |
| Method | Iterations | Mean | Ratio | Allocated | Alloc Ratio |
|---|---|---|---|---|---|
| ThrowingExceptions | 10 | 24,066.68 ns | 1.000 | 2400 B | 1.00 |
| WrappingExceptionsWithResults | 10 | 26,499.82 ns | 1.101 | 8000 B | 3.33 |
| ReturningResults | 10 | 132.79 ns | 0.006 | 1280 B | 0.53 |
| Method | Iterations | Mean | Ratio | Allocated | Alloc Ratio |
|---|---|---|---|---|---|
| ThrowingExceptions | 100 | 239,495.52 ns | 1.000 | 24000 B | 1.00 |
| WrappingExceptionsWithResults | 100 | 265,111.85 ns | 1.107 | 80000 B | 3.33 |
| ReturningResults | 100 | 1,268.33 ns | 0.005 | 12800 B | 0.53 |
Although there is a slight reduction in performance by wrapping the exception with a result, there is a phenomal gain in performance when returning a failed result while still maintaining the same level of information that could be provided by an exception.
Leave me a comment below or find me online and let me know how much you enjoyed eliminating exceptions from your application.
]]>Managers responsible for hiring staff in technology-based roles such as developers or IT technicians are often focused on a candidate’s formal post-secondary education and certifications. Unfortunately, those who do well in such contexts aren’t necessarily the best candidates to fill technology-based roles.
Some of the most
]]>
Managers responsible for hiring staff in technology-based roles such as developers or IT technicians are often focused on a candidate’s formal post-secondary education and certifications. Unfortunately, those who do well in such contexts aren’t necessarily the best candidates to fill technology-based roles.
Some of the most innovative people in the industry have little to no formal post-secondary education, they’ve simply had the vision and the minds to look at real-world problems in a different light in order to bring solutions that others didn’t see. Certifications, like most formal educational, focus on a person’s ability to retain information. Those who can remember the most tend to excel in certifications by scoring well in exams while those whose minds are more inclined towards knowing how to research and process information don’t tend to do as well in the same setting.
As technology changes faster and faster, analytical thinking is becoming the most important skill to have in order to be able to keep up. There is simply too much information out there for any single person to retain. As the world shifts towards the cloud, traditional certification paths have become out of alignment with the ever-changing landscape.
Microsoft, the gold standard certification path in the IT world, was the first to completely revamp their certification offering to better align with this new reality. I myself, an analytical thinker and problem-solver, never attempted any of those certifications since I am not one of those who excel in memory-based exams. However, now that they have shifted to role-based certifications which focus on the skills required for each role instead of a person’s ability to remember all of the material for a specific product, I’m interested.

I have over 30 years of experience with Microsoft products, starting in the early days when computing was a hobby and later on professionally through my evolving career. In that span, I’ve touched on three major releases of MS-DOS (4.0 to 6.22) and twenty major releases of Windows (Windows 3.1 through Windows 10 on the Desktop, and Windows NT 4 through Windows Server 2019 on the Server). And that’s excluding the plethora of updates, services packs, and point releases. And if I was to be evaluated from a purely academic and traditional certifications perspective, I wouldn’t pass the bar. I’ve always understood that learning how to study, analyze, and research a problem is far more important than trying to memorize all of the obscure details of a specific product.
As the world of technology continues to evolve, I continue to adapt and thrive because of my ability to address problems through analytical thinking and research. What are your thoughts on the value of certifications? Do you agree that Microsoft approach towards role-based certifications is better suited to realities of the technology industry? Do you value analytical thinking and problem-solving over education and certification?
]]>You’re probably a bit confused as to how I’m able to compare a technology company to a teenage soccer mom. It’s actually quite simple. You see, like a teenager who’s trying to figure out who she’s supposed to be and
]]>
You’re probably a bit confused as to how I’m able to compare a technology company to a teenage soccer mom. It’s actually quite simple. You see, like a teenager who’s trying to figure out who she’s supposed to be and a soccer mom who’s trying to do too much, NETGEAR has lost its focus. And just like a mother who abandons her kids because her focus is lost, NETGEAR abandoned their most valuable allies, the ITs on the ground who evangelized and believed in them.
To understand how I can make these comparisons, allow me to explain some history. At the turn of the century, Ethernet networking was the domain of system administrators and was usually only found in large businesses or universities. Small businesses were still trying to understand the value of computing, and many schools were still running the older Token Ring topology usually with Novell Network’s IPX/SPX. At the time, the rise of a global internetwork was spearheaded by Cisco deploying itself everywhere it could on key backbone routes. Networking was IT mythology and there was no need for that in someone’s home.

People often forget how young the modern Internet really is. Although TCP/IP as a global network has been in existence, thanks to its predecessor ARPANET, since 1983, it wasn’t until 1990 that things started to take shape when Tim Berners-Lee developed the HTTP protocol and launched the World Wide Web. A few years later, in 1996, NETGEAR was founded by Patrick Lo (along with Mark Merrill) who had the foresight and vision to understand the demand for connectivity that would soon arrive.

The following years, magic started to happen. The Internet was picking up steam, Ethernet was gaining huge leaps in popularity, and dial-up was finally starting to be replaced with broadband connectivity. NETGEAR as a brand remained relatively unknown until the early 2000s, and it was in 2003, when they released the iconic WGR614 Wireless Router alongside the FS605 5-Port 10/100 Switch and FS608 8-Port 10/100 Switch that things started to change.

With this huge momentum of connectivity being driven by the Internet, small businesses wanted to share broadband connectivity, and Cisco monolithic pricing wasn’t going to make it affordable for these small business owners. NETGEAR’s 2003 product line made 10/100 Ethernet connectivity affordable and won confidence with ITs thanks to its 3-Year Warranty. A move that would define the company for the better part of a decade. Soon “spaceships” started showing up everywhere, even in people’s homes. Their dedication to creating quality networking that was fast, reliable, and guaranteed to work, won the hearts and minds of ITs across the world.
Not long after that, they launched the ProSafe product line. This is where NETGEAR started really picking up traction. Businesses at the time were stuck between choosing between ungodly expensive Cisco’s products or unreliable discount bin products like D-Link. Linksys was gaining on the market but they didn’t have the performance or reliability that NETGEAR had.
In order for ITs to adopt a brand’s products, it has to satisfy the requirements of performance and reliability above all else. There’s nothing an IT hates more than dealing with a product that doesn’t perform, glitches, or breaks. NETGEAR always reached above and beyond expectation in that regard because there was a strong nerd culture within the company that pushed them to innovate as fast as technology would allow them. They were the first to market with RJ45 based 10GbE switches, for example. Their pricing was aggressive enough that it made their products appealing for businesses of all sizes. But there was one key factor that set them apart by a huge margin, it was their warranty.

Their entire ProSafe product line was backed by a Lifetime Warranty. It didn’t matter what you bought, you knew that if it had ProSafe stamped on it, it meant two things: Reliability and Lifetime Warranty. This was such an important keystone in the product line that I built an entire IT business on those two factors alone. I could sell NETGEAR’s ProSafe product line to my customers at a 40% markup while my competitors were selling at 5% because I knew that what I would install would last. I guaranteed all of my networks with a Lifetime Parts and Labor Warranty to all of my customers, and if it something went wrong and it said NETGEAR ProSafe on the product, I replaced it free of charge. I registered to my business name all of the NETGEAR ProSafe products I sent for repair and handled the entire RMA process for my customers. This was a win for my customers because they had a single network that was guaranteed for life, and this was a win for me because I was selling at much higher margins than my competitors. All of which was possible because NETGEAR made great products backed by their exceptional warranty.

In the early 2000s, Linksys had gained dominance in the home networking market thanks to a single product that brought them to fame. The WRT54G series of routers. Linksys had managed to appeal to the performance, reliability, and pricing golden triangle that so many ITs live by, and at a time where Wi-Fi was catching on like a wildfire. This was quickly spoiled by Cisco acquiring and fumbling the product line a few years into its success.

This led to a flood of unreliable inexpensive routers and switches flooding the market from everyone who could get them into the market. D-Link’s routers were so unreliable and unfortunately omnipresent that power cycling your router was considered normal. TP-Link was gaining traction as a cheap alternative but they were about as reliable as a round of Russian Roulette.

NETGEAR was pushing forward networking technology, expanding their product line, and staying ahead of the connectivity wave. To this end, near the end of the decade it launched another iconic product that would shake up the market. The WNDR3700 series router. Once again, the nerds had put together a router that performed, was reliable, and affordable. They were so popular that distributors and stores had a difficult time keeping them in stock.
Although NETGEAR had a strong position with its wired networking products. Wi-Fi products were still a hit and miss affair. When version 3 of its WNDR3700 router arrived, ITs started taking notice. They had chosen to equip it with a Broadcom chipset, which was a wise choice. Broadcom was and still is a connectivity champion when it comes to their chipsets. The router performed, it was reliable, and it was affordable. They had achieved the golden IT triangle once more.

It seemed like NETGEAR was on track. However, in 2008, the Great Recession hit the United States. The new realities of globalization were starting to have large financial impacts, and those effects were crawling up to the networking market. A few years later, the bad decisions started.

In an effort to maximize profits, they reverted to their previous choice of Atheros (now Qualcomm) as a chipset, and followed with a MediaTek chipset, effectively smashing the performance and reliable corners of the IT triangle. With version 5, the WNDR3700 had fallen from all its glory down to the abyss of unreliable cheap routers of the likes of TP-Link and D-Link.
At the same time that NETGEAR was cutting investments in the quality of their products, a new wolf was lurking in the background. Robert Pera had left Apple to start Ubiquiti because he believed it was possible to build the golden IT triangle of wireless products. The Unifi product line revolutionized Wi-Fi and his vision took the market by storm.

At the start of the decade, NETGEAR had a strong portfolio of switches and routers, but their wireless offering was weak. Ubiquiti had a strong portfolio of wireless access points, but switches and routers were non-existent. This was the golden IT triangle at its best. Two complementary product lines that could be used to create a seamless network that filled all of the requirements of performance, reliability, and affordability.
In 2013, business routing was championed by the excellent SRX5308 VPN Firewall Router. It was a flagship product worthy of being called as such. It offered enterprise class IPSec VPN gateway to gateway connectivity in a one-step automated wizard which made inter-office VPNs easy and reliable to setup. It was a straightforward “It just works” solution that was nearly bulletproof. It was a versatile VPN router thanks to its vast standards compliance. So much so that it even included Mode Config functionality, which almost no other router on the market offered. Avaya even went as far as to publish their own Solution & Interoperability Test Lab Application Notes for this router. The firewall and NATing functionality were straightforward. It was gigabit capable. It was reliable. It was affordable. This was IT gold.

That same year, Ubiquiti launched its EdgeRouter series of routers.

So what do you do when you have the lead horse in your market segment, and another horse enters the market? I’ll tell you what NETGEAR did. They shot their horse in the head. They stopped developing the SRX5308. They instead turned their attention to the unstable and volatile consumer market. And eventually, they stopped manufacturing the entire ProSafe VPN Firewall Router product line altogether. They let distribution dry up completely without saying a word, leaving their resellers, installers, and customers frustrated and confused for years. That is until they finally put up a subtle indication as such on the support section of the SRX5308 router.

Someone in a key position at NETGEAR must have gotten exited by some dingbat device in their home, such as an Amazon Alexa, saw stars in the consumer market, and completely derailed the company’s success train. The most important component in any network of any size is the router. Networks don’t exist without routers. FortiNet understands this, that’s why they invest millions in R&D on that single product segment. Cisco understands this, that’s why they ask for such a premium for that responsibility. Even D-Link understands that, they’re investing in that segment to fill the space that NETGEAR opened up.

Here’s the thing. ITs are evangelists. They will swear and die by the products that fulfill the promise of the golden IT triangle. Ubiquiti understands that and built their Unifi products around the evangelistic IT mindset. So what do you think happened when they released their router product line while NETGEAR killed theirs? They defected in droves from one camp to the other, out of pure necessity. I know I did.
NETGEAR seems to want to come back to the router market as they’ve recently released a new product line of Cloud Based Routers and Switches. I have a BR500 on my desk that I’ll be digging through soon, so I’ll be able to give some feedback on where they really stand with their new product line. However, I’m not sure it’s enough. They dropped out of this segment for almost 4 years, which is an eternity in this modern age of technology. Ubiquiti has built solid roots with their EdgeRouter series and nowadays ITs adopt ecosystems, not just products. Look at how Fortinet is developing their portfolio of switches and wireless access points as an example. With the arrival of the EdgeSwitch series switches, Ubiquiti now has end-to-end networking that fits squarely into the golden IT triangle of performance, reliability, and affordability.

All is not lost, though. There is still time for NETGEAR to make a comeback. Nostalgia and heritage play into the minds of ITs, and if you want proof, look at the revival of Linksys’ WRT series. What NETGEAR needs above all else is focus. It’s trying to be a consumer products company, a business networking company, and a software as a service company, all at the same time. Like an anxious soccer mom getting yanked on by all her kids, NETGEAR is undecided, in too many directions at once, and is losing its edge.

It’s time for a change. Consumer Markets and Business Markets are not the same. DuPont learned this the hard way after World War II when it tried to combine its military explosives division with its consumer chemicals division. It was such a monumental failure that it is now a business case study taught in universities.

In the future, there will be three critical markets for networking. The consumer home market, the small and medium business market, and the enterprise business and the data center market. Building “one size fits all” solutions does not work. NETGEAR needs to either segment itself into three business units and focus on each market individually, or reduce its product portfolio to something it can manage better. Otherwise, it’s giving out expectations to its customers that it won’t be able to fulfill. A good example of how this can be achieved is to look at Dell Technologies’ approach. Consumer products are developed, manufactured, sold, marketed, and supported completely independently to its small and medium business products, and completely independently to its enterprise and data center products. All three divisions act as completely separate business units because the entire market segment is different.
NETGEAR needs to recognize this important difference. A consumer doesn’t have the same expectation of his router than what a small business owner would have. A small business owner doesn’t have the same expectation of his router than what an IT would have. And a data center operator doesn’t have the same expectation of his router than what a small business IT would have.

Some honesty and transparency on their behalf also wouldn’t hurt. Marketing an entire product line that no longer exists is a pretty deceptive move. Talk about failed expectations. “I know Santa’s not real, so can we please stop lying about the ProSafe VPN Firewalls?”
]]>With the advent of Windows Vista and Server 2008, the Event Viewer became the central location for all things related to logging for pretty much everything Windows related. Sometimes, especially when bringing a new system online, you need a bit of clarity. Unfortunately, there’s no easy way to
]]>With the advent of Windows Vista and Server 2008, the Event Viewer became the central location for all things related to logging for pretty much everything Windows related. Sometimes, especially when bringing a new system online, you need a bit of clarity. Unfortunately, there’s no easy way to clear all of the logs in a single motion using the UI. A quick bit of batch file kung fu solves this issue for us.
Save the following into a file named something like “ClearLogs.bat”, right-click on it, and “Run As Administrator”. It will clear everything at once. This has been tested and working on Windows Vista, Windows 7, Windows 8, Server 2008, Server 2008 R2, and Server 2012.
@echo off
for /f "tokens=*" %%l in ('wevtutil.exe el') do (call :clearlog "%%l")
:clearlog
echo Clearing %1...
wevtutil.exe cl %1
goto :eof
exit
]]>[UPDATED 2019-03-11: OpenSSL has been updated to version 1.0.2r which is no longer vulnerable to the hearbleed bug.]
If you’re still using Gene6 FTP Server then you’re already aware that the developer has gone MIA. Nonetheless, as it stands, it still reigns as the
]]>[UPDATED 2019-03-11: OpenSSL has been updated to version 1.0.2r which is no longer vulnerable to the hearbleed bug.]
If you’re still using Gene6 FTP Server then you’re already aware that the developer has gone MIA. Nonetheless, as it stands, it still reigns as the best of its kind. Since there’s no way to know if the developer will ever be back or if the site could suddenly go offline, I decided to mirror the installation files as well as update the last known release to ensure its compatibility with Windows Server 2012 and later. Hopefully this will help those of us who have valid licences and still use this awesome, albeit dead, FTP server.
Getting Gene6 FTP Server to work on Windows Server 2012 and later is done in four steps.
1) Install Gene6 FTP Server using the original 3.10.0.2 setup file, found on the developer’s website or mirrored by me below.
2) Start the G6FTP Server Administrator, add your license, and stop the server.

3) Add the server service executable (G6FTPServer.exe) to the DEP exception list.

4) Overwrite the files “G6FTPServer.exe”, “libeay32.dll”, and “libssl32.dll”, with the ones found inside Gene3.10.0.15WithOpenSSL1.0.2r. The zipped archive contains the executable found from the last known update, which was 3.10.0.15. I replaced the OpenSSL DLLs with the ones from version 1.0.2r since the ones included in the zipped archive by the original developer are not compatible with Windows Server 2012 or later.
]]>I was hoping that the Adobe development team would have fixed this by now but it seems that they do not use their own products. At least, certainly not for standards compliant work. In a revisit to my original article on fixing the issue with CS4, here is an updated
]]>I was hoping that the Adobe development team would have fixed this by now but it seems that they do not use their own products. At least, certainly not for standards compliant work. In a revisit to my original article on fixing the issue with CS4, here is an updated tag library that you can use to stop Dreamweaver CS5 from changing your correct onmouseover events to the improper onMouseOver mixed cased version.
Download the HTML Tag Library below and overwrite the existing one which you’ll find by default in “C:\Program Files\Adobe\Adobe Dreamweaver CS5\configuration\TagLibraries” on x86 systems and in “C:\Program Files (x86)\Adobe\Adobe Dreamweaver CS5\configuration\TagLibraries” on x64 systems.
]]>If you are like me and you store all your code on a server, you will have likely learned about trusting a network share using CasPol.exe. However, when moving from Visual Studio 2008 (.NET Framework 2.0/3.0/3.5) over to Visual Studio 2010 (.NET Framework 4.
]]>If you are like me and you store all your code on a server, you will have likely learned about trusting a network share using CasPol.exe. However, when moving from Visual Studio 2008 (.NET Framework 2.0/3.0/3.5) over to Visual Studio 2010 (.NET Framework 4.0), you may find yourself scratching your head.
If you are used to using the Visual Studio Command Prompt to quickly get to CasPol, you may find that some of your projects will not seem to respect your new FullTrust settings. The reason is that, unless you are carefully paying attention, the Visual Studio Command Prompt defaults to adding the .NET Framework 4.0 folder to its path. If your project is still running under .NET Framework 2.0/3.0/3.5, it will require setting CasPol for those versions as well. Just a note, I have also personally had more success with using 1 as a code group instead of 1.2.
To trust a network share for all versions of the .NET Framework, simply call CasPol for each version using the full path as below:
C:\Windows\Microsoft.NET\Framework\v2.0.50727\CasPol -m -ag 1 -url file://YourSharePath\* FullTrust
C:\Windows\Microsoft.NET\Framework\v4.0.30319\CasPol -m -ag 1 -url file://YourSharePath\* FullTrust
]]>
Developing applications that communicate between different platforms can quickly hit ground if multi-byte integers are sent without taking the proper byte order into account. We often forgotten to watch for this as most of us stick to a single platform during development. Thankfully, the .NET Framework has taken all the
]]>Developing applications that communicate between different platforms can quickly hit ground if multi-byte integers are sent without taking the proper byte order into account. We often forgotten to watch for this as most of us stick to a single platform during development. Thankfully, the .NET Framework has taken all the guesswork out with a pair of simple methods.
Before transmitting integers over the wire, a quick call to IPAddress.HostToNetworkOrder() will change the byte order to the communications standard of significant byte first. Receiving integers also requires a single call to IPAddress.NetworkToHostOrder() to ensure the proper value is understood from the incoming bytes.
Read over the “Sockets Byte-Ordering Primer” article over at codeguru.com and the “Converting & Sending Sockets Data with a Leading Length Value” article over at developer.com for some great in-depth explanations on the matter.
]]>FreePBX has become quite popular over the last few years. Unfortunately, the documentation has not quite caught up to the popularity. At the time of this writing, most of the documentation available was for older versions of CentOS, FreePBX and/or Asterix. Below I have outlined the steps required to
]]>FreePBX has become quite popular over the last few years. Unfortunately, the documentation has not quite caught up to the popularity. At the time of this writing, most of the documentation available was for older versions of CentOS, FreePBX and/or Asterix. Below I have outlined the steps required to get FreePBX 2.8 working with Asterisk 1.8 on CentOS 5.5.
If you are reading this as after having followed the steps in my previous article Installing CentOS 5.5 with Linux Integration Services 2.1 on Hyper-V R2 or if you have not selected the following package groups during your installation of CentOS, make sure you do so now by using the following commands.
Preparations
You will need five different passwords.
PASSWORD1 – Your root password.
PASSWORD2 – Used for the asterisk database user.
PASSWORD3 – Used for the FreePBX administrator.
PASSWORD4 – Used for Flash Operator Panel.
PASSWORD5 – Used for the Asterisk Recording Interface.
Requirements
yum groupinstall "DNS Name Server"
yum groupinstall "Web Server"
yum groupinstall "Mail Server"
yum groupinstall "MySQL Database"
yum groupinstall "Development Tools"
Once you are sure that the needed package groups are installed, you will want to install the prerequisites as follows.
yum install e2fsprogs-devel keyutils-libs-devel krb5-devel libogg libselinux-devel libsepol-devel libxml2-devel libtiff-devel
yum install gmp php-pear php-pear-DB php-gd php-mysql php-pdo kernel-devel ncurses-devel audiofile-devel libogg-devel
yum install openssl-devel mysql-devel zlib-devel perl-DateManip sendmail-cf sox
Make sure you also have wget installed.
yum install wget
Next you will setup named.
echo "options {" >> /var/named/chroot//etc/named.conf
echo " directory \"/var/named\";" >> /var/named/chroot//etc/named.conf
echo " dump-file \"/var/named/data/cache_dump.db\";" >> /var/named/chroot//etc/named.conf
echo " statistics-file \"/var/named/data/named_stats.txt\";" >> /var/named/chroot//etc/named.conf
echo "};" >> /var/named/chroot//etc/named.conf
echo "include \"/etc/rndc.key\";" >> /var/named/chroot//etc/named.conf
cd /var/named/chroot//etc/
chmod 640 named.conf
chgrp named named.conf
ln -s /var/named/chroot//etc/named.conf /etc/named.conf
You will want to adjust the security settings as per your requirements but for the simplicity of this article, we are going to turn off Security-Enhanced Linux and open the firewall fully.
echo "SELINUX=disabled" > /etc/selinux/config
iptables -P INPUT ACCEPT
iptables -P OUTPUT ACCEPT
iptables -P FORWARD ACCEPT
iptables -F
iptables -X
/etc/init.d/iptables save
LAME is required for Asterisk’s audio related functions. You will want to download LAME to a source directory, compile and then install it.
cd /usr/src
wget http://downloads.sourceforge.net/project/lame/lame/3.98.4/lame-3.98.4.tar.gz?ts=1292626574&use_mirror=cdnetworks-us-1
tar zxvf lame-3.98.4.tar.gz
cd lame-3.98.4
./configure
make
make install
You can optionally remove the source once you have installed LAME.
cd ..
rm -fr lame-3.98.4
rm lame-3.98.4.tar.gz
Before continuing, insure that all packages are up to date and then reboot.
yum update
reboot
Installing Asterisk 1.8
Get Asterisk 1.8 and extract it to its own source folder.
cd /usr/src
wget http://downloads.asterisk.org/pub/telephony/asterisk/asterisk-1.8-current.tar.gz
tar xvfz asterisk-1.8-current.tar.gz
cd asterisk-1.8.0
contrib/scripts/get_mp3_source.sh
./configure
make menuconfig
The last command will launch the source configuration manager. The only portions you will want to install are app_mysql, app_saycountpl, cdr_mysql, format_mp3, res_config_mysql and EXTRAS-SOUNDS-EN-GSM (which can be found in the Extra Sound Packages sub-menu). Save your selections and exit. Now compile the source and install.
make
make install
You can optionally remove the source directory once you have installed Asterisk.
cd ..
rm -fR asterisk-1.8.0
rm asterisk-1.8-current.tar.gz
Installing FreePBX 2.8
Get FreePBX 2.8 and extract it to its own source folder.
cd /usr/src
wget http://mirror.freepbx.org/freepbx-2.8.0.tar.gz
tar xvfz freepbx-2.8.0.tar.gz
cd freepbx-2.8.0
Start MySQL, create the asterisk databases and run the initial SQL setup scripts.
/etc/init.d/mysqld start
chkconfig mysqld on
mysqladmin create asterisk
mysqladmin create asteriskcdrdb
mysql asterisk < SQL/newinstall.sql
mysql asteriskcdrdb < SQL/cdr_mysql_table.sql
Start the MySQL command line.
mysql
Define the user and password for each of the databases.
GRANT ALL PRIVILEGES ON asteriskcdrdb.* TO asteriskuser@localhost IDENTIFIED BY 'PASSWORD2';
GRANT ALL PRIVILEGES ON asterisk.* TO asteriskuser@localhost IDENTIFIED BY 'PASSWORD2';
flush privileges;
\q
Change the MySQL user to root.
mysqladmin -u root password 'PASSWORD1'
Create the Asterisk user and set folder permissions.
useradd -c "Asterisk PBX" -d /var/lib/asterisk asterisk
chown -R asterisk:asterisk /var/run/asterisk
chown -R asterisk:asterisk /var/log/asterisk
chown -R asterisk:asterisk /var/lib/php/session/
Update the Apache configuration file.
vi /etc/httpd/conf/httpd.conf
Change User apache and Group apache to User asterisk and Group asterisk.
Change AllowOverride None to AllowOverride All.
Update ServerName to use your server’s FQDN.
Start Apache.
/etc/init.d/httpd start
chkconfig httpd on
Start Asterisk.
./start_asterisk start
Configure FreePBX.
./install_amp --username=asteriskuser --password=PASSWORD2
The next series of prompts will give you default values within square brackets which you can accept by hitting enter. If you wish to change a value, simply type it and hit enter after.
[asteriskuser]
This is the database user you specified earlier.
[PASSWORD2]
This is the password for the database user.
[localhost]
Use the default value.
[admin]
The username for the FreePBX administrator.
[amp111]
The password for the FreePBX administrator. It is important to change this. (Use PASSWORD3 you prepared earlier.)
[/var/www/html]
Use the default value.
[xx.xx.xx.xx]
The public IP that will be used.
[passw0rd]
The Flash Operator Panel password. It is important to change this. (Use PASSWORD4 you prepared earlier.)
[extensions]
Use the default value.
[/var/lib/asterisk/bin]
Use the default value.
[/usr/local/sbin]
Use the default value.
Change the Asterisk Recording Interface password and turn on user authentication for the web interface by editing the amportal.conf file.
vi /etc/amportal.conf
Change the ARI_ADMIN_PASSWORD entry to update the ARI password.
ARI_ADMIN_PASSWORD=PASSWORD5
Change the AUTHTYPE entry to database to enable authentication.
AUTHTYPE=database
Optionally, you can turn off the FOP completely by changing the following settings.
FOPRUN=false
FOPDISABLE=true
Save and exit.
Add FreePBX to the boot process.
echo "/usr/local/sbin/amportal start" >> /etc/rc.local
You can ensure that the administrator user has the proper password in the database by navigating to the Administrators tab, choosing the admin user and clicking on the Update password link. Once your password has been updated, logout by clicking the link at the top right of the page.
Finally, reboot the server one last time.
reboot]]>
Hyper-V R2 brings some powerful virtualization to the table for those of us who do not have either the skills or the desire to work with virtual machineware. Most fans of Hyper-V are also likely to be well versed in Windows and may often lack the knowledge to rummage through
]]>Hyper-V R2 brings some powerful virtualization to the table for those of us who do not have either the skills or the desire to work with virtual machineware. Most fans of Hyper-V are also likely to be well versed in Windows and may often lack the knowledge to rummage through Linux. Although there are many resources available regarding Linux on Hyper-V, I felt that most assumed the reader had intimate knowledge with Linux, which is often not the case.
For Windows administrators new to Linux who wish to provide virtualized services to their end-users, my recommendation is to stick to CentOS 5.5. Being a close derivative of Red Hat Enterprise Linux (RHEL), the officially supported distribution by Microsoft, installation of the Integration Components is simplified and stability is matched to what is found when running RHEL.
Requirements
You will need the CentOS 5.5 x64 installation DVD ISO (CentOS-5.5-x86_64-bin-DVD-1of2.iso) which can be found at http://isoredirect.centos.org/centos/5/isos/x86_64/.
You will also need the Linux Integration Services 2.1 ISO (LinuxIC v21.iso) available through the Microsoft Download Center at http://www.microsoft.com/downloads/en/details.aspx?FamilyID=eee39325-898b-4522-9b4c-f4b5b9b64551.
Initial virtual machine Settings
To create the initial virtual machine, you will need to use the Legacy Network Adapter and limit yourself to a single CPU. You will also want to take time to decide how large of a VHD to allocate ahead of time as expanding a Linux partition can be a little complicated. Personally, I find 20GB to be sufficient for small, single purpose Linux virtual machines.

Installing CentOS 5.5
After booting from the CentOS ISO, you are presented with the choice to do a graphical or a text mode installation. To choose the text mode installation (as used here), simply type “linux text” at the boot: prompt and hit enter.

To navigate throughout the next portion of the text mode installation, use the Tab key to navigate between fields and the Space key to select options or hit buttons.
You will be asked if you would like to do a media test. You can safely skip this.

The initial welcome screen to the installation process.

Choose your language as appropriate.

And your keyboard.

You must then partition your VHD for Linux. As you will be starting off with a fresh VHD, you can simply choose “Use free space on selected drives and create default layout.” and continue with OK.

Be sure to hit No to continue as hitting Yes will simply bring you back to the previous screen.

As long as you have properly configured your virtual machine to use the Legacy Network Adapter, you will be presented with the opportunity to have the installation configure it for you.

Check the “Enable IPv4 support” option and hit OK to continue.

Switch to the “Manual address configuration” option and enter your IP address and netmask as appropriate.

Continue on by entering your default gateway (usually your router or your network’s default route). If you have internal DNS servers for your network, enter them here or alternatively, you can use OpenDNS.

The name of your virtual machine is defined here as the hostname.

Select your time zone and continue.

Be sure to choose a secure root password as the root user has complete access to the entire virtual machine and SSH is enabled on first boot.

For a bare minimum installation, uncheck all of the packages, check “Customize software selection” and hit OK.

Uncheck all package groups and continue. Anything you require can later be installed by yum anyway.

Installation will begin once you continue past this screen.

Once installation is complete, you will be required to reboot.

After rebooting, you will be ready to login. At this point, I recommend connecting via SSH in order to copy and paste commands.

Preparing to install the Linux Integration Components
The first thing that must be done is to update all the base packages and upgrade the kernel to the latest version. Simply run a “yum update”, then reboot.
yum update
reboot
You will need to install the required “kernel-devel”, “gcc”, “make” and “perl” packages to compile and install the Linux Integration Components. Also, I suggest installing the VIM text editor.
yum install kernel-devel
yum install gcc
yum install make
yum install perl
yum install vim-enhanced.x86_64
Installing the Linux Integration Components
Attach the Linux Integration Services ISO. Once attached, you will need to mount the cdrom. You must then copy and compile the source in a temporary folder. Finally, you will be able install the Linux Integration Components. “make” will compile the source, then “make install” will install the compiled drivers.
mkdir -p /mnt/cdrom
mount /dev/cdrom /mnt/cdrom
cp -rp /mnt/cdrom /opt/linux_ic
umount /mnt/cdrom
cd /opt/linux_ic
make
make install
The time synchronisation component is not compatible with CentOS, therefore you will need to install “adjtimex”.
yum install adjtimex
You will need to shutdown the virtual machine in order to enable the Synthetic Network Adapter and increase the number of CPUs allocated. To do so, run the shutdown command.
shutdown -h -t 0 0
Change the settings in Hyper-V once the virtual machine has completely shutdown.

Start the virtual machine and log in. You will need to reconfigure the network adapter as “eth0” will have disapeared and a new adapter, “seth0”, will have taken its place.
The easiest way to do this is to edit the MAC address in the “eth0” backup file to match the MAC address of the Network Adapter as displayed in the virtual machine settings in Hyper-V, then copy the backup file as “seth0” and restart the network service. Don’t forget to also update the DEVICE line use “seth0”.
cd /etc/sysconfig/network-scripts/
vi ifcfg-eth0.bak
(edit DEVICE and HWADDR)
(save and exit)
rm -f ifcfg-seth0
mv ifcfg-eth0.bak ifcfg-seth0
service network restart
If all went well, you will find yourself with a bare minimum install of CentOS 5.5 running the latest kernel and version 2.1 of the Linux Integration Services. Fully virtualized and synthetic. You can now enjoy the many benefits of Hyper-V Linux such as the ability to shutdown the virtual machine without the root password.
]]>