In this post, we’ll have a look at the basic structure of a CI/CD pipeline for Microsoft Fabric using the fabric-cicd Python library and Azure DevOps. I’ll also share a few lessons from my own experience.
For a detailed description of how the fabric-cicd library works and how to set it up please refer to this page.
CI/CD in Fabric: The Basics
To implement CI/CD for Fabric, we use the fabric-cicd Python library, which allows us to export and import Fabric artifacts (like Lakehouses, Notebooks, Pipelines, etc.) in a structured way.
Key Components of the Pipeline
- YAML Pipeline File (
fabric-release-pipeline.yml):- This is your Azure DevOps pipeline configuration file. It defines the steps to install dependencies, authenticate, and call the
fabric-deploy.pyfile.
- This is your Azure DevOps pipeline configuration file. It defines the steps to install dependencies, authenticate, and call the
- Python File (
fabric-deploy.py):- This is the Python file where the actual logic for the CI/CD is defined.
- Parameters File (
parameters.yml):- This file is used for the parametrization of your objects in Fabric. Using find and replace (key value pairs) you can define the IDs of the Objects in different stages (workspaces) and link them together.
- Environment Variables / Secrets:
- You’ll need to securely store credentials and tokens used for authentication (usually via Azure DevOps Library or Key Vault integration).
To setup your CI/CD pipeline in DevOps you need to adjust these files to your context.
Challenges and lessons learned
While setting up and working with CI/CD for Fabric, I encountered a few challenges and lessons learned worth sharing:
Lakehouse initial deployment did not work with Service Principal
While we were able to release other objects (such as notebooks for example) using a service principal, the initial deployment of Lakehouses failed. We received the following error:
DatamartCreationFailedDueToBadRequest
Datamart creation failed with the error ‘Required feature switch disabled’
We made sure that all the required settings were correct in the Fabric Admin Portal but we still received the error. These settings included the following:
- Service Principals can use Fabric APIs
- enabled for entire organization
- Users can create Fabric items:
- enabled for entire organization
- Create Datamarts
- enabled for entire organization
We then tried to use a “personalized” User in the deployment pipeline using az login and the deployment worked.
Generally speaking the Service Principal authentication seems to fail sometimes without clear error messages. In these cases it is worthwhile to try the deployment with your own user to make sure that there is no general issue in your CI/CD pipeline.
Debugging
Debugging can be quite tricky as the error messages you get are not always clear. To make debugging easier I would suggest to enable debug logging and to create a file you can use to debug locally. These are valid not only for Fabric CI/CD but generally speaking.
Enabling the debug logging will give more visibility to what’s happening under the hood. The local debug file will help you to pinpoint where exactly the issue lies so you can investigate further.
Start early with the implementation of your CI/CD pipeline
Adding CI/CD later in the project when you have loads of artifacts will make the implementation messier. I would therefore suggest to setup your CI/CD pipeline as soon as your project starts to grow. Even a basic export/import pipeline will save you hours of manual deployment down the line.
Wait and try again
Now this is a weird one. But sometimes when your CI/CD pipeline fails it is worth just waiting a bit and then try again. Some Fabric services can have consistency issues occasionally and new artifacts may need publishing time before they are actually available in target workspaces. We encountered more than one failure that was solved by simply triggering the CI/CD pipeline a few minutes later again.
It might be useful to implement a retry logic in your CI/CD pipeline to avoid these issues.
Final Thoughts
CI/CD in Microsoft Fabric is still evolving. Using the fabric-cicd Python library it is possible to implement automated pipelines. However, the implementation is not as straightforward as it is for more established Tools. Azure DevOps is a solid companion for orchestrating deployments, especially when paired with secure authentication and structured config files.
If you’re working in a Fabric environment, I highly recommend giving CI/CD a try early in your project.
]]>In this blog post, we’ll explore the potential of Fabric Data Agents, their use cases, limitations, and how they differ from Microsoft Copilot.
How the Data Agents work
The Fabric Data Agent leverages large language models (LLMs) through Azure OpenAI Assistant APIs to enable natural, conversational interactions with data. Acting as an intelligent agent, it interprets user questions, identifies the most relevant data source—whether it’s a Lakehouse, Warehouse, Power BI dataset, or KQL database—and selects the right tool to generate, validate, and execute the necessary queries. This allows users to ask questions in plain language and receive clear, structured responses—removing the need to write complex queries while maintaining secure and accurate access to data.
Use Cases of Fabric Data Agents
Fabric Data Agents are designed to democratize data access, making it easier for users to retrieve and interpret structured data insights. Some of the key use cases include:
- Conversational Data Retrieval: Users can ask questions in natural language, and Fabric Data Agents return structured responses without needing deep technical expertise.
- Data-Driven Decision Making: Business analysts and non-technical users can extract insights from enterprise data effortlessly using natural language.
- Enhanced Productivity: Eliminates the need for complex queries, saving time.
- Improved Accessibility: Enables seamless interaction across various datasets, ensuring users at all levels can leverage their data effectively.
How Fabric Data Agents Differ from Copilot
Although Microsoft Fabric also integrates Copilot capabilities, there are distinct differences between Fabric Data Agentsand Copilot in Fabric:
| Feature | Fabric Data Agents | Copilot in Fabric |
| Primary Function | Conversational data retrieval | AI-assisted analytics & coding |
| Interaction Type | Q&A-based queries | Code generation, data visualization |
| Data Manipulation | Read-only access | Supports analytics & data transformation |
| Integration Focus | Querying structured datasets | Assists in building reports, models, and notebooks |
While Copilot enhances productivity by generating visualizations, code snippets, and reports, Fabric Data Agents focus on making structured data retrieval more intuitive via natural language interaction.
Configuring a Fabric Data Agent
Setting up a Fabric Data Agent follows a process similar to creating a Power BI report—you first design and refine its configuration to ensure it aligns with your needs, then publish and share it so colleagues can interact with the data. The setup involves several key steps:
Selecting Data Sources
Fabric Data Agents can integrate up to five data sources, allowing flexibility in combining lakehouses, warehouses, KQL databases, and Power BI semantic models. A single agent could contain five Power BI semantic models, or a mix such as two Power BI semantic models, one lakehouse, and one KQL database. You have various options to structure your data environment effectively.
Choosing Relevant Tables
Once you’ve selected your data sources, you need to add them one by one and specify which tables will be used by the Fabric Data Agent. This ensures the agent focuses on the most relevant data, optimizing response accuracy and efficiency.
Adding Context for Better Accuracy
Enhancing a Fabric Data Agent’s accuracy requires providing additional context through agent instructions and example queries. These components help the Azure OpenAI Assistant API better understand user questions and determine the most appropriate data source for each query.
Agent Instructions
You can define custom guidelines to help the underlying agent decide which data sources to reference for specific types of queries. Instructions can also include rules and definitions that clarify organizational terminology or preferences for data retrieval.
Example Queries
Providing sample question-query pairs helps the Fabric Data Agent interpret similar queries with greater accuracy. These examples serve as a reference, guiding the agent in structuring responses that align with expectations.
Limitations of Fabric Data Agents
While Fabric Data Agents offer promising capabilities, there are some limitations to keep in mind:
- Public Preview Stage: Since this feature is still in development, Microsoft may refine its functionality based on user feedback.
- Fabric Capacity Requirements: Users must have a paid Fabric capacity resource (F2 or higher) and enable specific tenant settings to use Data Agents.
- Read-Only Access: Currently, Data Agents only support read queries, meaning users cannot modify datasets through conversational queries.
- Dependency on Data Availability: The effectiveness of responses depends on the quality and structure of the datasets linked to Fabric.
- Limited number of sources per agent: While setting up an agent users can select a maximum of 5 sources (Lakehouses, Warehouses, Semantic Models, …) to be considered in the context of the agent.
This list is not exhaustive. The complete list of limitations can be found here.
]]>This blog post walks you through everything you need to know about Spark in Microsoft Fabric—from foundational concepts to configuring pools, environments, and jobs—so you can build and scale data workloads effectively.
- What is Apache Spark?
- Core concepts of Spark in Fabric
- How to Configure Spark Settings in Microsoft Fabric
- Conclusion
What is Apache Spark?
Apache Spark is an open-source distributed computing engine designed for large-scale data processing. It allows developers and analysts to process data in parallel across multiple machines (nodes), making it dramatically faster than traditional approaches
How Does Spark Work?
Each Spark cluster consists of multiple nodes. The driver node is responsible for coordinating the task execution. The worker (executor) nodes execute tasks and store data for in-memory processing. Each worker node receives its own set of resources such as memory and CPU.
Node sizes in Microsoft Fabric
There are different node sizes in Microsoft Fabric. Here’s how they differ:
| Size | vCore | Memory |
| Small | 4 | 32 GB |
| Medium | 8 | 64 GB |
| Large | 16 | 128 GB |
| X-Large | 32 | 256 GB |
| XX-Large | 64 | 512 GB |
Please note that as of now X-large and XX-large node sizes are only allowed for non-trial Fabric SKUs.
Number of nodes
The number of nodes you can have in your Spark pool depends on the capacity you are using. Two Apache Spark vCores equal one capacity Unit (CU). To calculate the total number of Spark vCores you get you can use the following formula:
CU * 2 * 3 (Burst multiplier)
So a F32 capacity will get you a total of 32 * 2 * 3 =192 vCores.
Core concepts of Spark in Fabric
Before we go into the question of how to configure the spark settings in Microsoft Fabric, let’s first look at two important core concepts of Spark.
Autoscaling
Autoscale dynamically adjusts the number of nodes in your Spark pool based on workload demand.
- Minimum Nodes: Keeps a baseline of resources available.
- Maximum Nodes: Caps the number of nodes to control cost.
Benefits
- Cost efficiency: Avoid paying for idle capacity.
- Flexibility: Scale up for large jobs, scale down for light workloads.
If autoscaling is disabled then the number of nodes remains fixed.
Dynamic allocation
Dynamic Allocation adjusts the number of executors during a Spark job based on current needs.
- Executors scale up when there are pending tasks.
- Executors scale down when they’re idle.
This complements autoscaling at the infrastructure level and helps improve performance at runtime.
How to Configure Spark Settings in Microsoft Fabric
Microsoft Fabric abstracts much of the Spark infrastructure while still giving you fine-grained control via five core components: Pools, Environments, Jobs, High concurrency and Automatic log. We will not have a closer look at the automatic log option as it is pretty self explanatory. To enter the spark settings navigate to the Workspace settings, click on the Section “Data Engineering/Science” and then the option “Spark settings”.

Spark Pools: Your Compute Backbone
A Spark Pool is a collection of compute resources (virtual machines) dedicated to Spark processing. Pools determine your job’s execution power, scaling behavior, and concurrency.
Starter Pool vs Custom Pool
A so-called starter pool is provided automatically. These pools are pre-configured and can only be customized to a certain extent. The node size of a starter pool is automatically set to Medium and cannot be modified. The only parameters that you can modify are the autoscaling and dynamic allocation. While you can’t disable these options you can modify the number of nodes and executors. Starter pools provide Spark clusters that are always running. This means that you do not need to wait for the nodes to be setup.
Custom pools on the other hand can (as their name suggests) be highly customized. You can define the node size, and completely disable the autoscaling and dynamic allocation.
Starter Pools are perfect for exploration and development. Custom Pools are essential for optimized performance, enterprise-level concurrency, and cost control.
Environments: Templating Spark Settings
Before we look at the Environment workspace settings, let’s first explain what an Environment is.
In Microsoft Fabric, an Environment is a special item that holds a set of settings used to run Spark tasks. These settings can include things like the Spark pool you want to use, the version of the Spark runtime, any custom Spark properties, and extra libraries your code might need.
You can think of an Environment as a “package” of settings. Once you create it, this package is saved in your Fabric workspace as its own item. You can share it with other users, and reuse it in different Spark notebooks or jobs.
The main benefit of creating different environments is that it gives you more control. For example, imagine you have multiple notebooks that each need different settings. Instead of changing the settings every time, you can simply assign each notebook its own environment with the right configuration.
Jobs: Scheduled Spark Workflows
In the “Jobs” Section there are two main options that you can configure. The first one is the Spark session timeout. Here you can define the duration after which an inactive Spark session is terminated.
The second option is related to the job admission. By default Microsoft Fabric uses a method called optimistic job admission to manage how Spark jobs are started and scaled. This method helps decide whether there are enough resources (like CPU cores) available to start and run a job.
This applies to:
- Jobs run from notebooks
- Jobs in Lakehouses
- Scheduled Spark jobs
Here’s how it works:
- Each Spark pool has a minimum number of nodes (computing units) it needs to run a job. Starter pools use 1 node by default. Custom pools let you choose the minimum.
- When you submit a job, Fabric checks if there are enough free cores in your workspace’s capacity to meet the job’s minimum requirement.
- If yes, the job starts right away.
- If no, the job may either be blocked (for notebooks) or queued (for batch jobs).
- Once running, the job starts with the minimum number of nodes and can scale up to use more—up to the maximum node setting—depending on how busy it gets.
- Fabric will only let the job scale up if there are still free cores available within your assigned capacity.
- If all cores are in use (meaning the system is at its max capacity), the job can’t scale up any further until another job finishes or is canceled.
Example:
Let’s say you’re using the Fabric F32 capacity and all jobs use the default starter pool:
- Without optimistic job admission: only 3 jobs could run at once, because each job uses the maximum number of cores allowed by its pool.
- With optimistic job admission: up to 24 jobs could start at the same time—each using only their minimum required cores to begin with, then trying to scale up if possible.
This smarter approach helps you run more jobs at once by starting small and growing only if resources allow.
High Concurrency Mode: Collaborative Spark Processing
High concurrency mode enables multiple users or jobs to execute on the same spark session simultaneously with optimal resource utilization and minimal interference.
Benefits:
- Improved resource isolation for each session
- Efficient multi-user support in shared environments
- Ideal for notebook collaboration, streaming, or batch jobs
Pro Tip: Always enable high concurrency for custom pools in collaborative or production scenarios. It prevents one user’s job from monopolizing the entire session.
Conclusion
Microsoft Fabric brings the power of Apache Spark into a fully integrated, cloud-native experience. Whether you’re a seasoned data engineer or a newcomer exploring notebooks for the first time, understanding how to configure and optimize Spark settings is crucial.
With custom pools, autoscaling, dynamic allocation, and high concurrency, you can tailor your Spark environment to fit both experimental work and enterprise-scale pipelines—all while managing performance and cost effectively.
Start small. Tune carefully. Scale confidently.
]]>Introduction
In the evolving landscape of data engineering, ETL (Extract, Transform, Load) and ELT (Extract, Load, Transform)are two primary approaches to data processing. With the introduction of Microsoft Fabric, data professionals have new tools to implement both strategies efficiently. This blog post explores the differences between ETL and ELT in Microsoft Fabric, their use cases, and best practices for data transformation.
Understanding ETL and ELT
What is ETL?
ETL is a traditional approach where data is first extracted from source systems, then transformed in a staging area before being loaded into a target data warehouse or lakehouse. This method ensures that only clean, structured data enters the final storage layer.
Pros of ETL:
- Ensures data quality and consistency before loading.
- Reduces the need for complex transformations within the storage layer.
- Works well for structured data with strict compliance requirements.
Cons of ETL:
- Can be slow due to pre-loading transformations.
- Requires additional infrastructure for processing before loading data.
What is ELT?
ELT reverses the transformation step: data is first extracted and loaded into a storage system (e.g., a data lakehouse) and then transformed using compute resources within the platform. Microsoft Fabric, with its integrated OneLake and Synapse Data Engineering, is optimized for this approach.
Pros of ELT:
- Faster data ingestion since transformations happen post-loading.
- Leverages cloud storage and scalable compute resources for transformations.
- Supports semi-structured and unstructured data.
Cons of ELT:
- Requires robust governance and metadata management.
- Raw data may consume more storage and introduce security risks.
ETL vs. ELT in Microsoft Fabric
Microsoft Fabric provides multiple tools for implementing ETL and ELT:
| Feature | ETL Approach | ELT Approach |
| Transformation Timing | Before loading | After loading |
| Storage Layer | Structured (Data Warehouse) | Raw (OneLake, Lakehouse) |
| Processing | Dataflows, Pipelines | Notebooks, SQL Queries |
| Best For | Compliance-heavy, structured data | Big data, real-time processing, unstructured data |
| Key Fabric Tools | Dataflows, Data Factory Pipelines | OneLake, Notebooks, SQL |
How to choose between ETL and ELT
Whether the ETL or ELT approach is better suited for your use case depends on multiple factors. Unfortunately there is not one approach that always works best. There are however a few rules of thumb.
| Factor | ETL | ELT |
| Volume, variety and velocity of Data | smaller amounts of data | big data and real-time data |
| format of data | (semi) structured data | unstructured data |
| Governance requirements | strict | variable |
| Analysis and Reporting objectives | clear and pre-determined | exploratory / ad-hoc |
| Scalability & Flexibility | Limited scalability, fixed resources | Highly scalable, flexible resources |
Best Practices for Data Transformation in Microsoft Fabric
- Choose the Right Transformation Strategy
- Based on the table above choose the correct strategy
- If we need to create a pre-determined financial report that is based on structured data for example it is probably best to choose the ETL approach.
- Utilize Microsoft Fabric’s Native Integration
- Leverage OneLake for centralized storage.
- Use Dataflows for low-code ETL within Power BI and Fabric.
- Apply Notebooks (Python, Spark) for scalable ELT transformations.
- Optimize Performance with Direct Lake Mode
- Direct Lake mode in Fabric allows Power BI to query data without importing, improving performance.
- Ensure proper partitioning and indexing to speed up ELT transformations.
- Implement Strong Data Governance
- For example apply role-based access to prevent unauthorized transformations. For more information check out this post.
- Monitor and Automate Pipelines
- Use Fabric Data Factory to schedule and orchestrate ETL/ELT workflows.
- Implement logging and monitoring for data quality and performance tracking.
Conclusion
Both ETL and ELT are viable approaches in Microsoft Fabric, depending on business needs. ETL ensures clean, structured data but can be slower, while ELT is more flexible and scalable. By leveraging Fabric’s tools like OneLake, Dataflows, Synapse Notebooks, and Data Factory, organizations can optimize their data transformation strategies for efficiency and performance.
]]>GitHub Actions provides a straightforward way to implement CI/CD for Azure Data Factory, enabling automated integration and deployment directly from your GitHub repository. In this guide, we’ll walk through setting up a CI/CD pipeline using GitHub Actions, covering key steps such as exporting ADF resources, managing configurations, and deploying changes to different environments.
By the end of this tutorial, you’ll have a functional pipeline that automates your ADF deployment process, improving efficiency and reliability. Let’s get started!
Prerequisites
There are some prerequisites that need to be fulfilled for our approach to work:
- Azure Subscription
- Azure Resource Groups for DEV and PROD environments
- Azure Data Factory instances for DEV and PROD
- GitHub repository
Setup
The setup for this demo looks like this:
We have one Azure Subscription containing two resource groups. One resource group covers the DEV environment (rg-demo-adf-github-dev) and the other resource group covers the PROD environment (rg-demo-adf-github-prod). Each resource group contains an Azure Data Factory.
Additionally we have setup a GitHub repository called “adf-cicd”.
The goal is to create a CI/CD pipeline that automatically deploys the Azure Data Factory from the DEV to the PROD environment.
Step 1: Connecting our DEV Azure Data Factory to our GitHub repository
To connect our DEV Azure Data Factory to our GitHub repository we need to open the ADF. We then navigate to the “Manage” section and click on “Git configuration”.

Once we click on “Configure” a side menu will open. We select GitHub as Repository type and type in the GitHub repository owner. In this case it is “linusdata”. If the GitHub repository was created in an organisation type in the name of the organisation. We can then select an existing repository under “Repository name”. In our case the repository name is “adf-cicd”. We can then choose a collaboration branch, a publish branch and a root folder. The Azure Data Factory will make suggestions for these values. In our demo we are sticking to these suggestions. We finish the Git configuration by clicking on “apply”.

If the configuration was successful we will now see a summary of the configuration.

Additionally you will now see that the main branch of your repository contains at least a folder “factory” and a “publish_config.json” file.

Step 2: Create a user-assigned managed identity
In order for GitHub to be able to access Azure and deploy our ADF we need to setup a user-assigned managed identity and federated credentials within the target (PROD) resource group.
To do so we simply search for “Managed Identities” in the Azure Portal and click on the Service. By clicking on “Create” we can setup a new managed identity

This will open the configuration menu. Select the Subscription and Resource group where your PROD ADF is located, select a Region and give your new User Assigned Managed Identity a name.

Then click on “Create” to deploy you new managed identity. Once the new resource has been deployed we can open it. To add the federated credentials we need to navigate to “Settings” and then “Federated credentials”.

As the scenario we select “Github Actions deploying Azure resources”. We then enter the Organization and Repository name. Under “Entity” we select “Branch” and set the “main” branch. Finally we need to give a name to the new federated credentials. We confirm by clicking on “Add”.

We have now enabled GitHub to access Azure. There is only one thing left to do and that is to assign the “Data Factory Contributor” role within the target (PROD) resource group to the newly created managed identity. We can do so by navigating to the target resource group. Once there we click on “Access control (IAM)” then on “Add” and finally on “Add role assignment”.

We then search for “Data Factory Contributor”, select the Role and click on “Next”.

We then select “Managed identity and click on “select members”. Under “Managed identity” we select “User-assigned managed identity” and click on the newly created managed identity.

We confirm the role assignment by clicking on “review and assign”.
Step 3: Configure the GitHub secrets
To enable GitHub to deploy our ADF from DEV to PROD we need to store some Azure Credentials as secrets in our GitHub repository. These Credentials are the Subscription ID and the Client ID of our Managed Identity and the Tenant ID of our subscription.
To retrieve the subscription and client id we open the managed identity. In the Overview we will find the needed id’s and can copy them to a notepad.

To retrieve the tenant ID we search for “Microsoft Entra ID” within Azure and open the Service.

Now that we have stored the three needed ID’s in a notepad we can switch over to GitHub where we will create the secrets. To do so we go into the settings. Under “Security” we select “Secrets and variables” and click on “Actions”. There we will create our new repository secrets.

We will create three secrets called “AZURE_TENANT_ID”, “AZURE_SUBSCRIPTION_ID” and “AZURE_CLIENT_ID”. Once you are done your GitHub should look like this:

Step 4: Setup the CI/CD pipeline in GitHub
Before we can setup our actual CI/CD pipeline we need to add one file to our repository. The file is called “package.json” and I have put it into a folder called “build”. This file simply contains the package name needed for our CI/CD pipeline to work. Its full content is the following:
{
    "scripts":{
        "build":"node node_modules/@microsoft/azure-data-factory-utilities/lib/index"
    },
    "dependencies":{
        "@microsoft/azure-data-factory-utilities":"^1.0.0"
    }
}
Here is what it should look like in your GitHub repository:

We are now ready to create our CI/CD pipeline. To do so we navigate to “Actions” and click on “set up a workflow yourself”.

This will open a .yml file with the name “main.yml”. In there you can paste the following code:
on:
  push:
    branches:
    - main

permissions:
      id-token: write
      contents: read

jobs:
  build:
    runs-on: ubuntu-latest
    steps:

    - uses: actions/checkout@v3
# Installs Node and the npm packages saved in your package.json file in the build
    - name: Setup Node.js environment
      uses: actions/[email protected]
      with:
        node-version: 18.x

    - name: install ADF Utilities package
      run: npm install
      working-directory: ${{github.workspace}}/build  # (1) provide the folder location of the package.json file

# Validates all of the Data Factory resources in the repository. You'll get the same validation errors as when "Validate All" is selected.
    - name: Validate
      run: npm run build validate ${{github.workspace}}/ /subscriptions/<yourSubscriptionID>/resourceGroups/<yourDevResourceGroupName>/providers/Microsoft.DataFactory/factories/<DevdataFactoryName> # (2) The validate command needs the root folder location of your repository where all the objects are stored. And the 2nd parameter is the resourceID of the ADF instance
      working-directory: ${{github.workspace}}/build


    - name: Validate and Generate ARM template
      run: npm run build export ${{github.workspace}}/ /subscriptions/<yourSubscriptionID>/resourceGroups/<yourDevResourceGroupName>/providers/Microsoft.DataFactory/factories/<DevdataFactoryName> "ExportedArmTemplate"  # (3) The build command, as validate, needs the root folder location of your repository where all the objects are stored. And the 2nd parameter is the resourceID of the ADF instance. The 3rd parameter is the exported ARM template artifact name
      working-directory: ${{github.workspace}}/build

# In order to leverage the artifact in another job, we need to upload it with the upload action
    - name: upload artifact
      uses: actions/upload-artifact@v4
      with:
        name: ExportedArmTemplate # (4) use the same artifact name you used in the previous export step
        path: ${{github.workspace}}/build/ExportedArmTemplate

  release:
    needs: build
    runs-on: ubuntu-latest
    steps:

 # we 1st download the previously uploaded artifact so we can leverage it later in the release job
      - name: Download a Build Artifact
        uses: actions/download-artifact@v4
        with:
          name: ExportedArmTemplate # (5) Artifact name


      - name: Login via Az module
        uses: azure/login@v1
        with:
          client-id: ${{ secrets.AZURE_CLIENT_ID }}
          tenant-id: ${{ secrets.AZURE_TENANT_ID }}
          subscription-id: ${{ secrets.AZURE_SUBSCRIPTION_ID }}
          enable-AzPSSession: true

      - name: data-factory-deploy
        uses: Azure/[email protected]
        with:
          resourceGroupName: <ProdResourceGroup>
          dataFactoryName: <ProdDataFactoryName>
          armTemplateFile: ARMTemplateForFactory.json
          armTemplateParametersFile: ARMTemplateParametersForFactory.json
          #additionalParameters: # (10) Parameters which will be replaced in the ARM template. Expected format 'key1=value key2=value keyN=value'. At the minimum here you should provide the target ADF name parameter. Check the ARMTemplateParametersForFactory.json file for all the parameters that are expected in your scenario

          # skipAzModuleInstallation:  # Parameters which skip the Az module installation. Optional, default is false.
I know the code looks bad here, but don’t worry. Once you copy it into your GitHub it will look much better. Make sure you replace all the placeholders indicated by “<…>”. There are five three placeholders that you need to replace in line 28 (Subscription ID, Name of DEV Resource group and Name of DEV ADF). The same placeholders also must be replaced in line 33. Finally you need to add the Name of your target (PROD) resource group in line 66 and the Name of your target (PROD) ADF in line 67. Once you have made the replacements you can click on “commit”. The file is then added to your repository. In the first 4 lines of the file we define that the workflow should be started everytime you commit to the “main” branch. This means that the workflow will immediately be triggered. Most likely it will fail the first time as there is no ARM Template to retrieve yet.
By clicking on “Actions” again you can see the workflow. You can then click on the workflow and will see that our CI/CD pipeline consists of two steps (build and release).
We can now test our CI/CD pipeline.
Step 5: Test your CI/CD pipeline
To test our CI/CD pipeline we open the DEV ADF and create a simple pipeline that only consists of a “Wait” activity.

Once the test pipeline is created we simply click on “Save all”. This will save the Pipeline to our GitHub repository. Make sure you click “Publish” as well. This will automatically create the “adf_publish” branch which is necessary for our CI/CD pipeline to work. The “adf_publish” branch will hold the ARM templates that are extracted, validated and released within our CI/CD pipeline.
We can now open the GitHub workflow again by clicking on “Actions” and selecting the newly created workflow. As we created our ADF “test_pipeline” in the main branch directly the workflow was automatically triggered as soon as we clicked on “Save all” in the ADF. If you have setup everything correctly the workflow will look like this:

As you can see the CI/CD pipeline was successful. We can also check this by opening our PROD ADF. The newly created “test_pipeline” should now also be visible in our production environment.
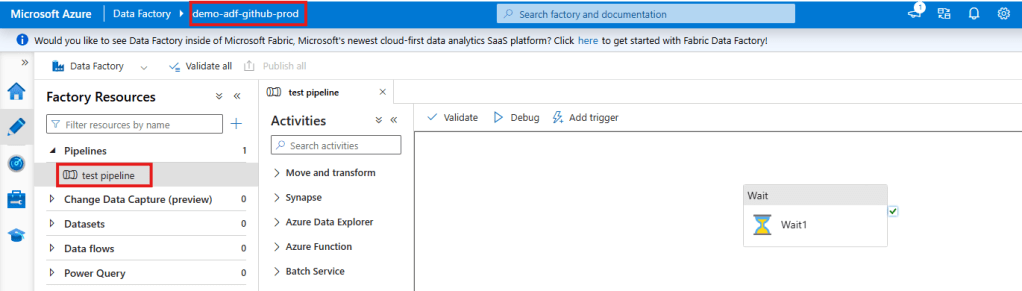
And tadaaa the pipeline “magically” appears in our PROD environment.
]]>Introduction
Microsoft Fabric introduces a powerful feature called Shortcuts, enabling seamless access to data across different sources without duplication. Shortcuts make data more accessible, reduce storage costs, and streamline data engineering workflows.
In this post, we will cover:
- What Shortcuts in Microsoft Fabric are and why they are useful.
- The difference between Shortcuts and traditional data copying methods.
- A step-by-step guide to creating a Shortcut in Microsoft Fabric, complete with screenshots and examples.
Let’s dive in!
What Are Shortcuts in Microsoft Fabric?
Shortcuts in Microsoft Fabric allow users to reference internal and external data without moving or copying it. Instead of duplicating data into Microsoft Fabric’s OneLake, Shortcuts create a logical link to other storage locations such as:
- Internal OneLake shortcuts
- allows you to reference data within existing Fabric items
- Azure Data Lake Storage (ADLS shortcuts)
- Microsoft Dataverse
- Amazon S3
- Google Cloud Storage
This means that data remains in its original location, but users can query, analyze, and process it as if it were stored in Fabric’s OneLake.
Authorization
Internal OneLake shortcuts
The authorization to the data in the target path is handled by using the identity of the calling user. This means that the calling user must have permissions in the target location to access the data.
external shortcuts (ADLS, Dataverse, S3, Google Cloud Storage)
When using external shortcuts a delegated authorization model is used. This means that the shortcut creator needs to specify a credential for the ADLS shortcut. All access to the target data is then authorized using that credential. The supported credential types differ based on the type of external shortcuts:
- ADLS: Organizational account, Account Key, Shared Access Signature (SAS), and Service Principal
- Dataverse: Organizational account
- Amazon S3: Key and Secret for an IAM user
- Google Cloud Storage: HMAC key and secret for a Service- or User account
Why Use Shortcuts?
Here are some key benefits of using Shortcuts in Microsoft Fabric:
- Eliminate Data Duplication – No need to move or copy large datasets, saving storage and costs.
- Unified Data Access – Work seamlessly across multiple cloud storage systems.
- Real-Time Access – Get the latest data without manual refreshes or ETL jobs.
- Simplify Data Engineering – No complex data pipelines for moving data between storage systems.
- Improved Governance & Security – Maintain data security by keeping it in its original location while managing access through Fabric.
Step-by-Step Guide: How to Create a Shortcut in Microsoft Fabric
Now, let’s walk through the process of creating an ADLS shortcut in Microsoft Fabric Lakehouse.
- Navigate to your Lakehouse
- Inside the Lakhouse go either to the “Tables” or “Files” Section. In our case we are going to create a shortcut to a file. Therefore we open the “Files” section.
- Right click on “Files” and select “New shortcut”.
- Select the “Azure Data Lake Storage Gen2” under “External Sources”.

- Click on “create new connection”
- Enter the “dfs” endpoint of the container that holds your data
- Optionally: enter a name for the connection
- Select your Authentication method -> In our case we are going to use “Organizational account”

- Click on the directory. In our case the directory is going to be called “data”. To the right you will see the content of the directory you selected.
- Click on “Next”

- You will now see a preview of your shortcut. By clicking on the pen under “Actions” you can rename your shortcut if necessary.
- Click on “Create”

- In your lakehouse you will now see the newly created shortcut.
- By clicking on the new shortcut folder “data” we can see the “flights.csv” file and interact with it.

Once you have successfully created a shortcut you can access them via Apache Spark, SQL, Real-Time Intelligence or Analysis Services (for example in semantic models). The shortcuts can even be accessed from outside of Fabric via the OneLake API.
Prerequisites
There are some prerequisites that need to be fulfilled before you can successfully create a shortcut. Below I have collected some of them. Be aware that this list might not be complete.
ADLS shortcuts
- ADLS shortcuts must point to the DFS endpoint and include at least one container. The .blob endpoints will not work.
- In the case that your storage account is protected by a storage firewall you need to configure trusted service access for Fabric. You will find instruction of how to set this up here.
- If you are using “Organizational account” to connect to your storage account you must have one of the following roles assigned on the storage account: Storage Blob Data Reader, Storage Blob Data Contributor, or Storage Blob Data Owner
- Hierarchical Namespaces must be enabled on your ADLS Gen 2 storage account for shortcuts to work.
S3 shortcuts
- The target name must contain at least a bucket name.
- Access to the S3 endpoint must not be blocked by a virtual private cloud or storage firewall.
- The IAM user in used in the connection must have the following permissions on the target bucket: S3:GetObject, S3:GetBucketLocation, S3:ListBucket
Google Cloud Storage shortcuts
- The target path must contain at least a bucket name.
- You can either use the bucket specific endpoint or the global endpoint.
- If the bucket specific endpoint is used the account used in the connection must have the following permissions: storage.objects.get, storage.objects.list
- If the global endpoint is used the user must additionally have the storage.buckets.list permission.
Conclusion
Shortcuts in Microsoft Fabric provide a new way to access external data efficiently without unnecessary duplication. They help streamline data engineering workflows, improve governance, and optimize storage costs.
By following this guide, you can quickly set up Shortcuts in Microsoft Fabric and start leveraging their benefits.
]]>1. Workspace-Level Access
What it is
Workspace-level access controls permissions for an entire workspace in Microsoft Fabric. This includes all objects within that workspace.
When to use it
Use workspace-level access when you want to manage permissions for a group of related assets collectively. For example:
- Granting a team access to collaborate on all objects within a workspace.
- Setting up admin roles for workspace-wide management.
Roles
- Admin: Full control over the workspace, including adding/removing members, publishing content, and modifying settings.
- Member: Can contribute content, edit items, and share objects.
- Contributor: Can add and edit content but cannot manage workspace settings or permissions.
- Viewer: Can only view content without editing or sharing.
You can find more detailed information about the roles here.
How to set it up
- Open a workspace
- click on “Manage access”

- click on “add people or groups”
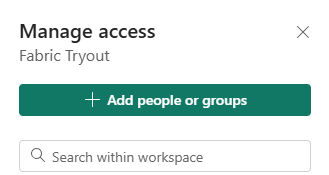
- enter the name of a person or group and select a role
- click “add”

2. Item-Level Access
What it is
Item-level access provides control over individual items, such as semantic models, reports, lakehouses or warehouses, within a workspace. Giving people or groups item-level access means, that they will only have access on the selected items and not everything within a workspace.
When to use it
- Share specific assets with users who don’t need access to the entire workspace.
- Restrict sensitive reports or datasets within a collaborative workspace.
Levels
The levels/roles you can assign will depend based on the object you want to share. A Power BI Report will have other options than a Lakehouse for example. You can find a detailed overview of the roles here.
How to set it up
- Select the item (e.g., a dataset or report) in the workspace.
- Click on the More Options (ellipsis) and choose Manage Permissions or click on Share.

- Add users or groups and assign the appropriate access level.
- click on “grant”

Note:
If you don’t select any additional permissions the user or group can access the lakehouse via the OneLake hub. They will not be able to access any tables within the lakehouse though. This can make sense if you are trying to set up object-level or column-level access.
3. Object-Level Access
What it is
Object-level access refers to controlling visibility and interaction with specific database objects within a lakehouse/warehouse, such as tables or views.
When to use it
Object-level access is ideal for scenarios where:
- Certain tables contain sensitive data.
- You want to provide a subset of data for a particular audience.
How to set it up
You can setup object-level access using T-SQL GRANT statements.
GRANT SELECT ON <schema_name>.<table_name> TO <group_or_user_name>;4. Row/Column-Level Access
What it is
Row/Column-level access allows fine-grained control over data visibility, restricting access to specific rows or columns of a database object based on user roles or attributes.
When to use it
- Data visibility needs to align with organizational roles or regional restrictions.
- You’re working with large datasets that need to serve multiple audiences securely.
- Certain columns contain sensitive data.
How to set it up
Similar to object-level access row/column-level access can also be managed using T-SQL statements. The creation of row-level access is a bit more advanced compared to the column-level access. You can implement row-level access in a Microsoft Fabric Warehouse by using the CREATE SECURITY POLICY T-SQL statement and predicates created as functions.
The setup of column-level access is more straightforward and very similar to the object-level access. They can be defined by using T-SQL GRANT statements. The only difference to the object-level access is that you specify the columns users should be able to access within the statement as well.
GRANT SELECT ON <schema_name>.<table_name> (<column_names>) TO <group_or_user_name>;Best Practices for Access Management in Microsoft Fabric
- Principle of Least Privilege: Always grant the minimum necessary access to perform a task.
- Use Groups Over Individuals: Manage permissions through security groups to simplify administration.
- Regularly Audit Access: Periodically review permissions to ensure compliance and identify potential risks.
- Combine Access Levels: Leverage a combination of workspace, item, object, and row/column-level access to achieve precise control.
What is the Delta Lake Format?
Delta Lake is an open-source storage format built on top of Apache Parquet. It enhances data lakes by introducing ACID (Atomicity, Consistency, Isolation, Durability) transactions and scalable metadata handling.
Key features of Delta Lake include:
- ACID Transactions: Provides consistency and reliability by enabling concurrent reads and writes without compromising data integrity.
- Schema Enforcement and Evolution: Prevents invalid data from entering the dataset and supports updates to schema as requirements change.
- Time Travel: Allows querying of historical data versions, useful for auditing and debugging.
- Scalable Metadata: Efficiently handles large datasets with numerous files and partitions.
- Open Format: Based on Parquet, ensuring compatibility with a wide range of tools and platforms.
Use Cases and Advantages of Delta Lake
Delta Lake’s features address common challenges in data workflows. Some key applications include:
- Unified Batch and Streaming Data:
- By supporting both real-time and batch processing, Delta Lake simplifies pipelines and enhances analytics.
- Ensuring Data Quality:
- ACID transactions and schema enforcement provide the reliability needed for high-stakes data processing.
- Supporting Machine Learning and AI:
- Time travel enables consistent datasets for reproducible experiments and training.
- Cost Efficiency:
- Incremental updates reduce the need for full dataset refreshes, saving storage and compute resources.
- Scalability:
- Optimized for large-scale operations, Delta Lake can handle growing datasets effectively.
Microsoft Fabric’s Approach to Delta Lake
Microsoft Fabric incorporates Delta Lake into its unified analytics platform. Instead of introducing new paradigms, Fabric integrates Delta Lake into its ecosystem, aiming to simplify data workflows while maintaining flexibility. Here’s how it approaches Delta Lake:
- Lakehouse Architecture Support:
- Fabric supports the Lakehouse model, using Delta Lake for storing structured and unstructured data.
- Its OneLake feature provides a centralized storage solution, reducing complexity in managing data.
- Native Delta Lake Integration:
- Fabric’s tools, such as Dataflows and Synapse, natively support Delta Lake, allowing seamless use without extra configurations.
- End-to-End Workflow Support:
- From ingestion to transformation and visualization, Fabric integrates Delta Lake into its processes, ensuring consistency across workflows.
- Optimized Performance:
- Fabric’s compute engines are designed to work efficiently with Delta Lake, enhancing query speeds and reducing latency.
- Governance and Security:
- Delta Lake in Fabric benefits from integrations with Azure’s security and governance features, such as Purview and Active Directory.
- Facilitating Collaboration:
- Built-in tools enable teams to collaborate on Delta Lake datasets securely, streamlining project workflows.
Assessing the Impact
Delta Lake and Microsoft Fabric together offer a practical solution for managing data at scale. Rather than overhauling existing systems, Fabric’s integration of Delta Lake focuses on streamlining and enhancing workflows. The combination is particularly effective for organizations looking to:
- Transition from siloed systems to unified architectures.
- Improve data reliability with minimal manual intervention.
- Scale their data operations without sacrificing performance.
Getting Started
For professionals interested in exploring Delta Lake in Microsoft Fabric:
- Experiment with Lakehouse Tools: Start with Fabric’s Dataflows or Synapse for data ingestion and transformation.
- Leverage Notebooks: Use Spark-based notebooks to explore Delta Lake Tables advanced features.
- Connect with Power BI: Visualize data stored in Delta Lake Tables through Power BI, leveraging its native integrations.
Conclusion
Delta Lake Tables provides a solid foundation for managing complex data workflows. By focusing on reliability, scalability, and usability, Microsoft Fabric offers a balanced approach to modern data challenges. Whether you’re handling real-time analytics or ensuring robust data governance exploring Delta Lake and Fabric’s capabilities is a worthwhile step in optimizing your data strategy.
]]>What is TMDL?
TMDL, or Tabular Model Definition Language, is a structured, text-based format that describes the semantic model of a Power BI report. This includes tables, columns, relationships, measures, and other objects that define how data is organized and analyzed. While Power BI’s graphical interface has always provided a way to build and manage these models, TMDL takes it a step further by introducing a scripting approach that offers greater control and flexibility.
How Does TMDL Scripting Work?
Enabling the TMDL scripting experience is straightforward:
- Navigate to File > Options and settings > Options > Preview features.
- Check the box for TMDL View and restart Power BI Desktop.
Once enabled, you can:
- Open a new TMDL View from the ribbon.
- Drag and drop semantic model objects (e.g., tables, measures, hierarchies) into the TMDL editor to generate the corresponding script.
- Use the rich code editor to make changes, supported by features like syntax highlighting, search-and-replace, and keyboard shortcuts.
- Apply your changes to the model by clicking the Apply button, instantly updating the semantic model.
Key Advantages of TMDL Scripting
The introduction of TMDL scripting is a game-changer for data professionals. Here’s why:
- Enhanced Development Efficiency: The TMDL editor streamlines complex modeling tasks. Features like multi-line editing and bulk find-and-replace make it easier to manage large models and repetitive updates.
- Improved Reusability: TMDL scripts can be saved, shared, and reused, allowing teams to standardize components such as date tables or calculation groups. This is particularly useful for organizations that rely on consistent modeling practices across multiple reports.
- Greater Control and Transparency: With TMDL, every property of a semantic model object is exposed, including advanced configurations like
IsAvailableInMDXorDetailRowsDefinitionthat are not accessible through the GUI. This level of detail enables fine-tuned optimizations and customizations. - Seamless Collaboration: By integrating with source control systems, TMDL supports versioning and collaborative development. Teams can track changes, merge updates, and maintain a history of their semantic model modifications.
- Empowering Advanced Use Cases: For developers comfortable with scripting, TMDL opens up opportunities for automation and integration. For instance, you can generate scripts programmatically or use them as templates for similar projects.
Practical Use Cases
Here are some scenarios where TMDL scripting shines:
- Standardizing Date Tables: Save a TMDL script of a calendar table with pre-defined columns, hierarchies, and relationships. Reuse it across multiple projects to ensure consistency.
- Bulk Edits to Measures: Use search-and-replace in the TMDL editor to update measure definitions across an entire model in seconds.
- Advanced Customizations: Add properties like
DetailRowsDefinitionthat are not exposed in the graphical interface, optimizing the user experience for report consumers. - Version Control and Auditing: Track changes to your semantic model over time, ensuring transparency and accountability in collaborative environments.
Getting Started with TMDL
If you’re new to scripting or hesitant to leave the comfort of the GUI, don’t worry—TMDL scripting is designed to complement, not replace, the graphical interface. Start by:
- Enabling TMDL View and experimenting with small changes.
- Reviewing the generated scripts to understand the structure and syntax.
- Gradually incorporating TMDL into your workflow for tasks like bulk updates or advanced customizations.
Conclusion
The TMDL scripting experience in Power BI Desktop is a powerful tool for data professionals, offering enhanced efficiency, flexibility, and control over semantic modeling.
While TMDL might not be suitable for all users as it requires some scripting knowledge, it is undoubtedly a step in the right direction to make modeling in Power BI Desktop more flexible, reusable, and robust.
]]>In this post, we’ll break down these concepts, explore how they work in Microsoft Fabric, and provide practical insights.
What is Data Governance, and Why Does It Matter?
Data governance refers to the processes, policies, and tools that ensure your data is reliable, secure, and compliant with regulations. It includes tracking where data comes from, managing access to sensitive data, and ensuring it meets industry standards.
Why is this important?
- Trust: Reliable and well-governed data ensures better decision-making.
- Security: Sensitive data must be protected from unauthorized access.
- Compliance: Organizations must meet regulatory standards to avoid legal risks and penalties.
Key Features of Data Governance in Microsoft Fabric
Microsoft Fabric provides three core features that help with data governance:
- Data Lineage
- Sensitivity Labels
- Compliance Management
Let’s explore each of these in detail.
Data Lineage: Understanding Your Data’s Journey
Data lineage is the ability to track how data flows and transforms across your system. It helps answer questions like:
- Where did this data come from?
- How has it been transformed?
- Which reports or dashboards depend on this data?
Why is Data Lineage Important?
- Transparency: Understand the entire lifecycle of your data, from source to destination.
- Troubleshooting: Quickly identify issues in data pipelines.
- Impact Analysis: Assess how changes to data sources affect downstream reports and systems.
How Microsoft Fabric Enables Lineage
In Microsoft Fabric, lineage is automatically tracked across different components (like dataflows, notebooks, and reports). You can visually explore data lineage through Fabric’s built-in lineage view.
For example:
- A data analyst creates a Power BI report based on a dataflow.
- Fabric automatically maps the relationship between the dataflow and the report.
- If the dataflow changes, you can easily see which reports might be affected.
To see the data lineage you can simply switch from the list view to the lineage view.

Sensitivity Labels: Classifying and Protecting Your Data
Not all data is created equal—some data, like customer records or financial information, is more sensitive and requires stricter controls. Sensitivity labels allow you to classify and protect your data in Microsoft Fabric.
What Are Sensitivity Labels?
Sensitivity labels are tags that classify data based on its confidentiality level. They are customizable and could look like this:
- Public: Non-sensitive data accessible to everyone.
- General: Internal data with minimal restrictions.
- Confidential: Sensitive data requiring limited access.
- Highly Confidential: Critical data with strict access controls.
How Do Sensitivity Labels Work in Microsoft Fabric?
- Labels can be applied to items in Fabric.
- Since the label is in clear text, it’s easy for users to understand how to treat the content according to sensitivity label guidelines.
- Once labeled, the data inherits protections.
- Labels integrate with Microsoft Purview and other security tools, ensuring consistent protection across your data estate.
Compliance Management: Meeting Industry Standards
Compliance ensures that your organization’s data practices align with regulatory and industry requirements.
How Microsoft Fabric Helps with Compliance
- Automated Policies: Fabric allows you to define and enforce compliance policies across your data environment.
- Monitoring and Auditing: You can track user activity, data access, and changes to ensure compliance.
- Integration with Microsoft Purview: Fabric integrates with Purview for unified governance, enabling you to discover, manage, and audit data assets.
Getting Started with Data Governance in Microsoft Fabric
Here’s a simple roadmap to start implementing data governance in Microsoft Fabric:
- Explore the Lineage View:
- Navigate to the lineage view in Fabric to visualize data dependencies.
- Identify areas where you can improve your data pipelines.
- Apply Sensitivity Labels:
- Start by classifying your most critical items.
- Set Up Compliance Policies:
- Define policies for data retention, encryption, and access control.
- Integrate Microsoft Purview to manage compliance across your data assets.
- Monitor and Audit:
- Regularly review data lineage, sensitivity labels, and compliance reports.
- Use these insights to improve governance practices.
The Benefits of Effective Data Governance
Implementing strong data governance in Microsoft Fabric brings several benefits:
- Increased Trust: Ensure data accuracy and transparency across your organization.
- Enhanced Security: Protect sensitive data from unauthorized access.
- Simplified Compliance: Reduce the complexity of meeting industry regulations.
- Better Decision-Making: Reliable, well-governed data leads to smarter business decisions.
Conclusion
Data governance is no longer optional—it’s a necessity for organizations managing vast amounts of data. Microsoft Fabric makes data governance approachable and effective with tools like lineage tracking, sensitivity labels, and compliance features.
By understanding your data’s journey, classifying sensitive information, and ensuring compliance, you can build a foundation of trust, security, and reliability.
]]>