While sometimes Claude is writing commit messages for the work it's doing, I still, gasp, write code manually from time-to-time, and outside of my day job I'm not the best at writing descriptive commit messages. Which is a shame, because I do find myself grepping old commit messages fairly often trying to find things.
So I (...Claude) wrote a zsh function that stages everything, passes the diff to Claude, and gets back a properly formatted commit message. Here's what it looks like in action:

...which resulted in this commit.
The function itself is pretty straightforward:
gcam() {
  # Stage all changes
  git add -A

  # Get the staged diff
  local diff=$(git diff --cached)

  # Check if there are staged changes
  if [ -z "$diff" ]; then
    echo "No changes to commit"
    return 1
  fi

  # Generate commit message using Claude and edit it with nvim via vipe
  local final_msg=$(echo "$diff" | claude -p "Generate a simple, straightforward git commit message for these changes. Be concise but specific about what was changed. Include specific keywords and technical terms (function names, file types, configuration settings, etc.) that would be useful for searching commit history later. Do not be overly detailed. Use proper sentences with correct capitalization and punctuation, including periods at the end of sentences. Return only the commit message without any explanation or formatting." --output-format text | EDITOR=nvim vipe)

  # If the message is not empty, commit with it
  if [ -n "$final_msg" ]; then
    git commit -m "$final_msg"
  else
    echo "Commit aborted (empty message)"
    return 1
  fi
}
The stack here is simple: zsh function → git diff → Claude Code → vipe (for piping in-and-out of $EDITOR) -> nvim → git commit. Everything gets staged automatically, Claude generates a searchable commit message with the right technical terms, and you get a chance to edit it in nvim before it's committed. 🎉
Edit: Hello! I've decided to sunset the JobsByReferral.com project (which might have redirected you here). It was super fun while it lasted, but wasn't free to operate!
Throughout June 2025, several of my developer friends had been laid off.
We were discussing the state of the job market in tech (which is... Not Great, Bob), and were collectively surprised to find that searching for jobs on LinkedIn no longer had an "In My Network" filter (but more on this later -- it's still there, sorta).
The conversation kept coming back to how frustrating the job search had become in general. Cold applying to jobs has become ineffective when you're competing with hundreds or thousands of applicants per job post. AI tools make it easy to tailor resumes and cover letters to each position, so companies are drowning in applications.
In my 20 years in tech, the majority of roles I've landed were through a referral of some sort. Knowing what roles are available is the first step in that process -- you can't leverage your network if you don't know where the opportunities are.
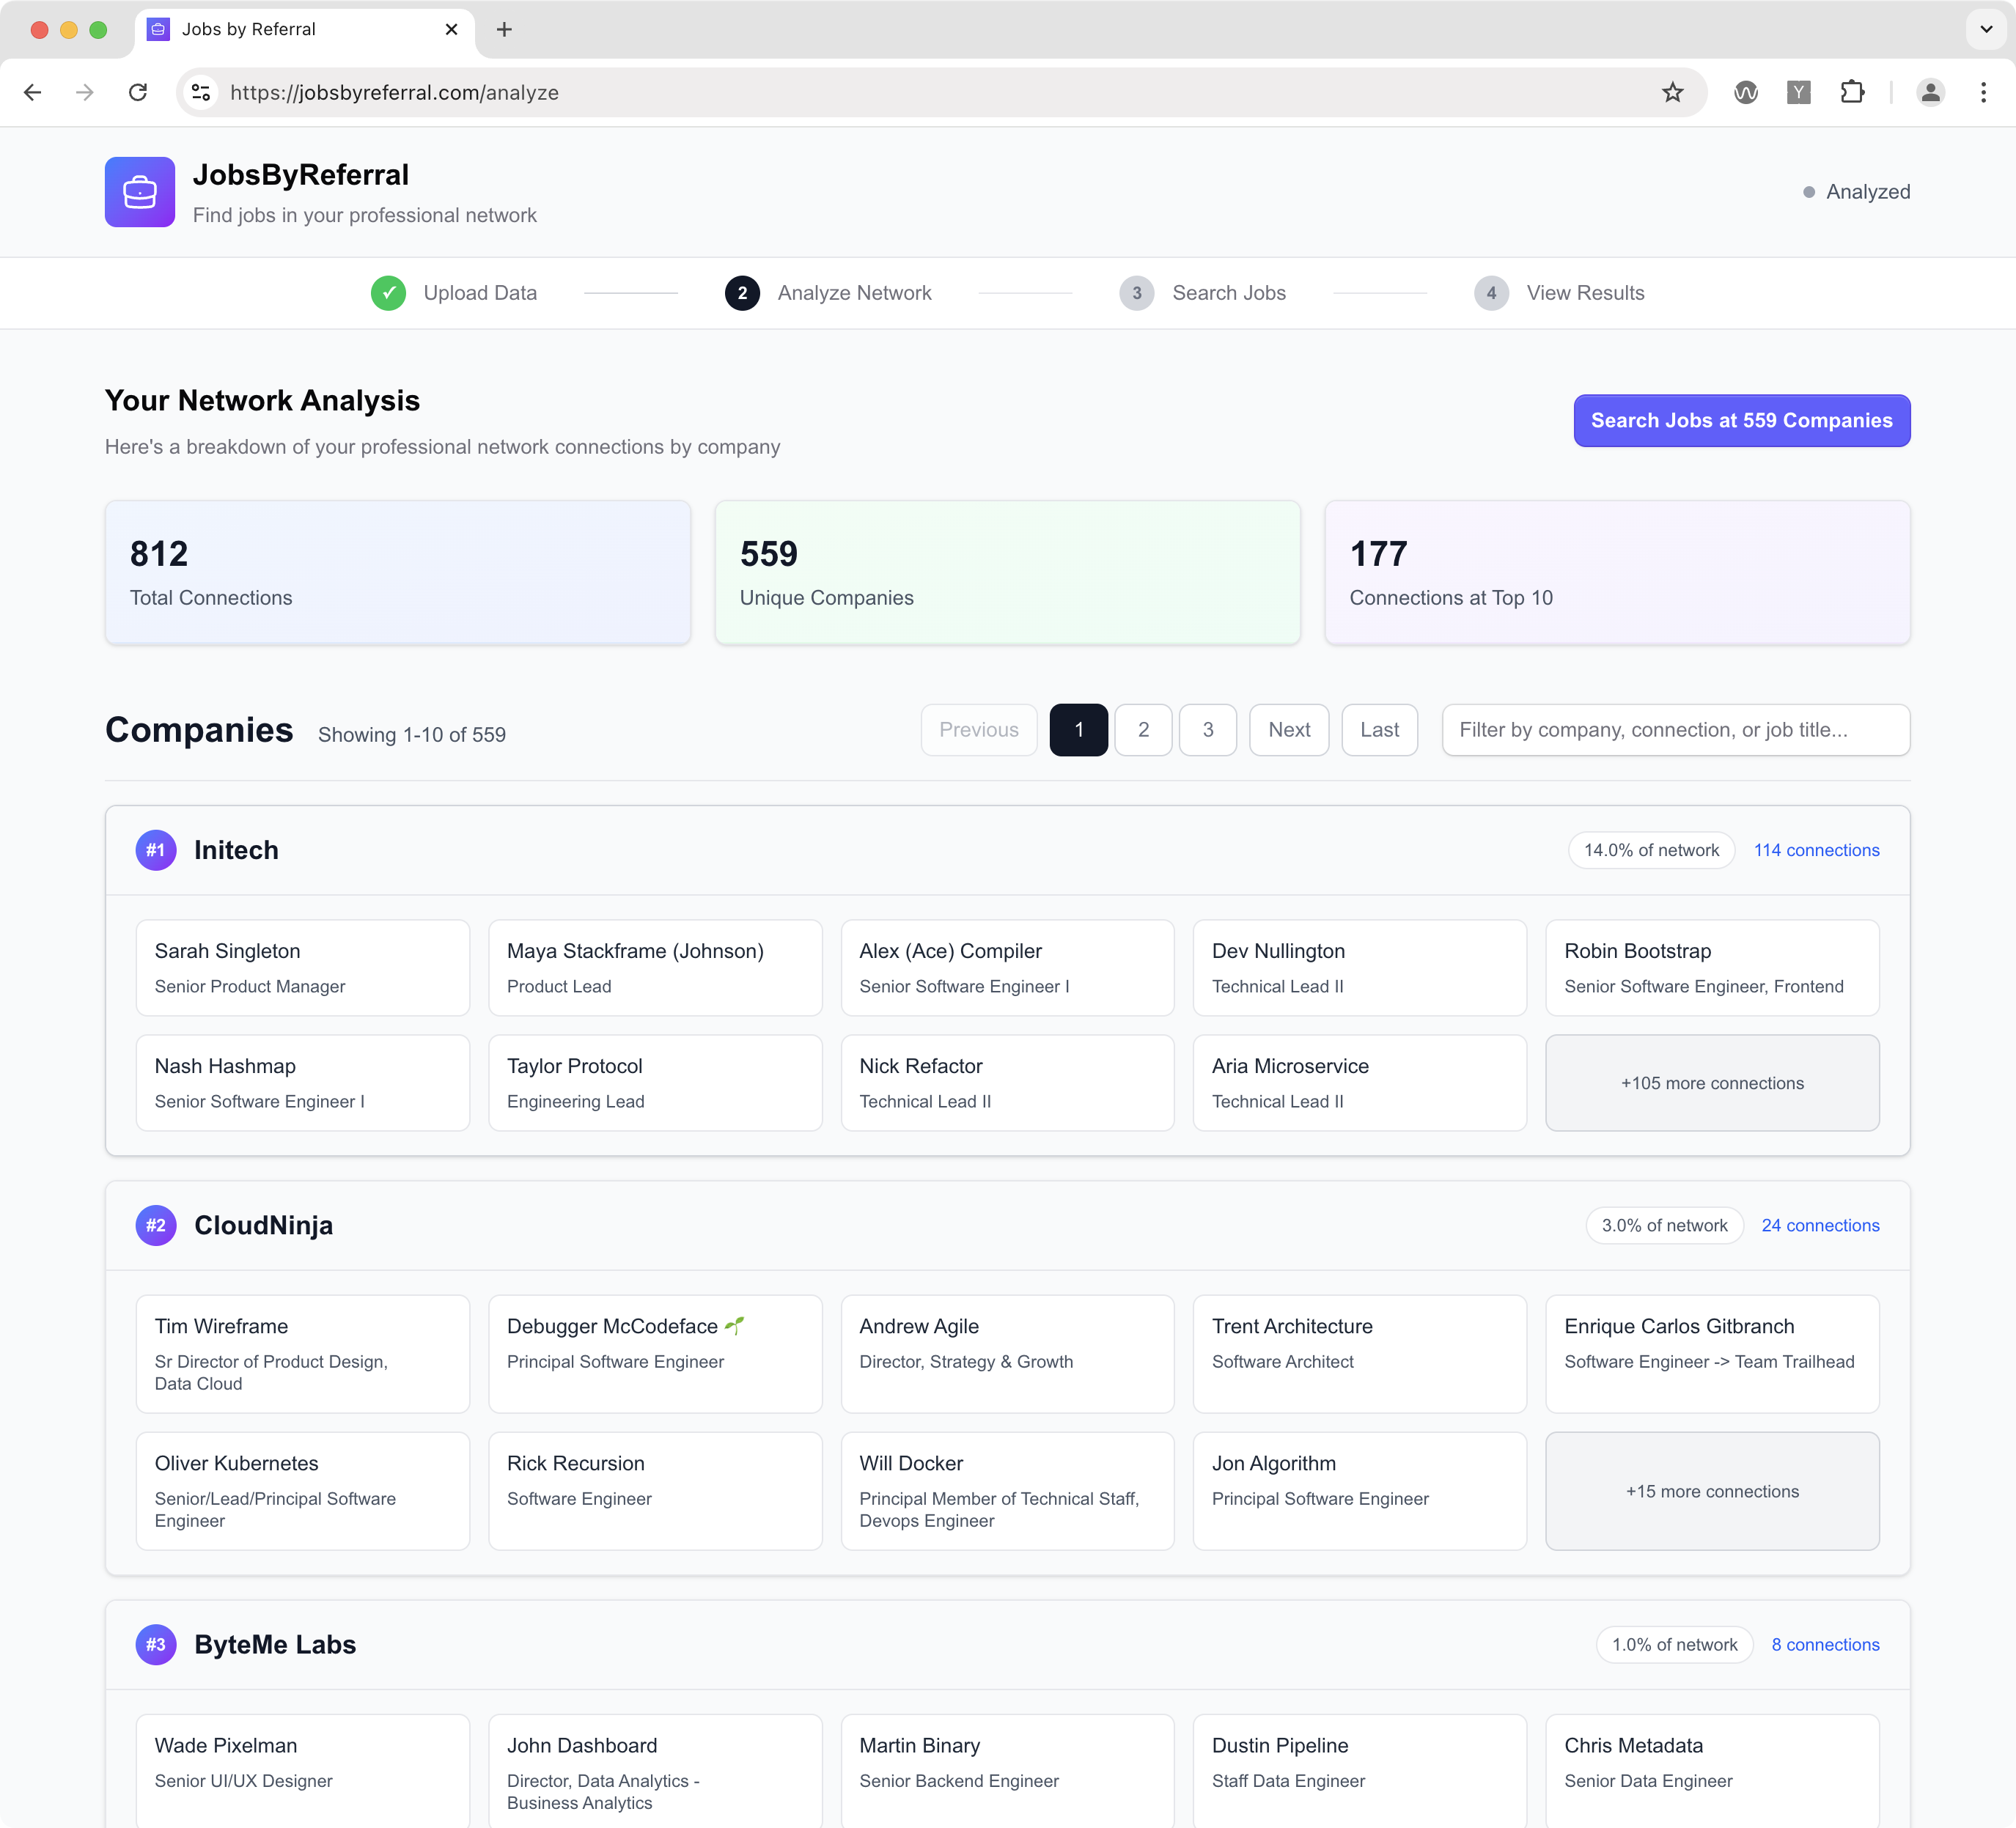
I was quickly nerd-sniped and spent a couple of hours with Claude Code vibe-coding an app that would do something simple: take your personal LinkedIn connections data and show you open jobs at companies they worked at: JobsByReferral.com.
The 15-Minute MVP
Within 15 minutes I had a working approach: you could request your own personal LinkedIn data archive which contains a Connections.csv file. This has your connections' names, company names, and email addresses. From there the app I created would analyze your network and show you the companies you're connected to (and who works there):
Then, the app runs each company through JSearch, which uses the Google for Jobs API:

I shared this with my friends who were job hunting, and some of them found it pretty useful. They were finding companies they didn't realize they were connected to, and it gave them a systematic way to approach their network rather than just pouring through job boards.
Tech Stack
I built this with Next.js on Vercel, and used jszip to do the data archive ZIP extraction entirely on the client. This was one of my core tenets of this project: don't let personal data touch a server. As I had noted in this HN comment:
we do not pass user data to the backend endpoints, which you can verify by viewing the network calls. When you upload the ZIP or CSV the extraction/parsing happens entirely client-side, and then we use auto-generated IDs to map connection data from the JSearch API response to the client-side stored connection data.
Searching for "In My Network" jobs on LinkedIn
As I had noted above, turns out we were somewhat mistaken on the lack of an "In My Network" feature in LinkedIn Jobs search. They're rolling out a new AI-powered Jobs Search platform, so the previous filter for "In My Network" is built into the query itself instead of being a toggle you could flip, like the old search.
So the functionality is still there but it's less discoverable, which is what motivated this little experiment in the first place. I think there's an interesting sidebar here about how AI/LLM integrations in products are hiding advanced features that many folks rely on and expect from tools, but that's another post!
24 hours on the front page of Hacker News
I threw it on Hacker News as a Show HN post and rushed out the door to take my kid to dance class. A couple hours later I noticed 50+ realtime users on my Fathom dashboard, and knew it had popped to the homepage - where it sat for about 24 hours!
This was a fun project to build and was neat to see some traction, though the popularity is likely driven by the state of the job market, which is more than a little bittersweet.
]]>I write up a GH issue in detail, including links to lines, files, and all the context needed for implementation.
I can add images in the GH issue that will be used in the implementation (ie., to put onto a website).
I give it a budget: "Max budget: $10.00" to keep scope manageable. Claude Code won't accept the issue if there's no budget specified.
I assign that issue to Claude Code
Claude Code immediately starts working:
- It clones the repo and checks out a new branch.
- It pours all of my input into context.
- It downloads any images I had attached to the issue and puts them in the appropriate place in the repo.
- It runs the Next.js app and iterates through doing the work until it hits the max budget. It should visually verify the changes it's making.
When the max budget is reached or it thinks it's sufficiently complete, it submits a PR.
I review the PR using GitHub's standard review process - adding line comments and feedback.
Once I submit my review, if it's "Request changes," Claude goes back to work (I'll give it a new budget for the fixes).
We iterate until the PR is solid
I approve the PR and Claude merges it, triggering auto deploy and CI processes
Does this exist? Let me know!
]]>Chrome:
Safari:

At some point in the past, we used to be able to fix this with:
-webkit-font-smoothing: antialiased;
-moz-osx-font-smoothing: grayscale;
But, this no longer seems to have an effect. I landed on this Stack Overflow answer and indeed that fixes the issue:
Safari with font-synthesis: style:
So by not providing font-synthesis: weight, we can tell the browser "stop artificially modifying this font and faithfully render the weights provided to you by the font". Which sort of feels like should be the default (and appears to be in Chrome), but... 🤷♂️.
const header = headers();
const ip = header.get('x-forwarded-for');

if (!['1.2.3.4', '::1'].includes(ip || '')) {
  return notFound();
}
Sure enough, removing that reverts back to Next.js's typical app-router caching behavior.
The docs are also quite clear on this, which is nice:
]]>headers is a Dynamic API whose returned values cannot be known ahead of time. Using it in will opt a route into dynamic rendering.
I recently started using an RSS reader again after a failed attempt at building our own. Landed on NetNewsWire and it really is quite lovely. Also easy to tinker with if you're into learning some macOS dev / Swift (GitHub).
This blog itself isn't open source because it's running on our website platform that we've developed for FLX Websites (which I founded ~5 years ago).
Some bloggers I've been enjoying lately:
- Cole's Blog (who also runs a website business similar to FLX Websites!)
- Jack Baty
- Kev Quirk (who's also into watches!)
- Jason Cohen
Anyone else I should start following?
]]>What is this post?
This post identifies a growing technical challenge that some companies might experience after working with a large monolith (such as Rails or Django) that is tightly coupled to a front-end application (JavaScript).
I'll provide an overview of the problems you might be facing today, and what those problems might lead to. I'll cover the major pieces of the back-end-to-front-end relationship, and what each of them handles.
Finally, I'll talk about how you might fix these problems by moving to a front-end heavy web application (if that makes sense for your application), by implementing a common and consistent REST API on the back-end.
The role of the back-end
Let's assume Rails is your back-end application framework of choice. It's responsible for most of the heavy lifting and integration work of our product. It handles data:
- storage
- retrieval
- relationships
- caching
Your Rails back-end is the source of truth for the business-logic of your product. It defines terminology and behavior (what is an application? what is an organization?), and it's charged with processing and massaging that data into more useful data, such as graphs, aggregation, association, etc. It also provides a platform for processing data outside of the typical user-to-product relationship:
- Email delivery
- Transactional messaging
- Third-party associations: Twitter <-> applicationFacebook <-> application
In support of these many responsibilities, your Rails back-end might interface with several systems:
- Web browsers via HTML rendering and JSON endpoints (currently Rails resource endpoints)
- Our datastore via database connections
- Third-party APIs such as Zuora, NetSuite, SendGrid, Salesforce, etc.
The relationship between the Rails application and web browsers is overloaded. Delivering HTML, JavaScript, and resource data to the browser and then patching business logic via tightly-coupled JavaScript applications is what this post is intended to address.
The role of the front-end
The role of the front-end in a modern web application is to deliver the visual representation of your product, and its purpose, to users. It portrays how your application looks and how it works.
The components of a web front-end are:
- HTML rendering
- CSS styling
- JavaScript for application and business logic
The JavaScript part of your front-end is a piece that gets a large amount of attention, as significant amounts of business logic have been moving from the back-end to the front-end in recent years. Some examples of application and business logic that JavaScript might now be responsible for are:
- Code that combines resources (data) according to known relationships, and presents that information to the user.
- Input validation from a user before sending data to the back-end.
- State management: application viewsstate storage in URLs, local storage, etc.
Differences between back-end heavy and front-end heavy applications
When web applications were in their infancy, they tended to be back-end heavy. Servers would send HTML to a web browser, respond to user input, crunch some data and send back more HTML. This traditional request/response cycle was useful and necessary in the early days of the web. It had some benefits:
- Browsers had poor support for handling much more than the typical request/response cycle.
- Servers were more powerful than personal computers (this one is making a comeback).
There are still some significant benefits to writing back-end heavy applications today. They tend to shine best when users of your application will typically only do a small number of things during their visit. You can do all the back-end processing on a powerful server and deliver a single response with everything the user needs to do that one thing. Consider Wikipedia as an example here: the majority of visitors are landing on the page from a Google search, and it makes sense to deliver that page as fast as possible with no additional overhead than what's needed to display that page.
But with more technologically advanced browsers came an opportunity for application developers to build systems that could front-load processing on a user's device and only request smaller updates from a server incrementally, instead of making large requests on every single view. This shift drove the rapid development of front-end application frameworks such as jQuery, Backbone, Angular, Ember, and React.
Let's imagine two cycles: one back-end heavy and one front-end heavy:
Back-end heavy cycle
- User visits a page that lists the comments on one of their blog posts.
- The server looks at the request, sees the supplied cookie, and starts hitting the database: Who's this user? Get the user's blog post that matches this request / URL. Get the blog post's comments that match this result. Get any extra data you might need to render the page (say, user's organization, a count of all blog posts, etc). Do a templating cycle that renders a page based on any supplied templates (headers, footers, blog post, comments, etc). Compile the templates into a string. Send the HTML back to the browser.
This is all fine and well, until the user visits another view. The back-end heavy application has to do this all over again. This is computationally expensive both on the server and the client, and is a waste of resources.
Front-end heavy cycle
- Do all of the things above, but include a heap of JavaScript that sets up an application that will then handle any future route changes via pushState.
- When a route changes or an action happens on the page, the browser can ask the server "can I have this user's blog posts?", and the server can deliver just the blog posts, not a payload that requires an entire cycle of extraneous data, templating, compiling, etc.
Of course, this introduces a new layer: processing on the client. It means that the first time the page loads, the browser on the client now must do some processing to establish code that will handle future actions and route changes.
Why do this? If your users will typically visit more than one route or perform more than one action, you'll save measurable cycles on both the server and the client. This doesn't just save cycles for the current session - for the entire time the user is logged-in and has cached JavaScript, you benefit from this lightweight data-transport approach.
When you have an application that encourages users to visit multiple views or perform many actions, and you provide a back-end heavy implementation, you will eventually deal with performance bottlenecks that will eat engineering time. You can always layer on more caching, but it's far easier to cache raw data than entire request/response cycles and the complexities around that. This is why front-end heavy applications have become commonplace.
Where do you go from here?
There are short-term wins that you can start doing to help facilitate the switch to a front-end heavy application:
- Instate new front-end build tools (Grunt, Gulp, etc.)
- Separate the front-end from Rails. This means HTML, CSS, and JavaScript. Say goodbye to
.erbtemplates. - Use modern development practices: switch to ES6, adopt a stricter component architecture, and streamline tests.
In the long-term, you should hope to have clear separation between the Rails application and the front-end. This will allow you to hire specialists on both the front-end and the Rails side, and help you strengthen your codebase at a faster rate.
How do you change?
You change by discussing this post as an organization and proposing incremental actions. As mentioned above, you might start with:
- Improving the JS and CSS build process with tools such as Gulp.
- Supporting ES6 with Rails 4 + Sprockets (or similar workflows for other back-ends)
Your next steps are to identify exactly how you make technical and workflow changes, in addition to what you've already done.
A common, consistent, and scalable API.
What is the point of an API? It's an interface for data, which systems (and humans) can use. A good API is one which employs consistency, intelligible interfacing, and complete documentation.
A common interface is one which is guessable, across resources:
/api/users/api/organizations/api/users/1/api/organizations/1/api/users/1/organizations
HATEOAS
We're all familiar with REST APIs, and HATEOAS has gotten a fair amount of coverage over the years. HATEOAS is a specification of a REST implementation that primarily differentiates how resources are represented and linked to via the system. HATEOAS is not an excuse for a lack of documentation, and it does provide usability benefits for both human and computer driven clients. It allows the server to define resource locations dynamically and seamlessly upgrade resource relationships. An example of a HATEOAS-style resource endpoint:
/api/users/1
{
 id: 1,
 username: 'nick',
 organization: 'https://api.app.com/organizations/60',
 applications: 'https://api.app.com/users/1/applications'
}
The endpoint provides enough information for us to subsequently access additional related resources, but doesn't make assumptions about what we want to do with the resource.
Endpoints could also filter via querystring:
/api/applications?user=1
[
 {
 id: 123
 }
]
HATEOAS-style APIs can reduce computational load on the API server by reducing the number of relationships which must be calculated and retrieved on endpoints. It's up to the client to make subsequent requests to retrieve the data it needs to paint a complete picture of resources and their relationships. This means a greater number of requests from client-to-server, but ideally the lighter data load on the API (as far as relationships go) should allow us to more easily optimize the performance of individual endpoints.
A happy side effect for front-end developers building on top of a HATEOAS-style API is the ability to click through an API via standard web browser. Surprisingly this can make debugging even production systems much more pleasant (ie., share the resource URL via the API instead of a full UI).
Complex and non-traditional endpoints
While HATEOAS/REST specifications dictate that a strict coherence to resource structure must be followed, in the real-world there are sometimes edge cases for complex requests. Any divergence from the traditional REST structure makes the API less consistent, less discoverable, and more difficult to develop with. The edge case must present a strong-enough benefit to diverge (such as performance, security, etc), but sometimes that might happen.
Some examples of non-standard endpoints might include:
- /api/applications/1/usage-graph?from=01-01-2015
- /api/applications/1/recent-actions?include=users
Any endpoint that returns data that would not strictly be considered a "resource" would be a non-traditional endpoint and should be treated with care. As mentioned, exceptions can be made, but only when the trade-offs are clear and the endpoint is well documented.
Transactional endpoints
Sometimes it's necessary to build an endpoint that takes a request, performs some background action, and returns the result. An example of this might be uploading a user's public key via a PATCH to the endpoint:
PATCH /api/users/1
Request body:
{
 ssh_key: 'ssh-dss AAAB'
}
You might want to take that key and store it on S3, perhaps. What happens if there's an error uploading the file to S3, though? Instead of having the endpoint respond immediately, one alternative is to respond after the upload is finished, but this introduces latency with the API and can create disconnects between the server and client (e.g. the user closes their browser). One potential solution is to respond with a request identifier that the server maintains and that both the client and server can work with later. An example response to our sample request above:
{
 status: 'working',
 message: 'Uploading key to S3.',
 request: 'https://api.app.com/requests/12345'
}
This response can be instantly returned - even before we begin any background process. Later, the client can ask the server for information on the request:
/api/requests/12345
{
 status: 'complete'.
 message: 'Key uploaded successfully.'
}
This type of request handling is non-standard within the REST/HATEOAS spec, but again, sometimes exceptions must be made to ensure performance and data consistency between systems.
Authentication
With a completely separated front-end and back-end, authentication and authorization become the primary mechanisms for identifying who a user is and what they can do. With a typical Rails app, this is handled via cookies / session data stored on the server. With an API you need to authenticate first, then give that client a secret they can use later to identify themselves with every call. This is most often done via OAuth.
Mocking API endpoints
One of the primary benefits a common API provides to a front-end team is the ability to mock endpoints between the client and the server. This can be very useful during development, as the front-end team can build features against an API that will eventually exist.
It can also be helpful for the back-end team, in that they can see exactly what the front-end team has built a feature against. There are many libraries that exist to facilitate the creation of a mock API, and it is trivial to build one from scratch, as well. Being able to create mock endpoints is pointless, though, without a common and consistent API that exists for the production back-end.
Documentation
Along with a clean and consistent API comes a responsibility for writing equally clean and consistent documentation for that API. As mentioned, HATEOAS is not an excuse for a lack of documentation. An API is only as good as its documentation.
Every endpoint should be documented, clearly explaining the following:
- Acceptable request methods.
- Response format for each method.
- Available request parameters.
- Any special cases and/or caveats.
Additionally, each endpoint in the doc should provide examples of request/response pairs, and explain (generally) the usage and purpose of the endpoint.
Many types of API doc frameworks exist, but from a publication standpoint, GitHub's API documentation is an excellent example (and is open-source).
Why should we change?
Velocity
A strong separation of concerns allows teams to move faster through the use of improved documentation, clear boundaries, and better cross-team communication.
Testability
By cleanly separating the front-end from the back-end, each respective codebase can adopt best practices for testing with regards to build tools, testing platforms, etc.
Scalability
In a world where the front-end and the back-end are completely separate, systems engineers can more appropriately delegate resources for each system. Front-ends and back-ends have different hardware requirements, and keeping them separate allows us to more appropriately delegate those resources. It also makes fine-tuning performance easier - the front-end need not be burdened by the computational load of the back-end.
When you have them properly separated, the front-end can deliver a controlled experience to the user faster - and we can manage load-time expectations from the back-end much more quickly.
Hire-ability
Front-end and back-end engineering have been going through a specialization phase in the industry for a few years. Front-end engineers have increasingly grown fond of working only with JavaScript, interfacing with an API somewhere. Back-end engineers have begun taking roles exclusively building APIs for applications.
By separating the front-end from the back-end, we're not precluding full-stack engineers from working on either piece - you're making it easier to hire specialists and in return also lowering the barrier for engineers with cross-platform interests to work between the two.
Workflow changes post-API
Once you've developed a stronger separation between the back-end and the front-end, you'll begin to see shifts in what specific types of engineers are interested in working with.
Rails engineers can focus on data, business logic, storage, caching, tests, permissions, etc. Front-end engineers can focus on things such as routing, defining stricter view components, handling data/resources from the API, and more fine-grained tests based on the assumption of a common, consistent API.
From a project management perspective, resources may eventually become more specific. You'll likely have dedicated front-end engineers and dedicated back-end engineers working on their respective pieces. Project managers will need to re-allocate engineering resources according to how workflows eventually shift. Ideally, the separation of concerns between the front-end and the back-end will make individual engineers more effective and efficient with their work.
]]>AWS Lambda is an on-demand computation service that allows you to write code that responds to events, and can be executed at scale within the AWS ecosystem. It has some unique benefits that make working with it particularly desirable. It's cost-effective, scalable, and presents an alternative to spinning up heavy servers to do straightforward event-based work.
At Localytics, we process billions of data points in real-time. At the end of our processing pipeline we output our data to Kinesis streams and S3 buckets. This allows teams to process either live data via the stream or historical data via S3. The format of the data is identical. Lambda was an ideal fit for handling both data sources, as we could write the event handling logic as a single Lambda, and make our data-processing code source-agnostic.
Event sources
Lambda responds to events from a variety of sources. For our purposes we were focused on handling Kinesis stream events and S3 PUT events. See here if you'd like to learn more about the types of events that Lambda supports.
We were tasked with creating a new service that could process historical and live data. As we've made the format identical between S3 and Kinesis data sources, we were able to write a single lambda to handle both event sources. This reduced the surface area of our code that needed to be maintained and clarified the deploy process.
S3 PUT Events
Our Lambda will receive an event when invoked from an S3 PUT notification. It looks like this:
{
  "Records":[
    {
      "eventVersion":"2.0",
      "eventSource":"aws:s3",
      "awsRegion":"us-east-1",
      "eventTime":"1970-01-01T00:00:00.000Z",
      "eventName":"ObjectCreated:Put",
      "userIdentity":{
        "principalId":"EXAMPLE"
      },
      "requestParameters":{
        "sourceIPAddress":"127.0.0.1"
      },
      "responseElements":{
        "x-amz-request-id":"EXAMPLE",
        "x-amz-id-2":"EXAMPLE"
      },
      "s3":{
        "s3SchemaVersion":"1.0",
        "configurationId":"testConfigRule",
        "bucket":{
          "name":"sourcebucket",
          "ownerIdentity":{
            "principalId":"EXAMPLE"
          },
          "arn":"arn:aws:s3:::mybucket"
        },
        "object":{
          "key":"HappyFace.jpg",
          "size":1024,
          "eTag":"d41d8cd98f00b204e9800998ecf8427e"
        }
      }
    }
  ]
}
It's important to note that we're only given metadata about the object (not the data itself). It's on us to get that object from S3. Also, we store our data gzipped, so we need to ungzip the data before we can do something with it.
Here's the functional code that handles this in our lambda (we'll show a complete example later on):
async.waterfall([
  function download(next) {
    s3.getObject({
      Bucket: record.s3.bucket.name,
      Key: record.s3.object.key
    }, function(err, data) {
      next(err, data);
    });
  },
  function gunzip(response, next) {
    var buffer = new Buffer(response.Body);
    zlib.gunzip(buffer, function(err, decoded) {
      next(err, decoded && decoded.toString());
    });
  },
  function doSomething(data, next) {
    // `data` is raw data, ready for use.

  }
], function(e, r) {
  if (e) throw e;
});
Kinesis Events
Our Kinesis stream is always on and channeling data, so our lambda simply listens to the stream and acts upon it.
When Lambda responds to a Kinesis stream event, our event source looks like this:
{
  "Records":[
    {
      "kinesis":{
        "partitionKey":"partitionKey-3",
        "kinesisSchemaVersion":"1.0",
        "data":"TG9jYWx5dGljcyBFbmdpbmVlcmluZyBpcyBoaXJpbmchIGh0dHA6Ly9iaXQubHkvMURqN2N1bA==",
        "sequenceNumber":"EXAMPLE"
      },
      "eventSource":"aws:kinesis",
      "eventID":"shardId-000000000000:EXAMPLE",
      "invokeIdentityArn":"arn:aws:iam::EXAMPLE",
      "eventVersion":"1.0",
      "eventName":"aws:kinesis:record",
      "eventSourceARN":"arn:aws:kinesis:EXAMPLE",
      "awsRegion":"us-east-1"
    }
  ]
}
Records[0].kinesis.datais what we want. The beauty of this event source is that it contains base64 encoded data. Very simple to decode and use in our lambda:
var data = new Buffer(Records[0].kinesis.data, 'base64').toString('utf8');
Creating a dual-purpose lambda
Let's walk through creating and deploying a single lambda that can handle both S3 PUT notifications as well as Kinesis stream events. The full codebase for this example can be found on GitHub.
Permissions
First off, there are two specific permissions that you'll need:
- User permission for
iam:PassRole. This policy needs to be applied to the user who is creating the lambda: - Lambda execution role. You need to create a new role that the Lambda will run as. We assume that role is named
lambda_basic_executionfor the purposes of this project. That role must have (at least) this policy applied:
{
    "Version": "2012-10-17",
    "Statement": [
        {
            "Sid": "Stmt1429124462000",
            "Effect": "Allow",
            "Action": [
                "iam:PassRole"
            ],
            "Resource": [
                "arn:aws:iam::<account_id>:role/lambda_basic_execution"
            ]
        }
    ]
}
{
  "Version": "2012-10-17",
  "Statement": [
    {
      "Effect": "Allow",
      "Action": [
        "logs:*"
      ],
      "Resource": "arn:aws:logs:*:*:*"
    }
  ]
}
Your lambda execution role will also need permissions for whatever services you want to use within your function. If you intend to be working with S3, for example, you need to specifically grant your execution role permissions for whatever you intend to do with S3.
Source code walkthrough for a dual-purpose lambda
Let's create a file namedMyLambda.js, and require some things:
var async = require('async');
var AWS = require('aws-sdk');
var fs = require('fs');
var zlib = require('zlib');
We'll be usingasyncas mentioned previously to pull objects from S3 and unzip them withzlib.gunzip.aws-sdkis required for working with S3.
Let's initialize the SDK:
var s3 = new AWS.S3();
Since our code is running as a role within the Lambda system, we don't need to provide credentials. The SDK will happily make any requests you ask of it, and the role's permissions will dictate what we can and cannot do.
Let's write some code that will handle Kinesis events:
exports.kinesisHandler = function(records, context) {
  var data = records
    .map(function(record) {
      return new Buffer(record.kinesis.data, 'base64').toString('utf8');
    })
    .join();
  doWork(data);
  context.done();
};
When we get a Kinesis stream event, we could have any number of records to process. Our code expects that, maps the base64-encoded value and joins them to provide a single base64-decoded string that we can work with.
Then we calldoWork(data). In the real world you might be doing asynchronous work on the data (and you may be interested in reading Better Asynchronous JavaScript).
context.done()is how we let Lambda know that we're finished doing work.
That's all we need to do to handle Kinesis event streams, so let's move on to S3 PUT events.
exports.s3Handler = function(record, context) {
  async.waterfall([
    function download(next) {
      s3.getObject({
        Bucket: record.s3.bucket.name,
        Key: record.s3.object.key
      }, function(err, data) {
        next(err, data);
      });
    },
    function gunzip(response, next) {
      var buffer = new Buffer(response.Body);
      zlib.gunzip(buffer, function(err, decoded) {
        next(err, decoded && decoded.toString());
      });
    },
    function doSomething(data, next) {
      doWork(data);
      context.done();
    }
  ], function(err) {
    if (err) throw err;
  });
};
This should look familiar from earlier in this post. When we get a S3 PUT event, we know that we'll only ever have a single record to work with. So we pass that record to ours3Handler, download the object, unzip the object, and finallydoSomethingwith the data.
Now that we have our two specific handlers for each event type we intend to support, we need to handle the direct event source from Lambda:
exports.handler = function(event, context) {
  var record = event.Records[0];
  if (record.kinesis) {
    exports.kinesisHandler(event.Records, context);
  } else if (record.s3) {
    exports.s3Handler(record, context);
  }
};
Our actual handler is very simple. If the event looks like an S3 event, let thes3Handlerdo the work. Otherwise, if it looks like a Kinesis event, letkinesisHandlerdo the work.
This is all of the code that's necessary to write your first lambda that supports both S3 and Kinesis.
Deployment
Now that we have our code that we want to deploy to Lambda, it's time to actually upload it.
A few basic first steps:
- Install the AWS CLI via
pip install awscli - Configure your AWS credentials at
~/.aws/credentials: - Ensure you've given your user permissions for
iam:PassRole. - Create the
lambda_basic_executionrole as directed above.
[default]
aws_access_key_id = ...
aws_access_key_secret = ...
Once those are set, we need to package our module up:
npm initnpm install async aws-sdk --savenpm installzip -r ./MyLambda.zip *
Now we can upload the module:
aws lambda create-function \
    --region us-east-1 \
    --function-name node-lambda-starter \
    --zip-file fileb://MyLambda.zip \
    --handler MyLambda.handler \
    --runtime nodejs \
    --role arn:aws:iam::<account_id>:role/lambda_basic_execution
If your upload was successful, you should receive a response like this:
{
    "FunctionName": "node-lambda-starter",
    "CodeSize": 1158014,
    "MemorySize": 128,
    "FunctionArn": "arn:aws:lambda:us-east-1:<account_id>:function:node-lambda-starter",
    "Handler": "MyLambda.handler",
    "Role": "arn:aws:iam::<account_id>:role/lambda_basic_execution",
    "Timeout": 3,
    "LastModified": "2015-04-23T20:58:17.586+0000",
    "Runtime": "nodejs",
    "Description": ""
}
You can see your uploaded lambda on your dashboard. From there you can also edit/invoke with sample data.
Add event sources
Now that your lambda has been created and uploaded, you can add event sources to it via the dashboard. As mentioned, both S3 PUT events and Kinesis streams will work properly with this lambda we've created.
Starter module
To make working with Lambda a bit easier, we wrote a starter Lambda module. We defined a handful of Make targets which can make managing a single lambda a bit easier:
make upload-- upload your function for the first time.make update-- upload new function code.make get-- retrieve details of your existing function on Lambda.make invoke-- invoke your function with sample data provided within the repomake delete-- remove this function from Lambda.
We hope you find it useful! Be sure to drop an issue on GitHub for any questions / bugs.
Conclusion
Lambda presents a new way of programming application logic around events instead of infrastructure. We think this has the potential to bring entirely new types of applications and workflows to market, and it fills a gap in AWS's cloud computing lineup that makes it easier and faster to do real-time work on data within the ecosystem.
Even aside from the affordability and durability of Lambda, being able to direct chunks of logic to process individual events from systems represents an opportunity for data-heavy organizations to drastically streamline their technical infrastructure.
]]>- Running a Node app on port 80.
- Running nginx on port 80.
- Running a watched test-suite for a Node app.
- Auto-compiling SCSS source files to CSS.
- Running a Django app with Gunicorn.
- Running a Django app with the built-in dev server.
There are a few things that make Supervisor well-suited for the above tasks. All of the above tasks:
- I prefer to have running in the background.
- I need quick access to logs, especially streaming via
tail -f. - I'd like to have a common interface for starting, stopping, and restarting.
My favorite part of having Supervisor wrap all of these processes is the common interface for accessing logs. Let's say I want to watch the logs for my Django app I'm running via the built-in dev server (wheresniptis the program name I configured -- more on that later):
> sudo supervisorctl tail -f snipt stderr
The output streams to my terminal:
> sudo supervisorctl tail -f snipt stderr
==> Press Ctrl-C to exit <==
"GET /static/js/projects.js HTTP/1.1" 304 0
[08/May/2013 18:05:42] "GET /login/?next=/ HTTP/1.1" 200 3811
...
Or if I just want to dump all of the logs:
> sudo supervisorctl tail snipt stderr
You get the idea. If you want to learn more about what Supervisor can really do, check out the docs.
Installation
Installing Supervisor on OS X is simple:
> sudo pip install supervisor
This assumes you havepip. If you don't:
> curl -O http://python-distribute.org/distribute_setup.py
> python distribute_setup.py
> sudo easy_install pip
> sudo pip install supervisor
Or if you use Homebrew:
> brew install distribute
> sudo easy_install pip
> sudo pip install supervisor
Or you could install everything from source. Good luck with that.
Regardless of how you've done it, once you've successfully installed you should be able to runsupervisorctland get something like:
Error: No config file found at default paths
That's fine, that means Supervisor is installed and ready to configure. On to bigger and better things (Configuration).
Configuration
The Supervisor documentation provides excellent information on configuration (as well as everything else). For the sake of getting this running on OS X, however, here's what mysupervisord.conflooks like:
[unix_http_server]
file=/tmp/supervisor.sock
chmod=0700

[supervisord]
logfile = /Users/Nick/Sources/dotfiles-private/supervisor/logs/supervisord.log
logfile_maxbytes = 50MB
logfile_backups=10
loglevel = info
pidfile = /tmp/supervisord.pid
nodaemon = False
minfds = 1024
minprocs = 200
umask = 022
identifier = supervisor
directory = /tmp
nocleanup = true
childlogdir = /tmp

[supervisorctl]
serverurl = unix:///tmp/supervisor.sock

[rpcinterface:supervisor]
supervisor.rpcinterface_factory = supervisor.rpcinterface:make_main_rpcinterface

[include]
files = /usr/local/share/supervisor/conf.d/*.conf
You may want to configure some of these to your liking if you know what you're after, otherwise just change the directories to point to your log file, configuration directory, etc. The configuration directory can be anywhere, just make sure yoursupervisord.confis directed to include configuration files from there.
Supervisor is going to look for thissupervisord.conffile in a few places by default:
/usr/local/share/etc/supervisord.conf
/usr/local/share/supervisord.conf
./supervisord.conf
./etc/supervisord.conf
/etc/supervisord.conf
You can place it anywhere, though, as we'll be running the Supervisor daemon with a configuration flag (see below).
Running Supervisor
Now that we have a main configuration file somewhere, we can run the daemon. Oh, about that: there are two parts to Supervisor: the daemon (supervisord) and the client (supervisorctl). The daemon runs in the background and does all of the hard work, and the client provides a nice little UI for... doing stuff.
You can run the daemon manually like this:
> supervisord -c /path/to/supervisord.conf
But we're not interested in that. We want Supervisor to run on startup as root so we can have Supervisor do things with root-level priviliges (like running servers on port 80).
So in order to start Supervisor on startup, we need to use OS X'slaunchdsystem, which loads programs asrooton startup. You don't actually use thelaunchdprogram, you write a configuration file and you load it withlaunchctl. Here's the file:
/Library/LaunchDaemons/com.agendaless.supervisord.plist
<?xml version="1.0" encoding="UTF-8"?>
<!DOCTYPE plist PUBLIC "-//Apple//DTD PLIST 1.0//EN" "http://www.apple.com/DTDs/PropertyList-1.0.dtd">
<plist version="1.0">
<dict>
    <key>KeepAlive</key>
    <dict>
        <key>SuccessfulExit</key>
        <false/>
    </dict>
    <key>Label</key>
    <string>com.agendaless.supervisord</string>
    <key>ProgramArguments</key>
    <array>
        <string>/usr/local/share/python/supervisord</string>
        <string>-n</string>
        <string>-c</string>
        <string>/usr/local/share/supervisor/supervisord.conf</string>
    </array>
    <key>RunAtLoad</key>
    <true/>
</dict>
</plist>
Note: The "agendaless" connotation is the organization that created Supervisor. You can use whatever you want there, but "agendaless" makes the most sense.
This plist file tells OS X to run thesupervisordprogram on startup (theRunAtLoadpart), and to run the program as "nodaemon" (the-nflag), meaning we want it in the foreground. Then we pass the configuration file (the-cpart followed by the .conf path). Here's where you'd change the path to your configuration file, if needed.
To register this plist, run this:
> launchctl load /Library/LaunchDaemons/com.agendaless.supervisord.plist
If everything worked well, you should be able to runsudo supervisorctland see something like this:
\t> sudo supervisorctl supervisor>
If you see that, you're in the Supervisor terminal-based UI, the Supervisor daemon is running properly, and thesupervisorctlprogram has found thesupervisord.conffile correctly. This means you're ready to start configuring programs.
If you see anything other thansupervisor>, something is probably wrong. First off: reboot your computer. It's possible that you need to get OS X to loadsupervisordfromlaunchdas root on startup in order to get things to work. If you've rebooted and you're still having problems, drop a note in the comments and we'll see if we can figure it out :)
Otherwise, you're ready to start configuring programs.
Program configurations
In Supervisor, you write configurations like this. It's quite simple, and the configuration options for program definitions are robust. The simplest program configuration looks like this:
[program:foo]
command=/bin/cat
That would be the content of the file/usr/local/share/supervisor/conf.d/foo.conf(or wherever you pointed your configuration files at insupervisord.conf.
Let's pretend for a moment that the programcatruns in the foreground and you just want to run it via Supervisor:
- Hop into the Supervisor UI:
> supervisorctl. - Tell Supervisor to read all of the configuration files:
reread. - You should get a notice that
foois available. - Add the
fooprogram:add foo. foois now ready to be managed by Supervisor.- Type
statusto see a list of programs:fooshould be in there, with a status ofSTOPPED.
At this point, thefooprogram is ready to be managed by Supervisor, and is stopped. Here are some common operations:
start foo
restart foo
stop foo
tail foo stderr
tail foo stdout
tail -f foo
tail -f foo stderr
...etc, etc. For a complete list of commands, typehelpin the Supervisor UI, orsudo supervisorctl help. Which brings up a good point: you can run Supervisor commands either inside the UI (viasudo supervisorctl) or directly from the commandline, like this:
sudo supervisorctl start foo
That's about it for creating a basic program to be managed by Supervisor.
Here are some program-specific examples of configuration files:
Django app with built-in dev server
[program:myawesomeprogram]
command=/path/to/python /path/to/project/manage.py runserver localhost:4000
directory=/path/to/project
autostart=false
autorestart=true
stopsignal=KILL
killasgroup=true
stopasgroup=true
Note: thekillasgroupandstopasgroupdeclarations are very important when running the Django dev server via Supervisor.
Django app with gunicorn process
[program:anotherawesomeprogram]
command=/path/to/bin/gunicorn -c /path/to/gunicorn.conf.py debug_wsgi:application
directory=/path/to/project
autostart=false
autorestart=true
Node app
[program:yetanotherprogram]
command=sudo /usr/local/bin/node app 80
directory=/path/to/node/project
autostart=false
autorestart=true
Auto-compiling SCSS source files to CSS
[program:css]
command=/usr/local/opt/ruby/bin/scss --watch hi.scss:hi.css
directory=/path/to/css
autostart=false
autorestart=true
Nginx
[program:nginx]
command=sudo /usr/local/sbin/nginx
autostart=false
autorestart=true

# Note: in your nginx.conf, make sure to set `daemon off;`.
# Also note: since Supervisor is run as root, you can configure Nginx to run on port 80 without trouble.
It's important to provide absolute paths to programs, especially if those programs were user-installed, like Ruby gems, Python programs, etc. Remember, thesupervisordprogram does all the work, and it's run as root, which won't source user-level PATHs.
Django settings
I ran into an issue with some app complaining about not being able to work with naive timezones. You'll need to add this to your settings.py:
USE_TZ = True
Tag changes
The URL tag has changed to take a path to a view function as a string. Previously this wasn't stringified.
{% url whatever args %} -> {% url 'whatever' args %}
direct_to_template
The olddirect_to_templategeneric view has been changed to a more traditional class. Here's the new structure:
from django.views.generic import TemplateView
...
url(r'^500/$', TemplateView.as_view(template_name='500.html')),
django-registration
The quite-popular django-registration app took some time to get proper 1.5 support, but the awesome Mr. Bennett was able to get support rolling during a PyCon sprint. You should Gittip him.
Primarily,django-registrationhas been rewritten to use class-based views. If you had a custom form you were passing to your registration app, you'll need to do some things.
On Snipt I use a custom registration form that further restricts characters in usernames, as well as forces uniqueness of email site-wide. Here's what you need to do to get 1.5 support fromdjango-registrationwith custom forms:
- First off, make sure you're using the
django-registrationfrom Bitbucket, not pip. It should land on pip soon, but for now do this. When you install it, you must also have Django installed first. I have no idea why this is the case. - Second, set up your custom registration_register URL.
- Create your custom registration form.
- Create your custom registration view and point it to the form.
- Make sure your custom registration view sub classes the
RegistrationViewfromregistration.backends.default.views.
django-haystack
This may or may not be 1.5-specific, but you need to make sure yourindex_querysetis accepting**kwargs, like this.
pyelasticsearch
This was fun. Both of thesepyelasticsearchrepos will fail in 1.5:
You need to specifically install version 0.3 frompip.
@mixin border-radius($radius: 5px) {
    -webkit-background-clip: padding-box;
    -webkit-border-radius: $radius;
    -moz-background-clip: padding-box;
    -moz-border-radius: $radius;
    border-radius: $radius;
    background-clip: padding-box;
}
@mixin box-shadow($horizontal: 0px, $vertical: 1px, $blur: 2px, $color: #CCC) {
  -webkit-box-shadow: $horizontal $vertical $blur $color;
  -moz-box-shadow: $horizontal $vertical $blur $color;
  box-shadow: $horizontal $vertical $blur $color;
}
@mixin inset-box-shadow($horizontal: 0px, $vertical: 1px, $blur: 2px, $color: #CCC) {
  -webkit-box-shadow: inset $horizontal $vertical $blur $color;
  -moz-box-shadow: inset $horizontal $vertical $blur $color;
  box-shadow: inset $horizontal $vertical $blur $color;
}
@mixin multi-color-border($top, $sides, $bottom) {
    border-top: 1px solid $top;
    border-left: 1px solid $sides;
    border-right: 1px solid $sides;
    border-bottom: 1px solid $bottom;
}
@mixin multi-border-radius($topLeft: 5px, $topRight: 5px, $bottomRight: 5px, $bottomLeft: 5px) {
    -webkit-border-top-left-radius: $topLeft;
    -webkit-border-top-right-radius: $topRight;
    -webkit-border-bottom-right-radius: $bottomRight;
    -webkit-border-bottom-left-radius: $bottomLeft;
    -moz-border-radius-topleft: $topLeft;
    -moz-border-radius-topright: $topRight;
    -moz-border-radius-bottomright: $bottomRight;
    -moz-border-radius-bottomleft: $bottomLeft;
    border-top-left-radius: $topLeft;
    border-top-right-radius: $topRight;
    border-bottom-right-radius: $bottomRight;
    border-bottom-left-radius: $bottomLeft;
}
@mixin vertical-gradient($start: #000, $stop: #FFF) { background: ($start + $stop) / 2;
    background: -webkit-gradient(linear, left top, left bottom, from($start), to($stop));
    background: -moz-linear-gradient(center top, $start 0%, $stop 100%);
    background: -moz-gradient(center top, $start 0%, $stop 100%);
}
@mixin vertical-gradient-with-image($image, $start: #000, $stop: #FFF) {
    background: ($start + $stop) / 2 $image;
    background: $image, -webkit-gradient(linear, left top, left bottom, from($start), to($stop));
    background: $image, -moz-linear-gradient(center top, $start 0%, $stop 100%);
    background: $image, -moz-gradient(center top, $start 0%, $stop 100%);
}
@mixin opacity($op) {
    -khtml-opacity: $op;
    -moz-opacity: $op;
    opacity: $op;
}
]]>"Supervisor is a client/server system that allows its users to monitor and control a number of processes on UNIX-like operating systems."
Steve Losh said that the trick to getting anything working with Supervisor is to make sure it doesn't daemonize. But, alas, there are other tricks.
This blog post concerns getting PostgreSQL working with Supervisor.
First, install PostgreSQL normally. On Ubuntu 10.10, the default way of running PostgreSQL is via Unix socket. This socket lives at/var/run/postgresql. Now, believe it or not, this creates a problem when trying to run PostgreSQL in foreground mode, as required by Supervisor. More on that later.
To understand the problem, you have to understand how PostgreSQL runs normally. Typically, you run PostgreSQL via init script, like/etc/init.d/postgresql start. This script runs a bunch of code, some of which actually creates the dir/var/run/postgresqland sets the proper permissions.
Problem: when you run PostgreSQL in foreground mode with Supervisor, it tries to open the socket in/var/run/postgresql. This will work if you've previously run PostgreSQL with the init script, because the init script created and set the permissions for that dir. However, after reboot, that dir will be gone, and PostgreSQL won't be able to open the socket there, resulting in failure. So, we either need to move the socket (meaning a config change with your app), or make PostgreSQL run on a TCP port instead. TCP port it is.
To get things running with Supervisor:
- Stop PostgreSQL:
sudo /etc/init.d/postgresql stop - Move the init script somewhere safe:
sudo mv /etc/init.d/postgresql ~/somewhere-safe(so it won't startup in daemon mode) - Edit the PostgreSQL config:
sudo vim /etc/postgresql/8.4/main/postgresql.conf - Line 49: comment out
external_pid_file(not needed for TCP mode) - Line 63: comment out port (unless you want to change the default port of 5432)
- Line 68: change
unix_socket_directoryto/tmp
With this config, PostgreSQL will default to using TCP port 5432 instead of a Unix socket.
Here's what my Supervisor conf looks like for PostgreSQL:
[program:postgresql]
user=postgres
command=/usr/lib/postgresql/8.4/bin/postmaster -D "/var/lib/postgresql/8.4/main"
process_name=%(program_name)s
stopsignal=INT
autostart=true
autorestart=true
redirect_stderr=true
Now, you might also get an error about PostgreSQL not being able to read the config file at/var/lib/postgresql/8.4/main/postgresql.conf.
I had to symlink:
sudo ln -s /etc/postgresql/8.4/main/postgresql.conf /var/lib/postgresql/8.4/main/postgresql.conf
Your mileage may vary. Good luck.
]]>When Pete and I first arrived in Boston (me from Rochester, him from Acton, MA), we started talking about trying to build something that might make a splash at the event. We knew these conferences get a lot of coverage on Twitter, Flickr, Facebook, etc. We thought it'd be convenient to have one place to view a live stream of activity that covered all of the major sources, instead of having to bounce through Twitter hashtag searches, Flickr tag searches, etc. So we decided to build a feed aggregator.
We called it A Feed Apart, and it aggregates the conference hashtags from Twitter and tags Flickr, and does so in real-time (currently switched off). Check out Pete's posts on what we learned, and how we built it.
As some of you may know, I'm a terrible notetaker. So, my reactions / recaps / thoughts listed below are a combination of my memory of the presentations, the slides (available only to AEA attendees), and the reactions from people on Twitter (which you can find here: http://afeedapart.com/sessions). If I misquoted you, or you want direct attribution, drop me a line at nick at this domain.com.
By the way, be sure to check out Jeremy Keith's (@adactio) liveblogging journals, which I've linked to at the beginning of each session from the first day below. Excellent stuff there - thanks Jeremy, you rock.
Revealing Design Treasures from The Amazon: Jarod Spool (@jmspool)
- Jeremy Keith's liveblog of the presentation
- Tuscan Whole Milk, 1 Gallon, 128 fl oz (read reviews)
- 71,431,000 amazon.com visitors in December, 2008
- Amazon: 1 of every 5 purchases comes from a review
- The question "Was this review helpful to you?" was responsible for an additional $2.7B of revenue
- 0.07% of users leave reviews after purchasing a product
- Denon AKDL1 Dedicated Link Cable (read tags)
- "Risk adverse companies produce crap" - brilliant
- Experimenting with new ideas is a critical part of innovation
- Amazon took 12 weeks to roll out navigation changes, and they studied the user experience in phases
- Amazon turns over its inventory every 20 days - nuts
- Understand where people are spending time
- Design is about creating an experience that meets a business objective
Content First: Kristina Halvorson (@halvorson)
- Jeremy Keith's liveblog of the presentation
- Have a content strategy for every project
- Content should focus on the user, not on products
- Content is not a feature - it's a living-breathing thing that evolves & involves multiple avenues of input
- Content is cyclical, you can't "set it and forget it"
- Someone needs to own the content from the beginning of the process
- Lorem ipsum must die
- You can't just put icons on the page and expect users to find their way
- Crappy content == crappy user experience
Thinking Small: Jason Santa Maria (@jasonsantamaria)
- Jeremy Keith's liveblog of the presentation
- Use grid-based layouts
- Use a notebook for sketching designs before any real design work happens
- "Sketchbooks are not about being a good artist, they're about being a good thinker"
- Arial is like fishing gum out of a urinal
Future Shock Treatment: Jeremy Keith (@adactio)
- Jeremy Keith's PDF of his presentation
- Write for your future self, because you don't want to piss off your future self
- Use a JavaScript framework
- Don't use a CSS framework
- Standards are like sausages - they're delicious but you don't want to see how they're made
- http://dowebsitesneedtolookexactlythesameineverybrowser.com/ (view in multiple browsers)
- HTML5 is coming sooner than you think, and you should be ready for it now
- Create your own reusable CSS libraries for things like lists, forms, tables, clearfix, etc.
- Choose a framework based on its philosophy - work with the framework rather than against it
Designing With Psychology in Mind: Joshua Porter (@bokardo)
- Jeremy Keith's liveblog of the presentation
- People are easily swayed to being bad (Stanford prison experiment)
- Changing behavior is what web designers do, and what psychologists study
- Behavior first, design second
- We can't change the person but we can change the environment - thus changing the experience
- Websites are the most common form of persuasive technology today
- http://hunch.com
- The behavior you're seeing is the behavior you designed for, whether intentional or not
- Awareness test: http://www.dothetest.co.uk/
DIY UX: Give Your Users an Upgrade (Without Calling In a Pro): Whitney Hess (@WhitneyHess)
- Jeremy Keith's liveblog of the presentation
- Creative spaces and tools allow for creative thinking
- "Never tell your UX Designer 'it looks good' - they'll punch you in the face. Tell them what an epic fail it is, instead."
- Customers that feel they're being heard translates to word of mouth (and more business)
- "You need to have humility and listen. Users aren't always right but you need to hear them."
- "The key to a company's success is the 'culture of iteration'."
Implementing Design: Bulletproof A-Z: Dan Cederholm (@simplebits)
- Jeremy Keith's liveblog of the presentation
- "There's like 50 letters in the alphabet, or something"
- "It's the craftsmanship stupid"
- RGBa = Red, Green, Blue, AWESOME
- Neuropol is the best font in the universe
Beyond Pixel Pushing: A Simple Way to Better Websites and Happier Clients: Brett Welch (@higoodbarry)
- "Lowering prices is a race to the bottom - we need to sell our design value more effectively"
- "A website needs a marketing plan. Always."
- "When dealing with a scrooge client, cut your scope, not your price"
A Site Redesign: Jeffrey Zeldman (@zeldman)
- Any project not for yourself should start with research. Research produces achievable goals
- Research makes a you a credible partner, not a nag or another mouth to feed
- User research is not market research - it's about how people act and think
- Find people that represent real users and define their personas. Design your site around those personas
- Have a content strategy, and place real content in your designs instead of placeholder text
- Zeldman likes bacon, mayonnaise, and coffee
- Clients have a lot of stuff on their mind. Use the Alzheimer's method of repetition in a non-condescending fashion; remind them of steps / changes, and keep in contact
- "Sell ideas, not pixels"
- Always avoid combating the client, you want them to always be your friend
- More sexy time
- Working with text in Photoshop is hard - writing a few lines of CSS is not
- "Beta testing is good - it gives the impression that you care"
- "Mostly I have really terrible ideas one after another, and eventually I get to mediocrity and feel so relieved"
- "I would kill myself if I had to listen to all of my bad ideas"
- Simply re-skinning a site is a missed opportunity
Flash and Web Standards - Getting Along on the Playground: Daniel Mall (@danielmall)
- "Flash is the smelly kid." (joking)
- Jakob Nielson's article in 2000 calling Flash 99% bad was very hurtful to the Flash community, but 100% true
- "Why'd you create Comic Sans? - 'beacuse sometimes it's better than Times New Roman.'"
- In design, there is no bad - just appropriate and inappropriate
- Flash is another tool in your arsenal
- The web is a playground - our job is to figure out how to get all of our 'friends' (HTML/CSS/JS/Flash) to play along
- Be willing to compromise and use whatever technique that gets the task done
Accessibility - Experiments at the Edges of Experience: Derek Featherstone (@feather)
- The coolest thing ever can become passe more quickly than you can even realize
- The API (generally speaking) is the best tool you have
- "I have no idea if this is useful, but we'll never know unless we try"
- "We have to push our limits so that others may break through theirs" - brilliant
- "When you think you're at your 'accessibility limit', push through and find the next limit"
Findability Bliss Through Web Standards: Aarron Walter (@aarron)
- "If its natural and OK, put keywords in your URLs. If not, then you are negatively impacting your findability"
- Keep your SEO keyword usage placement \<= 7% to avoid being penalized
- Meta descriptions do not help boost your SEO, but help your users tremendously in findability
- Google is now recognizing (some) Microformats
- http://microformats.org/
- http://sensational-seo.com/
- http://buildingfindablewebsites.com/
Change the World (Wide Web)?: Scott Thomas (@simplescott)
- Deliver clear and concise messaging, focused on the "we" rather than the "he" (Obama)
- "We were building a plane while in flight" - had to deliver materials day-to-day while contributing to the longer-term mission
- The fold is dead
- Websites are living-breathing-evolving organisms
- "Empower other people in the process, and really wonderful things can happen"
- http://data.gov
Surprise & Delight: Heather Champ (@hchamp)
- Respect your members
- 'Archer' is very six months ago
- Provide guidelines for good citizenship
- Leaderboards will bite you in the ass
- http://www.flickr.com/explore/panda
- Put more tools into the hands of your users
- A tsunami of feedback has a lifecycle
- Site changes make users react "like we were throwing kittens out of helicopters on top of small children playing with glass"
- Be as transparent as you can
- "Things will happen. It's how you step up, move forward, and change - you'll always make mistakes"
- Make Lemonade
- Embrace the chaos
- noindex all of your abuse / report pages so they don't appear in searches
- Greenland?
Walls Come Tumbling Down: Andy Clarke (@malarkey)
- Andy Clarke puts the sexy in CSS
- "Limitations imposed by a recession make us think & work in new ways, help us to focus, sharpen our skills, and make us more competitive"
- "We own our skills, no one else - now is the time to improve ourselves"
- It's time to discard outdated workflows
- Develop new workflows based on creativity
- Embrace agile design / development
- "Designing static visuals that will live in a browser fails by definition"
- "It's time to stop showing clients static design visuals"
- "Static visuals reinforce the misconception that websites should look exactly the same in every browser"
- As the browser landscape gets more diverse, it becomes uneconomical and undesirable to seek "cross-browser, pixel-perfection"
- "You know, sometimes I think that web designers have got no fucking balls"
- "Different does not mean broken"
- Does your aunt fire up two browsers and say, 'It doesn't fucking look the same in Firefox!'?
- "HTML/CSS should be a tool in the work belt of developers AND designers"
- Design systems, not individual pages
- "Clients are not paying you for the hours you work, but for the years of knowledge you have"
- Do not charge less just because you can work faster
- Focus efforts on redefining why we do what we love so much
Fabric is:
...a simple pythonic remote deployment tool. It is designed to upload files to, and run shell commands on, a number of servers in parallel or serially. These commands are grouped in tasks (regular python functions) and specified in a 'fabfile.' It is a bit like a dumbed down Capistrano, except it's in Python, doesn't expect you to be deploying Rails applications, and the 'put' command works. Unlike Capistrano, Fabric wants to stay small, light, easy to change and not bound to any specific framework.
It is awesome. But don't let me tell you, let me show you.
We have lots of projects floating all over the place, all neat and tidy in our Subversion repository. When I'm ready to start building a new feature or fix a bug, I like to have a copy of the production database for that application on my local machine for development. Most of the time, these applications are Drupal or Django based. When I'm ready to start building, I do something like this:
The shell script I run essentially does this:
- log into the remote production server
- take a snapshot of the production database
- save the dumpfile
- log out of the server
- transfer the file from the production server to my workstation
- remove the existing development database from my local MySQL installation
- create a new database to contain the production database
- import the production database into the new database
It's nice that the script takes care of all of that for me - but, you see, there are 10-20 of those files (one for each project). This becomes an enormous headache when we change servers or add a new feature to the script. We needed a better solution.
Enter Fabric. I got it up and running in about 5 minutes, and began to migrate that shell script into one 'fabfile'. However, since I needed to use exactly the same functions for every project, we needed to share the functions with all projects. Fabric makes this easy.
In each project root, there is a file named 'fabfile.py', with the following contents:
Important note: The reason I use config.fab_hosts instead of 'set(fab_hosts = ['...'])' is because I've built my Fabric installation from the git master branch. If you've downloaded the 0.0.9 package, use:
The fabfile sets some basic variables for the server we're connecting to, the user we connect with, and MySQL credentials. The very first thing the file does is import a file named 'fabric_global.py', which contains the following:
At first glance, it may look a little confusing, but this code is something like 10% of what it would be if it were duplicated for each project (and with all the additional commands).
The 'fabric_global.py' file defines two functions that we can run on a codebase. One is for updating the development database with the production database, and the other is for simply committing file changes and updating them on the server.
Now, when I need to grab the production database at the beginning a project, I simply do this:
Well crap, that's a lot easier.
When it's time to deploy my code changes, I simply do:
If I had already committed my changes and simply wanted to update them on the production server, I would just do:
Quite amazing, if you ask me.
Also, Fabric can do a whole lot more than what I just demonstrated, so checkout the docs.
I'd like to thank the Fabric team for probably preserving a few years of my lifespan. Also, it should be noted that the current version of Fabric is 0.0.9, which should give you an idea of the amount of awesomeness to eventually come to newer releases.
]]>We also build a lot of other generic web applications separate from our Zope4Media installations. Naturally, it makes sense for us to investigate the use of Zope 3 for use as our primary development environment for these other applications.
UPDATE: Aaron Lehmann of Zope Corporation was kind enough to respond to many of the points I make in this post. I've added his responses inline below.
What is Zope 3?
Zope 3 is the latest in the line of Zope-powered web application servers. It was released nearly 4 years ago on November 6th, 2004. It is a standalone server written in the excellent Python programming language that provides a framework for developing applications such as content management systems, intranets, and other dynamic web-based tools. It provides data storage in the form of the ZODB (Zope Object Database) which operates as transparent and persistent storage of Python objects.
Aaron Lehmann: Zope 3 is technically not a web server but a group of libraries that can be used together. While some of the packages handle web publishing, it is possible to write sophisticated applications in Zope 3 that have nothing to do with web publishing.
In fact, the heart and soul of Zope 3 is the Component Architecture, which allows behaviors to be loosely coupled to the data involved.
Zope 3, like other modern development platforms, follows a loose interpretation of the MVC (Model-View-Controller) design pattern. By nature of it being a Python application, it encourages clean and intelligently designed code.
The purpose of this blog post is to journey through the installation, configuration and development of a simple Zope 3 web application.
Installation
First things first, we need to download and install Zope 3. It must be installed and configured on the server before you may begin development.
Since I'm a Subversion junkie, I want to grab a checkout of the Zope 3 application, rather than download.
Aaron Lehmann: The best way to get hold of the packages you need is to make a buildout (analogous to a Makefile) and use zc.buildout to get the necessary dependencies. To ensure the packages you get all work together, you'll want to nail the versions. There is a known good set, which has been consistently inter-compatible. For a very quick start and a sample buildout, you might try the zopeproject egg, which can be gotten from PyPI.
For a less steep learning curve some folks recommend the Grok project, which is built on top of the Zope 3 libraries.
Head over to the Zope 3 website and look for their SVN repository. There's a link in the left sidebar for Zope SVN, so that's probably a good place to start. This page, however, doesn't seem to have any information on where the SVN repo lives, so we hit up the SVN FAQ. The first thing I see on this page is:
svn co svn://svn.zope.org/repos/main/Zope/trunk Zope
That looks to be exactly what we're after, so I go ahead and try to checkout. Unfortunately, this appears to checkout Zope 2, not Zope 3. There's also no indiciation on their FAQ that this is or isn't the case.
I'll save you the headache of trying to figure out just where Zope 3 lives on their repository, since it's not really documented anywhere. The SVN list of Zope 3 releases really lives here:
svn ls svn://svn.zope.org/repos/main/Zope3/tags
From there, you'll see a list of Zope 3 releases. We're interested in the latest release, which from what I can see from here, is 3.3.1. We grab that release by checking out with the following:
svn co svn://svn.zope.org/repos/main/Zope3/tags/3.3.1/ zope
The checkout will take a while. After it's finished, it looks like the entire checkout clocks in at around 111 MB. Quite large.
Now that we've got the latest version of Zope 3 in our hands, we need to install it on our system. Here's where I picked up Benji York's excellent Zope 3 quick start guide.
Following from Benji's tutorial, I run the installation command for Linux, since I'm on OS X:
python setup.py install_data --install-dir .
All went well with installation, so now's time to setup our first instance of Zope 3 (a standalone application):
python zope/bin/mkzopeinstance
The initial instances weighs in at 376k.
Running the server
Our Zope instances makes available to us the Zope 3 application server to host our instance. We do so with the following command from within the instance path:
bin/runzope
Your Zope 3 application should be accessible at http://localhost:8080.
At this point, I'll be completely honest with you. I wrote this tutorial in segments, meaning I wrote down my initial steps first, then iterate on the instructions and comments to increase accuracy. However, the second time around, when trying to run the server for the application I had already built, I got the following error:
ImportError: No module named zope.app.twisted.main
Now, I am completely certain I had a working application when I last touched it. That said, I decided to start fresh with the instructions above. I checked out a fresh copy of Zope 3, reinstalled, and attempted to create a new instance. This is what I get when trying to run 'mkzopeinstance':
ImportError: No module named _zope_proxy_proxy
I honestly have no clue what's going on here. I'm beginning to think the SVN location above is incorrect, but there is absolutely no (good) information on Zope.org to point me in the right direction. Even the official 3.3.1 release page has no reference of the SVN location.
Unfortunately, the list of releases in the Zope 3 SVN project makes it quite hard to figure out what release is correct:
3.2.2/3.2.3/3.3.0/3.3.0-zope.interface/3.3.0b2/3.3.0c1/3.3.1/3.3.2/3.4.0a1/3.4.0b1/3.4.0b2/3.4.0c1/Zope-3.1.0/Zope-3.1.0b1/Zope-3.1.0c1/Zope-3.1.0c2/Zope-3.1.0c3/Zope-3.2.0/Zope-3.2.0b1/Zope-3.2.0b2/Zope-3.2.0b3/Zope-3.2.1/Zope-3.3.0b1/Zope3-29921/
Naturally, '3.3.1/' appears to be (the most) correct.
Anyway, I'm going to continue with the tutorial assuming you finally got it working, somehow.
Zope Management Interface (ZMI)
The Zope Management Interface is the default interface you see when accessing your application for the first time. It goes without saying that this interface is incredibly intimidating to those who are using Zope 3 for the first time. Even after working with the interface a bit, I'm still not sure exactly what everything does, and why everything is there.
Aaron Lehmann: I agree somewhat with you about the Rotterdam Skin (the default ZMI Look and Feel). This is an example where getting a monolithic package works against you, as a custom-assembled application can avoid using it entirely.
That said, I'm sure everything is there for a reason. It'd be nice to have a more formal beginners documentation regarding exactly what everything in the ZMI does.
Aaron Lehmann: The ZMI is intended to be a way to manage all of one's configurations through the web. It's a philosophical holdover from Zope 2. We don't use it much in Z4M, but it does allow quite a lot of options for through the web control.
My biggest pet peeve with ZMI is that there's no way to log out of the application. I can successfully login using the credentials I provided when creating the instance, but there is no logout link anywhere. After a few tries at guessing what the logout URL might be, it turns out that it is:
http://localhost:8080/logout.html
That should come in handy.
Zope Object Database (ZODB)
As mentioned, Zope 3 stores data using the ZODB. From Wikipedia:
The Zope Object Database (ZODB) is an object-oriented database for transparently and persistently storing Python objects. It is included as part of the Zope web application server, but can also be used independently of Zope.
Essentially, this means data is read and written from the database transparently through the use of Python objects, which also means there is no need for SQL. Unfortunately, this also means data portability is somewhat affected, since it's not as easy to import or extract data from ZODB (at least, not apparently).
Aaron Lehmann: Non-trivial relational databases (and the software that interfaces with them) are almost invariably tightly coupled with the peculiarities of a particular RDBMS (DB-specific languages for triggers, custom data types, SQL extensions, etc.), so migrating from one system to another is not easy. The same can be said of ZODB (or any other object database). The end result is that most migrations from any database to another will demand technical sophistication regardless of the database being used.
Similarly, datamarting applications often denormalize their schema so that non-technical people can treat them as spreadsheets. The skill necesary to do that will also allow one to denormalize an ODB. In fact, some Zope 3 shops do just this, pushing their data to an unnormalized RDBMS. One might argue that the RDBMS is still better, because it is what they use for non-technical report needs, but I think it's important to note that no programmer uses an unnormalized database for his code.
There are many factors in choosing the best data storage technology for a particular system. The decision often comes down to programming speed; ZODB lets Python programmers create native Python objects that persist between program restarts. It doesn't get much easier than that.
Serving a static page
Applications have static pages, so the first thing on our list is to serve a static page with our new Zope 3 application. Should be fairly straightforward.
At this point, I'll turn over the mic to Benji, where he can walk you through the quick steps of how to get a static page up and running.
Aaron Lehmann: I think it's worth mentioning that Zope 3 is not optimized with static pages in mind, but rather for applications, which may be published on the web. In that context, the steps involved make code layering in an application much more straightforward. Really, if all you want to display is a static page, your best course is to use a more mainstream web server, such as Apache or Lighttp.
The basic steps are:
- Creating the content object (the 'page')
- Registering the content type (so Zope 3 knows it exists)
- Creating and configuring a view to bind the content object to some method
- Configure the security permissions on the view
The steps are quite simple, but it's not entirely apparent how exactly everything works. The most confusing part of the whole thing is the XML-based configuration files. In my opinion, using XML to manage the configuration for these objects rather than native Python configuration objects is not necessary. This is a hot topic in the Zope 3 community.
Aaron Lehmann: It's true that ZCML is opaque to learn and debug. I'm not personally a fan of it, but less because of the fact that it's XML, than because a lot of the directives make too many assumptions and are too elaborate in their implementations. Of course, you don't have to use any of the ZCML if you don't want to. It's all based on Python underneath, and if you want to understand what it is hiding from you, you can do it yourself.
After I created the object using Benji's suggestions, I found that I had to somehow 'enable' the object. This is done by selecting the object from the left menu and then naming the object.
When working with changes to your code, it should be noted that you need to restart the Zope 3 application server to reflect the new code.
Aaron Lehmann: As a clarifying note here, the need for a restart only applies to code that is loaded at server start time, typically Python code. Templates generally get loaded dynamically either out of the database or off of the disk, and so do not suffer from this restriction.
Templating
Templating in Zope 3 is accomplished with Zope Page Templates (ZPT), an XML-based templating system designed specifically for use with Zope. A simple example:
<div tal:attributes="class here/class; style string:border: 1px solid black;" tal:content="string:Hello World!"> Hello World!</div>
I'm very familiar with ZPT, since all of the template development work we do with Zope4Media is done with ZPT. Zope Corporation owns and maintains Zope4Media, which is based on Zope 3.
While ZPT is fairly straightforward and easy to learn, it presents several problems.
- ZPT introduces business logic into templating with the allowance of Python code within page templates. Business logic should be separated from presentation logic.
Aaron Lehmann: ZPT allows Python expressions inside of templates. This doesn't set it apart from any other templating system, and it certainly doesn't mix business logic into presentation.
Business logic handles the modeling of real-world objects and managing how those objects are accessed and how they access one another. Since ZPT only allows very restricted expressions, ZPT can only modify things through the API exposed to it. While such an API allowing business logic in templates is possible, it would be a gross misuse of the system, and would fall under Python's "consenting adults" policy with regard to poor practices.
- Writing business logic as well as presentation logic in XML is a nightmare. XML was never designed to be a logical scripting language, and thus, should not be used for making logical calculations to manipulate content.
Aaron Lehmann: I agree that writing business logic in ZPT would be extremely challenging and feel your pain about writing presentation logic in it as well.
I suspect that your difficulties stem less from ZPT as a framework than from the APIs you're working with specifically.
From what I understand, one of the major benefits to using ZPT is that it is XML-based, meaning WYSIWYG HTML editors should be able to render and modify the code without messing with the logic. That said, no professional template developer uses a WYSIWYG editor, in any fashion.
Aaron Lehmann: Not everyone who writes templates is a professional templater. Some people might find templating and front-end development to be difficult, and be glad to have a way to save themselves some of the difficulty of writing (X)HTML. ZPT does a fine job allowing them to use tools to generate the markup, while the template programmer works with the logic, at the expense of a slight complexity overhead for both. Unfortunately, when the designer and the templater are the same person, he suffers from the fact that he's got an unnessesary abstraction.
That said, I can agree ZPT can be painful to write. You may have a better way to do things, and the beauty of the Component Architecture is that you can plug it in and use it for your templates, if you develop with a Zope server.
Error pages
At some point in your application, you're going to break something, I promise. It's certainly useful to have a strong debug tool for development, but Zope 3 appears to be lacking in this area. When you break something in Zope 3, you may see an error page something like this:
A system error has occurred.
This is great for production, since you don't necessarily want retail users to see the innards of your code. In development, however, it's not useful at all. I understand there may be ways to display the full traceback to the retail page, but I'm not entirely sure how.
Aaron Lehmann: To show the traceback on the screen, you'll want to register a view on Exception that returns the traceback as HTML. An alternative is to look in the Error Log in the ZMI (Errors link in on the upper right portion of the page). It will allow you to adjust the settings on which errors get logged there, and view the latest ones.
Also useful is including the line 'import pdb; pdb.set_trace()' in your code where you suspect the error will manifest, and running the server in the foreground mode. This will let you step through the call from the point of your choosing, using Python's standard debugger. Caveat: This only works well if you run your servers in single threaded mode. If there are multiple threads, they will all output to the same terminal, which will make debugging more difficult.
Conclusion and pros vs. cons of Zope 3
While Zope 3 has long since been a viable option for developers looking for rapid MVC-style development framework, I don't necessarily agree with some of the approaches the platform takes on templating (ZPT) and data handling (ZODB).
I've come up with a few bullet points highlighting what I see are the pros and cons of Zope 3:
Pros
- Zope 3 offers a tried and true development platform used in many high-load production environments.
- There is a vast community of very intelligent programmers (though decreasing).
Cons
- The vast majority of documentation and tutorials for Zope 3 are at least two years old, with some being over 4 years old.
- The Zope 3 book itself is out date.
- The Zope Management Interface (ZMI) is far too confusing for beginning developers.
- ZPT introduces business logic into presentation logic.
- ZODB lacks data portability.
Aaron Lehmann:
The worldwide Zope 3 community is quite robust, as is
evidenced if one subscribes to the
[Zope3-users](http://mail.zope.org/mailman/listinfo/zope3-users) and
[zope-dev](http://mail.zope.org/mailman/listinfo/zope-dev) mailing
lists.

Zope 3 strives to allow a programmer to mix and match his components,
so it's difficult to write a tutorial that uses all, or even most of the
available components in a reasonable way without shoehorning them in for
no purpose.

There is a fine book, ["Web Component Development with Zope 3" by
Philipp von Weitershausen](http://www.worldcookery.com), currently in
its third edition, with a fourth on the way.

The ZMI has its pros and cons: It allows one to manage applications
through the web, at the expense of a slower start time, and many
dependencies. We use it rarely in Z4M. While it is confusing for a new
developer, it is powerful, particularly for more advanced programmers.
But in all cases, it is not a requirement.

ZPT does not allow statements, meaning there can be no data
manipulation except through exposed python code. This renders writing
business logic in ZPT impossible. ZPT is for presentation. It is also
not required that you use it in your own projects. You may use another
templating language, or no templating language.

ZODB is just as portable as any other DBMS: data can be migrated from
it to another database or schema via scripts which can be written in
Python.

Zope 3 is a vast a la carte selection of libraries which offers
enormous flexibility and capabilities to do anything users can imagine.
It is not a 'chef's special', so to speak. What it may not have in terms
of simplicity of use, it trumps other frameworks in terms of its power,
broad capability, and extensibility.
Introduction
Navigation is such a vital piece of your website. It provides your users with a tool to move around and discover your content. As web professionals, we use navigation to predefine a structural organization of website content.
Jakob Nielsen, web usability guru, suggests that:
Without structural links, pages become orphans that are not contextualized:
Amen, brother. A well-constructed and contextualized navigation for your website can make or break your users' experience. Too much navigational information will confuse the user, and not enough will confuse the user. There's a middle ground, and it's different for every website.
At my company, we primarily build websites for - or in support of - newspapers. Newspapers have a long-standing traditional navigation structure, but they're optimized for print. We hold the responsibility to translate these navigational structures into something useful for web users.
It's easy to see how vital a well-constructed navigation can be to the success of your website. Ultimately, it's your job to make sure the user understands the website structure and is not prohibited in any fashion from doing so. Barriers include informational overload, readability, and - for the sake of this article - technological hurdles.
Using JavaScript with website navigation
At a high-level, there are two ways JavaScript can be used with navigation:
- using JavaScript to enhance the user experience
- using JavaScript to provide the user experience
Enhancing the user experience
A typical use of JavaScript to enhance the user experience would be to provide behavioral functionality in support of showing or hiding navigational menu items. Examples of this would include dropdown menus and / or displaying content's location within a hierarchical structure of other content. To fall into this category, the JavaScript should be unobtrusive to the overall user experience.
Unobtrusive JavaScript is a technique used to more strictly adhere to the behavioral nature of JavaScript as a scripting language. According to the technique, JavaScript should be used in circumstances where:
- the script successfully fills a behavioral gap not intended to be filled by XHTML or CSS
- the script does so in a fashion that gracefully degrades in instances where JavaScript functionality is not available
- the script takes into account browser inconsistencies and attempts to avoid problems associated with them
According to these guidelines, JavaScript could be successfully used in website navigation so long as:
- core navigational elements are established structurally through XHTML
- the lack of JavaScript does not prohibit the user from using the core navigation
- the JavaScript simply provides behavioral improvements to the navigation that may be less usable with XHTML only
Now, there are many stable CSS alternatives to providing behavioral functionality for navigation, but I'm not going to get into them.
Providing the user experience
In contrast, using JavaScript to provide the entire user experience presents several problems. The definition of 'providing the user experience' would be something to the effect of using JavaScript to generate an XHTML navigation on the fly from, perhaps, a JSON object.
As I've pointed out above, doing so would be in direct violation of several principles in that:
- the user's viewing medium is required to support JavaScript in order to allow the user to successfully move to and from content
- the script is not simply filling a behavioral gap, it is providing a solution that is normally suited for structural markup with XHTML
Thus, using JavaScript to solely provide the user's navigational experience is never recommended.
The effect on search engine optimization
Google has been making great strides towards indexing Flash and JavaScript generated content, but it's still not an exact science.
If JavaScript is used as it is intended as a behavioral layer to provide additional user experience elements (coined 'progressive enhancement'), the structural markup of a page should still contain the information that search engines are looking for.
If you're starting from scratch, a good approach is to build your site's structure and navigation using only HTML. Then, once you have the site's pages, links, and content in place, you can spice up the appearance and interface with AJAX. Googlebot will be happy looking at the HTML, while users with modern browsers can enjoy your AJAX bonuses.
In the event that JavaScript is intended to enhance the user experience with an already defined XHTML structure on the page, no search engine performance degradation should occur.
However, in the event that the entire navigational structure of a website is defined in JavaScript and later interpreted into an XHTML structure on the page, it should be expected that serious search engine performance degradation will occur.
Web accessibility
Developing navigation solutions with JavaScript techniques not only takes a toll on SEO, but more importantly on web accessibility.
Adherence to web accessibility guidelines is vital to the usability of your website by users with screen readers, speech recognition software, and other assistive technologies. The availability and usefulness of JavaScript to these users is often limited, and your design teams must take this into consideration.
The mobile effort
The mobile web has come a long way in recent times, and while it is suggested that mobile strategies are not simply mirrored from desktop strategies, it should be noted that mobile phones traditionally (sans-iPhone) have little support for JavaScript.
If you're truly interested in delivering a quality mobile web product, read Cameron Moll's book, Mobile Web Design, and give Pete a shout.
Performance and page load times
As stated, JavaScript is intended to be a solution for providing a level of behavioral improvement to a website. Since JavaScript is a client-side scripting language, it relies on the web browser to process the script. Thus, JavaScript should not be rendered until the webpage has completed loading the XHTML onto the page. Unfortunately, this often means a period of loading time is associated with the rendering of the script.
Excessive amounts of JavaScript can also have serious performance issues, especially, for example, when parsing a large JSON object for manipulation into an XHTML navigation structure.
Conclusion
Any JavaScript technique used to enhance the user's experience with navigation should be very carefully implemented. Be absolutely sure there's no way to accomplish what you want with other, more friendly, means such as CSS.
If you must use JavaScript to enhance the user's experience, do so paying close attention to the guidelines set forth by the W3C and the ideals of progressive enhancement.
Finally, never, ever use JavaScript to single-handedly provide the navigation for your website.
]]>Root access and Developer Tools package
First thing to do is make sure you've got root access to your server and that you have the (mt) Developer Tools package installed.
You can enable root access and Developer Tools on your DV by going to your (mt) account center, select the server, and select 'Root Access and Developer Tools'. From there, you can switch on root access, as well as the Developer Tools package.
Among other things, the Developer Tools package installs Subversion, which we'll use to grab the latest Django release.
Once you've got root access, you're ready to proceed with installation. Here's a high-level look at what we'll be doing:
- Download Django
- Install Django
- Start a Django project
- Serve the project through Apache
First, SSH to your server. Switch to the root user with the password you setup in the account center, with the following command:
su -
You should see something like this:
[root@servername ~]#
Download Django
You'll want to install Django into '/var', so switch to that directory:
cd /var
Once you're there, download Django from djangoproject.com with the following command:
svn checkout http://code.djangoproject.com/svn/django/trunk/ django-trunk
This command will use Subversion to checkout the latest trunk release of Django. This may change in the future as Django approaches a 1.0 release, as trunk checkouts are generally considered unstable.
Install Django
Next, you'll need to install Django. The installation process essentially allows Python to see your Django checkout. Django is technically nothing more than a bunch of Python modules, so installation is simple. Python simply needs to have the Django directory accessible from the PythonPath. Django ships with an installation script to copy your checkout into the Python packages directory, but this eliminates your ability to run periodic Subversion updates on the Django checkout, since Django is still not yet a 1.0 release. Thus, we simply create a symlink from our checkout to the Python packages directory. The following code will do that for you from within the '/var/' directory:
ln -s `pwd`/django-trunk/django /usr/lib/python2.4/site-packages/django
If nothing happens, it was successful. You can test whether or not Python is ready to use Django by hopping into the Python interactive shell by typing the command at any directory other than the parent directory of the 'django-trunk/django' directory (because Python inherits the path you're currently in):
python
You should get:
Python 2.4.3 (#1, Mar 14 2007, 18:51:08)
[GCC 4.1.1 20070105 (Red Hat 4.1.1-52)] on linux2
Type "help", "copyright", "credits" or "license" for more information.
>>>
Type the following at the Python prompt:
import django
then:
django.VERSION
You should see something similar to this:
>>> import django
>>> django.VERSION
(1, 0, 'alpha')
>>>
The version numbers may be different, but that's fine. As long as you didn't see an import error, you've successfully installed Django and can begin building applications.
Start a Django project
Now you need to start your first Django project. Django provides a handy script that starts a base project for you. This script lives within your Django checkout, but for simplicity's sake, it'll be easier to put this script on your system path so you don't need to use the full path to your Django checkout everytime you want to start a new project. Run the following command from your '/var' directory to put the script on your path:
ln -s `pwd`/django-trunk/django/bin/django-admin.py /usr/local/bin
Cool. Let's say you want all of your Django projects to live within one directory ('/var/django-projects'). Head over to '/var' and run the following command:
mkdir django-projects
Now create a project within that directory with the following command:
django-admin.py startproject mysite
That's it. The Django script will generate a directory within django-projects titled 'mysite' which has some basic code to get you up and running with your first application.
Serve the project through Apache
Django comes with a really handy development server, but it is not intended for use as a production server. Thus, the easiest thing to do is to get Apache to server your Django application with mod_python. While mod_python is quite old, and is not the fastest and most preferred method of hosting your Django apps on Apache, it is currently the recommended solution.
Your DV 3.5 server should already have mod_python installed and working under Apache. There's nothing you need to do to get that running.
You do, however, need to let Apache know that you'd like it to serve a Django application somewhere. You'll do this in your vhost directives.
You'll need to be logged in as root to modify your vhost directives, so go ahead and do that, and navigate to your domain's directory. It'll be something like this:
/var/www/vhosts/domain.com
Once in there, navigate to the 'conf' directory for that domain.
Inside of that directory, you'll see this:
httpd.include
Don't touch that. That's a file that's generated from Plesk, and if you modify it, you'll lose your changes the next time Plesk updates. Instead, create a file named 'vhost.conf'. Plesk looks for this file in every 'conf' directory when it updates to include that file if there is one. Thus, you can make all of your changes here, and you'll be good to go.
Within your newly created 'vhost.conf' file, enter this:
<Location "/">
    SetHandler python-program
    PythonPath "['/var/django-projects'] + sys.path"
    PythonHandler django.core.handlers.modpython
    SetEnv DJANGO_SETTINGS_MODULE mysite.settings
    PythonDebug On
    PythonInterpreter mysite
</Location>

<Location "/media">
    SetHandler None
</Location>

<LocationMatch "\.(jpg|gif|png)$">
    SetHandler None
</LocationMatch>
These directives will do a few things:
- Tell Apache to let mod_python handle all of the requests to '/' for 'domain.com' (because we're in /var/www/domain.com).
- Tell Django where to find the settings file for the Django application. We use mysite.settings here because we used django-admin.py to start the project 'mysite', and 'settings.py' lives within that directory.
- Turn the Python debugger on - you'll want this off for production sites (it basically enables detailed error messages).
- Set a unique id for the PythonInterpreter. This is needed if you plan to power multiple applications under mod_python (I think).
- Tell Apache to not use mod_python for any files under the '/media' directory (or any file ending with .jpg, .gif or .png). This is because we'll want to serve real files under this directory - and mod_python shouldn't touch them.
Once you've saved that file, you need to restart Plesk / Apache so that it will detect this file and process it for directives. On your (mt) DV 3.5, run the following command to restart:
/usr/local/psa/admin/sbin/websrvmng -a -v
Go ahead and load up the domain that you've pointed to use Django, and, with any luck, you're good!
My headache
Now, when I first attemped to get Django running under mod_python, Python wouldn't recognize Django. This made me crazy for about two days, until I realized I had installed Django into my home folder, which Apache was not allowed to read. Sigh.
So that's about it, have fun!
]]>- Create any custom profile fields
- Customize the output of the profile page
Creating custom profile fields
The first thing you'll need to do before you can begin adding custom profile fields is to enable the core module 'Profile'. This module is shipped with every Drupal installation. Simply head over to '/admin/build/modules' and enable 'Profile' under the 'Core - optional' module list.
Next, go to 'Administer -> User management -> Profiles' and from there you can add new profile fields.
Once you've got your profile fields all set, you'll notice that your user account page has automatically reflected these new fields. However, they're probably not structured the way you want them to be, so the next step is to override the default user account page.
Customizing the output of the profile page
First, create a new template file in your theme directory named 'user-profile.tpl.php'. Drupal looks for this file every time the user account page is loaded for theme overrides.
Within this template, you have two important variables at your disposal:
<? $user_profile and $account
The '$user_profile' variable stores the rendered HTML for the default profile page. You'll remove this variable if you plan to customize the structure and layout of the user profile page.
The '$account' variable is an object that you may use to pick and choose user and profile data, including the profile fields that you just created.
You can use the following code in your 'user-profile.tpl.php' template to take a peek at what's inside your '$account' variable:
<? var_dump($account);
As mentioned, your new profile fields will also exist here. As an example, if you wanted to output a profile field with an ID of 'zip_code', you would use the following code:
<? print t('%zip', array('%zip' => $account->profile_zip_code));
For info on what the t() function does, checkout the API doc on Drupal.org.
That's pretty much it!
]]>Since I'm finally eating my own dog food and switching to Drupal, I'm using the Geshi filter module for syntax highlighting support. The Geshi project is awesome, to say the least, and supports many different languages.
The default Geshi CSS, however, leaves a lot to be desired. I use TextMate for my editor, and am in love with my current theme pack, Sunburst, so it'd be great if I could match that. There is a TextMate Geshi CSS packavailable, but it doesn't include Sunburst, so I set out on my own to port the Sunburst theme to Geshi CSS.
Here are the styles:
li.li2 { font-style: italic;}
.kw1 {color: #E06645; }
.kw2 {color: #85D04B; }
.kw3 {color: #D9CF81;}
.co0 {color: #808080; font-style: italic;}
.co1 {color: #808080; font-style: italic;}
.co2 {color: #808080; font-style: italic;}
.coMULTI {color: #808080; font-style: italic;}
.es0 {color: #EEBE5B; }
.br0 {color: #FFF;}
.sy0 {color: #E06645;}
.st0 {color: #47B340;}
.nu0 {color: #cc66cc;}
.me1 {color: #0085CD;}
.me2 {color: #0085CD;}
.re0 {color: #8594A8;}
.re1 {color: #0085CD;}
.geshifilter-css .re1 {color: #A16D3A;}
.geshifilter-css .kw1 {color: #C7AE71;}
.geshifilter-css .re3, .geshifilter-css .nu0 {color: #ED7831 !important;}
.geshifilter-css .kw2,  pre.geshifilter-css {color: #FBEF94;}
.geshifilter-html4strict .kw2, .geshifilter-html4strict .kw3, .geshifilter-html4strict .sy0 {color: #79BAFB;}
.geshifilter-html4strict .kw3 {color: #DAD081;}
.ln-xtra, li.ln-xtra, div.ln-xtra {color: #cc0; background-color: #ffc;}
A vast number of Drupal themes available for download on Drupal.org look strikingly similar. Perhaps it's the general notion of 'blocks' and 'regions' or the oh-so-obvious login form. Perhaps it's the typical 3-column layout that gives it away. In any case, there's a clear problem within the Drupal theming community.
Themers are letting Drupal decide how the theme should look. Why? Because the way Drupal's theme layer handles themable output is unique, and many designers look to the common theme practices to decide what will go where to prevent additional work down the road. When a designer begins work on a website that he or she knows will end up in Drupal, and that designer has worked with Drupal before, he or she has preconceived notions about how the content will be laid out by Drupal. The designer knows that the least amount of resistance from conception to completion is to eliminate as many roadblocks in between as possible. Since every piece of output from Drupal comes with 'default' HTML output, why re-invent the wheel by changing the default? Well, that is precisely why we're in the predicament we're in.
As a designer, you're responsible for building a user-friendly application which your users will use to do things. This is user experience design. As a content management system, Drupal is responsible for providing safe, secure and easy access to the creation and management of content, be it a blog post, a user account, or any number of other pieces of content. There needs to be a clearer separation of responsibilities here.
Here are three websites. Without looking at the source code, or using trickery, pick which one is a Drupal website:
You probably picked 'thebatavian.com'. Why? Probably because of one of these clues:
- The three-column layout
- The login form
- The style of page numbers at the bottom of the page
Well, the truth is, all three of those websites are Drupal-powered. Each of them also happened to be designed by myself (shameful plug). The Batavian was an experiment that merited a very, very short development-to-launch timeframe. Thus, little time was spent on UXD.
The other two websites were designed from the ground up without Drupal in mind. That said, I knew that the websites were going to be powered by Drupal. What I also knew was that Drupal can be built to do whatever you want it to do, if you take the time to do it.
So, folks, stop letting Drupal design your website. Let Drupal do what it does best. Let it provide an awesome framework for building robust websites and web applications, and let it keep your users and content secure, and your page load times short, but don't let it steer you away from usable design. After all, without users, who's left?
I'm outta steam, but this will probably stir some feathers within the theming community, so let me know your thoughts.
]]>First off, the way that most themes generate primary links is like so:
<? theme('links', $primary_links);
As mentioned, this will only output the top-level menu items, like so:
<ul>
  <li>Menu Item 1</li>
  <li>Menu Item 2</li>
  <li>Menu Item 3</li>
</ul>
That's not very useful for sites with a robust navigation tree.
To get around this, the simplest way is to remove the original theme() function outputing the primary links, and create a new region in your template where you'd like your navigation menu to show up. Then, you can assign the 'Primary links' block to that region, and the entire menu tree will be displayed there.
To create a region in Drupal 5:
You'll need to modify your theme's template.php file. If it doesn't yet have one, create it, and enter the following:
<?
function name_of_theme_regions() {
  return array(
        'name_of_new_region' => t('name of new region'),
   );
}
To create a region in Drupal 6:
In your theme's '.info' file, you'll need to define your new region. Put something like this:
regions[name_of_new_region] = name of new region
Be sure to replace 'name_of_theme' with the name of your theme, and 'name_of_new_region' with the name of your new region.
Outputting content of the new region
The key of the array item (or value in between brackets for Drupal 6) will be used as the variable name in your theme files, like '$name_of_new_region'.
The value of the array item (or value to the right of the equals sign for Drupal 6) will be used as the title of the region on the '/admin/build/block' page.
In your page.tpl.php file, output the content of the region like so:
<? if ($name_of_new_region) print $name_of_new_region;
Then, head over to '/admin/build/block' and set the 'Primary links' block to the region you just created.
Done!
]]>The creation and management of these sites on one Drupal installation is straightforward using Drupal's multi-site feature, along with a unified installation profile. So that wasn't our concern. However, of larger concern was the creation and management of 300+ Drupal themes using our existing websites as templates. Luckily, our CMS allows us to create one template that is available on every single site. This got us our base template from which we wanted our Drupal themes to be based off of.
So, I thought it would be excellent if we had a Drupal module that would:
- Take a local or remote path to an HTML mockup
- Automatically generate Drupal regions based on a replacement pattern in the HTML document
- Take theme information settings, such as 'id', 'name', etc
- Generate a new Drupal theme based on the above settings
A few brainstorming sessions and five hours of coding later, I've got a working Drupal module that does just that. Enter the Theme Generator module. For now, it serves our organization's very specific needs. However, I've got big plans for the module that may benefit others.
Here are some examples of our sites and their corresponding Drupal templates:
- MPNnow.com (Drupal template)
- Wicked Local Plymouth (Drupal template)
- Rockford Register Star (Drupal template)
...and 391 others.
Here's how it works. Upload and enable the module, head over to '/admin/settings/theme_generator'. From this screen, you have 5 fields:
Template path
This should be a URL, either local or remote, to the HTML mockup you want to use as the source of your Drupal theme. For example:
http://www.mpnnow.com/drupal_owrap
Region replacement pattern
The generator will look for a pattern of text that it will use to build the Drupal regions. You can change that pattern here, but by default we use:
__%(.+)%__
Where '(.+)' would be the ID of the region to be created. Any regex pattern can be used here. Patterns should be constructed like so (if our replacement pattern were '__%(.+)%__'):
__%name_of_region%__
The generator would interpret this as a region like so:
regions[name_of_new_region] = name of new region
During the generation process, it will replace those patterns with the appropriate PHP code to output the regions.
Theme ID
This should be the computer readable format of the name of your theme. If you want your theme to be called 'Wicked Local Plymouth', your ID should be:
wicked_local_plymouth
No spaces or whacky characters here, please.
Theme name
This is simply the name of your theme. This will show up on the themes listing page (/admin/build/themes).
Theme description
Just the description, and will also show up on the themes listing page.
The generation process
So, with those fields set, clicking 'Generate theme' will do the following:
- Grab the content from the template URL
- Build the theme's .info file based on the preferences
- Process the replacements: Replace title with PHPTemplate code. Write PHPTemplate code for outputing $head, $styles, $scripts. Remove the base element (long story). Write PHPTemplate code for outputing correct Drupal language. Write Drupal body stylesWrite $closure.
- Finally, create the theme directory and write both the .info file and page.tpl.php to the directory
That's about it. You'll need to be sure Apache has write permissions on /sites/all/themes.
Thinking ahead, not only is creating these Drupal themes quickly and efficiently very useful, but the management and update process of those Drupal themes would also be significantly useful.
Since we want one central location where we will manage our site templates, we only want to have to make modifications to that one place. Thus, we'll need Drupal to keep tabs on these automatically generated themes, and update them accordingly if changes are made to the root template. This should be a fairly straightforward enhancement to this module, allowing for manual theme updates, as well as updates run on cron.
Again, this module is in its infancy, but judging by the amount of usefulness we've found it provides already, there will likely be many enhancements to this project.
Download the Theme Generator module.
My to-do list for this module:
- Write vars such as $messages, $help, $tabs, etc, to generated template
Finally, my feature wishlist for this module (in no particular order):
- Gauge interest in support for additional template engines
- Build a management interface for the automatically generated themes
- Provide functionality to re-build the generated themes should the source of the template have changed
- Ingest external CSS and JS, and write to Drupal filesystem
- Provide some sort of intelligent URL re-writing to support templates using relative paths instead of absolute paths
That's about if for now, let me know your thoughts!
]]>Software to help us
Many developers are used to managing software codebases with either CVS or Subversion (both are revision control systems). These systems make it easy to manage file-based software releases, rollbacks, development branches, etc. However, because of Drupal's database-usage strategy, managing and moving around Drupal codebases is not as beneficial as it is with other software.
So what exactly are the options we have for managing our sites? Well, I'm going to run through the process by which we are currently managing a live site between development and production (sans-staging). I've also linked to many other articles and theories on this topic at the end of this post.
A few months ago, I wrote a blog post on Painless Drupal revision control with CVS and Subversion on a shared host. That post is an good read for those interested in simply getting up and running with a Drupal codebase utilizing CVS and Subversion for local revision control, as well as easy upgrades from Drupal.org's CVS. While that blog post focuses on simply getting setup, this post will be more geared towards the issues we currently face with that setup, the proposed workarounds, and the strategies we personally implement.
A sample scenario
I'll start off with the site that we're currently in active development with, and have also already launched. The site is currently sneaking by under the radar, and we're going to keep it like that for a while, so we'll refer to the site as 'Project X'.
Project X began life as a simple CVS checkout from Drupal.org onto my local machine. At that same time, I also ran CVS checkouts of all the modules that I knew I would need for the project. When I had that fairly set, I imported the entire project into our corporate Subversion repository. I then deleted the codebase from my local machine, and checked out a working copy of the project back onto my machine. The project is being developed by myself and one other developer, so he checked out a copy to his local machine as well.
Drupal installation
I went about installing Drupal as normal, knowing that I'd be storing development connection settings in our /sites/default/settings.php. This is so when we release the software, we would be more specific with the definition of the settings.php file in /sites/projectx.com/settings.php. With that setup, we can retain the same codebase for both development and production environments. Drupal will look for 'projectx.com' on both servers (dev and prod), but since the development 'servers' are simply our local machines, it will fall back to /sites/default. Within our /sites/default/settings.php, we pointed the database to a MySQL server we run in-house that we can both connect to.
At this point, it should be noted that the codebase we both have checked out is from 'trunk'. We always develop on trunk. That is, of course, until we have a reason to branch off into separate branches. This is a smaller project, however, so we simply build on trunk for now.
Drupal configuration and customization
I go about building the theme within my trunk checkout, committing changes, adding files, etc. Our other developer, we'll call him 'Pete', is hacking away at a new module we're building to take care of some special functionality. He's commiting his changes, too. Every once in a while, we'll tell each other to run updates to grab the latest code from trunk. This is especially important when adding new modules. If you need to add a new module into trunk, download (or CVS checkout) the module into your codebase, then add and commit to trunk. Before you enable the module, tell Pete to run an update on his codebase (he'll probably have no clue what you're talking about). We don't want to go about enabling a module, resulting in the database change, and have Mr. Pete access the site with the now enabled module in the database, but no module files to support it. In fact, I'm not sure really what would happen, perhaps a black hole, probably nothing. Either way, I'll leave it to someone else to find out.
That's pretty much it for developing pre-production. We make our changes, have our fun, build some stuff, etc. The fun times come for when we want to launch the site on our production server.
Before you release your first version, you'll want to setup your settings.php for the production site. Create the directory /sites/projectx.com and copy the 'settings.php' from /sites/default to the directory. Modify the projectx.com settings.php, specifically the $db_url (line 93 for Drupal 6). Set the correct DB connections here to your production database. That'll be it for the settings.php file.
Now you'll need to dump and import the development database into the production database that you've setup. Since this is the first release, you don't need to worry about overwriting anything.
Tagging our first release
Once we've finished developing on our local machines, have duplicated the development database to the production database, and have finished our final commits from both machines to the repo, we're ready to checkout a copy onto the production server. However, before we do that, we should keep in mind our future development patterns. We will surely want to be able to continue developing on trunk while not having to worry about our production codebase. For that, we use 'tags'. Each time we have a software release we feel is ready for production, we release a new version, and switch the production version to use the latest release.
The quickest way to do this is to SSH to the server that hosts your repositories. The following command (svn copy) will copy your current trunk build to your very first tag:
svn copy file:///path/to/repos/project-x/trunk file:///path/to/repos/project-x/tags/REL-1-0-0 -m 'Tagging release 1.0.0'
Once that's set, you're ready to checkout the tagged release to your production server. Head over to the server, and checkout the 1.0.0 release:
svn checkout svn+ssh://[email protected]/path/to/repos/project-x/tags/REL-1-0-0 working-copy-directory
If you've setup the settings.php correctly, the site should be good to go. That's it for the initial launch. The site's done, right? Wrong.
Post-launch
Now that the site is live and accumulating data, we need to change our development habits. The development database is no longer the 'master', as there have been changes to the production database that we don't want to overwrite with development data. While we haven't devised a brilliant solution for merging development and production data, we've realized that we don't really need to.
When we're ready to begin a new 'development cycle', we clone the production database, and completely dump and rebuild the development database with the production database. I wrote a stupid quick production to development bash script to handle this for us. Much easier than doing it manually, anyways. This is by no means a cutting-edge development process, but it seems the most logical for us. This is a fairly small project that doesn't really warrant some of the more in-depth development environments that I've linked to at the end of this article.
So now that we've cloned the production DB to the development DB, we've got all of the content available to us for testing with. The majority of our development is done in two areas:
- Theme development
- Custom module development
Theme development is heavily (if not all) file-based, so this development strategy caters well to that. Custom module development is heavily file-based, but can also be heavily database dependent. We find that, while not having a solid development to production database migration process, manually setting up the module in production really isn't that much work. When I first delved into this problem, I wanted a solid, complete and foolproof solution to migrating development database changes to production. Unfortunately, that just isn't available, and once I came to terms with that, I realized I'm not all that upset about it.
If you develop often, and release often, you'll probably agree with me. Surely, if you're building 4 new themes, 20 new modules, installing 6 contrib modules, and expecting to not have to do any work when migrating to production, you're in for a treat. If you're doing that, however, shouldn't you have rolled that into your initial release?
Ah, I digress. So that's our general strategy. So what happens when we're ready to release our new-fangled changes on development?
Releasing upgrades
When we release upgrades to the software, we simply create a new tag. When you're ready to tag the current trunk build as a new release, simply:
svn copy file:///path/to/repos/project-x/trunk file:///path/to/repos/project-x/tags/REL-1-0-1 -m 'Tagging release 1.0.1'
Once you've done that, you're ready to upgrade your production checkout to the latest release. But, how?
We use the 'svn switch' method. Essentially, we're switching a current working copy to a new subversion project URL. Subversion takes care of the changes between those URLs, with the 'switch' command. When ready to release 1.0.1, we head to the production server working copy and:
svn switch svn+ssh://[email protected]/path/to/repos/project-x/tags/REL-1-0-1
Subversion makes the appropriate changes to the working copy to reflect changes made from REL-1-0-0 and REL-1-0-1. Win.
Managing production filesystem changes
So now we're done, right? Not really. What happens if there are changes to the filesystem on your production server, such as user file uploads, pictures, etc? Let's say Jon uploads a picture of a drunk cat for his profile picture. We want those file changes to be stored in our repository, as well. You might not want to, and if that's the case, you can skip this part. If you do, that's where 'svn merge' comes in handy. The merge command will essentially 'merge' differences between two sources into a working copy.
Before you can merge the changes, you need to commit the appropriate changes you want merged to your tagged release. From the production checkout, run 'svn add' on the files that were added. Then, commit your changes. Be careful to not commit file modifications that you did not specifically want merged.
You'll need to run the merge from a trunk checkout, since you want to merge the changes from a tagged release into trunk. From a working copy of trunk:
svn merge svn+ssh://[email protected]/path/to/repos/project-x/trunk svn+ssh://[email protected]/path/to/repos/project-x/tags/REL-1-0-1 --dry-run
You'll note the use of '--dry-run'. Run the command once as a 'dry run' to see the changes before you actually do them. This is very useful. When you're satisfied with the file changes, remove the '--dry-run' and re-run.
With an 'svn status', you'll see the local file modifications to your trunk checkout. If you're still happy, commit the changes to trunk, and you're done.
I always do the merge after (and only directly after) I upgrade the production copy to the latest tagged release. That way, the changes from tag to trunk only include the file changes or additions that occurred on production, and not file changes on trunk.
So that's about it for our entire development lifecycle.
Other options
The above solution will probably only suffice for small-scale Drupal productions. It may or may not be what you're looking for. Fortunately, there are many brilliant minds in the Drupal community, and there are quite a few alternatives for 'development to staging to production lifecycle' solutions:
]]>There's an excellent tutorial that runs through the process of customizing just about everything with Terminal, but I'm going to get right to the point with as little extra stuff as possible.
The very first thing we need to do is actually enable colors in our Terminal. Pop open Terminal. You should automatically be at your home directory to start, but if you're not, just:
cd ~
Now we need to create a file titled.bash_profile. This file gets loaded every time you open a new Terminal session. Create a new file with VIM like so:
vim .bash_profile
and enter the following:
source ~/.bashrc
Save the file with:wq. Essentially, all this says is 'load a file called .bashrc'. Each user can have a .bashrc file. Create your .bashrc file:
vim .bashrc
and enter the following:
export TERM=xterm-color
export GREP_OPTIONS='--color=auto' GREP_COLOR='1;32'
export CLICOLOR=1
alias ls='ls -G'
export COLOR_NC='\e[0m' # No Color
export COLOR_WHITE='\e[1;37m'
export COLOR_BLACK='\e[0;30m'
export COLOR_BLUE='\e[0;34m'
export COLOR_LIGHT_BLUE='\e[1;34m'
export COLOR_GREEN='\e[0;32m'
export COLOR_LIGHT_GREEN='\e[1;32m'
export COLOR_CYAN='\e[0;36m'
export COLOR_LIGHT_CYAN='\e[1;36m'
export COLOR_RED='\e[0;31m'
export COLOR_LIGHT_RED='\e[1;31m'
export COLOR_PURPLE='\e[0;35m'
export COLOR_LIGHT_PURPLE='\e[1;35m'
export COLOR_BROWN='\e[0;33m'
export COLOR_YELLOW='\e[1;33m'
export COLOR_GRAY='\e[1;30m'
export COLOR_LIGHT_GRAY='\e[0;37m'
alias colorslist="set | egrep 'COLOR_\w*'"
The above is what enables the colors for your terminal. Save the file.
You could now quit terminal, and start a new session, and you should have colors. The default colors aren't so nice, though. Luckily, a few quick plugins will allow us to customize the colors. Ciaran Walsh runs through these steps, or you an follow along below.
First, install SIMBL. Second, download Ciaran's SIMBL plugin. You can now quit terminal, restart, and you'll see a 'More' button in Terminal settings allowing you to customize your colors.
I personally use InfiniteRed's theme here.
So now everything is beautiful, except for VIM. I use VIM quite a bit throughout my day, so this is important for me. Luckily, there's a simple fix for this as well. Navigate to your home directory, and create the file '.vimrc', and enter the following code (or grab it from here):
" This .vimrc file should be placed in your home directory
" The Terminal app supports (at least) 16 colors
" So you can have the eight dark colors and the eight light colors
" the plain colors, using these settings, are the same as the light ones
" NOTE: You will need to replace ^[ with a raw Escape character, which you
" can type by typing Ctrl-V and then (after releaseing Ctrl-V) the Escape key.
if has("terminfo")
  set t_Co=16
  set t_AB=[%?%p1%{8}%<%t%p1%{40}%+%e%p1%{92}%+%;%dm
  set t_AF=[%?%p1%{8}%<%t%p1%{30}%+%e%p1%{82}%+%;%dm
else
  set t_Co=16
  set t_Sf=[3%dm
  set t_Sb=[4%dm
endif
syntax on
" Everything from here on down is optional
" These colors are examples of what is possible
" type :help syntax
" or :help color within vim for more info
" and try opening the file
" share/vim/vim61/syntax/colortest.vim
" Note: where share is depends on where/how you installed vim
highlight Comment       ctermfg=DarkGreen
highlight Constant      ctermfg=DarkMagenta
highlight Character     ctermfg=DarkRed
highlight Special       ctermfg=DarkBlue
highlight Identifier    ctermfg=DarkCyan
highlight Statement     ctermfg=DarkBlue
highlight PreProc       ctermfg=DarkBlue
highlight Type          ctermfg=DarkBlue
highlight Number        ctermfg=DarkBlue
highlight Delimiter     ctermfg=DarkBlue
highlight Error         ctermfg=Black
highlight Todo          ctermfg=DarkBlue
highlight WarningMsg    term=NONE           ctermfg=Black ctermbg=NONE
highlight ErrorMsg      term=NONE           ctermfg=DarkRed ctermbg=NONE
" These settings only affect the X11 GUI version (which is different
" than the fully Carbonized version at homepage.mac.com/fisherbb/
highlight Comment       guifg=Green                 gui=NONE
highlight Constant      guifg=Magenta               gui=NONE
highlight Character     guifg=Red                   gui=NONE
highlight Special       guifg=Blue                  gui=NONE
highlight Identifier    guifg=DarkCyan              gui=NONE
highlight Statement     guifg=DarkGreen             gui=NONE
highlight PreProc       guifg=Purple                gui=NONE
highlight Type          guifg=DarkGreen             gui=NONE
"highlight Normal                   guibg=#E0F2FF   gui=NONE
highlight Number        guifg=Blue                  gui=NONE
"highlight Cursor       guifg=NONE  guibg=Green
"highlight Cursor       guifg=bg    guibg=fg
highlight Delimiter     guifg=blue                  gui=NONE
"highlight NonText                  guibg=lightgray gui=NONE
"highlight Error        guifg=White guibg=Red       gui=NONE
highlight Error         guifg=NONE  guibg=NONE      gui=NONE
highlight Todo          guifg=Blue  guibg=Yellow    gui=NONE
"#### end color settings #############
That should take care of it. Enjoy!
]]>The first thing you should do if you're starting your first Drupal 6 module, is follow along with Drupal.org's Module Development Guide for Drupal 6. That will step you through everything you'll need to know to write your first module.
However, if you're like me, and would rather fail miserably and break everything before you figure out how to do something right, you'll find that it's a bit difficult to discover how to utilize the theme layer to output content from your module. (Unless, of course, you read that tutorial above first.)
But anyways, if you're simply looking for how to register your theme functions, do this in your module:
<?
function name_of_module_theme() {
  return array(
    'name_of_theme_function' => array(
      'arguments' => array('items' => NULL)
    )
  );
}
That piece of code will register your theme function, and tell Drupal's theme layer to look for the 'name_of_theme_function()' function to display content from your module. It also says that your theme function will take one argument, and that argument should be a variable defined as '$items'. You can add arguments by simply expanding that array.
Within your module, also specify a default theming function:
<?
function theme_name_of_theme_function($items = NULL) {
  $output = 'hey, this is some output that gets generated when theme_name_of_theme_function($items) is called from somewhere';
  return $output;
}
With this in place, your module can use the following theme function to trigger the theming:
<? theme('name_of_theme_function',$items);
This is extremely useful, because now different themes can use the following call in their template.php file to override your default theme function:
<?
nameofdifferentheme_name_of_theme_function($items){
  return 'dont display that crap!' . $items;
}
Continuing from Part I and Part II in our 'From HTML mockup to a full Drupal site: a tutorial' series, this final part will focus on integrating our finished HTML / CSS mockup into our now final Drupal site. As I mentioned before, I'm omitting quite a bit of advanced (and some not-so-advanced) theming practices, intentionally. What were focusing on is making quick work of simpler clients' website needs.
So what've we got? We have a skeleton of a Drupal site fully built out, and an HTML / CSS mockup sitting around somewhere. Let's meld the two.
Administration menu
Back in part II, when I said we were done with all the setup and module bit'ness, I lied. That's because I forgot one module, the 'Administration Menu module'. Why do we need this module? Well, we don't, if you plan on truly building your theme to support all native Drupal functions (including multiple navigation slots).
Since our BeeEss mockup clearly only has one navigation, and that navigation is used for retail purposes, we don't really have an all-that-intuitive place to dump our 'admin' menu system. Well, the Administration Menu module takes care of that. What it does is place the 'admin' menu at the absolute top of each page, so you don't have to worry about integrating it into your site layout. So go ahead and upload and enable that module. Once enabled, you'll see the menu at the top. Sweet!
With the admin menu out of the way, we can focus on building the theme.
Theme directory structure
The first thing you need to do when beginning a new theme is to create the directory that will house your theme. We'll want our theme to live in '/sites/all/themes/custom/bellascena'. You'll need to create the 'custom' directory if this is a fresh Drupal install. Also, I would suggest naming your actual theme directory with no dashes or underscores. I seemed to have some questionable results with one or the other (can't remember specifically).
Within our newly created theme directory, we'll need the following files to start:
- page.tpl.php (can be blank for now)
- node.tpl.php (ditto)
- screenshot.png (a 150x90 screenshot of your theme)
- style.css (can also be blank for now)
We'll also want an 'images' directory within our theme's root directory as well. This isn't Drupal specific, it's just where I think images belong :). For our BeeEss theme, we also need to employ the IE PNG fix. Grab a copy ofiepngfix.htc and place it within our theme directory.
How theme processing works
Drupal's theme engine, in our case - PHPTemplate - looks for specific files to theme a page when it builds a certain page. The 'algorithm' is not complex, actually it's quite simple. If you're loading a 'blog' page in Drupal, the system will look for 'page-blog.tpl.php', and if it doesn't find it, will move on to 'page.tpl.php'. It's a hierarchical approach.
Since we've only got 'pages' and 'news entries', we can focus on just using 'page.tpl.php' to handle the core 'page', and 'node.tpl.php' to handle the news entries (well, pages, too - but we'll get into that later). Since 'news' is a content type in Drupal, the theme engine will look for 'news.tpl.php', and move on to 'node.tpl.php', since instances of the 'news' content type are essentially 'nodes'.
Bring in the HTML!
If you'd like to follow along with the actual BeeEss theme itself, you can grab the images to drop in the 'images' folder. Also, you can go ahead and copy the styles to your own style.css. Now, modify page.tpl.php to be the complete page mockup (straight HTML). If you're following along, copy the BeeEss mockup HTML into your page.tpl.php.
Bring in the PHP!
Now what we need to do is get some dynamic content (PHP vars) into our template. Pop open page.tpl.php. Here are the variables that we'll be putting into this template:
- $language: The 'locale' of this Drupal site. For english, will be 'en'.
- $head_title: The title of the current page being loaded.
- $site_slogan: The site slogan. We'll use this for construction of the '<title>' as well.
- $styles: The output of CSS styles as defined by modules, core system styles, as well as 'style.css'.
- $site_name: The name of the site.
- $head: Spits out some various things, like the link to the favicon, among others.
- $feed_icons: URLs to RSS feeds provided by Views.
- $scripts: JavaScript files needed by modules or Drupal core, such as jQuery.
- $base_path: The base path to your website. This would be something like http://www.website.com.
- $directory: The path to your theme directory. Useful for images and files residing within, in our case, /sites/all/themes/custom/bellascena.
- $logo: The URL to the 'logo' if you've uploaded one.
- $primary_links: An iterable list of menu items deemed 'Primary Links'. We'll use this for our nav.
- $is_front: Either 'TRUE' or 'FALSE' depending on whether or not the page being loaded is the 'front page'.
- $content: The good stuff! '$content' is the alpha and the omega. It carries the core 'content', ie. a page 'body', or a node 'body'.
- $title: The 'title' of the node or page, or some other content type, such as a blog entry 'title', or a page 'title'.
- $footer_message: The 'footer' content we filled out on the site info page.
- $closure: Probably one of the most important vars to remember to include in your theme. This var carries output of things such as the admin_menu, google_analytics module, etc. Don't forget it!
So that's a good overview of what we'll be plugging into our now static HTML template. Crack open your page.tpl.php file, and make it look like this one: BeeEss mockup PHP + HTML. Take a look at the integration of the above vars within the template, and I'll step through some of the not-so-obvious pieces now.
Implementing the new theme
Go ahead and copy the PHP'd version of page.tpl.php to your server. Head over to /admin/build/themes, find the theme, enable, and set to 'default'. Click 'save configuration'. Woah! Our site is now using our theme. The first thing I notice is that the logo is missing. Back on the themes listing page, click 'configure' next to the theme we're using. Down the page a bit, you'll see the form for 'custom logo'. Uncheck the 'Use the default logo' checkbox, and download and upload this logo (it's also located within the images directory I linked to earlier). Much better. You can also upload your custom favicon here (grab it here). Win!
So for the most part, things are pretty self-explanatory. Let's run through a few of the not-so-obvious pieces now.
The homepage switcheroo
Well, there are a few different ways to theme separate 'pages' differently. For BeeEss, I took the approach of hardcoding a small conditional in page.tpl.php, and putting the HTML into a Drupal 'Page' for the actual content of the homepage. The switch in page.tpl.php looks like this (forgive my too-lazy-and-busy-to-do-my-own-blog-theme reasoning for no code highlighting):
<?php if ($is_front == true) { ?>
 <div class="content-container-front clearfix">
  <?php print $content ?>
 </div>
<?php } else { ?>
 <div class="content-container clearfix">
  <h1 style="margin-bottom: 10px;"><?php print $title ?></h1><?php if ($tabs): print $tabs; endif; ?>
  <?php print $content ?>
 </div>
<?php } ?>
Clearly there are better ways to do this, but whatever.
So now that we've got that setup to just dump the unadulterated homepage HTML where we want it, we need to edit the 'homepage' page that we created earlier. Go edit the page, and put this as the body. Before you save it, be sure to set your input format to 'PHP Code'. You don't ever want to use this format unless you must, and in Drupal 6, it's not even there by default. But, in our case, we'd like to surface our mission statement on our homepage. Go ahead and save that puppy.
Now, right after you save it, you may notice it looks pretty whacky. That's because /home is not set to our 'homepage' yet, and our little conditional above isn't taking effect. Head to /admin/settings/site-information, and at the bottom you'll find 'Default front page'. Change that to 'home' without the qutoes. Click on 'Home' in your nav, and we're in damn good shape. You'll also notice the mission is being pulled in from the variable_get function. Score!
Navigation
Our navigation is setup to use list items, which should be working just fine. This is the function we use in page.tpl.php to build the nav menu:
<div id="navigation">
 <?php if (isset($primary_links)) : ?>
  <?php print theme('links', $primary_links, array('class' => 'nav-links primary-nav-links')) ?>
 <?php endif; ?>
</div>
Basically, we're saying, print out my primary_links, with the UL class of 'nav-links primary-nav-links'. Pretty straightforward. There are ways to modify the output of these links, and - well - everything in Drupal theming, but again this post is focusing on simplicity.
Almost... there...
So yeah, I forgot to tell you really anything about node.tpl.php. And, for some reason, nodes still seem to be appearing quite well. Well, almost. We need to really have a template that will tell a node how the hell to look on the page. Use this for your node.tpl.php. It should be pretty straightforward. Basically, this template is what gets called when any node is loaded, whether it be a teaser view of a node, full node itself, or even a page (since they're nodes, too, you know - have a little respect).
So yeah, moving forward...
I must admit, after being at Drupalcon all week, I've become a tad 'reserved' (as in, not motivated) with regards to this blog post, so it may or may not fulfill one's theming dreams. I actually had second thoughts about whether or not I should've really written this post, so tell me if I made a good choice or not. So why did I have second thoughts? Well - Drupal 6, and Theme Developer for devel.
So all things aside, I'm sure I left out a bunch of stuff, so feel free to publicly harass and embarrass me if you will.
Arrivederci.
]]>So we've got the makings of a site now. Let's build the site out to the client's content mockup and requirements spec. We'll build the navigation, add all of the content, build the content type for news and setup the appropriate views. After we're done with all of that, we'll focus on integrating our BeeEss theme with our new Drupal site in Part III of this series.
General site information
We need to put some basic information about our site into our new Drupal system. Navigate to '/drupal/admin/settings/site-information'. You can also find it on the 'Administer' page under the 'Site configuration' section. Enter the title, administrator's e-mail, slogan, mission and footer. We'll use all of these in our theming, so be sure to enter values for each of them. For example, the 'Slogan' will be used in the page title like this:
<title>(current-page) | (site-title) - (slogan)</title>
This, of course, is a function of theming and may not be the same with all Drupal themes, but it'll help you decide what your slogan should be for our example site.
Here's what I'm putting in each of the fields:
Title: BeeEss
E-mail address: [email protected]
Slogan: Syracuse, Albany, Rochester and Central NY specialists in natural stone restoration and terrazzo restoration.
Mission: <p>We strive to promote an aesthetically pleasing and healthy environment in commercial and public buildings by restoring and preserving their natural stone.  <a href="proxy.php?url=value-proposition" title="Learn more about how BeeEss can help with your Syracuse, NY natural stone restoration or terrazzo restoration project.">Learn more</a>.</p>
Footer message: <div id="footer-address">BeeEss, Ltd.  7 Adler Dr., East Syracuse, NY 13057</div><div id="footer-copyright">Copyright 2007 BeeEss Ltd.  All Rights Reserved.<br />Developed by <a href="proxy.php?url=http://graffetto.com" title="Graffetto Technologies">Graffetto Technologies</a>.<br /><a href="proxy.php?url=http://validator.w3.org/check/referer" title="XHTML 1.0 Strict Compliant">XHTML</a> | <a href="proxy.php?url=http://jigsaw.w3.org/css-validator/check/referer" title="CSS Compliant">CSS</a> | <a href="proxy.php?url=http://www.contentquality.com/..." title="508 Accessible">508</a> | <a href="proxy.php?url=http://www.contentquality.com/..." title="Web Accessibility Initiative Compliant">WAI</a></div>
Default front page: http://bellascena.com/node
You'll note that I put actual HTML into the Mission and Footer fields. Yup, you can do that.
In a little bit, we'll actually be changing the default front page, but for now, we'll leave it as is.
Go ahead and save your configuration after you've put in your values.
Date and time
Head on over to the 'Date and time' section under Administer > Site configuration > Date and time. Set your correct time zone, and any custom formats you'd like.
Creating users and setting permissions
Since we're not really building a heavily user-based site, we'll setup our user system for the administrator only. We'll also need to turn off user registration so no one is allowed to do so.
Go to Administer > User management > User settings. I'm going to select 'Only site administrators can create new user accounts.' to disable user registration. I'll also ignore the e-mail customizations since we won't need them.
Now we need to setup the site administrator. Note the difference between the admin user we create and the user account you use to setup and build the site. The user account that you use, the very first one we setup, has 'super' privileges to do anything. The admin user we'll create for our client will be subject to permissions we set.
Go to Administer > User management > Users. Select 'Add user' and fill out the form. You probably don't want to notify the client of the new account automatically, since the site isn't done yet :). The user I created is 'admin'. You can go to 'List' and see both users, the one you just created, and your user account.
We need to be able to distinguish between our administrator that we just created and anyone else who we might create accounts for in the future. Thus, we need to create a new role, the 'administrator' role. Go to Administer > User management > Roles. At the bottom of the list of current roles, you'll see an input box for a new role. Create a new role titled 'administrator' and click 'Add role'. Now we need to assign that role to our user that we just created, and to ourselves, of course :). Go back to the users list, and for each user, click 'edit', then under the 'Roles' section, check the 'administrator' box, and save.
Google Analytics
So now we get to start playing around with some real content. The first thing I did when starting the site was to register the site with my Analytics account. If you don't use Google Analytics, you can skip this part, but I highly suggest it.
The easiest and most sensible means to get Google Analytics on our site is to use the Google Analytics module. Go ahead and download a copy to your computer. Within the download, you'll find a folder titled 'google_analytics'. We need to get that into our Drupal installation. Create a new folder within '/sites/all' titled 'modules'. Place the 'google_analytics' folder within the '/sites/all/modules' folder. Upload the new folders to your server.
The first thing we need to do when we upload a new module is to enable the module within our Drupal system. Navigate to Administer > Site building > Modules. At the bottom of the list, you should see our 'Google Analytics' module. Wahoo! Go ahead and check that there box and click 'Save configuration'. Yeehaw.
Now, the Google Analytics module has some advanced features that are probably beyond our scope here, but you can read about them at the module homepage. We just need to configure the module to use our unique Google Analytics User ID. Visit Administer > Site configuration. You'll see a new menu option there, titled 'Google Analytics'. Go ahead and click on it. You'll see the field for your User ID. Enter your User ID and click 'Save configuration'. You can safely ignore the other settings for now, as mentioned above.
There, all done! Our first module is installed and configured correctly. In fact, since the default theme makes use of common Drupal theming techniques, the code is live on all of your pages. If you visit your front page and check the source, you'll see it!
Navigation - Introduction
At some point, we'll need to tackle the navigation structure for our new site. The BeeEss navigation schema is as follows (with links to the current site sections in action):
- Home (static)
- Company Info (static)
- Value Proposition (static)
- Process (static)
- Photos (non-Drupal)
- White Papers (teaser view of content type 'White Papers')
- News (teaser view of content typ 'News')
- Contact (contact form)
As you can see, we have three different types here: static, teaser views, and the contact form. The photo gallery solution I used for the site is not affiliated with or integrated into Drupal at all. I'll get into the details of why I chose an external solution (and what I used) a bit later, but for now we can ignore it.
For now, we won't actually build the navigation menu items yet, because we're going to create them on the fly when we build the content. We'll revisit navigation structure a bit later.
Static pages
Before we bang out the few static pages our client needs, we need to tweak a few settings to make our URLs b-e-a-utiful. In a default Drupal install, when you add a node, be it a page, story, or anything, the URL to that node is automatically created like so:
http://domain.com/node/4
Unfortunately, that's not very useful for search engines. Search engines enjoy URLs that are relevant and descriptive, such as this:
http://domain.com/cat-jumps-over-cows-moon
Luckily, Drupal provides a few pieces of functionality that allow you to do just that easily and seamlessly. Drupal's Path module is a core module that comes with every Drupal install. The Path module allows you to create 'URL Aliases' which essentially map custom URLs to nodes within the system. This is fine and dandy for a web-savvy developer who is hip to the SEO juicyness, but what about the content that your client will create on the fly? Well, for that, we need a more automated system.
Pathauto
Enter Pathauto. Pathauto is a nice little module that'll take care of the oh-so-tedious task of manually choosing URLs for your nodes to be accessed by. It does this automatically based on an algorithm that computes the URL from your node title. Long story short, the content author need not know anything about it. Splendid. So let's grab that. Download a copy of the module to your computer. Unpack it, and you'll find the 'pathauto' folder with all the guts inside. Upload the 'pathauto' folder to your '/sites/all/modules' folder just like we did with the google_analytics module if you were paying attention above. Upload the goodness to your server, and revisit the modules page at Administer > Site building > Modules. Scroll down and find the Pathauto module we just uploaded. Crap. Looks like we can't enable it yet because we need a module that Pathauto depends on. That's the Token module. I really don't know much about the Token module, but according to the project page:
Tokens are small bits of text that can be placed into larger documents via simple placeholders, like %site-name or [user]. The Token module provides a central API for modules to use these tokens, and expose their own token values.
Since Pathauto is insisting that it really wants Token, go ahead and download the Token module and upload into your '/sites/all/modules' directory as usual. I did - it wasn't so bad.
Now go back to the modules admin screen and reload. You'll see the Token module popup right underneath the Pathauto module. Enable them both, and click 'Save configuration'. Doing so notifies me that I also need to enable the Path module, which is a core module already available in our installation. Click 'Continue' to have Drupal enable the Path module in addition to the Token and Pathauto modules.
Now, when Pathauto is first enabled, it's comes pre-configured for 'optimal' performance with most Drupal installations. We will, however, want to make one modification. When Pathauto generates a URL, we want it to be reflective of what type of content that node is. For example, if Pathauto is building a URL alias for a 'News' content type, we'll want the URL to be something like '/news/nice-friendly-url-to-content', rather than just '/nice-friendly-url-to-content'. Go to Administer > Site configuration > Pathauto. Open up 'Node path settings'. In there, you'll see 'path patterns'. The default path pattern is set to 'content/[title-raw]'. You can keep that as is, but for 'Pattern for all Page paths', set it to '[title-raw]' (without the quotes). When we create other content types, we'll modify these settings accordingly.
WYSIWYG Editor
We're almost ready to start adding static pages of content. Head on over to Create content -> Page. At this point, put yourself in the client's shoes and try and invision what they need to do at this step. Ideally they really only need a 'Title' and a 'Body'. That's about it for a Page. It would be nice, however, to have a WYSIWYG editor for the client to be able to easily manage things such as bold text, hyperlinks, etc. There are a few options for Drupal, including FCKeditor, TinyMCE, BBCode and WYMeditor. I'm a big proponent of what the guys behind WYMeditor are attempting to do, but it's still in its infancy and I'm not convinced it's ready for a production site (as mentioned on the product page as well). TinyMCE and FCKeditor both take the approach of 'everything but the kitchen sink', with the option to include the kitchen sink. We don't need the kitchen sink. Go ahead and grab the BBCode module, upload it, and enable it. You should be able to figure it out by now ;). If not, read the Google Analytics part above.
So you've got it installed. Go to Administer > Site configuration > Input formats. Input formats are something we haven't touched on yet. They are essentially a grouping of filters that can be used on node creation and editing. BBCode's editor is really just a 'filter' that we can assign to an input format. Go ahead and create a new input format titled 'BBCode'. So here's the first showing of our 'administrator' role that we created a while ago. Be sure to select the 'administrator' to be able to use this input format. I made this mistake the first time I we through this, and it wasn't fun debugging why the heck it wasn't working. So yeah, do that. For 'Filters', choose 'BBCode', and click 'Save configuration'. You'll see your new input format show up in the list. Go ahead and set our new BBCode input format to 'Default' so our client won't have to select that format each time. It's also worth noting that you can disable the 'Filtered HTML' format that we'll probably never use for this project. To do that, click 'configure', then uncheck both users and save it. Note that the super-user can always use any of the formats listed here, even if they are disabled for any specific roles. This will come in handy when we build a static page that has all sorts of fun stuff in it.
So now our input format is set to BBCode, but we need some way to provide a GUI for the user, rather than having to resort to the BBCode documentation every time. Fortunately, there is the Quicktags module. Unfortunately, at the time of this writing, the 'stable' release of this module is actualy unstable. There is a bug in the code that was fixed in the development trunk. Go ahead and grab the latest development snapshot for this module. You can find it here: http://drupal.org/node/13362/release. The correct version to download (at this time) is 5.x-3.x-dev. Go ahead and download, upload and enable the module. Also enable the QuicktagsPlus module that comes with Quicktags. That'll add some additional buttons that we can use. Head over to Administer > Site configuration > Quicktags for configuration. I'm content with having Quicktags show up everywhere, because I'm not going to allow or surface comments for our site, but if you want to change this, you can.
Creating Pages
Now we're ready to add our first static page. Visit Create content > Page. Now, I need to create the 'Company Info' page for our client. The page looks like this (in completion): http://bellascena.com/company-info. It's pretty basic. Go ahead and enter the the title of the page, and the body. Try and replicate what I've done here. The 'Management and Principles' heading should be an H1 tag, and the names of the managers should only be bolded. As you can see, BBCode makes easy work of this. Easier than Word if you ask me. Now, without modifying anything else (read: simple), click 'Submit'.
Sweet mother of molasses, we have our first 'Page'. Better yet, check the URL of your page, it should be '/company-info'. If so, Pathauto is working stupendously. Win.
So it really is almost as simple as that for creating pages, with one exception. Since these 'Pages' will be main sections of our website, we want them to be accessible via our primary navigation. Go back to the page we just created and click 'Edit'. Open up 'Menu settings', enter the title (Company Info), the description (which will be used for alt text - I used 'Company information about BeeEss') and the parent item (Primary links - at the bottom). Don't worry about the weight for now, we'll move things around once we've got our main items in our navigation. Save the page. If you look at the top of the site where the default location of primary links reside, you'll see our new menu item. Nice!
Homework: repeat the above steps for creating pages and menu items for the following pages:
- http://bellascena.com/value-proposition
- http://bellascena.com/process (you can ignore the logos at the bottom of the page, but try and implement the list items)
Also, create a 'Home' page using the same techniques. For the title, use 'Home', and for the body, just use some simple HTML and set the input format to 'Full HTML'. We'll perfect this later.
News Page, and News Content Types
Our client needs an area of the website to be able to post latest news about what they're up to. A traditional 'News' section is in order. It's not completely apparent how to accomplish this easily in Drupal, though. The key here is the Views module. The Views module makes it possible to generate dynamic 'views' of certain content types with all sorts of configurations. Luckily, what we need Views to do for us is extremely basic, and thus easy to setup.
Grab the latest version of the Views module from Drupal.org and upload to your server. The module itself comes with many different components. Enable each of the Views modules, with the exception of the 'Views Theme Wizard'. We won't need that. So, you'll be enabling 'Views', 'Views RSS' and 'Views UI'.
Before we can setup a view of content types, we need to actually create that content type. Navigate to Administer > Content management > Content types. We need to add a new one, so select 'Add content type'. For a news item, we really only need a title, the body of the news item, and the date / time when the news was posted. Luckily, that's exactly what a basic content type provides. I entered the following for our news content type:
Name: News
Type: news
Description: A news item.
I left the rest of the fields untouched, with the exception of 'Promoted to front page'. Uncheck that one, then click 'Save content type'.
Now that we have a new content type, we'll want to modify our Pathauto settings to reflect it. As mentioned, when we post a 'news' item, we'll want the URL to be something like '/news/some-news-item'. Head over to the Administer > Site configuration > Pathauto section and open up the Node path settings. You'll see 'Pattern for all News paths'. Enter 'news/[title-raw]' without the quotes. Save the configuration.
Create some mock news items so we can test our setup. Go to Create content > News. Create about 3 or 4 news items. All you need is Title, Body and to ensure that 'Published' is selected (which it is by default). Make the body of a few of the news items pretty long so we can test the 'teaser' view versus the 'full' view of the news item a little later. Confirm that the URL reflects our Pathauto setting (/news/news-item-title).
Now that we've got some news items in our Drupal system, we need to surface them somehow. Ideally, we'd have a 'News' page that lists 'teasers' of each news item, with links off to each individual news item for the full view. Go to Administer > Site building > Views. You'll see a few default views that are created when you enable the Views module. I'm going to disable each of them, as we'll be creating our own. Select 'Add' to add a new view. Name your view 'news' and allow access to all roles. Views can be configured as either 'Pages' or 'Blocks'. Since we want our users to be able to access the news listings via a page, we'll setup our view as a page. Open up the 'Page' fieldset, and select 'Provide Page View'. We want our view to be accessible at http://www.bellascena.com/news, so for the URL, enter 'news' without the quotes. Change the 'View Type' to 'Teaser List'. Open the fieldset 'Empty Text'. This is where we'll define our content of the page should there be no 'news' items to display. I entered 'Sorry, there are no news items yet.' Under the 'Menu' fieldset, we definitely want to create a menu item for this view, so our users can access the News page via the main navigation. Check 'Provide Menu', and enter 'News' for the Menu Title.
Continuing on down the new view form, open up the 'Fields' fieldset. We want to add three fields in total: Title, Body and creation date / time of each news item. You'll find these as 'Node: Title', 'Node: Body', 'Node: Created Time'. Add each of those. Next comes filters. We need to filter which nodes the view will show by whether or not the node is of type 'News'. Thus, add the filter 'Node: Type', and set it to 'Is One Of: News'. Now we need to select how our nodes will be sorted. Open the 'Sort Criteria' fieldset. Add 'Node: Created Time' as a criteria, and set it to 'Descending'. Click 'Save' to save the view. All that's left is to set the view to also provide an RSS view of the node listing. Open the 'Arguments' fieldset, and add 'RSS: RSS Feed Selector'. Set the default to 'Display All Values', and save the view.
Navigate to www.domain.com/news, and you should now see your listing of news items! You should also have a nice RSS feed at www.domain.com/news/feed. The only thing left to do is move the Menu item under the corresponding parent item. Head to Administer > Site building > Menus, and edit the 'News' item. Change the parent item to 'Primary links'.
Contact Page
So the last 'page' that our client needs is a contact form. It would also be nice to put his address and contact information on that page as well. Drupal's default installation comes with the 'Contact' core module. Go to Administer > Site building > Modules and enable the 'Contact' module under the 'Core - optional' fieldset. Then head over to the Administer > Site building > Contact form. We'll need to setup a default category, or even multiple categories if we so desire. Select 'Add category' and enter the category name, recipients, 'selected' to 'Yes', and submit. I used 'General Information' for the title of my category since I'll only have one (it won't appear as an option if you've only got one). Now we need to enable access to the contact form to all visitors to the site. Go to Administer > User management > Access control, and enable 'access site-wide contact form' for all. If you visit www.domain.com/contact, you'll see the new form! Now we just need to get it in our primary navigation. Go modify your menu and create a new menu item for the contact page. You'll need to add a new item.
Navigation - Organization
We're all done adding items to our navigation, but we need to organize them. It's pretty simple, but also a tad tedious. Navigate to Administer > Site building > Menus. For each 'Primary links' menu item, select 'edit' and set the appropriate weight. I'm setting mine from 0 -> 5 (left to right).
Photo Gallery - What Happened?
So why didn't I use Drupal for my photo gallery solution? Well, there are several reasons. First off, the final photo gallery looks like this. The photo gallery I ended up using is ZenPhoto, and I've used it before.
Drupal does alot of things well. It manages all sorts of content very well, integrates great caching features and a bulletproof user management system. But photo galleries are not something Drupal is very well known for. My main concern was the UI for managing many photos and galleries. I have yet to find a very robust and clean photo gallery management solution for Drupal.
I've used ZenPhoto for a while now, and find it to be the best out-of-the-box solution for a very simple yet functional photo gallery solution. I commend the guys working on it. The system was built with modularity, simple styling techniques, caching, thumbnail generation and stupid-easy gallery management in mind. Styling a ZenPhoto system is simple. By the way, I'm not affiliated with them at all, but if you're in the market for a nice photo gallery solution, check them out.
Performance Tweaks
For the most part, our site's content structure and functionality spec is done. Now let's speed it up. Drupal has some excellent caching tools available, and they're very easy to use. Head over to Administer > Site configuration > Performance. There's quite a bit going on behind the scenes of Drupal's caching system, but all you need to know is how to turn it on and off, for the most part. You can safely enable 'Page cache', so go ahead and do so. After you log out of the site with page caching enabled, you will instantly notice a significant improvement in page load times.
You can also experiment with the CSS compression on that page. I always run my production sites with 'Aggregate and compress CSS files' enabled, but you may experience issues with this setting. If you have PHP safe-mode turned on (like with a default hosting platform with Media Temple), you'll need to turn it off before you enable the setting.
So now things are spiffy fast.
Conclusion
What's my conclusion? This blog post was way, way, way too long. So if you made it this far, you are a brave soul, and you should have a pretty functional site at this point. I commend your patience and invite you to sit in for the third part of this series coming in a week or so, titled 'Template Theming, Integration and Finishing Touches'. As always, feel free to leave questions or comments. Thanks!
Continue on to the third part: Part III: Template Theming, Integration and Finishing Touches.
]]>Well, fortunately, you don't have to be a programmer (any more) to implement a simple and easy-to-use content management system (CMS) for both your client, and yourself. It's actually quite easy, and I'll try and run you through the motions here.
Before I met Mr. Drupal a few months ago, I myself spent countless hours reinventing the proverbial wheel of content management systems many times over. My 'mantra' was that who better to decide what my clients need than myself? For that reason, I felt 'pre-built' content management systems were for those non-programming types, not me. I was wrong.
If you're still not convinced that Drupal can suit your needs, here are the main reasons that I generally choose Drupal over a custom-built CMS solution (in most cases):
- User management
- Security
- Caching
- Native error reporting and handling
- Great search engine optimization (SEO) out of the box
- Theming
So let's get to it. First let me start off by saying this tutorial will just cover a very basic Drupal integration for a simple site, such as a local business. Essentially, 80% of my clients just need this:
- A few pages: 'Homepage', 'About Us', 'News', 'Contact' (usually a few company-specific pages, too, but they generally follow these same formats)
- Excellent location-based SEO performance (ie. 'Rochester Seal Coating' [read: elitefinishes.com])
- A visually appealing site that functions well
- The ability to manage content as easily as possible without the consult of a technical individual
In my experience, if you've accomplished the above, you've been successful for the majority of small-businesses seeking a website.
Throughout this tutorial, I'm going to use a site that I just finished a few months ago. The site is BellaScena.com. The site as you see it there is a fully Drupal-powered site. I'll take you from the point at which the site was mocked up in XHTML / CSS and through the steps to full Drupal integration.
BeeEss has some basic features that you might see on a simple business site. These are the main components that make up the site:
- Doctype declaration
- Title
- Some meta data
- CSS stylesheets
- External JavaScript files
- Logo
- Navigation
- Content well
- Footer
- Google Analytics code
So that's the basic skeleton, nothing creepy in there. For our purposes here, you could think of a Drupal 'site' as two separate entities. The Drupal system itself, and a site 'theme'. Drupal themes should, in theory, be able to be used with any Drupal installation, and you should develop your theme with that in mind. That said, our XHTML / CSS mockup is done, so now we need to prep our Drupal installation before we can move forward with our theme development.
There's a couple different ways you can go about setting up a basic Drupal installation. You can use traditional means by downloading and uploading a copy of Drupal onto your server. You could also use CVS to checkout a copy of Drupal from Drupal.org onto your server. About a month ago, I wrote a blog post outlining steps to manage your Drupal installation with CVS and Subversion if you're feeling brave.
For simplicity's sake with this tutorial, I'm going to use the traditional method of downloading and uploading a copy of Drupal to the server. I'm making a few assumptions here, they are:
- You've got a server somewhere where you can install your Drupal site, and it supports PHP and MySQL. If not, try 1and1, that's who I use.
- You have FTP access to your server
- You have a basic knowledge of XHTML and CSS
- You have a basic knowledge of how PHP and MySQL databases work
Okay, so let's get started. Go to www.drupal.org and download the latest version of the Drupal software to your computer. The current version is located here, but be sure to check that there isn't a newer version available.
Now log into your server via FTP and create a folder where you'll want to extract Drupal into. Let's assume you want to install Drupal at the root of your server like so:
/drupal
Go find the Drupal copy that you just downloaded and extract it somewhere on your computer. It should extract a folder titled 'drupal-5.6' (or the version number of your copy). Within that folder lives the Drupal core codebase. Go ahead and upload the entire codeset to your '/drupal' folder that you've created on your server.
Now, I'm not sure how your host is setup, but you'll need to configure a domain or subdomain to point to your new installation. You can go ahead and do that now. 1and1 calls this a 'destination' for a domain.
Go ahead and navigate to the domain you've just setup to point to your Drupal installation. OK, real world problem. I just navigated to my directory and received the following error:
Incompatible Environment
The following error must be resolved before you can continue the installation process:
register_globals is enabled. Drupal requires this configuration directive to be disabled. Your site may not be secure when register_globals is enabled. The PHP manual has instructions for how to change configuration settings. (Currently using PHP 4.4.7)
I definitely wasn't expecting that, so we need to fix the error before we can proceed with installation. So a little googling reveals there's quite a few problems with 1and1's configuration setup. The normal solution to this problem would be to set 'register_globals' to 'off' with a .htaccess file. Unfortunately, 1and1 is not so forgiving with the following .htaccess file:
php_value register_globals 0
Since that doesn't work, the next best solution that I tried and was successful with on 1and1 is to set this directory and all subdirectories within it to use PHP 5 with any PHP files, rather than PHP 4. To do so, create a .htaccess file in the '/drupal' directory with the following contents:
AddType x-mapp-php5 .php
That should take care of our problem. A quick reload confirms my findings. If you've had such luck, you'll be confronted with a 'Database Configuration' page. Now is where the MySQL database comes in. Drupal is happy with either MySQL 4, or MySQL 5. For the sake of this tutorial, it won't really matter which one you use. Since 1and1 allows me to choose which version to use with a new database, I'll choose MySQL 5. Go ahead and setup a new database with your host and note the following:
Database Name
Database Username
Database Password
Database Host (if you're on a shared server, it probably won't be 'localhost')
Since I'm on a shared server, I need to specify the hostname for my database's location. At first glance, Drupal doesn't have that field, but if you click 'Advanced options', you'll see it there. Go ahead and enter the appropriate data for your newly created database. You can usually leave the 'Database port' alone. 'Table prefix' comes in handy when you're using a single database for more than one application. Essentially, if you enter 'test' into the 'Table prefix' field, all of your tables will be prefixed with 'test_'. Once you've entered your database connection information, click 'Save configuration'.
If you've entered everything correctly, you'll be taken to a page that says 'Drupal installation complete'. Your Drupal site is now completely installed!
The very first thing you need to do is create a user. This user will be the 'super user', and there can be no other 'super users'. Thus, it's important to do this directly after you install Drupal. The 'super user' has full administration rights to do absolutely everything. Go ahead and create your username by clicking 'create the first account' in the first list item. You are assigned a default password, which you should change immediately via the form.
Before I forget, you should always download the 'settings.php' file that Drupal just modified for you. The file is located in:
/drupal/sites/default
Among other things, that file houses your database connection string. It's important to download this so that you don't overwrite the file later on with settings.php changes if you need to make them locally. It's also worth noting that Drupal will set that file's permissions to 'read only'. Thus, if you really do need to change the file, you'll have to modify the permissions before you can do so.
So now you're in your Drupal site. What next? Well that's really up to you, but you should poke around the administration pages to get a feel for things. One of the first things I do is setup "Clean URLs". Enabling Clean URLs will make all of your Drupal powered URLs look like this:
http://site.com/admin/settings/admin
instead of this:
http://site.com/?q=admin/settings/admin
There are a few pre-requisites to safely using Clean URLs, which is why it's not enabled by default. To begin the process, visit the 'Administer' page via the left-hand navigation column, and select "Clean URLs" from the 'Site Configuration' section in the right hand column of the page. You'll notice that both of the options are disabled. Well that sucks. Not really, you just need to have Drupal run some tests on your system to ensure it is safe to enable Clean URLs. To do so, click the 'Run the clean URL test' at the end of the paragraph.
Ahh! 404 error for me. That's 1and1 for you. If you've received the 404 error when you clicked on that, it's most likely because you've installed Drupal into a sub-directory onto your server. You must've not been paying attention above. Tisk, tisk. Anywho, it's a quick fix. Go back to that .htaccess file that you may or may not have created above to handle the PHP 5 switch, and add the following lines to that file:
<IfModule mod_rewrite.c>
  RewriteEngine on
  RewriteBase /
  RewriteCond %{REQUEST_FILENAME} !-f
  RewriteCond %{REQUEST_FILENAME} !-d
  RewriteRule ^(.*)$ index.php?q=$1 [L,QSA]
</IfModule>
Okay okay, backup a bit. Some seasoned Drupal developers may be scratching their head a bit right now. In fact, I am myself. I'm a little confused as to why our new Drupal copy didn't come with a default .htaccess file with some of the goodies above already written in for us. If anyone wants to chime in here, please do so. Long story short, the code above was pulled from my BeeEss site listed above. I'm calling it 'BeeEss' so I don't affect the SEO of the actual site, like I did when I originally posted this :). The main reason you were receiving the 404 error (if you were) is beacuse of this line:
RewriteBase /
Well, that's what the line needs to be if you've installed Drupal into a sub-directory. So for the sake of moving on, we'll assume this is all set. By all means, leave a comment if you're having trouble at this point.
K, now upload the updated .htaccess file to your Drupal root. You should be able to refresh that 'Clean URL' test page now, and it should no longer result in a 404 error. The options for enabling / disabling clean URLs should also now be usable. Go ahead and click 'Enabled', and select 'Save configuration'. Now your URLs are delicious.
Go back to the 'Administer' page. Oh snap, a big red box. Not looking good. It probably says this:
One or more problems were detected with your Drupal installation. Check the status report for more information.
Go ahead and open the status report. There are probably two 'problems' being reported. The first of which is 'Cron maintenance tasks', and the second 'File system'. For the 'Cron maintenance tasks', you can safely ignore that for now, but go ahead and click 'run cron manually' to make it disappear temporarily. It's not important at this point, but maybe I'll get into it a bit later.
The other error is because the directory '/drupal/files' doesn't exist. That directory is used for files created by the Drupal system, such as theme specific files, user uploaded files, etc. A quick click on 'file system settings page' will actually generate the directory for you. That was easy. I wish all error resolution was that easy.
So we've finished our installation and basic setup of our barebones Drupal site. The next part in this series is titled "Site Setup, Content and Modules" and will focus on building our actual site with content, content types, structure and modules. After that, I'll run you through the motions of theming the entire site with my BeeEss site mockup.
If there's anything else you'd like me to touch on in the next two parts of this series, shoot me an e-mail or leave a comment on this post. Thanks!
See also: Drupal Installation Profile and Distributions
Continue on to the second part: Part II: Site Setup, Content and Modules.
]]>Through this post, I'm going to attempt to take you through all of the steps of managing your Drupal installation as well as any contributed modules you may need to utilize.
So the first steps are to have CVS and SVN running on either your server or production computer. In my case, I've got them running on both. If you've got a shared host, there are a few tutorials out there on how to setup SVN (many hosts already have CVS installed). Here's a rediculously quick tutorial on how to setup a base install of SVN on your shared server:
- Login to your server via SSH
- Create a directory where you'd like to install the Subversion software
- Navigate to that directory, and download two packages (Subversion itself, and Subversion Dependencies [latest versions here: http://subversion.tigris.org/]) with these commands:
wget http://subversion.tigris.org/downloads/subversion-1.4.5.tar.gz
wget http://subversion.tigris.org/downloads/subversion-deps-1.4.5.tar.gz
- You'll see the two packages in your directory. Now you need to unpackage them. Run the following commands:
tar -xzvf subversion-1.4.5.tar.gz
tar -xzvf subversion-deps-1.4.5.tar.gz
- Now you'll have a new directory named 'subversion-1.4.5'. Navigate to that directory and run the following command to begin installation (change /path/to/installation to your own):
./configure --prefix=/path/to/installation
make
make install
- Once the above is complete, Subversion is installed, but you need to setup your path to recognize the commands now in your installation directory.
- Navigate to your home directory (cd ~) and then edit or create the file '.bash_profile' (vim .bash_profile). Add the following lines:
PATH=~/path/to/installation/bin
export PATH
- Save the file, log out, log back in, and SVN should be sufficiently installed. Again, this was a stupid-quick tutorial, and I probably missed some stuff, so feel free to ask for clarification
Okay, so now we're assuming CVS and SVN are correctly installed and working on your box. The first step is to checkout a base installation of Drupal. Create and navigate to a directory where you'd like your Drupal installation to live. Once you're there, create the following directories:
- tags
- trunk
- branches
For an in-depth explanation of what these folders mean, see Wikipedia's decent overview.
Now, you'll checkout Drupal into the trunk folder. To do that, run the following command from the parent folder housing those three new directories:
cvs -d:pserver:anonymous:[email protected]:/cvs/drupal checkout -d ./trunk -r DRUPAL-5 drupal
The above code assumes you're looking for the latest stable Drupal 5 version, and that you want to check it out into './trunk'.
After that finishes, you've got a working copy of a Drupal installation straight from Drupal.org. Now we need to get your installation into your own Subversion repository for your personal safe-keeping. First you'll need to create a Subversion repository.
Think of your 'repository' as a bank. It's where you'll put your revision-controlled files, but not where you'll work on them. Once you've created the repository, you checkout versions of your projects and work on them in a remote location (remote as in another directory, or even another computer). The checked out version of your project from the repository is called a 'working copy'. You can then make changes incrementally to the version in the repository with the changes from your working copy.
Run the following command to create a repository named 'repos' in your current directory:
svnadmin create repos
If this doesn't work, be sure that the 'bin' folder from your SVN installation is correctly setup in your PATH. Run the command 'env' to check to see if that path is in there.
Then, go back to your Drupal checkout. At the top directory (where you see the folder that houses 'tags', 'trunk' and 'branches'), run the following command to put the entire codeset (including directories 'tags', 'trunk' and 'branches') into your repository you just created:
svn import name-of-folder file:///path/to/repos -m 'First Import'
There! You've just imported your base Drupal CVS checkout to your repository. At this point, if you wanted, you could delete the source files that you just used to import the code into the repository. I'd hold off until you do the next step.
Now that your project is in your Subversion repository, you need some way to manage and modify that code. The code that you used to import into the repository is in no way connected to the repository. What you need to do now, is do exactly what you did above with the Drupal installation, checkout your files into a working copy.
Navigate to the directory where you'll want your checkout to live, and run the following command:
svn checkout file:///path/to/repos/name-of-project/trunk name-of-destination-directory/
It's important to remember to checkout the '/trunk' of the project, because you don't really need the others, unless you have branched or tagged versions you're working on. Again, see that Wikipedia article for the usage of those folders.
Now you've got a working copy of your Drupal installation from your personal Subversion repository, which also maintains the integrity of your Drupal CVS checkout from Drupal.org. Let's say this checkout acts as the live codeset from which your site is running on. When Drupal.org announces an update, all you need to do is go back to your checked out version of Drupal, and run the following command to update your Drupal codebase with the latest version (assuming here that latest tagged release is '5.7'):
cvs update -r DRUPAL-5-7 -dP
It's as simple as that for upgrading your Drupal installation. Well, not really, if you have modules installed, you may need to perform some additional steps, but for the most part, it's as simple as that.
So now that you've got a nicely updated (from 3 minutes ago) installation of Drupal, you can start breaking stuff (or building, whatever you like). Let's say you find a nice little module on Drupal.org and you'd like to download and install that module into your Drupal installation. With this nice little setup we've got going on, there's no need to download the files manually, dump them into your Drupal installation and FTP to your server. Instead, you can do a CVS checkout of that specific module, then commit to your personal Subversion repository and check out a working copy on your server.
Navigate to:
your-drupal-installation/sites/all/modules/
You may need to create the 'modules' directory if this is a fresh Drupal install. Once you're there, run the following command to grab the 'Image' module from Drupal.org:
cvs -d:pserver:anonymous:[email protected]:/cvs/drupal-contrib checkout -d image -r DRUPAL-5--1-6 contributions/modules/image
Note that the revision tag (DRUPAL-5--1-6) may be different for each module. You'll want to make sure you grab the latest stable revision, rather than the HEAD, as many times the HEAD will contain development (and thus, unstable) code.
So once you run the command above, you'll have checked out the image module, and should now see it in your /sites/all/modules directory. The update process for modules is the same as your Drupal checkout. Navigate to the /sites/all/modules/image directory, and run the following command:
cvs update -dP
CVS will check your working copy against the revision you checked out of Drupal.org for changes. If there are changes, it'll bring your code up to date.
So now you have a Drupal installation and a module as working copies from Drupal.org. You'll want to commit your addition of the image module to your personal Subversion repository for safe-keeping. Run the following code at the root of your Drupal installation:
svn status
SVN will iterate through your installation and notify you of changes that you've made to your local working copy. You should see all of the additional files your Image module CVS checkout created. Run the following command to 'commit' (save) these changes to your repository:
svn commit -m 'adding cvs checkout of image module from drupal.org'
Then, you can run an 'svn status' again.
There should be no more pending actions. When you run 'svn status' and it returns a prompt with no actions, that means there is no difference between your LOCAL changes and the repository version. However, it does not necessarily mean there have not been changes to the repository. After all, if someone applies a patch to a piece of code in the repository, it does not automatically update your working copy for obvious reasons. You can see if there have been changes to the repository by the following command:
svn status --show-updates
So now, you've got a Drupal installation with your custom or contributed modules all under a personal Subversion repository, as well as copies of your Drupal installation and modules tied to a CVS checkout for upgrading (and downgrading) with ease.
Oh, here's a few links I was attached to when I first began this debacle:
- Abbey Workshop Subversion Cheat Sheet
- HOWTO: Checkout a drupal module from Drupal CVS
- Brett Coburn: Subversion on 1and1
At this point, I'm pretty much out of breath and I think we've covered a fair amount of ground.
So, yeah, well, I'm done.
]]>Whenever you search for 'reasons to switch to mac', you'll see lots of blog posts and articles written boasting about Mac hardware's sleek lines, and OS X's sleek UI (read: fanboys). While both of these are true and accurate observations (uhh?), they are not in themselves underlying reasons to switch platforms.
First things first. I'm what you would call a 'stubborn user of software', in that I don't embrace change unless there are clear reasons to do so and substantial productivity benefits resulting from the switch (complete opposite of my good friend Jon). So why then, after nearly 10 years of Windows use, did I switch to Mac?
Usability
Bottom line: Using OS X is just plain easier and more graceful than using Windows XP. If you're a keyboard shortcut fan like myself, you'll be happy to know that OS X is almost exclusively focused on keyboard-centric navigation and workflow. For example, I can open any site I'd like with three keystrokes + the actual domain. Actually, scratch that, if I've been to the site before, it should only take me about 4 or 5 keystrokes. Second that for sending email, opening an IM conversation, opening any file on the computer, any application on the computer, or even any system preference 'pane'. You figure out how to do that on XP (quickly and efficiently) and let me know.
Screen organization on OS X is ultimately more refined than XP. 'Expose' allows me to spread out all of my windows and pick and choose, rather than just ctrl+tab through 40 open windows (though you could if you'd like). Spaces let's me see all of my multiple desktops (currently 4) at a glance, and I find the 'show desktop' feature much more intuitive than XP's.
Prior to my decision to finally switch to Mac, I had toyed with the idea of Ubuntu, fairly seriously. I fell in love with the terminal. For many, 'terminal' simply means nothing more to them than 'computer', as you can perform any action, and more, via command line. I got my start using command line when I moved everything under the sun into Subversion repositories for version control of my life. I've since wondered how I ever went about my business without Subversion, but that's another blog post.
So anyways - with Unix under the hood - I've got some great tools natively supported in OS X, like SSH for secure terminal connections to servers, SCP for safely copying files to and from machines, Fink for virtually any supported Unix / Linux based applications, and general day-to-day process improvements. Many times, I find it easier to manage files and folders via terminal rather than OS X's fairly quirky 'Finder'.
User Interface
When I ran XP, I had been stuck on one theme for nearly 5 years. I never thought much of it, and never really changed the theme around. I came to realize, after reading Andy Rutledge's article on Quiet Structure, that my choice of XP theme attempted to accomplish just that.
Prior to switching to Mac I began wondering what 'themeing' possibilities there were with Mac, which it turns out there are slim to none. I took some advice from a fellow XP -> OS X convert that I should just give OS X's default theme a whirl. After a few days, I realized the default theme did exactly what it was supposed to do: provide the framework for more productivity. For me, it's certainly an example of 'Quiet Structure', and I find myself thinking more about what I'm doing, and less about the visual aesthetics of the platform itself. This is a major plus for design related work.
Updates
This is really just the tip of the iceberg, but when was the last time anyone really got excited about a Windows Update? I'm not really confident I could answer that, personally. From my first few weeks of using OS X, I find updates much more informative and interesting than XP's. That's probably because 90% of XP's updates were security related. While security related updates on XP are a necessary evil, not receiving so many with OS X is a nice change.
Unification
Virtualization is probably the main reason I switched. Well, it's probably the only way I could have successfully made the switch in the first place, from a process standpoint. Software like VMWare or Parallels takes the edge off of switching, allowing you to say 'well, I can always run that app under VMWare or Parallels'.
Before I switched, I had a list of software I needed to either duplicate or setup in VMWare (I'm a VMWare Fusionuser, myself). Over time, I slowly began dumping my old XP apps in leiu of equivalent (and much more elegant) OS X software. My only beef is a good text editor. There are lots of options, none of which fulfill all of my needs or desires, but for now, I'm a loyal Coda guy. Again, that's another blog post.
Quality Software
Pete Karl made an interesting point regarding third-party software out there in the intertubes. He mentioned that you'll see alot more 'high quality or bust' software. Essentially, the number of software developers for OS X is much lower than that of Windows, so you'll tend to find that software is either well written and devoid of 'malware', or it just won't exist at all.
Some of my favorites thus far:
Other Neat Features
Music sharing in OS X is ultimately more streamlined and integrated with iTunes. Well, iTunes just runs much better on OS X in general.
The 'Preview' app is a breath of fresh air. Coming from a world of specific applications for every filetype, it's quite convenient to have a built-in app that'll give you a quick 'preview' of the file. Especially nice for PDF's and PSD's, without having to open up the monster apps themselves.
According to a friend, it's been said that a Mac is incomplete without Quicksilver. Think of it as a direct path to your destination. Ctrl+Space, type what you want, and 'enter'. Works for nearly everything on your computer - files, folders, applications, network drives, system preferences, etc.
Spotlight is also a great feature. While desktop search is certainly a necessary feature, Apple seems to have done a much nicer and more efficient job than XP could ever have dreamt of.
OS X's built in Disk Utility allows you to quickly burn disk images on the fly, without the use of third party software. I'm not 100% positive XP couldn't do this, but I certainly never found that feature.
Apple's Migration Assistant works quite amazingly when switching to another Mac. I'll explain later, but I've used the migration assistant 4 times now, flawlessly. It essentally 'carbon copies' your mac to another. Brilliant.
Printer detection in OS X is genius. Simply find the printer, and add it. In most cases (all in my experience), OS X will transparently find and install the drivers for you. Not so much for XP, nope.
And now the bad part... hardware
Well, I've said quite a bit about my wonderful (software / OS) transition to OS X, and it surely has been a delight. But now I must share with you my experience over the past month or so regarding Apple hardware.
I purchased a Mac Pro with 5GB RAM, hooked it up to two 23" Cinema's for my main workstation at work (GateHouse Media). Worked great out of the box, no issues whatsoever. I'll come back to this.
A few weeks later, I purchased a MacBook Pro for my personal use. I got it from the Apple store online, and it shipped a few days later. Upon inspecting the laptop, I noticed one single pixel 'stuck' on red. Fail. Since I was in my 30-day grace period, I called Apple up and they were happy to issue me an RMA.
I proceeded to ship the laptop back, and since I couldn't wait for another, I went to an Apple Retail store and purchased another one (in anticipation of my refund from the first defective laptop). I inspected the laptop before I purchased it this time, and all looked well. I used the laptop for a few days, and began to notice a whacky 'flicker' in the screen. It was as if the screen was very quickly flickering from a slightly dimmer setting and back to the original brightness, all within just a few milliseconds.
So, naturally, I returned the second laptop, and they (unexpectedly) just gave me a new MBP for my troubles (it was only a few days after I purchased it, anyways).
Finally, the third laptop had worked as expected, for a little while. Only recently I noticed the intermittent 'blackout' of my keyboard functionality. Every once in while, the integrated keyboard on the laptop will cease functioning, and will remain 'dead' for about 10-30 seconds. This happens probably once every 1-2 minutes, until I restart the laptop. Upon restarting, the problem usually goes away for a few days. It rears it's ugly head every now and again. A quick glance at the Apple forums reveals that this is a fairly common problem, and that there is no fix. Please fix. Thanks.
So the laptop is functioning at 95% (keyboard issue is... eh).
Finally, last week, my Mac Pro (see above) decided to take a dive. I was working normally, and applications began getting a tad buggy, sluggish, and downright unreliable. iTunes lost my library, no idea where it went. So I restarted... kernel panic. I took it to the Apple store - hard drive had failed, and data was not recoverable. Thank you Subversion (see above).
Long story (not cut short), the Mac Pro is back, with a fully functioning hard drive (for now).
Oh, life.
And that concludes my ramblings. Thanks for listening, have a nice day.
]]>