The Evolution of WordPress: Major Updates and Features
WordPress has undergone significant transformations in 2025, with WordPress 6.8 “Cecil” being the latest major release launched on April 15, 2025. This version introduces several groundbreaking features that modernize the platform:
Key Features in WordPress 6.8
Style Book Enhancements: The Style Book now offers a cleaner, structured layout with clearer labels, making it easier to edit site styles. It’s also available in select Classic themes that have editor-styles or a theme.json file.
Speculative Loading: This innovative feature preloads pages when users hover over or click links, significantly improving site performance. The feature works exclusively in modern browsers without impacting older ones.
Enhanced Security: WordPress 6.8 introduces bcrypt password hashing, which increases the computational effort required to crack passwords, providing better security protection.
Performance Improvements: The update includes over 100 accessibility fixes and performance enhancements, with smarter query caching that reduces database strain for high-traffic sites.
Top WordPress Development Trends for 2025
1. AI-Powered WordPress Development
Artificial intelligence is revolutionizing WordPress development in 2025. AI-powered tools are now integrated into the platform through plugins and themes, enabling users to generate content, images, layouts, and entire websites faster than ever before.
Popular AI plugins like AI Engine provide comprehensive AI capabilities, including chatbots, content generation, image creation, and translation services. These tools seamlessly connect WordPress with leading AI providers like OpenAI, Anthropic, Google, and Hugging Face.
2. Full Site Editing (FSE) Becomes the Standard
Block-first development has matured significantly in 2025, with the Block Editor finally becoming the default for serious WordPress development. Most modern themes are now built as block themes, featuring full Site Editor support, responsive layouts, and deeply integrated global styles.
Full Site Editing allows users to edit every aspect of their website using the block editor, democratizing website design for non-developers. This shift moves away from traditional themes toward more dynamic and modular design possibilities.
3. Rise of Headless WordPress Architecture
Headless WordPress is gaining significant traction in 2025, separating content management from frontend presentation. This architecture enables developers to use modern JavaScript frameworks like React, Vue.js, or Angular for frontend development while maintaining WordPress as a robust content management system.
Benefits of headless WordPress include:
- Superior performance: Static site generation eliminates database queries during user requests
- Enhanced security: Reduced attack surface with separated frontend and backend
- Unlimited design flexibility: Freedom to choose any frontend technology
- Multi-platform content distribution: Content can be served to websites, mobile apps, and IoT devices
4. Enhanced Performance and Security Focus
WordPress development in 2025 emphasizes performance optimization and security hardening. Key practices include:
Performance Optimization:
- Implementing caching plugins like WP Rocket or WP-Optimize
- Using Content Delivery Networks (CDNs) for faster global content delivery
- Optimizing images with compression tools
- Minifying CSS and JavaScript files
Security Best Practices:
- Enabling two-factor authentication (2FA) for all admin users
- Implementing strong password policies
- Regular updates of WordPress core, themes, and plugins
- Using security plugins like Wordfence or Sucuri
WordPress Development Best Practices for 2025
Coding Standards and Architecture
Following WordPress coding standards is crucial for maintainable, scalable code. The official WordPress Coding Standards cover five key areas:
- PHP Standards: Utilizing PHP 7.4+ features, following WordPress-specific conventions
- HTML Standards: Promoting structured and semantic markup
- JavaScript Standards: Ensuring effective client-side functionality
- CSS Standards: Maintaining consistent styling approaches
- Accessibility Standards: Ensuring inclusive and user-friendly designs
Modern Development Workflow
Git plays a prime role in modern WordPress development workflows, enabling collaboration and maintaining high coding standards. Essential tools include:
- Local Development: Tools like Local WP, WordPress Studio, and XAMPP for local testing
- Version Control: Git for tracking changes and collaboration
- Build Tools: Gulp or Webpack for automating tasks like Sass compilation and minification
- Code Quality: PHP_CodeSniffer for enforcing coding standards
Plugin and Theme Development
Choose plugins wisely by selecting frequently updated options with excellent user ratings. For custom development:
- Use object-oriented programming (OOP) for better modularity
- Implement proper error handling with WordPress debug logging
- Never modify core WordPress files – extend functionality using hooks and filters
- Use child themes for customizations to preserve update compatibility
Career Opportunities in WordPress Development
Salary Landscape
WordPress development offers competitive salaries across different markets:
India: The average annual salary ranges from ₹2-4 lakhs for entry-level positions to ₹9-20 lakhs for senior roles and architects. WordPress developers can expect:
- Entry-Level (0-2 years): ₹2-3 lakhs
- Mid-Level (3-7 years): ₹4-6 lakhs
- Senior Level (5-9 years): ₹6-9 lakhs
- Expert/Architect (8+ years): ₹9-20 lakhs
United States: WordPress developers earn an average of $84,542 annually, with top earners making up to $148,000.
Job Market Trends
The WordPress job market remains robust with opportunities spanning:
- Remote WordPress Development: Average salary range of $4.6k-$6.8k per month globally
- Full-Stack WordPress Development: Combining WordPress with modern frameworks
- WordPress Consulting: Helping businesses optimize their WordPress implementations
- Plugin and Theme Development: Creating commercial products for the WordPress ecosystem
Skills in High Demand
Essential skills for WordPress developers in 2025 include:
- Modern PHP: PHP 8+ with object-oriented programming
- JavaScript Frameworks: React, Vue.js for headless implementations
- Block Development: Creating custom Gutenberg blocks
- Performance Optimization: Core Web Vitals and site speed optimization
- Security Implementation: WordPress hardening and security best practices
- AI Integration: Implementing AI-powered features and workflows
WordPress Community and Open Source Contributions
The Power of Open Source
WordPress remains committed to its open source philosophy, operating under the GPL license that provides four core freedoms:
- Freedom to run the program for any purpose
- Freedom to study and modify the program
- Freedom to redistribute
- Freedom to distribute modified versions
Community Contributions
The WordPress community continues to thrive with significant contributions:
- 924 contributors from 73 countries contributed to WordPress 6.8
- Major companies like GoDaddy invested $500,000 in WordPress community support
- Five for the Future initiative encourages organizations to contribute 5% of their WordPress-related resources back to the project
Getting Involved
Contributing to WordPress offers numerous benefits:
- Professional Development: Gaining experience with enterprise-level code
- Networking: Connecting with developers worldwide
- Giving Back: Supporting the platform that powers millions of websites
- Career Advancement: Building reputation and skills in the WordPress ecosystem
The Future of WordPress Development
Emerging Technologies
WordPress development in 2025 is shaped by several emerging technologies:
Artificial Intelligence: AI integration will continue expanding, with more sophisticated content generation, automated testing, and intelligent user experiences.
Progressive Web Apps (PWAs): WordPress sites increasingly adopt PWA features for mobile-first experiences.
Serverless Architecture: Integration with serverless platforms for improved scalability and cost-effectiveness.
Challenges and Opportunities
Performance Requirements: Modern web standards demand faster loading times, pushing developers toward optimization techniques and modern architectures.
Security Concerns: Growing cyber threats require continuous security improvements and best practices.
Accessibility Standards: Increasing focus on inclusive design and accessibility compliance.
Conclusion
WordPress development in 2025 represents an exciting convergence of traditional content management strength with cutting-edge technologies. The platform’s evolution toward AI integration, headless architecture, and enhanced performance capabilities positions it as a powerful choice for modern web development.
For developers entering or advancing in WordPress development, the opportunities are vast. From mastering Full Site Editing and block development to implementing AI-powered features and headless architectures, the skill set continues to expand. The strong community support, extensive documentation, and commitment to open source principles ensure that WordPress remains a valuable platform for building the web’s future.
Whether you’re a beginner exploring WordPress development or an experienced developer looking to modernize your skills, 2025 offers unprecedented opportunities to create impactful, high-performing websites that meet the demands of today’s digital landscape.
]]>The Block protocol enables toy to use block by any application. The Block protocol is a middle-man between blocks and applications, so any application embed any block.
]]>What ought to write the debug log?
The plugin should write what it is processing. The backup plugin writes a new log file for a backup, restore, and migration. The plugin should write the log what it is doing. If anything is failing, it should be written in the log file. Every if-then condition should be written with a detailed description, and it will pay off you in the future.
Please avoid writing short form words like “a”, “b” and “c” etc. in the log file
How to write the debug log?
There should be a method called log() in the main plugin class. It takes arguments like text, debug level, and process id or nonce.
For each new process id or nonce, a new log file will be written.
The debug levels are of the following types:
- Info
- Error
Should the debug log auto cleared?
The X days old log should be cleared automatically, otherwise it consumes a lot amount of space. The X can be 30 or anything that is suitable for your plugin. To clear the log files, you can setup the WP Cron.
]]>When I started a career in web development, we are making webpage using table tags. Surprised!?! Yes, It was.
Then I was making webpage using float. At that time Bootstrap and foundation CSS frameworks came and all web developers/designers started to use them.
Now, CSS has variable, flexbox and grid box features.
We can make responsive layouts instantly with flexbox and flexbox is supported by major browsers. We can see it at https://caniuse.com/?search=flexbox. The flexbox is explained sufficiently on CSS-Tricks https://css-tricks.com/snippets/css/a-guide-to-flexbox/.
Nowadays, Web Designers/Developers are using Tailwind CSS but It makes the webpage design more complex. I believe in simplicity for coding.
]]>For Sticking to one Coding Standard:
The Plugin code should follow one code standard. More than one developer is working on the same plugin. Coding Standard is giving feel like all code developed by a Developer.
If we follow a coding standard, there is a low chance to produce a buggy code and We can understand the code easily.
Code is like poetry and following coding standard gives good look to the code. As a developer, We are spending a lot of time reading code instead of writing a code. A Well Structured code is easy to read and understand.
There are three tools to maintain WordPress Coding Standard:
- PHP CodeSniffer – https://github.com/squizlabs/PHP_CodeSniffer
- PHP Coding Standards Fixer – https://cs.symfony.com/
For WordPress plugin code, I recommended using WordPress coding standard or PSR-3 or higher coding standard.
Right IDE:
If we use the right IDE, We can see syntax errors easily, Debug PHP code with Xdebug. I recommended using VSCode or PHPStorm IDE for WordPress Plugin Code development.
Static code analysis Tool:
We should remove unused code and variables from the code. For it, We should PHPStan – PHP Static Analysis Tool.
Task runner tool:
For compressing JS and CSS files, Remove comments and make PRO and Free plugins, We should use Gulp, Grunt, Codekit, or Webpack.
Version Control System:
We should use git for the version control system.
]]>Suppose you are giving the service of WordPress WebSite Development. A client who developed a website from you 2 or 3 years ago came back and requested a few tweaks, and you are wasting hours finding where and how you should achieve these minor tweaks because you forget where you have written your code logic! You are embracing bad code.
If you are in a WordPress Product (Plugin or Theme or Saas) for a long time, You may feel that your productivity is slowing down day by day due to bad code.
The difference between developing a code in other PHP frameworks and WordPress is that WordPress doesn’t insist on a specific code structure. Other PHP frameworks like Laravel, Symfony, CakePHP, and Zend force developers to write code in a certain way. WordPress gives developers to write code in their own way. WordPress gives the flexibility to developers to develop code in any way. But this flexibility comes with great disadvantages. Each plugin developer structures code in their own way. There is no standard structure to develop a code in WordPress. Some WordPress developer writes code in a procedure styles and others are in OOPs styles. The same inconsistencies can be seen in the Plugin and Theme files structure.
Some Plugin development companies understand these messes of code later when their plugin codebase grows vastly. If a developer tries to add a new feature, The Plugin release occurs with 2 to 3 bugs. If a developer tries to fix these bugs, They introduce new more bugs, and the WordPress plugin falls into a vicious cycle of bugs. The developer will fall in a spiral cycle of bugs, and customers of the plugin start complaining, creating tickets, asking for refunds, and giving bad reviews to the plugin. These will affect plugin revenues. One side developer of the Plugin has near-zero productivity, and the Plugin owner companies’ revenues growth decrease and support load increases. Another side, the product codebase become more worsen than previous. At this time, the Plugin owner company start to hire new developers. New developers learn the existing messy code system and add a new feature. At the starting of the phase of new developers giving enough productivity because they have learned messy code base and make more worst messier code. At this time, Old developers resign from the company or are thrown away by the company due to their productivity issues. After some time, the new developer reaches the same level of lacking productivity as the old developer. This way company has new developers every 2 to 3 years. These developer’s cycles hurt the company. New developer requires time to familiar with the plugin codebase. This vicious cycle creates bad image of the product and the product company.
Bad messy code requires more time for the new developers to be familiar with the Plugin codebase.
The messy code degrades plugin quality day by day and loss customer respect. The customers are starting to look at alternative plugins.
Until now, We understood that bad quality code affects you and your plugin company very worst. Later, We will discuss the solution to overcome the bad quality codebase.
]]>Researcher: Prashant Baldha ([email protected])
You can find the details publicly disclosed CVE detail on WordFence: https://www.wordfence.com/vulnerability-advisories/#CVE-2021-34629
The SendGrid Plugin was the official SendGrid WordPress Plugin. It is no longer maintained, and It has 100,000+ active installs.
Description: There is an Authorization bypass vulnerability in the SendGrid plugin if we run the plugin in multisite. The Subscriber user role can get SendGrid statistics intended to use only by the Administrator user role.
Which part of plugin infected: The subscriber user can get SendGrid statistics from the main site of Multisite.
Version: 1.11.8 (Latest Version)
Proof of Concept:
Prerequisite setup
- Setup a WordPress MultiSite Network.
- Install the SendGrid Plugin from https://wordpress.org/plugins/sendgrid-email-delivery-simplified/ and activate it network-wide.
- SignUp to the SendGrid on the https://sendgrid.com/.
- Go to https://app.sendgrid.com/settings/sender_auth and verify your email as a single sender.
- Go to https://app.sendgrid.com/settings/api_keys and make SendGrid full API access key.
- Open the wp-config.php and write below contestants:
define( 'SENDGRID_API_KEY', 'XXX' );
define( 'SENDGRID_SEND_METHOD', 'api' );
define( 'SENDGRID_FROM_NAME', 'Prashant' );
define( 'SENDGRID_FROM_EMAIL', '[email protected]' );
define( 'SENDGRID_REPLY_TO', '[email protected]' );- Make sure that you have changed the API key, name, and from email and reply to email in the above code snippet.
- Go to http://yoursite.com/wp-admin/network/admin.php?page=sendgrid-settings, scroll down, and send a test mail to you.
- Go to http://yoursite.com/wp-admin/index.php?page=sendgrid-statistics. Here you can see SendGrid statistics. This statistical data can be get by subscriber users of the main site.
Exploit Vulnerability
- Register as a Subscriber to the main site of this network multi-site.
- Login as the subscriber to the admin dashboard, View Page source and find the javascript var sendgrid_vars and copy the sendgrid nonce.
- Send the request to the URL /wp-admin/admin-ajax.php with subscriber cookie and the given POST parameters
action=sendgrid_get_stats&start_date=2021-06-30&end_date=2021-07-07&type=wordpress&sendgrid_nonce=bc060d13cfand you will see SendGrid statistics in JSON format.
Technical details of Vulnerability
- The plugin author has written the below code for adding action of the
admin_enqueue_scripts.In this code snippet, You should notice that the plugin author is enqueueing scripts in multisite and if the current site is the main site. Refer to the “elseif” condition in the below code.
 /**
   * Method that is called to set up the settings menu
   *
   * @return void
   */
  public static function set_up_menu()
  {
    if ( ( ! is_multisite() and current_user_can('manage_options') ) || ( is_multisite() and ! is_main_site() and get_option( 'sendgrid_can_manage_subsite' ) ) ) {
      // Add SendGrid widget in dashboard
      add_action( 'wp_dashboard_setup', array( __CLASS__, 'add_dashboard_widget' ) );

      // Add SendGrid stats page in menu
      add_action( 'admin_menu', array( __CLASS__, 'add_statistics_menu' ) );

      // Add SendGrid javascripts in header
      add_action( 'admin_enqueue_scripts', array( __CLASS__, 'add_headers' ) );

      // Add SendGrid page for get statistics through ajax
      add_action( 'wp_ajax_sendgrid_get_stats', array( __CLASS__, 'get_ajax_statistics' ) );
    } elseif ( is_multisite() and is_main_site() ) {
      // Add SendGrid stats page in menu
      add_action( 'network_admin_menu', array( __CLASS__, 'add_network_statistics_menu' ) );

      // Add SendGrid javascripts in header
      add_action( 'admin_enqueue_scripts', array( __CLASS__, 'add_headers' ) );

      // Add SendGrid page for get statistics through ajax
      add_action( 'wp_ajax_sendgrid_get_stats', array( __CLASS__, 'get_ajax_statistics' ) );
    }
}- The
add_header_fuctionrenders scripts and localize variable in all admin dashboard page:
  /**
   * Method that is called to set up the settings menu
   *
   * @return void
   */
  public static function set_up_menu()
  {
    if ( ( ! is_multisite() and current_user_can('manage_options') ) || ( is_multisite() and ! is_main_site() and get_option( 'sendgrid_can_manage_subsite' ) ) ) {
      // Add SendGrid settings page in the menu
      add_action( 'admin_menu', array( __CLASS__, 'add_settings_menu' ) );
      // Add SendGrid settings page in the plugin list
      add_filter( 'plugin_action_links_' . self::$plugin_directory, array( __CLASS__, 'add_settings_link' ) );
    } elseif ( is_multisite() and is_main_site() ) {
      // Add SendGrid settings page in the network admin menu
      add_action( 'network_admin_menu', array( __CLASS__, 'add_network_settings_menu' ) );
    }
    // Add SendGrid Help contextual menu in the settings page
    add_filter( 'contextual_help', array( __CLASS__, 'show_contextual_help' ), 10, 3 );
    // Add SendGrid javascripts in header
    add_action( 'admin_enqueue_scripts', array( __CLASS__, 'add_headers' ) );
}- AJAX action has no code to check the authorization of the user. The AJAX action code as below:
  /**
   * Get SendGrid stats from API and return JSON response,
   * this function work like a page and is used for ajax request by javascript functions
   *
   * @return void;
   */
  public static function get_ajax_statistics()
  {
    if ( ! isset( $_POST['sendgrid_nonce'] ) || ! wp_verify_nonce( $_POST['sendgrid_nonce'], 'sendgrid-nonce') ) {
      die( 'Permissions check failed' );
    }

    $parameters = array();
    $parameters['apikey']   = Sendgrid_Tools::get_api_key();
    $parameters['data_type'] = 'global';

    if ( array_key_exists( 'days', $_POST ) ) {
      $parameters['days'] = $_POST['days'];
    } else {
      $parameters['start_date'] = $_POST['start_date'];
      $parameters['end_date']   = $_POST['end_date'];
    }

    $endpoint = 'v3/stats';

    if ( isset( $_POST['type'] ) && 'general' != $_POST['type'] ) {
      if( 'wordpress' == $_POST['type'] ) {
        $parameters['categories'] = 'wp_sendgrid_plugin';
      } else {
        $parameters['categories'] = urlencode( $_POST['type'] );
      }
      $endpoint = 'v3/categories/stats';
    }
    echo Sendgrid_Tools::do_request( $endpoint, $parameters );

    die();
}What are SPF, DKIM & DMARC?
SPF, DKIM & DMARC are authentication mechanisms or protocols that ensure you are a legitimate email sender. They ensure that no spammers are sending emails on behalf of your domain. Suppose you own a prashantwp.com domain; then your server is only legitimate to send email from [email protected], no one other.
Setup SPF
SPF stands for Sender Policy Framework. Your domain SPF record tells the email receiver which servers are eligible to send mail on behalf of your domain. It is used to determine sender server is authenticated to send an email on behalf of the given domain.
To set up SPF, You should add the below record to your DNS server.
- Type: TXT
- Name: domain.com
- TTL: Auto
- Content: v=spf1 ip4:172,76.0.9 ip6:2001:0000:3238:DFE1:63:0000:0000:FEFB include:_spf.google.com ~all
In the above SPF DNS record content, The v=spf1 substring is indicating the SPF protocol version.
In the above SPF DNS record content, The ip4:172,76.0.9 substring is indicating your server’s IPv4 IP address.
In the above SPF DNS record content, The ipv6:2001:0000:3238:DFE1:63:0000:0000:FEFB substring is indicating your server’s IPv6 IP address.
In the above SPF DNS record content, The include:_spf.google.com is indicating google is allowed to send an email on behalf of your domain. It is useful if you are using any third-party mail service. I am using Google WorKPlace for my mailbox. If you are using any third-party mailbox service, You should mention its SPF record’s address here.
In the above SPF DNS record content, The ~all substring is indicating all other email sender servers should be SPF soft fail. If you write -all instead of ~all, Then It indicates all other email sender servers should be SPF hard fail. You can write +all substring But I am not recommending it because It makes valid all other servers to send emails on behalf of your domain.
For more details about SPF records content, Please visit the https://postmarkapp.com/blog/explaining-spf.
Setup DKIM
DKIM stands for DomainKeys Identified Mail.
To set up DKIM, You need to generate public-private Public key pair. The DKIM mechanism.
The public key is published by DNS record. The Private key is used to generate a HASH of the content of the email. The Hash is going with email in header form. The receiver mailbox received mail hash and content, and It verifies the Hash is right.
DKIM ensures that no one has changed the content of an email between sender and receiver. DKIM saves you from email spoofing.
Generate Public Private Key Pair
You can generate public-private key pair in Putty Gen software in Windows Operating System. You can generate a public-private key pair SSH KeyGen in Mac and Linux Operating Systems. You can generate public-private key pair on the https://cryptotools.net/rsagen online without any utility.
Set up DKIM public key DNS record
The TXT DNS record name should be _selector.domain.com. Here, I am choosing selector phpmailer so that the DNS record name would be _phpmailer.domain.com. The TXT DNS record content would be your generated public key.
To set up DKIM, You should add the below record to your DNS server.
- Type: TXT
- Name: _phpmailer.domain.com
- TTL: Auto
- Content: v=DKIM1;t=s;p=public_key_string
In the above DNS record content, The v=DKIM1 substring is indicating the DKIM protocol version.
In the above DNS record content, The t=s substring is indicating the timestamp version. Its value can be anything.
In the above DNS record content, The p=public_key_string substring is indicating the public key. Do not forget to replace the public_key_string with an actual public key that we have generated.
Sign an Email with DKIM Private Key in WordPress
To Sign with DKIM private key, please add the below code snippet in the root/wp-content/mu-plugins/dkim-sign-email.php
<?php
add_action( 'phpmailer_init', function( &$phpmailer ) {
	$phpmailer->DKIM_domain = 'prashantwp.com';
	$phpmailer->DKIM_selector = 'phpmailer'; // Replace phpmailer with your DKIM selector.
	$phpmailer->DKIM_private_string = 'private_key_string'; // Replace private_key_string with actual private key you generated
	$phpmailer->DKIM_passphrase = '';
	$phpmailer->DKIM_identity = $phpmailer->From;
} );
Setup DMARC
DMARC stands for Domain-based Message Authentication Reporting and Conformance.
DMARC tells the mailbox what to do if SPF and DKIM fail to meet the criteria. To set up DKIM, You have just to set up a DNS TXT record.
To set up DMARC, You should add the below record to your DNS server.
- Type: TXT
- Name: _dmarc
- TTL: Auto
- Content:
v=DMARC1; p=none; rua=mailto:[email protected]
In the above DNS record content, The v=DMARC1 substring is indicating the DKIM protocol version.
In the above DNS record content, The p=none substring is indicating the policy what to do if SPF and DKIM fail to authenticate. There are three values of the policy:
- Diffrent DMARC policies:
- none: No action taken if the SPF and DKIM policy is not passed in the receiver mailbox.
- quarantine: If receiver mailbox has setup quarantine setting, The email is send to it otherwise it goes to the spam folder, If the SPF and DKIM of an email doen’t pass.
- reject: The email goes to the spam folder, If the SPF and DKIM of an email doen’t pass .
In the above DNS record content, The rua=mailto:[email protected] substring indicates the email address to send all DMARC activity to the given email address. Do not forget to change [email protected] with your actual email address.
Besides these DMARC arguments, There are other DMARC DNS record arguments are also exist. DMARC All DMARC arguments are listed on the Google DMARC record document.
Setup List Unsubscribe Header in Email
Add below headers in the sending emails:
$header .= "List-Id: PrashantWPMain \r\n";
$header .= "List-Owner: <mailto:[email protected]> \r\n"
$header .= 'List-Unsubscribe-Post: List-Unsubscribe=One-Click \r\n';
$header .= 'List-Unsubscribe: <mailto:[email protected]?subject=Unsubscribe>';
Please do not forget to change my email addresses with your email addresses.
]]>In WordPress, Each user has been assigned a user role. User role is a label for authorization in WordPress. A User role has many capabilities (permissions).
User roles along with capabilities
There are five in-built WordPress user roles are listed below. The related user role capabilities are also listed with each user role. You should not remember all capabilities for each user role. It is just for reference.
- Administrator: The administrator has almost all permission to do in WordPress site. The role has below capabilities:
switch_themes, edit_themes, activate_plugins, edit_plugins, edit_users, edit_files, manage_options, moderate_comments, manage_categories, manage_links, upload_files, import, unfiltered_html, edit_posts, edit_others_posts, edit_published_posts, publish_posts, edit_pages, read, level_10, level_9, level_8, level_7, level_6, level_5, level_4, level_3, level_2, level_1, level_0, edit_others_pages, edit_published_pages, publish_pages, delete_pages, delete_others_pages, delete_published_pages, delete_posts, delete_others_posts, delete_published_posts, delete_private_posts, edit_private_posts, read_private_posts, delete_private_pages, edit_private_pages, read_private_pages, delete_users, create_users, unfiltered_upload, edit_dashboard, update_plugins, delete_plugins, install_plugins, update_themes, install_themes, update_core, list_users, remove_users, promote_users, edit_theme_options, delete_themes, export- Editor: The Editor user can write, edit, delete and publish all posts. The role user can edit, delete and publish other user’s posts too. The role has below capabilities:
moderate_comments, manage_categories, manage_links, upload_files, unfiltered_html, edit_posts, edit_others_posts, edit_published_posts, publish_posts, edit_pages, read, level_7, level_6, level_5, level_4, level_3, level_2, level_1, level_0, edit_others_pages, edit_published_pages, publish_pages, delete_pages, delete_others_pages, delete_published_pages, delete_posts, delete_others_posts, delete_published_posts, delete_private_posts, edit_private_posts, read_private_posts, delete_private_pages, edit_private_pages, read_private_pages- Author: The Author can write, publish and delete posts only own by them. The role has below capabilities:
upload_files, edit_posts, edit_published_posts, publish_posts, read, level_2, level_1, level_0, delete_posts, delete_published_posts- Contributor: The Contributor can write and edit owns posts. The user role can not even publish own post too. The role has below capabilities:
edit_posts, read, level_1, level_0, delete_posts- Subscriber: The Subscriber can read all contents of WordPress site. The role has below capabilities:
read, level_0In Multisite user, There is an extra user role named as Super Administrator. The Super Administrator can do anything in any site of Multisite WordPress. When the Super Administrator user is logged in, All permission checks are bypassed and all capabilities to given them.
The level_x capabilities are no longer used. It is retained for backward compatibilities purposes. So, please do not worry about it.
Authentication and Authorization
Authentication and Authorization terms are ambiguous with each other. However, there is a difference between both.
Authentication refer to check whether a user is logged in. Authorization means to check whether the logged in user has permission to perform specific action.
For authentication, WordPress has is_user_logged_in function available.
To display the “Thank You User_Name.” in the header of the front end of WordPress WebSite, We can use the below code snippets:
add_action( 'wp_footer', 'pmb_footer_display_thanks_message' );
function pmb_footer_display_thanks_message() {
    if ( is_user_logged_in() ) {
        printf( esc_html__( 'Thank You %1$s.', 'pmb-text-domain' ), $GLOBALS['current_user']->display_name );
    }
}
For authorization, There is a current_user_can function available in WordPress.
current_user_can( string $capability, mixed $args )
- $capability – the permission to check the current user has.
- $args – Other argument. Generally, It is object id for which the capability (permission) are checked.
For displaying edit post link to the logged-in user who has the capability to edit the post, We can use below code snippets:
add_action( 'the_content', 'pmb_content_add_edit_link', 10, 1 );
function pmb_content_add_edit_link( $content ) {
	if ( current_user_can( 'edit_post', $GLOBALS['post']->ID ) ) {
		return '<center><a href="proxy.php?url=' . esc_url( get_edit_post_link( $GLOBALS['post']->ID ) ) . '">' . __( 'Edit Post', 'pmb-text-domain' ) . '</a></center>' . $content;
	} else {
		return $content;
	}
}
Sometimes there is a need to check general capability check that is not related to any object. At that time, There is no need to pass the object id to the current_user_can function. For example, The current user has capability to manage all option, We can use the code if ( current_user_can( 'manage_options' ) ) {
The Revolution slider doesn’t produce a web-accessible slider by default. We should make a revolution slider web accessible by ourselves.
Keyboard Navigation in Revolution Slider
To enable keyboard navigation, Go to Revolution Slider > Navigation > Keyboard and enable keyboard arrow navigation by switching on.

Play and Pause links or buttons with screen reader texts and focusable
Add Play button to all slides
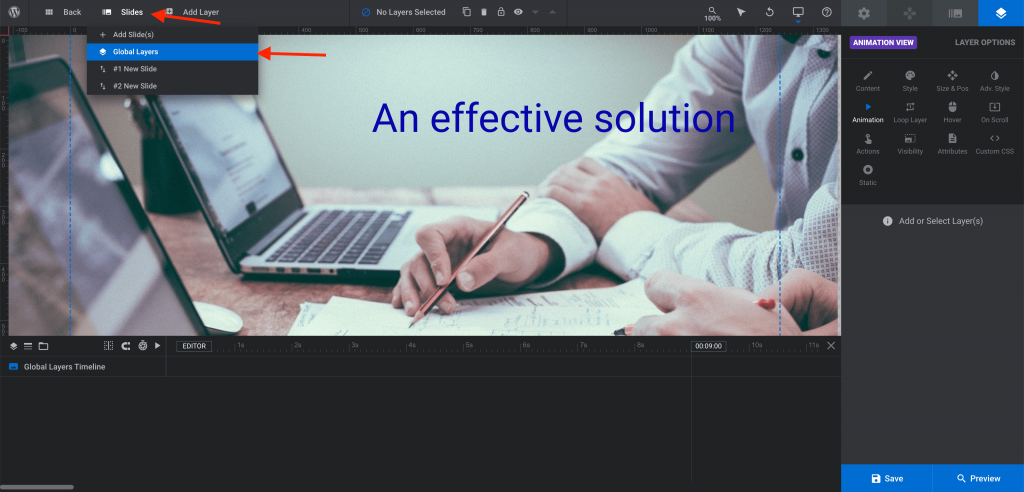
- Go to Slides > Global Layers.
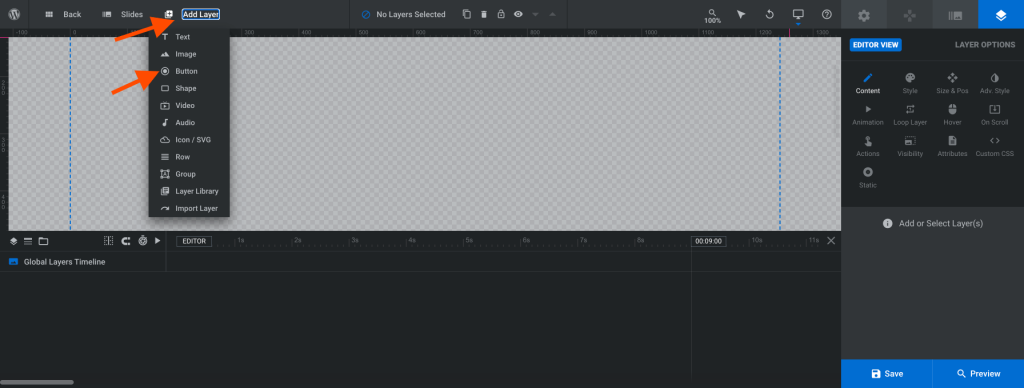
- Add Button Layer from Add Layers > Button.
- Set the button vertically bottom and horizontally centered position by locating Editor View > Size & Pos > Position & Size tab. Click on the Alignment Horizontal center and Vertical bottom button as mention in the below screenshot:

- Go to Editor View > Content > Text/Button Layer content tab and change text of Idle text box field to “Play” as mentioned in the below screenshot:

- Go to Editor View > Attributes > Attributes Tab > fill classes textbox field with the value “slider-button play”.

- Go to Editor View > Actions > Actions Modal anse Select “Play Slide” option.

- Click on the ‘Add to “button-x”‘.
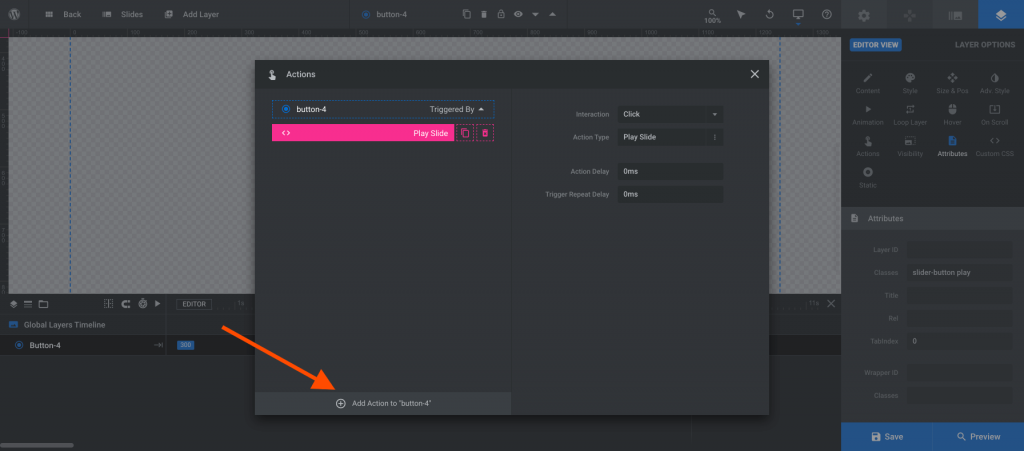
- Click on the “x” button of Actions modal to close it.

- Click on the “Save” button to save tha play buttom.

Save the play button in global layer of revolution slider
Add Pause button to all slides
- Select Play button in the global layer of revolution slider and Click on the Duplicate button.

- Retain the new duplicated button at the same position
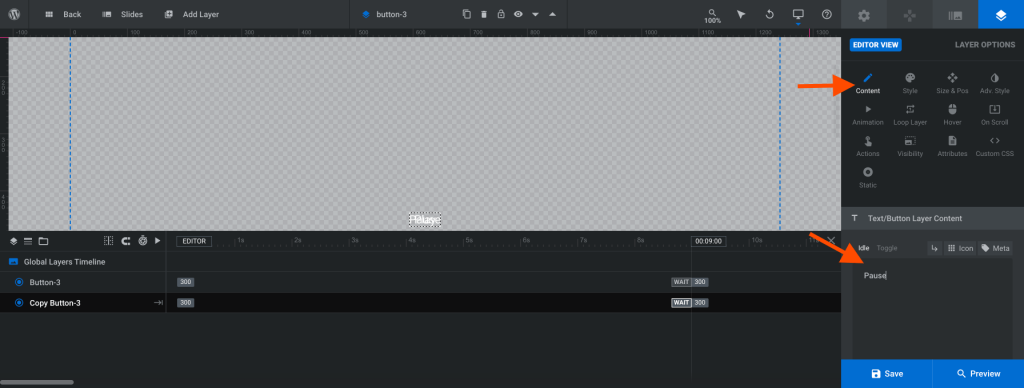
- Go to Editor View > Content > Text/Button Layer Content and Change the idel content to the “Pause” of the duplicated button.
- Go to Editor View > Actions >. Actions Modal and Select “Pause Slider” action.

- After Selecting Action of the Pause button, Click on the “Add action to Button-x”.
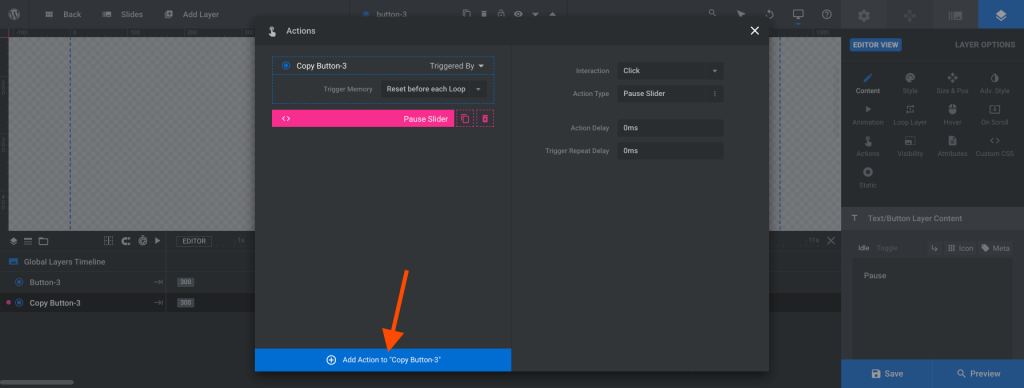
- Click on the “x” button of Pause Slider action modal popupbox.

Make Play and Pause button toggling display, Add screen reader text and focusable
To add screen reader text, make them focusable and toggling display add the below code in the root/wp-content/mu-plugins/revolution-slider-web-accessible.php file:
function pmb_make_rev_slider_play_pause_buttons_accessible() {
        <script>
		var revapi = jQuery(document).ready(function() {

			jQuery('#rev_slider_1').show().revolution({

				/* SLIDER SETTINGS HERE */

			});
		});

		revapi.on( 'revolution.slide.onloaded', function() {

			var slider = jQuery(this);
			slider.find( '.slider-button' ).attr( 'role', 'button' );
			slider.find( '.slider-button.play' ).attr( 'aria-label', 'play slides' ).hide();
			slider.find( '.slider-button.pause' ).attr( 'aria-label', 'pause slides' );

			slider.find( '.slider-button.play' ).attr( 'tabindex', '0' );
			slider.find( '.slider-button.pause' ).attr( 'tabindex', '0' );
		});

		revapi.on('revolution.slide.onpause', function() {
			// console.log('paused');
			var slider = jQuery(this);
			slider.find( '.slider-button.play' ).show();
			slider.find( '.slider-button.pause' ).hide();
		});

		revapi.on('revolution.slide.onresume', function() {
			// console.log('resumed to play');
			var slider = jQuery(this);
			slider.find( '.slider-button.play' ).hide();
			slider.find( '.slider-button.pause' ).show();
		});
		</script>
    <?php
}
add_action('wp_footer', 'pmb_make_rev_slider_play_pause_buttons_accessible', 999);
Next Previous buttons with screen reader texts and focusable
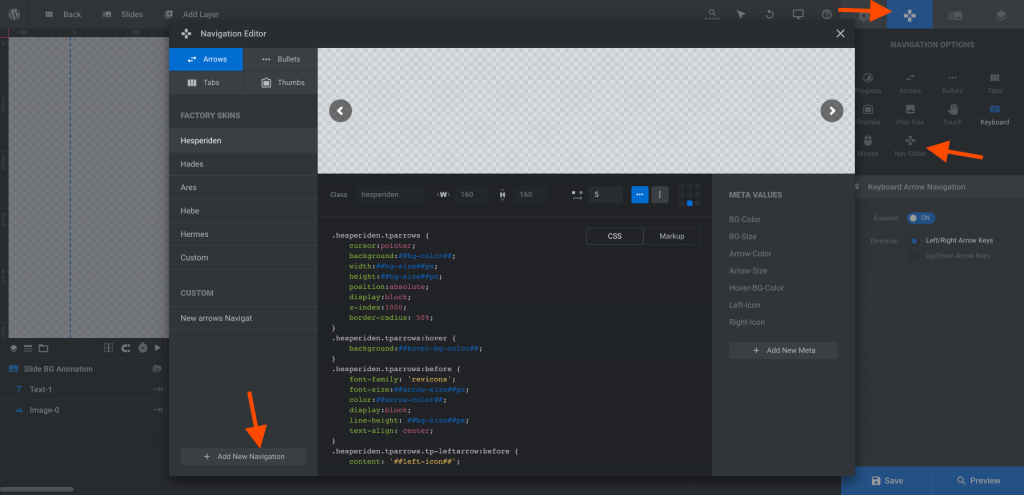
To show the Next and Previous buttons in the revolution slider, Go to Revolution Slider > Navigation > Nav Editor > Choose your Factory Skin and click on the “Add New Navigation” and Then click on the “Save Navigation” button as mentioned in the below screenshots:

To add screen reader text and make next and previous buttons focusable, Add the below code in the root/wp-content/mu-plugins/revolution-slider-web-accessible.php file:
function pmb_make_rev_slider_accessible() {
        <script>
		var revapi = jQuery( document ).ready( function() {

			jQuery('#rev_slider_1').show().revolution({

				/* SLIDER SETTINGS HERE */

			});
		});

		revapi.on( 'revolution.slide.onloaded', function() {

			var slider = jQuery(this);

			// Add tab suppport to bullets and arrows
			var bulletsArrows = slider.find( '.tp-bullet, .tparrows' );

			bulletsArrows.attr( 'tabindex', '0' );
			bulletsArrows.attr( 'role', 'button' );
			bulletsArrows.keypress( function( event ) {
				if( event.keyCode == 13 ) {
					jQuery( this ).click();
				}
			} );


			// Add label to next arrow
			slider.find( '.tp-leftarrow' ).attr( 'aria-label', 'previous slide' );

            // Add label to prev arrow
			slider.find( '.tp-rightarrow' ).attr( 'aria-label', 'next slide' );


		});


		</script>
    <?php
}
add_action( 'wp_footer', 'pmb_make_rev_slider_accessible', 999 );
In the above code, rev_slider_1 is the id of the revolution slider. Please do not forget to replace it with your revolution slider id.
]]>