The post Dark Mode Toggle appeared first on ScriptsTown.
]]>Frequently Asked Questions
Where to find the Options related to the Plugin?
You can find all the options related to the plugin in “Appearance” > “Dark Mode”.
How to Fix Images when Dark Mode is Active?
If you see any reverse effect on certain images when dark mode is active, then you can avoid that reverse effect on those images with the CSS. For example, if all those images have a class, “.css-selector”, then you can apply this CSS to remove invert effect from those images:
.darkmode--activated .css-selector { filter: invert(1); }You may also read this in-depth guide on how to fix inverse effect on images.
Is there a Premium version available?
There is a premium version, Dark Mode Toggle Pro available with advanced features.
The post Dark Mode Toggle appeared first on ScriptsTown.
]]>The post Dark Mode Toggle Pro appeared first on ScriptsTown.
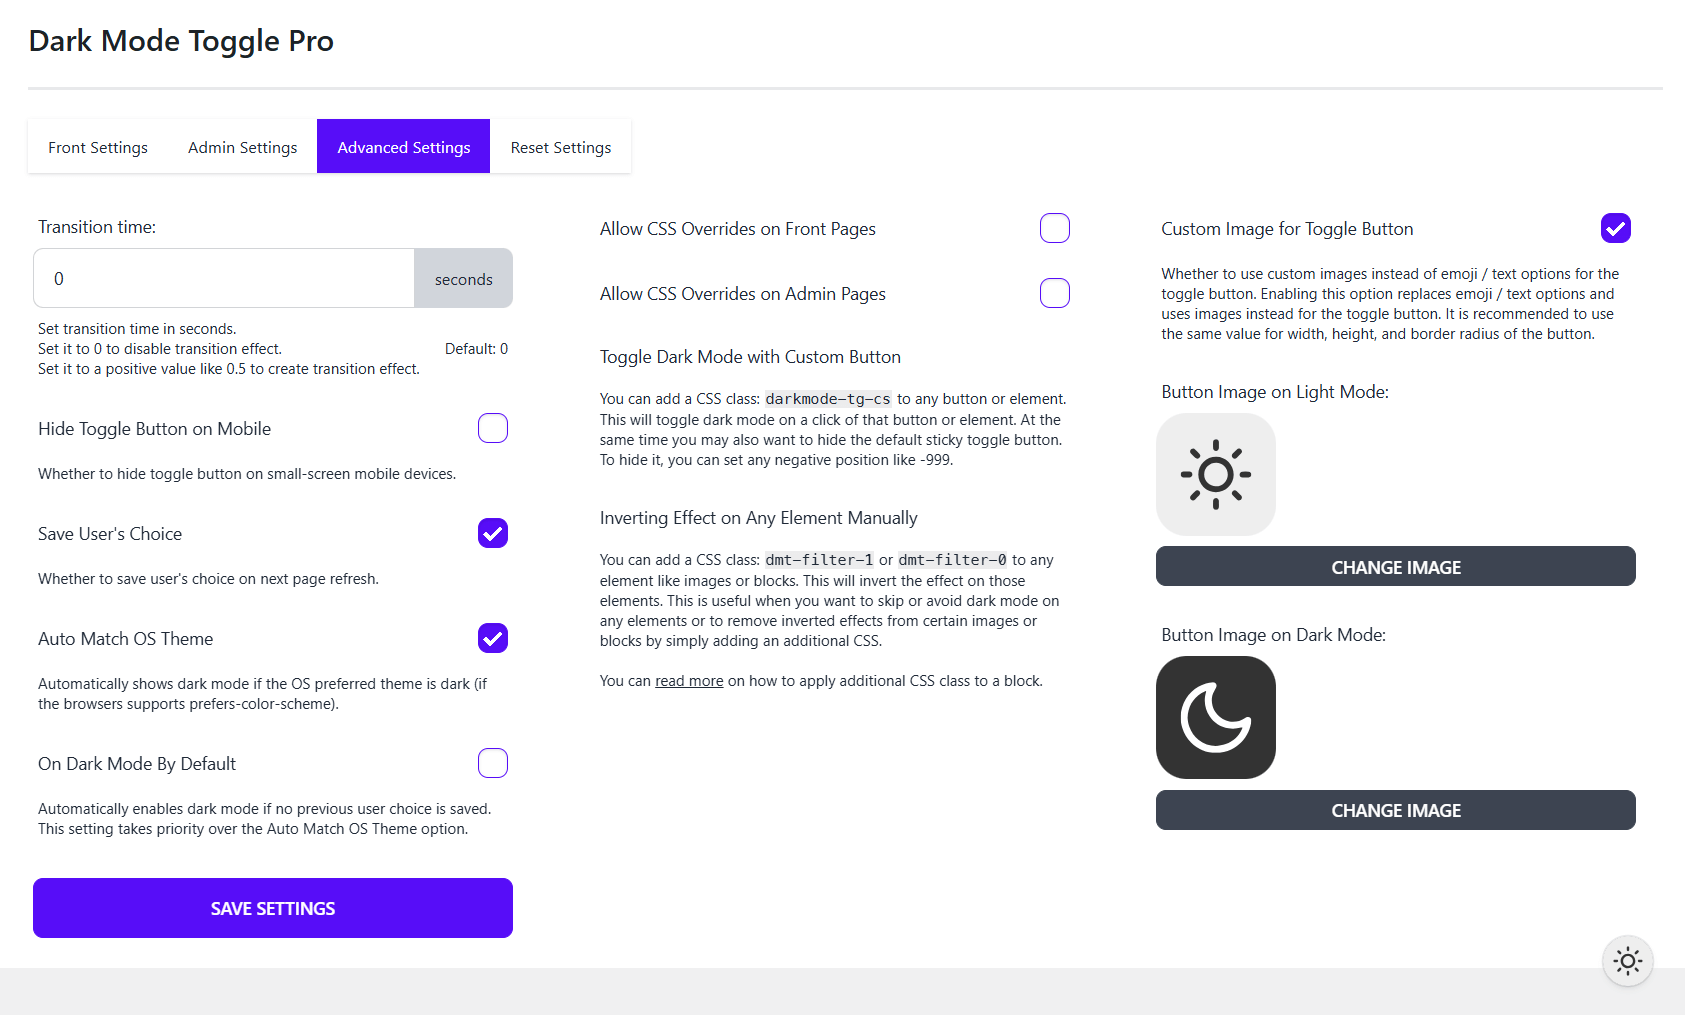
]]>The plugin comes with automatic configuration as well as many options to customize the toggle button very easily. Also, it is very lightweight, fast, and easy to use.
Upload Customized Toggle Buttons
In the pro version, you can upload custom toggle buttons for both dark mode and light mode.
Frequently Asked Questions
Where to find the Dark Mode Options and Settings?
You can find all the options and settings of the plugin in “Appearance” > “Dark Mode Pro”.
The post Dark Mode Toggle Pro appeared first on ScriptsTown.
]]>The post Login Security Pro appeared first on ScriptsTown.
]]>The post Login Security Pro appeared first on ScriptsTown.
]]>The post Event Timeline Feed appeared first on ScriptsTown.
]]>The post Event Timeline Feed appeared first on ScriptsTown.
]]>The post Contact Form Query appeared first on ScriptsTown.
]]>It supports filtering and searching for messages. And, you can add extra notes to a message for reference purposes or mark them as answered.
To prevent spam entries in the contact form, this plugin allows you to block messages based on blacklisted keywords so you can input and provide any keywords to easily block certain types of spam messages. Also, it comes with a captcha feature with support for Google reCAPTCHA and Cloudflare Turnstile.
Frequently Asked Questions
How to display a contact form on a page or post?
Use the shortcode [contact_form_query] to display the contact form on a page or post. Also, you may use “Contact Form” block in the block editor to display the contact form.
Email not working when using WP Mail?
You can read the following guide to correctly configure your email settings, so emails work properly on your WordPress site.
How to get Site Key and Secret Key for reCAPTCHA or Cloudflare Turnstile?
Read the guide on how to get the site key and secret key for Google reCAPTCHA.
Also, you can read how to get the site key and secret key for Cloudflare Turnstile.
How to block message entries based on keywords?
You can block messages based on keywords. Simply input all the keywords line by line that you want to block in the “Blacklist Keywords” field available in “Contact” > “Settings” > “Captcha”. For example, if you input this:
block keyword one
[email protected]
keywordthree
This will block any message that contains any of the above three keywords “block keyword one”, “blockthisemail@domain”, or “keywordthree”. Also, these keywords can be in any of the fields like email, subject, message, name, etc. You can leave this field empty if you do not want to block message entries based on keywords.
The post Contact Form Query appeared first on ScriptsTown.
]]>The post Social Icons Sticky appeared first on ScriptsTown.
]]>Frequently Asked Questions
Where to Find the Plugin Settings?
In your WordPress admin panel, you can find all the settings related to Social Icons Sticky plugin from “Settings” > “Social Share”.
The post Social Icons Sticky appeared first on ScriptsTown.
]]>The post Login Security Captcha appeared first on ScriptsTown.
]]>Frequently Asked Questions
Is Google reCAPTCHA not working?
You may have a caching plugin installed on your WordPress site. To make reCAPTCHA work, you can try any one of the following options:
- Exclude this URI in your caching plugin settings (JS Excludes): /repatcha/api.js
- Disable JavaScript-related caching from your plugin settings.
- Or, simply deactivate the caching plugin.
The post Login Security Captcha appeared first on ScriptsTown.
]]>