The post WordPress Cache Enabler Advanced Full Page Caching Guide appeared first on Server Manager Guide.
]]>This WordPress guide will also show you how Centmin Mod’s Cache Enabler advanced caching can optionally enable specific query string cache inclusions for query string trackers like ?fbclid, ?gclid and ?utm_*. WordPress will be installed via Centmin Mod 123.09beta01’s centmin.sh menu option 22 WordPress Nginx vhost installer which allows Cache Enabler’s advanced cache mode selection and will be behind Cloudflare CDN proxy for performance and security.
- Upcloud.com KVM VPS Server Creation With CentOS 7
- Cloudflare Configuration Setup
- Centmin Mod 123.09beta01 Advance Installation On Upcloud.com KVM VPS Server
- Enabling Centmin Mod’s free Letsencrypt SSL certificate issuance via Cloudflare DNS API validation
- WordPress Installation with Cache Enabler advance cache mode setup
- Final WordPress & Cloudflare Completion Tasks
- Testing Cache Enabler Full HTML Page Cache
- Notable Updates Since Initial Publication
Upcloud.com KVM VPS Server Creation With CentOS 7
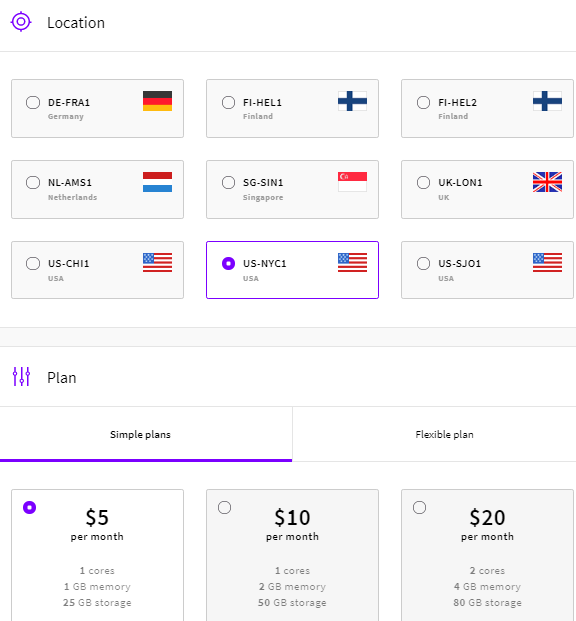
To create Upcloud.com KVM VPS server, sign up for an account via affiliate link here (signees also get US$25 credits to use as well). Read the official Centmin Mod installation guide’s minimum and recommended memory and disk resource requirements. For the purpose of this guide, will create a 1 cpu, 1GB memory, 25GB disk US$5/month KVM VPS server in New York City datacenter location using CentOS 7 OS (CentOS 8 is currently not supported yet).
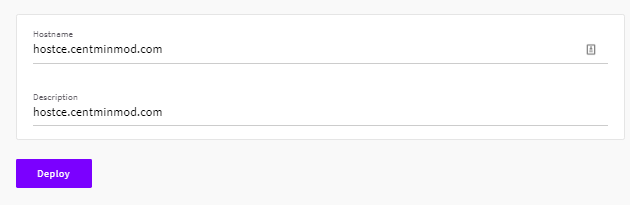
The chosen hostname for KVM VPS server is based on the official Getting Started Guide step 1 – main hostname setup guide. Where the main hostname is hostce.centminmod.com and the intended WordPress site domain name is cache-enabler.centminmod.com
Upcloud.com New York City data center is relatively new and is solely populated with newer AMD EPYC 7542 Rome based server processors.
lscpu
Architecture: x86_64
CPU op-mode(s): 32-bit, 64-bit
Byte Order: Little Endian
CPU(s): 1
On-line CPU(s) list: 0
Thread(s) per core: 1
Core(s) per socket: 1
Socket(s): 1
NUMA node(s): 1
Vendor ID: AuthenticAMD
CPU family: 23
Model: 49
Model name: AMD EPYC 7542 32-Core Processor
Stepping: 0
CPU MHz: 2894.560
BogoMIPS: 5789.12
Hypervisor vendor: KVM
Virtualization type: full
NUMA node0 CPU(s): 0
Flags: fpu vme de pse tsc msr pae mce cx8 apic sep mtrr pge mca cmov pat pse36 clflush mmx fxsr sse sse2 syscall nx mmxext fxsr_opt pdpe1gb rdtscp lm art rep_good nopl extd_apicid eagerfpu pni pclmulqdq ssse3 fma cx16 sse4_1 sse4_2 x2apic movbe popcnt tsc_deadline_timer aes xsave avx f16c rdrand hypervisor lahf_lm cmp_legacy cr8_legacy abm sse4a misalignsse 3dnowprefetch osvw topoext perfctr_core retpoline_amd ssbd ibrs ibpb vmmcall fsgsbase tsc_adjust bmi1 avx2 smep bmi2 rdseed adx smap clflushopt clwb sha_ni xsaveopt xsavec xgetbv1 arat umip spec_ctrl
Cloudflare Configuration Setup
Once, Upcloud KVM VPS server is created you will be assigned a public IP address. If you haven’t already done so, you need for your domain DNS to be on Cloudflare. You can follow Cloudflare’s Welcome setup wizard to guide you through the steps in adding your domain and DNS to Cloudflare at https://www.cloudflare.com/welcome-center. Note, you won’t be able to successfully pass the Cloudflare Healthcheck for your WordPress intended domain name until you complete the WordPress installation through the below outlined steps. You can skip the Cloudflare Welcome setup wizard if you already have your primary domain added to a Cloudflare account zone.
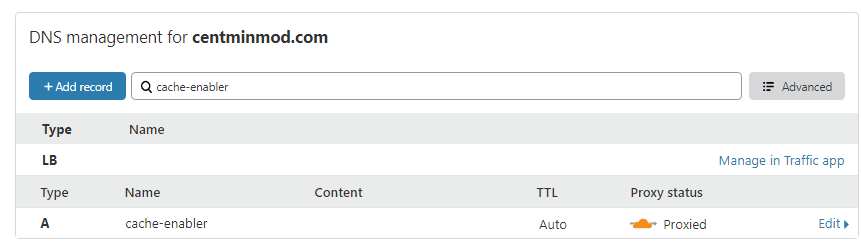
You will want to log into your Cloudflare account for the WordPress domain and create your desired DNS A record for the domain or subdomain i.e. cache-enabler.centminmod.com and also the hostname, hostce.centminmod.com. Example for cache-enabler.centminmod.com DNS A record (masked out for privacy here) – making sure that orange cloud Proxied is enabled for Cloudflare to CDN proxy your site.
Centmin Mod 123.09beta01 Advance Installation
The first step is installing Centmin Mod 123.09beta01 on Upcloud.com KVM VPS server – 1 cpu, 1GB, 25GB disk US$5/month VPS server in New York City data center location. The Centmin Mod Advance Installation method will be used. After the initial install, follow the official Getting Started Guide for the remaining steps to fully complete the setup. Throughout this guide, the centmin.sh menu options will be referred to. You can read how to run centmin.sh shell based menu here.
First set your desired notification email address in a variable, EMAIL. This is to be typed into your logged in SSH session as root user which will setup up the SSH session variable EMAIL which will be used later in this guide.
# set your email address you want to receive alerts and server emails
[email protected]
Then set up the persistent configuration file which allows you to override Centmin Mod’s centmin.sh menu script’s default settings without modifying centmin.sh itself. The commands below are to be typed into your logged in SSH session as root user which will create the /etc/centminmod directory and then create the empty /etc/centminmod/custom_config.inc persistent config file.
# create initial persistent config file to override centmin.sh defaults
# https://centminmod.com/upgrade.html#persistent
mkdir -p /etc/centminmod
touch /etc/centminmod/custom_config.inc
Next step is to populate the persistent configuration file with variables which enable advanced features in Centmin Mod LEMP stack. The echo commands below are to be typed into your logged in SSH session as root user and they populate the persistent config file at /etc/centminmod/custom_config.inc. Each advance enabled option has a comment linked to a Centmin Mod community forum thread/post explaining what the advance option does etc. You can choose which advance options if any or all to enable or skip the ones you don’t need. Note the last option listed for WPCLI_CE_QUERYSTRING_INCLUDED=’y’ is required to enable Cache Enabler’s optional query string cache inclusions.
# dynamically tune nginx ssl_session_cache in /usr/local/nginx/conf/ssl_include.conf based on system detected memory
# https://community.centminmod.com/posts/76615/
echo "NGINX_SSLCACHE_ALLOWOVERRIDE='y'" >> /etc/centminmod/custom_config.inc

# override Nginx default OCSP response cache refresh time 1h (3600 seconds) to 24hrs (86400 seconds)
# https://community.centminmod.com/threads/19515/
echo "NGINX_STAPLE_CACHE_OVERRIDE='y'" >> /etc/centminmod/custom_config.inc
echo "NGINX_STAPLE_CACHE_TTL='86400'" >> /etc/centminmod/custom_config.inc

# SET_DEFAULT_MYSQLCHARSET='utf8mb4' to override MariaDB MySQL
# default characterset and collation from default utf8 to utf8mb4
# https://community.centminmod.com/threads/17949/
echo "SET_DEFAULT_MYSQLCHARSET='utf8mb4'" >> /etc/centminmod/custom_config.inc

# enable nginx backlog override https://community.centminmod.com/threads/17620/
echo "AUTOHARDTUNE_NGINXBACKLOG='y'" >> /etc/centminmod/custom_config.inc

# enable zstd compressed logrotation for nginx & php-fpm https://community.centminmod.com/threads/16374/
echo "ZSTD_LOGROTATE_NGINX='y'" >> /etc/centminmod/custom_config.inc
echo "ZSTD_LOGROTATE_PHPFPM='y'" >> /etc/centminmod/custom_config.inc

# enable letsencrypt ssl certificate + dual RSA+ECDSA ssl certs https://centminmod.com/acmetool/
echo "LETSENCRYPT_DETECT='y'" >> /etc/centminmod/custom_config.inc
echo "DUALCERTS='y'" >> /etc/centminmod/custom_config.inc

# enable ECC 256bit ECDSA self-signed SSL certificate generation https://community.centminmod.com/posts/82177/
echo "SELFSIGNEDSSL_ECDSA='y'" >> /etc/centminmod/custom_config.inc

# enable nginx zero downtime on the fly nginx binary upgrades https://community.centminmod.com/threads/8000/
#echo "NGINX_ZERODT='y'" >> /etc/centminmod/custom_config.inc

# enable brotli compression https://community.centminmod.com/threads/10688/
echo "NGINX_LIBBROTLI='y'" >> /etc/centminmod/custom_config.inc
echo "NGXDYNAMIC_BROTLI='y'" >> /etc/centminmod/custom_config.inc

# boost PHP 7 performance by enabling Profile Guided Optimisation flag
# https://centminmod.com/perf/
# will dramatically increase PHP-FPM compile/install times but result in
# 5-20% faster PHP 7+ performance. PHP_PGO='y' only works with servers with
# 2+ or more cpu threads. However, you can force PHP PGO optimisations with
# 1 cpu thread servers via PHP_PGO_ALWAYS='y'
echo "PHP_PGO_ALWAYS='y'" >> /etc/centminmod/custom_config.inc
echo "PHP_PGO='y'" >> /etc/centminmod/custom_config.inc

# php compression extensions https://community.centminmod.com/posts/70777/
echo "PHP_BROTLI='y'" >> /etc/centminmod/custom_config.inc
echo "PHP_LZFOUR='y'" >> /etc/centminmod/custom_config.inc
echo "PHP_LZF='y'" >> /etc/centminmod/custom_config.inc
echo "PHP_ZSTD='y'" >> /etc/centminmod/custom_config.inc

# php file info
echo "PHPFINFO='y'" >> /etc/centminmod/custom_config.inc

# enable centmin.sh menu option 22 WordPress Cache Enabler Query String inclusions
# https://community.centminmod.com/posts/85927/
echo "WPCLI_CE_QUERYSTRING_INCLUDED='y'" >> /etc/centminmod/custom_config.inc
Once persistent config file /etc/centminmod/custom_config.inc is populated, it should look something like this. If you have second thoughts about enabling a specific advanced option, you can comment it out with a hash # in front of the variable before proceeding with the actual Centmin Mod installation in the next step.
NGINX_SSLCACHE_ALLOWOVERRIDE='y'
NGINX_STAPLE_CACHE_OVERRIDE='y'
NGINX_STAPLE_CACHE_TTL='86400'
SET_DEFAULT_MYSQLCHARSET='utf8mb4'
AUTOHARDTUNE_NGINXBACKLOG='y'
ZSTD_LOGROTATE_NGINX='y'
ZSTD_LOGROTATE_PHPFPM='y'
LETSENCRYPT_DETECT='y'
DUALCERTS='y'
SELFSIGNEDSSL_ECDSA='y'
NGINX_LIBBROTLI='y'
NGXDYNAMIC_BROTLI='y'
PHP_PGO_ALWAYS='y'
PHP_PGO='y'
PHP_BROTLI='y'
PHP_LZFOUR='y'
PHP_LZF='y'
PHP_ZSTD='y'
PHPFINFO='y'
WPCLI_CE_QUERYSTRING_INCLUDED='y'
Centmin Mod Installation
The actual Centmin Mod LEMP stack install command to run in your logged in SSH session as root user using latest betainstaller73.sh script so PHP (php-fpm) 7.3 latest version is default installed.
# install centmin mod latest beta with php-fpm 7.3 default
# https://community.centminmod.com/threads/centmin-mod-09-beta-branch-testing.4128/
yum -y update; curl -O https://centminmod.com/betainstaller73.sh && chmod 0700 betainstaller73.sh && bash betainstaller73.sh
Or you can use the latest betainstaller74.sh script so PHP (php-fpm) 7.4 latest version is default installed.
# install centmin mod latest beta with php-fpm 7.4 default
# https://community.centminmod.com/threads/centmin-mod-09-beta-branch-testing.4128/
yum -y update; curl -O https://centminmod.com/betainstaller74.sh && chmod 0700 betainstaller74.sh && bash betainstaller74.sh
For this guide, I will use PHP 7.4 default installer. Note, you can only run the installer once. If you want to later downgrade or upgrade PHP-FPM versions, you can do that via centmin.sh menu option 5 PHP upgrade/downgrade shell based menu option after the initial Centmin Mod installation.
At the end of Centmin Mod LEMP stack installation, the initial install times for various components are displayed including the total installation time. As Nginx and PHP-FPM are source compiled, time to install is dependent on the speed of your server – including cpu clock speed and number of cpu threads available. The higher the cpu clock speed and the more cpu threads available, the faster the installation. You can basically use the Centmin Mod LEMP stack installer as a benchmark to evaluate the performance of your server.
Usually, the times are a fairly accurate representation of the performance of your server for Centmin Mod LEMP purposes. Enabling PHP Profile Guided Optimizations (PGO) in this advance guide will also further increase the duration for PHP-FPM compilation by approximately 2x. But PHP PGO will give up between 5-20% faster PHP performance. So you can weigh up the added PHP-FPM compile time versus resulting PHP-FPM performance you gain. Without PHP PGO, the PHP install time below of 1106 seconds would have been halved to around 450-500 seconds.
This Centmin Mod install took ~2206 seconds or just under 37 minutes on 1 cpu core VPS. If you had chosen 2 cpu core, it would be ~25-45% faster and 4 cpu core would be 30-60% faster.
---------------------------------------------------------------------------
Total Curl Installer YUM or DNF Time: 102.2205 seconds
Total YUM Time: 9.969806311 seconds
Total YUM or DNF + Source Download Time: 36.2631
Total Nginx First Time Install Time: 502.3685
Total PHP First Time Install Time: 1106.8022
Download From Github Time: 0.8572
Total Time Other eg. source compiles: 458.2096
Total Centmin Mod Install Time: 2103.6433
---------------------------------------------------------------------------
Total Install Time (curl yum + cm install + zip download): 2206.7210 seconds
---------------------------------------------------------------------------
1 AMD EPYC 7542 32-Core Processor
1 2894.560
---------------------------------------------------------------------------
Nginx latest mainline version installed where the version build tag of 050920-055953-centos7-kvm-19b44b9-br-25f86f0 refers to the following: day/month/year-seconds-centos7-virtualization type-Centmin Mod git commit tag at time of install-brotli-brotli-git-tag at time of install.
nginx -V
nginx version: nginx/1.19.2 (050920-055953-centos7-kvm-19b44b9-br-25f86f0)
built by gcc 8.3.1 20190311 (Red Hat 8.3.1-3) (GCC)
built with OpenSSL 1.1.1g 21 Apr 2020
TLS SNI support enabled
configure arguments: –with-ld-opt=’-Wl,-E -L/usr/local/zlib-cf/lib -L/usr/local/lib -ljemalloc -Wl,-z,relro -Wl,-rpath,/usr/local/zlib-cf/lib:/usr/local/lib -flto=1 -fuse-ld=gold’ –with-cc-opt=’-I/usr/local/zlib-cf/include -I/usr/local/include -m64 -march=x86-64 -DTCP_FASTOPEN=23 -g -O3 -fstack-protector-strong -flto=1 -fuse-ld=gold –param=ssp-buffer-size=4 -Wformat -Werror=format-security -Wno-error=pointer-sign -Wimplicit-fallthrough=0 -fcode-hoisting -Wno-cast-function-type -Wno-format-extra-args -Wp,-D_FORTIFY_SOURCE=2 -Wno-deprecated-declarations’ –sbin-path=/usr/local/sbin/nginx –conf-path=/usr/local/nginx/conf/nginx.conf –build=050920-055953-centos7-kvm-19b44b9-br-25f86f0 –with-compat –with-http_stub_status_module –with-http_secure_link_module –with-libatomic –with-http_gzip_static_module –add-dynamic-module=../ngx_brotli –with-http_sub_module –with-http_addition_module –with-http_image_filter_module=dynamic –with-http_geoip_module –with-stream_geoip_module –with-stream_realip_module –with-stream_ssl_preread_module –with-threads –with-stream –with-stream_ssl_module –with-http_realip_module –add-dynamic-module=../ngx-fancyindex-0.4.2 –add-module=../ngx_cache_purge-2.5.1 –add-dynamic-module=../ngx_devel_kit-0.3.0 –add-dynamic-module=../set-misc-nginx-module-0.32 –add-dynamic-module=../echo-nginx-module-0.62 –add-module=../redis2-nginx-module-0.15 –add-module=../ngx_http_redis-0.3.7 –add-module=../memc-nginx-module-0.19 –add-module=../srcache-nginx-module-0.32 –add-dynamic-module=../headers-more-nginx-module-0.33 –with-pcre-jit –with-zlib=../zlib-cloudflare-1.3.0 –with-http_ssl_module –with-http_v2_module –with-openssl=../openssl-1.1.1g
PHP-FPM 7.4 latest installed
php -v
PHP 7.4.10 (cli) (built: Sep 5 2020 06:23:22) ( NTS )
Copyright (c) The PHP Group
Zend Engine v3.4.0, Copyright (c) Zend Technologies
with Zend OPcache v7.4.10, Copyright (c), by Zend Technologies
MariaDB MySQL 10.3 latest installed
mysqladmin ver
mysqladmin Ver 9.1 Distrib 10.3.24-MariaDB, for Linux on x86_64
Copyright (c) 2000, 2018, Oracle, MariaDB Corporation Ab and others.

Server version 10.3.24-MariaDB
Protocol version 10
Connection Localhost via UNIX socket
UNIX socket /var/lib/mysql/mysql.sock
Uptime: 5 min 52 sec

Threads: 4 Questions: 1 Slow queries: 0 Opens: 17 Flush tables: 1 Open tables: 11 Queries per second avg: 0.002
and PHP extensions loaded
php -m
[PHP Modules]
bcmath
brotli
bz2
calendar
Core
ctype
curl
date
dom
enchant
exif
FFI
fileinfo
filter
ftp
gd
geoip
gettext
gmp
hash
iconv
igbinary
imagick
imap
intl
json
ldap
libxml
lz4
lzf
mailparse
mbstring
mcrypt
memcache
memcached
mysqli
mysqlnd
openssl
pcntl
pcre
PDO
pdo_mysql
pdo_sqlite
Phar
posix
pspell
readline
redis
Reflection
session
shmop
SimpleXML
snmp
soap
sockets
sodium
SPL
sqlite3
standard
sysvmsg
sysvsem
sysvshm
tidy
timezonedb
tokenizer
xml
xmlreader
xmlrpc
xmlwriter
xsl
Zend OPcache
zip
zlib
zstd

[Zend Modules]
Zend OPcache
Running cminfo command, can also give you an overview of the Centmin Mod installation.
cminfo
------------------------------------------------------------------
Centmin Mod Quick Info:
------------------------------------------------------------------
Server Location Info

ip: xxx.xxx.xxx.xxx
city: New York City
region: New York
country: US
timezone: America/New_York

Processors physical = 1, cores = 1, virtual = 1, hyperthreading = no

1 2894.560
1 AMD EPYC 7542 32-Core Processor
1 512 KB

System Up Since: 2020-09-05 04:44:41
System Uptime: up 2 hours, 10 minutes
MySQL Server Started 2020-09-05 06:29:44
MySQL Uptime: 25 min 19 sec
MySQL Uptime (secs): 1519
Server Type: kvm
CentOS Version: 7.8
Centmin Mod: 123.09beta01.b582
Nginx PageSpeed: OFF
Nginx Version: 1.19.2 (050920-055953-centos7-kvm-19b44b9-br-25f86f0)
PHP-FPM Version: 7.4.10
MariaDB Version: 10.3.24
CSF Firewall: v14.04
Memcached Server: 1.6.5
NSD Version: -
Siege Version: 4.0.4
Maldet Version: not installed
ClamAV Version: not installed
ElasticSearch: not installed

------------------------------------------------------------------
Site Nginx Vhost Accounts:
------------------------------------------------------------------

* demodomain.com: /home/nginx/domains/demodomain.com
├── backup
├── log
├── private
└── public
------------------------------------------------------------------
Site Nginx Vhost Config Files:
------------------------------------------------------------------
* /usr/local/nginx/conf/conf.d/demodomain.com.conf
* /usr/local/nginx/conf/conf.d/virtual.conf

------------------------------------------------------------------
MySQL Databases:
------------------------------------------------------------------
* mysql [idx: 0.17 MB data: 0.55 MB]
* pgo_train [idx: 0.00 MB data: 0.11 MB]
Then you can pre-create Nginx HTTPS site’s dhparam file beforehand to speed up subsequent Nginx vhost creation routines. On slow systems, this command will take a few minutes to complete.
openssl dhparam -out /usr/local/nginx/conf/ssl/dhparam.pem 2048
Then optional extra features you can choose to enable after Centmin Mod LEMP stack has been installed for Auditd.
# install and configure auditd https://community.centminmod.com/posts/37680/
echo "AUDITD_ENABLE='y'" >> /etc/centminmod/custom_config.inc
/usr/local/src/centminmod/tools/auditd.sh setup
Then setup disk space usage alerts making use of EMAIL variable you set up as an SSH session variable you populated at the start of this guide.
# setup email alerts for diskalert cronjob /etc/cron.daily/diskalert
# https://community.centminmod.com/posts/59973/
sed -i "s|EMAIL=.*|EMAIL='$EMAIL'|" /etc/cron.daily/diskalert
Lastly, if you intend to use Cloudflare in front of your Centmin Mod LEMP stack’s Nginx server, you can setup csfcf.sh cronjob to automatically manage Cloudflare’s IPs in CSF Firewall and Nginx real IP address detection. Latest 123.09beta01 should already have the csfcf.sh cronjob installed.
You can check via crontab -l command
crontab -l
13 23 * * * /usr/local/src/centminmod/tools/autoprotect.sh >/dev/null 2>&1
0 */4 * * * /usr/bin/cminfo_updater 2>/dev/null
22 */12 * * * /usr/local/src/centminmod/tools/csfcf.sh auto >/dev/null 2>&1
If csfcf.sh doesn’t show up, you can create it manually via the following commands run in SSH session as root user.
# cloudflare cronjob
# https://community.centminmod.com/threads/6241/
crontab -l > cronjoblist
sed -i '/csfcf.sh/d' cronjoblist
echo "22 */12 * * * /usr/local/src/centminmod/tools/csfcf.sh auto >/dev/null 2>&1" >> cronjoblist
crontab cronjoblist
Enabling Centmin Mod’s free Letsencrypt SSL certificate issuance via Cloudflare DNS API validation
Centmin Mod 123.09beta01 has integrated support for free Letsencrypt SSL certificates via addons/acmetool.sh addon which uses Neil Pang’s acme.sh shell bash based client as the underlying Letsencrypt client for obtaining Letsencrypt SSL certificates. The integration is enabled when you set LETSENCRYPT_DETECT=’y’ is set in your persistent config file /etc/centminmod/custom_config.inc as we did in above Centmin Mod advance install steps in populating the persistent config file. The default method of domain validation is via webroot authentication for a generated file at yourdomain.com/.well-known. However, as of September 6th, 2020 addons/acmetool.sh addon has added support for Cloudflare DNS domain validation as well via Cloudflare DNS API support in the underlying acme.sh client.
As the intended WordPress site will be using Cloudflare for DNS and CDN proxy, we will leverage the newly added Cloudflare DNS API support for our free Letsencrypt SSL certificate issuance as well. Cloudflare SSL will be configured to switch from Flexible SSL to Full (non-strict) SSL mode so that the connection between Cloudflare edge servers and Centmin Mod’s origin Nginx server is done over an encryption connection. For the encrypted connection to occur under Cloudflare Full (non-strict) SSL mode, Centmin Mod’s Nginx based WordPress site needs to have it’s own SSL certificate and HTTPS configuration. Once set up, Cloudflare edge servers will connect with Centmin Mod’s origin Nginx server over an encrypted HTTPS TLSv1.3 connection as Centmin Mod Nginx uses OpenSSL 1.1.1 with TLSv1.3 protocol support.
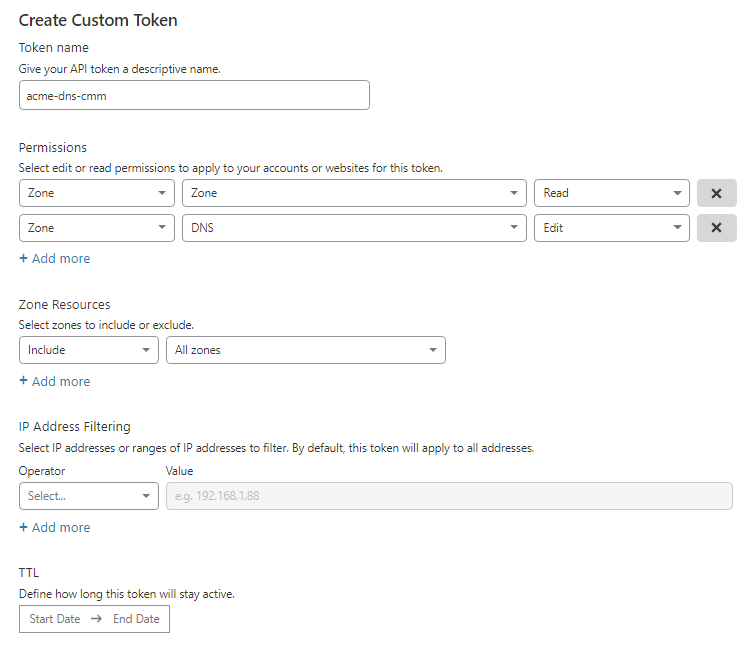
To setup Cloudflare DNS API support for Centmin Mod Letsencrypt SSL certificate issuance, you’ll need to log into your Cloudflare account and create your Cloudflare API Token at https://dash.cloudflare.com/profile/api-tokens. Cloudflare API Tokens require
- Create your Cloudflare Token API with permissions for read access to Zone.Zone, and edit/write access to Zone.DNS, across all Zones.
- Grab your Cloudflare Account ID from any of your Cloudflare domain’s main dashboard’s right side column listing
You can set up the following variables in the persistent config file at /etc/centminmod/custom_config.inc that you previously created. Replacing YOUR_CF_TOKEN with your API token you created and replacing YOUR_CF_ACCOUNT_ID with your Cloudflare Account ID.
CF_DNSAPI_GLOBAL='y'
CF_Token="YOUR_CF_TOKEN"
CF_Account_ID="YOUR_CF_ACCOUNT_ID"
The persistent config file will now look something like below:
CF_DNSAPI_GLOBAL='y'
CF_Token="YOUR_CF_TOKEN"
CF_Account_ID="YOUR_CF_ACCOUNT_ID"
NGINX_SSLCACHE_ALLOWOVERRIDE='y'
NGINX_STAPLE_CACHE_OVERRIDE='y'
NGINX_STAPLE_CACHE_TTL='86400'
SET_DEFAULT_MYSQLCHARSET='utf8mb4'
AUTOHARDTUNE_NGINXBACKLOG='y'
ZSTD_LOGROTATE_NGINX='y'
ZSTD_LOGROTATE_PHPFPM='y'
LETSENCRYPT_DETECT='y'
DUALCERTS='y'
SELFSIGNEDSSL_ECDSA='y'
NGINX_LIBBROTLI='y'
NGXDYNAMIC_BROTLI='y'
PHP_PGO_ALWAYS='y'
PHP_PGO='y'
PHP_BROTLI='y'
PHP_LZFOUR='y'
PHP_LZF='y'
PHP_ZSTD='y'
PHPFINFO='y'
WPCLI_CE_QUERYSTRING_INCLUDED='y'
MARCH_TARGETNATIVE='n'
AUDITD_ENABLE='y'
Once you have populated persistent config file at /etc/centminmod/custom_config.inc, you can verify if your Cloudflare API Token is working by installing addons/acmetool.sh which will install the underlying acme.sh client and running check_cfapi option to verify the CF API Token. This step is optional, as addons/acmetool.sh is automatically installed the first time you run an Nginx vhost creation routine via centmin.sh menu option 2, 22 or nv command line when LETSENCRYPT_DETECT=’y’ is set in your persistent config file /etc/centminmod/custom_config.inc.
echo y | /usr/local/src/centminmod/addons/acmetool.sh acmeinstall
echo y | /usr/local/src/centminmod/addons/acmetool.sh check_cfapi
acmeinstall
echo y | /usr/local/src/centminmod/addons/acmetool.sh acmeinstall
-----------------------------------------------------
check acme auto renew cronjob setup:
-----------------------------------------------------
32 0 * * * "/root/.acme.sh"/acme.sh --cron --home "/root/.acme.sh" > /dev/null
-----------------------------------------------------
acme.sh installed
-----------------------------------------------------
check_cfapi option only verifies that CF API Token works but not necessarily verifies if it works with CF DNS API itself as that is permission dependent.
echo y | /usr/local/src/centminmod/addons/acmetool.sh check_cfapi

-------------------------------------------------
acmetool.sh is in beta testing phase
please read & provide bug reports &
feedback for this tool via the forums
https://centminmod.com/acmetool
-------------------------------------------------

Verifying working Cloudflare DNS API Credentials
CF API Tokens detected
Ok: CF API Token works
WordPress Installation with Cache Enabler advance cache mode setup
The final step is the actual WordPress installation with Cache Enabler done using centmin.sh menu option 22 where at WordPress caching selection, you will select Cache Enabler for automatic advance cache mode configuration.
Below I will run centmin.sh menu option 22 to auto install WordPress and create Nginx vhost site for subdomain = cache-enabler.centminmod.com. I have checked that I have set up Cloudflare DNS A record for the subdomain to point to Upcloud.com server’s allocated public IP address. Checking dig DNS A record for subdomain will show Cloudflare CDN proxy’s public IP addresses as intended as Cloudflare CDN proxy hides your real server IP address.
dig +short A cache-enabler.centminmod.com
104.18.11.170
104.18.10.170
curl -s https://ipinfo.io/104.18.11.170
{
"ip": "104.18.11.170",
"city": "Atlantic City",
"region": "New Jersey",
"country": "US",
"loc": "39.3642,-74.4231",
"org": "AS13335 Cloudflare, Inc.",
"postal": "08404",
"timezone": "America/New_York",
"readme": "https://ipinfo.io/missingauth"
}
To run centmin.sh shell based menu on subsequent SSH logs other than initial Centmin Mod install login, you can run command = centmin. If you’re still in initial Centmin Mod install SSH login, you can run:
cd /usr/local/src/centminmod
./centmin.sh
Then on centmin.sh menu select and type menu option 22 to start Nginx WordPress auto installer routine which will have a wizard prompt style question where you answer a few questions and the installer will create an Nginx vhost for your site and auto install WordPress and configure it for your desired WordPress caching method.
--------------------------------------------------------
Centmin Mod Menu 123.09beta01 centminmod.com
--------------------------------------------------------
1). Centmin Install
2). Add Nginx vhost domain
3). NSD setup domain name DNS
4). Nginx Upgrade / Downgrade
5). PHP Upgrade / Downgrade
6). XCache Re-install
7). APC Cache Re-install
8). XCache Install
9). APC Cache Install
10). Memcached Server Re-install
11). MariaDB MySQL Upgrade & Management
12). Zend OpCache Install/Re-install
13). Install/Reinstall Redis PHP Extension
14). SELinux disable
15). Install/Reinstall ImagicK PHP Extension
16). Change SSHD Port Number
17). Multi-thread compression: zstd,pigz,pbzip2,lbzip2
18). Suhosin PHP Extension install
19). Install FFMPEG and FFMPEG PHP Extension
20). NSD Install/Re-Install
21). Data Transfer (TBA)
22). Add WordPress Nginx vhost + Cache Plugin
23). Update Centmin Mod Code Base
24). Exit
--------------------------------------------------------
Enter option [ 1 - 24 ] 22
--------------------------------------------------------
The first time it will install WP-CLI command line too which is used to install and configure WordPress. On subsequent centmin.sh menu option 22 runs, it will auto update WP-CLI to the latest version before proceeding.
------------------------------------------------------------
Installing wpcli.sh
------------------------------------------------------------
installing...

Error: /usr/bin/wp not found !!! Downloading now......
2020-09-06 00:19:26 URL:https://raw.githubusercontent.com/wp-cli/builds/gh-pages/phar/wp-cli.phar [5568133/5568133] -> "/usr/bin/wp" [1]
Download done.

Error: /root/wpcli/wp-completion.bash not found !!! Downloading now......
2020-09-06 00:19:26 URL:https://raw.githubusercontent.com/wp-cli/wp-cli/master/utils/wp-completion.bash [495/495] -> "/root/wpcli/wp-completion.bash" [1]
Download done.

-------------------------------------------------------------
wp-cli info
OS:     Linux 3.10.0-1127.19.1.el7.x86_64 #1 SMP Tue Aug 25 17:23:54 UTC 2020 x86_64
Shell:  /bin/bash
PHP binary:     /usr/local/bin/php
PHP version:    7.4.10
php.ini used:   /usr/local/lib/php.ini
WP-CLI root dir:        phar://wp-cli.phar/vendor/wp-cli/wp-cli
WP-CLI vendor dir:      phar://wp-cli.phar/vendor
WP_CLI phar path:       /usr/local/src/centminmod/addons
WP-CLI packages dir:    /root/.wp-cli/packages/
WP-CLI global config:
WP-CLI project config:
WP-CLI version: 2.4.0
-------------------------------------------------------------

-------------------------------------------------------------
wp-cli install completed
Read http://wp-cli.org/ for full usage info

-------------------------------------------------------------
Please log out of SSH session and log back in
You can then call wp-cli via command: wp
i.e. wp --info --allow-root
-------------------------------------------------------------
Then the actual Nginx vhost creation process starts with an information message related to additional Centmin Mod WordPress security features which may cause 403 permission denied errors as you may need to whitelist WordPress plugins.
-------------------------------------------------------------
Setup full Nginx vhost + WordPress + WP Plugins
-------------------------------------------------------------

---------------------------------------------------------------
Important Information
---------------------------------------------------------------

You are about to create an WordPress based Nginx vhost site with
or without HTTPS/SSL support.
Also read the continually updated Getting Started Guide
at centminmod.com/getstarted.html if you haven't already
---------------------------------------------------------------
403 Permission denied message handling
if after vhost site setup you encounter 403 permission denied errors,
check https://community.centminmod.com/threads/11215/ to see if your
site needs tools/autoprotect.sh tweaking & whitelisting
---------------------------------------------------------------
Next, it will prompt you if you want to proceed with Nginx vhost site creation and ask you for desired WordPress Nginx site domain or subdomain name. Leave off www and only enter the domain as www. will be auto added. If you have Letsencrypt mode enabled, it will also prompt you for Letsencrypt SSL certificate issuance type where you can choose between HTTP + HTTPS or HTTPS default only and choose from staging untrusted Letsencrypt SSL certificates or browser trusted Letsencrypt SSL certificates. Here we choose option 4 for HTTPS default only live browser trusted Letsencrypt SSL certificate issuance for Nginx vhost domain = cache-enabler.centminmod.com. Option 4 will automatically configure the non-HTTPS to HTTPS default redirects at Nginx server level.
Do you want to continue with Nginx vhost site creation ? [y/n] y

Enter vhost domain name you want to add (without www. prefix): cache-enabler.centminmod.com

Create a self-signed SSL certificate Nginx vhost? [y/n]: y
Get Letsencrypt SSL certificate Nginx vhost? [y/n]: y

You have 4 options:
1. issue staging test cert with HTTP + HTTPS (untrusted)
2. issue staging test cert with HTTPS default (untrusted)
3. issue live cert with HTTP + HTTPS (trusted)
4. issue live cert with HTTPS default (trusted)
Enter option number 1-4: 4
Next are some WordPress site setup questions which you answer to configure your desired WordPress install. If you operate a member log in based WordPress site, make sure to disable wp-login.php password protection when prompted to do so. The entered email address will be your WordPress site administrator’s login email address.
Theme Setup:
Install CyberChimps Responsive Theme (cyberchimps.com/responsive-theme/) [y/n]: n

Wordpress Setup:

Not a fan of Gutenberg Editor ? You can switch to Classic Editor
If you run into Gutenberg Editor issues, you can later switch to
the Classic Editor https://wordpress.org/plugins/classic-editor/
Install Classic Editor WordPress Plugin ? [y/n]: y

Autoptimize WP Plugin is installed by default. Do you want to install
companion Autoptimize Gzip Plugin to precompresses js/css optimized files
details at https://community.centminmod.com/threads/15314/
Install Autoptimize Gzip Companion WordPress Plugin ? [y/n]: y

Google Native LazyLoad Plugin https://wordpress.org/plugins/native-lazyload/
Install Google Native LazyLoad Plugin ? [y/n]: y

Set custom WP Admin Display Name ? [y/n]: y
Enter Custom WP Admin Display Name: George
Install WordPress in subdirectory /blog ? [y/n]: n
Disable Auto Generated WP Admin Username / Password ? [y/n]: n
Disable wp-login.php password protection ? (less security) [y/n]: y
Enter email address for Admin User for WordPress Installation: [email protected]
Next up is prompt to select the method of WordPress caching Centmin Mod will automatically configure for your WordPress site. There are three methods to choose from my default with a fourth option for PHP-FPM fastcgi_cache in development. The three methods are KeyCDN’s Cache Enabler, Redis Nginx level caching and WordPress Super Cache. All three methods do guest full HTML page caching where Cache Enabler and Redis Nginx level caching are only ones to completely bypass PHP-FPM to serve caching via Nginx. You can read up more about them here in official Centmin Mod community forum sticky thread titled: Differences between WordPress regular install vs centmin.sh menu option 22 install
For this guide, we are choosing KeyCDN Cache Enabler option 1 which is configured with advanced caching at Nginx level bypassing PHP-FPM completely.
Default is to install KeyCDN WP Cache Enabler Plugin
as it's more stable and reliable than WP Super Cache.
Redis cache may have issues with caching due to long 6hr cache TTL
You can select which caching method to use below:

--------------------------------------------------------
Wordpress Caching
--------------------------------------------------------
1) KeyCDN Cache Enabler
2) Redis Nginx Level Caching
3) WordPress Super Cache
--------------------------------------------------------
Enter option [ 1 - 3 ] 1

you selected option 1 (KeyCDN Cache Enabler) [wpscache=n]
Next is prompt for your Pure-FTP virtual FTP username and auto generated FTP password
Create FTP username for vhost domain (enter username): YOUR_FTPUSERNAME
Do you want to auto generate FTP password (recommended) [y/n]: y

FTP username you entered: YOUR_FTPUSERNAME
FTP password auto generated: YOUR_FTPPASSWORD

Password:
Enter it again:
Next centmin.sh menu routine will create your Cache Enabler included map file /usr/local/nginx/conf/wpcacheenabler_map.conf which is inserted into /usr/local/nginx/conf/nginx.conf and is responsible for controlling whether mobile/tablet devices are cached or not and which advanced query string cache inclusions are included in Cache Enabler’s cache detection logic. The Cloudflare Authenticated Origin Pull certificate is also automatically downloaded to /usr/local/nginx/conf/ssl/cloudflare/cache-enabler.centminmod.com/origin.crt path but not enabled by default and finally, self-signed SSL certificate is generated which is a fallback SSL certificate if Letsencrypt SSL certificate issuance and domain validation fails.
include file /usr/local/nginx/conf/wpcacheenabler_map.conf add to nginx.conf
---------------------------------------------------------------
SSL Vhost Setup...
---------------------------------------------------------------

--2020-09-06 00:21:13-- https://support.cloudflare.com/hc/en-us/article_attachments/360044928032/origin-pull-ca.pem
Resolving support.cloudflare.com... 104.18.7.251, 104.18.6.251
Connecting to support.cloudflare.com|104.18.7.251|:443... connected.
HTTP request sent, awaiting response... 200 OK
Length: unspecified [text/plain]
Saving to: ‘/usr/local/nginx/conf/ssl/cloudflare/cache-enabler.centminmod.com/origin.crt’

0K .. 24.7M=0s

2020-09-06 00:21:14 (24.7 MB/s) - ‘/usr/local/nginx/conf/ssl/cloudflare/cache-enabler.centminmod.com/origin.crt’ saved [2155]

---------------------------------------------------------------
Generating self signed SSL certificate...
CSR file can also be used to be submitted for paid SSL certificates
If using for paid SSL certificates be sure to keep both private key and CSR safe
creating CSR File: cache-enabler.centminmod.com.csr
creating private key: cache-enabler.centminmod.com.key
creating self-signed SSL certificate: cache-enabler.centminmod.com.crt
Signature ok
subject=/C=US/ST=California/L=Los Angeles/O=cache-enabler.centminmod.com/OU=cache-enabler.centminmod.com/CN=cache-enabler.centminmod.com
Getting Private key
Certificate:
Data:
Version: 3 (0x2)
Serial Number:
f1:50:3f:45:85:40:52:e0
Signature Algorithm: ecdsa-with-SHA256
Issuer: C=US, ST=California, L=Los Angeles, O=cache-enabler.centminmod.com, OU=cache-enabler.centminmod.com, CN=cache-enabler.centminmod.com
Validity
Not Before: Sep 6 00:21:23 2020 GMT
Not After : Aug 13 00:21:23 2120 GMT
Subject: C=US, ST=California, L=Los Angeles, O=cache-enabler.centminmod.com, OU=cache-enabler.centminmod.com, CN=cache-enabler.centminmod.com
Subject Public Key Info:
Public Key Algorithm: id-ecPublicKey
Public-Key: (256 bit)
pub:
04:3b:f4:35:92:b1:4c:c5:9e:a6:d5:de:57:af:2b:
cd:2e:5d:70:85:20:41:a0:9d:ba:7f:cd:ad:11:99:
3a:87:09:1a:f4:6b:46:3e:cc:16:c4:c9:32:bf:55:
0f:cb:d0:81:f7:34:08:0b:f7:ef:46:86:50:5e:79:
c5:08:85:e4:59
ASN1 OID: prime256v1
NIST CURVE: P-256
X509v3 extensions:
X509v3 Authority Key Identifier:
DirName:/C=US/ST=California/L=Los Angeles/O=cache-enabler.centminmod.com/OU=cache-enabler.centminmod.com/CN=cache-enabler.centminmod.com
serial:F1:50:3F:45:85:40:52:E0

X509v3 Basic Constraints:
CA:FALSE
X509v3 Key Usage:
Digital Signature, Non Repudiation, Key Encipherment, Data Encipherment
X509v3 Subject Alternative Name:
DNS:cache-enabler.centminmod.com, DNS:www.cache-enabler.centminmod.com
Signature Algorithm: ecdsa-with-SHA256
30:46:02:21:00:e9:44:95:8f:de:99:74:17:63:1a:7b:09:b1:
07:75:ce:e0:e1:d2:38:7a:f9:c5:0e:eb:05:76:aa:11:51:2a:
ff:02:21:00:95:0e:42:de:06:bc:b8:ba:19:a7:34:70:6c:85:
2f:fc:0b:12:54:61:14:c8:7b:a6:6d:dd:cd:6f:3c:fb:b8:a8

---------------------------------------------------------------
Next is prompt to whether you want Cache Enabler to include or exclude mobile and tablet devices from caching. Some WordPress mobile theme plugins may not be fully responsive in design so may have issues with caching. For this example, will exclude mobile/tablet devices from caching.
------------------------------------------------------------
Setup WordPress + Cache Enabler for cache-enabler.centminmod.com
------------------------------------------------------------

Using full static page caching may cause problems for mobile & tablet device
visitors depending on your WP themes used so you may want to exclude those

Do you want to exclude mobile/tablet devices from full page caching ? [y/n]: y
If in future you want to include mobile/tablet devices in Cache Enabler’s caching, you can edit the generated include file at /usr/local/nginx/conf/wpincludes/cache-enabler.centminmod.com/wpcacheenabler_cache-enabler.centminmod.com.conf and modifying the following
from
# exclude mobile devices from redis caching
if ($cmwpcache_device = mobile) { set $cache_uri 'nullcache'; }
to below with hash # in front of the 2nd line to disable cache exclusion
# exclude mobile devices from redis caching
#if ($cmwpcache_device = mobile) { set $cache_uri 'nullcache'; }
Next is the actual WordPress core site install routine done via WP-CLI command line tool including the cronjob auto configuration and display of cronjobs at time of WordPress install.
Downloading WordPress 5.5.1 (en_US)...
md5 hash verified: 72c6f56b4818ffd0e6e6a4ed8f3e8d4e
Success: WordPress downloaded.
Success: Generated 'wp-config.php' file.
13 23 * * * /usr/local/src/centminmod/tools/autoprotect.sh >/dev/null 2>&1
0 */4 * * * /usr/bin/cminfo_updater 2>/dev/null
22 */12 * * * /usr/local/src/centminmod/tools/csfcf.sh auto >/dev/null 2>&1
32 0 * * * "/root/.acme.sh"/acme.sh --cron --home "/root/.acme.sh" > /dev/null
0 0 * * 5 /usr/local/src/centminmod/tools/cf-authenticated-origin-cert-update.sh update >/dev/null 2>&1
#*/15 * * * * sleep 324s ; wget -4 -O - -q -t 1 http://cache-enabler.centminmod.com/wp-cron.php?doing_wp_cron > /dev/null 2>&1
Success: WordPress installed successfully.
Success: Updated user 39xxx6.
Success: Rewrite structure set.
Success: Rewrite rules flushed.
------------------------------------------------------------
Next is WP-CLI tool install, activation and configuration of a select few WordPress plugins for Native LazyLoad and Classic Editor you chose at early prompted questions
Installing Native Lazyload (1.0.2)
Downloading installation package from https://downloads.wordpress.org/plugin/native-lazyload.1.0.2.zip...
Unpacking the package...
Installing the plugin...
Plugin installed successfully.
Activating 'native-lazyload'...
Plugin 'native-lazyload' activated.
Success: Installed 1 of 1 plugins.
------------------------------------------------------------
------------------------------------------------------------
Installing Classic Editor (1.6)
Downloading installation package from https://downloads.wordpress.org/plugin/classic-editor.1.6.zip...
Unpacking the package...
Installing the plugin...
Plugin installed successfully.
Activating 'classic-editor'...
Plugin 'classic-editor' activated.
Success: Installed 1 of 1 plugins.
------------------------------------------------------------
Next is actual Cache Enabler install and auto configuration – including setting up advanced cache inclusion for select query strings via a regular expression /^fbclid|ref|mc_(cid|eid)|utm_(source|medium|campaign|term|content|expid)|gclid|fb_(action_ids|action_types|source)|age-verified|ao_noptimize|usqp|cn-reloaded|_ga|_ke$/ which was enabled via WPCLI_CE_QUERYSTRING_INCLUDED=’y’ variable in persistent config file we did earlier.
Installing Cache Enabler – WordPress Cache (1.4.8)
Downloading installation package from https://downloads.wordpress.org/plugin/cache-enabler.zip...
Unpacking the package...
Installing the plugin...
Plugin installed successfully.
Activating 'cache-enabler'...
Plugin 'cache-enabler' activated.
Success: Installed 1 of 1 plugins.
------------------------------------------------------------
configure cache-enabler
Success: Updated 'cache-enabler' option.
Success: Updated 'cache-enabler' option.
"\/^fbclid|ref|mc_(cid|eid)|utm_(source|medium|campaign|term|content|expid)|gclid|fb_(action_ids|action_types|source)|age-verified|ao_noptimize|usqp|cn-reloaded|_ga|_ke$\/"
{"expires":6,"clear_on_upgrade":1,"new_post":1,"new_comment":1,"update_product_stock":0,"webp":0,"compress":1,"excl_ids":"","excl_paths":"","excl_cookies":"","incl_parameters":"\/^fbclid|ref|mc_(cid|eid)|utm_(source|medium|campaign|term|content|expid)|gclid|fb_(action_ids|action_types|source)|age-verified|ao_noptimize|usqp|cn-reloaded|_ga|_ke$\/","minify_html":0}
Next is to install Autoptimize and Autoptimize Gzip companion plugin. The companion plugin enables Autoptimize’s pre-compress gzip and brotli features to pre-compress Autoptimize optimised CSS/JSS generated files.
Installing Autoptimize (2.7.7)
Downloading installation package from https://downloads.wordpress.org/plugin/autoptimize.2.7.7.zip...
Unpacking the package...
Installing the plugin...
Plugin installed successfully.
Activating 'autoptimize'...
Plugin 'autoptimize' activated.
Success: Installed 1 of 1 plugins.
option_name option_value
autoptimize_ccss_version AO_2.7.7
autoptimize_service_availablity a:2:{s:12:"extra_imgopt";a:3:{s:6:"status";s:2:"up";s:5:"hosts";a:1:{i:1;s:26:"https://cdn.shortpixel.ai/";}s:16:"launch-threshold";s:4:"4096";}s:7:"critcss";a:2:{s:6:"status";s:2:"up";s:5:"hosts";a:1:{i:1;s:24:"https://criticalcss.com/";}}}
autoptimize_version 2.7.7

configure autoptimize-gzip https://community.centminmod.com/threads/15314/
2020-09-06 00:21:42 URL:https://raw.githubusercontent.com/centminmod/autoptimize-gzip/master/autoptimize-gzip.php [573/573] -> "/home/nginx/domains/cache-enabler.centminmod.com/public/wp-content/plugins/autoptimize-gzip/autoptimize-gzip.php" [1]
2020-09-06 00:21:43 URL:https://raw.githubusercontent.com/centminmod/autoptimize-gzip/master/index.html [192/192] -> "/home/nginx/domains/cache-enabler.centminmod.com/public/wp-content/plugins/autoptimize-gzip/index.html" [1]
2020-09-06 00:21:43 URL:https://github.com/centminmod/autoptimize-gzip/blob/master/readme.md [100610] -> "/home/nginx/domains/cache-enabler.centminmod.com/public/wp-content/plugins/autoptimize-gzip/readme.md" [1]
2020-09-06 00:21:43 URL:https://raw.githubusercontent.com/centminmod/autoptimize-gzip/master/LICENSE [18026/18026] -> "/home/nginx/domains/cache-enabler.centminmod.com/public/wp-content/plugins/autoptimize-gzip/LICENSE" [1]
Plugin 'autoptimize-gzip' activated.
Success: Activated 1 of 1 plugins.
Plugin autoptimize-gzip details:
Name: Autoptimize Gzip
Status: Active
Version: 0.1
Author: George Liu
Description: Hook into Frank Goossens (futtta) Autoptimize API to pre-compress CSS/JS files
Next is install of Sucuri Security plugin, Disable XML-RPC and CDN Enabler plugins
Installing Sucuri Security – Auditing, Malware Scanner and Security Hardening (1.8.24)
Downloading installation package from https://downloads.wordpress.org/plugin/sucuri-scanner.1.8.24.zip...
Unpacking the package...
Installing the plugin...
Plugin installed successfully.
Activating 'sucuri-scanner'...
Plugin 'sucuri-scanner' activated.
Success: Installed 1 of 1 plugins.
------------------------------------------------------------
Installing Disable XML-RPC (1.0.1)
Downloading installation package from https://downloads.wordpress.org/plugin/disable-xml-rpc.1.0.1.zip...
Unpacking the package...
Installing the plugin...
Plugin installed successfully.
Activating 'disable-xml-rpc'...
Plugin 'disable-xml-rpc' activated.
Success: Installed 1 of 1 plugins.
------------------------------------------------------------
Installing CDN Enabler – WordPress CDN Plugin (1.0.9)
Downloading installation package from https://downloads.wordpress.org/plugin/cdn-enabler.zip...
Unpacking the package...
Installing the plugin...
Plugin installed successfully.
Activating 'cdn-enabler'...
Plugin 'cdn-enabler' activated.
Success: Installed 1 of 1 plugins.
------------------------------------------------------------
Uninstalled and deleted 'hello' plugin.
Success: Uninstalled 1 of 1 plugins.
Success: Plugin already updated.
Next a final summary listing of all WordPress plugins
10 installed plugins:
I akismet 4.1.6
A autoptimize 2.7.7
A autoptimize-gzip 0.1
A cache-enabler 1.4.8
A cdn-enabler 1.0.9
A classic-editor 1.6
A disable-xml-rpc 1.0.1
A native-lazyload 1.0.2
A sucuri-scanner 1.8.24
D advanced-cache.php

Legend: I = Inactive, A = Active, D = Drop-In
------------------------------------------------------------
System Cache Expiry Cronjob
Next final system cronjob listing which adds one for purging Cache Enabler’s advance Nginx level cache files every 24hrs at 11:16PM. You can adjust the cronjob interval to shorten or lengthen the cache TTL times. This cronjob is needed as Cache Enabler’s admin settings cache TTL will only work with PHP based cache defaults. While Centmin Mod’s Cache Enabler uses advance Nginx level caching instead and needs this cronjob to control cache TTL times.
13 23 * * * /usr/local/src/centminmod/tools/autoprotect.sh >/dev/null 2>&1
0 */4 * * * /usr/bin/cminfo_updater 2>/dev/null
22 */12 * * * /usr/local/src/centminmod/tools/csfcf.sh auto >/dev/null 2>&1
32 0 * * * "/root/.acme.sh"/acme.sh --cron --home "/root/.acme.sh" > /dev/null
0 0 * * 5 /usr/local/src/centminmod/tools/cf-authenticated-origin-cert-update.sh update >/dev/null 2>&1
#*/15 * * * * sleep 324s ; wget -4 -O - -q -t 1 http://cache-enabler.centminmod.com/wp-cron.php?doing_wp_cron > /dev/null 2>&1
16 23 * * * echo "cache-enabler.centminmod.com cacheenabler cron"; sleep 249s ; rm -rf /home/nginx/domains/cache-enabler.centminmod.com/public/wp-content/cache/cache-enabler/* > /dev/null 2>&1
Next are WordPress site uninstall and auto updater script generation
------------------------------------------------------------
Created uninstall script
/root/tools/wp_uninstall_cache-enabler.centminmod.com.sh
------------------------------------------------------------
------------------------------------------------------------
Created wp_updater_cache-enabler.centminmod.com.sh script
/root/tools/wp_updater_cache-enabler.centminmod.com.sh
------------------------------------------------------------
by default generated WordPress auto updater script at /root/tools/wp_updater_cache-enabler.centminmod.com.sh only does WordPress minor core updates and plugin updates unless you uncomment these 3 lines for /usr/bin/wp
# for major core updates uncomment 3 lines directly below
#/usr/bin/wp core update --allow-root
#/usr/bin/wp core update-db --allow-root
#/usr/bin/wp core update --allow-root
and the respective cronjobs for auto updating WordPress plugins and minor WordPress versions every 8hrs
13 23 * * * /usr/local/src/centminmod/tools/autoprotect.sh >/dev/null 2>&1
0 */4 * * * /usr/bin/cminfo_updater 2>/dev/null
22 */12 * * * /usr/local/src/centminmod/tools/csfcf.sh auto >/dev/null 2>&1
32 0 * * * "/root/.acme.sh"/acme.sh --cron --home "/root/.acme.sh" > /dev/null
0 0 * * 5 /usr/local/src/centminmod/tools/cf-authenticated-origin-cert-update.sh update >/dev/null 2>&1
#*/15 * * * * sleep 324s ; wget -4 -O - -q -t 1 http://cache-enabler.centminmod.com/wp-cron.php?doing_wp_cron > /dev/null 2>&1
16 23 * * * echo "cache-enabler.centminmod.com cacheenabler cron"; sleep 249s ; rm -rf /home/nginx/domains/cache-enabler.centminmod.com/public/wp-content/cache/cache-enabler/* > /dev/null 2>&1
0 */8 * * * sleep 136s ;/root/tools/wp_updater_cache-enabler.centminmod.com.sh >/dev/null 2>&1
Next Centmin Mod’s autoprotect.sh generated include files are generated. The autoprotect.sh script automatically scans your Nginx vhost public webroot directories for .htaccess files of the ‘deny all’ variety and auto generates an equivalent Nginx rewrite rule to attempt to alert you and protect your WordPress and Nginx directories as Nginx doesn’t support Apache .htaccess. So if a web developer’s web app/script uses .htaccess to protect private directories intended for Apache, they would be fully exposed on Nginx server! You can read more about autoprotect.sh and how to customise and disable it here.
generated nginx include file [initial]: /usr/local/nginx/conf/autoprotect/cache-enabler.centminmod.com/autoprotect-cache-enabler.centminmod.com.conf
generated nginx include file [same]: /usr/local/nginx/conf/autoprotect/demodomain.com/autoprotect-demodomain.com.conf

autoprotect.sh run completed skipped nginx reload...
After Nginx vhost and WordPress have been installed, it’s time for centmin.sh menu option 22 process to obtain the free Letsencrypt SSL certificate via Cloudflare DNS API using addons/acmetool.sh and the underlying acme.sh client. As addons/acmetool.sh is beta right now there’s an additional prompt to answer yes for to continue.
-------------------------------------------------------------
ok: /usr/local/src/centminmod/addons/acmetool.sh
/usr/local/src/centminmod/addons/acmetool.sh issue cache-enabler.centminmod.com wplived

-------------------------------------------------
acmetool.sh is in beta testing phase
please read & provide bug reports &
feedback for this tool via the forums
https://centminmod.com/acmetool
-------------------------------------------------

continue [y/n] ? y
Next the underlying acme.sh client will always be auto updated to the latest version before being called.
-----------------------------------------------------
updating acme.sh client...
-----------------------------------------------------
Cloning into 'acme.sh'...
[Sun Sep 6 00:22:04 UTC 2020] It is recommended to install socat first.
[Sun Sep 6 00:22:04 UTC 2020] We use socat for standalone server if you use standalone mode.
[Sun Sep 6 00:22:04 UTC 2020] If you don't use standalone mode, just ignore this warning.
[Sun Sep 6 00:22:04 UTC 2020] Installing to /root/.acme.sh
[Sun Sep 6 00:22:04 UTC 2020] Installed to /root/.acme.sh/acme.sh
[Sun Sep 6 00:22:04 UTC 2020] Installing alias to '/root/.bashrc'
[Sun Sep 6 00:22:04 UTC 2020] OK, Close and reopen your terminal to start using acme.sh
[Sun Sep 6 00:22:04 UTC 2020] Installing alias to '/root/.cshrc'
[Sun Sep 6 00:22:04 UTC 2020] Installing alias to '/root/.tcshrc'
[Sun Sep 6 00:22:04 UTC 2020] Installing cron job
32 0 * * * "/root/.acme.sh"/acme.sh --cron --home "/root/.acme.sh" > /dev/null
[Sun Sep 6 00:22:04 UTC 2020] Good, bash is found, so change the shebang to use bash as preferred.
[Sun Sep 6 00:22:05 UTC 2020] OK
https://github.com/acmesh-official/acme.sh
v2.8.8
-----------------------------------------------------
acme.sh updated
-----------------------------------------------------
Next is actual acme.sh client’s issuance of 2x Letsencrypt SSL certificates – one for RSA 2048 bit and one for ECC 256bit ECDSA SSL certificate for Nginx dual SSL certificate mode. This is due to configuring in the persistent config file the variable to enable dual SSL certificates mode which serves faster performing ECDSA SSL certificates to browsers that support it and slower traditional RSA 2048bit SSL certificates to browsers that don’t support ECDSA SSL. In Cloudflare proxied setup, this allows most optimal performance as Cloudflare edge servers will connect to Centmin Mod Nginx via faster ECDSA SSL certificates.
DUALCERTS='y'
The RSA 2048bit SSL certificate issuance via acme.sh with Cloudflare DNS API token. Notice acme.sh command adds –dns dns_cf flag and you can see DNS API adding the TXT validation record and removing it after.
-----------------------------------------------------------
issue & install letsencrypt ssl certificate for cache-enabler.centminmod.com
-----------------------------------------------------------
testcert value = wplived
wp routine detected use reissue instead via --force
/root/.acme.sh/acme.sh --force --dns dns_cf --issue -d cache-enabler.centminmod.com --days 60 -w /home/nginx/domains/cache-enabler.centminmod.com/public -k 2048 --useragent centminmod-centos7-acmesh-webroot --log /root/centminlogs/acmetool.sh-debug-log-060920-002155.log --log-level 2
[Sun Sep 6 00:22:06 UTC 2020] Using CA: https://acme-v02.api.letsencrypt.org/directory
[Sun Sep 6 00:22:06 UTC 2020] Create account key ok.
[Sun Sep 6 00:22:06 UTC 2020] Registering account: https://acme-v02.api.letsencrypt.org/directory
[Sun Sep 6 00:22:07 UTC 2020] Registered
[Sun Sep 6 00:22:07 UTC 2020] ACCOUNT_THUMBPRINT='rRHFqDi2lniJYRaxxx-_rvAl6UzG7ovF7Jq7dce6y8'
[Sun Sep 6 00:22:07 UTC 2020] Creating domain key
[Sun Sep 6 00:22:07 UTC 2020] The domain key is here: /root/.acme.sh/cache-enabler.centminmod.com/cache-enabler.centminmod.com.key
[Sun Sep 6 00:22:07 UTC 2020] Single domain='cache-enabler.centminmod.com'
[Sun Sep 6 00:22:07 UTC 2020] Getting domain auth token for each domain
[Sun Sep 6 00:22:09 UTC 2020] Getting webroot for domain='cache-enabler.centminmod.com'
[Sun Sep 6 00:22:09 UTC 2020] Adding txt value: 96N03rA1CTjVReovOjzoJB7486-V2GvNVZX7juJ9cyU for domain: _acme-challenge.cache-enabler.centminmod.com
[Sun Sep 6 00:22:10 UTC 2020] Adding record
[Sun Sep 6 00:22:10 UTC 2020] Added, OK
[Sun Sep 6 00:22:10 UTC 2020] The txt record is added: Success.
[Sun Sep 6 00:22:10 UTC 2020] Let's check each DNS record now. Sleep 20 seconds first.
[Sun Sep 6 00:22:30 UTC 2020] Checking cache-enabler.centminmod.com for _acme-challenge.cache-enabler.centminmod.com
[Sun Sep 6 00:22:31 UTC 2020] Domain cache-enabler.centminmod.com '_acme-challenge.cache-enabler.centminmod.com' success.
[Sun Sep 6 00:22:31 UTC 2020] All success, let's return
[Sun Sep 6 00:22:31 UTC 2020] Verifying: cache-enabler.centminmod.com
[Sun Sep 6 00:22:34 UTC 2020] Success
[Sun Sep 6 00:22:34 UTC 2020] Removing DNS records.
[Sun Sep 6 00:22:34 UTC 2020] Removing txt: 96N03rA1CTjVReovOjzoJB7486-V2GvNVZX7juJ9cyU for domain: _acme-challenge.cache-enabler.centminmod.com
[Sun Sep 6 00:22:35 UTC 2020] Removed: Success
[Sun Sep 6 00:22:35 UTC 2020] Verify finished, start to sign.
[Sun Sep 6 00:22:35 UTC 2020] Lets finalize the order.
[Sun Sep 6 00:22:35 UTC 2020] Le_OrderFinalize='https://acme-v02.api.letsencrypt.org/acme/finalize/95901924/5041645894'
[Sun Sep 6 00:22:36 UTC 2020] Downloading cert.
[Sun Sep 6 00:22:36 UTC 2020] Le_LinkCert='https://acme-v02.api.letsencrypt.org/acme/cert/0399f04d1dd4bbb664fd1769ae76cda66601'
[Sun Sep 6 00:22:37 UTC 2020] Cert success.
-----BEGIN CERTIFICATE-----
MI snipped Oi
-----END CERTIFICATE-----
[Sun Sep 6 00:22:37 UTC 2020] Your cert is in /root/.acme.sh/cache-enabler.centminmod.com/cache-enabler.centminmod.com.cer
[Sun Sep 6 00:22:37 UTC 2020] Your cert key is in /root/.acme.sh/cache-enabler.centminmod.com/cache-enabler.centminmod.com.key
[Sun Sep 6 00:22:37 UTC 2020] The intermediate CA cert is in /root/.acme.sh/cache-enabler.centminmod.com/ca.cer
[Sun Sep 6 00:22:37 UTC 2020] And the full chain certs is there: /root/.acme.sh/cache-enabler.centminmod.com/fullchain.cer
The ECC 256bit ECDSA SSL certificate issuance via acme.sh with Cloudflare DNS API token
get 2nd SSL cert issued for dual ssl cert config

/root/.acme.sh/acme.sh --force --dns dns_cf --issue -d cache-enabler.centminmod.com --days 60 -w /home/nginx/domains/cache-enabler.centminmod.com/public -k ec-256 --useragent centminmod-centos7-acmesh-webroot --log /root/centminlogs/acmetool.sh-debug-log-060920-002155.log --log-level 2
[Sun Sep 6 00:22:37 UTC 2020] Using CA: https://acme-v02.api.letsencrypt.org/directory
[Sun Sep 6 00:22:37 UTC 2020] Creating domain key
[Sun Sep 6 00:22:37 UTC 2020] The domain key is here: /root/.acme.sh/cache-enabler.centminmod.com_ecc/cache-enabler.centminmod.com.key
[Sun Sep 6 00:22:37 UTC 2020] Single domain='cache-enabler.centminmod.com'
[Sun Sep 6 00:22:37 UTC 2020] Getting domain auth token for each domain
[Sun Sep 6 00:22:39 UTC 2020] Getting webroot for domain='cache-enabler.centminmod.com'
[Sun Sep 6 00:22:39 UTC 2020] cache-enabler.centminmod.com is already verified, skip dns-01.
[Sun Sep 6 00:22:39 UTC 2020] Verify finished, start to sign.
[Sun Sep 6 00:22:39 UTC 2020] Lets finalize the order.
[Sun Sep 6 00:22:39 UTC 2020] Le_OrderFinalize='https://acme-v02.api.letsencrypt.org/acme/finalize/95901924/5041651897'
[Sun Sep 6 00:22:41 UTC 2020] Downloading cert.
[Sun Sep 6 00:22:41 UTC 2020] Le_LinkCert='https://acme-v02.api.letsencrypt.org/acme/cert/044361415b2122755802a6d7db85354a4c7e'
[Sun Sep 6 00:22:41 UTC 2020] Cert success.
-----BEGIN CERTIFICATE-----
MII snipped qo
-----END CERTIFICATE-----
[Sun Sep 6 00:22:41 UTC 2020] Your cert is in /root/.acme.sh/cache-enabler.centminmod.com_ecc/cache-enabler.centminmod.com.cer
[Sun Sep 6 00:22:41 UTC 2020] Your cert key is in /root/.acme.sh/cache-enabler.centminmod.com_ecc/cache-enabler.centminmod.com.key
[Sun Sep 6 00:22:41 UTC 2020] The intermediate CA cert is in /root/.acme.sh/cache-enabler.centminmod.com_ecc/ca.cer
[Sun Sep 6 00:22:41 UTC 2020] And the full chain certs is there: /root/.acme.sh/cache-enabler.centminmod.com_ecc/fullchain.cer

success: 2nd SSL cert issued for dual ssl cert config
Next is actual Letsencrypt SSL certificate installation into the WordPress Nginx vhost site at /usr/local/nginx/conf/ssl/cache-enabler.centminmod.com
-----------------------------------------------------------
install cert
-----------------------------------------------------------
/root/.acme.sh/acme.sh --installcert -d cache-enabler.centminmod.com --certpath /usr/local/nginx/conf/ssl/cache-enabler.centminmod.com/cache-enabler.centminmod.com-acme.cer --keypath /usr/local/nginx/conf/ssl/cache-enabler.centminmod.com/cache-enabler.centminmod.com-acme.key --capath /usr/local/nginx/conf/ssl/cache-enabler.centminmod.com/cache-enabler.centminmod.com-acme.cer --reloadCmd /usr/bin/ngxreload --fullchainpath /usr/local/nginx/conf/ssl/cache-enabler.centminmod.com/cache-enabler.centminmod.com-fullchain-acme.key
[Sun Sep 6 00:22:41 UTC 2020] Installing cert to:/usr/local/nginx/conf/ssl/cache-enabler.centminmod.com/cache-enabler.centminmod.com-acme.cer
[Sun Sep 6 00:22:41 UTC 2020] Installing CA to:/usr/local/nginx/conf/ssl/cache-enabler.centminmod.com/cache-enabler.centminmod.com-acme.cer
[Sun Sep 6 00:22:41 UTC 2020] Installing key to:/usr/local/nginx/conf/ssl/cache-enabler.centminmod.com/cache-enabler.centminmod.com-acme.key
[Sun Sep 6 00:22:41 UTC 2020] Installing full chain to:/usr/local/nginx/conf/ssl/cache-enabler.centminmod.com/cache-enabler.centminmod.com-fullchain-acme.key
[Sun Sep 6 00:22:41 UTC 2020] Run reload cmd: /usr/bin/ngxreload
Reloading nginx configuration (via systemctl): [ OK ]
[Sun Sep 6 00:22:41 UTC 2020] Reload success

install 2nd SSL cert issued for dual ssl cert config

/root/.acme.sh/acme.sh --installcert -d cache-enabler.centminmod.com --certpath /usr/local/nginx/conf/ssl/cache-enabler.centminmod.com/cache-enabler.centminmod.com-acme-ecc.cer --keypath /usr/local/nginx/conf/ssl/cache-enabler.centminmod.com/cache-enabler.centminmod.com-acme-ecc.key --capath /usr/local/nginx/conf/ssl/cache-enabler.centminmod.com/cache-enabler.centminmod.com-acme-ecc.cer --reloadCmd /usr/bin/ngxreload --fullchainpath /usr/local/nginx/conf/ssl/cache-enabler.centminmod.com/cache-enabler.centminmod.com-fullchain-acme-ecc.key --ecc
[Sun Sep 6 00:22:41 UTC 2020] Installing cert to:/usr/local/nginx/conf/ssl/cache-enabler.centminmod.com/cache-enabler.centminmod.com-acme-ecc.cer
[Sun Sep 6 00:22:41 UTC 2020] Installing CA to:/usr/local/nginx/conf/ssl/cache-enabler.centminmod.com/cache-enabler.centminmod.com-acme-ecc.cer
[Sun Sep 6 00:22:41 UTC 2020] Installing key to:/usr/local/nginx/conf/ssl/cache-enabler.centminmod.com/cache-enabler.centminmod.com-acme-ecc.key
[Sun Sep 6 00:22:41 UTC 2020] Installing full chain to:/usr/local/nginx/conf/ssl/cache-enabler.centminmod.com/cache-enabler.centminmod.com-fullchain-acme-ecc.key
[Sun Sep 6 00:22:41 UTC 2020] Run reload cmd: /usr/bin/ngxreload
Reloading nginx configuration (via systemctl): [ OK ]
[Sun Sep 6 00:22:42 UTC 2020] Reload success

setup ssl_trusted_certificate dual cert version:
/usr/local/nginx/conf/ssl/cache-enabler.centminmod.com/cache-enabler.centminmod.com-dualcert-rsa-ecc.cer

letsencrypt ssl certificate setup completed
ssl certs located at: /usr/local/nginx/conf/ssl/cache-enabler.centminmod.com
Next is the Pure-FTP virtual FTP user login details which are via FTP over SSL
-------------------------------------------------------------
FTP hostname : xxx.xxx.xxx.xxx
FTP port : 21
FTP mode : FTP (explicit SSL)
FTP Passive (PASV) : ensure is checked/enabled
FTP username created for cache-enabler.centminmod.com : YOUR_FTPUSERNAME
FTP password created for cache-enabler.centminmod.com : YOUR_FTPPASSWORD
-------------------------------------------------------------
vhost for cache-enabler.centminmod.com created successfully
Next is a summary of Nginx vhost created directories, files etc. Like public webroot being at /home/nginx/domains/cache-enabler.centminmod.com/public. Which are also outlined on official site’s config files page at https://centminmod.com/configfiles.html
vhost ssl for cache-enabler.centminmod.com created successfully

domain: https://cache-enabler.centminmod.com
vhost ssl conf file for cache-enabler.centminmod.com created: /usr/local/nginx/conf/conf.d/cache-enabler.centminmod.com.ssl.conf
/usr/local/nginx/conf/ssl_include.conf created
Self-signed SSL Certificate: /usr/local/nginx/conf/ssl/cache-enabler.centminmod.com/cache-enabler.centminmod.com.crt
SSL Private Key: /usr/local/nginx/conf/ssl/cache-enabler.centminmod.com/cache-enabler.centminmod.com.key
SSL CSR File: /usr/local/nginx/conf/ssl/cache-enabler.centminmod.com/cache-enabler.centminmod.com.csr
Backup SSL Private Key: /usr/local/nginx/conf/ssl/cache-enabler.centminmod.com/cache-enabler.centminmod.com-backup.key
Backup SSL CSR File: /usr/local/nginx/conf/ssl/cache-enabler.centminmod.com/cache-enabler.centminmod.com-backup.csr
letsdebug API check log: /root/centminlogs/letsdebug-cache-enabler.centminmod.com-060920-001334.log

upload files to /home/nginx/domains/cache-enabler.centminmod.com/public
vhost log files directory is /home/nginx/domains/cache-enabler.centminmod.com/log

------------------------------------------------------------
SSH commands to uninstall created WordPress install and Nginx vhost:
/root/tools/wp_uninstall_cache-enabler.centminmod.com.sh
------------------------------------------------------------

------------------------------------------------------------
Wordpress Auto Updater created at:
/root/tools/wp_updater_cache-enabler.centminmod.com.sh
cronjob set for every 8 hours update (3x times per day)
------------------------------------------------------------
Next is a summary of WordPress login and install details
WordPress domain: cache-enabler.centminmod.com
Wordpress DB Name: wp747xxxxx1db_31356
Wordpress DB User: wpdbxxxxxx88
Wordpress DB Pass: wpdbxxxxxx9Zp29213
Wordpress Admin User ID: 39xxx6
Wordpress Admin User: zW3sTxxxxxxxxp1825
Wordpress Admin Pass: zUGxxxxxxxxxxx45
Wordpress Admin Email: [email protected]
Wordpress Admin Display Name: George
Next are final steps to complete WordPress setup where applicable
------------------------------------------------------------
To complete setup:
1. Enable Permalinks (DO NOT use links with .html extensions for performance reasons) i.e. /%post_id%/%postname%/
2. Settings Menu > Cache Enabler set options and hit Save Changes (https://community.centminmod.com/threads/15039/)
3. Settings Menu > Optimus set options and hit Save Changes
4. Appearance > Theme Options (Responsive theme) > Home Page nav bar > Uncheck Overrides WordPress front page option
------------------------------------------------------------
Next is note to the log file which saved the entire centmin.sh menu option 22 process so you can inspect it for login details or troubleshooting etc.
-------------------------------------------------------------
vhost for cache-enabler.centminmod.com wordpress setup successfully
cache-enabler.centminmod.com setup info log saved at:
/root/centminlogs/centminmod_123.09beta01.b582_060920-001334_wordpress_addvhost.log
And finally a wpinfo.sh script is generated which you can run to get a full overview of your WordPress installation
-------------------------------------------------------------
wpinfo.sh script saved at:
/usr/local/nginx/conf/wpincludes/cache-enabler.centminmod.com/wpinfo.sh
Example wpinfo.sh run output
/usr/local/nginx/conf/wpincludes/cache-enabler.centminmod.com/wpinfo.sh
WP-CLI 2.4.0
WP-Home https://cache-enabler.centminmod.com
WP-SiteURL https://cache-enabler.centminmod.com
WordPress version: 5.5.1
Database revision: 48748
TinyMCE version: 4.9100 (49100-20200624)
Package language: en_US
+--------+-----------------------------------+--------------+---------------------------+---------------------+---------------+
| ID | user_login | display_name | user_email | user_registered | roles |
+--------+-----------------------------------+--------------+---------------------------+---------------------+---------------+
| 39xxx6 | zW3sTxxxxxxxxp1825 | George | [email protected] | 2020-09-06 00:21:32 | administrator |
+--------+-----------------------------------+--------------+---------------------------+---------------------+---------------+
+----------------------+------------------------------------------------------------------+----------+
| name | value | type |
+----------------------+------------------------------------------------------------------+----------+
| table_prefix | 25xxx_ | variable |
| WP_CACHE | 1 | constant |
| DB_NAME | wpxxxxxxxxdb_31356 | constant |
| DB_USER | wpdbxxxxxxxxx88 | constant |
| DB_PASSWORD | wpdbxxxxxxxxxxxxxxxxx9213 | constant |
| DB_HOST | localhost | constant |
| DB_CHARSET | utf8 | constant |
| DB_COLLATE | | constant |
| DISABLE_WP_CRON | | constant |
| WP_AUTO_UPDATE_CORE | minor | constant |
| WP_POST_REVISIONS | 10 | constant |
| EMPTY_TRASH_DAYS | 10 | constant |
| WP_CRON_LOCK_TIMEOUT | 60 | constant |
| CONCATENATE_SCRIPTS | | constant |
| AUTH_KEY | {[{9*v1}VI/mqSe(xxxxxxxxxxxxxxxxx+Gk(:~f%|ZKQaT*z^73%Vl0|^XfiP~o | constant |
| SECURE_AUTH_KEY | ?57(T*}PZn]3ixxxxxxxxxxxxxxxxxxxxxxxxxxxc_ A$NIX5DRd!1-5nAoFOpo= | constant |
| LOGGED_IN_KEY | ,fA}Hl8>KF3?:CeXxxxxxxxxxxxxxxxxxxxxxxxxxxxxgD}d !~!jyRpBhrQw`d0 | constant |
| NONCE_KEY | ;4`6I`*sBUxxxxxxxxxxxxxxxxxxxxxxxxxxxxxxxxxxxxxxxxx,KO(2R#,Kj~nh | constant |
| AUTH_SALT | #c712,y%!uYxxxxxxxxxxxxxxxxxxxxxxxxxxxxxxxxxxxxxxxxxq>T$&U$>CM#e | constant |
| SECURE_AUTH_SALT | vBzZoSz3xxxxxxxxxxxxxxxxxxxxxxxxxxxxxxxxxxxxxxxxxxxxxfX!C5_Bj^O, | constant |
| LOGGED_IN_SALT | O<Lj~QtczMbxxxxxxxxxxxxxxxxxxxxxxxxxxxxxxxxxxxxxxxxxxxxxCvfj=`*] | constant |
| NONCE_SALT | =k&;9Hi1CxxxxxxxxxxxxxxxxxxxxxxxxxxxxxxxxxxxxxxxxxxxxxxdX}8kZ89M | constant |
| WP_CACHE_KEY_SALT | *&^C&awDC#xxxxxxxxxxxxxxxxxxxxxxxxxxxxxxxxxxxxxxxxxxxx(o`Z=tc7A= | constant |
+----------------------+------------------------------------------------------------------+----------+
+--------------------+----------+--------+---------+
| name | status | update | version |
+--------------------+----------+--------+---------+
| akismet | inactive | none | 4.1.6 |
| autoptimize | active | none | 2.7.7 |
| autoptimize-gzip | active | none | 0.1 |
| cache-enabler | active | none | 1.4.8 |
| cdn-enabler | active | none | 1.0.9 |
| classic-editor | active | none | 1.6 |
| disable-xml-rpc | active | none | 1.0.1 |
| native-lazyload | active | none | 1.0.2 |
| sucuri-scanner | active | none | 1.8.24 |
| advanced-cache.php | dropin | none | |
+--------------------+----------+--------+---------+
+-----------------+----------+--------+---------+
| name | status | update | version |
+-----------------+----------+--------+---------+
| twentynineteen | inactive | none | 1.7 |
| twentyseventeen | inactive | none | 2.4 |
| twentytwenty | active | none | 1.5 |
+-----------------+----------+--------+---------+
Final WordPress & Cloudflare Completion Tasks
Final tasks to complete WordPress setup.
Cache Enabler Settings
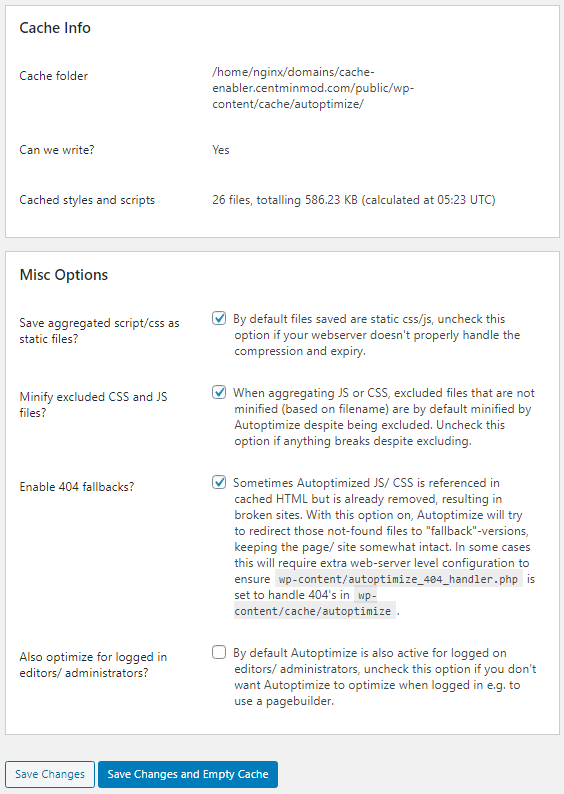
Ensure you configure Cache Enabler settings. Noting Cache Expiry doesn’t work as Cache Enabler has been configured for advance Nginx caching so needs the above mentioned cronjob to set Cache Expiry.

Autoptimize Configuration Settings
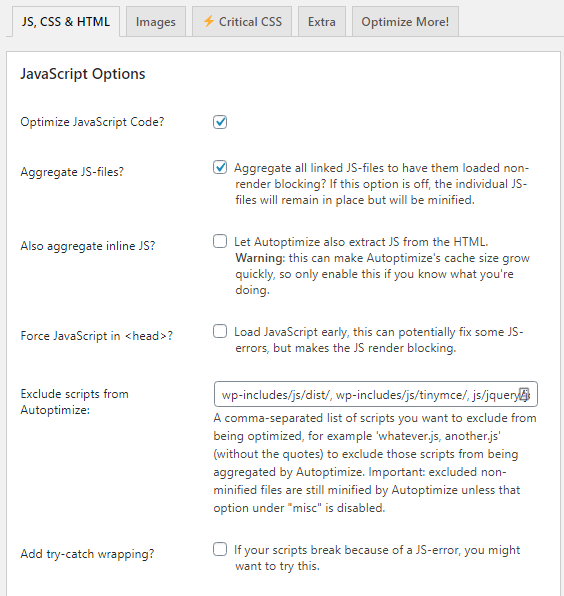
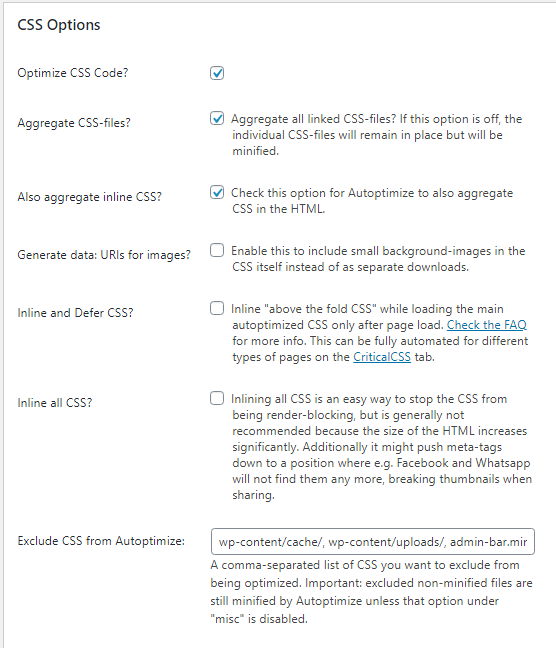
Ensure you edit your Autoptimize CSS and JS settings as follows
Nginx Visitor Real IP Detection
As your WordPress site is behind Cloudflare proxy, you need to enable cloudflare.conf include file in Nginx generated vhost config file at /usr/local/nginx/conf/conf.d/cache-enabler.centminmod.com.ssl.conf so that visitor’s real IP addresses are detected by Nginx and your WordPress install otherwise, you will see Cloudflare server IPs being attributed to visitors in your Nginx access logs at /home/nginx/domains/cache-enabler.centminmod.com/log/access.log and in WordPress IP detection routines.
To enable cloudflare.conf include file in /usr/local/nginx/conf/conf.d/cache-enabler.centminmod.com.ssl.conf
change
#include /usr/local/nginx/conf/cloudflare.conf;
to
include /usr/local/nginx/conf/cloudflare.conf;
You can do that manually or via SSH command line sed replacement and Nginx + PHP-FPM service restart commands below:
sed -i 's|^ #include /usr/local/nginx/conf/cloudflare.conf;| include /usr/local/nginx/conf/cloudflare.conf;|' /usr/local/nginx/conf/conf.d/cache-enabler.centminmod.com.ssl.conf
nprestart
So the Nginx site vhost config file at /usr/local/nginx/conf/conf.d/cache-enabler.centminmod.com.ssl.conf will show the following lines
# uncomment cloudflare.conf include if using cloudflare for
# server and/or vhost site
include /usr/local/nginx/conf/cloudflare.conf;
Cloudflare Settings
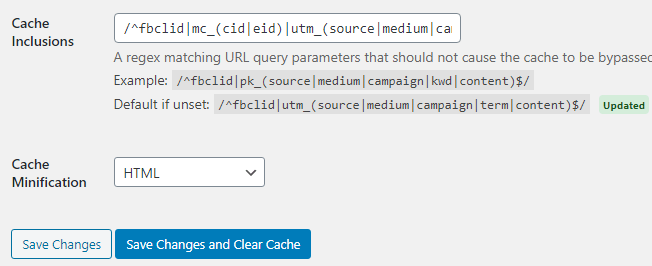
The next step to ensure Cache Enabler works with Cloudflare CDN proxy is to ensure that Cloudflare auto HTML minification is disabled in Cloudflare dashboard (which is the default unless you specifically enabled it) and instead do the HTML minification from Cache Enabler WordPress admin settings.
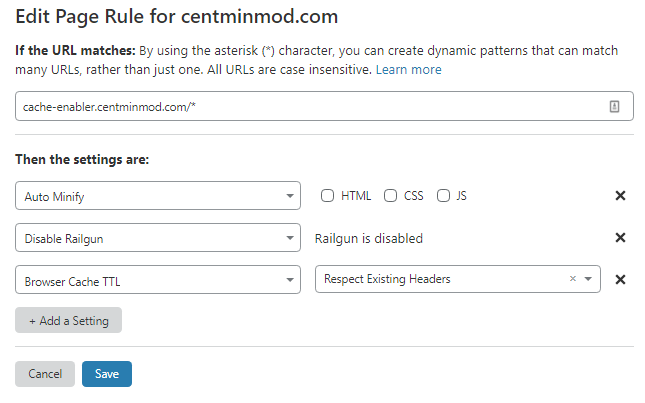
You can use a specific Cloudflare Page Rule to disable Auto Minify if you only want a specific subdomain disabled by setting Auto Minify Page Rule but leaving HTML checkbox unchecked. Here I also disabled Railgun as I don’t have it configured for this specific server.

Then instead in Cache Enabler WordPress admin settings, enable Cache Minification for HTML there if you desire.
You can then verify if Cache Enabler caching is working after visiting your WordPress site as a guest to populate the cache by running curl commands below to inspect the source code of the WordPress page to see if there is a Cache Enabler timestamp comment added to indicator caching done.
curl -4sk https://cache-enabler.centminmod.com/ | tail -2

<!-- Cache Enabler by KeyCDN @ 06.09.2020 01:17:47 (https gzip) -->
and checking if advanced caching of specific query strings is working for ?utm_sourcr
curl -4sk "https://cache-enabler.centminmod.com/?utm_source" | tail -2

<!-- Cache Enabler by KeyCDN @ 06.09.2020 01:17:47 (https gzip) -->
and for ?fbclid
curl -4sk "https://cache-enabler.centminmod.com/?fbclid" | tail -2

<!-- Cache Enabler by KeyCDN @ 06.09.2020 01:17:47 (https gzip) -->
Inspecting the generated cache files and pre-compressed cache files themselves
ls -lahR /home/nginx/domains/cache-enabler.centminmod.com/public/wp-content/cache/cache-enabler/cache-enabler.centminmod.com/
/home/nginx/domains/cache-enabler.centminmod.com/public/wp-content/cache/cache-enabler/cache-enabler.centminmod.com/:
total 36K
drwxrws--- 2 nginx nginx 57 Sep 6 01:17 .
drwxrws--- 3 nginx nginx 42 Sep 6 01:17 ..
-rw-rw---- 1 nginx nginx 28K Sep 6 01:17 https-index.html
-rw-rw---- 1 nginx nginx 7.3K Sep 6 01:17 https-index.html.gz
Sucuri File Integrity Checks
The centmin.sh menu option 22 WordPress installer also automatically installs Sucuri WordPress plugin so first task is to process any reported WordPress core/file integrity alerts for Centmin Mod Nginx vhost default added files and mark them as fixed/legit.

Add Browser Cache Headers To Cached Files
By default Cache Enabler served cached files via Nginx don’t serve up a Cache-Control header for web browser caching. You can optionally enable this by editing centmin.sh menu option 22 generated include file at /usr/local/nginx/conf/wpincludes/cache-enabler.centminmod.com/wpcacheenabler_cache-enabler.centminmod.com.conf and at bottom of the file add the following Nginx rules to set expires header only when Cache Enabler cached files exist on disk.
This sets web browser cache to 120 seconds – adjust accordingly to your own needs.
if (-f $document_root$cache_enabler_uri) {
 set $cttls "120s";
}
expires $cttls;
Then in Cloudflare site zone’s dashboard on Caching > Configuration section set Browser Cache TTL to ‘Respect Existing Headers’.

Or set it via custom Cloudflare Page Rule if you only want to apply it to a specific subdomain or path.
Resulting in the following served when Cache Enabler’s cached file exists – notice the Cache-Control and Expires header set.
curl -I "https://cache-enabler.centminmod.com/"
HTTP/1.1 200 OK
Date: Tue, 08 Sep 2020 13:41:46 GMT
Content-Type: text/html; charset=utf-8
Connection: keep-alive
Set-Cookie: __cfduid=d7ff7a29b86371991fed6f3c741b4bace1599572506; expires=Thu, 08-Oct-20 13:41:46 GMT; path=/; domain=.centminmod.com; HttpOnly; SameSite=Lax
Last-Modified: Tue, 08 Sep 2020 01:19:05 GMT
Vary: Accept-Encoding
X-Powered-By: centminmod
Expires: Tue, 08 Sep 2020 13:43:46 GMT
Cache-Control: max-age=120
Strict-Transport-Security: max-age=31536000; includeSubdomains;
X-Frame-Options: SAMEORIGIN
X-Xss-Protection: 1; mode=block
X-Content-Type-Options: nosniff
Referrer-Policy: strict-origin-when-cross-origin
Feature-Policy: accelerometer 'none'; camera 'none'; geolocation 'none'; gyroscope 'none'; magnetometer 'none'; microphone 'none'; payment 'none'; usb 'none'
CF-Cache-Status: DYNAMIC
cf-request-id: 050f8c8f20000091fe18b86200000001
Expect-CT: max-age=604800, report-uri="https://report-uri.cloudflare.com/cdn-cgi/beacon/expect-ct"
Server: cloudflare
CF-RAY: 5cf916c50f5491fe-EWR
alt-svc: h3-27=":443"; ma=86400, h3-28=":443"; ma=86400, h3-29=":443"; ma=86400
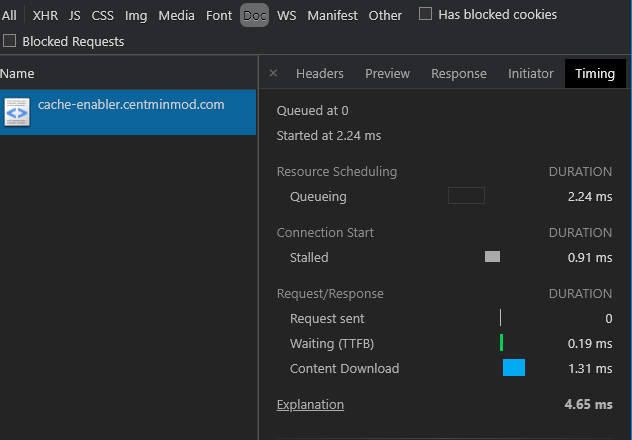
With web browser cache headers in place, visitors will have a faster page loading experience if they already have a cached version in their local browser cache. Here’s Opera web browser network developer tools showing how a browser cached version of WordPress full HTML page cached loads.
The response is loaded from visitor’s browser disk cache and has a total time of just 2 milliseconds of which 1 millisecond was over the network. I’m in Brisbane, Australia and test WordPress install is in New York City.
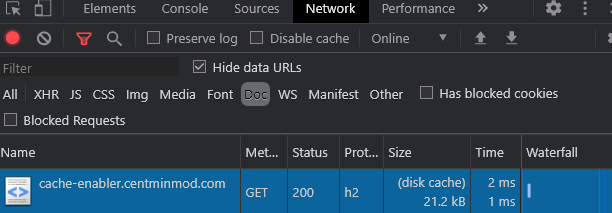
A breakdown of the request’s timings where waiting TTFB was 0.19 ms and Content Download was 1.31ms.
Testing Cache Enabler Full HTML Page Cache
You can run a quick load test using my forked wrk, wrk-cmm load testing tool with 300 concurrent users for 15 second duration. You need to specifically test with a User Agent specified otherwise, Cloudflare Web Application Firewall (WAF) on paid plans may have WAF rules that block or challenge requests which have an empty User Agent and wrk-cmm will end up with non-2xx or 3xx responses reported.
wrk-cmm test for WordPress index page
wrk-cmm -t1 -c300 -d15s -H "User-Agent: Mozilla/5.0 (Windows NT 10.0; Win64; x64) AppleWebKit/537.36 (KHTML, like Gecko) Chrome/87.0.4255.0 Safari/537.36" --latency --breakout https://cache-enabler.centminmod.com/
Running 15s test @ https://cache-enabler.centminmod.com/
  1 threads and 300 connections
  Thread Stats   Avg      Stdev     Max   +/- Stdev
    Latency    97.63ms   72.66ms   1.25s    84.71%
    Connect   175.27ms   82.03ms 353.45ms   69.56%
    TTFB       89.96ms   71.20ms   1.25s    87.47%
    TTLB        7.60ms   15.44ms 207.93ms   94.45%
    Req/Sec     3.36k     1.02k    5.27k    67.88%
  Latency Distribution
     50%   73.31ms
     75%  109.15ms
     90%  183.63ms
     95%  258.38ms
     99%  363.04ms
  49605 requests in 15.03s, 1.32GB read
Requests/sec:   3299.40
Transfer/sec:     90.24MB
h2load HTTP/2 HTTPS load tester for WordPress index page
h2load -t1 -c300 -n5000 -m60 -H "User-Agent: Mozilla/5.0 (Windows NT 10.0; Win64; x64) AppleWebKit/537.36 (KHTML, like Gecko) Chrome/87.0.4255.0 Safari/537.36" https://cache-enabler.centminmod.com/
starting benchmark...
spawning thread #0: 300 total client(s). 5000 total requests
TLS Protocol: TLSv1.2
Cipher: ECDHE-ECDSA-AES128-GCM-SHA256
Server Temp Key: ECDH P-256 256 bits
Application protocol: h2
progress: 10% done
progress: 20% done
progress: 30% done
progress: 40% done
progress: 50% done
progress: 60% done
progress: 70% done
progress: 80% done
progress: 90% done
progress: 100% done

finished in 3.30s, 1513.31 req/s, 40.44MB/s
requests: 5000 total, 5000 started, 5000 done, 5000 succeeded, 0 failed, 0 errored, 0 timeout
status codes: 5000 2xx, 0 3xx, 0 4xx, 0 5xx
traffic: 133.61MB (140101965) total, 404.88KB (414601) headers (space savings 87.38%), 132.94MB (139400000) data
                     min         max         mean         sd        +/- sd
time for request:   180.42ms       3.10s       1.85s    839.88ms    56.42%
time for connect:   126.24ms       1.78s    399.34ms    437.13ms    88.00%
time to 1st byte:   325.57ms       3.25s       1.56s    793.29ms    61.33%
req/s           :       4.85       28.26        5.87        2.27    93.33%
wrk-cmm testing of query string cache inclusion for the index page with ?fbclid query string
wrk-cmm -t1 -c300 -d15s -H "User-Agent: Mozilla/5.0 (Windows NT 10.0; Win64; x64) AppleWebKit/537.36 (KHTML, like Gecko) Chrome/87.0.4255.0 Safari/537.36" --latency --breakout https://cache-enabler.centminmod.com/?fbclid
Running 15s test @ https://cache-enabler.centminmod.com/?fbclid
  1 threads and 300 connections
  Thread Stats   Avg      Stdev     Max   +/- Stdev
    Latency    93.21ms   58.89ms 625.70ms   85.31%
    Connect   173.79ms   81.42ms 347.52ms   68.33%
    TTFB       84.35ms   56.61ms 592.67ms   86.35%
    TTLB        8.36ms   15.56ms 282.17ms   92.53%
    Req/Sec     3.47k     1.23k    6.00k    72.39%
  Latency Distribution
     50%   77.05ms
     75%  100.73ms
     90%  157.51ms
     95%  219.20ms
     99%  331.03ms
  50304 requests in 15.01s, 1.34GB read
Requests/sec:   3351.11
Transfer/sec:     91.74MB
Notes
- By default Cloudflare only caches static content files like images, css and js and doesn’t cache dynamically generated HTML files like WordPress blog pages unless you tell it specifically to do so via ‘Cache Everything’ page rules as outlined at Understand Cloudflare’s CDN. So the test is communicating directly with your origin Nginx server and is load testing Centmin Mod Nginx origin’s WordPress Cache Enabler caching at Nginx cache level out of the box. So response times are dependent and relative to the test server’s geographical location and your Centmin Mod Nginx server’s location i.e. Upcloud New York City locale. You can see an example of this in below screenshot using KeyCDN performance testing tool testing ?fbclid query string cache inclusion performance. If you configure Cloudflare CDN cache for dynamic HTML content, then you’ll have 2 caching layers – one at Cloudflare CDN edge server and one at Centmin Mod Nginx server level.
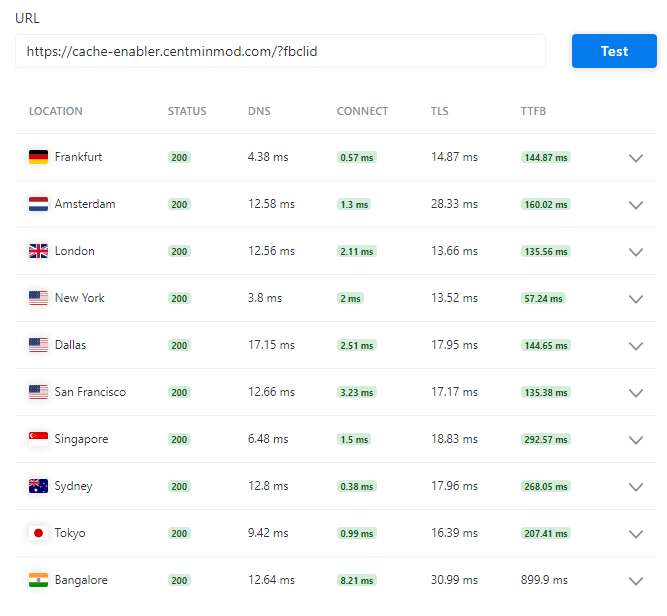
- The above wrk-cmm and h2load tests were run on same Upcloud server as WordPress install so the load testers are competing with Nginx resources as there’s only 1 cpu core on this KVM VPS server so latency and performance will be less than if you ran wrk-cmm and h2load on separate Upcloud KVM VPS server itself. But as you can see, the requests per second rate is much higher serving via Nginx level cache via Cache Enabler’s full HTML page cache than via PHP-FPM.
Using third party loader.io load testing service to move testing outside of the Upcloud KVM VPS server.
loader.io test configuration for 300 users
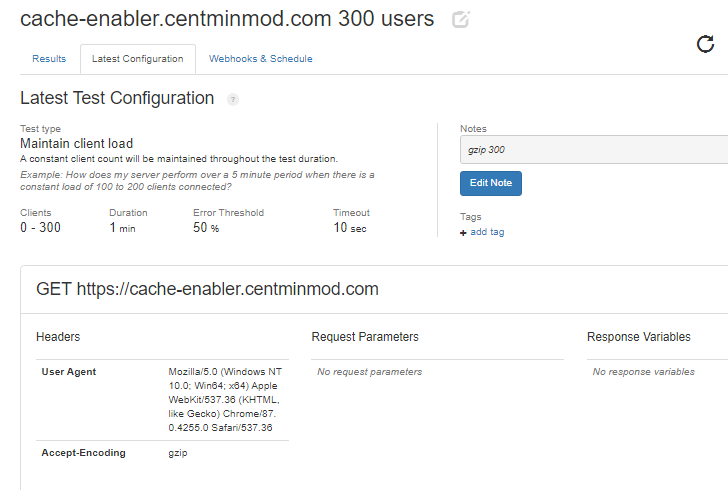
loader.io test results for 300 users with User Agent and gzip compression header requested shows an average of response time of 34 milliseconds over a 60 second test duration.
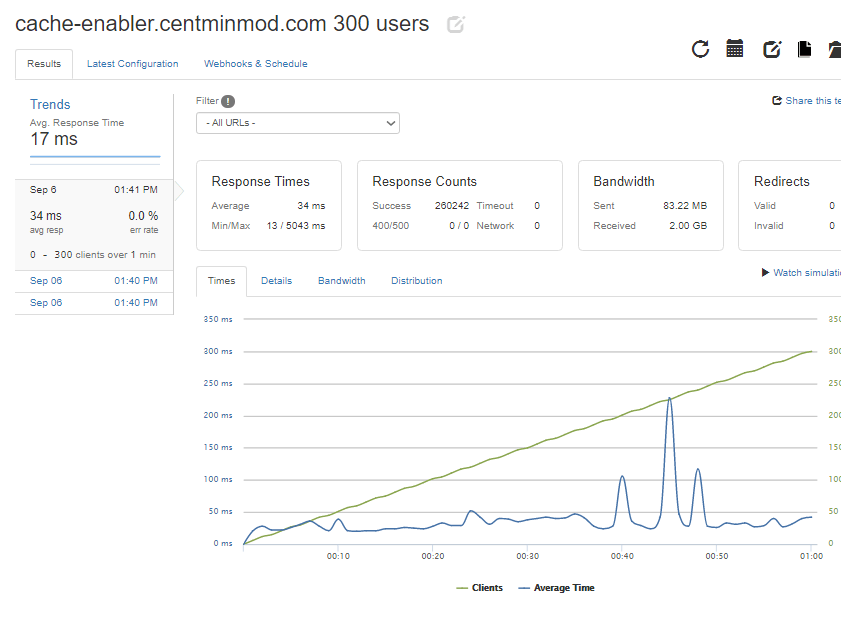
loader.io test configuration for 600 users
loader.io test results for 600 users with User Agent and gzip compression header requested shows an average of response time of 43 milliseconds over a 60 second test duration.
loader.io test configuration for 1000 users
loader.io test results for 1000 users with User Agent and gzip compression header requested shows an average of response time of 64 milliseconds over a 60 second test duration. With 1 timeout response recorded. Not bad for a 1 cpu, 1GB memory, 25GB disk US$5/month KVM VPS server based WordPress installation.
And with a bit of Nginx and PHP-FPM server side tuning of settings, at 5,000 constant user loader.io test. Though average latency response time isn’t ideal at 1170ms or 1.17 seconds. But not bad for a 1cpu, 1GB memory KVM VPS server at US$5/month.

Installing and running WPPerformanceTester plugin where the server performance numbers are highly influenced by server’s CPU model and clock speed. This Upcloud 1cpu core, 1GB ram server sports an AMD EPYC 7542 cpu @2.9Ghz base clocks.
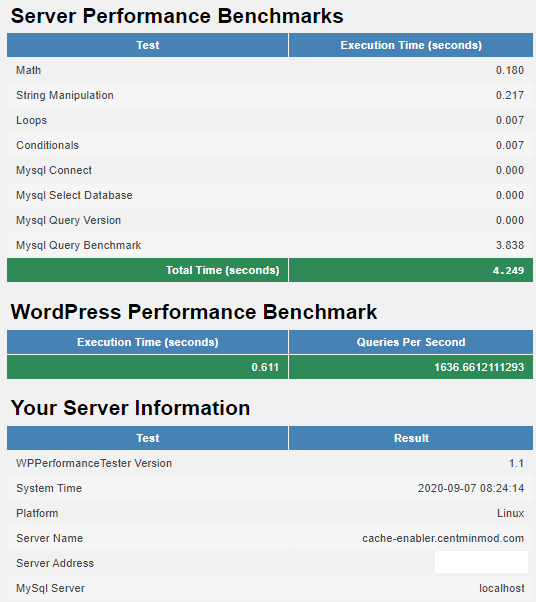
The final result for Google Lighthouse via Google PageSpeed Insights online tool for WordPress 5.5.1 default site theme testing specifically the query string cache inclusion string for ?fbclid for both mobile and desktop respectively.
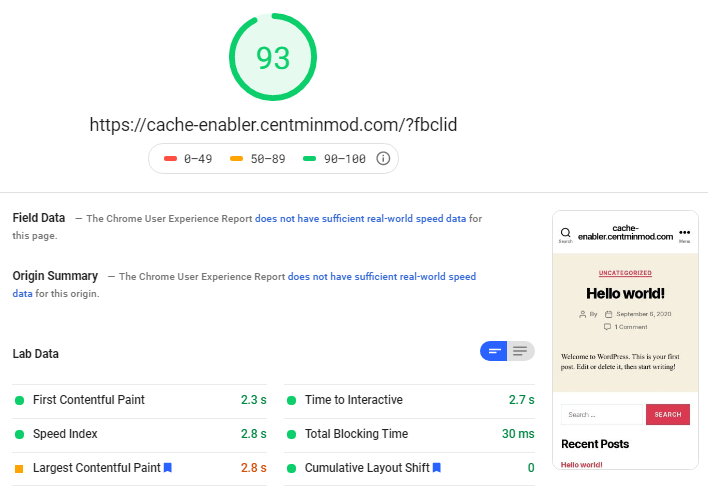
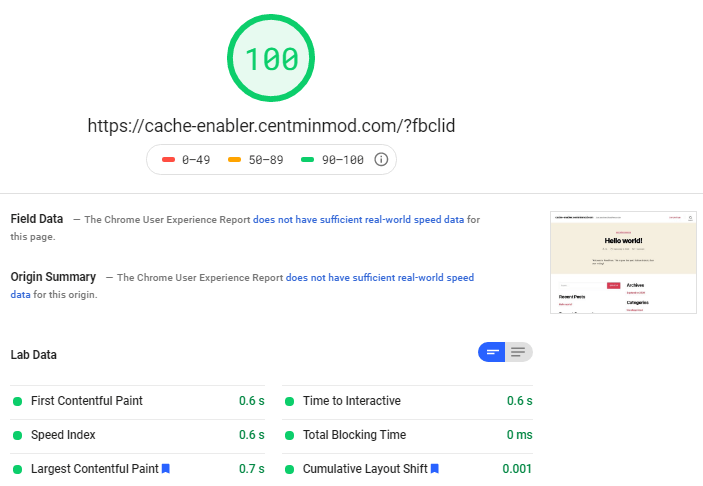
And for Webpagetest.org testing WordPress with query string cache inclusion for ?fbclid.

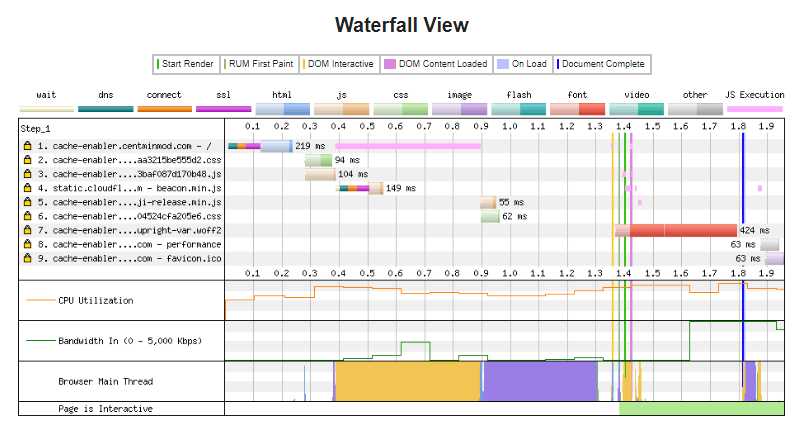
Notable Updates Since Initial Publication
Below are some updates and changes since initial publication of this blog post.
- Cache Enabler 1.5.1 release has some major changes under the hood option settings wise so Centmin Mod’s centmin.sh menu option 22 needed an update.
- Updated Centmin Mod WordPress install to force downgraded Cache Enabler 1.4.9 version due to various issues with Cache Enabler 1.5.1+ new cache routines. Details here.
The post WordPress Cache Enabler Advanced Full Page Caching Guide appeared first on Server Manager Guide.
]]>The post How To Install DirectAdmin Control Panel On CentOS 7 appeared first on Server Manager Guide.
]]>Seems like the cheapest way to get access to DirectAdmin for testing/learning purposes. The 1GB KVM plan only has 20GB disk space which isn’t suitable for production usage but for purpose of writing this guide and learning on DirectAdmin it should suffice. Otherwise, if you web host doesn’t provide a DirectAdmin license you’d have to buy a DirectAdmin license directly with DirectAdmin. As I am new to DirectAdmin, this guide serves a dual purpose in also documenting my learning and experiences with DirectAdmin installation process. As such this guide will be constantly updated over time so check back regularly. I’ve added a last updated date timestamp for this very purpose. Update: besides DirectAdmin standard licenses, there are also DirectAdmin Lite & Personal limited license options available. For details of what DirectAdmin limited licenses means, read here.
The following DirectAdmin installation steps are based on the official DirectAdmin outlined documentation for:
- DirectAdmin System Requirements
- DirectAdmin Installation Guide
- Common DirectAdmin pre-installation commands
- DirectAdmin SSL setup and configuration
- How to enable Letsencrypt SSL certificate support
- Installing Letsencrypt SSL certificate on DirectAdmin hostname
- DirectAdmin Tech Notes
Contents
- Step 1. CentOS 7 server preparation
- Step 2. Verify your DirectAdmin license information.
- Step 3. DirectAdmin Installation
- Step 4. Post-Install DirectAdmin Tasks
- Step 5. DirectAdmin HTTPS / SSL Configuration
- Step 6. Access DirectAdmin Control Panel
- Step 7. Switching DirectAdmin From Firewalld To CSF Firewall
- Step 8. DirectAdmin Skin Customisations
- Step 9. DirectAdmin Mail Handling
- Step 10. DirectAdmin Optimisations
- Step 11. Switching MySQL Server Versions – Oracle vs MariaDB MySQL
- Step 12. DirectAdmin Log Locations
- Step 13. Updating DirectAdmin
- Step 14. Speeding Up DirectAdmin Compile Times
- Summary
Step 1. CentOS 7 server preparation
DirectAdmin system requirements guidelines outline specific recommendations. The ones relevant to this DirectAdmin installation are:
- For CentOS 7, use the xfs quota system. If you use ext4, add use_xfs_quota=0 to the /usr/local/directadmin/conf/directadmin.conf.
- Swap disk size – for less than 2GB memory based servers, set swap disk size to 2x memory installed. For 2-8GB memory based servers, set swap disk size to same amount as installed memory. For greater than 8GB memory based servers, set swap disk size to at least 4GB.
- Ensure basic development/compiling tools such as gcc, g++, and perl have been installed
- Do not install services such as Apache, PHP, MySQL, Ftp, Sendmail, etc as DirectAdmin installation will take care of installation and configuration of such services. Full outline list of what DirectAdmin installs can be found at https://www.directadmin.com/technologies.php
- At a bare minimum your server must have one static IPv4 IP address. However, for DNS control you will sometimes need at least two (2) IP addresses. With only one IP address you might be forced to use an external DNS service, depending on your registrar. This means web sites you create through the control panel will not propagate automatically. For this DirectAdmin installation guide I’ll be using only one static IPv4 IP address with intention of using Cloudflare for DNS management.
- Setup and configuration of your DirectAdmin server’s hostname which should not be the same as the primary domain name. e.g. yourdomain.com is not a good hostname, where server.yourdomain.com or host.yourdomain.com is. If you have signed up with a VPS or dedicated server provider, at order time you would of specified a hostname to label and name your server. This is usually the hostname that the CentOS 7 image will configure out of the box when you log in for the first time and as such may require changing to a hostname that suits your needs.
So within your SSH logged in session as root user, run the following commands to prepare your CentOS 7 server for DirectAdmin installation.
Configuring your hostname for your DirectAdmin server. You can find the current registered hostname for your CentOS 7 server via either of these commands
uname -n
hostname
On BuyVM.net VPS there’s currently a bug in their system which incorrectly populates the hostname as the following instead of your entered hostname at order time. BuyVM folks are aware of this bug and actively working on a fix.
[root@roblifehack ~]# uname -n
roblifehack.com

[root@roblifehack ~]# hostname
roblifehack.com
The bug also appears in the default BuyVM Stallion control panel’s networking PTR configuration field so you will need to adjust those to your desired hostname with the proceeding instructions.
If your desired hostname needs changing you can do that now using command below changing hostname.yourdomain.com to your own desired hostname.
hostnamectl set-hostname hostname.yourdomain.com
You can verify with with above commands used to get current registered hostname or via
hostnamectl status
Then ensure your hostname’s DNS works via DNS A record pointing to DirectAdmin server’s public IP address. This is important for proper mail delivery from the server and for DirectAdmin licensing checks.
Configuring a swap disk. As DirectAdmin does do quite a bit of source compilation, my own experience with Centmin Mod LEMP stack has taught me that on low memory VPS servers, always have adequate swap disk size. So I opted to configure a 3GB swap disk for this 1GB BuyVM KVM VPS server. Below SSH commands create a 3GB swap disk for DirectAdmin to use.
if [ "$(df -hT | grep -w xfs)" ]; then dd if=/dev/zero of=/swapfile bs=1024 count=3072k; else fallocate -l 3G /swapfile; fi
mkswap /swapfile
swapon /swapfile
chown root:root /swapfile
chmod 0600 /swapfile
swapon -s
echo "/swapfile swap swap defaults 0 0" >> /etc/fstab
mount -a
free -m
BuyVM.net VPS already provisioned a 1GB swap file so this change would increase your total swap available to 4GB
free -ml
              total        used        free      shared  buff/cache   available
Mem:            991          59         412          12         518         757
Low:            991         578         412
High:             0           0           0
Swap:          1023           0        1023
After adding 3GB swap file to existing 1GB swap file = 4GB swap total
free -m
              total        used        free      shared  buff/cache   available
Mem:            991          61         405          12         524         755
Swap:          4095           0        4095
Installing basic development and compiling tools via YUM. I also add the following additional YUM packages:
- nano – my preferred linux text editor
- cmake, cmake3 – for compiling other software which may use cmake or version 3 of cmake
- screen – useful to run lengthy scripts or where you want your SSH session to survive disconnections from SSH
- sysstat – access to useful system resource gathering tools like sar, pidstat, mpstat, and iostat
- perl-libwww-perl – required if you want to install CSF Firewall
- perl-Crypt-SSLeay – required if you want to install CSF Firewall
- perl-Net-SSLeay – required if you want to install CSF Firewall
- perl-LWP-Protocol-https – required if you want to install CSF Firewall for CentOS 7
- GeoIP-devel
- GeoIP
- mlocate
- bc
- jq – install via EPEL YUM repo
- nghttp2 – for HTTPS/SSL diagnostics testing and access to h2load HTTP/2 HTTPS load tester
- redis – install via Remi YUM repo for newer version that CentOS 7 base YUM repo version
- memcached – install via Remi YUM repo for newer version that CentOS 7 base YUM repo version
- memcached-devel – install via Remi YUM repo for newer version that CentOS 7 base YUM repo version
- libmemcached-devel – install via CentOS 7 base YUM repo version
- libmemcached – install via CentOS 7 base YUM repo version
yum clean all
yum -y install wget gcc gcc-c++ flex bison make bind bind-libs bind-utils libaio libcom_err-devel openssl openssl-devel perl quota libcurl-devel gd zlib-devel zip unzip libcap-devel cronie bzip2 cyrus-sasl-devel perl-ExtUtils-Embed autoconf automake libtool which patch mailx bzip2-devel lsof glibc-headers kernel-devel expat-devel psmisc net-tools systemd-devel libdb-devel perl-DBI perl-Perl4-CoreLibs xfsprogs rsyslog logrotate crontabs file kernel-headers nano cmake cmake3 screen sysstat perl-libwww-perl perl-Crypt-SSLeay perl-Net-SSLeay perl-LWP-Protocol-https GeoIP-devel GeoIP mlocate bc

# EPEL & Remi YUM repo
yum -y install epel-release yum-utils
rpm -ivh https://rpms.remirepo.net/enterprise/remi-release-7.rpm
# disable Remi & EPEL by default and only enable manually when needed
yum-config-manager --disable remi epel
yum -q list jq nghttp2 redis memcached memcached-devel libmemcached-devel libmemcached --enablerepo=epel,remi
yum -y install jq nghttp2 redis memcached memcached-devel libmemcached-devel libmemcached --enablerepo=epel,remi
# mlocate
updatedb
Disabling SELINUX
setenforce 0
sed -i 's|enforcing|disabled|g' /etc/selinux/config
A YUM update and reboot is highly recommended before proceeding to ensure that your Linux Kernel is the latest available patch fixed for Meltdown/Spectre and other vulnerabilities.
yum -y update
reboot
After setting up 3+1 = 4GB swap disks and doing YUM update and package installs, current disk usage is:
df -hT
Filesystem     Type      Size  Used Avail Use% Mounted on
/dev/vda1      ext4       19G  4.8G   13G  27% /
devtmpfs       devtmpfs  486M     0  486M   0% /dev
tmpfs          tmpfs     496M     0  496M   0% /dev/shm
tmpfs          tmpfs     496M  6.7M  489M   2% /run
tmpfs          tmpfs     496M     0  496M   0% /sys/fs/cgroup
tmpfs          tmpfs     100M     0  100M   0% /run/user/0
Step 2. Verify your DirectAdmin license information.
If you didn’t get your DirectAdmin license from your web host but direct with DirectAdmin, sign into your client account at https://www.directadmin.com/clients and
- Click the “view” link next to your license and make sure that the license is Active and Verified (if it isn’t, then DirectAdmin’s billing system hasn’t processed the order yet).
- Verify that the server IP address and operating system is correct.
For BuyVM.net they offer free DirectAdmin licenses for their VPS which you can order after your BuyVM VPS has been provisioned and assigned an IP address here. The order form prompts you to provide the IP address of the BuyVM VPS server you intend to install DirectAdmin on, Once ordered you should see your DirectAdmin license listed in services listing. Clicking on the service will reveal the DirectAdmin license id, client id, status and registered IP and OS. Note, for new first time BuyVM VPS customers when you first provision a new VPS, mail ports are blocked by default until you contact their technical support to unblock the mail ports. This is a one time task you need to do.
You’ll also receive an email from BuyVM with DirectAdmin license details
Step 3. DirectAdmin Installation
Now to the actual DirectAdmin install which is done as root user in SSH logged in session. You first download the DirectAdmin setup.sh script and give it executable permissions. You can download setup.sh and save anywhere on your server but I generally like to group all my tools in a directory like /root/tools
mkdir -p /root/tools
cd /root/tools
wget -4 https://www.directadmin.com/setup.sh
chmod 755 setup.sh
Next is to actually run the setup.sh script. If you have a flaky SSH connection and do not want SSH disconnections to occur during setup.sh run, you can run setup.sh within a screen session. I also raise the default screen scrollback limit in /root/.screenrc.
You will be prompted for a client ID number, license ID number, and hostname when you run setup.sh as well as ethernet adaptor device name for the public IP address for the server.
- The hostname should not be the same as the primary domain name and should of been the same one we prepared and configured in step 1 preparation stage e.g. yourdomain.com is not a good hostname, where server.yourdomain.com or host.yourdomain.com is.
- Having the same host/main domain name will cause e-mail and FTP problems.
- Also, make sure the hostname resolves once you setup DNS – so ensure a DNS A record for your hostname exists pointing to the DirectAdmin server’s public IP address.
- You can find the list of your ethernet adaptor’s device name for public IP via command. For BuyVM VPS the public IP is on eth0 device name
/sbin/ifconfig
Actual DirectAdmin installation commands for running setup.sh or read further below on customising setup.sh runs:
echo "defscrollback 200000" >> /root/.screenrc
screen -dmS directadmin
screen -r directadmin
time ./setup.sh
Pre-configure DirectAdmin Installs
Was only made aware after writing this article that you can customise setup.sh and use preset options.conf prior to actual install via outlined instructions here. You can see this DirectAdmin installations final options.conf file settings in a Gist file here.
So populate these SSH session variables or put into a script the following. Where YOUR_LINK_TO_HOSTED_OPTIONS_FILE would be something like https://yourdomain.com/options.conf where you host the customised options.conf file usually created by DirectAdmin at /usr/local/directadmin/custombuild/options.conf.
clientid=YOUR_CLIENTID
licenseid=YOUR_LICENSEID
hostname=YOUR_HOSTNAME
ip=YOUR_SERVERIP
devicename=YOUR_ETHERNET_DEVICENAME
opturl=YOUR_LINK_TO_HOSTED_OPTIONS_FILE
custombuild_ver=2.0
Also you can pre-configure your DirectAdmin admin email and nameservers in the following files prior to running setup.sh:
- /root/.email.txt
- /root/.ns1.txt
- /root/.ns2.txt
Then you’d change your setup.sh run to
mkdir -p /root/tools
cd /root/tools
wget -4 https://www.directadmin.com/setup.sh
chmod 755 setup.sh

echo "defscrollback 200000" >> /root/.screenrc
screen -dmS directadmin
screen -r directadmin

echo $custombuild_ver > /root/.custombuild
time ./setup.sh $clientid $licenseid $hostname $devicename $ip
If you have a preconfigured options.conf config file you saved from an existing DirectAdmin server location at /usr/local/directadmin/custombuild/options.conf, you can use that too by setting up /usr/local/directadmin/custombuild/options.conf before running setup.sh by downloading your custom options.conf file from remote server or Gist hosted file you defined in above populated variables for $opturl. You can see this DirectAdmin installations final options.conf file settings in a Gist file here.
Downloading preset options.conf to /usr/local/directadmin/custombuild/options.conf
mkdir -p /usr/local/directadmin/custombuild
wget -O /usr/local/directadmin/custombuild/options.conf $opturl
Example using my Gist file to prepopulate options.conf and using sed to replace values for redirect_host (remember to also configure and setup DirectAdmin over HTTPS) and email options:
HOSTNAME='hostname.yourdomain.com'
EMAIL='your_directadmin_email'
mkdir -p /usr/local/directadmin/custombuild
curl -s -4 https://gist.githubusercontent.com/centminmod/62cc0bcdb44977718f98390a93ad8776/raw/options.conf | sed -e "s|^redirect_host=.*|redirect_host=$HOSTNAME|" -e "s|^email=.*|email=$EMAIL|" > /usr/local/directadmin/custombuild/options.conf
The setup.sh has various setup question prompts for you to answer. Once all question prompts have been answered it’s waiting for DirectAdmin installation process to complete. As there’s source compilation involved, how fast DirectAdmin installs will depend on your specific server hardware configuration.
- The higher the cpu clock frequency, the faster source compilations go.
- The more cpu threads available, the faster source compilations should go if DirectAdmin makes use of multiple cpu threads during source compilation.
- The faster the underlying disk storage layer i.e. NVMe SSD vs SSD vs non-SSD, the faster source compilations are.
- New cpu models are generally clock for clock faster than previous cpu generations.
The BuyVM VPS has 1GB of memory with 1 cpu thread on an Intel Xeon E3-1270v3 Haswell based processor.
lscpu
Architecture:          x86_64
CPU op-mode(s):        32-bit, 64-bit
Byte Order:            Little Endian
CPU(s):                1
On-line CPU(s) list:   0
Thread(s) per core:    1
Core(s) per socket:    1
Socket(s):             1
NUMA node(s):          1
Vendor ID:             GenuineIntel
CPU family:            6
Model:                 60
Model name:            Intel(R) Xeon(R) CPU E3-1270 v3 @ 3.50GHz
Stepping:              3
CPU MHz:               3499.992
BogoMIPS:              6999.98
Hypervisor vendor:     Microsoft
Virtualization type:   full
L1d cache:             32K
L1i cache:             32K
L2 cache:              4096K
L3 cache:              16384K
NUMA node0 CPU(s):     0
Flags:                 fpu vme de pse tsc msr pae mce cx8 apic sep mtrr pge mca cmov pat pse36 clflush mmx fxsr sse sse2 ss syscall nx pdpe1gb rdtscp lm constant_tsc arch_perfmon rep_good nopl xtopology eagerfpu pni pclmulqdq ssse3 fma cx16 pcid sse4_1 sse4_2 x2apic movbe popcnt tsc_deadline_timer aes xsave avx f16c rdrand hypervisor lahf_lm abm fsgsbase tsc_adjust bmi1 avx2 smep bmi2 erms invpcid xsaveopt arat umip
Excerpt below:
time ./setup.sh
*** 64-bit OS ***

*****************************************************
*
* DirectAdmin requires certain packages, described here:
* http://help.directadmin.com/item.php?id=354
*
* Would you like to install these required pre-install packages? (y/n): y
*****************************************************

Please enter your Client ID : CLIENTID
Please enter your License ID : LICENSEID
Please enter your hostname (server.domain.com)
It must be a Fully Qualified Domain Name
Do *not* use a domain you plan on using for the hostname:
eg. don't use domain.com. Use server.domain.com instead.
Do not enter http:// or www

Your current hostname is: hostname.yourdomain.com

Enter your hostname (FQDN) : hostname.yourdomain.com
Client ID:  CLIENTID
License ID: LICENSEID
Hostname: hostname.yourdomain.com
Is this correct? (y,n) : y
The following ethernet devices/IPs were found. Please enter the name of the device you wish to use:

eth0       MY_SERVERIP
eth1

Enter the device name: eth0
Your external IP: MY_SERVERIP
The external IP should typically match your license IP.

Is MY_SERVERIP the IP in your license? (y,n) : y

DirectAdmin will now be installed on: Enterprise 7.6
Is this correct? (must match license) (y,n) : y
You have chosen custombuild 2.0.
Prompts for Apache/PHP setup – I deliberately chose a non-default Apache/PHP setup just to see what options are available for now. Will play with different configurations later down the track.
Would you like the default settings of apache 2.4 with mod_ruid2 and php 7.2 cli? (y/n): n
You have chosen to customize the custombuild options. Please wait while options configurator is downloaded...

Cannot find /usr/local/directadmin/custombuild/options.conf, writing defaults.
Downloading versions.txt...

Would you like to backup the current options.conf? (yes/no): yes
Backup created: /usr/local/directadmin/custombuild/options.conf.20190717054458.backup

Please select webserver you would like to use (apache/nginx/nginx_apache/litespeed/openlitespeed):apache

Please select FTP server you would like to use (proftpd/pureftpd/no):pureftpd

Please select default PHP version you would like to use (5.3/5.4/5.5/5.6/7.0/7.1/7.2/7.3):7.3

Please select default PHP mode you would like to use (php-fpm/fastcgi/suphp/lsphp/mod_php):php-fpm

Would you like to have a second instance of PHP installed? (yes/no): yes

Please select additional PHP version you would like to use (5.3/5.4/5.5/5.6/7.0/7.1/7.2/7.3):7.2

Please select additional PHP mode you would like to use (php-fpm/fastcgi/suphp/lsphp):php-fpm

Would you like to have a third instance of PHP installed? (yes/no): yes

Please select additional PHP version you would like to use (5.3/5.4/5.5/5.6/7.0/7.1/7.2/7.3):5.6

Please select additional PHP mode you would like to use (php-fpm/fastcgi/suphp/lsphp):php-fpm

Would you like to have a fourth instance of PHP installed? (yes/no): no

Please select if you would like to use ionCube (yes/no):no

Please select if you would like to use Zend Guard Loader (yes/no):no

Please select if you would like to use suhosin (yes/no):no

Please select if you would like CustomBuild to manage Exim installation (yes/no):yes

Please select if you would like CustomBuild to manage Dovecot installation (yes/no):yes

Please select if you would like CustomBuild to manage phpMyAdmin installation (yes/no):yes

Please select if you would like CustomBuild to manage SquirrelMail installation (yes/no):yes

Please select if you would like CustomBuild to manage RoundCube installation (yes/no):yes

Would you like to search for the fastest download mirror? (y/n): y
Installation on BuyVM 1GB KVM VPS with 1 cpu thread, took approximately 95 minutes to complete ending with the following message
To login now, follow this link:

http://MY_SERVERIP:2222

and enter your Admin username and password when prompted.

You should now visit http://admin.site-helper.com and http://www.directadmin.com/newinstall.html to learn how to get started.

Thank you for using DirectAdmin. Should you have any questions, don't hesitate to contact us at [email protected]

## REPORT_END
Permissions set

System Security Tips:
http://help.directadmin.com/item.php?id=247
Disk space usage after DirectAdmin install:
df -hT
Filesystem     Type      Size  Used Avail Use% Mounted on
/dev/vda1      ext4       19G  6.2G   12G  35% /
devtmpfs       devtmpfs  486M     0  486M   0% /dev
tmpfs          tmpfs     496M     0  496M   0% /dev/shm
tmpfs          tmpfs     496M  6.7M  489M   2% /run
tmpfs          tmpfs     496M     0  496M   0% /sys/fs/cgroup
tmpfs          tmpfs     100M     0  100M   0% /run/user/0
If you do happen to get disconnected from your SSH session during setup.sh run, you can just SSH login again and reattach the screen session named, directadmin and will see the setup.sh script is still continuing it’s run if it hasn’t finished yet or may see that setup.sh run has completed.
screen -r directadmin
Once DirectAdmin is installed to access the control panel on port 2222, you’d need to whitelist it in CentOS 7’s Firewalld firewall.
firewall-cmd --permanent --zone=public --add-port=2222/tcp
However, on my BuyVM VPS server DirectAdmin install instance, I was able to reach DirectAdmin control panel on port 2222 without whitelisting port 2222 because it seems Firewalld service wasn’t running !
service firewalld status
Redirecting to /bin/systemctl status firewalld.service
● firewalld.service - firewalld - dynamic firewall daemon
Loaded: loaded (/usr/lib/systemd/system/firewalld.service; disabled; vendor preset: enabled)
Active: inactive (dead)
Docs: man:firewalld(1)
So have to manually start CentOS 7’s Firewalld service which then will block port 2222 access until you run the above firewall-cmd command to whitelist port 2222
service firewalld start
Checking Firewalld
firewall-cmd --state
running
Listing current open public ports before whitelisting port 2222 returns empty for this command as no ports are whitelisted as yet.
firewall-cmd --zone=public --list-ports
Whitelist port 2222 in Firewalld and then recheck public whitelisted ports
firewall-cmd --permanent --zone=public --add-port=2222/tcp
success

firewall-cmd --reload

firewall-cmd --zone=public --list-ports
2222/tcp
Do the same for whitelisting SSH and common service ports. I also added 9418 for Git usage and FTP passive port range 35000-35999. Would be nice if DirectAdmin did this by default for it’s known installed services so out of the box DirectAdmin installations would be protected behind Firewalld initially.
firewall-cmd --permanent --zone=public --add-port=22/tcp
firewall-cmd --permanent --zone=public --add-port=2222/tcp
firewall-cmd --permanent --zone=public --add-port=9418/tcp
firewall-cmd --permanent --zone=public --add-port=35000-35999/tcp
firewall-cmd --permanent --zone=public --add-service=dns
firewall-cmd --permanent --zone=public --add-service=ftp
firewall-cmd --permanent --zone=public --add-service=http
firewall-cmd --permanent --zone=public --add-service=https
firewall-cmd --permanent --zone=public --add-service=imap
firewall-cmd --permanent --zone=public --add-service=imaps
firewall-cmd --permanent --zone=public --add-service=pop3
firewall-cmd --permanent --zone=public --add-service=pop3s
firewall-cmd --permanent --zone=public --add-service=smtp
firewall-cmd --permanent --zone=public --add-service=smtps
firewall-cmd --permanent --zone=public --add-service=smtp-submission
firewall-cmd --reload
firewall-cmd --zone=public --list-ports
firewall-cmd --zone=public --list-services
Check port and service listings that are whitelisted now
firewall-cmd --zone=public --list-ports
2222/tcp 22/tcp 35000-35999/tcp 9418/tcp

firewall-cmd --zone=public --list-services
ssh dhcpv6-client dns ftp http https imaps pop3s smtp imap pop3 smtps smtp-submission
The corresponding whitelisted services’ ports from their profile
echo "ssh dhcpv6-client dns ftp http https imaps pop3s smtp imap pop3 smtps smtp-submission" | xargs -n1 | while read s; do echo -n "/usr/lib/firewalld/services/$s.xml"; grep 'port protocol' /usr/lib/firewalld/services/$s.xml; done
/usr/lib/firewalld/services/ssh.xml <port protocol="tcp" port="22"/>
/usr/lib/firewalld/services/dhcpv6-client.xml <port protocol="udp" port="546"/>
/usr/lib/firewalld/services/dns.xml <port protocol="tcp" port="53"/>
<port protocol="udp" port="53"/>
/usr/lib/firewalld/services/ftp.xml <port protocol="tcp" port="21"/>
/usr/lib/firewalld/services/http.xml <port protocol="tcp" port="80"/>
/usr/lib/firewalld/services/https.xml <port protocol="tcp" port="443"/>
/usr/lib/firewalld/services/imaps.xml <port protocol="tcp" port="993"/>
/usr/lib/firewalld/services/pop3s.xml <port protocol="tcp" port="995"/>
/usr/lib/firewalld/services/smtp.xml <port protocol="tcp" port="25"/>
/usr/lib/firewalld/services/imap.xml <port protocol="tcp" port="143"/>
/usr/lib/firewalld/services/pop3.xml <port protocol="tcp" port="110"/>
/usr/lib/firewalld/services/smtps.xml <port protocol="tcp" port="465"/>
/usr/lib/firewalld/services/smtp-submission.xml <port protocol="tcp" port="587"/>
If you have other services, Firewalld has a profile for some of these services which you can use –add-service=SERVICENAME to whitelist in public zone where appropriate:
ls -alh /usr/lib/firewalld/services/
total 512K
drwxr-xr-x. 2 root root 4.0K May 12 23:10 .
drwxr-xr-x. 8 root root 4.0K May 12 23:09 ..
-rw-r--r--. 1 root root  412 Oct 30  2018 amanda-client.xml
-rw-r--r--. 1 root root  447 Oct 30  2018 amanda-k5-client.xml
-rw-r--r--. 1 root root  320 Oct 30  2018 bacula-client.xml
-rw-r--r--. 1 root root  346 Oct 30  2018 bacula.xml
-rw-r--r--. 1 root root  339 Oct 30  2018 bgp.xml
-rw-r--r--. 1 root root  275 Oct 30  2018 bitcoin-rpc.xml
-rw-r--r--. 1 root root  307 Oct 30  2018 bitcoin-testnet-rpc.xml
-rw-r--r--. 1 root root  281 Oct 30  2018 bitcoin-testnet.xml
-rw-r--r--. 1 root root  244 Oct 30  2018 bitcoin.xml
-rw-r--r--. 1 root root  294 Oct 30  2018 ceph-mon.xml
-rw-r--r--. 1 root root  329 Oct 30  2018 ceph.xml
-rw-r--r--. 1 root root  168 Oct 30  2018 cfengine.xml
-rw-r--r--. 1 root root  260 Oct 30  2018 condor-collector.xml
-rw-r--r--. 1 root root  296 Oct 30  2018 ctdb.xml
-rw-r--r--. 1 root root  305 Oct 30  2018 dhcpv6-client.xml
-rw-r--r--. 1 root root  234 Oct 30  2018 dhcpv6.xml
-rw-r--r--. 1 root root  227 Oct 30  2018 dhcp.xml
-rw-r--r--. 1 root root  346 Oct 30  2018 dns.xml
-rw-r--r--. 1 root root  374 Oct 30  2018 docker-registry.xml
-rw-r--r--. 1 root root  391 Oct 30  2018 docker-swarm.xml
-rw-r--r--. 1 root root  228 Oct 30  2018 dropbox-lansync.xml
-rw-r--r--. 1 root root  338 Oct 30  2018 elasticsearch.xml
-rw-r--r--. 1 root root  836 Oct 30  2018 freeipa-ldaps.xml
-rw-r--r--. 1 root root  836 Oct 30  2018 freeipa-ldap.xml
-rw-r--r--. 1 root root  315 Oct 30  2018 freeipa-replication.xml
-rw-r--r--. 1 root root  629 Oct 30  2018 freeipa-trust.xml
-rw-r--r--. 1 root root  374 Oct 30  2018 ftp.xml
-rw-r--r--. 1 root root  184 Oct 30  2018 ganglia-client.xml
-rw-r--r--. 1 root root  176 Oct 30  2018 ganglia-master.xml
-rw-r--r--. 1 root root  212 Oct 30  2018 git.xml
-rw-r--r--. 1 root root  132 Oct 30  2018 gre.xml
-rw-r--r--. 1 root root  603 Oct 30  2018 high-availability.xml
-rw-r--r--. 1 root root  448 Oct 30  2018 https.xml
-rw-r--r--. 1 root root  353 Oct 30  2018 http.xml
-rw-r--r--. 1 root root  372 Oct 30  2018 imaps.xml
-rw-r--r--. 1 root root  327 Oct 30  2018 imap.xml
-rw-r--r--. 1 root root  454 Oct 30  2018 ipp-client.xml
-rw-r--r--. 1 root root  427 Oct 30  2018 ipp.xml
-rw-r--r--. 1 root root  554 Oct 30  2018 ipsec.xml
-rw-r--r--. 1 root root  255 Oct 30  2018 ircs.xml
-rw-r--r--. 1 root root  247 Oct 30  2018 irc.xml
-rw-r--r--. 1 root root  264 Oct 30  2018 iscsi-target.xml
-rw-r--r--. 1 root root  213 Oct 30  2018 jenkins.xml
-rw-r--r--. 1 root root  182 Oct 30  2018 kadmin.xml
-rw-r--r--. 1 root root  233 Oct 30  2018 kerberos.xml
-rw-r--r--. 1 root root  384 Oct 30  2018 kibana.xml
-rw-r--r--. 1 root root  249 Oct 30  2018 klogin.xml
-rw-r--r--. 1 root root  221 Oct 30  2018 kpasswd.xml
-rw-r--r--. 1 root root  182 Oct 30  2018 kprop.xml
-rw-r--r--. 1 root root  242 Oct 30  2018 kshell.xml
-rw-r--r--. 1 root root  232 Oct 30  2018 ldaps.xml
-rw-r--r--. 1 root root  199 Oct 30  2018 ldap.xml
-rw-r--r--. 1 root root  385 Oct 30  2018 libvirt-tls.xml
-rw-r--r--. 1 root root  389 Oct 30  2018 libvirt.xml
-rw-r--r--. 1 root root  349 Oct 30  2018 managesieve.xml
-rw-r--r--. 1 root root  424 Oct 30  2018 mdns.xml
-rw-r--r--. 1 root root  343 Oct 30  2018 minidlna.xml
-rw-r--r--. 1 root root  237 Oct 30  2018 mongodb.xml
-rw-r--r--. 1 root root  473 Oct 30  2018 mosh.xml
-rw-r--r--. 1 root root  211 Oct 30  2018 mountd.xml
-rw-r--r--. 1 root root  170 Oct 30  2018 mssql.xml
-rw-r--r--. 1 root root  190 Oct 30  2018 ms-wbt.xml
-rw-r--r--. 1 root root  242 Oct 30  2018 murmur.xml
-rw-r--r--. 1 root root  171 Oct 30  2018 mysql.xml
-rw-r--r--. 1 root root  342 Oct 30  2018 nfs3.xml
-rw-r--r--. 1 root root  324 Oct 30  2018 nfs.xml
-rw-r--r--. 1 root root  293 Oct 30  2018 nmea-0183.xml
-rw-r--r--. 1 root root  247 Oct 30  2018 nrpe.xml
-rw-r--r--. 1 root root  389 Oct 30  2018 ntp.xml
-rw-r--r--. 1 root root  335 Oct 30  2018 openvpn.xml
-rw-r--r--. 1 root root  260 Oct 30  2018 ovirt-imageio.xml
-rw-r--r--. 1 root root  343 Oct 30  2018 ovirt-storageconsole.xml
-rw-r--r--. 1 root root  235 Oct 30  2018 ovirt-vmconsole.xml
-rw-r--r--. 1 root root  433 Oct 30  2018 pmcd.xml
-rw-r--r--. 1 root root  474 Oct 30  2018 pmproxy.xml
-rw-r--r--. 1 root root  544 Oct 30  2018 pmwebapis.xml
-rw-r--r--. 1 root root  460 Oct 30  2018 pmwebapi.xml
-rw-r--r--. 1 root root  357 Oct 30  2018 pop3s.xml
-rw-r--r--. 1 root root  348 Oct 30  2018 pop3.xml
-rw-r--r--. 1 root root  181 Oct 30  2018 postgresql.xml
-rw-r--r--. 1 root root  509 Oct 30  2018 privoxy.xml
-rw-r--r--. 1 root root  261 Oct 30  2018 proxy-dhcp.xml
-rw-r--r--. 1 root root  424 Oct 30  2018 ptp.xml
-rw-r--r--. 1 root root  414 Oct 30  2018 pulseaudio.xml
-rw-r--r--. 1 root root  297 Oct 30  2018 puppetmaster.xml
-rw-r--r--. 1 root root  273 Oct 30  2018 quassel.xml
-rw-r--r--. 1 root root  520 Oct 30  2018 radius.xml
-rw-r--r--. 1 root root  268 Oct 30  2018 redis.xml
-rw-r--r--. 1 root root  741 Oct 30  2018 RH-Satellite-6.xml
-rw-r--r--. 1 root root  214 Oct 30  2018 rpc-bind.xml
-rw-r--r--. 1 root root  310 Oct 30  2018 rsh.xml
-rw-r--r--. 1 root root  311 Oct 30  2018 rsyncd.xml
-rw-r--r--. 1 root root  384 Oct 30  2018 samba-client.xml
-rw-r--r--. 1 root root  461 Oct 30  2018 samba.xml
-rw-r--r--. 1 root root  337 Oct 30  2018 sane.xml
-rw-r--r--. 1 root root  283 Oct 30  2018 sips.xml
-rw-r--r--. 1 root root  509 Oct 30  2018 sip.xml
-rw-r--r--. 1 root root  231 Oct 30  2018 smtp-submission.xml
-rw-r--r--. 1 root root  577 Oct 30  2018 smtps.xml
-rw-r--r--. 1 root root  550 Oct 30  2018 smtp.xml
-rw-r--r--. 1 root root  308 Oct 30  2018 snmptrap.xml
-rw-r--r--. 1 root root  342 Oct 30  2018 snmp.xml
-rw-r--r--. 1 root root  405 Oct 30  2018 spideroak-lansync.xml
-rw-r--r--. 1 root root  173 Oct 30  2018 squid.xml
-rw-r--r--. 1 root root  463 Oct 30  2018 ssh.xml
-rw-r--r--. 1 root root  297 Oct 30  2018 syncthing-gui.xml
-rw-r--r--. 1 root root  311 Oct 30  2018 syncthing.xml
-rw-r--r--. 1 root root  496 Oct 30  2018 synergy.xml
-rw-r--r--. 1 root root  444 Oct 30  2018 syslog-tls.xml
-rw-r--r--. 1 root root  329 Oct 30  2018 syslog.xml
-rw-r--r--. 1 root root  393 Oct 30  2018 telnet.xml
-rw-r--r--. 1 root root  301 Oct 30  2018 tftp-client.xml
-rw-r--r--. 1 root root  437 Oct 30  2018 tftp.xml
-rw-r--r--. 1 root root  336 Oct 30  2018 tinc.xml
-rw-r--r--. 1 root root  771 Oct 30  2018 tor-socks.xml
-rw-r--r--. 1 root root  244 Oct 30  2018 transmission-client.xml
-rw-r--r--. 1 root root  264 Oct 30  2018 upnp-client.xml
-rw-r--r--. 1 root root  593 Oct 30  2018 vdsm.xml
-rw-r--r--. 1 root root  475 Oct 30  2018 vnc-server.xml
-rw-r--r--. 1 root root  310 Oct 30  2018 wbem-https.xml
-rw-r--r--. 1 root root  509 Oct 30  2018 xmpp-bosh.xml
-rw-r--r--. 1 root root  488 Oct 30  2018 xmpp-client.xml
-rw-r--r--. 1 root root  264 Oct 30  2018 xmpp-local.xml
-rw-r--r--. 1 root root  545 Oct 30  2018 xmpp-server.xml
-rw-r--r--. 1 root root  314 Oct 30  2018 zabbix-agent.xml
-rw-r--r--. 1 root root  315 Oct 30  2018 zabbix-server.xml
Revisiting DirectAdmin control panel login page on port 2222 now:
Check MySQL version installed by default where MySQL root password details are located in
- /usr/local/directadmin/conf/mysql.conf read by DirectAdmin
- /usr/local/directadmin/conf/my.cnf read by MySQL server/client
- /usr/local/directadmin/scripts/setup.txt contents variables logins setup by DirectAdmin
MariaDB 5.5 MySQL server is installed by default it seems according to mysqladmin ver command
mysqladmin --defaults-extra-file=/usr/local/directadmin/conf/my.cnf ver
If you find having to pass –defaults-extra-file path tedious, setup a custom command alias in your ~/.bashrc file
alias mysqladmin='mysqladmin --defaults-extra-file=/usr/local/directadmin/conf/my.cnf'
Output
mysqladmin --defaults-extra-file=/usr/local/directadmin/conf/my.cnf ver
mysqladmin Ver 9.0 Distrib 5.5.63-MariaDB, for Linux on x86_64
Copyright (c) 2000, 2018, Oracle, MariaDB Corporation Ab and others.

Server version 5.5.63-MariaDB
Protocol version 10
Connection Localhost via UNIX socket
UNIX socket /var/lib/mysql/mysql.sock
Uptime: 2 hours 39 min 46 sec

Threads: 1 Questions: 66 Slow queries: 0 Opens: 3 Flush tables: 2 Open tables: 29 Queries per second avg: 0.006
Check Apache version and config installed – Apache 2.4.39 built as Event MPM worker
httpd -V
Server version: Apache/2.4.39 (Unix)
Server built: Jul 17 2019 17:56:35
Server's Module Magic Number: 20120211:84
Server loaded: APR 1.6.5, APR-UTIL 1.6.1
Compiled using: APR 1.6.5, APR-UTIL 1.6.1
Architecture: 64-bit
Server MPM: event
threaded: yes (fixed thread count)
forked: yes (variable process count)
Server compiled with....
-D APR_HAS_SENDFILE
-D APR_HAS_MMAP
-D APR_HAVE_IPV6 (IPv4-mapped addresses enabled)
-D APR_USE_SYSVSEM_SERIALIZE
-D APR_USE_PTHREAD_SERIALIZE
-D SINGLE_LISTEN_UNSERIALIZED_ACCEPT
-D APR_HAS_OTHER_CHILD
-D AP_HAVE_RELIABLE_PIPED_LOGS
-D DYNAMIC_MODULE_LIMIT=256
-D HTTPD_ROOT="/etc/httpd"
-D HAVE_SYSTEMD
-D SUEXEC_BIN="/usr/sbin/suexec"
-D DEFAULT_PIDLOG="/var/logs/httpd.pid"
-D DEFAULT_SCOREBOARD="logs/apache_runtime_status"
-D DEFAULT_ERRORLOG="logs/error_log"
-D AP_TYPES_CONFIG_FILE="conf/mime.types"
-D SERVER_CONFIG_FILE="conf/httpd.conf"
Check which Apache modules loaded into Apache – take note that mod_remoteip (remoteip_module) is loaded. Important if you plan to use Cloudflare in front of your DirectAdmin web sites.
httpd -M
Loaded Modules:
 core_module (static)
 authn_file_module (static)
 authn_dbm_module (static)
 authn_anon_module (static)
 authn_dbd_module (static)
 authn_socache_module (static)
 authn_core_module (static)
 authz_host_module (static)
 authz_groupfile_module (static)
 authz_user_module (static)
 authz_dbm_module (static)
 authz_owner_module (static)
 authz_dbd_module (static)
 authz_core_module (static)
 access_compat_module (static)
 auth_basic_module (static)
 auth_form_module (static)
 auth_digest_module (static)
 allowmethods_module (static)
 file_cache_module (static)
 cache_module (static)
 cache_disk_module (static)
 cache_socache_module (static)
 socache_shmcb_module (static)
 socache_dbm_module (static)
 socache_memcache_module (static)
 socache_redis_module (static)
 so_module (static)
 watchdog_module (static)
 macro_module (static)
 dbd_module (static)
 dumpio_module (static)
 buffer_module (static)
 ratelimit_module (static)
 reqtimeout_module (static)
 ext_filter_module (static)
 request_module (static)
 include_module (static)
 filter_module (static)
 substitute_module (static)
 sed_module (static)
 deflate_module (static)
 http_module (static)
 mime_module (static)
 log_config_module (static)
 log_debug_module (static)
 logio_module (static)
 env_module (static)
 expires_module (static)
 headers_module (static)
 unique_id_module (static)
 setenvif_module (static)
 version_module (static)
 remoteip_module (static)
 proxy_module (static)
 proxy_connect_module (static)
 proxy_ftp_module (static)
 proxy_http_module (static)
 proxy_fcgi_module (static)
 proxy_scgi_module (static)
 proxy_uwsgi_module (static)
 proxy_fdpass_module (static)
 proxy_wstunnel_module (static)
 proxy_ajp_module (static)
 proxy_balancer_module (static)
 proxy_express_module (static)
 proxy_hcheck_module (static)
 session_module (static)
 session_cookie_module (static)
 session_dbd_module (static)
 slotmem_shm_module (static)
 ssl_module (static)
 http2_module (static)
 lbmethod_byrequests_module (static)
 lbmethod_bytraffic_module (static)
 lbmethod_bybusyness_module (static)
 lbmethod_heartbeat_module (static)
 unixd_module (static)
 dav_module (static)
 status_module (static)
 autoindex_module (static)
 info_module (static)
 suexec_module (static)
 cgi_module (static)
 dav_fs_module (static)
 dav_lock_module (static)
 vhost_alias_module (static)
 negotiation_module (static)
 dir_module (static)
 actions_module (static)
 speling_module (static)
 userdir_module (static)
 alias_module (static)
 rewrite_module (static)
 systemd_module (shared)
 mpm_event_module (shared)
Check Apache httpd.conf default include files which are available or commented out/disabled
grep Include /etc/httpd/conf/httpd.conf
Include /etc/httpd/conf/extra/httpd-phpmodules.conf
    # Include some DirectAdmin alias
    Include conf/extra/httpd-alias.conf
Include conf/extra/httpd-includes.conf
Include conf/extra/httpd-directories.conf
Include conf/extra/httpd-nginx.conf
Include conf/extra/httpd-mpm.conf
Include conf/extra/httpd-multilang-errordoc.conf
Include conf/extra/httpd-autoindex.conf
Include conf/extra/httpd-languages.conf
#Include conf/extra/httpd-userdir.conf
Include conf/extra/httpd-info.conf
Include conf/extra/httpd-suphp.conf
#Include conf/extra/httpd-manual.conf
Include conf/extra/httpd-dav.conf
Include conf/extra/httpd-default.conf
Include conf/extra/httpd-ssl.conf
Include conf/extra/httpd-deflate.conf
Include conf/extra/httpd-php-handlers.conf
Include conf/extra/httpd-vhosts.conf
Include conf/extra/directadmin-vhosts.conf
Looks like the /etc/httpd/conf/extra/directadmin-vhosts.conf file contains the DirectAdmin added domain site’s Apache vhost configurations in /usr/local/directadmin/data/users/admin/httpd.conf include file
cat conf/extra/directadmin-vhosts.conf
Include /usr/local/directadmin/data/users/admin/httpd.conf
Within /usr/local/directadmin/data/users/admin/httpd.conf are the domain site’s Apache vhost configurations it seems. Example in Gist posted here.
How DirectAdmin’s Apache was compiled/configured
cat /usr/local/directadmin/custombuild/configure/ap2/configure.apache
#!/bin/sh
"./configure" \
"--prefix=/etc/httpd" \
"--exec-prefix=/etc/httpd" \
"--bindir=/usr/bin" \
"--sbindir=/usr/sbin" \
"--sysconfdir=/etc/httpd/conf" \
"--enable-so" \
"--enable-dav" \
"--enable-dav-fs" \
"--enable-dav-lock" \
"--enable-suexec" \
"--enable-deflate" \
"--enable-unique-id" \
"--enable-cgi" \
"--disable-cgid" \
"--enable-mods-static=most" \
"--enable-mpms-shared=all" \
"--with-suexec-safedir=/usr/local/safe-bin" \
"--with-suexec-caller=apache" \
"--with-suexec-docroot=/" \
"--with-suexec-gidmin=100" \
"--with-suexec-logfile=/var/log/httpd/suexec_log" \
"--with-suexec-uidmin=100" \
"--with-suexec-userdir=public_html" \
"--with-suexec-bin=/usr/sbin/suexec" \
"--with-included-apr" \
"--with-pcre=/usr/local" \
"--includedir=/usr/include/apache" \
"--libexecdir=/usr/lib/apache" \
"--libdir=/usr/lib/apache" \
"--mandir=/usr/share/man" \
"--datadir=/var/www" \
"--localstatedir=/var" \
"--enable-logio" \
"--enable-ssl" \
"--enable-rewrite" \
"--enable-proxy" \
"--enable-expires" \
"--enable-reqtimeout" \
"--with-ssl=/usr" \
"--disable-md" \
"--enable-headers"
Check PHP command line version – looks like Zend Opcache isn’t installed by default which will result in PHP performance being much lower ! Check the Post-Install steps for using CustomBuild 2.0 to install Zend Opcache.
php -v
PHP 7.3.7 (cli) (built: Jul 17 2019 18:33:55) ( NTS )
Copyright (c) 1997-2018 The PHP Group
Zend Engine v3.3.7, Copyright (c) 1998-2018 Zend Technologies
Check if DirectAdmin PHP 7.3 supports Argon2 password hashing algorithm and libsodium – looks like libsodium is supported but missing Argon2 password hashing support. FYI, PHP web apps like Xenforo 2.x support newer Argon2 password hashing algorithm if your PHP version supports it.
php -r 'print_r(get_defined_constants());' | grep -i argon
[SODIUM_CRYPTO_PWHASH_ALG_ARGON2I13] => 1
[SODIUM_CRYPTO_PWHASH_ALG_ARGON2ID13] => 2
[SODIUM_CRYPTO_PWHASH_STRPREFIX] => $argon2id$
Usually for PHP 7.3 on my Centmin Mod LEMP 123.09beta01 stack installs I add Argon2 + libsodium support and you should see the following:
php -r 'print_r(get_defined_constants());' | grep -i argon
[PASSWORD_ARGON2I] => 2
[PASSWORD_ARGON2ID] => 3
[PASSWORD_ARGON2_DEFAULT_MEMORY_COST] => 1024
[PASSWORD_ARGON2_DEFAULT_TIME_COST] => 2
[PASSWORD_ARGON2_DEFAULT_THREADS] => 2
[SODIUM_CRYPTO_PWHASH_ALG_ARGON2I13] => 1
[SODIUM_CRYPTO_PWHASH_ALG_ARGON2ID13] => 2
[SODIUM_CRYPTO_PWHASH_STRPREFIX] => $argon2id$
For Argon2 you need newer 1.5+ version of libzip for PHP 7 to compile Argon2. On DirectAdmin PHP 7.3 seems libzip is older 1.1.2 version
php --ri zip

zip

Zip => enabled
Zip version => 1.15.4
Libzip version => 1.1.2
And looks like DirectAdmin default PHP 7.3 configuration is compiled with –without-libzip
php-config
Usage: /usr/local/bin/php-config [OPTION]
Options:
  --prefix            [/usr/local/php73]
  --includes          [-I/usr/local/php73/include/php -I/usr/local/php73/include/php/main -I/usr/local/php73/include/php/TSRM -I/usr/local/php73/include/php/Zend -I/usr/local/php73/include/php/ext -I/usr/local/php73/include/php/ext/date/lib]
  --ldflags           [ -L/usr/local/lib -L/usr/local/icu/lib]
  --libs              [-lcrypt   -lz -lexslt -lresolv -lcrypt -lsodium -lrt -lstdc++ -liconv -lpng -lz -ljpeg -lwebp -lz -lrt -lm -ldl -lnsl  -lsystemd -lxml2 -lz -liconv -lm -ldl -lgssapi_krb5 -lkrb5 -lk5crypto -lcom_err -lssl -lcrypto -lpcre2-8 -lcurl -lxml2 -lz -liconv -lm -ldl -lssl -lcrypto -lfreetype -licui18n -licuuc -licudata -licuio -lxml2 -lz -liconv -lm -ldl -lxml2 -lz -liconv -lm -ldl -lcrypt -lxml2 -lz -liconv -lm -ldl -lxml2 -lz -liconv -lm -ldl -lxml2 -lz -liconv -lm -ldl -lxslt -lxml2 -lz -liconv -ldl -lm -lssl -lcrypto -lcrypt ]
  --extension-dir     [/usr/local/php73/lib/php/extensions/no-debug-non-zts-20180731]
  --include-dir       [/usr/local/php73/include/php]
  --man-dir           [/usr/local/php73/php/man]
  --php-binary        [/usr/local/php73/bin/php73]
  --php-sapis         [ cli fpm phpdbg cgi]
  --configure-options [--prefix=/usr/local/php73 --program-suffix=73 --enable-fpm --with-fpm-systemd --with-config-file-scan-dir=/usr/local/php73/lib/php.conf.d --with-curl --with-gd --with-gettext --with-jpeg-dir=/usr/local/lib --with-freetype-dir=/usr/local/lib --with-libxml-dir=/usr/local/lib --with-kerberos --with-openssl --with-mhash --with-mysql-sock=/var/lib/mysql/mysql.sock --with-mysqli=mysqlnd --with-pcre-regex=/usr/local --with-pdo-mysql=mysqlnd --with-pear --with-png-dir=/usr/local/lib --with-sodium=/usr/local --with-webp-dir=/usr/local/lib --with-xsl --with-zlib --enable-zip --without-libzip --with-iconv=/usr/local --enable-bcmath --enable-calendar --enable-exif --enable-ftp --enable-sockets --enable-soap --enable-mbstring --with-icu-dir=/usr/local/icu --enable-intl]
  --version           [7.3.7]
  --vernum            [70307]
cat /usr/local/directadmin/custombuild/configure/ap2/configure.php73
#!/bin/sh
./configure \
        --with-apxs2 \
        --with-config-file-scan-dir=/usr/local/lib/php.conf.d \
        --with-curl \
        --with-gd \
        --with-gettext \
        --with-jpeg-dir=/usr/local/lib \
        --with-freetype-dir=/usr/local/lib \
        --with-libxml-dir=/usr/local/lib \
        --with-kerberos \
        --with-openssl \
        --with-mhash \
        --with-mysql-sock=/var/lib/mysql/mysql.sock \
        --with-mysqli=mysqlnd \
        --with-pcre-regex=/usr/local \
        --with-pdo-mysql=mysqlnd \
        --with-pear \
        --with-png-dir=/usr/local/lib \
        --with-sodium=/usr/local \
        --with-webp-dir=/usr/local/lib \
        --with-xsl \
        --with-zlib \
        --enable-zip \
        --without-libzip \
        --with-iconv=/usr/local \
        --enable-bcmath \
        --enable-calendar \
        --enable-exif \
        --enable-ftp \
        --enable-sockets \
        --enable-soap \
        --enable-mbstring \
        --with-icu-dir=/usr/local/icu \
        --enable-intl
On Centmin Mod PHP 7.3 builds I deliberately use a newer libzip 1.5 version instead of CentOS 7 provided libzip 1.1.2 for this reason. Example from Centmin Mod 123.09beta01 with PHP 7.3.7
php --ri zip

zip

Zip => enabled
Zip version => 1.15.4
Libzip headers version => 1.5.0
Libzip library version => 1.5.0
Check where DirectAdmin’s PHP command line version is reading settings .ini file directories from
php --ini
Configuration File (php.ini) Path: /usr/local/php73/lib
Loaded Configuration File: /usr/local/php73/lib/php.ini
Scan for additional .ini files in: /usr/local/php73/lib/php.conf.d
Additional .ini files parsed: /usr/local/php73/lib/php.conf.d/50-webapps.ini
Check DirectAdmin’s PHP command line loaded PHP extension modules
php -m
[PHP Modules]
bcmath
calendar
Core
ctype
curl
date
dom
exif
fileinfo
filter
ftp
gd
gettext
hash
iconv
intl
json
libxml
mbstring
mysqli
mysqlnd
openssl
pcre
PDO
pdo_mysql
pdo_sqlite
Phar
posix
Reflection
session
SimpleXML
soap
sockets
sodium
SPL
sqlite3
standard
tokenizer
xml
xmlreader
xmlwriter
xsl
zip
zlib

[Zend Modules]
Checking the cpu load and memory usage of DirectAdmin install as sysstat YUM package was installed as part of preparation stage.
cpu load
sar -q | sed -e "s|$(hostname)|hostname|"
Linux 3.10.0-957.21.3.el7.x86_64 (hostname)     07/17/2019      _x86_64_        (1 CPU)

05:10:00 PM       LINUX RESTART

05:20:01 PM   runq-sz  plist-sz   ldavg-1   ldavg-5  ldavg-15   blocked
05:30:01 PM         1        83      0.00      0.00      0.00         0
05:40:01 PM         1        83      0.00      0.00      0.00         0
05:50:01 PM         1        91      0.45      0.16      0.07         0
06:00:02 PM         2       116      1.81      1.57      0.85         0
06:10:02 PM         2       118      1.32      1.45      1.16         0
06:20:01 PM         3       113      1.12      1.39      1.31         0
06:30:02 PM         3       114      1.64      1.56      1.44         0
06:40:01 PM         3       114      1.16      1.44      1.46         0
06:50:02 PM         2       114      1.33      1.46      1.47         0
07:00:01 PM         2       114      1.84      1.62      1.54         0
07:10:01 PM         3       113      2.01      1.84      1.71         1
07:20:01 PM         3       128      1.94      1.77      1.71         0
07:30:01 PM         1       522      0.14      1.08      1.48         0
07:40:01 PM         2       523      0.00      0.15      0.78         0
07:50:01 PM         2       525      0.00      0.02      0.41         0
08:00:01 PM         5       527      0.00      0.01      0.22         0
08:10:01 PM         3       528      0.00      0.01      0.12         0
08:20:01 PM         1       527      0.09      0.07      0.10         0
08:30:01 PM         3       528      0.00      0.02      0.06         0
08:40:01 PM         2       525      0.00      0.01      0.05         0
08:50:01 PM         1       524      0.00      0.01      0.05         0
09:00:01 PM         3       527      0.00      0.01      0.05         0
Average:            2       298      0.68      0.71      0.73         0
memory usage
sar -r | sed -e "s|$(hostname)|hostname|"
Linux 3.10.0-957.21.3.el7.x86_64 (hostname)     07/17/2019      _x86_64_        (1 CPU)

05:10:00 PM       LINUX RESTART

05:20:01 PM kbmemfree kbmemused  %memused kbbuffers  kbcached  kbcommit   %commit  kbactive   kbinact   kbdirty
05:30:01 PM    857528    157360     15.51     10060     66416    172372      3.31     49376     61324         0
05:40:01 PM    856412    158476     15.62     10124     67356    172372      3.31     49996     61700        16
05:50:01 PM    237420    777468     76.61     13492    582788    265880      5.10    347640    358336     44516
06:00:02 PM     84916    929972     91.63     17932    609740    889168     17.07    392288    443152      7624
06:10:02 PM     68800    946088     93.22      7652    518300   1002412     19.24    400396    443116      6988
06:20:01 PM    343964    670924     66.11     15040    308432    914316     17.55    192084    364012     11372
06:30:02 PM    686800    328088     32.33      7380    187656    889076     17.07     77984    184040      6244
06:40:01 PM     68984    945904     93.20     12516    599196   1052332     20.20    473912    370572      6380
06:50:02 PM    624964    389924     38.42      8748    193772    920440     17.67    109684    197288      6316
07:00:01 PM    201596    813292     80.14     10960    472432   1050972     20.18    393552    318388      8688
07:10:01 PM    381048    633840     62.45     12244    448196    892164     17.13    219448    317064      6560
07:20:01 PM     85520    929368     91.57     11608    726004    900956     17.30    380644    437972     11616
07:30:01 PM    340136    674752     66.49     57184    312992   3813832     73.21    274420    285892         0
07:40:01 PM    339664    675224     66.53     57336    313272   3813832     73.21    274568    286184         0
07:50:01 PM    299644    715244     70.48     58704    322676   3848780     73.88    307624    291068         0
08:00:01 PM    296944    717944     70.74     58940    322980   3852336     73.95    311300    289780        20
08:10:01 PM    292696    722192     71.16     59264    324164   3856300     74.03    313924    290564        60
08:20:01 PM    250300    764588     75.34     60464    366480   3853488     73.97    323220    323740       180
08:30:01 PM    244376    770512     75.92     61368    370316   3856012     74.02    325556    327132        76
08:40:01 PM    247284    767604     75.63     61968    370712   3849488     73.90    323016    327864         0
08:50:01 PM    246944    767944     75.67     62112    370760   3849488     73.90    323040    328040         0
09:00:01 PM    245516    769372     75.81     62268    370804   3852592     73.96    324256    328228         0
09:10:01 PM    246096    768792     75.75     62432    370952   3849488     73.90    323404    328448         0
Average:       328154    686734     67.67     34774    373756   2235569     42.92    283101    302778      5072
Verify DirectAdmin detected OS and environment to ensure CentOS 7 is detected
/usr/local/directadmin/directadmin o
Output
/usr/local/directadmin/directadmin o
Compiled on 'CentOS 7.0 64-Bit'
Compile time: Jul 12 2019 at 09:37:52
Timestamp: '1562945823'
Compiled with IPv6
Step 4. Post-Install DirectAdmin Tasks
Hide DirectAdmin Apache Version header by editing /etc/httpd/conf/extra/httpd-default.conf and to customise Apache default MPM Worker settings edit /etc/httpd/conf/extra/httpd-mpm.conf.
Current Apache defaults show ServerSignature is already set to Off (disabled) but ServerTokens should be changed from Major to Prod.
egrep '^ServerTokens|^ServerSignature' /etc/httpd/conf/extra/httpd-default.conf
ServerTokens Major
ServerSignature Off
Change via sed replacement
sed -i 's|^ServerTokens .*|ServerTokens Prod|' /etc/httpd/conf/extra/httpd-default.conf
sed -i 's|^ServerSignature .*|ServerSignature Off|' /etc/httpd/conf/extra/httpd-default.conf
Verify the changes
egrep '^ServerTokens|^ServerSignature' /etc/httpd/conf/extra/httpd-default.conf
ServerTokens Prod
ServerSignature Off
Then ensure these changes don’t get overwritten by DirectAdmin
cd /usr/local/directadmin/custombuild/
mkdir -p custom/ap2/conf/extra/
cp -p /etc/httpd/conf/extra/httpd-default.conf /usr/local/directadmin/custombuild/custom/ap2/conf/extra/
cp -p /etc/httpd/conf/extra/httpd-mpm.conf /usr/local/directadmin/custombuild/custom/ap2/conf/extra/
Then test the modified Apache config files
httpd -t
Syntax OK
Then restart Apache service
service httpd restart
Then do a curl header check to ensure DirectAdmin Apache server only reports Server = Apache without any version identifiers.
curl -I localhost
HTTP/1.1 200 OK
Date: Thu, 25 Jul 2019 14:01:18 GMT
Server: Apache
Upgrade: h2,h2c
Connection: Upgrade
Last-Modified: Tue, 23 Jul 2019 13:32:29 GMT
ETag: "2c-58e593965e689"
Accept-Ranges: bytes
Content-Length: 44
Vary: User-Agent
Content-Type: text/html
Hide DirectAdmin HTTP Daemon Header for port 2222 non-logged in visitors as per instructions here.
By default HTTP header response for requests over DirectAdmin port 2222 return the full DirectAdmin version number and the full name of the person the DirectAdmin license belongs to:
Server: DirectAdmin Daemon v1.57.5 Registered to FULL NAME - FULL NAME - DirectAdmin License
However, you can disable the more verbose version by setting show_info_in_header=0 in /usr/local/directadmin/conf/directadmin.conf
echo 'show_info_in_header=0' >> /usr/local/directadmin/conf/directadmin.conf
service directadmin restart
Then HTTP Header would return a less verbose version
Server: DirectAdmin Daemon
DirectAdmin Apache server-status configuration
Setup Apache server-status and server-info configured for the server hostname you setup in Step 1 above via modifying Apache Include file /etc/httpd/conf/extra/httpd-info.conf – making sure to change YOUR_ISP_IP_ADDR to your ISP IP address or IP address you want to be able to view /server-status and /server-info statistics from and enable ExtendedStatus.
myisp_ip=YOUR_ISP_IP_ADDR
sed -i "s|Require host .*|Require host $(hostname -f)|g" /etc/httpd/conf/extra/httpd-info.conf
sed -i "s|Require ip .*|Require ip 127\n    Require ip $myisp_ip|g" /etc/httpd/conf/extra/httpd-info.conf
sed -i 's|^#ExtendedStatus On|ExtendedStatus On|' /etc/httpd/conf/extra/httpd-info.conf
Modified contents of /etc/httpd/conf/extra/httpd-info.conf
#
# Get information about the requests being processed by the server
# and the configuration of the server.
#
# Required modules: mod_authz_core, mod_authz_host,
#                   mod_info (for the server-info handler),
#                   mod_status (for the server-status handler)

#
# Allow server status reports generated by mod_status,
# with the URL of http://servername/server-status
# Change the ".example.com" to match your domain to enable.

<Location /server-status>
    SetHandler server-status
    Require host hostname.yourdomain.com
    Require ip 127
    Require ip YOUR_ISP_IP_ADDR
</Location>

#
# ExtendedStatus controls whether Apache will generate "full" status
# information (ExtendedStatus On) or just basic information (ExtendedStatus
# Off) when the "server-status" handler is called. The default is Off.
#
ExtendedStatus On

#
# Allow remote server configuration reports, with the URL of
#  http://servername/server-info (requires that mod_info.c be loaded).
# Change the ".example.com" to match your domain to enable.
#
<Location /server-info>
    SetHandler server-info
    Require host hostname.yourdomain.com
    Require ip 127
    Require ip YOUR_ISP_IP_ADDR
</Location>
Then restart Apache service
service httpd restart
Then accessing hostname.yourdomain.com/server-status or hostname.yourdomain.com/server-info from the specified YOUR_ISP_IP_ADDR IP address will allow you to see DirectAdmin’s Apache server status and server info pages.
For hostname.yourdomain.com/server-status
For hostname.yourdomain.com/server-info
Setup nightly update notification cronjob as outlined here.
Defaults in /usr/local/directadmin/custombuild/options.conf
#Cronjob Settings
cron=no
cron_frequency=weekly
[email protected]
notifications=yes
da_autoupdate=no
updates=no
webapps_updates=yes
Change to below replacing email with your desired email addresss for notifications
#Cronjob Settings
cron=yes
cron_frequency=weekly
[email protected]
notifications=yes
da_autoupdate=yes
updates=no
webapps_updates=yes
Then type:
./build cron
./build cron
Cronjob is set for MYEMAILADDRESS:
Cronjob frequency: weekly
Automatic notifications: yes
Automatic updates: no
Actual cronjob at /etc/cron.weekly/custombuild
#!/bin/sh
cd /usr/local/directadmin/custombuild
./build update >/dev/null 2>&1
AVAIL_UPDATES="`./build versions_nobold | grep -c -e 'update is available.'`"
if [ "${AVAIL_UPDATES}" -gt 0 ]; then
./build versions_nobold | grep 'update is available.' | mail -s "${AVAIL_UPDATES} updates available for `hostname`" MYEMAILADDRESS
./build update_da
./build update_webapps
fi
exit 0;
Then when you get email notification alerts for updates, run
cd /usr/local/directadmin/custombuild
./build update_versions
Optionally if you need to create alias redirects i.e. create a /mydir alias which redirects users to /var/www/html/directory as per instructions here.
cd /usr/local/directadmin/custombuild
mkdir -p custom
mkdir -p /var/www/html/mydirectory
echo "mydir=mydirectory" >> custom/webapps.list
./build rewrite_confs
Disable /~username access
cd /usr/local/directadmin/custombuild
./build set userdir_access no
./build rewrite_confs
If CustomBuild 2.0 isn’t installed you can install it first. Verify if CustomBuild 2.0 is installed by check build options and updates available:
cd /usr/local/directadmin/custombuild
./build options
./build versions
Build options output
./build options
Apache: 2.4.39
mod_ruid2: no
ModSecurity: no
htscanner: no
Dovecot: 2.3.7
Dovecot configuration: yes
AWstats: no
Exim: 4.92
exim.conf update: yes, release 4.5
BlockCracking: no
Easy Spam Fighter: no
SpamAssassin: no
ClamAV: no
MySQL: no
MySQL backup: yes
MySQL backup directory: /usr/local/directadmin/custombuild/mysql_backups
MySQL compress backups: no
PHP (default): 7.3 as php-fpm
PHP (additional): 7.2 as php-fpm
PHP (additional, 3rd): 5.6 as php-fpm
phpMyAdmin: 4.9.0.1-all-languages
ProFTPD: no
Pure-FTPd: 1.0.49
RoundCube webmail: 1.3.9
Replace "php.ini" with './build all' and './build php_ini': no
Auto updates/notifications: no
Run "clean" every time: yes
Run "clean_old_webapps" every time: yes
Run "clean_old_tarballs" every time: yes
Show texts in bold: yes
SquirrelMail: 1.4.23-20190509_0200
Zend Guard Loader: no
ionCube loader: no
Suhosin: no
Build versions output
./build versions
Latest version of DirectAdmin: 1.57.5
Installed version of DirectAdmin: 1.57.5

Latest version of Let's Encrypt client: 1.1.23
Installed version of Let's Encrypt client: 1.1.23

Latest version of Apache: 2.4.39
Installed version of Apache: 2.4.39

Latest version of Pure-FTPD: 1.0.49
Installed version of Pure-FTPd: 1.0.49

Latest version of libpng: 1.6.37
Installed version of libpng: 1.6.37

Latest version of libwebp: 1.0.2
Installed version of libwebp: 1.0.2

Latest version of nghttp2: 1.39.1
Installed version of nghttp2: 1.39.1

Latest version of libjpeg: 9c
Installed version of libjpeg: 9c

Latest version of ICU4C: 64.1
Installed version of ICU4C: 64.1

Latest version of libsodium: 1.0.17
Installed version of libsodium: 1.0.17

Latest version of libxml2: 2.9.8
Installed version of libxml2: 2.9.8

Latest version of libxslt: 1.1.32
Installed version of libxslt: 1.1.32

Latest version of iconv: 1.15
Installed version of iconv: 1.15

Latest version of PCRE: 8.43
Installed version of PCRE: 8.43

Latest version of PCRE2: 10.32
Installed version of PCRE2: 10.32

Latest version of FreeType: 2.10.1
Installed version of FreeType: 2.10.1

Latest version of dovecot: 2.3.7
Installed version of dovecot: 2.3.7

Latest version of dovecot.conf: 0.3
Installed version of dovecot.conf: 0.3

Latest version of Exim: 4.92
Installed version of Exim: 4.92

Latest version of exim.conf: 4.5.14
Installed version of exim.conf: 4.5.14

Latest version of PHP 5.6: 5.6.40
Installed version of PHP 5.6: 5.6.40

Latest version of PHP 7.2: 7.2.20
Installed version of PHP 7.2: 7.2.20

Latest version of PHP 7.3: 7.3.7
Installed version of PHP 7.3: 7.3.7

Latest version of RoundCube webmail: 1.3.9
Installed version of RoundCube webmail: 1.3.9

Latest version of phpMyAdmin: 4.9.0.1-all-languages
Installed version of phpMyAdmin: 4.9.0.1-all-languages

Latest version of SquirrelMail: 1.4.23-20190509_0200
Installed version of SquirrelMail: 1.4.23-20190509_0200

If you want to update all the available versions run: ./build update_versions
To install CustomBuild 2.0 if nothing or error is returned by build options/versions commands:
cd /usr/local/directadmin
wget -O custombuild.tar.gz http://files.directadmin.com/services/custombuild/2.0/custombuild.tar.gz
tar xvzf custombuild.tar.gz
cd custombuild
./build
./build all d
To see current build options set in options.conf:
cd /usr/local/directadmin/custombuild
./build options
To see what each options.conf setting is related to run:
cd /usr/local/directadmin/custombuild
./build opt_help full
To see what configuration files CustomBuild are using:
cd /usr/local/directadmin/custombuild
./build used_configs
Output for used_configs
./build used_configs
Apache configuration file: /usr/local/directadmin/custombuild/configure/ap2/configure.apache
PHP (default) php.ini file: /usr/local/php73/lib/php.ini
PHP (additional) php.ini file: /usr/local/php72/lib/php.ini
PHP (additional, 3rd) php.ini file: /usr/local/php56/lib/php.ini
PHP (default) configuration file: /usr/local/directadmin/custombuild/configure/fpm/configure.php73
PHP (additional) configuration file: /usr/local/directadmin/custombuild/configure/fpm/configure.php72
PHP (additional, 3rd) configuration file: /usr/local/directadmin/custombuild/configure/fpm/configure.php56
PureFTPD configuration file: /usr/local/directadmin/custombuild/configure/pureftpd/configure.pureftpd
Exim Makefile: http://files2.directadmin.com/services/custombuild/Makefile
Dovecot configuration file: /usr/local/directadmin/custombuild/configure/dovecot/configure.dovecot
If using EXT4 filesystem add use_xfs_quota=0 in /usr/local/directadmin/conf/directadmin.conf. Check if the setting already is populated via grep
grep 'use_xfs_quota' /usr/local/directadmin/conf/directadmin.conf
use_xfs_quota=0
Looks like DirectAdmin install process already setup this variable for us. If it returned empty, then you’d need to add this via command below.
echo 'use_xfs_quota=0' >> /usr/local/directadmin/conf/directadmin.conf
The BuyVM.net KVM VPS server I am using has EXT4 filesystem in place so this modification is needed
df -hT
Filesystem     Type      Size  Used Avail Use% Mounted on
/dev/vda1      ext4       19G  1.5G   17G   9% /
devtmpfs       devtmpfs  486M     0  486M   0% /dev
tmpfs          tmpfs     496M     0  496M   0% /dev/shm
tmpfs          tmpfs     496M   13M  483M   3% /run
tmpfs          tmpfs     496M     0  496M   0% /sys/fs/cgroup
tmpfs          tmpfs     100M     0  100M   0% /run/user/0
Installing AWStats via CustomBuild 2.0
cd /usr/local/directadmin/custombuild
./build set awstats yes
./build awstats
Installing Zend Opcache for better PHP performance via CustomBuild 2.0.
cd /usr/local/directadmin/custombuild
./build update
./build set opcache yes
./build opcache
Output from build opcache
./build opcache
opCache is now installed for PHP 7.3.
opCache is now installed for PHP 7.2.
opCache is now installed for PHP 5.6.
Restarting php-fpm73.
Restarting php-fpm72.
Restarting php-fpm56.
Verify Zend Opcache
php -v
PHP 7.3.7 (cli) (built: Jul 17 2019 18:33:55) ( NTS )
Copyright (c) 1997-2018 The PHP Group
Zend Engine v3.3.7, Copyright (c) 1998-2018 Zend Technologies
with Zend OPcache v7.3.7, Copyright (c) 1999-2018, by Zend Technologies
php --ri 'zend opcache'

Zend OPcache

Opcode Caching => Up and Running
Optimization => Enabled
SHM Cache => Enabled
File Cache => Disabled
Startup => OK
Shared memory model => mmap
Cache hits => 0
Cache misses => 0
Used memory => 8770936
Free memory => 125446792
Wasted memory => 0
Interned Strings Used memory => 450608
Interned Strings Free memory => 5840424
Cached scripts => 0
Cached keys => 0
Max keys => 7963
OOM restarts => 0
Hash keys restarts => 0
Manual restarts => 0

Directive => Local Value => Master Value
opcache.enable => On => On
opcache.use_cwd => On => On
opcache.validate_timestamps => On => On
opcache.validate_permission => On => On
opcache.validate_root => Off => Off
opcache.dups_fix => Off => Off
opcache.revalidate_path => On => On
opcache.log_verbosity_level => 1 => 1
opcache.memory_consumption => 128 => 128
opcache.interned_strings_buffer => 8 => 8
opcache.max_accelerated_files => 4000 => 4000
opcache.max_wasted_percentage => 5 => 5
opcache.consistency_checks => 0 => 0
opcache.force_restart_timeout => 180 => 180
opcache.revalidate_freq => 0 => 0
opcache.file_update_protection => 2 => 2
opcache.preferred_memory_model => no value => no value
opcache.blacklist_filename => no value => no value
opcache.max_file_size => 0 => 0
opcache.protect_memory => 0 => 0
opcache.save_comments => 1 => 1
opcache.optimization_level => 0x7FFEBFFF => 0x7FFEBFFF
opcache.opt_debug_level => 0 => 0
opcache.enable_file_override => On => On
opcache.enable_cli => On => On
opcache.error_log => no value => no value
opcache.restrict_api => no value => no value
opcache.lockfile_path => /tmp => /tmp
opcache.file_cache => no value => no value
opcache.file_cache_only => 0 => 0
opcache.file_cache_consistency_checks => 1 => 1
opcache.huge_code_pages => Off => Of
Installing Imagick via CustomBuild 2.0. DirectAdmin source compiles ImageMagick 7.x. From my experience with my optimise-images.sh script for batch image optimisation, ImageMagick 7.x is actually slower than ImageMagick 6.x for image conversions etc.
cd /usr/local/directadmin/custombuild
./build update
./build set imagick yes
./build imagick
Output
./build set imagick yes
Changed imagick option from no to yes
For ImagicK PHP extension
----------------------------------------------------------------------
Libraries have been installed in:
/usr/local/directadmin/custombuild/imagick-3.4.4/modules

If you ever happen to want to link against installed libraries
in a given directory, LIBDIR, you must either use libtool, and
specify the full pathname of the library, or use the `-LLIBDIR'
flag during linking and do at least one of the following:
- add LIBDIR to the `LD_LIBRARY_PATH' environment variable
during execution
- add LIBDIR to the `LD_RUN_PATH' environment variable
during linking
- use the `-Wl,--rpath -Wl,LIBDIR' linker flag
- have your system administrator add LIBDIR to `/etc/ld.so.conf'

See any operating system documentation about shared libraries for
more information, such as the ld(1) and ld.so(8) manual pages.
----------------------------------------------------------------------

Build complete.
Don't forget to run 'make test'.

Make complete
Installing shared extensions: /usr/local/php56/lib/php/extensions/no-debug-non-zts-20131226/
Installing header files: /usr/local/php56/include/php/
find . -name \*.gcno -o -name \*.gcda | xargs rm -f
find . -name \*.lo -o -name \*.o | xargs rm -f
find . -name \*.la -o -name \*.a | xargs rm -f
find . -name \*.so | xargs rm -f
find . -name .libs -a -type d|xargs rm -rf
rm -f libphp.la modules/* libs/*
Restarting php-fpm73.
Restarting php-fpm72.
Restarting php-fpm56.
imagick 3.4.4 PHP extension has been installed successfully.
Check ImagicK PHP extension info
php --ri imagick

imagick

imagick module => enabled
imagick module version => 3.4.4
imagick classes => Imagick, ImagickDraw, ImagickPixel, ImagickPixelIterator, ImagickKernel
Imagick compiled with ImageMagick version => ImageMagick 7.0.8-46 Q16 x86_64 2019-07-18 https://imagemagick.org
Imagick using ImageMagick library version => ImageMagick 7.0.8-46 Q16 x86_64 2019-07-18 https://imagemagick.org
ImageMagick copyright => © 1999-2019 ImageMagick Studio LLC
ImageMagick release date => 2019-07-18
ImageMagick number of supported formats: => 227
ImageMagick supported formats => 3FR, 3G2, 3GP, A, AAI, AI, ART, ARW, AVI, AVS, B, BGR, BGRA, BGRO, BMP, BMP2, BMP3, BRF, C, CAL, CALS, CANVAS, CAPTION, CIN, CIP, CLIP, CMYK, CMYKA, CR2, CRW, CUBE, CUR, CUT, DATA, DCM, DCR, DCRAW, DCX, DDS, DFONT, DNG, DPX, DXT1, DXT5, EPDF, EPI, EPS, EPS2, EPS3, EPSF, EPSI, ERF, FAX, FILE, FITS, FLV, FRACTAL, FTP, FTS, G, G3, G4, GIF, GIF87, GRADIENT, GRAY, GRAYA, HALD, HDR, HISTOGRAM, HRZ, HTM, HTML, HTTP, HTTPS, ICB, ICO, ICON, IIQ, INFO, INLINE, IPL, ISOBRL, ISOBRL6, JNG, JNX, JPE, JPEG, JPG, JPS, JSON, K, K25, KDC, LABEL, M, M2V, M4V, MAC, MAP, MASK, MAT, MATTE, MEF, MIFF, MKV, MNG, MONO, MOV, MP4, MPC, MPEG, MPG, MRW, MSL, MSVG, MTV, MVG, NEF, NRW, NULL, O, ORF, OTB, OTF, PAL, PALM, PAM, PANGO, PATTERN, PBM, PCD, PCDS, PCL, PCT, PCX, PDB, PDF, PDFA, PEF, PES, PFA, PFB, PFM, PGM, PGX, PICON, PICT, PIX, PJPEG, PLASMA, PNG, PNG00, PNG24, PNG32, PNG48, PNG64, PNG8, PNM, PPM, PS, PS2, PS3, PSB, PSD, PWP, R, RADIAL-GRADIENT, RAF, RAS, RAW, RGB, RGBA, RGBO, RGF, RLA, RLE, RMF, RW2, SCR, SCREENSHOT, SCT, SFW, SGI, SHTML, SIX, SIXEL, SPARSE-COLOR, SR2, SRF, STEGANO, SUN, SVG, SVGZ, TEXT, TGA, THUMBNAIL, TILE, TIM, TTC, TTF, TXT, UBRL, UBRL6, UIL, UYVY, VDA, VICAR, VID, VIFF, VIPS, VST, WBMP, WEBP, WMV, WPG, X3F, XBM, XC, XCF, XPM, XPS, XV, Y, YCbCr, YCbCrA, YUV

Directive => Local Value => Master Value
imagick.locale_fix => 0 => 0
imagick.skip_version_check => 0 => 0
imagick.progress_monitor => 0 => 0
Installing PHP Redis, GeoIP, Memcached, Memcache extensions via Poralix directadmin-utils script – under /php directory from their article.
mkdir -p /root/tools/poralix
cd /root/tools/poralix
wget -4 https://raw.githubusercontent.com/poralix/directadmin-utils/master/php/php-extension.sh -O php-extension.sh
chmod 750 php-extension.sh
./php-extension.sh install redis
./php-extension.sh install geoip
./php-extension.sh install memcached
./php-extension.sh install memcache
For Redis PHP extension
./php-extension.sh install redis

----------------------------------------------------------------------
Libraries have been installed in:
/usr/local/src/tmp.d5XOaepCUZ/redis-5.0.1/modules

If you ever happen to want to link against installed libraries
in a given directory, LIBDIR, you must either use libtool, and
specify the full pathname of the library, or use the `-LLIBDIR'
flag during linking and do at least one of the following:
- add LIBDIR to the `LD_LIBRARY_PATH' environment variable
during execution
- add LIBDIR to the `LD_RUN_PATH' environment variable
during linking
- use the `-Wl,--rpath -Wl,LIBDIR' linker flag
- have your system administrator add LIBDIR to `/etc/ld.so.conf'

See any operating system documentation about shared libraries for
more information, such as the ld(1) and ld.so(8) manual pages.
----------------------------------------------------------------------

Build complete.
Don't forget to run 'make test'.

Installing shared extensions: /usr/local/php73/lib/php/extensions/no-debug-non-zts-20180731/
[OK] Installation of redis for php73 completed!
[OK] Found redis.so. Enabling the extension in /usr/local/php73/lib/php.conf.d/90-custom.ini
redis
Redis Support => enabled
Redis Version => 5.0.1
Check Redis PHP extension info
php --ri redis

redis

Redis Support => enabled
Redis Version => 5.0.1
Available serializers => php, json

Directive => Local Value => Master Value
redis.arrays.algorithm => no value => no value
redis.arrays.auth => no value => no value
redis.arrays.autorehash => 0 => 0
redis.arrays.connecttimeout => 0 => 0
redis.arrays.distributor => no value => no value
redis.arrays.functions => no value => no value
redis.arrays.hosts => no value => no value
redis.arrays.index => 0 => 0
redis.arrays.lazyconnect => 0 => 0
redis.arrays.names => no value => no value
redis.arrays.pconnect => 0 => 0
redis.arrays.previous => no value => no value
redis.arrays.readtimeout => 0 => 0
redis.arrays.retryinterval => 0 => 0
redis.arrays.consistent => 0 => 0
redis.clusters.cache_slots => 0 => 0
redis.clusters.auth => no value => no value
redis.clusters.persistent => 0 => 0
redis.clusters.read_timeout => 0 => 0
redis.clusters.seeds => no value => no value
redis.clusters.timeout => 0 => 0
redis.pconnect.pooling_enabled => 1 => 1
redis.pconnect.connection_limit => 0 => 0
redis.session.locking_enabled => 0 => 0
redis.session.lock_expire => 0 => 0
redis.session.lock_retries => 10 => 10
redis.session.lock_wait_time => 2000 => 2000
For GeoIP PHP extension fails seems GeoIP 1.0.8 installed is too old for PHP 7.3 ?
./php-extension.sh install geoip

/usr/local/src/tmp.8TYhIfRHNY/geoip-1.0.8/geoip.c:583:2: error: 'RETURN_STRING' undeclared (first use in this function)
  RETURN_STRING((char*)timezone, 1);
  ^
make: *** [geoip.lo] Error 1
[ERROR] Installation of geoip for php73 failed
[ERROR] Could not find /usr/local/php73/lib/php/extensions/no-debug-non-zts-20180731/geoip.so. Removing extension from /usr/local/php73/lib/php.conf.d/10-directadmin.ini
[ERROR] Could not find /usr/local/php73/lib/php/extensions/no-debug-non-zts-20180731/geoip.so. Removing extension from /usr/local/php73/lib/php.conf.d/50-webapps.ini
[ERROR] Could not find /usr/local/php73/lib/php/extensions/no-debug-non-zts-20180731/geoip.so. Removing extension from /usr/local/php73/lib/php.conf.d/90-custom.ini
Update: was informed by script author that php-extension.sh can also install beta versions of PHP extensions too
cd /root/tools/poralix
./php-extension.sh install geoip --beta
Excerpt output for GeoIP beta PHP extension install
----------------------------------------------------------------------
Libraries have been installed in:
   /usr/local/src/tmp.Fad76oPvIV/geoip-1.1.1/modules

If you ever happen to want to link against installed libraries
in a given directory, LIBDIR, you must either use libtool, and
specify the full pathname of the library, or use the `-LLIBDIR'
flag during linking and do at least one of the following:
   - add LIBDIR to the `LD_LIBRARY_PATH' environment variable
     during execution
   - add LIBDIR to the `LD_RUN_PATH' environment variable
     during linking
   - use the `-Wl,--rpath -Wl,LIBDIR' linker flag
   - have your system administrator add LIBDIR to `/etc/ld.so.conf'

See any operating system documentation about shared libraries for
more information, such as the ld(1) and ld.so(8) manual pages.
----------------------------------------------------------------------

Build complete.
Don't forget to run 'make test'.

Installing shared extensions:     /usr/local/php73/lib/php/extensions/no-debug-non-zts-20180731/
[OK] Installation of geoip for php73 completed!
[OK] Found geoip.so. Enabling the extension in /usr/local/php73/lib/php.conf.d/90-custom.ini
geoip
geoip support => enabled
geoip extension version => 1.1.1
php-extensions.sh installed GeoIP 1.1.1 from beta repository
php --ri geoip

geoip

geoip support => enabled
geoip extension version => 1.1.1
geoip library version => 1005000

Directive => Local Value => Master Value
geoip.custom_directory => no value => no value
On Centmin Mod LEMP stacks for PHP 7.3, I usually install GeoIP 1.1.2-dev builds. Example from Centmin Mod LEMP stack CentOS 7 install.
php --ri geoip

geoip

geoip support => enabled
geoip extension version => 1.1.2-dev
geoip library version => 1005000

Directive => Local Value => Master Value
geoip.custom_directory => /usr/share/GeoIP => /usr/share/GeoIP
For Memcached PHP extension
./php-extension.sh install memcached

----------------------------------------------------------------------
Libraries have been installed in:
   /usr/local/src/tmp.757g97rpzB/memcached-3.1.3/modules

If you ever happen to want to link against installed libraries
in a given directory, LIBDIR, you must either use libtool, and
specify the full pathname of the library, or use the `-LLIBDIR'
flag during linking and do at least one of the following:
   - add LIBDIR to the `LD_LIBRARY_PATH' environment variable
     during execution
   - add LIBDIR to the `LD_RUN_PATH' environment variable
     during linking
   - use the `-Wl,--rpath -Wl,LIBDIR' linker flag
   - have your system administrator add LIBDIR to `/etc/ld.so.conf'

See any operating system documentation about shared libraries for
more information, such as the ld(1) and ld.so(8) manual pages.
----------------------------------------------------------------------

Build complete.
Don't forget to run 'make test'.

Installing shared extensions:     /usr/local/php73/lib/php/extensions/no-debug-non-zts-20180731/
[OK] Installation of memcached for php73 completed!
[OK] Found memcached.so. Enabling the extension in /usr/local/php73/lib/php.conf.d/90-custom.ini
memcached
memcached support => enabled
memcached.compression_factor => 1.3 => 1.3
Check Memcached PHP extension info
php --ri memcached

memcached

memcached support => enabled
Version => 3.1.3
libmemcached version => 1.0.16
SASL support => yes
Session support => yes
igbinary support => no
json support => no
msgpack support => no

Directive => Local Value => Master Value
memcached.sess_locking => On => On
memcached.sess_lock_wait_min => 150 => 150
memcached.sess_lock_wait_max => 150 => 150
memcached.sess_lock_retries => 5 => 5
memcached.sess_lock_expire => 0 => 0
memcached.sess_binary_protocol => Off => Off
memcached.sess_consistent_hash => On => On
memcached.sess_consistent_hash_type => ketama => ketama
memcached.sess_number_of_replicas => 0 => 0
memcached.sess_randomize_replica_read => Off => Off
memcached.sess_remove_failed_servers => Off => Off
memcached.sess_server_failure_limit => 0 => 0
memcached.sess_connect_timeout => 0 => 0
memcached.sess_sasl_username => no value => no value
memcached.sess_sasl_password => no value => no value
memcached.sess_persistent => Off => Off
memcached.sess_prefix => memc.sess.key. => memc.sess.key.
memcached.sess_lock_wait => not set => not set
memcached.sess_lock_max_wait => not set => not set
memcached.compression_type => fastlz => fastlz
memcached.compression_factor => 1.3 => 1.3
memcached.compression_threshold => 2000 => 2000
memcached.serializer => php => php
memcached.store_retry_count => 2 => 2
memcached.default_consistent_hash => Off => Off
memcached.default_binary_protocol => Off => Off
memcached.default_connect_timeout => 0 => 0
For Memcache PHP extension like GeoIP also failed for PHP 7 as it tries to install Memcache 2.2.7 which is very very old and doesn’t support PHP 7
./php-extension.sh install memcache

configure: creating ./config.status
config.status: creating config.h
/bin/sh /usr/local/src/tmp.syOuw7Zz4k/memcache-2.2.7/libtool --mode=compile cc -I/usr/local/php73/include/php -I. -I/usr/local/src/tmp.syOuw7Zz4k/memcache-2.2.7 -DPHP_ATOM_INC -I/usr/local/src/tmp.syOuw7Zz4k/memcache-2.2.7/include -I/usr/local/src/tmp.syOuw7Zz4k/memcache-2.2.7/main -I/usr/local/src/tmp.syOuw7Zz4k/memcache-2.2.7 -I/usr/local/php73/include/php -I/usr/local/php73/include/php/main -I/usr/local/php73/include/php/TSRM -I/usr/local/php73/include/php/Zend -I/usr/local/php73/include/php/ext -I/usr/local/php73/include/php/ext/date/lib  -DHAVE_CONFIG_H  -g -O2   -c /usr/local/src/tmp.syOuw7Zz4k/memcache-2.2.7/memcache.c -o memcache.lo
mkdir .libs
 cc -I/usr/local/php73/include/php -I. -I/usr/local/src/tmp.syOuw7Zz4k/memcache-2.2.7 -DPHP_ATOM_INC -I/usr/local/src/tmp.syOuw7Zz4k/memcache-2.2.7/include -I/usr/local/src/tmp.syOuw7Zz4k/memcache-2.2.7/main -I/usr/local/src/tmp.syOuw7Zz4k/memcache-2.2.7 -I/usr/local/php73/include/php -I/usr/local/php73/include/php/main -I/usr/local/php73/include/php/TSRM -I/usr/local/php73/include/php/Zend -I/usr/local/php73/include/php/ext -I/usr/local/php73/include/php/ext/date/lib -DHAVE_CONFIG_H -g -O2 -c /usr/local/src/tmp.syOuw7Zz4k/memcache-2.2.7/memcache.c  -fPIC -DPIC -o .libs/memcache.o
/usr/local/src/tmp.syOuw7Zz4k/memcache-2.2.7/memcache.c:40:40: fatal error: ext/standard/php_smart_str.h: No such file or directory
 #include "ext/standard/php_smart_str.h"
                                        ^
compilation terminated.
make: *** [memcache.lo] Error 1
[ERROR] Installation of memcache for php73 failed
[ERROR] Could not find /usr/local/php73/lib/php/extensions/no-debug-non-zts-20180731/memcache.so. Removing extension from /usr/local/php73/lib/php.conf.d/10-directadmin.ini
[ERROR] Could not find /usr/local/php73/lib/php/extensions/no-debug-non-zts-20180731/memcache.so. Removing extension from /usr/local/php73/lib/php.conf.d/50-webapps.ini
[ERROR] Could not find /usr/local/php73/lib/php/extensions/no-debug-non-zts-20180731/memcache.so. Removing extension from /usr/local/php73/lib/php.conf.d/90-custom.ini
Tried beta install but fails too as tries to install Memcache 3.0.8 which doesn’t support PHP 7+
cd /root/tools/poralix
./php-extension.sh install memcache --beta
php-extension.sh install Memcache 3.0.8 beta failure errors
configure: creating ./config.status
config.status: creating config.h
/bin/sh /usr/local/src/tmp.3qxkvT80jB/memcache-3.0.8/libtool --mode=compile cc -I/usr/local/php73/include/php -I. -I/usr/local/src/tmp.3qxkvT80jB/memcache-3.0.8 -DPHP_ATOM_INC -I/usr/local/src/tmp.3qxkvT80jB/memcache-3.0.8/include -I/usr/local/src/tmp.3qxkvT80jB/memcache-3.0.8/main -I/usr/local/src/tmp.3qxkvT80jB/memcache-3.0.8 -I/usr/local/php73/include/php -I/usr/local/php73/include/php/main -I/usr/local/php73/include/php/TSRM -I/usr/local/php73/include/php/Zend -I/usr/local/php73/include/php/ext -I/usr/local/php73/include/php/ext/date/lib  -DHAVE_CONFIG_H  -g -O2   -c /usr/local/src/tmp.3qxkvT80jB/memcache-3.0.8/memcache.c -o memcache.lo
mkdir .libs
 cc -I/usr/local/php73/include/php -I. -I/usr/local/src/tmp.3qxkvT80jB/memcache-3.0.8 -DPHP_ATOM_INC -I/usr/local/src/tmp.3qxkvT80jB/memcache-3.0.8/include -I/usr/local/src/tmp.3qxkvT80jB/memcache-3.0.8/main -I/usr/local/src/tmp.3qxkvT80jB/memcache-3.0.8 -I/usr/local/php73/include/php -I/usr/local/php73/include/php/main -I/usr/local/php73/include/php/TSRM -I/usr/local/php73/include/php/Zend -I/usr/local/php73/include/php/ext -I/usr/local/php73/include/php/ext/date/lib -DHAVE_CONFIG_H -g -O2 -c /usr/local/src/tmp.3qxkvT80jB/memcache-3.0.8/memcache.c  -fPIC -DPIC -o .libs/memcache.o
In file included from /usr/local/src/tmp.3qxkvT80jB/memcache-3.0.8/php_memcache.h:34:0,
                 from /usr/local/src/tmp.3qxkvT80jB/memcache-3.0.8/memcache.c:30:
/usr/local/src/tmp.3qxkvT80jB/memcache-3.0.8/memcache_pool.h:45:47: fatal error: ext/standard/php_smart_str_public.h: No such file or directory
 #include "ext/standard/php_smart_str_public.h"
                                               ^
compilation terminated.
make: *** [memcache.lo] Error 1
[ERROR] Installation of memcache for php73 failed
[ERROR] Could not find /usr/local/php73/lib/php/extensions/no-debug-non-zts-20180731/memcache.so. Removing extension from /usr/local/php73/lib/php.conf.d/10-directadmin.ini
[ERROR] Could not find /usr/local/php73/lib/php/extensions/no-debug-non-zts-20180731/memcache.so. Removing extension from /usr/local/php73/lib/php.conf.d/50-webapps.ini
[ERROR] Could not find /usr/local/php73/lib/php/extensions/no-debug-non-zts-20180731/memcache.so. Removing extension from /usr/local/php73/lib/php.conf.d/90-custom.ini
On Centmin Mod LEMP stacks for PHP 7+, I usually install Memcache 4.0.4 which supports PHP 7.3 fine. Example:
php --ri memcache

memcache

memcache support => enabled
Version => 4.0.4
Revision => $Revision$

Directive => Local Value => Master Value
memcache.allow_failover => 1 => 1
memcache.max_failover_attempts => 20 => 20
memcache.default_port => 11211 => 11211
memcache.chunk_size => 32768 => 32768
memcache.protocol => ascii => ascii
memcache.hash_strategy => consistent => consistent
memcache.hash_function => crc32 => crc32
memcache.redundancy => 1 => 1
memcache.session_redundancy => 2 => 2
memcache.compress_threshold => 20000 => 20000
memcache.lock_timeout => 15 => 15
memcache.session_prefix_host_key => 0 => 0
memcache.session_prefix_host_key_remove_www => 1 => 1
memcache.session_prefix_host_key_remove_subdomain => 0 => 0
memcache.session_prefix_static_key => no value => no value
memcache.session_save_path => no value => no value
memcache.prefix_host_key => 0 => 0
memcache.prefix_host_key_remove_www => 1 => 1
memcache.prefix_host_key_remove_subdomain => 0 => 0
memcache.prefix_static_key => no value => no value
Enabling pigz multi-threaded gzip compression as outlined here if you have 2 or more cpu threads. There is no point in enabling pigz support if you only have 1 cpu thread.
You can use below command to find out how many cpu threads you have for your server
grep -c "processor" /proc/cpuinfo
Then if the resulting output is a number 2 or more, you can enable pigz support in DirectAdmin
getcpus=$(grep -c "processor" /proc/cpuinfo)
sed -i "s|^pigz=.*|pigz=$getcpus|" /usr/local/directadmin/conf/directadmin.conf
Then run CustomBuild 2.0 to install pigz
cd /usr/local/directadmin/custombuild
./build update
./build pigz
If on VPS server, there are additional steps to properly register the ethernet NIC device name with DirectAdmin. Within /usr/local/directadmin/conf/directadmin.conf edit:
ethernet_dev=devicename
For example, on many vps systems it will be:
ethernet_dev=venet0:0
Other systems where the IP is not the base IP on the device, you’d need to simply set the correct number:
ethernet_dev=eth0:1
Or other systems with the IP on a different device, it might be:
ethernet_dev=eth1
To see what your server’s device name is, type:
/sbin/ifconfig
Replace devicename with the FULL devicename reported by ifconfig. If your VPS system emulates eth0, then you may skip this step.
The device name would be the one linked to your public IPv4 address. You can find your public IPv4 address usually with below curl command:
curl -4s https://ipinfo.io/ip
For BuyVM VPS device name is eth0 and seems to be already the default in Directadmin configuration
grep ethernet /usr/local/directadmin/conf/directadmin.conf
ethernet_dev=eth0
If you need to later change the DirectAdmin hostname setup in Step 1, follow guide outlined here including updating your new hostname’s DNS records.
Further customisation of DirectAdmin setup can be made via editing settings in /usr/local/directadmin/conf/directadmin.conf. This old guide lists some of the options available.
# change max username length from default to 10 to 16
# https://www.directadmin.com/features.php?id=189
# https://www.directadmin.com/features.php?id=2294
sed -i 's|^max_username_length=10|max_username_length=16|' /usr/local/directadmin/conf/directadmin.conf
After editing /usr/local/directadmin/conf/directadmin.conf, you need to restart DirectAdmin
cd /usr/local/directadmin
echo "action=directadmin&value=restart" >> /usr/local/directadmin/data/task.queue; /usr/local/directadmin/dataskq d2000
Verify that DirectAdmin is using the updated /usr/local/directadmin/conf/directadmin.conf settings. The command should return the values matching the parameters passed via egrep.
/usr/local/directadmin/directadmin c | egrep '^max_username_length=|^force_hostname=|^ssl_redirect_host=|^use_xfs_quota=|^pigz='
This is the default output before above changes
/usr/local/directadmin/directadmin c | egrep '^max_username_length=|^force_hostname=|^ssl_redirect_host=|^use_xfs_quota=|^pigz='
max_username_length=10
use_xfs_quota=0
ssl_redirect_host=
force_hostname=
pigz=0
Install and configure Linux Malware Detect (Maldet) on DirectAdmin as outlined here but first install ClamAV so that Maldet can use ClamAV’s scanning engine which allows you to speed up Maldet scans dramatically. Without ClamAV engine, Maldet scans will be very slow in comparison.
Install ClamAV using CustomBuild 2.0 with Exim ClamAV support,
cd /usr/local/directadmin/custombuild
./build update
./build set clamav yes
./build set clamav_exim yes
./build set exim yes
./build set eximconf yes
./build set eximconf_release 4.5
./build clamav
./build exim
./build exim_conf
Looks like build updates download files from plain text non-HTTPS locations
./build update
--2019-07-17 21:36:08-- http://files2.directadmin.com/services/custombuild/2.0/custombuild.tar.gz
Resolving files2.directadmin.com (files2.directadmin.com)... 208.167.226.3
Connecting to files2.directadmin.com (files2.directadmin.com)|208.167.226.3|:80... connected.
HTTP request sent, awaiting response... 200 OK
Length: 226253 (221K) [application/x-gzip]
Saving to: './custombuild.tar.gz'

100%[================================================================================================================================================================================================================>] 226,253 491KB/s in 0.4s

2019-07-17 21:36:09 (491 KB/s) - './custombuild.tar.gz' saved [226253/226253]

Extracting custombuild.tar.gz...
Then
./build set clamav yes
Changed clamav option from no to yes

./build set clamav_exim yes
Changed clamav_exim option from yes to yes

./build set exim yes
Changed exim option from yes to yes

./build set eximconf yes
Changed eximconf option from yes to yes

./build set eximconf_release 4.5
Changed eximconf_release option from 4.5 to 4.5
Actual ClamAV build which is source compiled
./build clamav
Downloading             clamav-0.101.2.tar.gz...
--2019-07-17 21:40:03--  http://files2.directadmin.com/services/custombuild/clamav-0.101.2.tar.gz
Resolving files2.directadmin.com (files2.directadmin.com)... 208.167.226.3
Connecting to files2.directadmin.com (files2.directadmin.com)|208.167.226.3|:80... connected.
HTTP request sent, awaiting response... 200 OK
Length: 21722932 (21M) [application/x-gzip]
Saving to: '/usr/local/directadmin/custombuild/clamav-0.101.2.tar.gz'

100%[================================================================================================================================================================================================================>] 21,722,932  1.21MB/s   in 19s

Enabling clamd in systemd...
Created symlink from /etc/systemd/system/multi-user.target.wants/clamd.service to /etc/systemd/system/clamd.service.
Enabling freshclam in systemd...
Created symlink from /etc/systemd/system/multi-user.target.wants/freshclam.service to /etc/systemd/system/freshclam.service.
Current working dir is /usr/local/share/clamav
ClamAV update process started at Wed Jul 17 21:44:33 2019
Using IPv6 aware code
Max retries == 3
Querying current.cvd.clamav.net
TTL: 153
Software version from DNS: 0.101.2
Retrieving http://database.clamav.net/main.cvd
Trying to download http://database.clamav.net/main.cvd (IP: 104.16.218.84)
Downloading main.cvd [100%]
Loading signatures from main.cvd
Properly loaded 4566249 signatures from new main.cvd
main.cvd updated (version: 58, sigs: 4566249, f-level: 60, builder: sigmgr)
Querying main.58.102.1.0.6810DA54.ping.clamav.net
Can't query main.58.102.1.0.6810DA54.ping.clamav.net
Retrieving http://database.clamav.net/daily.cvd
Trying to download http://database.clamav.net/daily.cvd (IP: 104.16.218.84)
Downloading daily.cvd [100%]
Loading signatures from daily.cvd
Properly loaded 1659025 signatures from new daily.cvd
daily.cvd updated (version: 25513, sigs: 1659025, f-level: 63, builder: raynman)
Querying daily.25513.102.1.0.6810DA54.ping.clamav.net
Can't query daily.25513.102.1.0.6810DA54.ping.clamav.net
Retrieving http://database.clamav.net/bytecode.cvd
Trying to download http://database.clamav.net/bytecode.cvd (IP: 104.16.218.84)
Downloading bytecode.cvd [100%]
Loading signatures from bytecode.cvd
Properly loaded 94 signatures from new bytecode.cvd
bytecode.cvd updated (version: 330, sigs: 94, f-level: 63, builder: neo)
Querying bytecode.330.102.1.0.6810DA54.ping.clamav.net
Can't query bytecode.330.102.1.0.6810DA54.ping.clamav.net
Database updated (6225368 signatures) from database.clamav.net (IP: 104.16.218.84)
Restarting freshclam.
Restarting clamd.
Restarting exim.
Done ClamAV.
Actual Exim build
./build exim

>>> exim binary built

make[1]: Leaving directory `/usr/local/directadmin/custombuild/exim-4.92/build-Linux-x86_64'

Installation directory is /usr/sbin

cp exim /usr/sbin/exim-4.92-5
/bin/chown root /usr/sbin/exim-4.92-5
chmod a+x /usr/sbin/exim-4.92-5
chmod u+s /usr/sbin/exim-4.92-5
creation of symlink omitted
(NO_SYMLINK is specified in Local/Makefile)
cp /usr/sbin/exim_dumpdb /usr/sbin/exim_dumpdb.O
cp exim_dumpdb /usr/sbin
cp /usr/sbin/exim_fixdb /usr/sbin/exim_fixdb.O
cp exim_fixdb /usr/sbin
cp /usr/sbin/exim_tidydb /usr/sbin/exim_tidydb.O
cp exim_tidydb /usr/sbin
cp /usr/sbin/exinext /usr/sbin/exinext.O
cp exinext /usr/sbin
cp /usr/sbin/exiwhat /usr/sbin/exiwhat.O
cp exiwhat /usr/sbin
cp /usr/sbin/exim_dbmbuild /usr/sbin/exim_dbmbuild.O
cp exim_dbmbuild /usr/sbin
cp /usr/sbin/exicyclog /usr/sbin/exicyclog.O
cp exicyclog /usr/sbin
cp /usr/sbin/exigrep /usr/sbin/exigrep.O
cp exigrep /usr/sbin
cp /usr/sbin/eximstats /usr/sbin/eximstats.O
cp eximstats /usr/sbin
cp /usr/sbin/exipick /usr/sbin/exipick.O
cp exipick /usr/sbin
cp /usr/sbin/exiqgrep /usr/sbin/exiqgrep.O
cp exiqgrep /usr/sbin
cp /usr/sbin/exiqsumm /usr/sbin/exiqsumm.O
cp exiqsumm /usr/sbin
cp /usr/sbin/exim_lock /usr/sbin/exim_lock.O
cp exim_lock /usr/sbin
cp /usr/sbin/exim_checkaccess /usr/sbin/exim_checkaccess.O
cp exim_checkaccess /usr/sbin

Configuration file /etc/exim.conf already exists

Exim installation complete
Moving exim binary.
Enabling exim in systemd...
Exim 4.92 Installed.
Restarting exim.
Actual Exim Conf build
./build exim_conf

--2019-07-17 21:51:12-- http://files2.directadmin.com/services/SpamBlocker/4.5.14/exim.conf-SpamBlockerTechnology-v4.5.14.txt
Resolving files2.directadmin.com (files2.directadmin.com)... 208.167.226.3
Connecting to files2.directadmin.com (files2.directadmin.com)|208.167.226.3|:80... connected.
HTTP request sent, awaiting response... 200 OK
Length: 32137 (31K) [text/plain]
Saving to: '/etc/exim.conf.cb20'

100%[================================================================================================================================================================================================================>] 32,137 --.-K/s in 0.1s

2019-07-17 21:51:13 (245 KB/s) - '/etc/exim.conf.cb20' saved [32137/32137]

--2019-07-17 21:51:13-- http://files2.directadmin.com/services/custombuild/system_filter.exim
Resolving files2.directadmin.com (files2.directadmin.com)... 208.167.226.3
Connecting to files2.directadmin.com (files2.directadmin.com)|208.167.226.3|:80... connected.
HTTP request sent, awaiting response... 200 OK
Length: 10489 (10K)
Saving to: '/etc/system_filter.exim'

100%[================================================================================================================================================================================================================>] 10,489 --.-K/s in 0s

2019-07-17 21:51:13 (119 MB/s) - '/etc/system_filter.exim' saved [10489/10489]

--2019-07-17 21:51:13-- http://files2.directadmin.com/services/SpamBlocker/4.5.14/exim.strings.conf
Resolving files2.directadmin.com (files2.directadmin.com)... 208.167.226.3
Connecting to files2.directadmin.com (files2.directadmin.com)|208.167.226.3|:80... connected.
HTTP request sent, awaiting response... 200 OK
Length: 2076 (2.0K) [text/plain]
Saving to: '/etc/exim.strings.conf.cb20'

100%[================================================================================================================================================================================================================>] 2,076 --.-K/s in 0s

2019-07-17 21:51:13 (123 MB/s) - '/etc/exim.strings.conf.cb20' saved [2076/2076]

--2019-07-17 21:51:13-- http://files2.directadmin.com/services/SpamBlocker/4.5.14/exim.variables.conf.default
Resolving files2.directadmin.com (files2.directadmin.com)... 208.167.226.3
Connecting to files2.directadmin.com (files2.directadmin.com)|208.167.226.3|:80... connected.
HTTP request sent, awaiting response... 200 OK
Length: 924 [text/plain]
Saving to: '/etc/exim.variables.conf.cb20'

100%[================================================================================================================================================================================================================>] 924 --.-K/s in 0s

2019-07-17 21:51:13 (148 MB/s) - '/etc/exim.variables.conf.cb20' saved [924/924]

--2019-07-17 21:51:14-- http://files2.directadmin.com/services/exim.pl.24
Resolving files2.directadmin.com (files2.directadmin.com)... 208.167.226.3
Connecting to files2.directadmin.com (files2.directadmin.com)|208.167.226.3|:80... connected.
HTTP request sent, awaiting response... 200 OK
Length: 17716 (17K)
Saving to: '/etc/exim.pl.cb20'

100%[================================================================================================================================================================================================================>] 17,716 --.-K/s in 0.06s

2019-07-17 21:51:14 (276 KB/s) - '/etc/exim.pl.cb20' saved [17716/17716]

Restarting exim.
Then install Maldet
cd /usr/local/src
wget -4 http://www.rfxn.com/downloads/maldetect-current.tar.gz
tar -zxvf maldetect-current.tar.gz
cd $(ls -1d maldetect-*/ | tail -1)
./install.sh
Install output
./install.sh
Created symlink from /etc/systemd/system/multi-user.target.wants/maldet.service to /usr/lib/systemd/system/maldet.service.
Linux Malware Detect v1.6.4
(C) 2002-2019, R-fx Networks <[email protected]>
(C) 2019, Ryan MacDonald <[email protected]>
This program may be freely redistributed under the terms of the GNU GPL

installation completed to /usr/local/maldetect
config file: /usr/local/maldetect/conf.maldet
exec file: /usr/local/maldetect/maldet
exec link: /usr/local/sbin/maldet
exec link: /usr/local/sbin/lmd
cron.daily: /etc/cron.daily/maldet
maldet(1291): {sigup} performing signature update check...
maldet(1291): {sigup} local signature set is version 201907043616
maldet(1291): {sigup} new signature set 2019071622063 available
maldet(1291): {sigup} downloading https://cdn.rfxn.com/downloads/maldet-sigpack.tgz
maldet(1291): {sigup} downloading https://cdn.rfxn.com/downloads/maldet-cleanv2.tgz
maldet(1291): {sigup} verified md5sum of maldet-sigpack.tgz
maldet(1291): {sigup} unpacked and installed maldet-sigpack.tgz
maldet(1291): {sigup} verified md5sum of maldet-clean.tgz
maldet(1291): {sigup} unpacked and installed maldet-clean.tgz
maldet(1291): {sigup} signature set update completed
maldet(1291): {sigup} 15542 signatures (12730 MD5 | 2035 HEX | 777 YARA | 0 USER)
Edit Maldet config file at /usr/local/maldetect/conf.maldet and set scan_clamscan=”1″ to enable ClamAV scanner if it isn’t already set to 1
# If installed, use ClamAV clamscan binary as default scan engine which
# provides improved scan performance on large file sets. The clamscan
# engine is used in conjunction with native ClamAV signatures updated
# through freshclam along with LMD signatures providing additional
# detection capabilities.
# [ 0 = disabled, 1 = enabled ]
scan_clamscan="1"
Add support for Malware.Expert definitions
echo "DatabaseCustomURL http://cdn.malware.expert/malware.expert.ndb" >> /etc/freshclam.conf
echo "DatabaseCustomURL http://cdn.malware.expert/malware.expert.hdb" >> /etc/freshclam.conf
echo "DatabaseCustomURL http://cdn.malware.expert/malware.expert.ldb" >> /etc/freshclam.conf
echo "DatabaseCustomURL http://cdn.malware.expert/malware.expert.fp" >> /etc/freshclam.conf
service freshclam restart
ls -la /usr/local/share/clamav/malware.expert.* /var/lib/clamav/malware.expert.*
resulting databases are in directory at /usr/local/share/clamav/
ls -la /usr/local/share/clamav/malware.expert.* /var/lib/clamav/malware.expert.*
ls: cannot access /var/lib/clamav/malware.expert.*: No such file or directory
-rw-r--r-- 1 clamav clamav   2744 Jul 17 21:57 /usr/local/share/clamav/malware.expert.fp
-rw-r--r-- 1 clamav clamav  29852 Jul 17 21:57 /usr/local/share/clamav/malware.expert.hdb
-rw-r--r-- 1 clamav clamav  20550 Jul 17 21:57 /usr/local/share/clamav/malware.expert.ldb
-rw-r--r-- 1 clamav clamav 134358 Jul 17 21:57 /usr/local/share/clamav/malware.expert.ndb
Malware.Expert outlines what those databases contain:
Pay attention to malware.expert.ndb database it may contain false positive alert/alarms due to normal PHP code having legit use for specific PHP patterns i.e. eval/base64 so you will need to bare that in mind and inspect manually the files it reports as malware.
Example scan with extended ClamAV signature databases
time freshclam
time clamscan -ri /home
time clamscan -ri /var/www
freshclam
time freshclam
ClamAV update process started at Wed Jul 17 21:59:02 2019
malware.expert.ndb is up to date (version: custom database)
malware.expert.hdb is up to date (version: custom database)
malware.expert.ldb is up to date (version: custom database)
malware.expert.fp is up to date (version: custom database)
main.cvd is up to date (version: 58, sigs: 4566249, f-level: 60, builder: sigmgr)
daily.cvd is up to date (version: 25513, sigs: 1659025, f-level: 63, builder: raynman)
bytecode.cvd is up to date (version: 330, sigs: 94, f-level: 63, builder: neo)

real    0m0.182s
user    0m0.015s
sys     0m0.015s
clamscan
time clamscan -ri /home

----------- SCAN SUMMARY -----------
Known viruses: 6232930
Engine version: 0.101.2
Scanned directories: 18
Scanned files: 14
Infected files: 0
Data scanned: 0.01 MB
Data read: 0.01 MB (ratio 1.00:1)
Time: 90.304 sec (1 m 30 s)

real 1m30.332s
user 1m11.138s
sys 0m1.705s
time clamscan -ri /var/www

----------- SCAN SUMMARY -----------
Known viruses: 6232930
Engine version: 0.101.2
Scanned directories: 1117
Scanned files: 8708
Infected files: 0
Data scanned: 155.67 MB
Data read: 85.73 MB (ratio 1.82:1)
Time: 267.519 sec (4 m 27 s)

real    4m27.539s
user    3m38.392s
sys     0m9.880s
Then manually can run maldet on public web root directories of which there are currently none that exist on fresh DirectAdmin installation
time maldet -a /home?/?/domains/?/public_html
output
time maldet -a /home?/?/domains/?/public_html
Linux Malware Detect v1.6.4
(C) 2002-2019, R-fx Networks <[email protected]>
(C) 2019, Ryan MacDonald <[email protected]>
This program may be freely redistributed under the terms of the GNU GPL v2

maldet(2102): {scan} signatures loaded: 15542 (12730 MD5 | 2035 HEX | 777 YARA | 0 USER)
maldet(2102): {scan} building file list for /home?/?/domains/?/public_html, this might take awhile...
maldet(2102): {scan} setting nice scheduler priorities for all operations: cpunice 19 , ionice 6
maldet(2102): {scan} scan returned empty file list; check that path exists and contains files in scope of configuration.

real 1m25.958s
user 0m0.235s
sys 0m0.119s
or add -b flag to run in background
maldet -b -a /home?/?/domains/?/public_html
The post How To Install DirectAdmin Control Panel On CentOS 7 appeared first on Server Manager Guide.
]]>The post Centmin Mod vs Easyengine vs Webinoly vs VestaCP vs OneInStack LEMP Stack Benchmarks appeared first on Server Manager Guide.
]]>You can read the full benchmark comparison results below:
- Nginx HTTP/2 HTTPS static HTML benchmarks
- Nginx non-HTTPS static HTML benchmarks
- PHP (php-fpm) HTTP/2 HTTPS benchmarks
Preview of some of the benchmark comparison results
For Nginx HTTP/2 HTTPS static HTML
Combining results for last 2 runs for h2load -t1 vs h2load -t2 for 1,000 concurrent user tests. You can see which Nginx versions are better optimised for multi-threaded Nginx work loads by comparing their respective h2load -t1 vs -t2 results and seeing which -t2 results continue to scale in terms of performance.
LEMP stack installers installed in Ubuntu 18.04 LTS LXD containers on a ssdnode’s 4 CPU, 16GB ram, 80GB disk KVM VPS with Ubuntu 18.04 LTS and their respective performance scaling with from -t1 to -t2 (1 thread to 2 threads)
- Centmin Mod 123.09beta01 beta Nginx 1.15.0 on CentOS 7.5 64bit (default gzip compression = 5) = 39.1% increase in average requests/s and 29.39% increase in min requests/s and 7.03% increase in max requests/s
- Easyengine 3.8.1 using Nginx 1.14.0 on Ubuntu 16.04 LTS (default gzip compression = 6) = 19.5% increase in average requests/s and 22.2% increase in min requests/s and 28.7% increase in max requests/s
- OneInStack Nginx 1.14.0 on Ubuntu 16.04 LTS (default gzip compression = 6) = 45.55% increase in average requests/s and 61.19% increase in min requests/s and 3.5% increase in max requests/s
- OneInStack OpenResty Nginx 1.13.6 on Ubuntu 16.04 LTS (default gzip compression = 6) = 48.8% increase in average requests/s and 92.55% increase in min requests/s and 4.25% decrease in max requests/s
- VestaCP 0.9.8-21 using Nginx 1.15.0 on Ubuntu 16.04 LTS (default gzip compression = 9) = 10.4% increase in average requests/s and 14.96% increase in min requests/s and 12.13% decrease in max requests/s
- Webinoly 1.4.3 using Nginx 1.14.0 on Ubuntu 18.04 LTS (default gzip compression = 6) = 19.6% increase in average requests/s and 6.36% increase in min requests/s and 24.2% increase in max requests/s
Observations
- For average requests/s, Centmin Mod Nginx’s 1 thread results are actually faster than EasyEngine (+10.33%), VestaCP (+15.6%) and Webinoly’s (+53.11%) 2 thread results and within 80-87% of OneInStack’s 2 thread results !
- For minimum requests/s, Centmin Mod Nginx’s 2 thread results are actually faster than the average requests/s for EasyEngine (+0.37%), VestaCP (+5.15%) and Webinoly (+39.28) !

For Nginx non-HTTPS static HTML
Nginx static HTML benchmarks are done using my forked version of wrk, wrk-cmm. Each test configuration was run 2x times. Raw numbers are further below while summary chart is directly below:
wrk-cmm load tests were done at 4 user concurrency levels – 10 users, 100 users, 500 users and 1000 users for 10 second duration using following test parameters
- at 10 user concurrency, Centmin Mod Nginx is 16.7% faster than Easyengine Nginx and 8.76% faster than Webinoly Nginx and 18.39% faster than VestaCP Nginx and Webinoly is 7.3% faster than Easyengine Nginx and 8.86% faster than VestaCP Nginx
- at 100 user concurrency, Centmin Mod Nginx is 55.77% faster than Easyengine Nginx and 32.04% faster than Webinoly Nginx and 56.9% faster than VestaCP Nginx and Webinoly is 17.8% faster than Easyengine Nginx and 18.86% faster than VestaCP Nginx
- at 500 user concurrency, Centmin Mod Nginx is 39.73% faster than Easyengine Nginx and 33.45% faster than Webinoly Nginx and 41.3% faster than VestaCP Nginx and Webinoly is 4.7% faster than Easyengine Nginx and 5.9% faster than VestaCP Nginx
- at 1000 user concurrency, Centmin Mod Nginx is 43.70% faster than Easyengine Nginx and 33.08% faster than Webinoly Nginx and 39.06% faster than VestaCP Nginx and Webinoly is 7.97% faster than Easyengine Nginx and 4.49% faster than VestaCP Nginx

For PHP (php-fpm) HTTP/2 HTTPS benchmarks
Next up is doing h2load HTTP/2 HTTPS PHP-FPM tests against hello.php file at a much higher user concurrency work load of 500 users and 5000 requests. As previously mentioned, using PHP-FPM Unix Sockets (with OneInStack LEMP stacks default config) can be faster but up to a certain point, they’re hit a concurrent work load limit and requests will start to fail. On the other hand, PHP-FPM TCP listeners are slower but scale much better in handling high user concurrent work loads. This can be clearly seen in below test results.
- OneInStack LEMP stacks default to PHP-FPM Unix Sockets unlike other LEMP stacks tested defaulting to TCP listeners. So at 500 user concurrency, OneInStack PHP-FPM configs start to fail under the h2load load tester tool. Between 35-38% of all requests failed which in turn inflates and skews the requests/s and TTFB 99% percentile latency values. Requests per second and latency is based on the time to complete a request and thus failed requests resulted in h2load reporting higher requests/s and lower TTFB 99% percentile latency values. You do not want to be using PHP-FPM Unix Sockets under high concurrent user loads when almost 2/5 requests fail!
- h2load requests/s numbers along won’t show the complete picture until you factor into request latency. In this case I added to the chart the 99% percentile value for Time To First Byte (TTFB). Meaning 99% of the time, requests had such latency response times. Here Webinoly had a decent requests/s but much higher TTFB due to one of the 9x test runs stalling and thus resulting in minimum requests/s dropping to just 265.33. EasyEngine also had one of the 9x test runs stall and thus dropped requests/s to 240.3.
- Only Centmin Mod no-pgo/pgo and VestaCP managed to complete 100% of the requests but VestaCP’s TTFB 99% percentile value was double that of Centmin Mod’s PHP-FPM performance.
The post Centmin Mod vs Easyengine vs Webinoly vs VestaCP vs OneInStack LEMP Stack Benchmarks appeared first on Server Manager Guide.
]]>The post How To Install WordPress On Centmin Mod LEMP Stack Guide appeared first on Server Manager Guide.
]]>The following guide illustrates how to use the latest Centmin Mod 123.09beta01’s centmin.sh menu option 22 WordPress installer which will install Nginx HTTP/2 HTTPS site with TLS 1.3 support via integrated free Letsencrypt SSL certificates in dual RSA 2048bit + ECDSA 256bit SSL certificate mode and automatically install WordPress and configure the site optimally for both performance and security.
Step 1.
Ensure you’re using Centmin Mod 123.09beta01 or newer version with integrated free Letsencrypt SSL certificates via addons/acmetool.sh which uses underlying acme.sh client developed by Neil Pang and that you have enabled Letsencrypt SSL support via persistent configuration file /etc/centminmod/custom_config.inc variables below.
- The first variable LETSENCRYPT_DETECT=’y’ enables regular RSA 2048bit SSL certificates via Letsencrypt.
- While second variable DUALCERTS=’y’ enables dual RSA 2048bit + ECDSA 256bit SSL certificate mode with a second Letsencrypt SSL certificated being obtained that is ECDSA 256bit based. Dual SSL certificates allow Centmin Mod Nginx to serve better performance based ECDSA 256bit SSL certificates to web browser and clients that support such certificates while falling back to traditional standard RSA 2048bit SSL certificates for older web browser and clients that do not support ECDSA 256bit. In the context of usage with Cloudflare, that means Cloudflare’s connection to Centmin Mod Nginx origin server is optimal as Cloudflare can now communicate with Centmin Mod Nginx origin using faster performing ECDSA 256bit SSL certificates as well as communicate between Cloudflare and Centmin Mod Nginx origin using better performing TLS 1.3 protocol which reduced the connection by 1-RTT – round trip time compared to communicating over older TLS 1.0/1.1/1.2 protocol. That 1-RTT savings can result in as much as 300+ milliseconds faster connection over slow mobile internet connections.
- When these variables are enabled, centmin.sh menu options 2, 22 and nv command line options to create Nginx vhost sites enable an additional menu options to support obtaining Letsencrypt free SSL certificates. If these variables are not enabled, centmin.sh menu options 2, 22 and nv command line will only provide self-signed SSL certificate for testing purpose.
# enable letsencrypt ssl certificate + dual RSA+ECDSA ssl certs https://centminmod.com/acmetool/
echo "LETSENCRYPT_DETECT='y'" >> /etc/centminmod/custom_config.inc
echo "DUALCERTS='y'" >> /etc/centminmod/custom_config.inc
DUALCERTS=’y’ mode was enabled for this WordPress site via the advanced customisation Centmin Mod installation guide already.
Step 2
Update your intended WordPress site’s domain name DNS A records to point to server’s IP address. You’d need to do that for both non-www and www version of your domain name or intended subdomain as by default addons/acmetool.sh and Letsencrypt SSL certificate integration uses webroot domain validation to verify your domain name before Letsencrypt issues your free SSL certificates. Screenshot is from Cloudflare DNS tab dashboard.
Cloudflare and Letsencrypt webroot authentication
At this stage though, you need to set Cloudflare DNS record as grey cloud not orange cloud proxy as Letsencrypt issuance needs to be able to communicate with your Centmin Mod Nginx origin server for webroot authentication and validation of your domain. If you select Centmin Mod Nginx default HTTPS, then you won’t have a non-HTTPS Nginx vhost origin for Cloudflare Flexible SSL to speak with at this stage, so Letsencrypt webroot authentication will fail unless instead of selecting below option 4 for Letsencrypt Nginx default HTTPS, you select option 3 for Nginx HTTP + HTTPS vhost so both non-HTTPS port 80 and HTTPS port 443 can be communicated to for Letsencrypt webroot authentication. Once Nginx vhost is created you can change your DNS record to orange proxy cloud and change to HTTPS default and Cloudflare Full SSL mode.

Step 3
Run centmin.sh menu option 22 to start the Nginx vhost site generator which will automatically install and configure WordPress as well. A series of question prompts will ask you about how you would like to the Nginx vhost site and WordPress setup to be configured. The WordPress auto installer utilises WP-CLI command line too to do the heavy lifting for the actual WordPress installation.
--------------------------------------------------------
Centmin Mod Menu 123.09beta01 centminmod.com
--------------------------------------------------------
1). Centmin Install
2). Add Nginx vhost domain
3). NSD setup domain name DNS
4). Nginx Upgrade / Downgrade
5). PHP Upgrade / Downgrade
6). XCache Re-install
7). APC Cache Re-install
8). XCache Install
9). APC Cache Install
10). Memcached Server Re-install
11). MariaDB MySQL Upgrade & Management
12). Zend OpCache Install/Re-install
13). Install/Reinstall Redis PHP Extension
14). SELinux disable
15). Install/Reinstall ImagicK PHP Extension
16). Change SSHD Port Number
17). Multi-thread compression: zstd,pigz,pbzip2,lbzip2
18). Suhosin PHP Extension install
19). Install FFMPEG and FFMPEG PHP Extension
20). NSD Install/Re-Install
21). Update - Nginx + PHP-FPM + Siege
22). Add WordPress Nginx vhost + Cache Plugin
23). Update Centmin Mod Code Base
24). Exit
--------------------------------------------------------
Enter option [ 1 - 24 ] 22
--------------------------------------------------------
The installation of WP-CLI follows if not detected as installed yet. On subsequent centmin.sh menu option 22 runs, WP-CLI will always be updated before proceeding further to ensure WP-CLI is always the latest version used for every WordPress installation.
------------------------------------------------------------
Installing wpcli.sh
------------------------------------------------------------
installing...
-------------------------------------------------------------
wp-cli info
OS: Linux 3.10.0-957.21.3.el7.x86_64 #1 SMP Tue Jun 18 16:35:19 UTC 2019 x86_64
Shell: /bin/bash
PHP binary: /usr/local/bin/php
PHP version: 7.3.7
php.ini used: /usr/local/lib/php.ini
WP-CLI root dir: phar://wp-cli.phar/vendor/wp-cli/wp-cli
WP-CLI vendor dir: phar://wp-cli.phar/vendor
WP_CLI phar path: /usr/local/src/centminmod/addons
WP-CLI packages dir: /root/.wp-cli/packages/
WP-CLI global config:
WP-CLI project config:
WP-CLI version: 2.2.0
-------------------------------------------------------------

-------------------------------------------------------------
wp-cli install completed
Read http://wp-cli.org/ for full usage info
Followed by some information notices and prompt for your desired domain name (without www prefix) and whether you want to install self-signed SSL certificates and/or Letsencrypt SSL certificates on Nginx vhost site. Here I choose option 4 for live trusted Letsencrypt SSL certificates with HTTPS default (the non-https to https redirect is automatically configured for you).
-------------------------------------------------------------
Setup full Nginx vhost + WordPress + WP Plugins
-------------------------------------------------------------

---------------------------------------------------------------
Important Information
---------------------------------------------------------------

You are about to create an WordPress based Nginx vhost site with
or without HTTPS/SSL support.
Also read the continually updated Getting Started Guide
at centminmod.com/getstarted.html if you haven't already
---------------------------------------------------------------
403 Permission denied message handling
if after vhost site setup you encounter 403 permission denied errors,
check https://community.centminmod.com/threads/11215/ to see if your
site needs tools/autoprotect.sh tweaking & whitelisting
---------------------------------------------------------------

Do you want to continue with Nginx vhost site creation ? [y/n] y

Enter vhost domain name you want to add (without www. prefix): servermanager.guide

Create a self-signed SSL certificate Nginx vhost? [y/n]: n
Get Letsencrypt SSL certificate Nginx vhost? [y/n]: y

You have 4 options:
1. issue staging test cert with HTTP + HTTPS (untrusted)
2. issue staging test cert with HTTPS default (untrusted)
3. issue live cert with HTTP + HTTPS (trusted)
4. issue live cert with HTTPS default (trusted)
Enter option number 1-4: 4
There’s other question prompts for optional extras like switching from Gutenberg editor to WordPress Classic editor, installing Autoptimize Gzip companion plugin which works with Autoptimize WordPress plugin to automatically pre-compress optimised CSS/JS assets, and whether to allow WordPress installer to automatically generate the desired WordPress admin username/password and whether or now WordPress login page gets HTTP password protected. And lastly your desired WordPress admin user’s email address.
Theme Setup:
Install CyberChimps Responsive Theme (cyberchimps.com/responsive-theme/) [y/n]: n

Wordpress Setup:

Not a fan of Gutenberg Editor ? You can switch to Classic Editor
If you run into Gutenberg Editor issues, you can later switch to
the Classic Editor https://wordpress.org/plugins/classic-editor/
Install Classic Editor WordPress Plugin ? [y/n]: y

Autoptimize WP Plugin is installed by default. Do you want to install
companion Autoptimize Gzip Plugin to precompresses js/css optimized files
details at https://community.centminmod.com/threads/15314/
Install Autoptimize Gzip Companion WordPress Plugin ? [y/n]: y

Set custom WP Admin Display Name ? [y/n]: y
Enter Custom WP Admin Display Name: George
Install WordPress in subdirectory /blog ? [y/n]: n
Disable Auto Generated WP Admin Username / Password ? [y/n]: n
Disable wp-login.php password protection ? (less security) [y/n]: n
Enter email address for Admin User for WordPress Installation: MYEMAIL_ADDRESS
Next up is WordPress installer provides users with a choice full page WordPress caching options for better performance. The first 3 are available out of the box as of writing while the 4th option for PHP-FPM fastcgi_cache based full page caching is currently available via a switch for private development and testing. For this blog and testing purposes the choice for option 4 for PHP-FPM fastcgi_cache based full page caching was made. For 99% of usage cases for best performance with least issues and problems, choosing KeyCDN Cache Enabler for static HTML full page caching is the recommended option as it’s a faster and less problematic version of WordPress Super Cache plugin.
Default is to install KeyCDN WP Cache Enabler Plugin as it is more
stable and reliable than WP Super Cache and Redis Cache.
Redis cache may have issues with caching due to long 6hr cache TTL
Fastcgi_cache (PHP-FPM) will have best performance
You can select which caching method to use below:

--------------------------------------------------------
Wordpress Caching
--------------------------------------------------------
1) KeyCDN Cache Enabler
2) Redis Nginx Level Caching
3) WordPress Super Cache
4) Fastcgi_cache (PHP-FPM)
--------------------------------------------------------
Enter option [ 1 - 4 ] 4

you selected option 4 (Fastcgi_cache PHP-FPM) [wpscache=fastcgicache]
Next up is creating the Pure-ftpd virtual FTP username/password and if you opted for, the HTTP password protection for WordPress login page.
Create FTP username for vhost domain (enter username): FTPUSERNAME
Do you want to auto generate FTP password (recommended) [y/n]: y

FTP username you entered: FTPUSERNAME
FTP password auto generated: FTPPASSWORD

Password:
Enter it again:
/usr/local/nginx/conf/htpasswd.sh create /home/nginx/domains/servermanager.guide/htpasswd_wplogin HTTP_USERNAME HTTP_PASSWORD

/home/nginx/domains/servermanager.guide/htpasswd_wplogin contents:
HTTP_USERNAME:$ap******S3gN0bY2.NPw******
Then PHP-FPM fastcgi_cache related Nginx include and configuration files are created and populated. Pay particular attention to the path to /usr/local/nginx/conf/wpfastcgi_cache_map_debug.conf as it allows you to add your ISP IP address to it to reveal and expose some additional hidden Nginx response headers for PHP-FPM fastcgi_cache diagnostics.
touch /usr/local/nginx/conf/wpfastcgi_cache_map_debug.conf
touch /usr/local/nginx/conf/wpfastcgi_cache_map_include_mobile.conf
touch /usr/local/nginx/conf/wpfastcgi_cache_map_include_nocachecookie.conf
touch /usr/local/nginx/conf/wpfastcgi_cache_map_include_nocacheuri.conf

include file /usr/local/nginx/conf/wpfastcgi_cache_path_includes.conf add to nginx.conf

include file /usr/local/nginx/conf/wpfastcgi_cache_map.conf add to nginx.conf

include file /usr/local/nginx/conf/wpcacheenabler_map.conf add to nginx.conf
Contents of where I added my ISP IP address into the include file at /usr/local/nginx/conf/wpfastcgi_cache_map_debug.conf and set it’s to value of 1 which corresponds to Nginx mapped variable called $fastcgi_debug.
cat /usr/local/nginx/conf/wpfastcgi_cache_map_debug.conf
YOUR_ISP_IP_ADDR 1;
The include file is part of another include file at /usr/local/nginx/conf/wpfastcgi_cache_map.conf which maps the visitor’s IP address to $fastcgi_debug variable which decides whether a listed ISP IP address is allowed to see the additional hidden Nginx PHP-FPM fastcgi_cache response headers.
map $remote_addr $fastcgi_debug {
default 0;
include /usr/local/nginx/conf/wpfastcgi_cache_map_debug.conf;
# YOUR_ISP_IP_ADDR 1;
}
With your ISP IP added to enable $fastcgi_debug mapped variable, additional Nginx response headers are available which include, PHP-FPM fastcgi_cache cache status – HIT or BYPASS, as well as x-fpmcache-skip header to give the reason why cache was bypassed and other x-fpmcache headers and request processing time headers.
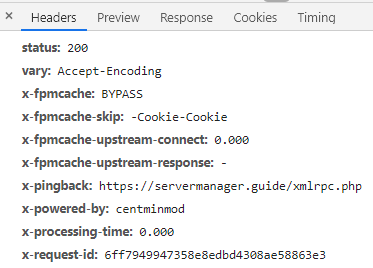
Next part is related to SSL certificate setup and configuration. First is that Centmin Mod Nginx generation routines for HTTPS will also setup Cloudflare Authenticated Origin Pulls TLS client certificates on your Nginx HTTPS site but disable them by default – but the configuration is ready to be enabled just by editing your Nginx vhost configuration file at yourdomain.com.ssl.conf by uncommenting a few lines. This is the part which downloads Cloudflare Authenticated Origin Pulls TLS client certificates.
---------------------------------------------------------------
SSL Vhost Setup...
---------------------------------------------------------------

--2019-07-12 22:20:01-- https://support.cloudflare.com/hc/en-us/article_attachments/201243967/origin-pull-ca.pem
Resolving support.cloudflare.com... 104.16.55.111, 104.16.51.111, 104.16.52.111, ...
Connecting to support.cloudflare.com|104.16.55.111|:443... connected.
HTTP request sent, awaiting response... 200 OK
Length: 2151 (2.1K) [application/x-x509-ca-cert]
Saving to: ‘/usr/local/nginx/conf/ssl/cloudflare/servermanager.guide/origin.crt’

0K .. 100% 26.8M=0s

2019-07-12 22:20:01 (26.8 MB/s) - ‘/usr/local/nginx/conf/ssl/cloudflare/servermanager.guide/origin.crt’ saved [2151/2151]
The Nginx vhost configuration file /usr/local/nginx/conf/conf.d/servermanager.guide.ssl.conf has a commented out (disabled) directive for Cloudflare Authenticated Origin Pulls TLS client certificates ready to be enabled if you choose to enable such feature.
# cloudflare authenticated origin pull cert community.centminmod.com/threads/13847/
#ssl_client_certificate /usr/local/nginx/conf/ssl/cloudflare/servermanager.guide/origin.crt;
#ssl_verify_client on;
To enable, uncomment the 2 directive lines by removing the hash # and then restart Nginx service.
# cloudflare authenticated origin pull cert community.centminmod.com/threads/13847/
ssl_client_certificate /usr/local/nginx/conf/ssl/cloudflare/servermanager.guide/origin.crt;
ssl_verify_client on;
Then in your Cloudflare Crypto dashboard tab, enable Cloudflare Authenticated Origin Pulls TLS client certificates.
Next part is regardless of whether you choose to enable self-signed SSL certificates, the Centmin Mod HTTPS routine will generate them automatically as they are also used as fallback in case your Letsencrypt SSL certificate domain verification and issuance fail for whatever reason.
Generating self signed SSL certificate...
CSR file can also be used to be submitted for paid SSL certificates
If using for paid SSL certificates be sure to keep both private key and CSR safe
creating CSR File: servermanager.guide.csr
creating private key: servermanager.guide.key
creating self-signed SSL certificate: servermanager.guide.crt
Next is actual WordPress installation and PHP-FPM fastcgi_cache setup process.
------------------------------------------------------------
Setup Fastcgi_cache PHP-FPM for servermanager.guide
------------------------------------------------------------

Using full static page caching may cause problems for mobile & tablet device
visitors depending on your WP themes used so you may want to exclude those

Do you want to exclude mobile/tablet devices from Cache Enabler caching ? [y/n]: y
Downloading WordPress 5.2.2 (en_US)...
md5 hash verified: aea5bb5e4fd51034f67c85e6d8bc6bbf
Success: WordPress downloaded.
Success: Generated 'wp-config.php' file.
13 23 * * * /usr/local/src/centminmod/tools/autoprotect.sh >/dev/null 2>&1
0 */4 * * * /usr/bin/cminfo_updater 2>/dev/null
23 */12 * * * /usr/local/src/centminmod/tools/csfcf.sh auto >/dev/null 2>&1
7 0 * * * "/root/.acme.sh"/acme.sh --cron --home "/root/.acme.sh" > /dev/null
#*/15 * * * * sleep 248s ; wget -4 -O - -q -t 1 http://servermanager.guide/wp-cron.php?doing_wp_cron > /dev/null 2>&1
Success: WordPress installed successfully.
Success: Updated user 2**2***.
Success: Rewrite structure set.
Success: Rewrite rules flushed.
------------------------------------------------------------
Then some additional WordPress plugins are automatically installed and activated via WP-CLI command line tool. These include
- Autoptimize WordPress Plugin
- Autoptimize Gzip companion WordPress Plugin
- Classic Editor WordPress Plugin
- Disable-XML-RPC WordPress Plugin
- Nginx Helper WordPress Plugin for managing PHP-FPM fastcgi_cache full page caching
- Sucuri WordPress Plugin
------------------------------------------------------------
Installing Nginx Helper (2.0.3)
Downloading installation package from https://downloads.wordpress.org/plugin/nginx-helper.2.0.3.zip...
Unpacking the package...
Installing the plugin...
Plugin installed successfully.
Activating 'nginx-helper'...
Plugin 'nginx-helper' activated.
Success: Installed 1 of 1 plugins.
Success: Updated 'rt_wp_nginx_helper_options' option.
{"enable_purge":1,"cache_method":"enable_fastcgi","enable_map":0,"enable_log":0,"enable_stamp":1,"purge_homepage_on_edit":1,"purge_homepage_on_del":1,"purge_archive_on_edit":1,"purge_archive_on_del":1,"purge_archive_on_new_comment":1,"purge_archive_on_deleted_comment":1,"purge_page_on_mod":1,"purge_page_on_new_comment":1,"purge_page_on_deleted_comment":1,"purge_method":"unlink_files","purge_url":"","redis_hostname":"127.0.0.1","redis_port":"6379","redis_prefix":"nginx-cache:"}
------------------------------------------------------------
Installing Autoptimize (2.5.1)
Downloading installation package from https://downloads.wordpress.org/plugin/autoptimize.2.5.1.zip...
Unpacking the package...
Installing the plugin...
Plugin installed successfully.
Activating 'autoptimize'...
Plugin 'autoptimize' activated.
Success: Installed 1 of 1 plugins.
option_name option_value
autoptimize_service_availablity a:2:{s:12:"extra_imgopt";a:3:{s:6:"status";s:2:"up";s:5:"hosts";a:1:{i:1;s:26:"https://cdn.shortpixel.ai/";}s:16:"launch-threshold";s:4:"4096";}s:7:"critcss";a:2:{s:6:"status";s:2:"up";s:5:"hosts";a:1:{i:1;s:24:"https://criticalcss.com/";}}}
autoptimize_version 2.5.1
configure autoptimize-gzip https://community.centminmod.com/threads/15314/
2019-07-12 22:20:40 URL:https://raw.githubusercontent.com/centminmod/autoptimize-gzip/master/autoptimize-gzip.php [573/573] -> "/home/nginx/domains/servermanager.guide/public/wp-content/plugins/autoptimize-gzip/autoptimize-gzip.php" [1]
2019-07-12 22:20:40 URL:https://raw.githubusercontent.com/centminmod/autoptimize-gzip/master/index.html [192/192] -> "/home/nginx/domains/servermanager.guide/public/wp-content/plugins/autoptimize-gzip/index.html" [1]
2019-07-12 22:20:41 URL:https://github.com/centminmod/autoptimize-gzip/blob/master/readme.md [84801] -> "/home/nginx/domains/servermanager.guide/public/wp-content/plugins/autoptimize-gzip/readme.md" [1]
2019-07-12 22:20:41 URL:https://raw.githubusercontent.com/centminmod/autoptimize-gzip/master/LICENSE [18026/18026] -> "/home/nginx/domains/servermanager.guide/public/wp-content/plugins/autoptimize-gzip/LICENSE" [1]
Plugin 'autoptimize-gzip' activated.
Success: Activated 1 of 1 plugins.
Plugin autoptimize-gzip details:
Name: Autoptimize Gzip
Status: Active
Version: 0.1
Author: George Liu
Description: Hook into Frank Goossens (futtta) Autoptimize API to pre-compress CSS/JS files
------------------------------------------------------------
------------------------------------------------------------
Installing Classic Editor (1.5)
Downloading installation package from https://downloads.wordpress.org/plugin/classic-editor.1.5.zip...
Unpacking the package...
Installing the plugin...
Plugin installed successfully.
Activating 'classic-editor'...
Plugin 'classic-editor' activated.
Success: Installed 1 of 1 plugins.
------------------------------------------------------------
------------------------------------------------------------
Installing Sucuri Security – Auditing, Malware Scanner and Security Hardening (1.8.21)
Downloading installation package from https://downloads.wordpress.org/plugin/sucuri-scanner.1.8.21.zip...
Unpacking the package...
Installing the plugin...
Plugin installed successfully.
Activating 'sucuri-scanner'...
Plugin 'sucuri-scanner' activated.
Success: Installed 1 of 1 plugins.
------------------------------------------------------------
Installing Disable XML-RPC (1.0.1)
Downloading installation package from https://downloads.wordpress.org/plugin/disable-xml-rpc.1.0.1.zip...
Unpacking the package...
Installing the plugin...
Plugin installed successfully.
Activating 'disable-xml-rpc'...
Plugin 'disable-xml-rpc' activated.
Success: Installed 1 of 1 plugins.
Uninstalled and deleted 'hello' plugin.
Success: Uninstalled 1 of 1 plugins.
Success: Plugin already updated.
7 installed plugins:
I akismet 4.1.2
A autoptimize 2.5.1
A autoptimize-gzip 0.1
A classic-editor 1.5
A disable-xml-rpc 1.0.1
A nginx-helper 2.0.3
A sucuri-scanner 1.8.21
Legend: I = Inactive, A = Active
------------------------------------------------------------
Then the creation of WordPress Nginx site uninstaller and WordPress automatic update cron job scheduler which auto updates WordPress plugins via WP-CLI command line too every 8 hrs. And also creation of autoprotect.sh include file and cronjob schedule which basically checks entire Centmin Mod LEMP stack server’s Nginx vhost site’s public web accessible directories for .htaccess files with DENY ALL directives that exist. Then grabbing their directory path to .htaccess file and auto generating an Nginx equivalent location match and deny all setup to prevent accidental exposure of directories which the web author intended to be private under Apache .htaccess. But Nginx doesn’t support .htaccess so automatic Nginx deny rules are generated to protect your Nginx site.
------------------------------------------------------------ Created uninstall script /root/tools/wp_uninstall_servermanager.guide.sh ------------------------------------------------------------ ------------------------------------------------------------ Created wp_updater_servermanager.guide.sh script /root/tools/wp_updater_servermanager.guide.sh ------------------------------------------------------------ 173 17 final 173 final 17 13 23 * * * /usr/local/src/centminmod/tools/autoprotect.sh >/dev/null 2>&1 0 */4 * * * /usr/bin/cminfo_updater 2>/dev/null 23 */12 * * * /usr/local/src/centminmod/tools/csfcf.sh auto >/dev/null 2>&1 7 0 * * * "/root/.acme.sh"/acme.sh --cron --home "/root/.acme.sh" > /dev/null #*/15 * * * * sleep 248s ; wget -4 -O - -q -t 1 http://servermanager.guide/wp-cron.php?doing_wp_cron > /dev/null 2>&1 0 */8 * * * sleep 173s ;/root/tools/wp_updater_servermanager.guide.sh >/dev/null 2>&1 ------------------------------------------------------------- generated nginx include file [initial]: /usr/local/nginx/conf/autoprotect/demodomain.com/autoprotect-demodomain.com.conf generated nginx include file [initial]: /usr/local/nginx/conf/autoprotect/servermanager.guide/autoprotect-servermanager.guide.conf autoprotect.sh run completed...
Now comes the Letsencrypt SSL certificate issuance stage. You’ll need to confirm you want to proceed with this during the beta testing
------------------------------------------------------------- ok: /usr/local/src/centminmod/addons/acmetool.sh /usr/local/src/centminmod/addons/acmetool.sh issue servermanager.guide wplived ------------------------------------------------- acmetool.sh is in beta testing phase please read & provide bug reports & feedback for this tool via the forums https://centminmod.com/acmetool ------------------------------------------------- continue [y/n] ? y
Then Centmin Mod will always automatically update the underlying acme.sh client to latest version before proceeding.
----------------------------------------------------- updating acme.sh client... ----------------------------------------------------- Cloning into 'acme.sh'... [Fri Jul 12 22:28:11 UTC 2019] It is recommended to install socat first. [Fri Jul 12 22:28:11 UTC 2019] We use socat for standalone server if you use standalone mode. [Fri Jul 12 22:28:11 UTC 2019] If you don't use standalone mode, just ignore this warning. [Fri Jul 12 22:28:11 UTC 2019] Installing to /root/.acme.sh [Fri Jul 12 22:28:11 UTC 2019] Installed to /root/.acme.sh/acme.sh [Fri Jul 12 22:28:12 UTC 2019] Installing alias to '/root/.bashrc' [Fri Jul 12 22:28:12 UTC 2019] OK, Close and reopen your terminal to start using acme.sh [Fri Jul 12 22:28:12 UTC 2019] Installing alias to '/root/.cshrc' [Fri Jul 12 22:28:12 UTC 2019] Installing alias to '/root/.tcshrc' [Fri Jul 12 22:28:12 UTC 2019] Installing cron job 7 0 * * * "/root/.acme.sh"/acme.sh --cron --home "/root/.acme.sh" > /dev/null [Fri Jul 12 22:28:12 UTC 2019] Good, bash is found, so change the shebang to use bash as preferred. [Fri Jul 12 22:28:12 UTC 2019] OK https://github.com/Neilpang/acme.sh v2.8.2 ----------------------------------------------------- acme.sh updated -----------------------------------------------------
Then Letsencrypt SSL issuance and domain validation via webroot authentication begins. As dual RSA 2048bit + ECDSA 256bit SSL certificate mode was enabled, you will see 2 sets of Letsencrypt SSL issuance and domain validation occur – one for RSA 2048bit SSL certificate issuance and domain validation and a second for ECDSA 256bi SSL certificate issuance and domain validation.
First RSA 2048bit SSL certificate issuance and domain validation
----------------------------------------------------------- issue & install letsencrypt ssl certificate for servermanager.guide ----------------------------------------------------------- testcert value = wplived wp routine detected use reissue instead via --force /root/.acme.sh/acme.sh --force --issue -d servermanager.guide -d www.servermanager.guide --days 60 -w /home/nginx/domains/servermanager.guide/public -k 2048 --useragent centminmod-centos7-acmesh-webroot --log /root/centminlogs/acmetool.sh-debug-log-120719-222049.log --log-level 2 [Fri Jul 12 22:28:13 UTC 2019] Creating domain key [Fri Jul 12 22:28:13 UTC 2019] The domain key is here: /root/.acme.sh/servermanager.guide/servermanager.guide.key [Fri Jul 12 22:28:13 UTC 2019] Multi domain='DNS:servermanager.guide,DNS:www.servermanager.guide' [Fri Jul 12 22:28:13 UTC 2019] Getting domain auth token for each domain [Fri Jul 12 22:28:14 UTC 2019] Getting webroot for domain='servermanager.guide' [Fri Jul 12 22:28:14 UTC 2019] Getting webroot for domain='www.servermanager.guide' [Fri Jul 12 22:28:14 UTC 2019] Verifying: servermanager.guide [Fri Jul 12 22:28:17 UTC 2019] Success [Fri Jul 12 22:28:17 UTC 2019] Verifying: www.servermanager.guide [Fri Jul 12 22:28:19 UTC 2019] Success [Fri Jul 12 22:28:19 UTC 2019] Verify finished, start to sign. [Fri Jul 12 22:28:19 UTC 2019] Lets finalize the order, Le_OrderFinalize: https://acme-v02.api.letsencrypt.org/acme/finalize/61131839/708977128 [Fri Jul 12 22:28:20 UTC 2019] Download cert, Le_LinkCert: https://acme-v02.api.letsencrypt.org/acme/cert/03ef148cda5dec70396114e521233f6d996f [Fri Jul 12 22:28:20 UTC 2019] Cert success. -----BEGIN CERTIFICATE----- MIds= -----END CERTIFICATE----- [Fri Jul 12 22:28:20 UTC 2019] Your cert is in /root/.acme.sh/servermanager.guide/servermanager.guide.cer [Fri Jul 12 22:28:20 UTC 2019] Your cert key is in /root/.acme.sh/servermanager.guide/servermanager.guide.key [Fri Jul 12 22:28:20 UTC 2019] The intermediate CA cert is in /root/.acme.sh/servermanager.guide/ca.cer [Fri Jul 12 22:28:20 UTC 2019] And the full chain certs is there: /root/.acme.sh/servermanager.guide/fullchain.cer
Then second for ECDSA 256bit SSL issuance and domain validation
get 2nd SSL cert issued for dual ssl cert config /root/.acme.sh/acme.sh --force --issue -d servermanager.guide -d www.servermanager.guide --days 60 -w /home/nginx/domains/servermanager.guide/public -k ec-256 --useragent centminmod-centos7-acmesh-webroot --log /root/centminlogs/acmetool.sh-debug-log-120719-222049.log --log-level 2 [Fri Jul 12 22:28:21 UTC 2019] Creating domain key [Fri Jul 12 22:28:21 UTC 2019] The domain key is here: /root/.acme.sh/servermanager.guide_ecc/servermanager.guide.key [Fri Jul 12 22:28:21 UTC 2019] Multi domain='DNS:servermanager.guide,DNS:www.servermanager.guide' [Fri Jul 12 22:28:21 UTC 2019] Getting domain auth token for each domain [Fri Jul 12 22:28:22 UTC 2019] Getting webroot for domain='servermanager.guide' [Fri Jul 12 22:28:22 UTC 2019] Getting webroot for domain='www.servermanager.guide' [Fri Jul 12 22:28:22 UTC 2019] servermanager.guide is already verified, skip http-01. [Fri Jul 12 22:28:22 UTC 2019] www.servermanager.guide is already verified, skip http-01. [Fri Jul 12 22:28:22 UTC 2019] Verify finished, start to sign. [Fri Jul 12 22:28:22 UTC 2019] Lets finalize the order, Le_OrderFinalize: https://acme-v02.api.letsencrypt.org/acme/finalize/61131839/708977583 [Fri Jul 12 22:28:23 UTC 2019] Download cert, Le_LinkCert: https://acme-v02.api.letsencrypt.org/acme/cert/03d967dbf195e3017d41159bd7188fa9443d [Fri Jul 12 22:28:23 UTC 2019] Cert success. -----BEGIN CERTIFICATE----- Mvy7s= -----END CERTIFICATE----- [Fri Jul 12 22:28:23 UTC 2019] Your cert is in /root/.acme.sh/servermanager.guide_ecc/servermanager.guide.cer [Fri Jul 12 22:28:23 UTC 2019] Your cert key is in /root/.acme.sh/servermanager.guide_ecc/servermanager.guide.key [Fri Jul 12 22:28:24 UTC 2019] The intermediate CA cert is in /root/.acme.sh/servermanager.guide_ecc/ca.cer [Fri Jul 12 22:28:24 UTC 2019] And the full chain certs is there: /root/.acme.sh/servermanager.guide_ecc/fullchain.cer success: 2nd SSL cert issued for dual ssl cert config
Then once Letsencrypt SSL certificates are issued, then need to be installed by acme.sh client to locations which Nginx will look for them.
Letsencrypt RSA 2048bit SSL certificate installation
----------------------------------------------------------- install cert ----------------------------------------------------------- /root/.acme.sh/acme.sh --installcert -d servermanager.guide -d www.servermanager.guide --certpath /usr/local/nginx/conf/ssl/servermanager.guide/servermanager.guide-acme.cer --keypath /usr/local/nginx/conf/ssl/servermanager.guide/servermanager.guide-acme.key --capath /usr/local/nginx/conf/ssl/servermanager.guide/servermanager.guide-acme.cer --reloadCmd /usr/bin/ngxreload --fullchainpath /usr/local/nginx/conf/ssl/servermanager.guide/servermanager.guide-fullchain-acme.key [Fri Jul 12 22:28:24 UTC 2019] Installing cert to:/usr/local/nginx/conf/ssl/servermanager.guide/servermanager.guide-acme.cer [Fri Jul 12 22:28:24 UTC 2019] Installing CA to:/usr/local/nginx/conf/ssl/servermanager.guide/servermanager.guide-acme.cer [Fri Jul 12 22:28:24 UTC 2019] Installing key to:/usr/local/nginx/conf/ssl/servermanager.guide/servermanager.guide-acme.key [Fri Jul 12 22:28:24 UTC 2019] Installing full chain to:/usr/local/nginx/conf/ssl/servermanager.guide/servermanager.guide-fullchain-acme.key [Fri Jul 12 22:28:24 UTC 2019] Run reload cmd: /usr/bin/ngxreload Reloading nginx configuration (via systemctl): [ OK ] [Fri Jul 12 22:28:24 UTC 2019] Reload success
Letsencrypt ECDSA 256bit SSL certificate installation
install 2nd SSL cert issued for dual ssl cert config /root/.acme.sh/acme.sh --installcert -d servermanager.guide -d www.servermanager.guide --certpath /usr/local/nginx/conf/ssl/servermanager.guide/servermanager.guide-acme-ecc.cer --keypath /usr/local/nginx/conf/ssl/servermanager.guide/servermanager.guide-acme-ecc.key --capath /usr/local/nginx/conf/ssl/servermanager.guide/servermanager.guide-acme-ecc.cer --reloadCmd /usr/bin/ngxreload --fullchainpath /usr/local/nginx/conf/ssl/servermanager.guide/servermanager.guide-fullchain-acme-ecc.key --ecc [Fri Jul 12 22:28:24 UTC 2019] Installing cert to:/usr/local/nginx/conf/ssl/servermanager.guide/servermanager.guide-acme-ecc.cer [Fri Jul 12 22:28:24 UTC 2019] Installing CA to:/usr/local/nginx/conf/ssl/servermanager.guide/servermanager.guide-acme-ecc.cer [Fri Jul 12 22:28:24 UTC 2019] Installing key to:/usr/local/nginx/conf/ssl/servermanager.guide/servermanager.guide-acme-ecc.key [Fri Jul 12 22:28:24 UTC 2019] Installing full chain to:/usr/local/nginx/conf/ssl/servermanager.guide/servermanager.guide-fullchain-acme-ecc.key [Fri Jul 12 22:28:24 UTC 2019] Run reload cmd: /usr/bin/ngxreload Reloading nginx configuration (via systemctl): [ OK ] [Fri Jul 12 22:28:24 UTC 2019] Reload success setup ssl_trusted_certificate dual cert version: /usr/local/nginx/conf/ssl/servermanager.guide/servermanager.guide-dualcert-rsa-ecc.cer letsencrypt ssl certificate setup completed ssl certs located at: /usr/local/nginx/conf/ssl/servermanager.guide
Then the Pure-ftpd virtual FTP user details are displayed
------------------------------------------------------------- FTP hostname : SERVER_IP FTP port : 21 FTP mode : FTP (explicit SSL) FTP Passive (PASV) : ensure is checked/enabled FTP username created for servermanager.guide : FTPUSERNAME FTP password created for servermanager.guide : FTPPASSWORD -------------------------------------------------------------
Then Nginx vhost details are displayed for Nginx vhost configuration file at yourdomain.com.ssl.cof
vhost for servermanager.guide created successfully vhost ssl for servermanager.guide created successfully domain: https://servermanager.guide vhost ssl conf file for servermanager.guide created: /usr/local/nginx/conf/conf.d/servermanager.guide.ssl.conf /usr/local/nginx/conf/ssl_include.conf created Self-signed SSL Certificate: /usr/local/nginx/conf/ssl/servermanager.guide/servermanager.guide.crt SSL Private Key: /usr/local/nginx/conf/ssl/servermanager.guide/servermanager.guide.key SSL CSR File: /usr/local/nginx/conf/ssl/servermanager.guide/servermanager.guide.csr Backup SSL Private Key: /usr/local/nginx/conf/ssl/servermanager.guide/servermanager.guide-backup.key Backup SSL CSR File: /usr/local/nginx/conf/ssl/servermanager.guide/servermanager.guide-backup.csr upload files to /home/nginx/domains/servermanager.guide/public vhost log files directory is /home/nginx/domains/servermanager.guide/log
Location of WordPress uninstaller and auto WordPress updater cronjob are displayed
------------------------------------------------------------ SSH commands to uninstall created WordPress install and Nginx vhost: /root/tools/wp_uninstall_servermanager.guide.sh ------------------------------------------------------------ ------------------------------------------------------------ Wordpress Auto Updater created at: /root/tools/wp_updater_servermanager.guide.sh cronjob set for every 8 hours update (3x times per day) ------------------------------------------------------------
Then WordPress configuration and database info and WordPress admin user info is displayed
WordPress domain: servermanager.guide Wordpress DB Name: **********_***** Wordpress DB User: ***************** Wordpress DB Pass: ***************** Wordpress Admin User ID: 2**2*** Wordpress Admin User: *********** Wordpress Admin Pass: *********** Wordpress Admin Email: MYEMAIL_ADDRESS Wordpress Admin Display Name: George Wordpress wp-login.php password protection info: wp-login.php protection file /home/nginx/domains/servermanager.guide/htpasswd_wplogin wp-login.php protection Username: HTTP_USERNAME wp-login.php protection Password: HTTP_PASSWORD https://HTTP_USERNAME:[email protected]/wp-login.php Resetting wp-login.php protection: Step 1. remove protection file at /home/nginx/domains/servermanager.guide/htpasswd_wplogin rm -rf /home/nginx/domains/servermanager.guide/htpasswd_wplogin Step 2. run command: /usr/local/nginx/conf/htpasswd.sh create /home/nginx/domains/servermanager.guide/htpasswd_wplogin YOURUSERNAME YOURPASSWORD Step 3. restart Nginx + PHP-FPM services nprestart
Then Nginx vhost directory and site’s Nginx SSL directory contents are displayed
------------------------------------------------------------- Current vhost listing at: /usr/local/nginx/conf/conf.d/ Jul 12 19:12 1.1K demodomain.com.conf Jul 12 19:25 1.4K virtual.conf Jul 12 19:40 3.2K virtual.ssl.conf Jul 12 22:28 5.9K servermanager.guide.ssl.conf ------------------------------------------------------------- Current vhost ssl files listing at: /usr/local/nginx/conf/ssl/servermanager.guide Jul 12 22:20 1.7K servermanager.guide.key Jul 12 22:20 1.2K servermanager.guide.csr Jul 12 22:20 1.7K servermanager.guide.crt Jul 12 22:20 424 dhparam.pem Jul 12 22:28 375 acme-vhost-config.txt Jul 12 22:28 3.6K servermanager.guide-acme.cer Jul 12 22:28 1.7K servermanager.guide-acme.key Jul 12 22:28 3.6K servermanager.guide-fullchain-acme.key Jul 12 22:28 3.3K servermanager.guide-acme-ecc.cer Jul 12 22:28 302 servermanager.guide-acme-ecc.key Jul 12 22:28 3.3K servermanager.guide-fullchain-acme-ecc.key Jul 12 22:28 805 servermanager.guide.crt.key.conf Jul 12 22:28 6.8K servermanager.guide-dualcert-rsa-ecc.cer
Then setup steps to complete WordPress install are displayed
------------------------------------------------------------ To complete setup: 1. Enable Permalinks (DO NOT use links with .html extensions for performance reasons) i.e. /%post_id%/%postname%/ 2. Settings Menu > Nginx Helper set options and hit Save All Changes 3. Settings Menu > Autoptimize Main Tab set options and hit Save Changes 4. Settings Menu > Autoptimize Extra Tab set options and hit Save Changes ------------------------------------------------------------
Then the centmin.sh menu option 22 run entire output logged file is displayed – here you can inspect the log to get any of Nginx site and WordPress install and setup information.
------------------------------------------------------------- vhost for servermanager.guide wordpress setup successfully servermanager.guide setup info log saved at: /root/centminlogs/centminmod_123.09beta01.b203_120719-221749_wordpress_addvhost.log -------------------------------------------------------------
Finally, a wpinfo.sh script is created which when run, outputs all relevant WordPress install info WP-CLI version installed, including database name, database admin users, WordPress file and database versions, WordPress plugins installed, WordPress themes installed etc.
------------------------------------------------------------- wpinfo.sh script saved at: /usr/local/nginx/conf/wpincludes/servermanager.guide/wpinfo.sh -------------------------------------------------------------
Step 4
As Cloudflare is used in front of your Centmin Mod Nginx created WordPress site, you will need to ensure visitor’s real IP address is detected by Nginx instead of Cloudflare’s proxy IPs and to ensure Cloudflare’s IP addresses are whitelisted in Centmin Mod CSF Firewall. Centmin Mod 123.09beta01 and newer can do this via tools/csfcf.sh script. Manual steps are also outlined in Getting Started Guide step 5 – link directly to Nginx Cloudflare & Incapsula (reverse proxy HttpRealIpModule).
In your WordPress site’s Nginx vhost config file at /usr/local/nginx/conf/conf.d/servermanager.guide.ssl.conf find the commented out disabled include file, /usr/local/nginx/conf/cloudflare.conf for
# uncomment cloudflare.conf include if using cloudflare for # server and/or vhost site #include /usr/local/nginx/conf/cloudflare.conf;
remove the hash in front of the include line to uncomment and enable the include file
# uncomment cloudflare.conf include if using cloudflare for # server and/or vhost site include /usr/local/nginx/conf/cloudflare.conf;
Then manually run the tools/csfcf.sh script with auto flag once which will grab latest known Cloudflare IP addresses and whitelist them in CSF Firewall and also populate the include file at /usr/local/nginx/conf/cloudflare.conf with the Nginx settings to allow Nginx to see visitor’s real IP addresses instead of Cloudflare’s proxy IP addresses.
/usr/local/src/centminmod/tools/csfcf.sh auto
Then add to your server’s cronjob the following to run once per day via crontab -e command. You can use crontab -l to view current cronjobs and crontab -e command to invoke nano text editor see guide at HowTo: Add Jobs To cron Under Linux or UNIX?
23 */36 * * * /usr/local/src/centminmod/tools/csfcf.sh auto >/dev/null 2>&1
Example of the auto populated include file /usr/local/nginx/conf/cloudflare.conf contents below:
include /usr/local/nginx/conf/cloudflare_customips.conf; set_real_ip_from 173.245.48.0/20; set_real_ip_from 103.21.244.0/22; set_real_ip_from 103.22.200.0/22; set_real_ip_from 103.31.4.0/22; set_real_ip_from 141.101.64.0/18; set_real_ip_from 108.162.192.0/18; set_real_ip_from 190.93.240.0/20; set_real_ip_from 188.114.96.0/20; set_real_ip_from 197.234.240.0/22; set_real_ip_from 198.41.128.0/17; set_real_ip_from 162.158.0.0/15; set_real_ip_from 104.16.0.0/12; set_real_ip_from 172.64.0.0/13; set_real_ip_from 131.0.72.0/22; #set_real_ip_from 2400:cb00::/32; #set_real_ip_from 2606:4700::/32; #set_real_ip_from 2803:f800::/32; #set_real_ip_from 2405:b500::/32; #set_real_ip_from 2405:8100::/32; #set_real_ip_from 2a06:98c0::/29; #set_real_ip_from 2c0f:f248::/32; real_ip_header X-Forwarded-For;
Then restart Nginx server
service nginx restart
or via Centmin Mod command shortcut
ngxrestart
Cloudflare and Letsencrypt webroot authentication
Finally at this stage, you can opt to switch and set Cloudflare DNS record from grey cloud to orange cloud proxy as first time Letsencrypt issuance has been validated with your Centmin Mod Nginx origin server for webroot authentication. If you select Centmin Mod Nginx default HTTPS, then select Cloudflare Full SSL mode.
If you have questions or feedback suggestions regarding this WordPress installer guide, head on over to the official Centmin Mod Community forum’s Blog & CMS subforum.
The post How To Install WordPress On Centmin Mod LEMP Stack Guide appeared first on Server Manager Guide.
]]>The post Centmin Mod Advanced Customised Installation Guide appeared first on Server Manager Guide.
]]>The following outlined SSH commands are to be run within the same SSH session window.
First set your desired notification email address in variable, EMAIL
# set your email address you want to receive alerts and server emails [email protected]
Then setup the persistent configuration file which allows you to override Centmin Mod’s centmin.sh menu script’s default settings without modifying centmin.sh itself.
# create initial persistent config file to override centmin.sh defaults # https://centminmod.com/upgrade.html#persistent mkdir -p /etc/centminmod touch /etc/centminmod/custom_config.inc
Populate the persistent configuration file with variables which enable advanced features in Centmin Mod LEMP stack
# dynamically tune nginx ssl_session_cache in /usr/local/nginx/conf/ssl_include.conf based on system detected memory # https://community.centminmod.com/posts/76615/ echo "NGINX_SSLCACHE_ALLOWOVERRIDE='y'" >> /etc/centminmod/custom_config.inc # override Nginx default OCSP response cache refresh time 1h (3600 seconds) to 24hrs (86400 seconds) # https://community.centminmod.com/threads/19515/ echo "NGINX_STAPLE_CACHE_OVERRIDE='y'" >> /etc/centminmod/custom_config.inc echo "NGINX_STAPLE_CACHE_TTL='86400'" >> /etc/centminmod/custom_config.inc # SET_DEFAULT_MYSQLCHARSET='utf8mb4' to override MariaDB MySQL # default characterset and collation from default utf8 to utf8mb4 # https://community.centminmod.com/threads/17949/ echo "SET_DEFAULT_MYSQLCHARSET='utf8mb4'" >> /etc/centminmod/custom_config.inc # enable nginx backlog override https://community.centminmod.com/threads/17620/ echo "AUTOHARDTUNE_NGINXBACKLOG='y'" >> /etc/centminmod/custom_config.inc # enable zstd compressed logrotation for nginx & php-fpm https://community.centminmod.com/threads/16374/ echo "ZSTD_LOGROTATE_NGINX='y'" >> /etc/centminmod/custom_config.inc echo "ZSTD_LOGROTATE_PHPFPM='y'" >> /etc/centminmod/custom_config.inc # enable letsencrypt ssl certificate + dual RSA+ECDSA ssl certs https://centminmod.com/acmetool/ echo "LETSENCRYPT_DETECT='y'" >> /etc/centminmod/custom_config.inc echo "DUALCERTS='y'" >> /etc/centminmod/custom_config.inc # enable ECC 256bit ECDSA self-signed SSL certificate generation https://community.centminmod.com/posts/82177/ echo "SELFSIGNEDSSL_ECDSA='y'" >> /etc/centminmod/custom_config.inc # enable nginx zero downtime on the fly nginx binary upgrades https://community.centminmod.com/threads/8000/ #echo "NGINX_ZERODT='y'" >> /etc/centminmod/custom_config.inc # enable brotli compression https://community.centminmod.com/threads/10688/ echo "NGINX_LIBBROTLI='y'" >> /etc/centminmod/custom_config.inc echo "NGXDYNAMIC_BROTLI='y'" >> /etc/centminmod/custom_config.inc # boost PHP 7 performance by enabling Profile Guided Optimisation flag # https://centminmod.com/perf/ # will dramatically increase PHP-FPM compile/install times but result in # 5-20% faster PHP 7+ performance. PHP_PGO='y' only works with servers with # 2+ or more cpu threads. However, you can force PHP PGO optimisations with # 1 cpu thread servers via PHP_PGO_ALWAYS='y' echo "PHP_PGO_ALWAYS='y'" >> /etc/centminmod/custom_config.inc echo "PHP_PGO='y'" >> /etc/centminmod/custom_config.inc # php compression extensions https://community.centminmod.com/posts/70777/ echo "PHP_BROTLI='y'" >> /etc/centminmod/custom_config.inc echo "PHP_LZFOUR='y'" >> /etc/centminmod/custom_config.inc echo "PHP_LZF='y'" >> /etc/centminmod/custom_config.inc echo "PHP_ZSTD='y'" >> /etc/centminmod/custom_config.inc # php file info echo "PHPFINFO='y'" >> /etc/centminmod/custom_config.inc # enable centmin.sh menu option 22 WordPress Cache Enabler Query String inclusions # https://community.centminmod.com/posts/85927/ echo "WPCLI_CE_QUERYSTRING_INCLUDED='y'" >> /etc/centminmod/custom_config.inc
The actual Centmin Mod LEMP stack install command using latest betainstaller73.sh script so PHP (php-fpm) 7.3 latest version is default installed.
# install centmin mod latest beta with php-fpm 7.3 default # https://community.centminmod.com/threads/centmin-mod-09-beta-branch-testing.4128/ yum -y update; curl -O https://centminmod.com/betainstaller73.sh && chmod 0700 betainstaller73.sh && bash betainstaller73.sh
Then you can pre-create Nginx HTTPS site’s dhparam file before hand to speed up subsequent Nginx vhost creation routines. On slow systems, this command will take a few minutes to complete.
openssl dhparam -out /usr/local/nginx/conf/ssl/dhparam.pem 2048
Then optional extra features you can choose to enable after Centmin Mod LEMP stack has been installed for Auditd and CSF Firewall advance blocklists
# install and configure auditd https://community.centminmod.com/posts/37680/ echo "AUDITD_ENABLE='y'" >> /etc/centminmod/custom_config.inc /usr/local/src/centminmod/tools/auditd.sh setup # setup extended CSF Firewall blocklists https://community.centminmod.com/posts/50060/ /usr/local/src/centminmod/tools/csf-advancetweaks.sh
Optionally enable CSF Firewall native fail2ban like rules
# enable CSF Firewall native fail2ban like support # https://community.centminmod.com/posts/62343/ csf --profile backup backup-b4-customregex cp -a /usr/local/csf/bin/regex.custom.pm /usr/local/csf/bin/regex.custom.pm.bak egrep 'CUSTOM1_LOG|CUSTOM2_LOG|CUSTOM3_LOG|CUSTOM4_LOG' /etc/csf/csf.conf sed -i "s|CUSTOM1_LOG = .*|CUSTOM1_LOG = \"/home/nginx/domains/\*/log/access.log\"|" /etc/csf/csf.conf sed -i "s|CUSTOM2_LOG = .*|CUSTOM2_LOG = \"/home/nginx/domains/\*/log/error.log\"|" /etc/csf/csf.conf sed -i "s|CUSTOM3_LOG = .*|CUSTOM3_LOG = \"/var/log/nginx/localhost.access.log\"|" /etc/csf/csf.conf sed -i "s|CUSTOM4_LOG = .*|CUSTOM4_LOG = \"/var/log/nginx/localhost.error.log\"|" /etc/csf/csf.conf egrep 'CUSTOM1_LOG|CUSTOM2_LOG|CUSTOM3_LOG|CUSTOM4_LOG' /etc/csf/csf.conf wget -O /usr/local/csf/bin/regex.custom.pm https://gist.github.com/centminmod/f5551b92b8aba768c3b4db84c57e756d/raw/regex.custom.pm csf -ra
Then setup disk space usage alerts making use of EMAIL variable you populated at the start of this guide.
# setup email alerts for diskalert cronjob /etc/cron.daily/diskalert # https://community.centminmod.com/posts/59973/ sed -i "s|EMAIL=.*|EMAIL='$EMAIL'|" /etc/cron.daily/diskalert
Lastly, if you intend to use Cloudflare in front of your Centmin Mod LEMP stack’s Nginx server, you can setup csfcf.sh cronjob to automatically manage Cloudflare’s IPs in CSF Firewall and Nginx real IP address detection.
# cloudflare cronjob # https://community.centminmod.com/threads/6241/ crontab -l > cronjoblist sed -i '/csfcf.sh/d' cronjoblist echo "23 */12 * * * /usr/local/src/centminmod/tools/csfcf.sh auto >/dev/null 2>&1" >> cronjoblist crontab cronjoblist
End result is an optimised Centmin Mod LEMP stack installation
With Nginx mainline version with OpenSSL 1.1.1 branch with HTTP/2 HTTPS TLS 1.3 support and built using GCC 8.3.1 compiler
nginx -V
nginx version: nginx/1.17.1 (120719-190938-centos7-kvm)
built by gcc 8.3.1 20190311 (Red Hat 8.3.1-3) (GCC)
built with OpenSSL 1.1.1c 28 May 2019
TLS SNI support enabled
configure arguments: –with-ld-opt=’-Wl,-E -L/usr/local/zlib-cf/lib -L/usr/local/lib -ljemalloc -Wl,-z,relro -Wl,-rpath,/usr/local/zlib-cf/lib:/usr/local/lib’ –with-cc-opt=’-I/usr/local/zlib-cf/include -I/usr/local/include -m64 -march=x86-64 -mavx -mavx2 -mpclmul -msse4 -msse4.1 -msse4.2 -DTCP_FASTOPEN=23 -g -O3 -fstack-protector-strong -flto -fuse-ld=gold –param=ssp-buffer-size=4 -Wformat -Werror=format-security -Wimplicit-fallthrough=0 -fcode-hoisting -Wno-cast-function-type -Wno-format-extra-args -Wp,-D_FORTIFY_SOURCE=2′ –sbin-path=/usr/local/sbin/nginx –conf-path=/usr/local/nginx/conf/nginx.conf –build=120719-190938-centos7-kvm –with-compat –with-http_stub_status_module –with-http_secure_link_module –with-libatomic –with-http_gzip_static_module –with-http_sub_module –with-http_addition_module –with-http_image_filter_module=dynamic –with-http_geoip_module –with-stream_geoip_module –with-stream_realip_module –with-stream_ssl_preread_module –with-threads –with-stream –with-stream_ssl_module –with-http_realip_module –add-dynamic-module=../ngx-fancyindex-0.4.2 –add-module=../ngx_cache_purge-2.5 –add-dynamic-module=../ngx_devel_kit-0.3.0 –add-dynamic-module=../set-misc-nginx-module-0.32 –add-dynamic-module=../echo-nginx-module-0.61 –add-module=../redis2-nginx-module-0.15 –add-module=../ngx_http_redis-0.3.7 –add-module=../memc-nginx-module-0.18 –add-module=../srcache-nginx-module-0.31 –add-dynamic-module=../headers-more-nginx-module-0.33 –with-pcre-jit –with-zlib=../zlib-cloudflare-1.3.0 –with-http_ssl_module –with-http_v2_module –with-openssl=../openssl-1.1.1c
PHP 7.3 latest php-fpm build
php -v PHP 7.3.7 (cli) (built: Jul 14 2019 19:51:27) ( NTS ) Copyright (c) 1997-2018 The PHP Group Zend Engine v3.3.7, Copyright (c) 1998-2018 Zend Technologies with Zend OPcache v7.3.7, Copyright (c) 1999-2018, by Zend Technologies
MariaDB MySQL 10.3 server
mysqladmin ver mysqladmin Ver 9.1 Distrib 10.3.16-MariaDB, for Linux on x86_64 Copyright (c) 2000, 2018, Oracle, MariaDB Corporation Ab and others. Server version 10.3.16-MariaDB Protocol version 10 Connection Localhost via UNIX socket UNIX socket /var/lib/mysql/mysql.sock Uptime: 2 days 5 hours 55 min 16 sec Threads: 5 Questions: 385311 Slow queries: 12 Opens: 44 Flush tables: 1 Open tables: 36 Queries per second avg: 1.984
Then check out the following:
- The official Getting Started Guide to get all your sites and configuration working.
- The official Centmin Mod configuration overview to learn how Centmin Mod configuration is structured.
- The Guide to learning about Centmin Mod tips.
- Join the official Centmin Mod community forums to ask questions and share your Centmin Mod experience. Any and all severe security and bug related announcements will be first posted on the official Centmin Mod community forum.
The post Centmin Mod Advanced Customised Installation Guide appeared first on Server Manager Guide.
]]>The post Server Manager Guide Launch appeared first on Server Manager Guide.
]]>For more info check out the About page.
The post Server Manager Guide Launch appeared first on Server Manager Guide.
]]>