The post What is Autoblogging and How Does it Work appeared first on SmartWP.
]]>Still, autoblogging isn’t magic, and it isn’t “copy and paste the internet.” Done well, it’s automated content creation, a workflow that collects data, processes it, and publishes content with guardrails, so your site stays useful, original, and compliant in 2026.
This guide breaks down how autoblogging works on WordPress, what you should automate (and what you shouldn’t), and the safeguards that keep you out of trouble.
What autoblogging is (and what it isn’t)
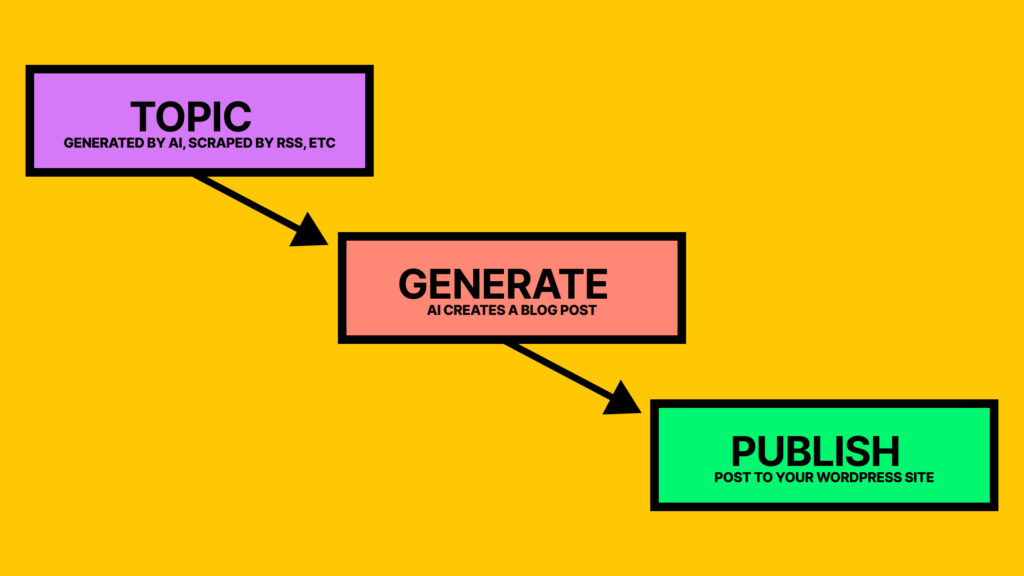
Autoblogging is the process of automatically creating WordPress posts from external inputs, like AI topic generation, RSS feeds, external APIs, or structured sources like YouTube channels. A plugin (or an external service connected to WordPress) pulls items on a schedule, formats them, and then publishes them, or queues them for review.
The important part is how you use it.
Autoblogging is useful when you need timely updates, recurring summaries, or curated roundups. For example, you might run a niche site like a local events site that uses content curation to import event listings from approved partners, then adds your own notes, maps, and “who it’s for” advice. Another good fit is a niche news brief where you publish short, attributed summaries, then link to original reporting.
On the other hand, autoblogging becomes risky when it turns into bulk publishing of duplicate content, hurting your search engine optimization. Google’s 2026 spam policies still target scaled content abuse, including automated pages that exist mainly to rank without adding real value. High-quality automated pages help visibility on search engine results pages (SERPs), while low-quality ones harm it. That’s true whether the content comes from scraping, feeds, or AI.
If your auto-posts don’t add something a reader would miss, they aren’t helping your site. They’re just filling space.
So, think of autoblogging as a conveyor belt. It can move items fast, but you still choose what goes on it, how it’s labeled, and what gets rejected.
How autoblogging works in WordPress, from source to published post
Most WordPress autoblogging setups follow the same pipeline, even if the plugin names differ. Here’s what’s happening behind the scenes:
- You pick a source type. Common inputs include RSS/Atom feeds, keyword-based content discovery, and APIs (some tools like RightBlogger can pull from YouTube or social media platforms). Your first job is deciding what you’ll accept and what you’ll refuse.
- Automated systems run the import through automated scheduling. WordPress often relies on WP-Cron (triggered by site visits), although many site owners prefer a real server cron for reliability on low-traffic sites.
- A WordPress plugin fetches items and normalizes them. Titles, dates, authors, images, and categories get mapped into WordPress fields. Better tools also store a source ID so they can skip duplicates later.
- Content processing happens next. Depending on your rules, the plugin might:
- Create a short excerpt and keep the original link as the main destination.
- Build a summary and add attribution.
- Use AI to draft a rewritten version (which still needs editing).
- Insert internal templates like disclaimers, pros and cons blocks, internal linking to other relevant posts on the site, or affiliate disclosures.
- Publishing and rate controls kick in. Instead of dumping 50 posts at once, you drip them out. Rate limits protect your site performance and help you avoid obvious automation footprints.
If you’re exploring tools, start by reading how a plugin handles external dependencies, storage, and scheduling. For example, the WordPress.org listing for AI Autoblogger, a vital part of your content sources strategy, shows that it fetches content through an external API, which means uptime and data handling matter as much as WordPress settings.
Also, if your workflow includes AI-generated content, keep the writing step separate from publishing. You can generate a usable first pass, then rewrite with your own experience and screenshots.
If you want a starting point for that part of the workflow, SmartWP’s AI WordPress article writer can help you move from topic to draft fast, but you still own the accuracy and final voice.
How to autoblog responsibly in 2026 (sources, originality, safeguards, monitoring)
Autoblogging only works long-term when you treat automation as a helper, not a replacement for judgment. That starts with your sources.
Choose sources like an editor, not a scraper
Before you import anything, set criteria you can explain out loud:
- Permission and licensing: Always verify clear rights to republish, quote, or summarize to avoid copyright infringement. RSS feeds do not automatically grant republication rights.
- Consistency and quality: If a feed is full of thin posts, your site will inherit that problem. For automated systems, this ensures quality control in automated content creation.
- Stability: Feeds break, endpoints change, and APIs get rate-limited. Pick content sources that won’t disappear next month.
- Audience match: A high-authority source is still a bad source if it doesn’t serve your readers.
When you’re unsure, summarize and link out, rather than republishing full text.
Add unique value so the post earns its place
Your edge is what you know, not what you can import. Good “value add” options include short comparisons, a local angle, setup steps, updated screenshots, or a plain-English explanation of what changed and why it matters. Adding these original insights boosts search engine optimization and builds organic traffic. Even a tight “what to do next” section can turn a generic update into something useful.
Put safeguards in place before you scale
A safe autoblogging setup usually includes:
- Manual review queues: Import to Draft or Pending Review for human oversight, especially when editing AI-generated content, then publish after edits.
- Duplicate detection: Skip posts with matching titles, source IDs, or near-identical text.
- Plagiarism checks: Use them as a filter, then still verify quotes and facts.
- Fact-checking habits: Confirm dates, prices, product names, and “breaking” claims.
- Rate limits: Cap imports per hour and per day, and throttle AI calls to avoid runaway costs.
- Logging: Keep import logs so you can trace failures, broken feeds, and unexpected spikes.
WordPress offers cost-effectiveness as a publishing platform for content marketing, but safeguards like these help produce unique articles through automation combined with manual editing.
A good rule: don’t automate anything you can’t monitor.
Monitor performance and search trust signals
After you turn autoblogging on, watch three places:
- Google Search Console: Coverage issues, manual actions, indexing drops, sudden crawl spikes, and meta descriptions on imported posts.
- Analytics: Engagement by template, source, and category (auto content should not be your highest bounce rate cluster).
- Server and plugin logs: Cron failures, feed timeouts, memory errors, and API limits.
If a source starts producing low-quality items, pause it quickly. Your site’s overall quality signals matter more than volume.
Autoblogging vs AI content generation vs RSS readers
Here’s a quick way to think about the differences, especially for sites pursuing affiliate marketing and monetization strategies:
| Approach | What you get | What you control | Main risk | Best use |
|---|---|---|---|---|
| Autoblogging | Posts created in WordPress automatically | Source rules, templates, scheduling, review gates | Low-value scale and duplication | Curated briefs, listings, structured updates |
| AI content generation | Drafts written from prompts or outlines | Voice, structure, originality (with editing) | Hallucinations and sameness | Tutorials, comparisons, first drafts |
| RSS feed readers | A private stream of updates | Your reading list, not your site | No publishing workflow | Research and topic discovery |
If you’re combining autoblogging and AI, keep human review in the middle to create unique articles. SmartWP’s guides on the best AI writers for bloggers can help you choose tools that support editing and consistency, not just fast output.
Autoblogging Tools (RightBlogger, Outrank, Arvow)
If you want automation without turning your site into a content firehose, the tool matters. Some tools are better at “publish more.” Others are better at helping you publish better with less effort.
1. RightBlogger

RightBlogger is the best way to automate your blog if you want automation that still feels like you are running a real editorial workflow. Instead of only pushing out posts, it helps you create drafts you can quickly shape into something original.
- Best for: WordPress users who want faster drafts, a cleaner workflow, and more control over quality.
- How it helps: you can generate posts from real inputs (like topics and video content), organize them in a simple publishing flow, then send them to WordPress as drafts or scheduled posts.
- Why it tends to work well long-term: it makes it easier to add your “human layer” (examples, screenshots, internal links, edits) before publishing, which is the part that protects you from thin, repeatable content.
2. Outrank

Outrank is more focused on SEO planning and keyword-driven writing. It is designed to help you fill a content calendar based on search opportunities.
- Best for: turning keyword ideas into consistent, SEO-shaped drafts.
- How it helps: you pick topics or keywords, it generates posts, and it can publish to WordPress on a schedule.
- Watch-out: it is easy to let keyword automation drive the whole strategy. You still need to add distinct angles, real-world insight, and updates, or posts can start to feel similar.
3. Arvow (formerly Journalist AI)
Arvow is geared toward heavier automation, including RSS-style sourcing and higher-volume posting with rules and templates.
- Best for: structured content streams (briefs, updates, roundups) where volume matters and the format is repeatable.
- How it helps: you choose an automation mode (auto-publish, planned, or review-first) and connect WordPress to schedule posts.
- Watch-out: with tools built for scale, quality control has to be intentional. Review queues, rate limits, and strict source rules are not optional.
Practical takeaway: if your goal is sustainable SEO, pick the tool that makes it easiest to publish content you would be proud to put your name on. Automation should handle the busywork. You should still own the final voice, accuracy, and added value.
Conclusion
Autoblogging is a powerful time-saving tool, but only if you design it like a real publishing system. Choose sources you have rights to use, add original commentary or summaries, and keep a manual review step until you trust the workflow. Most importantly, monitor Search Console, analytics, and logs so problems don’t grow quietly.
Start small, prove the quality, then scale the parts that readers actually value. Providing regular updates is the best way to maintain authority and keep readers coming back. Autoblogging works best when it supports your expertise, not when it tries to replace it.
The post What is Autoblogging and How Does it Work appeared first on SmartWP.
]]>The post Passkeys Explained (and How to Use Them in WordPress) appeared first on SmartWP.
]]>Passkeys are real, they’re mainstream in 2026, and they’re not just a new name for passwords. They’re a different way to prove it’s you, without typing a shared secret that can be copied, reused, or stolen.
In this guide, you’ll get a plain-English explanation of how passkeys work, why they matter, and how to start using them on a WordPress site today. You’ll also learn the part people skip: passkeys reduce password risk a lot, but recovery still matters when devices change, phones get replaced, or a teammate leaves.
What a passkey is, in plain English (and why it feels so different from a password)
A password is a secret you type into a site. The site checks if it matches what it expects. That means the secret has to travel from your hands to the website, and it has to be something you can repeat later. That’s why passwords get reused. It’s also why fake login pages work.
A passkey flips the whole story.
Think of a passkey like a special key that only works when you’re standing at the right door. If someone tricks you into walking up to a painted cardboard “door” (a phishing site), the key won’t turn. And because you never type the key, there’s nothing to “hand over” by mistake.
This is why passkeys feel different in practice. You don’t “enter” them. You approve them. Your device does the hard part, usually after you unlock it with Face ID, Touch ID, a fingerprint, or a PIN.
Another big difference is reuse. With passwords, reuse is common. With passkeys, reuse doesn’t really happen the same way because each site gets its own unique credential.
The simple idea, your device holds the secret, the website holds the public proof
Under the hood, passkeys are built on public key cryptography. Here’s the human version:
- Your device creates two linked keys.
- One key is private, it stays with you.
- The other key is public, the website can store it safely.
A good mental picture is a wax seal.
- The private key is the seal stamp you keep in your pocket.
- The public key is what others use to check that the seal is real.
The important part is this: the private key never leaves your device (or it lives inside a synced system you control, like a platform password manager). The site doesn’t need your secret. It only needs the public proof so it can verify what your device signs.
That also changes what “stealing” looks like. If someone breaks into a website database, they don’t find a list of reusable passwords. They find public keys, which are not useful for logging in by themselves.
How passkeys log you in, the website sends a one-time challenge, your device signs it
Browsers use the WebAuthn standard to make passkeys work across major platforms. The flow has two moments: registration, then login.
Here’s what it looks like in real life:
- Register: You choose “Create passkey,” your device generates keys, and the site saves the public key.
- Login: The site sends a one-time challenge, your device signs it, and the site verifies the signature.
- Approve: You unlock the passkey with Face ID, fingerprint, or a device PIN.
- Enter: You’re signed in, without typing anything.
Each login uses a fresh challenge, so copying an old signed response won’t help an attacker later. And your biometrics don’t get sent to the site. They just unlock the key on your device.
If you’re used to password managers, passkeys can feel like the next step. The “thing you know” fades away, and the “thing you have” (plus device unlock) takes over.
Why passkeys are safer than passwords (and where they can still go wrong)
Security advice around passwords often sounds like a lecture. Use 20 characters. Never reuse. Don’t store in a notes app. Don’t fall for phishing. People nod, then they get busy, and the old habits come back.
Passkeys help because they remove the easiest failure points.
You don’t type a secret into a form, so keyloggers and fake forms have less to grab. You don’t reuse a single string across five sites, so one breach doesn’t turn into ten. And because the credential is bound to a site, the “wrong door” problem gets much harder.
Passkeys also feel faster. If you’ve ever fumbled a password on your phone while standing in a parking lot, passkeys feel like trading a long combination lock for a thumbprint.
What passkeys stop well: phishing, credential-stuffing, and database leaks
Three common attacks get weaker fast when passkeys are used correctly:
Phishing: A fake WordPress login page in an email might look perfect. With passwords, one tired click can end the day. With passkeys, the browser checks the real site identity, so the passkey prompt usually won’t complete on the fake domain.
Credential-stuffing: Attackers try huge lists of leaked passwords against your login page. If you don’t have passwords in the same way, that list becomes useless.
Database leaks: When a site leaks password data, users suffer for years, because many reused the same password elsewhere. With passkeys, the website stores public keys, so a leak doesn’t hand out login secrets.
Passkeys don’t replace all security work, but they do remove the most fragile step: typing a reusable secret into a box.
The real-life limits: device loss, sharing accounts, and mixed-device confusion
Passkeys still have sharp edges, and it’s better to see them now than during a support crisis.
Device loss or replacement: If your passkey lives only on one device and that device is gone, you can’t use that passkey anymore. Many people avoid this by using synced passkeys through Apple iCloud Keychain, Google Password Manager, or Microsoft’s ecosystem. Some passkeys are device-bound, which can be great for high-security roles, but it raises the stakes for recovery planning.
Shared accounts: Passkeys are personal by design. If “support@” is shared by three people, passkeys don’t fit that workflow well. A better pattern is separate accounts, proper roles, and shared access through the app, not by sharing login credentials.
Mixed-device confusion: Someone registers a passkey on a laptop, then tries to log in on a phone and expects it to be there. Sometimes it will be (if it syncs). Sometimes it won’t. That mismatch is where frustration starts.
Also, many sites keep passwords as a fallback, which means passwords still matter. If you’re keeping passwords enabled, keep them strong, and pair them with 2FA. Passkeys lower risk, but they don’t erase it.
If you also use API tools that need WordPress access, remember passkeys are for human sign-ins, not automation. For integrations, it’s smarter to set up WordPress application passwords and revoke them when you’re done.
How to use passkeys in WordPress (setup, user flow, and best practices)
WordPress core still doesn’t include built-in passkeys support in 2026, so you’ll add passkeys through a plugin. One option is Secure Passkeys by Mohamed Endisha, which adds WebAuthn-based sign-in to WordPress and supports biometrics, security keys, and device-bound credentials.
The goal isn’t to flip a switch for every user on day one. The goal is to introduce passkeys without locking anyone out.
Before you add passkeys: hosting, HTTPS, and who should get access first
Passkeys require modern web foundations. If your site feels like it’s running on old wiring, fix that first.
A quick pre-check:
- HTTPS is required (valid TLS certificate, no mixed-content chaos).
- Modern browsers are needed for WebAuthn prompts to work.
- Plan for a modern stack. Many passkey plugins expect WordPress 6.0+ and PHP 8+ as a reasonable baseline.
Rollout order matters more than most people think:
Admins first: They can recover others and confirm settings.
Editors next: They log in often and will give fast feedback.
Customers or members last: The volume is higher, so mistakes cost more.
Before you invite everyone, write down your recovery policy. If you don’t, your inbox will write it for you.
Secure Passkeys plugin walkthrough: install, register a passkey, and test login
Keep your first test boring. One staging site, one admin user, one laptop, one phone. You’re checking the flow, not trying to impress anyone.
- Install and activate the plugin (if you need a refresher, follow this step-by-step WordPress plugin installation).
- Open the plugin settings and review options like user verification and timeout (timeouts that are too short frustrate people).
- Sign in as a test user and register a passkey from the user’s profile area (Secure Passkeys lets users manage passkeys there).
- Log out, then sign back in using the passkey prompt.
- Confirm your fallback login method still works (password, and ideally password plus 2FA).
Secure Passkeys can integrate beyond the default WordPress login form. It supports popular flows like WooCommerce login pages, MemberPress, Easy Digital Downloads, and Ultimate Member, which matters if your users rarely touch /wp-admin.
It also includes shortcodes so you can place passkey login and registration on front-end pages. That’s useful for membership sites that want a custom login page, not the default WordPress screen.
Admin controls that matter: multiple passkeys, role limits, and activity logs
Most passkey trouble comes from real life, not hackers. Phones break. Laptops get replaced. People travel. That’s why multiple passkeys per user is one of the most practical settings you can enable.
A sensible approach:
- Allow at least two passkeys per user (phone plus laptop).
- Consider allowing a hardware security key as a backup for admins.
- Use role restrictions to exclude roles that shouldn’t use passkeys yet (or shouldn’t have access at all).
Secure Passkeys also includes admin management tools so admins can activate, deactivate, or delete passkeys for users. That’s helpful when an employee leaves or a device is lost.
For visibility, activity logging can help you spot patterns like repeated failed challenges or unexpected registration events. If you want more ways to audit user activity in WordPress, it also helps to show a user’s last login date in WordPress so you can catch dormant accounts before they become a problem.
Safer rollout plan: recovery options, lost devices, and support tickets
The safest rollout is not “passkeys only” on day one. It’s “passkeys first, with a safety net.”
A practical plan that won’t explode your support queue:
- Keep a fallback at first (strong password plus 2FA).
- Encourage users to register two passkeys (or one passkey plus a hardware key).
- Document what users should do if they lose a device.
- Train your support team on what to verify before resetting access.
Also protect the login surface while you’re changing habits. Bots don’t care that you’re modernizing. If you want a privacy-friendly way to reduce automated login abuse, add Cloudflare Turnstile to WordPress on your login and registration forms.
Here’s a short email template you can paste to users:
Your account can now use passkeys for faster, safer login. Please add a passkey from your profile, then add a second one on another device as a backup. If you lose access to a device, you can still sign in with your password while we help you reset passkeys. If you get stuck, reply to this email with your username and the device you’re using.
Conclusion
Passkeys aren’t magic, but they remove the biggest weak link in login security: shared, reusable secrets. They use WebAuthn, your private key stays with you, and phishing gets much harder because the passkey won’t work on the wrong site.
WordPress can support passkeys today with a plugin like Secure Passkeys, as long as you roll it out with care. Keep recovery in mind, allow more than one passkey per user, and don’t rush into removing every fallback until you’ve tested real user behavior.
Pick one account today, add a passkey, then add a second backup passkey, and test what happens if you switch devices. That small drill is the difference between a smooth rollout and a long support week.
The post Passkeys Explained (and How to Use Them in WordPress) appeared first on SmartWP.
]]>The post WP CLI Commands to Quickly Update WordPress Sites (2026) appeared first on SmartWP.
]]>This guide walks through a practical workflow for updating everything from the command line. It assumes you are already comfortable with SSH and basic shell commands, and you want faster, safer updates for single or multiple sites.
By the end, you will have a repeatable routine for keeping WordPress 6.9 and your stack fully patched using WP-CLI only.
What Is WP-CLI and Why Use It for Updates?
WP-CLI is the WordPress Command Line Interface, a tool that lets you control almost every part of a site with terminal commands. Instead of logging into wp-admin, you run things like wp core update, wp plugin update, or wp theme update from your server.
For updates, WP-CLI has a few big advantages:
- It is faster than the dashboard, especially on slow connections.
- It is easy to script, so you can update several sites with one command sequence.
- It prints clear success and error messages in the terminal.
- It keeps working even when
wp-adminis timing out or stuck in maintenance mode.
The core update commands live under wp core. Plugins use wp plugin, themes use wp theme. Around those you have helpers, like wp db for backups, wp maintenance-mode to hide changes during work, and wp config for quick debugging edits.
If you pair WP-CLI with a host that has good SSH access and performance, it becomes a very efficient maintenance toolkit. If you are still choosing a host, this top WordPress hosting providers comparison is a good place to see which plans support SSH and WP-CLI well.
When WP-CLI Updates Make More Sense Than the Dashboard
There are situations where using WP-CLI is not just “nice”, it is the only sane choice:
- You manage many client sites, and logging into each dashboard would take all day.
- You want automated deployments from Git, where updates happen as part of a script.
- A web-based update is stuck, and the dashboard only shows a half-finished maintenance screen.
- The site has dozens of plugins, and the updates page feels like a slot machine.
wp-admindoes not load at all because of a broken plugin or theme.
With WP-CLI you can chain commands in a single line. For example, export the database, enable maintenance mode, run updates, then turn maintenance mode off again. That kind of repeatable flow is hard to match in the browser.
All WP CLI Commands
Just want a quick list of all WP-CLI commands? Well check them out in the list below.
| Command | Description |
|---|---|
wp admin | Opens the WordPress admin dashboard in your browser |
wp cache | Manage the object cache |
wp cap | Add, remove, or list user role capabilities |
wp cli | Manage WP-CLI itself (info, update, aliases) |
wp comment | Moderate and manage comments |
wp config | Create or modify the wp-config.php file |
wp core | Install, update, or verify WordPress core |
wp cron | Manage WP-Cron events |
wp db | Run database operations like export, import, optimize |
wp dist-archive | Create a WordPress distribution archive |
wp embed | Inspect or clear cached embeds |
wp eval | Execute arbitrary PHP code |
wp eval-file | Execute a PHP file |
wp export | Export WordPress content to WXR |
wp find | Locate WordPress installs on a system |
wp help | Display help for WP-CLI commands |
wp i18n | Tools for translation and localization |
wp import | Import content from WXR files |
wp language | Install and manage language packs |
wp media | Import and regenerate media files |
wp menu | Create and manage navigation menus |
wp network | Manage multisite networks |
wp option | Get, update, or delete site options |
wp package | Install and manage WP-CLI packages |
wp plugin | Install, activate, update, or delete plugins |
wp post | Create and manage posts and custom post types |
wp post-meta | Manage post meta fields |
wp post-type | List and manage post types |
wp rewrite | Manage rewrite rules and permalinks |
wp role | Manage user roles |
wp scaffold | Generate plugin, theme, or block boilerplate |
wp search-replace | Search and replace content in the database |
wp sidebar | Manage registered sidebars |
wp site | Manage individual sites in multisite |
wp super-admin | Manage multisite super admins |
wp taxonomy | Manage taxonomies |
wp term | Create and manage taxonomy terms |
wp theme | Install, activate, update, or delete themes |
wp transient | Manage transients |
wp user | Create, update, or delete users |
wp user-meta | Manage user meta fields |
wp widget | Manage widgets |
Before You Run WP-CLI Updates: Requirements and Safety Checks
Before you start firing off wp core update, take a minute to set the stage. A few basic checks will save you from ugly surprises.
Make Sure WP-CLI and WordPress Are Ready
First, confirm that WP-CLI is installed and usable:
- Run
wp --infoorwp cli version. You should see details and a version number, such asWP-CLI 2.12.0.
If you get a “command not found” error, your host might not have WP-CLI installed, or it is not in your PATH. Many managed WordPress hosts ship it by default, while others need a manual install.
Next, make sure you are in the right directory. WP-CLI acts on the WordPress install in your current folder. That folder should contain wp-config.php.
For example:
cd /home/username/public_html- Or into a subfolder like
/home/username/sites/client1/wordpress
On servers with cPanel or many installs, it is easy to land in the wrong document root. If you run updates from the wrong folder, you will update the wrong site.
Create a Quick Backup Before Updating
At a minimum, save a database backup before any major update. With WP-CLI, that is one simple command:
wp db export
This exports the database to a .sql file in the current directory. Many hosts also let you back up files via their panel or snapshots. That is ideal, but the database export is your “no excuses” safety net.
If you later need to roll back, you can restore it with:
wp db import backup-file.sql
You do not want your only restore option to be “hope the host has a nightly backup”.
Use Maintenance Mode and Staging Environments
Maintenance mode is handy when you are doing bulk updates or core upgrades:
- Turn it on:
wp maintenance-mode activate - Turn it off:
wp maintenance-mode deactivate
For small plugin updates on a low-traffic site, you might skip maintenance mode. For big batches, it prevents visitors from hitting a half-updated state.
For serious sites, test large changes on a staging site or local clone first. That is especially true when you are also doing migrations or domain changes, like when you move from WordPress.com to self-hosted WordPress. Get things stable there, then repeat the same commands on production.
How to Update WordPress Core With WP-CLI
Core updates are the foundation. Once WordPress itself is current, theme and plugin updates tend to behave better.
Check Your Current Version and Available Core Updates
Start by seeing which version you are running:
wp core version
For more context on version checks, you can also review this guide on methods to check WordPress version.
To see if a newer version is available:
wp core check-update
If there is an update, it will show the new version (for example WordPress 6.9), the type of update, and a download URL. If not, you will see a message that you are already on the latest version.
Run a Safe WordPress Core Update From the Command Line
A basic, safe core update flow looks like this:
wp db exportwp maintenance-mode activatewp core updatewp maintenance-mode deactivate
wp core update downloads and installs the latest stable WordPress version. After it finishes, WordPress might ask for a database update in the dashboard. From WP-CLI, you handle that with:
wp core update-db
That makes any schema changes the new version needs, so you do not get stuck on a “database update required” screen.
If you suspect something is off with core files after an update, run:
wp core verify-checksums
This compares your core files with the official checksums from WordPress.org and flags anything changed or missing. It is a quick way to spot hacked or corrupted files.
Update or Roll Back to a Specific WordPress Version
Sometimes you need to match a staging site or troubleshoot a plugin that only behaves on a certain version. In those cases you can set a specific core version with:
wp core update --version=6.0.3 --force
Replace 6.0.3 with the version you want. The --force flag tells WP-CLI to install that version even if you are already on a newer one.
Treat this like surgery:
- Always have a fresh database export.
- Prefer to test the change on staging first.
- Keep a note of your previous version so you can move back if needed.
How to Update Plugins With WP-CLI Commands
Plugins are where things break most often, so having fast control over them from the terminal is a big win.
See Which Plugins Need Updates in One Command
Get a full plugin overview with:
wp plugin list
You will see each plugin name, status (active or inactive), version, and whether an update is available.
To focus only on plugins that need updates, use:
wp plugin list --update=available
To see only active plugins with updates:
wp plugin list --status=active --update=available
This beats clicking around multiple pages in the dashboard, especially on large sites or slow admin panels.
Update One or All Plugins From the Terminal
You can update a single plugin by its slug:
wp plugin update jetpack
The slug is the folder name shown in wp plugin list, and it usually matches the last part of the plugin’s WordPress.org URL.
To update every plugin in one go:
wp plugin update --all
On production, a nice pattern is:
- Update a few key plugins one by one and spot-check the site.
- Then run
wp plugin update --allfor the rest.
That gives you a better sense of which change broke something if a problem shows up.
Fix Common Plugin Problems After an Update
If a plugin update breaks the site, you can quickly deactivate that single plugin:
wp plugin deactivate jetpack
If the site is completely white-screened and you are not sure which plugin is at fault, you can deactivate all of them:
wp plugin deactivate --all
After that, reactivate plugins one by one with wp plugin activate plugin-slug until the issue reappears.
When even running WP-CLI seems to hit fatal errors from theme or plugin code, add these global flags to commands:
--skip-plugins--skip-themes
For example:
wp --skip-plugins --skip-themes plugin deactivate problem-plugin
That lets you bypass broken code long enough to clean it up.
How to Update Themes With WP-CLI Commands
Themes can be just as dangerous as plugins after an update, especially if there are direct edits or old code involved. WP-CLI makes it easier to see what is going on and recover fast.
List Installed Themes and Find What Needs Updating
To see all installed themes:
wp theme list
You will get each theme’s name, status (active or inactive), version, and update status. To focus on themes that have updates available:
wp theme list --update=available
This is handy when you manage a stack with several child themes, or when you want to double-check that old default themes are not quietly out of date.
Update Single Themes or Run Bulk Theme Updates
To update one theme by slug:
wp theme update twentytwentytwo
To update every theme at once:
wp theme update --all
Be a little more cautious with your active theme, especially if it is not a child theme and you have made custom edits. A good habit is to keep custom work in a child theme, then update the parent with WP-CLI.
Switch Themes or Recover From a Broken Theme Update
If a theme update breaks the front end or wp-admin, switch to a default theme:
wp theme activate twentytwentyfive
Combine that with the skip flags if needed:
wp --skip-plugins --skip-themes theme activate twentytwentyfive
Once the site is reachable again, you can inspect logs, roll back files from backup, or reinstall the problem theme in a safer environment.
Building a Repeatable WP-CLI Update Workflow
The real power of WP CLI commands shows up when you turn them into a simple, repeatable routine. Over time, that routine becomes muscle memory.
If you enjoy automating tasks and working with code, pairing this with things like programmatic post creation in WordPress can give you a full dev-style workflow around your sites.
Sample Step-by-Step Update Routine You Can Reuse
Here is a compact routine you can follow for most maintenance windows:
- SSH into your server.
cdinto the correct WordPress directory that holdswp-config.php.- Export the database with
wp db export. - Activate maintenance mode with
wp maintenance-mode activate. - Check core updates with
wp core check-update. If an update exists, runwp core update, thenwp core update-dbif needed. - List plugins with
wp plugin list --update=available, then runwp plugin update --all. - List themes with
wp theme list --update=available, then runwp theme update --all. - Optionally verify core files with
wp core verify-checksums. - Turn maintenance mode off with
wp maintenance-mode deactivate. - Load the front end and
wp-adminin your browser and do a quick click-through.
You can paste a trimmed version of this into a shell script or your personal notes and adjust it per project.
Tips for Safer and Faster Command Line Updates
A few habits make WP-CLI updates much smoother:
- Test big changes on staging first, especially major core releases or heavy plugins like page builders.
- Run updates during low-traffic hours, so visitors are less likely to hit maintenance mode.
- Keep WP-CLI itself current with
wp cli update, so you get new commands and better dependency checks. - For migrations and domain changes, learn
wp search-replaceso you can update old URLs in the database without manual edits. - After each maintenance run, clear any caching layer and do a quick health check of key pages, logins, and forms.
Over time, you will build your own variations on this flow, but the basics stay the same: backup, update, verify, test.
Conclusion
Using WP CLI commands for updates gives you speed, control, and a clear way to recover if something goes wrong. Instead of hunting through menus, you run a short sequence, read the output, and know exactly what happened.
If you are new to WP-CLI, start with safe, read-only commands like wp core version, wp plugin list, and wp theme list. Once those feel comfortable, layer in database exports, maintenance mode, then core, plugin, and theme updates.
Stick this routine on your calendar as a regular maintenance task, and your sites will stay more secure, more stable, and a lot easier to manage over time.
The post WP CLI Commands to Quickly Update WordPress Sites (2026) appeared first on SmartWP.
]]>The post Best AI Writers for Bloggers in 2026 (Top Picks Ranked) appeared first on SmartWP.
]]>This guide covers the best AI writers for bloggers in 2026. I’ll highlight their strengths, pricing, and ideal use cases.
Key Takeaways
- RightBlogger is the top AI writing tool for bloggers who want all-in-one blog creation, SEO, and quick publishing.
- Jasper AI suits teams or agencies that need templates and strong brand voice controls.
- Surfer AI focuses on SEO scoring and content optimization.
- Writesonic offers flexible content types for both blogs and social media at a lower price.
- Rytr is the best option for bloggers on a budget looking for quick drafts and outlines.
At the top of the list is RightBlogger, a tool built with bloggers in mind.
1. RightBlogger – The Blogger-First AI Platform (My #1 Pick)

RightBlogger is my top choice for one simple reason: it was built for bloggers. Many AI tools focus on general copywriting or business use. RightBlogger focuses on helping you grow a blog faster plus it’s one of the best ways to help you make money with AI.
Key features bloggers will love:
- Article Writer: Create full blog posts over 2,000 words with SEO built in.
- AutoBlogging: The ability to automatically post to your site using AI and a content calendar.
- Smart Suggest + Post Ideas: Generate topics and long-tail keywords you can rank for.
- Video & Podcast to Blog: Repurpose YouTube videos or transcripts into ready-to-publish posts.
- SEO Reports: Compare your content against competitors and auto-optimize drafts.
- MyTone Personalization: Train the AI to sound like you, not a generic robot.
- AI Image Generator: Add original images without leaving the platform.
- Tool Studio: Build interactive tools powered by AI to keep readers engaged.
RightBlogger is more than a writing app. It covers your workflow from idea to scheduling & publishing. You can even push posts straight to WordPress, Webflow, or Ghost.
Best for: Bloggers, affiliate marketers, and creators who want an all-in-one solution.
Pricing: Free plan available, premium starts at $29.99/month.
2. Jasper AI – Long-Form Copywriting for Teams

Jasper is one of the most popular AI writing platforms. It’s built with teams and businesses in mind, offering dozens of templates for different use cases.
Why Jasper stands out:
- Templates for blog posts, product descriptions, and ad copy.
- Strong brand voice controls to keep content consistent.
- Integrations with Surfer SEO and other marketing tools.
- Collaboration features that make it easier for multiple writers to work together.
Jasper produces solid long-form drafts, but it’s less focused on bloggers. Many features lean toward marketing teams or agencies. Pricing is also higher compared to blogger-focused tools.
Best for: Agencies or businesses creating lots of branded content.
Pricing: Starts at $39/month.
3. Surfer AI – The SEO Specialist

Surfer began as an SEO analysis platform, then added AI writing. It’s great for bloggers who want to focus heavily on optimization.
What Surfer does best:
- Assigns an SEO score to your draft based on competitors.
- Recommends word counts, headers, and keyword frequency.
- Shows related terms to fill content gaps.
- Works well when paired with another AI writer like RightBlogger or Jasper.
Surfer’s strength is SEO structure, not writing style. The content often feels robotic without editing. Use it for analysis, then refine the draft with another tool.
Best for: Bloggers who want data-driven optimization.
Pricing: Starts at $89/month.
4. Writesonic – Multi-Channel Content Generator

Writesonic combines blog generation with social media tools. It’s flexible if you publish across multiple platforms and need content in many formats. The interface is simple, and beginners can get started without much setup.
Key features include:
- Blog writer with customizable tones
- Templates for Facebook posts, LinkedIn updates, and Google Ads
- Short-form content like captions or taglines
- Lower starting price than Jasper or Surfer
The blog content is fine for quick drafts but often lacks depth compared to higher-end tools. Where Writesonic shines is in variety; it can generate everything from product descriptions to ad copy in minutes. It’s a strong choice if you value speed and want one tool for both blogs and social content.
Best for: Bloggers who also need social and ad copy
Pricing: Starts at $15/month
5. Rytr – The Affordable Assistant

Rytr is one of the most budget-friendly AI writing tools. It’s simple and effective for shorter pieces.
What makes Rytr useful:
- Blog outlines, intros, and quick drafts.
- Support for over 30 languages.
- Multiple tones like casual, formal, or enthusiastic.
- Built-in plagiarism checker.
It’s not the strongest tool for long-form SEO posts. But it’s perfect if you need help brainstorming or writing small sections. If you are family with prompting ChatGPT you might be better off just using a standard chat app.
Best for: Bloggers on a tight budget.
Pricing: Free plan available, unlimited plan is $7.50/month.
6. Brandwell (Content at Scale) – Bulk Long-Form Content
Brandwell, previously called Content at Scale, focuses on generating large amounts of content quickly.
Why people choose Brandwell:
- Produces long, detailed drafts from minimal input.
- Claims to generate human-like writing that passes AI detectors.
- Designed for agencies and publishers managing dozens of posts.
It’s expensive and may be overkill for solo bloggers. But if you’re running a site that needs constant publishing, it can help scale production.
Best for: Agencies and publishers managing bulk content.
Pricing: Starts at $249/month.
7. Grammarly and Hemingway – Must-Have Editors

These two aren’t AI writers, but they’re essential companions.
- Grammarly: Fixes grammar, clarity, and tone. It also integrates with Google Docs, WordPress, and email.
- Hemingway App: Grades readability and highlights sentences that are too long or complex.
Use these tools after generating content with AI. They provide polish and improve readability. I like to use Hemingway to make sure my content sounds natural and is easy to read.
Best for: Every blogger who wants clean, clear writing.
Pricing: Grammarly starts free, premium plans from $12/month. Hemingway offers a free version and a $20 desktop app.
Comparison Table: Best AI Writers for Bloggers
Use this quick table to compare the top AI writing tools by features, pricing, and best use cases.
| Tool | Best For | Key Strengths | Price (Starting At) |
|---|---|---|---|
| RightBlogger | Bloggers & creators | Long posts, SEO, repurposing, publishing | $29.99/mo |
| Jasper | Teams & agencies | Templates, brand voice, collaboration | $39/mo |
| Surfer | SEO optimization | Content scoring, keyword analysis | $89/mo |
| Writesonic | Blog + social posts | Multi-channel content, affordable | $15/mo |
| Rytr | Budget bloggers | Outlines, short-form, multilingual | $7.50/mo |
| Brandwell | Bulk publishing | Long-form, human-like drafts | $249/mo |
| Grammarly/Hemingway | Editing & polish | Grammar, clarity, readability | Free-$12/mo |
How to Pick the Right AI Writer
Not every AI tool fits the same needs. The best choice depends on your workflow, goals, and budget. Here’s a simple framework to help you decide.
1. Define your main goal
Start with what matters most to your blog:
- Publishing more articles quickly → RightBlogger or Jasper
- Ranking higher in search → RightBlogger, Surfer or Clearscope
- Editing and clarity → Grammarly or Hemingway
- Saving money while experimenting → Rytr or Quillbot
2. Look at how you work
Ask yourself: Do you want an all-in-one platform or a tool for just one task?
- All-in-one (writing, SEO, publishing): RightBlogger
- Specialized (SEO scoring or editing): Surfer, Grammarly
3. Consider integrations
If you use WordPress, Webflow, or Google Docs, pick a tool that connects directly. This saves time moving drafts around. RightBlogger, Jasper, and Surfer all integrate well.
4. Compare pricing to output
- Solo bloggers usually spend $30-$50/month.
- Agencies or content teams may need higher-tier plans.
- Free tools are fine for testing, but paid plans give better results.
5. Test before you commit
Most AI writers offer free trials. Use them to run a real test article. Check if the tone feels natural, if SEO suggestions are useful, and if it fits your workflow.
👉 Key takeaway: Pick the tool that matches your main goal. If you want speed and SEO in one place, start with RightBlogger. Add a specialist tool later if you need deeper editing or optimization.
FAQs: Choosing the Best AI Writer
Do AI writers really help with SEO?
Yes. Tools like RightBlogger and Surfer can suggest keywords, improve structure, and show content gaps. AI gives you a head start, but rankings still depend on human editing and smart linking.
Can AI fully replace human writers?
No. AI is great for drafts, outlines, and repurposing, but it can’t replace your voice or judgment. The best workflow is AI for speed, humans for polish.
Which AI writer is best for beginners?
RightBlogger is the easiest to use because it’s built for bloggers. If you’re on a budget, Rytr is a simple starting point.
What’s the best tool for long-form blog posts?
RightBlogger and Jasper both handle long posts well, but RightBlogger adds built-in SEO and publishing. Pair it with Surfer if you want deep optimization.
How much should a blogger spend on AI tools?
Most solo bloggers can get everything they need for $30-$50 per month with RightBlogger or a similar tool. Agencies may need higher-priced options like Jasper or Brandwell.
Final Thoughts
AI writing tools are not a replacement for your voice. They act as assistants that save time, improve SEO, and give you a head start on every post. The real value comes when you combine their speed with your experience, judgment, and style.
For most bloggers, RightBlogger is the best pick. It brings together writing, SEO insights, repurposing, and publishing in one place, which means you can focus more on creating and less on juggling tools. Pair it with Surfer for advanced optimization and GramDiscover the best AI writers for bloggers in 2026. Compare top tools like RightBlogger, Jasper, Surfer, and more to create faster, SEO-friendly blog posts and grow your site.marly for editing, and you’ll have a complete, reliable system for building and growing a blog in 2026.
The post Best AI Writers for Bloggers in 2026 (Top Picks Ranked) appeared first on SmartWP.
]]>The post How to Stop WordPress Spam Comments (Complete Guide + AI Method) appeared first on SmartWP.
]]>If you’re tired of dealing with unwanted comment spam, this comprehensive guide is exactly what you need. We’ll cover easy-to-implement methods from built-in WordPress settings and popular anti-spam plugins to powerful new AI-driven tools that fully automate spam management.
Let’s dive straight into effective solutions, including an innovative service—RightComments—that stops spam comments completely using advanced AI.
Why Spam Comments Hurt Your WordPress Site
Spam comments do far more damage than clutter your moderation queue:
- SEO penalties: Search engines penalize websites stuffed with spammy links.
- User dissatisfaction: Real users won’t comment on blogs filled with irrelevant or promotional spam.
- Security risks: Spam comments often contain malicious phishing links.
Understanding why blocking spam is important guides smarter prevention strategies.
How to Stop WordPress Spam Comments (Top Methods)
1. Enable Comment Moderation Manually
One straightforward but effective approach is to manually review all comments. That way, you can ensure only quality comments appear on your site.
To do this, visit Settings → Discussion, then check these options:
- ✅ Comment must be manually approved
- ✅ Comment author must have a previously approved comment (optional if you trust returning visitors)
Now you’ll see all incoming comments in your moderation queue, ready for your approval.
Of course this method is extremely time consuming for large sites.

2. Blocklist Spammy Words and Phrases
Spam comments often include certain phrases or SEO keywords. You can automatically filter such spammy content by adding common spam phrases into WordPress’s blocklist.
Just navigate to Settings → Discussion, then find the “Disallowed Comment Keys” box. Enter spammy words or suspect phrases, each on a new line. Consider adding typical spam-related terms like:
- “free download”
- “click here”
- “visit my website”
- “cheap pills”
- Adult keywords or suspicious SEO terms

3. Disable Anonymous Comments
Allowing anonymous comments usually leads to higher spam volume. To reduce comment spam instantly, require commenters to leave their name and email address:
- Visit
Settings → Discussion - Enable ✅ “Comment author must fill out name and email”
For even greater control, plugins such as “Yoast Comment Hacks” offer smart features like redirecting first-time commenters or disallowing comments above or below certain lengths and blocking comments originating from specific countries or IP addresses.
4. Limit Comment Links Automatically
Spammers love inserting lots of promotional or malicious links. Reduce this headache by limiting the number of permissible links in comments:
- Visit
Settings → Discussion - Under “Comment Moderation,” set the allowed number of links to zero or one. Doing this immediately flags any link-heavy comment for your manual moderation.
5. Implement reCAPTCHA to Stop Spam Bots
CAPTCHA verification prevents automated spambots from flooding your site. Plugins like “Advanced noCaptcha & Invisible CAPTCHA” let visitors quickly prove they’re humans.
We recommend Google’s reCAPTCHA v3, which provides invisible spam prevention without annoying your readers.

6. Require User Registration Before Commenting
Another powerful method is to limit comments only to registered users who’ve already logged in. Registration requirements drive away spammers and bots almost instantly:
- Visit
Settings → Discussion - Check ✅ “Users must be registered and logged in to comment”
WordPress allows multiple user privileges, letting you build a high-quality membership community that promotes thoughtful discussion.
7. Disable Pingbacks and Trackbacks to Reduce Spam Notifications
Pingbacks and trackbacks can be abused by spammers. Disable them by navigating to Settings → Discussion, then unchecking ✅ “Allow link notifications from other blogs (pingbacks and trackbacks)”.

8. Remove URL Field from the Comment Form
Most comment spam aims at gaining backlinks for SEO. Remove that temptation by eliminating the URL field entirely from your comments section. Paste the below snippet in your theme’s functions.php or via a plugin like “Code Snippets.”
function remove_comment_url_field( $fields ) {
    unset( $fields['url'] );
    return $fields;
}
add_filter('comment_form_default_fields', 'remove_comment_url_field');
9. Use Dedicated Anti-Spam Plugins (Akismet, Antispam Bee, CleanTalk)
Popular anti-spam plugins constantly analyze comments, filtering legitimate ones from spammy content. Consider these trusted options:
- Akismet: Comes bundled with WordPress. Automatically flags and filters spam.
- Antispam Bee: Excellent free option with privacy in mind. Automatically deletes spam after a set period.
- CleanTalk: Robust anti-spam plugin with real-time blocking tools, honeypot fields, and invisible CAPTCHA protection.
Using one or two anti-spam plugins makes comment moderation significantly easier. My personal favorite is Antispam Bee, which does a fairly good job of removing mass spam attacks.

10. Block Spam with Web Application Firewalls (WAF)
Services like Cloudflare or Sucuri provide WAFs that filter malicious bot traffic before it reaches your server. Blocking spammy bots at the firewall level drastically reduces comment spam volume.
- “Cloudflare” offers fast integration, free plans, and effective bot-blocking capabilities.
- “Sucuri” includes malware protection, bot filtering, and robust web security features.
11. Completely Disable Comments on Your Site (If Necessary)
If comments aren’t crucial to your website, consider disabling them completely:
- Navigate to
Settings → Discussion - Uncheck ✅ “Allow people to submit comments on new posts”
For existing posts, individually disable comments in the post-editing screen or use “Disable Comments” plugin to turn them off everywhere permanently.
Bonus Tip: Use AI to Fully Eliminate Comment Spam
Manually moderating and fighting spam plugins can be exhausting. But what if you could completely automate spam detection and even generate smart replies?
I got sick of dealing with spam comments all the time, so I built RightComments, a super simple WordPress plugin to eliminate comment spam.
That’s exactly what RightComments offers:
- AI-powered spam detection: Every comment gets reviewed by AI, intelligently recognizing spam instantly.
- Customized settings & rules: Tailor how aggressive your spam blocking and moderation is.
- Automatic relevant replies: RightComments even responds automatically, engaging your visitors instantly.
Setup is quick and straightforward:
- Register at RightComments.com
- Install and activate the RightComments plugin in WordPress (available after logging in)
- Connect your site to your account using a simple API key to copy and paste
Now relax, knowing spam is a thing of the past.

Final Thoughts (Getting Rid of Spam Forever)
Battling WordPress spam comments isn’t fun—but with these practical solutions, it’s manageable and straightforward. Selecting the right combination of tools ensures better SEO, happier users, and fewer headaches.
For the ultimate freedom from spam comments, RightComments.com provides a genuinely innovative AI approach, giving you total peace of mind.
So go ahead—say goodbye to spam, and hello to real user engagement!
The post How to Stop WordPress Spam Comments (Complete Guide + AI Method) appeared first on SmartWP.
]]>The post Best AI Image Generators (Tested in 2026) appeared first on SmartWP.
]]>That’s where AI image generators come in, changing how we create visuals.
Why Use AI Image Generators for Your WordPress Blog?
Sourcing images can be a real pain. Stock photos (from sites like Unsplash), while convenient, can feel generic and overused. Plus, licensing costs can add up. Creating your own graphics requires time, skill, and often expensive software.
AI image generators offer a compelling alternative. They empower you to create unique, relevant visuals tailored specifically to your content, all without needing design expertise.
Here’s why they’re a game-changer for bloggers:
- Uniqueness: Say goodbye to the same stock photos everyone else is using. AI allows you to generate original images that perfectly match your blog’s niche and style.
- Cost-Effectiveness: Many AI image generators offer free plans or affordable subscriptions, making them a budget-friendly option compared to stock photo sites or hiring a designer.
- Time-Saving: Generate images in seconds, freeing up valuable time to focus on writing and other aspects of your blog.
- SEO Benefits: Unique images can improve your site’s SEO. Search engines favor original content, and visually appealing posts tend to have lower bounce rates and higher engagement, all positive ranking signals.
Choosing the Right AI Image Generator: Key Features to Consider
The AI image generation world is constantly changing, with new tools and features coming out all the time. To help you navigate this exciting space, here are some key factors to consider when choosing the best AI image generator for your needs:
- Image Quality: This is paramount. Look for generators that produce high-resolution, detailed images.
- Style Variety: Does the generator offer a range of styles (photorealistic, artistic, abstract, etc.) to match your blog’s look?
- Ease of Use: A user-friendly interface is essential, especially if you’re new to AI tools.
- Customization Options: The ability to fine-tune your images (e.g., aspect ratio, colors, specific details) gives you greater creative control. This could include features like negative prompts (specifying what you don’t want in the image) or art style reference images to guide the AI’s look.
- Text Generation Capabilities: Some generators are great at incorporating text into images, perfect for creating social media graphics, banners, or featured images with titles.
- Pricing: Consider your budget and usage needs. Some tools offer free plans with limited generations, while others require paid subscriptions.
- Batch Generation: If you create lots of similar style images, look for generators that allow you to create them at the same time.
- Image Upscaling: Does it offer built-in image upscaling to improve the resolution of your generated images?
- Sketch Enhancement Do you want to turn a quick drawing into a high-quality image?
Top AI Image Generators for WordPress in 2026
Let’s explore some of the leading AI image generators, highlighting their strengths and how they can benefit your site:
1. RightBlogger’s AI Image Generator: Simple, Powerful, and Blog-Focused

RightBlogger’s AI Image Generator is a powerful tool designed specifically for content creators. It uses artificial intelligence to generate unique and creative images from your text prompts. It’s all about making your blog posts stand out.
Here’s how it works, and why it’s perfect for WordPress users:
- Detailed Prompts: Describe the image you envision. The more specific you are, the better the results. For a blog post about “Best Hiking Trails in the Pacific Northwest,” you might enter a prompt like: “A panoramic view of a lush, green hiking trail winding through a forest in the Pacific Northwest, with a snow-capped mountain in the background, early morning light.”
- Style Selection: Choose a style that fits your blog’s look. Options might include “Photorealistic,” “Watercolor,” “Digital Art,” or “Cartoon.” This helps the AI understand the desired look and feel.
- Aspect Ratio Control: Select the appropriate aspect ratio for your image. Will it be a square featured image? A wide landscape banner? A portrait-oriented image for Pinterest? RightBlogger lets you tailor the dimensions to your needs.
- Auto prompt improver RightBlogger also features an auto prompt improver; it takes your short prompt and enhances it with way more detail.
- Automatic file naming: Of course, the filename of your images is extremely important when uploading to your site. RightBlogger automatically assigns a descriptive filename for all images generated.
RightBlogger also offers a free trial, making it a risk-free way to experiment with AI image generation.
2. Midjourney: Artistic Excellence and a Thriving Community

Midjourney is known for its ability to create stunning, artistic images, often with a dreamlike quality. It operates through a Discord server, fostering a vibrant community where users share creations and inspiration. The platform excels at image generation platforms and offers robust performance comparison.
Pros:
- Exceptional image quality, often resembling paintings or intricate illustrations.
- Active community for collaboration and learning, with regular community challenges.
- Continuous updates and feature improvements.
Cons:
- Requires a paid subscription.
- The Discord-based interface might have a learning curve for some.
3. Image-GPT (via ChatGPT): Conversational Image Creation

DALL-E 3, developed by OpenAI, is integrated into ChatGPT Plus. Its strength lies in its natural language processing capabilities. You can “chat” with the AI to refine your image, making it a highly interactive experience. DALL-E 3 is strong in creating various image types and understanding different prompt styles.
Pros:
- Excellent at understanding complex prompts.
- Allows for iterative refinement through conversation.
- Can generate images with text.
Cons:
- Requires a ChatGPT Plus subscription (no free plan).
- Image quality can sometimes vary.
4. Ideogram: Mastering Text in Images

Ideogram stands out for its exceptional ability to generate images with accurate and legible text. This makes it ideal for creating social media graphics, posters, or any visual where text is a key element. The Ideogram platform is known for its text integration capabilities.
Pros:
- Unparalleled text generation capabilities.
- Simple and intuitive interface.
- Offers a “Magic Prompt” feature to improve your descriptions.
Cons:
- Less control over fine-tuning image details compared to some other generators.
5. Adobe Firefly: Ethical and Creative Powerhouse

Adobe Firefly is part of Adobe’s Creative Cloud suite. It’s trained primarily on Adobe Stock images, addressing copyright concerns that surround some other AI generators, making it a leader in ethical training. Adobe Firefly also offers generative fill and vector generation.
Pros:
- Ethically sourced training data, providing full usage rights for generated images.
- Offers a range of customization options.
- Integrates with other Adobe tools (e.g., Photoshop).
Cons:
- May struggle with photorealism compared to some competitors.
- A paid subscription is required.
6. Leonardo AI: A Feature-Rich Platform

Leonardo AI started by using Stable Diffusion models but now includes the custom ‘Phoenix’ model. Leonardo gives its user high control over its image generations. The Leonardo AI platform features the Phoenix model and offers tools for image upscaling.
Pros:
- Free Version.
- Video Mode.
- Lots of control when generating images.
Cons:
- Complex User Interface.
7. Google Imagen (Gemini): Natural Language Powerhouse

Google’s Gemini chatbot utilizes the Imagen 3 model for image generation. It excels at understanding natural language prompts and offers iterative refinement through conversation.
Pros:
- Easy editing through follow-up prompting
- Natural Language
Cons:
- Limited Control over fine-tuning.
Copyright and Legal Considerations of AI Image Generation
Using AI image generators raises important questions about copyright and ownership. While the legal landscape is still evolving, here’s a general overview:
- Who Owns the Copyright? The U.S. Copyright Office has generally taken the position that AI-generated images, lacking human authorship, are not eligible for copyright protection. This means they often fall into the public domain. However, if a human significantly modifies the AI-generated image, that modified version might be eligible for copyright.
- Commercial Use: Always check the terms and conditions (Ts&Cs) of the specific AI image generator you’re using. Some platforms grant full usage rights, including for commercial purposes, while others may have restrictions.
- Watermark Some generators include watermarks. Always keep it.
- Scraping and Training Data: Some AI models are trained by scraping images from the internet, which can raise ethical and legal concerns. Tools like Adobe Firefly, with its ethical training set, aim to address this by using licensed or copyright-free images.
- Liability: Be aware you may have some liability from generated images.
- Creative Commons: While not directly related to AI generation, understanding Creative Commons licenses is important for using any images you find online.
Ethical and Community Considerations
Beyond legal aspects, there are ethical considerations surrounding AI image generation:
- Impact on Creative Professionals: The rise of generative AI tools raises questions about the role of creative professionals and the potential for job displacement.
- Bias in AI Models: AI models can reflect biases present in their training data, potentially leading to unfair or discriminatory outputs.
- Community Engagement: Many AI image generators have active communities where users share their creations, provide feedback, and participate in community challenges. This fosters collaboration and helps shape the development of these tools.
Integrating AI Images into Your WordPress Workflow
Once you’ve generated your images, integrating them into your WordPress blog is straightforward:
- Download: Save the generated image to your computer.
- Upload: In your WordPress post editor, add an “Image” block and upload your AI-generated image.
- Optimize:
- Resize: Ensure the image is appropriately sized for your blog layout. Oversized images can slow down your site.
- Compress: Use a site like Crush Image or a WordPress plugin like Smush or ShortPixel to compress the image, reducing file size without sacrificing quality.
- Alt Text: Add descriptive alt text to the image, if you aren’t sure where to start you can use an image caption generator. This is crucial for accessibility and SEO.
Conclusion
AI image generators are transforming the way we create content. For bloggers, they offer a powerful, affordable, and time-saving solution to improve their posts with stunning visuals. Whether you’re looking for photorealistic images (portrait aesthetics), artistic illustrations, or graphics with text, there’s an AI tool out there to meet your needs.
By experimenting with different generators and using them in your workflow, you can improve your blog’s visual appeal, engage your audience, and create a more impactful online presence. The future of visual content creation is here.
The post Best AI Image Generators (Tested in 2026) appeared first on SmartWP.
]]>The post WordPress Application Passwords – How to Set Up & Use Them appeared first on SmartWP.
]]>In this post, I’ll break down exactly what these special passwords are, why they’re important, and most importantly, how you can generate and manage them right from your WordPress dashboard.
What Are WordPress Application Passwords?
A WordPress application password is essentially a single-use password designed specifically for external applications or integrations. Instead of handing over your actual admin password to apps that need access to your WordPress site, you provide them with an application password.
These application passwords are much more secure than sharing your main password because:
- They’re specific to one app or integration.
- You can create multiple passwords and revoke any of them anytime, blocking access to just one app (without affecting others).
- They don’t get reset if you change your main password—meaning less potential for accidentally breaking external workflows.
This comes in handy when connecting productivity tools like Zapier or automating tasks based on your website’s activity. Instead of sharing your WordPress credentials, you create an application password, give that to Zapier (as an example), and integrate your site securely.
If you’re serious about ensuring your site’s security, you may also want to learn about additional tips like how to change your WordPress login URL to make your site even more secure.
How to Set Up a WordPress Application Password
Ready to get a new application password for an app integration? Let’s go over the step-by-step process inside your WordPress dashboard:
- Log in to your WordPress dashboard (as an admin). You can usually do this by navigating to
yourwebsite.com/wp-admin. - Once logged in, find Users in your dashboard, then click on Profile.
- Scroll down until you see the “Application Passwords” section.
- Now you’ll be able to see an option to create a new application password.
Let’s say you’re integrating with Zapier. To generate a password for it, simply:
- Type “Zapier” into the application name field.
- Hit the button to generate a new password.
- Your new password (a randomly generated string) will be shown on screen. Copy this password for use in Zapier.
This password now connects the two apps without needing your main login password. If you reset your main WordPress login later, the connection to Zapier remains intact.
If at any point you decide to stop using this service, WordPress makes it extremely easy to revoke that password and stop the app from accessing your site.
You’ll also love being able to remove passwords individually instead of doing a major reset affecting all integrations, a perfect example of how application passwords enhance security and simplify connections.
Managing Application Passwords
Once you’ve successfully created one, it’s worth paying close attention to how application passwords are managed. Here are some best practices for managing the security of your website when working with them:
- Regularly review active passwords to ensure you’re only giving access to services you are actively using.
- Keep a record of which apps you’ve generated credentials for. If you lose track, WordPress makes it quick to check by revisiting the Application Passwords section.
- Revoke unused credentials as soon as you no longer need those services. You can easily click to revoke an application’s password, which will immediately stop it from accessing your website.
This simple approach makes security far more manageable, especially when you’re working with several third-party integrations. To further enhance the protection of your WordPress login process, you can also follow some additional WordPress user management tips to keep your site’s user roles and permissions under control.
Why You Should Use Application Passwords
Wondering if it’s really worth the effort to use application passwords? Here’s why the answer is yes:
- Better Security: Your WordPress admin password is sacred. It’s far better to entrust external apps with an application password that doesn’t grant total control of your site.
- Control: Generating individual passwords allows precise control over which applications or services can access your website, and you have the power to revoke them instantly.
- Simplicity with Automation: Many new WordPress users will eventually want to automate repetitive tasks, such as integrating with mailing services, form apps, etc. Using application passwords helps streamline various workflows without interrupting other external connections when you update your main WordPress password.
At its core, this system is designed to keep things safe, but more importantly, keep things simple when managing access. If you’re interested in more strategies for a secure but accessible setup, take a look at our guide on the top WordPress security plugins that go hand in hand with managing security credentials.
Conclusion
WordPress application passwords deliver a balance of security and flexibility while ensuring other 3rd-party apps, like Zapier, have access to your website without compromising your admin credentials. They’re convenient, but also place important controls into your hands. You can generate them quickly, manage them easily, and (most importantly) revoke them whenever necessary.
This approach not only improves your site security but also simplifies how you manage multiple connections without ever having to put your primary login information at risk.
If you liked this guide or found it helpful, be sure to check out more of our WordPress tips and hit the subscribe buttons on both our YouTube and website. Finally, for more profound WordPress security tips, don’t forget to explore advanced strategies like regularly checking your WordPress version to stay updated with important features or security patches.
The post WordPress Application Passwords – How to Set Up & Use Them appeared first on SmartWP.
]]>The post 9 Best WordPress AI Plugins for Bloggers & Content Creators appeared first on SmartWP.
]]>But with so many different plugins out there, it can be tough to know where to begin.
First, let’s quickly recap what WordPress plugins are. A WordPress plugin is like an add-on for your WordPress site, giving it new functionality. They’re easy and straightforward to install.
Some plugins do one simple thing (e.g. they compress images automatically) and other plugins add loads of new features and enhancements (e.g. SEO plugins).
Many plugins are free, or at least have a free version: you can find these in the WordPress plugins directory. Others are premium (paid) and offer the most advanced features and customer support.
Let’s take a look at some of the best AI plugins out there.
9 Best WordPress AI Plugins (AI Tools) for Bloggers and Content Creators
1. Jetpack AI Assistant (Generative AI)

Jetpack is WordPress’s own plugin (powered by WordPress.com) offering a range of security, performance, and marketing tools. The Jetpack team has now created Jetpack AI Assistant, which costs from $4.95/month (paid annually).
Jetpack AI assistant has a range of AI features so you can create all kinds of WordPress content, including lists, tables, images, and more. It also has a style, grammar, and spelling checker to highlight things you may want to change … plus it offers some SEO features.
Pros
- Makes it easy to create AI-generated content directly in WordPress
- If you already have Jetpack, you don’t need to install a new plugin
- Offers title suggestions to improve SEO
- Can correct spelling and grammar (and advise on style)
- Is able to rewrite text in different tones
- Can translate content into multiple languages
- Good all in one option that can handle multiple AI tasks
Cons
- Interface can be a little clunky
- Pricing structure means paying monthly works out significantly more expensive than paying annually
2. Uncanny Automator (AI Workflows)

Uncanny Automator is (as you might expect from the name) an automation plugin. This lets you set up workflows of tasks to happen automatically, without you needing to do them all manually, and without needing a load of extra plugins.
With Uncanny Automator, you can connect over 175 different plugins and apps using “recipes”. You can do things like automatically share blog posts on Facebook, send out course reminders, connect with tools like Google Sheets and Slack, and much more.
Pros
- Code-free interface for non-technical users … plus full developer documentation and code samples
- Data is all processed on your site (not by a third party)
- Unlimited recipes, which you can run unlimited times
- Helps you slim down or streamline your plugin stack
- Great, friendly support
Cons
- Costs $149/year minimum (no option to pay monthly instead), which only covers one site
- Doesn’t have a free version
3. AI Engine (AI Chatbot)

AI Engine lets you add an automated chatbot to your WordPress site—which could help you to improve visitors’ engagement with your site and convert more traffic into leads (or even customers).
You also get content generation and image generation, plus the ability to train your own customizable AI models, with the power of machine learning and natural language processing. AI Engine includes an “AI Playground” where you can try out translation tools, grammar correction tools, and more. If you pay for the premium version, you can build AI assistants, create dynamic forms, and more.
Pros
- Free version includes loads of features, such as the AI chatbot, text and image generators, option to create your own templates, and more
- Lots of customization options
- Gives you the option to prepare datasets and train your own AI models
- Updated regularly and has plenty of documentation from the creator
- Pro version is good value (costing from $59/year for one site; $79/year for up to 5 sites)
Cons
- You’ll need your own API key to draw on an LLM like ChatGPT(OpenAI), Microsoft Azure, etc—AI Engine simply connects with these services
4. Imajinn (Image Generation)

Imajinn is an AI-powered plugin that can create photo-realistic images or illustrations, like MidJourney or DALL-E. It’s powered by the Stable Diffusion XL model.
With Imajinn, you can create images inside the Gutenberg editor, with the Imajinn AI Block. You can also look back through previous versions of your images, create additional variations, touchup images, and more. Of course, you can save your favorites to your WordPress media library.
Pros
- You can use the Imajinn plugin across as many sites (and WordPress users) as you want
- You don’t need an API key—just click to connect!
- Simple to use (with great documentation if you need it)
- Includes “Prompt Genie” to help you craft better image prompts
Cons
- Free version only gives you 10 credits (10 prompts—each prompt creates 4 image variations). You’ll need to pay if you want more credits.
- Images can be a little slow to generate
- Plugin hasn’t been updated in the last 12 months so could have conflicts with the most recent version of WordPress
5. Divi AI (Website Creation)

Divi is a popular WordPress site creator from Elegant Themes, and they’ve now added Divi AI—a website builder that can design layouts, write content, and generate images too. It’s integrated with the Divi builder and can be used to build whole websites (whether for yourself or for a client).
You can even get Divi AI to write HTML code and custom CSS snippets to use in the Divi builder. (It’s specifically trained on the Divi codebase.) It learns from your website, too, crafting content based on the context.
Pros
- Available as an add-on to your existing Divi membership (or you can choose a package that includes it for a new membership)
- Can be used to create whole pages or even whole websites, and incorporates a content writer
- Fits with your branding—just give the AI your brand colors and fonts
- Lets you and your team create unlimited images and text
- Integrates seamlessly with Divi and can easily write Divi-compatible code
- Divi is adding new features to Divi AI as time goes by
- Has a (limited) free trial
Cons
- Needs to be used with a full Divi subscription—isn’t a standalone product
- Can only be accessed from within Divi on your website
6. Rank Math Content AI (SEO Content)

Rank Math is a popular SEO (search engine optimization) plugin for WordPress. The team has now created Rank Math’s Content AI so you can write SEO-optimized posts in seconds, from keyword research to outlining to writing the post itself. It’s my absolute favorite SEO plugin!
Rank Math has high-converting templates and tools built-in, helping you not only write SEO-friendly content but also fix grammar, create product descriptions, optimize for SEO, write a bio, reply to comments, craft FAQs, write social media posts, and more.
Pros
- Simple, attractive interface—easy user experience
- Lets you create AI content directly within WordPress
- Includes personalized content recommendations for your target audience
- Integrates with the rest of the Rank Math plugin for meta titles, meta description, open graph, and more
- Allows you to create and fine-tune a custom, branded tone of voice
- Limited version available for free
- Starts at $4.99/month (billed annually) for 5,000 monthly credits
Cons
- Free version is very limited (only 750 monthly credits, which is just 750 words of content)
- Separate subscription from the Rank Math PRO plugin
- Credits can’t be rolled over from month to month
7. Tidio (AI Chatbot)

Tidio’s key feature is an AI-powered chatbot, Lyro, that lets you handle customer inquiries 24/7. It’s designed to give instant responses, based on your support materials … but you (or one of your customer service agents) can step in and take over the conversation at any point.
It’s easy to set up and customize your chat widget, and you can review the Chatbot’s performance over time, updating its knowledge base as needed.
Pros
- Saves lots of time by handling basic customer service tasks
- Can be customized and tweaked to perform well
- Lets you respond instantly (even in the middle of the night) for better user engagement
- Also includes ticketing system to handle more involved customer queries
- Has “plug and play” flows to offer discounts, recover abandoned carts, and more
- Connects with other tools in your tech stack, particularly WordPress and WooCommerce (for ecommerce sites)
Cons
- Live chat plugin is supposedly free, but some users reported being unable to use it without paying
- Full version costs a minimum of $29/month and this only gives you 50 AI conversations
8. ZipWP (Website Creation)

ZipWP is a WordPress website builder powered by AI. With it, you can create a full WordPress website in just 60 seconds (without needing to fiddle with any code). The AI can pick out a design, craft copy, add relevant visuals and images, and create your full site.
Of course, you can edit and adjust the site—there’s a built-in AI assistant to help you with this. ZipWP also comes with a full library of designs that adapt to your unique website.
Pros
- Lets you create websites fast, including the website content
- Can be used by website hosting companies to give clients added value
- Has a free version that you can use to create 2 AI sites
- Simple, straightforward interface
- One-off payment option rather than subscription if you just want to create a few (up to 5) websites
- Powerful plans available if you build sites for other website owners
- Customer services is very helpful and proactive
Cons
- Need to create an account after installing the plugin (ZipWP explains this is due to spam/DDoS attacks)
- Has limited built-in customization options
9. Elementor (Website Creation)

Elementor has been around as a page builder for years—but now they have an AI option too. You can give this a go for free with your Elementor WordPress site. With “Copilot”, you’ll get layout suggestions based on your previous preferences.
There’s also a Prompt Enhancer to help you get better results from the AI, plus “AI Context” to learn your tone of voice and to understand more about your business. The Starter AI plan costs $48/year.
Pros
- Create instant, well-designed layouts for your site (you can use written prompts for this)
- Make variations based on your existing Elementor containers or pick from the library
- Generate wireframe designs
- Create AI images directly in Elementor
- Can be used to make websites for clients
- You only need one subscription, regardless of how many Elementor websites you have
Cons
- Has to be paid for annually (no month-by-month option)
- Credits don’t roll over after your year is up
Tips for Using an AI-Powered WordPress Plugin
To get the most from your AI WordPress plugin (or any WordPress plugin!) it’s a good idea to:
- Try one new plugin at a time. Installing too many plugins at once makes it tricky to pinpoint the problem plugin if something goes wrong with your site.
- If you’re getting a free plugin, always use the official WordPress plugin directory (also found inside your WordPress backend, under Plugins→Add New Plugins).
- If you’re getting a paid plugin, always use the official website for the company that produces the plugin (e.g. Elegant Themes for Divi). Don’t buy from a third party: it could be malware or a scam.
- Keep your plugins up to date. Plugin developers should update their plugins if any security issues are found—but if you’re using an outdated version, your site will be vulnerable.
Whenever you’re using AI tools, remember not to blindly trust the AI. It might generate text that’s misleading or flat-out wrong, or create images of people with 6 fingers—always check for mistakes and correct these as needed. Whether you’re creating a blog post, an image, or a whole website, you want the result to be as high-quality as possible.
Which WordPress AI Plugin Will You Try Today?
There are so many great WordPress AI plugins out there to try. Any of the 9 plugins above could be a fantastic addition to your site.
More AI plugins are appearing all the time, too. Over at RightBlogger, for instance, we’re busy working on an AI plugin so that bloggers and businesses can quickly incorporate their RightBlogger-created posts and pages into their websites. Right now you can use our AI Article Writer for WordPress to publish directly to your site. In time, we plan for our powerful AI blogging tools to be available directly within WordPress.
If you are looking for more advanced AI tools to write blog posts, check out this breakdown of AI content writing tools for bloggers.
Pick one of the plugins above to try today – many have a free trial – and see the power of AI in action on your website.
The post 9 Best WordPress AI Plugins for Bloggers & Content Creators appeared first on SmartWP.
]]>The post How to Limit Comment Length in WordPress appeared first on SmartWP.
]]>In this guide, I’ll walk you through the simple steps to set a minimum and maximum character limit for comments.
Why Limit Comment Length?
An active comments section is a great way to foster engagement and build a community around your blog. However, not all comments are valuable. Here are a few reasons why you might want to limit comment length:
- One-word comments are usually not helpful and are often spam attempts to get backlinks.
- Extremely long comments (over 5,000 characters) are often rants, complaints, or irrelevant to the article.
- Short comments (under 60 characters) rarely contribute meaningful insights or feedback.
By setting comment length limits, you can discourage spam, rants, and low-quality comments, ultimately improving the overall discussion quality on your site.
Setting Comment Length Limits in WordPress
Unfortunately, WordPress doesn’t offer a built-in way to limit comment length. However, you can easily achieve this by adding a code snippet to your site. To ensure safety and avoid breaking your site, we recommend using the Code Snippets plugin.
- Install and activate the Code Snippets plugin. You can find detailed instructions on how to install a WordPress plugin in our beginner’s guide.
- Once activated, go to Code Snippets > + Add Snippet in your WordPress admin area.
- Click the “Use Snippet” button under “Add Your Custom Code (New Snippet)”.
Modify the numbers 6000 and 50 to set your desired maximum and minimum character limits, respectively.
That’s it! Your comment length limits are now in effect. When users attempt to submit a comment that’s too short or too long, they’ll see the custom error message you’ve set.
Conditional Logic (Optional)
If you only want to limit comment length on specific pages or posts, you can use the Conditional Logic feature in Code Snippets. Enable the “Conditional Logic” toggle and set the conditions for when the code snippet should be executed (e.g., specific page URLs).
Conclusion
Limiting comment length is a simple yet effective way to improve the quality of discussions on your WordPress site. By setting reasonable minimum and maximum character limits, you can discourage spam, rants, and low-quality comments, ultimately creating a more engaging and valuable comments section for your readers.
The post How to Limit Comment Length in WordPress appeared first on SmartWP.
]]>The post How to Check if a WordPress Plugin is Active Using PHP appeared first on SmartWP.
]]>is_plugin_active() function.
Why Check if a Plugin is Active?
Knowing whether a plugin is active can help you:
- Enhance Compatibility: Ensure that your plugin works smoothly alongside other plugins.
- Conditional Features: Enable or disable features based on the activation of another plugin.
- Avoid Conflicts: Prevent potential conflicts with other active plugins.
Using get_option()
This is actually the method I went with when making the MightyShare plugin. Using get_option works on the front end and admin dashboard, this allows you to search the array of active plugins.
Using is_plugin_active()
The is_plugin_active() function allows you to check if a specific plugin is active. Here’s how to use it, depending on whether you’re in the Admin Area or on the front-end.
Check in the Admin Dashboard
If you’re in the WP Admin Area, you can use the function directly. For example:
The parameter for is_plugin_active() requires both the plugin subdirectory and the main plugin file name.
Check on the Front-End
According to the WP Documentation:
is_plugin_active() is defined in /wp-admin/includes/plugin.php, so it’s only available in the admin pages. To use it in a template, you need to manually include plugin.php.
Here’s an example of using the function to check if a plugin is active on the front-end:
The function returns true if the specified plugin is active, and false if it’s not.
Conclusion
For more information on WordPress development and plugin functions, check out the official WordPress website.
Leveraging the is_plugin_active() function or get_options() can significantly boost your plugin’s utility and reliability, ensuring a seamless experience for your users across different plugin environments.
The post How to Check if a WordPress Plugin is Active Using PHP appeared first on SmartWP.
]]>The post How to Set Up a Reply-To Email Address in Contact Form 7 appeared first on SmartWP.
]]>Here’s how to setup a reply-to for an email in Contact Form 7:
Using Additional Headers
In your Contact Form 7 form settings, add this to the Additional Headers field:
It’s as simple as adding the following to the additional headers field:
Reply-To: [your-name] <[your-email]>Make sure to configure the other key mail settings too:
- To: Use a valid email address you can access, like
[email protected] - From: Use an email address on your website’s domain, like
[email protected] - Subject: Include your site name and the submitted subject, like
Your Site - [your-subject]
Some web hosts may need slightly different headers to allow replies. If the above doesn’t work, try adding Sender and Reply-To headers instead:
Sender: [email protected]
Reply-To: [your-name] <[your-email]>
From the Email Body
Another option is to include the submitted email as a mailto link right in your email body. In the Message field, add something like:
Reply to sender: <a href="proxy.php?url=mailto:[your-email]">[your-email]</a>Of course with this method it will require you clicking the button to have your email client create a reply email.
Conclusion
That’s it! Now when someone fills out your form, you can easily hit Reply in your email app to respond directly to them. No more copying and pasting email addresses. This is a great way to ensure your emails are still delivered from your server and you can still reply to the user.
The post How to Set Up a Reply-To Email Address in Contact Form 7 appeared first on SmartWP.
]]>The post How to Underline Text in WordPress Block Editor (Step-by-Step) appeared first on SmartWP.
]]>Although the editor offers bold and italic formatting, the underline feature is notably missing.
Despite the common practice of underlining for emphasis, it has been removed due to its association with hyperlinks, potentially causing confusion among readers. Nonetheless, it is still possible to underline text in the Gutenberg editor with a simple workaround.
Underlining Text in WordPress
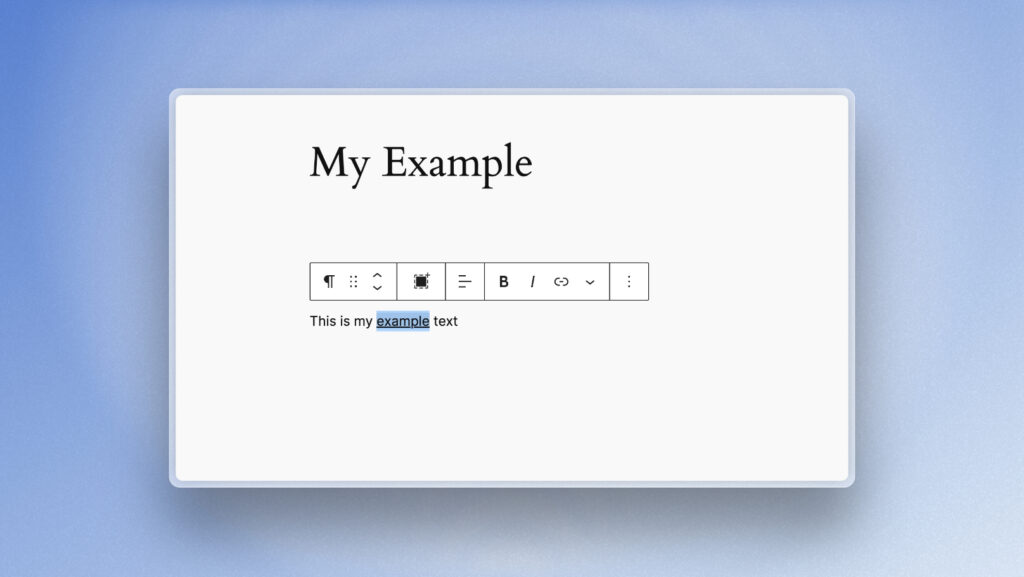
Thankfully, the underline function has not been entirely removed in the Gutenberg editor. To underline text in WordPress, you can utilize a straightforward keyboard shortcut.
By selecting the desired text and pressing CTRL + U (on Windows) or CMD + U (on macOS), you can instantly underline the text without the need for an underline button.
Not working for you? You can use the built in HTML editor instead. By clicking on the three dots of the text block and choosing ‘Edit as HTML’, you can then enclose the text to be underlined within the tags.
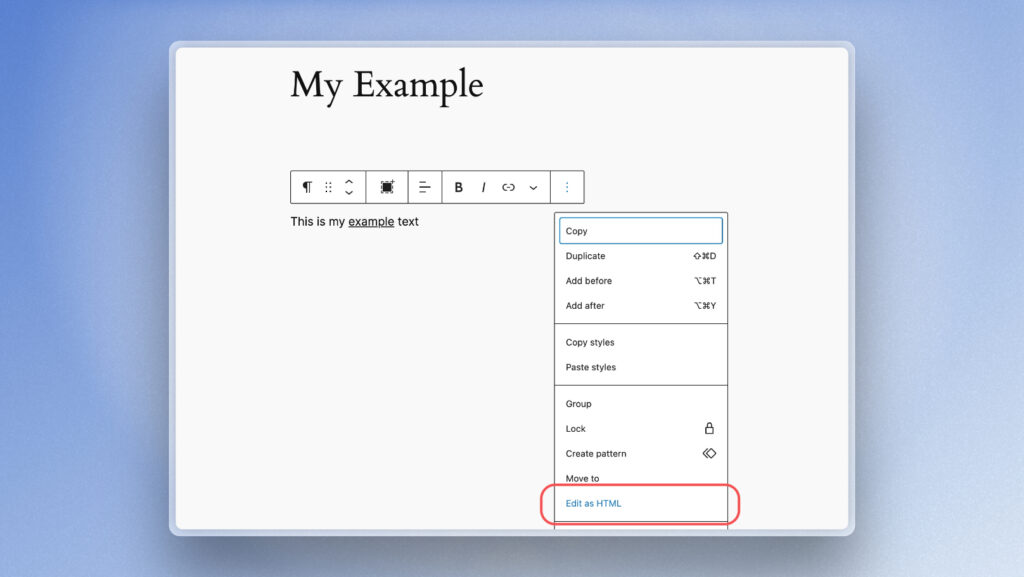
This is done by wrapping your text in a <span> tag. Within the tag, you can incorporate an inline style to achieve the desired underline effect.

Here is a code example:
Here is my <span style="text-decoration: underline;">underlined</span> text.Why Doesn’t WordPress have an Underline Button?
Underlining text in WordPress can confuse users because it’s commonly associated with hyperlinks. To avoid this confusion, the WordPress team decided not to include underlining as a formatting option. Instead, you can use alternative styles like bold to emphasize text effectively.
Conclusion
In conclusion, underlining text in the Gutenberg editor can be achieved by simply remembering a basic keyboard shortcut. Should you encounter any difficulties with underlining text in Gutenberg, feel free to let us know in the comments below.
The post How to Underline Text in WordPress Block Editor (Step-by-Step) appeared first on SmartWP.
]]>