How to tell
Depending on the Windows sign-in (Password, FIDO2 key, Windows Hello), there is more than one PRT for a user. The PRTs can be told apart by looking at the time stamp for the AzureAdPrtUpdateTime or the AzureAdPrtExpiryTime from the “dsregcmd /status” command as shown in this 1:05 video.
The video shows how Windows is unlocked three times:
- first, using the password,
- second, using a FIDO2 key,
- third, using the Windows Hello PIN.
The “dsregcmd /status” command shows three different time stamps, one for each PRT.
Set up Azure AD Conditional Access to require MFA. Sign in with an Azure AD account on an Azure AD joined Windows 10 device, open the Edge browser (with the setting “Allow single sign-on for work or school sites using this profile” enabled) and clear all the cookies. Authenticate to Azure AD, for example by opening https://portal.office.com; the Edge browser will use the PRT for authentication. The following 2:40 video shows this.
The video shows how the web page https://portal.office.com is opened three times:
- first, after a Windows sign-in with the Windows Hello PIN,
- second, after a Windows unlock with the password,
- third, after a Windows unlock with the Windows Hello PIN.
Because the cookies are cleared each time, the Edge browser uses the respective PRT. There is an MFA prompt for the second case because the PRT does not contain the MFA claim. The PRT does contain the MFA claim in the first and third case.
The PRT, as it is transferred by the Edge browser to Azure AD, can be seen with the help of the developer tools (F12). A GET request to https://login.microsoftonline.com/common/oauth2/authorize contains the PRT in the “x-ms-RefreshTokenCredential” HTTP header field.

MFA Imprinting
There are cases where a PRT without MFA claim gets imprinted with the MFA claim. This happens during an interactive Web Account Manager (WAM) sign-in. Clearly, it depends on the client application and on the authentication library whether or not a sign-in occurs via WAM. How can MFA imprinting be seen in action? Luckily, the OneDrive application can be used to help to understand the MFA imprinting effect via a registry key:
- [HKEY_CURRENT_USER\SOFTWARE\Microsoft\OneDrive] “EnableADAL”=dword:1 –> WAM is used
- [HKEY_CURRENT_USER\SOFTWARE\Microsoft\OneDrive] “EnableADAL”=dword:2 –> WAM is not used
The following 3:00 video starts off in a Windows session that was started with a password logon and a PRT without the MFA claim. First, a OneDrive sign-in is shown with the registry key set to “2”:
- The “Windows.Internal.Security.Authentication.Web.WamProviderRegistration” registry key was not accessed by OneDrive.
- The Edge browser presents an MFA prompt when authenticating with the PRT.
- The PRT is unchanged: the expiry time is the same as before.
Then, a OneDrive sign-in is shown with the registry key set to “1”:
- The “Windows.Internal.Security.Authentication.Web.WamProviderRegistration” registry key was accessed by OneDrive (shown in Process Monitor).
- The PRT is changed: the expiry time is different.
- The Edge browser does not present an MFA prompt when authenticating with the PRT.
Obviously, MFA imprinting has taken place.
Process Monitor in this video uses the filter “Process Name contains onedrive” and “Path contains Windows.Internal.Security.Authentication.Web.WamProviderRegistration.”

There seem to be several registry keys that can be used as indicators for sign-ins via WAM, this [HKLM\Software\Microsoft\WindowsRuntime\ActivatableClassId\Windows.Internal.Security.Authentication.Web.WamProviderRegistration] is one of them.
Some side notes regarding MFA imprinting:
- In my test lab, I could observe MFA imprinting by way of
- a successful Windows Hello for Business setup (tested on 20H2 and 21H1),
- signing in to the Edge browser (with the Edge browser as native app),
- signing in to OneDrive,
- signing in to Teams,
- signing in to Outlook,
- signing in to Excel.
- Signing in to a Web app (like https://portal.office.com) in an Edge browser session does not produce MFA imprinting. Quote: A PRT is only issued and renewed during native app authentication. A PRT is not renewed or issued during a browser session.
- The MFA imprint is carried forward with a PRT refresh.
- I was unsuccessful at trying to get rid of the MFA imprint while the device remains enabled in Azure AD. In my test lab, a new PRT from a password logon contains the MFA claim even after letting the previous PRT expire (2 weeks inactive) or after revoking (Revoke-AzureADUserAllRefreshToken) the previous PRT. If you know of any way that the MFA imprint can be lost while the device remains enabled in Azure AD, please let me know in the comments.
Windows sign-in with Windows Hello or with Fido2 key
After a sign-in with Windows Hello or with a Fido2 key on an Azure AD joined Windows 10 device, the PRT contains the MFA claim.
Windows sign-in with password
There are three ways (I am aware of) that MFA can be required for Azure AD join:
- Per-user MFA
- Device settings
- Conditional Access user actions
After a sign-in with the password on an Azure AD joined Windows 10 device, the PRT contains the MFA claim
- if the user signs in who had originally joined the device to Azure AD and the Azure AD join had taken place with MFA,
- or after MFA imprinting has taken place.
Summary
It is not so easy to have a PRT without MFA claim: sign-in with the password as a user who did not join the device to Azure AD with MFA and avoid anything that leads to MFA imprinting. So, on a standard Azure AD joined Windows 10 device, the PRT contains the MFA claim virtually all the time for the regular user. MFA fatigue is not a problem because the MFA claim in the PRT prevents interactive MFA prompts. Consequently, there is no downside in always requiring MFA and compliant device from fully managed Azure AD joined devices in Conditional Access.
But there is a clear upside to requiring MFA in addition to compliant device: assume only “require compliant device” is set up in Conditional Access. Also assume the organization has 10.000 users and each user has an Azure AD joined Windows 10 device. A malicious attacker has compromised the password of User1, but cannot complete MFA for User1. Now the malicious attacker can steal just any of the 10.000 devices and use it to log on as User1. The PRT will not satisfy the Conditional Access MFA requirement, but this does not matter if only device compliance is required.
If, however, “require compliant device AND MFA” is set up (or “always require MFA”), then the malicious attacker won’t get far with any device other than User1’s. The malicious attacker can log on to another user’s device with User1’s account and password, but cannot complete Windows Hello and cannot connect to any service because there will be MFA prompts for all of those. The malicious attacker would have to steal User1’s Windows 10 device in addition to compromising the password, a much higher obstacle than having to steal just any device.

For example, there is an application registered named jmprieur-dotnet-web-daemon-v2 with
- tenant where application is registered: 8b3c36dd-942d-4ea7-a4dd-df9ef430cf5a
- application ID: 5fdb1e39-be38-4cb1-8523-9d97365ed7de
- application secret: li.t14-00uhd9Ji~5a2a647D_h68F6sx11
- tenant where consent is given for application: 9cbada80-ca8c-43b1-8fb2-492cf58bccc9

The application has two delegated permissions and one application permission set up.

Microsoft recommends using an authentication library (like MSAL) for Azure AD authentication scenarios. Ignoring that, a simple HTTP POST request also gets an access token.
$postParams = @{

    client_id='5fdb1e39-be38-4cb1-8523-9d97365ed7de';

    client_secret='li.t14-00uhd9Ji~5a2a647D_h68F6sx11';

    scope='https://graph.microsoft.com/.default';

    grant_type='client_credentials'}

$accessToken = ((Invoke-WebRequest -Uri https://login.microsoftonline.com/9cbada80-ca8c-43b1-8fb2-492cf58bccc9/oauth2/v2.0/token -Method POST -Body $postParams).Content | ConvertFrom-Json).access_token
Note that the ‘scope’ parameter is required. Specifying ‘.default’ returns an access token that contains all application permissions. In the example it looks like this:

It can be seen that the access token contains the one application permission, but none of the delegation permissions. Consequently, in this example, the access token cannot be used to read a user’s mail, but it can be used to read all properties of all Azure AD accounts.
The manager of user [email protected] can be found with the following REST call:
Invoke-RestMethod -Uri 'https://graph.microsoft.com/v1.0/users/[email protected]/manager' -Headers @{'Authorization' = "Bearer " + $accessToken} -Method Get

This blog post is a small add-on to Jan Geisbauer‘s Privilege escalation in Azure AD article.
]]>MCAS uses the Linux Teams Client User Agent string to take the decision that this traffic is coming from a desktop application. The string is “Mozilla/5.0 (X11; Linux x86_64) AppleWebKit/537.36 (KHTML, like Gecko) MicrosoftTeams-Preview/1.2.00.32451 Chrome/69.0.3497.128 Electron/4.2.12 Safari/537.36” as can be seen, for example, in the Azure AD Sign-ins.

The immediate question one can ask is “Can this be used for spoofing in a browser to bypass the MCAS session policies?” And clearly yes, it can. Of course, user agent spoofing in a browser is very simple; the following video shows the described effect on Conditional Access App Control and MCAS session policies.
When contacted with this, the Microsoft Security Response Center (MSRC) replied “Our team investigated this issue, and this is by design. To mitigate, customer can create an access policy scoped to client apps with an action of “block”. This way, if a browser is spoofed as a client app, it will be blocked, and if it isn’t, session policy will apply as expected.” With this being the official position by Microsoft, here is a brief discussion what such an access policy could look like. Note that any access policy that produces the desired effect of preventing the spoofed browser session will always also prevent the Microsoft Teams Client for Linux.
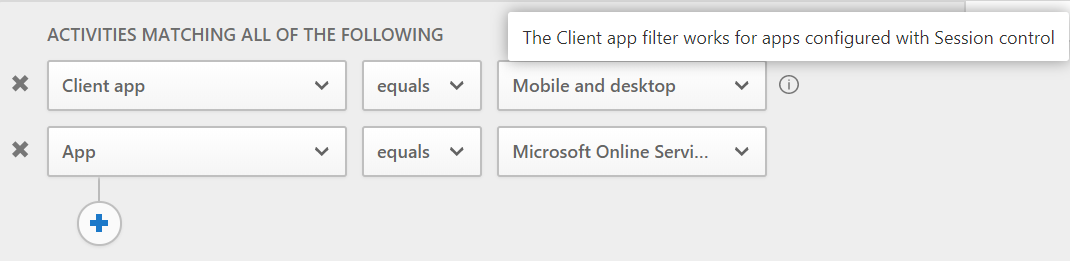
Essentially, the MCAS access policy has action “Block” with the crucial part being the filter for matching the activities. Ideally, the filter would consist only of the Linux Teams Client User Agent string, but this just does not work: it does not match the spoofed browser sessions.

The filter must include the “Client app equals Mobile and desktop” expression (the information notification mentions that this filter works for apps with session control). Whenever “Client app” is specified in the filter, then also “App” needs to be specified in the filter, otherwise the access policy cannot be saved. Using “Microsoft Online Services” as App, the resulting filter looks like this:
If your overall architecture is to use Conditional Access App Control only for browsers and never for Mobile and desktop apps, this filter is a good choice. It simply blocks all Mobile and desktop apps including anything that uses the Microsoft Teams Client for Linux User Agent string. Note that you must create additional access policies with “Block” action if you want to prevent the session policy bypass also for other apps that are not included in the “Microsoft Online Services” list.
If you have an architecture that does use Conditional Access App Control for Mobile and desktop apps as well, the filter needs to include the User agent string so as not to block those Mobile and desktop apps you want to allow. One possibility is to simply paste the whole string into the “User agent string” filter expression:
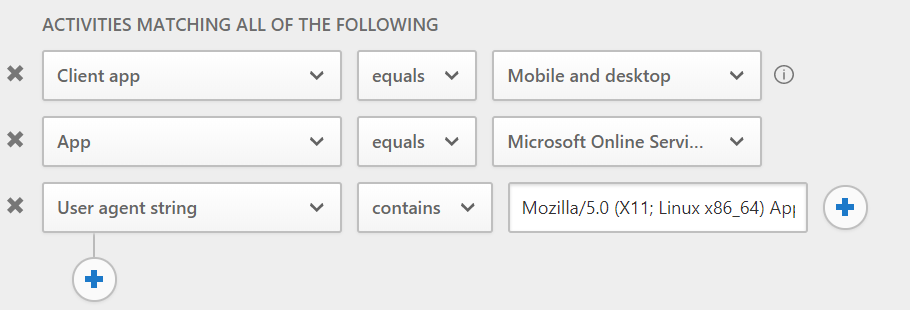
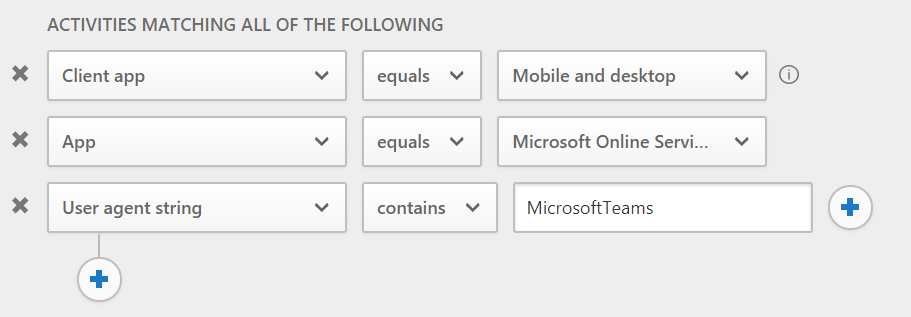
This will prevent the Microsoft Teams Client for Linux, it will prevent the User agent spoofed browser sessions, but leave all other Mobile and desktop apps unaffected. The downside is: it will no longer work once Microsoft changes only one character in the Teams Client for Linux User agent string. Unfortunately, putting a regular expression like Linux.*MicrosoftTeams.*Electron into the field is not possible, neither is it possible to specify a filter like User Agent string contains Linux AND User Agent string contains MicrosoftTeams AND User Agent string contains Electron because there can be only one User Agent string contains expression in the filter. Putting MicrosoftTeams or MicrosoftTeams-Preview into the field is an option because these strings do not occur in the User agent string for the Windows or MacOS Teams client.
In any case, whatever value you specify for the User Agent string filter expression, the matching of the access policy needs to be monitored closely as Microsoft might change the User Agent string for its Teams Clients anytime.
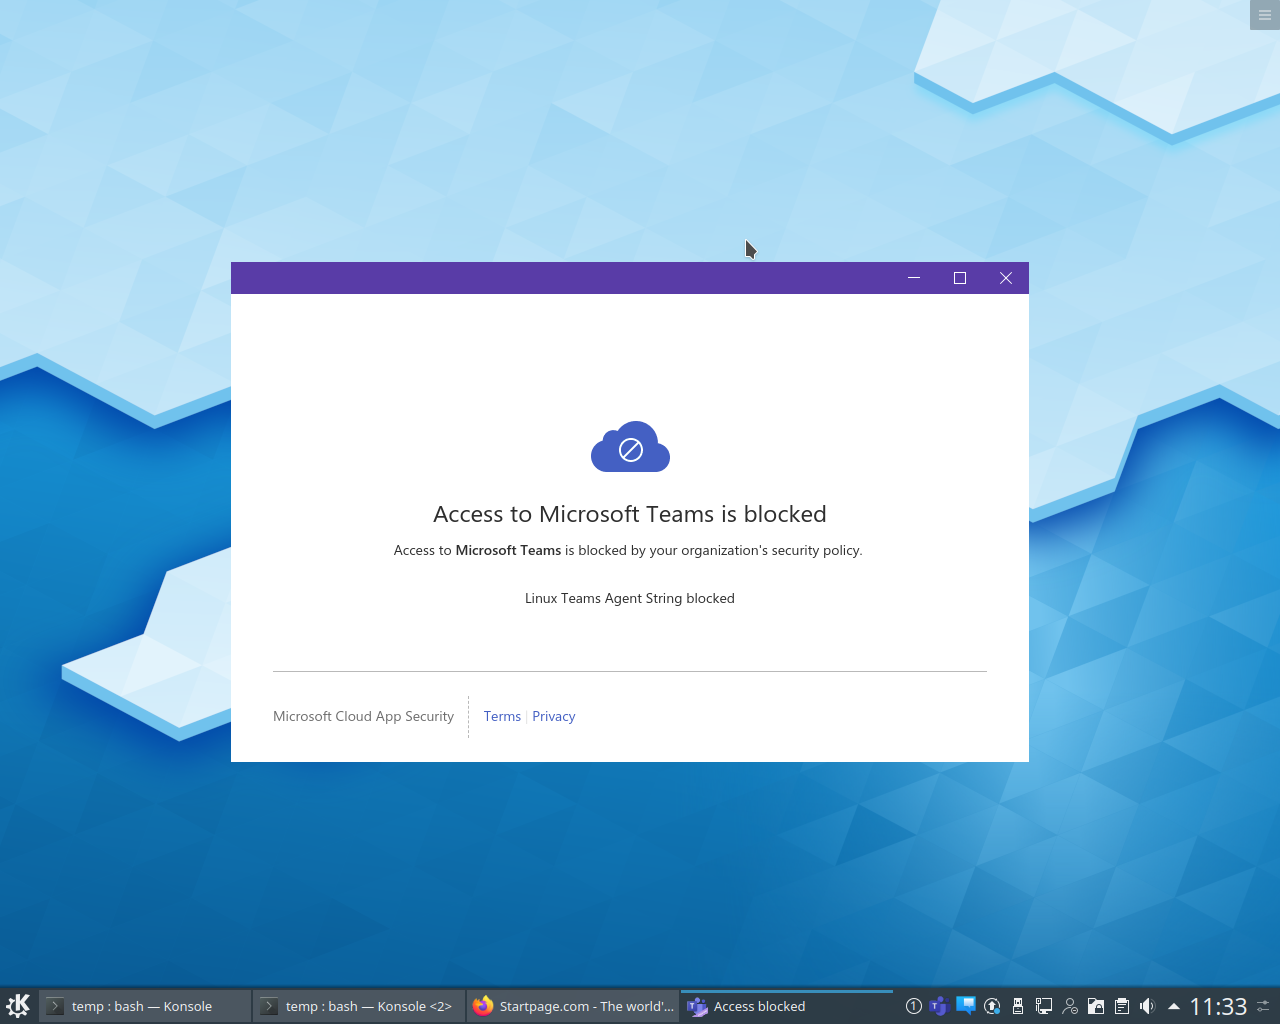
Once an access policy with the above filter is in place, the Microsoft Teams Client for Linux is blocked:
A spoofed browser session is also blocked:

The MCAS activity log shows the blocked access for the Microsoft Teams Client for Linux and for the spoofed browser session and also shows the allowed access for the non-spoofed browser session:

Microsoft calls this “Azure AD Join Single Sign-on” as described in this article: https://docs.microsoft.com/en-us/windows/security/identity-protection/hello-for-business/hello-hybrid-aadj-sso-base. This article mentions the term “Key trust model”, so let’s follow the key to see how the Azure AD joined Windows 10 device gets a Kerberos TGT from a domain controller for the logged on user. The Azure AD joined Windows 10 device accomplishes this even though it does not have an on-premises Active Directory computer object and it does not have a secure channel to any domain controller.
When a user on an Azure AD joined Windows 10 device sets up Windows Hello, a public / private key pair is generated. The private key goes into the TPM chip on the device. The public key, however, goes on a nice little journey. First of all, it can be found in a self-signed certificate in the user certificate store on the device.
We will use the 10 bytes D70BDEE9F322E931CCE0 to keep track of the key in this example.
Windows 10 then writes this key into the Azure AD object of the user. The user’s Azure AD object thus accumulates all keys from all devices where that user set up Windows Hello for Business. These Windows Hello for Business keys go into the attribute “searchableDeviceKey”, from where they can be accessed using Azure AD Graph API: https://graph.windows.net/<TenantId>/users/<UserUPN>?api-version=1.6-internal&$select=searchableDeviceKey
The following simple PowerShell script can be used to extract the Windows Hello for Business keys from a given Azure AD user. You need to modify the script with your Tenant ID and your Azure AD user’s UPN at the beginning; the script uses the Powershell Client ID and requires you to enter the user’s or some administrator’s credentials. Note that you must have the Azure AD Powershell module or the Azure AD Preview Powershell module installed.
Get-WHfBDeviceKeys-from-AzureAD
If, as in this example, the user has set up Windows Hello for Business on 5 devices, then 5 keys are returned.
The base64 encoded key material from the first key is

After base64 decoding we get

Now, Azure AD Connect takes over and synchronizes the key from searchableDeviceKey to the user’s on-premises AD object into the attribute msDS-KeyCredentialLink. Note that msDS-KeyCredentialLink is introduced with the Windows Server 2016 AD schema and only Windows Server 2016 domain controllers can make use of it. You can see the value of msDS-KeyCredentialLink with ldp.exe:
The number of entries should match the number from the PowerShell output, 5 in this case. One of the keys is the one we are following.
Whenever the user signs in to the Azure AD joined Windows 10 device, Azure AD sends the name of the on-premises domain the user is a member of back to the device. With this knowledge, the device tries to find domain controllers for this domain using DNS and Netbios broadcasts; the device succeeds if it is on the corporate network. Next, the device contacts each domain controller one by one until it finds a domain controller that is on Windows Server 2016 or newer. It does so by connection-less LDAP requests over UDP (CLDAP), exactly in the same way that the command nltest /dsgetdc:<domain>.com /DS_10 does it. Thanks to André Mieth for pointing this out.

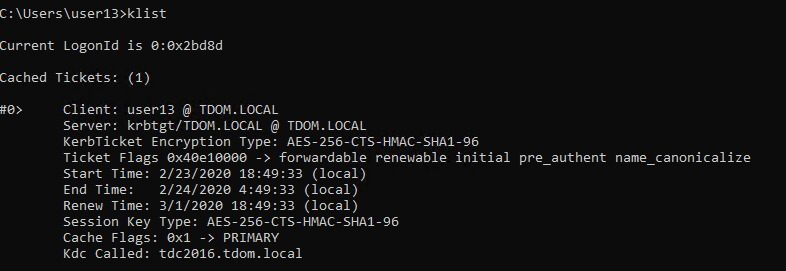
Once a Windows Server 2016 (or newer) domain controller is found, the Azure AD joined Windows 10 device starts talking Kerberos to get a TGT. Upon first try, the domain controller tells the device that Kerberos pre-authentication is required.
![]()
The client obeys and sends the self-signed certificate for pre-authentication in the next Kerberos AS-REQ.
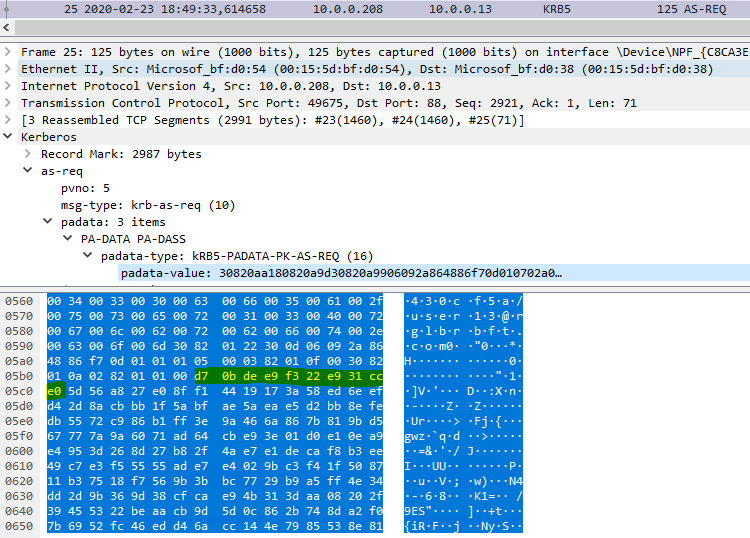
Obviously, the self-signed certificate contains the key we are following. The domain controller checks if the key is present in the user’s msDS-KeyCredentialLink attribute, note that only Windows Server 2016 (or newer) domain controllers can do that. If the domain controller finds the key, it notes the pre-authentication method in the event log and issues a TGT.

On the side: for a successful Kerberos protocol exchange, the domain controller also needs to provide something to prove that it is valid. It does so by sending a certificate to the Windows 10 device. This certificate needs to contain the KDC Authentication enhanced key usage; and the Windows 10 device must be able to reach a CRL distribution point via HTTP. For a detailed explanation see the already mentioned article https://docs.microsoft.com/en-us/windows/security/identity-protection/hello-for-business/hello-hybrid-aadj-sso-base.
In this article, the expression “Home Tenant” is used to denote the tenant where the Azure AD account of the user resides. The expression “Inviting Tenant” is used for the tenant where the B2B Guest account of the user resides.
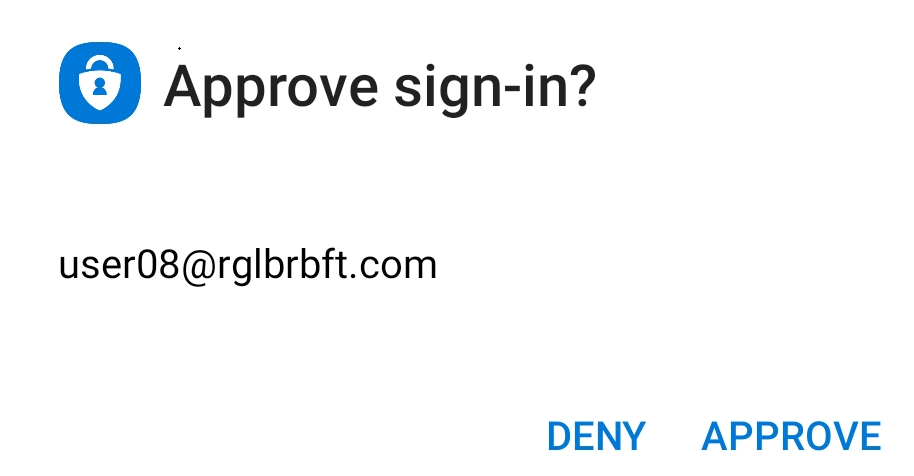
For the sake of demonstration, let’s assume you use a new in-private window or guest window in a browser (so there are no tokens in cookies and there is no access to the Primary Refresh Token that could get in the way). The Home Tenant requires MFA for the user and the Inviting Tenant requires MFA for guests. Then you will have a logon experience as shown in this video:
There are two MFA prompts. The first MFA prompt at 00:27 comes from your Home Tenant as you are authenticating to Teams in your Home Tenant. It has the branding from the Home Tenant and the notification in the authenticator app looks like this:
The second MFA prompt at 01:00 is from the Inviting Tenant as you are authenticating to Teams in the Inviting Tenant.
Noted in August 2020, but the change in behavior might have been made some time before: the background image is now from the resource tenant, while the banner logo in the dialog box is from the home tenant.
but the notification in the authenticator apps looks different:
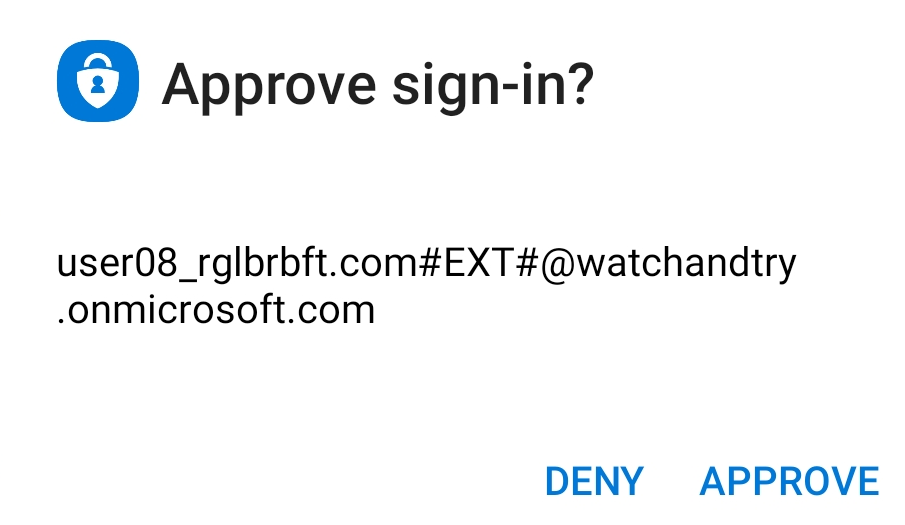
If you are using the authenticator app, then this is how you can tell the difference: you will see the B2B guest account syntax in the notification if the MFA prompt comes from the Inviting Tenant.
Obviously, for such a logon experience as shown in the video, you must have registered with MFA in both tenants at some point in time in the past. Note that this are two separate and independent MFA registrations! Here is how you can navigate to the MFA settings in the Inviting Tenant:
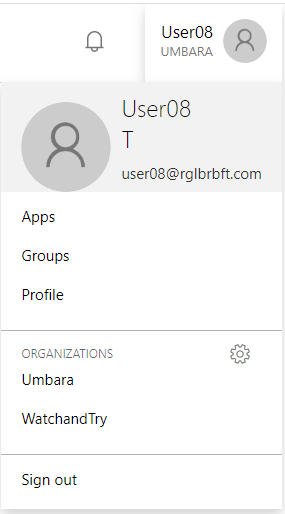
In a browser, connect to https://myapps.microsoft.com and authenticate normally with your Home Tenant credentials (or use a browser session that is already authenticated).
August 2020: myapps.microsoft.com redirects to myapplications.microsoft.com by default. To navigate as described below you will have to click on ‘Leave new experience’ from the dialog of the account object in the upper right corner.
Click on the User Icon and choose “Profile” or choose the settings symbol next to Organizations.
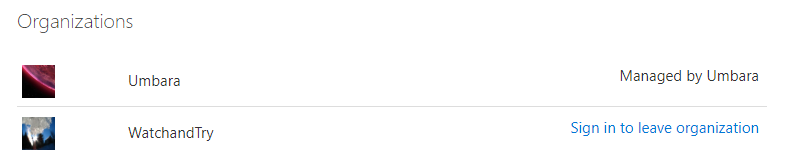
The next page shows your Home Tenant and all the other Tenants where you have a guest account. Click on “Sign in to leave organization” for the Inviting Tenant in question.
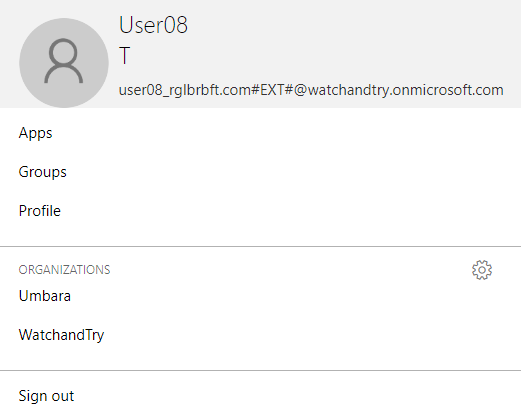
You should be getting an MFA prompt as you sign in to the Inviting Tenant. If you click on the user icon, you see that you are logged on to the Inviting Tenant now.
If you choose “Profile”, you can also see that you are logged on to the Inviting Tenant as it offers you to “Leave Organization”. Obviously, this is not what you want to do at this point as it deletes your guest account in the Inviting Tenant.
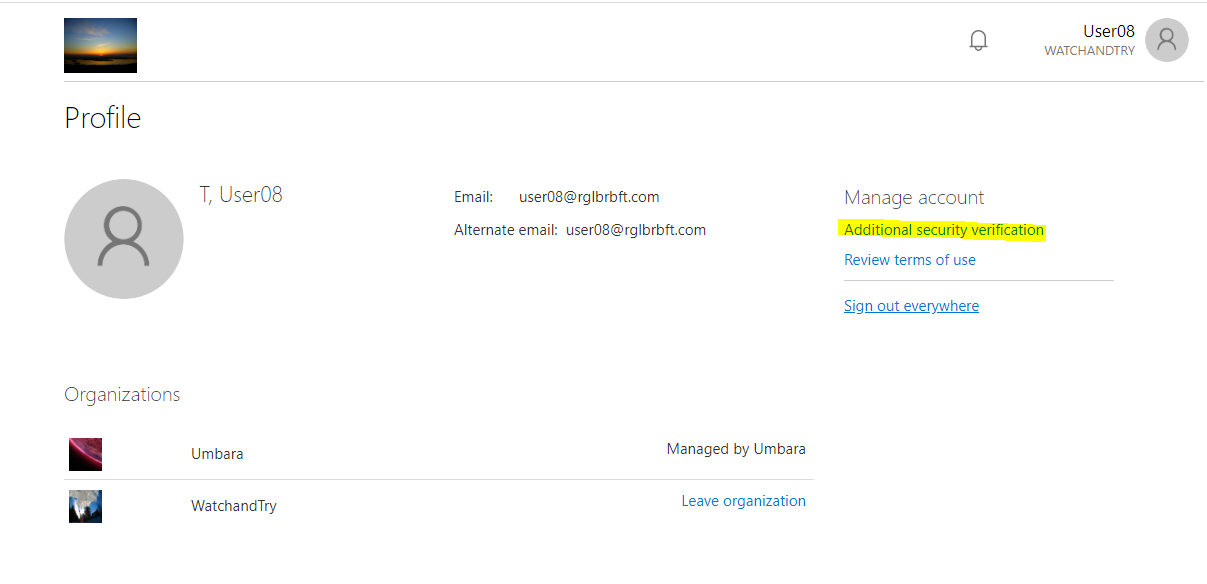
Instead, choose “Additional security verification” as this takes you to your guest account’s MFA settings in the Inviting Tenant.
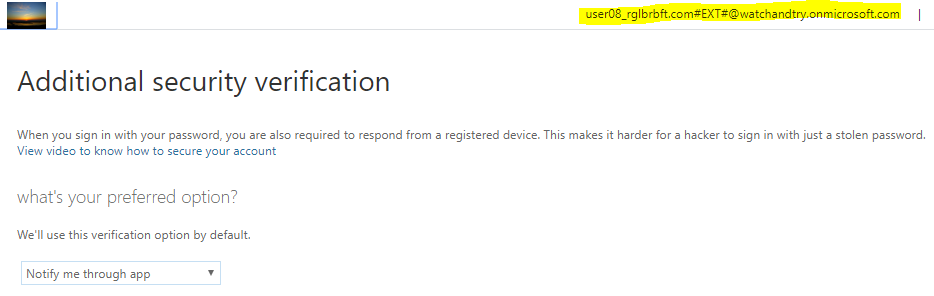
That said, you can set up a different authentication method for the Inviting Tenant. For example, use the Authenticator app in your Home Tenant and use phone call or text message in the Inviting Tenant. That will also let you distinguish between MFA prompts from the two tenants quite easily.
On the side: some people, myself included, believe that two or more MFA registrations is too confusing for users. We therefore recommend to exclude guest users from any and all MFA requirements. For guests: manage authorization, not authentication!

But how?
Well, for one thing, you can use Azure Portal and navigate to the sign-ins for your own Azure AD user identity. 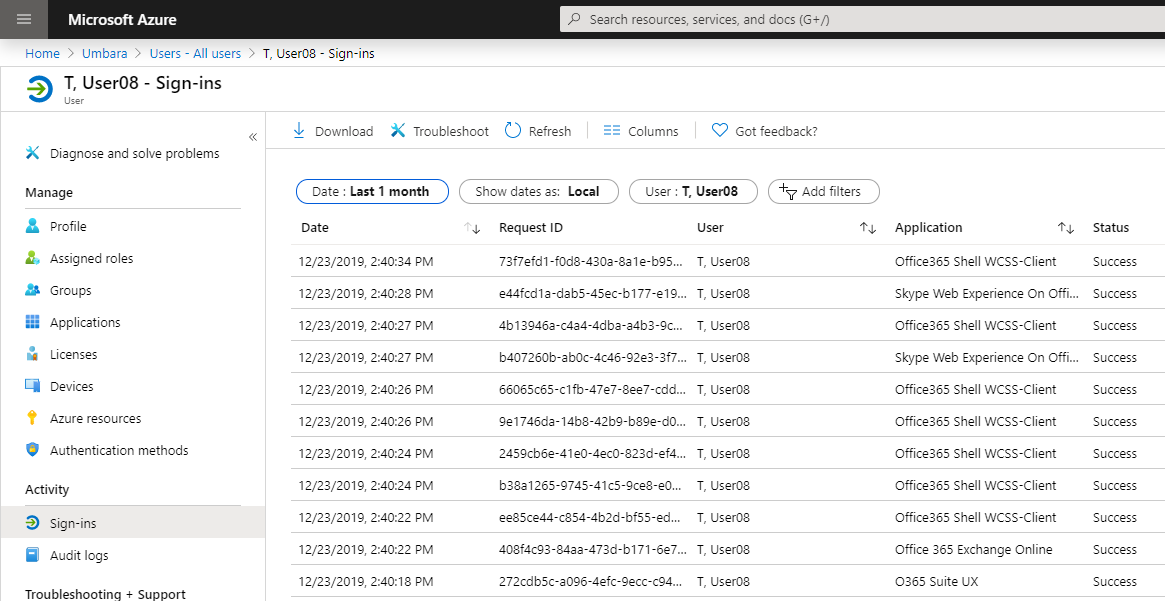
Obviously, navigating through the Azure Portal presupposes that you are allowed to do just that, which is usually not the case for normal end users without administrative roles. So, what then? Well, Microsoft Graph API comes to the rescue. After all, you are allowed to read your sign-in data and preventing you from accessing the Azure Portal should not prevent you from accessing all pieces of information from your sign-ins. To leverage the Graph API to access you sign-in data, you need two pieces of data:
- the Tenant ID of the Azure Active Directory tenant that holds your Azure AD identity,
- the Object ID of your Azure AD identity.
Here is how you can find out about the Tenant ID and the Azure AD identity’s Obejct ID.
To read the sign-ins using the Graph API, the version 1.0 as well as the beta version documentation states that AuditLog.Read.All, Directory.Read.All permissions are needed to call this API. A normal end user does not have those permissions. Another dead end? No. It turns out you need to filter appropriately to read only your own sign-ins, then you don’t need those permissions. Here is the trick:
Call the Graph API as follows:
"https://graph.microsoft.com/beta/auditLogs/signIns?api-version=beta&$filter=(userId eq 'YourObjectIDgoeshere')"
For example, with "https://graph.microsoft.com/beta/auditLogs/signIns?api-version=beta&$filter=(userId eq 'd9349202-2a5a-40bf-89c6-fe630ffb5861')" as seen in Graph Explorer:

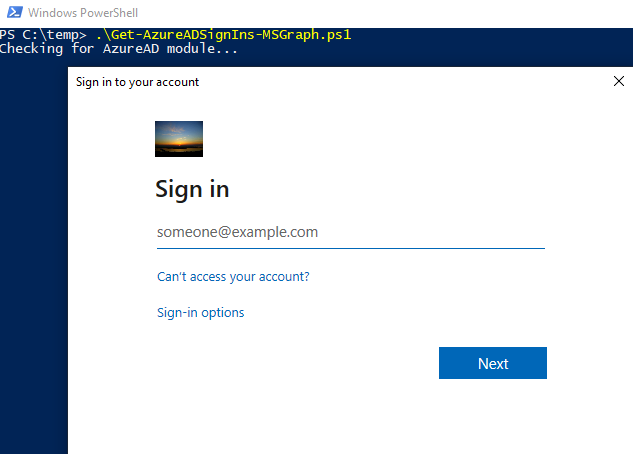
The following PowerShell script does that (see the highlighted line below). You need to modify the script with your Tenant ID and your Azure AD account’s Object ID at the beginning; the script uses the Powershell Client ID and requires you to enter your credentials, including MFA if your tenant is, hopefully, set up for it. The script writes the sign-ins into a csv file. Note that you must have the Azure AD Powershell module or the Azure AD Preview Powershell module installed.
Download the Powershell script Get-AzureADSignIns-MSGraph.ps1 as zip file.
#------------------------------------------------------------
# Based on Azure AD Sign-Ins "DownloadScripts.ps1" from Microsoft
#
# Function Get-AccessToken taken from https://blogs.technet.microsoft.com/cloudlojik/2018/06/29/connecting-to-microsoft-graph-with-a-native-app-using-powershell/
# (Paul Kotylo)
#
#
# 20191208
# Stephan Wälde
#
# tested with version 2.0.2.77 of the AzureADPreview PowerShell module
# tested with version 2.0.2.76 of the AzureAD Powershell module
#------------------------------------------------------------


# Replace with own Tenant ID and Account ID
$tenantId = "xxxxxxxx-86f1-41af-91ab-xxxxxxxxxxxx"
$accountId = "xxxxxxxx-44b4-4489-8e99-xxxxxxxxxxxx"


# The filter expression in this URL gets the Sign-In records of the specified Account ID
# The records will be returned by the Graph API after Account ID's logon without any additional permissions
$url = "https://graph.microsoft.com/beta/auditLogs/signIns?api-version=beta&`$filter=(userId%20eq%20%27$accountId%27)&`$orderby=createdDateTime%20desc"


# from https://blogs.technet.microsoft.com/cloudlojik/2018/06/29/connecting-to-microsoft-graph-with-a-native-app-using-powershell/
# using PowerShell as clientID
Function Get-AccessToken ($TenantName, $ClientID, $redirectUri, $resourceAppIdURI, $CredPrompt){
    Write-Host "Checking for AzureAD module..."
    if (!$CredPrompt){$CredPrompt = 'Auto'}

    $AadModule = Get-Module -Name "AzureAD" -ListAvailable
    if ($AadModule -eq $null) {$AadModule = Get-Module -Name "AzureADPreview" -ListAvailable}
    if ($AadModule -eq $null) {write-host "AzureAD Powershell module is not installed. The module can be installed by running 'Install-Module AzureAD' or 'Install-Module AzureADPreview' from an elevated PowerShell prompt. Stopping." -f Yellow;exit}
    if ($AadModule.count -gt 1) {
        $Latest_Version = ($AadModule | select version | Sort-Object)[-1]
        $aadModule      = $AadModule | ? { $_.version -eq $Latest_Version.version }
        $adal           = Join-Path $AadModule.ModuleBase "Microsoft.IdentityModel.Clients.ActiveDirectory.dll"
        $adalforms      = Join-Path $AadModule.ModuleBase "Microsoft.IdentityModel.Clients.ActiveDirectory.Platform.dll"
        }
    else {
        $adal           = Join-Path $AadModule.ModuleBase "Microsoft.IdentityModel.Clients.ActiveDirectory.dll"
        $adalforms      = Join-Path $AadModule.ModuleBase "Microsoft.IdentityModel.Clients.ActiveDirectory.Platform.dll"
        }
    [System.Reflection.Assembly]::LoadFrom($adal) | Out-Null
    [System.Reflection.Assembly]::LoadFrom($adalforms) | Out-Null
    $authority          = "https://login.microsoftonline.com/$TenantName"
    $authContext        = New-Object "Microsoft.IdentityModel.Clients.ActiveDirectory.AuthenticationContext" -ArgumentList $authority
    $platformParameters = New-Object "Microsoft.IdentityModel.Clients.ActiveDirectory.PlatformParameters"    -ArgumentList $CredPrompt
    $authResult         = $authContext.AcquireTokenAsync($resourceAppIdURI, $clientId, $redirectUri, $platformParameters).Result
    return $authResult
    }


# First, let's authenticate
$clientId = "1b730954-1685-4b74-9bfd-dac224a7b894" # PowerShell
$redirectUri = "urn:ietf:wg:oauth:2.0:oob"
$MSGraphURI = "https://graph.microsoft.com"
$CredPrompt = "Always"

$AccessToken = Get-AccessToken -TenantName $tenantId -ClientID $clientId -redirectUri $redirectUri -resourceAppIdURI $MSGraphURI -CredPrompt $CredPrompt


# Next, let's get the Sign-in data
$now = get-date -Format "yyyyMMddhhmm"
$outputFile = "$now-AzureADSignIns-$tenantId.csv"

$headers = @{
        'Content-Type'  = 'application\json'
        'Authorization' = $AccessToken.CreateAuthorizationHeader()
        }


# anything below is taken from the "DownloadScripts.ps1" from Microsoft
Function Expand-Collections {
    [cmdletbinding()]
    Param (
        [parameter(ValueFromPipeline)]
        [psobject]$MSGraphObject
    )
    Begin {
        $IsSchemaObtained = $False
    }
    Process {
        If (!$IsSchemaObtained) {
            $OutputOrder = $MSGraphObject.psobject.properties.name
            $IsSchemaObtained = $True
        }

        $MSGraphObject | ForEach-Object {
            $singleGraphObject = $_
            $ExpandedObject = New-Object -TypeName PSObject

            $OutputOrder | ForEach-Object {
                Add-Member -InputObject $ExpandedObject -MemberType NoteProperty -Name $_ -Value $(($singleGraphObject.$($_) | Out-String).Trim())
            }
            $ExpandedObject
        }
    }
    End {}
}

Write-Output "--------------------------------------------------------------"
Write-Output "Downloading from $url"
Write-Output "Output file: $outputFile"
Write-Output "--------------------------------------------------------------"

$count=0
$retryCount = 0
$oneSuccessfulFetch = $False

Do {
    Write-Output "Fetching data using Url: $url"

    Try {
        $myReport = (Invoke-WebRequest -UseBasicParsing -Headers $headers -Uri $url)
        $convertedReport = ($myReport.Content | ConvertFrom-Json).value
        $convertedReport | Expand-Collections | ConvertTo-Csv -NoTypeInformation | Add-Content $outputFile
        $url = ($myReport.Content | ConvertFrom-Json).'@odata.nextLink'
        $count = $count+$convertedReport.Count
        Write-Output "Total Fetched: $count"
        $oneSuccessfulFetch = $True
        $retryCount = 0
    }
    Catch [System.Net.WebException] {
        $statusCode = [int]$_.Exception.Response.StatusCode
        Write-Output $statusCode
        Write-Output $_.Exception.Message
        if($statusCode -eq 401 -and $oneSuccessfulFetch)
        {
            # Token might have expired! Renew token and try again
            $authResult = $authContext.AcquireToken($MSGraphURI, $clientId, $redirectUri, "Auto")
            $token = $authResult.AccessToken
            $headers = Get-Headers($token)
            $oneSuccessfulFetch = $False
        }
        elseif($statusCode -eq 429 -or $statusCode -eq 504 -or $statusCode -eq 503)
        {
            # throttled request or a temporary issue, wait for a few seconds and retry
            Start-Sleep -5
        }
        elseif($statusCode -eq 403 -or $statusCode -eq 400 -or $statusCode -eq 401)
        {
            Write-Output "Please check the permissions of the user"
            break;
        }
        else {
            if ($retryCount -lt 5) {
                Write-Output "Retrying..."
                $retryCount++
            }
            else {
                Write-Output "Download request failed. Please try again in the future."
                break
            }
        }
     }
    Catch {
        $exType = $_.Exception.GetType().FullName
        $exMsg = $_.Exception.Message

        Write-Output "Exception: $_.Exception"
        Write-Output "Error Message: $exType"
        Write-Output "Error Message: $exMsg"

         if ($retryCount -lt 5) {
            Write-Output "Retrying..."
            $retryCount++
        }
        else {
            Write-Output "Download request failed. Please try again in the future."
            break
        }
    }

    Write-Output "--------------------------------------------------------------"
} while($url -ne $null)
]]>In this article, the expression “Home Tenant” is used to denote the tenant where the Azure AD account of the user resides. The expression “Inviting Tenant” is used for the tenant where the B2B Guest account of the user resides.
For the end user view, simply add the Inviting Tenant ID to the URL, like this: "https://mysignins.microsoft.com/?tenant=766be2d4-f169-4e66-82f5-5a1c7d162a19". Then log on to your B2B guest account (see below on how to find the Inviting Tenant ID). But what if you are interested in the additional information you get with the administrator’s view?
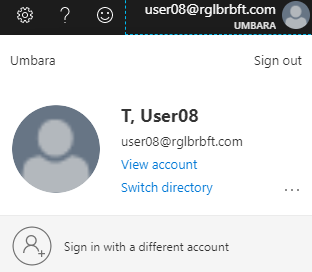
Only in the exceptional and very rare case that a guest user has been promoted to user type “Member” and the Inviting Tenant does not restrict access to the Azure AD administration portal can a guest user access her own sign-ins in the Azure Portal. Strictly speaking, this user is no longer a guest user in the Inviting Tenant, but rather an “External Azure Active Directory user with user type Member”. You can get to your guest sign-ins by signing in to the Azure portal using the credentials from the Home Tenant, then choosing the Inviting Tenant in the Switch Directory Menu in the upper right corner. Once the focus is on the Inviting Tenant, navigate to your own guest identity and choose “Sign-Ins” under Activity.
But normally, the guest user has not been promoted to user type Member and/or access to the Azure AD administrative portal is restricted in the Inviting Tenant. So, what then? Like in the normal user case, Graph API helps.
First, you have to find the Tenant ID of the Inviting Tenant and the Object ID of the guest account therein. The PowerShell script to dump your sign-ins from the Inviting Tenant is identical to the PowerShell script from the user account in the Home Tenant. Modify the script by setting the variables for the Tenant ID and the Object ID accordingly at the beginning of the script. The Graph API is called as follows:
"https://graph.microsoft.com/beta/auditLogs/signIns?api-version=beta&$filter=(userId eq 'YourObjectIDgoeshere')"
Download the Powershell script Get-AzureADSignIns-MSGraph.ps1 as zip file.
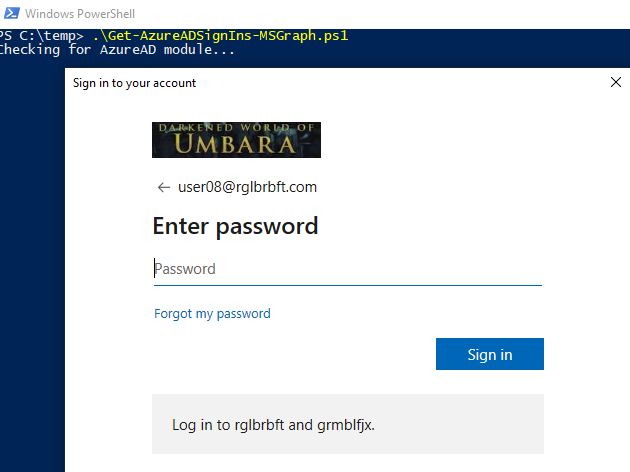
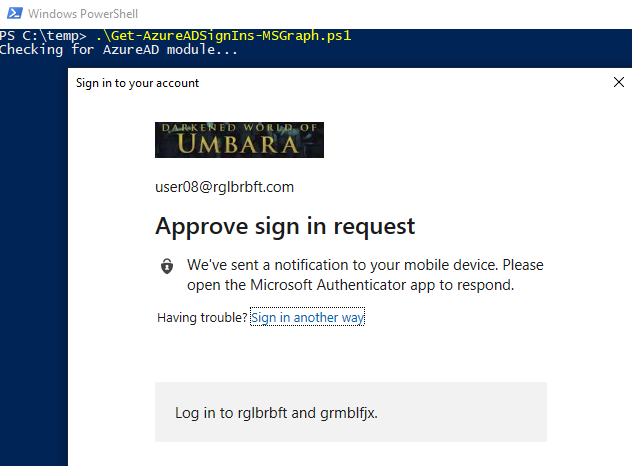
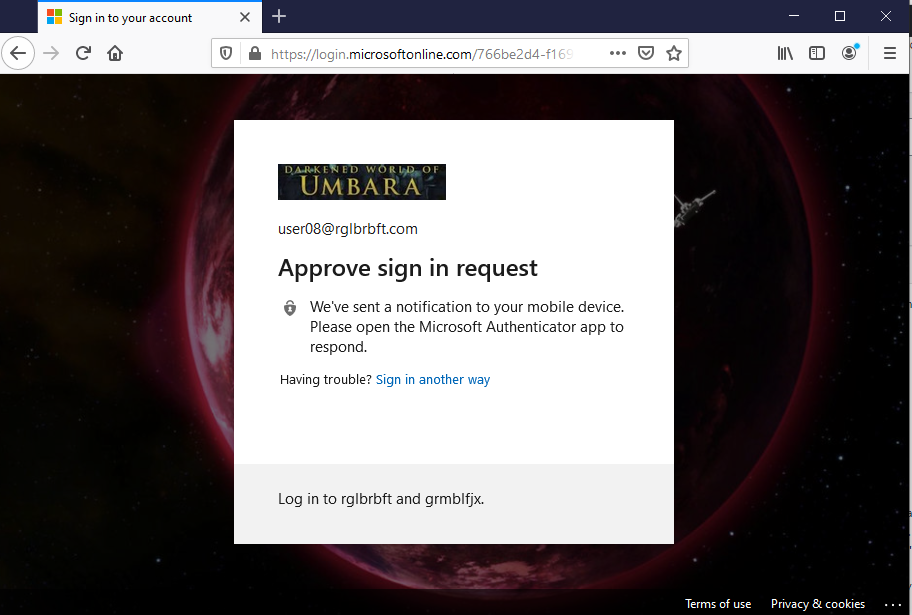
The script logs you in directly to the Inviting Tenant using the guest account. So the login experience is similar to the login experience from Azure CLI. First, you get a prompt with the branding from the Inviting Tenant.
Ignore the branding and enter your user name from your Home Tenant. The password prompt branding will be from your Home Tenant.
This direct login to the Inviting Tenant bypasses Conditional Access in your Home Tenant.
So you do not get an MFA prompt from your Home Tenant, even if Conditional Access is set up to require MFA for you. But you might get an MFA prompt from the Inviting Tenant, if the Inviting Tenant requires MFA for your guest account. But, just to confuse you, the branding from this MFA prompt is from your Home Tenant. (See the article How to tell wich tenant prompts for MFA for more details.)
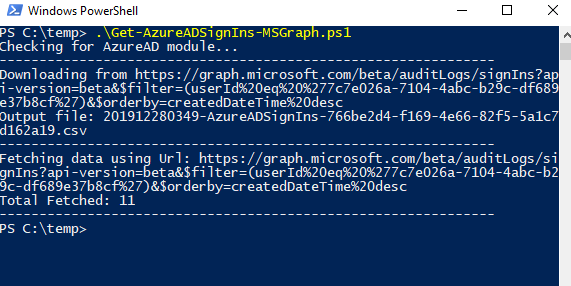
After a successful logon with your guest account in the Inviting Tenant, the script will run and dump your sign-ins into a csv file.
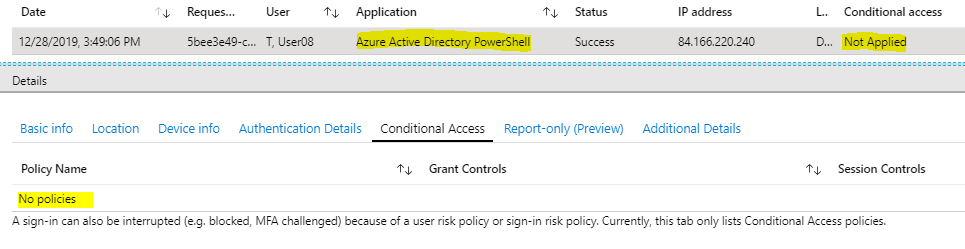
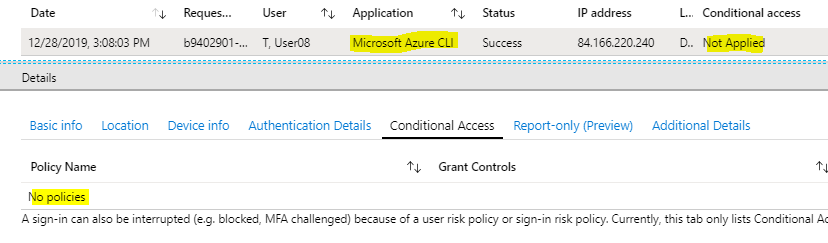
Oh, and by the way: check out the column “appliedConditionalAccessPolicies” in the csv output. This might be worth more than a side note, but here you go. You get some pieces of information about the Conditional access rules that are set up in the Inviting Tenant: the list of all rules, their names, some information about the grant controls and whether or not a rule was applied to the sign-in.
]]>Being a normal end user without any administrative roles, there are several ways to find the Tenant ID of the tenant to which your Azure AD account belongs. Some are presented here, I am sure there are more.
You can open the Azure Portal. Even if you are not allowed to navigate, which is likely, you can click on “Switch Directory” in the upper right corner and read the ID of your tenant.
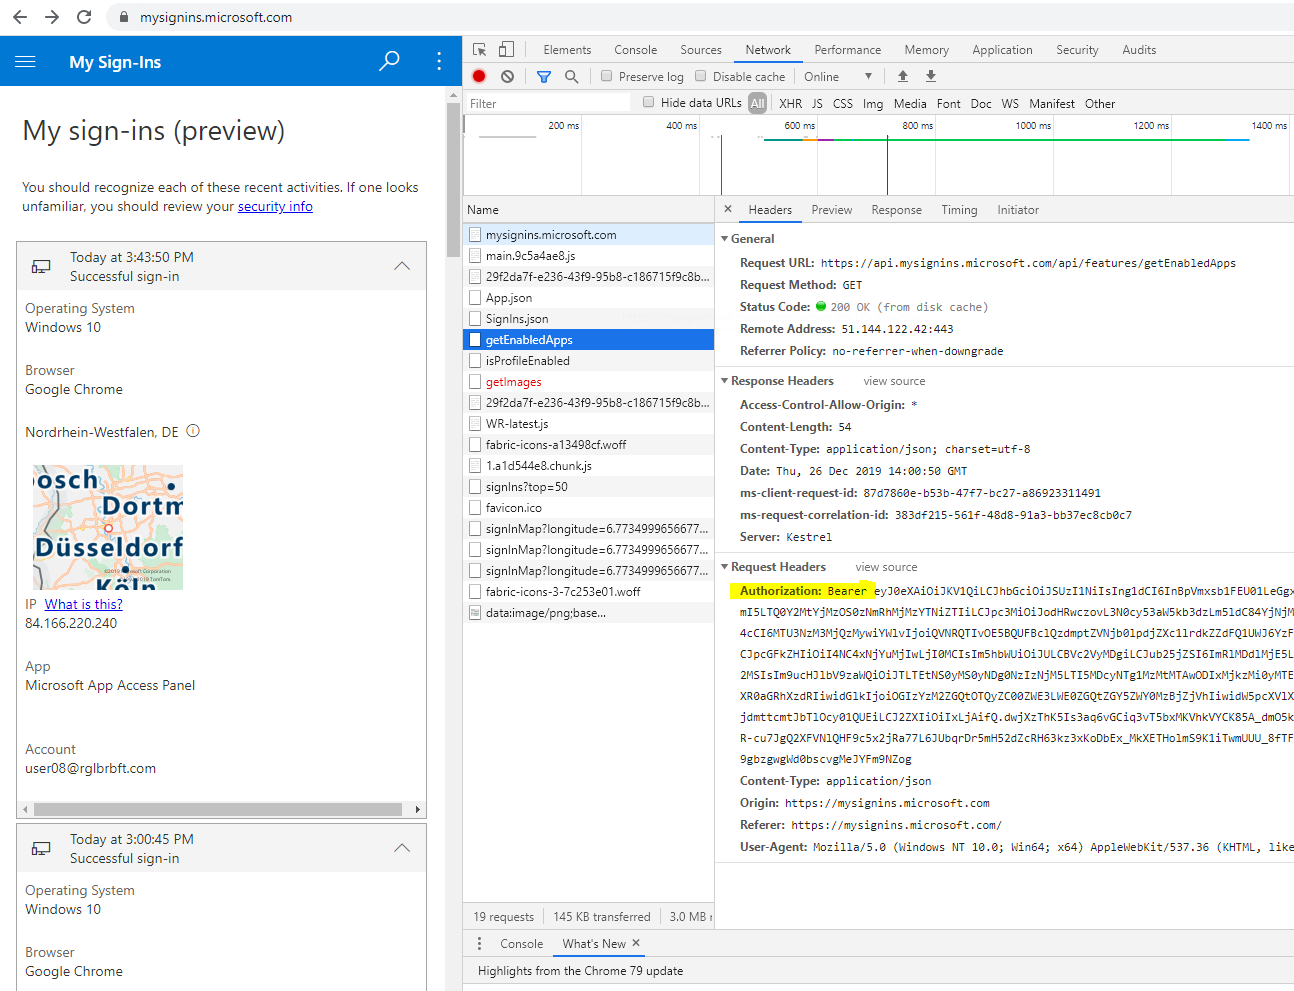
You can also open My Sign-ins and navigate in the menu, for example to “Devices” or “Organizations”. The Tenant ID will show in the URL in the address bar in the browser.
Or, you can use PowerShell with the Azure AD module. Run the command Connect-AzureAD and enter your normal end user credentials. The Tenant ID is displayed right away.

Find the Object ID
There are also several ways to find the Object ID as a normal end user.
For once, you can view the browser activity using F12 while navigating through the Office portal or My Sign-ins. You can check through the HTTP requests until you find one with the Bearer token in the HTTP request header.
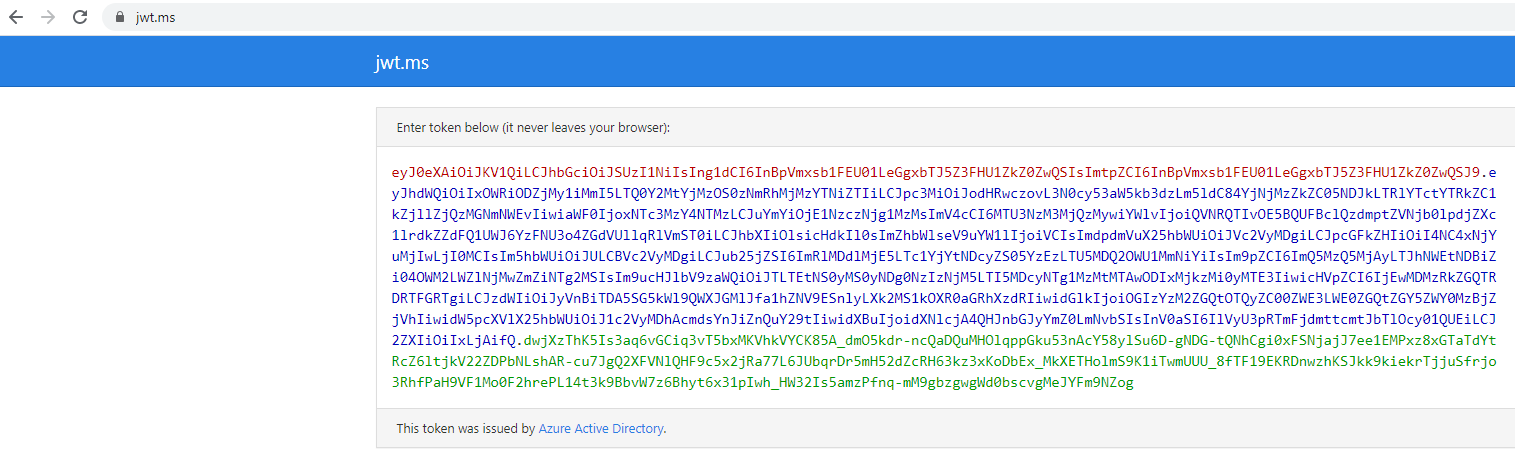
Copy the value from the Bearer field and paste it into https://jwt.ms.
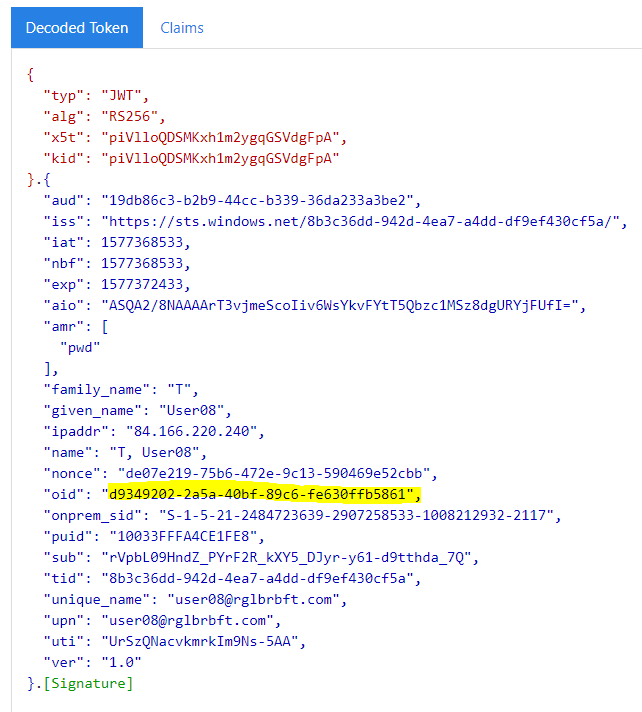
In the “Decoded Token” part, you will find the Object ID:
Another way is to use PowerShell again. After connecting to Azure AD, run the command Get-AzureADUser -searchstring <your user name>.
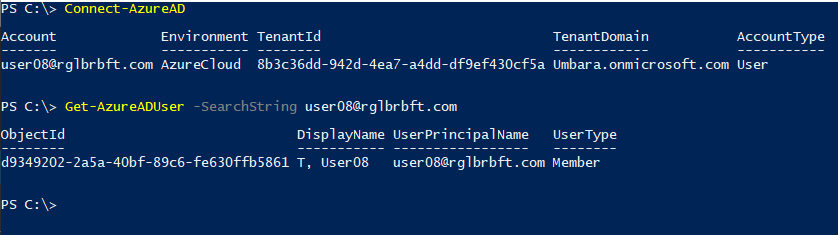
The Object ID is displayed.
Find the Tenant ID
Now this is about finding the Tenant ID of the Inviting Tenant.
You can open the Azure Portal, logging on as the Azure AD user in the Home Tenant. Even if you are not allowed to navigate, which is likely, you can click on “Switch Directory” in the upper right corner and read the IDs of all tenants in which you are a guest.
Another way to find the Inviting Tenant’s ID is Azure CLI. Use the command az login --allow-no-subscriptions to log on to Azure without connecting to any subscription. Your default browser opens to start an interactive login dialog. Log on using the credentials from your Home Tenant. The logon dialog will include an MFA prompt from your Home Tenant, if your Home Tenant requires MFA for you. Right after login you get a list that includes your Home Tenant (“isDefault”: true) and that includes one entry for every Inviting Tenant (“isDefault”: false) where you have a guest account.

Instead of a list entry you might get an error message for a given Inviting Tenant, this is the case if the Inviting Tenant requires MFA for you to sign in. No matter if you get a valid list entry or an error message, the Tenant ID is displayed in either case. If you have guest accounts in many tenants, it might be difficult to understand which Tenant ID belongs to which tenant. The easiest way to find out is to compare the Tenant IDs from the Azure CLI to the list you see in Azure Portal when you click on “Switch Directory”.
On the side: in this Azure CLI session, you can use the command az ad signed-in-user show --query objectId to get the Object ID of the Azure AD account in the Home Tenant. But there are easier methods for that.
Find the Object ID
This is about finding the Object ID of the guest account in the Inviting Tenant.
You can use Azure CLI to do that. Use the command az login --allow-no-subscriptions --tenant <Tenant ID>. The default browser opens and shows the branding from the Inviting Tenant when asking for the user name.

Ignore the branding and enter the user name from the Home Tenant. When displaying the prompt for the password, the branding from your Home Tenant is shown. The background picture is still from the branding of the Inviting Tenant.

If you find the branding story confusing so far, wait until we talk about MFA! Directly logging in to the Inviting Tenant bypasses Conditional Access in the Home Tenant:
So you never get an MFA prompt from you Home Tenant when logging in directly to the Inviting Tenant. However, you might still get an MFA prompt at this point: if the Inviting Tenant requires MFA for your guest account. While it is the Inviting Tenant that prompts you for MFA, note that the prompt branding and the background branding is from your Home Tenant.
Let’s hope the Inviting Tenant does not require MFA for a guest login. Anyway, now you are logged on with your guest account in the Inviting Tenant. You can now run the command az ad signed-in-user show --query objectId, which will display the Object ID of your guest account.

One final word
about the default browser that opens during the interactive az login. If you have an Azure AD joined Windows 10 device or a Hybrid Azure AD joined Windows 10 device and if you use a default browser that can access your Primary Refresh Token, then you can only interactively logon to Azure CLI with the currently logged on Windows user. This is fine if that’s the account you are looking at anyway.
If not, you have to use a workaround. What you can do is to temporarily set up a default browser that cannot access the Primary Refresh Token; Firefox is a good choice. With Firefox as default browser, you can interactively logon using az login with any Azure AD account.