Projects may also set up additional technical requirements, such as building and testing the code, performing static style checks, or even scanning the diff with a generative AI code review bot.
With all of these automated processes, it’s more important than ever to focus on the primary purpose of pull requests:
The main purpose of pull requests is to communicate with the other humans interacting with the project.
Many contributors erroneously assume that the purpose of pull requests is to avoid bugs or regressions. While that’s important, we avoid regressions by having a robust test suite that is checked before merging. While sometimes humans can catch bugs, they are incredibly fallible. I personally believe that code is easier to write than it is to read, so how can I expect a reviewer to catch something that I didn’t while writing, building, and running the code locally?
This is where it becomes critical to communicate clearly when presenting a change to your project.
Every code change has risk. Why is the expected reward worth that risk? What have you done to minimize the risk and maximize the value?
Every code change interrupts the mental model of other engineers. How can you use your pull request as an opportunity to improve everyone’s mental model of the project? What concepts and ideas were of utmost importance, even if you think that most contributors already know it?
Every line of code is technical debt. You are asking your team to take ownership of this change into the future. Your new feature is something that may cause maintenance burden or add complexity to future changes. How can future contributors make sense of your change and why you made it?
With these things in mind, the most important thing to keep in mind is that no one understands this section of the code as much as you do in this moment, including you in the future. You already have a lot of valuable information in your brain right now. Write it down before it’s too late!
Improving your communication has benefits in a few different directions:
- Most Obvious: You can help the reviewers jump into review with full context and get to high quality feedback as soon as possible.
- Less Obvious: You can do a self-review before sharing your change with your team, helping to improve your own understanding of the problem and avoiding costly asynchronous feedback loops with the team.
- Most Obscure: Your future self may stumble on this change again and will have lost the necessary context that you have right now. Make it easy to reload that context out of your long-term memory by encoding it in writing.
While taking the time to communicate well may seem like friction to your development process, this is a critical step to speed up your reviews and to minimize maintenance costs in the future.
This guide will present some examples of how to communicate well that you can take back to your team and project. Work with your community to establish the standards you expect everyone to follow and point a way forward to improved communication.
Opportunities for communication
When working with pull requests, the first thing reviewers see is an opportunity to set the stage and prepare them to dig into your code change with confidence.
Let’s review a few common opportunities in every pull request system.
Use helpful titles
When reviewers are perusing a list of pull requests to review, they are likely drowning in a long list of possible changes. How can you catch the eye of a reviewer to signal that your change is relevant and valuable?
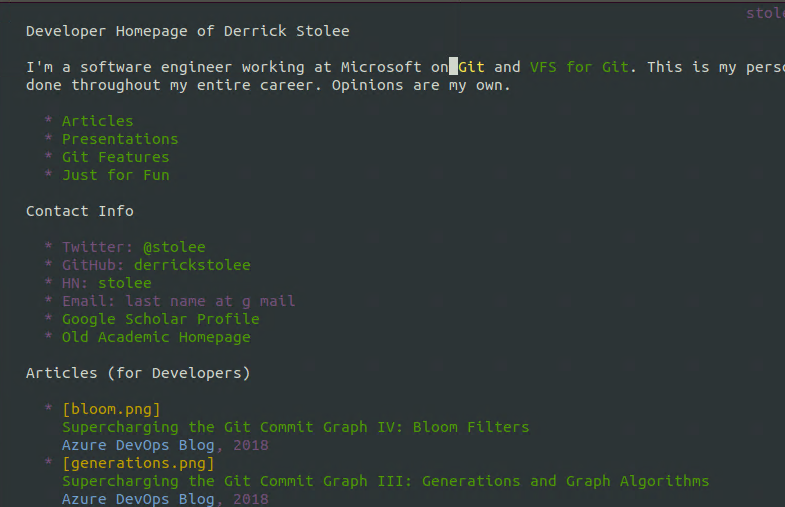
It can help to start your title with a general area of the project or a feature name. This can help catch the eye of experts in certain subareas.
Then, create a short descriptive name for the change. Be concise and get to the core of the change. Think about how you can signal the type of change:
- User facing feature? Describe what a user will be able to do when done.
- Security issue? Start your title with “[URGENT: SECURITY]” or similar.
- Incremental change? Provide a numeral such as “[Feature 4/N]”.
Link to related work
Outside of the context that you’ll provide in the description, it can be helpful to link to work items, issues, or related pull requests. These links can help unlock a network of related changes and other involved engineers who have worked in this space before.
These links can be extremely important for leaving breadcrumbs. You can see whether or not the feature is fully complete with this change or if it is one of a sequence of changes in this direction. Did we need to rollback a similar change in the past?
Linked work items can also fill in much of the context that you may not want to repeat
Write self-contained descriptions
The bulk of your communication should be done in the pull request description. This is particularly important as it will also be the basis of the commit message when your change is merged.
Note: GitHub doesn’t automatically copy your description into the merge commit message, but you do have an opportunity to copy it yourself. Azure DevOps does use the pull request title and description as the commit message when you complete your pull request.
Expect your reviewers to read the description from top to bottom. What is the most important thing to say first? How can you tell a story that will help them understand the change?
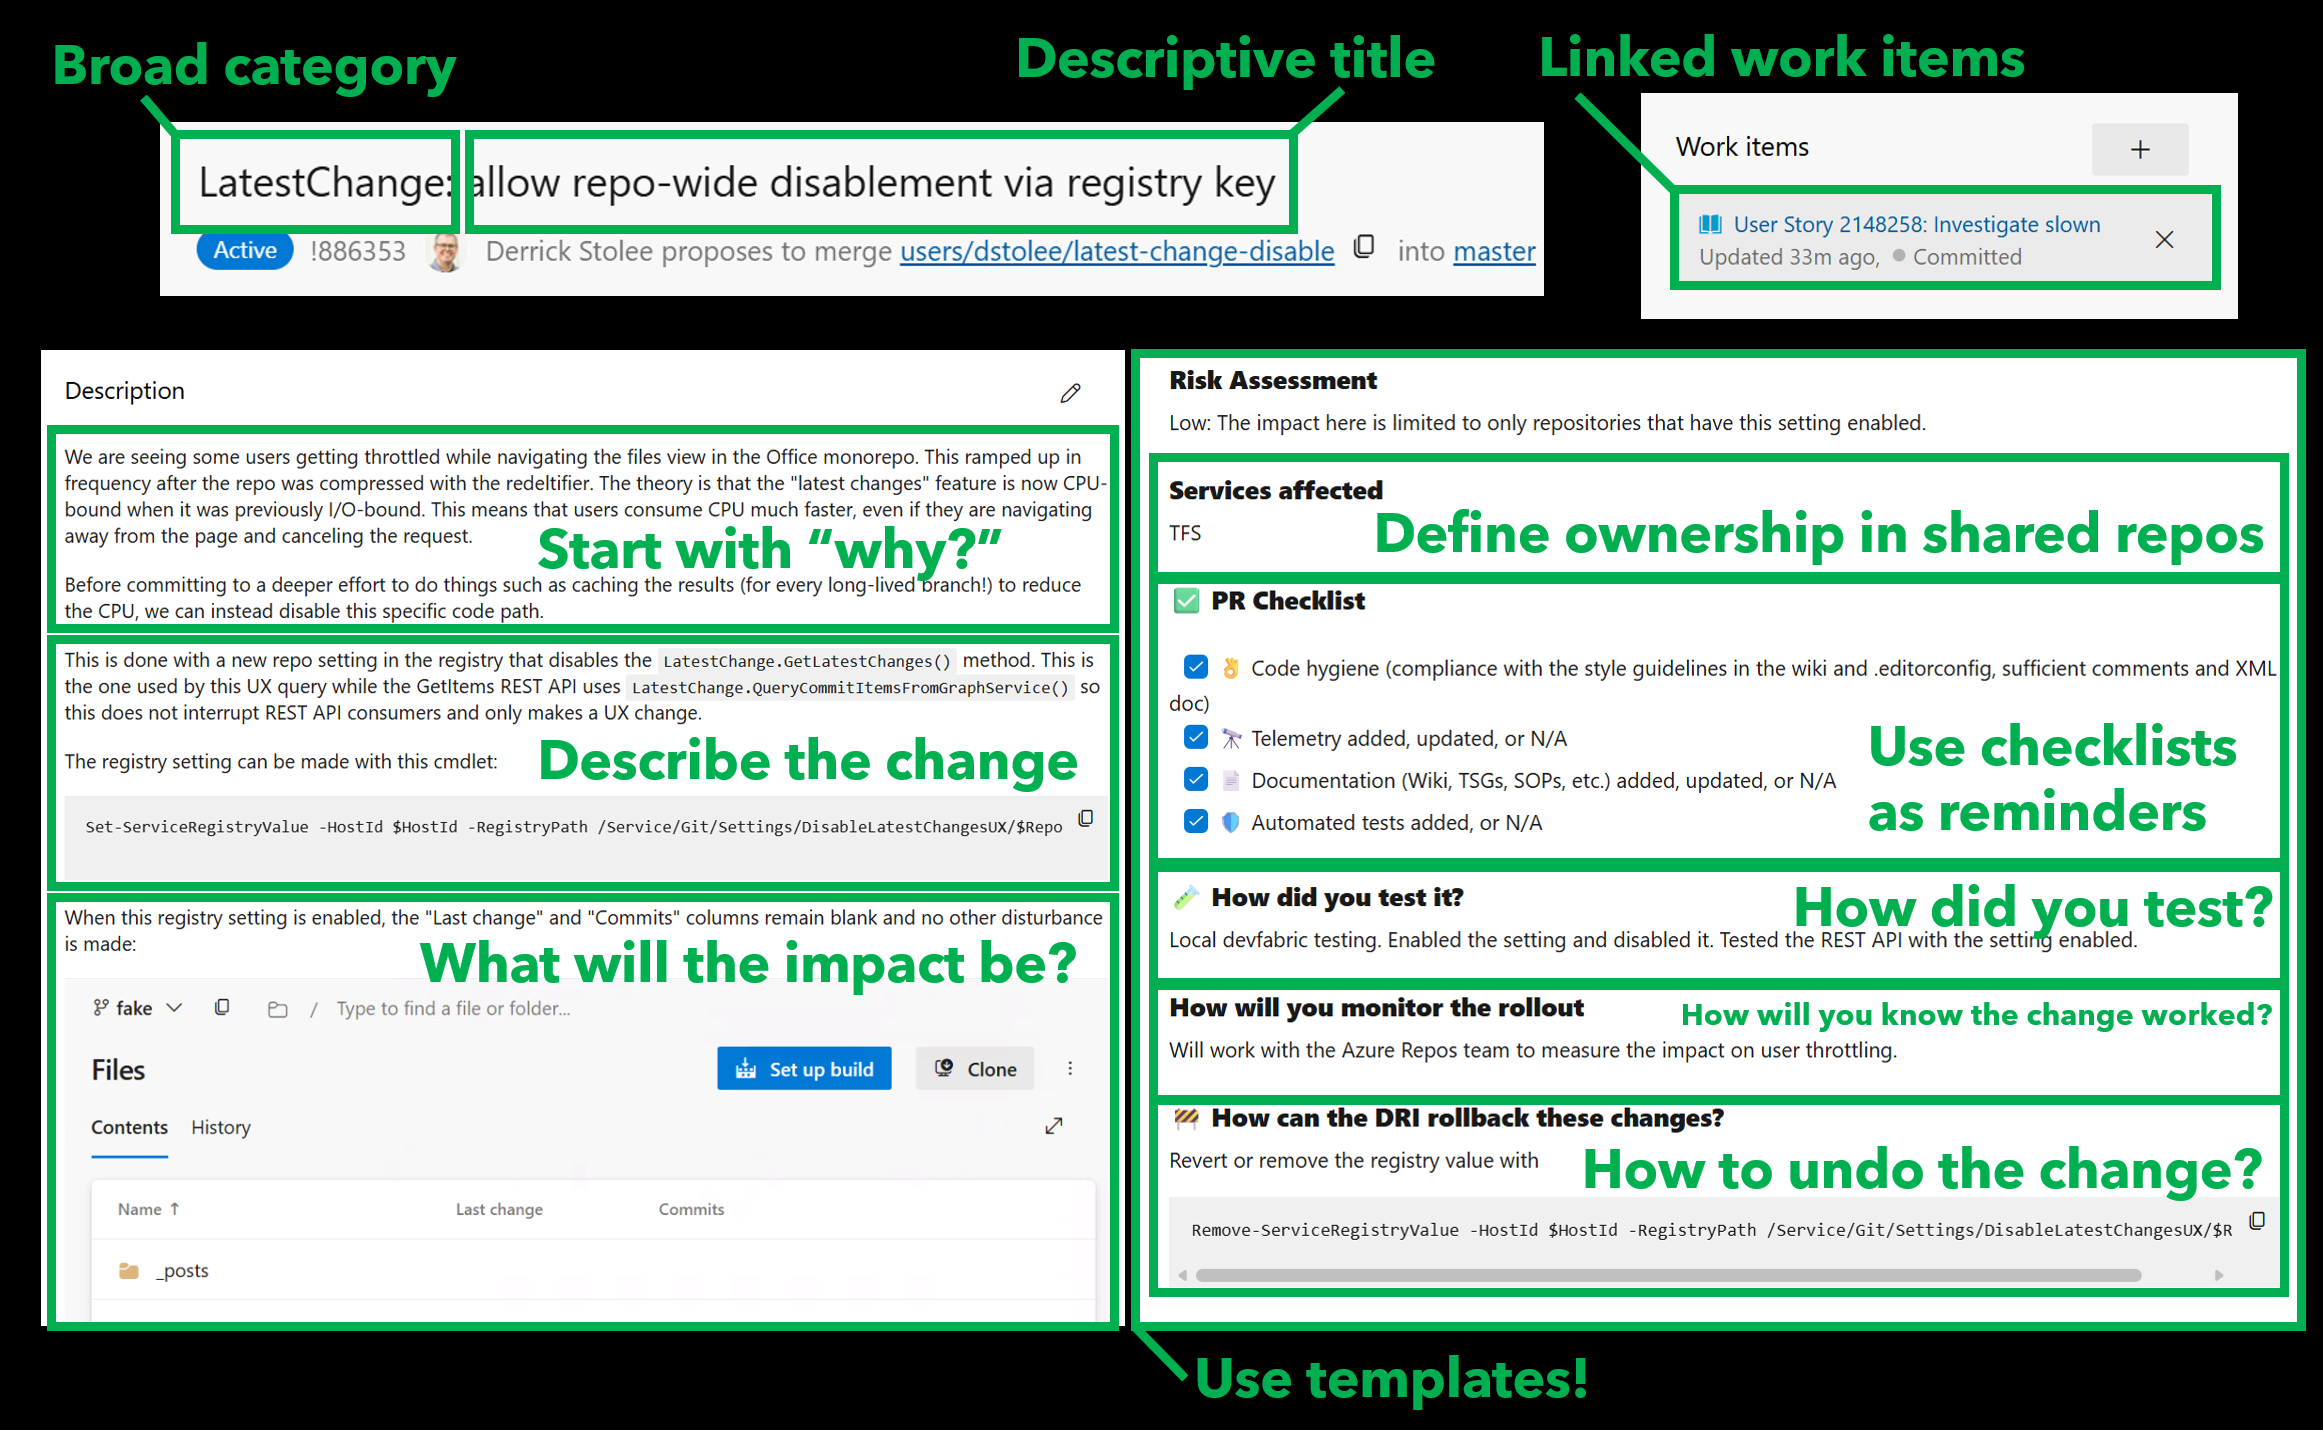
I’ve developed a structure that I like to use over and over again:
-
Start with “why”. What context has led to this change being necessary or valuable? Are users complaining about a bug, or did you happen to notice something when doing your own testing? Is this a funded feature or are you volunteering to pay down tech debt?
-
Describe the change. What code was changed? Was it easy to find the way forward or did it take digging?
-
Demonstrate the impact. What’s the proof that this does what you say it does? What tests did you add that would fail before but pass now? Did you do performance tests? Do you have screenshots of the new behavior?
-
Consider alternatives. (Optional) Sometimes, there’s one clear way to accomplish a task. Often, there are multiple ways a problem could have been solved. Why did you pick this one? Did you try something else before going down this road? Including these details could avoid a costly round of async feedback recommending alternatives.
After this free-form description is a good time to fill out a pull request template. These templates are specified by the repository owners and frequently include checklists and questions that are important for every change author to consider and demonstrate that they have understood the requirements.
If you are in the privileged position to be designing a pull request template, make sure that every item you put in that template has a real purpose. If you are making a change and come across a pull request template, fill it out with the perspective that every line is there for a reason (and usually that reason is an incident due to a bad code change).
A brief aside about templates
Sometimes templates and checklists can feel tedious or restrictive. They don’t communicate trust in the engineers making changes in the repo.
I’d like to counter any concerns about trust with this idea:
Every checklist is an opportunity to double-check yourself while you’re in the thick of things. While working on a problem, you may be too close to it to see the forest through the trees.
I know this due to hard experience. Please indulge me as I tell you a story:
I was once tasked with creating templates for “production change records” which were going to become a requirement to improve availability issues in our product. I was interested in the idea and started writing down all of the standard questions I would ask about safe deployment based on my own experiences. These were all things I already knew. Once I had encoded these concepts into a document for review, I decided to lead by example and apply the checklist to a change I had already submitted for review.
I was missing important details.
That’s right: by using my own checklist, I caught myself missing an important detail in my own change. This is why encoding best practices into written form is critical to avoiding human error.
Humans are fallible. We have limited working memory in our brains. We need strategies to externalize information to assist with recall from long-term memory. I found that externalizing my own experiences into a checklist of questions led to an improved outcome for changes I was making. I’m confident that this will help most software engineers, too.
Use draft pull requests
The state of the PR may also be important. Is it a draft that is looking for high-level feedback and not a full review? Are there tags about impacted areas? Is it urgent for deadlines, hotfixing, or security reasons?
Use the pull request discussion
Depending on what you’re trying to communicate, it may be helpful to add comments into your pull request discussion that don’t make sense to keep in the pull request description.
For example, you could pre-load discussion with requests for what reviewers should focus on. These comments could even highlight the most critical code paths as a good place to start before going through the rest of the changes and test code.
Sometimes you’ll want to post a change for full review but also block the change on your own comment regarding some final round of performance testing.
During the review, you can use emoji to indicate “I’ve applied this advice locally” while waiting to resolve a comment until you’ve pushed a change that has the full reaction.
Other communication
When you’re working on a team, there are many ways that you can communicate your change. Email, teams, chatting in hallways, pairing sessions are all informal outlets for communication and can provide valuable context such as “I need early feedback on this direction; please ignore style issues” or “This change is very low risk, can I get a quick look?”
Keep in mind that “if it’s not in the PR, then it didn’t happen” in terms of the official record. The pull request review sequence itself is an important historical record of its own that may need to be referenced in the future. I’ve found myself inspecting a change and tracking down the original pull request and reading the discussion to find out how they landed on that direction (or worse: found that there was no discussion and maybe the review wasn’t very careful).
Where I learned these things
It’s important to show my work, so let me briefly describe how I came to have strong opinions about communication here.
Before I was an engineer, I was an academic. My career was built around sharing knowledge and teaching others. Even within that space, every research paper or grant proposal I wrote had to justify why the contribution was important and why it was worth the readers’ time.
The skills I learned there became valuable when I changed careers to software engineering, starting on the Azure Repos backend team. Working on a massive scale source control system had very high risk concerns around protecting user data. Correctness, resiliency, and privacy were critical for every change. That team already had high standards for reviews, which taught me both how to review code critically and how to present my code in a reviewable way.
My next career shift included moving from the Git server to the open-source Git community, working on client side performance. While I thought that the Azure Repos team had high standards, the Git community was a step beyond that. There were two critical differences working with the Git community:
-
Every part of the change is up for review, including every commit message and the organization of commits into small pieces.
-
There is no agreed-upon backlog to lean on for why the changes should happen. Every patch series is a request for the community to take ownership of your change.
These two differences were an interesting challenge and have motivated much of my philosophy around communicating code changes. While these standards are on the more extreme side, it is worth considering which of the requirements are worth keeping for your project and which are needed only occasionally.
In my career since, I’ve had the opportunity to work with many teams and many different sets of expectations. In my current role, I jump around many different repositories and work with many different teams. I find myself needing to understand new codebases constantly and am missing the hints left by careful commit messages. When I make a change, I find myself needing to justify why I’m in their space and providing an unexpected (or even uninvited) change.
Sometimes, the most important thing I can say in a pull request is “Hi, I’m new to this space. Here’s what I know for sure and what I am still unsure about.”
Advanced techniques
The techniques that follow are more sophisticated and may not be necessary for every project or every change. However, they can be powerful tools when you need to communicate complex changes or work within specific project requirements.
Advanced Technique: Commit-by-Commit Review
Some projects, such as Git itself, do review on a commit-by-commit basis. Git hosts that use pull requests don’t always make commit-by-commit review easy or necessary, but it can be valuable to use it on occasion.
The trick here is that you need to carefully construct your commits to be meaningful on their own and tell a story in finer detail than the full pull request. This comes in handy in a few different cases:
-
There is one very critical piece of logic that you want to highlight for careful review while the rest of the changes are mostly boilerplate that can be reviewed quickly.
-
In order to make the change, some large refactoring was needed. Separating the refactor as its own commit followed by a commit that does the important logic can help reviewers read the changes with the right level of detail.
As an example, I wanted to share one of my favorite contributions to the Git client: making topological sort extremely fast.
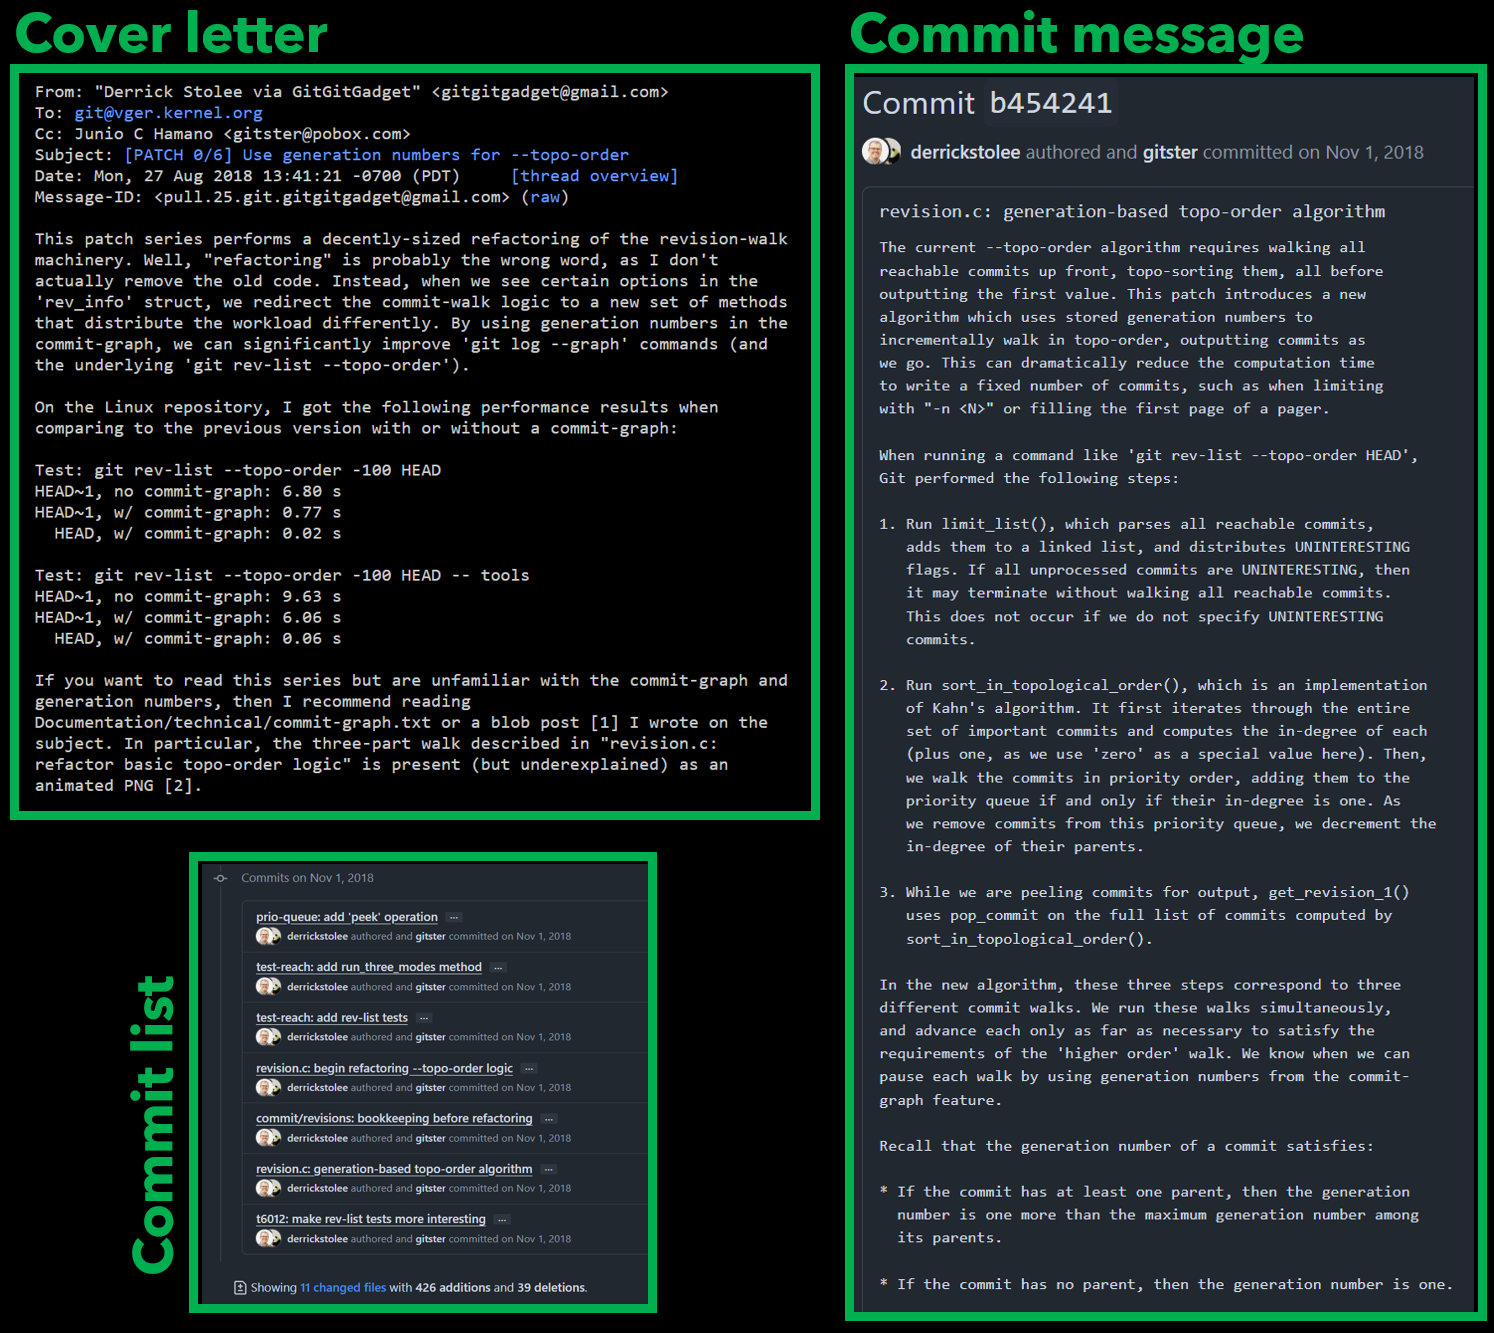
In the mailing list discussion, the cover letter for a patch series is like a pull request description and can describe the high-level purpose of the patches. The cover letter isn’t stored in the final sequence of commits.
But in this patch series, there was one commit that was larger than the rest, both in terms of the commit message and the code change. This was the crucial step that essentially reimplemented the old algorithm using a new structure. However, the commits leading up to that point were valuable to create some shared code that could be used by both approaches. Doing it in this way made it clear that this large change was purely new code and not mutating the older path.
While this is one of my favorite contributions that I’ve ever made, I do regret that I didn’t take the time to construct parts of the algorithm across multiple commits, even though the first commits would need to introduce methods that were not called by anything until the later commits arrived.
Advanced Technique: Stacked Pull Requests
Reading code is hard. Reading a lot of code is harder. Do your reviewers a favor and break up large changes into a sequence of smaller changes. When using pull requests as your quantum of change, stacked pull requests can tell a multi-part story across several changes.
Showing a pull request stack can be great to help get an early change merged while also showing that the change is contributing to a long-term vision (even if that vision is only visible as some draft pull requests that don’t have everything ready yet). This can avoid reworking an early data structure or API by demonstrating the current definition is sufficient for a later application.
I love using stacked pull requests to help me tell a story. It’s a great way to get some of the benefits of commit-by-commit review while still using the pull request as the minimum reviewable piece. It’s also easier to track differences between versions using things like Azure Repos’ iterations.
Stacked pull requests are mostly an informal idea at the moment for most Git hosts, so you need to do some work yourself to communicate the existence of the stack and where each pull request fits within the stack. See the figure below for how I’ve done this in the past.
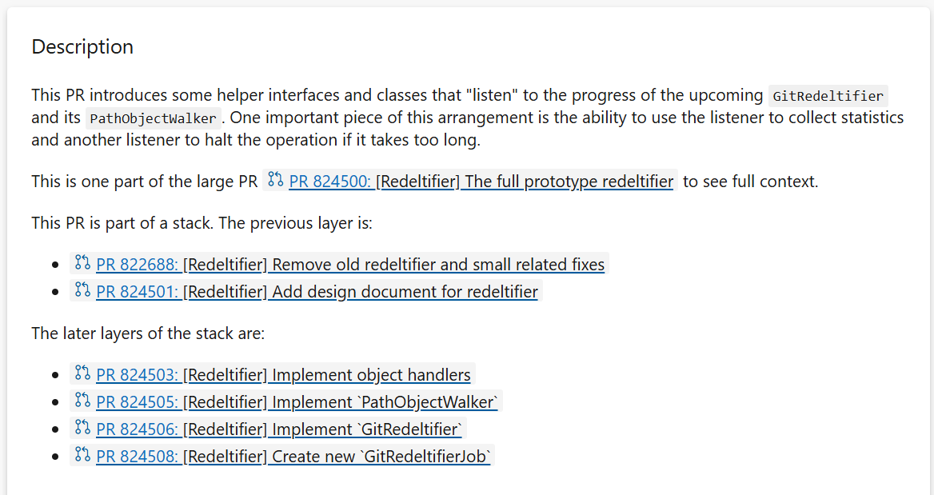
To construct a pull request stack, you create the first layer as normal. Each next layer is then a pull request into the source branch of the previous layer, making the presented diff be only the change between those two branches.
As lower layers complete, you may need to retarget the next layer to the intended target branch. If you use squash merges, you’ll need to use something like
git rebase --onto <target> <old-branch> <tip-branch>
to update your changes into the new target branch that includes the
squashed merge. Using git rebase --update-refs can help update all of
your local branches in the stack as you change things anywhere in the
stack.
If you’re intrigued by this idea, then you can read more in these places:
- Stacked Pull Requests - The Complete Guide for Developers
- Stacked diffs (and why you should know about them)
- Working with stacked branches in Git is easier with
--update-refs
Establishing team standards
I’m done sharing my ideas around effective communication and my bag of tricks. You can adopt or ignore these as you see fit.
Ultimately, it is up to you and your team to decide what standards you expect of each other.
I challenge you to get together with your team or community and discuss pull request communication in very clear terms. Discuss what is at stake when you make changes and find the right level of rigor that you find important for your context.
Communication retrospective
Meet with your team and do a blameless retrospective of review process. Consider pull requests that were communicated well, or not well. Do you have recent changes that caused issues as they deployed? What could have been done in the pull request communication to avoid this? Create guidelines for your minimum standards of communication. Create guidelines for when you should go above and beyond.
Consider your project on a technical basis and discover where some common patterns are repeated and thus could be externalized to runbooks that can be referenced instead of repeated. When using these runbooks, what questions are still important to be answered in each situation?
Consider the seniority of your team. How many engineers do you have of differing levels of expertise? How often are you training newer engineers in this space? Do you have an external operations team that is the first line of support and may need to react to issues in your domain?
Create templates
Take what you learned in the retrospective and encode the most important bits into pull request templates.
Here are some ideas that could be valuable to include in a template:
- What kind of change is this? A refactoring? A new feature? A bugfix?
- What kind of testing was done? Manual testing? New regression tests? Or: is testing particularly difficult and our only known mechanism to test is to deploy to production? (Keep an eye out for these to inform your backlog of technical debt.)
- How will this impact production? What monitors or alerts would fire if this goes poorly? What metrics will positively indicate that the change is working as intended?
- When will this change be deployed, and how? Is it going out in the next binary deployment with immediate effect? Is it waiting for the next release branch? Is it a binary deployment change or is it gated by a feature flag or special configuration?
Here are some ideas for things to include, but I recommend to make it clear that they can be deleted from the template when they don’t apply to a change:
-
What alternative approaches were considered? Do you have branches that show those prototypes? Why were those approaches rejected and this approach chosen?
-
What was difficult about making this change? Is there technical debt that made this more complicated than it should have been, and thus we should track this as justification to pay down that debt?
-
What was difficult about testing this change? Are there concerns around special cases, operating at scale or under load? How does your deployment plan include strategies to safely learn more as this change rolls out to real use?
Keep in mind that some of these questions may be answered similarly in many “regular” changes. Consider creating runbooks for certain types of changes and then point to those runbooks if the change fits that scenario perfectly. We don’t need to reinvent the wheel, but we do need to know that there is prior art.
Make everyone better
Another main goal here is to help junior engineers or engineers who are new to the project to understand these changes. I personally find it extremely valuable to learn about a project by watching what others are doing to change it. But if they don’t overcommunicate the context, then I’m lost and need to work even harder (or interrupt the contributor with questions) to find that context. If you just wrote the code, then you already have this context in your head! Externalize it to help everyone else catch up.
This concept of overcommunicating the context is important for contributors of all levels. Newer contributors should overcommunicate their understanding so more experienced contributors can double-check that understanding against their experience. Experienced contributors should overcommunicate their understanding as that will expand the knowledge of the newer contributors.
Revisit your decisions
Schedule time to revisit all of these thoughts after experimenting with the new standards for a while (1 month, 3 months, 1 year?). You will always learn new things that can help expand or contract the templates.
Do you track statistics for your team? Consider tracking any change in the following metrics:
- Pull request dwell time.
- Feature delivery and backlog burndown rate.
- Incident rate.
- Incident response time.
- Do you have regular “engineer wellness” surveys?
Long-term benefits and considerations
Here are some additional thoughts about the long-term impact of good communication practices.
Future you thanks you
Software products are not static things, but are constantly changing. Even projects that have little code change are impacted by a changing environment, changing user behavior, or any number of external variables. As things change, things will go wrong. How do you react to these incidents?
In most cases, teams share the load of supporting a project by rotating who is responsible for front-line support. This will frequently mean that the person driving the investigation is not the person who wrote the code that is misbehaving or needs updating. Even if the person responding to the incident wrote the code that is misbehaving, memory is fallible over time and the context of the change can be hard to remember.
In this way, carefully communicating your change in the pull request can help all engineers be better prepared to support an issue in this space, including your future self!
Keep in mind that the pull request title and description will be stored
as the commit message, so if you are using git log to find recent
changes in a section of code, then you can automatically load that
necessary context. The title will frequently point to the pull request
by number, so you can load the discussion to see if there are any other
hints of what may have been tricky here.
Outside of the history, you may also need to look at the related work items or issues to see if they had any other related work that is involved. This linking process can help point to a different area that was changed in reaction to this, or similar problems.
The robots can sometimes help, but also need help
Generative AI tools are getting really good at describing a code change. It is natural to think that we could rely on those tools to do all of this for us.
There are some limitations:
-
AI summaries are frequently in the pull request metadata, but not actually committed to the commit message.
-
AI summaries are based on the diff presented, and can only describe the change based on that context. They can’t talk about alternatives that you tried and rejected. They typically can’t describe the larger context of how this change will impact the larger project, especially around when and how it will be deployed.
-
With proper prompting, AI tools could look for risk factors or improved test coverage. While these could be factored in via a custom build policy that runs custom prompting, the best time to ask AI for these types of things is during development and doing a careful evaluation of those outputs while the change is in your working memory.
In general, generative AI tools are doing pattern matching from previous work done by humans. Consider that their generated descriptions could be based on poor descriptions, leading to garbage in, garbage out.
As you do your work, you are naturallly creating the data set for the next generation of generative AI tooling. Be part of improving those tools!
Further reading
Here are some valuable resources that I find myself revisiting time and again.
Write Better Commits, Create Better Projects
This blog post by GitHub engineer Victoria Dye focuses on commits as a method of communicating a larger change via small atomic changes. It goes deep on methods for organizing and updating your commits via intereactive rebase.
If you are focused on pull requests as your unit of change and always squash-merge, then you don’t need the details around commit manipulation. The advice around justifying your work in a commit message translates well into communicating in a pull request description.
Git is about communication
This blog post focuses on how Git commits are an archive of important context that you’ll be grateful to have later if you are diligent about discussing the “why” of your changes in the present.
Pull Request Best Practices: A Complete Guide for Modern Developers
This guide by Mergify focuses on why small pull requests are better. It includes some discussion about PR metrics as well. There’s also some discussion about automating parts of the review to free up time for the humans reviewing things at a higher level.
Git contribution guidelines
Did you know that Git itself doesn’t use pull requests? This document details much about the process for submitting patches to the Git mailing list. One main aspect of code review on a mailing list is that every bit of the change is up for review, including each and every commit message.
This document includes some very helpful ideas for being rigorous around communicating a code change.
Git code review guidelines
This document details the Git community’s expectations for code reviewers, not just authors. Consider creating something like this for your own team so you can set standards that fit your group and hold each other accountable.
The Programmer’s Brain
This book by Prof. Felienne Hermans goes deep to connect the science of human brains to the realities faced by programmers dealing with large systems. Much of the book focuses on our limited working memory and how mental models, architecture, and tooling help us work through complex ideas while paging ideas in and out of our long-term memory.
]]>